
Бесплатная доставка
По Москве и большинству городов России
Подробнее
Бесплатное подключение
Профессионально установим технику на готовые коммуникации
Подробнее
Бесплатное хранение
До 180 дней — купите сегодня, а получите, когда удобно
Подробнее
Простой возврат и обмен
Что-то не так? Обменяем товар или вернем деньги
Подробнее
Displayed below is the user manual for Beoplay H4 by Bang & Olufsen which is a product in the Headphones & Headsets category.
This manual has pages.

BeoplayH4 2nd Gen
User Guide
Betjeningsvejledning
Bedienungsanleitung
Guía del usuario
Mode d’emploi
Guida utente
ユーザーガイド
사용 설명서
Gebruikershandleiding
Guia do utilizador
Руководство пользователя
Användarhandbok
用户指南
使用者指南

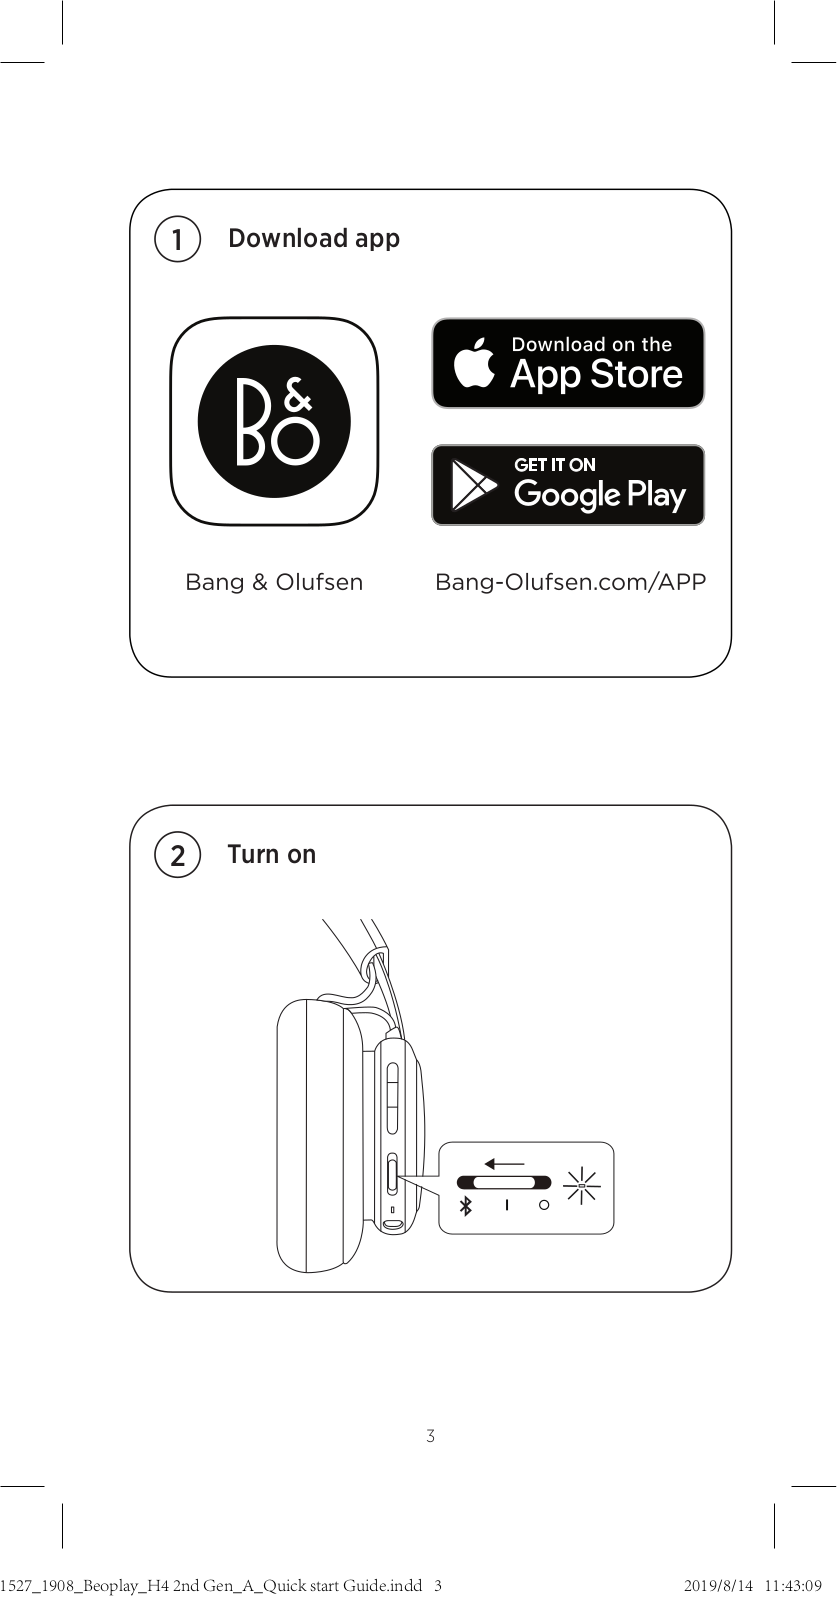
Configuring your H4 2nd Gen
EN Use the Bang & Olufsen app for setup, product customization
and music enhancing features.
DA Brug appen Bang & Olufsen til konfiguration,
produkttilpasning og funktioner til forbedring af musikken.
DE Benutzen Sie die Bang & Olufsen-App für die Einrichtung,
Produktpersonalisierung und für die Verbesserung der
Musikwiedergabe.
ES Utilice Bang & Olufsen App para usar las funciones de
configuración, personalización del producto y mejora de la
música.
FR Utilisez Bang & Olufsen app pour la configuration, la
personnalisation du produit et les fonctions d’amélioration de
la musique.
IT Utilizzare l’app Bang & Olufsen per la dotazione di settaggio,
personalizzazione articolo e miglioramento di esperienza
musicale.
JA Bang & Olufsen ア プ リ か ら は 、製 品 の セ ットア ップ 、カ ス タ マ
イズ やイコライザ 機 能 にアクセ スで きま す。
KO Bang & Olufsen 앱을 사용해 설정, 제품 맞춤화 및 음질
개선 기능을 이용할 수 있습니다.
NL Gebruik de Bang & Olufsen app voor het instellen en
aanpassen van het apparaat en voor de muziekinstellingen.
PT Utilize a app Bang & Olufsen para configuração e
personalização do produto, assim como para funcionalidades
de aperfeiçoamento sonoro.
3

RU Используйте приложение Bang & Olufsen для
настройки, индивидуальной конфигурации и
улучшения звучания музыки.
SV Använd Bang & Olufsen appen för installation, produkt
anpassning och förbättrande åtgärder för musik.
ZH 使用 Bang & Olufsen 进 行 设 置 、产 品 定 制 和 增 强 音 乐 特 性 。
ZHTW 使用 Bang & Olufsen 應用程式以安裝,進行產品自訂與獲得
音樂強化功能。
AR
4
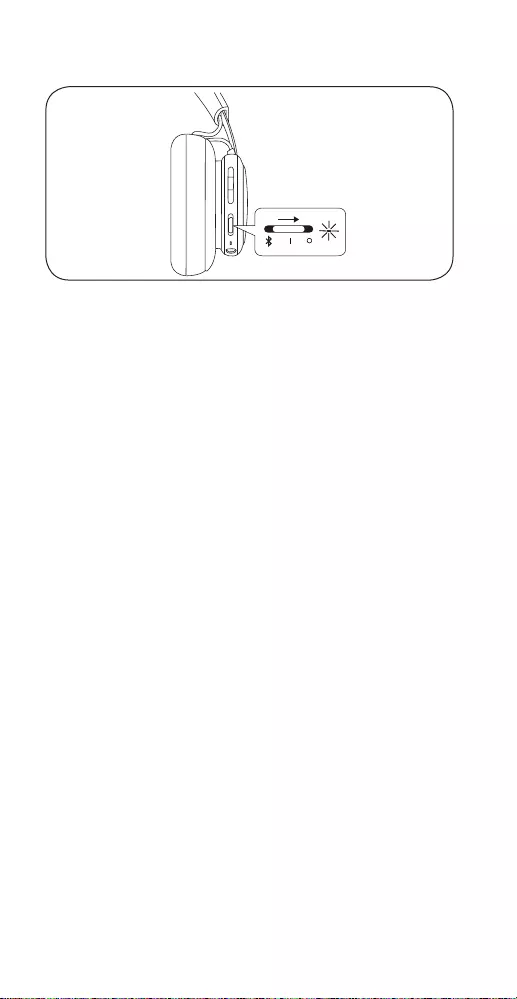
Turn on and o
EN Move switch to the “I” position to turn on the headphones.
To turn o, move the switch to the “O” position. The
headphones will automatically turn o when not in use for
15 mins. Beoplay H4 2nd Gen remembers previously
connected devices. When turned on, it will attempt to
reconnect to previously paired devices.
DA Bevæg kontakten til positionen “I” for at tage
hovedtelefonen på. Deaktiver funktionen ved at bevæge
kontakten til positionen “O”. Hovedtelefonen slukkes
automatisk, når den ikke har været i brug i 15 minutter.
Beoplay H4 2nd Gen Gen husker tidligere forbundne
enheder. Når Beoplay H4 2nd Gen er tændt, forsøger den
at oprette forbindelse til tidligere parrede enheder.
DE Schieben Sie den Schalter in die Position „I“, um den
Kopfhörer einzuschalten. Schieben Sie den Schalter zum
Ausschalten in die Position „O“. Der Kopfhörer schaltet sich
nach 15 Minuten ohne Aktivität automatisch aus. Der
Beoplay H4 2nd Gen-Kopfhörer speichert zuvor
verbundene Geräte. Ist der Kopfhörer eingeschaltet,
versucht dieser, eine Verbindung zu zuvor gekoppelten
Geräten herzustellen.
ES Mueva el interruptor a la posición “I” para encender los
auriculares. Para apagarlos, mueva el interruptor a la
posición “O”. Los auriculares se apagan automáticamente
cuando no se utilizan durante más de 15 minutos. Beoplay
H4 2nd Gen recuerda a los dispositivos conectados
previamente. Cuando se enciende, intentará volver a
conectarse a los dispositivos emparejados previamente.
5
FR Mettez l’interrupteur en position “I” pour allumer le casque.
Pour l’éteindre, déplacez l’interrupteur sur la position “O”.
Le casque s’éteindra automatiquement lorsqu’il n’est pas
utilisé pendant 15 minutes. Beoplay H4 2nd Gen se souvient
des appareils précédemment connectés. Lorsqu’il est
allumé, il tentera de se reconnecter à des appareils
précédemment jumelés.
IT Portare l’interruttore in posizione “I” per accendere le
cue. Per spegnere, portare l’interruttore in posizione “O”.
Le cue si spegneranno automaticamente se inutilizzate
per 15 minuti. Le Beoplay H4 2nd Gen conserva in memoria
i dispositivi connessi in precedenza. All’accensione tenterà
di riconnettersi ai dispositivi accoppiati in precedenza.
JAヘ ッド フ ォン を オ ン に す る に は 、ス イ ッ チ を “I” ポジションに
入 れ ま す 。オ フ に す る に は 、ス イッ チ を “O” ポジションに入れ
ます。ヘッドフォンは、使用していない状態が15 分 間 続くと自
動 的 に オフに なりま す。Beoplay H4 2nd Gen に は 、以 前 接 続
していたデバイスの情報が記憶されます。オンになると、以
前ペアリングしていたデバイスとの再接続が試行されます。
KO 헤드폰의 전원을 켜려면 스위치를 켜기(I) 위치로
이동합니다. 전원을 끄려면 스위치를 끄기(O) 위치로
이동합니다. 15분 동안 사용하지 않으면 헤드폰이 자동으로
꺼집니다. Beoplay H4 2nd Gen는 이전에 연결된 장치를
기억합니다. 전원이 켜지면 이전에 페어링되었던 장치의
다시 연결을 시도합니다.
NL Zet de schakelaar op “I” om de hoofdtelefoon aan te zetten.
Zet de schakelaar op “O” om het apparaat uit te schakelen.
De hoofdtelefoon wordt automatisch uitgeschakeld
wanneer deze gedurende 15 minuten niet wordt gebruikt.
Beoplay H4 2nd Gen onthoudt eerder aangesloten
apparaten. Wanneer deze functie wordt ingeschakeld,
probeert het apparaat opnieuw verbinding te maken met
eerder gekoppelde apparaten.
6

PT Coloque o interruptor na posição Ligado para ligar os
auscultadores. Para desligá-lo, coloque o interruptor na
posição Desligado. Os auscultadores desligam-se
automaticamente se não forem utilizados durante 15
minutos. O Beoplay H4 2nd Gen memoriza dispositivos
ligados anteriormente. Quando é ligado, tenta restabelecer
a dispositivos emparelhados anteriormente.
RU Чтобы включить наушники, установите переключатель
в положение “I”. Чтобы выключить наушники,
установите переключатель в положение “O”. Если
наушники не используются, то автоматическое
выключение произойдет через 15 минут. Модель
Beoplay H4 2nd Gen запоминает ранее
подключавшиеся устройства. При включении
наушники пытаются подключиться к устройствам, с
которыми ранее было выполнено сопряжение.
SV Flytta till “I”-positionen för att slå på hörlurarna. För att slå
av hörlurarna, flytta knappen till “O”-positionen. Hörlurarna
kommer att stänga av sig själva om de inte används efter 15
minuter. Beoplay H4 2nd Gen kommer ihåg enheter som
anslutits tidigare. När hörlurarna slås på försöker de att
ansluta med enheter som anslutits tidigare.
ZH 将开关移至 “I” 位置可打开耳机。要关闭耳机,请将开关移
至 “O” 位 置 。耳 机 处 于 非 使 用 状 态 15 分钟后会自动关闭。
Beoplay H4 2nd Gen 会记住以前连接过的设备。打开后,它将
尝试重新连接以前配对过的设备。
ZHTW 將開關移動到 “I” 位置以開啟耳機。若要關閉,請將開關
移動到 “O” 位 置 。不 使 用 達 15 分 鐘 後 ,耳 機 將 自 動 關 閉 。
Beoplay H4 2nd Gen 會記住先前連接的裝置。開啟時,耳
機將嘗試重新連接到先前配對的裝置。
I
15
AR
7
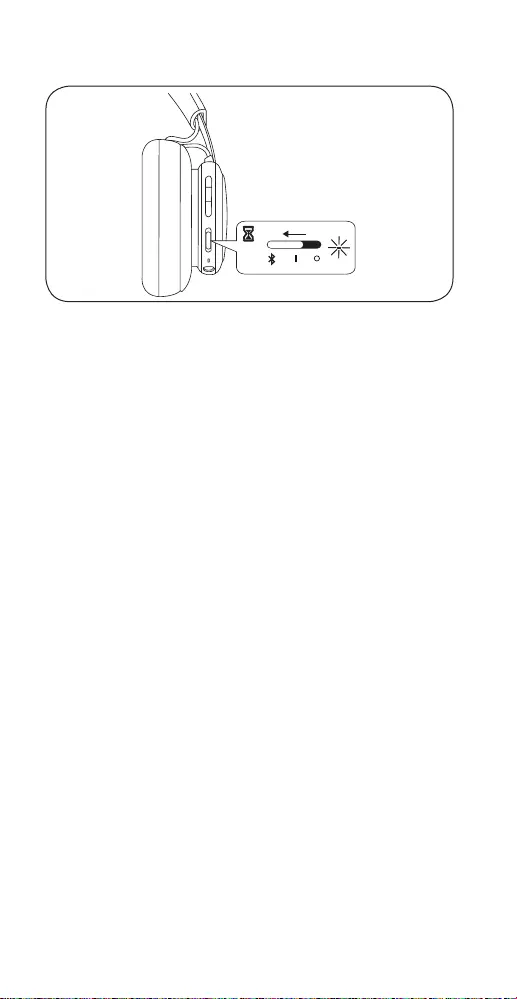
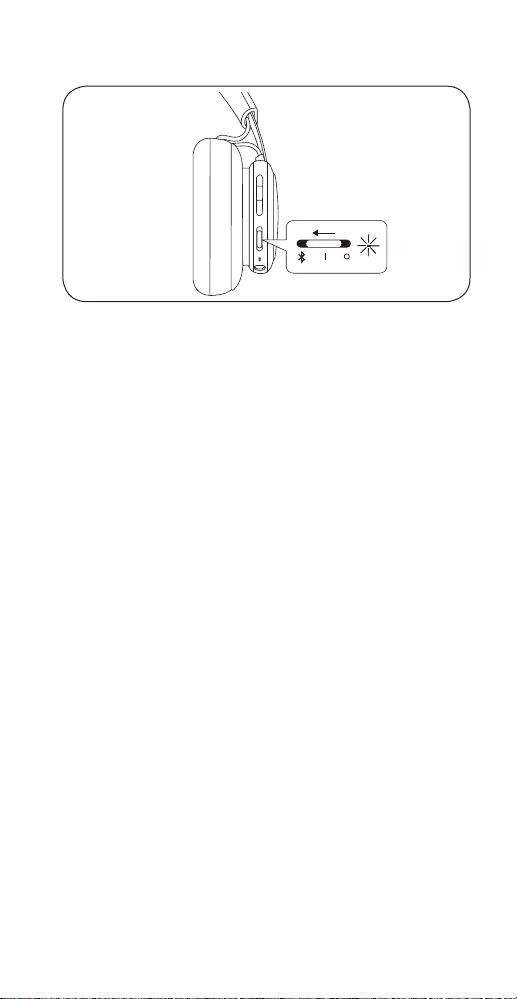
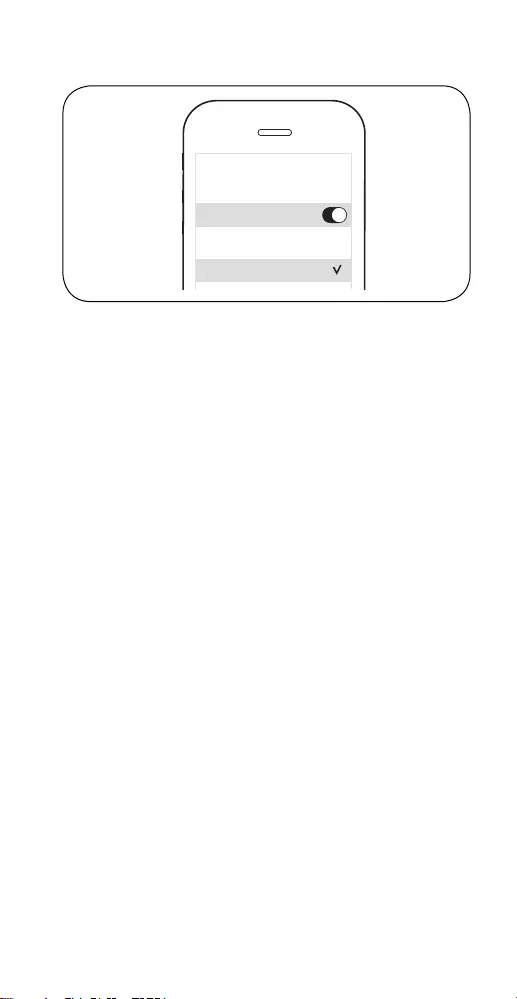
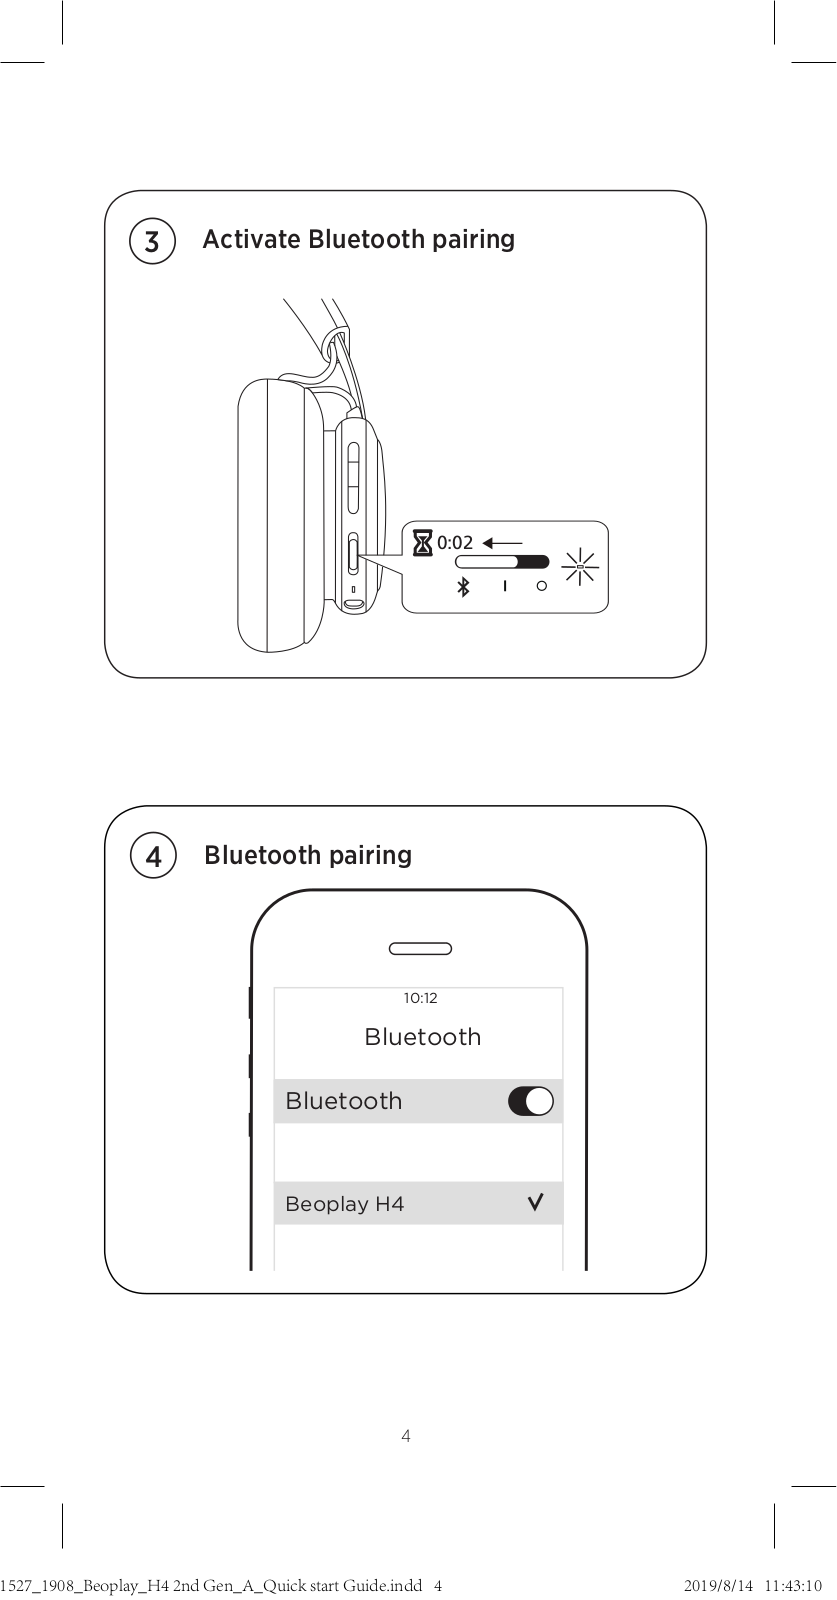
Bluetooth® pairing
EN Move switch to the top position and hold for 2 sec. to initiate
Bluetooth pairing. Release the switch when a sound is
heard and the indicator starts flashing blue. Select Beoplay
H4 in the Bluetooth settings on your device.
DA
Skub knappen til den øverste position, og hold den i 2 sekunder
for at aktivere Bluetooth-parring. Slip knappen, når der høres
en lyd, og indikatorlampen begynder at blinke blåt. Vælg
Beoplay H4 under Bluetooth-indstillingerne på din enhed.
DE Stellen Sie den Schalter in die obere Position und halten
Sie ihn 2 Sek. gedrückt, um die Bluetooth-Verbindung zu
aktivieren. Lassen Sie den Schalter nach dem Tonsignal los.
Die Anzeige blinkt blau. Wählen Sie Beoplay H4 in den
Bluetooth-Einstellungen Ihres Gerätes aus.
ES Mantenga el interruptor en la posición superior durante
2 segundos para iniciar el emparejamiento Bluetooth. Suelte
el interruptor cuando escuche un sonido y el indicador
comience a parpadear en color azul. En los ajustes de
Bluetooth del dispositivo, seleccione Beoplay H4.
FR Déplacez le commutateur vers le haut et maintenez-le dans
cette position pendant 2secondes pour initier la connexion
par Bluetooth. Relâchez le commutateur une fois qu’un son
est émis et que le voyant commence à clignoter en bleu.
Sélectionnez le Beoplay H4 dans les paramètres Bluetooth
de votre appareil.
IT Per avviare l’abbinamento Bluetooth, spostare lo switch
nella posizione superiore e tenere premuto per 2 secondi.
Rilasciare lo switch quando si sente l’audio e la spia inizia
a lampeggiare in blu. Selezionare Beoplay H4 nelle
impostazioni Bluetooth sul dispositivo.
8
10:12
Bluetooth
Bluetooth
CHOOSE
Beoplay H4
JA スイッチを一番上の位置まで回し、そのまま2秒間待つと
Bluetooth®のペアリングを開始します。音が鳴りインジケー
ターランプが青色に点滅し始めたらスイッチから手を離して
ください。お使いの機器のBluetooth設定でBeoplay H4を
選択してください。
KO 블루투스 페어링을 시작하려면 스위치를 맨 위로 올린
상태로 2초 동안 둡니다. 소리가 들리고 표시등이
파란색으로 점멸하기 시작하면 스위치에서 손을 뗍니다.
사용하는 기기의 블루투스 설정에서 Beoplay H4을
선택합니다.
NL Houd de schakelaar gedurende 2 sec. in de bovenste positie
voor Bluetooth-koppeling. Laat de schakelaar los wanneer
u een geluid hoort en het lampje blauw begint te knipperen.
Selecteer Beoplay H4 in de Bluetooth-instellingen op uw
apparaat.
PT Desloque o botão para a posição superior e mantenha por
2 segundos para iniciar o emparelhamento por Bluetooth.
Solte o botão quando ouvir um som e o indicador começar
a piscar a azul. Seleccione Beoplay H4 nas definições
Bluetooth do seu dispositivo.
RU Переместите переключатель в верхнее положение и
удерживайте в течение 2 с, чтобы начать спаривание
по Bluetooth. Отпустите переключатель после того, как
прозвучит звуковой сигнал и индикатор начнет мигать
синим. Выберите Beoplay H4 в настройках Bluetooth на
вашем устройстве.
SV Dra omkopplaren till det översta läget och håll den där i 2
sekunder för att initiera parkoppling med Bluetooth. Släpp
omkopplaren när ett ljud hörs och indikatorn börjar blinka
med blått ljus. Välj Beoplay H4 i Bluetooth-inställningarna
på din enhet.
9

AR
ZH 将开关移到上部并保持 2 秒钟,可 启 动 蓝 牙 配 对 。听 到 声 音 并
且指示灯开始闪蓝光时,松开开关。在设备的蓝牙设置中选择
Beoplay H4。
ZHTW 將切換鈕移動至上方並長按 2 秒 鐘 ,即 可 啟 動 藍 牙 配 對 。聽
見警示音且指示燈開始閃爍藍燈時,請放開切換鈕。請在裝
置的藍牙設定中選取 Beoplay H4。
10
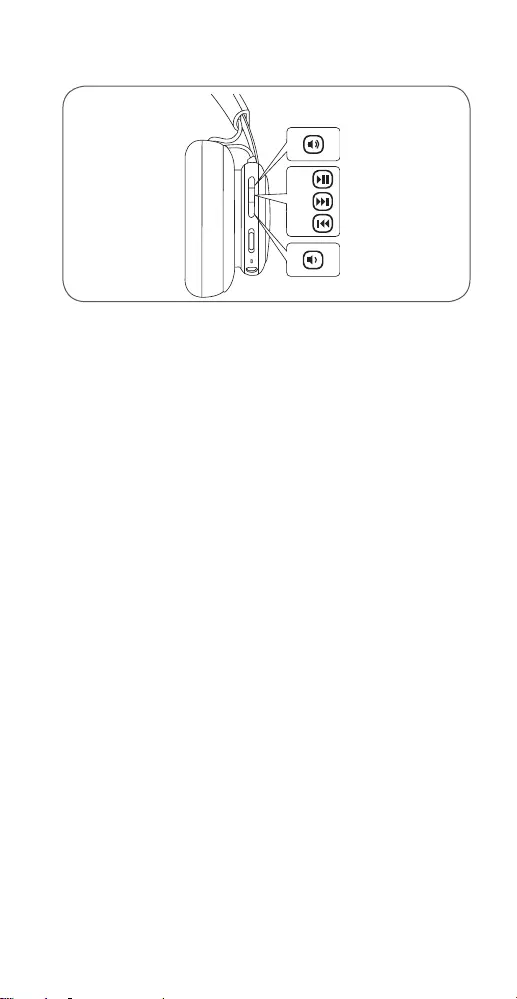
Music operation
EN
Press the center button once to play or pause music. Double
press to go to next track and triple press to go to previous
track. Press Vol+ to increase or press Vol- to reduce volume.
DA Tryk én gang på midterknappen for at afspille musik eller
sætte afspilningen på pause. Tryk to gange for at gå til
næste nummer, og tryk tre gange for at gå til forrige spor.
Tryk på lydstyrke op for at forøge lydstyrken, og tryk på
lydstyrke ned for at reducere lydstyrken.
DE Drücken Sie die mittlere Taste einmal, um die
Musikwiedergabe zu starten oder anzuhalten. Drücken Sie
zweimal, um den nächsten Musiktitel, und dreimal, um den
vorherigen zu wählen. Drücken Sie Vol+, um die Lautstärke
zu erhöhen, und Vol-, um sie zu verringern.
ES Presione una vez el botón central para reproducir o pausar
la música. Presione dos veces para avanzar a la siguiente
canción o tres veces para ir a la canción anterior. Presione
Vol+ para aumentar el volumen o Vol— para reducirlo.
FR Appuyez une fois sur le bouton central pour lire ou mettre
en pause la musique. Appuyez deux ou trois fois pour
passer à la piste suivante ou revenir à la piste précédente
respectivement. Appuyez sur Vol+ ou Vol- pour augmenter
ou diminuer le volume.
IT Premere il tasto centrale una volta per riprodurre o mettere
in pausa la riproduzione musicale. Premere due volte per
passare al brano successivo e premere tre volte per tornare
al brano precedente. Premere Vol + per aumentare o Vol-
per ridurre il volume.
11

JA 音楽の再生/一 時 停 止 に は 、中 央 の ボ タ ン を 一 回 だ け 押 し
ま す 。次 の 曲 に ス キ ップ す る に は
2
回 素 早 く 押 し 、前 の 曲 に
戻るには
3
回素早く押します。音量を上げるには音量アップ
ボタンを、下げるには音量ダウンボタンを押します。
KO 음악을 재생하거나 일시 중지하려면 가운데 버튼을 한 번
누릅니다.다음 트랙으로 이동하려면 두 번 쿠르고, 이전
트랙으로 이동하려면 세 번 누릅니다.볼륨을 높이려면
Vol+
를 누르고, 볼륨을 낮추려면
Vol—
를 누릅니다.
NL Druk en keer op de middelste knop om muziek af te spelen
of te pauzeren. Twee keer indrukken om naar het volgende
track te gaan en drie keer indrukken om naar het vorige
track te gaan. Druk op Vol+ om het volume te verhogen of
Vol- om het volume te verlagen.
PT Pressione o botão central uma vez para reproduzir a música
ou colocá-la em pausa. Prima duas vezes para avançar para
a faixa seguinte e prima três vezes para voltar à faixa anterior.
Prima Vol+ para aumentar o volume ou prima Vol- para
reduzir o volume.
RU Для воспроизведения или остановки музыки нажмите
один раз на кнопку в центре. Нажмите 2 раза, чтобы
перейти к следующему треку, и 3 раза, чтобы вернуться
к предыдущему треку. Чтобы увеличить громкость,
нажмите кнопку Vol+, чтобы уменьшить — кнопку Vol-.
SV Tryck på knappen i mitten en gång för att spela upp eller
pausa musik. Tryck två gånger för att komma till nästa spår
och tre gånger för att återgå till föregående spår. Tryck på
Vol+ för att höja ljudet och Vol- för att minska ljudvolymen.
ZH 按下中央按钮一次可播放或暂停音乐。按两次可进入下一个曲
目,按三次可回到上一个曲目。按下音量加按键可增大音量,
按下音量减按键可减小音量。
ZHTW 請再次按下中央按鈕以播放或暫停音樂。按兩次可進入下一
個曲目,按三次可回到上一個曲目。按下 Vol+ 按鈕可增加音
量 ,按 下 Vol— 按鈕可降低音量。
AR
12
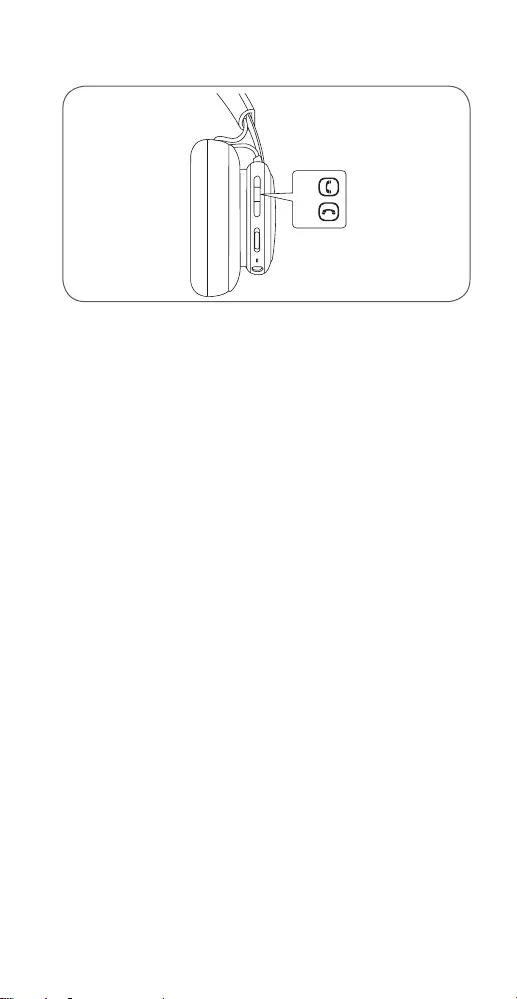
Call operation
EN
When there is an incoming call, short press the center button
to accept or double press to reject the call. During a call,
double press to terminate and long press to transfer audio
from Beoplay H4 2nd Gen to the device.
DA Tryk kort på midterknappen for at acceptere, når der er et
indgående opkald, eller dobbelttryk for at afvise opkaldet.
Dobbelttryk for at afslutte under et opkald, og tryk langt
for at overføre lyd fra Beoplay H4 2nd Gen til enheden.
DE Wenn ein Anruf eingeht, drücken Sie die mittlere Taste kurz
zur Annahme oder zwei Mal, um den Anruf abzulehnen.
Drücken Sie zwei Mal während eines Anrufs, um ihn zu
beenden, und drücken Sie lange, um den Ton von Beoplay
H4 2nd Gen auf das Gerät zu übertragen.
ES Al recibir una llamada, pulse brevemente el botón central
para contestar o pulse dos veces para rechazarla . Durante
una llamada, al pulsar dos veces se finaliza la llamada y al
pulsar prolongadamente se transmite el audio desde
Beoplay H4 2ª generación al dispositivo.
FR Lorsque vous recevez un appel, appuyez brièvement sur le
bouton central pour accepter l’appel ou appuyez deux fois
dessus pour rejeter l’appel. Pendant un appel, appuyez deux
fois dessus pour terminer l’appel et appuyez longuement
pour transférer le son de Beoplay H4 2nd Gen à l’appareil.
IT Quando arriva una chiamata, premere brevemente il
pulsante centrale per accettare o premere due volte per
rifiutare la chiamata. Durante una chiamata, premere due
volte per terminare e tenere premuto per trasferire l’audio
dalle Beoplay H4 2nd Gen al dispositivo.
13

JA 着信があったら、センターボタンを短く押して電話に出るか、
または着信を拒否するために二度押しします。通話中に、2
回押すと通話を終了し、長押しするとBeoplayH42ndGen
からデバイスにオーディオが転送されます。
KO 전화를 수신하게 되면 가운데에 있는 버튼을 짧게 눌러
전화에 응답하거나 두 번 눌러 전화를 거부합니다. 전화
중에 두 번 누르면 전화를 끝내게 되면 길게 누르면
오디오를 Beoplay H4 2nd Gen으로부터 장치로
전송하게 됩니다.
NL Bij een inkomende oproep drukt u kort op de middelste knop
om de oproep te accepteren, of tweemaal om de oproep te
weigeren. Druk tijdens een gesprek tweemaal indrukken om
het gesprek te beëindigen, en ingedrukt houden om audio
van de Beoplay H4 2e generatie door te sturen naar het
apparaat.
PT Quando receber uma chamada, pressione rapidamente o
botão central para aceitar ou pressione duas vezes para
rejeitar a chamada. Durante uma chamada, pressione duas
vezes para terminá-la e pressione continuamente para
transferir áudio do Beoplay H4 2nd Gen para o dispositivo.
RU При поступлении входящего звонка используйте
короткое нажатие на кнопку в центре, чтобы принять
звонок, или двойное нажатие, чтобы его отклонить.
Во время звонка двойное нажатие на кнопку
завершает разговор, а долгое нажатие передает
аудиозапись с Beoplay H4 2nd Gen на устройство.
SV Korttryck på mittenknappen för att acceptera ett samtal,
eller dubbeltryck för att inte acceptera samtalet.
Dubbeltryck för att lägga på, samt långtryck för att
överföra ljud från Beoplay H4 2nd Gen till enheten.
ZH 有来电时,短按中间按钮可接听来电,或者双击此按钮可拒绝
来电。在通话期间双击可终止通话,长按可将音频从 Beoplay
H4 2nd Gen 传输到设备。
ZHTW 當有來電時,短按中央按鈕以接聽或按兩下以拒接來電。通
話期間,按兩下以終止,或長按將音訊從 Beoplay H4 2nd
Gen 傳輸到裝置。
AR
14
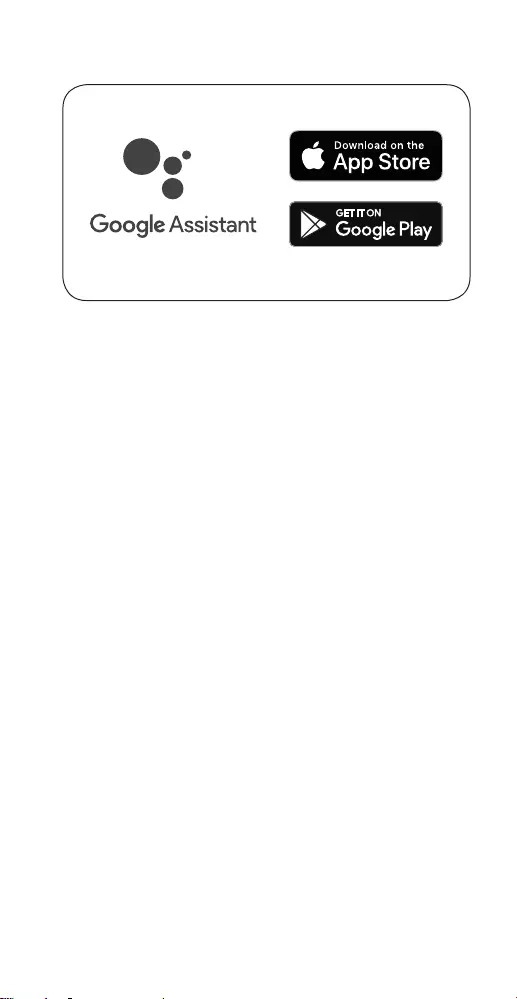
Set up your Google Assistant
EN For Android devices, the Google Assistant is open for setup
when Bluetooth pairing is initiated. For iOS devices, use the
Google Assistant app for setup.
DA Google Assistant for Android-enheder er klar til opsætning,
når Bluetooth-parring er startet. For iOS-enheder skal du
bruge Google Assistant-appen til opsætning.
DE Bei Android-Geräten ist der Google Assistant zur
Einrichtung geönet, wenn die Bluetooth-Kopplung
gestartet wird. Für iOS-Geräte verwenden Sie für die
Einrichtung die App Google Assistant.
ES En dispositivos Android, Google Assistant está abierto para
la configuración cuando el emparejamiento Bluetooth se
inicia. En dispositivos iOS, utilice la aplicación de Google
Assistant para la configuración.
FR Pour les appareils Android, le Google Assistant est ouvert
pour la configuration lors du lancement du jumelage
Bluetooth. Pour les appareils iOS, utilisez l’application Google
Assistant pour la configuration.
IT Per i dispositivi Android, Assistente Google si apre per la
configurazione in caso di avvio dell’abbinamento Bluetooth.
Per i dispositivi iOS, utilizzare l’app Assistente Google per la
configurazione.
JA Androidデバイスの場合、Bluetoothペアリングを起動する
と、Google Assistantが 開 いて 設 定 に 入りま す。iOSデバイスの
場合、Google Assistantアプリを 使 用して 設 定 に 入りま す。
15

KO 안드로이드 장치의 경우, 블루투스 페어링이 시작될 때
Google Assistant가 설정을 위해 기동됩니다. iOS
장치의 경우 설정을 위해 Google Assistant를
사용하 십시오.
NL Voor Android-apparaten is de Google Assistant open voor
instellen wanneer Bluetooth-koppeling wordt gestart.
Gebruik voor iOS-apparaten de Google Assistant app voor
installatie.
PT Para os dispositivos Android, o Google Assistant é aberto
para efetuar a configuração quando o emparelhamento de
Bluetooth é iniciado. Para dispositivos iOS, utilize a
aplicação Google Assistant para efetuar a configuração.
RU Для настройки устройств на базе Android при
инициации Bluetooth—соединения открыт Google
Assistant. В случае устройств на базе iOS используйте
приложение Google Assistant.
SV För Android-enheter är Google Assistant redo för
konfiguration när Bluetooth-parkoppling har startats.
IOS-enheter skall använda Google Assistant-appen för
konfiguration.
ZH 对于 安卓设备,蓝 牙配 对启 动时,“Google Assistant”将打开
用 于 设 置 。对 苹 果 设 备 ,请 使 用 “Google Assistant”应用进行
设置。
ZHTW 針對 Android 裝 置 ,初 始 化 藍 牙 後 ,將 開 啟 Google Assistant
進 行 設 定 。針 對 iOS 裝 置 ,請 使 用 Google Assistant 應用程
式進行設定。
AR
16
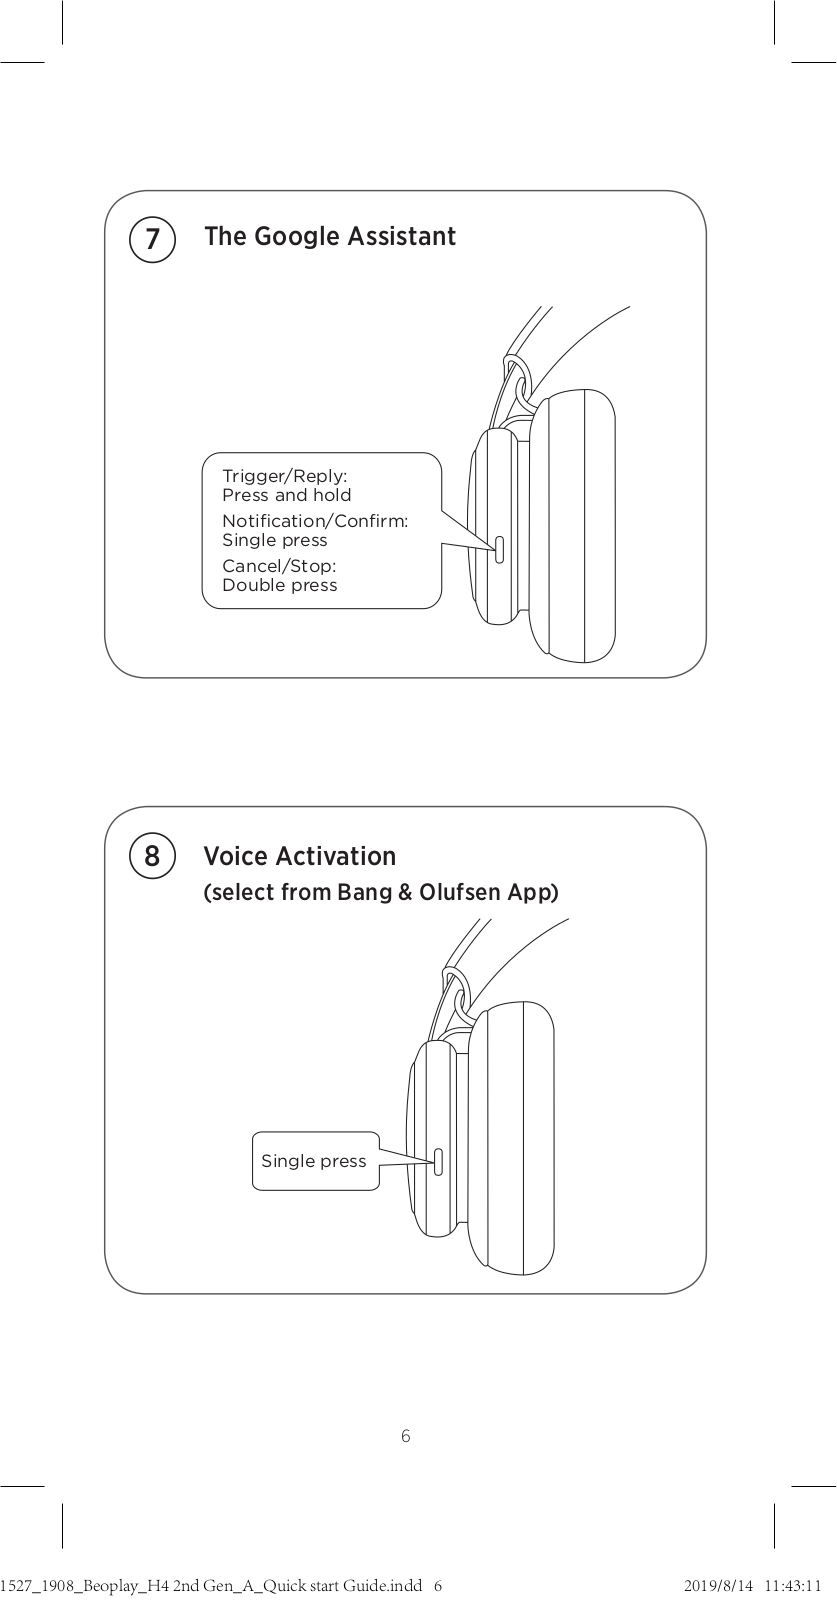
Use your Google Assistant
EN Press and hold the button to trigger or reply to your Google
Assistant. Single press the button to get your notifications.
Double press the button to stop your Google Assistant.
DA Tryk og hold knappen nede for at udløse eller svare din
Google Assistant. Tryk en enkelt gang på knappen for at få
dine meddelelser. Tryk to gange på knappen for at stoppe
din Google Assistant.
DE Halten Sie die Taste gedrückt, um Ihren Google Assistant
aufzurufen oder ihm zu antworten. Drücken Sie die Taste
einmal, um Benachrichtigungen zu erhalten. Drücken Sie
die Taste zweimal, um den Google Assistant anzuhalten.
ES Pulse y mantenga pulsado el botón para activar o
responder a su Google Assistant. Tan sólo pulse el botón
para obtener sus notificaciones. Pulse dos veces el botón
para detener su Google Assistant.
FR Maintenez le bouton enfoncé pour déclencher ou répondre à
votre Google Assistant. Appuyez une fois sur le bouton pour
obtenir vos notifications. Appuyez deux fois sur le bouton
pour arrêter votre Google Assistant.
IT Tenere premuto il pulsante per avviare o rispondere ad
Assistente Google. Premere una volta il pulsante per
ricevere le notifiche. Premere due volte il pulsante per
arrestare Assistente Google.
JA ボタンを押したままトリガーするか、Google Assistantに応
答 し ま す 。ボ タ ン を 1 度 押 し て 通 知 を 受 け 取 り ま す 。ボ タ ン を
2度押してGoogle Assistantを停止します。
Trigger/Reply:
Press and hold
Notification/Confirm:
Single press
Cancel/Stop:
Double press
17

KO Google Assistant를 기동하거나 답하기 위해 버튼을
누른 후 홀드하십시오. 버튼을 한 차례 누르면 알림을
확인하게 됩니다. Google Assistant를 종료하려면
버튼을 두 번 누르십시오.
NL Houd de knop ingedrukt om Google Assistant te activeren
of te beantwoorden. Druk één keer op de knop om
meldingen te ontvangen. Druk twee keer op de knop om
uw stop te zetten Google Assistant.
PT Pressione e mantenha o botão pressionado para ativar ou
responder ao Google Assistant. Para obter notificações
pressione o botão uma vez. Pressione duas vezes o botão
para parar o Google Assistant.
RU Нажмите и удерживайте кнопку, чтобы вызвать или
ответить на вызов Google Assistant. Нажмите кнопку,
чтобы получить уведомления. Дважды нажмите
кнопку, чтобы остановить работу Google Assistant.
SV Tryck och håll ned knappen för att slå på eller svara med
Google Assistant. Tryck på knappen en gång för att få dina
meddelanden. Dubbeltryck på knappen för att stoppa
Google Assistant.
ZH 长 按 按 钮 ,激 活 或 答 复 “Google Assistant”。单 击 按 钮 ,查 看
通知。双击按钮,停用“Google Assistant”。
ZHTW 按住按鈕可觸發 Google Assistant 或 回 覆 它 。按 一 次 按 鈕 可
取得您的通知。按兩次按鈕可停止您的 Google Assistant。
.
AR
18
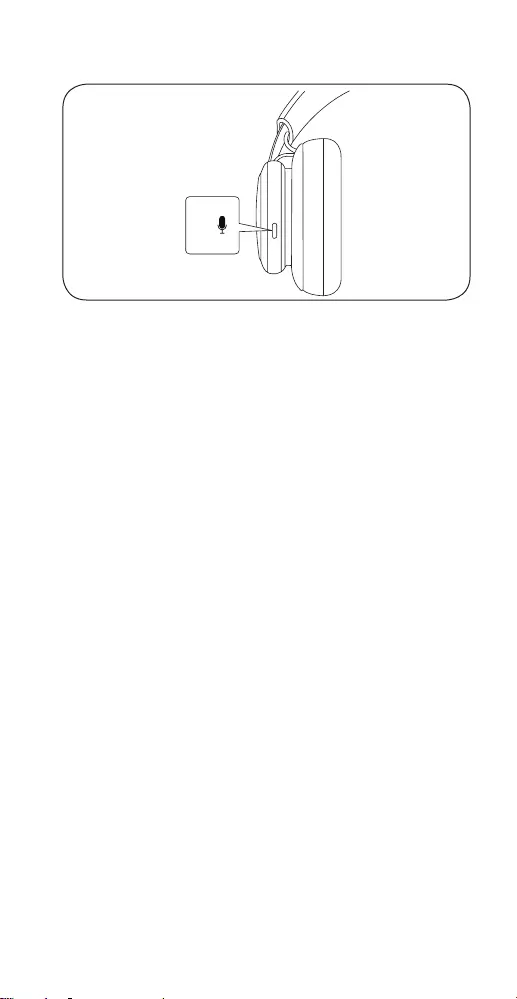
Voice Activation
EN Single press the button to activate the default voice
assistant on your device. Enable the function using the
Bang & Olufsen app first before voice activation.
DA Tryk en enkelt gang knappen for at aktivere standard
stemmeassistenten på din enhed. Aktivér først funktionen
ved hjælp af Bang & Olufsen-appen før stemmeaktivering.
DE Drücken Sie die Taste einmal, um den Standard-
Sprachassistenten auf Ihrem Gerät zu aktivieren. Aktivieren
Sie die Funktion zuerst über die App Bang & Olufsen, bevor
Sie die Sprachaktivierung starten.
ES Tan sólo pulse el botón para activar el asistente de voz
predeterminado en su dispositivo. Primero habilite la
función mediante la aplicación Bang & Olufsen antes de la
activación de voz.
FR Appuyez une fois sur le bouton pour activer l’assistant vocal
par défaut sur votre appareil. Activez la fonction à l’aide de
l’application Bang & Olufsen avant l’activation vocale.
IT Premere una volta il pulsante per attivare l’assistente vocale
predefinito sul proprio dispositivo. Abilitare la funzione
utilizzando l’app Bang & Olufsen prima dell’attivazione
vocale.
JA ボタンを1度押してデバイスのデフォルトのボイスアシスタン
トを有効化します。最初にBang & Olufsenアプリを使用して
機能を有効化してから、ボイスを有効化します。
19

KO 버튼을 한 번 눌러 장치 상의 기본 목소리 어시스턴트를
기동하십시오. 목소리 어시스턴트에 앞서 먼저 Bang &
Olufsen 앱을 이용해 해당 기능을 활성화하십시오.
NL Druk één keer op de knop om de standaard stemassistent
op het apparaat te activeren. Schakel de functie eerst in
met behulp van de Bang & Olufsen app eerst
spraakactivering.
PT Pressione uma vez o botão para ativar o assistente de voz
predefinido no dispositivo. Ative primeiro a função através
da aplicação Bang & Olufsen antes da ativação de voz.
RU Нажмите кнопку, чтобы активировать голосовой
помощник по умолчанию на вашем устройстве. Перед
голосовой активацией сначала включите функцию,
используя приложение Bang & Olufsen.
SV Tryck på knappen en gång för att aktivera din enhets
standardröstassistent. Aktivera funktionen först med Bang
& Olufsen-appen innan du använder röstaktivering.
ZH 单击按钮,激活设备上的默认语音助理。启动语音之前,使
用“Bang & Olufsen”应用启用此功能。
ZHTW 按一次按鈕可啟動您裝置上預設的語音助理。啟動語音之
前 ,請 先 使 用 Bang & Olufsen 應用程式來啟用此功能。
AR
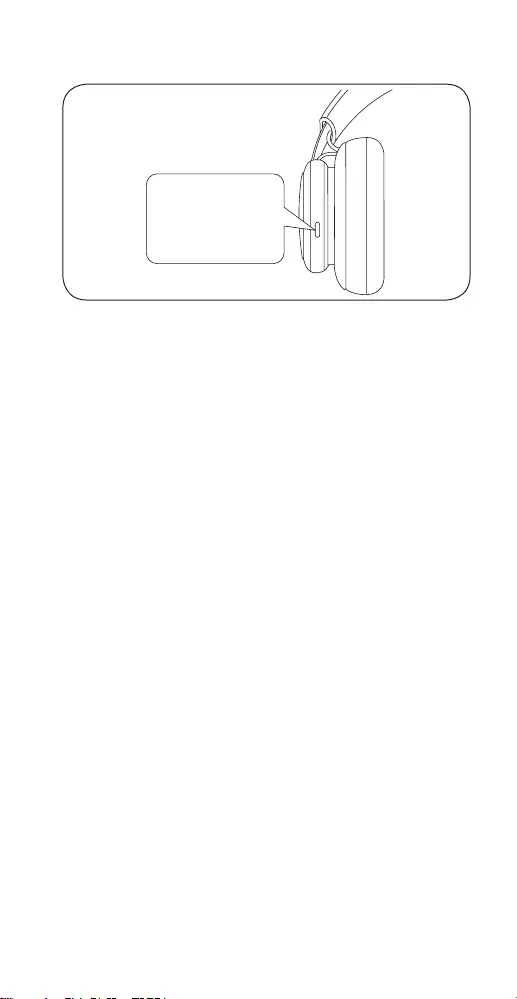
20
EN Plug in the enclosed mini-jack cable to use the headphones
if you are not allowed to use Bluetooth or if the battery is
discharged.
DA Tilslut det medfølgende minijackkabel, så du kan bruge
hovedtelefonerne, hvis du ikke kan bruge Bluetooth, eller hvis
batteriet er afladet.
DE Verwenden Sie das beigefügte Kabel mit Miniklinke, wenn
Sie Bluetooth nicht verwenden können oder der Akku nicht
aufgeladen ist.
ES
Conecte el cable minijack suministrado para usar los auriculares
si no se permite el uso de la conexión Bluetooth o la batería
está descargada.
FR Branchez le câble mini-jack fourni pour utiliser le casque si
vous ne pouvez pas employer le Bluetooth ou si la batterie
est déchargée.
IT
Se non è possibile utilizzare Bluetooth o se la batteria è scarica,
collegare il cavo mini-jack in dotazione per usare le cue.
JA Bluetooth が使用できない場合、または充電残量がない場合
は、付属のミニプラグケーブルを差し込んでヘッドフォンを使
うこと が で きま す。
Use with cable
21

KO
블루투스를 사용할 수 없거나 배터리가 방전된 경우에는 함께
제공된 미니 잭 케이블을 연결해 헤드폰을 사용하십시오.
NL Sluit de meegeleverde ministekkerkabel aan om de
hoofdtelefoon te gebruiken als u geen Bluetooth mag
gebruiken of als de batterij leeg is.
PT Se não puder usar Bluetooth ou se a bateria estiver
descarregada, ligue o cabo mini-jack fornecido p muliti ara
usar os auscultadores.
RU Подключите прилагаемый кабель с мини-разъемом,
чтобы использовать наушники, если вам не разрешается
использовать Bluetooth или разрядился аккумулятор.
SV Anslut den medföljande minijack-kabeln för att använda
lurarna om du inte får använda Bluetooth eller om batteriet
är urladdat.
ZH 如果处于不允许使用蓝牙的环境或者电池已用尽,可以插入随
附的 mini-jack 线 缆 来 使 用 耳 机 。
ZHTW 若您無法使用藍牙或者電池已無電力,請插上隨附的迷你接
頭纜線來使用耳機。
AR
22
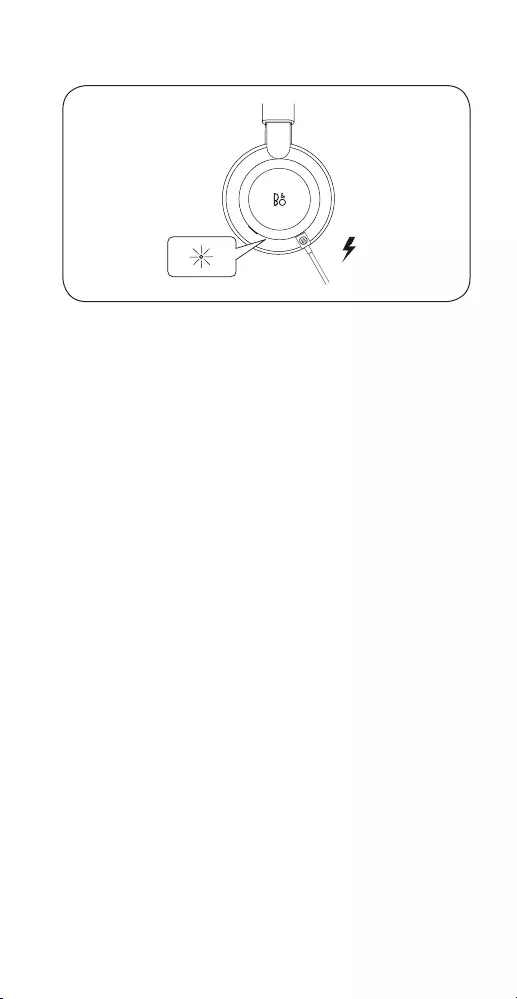
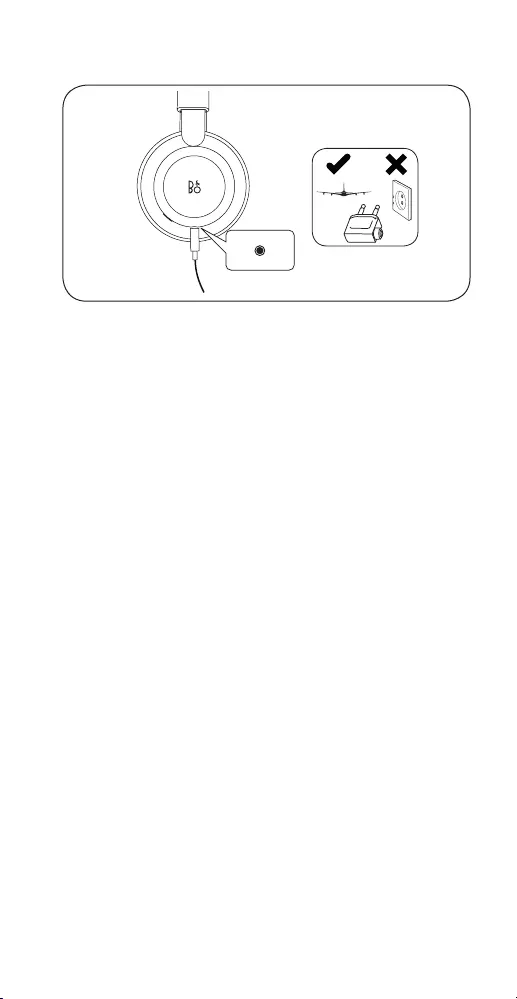
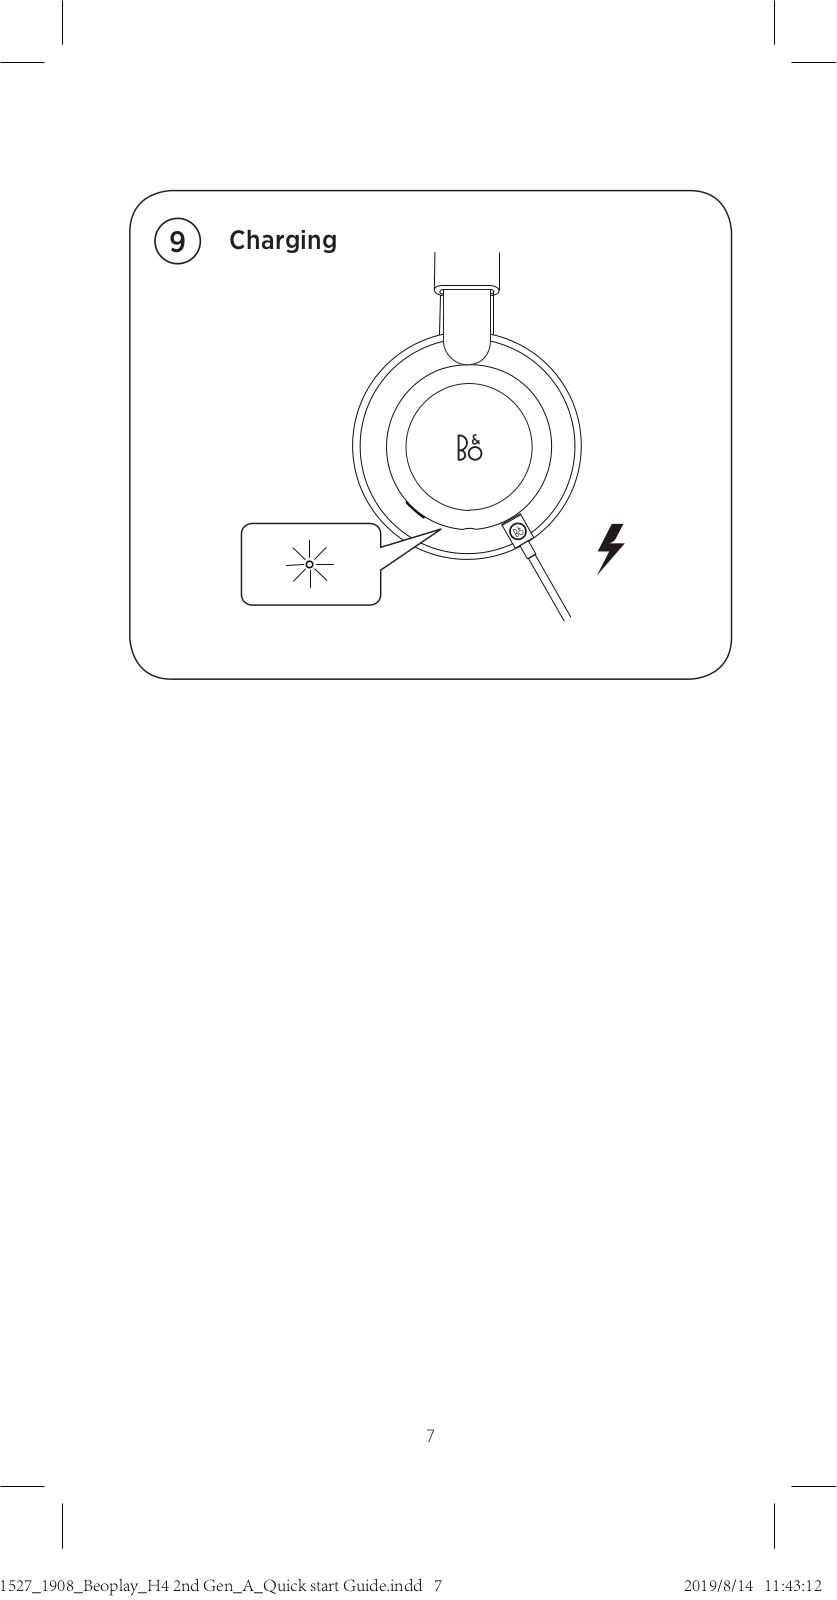
EN
When the indicator turns red, the battery power is below 10%.
Charge the headphones using the USB cable. You can use the
headphones while they are charging. When the battery is
fully charged, the indicator turns solid green.
DA Når indikatoren begynder at lyse rødt, er batteriniveauet
faldet til under 10 %. Oplad hovedtelefonen ved brug af
USB-kablet. Du kan bruge hovedtelefonen under opladning.
Når batteriet er helt genopladet, begynder indikatoren at
lyse grønt.
DE Leuchtet die LED-Anzeige rot, ist der Akkuladestand unter
10 %. Laden Sie den Kopfhörer mithilfe des USB-Kabels.
Sie können den Kopfhörer während des Ladevorgangs
benutzen. Ist der Akku vollständig geladen, leuchtet die
LED-Anzeige konstant grün.
ES Cuando el indicador se ilumina en rojo, significa que la
batería tiene menos del 10% de carga. Cargue el auricular
mediante el cable USB. Puede utilizar el auricular mientras
se carga la batería. Una vez cargada la batería, el indicador
permanece encendido en verde.
FR Lorsque le témoin devient rouge, la charge de la batterie
est inférieure à 10 %. Chargez le casque à l’aide du câble
USB. Vous pouvez utiliser le casque pendant la recharge.
Lorsque la batterie est complètement chargée, le témoin
devient vert continu.
IT Quando l’indicatore diventa rosso, la carica residua della
batteria è inferiore al 10%. Caricare le cue con il cavo USB.
È possibile utilizzare le cue mentre esse sono in carica.
Quando la batteria è completamente carica, l’indicatore si
accende con luce verde fissa.
Battery and charging
23

JA バッテリー残量が 10% を 切 る と 、イ ン ジ ケ ー タ が 赤 色 に 点
灯 し ま す 。ヘ ッ ド フ ォ ン の 充 電 に は USB ケ ーブ ル を 使 用 し て
ください。ヘッドフォンは充電中でも使用することができま
す。充 電 が 完 了 すると、イン ジケ ータが 緑 色 に点 灯しま す。
KO 표시기가 빨간색으로 바뀌면 배터리 전원이 10% 미만입니다.
USB 케이블을 사용하여 헤드폰을 충전합니다.충전하는
동안에도 헤드폰을 사용할 수 있습니다.배터리가 완충되면
표시기가 녹색으로 계속 켜져 있습니다.
NL Als de indicator rood is, heeft de batterij minder dan 10%
vermogen. De hoofdtelefoon opladen met de USB-kabel.
U kunt de hoofdtelefoon tijdens het opladen gebruiken.
Wanneer de batterij volledig is opgeladen, wordt de
indicator groen.
PT Quando o indicador fica iluminado com uma luz vermelha,
a carga da bateria é inferior a 10%. Carregue aos auscultadores
utilizando o cabo USB. Pode utilizar os auscultadores
enquanto estão a carregar. Quando a bateria está totalmente
carregada, o indicador fica permanentemente iluminado com
uma luz verde.
RU Когда заряд батареи ниже 10%, индикатор становится
красным. Заряжайте наушники с помощью USB кабеля.
Наушники можно использовать во время их зарядки.
Когда батарея полностью заряжена, индикатор
становится зеленым.
SV När indikatorlampan lyser röd, är batterikapaciteten under
10 %. Ladda hörlurarna genom att använda USB-kabeln.
Du kan använda hörlurarna under tiden som de laddas.
När batteriet är helt laddat, lyser indikatorlampan med
fast grönt sken.
ZH 当指示灯变红时,表示电池电量低于 10%。请 使 用 USB 连接
线为耳机充电。充电时也可使用耳机。当电池完全充满时,指
示灯将变成绿色恒亮。
ZHTW 當指示燈轉為紅色時,表示電池電量低於 10%。請 使 用 USB
連接線為耳機充電。充電時,您仍然可以使用耳機。當電池
完全充滿時,指示燈將變成綠色恆亮。
10%
AR
24

TILMELD DIG ONLINE
REGISTRIEREN SIE SICH ONLINE
REGISTER ONLINE
REGISTRO EN LÍNEA
INSCRIPTION EN LIGNE
REGISTRAZIONE ON-LINE
オンライン登 録
온라인 등록
ONLINE REGISTREREN
REGISTO ONLINE
ОНЛАЙН РЕГИСТРАЦИЯ
ONLINE-REGISTRERING
在线注册
線上註冊
25

Tilmeld dig online på www.bang-olufsen.com/register-product for at
modtage vigtige oplysninger om produkt- og softwareopdateringer
fra BANG & OLUFSEN Group. Hvis du har købt dit produkt i en BANG
& OLUFSEN-butik eller på www.bang-olufsen.com, er du automatisk
blevet tilmeldt.
Registrieren Sie sich online unter www.bang-olufsen.com/register-
product, um wichtige Informationen zu Produkt- und Software-
Aktualisierungen sowie interessante Neuigkeiten und Angebote von
der BANG & OLUFSEN Gruppe zu erhalten. Wenn Sie ein Produkt in
einem BANG & OLUFSEN Fachgeschäft oder auf www.bang-olufsen.
com gekauft haben, sind Sie bereits registriert.
Register online at www.bang-olufsen.com/register-product to receive
important information about product and software updates – and to
get exciting news and offers from the BANG & OLUFSEN Group. If you
have purchased your product at a BANG & OLUFSEN store or at www.
bang-olufsen.com, you have automatically been registered
Regístrese online en la página web www.bang-olufsen.com/register-
product para recibir información importante acerca del productos y
de actualizaciones de software – y para conseguir fantásticas noticias
y ofertas del Grupo BANG & OLUFSEN. Si ha adquirido el equipo en
una tienda BANG & OLUFSEN o en www.bang-olufsen.com, se habrá
registrado automáticamente.
Inscrivez-vous en ligne sur www.bang-olufsen.com/register-product
pour recevoir des informations importantes sur les mises à jour de
produits et de logiciels — et pour obtenir des nouvelles et des offres
intéressantes du Groupe BANG & OLUFSEN. Si vous avez acheté votre
produit dans un magasin BANG & OLUFSEN ou sur www.bang-olufsen.
com, vous avez été inscrit automatiquement.
Registrarsi online su www.bang-olufsen.com/register-product per
ricevere importanti informazioni su prodotti e aggiornamenti software,
notizie e le fantastiche offerte del Gruppo BANG & OLUFSEN. Se hai
acquistato il tuo prodotto in un punto vendita BANG & OLUFSEN o su
www.bang-olufsen.com, la registrazione è automatica.
www.bang-olufsen.com/register-product にご登録されれば、製品とソフトウ
ェアの更新に関する重要な情報についてお知らせいたします。さらには BANG
& OLUFSEN Group からのホットなニュースやオファーもご利用になれます。
BANG & OLUFSEN ストアまたは www.bang-olufsen.com にて商品をご購
入されたお客様はすでに登録済です。
제품 및 소프트웨어에 관한 중요 정보를 수신하고 BANG & OLUFSEN 그룹
으로 뉴스와 특별 혜택 소식을 받아보려면 www.bang-olufsen.com/register-
product에서 온라인으로 등록하십시오. BANG & OLUFSEN 대리점 또는
www.bang-olufsen.com에서 제품을 구입하신 고객은 자동으로 등록됩니다.
Registreer online op www.bang-olufsen.com/register-product om
belangrijke informatie te ontvangen over product- en software-updates
— en om de laatste nieuwtjes en aanbiedingen van de BANG & OLUFSEN
Group te ontvangen. Als u uw product in een BANG & OLUFSEN-
winkel of op www.bang-olufsen.com hebt gekocht, bent u automatisch
geregistreerd.
DA DE EN ES FR KO NLJAIT
26

www.bang-olufsen.com/support/beoplay-h4
RU SV ZH ZHTW
Registe-se online em www.bang-olufsen.com/register-product para
receber informações importantes sobre atualizações de produtos e
software, e para receber notícias e ofertas entusiasmantes do Grupo
BANG & OLUFSEN. Se adquiriu o seu produto numa loja BANG &
OLUFSEN ou em www.bang-olufsen.com, foi automaticamente registado.
Registrera dig online på www.bang-olufsen.com/register-product för
att få viktig information om produkter och programuppdateringar samt
för att få spännande nyheter och erbjudanden från BANG & OLUFSEN
Group. Om du har köpt din produkt i en BANG & OLUFSEN-affär eller
hos www.bang-olufsen.com behöver du inte registrera dig, eftersom
registreringen redan har utförts automatiskt.
在线注册www.bang-olufsen.com/register-product,以接收有关产品和软
件更新的重要信息,以及获得BANG & OLUFSEN Group令人兴奋的新闻与
优惠。如果您从 BANG & OLUFSEN 商店或 www.bang-olufsen.com 购入
产品、即已自动注册。
請上 www.bang-olufsen.com/register-product 註冊,以取得有關產品與軟
體更新的重要資訊 — 以及獲得來自 BANG & OLUFSEN 集團的重要新聞與優
惠。如果您的產品是在 BANG & OLUFSEN 店面或 www.bang-olufsen.com
購買、即已自動獲得註冊。
PT
27


User’s Guide
23 pages
en
fr
it
ja
ko
nn
ru
sv
dk
sp
zh
nl
pt
Quick Start Guide
11 pages
en
fr
it
ja
ko
nn
ru
sv
dk
sp
zh
nl
pt
User’s Guide
17 pages
User’s Guide
23 pages
de
en
fr
it
ja
ko
ru
sv
dk
sp
zh
nl
pl
pt
Bang Olufsen Beoplay H4 Specification
The Bang & Olufsen Beoplay H4 is a premium wireless over-ear headphone that combines sophisticated design with advanced acoustic performance. Crafted from high-quality materials, the Beoplay H4 features a minimalist aesthetic with lambskin leather ear cushions, an aluminum frame, and stainless steel sliders that offer a comfortable yet durable build. The headphones are equipped with 40mm electro-dynamic drivers, delivering a balanced and precise audio experience with a frequency range of 20Hz to 20kHz, ensuring deep bass and clear treble across various music genres. Bluetooth 4.2 with support for AAC and SBC codecs provides seamless wireless connectivity, while a 3.5mm audio jack is available for wired connections. The integrated microphone supports clear voice calls and voice assistant interactions, enhancing user convenience.
The Beoplay H4 boasts an impressive battery life, offering up to 19 hours of continuous playtime on a single charge, with a charging time of approximately 2.5 hours via a USB-C port. User-friendly interface elements include intuitive touch controls on the earcup, allowing easy management of music playback, volume adjustments, and call handling. The headphones support the Bang & Olufsen app, which provides additional customization options such as sound profile adjustments and software updates. Designed for both style and functionality, the Beoplay H4 is compatible with a wide range of devices, making it a versatile choice for music enthusiasts who value both aesthetics and superior sound quality. These headphones exemplify Bang & Olufsen’s commitment to craftsmanship and innovation in the audio industry.
Bang Olufsen Beoplay H4 F.A.Q.
To pair your Beoplay H4, turn on the headphones and press the Bluetooth button until the LED indicator starts flashing blue. Then, enable Bluetooth on your device and select ‘Beoplay H4’ from the list of available devices.
If your Beoplay H4 won’t turn on, ensure the battery is charged by connecting it to a charger. If it still doesn’t turn on, try resetting the headphones by pressing and holding the power button for 10 seconds.
To reset your Beoplay H4 to factory settings, press and hold the power button and the volume up button simultaneously for about 10 seconds until the LED indicator flashes red.
To update the firmware on your Beoplay H4, download the Bang & Olufsen app and connect your headphones to the app. Follow the instructions to check for and install any available updates.
If the sound quality is poor, try resetting the headphones and ensuring they are charged. Also, check the audio source and connection stability. If issues persist, contact Bang & Olufsen support.
Yes, you can use your Beoplay H4 headphones while they are charging. However, using them during charging may extend the charging time.
To clean your Beoplay H4, use a soft, dry cloth to wipe the surfaces. Avoid using water or cleaning agents. Regularly check for ear pad wear and replace them if necessary to maintain sound quality.
The Beoplay H4 provides up to 19 hours of battery life on a full charge. To maximize battery life, keep the volume at moderate levels and turn off the headphones when not in use.
Ensure there are no obstructions between your device and the headphones, and keep them within a close range. Also, avoid interference from other electronic devices and ensure the latest firmware is installed.
If your Beoplay H4 is not charging, check the charging cable and port for any damage or debris. Try using a different cable and power source. If the problem persists, contact Bang & Olufsen support.
Bang & Olufsen
Loading…
B
- Beomaster-16002
- Beomaster-22004
- Beomaster 33002
- Beomaster 3400
- Beomaster 35002
- Beomaster 40002
- Beomaster 44005
- Beomaster 4401
- Beomaster 45003
- Beomaster 521
- Beomaster 50006
- Beomaster 55003
- Beomaster 60006
- Beomaster 65003
- Beomaster 700
- Beomaster 70002
- Beomaster 8003
- Beomaster 80004
- Beomaster 80022
- Beomaster 9006
- Beomaster 900 K
- Beomaster 900 M
- Beomaster 900 RG
- Beomaster 9016
- Beomaster 901 Mk2
- BeoMedia 122
- Beomic
- Beomic 1000
- Beomic Beovox
- BeoPlay 4
- BeoPlay A16
- BeoPlay A22
- beoplay a2 active2
- BeoPlay A3
- BeoPlay A6
- BeoPlay A82
- BeoPlay A96
- Beoplay A9 3rd Generation
- Beoplay A9 4th Generation2
- BeoPlay A9 Generation 4th
- BeoPlay Beolit 15
- BeoPlay E4
- BeoPlay E6
- BeoPlay E83
- BeoPlay E8 2.03
- BeoPlay E8 3.0
- BeoPlay E8 Sports
- BeoPlayer
- BeoPlay H24
- BeoPlay H311
- BeoPlay H3 ANC2
- Beoplay H4 2ND GEN
- BEOPLAY H54
- BeoPlay H68
- BeoPlay H72
- BeoPlay H84
- BeoPlay H8i
- Beoplay H9 3RD GEN2
- BeoPlay H95
- BeoPlay H9i2
- BeoPlay M32
- Beoplay M54
- BeoPlay P22
- Beoplay P64
- BeoPlay S3
- BeoPlay S82
- BeoPlay V13
- BeoPlay V1–32
- BeoPlay V1-40
- BeoPlay V1 Stands Brackets
- BeoPort14
- BeoRemote One4
- Beosat-LM-3002
- BeoSound
- Beosound 126
- Beosound 210
- Beosound 20002
- Beosound 2300
- BeoSound 316
- Beosound 300019
- BeoSound 320031
- BeoSound 352
- BeoSound 418
- Beosound 40002
- Beosound 4500
- Beosound 530
- BeoSound 5 Encore4
- BeoSound 5 Spotify
- BeoSound 620
- Beosound 6500
- BeoSound 82
- Beosound 900047
- Beosound 9000 Mk3
- Beosound 9000 Mk3-2
- Beosound 9000 Mk3-SM
- BeoSound 9000 MKIII
- BeoSound Balance
- BeoSound Century9
- Beosound Century-2
- Beosound Century-SM
Loading…
Loading…
Nothing found
Beoplay H4 2ND GEN
User Manual
28 pgs6.67 Mb0
Table of contents
Loading…
…
Bang & Olufsen User Manual
Download
Specifications and Main Features
Frequently Asked Questions
User Manual


Loading…
+ 19 hidden pages
You need points to download manuals.
1 point = 1 manual.
You can buy points or you can get point for every manual you upload.
Buy points
Upload your manuals
A good user manual
The rules should oblige the seller to give the purchaser an operating instrucion of Bang Olufsen BEOPLAY H4, along with an item. The lack of an instruction or false information given to customer shall constitute grounds to apply for a complaint because of nonconformity of goods with the contract. In accordance with the law, a customer can receive an instruction in non-paper form; lately graphic and electronic forms of the manuals, as well as instructional videos have been majorly used. A necessary precondition for this is the unmistakable, legible character of an instruction.
What is an instruction?
The term originates from the Latin word „instructio”, which means organizing. Therefore, in an instruction of Bang Olufsen BEOPLAY H4 one could find a process description. An instruction’s purpose is to teach, to ease the start-up and an item’s use or performance of certain activities. An instruction is a compilation of information about an item/a service, it is a clue.
Unfortunately, only a few customers devote their time to read an instruction of Bang Olufsen BEOPLAY H4. A good user manual introduces us to a number of additional functionalities of the purchased item, and also helps us to avoid the formation of most of the defects.
What should a perfect user manual contain?
First and foremost, an user manual of Bang Olufsen BEOPLAY H4 should contain:
— informations concerning technical data of Bang Olufsen BEOPLAY H4
— name of the manufacturer and a year of construction of the Bang Olufsen BEOPLAY H4 item
— rules of operation, control and maintenance of the Bang Olufsen BEOPLAY H4 item
— safety signs and mark certificates which confirm compatibility with appropriate standards
Why don’t we read the manuals?
Usually it results from the lack of time and certainty about functionalities of purchased items. Unfortunately, networking and start-up of Bang Olufsen BEOPLAY H4 alone are not enough. An instruction contains a number of clues concerning respective functionalities, safety rules, maintenance methods (what means should be used), eventual defects of Bang Olufsen BEOPLAY H4, and methods of problem resolution. Eventually, when one still can’t find the answer to his problems, he will be directed to the Bang Olufsen service. Lately animated manuals and instructional videos are quite popular among customers. These kinds of user manuals are effective; they assure that a customer will familiarize himself with the whole material, and won’t skip complicated, technical information of Bang Olufsen BEOPLAY H4.
Why one should read the manuals?
It is mostly in the manuals where we will find the details concerning construction and possibility of the Bang Olufsen BEOPLAY H4 item, and its use of respective accessory, as well as information concerning all the functions and facilities.
After a successful purchase of an item one should find a moment and get to know with every part of an instruction. Currently the manuals are carefully prearranged and translated, so they could be fully understood by its users. The manuals will serve as an informational aid.