
Раздел: Бытовая, кухонная техника, электроника и оборудование
Тип: Пароварка
Характеристики, спецификации
Тип управления:
электронное
Максимальная потребляемая мощность:
900 Вт
Таймер:
на 99 мин, с отключением
Отключение при недостатке воды:
есть
Материал изготовления корпуса:
пластик/нерж. сталь
Материал изготовления паровых корзин:
пластик/нерж. сталь
Объем паровых корзин:
2.6/3.5/4.5 л
Объем резервуара для воды:
1 л
Чаша для риса:
есть, на 1.2 л
Индикатор уровня воды:
есть
Функция «Быстрый пар»:
нет
Функция «Отсрочка старта»:
нет
Габариты (ШхВхГ):
33x43x33 см
Отсек для сетевого шнура:
есть
Инструкция к Пароварке Kenwood FS560

Kenwood Limited, New Lane, Havant, Hampshire PO9 2NH, UK
www.kenwood.co.uk
56021/3
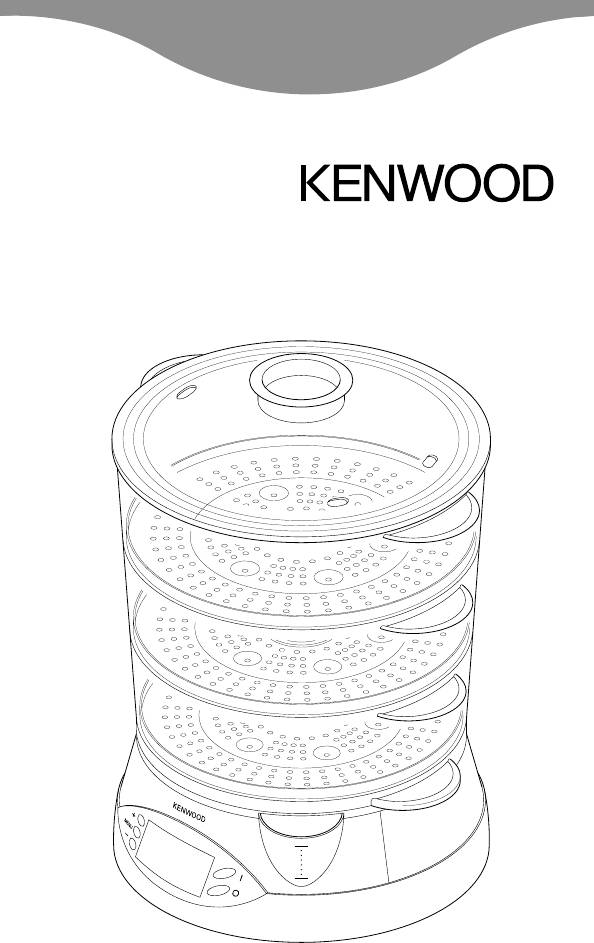
FS560 series

English 2 — 7
Nederlands 8 — 13
Français 14 — 19
Deutsch 20 — 25
Italiano 26 — 31
Português 32 — 38
Español 39 — 44
Dansk 45 — 50
Svenska 51 — 56
Norsk 57 — 62
Suomi 63 — 68
Türkçe 69 — 74
Ïesky 75 — 80
Magyar 81 — 86
Polski 87 — 92
Русский 93 — 99
Ekkgmij 100 — 106
´¸∂w
107 — 112
UNFOLD

●
This steamer complies with
safety
European Economic Community
machine safety
Directive 89/336/EEC.
●
This machine produces steam which
before using for the first time
can burn you.
1 Remove all packaging and any labels.
●
Don’t get burnt by steam coming
2 Wash the parts: see ‘care and
out of your steamer, especially when
cleaning’.
removing the lid.
3 Wipe the water tank with a damp
●
Be careful when handling anything:
cloth, then dry.
any liquid, steamer part or
4 Push excess cord into the back of
condensation will be very hot. Use
the appliance.
oven gloves.
●
Don’t let infirm people use the
know your Kenwood
steamer without supervision.
●
Keep children away from the
food steamer
machine and never let the cord hang
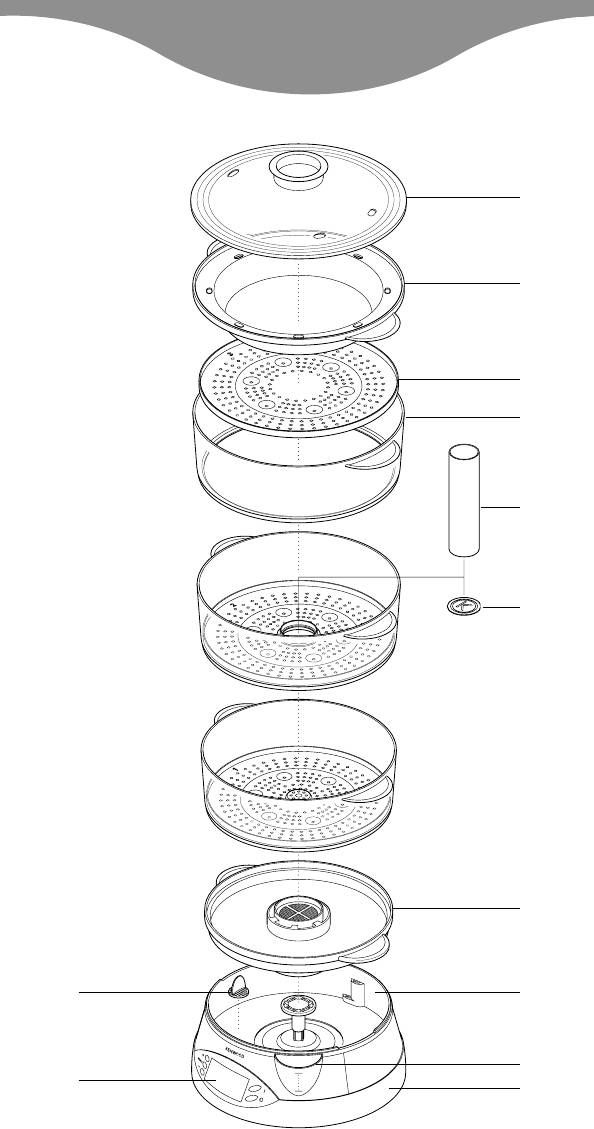
햲 lid
down where a child could grab it.
햳 rice bowl
●
Never use a damaged steamer. Get
햴 removable trays
it checked or repaired: see ‘service
햵 basket rings
and customer care’.
햶 steam tube
●
Never put the steamer, cord or plug
햷 disc
in water – you could get an electric
햸 drip tray
shock. Keep the controls clean and
햹 water tank
dry.
햺 exterior fill funnel
●
Always unplug the steamer when not
햻 base
in use.
햽 controls
●
Never put your steamer on a cooker
햾 strainer
or in an oven.
●
Never move your steamer if it
to use your steamer
contains anything hot.
●
Don’t let children play with this
●
Keep your steamer away from walls
appliance.
and overhanging cupboards: the
●
Only use this appliance for its
steam could damage them.
intended domestic use.
●
Season food after cooking. If
food safety
seasoning gets into the water, it
●
Cook meat, fish and seafood
could damage the heating element.
●
thoroughly. And never cook them
See the cooking guides on pages 6
from frozen.
and 7.
●
If you’re using more than one
1 Fit the strainer inside the water tank.
basket, put meat, poultry and fish in
(It stops particles getting into the
the bottom basket so that its raw
element.)
juice cannot drip onto food below.
2 Pour cold water into the tank.
●
Do not reheat cooked rice in your
Always make sure the water is
steamer.
between the ‘Min’ and ‘Max’ levels
before plugging in
marked. (When filled to ‘Max’, this
●
Make sure your electricity supply is
will produce steam for approximately
the same as the one shown on the
60 minutes.)
underside of your steamer.
2

●
The steamer is fitted with an anti
on the menu it can if necessary be
limescale coated heating element to
adjusted higher or lower using the
prolong the life and efficiency of your
‘+’ and ‘-’ buttons. Once the desired
steamer. However, depending upon
time has been selected press the
the water hardness of your area, we
‘START’ (I) button.
recommend the use of filtered water.
To stop the steaming process press
(Kenwood water filters are widely
and hold down the ‘STOP’ (O)
available).
button.
●
Don’t add anything (even salt or
to select a time
pepper) to the water – it could
To select a time different to the
damage the heating element.
displayed time of 45 minutes, press
●
To avoid the water level dropping
the ‘+’ or ‘-’ buttons to increase or
below ‘Min’, you can top up during
decrease the time. When the desired
cooking. Simply add water via the
time is displayed, press the ‘START’
exterior fill funnel, taking care not to
button and the steamer will switch
overfill.
on and the cook symbol will flash.
3 Sit the drip tray onto the base
To stop the steaming process press
making sure the handles fit over the
and hold down the ‘STOP’ button.
grooves in the base.
●
After 1 minute, if the time/menu is
4 Fit the removable trays, rim
displayed but the ‘START’ button
uppermost into their corresponding
has not been selected, the display
basket rings — both parts are
will switch off. To re-select a
numbered to assist with this.
programme press the ‘START’
5 Place the disc in the centre of tray 2.
button.
6 Add the food, then stack the
●
A buzzer will sound whenever the
baskets on the base, starting with
‘START’ button is pressed or when
the lowest numbered basket at the
the steamer switches off.
bottom and the highest number at
keep warm function
the top .
The flavour and nutritional value of
using the rice bowl
steamed food is best when freshly
●
Put water and rice in the rice bowl.
cooked. However, should you wish
Put the rice bowl into a basket. (You
to keep food warm for a short period
can also cook something in the
of time, select ‘KEEP WARM’ on the
other baskets if required).
menu and if necessary adjust the
7 Fit the lid, plug in. The whole display
time accordingly.
will illuminate and the buzzer will
8 Unplug and clean after use.
sound. (Should the display fail to
important
illuminate press the ‘START’ button.)
At the end of the cooking cycle your
to select from the menu
steamer will automatically switch
Press the ‘MENU’ button, and each
to the keep warm setting for 20
time the button is pressed the menu
minutes. During this time the
will scroll around to display a pre-set
steamer will cycle on and off, so take
time and suggested usage. The
care as steam may be produced
choices are as follows:- 10 minutes
when you’re not expecting it.
‘KEEP WARM’, then to cook the
To switch the steamer off or to
following, shellfish 10 minutes, eggs
cancel the keep warm setting, press
12 minutes, fish 15 minutes,
and hold down the ‘STOP’ button.
vegetables 20 minutes, chicken
portions 35 minutes and rice 40
minutes. Once the time is displayed
3

hints
4 Place the steam tube upright in the
●
Condensation will drip from the
centre of the bottom tray, then fit the
upper basket into the lower basket.
assembled tray 2 over the steam
So make sure the flavours go well
tube. When using the steam tube
together.
the disc should be removed.
●
Liquid left over in the drip tray is
5 Fi the assembled tray 3 on the top.
good for making soup or stock. But
6 Fit the lid.
be careful: it will be very hot.
important
●
You can also use the rice bowl for
The steam tube must be used in
cooking anything in liquid (eg
conjunction with all three baskets.
vegetables in sauces or poaching
fish in water).
care and cleaning
●
Leave gaps between pieces of food.
And put the thicker pieces nearer the
●
Before cleaning, always switch off,
outside.
unplug and let everything cool.
●
Stir large amounts half way through
●
Never put your steamer base in
cooking.
water or let the cord or plug get wet.
●
Smaller amounts cook faster than
cleaning the water tank
larger amounts.
●
Empty, then rinse out with warm
●
Similar-sized pieces of food cook evenly.
water and dry.
●
Like a conventional oven, you can add
cleaning the outside
food as you go along. If something
●
Wipe with a damp cloth, then dry.
needs less time, add it later.
●
If you lift the lid, steam will escape
all other parts
and cooking will take longer.
●
Wash, then dry.
●
The cooking times on pages 6 — 7
●
Don’t wash parts in the dishwasher.
are guides based on using the lower
●
For storage, stack the assembled
basket. The higher the food is, the
baskets one inside the other, starting
slower it cooks. So allow an extra
with the highest numbered basket
5 — 10 minutes for food in the next
and finishing with basket number 1.
basket above. Check that food is
●
Push excess cord into the back of
thoroughly cooked before eating.
the steamer.
●
If your food’s not cooked enough,
descaling
reset the time. You may need to top
●
Descaling increases steam power
up with water.
and helps your steamer last longer.
using the steam tube
1 Pour clear vinegar into the tank up
Use the steam tube when you want
to ‘Min’. Don’t use a descaler.
to cook large quantities of the same
2 Fit the drip tray, assembled baskets
food such as fruit or vegetables at
and lid.
the same time.
3 Plug in and set the timer for 20-25
1 Place equal amounts of the same
minutes. Ensure the room in well
food in each tier. (Where appropriate
ventilated. Unplug if the vinegar
the food should be cut into equal
overflows.
size pieces).
4 Unplug and when the steamer is
2 Follow steps 1 to 4 ‘to use your
cool, pour away the vinegar and
steamer’.
rinse out the tank several times with
3 Fit the assembled tray marked 1 into
water. Wash the drip tray, basket
the steamer.
rings, trays and lid.
4

service and customer
care
●
If the cord is damaged it must, for
safety reasons, be replaced by
Kenwood or an authorised Kenwood
repairer.
If you need help with:
●
using your steamer
●
servicing, spare parts or repairs
Contact the shop where you bought
your steamer.
5
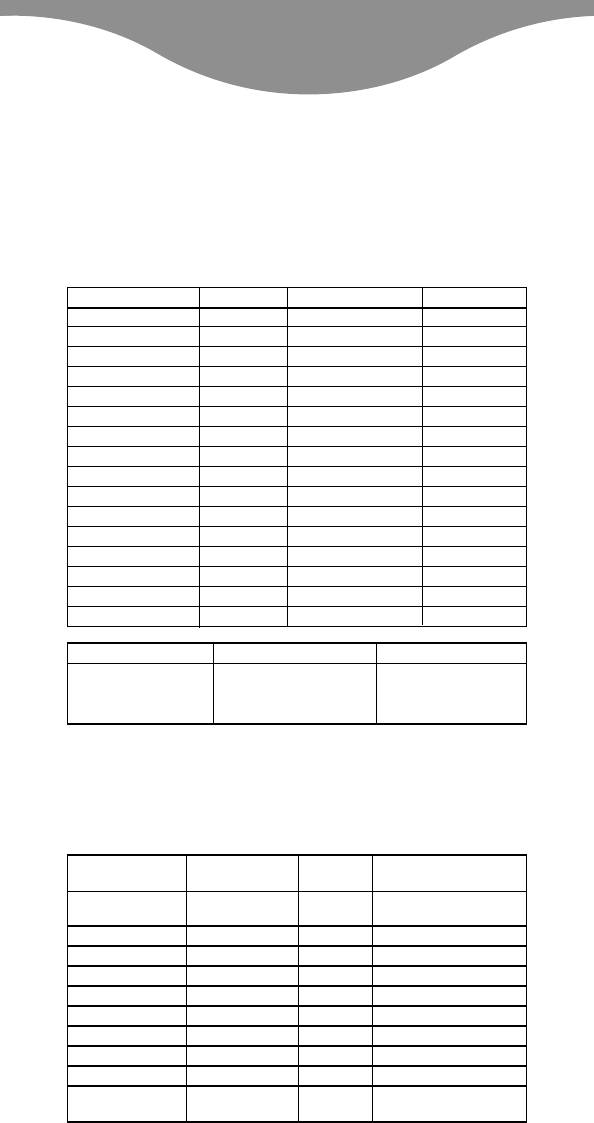
cooking guides
● These cooking times are only guidelines based on using the lower basket.
● Read ‘food safety’, page 2, and ‘hints’, page 4.
vegetables
● Clean vegetables before cooking. Remove stems and peel if you like.
vegetable quantity preparation minutes
Asparagus 454g (1lb) Trim 15
Beans, green 454g (1lb) Trim 15-20
Beans, runner 454g (1lb) Trim and thinly slice 15-20
Broccoli 454g (1lb) Cut into florets 20
Brussels sprouts 454g (1lb) Trim and cut bases 25
Cabbage 1 small Shred 25
Carrots 454g (1lb) Thinly slice 20
Cauliflower 1 medium Cut into florets 25
Courgettes 454g (1lb) Thinly slice 15
Celery 1 head Thinly slice 15
Leeks 3-4 Thinly slice 15
Mange tout 227g (8oz) Trim 15
Mushrooms, button 454g (1lb) Wipe 10
Parsnips 454g (1lb) Dice or thinly slice 15
Peas 454g (1lb) Shell 15
Potatoes, new 454g (1lb) Wipe 30
eggs preparation minutes
Boiling* or poaching Use a cup or 10-12 for soft,
ramekin dish 15-20 for hard
for poaching
* When boiling eggs, place them in the built in egg holders in the trays.
poultry and fish
● Don’t overcrowd the baskets.
food quantity minutes comments
Chicken, 4-5 30 Steam until thoroughly
boneless breasts cooked and tender
Clams 454g (1lb) 10 Steam until open
Prawns, medium 454g (1lb) 10 Steam until pink
Fish, fillets 227g (8oz) 10 Steam until it flakes
Fish, steak 2.5cm (1″) thick 15-20 Steam until it flakes
Fish, whole 340g (12oz) 15-20 Steam until it flakes
Lobster tails 2-4 20 Steam until red
Mussels 454g (1lb) 15 Steam until open
Oysters 6 15 Steam until open
Scallops 227g (8oz) 15 Steam until hot and
tender
6
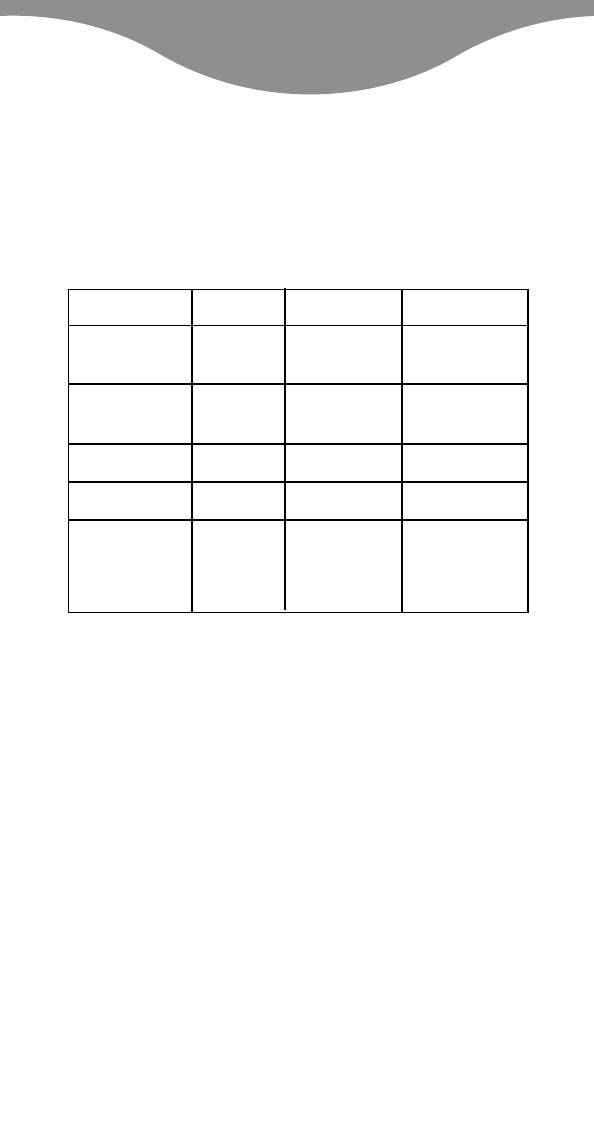
cooking guides continued
cereals and grains
● When using the rice bowl, you still put water in the tank. But you can put a
different liquid, such as wine or stock, inside the rice bowl to cook your rice in.
You can also add seasoning, chopped onions, parsley, almonds or sliced
mushrooms.
food quantity liquid to add minutes
to rice bowl
White long-grain 100g (4oz) 125ml (4fl oz) 25
rice (eg Basmati, 200g (8oz) 250ml (9fl oz) 30
easy cook) 300g (12oz) 375ml (13fl oz) 35
Brown rice 100g (4oz) 125ml (4fl oz) 40
200g (8oz) 250ml (9fl oz) 45
300g (12oz) 375ml (13fl oz) 50
Couscous 200g (8oz) 150ml (5fl oz) 15-20
warm water
Porridge 75g (3oz) 450ml (16fl oz) 40 (stir half way
milk/water through)
Rice pudding 75g (3oz) 25g (1oz) caster 80 (stir half way
pudding rice sugar and through)
375-500ml
(3/4-1pt) milk
7

Nederlands
Vouw voor het lezen a.u.b. de voorpagina met illustraties uit
voordat u de stekker in het
veiligheid
stopcontact steekt
veiligheid apparaat
●
Controleer of de stroomvoorziening
●
Dit apparaat produceert stoom
overeenkomt met de gegevens op
waaraan u zich kunt verbranden.
de onderzijde van uw stoompan.
●
Zorg dat u zich niet verbrandt aan
●
Deze stoompan voldoet aan EG-
de stoom die uit uw stoompan komt,
Richtlijn 89/336/EEC.
vooral wanneer u de deksel
voordat u de stoompan voor
verwijdert.
het eerst gaat gebruiken
●
Wees voorzichtig: alle vloeistoffen,
1 Verwijder alle verpakkingsmaterialen
onderdelen of condensatie van de
en etiketten.
stoomkoker zijn erg heet! Draag
2 Was de onderdelen; zie ‘onderhoud
ovenhandschoenen.
en reiniging’.
●
Houd kinderen uit de buurt van de
3 Doe het waterreservoir af met een
stoomkoker en laat het snoer nooit
vochtige doek en droog het daarna
loshangen, zodat een kind eraan kan
af.
trekken.
4 Berg het overbodige stuk snoer op
●
Gebruik de stoompan nooit als hij
achter in het apparaat.
beschadigd is. Laat de pan nakijken
of repareren: zie ‘klantenservice’.
ken uw Kenwood
●
Dompel de stoomkoker, het snoer of
de stekker nooit onder in water – u
stoompan
zou een elektrische schok kunnen
햲 deksel
krijgen. Houd de regelknoppen
햳 rijstkom
schoon en droog.
햴 verwijderbare onderplaten
●
Trek altijd de stekker uit het
햵 mandringen
stopcontact als de stoomkoker niet
햶 stoombuis
in gebruik is.
햷 schijf
●
Plaats uw stoompan nooit op een
햸 druiplade
fornuis of in een oven.
햹 waterreservoir
●
Verplaats uw stoompan nooit als er
햺 externe vultrechter
hete etenswaren of vloeistoffen
햻 onderstel
inzitten.
햽 bedieningsknoppen
●
Laat kinderen niet met dit apparaat
햾 zeef
spelen.
●
Gebruik dit apparaat uitsluitend voor
gebruik van uw
het beoogde huishoudelijke doel.
●
Warm in de stoomkoker geen
stoompan
gekookte rijst op.
●
Houd uw stoompan uit de buurt van
veiligheid voedsel
muren en overhangende kasten: de
●
Zorg dat vlees, vis en zeevruchten
stoom zou beschadigingen kunnen
goed gaar zijn. Laat deze producten
veroorzaken.
ontdooien voor gebruik.
●
Kruid voedsel pas na het stomen.
●
Als u meer dan één mandje gebruikt,
Als er specerijen in het water terecht
moet u vlees, gevogelte en vis in het
komen, kan het verwarmingselement
onderste mandje doen zodat het
beschadigen.
ongekookte vocht hiervan niet op
●
Zie de richtlijnen voor bereiding op
het onderliggende voedsel kan
pagina 12 — 13.
druppen.
8

1 Plaats de zeef in het waterreservoir.
7 Zet het deksel op zijn plaats en
(Het zorgt dat er geen deeltjes in het
steek de stekker in het stopcontact.
element terechtkomen)
Het hele display licht op en u hoort
2 Giet koud water in het reservoir.
de zoemer. (Als het display niet
Controleer altijd of het waterpeil zich
oplicht, drukt u op de START-knop.)
tussen ‘Min’ en ‘Max’ bevindt. (Als
uit het menu kiezen
het reservoir tot ‘Max’ is gevuld,
Druk op de MENU-knop. Telkens
produceert het stoom gedurende ca.
wanneer u op de knop drukt,
60 minuten.)
vertoont het display een van tevoren
●
De stoomkoker is uitgerust met een
ingestelde tijd met het aanbevolen
verwarmingselement met een
gebruik. De keuzes zijn als volgt: 10
antikalkaanslaglaagje, zodat de
minuten WARM HOUDEN (KEEP
koker langer mee zal gaan en goed
WARM), dan: schelpdieren 10
zal blijven functioneren. Toch wordt
minuten, eieren 12 minuten, vis 15
aanbevolen om gefilterd water te
minuten, groente 20 minuten, stukjes
gebruiken, afhankelijk van de
kip 35 minuten en rijst 40 minuten.
hardheid van het water. (Kenwood
De tijd die op het menu staat
waterfilters zijn overal verkrijgbaar).
weergegeven, kan hoger of lager
●
Voeg niets toe aan het water (ook
ingesteld worden met de + (plus) en
geen zout of peper) — het
– (min)-knoppen. Zodra de gewenste
verwarmingselement zou
tijd is ingesteld, drukt u op de
beschadigd kunnen raken
START (I)-knop. Als u het
●
Om te voorkomen dat het waterpeil
stoomproces wilt stoppen, houdt u
onder ‘Min’ zakt, kunt u het reservoir
de STOP (O)-knop ingedrukt.
tijdens het koken bijvullen. Voeg
een tijd instellen
gewoon water toe via de uitwendige
Als u een andere tijd dan de
vultrechter. Pas ervoor op dat u het
weergegeven tijd van 45 minuten wilt
reservoir niet te vol doet.
kiezen, drukt u op de + (plus) of –
3 Plaats de druiplade op het onderstel,
(min)-knop om de tijd te verlengen of
waarbij de hendels over de gleuven
te verkorten. Zodra de gewenste tijd
in het onderstel passen.
wordt weergegeven, drukt u op de
4 Leg de verwijderbare onderplaten,
START-knop. De stoomkoker gaat
met de rand naar boven, in de
aan en het kooksymbool begint te
bijbehorende mandringen – beide
knipperen. Als u het stoomproces
onderdelen zijn genummerd.
wilt stoppen, houdt u de STOP-knop
5 Plaats de schijf in het midden van
ingedrukt.
plaat 2.
●
Als de tijd/menu is weergegeven,
6 Voeg de etenswaren toe, plaats de
maar nog niet op de START-knop is
manden bovenop elkaar op het
gedrukt, zal het display na 1 minuut
onderstel: de mand met het laagste
automatisch uitschakelen. Als u het
nummer onderop en de mand met
programma opnieuw wilt selecteren,
het hoogste nummer bovenaan .
drukt u op de START-knop.
het gebruik van de rijstkom
●
De zoemer gaat af wanneer op de
●
Doe water en rijst in de rijstkom. Zet
START-knop is gedrukt of als de
de rijstkom in een mand. (U kunt ook
stoomkoker uitschakelt.
andere etenswaren in de andere
manden koken, als u dat wilt).
9

warmhoudfunctie
●
U kunt, net als bij een gewone oven,
De smaak en de voedingswaarde
voedsel toevoegen terwijl de
van gestoomde etenswaren zijn het
stoompan al bezig is. Als een
beste wanneer ze direct worden
bepaald ingrediënt een kortere
opgediend. Als u het eten echter
bereidingstijd heeft, kunt u het later
korte tijd wilt warm houden, kiest u
toevoegen.
WARM HOUDEN (KEEP WARM) op
●
Als u de deksel van de pan tilt, zal er
het menu en stelt u zo nodig de tijd
stoom ontsnappen en zal de
bij.
bereiding langer duren.
8 Trek na gebruik de stekker uit het
●
Het eten zal door blijven koken als
stopcontact en reinig de stoomkoker.
uw stoompan uitschakelt, dus haal
het direct uit de pan.
belangrijk
●
De bereidingstijden op pagina 12 —
Aan het eind van de kookperiode
13 zijn slechts richtlijnen gebaseerd
schakelt de stoomkoker
op gebruik van het onderste mandje.
automatisch over op 20 minuten
Hoe hoger het voedsel in de pan
warm houden. Omdat de
wordt geplaatst, hoe langer de
stoomkoker in deze periode
bereiding zal duren. Laat voedsel in
afwisselend aan- en uitgaat, moet u
het hogere mandje dus 5-10
oppassen omdat stoom kan worden
minuten extra doorstomen.
geproduceerd wanneer u dat niet
●
Als het voedsel onvoldoende is
verwacht.
gekookt, stel dan opnieuw de tijd in.
Als u de stoomkoker wilt
Mogelijk moet u het reservoir
uitschakelen of als u de
bijvullen.
warmhoudstand wilt annuleren,
de stoombuis gebruiken
houdt u de STOP-knop ingedrukt.
Gebruik de stoombuis wanneer u
tips voor gebruik
grote hoeveelheden van dezelfde
●
Er zal condensatie vanuit het
etenswaren, zoals fruit of groente
bovenste mandje in het onderste
tegelijkertijd wilt koken.
mandje druppen. Zorg er dus voor
1 Plaats gelijke hoeveelheden van
dat de smaken goed bij elkaar
dezelfde etenswaren in elke mand.
passen.
(Zo mogelijk moet het eten in stukjes
●
Vocht dat op het druppelplateau
van dezelfde grootte gesneden zijn).
achterblijft is geschikt voor het
2 Volg stappen 1 t/m 4 van ‘uw
bereiden van soep of bouillon. Let
stoomkoker gebruiken’.
op: dit vocht is erg heet.
3 Plaats de geassembleerde
●
U kunt de rijstkom ook gebruiken
onderplaat met nummer 1 in de
om gerechten in een vloeistof te
stoomkoker.
bereiden (bijv. groenten met een
4 Plaats de stoombuis rechtop in het
saus of in water gepocheerde vis).
midden van de onderste onderlaag.
●
Laat ruimte tussen de stukken
Plaats daarna geassembleerde
voedsel en leg dikkere stukken meer
onderlaag 2 over de stoombuis.
aan de buitenkant.
Wanneer u de stoombuis gebruikt,
●
Roer halverwege de bereiding door
moet de schijf worden verwijderd.
grotere hoeveelheden voedsel.
5 Plaats geassembleerde onderlaag 3
●
Kleinere hoeveelheden zijn sneller
daarbovenop.
klaar dan grotere hoeveelheden.
6 Zet het deksel op zijn plaats.
●
Stukken voedsel die even groot zijn
belangrijk
tegelijk klaar.
De stoombuis moet met de drie
manden tegelijkertijd worden
gebruikt.
10

onderhoud en reiniging
klantenservice
●
Voordat u de stoompan gaat
●
Als het snoer beschadigd is, moet
reinigen, moet u hem altijd
het om veiligheidsredenen vervangen
uitschakelen, de stekker uit het
worden door KENWOOD of een
stopcontact halen en alle onderdelen
erkende KENWOOD reparateur.
laten afkoelen.
Als u hulp nodig heeft met:
●
Dompel het onderstel van uw
●
het gebruik van uw stoompan, of
stoompan nooit in water en zorg dat
●
onderhoud of onderdelen
het snoer en de stekker niet nat
neem dan contact op met de winkel
worden.
waar u uw stoompan gekocht heeft.
reiniging van het
waterreservoir
●
Leeggieten, met warm water spoelen
en dan drogen.
reiniging van de buitenzijde
●
Met een vochtige doek afvegen en
dan drogen.
overige onderdelen
●
Afwassen en -drogen.
●
Was de onderdelen niet in de
vaatwasmachine.
●
Opslag: nestel de geassembleerde
manden in elkaar, te beginnen met
de mand met het hoogste nummer
en eindigend met mand nummer 1.
●
Berg het overbodige stuk snoer op
achter in de stoomkoker.
ontkalken
●
Als u de kalkaanslag verwijdert,
wordt de stoomkracht groter en gaat
uw stoomkoker langer mee.
1 Giet heldere azijn in het reservoir tot
‘Min’. Gebruik geen ontkalker.
2 Installeer de druiplade, de
geassembleerde manden en het
deksel.
3 Steek de stekker in het stopcontact
en stel de timer in op 20-25
minuten. Zorg voor goede ventilatie
in het vertrek. Trek de stekker uit het
stopcontact, als de azijn overloopt.
4 Haal de stekker uit het stopcontact
en wanneer de stoomkoker is
afgekoeld, giet u de azijn weg en
spoelt u het reservoir enkele malen
met water uit. Was de druiplade, de
mandringen, de onderplaten en het
deksel.
11

richtlijnen voor bereiding
●
Deze kooktijden zijn slechts richtlijnen, op basis van het gebruik van de laagste
mand.
●
Lees ‘veiligheid voedsel’ op pagina 8 en ‘tips voor gebruik’ op pagina 10.
groenten
●
Maak groenten schoon voordat u ze gaat bereiden. Verwijder stengels en schil
de groenten indien gewenst.
groente hoeveelheid voorbereiding minuten
Asperges 454g Schillen 15
Bonen, groen 454g Schillen 15-20
Pronkbonen 454g Schillen en in plakjes 15-20
snijden
Broccoli 454g In roosjes verdelen 20
Spruiten 454g Schillen en onderkant 25
afsnijden
Kool 1 kleine Schaven 25
Wortels 454g In plakjes snijden 20
Bloemkool 1 middelmaat In roosjes verdelen 25
Courgettes 454g In plakjes snijden 15
Selderij 1 stronk In plakjes snijden 15
Prei 3-4 stuks In plakjes snijden 15
Peultjes 227g Schillen 15
Champignons 454g Schoonvegen 10
Pastinaak 454g In blokjes of plakjes snijden 15
Erwten 454g Doppen 15
Aardappels, nieuwe 454g Schoonvegen 30
eieren voorbereiding minuten
Koken* of pocheren Gebruik een kopje of zacht: 10-12
bakje voor het pocheren hard: 15-20
* Wanneer u eieren kookt, legt u ze in de ingebouwde eierhouders in de
onderplaten.
12

richtlijnen voor bereiding vervolg
vis en gevogelte
●
Doe de mandjes niet te vol.
voedsel hoeveelheid minuten opmerkingen
Kip, borststukken 4-5 30 Stomen tot goed gaar en mals
zonder bot
Schelpdieren 454g 10 Stomen tot schelpen openen
Garnalen, 454g 10 Stomen tot ze roze zijn
medium
Vis, filet 227g 10 Stomen tot vis uiteenvalt
Vis, moot 2,5cm dik 15-20 Stomen tot vis uiteenvalt
Vis, hele 340g 15-20 Stomen tot vis uiteenvalt
Kreeftenstaartjes 2-4 20 Stomen tot ze rood zijn
Mosselen 454g 15 Stomen tot schelpen openen
Oesters 6 15 Stomen tot schelpen openen
Sint- 227g 15 Stomen tot ze heet en mals
Jakobsschelpen zijn
graanproducten
●
Als u gebruik maakt van de rijstkom, moet u toch water in het reservoir doen. U
kunt de rijstkom echter ook met een andere vloeistof vullen, bijvoorbeeld wijn of
bouillon, om de rijst in te koken. U kunt ook specerijen, gesnipperde uien,
peterselie, amandelen of gesneden champignons toevoegen.
voedsel hoeveelheid hoev. vloeistof minuten
in rijstkom
Witte langkorrelige 100g 125ml 25
rijst (bijv. Basmati, 200g 250ml 30
snelkookrijst) 300g 375ml 35
Bruine rijst 100g 125ml 40
200g 250ml 45
300g 375ml 50
Koeskoes 200g 150ml 15-20
warm water
(Havermout) pap 75g 450ml 40 (halverwege
melk/water doorroeren)
Rijstebrij 75g rijst voor 25g griessuiker 80 (na 60 min. roeren
rijsterbrij en 375-500ml en tijdschakelaar opnieuw
melk instellen. Indien nodig
meer water toevoegen)
13

Français
Avant de lire, dépliez la première page pour voir les illustrations
●
Si vous utilisez plus d’un panier,
sécurité
placez la viande, la volaille et le
sécurité de l’appareil
poisson dans le panier inférieur afin
●
Cet appareil produit de la vapeur qui
que les liquides non cuits ne
risque de vous brûler.
tombent pas sur les aliments placés
●
Lorsque vous soulevez le couvercle,
en-dessous.
faites attention à la vapeur qui
●
Ne réchauffez pas du riz cuit dans
s’échappe car vous pouvez vous
votre appareil de cuisson à la vapeur.
brûler.
avant de brancher l’appareil
●
Prenez soin d’utiliser des gants
●
Assurez-vous que le courant
lorsque vous utilisez l’appareil, car
électrique que vous utilisez est le
les liquides et la vapeur ou la
même que celui qui est indiqué sous
condensation sont très chauds.
votre appareil.
●
Conservez l’appareil hors de la
●
Cet appareil est conforme à la
portée des enfants et ne laissez
directive 89/336 de la C.E.
jamais le cordon pendre de telle
avant d’utiliser votre appareil
façon qu’un enfant puisse s’en saisir.
pour la première fois
●
N’utilisez jamais un appareil
1 Retirez tous les emballages et les
endommagé. Faites-le vérifier ou
étiquettes.
réparer: Reportez-vous à la section
2 Lavez les pièces : voir “entretien et
“Service après-vente”.
nettoyage”.
●
Ne jamais plonger l’appareil de
3 Essuyez le réservoir à eau avec un
cuisson à la vapeur, le cordon ou la
chiffon humide et séchez ensuite.
prise électrique dans de l’eau – vous
4 Poussez le reste du cordon
pourriez recevoir un choc électrique.
électrique à l’arrière de l’appareil.
Gardez les commandes propres et
sèches.
faites connaissance
●
Débranchez toujours votre appareil
de cuisson à la vapeur quand vous
avec votre appareil de
ne l’utilisez pas.
cuisson à la vapeur
●
Ne mettez jamais votre appareil sur
une plaque de cuisson ou à
Kenwood
l’intérieur d’un four.
햲 couvercle
●
Ne déplacez jamais votre appareil
햳 cocotte pour le riz
lorsqu’il contient des aliments
햴 plateaux amovibles
chauds.
햵 anneaux du panier
●
Ne laissez pas les enfants jouer avec
햶 tube vapeur
cet appareil.
햷 disque
●
Cet appareil a été conçu pour un
햸 égouttoir
usage domestique uniquement : ne
햹 réservoir à eau
l’utilisez pas autrement.
햺 entonnoir pour remplissage
sécurité des aliments
extérieur
●
La viande, le poisson et les fruits de
햻 base
mer doivent être cuits
햽 réglages
complètement. Ne cuisez jamais
햾 passoire
des aliments congelés.
14

4 Placez les plateaux amovibles en
utilisation de votre appareil
mettant leur bord supérieur dans les
de cuisson à la vapeur
anneaux du panier correspondant.
Les deux parties sont numérotées
●
Eloignez votre appareil des murs et
pour vous aider dans cette tâche.
des placards de cuisine, la vapeur
5 Placez le disque au milieu du plateau
pourrait les abîmer
n°2.
●
Salez votre nourriture après la
6 Ajoutez les aliments puis empilez les
cuisson. Si le sel entrait en contact
paniers sur la base, le panier ayant
avec l’élément électrique, il pourrait
le numéro le plus petit en dessous et
l’endommager
le panier ayant le numéro le plus
●
Reportez-vous aux guides de
élevé au-dessus.
cuisson en pages 18 — 19
1 Placez la passoire à l’intérieur du
utilisation de la cocotte pour
réservoir à eau (cela évite que les
le riz
●
particules ne pénètrent dans
Ajoutez l’eau et le riz dans la cocotte
l’élément).
pour le riz. Mettez la cocotte pour le
2 Versez de l’eau froide dans le
riz dans un panier (vous pouvez
réservoir. Assurez-vous toujours que
également cuire quelque chose dans
l’eau arrive entre les niveaux ‘Min’ et
les autres paniers si vous le
‘Max’ marqués. (Lorsque rempli
souhaitez).
jusqu’au niveau ‘Max’, de la vapeur
7 Ajustez le couvercle et branchez
sera produite pendant
l’appareil. L’écran s’allume
approximativement 60 minutes.)
entièrement et la sonnerie retentit (si
●
L’appareil de cuisson à la vapeur
l’affichage ne s’allume pas, appuyez
comporte une résistance avec
sur le bouton ‘DEMARRER’ (START)).
revêtement anti-tartre afin de
pour sélectionner à partir du
prolonger sa durée de vie et son
menu
efficacité. Cependant, en fonction de
Appuyez sur le bouton ‘MENU’ et à
la dureté de l’eau où vous habitez,
chaque fois que vous appuyez sur le
nous vous recommandons d’utiliser
bouton, le menu défile pour afficher
de l’eau filtrée (vous trouverez
un temps prédéfini et une
aisément les filtres à eau Kenwood).
suggestion d’utilisation. Les choix
●
N’ajoutez aucun condiment (ni sel
sont les suivants : — 10 minutes
ni poivre) à l’eau, cela pourrait
‘GARDER AU CHAUD’ (KEEP
endommager l’élément électrique.
WARM) puis, pour cuire les aliments
●
Pour éviter que le niveau d’eau ne
suivants, fruits de mer 10 minutes,
tombe en-dessous de ‘Min’, vous
oeufs 12 minutes, poisson 15
pouvez ajouter de l’eau en cours de
minutes, légumes 20 minutes,
cuisson. Versez tout simplement
portions de poulet 35 minutes et riz
celle- ci dans l’entonnoir de
40 minutes. Lorsque le temps
remplissage extérieur, en faisant bien
s’affiche sur le menu, il est parfois
attention de ne pas trop remplir le
nécessaire d’augmenter la durée ou
réservoir.
de la diminuer à l’aide des boutons
3 Posez l’égouttoir sur la base en vous
‘+’ et ‘-’. Lorsque que le temps
assurant que les poignées reposent
souhaité a été sélectionné, appuyez
sur les sillons de la base.
sur le bouton ‘DEMARRER’(START)
(I). Pour arrêter la cuisson à la
vapeur, appuyez sur le bouton
‘STOP’ (O) et maintenez-le enfoncé.
15

pour sélectionner un temps
être produite de façon inopinée.
de cuisson
Pour éteindre l’appareil de cuisson à
Pour sélectionner un temps de
la vapeur ou pour annuler la fonction
cuisson différent du temps affiché de
« garder au chaud », appuyez sur le
45 minutes, appuyez sur le bouton
bouton ‘STOP’ et maintenez-le
‘+’ ou ‘-’ afin d’augmenter ou de
enfoncé.
réduire la durée. Lorsque le temps
conseils
souhaité s’affiche, appuyez sur le
●
Des gouttes de condensation
bouton ‘DEMARRER’ (START) et
couleront du panier supérieur au
l’appareil de cuisson à la vapeur se
panier inférieur. Veillez à cuire des
mettra en marche et le symbole de
aliments avec des goûts compatibles.
cuisson clignotera. Pour arrêter la
●
Les liquides qui s’accumulent dans
cuisson à la vapeur, appuyez sur le
l’égouttoir sont excellents pour faire
bouton ‘STOP’ et maintenez-le
de la soupe ou du bouillon. Soyez
enfoncé.
prudent car ils sont très chauds.
●
Après 1 minute, si le temps/le menu
●
Vous pouvez aussi utiliser votre
s’affiche mais que le bouton
cocotte pour le riz pour pocher des
‘DEMARRER’ (START) n’a pas été
aliments (par exemple, des légumes
sélectionné, l’affichage s’éteindra.
en sauce ou du poisson poché).
Pour sélectionner à nouveau un
●
Espacez les aliments et placez les
programme, appuyez sur le bouton
plus gros morceaux vers l’extérieur.
‘DEMARRER’ (START).
●
Remuez les aliments à mi-cuisson
●
Une sonnerie retentit dès que vous
pour les grosses quantités.
appuyez sur le bouton ‘DEMARRER’
●
La cuisson est plus rapide si vous
(START) ou lorsque l’appareil de
avez peu d’aliments à cuire.
cuisson à la vapeur s’éteint.
●
Pour obtenir une cuisson uniforme,
choisissez des aliments de taille
pour garder les aliments
identique.
chauds
●
Comme dans un four traditionnel,
Les aliments cuits à la vapeur ont
vous pouvez ajouter des ingrédients
meilleur goût et ont une meilleure
au fur et à mesure. Si l’un des
valeur nutritionnelle lorsqu’ils
ingrédients nécessite une cuisson
viennent d’être cuits. Cependant, si
moindre, ajoutez-le plus tard.
vous souhaitez garder au chaud des
●
Si vous soulevez le couvercle, la
aliments pour une courte durée,
vapeur s’échappera et le temps de
sélectionnez la fonction ‘GARDER
cuisson sera alors plus long.
AU CHAUD’ (KEEP WARM) sur le
●
Les aliments continuent à cuire
menu et si nécessaire, ajustez le
quand l’appareil s’arrête, retirez-les
temps en conséquence.
immédiatement.
8 Débranchez et nettoyez l’appareil
●
Les temps de cuisson indiqués
après l’usage.
pages 18 — 19 sont une indication
important
basée sur l’utilisation du panier
Au terme du cycle de cuisson, votre
inférieur. Plus les éléments sont
appareil de cuisson à la vapeur
placés en hauteur, moins leur
passe automatiquement en
cuisson est rapide. Par conséquent,
fonction maintien au chaud pendant
ajoutez 5-10 minutes à la cuisson
20 minutes. Pendant cette période,
des aliments du panier
votre appareil de cuisson à la vapeur
immédiatement au-dessus. Vérifiez
se met en marche par intermittence ;
que les aliments sont bien cuits
par conséquent, la prudence est
avant de les manger.
recommandée car de la vapeur peut
16

●
Si vos aliments ne sont pas assez
●
Pour ranger les éléments, empilez
cuits, remettez le minuteur à zéro. Il
les paniers assemblés les uns dans
vous faudra peut-être ajouter de l’eau.
les autres, le panier portant le
numéro le plus élevé en bas et en
utilisation du tube vapeur
terminant par le panier portant le
Utilisez le tube vapeur lorsque vous
numéro 1.
souhaitez cuire de grandes quantités
●
Poussez le reste du cordon
du même aliment comme des fruits
électrique à l’arrière de l’appareil de
ou des légumes en même temps.
cuisson à la vapeur.
1 Mettez des quantités identiques du
même aliment dans chaque partie
le détartrage
(lorsque cela est possible, les
●
Le détartrage augmente la
aliments doivent être coupés en
puissance de la vapeur et aide à
morceaux de tailles égales).
augmenter la durée de vie de votre
2 Suivez les étapes 1 à 4 de la
appareil de cuisson à la vapeur.
rubrique ‘utilisation de votre appareil
1 Versez du vinaigre incolore dans le
de cuisson à la vapeur’.
réservoir jusqu’au niveau ‘Min’.
3 Placez le plateau assemblé marqué
N’utilisez pas de détartrant.
1 dans l’appareil de cuisson à la
2 Placez l’égouttoir, les paniers
vapeur.
assemblés et le couvercle.
4 Mettez le tube vapeur droit au milieu
3 Branchez et réglez la minuterie sur
du plateau inférieur et mettez le
20-25 minutes. Veillez à la bonne
plateau assemblé marqué 2 sur le
aération de la pièce. Débranchez si
tube vapeur. Lors de l’utilisation du
le vinaigre déborde.
tube vapeur, il est nécessaire
4 Débranchez l’appareil de cuisson à
d’enlever le disque.
la vapeur et lorsqu’il est froid, videz
5 Placez le plateau assemblé marqué
le vinaigre et rincez le réservoir
3 sur le dessus.
plusieurs fois à l’eau. Lavez
6 Mettez le couvercle en place.
l’égouttoir, les anneaux des paniers,
important
les plateaux et le couvercle.
Le tube vapeur doit être utilisé avec
la totalité des trois paniers.
service après-vente
●
Si le cordon est endommagé, il doit
entretien et nettoyage
être remplacé pour des raisons de
●
Eteignez, débranchez et laissez
sécurité par Kenwood ou par un
toujours votre appareil refroidir avant
réparateur agréé de Kenwood.
de le nettoyer.
Si vous avez besoin d’assistance
●
N’immergez jamais la base de votre
pour:
appareil dans de l’eau et ne mouillez
●
utiliser votre appareil
pas la prise.
●
entretenir ou faire réparer votre
nettoyage du réservoir à eau
appareil
●
Videz, rincez avec de l’eau tiède puis
contactez le magasin où vous avez
séchez.
acheté votre appareil.
nettoyage de l’extérieur
●
Essuyez avec un chiffon humide,
puis séchez.
les autres parties
●
Lavez puis séchez.
●
Ne passez aucune pièce au lave-
vaisselle.
17
Оглавление
Аннотации для Пароварки Kenwood FS560 в формате PDF
Топ 10 инструкций
Другие инструкции

Меры безопасности
Пароварка
●
Это устройство вырабатывает
пар, который может привести к
ожогам.
●
Остерегайтесь ожогов
выходящим паром, в особенности
в момент удаления крышки.
●
При работе с пароваркой
соблюдайте осторожность: все
жидкости, детали кипятильника и
конденсат нагреты до очень
высокой температуры.
Пользуйтесь кухонными
перчатками.
●
Не разрешайте маленьким детям
подходить близко к
электроприбору и не допускайте
свешивания шнура в тех местах,
где до него может дотянуться
ребенок.
●
Никогда не пользуйтесь
неисправной пароваркой.
Осмотрите или отремонтируйте
ее: см. раздел «Обслуживание и
уход».
●
Во избежание поражения
электрическим током
запрещается погружать в воду
пароварку, сетевой шнур или
вилку. Держите панель
управления чистой и сухой.
●
Если пароварка не используется,
отключите ее от сети питания.
●
Никогда не ставьте пароварку на
плиту или в духовку.
●
Никогда не передвигайте
пароварку, содержащую горячую
пищу.
●
Не позволяйте детям играть с
прибором.
●
этот прибор предназначен только
для бытового применения.
Пища
●
Готовьте мясо, рыбу и морские
продукты до полной готовности.
Всегда используйте только
размороженные продукты.
●
Если Вы пользуетесь
одновременно несколькими
корзинами, кладите мясо, птицу
или рыбу в нижнюю корзину,
чтобы сырой сок не стекал на
продукты внизу.
●
Не подогревайте в пароварке
приготовленный рис.
Перед включением в сеть
●
Убедитесь в том, что ваш
источник тока соответствует
требованиям, приведенным на
нижней стороне пароварки.
●
Эта пароварка соответствует
Требованиям Европейского
Экономического Сообщества
89/336/ЕЕС.
Перед первоначальным
использованием
1 Удалите упаковку и любые
наклейки.
2 Вымойте детали пароварки: см.
«Уход и очистка
3 Протрите бачок для воды
влажной, а затем сухой тканью.
4 Уберите лишний электрошнур в
задний отсек пароварки.
Познакомьтесь с
пароваркой Kenwood
ቢ крышка
ባ чаша для варки риса
ቤ съемные лотки
ብ кольца корзины
ቦ трубка для подачи пара
ቧ диск
ቨ лоток для сбора капель
ቩ резервуар для воды
ቪ наружная заливная воронка
ቫ основание
ቭ органы управления
ቮ сетчатый фильтр
Как пользоваться
пароваркой
●
Не устанавливайте пароварку
вблизи стен и навесных
шкафчиков: пар может их
повредить.
●
Приправляйте еду после ее
приготовления. Если приправа
попадет в воду, она может
93
Русский
См. иллюстра ии на передней страни е
Kenwood FS560
Kenwood Limited, New Lane, Havant, Hampshire PO9 2NH, UK
www.kenwood.co.uk
56020/1
View the manual for the Kenwood FS560 here, for free. This manual comes under the category rice cookers and has been rated by 1 people with an average of a 5.2.
This manual is available in the following languages: English. Do you have a question about the Kenwood FS560 or do you need help?
Ask your question here
Product Images (3)

Kenwood FS560 specifications
Below you will find the product specifications and the manual specifications of the Kenwood FS560.
The Kenwood FS560 rice cooker is a kitchen appliance that operates at a power of 900 watts. With a weight of 2690 grams, it is designed to be relatively lightweight and easily portable.
This rice cooker comes equipped with various features to facilitate the cooking process. It includes a non-stick inner pot for convenient cleaning and maintenance. The inner pot has a capacity suitable for cooking a moderate amount of rice. Additionally, the cooker has a transparent glass lid, allowing users to monitor the cooking progress without interrupting the process.
The appliance is designed with simplicity in mind, featuring an easy-to-use control panel with clear buttons for different settings. It offers options for cooking a variety of grains, including white rice, brown rice, and even porridge. The rice cooker also includes a keep-warm function, which automatically switches on at the end of the cooking process to ensure the rice stays warm and ready to serve.
The Kenwood FS560 rice cooker upholds a high standard of safety. It incorporates a thermal fuse to prevent overheating and potential damage. Its compact size and lightweight design make it suitable for small kitchens or for those who require portability in their kitchen appliances.
Overall, the Kenwood FS560 rice cooker is a reliable and versatile kitchen appliance, providing a convenient and efficient way to cook rice and other grains. With its robust construction and user-friendly features, it offers durability and ease of use for a variety of cooking needs.
General
| Brand | Kenwood |
| Model | FS560 | 0WFS560002 |
| Product | rice cooker |
| EAN | 3610480095617 |
| Language | English |
| Filetype | User manual (PDF) |
Power
Features
Weight & dimensions
show more
Frequently Asked Questions
Can’t find the answer to your question in the manual? You may find the answer to your question in the FAQs about the Kenwood FS560 below.
Does the Kenwood FS560 have a high power output?
The Kenwood FS560 has a power output of 900 W, which is considered to be high compared to other rice cookers. This means that it can cook rice faster and more efficiently than models with lower power ratings.
How do I properly unfold the Kenwood FS560 rice cooker?
To properly unfold the Kenwood FS560 rice cooker, follow these steps:
1. Fit the strainer inside the water tank to prevent particles from getting into the heating element.
2. Pour cold water into the tank, ensuring that the water level is between the «Min» and «Max» marks. If necessary, top up the water level during cooking using the exterior fill funnel.
3. Sit the drip tray onto the base, making sure the handles fit over the grooves in the base.
4. Fit the removable trays, with the rim uppermost, into their corresponding basket rings. Both parts are numbered to assist with this.
5. Place the disc in the center of tray 2.
6. Add the food to be steamed and stack the baskets on the base, starting with the lowest numbered basket at the bottom and the highest number at the top.
7. If using the rice bowl, put water and rice in the rice bowl and place it into a basket.
8. Fit the lid securely onto the rice cooker.
9. Plug in the rice cooker, and the display will illuminate, and the buzzer may sound.
10. To unfold the Kenwood FS560 rice cooker, simply follow these steps in the reverse order when you are finished using it.
By following these steps, you can properly unfold and set up the Kenwood FS560 rice cooker for use.
What should I do if I accidentally touch the hot steam while using the rice cooker?
If you accidentally touch the hot steam while using the Kenwood FS560 rice cooker, follow these steps:
1. Immediately remove your hand from the steam to prevent further injury.
2. Run the affected area under cool running water for several minutes to help soothe the burn and reduce pain.
3. If the burn is severe or covers a large area, seek medical attention.
4. Do not apply ice, butter, or any ointments to the burn as it may worsen the injury.
5. Cover the burn with a clean, non-stick dressing or a sterile gauze pad to protect it from infection.
6. Take over-the-counter pain relievers, such as ibuprofen or acetaminophen, if necessary, to alleviate pain.
7. Monitor the burn for any signs of infection, such as increased redness, swelling, or pus.
8. If signs of infection develop, consult a healthcare professional.
9. Be cautious and avoid touching the hot steam in the future by using oven mitts or tongs when handling the rice cooker.
By following these steps, you can effectively address and treat a burn caused by accidentally touching the hot steam while using the Kenwood FS560 rice cooker.
Can I use the Kenwood FS560 rice cooker to cook meat, fish, and seafood?
Yes, you can use the Kenwood FS560 rice cooker to cook meat, fish, and seafood. Here are the steps to do so:
1. Fit the strainer inside the water tank to prevent particles from getting into the heating element.
2. Pour cold water into the tank, ensuring that the water level is between the «Min» and «Max» marks.
3. Sit the drip tray onto the base, making sure the handles fit over the grooves in the base.
4. Fit the removable trays, with the rim uppermost, into their corresponding basket rings.
5. Place the disc in the center of tray 2.
6. Add the meat, fish, or seafood to be steamed.
7. Stack the baskets on the base, starting with the lowest numbered basket at the bottom and the highest number at the top.
8. Fit the lid securely onto the rice cooker.
9. Plug in the rice cooker, and the display will illuminate.
10. Select the desired cooking time for the meat, fish, or seafood using the menu options or by adjusting the time manually.
11. Press the «START» button to begin the steaming process.
12. Once the cooking time is complete, carefully remove the cooked meat, fish, or seafood from the rice cooker.
By following these steps, you can use the Kenwood FS560 rice cooker to cook meat, fish, and seafood to perfection.
What should I check if the rice cooker is not turning on after plugging it in?
If the Kenwood FS560 rice cooker is not turning on after plugging it in, you should check the following:
1. Ensure that the electricity supply matches the requirements specified on the underside of the rice cooker. In the UK, the wires in the cord are colored as follows: Green and Yellow = Earth, Blue = Neutral, Brown = Live. The appliance must be protected by a 13A approved (BS1362) fuse.
2. Make sure that the power cord is securely plugged into a functioning power outlet.
3. Verify that the power outlet is working by testing it with another device.
4. Check if the rice cooker’s display is illuminated. If not, press the «START» button to see if the display turns on.
5. If the display fails to illuminate, it may indicate a potential issue with the rice cooker. In such cases, it is recommended to contact Kenwood’s authorized repair service for further assistance.
By following these steps, you can troubleshoot and identify possible reasons why the Kenwood FS560 rice cooker is not turning on after being plugged in.
What steps should I follow to prepare the Kenwood FS560 rice cooker for first-time use?
To prepare the Kenwood FS560 rice cooker for first-time use, follow these steps:
1. Remove all packaging materials and labels from the rice cooker.
2. Wash the inner pot, steaming trays, and accessories with warm soapy water. Rinse them thoroughly and dry them completely.
3. Wipe the exterior of the rice cooker with a damp cloth to remove any dust or residue.
4. Place the rice cooker on a stable and heat-resistant surface, away from any flammable materials.
5. Ensure that the power cord is not tangled or damaged.
6. Organize the power cord neatly and securely, using the cord storage at the back of the rice cooker.
7. Before plugging in the rice cooker, check the electricity supply and ensure that it matches the requirements specified on the underside of the rice cooker.
8. Once everything is in place, plug the rice cooker into a functioning power outlet.
9. The rice cooker is now ready for use. Follow the specific instructions for cooking rice or other food items as outlined in the manual.
By following these steps, you can properly prepare the Kenwood FS560 rice cooker for its first-time use.
What is the weight of the Kenwood FS560?
The Kenwood FS560 has a weight of 2690 g.
Is the manual of the Kenwood FS560 available in English?
Yes, the manual of the Kenwood FS560 is available in English .
Is your question not listed? Ask your question here
Перейти к контенту
Пароварки Kenwood
- Размер инструкции: 661.46 kB
- Формат файла: pdf
Если вы потеряли инструкцию от пароварки Kenwood FS560, можете скачать файл для просмотра на компьютере или печати.
Инструкция для пароварки Kenwood FS560 на русском языке. В руководстве описаны возможности и полезные функции, а также правила эксплуатации. Перед использованием внимательно ознакомьтесь с инструкцией.
Чтобы не читать всю инструкцию вы можете выполнить поиск по содержимому внутри инструкции и быстро найти необходимую информацию. Рекомендации по использованию помогут увеличить срок службы пароварки Kenwood FS560. Если у вас появилась проблема, то найдите раздел с описанием неисправностей и способами их решения. В нем указаны типичные поломки и способы их решения.
Хорошее руководство по эксплуатации
Законодательство обязывает продавца передать покупателю, вместе с товаром, руководство по эксплуатации Kenwood FS560. Отсутствие инструкции либо неправильная информация, переданная потребителю, составляют основание для рекламации в связи с несоответствием устройства с договором. В законодательстве допускается предоставлении руководства в другой, чем бумажная форме, что, в последнее время, часто используется, предоставляя графическую или электронную форму инструкции Kenwood FS560 или обучающее видео для пользователей. Условием остается четкая и понятная форма.
Что такое руководство?
Слово происходит от латинского «instructio», тоесть привести в порядок. Следовательно в инструкции Kenwood FS560 можно найти описание этапов поведения. Цель инструкции заключается в облегчении запуска, использования оборудования либо выполнения определенной деятельности. Инструкция является набором информации о предмете/услуге, подсказкой.
К сожалению немного пользователей находит время для чтения инструкций Kenwood FS560, и хорошая инструкция позволяет не только узнать ряд дополнительных функций приобретенного устройства, но и позволяет избежать возникновения большинства поломок.
Из чего должно состоять идеальное руководство по эксплуатации?
Прежде всего в инструкции Kenwood FS560 должна находится:
— информация относительно технических данных устройства Kenwood FS560
— название производителя и год производства оборудования Kenwood FS560
— правила обслуживания, настройки и ухода за оборудованием Kenwood FS560
— знаки безопасности и сертификаты, подтверждающие соответствие стандартам
Почему мы не читаем инструкций?
Как правило из-за нехватки времени и уверенности в отдельных функциональностях приобретенных устройств. К сожалению само подсоединение и запуск Kenwood FS560 это слишком мало. Инструкция заключает ряд отдельных указаний, касающихся функциональности, принципов безопасности, способов ухода (даже то, какие средства стоит использовать), возможных поломок Kenwood FS560 и способов решения проблем, возникающих во время использования. И наконец то, в инструкции можно найти адресные данные сайта Kenwood, в случае отсутствия эффективности предлагаемых решений. Сейчас очень большой популярностью пользуются инструкции в форме интересных анимаций или видео материалов, которое лучше, чем брошюра воспринимаются пользователем. Такой вид инструкции позволяет пользователю просмотреть весь фильм, не пропуская спецификацию и сложные технические описания Kenwood FS560, как это часто бывает в случае бумажной версии.
Почему стоит читать инструкции?
Прежде всего здесь мы найдем ответы касательно конструкции, возможностей устройства Kenwood FS560, использования отдельных аксессуаров и ряд информации, позволяющей вполне использовать все функции и упрощения.
После удачной покупки оборудования/устройства стоит посвятить несколько минут для ознакомления с каждой частью инструкции Kenwood FS560. Сейчас их старательно готовят или переводят, чтобы они были не только понятными для пользователя, но и чтобы выполняли свою основную информационно-поддерживающую функцию.