
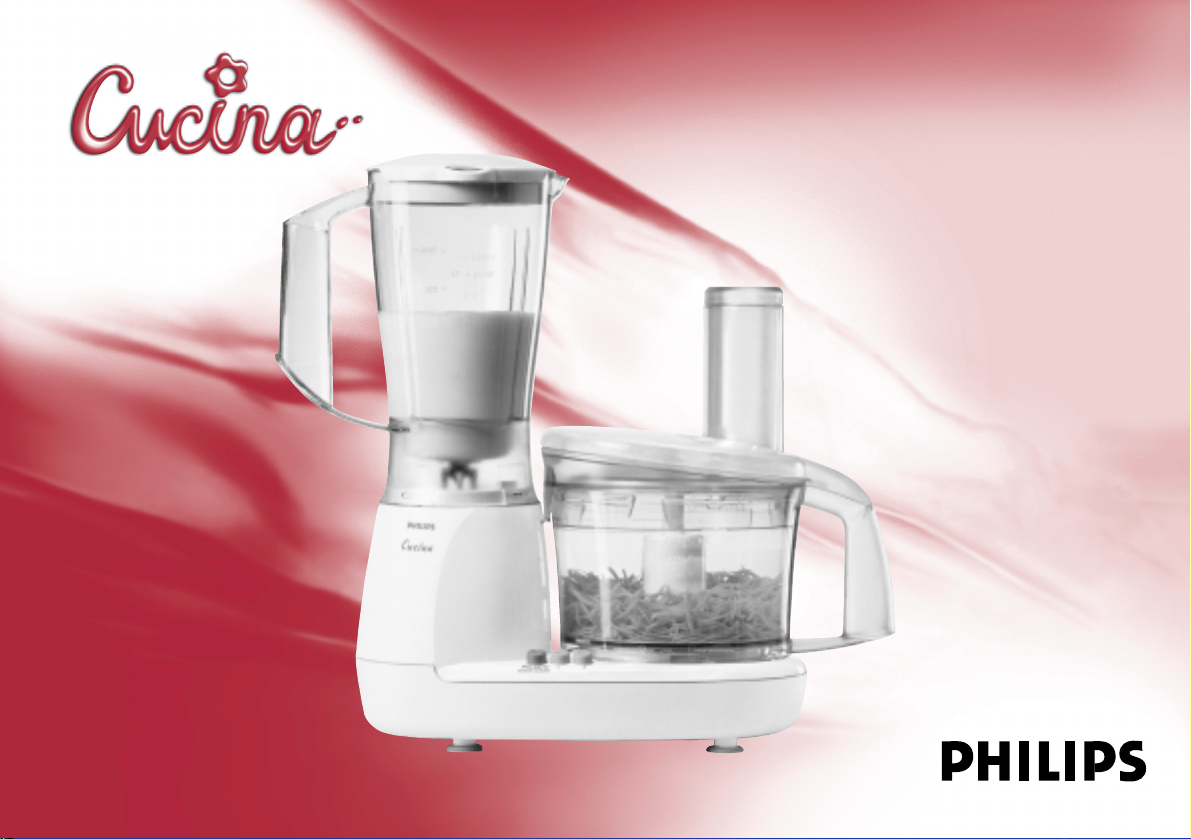
View the manual for the Philips Cucina 3 in 1 HD2430 here, for free. This user manual comes under the category fondues, gourmets & woks and has been rated by 1 people with an average of a 6.3. This manual is available in the following languages: English. Do you have a question about the Philips Cucina 3 in 1 HD2430?
Ask your question here
Frequently asked questions
Can’t find the answer to your question in the manual? You may find the answer to your question in the FAQs about the Philips Cucina 3 in 1 HD2430 below.
Is the manual of the Philips Cucina 3 in 1 HD2430 available in English?
Yes, the manual of the Philips Cucina 3 in 1 HD2430 is available in English .
Is your question not listed? Ask your question here
Report abuse
Libble takes abuse of its services very seriously. We’re committed to dealing with such abuse according to the laws in your country of residence. When you submit a report, we’ll investigate it and take the appropriate action. We’ll get back to you only if we require additional details or have more information to share.
Product:
Forumrules
To achieve meaningful questions, we apply the following rules:
- First, read the manual;
- Check if your question has been asked previously;
- Try to ask your question as clearly as possible;
- Did you already try to solve the problem? Please mention this;
- Is your problem solved by a visitor then let him/her know in this forum;
- To give a response to a question or answer, do not use this form but click on the button ‘reply to this question’;
- Your question will be posted here and emailed to our subscribers. Therefore, avoid filling in personal details.
Register
Register getting emails for Philips hd 2430 cucina 3 in 1 at:
- new questions and answers
- new manuals
You will receive an email to register for one or both of the options.
Get your user manual by e-mail
Enter your email address to receive the manual of Philips hd 2430 cucina 3 in 1 in the language / languages: English, German, Dutch, Danish, French, Italian, Portuguese, Swedish, Turkish, Spanish, Norwegian, Finnish as an attachment in your email.
The manual is 2,75 mb in size.
You will receive the manual in your email within minutes. If you have not received an email, then probably have entered the wrong email address or your mailbox is too full. In addition, it may be that your ISP may have a maximum size for emails to receive.
The manual is sent by email. Check your email
If you have not received an email with the manual within fifteen minutes, it may be that you have a entered a wrong email address or that your ISP has set a maximum size to receive email that is smaller than the size of the manual.
The email address you have provided is not correct.
Please check the email address and correct it.
Your question is posted on this page
Would you like to receive an email when new answers and questions are posted? Please enter your email address.
HR7638
Recipes & Directions for use
Rezepte & Gebrauchanweisung
Recettes & Mode d’emploi.
Recepten & Gebruiksaanwijzing
Recetas & Instrucciones de Uso
Ricette & Istruzioni per l’uso
Receitas & Modo de Emprego
Yemek tarifleri ve kullanma
talimatları

A
B
C
D
E
F
G
H
I
J
K
L
M
N
O
P
Q
R
S
T
U


ENGLISH 6
DEUTSCH 21
FRANÇAIS 37
NEDERLANDS 52
ESPAÑOL 68
ITALIANO 84
PORTUGUÊS 99
TÜRKÇE 114
HR7638
5

ENGLISH6
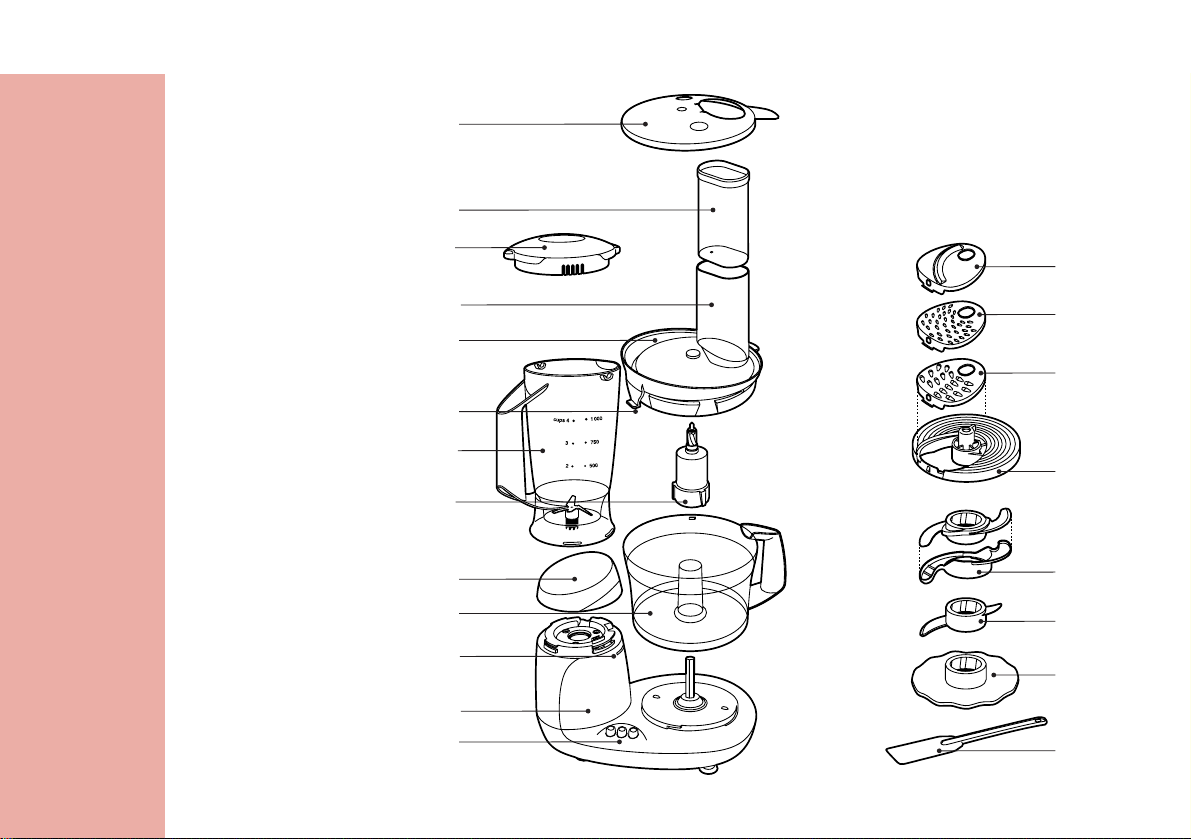
Food processor: parts and accessories
A Speed control
B Motor unit
C Built-in saftely lock
D Bowl
E Screw cap (for closing the blender fixing hole
when the blender is not in use)
F Tool holder
G Blender jar
H Peg of lid (activates and deactivates the safety
switch)
I Lif of bowl
J Feed tube
K Pusher
L Lid of blender jar
M Cover with closable insert storage space
N Slicing insert medium
O Slicing insert fime
P Shredding insert medium
Q Insert holder
R Blade (with protective cover)
S Kneading accessory
T Emulsifying disc
U Spatula
Introduction
This appliance has been equipped with an
automatic thermal cut-off system. This system will
automatically cut off the power supply to the
appliance in case of overheating.
If your appliance suddenly stops
running:
1 Pull the mains plug out of the wall socket.
2 Press the ‘PULSE / 0’ button to switch the
appliance off.
3 Let the appliance cool down for
60 minutes.
4 Put the mains plug in the wall socket.
5 Switch the appliance on again.
Please contact your Philips dealer or authorised
Philips service centre if the automatic thermal cutout system is activated too often.
CAUTION: In order to avoid a hazardous
situation, this appliance must never be connected
to a timer switch.
Important
◗ Read the instructions for use carefully and
look at the illustrations before using the
appliance.
◗ Keep these instructions for use for future
reference.
◗ Check if the voltage indicated on the
appliance corresponds to the local mains
voltage (110-127V or 220-240V) before you
connect the appliance.

ENGLISH 7
◗ Never use any accessories or parts from
other manufacturers or that have not been
specifically advised by Philips. Your guarantee
will become invalid if such accessories or
parts have been used.
◗ Do not use the appliance if the mains cord,
the plug or other parts are damaged.
◗ If the mains cord is damaged, it must be
replaced by Philips, a service centre
authorised by Philips or similarly qualified
persons in order to avoid a hazard.
◗ Thoroughly clean the parts that will come
into contact with food before you use the
appliance for the first time.
◗ Do not exceed the quantities and preparation
times indicated in the tables and recipes.
◗ Do not exceed the maximum content
indicated on the bowl or the blender jar, i.e.
do not fill beyond the top graduation.
◗ Unplug the appliance immediately after use.
◗ Never use your fingers or an object (e.g. a
spatula) to push ingredients down the feed
tube while the appliance is running. Only the
pusher is to be used for this purpose.
◗ Always unplug the appliance before reaching
into the blender jar with your fingers or an
object (e.g. a spatula).
◗ Keep the appliance out of the reach of
children.
◗ Never let the appliance run unattended.
◗ Never switch the appliance off by turning the
lid. Always switch the appliance off by
pressing the PULSE / 0 button.
◗ Switch the appliance off before detaching any
accessory.
◗ Never immerse the motor unit in water or
any other fluid, nor rinse it under the tap. Use
only a moist cloth to clean the motor unit.
◗ When you mount the blender jar, the bowl
and the screw cap in the proper way, you will
hear a click.
◗ The emulsifying disc, the blade and the
kneading accessory have to be placed on the
toolholder that stands in the bowl.
◗ Remove the protective cover from the blade
before use.
◗ Avoid touching the SHARP cutting edges of
the blades and inserts, especially when the
appliance is plugged in.
◗ If one of the blades get stuck, unplug the
appliance before removing the ingredients
that are blocking the blades.
◗ Let hot ingredients cool down before
processing them (max. temperature
80cC/175cF).
◗ If you are processing a liquid that tends to
foam, do not put more than 1 litre into the
blender jar to avoid spillage.
Note that if both the blender and the bowl have
been correctly mounted, only the blender will
function.
ENGLISH8
Using the appliance
Bowl
◗ If you want to use the bowl, remove the
blender jar and close the fixing hole with the
screw cap. All functions that require the use
of the bowl will only work if the blender jar
has been removed.
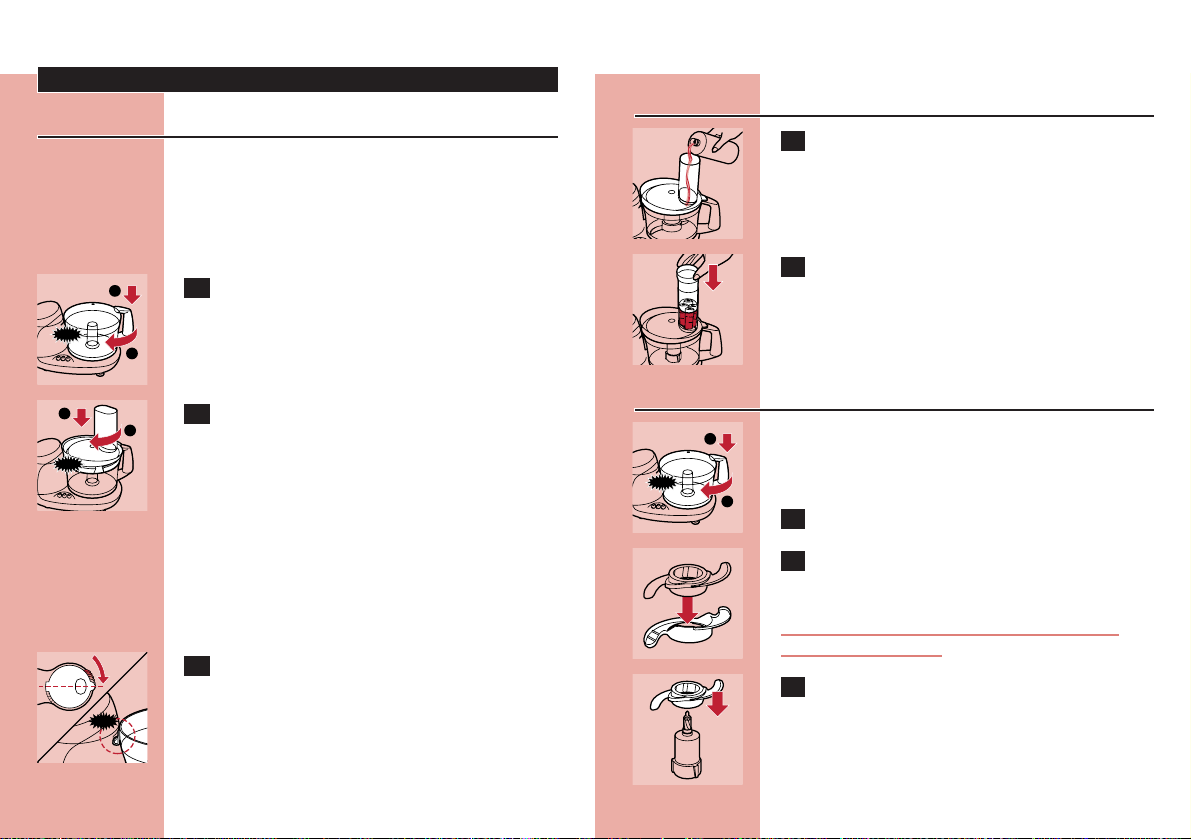
C
1 Mount the bowl on the food processor by
turning the handle in the direction of the
arrow until you hear a click.
C
2 Put the lid on the bowl. Turn the lid in the
direction of the arrow until you hear a
click (this requires some force).
Built-in safety lock
B
The motor unit as well as the lid have been
provided with marks. The appliance will only
function if the arrow on the motor unit is placed
directly opposite the mark on the lid.
C
1 Make sure that the mark on the lid and
the arrow on the bowl are directly
opposite each other. The projection of the
lid will now cover the opening of the
handle.
CLICK
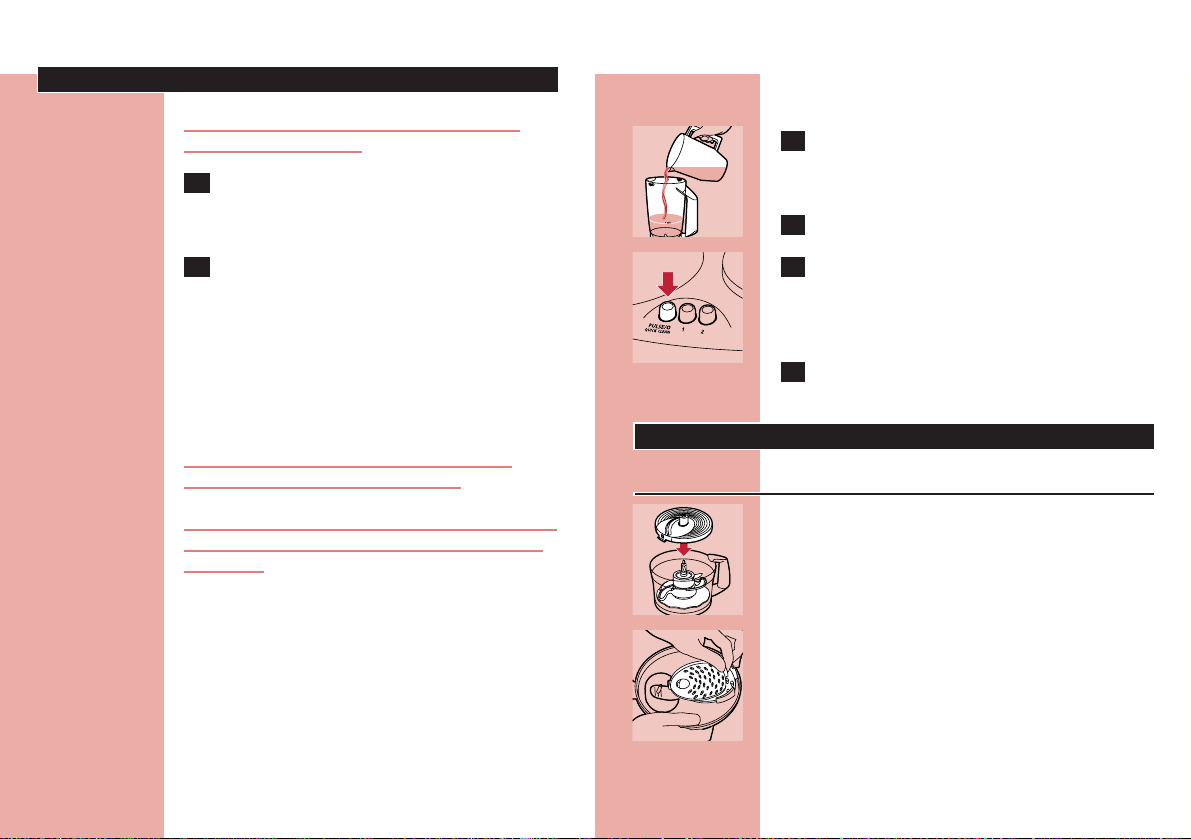
Feed tube and pusher
C
1 Use the feed tube to add liquid and/or
solid ingredients. Use the pusher to push
solid ingredients down the feed tube.
C
2 You can also use the pusher to close the
feed tube in order to prevent ingredients
from escaping down the feed tube.
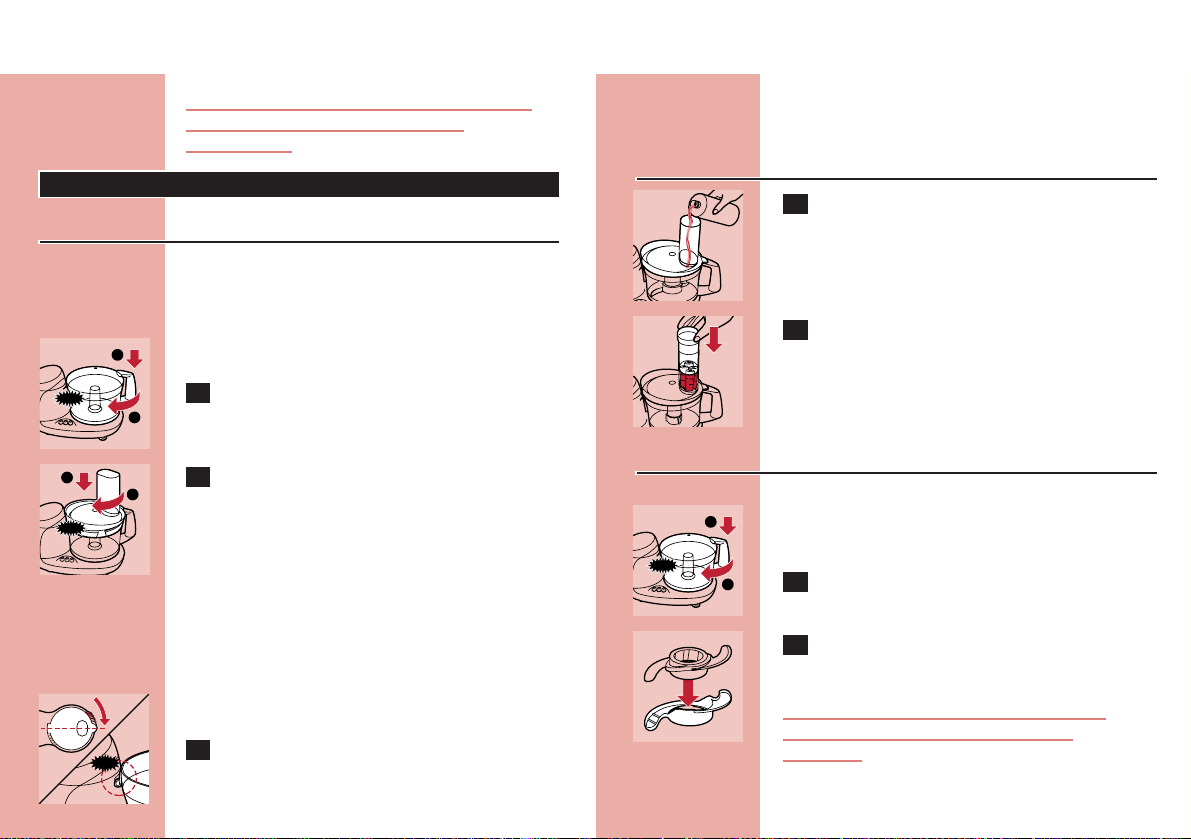
Blade
◗ The blade can be used for chopping, mixing,
blending, pureeing and preparing cake
mixtures.
C
1 Put the bowl on the motor unit.
C
2 Remove the protective cover from the
blade.
The cutting edges of the blade are very sharp
Avoid touching them!
C
3 Put the blade on the tool holder.
1
2
CLICK
1
2
CLICK
1
2
CLICK

ENGLISH 9
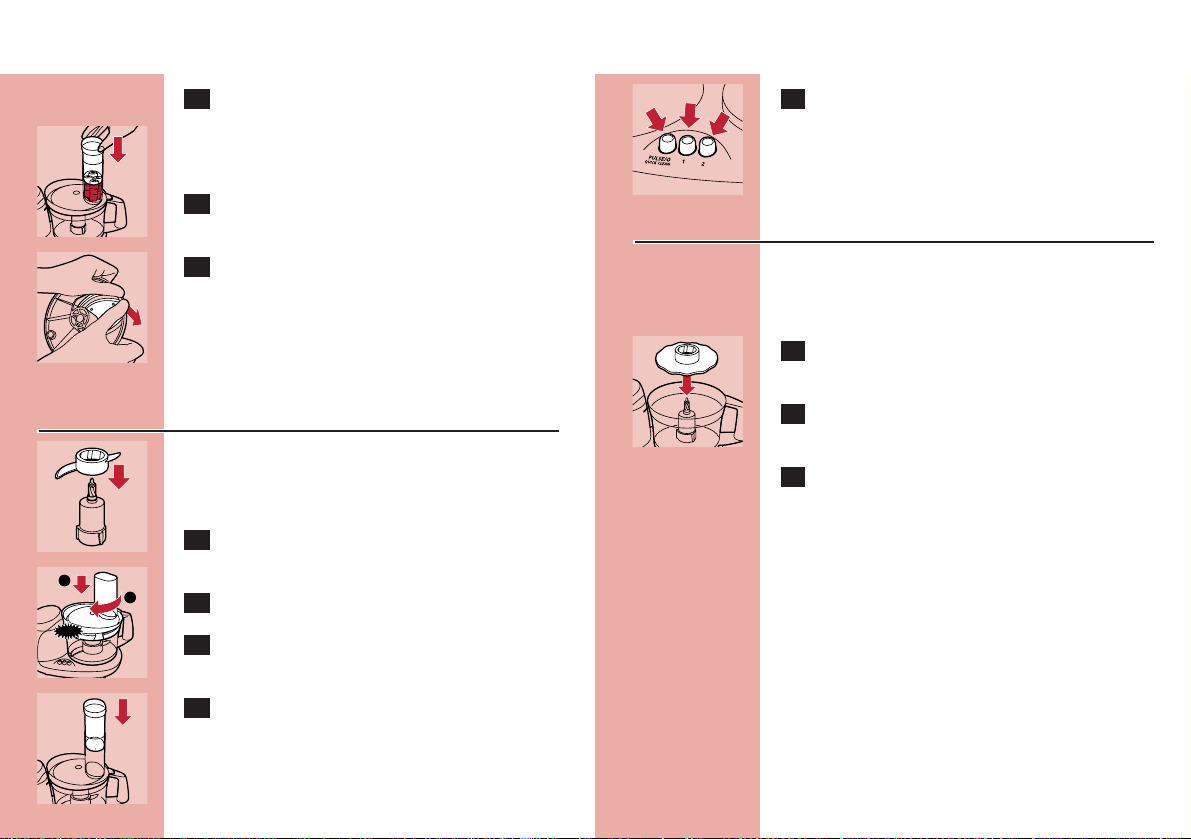
C
4 Put the tool holder in the bowl.
5 Put the ingredients in the bowl. Pre-cut
large pieces of food into pieces of approx.
3 x 3 cm. Put the lid on the bowl.
C
6 The buttons allow you to adjust the speed
of the appliance to obtain optimal results.
B
‘PULSE / 0’ button: for pulse operation and for
turning the appliance off. If the PULSE / 0 button
is pressed the appliance runs at the highest
speed. The appliance stops running when the
button is released.
B
button 1: for normal speed.
B
button 2: for high speed.
See the table for the recommended speeds.
Processing takes 10 — 60 seconds.
Tips
◗ The appliance chops very quickly. Use the
pulse function for short periods at a time to
prevent the food from becoming too finely
chopped.
◗ Do not let the appliance run too long when
you are chopping (hard) cheese. The cheese
will become too hot, will start to melt and
will turn lumpy.
◗ Do not use the blade to chop very hard
ingredients like coffee beans, nutmeg and ice
cubes. The blade might get blunt.
If food sticks to the blade or to the inside of the
bowl:
1 Switch the appliance off.
2 Remove the lid from the bowl.
3 Remove the ingredients with the spatula.
Inserts
The cutting edges of the inserts are very sharp
Do not touch them!
Do not process hard ingredients, such as ice
cubes, with the inserts!
C
1 Put the selected insert in the insert holder.
C
2 Place the insert holder onto the tool
holder that stands in the bowl.
3 Put the lid on the bowl.
C
4 Put the ingredients in the feed tube. Pre-
cut large chunks to make them fit into the
feed tube.
5 Fill the feed tube evenly for the best
results.
When you have to cut large amounts of food,
process only small batches at a time and empty
the bowl regularly between the batches.
1
CLICK
2
ENGLISH10
3 Select the appropriate speed to obtain
optimal results. See the table for the
recommended speed.
Processing takes 10-60 seconds.
C
4 Press the ingredients slowly and steadily
down the feed tube with the pusher.
C
5 To remove the insert from the insert
holder, take the insert holder in your
hands with its bottom pointing towards
you. Push the edges of the insert with
your thumbs to make the insert fall out of
the holder.
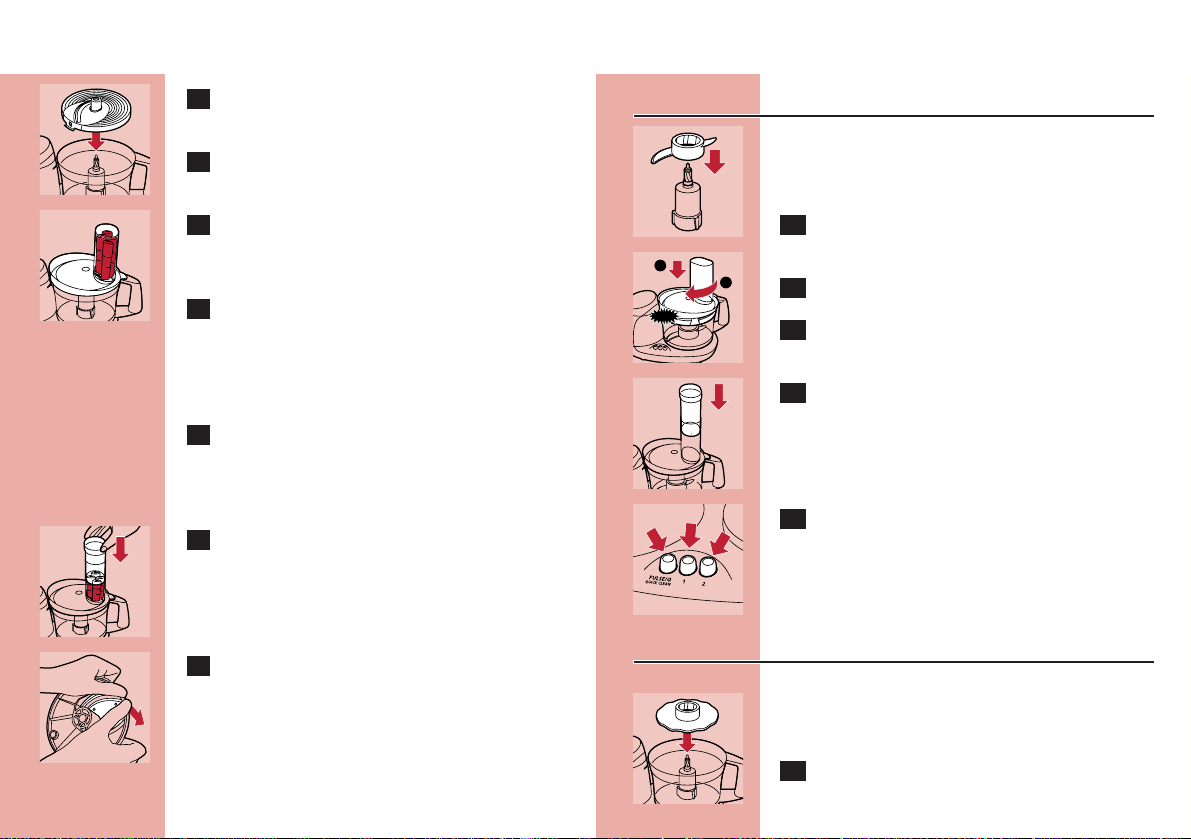
Kneading accessory
The kneading accessory can be used for kneading
dough for bread and dumplings and for mixing
batters and cake mixtures.
C
6 Fit the kneading accessory onto the tool
holder.
7 Put the ingredients in the bowl.
C
8 Close the bowl with the lid.
C
9 Close the feed tube by placing the pusher
in it.
C
10 Select the appropriate speed to obtain
optimal results. See the table for the
recommended speed.
Emulsifying disc
You can use the emulsifying disc to prepare
mayonnaise, to whip cream and to whisk egg
whites.
C
11 Put the emulsifying disc onto the tool
holder that stands in the bowl.
12 Put the ingredients in the bowl and put
the lid on the bowl.
13 Select the appropriate speed to obtain
optimal results. See the table for the
recommended speed.
Tips
◗ When you want to whisk egg whites, make
sure the eggs are at room temperature.
Take the eggs out of the refrigerator at least half
an hour before you are going to use them.
◗ All the ingredients for making mayonnaise
must be at room temperature.
Oil can be added through the small hole in the
bottom of the pusher.
CLICK
1
2

ENGLISH 11
◗ If you are going to whip cream, the cream
must be taken straight from the refrigerator.
Please observe the preparation time in the
table. Cream should not be whipped too long.
Use the pulse function to have more control over
the process.
Blender
The blender is intended for:
— Blending fluids, e.g. dairy products, sauces, fruit
juices, soups, mixed drinks, shakes.
— Mixing soft ingredients, e.g. pancake batter or
mayonnaise.
— Pureeing cooked ingredients, e.g. for making
baby food.
C
14 Remove the screw cap.
C
15 Mount the blender jar in the fixing hole by
turning it in the direction of the arrow
until it is firmly fixed.
Do not exert too much pressure on the handle
of the blender jar.
C
16 Put the ingredients in the blender jar.
17 Screw the lid onto the blender jar.
18 Switch the appliance on and blend the
ingredients. The buttons allow you to
adjust the speed of the appliance to obtain
optimal results. See the table for the
recommended speed.
Tips
C
◗ Pour liquid ingredients into the blender jar
through the hole in the lid.
◗ The longer you let the appliance run, the finer
the blending result will be.
◗ Pre-cut solid ingredients into smaller pieces
before putting them into the blender. If you
want to prepare a large quantity, process
small batches of ingredients instead of trying
to process a large quantity at once.
◗ If you have doubts about the right speed,
always choose the highest speed (button 2).
If ingredients stick to the wall of the blender jar:
1 Switch the appliance off and unplug it.
2 Remove the lid.
Never remove the lid while the appliance is still
running.
3 Use a spatula to remove the ingredients
from the wall of the jar.
Keep the spatula at a safe distance from the
cutting edges of the blade unit (approx. 2 cm).
1
CLICK
2
1
2
1
2
ENGLISH12
Cleaning
Always unplug the appliance before you start
cleaning the motor unit.
1 Clean the motor unit with a damp cloth.
Do not immerse the motor unit in water
and do not rinse it either.
2 Always clean the parts that have come
into contact with food in hot water with
washing-up liquid immediately after use.
◗ The bowl, the lid of the bowl, the pusher and
the accessories can also be washed in a
dishwasher.
These parts have been tested for dishwasher
resistance according to DIN EN 12875.
The cover with insert storage space and the
blender jar are not dishwasher proof!
Clean the blade, the blade unit of the blender and
the inserts very carefully. Their cutting edges are
very sharp!
Make sure that the cutting edges of the blade, the
blade unit of the blender and the inserts do not
come into contact with hard objects. This could
cause them to become blunt.
Certain ingredients may cause discolourations on
the surface of the accessories. This does not have
a negative effect on the accessories. The
discolourations usually disappear after some time.
Blender quick-cleaning operation
C
1 Pour lukewarm water (not more than
0.5 litres) and some washing-up liquid into
the blender jar.
2 Assemble the lid.
C
3 Let the appliance run for a few moments
by pressing the Pulse button. (The
appliance stops running when you release
the button.)
4 Detach the blender jar and rinse it with
clean water.
Storage
MicroStore
C
◗ Put the accessories (emulsifying disc, blade,
kneading accessory, insert holder) on the tool
holder and store them in the bowl. Always
end up with the insert holder.
C
◗ Two inserts can be stored in the storage
space in the cover that covers the lid of the
bowl, as indicated on the inside of the cover.
The inserts have to be slid into the cover, not
pressed.

13ENGLISH
Quantities and preparation times
C
◗ Place the cover with insert storage space on
the transparent lid of the bowl.
◗ Wrap the mains cord around the reel on the
back of the appliance.
Information & service
If you need information or if you have a problem,
please visit the Philips Web site at
www.philips.com or contact the Philips
Customer Care Centre in your country (you will
find its phone number in the worldwide
guarantee leaflet).
If there is no Customer Care Centre in your
country, turn to your local Philips dealer or
contact the Service Department of Philips
Domestic Appliances and Personal Care BV.
Applications
Pancakes,
waffles
Breadcrumbed
dishes, au
gratin dishes
Desserts,
toppings
Garnishing,
raw
vegetables,
turnip dishes,
cakes, dips
Salads
Garnishing,
soup, sauces,
au gratin
dishes
Sauces, pizzas,
au gratin
dishes, fondue
Procedure
First pour the milk into the
blender and then add the dry
ingredients. Mix the ingredients
approx. 1 minute. If necessary,
repeat this procedure 2 times.
Use dry, crispy bread.
Use soft butter for a light
result.
Cut the vegetables into pieces
that fit into the tube. Fill the
feed tube with the pieces and
shred them while pressing the
pusher down lightly.
Fill the feed tube with pieces of
vegetables and press them
carefully down with the pusher.
Use a piece of rindless
Parmesan and cut it into pieces
of approx. 3 x 3 cm.
Cut the cheese into pieces that
fit into the tube. Press the
pieces carefully down with the
pusher.
Speed
/acces
sory
2 / P
2 / P
2 / P
2 / j
k
2 / P /
g
2 / P
2 / j
k
Max.
quanti
ty
250
ml
milk
100g
300g
350g
350g
200g
200g
Ingredients &
results
Batter
(pancake) whisking
Breadcrumbs chopping
Butter cream
(creme au
beurre) whisking
Vegetables
(carrots,
turnips, white
radishes) shredding
Vegetables
(carrots, leaks,
celery) — slicing
Cheese
(Parmesan) chopping
Cheese
(Gouda) shredding

ENGLISH14
Applications
Garnishing,
sauces, pastry,
puddings,
mousses
Purees, soups
Baby and
infant food
Salad,
garnishing
Bread
Pizza
Apple pies,
sweet biscuits,
open fruit flans
Procedure
Use hard, plain chocolate.
Break it into pieces of 2 cm.
Use cooked peas or beans. If
necessary, add some liquid to
improve the consistency of the
mixture.
For coarse puree, add only a
little liquid. For fine puree, keep
adding liquid until the mixture
is smooth enough.
Put the cucumber in the tube
and press it carefully down
with the pusher.
Mix warm water with yeast and
sugar. Add flour, oil and salt
and knead the dough for
approx. 90 seconds. Leave to
rise for 30 minutes.
Follow the same procedure as
for bread dough. Knead the
dough for approx. 1 minute.
First put in the flour and then
the other ingredients.
Use cold margarine, cut into
pieces of 2 cm. Put all the
ingredients in the bowl and
knead until the dough has
turned into a ball. Allow the
dough to cool before further
processing.
Speed
/acces
sory
2 / P
2 / P
D
2 / P
1 / g
2 / {
2 / {
2 / P
Max.
quanti
ty
200g
250g
300g
1
cucum
ber
350g
flour
400g
flour
200g
flour
Ingredients &
results
Chocolate chopping
Cooked peas,
beans pureeing
Cooked
vegetables and
meats pureeing
Cucumbers slicing
Dough (for
bread) kneading
Dough (for
pizzas) kneading
Dough (for
shortcrust
pastry) kneading
Applications
Fruit tarts, pies,
quiches
Luxury bread
Pudding,
soufflees,
meringues
Puddings, baby
food
Garnishing,
dips
Procedure
Use cold margarine and cold
water. Put flour in the bowl
and add the margarine cut into
pieces of 2cm. Mix at the
highest speed until the dough
has become crumbly, then add
cold water while mixing. Stop
as soon as the dough starts to
turn into a ball. Allow the
dough to cool before further
processing.
First mix yeast, warm milk and
some sugar in a separate bowl.
Put all the ingredients in the
food processor bowl and
knead the dough until it is
smooth and no longer sticks to
the wall of the bowl (takes
approx. 1 minute). Leave it to
rise for 30 minutes.
Use egg whites at room
temperature. Note: use at least
2 egg whites.
Tip: add a little lemon juice to
prevent the fruit from
discolouring. Add some liquid
to obtain a smooth puree.
Peel the garlic. Always press
the pulse button several times
to prevent the garlic from
being chopped too fine. Use at
least 150g.
Speed
/acces
sory
2 / P
2 / {
2 / S
P / P
P / P
Max.
quanti
ty
200g
flour
300g
flour
4 egg
whites
500g
300g
Ingredients &
results
Dough (for
tarts, pies) kneading
Dough (yeast)
— kneading
Egg whites emulsifying
Fruit (e.g.
apples,
bananas) chopping/pure
eing
Garlic chopping

ENGLISH 15
Applications
Sauces, soups,
garnishing,
herb butter
Fruit juices
Salads,
garnishing and
barbecue
sauces
Steaks tartare,
hamburgers,
meat balls
Milkshakes
Various cakes.
Salads, bread,
almond paste,
puddings
Procedure
Wash and dry the herbs before
chopping
Add water or another liquid
(optional) to obtain a smooth
juice.
All the ingredients must be at
room temperature. Note: use
at least one large egg, two
small eggs or two egg yolks.
Put the egg and a little vinegar
in the bowl and add the oil
drop by drop.
First remove any sinews or
bones. Cut the meat into cubes
of 3 cm. Use the pulse function
for a coarser chopping result.
Puree the fruit (e.g. bananas,
strawberries) with sugar, milk
and some ice cream and mix
well.
The ingredients must be at
room temperature. Mix the
softened butter and the sugar
until the mixture is smooth and
creamy. Then add milk, eggs
and flour.
Use the pulse button for
coarse chopping or speed 2 for
fine chopping.
Speed
/acces
sory
2/P / P
2 / D
1-2 /
S
2/ P /
P
2 / D
2 / P
2/ P /
P
Max.
quanti
ty
Min.
75g
500g
(total
amou
nt)
3 eggs
300g
250ml
milk
3 eggs
250g
Ingredients &
results
Herbs (e.g.
parsley) chopping
Juices (e.g.
papaya, water
melon, pear) blending
Mayonnaise emulsifying
Meat (lean) mincing
Milkshakes blending
Cake mixture
— mixing
Nuts chopping
Applications
Stir-fries,
garnishing
Stir-fries,
garnishing
Minced meat
Soups, sauces
Garnishing,
cream, icecream
mixtures
Procedure
Peel the onions and cut them
into 4 pieces. Note: use at least
100g. Always press the pulse
button several times to prevent
the onions from being chopped
too fine.
Peel the onions and cut them
into pieces that fit into the
tube. Note: use at least 100g.
First remove any sinews or
bones. Cut the meat into cubes
of 3 cm. Use the pulse button
for a coarser chopping result.
Use cooked vegetables
Use cream that comes straight
from the refrigerator. Note:
use at least 125ml cream. The
whipped cream is ready after
approx. 20 seconds.
Speed
/acces
sory
P / P
1 / g
2/ P /
P
2 / D
P / S
Max.
quanti
ty
400g
300g
200g
500ml
350ml
Ingredients &
results
Onions chopping
Onions slicing
Poultry mincing
Soups blending
Whipping
cream whipping

ENGLISH16
Recipes
Broccoli soup (for 4 persons)
kP
— 50g mature Gouda cheese
— 300g cooked broccoli (stalks and head)
— cooking liquid of the broccoli
— 2 boiled potatoes in pieces
— 2 stock cubes
— 2 tbsp whipping cream
— curry
— salt
— pepper
— nutmeg
B
Shred the cheese. Puree the broccoli with the
boiled potatoes and some of the cooking liquid of
the broccoli. Put the broccoli puree and the
remaining liquid and stock cubes into a measuring
beaker and fill it up to 750ml. Transfer the soup
to a pan and bring it to the boil while stirring. Stir
in the cheese and season with curry, salt, pepper
and nutmeg and add the cream.
Fruit cake
P
— 450 g dry pitted dates, halved
— 200 g dry plums, halved
— 650 g pecan nuts
— 160 g shredded coconut
— 300 g glazed pineapple
— 1 tin (400 g) sweetened condensed milk
— 1 tsp vanilla essence
B
Grease two 20cm-long baking tins and preheat
the oven to 135° C.
B
Put the halved dates and plums in the food
processor bowl and chop at maximum speed for
30 seconds. Then empty the bowl.
B
Put the pecan nuts in the food processor bowl and
roughly chop the nuts, using the pulse function.
Then empty the bowl.
B
Put the glazed pineapple in the food processor
bowl and chop into pieces, using the pulse
function. Then empty the bowl.
B
Mix the dates, plums, pecan nuts, pineapple and
shredded coconut in a large mixing bowl and mix
them.
B
Add milk and vanilla to the ingredients and mix.
B
Put the fruit mixture in the baking tins and bake
the cakes at 135° C for 90 minutes.
B
Do not process this recipe more than once
without interruption. If you need to process more
quantities, let the appliance cool down first and
then continue the process.
Mashed Potatoes
P
— 750g cooked potatoes
— approx. 250ml hot milk (90cC)
— 1 tbsp of butter
— salt
B
First mash the potatoes, then add milk, salt and
butter. Use speed 1 and process for approx.
30 seconds to prevent the puree from becoming
sticky.

ENGLISH 17
Mayonnaise
S
— 2 egg yolks or 1 large egg
— 1 tsp mustard
— 1 tsp vinegar
— 200ml oil
B
The ingredients must be at room temperature. Put
the emulsifying disc in the bowl. Put the egg yolks
or egg, mustard and vinegar in the bowl. Use
speed 1 or 2. Pour the oil gradually through the
feed tube onto the rotating disc. You can use the
hole in the pusher to add the oil.
B
Tip for tartare sauce: add parsley, gherkins and
hard-boiled eggs.
B
Tip for cocktail sauce: add 50ml creme fraiche, a
dash of whisky, 3 tsp tomato puree and a dash of
ginger syrup to 100ml mayonnaise.
Milkshake
P
— 175ml milk
— 10g sugar
— 1/2 banana or approx. 65g other fresh fruit
— 50g vanilla ice cream
B
Mix all the ingredients until the mixture is frothy.
Pizza
{
— 400g flour
— 40ml oil
— 1/2 tsp salt
— 20g fresh yeast or 1.5 sachets dried yeast
— approx. 240ml water (35cC)
B
For the topping:
— 300ml sieved tomatoes (tinned)
— 1 tsp. mixed Italian herbs (dried or fresh)
— salt and pepper
— sugar
— Ingredients to be spread on the sauce: olives,
salami, artichokes, mushrooms, anchovies,
Mozzarella cheese, peppers, grated mature
cheese and olive oil according to taste.
B
Place the kneading accessory in the bowl. Put all
the ingredients in the bowl and select speed 2.
Knead the dough for approx. 1 minute until a
smooth ball has formed. Hold the appliance down
with one hand to prevent it from moving around
on the worktop. Put the dough in a separate bowl,
covered it with a damp cloth and leave it to rise
for about 30 minutes.
B
Use the blade to chop the onion and garlic. Fry
the chopped onion and garlic until transparent.
B
Add the sieved tomatoes and the herbs and
simmer the sauce for about 10 minutes.
B
Season to taste with salt, pepper and sugar. Allow
the sauce to cool down.
B
Heat the oven to 250cC.

ENGLISH18
B
Roll the dough out on a floured worktop and
make two round shapes. Place the dough on a
grease baking tray. Spread the topping on the
pizza, leaving the edges free. Spread with the
desired ingredients, scatter some grated cheese
over the pizza and drip some olive oil over it.
B
Bake the pizzas for 12 to 15 minutes.
Potato-courgette gratin
Pgk
— 375g potatoes
— pinch salt
— 1 courgette (approx. 250g)
— 1 clove of garlic, crushed
— approx. 40g butter + butter to grease the oven
dish
— 2 tsp Italian or Provincial herbs
— 1 large egg
— 75ml whipping cream.
— 75ml milk
— pepper
— 70g semi-matured cheese
B
Peel and wash the potatoes.
B
Put the slicing insert in the insert holder disc and
place the insert holder in the bowl. Slice the
potatoes and the courgette at speed 1.
B
Boil the potato slices in boiling water with a pinch
of salt until they are almost done.
B
Put the slices in a colander and drain them
properly.
B
Put 20g butter and crushed garlic in a frying pan,
fry half of the courgette slices for 3 minutes while
turning them frequently. Sprinkle the slices with
1 tsp of Italian or Provincial herbs. Fry the other
half of the courgette slices in the same way.
Sprinkle them with the rest of the herbs.
B
Drain the fried courgette slices on kitchen paper.
B
Grease a low-sided oven dish and put the
courgette and potato slices in the dish, alternating
them and arranging them in such way that they
partly overlap like roof tiles.
B
Whisk the egg with the cream and the milk with
the blade at speed 2. Add salt and pepper
according to taste and pour the mixture over the
potato and courgette slices in the dish.
B
Replace the slicing insert with the shredding insert,
shred the cheese at speed 2 and sprinkle it over
the dish.
B
Put the dish in the centre of a hot oven (200cC)
and brown it in about 15 minutes
Salmon mousse (serves 3-4 people)
PS
— 1 tin of salmon (220g)
— 2 sheets of gelatine
— a few stems of chives
— pinch salt
— pinch cayenne pepper
— half tbsp lemon juice
— 125ml whipping cream
— 1 small onion
— watercress for garnishing
B
Soak the gelatine in plenty of water.
B
Chop the chives and onions in the food processor
using the pulse setting.

19ENGLISH
B
Remove the bones and skin from the salmon.
B
Add salt, cayenne pepper, lemon juice, the salmon
and the liquid from the tin to the chopped chives
and onion and puree the ingredients at speed 2.
B
Put the puree in a bowl.
B
Boil a small quantity of water and dissolve the
gelatine in it.
B
Stir the gelatine solution through the salmon
puree.
B
Put the emulsifying disc in the bowl and whip the
cream by pressing the pulse button for about
15 seconds.
B
Fold the whipped cream into the salmon puree
with a wooden spoon.
B
Turn the mousse out onto a dish, cover it and chill
it in the refrigerator for a few hours.
B
Garnish the mousse with some watercress.
Sandwich spread
P
— 2 small carrots in pieces
— 2-3 gherkins in pieces
— 75g cauliflower in pieces
— 75g celeriac in pieces
— green herbs (parsley, dill, tarragon, celery stalks
in pieces)
— 100g mayonnaise
— 100g quark
— salt
— pepper
B
Chop the carrots, gherkins, cauliflower, green herbs
and celeriac fine. Mix in the mayonnaise and quark
carefully and season to taste with pepper and salt.
Spanish cabbage salad
g
— 1 small red cabbage
— 2 red onions
— 1 fennel
— 1 apple
— juice of one orange and 2 tbsp red wine
vinegar
— 1 tbsp mustard
B
Mix the juice, mustard and vinegar. Slice the
cabbage, onions, fennel and apple at speed 1.
B
Combine the ingredients in a salad bowl.
Sponge cake
P
— 4 eggs
— 30ml of water (35cC)
— 1 pinch of salt
— 150g sugar
— 1 sachet vanilla sugar
— 150g sieved flour
— 3g baking powder
B
Beat the eggs and the water for approx. 2 minutes.
Gradually add the sugar, vanilla sugar and the salt
and mix for approx. 1 minute. The mixture should
leave a trail when some of it is lifted from the
bowl with a spoon. Fold in the flour and baking
powder with a spatula. Bake it in the oven at
approx. 170cC for approx. 30-35 minutes.
B
Tip: You can fill the sponge cake with different
kinds of butter cream or simply with whipped
cream and fresh fruit.

ENGLISH20
Tzatziki
k
— 1 cucumber
— 200ml yoghurt
— 1 tbsp olive oil
— 2 cloves garlic
— pinch salt
— 1 tsp finely chopped dill
— a few mint leaves
B
Peel the cucumber and shred it at speed 1. Put
the shredded cucumber in a colander and let it
drain properly.
B
Mix the other ingredients, except for the mint
leaves, through the cucumber. Chill the salad by
putting it in a covered bowl in the refrigerator for
one hour. Sprinkle mint leaves on top before
serving.

DEUTSCH 21
Küchenmaschine: Teile und Zubehör
A Geräteschalter mit Geschwindigkeitsregler
B Motorgehäuse
C Integrierte Sicherheitsverriegelung
D Schüssel
E Schutzverschluss, verschließt die Öffnung,
wenn der Mixbecher nicht aufgesetzt ist
F Zwischenteil
G Mixbecher
H Haken zur Sicherheitsverriegelung
I Deckel der Schüssel
J Einfüllstutzen
K Stopfer
L Deckel zum Mixbecher
M Deckel mit verschließbarer Kassette zur
Aufbewahrung von Einsätzen
N Schneideinsatz, mittelfein
O Schneideinsatz, fein
P Raspeleinsatz
Q Trägerscheibe, für Schneid- und Raspeleinsätze
R Messer mit Schneidschutz
S Kneteinsatz
T Emulgierscheibe
U Spatel
Einleitung
Dieses Gerät ist mit einem Überhitzungsschutz
versehen, der es bei zu starker Erwärmung
ausschaltet.
Wenn das Gerät plötzlich stillsteht:
1 Ziehen Sie den Stecker aus der Steckdose.
2 Drücken Sie die Taste «PULSE/0» um das
Gerat aus zu .
3 Lassen Sie das Gerät 60 Minuten abkühlen.
4 Stecken Sie den Stecker wieder in die
Steckdose.
5 Schalten Sie das Gerät wieder ein.
Wenn der automatische Überhitzungsschutz das
Gerät wiederholt ausschaltet, so wenden Sie sich
bitte an Ihren Philips-Händler oder an das Philips
Service Center in Ihrem Lande.
VORSICHT: Vermeiden Sie unvorhersehbare
Risiken durch Überhitzung; schließen Sie dieses
Gerät niemals an eine Zeitschaltuhr an!
Wichtig
◗ Lesen Sie diese Gebrauchsanweisung
sorgfältig durch, und sehen Sie sich dabei die
Abbildungen an, bevor Sie das Gerät zum
ersten Mal benutzen.
◗ Bewahren Sie diese Gebrauchsanweisung zur
späteren Einsichtnahme gut auf.
◗ Prüfen Sie, ob die Spannungsangabe auf dem
Gerät (110-127 V bzw. 220-240 V) mit der
örtlichen Netzspannung übereinstimmt.

DEUTSCH22
◗ Verwenden Sie mit dieser Küchenmaschine
keine Zusatzgeräte oder andere Teile, die von
Philips nicht ausdrücklich empfohlen werden.
Ist das trotzdem der Fall, führt dies zum
Verlust der Garantie.
◗ Verwenden Sie das Gerät nicht, wenn das
Motorgehäuse, das Netzkabel oder der
Stecker beschädigt ist.
◗ Wenn das Netzkabel defekt oder beschädigt
ist, darf es nur von einem Philips ServiceCenter oder einer von Philips autorisierten
Werkstatt ausgetauscht werden, um ein
Sicherheitsrisiko zu vermeiden.
◗ Waschen Sie vor dem ersten Gebrauch
sorgfältig alle Teile ab, die mit Lebensmitteln
in Berührung kommen können.
◗ Überschreiten Sie nicht die in der Tabelle und
Rezepte angegebenen Mengen und
Zubereitungszeiten.
◗ Füllen Sie die Schüssel und den Mixbecher
niemals höher als bis zur obersten
Markierung.
◗ Ziehen Sie nach Gebrauch sofort den
Netzstecker aus der Steckdose.
◗ Stecken Sie niemals Ihre Finger oder
irgendwelche Gegenstände, auch nicht den
Spatel, in den Einfüllstutzen. Verwenden Sie
hierzu nur den Stopfer.
◗ Ziehen Sie stets den Netzstecker aus der
Steckdose, bevor Sie mit der Hand oder
einem Gegenstand, z. B. dem Spatel, in den
Mixbecher langen.
◗ Halten Sie Kinder von dem Gerät fern.
◗ Lassen Sie das eingeschaltete Gerät niemals
unbeaufsichtigt.
◗ Schalten Sie nie das Gerät aus, indem Sie den
Deckel drehen. Schalten Sie es ausschließlich
mit der Taste «PULS/0» aus.
◗ Schalten Sie das Gerät aus, bevor Sie
irgendeinen Einsatz anbringen oder
austauschen.
◗ Tauchen Sie das Motorgehäuse niemals in
Wasser oder eine andere Flüssigkeit. Spülen
Sie es auch nicht unter fließendem Wasser ab.
◗ Wenn Sie den Mixbecher, die Schüssel oder
den Deckel richtig aufgesetzt haben,
vernehmen Sie ein Geräusch («Klick»).
◗ Die Emulgierscheibe, das Messer und der
Knetaufsatz sind auf das Zwischenteil in der
Schüssel anzubringen.
◗ Nehmen Sie den Schneidschutz vom Messer
ab, bevor Sie das Messer einsetzen.
◗ Die Schneiden des Messers sind SCHARF;
vermeiden Sie darum jede Berührung,
besonders wenn das Gerät eingeschaltet ist.
◗ Wenn das Messer blockiert ist, so ziehen Sie
den Netzstecker aus der Steckdose, bevor Sie
das Messer von den blockierenden Zutaten
frei machen.
◗ Lassen Sie heiße Zutaten auf höchstens 80cC
abkühlen, bevor Sie sie im Gerät verarbeiten.
◗ Wenn Sie Flüssigkeiten verarbeiten, die zum
Schäumen neigen, so füllen Sie nicht mehr als
1 Liter in den Mixbecher, damit sie nicht
überlaufen.
DEUTSCH 23
Wenn sowohl die Schüssel wie der Mixbecher
aufgesetzt sind, ist nur der Mixbecher
betriebsbereit.
Der Gebrauch des Geräts
Die Schüssel
◗ Zum Gebrauch der Schüssel entfernen Sie ggf.
den Mixbecher und verschließen die Öffnung
mit dem zugehörigen Deckel. Die Schüssel
lässt sich nur verwenden, wenn der
Mixbecher abgenommen ist.
C
1 Setzen Sie die Schüssel auf das Gerät, und
drehen Sie den Griff in Pfeilrichtung, bis
die Schüssel hörbar einrastet («Klick»).
C
2 Setzen Sie den Deckel auf die Schüssel.
Drehen Sie den Deckel in Pfeilrichtung, bis
auch er hörbar einrastet. Dazu ist ein
leichter Widerstand zu überwinden.
Die integrierte
Sicherheitsverriegelung
B
Das Motorgehäuse und der Deckel sind mit
Markierungen versehen. Das Gerät kann nur
arbeiten, wenn der Pfeil auf dem Motorgehäuse
der Markierung auf dem Deckel in einer Flucht
genau gegenübersteht.
C
1 Achten Sie darauf, dass die Markierung auf
dem Deckel und der Pfeil auf der Schüssel
sich genau gegenüberstehen. Die Öffnung
im Griff der Schüssel wird nun durch die
Ausbuchtung im Deckel verschlossen.
Der Einfüllstutzen
C
1 Durch den Einfüllstutzen lassen sich
flüssige und feste Zutaten in die Schüssel
geben. Verwenden Sie nur den Stopfer, um
die Zutaten anzudrücken.
C
2 Sie können während der Verarbeitung den
Stopfer im Einfüllstutzen lassen, damit
nichts herausspritzt.
Das Messer
◗ Das Messer kann zum Schneiden, Mischen,
Mixen, Pürieren und zum Kneten von Teig
verwendet werden.
C
1 Setzen Sie die Schüssel auf das
Motorgehäuse.
C
2 Nehmen Sie den Schneidschutz vom
Messer ab.
Die Schneiden des Messers sind sehr scharf
Vermeiden Sie jede Berührung mit den
Schneiden.
CLICK
CLICK
1
2
1
2
CLICK
CLICK
1
2

DEUTSCH24
C
3 Setzen Sie das Messer auf das
Zwischenteil.
C
4 Setzen Sie das Zwischenteil mit dem
Messer in die Schüssel ein.
5 Geben Sie die Zutaten in die Schüssel.
Schneiden Sie große Stücke zuvor in
Würfel von ca. 3 cm Kantenlänge. Setzen
Sie den Deckel auf.
C
6 Mit dem Geräteschalter lassen sich
verschiedene Geschwindigkeiten wählen,
die optimale Resultate ermöglichen.
B
Position «PULSE/0»: Momentschaltung und
Ausschalter. Wird diese Taste gedrückt, arbeitet
das Gerät mit der höchsten Geschwindigkeit. Der
Motor hält an, wenn die Taste losgelassen wird.
B
Position 1: normale Geschwindigkeit.
B
Position 2: hohe Geschwindigkeit.
Vgl. die Tabelle zur Wahl der angemessenen
Geschwindigkeit. Verarbeitungszeit: 1 bis 60
Sekunden.
Hinweise
◗ Das Gerät zerkleinert sehr schnell. Drücken
Sie «PULSE/0» für kurzzeitige Bearbeitung,
damit die Zutaten nicht zu fein zerkleinert
werden.
◗ Wenn Sie (Hart-)Käse verarbeiten, so lassen
Sie das Gerät nicht zu lange laufen. Dadurch
wird der Käse erhitzt, schmilzt und wird
flockig.
◗ Verwenden Sie das Messer nicht, um harte
Zutaten zu zerkleinern, z. B. Kaffeebohnen,
Muskatnüsse und Eiswürfel. Das Messer kann
dadurch stumpf werden.
Wenn Zutaten am Messer kleben oder sich an
der Wand absetzen:
1 Schalten Sie das Gerät aus,
2 nehmen Sie den Deckel von der Schüssel
ab,
3 entfernen Sie die Zutaten mit dem Spatel.
Die Einsätze
Die Schneiden der Einsätze sich sehr scharf
Vermeiden Sie jede Berührung mit den
Schneiden.
Verarbeiten Sie mit den Einsätzen keine harten
Zutaten, z. B. Eiswürfel.
C
1 Setzen Sie den erforderlichen Einsatz in
die Trägerscheibe.
1
CLICK
2
25DEUTSCH
C
2 Setzen Sie die Trägerscheibe auf das
Zwischenteil.
3 Setzen Sie den Deckel auf die Schüssel.
C
4 Geben Sie die Zutaten in die Schüssel.
Schneiden Sie größere Stücke so zurecht,
dass sie in den Einfüllstutzen passen.
5 Die besten Resultate erhalten Sie, wenn
Sie den Einfüllstutzen gleichmäßig füllen.
Verarbeiten Sie größere Mengen nach und nach
in Teilmengen. Leeren Sie die Schüssel dann
zwischendurch regelmäßig.
3 Wählen Sie die angemessene
Geschwindigkeit. — Vgl. die Tabelle.
Die Verarbeitung dauert je nach Zutat 10 bis
60 Sekunden.
C
4 Drücken Sie die Zutaten mit dem Stopfer
langsam und gleichmäßig in die
Einfüllöffnung.
C
5 Einen Einsatz nehmen Sie von der
Trägerscheibe ab, indem Sie den
Einsatzträger mit seiner Rückseite auf Sie
weisend in Ihre Hände nehmen. Drücken
Sie die Ränder mit ihrem Daumen, damit
er aus der Trägerscheibefällt.
Der Knetaufsatz
Der Knetaufsatz kann zum Kneten von Brotteig,
Klößen und zum Mischen von Kuchenteig
verwendet werden.
C
6 Setzen Sie den Knetaufsatz auf das
Zwischenteil.
7 Geben Sie die Zutaten in die Schüssel.
C
8 Schließen Sie die Schüssel mit dem
zugehörigen Deckel.
C
9 Verschließen Sie die Einfüllöffnung mit dem
Stopfer.
C
10 Wählen Sie die erforderliche
Geschwindigkeit, um optimale Ergebnisse
zu erzielen. — Vgl. die Tabelle.
Die Emulgierscheibe
Sie können die Emulgierscheibe zur Zubereitung
von Majonäse und zum Schlagen von Sahne oder
Eiern verwenden.
C
11 Setzen Sie die Emulgierscheibe auf das
Zwischenteil in der Schüssel.
1
CLICK
2
DEUTSCH26
12 Geben Sie die Zutaten in die Schüssel, und
setzen Sie den Deckel auf.
13 Wählen Sie die erforderliche
Geschwindigkeit, um optimale Ergebnisse
zu erzielen. — Vgl. die Tabelle.
Hinweise
◗ When you want to whisk egg whites, make
sure the eggs are at room temperature.
Nehmen Sie die Eier mindestens eine halbe
Stunde vor der Verarbeitung aus dem
Kühlschrank.
◗ All the ingredients for making mayonnaise
must be at room temperature.
Öl kann durch die kleine Öffnung unten am
Stopfer zugegeben werden.
◗ If you are going to whip cream, the cream
must be taken straight from the refrigerator.
Please observe the preparation time in the
table. Cream should not be whipped too long.
Bei Verwendung der Momentschaltung
(«PULSE/0») haben Sie volle Kontrolle über den
Fortgang der Bearbeitung.
Der Mixbecher:
Der Mixer ist geeignet für:
— Mischen von Flüssigkeiten, z.B. Milchprodukte,
Soßen, Obstsäfte, Suppen, Mixgetränke, MilchShakes.
— Mischen weicher Zutaten, z. B. Pfannkuchenteig
und Majonäse.
— Pürieren gegarter Zutaten, z.B. zur Zubereitung
von Baby-Nahrung.
C
14 Nehmen Sie den Schutzverschluss ab.
C
15 Setzen Sie den Mixbecher mit einer
Drehung in Pfeilrichtung in die Öffnung, bis
er fest sitzt.
Ziehen Sie nicht zu stark am Griff des
Mixbechers.
C
16 Geben Sie die Zutaten in den Mixbecher.
17 Schrauben Sie den Deckel auf den
Mixbecher.
18 Schalten Sie das Gerät ein, und mischen
Sie die Zutaten. Mit Hilfe der
verschiedenen Einstellungen können Sie
optimale Resultate erzielen. Vgl. die
Tabelle.
Hinweise
C
◗ Gießen Sie Flüssigkeiten
◗ Je länger Sie das Gerät betreiben, um so
feiner wird das Ergebnis.
◗ Schneiden Sie feste Zutaten zuvor in kleinere
Stücke.
◗ Wählen Sie im Zweifel die höhere
Geschwindigkeit = Position 2.
1
CLICK
2
1
2
1
2

DEUTSCH 27
Wenn Zutaten an der Wand des Mixbechers
haften:
1 Schalten Sie das Gerät aus, und ziehen Sie
den Netzstecker aus der Steckdose,
2 und nehmen Sie den Deckel ab.
Nehmen Sie niemals den Deckel bei laufendem
Gerät ab!
3 Entfernen Sie die Zutaten, die an der
Wand haften, mit einem Spatel.
Halten Sie den Spatel in sicherer Entfernung (ca.
2 cm) zum Messer.
Reinigung
Ziehen Sie vor jeder Reinigung den Netzstecker
aus der Steckdose.
1 Reinigen Sie das Motorgehäuse mit einem
feuchten Tuch, auf das Sie bei Bedarf ein
wenig Spülmittel auftragen können.
Tauchen Sie das Motorgehäuse niemals in
Wasser, und spülen Sie es auch nicht unter
fließendem Wasser ab.
2 Spülen Sie alle Teile, die mit Lebensmitteln
in Berührung gekommen sind, sofort nach
Gebrauch in warmem Wasser, dem Sie
etwas Spülmittel zugesetzt haben.
◗ Die Schüssel, der Deckel der Schüssel, der
Stopfer und die Einsätze können im
Geschirrspüler gereinigt werden.
Diese Teile sind getestet und nach DIN EN
12875 spülmaschinenfest.
Der Deckel mit verschließbarer Kassette zur
Aufbewahrung von Einsätzen ist NICHT zur
Reinigung im Geschirrspüler geeignet.
Reinigen Sie das Messer, die Messereinheit des
Mixers und die Einsätze mit großer Vorsicht. Die
Schneiden sind sehr scharf!
Achten Sie darauf, dass die Schneiden des
Messers, der Messereinheit des Mixers und der
Einsätze nicht mit harten Gegenständen in
Kontakt kommen. Sie könnten schartig und
stumpf werden.
Einige Zutaten können an der Oberfläche der
Einsätze eine Verfärbung verursachen. Dies
beeinträchtigt nicht die Funktion dieser Teile.
Meist geht die Verfärbung nach einiger Zeit
zurück.
Schnellreinigung des Mixers
C
1 Gießen Sie nicht mehr als 500 ml
lauwarmes Wasser, dem Sie einige
Tropfen Spülmitel zugefügt haben, in den
Mixbecher.
2 Schrauben Sie den Deckel auf.

DEUTSCH28
C
3 Drücken Sie einen Augenblick die Taste
«PULSE/0». Der Motor steht still, sobald
Sie die Taste loslassen.
4 Nehmen Sie den Mixbecher vom Gerät ab,
und spülen Sie ihn mit klarem Waser aus.
Aufbewahrung
Kurzzeitig
C
◗ Setzen Sie alle Einsätze (Emulgierscheibe,
Messer, Knetaufsatz, Trägerscheibe), das
Zwischenstück und zuletzt die Trägerscheibe
auf das Zwischenteil in der Schüssel.
C
◗ Zwei Einsätze lassen sich in der
verschließbaren Kassette des Deckels (G)
unter dem Deckel der Schüssel unterbringen.
Die Einsätze müssen eingeschoben, nicht
eingedrückt werden! — Vgl. den Hinweis auf
der Innenseite des Deckels.
C
◗ Setzen Sie den Deckel mit der Kassette für
die Einsätze auf den transparenten Deckel der
Schüssel.
◗ Wickeln Sie das Netzkabel um die
Kabelaufwicklung an der Rückseite des
Geräts.
Information und Service
Informationen zu Ihren Fragen, Wünschen und
Problemen erhalten Sie auf unserer Homepage
www.philips.com oder beim Philips Service
Center in Ihrem Lande. Sollte sich in Ihrem Lande
kein solches Center befinden, so wenden Sie sich
bitte an das Service Department von Philips
Domestic Appliances and Personal Care BV. Die
Telefonnummern entnehmen Sie bitte der
beigefügten Garantieschrift.

DEUTSCH 29
Höchstmengen und Zubereitungszeiten
Anwendungsb
eispiele
Pfannkuchen,
Waffeln
Panierte
Speisen,
Gratins
Desserts,
Garnituren
Garnituren,
Rohkost,
Eintopf,
Kuchen, Dips
Salate
Garnituren,
Suppen,
Soßen, Gratin
Soßen, Pizzas,
Gratin, Fondue
Zubereitung
Zuerst die Milch in den
Mixbecher geben, danach die
trockenen Zutaten. Die
Zutaten ca. 1 Minute mischen.
Den Vorgang bei Bedarf
zweimal wiederholen.
Trockenes Brot oder trockene
Brötchen verwenden.
Weiche Butter ergibt ein
leichtes Resultat.
In Stücke schneiden, die in den
Einfüllstutzen passen. Mit dem
Stopfer leicht nachdrücken.
In den Einfüllstutzen einführen.
Mit dem Stopfer leicht
nachdrücken.
Parmesan ohne Rinde
verwenden. In Würfel von ca. 3
cm Kantenlänge schneiden.
Den Käse in Stücke schneiden,
die in den Einfüllstutzen passen.
Mit dem Stopfer leicht
nachdrücken.
Schalt
erstell
ung /
Zubeh
ör
2 / P
2 / P
2 / P
2 / j
k
2 / P /
g
2 / P
2 / j
k
Höchs
tmeng
e
250
ml
Milch
100 g
300 g
350 g
350 g
200 g
200 g
Zutaten und
Ergebnisse
Pfannkuchente
ig — Schlagen
Paniermehl Zerkleinern
Buttercreme Schlagen
Gemüse
(Möhren,
Rüben,
Rettich) Schneiden
Gemüse
(Möhren,
Lauch, Sellerie)
— Schneiden
Käse
(Parmesan) Zerkleinern
Käse (Gouda)
— Raspeln
Anwendungsb
eispiele
Garnituren,
Soßen,
Gebäck,
Pudding,
Mousse
Pürees,
Suppen
Baby- und
Kindernahrung
Salat,
Garnituren
(Weiß-)Brot
Pizza
Zubereitung
Harte /(Block-)Schokolade
verwenden. In Stücke von 2 cm
Größe brechen.
Gekochte Erbsen bzw.Bohnen
verwenden. Bei Bedarf etwas
Flüssigkeit zufügen.
Für grobes Püree nur wenig
Wasser zufügen. Für feines
Püree langsam Flüssigkeit
zufügen, bis die gewünschte
Konsistenz erreicht ist.
Die Gurke in den Einfüllstutzen
stecken und leicht
nachdrücken.
Warmes Wasser mit Hefe und
Zucker mischen. Mehl, Öl und
Salz hinzugeben und ca. 90
Sekunden kneten. Teig 30
Minuten gehen lassen.
Warmes Wasser mit Hefe und
Zucker mischen. Zuerst das
Mehl, danach Öl und Salt
hinzugeben und ca. 60
Sekunden kneten. Teig ca. 30
Minuten gehen lassen.
Schalt
erstell
ung /
Zubeh
ör
2 / P
2 / P
2 / P
1 / g
2 / {
2 / {
Höchs
tmeng
e
200 g
250 g
300 g
1
Salatg
urke
350 g
Mehl
400 g
Mehl
Zutaten und
Ergebnisse
Schokolade Zerkleinern
Hülsenfrüchte
— Pürieren
Gekochtes
Gemüse und
Fleisch Pürieren
Gurken Schneiden
Brotteig Kneten
Pizzateig Kneten

DEUTSCH30
Anwendungsb
eispiele
Apfelkuchen,
süße Biskuits,
ungedeckter
Obstkuchen
Obsttorte,
Quiche
Feingebäck
Zubereitung
Kalte Butter/Margarine in
Stücke von ca. 2 cm
Kantenlänge schneiden. Alle
Zutaten in die Schüssel geben
und kneten, bis der Teig zur
Kugel wird. Vor der
Weiterverarbeitung (im
Kühlschrank) kühlen.
Kalte Margarine/Butter und
kaltes Wasser verwenden. Das
Mehl in die Schüssel geben. Die
Margarine/Butter in Stücken
von 2 cm Kantenlänge
darauflegen. Bei Position 2
mischen, bis der Teig krümelig
ist; dann während des Rührens
nach und nach kaltes Wasser
zufügen. Ausschalten, sobald
der Teig zur Kugel wird. Vor
der Weiterverarbeitung (im
Kühlschrank) kühlen.
Zuerst in einer getrennten
Schüssel Hefe, warme Milch
und etwas Zucker mischen.
Alle Zutaten in die Schüssel
des Geräts geben und ca. 1
Minute kneten, bis der Teig
glatt ist und nicht mehr an der
Wand der Schüssel haftet. Teig
30 Minuten gehen lassen.
Schalt
erstell
ung /
Zubeh
ör
2 / P
2 / P
2 / {
Höchs
tmeng
e
200 g
Mehl
200 g
Mehl
300 g
Mehl
Zutaten und
Ergebnisse
Mürbeteig I Kneten
Mürbeteig II Kneten
Hefeteig Kneten
Anwendungsb
eispiele
Pudding,
Soufflees,
Baisergebäck
Pudding,
Babynahrung
Garnituren,
Dips
Soßen,
Suppen,
Garnituren,
Kräuterbutter
Fruchtsäfte
Salate,
Garnituren,
BarbecueSoßen
Zubereitung
Eier mit Raumtemperatur
verarbeiten. Mindestens 2 Eier
verwenden!
Hinweis: Etwas Zitronensaft
hinzugefügt verhindert, dass
sich das Obst verfärbt.
Die Zehen schälen. Einige Male
kurz «PULSE/0» drücken, damit
der Knoblauch nicht zu fein
zerkleinert wird. Mindestens
150 g verwenden.
Kräuter vor der Verarbeitung
waschen und trocknen.
Bei Bedarf Wasser oder andere
Flüssikeiten hinzufügen.
Alle Zutaten mit
Raumtemperatur. Hinweis:
Wenigstens ein großes Ei oder
zwei kleine Eier bzw. Eigelbe
verwenden. Geben Sie ein Ei
mit ein wenig Essig in die
Schüssel und geben Sie das Öl
tropfenweise hinzu.
Schalt
erstell
ung /
Zubeh
ör
2 / S
P / P
P / P
2/P / P
2 / D
1-2 /
S
Höchs
tmeng
e
4
Eiweiß
e
500 g
300 g
mind.
75 g
500 g
insges
amt
3 Eier
Zutaten und
Ergebnisse
Eischnee
Obst Schneiden /
Pürieren
Knoblauch Zerkleinern
Kräuter (z. B.
Petersilie) Zerkleinern
Säfte (z. B.
Papaya,
Wassermelon
en, Birnen) Mixen
Majonäse Emulgieren
Loading…
-
Page 1
HR7633 Recipes & Directions f or use Rezepte & Gebrauchanw eisung Oppskrifter og bruksan visning Recept & Bruksan visning Käyttöohje & ruokaohjeita Opskrifter & Brugsan visning & […]
-
Page 2
[…]
-
Page 3
3 A B C D E F G H I J K L M N O P Q R[…]
-
Page 4
[…]
-
Page 5
ENGLISH 6 DEUTSCH 19 NORSK 33 SVENSKA 45 SUOMI 58 D ANSK 70 83 HR7633 5[…]
-
Page 6
ENGLISH 6 F oodprocessor: parts and accessories A) Speed control B) Motor unit C) Built-in safety lock D) Bowl E) T ool holder F) P eg of lid (activates and deactivates the safety switch) G) Lid of bowl H) Feed tube I) Pusher J) Cov er with closeable inser t storage space K) Slicing inser t medium L) Shredding inser t fine M) Shredding inser t medi[…]
-
Page 7
ENGLISH 7 ◗ Do not use the appliance when the mains cord, the plug or other parts are damaged. ◗ If the mains cord is damaged, it must be replaced b y Philips, a ser vice centre authorised by Philips or similarly qualified persons in order to a v oid a hazard. ◗ Thoroughl y clean the parts that will come into contact with food befor e you use[…]
-
Page 8
ENGLISH 8 each other . The projection of the lid will now cov er the opening of the handle. Feed tube and pusher C 1 Use the feed tube to add liquid ingr edients and/or solid ingredients. Use the pusher to push ingredients do wn the feed tube. C 2 Y ou can also use the pusher to close the feed tube in order to pr ev ent ingredients from esca ping t[…]
-
Page 9
ENGLISH 9 ◗ Do not use the blade to chop very hard ingredients lik e coffee beans, nutmeg and ice cubes. The blade might get blunt. If food sticks to the blade or to the inside of the bowl: 1 Switch the appliance off. 2 Remov e the lid from the bo wl. 3 Remov e the ingredients with the spatula. Inserts The cutting edges of the blades are v er y s[…]
-
Page 10
ENGLISH 10 C 4 Close the feed tube by placing the pusher in it. C 5 Select the appr opriate speed to obtain optimal results. See the table for the recommended speed. Emulsifying disc Y ou can use the emulsifying disc to prepare may onnaise , to whip cream and to whisk egg white . C 1 Put the emulsifying disc onto the tool holder that stands in the […]
-
Page 11
ENGLISH 11 Clean the blade and the inser ts ver y carefully . The cutting edges are ver y sharp! Make sure that the cutting edges of the blade and the inser ts do not come into contact with hard objects. This could cause them to become blunt. Cer tain ingredients may cause discolourations on the surface of the accessories. This does not have a nega[…]
-
Page 12
ENGLISH 12 Quantities and preparation times Applications Salads, raw vegetables Pancakes, waffles Breadcr umb ed dishes, au gratin dishes Deser ts, toppings Garnishing, soup, sauces, au gratin dishes Sauces, pizzas, au gratin dishes, fondue Garnishing, sauces, pastr y , puddings, mousses Procedur e Cut the fr uit/vegetables into pieces that fit int[…]
-
Page 13
13 ENGLISH Applications Fr uit tar ts, apple dumplings, pies, quiches Luxur y bread Pudding, soufflees, meringues Sauces, jams, puddings, baby food Sauces, soups, garnishing, herb butter Procedur e Use cold margar ine and cold water . Put flour in the bowl and add the margar ine cut into pieces of 2cm. Knead at the highest speed until the dough has[…]
-
Page 14
ENGLISH 14 Applications Minced meat Soups, raw vegetables, salads Baby and infant food Garnishing, cream, ice- cream mixtures Procedur e Fir st remove sinews and bones. Cut the meat into cubes of 3 cm. Use the pulse button for a coar ser chopping result. Pre-cut into cubes of 3 cm and chop them with the blade. For coar se puree , add a little liqui[…]
-
Page 15
ENGLISH 15 B Grease two 20cm-long baking tins and preheat the oven to 135° C . B Put the halved dates and plums in the food processor bowl and chop at maximum speed for 30 seconds. Then empty the bowl. B Put the pecan nuts in the food processor bowl and roughly chop the nuts, using the pulse function. Then empty the bowl. B Put the glazed pineappl[…]
-
Page 16
ENGLISH 16 Pizza { — 400g flour — 40ml oil — 1/2 tsp salt — 20g fresh yeast or 1.5 sachets dried yeast — approx. 240ml water (35 c C) B For the topping: — 300ml sieved tomatoes (tinned) — 1 tsp. mixed Italian herbs (dried or fresh) — salt and pepper — sugar — Ingredients to be spread on the sauce: olives, salami, ar tichokes, mushrooms, anchovies, […]
-
Page 17
ENGLISH 17 1 tsp of Italian or Provincial herbs. Fr y the other half of the courgette slices in the same way . Sprinkle them with the rest of the herbs . B Drain the fried courgette slices on kitchen paper. B Grease a low-sided oven dish and put the courgette and potato slices in the dish, alter nating them and arranging them in such way that they […]
-
Page 18
ENGLISH 18 Spanish cabba ge salad g — 1 small red cabbage — 2 red onions — 1 fennel — 1 apple — juice of one orange and 2 tbsp red wine vinegar — 1 tbsp mustard B Mix the juice, mustard and vinegar . Slice the cabbage, onions , fennel and apple at speed 1. B Combine the ingredients in a salad bowl. Sponge cak e P — 4 eggs — 30ml of water (35 c C) -[…]
-
Page 19
19 DEUTSCH Küchenmaschine:T eile und Zubehör A) Geräteschalter mit Geschwindigkeitsregler B) Motorgehäuse C) Integr ier te Sicherheitsverr iegelung D) Schüssel E) Zwischenteil F) Haken zur Sicherheitsverr iegelung G) Deckel der Schüssel H) Einfüllstutzen I) Stopfer J) Deckel-Aufsatz mit Kassette zur Aufbewahr ung von Einsätzen K) Schneidein[…]
-
Page 20
◗ W enn das Netzkabel defekt oder beschädigt ist, darf es nur von einem Philips Service- Center oder einer von Philips autorisierten W erkstatt ausgetauscht werden, um ein Sicherheitsrisik o zu vermeiden. ◗ W aschen Sie vor dem ersten Gebrauch sorgfältig alle T eile ab, die mit Lebensmitteln in Berührung k ommen können. ◗ W enn die Schüs[…]
-
Page 21
Die integrierte Sicherheitsver riegelung B Das Motorgehäuse und der Deckel sind mit Mar kier ungen ver sehen. Das Gerät kann nur arbeiten, wenn der Pfeil auf dem Motorgehäuse der Mar kier ung auf dem Deckel in einer Flucht genau gegenübersteht. C 3 Achten Sie darauf, dass die Markierung auf dem Deck el und der Pfeil auf der Schüssel sich genau[…]
-
Page 22
Gerät mit der höchsten Gschwindigkeit. Der Motor hält an, wenn die T aste losgelassen wird. B P osition 1: nor male Geschwindigkeit. B P osition 2: hohe Geschwindigkeit. Vgl. die T abelle zur W ahl der angemessenen Geschwindigkeit. V erarbeitungszeit: 1 bis 60 Sekunden. Hinweise ◗ Das Gerät zerkleinert sehr schnell. Schalten Sie es nur für k[…]
-
Page 23
C 7 Drück en Sie die Zutaten mit dem Stopfer langsam und gleichmäßig in den Einfüllstutzen. C 8 Einen Einsatz nehmen Sie von der T rägerscheibe ab, indem Sie den Einsatzträger mit seiner Rückseite auf Sie weisend in Ihr e Hände nehmen. Drücken Sie auf die Ränder des Einsatzes, damit er aus der T rägerscheibe fällt. Der Knetaufsatz Der K[…]
-
Page 24
◗ Die Sahne zur Zubereitung v on Schlagsahne sollte direkt aus dem Kühlschrank genommen und nicht zu lange geschlagen wer den. Bei V erwendung der Momentschaltung «PULSE/0» haben Sie volle Kontrolle über den For tgang der Bearbeitung. Reinigung Ziehen Sie vor jeder Reinigung des Motorgehäuses den Stecker aus der Steckdose . 1 Reinige[…]
-
Page 25
Garantie und Ser vice Informationen zu Ihren Fr agen, Wünschen und Problemen erhalten Sie auf unserer Homepage www .philips.com oder beim Philips Ser vice Center in Ihrem Lande . Sollte sich in Ihrem Lande kein solches Center bef inden, so wenden Sie sich bitte an das Ser vice Depar tment von Philips Domestic Appliances and Personal Care BV . Die […]
-
Page 26
Anwendungs beispiele Pürees, Suppen Baby- und Kindernahr ung Salat, Garnituren (W eiß-)Brot Pizza Apfelkuchen, süße Biskuits, ungedeckter Obstkuchen Zubereitung Gekochte Erbsen bzw . Bohnen verwenden. Bei Bedarf etwas Flüssigkeit hinzufügen. Für grobes Püree nur wenig W asser zufügen. Für feines Püree langsam Flüssigkeit zufügen, bis d[…]
-
Page 27
Anwendungs beispiele Soßen, Suppen, Garnituren, Kräuterbutter Salate, Garnituren, Barbecue- Soßen T ar tar , Hackfleisch, Hackbraten, Frikadellen Fleisch- /Fischbällchen V er schiedenes Gebäck Salate, Brotbelag, Marzipan, Pudding Zubereitung V or der V erarbeitung waschen und trocknen. Alle Zutaten mit Raumtemperatur . Hinw eis: W enigstens ei[…]
-
Page 28
Rezepte Br okkoli-Suppe Einsätze: kP — 50 g mittelalter Gouda — 300g gekochte Brokkoli (Röschen und Zw eige) — W asser , in dem der Brokkoli gekocht wurde — 2 gekochte Kar toffeln, in Stücken — 2 Brühwürfel — W asser , in dem der Brokkoli gekocht wurde — Curr y — Salz — Pfeff er — Muskat B Den Käse raspeln. Den Brokkoli mit den gekochten Kart[…]
-
Page 29
Pizza { — 400 g Mehl — 40ml Speiseöl — 1/2 Tl Salz — 20 g frische Hefe oder 1 1/2 Päckchen T rockenhefe — ca. 240 ml Wasser (35 c C) B Zum Belag: — 300 ml gesiebte T omaten, aus Dosen — 1 Tl gemischte italienische Kräuter , fr isch oder getrocknet — Salz und Pfeff er — Zucker — Zutaten zum Belegen der Soße: Olive, Salami, Ar tischocken, Pilze, […]
-
Page 30
B Eine feuerf este Schale mit niedrigem Rand einfetten, mit den Zucchini- und Kar toffelscheiben so belegen, dass sie miteinander abwechseln und sich wie Dachziegeln gegenseitig überlappen. B Das Ei mit der Sahne und der Milch bei P osition 2 mit dem Messer -Einsatz schlagen. Mit Salz und Pfeff er abschmecken und die Mischung über die Zucchini- u[…]
-
Page 31
B Die Gelatine in reichlich W asser einweichen. B Schnittlauch und die Zwiebeln mit «PULSE/0» zerkleiner n. B Haut und Gräten vom Lachs entfernen. B Salz, Pfeff er , Cayenne-Pfeff er , Zitronensaft, den Lachs und die Flüssigkeit aus der Dose zu den zerkleiner ten Zwiebeln und dem Schnittlauch hinzugeben und bei P osition 2 pürieren. B […]
-
Page 32
B Das Ei und das W asser ca. 2 Minuten schlagen. Zucker , Vanillin-Zuck er und das Salz nach und nach hinzugeben und ca. 1 Minute mixen. Die Masse soll wie ein dickes Band vom Löff el herabrinnen. Das Mehl und das Backpulver mit einem Spatel dar unterziehen. Im Backofen bei ca. 170 c C 30 bis 35 Minuten backen. B Hinweis: Der Rühr teig kann mit v[…]
-
Page 33
NORSK 33 Kjøkk enmaskin: deler og tilbehør A) Hastighetskontroll B) Motorenhet C) Innebygd sikkerhetslås D) Bolle E) V er ktøyholder F) Låsehake (aktiverer og deaktiv erer sikkerhetsbr yteren) G) Lokk til bolle H) Materør I) Stamper J) Deksel med oppbevaringsplass K) Kutteskive for middels kutting L) Raspeskive for finrasping M) Raspeskive fo[…]
-
Page 34
◗ Før De bruk er apparatet for første gang, må alle deler som k ommer i kontakt med mat, rengjør es grundig. ◗ Når bollen settes fast på motorenheten, høres et klikk. ◗ Vispeskiven, kniven og deigelter en må settes i verktøyholder en som står i bollen. ◗ Ikk e overskrid mengdene eller tilberedningstidene som er angitt i tabellen. […]
-
Page 35
C 2 De kan også bruk e stamperen til å lukk e materøret, slik at ikk e noe faller ned i det. Kniv ◗ Kniven kan bruk es til hakking, blanding (a v faste ingredienser og væsk er) og mosing og til å lage kak edeig. C 1 Sett bollen på motorenheten. C 2 T a bladbeskytteren a v kniven. Bladene er skarpe og må ikke berøres. C 3 Sett kniven på v[…]
-
Page 36
Skiver Kantene på skiven er skarpe og må ikke berøres. Ikke bearbeide harde ingredienser , som f.eks isbiter , med skivene. C 1 Sett valgt skive i holder en. C 2 Sett skiveholder en på verktøyholder en som står i bollen. 3 Sett lokk et på bollen. C 4 Ha ingrediensene i materør et. Store stykk er deles opp slik at de passer i røret. 5 Fyll […]
-
Page 37
C 1 Sett vispeskiven på v erktøyholderen som står i bollen. 2 Ha ingrediensene i bollen, og sett på lokk et. C 3 V elg riktig hastighet for beste resultat. Se tabellen for anbefalte hastigheter . Tips ◗ Når De skal pisk e eggehviter , må De passe på at de holder romtemperatur . T a ingrediensene ut av kjøleskapet ca. en halv time før De […]
-
Page 38
Oppbe varing Mikr olagring C ◗ Sett tilbehøret (vispeskiv en, kniven, deigelteren, skiveholder en) på verktøyholder en, og lagre dem i bollen. T a alltid skiveholder en til slutt. C ◗ Det er plass til to skiver i oppbevaringsr ommet i dekselet ov er lokket på bollen, som angitt på innsiden av dekselet. Skivene må skyv es inn i dekselet, i[…]
-
Page 39
Bruksområder Barnemat Salat, garnityr Brød Pizza Eplepaier , søte kjeks, åpne fr uktter ter Fr uktter ter , innbakte epler , paier , quiche Fremgangsmåte For grov mosing: Tilsett bare litt væske. For fin mosing: Ha i væske til blandingen er jevn. For grov mosing: Tilsett bare litt væske. For fin mosing: Ha i væske til blandingen er jevn. B[…]
-
Page 40
Bruksområder Diverse kaker Salater , brød, mandelmasse, puddinger Salater , brød, mandelmasse, puddinger Panneretter , garnityr Hakket kjøtt Supper , rå grønnsaker , salater Barnemat Garnityr , krem, iskremblanding er Fremgangsmåte Ingrediensene må ha romtemperatur . Visp mykt smør og sukker til blandingen er jevn og kremaktig. Tilsett der[…]
-
Page 41
Majones S — 2 eggeplommer eller 1 stor t egg — 1 ts sennep — 1 ts eddik — 2 dl olje B Ingrediensene må holde romtemperatur . Sett vispeskiven i bollen. Ha eggeplommene/egget, sennep og eddik i bollen. Br uk hastighet 1 eller 2. Hell oljen gradvis gjennom materøret ned på den roterende skiven. De kan tilsette oljen gjennom hullet i stamperen. B T[…]
-
Page 42
P otet- og zucchinigrateng Pgk — 375 g poteter — en klype salt — 1 zucchini (ca. 250 g) — 1 fedd hvitløk, knust — ca. 40 g smør + smør til formen — 2 ts italienske eller pro vençalske ur ter — 1 stor t egg — 0,75 dl kremfløte — 0,75 dl melk — pepper — 70 g halvmoden ost B Skrell og vask potetene. B Sett kutteskiven i holderen, og sett holderen[…]
-
Page 43
Pålegg P — 2 små gulrøtter i stykker — 2-3 sylteagur ker i stykker — 75 g blomkål i stykk er — 75 g knollselleri i stykker — grønne ur ter (per sille , dill, estr agon, seller istilker i stykker) — 100 g majones — 100 g ostemasse — salt — pepper B Hakk gulrøttene, sylteagur kene, blomkålen, de grønne urtene og knollseller ien fint. Bland fo[…]
-
Page 44
NORSK 44 Sukk erbrød P — 4 egg — 3 dl vann (35 c C) — en klype salt — 150 g sukker — 1-2 ts vaniljesukker — 150 g siktet mel — 3 g bakepulv er B Visp egg og vann i ca. 2 minutter . Tilsett sukker , vanilje og salt litt etter litt, og visp i ca. 1 minutt. Røren skal være litt tykk. V end inn melet og bakepulveret med en slikk epott. Stekes i ovn […]
-
Page 45
SVENSKA 45 Matberedar e — delar och tillbehör A) Hastighetsreglage B) Motordel C) Inbyggd säkerhetsspärr D) Beredningsskål E) Redskapshållare F) Lockets stift (aktiverar/inaktiverar säkerhetsbr ytaren) G) Beredningsskålens lock H) Matningstub I) Påtr yckare J) Lock med för var ingsfack K) Skivningsinsats — medel L) Rivningsinsats — fin M) […]
-
Page 46
◗ Om nätsladden är skadad, måste den bytas a v Philips, ett av Philips auktoriserat ser viceombud eller en likaledes kvalificerad person för att fara inte ska uppstå. ◗ Gör ren alla delar som k ommer i k ontakt med livsmedel omsorgsfullt innan du använder matberedar en första gången. ◗ När beredningsskålen har skruvats fast ordentl[…]
-
Page 47
C 3 K ontrollera att märk et på locket och pilen på skålen står precis mitt för varandra. Lock ets utskjutande del täcker då handtagsöppningen. Matningstuben och påtr yckaren C 1 Använd matningstuben för att tillsätta vätska och/eller fasta ingredienser . Använd påtr yckaren för att trycka ner ingredienser i matningstuben. C 2 Du k[…]
-
Page 48
◗ Kör inte matberedar en för länge när du hackar (hård)ost. Osten blir då för varm, smälter och klumpar sig. ◗ Använd inte kniv en för att hacka m ycket hår da ingredienser såsom kaff ebönor , musk otnöt och iskuber . Kniven blir slö a v det. Gör så här om maten fastnar på kniven eller insidan av beredningsskålen: 1 Stäng a[…]
-
Page 49
C 1 Sätt fast knådningsredska pet på redska pshållaren. 2 Lägg ingredienserna i ber edningsskålen. C 3 Stäng beredningsskålen med lock et. C 4 Stäng igen matningstuben genom att placera påtr yckaren i den. C 5 Välj lämplig hastighet för optimalt resultat. De rek ommenderade hastighetsinställningarna framgår a v tabellen. Emulgeringss[…]
-
Page 50
2 Rengör alltid de delar som varit i k ontakt med livsmedel i varmt vatten och diskmedel omedelbart när du är klar . ◗ Beredningsskålen, lock et, påtr yckaren och tillbehören kan maskindiskas. Maskindiskbarheten har provats enligt krav en i DIN EN 12875. Kåpan med för var ingsfacket får inte maskindiskas! Rengör kniven och insatserna yt[…]
-
Page 51
Kvantiteter och beredningstider Tillämpningar Sallader , råa grönsaker Pannkakor , våfflor Rätter med ströbröd, gratänger Desser ter , garner ingar Garner ingar , soppor , såser , gratänger Såser , pizzor , gratänger , fonduer Garner ingar , såser , bakver k, puddingar , mousser Metod Skär fr ukten/grönsakerna i bitar som passar matn[…]
-
Page 52
Tillämpningar Fr ukttår tor , äppelknyten, pajer , quicher Lyxbröd Puddingar , suffléer , maränger Såser , sylt, puddingar , barnmat Såser , soppor , garner ing, kr yddsmör Metod Använd kallt margar in och kallt vatten. Häll mjölet i skålen. Tillsätt margar inet skuret i 2 cm tjocka skivor . Blanda på den högsta hastigheten tills de[…]
-
Page 53
Tillämpningar Köttfär s Soppor , råa grönsaker , sallader Barn- och babymat Garner ing, grädde, glassmixer Metod Börja med att ta bor t senor och ben. Skär köttet i 3 cm stora kuber . Använd pulsinställningen för att få en grövre fär s. Skär grönsakerna i 3 cm stor a kuber och hacka dem sedan med kniven. Tillsätt endast lite väts[…]
-
Page 54
Majonnäs S — 2 äggulor eller 1 stor t ägg — 1 tesked senap — 1 tesked vinäger — 200 ml olja B Alla ingredienser ska var a r umstempererade. Placera emulgeringsskivan i beredningsskålen. Lägg äggulor na eller ägget, senapen och vinäger n i skålen. Välj hastighet 1 eller 2. Häll oljan, lite i taget, genom matningstuben på emulgeringsskiv[…]
-
Page 55
åsen över degen, men lämna ytter kanterna. Strö över de önskade ingredienser na. Strö till sist lite riven ost över pizzor na och droppa lite olivolja över dem. B Grädda pizzor na i 12-15 minuter . P otatis/zucchinigratäng Pgk — 375 gram potatis — en nypa salt — 1 zucchini (cir ka 250 gr am) — 1 krossad vitlöksklyfta — cir ka 40 gr am s[…]
-
Page 56
B Häll moset i beredningsskålen. B Koka upp lite vatten och lös gelatinet i det. B Blanda gelatinlösningen i laxmoset. B Placera emulgeringsskivan i beredningsskålen och vispa grädden genom att tr ycka in pulsknappen i cir ka 15 sekunder . B Vänd ner den vispade grädden i laxmoset med en träslev . B Häll ut moset i en skål, täck skålen[…]
-
Page 57
Tzatziki k — 1 gur ka — 2 dl yoghur t — 1 tesked oliv olja — 2 vitlöksklyftor — en nypa salt — 1 tesked f inhackad dill — några myntablad B Skala gur kan och r iv den på hastighet 1. Lägg den rivna gur kan i ett durkslag och låt den r inna av ordentligt. B Blanda ner de andra ingredienserna, utom myntabladen i gurkan. Kyl salladen i kylskåpet[…]
-
Page 58
SUOMI 58 Monitoimik one: osat ja lisäosat A) Nopeudensäädin B) Runko C) T ur vakytkin D) Kulho E) Lisäosanpidin F) Kannen kieleke (sulkee ja avaa tur vakytkimen) G) Kulhon kansi H) Syöttösuppilo I) Syöttöpainin J) Kannen suojus jossa säilytystila K) Viipalointiterä — puolipaksu L) Suikalointiterä — hieno M) Suikalointiterä — puolikar ke[…]
-
Page 59
◗ V aro ylittämästä tauluk ossa annettuja määriä ja valmistusaik oja. ◗ Vispilälevy , hienonnusterä ja taikinansek oitin on asetetta va kulhossa olevaan lisäosanpitimeen. ◗ V aro ylittämästä tauluk ossa annettuja määriä ja valmistusaik oja. ◗ K ulhoon merkittyä enimmäismäärää eli asteik on ylintä viivaa ei saa ylittä?[…]
-
Page 60
C 2 V oit sulkea syöttösuppilon syöttöpainimella, niin ettei mm. jauhopöly nouse ylös. Hienonnusterä ◗ Hienonnusterällä hienonnetaan, soseutetaan ja sek oitetaan. C 1 Nosta kulho rungolle. C 2 Poista hienonn usterästä teränsuojus. Hienonnusterän reunat o vat er ittäin terävät. V aro koskemasta niihin! C 3 Aseta hienonnusterä lis?[…]
-
Page 61
Viipalointi-, suikalointi- ja raastinterät Aseta valittu terä teräalustaan. T er ien leikkuureunat ovat h yvin terävät. V aro koskemasta niihin! C 1 Aseta teräalusta lisäosanpitimeen, joka on kulhossa. C 2 Aseta teräalusta lisäosanpitimeen, joka on kulhossa. 3 Laita kansi kulhon päälle. C 4 Laita aineet syöttösuppiloon. Leikkaa suuret […]
-
Page 62
Vispilälevy Vispilälevyllä valmistetaan majoneesi, vatkataan kerma ja munanvalkuaiset. C 1 Aseta vispilälevy kulhossa ole vaan lisäosanpitimeen. 2 Mittaa aineet kulhoon ja laita kansi kulhon päälle. C 3 V alitse lopputuloksen kannalta sopiva nopeus. Katso taulukosta suositelta vat nopeudet. Vinkk ejä ◗ V atkaa munanvalkuaiset huoneenlämp[…]
-
Page 63
Säilytys Micr oStore C ◗ Laita lisäosat (vispilälevy , hienonnusterä, taikinansek oitin, teräalusta) lisäosanpitimeen ja säilytä niitä kulhossa. T eräalusta tulee aina viimeiseksi. C ◗ K ulhon kannen suojuksessa v oidaan säilyttää kahta terää, suojuksen sisäpuolella näytetyllä ta valla.T erät työnnetään, ei paineta, paikal[…]
-
Page 64
Käyttötar koitus Salaatti, koristelu Leipä Pizza Piiraat, paistokset, quiche Ohje Aseta kur kku pystyyn syöttösuppiloon ja paina varovasti. Sekoita vesi (37 c C), hiiva ja sokeri. Lisää jauhot, öljy ja suola. Sekoita taikinaa noin 90 sekuntia. Anna taikinan nousta noin 30 minuuttia tai kunnes taikina ir toaa kulhon reunoista. Noudata leipä[…]
-
Page 65
Käyttötar koitus Kuivakakut Kuivakakut Erilaisiin r uokiin Erilaisiin r uokiin Jauhettu liha Keitot, raakasalaatit Ohje Käytä aineet huoneenlämpöisinä. Vatkaa pehmeä voi ja sokeri kuohkeaksi. Lisää maito, m unat ja jauhot. Kar kea rouhe: pitopainike; hieno rouhe: nopeus 2. Kuori sipulit ja leikkaa 4 osaan. Huomaa: kerr alla vähintään 1[…]
-
Page 66
Hedelmäkakku P — 450 g kivettömiä taateleita, puolitettuna — 200 g kuivattuja luumuja, puolitettuna — 650 g pekaanipähkinöitä — 150 g kookoshiutaleita — 300 g sokerihuur rettuja ananaspaloja — 1 tölkki (400 g) makeutettua maitotiivistettä — 1 tl vanilliiniesanssia B V oitele kaksi 20 cm pitkää kakkuvuokaa ja esikuumenna uuni 135 asteeseen[…]
-
Page 67
liikkua työpöydällä. Siir rä taikina toiseen kulhoon ja anna nousta liinan alla noin 30 minuuttia. B V aihda hienonnusterä kulhoon. Hienonna sipuli ja valkosipulinkynnet ja paista ne öljyssä pannulla läpikuultaviksi. B Lisää pannuun tomaattimurska ja mausteet. Anna kiehua hiljalleen noin 10 minuuttia. B Mausta suolalla, pippur illa ja so[…]
-
Page 68
B Lisää sipuleiden joukkoon suola, cayennenpippuri, sitr uunamehu, lohipala ja lohitölkin liemi. Soseuta tasaiseksi seokseksi nopeudella 2. B Kiehauta tilkka vettä ja liuota liivatelehdet siihen. B Kaada liivate-vesiseos monitoimikoneen kulhoon lohiseoksen päälle. Sekoita kaikki keskenään. B Lisää kermavaahto lohiseokseen ja sekoita nopea[…]
-
Page 69
Tzatziki-salaatti k — 1 kur kku — 2 dl maustamatonta jugur ttia — 1 r kl oliiviöljyä — 2 valkosipulinkynttä — 1 tl suolaa — 1 r kl hienonnettua tilliä — koristeeksi mintunlehtiä B Aseta suikalointiterä kulhoon. Kuor i kur kku ja suikaloi nopeudella 1. Nosta kur kkusuikaleet siivilään ja valuta hyvin. B Sekoita kulhossa kur kun joukkoon muut[…]
-
Page 70
D ANSK 70 F oodprocessor: Dele og tilbehør A) Hastighedskontrol B) Motorenhed C) Indbygget sikkerhedslås D) Skål E) Holder til tilbehør F) T ap på låg (aktiverer og deaktiverer sikkerhedsafbr yderen) G) Låg til skål H) Påfyldningstr agt I) Nedstopper J) Låg med opbevaringsr um K) Medium snitteskive L) Fin råkostskive M) Medium råkostski[…]
-
Page 71
ser viceværksted — eller af tilsvar ende kvalificerede personer f or at undgå enhver risik o ved efterfølgende brug af apparatet. ◗ Alle dele, der kommer i k ontakt med fødevar er , vask es grundigt af, før apparatet tages i brug. ◗ Når skålen er sat rigtigt på motorenheden, høres der et «klik». ◗ Pisk eskive, knivenhed og […]
-
Page 72
Påfyldningstragt og nedstopper C 1 Brug altid påfyldningstragten når der skal tilsættes væsk e og/eller faste ingredienser . Brug nedstopperen til at trykke faste ingredienser ned gennem påfyldningstragten. C 2 Nedstopperen kan også bruges til at lukk e for påfyldningstragten, så sprøjt undgås under tilberedningen. Knivenhed ◗ Knivenhe[…]
-
Page 73
Hvis ingredienserne sætter sig fast på kniven eller inder siden af skålen, gøres følgende: 1 Sluk for apparatet. 2 T ag låget af skålen. 3 Fjern madresterne v ed hjælp af spatlen. Tilbehør Knivenheden er meget skarp. Undgå berør ing af knivbladene! Skiverne må ikke br uges til hårde ingredienser som f.eks. ister ninger . C 1 Sær det v[…]
-
Page 74
C 4 Luk for påfyldningstragten v ed at sætte nedstopperen i. C 5 Vælg den rigtige hastighed, så resultatet bliver bedst m uligt. Se de anbefalede hastighedsindstillinger i tabellen. Pisk eskive Piskeskiven kan bruges til tilberedning af may onnaise samt til piskning af flødeskum og æggehvider . C 1 Sæt pisk eskiven på tilbehørsholder en i […]
-
Page 75
Vær meget for sigtig ved rengøring af kniv og skiver , da disse dele er meget skar pe! Sørg for , at de skærende dele på kniv og skiver ikke kommer i k ontakt med hårde genstande , da dette kan gøre dem sløve. Visse ingredienser kan forår sage misfar vning af tilbehørets ov erflader . Dette har ingen negativ effekt, og misfar vningen for […]
-
Page 76
Kvantiteter og tilber edningstider Anv endelse Salater , rå grøntsager Pandekager , vafler Retter med rasp, gratiner ing Desser ter , pynt Garniture , suppe, sauce, gratiner ing Sauce, pizza, gratiner ing, fondue Garniture , sauce, kager , budding, mousse Fremgangsmåde Skær ingredienserne i passende stykker , så de kan komme ned i påfyldnings[…]
-
Page 77
Anv endelse Fr ugttær ter , indbagninger o.lign. Brød Budding, soufflé, marengs Sauce, syltetøj, budding, babymad Sauce, suppe, garniture , kr yddersmør Fremgangsmåde Anvend k old margar ine og koldt vand. Kom melet op i skålen og tilsæt margar inen i stykker á ca. 2 cm. Mixes v ed max. hastighed indtil dejen er smuldret. Derefter tilsætt[…]
-
Page 78
Anv endelse Garniture Hakket kød Suppe, rå grøntsager , salat Baby- og børnemad Garniture , kagecreme, isdesser ter Fremgangsmåde Skræl løgene og skær dem i passende stykker , så de kan komme ned i påfyldningstragten. Bemær k: Anvend mindst 100g løg. Før st fjer nes eventuelle sener og ben. Skær kødet i tern á ca. 3 cm. Ønskes et g[…]
-
Page 79
Ma y onnaise S — 2 æggeblommer eller 1 stor t æg. — 1 tsk sennep — 1 tsk vineddike — 2dl olie B Ingredienser ne skal have stuetemperatur . Sæt piskeskiven ned i skålen. Kom æggeblommer eller æg, sennep og vineddike i skålen. Vælg hastighed 1 eller 2. Mens skiven drejer r undt, hældes olien langsomt ned i påfyldningstragten. Olien kan ogs?[…]
-
Page 80
Kartoffel-courgettegratin Pgk — 375g kar tofler — En knivspids salt — 1 courgette (ca. 250g) — 1 fed hvidløg, knust — Ca. 40g smør + smør til pensling — 2 tsk italienske eller Pro vence-ur ter — 1 stor t æg — 3/4 dl piskefløde — 3/4 dl mælk — P eber — 70g mellemlagret ost B Skræl og vask kartofler ne. B Sæt snitteskiven i skive-holderen og […]
-
Page 81
B Kom moussen over i et f ad, som tildækkes og sættes i køleskab i et par timer . B Pynt med brøndkarse . Sandwich-smørepålæg P — 2 små gulerødder i små stykker — 2-3 agur ker i små stykker — 75g blomkål i små b uketter — 75g knoldselleri i små stykker — Grønne ur ter (per sille , dild, estr agon, selleristilke i små stykker) — 100g[…]
-
Page 82
B Med undtagelse af mintbladene blandes de øvrige ingredienser med agur keskiverne . Afkøl salaten ved at komme den i en skål, som tildækkes og sættes i køleskab i en time. Pynt med mintblade inden ser ver ingen. D ANSK 82 Sukk erbrødskag e P — 4 æg — 0,3 dl vand (35 c C) — 1 knivspids salt — 150g sukker — 1 brev vanillesukker — 150g mel — […]
-
Page 83
83 : A) B) C) D) ?[…]
-
Page 84
Philips. .[…]
-
Page 85
C 2 . . ?[…]
-
Page 86
. PULSE / 0 . ?[…]
-
Page 87
6 . ?[…]
-
Page 88
◗ , . ?[…]
-
Page 89
C ◗ ( , , , ) ?[…]
-
Page 90
, , , , ?[…]
-
Page 91
, , , , , ?[…]
-
Page 92
, , , , , ?[…]
-
Page 93
, , ?[…]
-
Page 94
B . . B ?[…]
-
Page 95
B : — 300ml ( ) — 1 .. ( ) — — — ?[…]
-
Page 96
. . B . B ?[…]
-
Page 97
— — B , , , , . […]
-
Page 98
u 4222 002 23584 www .philips.com[…]
Инструкция по эксплуатации Philips HD 2430
Страница 8

Когда зеленый индикатор нагрева пог аснет, вылейте взбитое жидкое тесто на нижнюю
пластину для приготовления вафель (рис. 15).
Вылейте около 100 мл взбитого жидкого теста на нижнюю пластину для приготовления
скандинавских вафель и около 180 мл взбитого жидкого теста на нижнюю пластину для
приготовления вафель по-фламандски.
Закройте прибор (рис. 16).
Осторожно прикройте взбитое жидкое тесто верхней пластиной, НЕ ЗАЩЕЛКИВАЯ ее. Это
обеспечит приготовление воздушных вафель лучшего качества.
Во время приготовления зеленый индикатор нагрева будет периодически загораться,
сигнализируя о включении и отключении нагревательного элемента для поддержания нужной
температуры.
Спустя 5-7 минут откройте прибор.
Проверьте, приобрели ли вафли золотисто-коричневый цвет. Время, необходимое для
приготовления хрустящих вафель с золотистой или коричневой корочкой, определяется
сортом взбитого жидкого теста и вашим вкусом.
Извлеките вафли (рис. 17).
Используйте деревянные или пластмассовые кухонные принадлежности (например,
лопаточку) для извлечения вафель из вафельницы. Не используйте металлические, острые или
абразивные кухонные приспособления. Дайте вафлям остыть на решетке до приобретения
ими хрустящих свойств.
Длительное время приготовления позволяет получить более темные вафли, а при быстром
приготовлении вафли получаются светлыми.
Чтобы продолжить приготовление вафель, вылейте следующую порцию взбитого жидкого
теста на нижнюю пластину, как только погаснет зеленый индикатор нагрева.
После завершения работы отключите прибор от розетки электросети.
1 столовая ложка = 15 мл
1 чайная ложка = 5 мл
1 чашка = 100 мл
◗ Хрустящие вафли (6-10 вафель)
200 мл холодной воды
200 г пшеничной муки
300 мл сливок (40% жирности)
Смешайте муку с водой. Хорошо перемешайте до получения однородного взбитого жидкого
теста. Взбейте сливки до получения густой пены и смешайте их с взбитым жидким
тестом. Приготовьте вафли.
◗ Традиционные вафли (6-10 вафель)
1,5 чашки молока
3 яйца
7 столовых ложек растительного масла
1,75 чашки муки
1 столовая ложка сахара
2 чайных ложки пекарского порошка
1/2 чайной ложки соли
Источник
Инструкция и руководство для
Philips HD 2430 на русском
11 страниц подробных инструкций и пользовательских руководств по эксплуатации
Radio DAB+ Philips AE5220
Кофеварка Philips HD7459/20 — Обзор. Возможности. Описание кофеварки Philips!
Обзор Кофеварки PHILIPS HD7140 / Как Она Готовит Кофе
Кофеварка Philips 7459
Кофеварка PHILIPS HD7434 Мал да удал! Coffee maker
Функция поддержания температуры чайник Филипс
Кофеварка PHILIPS HD7447/00, капельная
Кофеварка PHILIPS HD7434 1 Год Итоги.
Тостеры Philips
HD2433, HD2432, HD2431, HD2430
Общее описание A Система Vario Lock.
Система Vario Lock`
Съёмные пластины (можно мыть в посудомоечной машине): пластины для бутербродов
(B1 cut & seal — пластина, которая обрезает и сжимает края бутерброда, или
прямоугольная пластина), пластины для вафель по-фламандски скандинавских вафель (B2 ),
пластины-гриль (B3).
Механизм автоматической блокировки
Приспособление для хранение шнура питания
Кнопки снятия блокировки съёмных пластин
Система Vario Lock`
Шарнирная система автоматически подстраивается под размер устанавливаемой съёмной
пластины.
Модель HD2430: для приготовления вафель по-фламандски, для приготовления
обрезанных бутербродов со сжатыми краями cut & seal, пластины-гриль.
Модель HD2431: для приготовления вафель по-фламандски, для приготовления
бутербродов прямоугольной формы, пластины-гриль.
Модель HD2422: для приготовления скандинавских вафель (в форме сердечка), для
приготовления обрезанных бутербродов со сжатыми краями cut & seal, пластины-гриль.
Модель HD2433: для приготовления скандинавских вафель (в форме сердечка), для
приготовления бутербродов прямоугольной формы, пластины-гриль.
Механизм автоматической блокировки
Механизм автоматической блокировки универсального прибора 3-в-1. Механизм
автоматической блокировки не включается для наилучшего приготовления вафель при
установке пластины для вафель по-фламандски.
До начала эксплуатации прибора внимательно ознакомьтесь с настоящим руководством и
сохраните его для дальнейшего использования в качестве справочного материала.
◗ Перед подключением прибора убедитесь, что номинальное напряжение, указанное на
нижней панели прибора, соответствует напряжению местной электросети.
◗ Вставьте вилку шнура питания прибора в заземлённую розетку электросети.
◗ В случае повреждения сетевого шнура, его необходимо заменить. Чтобы обеспечить
безопасную эксплуатацию прибора, заменяйте шнур только в торговой организации
Philips, в авторизованном сервисном центре Philips или в сервисном центре с
персоналом аналогичной квалификации.
◗ Запрещается погружать прибор или сетевой шнур в воду или другие жидкости.
◗ Установите прибор так, чтобы:
— сетевой шнур не свисал с края стола или места установки прибора;
— включенный прибор был недоступен для детей;
— прибор был установлен на ровную устойчивую поверхность и вокруг прибора было
После завершения работы отключите прибор от розетки электро.
◗ После завершения работы отключите прибор от розетки электросети.
◗ Храните прибор в недоступном для детей месте.
◗ Не оставляйте включённый прибор без присмотра. Не размещайте работающий прибор
под или рядом с занавесками или иными легковоспламеняющимися материалами, а
также под навесными шкафами, поскольку хлеб может загореться.
◗ Не прикасайтесь к сильно нагретым металлическим частям включенного прибора.
◗ Дайте прибору полностью остыть, прежде чем сменить пластины, очистить или
поместить для хранения.
◗ После установки в прибор съемных пластин, убедитесь, что они установлены правильно.
◗ Не касайтесь пластин острыми предметами или абразивными материалами, чтобы не
повредить антипригарное покрытие.
◗ Всегда очищайте прибор после использования.
◗ Следите, чтобы шнур питания не находился близко к горячим поверхностям прибора и
не допускайте контакта шнура питания с горячими поверхностями.
◗ Съёмные пластины необходимо разогреть перед тем, как поместить продукты между
Перед первым использованием
Снимите с прибора все наклейки и очистите его влажной тканью.
Нажмите на кнопки снятия блокировки съёмных пластин (одна для верхней пластины и одна
для нижней пластины), затем выньте пластины, взявшись за ручки.
Выньте пластины из прибора (рис. 1).
Очистите каждую пластину с помощью мягкой ткани или вымойте в горячей воде с
мылом или в посудомоечной машине (рис. 2).
Вытрите пластины и снова установите их в прибор.
При первом включении прибора может выделяться немного дыма. Это нормально.
◗ Можно выбрать требуемую длину шнура питания, намотав его часть на приспособление
для хранения шнура питания (рис. 18).
Приготовление горячих бутербродов
При приготовлении бутербродов можно использовать два типа пластин для бутербродов:
пластину для бутербродов cut & seal, которая обрезает и сжимает края бутерброда, и
пластину прямоугольной формы. Пластина cut & seal сжимает края бутерброда, и обрезает его
до треугольной формы. Пластина прямоугольной формы только сжимает края прямоугольного
бутерброда.
Не оставляйте включённый прибор без присмотра.
Установите съемные пластины в прибор (рис. 3).
При правильной установке пластин должен прозвучать щелчок.
Смажьте пластины небольшим количеством сливочного или растительного масла.
Выберите режим приготовления бутербродов, установив ручку термостата в положение
(рис. 4).
Вставьте вилку в розетку электросети.
Загорятся красный индикатор питания и зеленый индикатор нагрева.
Подготовьте продукты для приготовления бутерброда.
Для каждого бутерброда вам потребуются два кусочка хлеба и подходящая начинка. См.
предлагаемые варианты главы «Рецепты приготовления горячих бутербродов». Для получения
равномерно поджаренной золотисто.
равномерно поджаренной золотисто-коричневой корочки, смажьте небольшим количеством
масла стороны хлеба, прилегающие к пластинам.
Прибор готов к работе, как только погаснет зеленый индикатор нагрева (рис. 5).
Положите на нижнюю пластину два кусочка хлеба вниз сторонами, смазанными маслом,
распределите начинку на каждом кусочке и накройте еще двумя кусочками хлеба, смазав
верхние стороны маслом. При необходимости можно приготовить только один бутерброд.
Для оптимального сжатия не кладите начинку слишком близко к краям ломтиков.
Закройте прибор (рис. 6).
Прижмите хлеб верхней пластиной до щелчка механизма автоматической блокировки с
фиксацией на нижней пластине.
Во время приготовления зеленый индикатор нагрева будет периодически загораться,
сигнализируя о включении и отключении нагревательного элемента для поддержания нужной
температуры.
Спустя 4-6 минут откройте прибор.
Проверьте, приобрел ли поджаренный бутерброд золотисто-коричневый цвет. Время
приготовления бутербродов определяется сортом хлеба, характером начинки и вашим вкусом
в отношении степени подрумянивания: от золотистого до коричневого цвета.
Извлеките бутерброды (рис. 7).
Используйте деревянные или пластмассовые кухонные принадлежности (например,
лопаточку) для извлечения поджаренных бутербродов из прибора. Не используйте
металлические, острые или абразивные кухонные приспособления.
Чтобы продолжить приготовление горячих бутербродов, поместите еще два кусочка хлеба на
нижнюю пластину, как только погаснет зеленый индикатор нагрева.
После завершения работы отключите прибор от розетки электросети.
Рецепты приготовления горячих бутербродов
◗ Бутерброд с ветчиной, сыром и ананасом
4 ломтика белого хлеба
2 кусочка сыра
2 кусочка ананаса
2 тонких ломтика ветчины
Порошок карри
Дайте прибору нагреться.
Положите на два кусочка хлеба сыр, ананас, затем ветчину. Посыпьте ветчину порошком
карри и накройте сверху еще двумя кусочками хлеба.
Следуйте рекомендациям главы «Приготовление горячих бутербродов».
◗ Бутерброд с помидорами, сыром и анчоусами
4 ломтика белого хлеба
1-2 помидора (нарезанных ломтиками)
2 столовые ложки тертого сыра Пармезан
6 анчоусов
Паприка, майоран
Дайте прибору нагреться.
Положите ломтики помидора, анчоусы и тертый сыр на два кусочка хлеба. Посыпьте
паприкой, майораном и накройте сверху еще двумя кусочками хлеба.
Следуйте рекомендациям главы «Приготовление горячих бутербродов».
Поджаривание на решетке.
Поджаривание на решетке (пластины-гриль)
Не оставляйте включенный прибор с пластиной-гриль без присмотра.
Установите в прибор пластины-гриль (рис. 8).
При правильной установке пластин-гриль должен прозвучать щелчок.
Смажьте пластины небольшим количеством сливочного или растительного масла.
Установите ручку термостата в подходящее для обжаривания данных продуктов
положение (1=слабый нагрев, 5= сильный нагрев) (рис. 9).
Вставьте вилку в розетку электросети.
Загорятся красный индикатор питания и зеленый индикатор нагрева.
Продукты можно поместить на нижнюю пластину-гриль, как только погаснет зеленый
индикатор нагрева (рис. 10).
Для получения наилучших результатов, помещайте продукты в центр нижней пластины-гриль.
Во время приготовления зеленый индикатор нагрева будет периодически загораться,
сигнализируя о включении и отключении нагревательного элемента для поддержания нужной
температуры.
Закройте прибор (рис. 11).
Прижмите бутерброд верхней пластиной-гриль до щелчка механизма автоматической
блокировки с фиксацией на нижней пластине. Верхняя пластина-гриль помещается над
продуктами для равномерного обжаривания со всех сторон.
При обжаривании толсто нарезанных продуктов не прижимайте верхнюю пластину вниз для
срабатывания автоблокировочного механизма. Просто оставьте её сверху на продуктах.
Спустя 3-5 минут раскройте пластины-гриль.
Время, требующееся для поджаривания продуктов, определяется их типом, толщиной и вашим
вкусом.
См. таблицу, содержащую сведения о времени приготовления продуктов на гриле.
Выньте приготовленные продукты (рис. 12).
Используйте деревянные или пластмассовые кухонные принадлежности (например,
лопаточку) для извлечения из прибора поджаренных продуктов. Не используйте
металлические, острые или абразивные кухонные приспособления.
Чтобы продолжить поджаривание, поместите следующую порцию продуктов на нижнюю
пластину, как только погаснет зеленый индикатор нагрева.
Для получения наилучших результатов, прежде чем положить следующую порцию продуктов
на пластину-гриль, удалите с неё излишки жира с помощью кулинарной бумаги.
После завершения работы отключите прибор от розетки электросети.
В таблице указаны рецепты приготовления различных блюд на пластинах-гриль. Указанное в
таблице время поджаривания не включает время нагрева прибора.
Во время поджаривания зеленый индикатор готовности прибора попеременно загорается и
гаснет, сообщая о включении и выключении нагревательных элементов для поддержания
требуемой температуры. При этом можно продолжать готовить.
Можно установить время поджаривания продуктов и температурный режим в соответствии с
вашим вкусом. При установке следует учитывать тип продуктов (например, мяса), толщину
кусочков и их температуру.
Источник