

Operation Manual
CD Receiver
DEH-P4950MP
English
Español
Português (B)
Contents
Thank you for buying this Pioneer product.
Please read through these operating instructions so you will know how to operate
your model properly. After you have finished reading the instructions, keep this man-
ual in a safe place for future reference.
Before You Start
About this unit 4
About WMA 4
About MP3 4
About AAC 4
iPod® compatibility 4
Visit our website 5
Protecting your unit from theft 5
– Removing the front panel 5
– Attaching the front panel 5
Use and care of the remote control 5
– Installing the battery 5
– Using the remote control 6
Basic Operations
What’s What 7
– Head unit 7
– Remote control 8
Turning the unit on and selecting a
source 8
Adjusting the volume 8
Turning the unit off 8
Tuner
Listening to the radio 9
Introduction of advanced tuner operation 9
Storing and recalling broadcast
frequencies 9
Storing the strongest broadcast
frequencies 10
Tuning in strong signals 10
Built-in CD Player
Playing a CD 11
Introduction of advanced built-in CD player
operation 11
Repeating play 11
Playing tracks in random order 12
Scanning tracks of a CD 12
Pausing CD playback 12
Using compression and BMX 12
Searching every 10 tracks in the current
disc 12
Using disc title functions 13
– Entering disc titles 13
– Displaying disc titles 13
Using CD TEXT functions 14
– Displaying text information on CD TEXT
discs 14
WMA/MP3/AAC/WAV Player
Playing WMA/MP3/AAC/WAV files 15
Introduction of advanced built-in CD player
(WMA/MP3/AAC/WAV) operation 16
Repeating play 16
Playing tracks in random order 16
Scanning folders and tracks 16
Pausing WMA/MP3/AAC/WAV playback 17
Using compression and BMX 17
Searching every 10 tracks in the current
folder 17
Displaying text information on WMA/MP3/
AAC/WAV disc 18
– When playing back a WMA/MP3/AAC
disc 18
– When playing back a WAV disc 18
Multi-CD Player
Playing a CD 19
Introduction of advanced multi-CD player
operation 19
Repeating play 20
Playing tracks in random order 20
Scanning CDs and tracks 20
Pausing CD playback 21
Using compression and bass emphasis 21
Using ITS playlists 21
2
En
Contents
English
– Creating a playlist with ITS
programming 21
– Playback from your ITS playlist 22
– Erasing a track from your ITS
playlist 22
– Erasing a CD from your ITS playlist 22
Using disc title functions 22
– Entering disc titles 23
– Displaying disc titles 23
Using CD TEXT functions 23
– Displaying text information on CD TEXT
discs 24
Playing songs on iPod
Listening to songs on your iPod 25
Browsing for a song 25
Displaying text information on iPod 26
Introduction of advanced iPod adapter
operation 26
Repeating play 26
Playing songs in a random order
(shuffle) 26
Pausing a song 27
Audio Adjustments
Introduction of audio adjustments 28
Using balance adjustment 28
Using the equalizer 28
– Recalling equalizer curves 28
– Adjusting equalizer curves 29
– Fine-adjusting equalizer curve 29
Adjusting loudness 29
Using subwoofer output 30
– Adjusting subwoofer settings 30
Using the high pass filter 30
Boosting the bass 31
Front image enhancer (F.I.E.) 31
Adjusting source levels 31
Other Functions
Adjusting initial settings 32
Setting the clock 32
Setting the FM tuning step 32
Setting the AM tuning step 32
Switching the auxiliary setting 33
Setting the rear output and subwoofer
controller 33
Turning the clock display on or off 33
Using the AUX source 34
– About AUX connection method 34
– Selecting AUX as the source 34
– Setting the AUX title 34
Additional Information
Understanding built-in CD player error
messages 35
Handling guideline of discs and player 35
Dual Discs 36
WMA, MP3, AAC and WAV files 36
– Example of a hierarchy 36
– Compressed audio compatibility 37
Specifications 38
En
3
Section
01
Before You Start
About this unit
CAUTION
! Do not allow this unit to come into contact
with liquids. Electrical shock could result.
Also, this unit damage, smoke, and overheat
could result from contact with liquids.
! Keep this manual handy as a reference for op-
erating procedures and precautions.
! Always keep the volume low enough so that
you can hear sounds from outside the vehicle.
! Protect this unit from moisture.
! If the battery is disconnected or discharged,
the preset memory will be erased and must be
reprogrammed.
! If this unit does not operate properly, contact
your dealer or nearest authorized Pioneer Service Station.
About WMA
The Windows Media™ logo printed on the box
indicates that this unit can play back WMA
data.
WMA is short for Windows Media™ Audio
and refers to an audio compression technology that is developed by Microsoft
Corporation. WMA data can be encoded by
using Windows Media Player version 7 or
later.
Windows Media and the Windows logo are trademarks or registered trademarks of Microsoft
Corporation in the United States and/or other
countries.
Note
This unit may not operate correctly depending on
the application used to encode WMA files.
About MP3
Supply of this product only conveys a license
for private, non-commercial use and does not
convey a license nor imply any right to use
this product in any commercial (i.e. revenuegenerating) real time broadcasting (terrestrial,
satellite, cable and/or any other media), broadcasting/streaming via internet, intranets and/
or other networks or in other electronic content distribution systems, such as pay-audio or
audio-on-demand applications. An independent license for such use is required. For details, please visit
http://www.mp3licensing.com.
About AAC
AAC is short for Advanced Audio Coding and
refers to an audio compression technology
standard used with MPEG 2 and MPEG 4.
Several applications can be used to encode
AAC files, but file formats and extensions differ depending on the application which is
used to encode.
This unit plays back AAC files encoded by
®
iTunes
version 6.05 and earlier.
iTunes is a trademark of Apple Computer, Inc.,
registered in the U.S. and other countries.
iPod®compatibility
iPod is a trademark of Apple Computer, Inc.,
registered in the U.S. and other countries.
4
En
Before You Start
Section
01
English
Visit our website
Visit us at the following site:
! We offer the latest information about
Pioneer Corporation on our website.
Protecting your unit from
theft
The front panel can be detached to deter theft.
Important
! Handle gently when removing or attaching
the front panel.
! Avoid subjecting the front panel to excessive
shocks.
! Keep the front panel out of direct sunlight and
high temperatures.
Removing the front panel
1 Press DETACH to release the front
panel.
Attaching the front panel
1 Slide the front panel to the left until it
clicks.
Front panel and the head unit are jointed on
the left side. Make sure that the front panel
has been jointed to the head unit.
2 Press the right side of the front panel
until it is firmly seated.
# If you can’t attach the front panel to the head
unit successfully, try again. Front panel may be
damaged if you attach the front panel forcedly.
Use and care of the remote
control
Installing the battery
Slide the tray out on the back of the remote
control and insert the battery with the plus (+)
and minus (–) poles pointing in the proper direction.
2 Grab the front panel and remove.
3 Put the front panel into provided protective case for safe keeping.
WARNING
Keep the battery out of the reach of children.
Should the battery be swallowed, immediately
consult a doctor.
CAUTION
! Use only one CR2025 (3 V) lithium battery.
! Remove the battery if the remote control is not
used for a month or longer.
! Danger of explosion if battery is incorrectly re-
placed. Replace only with the same or equivalent type.
En
5
Section
01
Before You Start
! Do not handle the battery with metallic tools.
! Do not store the battery with metallic materi-
als.
! In the event of battery leakage, wipe the re-
mote control completely clean and install a
new battery.
! When disposing of used batteries, please
comply with governmental regulations or environmental public institutions’ rules that
apply in your country/area.
Using the remote control
Point the remote control in the direction of the
front panel to operate.
Important
! Do not store the remote control in high tem-
peratures or direct sunlight.
! The remote control may not function properly
in direct sunlight.
! Do not let the remote control fall onto the
floor, where it may become jammed under the
brake or accelerator pedal.
6
En
Basic Operations
Section
02
English
g
What’s What
Head unit
1 AUDIO button
Press to select various sound quality controls.
2 ATT button
Press to quickly lower the volume level, by
about 90%. Press once more to return to the
original volume level.
3 DISPLAY button
Press to select different displays.
4 SOURCE button, VOLUME
This unit is turned on by selecting a source.
Press to cycle through all the available
sources.
Rotate it to increase or decrease the volume.
b
d
f
e
7 CLOCK button
Press to change to the clock display.
8 DETACH button
Press to remove the front panel from the
head unit.
9 1 to 6 buttons
Press for preset tuning and disc number
search when using a multi-CD player.
a a/b/c/d buttons
Press to perform manual seek tuning, fast
forward, reverse and track search controls.
Also used for controlling functions.
b BAND button
Press to select among three FM bands and
one AM band and to cancel the control
mode of functions.
c EQ button
Press to select various equalizer curves.
2
a
1
3
5 Disc loading slot
Insert a disc to play.
6 EJECT button
Press to eject a CD from your built-in CD
player.
d FUNCTION button
Press to select functions.
En
7

Section
02
Basic Operations
Remote control
Operation is the same as when using the buttons on the head unit. See the explanation of
the head unit about the operation of each button with the exception of PAUSE, which is ex-
plained below.
e PAUSE button
Press to turn pause on or off.
f SOURCE button
This unit is turned on by selecting a source.
Press to cycle through all the available
sources.
g VOLUME button
Press to increase or decrease the volume.
Turning the unit on and
selecting a source
You can select a source you want to listen to.
To switch to the built-in CD player, load a disc
in the unit (refer to page 11).
% Press SOURCE to select a source.
Press SOURCE repeatedly to switch between
the following sources:
Tuner—Television—Built-in CD player—
Multi-CD player—iPod—External unit 1—
External unit 2—AUX1—AUX2
! AUX1 is set to on by default. Turn off the AUX1
when not in use (refer to Switching the auxili-
ary setting on page 33).
! External unit refers to a Pioneer product (such
as one available in the future) that, although
incompatible as a source, enables control of
basic functions by this unit. Two external units
can be controlled by this unit. When two external units are connected, the allocation of
them to external unit 1 or external unit 2 is
automatically set by this unit.
! When this unit’s blue/white lead is connected
to the vehicle’s auto-antenna relay control
terminal, the vehicle’s antenna extends when
this unit’s source is turned on. To retract the
antenna, turn the source off.
Adjusting the volume
% Use VOLUME to adjust the sound
level.
Turning the unit off
% Press SOURCE and hold until the unit
turns off.
Notes
! In the following cases, the sound source will
not change:
— When there is no unit corresponding to the
selected source connected to this unit.
— When there is no disc in the unit.
— When there is no magazine in the multi-
CD player.
— When the AUX (auxiliary input) is set to off
(refer to page 33).
8
En
Tuner
Section
03
English
Listening to the radio
Important
If you are using this unit in North, Central or
South America, reset the AM tuning step (see
Setting the AM tuning step on page 32).
1 Band indicator
Shows which band the radio is tuned to, AM
or FM.
2 Frequency indicator
Shows the frequency to which the tuner is
tuned.
3 Stereo (5) indicator
Shows when the selected frequency is
being broadcast in stereo.
4 Preset number indicator
Shows which preset has been selected.
5 LOC indicator
Shows when local seek tuning is on.
3 To perform manual tuning, briefly press
c or d.
The frequencies move up or down step by
step.
4 To perform seek tuning, press and hold
c or d for about one second and release.
The tuner will scan the frequencies until a
broadcast strong enough for good reception is
found.
# You can cancel seek tuning by briefly pressing
c or d.
# If you press and hold c or d you can skip sta-
tions. Seek tuning starts as soon as you release
the button.
Introduction of advanced
tuner operation
% Press FUNCTION to display the function
names.
Press FUNCTION repeatedly to switch between the following functions:
BSM (best stations memory)—LOCAL (local
seek tuning)
# To return to the frequency display, press
BAND.
# If you do not operate the function within about
30 seconds, the display is automatically returned
to the frequency display.
1 Press SOURCE to select the tuner.
Press SOURCE until you see TUNER displayed.
2 Press BAND to select a band.
Press BAND until the desired band (F1, F2, F3
for FM or AM) is displayed.
Storing and recalling
broadcast frequencies
If you press any of the preset tuning buttons 1
to 6 you can easily store up to six broadcast
frequencies for later recall with the touch of a
button.
! Up to 18 FM stations, six for each of the
three FM bands, and six AM stations can
be stored in memory.
En
9
Section
03
Tuner
% When you find a frequency that you
want to store in memory, press one of preset tuning buttons 1 to 6 and hold until the
preset number stops flashing.
The number you have pressed will flash in the
preset number indicator and then remain lit.
The selected radio station frequency has been
stored in memory.
The next time you press the same preset tuning button the radio station frequency is recalled from memory.
# You can also use a and b to recall radio sta-
tion frequencies assigned to preset tuning buttons 1 to 6.
Storing the strongest
broadcast frequencies
BSM (best stations memory) lets you automatically store the six strongest broadcast frequencies under preset tuning buttons 1 to 6.
Once stored you can tune in to those frequencies with the touch of button.
! Storing broadcast frequencies with BSM
may replace broadcast frequencies you
have saved using buttons 1 to 6.
2 Press a to turn local seek tuning on.
Local seek sensitivity (e.g., LOCAL 2) appears
in the display.
# To turn local seek tuning off, press b.
3 Press c or d to set the sensitivity.
There are four levels of sensitivity for FM and
two levels for AM:
FM: LOCAL 1—LOCAL 2—LOCAL 3—
LOCAL 4
AM: LOCAL 1—LOCAL 2
The LOCAL 4 setting allows reception of only
the strongest stations, while lower settings let
you receive progressively weaker stations.
1 Press FUNCTION to select BSM.
2 Press a to turn BSM on.
Six strongest broadcast frequencies will be
stored in the order of their signal strength.
# To cancel the storage process, press b.
Tuning in strong signals
Local seek tuning lets you tune in only those
radio stations with sufficiently strong signals
for good reception.
1 Press FUNCTION to select LOCAL.
10
En

Built-in CD Player
Section
04
English
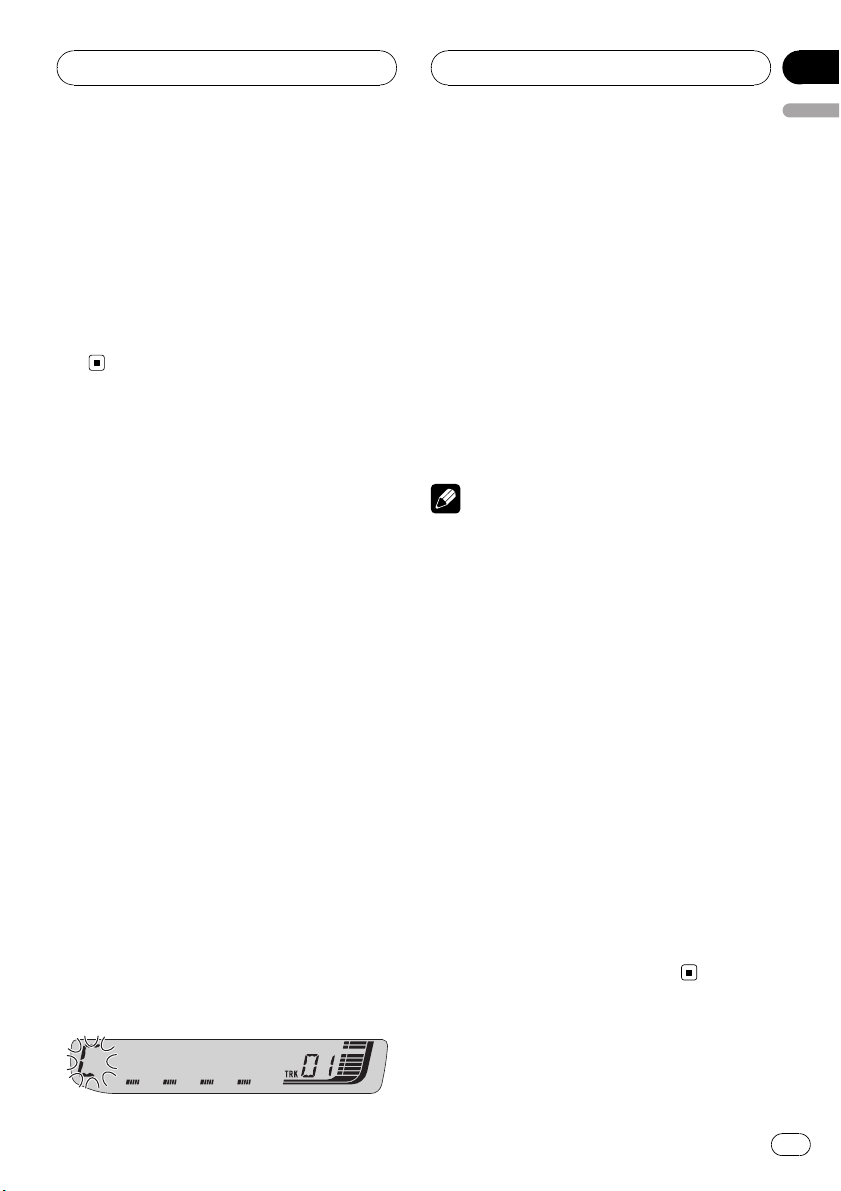
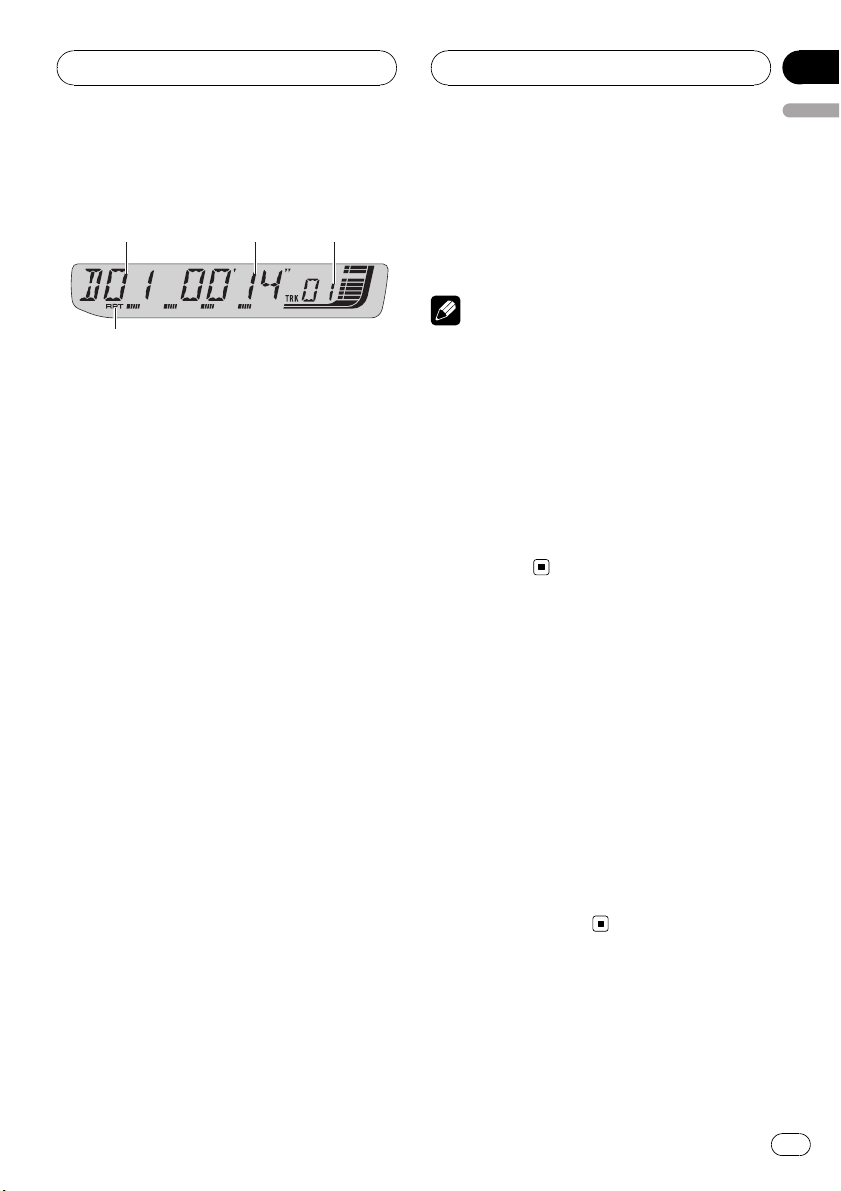
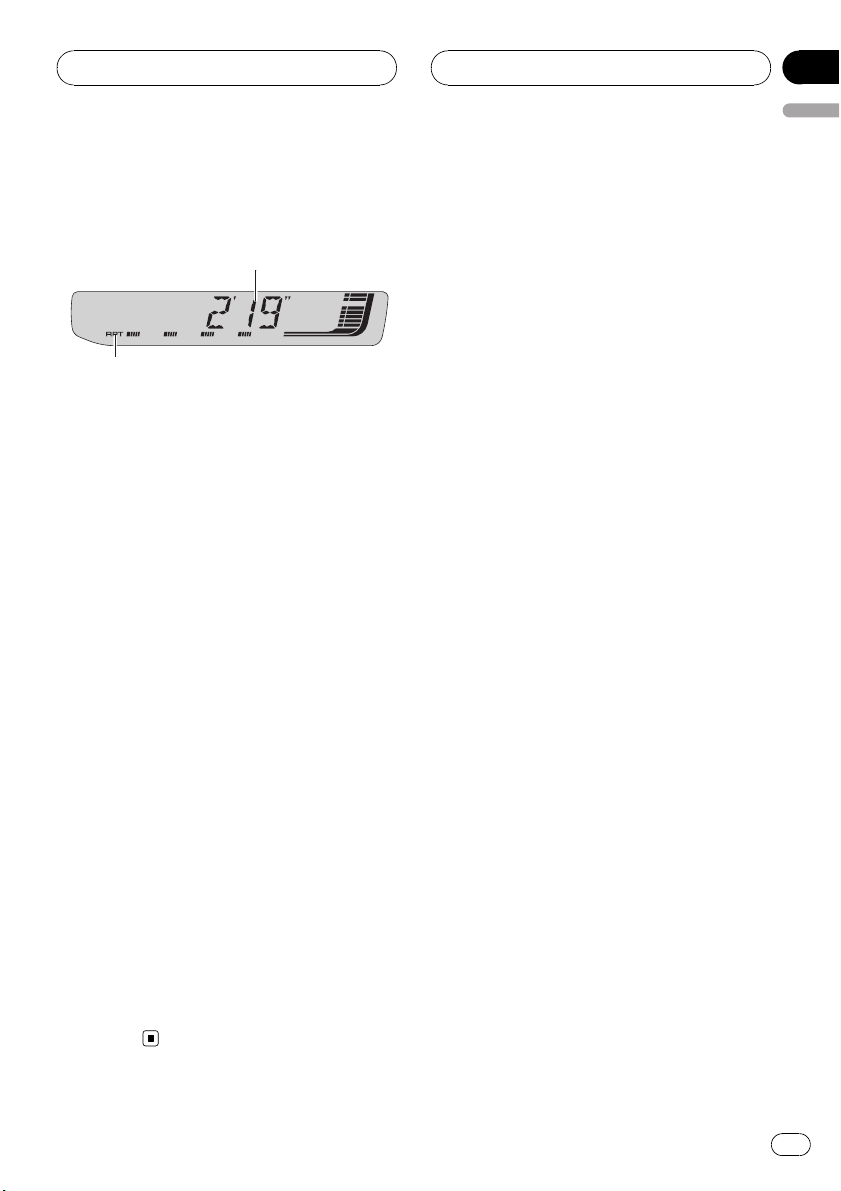
Playing a CD
1 Play time indicator
Shows the elapsed playing time of the current track.
2 Track number indicator
Shows the track number currently playing.
3 RPT indicator
Shows when repeat play is turned on.
1 Insert a CD into the CD loading slot.
Playback will automatically start.
# Be sure to turn up the label side of a disc.
# After a CD has been inserted, press SOURCE
to select the built-in CD player.
# You can eject a CD by pressing EJECT.
2 To perform fast forward or reverse,
press and hold c or d.
# If you select ROUGH, pressing and holding c
or d enables you to search every 10 tracks in the
current disc. (Refer to Searching every 10 tracks in
the current disc on the next page.)
3 To skip back or forward to another
track, press c or d.
Notes
! Read the precautions with discs and player on
page 35.
! If an error message such as ERROR-11 is dis-
played, refer to Understanding built-in CD
player error messages on page 35.
! When a CD TEXT disc is inserted, text informa-
tion currently selected on Using CD TEXT func-
tions on page 14 automatically begins to
scroll in the display.
Introduction of advanced
built-in CD player operation
% Press FUNCTION to display the function
names.
Press FUNCTION repeatedly to switch between the following functions:
RPT (repeat play)—RDM (random play)—
SCAN (scan play)—PAUSE (pause)—COMP
(compression and BMX)—FF/REV (search
method)
# To return to the playback display, press BAND.
# If you do not operate the function within about
30 seconds, the display is automatically returned
to the frequency display.
Repeating play
Repeat play lets you hear the same track or
disc over again.
1 Press FUNCTION to select RPT.
2 Press c or d to select the repeat range.
! DSC – Repeat the current disc
! TRK – Repeat just the current track
Note
If you perform track search or fast forward/reverse during TRK, the repeat play range changes
to DSC.
En
11
Section
04
Built-in CD Player
Playing tracks in random order
Random play lets you play back tracks on the
CD in a random order.
1 Press FUNCTION to select RDM.
2 Press a to turn random play on.
RDM :ON appears in the display. Tracks will
play in a random order.
# To turn random play off, press b.
Scanning tracks of a CD
Scan play lets you hear the first 10 seconds of
each track on the CD.
1 Press FUNCTION to select SCAN.
2 Press a to turn scan play on.
SCAN :ON appears in the display. The first 10
seconds of each track is played.
3 When you find the desired track press
b to tur n scan play off.
# If the display has automatically returned to
the playback display, select SCAN again by pressing FUNCTION.
2 Press a to turn pause on.
PAUSE:ON appears in the display. Play of the
current track pauses.
# To turn pause off, press b.
Using compression and BMX
Using the COMP (compression) and BMX
functions let you adjust the sound playback
quality of this unit. Each of the functions has a
two-step adjustment. The COMP function balances the output of louder and softer sounds
at higher volumes. BMX controls sound reverberations to give playback a fuller sound. Listen to each of the effects as you select
through them and use the one that best enhances the playback of the track or CD that
you are listening to.
1 Press FUNCTION to select COMP.
2 Press a or b to select your favorite setting.
COMP OFF—COMP 1—COMP 2—
COMP OFF—BMX 1—BMX 2
Note
After scanning of a CD is finished, normal playback of the tracks will begin again.
Pausing CD playback
Pause lets you temporarily stop playback of
the CD.
1 Press FUNCTION to select PAUSE.
Press FUNCTION until PAUSE appears in the
display.
12
En
Searching every 10 tracks in
the current disc
You can switch the search method between
fast forward/reverse and searching every 10
tracks. Selecting ROUGH enables you to
search every 10 tracks.
1 Press FUNCTION to select FF/REV.
# If the search method ROUGH has been pre-
viously selected, ROUGH will be displayed.
2 Press d to select ROUGH.
! FF/REV – Fast forward and reverse
! ROUGH – Searching every 10 tracks
Built-in CD Player
Section
04
English
# To select FF/REV, press c.
3 Press BAND to return to the playback
display.
4 Press and hold c or d to search every
10 tracks on a disc.
# If the rest of track number is less than 10,
press and hold c or d recalls the first (last)
one.
Using disc title functions
You can input CD titles and display the title.
The next time you insert a CD for which you
have entered a title, the title of that CD will be
displayed.
Entering disc titles
Use the disc title input feature to store up to
48 CD titles in the unit. Each title can be up to
8 characters long.
1 Play the CD that you want to enter a
title for.
2 Press FUNCTION and hold until TITLE IN
appears in the display.
# When playing a CD TEXT disc, you cannot
switch to TITLE IN. The disc title will have already
been recorded on a CD TEXT disc.
3 Press a or b to select a letter of the alphabet.
Each press of a will display alphabet, numbers or symbols in ascending order (A B C …).
Each press of b will display a letter in descending order.
4 Press d to move the cursor to the next
character position.
When the letter you want is displayed, press d
to move the cursor to the next position and
then select the next letter. Press c to move
backwards in the display.
5 Move the cursor to the last position by
pressing d after entering the title.
When you press d one more time, the entered
title is stored in memory.
6 Press BAND to return to the playback
display.
Notes
! Titles remain in memory, even after the disc
has been removed from the unit, and are recalled when the disc is reinserted.
! After data for 48 discs has been stored in
memory, data for a new disc will overwrite the
oldest one.
! If you connect a multi-CD player, you can
input disc titles for up to 100 discs.
Displaying disc titles
You can display the text information of any
disc that has had a disc title entered.
% Press DISPLAY.
Press DISPLAY repeatedly to switch between
the following settings:
Play time—DISC TTL (disc title)
When you select DISC TTL, the title of the currently playing disc is shown in the display.
# If no title has been entered for the currently
playing disc, NO D-TTL is displayed.
En
13
Section
04
Built-in CD Player
Using CD TEXT functions
Some discs have certain information encoded
on the disc during manufacture. These discs
may contain such information as the CD title,
track title, artist’s name and playback time
and are called CD TEXT discs. Only these specially encoded CD TEXT discs support the
functions listed below.
Displaying text information on
CD TEXT discs
% Press DISPLAY.
Press DISPLAY repeatedly to switch between
the following settings:
Play time—DISC TTL (disc title)—DISC ART
(disc artist name)—TRK TTL (track title)—
TRK ART (track artist name)
# If specific information has not been recorded
on a CD TEXT disc, NO XXXX will be displayed
(e.g., NO T-TTL).
Notes
! You can scroll to the left of the title by pressing
and holding DISPLAY.
! Audio CD that contains certain information
such as text and/or number is CD TEXT.
14
En

WMA/MP3/AAC/WAV Player
Section
05
English
Playing WMA/MP3/AAC/
WAV files
1 Folder number indicator
Shows the folder number currently playing.
2 Play time indicator
Shows the elapsed playing time of the current track (file).
3 Track number indicator
Shows the track (file) number currently playing.
! If a track number 100 or more is selected,
d on the left of the track number indicator will light.
4 RPT indicator
Shows when repeat range is selected to current track (file).
1 Insert a CD-ROM into the CD loading
slot.
Playback will automatically start.
# Be sure to turn up the label side of a disc.
# After a CD-ROM has been inserted, press
SOURCE to select the built-in CD player.
# You can eject a CD-ROM by pressing EJECT.
2 Press a or b to select a folder.
# You cannot select a folder that does not have
a WMA/MP3/AAC/WAV file recorded in it.
# To return to folder 01 (ROOT), press and hold
BAND. However, if folder 01 (ROOT) contains no
files, playback commences with folder 02.
3 To perform fast forward or reverse,
press and hold c or d.
# If you select ROUGH, pressing and holding c
or d enables you to search every 10 tracks in the
current folder. (Refer to Searching ever y 10 tracks
in the current folder on page 17.)
4 To skip back or forward to another
track, press c or d.
Notes
! Read the precautions with discs and player on
page 35.
! When playing discs with WMA/MP3/AAC/
WAV files and audio data (CD-DA) such as
CD-EXTRA and MIXED-MODE CDs, both types
can be played only by switching mode between WMA/MP3/AAC/WAV and CD-DA with
BAND.
! If you have switched between playback of
WMA/MP3/AAC/WAV files and audio data
(CD-DA), playback starts at the first track on
the disc.
! The built-in CD player can play back a WMA/
MP3/AAC/WAV file recorded on CD-ROM.
(Refer to page 36 for files that can be played
back.)
! There is sometimes a delay between starting
up disc playback and the sound being issued.
When being read, FRMTREAD is displayed.
! Playback is carried out in order of file number.
Folders are skipped if they contain no files. (If
folder 01 (ROOT) contains no files, playback
commences with folder 02.)
! When playing back files recorded as VBR
(variable bit rate) files, the play time will not be
correctly displayed if fast forward or reverse
operations are used.
! There is no sound on fast forward or reverse.
! If an error message such as ERROR-11 is dis-
played, refer to Understanding built-in CD
player error messages on page 35.
En
15
Section
05
WMA/MP3/AAC/WAV Player
! When a WMA/MP3/AAC/WAV disc is inserted,
text information currently selected on Display-
ing text information on WMA/MP3/AAC/WAV
disc on page 18 automatically begins to scroll
in the display.
Introduction of advanced
built-in CD player (WMA/
MP3/AAC/WAV) operation
% Press FUNCTION to display the function
names.
Press FUNCTION repeatedly to switch between the following functions:
RPT (repeat play)—RDM (random play)—
SCAN (scan play)—PAUSE (pause)—COMP
(compression and BMX)—FF/REV (search
method)
# To return to the playback display, press BAND.
# If you do not operate the function within about
30 seconds, the display is automatically returned
to the playback display.
Repeating play
For WMA/MP3/AAC/WAV playback, there are
three repeat play ranges: FLD (folder repeat),
TRK (one-track repeat) and DSC (repeat all
tracks).
! If you perform track search or fast forward/re-
verse during TRK, the repeat play range
changes to FLD.
! When FLD is selected, it is not possible to play
back a subfolder of that folder.
! If you select FLD and then return to the play-
back display, FRPT appears in the display.
Playing tracks in random order
Random play lets you play back tracks in a
random order within the repeat range, FLD
and DSC.
1 Select the repeat range.
Refer to Repeating play on this page.
2 Press FUNCTION to select RDM.
3 Press a to turn random play on.
RDM :ON appears in the display. Tracks will
play in a random order within the previously
selected FLD or DSC ranges.
# To turn random play off, press b.
Note
If you turn random play on during FLD and then
return to the playback display, FRDM appears in
the display.
1 Press FUNCTION to select RPT.
2 Press c or d to select the repeat range.
! FLD – Repeat the current folder
! TRK – Repeat just the current track
! DSC – Repeat all tracks
Notes
! If you select another folder during repeat play,
the repeat play range changes to DSC.
16
En
Scanning folders and tracks
While you are using FLD, the beginning of
each track in the selected folder plays for
about 10 seconds. When you are using DSC,
the beginning of the first track of each folder
is played for about 10 seconds.
1 Select the repeat range.
Refer to Repeating play on page 20.

WMA/MP3/AAC/WAV Player
Section
05
English
2 Press FUNCTION to select SCAN.
3 Press a to turn scan play on.
4 When you find the desired track (or
folder) press b to turn scan play off.
SCAN :OFF appears in the display. The track
(or disc) will continue to play.
# If the display has automatically returned to
the playback display, select SCAN again by pressing FUNCTION.
Notes
! After track or folder scanning is finished, nor-
mal playback of the tracks will begin again.
! If you turn scan play on during FLD and then
return to the playback display, FSCN appears
in the display.
Pausing WMA/MP3/AAC/
WAV playback
Pause lets you temporarily stop playback of
the WMA/MP3/AAC/WAV.
1 Press FUNCTION to select PAUSE.
2 Press a to turn pause on.
PAUSE:ON appears in the display. Play of the
current track pauses.
# To turn pause off, press b.
berations to give playback a fuller sound. Listen to each of the effects as you select
through them and use the one that best enhances the playback of the track or CD that
you are listening to.
1 Press FUNCTION to select COMP.
2 Press a or b to select your favorite setting.
COMP OFF—COMP 1—COMP 2—
COMP OFF—BMX 1—BMX 2
Searching every 10 tracks in
the current folder
You can switch the search method between
fast forward/reverse and searching every 10
tracks. Selecting ROUGH enables you to
search every 10 tracks.
1 Press FUNCTION to select FF/REV.
# If the search method ROUGH has been pre-
viously selected, ROUGH will be displayed.
2 Press d to select ROUGH.
! FF/REV – Fast forward and reverse
! ROUGH – Searching every 10 tracks
# To select FF/REV, press c.
3 Press BAND to return to the playback
display.
Using compression and BMX
Using the COMP (compression) and BMX
functions let you adjust the sound playback
quality of this unit. Each of the functions has a
two-step adjustment. The COMP function balances the output of louder and softer sounds
at higher volumes. BMX controls sound rever-
4 Press and hold c or d to search every
10 tracks in the current folder.
# If the rest of track number is less than 10,
press and hold c or d recalls the first (last)
one.
En
17
Section
05
WMA/MP3/AAC/WAV Player
Displaying text information
on WMA/MP3/AAC/WAV disc
Text information recorded on a WMA/MP3/
AAC/WAV disc can be displayed.
When playing back a WMA/
MP3/AAC disc
% Press DISPLAY.
Press DISPLAY repeatedly to switch between
the following settings:
Play time—FOLDER (folder name)—FILE (file
name)—TRK TTL (track title)—ARTIST (artist
name)—ALBUM (album title)—COMMENT
(comment)—Bit rate
# When playing back MP3 files recorded as VBR
(variable bit rate) files, the bit rate value is not displayed even after switching to bit rate.
# When playing back WMA files recorded as
VBR (variable bit rate) files, the average bit rate
value is displayed.
# If specific information has not been recorded
on a WMA/MP3/AAC disc, NO XXXX will be displayed (e.g., NO NAME).
# Depending on the version of iTunes
write MP3 files onto a disc, comment information
may not be correctly displayed.
# Depending on the version of Windows Media
Player used to encode WMA files, album names
and other text information may not be correctly
displayed.
®
used to
Play time—FOLDER (folder name)—FILE (file
name)—Sampling frequency
# If specific information has not been recorded
on a WAV disc, NO XXXX will be displayed (e.g.,
NO NAME).
# You can only play back WAV files in the frequencies 16, 22.05, 24, 32, 44.1 and 48 kHz
(LPCM), or 22.05 and 44.1 kHz (MS ADPCM). The
sampling frequency shown in the display may be
rounded.
Note
You can scroll to the left of the title by pressing
and holding DISPLAY.
Note
You can scroll to the left of the title by pressing
and holding DISPLAY.
When playing back a WAV disc
% Press DISPLAY.
Press DISPLAY repeatedly to switch between
the following settings:
18
En
Multi-CD Player
Section
06
English
Playing a CD
You can use this unit to control a multi-CD
player, which is sold separately.
! Only those functions described in this man-
ual are supported by 50-disc multi-CD
players.
1 Disc number indicator
Shows the disc number currently playing.
2 Play time indicator
Shows the elapsed playing time of the current track.
3 Track number indicator
Shows the track number currently playing.
4 RPT indicator
Shows when repeat range is selected to current track.
1 Press SOURCE to select the multi-CD
player.
Press SOURCE until you see MULTI CD displayed.
2 Select a disc you want to listen to with
the 1 to 6 buttons.
For discs 1 to 6, press the corresponding button number.
For discs 7 to 12, press and hold the corresponding numbers, such as 1 for disc 7, until
the disc number appears in the display.
# You can also sequentially select a disc by
pressing a/b.
3 To perform fast forward or reverse,
press and hold c or d.
4 To skip back or forward to another
track, press c or d.
Notes
! When the multi-CD player performs the pre-
paratory operations, READY is displayed.
! If an error message such as ERROR-11 is dis-
played, refer to the multi-CD player owner’s
manual.
! If there are no discs in the multi-CD player ma-
gazine, NO DISC is displayed.
! When you select a CD TEXT disc on a CD TEXT
compatible multi-CD player, text information
currently selected on Using CD TEXT functions
on page 23 automatically begins to scroll in
the display.
Introduction of advanced
multi-CD player operation
% Press FUNCTION to display the function
names.
Press FUNCTION repeatedly to switch between the following functions:
RPT (repeat play)—RDM (random play)—
SCAN (scan play)—ITS-P (ITS play)—PAUSE
(pause)—COMP (compression and DBE)
# To return to the playback display, press BAND.
# If you do not operate the function within about
30 seconds, the display is automatically returned
to the playback display.
En
19

Section
06
Multi-CD Player
Repeating play
There are three repeat play ranges for the
multi-CD player: MCD (multi-CD player repeat), TRK (one-track repeat) and DSC (disc repeat).
1 Press FUNCTION to select RPT.
2 Press c or d to select the repeat range.
! MCD – Repeat all discs in the multi-CD
player magazine
! TRK – Repeat just the current track
! DSC – Repeat the current disc
Notes
! If you select other discs during repeat play,
the repeat play range changes to MCD.
! If you perform track search or fast forward/re-
verse during TRK, the repeat play range
changes to DSC.
! When you select DSC for the repeating range
and return to the playback display, DRPT is
displayed.
Playing tracks in random order
Random play lets you play back tracks in random order within the repeat range, MCD and
DSC.
Note
If you turn random play on during DSC and then
return to the playback display, DRDM appears in
the display.
Scanning CDs and tracks
While you are using DSC, the beginning of
each track on the selected disc plays for about
10 seconds. When you are using MCD, the beginning of the first track of each disc is played
for about 10 seconds.
1 Select the repeat range.
Refer to Repeating play on this page.
2 Press FUNCTION to select SCAN.
3 Press a to turn scan play on.
SCAN :ON appears in the display. The first 10
seconds of each track of the current disc (or
the first track of each disc) is played.
4 When you find the desired track (or
disc) press b to turn scan play off.
SCAN :OFF appears in the display. The track
(or disc) will continue to play.
# If the display has automatically returned to
the playback display, select SCAN again by pressing FUNCTION.
1 Select the repeat range.
Refer to Repeating play on this page.
2 Press FUNCTION to select RDM.
3 Press a to turn random play on.
RDM :ON appears in the display. Tracks will
play in a random order within the previously
selected MCD or DSC ranges.
# To turn random play off, press b.
20
En
Notes
! After track or disc scanning is finished, nor-
mal playback of the tracks will begin again.
! If you turn scan play on during DSC and then
return to the playback display, DSCN appears
in the display.
Multi-CD Player
Section
06
English
Pausing CD playback
Pause lets you temporarily stop playback of
the CD.
1 Press FUNCTION to select PAUSE.
2 Press a to turn pause on.
PAUSE:ON appears in the display. Play of the
current track pauses.
# To turn pause off, press b.
Using compression and
bass emphasis
You can use these functions only with a multiCD player that supports them.
Using COMP (compression) and DBE (dynamic bass emphasis) functions lets you adjust the sound playback quality of the multiCD player. Each of the functions has a twostep adjustment. The COMP function balances
the output of louder and softer sounds at higher volumes. DBE boosts bass levels to give
playback a fuller sound. Listen to each of the
effects as you select them and use the one
that best enhances the playback of the track
or CD that you are listening to.
1 Press FUNCTION to select COMP.
# If the multi-CD player does not support
COMP/DBE, NO COMP is displayed when you attempt to select it.
2 Press a or b to select your favorite setting.
COMP OFF—COMP 1—COMP 2—
COMP OFF—DBE 1—DBE 2
Using ITS playlists
ITS (instant track selection) lets you make a
playlist of favorite tracks from those in the
multi-CD player magazine. After you have
added your favorite tracks to the playlist you
can turn on ITS play and play just those selections.
Creating a playlist with ITS
programming
You can use ITS to enter and play back up to
99 tracks per disc from up to 100 discs (with
the disc titles). (With multi-CD players sold before the CDX-P1250 and CDX-P650, up to 24
tracks can be stored in the playlist.)
1 Play a CD that you want to program.
Press a or b to select the CD.
2 Press FUNCTION and hold until TITLE IN
appears in the display, then press
FUNCTION to select ITS.
TITLE IN (disc title input)—ITS (ITS program-
ming)
3 Select the desired track by pressing c
or d.
4 Press a to store the currently playing
track in the playlist.
ITS IN is displayed briefly and the currently
playing selection is added to your playlist. The
display then shows ITS again.
5 Press BAND to return to the playback
display.
Note
After data for 100 discs has been stored in memory, data for a new disc will overwrite the oldest
one.
En
21

Section
06
Multi-CD Player
Playback from your ITS playlist
ITS play lets you listen to the tracks that you
have entered into your ITS playlist. When you
turn on ITS play, tracks from your ITS playlist
in the multi-CD player will begin to play.
1 Select the repeat range.
Refer to Repeating play on page 20.
2 Press FUNCTION to select ITS-P.
3 Press a to turn ITS play on.
ITS-P:ON appears in the display. Playback be-
gins of those tracks from your playlist within
the previously selected MCD or DSC ranges.
# If no tracks in the current range are programmed for ITS play, then EMPTY is displayed.
# To turn ITS play off, press b.
Erasing a track from your ITS
playlist
You can delete a track from your ITS playlist if
ITS play is on.
If ITS play is already on, skip to step 2. If ITS
play is not already on, press FUNCTION.
1 Play the CD with the track you want to
delete from your ITS playlist, and turn ITS
play on.
Refer to Playback from your ITS playlist on this
page.
4 Press b to erase the track from your ITS
playlist.
The currently playing selection is erased from
your ITS playlist and playback of the next track
from your ITS playlist begins.
# If there are no tracks from your playlist in the
current range, EMPTY is displayed and normal
play resumes.
5 Press BAND to return to the playback
display.
Erasing a CD from your ITS playlist
You can delete all tracks of a CD from your ITS
playlist if ITS play is off.
1 Play the CD that you want to delete.
Press a or b to select the CD.
2 Press FUNCTION and hold until TITLE IN
appears in the display, then press
FUNCTION to select ITS.
3 Press b to erase all tracks on the currently playing CD from your ITS playlist.
All tracks on the currently playing CD are
erased from your playlist and ITS CLR is displayed.
4 Press BAND to return to the playback
display.
2 Press FUNCTION and hold until TITLE IN
appears in the display, then press
FUNCTION to select ITS.
3 Select the desired track by pressing c
or d.
22
En
Using disc title functions
You can input CD titles and display the titles.
Then you can easily search for and play a desired disc.
Multi-CD Player
Section
06
English
Entering disc titles
Use the disc title input feature to store up to
100 CD titles (with ITS playlist) into the multiCD player. Each title can be up to 8 characters
long.
1 Play the CD that you want to enter a
title for.
Press a or b to select the CD.
2 Press FUNCTION and hold until TITLE IN
appears in the display.
After TITLE IN is displayed, press FUNCTION
repeatedly, the following functions appear in
the display:
TITLE IN (disc title input)—ITS (ITS programming)
# When playing a CD TEXT disc on a CD TEXT
compatible multi-CD player, you cannot switch to
TITLE IN. The disc title has already been recorded
on a CD TEXT disc.
3 Press a or b to select a letter of the alphabet.
Each press of a will display alphabet, numbers or symbols in ascending order (A B C …).
Each press of b will display a letter in descending order.
4 Press d to move the cursor to the next
character position.
When the letter you want is displayed, press d
to move the cursor to the next position and
then select the next letter. Press c to move
backwards in the display.
6 Press BAND to return to the playback
display.
Notes
! Titles remain in memory, even after the disc
has been removed from the magazine, and
are recalled when the disc is reinserted.
! After data for 100 discs has been stored in
memory, data for a new disc will overwrite the
oldest one.
Displaying disc titles
You can display the text information of any
disc that has had a disc title entered.
% Press DISPLAY.
Press DISPLAY repeatedly to switch between
the following settings:
Play time—DISC TTL (disc title)
When you select DISC TTL, the title of the currently playing disc is shown in the display.
# If no title has been entered for the currently
playing disc, NO D-TTL is displayed.
Using CD TEXT functions
You can use these functions only with a CD
TEXT compatible multi-CD player.
Some discs have certain information encoded
on the disc during manufacture. These discs
may contain such information as the CD title,
track title, artist’s name and playback time
and are called CD TEXT discs. Only these specially encoded CD TEXT discs support the
functions listed below.
5 Move the cursor to the last position by
pressing d after entering the title.
When you press d one more time, the entered
title is stored in memory.
En
23

Section
06
Multi-CD Player
Displaying text information on
CD TEXT discs
% Press DISPLAY.
Press DISPLAY repeatedly to switch between
the following settings:
Play time—DISC TTL (disc title)—DISC ART
(disc artist name)—TRK TTL (track title)—
TRK ART (track artist name)
# If specific information has not been recorded
on a CD TEXT disc, NO XXXX will be displayed
(e.g., NO T-TTL).
Note
You can scroll to the left of the title by pressing
and holding DISPLAY.
24
En
Playing songs on iPod
Section
07
English
Listening to songs on your
iPod
You can use this unit to control an iPod adapter,
which is sold separately.
For details concerning operation, refer to the
iPod adapter’s operation manuals. This section provides information on iPod operations
with this unit which differs from that described
in the iPod adapter’s operation manual.
! This unit is a head unit group 1 unit.
! iPod is a trademark of Apple Computer,
Inc., registered in the U.S. and other countries.
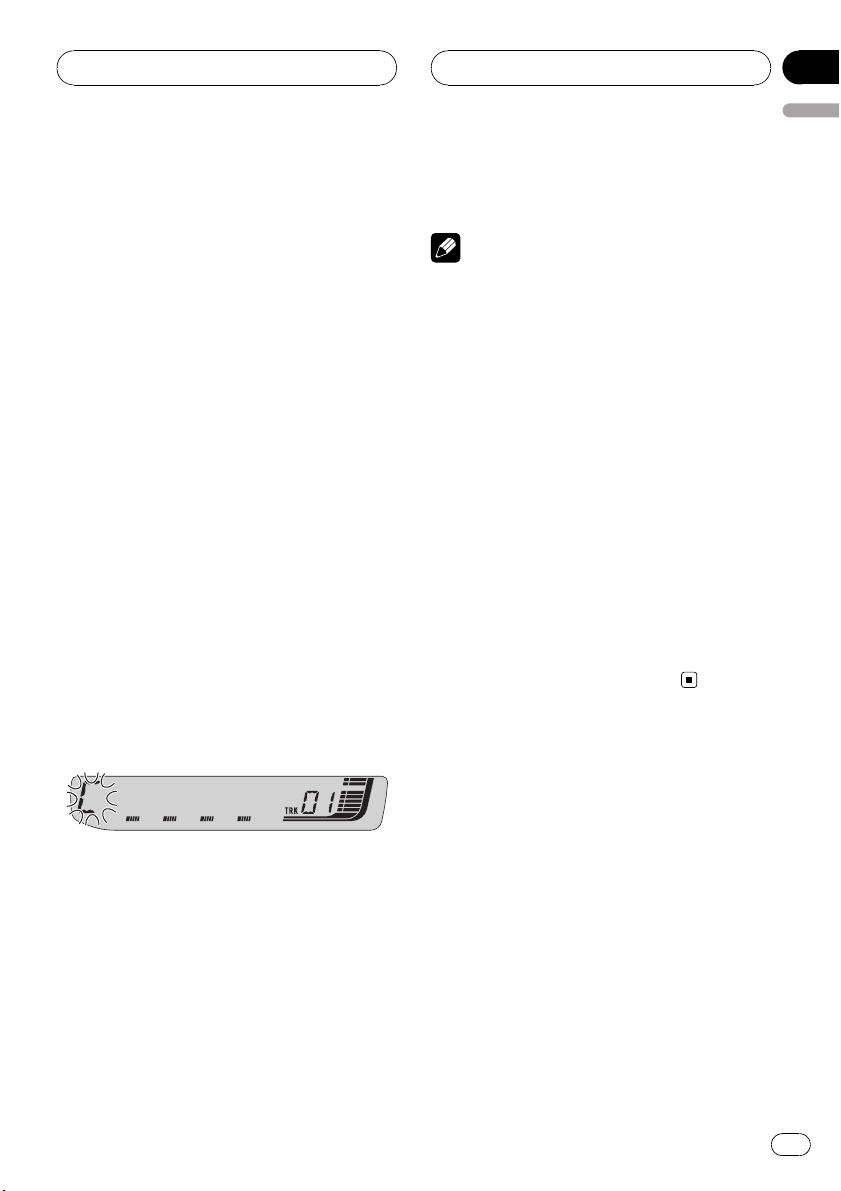
1 Play time indicator
Shows the elapsed playing time of the current song.
2 RPT indicator
Shows when repeat play is turned on.
1 Press SOURCE to select the iPod.
Press SOURCE until you see IPOD displayed.
2 To perform fast forward or reverse,
press and hold c or d.
3 To skip back or forward to another
track, press c or d.
Pressing d skips to the start of the next track.
Pressing c once skips to the start of the current track. Pressing again will skip to the previous track.
Browsing for a song
The operation of this unit to control an iPod is
designed to be as close to the operation of the
iPod as possible for easy operation and song
search.
! If playlist has been selected, first, this unit
shows playlist of your iPod’s name. This
playlist plays all songs in your iPod.
! If the characters recorded on the iPod are
not compatible with this unit, those characters will not be displayed.
! If all characters recorded on the iPod are
not compatible with this unit, NO INFO will
be displayed.
1 Press a or b to select the desired category.
Press a or b repeatedly to switch between the
following settings:
PLAYLIST (playlists)—ARTIST (artists)—
ALBUM (albums)—SONG (songs)—GENRE
(genres)
2 Press d to determine the category.
List from the selected category is displayed.
3 Press a or b to select a song list, album
list, artist list or genre list from among the
lists.
Press a or b repeatedly to switch the lists.
4 Press d to determine the list.
Lists from the selected list are displayed.
5 Repeat step 3 and 4 to find a song you
want to listen to.
# You can start playback throughout the selected list by pressing and holding d.
# To return to the previous list, press c.
# Press BAND to return to the normal display.
En
25
Section
07
Playing songs on iPod
Note
If you do not operate the list within about 30 seconds, the list search is cancelled automatically.
Displaying text
information on iPod
Text information recorded on the iPod can be
displayed.
% Press DISPLAY.
Press DISPLAY repeatedly to switch between
the following settings:
Play time—SONG (song title)—ARTIST (artist
name)—ALBUM (album title)—Track number
# If the characters recorded on the iPod are not
compatible with this unit, those characters will
not be displayed.
# If all characters recorded on the iPod are not
compatible with this unit, NO INFO will be displayed.
# If the song number is more than 1 000, song
number is not displayed. “–” will be displayed instead of song number.
Introduction of advanced
iPod adapter operation
% Press FUNCTION to display the function
names.
Press FUNCTION repeatedly to switch between the following functions:
RPT (repeat play)—SHFFL (random play)—
PAUSE (pause)
# To return to the playback display, press BAND.
Note
If you do not operate the function within about 30
seconds, the display is automatically returned to
the playback display.
Repeating play
For playback of the songs on the iPod, there
are two repeat play ranges: RPT:ONE (repeat
one song) and RPT:ALL (repeat all songs in
the list).
! While RPT is set to RPT :ONE, you cannot
select the other songs.
1 Press FUNCTION to select RPT.
2 Press c or d to select the repeat range.
Press c or d until the desired repeat range appears in the display.
! RPT:ONE – Repeat just the current song
! RPT:ALL – Repeat all songs in the selected
list
Playing songs in a random
order (shuffle)
For playback of the songs on the iPod, there
are two random play methods: SHFFL :SNG
(play back songs in a random order) and
SHFFL :ALB (play back albums in a random
order).
1 Press FUNCTION to select SHFFL.
2 Press c or d to select your favorite setting.
Press c or d repeatedly to switch between the
following settings:
SHFFL :OFF—SHFFL:SNG—SHFFL :ALB
26
En
Playing songs on iPod
! SHFFL :SNG – Play back songs in a random
order within the selected list
! SHFFL :ALB – Select an album randomly,
and then play back all the songs in it in
order
Pausing a song
Pause lets you temporarily stop playback of a
song.
1 Press FUNCTION to select PAUSE.
2 Press a to turn pause on.
Playback of the current song pauses.
# To turn pause off, press b.
Section
07
English
En
27
Section
08
Audio Adjustments
Introduction of audio
adjustments
1 Audio display
Shows the audio adjustment status.
% Press AUDIO to display the audio function names.
Press AUDIO repeatedly to switch between
the following audio functions:
FAD (balance adjustment)—EQ (equalizer
curve adjustment)—LOUD (loudness)—
SUB.W (subwoofer on/off setting)—80: 0 (subwoofer setting)—HPF (high pass filter)—BASS
(bass boost)—FIE (front image enhancer)—
SLA (source level adjustment)
# You can select the 80: 0 only when subwoofer
output is turned on in SUB.W.
# When the F.I.E. function is on, you cannot select HPF.
# When the rear output setting is R-SP :S/W,
you cannot select FIE.
# When the HPF function is on, you cannot select FIE.
# When selecting the FM tuner as the source,
you cannot switch to SLA.
# To return to the display of each source, press
BAND.
# If you do not operate the audio function within
about 30 seconds, the display is automatically returned to the source display.
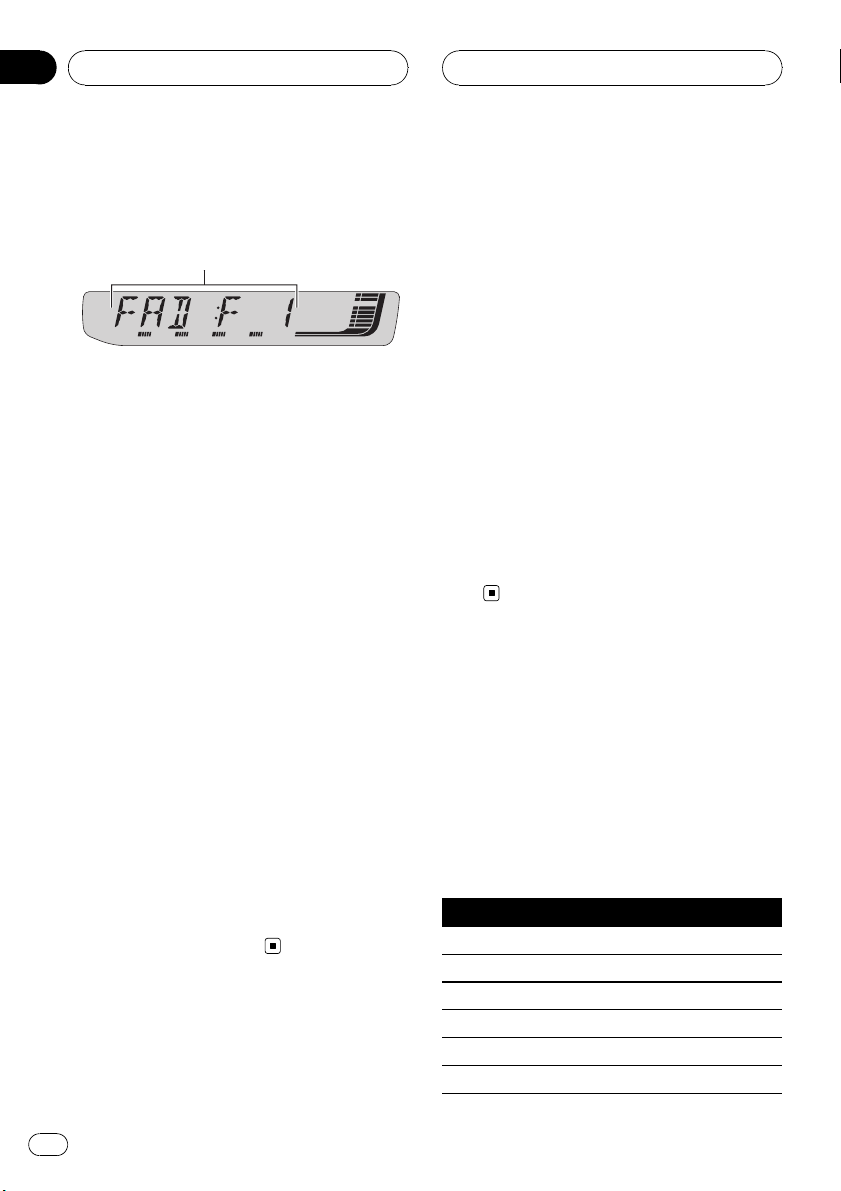
Using balance adjustment
You can change the fader/balance setting so
that it can provide you an ideal listening environment in all occupied seats.
1 Press AUDIO to select FAD.
# If the balance setting has been previously adjusted, BAL will be displayed.
2 Press a or b to adjust front/rear speaker balance.
FAD :F15 to FAD :R15 is displayed as the
front/rear speaker balance moves from front to
rear.
# FAD : 0 is the proper setting when only two
speakers are used.
# When the rear output setting is R-SP :S/W,
you cannot adjust front/rear speaker balance.
Refer to Setting the rear output and subwoofer
controller on page 33.
3 Press c or d to adjust left/right speaker
balance.
BAL : L15 to BAL : R15 is displayed as the left/
right speaker balance moves from left to
right.
Using the equalizer
The equalizer lets you adjust the equalization
to match car interior acoustic characteristics
as desired.
Recalling equalizer curves
There are six stored equalizer curves which
you can easily recall at any time. Here is a list
of the equalizer curves:
Display Equalizer curve
POWERFUL Powerful
NATURAL Natural
VOCAL Vocal
CUSTOM Custom
EQ FLAT Flat
SPR-BASS Super bass
28
En
Audio Adjustments
Section
08
English
! CUSTOM is an adjusted equalizer curve
that you create. If you make adjustments to
an equalizer curve, the equalizer curve setting will be memorized in CUSTOM.
! When EQ FLAT is selected no supplement
or correction is made to the sound. This is
useful to check the effect of the equalizer
curves by switching alternatively between
EQ FLAT and a set equalizer curve.
% Press EQ to select the equalizer.
Press EQ repeatedly to switch between the following equalizers:
POWERFUL—NATURAL—VOCAL—CUSTOM
—EQ FLAT—SPR-BASS
Adjusting equalizer curves
You can adjust the currently selected equalizer
curve setting as desired. Adjusted equalizer
curve settings are memorized in CUSTOM.
1 Press AUDIO to select EQ.
2 Press c or d to select the equalizer
band to adjust.
EQ-L (low)—EQ-M (mid)—EQ-H (high)
3 Press a or b to adjust the level of the
equalizer band.
+6 to –6 is displayed as the level is increased
or decreased.
# You can then select another band and adjust
the level.
Note
If you make adjustments, CUSTOM curve is updated.
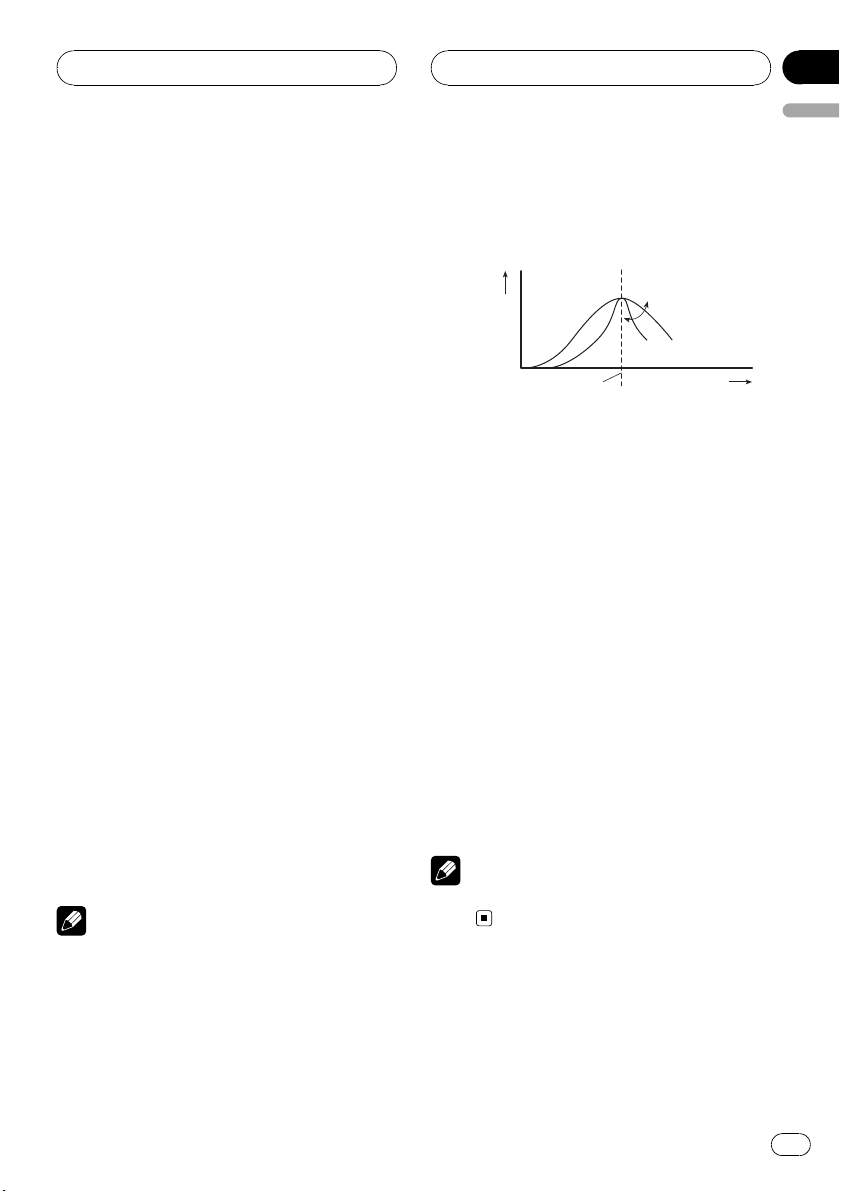
Fine-adjusting equalizer curve
You can adjust the center frequency and the Q
factor (curve characteristics) of each currently
selected curve band (EQ-L/EQ-M/EQ-H).
Level (dB)
Q=2W
Q=2N
Center frequency
1 Press AUDIO and hold until frequency
and the Q factor (e.g., F- 80:Q1W) appears
in the display.
2 Press AUDIO to select the band for adjustment from among low, mid and high.
Press AUDIO repeatedly to switch between
the following functions:
Low—Mid—High
3 Press c or d to select the desired frequency.
Low: 40—80—100—160 (Hz)
Mid: 200—500—1k—2k (Hz)
High: 3k—8k—10k—12k (Hz)
4 Press a or b to select the desired Q factor.
2N—1N—1W—2W
Note
If you make adjustments, CUSTOM curve is updated.
Frequency (Hz)
Adjusting loudness
Loudness compensates for deficiencies in the
low- and high-sound ranges at low volume.
1 Press AUDIO to select LOUD.
En
29

Section
08
Audio Adjustments
2 Press a to turn loudness on.
Loudness level (e.g., LOUD :MID) appears in
the display.
# To turn loudness off, press b.
3 Press c or d to select a desired level.
LOW (low)—MID (mid)—HI (high)
Using subwoofer output
This unit is equipped with a subwoofer output
which can be turned on or off.
1 Press AUDIO to select SUB.W.
2 Press a to turn subwoofer output on.
SUB.W:NOR appears in the display. Subwoo-
fer output is now on.
# If the subwoofer output phase has been set to
the reverse, SUB.W:REV will be displayed.
# To turn subwoofer output off, press b.
3 Press c or d to select the phase of subwoofer output.
Press c to select reverse phase and REV appears in the display. Press d to select normal
phase and NOR appears in the display.
Adjusting subwoofer settings
When the subwoofer output is on, you can adjust the cut-off frequency and the output level
of the subwoofer.
1 Press AUDIO to select 80: 0.
# When the subwoofer output is on, you can select 80: 0.
# If the subwoofer setting has been previously
adjusted, the frequency of that previously selected will be displayed instead of 80.
Only frequencies lower than those in the selected range are outputted from the subwoofer.
3 Press a or b to adjust the output level
of the subwoofer.
+6 to –24 is displayed as the level is increased
or decreased.
Using the high pass filter
When you do not want low sounds from the
subwoofer output frequency range to play
from the front or rear speakers, turn on the
HPF (high pass filter). Only frequencies higher
than those in the selected range are outputted
from the front or rear speakers.
1 Press AUDIO to select HPF.
# When the F.I.E. function is on, you cannot select HPF.
2 Press a to turn high pass filter on.
HPF : 80 appears in the display. High pass fil-
ter is now on.
# If the high pass filter has been previously adjusted, the frequency of that previously selected
will be displayed instead of HPF : 80.
# To turn high pass filter off, press b.
3 Press c or d to select cut-off frequency.
50—63—80—100—125 (Hz)
Only frequencies higher than those in the selected range are outputted from the front or
rear speakers.
2 Press c or d to select cut-off frequency.
50—63—80—100—125 (Hz)
30
En
Loading…
-
Страница 1
Operation Manual CD Receiver DEH-P4950MP English P ortuguês (B) Español[…]
-
Страница 2
Thank you for buying this P ioneer product. Please read through these operating instruct ions so you will know how to operate your model properly . After you have finished reading the instructio ns, keep this man- ual in a safe place for future r eference. Before Y ou Start About this unit 4 About WMA 4 About MP3 4 About AAC 4 iP od® compatibility[…]
-
Страница 3
– Creating a playlist with ITS programming 21 – Playback from your ITS playlist 22 – Erasing a track from your ITS playlist 22 – Erasing a CD from your ITS playlist 22 Using disc title functions 22 – Entering disc titles 23 – Displaying disc titles 23 Using CD TEXT functions 23 – Displaying text information on CD TEXT discs 24 Playing[…]
-
Страница 4
About this unit CAUTION ! Do not allow this unit to come into contact with liquids. Electrical shock could result. Also, this unit damage, smoke, and overheat could result from contact with liquids. ! Keep this manual handy as a reference for op- erating procedures and precautions. ! Always keep the volume low enough so that you can hear sounds fro[…]
-
Страница 5
Visit our website Visit us at the following site: ! W e offer the latest information about Pioneer Corporation on our website. Protecting your unit from theft The front panel can be detached to deter thef t. Important ! Handle gently when removing or attaching the front panel. ! Avoid subjecting the front panel to excessive shocks. ! Keep the front[…]
-
Страница 6
! Do not handle the batter y with metallic tools. ! Do not store the batter y with metallic materi- als. ! In the event of batter y leakage, wipe the re- mote control completely clean and install a new batter y . ! When disposing of used batteries, please comply with governmental regulations or en- vironmental public institutions ’ rules that app[…]
-
Страница 7
What ’ s What Head unit 1 AUDIO button Press to select various sound quality con- trols. 2 A TT button Press to quickly lower the volume level, by about 90%. Press once more to return to the original volume level. 3 DISPLA Y button Press to select differ ent displays. 4 SOURCE button, VOLUME This unit is turned on by selecting a source. Press to […]
-
Страница 8
Remote control Operation is the same as when using the but- tons on the head unit. See the explanation of the head unit about the operation of each but- ton with the exception of P AUSE , which is ex- plained below . e P AUSE button Press to turn pause on or off . f SOURCE button This unit is turned on by selecting a source. Press to cycle through […]
-
Страница 9
Listening to the radio 2 2 2 3 3 3 1 1 1 4 5 Important If you are using this unit in North, Central or South America, reset the AM tuning step (see Setting the AM tuning step on page 32). 1 Band indicator Shows which band the radio is tuned to, AM or FM. 2 Frequency indicator Shows the frequency to which the tuner is tuned. 3 Stereo ( 5 ) indicator[…]
-
Страница 10
% When you find a frequency that you want to store in memory , press one of pre- set tuning buttons 1 to 6 and hold until the preset number stops flashing. The number you have pressed will flash in the preset number indicator and then remain lit. The selected radio station frequency has been stored in memor y. The next time you press the same prese[…]
-
Страница 11
Playing a CD 2 2 2 1 1 1 3 1 Play time indicator Shows the elapsed playing time of the cur- rent track. 2 T rack number indicator Shows the track number currently playing. 3 RPT indicator Shows when repeat play is turned on. 1 Insert a CD into the CD loading slot. Playback will automatically start. # Be sure to turn up the label side of a disc. # A[…]
-
Страница 12
Playing tracks in random order Random play lets you play back tracks on the CD in a random order . 1 Press FUNCTION to select RDM. 2 Press a to turn random play on. RDM :ON appears in the display. T racks will play in a random order . # T o turn random play off, press b . Scanning tracks of a CD Scan play lets you hear the first 10 seconds of each […]
-
Страница 13
# T o select FF/REV , press c . 3 Press BAND to return to the playback display . 4 Press and hold c or d to search every 10 tracks on a disc. # If the rest of track number is less than 10, press and hold c or d recalls the first (last) one. Using disc title functions Y ou can input CD titles and display the title. The next time you insert a CD for […]
-
Страница 14
Using CD TEXT func tions Some discs have certain information encoded on the disc during manufacture. These discs may contain such information as the CD title, track title, artist ’ s name and playback time and are called CD TEXT discs. Only these spe- cially encoded CD TEXT discs support the functions listed below. Displaying text information on […]
-
Страница 15
Playing WMA/MP3/A AC/ WA V files 3 3 3 2 2 2 1 1 1 4 1 Folder number indicator Shows the folder number currently playing. 2 Play time indicator Shows the elapsed playing time of the cur- rent track (file). 3 T rack number indicator Shows the track (file) number currently play- ing. ! If a track number 100 or more is selected, d on the left of the t[…]
-
Страница 16
! When a WMA/MP3/AAC/W AV disc is inserted, text information currently selected on Display- ing text information on WMA/MP3/AAC/W AV disc on page 18 automatically begins to scroll in the display. Introduction of advanced built-in CD player (WMA/ MP3/AAC/WA V) operation % Press FUNCTION to display the function names. Press FUNCTION repeatedly to swi[…]
-
Страница 17
2 Press FUNCTION to select SCAN. 3 Press a to turn scan play on. 4 When you find the desired track (or folder) press b to turn scan play off. SCAN :OFF appears in the display. The track (or disc) will continue to play . # If the display has automatically returned to the playback display, select SCAN again by press- ing FUNCTION . Notes ! After trac[…]
-
Страница 18
Displaying text information on WMA/MP3/AAC/WA V disc T ext information recorded on a WMA/MP3/ AAC/WA V disc can be displayed. When playing back a WMA/ MP3/AAC disc % Press DISPLA Y. Press DISPLA Y repeatedly to switch between the following settings: Play time — FOLDER (folder name) — FILE (file name) — TRK TTL (track title) — ARTIST (artist[…]
-
Страница 19
Playing a CD 3 3 3 2 2 2 1 1 1 4 Y ou can use this unit to contr ol a multi- CD player , which is sold separately . ! Only those functions described in this man- ual are supported by 50-disc multi- CD players. 1 Disc number indicator Shows the disc number currently playing. 2 Play time indicator Shows the elapsed playing time of the cur- rent track[…]
-
Страница 20
Repeating play There are three repeat play ranges for the multi-CD player: MCD (multi- CD player re- peat), TRK (one-track repeat) and DSC (disc re- peat). 1 Press FUNCTION to select RPT. 2 Press c or d to select the repeat range. ! MCD – Repeat all discs in the multi-CD player magazine ! TRK – Repeat just the current track ! DSC – Repeat the[…]
-
Страница 21
Pausing CD playback P ause lets you temporarily stop playback of the CD. 1 Press FUNCTION to select P AUSE. 2 Press a to turn pause on. P AUSE:ON appears in the display . Play of the current track pauses. # T o turn pause off , press b . Using compression and bass emphasis Y ou can use these functions only with a multi- CD player that supports them[…]
-
Страница 22
Playback from your ITS playlist ITS play lets you listen to the tracks that you have entered into your ITS playlist. When you turn on ITS play, tracks from your ITS playlist in the multi- CD player will begin to play. 1 Select the repeat range. Refer to Repeating play on page 20. 2 Press FUNCTION to select ITS-P. 3 Press a to turn ITS play on. ITS-[…]
-
Страница 23
Entering disc titles Use the disc title input feature to store up to 100 CD titles (with ITS playlist) into the multi- CD player . Each title can be up to 8 characters long. 1 Play the CD that you want to enter a title for . Press a or b to select the CD. 2 Press FUNCTION and hold until TITLE IN appears in the display . After TITLE IN is displayed,[…]
-
Страница 24
Displaying text information on CD TEXT discs % Press DISPLA Y. Press DISPLA Y repeatedly to switch between the following settings: Play time — DISC TTL (disc title) — DISC ART (disc artist name) — TRK TTL (track title) — TRK ART (track artist name) # If specific information has not been recorded on a CD TEXT disc, NO XXXX will be displayed […]
-
Страница 25
Listening to songs on your iPod 1 1 1 2 Y ou can use this unit to contr ol an iPod adapter , which is sold separately . F or details concerning operation, refer to the iP od adapter ’ s operation manuals. This sec- tion provides information on iPod operations with this unit which differs from that described in the iPod adapter ’ s operation man[…]
-
Страница 26
Note If you do not operate the list within about 30 sec- onds, the list search is cancelled auto- matically . Displaying text information on iPod T ext information recorded on the iP od can be displayed. % Press DISPLA Y. Press DISPLA Y repeatedly to switch between the following settings: Play time — SONG (song title) — ARTIST (artist name) —[…]
-
Страница 27
! SHFFL :SNG – Play back songs in a random order within the selected list ! SHFFL :ALB – Select an album randomly , and then play back all the songs in it in order Pausing a song P ause lets you temporarily stop playback of a song. 1 Press FUNCTION to select P AUSE. 2 Press a to turn pause on. Playback of the current song pauses. # T o turn pau[…]
-
Страница 28
Introduction of audio adjustments 1 1 1 Audio display Shows the audio adjustment status. % Press AUDIO to display the audio func- tion names. Press AUDIO repeatedly to switch between the following audio functions: FAD (balance adjustment) — EQ (equalizer cur ve adjustment) — LOUD (loudness) — SUB.W (subwoofer on/off setting) — 80: 0 (sub- w[…]
-
Страница 29
! CUSTOM is an adjusted equalizer cur ve that you create. If you make adjustments to an equalizer curve, the equalizer cur ve set- ting will be memorized in CUSTOM . ! When EQ FLA T is selected no supplement or correction is made to the sound. This is useful to check the effect of the equalizer cur ves by switching alternatively between EQ FLA T an[…]
-
Страница 30
2 Press a to turn loudness on. Loudness level (e.g., LOUD :MID ) appears in the display . # T o turn loudness off , press b . 3 Press c or d to select a desired level. LOW (low) — MID (mid) — HI (high) Using subwoofer output This unit is equipped with a subwoofer output which can be turned on or off . 1 Press AUDIO to select SUB.W. 2 Press a to[…]
-
Страница 31
Boosting the bass Bass boost function boosts the bass level of sound lower than 100 Hz. The more the bass level is increased, the more the bass sound is emphasized and the entire sound becomes power ful. When using this function with the subwoofer , the sound under the cut-off fre- quency is booste d. 1 Press AUDIO to select BASS. 2 Press a or b to[…]
-
Страница 32
Adjusting initial settings 1 1 Using the initial settings, you can customize various system settings to achieve optimal per- formance from this unit. 1 Function display Shows the function status. 1 Press SOURCE and hold until the unit turns off. 2 Press SOURCE and hold again until function name appears in the display . 3 Press FUNCTION to select on[…]
-
Страница 33
2 Press c or d to select the AM tuning step. Press c to select 9 (9 kHz). P ress d to select 10 (10 kHz). Switching the auxiliary setting Auxiliar y equipments connected to this unit can be activated individually. Set each AUX source to ON when using. About connecting or using auxiliar y equipments, refer to Using the A UX sour ce on the next page.[…]
-
Страница 34
Using the AUX source This unit can control up to two auxiliary equip- ments such as VCR or portable devices (sold separately). When connected, auxiliar y equip- ments are automatically read in as AUX sources and assigned to AUX1 or AUX2 . The relationship between AUX1 and AUX2 sources is explained below . About AUX connection method Y ou have two m[…]
-
Страница 35
Understanding built-in CD player error messages When you contact your dealer or your nearest Pioneer Ser vice Center , be sure to record the error message. Message Cause Action ERROR-11, 12, 17, 30 Dirty disc Clean disc. ERROR-11, 12, 17, 30 Scratched disc Replace disc. ERROR-15 The inserted disc does not contain any data Replace disc. ERROR-10, 11[…]
-
Страница 36
! T ext information may not be correctly dis- played depending on the recorded environ- ment. ! Road shocks may interrupt disc playback. ! Read the precautions with discs before using them. Dual Discs ! Dual Discs are two -sided discs that have a recordable CD for audio on one side and a recordable DVD for video on the other . ! Since the CD side o[…]
-
Страница 37
Compressed audio compatibility WMA ! Compatible format: WMA encoded by Windows Media Player Ver . 7, 7.1, 8, 9 or 10 ! Bit rate: 48 kbps to 320 kbps (CBR), 48 kbps to 384 kbps (VBR) ! Sampling frequency : 32 kHz to 48 kHz ! Windows Media Audio 9 Professional, Loss- less, V oice: No MP3 ! Bit rate: 8 kbps to 320 kbps ! Sampling frequency : 16 kHz to[…]
-
Страница 38
Specifications General Rated powe r source …………… 14.4 V DC (allowable voltage range: 12.0 V to 14.4 V DC) Grounding system ………………. N e g a tive type Max. current consumption …………………………………………….. 10.0 A Dimensions (W × H × D): DIN Chassis ………………… 1 7 8 × 5 0 × 1 6 2 m m N o s e[…]
-
Страница 39
Signal-to-noise ratio …………… 6 5 dB ( I E C -A n e t w o r k ) Infrared remote control Wa v e l e n g t h …………………………… 9 4 0 n m ± 5 0 n m O u t p u t ……………………………………. t y p ; 1 2 m w / s r p e r I n frared LED Note Specifications and the design are subject to pos- sible modifications withou[…]
-
Страница 40
Gracias por haber comprado este producto P ioneer . Lea con detenimiento estas instrucciones sobre el funcionamiento del aparato, para que pueda darle el mejor uso posible. Una vez que las haya leído, con ser ve este manual en un lugar segur o para consultarlo en el futuro. Antes de comenzar Acerca de esta unidad 42 Acerca de WMA 42 Acerca de MP3 […]
-
Страница 41
Exploración de CD y pistas 59 P ausa de la reproducción de un CD 60 Uso de la compresión y del enfatizador de graves 60 Uso de listas de reproducción ITS 60 – Creación de una lista de reproducción con la programación ITS 61 – Reproducción de la lista de reproducción ITS 61 – Borrado de una pista de la lista de reproducción ITS 61 ?[…]
-
Страница 42
Acerca de esta unidad PRECAUCIÓN ! No permita que esta unidad entre en contacto con líquidos, ya que ello puede producir una descarga eléctrica. Además, el contacto con líquidos puede causar daños en la unidad, humo y recalentamiento. ! Conserve este manual a mano para que pueda consultar los procedimientos de opera- ción y las precauciones […]
-
Страница 43
iT unes es una marca comercial de Apple Computer , Inc., registrada en los EE.UU. y otros países. Compatibilidad con iPod ® iP od es una marca comercial de Apple Computer , Inc., registrada en los EE.UU. y otros países. Visite nuestro sitio Web Visítenos en el siguiente sitio: ! En nuestro sitio Web ofrecemos la informa- ción más reciente ace[…]
-
Страница 44
Uso y cuidado de l mando a distancia Instalación de la batería Deslice y extraiga la bandeja de la parte poste- rior del mando a distancia y coloque la batería con los polos positivo (+) y negativo ( – )e nl a dirección correcta. ADVERTENCIA Mantenga la batería fuera del alcance de los niños. En caso de ingestión accidental, consulte a un […]
-
Страница 45
Qué es cada cosa Unidad principal 1 Botón AUDIO Presione este botón para seleccionar los di- versos controles de calidad del sonido. 2 Botón A TT Presione este botón para bajar rápidamente el nivel de volumen, aproximadamente el 90%. P resione una vez más para volver al nivel de volumen original. 3 Botón DISPLA Y Presione este botón para s[…]
-
Страница 46
d Botón FUNCTION Presione este botón para seleccionar las funciones. Mando a distancia Las funciones se utilizan de la misma manera que al usar los botones de la unidad princ ipal. Consulte la explicación de la unidad principal acerca del uso de cada botón, con excepción de P AUSE , que se explica a continuación. e Botón P AUSE Presione este[…]
-
Страница 47
Para escuchar la radio 2 2 2 3 3 3 1 1 1 4 5 Importante Si se utiliza esta unidad en América del Norte, América Central o América del Sur , se deberá cambiar el paso de sintonía de AM (consulte Ajuste del paso de sintonía de AM en la página 73). 1 Indicador de banda Muestra la banda en que la radio está sinto — nizada: AM o FM. 2 Indicador […]
-
Страница 48
Almacenamiento y recuperación de frecuencias Si se presiona cualquiera de los botones de ajuste de presintonías 1 a 6 , se pueden alma- cenar con facilidad hasta seis frecuencias de emisoras para recuperarlas con posterioridad presionando un solo botón. ! Se pueden almacenar en la memoria hasta 18 emisoras FM, seis por cada una de las tres banda[…]
-
Страница 49
Reproducción de un CD 2 2 2 1 1 1 3 1 Indicador de tiempo de reproducción Muestra el tiempo transcurrido de reproduc- ción de la pista actual. 2 Indicador de número de pista Muestra el número de pista que se está re- produciendo actualmente. 3 Indicador RPT Aparece cuando la repetición de reproduc- ción está activada. 1 Introduzca un CD po[…]
-
Страница 50
2 Presione c o d para seleccionar la gama de repetición. ! DSC – Repite el disco actual ! TRK – Sólo repite la pista actual Nota Si se realiza una búsqueda de pistas o el avance rápido/retroceso durante la repetición TRK ,l a gama de repetición cambia a DSC . Reproducción de las pistas en orden aleatorio La reproducción aleatoria le per[…]
-
Страница 51
Uso de la compresión y BMX El uso de las funciones COMP (compresión) y BMX le permiten ajustar la calidad de repro- ducción de sonido de este reproductor . Cada una de las funciones tiene un ajuste de dos pasos. La función COMP equilibra la salida de los sonidos más fuertes y más suaves a volú- menes altos. La función BMX permite contro- la[…]
-
Страница 52
4 Presione d para mover el cursor a la próxima posición de carácter . Cuando se visualice la letra deseada, presione d para mover el cursor a la próxima posición y seleccione la próxima letra. Presione c para mover el cursor hacia atrás en el display . 5 Mueva el cursor a la última posición presionando d después de ingresar el títu- lo. […]
-
Страница 53
Reproducción de ficheros WMA/MP3/AAC/WA V 3 3 3 2 2 2 1 1 1 4 1 Indicador del número de carpeta Muestra el número de la carpeta que se está reproduciendo. 2 Indicador de tiempo de reproducción Muestra el tiempo transcurrido de reproduc- ción de la pista (fichero) actual. 3 Indicador de número de pista Muestra el número de pista (fichero) qu[…]
-
Страница 54
! Los discos se reproducen por orden del núme- ro de fichero. Se saltan las carpetas que no tienen ficheros. (Si la carpeta 01 (RAÍZ) no contiene ficheros, la reproducción comienza en la carpeta 02.) ! Al reproducir ficheros grabados como VBR (velocidad de grabación variable), el tiempo de reproducción no se visualizará correcta- mente si se […]
-
Страница 55
2 Presione FUNCTION para seleccionar RDM. 3 Presione a para activar la reproducción aleatoria. RDM :ON aparece en el display . Las pistas se reproducirán en un orden aleatorio en la gama de repetición FLD o DSC seleccionada con anterioridad. # P resione b para desactivar la reproducción aleatoria. Nota Si se activa la reproducción aleatoria en[…]
-
Страница 56
Uso de la compresión y BMX El uso de las funciones COMP (compresión) y BMX le permiten ajustar la calidad de repro- ducción de sonido de este reproductor . Cada una de las funciones tiene un ajuste de dos pasos. La función COMP equilibra la salida de los sonidos más fuertes y más suaves a volú- menes altos. La función BMX permite contro- la[…]
-
Страница 57
# Según sea la versión de iT unes ® utilizada para grabar ficheros MP3 en un disco, es posible que no se visualice correctamente la información de comentarios. # Según la versión del Windows Media Player utilizada para codificar los ficheros WMA, es po- sible que no se visualicen correctamente los nombres de álbumes y demás información de […]
-
Страница 58
Reproducción de un CD 3 3 3 2 2 2 1 1 1 4 Se puede usar esta unidad para controlar un re- productor de CD múltiple, que se vende por se- parado. ! Sólo las funciones descrit as en este manual son compatibles con los repr oductores de CD múltiple de 50 discos. 1 Indicador de número de disco Muestra el número de disco que se está re- producien[…]
-
Страница 59
# Si no se utiliza la función en unos 30 segun- dos, el display volverá automáticamente a la vi- sualización de reproducción. Repetición de reproducción Hay tres gamas de repetición para la repro- ducción de un reproductor de CD múltiple: MCD (repetición de todos los discos del repro- ductor de CD múltiple), TRK (repetición de una sola[…]
-
Страница 60
3 Presione a para activar la reproducción con exploración. SCAN :ON aparece en el display . Se reproduci- rán los primeros 10 segundos de cada pista del disco actual (o la primera pista de cada disco). 4 Cuando encuentre la pista (o el disco) deseada(o), presione b para desactivar la exploración. SCAN :OFF aparece en el display . La pista (o el[…]
-
Страница 61
Creación de una lista de reproducción con la programación ITS Puede utilizar la función ITS para ingresar y re- producir hasta 99 pistas por disco en un máxi- mo de 100 discos (incluidos los títulos de los discos). (Con reproductores de CD múltiple vendidos antes del CDX-P1250 y el CDX-P650, es posible guardar hasta 24 pistas en la lista de […]
-
Страница 62
2 Mantenga presionado FUNCTION hasta que TITLE IN aparezca en el display , y pre- sione FUNCTION para seleccionar ITS. 3 Seleccione la pista deseada presionan- do c o d . 4 Presione b para borrar la pista de la lista de reproducción ITS. La pista que se está reproduciendo se borra de la lista de reproducción ITS y comienza la reproducción de la[…]
-
Страница 63
4 Presione d para mover el cursor a la próxima posición de carácter . Cuando se visualice la letra deseada, presione d para mover el cursor a la próxima posición y seleccione la próxima letra. Presione c para mover el cursor hacia atrás en el display . 5 Mueva el cursor a la última posición presionando d después de ingresar el títu- lo. […]
-
Страница 64
Para escuchar canciones en su iPod 1 1 1 2 Se puede utilizar esta unidad para contr olar un adaptador de iP od, que se vende por separado. P ara obtener más información, consulte los manuales de instrucciones del adaptador de iP od. Esta sección proporciona información acerca de las funciones de iP od con esta uni- dad que difieren de las descr[…]
-
Страница 65
4 Presione d para determinar la lista. Se visualizan las listas de la lista selecciona- da. 5 Repita los pasos 3 y 4 para encontrar una canción que desee escuchar . # P uede comenzar la reproducción por la lista seleccionada manteniendo presionado d . # P ara volver a la lista anterior , presione c . # P resione BAND para volver a la visualizaci?[…]
-
Страница 66
Reproducción de las canciones en un orden aleatorio (selección aleatoria) P ara la reproducción de las canciones en el iP od existen dos métodos de reproducción aleatoria: SHFFL :SNG (reproducir canciones en un orden aleatorio) y SHFFL :ALB (reprodu- cir álbumes en un orden aleatorio). 1 Presione FUNCTION para seleccionar SHFFL. 2 Presione c […]
-
Страница 67
Introducción a los ajustes de audio 1 1 1 Visualización de audio Muestra el estado de los ajustes de audio. % Presione AUDIO para visualizar los nombres de las funciones de audio. Presione AUDIO repetidamente para cambiar entre las siguientes funciones de audio: FAD (ajuste del balance) — EQ (ajuste de la cur va de ecualización) — LOUD (sono[…]
-
Страница 68
Recuperación de las curvas de ecualización Hay seis tipos de cur vas de ecualización me- morizadas que se pueden recuperar con facili- dad en cualquier momento. A continuación se ofrece una lista de estas cur vas de ecualiza- ción: Visualización Curva de ecualización POWERFUL P otente NA TURAL Natural VOCAL Vocal CUSTOM Personalizada EQ FLA […]
-
Страница 69
3 Presione c o d para seleccionar la fre- cuencia deseada. Baja: 40 — 80 — 100 — 160 (Hz) Media: 200 — 500 — 1k — 2k (Hz) Alta: 3k — 8k — 10k — 12k (Hz) 4 Presione a o b para seleccionar el fac- tor Q deseado. 2N — 1N — 1W — 2W Nota Si realiza ajustes, la cur va CUSTOM se actualizará. Ajuste de la sonoridad La sonoridad com[…]
-
Страница 70
Uso del filtro de paso alto Cuando no desea que se generen los sonidos bajos de la gama de frecuencias de salida de subgraves a través de los altavoces delanteros o traseros, active el filtro de paso alto (HPF). Sólo las frecuencias más altas que las de la gama seleccionada se generan a través de los altavoces delanteros o traseros. 1 Presione […]
-
Страница 71
Notas ! Después de activar la función F .I.E., utilice el ajuste del balance (consulte la página 67) y ajuste los niveles de volumen de los altavoces delanteros y traseros hasta que queden equili- brados. ! Desactive la función F .I.E. si utiliza un sistema de 2 altavoces. Ajuste de los niveles de la fuente La función SLA (ajuste del nivel de […]
-
Страница 72
Configuración de los ajustes iniciales 1 1 Utilizando los ajustes iniciales, puede perso- nalizar varios ajustes del sistema para lograr un funcionamiento óptimo de esta unidad. 1 Visualización de función Muestra el estado de la función. 1 Mantenga presionado SOURCE hasta que se apague la unidad. 2 Mantenga presionado SOURCE nueva- mente hasta[…]
-
Страница 73
Ajuste del paso de sintonía de AM El paso de sintonía de AM se puede cambiar entre 9 kHz, el paso predefinido, y 10 kHz. Si se utiliza el sintonizador en América del Norte, América Central o América del Sur , se deberá cambiar el paso de sintonía de 9 kHz (531 kHz a 1 602 kHz permisibles) a 10 kHz (530 kHz a 1 640 kHz permisibles). 1 Presion[…]
-
Страница 74
Activación y desactivación de la visualización del reloj Se puede activar y desactivar la visualización del reloj. % Presione CLOCK para activar o desacti- var la visualización del reloj. Cada vez que se presiona CLOCK , se activa o desactiva la visualización del reloj. # La visualización del reloj desaparece momen- táneamente cuando se uti[…]
-
Страница 75
2 Presione a o b para seleccionar una letra del alfabeto. Cada vez que se presiona a , se visualizan las letras del alfabeto, números o símbolos en orden ascendente ( A B C … ). Cada vez que se presiona b , se visualiza una letra en orden descendente. 3 Presione d para mover el cursor a la próxima posición de carácter . Cuando se visualice l[…]
-
Страница 76
Comprensión de los mensajes de error del reproductor de CD incorporado Cuando contacte con su concesionario o con el servicio técnico Pioneer más cercano, ase- gúrese de anotar el mensaje de error . Mensaje Causa Acción ERROR-11, 12, 17, 30 Disco sucio Limpie el disco. ERROR-11, 12, 17, 30 Disco rayado Reemplace el disco. ERROR-15 El disco ins[…]
-
Страница 77
! La condensación puede afectar temporal- mente el rendimiento del reproductor . Deje que se adapte a la temperatura más cálida durante aproximadamente una hora. Ade- más, si los discos tienen humedad, séque- los con un paño suave. ! Puede ocurrir que no sea posible reprodu- cir algunos discos debido a sus caracterís- ticas, formato, aplicac[…]
-
Страница 78
Ejemplo de una jerarquía : Carpeta : Fichero 1 2 3 4 5 6 Niv e l 1 Niv e l 2 Niv e l 3 Niv e l 4 ! Esta unidad asigna los números de carpe- tas. El usuario no puede asignarlos. ! Se permite una jerarquía de carpetas de hasta ocho niveles. Sin embargo, la jerar- quía práctica de carpetas es de menos de dos niveles. ! Es posible reproducir hasta[…]
-
Страница 79
Especificaciones Generales F ue nte de alimen tación no minal …………………………………………….. 14,4 V CC (gama de tensió n permisi- ble: 12,0 V a 14,4 V CC) Sistema de conex ión a tierr a …………………………………………….. T i p o n e g ativo Consumo máximo de corrie nte …………………………….[…]
-
Страница 80
Distorsión ……………………………… 0, 3 % ( a 65 d B f, 1 k H z , esté- reo) 0,1 % (a 65 dBf , 1 kHz, mono) Respuesta de frecu encia ….. 3 0 H z a 15 00 0 H z ( ± 3 dB ) Separación estéreo …………….. 4 5 d B ( a 6 5 d B f, 1 k H z ) Sintonizador de AM Gama de frecuencias ………… 5 3 1 k H z a 1 6 0 2 k H z ( 9 k H z […]
-
Страница 81
Agradecemos por você ter adquirido este produto P ioneer . Leia as instruções de operação a seguir para sabe r com o operar corretamente o seu modelo. Ao term inar de ler as instruções, guarde este manual em um local seg u- ro para referê ncia futura. Antes de utilizar este produto Sobre esta unidade 83 Sobre o WMA 83 Sobre MP3 83 Sobre o A[…]
-
Страница 82
P rocura de CDs e faixas 100 P ausa na reprodução do CD 101 Utilização de compressão e ênfase de graves 101 Utilização de listas de reprodução ITS 101 – Criação de uma lista de reprodução com a programação ITS 102 – Reprodução da sua lista ITS 102 – Exclusão de uma faixa da sua lista de reprodução ITS 102 – Exclusão de[…]
-
Страница 83
Sobre esta unidade CUIDADO ! Não permita que esta unidade entre em con- tato com líquidos. Há risco de choque elétri- co. Além disso, o contato com líquidos pode causar danos, fumaça e superaquecimento desta unidade. ! Mantenha este manual acessível como refe- rência para os procedimentos de operação e precauções. ! Deixe sempre o volu[…]
-
Страница 84
Compatibilidade com iPod ® iP od é uma marca comercial da Apple Com- puter , Inc., registrada nos Estados Unidos e em outros países. Visite o nosso website Visite-nos no seguinte site: ! Oferecemos as últimas informações sobre a P ioneer Corporation em nosso site da W eb. Proteção da sua unidade contra roubo O painel frontal pode ser extra?[…]
-
Страница 85
ADVERTÊNCIA Mantenha a bateria fora do alcance de crianças. Caso ela seja ingerida, consulte imediatamente um médico. CUIDADO ! Utilize apenas uma bateria de lítio CR2025 (3 V) . ! Remova a bateria se não for utilizar o controle remoto por um mês ou mais. ! Se a bateria for substituída incorretamente, haverá perigo de explosão. Substitua-a[…]
-
Страница 86
Introdução aos botões Unidade principal 1 Botão AUDIO Pressione para selecionar vários controles de qualidade sonora. 2 Botão A TT Pressione para diminuir rapidamente o nível de volume, em aproximadamente 90%. Pressione novamente para retornar ao nível de volume original. 3 Botão DISPLA Y Pressione para selecionar diferentes dis- plays. 4 […]
-
Страница 87
Controle remoto A operação é a mesma que ao utilizar os bo — tões na unidade principal. Consulte a explica- ção da unidade principal sobre a operação de cada botão, com exceção de P AUSE , que será explicado posteriormente. e Botão P AUSE Pressione para ativar ou desativar a pausa. f Botão SOURCE Esta unidade será ligada ao seleciona[…]
-
Страница 88
Como ouvir o rádio 2 2 2 3 3 3 1 1 1 4 5 Importante Se você estiver utilizando esta unidade na Améri- ca do Norte, Central ou do Sul, reajuste o passo de sintonia AM (consulte Ajuste do passo de sin- tonia AM na página 114). 1 Indicador de banda Mostra em qual banda o rádio está sintoni- zado, AM ou FM. 2 Indicador de freqüência Mostra em q[…]
-
Страница 89
Armazenamento e chamada das freqüências de transmissão da memória Se você pressionar qualquer um dos botões de sintonia programada 1 a 6 , poderá facil- mente armazenar até seis freqüências de transmissão a serem chamadas posterior- mente da memória com o toque de um botão. ! Até 18 emissoras FM, seis para cada uma das três bandas FM[…]
-
Страница 90
Reprodução de um CD 2 2 2 1 1 1 3 1 Indicador de tempo de reprodução Mostra o tempo de reprodução decorrido da faixa atual. 2 Indicador de número da faixa Mostra o número da faixa que está sendo reproduzida. 3 Indicador RPT Mostra quando a reprodução com repetição está ativada. 1 Insira um CD no slot de inserção de CD. A reproduçã[…]
-
Страница 91
! TRK – Repete apenas a faixa atual Nota Se você executar a busca por faixa ou o avanço/ /retrocesso rápido durante TRK , a série de repro- dução com repetição mudará para DSC . Reprodução de faixas em ordem aleatória A reprodução aleatória permite que você re- produza as faixas do CD em uma ordem alea- tória. 1 Pressione FUNCTIO[…]
-
Страница 92
Utilização de compressão e BMX A utilização das funções COMP (Compressão) e BMX permite ajustar a qualidade sonora desta unidade. Cada uma das funções tem um ajuste de dois níveis. A função COMP equilibra a saída dos sons mais altos e mais baixos em volumes mais altos. BMX controla as reflexões sonoras para produzir um som mais forte[…]
-
Страница 93
4 Pressione d para mover o cursor para a próxima posição de caractere. Quando a letra desejada for visualizada, pres- sione d para mover o cursor para a próxima posição e, em seguida, selecione a próxima letra. P ressione c para voltar no display . 5 Mova o cursor para a última posição ao pressionar d depois de introduzir o título. Ao pr[…]
-
Страница 94
Reprodução de arquivos WMA/MP3/AAC/WA V 3 3 3 2 2 2 1 1 1 4 1 Indicador de número da pasta Mostra o número da pasta atualmente sendo reproduzida. 2 Indicador de tempo de reprodução Mostra o tempo de reprodução decorrido da faixa atual (arquivo). 3 Indicador de número da faixa Mostra o número da faixa (arquivo) atual- mente sendo reproduzi[…]
-
Страница 95
! Ao reproduzir arquivos gravados como VBR (T axa de bit variável), o tempo de reprodução não será exibido corretamente se as opera- ções de avanço rápido e retrocesso forem uti- lizadas. ! Não há som no avanço/retrocesso rápido. ! Se uma mensagem de erro, como ERROR-11 for visualizada, consulte Compreensão das mensagens de erro do CD[…]
-
Страница 96
3 Pressione a para ativar a reprodução aleatória. RDM :ON é visualizado no display. As faixas serão reproduzidas em uma ordem aleatória dentro das séries FLD ou DSC anteriormente selecionadas. # P ara desativar a reprodução aleatória, pressio- ne b . Nota Se você ativar a reprodução aleatória durante FLD e, em seguida, retornar à vis[…]
-
Страница 97
2 Pressione a ou b para selecionar o seu ajuste favorito. COMP OFF — COMP 1 — COMP 2 — COMP OFF — BMX 1 — BMX 2 Busca a cada 10 faixas na pasta atual V ocê pode alternar o método de busca entre avanço/retrocesso rápido e busca a cada 10 faixas. Selecionar ROUGH permitirá uma busca a cada 10 faixas. 1 Pressione FUNCTION para seleciona[…]
-
Страница 98
# Se não tiverem sido gravadas informações específicas em um disco WA V , NO XXXX será vi- sualizado (por exemplo, NO NAME ). # Somente é possível reproduzir arquivos WAV nas freqüências 16, 22,05, 24, 32, 44,1 e 48 kHz (LPCM) ou 22,05 e 44,1 kHz (MS ADPCM). A fre- qüência de amostragem visualizada no visor pode ser arredondada. Nota V o[…]
-
Страница 99
Reprodução de um CD 3 3 3 2 2 2 1 1 1 4 V ocê pode utilizar esta unidade para controlar um Multi-CD player , que é vendido separada- mente. ! Apenas as funções descritas neste manual são suportadas nos Multi- CD players para 50 discos. 1 Indicador de número do disco Mostra o número do disco atualmente sendo reproduzido. 2 Indicador de temp[…]
-
Страница 100
Repetição da reprodução Existem três séries de reprodução com repeti- ção para o Multi- CD player: MCD (Repetição de Multi-CD player), TRK (Repetição de uma faixa) e DSC (Repetição do disco). 1 Pressione FUNCTION para selecionar RPT. 2 Pressione c ou d para selecionar a série de repetição. ! MCD – Repete todos os discos na disq[…]
-
Страница 101
# Se o display retornou automaticamente à vi- sualização de reprodução, selecione SCAN mais uma vez ao pressionar FUNCTION . Notas ! Depois que a procura de uma faixa ou disco for concluída, a reprodução normal das faixas começará novamente. ! Se você ativar a reprodução com exploração durante DSC e, em seguida, retornar à visuali- […]
-
Страница 102
Criação de uma lista de reprodução com a programação ITS V ocê pode utilizar ITS para programar e repro — duzir até 99 faixas por disco até 100 discos (com títulos de disco). (Em Multi-CD players vendidos antes de CDX-P1250 e CDX-P650, até 24 faixas podem ser armazenadas na lista de reprodução.) 1 Reproduza um CD que deseja progra- mar[…]
-
Страница 103
4 Pressione b para excluir a faixa da sua lista de reprodução ITS. A seleção atualmente sendo reproduzida é ex- cluída da sua lista de reprodução ITS e a re- produção da próxima faixa é iniciada. # Se não existirem faixas da sua lista de repro- dução na série atual, EMPTY será visualizado e a reprodução normal será retomada. 5 P[…]
-
Страница 104
6 Pressione BAND para retornar à visuali- zação de reprodução. Notas ! Os títulos permanecerão na memória, mesmo após o disco ter sido removido da disqueteira, e serão chamados da memória quando o disco for novamente inserido. ! Depois que dados para 100 discos forem ar- mazenados na memória, dados para um novo disco sobregravarão os a[…]
-
Страница 105
Como ouvir músicas no seu iPod 1 1 1 2 V ocê pode utilizar esta unidade para controlar um adaptador iPod, que é vendido separada- mente. P ara obter detalhes relacionados à operação, consulte os manuais de operações do adapta- dor iP od. Esta seção fornece informações sobre as operações do iPod com esta unidade, que diferem das descri[…]
-
Страница 106
5 Repita as etapas 3 e 4 para localizar uma música que deseja ouvir . # V ocê pode iniciar a reprodução por toda a lista selecionada ao pressionar e segurar d . # P ara retornar à lista anterior , pressione c . # P ressione BAND para retornar à visualização normal. Nota Se você não operar a lista em aproximadamente 30 segundos, a pesquisa[…]
-
Страница 107
Reprodução de músicas em uma ordem aleatória (shuffle) P ara reprodução de músicas no iPod, existem dois métodos de reprodução aleatória: SHFFL :SNG (Reprodução de músicas em uma ordem aleatória) e SHFFL :ALB (Reprodução de álbuns em uma ordem aleatória). 1 Pressione FUNCTION para selecionar SHFFL. 2 Pressione c ou d para selecio[…]
-
Страница 108
Introdução aos ajustes de áudio 1 1 1 Display de áudio Mostra o status do ajuste de áudio. % Pressione AUDIO para visualizar os nomes das funções de áudio. Pressione AUDIO várias vezes para alternar entre as seguintes funções de áudio: FAD (Ajuste do equilíbrio) — EQ (Ajuste da cur va do equalizador) — LOUD (Sonoridade) — SUB.W ([…]
-
Страница 109
Chamada das curvas do equalizador da memória Existem seis cur vas do equalizador armazena- das que podem ser facilmente chamadas da memória a qualquer momento. A seguir está uma lista das cur vas do equalizador: Display Curva do equalizador POWERFUL Potente NA TURAL Natural VOCAL V ocal CUSTOM Personalizada EQ FLA T Plana SPR-BASS Ultrabaixo ! C[…]
-
Страница 110
3 Pressione c ou d para selecionar a fre- qüência desejada. Baixa: 40 — 80 — 100 — 160 (Hz) Média: 200 — 500 — 1k — 2k (Hz) Alta: 3k — 8k — 10k — 12k (Hz) 4 Pressione a ou b para selecionar o fator Q desejado. 2N — 1N — 1W — 2W Nota Se você fizer ajustes, a curva CUSTOM será atualizada. Ajuste da sonoridade A sonoridade[…]
-
Страница 111
3 Pressione a ou b para ajustar o nível de saída do alto-falante de graves secundá- rio. +6 a – 24 é visualizado à medida que o nível é aumentado ou diminuído. Utilização do filtro de alta freqüência Quando você não quiser que sons baixos da faixa de freqüência de saída do alto-falante de graves secundário sejam reproduzidos nos[…]
-
Страница 112
2 Pressione a para ativar F .I.E. # P ara desativar F .I.E., pressione b . 3 Pressione c ou d para selecionar uma freqüência desejada. 100 — 160 — 250 (Hz) Notas ! Após ativar a função F .I.E., utilize o ajuste de equilíbrio (consulte a página 108) e ajuste os níveis de volume dos alto-falantes dianteiros e traseiros até ficarem equili[…]
-
Страница 113
Definição dos ajustes iniciais 1 1 Ao utilizar os ajustes iniciais, você pode perso- nalizar vários ajustes do sistema a fim de obter um ótimo desempenho desta unidade. 1 Display de função Mostra o status da função. 1 Pressione e segure SOURCE até desligar a unidade. 2 Pressione SOURCE e segure novamente até visualizar o nome da função[…]
-
Страница 114
Ajuste do passo de sintonia AM O passo de sintonia AM pode ser alternado entre 9 kHz, o passo predefinido e 10 kHz. Ao utilizar o sintonizador na América do Norte, Central ou do Sul, reajuste o passo de sintonia de 9 kHz (531 a 1 602 kHz permissível) a 10 kHz (530 a 1 640 kHz permissível). 1 Pressione FUNCTION para selecionar AM. 2 Pressione c o[…]
-
Страница 115
Ativação ou desativação da visualização de hora V ocê pode ativar ou desativar a visualização de hora. % Pressione CLOCK para ativar ou desati- var a visualização de hora. Cada vez que pressionar CLOCK , a visualiza- ção de hora será ativada ou desativada. # A visualização de hora desaparece tempora- riamente quando se executa outra[…]
-
Страница 116
2 Pressione a ou b para selecionar uma letra do alfabeto. Cada vez que pressionar em a , o alfabeto, nú- meros ou símbolos serão visualizados em ordem crescente ( A B C … ). Cada vez que pressionar em b , as letras serão visualizadas em ordem decrescente. 3 Pressione d para mover o cursor para a próxima posição de caractere. Quando a letra[…]
-
Страница 117
Compreensão das mensagens de erro do CD player inco rporado Ao entrar em contato com o revendedor ou a Central de Ser viços da Pioneer mais próxima, certifique-se de gravar a mensagem de erro. Mensagem Causa Ação ERROR-11, 12, 17, 30 Disco sujo Limpe o disco. ERROR-11, 12, 17, 30 Disco riscado Substitua o disco. ERROR-15 O disco inserido não […]
-
Страница 118
! A reprodução de discos pode não ser possí- vel devido às suas características, aos seus formatos, ao aplicativo gravado, ao ambien- te de gravação, às condições de armazena- mento e assim por diante. ! As informações de texto podem não ser corretamente visualizadas dependendo do ambiente de gravação. ! Impactos nas estradas ao dir[…]
-
Страница 119
Exemplo de uma hierarquia : P asta : Arquivo 1 2 3 4 5 6 N í v e l 1 N í v el 2 N í v el 3 N í vel 4 ! Esta unidade atribui os números de pastas. O usuário não pode atribuir números de pastas. ! A hierarquia de pastas pode ter até oito ca- madas. No entanto, uma hierarquia de pas- tas prática tem menos do que duas camadas. ! Até 99 pasta[…]
-
Страница 120
Especificações Geral Fonte de alimentação nominal …………………………………………….. 14,4 V CC (faixa de tensã o permissível: 12,0 V a 14,4 V CC) Sistema de a terram ento …… T i p o n e g a tivo Consumo máx. de energia …………………………………………….. 10,0 A Dimensões (L × A × P): DIN C h a s s […]
-
Страница 121
Distorção ………………………………. 0, 3 % ( a 6 5 d B f, 1 k H z , esté- reo) 0,1 % (a 65 dBf , 1 kHz, mono) Resposta de freqüência ……. 3 0 H z a 1 5 00 0 H z ( ± 3 dB ) Separação de estéreo ………… 4 5 d B ( a 6 5 d B f, 1 k H z ) Sintonizador de AM F aixa de freqüência ……………. 5 3 1 k H z a 1 6 0 2 kH z ([…]
-
Page 1: Pioneer DEH-P4950MP
Operation Manual CD Receiver DEH-P4950MP English P ortuguês (B) Español[…]
-
Page 2: Pioneer DEH-P4950MP
Thank you for buying this P ioneer product. Please read through these operating instruct ions so you will know how to operate your model properly . After you have finished reading the instructio ns, keep this man- ual in a safe place for future r eference. Before Y ou Start About this unit 4 About WMA 4 About MP3 4 About AAC 4 iP od® compatibility[…]
-
Page 3: Pioneer DEH-P4950MP
– Creating a playlist with ITS programming 21 – Playback from your ITS playlist 22 – Erasing a track from your ITS playlist 22 – Erasing a CD from your ITS playlist 22 Using disc title functions 22 – Entering disc titles 23 – Displaying disc titles 23 Using CD TEXT functions 23 – Displaying text information on CD TEXT discs 24 Playing[…]
-
Page 4: Pioneer DEH-P4950MP
About this unit CAUTION ! Do not allow this unit to come into contact with liquids. Electrical shock could result. Also, this unit damage, smoke, and overheat could result from contact with liquids. ! Keep this manual handy as a reference for op- erating procedures and precautions. ! Always keep the volume low enough so that you can hear sounds fro[…]
-
Page 5: Pioneer DEH-P4950MP
Visit our website Visit us at the following site: ! W e offer the latest information about Pioneer Corporation on our website. Protecting your unit from theft The front panel can be detached to deter thef t. Important ! Handle gently when removing or attaching the front panel. ! Avoid subjecting the front panel to excessive shocks. ! Keep the front[…]
-
Page 6: Pioneer DEH-P4950MP
! Do not handle the batter y with metallic tools. ! Do not store the batter y with metallic materi- als. ! In the event of batter y leakage, wipe the re- mote control completely clean and install a new batter y . ! When disposing of used batteries, please comply with governmental regulations or en- vironmental public institutions ’ rules that app[…]
-
Page 7: Pioneer DEH-P4950MP
What ’ s What Head unit 1 AUDIO button Press to select various sound quality con- trols. 2 A TT button Press to quickly lower the volume level, by about 90%. Press once more to return to the original volume level. 3 DISPLA Y button Press to select differ ent displays. 4 SOURCE button, VOLUME This unit is turned on by selecting a source. Press to […]
-
Page 8: Pioneer DEH-P4950MP
Remote control Operation is the same as when using the but- tons on the head unit. See the explanation of the head unit about the operation of each but- ton with the exception of P AUSE , which is ex- plained below . e P AUSE button Press to turn pause on or off . f SOURCE button This unit is turned on by selecting a source. Press to cycle through […]
-
Page 9: Pioneer DEH-P4950MP
Listening to the radio 2 2 2 3 3 3 1 1 1 4 5 Important If you are using this unit in North, Central or South America, reset the AM tuning step (see Setting the AM tuning step on page 32). 1 Band indicator Shows which band the radio is tuned to, AM or FM. 2 Frequency indicator Shows the frequency to which the tuner is tuned. 3 Stereo ( 5 ) indicator[…]
-
Page 10: Pioneer DEH-P4950MP
% When you find a frequency that you want to store in memory , press one of pre- set tuning buttons 1 to 6 and hold until the preset number stops flashing. The number you have pressed will flash in the preset number indicator and then remain lit. The selected radio station frequency has been stored in memor y. The next time you press the same prese[…]
-
Page 11: Pioneer DEH-P4950MP
Playing a CD 2 2 2 1 1 1 3 1 Play time indicator Shows the elapsed playing time of the cur- rent track. 2 T rack number indicator Shows the track number currently playing. 3 RPT indicator Shows when repeat play is turned on. 1 Insert a CD into the CD loading slot. Playback will automatically start. # Be sure to turn up the label side of a disc. # A[…]
-
Page 12: Pioneer DEH-P4950MP
Playing tracks in random order Random play lets you play back tracks on the CD in a random order . 1 Press FUNCTION to select RDM. 2 Press a to turn random play on. RDM :ON appears in the display. T racks will play in a random order . # T o turn random play off, press b . Scanning tracks of a CD Scan play lets you hear the first 10 seconds of each […]
-
Page 13: Pioneer DEH-P4950MP
# T o select FF/REV , press c . 3 Press BAND to return to the playback display . 4 Press and hold c or d to search every 10 tracks on a disc. # If the rest of track number is less than 10, press and hold c or d recalls the first (last) one. Using disc title functions Y ou can input CD titles and display the title. The next time you insert a CD for […]
-
Page 14: Pioneer DEH-P4950MP
Using CD TEXT func tions Some discs have certain information encoded on the disc during manufacture. These discs may contain such information as the CD title, track title, artist ’ s name and playback time and are called CD TEXT discs. Only these spe- cially encoded CD TEXT discs support the functions listed below. Displaying text information on […]
-
Page 15: Pioneer DEH-P4950MP
Playing WMA/MP3/A AC/ WA V files 3 3 3 2 2 2 1 1 1 4 1 Folder number indicator Shows the folder number currently playing. 2 Play time indicator Shows the elapsed playing time of the cur- rent track (file). 3 T rack number indicator Shows the track (file) number currently play- ing. ! If a track number 100 or more is selected, d on the left of the t[…]
-
Page 16: Pioneer DEH-P4950MP
! When a WMA/MP3/AAC/W AV disc is inserted, text information currently selected on Display- ing text information on WMA/MP3/AAC/W AV disc on page 18 automatically begins to scroll in the display. Introduction of advanced built-in CD player (WMA/ MP3/AAC/WA V) operation % Press FUNCTION to display the function names. Press FUNCTION repeatedly to swi[…]
-
Page 17: Pioneer DEH-P4950MP
2 Press FUNCTION to select SCAN. 3 Press a to turn scan play on. 4 When you find the desired track (or folder) press b to turn scan play off. SCAN :OFF appears in the display. The track (or disc) will continue to play . # If the display has automatically returned to the playback display, select SCAN again by press- ing FUNCTION . Notes ! After trac[…]
-
Page 18: Pioneer DEH-P4950MP
Displaying text information on WMA/MP3/AAC/WA V disc T ext information recorded on a WMA/MP3/ AAC/WA V disc can be displayed. When playing back a WMA/ MP3/AAC disc % Press DISPLA Y. Press DISPLA Y repeatedly to switch between the following settings: Play time — FOLDER (folder name) — FILE (file name) — TRK TTL (track title) — ARTIST (artist[…]
-
Page 19: Pioneer DEH-P4950MP
Playing a CD 3 3 3 2 2 2 1 1 1 4 Y ou can use this unit to contr ol a multi- CD player , which is sold separately . ! Only those functions described in this man- ual are supported by 50-disc multi- CD players. 1 Disc number indicator Shows the disc number currently playing. 2 Play time indicator Shows the elapsed playing time of the cur- rent track[…]
-
Page 20: Pioneer DEH-P4950MP
Repeating play There are three repeat play ranges for the multi-CD player: MCD (multi- CD player re- peat), TRK (one-track repeat) and DSC (disc re- peat). 1 Press FUNCTION to select RPT. 2 Press c or d to select the repeat range. ! MCD – Repeat all discs in the multi-CD player magazine ! TRK – Repeat just the current track ! DSC – Repeat the[…]
-
Page 21: Pioneer DEH-P4950MP
Pausing CD playback P ause lets you temporarily stop playback of the CD. 1 Press FUNCTION to select P AUSE. 2 Press a to turn pause on. P AUSE:ON appears in the display . Play of the current track pauses. # T o turn pause off , press b . Using compression and bass emphasis Y ou can use these functions only with a multi- CD player that supports them[…]
-
Page 22: Pioneer DEH-P4950MP
Playback from your ITS playlist ITS play lets you listen to the tracks that you have entered into your ITS playlist. When you turn on ITS play, tracks from your ITS playlist in the multi- CD player will begin to play. 1 Select the repeat range. Refer to Repeating play on page 20. 2 Press FUNCTION to select ITS-P. 3 Press a to turn ITS play on. ITS-[…]
-
Page 23: Pioneer DEH-P4950MP
Entering disc titles Use the disc title input feature to store up to 100 CD titles (with ITS playlist) into the multi- CD player . Each title can be up to 8 characters long. 1 Play the CD that you want to enter a title for . Press a or b to select the CD. 2 Press FUNCTION and hold until TITLE IN appears in the display . After TITLE IN is displayed,[…]
-
Page 24: Pioneer DEH-P4950MP
Displaying text information on CD TEXT discs % Press DISPLA Y. Press DISPLA Y repeatedly to switch between the following settings: Play time — DISC TTL (disc title) — DISC ART (disc artist name) — TRK TTL (track title) — TRK ART (track artist name) # If specific information has not been recorded on a CD TEXT disc, NO XXXX will be displayed […]
-
Page 25: Pioneer DEH-P4950MP
Listening to songs on your iPod 1 1 1 2 Y ou can use this unit to contr ol an iPod adapter , which is sold separately . F or details concerning operation, refer to the iP od adapter ’ s operation manuals. This sec- tion provides information on iPod operations with this unit which differs from that described in the iPod adapter ’ s operation man[…]
-
Page 26: Pioneer DEH-P4950MP
Note If you do not operate the list within about 30 sec- onds, the list search is cancelled auto- matically . Displaying text information on iPod T ext information recorded on the iP od can be displayed. % Press DISPLA Y. Press DISPLA Y repeatedly to switch between the following settings: Play time — SONG (song title) — ARTIST (artist name) —[…]
-
Page 27: Pioneer DEH-P4950MP
! SHFFL :SNG – Play back songs in a random order within the selected list ! SHFFL :ALB – Select an album randomly , and then play back all the songs in it in order Pausing a song P ause lets you temporarily stop playback of a song. 1 Press FUNCTION to select P AUSE. 2 Press a to turn pause on. Playback of the current song pauses. # T o turn pau[…]
-
Page 28: Pioneer DEH-P4950MP
Introduction of audio adjustments 1 1 1 Audio display Shows the audio adjustment status. % Press AUDIO to display the audio func- tion names. Press AUDIO repeatedly to switch between the following audio functions: FAD (balance adjustment) — EQ (equalizer cur ve adjustment) — LOUD (loudness) — SUB.W (subwoofer on/off setting) — 80: 0 (sub- w[…]
-
Page 29: Pioneer DEH-P4950MP
! CUSTOM is an adjusted equalizer cur ve that you create. If you make adjustments to an equalizer curve, the equalizer cur ve set- ting will be memorized in CUSTOM . ! When EQ FLA T is selected no supplement or correction is made to the sound. This is useful to check the effect of the equalizer cur ves by switching alternatively between EQ FLA T an[…]
-
Page 30: Pioneer DEH-P4950MP
2 Press a to turn loudness on. Loudness level (e.g., LOUD :MID ) appears in the display . # T o turn loudness off , press b . 3 Press c or d to select a desired level. LOW (low) — MID (mid) — HI (high) Using subwoofer output This unit is equipped with a subwoofer output which can be turned on or off . 1 Press AUDIO to select SUB.W. 2 Press a to[…]
-
Page 31: Pioneer DEH-P4950MP
Boosting the bass Bass boost function boosts the bass level of sound lower than 100 Hz. The more the bass level is increased, the more the bass sound is emphasized and the entire sound becomes power ful. When using this function with the subwoofer , the sound under the cut-off fre- quency is booste d. 1 Press AUDIO to select BASS. 2 Press a or b to[…]
-
Page 32: Pioneer DEH-P4950MP
Adjusting initial settings 1 1 Using the initial settings, you can customize various system settings to achieve optimal per- formance from this unit. 1 Function display Shows the function status. 1 Press SOURCE and hold until the unit turns off. 2 Press SOURCE and hold again until function name appears in the display . 3 Press FUNCTION to select on[…]
-
Page 33: Pioneer DEH-P4950MP
2 Press c or d to select the AM tuning step. Press c to select 9 (9 kHz). P ress d to select 10 (10 kHz). Switching the auxiliary setting Auxiliar y equipments connected to this unit can be activated individually. Set each AUX source to ON when using. About connecting or using auxiliar y equipments, refer to Using the A UX sour ce on the next page.[…]
-
Page 34: Pioneer DEH-P4950MP
Using the AUX source This unit can control up to two auxiliary equip- ments such as VCR or portable devices (sold separately). When connected, auxiliar y equip- ments are automatically read in as AUX sources and assigned to AUX1 or AUX2 . The relationship between AUX1 and AUX2 sources is explained below . About AUX connection method Y ou have two m[…]
-
Page 35: Pioneer DEH-P4950MP
Understanding built-in CD player error messages When you contact your dealer or your nearest Pioneer Ser vice Center , be sure to record the error message. Message Cause Action ERROR-11, 12, 17, 30 Dirty disc Clean disc. ERROR-11, 12, 17, 30 Scratched disc Replace disc. ERROR-15 The inserted disc does not contain any data Replace disc. ERROR-10, 11[…]
-
Page 36: Pioneer DEH-P4950MP
! T ext information may not be correctly dis- played depending on the recorded environ- ment. ! Road shocks may interrupt disc playback. ! Read the precautions with discs before using them. Dual Discs ! Dual Discs are two -sided discs that have a recordable CD for audio on one side and a recordable DVD for video on the other . ! Since the CD side o[…]
-
Page 37: Pioneer DEH-P4950MP
Compressed audio compatibility WMA ! Compatible format: WMA encoded by Windows Media Player Ver . 7, 7.1, 8, 9 or 10 ! Bit rate: 48 kbps to 320 kbps (CBR), 48 kbps to 384 kbps (VBR) ! Sampling frequency : 32 kHz to 48 kHz ! Windows Media Audio 9 Professional, Loss- less, V oice: No MP3 ! Bit rate: 8 kbps to 320 kbps ! Sampling frequency : 16 kHz to[…]
-
Page 38: Pioneer DEH-P4950MP
Specifications General Rated powe r source …………… 14.4 V DC (allowable voltage range: 12.0 V to 14.4 V DC) Grounding system ………………. N e g a tive type Max. current consumption …………………………………………….. 10.0 A Dimensions (W × H × D): DIN Chassis ………………… 1 7 8 × 5 0 × 1 6 2 m m N o s e[…]
-
Page 39: Pioneer DEH-P4950MP
Signal-to-noise ratio …………… 6 5 dB ( I E C -A n e t w o r k ) Infrared remote control Wa v e l e n g t h …………………………… 9 4 0 n m ± 5 0 n m O u t p u t ……………………………………. t y p ; 1 2 m w / s r p e r I n frared LED Note Specifications and the design are subject to pos- sible modifications withou[…]
-
Page 40: Pioneer DEH-P4950MP
Gracias por haber comprado este producto P ioneer . Lea con detenimiento estas instrucciones sobre el funcionamiento del aparato, para que pueda darle el mejor uso posible. Una vez que las haya leído, con ser ve este manual en un lugar segur o para consultarlo en el futuro. Antes de comenzar Acerca de esta unidad 42 Acerca de WMA 42 Acerca de MP3 […]
-
Page 41: Pioneer DEH-P4950MP
Exploración de CD y pistas 59 P ausa de la reproducción de un CD 60 Uso de la compresión y del enfatizador de graves 60 Uso de listas de reproducción ITS 60 – Creación de una lista de reproducción con la programación ITS 61 – Reproducción de la lista de reproducción ITS 61 – Borrado de una pista de la lista de reproducción ITS 61 ?[…]
-
Page 42: Pioneer DEH-P4950MP
Acerca de esta unidad PRECAUCIÓN ! No permita que esta unidad entre en contacto con líquidos, ya que ello puede producir una descarga eléctrica. Además, el contacto con líquidos puede causar daños en la unidad, humo y recalentamiento. ! Conserve este manual a mano para que pueda consultar los procedimientos de opera- ción y las precauciones […]
-
Page 43: Pioneer DEH-P4950MP
iT unes es una marca comercial de Apple Computer , Inc., registrada en los EE.UU. y otros países. Compatibilidad con iPod ® iP od es una marca comercial de Apple Computer , Inc., registrada en los EE.UU. y otros países. Visite nuestro sitio Web Visítenos en el siguiente sitio: ! En nuestro sitio Web ofrecemos la informa- ción más reciente ace[…]
-
Page 44: Pioneer DEH-P4950MP
Uso y cuidado de l mando a distancia Instalación de la batería Deslice y extraiga la bandeja de la parte poste- rior del mando a distancia y coloque la batería con los polos positivo (+) y negativo ( – )e nl a dirección correcta. ADVERTENCIA Mantenga la batería fuera del alcance de los niños. En caso de ingestión accidental, consulte a un […]
-
Page 45: Pioneer DEH-P4950MP
Qué es cada cosa Unidad principal 1 Botón AUDIO Presione este botón para seleccionar los di- versos controles de calidad del sonido. 2 Botón A TT Presione este botón para bajar rápidamente el nivel de volumen, aproximadamente el 90%. P resione una vez más para volver al nivel de volumen original. 3 Botón DISPLA Y Presione este botón para s[…]
-
Page 46: Pioneer DEH-P4950MP
d Botón FUNCTION Presione este botón para seleccionar las funciones. Mando a distancia Las funciones se utilizan de la misma manera que al usar los botones de la unidad princ ipal. Consulte la explicación de la unidad principal acerca del uso de cada botón, con excepción de P AUSE , que se explica a continuación. e Botón P AUSE Presione este[…]
-
Page 47: Pioneer DEH-P4950MP
Para escuchar la radio 2 2 2 3 3 3 1 1 1 4 5 Importante Si se utiliza esta unidad en América del Norte, América Central o América del Sur , se deberá cambiar el paso de sintonía de AM (consulte Ajuste del paso de sintonía de AM en la página 73). 1 Indicador de banda Muestra la banda en que la radio está sinto — nizada: AM o FM. 2 Indicador […]
-
Page 48: Pioneer DEH-P4950MP
Almacenamiento y recuperación de frecuencias Si se presiona cualquiera de los botones de ajuste de presintonías 1 a 6 , se pueden alma- cenar con facilidad hasta seis frecuencias de emisoras para recuperarlas con posterioridad presionando un solo botón. ! Se pueden almacenar en la memoria hasta 18 emisoras FM, seis por cada una de las tres banda[…]
-
Page 49: Pioneer DEH-P4950MP
Reproducción de un CD 2 2 2 1 1 1 3 1 Indicador de tiempo de reproducción Muestra el tiempo transcurrido de reproduc- ción de la pista actual. 2 Indicador de número de pista Muestra el número de pista que se está re- produciendo actualmente. 3 Indicador RPT Aparece cuando la repetición de reproduc- ción está activada. 1 Introduzca un CD po[…]
-
Page 50: Pioneer DEH-P4950MP
2 Presione c o d para seleccionar la gama de repetición. ! DSC – Repite el disco actual ! TRK – Sólo repite la pista actual Nota Si se realiza una búsqueda de pistas o el avance rápido/retroceso durante la repetición TRK ,l a gama de repetición cambia a DSC . Reproducción de las pistas en orden aleatorio La reproducción aleatoria le per[…]
-
Page 51: Pioneer DEH-P4950MP
Uso de la compresión y BMX El uso de las funciones COMP (compresión) y BMX le permiten ajustar la calidad de repro- ducción de sonido de este reproductor . Cada una de las funciones tiene un ajuste de dos pasos. La función COMP equilibra la salida de los sonidos más fuertes y más suaves a volú- menes altos. La función BMX permite contro- la[…]
-
Page 52: Pioneer DEH-P4950MP
4 Presione d para mover el cursor a la próxima posición de carácter . Cuando se visualice la letra deseada, presione d para mover el cursor a la próxima posición y seleccione la próxima letra. Presione c para mover el cursor hacia atrás en el display . 5 Mueva el cursor a la última posición presionando d después de ingresar el títu- lo. […]
-
Page 53: Pioneer DEH-P4950MP
Reproducción de ficheros WMA/MP3/AAC/WA V 3 3 3 2 2 2 1 1 1 4 1 Indicador del número de carpeta Muestra el número de la carpeta que se está reproduciendo. 2 Indicador de tiempo de reproducción Muestra el tiempo transcurrido de reproduc- ción de la pista (fichero) actual. 3 Indicador de número de pista Muestra el número de pista (fichero) qu[…]
-
Page 54: Pioneer DEH-P4950MP
! Los discos se reproducen por orden del núme- ro de fichero. Se saltan las carpetas que no tienen ficheros. (Si la carpeta 01 (RAÍZ) no contiene ficheros, la reproducción comienza en la carpeta 02.) ! Al reproducir ficheros grabados como VBR (velocidad de grabación variable), el tiempo de reproducción no se visualizará correcta- mente si se […]
-
Page 55: Pioneer DEH-P4950MP
2 Presione FUNCTION para seleccionar RDM. 3 Presione a para activar la reproducción aleatoria. RDM :ON aparece en el display . Las pistas se reproducirán en un orden aleatorio en la gama de repetición FLD o DSC seleccionada con anterioridad. # P resione b para desactivar la reproducción aleatoria. Nota Si se activa la reproducción aleatoria en[…]
-
Page 56: Pioneer DEH-P4950MP
Uso de la compresión y BMX El uso de las funciones COMP (compresión) y BMX le permiten ajustar la calidad de repro- ducción de sonido de este reproductor . Cada una de las funciones tiene un ajuste de dos pasos. La función COMP equilibra la salida de los sonidos más fuertes y más suaves a volú- menes altos. La función BMX permite contro- la[…]
-
Page 57: Pioneer DEH-P4950MP
# Según sea la versión de iT unes ® utilizada para grabar ficheros MP3 en un disco, es posible que no se visualice correctamente la información de comentarios. # Según la versión del Windows Media Player utilizada para codificar los ficheros WMA, es po- sible que no se visualicen correctamente los nombres de álbumes y demás información de […]
-
Page 58: Pioneer DEH-P4950MP
Reproducción de un CD 3 3 3 2 2 2 1 1 1 4 Se puede usar esta unidad para controlar un re- productor de CD múltiple, que se vende por se- parado. ! Sólo las funciones descrit as en este manual son compatibles con los repr oductores de CD múltiple de 50 discos. 1 Indicador de número de disco Muestra el número de disco que se está re- producien[…]
-
Page 59: Pioneer DEH-P4950MP
# Si no se utiliza la función en unos 30 segun- dos, el display volverá automáticamente a la vi- sualización de reproducción. Repetición de reproducción Hay tres gamas de repetición para la repro- ducción de un reproductor de CD múltiple: MCD (repetición de todos los discos del repro- ductor de CD múltiple), TRK (repetición de una sola[…]
-
Page 60: Pioneer DEH-P4950MP
3 Presione a para activar la reproducción con exploración. SCAN :ON aparece en el display . Se reproduci- rán los primeros 10 segundos de cada pista del disco actual (o la primera pista de cada disco). 4 Cuando encuentre la pista (o el disco) deseada(o), presione b para desactivar la exploración. SCAN :OFF aparece en el display . La pista (o el[…]
-
Page 61: Pioneer DEH-P4950MP
Creación de una lista de reproducción con la programación ITS Puede utilizar la función ITS para ingresar y re- producir hasta 99 pistas por disco en un máxi- mo de 100 discos (incluidos los títulos de los discos). (Con reproductores de CD múltiple vendidos antes del CDX-P1250 y el CDX-P650, es posible guardar hasta 24 pistas en la lista de […]
-
Page 62: Pioneer DEH-P4950MP
2 Mantenga presionado FUNCTION hasta que TITLE IN aparezca en el display , y pre- sione FUNCTION para seleccionar ITS. 3 Seleccione la pista deseada presionan- do c o d . 4 Presione b para borrar la pista de la lista de reproducción ITS. La pista que se está reproduciendo se borra de la lista de reproducción ITS y comienza la reproducción de la[…]
-
Page 63: Pioneer DEH-P4950MP
4 Presione d para mover el cursor a la próxima posición de carácter . Cuando se visualice la letra deseada, presione d para mover el cursor a la próxima posición y seleccione la próxima letra. Presione c para mover el cursor hacia atrás en el display . 5 Mueva el cursor a la última posición presionando d después de ingresar el títu- lo. […]
-
Page 64: Pioneer DEH-P4950MP
Para escuchar canciones en su iPod 1 1 1 2 Se puede utilizar esta unidad para contr olar un adaptador de iP od, que se vende por separado. P ara obtener más información, consulte los manuales de instrucciones del adaptador de iP od. Esta sección proporciona información acerca de las funciones de iP od con esta uni- dad que difieren de las descr[…]
-
Page 65: Pioneer DEH-P4950MP
4 Presione d para determinar la lista. Se visualizan las listas de la lista selecciona- da. 5 Repita los pasos 3 y 4 para encontrar una canción que desee escuchar . # P uede comenzar la reproducción por la lista seleccionada manteniendo presionado d . # P ara volver a la lista anterior , presione c . # P resione BAND para volver a la visualizaci?[…]
-
Page 66: Pioneer DEH-P4950MP
Reproducción de las canciones en un orden aleatorio (selección aleatoria) P ara la reproducción de las canciones en el iP od existen dos métodos de reproducción aleatoria: SHFFL :SNG (reproducir canciones en un orden aleatorio) y SHFFL :ALB (reprodu- cir álbumes en un orden aleatorio). 1 Presione FUNCTION para seleccionar SHFFL. 2 Presione c […]
-
Page 67: Pioneer DEH-P4950MP
Introducción a los ajustes de audio 1 1 1 Visualización de audio Muestra el estado de los ajustes de audio. % Presione AUDIO para visualizar los nombres de las funciones de audio. Presione AUDIO repetidamente para cambiar entre las siguientes funciones de audio: FAD (ajuste del balance) — EQ (ajuste de la cur va de ecualización) — LOUD (sono[…]
-
Page 68: Pioneer DEH-P4950MP
Recuperación de las curvas de ecualización Hay seis tipos de cur vas de ecualización me- morizadas que se pueden recuperar con facili- dad en cualquier momento. A continuación se ofrece una lista de estas cur vas de ecualiza- ción: Visualización Curva de ecualización POWERFUL P otente NA TURAL Natural VOCAL Vocal CUSTOM Personalizada EQ FLA […]
-
Page 69: Pioneer DEH-P4950MP
3 Presione c o d para seleccionar la fre- cuencia deseada. Baja: 40 — 80 — 100 — 160 (Hz) Media: 200 — 500 — 1k — 2k (Hz) Alta: 3k — 8k — 10k — 12k (Hz) 4 Presione a o b para seleccionar el fac- tor Q deseado. 2N — 1N — 1W — 2W Nota Si realiza ajustes, la cur va CUSTOM se actualizará. Ajuste de la sonoridad La sonoridad com[…]
-
Page 70: Pioneer DEH-P4950MP
Uso del filtro de paso alto Cuando no desea que se generen los sonidos bajos de la gama de frecuencias de salida de subgraves a través de los altavoces delanteros o traseros, active el filtro de paso alto (HPF). Sólo las frecuencias más altas que las de la gama seleccionada se generan a través de los altavoces delanteros o traseros. 1 Presione […]
-
Page 71: Pioneer DEH-P4950MP
Notas ! Después de activar la función F .I.E., utilice el ajuste del balance (consulte la página 67) y ajuste los niveles de volumen de los altavoces delanteros y traseros hasta que queden equili- brados. ! Desactive la función F .I.E. si utiliza un sistema de 2 altavoces. Ajuste de los niveles de la fuente La función SLA (ajuste del nivel de […]
-
Page 72: Pioneer DEH-P4950MP
Configuración de los ajustes iniciales 1 1 Utilizando los ajustes iniciales, puede perso- nalizar varios ajustes del sistema para lograr un funcionamiento óptimo de esta unidad. 1 Visualización de función Muestra el estado de la función. 1 Mantenga presionado SOURCE hasta que se apague la unidad. 2 Mantenga presionado SOURCE nueva- mente hasta[…]
-
Page 73: Pioneer DEH-P4950MP
Ajuste del paso de sintonía de AM El paso de sintonía de AM se puede cambiar entre 9 kHz, el paso predefinido, y 10 kHz. Si se utiliza el sintonizador en América del Norte, América Central o América del Sur , se deberá cambiar el paso de sintonía de 9 kHz (531 kHz a 1 602 kHz permisibles) a 10 kHz (530 kHz a 1 640 kHz permisibles). 1 Presion[…]
-
Page 74: Pioneer DEH-P4950MP
Activación y desactivación de la visualización del reloj Se puede activar y desactivar la visualización del reloj. % Presione CLOCK para activar o desacti- var la visualización del reloj. Cada vez que se presiona CLOCK , se activa o desactiva la visualización del reloj. # La visualización del reloj desaparece momen- táneamente cuando se uti[…]
-
Page 75: Pioneer DEH-P4950MP
2 Presione a o b para seleccionar una letra del alfabeto. Cada vez que se presiona a , se visualizan las letras del alfabeto, números o símbolos en orden ascendente ( A B C … ). Cada vez que se presiona b , se visualiza una letra en orden descendente. 3 Presione d para mover el cursor a la próxima posición de carácter . Cuando se visualice l[…]
-
Page 76: Pioneer DEH-P4950MP
Comprensión de los mensajes de error del reproductor de CD incorporado Cuando contacte con su concesionario o con el servicio técnico Pioneer más cercano, ase- gúrese de anotar el mensaje de error . Mensaje Causa Acción ERROR-11, 12, 17, 30 Disco sucio Limpie el disco. ERROR-11, 12, 17, 30 Disco rayado Reemplace el disco. ERROR-15 El disco ins[…]
-
Page 77: Pioneer DEH-P4950MP
! La condensación puede afectar temporal- mente el rendimiento del reproductor . Deje que se adapte a la temperatura más cálida durante aproximadamente una hora. Ade- más, si los discos tienen humedad, séque- los con un paño suave. ! Puede ocurrir que no sea posible reprodu- cir algunos discos debido a sus caracterís- ticas, formato, aplicac[…]
-
Page 78: Pioneer DEH-P4950MP
Ejemplo de una jerarquía : Carpeta : Fichero 1 2 3 4 5 6 Niv e l 1 Niv e l 2 Niv e l 3 Niv e l 4 ! Esta unidad asigna los números de carpe- tas. El usuario no puede asignarlos. ! Se permite una jerarquía de carpetas de hasta ocho niveles. Sin embargo, la jerar- quía práctica de carpetas es de menos de dos niveles. ! Es posible reproducir hasta[…]
-
Page 79: Pioneer DEH-P4950MP
Especificaciones Generales F ue nte de alimen tación no minal …………………………………………….. 14,4 V CC (gama de tensió n permisi- ble: 12,0 V a 14,4 V CC) Sistema de conex ión a tierr a …………………………………………….. T i p o n e g ativo Consumo máximo de corrie nte …………………………….[…]
-
Page 80: Pioneer DEH-P4950MP
Distorsión ……………………………… 0, 3 % ( a 65 d B f, 1 k H z , esté- reo) 0,1 % (a 65 dBf , 1 kHz, mono) Respuesta de frecu encia ….. 3 0 H z a 15 00 0 H z ( ± 3 dB ) Separación estéreo …………….. 4 5 d B ( a 6 5 d B f, 1 k H z ) Sintonizador de AM Gama de frecuencias ………… 5 3 1 k H z a 1 6 0 2 k H z ( 9 k H z […]
-
Page 81: Pioneer DEH-P4950MP
Agradecemos por você ter adquirido este produto P ioneer . Leia as instruções de operação a seguir para sabe r com o operar corretamente o seu modelo. Ao term inar de ler as instruções, guarde este manual em um local seg u- ro para referê ncia futura. Antes de utilizar este produto Sobre esta unidade 83 Sobre o WMA 83 Sobre MP3 83 Sobre o A[…]
-
Page 82: Pioneer DEH-P4950MP
P rocura de CDs e faixas 100 P ausa na reprodução do CD 101 Utilização de compressão e ênfase de graves 101 Utilização de listas de reprodução ITS 101 – Criação de uma lista de reprodução com a programação ITS 102 – Reprodução da sua lista ITS 102 – Exclusão de uma faixa da sua lista de reprodução ITS 102 – Exclusão de[…]
-
Page 83: Pioneer DEH-P4950MP
Sobre esta unidade CUIDADO ! Não permita que esta unidade entre em con- tato com líquidos. Há risco de choque elétri- co. Além disso, o contato com líquidos pode causar danos, fumaça e superaquecimento desta unidade. ! Mantenha este manual acessível como refe- rência para os procedimentos de operação e precauções. ! Deixe sempre o volu[…]
-
Page 84: Pioneer DEH-P4950MP
Compatibilidade com iPod ® iP od é uma marca comercial da Apple Com- puter , Inc., registrada nos Estados Unidos e em outros países. Visite o nosso website Visite-nos no seguinte site: ! Oferecemos as últimas informações sobre a P ioneer Corporation em nosso site da W eb. Proteção da sua unidade contra roubo O painel frontal pode ser extra?[…]
-
Page 85: Pioneer DEH-P4950MP
ADVERTÊNCIA Mantenha a bateria fora do alcance de crianças. Caso ela seja ingerida, consulte imediatamente um médico. CUIDADO ! Utilize apenas uma bateria de lítio CR2025 (3 V) . ! Remova a bateria se não for utilizar o controle remoto por um mês ou mais. ! Se a bateria for substituída incorretamente, haverá perigo de explosão. Substitua-a[…]
-
Page 86: Pioneer DEH-P4950MP
Introdução aos botões Unidade principal 1 Botão AUDIO Pressione para selecionar vários controles de qualidade sonora. 2 Botão A TT Pressione para diminuir rapidamente o nível de volume, em aproximadamente 90%. Pressione novamente para retornar ao nível de volume original. 3 Botão DISPLA Y Pressione para selecionar diferentes dis- plays. 4 […]
-
Page 87: Pioneer DEH-P4950MP
Controle remoto A operação é a mesma que ao utilizar os bo — tões na unidade principal. Consulte a explica- ção da unidade principal sobre a operação de cada botão, com exceção de P AUSE , que será explicado posteriormente. e Botão P AUSE Pressione para ativar ou desativar a pausa. f Botão SOURCE Esta unidade será ligada ao seleciona[…]
-
Page 88: Pioneer DEH-P4950MP
Como ouvir o rádio 2 2 2 3 3 3 1 1 1 4 5 Importante Se você estiver utilizando esta unidade na Améri- ca do Norte, Central ou do Sul, reajuste o passo de sintonia AM (consulte Ajuste do passo de sin- tonia AM na página 114). 1 Indicador de banda Mostra em qual banda o rádio está sintoni- zado, AM ou FM. 2 Indicador de freqüência Mostra em q[…]
-
Page 89: Pioneer DEH-P4950MP
Armazenamento e chamada das freqüências de transmissão da memória Se você pressionar qualquer um dos botões de sintonia programada 1 a 6 , poderá facil- mente armazenar até seis freqüências de transmissão a serem chamadas posterior- mente da memória com o toque de um botão. ! Até 18 emissoras FM, seis para cada uma das três bandas FM[…]
-
Page 90: Pioneer DEH-P4950MP
Reprodução de um CD 2 2 2 1 1 1 3 1 Indicador de tempo de reprodução Mostra o tempo de reprodução decorrido da faixa atual. 2 Indicador de número da faixa Mostra o número da faixa que está sendo reproduzida. 3 Indicador RPT Mostra quando a reprodução com repetição está ativada. 1 Insira um CD no slot de inserção de CD. A reproduçã[…]
-
Page 91: Pioneer DEH-P4950MP
! TRK – Repete apenas a faixa atual Nota Se você executar a busca por faixa ou o avanço/ /retrocesso rápido durante TRK , a série de repro- dução com repetição mudará para DSC . Reprodução de faixas em ordem aleatória A reprodução aleatória permite que você re- produza as faixas do CD em uma ordem alea- tória. 1 Pressione FUNCTIO[…]
-
Page 92: Pioneer DEH-P4950MP
Utilização de compressão e BMX A utilização das funções COMP (Compressão) e BMX permite ajustar a qualidade sonora desta unidade. Cada uma das funções tem um ajuste de dois níveis. A função COMP equilibra a saída dos sons mais altos e mais baixos em volumes mais altos. BMX controla as reflexões sonoras para produzir um som mais forte[…]
-
Page 93: Pioneer DEH-P4950MP
4 Pressione d para mover o cursor para a próxima posição de caractere. Quando a letra desejada for visualizada, pres- sione d para mover o cursor para a próxima posição e, em seguida, selecione a próxima letra. P ressione c para voltar no display . 5 Mova o cursor para a última posição ao pressionar d depois de introduzir o título. Ao pr[…]
-
Page 94: Pioneer DEH-P4950MP
Reprodução de arquivos WMA/MP3/AAC/WA V 3 3 3 2 2 2 1 1 1 4 1 Indicador de número da pasta Mostra o número da pasta atualmente sendo reproduzida. 2 Indicador de tempo de reprodução Mostra o tempo de reprodução decorrido da faixa atual (arquivo). 3 Indicador de número da faixa Mostra o número da faixa (arquivo) atual- mente sendo reproduzi[…]
-
Page 95: Pioneer DEH-P4950MP
! Ao reproduzir arquivos gravados como VBR (T axa de bit variável), o tempo de reprodução não será exibido corretamente se as opera- ções de avanço rápido e retrocesso forem uti- lizadas. ! Não há som no avanço/retrocesso rápido. ! Se uma mensagem de erro, como ERROR-11 for visualizada, consulte Compreensão das mensagens de erro do CD[…]
-
Page 96: Pioneer DEH-P4950MP
3 Pressione a para ativar a reprodução aleatória. RDM :ON é visualizado no display. As faixas serão reproduzidas em uma ordem aleatória dentro das séries FLD ou DSC anteriormente selecionadas. # P ara desativar a reprodução aleatória, pressio- ne b . Nota Se você ativar a reprodução aleatória durante FLD e, em seguida, retornar à vis[…]
-
Page 97: Pioneer DEH-P4950MP
2 Pressione a ou b para selecionar o seu ajuste favorito. COMP OFF — COMP 1 — COMP 2 — COMP OFF — BMX 1 — BMX 2 Busca a cada 10 faixas na pasta atual V ocê pode alternar o método de busca entre avanço/retrocesso rápido e busca a cada 10 faixas. Selecionar ROUGH permitirá uma busca a cada 10 faixas. 1 Pressione FUNCTION para seleciona[…]
-
Page 98: Pioneer DEH-P4950MP
# Se não tiverem sido gravadas informações específicas em um disco WA V , NO XXXX será vi- sualizado (por exemplo, NO NAME ). # Somente é possível reproduzir arquivos WAV nas freqüências 16, 22,05, 24, 32, 44,1 e 48 kHz (LPCM) ou 22,05 e 44,1 kHz (MS ADPCM). A fre- qüência de amostragem visualizada no visor pode ser arredondada. Nota V o[…]
-
Page 99: Pioneer DEH-P4950MP
Reprodução de um CD 3 3 3 2 2 2 1 1 1 4 V ocê pode utilizar esta unidade para controlar um Multi-CD player , que é vendido separada- mente. ! Apenas as funções descritas neste manual são suportadas nos Multi- CD players para 50 discos. 1 Indicador de número do disco Mostra o número do disco atualmente sendo reproduzido. 2 Indicador de temp[…]
-
Page 100: Pioneer DEH-P4950MP
Repetição da reprodução Existem três séries de reprodução com repeti- ção para o Multi- CD player: MCD (Repetição de Multi-CD player), TRK (Repetição de uma faixa) e DSC (Repetição do disco). 1 Pressione FUNCTION para selecionar RPT. 2 Pressione c ou d para selecionar a série de repetição. ! MCD – Repete todos os discos na disq[…]
-
Page 101: Pioneer DEH-P4950MP
# Se o display retornou automaticamente à vi- sualização de reprodução, selecione SCAN mais uma vez ao pressionar FUNCTION . Notas ! Depois que a procura de uma faixa ou disco for concluída, a reprodução normal das faixas começará novamente. ! Se você ativar a reprodução com exploração durante DSC e, em seguida, retornar à visuali- […]
-
Page 102: Pioneer DEH-P4950MP
Criação de uma lista de reprodução com a programação ITS V ocê pode utilizar ITS para programar e repro — duzir até 99 faixas por disco até 100 discos (com títulos de disco). (Em Multi-CD players vendidos antes de CDX-P1250 e CDX-P650, até 24 faixas podem ser armazenadas na lista de reprodução.) 1 Reproduza um CD que deseja progra- mar[…]
-
Page 103: Pioneer DEH-P4950MP
4 Pressione b para excluir a faixa da sua lista de reprodução ITS. A seleção atualmente sendo reproduzida é ex- cluída da sua lista de reprodução ITS e a re- produção da próxima faixa é iniciada. # Se não existirem faixas da sua lista de repro- dução na série atual, EMPTY será visualizado e a reprodução normal será retomada. 5 P[…]
-
Page 104: Pioneer DEH-P4950MP
6 Pressione BAND para retornar à visuali- zação de reprodução. Notas ! Os títulos permanecerão na memória, mesmo após o disco ter sido removido da disqueteira, e serão chamados da memória quando o disco for novamente inserido. ! Depois que dados para 100 discos forem ar- mazenados na memória, dados para um novo disco sobregravarão os a[…]
-
Page 105: Pioneer DEH-P4950MP
Como ouvir músicas no seu iPod 1 1 1 2 V ocê pode utilizar esta unidade para controlar um adaptador iPod, que é vendido separada- mente. P ara obter detalhes relacionados à operação, consulte os manuais de operações do adapta- dor iP od. Esta seção fornece informações sobre as operações do iPod com esta unidade, que diferem das descri[…]
-
Page 106: Pioneer DEH-P4950MP
5 Repita as etapas 3 e 4 para localizar uma música que deseja ouvir . # V ocê pode iniciar a reprodução por toda a lista selecionada ao pressionar e segurar d . # P ara retornar à lista anterior , pressione c . # P ressione BAND para retornar à visualização normal. Nota Se você não operar a lista em aproximadamente 30 segundos, a pesquisa[…]
-
Page 107: Pioneer DEH-P4950MP
Reprodução de músicas em uma ordem aleatória (shuffle) P ara reprodução de músicas no iPod, existem dois métodos de reprodução aleatória: SHFFL :SNG (Reprodução de músicas em uma ordem aleatória) e SHFFL :ALB (Reprodução de álbuns em uma ordem aleatória). 1 Pressione FUNCTION para selecionar SHFFL. 2 Pressione c ou d para selecio[…]
-
Page 108: Pioneer DEH-P4950MP
Introdução aos ajustes de áudio 1 1 1 Display de áudio Mostra o status do ajuste de áudio. % Pressione AUDIO para visualizar os nomes das funções de áudio. Pressione AUDIO várias vezes para alternar entre as seguintes funções de áudio: FAD (Ajuste do equilíbrio) — EQ (Ajuste da cur va do equalizador) — LOUD (Sonoridade) — SUB.W ([…]
-
Page 109: Pioneer DEH-P4950MP
Chamada das curvas do equalizador da memória Existem seis cur vas do equalizador armazena- das que podem ser facilmente chamadas da memória a qualquer momento. A seguir está uma lista das cur vas do equalizador: Display Curva do equalizador POWERFUL Potente NA TURAL Natural VOCAL V ocal CUSTOM Personalizada EQ FLA T Plana SPR-BASS Ultrabaixo ! C[…]
-
Page 110: Pioneer DEH-P4950MP
3 Pressione c ou d para selecionar a fre- qüência desejada. Baixa: 40 — 80 — 100 — 160 (Hz) Média: 200 — 500 — 1k — 2k (Hz) Alta: 3k — 8k — 10k — 12k (Hz) 4 Pressione a ou b para selecionar o fator Q desejado. 2N — 1N — 1W — 2W Nota Se você fizer ajustes, a curva CUSTOM será atualizada. Ajuste da sonoridade A sonoridade[…]
-
Page 111: Pioneer DEH-P4950MP
3 Pressione a ou b para ajustar o nível de saída do alto-falante de graves secundá- rio. +6 a – 24 é visualizado à medida que o nível é aumentado ou diminuído. Utilização do filtro de alta freqüência Quando você não quiser que sons baixos da faixa de freqüência de saída do alto-falante de graves secundário sejam reproduzidos nos[…]
-
Page 112: Pioneer DEH-P4950MP
2 Pressione a para ativar F .I.E. # P ara desativar F .I.E., pressione b . 3 Pressione c ou d para selecionar uma freqüência desejada. 100 — 160 — 250 (Hz) Notas ! Após ativar a função F .I.E., utilize o ajuste de equilíbrio (consulte a página 108) e ajuste os níveis de volume dos alto-falantes dianteiros e traseiros até ficarem equili[…]
-
Page 113: Pioneer DEH-P4950MP
Definição dos ajustes iniciais 1 1 Ao utilizar os ajustes iniciais, você pode perso- nalizar vários ajustes do sistema a fim de obter um ótimo desempenho desta unidade. 1 Display de função Mostra o status da função. 1 Pressione e segure SOURCE até desligar a unidade. 2 Pressione SOURCE e segure novamente até visualizar o nome da função[…]
-
Page 114: Pioneer DEH-P4950MP
Ajuste do passo de sintonia AM O passo de sintonia AM pode ser alternado entre 9 kHz, o passo predefinido e 10 kHz. Ao utilizar o sintonizador na América do Norte, Central ou do Sul, reajuste o passo de sintonia de 9 kHz (531 a 1 602 kHz permissível) a 10 kHz (530 a 1 640 kHz permissível). 1 Pressione FUNCTION para selecionar AM. 2 Pressione c o[…]
-
Page 115: Pioneer DEH-P4950MP
Ativação ou desativação da visualização de hora V ocê pode ativar ou desativar a visualização de hora. % Pressione CLOCK para ativar ou desati- var a visualização de hora. Cada vez que pressionar CLOCK , a visualiza- ção de hora será ativada ou desativada. # A visualização de hora desaparece tempora- riamente quando se executa outra[…]
-
Page 116: Pioneer DEH-P4950MP
2 Pressione a ou b para selecionar uma letra do alfabeto. Cada vez que pressionar em a , o alfabeto, nú- meros ou símbolos serão visualizados em ordem crescente ( A B C … ). Cada vez que pressionar em b , as letras serão visualizadas em ordem decrescente. 3 Pressione d para mover o cursor para a próxima posição de caractere. Quando a letra[…]
-
Page 117: Pioneer DEH-P4950MP
Compreensão das mensagens de erro do CD player inco rporado Ao entrar em contato com o revendedor ou a Central de Ser viços da Pioneer mais próxima, certifique-se de gravar a mensagem de erro. Mensagem Causa Ação ERROR-11, 12, 17, 30 Disco sujo Limpe o disco. ERROR-11, 12, 17, 30 Disco riscado Substitua o disco. ERROR-15 O disco inserido não […]
-
Page 118: Pioneer DEH-P4950MP
! A reprodução de discos pode não ser possí- vel devido às suas características, aos seus formatos, ao aplicativo gravado, ao ambien- te de gravação, às condições de armazena- mento e assim por diante. ! As informações de texto podem não ser corretamente visualizadas dependendo do ambiente de gravação. ! Impactos nas estradas ao dir[…]
-
Page 119: Pioneer DEH-P4950MP
Exemplo de uma hierarquia : P asta : Arquivo 1 2 3 4 5 6 N í v e l 1 N í v el 2 N í v el 3 N í vel 4 ! Esta unidade atribui os números de pastas. O usuário não pode atribuir números de pastas. ! A hierarquia de pastas pode ter até oito ca- madas. No entanto, uma hierarquia de pas- tas prática tem menos do que duas camadas. ! Até 99 pasta[…]
-
Page 120: Pioneer DEH-P4950MP
Especificações Geral Fonte de alimentação nominal …………………………………………….. 14,4 V CC (faixa de tensã o permissível: 12,0 V a 14,4 V CC) Sistema de a terram ento …… T i p o n e g a tivo Consumo máx. de energia …………………………………………….. 10,0 A Dimensões (L × A × P): DIN C h a s s […]
-
Page 121: Pioneer DEH-P4950MP
Distorção ………………………………. 0, 3 % ( a 6 5 d B f, 1 k H z , esté- reo) 0,1 % (a 65 dBf , 1 kHz, mono) Resposta de freqüência ……. 3 0 H z a 1 5 00 0 H z ( ± 3 dB ) Separação de estéreo ………… 4 5 d B ( a 6 5 d B f, 1 k H z ) Sintonizador de AM F aixa de freqüência ……………. 5 3 1 k H z a 1 6 0 2 kH z ([…]
Для того, чтобы скачать инструкции по эксплуатации для автомагнитол Pioneer, необходимые Вам, выберете модель,
соответствующую Вашему устройству.
Список моделей для автомагнитол Pioneer Вы можете увидеть ниже. Когда Вы найдете необходимый Вам файл, кликните напротив
него кнопку «Скачать», чтобы перейти на конечную страницу для загрузки руководства пользователя для автомагнитол Pioneer. Обратите
внимание, представленные в нашем каталоге инструкции пользователя для автомагнитол Pioneer находятся в PDF формате и всегда
доступны для бесплатной загрузки.
Если Вы не можете найти необходимый Вам мануал, свяжитесь с нами. Просто оставьте свой запрос на отсутствующий файл через нашу
контактную форму, и мы постараемся Вам помочь.
Инструкций найдено (132 результаты)
| Продавец | Модель | Комментарии | Скачать | +CD |
|---|---|---|---|---|
| Pioneer | 1032 | Инструкция Pioneer 1032 | Скачать | |
| Pioneer | AVH-P7500DVD | Инструкция Pioneer AVH-P7500DVD | Скачать | |
| Pioneer | CDX-P1270 | Инструкция Pioneer CDX-P1270 | Скачать | |
| Pioneer | CDX-P2050VS | Инструкция Pioneer CDX-P2050VS | Скачать | |
| Pioneer | CDX-P650 | Инструкция Pioneer CDX-P650 | Скачать | |
| Pioneer | CDX-P670 | Инструкция Pioneer CDX-P670 | Скачать | |
| Pioneer | DEH-1300R | Инструкция Pioneer DEH-1300R, DEH-1330R, DEH-2300R, DEH-2300RB, DEH-2330R | Скачать | |
| Pioneer | DEH-1310 | Инструкция Pioneer DEH-1310 | Скачать | |
| Pioneer | DEH-1330R | Инструкция Pioneer DEH-1300R, DEH-1330R, DEH-2300R, DEH-2300RB, DEH-2330R | Скачать | |
| Pioneer | DEH-1400 | Инструкция Pioneer DEH-1400 | Скачать | |
| Pioneer | DEH-1400R | Инструкция Pioneer DEH-1400R, DEH-1400RB, DEH-1430R | Скачать | |
| Pioneer | DEH-1400RB | Инструкция Pioneer DEH-1400R, DEH-1400RB, DEH-1430R | Скачать | |
| Pioneer | DEH-1430R | Инструкция Pioneer DEH-1430R | Скачать | |
| Pioneer | DEH-1430R | Инструкция Pioneer DEH-1400R, DEH-1400RB, DEH-1430R | Скачать | |
| Pioneer | DEH-1510 | Инструкция Pioneer DEH-1510 | Скачать | |
| Pioneer | DEH-1530R | Инструкция Pioneer DEH-1530R | Скачать | |
| Pioneer | DEH-1530R | Инструкция Pioneer DEH-1530R | Скачать | |
| Pioneer | DEH-1600R | Инструкция Pioneer DEH-1600R, DEH-1600RB, DEH-1630R | Скачать | |
| Pioneer | DEH-1600RB | Инструкция Pioneer DEH-1600R, DEH-1600RB, DEH-1630R | Скачать | |
| Pioneer | DEH-1630R | Инструкция Pioneer DEH-1600R, DEH-1600RB, DEH-1630R | Скачать |
Обзор
- Автомагнитолы Инструкция (132)
- Музыкальные центры Инструкция (7)
- Плазменные панели Инструкция (1)
- Плееры Инструкция (37)
- ТВ-тюнеры Инструкция (1)
-
Pioneer DEH-P4950MP Operation manual (124 pages)
-
Pioneer DEH-P4950MP Service manual (68 pages)
Pioneer DEH-P4950MP Manuals come in various types, each serving a specific purpose to help users effectively operate and maintain their devices. Each type of Pioneer DEH-P4950MP instruction is designed to address specific needs, ensuring users have the necessary information to use, maintain, and repair their devices effectively.
Related Instructions for Pioneer DEH-P4950MP:
AVH-269BT, AVIC-F9880BT, XV-DV131, XDV-M8137ZT/UC, AVH-3200BT
- Pioneer AVH-269BT
- Pioneer AVIC-F9880BT
- Pioneer XV-DV131
- Pioneer XDV-M8137ZT/UC
- Pioneer AVH-3200BT
- Pioneer DEH-2430R
- Pioneer FH-P8800
- Pioneer SC430
- Pioneer DEH-P500UB — Premier Radio / CD
- Pioneer PDP-R05E
- Pioneer DMH-A340DAB
- Pioneer VSX-D710S
Car Receiver Devices by Other Brands:
| Brand | Device Model | Type of Document | Pages | Size | Views | Downloads | Updated |
|---|---|---|---|---|---|---|---|
| Sanyo |
FXCD-1100 — Radio / CD |
Sanyo FXCD-1100 — Radio / CD Operating instructions manual |
32 | 872 | 140 | 07-01-2025 | |
| Kenwood |
KDC-DAB41U |
Kenwood KDC-DAB41U Instruction manual |
124 | 1482 | 356 | 04-02-2025 | |
| Axis |
AX 1102BT |
Axis AX 1102BT Installation manual |
16 | 646 | 162 | 02-12-2024 | |
| Sony |
CDX-A250 |
Sony CDX-A250 Operating instructions manual |
28 | 237 | 43 | 08-12-2024 | |
| Sony |
AVD-C700ES — 5 Dvd Changer/receiver |
Sony AVD-C700ES — 5 Dvd Changer/receiver Notes |
1 | 0.02 Mb | 548 | 83 | 25-09-2024 |
Categories:
DC Drives
Dvd av receivers
Smart TV
Farm Equipment
Home cinema system
Power Supply