
Встраиваемая посудомоечная машина Beko DIS25010
Узкая встраиваемая посудомоечная машина шириной 45 см с 5 автоматическими программами, включая быстрое мытье посуды за 30 минут, и экономичным расходом воды при каждом полном цикле. Посудомойке присвоены класс энергоэффективности А+ и класс мойки и сушки А, она вмещает до 10 комплектов посуды и может работать при половинной загрузке. Благодаря специальной защите от протечек посудомоечную машину можно включать на ночь.
Подробнее об условиях принятия в гарантийное
обслуживание в разделе «Гарантия»
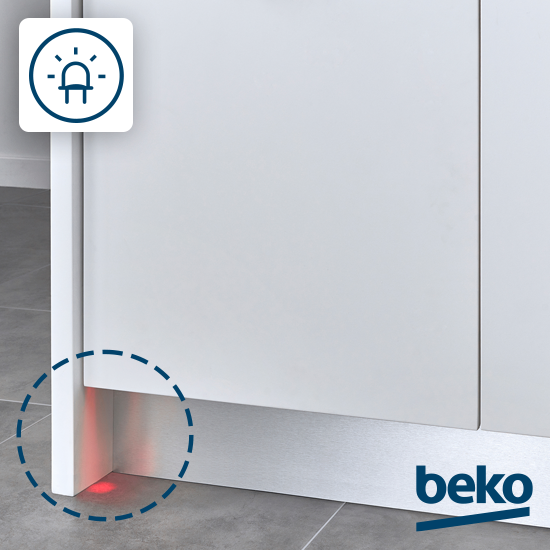
Световой индикатор на полу LedSpot
Включите любую программу и вернитесь к другим делам или отдыху – специальный световой индикатор на полу автоматически погаснет по ее завершению, не отвлекая вас раньше времени.

Гарантия производителя 2 года
На всю продукцию Beko действует официальная гарантия в течение 24 месяцев с момента покупки. Выезд специалиста, диагностика и ремонт при наступлении гарантийного случая будет бесплатным.
| Модель | DIS25010 |
| Цвет | Белый |
| SAP код | 7634268335 |
| Код EAN | 8690842198465 |
| Размеры | |
|---|---|
| Высота |
81.8 см |
| Ширина |
44.8 см |
| Глубина |
55 см |
| Вес нетто |
28.7 кг |
| Глубина с открытой дверцей |
115 см |
| Рекомендованный вес навешиваемой двери |
2.5-5.5 кг |
| Высота ниши для встраивания |
82-87 см |
| Техническая характеристика | |
| Максимальная загрузка (комплекты посуды) | 10 |
| Количество программ | 5 |
| Температуры мытья |
35-50-65-70 °С |
| Сенсор загрязнения | — |
| Внутренняя подсветка | — |
| Защита стекла GlassCare | — |
| Тип сушки | Конденсационная |
| Дисплей | LCD |
| Блокировка от детей |
—
|
| Антибактериальная прокладка | — |
| Фильтр | Частично металлический |
| Индикатор отсутствия соли | + |
| Индикатор отсутствия ополаскивателя | + |
| Индикатор протечки | + |
| Система смягчения воды | + |
| Количество степеней мойки посуды | 2 |
| Световой индикатор на полу LedSpot | + |
| Инверторный двигатель ProSmart | — |
| Система интенсивного мытья Aquaintense | — |
| Система интенсивного мытья CornerIntense | — |
| Панель управления | Кнопки |
| Параметры | |
| Класс энергопотребления | A (-10%) |
| Расход электроэнергии |
0.83 кВт/ч |
| Расход воды |
10.5 л |
| Уровень шума |
48 дБ |
| Класс сушки | A |
| Автоматическое открытие дверцы после завершения работы |
—
|
| Очистка камеры | — |
| Оборудование | |
| Складные держатели для тарелок в верхней корзине | — |
| Полка для длинных приборов | — |
| Регулировка высоты верхней корзины | — |
| Количество полок в верхней корзине |
2 шт |
| Складные держатели в нижней корзине |
—
|
| Третья корзина | — |
| Программы | |
| Самоочистка | — |
| Экономичная 50° | + |
| Автоматическая 40-65° | — |
| Интенсивная 70° | + |
| Quick&Shine | + |
| Мини 30′ 35° | + |
| AquaFlex | — |
| GlassCare 40° | — |
| Clean&Shine | + |
| Функции | |
| Половинная загрузка | + |
| Быстрая функция | — |
| Экстра Ополаскивание | — |
| Экстра Сушка | — |
| SideWash |
—
|
-
Документация по продукту
Beko DIS25010 Инструкция (User manual) -
Документация по продукту
Cхема встраивания
Вам также могут быть интересны
Посyдoмoeчнaя мaшинa
Инcтpyкция по зкcплyaтaции
DIS25010
RU
Document Number :
15 9339 1900_AA_BEKO_45E5_RU/ 09-04-18.(14:37)
Пожалуйста, сначала прочтите данное
руководство пользователя!
Уважаемый покупатель!
Надеемся, что вы сможете воспользоваться всеми преимуществами изделия,
которое является высококачественным и высокотехнологичным продуктом.
Внимательно и полностью изучите руководство и другие сопроводительные
документы до пользования изделием и держите его под рукой в качестве
справочного пособия. В случае передачи изделия передайте и руководство
пользователя. Соблюдайте все инструкции и предупреждения в данном
руководстве.
Помните, что данное руководство пользователя может применяться для многих
других моделей. Различия между моделями будут указаны в руководстве.
Описание символов
В данном руководстве по эксплуатации используются следующие символы:
Важная информация
или полезные советы по
C
A
B
эксплуатации.
Предупреждение об опасных
ситуациях для жизни людей и
имущества.
Предупреждение об опасности
поражения электрическим
током.
Материалы, используемые
для упаковки изделия
изготовлены могут
использоваться для
вторичной переработки
в соответствии с нашими
экологическими стандартами.
Не выбрасывайте упаковочный материал вместе с бытовым мусором и другими
отходами. Необходимо доставить упаковочный материал в специальный пункт
утилизации.
Этот продукт был произведен с использованием новейших технологий в экологически безопасных условиях.

СОДЕРЖАНИЕ
1 ИНСТРУКЦИИ ПО ТЕХНИКЕ
БЕЗОПАСНОСТИ И ОХРАНЕ
ОКРУЖАЮЩЕЙ СРЕДЫ. 4
Общие правила безопасности …………………… 4
Назначение изделия …………………………………. 5
Безопасность детей ………………………………….. 5
Утилизация упаковочных материалов ……….. 5
Транспортировка изделия …………………………. 6
Соответствие Директиве ЕС об утилизации
электрического и электронного оборудования
(WEEE) и утилизация вышедшего из
употребления оборудования: …………………….. 6
Соответствие Директиве ЕС об ограничении
содержания вредных веществ (RoHS): ………. 6
Информация об упаковке ………………………….. 6
2 ПОСУДОМОЕЧНАЯ МАШИНА 7
Обзор ………………………………………………………. 7
Система сушки вентиляторами …………………. 8
Технические характеристики……………………… 8
3 УСТАНОВКА 9
Выбор места для установки ………………………. 9
Подключение к водопроводной сети ………… 10
Aquasafe+ ……………………………………………….11
Подключение к электрической сети …………..11
Начальный период использования…………… 12
4 ПОДГОТОВКА 13
Рекомендации по экономии электроэнергии 13
Система смягчения воды ………………………… 13
Настройка системы смягчения воды ………… 13
Добавление смягчающей соли ………………… 15
Моющее средство …………………………………… 16
Моющее средство в таблетках ………………… 17
Ополаскиватель ……………………………………… 18
Предметы, которые не предназначены для
мытья в посудомоечной машине ……………… 19
Загрузка посуды в посудомоечную машину. 19
Корзина для столового серебра ……………… 22
Складные решетки нижней корзины ………… 22
Складные решетки нижней корзины ………… 23
Проволочный держатель для бутылок нижней
корзины ………………………………………………….. 24
Полка для верхней корзины …………………….. 24
Регулировка высоты верхней корзины ……… 25
Складные сетки верхней корзины ……………. 26
Верхняя корзина для кухонных приборов …. 26
5 ИСПОЛЬЗОВАНИЕ УСТРОЙСТВА 27
Кнопки ……………………………………………………. 28
Подготовка машины ………………………………… 28
Выбор программ …………………………………….. 28
Дополнительные функции ……………………….. 30
Планирование времени мытья ………………… 31
Регулировка количества ополаскивателя …. 32
Запуск программы ………………………………….. 32
Отмена программы …………………………………. 32
Индикатор соли ( ) ………………………………. 32
Индикатор ополаскивателя …………………… (
) …………………………………………………………….. 32
Окончание программы ……………………………. 33
Предупреждение об отключении воды …….. 33
Предупреждение о переполнении ……………. 33
6 ОБСЛУЖИВАНИЕ И ОЧИСТКА 34
Очистка внешней поверхности прибора …… 34
Очистка внутренней поверхности прибора . 34
Очистка фильтров…………………………………… 34
Чистка фильтра шланга…………………………… 35
Очистка крыльчаток ………………………………… 36
Нижняя крыльчатка …………………………………. 36
Верхняя крыльчатка ……………………………….. 36
7 УСТРАНЕНИЕ НЕПОЛАДОК 37

Инструкции по технике безопасности и охране
1
окружающей среды.
В этом разделе содержатся
инструкции по безопасности,
которые помогут вам защитить
себя от рисков получения травм
и повреждений имущества. При
несоблюдении этих инструкций
все гарантии аннулируются.
Общие правила
безопасности
• Не устанавливайте машину
на ковровом покрытии,
так как недостаточная
вентиляция под днищем
машины может привести к
перегреву электрических
деталей и проблемам в
работе изделия.
• Не пользуйтесь изделием в
случае повреждения кабеля
питания или штепсельной
вилки. Обратитесь в
фирменный сервисный
центр.
• Данное изделие следует
подключать к розетке с
заземлением, защищенной
предохранителем,
параметры которого
соответствуют данным,
приведенным в
таблице «Технические
характеристики».
Обязательно установите
заземление. Заземление
должен выполнять
квалифицированный
электрик. Наша компания
не несет ответственность
за любые повреждения,
полученные при
эксплуатации изделия без
заземления в соответствии
с местными стандартами.
• Для предотвращения
протечек шланг подачи воды
и сливной шланг должны
быть надежно закреплены и
не иметь повреждений.
• Отключайте машину от
электрической сети, когда
она не используется.
• Запрещается мыть машину
струей воды. Это может
привести к поражению
электрическим током!
• Не прикасайтесь влажными
руками к вилке шнура
питания. Извлекая вилку из
розетки, не тяните за шнур;
беритесь только за вилку.
• Перед выполнением
установки, технического
обслуживания, ремонта
или мытья машины
обязательно отключите ее
от электрической сети.
• Работы по установке
и ремонту машины
должны выполнять только
специалисты фирменного
сервисного центра.
Изготовитель не несет
ответственности за ущерб,
возникший в результате
выполнения работ лицами,
не имеющими на то права.
• Не применяйте к изделию
химические растворители:
Они повышают риск взрыва.
• Если полностью выдвинуть
верхнюю и нижнюю
корзины, их вес ляжет на
дверцу машины. Не кладите
на дверцу дополнительный
груз, иначе машина может
наклониться.
• Дверца изделия может быть
открыта только при загрузке
и выгрузке посуды.
4
/43 RU
Посyдoмoeчнaя мaшинa / Инcтpyкция по зкcплyaтaции

Инструкции по технике безопасности и охране окружающей среды.
• Открывайте дверцу
машины, когда она
работает, только в случае
необходимости. При
открытии дверцы машины
может произойти выброс
пара: будьте осторожны.
Назначение изделия
• Данное изделие
предназначено для
бытового применения.
• В ней следует мыть только
посуду бытового типа.
• Данный прибор
предназначен для
использования в домашнем
быту и подобных сферах
применения, например:
— Кухонные помещения в
магазинах, офисах и других
Безопасность детей
• Электроприборы
рабочих помещениях;
— Фермерские помещения;
— Клиенты в гостиницах, мотелях
и других жилых помещениях;
— Помещения с функцией
предоставления ночлега и
завтрака
• Уходя из помещения, где
• Следует использовать
только моющие средства,
средства для ополаскивания
и добавки, предназначенные
• Храните все моющие
для посудомоечных машин.
• Компания-изготовитель
не несет ответственности
за ущерб, возникший в
результате неправильного
применения или
транспортировки.
• Проектный срок службы
изделия составляет 10
лет. В этот период будут
доступны оригинальные
запасные части для
обеспечения надежной
работы изделия.
• Дети старше 8 лет, а также
Посyдoмoeчнaя мaшинa / Инcтpyкция по зкcплyaтaции
Утилизация упаковочных
материалов
Упаковочные материалы
представляют опасность для
детей. Храните упаковочные
материалы в безопасном месте,
недоступном для детей.
Упаковка посудомоечной
машины изготовлена из
материалов, подлежащих
вторичной переработке. Их
лица с ограниченными
физическими, сенсорными
и умственными
способностями или без
соответствующих навыков
и опыта могут использовать
данный прибор только под
присмотром или после
получения инструкций
по поводу безопасного
использования прибора и
осознания связанных с этим
опасностей. Не позволяйте
детям играть с прибором.
Не позволяйте детям
самостоятельно выполнять
очистку и обслуживание
прибора.
представляют опасность
для детей. Не подпускайте
детей к работающей
машине. Следите за тем,
чтобы они не повредили
машину.
установлена машина,
обязательно закрывайте
дверцу загрузочного люка.
средства и реагенты в
безопасном месте, вдали от
детей.
RU
5 / 43

Инструкции по технике безопасности и охране окружающей среды.
необходимо отсортировать и
утилизировать в соответствии с
правилами утилизации отходов.
Не выбрасывайте упаковочные
материалы вместе с обычными
бытовыми отходами.
Транспортировка изделия
Если необходимо передвинуть
изделие, необходимо
A
осуществить перенос его в
вертикальном положении,
держа за заднюю стенку. При
наклоне машины в сторону
передней части имеющиеся в
ней электронные компоненты
могут намокнуть и выйти из
строя.
1. Перед транспортировкой
отключите изделие от
электрической сети.
2. Отсоедините шланги от
водопровода и системы
слива.
3. Полностью слейте воду из
изделия.
Соответствие Директиве
ЕС об утилизации
электрического
и электронного
оборудования (WEEE) и
утилизация вышедшего
из употребления
оборудования:
Данное изделие
соответствует Директиве
ЕС об утилизации
электрического и
электронного оборудования
(2012/19/EU). Данное изделие
имеет маркировку,
указывающую на утилизацию
его как электрического и
6
/43 RU
Посyдoмoeчнaя мaшинa / Инcтpyкция по зкcплyaтaции
электронного оборудования
(WEEE).
Это изделие произведено из
высококачественных деталей и
материалов, которые подлежат
повторному использованию
и переработке. Поэтому
не выбрасывайте изделие
с обычными бытовыми
отходами после завершения
его эксплуатации. Его следует
сдать в соответствующий центр
по утилизации электрического и
электронного оборудования. О
местонахождении таких центров
вы можете узнать в местных
органах власти.
Соответствие Директиве
ЕС об ограничении
содержания вредных
веществ (RoHS):
Приобретенное вами изделие
соответствует Директиве
ЕС о правилах ограничения
содержания вредных веществ
(2011/65/EU). Оно не содержит
вредных и запрещенных
материалов, указанных в
Директиве.
Информация об упаковке
Упаковочные материалы
изделия изготовлены из
материалов, подлежащих
вторичной переработке, в
соответствии с местными
нормативами и правилами
касательно защиты
окружающей среды. Не
утилизируйте упаковочные
материалы вместе с бытовыми
или другими отходами.
Отнесите их в один из
пунктов приема упаковочных
материалов, назначенных
местными органами власти.
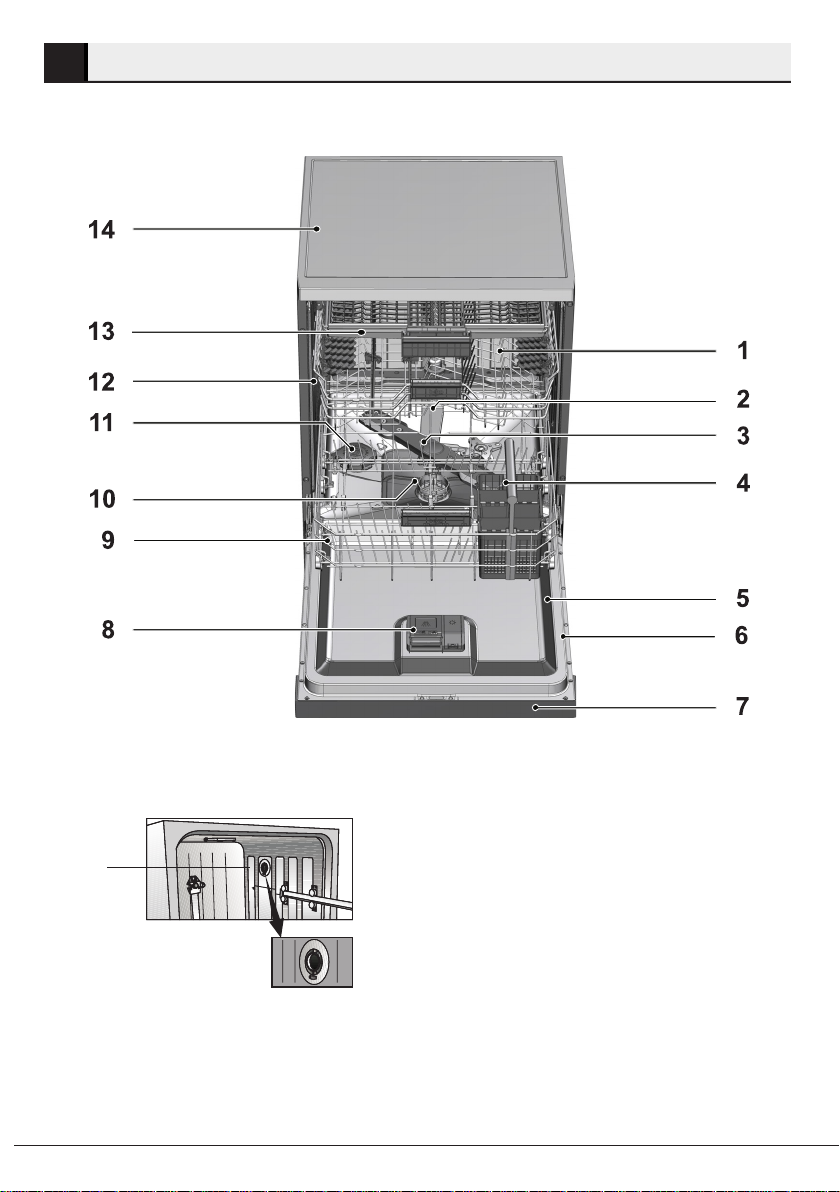
Посудомоечная машина
2
Обзор
1. Верхняя корзина
2. Верхняя крыльчатка
3. Нижняя крыльчатка
4. Корзина для столовых приборов
15
Посyдoмoeчнaя мaшинa / Инcтpyкция по зкcплyaтaции
5. Дверца
6. Паспортная табличка
7. Панель управления
8. Распределитель моющего средства
9. Нижняя корзина
10. Фильтры
11. Крышка емкости для соли
12. Направляющая верхней корзины
13. Верхняя корзина для кухонных приборов
(зависит от модели)
14. Верхняя панель (зависит от модели)
15. Система сушки вентилятором (зависит от
модели)
7 / 43
RU
Посудомоечная машина
Технические характеристики
Соответствие стандартам и данным испытаний/декларации
соответствия ЕС.
Изделие соответствует следующим директивам ЕС:
Стадии разработки, производства и продажи этого изделия отвечают правилам техники
безопасности, содержащимся в соответствующих нормативах Европейского Союза.
2014/35/EU, 2014/30/EU, 93/68/EC, IEC 60436/DIN 44990, EN 50242
Входная мощность 220-240 В, 50 Гц (см. табличку)
Общее энергопотребление 1800-2100 Вт, (см. табличку)
Энергопотребление обогревателя 1800 Вт, (см. табличку)
Общий ток (зависти от модели) 10 A (см. табличку)
Энергопотребление сливного насоса 30 Вт, (см. табличку)
Давление воды
Технические спецификации могут быть изменены без предварительного
C
C
C
уведомления, в целях улучшения качества изделия.
Рисунки в этом руководстве являются схематичными и могут немного
отличаться от оригинала.
Значения, указанные на маркировке на продукте или в печатных
материалах, поставляемых с продуктом, — это значения, полученные в
лаборатории в соответствии со стандартами. В зависимости от условий
эксплуатации и окружающей среды данные значения могут изменяться.
0,3 –10 бар (= 3 – 100 Н/см² = 0,01-1,0 МПа)
Система сушки вентиляторами
(зависит от модели)
Система сушки вентиляторами гарантирует эффективную осушку посуды.
При работе вентиляторов слышен дополнительный шум, отличный от шума,
характерного для цикла мойки.
Примечание для контролирующих учреждений:
Информация для проведения испытаний рабочих характеристик будет предоставлена
по запросу. Запрос можно направить электронной почтой по адресу:
dishwasher@standardloading.com
Наряду с вашей контактной информацией в сообщении электронной почты не забудьте
указать информацию о коде, партии и серийных номерах изделия. Код, инвентарный
и серийный номера изделия можно найти на паспортной табличке, прикрепленной к
торцевой стенке двери.
8
/43 RU
Посyдoмoeчнaя мaшинa / Инcтpyкция по зкcплyaтaции

3
Установка
Установку изделия должен производить
уполномоченный специалист. Обратитесь
в ближайший фирменный сервисный
центр. При подготовке изделия к
эксплуатации, прежде чем обращаться в
фирменный сервисный центр, убедитесь,
что электропитание, подача воды и
система слива воды функционируют
нормально. При необходимости
обратитесь к квалифицированному
электрику или сантехнику для устранения
неисправностей.
Покупатель несет
ответственность за
C
B
A
подготовку места установки,
электромонтаж и установку
систем подачи водопроводной
воды и слива сточной воды.
Механический и
электрический монтаж
должны выполняться
квалифицированным
техническим специалистом.
Производитель не несет
ответственности за
ущерб в результате работ,
выполненных лицами, не
имеющими специального
разрешения.
До начала монтажа
необходимо произвести
визуальный осмотр изделия
на предмет наличия
дефектов. Если таковые
имеются, не устанавливайте
изделие. Поврежденные
изделия могут представлять
угрозу безопасности людей.
При размещении изделия обратите
внимание на то, чтобы не повредить
пол, стены, трубопроводы и т.д. При
перемещении машины не держите ее за
дверь или панель.
Выбор места для установки
• Разместите изделие на твердой
и плоской поверхности, которая
в состоянии выдержать нагрузку.
Изделие следует установить на
ровной поверхности, чтобы иметь
возможность удобно и надежно
закрыть дверцу.
• Не устанавливайте изделие в
местах, где температура может
опуститься ниже 0ºC.
• Разместите изделие на расстоянии
минимум 1 см от краев другой
мебели.
• Разместите изделие на устойчивом
прочном полу. Не устанавливайте
изделие на ковровом покрытии с
длинным ворсом или подобных
поверхностях.
Не ставьте изделие на шнуре
B
• Обязательно выбирайте для
• Устанавливайте изделие рядом с
электропитания.
установки место, в котором будет
возможно загружать и разгружать
посуду быстро и удобно.
краном и дренажным отверстием.
Выбирайте место установки с учетом
того, что оно не изменится после
выполнения подсоединений.
Убедитесь в том, что
шланги подачи и отвода
C
Посyдoмoeчнaя мaшинa / Инcтpyкция по зкcплyaтaции
воды не защемлены и
полностью расправлены при
перемещении машины на
свое место после процедур
монтажа или мойки.
9 / 43
RU
Установка
min
300
min
120
max 1000
min 500
Подключение к
водопроводной сети
Мы рекомендуем прикрепить
фильтр на входной трубе
C
Допустимая температура воды: до
25 °C
Посудомоечную машину нельзя
подсоединять к водонагревателям
открытого типа и проточным
водонагревателям.
• Не используйте старый или
• Подсоедините шланг подачи
• Откройте полностью краны,
C
10
/43 RU
подачи водопроводной
воды для защиты машины
от повреждений, которые
могут быть вызваны
различными примесями
(песок, грязь, ржавчина и т.д),
поступающими из городских
сетей или ваших собственных
источников, а также для
предотвращения пожелтения
накопления шламов по
окончании мойки.
использованный шланг на новом
изделии. Подсоедините новый шланг
подачи воды, входящий в комплект
поставки.
воды непосредственно к крану
водопроводной воды. Давление в
кране должно быть в пределах от
0,3 до 10 бар. Если давление воды
превышает 10 бар, между ними
следует установить перепускной
клапан.
чтобы убедиться в герметичности
соединений.
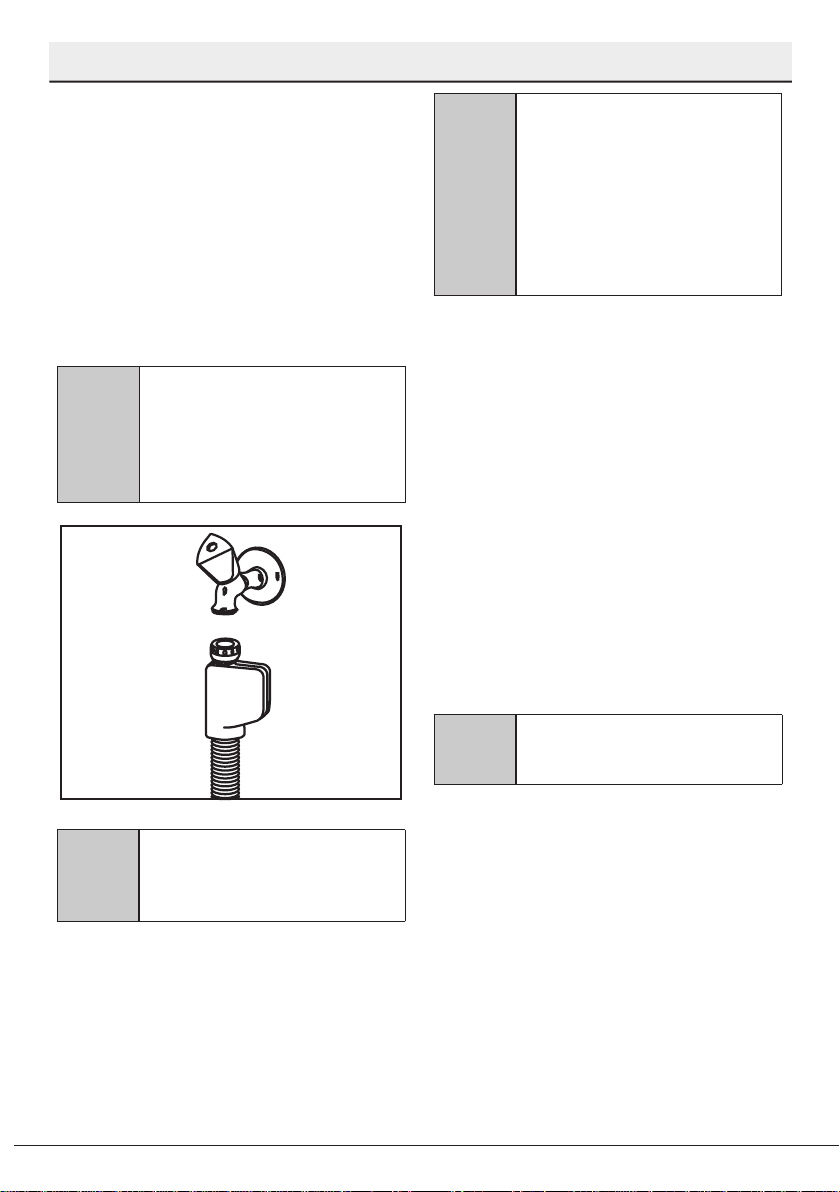
Для подсоединения шланга
подачи воды к крану с
наружной резьбой 2 см
воспользуйтесь винтовым
соединителем. При
необходимости установите
фильтр для фильтрации
отложений из труб.
В целях безопасности
закройте краны подачи воды
A
Подключение к сливу воды
Сливной шланг можно подсоединить
непосредственно к отверстию водостока
или сливной трубе раковины. Это
соединение должно находиться на
расстоянии минимум 50 см и максимум
110 см от уровня пола. Сливной шланг
длиннее 4 метров снижает качество
мытья.
Подсоедините сливной шланг к сливной
трубе, не сгибая его. Надежно прикрепите
сливной шланг к сливной трубе во
избежание его смещения во время
работы машины.
Посyдoмoeчнaя мaшинa / Инcтpyкция по зкcплyaтaции
после окончания программы
мойки.
Установка
Aquasafe+
(В Зависимости От Модели)
Защищайте систему Aquasafe+ от
протечек воды в районе впускного
отверстия шланга. Следует избегать
попадания воды в клапанную коробку
системы. В противном случае можно
повредить электрическую схему. При
повреждении системы Aquasafe+
отсоедините изделие от сети питания
и обратитесь в фирменный сервисный
центр.
Поскольку комплект шлангов
содержит электрические
A
соединения и схемы,
не укорачивайте и не
удлиняйте шланг с помощью
удлинительных шлангов.
Дверца посудомоечной
машины должна быть
A
надлежащим образом
подогнана, в противном
случае, возможна утечка
пара. Существует опасность
серьезных ожогов, различных
травм или повреждения
мебели.
Подключение к
электрической сети
Данное изделие следует подключать к
розетке с заземлением, защищенной
предохранителем, параметры которого
соответствуют данным, приведенным в
таблице «Технические характеристики».
Наша компания не несет ответственность
за любые повреждения, полученные при
эксплуатации изделия без заземления в
соответствии с местными стандартами.
• Подключение должно
осуществляться в соответствии с
национальными нормами.
• После установки машины вилка
сетевого шнура должна быть легко
доступна.
После окончания цикла
мойки отключите изделие от
B
электрической сети.
• Номиналы напряжения и допустимой
Присоедините дренажную
трубу к канализационной
C
Регулировка ножек
Если дверца изделия не закрывается
надлежащим образом либо оно
покачивается от легкого толчка,
отрегулируйте ножки изделия, как
показано в руководстве по установке,
которое входит в комплект поставки.
Посyдoмoeчнaя мaшинa / Инcтpyкция по зкcплyaтaции
системе. Не выводите ее к
источникам наземной воды.
• Напряжение в электросети должно
защиты предохранителей и
автоматических выключателей
указаны в разделе Технические
спецификации. Если в вашем
доме установлен предохранитель
или автоматический выключатель,
рассчитанный на ток меньше 16 А,
обратитесь к квалифицированному
электрику для установки
предохранителя на 16 А.
соответствовать указанному
напряжению.
RU
11 / 43

Установка
• Запрещается подключение к сети
с использованием удлинителей и
колодок с несколькими гнездами.
Поврежденные кабели
питания должны быть
B
B
B
заменены уполномоченным
квалифицированным
специалистом.
Если ваша посудомоечная
машина оснащена внутренним
освещением, то в случае
выхода из строя ламп их
замена должна производиться
уполномоченным
квалифицированным
специалистом.
При возникновении
неисправности изделия
необходимо прекратить
его эксплуатацию до
успешного выполнения
ремонта уполномоченным
квалифицированным
специалистом. Это может
привести к поражению
электрическим током!
Начальный период
использования
Перед началом эксплуатации
посудомоечной машины выполните все
необходимые процедуры, описанные
в разделе «Установка», соблюдая при
этом правила техники безопасности (см.
раздел «Правила техники безопасности»).
• Для подготовки изделия к мойке
посуды необходимо в первый
раз выполнить самую короткую
программу с моющим средством
без загрузки машины. При первом
использовании залейте в резервуар
для соли литр воды, прежде чем
заполнить его солью.
A
В машине может оставаться
некоторое количество воды
после проведения заводских
испытаний. Это не оказывает
негативного влияния на работу
изделия.
12
/43 RU
Посyдoмoeчнaя мaшинa / Инcтpyкция по зкcплyaтaции
Loading…
EN
Document Number :
15 9904 0100_AA_BEKO_E5_45_EN/ 26-01-18.(17:41)
Dishwasher
User’s Manual
Explanation of symbols
Throughout this User Manual the following symbols are used:
C
Important information or useful
hints about usage.
A
Warning for hazardous situations
with regard to life and property.
B
Warning for electric shock.
Packaging materials of the
product are manufactured
from recyclable materials in
accordance with our National
Environment Regulations.
Do not dispose of the packaging materials together with the domestic or other wastes.
Take them to the packaging material collection points designated by the local authorities.
Please read this user manual first!
Dear Customer,
We hope that you get the best results from your product which has been manufactured
with high quality and state-of-the-art technology. Therefore, please read this entire user
manual and all other accompanying documents carefully before using the product and
keep it as a reference for future use. If you handover the product to someone else, give
the user manual as well. Follow all warnings and information in the user manual.
Remember that this user manual is also applicable for several other models. Differences
between models will be identified in the manual.
This product was manufactured using the latest technology in environmentally friendly conditions.
CONTENTS
1 INSTRUCTIONS FOR SAFETY
AND ENVIRONMENT 4
General safety …………………………………4
Intended use ……………………………………4
Children’s safety ……………………………… 5
Disposing of packaging material ……..5
Transportation of the product …………5
Compliance with WEEE Directive and
Disposing of the Waste Product ………6
Compliance with RoHS Directive ……..6
Package information ……………………….6
2 DISHWASHER 7
Overview …………………………………………7
Fan drying system ……………………………8
Technical specications …………………..8
3 INSTALLATION 9
Appropriate installation location …….9
Connecting water supply …………………9
Connection to the drain ……………….. 10
Adjusting the feet ………………………… 10
Aquasafe+ ……………………………………. 11
Electrical connection ……………………..11
Initial use ……………………………………….11
4 PREPARATION 12
Tips for energy saving ……………………12
Water softening system ………………..12
Adjusting the water softening
system …………………………………………..12
Adding salt …………………………………….14
Detergent ………………………………………15
Tablet detergents ………………………….16
Rinse aid ………………………………………..17
Items not suitable for washing in the
dishwasher …………………………………….17
Placing the dishes into the
dishwasher …………………………………… 18
Cutlery basket ……………………………… 20
Collapsible lower basket tines ……… 20
Collapsible lower basket tines ……….21
Lower basket bottle wire ……………….21
Collapsible upper basket wires …….. 22
Upper basket multipurpose service
rack ………………………………………………. 22
Adjusting the height of the upper
basket ………………………………………….. 23
Ceiling cutlery basket …………………… 24
5 OPERATING THE PRODUCT 25
Keys ……………………………………………… 26
Function keys ………………………………. 26
Preparing the machine…………………. 26
Programme selection …………………… 26
Auxiliary functions ………………………. 28
Scheduling the washing time ………. 29
Adjusting the amount of rinse aid … 30
Starting the programme ………………. 30
Cancelling the programme …………… 30
Salt indicator ( ) ………………………… 30
Rinse Aid indicator ( ) ………………… 30
End of programme …………………………31
Water cut-o warning ……………………31
Overowing warning ……………………..31
6 MAINTENANCE AND
CLEANING 32
Cleaning the outer surface of the
product ………………………………………… 32
Cleaning the interior of the machine 32
Cleaning the lters ………………………. 32
Cleaning the hose lter ………………… 33
Cleaning the impellers …………………. 34
Lower impeller ……………………………… 34
Upper impeller …………………………….. 34
7 TROUBLESHOOTING 35

4Dishwasher / User’s Manual/40 EN
instructions for safety and environment
1
This section contains safety
instructions that will help to get
protected from risk of personal
injury or property damage. Failure
to follow these instructions shall
void all warranties.
General safety
•Never place the product
on a carpet-covered floor;
otherwise, lack of airflow
beneath the product will
cause electrical parts to
overheat. This will cause
problems with your product.
•Do not operate the product
if the power cable / plug is
damaged! Call the Authorised
Service Agent.
•Connect the product to a
grounded outlet protected
by a fuse complying with
the values in the “Technical
specifications” table. Do
not neglect to have the
grounding installation made
by a qualified electrician.
Our company shall not be
liable for any damages that
will arise when the product
is used without grounding
in accordance with the local
regulations.
•The water supply and
draining hoses must be
securely fastened and remain
undamaged.
•Unplug the product when not
in use.
•Never wash the product by
spreading or pouring water
onto it! There is the risk of
electric shock!
•Never touch the plug with
wet hands! Never unplug by
pulling on the cable, always
pull out by grabbing the plug.
•The product must be
unplugged during installation,
maintenance, cleaning and
repairing procedures.
•Always have the installation
and repairing procedures
carried out by the Authorised
Service Agent. Manufacturer
shall not be held liable for
damages that may arise from
procedures carried out by
unauthorised persons.
•Never use chemical solvents
in the product. They bring
forth the risk of explosion.
•When you pull the upper and
lower baskets out completely,
the door of the product will
bear all the weight of the
baskets. Do not put other
loads on the door; otherwise,
the product may tilt.
•Never leave the door of
the product open apart
from loading and unloading
procedures.
•Do not to open the door of
the product when it is running
unless necessary. Be careful
for the rush of hot vapour
when you need to open the
door.
Intended use
•This product has been
designed for domestic use.
•It must be used to do the
domestic type dishes only.

Dishwasher / User’s Manual 5 / 40 EN
instructions for safety and environment
•This appliance is intended
to be used in household and
similar applications such as:
— Staff kitchen areas in shops,
offices and other working
environments;
— Farm houses;
— By clients in hotels, motels
and other residential type
environments;
— Bed and breakfast type
environments
•Only dishwasher safe
detergents, rinse aids and
additives must be used.
•The manufacturer waives
any responsibility arisen
from incorrect usage or
transportation.
•The service life of your
product is 10 years. During
this period, original spare
parts will be available to
operate the product properly.
•This appliance can be used
by children aged from 8 years
and above and persons with
reduced physical,sensory
or mental capabilities or
lack of experience and
knowledge if they have
been given supervision or
instruction concerning use
of the appliance in a safe
way and understand the
hazards involved. Children
shall not play with the
appliance. Cleaning and user
maintenance shall not be
made by children without
supervision.
Chldren’s safety
•Electrical products are
dangerous for the children.
Keep children away from the
product when it is in use. Do
not let them to tamper with
the product.
•Do not forget to close the door
of the product when leaving
the room where it is located.
•Store all detergents and
additives in a safe place away
from the reach of the children.
Dsposng of
packagng materal
Packaging materials are
dangerous to children. Keep
packaging materials in a safe place
away from reach of the children.
Packaging materials of the
product are manufactured from
recyclable materials. Dispose
of them properly and sort in
accordance with recycled waste
instructions. Do not dispose
of them with normal domestic
waste.
Transportaton of the
product
A
If you need to move the
product, do it in upright
position and hold from
the rear side. Slanting
the product onto its
front side may cause the
electronic parts in it get
wet and damaged.

6Dishwasher / User’s Manual/40 EN
instructions for safety and environment
1. Unplug the product before
transporting it.
2. Remove water drainage and
water supply connections.
3. Drain the remaining water in
the product completely.
Complance wth
WEEE Drectve and
Dsposng of the
Waste Product
This product complies with
EU WEEE Directive
(2012/19/EU). This product
bears a classification symbol
for waste electrical and electronic
equipment (WEEE).This product
has been manufactured with high
quality parts and materials which
can be reused and are suitable for
recycling. Do not dispose of the
waste product with normal
domestic and other wastes at the
end of its service life. Take it to the
collection center for the recycling
of electrical and electronic
equipment. Please consult your
local authorities to learn about
these collection centers.
Complance wth RoHS
Drectve
The product you have purchased
complies with EU RoHS Directive
(2011/65/EU). It does not contain
harmful and prohibited materials
specified in the Directive.
Package nformaton
Packaging materials of the
product are manufactured from
recyclable materials in accordance
with our National Environment
Regulations. Do not dispose
of the packaging materials
together with the domestic or
other wastes. Take them to the
packaging material collection
points designated by the local
authorities.
Dishwasher / User’s Manual 7 / 40 EN
Dishwasher
2
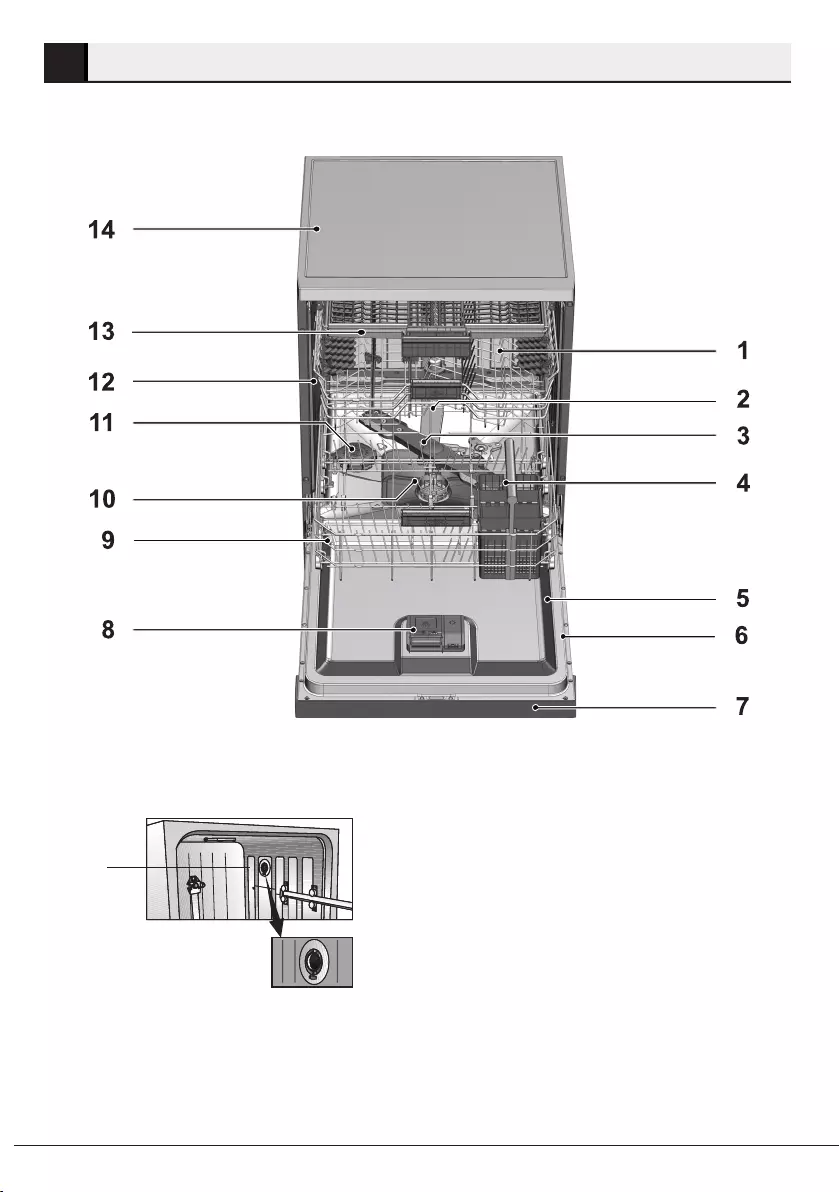
Overvew
1. Upper basket
2. Upper impeller
3. Lower impeller
4. Silverware basket
5. Door
6. Rating Label
7. Control panel
8. Detergent dispenser
9. Lower basket
10. Filters
11. Salt reservoir lid
12. Upper basket rail
13. Upper cutlery basket (depends on model)
14. Tabletop (depends on model)
15. Fan drying system (depends on model)
15
8Dishwasher / User’s Manual/40 EN
Dishwasher
Techncal specfcatons
Compliance to standards and test data / EC declaration of conformity
This product complies with the following EU directives;
Development, production and sales stages of this product comply with the safety
rules included in all pertaining European Community regulations.
2014/35/EU, 2014/30/EU, 93/68/EC, IEC 60436/DIN 44990, EN 50242
Power input 220-240 V, 50 Hz (see rating label)
Total power consumption 1800-2100 W (see rating label)
Heater power consumption 1800 W (see rating label)
Total current (depends on the model) 10 A (see rating label)
Drain pump power consumption 30 W (see rating label)
Water pressure 0.3 –10 bar (= 3 – 100 N/cm² = 0.01-1.0
Mpa)
C
Technical specifications may be changed without prior notice to improve the
quality of the product.
C
Figures in this manual are schematic and may not match the product exactly.
C
Values stated on the markings of the product or in the printed documents
accompanying the product are obtained in the laboratory on basis of the relevant
standards. Depending on operational and environmental conditions of the
product, these values may vary.
Note for test institutions:
Data required for performance tests shall be provided upon request. Requests can be
e-mailed to the following address:
dishwasher@standardloading.com
Do not forget to provide the code, stock and serial numbers of the product to be tested in
your request e-mail along with your contact information. Code, stock and serial numbers of
the product may be found on the type label attached to the side wall of the door.
Fan dryng system
(depends on model)
Fan drying system ensures efficient drying of your dishes.
It is normal to hear a different sound than that of washing cycle during fan operation.

Dishwasher / User’s Manual 9 / 40 EN
3Installation
Refer to the nearest Authorised Service
Agent for installation of your product. To
make the product ready for use, make sure
that the electricity, tap water supply and
water drainage systems are appropriate
before calling the Authorised Service Agent.
If they are not, call a qualified technician
and plumber to have any necessary
arrangements carried out.
C
Preparation of the location
and electrical, tap water and
waste water installations at the
place of installation is under
customer’s responsibility.
B
Installation and electrical
connections must be carried
out by the Authorised Service
Agent. Manufacturer shall not
be held responsible for damages
arising from processes carried
out by unauthorised persons.
A
Prior to installation, visually
check if the product has any
defects on it. If so, do not have
it installed. Damaged products
cause risks for your safety.
C
Make sure that the water inlet
and discharge hoses are not
folded, pinched or crushed
while pushing the product into
its place after installation or
cleaning procedures.
When placing the product, pay attention not
to damage the floor, walls, piping, etc. Do not
hold the product from its door or panel to
move it.
Approprate nstallaton
locaton
•Place the product on a solid and flat
floor that has sufficient load carrying
capacity! The product must be installed
on a flat surface in order for the door to
be closed comfortably and securely.
•Do not install the product at places
where temperature may fall below 0ºC.
•Place the product at least 1 cm away
from the edges of other furniture.
•Place the product on a rigid floor. Do
not place it on a long pile rug or similar
surfaces.
B
Do not place the product on the
power cable.
•Make sure that you select a location
that will allow you to load and unload
the dishes in a fast and comfortable
manner.
•Install the product in a place close to
the tap and the drain hole. Select the
installation location by considering
that it will not be changed after the
connections are made.
Connectng water supply
C
We recommend attaching a
filter on the house/apartment
supply water inlet to protect the
machine from damages that
may arise from impurities (sand,
dirt, rust, etc.) coming from the
urban water supply system or
from your own water system as
well as to prevent complaints
such as yellowing or sludge
accumulation at the end of
washing.
10 Dishwasher / User’s Manual/40 EN
Installation
Permitted water temperature: up
to 25°C
The dishwasher may not be connected to
open warm water devices or flow-through
water heaters.
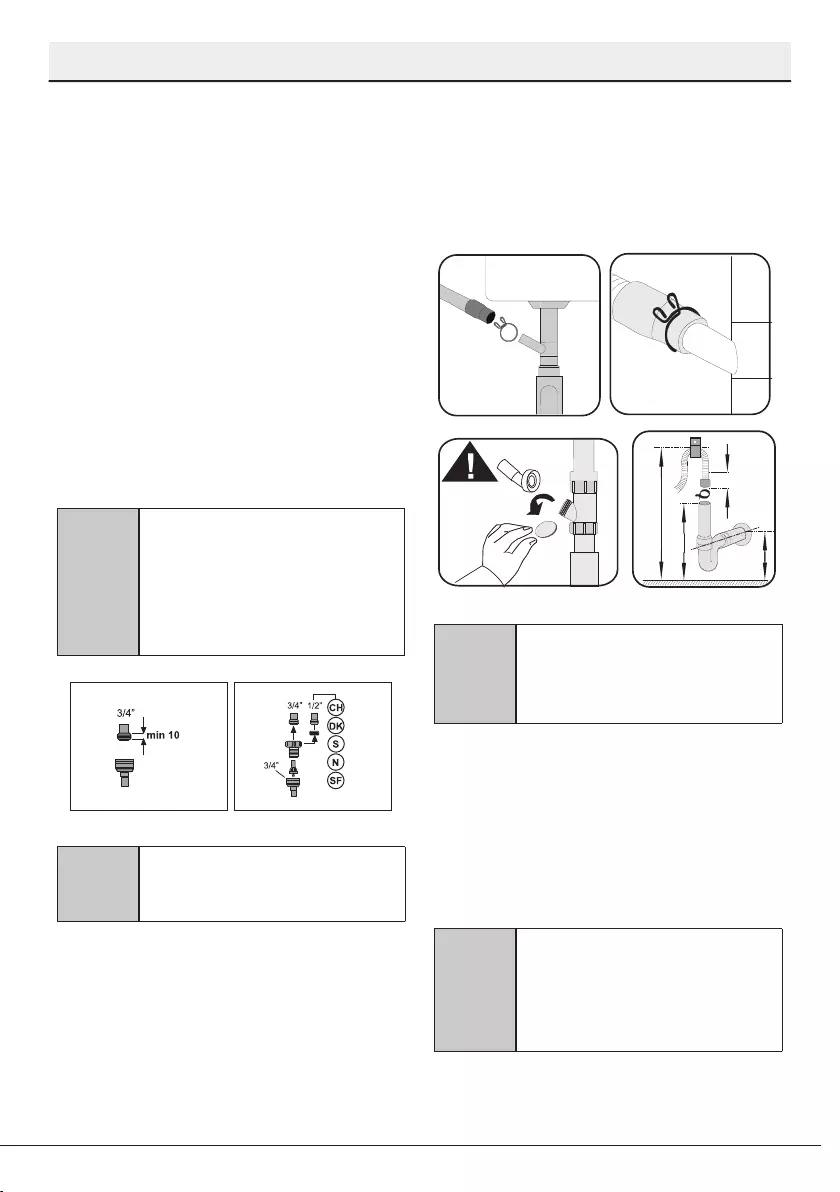
•Do not use old or used water inlet hose
on the new product. Use the new water
inlet hose supplied with the product.
•Connect the water inlet hose directly
to the water tap. Pressure coming from
the tap should be minimum 0.3 and
maximum 10 bars. If the water pressure
exceeds 10 bars, a pressure relief valve
should be installed in between.
•Open the taps completely after making
the connections to check for water
leaks.
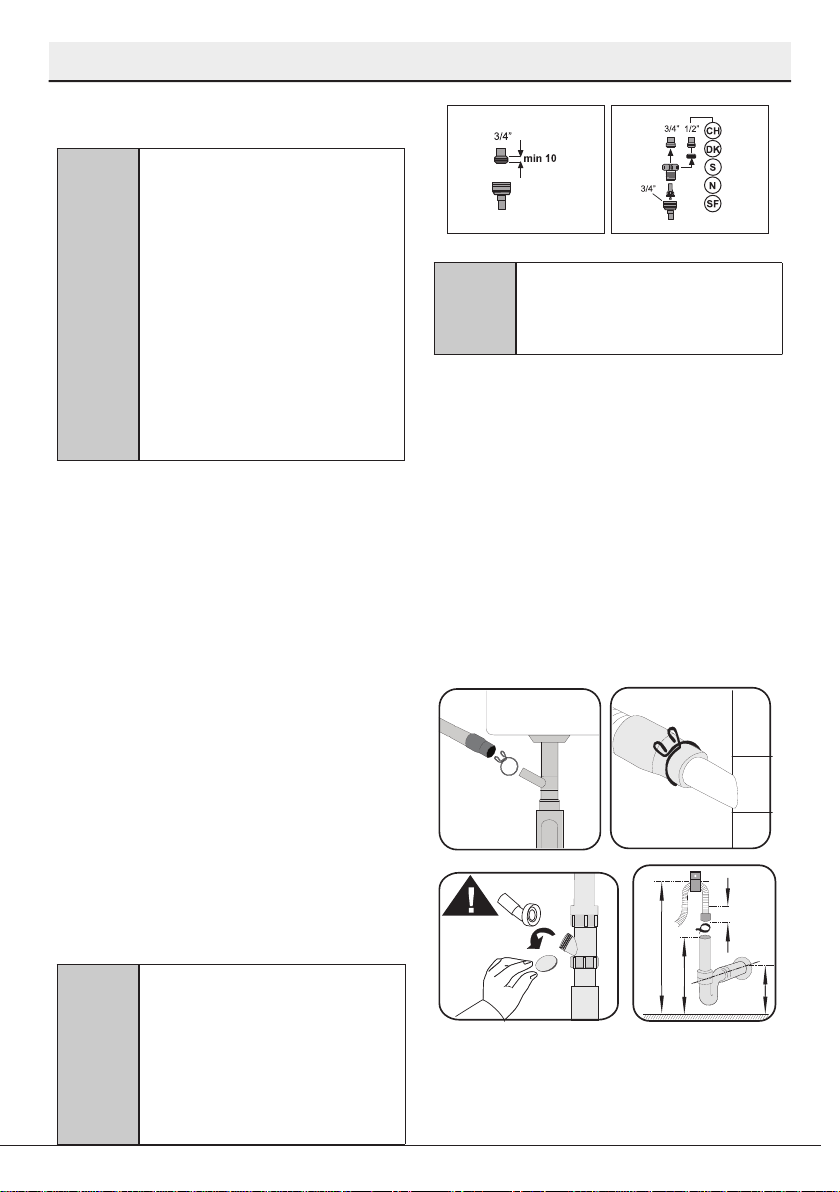
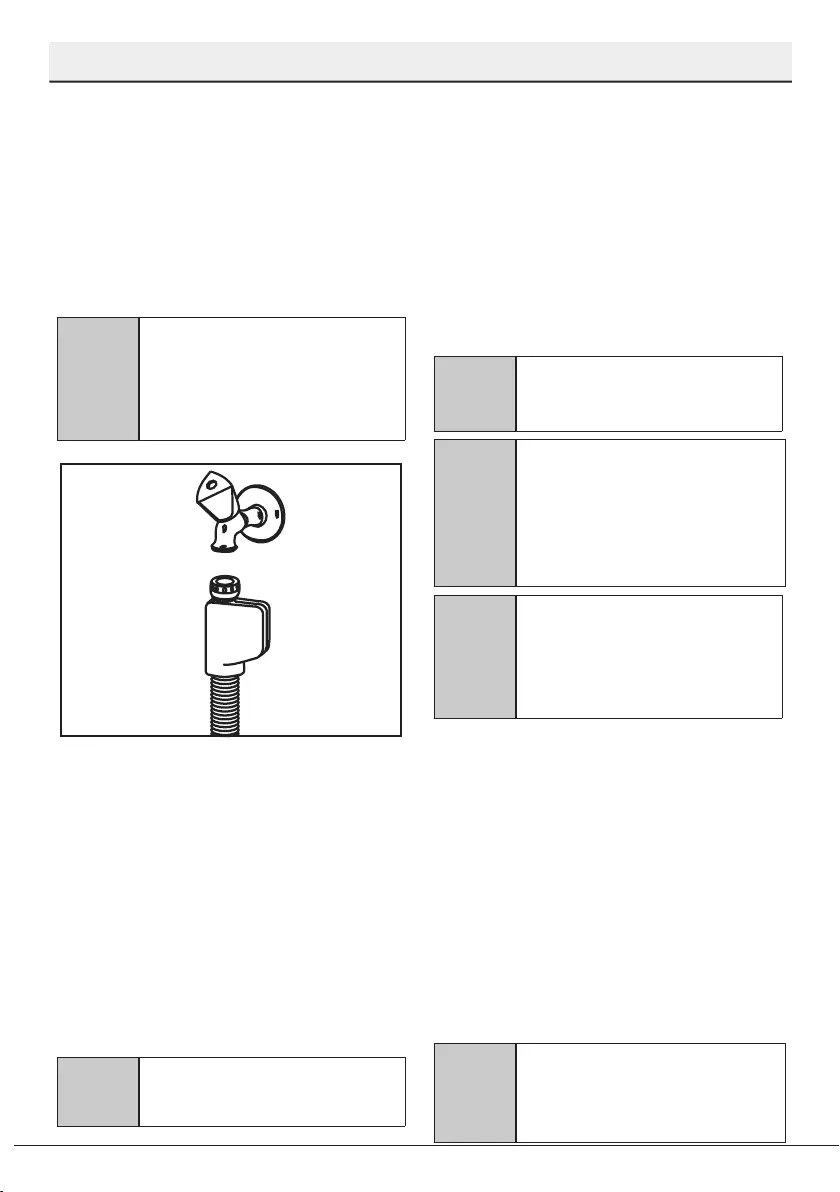
C
Use a screw-on hose connector
to connect the water inlet hose
to a water tap with a ¾ inch
external thread. If required, use
a filter insert to filter deposits
from the pipes.
A
For your safety, close the water
inlet tap completely after the
washing programme is over.
Connecton to the dran
Water discharge hose can directly be
connected to the drain hole or sink’s
drainage. The length of this connection must
be min. 50 cm and max. 100 cm from the
floor. A discharge hose longer than 4 meters
causes dirty washing.
Attach the water discharge hose to the
drainpipe without bending it. Tightly fix the
water discharge hose to the drainpipe in
order to prevent any dislocation of the water
discharge hose during operation of the
product.
min
300
min
120
max 1000
min 500
C
Drainpipe must be connected
to the sewage system and it
should not be connected to any
surface water.
Adjustng the feet
If the door of the product cannot be closed
properly or if the product swings when you
push it slightly, then you need to adjust
the feet of the product. Adjust the feet of
the product as illustrated in the installation
manual supplied with the product.
A
Diswashers door must be
aligned properly otherwise hot
steam can escape! Danger of
serious burns, other injury or
may damage furniture.
Dishwasher / User’s Manual 11 / 40 EN
Installation
•The voltage and allowed fuse or
breaker protection are specified in the
“Technical specifications” section. If the
current value of the fuse or breaker in
the house is less than 16 Amps, have
a qualified electrician install a 16 Amp
fuse.
•The specified voltage must be equal to
your mains voltage.
•Do not make connections via extension
cables or multi-plugs.
B
Damaged power cables must
be replaced by the Authorised
Service Agent.
B
If your dishwasher is equipped
with internal illumination, lamp
should only be replaced by the
Authorised Service Agent in case
of failures that may occur on the
lamp.
B
If the product has a failure, it
should not be operated unless
it is repaired by the Authorised
Service Agent! There is the risk
of electric shock!
Intal use
Before starting to use the product, make
sure that all preparations are made in
accordance with the instructions in sections
“Important safety instructions” and
“Installation”.
•To prepare the product to do the
dishes, perform first operation in the
shortest programme with detergent
while the machine is empty. During the
initial use, fill the salt reservoir with 1
litre of water prior to filling it with salt.
A
There might be a small amount
of water left in the product after
factory quality control tests. This
has no harm on the product.
Aquasafe+
(depends on model)
The Aquasafe+ system protects against
water leaks that may occur at the hose inlet.
Water contact with the valve box of the
system must be avoided to prevent damage
to the electrical system. If the Aquasafe+
system is damaged, unplug the product and
call the Authorised Service Agent.
A
As the hose set contains
electrical connections and
assemblies, never shorten
or lengthen the hose with
extension hoses.
Electrcal connecton
Connect the product to a grounded outlet
protected by a fuse complying with the
values in the “Technical specifications”
table. Our company shall not be liable for any
damages that will arise when the product is
used without grounding in accordance with
the local regulations.
•Connection must comply with national
regulations.
•Power cable plug must be within easy
reach after installation.
B
Unplug the product after the
washing programme is over.

12 Dishwasher / User’s Manual/40 EN
Preparation
4
Tps for energy savng
Following information will help you use the
product in an ecological and energy-efficient
manner.
Wipe away any coarse food remnants on the
dishes before putting them in the product.
Operate the product after filling it
completely.
When selecting a programme, consider
the table of «Programme data and average
consumption values».
Do not put more detergent than suggested
on the detergent package.
Water softenng system
The product is equipped with a water
softening system which reduces the
hardness of incoming water. This system
softens the supply water to a level that will
allow washing the dishes with the required
quality.
C
The mains water hardness must
be softened if it is over 7°dH.
Otherwise, hardness ions will
accumulate on the dishes that
are washed and may affect the
washing, rinsing and drying
performances of the machine.
Adjustng the water
softenng system
Cleaning, rinsing and drying performance of
your dishwasher will increase when water
softening system is adjusted properly.
Adjust the new water hardness level
according to the Water hardness level
instruction in this booklet.
Dishwasher / User’s Manual 13 / 40 EN
Preparation
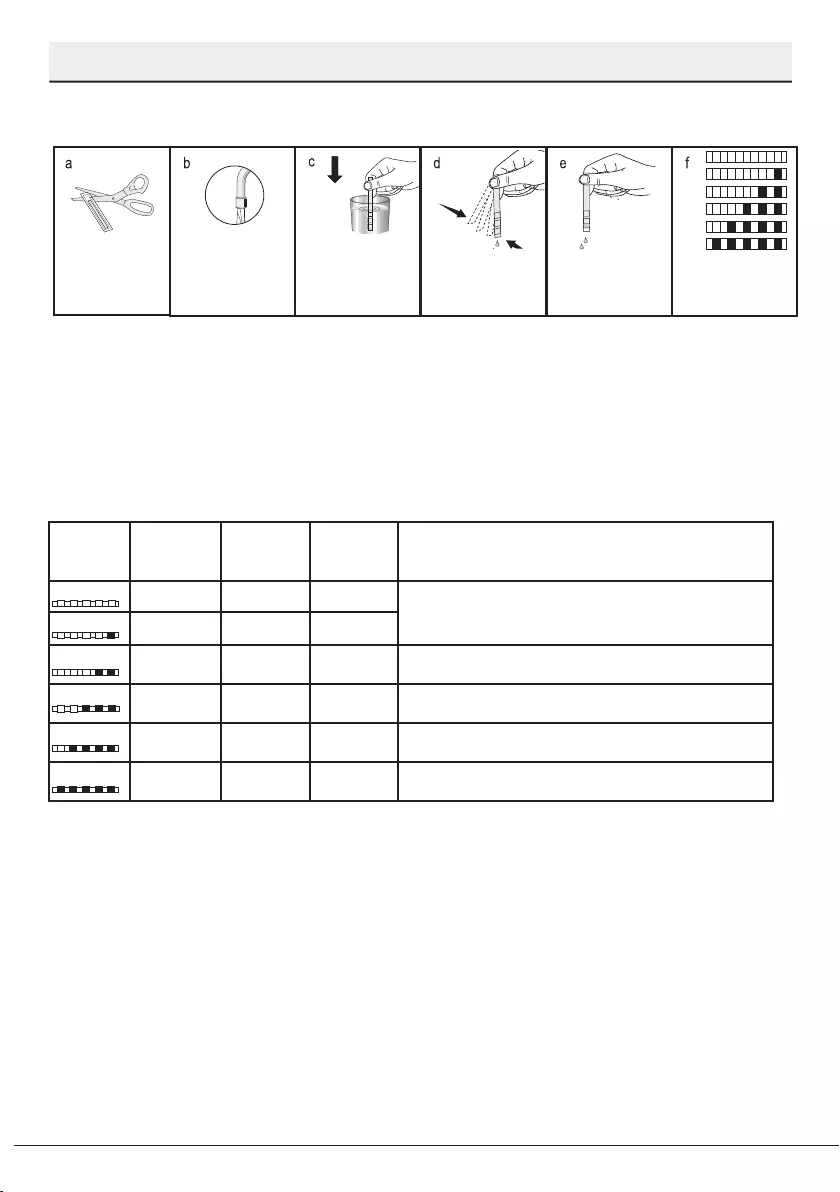
Use the test strip supplied with the product according to the steps given below to determine
hardness level of your supply water.
Remove the test
strip from the
packet.
Turn on the tap and
let the water run for
about a minute.
Hold the test strip in
the water for about
a second.
Remove the test
strip from the water
and shake it.
Wait for 1 minute. The test strip shows
you the hardness
level.
After determining hardness level of the supply water:
1. Turn on the machine, press Time Delay and P+/P keys simultaneously. After the countdown
(3,2,1) is displayed keep the keys pressed for a while.
2. Press P+/P key to activate the (r..) position.
3. Using Time Delay key, adjust water hardness level according to the hardness of the supply
water. See “Water hardness level adjustment table” for correct setting.
4. Press On / Off key to save the setting.
Water hardness level adjustment table
Hardness
Level
English Water
Hardness °dE
German Water
Hardness °dH
French Water
Hardness °dF Water Hardness Level Indicator
0th Level 0-5 0-4 0-8 Press the Time Delay key to switch the water hardness level
to position 1. (r1)
1st Level 6-9 5-7 9-13
2nd Level 10-15 8-12 14-22 Press the Time Delay key to switch the water hardness level
to position 2. (r2)
3rd Level 16-19 13-15 23-27 Press the Time Delay key to switch the water hardness level
to position 3. (r3)
4th Level 20-24 16-19 28-34 Press the Time Delay key to switch the water hardness level
to position 4. (r4)
5th Level 25-62 20-50 35-90 Press the Time Delay key to switch the water hardness level
to position 5. (r5)
If the hardness level of the supply water is above 90 °dF or if you are using well water, then it is
recommended to use water purification devices and special filters.
If the hardness level of the supply water is below 13°dF, there is no need to use salt in your
dishwasher. If this is the case, “No Salt Warning Indicator” (if any) illuminates continuously on the
panel of your machine.
If the water hardness level adjustment is set to level 1, the “No salt warning indicator” will
illuminate continuously although it is not necessary to use salt. If you use salt under this
condition, salt will not be consumed and the Salt indicator will not illuminate.
14 Dishwasher / User’s Manual/40 EN
Preparation
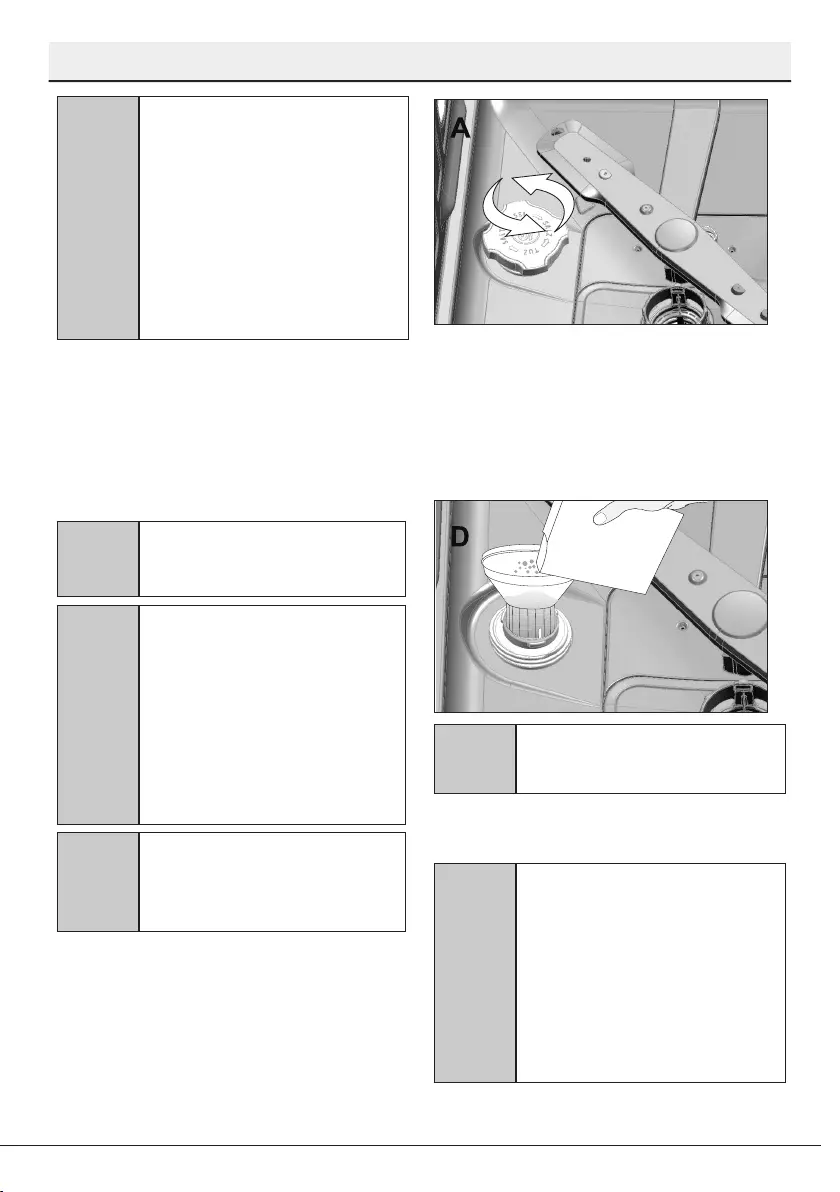
3. Add 1 litre of water to salt reservoir of
your machine only in initial use.
4. Fill the salt reservoir with salt by
using the salt funnel (D). To speed up
dissolution rate of salt in water, stir it
with a spoon.
C
You can put about 2 kg of
softening salt into the salt
reservoir.
5. Replace the lid and tighten it when the
reservoir is full.
C
You need to add salt right before
starting the machine. Thus, the
overflowing salty water will be
flushed immediately, preventing
the risk of corrosion in machine.
In cases where you would not
start washing immediately,
run your machine empty in the
shortest program.
C
If you move your house, it is
necessary to readjust water
hardness level of your machine
by considering the information
given above according to the
hardness level of the supply
water in your new location.
Your machine will display the
most recently adjusted water
hardness level.
Addng salt
Water softening system needs to be
regenerated in order for the product
operates with the same performance
continuously. Dishwasher salt is used for
this purpose.
C
Use only special softening salts
produced particularly for the
dishwashers in your machine.
C
It is recommended to use
granule- or powder-formed
softening salts in the water
softening system. Do not use
salts that do not completely
dissolve in water such as table
salt or rock salt. Otherwise the
performance of the system may
deteriorate in time.
C
Salt reservoir will be filled with
water when you start the
product. For this reason, add salt
before operating the machine.
1. Firstly, take the lower basket out to add
softening salt.
2. Turn the salt reservoir lid counter-
clockwise to open it (A).
Dishwasher / User’s Manual 15 / 40 EN
Preparation
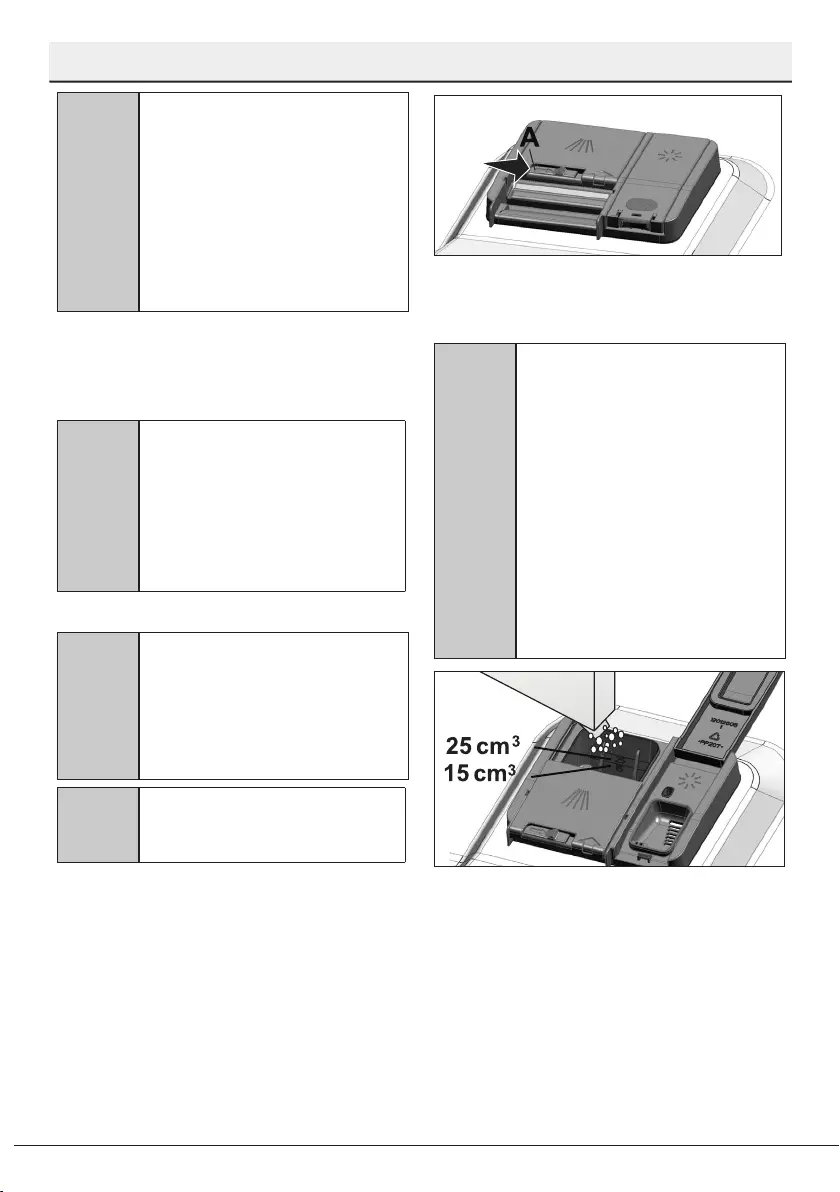
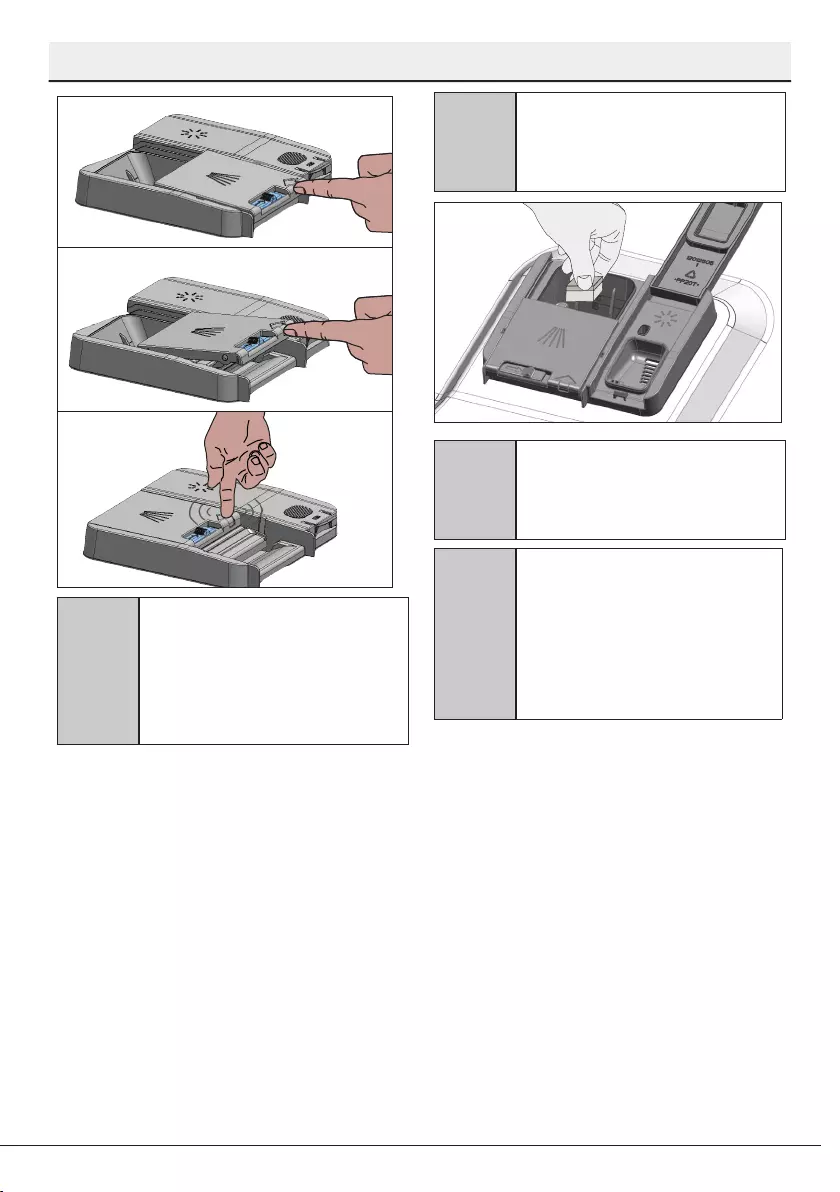
2. Put suggested amount of powder,
liquid/gel or tablet detergent in the
reservoir.
C
Inside the detergent dispenser
there are level markings that
help you use appropriate amount
of powder detergent. When
brimful, detergent dispenser will
contain 45 cm³ of detergent.
Fill detergent up to 15 cm³ or 25
cm³ level marks in the detergent
dispenser according to fullness
of the machine and/or soiling
degree of the dishes. One
tablet is enough if you are using
detergent tablets.
3. Push the lid of the detergent dispenser
to close it. A «click» will be heard when
the lid is closed.
C
Since different salt brands
in the market have different
particle sizes and since the water
hardness may vary, dissolution
of the salt in water may take
a couple of hours. Therefore,
Salt Indicator remains on for a
while after adding salt into the
machine.
Detergent
You can use powder, liquid/gel or tablet
detergents in the machine.
A
Only use in the machine the
detergents produced particularly
for use with dishwashers. We
recommend you not to use
detergents that contain chlorine
and phosphate as they are
harmful for the environment.
Adding detergent
C
Pay attention to the warnings
on the detergent packaging
to get better washing and
drying results. Contact the
manufacturer of the detergent
for further questions.
A
Do not put solvents into the
detergent dispenser. There is
the risk of explosion!
Put the detergent into the detergent
dispenser just before operating the machine
as illustrated below.
1. Push the latch to right to open the
detergent dispenser lid (A).
16 Dishwasher / User’s Manual/40 EN
Preparation
C
The best washing performance
in dishwashers is obtained by
using detergent, rinse aid and
water softening salt individually.
C
Observe the instructions of the
detergent manufacturer on
the package when using tablet
detergents.
C
Contact the detergent
manufacturer if your dishes
are wet and/or if you notice
limescale spots particularly on
your glasses after the washing
programme is over when using a
tablet detergent.
When you switch to powder
detergent from tablet detergent:
1. Make sure that salt and rinse aid
reservoirs are full.
2. Set the water hardness to the highest
level and perform an empty run.
3. After the empty washing cycle, review
the user manual and readjust the water
hardness level so as to suit the water
supply.
4. Make the appropriate rinse aid settings.
2
3
C
Use powder or liquid/gel
detergent in short programmes
without prewash since the
solubility of the tablet detergent
changes depending on the
temperature and time.
Tablet detergents
In addition to the conventional tablet
detergents, there are also commercially
available detergent tablets that show water
softening salt and/or rinse aid effect. Some
types of these detergents contain special-
purpose components such as glass and
stainless steel protectors. These tablets
show their effects up to a certain water
hardness level (21°dH). Water softening salt
and rinse aid must also be used together
with the detergent if the water hardness
level is above the mentioned level.
Dishwasher / User’s Manual 17 / 40 EN
Preparation
Rnse ad
C
The rinse aid used in
dishwashers is a special
combination that aims to
increase drying efficiency and
prevent water or lime stains
on the washed items. For this
reason, care must be paid
to have rinse aid in the rinse
aid reservoir and to use rinse
aids produced specially for
dishwashers only.
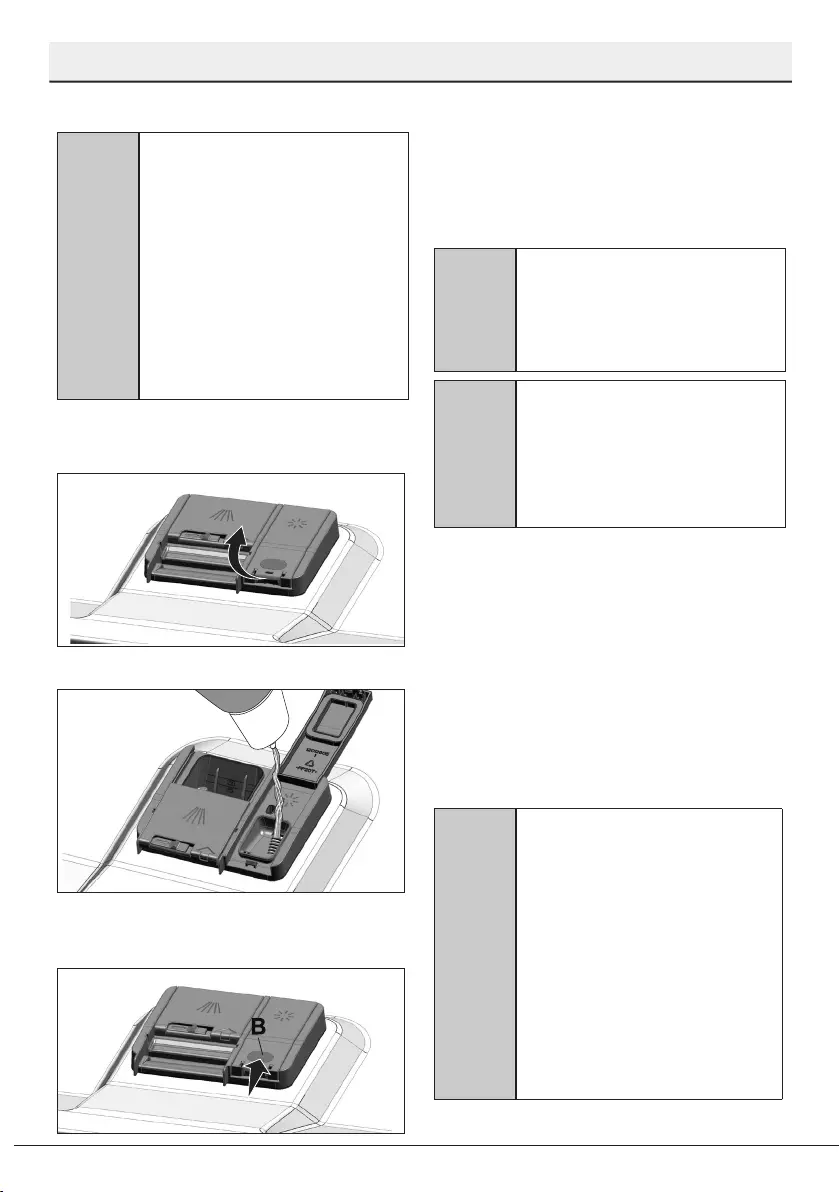
1. Open the lid of the rinse aid reservoir
with the help of the latch.
2. Fill the reservoir until “MAX” level.
3. Slightly press the point (B) of the
reservoir lid to close it.
4. If there are stains on tableware items
after washing, level must be increased
and if there is a blue trace after wiping
them by hand, it must be decreased.
This is set to position 3 as factory
default.
C
The rinse aid adjustment is
described under «Adjusting
the amount of rinse aid» in
the section for operating the
machine.
C
Wipe clean any spilled rinse
aid outside the reservoir. Rinse
aid that spilled accidentally
will cause foaming and it will
eventually decrease washing
performance.
Items not sutable for
washng n the dshwasher
•Never wash dishes soiled by cigarette
ash, candle remnants, polish, dyestuff,
chemicals, etc. in your dishwasher.
•Do not wash silverware and cutlery
with wooden or bone stems, glued
pieces, or pieces that are not resistant
to heat, as well as copper and tin-plated
containers in the dishwasher.
C
Decorative prints of chinaware
as well as aluminum and silver
items may get discoloured or
tarnished after washing in the
dishwasher just as it happens
in handwashing as well. Some
delicate glass types and crystals
may become dull in time. We
strongly recommend you to
check if the tableware you are
going to purchase is suitable
for washing especially in the
dishwasher.

18 Dishwasher / User’s Manual/40 EN
Preparation
Placng the dshes nto the
dshwasher
You can use your dishwasher in the optimum
way with respect to energy consumption
and washing and drying performance only if
you place the dishes in an orderly way.
•Wipe away any coarse food remnants
(bones, seeds, etc.) on the dishes
before placing them in the dishwasher.
•Place thin, narrow pieces in the middle
sections of baskets if possible.
•Place the heavily soiled and bigger
items in the lower basket and smaller,
delicate and light items in the upper
basket.
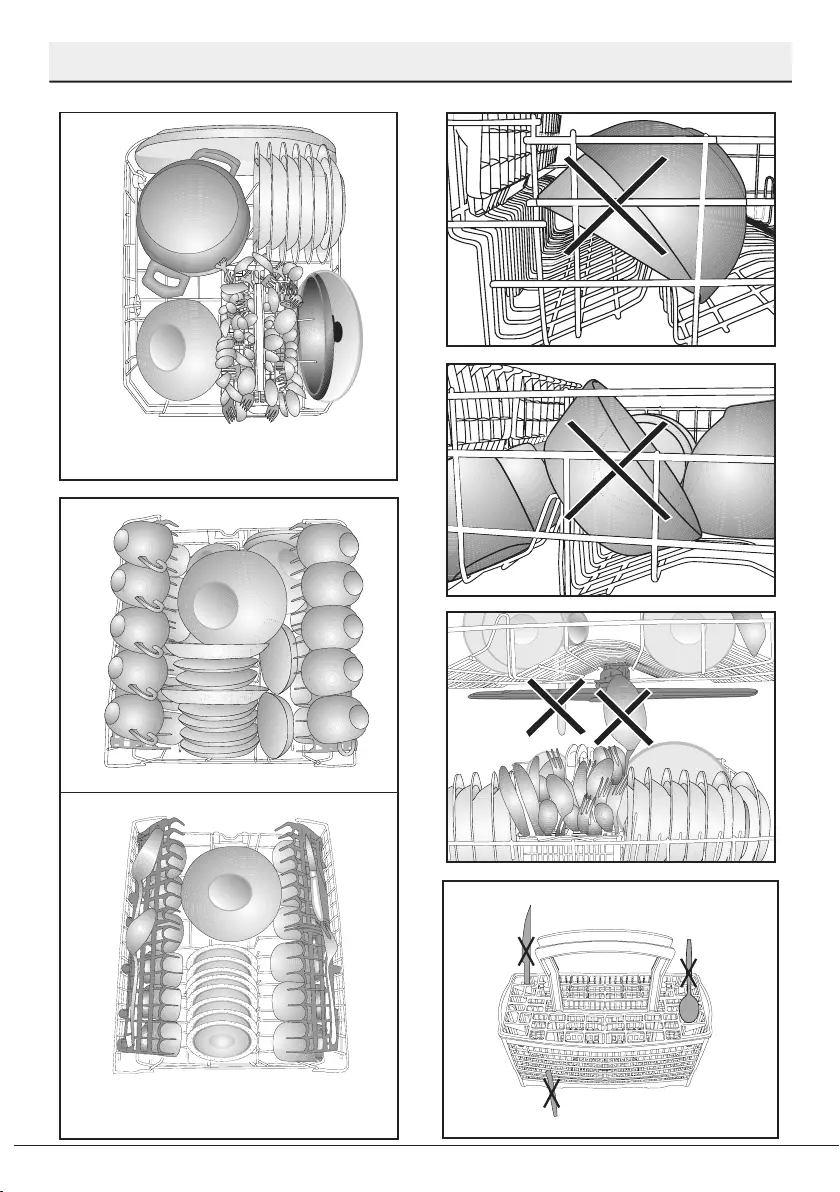
•Place the hollowed dishes such as
bowls, glasses and pans upside down in
the dishwasher. Thus, accumulation of
water in deep hollows is prevented.
A
To prevent possible injuries,
always place the sharp and
pointed dishes such as service
fork, bread knife, etc. upside
down so as their pointed ends
will face down or they will lie
horizontally in the dish basket.
Unload dishes in the lower basket first and
then the dishes in the upper basket.
Dishwasher / User’s Manual 19 / 40 EN
Preparation
Suggestions for loading the dishwasher
Lower basket
Upper basket
Improper Loading Of Dishware
20 Dishwasher / User’s Manual/40 EN
Preparation
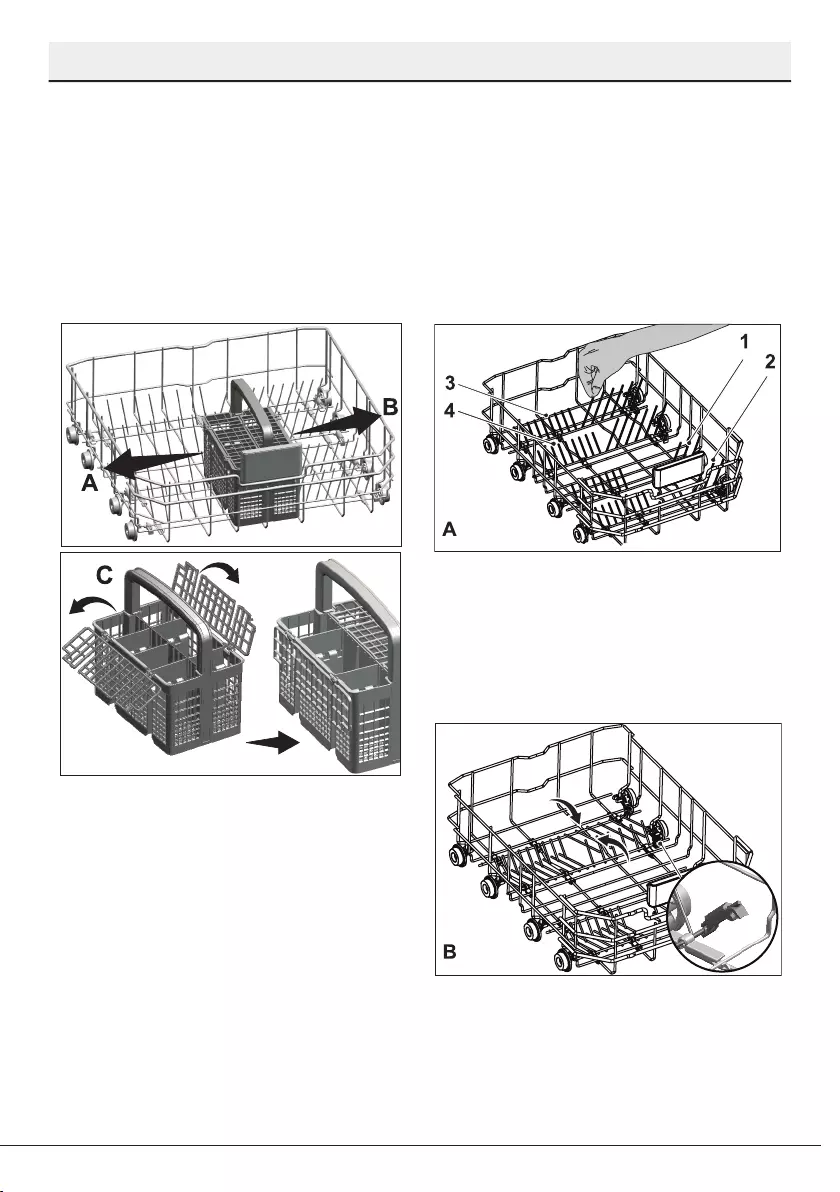
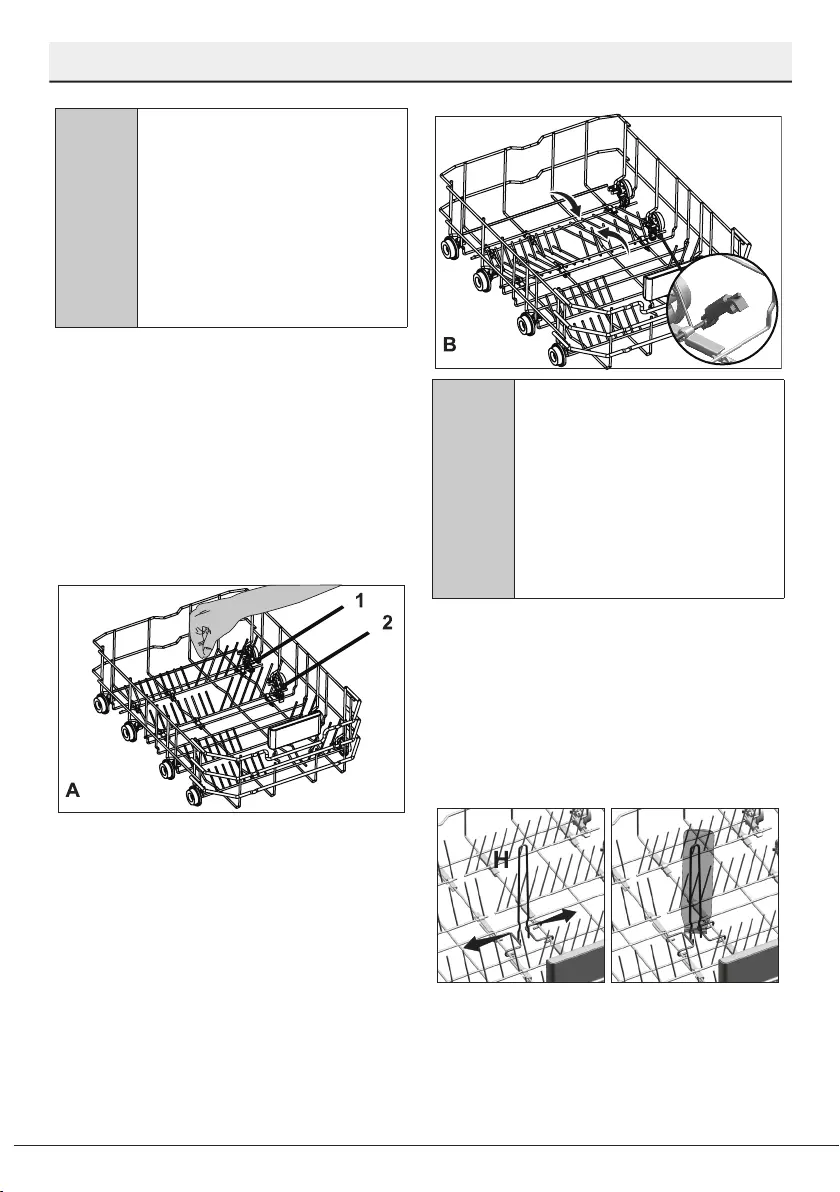
Collapsble lower basket
tnes
(depends on model)
Foldable tines (A) located at the lower basket
of the machine are designed for an easier
placement of large pieces such as pans,
bowls, etc. You can create larger spaces by
folding each tines individually or all of them
at once.
To bring the collapsible tines into horizontal
position, grab the tines from mid position
and push them in the directions of arrows
(B). To bring the tines back to vertical
position, just lift them up. Collapsible tines
will click into the latch again (C).
Cutlery basket
(depends on model)
Cutlery basket is designed to wash your
dishes such as knife, fork, spoon, etc. in an
efficient manner.
Since the cutlery basket can be moved (A,
B), you can create more space while placing
your dishes in the lower basket and free up
space for your dishes of different sizes.
Dishwasher / User’s Manual 21 / 40 EN
Preparation
C
Bringing the tines to the
horizontal position by holding
them from the tips may cause
them to bend. Therefore, it will
be appropriate to bring the tines
in the middle to horizontal or
vertical position by holding them
from their stems and pushing in
the direction of arrow.
Collapsble lower basket
tnes
(depends on model)
Foldable tines (A) located at the lower basket
of the machine are designed for an easier
placement of large pieces such as pans,
bowls, etc. You can create larger spaces by
folding each tines individually or all of them
at once.
To bring the collapsible tines into horizontal
position, grab the tines from mid position
and push them in the directions of arrows
(B). To bring the tines back to vertical
position, just lift them up. Collapsible tines
will click into the latch again (C).
C
Bringing the tines to the
horizontal position by holding
them from the tips may cause
them to bend. Therefore, it will
be appropriate to bring the tines
in the middle to horizontal or
vertical position by holding them
from their stems and pushing in
the direction of arrow.
Lower basket bottle wre
(depends on model)
The bottle wire is designed for easier
washing of long pieces with wide mouths.
You may take out the bottle wire from the
basket when not in use by pulling it out from
both sides (H).
22 Dishwasher / User’s Manual/40 EN
Preparation
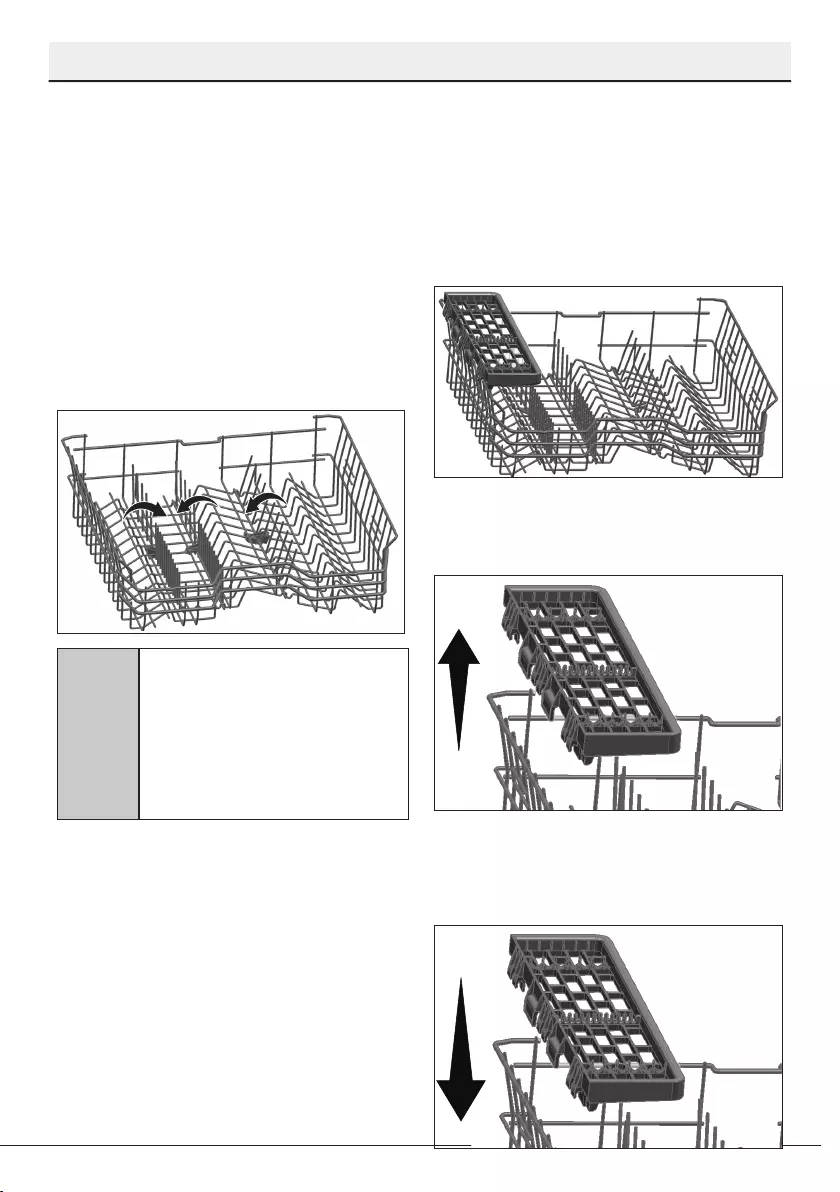
Collapsble upper basket
wres
(depends on model)
You can use collapsible wires when you need
a larger space for your dishes in the upper
basket of your machine.
To bring the collapsible wires into horizontal
position, grab the wire from the middle
position and push them in the direction of
arrow in the figure. Place your larger dishes
into the area created. To bring the wires back
to vertical position, just lift them up.
C
Bringing the wires to the
horizontal position by holding
them from the tips may cause
them to bend. Therefore, hold
the wires from their stems while
bringing them to the horizontal
or vertical positions.
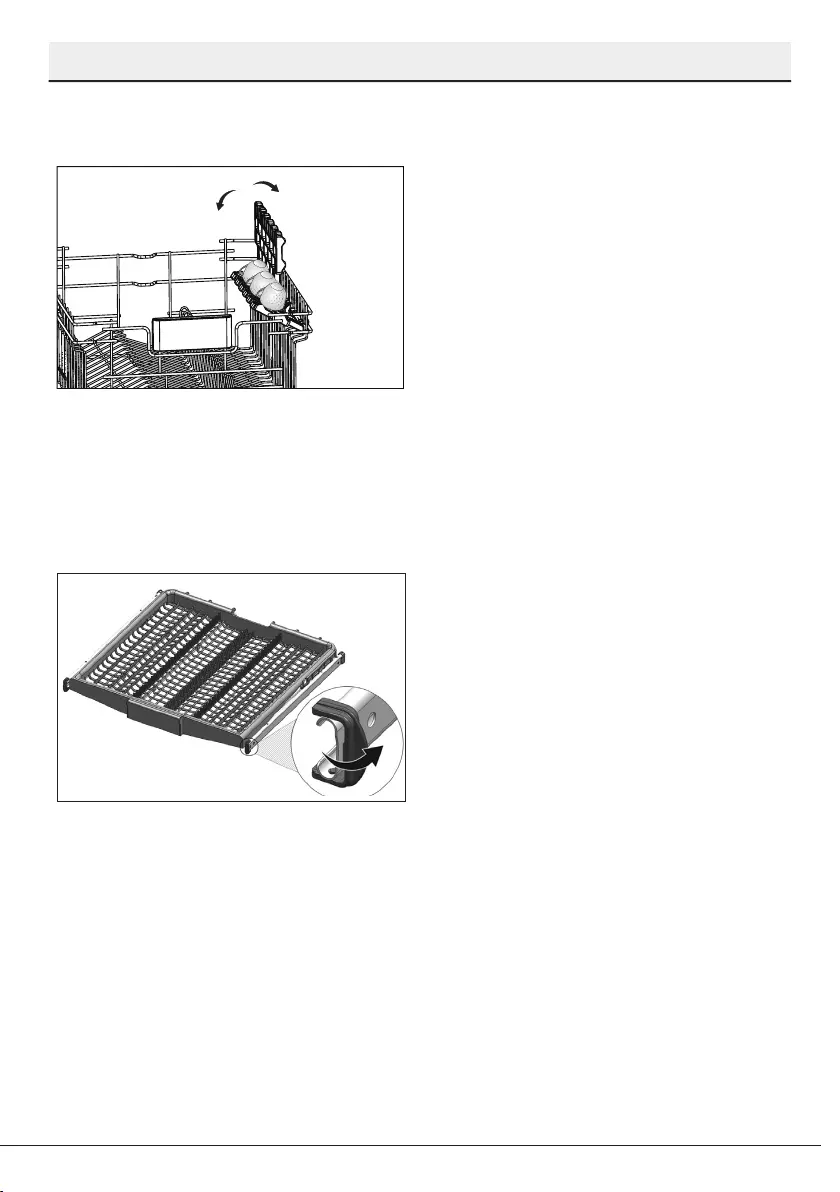
Upper basket multpurpose
servce rack
(depends on model)
This accessory located at the upper basket
of your machine allows you to easily wash
pieces such as extra long ladles and bread
knives.
You can lift up the upper basket
multipurpose service rack to remove it if you
do not want to use it.
If you want to use the upper basket
multipurpose service rack again, you can
easily attach it to the side section of your
upper basket.
Dishwasher / User’s Manual 23 / 40 EN
Preparation
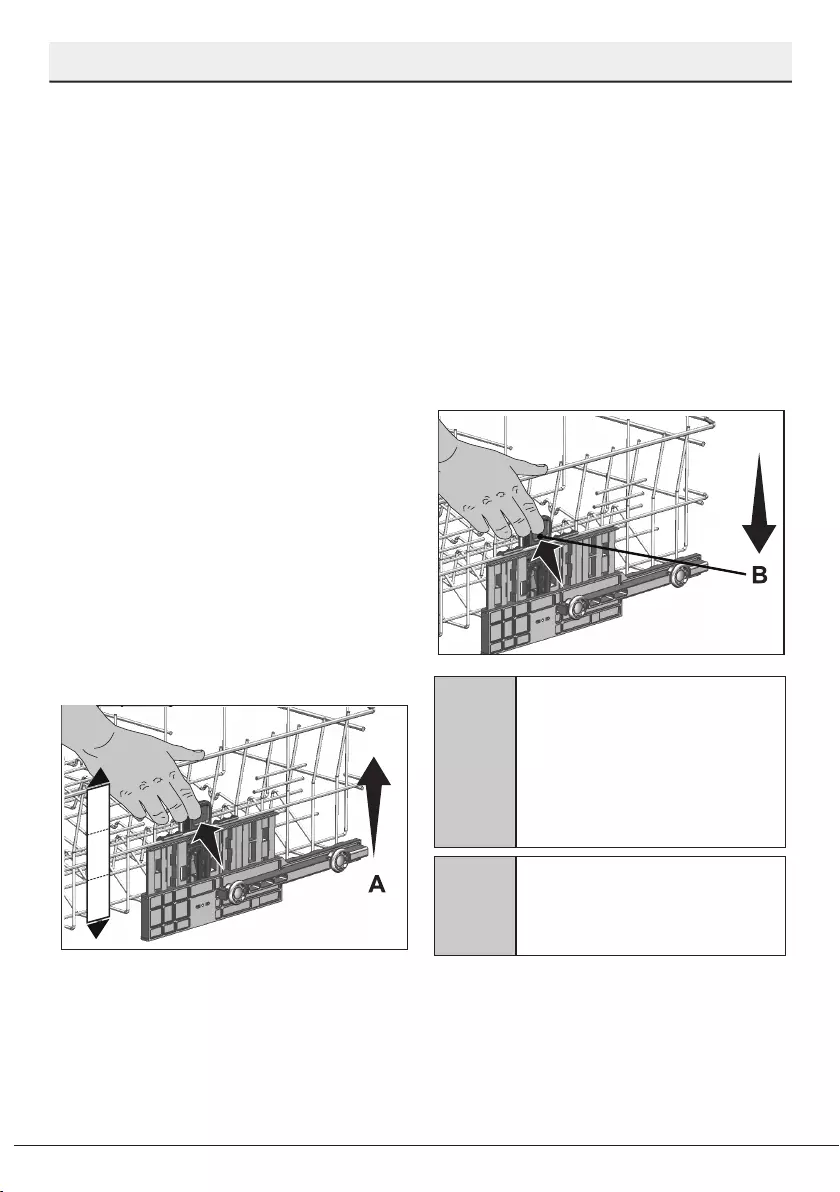
To lower the basket, while it is in the
uppermost position;
1. Hold the upper basket wires with both
hands, slightly lift up the basket and
simultaneously push and release the
latches shown in the figure (B).
2. Lower the basket from its current
position to the lower one.
3. Release the basket after it has reached
one level down.
Repeat the process if the height is not
sufficient.
C
The movement mechanism
may not function properly if the
upper basket is overloaded or
if the weight distribution is not
balanced. In heavier conditions,
there is the risk of falling one
level down.
C
Make sure that the adjustment
mechanism has the same
positions on the right and left
sides of the upper basket.
Adjustng the heght of the
upper basket
(depends on model)
The upper basket height adjustment
mechanism has been designed for you to
create large spaces in the lower or upper
sections of your machine depending on your
needs by adjusting the height in the upper
or lower direction while your basket is empty
or loaded.
Thanks to this mechanism, you can use your
basket in three different positions, namely
lower, middle and upper positions (1, 2, 3).
1. To raise your basket, hold the upper
basket wires with both hands while the
basket is in the lowermost position and
pull them up (A).
2. You will hear a «Click» from the right
and left mechanisms, indicating that
the basket has reached the next level.
Release the basket.
Repeat the process if the height is not
sufficient.
1
2
3
24 Dishwasher / User’s Manual/40 EN
Preparation
Celng cutlery basket
(depends on model)
Ceiling cutlery basket is designed to wash
your cutlery items such as forks, spoons and
etc. by placing them between the bars on
the basket.
Upper basket rack
(depends on model)

Dishwasher / User’s Manual 25 / 40 EN
5
5Operating the product
1. On/Off key
2. Programme Selection / Programme Cancel (3 seconds) key
3. Function keys
F1
F2
4. Programme indicator
5. Salt indicator
6.
7. Start / Cancel indicator
8. Time Delay / Programme Time indicator
9. Time Delay key
10. Time Delay indicator
11. End of Programme indicator
12.
13. Rinse Aid indicator
5
Tablet detergent function
Half Load function
Not in use
Not in use
1
10
2 4 5 6 7 8 3 9
111213
3

26 Dishwasher / User’s Manual/40 EN
Operating the product
Keys
On/Off key
When you press On / Off key, indicator lights
illuminate on the display for ON position. The
lights turn off in OFF position.
Programme Selection /
Programme Cancel key
Press this key until the desired programme
appears in the programme indicator.
To cancel the running programme open
the door of the product. Press and hold
the Programme Selection / Programme
Cancel keys for 3 seconds. After the 3 — 2 — 1
countdown, 0:01 is displayed, close the door
of the product and wait for the draining
process complete. Draining is completed in
2 minutes and the machine gives an audible
warning when it is completed.
Functon keys
If you press any of the Function keys
during programme selection or time delay
selection, an affirmative key signal will be
heard provided that the relevant function
is supported by the selected programme.
Function will be deemed selected when the
indicator of the selected function is lit.
To cancel the selected function, keep the
function key pressed until the function
indicator disappears.
Preparng the machne
1. Open the door of the dishwasher.
2. Place the dishes in accordance with the
instructions in the user manual.
3. Make sure that the upper and lower
impellers rotate freely.
4. Put adequate amount of detergent into
the detergent dispenser.
Programme selecton
1. Press the On/Off button to turn on your
machine.
2. Check the Salt and Rinse Aid indicators
and add salt and/or rinse aid if needed.
3. Refer to the table of “Programme data
and average consumption values”
to determine a washing programme
suitable for your dishes.
4. Selected programme will start when you
close the door of your machine.
Dishwasher / User’s Manual 27 / 40 EN
Operating the product
12345
Eco * Intensive Clean&Shine Quick&Shine Mini
50 ºC 70 ºC 65 ºC 60 ºC 35 ºC
Most economical
washing programme
for the medium soiled
daily dishes that are
kept waiting.
Suitable for heavily
soiled dishes, pots
and pans.
Daily washing
programme for
normally soiled
dishes.
Daily washing
programme for
normally soiled
dishes in the fastest
way.
Suitable for lightly
soiled daily dishes
that are scraped or
pre-cleaned.
Medium High Medium Medium Low
++—
+++++
++++ —
205 115 120 58 30
10,5 14,8 15 10,6 10,4
0,83 1,28 1,18 1,12 0,77
Programme Table
The consumption values shown in the table were determined under standard conditions. Differences may therefore occur under practical conditions. * Reference
programme for testing institutes. The tests in accordance with EN 50242 must be carried out with a full water softener salt dispenser and a full rinse aid reservoir,
and using the test programme.
Programme number
Programme name
Cleaning temperature
Degree of Soiling
Energy (kWh)
Prewash
Wash
Dry
Duration (min)
Water (I)
#
Sensitivity: Public

28 Dishwasher / User’s Manual/40 EN
Operating the product
Auxlary functons
Washing programmes of your dishwasher
are designed to obtain the best cleaning
effect, considering the type of the soiling,
soiling degree and properties of the dishes
to be washed.
Auxiliary functions allow you save from time,
water and power.
C
Auxiliary functions may cause
changes in the programme
duration.
C
Auxiliary functions are not
suitable for all washing
programs. Indicator of the
auxiliary function that is not
compatible with the programme
will not be active.
Half Load function
It is used to operate the machine without
loading it completely.
1. Load your dishes in the machine as you
like.
2. Turn the machine on with On/Off key.
3. Select the desired programme and press
the Half Load key.
4. Close the door of the machine to start
the programme.
C
With the Half Load function you
can save both water and power
while using the lower and upper
baskets of the machine.
Tablet detergent function
Allows to obtain a better drying performance
from the multi-purpose detergents called as
all in one detergents such as 2in1, 3in1, 4in1,
5in1 and etc., depending on the hardness
level of the tap water.
C
If you have used the Tablet
features during the last washing
programme you used, Tablet
function will remain active in the
next washing programme you
will select. If you do not want
to use these functions in the
new program you have selected,
press the Tablet Detergent key
until the indicator of the relevant
function turns off.
C
Tablet Detergent function may
cause change in the programme
duration.
Interior Lighting
(Depends on the model)
Some models have interior lighting to
illuminate the interior when the door is
opened.
Changing the interior lighting
setting
1. After turning on the machine, press
Time Delay and P+ keys simultaneously.
Continue to press until the countdown
3, 2, 1 is completed on the display.
2. Press P+ key to activate the L: option.
The interior lighting is turned off at «L:0»
option and turned on at «L:1» option. Set
the desired option with the Time Delay
key.
3. Turn off the machine with On/Off key to
save the changes.

Dishwasher / User’s Manual 29 / 40 EN
Operating the product
Floor illumination
Warning to show that machine is
in washing phase
(depends on the model)
Your machine reflects a light to the floor
during the washing process. This light turns
off after the washing process is complete.
C
Floor illumination is activated
automatically when the washing
programme starts and remains lit
until the end of the programme.
C
Floor illumination cannot be
cancelled by the user.
You can delay the start of the selected
programme until 24 hours.
1. Press the Time Delay function key after
selecting the washing programme and
other auxiliary functions.
2. Once you press the Time Delay key,
Display Information Line will show
«0:30» and Time Delay indicator will start
flashing.
3. Set the desired time by pressing the
Time Delay key. Time will increase with
increments of 30 minutes up to 6 hours
and after that in 1 hour increments up to
24 hours every time you press the key.
4. Close the door of your machine after
setting the Delayed Start. Once
the delay time is over, the selected
programme will start automatically.
Changing the settings while Time
Delay function is active
While the Time Delay function is activated,
you cannot make changes in the washing
programme, auxiliary functions or the
duration of delay time.
C
Programme and auxiliary
functions cannot be set/
changed after the programme
has started.
To cancel the Time Delay function
Open the door of the product Press and
hold the Programme Selection / Programme
Cancel keys for 3 seconds. After the 3 — 2 — 1
countdown, 0:01 is displayed, close the door
of the product and wait for the draining
process complete. Draining is completed in
2 minutes and the machine gives an audible
warning when it is completed.
C
You can select and start a
new programme following
the cancellation of Time Delay
function.
Changing Warning Sound Volume
1. After switching your machine on,
press Time Delay and P / P+ keys
simultaneously. Keep them pressed until
the countdown 3, 2, 1 is completed on
the display.
2. Press P / P+ key to activate the S:
position on the display.
3. Each pressing on the Time Delay key will
change the warning sound volume as
«S:0» off, «S:1» medium and «S:2» high.
4. Turn off the machine with the On/Off
key to save the changes.
C
Your machine is set to
“S:2” as factory default.
Schedulng the washng
tme
Time Delay
If an economical electricity tariff is applied
in your region, you can use the Time
Delay function to wash your dishes during
appropriate hours.
30 Dishwasher / User’s Manual/40 EN
Operating the product
C
Time Delay function cannot be
set after the programme starts.
Startng the programme
Close the door of your machine to start it
after selecting the programme and auxiliary
functions.
C
Your machine performs water
softening depending on the
hardness level of the supply
water. Washing time can
change while the programme
is running depending on the
ambient temperature where
your machine is installed,
temperature of the supply water
and amount of the dishes.
C
Pay attention not to open the
door of the machine when it is
running. There may be a rush of
vapour when you open the door
of your machine; be careful.
C
The machine will remain silent
in pause mode for some time
in order to remove the water
from the machine and on the
dishes completely and to have
the water softener cleaned, and
then it will resume running in
drying mode.
Cancellng the programme
Open the door of the product Press and
hold the Programme Selection / Programme
Cancel keys for 3 seconds. After the 3 — 2 — 1
countdown, 0:01 is displayed, close the door
of the product and wait for the draining
process complete. Draining is completed in
2 minutes and the machine gives an audible
warning when it is completed.
C
There might be residues of
detergent or rinse aid in the
machine and/or on the pieces
being washed depending on the
step the programme you have
cancelled was in.
Salt ndcator ( )
Please check the salt indicator on the display
to see whether there is adequate amount
of softening salt in the dishwasher or not.
You need to refill the salt reservoir with
salt whenever salt indicator appears on the
display of your machine.
C
Adjusting the water hardness
level is explained in Water
Softening System section.
Rnse Ad ndcator ( )
Please check the rinse aid indicator on the
display to see whether there is adequate
amount of rinse aid in the dishwasher or
not. You need to refill the rinse aid reservoir
with rinse aid whenever rinse aid indicator
appears on the display of your machine.
Adjustng the amount of
rnse ad
1. After turning on the machine, press
Time Delay and P+ keys simultaneously.
After the countdown (3, 2, 1) is
displayed keep the keys pressed for a
while.
2. Press P+ to move to position (P) on the
display.
3. Set to the appropriate level with the
Time Delay key.
4. Press On / Off key to save the setting.
No rinse aid dispensed in P:0 wash position.
1 dose of rinse aid is dispensed in P:1

Dishwasher / User’s Manual 31 / 40 EN
Operating the product
End of programme
C
When the programme you have
selected comes to an end, an
audible warning signal will warn
you to turn off your machine.
This audible signal will warn you
with certain intervals before it
turns off.
End of Programme indicator will light up
when the washing programme is over.
1. Open the door of the machine.
2. Press On/Off key to turn off your
machine.
3. Close the tap.
4. Unplug the machine from the socket.
C
For energy saving, the machine
is automatically turned off
following the completion of the
programme or if the programme
is not started.
C
Leave your dishes in the machine
for about 15 minutes to allow
them cool down after they are
washed. Your dishes will dry in a
shorter time if you leave the door
of your machine ajar during this
period. This process will increase
the drying effectiveness of your
machine.
Water cut-o warnng
If mains water is cut or water inlet tap is
turned off the machine cannot take water
in and E:02 icon will flash on the programme
indicator. As long as the problem continues,
washing programme is paused and the
water inlet is checked regularly by the
machine; when the water is restored E:02
icon will disappear after a while and the
washing programme resumes.
Overowng warnng
If the machine intakes too much water or
there is leakage at any of the components
then the machine will detect this and E:01
icon will flash on the Programme indicator.
As long as the overflowing continues safety
algorithm will be active and try to discharge
the water. If overflowing stops and safety is
assured, E:01 icon will disappear. If E:01 does
not disappear, there is a permanent fault. In
this case the authorised service should be
contacted.
position.
2 doses of rinse aid are dispensed in P:2
position.
3 doses of rinse aid are dispensed in P:3
position.
4 doses of rinse aid are dispensed in P:4
position.
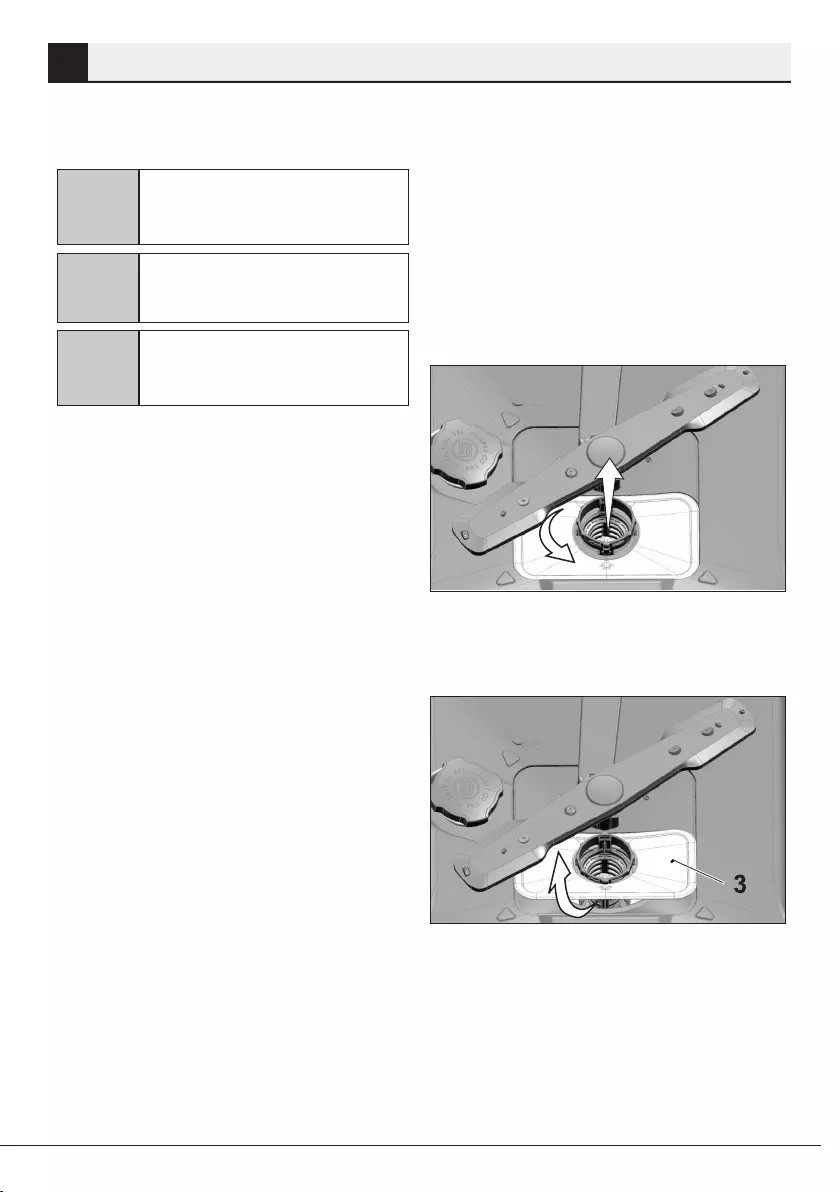
32 Dishwasher / User’s Manual/40 EN
Maintenance and cleaning
6
Service life of the product extends and
frequently faced problems decrease if it is
cleaned at regular intervals.
A
Unplug the product and turn off
the tap before attempting any
cleaning procedures.
C
Do not use abrasive substances
for cleaning.
C
Clean the filter and impellers at
least once a week in order for the
machine operates efficiently.
Cleanng the outer surface
of the product
Wipe the outer surface and door gaskets
of the product gently with a mild cleaning
material and damp cloth. Wipe the «Control
panel» only with a slightly damp cloth.
Cleanng the nteror of the
machne
•Clean the interior of the machine and
the tank by running a programme with
or without detergent based on the
degree of soil.
•If water has remained in the machine,
drain the water by performing the
procedures under the topic «Canceling
a programme». If the water cannot
be discharged, remove the filters
as specified in the «Cleaning the
filters» section and check if there
are any leftover deposits that have
accumulated at the bottom of the
machine, blocking the water path. Clean
if necessary.
Cleanng the flters
Clean the filters at least once a week in order
for the machine operates efficiently. Check if
food residues are left on the filters. If there
are food residues on filters, take them out
and clean well under running water.
1. Turn the micro filter (1) and coarse filter
(2) assembly counter clockwise and pull
it out from its seating.
2. Pull out the metal/plastic filter (3) from
the seating.
3. Press the two pawls on the coarse filter
inwards and separate the coarse filter
from the assembly.
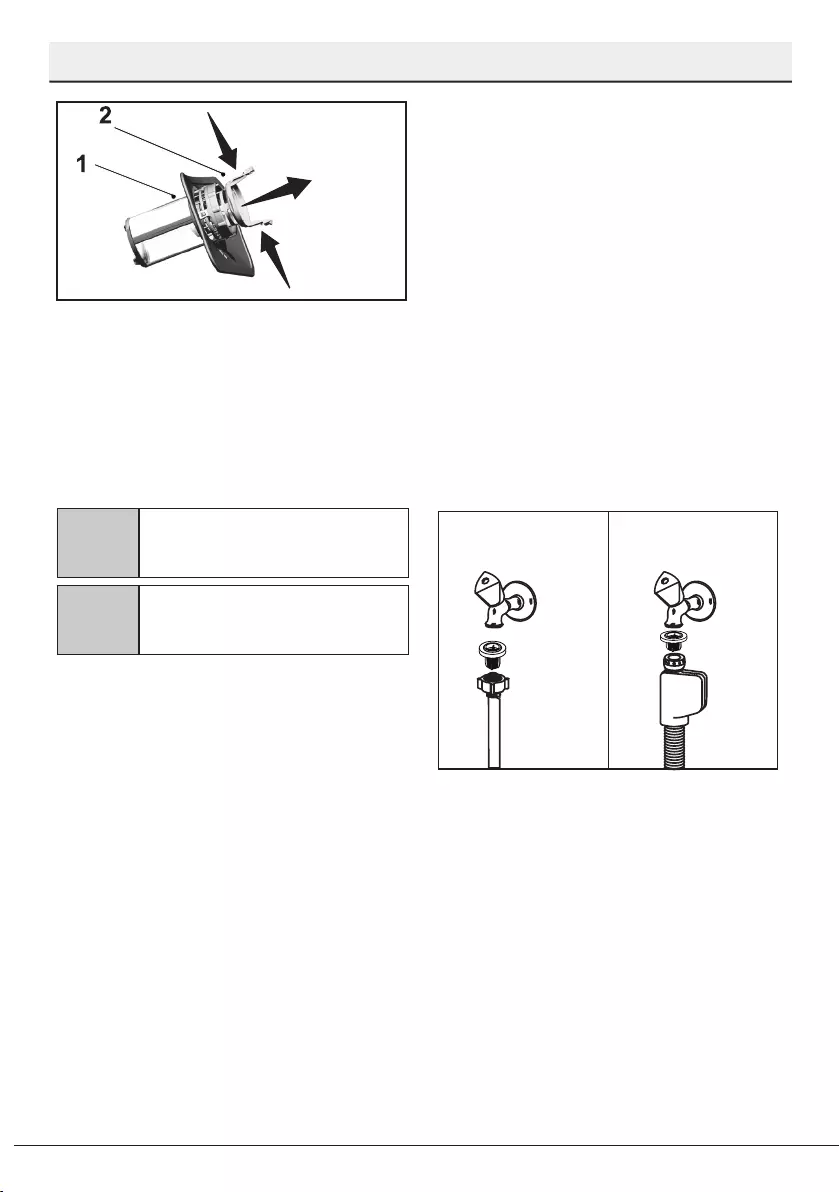
Dishwasher / User’s Manual 33 / 40 EN
Maintenance and cleaning
4. Clean all three filters under tap water by
means of a brush.
5. Place the metal/plastic filter.
6. Place the coarse filter into the micro
filter. Make sure that it is properly
seated. Turn the coarse filter clockwise
until a «click» sound is heard.
C
Do not use the dishwasher
without filter.
C
Incorrect placement of the filters
will reduce washing efficiency.
Cleanng the hose flter
Damages on the machine that may be
caused by impurities coming from the urban
supply water or your own water installation
(such as sand, dirt, rust, etc.) can be
prevented by means of the filter attached to
the water inlet hose. Check the filter and the
hose regularly and clean them if necessary.
1. Turn off the tap and remove the hose.
2. After taking out the filter, clean it under
running tap water.
3. Place the cleaned filter back to its seat
in the hose.
4. Install the hose to tap.
(depends on model)
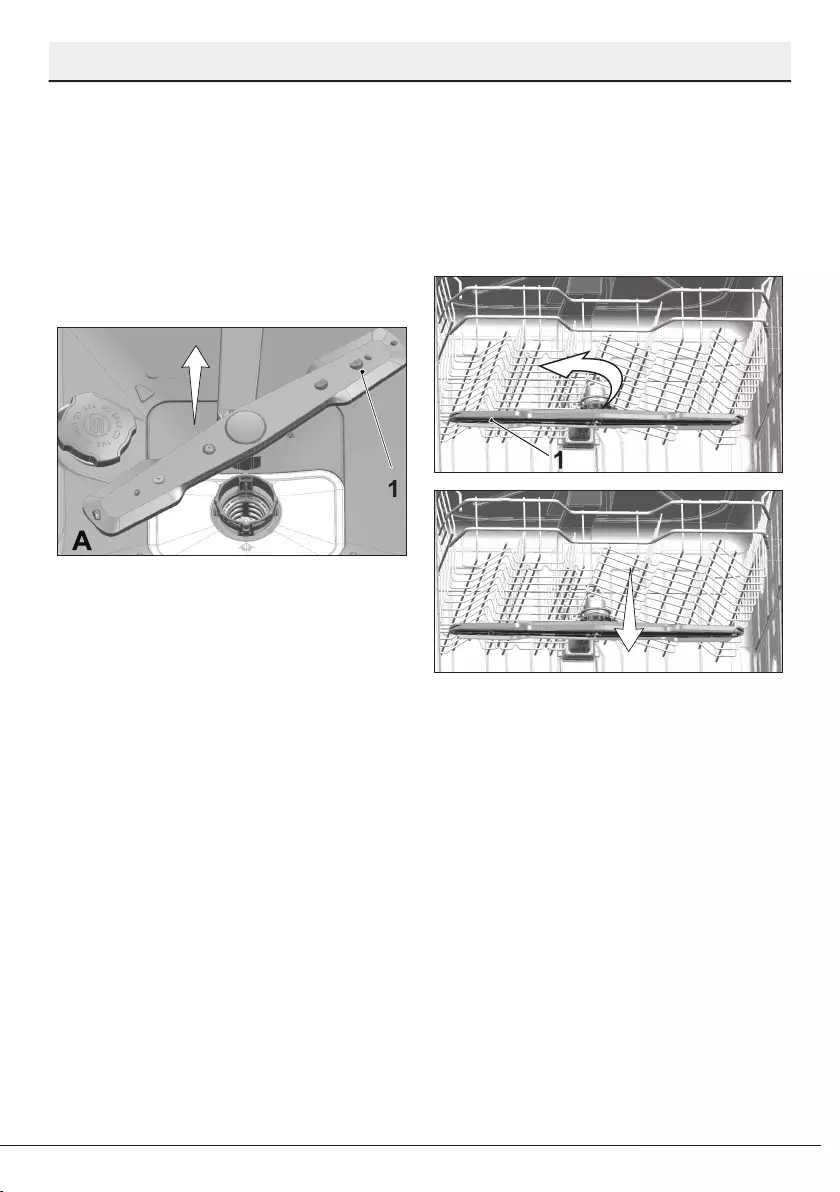
34 Dishwasher / User’s Manual/40 EN
Maintenance and cleaning
Cleanng the mpellers
Clean the impellers at least once a week in
order for the machine operates efficiently.
Lower mpeller
Check if the holes on the lower impeller (1)
are clogged. If they are clogged, remove and
clean the impeller. You can pull the lower
impeller up to remove it.
Upper mpeller
Check if the holes on the upper impeller (1)
are clogged. If they are clogged, remove
and clean the impeller. Turn its nut to left to
remove the upper impeller.
Make sure that the nut is tightened well
when installing the upper impeller.

Dishwasher / User’s Manual 35 / 40 EN
7Troubleshooting
Machine does not start.
• Power cable is unplugged. >>> Check if the power cable is plugged in.
• Fuse is blown. >>> Check the fuses in your house.
• Water is cut. >>> Make sure that the water inlet tap is open.
• Door of the machine is open. >>> Make sure that you have closed the door of the
machine.
• On / Off button is not pressed. >>> Make sure that you have turned on the machine by
pressing the On / Off button.
Dishes are not washed clean
• Dishes are not placed orderly in the machine. >>> Load the dishes as described in the
user manual.
• Selected programme is unsuitable. >>> Select a programme with a higher temperature
and cycle time.
• Impellers are stuck. >>> Prior to starting the programme, turn the lower and upper
impellers by hand to make sure that they rotate freely.
• Impeller holes are clogged. >>> Lower and upper impeller holes might be clogged with
food remnants such as lemon pips. Clean the impellers regularly as illustrated in section
“Cleaning and Care”.
• Filters are clogged. >>> Check if the filter system is clean. Clean the filter system
regularly as illustrated in section “Cleaning and Care”.
• Filters are installed incorrectly. >>> Check the filter system and make sure that it is
installed correctly.
• Baskets are overloaded. >>> Do not overload the baskets in excess of their capacity.
• Detergent is stored under unsuitable conditions. >>> If you are using powder detergent,
do not store the detergent package in humid places. Keep it in a closed container if
possible. For ease-of-storing, we recommend you to use tablet detergents.
• Detergent is not sufficient. >>> If you are using powder detergent, adjust the amount of
detergent according to the soiling degree of your dishes and/or programme definitions.
We recommend you to use tablet detergents for optimum results.
• Rinse aid is not sufficient. >>> Check the rinse aid indicator and add rinse aid if
necessary. Increase the rinse aid setting if there is enough amount of rinse aid in the
machine.
• Detergent dispenser lid is left open. >>> Make sure that the detergent dispenser lid is
closed tightly after adding detergent.
Dishes are not dry at the end of cycle
• Dishes are not placed orderly in the machine. >>> Place your dishes in a way that no
water will accumulate in them.

36 Dishwasher / User’s Manual/40 EN
Troubleshooting
• Rinse aid is not sufficient. >>> Check the rinse aid indicator and add rinse aid if
necessary. Increase the rinse aid setting if there is enough amount of rinse aid in the
machine.
• Machine is unloaded right after the programme is over. >>> Do not unload your machine
right after washing process is completed. Slightly open the door and wait for evacuation
of the steam inside for a while. Unload the dishes after the pieces cool down to a
touchable level. Start unloading process from the lower basket. Thus, dropping of water
remained on a piece at upper basket onto the pieces at lower basket is prevented.
• Selected programme is unsuitable. >>> Since rinsing temperature is low at programmes
with short duration, drying performance will also be low. Select programmes with longer
duration for a higher drying performance.
• Surface quality of the kitchen utensils is deteriorated. >>> Desired washing
performance can not be obtained on kitchen utensils with deteriorated surfaces and it
is not suitable to use such utensils in terms of hygiene as well. Also, water can not flow
easily on deteriorated surfaces. It is not recommended to wash such kitchen utensils in
dishwasher.
C
It is normal that drying complaints can be experienced with Teflon kitchen
utensils. It is associated with the structure of Teflon. Since the surface tensions
of Teflon and water are different, water droplets will remain as beads on the
Teflon surface.
Tea, cafe or lipstick stains remain on dishes.
• Selected programme is unsuitable. >>> Select a programme with a higher temperature
and cycle time.
• Surface quality of the kitchen utensils is deteriorated. >>> Tea and cafe stains or other
dye spots may not be cleaned in dishwasher when they have penetrated in deteriorated
surfaces. Desired washing performance can not be obtained on kitchen utensils with
deteriorated surfaces and it is not suitable to use such utensils in terms of hygiene as
well. It is not recommended to wash such kitchen utensils in dishwasher.
• Detergent is stored under unsuitable conditions. >>> If you are using powder detergent,
do not store the detergent package in humid places. Keep it in a closed container if
possible. For ease-of-storing, we recommend you to use tablet detergents.
Lime traces remain on dishes and glassware gains a misty appearance
• Rinse aid is not sufficient. >>> Check the rinse aid indicator and add rinse aid if
necessary. Increase the rinse aid setting if there is enough amount of rinse aid in the
machine.
• Water hardness setting is low or salt level is insufficient >>> Measure the hardness of
the supply water appropriately and check the water hardness setting.
• Salt leakage exists. >>> Pay attention not to spill salt around the salt filling hole while
adding salt. Make sure that the salt reservoir lid is tightly closed after finishing the filling
process. Run the prewash programme to remove the salt that spilled inside the machine.

Dishwasher / User’s Manual 37 / 40 EN
Troubleshooting
Since the salt granules that will remain under the lid will dissolve during prewash, causing
the lid loosen, check the lid once again at the end of the programme.
There is a different odour in the machine
C
A new machine has a peculiar odour. It will fade out after a couple of washes.
• Filters are clogged. >>> Check if the filter system is clean. Clean the filter system
regularly as illustrated in section “Cleaning and Care”.
• Dirty dishes are kept in dishwasher for 2-3 days. >>> If you are not going to start the
machine right after you have put the dishes into it, remove the remnants on the dishes
and run the Prewash programme without detergent every 2 days. In such cases, do not
close the door of the machine completely in order to avoid odour build up in machine. You
can also use commercially available odour removers or machine cleaners.
Rust, discoloration or surface deterioration occurs on dishes
• Salt leakage exists. >>> Salt may cause deterioration and oxidation on metal surfaces.
Pay attention not to spill salt around the salt filling hole while adding salt. Make sure that
the salt reservoir lid is tightly closed after finishing the filling process. Run the prewash
programme to remove the salt that spilled inside the machine. Since the salt granules
that will remain under the lid will dissolve during prewash, causing the lid loosen, check
the lid once again at the end of the programme.
• Salty food remnants have remained on dishes for a long time. >>> If cutlery soiled with
such foods will be kept waiting in machine, dirt must be removed by prewash or dishes
must be washed without being kept waiting.
• Electric installation is not grounded. >>>Check if your machine is connected to the actual
grounding line. Otherwise, the static electric created in the product causes arcs on the
surfaces of metal items creating pores, removing the protective cover on the surface and
causing discoloration.
• Intensive cleansers such as bleaches are used. >>> Protective cover on metal surfaces
gets damaged and looses its efficiency in time when it gets in contact with cleansers
such as bleach. Do not wash your dishes with bleach.
• Metal items particularly such as knives are used for purposes other then their intended
uses. >>> Protective cover on the edges of knives may get damaged when they are
used for purposes such as opening cans. Do not use metal kitchen utensils out of their
intended uses.
• Cutlery are made of low quality stainless steel. >>> Corrosion on such items is inevitable;
they should not be washed in dishwashers.
• Kitchen utensils that are already corroded are washed in dishwasher. >>> Rust on a
corroded item can migrate to other stainless steel surfaces and cause corrosion on those
surfaces as well. Such items should not be washed in dishwashers.

38 Dishwasher / User’s Manual/40 EN
Troubleshooting
Detergent remains in detergent dispenser.
• Detergent dispenser was damp when adding detergent. >>> Make sure that the
detergent dispenser is dried well prior to filling it with detergent.
• Detergent is added long before the washing process. >>> Pay attention to add detergent
shortly before start-up of the washing.
• Opening of the detergent dispenser lid is prevented during washing. >>> Place the
dishes in a way that will not prevent the detergent dispenser lid from opening and the
water going into the machine from impellers.
• Detergent is stored under unsuitable conditions. >>> If you are using powder detergent,
do not store the detergent package in humid places. Keep it in a closed container if
possible. For ease-of-storing, we recommend you to use tablet detergents.
• Impeller holes are clogged. >>> Lower and upper impeller holes might be clogged with
food remnants such as lemon pips. Clean the impellers regularly as illustrated in section
“Cleaning and Care”.
Decorations and ornaments on kitchen utensils are being erased.
C
Decorated glasses and decorated lustre porcelains are not suitable for washing in
the dishwasher. Manufacturers of some glassware and porcelain tableware items
do not recommend washing such kitchen utensils in the dishwashers either.
Dishes are scratched.
C
Kitchen utensils that contains or are made of aluminum should not be washed in
dishwasher.
• Salt leakage exists. >>> Pay attention not to spill salt around the salt filling hole while
adding salt. Spilled salt can cause scratches. Make sure that the salt reservoir lid is tightly
closed after finishing the filling process. Run the prewash programme to remove the salt
that spilled inside the machine. Since the salt granules that will remain under the lid will
dissolve during prewash, causing the lid loosen, check the lid once again at the end of the
programme.
• Water hardness setting is low or salt level is insufficient >>> Measure the hardness of
the supply water appropriately and check the water hardness setting.
• Dishes are not placed orderly in the machine. >>> When placing the glasses and other
glassware into the basket lean them not against other dishes but the edges or racks of
the basket or the glass support tines. Striking of the glasses to each other or to other
dishes due to the impact of water during washing can cause breaks, or scratches on their
surfaces.

Dishwasher / User’s Manual 39 / 40 EN
Troubleshooting
A smear remains on glasses that resembles milk stain which can not be
removed when wiped by hand. A bluish / rainbow appearance occurs when
the glass is pointed to light.
• Excessive rinse aid is used. >>>Lower rinse aid setting. Clean the spilled rinse aid when
adding rinse aid.
• Corrosion has occurred on glass due to soft water. >>> Measure the hardness of the
supply water appropriately and check the water hardness setting. If your supply water is
soft (<5 dH), do not use salt. Choose programmes that wash in higher temperatures (e.g.
60-65°C). You can also use glass protective detergents that are commercially available.
Foam forms in the machine.
• Dishes are washed with hand-wash detergent by hand but not rinsed before placing
them into the machine. >>> Hand-wash detergents do not contain antifoam. There is
no need to hand-wash the dishes before placing them into the machine. Removing the
coarse soil on the dishes under tap water, with a tissue paper or fork will be sufficient.
• Rinse aid has spilled into the machine when adding rinse aid. >>> Take care that rinse
aid is not spilled in the machine when you are filling it. Clean any spilled rinse ait with the
help of a tissue paper/towel.
• Lid of the rinse aid reservoir is left open. >>> Make sure that the lid of the rinse aid
reservoir is closed after adding rinse aid.
Kitchen utensils are broken.
• Dishes are not placed orderly in the machine. >>> Load the dishes as described in the
user manual.
• Baskets are overloaded. >>> Do not overload the baskets in excess of their capacity.
Water remains in the dishwasher at the end of the programme.
• Filters are clogged. >>> Check if the filter system is clean. Clean the filter system
regularly as illustrated in section “Cleaning and Care”.
• Discharge hose is clogged/blocked. >>> Check the discharge hose. If necessary, remove
the discharge hose, clear the blockage and insert is as illustrated in the user manual.
C
If you cannot eliminate the problem although you follow the instructions in this
section, consult your dealer or the Authorised Service Agent. Never try to repair a
nonfunctional product yourself.

Юридическим лицам
Доставка
Оплата товара
Оплата кредита
Оплата рассрочки
Вопросы и ответы
Как купить товар
Доставка
Оплата
Гарантия
Защита техники
Обмен? Легко!
Покупка в кредит
Покупка в рассрочку
Советы по выбору
Наклейка пленок
О корпорации «Центр»
Контакты
Партнеры
События
Юридическим лицам
Арендодателям
Отзывы о магазине
Вакансии
Наши магазины
8-800-100-3000
Искать в kcentr
Сравнение
Избранное
Корзина
Акции
Каталог товаров
Техника для кухни
Посудомоечные машины
Встраиваемые посудомоечные машины
Beko
16
отзывов
Код товара: 1210408
Краткие характеристики
Защита от детей
нет
Дисплей
есть
Энергопотребление за цикл
830 Втч
Количество программ
5
Ширина
44.8 см
Перейти к характеристикам
Нет в наличии
Характеристики
Описание
Отзывы
16
Инструкции и документация
1
Все товары Beko
Все встраиваемые посудомоечные машины Beko
Инструкции Встраиваемая посудомоечная машина Beko DIS 25010
Встраиваемая посудомоечная машина Beko DIS 25010 инструкция на русском языке
Адреса магазинов
С нами выгодно
Акции
С нами удобно
Сервисный центр
Установка и настройка
Оплата кредита
Оплата рассрочки
Доставка
Юридическим лицам
8-800-100-3000
8:00 — 17:00 МСК
Бесплатный звонок по России
kcentr.ru — официальный Интернет-магазин Корпорации «Центр» — российской розничной торговой сети по продаже
бытовой техники и электроники известных мировых производителей.
© 1990 — 2025, Корпорация «Центр»
Политика конфиденциальности
Информация на сайте не является публичной офертой