
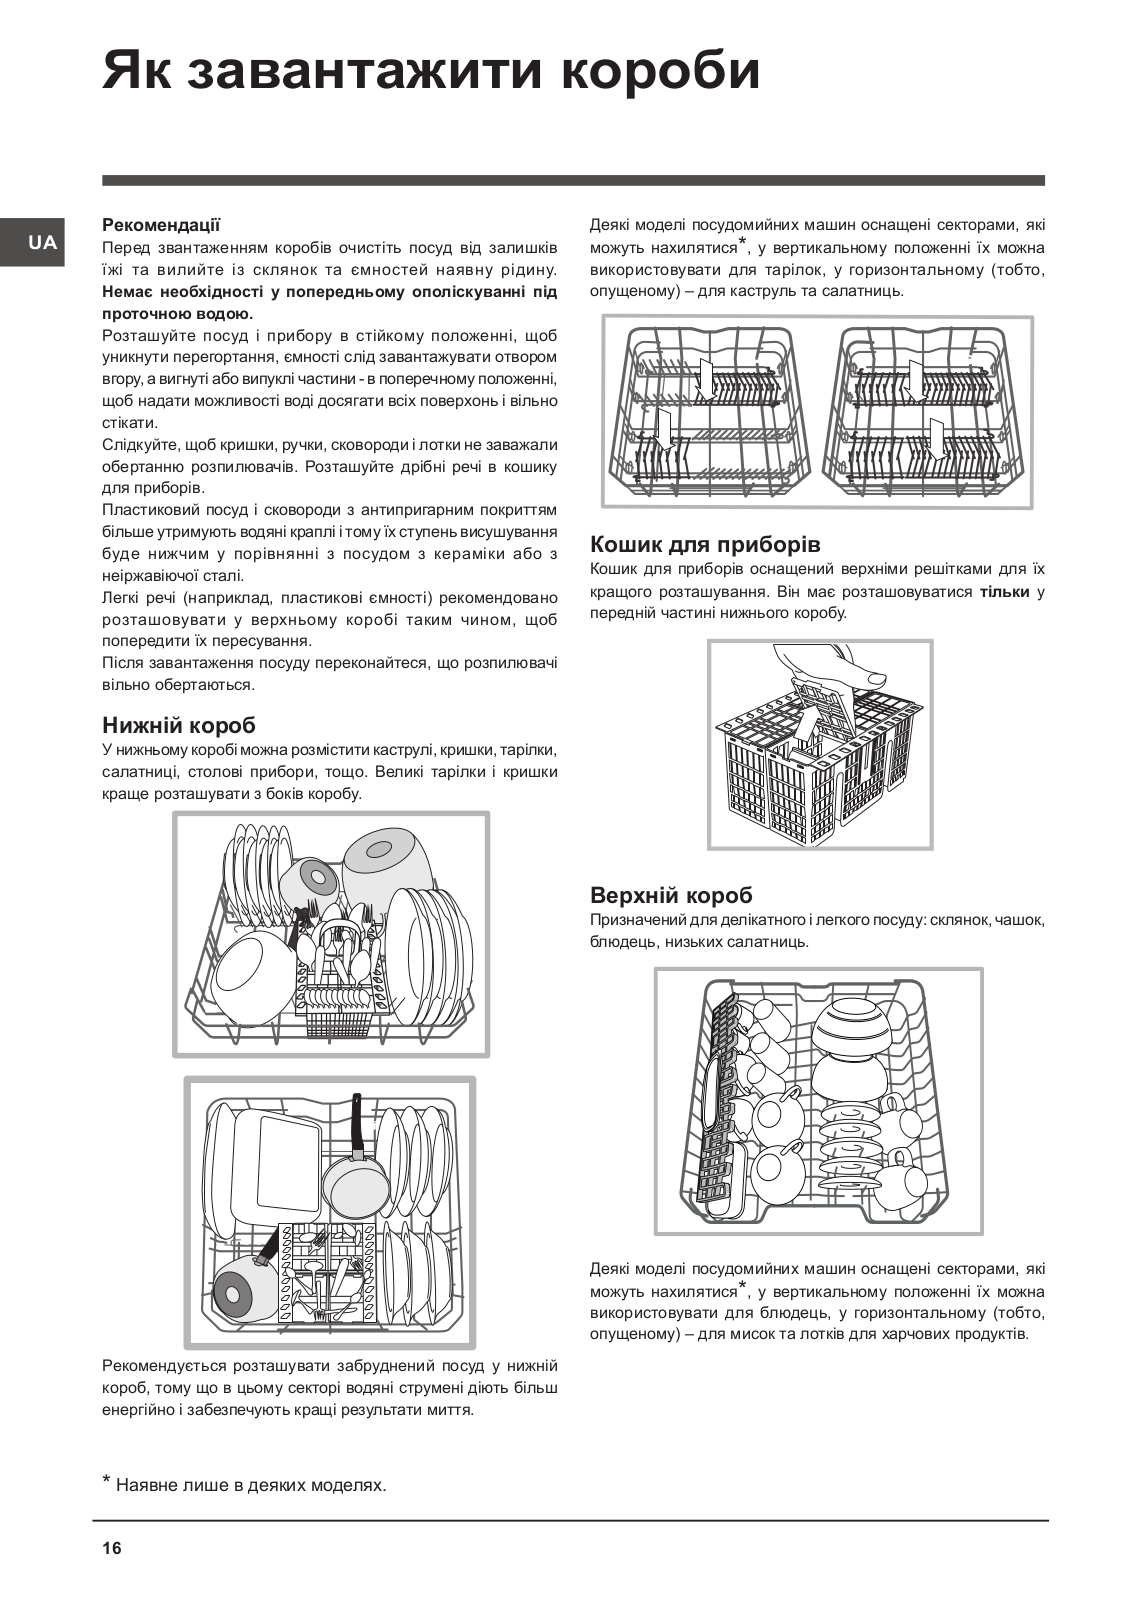
INDESIT
Loading…
D
- DFE 4200 S2
- DFE 4200 W
- DFE 5160 W
- DFG 015
- DFG 03
- DFG 04 TK
- DFG 0502
- DFG 0507
- DFG 050M (EX) 60 HZ
- DFG 0515
- DFG 0515
- DFG 051 EU11
- DFG 051 S
- DFG 051 S EU
- DFG054
- DFG 13B10 TK
- DFG 14B10 TK
- DFG 151
- DFG 15B19
- DFG 15B108
- DFG 15B10 ES5
- DFG 15B10 EU19
- DFG 15B10 S EU13
- DFG 15B1.1 UK
- DFG-15B1-A
- DFG 15B1 A EU11
- DFG 15B1 FR2
- DFG 15B1 IT
- DFG15B1K
- DFG 15B1 K UK
- DFG 15B1 PL
- DFG 15B1 S2
- DFG 15B1 S IT3
- DFG 15B1 SK
- DFG 15B1 S UK
- DFG 15B1 UK4
- DFG 15M10
- DFG2502
- DFG 251
- DFG254
- DFG254BFR
- DFG 254BS
- DFG254SFR
- DFG 255
- DFG255FR
- DFG 261
- DFG 26210
- DFG 2622
- DFG 2622 EU4
- DFG 2627
- DFG 262 EU15
- DFG 262 NX EU
- DFG262SEU2
- DFG 2631M2
- DFG 26353
- DFG 26B14
- DFG 26B104
- DFG 26 B 10 EU15
- DFG 26B10 NX EU3
- DFG 26B16 FR
- DFG26B16NX FR
- DFG 26B17 FR
- DFG 26B1 EU12
- DFG 26B1 NX3
- DFG 26B1 NX EU20
- DFG 26B1 S UK
- DFG 26B1 UK
- DFG 26M10
- DFG 26M1 A S IT4
- DFG 26T1
- DFGL 17B19 UK
- DFM 4180 S
- DFM 4200 W
- DFM 5180 W
- DFO 3C23 A7
- DFO 3C23 ACX UK 60HZ3
- DFO 3C23 A X7
- DFO 3C23 X UK3
- DFO 3C2610
- DFO 3C26 X10
- DFO3T133AF12
- DFO 3T133 A F X12
- DFP 2723
- DFP 27273
- DFP 272 EU
- DFP 2733
- DFP 2731M
- DFP 274B S FR
- DFP 275
- DFP 275 NX
- DFP 27B1
- DFP 27B102
- DFP 27B16 NX FR
- DFP 27B1 A
- DFP 27B1 SK
- DFP 27B1 UK3
- DFP 27B+96
- DFP 27B+96 Z7
- DFP 27M10 NX TK
- DFP 27T944
Loading…
Loading…
Nothing found
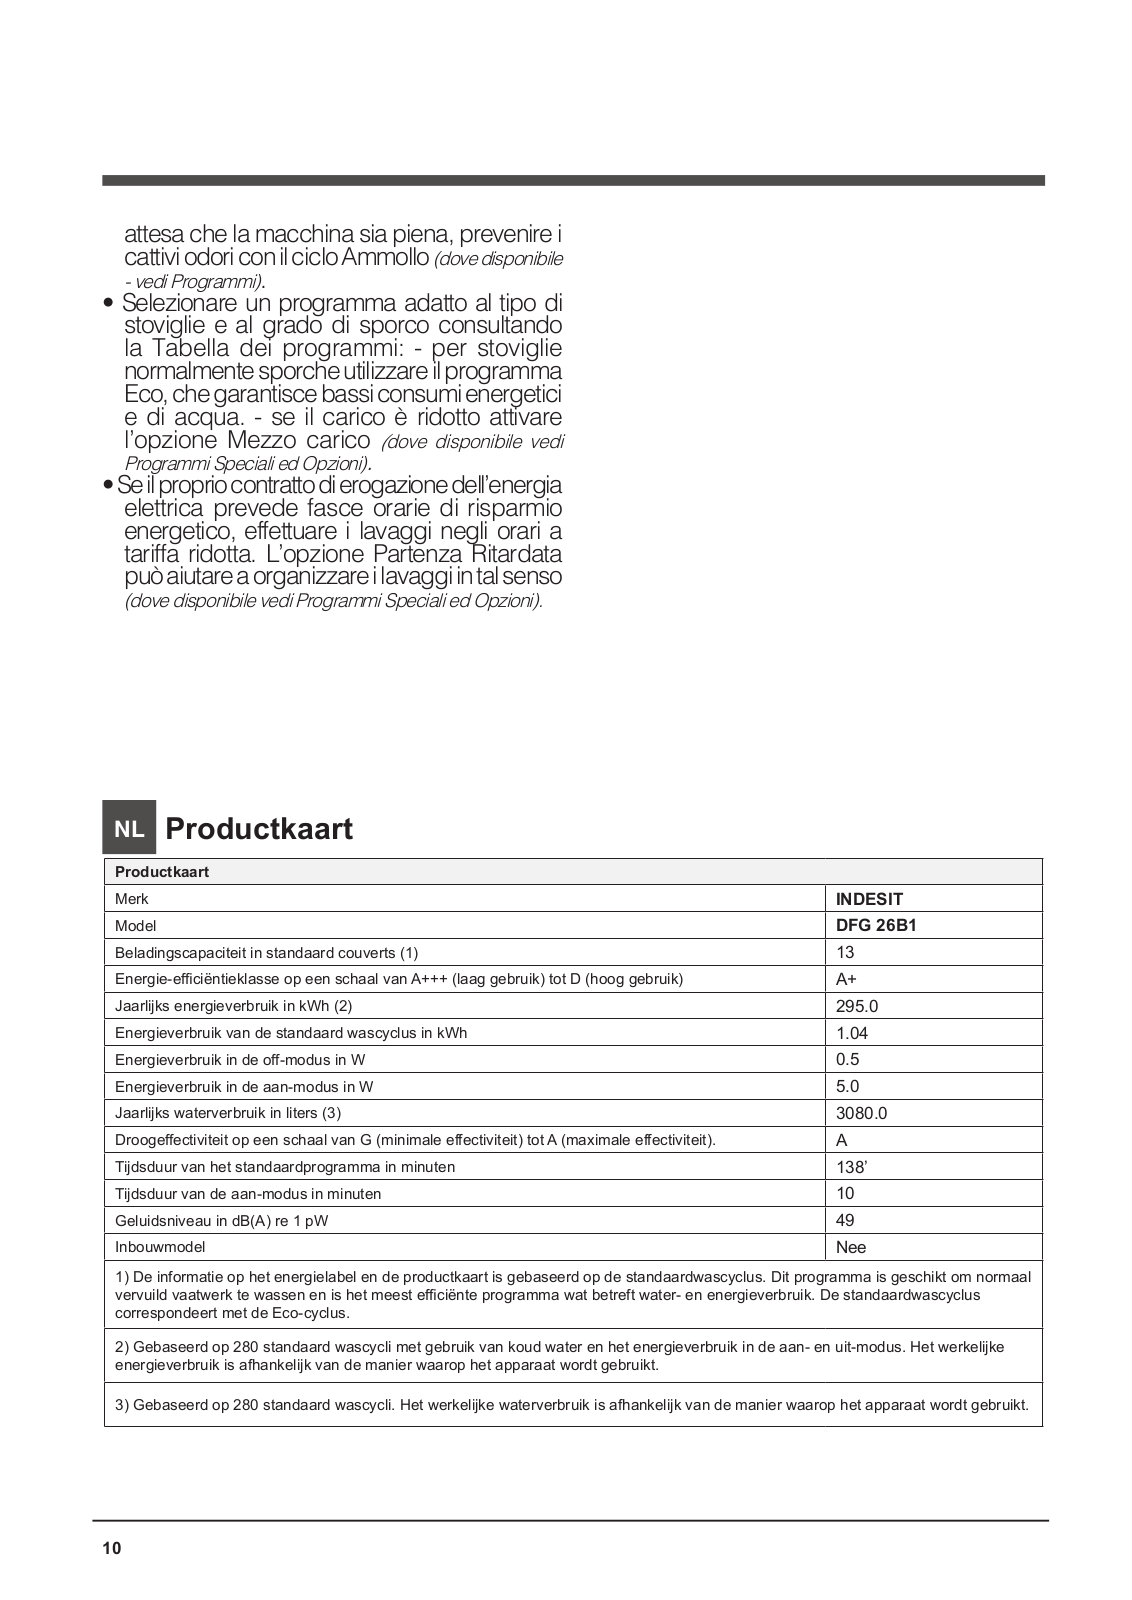
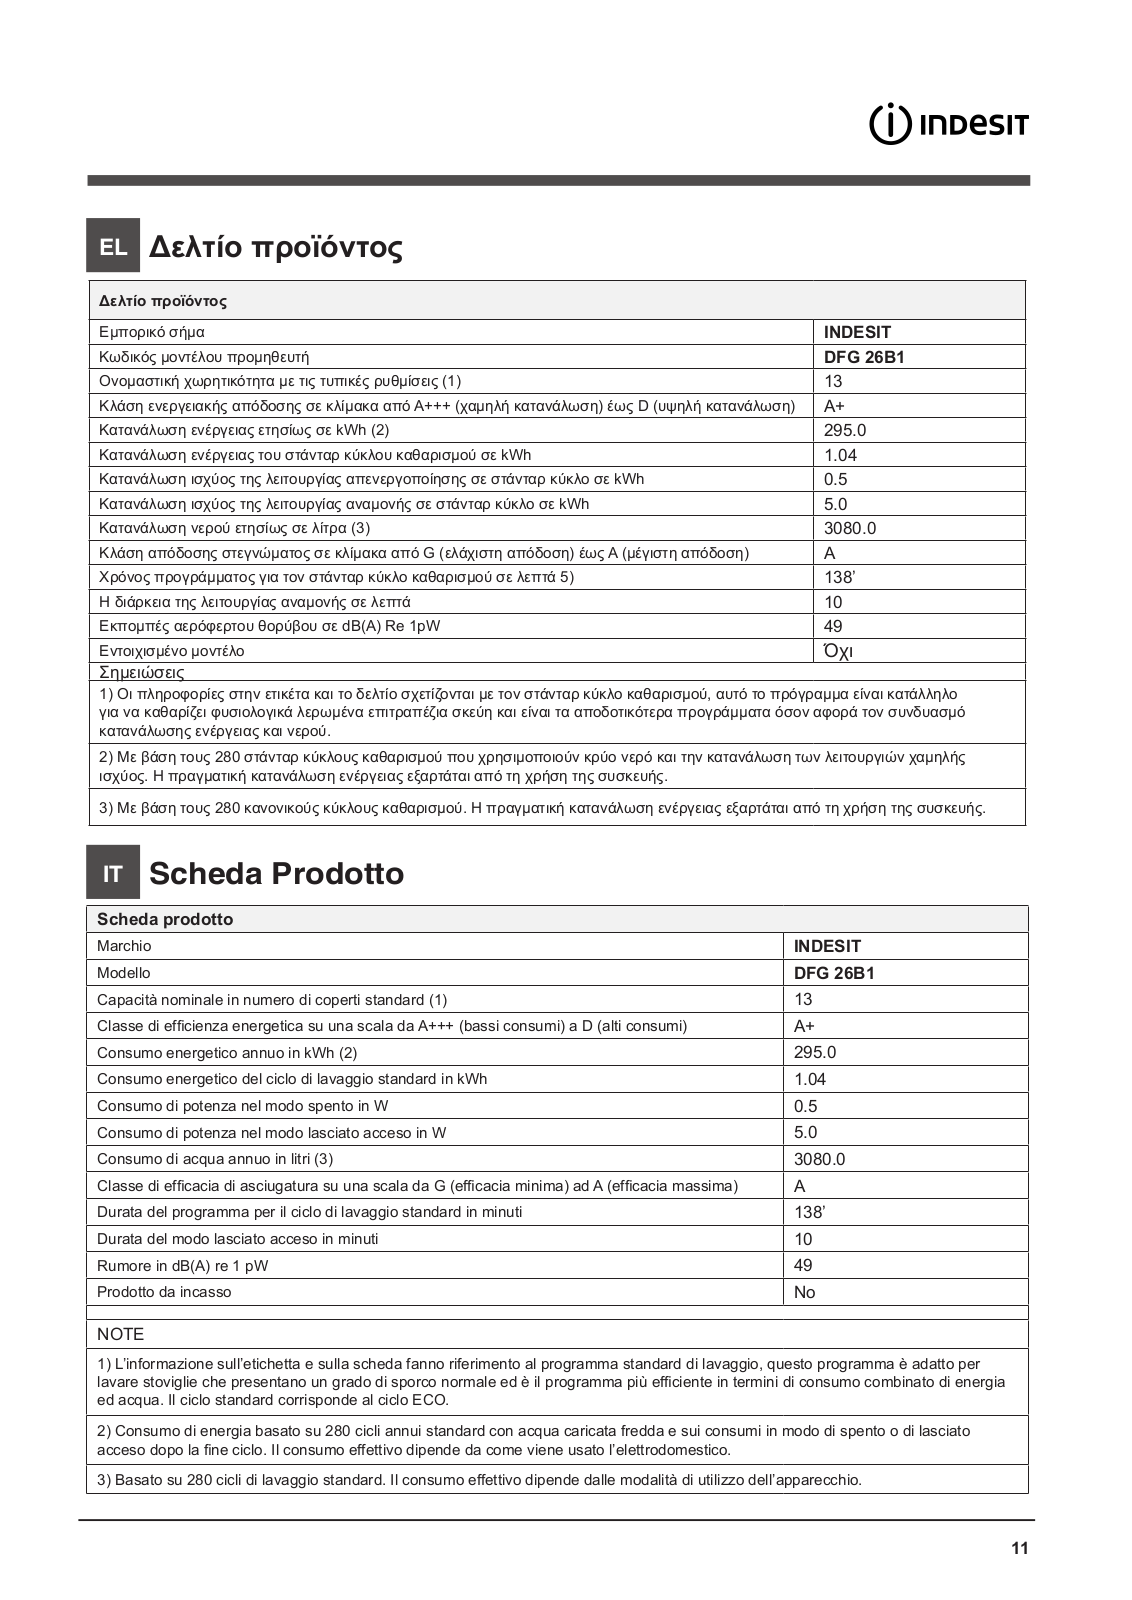
DFG 26B1 NX EU
Daily Reference Guide
8 pgs2.77 Mb0
Daily Reference Guide [cs]
8 pgs2.74 Mb0
Daily Reference Guide [de]
8 pgs2.74 Mb0
Daily Reference Guide [el]
8 pgs2.75 Mb0
Daily Reference Guide [es]
8 pgs2.74 Mb0
Daily Reference Guide [fr]
8 pgs2.7 Mb0
Daily Reference Guide [kk]
8 pgs2.82 Mb0
Daily Reference Guide [nl]
8 pgs2.71 Mb0
Daily Reference Guide [pl]
8 pgs2.71 Mb0
Daily Reference Guide [pt]
8 pgs2.74 Mb0
Daily Reference Guide [ru]
8 pgs2.7 Mb0
Daily Reference Guide [uk]
8 pgs2.71 Mb0
Health Safety & Environmental
24 pgs6.99 Mb0
User Manual
16 pgs2.87 Mb0
User Manual
72 pgs20.41 Mb0
User Manual
80 pgs17.61 Mb0
User Manual [fr]
80 pgs17.66 Mb0
User Manual [ro]
16 pgs21.14 Mb0
User Manual [ru]
44 pgs9.43 Mb0
User Manual [ru]
68 pgs14.98 Mb0
Table of contents
Loading…
…
INDESIT User Manual
Download
Specifications and Main Features
Frequently Asked Questions
User Manual


Loading…
+ 56 hidden pages
You need points to download manuals.
1 point = 1 manual.
You can buy points or you can get point for every manual you upload.
Buy points
Upload your manuals
Displayed below is the user manual for DFG 26B1 NX EU by Indesit which is a product in the Dishwashers category.
This manual has pages.
EN
1
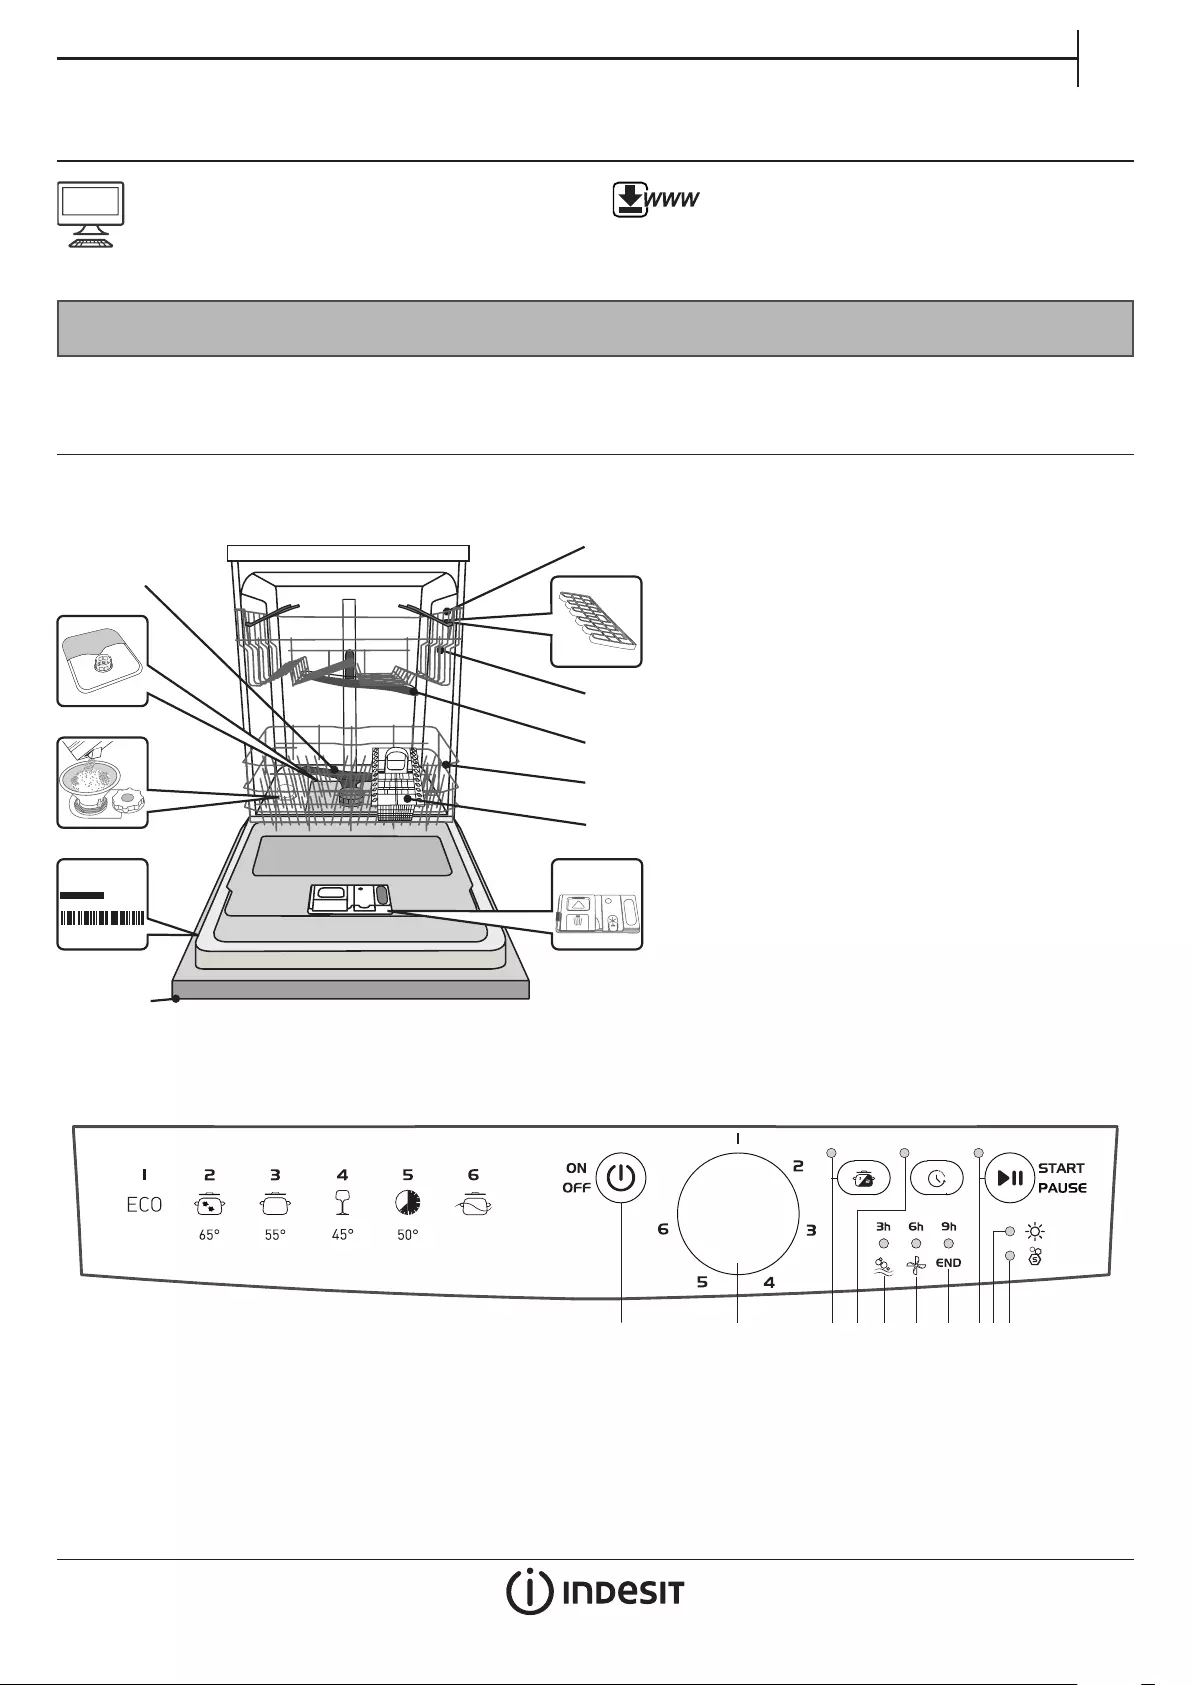
APPLIANCE
PRODUCT DESCRIPTION
1. Upper rack
2. Foldable aps
3. Upper rack height adjuster
4. Upper spray arm
5. Lower rack
6. Cutlery basket
7. Lower spray arm
8. Filter Assembly
9. Salt reservoir
10. Detergent and Rinse Aid dispensers
11. Rating plate
12. Control panel
DAILY REFERENCE
GUIDE
CONTROL PANEL
Before using the appliance carefully read Health and Safety guide.
THANK YOU FOR BUYING A INDESIT PRODUCT.
In order to receive a more complete assistance, please
register your appliance on: www.indesit.eu/register
You can download the Safety Instructions and the
Use and Care Guide, by visiting our website
docs.indesit.eu and following the Instructions on the
back of this booklet.
0000 000 00000
Service:
2
3
4
5
6
10
12
7
11
9
8
1. On-O/Reset button
2. Program selection knob
3. Half load button and indicator light
4. Delayed Start button and indicator light
5. Indicator light Washing and Delayed Start 3h
6. Indicator light Drying and Delayed Start 6h
7. Indicator light Wash Cycle Complete and Delayed Start 9h
8. Start/Pause button and indicator lights
9. Rinse Aid rell indicator light
10. Salt rell indicator light
1 32 4 765 1098
2
FIRST TIME USE
SALT, RINSE AID AND DETERGENT
ADVICE REGARDING THE FIRST TIME USE
After installation, remove the stoppers from the racks and the reta-
ining elastic elements from the upper rack.
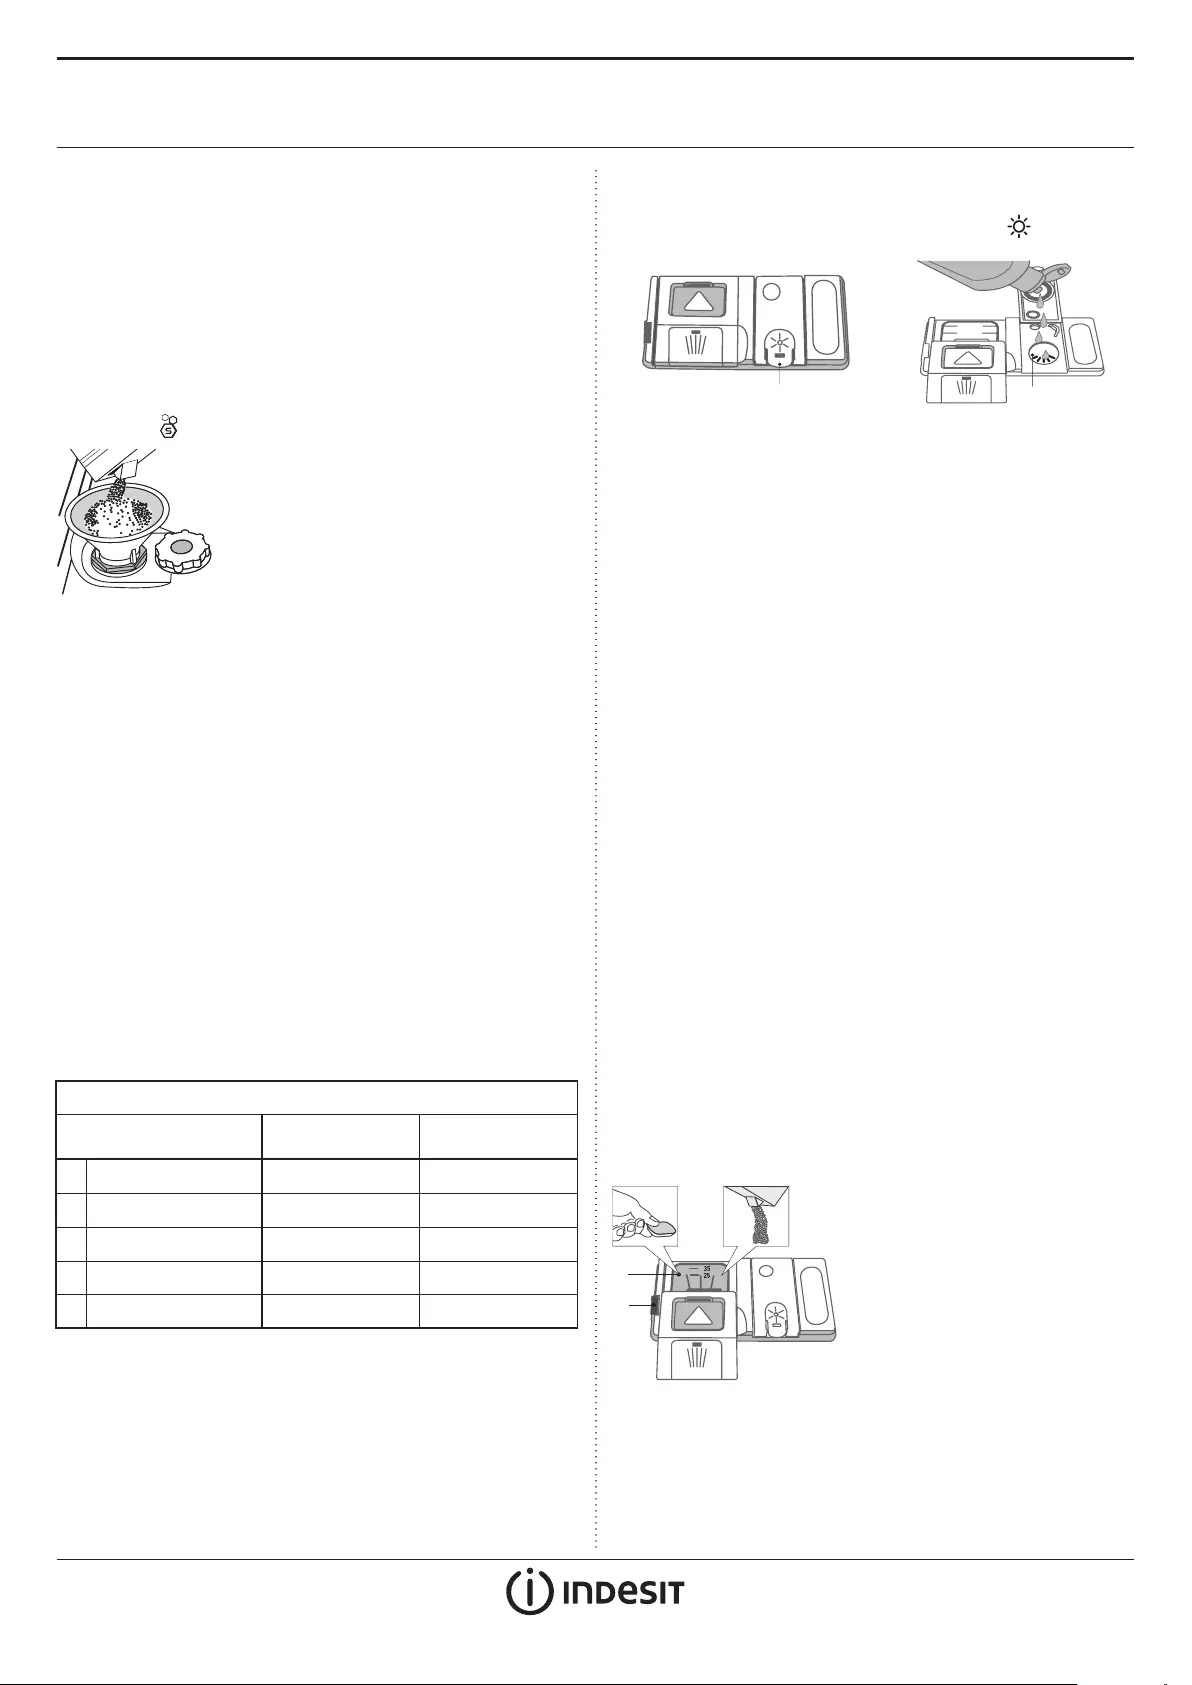
FILLING THE SALT RESERVOIR
The use of salt prevents the formation of LIMESCALE on the dishes and
on the machine’s functional components.
• It is important that the salt reservoir be never empty.
• It is important to set the water hardness.
TThe salt reservoir is located in the lower part of the dishwasher (see
PRODUCT DESCRIPTION) and should be lled when the SALT REFILL in-
dicator light in the control panel is lit.
1. Remove the lower rack and unscrew the
reservoir cap (anticlockwise).
2. Only the rst time you do this: ll the salt re-
servoir with water.
3. Position the funnel (see gure) and ll the salt
reservoir right up to its edge (approximately
1 kg); it is not unusual for a little water to leak out.
4. Remove the funnel and wipe any salt residue
away from the opening.
Make sure the cap is screwed on tightly, so that no detergent can get
into the container during the wash program (this could damage the
water softener beyond repair).
Whenever you need to add salt, it is mandatory to complete the
procedure before the beginning of the washing cycle.
SETTING THE WATER HARDNESS
To allow the water softener to work in a perfect way, it is essential that
the water hardness setting is based on the actual water hardness in
your house. This information can be obtained from your local water
supplier.
The factory setting is for average (3) water hardness.
• Switch on the appliance by pressing the ON/OFF button.
• Switch o the appliance by pressing the ON/OFF button.
• Hold down button START/PAUSE for 5 seconds, until you hear a beep.
• Switch on the appliance by pressing the ON/OFF button.
• The salt indicator light ashes (as many times as the current selection.)
• Set the PROGRAM SELECTION knob to the desired hardness level
number (see WATER HARDNESS TABLE).
• Switch o the appliance by pressing the ON/OFF button.
Setting is complete!
As soon as this procedure is complete, run a program without loading.
Only use salt that has been specically designed for dishwashers.
After the salt has been poured into the machine, the SALT REFILL indi-
cator light switches o.
If the salt container is not lled, the water softener and the
heating element may be damaged as a result.
Water Hardness Table
Level °dH
German degrees
°fH
French degrees
1 Soft 0 — 6 0 — 10
2 Medium 7 — 11 11 — 20
3 Average 12 — 17 21 — 30
4 Hard 18 — 34 31 — 60
5 Very hard 35 — 50 61 — 90
FILLING THE RINSE AID DISPENSER
Rinse aid makes dish DRYING easier. The rinse aid dispenser A should
be lled when the RINSE AID REFILL indicator light in the control
panel is lit.
1. Open the dispenser B by pressing and pulling up the tab on the lid.
2. Pour in the rinse aid (max.110 ml), making sure it does not overow
from the dispenser. If this happens, clean the spill immediately with
a dry cloth.
3. Press the lid down until you hear a click to close it.
NEVER pour the rinse aid directly into the appliance tub.
ADJUSTING THE DOSAGE OF RINSE AID
If you are not completely satised with the drying results, you can ad-
just the quantity of rinse aid used.
• Switch the dishwasher on using the ON/OFF button.
• Switch it o using the ON/OFF button.
• Press button
START/PAUSE
three times — a beep will be heard.
• Switch it on using the ON/OFF button.
• The rinse-aid indicator light will ash as many times as the level that
was set.
• Set the level of rinse aid quantity to be supplied using the
PROGRAM SELECTION knob (see PROGRAMS TABLE).
• Switch it o using the ON/OFF button.
Setting is complete!
If the rinse aid level is set to ZERO (ECO), no rinse aid will be supplied. The
LOW RINSE AID indicator light will not be lit if you run out of rinse aid.
A maximum of 4 levels can be set according to the dishwasher model.
The factory setting is specic to the model, please follow instruction
above to check this for your machine.
• If you see bluish streaks on the dishes, set a low number (1-2).
• If there are drops of water or limescale marks on the dishes, set a
mid-range number (3-4).
FILLING THE DETERGENT DISPENSER
To open the detergent dispenser use the opening device A.
Introduce the detergent into the dry dispenser B only. Place the
amount of detergent for pre-washing directly inside the tub.
1. When measuring out the detergent
refer to the mentioned earlier infor—
mation to add the proper quantity.
Inside the dispenser B there are
indications to help the detergent
dosing.
2. Remove detergent residues from
the edges of the dispenser and clo-
se the cover until it clicks.
3. Close the lid of the detergent
dispenser by pulling it up until the
closing device is secured in place.
The detergent dispenser automatically opens up at the right time
according to the program.
EN
3
ECO program data is measured under laboratory conditions according to European Standard EN 50242.
Note for Test Laboratories: for information on comparative EN testing conditions, please send an email to the following address:
assistenza_en_lvs@indesitcompany.com
Pre-treatment of the dishes is not needed before any of the programs.
*) Not all options can be used simultaneously.
**) The duration of the program shown on the display or in the booklet is an estimate calculated on standard conditions. The actual time may vary
depending on many factors such as temperature and pressure of the incoming water, room temperature, amount of detergent, quantity and type of load,
load balancing, additional selected options and sensor calibration. The sensor calibration can increase program duration up to 20 min.
Standby consumption: Left-on mode consumption: 6 W — O mode consumption: 0.5 W
Program
Drying
phase
Available
options *)
Detergent
container Duration
of wash
program
(h:min)**)
Water
consumption
(litres/cycle)
Energy
consumption
(kWh/cycle)
Tub B
1Eco 50° 3:20 12.0 1.04
2Intensive 65° — 2:30 15.0 1.50
3Normal 55° — 2:00 15.0 1.35
4Delicates 45° — — 1:40 11.5 1.10
5Rapid 40’ 50° — — 0:40 9.0 0.90
6Soak 50° —1:10 4.5 0.01
PROGRAMS TABLE
PROGRAMS DESCRIPTION
Instructions on wash cycle selection.
1 ECO
Normally soiled crockery. Standard program, the most ecient in
terms of its combined energy and water consumption.
2 INTENSIVE
Program recommended for heavily soiled crockery, especially suitable
for pans and saucepans (not to be used for delicate items).
3 NORMAL
For normally soiled dishes with dried food residues.
4 DELICATES
Program for delicate items, which are more sensitive to high tempera—
tures, for example glasses and cups.
5 RAPID 40’
Program to be used for lightly-soiled dishes with no dried food resi-
dues.
6 SOAK
Crockery to be washed later. No detergent to be used with this program.
Notes:
Please note that cycles like Rapid or Fast are most eective for lightly
soiled dishes.
To reduce consumption even further, only run the dishwasher
when it is full.

4
OPTIONS AND FUNCTIONS
OPTIONS can be selected directly by pressing the corresponding button (see CONTROL PANEL).
If an option is not compatible with the selected program see PROGRAMS TABLE, the corresponding LED ashes rapidly 3 times
and beeps will sound. The option will not be enabled.
DELAYED START
It is possible to delay the start time of the wash cycle by 3, 6
or 9 hours:
1. After selecting the desired wash cycle and any other
options, press the DELAYED START button, the indicator
light will illuminate.
2. Select the desired delay time by pressing the Delayed Start
button repeatedly. The wash phase (3 hours), the drying
phase (6 hours) and end (9 hours) indicator lights will
illuminate in succession.
If the Delayed Start button is pressed again, the option is
deselected and the indicator light switches o.
3. After the selection process, the countdown will begin if the
Start/Pause button is pressed. The selected delay period
indicator light ashes and the START/PAUSE button stops
ashing (xed light).
4. Once this time has elapsed, the DELAYED START indicator
light switches o and the wash cycle begins.
The Delayed Start function cannot be set once a wash
cycle has been started.
HALF LOAD
If there are not many dishes to be washed, a half load cycle
may be used in order to save water, electricity and detergent.
Select the program and press the HALF LOAD button: the
indicator light will light up. Press the HALF LOAD button to
deselect this option.
Remember to halve the amount of detergent.
EN
5
DAILY USE
1. CHECK WATER CONNECTION
Check that the dishwasher is connected to the water supply and
that the tap is open.
2. SWITCH ON THE DISHWASHER
Press the ON/OFF button.
3. LOAD THE RACKS
(see LOADING THE RACKS)
4. FILLING THE DETERGENT DISPENSER
(see PROGRAMS TABLE).
5. CHOOSE THE PROGRAM AND CUSTOMISE THE CYCLE
Select the most appropriate program in accordance with the type
of crockery and its soiling level (see PROGRAMS DESCRIPTION) by
turning the PROGRAM SELECTION knob clockwise.
Select the desired options (see OPTIONS AND FUNCTIONS).
6. START
Start the wash cycle by pressing the START/PAUSE button.
When the program starts you hear a beep.
7. END OF WASH CYCLE
At the end of the wash cycle the END indicator light will switch on.
Switch o the appliance by pressing the ON/OFF button and open
the door.
Wait for a few minutes before removing the crockery — to avoid
burns. Unload the racks, beginning with the lower one.
The machine will switch o automatically during certain extended
periods of inactivity, in order to minimise electricity consumption.
If the crockery is only lightly soiled or if it has been rinsed with
water before being placed in the dishwasher, reduce the amount
of detergent used accordingly.
MODIFYING A RUNNING PROGRAM
If a wrong program was selected, it is possible to change it, provided
that it has only just begun: press and hold the ON/OFF button, the
machine will switch o.
Switch the machine back on using the ON/OFF button and select the
new wash cycle and any desired options; start the cycle by pressing
the START/PAUSE button.
ADDING EXTRA CROCKERY
Press the START/PAUSE button and open the door, taking care
to avoid the escaping steam, and place the crockery inside the
dishwasher. Press the START/PAUSE button: The cycle will start again
after a long beep has been emitted.
ACCIDENTAL INTERRUPTIONS
If the door is opened during the wash cycle or there is a power cut,
the
cycle stops. It starts again from the point at which it was interrupted
once the door has been shut or the electricity supply is restored.
For more information about the functions, you can request or download
from the WEB a Use & Care Guide by following the instructions on the last
page.
ADVICE AND TIPS
TIPS
Before loading the baskets, remove all food residues from the crock-
ery and empty the glasses. You do not need to rinse beforehand
under running water.
Arrange the crockery so that it is held in place rmly and does not tip
over; and arrange the containers with the openings facing down-
wards and the concave/convex parts placed obliquely, thus allowing
the water to reach every surface and ow freely.
Warning: lids, handles, trays and frying pans do not prevent the
sprayer arms from rotating.
Place any small items in the cutlery basket.
Very soiled dishes and pans should be placed in the lower basket be—
cause in this sector the water sprays are stronger and allow a higher
washing performance.
After loading the appliance, make sure that the sprayer arms can
rotate freely.
HYGIENE
To avoid odour and sediment which can be accumulated in the dish-
washer please run a high temperature program at least one a month.
Use a tea spoon of detergent and run it without the loading to clean
your appliance.
UNSUITABLE CROCKERY
• Wooden crockery and cutlery.
• Delicate decorated glasses, artistic handicraft and antique crockery.
Their decorations are not resistant.
• Parts in synthetic material which do not withstand high tempera-
tures.
• Copper and tin crockery.
• Crockery soiled with ash, wax, lubricating grease or ink.
The colours of glass decorations and aluminium/silver pieces can
change and fade during the washing process. Some types of glass
(e.g. crystal objects) can become opaque after a number of wash
cycles too.
DAMAGE TO GLASS AND CROCKERY
• Only use glasses and porcelain guaranteed by the manufacturer as
dishwasher safe.
• Use a delicate detergent suitable for crockery
• Collect glasses and cutlery from the dishwasher as soon as the
wash cycle is over.

6
LOADING THE RACKS
LOWER RACK
For pots, lids, plates, salad bowls, cutlery etc… Large plates and lids
should ideally be placed at the sides to avoid interferences with the
spray arm.
(loading example for the lower rack)
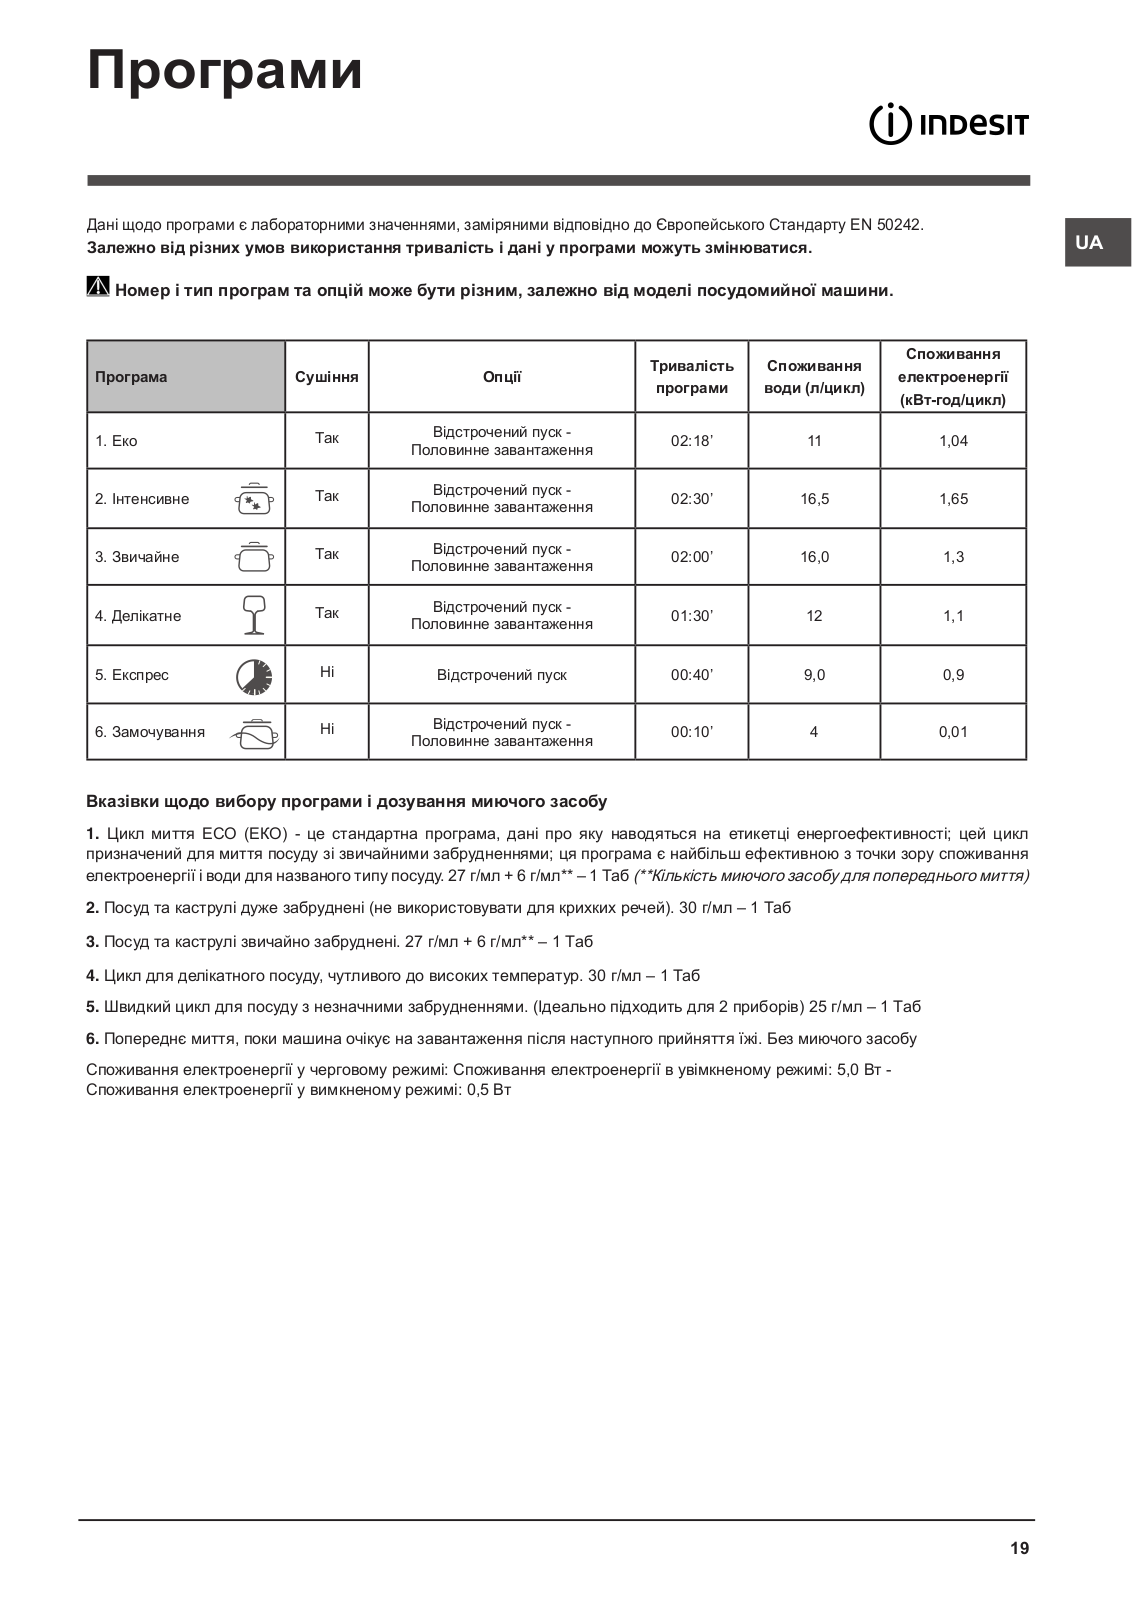
CUTLERY BASKET
The basket is equipped with
top grilles for improved cutlery
arrangement. The cutlery basket
should be positioned only at the front
of the lower rack.
Knives and other utensils with
sharp edges must be placed in
the cutlery basket with the points
facing downwards or they must
be positioned horizontally in the
tip-up compartments on the upper
rack.
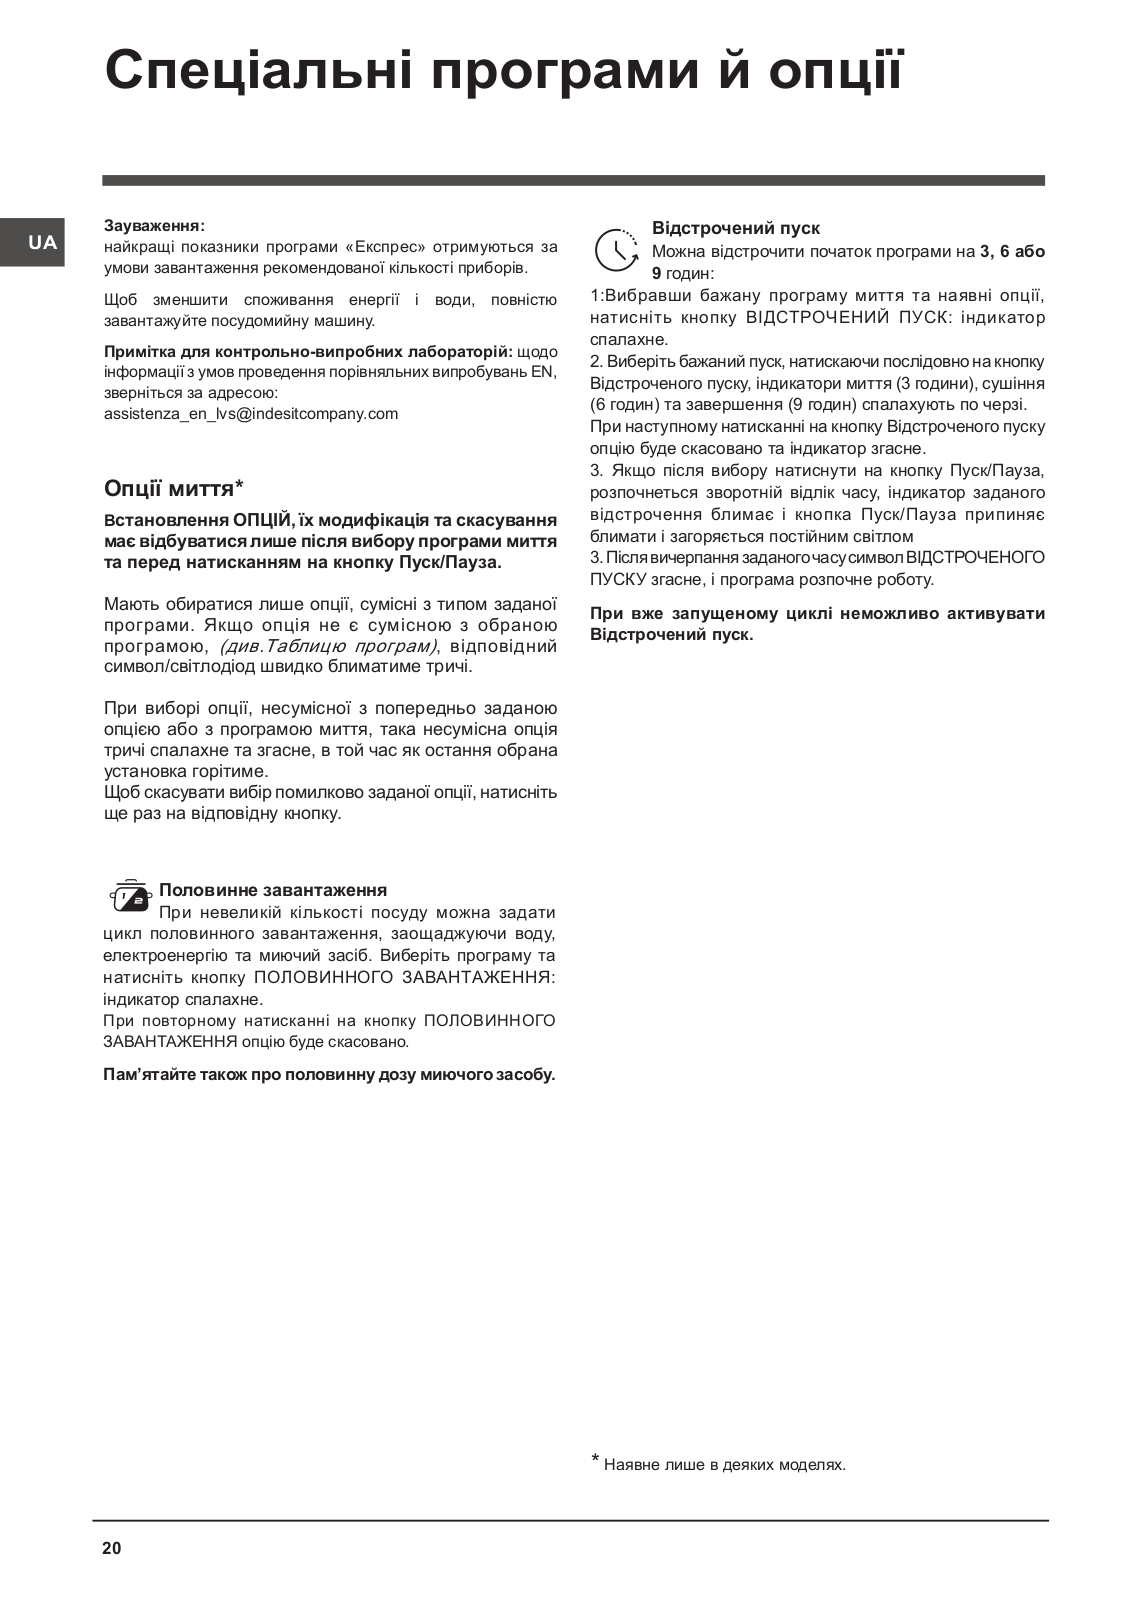
UPPER RACK
Load delicate and light dishes: glasses, cups, saucers, low salad bowls.
(loading example for the upper rack)
ADJUSTING THE HEIGHT OF THE UPPER RACK
The height of the upper basket can be adju-
sted: high position to place bulky crockery
in the lower basket and low position to
make the most of the tip-up compartments
by creating more space upwards.
The upper rack is equipped with a Upper
Rack height adjuster (see gure), witho-
ut pressing the levers, lift it up by simply
holding the rack sides, as soon as the rack
is stable in its upper position. To restore to
the lower position, press the levers (A) at
the sides of the rack and move the basket
downwards.
We strongly recommend that you do not adjust the height of the
rack when it is loaded.
NEVER raise or lower the basket on one side only.
FOLDABLE FLAPS WITH ADJUSTABLE POSITION
The side foldable aps can be positioned at
three dierent heights to optimize the arrange-
ment of crockery inside the rack.
Wine glasses can be placed safely in the folda-
ble aps by inserting the stem of each glass
into the corresponding slots.
For optimum drying results incline the foldable
aps more. To change the inclination, pull up
the foldable ap, slide it slightly and position it
as you wish.
EN
7
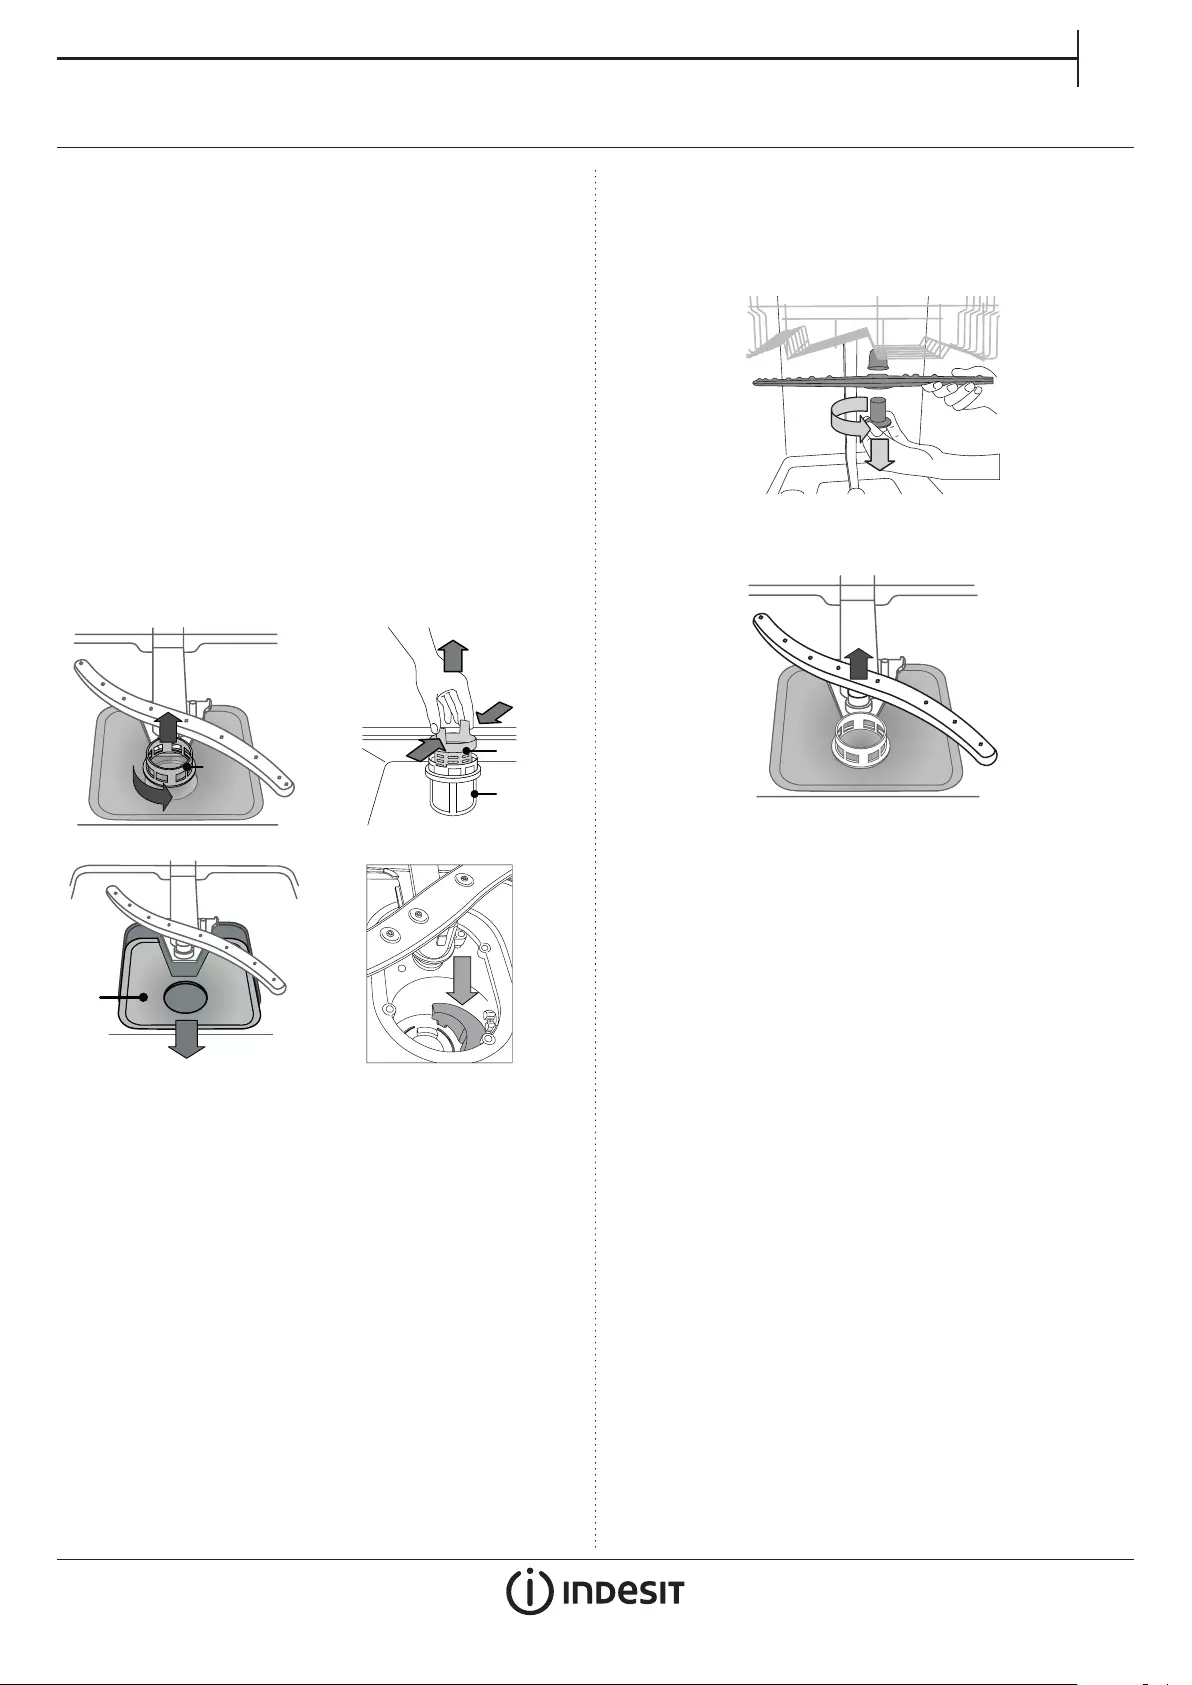
CLEANING THE FILTER ASSEMBLY
Regularly clean the lter assembly so that the lters do not clog and
that the waste water ows away correctly.
The lter assembly consists of three lters which remove food residues
from the washing water and then recirculate the water: to obtain the
best washing results, you need to keep them clean.
The dishwasher must not be used without lters or if the lter is
loose.
After several washes, check the lter assembly and if necessary clean it
thoroughly under running water, using a non-metallic brush and follo—
wing the instructions below:
1. Turn the cylindrical lter A in an anti-clockwise direction and pull
it out (Fig 1).
2. Remove the cup lter B by exerting a slight pressure on the side
aps (Fig 2).
3. Slide out the stainless-steel plate lter C (Fig 3).
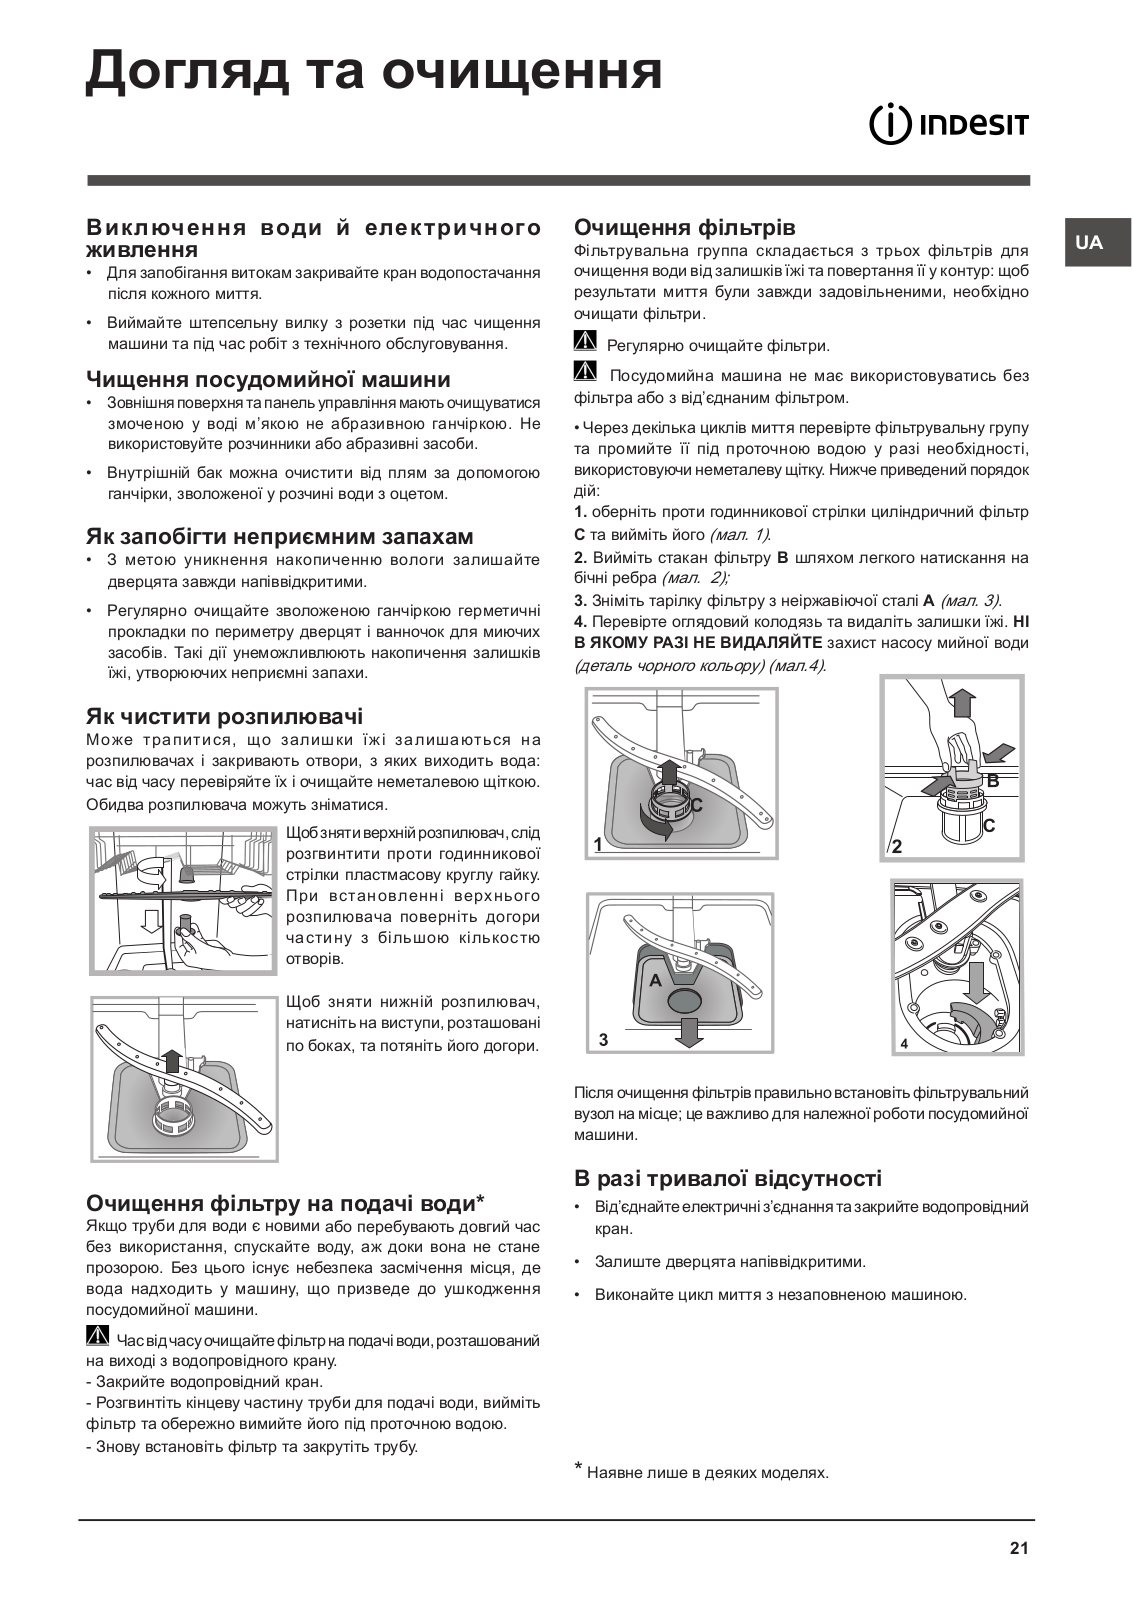
4. Inspect the trap and remove any food residues. NEVER REMOVE
the wash-cycle pump protection (black detail) (Fig 4).
After cleaning the lters, re-place the lter assembly and x it in
position correctly; this is essential for maintaining the ecient
operation of the dishwasher.
CLEANING THE SPRAY ARMS
On occasions, food residue may become encrusted onto the spray
arms and block the holes used to spray the water. It is therefore recom-
mended that you check the arms from time to time and clean them
with a small non-metallic brush.
To remove the upper spray arm, turn the plastic locking ring in an
anti-clockwise direction. The upper spray arm should be replaced so
that the side with the greater number of holes is facing upwards.
The lower spray arm may be removed by pulling it upwards.
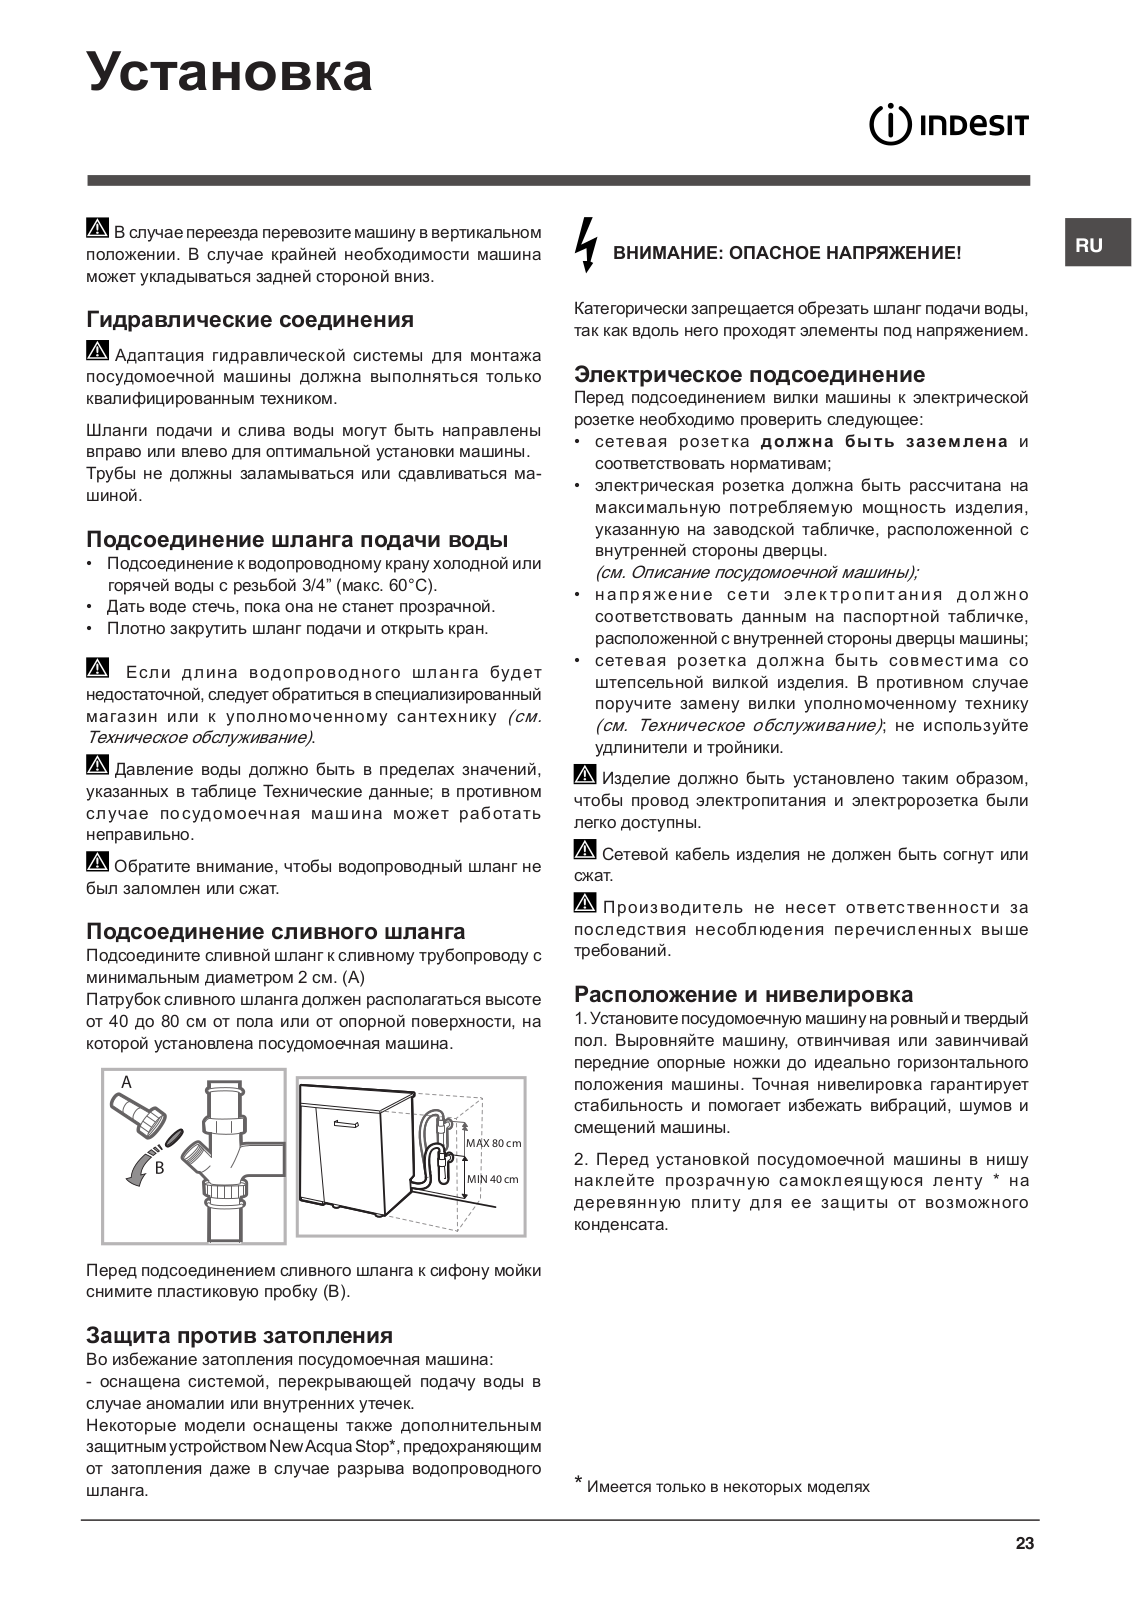
CLEANING THE WATER INLET HOSE
If the water hoses are new or have not been used for an extended
period of time, let the water run to make sure it is clear and free of
impurities before performing the necessary connections. If this
precaution is not taken, the water inlet could become blocked and da-
mage the dishwasher.
CARE AND MAINTENANCE
A
A
B
C
8
Your dishwasher may not work properly.
Before contacting the Service Centre check if the problem can be solved by going through the following list.
TROUBLESHOOTING
MAINTENANCE AND TROUBLESHOOTING GUIDE
For more information, maintenance procedures and troubleshooting,
see the Use and Care Guide
The Use and Care Guide can be obtained by:
• After-Sales Service; phone number see in warranty booklet.
• download from website: docs.indesit.eu
• use QR code
TECHNICAL DATASHEET
The technical data containing the energy consumption data can be
downloaded from the website: docs.indesit.eu
CONTACTING AFTER-SALES SERVICE
When you contact the After-Sales Service, you must provide the codes
shown on the rating plate attached to the left or right side inside the
door of the dishwasher. The phone number
is listed in the warranty booklet or on the
website: www.indesit.eu
IEC 436
:
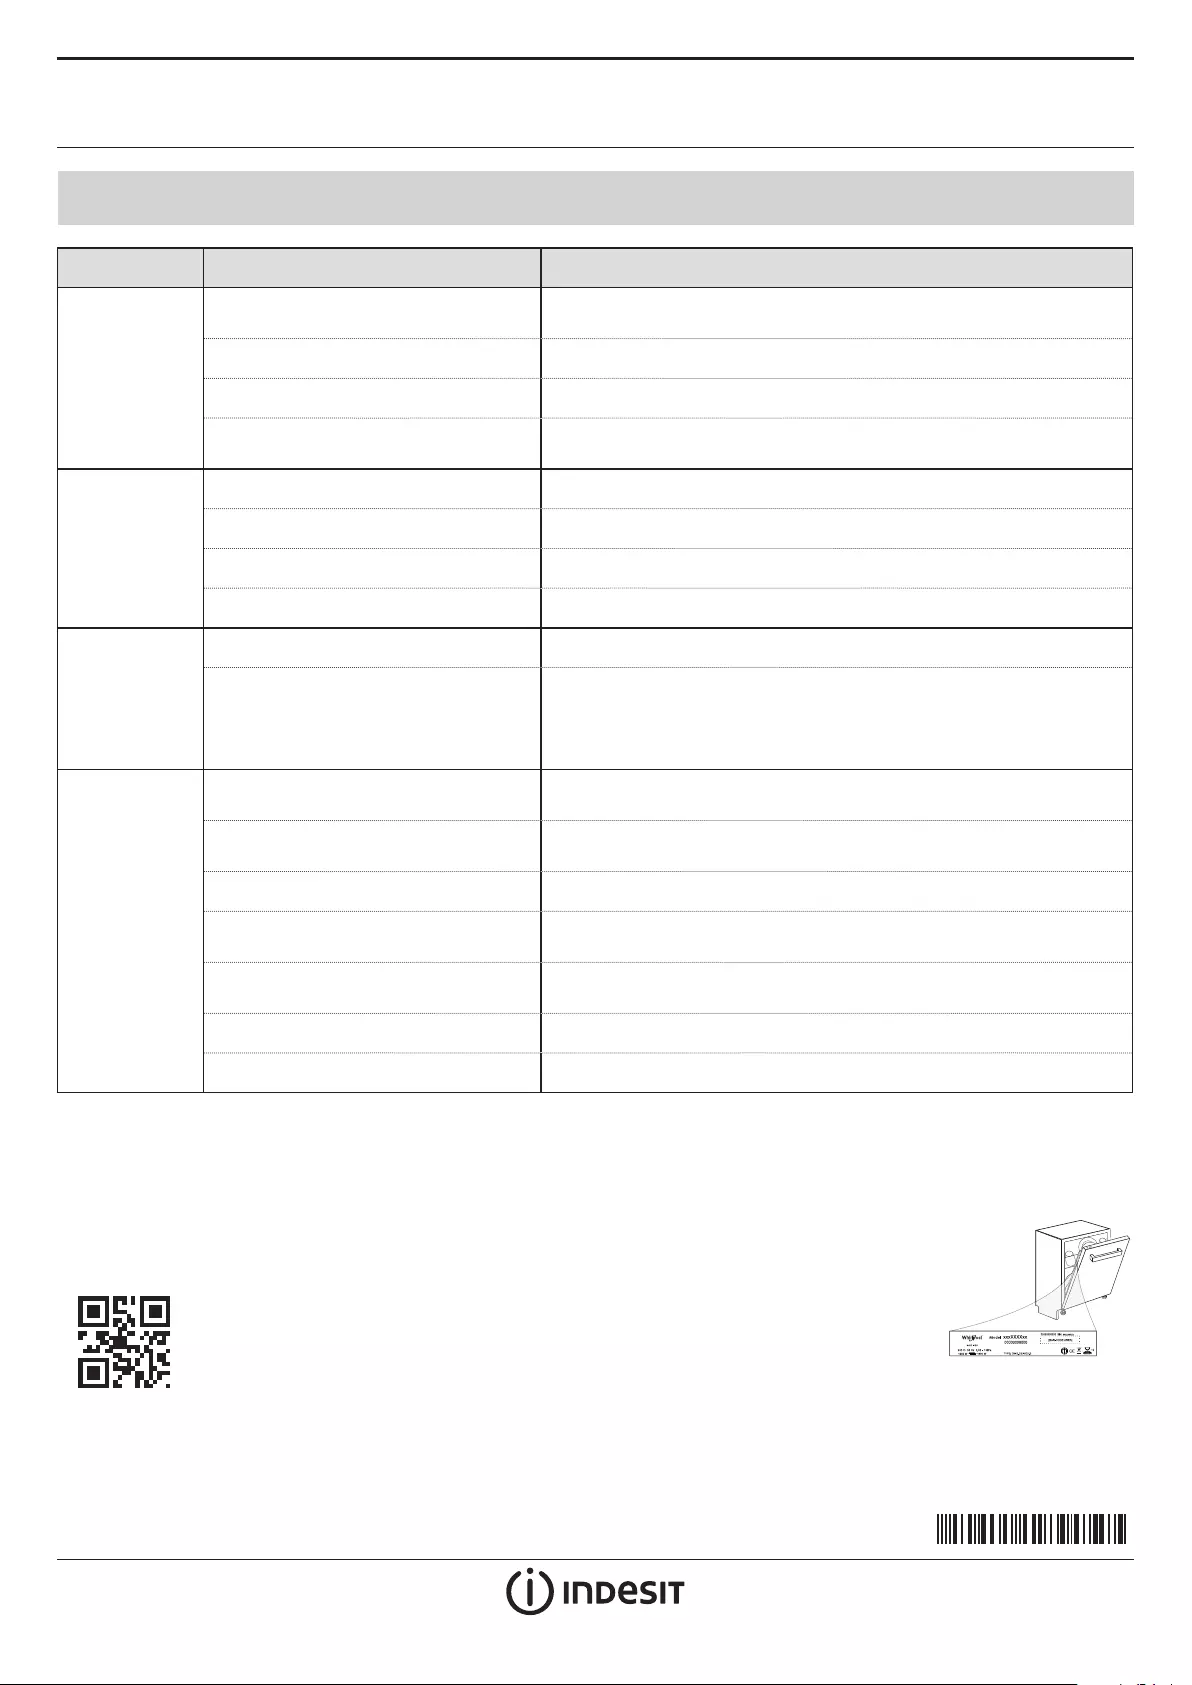
PROBLEMS POSSIBLE CAUSES SOLUTIONS
The dishwasher
won’t start
or does not
respond to com-
mands.
The appliance has not been plugged in
properly. Insert the plug into the socket.
Power outage. The dishwasher starts automatically when the power returns.
The dishwasher door is not closed. Vigorously push the door until you hear the “click”.
It does not respond to commands. Switch o the appliance by pressing the ON/OFF button, switch it back on
after approximately one minute and reset the program.
The dishwasher
won’t drain. The wash cycle has not nished yet. Wait until the wash cycle nishes.
The drain hose is bent. Check that the drain hose is not bent (see INSTALATION INSTRUCTION).
The sink drain pipe is blocked. Clean the sink drain pipe.
The lter is clogged up with food residues. Clean the lter (see CLEANING THE FILTER ASSEMBLY).
The dishwasher
makes
excessive noise.
The dishes are rattling against each Position the crockery correctly (see LOADING THE RACKS).
An excessive amount of foam has been
produced.
The detergent has not been measured out correctly or it is not suitable for
use in dishwashers (see FILLING THE DETERGENT DISPENSER). Reset dishwa-
sher by pressing the DRAIN button (see OPTIONS AND FUNCTIONS) and run
new program without detergent.
The dishes are
not clean.
The crockery has not been arranged
properly. Arrange the crockery correctly (see LOADING THE RACKS).
The spray arms cannot rotate freely, being
hindered by the dishes. Arrange the crockery correctly (see LOADING THE RACKS).
The wash cycle is too gentle. Select an appropriate wash cycle (see PROGRAMS TABLE).
An excessive amount of foam has been
produced.
The detergent has not been measured out correctly or it is not suitable for use
in dishwashers (see FILLING THE DETERGENT DISPENSER).
The cap on the rinse aid compartment has
not been shut correctly. Make sure the cap of the rinse aid dispenser is closed.
The lter is soiled or clogged. Clean the lter assembly (see CARE AND MAINTENANCE).
There is no salt. Fill the salt reservoir (see FILLING THE SALT RESERVOIR).
01/2019 as — Xerox Fabriano
Код: 30376
Извините, товара сейчас нет в наличии
Бесплатная доставка
по Красноярску
Извините, товара сейчас нет в наличии
Услуги:
Новости интернет-магазина «Лаукар»:
Дополнительная информация в категории Посудомоечная машина:
В интернет-магазине бытовой техники «Лаукар» Вы можете скачать инструкцию к товару Посудомоечная машина Indesit DFG 26B1 NX совершенно бесплатно.
Все инструкции, представленные на сайте интернет-магазина бытовой техники «Лаукар», предоставляются производителем товара.
Перед началом использования товара рекомендуем Вам ознакомиться с инструкцией по применению.
Для того чтобы скачать инструкцию, Вам необходимо нажать на ссылку «скачать инструкцию», расположенную ниже, а в случае, если ссылки нет,
Вы можете попробовать обратиться к данной странице позднее,
возможно специалисты интернет-магазина бытовой техники «Лаукар» еще не успели загрузить для скачивания инструкцию к товару:
Посудомоечная машина Indesit DFG 26B1 NX .

Фирма-производитель оставляет за собой право на внесение изменений в конструкцию, дизайн и комплектацию товара: Посудомоечная машина Indesit DFG 26B1 NX . Пожалуйста, сверяйте информацию о товаре с информацией на
официальном сайте компании производителя.
Перейти к контенту
Русские электронные инструкции по эксплуатации
Постоянно обновляемый большой каталог документации по эксплуатации и использованию современных устройств и оборудования на русском языке. Бесплатное скачивание файлов.
Поиск:
Главная
♥ В закладки
Просмотр инструкции в pdf
Инструкция по эксплуатации посудомоечной машины Indesit DFG 26B1 NX EU.
Скачать инструкцию к посудомоечной машине Indesit DFG 26B1 NX EU (7,49 МБ)
Инструкции по эксплуатации посудомоечных машин Indesit
« Инструкция к посудомоечной машине Indesit DFG 26B10 EU
» Инструкция к холодильнику Indesit SD 167
Вам также может быть интересно

Инструкция к холодильнику Indesit ES 20

Инструкция к электрической плите Indesit IS5E4KHW-RU
Инструкция к стиральной машине Indesit BTW A61052

Инструкция к стиральной машине Indesit EWSB 5085 BK CIS

Инструкция к холодильнику Indesit ITS 5200 W
.jpg)
Инструкция к стиральной машине Indesit WISL 103 (CIS)

Инструкция к холодильнику Indesit IB 160 R

Инструкция к холодильнику Indesit ITF 018 W
Добавить комментарий
Имя *
Email *
Сайт
Комментарий
Сохранить моё имя, email и адрес сайта в этом браузере для последующих моих комментариев.
- Добавить инструкцию
- Заказать инструкцию
- Политика конфиденциальности
На чтение7 мин
Опубликовано
Обновлено
Посудомоечная машина Indesit DFG 26B1 NX — это надежное и удобное решение для эффективного мытья посуды. Она предлагает широкий набор функций и режимов, которые позволяют получить идеально чистую и сухую посуду за минимальное время и с минимумом усилий.
Для начала использования посудомоечной машины Indesit DFG 26B1 NX необходимо правильно подключить ее к водопроводу и электрической сети. Убедитесь, что все подключения выполнены правильно и без повреждений. После подключения, откройте дверцу и убедитесь, что она открывается и закрывается легко и плавно.
После успешного подключения и проверки дверцы, загрузите посуду в машину. Распределите посуду равномерно по корзинам, расположенным внутри машины. Установите оптимальный режим и программу для вашей посуды. Indesit DFG 26B1 NX предлагает несколько режимов, таких как «интенсивное мытье», «обычное мытье» и «экономное мытье». Выберите наиболее подходящий для вашей посуды.
Совет: перед загрузкой посуды в машину, рекомендуется удалить остатки пищи и предварительно промыть ее под проточной водой. Так вы сможете добиться более эффективного и качественного мытья.
После выбора режима и программы, закройте дверцу посудомоечной машины Indesit DFG 26B1 NX. Убедитесь, что все ручки и кнопки на панели управления находятся в нужном положении, а затем нажмите кнопку «Старт». После этого машина начнет свою работу и выполнит выбранный режим и программу согласно заданным параметрам.
Включение и настройка
Для включения посудомоечной машины Indesit DFG 26B1 NX выполните следующие шаги:
- Убедитесь, что водопровод подключен и открыт.
- Включите посудомоечную машину в сеть, вставив штепсель в розетку.
- Нажмите кнопку «Включение/выключение» на панели управления.
После включения посудомоечная машина будет готова к использованию.
Для настройки параметров работы посудомоечной машины выполните следующие шаги:
- Выберите желаемую программу мытья, поворачивая ручку с программами в соответствующее положение.
- Если необходимо, установите дополнительные параметры, такие как температуру и интенсивность мытья, с помощью дополнительных кнопок на панели управления.
- При необходимости, выберите режим предварительной обработки посуды.
После настройки всех параметров, посудомоечная машина будет готова к началу работы. Закройте дверцу и нажмите кнопку «Старт».
Обратите внимание:
- Перед настройкой и включением посудомоечной машины убедитесь, что она заправлена средством для мытья посуды.
- Проверьте наличие соли и ополаскивателя, и при необходимости, заправьте их в соответствующие контейнеры.
- При первом использовании машины рекомендуется выполнить промывочную программу без посуды внутри для удаления остатков производства.
Следуя этим инструкциям, вы сможете правильно включить и настроить посудомоечную машину Indesit DFG 26B1 NX для эффективной и удобной работы.
Шаг 1: Подключение к электрической сети
Перед началом использования посудомоечной машины Indesit DFG 26B1 NX необходимо правильно подключить ее к электрической сети. Следуйте инструкциям ниже, чтобы гарантировать безопасное и правильное подключение:
- Убедитесь, что посудомоечная машина расположена рядом с электрической розеткой.
- Откройте заднюю крышку посудомоечной машины, чтобы получить доступ к электрическим клеммам.
- Проверьте напряжение электрической сети, чтобы убедиться, что оно соответствует указанному на табличке с техническими характеристиками посудомоечной машины.
- Отсоедините электрический провод от розетки, чтобы избежать случайного подключения.
- Подсоедините фазный провод (обычно красного цвета) к клемме L на машине.
- Подсоедините нулевой провод (обычно синего цвета) к клемме N на машине.
- Проверьте, чтобы все соединения были плотными и надежными.
- Закройте заднюю крышку посудомоечной машины.
- Включите электрический провод в розетку. Убедитесь, что машина получает питание.
После правильного подключения к электрической сети вы можете переходить к использованию других функций и настроек посудомоечной машины Indesit DFG 26B1 NX.
Шаг 2: Заполнение емкости солью и моющим средством
Для правильной и эффективной работы посудомоечной машины Indesit DFG 26B1 NX необходимо заполнить емкость солью и моющим средством.
1. Найдите емкость соли и моющего средства на внутренней стороне дверцы посудомоечной машины.
2. Откройте крышку емкости соли, вращая ее против часовой стрелки.
3. Заполните емкость солью для посудомоечных машин. Используйте только специальную соль для посудомоечных машин, которая предназначена для удаления и предотвращения образования накипи внутри машины. Не используйте обычную поваренную соль или другие химические вещества.
4. Закройте крышку емкости соли, вращая ее по часовой стрелке. Убедитесь, что крышка плотно закрыта.
5. Откройте крышку емкости моющего средства, вращая ее против часовой стрелки.
6. Введите необходимое количество моющего средства в соответствии с указаниями на упаковке. Обычно рекомендуется использовать одну таблетку моющего средства, но вы можете использовать и другие формы моющего средства, например, порошок или гель. Убедитесь, что выбранное вами моющее средство предназначено специально для использования в посудомоечных машинах.
7. Закройте крышку емкости моющего средства, вращая ее по часовой стрелке. Убедитесь, что крышка плотно закрыта.
8. Убедитесь, что все крышки емкостей плотно закрыты, чтобы предотвратить протечки и получить оптимальные результаты мойки.
Теперь вы готовы перейти к следующему шагу – загрузке посуды в машину и выбору необходимого режима мойки. Перейдите к Шагу 3: Загрузка посуды и выбор режима мойки.
Загрузка посуды
Правильная загрузка посуды в посудомоечную машину Indesit DFG 26B1 NX поможет достичь оптимального результата стирки и сэкономить время и энергию.
Вот некоторые рекомендации для загрузки посуды:
- Убедитесь, что все предметы, предназначенные для стирки в посудомоечной машине, совместимы с данной моделью и не имеют ограничений по размерам или материалам. Проверьте инструкции по эксплуатации для получения подробной информации.
- Удалите остатки пищевых продуктов с посуды, прежде чем загружать ее в машину. Большие куски пищи могут забить фильтры и негативно повлиять на результат стирки.
- Распределите посуду равномерно по корзинам и стойкам. Расположите большие и тяжелые предметы, такие как кастрюли и сковородки, в нижней корзине, а более легкую и хрупкую посуду, например, тарелки и стаканы, в верхней корзине.
- Посуду следует загружать таким образом, чтобы она не перекрывала форсунки и не препятствовала свободному распределению воды.
- Не перегружайте машину. Оставьте достаточное пространство между предметами для свободного циркуляции воды.
После того, как вы загрузили посуду, включите посудомоечную машину, используя соответствующую программу. Не забудьте закрыть дверцу машины и убедитесь, что она правильно заперта.
Следуя этим рекомендациям, вы добьетесь оптимального результата стирки и сохраните качество вашей посуды. Пользуйтесь посудомоечной машиной Indesit DFG 26B1 NX с уверенностью и наслаждайтесь чистой и сияющей посудой каждый день!
Шаг 3: Очистка и упорядочивание посуды
Перед тем, как закрыть дверцу посудомоечной машины Indesit DFG 26B1 NX и запустить программу, необходимо провести очистку и упорядочивание посуды. В этом разделе мы расскажем, как правильно выполнить этот шаг.
- Удалите остатки пищи: Проверьте, нет ли на посуде остатков пищи или посторонних предметов. Скребком или губкой удалите остатки пищи с тарелок, кружек и столовых приборов. Это поможет избежать засорения фильтров и неисправностей в работе посудомоечной машины.
- Упорядочите посуду: Разместите посуду в корзине для посуды. Распределите ее равномерно, чтобы вода и моющее средство могли легко достигать каждую поверхность. Большую посуду, такую как кастрюли и сковородки, разместите в нижней корзине, а мелкую посуду, такую как чашки и столовые приборы, в верхней. Постарайтесь избегать перекрытия или перекосов посуды, чтобы гарантировать равномерное и качественное мытье.
Совет: Если у вас есть чашки или посуда с декоративными элементами, рекомендуется мыть их вручную, чтобы сохранить их красоту и предотвратить повреждения во время цикла мойки в посудомоечной машине.
После того как вы очистили и упорядочили посуду, вы готовы переходить к следующему шагу — закрытию дверцы и запуску программы на посудомоечной машине Indesit DFG 26B1 NX.
Шаг 4: Размещение посуды в корзинах
После того, как вы загрузили посуду в посудомоечную машину Indesit DFG 26B1 NX, необходимо правильно распределить её по корзинам. Ниже приведены рекомендации по размещению различных видов посуды.
Верхняя корзина
В верхней корзине рекомендуется размещать следующие элементы:
- Столовые приборы. Размещайте их ручками вниз, чтобы не повредить сами приборы и не пораниться при вынимании;
- Мелкая пластиковая посуда, такая как крышки, контейнеры и половники;
- Кружки и чашки. Они должны быть расположены колбой вниз для более эффективного мойки и сушки;
- Менее грязные предметы, например, тарелки с остатками сухой пищи или столовые принадлежности;
Нижняя корзина
В нижней корзине рекомендуется размещать следующие элементы:
- Кастрюли, сковороды и другую крупную посуду. Разместите их распределенно и под углом, чтобы обеспечить равномерное распределение воды и моющего средства;
- Тарелки и подносы. Располагайте их вертикально, чтобы струя воды попадала в каждый предмет;
- Для более удобной и прочной фиксации крупных предметов на дне нижней корзины установите специальные держатели;
Помните, что при размещении посуды необходимо оставлять достаточно места между предметами для обеспечения свободного доступа воды и эффективной мойки.
Настройка программы
Посудомоечная машина Indesit DFG 26B1 NX предлагает несколько программ для мытья посуды. Чтобы выбрать желаемую программу, выполните следующие шаги:
- Включите посудомоечную машину, нажав кнопку включения/выключения.
- Откройте дверцу машины, чтобы разместить посуду внутри.
- Переключитесь на режим выбора программы, повернув регулятор программы в положение, соответствующее вашим потребностям:
| Режим | Описание |
|---|---|
| Интенсивная | Подходит для удаления сильных загрязнений и стойкого запаха. |
| Обычная | Рекомендуется для ежедневной мытья посуды с обычными загрязнениями. |
| Экономичная | Используется для экономии воды и энергии при мытье посуды с легкими загрязнениями. |
| Ночная | Предназначена для более тихого и энергосберегающего мытья посуды. |
Примечание: В некоторых моделях Indesit DFG 26B1 NX возможны дополнительные программы, такие как «Стекло», «Быстрая», «Замачивание» и другие. Обратитесь к инструкции пользователя для получения подробной информации.
После выбора программы закройте дверцу машины и нажмите кнопку старта/паузы. Посудомоечная машина начнет выполнять выбранную программу.