
User Guide
www.hp.com/videos/LaserJet
www.hp.com/support/ljM304
www.hp.com/support/ljM404
HP LaserJet Pro M304-M305, M404-M405


HP LaserJet Pro M304-M305, M404-M405
User Guide

Copyright and License
© Copyright 2019 HP Development Company,
L.P.
Reproduction, adaptation, or translation without
prior written permission is prohibited, except as
allowed under the copyright laws.
The information contained herein is subject to
change without notice.
The only warranties for HP products and
services are set forth in the express warranty
statements accompanying such products and
services. Nothing herein should be construed as
constituting an additional warranty. HP shall not
be liable for technical or editorial errors or
omissions contained herein.
Edition 2, 8/2019
Trademark Credits
Adobe®, Adobe Photoshop®, Acrobat®, and
PostScript® are trademarks of Adobe Systems
Incorporated.
Apple and the Apple logo are trademarks of
Apple Inc., registered in the U.S. and other
countries.
macOS is a trademark of Apple Inc., registered in
the U.S. and other countries.
AirPrint is a trademark of Apple Inc., registered in
the U.S. and other countries.
Google™ is a trademark of Google Inc.
Microsoft®, Windows®, Windows® XP, and
Windows Vista® are U.S. registered trademarks
of Microsoft Corporation.
UNIX® is a registered trademark of The Open
Group.

Table of contents
1 Printer overview …………………………………………………………………………………………………………………………………………………………………. 1
Warning icons ………………………………………………………………………………………………………………………………………………………. 1
Potential shock hazard ………………………………………………………………………………………………………………………………………… 2
Open source license …………………………………………………………………………………………………………………………………………….. 3
Printer views ………………………………………………………………………………………………………………………………………………………… 4
Printer front view ………………………………………………………………………………………………………………………………. 4
Printer back view ……………………………………………………………………………………………………………………………….. 4
Control panel view …………………………………………………………………………………………………………………………….. 5
Printer specications ……………………………………………………………………………………………………………………………………………. 7
Technical specications ……………………………………………………………………………………………………………………… 7
Supported operating systems …………………………………………………………………………………………………………… 7
Mobile printing solutions …………………………………………………………………………………………………………………… 8
Printer dimensions ……………………………………………………………………………………………………………………………. 9
Power consumption, electrical specications, and acoustic emissions ……………………………………………. 11
Operating environment range …………………………………………………………………………………………………………. 11
Printer hardware setup and software installation ……………………………………………………………………………………………… 11
2 Paper trays ………………………………………………………………………………………………………………………………………………………………………. 13
Introduction ……………………………………………………………………………………………………………………………………………………….. 13
Load paper to Tray 1 …………………………………………………………………………………………………………………………………………. 14
Introduction …………………………………………………………………………………………………………………………………….. 14
Load Paper Tray 1 …………………………………………………………………………………………………………………………… 14
Tray 1 paper orientation ………………………………………………………………………………………………………………….. 16
Load paper to Tray 2 …………………………………………………………………………………………………………………………………………. 18
Introduction …………………………………………………………………………………………………………………………………….. 18
Load Paper Tray 2 …………………………………………………………………………………………………………………………… 18
Tray 2 paper orientation ………………………………………………………………………………………………………………….. 20
Load paper to Tray 3 …………………………………………………………………………………………………………………………………………. 22
Introduction …………………………………………………………………………………………………………………………………….. 22
Load Paper Tray 3 (optional) …………………………………………………………………………………………………………… 22
Tray 3 paper orientation ………………………………………………………………………………………………………………….. 24
Load and print envelopes ………………………………………………………………………………………………………………………………….. 26
ENWW iii

Introduction …………………………………………………………………………………………………………………………………….. 26
Print envelopes ……………………………………………………………………………………………………………………………….. 26
Envelope orientation ……………………………………………………………………………………………………………………….. 26
3 Supplies, accessories, and parts ………………………………………………………………………………………………………………………………………. 29
Order supplies, accessories, and parts ………………………………………………………………………………………………………………. 30
Ordering ………………………………………………………………………………………………………………………………………….. 30
Supplies and accessories ………………………………………………………………………………………………………………… 30
Customer self-repair parts ………………………………………………………………………………………………………………. 31
Dynamic security ……………………………………………………………………………………………………………………………………………….. 32
Congure the HP toner-cartridge-protection supply settings ……………………………………………………………………………. 33
Introduction …………………………………………………………………………………………………………………………………….. 33
Enable or disable the Cartridge Policy feature ………………………………………………………………………………… 34
Use the printer control panel to enable the Cartridge Policy feature …………………………….. 34
Use the printer control panel to disable the Cartridge Policy feature ……………………………. 34
Use the HP Embedded Web Server (EWS) to enable the Cartridge Policy feature …………. 34
Use the HP Embedded Web Server (EWS) to disable the Cartridge Policy feature ………… 35
Enable or disable the Cartridge Protection feature ………………………………………………………………………….. 37
Use the printer control panel to enable the Cartridge Protection feature ……………………… 37
Use the printer control panel to disable the Cartridge Protection feature …………………….. 37
Use the HP Embedded Web Server (EWS) to enable the Cartridge Protection feature ….. 38
Use the HP Embedded Web Server (EWS) to disable the Cartridge Protection feature …. 38
Replace the toner cartridge ……………………………………………………………………………………………………………………………….. 40
Toner cartridge information …………………………………………………………………………………………………………….. 40
Remove and replace the cartridge …………………………………………………………………………………………………… 42
4 Print …………………………………………………………………………………………………………………………………………………………………………………. 45
Print tasks (Windows) ………………………………………………………………………………………………………………………………………… 46
How to print (Windows) …………………………………………………………………………………………………………………… 46
Automatically print on both sides (Windows) ………………………………………………………………………………….. 46
Manually print on both sides (Windows) ………………………………………………………………………………………….. 47
Print multiple pages per sheet (Windows) ………………………………………………………………………………………. 47
Select the paper type (Windows) …………………………………………………………………………………………………….. 48
Additional print tasks ………………………………………………………………………………………………………………………. 48
Print tasks (macOS) …………………………………………………………………………………………………………………………………………… 49
How to print (macOS) ………………………………………………………………………………………………………………………. 49
Automatically print on both sides (macOS) ……………………………………………………………………………………… 49
Manually print on both sides (macOS) …………………………………………………………………………………………….. 49
Print multiple pages per sheet (macOS) ………………………………………………………………………………………….. 50
Select the paper type (macOS) ………………………………………………………………………………………………………… 50
Additional print tasks ………………………………………………………………………………………………………………………. 51
iv ENWW

Store print jobs on the printer to print later or print privately ……………………………………………………………………………. 52
Introduction …………………………………………………………………………………………………………………………………….. 52
Before beginning …………………………………………………………………………………………………………………………….. 52
Set up job storage …………………………………………………………………………………………………………………………… 52
Disable or enable the job storage feature ……………………………………………………………………………………….. 53
Create a stored job (Windows) …………………………………………………………………………………………………………. 54
Create a stored job (macOS) ……………………………………………………………………………………………………………. 55
Print a stored job …………………………………………………………………………………………………………………………….. 56
Delete a stored job ………………………………………………………………………………………………………………………….. 57
Delete a job that is stored on the printer ………………………………………………………………………. 57
Information sent to printer for Job Accounting purposes ………………………………………………………………… 57
Mobile printing …………………………………………………………………………………………………………………………………………………… 58
Introduction …………………………………………………………………………………………………………………………………….. 58
Wi-Fi Direct printing (wireless models only) …………………………………………………………………………………….. 59
To turn on Wi-Fi Direct …………………………………………………………………………………………………… 59
Change the printer Wi-Fi Direct name …………………………………………………………………………… 60
Step one: Open the HP Embedded Web Server …………………………………………… 60
Step two: Change the Wi-Fi Direct name …………………………………………………….. 60
HP ePrint via Email ………………………………………………………………………………………………………………………….. 60
AirPrint …………………………………………………………………………………………………………………………………………….. 61
Android embedded printing …………………………………………………………………………………………………………….. 62
5 Manage the printer …………………………………………………………………………………………………………………………………………………………… 63
Change the printer connection type (Windows) …………………………………………………………………………………………………. 63
Advanced conguration with HP Embedded Web Server and Printer Home Page (EWS) …………………………………… 65
Method one: Open the HP Embedded Web Server (EWS) from the software ………………………………….. 65
Method two: Open the HP Embedded Web Server (EWS) from a web browser ……………………………….. 65
Congure IP network settings ……………………………………………………………………………………………………………………………. 68
Introduction …………………………………………………………………………………………………………………………………….. 68
Printer sharing disclaimer ……………………………………………………………………………………………………………….. 68
View or change network settings ……………………………………………………………………………………………………. 68
Rename the printer on a network ……………………………………………………………………………………………………. 69
Manually congure IPv4 TCP/IP parameters from the control panel ……………………………………………….. 69
Link speed and duplex settings ……………………………………………………………………………………………………….. 70
Printer security features ……………………………………………………………………………………………………………………………………. 71
Introduction …………………………………………………………………………………………………………………………………….. 71
Assign or change the system password using the Embedded Web Server ……………………………………… 71
Energy-conservation settings ……………………………………………………………………………………………………………………………. 72
Introduction …………………………………………………………………………………………………………………………………….. 72
Print with EconoMode ……………………………………………………………………………………………………………………… 72
Set the Sleep Delay (Min.) setting ……………………………………………………………………………………………………. 72
ENWW v

Set the Shutdown after Sleep (Hr.) setting ……………………………………………………………………………………… 72
Set the Disable Shutdown setting …………………………………………………………………………………………………… 73
HP Web Jetadmin ………………………………………………………………………………………………………………………………………………. 73
Update the rmware ………………………………………………………………………………………………………………………………………….. 74
Method one: Update the rmware using the control panel ……………………………………………………………… 74
Method two: Update the rmware using the HP Printer Update utility ……………………………………………. 74
6 Solve problems ………………………………………………………………………………………………………………………………………………………………… 77
Customer support ……………………………………………………………………………………………………………………………………………… 77
Restore the factory-set defaults ……………………………………………………………………………………………………………………….. 78
A “Cartridge is low” or “Cartridge is very low” message displays on the printer control panel …………………………… 79
Change the “Very Low” settings ………………………………………………………………………………………………………. 80
Change the «Very Low» settings from the control panel ……………………………………………….. 80
Order supplies …………………………………………………………………………………………………………………………………. 80
Printer does not pick up paper or misfeeds ……………………………………………………………………………………………………….. 81
Introduction …………………………………………………………………………………………………………………………………….. 81
The printer does not pick up paper ………………………………………………………………………………………………….. 81
The printer picks up multiple sheets of paper …………………………………………………………………………………. 84
Clear paper jams ………………………………………………………………………………………………………………………………………………… 86
Introduction …………………………………………………………………………………………………………………………………….. 86
Experiencing frequent or recurring paper jams? ……………………………………………………………………………… 86
Paper jam locations …………………………………………………………………………………………………………………………. 87
Clear paper jams in Tray 1 ……………………………………………………………………………………………………………….. 88
Clear paper jams in Tray 2 ……………………………………………………………………………………………………………….. 88
Clear paper jams in Tray 3 ……………………………………………………………………………………………………………….. 92
Clear paper jams in the toner cartridge or fuser area ……………………………………………………………………… 96
Clear paper jams in the output bin ………………………………………………………………………………………………… 100
Clear paper jams in the duplexer …………………………………………………………………………………………………… 102
Resolving print quality problems …………………………………………………………………………………………………………………….. 105
Introduction …………………………………………………………………………………………………………………………………… 105
Troubleshoot print quality …………………………………………………………………………………………………………….. 106
Update the printer rmware ……………………………………………………………………………………….. 106
Print from a dierent software program …………………………………………………………………….. 106
Check the paper-type setting for the print job ……………………………………………………………. 107
Check the paper type setting on the printer …………………………………………….. 107
Check the paper type setting (Windows) ………………………………………………….. 107
Check the paper type setting (macOS) ……………………………………………………… 107
Check toner-cartridge status ………………………………………………………………………………………. 108
Step one: Print a supplies status page ……………………………………………………… 108
Step two: Check supplies status ……………………………………………………………….. 108
Print a cleaning page …………………………………………………………………………………………………… 108
vi ENWW

Visually inspect the toner cartridge or cartridges ……………………………………………………….. 109
Check paper and the printing environment …………………………………………………………………. 110
Step one: Use paper that meets HP specications …………………………………… 110
Step two: Check the environment …………………………………………………………….. 110
Step three: Set the individual tray alignment ……………………………………………. 110
Try a dierent print driver …………………………………………………………………………………………… 111
Check the EconoMode settings …………………………………………………………………………………… 111
Adjust print density …………………………………………………………………………………………………….. 112
Troubleshoot image defects …………………………………………………………………………………………………………. 113
Solve wired network problems ………………………………………………………………………………………………………………………… 121
Introduction …………………………………………………………………………………………………………………………………… 121
Poor physical connection ………………………………………………………………………………………………………………. 121
The computer is unable to communicate with the printer …………………………………………………………….. 121
The printer is using incorrect link and duplex settings for the network …………………………………………. 122
New software programs might be causing compatibility problems ………………………………………………. 122
The computer or workstation might be set up incorrectly …………………………………………………………….. 122
The printer is disabled, or other network settings are incorrect ……………………………………………………. 122
Solve wireless network problems ……………………………………………………………………………………………………………………. 123
Introduction …………………………………………………………………………………………………………………………………… 123
Wireless connectivity checklist ………………………………………………………………………………………………………. 123
The printer does not print after the wireless conguration completes ………………………………………….. 124
The printer does not print, and the computer has a third-party rewall installed …………………………. 124
The wireless connection does not work after moving the wireless router or printer …………………….. 124
Cannot connect more computers to the wireless printer ………………………………………………………………. 125
The wireless printer loses communication when connected to a VPN …………………………………………… 125
The network does not appear in the wireless networks list ………………………………………………………….. 125
The wireless network is not functioning ……………………………………………………………………………………….. 125
Perform a wireless network diagnostic test ………………………………………………………………………………….. 126
Reduce interference on a wireless network …………………………………………………………………………………… 126
Index ………………………………………………………………………………………………………………………………………………………………………………….. 127
ENWW vii

viii ENWW

1 Printer overview
Review the location of features on the printer, the physical and technical specications of the printer, and where
to locate setup information.
●Warning icons
●Potential shock hazard
●Open source license
●Printer views
●Printer specications
●Printer hardware setup and software installation
For more information:
The following information is correct at the time of publication. For current information, see www.hp.com/
support/ljM304 or www.hp.com/support/ljM404.
HP’s all-inclusive help for the printer includes the following information:
●Install and congure
●Learn and use
●Solve problems
●Download software and rmware updates
●Join support forums
●Find warranty and regulatory information
Warning icons
Use caution if you see a warning icon on your HP printer, as indicated in the icon denitions.
●Caution: Electric shock
ENWW 1
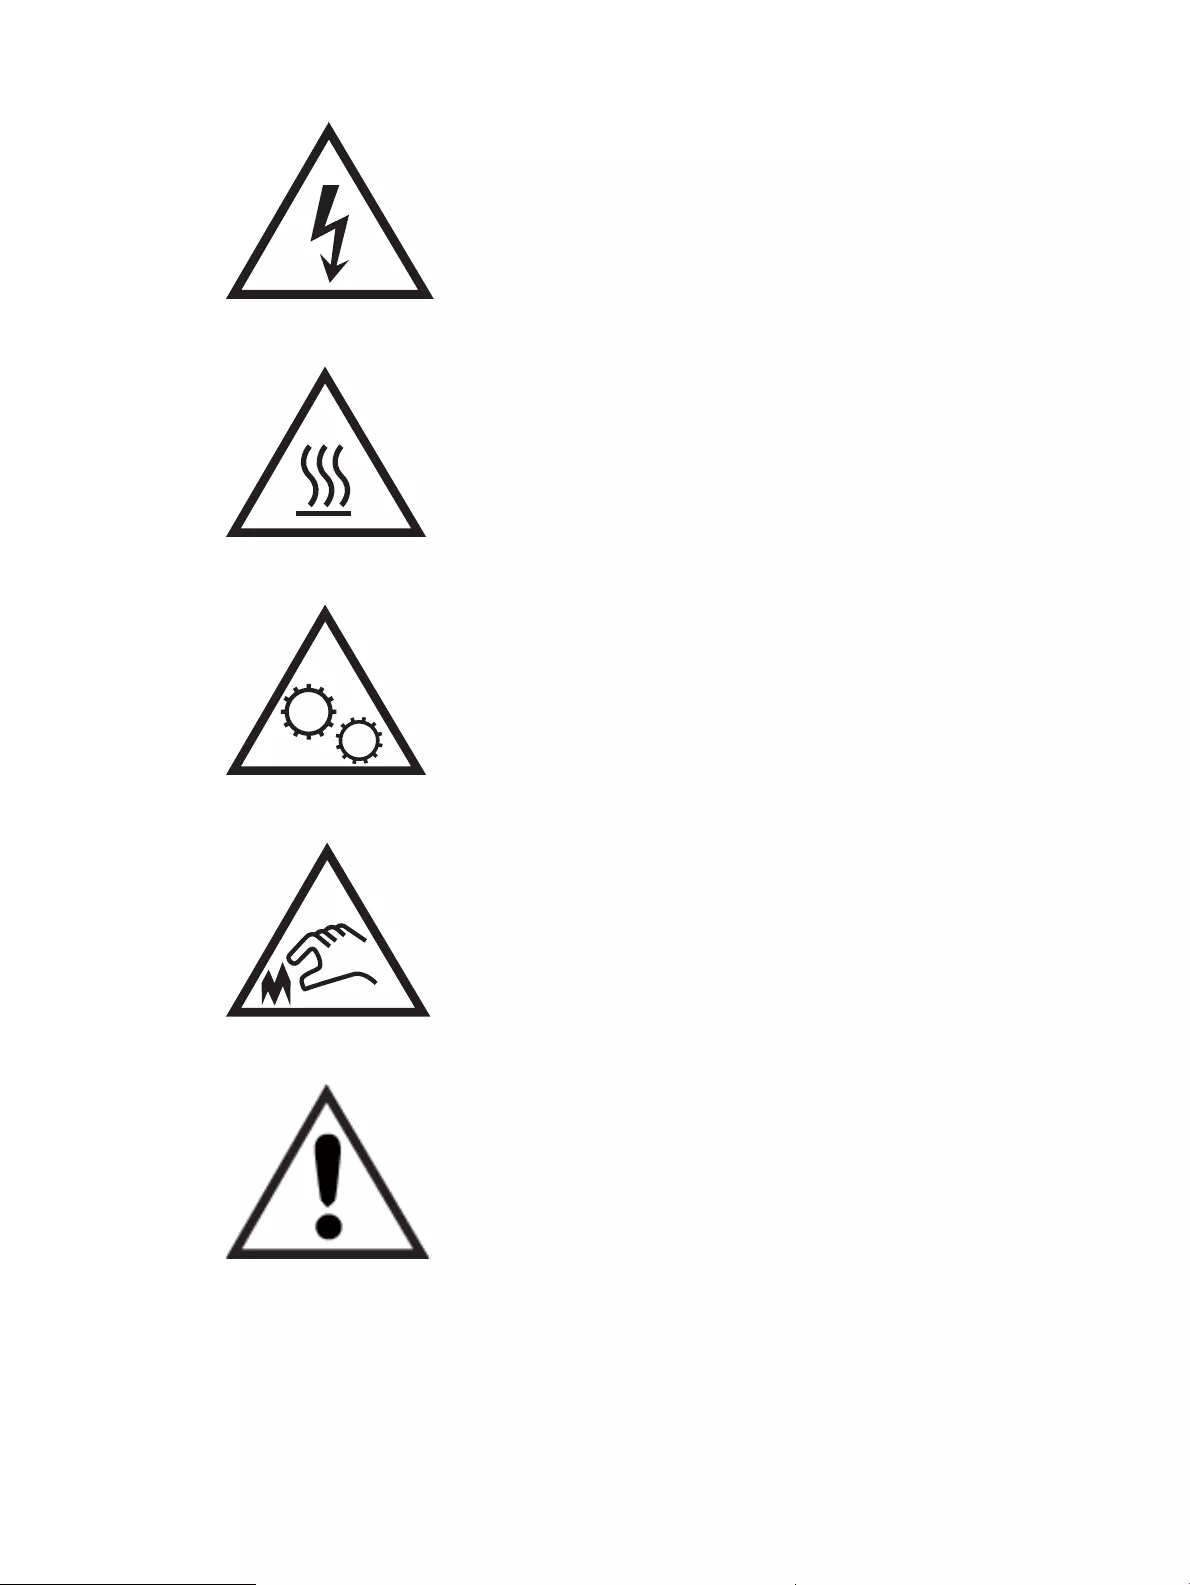
●Caution: Hot surface
●Caution: Keep body parts away from moving parts
●Caution: Sharp edge in close proximity
●Warning
Potential shock hazard
Review this important safety information.
2 Chapter 1 Printer overview ENWW

●Read and understand these safety statements to avoid an electrical shock hazard.
●Always follow basic safety precautions when using this product to reduce risk of injury from re or electric
shock.
●Read and understand all instructions in the user guide.
●Observe all warnings and instructions marked on the product.
●Use only a grounded electrical outlet when connecting the product to a power source. If you do not know
whether the outlet is grounded, check with a qualied electrician.
●Do not touch the contacts on any of the sockets on the product. Replace damaged cords immediately.
●Unplug this product from wall outlets before cleaning.
●Do not install or use this product near water or when you are wet.
●Install the product securely on a stable surface.
●Install the product in a protected location where no one can step on or trip over the power cord.
Open source license
For information on open source software used in this printer, visit www.hp.com/software/opensource.
ENWW Open source license 3
Printer views
Identify parts on the printer and buttons on the control panel.
●Printer front view
●Printer back view
●Control panel view
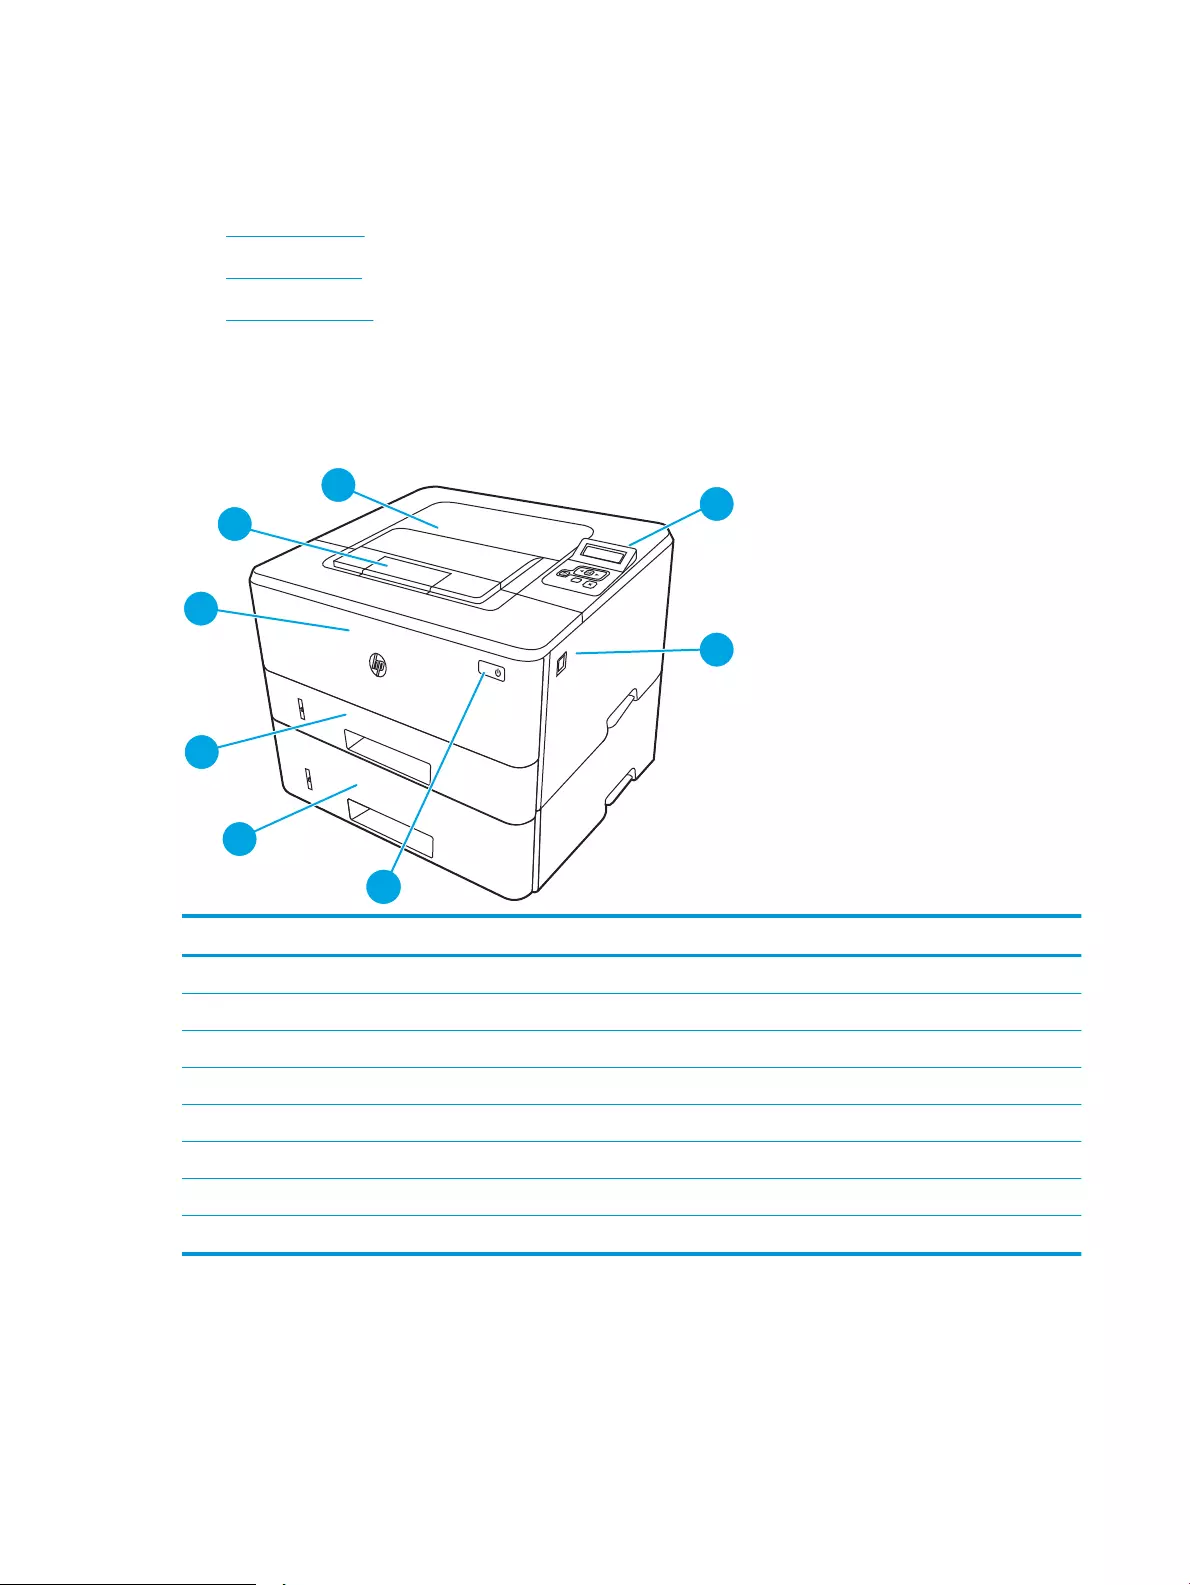
Printer front view
Identify the parts on the front of the printer.
Figure 1-1 Printer front view
Number Description
1 2-line backlit control panel
2 Front door release button (access to the toner cartridge)
3 Power on/o button
4 Tray 3 (optional)
5 Tray 2
6 Tray 1
7 Output bin extension
8 Output bin
Printer back view
Identify the parts on the back of the printer.
4 Chapter 1 Printer overview ENWW

Figure 1-2 Printer rear view
Number Description
1 USB port (for job storage and private printing)
NOTE: This port might be covered.
2 USB interface port
3 Ethernet port (network models only)
4 Power connection
5 Tray 3 (optional)
NOTE: Tray 3 extends when legal-size or A4-size paper is loaded.
6 Dust cover for Tray 2
NOTE: Dust cover ips up when legal-size or A4-size paper is loaded.
7 Serial number and product number label
8 Rear door (access for clearing jams)
Control panel view
Identify the buttons and lights on the printer control panel.
ENWW Printer views 5

Figure 1-3 Printer control panel
Number Item Description
1 Control panel display This screen displays menus and printer information.
2 Attention light (amber) This light blinks when the printer requires user attention.
3 Ready light (green) This light is on when the printer is ready to print. It blinks when the printer is receiving
print data.
4Left arrow button Use this button to navigate through the menus or to decrease a value that appears on
the display.
5Back arrow button Use this button for the following actions:
●Exit the control panel menus.
●Scroll back to a previous menu in a sub-menu list.
●Scroll back to a previous menu item in a sub-menu list (without saving changes
to the menu item).
6Wireless button (wireless
models only)
Use this button to access the wireless menu.
7Right arrow button Use this button to navigate through the menus or to increase a value that appears on
the display.
8OK button Press the OK button for the following actions:
●Open the control panel menus.
●Open a sub-menu displayed on the control panel display.
●Select a menu item.
●Clear some errors.
●Begin a print job in response to a control-panel prompt (for example, when the
message Press [OK] to continue appears on the control panel display).
9Cancel button Press this button to cancel a print job or to exit the control panel menus.
6 Chapter 1 Printer overview ENWW

Printer specications
Review hardware, software, and printer environment specications.
●Technical specications
●Supported operating systems
●Mobile printing solutions
●Printer dimensions
●Power consumption, electrical specications, and acoustic emissions
●Operating environment range
IMPORTANT: The following specications are correct at the time of publication, but they are subject to change.
For current information, see www.hp.com/support/ljM304 or www.hp.com/support/ljM404.
Technical specications
Review the technical specications for the printer.
See www.hp.com/support/ljM304 or www.hp.com/support/ljM404 for current information.
Supported operating systems
The following information applies to the printer-specic Windows and HP print drivers for macOS and to the
software installer.
Windows: The HP Software Installer installs either a V3 or V4 PCL 6 driver depending on the Windows operating
system along with optional software when using the full software installer. See the software installation notes
for more information.
macOS: Mac computers are supported with this printer. Download HP Easy Start either from 123.hp.com/
LaserJet or from the Printer Support page, and then use HP Easy Start to install the HP print driver. HP Easy Start
is not included in the HP Software Installer.
1. Go to 123.hp.com/LaserJet.
2. Follow the steps provided to download the printer software.
Linux: For information and print drivers for Linux, go to www.hp.com/go/linuxprinting.
UNIX: For information and print drivers for UNIX, go to www.hp.com/go/unixmodelscripts.
Table 1-1 Supported operating systems and print drivers
Operating system Print driver installed (from the software on the web)
Windows 7, 32-bit and 64-bit The HP PCL 6 (V3) printer-specic print driver is installed for this
operating system as part of the software installation.
Windows 8, 32-bit and 64-bit The HP PCL 6 (V3) printer-specic print driver is installed for this
operating system as part of the software installation.1
Windows 8.1, 32-bit and 64-bit The HP PCL-6 (V4) printer-specic print driver is installed for this
operating system as part of the software installation.2
ENWW Printer specications 7

Table 1-1 Supported operating systems and print drivers (continued)
Operating system Print driver installed (from the software on the web)
Windows 10, 32-bit and 64-bit The HP PCL-6 (V4) printer-specic print driver is installed for this
operating system as part of the software installation.
Windows Server 2008 R2, 64-bit The HP PCL 6 (V3) printer-specic print driver is available for
download from the printer support website. Download the driver,
and then use the Microsoft Add Printer tool to install it.3
Windows Server 2008 R2, SP1, 64-bit The HP PCL 6 (V3) printer-specic print driver is available for
download from the printer support website. Download the driver,
and then use the Microsoft Add Printer tool to install it.
Windows Server 2012 The HP PCL 6 (V3) printer-specic print driver is available for
download from the printer support website. Download the driver,
and then use the Microsoft Add Printer tool to install it.
Windows Server 2012 R2 The HP PCL 6 (V3) printer-specic print driver is available for
download from the printer support website. Download the driver,
and then use the Microsoft Add Printer tool to install it.
Windows Server 2016, 64-bit The HP PCL 6 (V3) printer-specic print driver is available for
download from the printer support website. Download the driver,
and then use the Microsoft Add Printer tool to install it.
macOS Sierra v10.12, macOS High Sierra v10.13, macOS Mojave
v10.14
To install the print driver, download HP Easy Start from 123.hp.com/
LaserJet. Follow the steps provided to install the printer software
and print driver.
1Windows 8 RT support is provided through Microsoft IN OS Version 4, 32-bit driver.
2Windows 8.1 RT support is provided through Microsoft IN OS Version 4, 32-bit driver.
3Microsoft retired mainstream support for Windows Server 2008 in January 2015. HP will continue to provide best eort support for the
discontinued Server 2008 operating system.
NOTE: For a current list of supported operating systems, go to www.hp.com/support/ljM304 or www.hp.com/
support/ljM404 for HP’s all-inclusive help for the printer.
Table 1-2 Minimum system requirements
Windows 7, 8, 8.1, 10 macOS Sierra v10.12, macOS
High Sierra v10.13, macOS
Mojave v10.14 Mobile devices, iOS, Android
●32-bit or 64-bit
●2 GB of available hard disk
space
●Microsoft Internet Explorer
●Internet connection
●USB port
●2 GB of available hard disk
space
●Internet connection
Router connection not required
www.hp.com/go/mobileprinting
Mobile printing solutions
HP oers multiple mobile and ePrint solutions to enable easy printing to an HP printer from a laptop, tablet,
smartphone, or other mobile device.
To see the full list and to determine the best choice, go to www.hp.com/go/MobilePrinting.
8 Chapter 1 Printer overview ENWW
●Bluetooth Low Energy
●HP Smart app for iOS and Android devices
●Google Cloud Print
●AirPrint
●Android Printing
●HP Roam
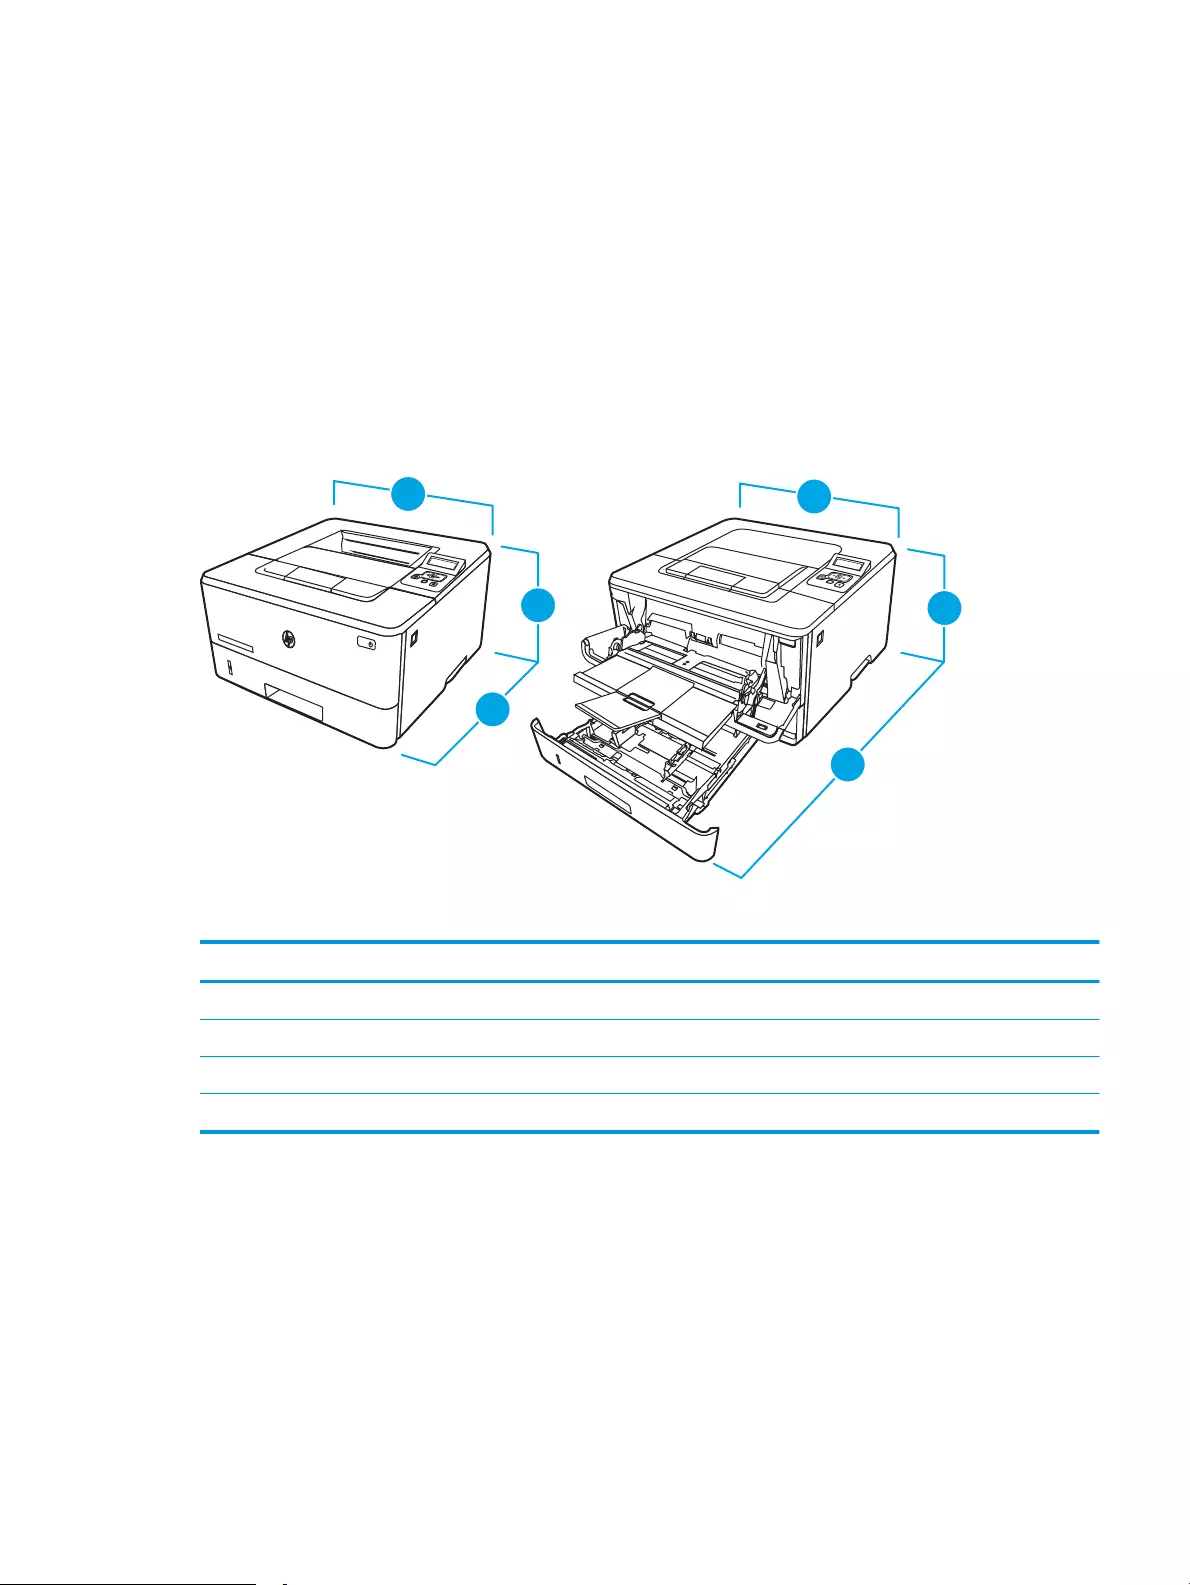
Printer dimensions
Make sure your printer environment is large enough to accommodate the printer.
Table 1-3 Dimensions for the M304, M305, M404, and M405 models
Measurement Printer fully closed Printer fully opened
1. Height 216 mm (8.5 in) 241 mm (9.5 in)
2. Depth 357 mm (14 in) 781 mm (30.8 in)
3. Width 381 mm (15 in) 381 mm (15 in)
Weight (with cartridges) 8.9 kg (19.6 lb) 8.9 kg (19.6 lb)
ENWW Printer specications 9
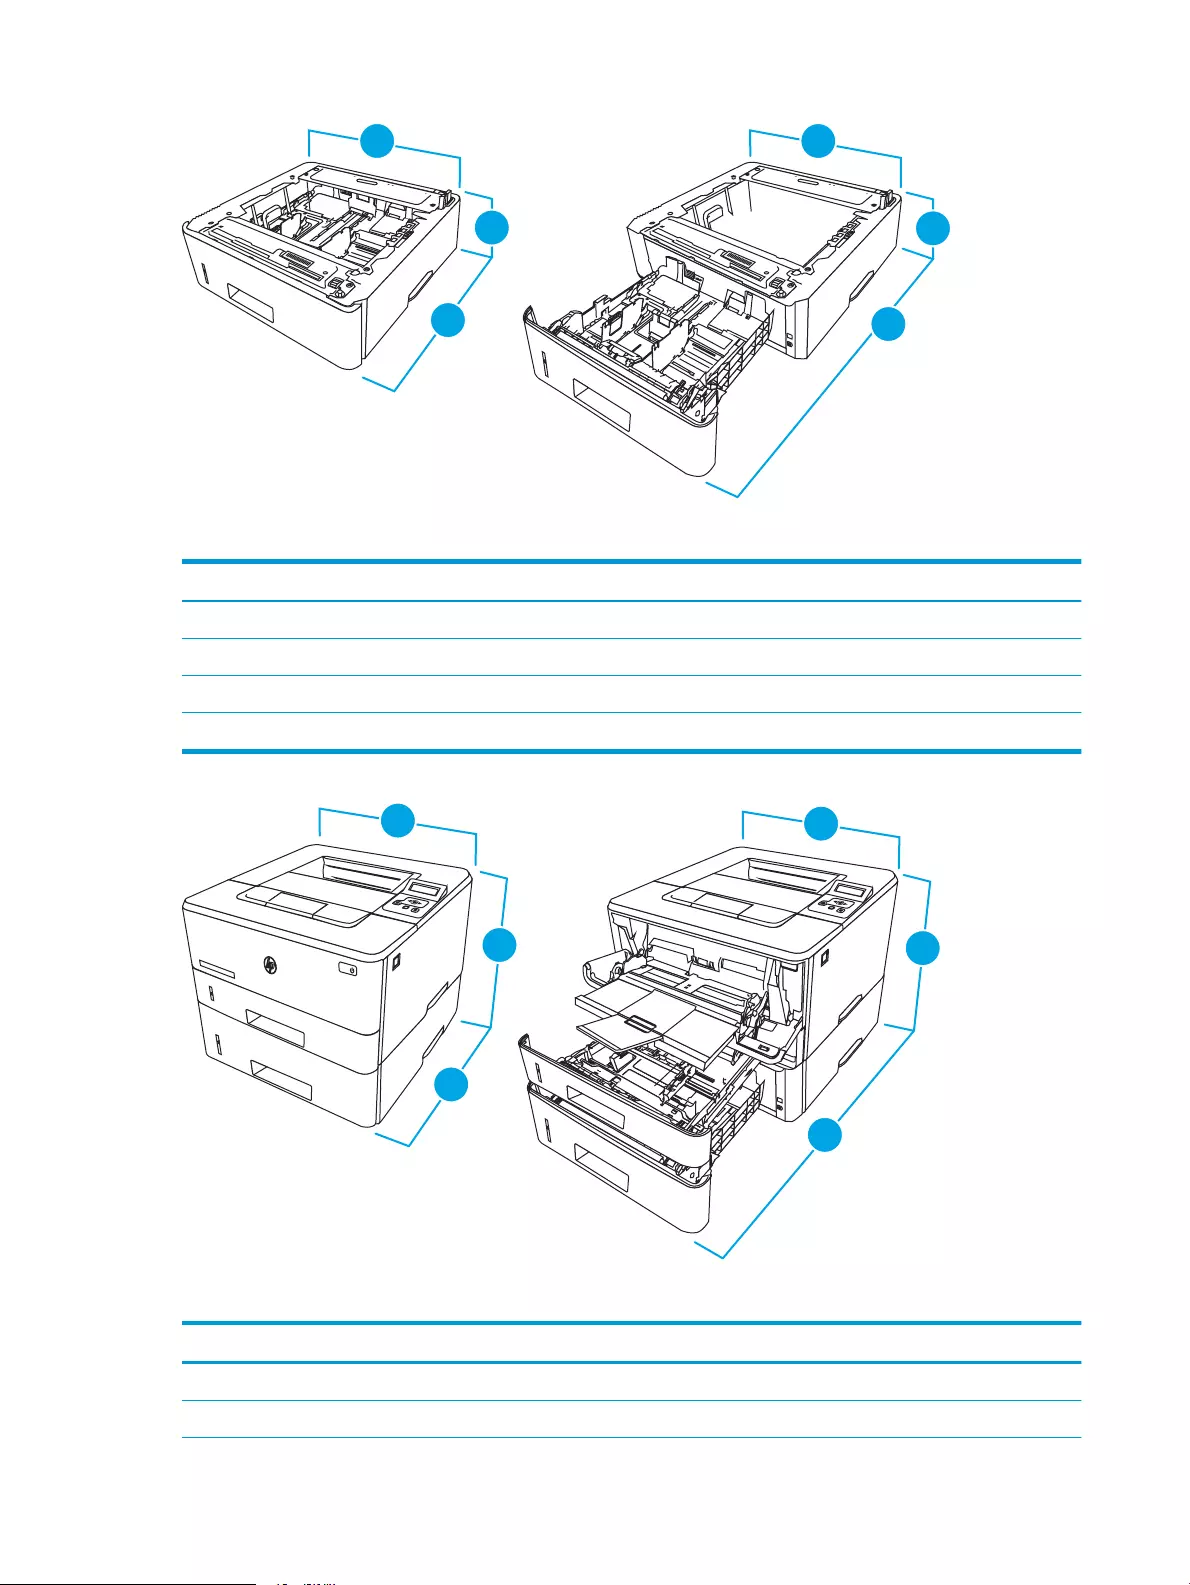
Table 1-4 Dimensions for the optional 550-sheet tray
Measurement Tray fully closed Tray fully open
1. Height 131 mm (5.1 in) 131 mm (5.1 in)
2. Depth 357 mm (14 in) 781 mm (30.8 in)
3. Width 381 mm (15 in) 381 mm (15 in)
Weight 3.7 kg (8.2 lb) 3.7 kg (8.2 lb)
Table 1-5 Dimensions for the printer with the optional 550-sheet tray
Measurement Printer fully closed Printer fully opened
1. Height 345 mm (13.6 in) 372 mm (14.6 in)
2. Depth 357 mm (14 in) 781 mm (30.8 in)
10 Chapter 1 Printer overview ENWW

Table 1-5 Dimensions for the printer with the optional 550-sheet tray (continued)
Measurement Printer fully closed Printer fully opened
3. Width 381 mm (15 in) 381 mm (15 in)
Weight (with cartridges) 12.6 kg (27.8 lb) 12.6 kg (27.8 lb)
Power consumption, electrical specications, and acoustic emissions
In order to operate properly, the printer must be in an environment that meets certain power specications.
For current information, see the support home page for your printer:www.hp.com/support/ljM304 or
www.hp.com/support/ljM404.
CAUTION: Power requirements are based on the country/region where the printer is sold. Do not convert
operating voltages. This will damage the printer and void the printer warranty.
Operating environment range
Review the recommended operating-environment specications for your printer.
Table 1-6 Operating environment specications
Environment Recommended Allowed
Temperature 17.5° to 25°C (63.5° to 77°F) 15° to 32.5°C (59° to 90.5°F)
Relative humidity 30% to 70% relative humidity (RH) 10% to 80% RH
Printer hardware setup and software installation
For basic setup instructions, see the Hardware Installation Guide that came with the printer. For additional
instructions, go to HP support on the web.
Go to www.hp.com/support/ljM304 or www.hp.com/support/ljM404 for HP’s all-inclusive help for the printer,
which includes the following information:
●Install and congure
●Learn and use
●Solve problems
●Download software and rmware updates
●Join support forums
●Find warranty and regulatory information
●Find instructions about how to use the Microsoft Add Printer tool
ENWW Printer hardware setup and software installation 11

12 Chapter 1 Printer overview ENWW

2 Paper trays
Discover how to load and use the paper trays, including how to load special items such as envelopes.
●Introduction
●Load paper to Tray 1
●Load paper to Tray 2
●Load paper to Tray 3
●Load and print envelopes
For more information:
HP’s all-inclusive help for the printer includes the following information:
●Install and congure
●Learn and use
●Solve problems
●Download software and rmware updates
●Join support forums
●Find warranty and regulatory information
Introduction
Review the following information about the paper trays.
CAUTION: Do not extend more than one paper tray at a time.
Do not use paper tray as a step.
Keep hands out of paper trays when closing.
All trays must be closed when moving the printer.
ENWW 13
Load paper to Tray 1
Review the following information about loading paper to Tray 1.
●Introduction
●Load Paper Tray 1
●Tray 1 paper orientation
Introduction
The following information describes how to load paper into Tray 1.
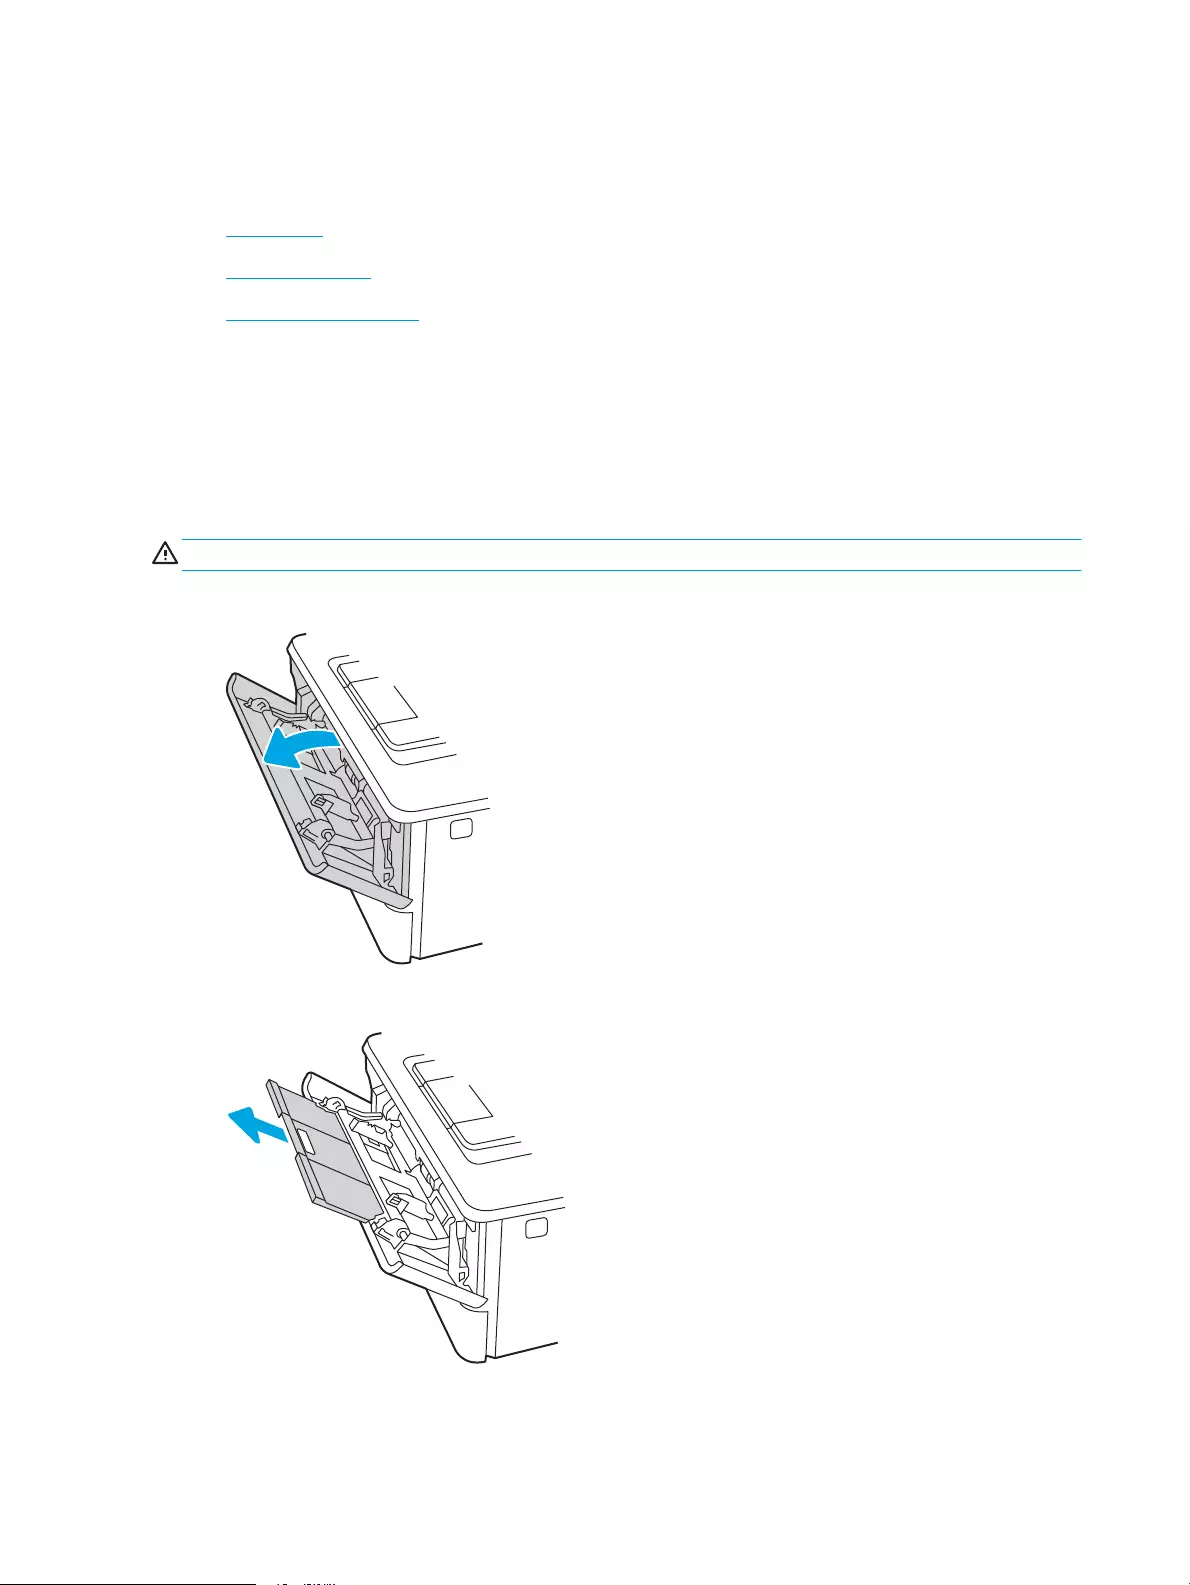
Load Paper Tray 1
This tray holds up to 100 sheets of 75 g/m2 (20 lb) paper.
CAUTION: To avoid jams, never add or remove paper from Tray 1 during printing.
1. Open Tray 1 by grasping the handles on the left and right side of the tray and pulling down.
2. Slide out the tray extension.
3. For long paper, ip out the tray extension to support the paper.
14 Chapter 2 Paper trays ENWW
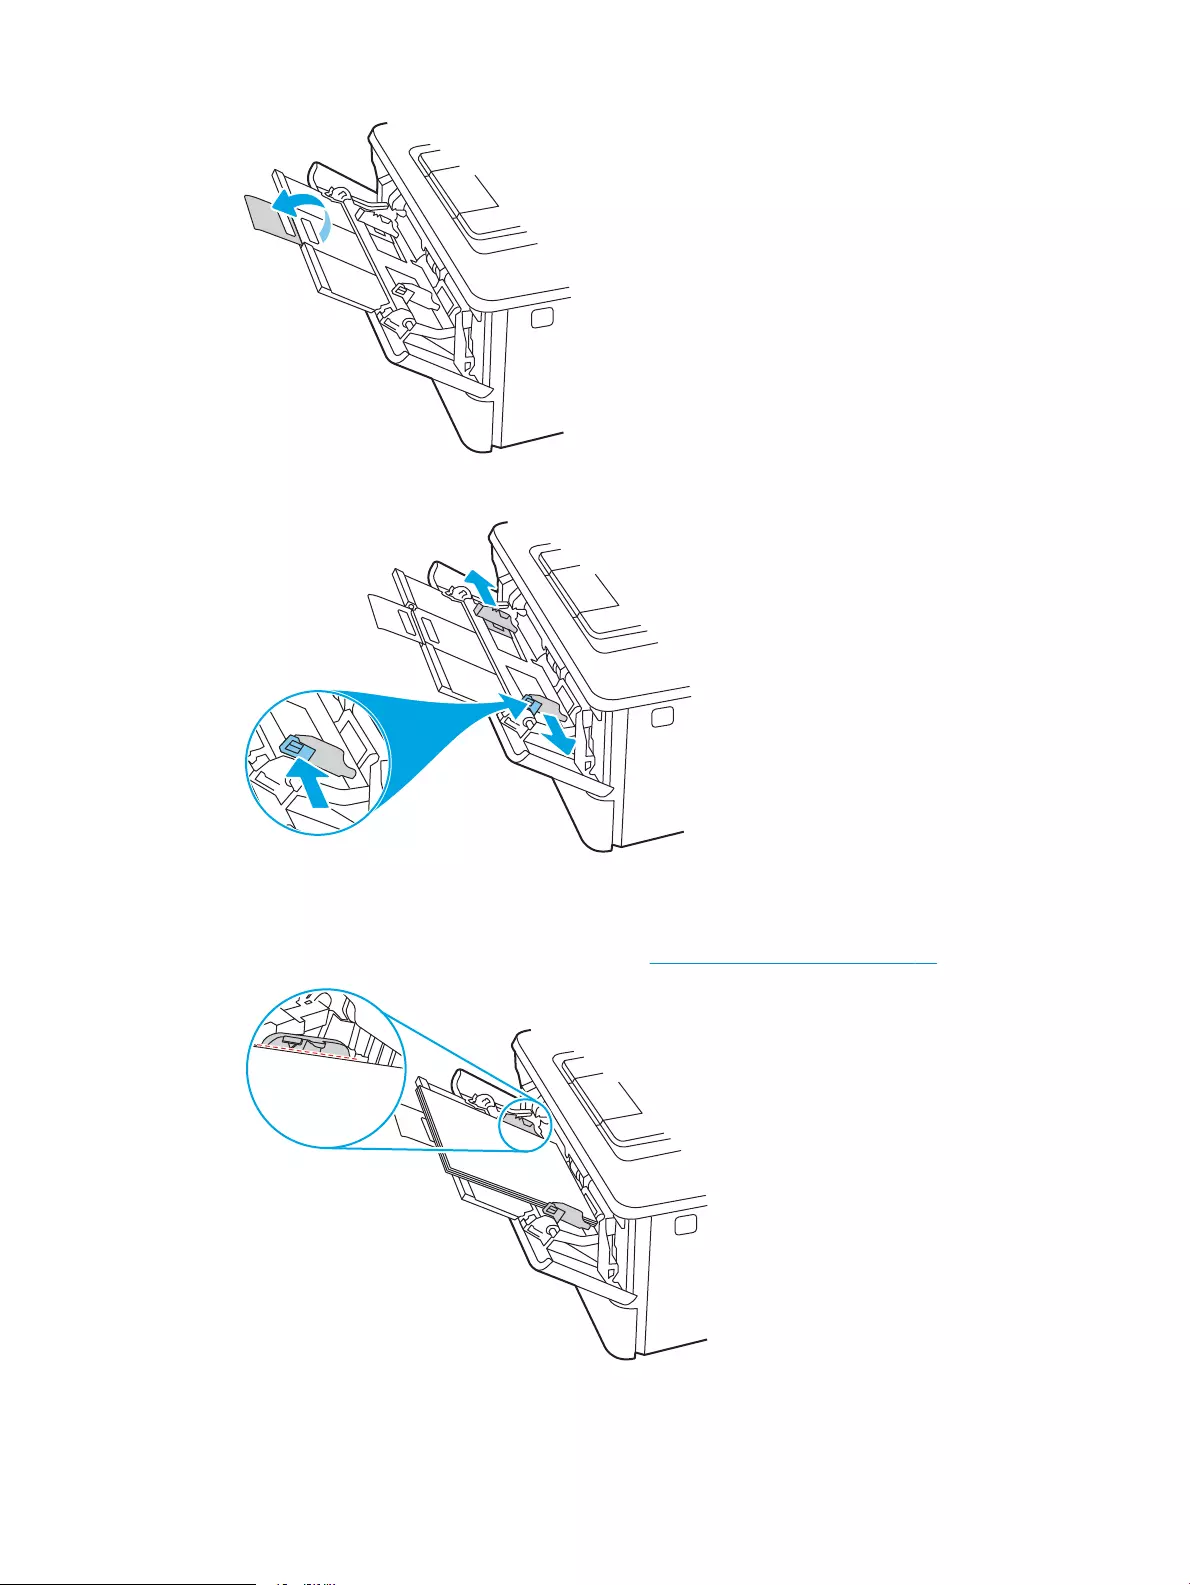
4. Press down on the tab on the right paper guide, and then spread the paper guides to the correct size.
5. Load the paper into the tray. Make sure that the paper ts under the tabs and below the maximumheight
indicators.
For information about how to orient the paper, see Tray 1 paper orientation on page 16.
ENWW Load paper to Tray 1 15
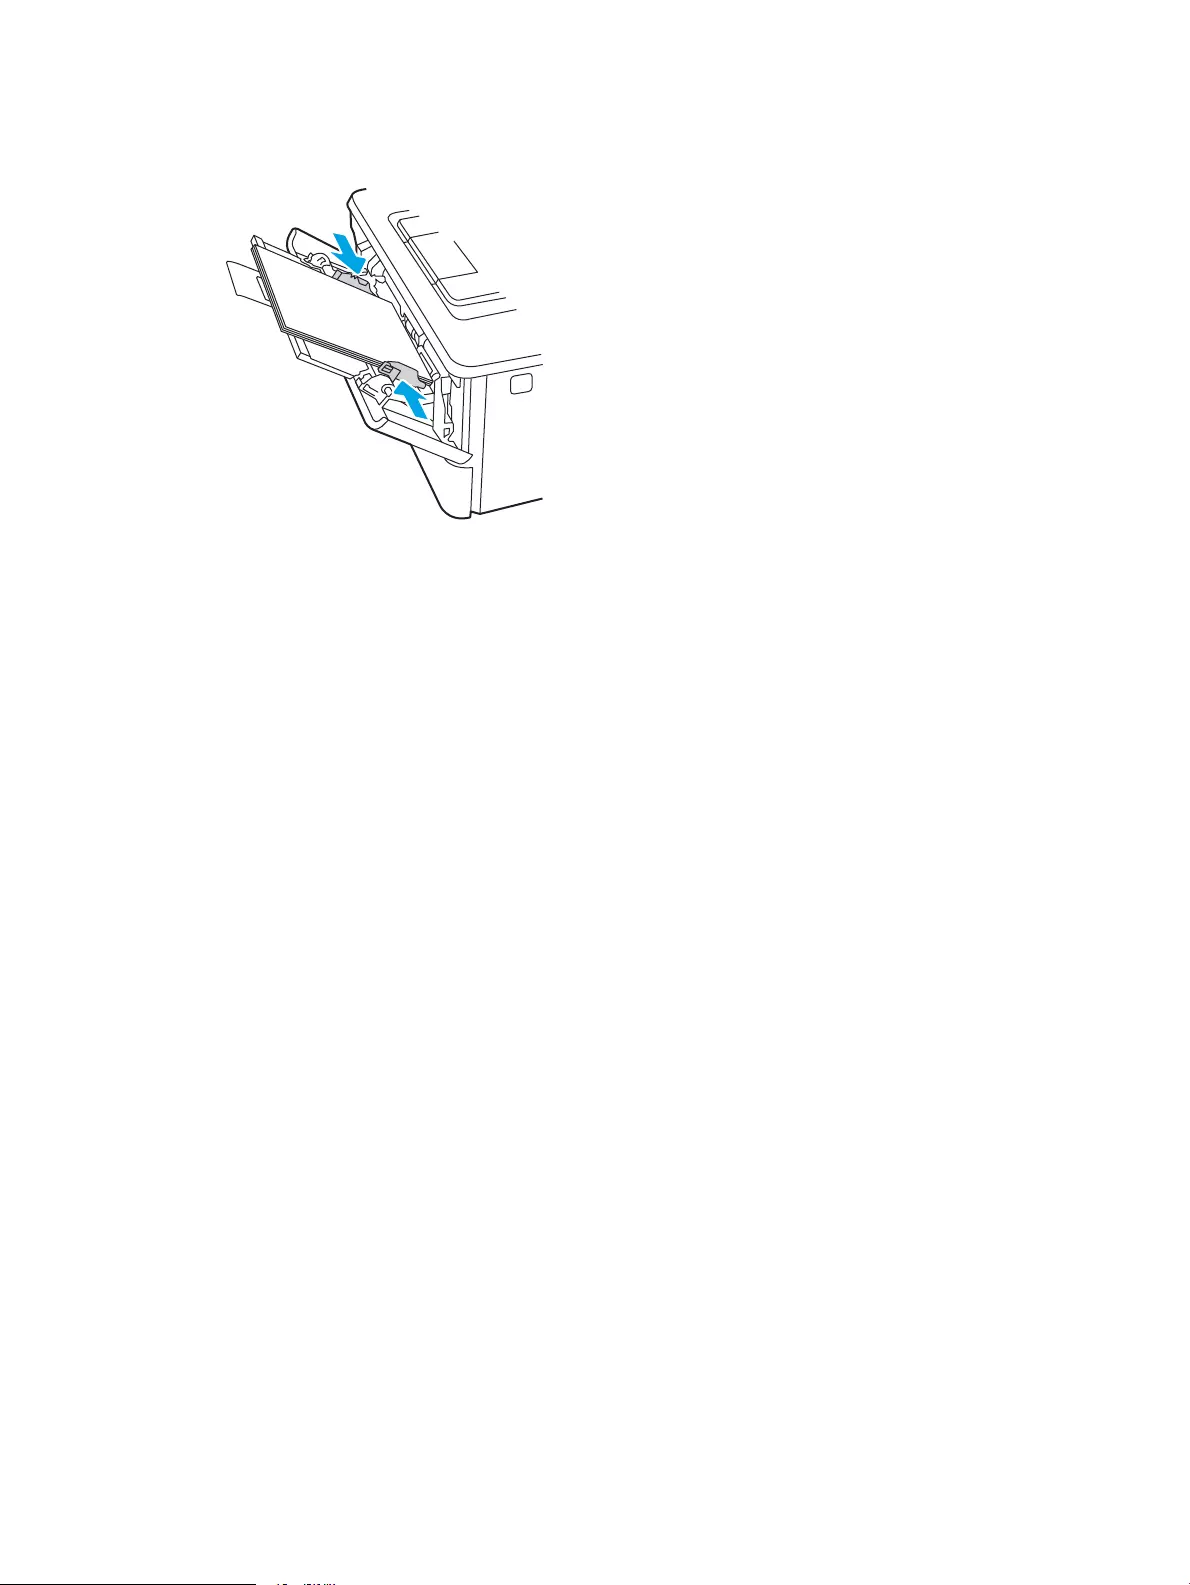
6. Press down on the tab on the right paper guide, and then adjust the paper guides so that they lightly touch
the paper stack but do not bend the paper.
7. At the computer, begin the printing process from the software application. Make sure that the driver is set
to the correct paper type and size for the paper being printed from the tray.
Tray 1 paper orientation
When using paper that requires a specic orientation, load it according to the information in the following table.
16 Chapter 2 Paper trays ENWW
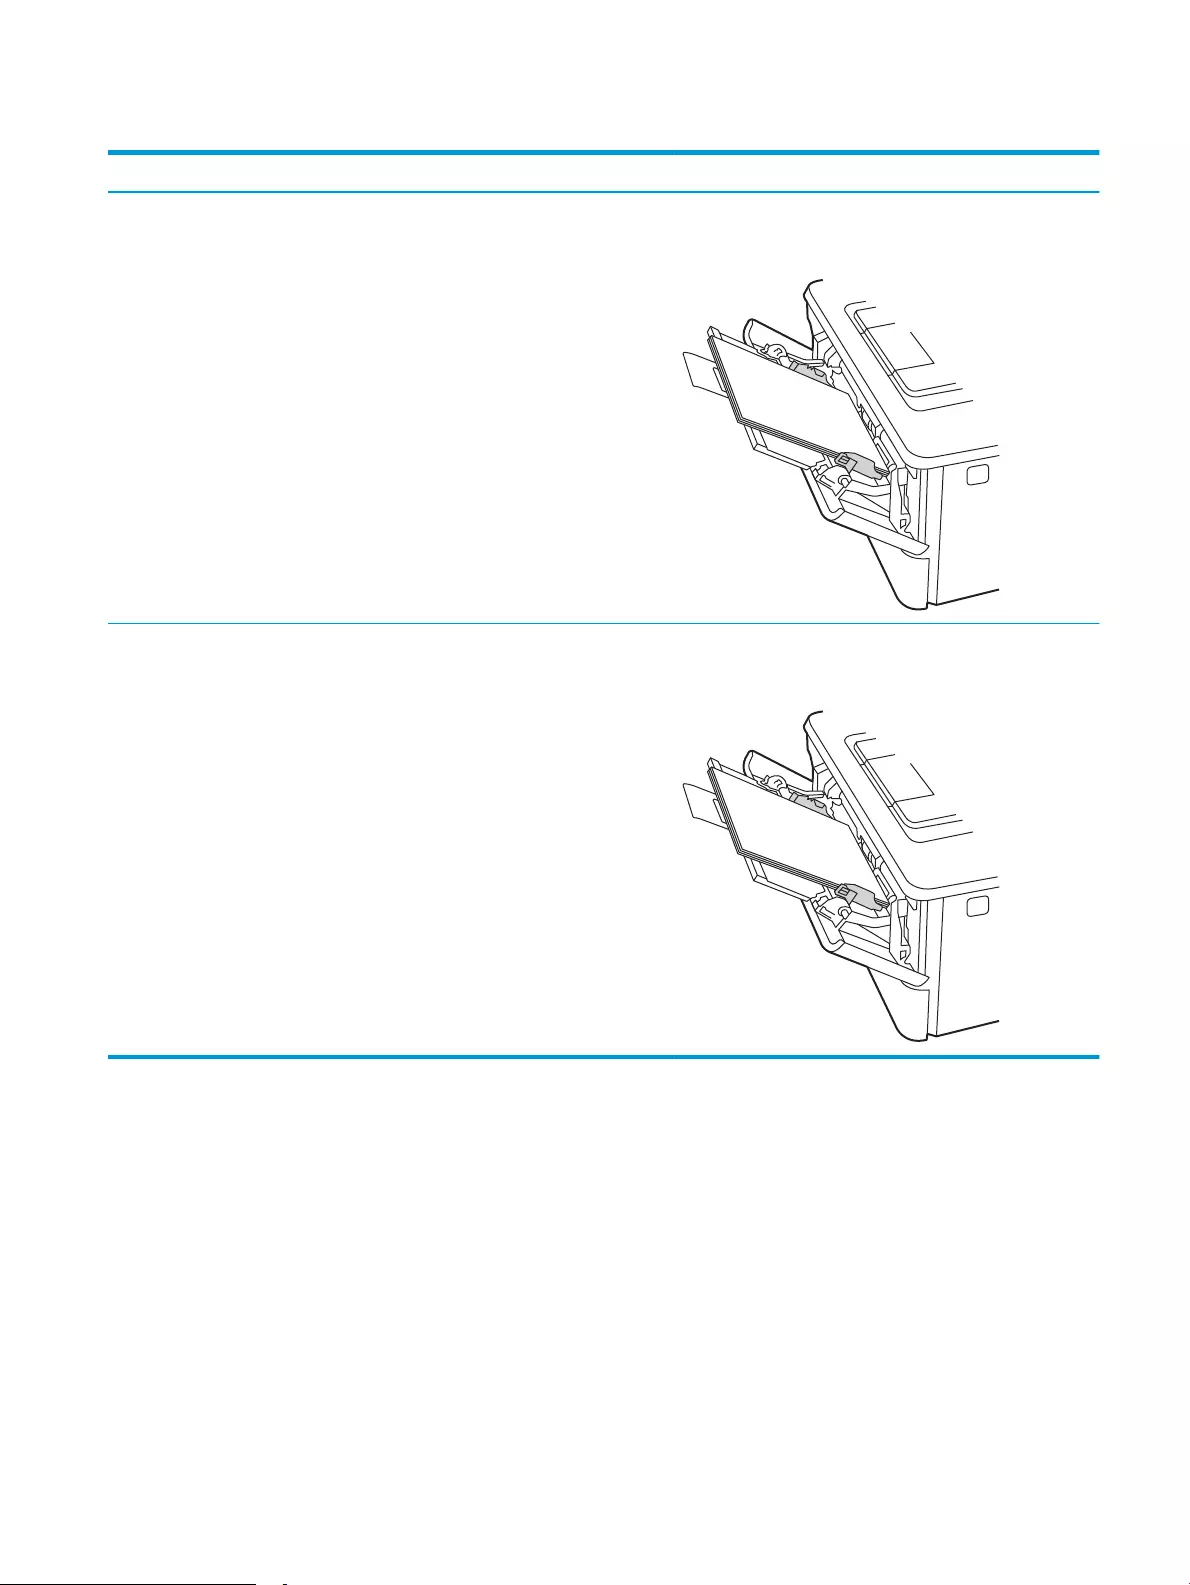
Table 2-1 Tray 1 paper orientation
Paper type Output How to load paper
Letterhead or preprinted 1-sided printing Face-up
Top edge leading into the printer
Letterhead or preprinted 2-sided printing Face-down
Top edge leading into the printer
ENWW Load paper to Tray 1 17
Load paper to Tray 2
Review the following information about loading paper to Tray 2.
●Introduction
●Load Paper Tray 2
●Tray 2 paper orientation
Introduction
The following information describes how to load paper into Tray 2.
Load Paper Tray 2
This tray holds up to 250 sheets of 75 g/m2 (20 lb) paper.
CAUTION: Do not print envelopes, labels, or unsupported sizes of paper from Tray 2. Print these types of paper
only from Tray 1.
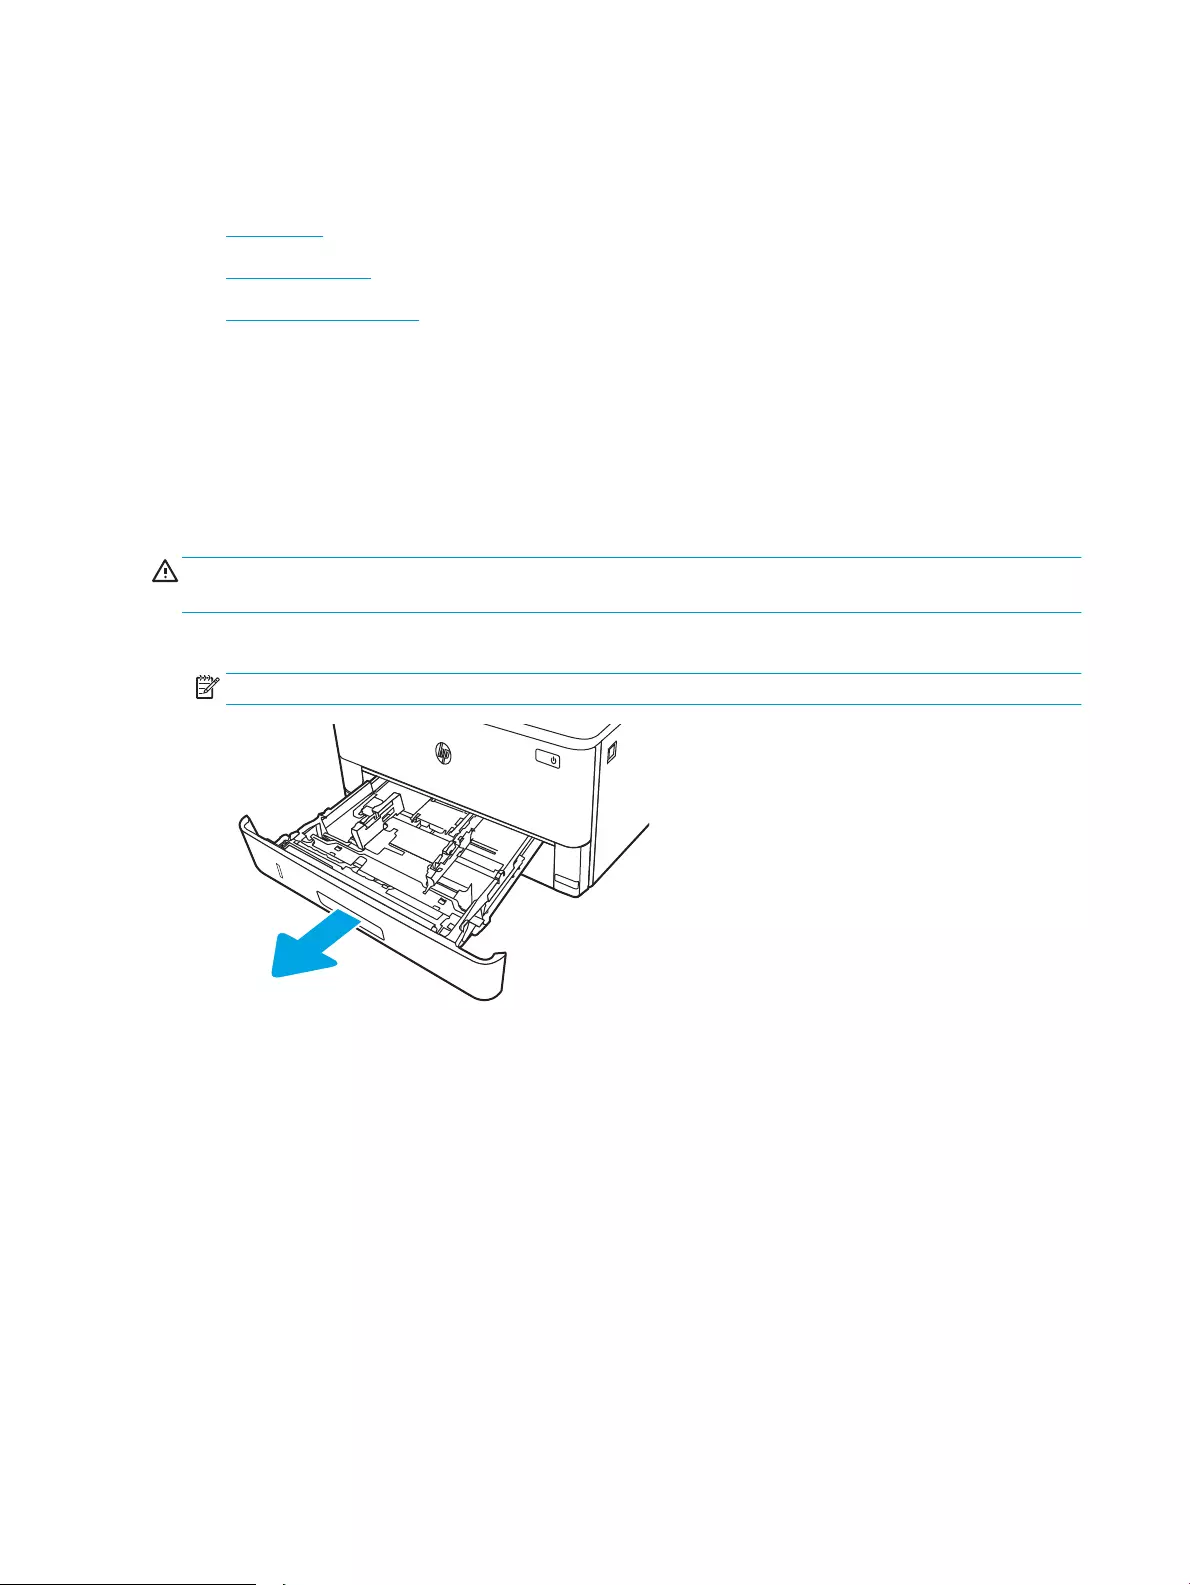
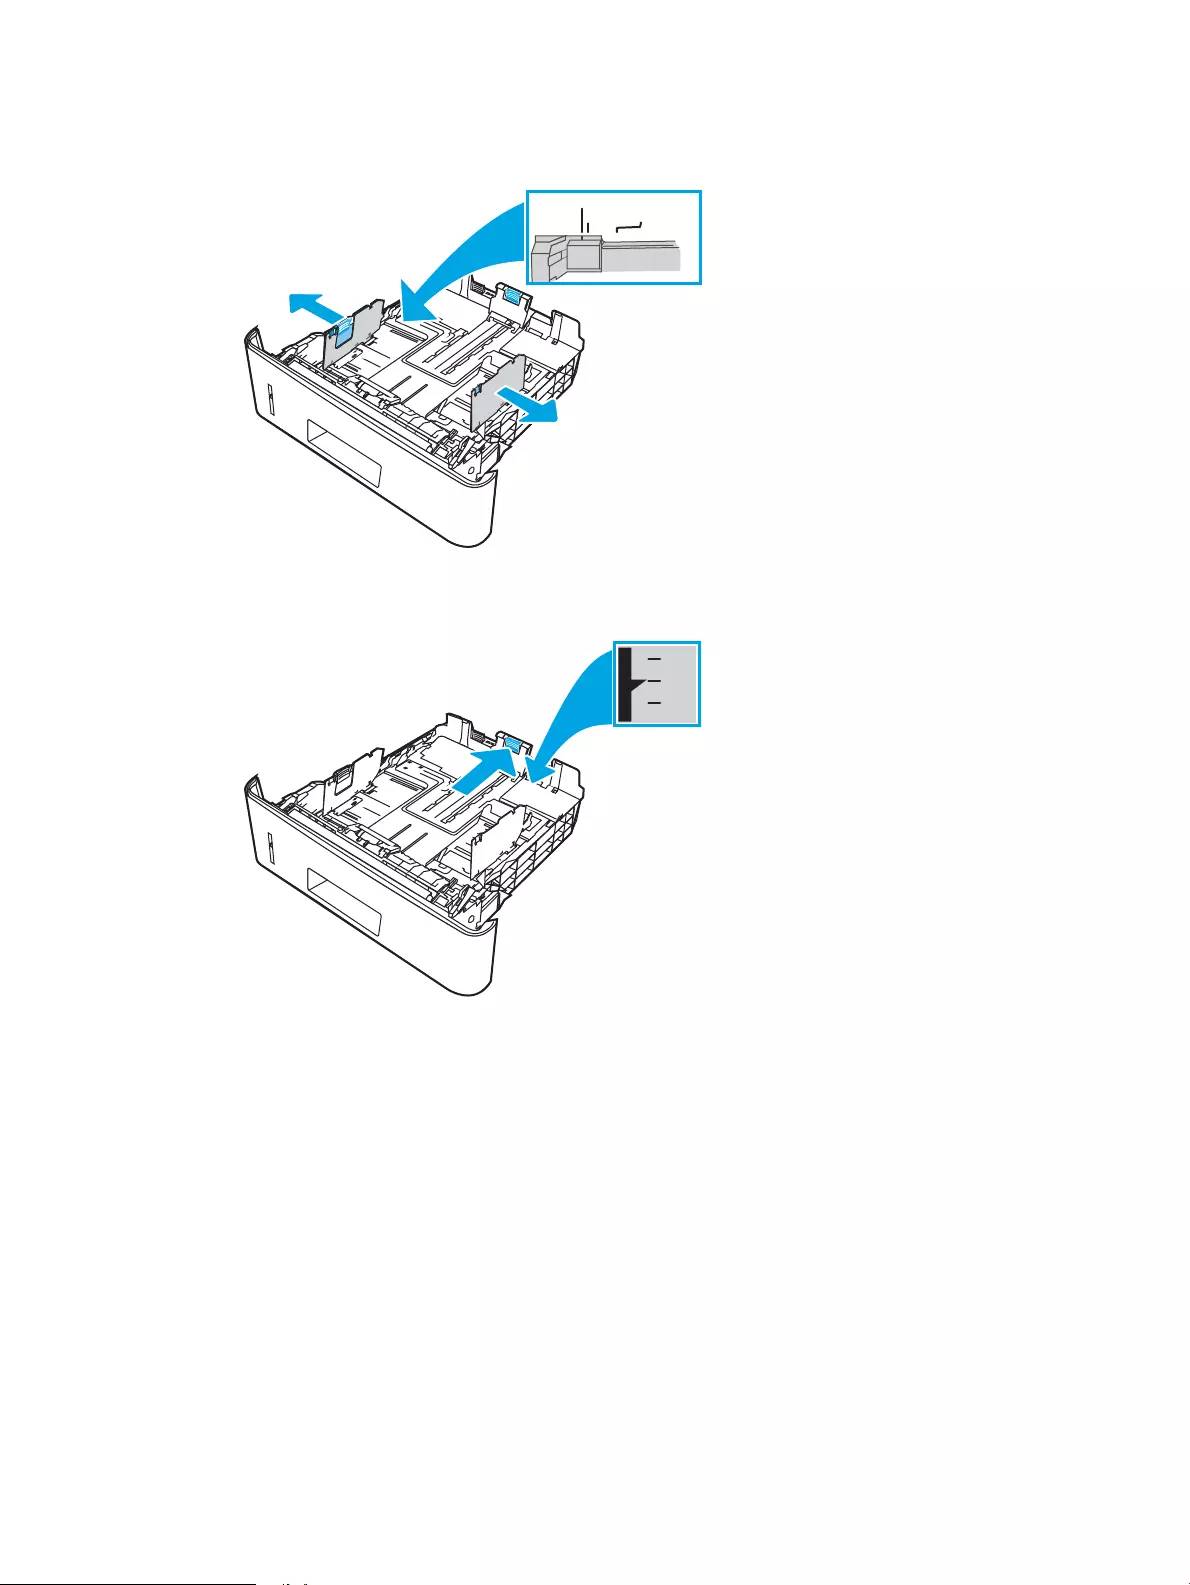
1. Pull the tray out and lift up slightly to remove it completely from the printer.
NOTE: Do not open this tray while it is in use.
18 Chapter 2 Paper trays ENWW
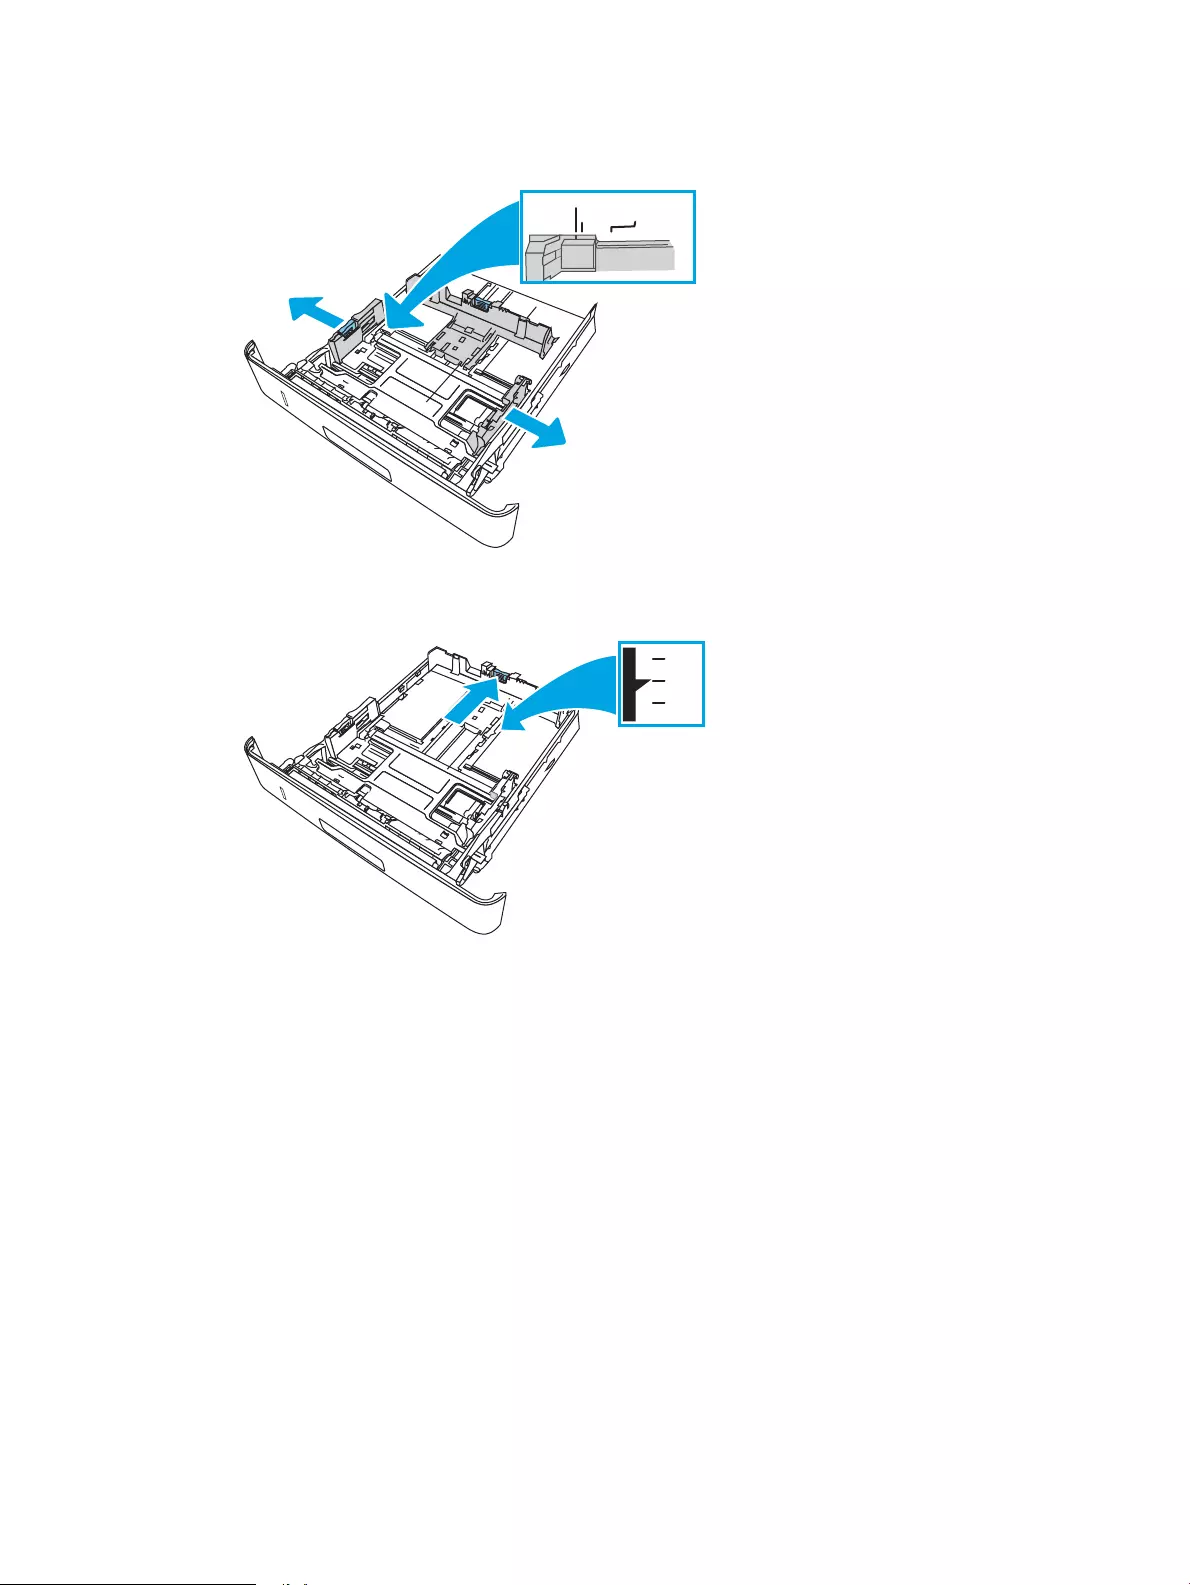
2. Adjust the paper-width guides by squeezing the adjustment latch on the left guide and sliding the guides to
the size of the paper being used.
3. Adjust the paper-length guide by squeezing the adjustment latch and sliding the guides to the size of the
paper being used.
ENWW Load paper to Tray 2 19
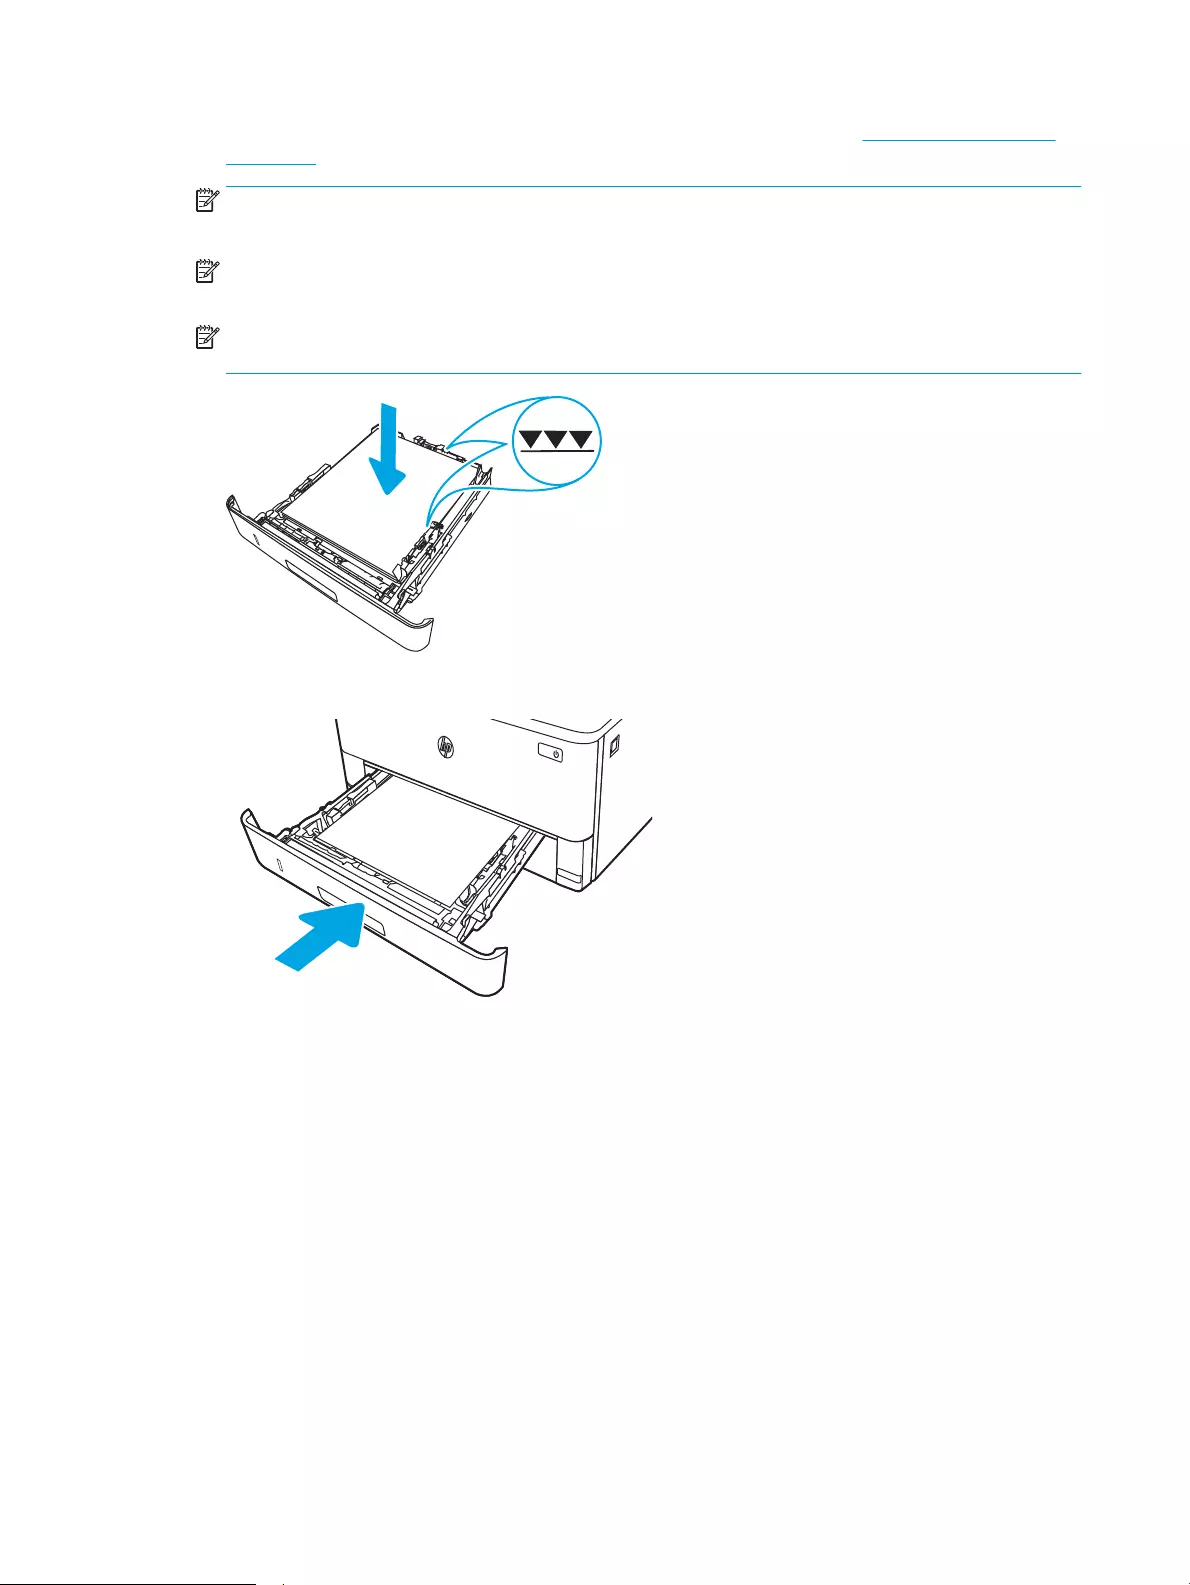
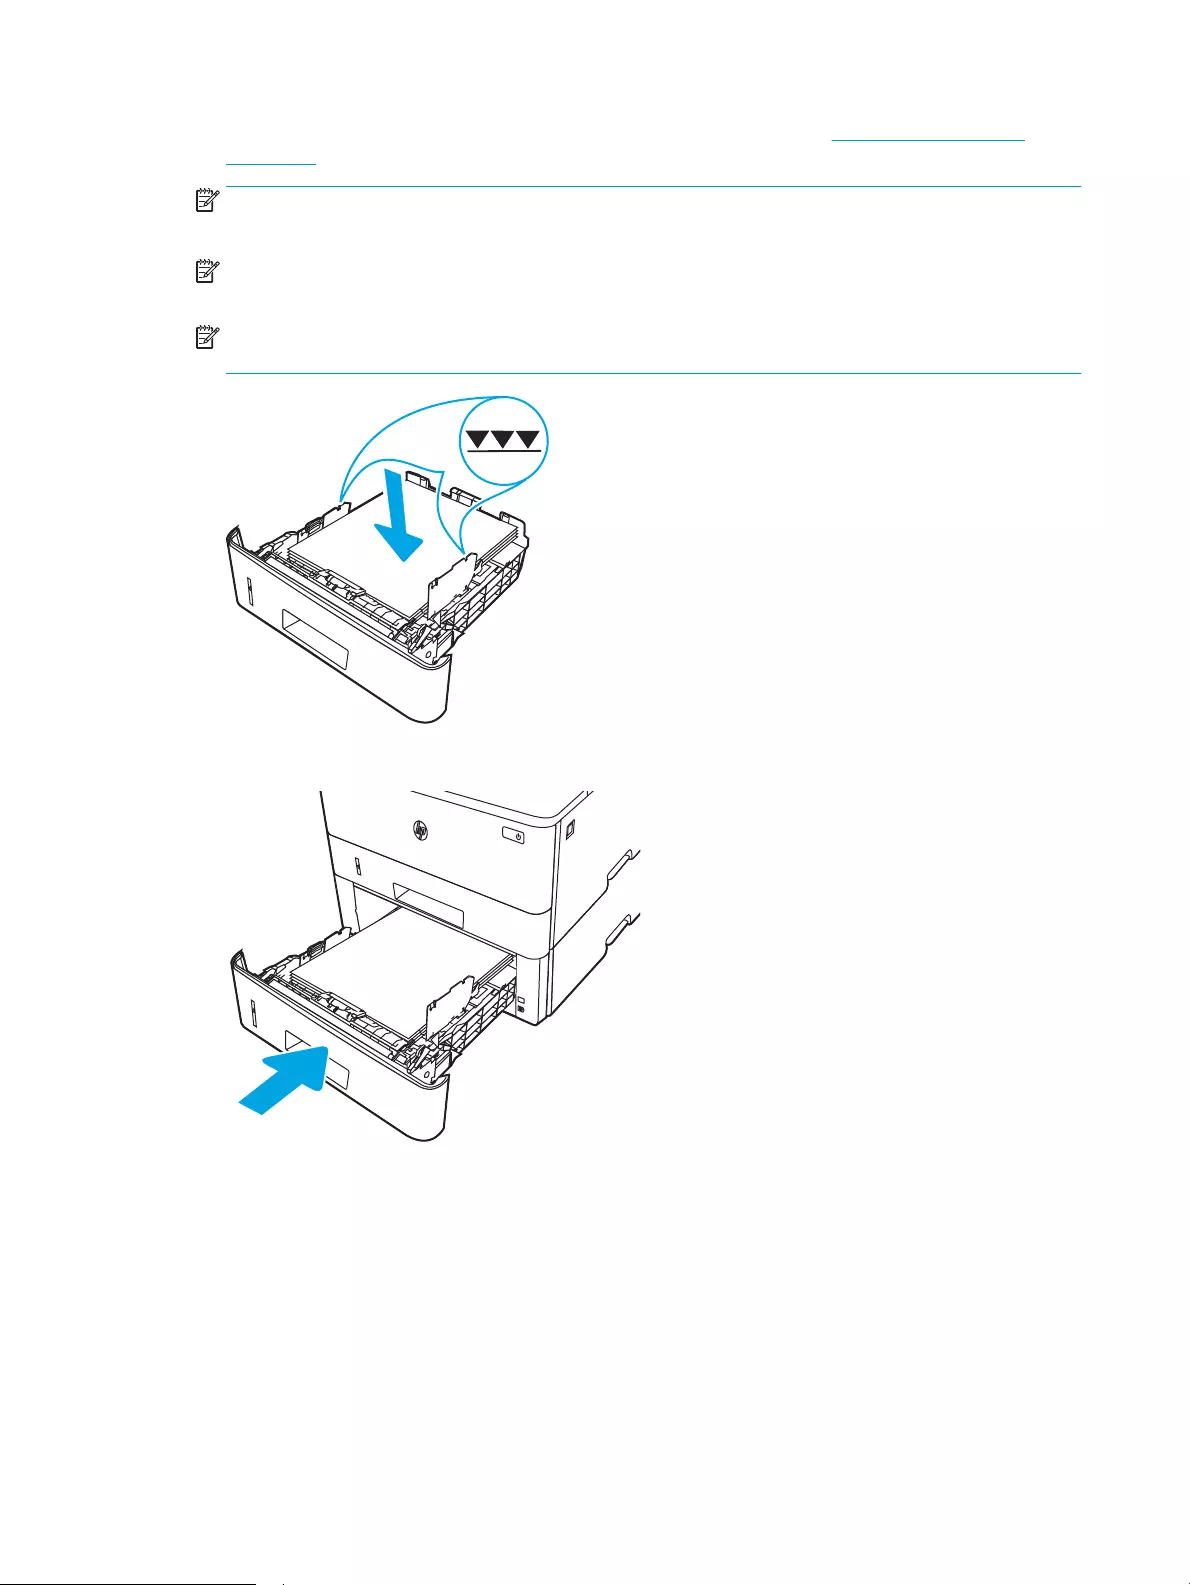
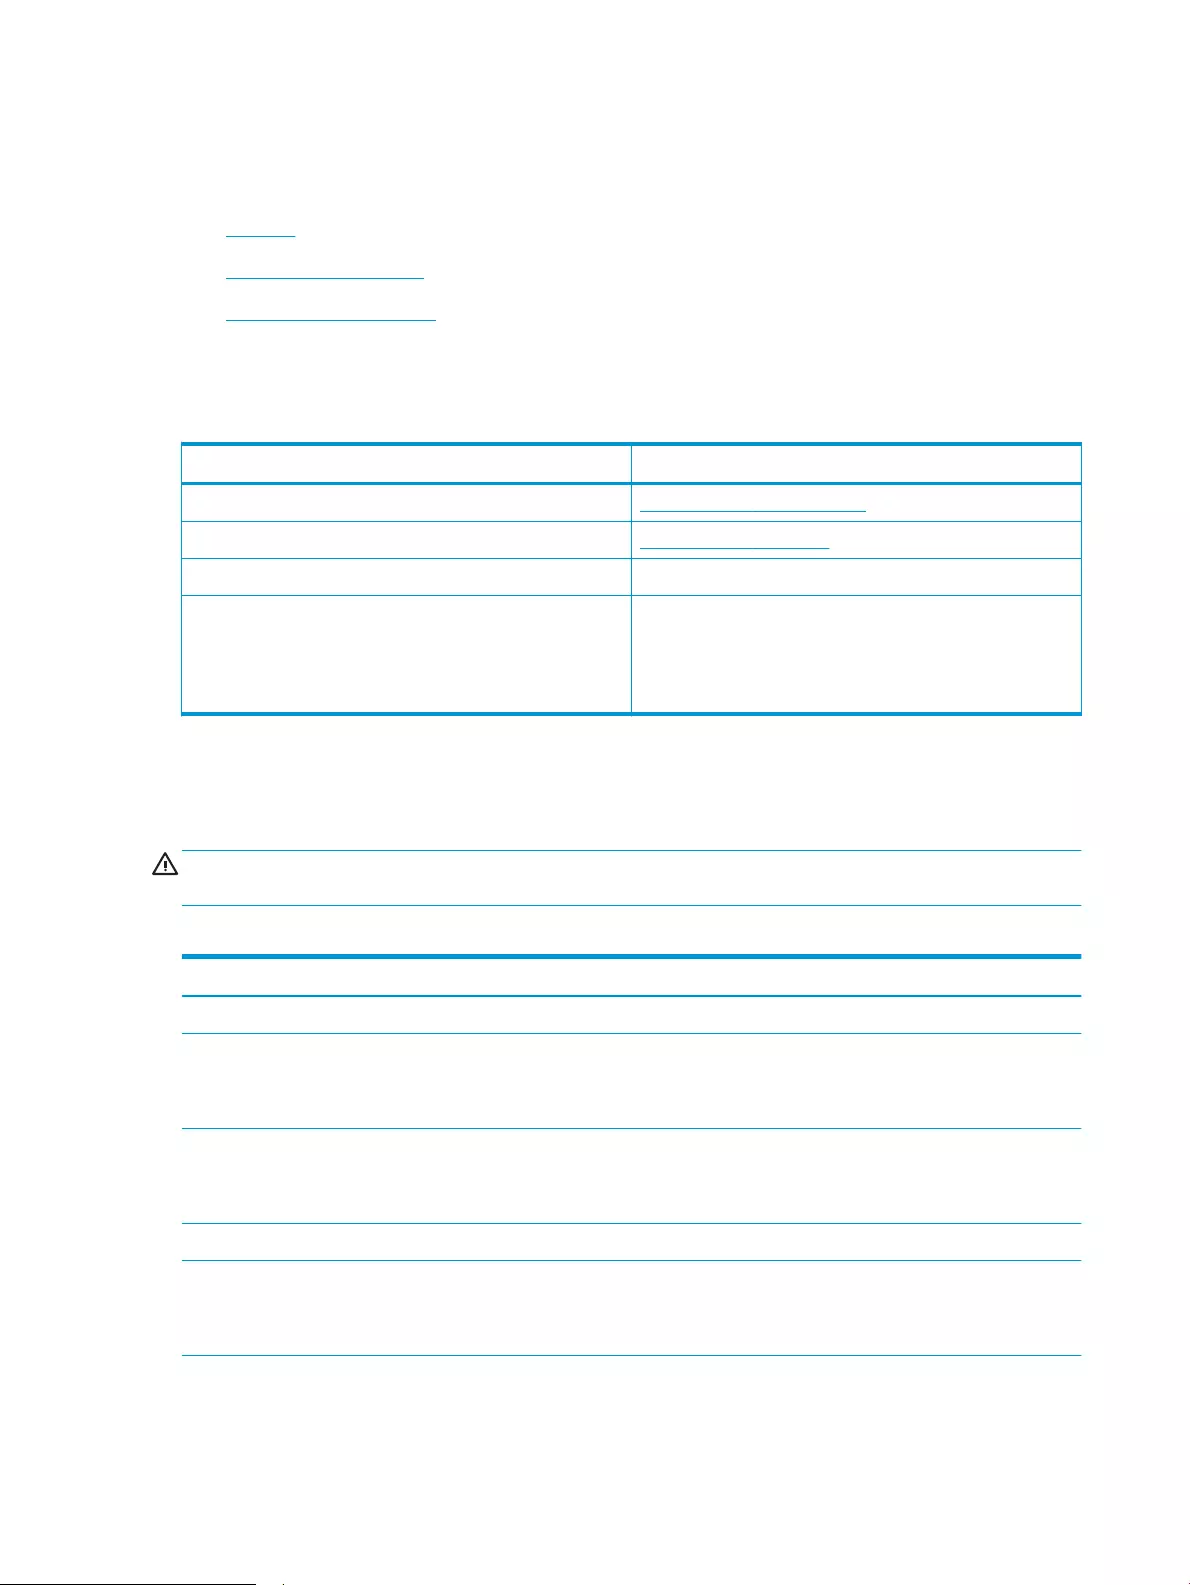
4. Load the paper into the tray. For information about how to orient the paper, see Tray 2 paper orientation
on page 20.
NOTE: Do not adjust the paper guides tightly against the paper stack. Adjust them to the indentations or
markings in the tray.
NOTE: To prevent jams, adjust the paper guides to the correct size and do not overll the tray. Be sure
that the top of the stack is below the tray full indicators, as shown in the enlargement in the illustration.
NOTE: If the tray is not adjusted correctly, an error message might display during printing or the paper
might jam.
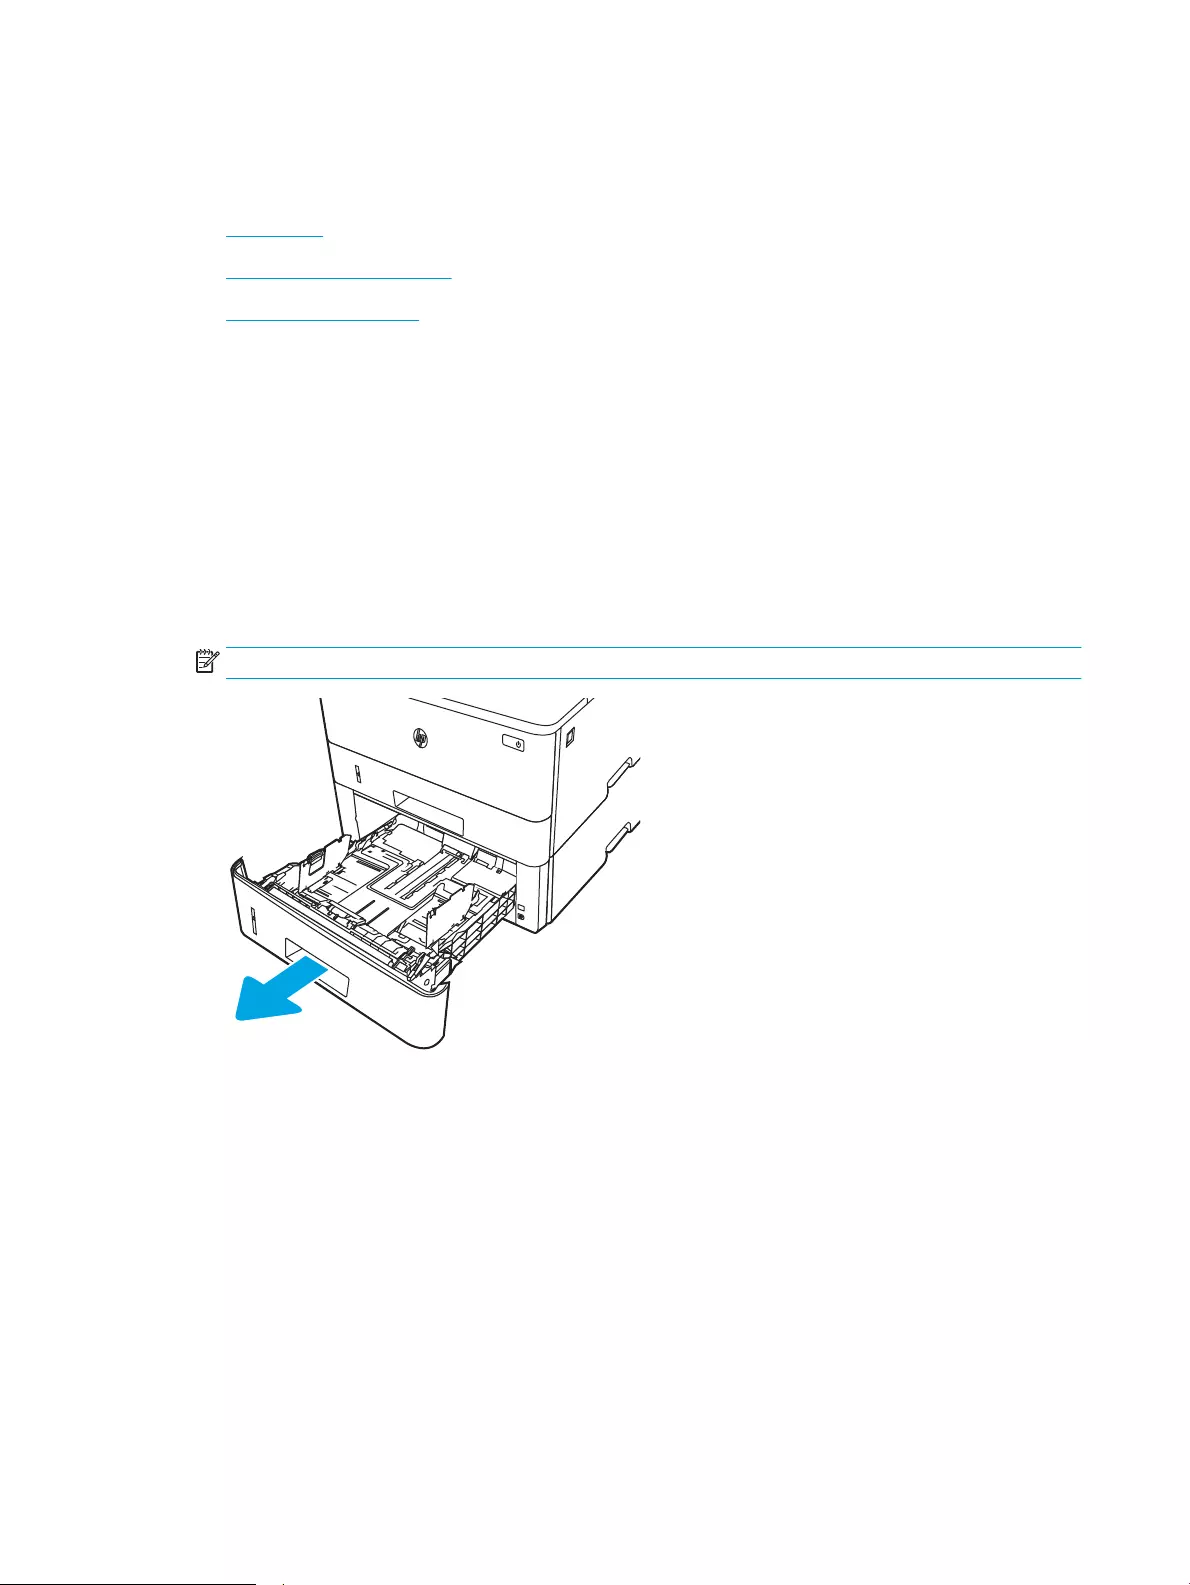
5. Slide the tray completely into the printer.
6. At the computer, begin the printing process from the software application. Make sure that the driver is set
to the correct paper type and size for the paper being printed from the tray.
Tray 2 paper orientation
When using paper that requires a specic orientation, load it according to the information in the following table.
20 Chapter 2 Paper trays ENWW
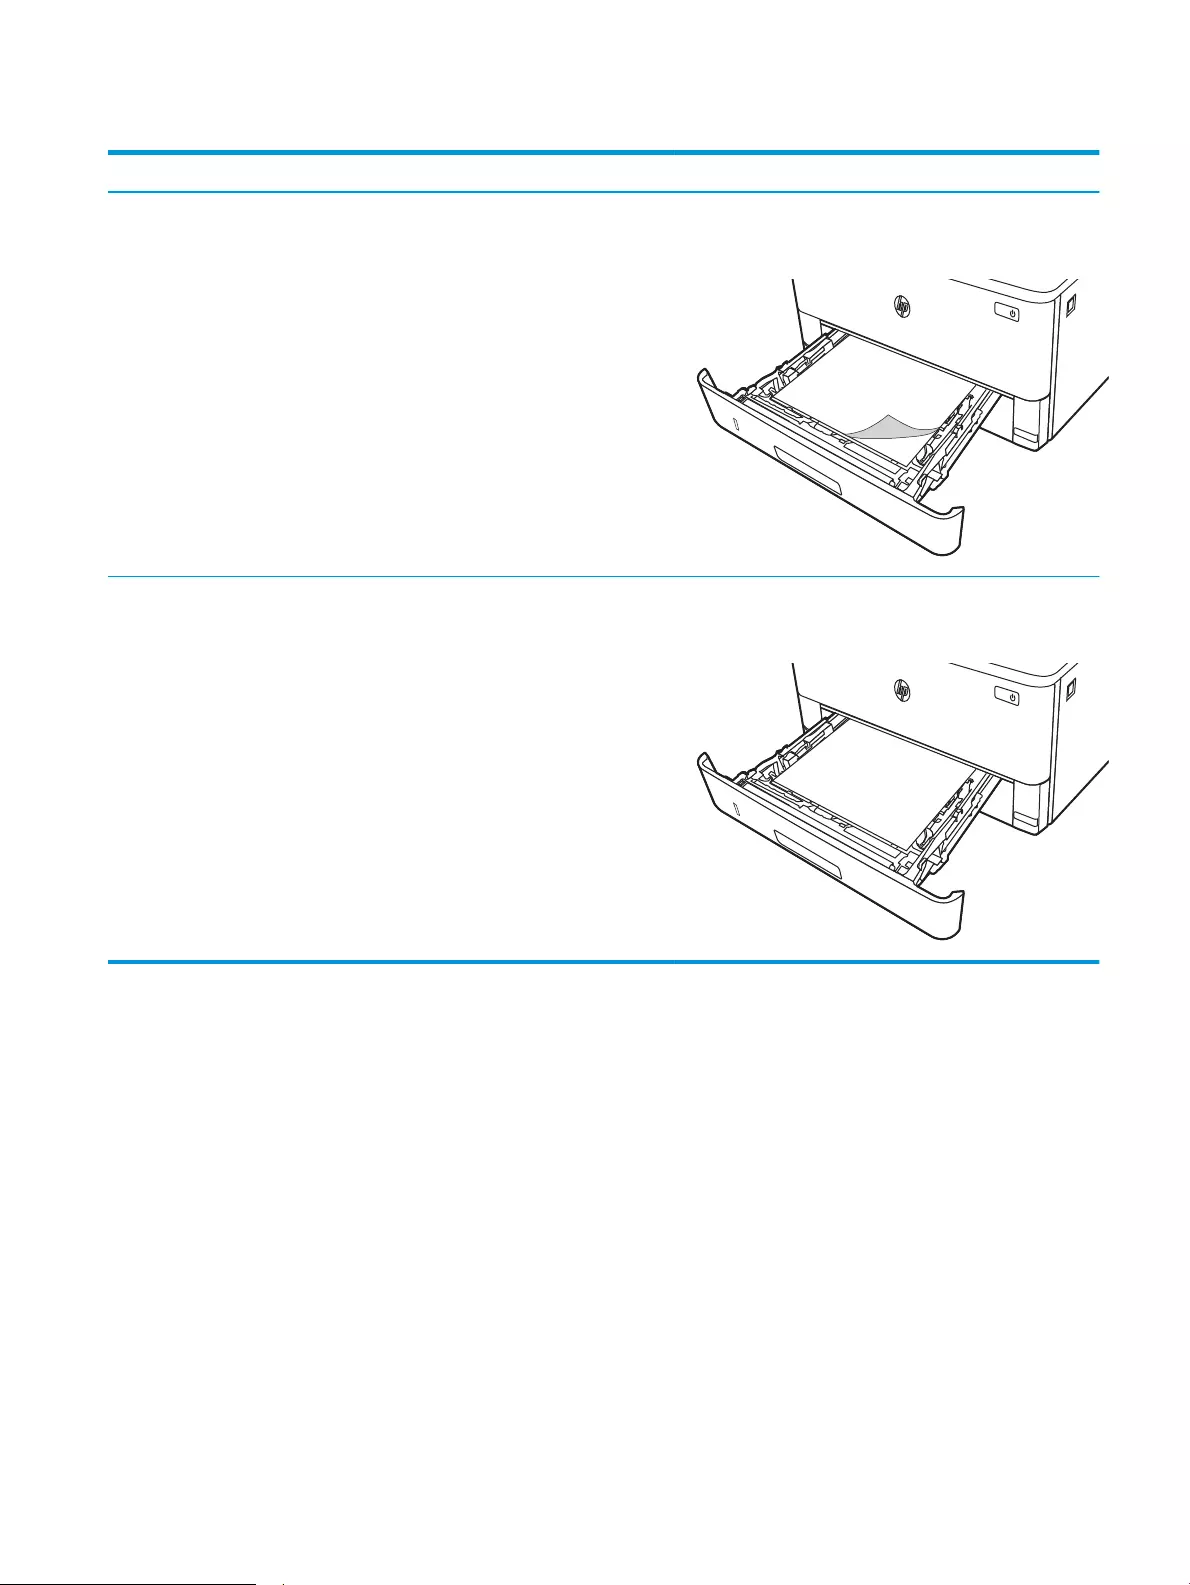
Table 2-2 Tray 2 paper orientation
Paper type Output How to load paper
Letterhead or preprinted 1-sided printing Face-down
Top edge toward the front of the tray
Letterhead or preprinted 2-sided printing Face-up
Top edge toward the front of the tray
ENWW Load paper to Tray 2 21
Load paper to Tray 3
Review the following information about loading paper to Tray 3.
●Introduction
●Load Paper Tray 3 (optional)
●Tray 3 paper orientation
Introduction
The following information describes how to load paper into Tray 3.
Load Paper Tray 3 (optional)
This tray holds up to 550 sheets of 75 g/m2 (20 lb) paper.
Do not print envelopes, labels, or unsupported sizes of paper from Tray 3. Print these types of paper only from
Tray 1.
1. Pull the tray out and lift up slightly to remove it completely from the printer.
NOTE: Do not open this tray while it is in use.
22 Chapter 2 Paper trays ENWW
2. Adjust the paper-width guides by squeezing the adjustment latch on the left guide and sliding the guides to
the size of the paper being used.
3. Adjust the paper-length guide by squeezing the adjustment latch and sliding the guides to the size of the
paper being used.
ENWW Load paper to Tray 3 23
4. Load paper into the tray. For information about how to orient the paper, see Tray 3 paper orientation
on page 24.
NOTE: Do not adjust the paper guides tightly against the paper stack. Adjust them to the indentations or
markings in the tray.
NOTE: To prevent jams, adjust the paper guides to the correct size and do not overll the tray. Be sure
that the top of the stack is below the tray full indicator, as shown in the enlargement in the illustration.
NOTE: If the tray is not adjusted correctly, an error message might display during printing or the paper
might jam.
5. Slide the tray completely into the printer.
6. At the computer, begin the printing process from the software application. Make sure that the driver is set
to the correct paper type and size for the paper being printed from the tray.
Tray 3 paper orientation
When using paper that requires a specic orientation, load it according to the information in the following table.
24 Chapter 2 Paper trays ENWW
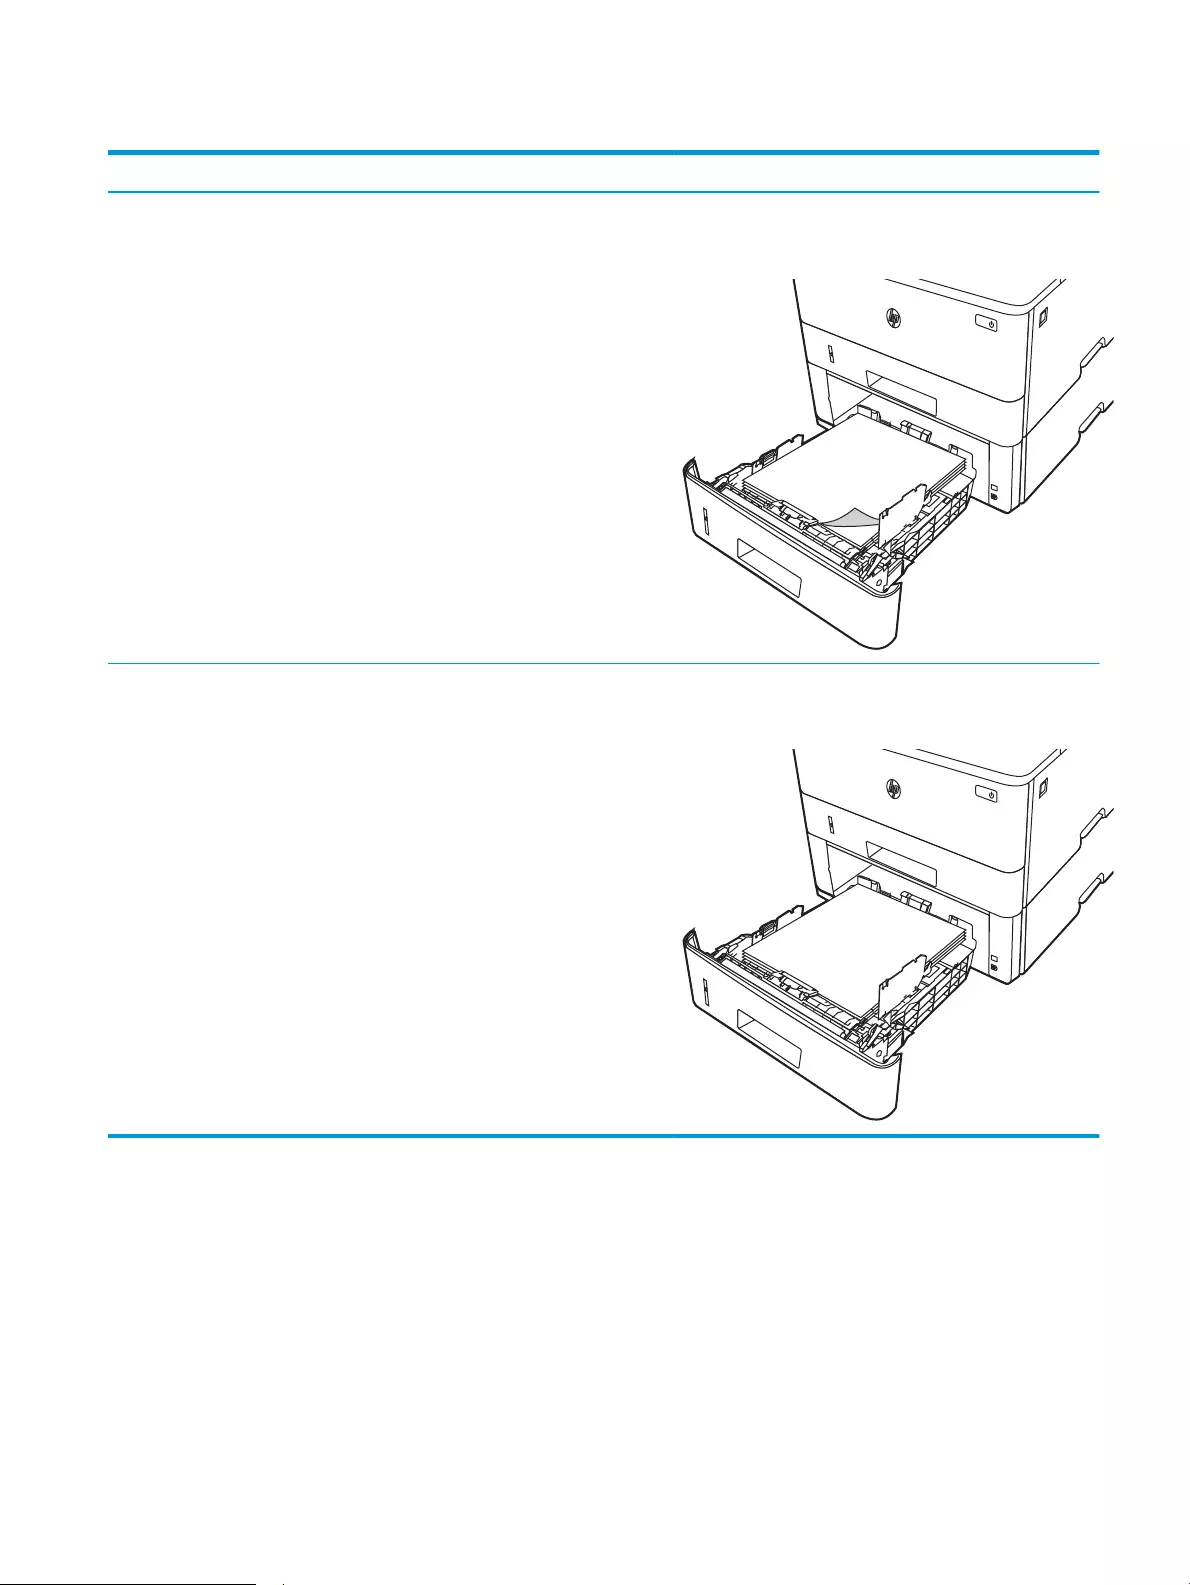
Table 2-3 Tray 3 paper orientation
Paper type Output How to load paper
Letterhead or preprinted 1-sided printing Face-down
Top edge at the front of the tray
Letterhead or preprinted 2-sided printing Face-up
Top edge at the front of the tray
ENWW Load paper to Tray 3 25

Load and print envelopes
Review the following information about loading and printing envelopes.
●Introduction
●Print envelopes
●Envelope orientation
Introduction
The following information describes how to load and print envelopes.
Use only Tray 1 to print on envelopes. Tray 1 holds up to 10 envelopes.
To print envelopes using the manual feed option, follow these steps to select the correct settings in the print
driver, and then load the envelopes into the tray after sending the print job to the printer.
Print envelopes
To print envelopes, follow these steps.
1. From the software program, select the Print option.
2. Select the printer from the list of printers, and then click or tap the Properties or Preferences button to
open the print driver.
NOTE: The name of the button varies for dierent software programs.
3. Click or tap the Paper/Quality tab.
4. In the Paper size drop-down list, select the correct size for the envelopes.
5. In the Paper type drop-down list, select Envelope.
6. In the Paper source drop-down list, select Manual feed.
7. Click the OK button to close the Document Properties dialog box.
8. In the Print dialog box, click the Print button to print the job.
Envelope orientation
When loading envelopes, load them according to the information in the following table.
26 Chapter 2 Paper trays ENWW

Table 2-4 Envelope orientation
Tray How to load
Tray 1 Face-up
Short, postage-end leading into the printer
ENWW Load and print envelopes 27

28 Chapter 2 Paper trays ENWW

3 Supplies, accessories, and parts
Order supplies or accessories, replace the toner cartridges, or remove and replace another part.
●Order supplies, accessories, and parts
●Dynamic security
●Congure the HP toner-cartridge-protection supply settings
●Replace the toner cartridge
For more information:
HP’s all-inclusive help for the printer includes the following information:
●Install and congure
●Learn and use
●Solve problems
●Download software and rmware updates
●Join support forums
●Find warranty and regulatory information
ENWW 29
Order supplies, accessories, and parts
Review details about ordering supplies, accessories and parts for your printer.
●Ordering
●Supplies and accessories
●Customer self-repair parts
Ordering
Find information and links for ordering supplies, parts, and accessories for your printer.
Ordering option Ordering information
Order supplies and paper www.hp.com/go/suresupply
Order genuine HP parts or accessories www.hp.com/buy/parts
Order through service or support providers Contact an HP-authorized service or support provider.
Order using the HP Embedded Web Server (EWS) To access, in a supported Web browser on your
computer, enter the printer IP address or host name in
the address/URL eld. The EWS contains a link to the
HP SureSupply Web site, which provides options for
purchasing Original HP supplies.
Supplies and accessories
Find information about the supplies and accessories that are available for your printer.
CAUTION: Cartridges are for distribution and use within their designated region only; they will not work outside
of their designated region.
Table 3-1 Supplies
Item Description Cartridge number Part number
For use in North America and Latin America only
HP 58A Black Original LaserJet
Toner Cartridge
M304 and M404 models only.
Standard-capacity replacement
black toner cartridge
58A CF258A
HP 58X High Yield Black Original
LaserJet Toner Cartridge
M304 and M404 models only.
High-capacity replacement black
toner cartridge
58X CF258X
For use in Europe, Middle East, Russia, CIS, and Africa only
HP 59A Black Original LaserJet
Toner Cartridge
M304 and M404 models only.
Standard-capacity replacement
black toner cartridge
59A CF259A
30 Chapter 3 Supplies, accessories, and parts ENWW

Table 3-1 Supplies (continued)
Item Description Cartridge number Part number
HP 59X High Yield Black Original
LaserJet Toner Cartridge
M304 and M404 models only.
High-capacity replacement black
toner cartridge
59X CF259X
For use in Asia Pacic (except China and India) only
HP 76A Black Original LaserJet
Toner Cartridge
M304 and M404 models only.
Standard-capacity replacement
black toner cartridge
76A CF276A
HP 76X High Yield Black Original
LaserJet Toner Cartridge
M304 and M404 models only.
High-capacity replacement black
toner cartridge
76X CF276X
For use in China and India only
HP 77A Black Original LaserJet
Toner Cartridge
M305 and M405 models only.
Standard-capacity replacement
black toner cartridge
77A CF277A
HP 77X High Yield Black Original
LaserJet Toner Cartridge
M305 and M405 models only.
High-capacity replacement black
toner cartridge
77X CF277X
Table 3-2 Accessories
Item Description Part number
Accessories
HP LaserJet 550-sheet Paper Tray Optional (Tray 3) 550-sheet paper feeder D9P29A
Customer self-repair parts
Customer Self-Repair (CSR) parts are available for many HP LaserJet printers to reduce repair time.
NOTE: More information about the CSR program and benets can be found at www.hp.com/go/csr-support and
www.hp.com/go/csr-faq.
Genuine HP replacement parts can be ordered at www.hp.com/buy/parts or by contacting an HP-authorized
service or support provider. When ordering, one of the following will be needed: part number, serial number
(found on back of printer), product number, or printer name.
●Parts listed as Mandatory self-replacement are to be installed by customers, unless you are willing to pay
HP service personnel to perform the repair. For these parts, on-site or return-to-depot support is not
provided under the HP printer warranty.
●Parts listed as Optional self-replacement can be installed by HP service personnel at your request for no
additional charge during the printer warranty period.
ENWW Order supplies, accessories, and parts 31

Table 3-3 Customer self-repair (CSR) parts
Item Description Self-replacement options Part number
250-sheet paper input tray Replacement cassette for Tray 2 Mandatory RM2-5392-000CN
HP LaserJet 1 x 550 Paper Feeder 550-sheet paper feeder (optional Tray 3) Mandatory RM2-5413-000CN
Dynamic security
Learn about dynamic-security-enabled printers.
Certain HP printers use cartridges that have security chips or electronic circuitry. Cartridges using a non-HP chip
or modied or non-HP circuitry* might not work. And, those that work today might not work in the future.
As is standard in the printing business, HP has a process for authenticating cartridges. HP continues to use
security measures to protect the quality of our customer experience, maintain the integrity of our printing
systems, and protect our intellectual property. These measures include authentication methods that change
periodically and might prevent some third-party supplies from working now or in the future. HP printers and
original HP cartridges deliver the best quality, security and reliability. When cartridges are cloned or
counterfeited, the customer is exposed to quality and potential security risks, compromising the printing
experience.
*Non-HP Chips and modied or non-HP electronic circuitry are not produced or validated by HP. HP cannot
guarantee that these chips or circuitry will work in your printer now or in the future. If you are using a non-
original HP cartridge, please check with your supplier to ensure your cartridge has an original HP security chip or
unmodied HP electronic circuitry.
32 Chapter 3 Supplies, accessories, and parts ENWW

Congure the HP toner-cartridge-protection supply settings
A network administrator can congure the toner-cartridge-protection settings using the printer control panel or
the HP Embedded Web Server (EWS).
●Introduction
●Enable or disable the Cartridge Policy feature
●Enable or disable the Cartridge Protection feature
Introduction
Use HP Cartridge Policy and Cartridge Protection to control which cartridges are installed in the printer and
protect the cartridges that are installed from theft.
●Cartridge Policy: This feature protects the printer from counterfeit toner cartridges by allowing only genuine
HP cartridges to be used with the printer. Using genuine HP cartridges ensures the best possible print
quality. When someone installs a cartridge that is not a genuine HP cartridge, the printer control panel
displays a message that the cartridge is unauthorized and it provides information explaining how to
proceed.
●Cartridge Protection: This feature permanently associates toner cartridges with a specic printer, or eet of
printers, so they cannot be used in other printers. Protecting cartridges protects your investment. When
this feature is enabled, if someone attempts to transfer a protected cartridge from the original printer into
an unauthorized printer, that printer will not print with the protected cartridge. The printer control panel
displays a message that the cartridge is protected, and it provides information explaining how to proceed.
CAUTION: After enabling cartridge protection for the printer, all subsequent toner cartridges installed in
the printer are automatically and permanently protected. To avoid protecting a new cartridge, disable the
feature before installing the new cartridge.
Turning the feature o does not turn o protection for cartridges that are currently installed.
Both features are o by default. Follow these procedures to enable or disable them.
ENWW Congure the HP toner-cartridge-protection supply settings 33

Enable or disable the Cartridge Policy feature
The Cartridge Policy feature can be enabled or disabled using the control panel or the Embedded Web Server
(EWS).
●Use the printer control panel to enable the Cartridge Policy feature
●Use the printer control panel to disable the Cartridge Policy feature
●Use the HP Embedded Web Server (EWS) to enable the Cartridge Policy feature
●Use the HP Embedded Web Server (EWS) to disable the Cartridge Policy feature
NOTE: Enabling or disabling this feature might require entering an administrator password.
Check with your administrator to determine if an administrator password has been set. EWS passwords cannot
be recovered.
Use the printer control panel to enable the Cartridge Policy feature
From the printer control panel, a network administrator can enable the Cartridge Policy feature. This allows only
genuine HP cartridges to be used with the printer.
1. On the printer control panel, press the OK button to display the Home screen.
2. Use the arrow buttons and the OK button to navigate to and open the following menus:
1. Setup
2. Supply Settings
3. Cartridge Policy
3. Use the arrow buttons to navigate to Authorized HP and then press the OK button to enable the feature.
Use the printer control panel to disable the Cartridge Policy feature
From the printer control panel, a network administrator can disable the Cartridge Policy feature. This removes
the restriction that only genuine HP cartridges can be used.
1. On the printer control panel, press the OK button to display the Home screen.
2. Use the arrow buttons and the OK button to navigate to and open the following menus:
1. Setup
2. Supply Settings
3. Cartridge Policy
3. Use the arrow buttons to select O, and then press OK to disable the feature.
Use the HP Embedded Web Server (EWS) to enable the Cartridge Policy feature
From the EWS, a network administrator can enable the Cartridge Policy feature. This allows only genuine HP
cartridges to be used with the printer.
1. Open the HP Embedded Web Server (EWS):
34 Chapter 3 Supplies, accessories, and parts ENWW
a. On the printer control panel, press the OK button to display the Home screen.
b. Use the arrow buttons and the OK button to navigate to and open the following menus:
1. Setup
2. Network Setup
3. General Settings
c. On the General Settings menu, select Show the IP Address, and then select Yes to display the printer’s
IP address or host name.
d. Open a web browser, and in the address line, type the IP address or host name exactly as it displays
on the printer control panel. Press the Enter key on the computer keyboard. The EWS opens.
NOTE: If a message displays in the web browser indicating that the website might not be safe, select
the option to continue to the website. Accessing this website will not harm the computer.
2. On the EWS Home page, click the Settings tab.
3. In the left navigation pane, click Supplies to expand the options, and then click Supply Settings.
4. In the Cartridge Policy area, click the drop-down menu and select Authorized HP.
5. Click Apply to save the changes.
Use the HP Embedded Web Server (EWS) to disable the Cartridge Policy feature
From the EWS, a network administrator can disable the Cartridge Policy feature. This removes the restriction that
only genuine HP cartridges can be used.
1. Open the HP Embedded Web Server (EWS):
a. On the printer control panel, press the OK button to display the Home screen.
b. Use the arrow buttons and the OK button to navigate to and open the following menus:
1. Setup
2. Network Setup
3. General Settings
c. On the General Settings menu, select Show the IP Address, and then select Yes to display the printer’s
IP address or host name.
d. Open a web browser, and in the address line, type the IP address or host name exactly as it displays
on the printer control panel. Press the Enter key on the computer keyboard. The EWS opens.
NOTE: If a message displays in the web browser indicating that the website might not be safe, select
the option to continue to the website. Accessing this website will not harm the computer.
2. On the EWS Home page, click the Settings tab.
ENWW Congure the HP toner-cartridge-protection supply settings 35

3. In the left navigation pane, click Supplies to expand the options, and then click Supply Settings.
4. In the Cartridge Policy area, click the drop-down menu and select O.
5. Click Apply to save the changes.
36 Chapter 3 Supplies, accessories, and parts ENWW

Enable or disable the Cartridge Protection feature
The Cartridge Protection feature can be enabled or disabled using the control panel or the Embedded Web
Server (EWS).
●Use the printer control panel to enable the Cartridge Protection feature
●Use the printer control panel to disable the Cartridge Protection feature
●Use the HP Embedded Web Server (EWS) to enable the Cartridge Protection feature
●Use the HP Embedded Web Server (EWS) to disable the Cartridge Protection feature
NOTE: Enabling or disabling this feature might require entering an administrator password.
Check with your administrator to determine if an administrator password has been set. EWS passwords cannot
be recovered.
Use the printer control panel to enable the Cartridge Protection feature
From the printer control panel, a network administrator can enable the Cartridge Protection feature. This
protects the cartridges associated with the printer from being stolen and used in other printers.
1. On the printer control panel, press the OK button to display the Home screen.
2. Use the arrow buttons and the OK button to navigate to and open the following menus:
1. Setup
2. Supply Settings
3. Cartridge Protection
3. Select Protect Cartridges.
CAUTION: After enabling cartridge protection for the printer, all subsequent toner cartridges installed in
the printer are automatically and permanently protected. To avoid protecting a new cartridge, disable the
feature before installing the new cartridge.
Turning the feature o does not turn o protection for cartridges that are currently installed.
Use the printer control panel to disable the Cartridge Protection feature
From the printer control panel, a network administrator can disable the Cartridge Protection feature. This
removes protection for any new cartridges installed in the printer.
1. On the printer control panel, press the OK button to display the Home screen.
2. Use the arrow buttons and the OK button to navigate to and open the following menus:
1. Setup
2. Supply Settings
3. Cartridge Protection
3. Use the arrow buttons to select O, and then press the OK button to disable the feature.
ENWW Congure the HP toner-cartridge-protection supply settings 37
Use the HP Embedded Web Server (EWS) to enable the Cartridge Protection feature
From the EWS, a network administrator can enable the Cartridge Protection feature. This protects the cartridges
that are associated with the printer from being stolen and used in other printers.
1. Open the HP Embedded Web Server (EWS):
a. On the printer control panel, press the OK button to display the Home screen.
b. Use the arrow buttons and the OK button to navigate to and open the following menus:
1. Setup
2. Network Setup
3. General Settings
c. On the General Settings menu, select Show the IP Address, and then select Yes to display the printer’s
IP address or host name.
d. Open a web browser, and in the address line, type the IP address or host name exactly as it displays
on the printer control panel. Press the Enter key on the computer keyboard. The EWS opens.
NOTE: If a message displays in the web browser indicating that the website might not be safe, select
the option to continue to the website. Accessing this website will not harm the computer.
2. On the EWS Home page, click the Settings tab.
3. In the left navigation pane, click Supplies to expand the options, and then click Supply Settings.
4. In the Cartridge Protection area, click the drop-down menu and select On.
5. Click Apply to save the changes.
CAUTION: After enabling Cartridge Protection for the printer, all subsequent toner cartridges installed in
the printer are automatically and permanently protected. To avoid protecting a new cartridge, disable the
feature before installing the new cartridge.
Turning the feature o does not turn o protection for cartridges that are currently installed.
Use the HP Embedded Web Server (EWS) to disable the Cartridge Protection feature
From the EWS, a network administrator can disable the Cartridge Protection feature. This removes protection for
any new cartridges installed in the printer.
1. Open the HP Embedded Web Server (EWS):
a. On the printer control panel, press the OK button to display the Home screen.
b. Use the arrow buttons and the OK button to navigate to and open the following menus:
1. Setup
2. Network Setup
3. General Settings
38 Chapter 3 Supplies, accessories, and parts ENWW

c. On the General Settings menu, select Show the IP Address, and then select Yes to display the printer’s
IP address or host name.
d. Open a web browser, and in the address line, type the IP address or host name exactly as it displays
on the printer control panel. Press the Enter key on the computer keyboard. The EWS opens.
NOTE: If a message displays in the web browser indicating that the website might not be safe, select
the option to continue to the website. Accessing this website will not harm the computer.
2. On the EWS Home page, click the Settings tab.
3. In the left navigation pane, click Supplies to expand the options, and then click Supply Settings.
4. In the Cartridge Protection area, click the drop-down menu and select O.
5. Click Apply to save the changes.
ENWW Congure the HP toner-cartridge-protection supply settings 39

Replace the toner cartridge
Replace the toner cartridge if you receive a message on the printer, or if you are have print quality problems.
●Toner cartridge information
●Remove and replace the cartridge
Toner cartridge information
Review details about ordering replacement toner cartridges.
The printer indicates when the toner-cartridge level is low and very low. The actual toner cartridge life remaining
can vary. Consider having a replacement cartridge available to install when print quality is no longer acceptable.
Continue printing with the current cartridge until redistributing the toner no longer yields acceptable print quality.
To redistribute the toner, remove the toner cartridge from the printer and gently rock the cartridge back and forth
about its horizontal axis. For graphical representation, see the cartridge replacement instructions. Reinsert the
toner cartridge into the printer and close the cover.
To purchase cartridges or check cartridge compatibility for the printer, go to HP SureSupply at www.hp.com/go/
suresupply. Scroll to the bottom of the page and verify that the country/region is correct.
CAUTION: Cartridges are for distribution and use within their designated region only; they will not work outside
of their designated region.
Table 3-4 Supplies
Item Description Cartridge number Part number
For use in North America and Latin America only
HP 58A Black Original LaserJet
Toner Cartridge
M304 and M404 models only.
Standard-capacity replacement
black toner cartridge
58A CF258A
HP 58X High Yield Black Original
LaserJet Toner Cartridge
M304 and M404 models only.
High-capacity replacement black
toner cartridge
58X CF258X
For use in Europe, Middle East, Russia, CIS, and Africa only
HP 59A Black Original LaserJet
Toner Cartridge
M304 and M404 models only.
Standard-capacity replacement
black toner cartridge
59A CF259A
HP 59X High Yield Black Original
LaserJet Toner Cartridge
M304 and M404 models only.
High-capacity replacement black
toner cartridge
59X CF259X
For use in Asia Pacic (except China and India) only
HP 76A Black Original LaserJet
Toner Cartridge
M304 and M404 models only.
Standard-capacity replacement
black toner cartridge
76A CF276A
40 Chapter 3 Supplies, accessories, and parts ENWW
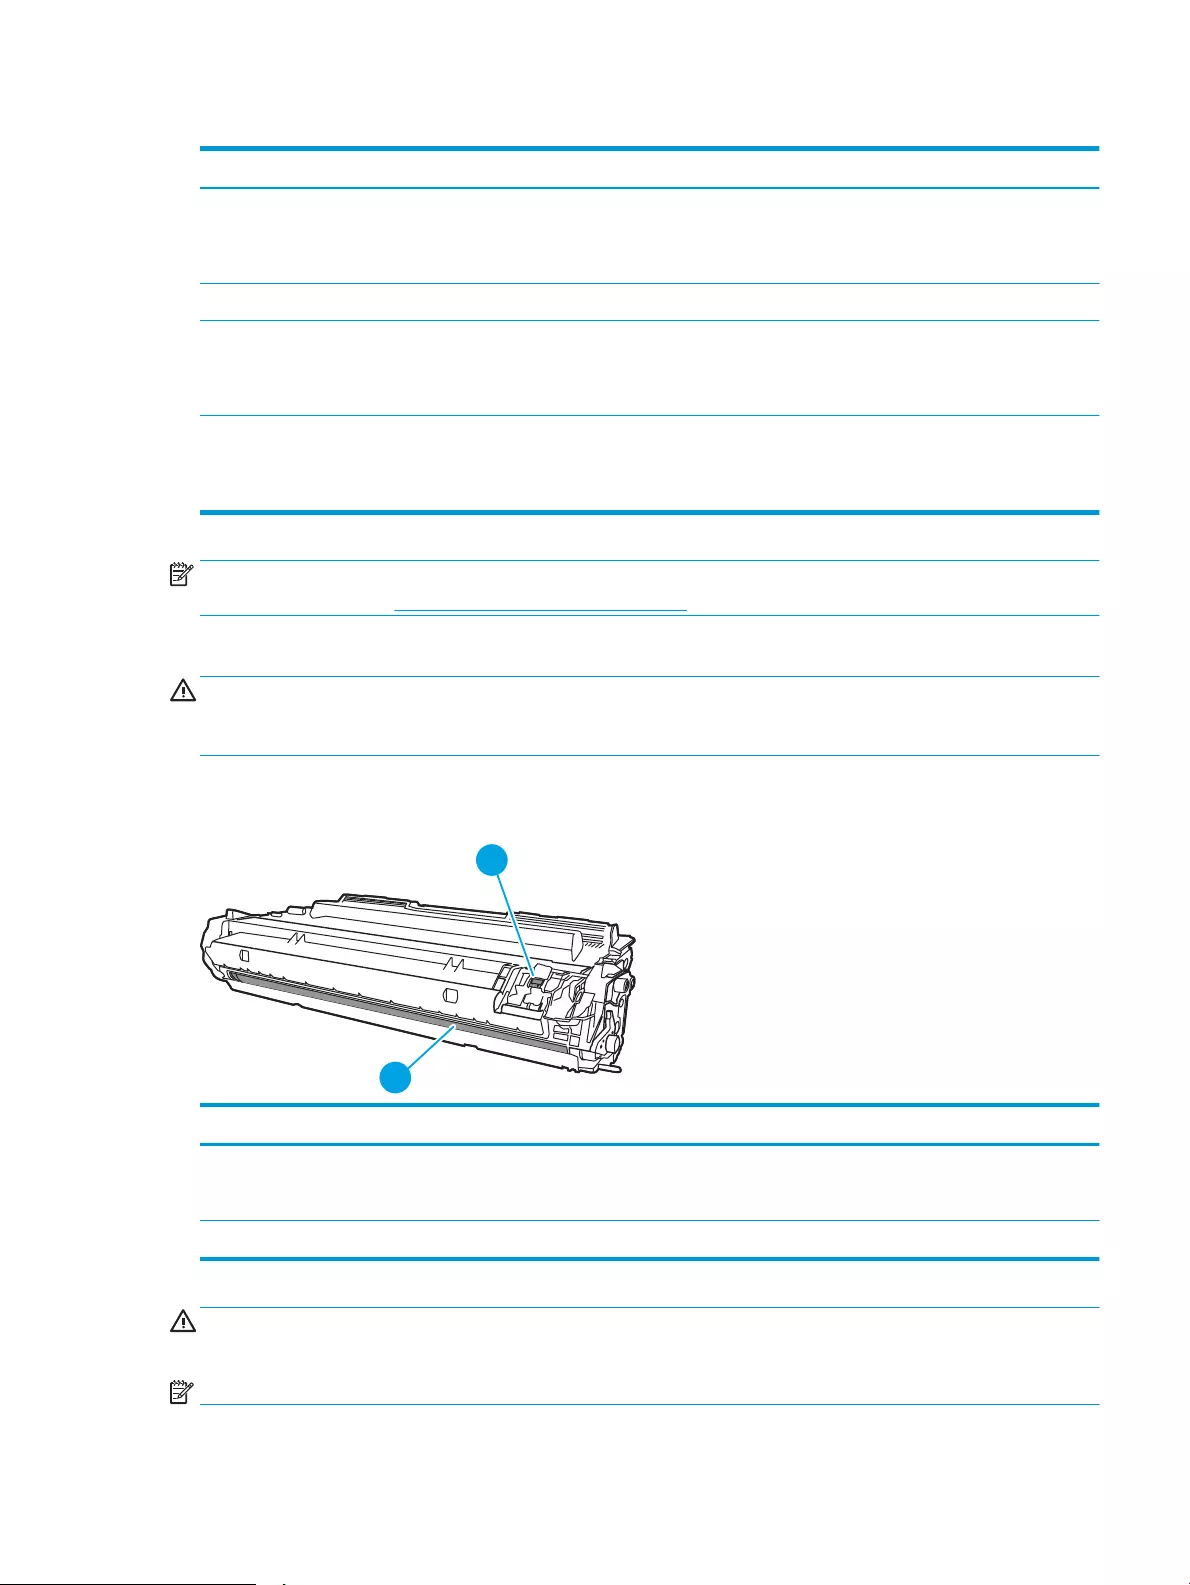
Table 3-4 Supplies (continued)
Item Description Cartridge number Part number
HP 76X High Yield Black Original
LaserJet Toner Cartridge
M304 and M404 models only.
High-capacity replacement black
toner cartridge
76X CF276X
For use in China and India only
HP 77A Black Original LaserJet
Toner Cartridge
M305 and M405 models only.
Standard-capacity replacement
black toner cartridge
77A CF277A
HP 77X High Yield Black Original
LaserJet Toner Cartridge
M305 and M405 models only.
High-capacity replacement black
toner cartridge
77X CF277X
NOTE: High-yield toner cartridges contain more toner than standard cartridges for increased page yield. For
more information, go to www.hp.com/go/learnaboutsupplies.
Do not remove the toner cartridge from its package until it is time to replace it.
CAUTION: To prevent damage to the toner cartridge, do not expose it to light for more than a few minutes.
Cover the green imaging drum if the toner cartridge must be removed from the printer for an extended period of
time.
The following illustration shows the toner cartridge components.
Figure 3-1 Toner cartridge components
Number Description
1 Imaging drum
CAUTION: Do not touch the imaging drum. Fingerprints can cause print-quality problems.
2 Memory chip
CAUTION: If toner gets on clothing, wipe it o by using a dry cloth and wash the clothes in cold water. Hot water
sets toner into fabric.
NOTE: Information about recycling used toner cartridges is in the toner cartridge box.
ENWW Replace the toner cartridge 41
Remove and replace the cartridge
Follow these steps to replace the toner cartridge.
Continue printing with the current cartridge until redistributing the toner by shaking the cartridge no longer
yields acceptable print quality.
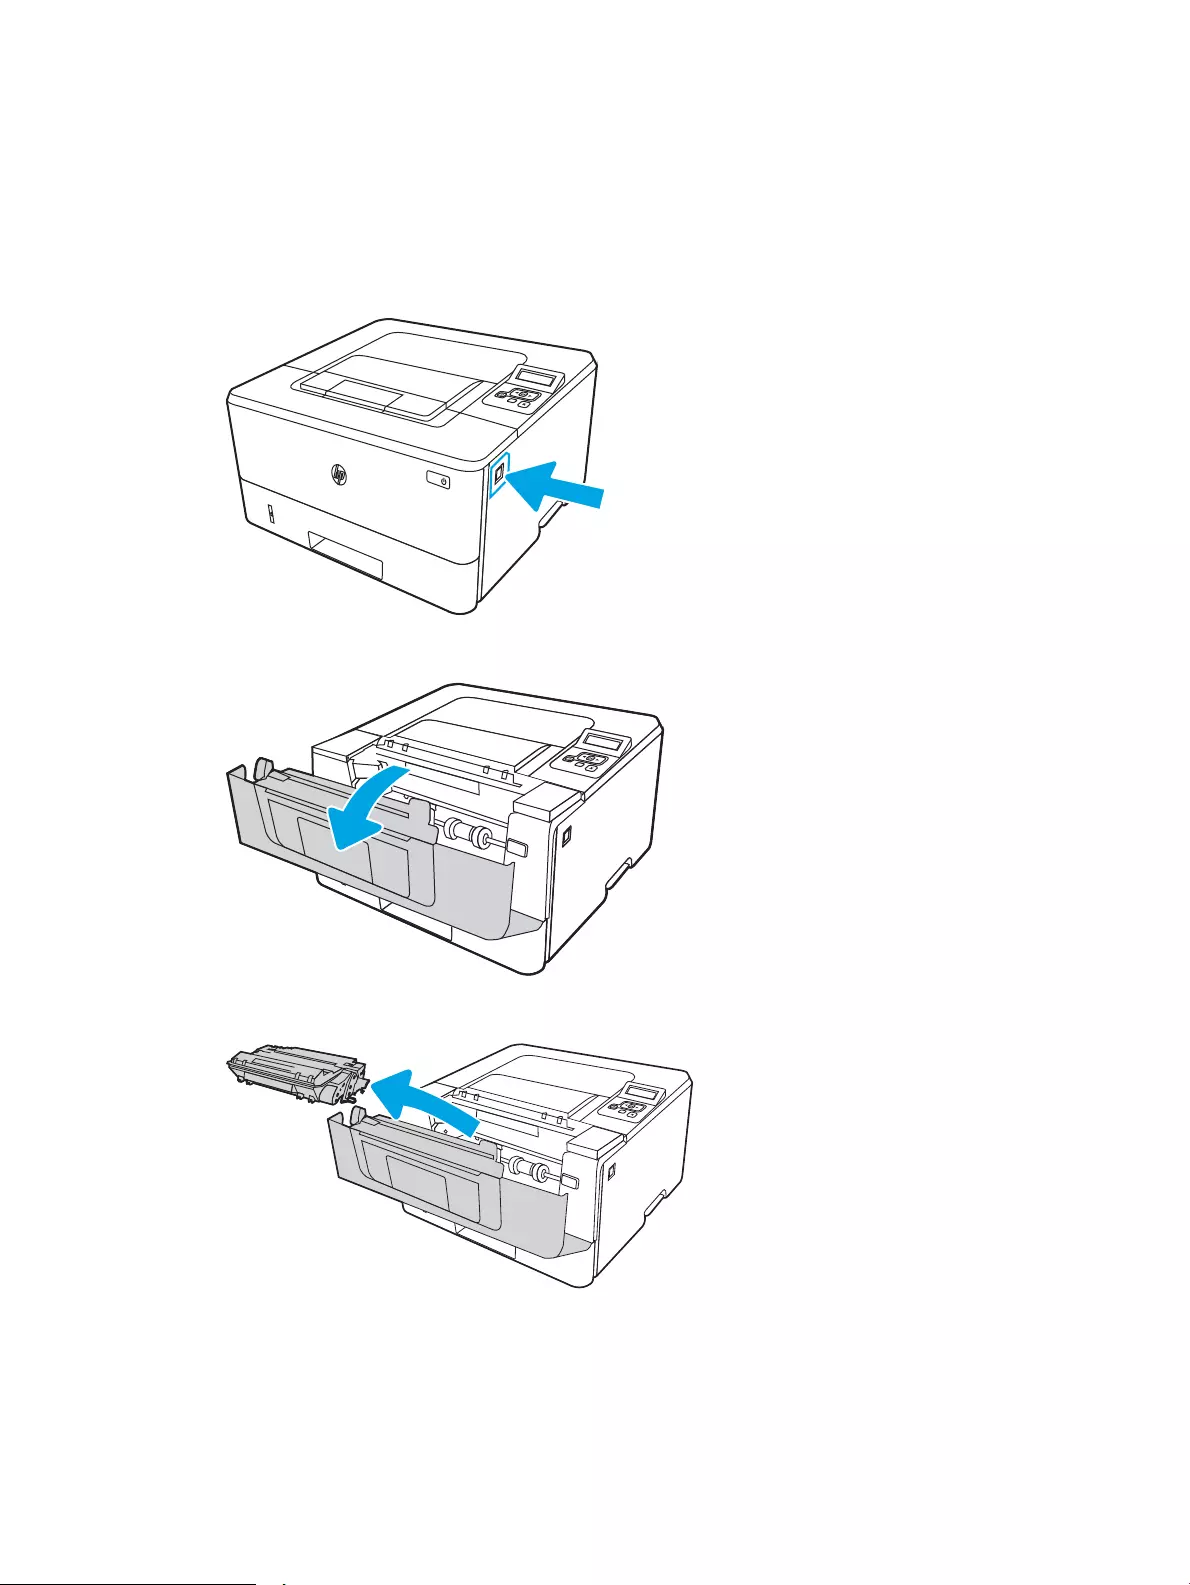
1. Press the front door release button.
2. Open the front door.
3. Remove the used toner cartridge from the printer.
42 Chapter 3 Supplies, accessories, and parts ENWW
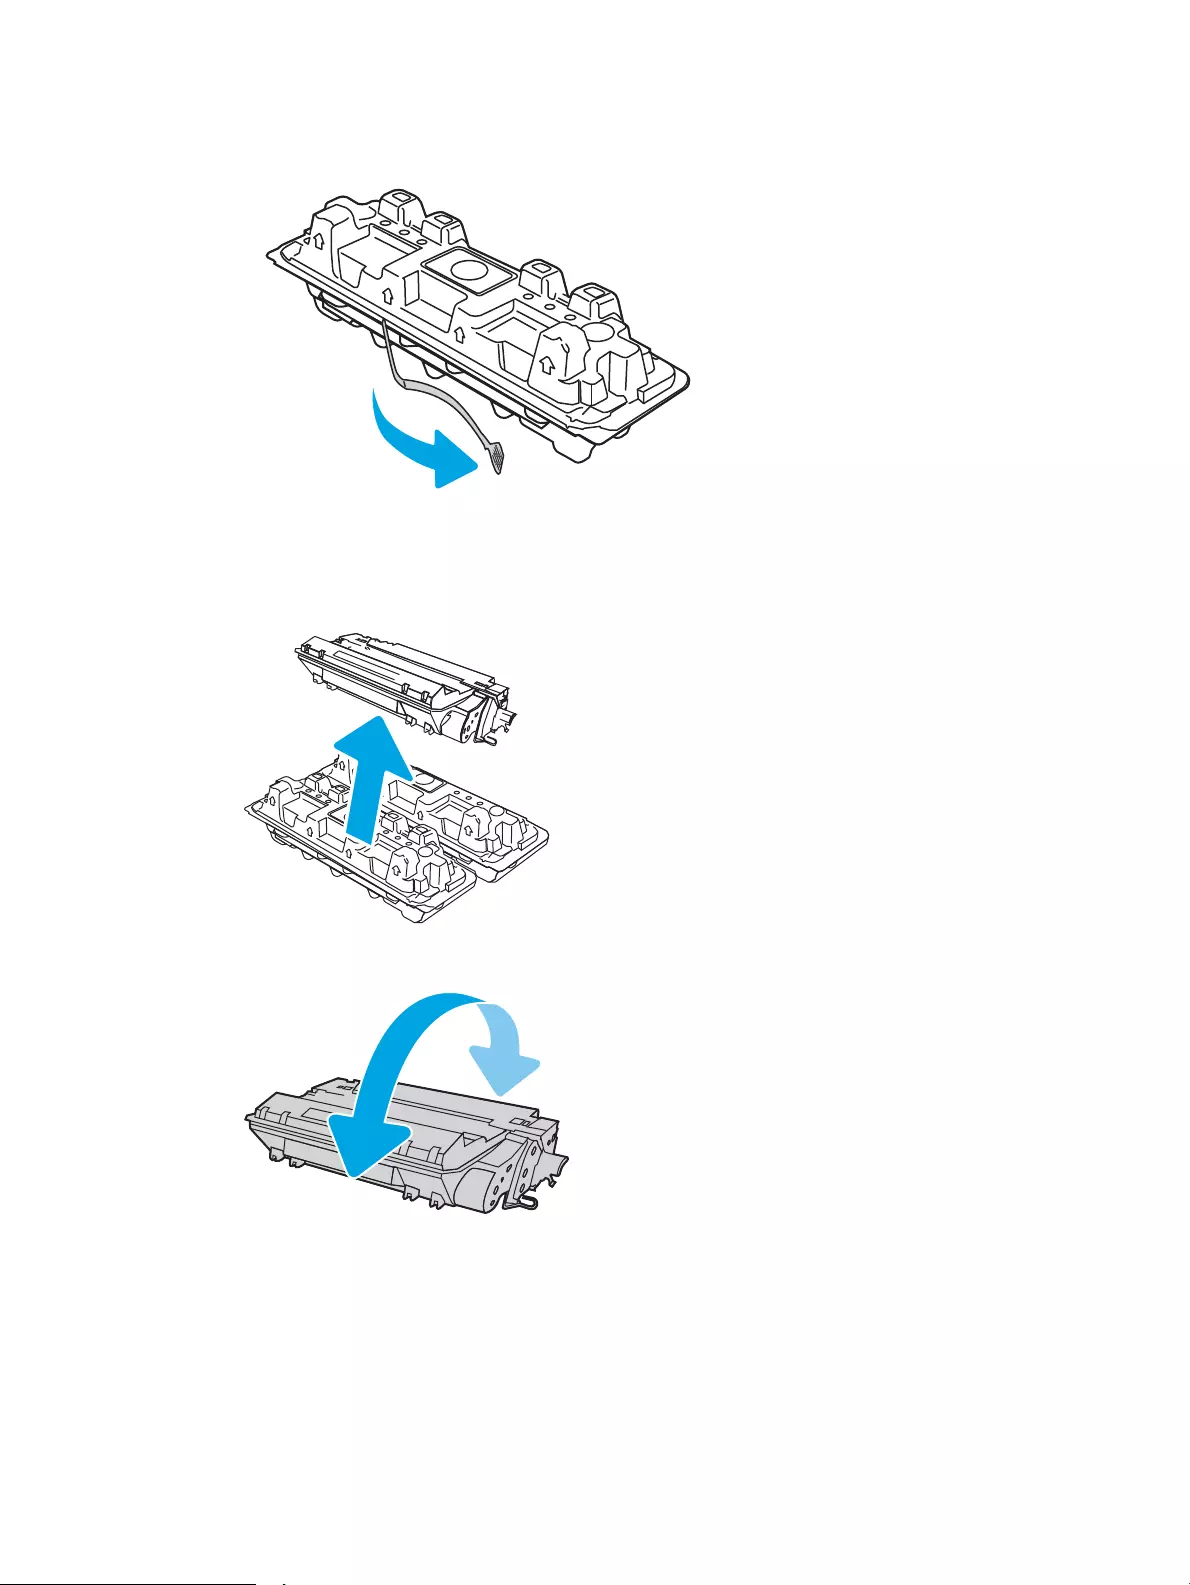
4. Remove the new toner cartridge package from the box, and then pull the release tab on the packaging.
5. Remove the toner cartridge from the opened packaging shell. Place the used toner cartridge in the shell for
recycling.
6. Hold both ends of the toner cartridge and rock it 5-6 times.
ENWW Replace the toner cartridge 43
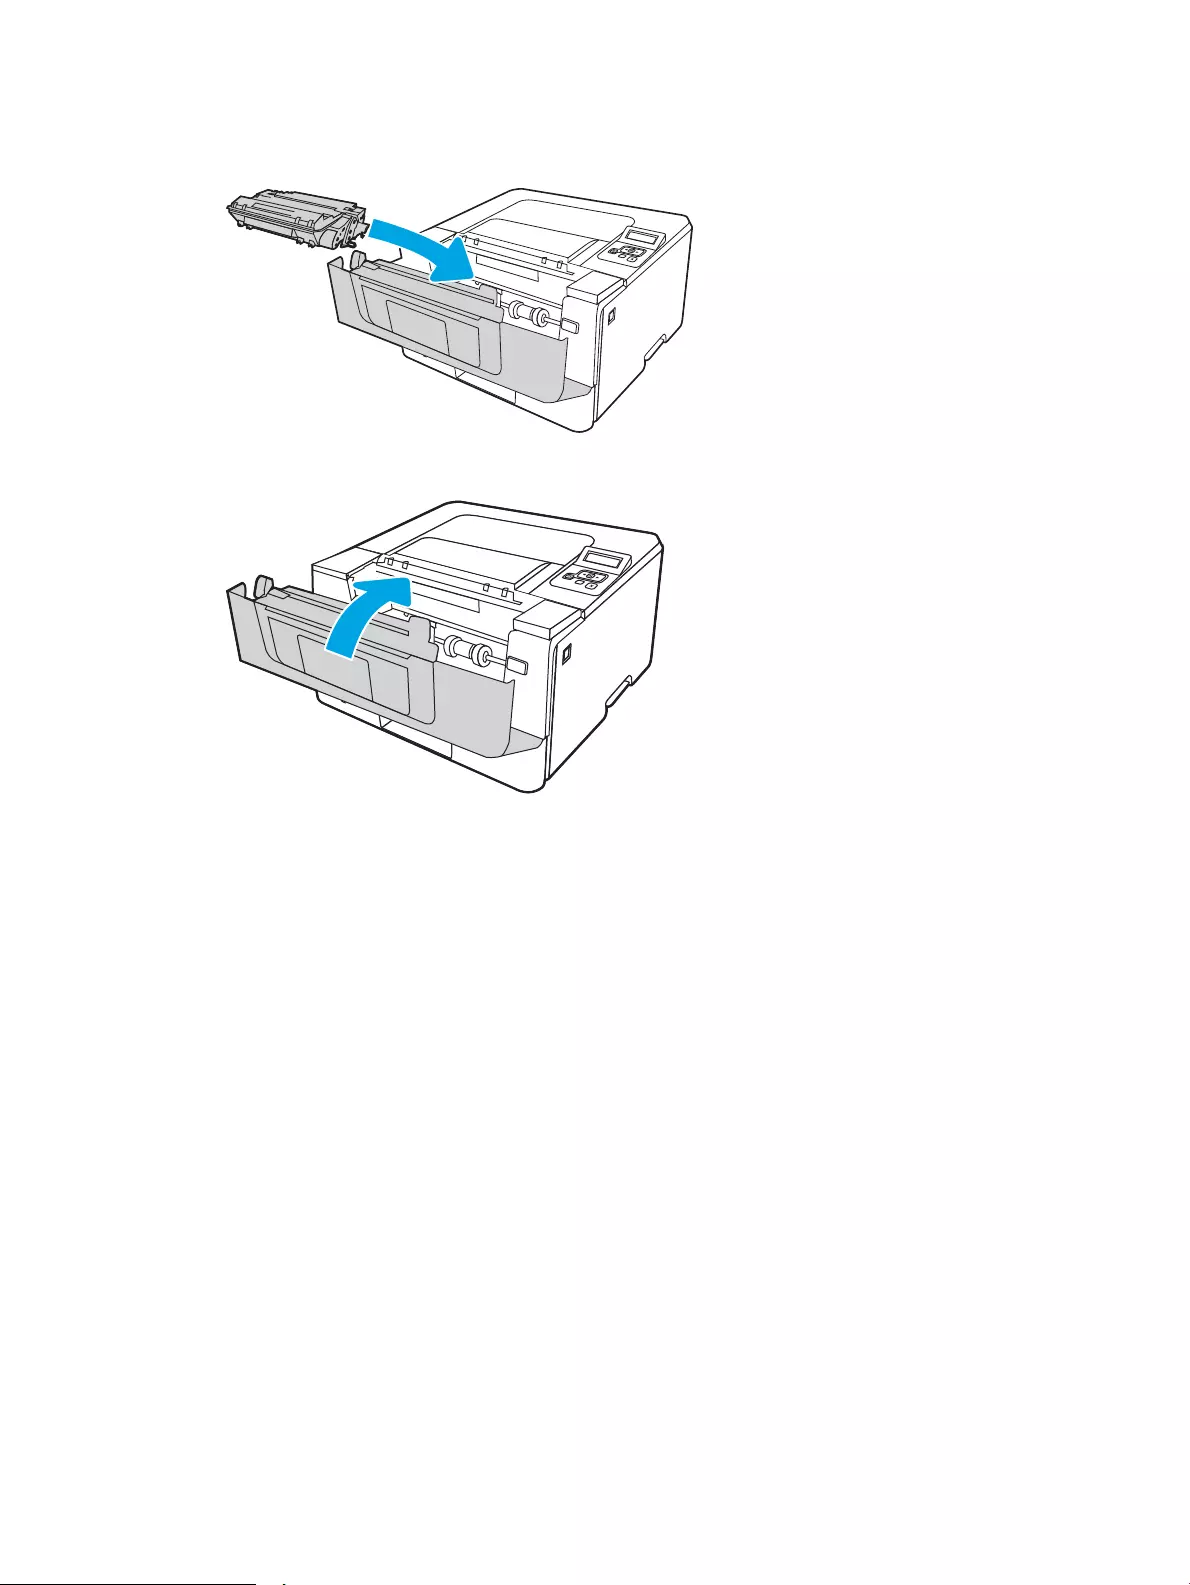
7. Align the toner cartridge with the tracks inside the printer, and install the toner cartridge until it is rmly
seated.
8. Close the front door.
44 Chapter 3 Supplies, accessories, and parts ENWW

4 Print
Print using the software, or print from a mobile device or USB ash drive.
●Print tasks (Windows)
●Print tasks (macOS)
●Store print jobs on the printer to print later or print privately
●Mobile printing
For more information:
HP’s all-inclusive help for the printer includes the following information:
●Install and congure
●Learn and use
●Solve problems
●Download software and rmware updates
●Join support forums
●Find warranty and regulatory information
ENWW 45

Print tasks (Windows)
Learn about common printing tasks for Windows users.
●How to print (Windows)
●Automatically print on both sides (Windows)
●Manually print on both sides (Windows)
●Print multiple pages per sheet (Windows)
●Select the paper type (Windows)
●Additional print tasks
How to print (Windows)
Use the Print option from a software application to select the printer and basic options for your print job.
The following procedure describes the basic printing process for Windows.
1. From the software program, select the Print option.
2. Select the printer from the list of printers. To change settings, click the Properties or Preferences button to
open the print driver.
NOTE:
●The name of the button varies for dierent software programs.
●For the HP PCL-6 V4 driver, the HP AiO Printer Remote application downloads additional driver
features when More settings is selected.
●For more information, click the Help (?) button in the print driver.
3. Click the tabs in the print driver to congure the available options. For example, set the paper orientation
on the Finishing tab, and set the paper source, paper type, paper size, and quality settings on the Paper/
Quality tab.
4. Click the OK button to return to the Print dialog box. Select the number of copies to print from this screen.
5. Click the Print button to print the job.
Automatically print on both sides (Windows)
If your printer has an automatic duplexer installed, you can automatically print on both sides of the paper. Use a
paper size and type supported by the duplexer.
1. From the software program, select the Print option.
2. Select the printer from the list of printers, and then click the Properties or Preferences button to open the
print driver.
46 Chapter 4 Print ENWW

NOTE:
●The name of the button varies for dierent software programs.
●For the HP PCL-6 V4 driver, the HP AiO Printer Remote application downloads additional driver
features when More settings is selected.
3. Click the Finishing tab.
4. Select Print on both sides. Click OK to close the Document Properties dialog.
5. In the Print dialog, click Print to print the job.
Manually print on both sides (Windows)
Use this procedure for printers that do not have an automatic duplexer installed or to print on paper that the
duplexer does not support.
1. From the software program, select the Print option.
2. Select the printer from the list of printers, and then click the Properties or Preferences button to open the
print driver.
NOTE:
●The name of the button varies for dierent software programs.
●For the HP PCL-6 V4 driver, the HP AiO Printer Remote application downloads additional driver
features when More settings is selected.
3. Click the Finishing tab.
4. Select Print on both sides (manually), and then click OK to close the Document Properties dialog.
5. In the Print dialog, click Print to print the rst side of the job.
6. Retrieve the printed stack from the output bin, and place it in Tray 1.
7. If prompted, select the appropriate control panel button to continue.
Print multiple pages per sheet (Windows)
When you print from a software application using the Print option, you can select an option to print multiple
pages on a single sheet of paper. For example, you might want to do this if you are printing a very large
document and want to save paper.
1. From the software program, select the Print option.
2. Select the printer from the list of printers, and then click the Properties or Preferences button to open the
print driver.
NOTE:
●The name of the button varies for dierent software programs.
●For the HP PCL-6 V4 driver, the HP AiO Printer Remote application downloads additional driver
features when More settings is selected.
3. Click the Finishing tab.
ENWW Print tasks (Windows) 47

4. Select the number of pages per sheet from the Pages per sheet drop-down.
5. Select the correct Print page borders, Page order, and Orientation options. Click OK to close the Document
Properties dialog.
6. In the Print dialog, click Print to print the job.
Select the paper type (Windows)
When you print from a software application using the Print option, you can set the paper type you are using for
your print job. For example, if your default paper type is Letter, but you are using a dierent paper type for a print
job, select that specic paper type.
1. From the software program, select the Print option.
2. Select the printer from the list of printers, and then click or tap the Properties or Preferences button to
open the print driver.
NOTE:
●The name of the button varies for dierent software programs.
●For the HP PCL-6 V4 driver, the HP AiO Printer Remote application downloads additional driver
features when More settings is selected.
3. Click the Paper/Quality tab.
4. Select the option for the type of paper you are using, and then click OK.
5. Click OK to close the Document Properties dialog.
6. In the Print dialog, click Print to print the job.
Additional print tasks
Locate information on the Web for performing common printing tasks.
Go to www.hp.com/support/ljM304 or www.hp.com/support/ljM404.
Instructions are available for print tasks, such as the following:
●Create and use printing shortcuts or presets
●Select the paper size, or use a custom paper size
●Select the page orientation
●Create a booklet
●Scale a document to t a specic paper size
●Print the rst or last pages of the document on dierent paper
●Print watermarks on a document
48 Chapter 4 Print ENWW

Print tasks (macOS)
Print using the HP printing software for macOS, including how to print on both sides or print multiple pages per
sheet.
●How to print (macOS)
●Automatically print on both sides (macOS)
●Manually print on both sides (macOS)
●Print multiple pages per sheet (macOS)
●Select the paper type (macOS)
●Additional print tasks
How to print (macOS)
Use the Print option from a software application to select the printer and basic options for your print job.
The following procedure describes the basic printing process for macOS.
1. Click the File menu, and then click the Print option.
2. Select the printer.
3. Click Show Details or Copies & Pages, and then select other menus to adjust the print settings.
NOTE: The name of the item varies for dierent software programs.
4. Click the Print button.
Automatically print on both sides (macOS)
If your printer has an automatic duplexer installed, you can automatically print on both sides of the paper. Use a
paper size and type supported by the duplexer.
This feature is available if you install the HP print driver. It might not be available if you are using AirPrint.
1. Click the File menu, and then click the Print option.
2. Select the printer.
3. Click Show Details or Copies & Pages, and then click the Layout menu.
NOTE: The name of the item varies for dierent software programs.
4. Select a binding option from the Two-Sided drop-down list.
5. Click the Print button.
Manually print on both sides (macOS)
If your printer does not have an automatic duplexer installed, or you are using a paper size or type not supported
by the duplexer, you can print on both sides of the paper using a manual process. You will need to reload the
pages for the second side.
ENWW Print tasks (macOS) 49

This feature is available if you install the HP print driver. It might not be available if you are using AirPrint.
1. Click the File menu, and then click the Print option.
2. Select the printer.
3. Click Show Details or Copies & Pages, and then click the Manual Duplex menu.
NOTE: The name of the item varies for dierent software programs.
4. Click the Manual Duplex check box, and select a binding option.
5. Go to the printer, and remove any blank paper that is in Tray 1.
6. Click the Print button.
7. Retrieve the printed stack from the output bin and place it with the printed-side facing down in the input
tray.
8. If prompted, touch the appropriate control panel button to continue.
Print multiple pages per sheet (macOS)
When you print from a software application using the Print option, you can select an option to print multiple
pages on a single sheet of paper. For example, you might want to do this if you are printing a very large
document and want to save paper.
1. Click the File menu, and then click the Print option.
2. Select the printer.
3. Click Show Details or Copies & Pages, and then click the Layout menu.
NOTE: The name of the item varies for dierent software programs.
4. From the Pages per Sheet drop-down list, select the number of pages that you want to print on each sheet.
5. In the Layout Direction area, select the order and placement of the pages on the sheet.
6. From the Border menu, select the type of border to print around each page on the sheet.
7. Click the Print button.
Select the paper type (macOS)
When you print from a software application using the Print option, you can set the paper type you are using for
your print job. For example, if your default paper type is Letter, but you are using a dierent paper type for a print
job, select that specic paper type.
1. Click the File menu, and then click the Print option.
2. Select the printer.
3. Click Show Details or Copies & Pages, and then click the Media & Quality menu or the Paper/Quality menu.
NOTE: The name of the item varies for dierent software programs.
4. Select from the Media & Quality or Paper/Quality options.
50 Chapter 4 Print ENWW

NOTE: This list contains the master set of options available. Some options are not available on all printers.
●Media Type: Select the option for the type of paper for the print job.
●Print Quality: Select the resolution level for the print job.
●EconoMode: Select this option to conserve toner when printing drafts of documents.
5. Click the Print button.
Additional print tasks
Locate information on the Web for performing common printing tasks.
Go to www.hp.com/support/ljM304 or www.hp.com/support/ljM404.
Instructions are available for print tasks, such as the following:
●Create and use printing shortcuts or presets
●Select the paper size, or use a custom paper size
●Select the page orientation
●Create a booklet
●Scale a document to t a specic paper size
●Print the rst or last pages of the document on dierent paper
●Print watermarks on a document
ENWW Print tasks (macOS) 51

Store print jobs on the printer to print later or print privately
Store print jobs in the printer memory for printing at a later time.
●Introduction
●Before beginning
●Set up job storage
●Disable or enable the job storage feature
●Create a stored job (Windows)
●Create a stored job (macOS)
●Print a stored job
●Delete a stored job
●Information sent to printer for Job Accounting purposes
Introduction
The following information provides procedures for creating and printing documents that are stored on a USB
ash drive. These jobs can be printed at a later time or printed privately.
NOTE: Job storage is not supported on the M404d or M405d models.
Before beginning
Review the requirements for using the job storage feature.
The job storage feature has the following requirements:
●A dedicated USB 2.0 storage device with at least 16 GB free space must be installed in the rear host USB.
This USB storage device holds the job storage jobs sent to the printer. Removing this USB storage device
from the printer disables the job storage feature.
●If you are using an HP Universal Print Driver (UPD), you must use UPD version 5.9.0 or above.
Set up job storage
Set up job storage in the print driver, insert the storage media (USB ash drive) in the printer, and verify the
feature is ready to use.
Before you begin, install the printer software if it is not already installed. Go to www.hp.com/support, click
Software and Drivers, and then follow the onscreen instructions to download the latest HP software.
When the print driver is installed, the Job Storage option is set to Automatic by default. The option is located as
follows:
●Windows: Devices and Printers►Printer Properties►Device Settings
●macOS: Printers & Scanners►Options & Supplies
To complete Job Storage setup:
52 Chapter 4 Print ENWW
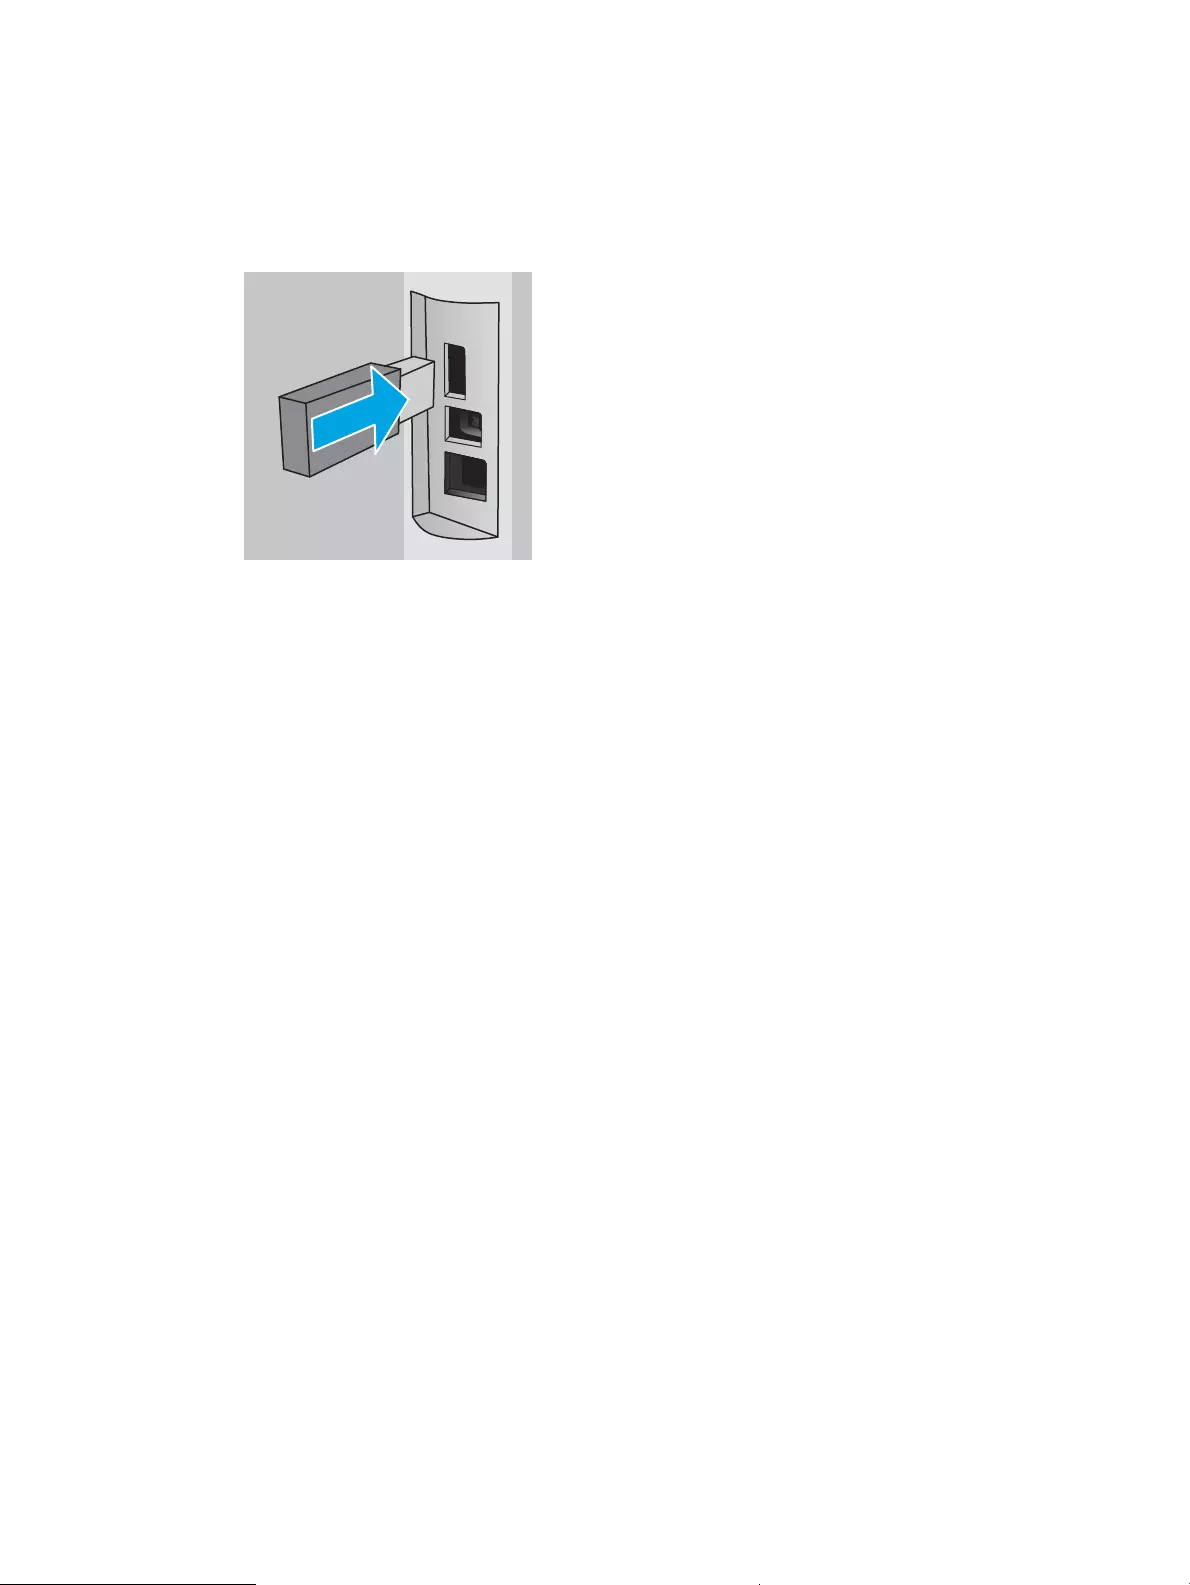
1. Locate the rear USB port.
On some models, the rear USB port is covered. Remove the rear USB port cover before proceeding.
2. Insert the USB ash drive into the rear USB port.
Figure 4-1 Insert USB ash drive
A message displays on the control panel warning that the USB drive will be formatted. Select OK to
complete the procedure.
3. Open the print driver to verify the Job Storage tab is visible. If it is visible, the feature is ready to use.
From a software program, select the Print option, select your printer from the list of printers, and do the
following:
●Windows: Select Properties or Preferences. Click the Job Storage tab.
If the Job Storage tab is not showing, activate it as follows:
From the Start menu, open Settings, click Devices, and then click Devices and Printers. Right-click on
the printer name and click Printer Properties. Click the Device Settings tab, click on Job Storage, and
then select Automatic. Click Apply and OK.
●macOS: The print driver displays the Copies & Pages menu. Open the drop-down list, and then click
the Job Storage menu.
If the Job Storage menu is not showing, close the Print window and then reopen it to activate the
menu.
Disable or enable the job storage feature
Disable the job storage feature to make it unavailable, even if a USB drive is inserted into the printer. Enable the
feature to make it available again.
1. Open the Printer Properties:
●Windows: From the Start menu, open Settings, click Devices, and then click Devices and Printers.
Right-click on the printer and click Printer properties.
●macOS: From the Apple menu, open System Preferences, and then click Printers & Scanners. Select
the printer and click Options & Supplies.
2. Disable the Job Storage option as follows:
ENWW Store print jobs on the printer to print later or print privately 53

●Windows: Click the Device settings tab, click on Job Storage, and then select Disable.
●macOS: On the Options tab, clear the Job Storage check box.
To enable the feature, set the Job Storage option back to Automatic (Windows), or select the Job Storage check
box (macOS).
Create a stored job (Windows)
Store jobs on the USB ash drive for private or delayed printing.
1. From the software program, select the Print option.
2. Select the printer from the list of printers, and then select Properties or Preferences.
NOTE:
●The name of the button varies for dierent software programs.
●For the HP PCL-6 V4 driver, the HP AiO Printer Remote application downloads additional driver
features when More settings is selected.
3. Click the Job Storage tab.
NOTE: If the Job Storage tab is not showing, follow the instructions in the «Disable or enable job storage
feature» section to activate the tab.
4. Select a Job Storage Mode option:
●Proof and Hold: Print and proof one copy of a job, and then print more copies. The rst copy prints
immediately. Printing of the subsequent copies must be initiated from the device’s front control panel.
For example, if 10 copies are sent, one copy prints immediately, and the other nine copies will print
when the job is retrieved. The job is deleted after all copies are printed.
●Personal Job: The job does not print until you request it at the printer control panel. For this job-
storage mode, you can select one of the Make Job Private/Secure options. If you assign a personal
identication number (PIN) to the job, you must provide the required PIN at the control panel. If you
encrypt the job, you must provide the required password at the control panel. The print job is deleted
from memory after it prints.
●Quick Copy: Print the requested number of copies of a job and store a copy of the job in the printer
memory so you can print it again later. The job is deleted manually or by the job retention schedule.
●Stored Job: Store a job on the printer and allow other users to print the job at any time. For this job-
storage mode, you can select one of the Make Job Private/Secure options. If you assign a personal
identication number (PIN) to the job, the person who prints the job must provide the required PIN at
the control panel. If you encrypt the job, the person who prints the job must provide the required
password at the control panel. The job is deleted manually or by the job retention schedule.
5. To use a custom user name or job name, click the Custom button, and then enter the user name or the job
name.
Select which option to use if another stored job already has that name:
54 Chapter 4 Print ENWW

●Use Job Name + (1-99): Append a unique number to the end of the job name.
●Replace Existing File: Overwrite the existing stored job with the new one.
6. Click the OK button to close the Document Properties dialog box. In the Print dialog box, click the Print
button to print the job.
Create a stored job (macOS)
Store jobs on the USB ash drive for private or delayed printing.
1. Click the File menu, and then click the Print option.
2. In the Printer menu, select the printer.
3. Click Show Details or Copies & Pages, and then click the Job Storage menu.
NOTE: If the Job Storage menu is not showing, follow the instructions in the «Disable or enable job storage
feature» section to activate the menu.
4. In the Mode drop-down list, select the type of stored job.
●Proof and Hold: Print and proof one copy of a job, and then print more copies. The rst copy prints
immediately. Printing of the subsequent copies must be initiated from the device’s front control panel.
For example, if 10 copies are sent, one copy prints immediately, and the other nine copies will print
when the job is retrieved. The job is deleted after all copies are printed.
●Personal Job: The job does not print until someone requests it at the printer control panel. If the job
has a personal identication number (PIN), provide the required PIN at the control panel. The print job
is deleted from memory after it prints.
●Quick Copy: Print the requested number of copies of a job and store a copy of the job in the printer
memory to print it again later. The job is deleted manually or by the job retention schedule.
●Stored Job: Store a job on the printer and allow other users to print the job at any time. If the job has a
personal identication number (PIN), the person who prints the job must provide the required PIN at
the control panel. The job is deleted manually or by the job retention schedule.
5. To use a custom user name or job name, click the Custom button, and then enter the user name or the job
name.
NOTE: macOS 10.14 Mojave and later: The print driver no longer includes the Custom button. Use the
options below the Mode drop-down list to set up the saved job.
Select which option to use if another stored job already has that name.
●Use Job Name + (1-99): Append a unique number to the end of the job name.
●Replace Existing File: Overwrite the existing stored job with the new one.
6. If you selected the Stored Job or Personal Job option in the Mode drop-down list, you can protect the job
with a PIN. Type a 4-digit number in the Use PIN to Print eld. When other people attempt to print this job,
the printer prompts them to enter this PIN.
7. Click the Print button to process the job.
ENWW Store print jobs on the printer to print later or print privately 55

Print a stored job
Print a job that is stored on a USB ash drive.
1. On the printer control panel, press the OK button to display the Home screen.
2. Use the arrow buttons to navigate to Job Storage, and then press the OK button again.
3. From the Job Folders list, use the arrow buttons to navigate to the name of the folder where the job is
stored, and then press OK.
4. Use the arrow buttons to navigate to the name of the job that you want to print, and then press OK.
If the job is private or encrypted, enter the PIN or password.
5. To adjust the number of copies, use the arrow buttons to navigate to the Copy option, and then press OK.
On the Copy screen, use the arrow buttons to select the number of copies and then press OK to save the
setting.
6. Press OK again to print the job.
56 Chapter 4 Print ENWW

Delete a stored job
When a new job is stored on a USB ash drive, any previous jobs with the same user and job name are
overwritten. If the memory on the USB ash drive is full, the following message displays on the printer control
panel: The USB ash storage device is out of memory. Delete unused jobs, and then try again. Existing stored
jobs must be deleted before additional print jobs can be stored.
●Delete a job that is stored on the printer
Delete a job that is stored on the printer
Delete a job that is stored on a USB ash drive.
1. On the printer control panel, press the OK button to display the Home screen.
2. Use the arrow buttons to navigate to Job Storage, and then press the OK button again.
3. From the Job Folders list, navigate to and select the name of the folder where the job is stored, and then
press OK.
4. Navigate to and select the name of the job that you want to delete, and press OK.
If the job is private or encrypted, enter the PIN or password.
5. Use the arrow buttons to navigate to the Delete option and then press the OK button. Press OK again to
delete the job.
Information sent to printer for Job Accounting purposes
Printing jobs sent from drivers on the client (e.g., PC) may send personally identiable information to HP’s
Printing and Imaging devices. This information may include, but is not limited to, user name and client name
from which the job originated that may be used for job accounting purposes, as determined by the Administrator
of the printing device. This same information may also be stored with the job on the mass storage device (e.g.,
disk drive) of the printing device when using the job storage feature.
ENWW Store print jobs on the printer to print later or print privately 57

Mobile printing
Mobile and ePrint solutions enable easy printing to an HP printer from a laptop, tablet, smartphone, or other
mobile device.
●Introduction
●Wi-Fi Direct printing (wireless models only)
●HP ePrint via Email
●AirPrint
●Android embedded printing
Introduction
Review the following information about mobile printing.
To see the full list of mobile and ePrint solutions and determine the best choice, go to www.hp.com/go/
LaserJetMobilePrinting.
58 Chapter 4 Print ENWW

Wi-Fi Direct printing (wireless models only)
Wi-Fi Direct enables printing from a wireless mobile device without requiring a connection to a network or the
Internet.
●To turn on Wi-Fi Direct
●Change the printer Wi-Fi Direct name
NOTE: Not all mobile operating systems are currently supported by Wi-Fi Direct.
Use Wi-Fi Direct to print wirelessly from the following devices:
●Android mobile devices compatible with the Android embedded print solution
●iPhone, iPad, or iPod touch using Apple AirPrint or the HP Smart app
●Android mobile devices using the HP Smart app or the Android embedded print solution
●PC and Mac devices using the HP ePrint Software
●HP Roam
For more information on Wi-Fi Direct printing, go to www.hp.com/go/wirelessprinting.
Wi-Fi Direct can be enabled or disabled from the printer control panel.
To turn on Wi-Fi Direct
To print wirelessly from mobile devices, Wi-Fi Direct must be turned on.
Follow these steps to turn on Wi-Fi Direct from the printer control panel.
1. On the printer control panel, press the OK button to display the Home screen. Use the arrow buttons and
the OK button to navigate to and open the following menus:
1. Setup
2. Wi-Fi Direct
3. Wi-Fi Direct Status
2. If Wi-Fi Direct is set to O, press the right arrow button to turn it on, and then press OK to save the setting.
NOTE: In environments where more than one model of the same printer is installed, it might be helpful to
provide each printer a unique Wi-Fi Direct name for easier printer identication when using Wi-Fi Direct printing.
To view the Wi-Fi Direct name on the printer control panel, press the OK button to display the Home screen, and
then navigate to and open the following menus:
1. Setup
2. Wi-Fi Direct
3. Wi-Fi Direct Name
ENWW Mobile printing 59
Change the printer Wi-Fi Direct name
Change the printer Wi-Fi Direct name using the HP Embedded Web Server (EWS):
●Step one: Open the HP Embedded Web Server
●Step two: Change the Wi-Fi Direct name
Step one: Open the HP Embedded Web Server
Use the EWS to manage your printer from a computer instead of the printer control panel.
Your printer must be connected to an IP-based network before you can access the EWS.
1. On the printer control panel, press the OK button to display the Home screen.
2. Use the arrow buttons and the OK button to navigate to and open the following menus:
1. Setup
2. Network Setup
3. General Settings
3. On the General Settings menu, select Show the IP Address, and then select Yes to display the printer’s IP
address or host name.
4. Open a web browser, and in the address line, type the IP address or host name exactly as it displays on the
printer control panel. Press the Enter key on the computer keyboard. The EWS opens.
NOTE: If a message displays in the web browser indicating that the website might not be safe, select the
option to continue to the website. Accessing this website will not harm the computer.
Step two: Change the Wi-Fi Direct name
Use the following procedure to change the Wi-Fi Direct name.
1. On the EWS Home page, click the Network tab.
2. In the left navigation pane, click Wi-Fi Direct.
3. Under the Status eld, click Edit Settings.
4. In the Wi-Fi Direct Name eld, enter the new name, and then click Apply.
HP ePrint via Email
Use HP ePrint to print documents by sending them as an email attachment to the printer’s email address from
any email-enabled device.
To use HP ePrint, the printer must meet these requirements:
●The printer must be connected to a wired or wireless network and have Internet access.
●HP Web Services must be enabled on the printer, and the printer must be registered with HP Connected.
Follow these steps to enable HP Web Services and register with HP Connected:
60 Chapter 4 Print ENWW
1. On the printer control panel, press the OK button to display the Home screen.
2. Use the arrow buttons and the OK button to navigate to and open the following menus:
1. Setup
2. Network Setup
3. General Settings
3. On the General Settings menu, select Show the IP Address, and then select Yes to display the printer’s IP
address or host name.
4. Open a web browser, and in the address line, type the IP address or host name exactly as it displays on the
printer control panel. Press the Enter key on the computer keyboard. The EWS opens.
NOTE: If a message displays in the web browser indicating that the website might not be safe, select the
option to continue to the website. Accessing this website will not harm the computer.
5. On the EWS Home page, click the Web Services tab.
6. In the Web Services Settings section, click Setup, click Continue, and then follow the onscreen instructions
to accept the terms of use.
The printer enables Web Services and then prints an information page. The information page contains the
printer code that is necessary to register the printer at HP Connected.
7. Go to www.hpconnected.com to create an HP ePrint account and complete the setup process.
AirPrint
With Apple AirPrint, you can print directly to the printer from your iOS device or Mac computer, without having a
print driver installed.
AirPrint is supported for iOS and from Mac computers running macOS (10.7 Lion and newer).
Use AirPrint to print directly to the printer from an iPad, iPhone (3GS or later), or iPod touch (third generation or
later) in the following mobile applications:
●Photos
●Safari
●iBooks
●Select third-party applications
To use AirPrint, the printer must be connected to the same network (sub-net) as the Apple device. For more
information about using AirPrint and about which HP printers are compatible with AirPrint, go to
www.hp.com/go/LaserJetMobilePrinting.
NOTE: Before using AirPrint with a USB connection, verify the version number. AirPrint versions 1.3 and earlier
do not support USB connections.
ENWW Mobile printing 61

Android embedded printing
HP’s built-in print solution for Android and Kindle enables mobile devices to automatically nd and print to HP
printers that are either on a network or within wireless range for Wi-Fi Direct printing.
The printer must be connected to the same network (sub-net) as the Android device.
The print solution is built into the supported operating systems, so installing drivers or downloading software is
not necessary.
For more information on how to use Android embedded printing and which Android devices are supported, go to
www.hp.com/go/LaserJetMobilePrinting.
62 Chapter 4 Print ENWW

5 Manage the printer
Utilize management tools, security and energy-conservation settings, and rmware updates for the printer.
●Change the printer connection type (Windows)
●Advanced conguration with HP Embedded Web Server and Printer Home Page (EWS)
●Congure IP network settings
●Printer security features
●Energy-conservation settings
●HP Web Jetadmin
●Update the rmware
For more information:
HP’s all-inclusive help for the printer includes the following information:
●Install and congure
●Learn and use
●Solve problems
●Download software and rmware updates
●Join support forums
●Find warranty and regulatory information
Change the printer connection type (Windows)
If you are already using the printer and you wish to change the way it is connected, use Device Setup & Software
to change the connection. For example, connect the new printer to the computer using a USB or network
connection, or change the connection from a USB to a wireless connection.
To open Device Setup & Software, complete the following procedure:
1. Open the HP Printer Assistant.
●Windows 10: From the Start menu, click All Apps, click HP, and then select the printer name.
●Windows 8.1: Click the down arrow in lower left corner of the Start screen, and then select the printer
name.
ENWW 63

●Windows 8: Right-click an empty area on the Start screen, click All Apps on the app bar, and then
select the printer name.
●Windows 7, Windows Vista, and Windows XP: From the computer desktop, click Start, select All
Programs, click HP, click the folder for the printer, and then select the printer name.
2. In the HP Printer Assistant, select Tools from the navigation bar, and then select Device Setup & Software.
64 Chapter 5 Manage the printer ENWW

Advanced conguration with HP Embedded Web Server and Printer
Home Page (EWS)
Use the HP Embedded Web Server to manage printing functions from your computer instead of the printer
control panel.
●Method one: Open the HP Embedded Web Server (EWS) from the software
●Method two: Open the HP Embedded Web Server (EWS) from a web browser
●View printer status information
●Determine the remaining life for all supplies and order new ones
●View and change tray congurations (paper types and sizes)
●View and print internal pages
●View and change network conguration
The HP Embedded Web Server works when the printer is connected to an IP-based network. The HP Embedded
Web Server does not support IPX-based printer connections. You do not have to have Internet access to open
and use the HP Embedded Web Server.
When the printer is connected to the network, the HP Embedded Web Server is automatically available.
NOTE: Printer Home Page (EWS) is software used to connect to the HP Embedded Web Server when the printer
is connected to a computer via USB. It is available only if a full installation was performed when the printer was
installed on a computer. Depending on how the printer is connected, some features might not be available.
NOTE: The HP Embedded Web Server is not accessible beyond the network rewall.
Method one: Open the HP Embedded Web Server (EWS) from the software
Use this method to open the EWS from the HP Printer Assistant software.
1. Open the HP Printer Assistant.
●Windows 10: From the Start menu, click All Apps, click HP, and then select the printer name.
●Windows 8.1: Click the down arrow in lower left corner of the Start screen, and then select the printer
name.
●Windows 8: Right-click an empty area on the Start screen, click All Apps on the app bar, and then
select the printer name.
●Windows 7, Windows Vista, and Windows XP: From the computer desktop, click Start, select All
Programs, click HP, click the folder for the printer, and then select the printer name.
2. In the HP Printer Assistant, select Print, and then select Printer Home Page (EWS).
Method two: Open the HP Embedded Web Server (EWS) from a web browser
Use the EWS to manage your printer from a computer instead of the printer control panel.
Your printer must be connected to an IP-based network before you can access the EWS.
ENWW Advanced conguration with HP Embedded Web Server and Printer Home Page (EWS) 65
1. On the printer control panel, press the OK button to display the Home screen.
2. Use the arrow buttons and the OK button to navigate to and open the following menus:
1. Setup
2. Network Setup
3. General Settings
3. On the General Settings menu, select Show the IP Address, and then select Yes to display the printer’s IP
address or host name.
4. Open a web browser, and in the address line, type the IP address or host name exactly as it displays on the
printer control panel. Press the Enter key on the computer keyboard. The EWS opens.
NOTE: If a message displays in the web browser indicating that the website might not be safe, select the
option to continue to the website. Accessing this website will not harm the computer.
Table 5-1 HP Embedded Web Server tabs
Tab or section Description
Home tab
Provides printer, status, and
conguration information.
●Sleep Mode: Congure the Sleep Mode settings.
●Web Services: Set up and manage Web Services such as HP ePrint and Print Apps.
●Printer Update: Check for new printer updates.
●Estimated Cartridge Levels: View the status of the cartridges and the estimated cartridge
levels.
●Network Summary: View a summary of the printer’s network settings.
●Print Quality Toolbox: Use maintenance tools to improve the print quality of your printouts.
●Wireless Setup Wizard: Connect the printer to a wireless network.
●Wi-Fi Direct: View and edit Wi-Fi Direct settings.
●AirPrint: View and edit AirPrint settings.
●Printer Information: View general information about the printer.
●Administrator: Set up and manage advanced security and usage controls for the printer.
●Shutdown Mode: Congure Shutdown Mode settings.
●Usage Report: View detailed information about printer usage.
●Firewall: Set up and manage the printer’s rewall.
●Printer Reports: View the reports available for the printer.
●Backup: Back up the printer settings into a password-encrypted le.
●Personalize: Add or remove features that display on the Home tab.
Copy/Print tab ●Change default print settings from your computer, such as the number of copies and print
quality.
Web Services tab ●Web Services Settings
66 Chapter 5 Manage the printer ENWW

Table 5-1 HP Embedded Web Server tabs (continued)
Tab or section Description
Network tab
(Network-connected printers only)
Provides the ability to change network
settings from your computer.
●General
●Wired (802.3)
●Wireless (802.11)
●Wi-Fi Direct
●Bluetooth Smart
●AirPrint
●Google Cloud Print
●Internet Printing Protocol
●Security
●Advanced Settings
Tools tab ●Product Information
●Reports
●Utilities
●Backup and Restore
●Printer Restart
●Printer Updates
Settings tab ●Power Management
●Preferences
●Supplies
●Security
●Email Alerts
●Restore Defaults
●Firewall
ENWW Advanced conguration with HP Embedded Web Server and Printer Home Page (EWS) 67

Congure IP network settings
Review the following information about conguring IP network settings.
●Introduction
●Printer sharing disclaimer
●View or change network settings
●Rename the printer on a network
●Manually congure IPv4 TCP/IP parameters from the control panel
●Link speed and duplex settings
Introduction
Use the information in the following sections to congure the printer network settings.
Printer sharing disclaimer
HP does not support peer-to-peer networking, as the feature is a function of Microsoft operating systems and
not of the HP printer drivers.
Go to Microsoft at www.microsoft.com.
View or change network settings
Use the HP Embedded Web Server to view or change IP conguration settings.
1. Open the HP Embedded Web Server (EWS):
a. On the printer control panel, press the OK button to display the Home screen.
b. Use the arrow buttons and the OK button to navigate to and open the following menus:
1. Setup
2. Network Setup
3. General Settings
c. On the General Settings menu, select Show the IP Address, and then select Yes to display the printer’s
IP address or host name.
d. Open a web browser, and in the address line, type the IP address or host name exactly as it displays
on the printer control panel. Press the Enter key on the computer keyboard. The EWS opens.
NOTE: If a message displays in the web browser indicating that the website might not be safe, select
the option to continue to the website. Accessing this website will not harm the computer.
2. On the EWS Home page, click the Network tab to view network information. Change settings as needed.
68 Chapter 5 Manage the printer ENWW
Rename the printer on a network
Use the HP Embedded Web Server (EWS) to rename the printer on a network so it can be uniquely identied.
1. Open the HP Embedded Web Server (EWS):
a. On the printer control panel, press the OK button to display the Home screen.
b. Use the arrow buttons and the OK button to navigate to and open the following menus:
1. Setup
2. Network Setup
3. General Settings
c. On the General Settings menu, select Show the IP Address, and then select Yes to display the printer’s
IP address or host name.
d. Open a web browser, and in the address line, type the IP address or host name exactly as it displays
on the printer control panel. Press the Enter key on the computer keyboard. The EWS opens.
NOTE: If a message displays in the web browser indicating that the website might not be safe, select
the option to continue to the website. Accessing this website will not harm the computer.
2. On the EWS Home page, click the Network tab.
3. In the left navigation pane, click General to expand the options, and then click Network Identication.
4. In the Host Name text eld, enter a name to uniquely identify this printer, and then click Apply to save the
changes.
Manually congure IPv4 TCP/IP parameters from the control panel
Use the control-panel menus to manually set the IPv4 address, subnet mask, and default gateway.
1. On the printer control panel, press the OK button to display the Home screen.
2. Use the arrow buttons and the OK button to navigate to and open the following menus:
1. Setup
2. Network Setup
3. Ethernet Settings
4. IP Settings
5. Manual
3. Use the arrow buttons to enter the IP Address and then press OK.
4. Use the arrow buttons to enter the Subnet Mask and then press OK.
5. Use the arrow buttons to enter the Gateway and then press OK.
ENWW Congure IP network settings 69
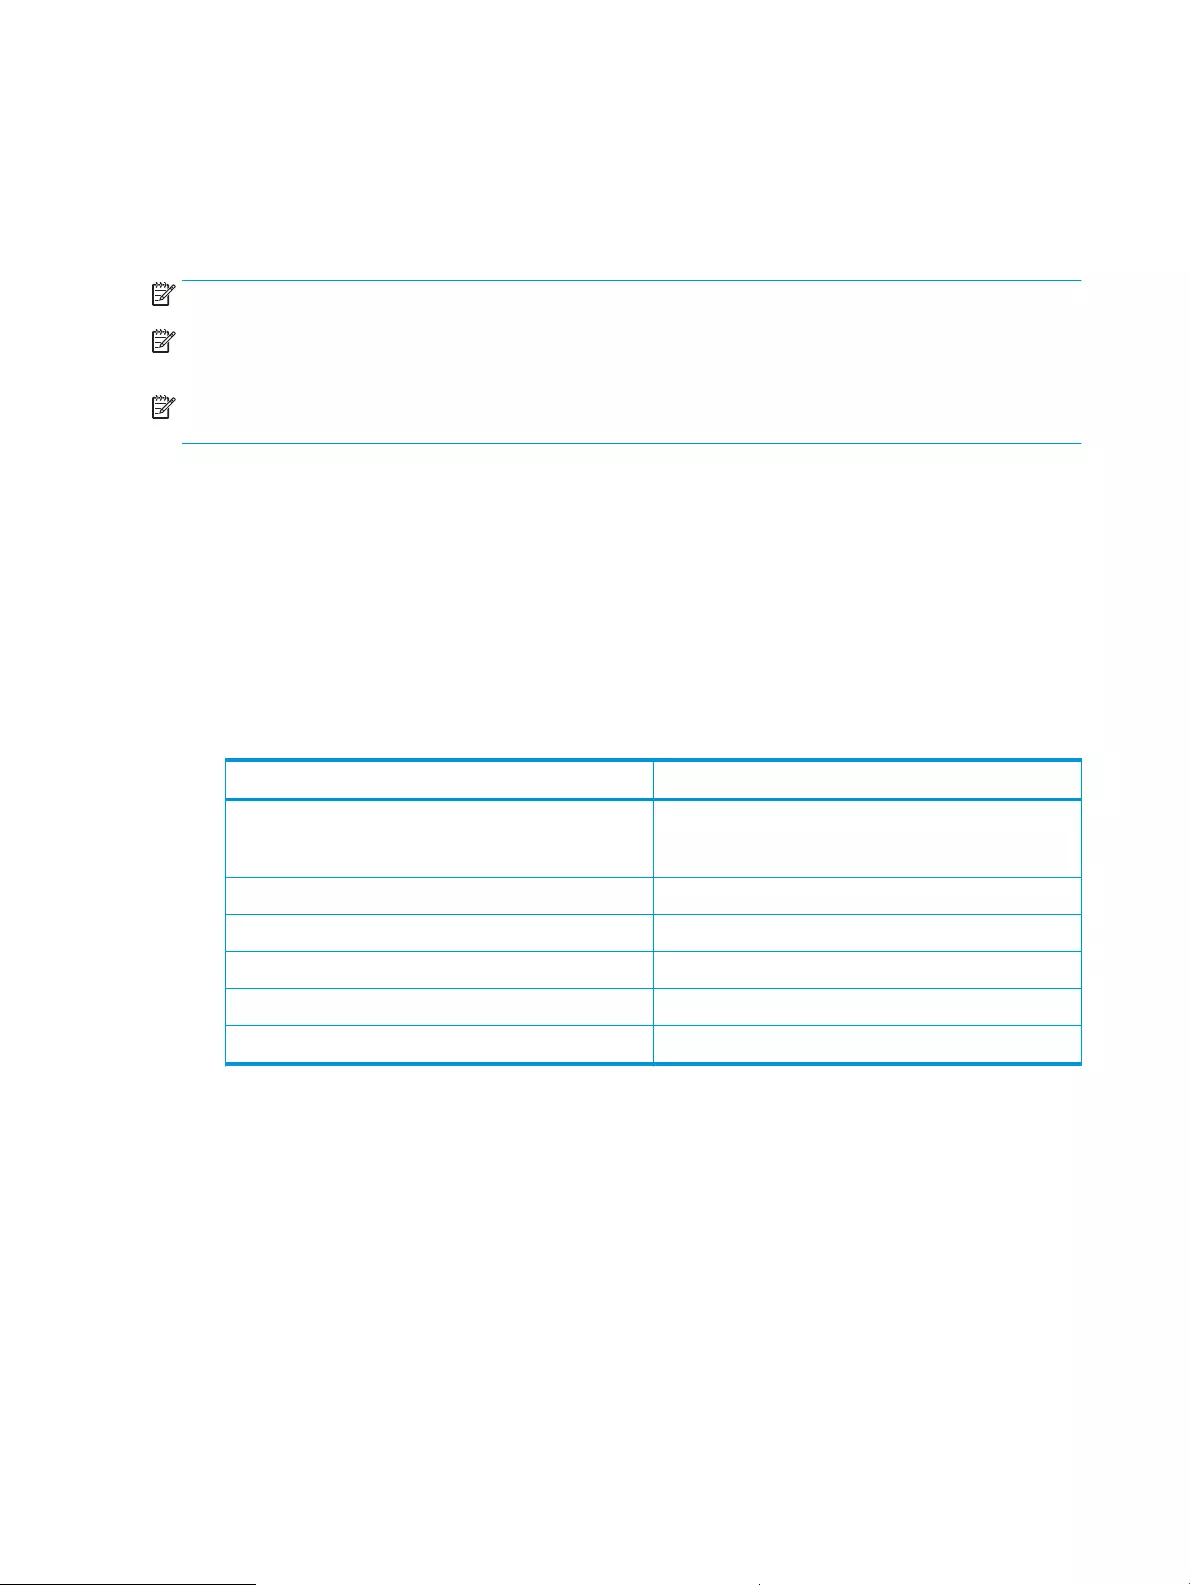
Link speed and duplex settings
The link speed and communication mode of the print server must match the network hub. For most situations,
leave the printer in automatic mode. Incorrect changes to the link speed and duplex settings might prevent the
printer from communicating with other network devices. If you need to make changes, use the printer control
panel.
NOTE: This information applies only to Ethernet (wired) networks. It does not apply to wireless networks.
NOTE: The printer setting must match the setting for the network device (a network hub, switch, gateway,
router, or computer).
NOTE: Making changes to these settings causes the printer to turn o and then on. Make changes only when
the printer is idle.
1. On the printer control panel, press the OK button to display the Home screen.
2. Use the arrow buttons and the OK button to navigate to and open the following menus:
1. Setup
2. Network Setup
3. Ethernet Settings
4. Link Speed
3. On the Link Speed menu, use the arrow buttons to navigate to and select one of the following options:
Setting Description
Automatic The print server automatically congures itself for
the highest link speed and communication mode
allowed on the network.
10T Full 10 Mbps, full-duplex operation
10T Half 10 Mbps, half-duplex operation
100TX Full 100 Mbps, full-duplex operation
100TX Half 100 Mbps, half-duplex operation
1000T Full 1000 Mbps, full-duplex operation
4. Press the OK button to save the setting. The printer turns o and then on.
70 Chapter 5 Manage the printer ENWW
Printer security features
Review the following information about the printer security features.
●Introduction
●Assign or change the system password using the Embedded Web Server
Introduction
The printer includes several security features to restrict who has access to conguration settings, to secure data,
and to prevent access to valuable hardware components.
Assign or change the system password using the Embedded Web Server
Assign an administrator password for access to the printer and the HP Embedded Web Server so that
unauthorized users cannot change the printer settings.
1. Open the HP Embedded Web Server (EWS):
a. On the printer control panel, press the OK button to display the Home screen.
b. Use the arrow buttons and the OK button to navigate to and open the following menus:
1. Setup
2. Network Setup
3. General Settings
c. On the General Settings menu, select Show IP Address, and then select Yes to display the printer’s IP
address or host name.
d. Open a web browser, and in the address line, type the IP address or host name exactly as it displays
on the printer control panel. Press the Enter key on the computer keyboard. The EWS opens.
NOTE: If a message displays in the web browser indicating that the website might not be safe, select
the option to continue to the website. Accessing this website will not harm the computer.
2. On the EWS Home page, click the Settings tab.
3. In the left navigation pane, click Security to expand the options, and then click General Security.
4. Enter a password.
5. Re-enter the password in the Conrm Password eld, and then click Apply.
NOTE: Make note of the password and store it in a safe place.
ENWW Printer security features 71

Energy-conservation settings
Learn about the energy-conservation settings that are available on your printer.
●Introduction
●Print with EconoMode
●Set the Sleep Delay (Min.) setting
●Set the Shutdown after Sleep (Hr.) setting
●Set the Disable Shutdown setting
Introduction
The printer includes several economy features to conserve energy and supplies.
Print with EconoMode
This printer has an EconoMode option for printing drafts of documents. Using EconoMode can use less toner.
However, using EconoMode can also reduce print quality.
HP does not recommend the full-time use of EconoMode. If EconoMode is used full-time, the toner supply might
outlast the mechanical parts in the toner cartridge. If print quality begins to degrade and is no longer acceptable,
consider replacing the toner cartridge.
NOTE: If this option is not available in your print driver, you can set it using the HP Embedded Web Server.
1. From the software program, select the Print option.
2. Select the printer, and then click the Properties or Preferences button.
3. Click the Paper/Quality tab.
4. Click the EconoMode check box.
Set the Sleep Delay (Min.) setting
Use the control panel menus to specify the amount of time the printer must be inactive before it goes into sleep
mode.
1. On the printer control panel, press the OK button to display the Home screen.
2. Use the arrow buttons and the OK button to navigate to and open the following menus:
1. Setup
2. Power Management
3. Sleep Delay (Min.)
3. Use the arrow buttons to select the number of minutes the printer must be inactive before it goes into
sleep mode, and then press the OK button to save the setting.
Set the Shutdown after Sleep (Hr.) setting
Use the control panel menus to specify the amount of time the printer must be inactive before it shuts down.
72 Chapter 5 Manage the printer ENWW

NOTE: After the printer shuts down, the power consumption is 1 watt or less.
1. On the printer control panel, press the OK button to display the Home screen.
2. Use the arrow buttons and the OK button to navigate to and open the following menus:
1. Power Management
2. Shutdown after Sleep (Hr.)
3. Use the arrow buttons to select the number of hours the printer must be inactive before it shuts down, and
then press the OK button to save the setting.
Set the Disable Shutdown setting
Use the control panel menus to disable the printer from shutting down after a period of inactivity.
1. On the printer control panel, press the OK button to display the Home screen.
2. Use the arrow buttons and the OK button to navigate to and open the following menus:
1. Power Management
2. Disable Shutdown
3. Use the arrow buttons to select one of the following options:
●When ports are active: The printer will not shut down unless all ports are inactive. An active network
link or fax connection will prevent the printer from shutting down.
●Never: The printer will shut down after a period of inactivity as determined by the Shutdown after
Sleep (Hr.) setting.
NOTE: The default setting is When ports are active.
4. Press the OK button to save the setting.
HP Web Jetadmin
HP Web Jetadmin is an award-winning, industry-leading tool for eiciently managing a wide variety of networked
HP products, including printers, multifunction printers, and digital senders. This single solution allows you to
remotely install, monitor, maintain, troubleshoot, and secure your printing and imaging environment —
ultimately increasing business productivity by helping you save time, control costs, and protect your investment.
HP Web Jetadmin upgrades are periodically made available to provide support for specic printer features. Go to
www.hp.com/go/webjetadmin for more information.
ENWW HP Web Jetadmin 73

Update the rmware
HP oers periodic printer updates, new Web Services apps, and new features to existing Web Services apps.
Follow these steps to update the printer rmware for a single printer. When you update the rmware, Web
Service apps will update automatically.
●Method one: Update the rmware using the control panel
●Method two: Update the rmware using the HP Printer Update utility
There are two supported methods to perform a rmware update on this printer. Use only one of the following
methods to update the printer rmware.
Method one: Update the rmware using the control panel
Follow these steps to update the rmware using the printer control panel (for network-connected printers only).
For USB-connected printers, skip to Method two.
1. Make sure the printer is connected to a wired (Ethernet) or wireless network with an active Internet
connection.
NOTE: The printer must be connected to the internet to update the rmware via a network connection.
2. On the printer control panel, press the OK button to display the Home screen.
3. Use the arrow buttons and the OK button to navigate to and open the following menus:
1. Setup
2. Printer Maintenance
3. Update Firmware
NOTE: If the Update Firmware option is not listed, use Method two.
4. If a rmware update is available, press the OK button to start the update process.
Method two: Update the rmware using the HP Printer Update utility
Follow these steps to manually download and install the HP Printer Update utility.
NOTE: This method is the only rmware update option available for printers connected to the computer via a
USB cable. This method also works for printers that are connected to a network.
NOTE: You must have a print driver installed in order to use this method.
1. Go to www.hp.com/go/support, click Software and Drivers, and then click Printer.
2. In the text eld, type the printer name, click Submit, and then click your printer model from the list of
search results.
3. In the Firmware section, locate the Firmware Update le.
4. Click Download, and then click Run.
74 Chapter 5 Manage the printer ENWW

5. When the HP Printer Update utility launches, select the printer that you wish to update, and then click
Update.
6. Follow the on-screen instructions to complete the installation, and then click the OK button to close the
utility.
ENWW Update the rmware 75

76 Chapter 5 Manage the printer ENWW

6 Solve problems
Troubleshoot problems with the printer. Locate additional resources for help and technical support.
●Customer support
●Restore the factory-set defaults
●A “Cartridge is low” or “Cartridge is very low” message displays on the printer control panel
●Printer does not pick up paper or misfeeds
●Clear paper jams
●Resolving print quality problems
●Solve wired network problems
●Solve wireless network problems
For more information:
HP’s all-inclusive help for the printer includes the following information:
●Install and congure
●Learn and use
●Solve problems
●Download software and rmware updates
●Join support forums
●Find warranty and regulatory information
Customer support
Find support contact options for your HP printer.
Table 6-1 HP support options
Support option Contact information
Get telephone support for your country/region
Have the printer name, serial number, date of purchase, and
problem description ready
Country/region phone numbers are on the yer that was in the box
with the printer or at www.hp.com/support.
ENWW 77

Table 6-1 HP support options (continued)
Support option Contact information
Get 24-hour Internet support, and download software utilities and
drivers
www.hp.com/support/ljM304 or www.hp.com/support/ljM404
Order additional HP service or maintenance agreements www.hp.com/go/carepack
Register the printer www.register.hp.com
Restore the factory-set defaults
Restoring the factory-set defaults returns all of the printer and network settings to the factory defaults. It will
not reset the page count, or tray size.
To restore the printer to the factory-default settings, follow these steps.
CAUTION: Restoring the factory-set defaults returns all of the settings to the factory defaults, and it also
deletes any pages that are stored in the memory.
1. On the printer control panel, press the OK button to display the Home screen.
2. Use the arrow buttons and the OK button to navigate to and open the following menus:
1. Setup
2. Printer Maintenance
3. Restore
4. Restore Factory Defaults
The printer automatically restarts.
78 Chapter 6 Solve problems ENWW

A “Cartridge is low” or “Cartridge is very low” message displays on
the printer control panel
Understand the cartridge-related messages on the control panel and what actions to take.
●Change the “Very Low” settings
●Order supplies
Cartridge is low: The printer indicates when a toner cartridge level is low. Actual toner cartridge life remaining
may vary. Consider having a replacement available to install when print quality is no longer acceptable. The toner
cartridge does not need to be replaced now.
Continue printing with the current cartridge until redistributing the toner no longer yields acceptable print quality.
To redistribute the toner, remove the toner cartridge from the printer and gently rock the cartridge back and forth
about its horizontal axis. For graphical representation, see cartridge replacement instructions. Reinsert the toner
cartridge into the printer and close the cover.
Cartridge is very low: The printer indicates when the toner cartridge level is very low. Actual toner cartridge life
remaining may vary. Consider having a replacement available to install when print quality is no longer
acceptable. The toner cartridge does not need to be replaced now unless the print quality is no longer
acceptable.
HP’s Premium Protection Warranty expires when a message indicating that HP’s Premium Protection Warranty
on this supply has ended appears on the Supplies Status Page or the EWS.
ENWW A “Cartridge is low” or “Cartridge is very low” message displays on the printer control panel 79

Change the “Very Low” settings
You can change the way the printer reacts when supplies reach the Very Low state. You do not have to re-
establish these settings when you install a new toner cartridge.
●Change the «Very Low» settings from the control panel
Change the «Very Low» settings from the control panel
Determine how the printer will notify you about very low cartridge levels.
1. On the printer control panel, press the OK button to display the Home screen.
2. Use the arrow buttons and the OK button to navigate to and open the following menus:
1. Setup
2. Supply Settings
3. Black Cartridge
4. Very Low Setting
3. Select one of the following options:
●Select the Stop option to set the printer to stop printing until you replace the toner cartridge.
●Select the Prompt option to set the printer to stop printing and prompt you to replace the toner
cartridge. You can acknowledge the prompt and continue printing.
●Select the Continue option to set the printer to alert you that the toner cartridge is very low, but to
continue printing.
NOTE: The Low Threshold option allows you to dene the level of ink that is considered very low.
Order supplies
Order supplies and paper for your HP printer.
Table 6-2 Options for ordering supplies
Ordering options Contact information
Order supplies and paper www.hp.com/go/suresupply
Order through service or support providers Contact an HP-authorized service or support provider.
Order using the HP Embedded Web Server (EWS) To access, in a supported web browser on your computer, enter the
printer IP address or host name in the address/URL eld. The EWS
contains a link to the HP SureSupply website, which provides
options for purchasing Original HP supplies.
80 Chapter 6 Solve problems ENWW

Printer does not pick up paper or misfeeds
Review the following information about the printer not picking up paper or misfeeding paper.
●Introduction
●The printer does not pick up paper
●The printer picks up multiple sheets of paper
Introduction
The following solutions can help solve problems if the printer is not picking up paper from the tray or is picking
up multiple sheets of paper at one time. Either of these situations can result in paper jams.
The printer does not pick up paper
If the printer does not pick up paper from the tray, try these solutions.
1. Open the printer and remove any jammed sheets of paper. Verify that no torn remnants of paper remain
inside of the printer.
2. Load the tray with the correct size of paper for the job.
3. Make sure the paper size and type are set correctly on the printer control panel.
ENWW Printer does not pick up paper or misfeeds 81

4. Make sure the paper guides in the tray are adjusted correctly for the size of paper. Adjust the guides to the
appropriate indentation in the tray. The arrow on the tray guide should line up exactly with the marking on
the tray.
NOTE: Do not adjust the paper guides tightly against the paper stack. Adjust them to the indentations or
markings in the tray.
The following image shows examples of the paper-size indentations in the trays. Most HP printers have
markings similar to these.
Figure 6-1 Examples of size markings
82 Chapter 6 Solve problems ENWW
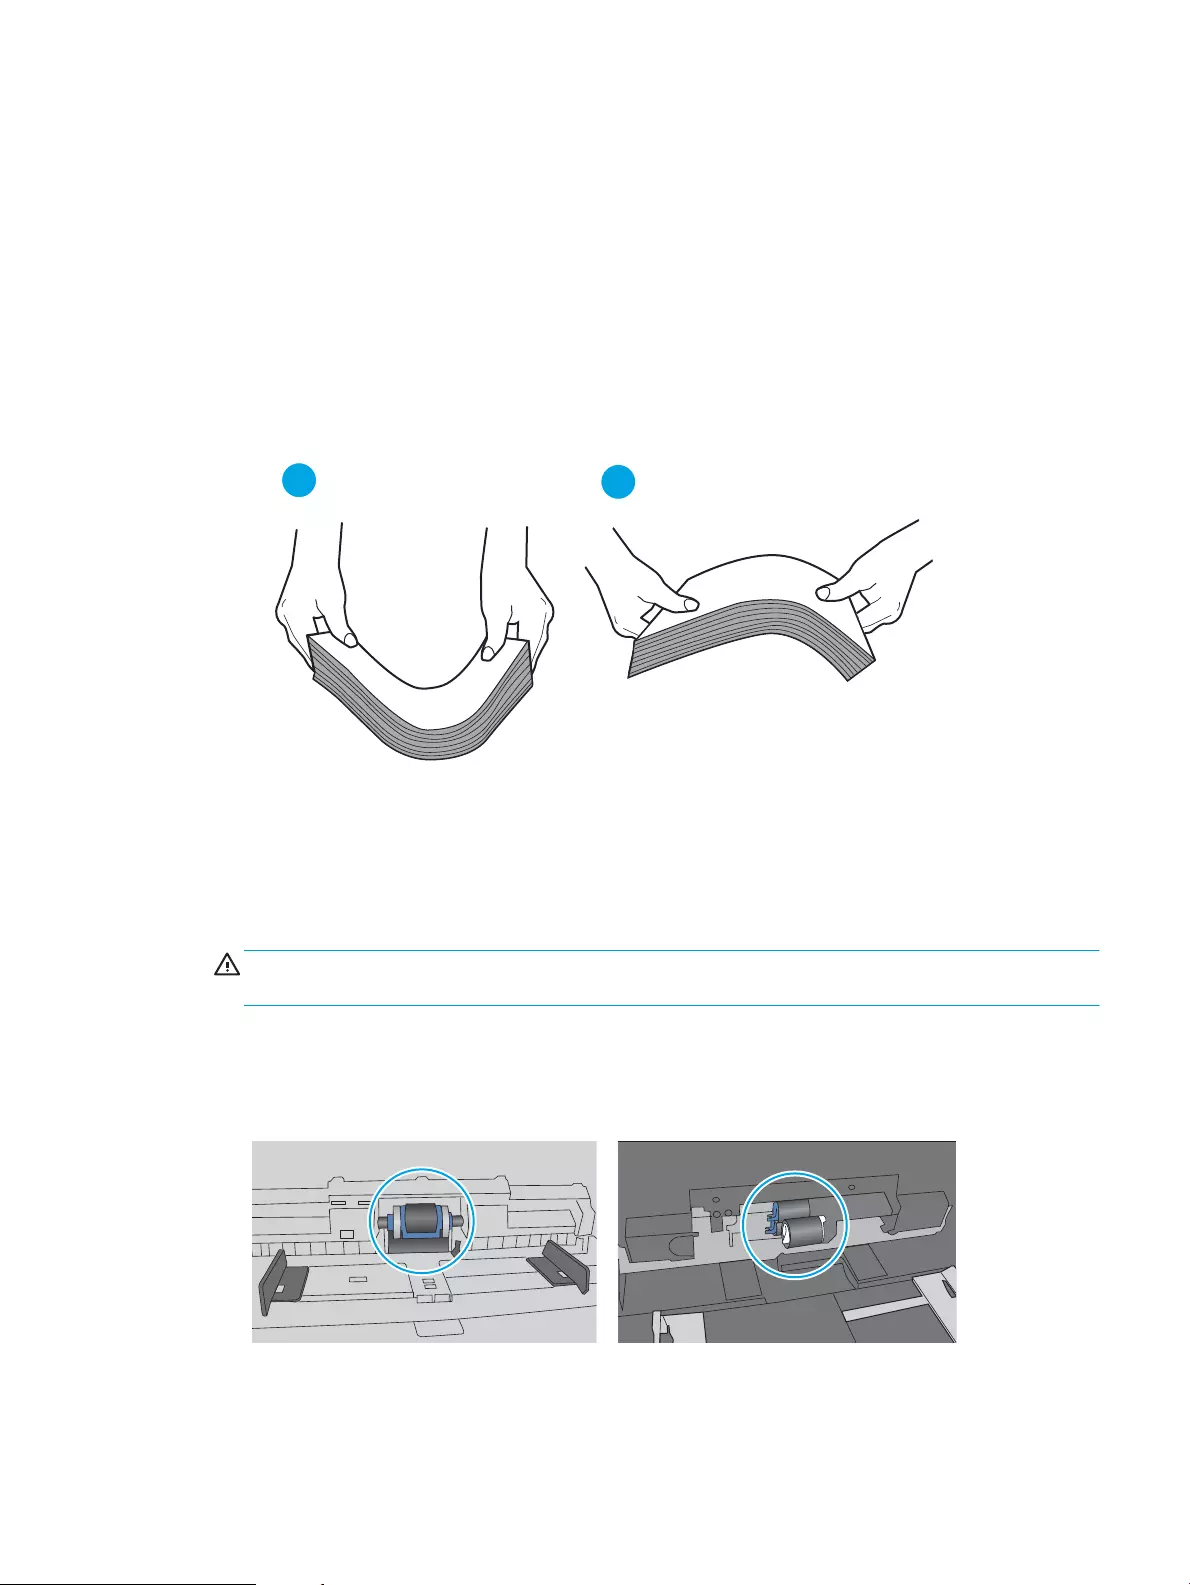
5. Verify that the humidity in the room is within specications for this printer, and that paper is being stored in
unopened packages. Most reams of paper are sold in moisture-proof wrapping to keep paper dry.
In high-humidity environments, paper at the top of the stack in the tray can absorb moisture, and it might
have a wavy or uneven appearance. If this happens, remove the top 5 to 10 sheets of paper from the stack.
In low-humidity environments, excess static electricity can cause sheets of paper to stick together. If this
happens, remove the paper from the tray, and ex the stack by holding it at each end and bringing the ends
up to form a U shape. Then, rotate the ends down to reverse the U shape. Next, hold each side of the stack
of paper, and repeat this process. This process releases individual sheets without introducing static
electricity. Straighten the paper stack against a table before returning it to the tray.
Figure 6-2 Technique for exing the paper stack
6. Check the printer control panel to see if it is displaying a prompt to feed the paper manually. Load paper,
and continue.
7. The rollers above the tray might be contaminated. Clean the rollers with a lint-free cloth dampened with
warm water. Use distilled water, if it is available.
CAUTION: Do not spray water directly on to the printer. Instead, spray water on the cloth or dab the cloth
in water and wring it out before cleaning the rollers.
The following image shows examples of the roller location for various printers.
Figure 6-3 Roller locations for Tray 1 or the multipurpose tray
ENWW Printer does not pick up paper or misfeeds 83
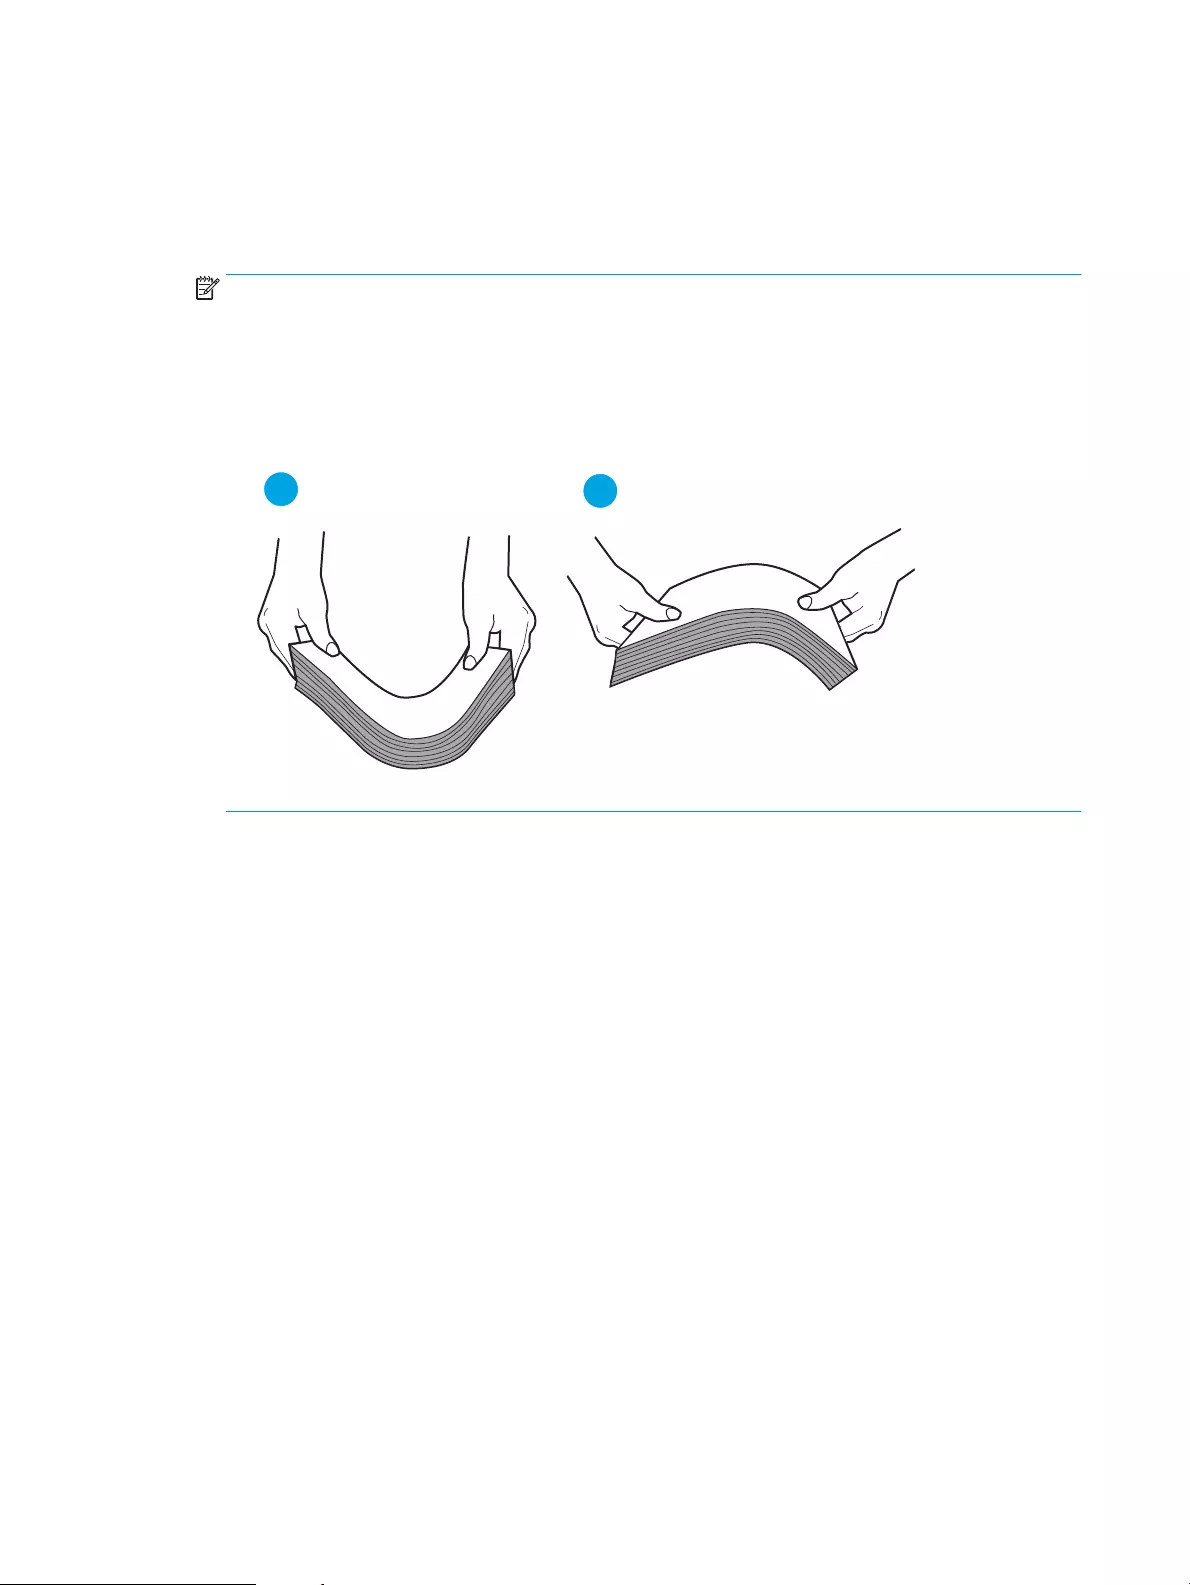
The printer picks up multiple sheets of paper
If the printer picks up multiple sheets of paper from the tray, try these solutions.
1. Remove the stack of paper from the tray and ex it, rotate it 180 degrees, and ip it over. Do not fan the
paper. Return the stack of paper to the tray.
NOTE: Fanning the paper introduces static electricity. Instead of fanning the paper, ex the stack by
holding it at each end and bringing the ends up to form a U shape. Then, rotate the ends down to reverse
the U shape. Next, hold each side of the stack of paper, and repeat this process. This process releases
individual sheets without introducing static electricity. Straighten the paper stack against a table before
returning it to the tray.
Figure 6-4 Technique for exing the paper stack
2. Use only paper that meets HP specications for this printer.
3. Verify that the humidity in the room is within specications for this printer, and that paper is being stored in
unopened packages. Most reams of paper are sold in moisture-proof wrapping to keep paper dry.
In high-humidity environments, paper at the top of the stack in the tray can absorb moisture, and it might
have a wavy or uneven appearance. If this happens, remove the top 5 to 10 sheets of paper from the stack.
In low-humidity environments, excess static electricity can cause sheets of paper to stick together. If this
happens, remove the paper from the tray, and ex the stack as described above.
4. Use paper that is not wrinkled, folded, or damaged. If necessary, use paper from a dierent package.
84 Chapter 6 Solve problems ENWW
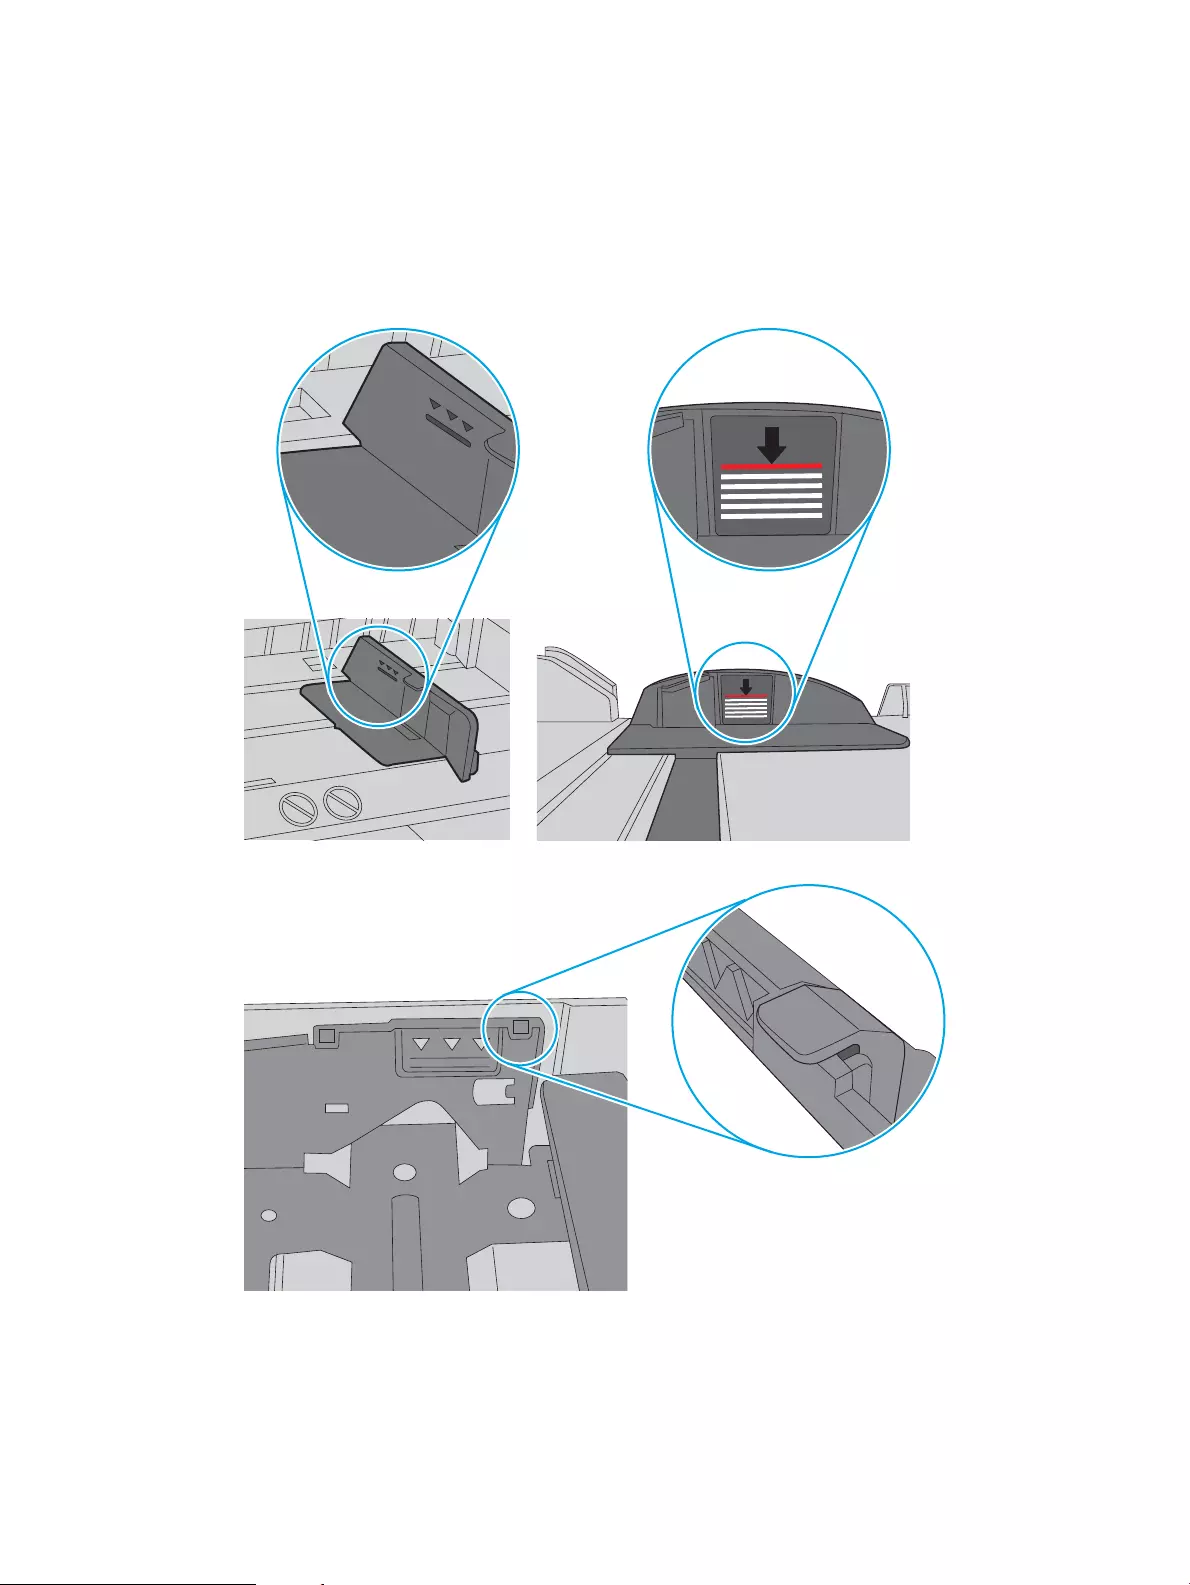
5. Make sure the tray is not overlled by checking the stack-height markings inside the tray. If it is overlled,
remove the entire stack of paper from the tray, straighten the stack, and then return some of the paper to
the tray.
The following images show examples of the stack-height markings in the trays for various printers. Most
HP printers have markings similar to these. Also make sure that all sheets of paper are below the tabs near
the stack-height marks. These tabs help hold the paper in the correct position as it enters the printer.
Figure 6-5 Stack height markings
Figure 6-6 Tab for the paper stack
6. Make sure the paper guides in the tray are adjusted correctly for the size of paper. Adjust the guides to the
appropriate indentation in the tray.
7. Make sure the printing environment is within recommended specications.
ENWW Printer does not pick up paper or misfeeds 85

Clear paper jams
Review the following information about clearing paper jams.
●Introduction
●Experiencing frequent or recurring paper jams?
●Paper jam locations
●Clear paper jams in Tray 1
●Clear paper jams in Tray 2
●Clear paper jams in Tray 3
●Clear paper jams in the toner cartridge or fuser area
●Clear paper jams in the output bin
●Clear paper jams in the duplexer
Introduction
The following information includes instructions for clearing paper jams from the printer.
Experiencing frequent or recurring paper jams?
Follow the steps to solve problems with frequent paper jams. If the rst step does not resolve the problem
continue with the next step until you have resolved the problem.
1. If paper has jammed in the printer, clear the jam and then print a conguration page to test the printer.
2. Check that the tray is congured for the correct paper size and type on the printer control panel. Adjust
paper settings if necessary.
a. Press the OK button to display the Home screen. Use the arrow buttons to navigate to Setup, and
then press the OK button again.
b. Use the arrow buttons and the OK button to navigate to and open the Paper setup menu.
c. Select the tray from the list.
d. Select Paper Type and then select the type of paper that is in the tray.
e. Select Paper Size and then select the size of paper that is in the tray.
3. Turn the printer o, wait 30 seconds, and then turn it on again.
4. Print a cleaning page to remove excess toner from inside the printer.
a. On the printer control panel, press the OK button to display the Home screen. Use the arrow buttons
to navigate to Setup, and then press the OK button again.
b. Use the arrow buttons and the OK button to navigate to and open the following menus:
86 Chapter 6 Solve problems ENWW
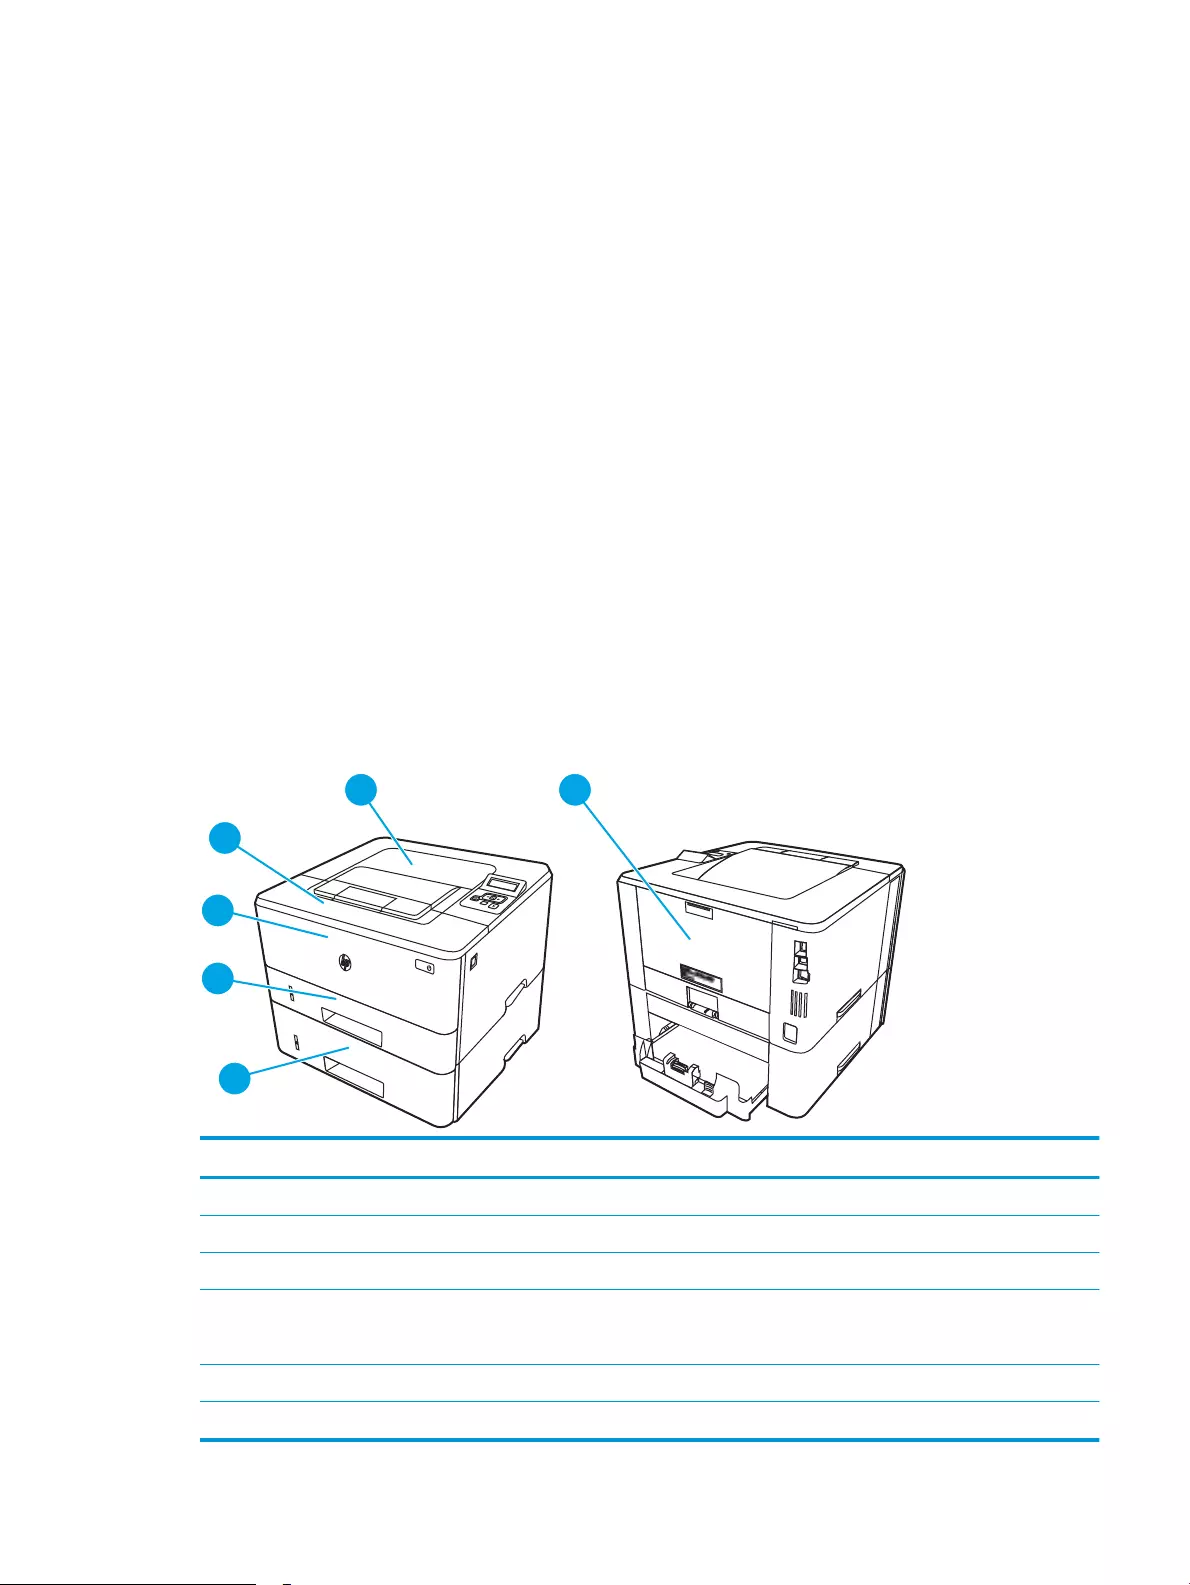
1. Printer Maintenance
2. Print Quality Tools
3. Cleaning Page
Press OK.
c. Load plain letter or A4 paper when you are prompted.
Wait until the process is complete. Discard the page that prints.
5. Print a conguration page to test the printer.
a. On the printer control panel, press the OK button to display the Home screen. Use the arrow buttons
to navigate to Setup, and then press the OK button again.
b. Use the arrow buttons and the OK button to navigate to and open the following menus:
1. Reports
2. Printer Conguration Report
If none of these steps resolves the problem, the printer might need service. Contact HP customer support.
Paper jam locations
Jams can occur in these locations.
Figure 6-7 Paper jam locations
Number Description
1 Output bin
2 Fuser area
3 Tray 3 (optional)
4 Tray 2
Duplexing area (remove Tray 2 for access)
5 Tray 1
6 Toner cartridge area (open the front door for access)
ENWW Clear paper jams 87
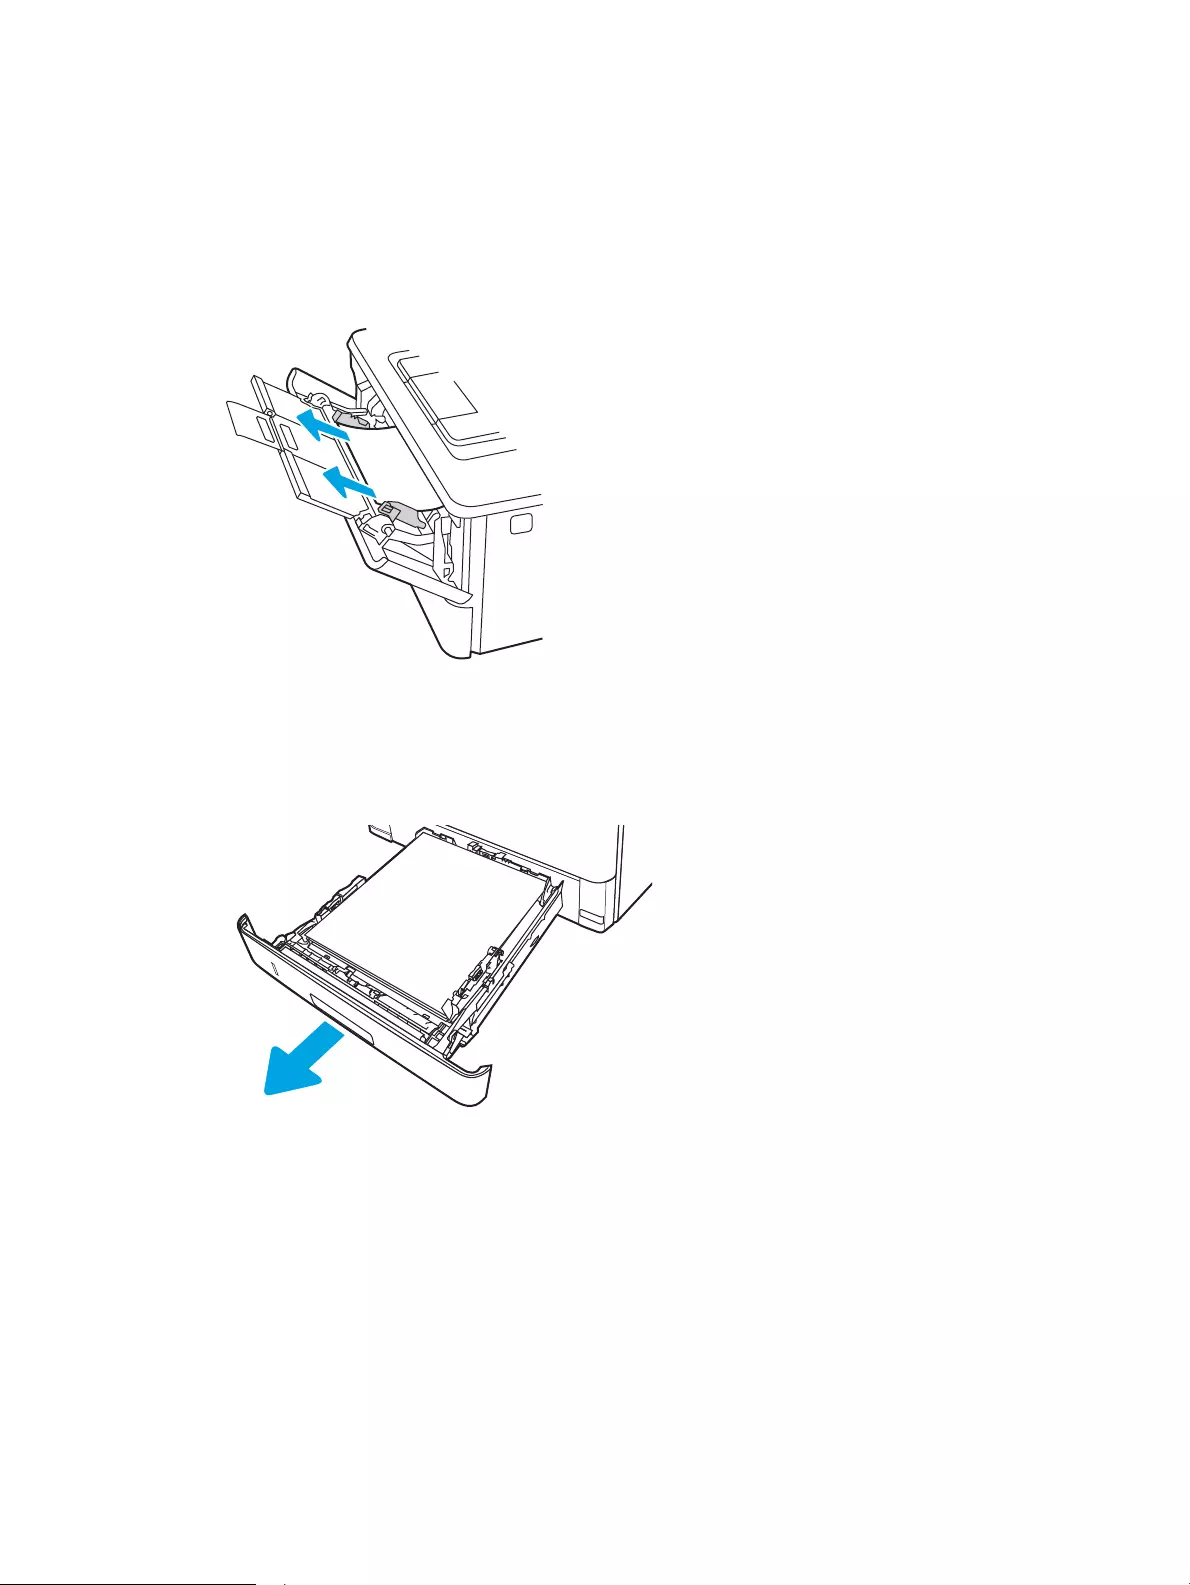
Loose toner might remain in the printer after a jam. This problem typically resolves itself after a few sheets have
been printed.
Clear paper jams in Tray 1
Use the following procedure to clear paper jams in Tray 1.
▲Slowly pull the jammed paper out of the printer.
Clear paper jams in Tray 2
Use the following procedure to check for paper in all possible jam locations related to Tray 2.
1. Remove the tray from the printer.
88 Chapter 6 Solve problems ENWW
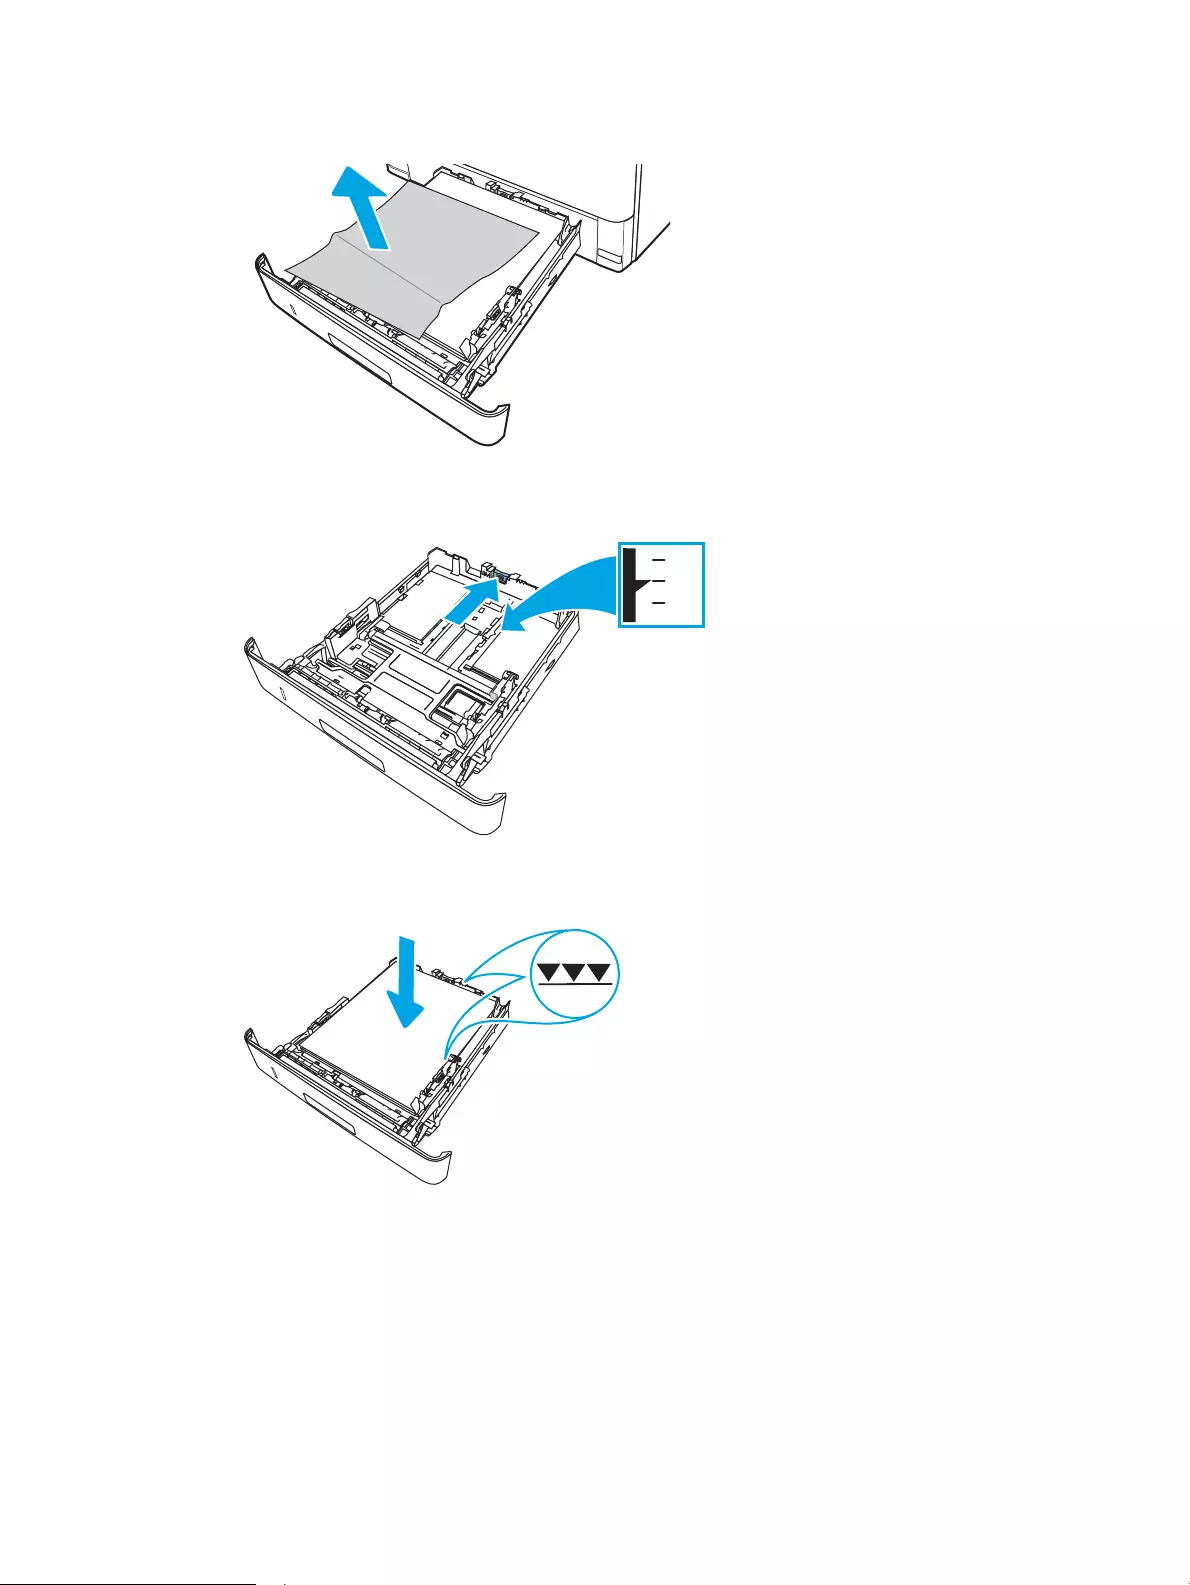
2. Remove the paper from the tray, and discard any damaged paper.
3. Verify that the rear paper guide is adjusted to the indentation for the correct paper size. If necessary, pinch
the release and move the rear paper guide to the correct position. It should click into place.
4. Load the paper into the tray. Make sure that the stack is at at all four corners and that the top of the stack
is below the maximum-height indicators.
ENWW Clear paper jams 89
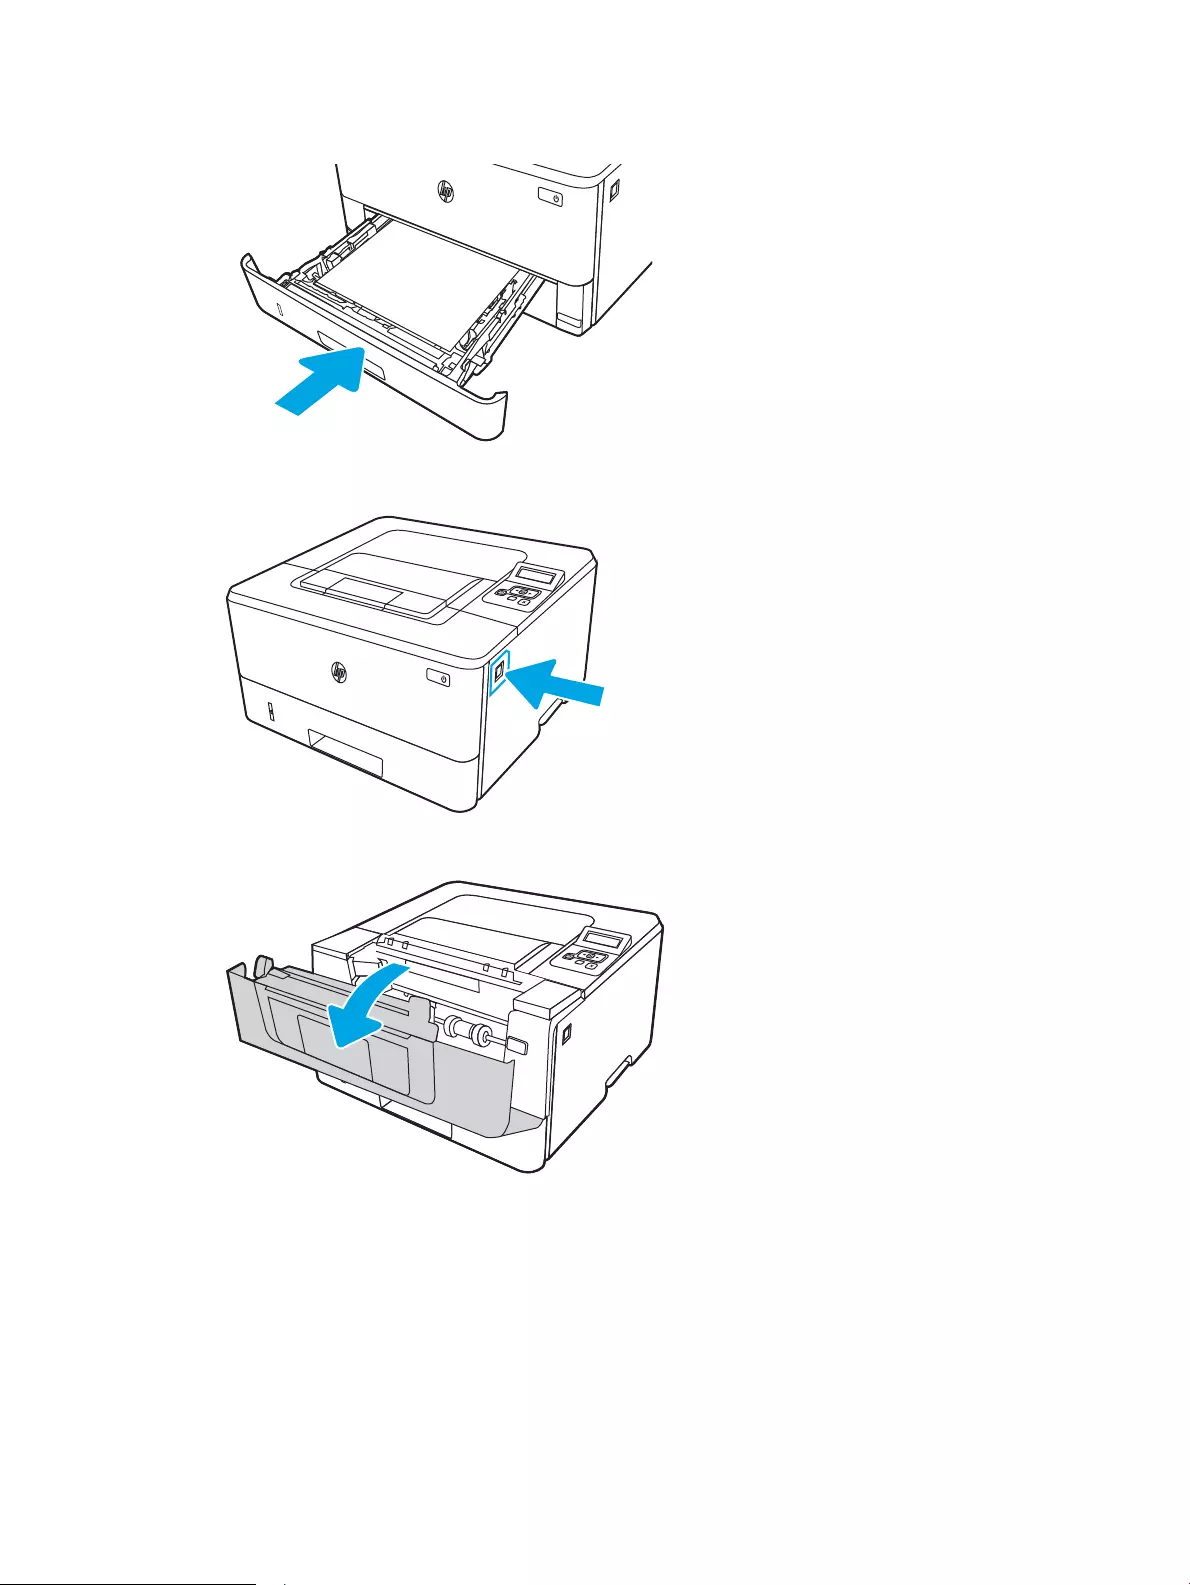
5. Reinsert and close the tray.
6. Press the front door release button.
7. Open the front door.
90 Chapter 6 Solve problems ENWW

8. Remove the toner cartridge.
9. Lift the jam-access cover.
10. Remove any jammed paper.
ENWW Clear paper jams 91
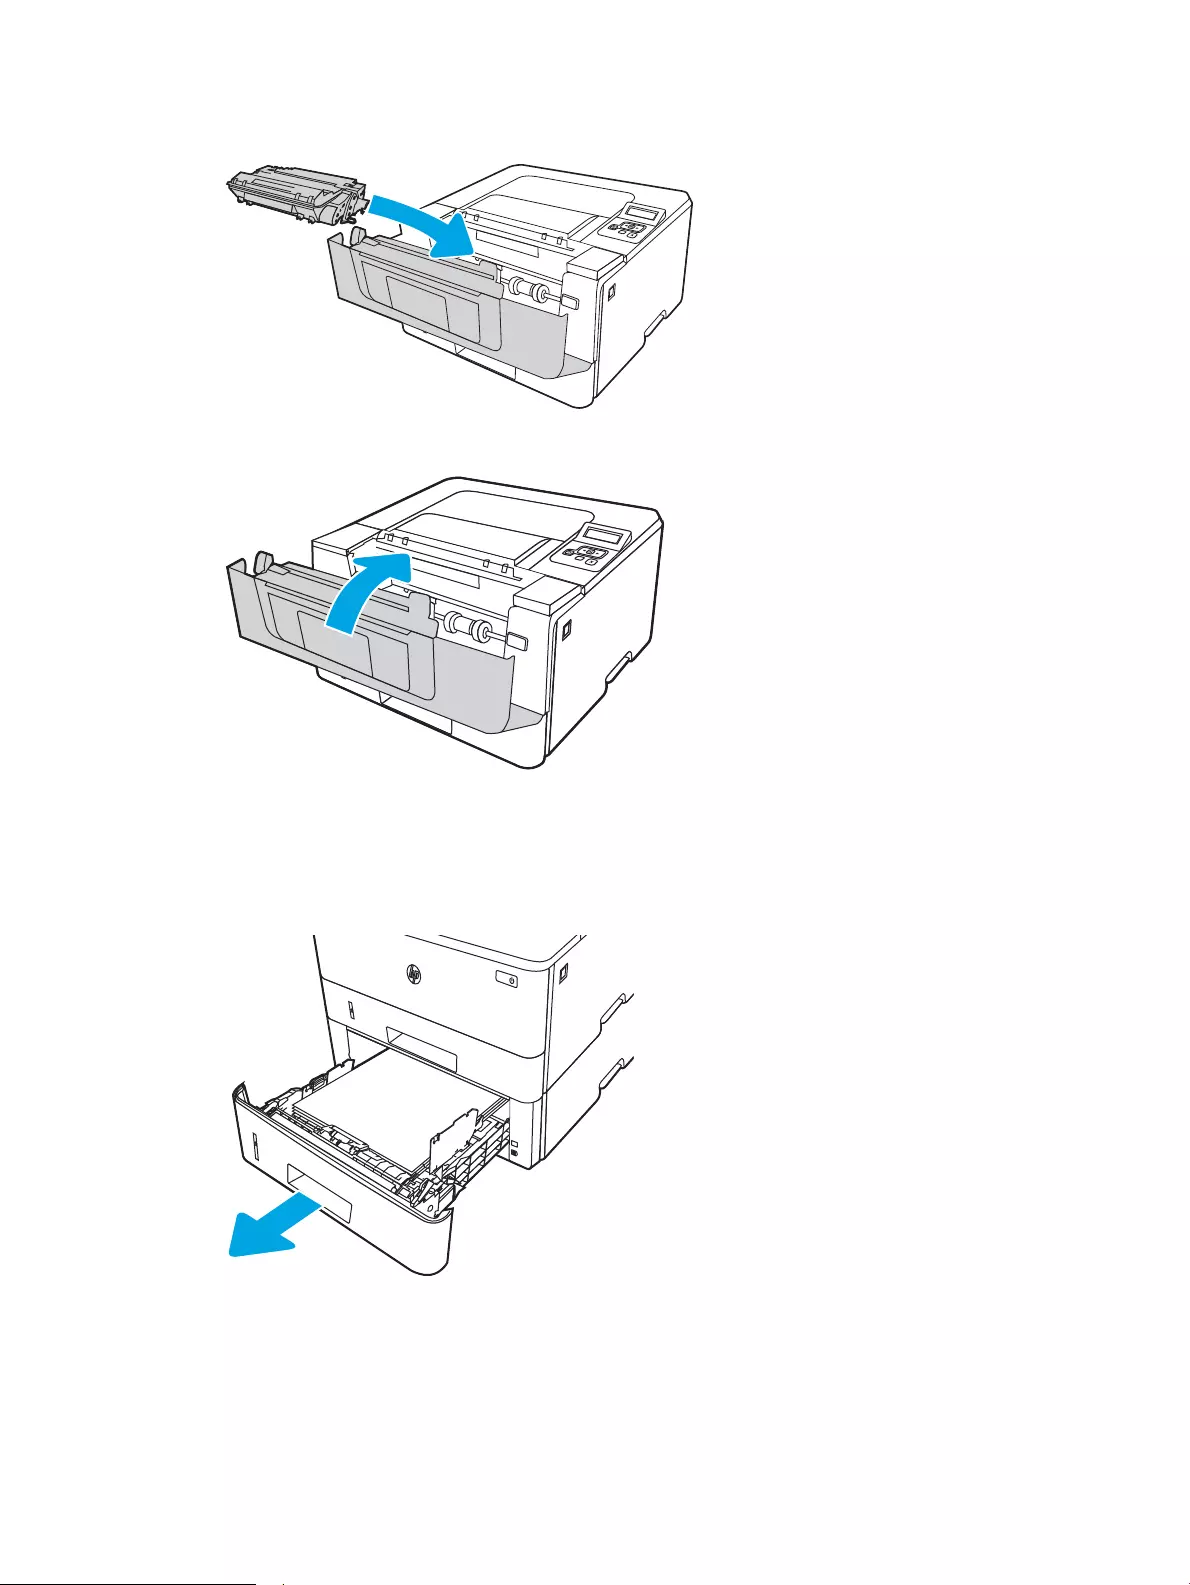
11. Install the toner cartridge.
12. Close the front door.
Clear paper jams in Tray 3
Use the following procedure to check for paper in all possible jam locations related to Tray 3.
1. Remove the tray from the printer.
92 Chapter 6 Solve problems ENWW
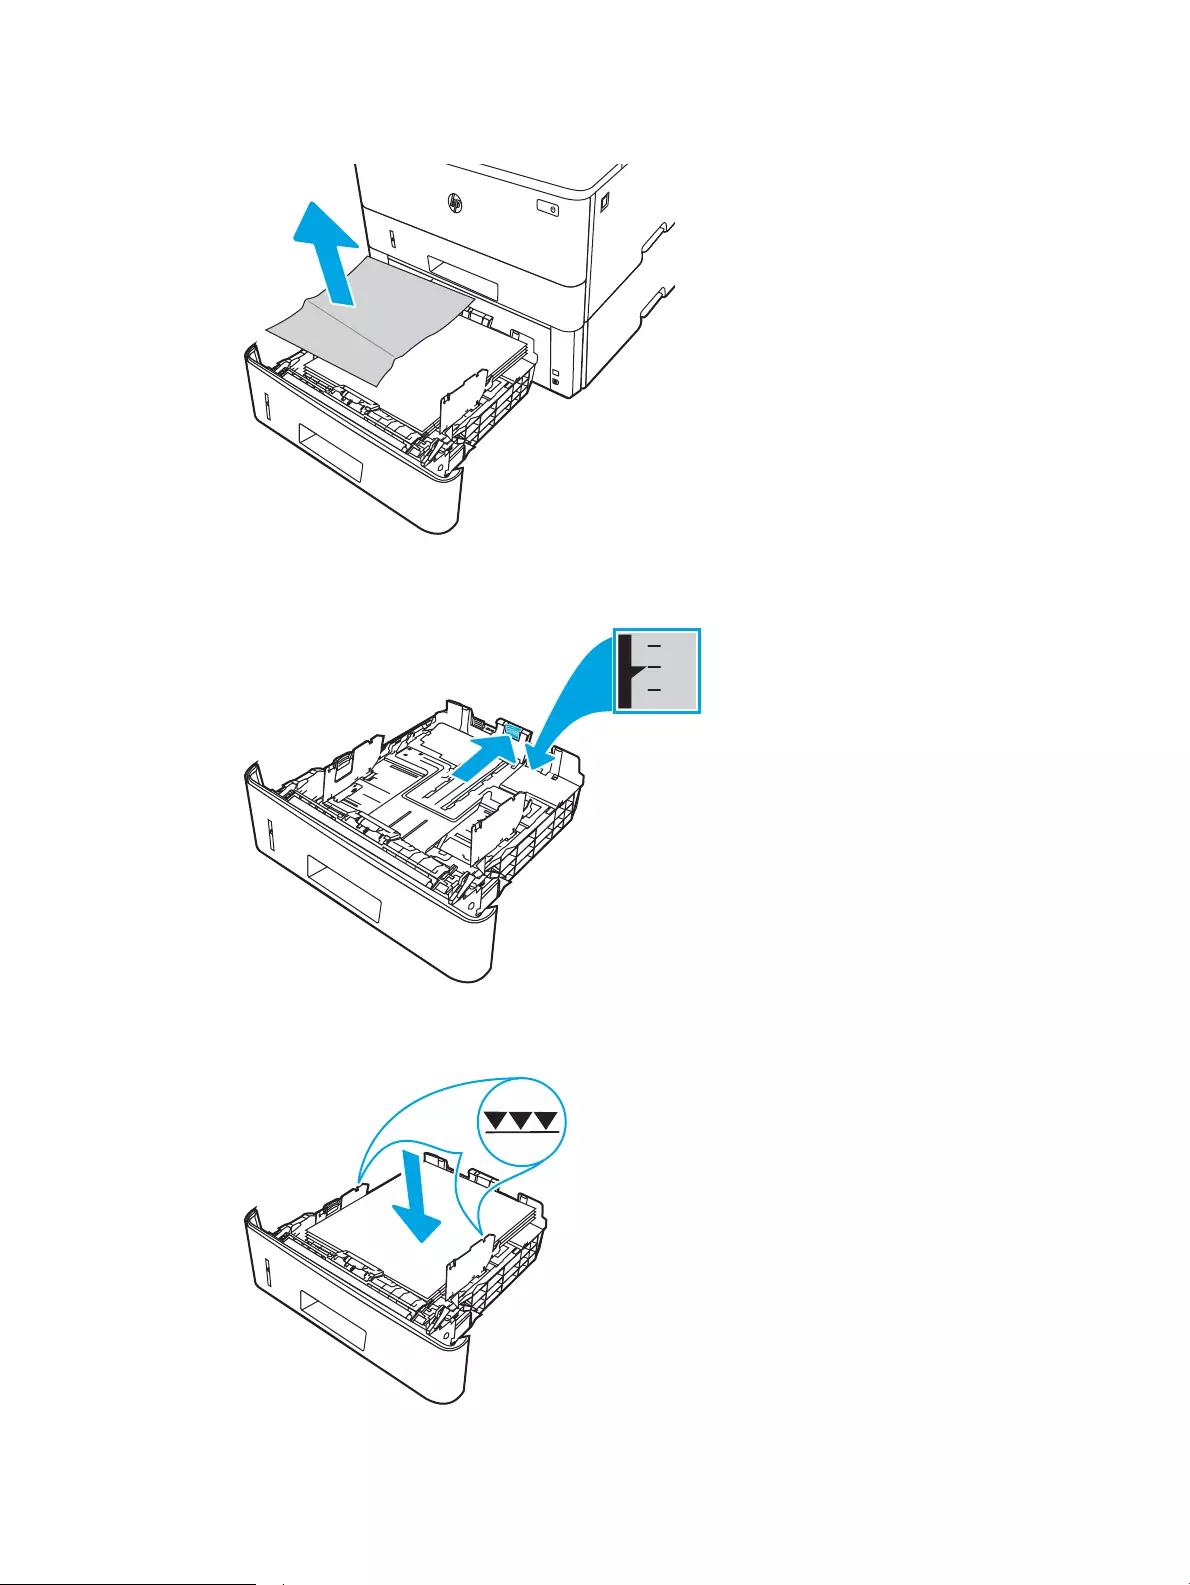
2. Remove the paper from the tray, and discard any damaged paper.
3. Verify that the rear paper guide is adjusted to the indentation for the correct paper size. If necessary, pinch
the release and move the rear paper guide to the correct position. It should click into place.
4. Load the paper into the tray. Make sure that the stack is at at all four corners and that the top of the stack
is below the maximum-height indicators.
ENWW Clear paper jams 93
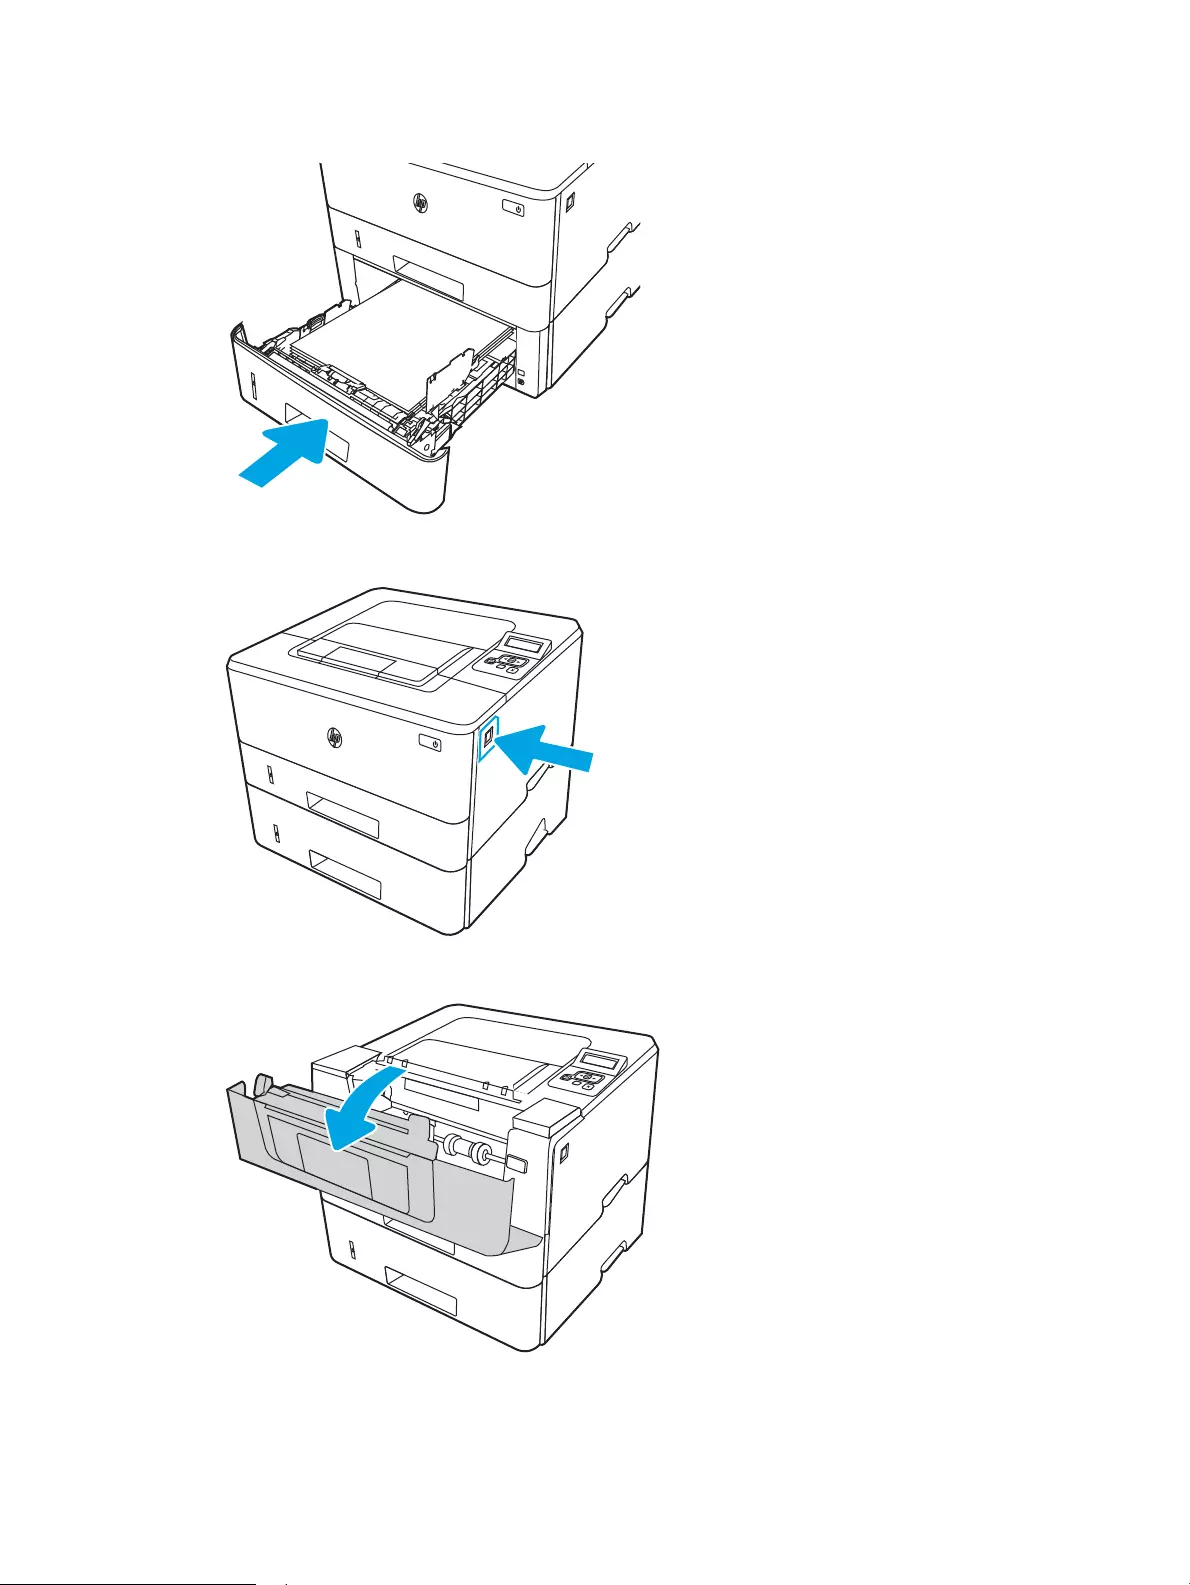
5. Reinsert and close the tray.
6. Press the front door release button.
7. Open the front door.
94 Chapter 6 Solve problems ENWW
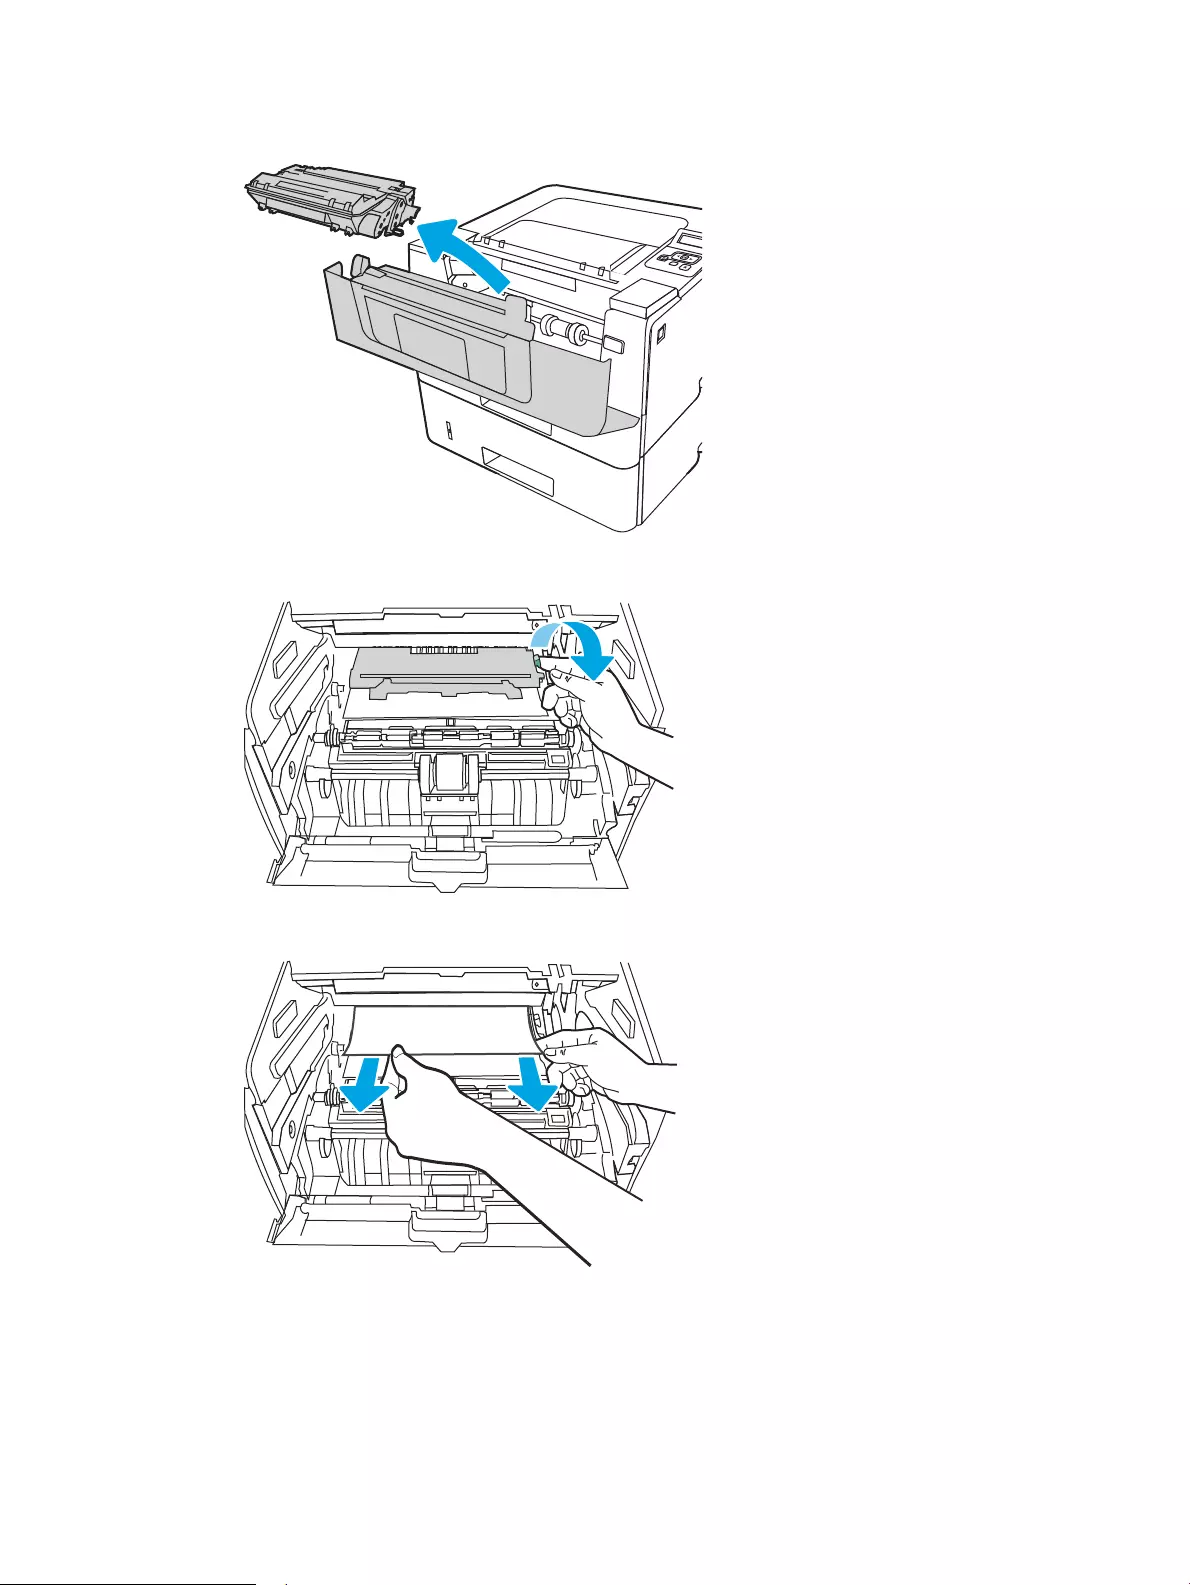
8. Remove the toner cartridge.
9. Lift the jam-access cover.
10. Remove any jammed paper.
ENWW Clear paper jams 95
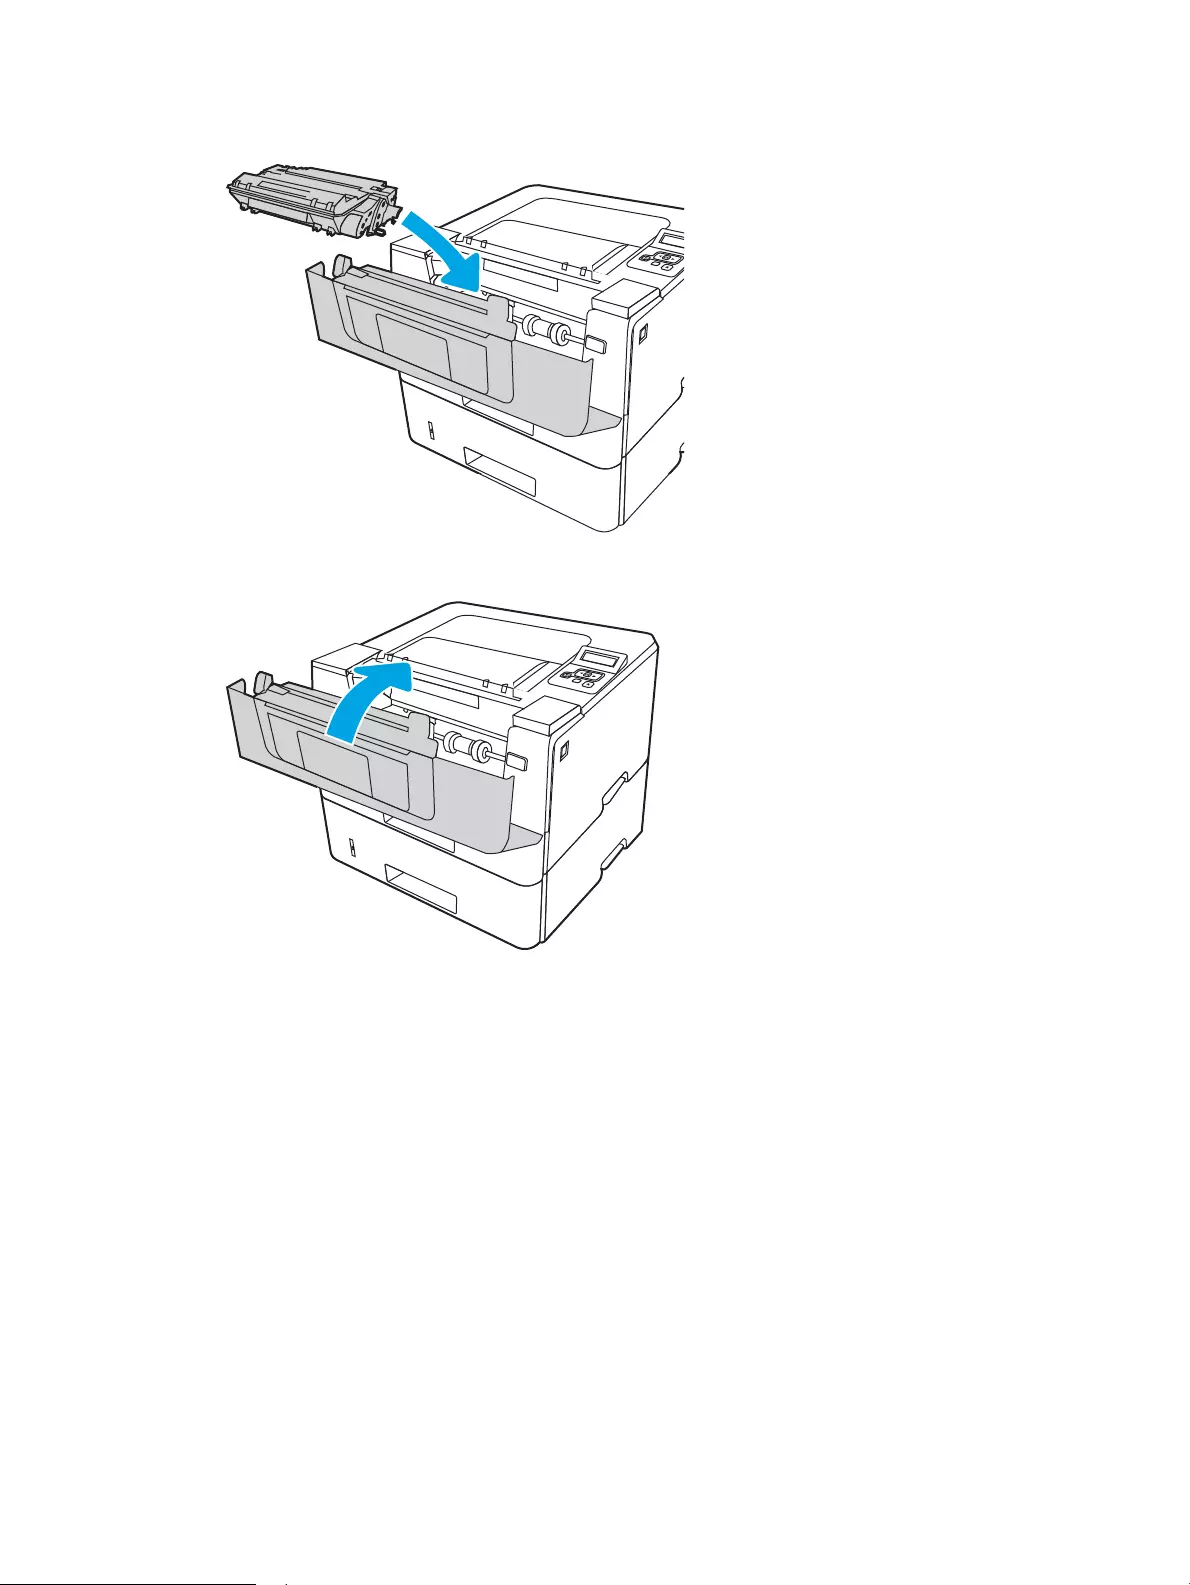
11. Install the toner cartridge.
12. Close the front door.
Clear paper jams in the toner cartridge or fuser area
Use the following procedure to check for paper in all possible jam locations in the toner cartridge or fuser area.
1. Press the front door release button.
96 Chapter 6 Solve problems ENWW
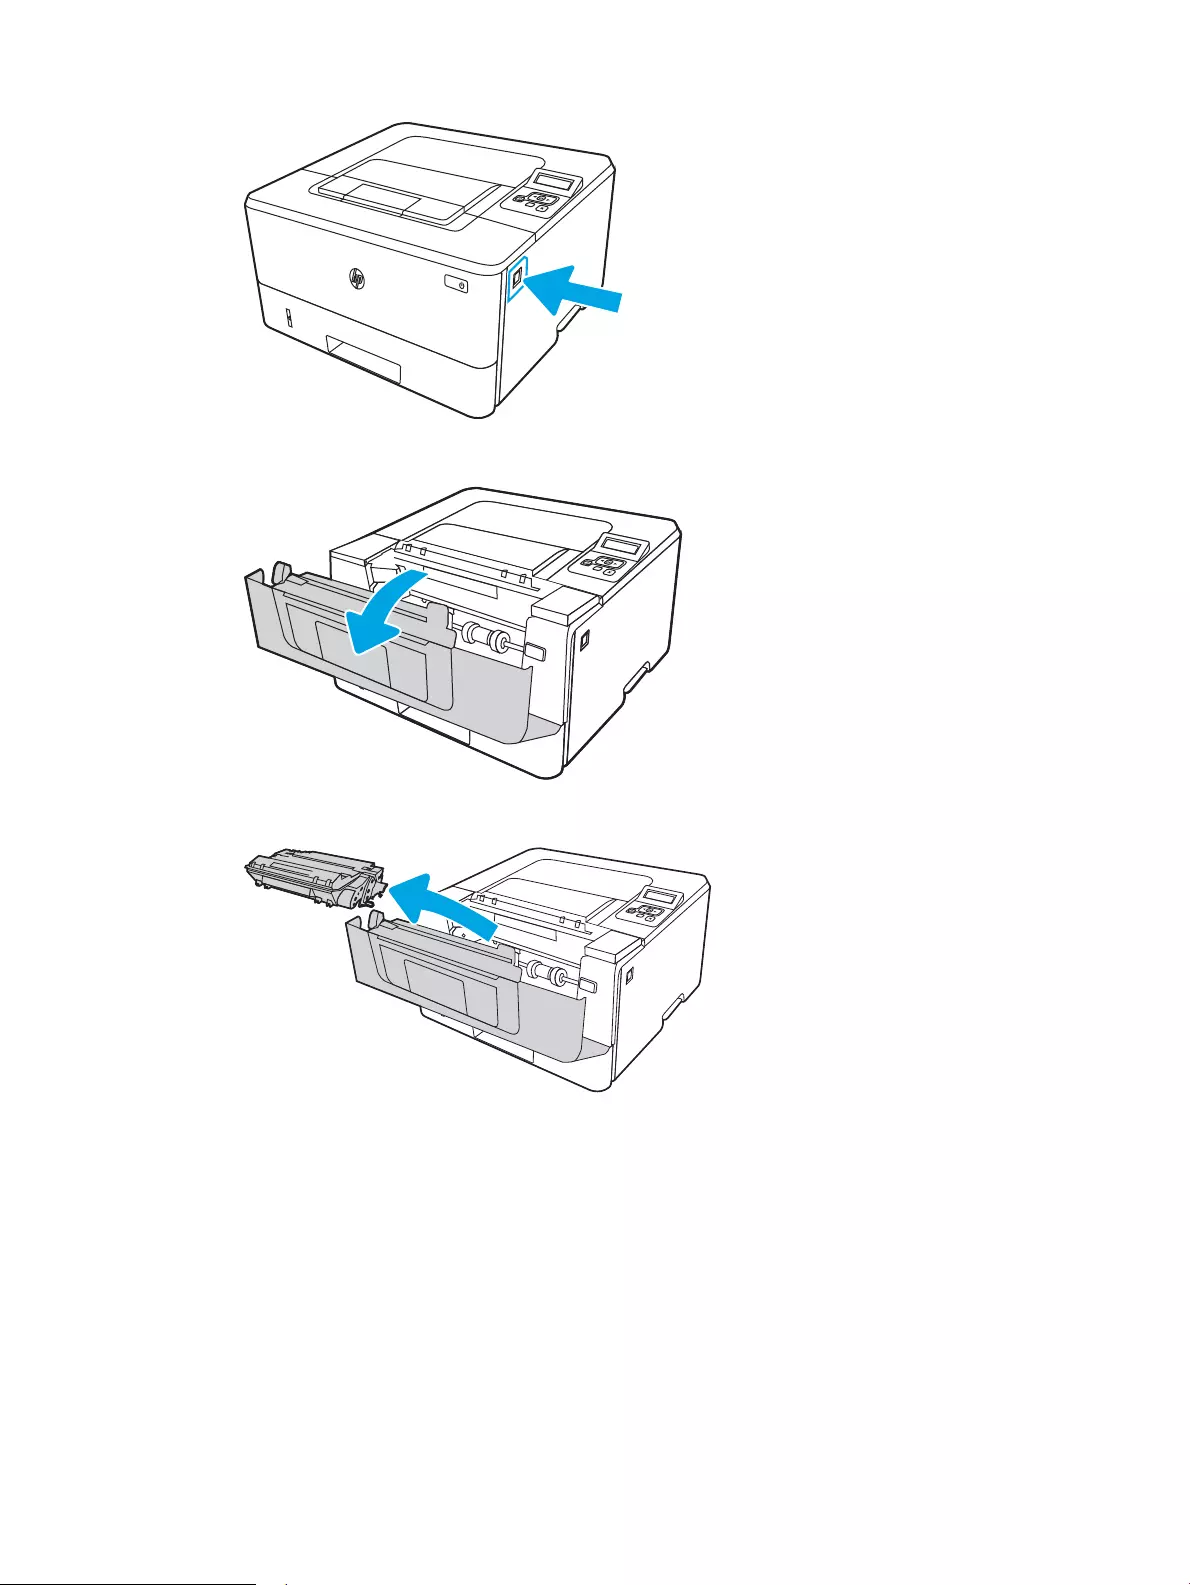
2. Open the front door.
3. Remove the toner cartridge.
4. Lift the jam-access cover.
ENWW Clear paper jams 97
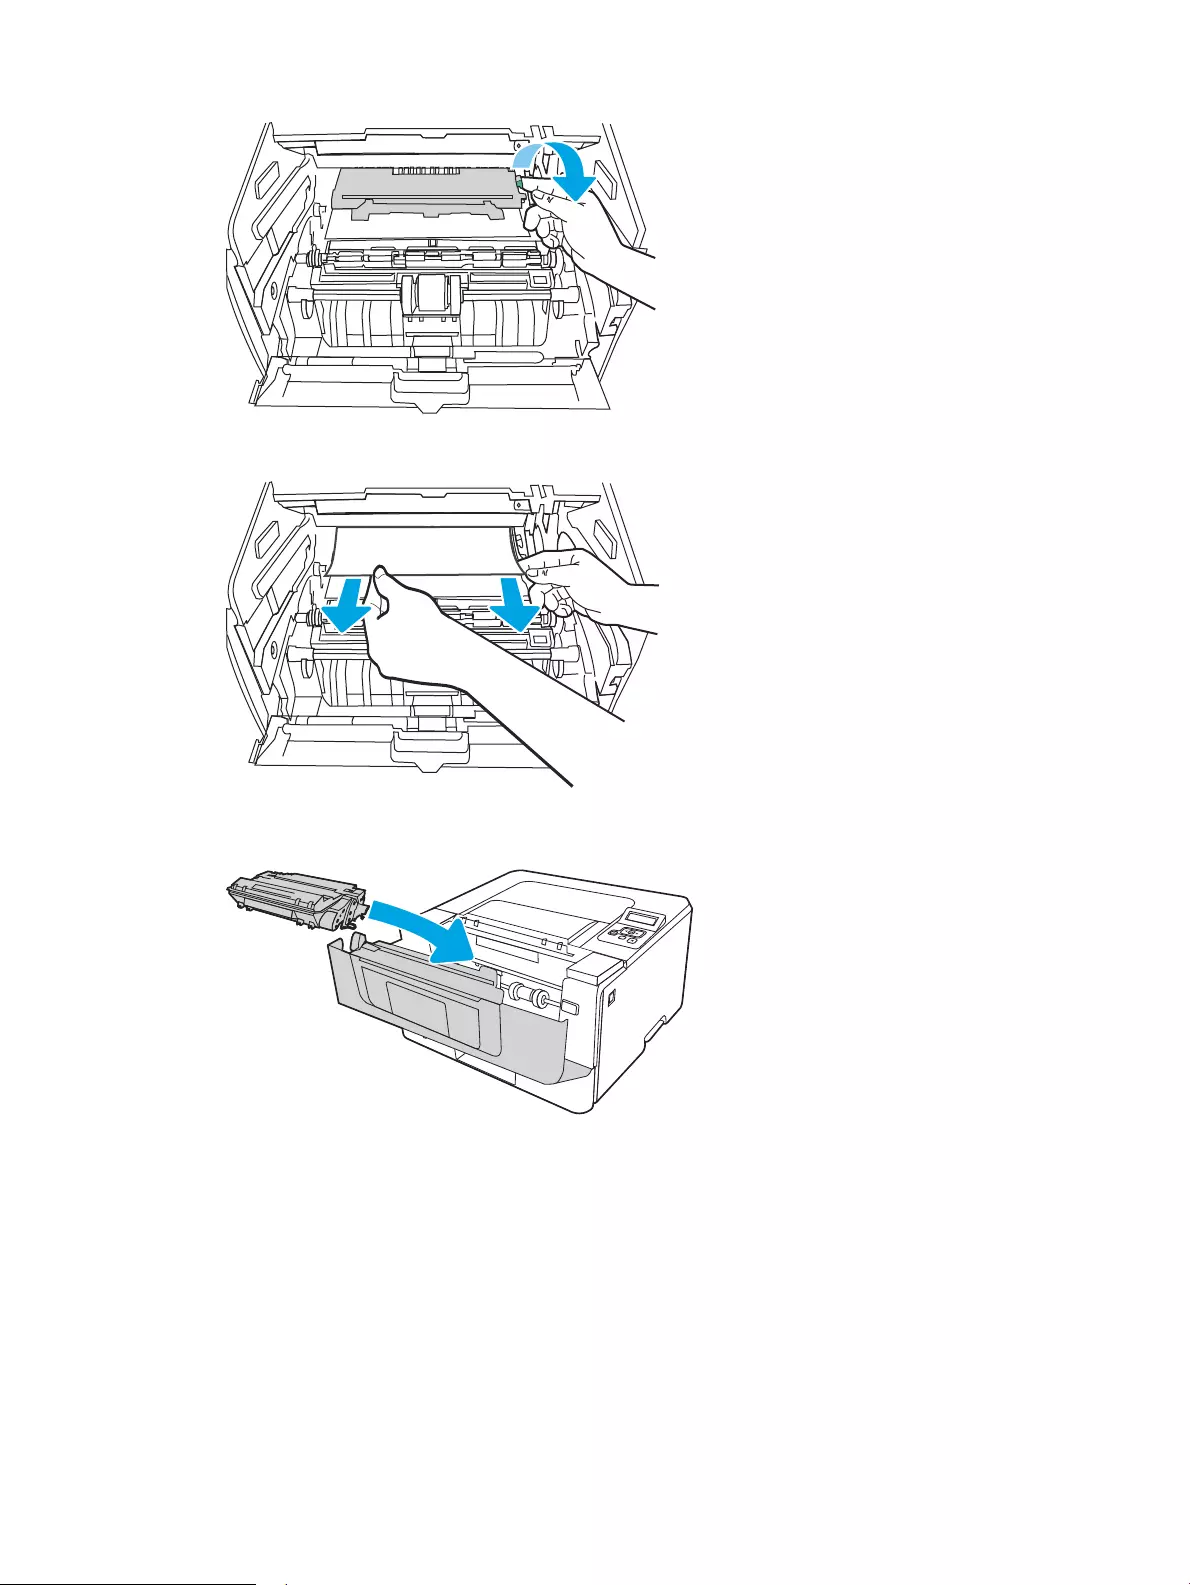
5. If jammed paper is visible, remove any jammed paper.
6. Install the toner cartridge.
7. Close the front door.
98 Chapter 6 Solve problems ENWW
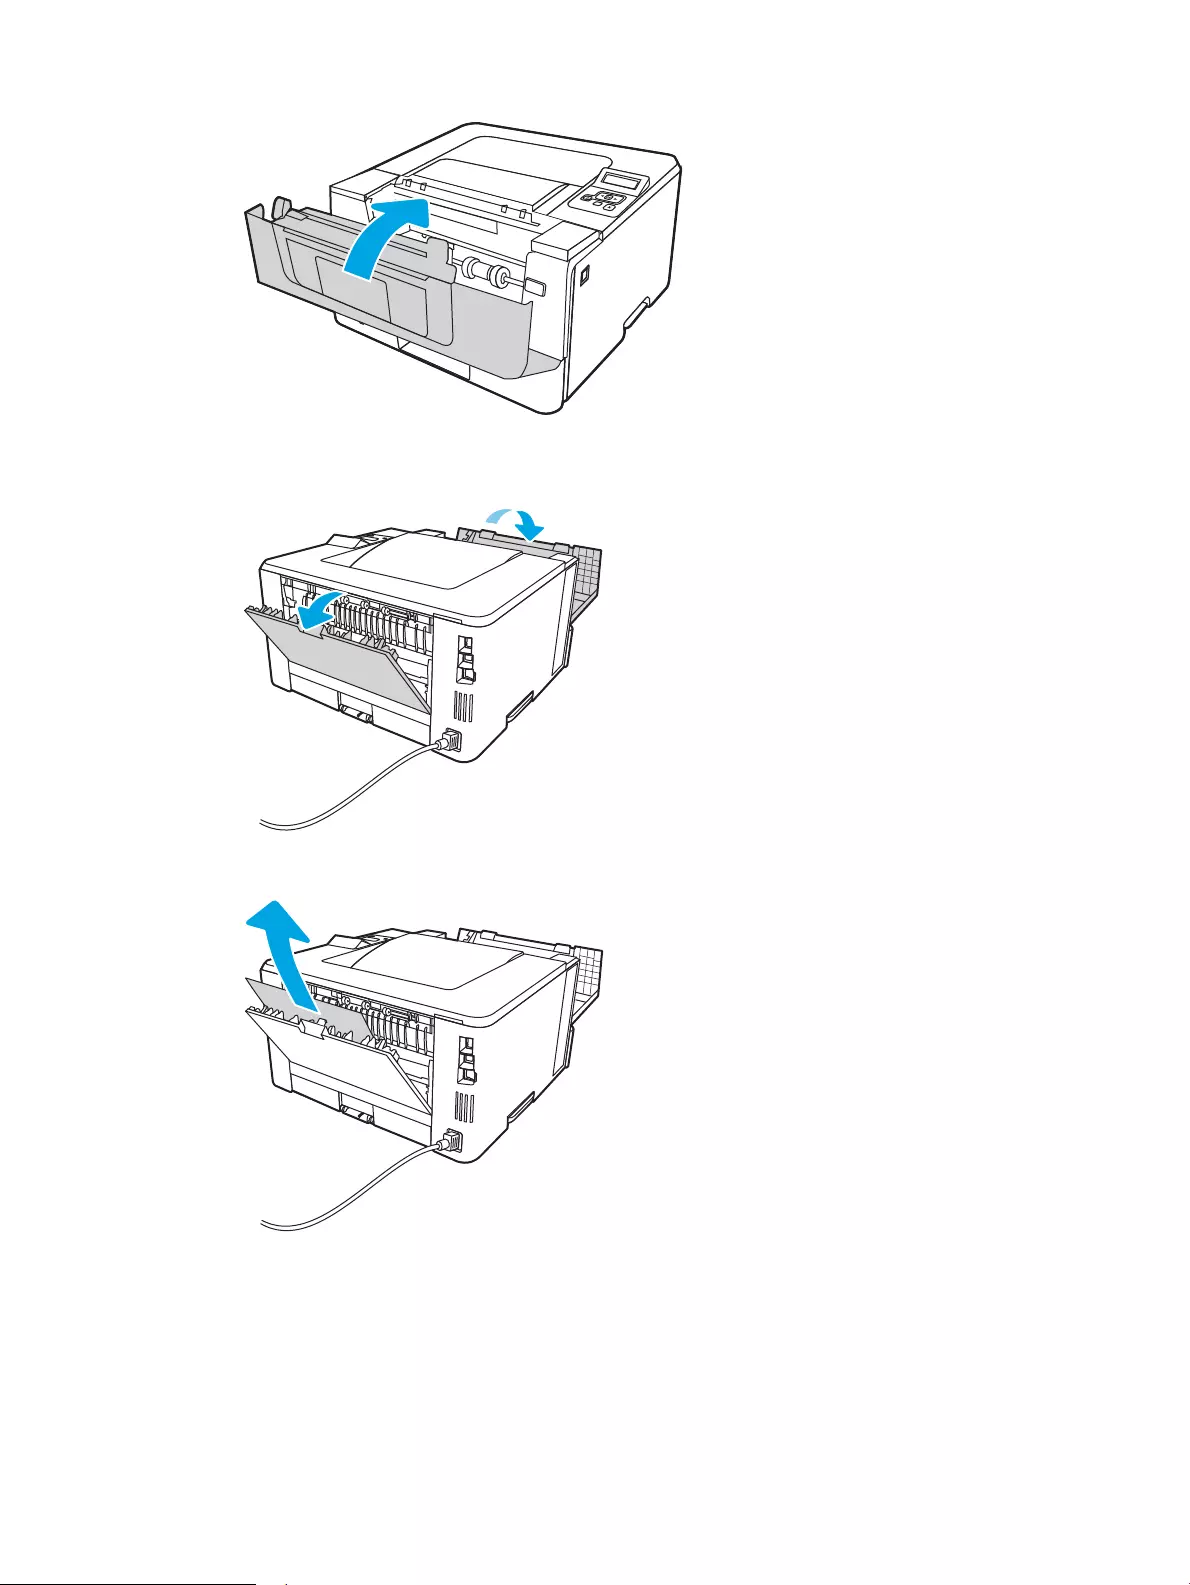
8. If no paper was jammed inside the print cartridge door, press the front door release button and open the
front door, and then open the rear door.
9. If jammed paper is visible, remove any jammed paper from the rear door area.
10. Close the rear door and the front door.
ENWW Clear paper jams 99
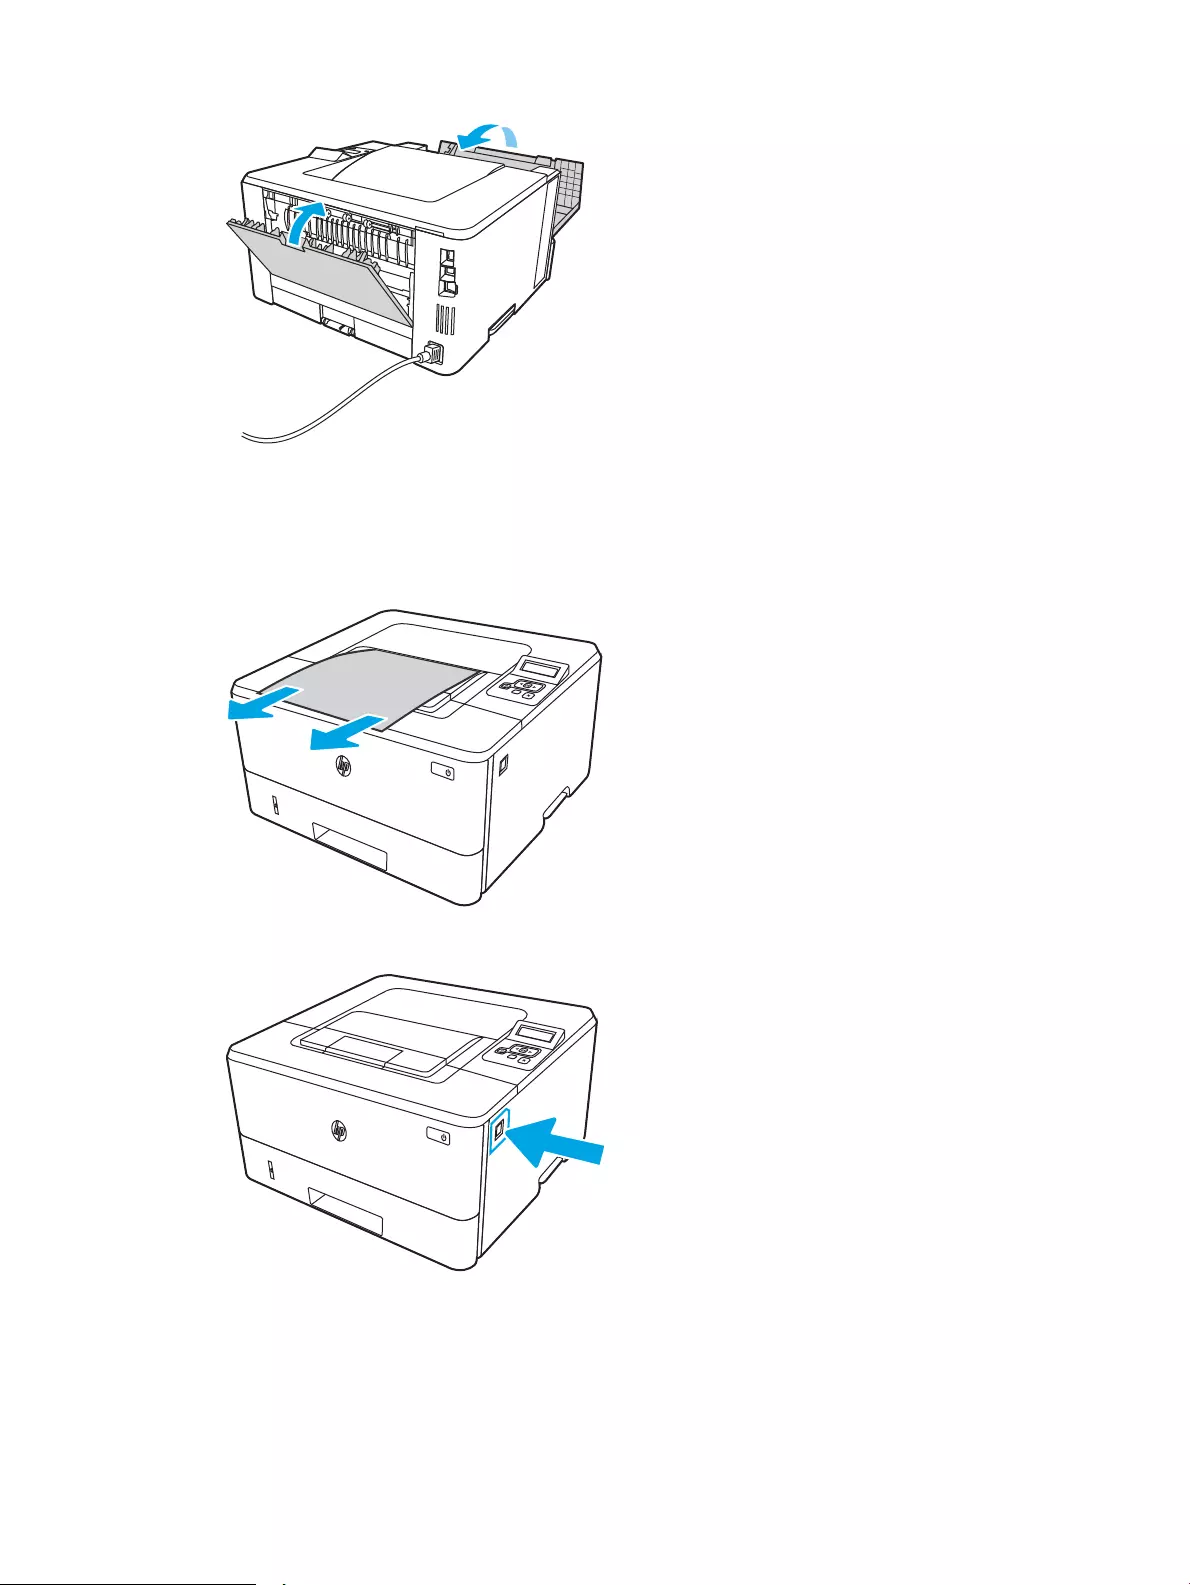
Clear paper jams in the output bin
Use the following procedure to check for paper in all possible jam locations related to the output bin.
1. If paper is visible in the output bin, grasp the leading edge and remove it.
2. Press the front door release button.
3. Open the front door.
100 Chapter 6 Solve problems ENWW
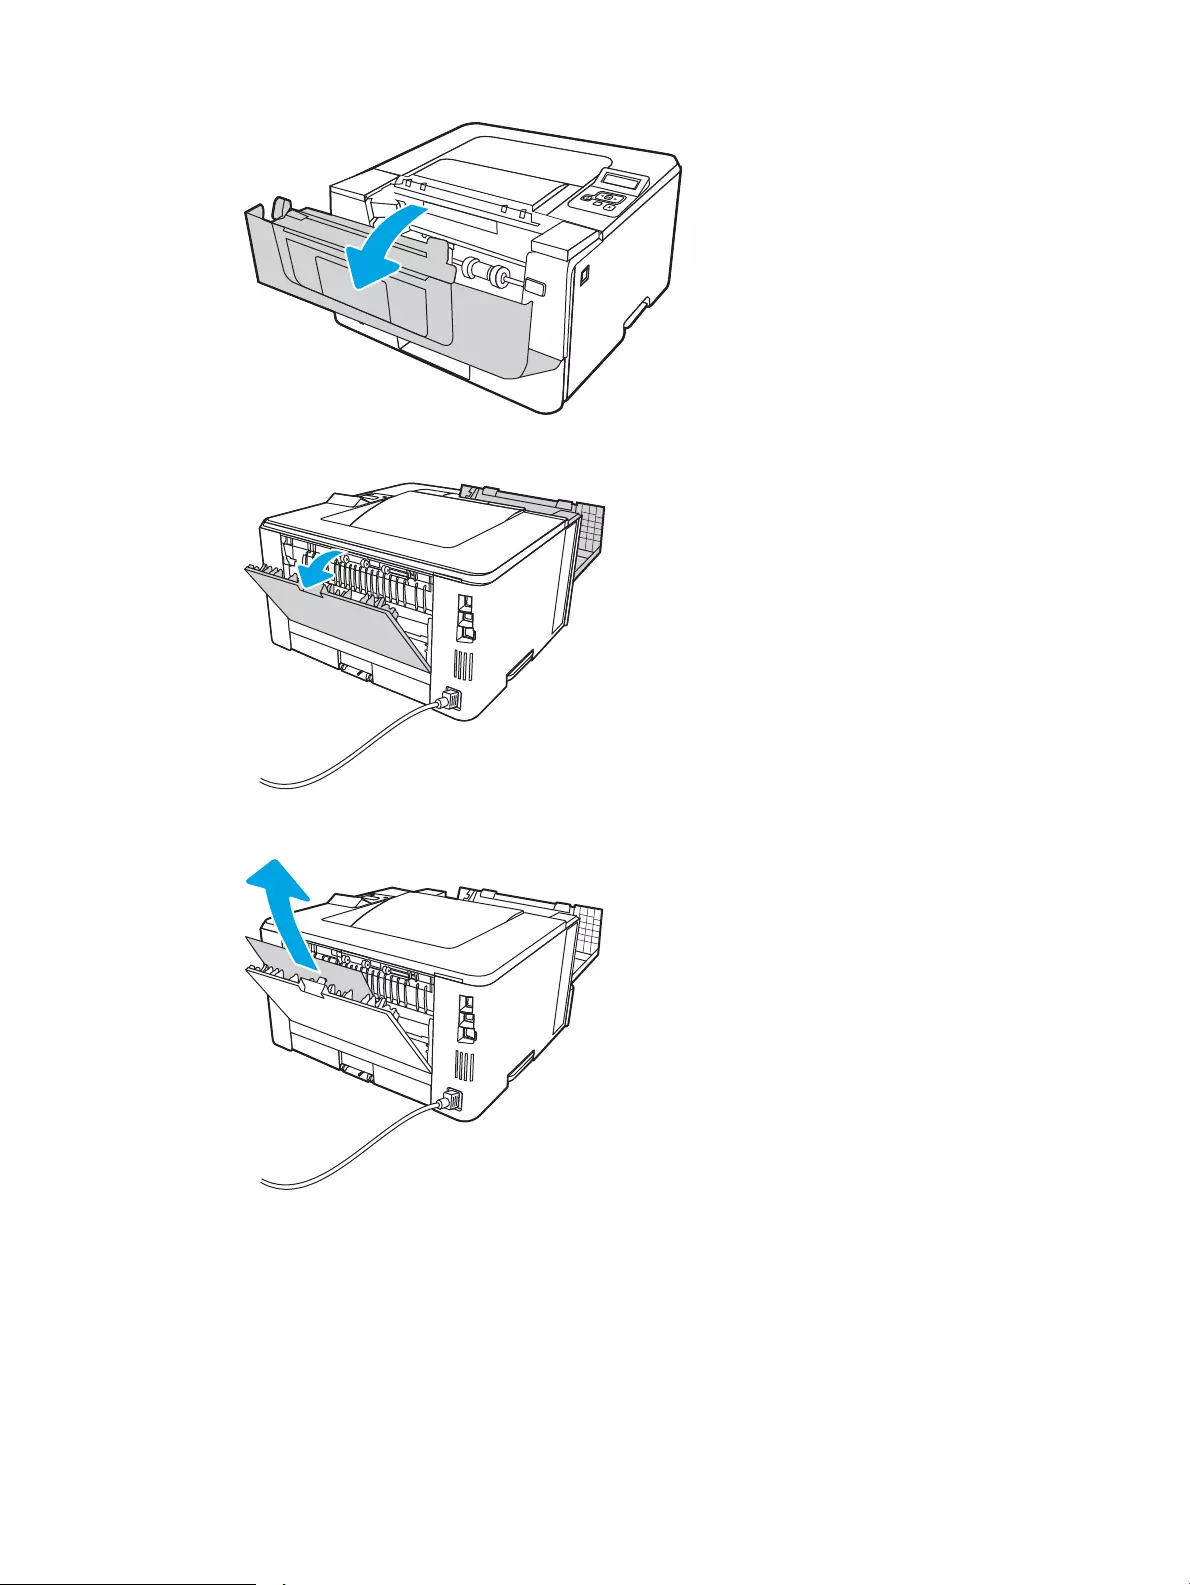
4. Open the rear door.
5. Remove any jammed paper from the rear door area.
6. Close the rear door and the front door.
ENWW Clear paper jams 101
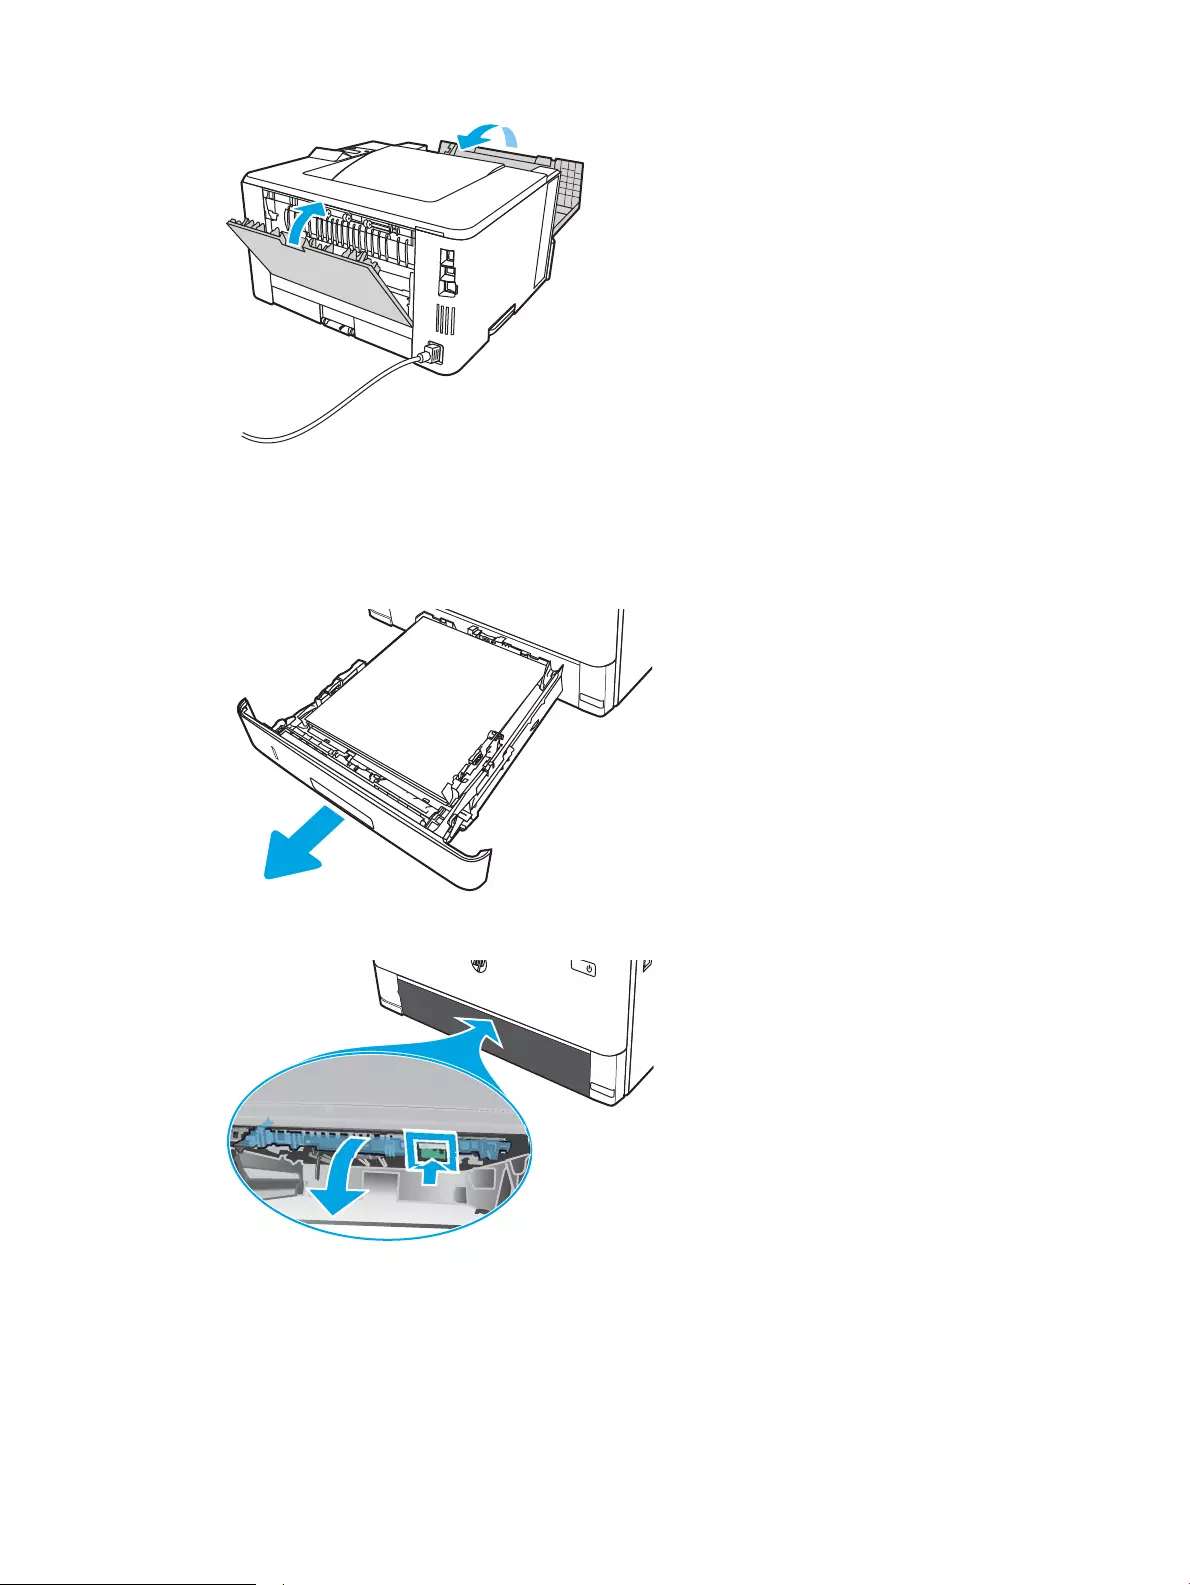
Clear paper jams in the duplexer
Use the following procedure to check for paper in all possible jam locations in the automatic duplexer.
1. Completely remove Tray 2 from the printer.
2. Push the green button to release the duplex pan.
102 Chapter 6 Solve problems ENWW
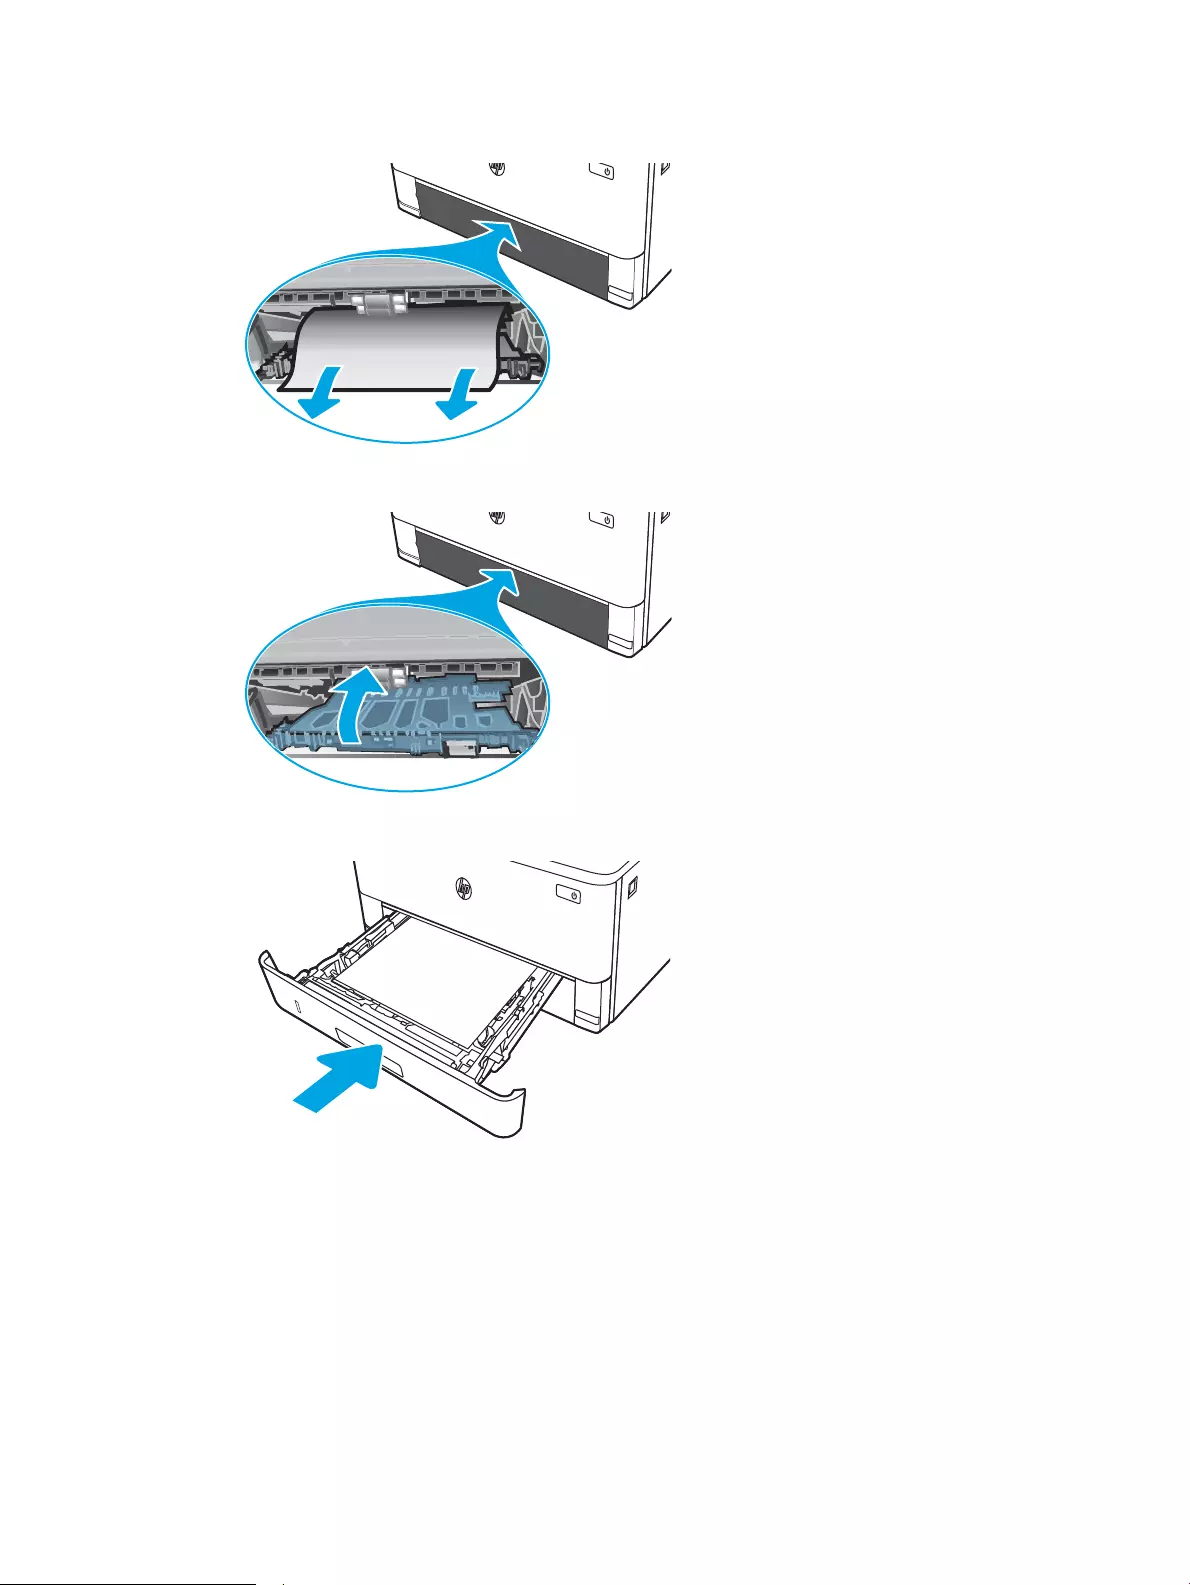
3. Remove any jammed paper.
4. Close the duplex pan.
5. Reinsert Tray 2.
ENWW Clear paper jams 103
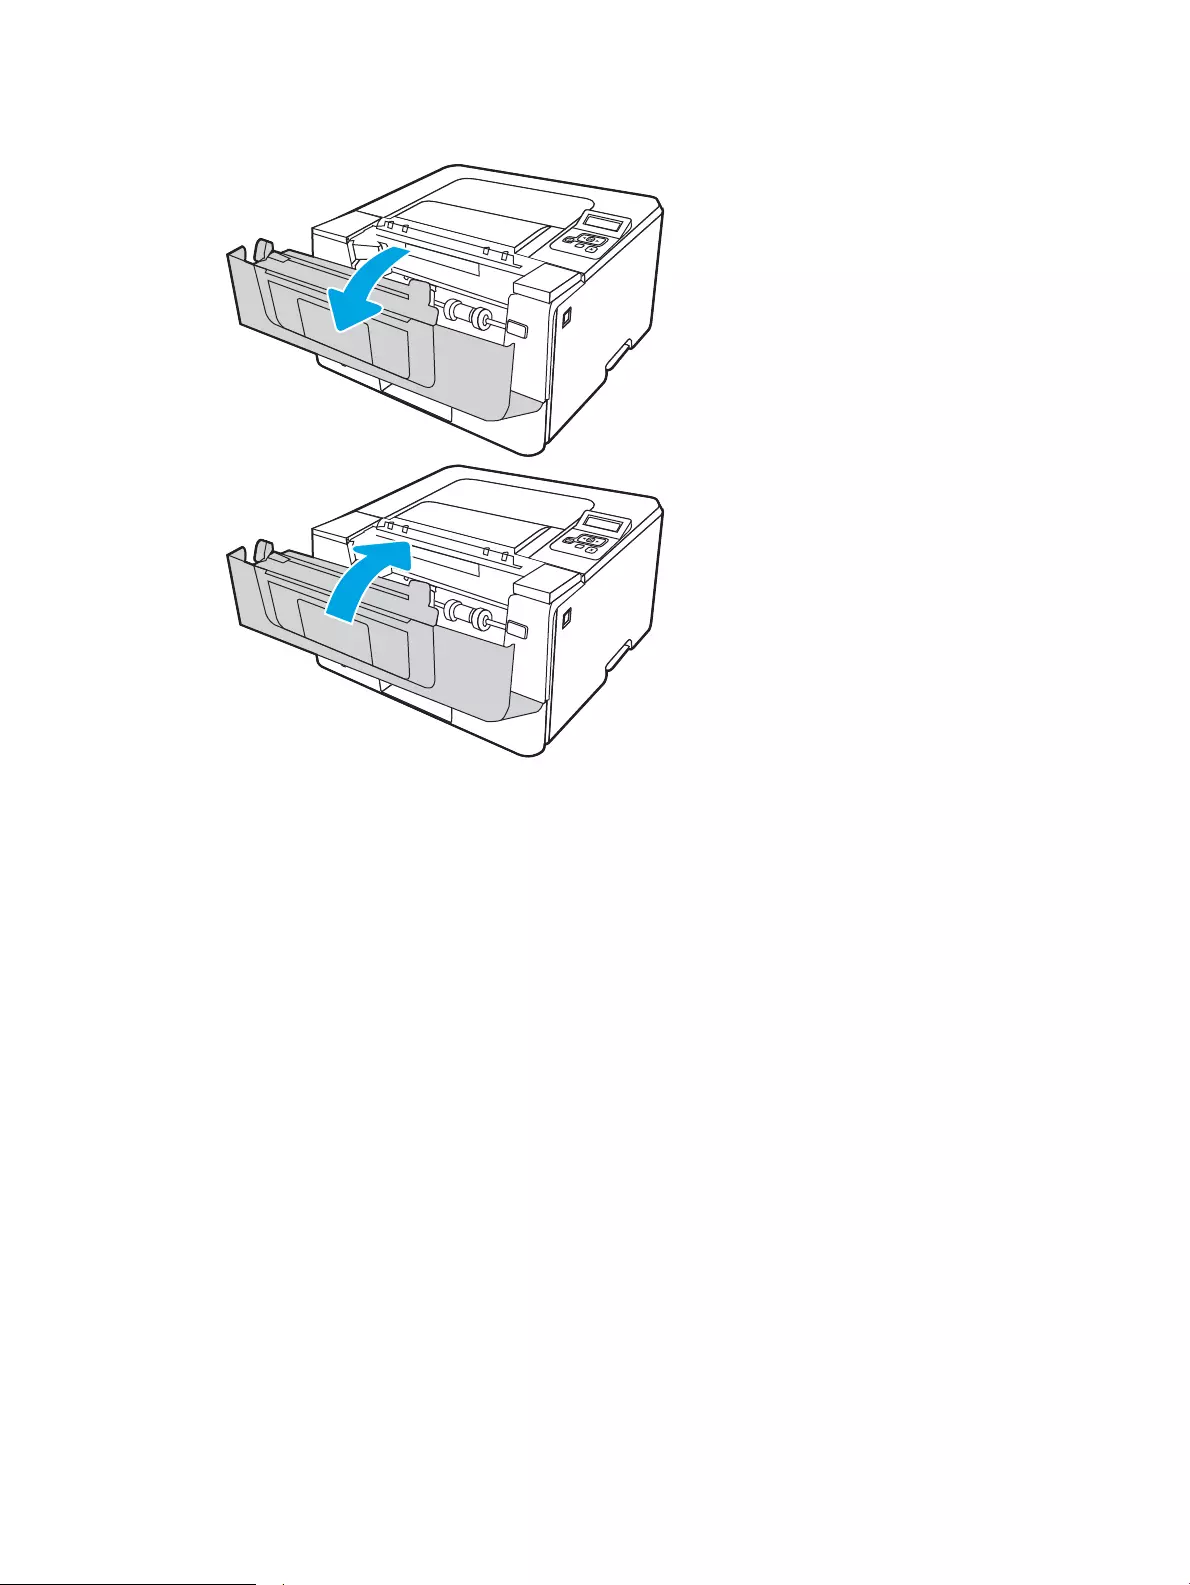
6. Open the front door, and then close the front door.
104 Chapter 6 Solve problems ENWW

Resolving print quality problems
Review the following information about resolving print quality problems.
●Introduction
●Troubleshoot print quality
●Troubleshoot image defects
Introduction
Use the information below to troubleshoot print-quality problems, including issues with image quality.
The troubleshooting steps can help resolve the following defects:
●Blank pages
●Black pages
●Curled paper
●Dark or light bands
●Dark or light streaks
●Fuzzy print
●Gray background or dark print
●Light print
●Loose toner
●Missing toner
●Scattered dots of toner
●Skewed images
●Smears
●Streaks
ENWW Resolving print quality problems 105

Troubleshoot print quality
To resolve print-quality issues, try these steps in the order presented.
●Update the printer rmware
●Print from a dierent software program
●Check the paper-type setting for the print job
●Check toner-cartridge status
●Print a cleaning page
●Visually inspect the toner cartridge or cartridges
●Check paper and the printing environment
●Try a dierent print driver
●Check the EconoMode settings
●Adjust print density
To troubleshoot specic image defects, see Troubleshoot Image Defects.
Update the printer rmware
Try upgrading the printer rmware.
See www.hp.com/support for more information.
Print from a dierent software program
Try printing from a dierent software program.
If the page prints correctly, the problem is with the software program from which you were printing.
106 Chapter 6 Solve problems ENWW

Check the paper-type setting for the print job
Check the paper type setting when printing from a software program and the printed pages have smears, fuzzy
or dark print, curled paper, scattered dots of toner, loose toner, or small areas of missing toner.
●Check the paper type setting on the printer
●Check the paper type setting (Windows)
●Check the paper type setting (macOS)
Check the paper type setting on the printer
Check the paper type setting on the printer control panel, and change the setting as needed.
1. Open the tray.
2. Verify that the tray is loaded with the correct type of paper.
3. Close the tray.
4. Follow the control panel instructions to conrm or modify the paper type settings for the tray.
Check the paper type setting (Windows)
Check the paper type setting for Windows, and change the setting as needed.
1. From the software program, select the Print option.
2. Select the printer, and then click the Properties or Preferences button.
3. Click the Paper/Quality tab.
4. From the Paper Type drop-down list, click the More… option.
5. Expand the list of Type is: options.
6. Expand the category of paper types that best describes your paper.
7. Select the option for the type of paper you are using, and click the OK button.
8. Click the OK button to close the Document Properties dialog box. In the Print dialog box, click the OK button
to print the job.
Check the paper type setting (macOS)
Check the paper type setting for macOS, and change the setting as needed.
1. Click the File menu, and then click the Print option.
2. In the Printer menu, select the printer.
3. Click Show Details or Copies & Pages.
4. Open the menus drop-down list, and then click the Paper/Quality menu.
5. Select a type from the Media Type drop-down list.
6. Click the Print button.
ENWW Resolving print quality problems 107

Check toner-cartridge status
Follow these steps to check the estimated life remaining in the toner cartridges, and if applicable, the status of
other replaceable maintenance parts.
●Step one: Print a supplies status page
●Step two: Check supplies status
Step one: Print a supplies status page
Use the control panel menus to print a supplies status page.
1. Press the OK button to display the Home screen.
2. Use the arrow buttons and the OK button to navigate to and open the following menus:
1. Setup
2. Reports
3. Supplies Status Page
3. Press the OK button to print the report.
Step two: Check supplies status
The supplies status page contains information about the cartridges and other replaceable maintenance parts.
1. Look at the supplies status page to check the percent of life remaining for the toner cartridges, and if
applicable, the status of other replaceable maintenance parts.
●Print quality problems can occur when using a toner cartridge that is at its estimated end of life. The
supplies status page indicates when a supply level is very low.
●HP’s Premium Protection Warranty expires when a message indicating that HP’s Premium Protection
Warranty on this supply has ended appears on the supplies status page or in the EWS.
●The toner cartridge does not need to be replaced now unless the print quality is no longer acceptable.
Consider having a replacement cartridge available to install when print quality is no longer acceptable.
●If you determine that you need to replace a toner cartridge, or another replaceable maintenance part,
the genuine HP part numbers are listed on the supplies status page.
2. Check to see if you are using a genuine HP cartridge.
A genuine HP toner cartridge has «HP» on it, or it has the HP logo. For more information on identifying HP
cartridges go to www.hp.com/go/learnaboutsupplies.
Print a cleaning page
During the printing process, paper, toner, and dust particles can accumulate inside the printer and can cause
print-quality issues such as toner specks or spatter, smears, streaks, lines, or repeating marks.
Use the following procedure to print a cleaning page.
1. Press the OK button to display the Home screen.
2. Use the arrow buttons and the OK button to navigate to and open the following menus:
108 Chapter 6 Solve problems ENWW

1. Setup
2. Printer Maintenance
3. Print Quality Tools
4. Cleaning Page
3. When prompted, load plain Letter or A4 size paper into the paper tray, and then press OK.
A Cleaning message displays on the printer control panel. Wait until the process is complete. Discard the
page that prints.
Visually inspect the toner cartridge or cartridges
Follow these steps to inspect each toner cartridge:
1. Remove the toner cartridge from the printer, and verify that the sealing tape has been removed.
2. Check the memory chip for damage.
3. Examine the surface of the green imaging drum.
CAUTION: Do not touch the imaging drum. Fingerprints on the imaging drum can cause print-quality
problems.
4. If you see any scratches, ngerprints, or other damage on the imaging drum, replace the toner cartridge.
5. Reinstall the toner cartridge and print a few pages to see if the problem has resolved.
ENWW Resolving print quality problems 109

Check paper and the printing environment
Use the following information to check the paper selection and the printing environment.
●Step one: Use paper that meets HP specications
●Step two: Check the environment
●Step three: Set the individual tray alignment
Step one: Use paper that meets HP specications
Some print-quality problems arise from using paper that does not meet HP specications.
●Always use a paper type and weight that this printer supports.
●Use paper that is of good quality and free of cuts, nicks, tears, spots, loose particles, dust, wrinkles, voids,
staples, and curled or bent edges.
●Use paper that has not been previously printed on.
●Use paper that does not contain metallic material, such as glitter.
●Use paper that is designed for use in laser printers. Do not use paper that is designed only for use in Inkjet
printers.
●Use paper that is not too rough. Using smoother paper generally results in better print quality.
Step two: Check the environment
The environment can directly aect print quality and is a common cause of print-quality or paper-feeding issues.
Try the following solutions:
●Move the printer away from drafty locations, such as open windows or doors, or air-conditioning vents.
●Make sure the printer is not exposed to temperatures or humidity outside of printer specications.
●Do not place the printer in a conned space, such as a cabinet.
●Place the printer on a sturdy, level surface.
●Remove anything that is blocking the vents on the printer. The printer requires good air ow on all sides,
including the top.
●Protect the printer from airborne debris, dust, steam, grease, or other elements that can leave residue
inside the printer.
Step three: Set the individual tray alignment
Follow these steps when text or images are not centered or aligned correctly on the printed page when printing
from specic trays.
1. Press the OK button to display the Home screen.
2. Use the arrow buttons and the OK button to navigate to and open the following menus:
1. Setup
2. Tray Management
110 Chapter 6 Solve problems ENWW

3. Image Adjust, and select the tray to adjust
4. Print Test Page
3. Follow the instructions on the printed pages.
4. Scroll to Print Test Page again to verify the results, and then make further adjustments if necessary.
Try a dierent print driver
Try a dierent print driver when printing from a software program and the printed pages have unexpected lines
in graphics, missing text, missing graphics, incorrect formatting, or substituted fonts.
Download any of the following drivers from the HP Web site: www.hp.com/support/ljM304 or www.hp.com/
support/ljM404.
Table 6-3 Print drivers
Driver Description
HP PCL.6 driver If available, this printer-specic print driver supports older operating systems like Windows
XP and Windows Vista. For a list of supported operating systems, go to www.hp.com/go/
support.
HP PCL 6 driver This printer-specic print driver supports Windows 7 and newer operating systems that
support version 3 drivers. For a list of supported operating systems, go to www.hp.com/go/
support.
HP PCL-6 driver This product-specic print driver supports Windows 8 and newer operating systems that
support version 4 drivers. For a list of supported operating systems, go to www.hp.com/go/
support.
HP UPD PS driver ●Recommended for printing with Adobe software programs or with other highly
graphics-intensive software programs
●Provides support for printing from Postscript emulation needs, or for Postscript ash
font support
HP UPD PCL 6 ●Recommended for printing in all Windows environments
●Provides the overall best speed, print quality, and printer feature support for most
users
●Developed to align with Windows Graphic Device Interface (GDI) for best speed in
Windows environments
●Might not be fully compatible with third-party and custom software programs that are
based on PCL 5
Check the EconoMode settings
HP does not recommend the full-time use of EconoMode. If EconoMode is used full-time, the toner supply might
outlast the mechanical parts in the toner cartridge. If print quality begins to degrade and is no longer acceptable,
consider replacing the toner cartridge.
NOTE: This feature is available with the PCL 6 print driver for Windows. If you are not using that driver, you can
enable the feature by using the HP Embedded Web Server.
Follow these steps if the entire page is too dark or too light.
ENWW Resolving print quality problems 111

1. From the software program, select the Print option.
2. Select the printer, and then click the Properties or Preferences button.
3. Click the Paper/Quality tab, and locate the Print Quality area.
4. If the entire page is too dark, use these settings:
●Select the 600 dpi option, if available.
●Select the EconoMode check box to enable it.
If the entire page is too light, use these settings:
●Select the FastRes 1200 option, if available.
●Clear the EconoMode check box to disable it.
5. Click the OK button to close the Document Properties dialog box. In the Print dialog, click the OK button to
print the job.
Adjust print density
Adjust the print density when your printing results are too dense or too light in color.
Complete the following steps to adjust the print density.
1. Open the HP Embedded Web Server (EWS) using one of the following methods:
Direct-connected printers:
a. Open the HP Printer Assistant:
●Windows 10: From the Start menu, click All Apps, click HP, and then select the printer name.
●Windows 8.1: Click the down arrow in the lower left corner of the Start screen, and then select
the printer name.
●Windows 8: Right-click an empty area on the Start screen, click All Apps on the app bar, and then
select the printer name.
●Windows 7: From the computer desktop, click Start, select All Programs, click HP, click the folder
for the printer, and then select the printer name.
b. In the HP Printer Assistant, select Print, and then select Printer Home Page (EWS).
Network-connected printers:
a. On the printer control panel, press the OK button to display the Home screen.
b. Use the arrow buttons and the OK button to navigate to and open the following menus:
1. Setup
2. Network Setup
3. General Settings
c. On the General Settings menu, select Show the IP Address, and then select Yes to display the printer’s
IP address or host name.
112 Chapter 6 Solve problems ENWW
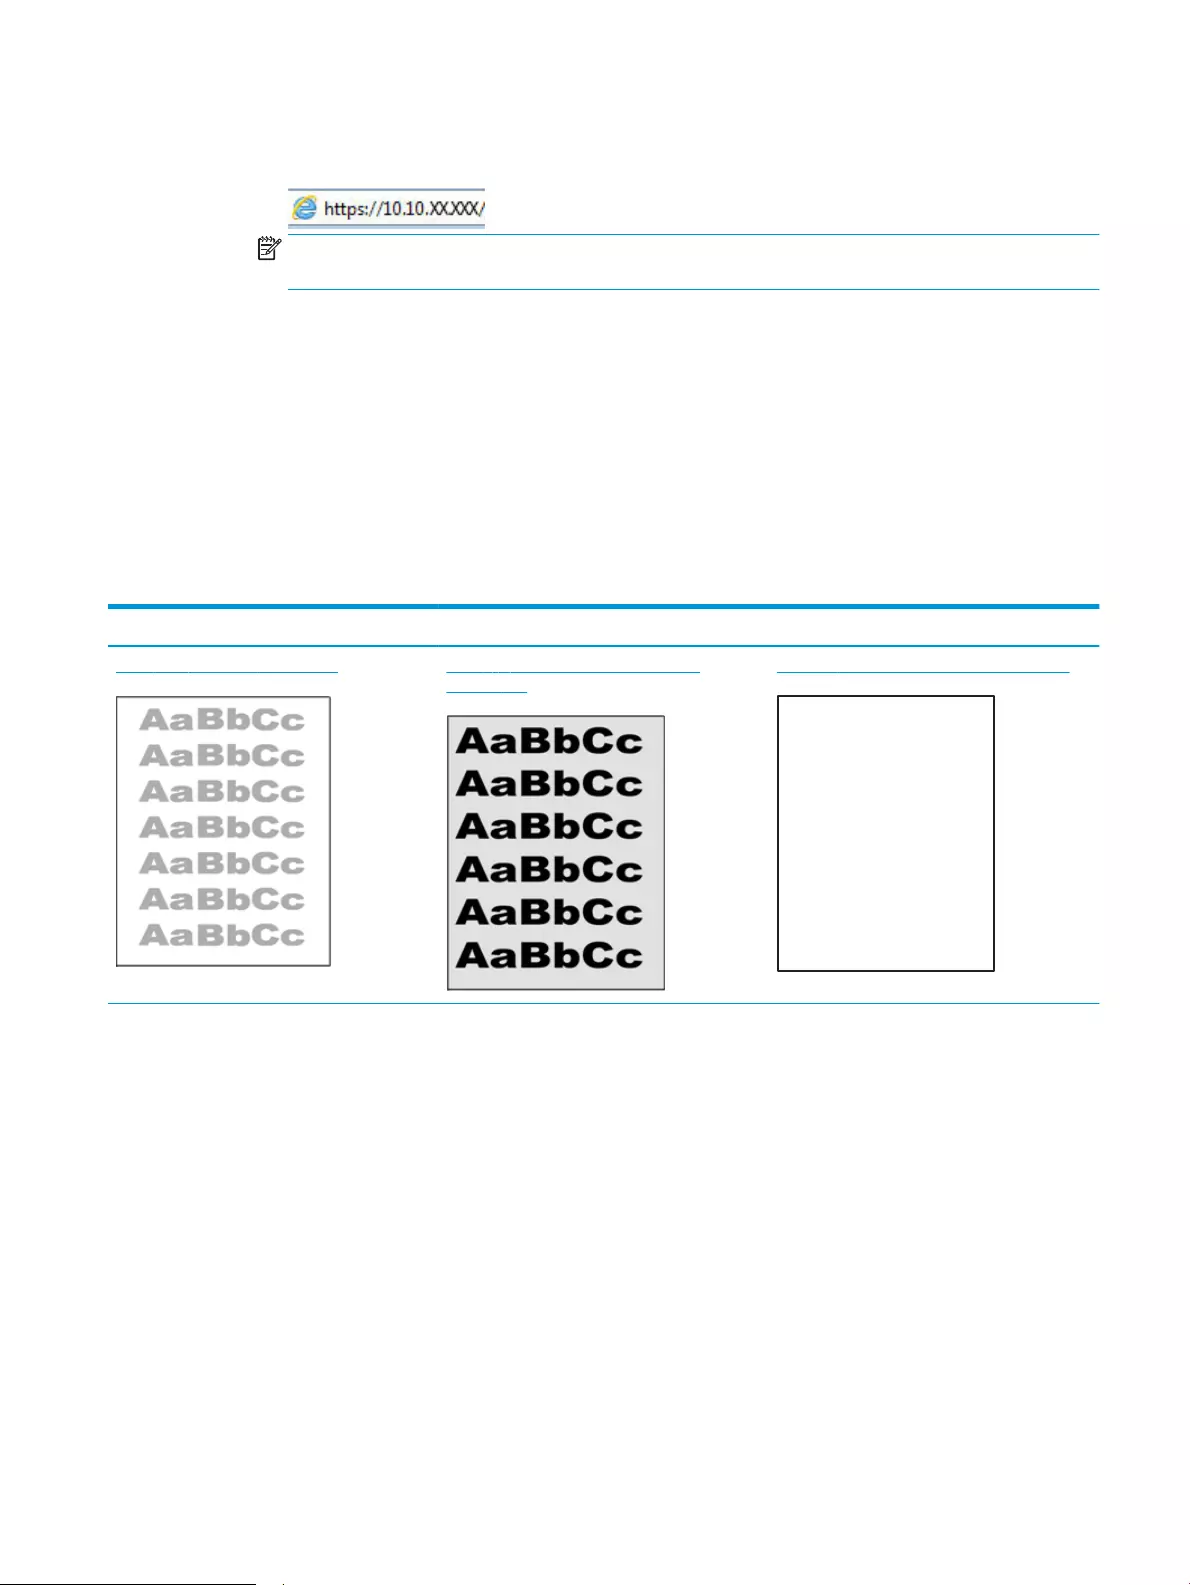
d. Open a web browser, and in the address line, type the IP address or host name exactly as it displays
on the printer control panel. Press the Enter key on the computer keyboard. The EWS opens.
NOTE: If a message displays in the web browser indicating that the website might not be safe, select
the option to continue to the website. Accessing this website will not harm the computer.
2. On the EWS Home page, click the Settings tab.
3. In the left navigation pane, click Preferences to expand the options, and then click General Printer Settings.
4. Under Print Density, use the drop-down list to select the desired setting.
5. Click Apply to save the changes.
Troubleshoot image defects
Review examples of image defects and steps to resolve these defects.
Table 6-4 Image defects table quick reference
Sample Description Possible solutions
Table 6-11 Light print on page 118 Table 6-9 Gray background or dark print
on page 117
Table 6-7 Blank page — No print on page 116
ENWW Resolving print quality problems 113
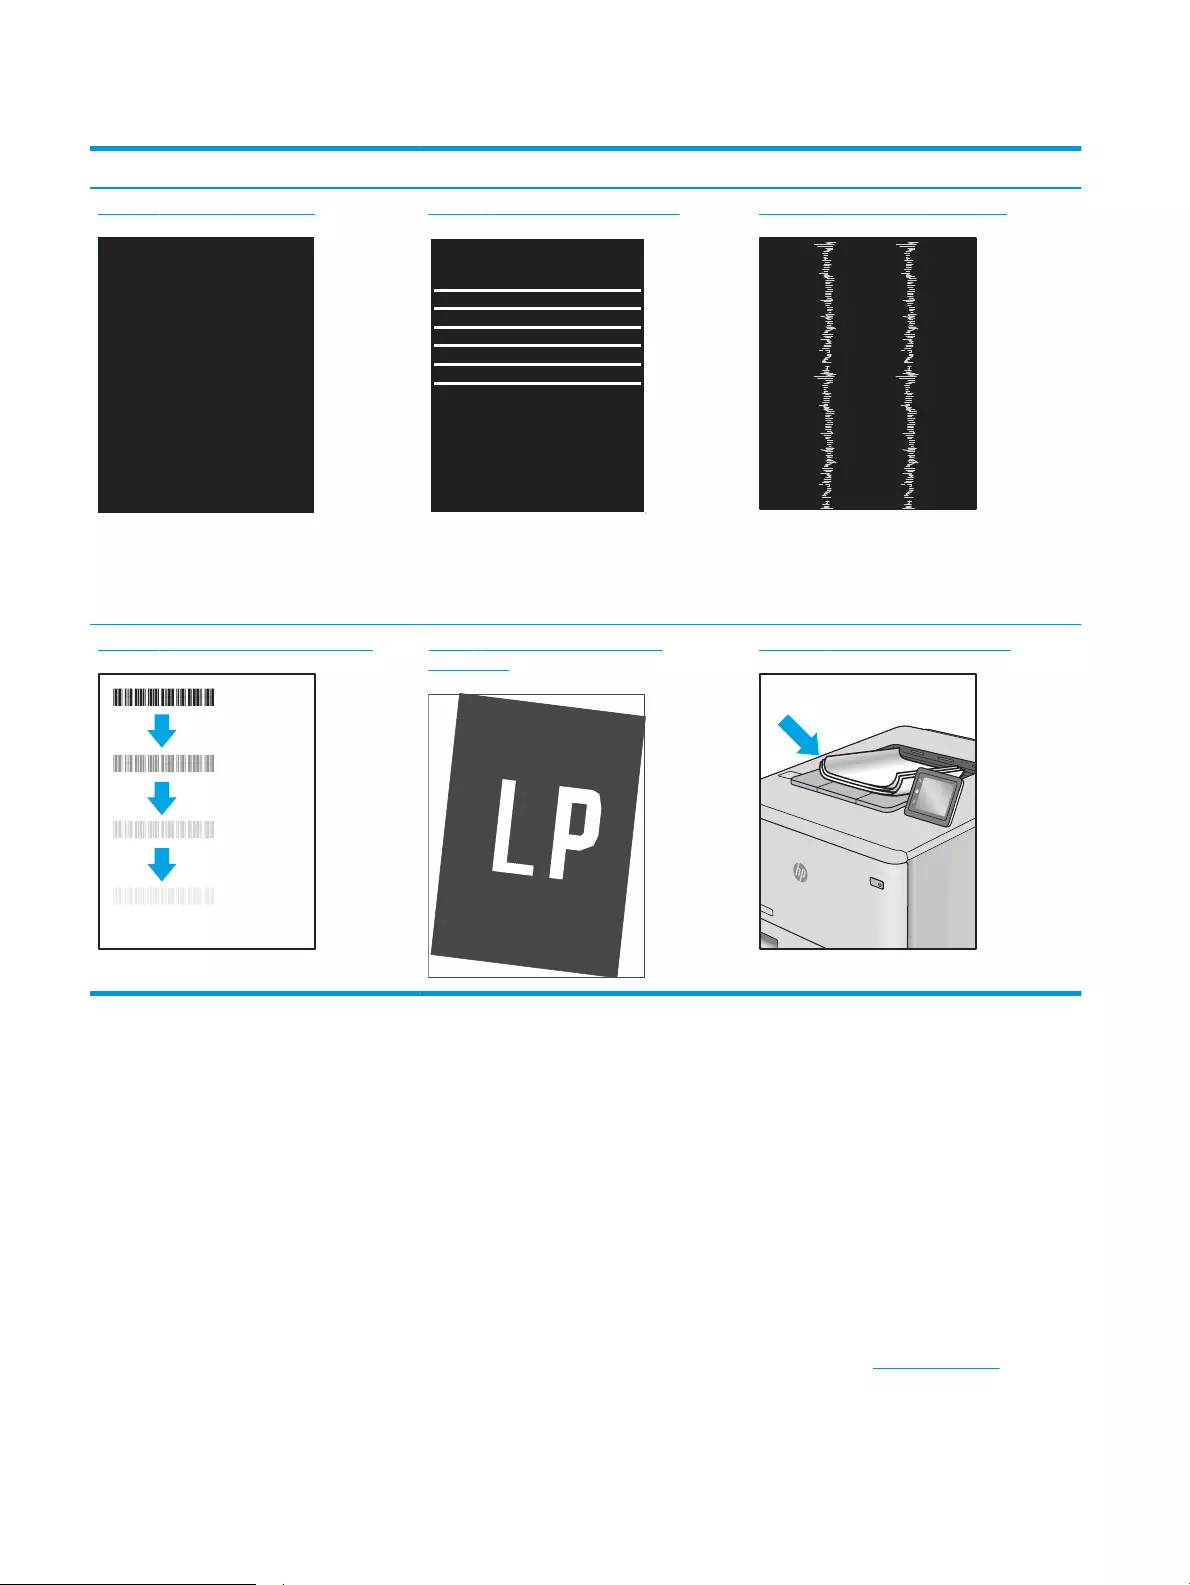
Table 6-4 Image defects table quick reference (continued)
Sample Description Possible solutions
Table 6-6 Black page on page 115 Table 6-5 Banding defects on page 115 Table 6-13 Streak defects on page 120
Table 6-8 Fixing/fuser defects on page 116 Table 6-10 Image placement defects
on page 117
Table 6-12 Output defects on page 119
Image defects, no matter the cause, can often be resolved using the same steps. Use the following steps as a
starting point for solving image defect issues.
1. Reprint the document. Print quality defects can be intermittent in nature or can go away completely with
continued printing.
2. Check the condition of the cartridge or cartridges. If a cartridge is in a Very Low state (it has passed the
rated life), replace the cartridge.
3. Make sure that the driver and tray print mode settings match the media that is loaded in the tray. Try using
a dierent ream of media or a dierent tray. Try using a dierent print mode.
4. Make sure that the printer is within the supported operating temperature/humidity range.
5. Make sure that the paper type, size, and weight are supported by the printer. See support.hp.com for a list
of the supported paper sizes and types for the printer.
114 Chapter 6 Solve problems ENWW

NOTE: The term “fusing” refers to the part of the printing process where toner is aixed to paper.
The following examples depict letter-size paper that has passed through the printer short edge rst.
Table 6-5 Banding defects
Sample Description Possible solutions
Dark or light lines which repeat down the
length of the page, and are wide-pitch
and/or impulse bands. They might be sharp
or soft in nature. The defect displays only in
areas of ll, not in text or sections with no
printed content.
1. Reprint the document.
2. Try printing from another tray.
3. Replace the cartridge.
4. Use a dierent paper type.
5. Enterprise models only: From the
Home screen on the printer control
panel, go to the Adjust Paper Types
menu, and then choose a print mode
that is designed for a slightly heavier
media than what you are using. This
slows the print speed and might
improve the print quality.
6. If the issue persists, go to
support.hp.com.
Table 6-6 Black page
Sample Description Possible solutions
The entire printed page is black.
1. Visually inspect the cartridge to check
for damage.
2. Make sure that the cartridge is
installed correctly.
3. Replace the cartridge.
4. If the issue persists, go to
support.hp.com.
ENWW Resolving print quality problems 115
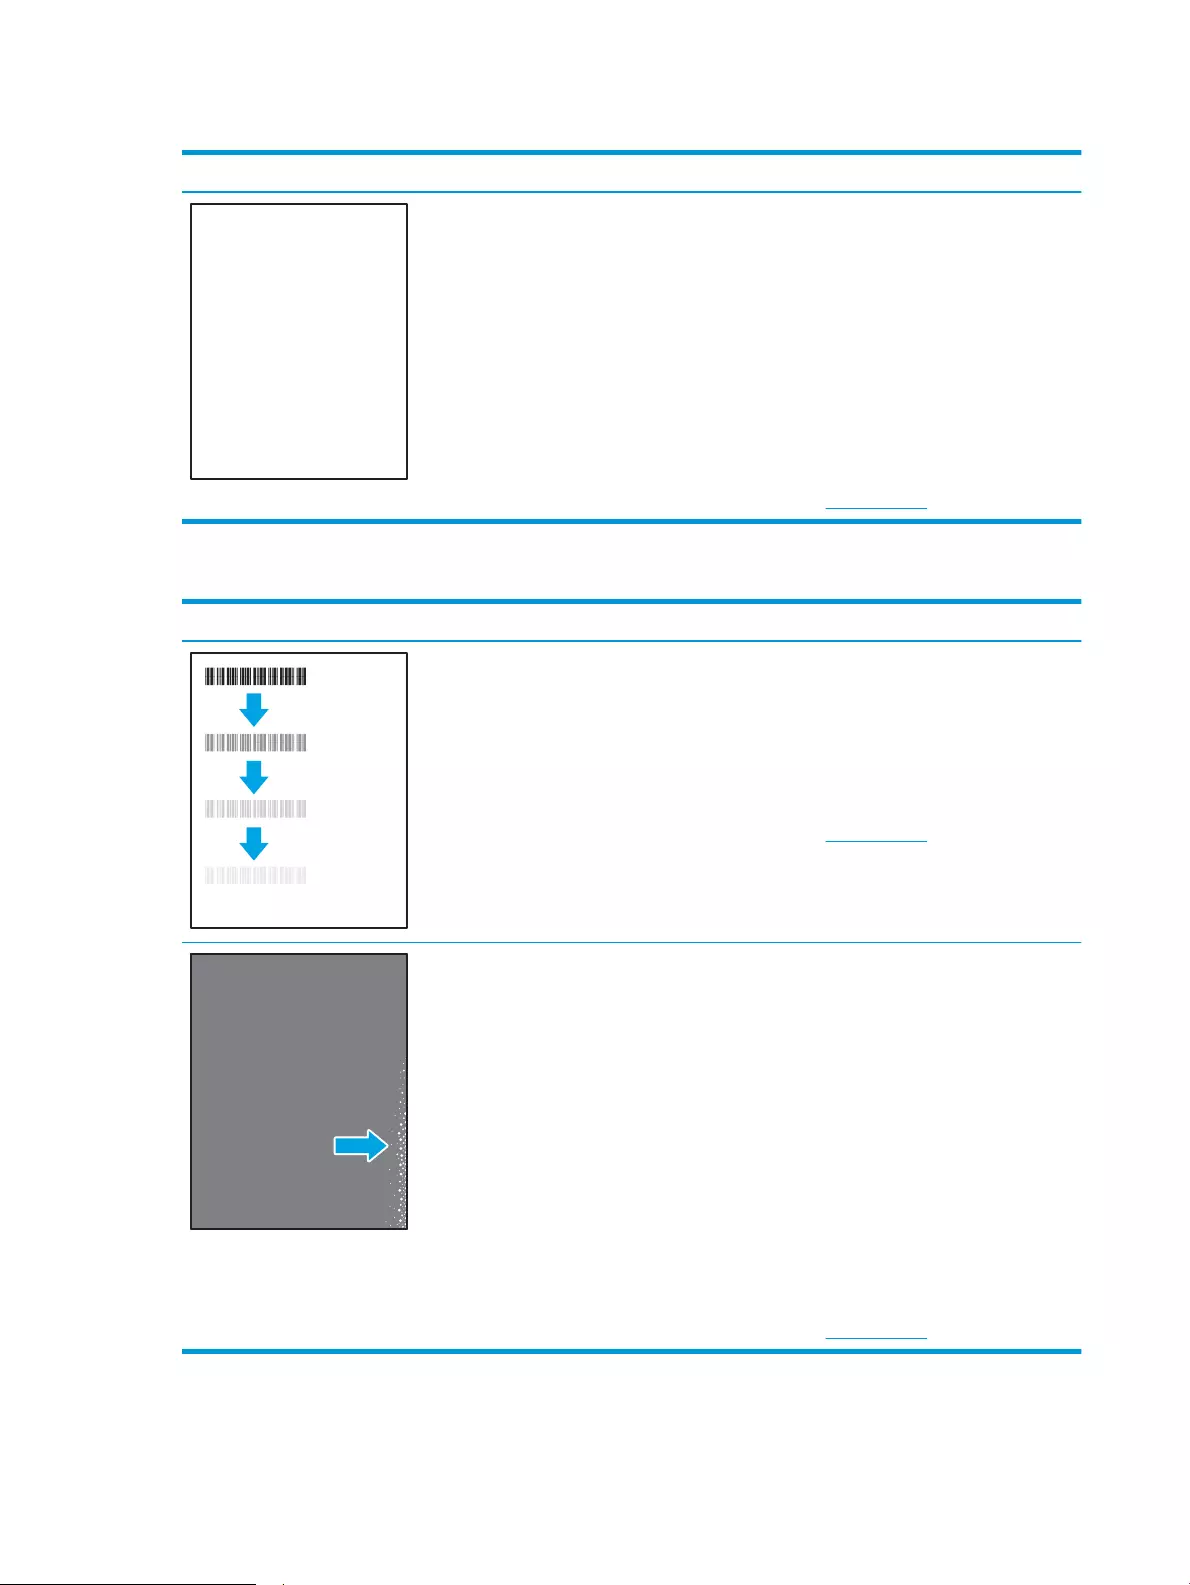
Table 6-7 Blank page — No print
Sample Description Possible solutions
The page is completely blank and contains
no printed content. 1. Make sure that the cartridges are
genuine HP cartridges.
2. Make sure that the cartridge is
installed correctly.
3. Print with a dierent cartridge.
4. Check the paper type in the paper tray
and adjust the printer settings to
match. If necessary, select a lighter
paper type.
5. If the issue persists, go to
support.hp.com.
Table 6-8 Fixing/fuser defects
Sample Description Possible solutions
Slight shadows or osets of the image are
repeated down the page. The repeated
image might fade with each recurrence.
1. Reprint the document.
2. Check the paper type in the paper tray
and adjust the printer settings to
match. If necessary, select a lighter
paper type.
3. If the issue persists, go to
support.hp.com.
Toner rubs o along either edge of the
page. This defect is more common at the
edges of high-coverage jobs, and on light
media types, but can occur anywhere on the
page.
1. Reprint the document.
2. Check the paper type in the paper tray
and adjust the printer settings to
match. If necessary, select a heavier
paper type.
3. Enterprise models only: From the
printer control panel, go to the Edge-
to-Edge menu and then select Normal.
Reprint the document.
4. Enterprise models only: From the
printer control panel, select Auto
Include Margins and then reprint the
document.
5. If the issue persists, go to
support.hp.com.
116 Chapter 6 Solve problems ENWW
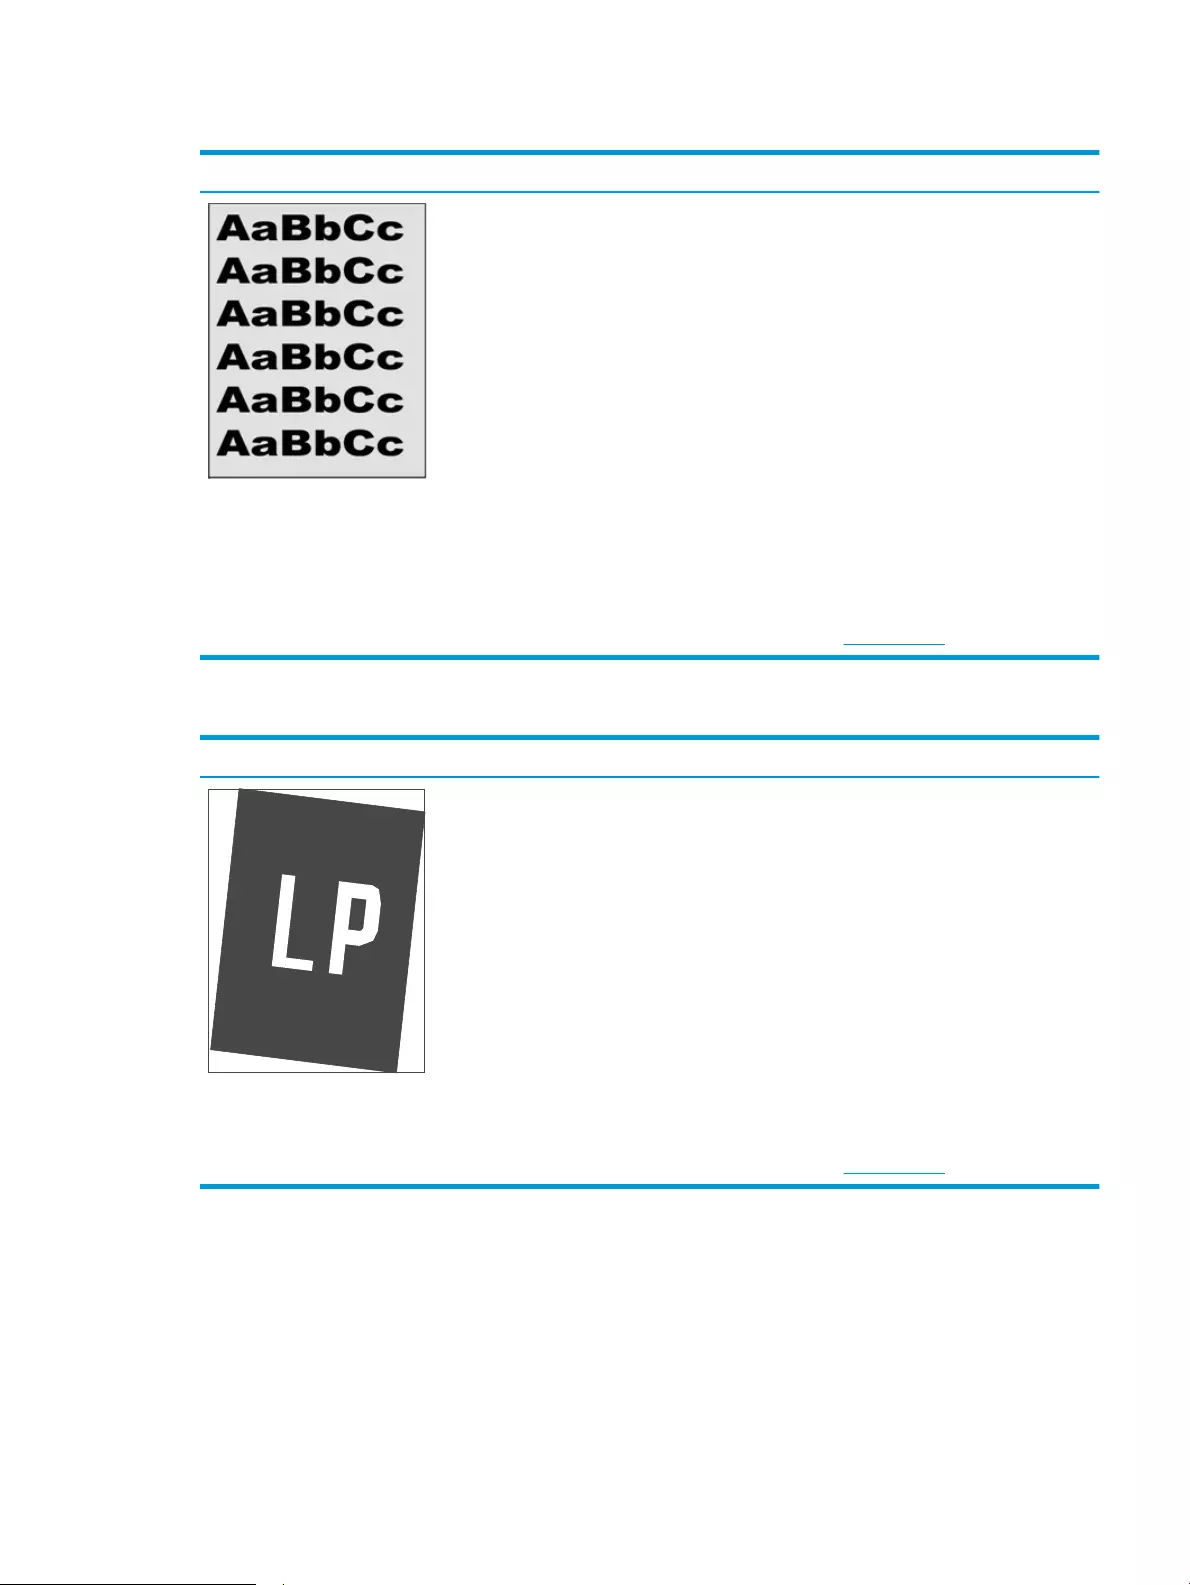
Table 6-9 Gray background or dark print
Sample Description Possible solutions
The image or text is darker than expected
and/or the background is gray. 1. Make sure that the paper in the trays
has not already been run through the
printer.
2. Use a dierent paper type.
3. Reprint the document.
4. Mono models only: From the Home
screen on the printer control panel, go
to the Adjust Toner Density menu, and
then adjust the toner density to a
lower level.
5. Make sure that the printer is within the
supported operating temperature and
humidity range.
6. Replace the cartridge.
7. If the issue persists, go to
support.hp.com.
Table 6-10 Image placement defects
Sample Description Possible solutions
The image is not centered, or is skewed on
the page. The defect occurs when the paper
is not positioned properly as it is pulled from
the tray and moves through the paper path.
1. Reprint the document.
2. Remove the paper and then reload the
tray. Make sure that all the paper
edges are even on all sides.
3. Make sure that the top of the paper
stack is below the tray-full indicator.
Do not overll the tray.
4. Make sure that the paper guides are
adjusted to the correct size for the
paper. Do not adjust the paper guides
tightly against the paper stack. Adjust
them to the indentations or markings
in the tray.
5. If the issue persists, go to
support.hp.com.
ENWW Resolving print quality problems 117

Table 6-11 Light print
Sample Description Possible solutions
The printed content is light or faded on the
entire page. 1. Reprint the document.
2. Remove the cartridge, and then shake
it to redistribute the toner.
3. Mono models only: Make sure that the
EconoMode setting is disabled, both at
the printer control panel and in the
print driver.
4. Make sure that the cartridge is
installed correctly.
5. Print a Supplies Status Page and check
the life and usage of the cartridge.
6. Replace the cartridge.
7. If the issue persists, go to
support.hp.com.
118 Chapter 6 Solve problems ENWW
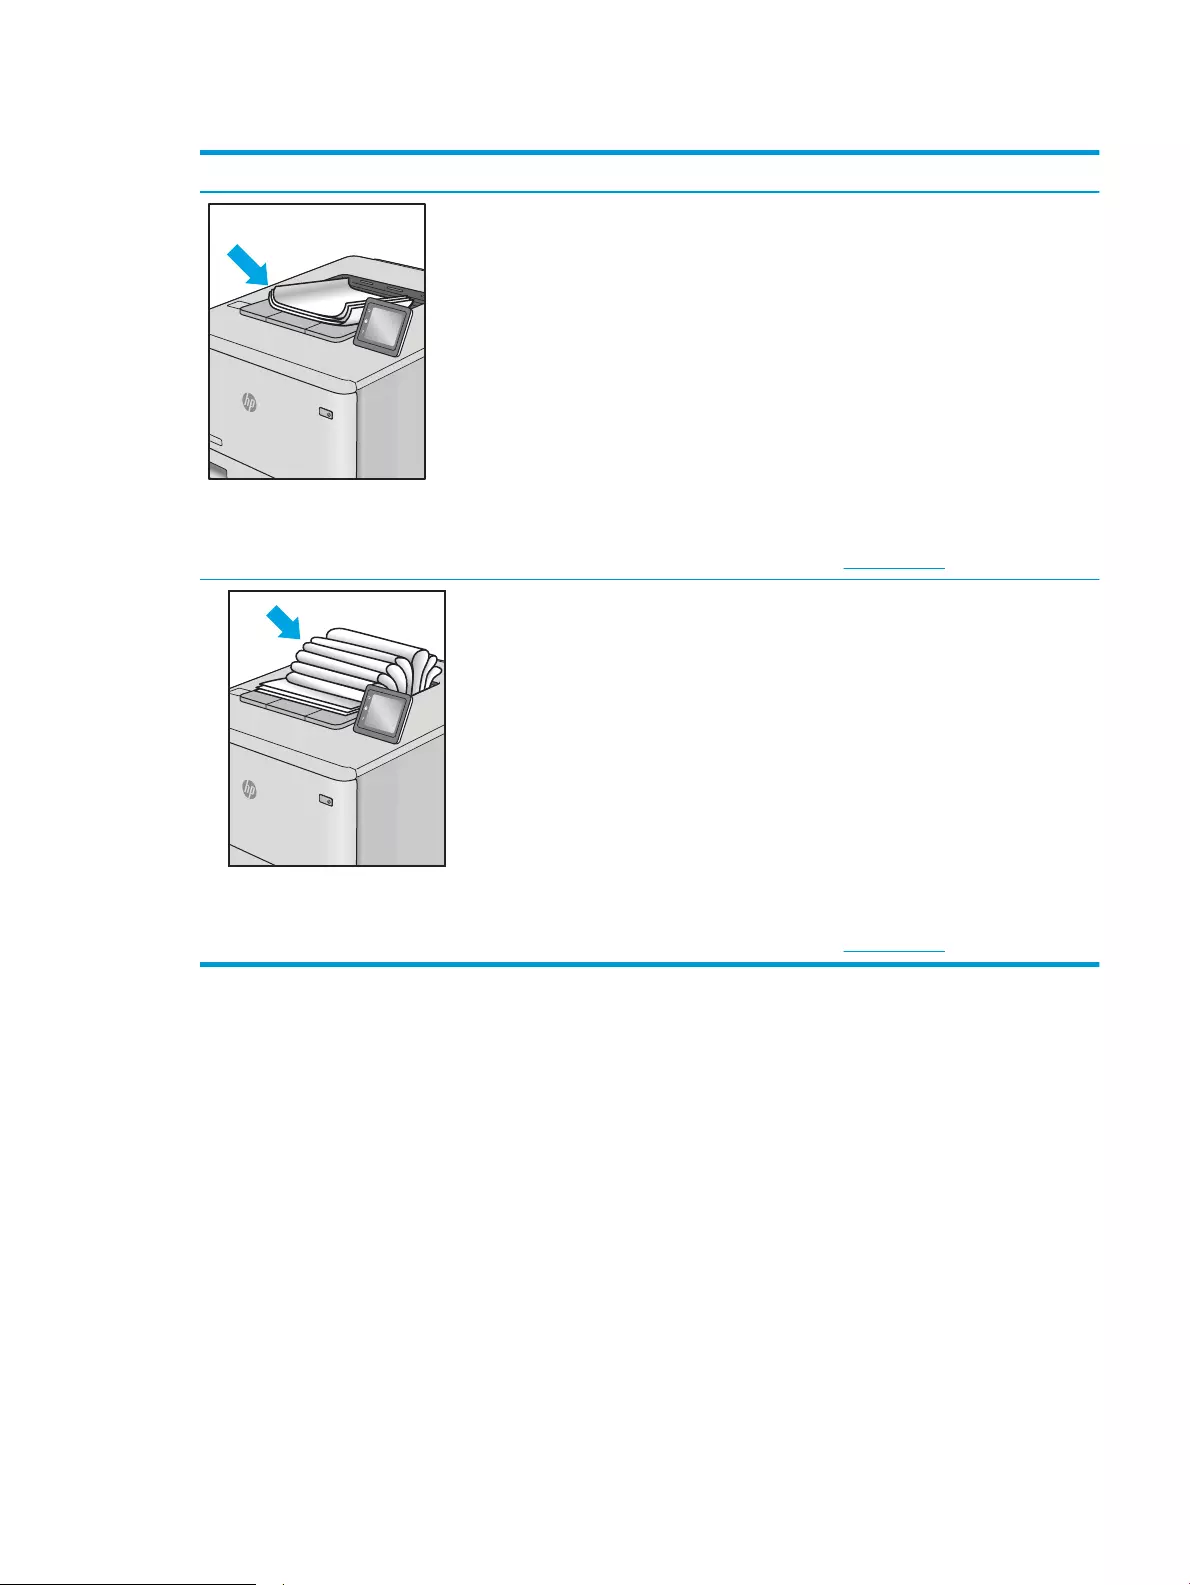
Table 6-12 Output defects
Sample Description Possible solutions
Printed pages have curled edges. The curled
edge can be along the short or long side of
the paper. Two types of curl are possible:
●Positive curl: The paper curls toward
the printed side. The defect occurs in
dry environments or when printing
high-coverage pages.
●Negative curl: The paper curls away
from the printed side. The defect
occurs in high-humidity environments
or when printing low-coverage pages.
1. Reprint the document.
2. Positive curl: From the printer control
panel, select a heavier paper type. The
heavier paper type creates a higher
temperature for printing.
Negative curl: From the printer control
panel, select a lighter paper type. The
lighter paper type creates a lower
temperature for printing. Try storing
the paper in a dry environment prior to
use, or use freshly opened paper.
3. Print in duplex mode.
4. If the issue persists, go to
support.hp.com.
The paper does not stack well in the output
tray. The stack might be uneven, skewed, or
the pages might be pushed out of the tray
and onto the oor. Any of the following
conditions can cause this defect:
●Extreme paper curl
●The paper in the tray is wrinkled or
deformed
●The paper is a non-standard paper
type, such as envelopes
●The output tray is too full
1. Reprint the document.
2. Extend the output bin extension.
3. If the defect is caused by extreme
paper curl, refer to the
troubleshooting steps for «Output
curl.»
4. Use a dierent paper type.
5. Use freshly opened paper.
6. Remove the paper from the output
tray before the tray gets too full.
7. If the issue persists, go to
support.hp.com.
ENWW Resolving print quality problems 119
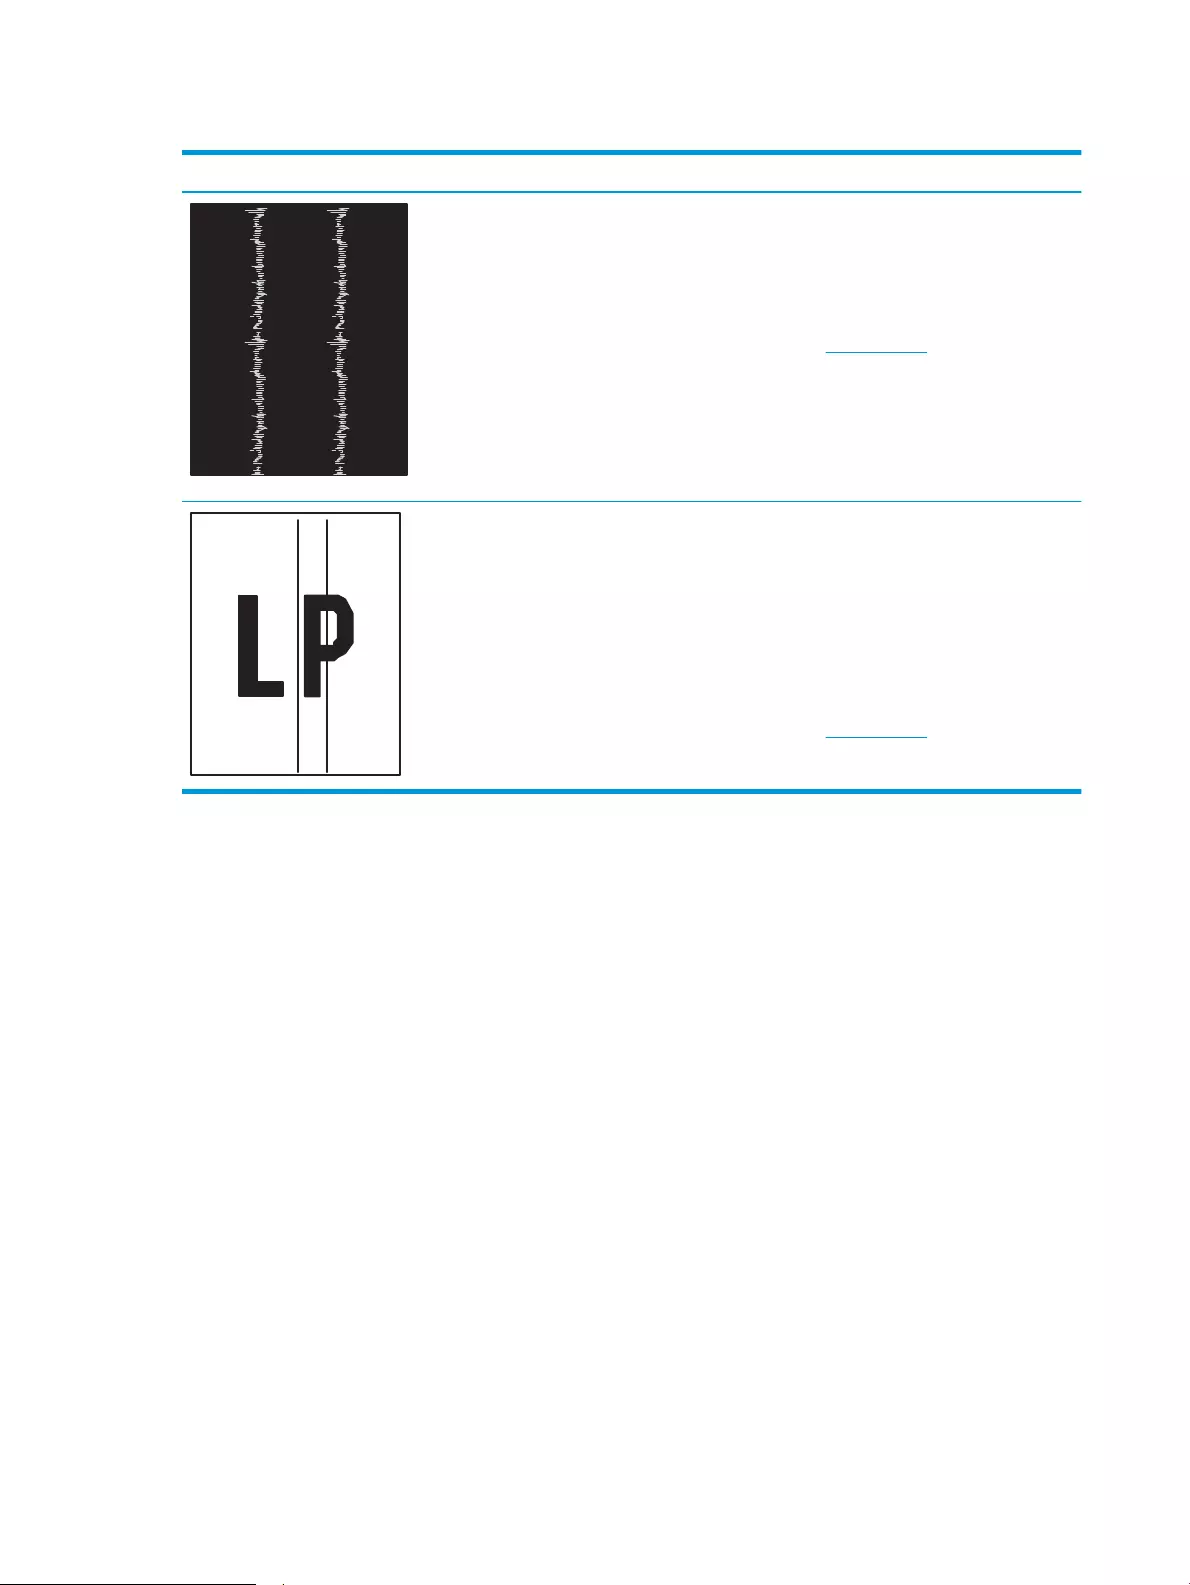
Table 6-13 Streak defects
Sample Description Possible solutions
Light vertical streaks that usually span the
length of the page. The defect displays only
in areas of ll, not in text or sections with no
printed content.
1. Reprint the document.
2. Remove the cartridge, and then shake
it to redistribute the toner.
3. If the issue persists, go to
support.hp.com.
NOTE: Both light and dark vertical streaks
can occur when the printing environment is
outside the specied range for temperature
or humidity. Refer to your printer‘s
environmental specications for allowable
temperature and humidity levels.
Dark vertical lines which occur down the
length of the page. The defect might occur
anywhere on the page, in areas of ll or in
sections with no printed content.
1. Reprint the document.
2. Remove the cartridge, and then shake
it to redistribute the toner.
3. Print a cleaning page.
4. Check the toner level in the cartridge.
5. If the issue persists, go to
support.hp.com.
120 Chapter 6 Solve problems ENWW

Solve wired network problems
Check the following information to resolve wired network issues.
●Introduction
●Poor physical connection
●The computer is unable to communicate with the printer
●The printer is using incorrect link and duplex settings for the network
●New software programs might be causing compatibility problems
●The computer or workstation might be set up incorrectly
●The printer is disabled, or other network settings are incorrect
Introduction
Certain types of problems can indicate there is a network communication problem. These problems include the
following issues:
Poor physical connection
Check the cable connections.
1. Verify that the printer is attached to the correct network port using a cable of the correct length.
2. Verify that cable connections are secure.
3. Look at the network port connection on the back of the printer, and verify that the amber activity light
ashes indicating network traic, and the green link-status light is continuously lit indicating a network link.
4. If the problem continues, try a dierent cable or port on the hub.
The computer is unable to communicate with the printer
Verify that the printer is communicating with the network and your computer.
1. Test network communication by pinging the network.
a. Open a command-line prompt on your computer.
●For Windows, click Start, click Run, type cmd, and then press Enter.
●For macOS, go to Applications, then Utilities, and open Terminal.
b. Type ping followed by the IP address for your printer.
c. If the window displays round-trip times, the network is working.
2. If the ping command failed, verify that the network hubs are on, and then verify that the network settings,
the printer, and the computer are all congured for the same network (also known as subnet).
3. Open the printer properties and click the Ports tab. Verify that the current IP address for the printer is
selected. The printer IP address is listed on the printer conguration page.
ENWW Solve wired network problems 121

4. If you installed the printer using the HP standard TCP/IP port, select the box labeled Always print to this
printer, even if its IP address changes.
5. If you installed the printer using a Microsoft standard TCP/IP port, use the printer’s hostname instead of the
IP address.
6. If the IP address is correct, delete the printer and then add it again.
7. Reinstall the printer software and driver.
The printer is using incorrect link and duplex settings for the network
HP recommends leaving these settings in automatic mode (the default setting). If you change these settings, you
must also change them for your network.
New software programs might be causing compatibility problems
Verify that any new software programs are correctly installed and that they use the correct print driver.
The computer or workstation might be set up incorrectly
An incorrectly congured computer can cause issues with printing.
1. Check the network drivers, print drivers, and the network redirection settings.
2. Verify that the operating system is congured correctly.
The printer is disabled, or other network settings are incorrect
Check the network settings.
1. Review the printer’s conguration/networking pages to check the status of the network settings and
protocols.
2. Recongure the network settings if necessary.
122 Chapter 6 Solve problems ENWW

Solve wireless network problems
To resolve network issues, try these steps in the order presented.
●Introduction
●Wireless connectivity checklist
●The printer does not print after the wireless conguration completes
●The printer does not print, and the computer has a third-party rewall installed
●The wireless connection does not work after moving the wireless router or printer
●Cannot connect more computers to the wireless printer
●The wireless printer loses communication when connected to a VPN
●The network does not appear in the wireless networks list
●The wireless network is not functioning
●Perform a wireless network diagnostic test
●Reduce interference on a wireless network
Introduction
Use the troubleshooting information to help resolve issues.
NOTE: To determine whether Wi-Fi Direct printing is enabled on your printer, print a conguration page from
the printer control panel
Wireless connectivity checklist
Review the following information to check wireless connectivity.
●Verify that the network cable is not connected.
●Verify that the printer and the wireless router are turned on and have power. Also make sure that the
wireless radio in the printer is turned on.
●Verify that the service set identier (SSID) is correct. Print a conguration page to determine the SSID. If you
are not sure the SSID is correct, run the wireless setup again.
●With secured networks, verify that the security information is correct. If the security information is
incorrect, run the wireless setup again.
●If the wireless network is working correctly, try accessing other computers on the wireless network. If the
network has Internet access, try connecting to the Internet over a wireless connection.
●Verify that the encryption method (AES or TKIP) is the same for the printer as it is for the wireless access
point (on networks using WPA security).
●Verify that the printer is within the range of the wireless network. For most networks, the printer must be
within 30 m (100 ft) of the wireless access point (wireless router).
ENWW Solve wireless network problems 123

●Verify that obstacles do not block the wireless signal. Remove any large metal objects between the access
point and the printer. Make sure poles, walls, or support columns containing metal or concrete do not
separate the printer and wireless access point.
●Verify that the printer is located away from electronic devices that might interfere with the wireless signal.
Many devices can interfere with the wireless signal including motors, cordless phones, security system
cameras, other wireless networks, and some Bluetooth devices.
●Verify that the print driver is installed on the computer.
●Verify that you have selected the correct printer port.
●Verify that the computer and printer connect to the same wireless network.
●For macOS, verify that the wireless router supports Bonjour.
The printer does not print after the wireless conguration completes
If the printer does not print after the wireless conguration completes, try these solutions.
1. Make sure that the printer is turned on and in the ready state.
2. Turn o any third-party rewalls on your computer.
3. Make sure that the wireless network is working correctly.
4. Make sure that your computer is working correctly. If necessary, restart the computer.
5. Verify that you can open the printer HP Embedded Web Server from a computer on the network.
The printer does not print, and the computer has a third-party rewall installed
If the printer does not print, and the computer has a third-party rewall installed, try these solutions.
1. Update the rewall with the most recent update available from the manufacturer.
2. If programs request rewall access when you install the printer or try to print, make sure you allow the
programs to run.
3. Temporarily turn o the rewall, and then install the wireless printer on the computer. Enable the rewall
when you have completed the wireless installation.
The wireless connection does not work after moving the wireless router or printer
If the wireless connection does not work after moving the wireless router or printer, try these solutions.
1. Make sure that the router or printer connects to the same network that your computer connects to.
2. Print a conguration page.
3. Compare the service set identier (SSID) on the conguration page to the SSID in the printer conguration
for the computer.
4. If the numbers are not the same, the devices are not connecting to the same network. Recongure the
wireless setup for the printer.
124 Chapter 6 Solve problems ENWW

Cannot connect more computers to the wireless printer
If additional computers cannot connect to the wireless printer, try these solutions.
1. Make sure that the other computers are within the wireless range and that no obstacles block the signal.
For most networks, the wireless range is within 30 m (100 ft) of the wireless access point.
2. Make sure that the printer is turned on and in the ready state.
3. Make sure there are not more than 5 concurrent Wi-Fi Direct users.
4. Turn o any third-party rewalls on your computer.
5. Make sure that the wireless network is working correctly.
6. Make sure that your computer is working correctly. If necessary, restart the computer.
The wireless printer loses communication when connected to a VPN
Typically, you cannot connect to a VPN and other networks at the same time.
The network does not appear in the wireless networks list
If the network does not appear in the wireless networks list, try these solutions.
●Make sure the wireless router is turned on and has power.
●The network might be hidden. However, you can still connect to a hidden network.
The wireless network is not functioning
If the wireless network is not functioning, try these solutions.
1. Make sure that the network cable is not connected.
2. To verify if the network has lost communication, try connecting other devices to the network.
3. Test network communication by pinging the network.
a. Open a command-line prompt on your computer.
●For Windows, click Start, click Run, type cmd, and then press Enter.
●For macOS, go to Applications, then Utilities, and open Terminal.
b. Type ping followed by the router IP address.
c. If the window displays round-trip times, the network is working.
4. Make sure that the router or printer connects to the same network that the computer connects to.
a. Print a conguration page.
b. Compare the service set identier (SSID) on the conguration report to the SSID in the printer
conguration for the computer.
c. If the numbers are not the same, the devices are not connecting to the same network. Recongure
the wireless setup for the printer.
ENWW Solve wireless network problems 125

Perform a wireless network diagnostic test
From the printer control panel, you can run a diagnostic test that provides information about the wireless
network settings.
1. From the printer control panel, press the OK button to display the Home screen.
2. Use the arrow buttons and the OK to navigate to and open the following menus:
1. Setup
2. Network Setup
3. Wireless Setting
4. Print Wireless Test Report
The printer prints a test page that shows test results.
Reduce interference on a wireless network
The following tips can reduce interference in a wireless network:
●Keep the wireless devices away from large metal objects, such as ling cabinets, and other electromagnetic
devices, such as microwaves and cordless telephones. These objects can disrupt radio signals.
●Keep the wireless devices away from large masonry structures and other building structures. These objects
can absorb radio waves and lower signal strength.
●Position the wireless router in a central location in line of sight with the wireless printers on the network.
126 Chapter 6 Solve problems ENWW

Index
Symbols/Numerics
550-sheet paper trays
part numbers 30
550-sheet tray
jams 92
A
accessories
ordering 30
part numbers 30
acoustic specications 7, 11
AirPrint 58, 61
Android devices
printing from 58, 62
B
bin, output
locating 4
browser requirements
HP Embedded Web Server 65
C
Cancel button
locating 5
cartridge
dynamic security 32
replacing 42
cartridge policy 33, 34
cartridge protection 33, 37
cartridges
order numbers 40
checklist
wireless connectivity 123
cleaning
paper path 106
control panel
locating 4
locating features 4, 5
control panel buttons
locating 5
covers, locating 4
customer support
online 77
D
deleting
stored jobs 52, 57
dimensions, printer 7, 9
double-sided printing
Mac 49
Windows 46
drivers, supported 7
duplex printing
Mac 49
duplex printing (double-sided)
settings (Windows) 46
Windows 46
duplexer
clear jams 102
duplexing
automatically (Windows) 46
manually (Mac) 49
manually (Windows) 46
dynamic security
toner cartridge 32
E
EconoMode setting 72, 106
economy settings 72
electrical specications 7, 11
Embedded Web Server (EWS)
assigning passwords 71
features 65
envelopes
orientation 14, 16
envelopes, loading 26
Ethernet (RJ-45)
locating 4
F
rmware
updating 74
formatter
locating 4
fuser
jams 96
G
genuine HP cartridges 33, 34
H
Help button
locating 4
Hi-Speed USB 2.0 printing port
locating 4
Home button
locating 4
HP Customer Care 77
HP Embedded Web Server (EWS)
features 65
HP ePrint 60
HP EWS, using 65
HP Printer Home Page, using 65
HP Web Jetadmin 73
I
image quality
check toner-cartridge status 106,
108
image quality issues
examples and solutions 105
interface ports
locating 4
IP network settings
congure 68
ENWW Index 127

J
jams
550-sheet tray 92
causes of 86
duplexer 102
fuser 96
locations 87
output bin 100
Tray 1 88
Tray 2 88
Tray 3 92
Jetadmin, HP Web 73
jobs, stored
creating (Windows) 52
deleting 52, 57
Mac settings 52
printing 52
K
keypad
locating 4
L
LAN port
locating 4
loading
paper in Tray 1 14
paper in Tray 2 18
paper in Tray 3 22
local area network (LAN)
locating 4
M
Mac driver settings
Job Storage 52
manual duplex
Mac 49
Windows 46
memory
included 7
memory chip (toner)
locating 40
minimum system requirements 7
mobile printing
Android devices 58, 62
mobile printing solutions 8
mobile printing, software supported
7, 8
multiple pages per sheet
printing (Mac) 49
printing (Windows) 46
N
network port
locating 4
network settings 68
networks
HP Web Jetadmin 73
supported 7
O
OK button
locating 5
on/o button
locating 4
online support 77
Open source license 3
operating systems (OS)
supported 7
operating systems, supported 7
ordering
supplies and accessories 30
OS (operating system)
supported 7
output bin
clear jams 100
locating 4
P
pages per minute 7
pages per sheet
selecting (Mac) 49
selecting (Windows) 46
paper
jams 87
loading Tray 1 14
loading Tray 2 18
loading Tray 3 22
selecting 106, 110
Tray 1 orientation 14, 16
Tray 2 orientation 18, 20
Tray 3 22
Tray 3 orientation 24
paper jams
550-sheet tray 92
duplexer 102
fuser 96
locations 87
output bin 100
Tray 1 88
Tray 2 88
Tray 3 92
paper pickup problems
solving 81, 84
paper trays
part numbers 30
paper type
selecting (Windows) 46
paper types
selecting (Mac) 49
paper, ordering 30
part numbers
accessories 30
replacement parts 31
supplies 30, 31
toner cartridges 30, 31
ports
locating 4
potential shock hazard 2
power
consumption 7, 11
power connection
locating 4
power switch
locating 4
print drivers, supported 7
print media
loading in Tray 1 14
print on both sides
Mac 49
manually, Windows 46
Windows 46
printing
stored jobs 52
printing on both sides
settings (Windows) 46
private printing 52
product number
locating 4
protect cartridges 33, 37
R
replacement parts
part numbers 31
replacing
toner cartridges 42
RJ-45 port
locating 4
S
security features 71
128 Index ENWW

serial number
locating 4
shut down after delay
setting 72
Sign In button
locating 4
Sign Out button
locating 4
sleep delay
setting 72
specications
electrical and acoustic 7, 11
storage, job
Mac settings 52
store print jobs 52
stored jobs
creating (Mac) 52
creating (Windows) 52
deleting 52, 57
printing 52
storing jobs
with Windows 52
supplies
low threshold settings 79
ordering 30
part numbers 30, 31
replacing toner cartridges 42
using when low 79
support
online 77
supported operating systems 7
system requirements
HP Embedded Web Server 65
minimum 7
T
technical support
online 77
toner cartridge
dynamic security 32
low threshold settings 79
using when low 79
toner cartridges
components 40
order numbers 40
part numbers 30, 31
replacing 42
Tray 1
jams 88
loading envelopes 26
paper orientation 14, 16
Tray 2
jams 88
loading 18
paper orientation 18, 20
Tray 3
jams 92
loading 22
paper orientation 22, 24
trays
capacity 7
included 7
locating 4
troubleshooting
check toner-cartridge status 106,
108
jams 86
network problems 121
paper feed problems 81
print quality 106
wired network 121
wireless network 123
two-sided printing
settings (Windows) 46
U
USB port
locating 4
W
web browser requirements
HP Embedded Web Server 65
Web sites
customer support 77
HP Web Jetadmin, downloading
73
weight, printer 7, 9
Wi-Fi Direct Print 7
Wi-Fi Direct Printing 58, 59
wireless network
troubleshooting 123
wireless network interference 123,
126
ENWW Index 129

130 Index ENWW
Get the most out of your desk space with printing that perfectly suits your work style. HP LaserJet Pro M304a is designed to move you and your business forward towards success. The two-line LCD touchscreen is easy to read and operate. Work without delay or mess with cartridges that feature automatic casing removal. Achieving success in organizations requires working smarter. This printer is designed so you can use your time to focus on the work that matters most, helping you grow your company and stay ahead of the competition. This HP LaserJet Pro M304a machine goes into play mode and prints quickly. Get your work done with less waiting times. Increase your productivity with fast print speeds of up to 35 (A4) pages per minute (ppm). Designed with ease of use in mind to make your day easier, Quickly set up your printer and easily control device settings to help increase overall printing efficiency.
HP LaserJet Pro M304a Manual
Download HP LaserJet Pro M304a Manual Instructions
Refer to the operating systems compatibility to ensure the HP LaserJet Pro M304a printer is compatible with your PC or Mac to avoid issues when installing or using the printer.
Download the HP LaserJet Pro M304a User Manual and Getting Started Guide
The manual below includes a User Guide to teach the user how to use the printer and a Setup Guide to configure the printer.
HP LaserJet Pro M304a User Guide
Filename: c06177490.pdf
File Type: PDF
Size: 2.17MB
HP LaserJet Pro M304a Getting Started Guide
Filename: c06177785.pdf
File Type: PDF
Size: 5.04MB
Read Also: HP LaserJet Pro 4001n Manual
All HP LaserJet Pro M304a manuals are copyrighted by HP Official or third-party HP official vendors. customer agrees to the applicable license or other agreement from HP.
|
Код: 111429 Извините, товара сейчас нет в наличии
Бесплатная доставка Извините, товара сейчас нет в наличии Сравнить Новости интернет-магазина «Лаукар»:23.04.2025 26.02.2025 17.02.2025 Дополнительная информация в категории Лазерный принтер:Таблица Авторизованных сервисных центров по брендам. Описание Инструкция Отзывы (0) В интернет-магазине бытовой техники «Лаукар» Вы можете скачать инструкцию к товару Лазерный принтер HP LaserJet Pro M304a совершенно бесплатно. Все инструкции, представленные на сайте интернет-магазина бытовой техники «Лаукар», предоставляются производителем товара. Для того чтобы скачать инструкцию, Вам необходимо нажать на ссылку «скачать инструкцию», расположенную ниже, а в случае, если ссылки нет, Скачать инструкцию Смотреть инструкцию 
Фирма-производитель оставляет за собой право на внесение изменений в конструкцию, дизайн и комплектацию товара: Лазерный принтер HP LaserJet Pro M304a. Пожалуйста, сверяйте информацию о товаре с информацией на |
…
HP Getting Started Guide [id]
LaserJet Pro M304-M305, M404-M405
HEWLETT-PACKARD
2
241 mm
9.5 in
781 mm
30.8 in
381 mm
15 in
www.hp.com/support/ljM304
www.hp.com/support/ljM404
W1A52-90922www.register.hp.com
© Copyright 2018 HP Development Company, L.P.
www.hp.com
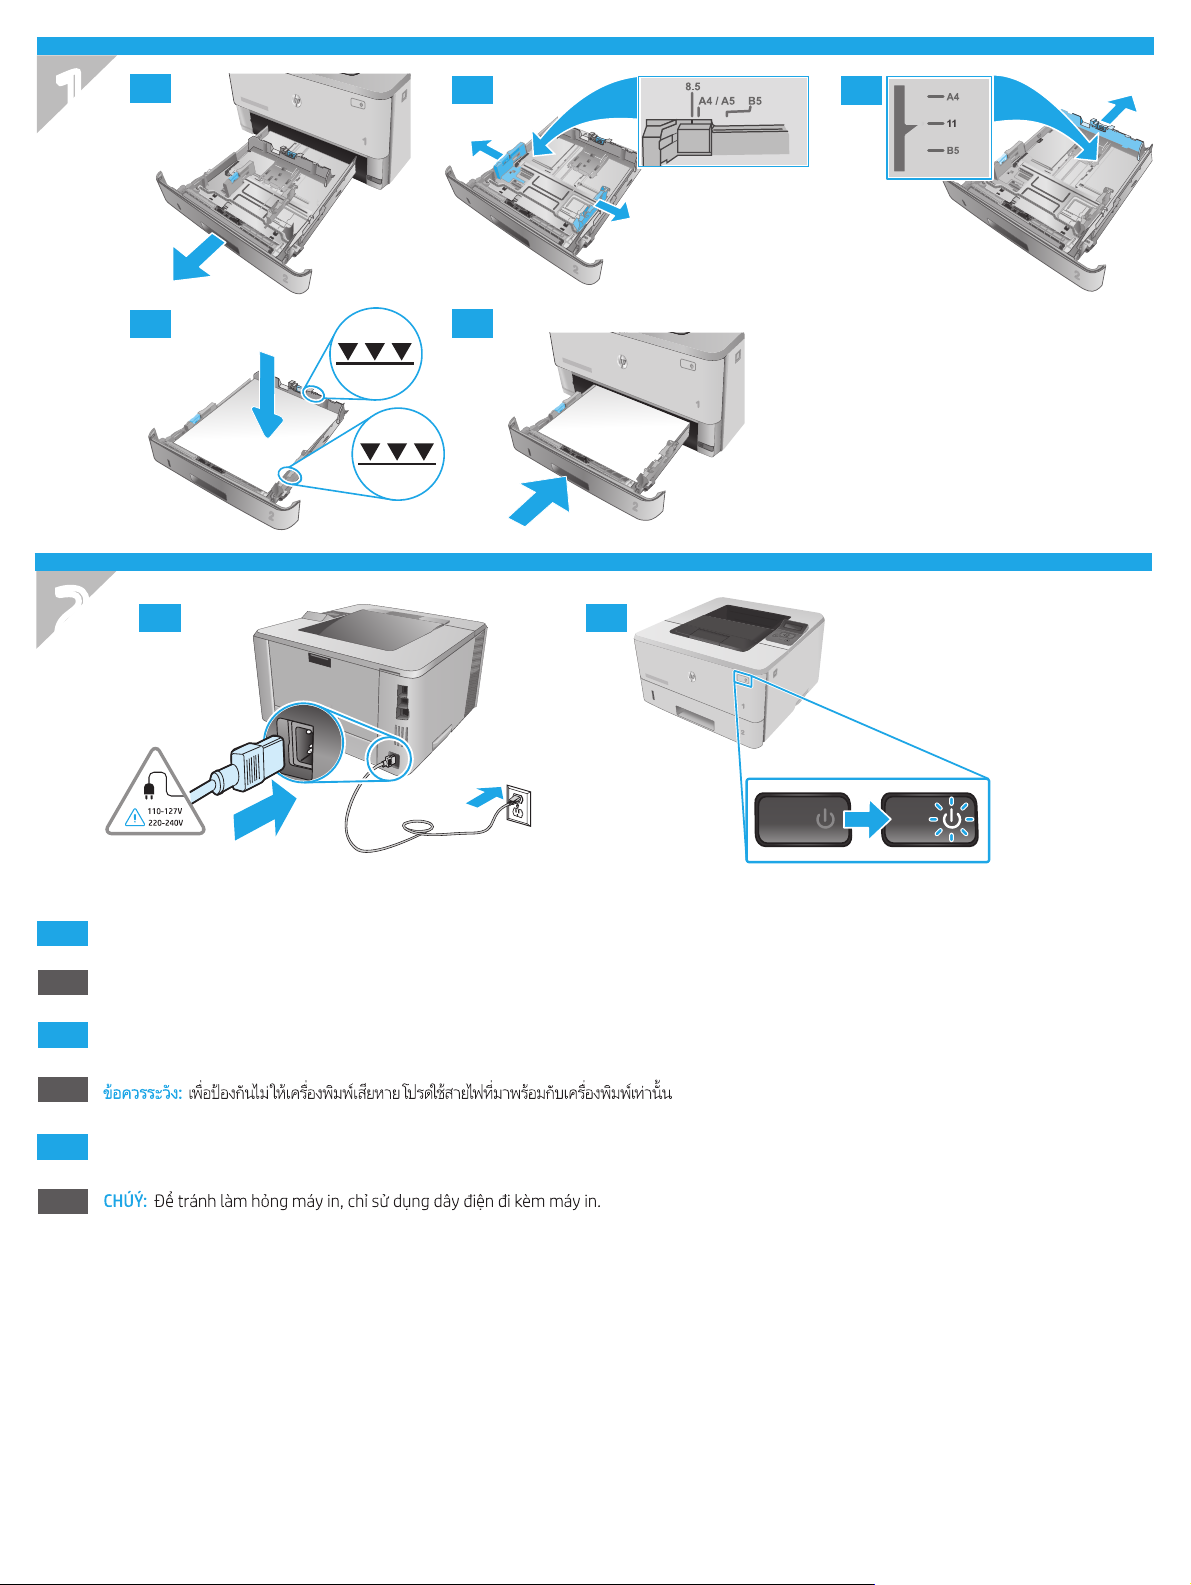
1
1.1
‘
1.2
1.3
2
1.4
1.5
2.1 2.2
EN
ID
KO
TH
ZHTW
VI
CAUTION: To prevent damage to the printer, use only the power cord that is provided with the printer.
PERHATIAN: Untuk mencegah kerusakan printer, gunakan hanya kabel daya yang disertakan bersama printer.
주의: 프린터의 손상을 방지하려면 프린터와 함께 제공된 전원 코드만 사용하십시오.
注意:為了避免對印表機造成損害,請僅使用印表機隨附的電源線。
2
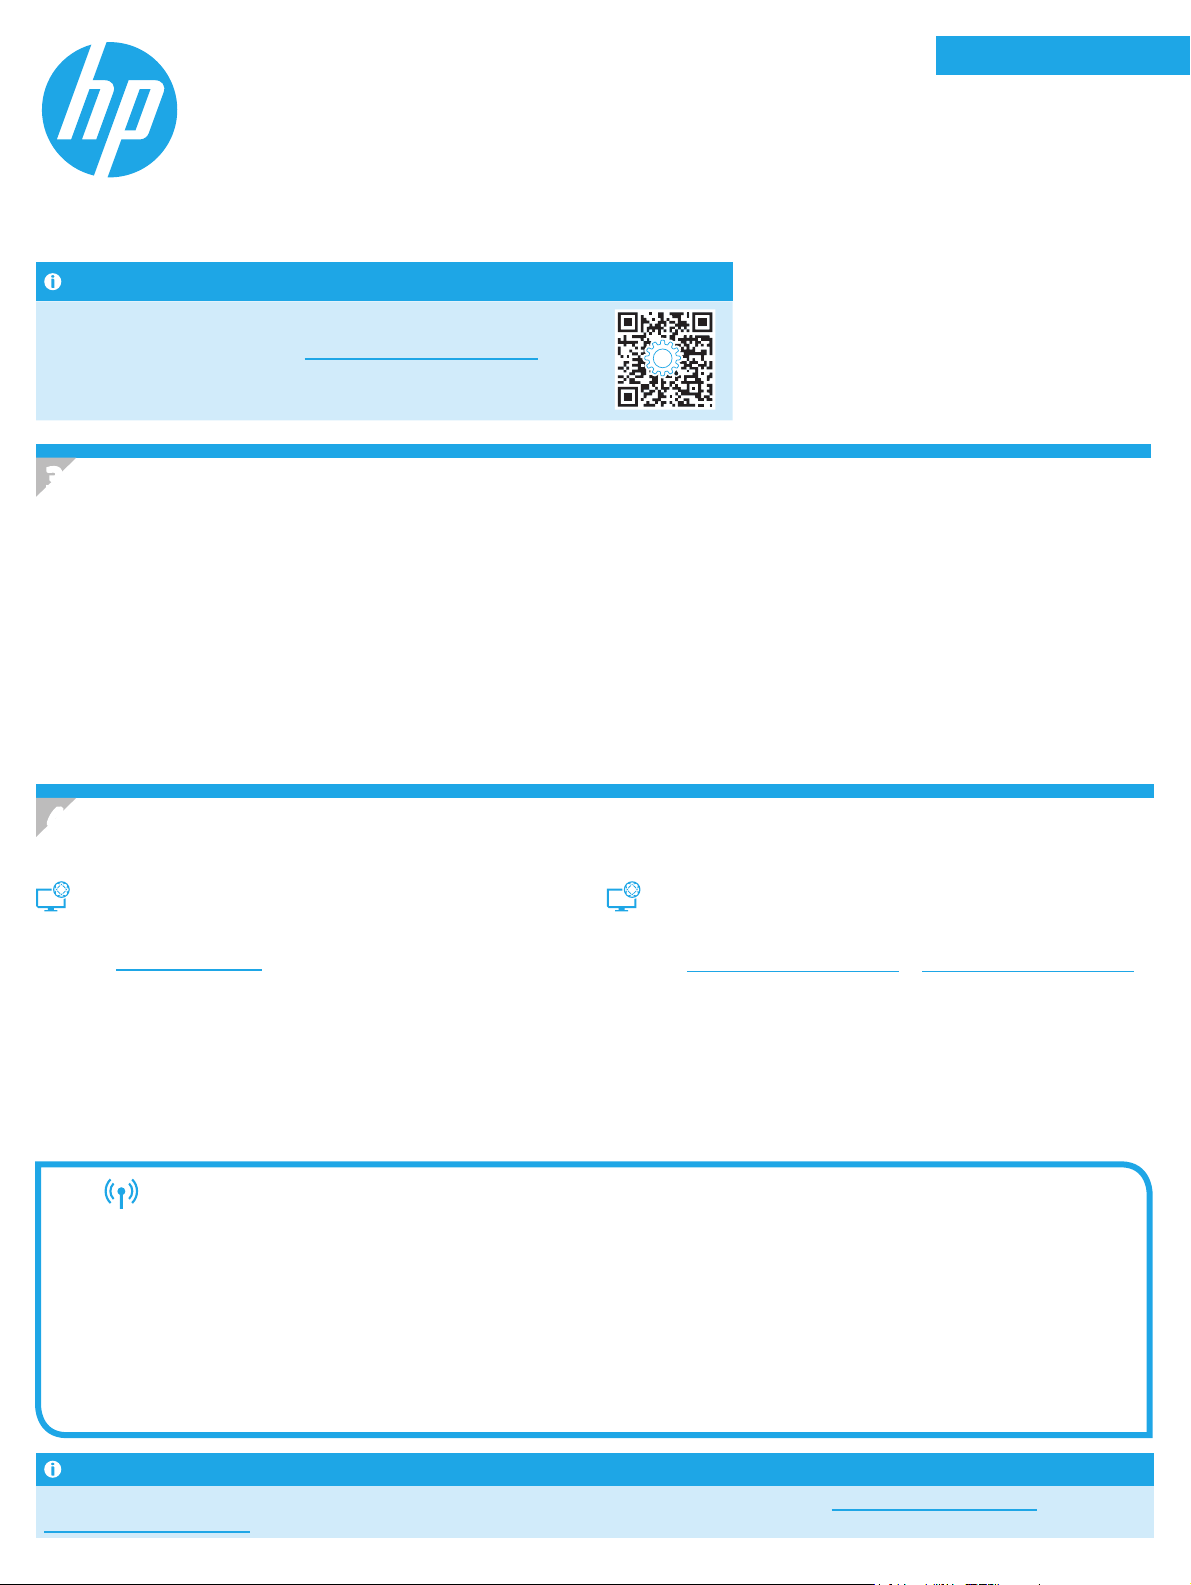
English…………………….3
LaserJet Pro M304-M305, M404-M405
Getting Started Guide
NOTE: Internet connection is required to set up the printer and download the software driver.
FAQ
For frequently asked questions, go to www.hp.com/support/ljM404FAQ or scan
the QR code.
Bahasa Indonesia ……..5
한국어 …………………….7
ไทย ………………………….9
繁體中文……………… 11
Tiếng Việt …………….. 13
3. Initial setup on the control panel
After turning on the printer, wait for it to initialize. To navigate the control panel, use arrow and OK button. Follow the prompts on the control panel to
congure these settings:
• Language
• Location
• Printer Setup Environment
Select one of these options:
• Self-managed: Optimized default settings for most users that include guided setup and conguration steps and automatic updates.
• IT-managed: Optimized default settings for eet manageability.
Settings are fully customizable after initial setup.
4. Download and install the software
NOTE: Do not connect the USB cable until you are prompted to do so.
Method 1: Download HP Easy Start (Windows and
Mac OS)
1. Go to 123.hp.com/laserjet, and click Download.
2. Follow the onscreen instructions and then prompts to save the le to
the computer.
3. Launch the software le from the folder where you saved the le.
4. Follow the onscreen instructions to install the software.
5. When prompted to select a connection type, select the appropriate
option for the type of connection.
Tips: Connect the printer to a wireless network using the HP Smart app (wireless models only) (iOS only)
1. Disconnect the Ethernet cable and USB cable from your printer.
2. From the printer control panel, select Setup > Network setup > Restore Network Setting to reset the printer network. Then the Wireless light
begins blinking.
3. Follow the steps in “5. Mobile Printing” Method 1 to install the HP Smart app.
4. Turn on Bluetooth on your mobile device.
5. Run the HP Smart app. Follow the onscreen instructions to select the name of your printer (e.g., “HP LaserJet XXXX”) and connect it to your
wireless network.
6. After the printer connects to the wireless network successfully, the Wireless light stops blinking and stays on.
Method 2: Download from printer support website
(Windows and Mac OS)
1. Go to www.hp.com/support/ljM304 or www.hp.com/support/ljM404.
2. Select Software and Drivers.
3. Download the software for your printer model and operating system.
4. Launch the software le from the folder where the le was saved.
5. Follow the onscreen instructions to install the software.
6. When prompted to select a connection type, select the appropriate
option for the type of connection.
Manually congure the IP address
See the printer user guide for information about conguring the IP address manually. For more information, go to www.hp.com/support/ljM304 or
www.hp.com/support/ljM404.
3
5. Mobile printing (Optional)
Method 1: HP Smart
Use the HP Smart app to set up, print, and more.
1. Scan the QR code or go to 123.hp.com.
2. Install the HP Smart app.
3. Run the HP Smart app and follow the onscreen instructions to connect, set up, print, and more.
Method 2: Wi-Fi Direct (wireless models only)
Wi-Fi Direct allows Wi-Fi capable devices, such as smart phones, tablets, or computers, to make a wireless network connection directly to the printer without
using a wireless router or access point. Connect to the printer’s Wi-Fi Direct signal the same way Wi-Fi capable devices are connected to a new wireless
network orhotspot.
Enable Wi-Fi Direct
1. On the printer control panel, press the OK button to display the
Homescreen.
2. Use arrow buttons and the OK button to open the following menus:
• Setup
• Wi-Fi direct
• Wi-Fi direct status
3. Use arrow buttons to navigate to ON or OFF, and press the OK button
to enable or disable the Wi-Fi Direct feature.
For more information on wireless printing and wireless setup, go to www.hp.com/go/wirelessprinting.
Discover the printer
1. From the mobile device, turn on Wi-Fi, and search for wireless
networks.
2. Select the printer name as it appears on the printer control panel.
Learn more about mobile printing
The product supports AirPrint and Wi-Fi Direct. For more mobile printing information, scan the QR code or go
to www.hp.com/go/LaserJetMobilePrinting.
Troubleshooting
User Guide
The User Guide includes printer usage and troubleshooting information.
It is available on the Web:
1. Go to www.hp.com/support/ljM304 or
www.hp.com/support/ljM404.
2. If prompted, select the printer, and then click User Guides.
Check for rmware updates
1. Go to www.hp.com/support/ljM304 or
www.hp.com/support/ljM404.
2. If prompted, select the printer, and then click Software and Drivers.
3. Select the operating system, and click the Next button.
4. Select Firmware, and click the Download button.
Additional support resources
For HP’s all-inclusive help for the printer, go to
www.hp.com/support/ljM304 or www.hp.com/support/ljM404.
• Solve problems
• Find advanced conguration instructions
• Download software updates
• Join support forums
• Find warranty and regulatory information
• Access mobile printing resources
To learn more about the printer, please go to
www.hp.com/support/ljM404FAQ or scan the QR code.
4
English…………………….3
LaserJet Pro M304-M305, M404-M405
Panduan Persiapan
CATATA N: Diperlukan koneksi internet untuk menyiapkan printer dan mendownload driver
perangkat lunak.
Pertanyaan Umum
Untuk pertanyaan umum, kunjungi www.hp.com/support/ljM404FAQ atau
pindai kode QR.
Bahasa Indonesia ……..5
한국어 …………………….7
ไทย ………………………….9
繁體中文……………… 11
Tiếng Việt …………….. 13
3. Kongurasi awal pada panel kontrol
Setelah menghidupkan printer, tunggu proses inisialisasi. Untuk menavigasikan panel kontrol, gunakan tombol panah dan tombol OK. Ikuti perintah pada panel
kontrol untuk mengongurasi pengaturan berikut:
• Bahasa
• Lokasi
• Lingkungan Penyiapan Printer
Pilih salah satu opsi ini:
• Dikelola sendiri: Pengaturan default yang dioptimalkan untuk sebagian besar pengguna mencakup langkah-langkah pengaturan dan kongurasi
terpandu, serta pembaruan otomatis.
• Dikelola TI: Pengaturan default yang dioptimalkan untuk kemampuan pengelolaan cepat.
Pengaturan dapat disesuaikan sepenuhnya setelah kongurasi awal.
4. Mendownload dan menginstal perangkat lunak
CATATA N: Jangan sambungkan kabel USB hingga diminta untuk melakukannya.
Metode 1: Download HP Easy Start (Windows dan
Mac OS)
1. Kunjungi 123.hp.com/laserjet, dan klik Download.
2. Ikuti instruksi di layar dan perintah untuk menyimpan le di komputer.
3. Jalankan le perangkat lunak dari folder tempat menyimpan le.
4. Ikuti petunjuk di layar untuk menginstal perangkat lunak.
5. Bila diminta untuk memilih jenis sambungan, gunakan pilihan yang tepat
untuk jenis sambungan.
Tips: Menyambungkan printer ke jaringan nirkabel menggunakan aplikasi HP Smart (hanya model
nirkabel) (hanya iOS)
1. Putuskan sambungan kabel Ethernet dan kabel USB dari printer.
2. Dari panel kontrol printer, pilih Setup > Network setup > Restore Network Setting (Pengaturan > Pengaturan jaringan > Pulihkan Pengaturan Jaringan).
Lalu Lampu nirkabel mulai berkedip.
3. Ikuti langkah di “5. Pencetakan Seluler” Metode 1 untuk menginstal aplikasi HP Smart.
4. Aktifkan Bluetooth di perangkat selular.
5. Instal aplikasi HP Smart. Ikuti instruksi di layar untuk memilih nama printer (mis., “HP LaserJet XXXX”) dan sambungkan ke jaringan nirkabel.
6. Setelah printer berhasil tersambung ke jaringan nirkabel, Lampu nirkabel berhenti berkedip dan terus menyala.
Metode 2: Download dari situs web dukungan
printer (Windowsdan Mac OS)
1. Kunjungi www.hp.com/support/ljM304 atau www.hp.com/support/ljM404.
2. Pilih Software and Drivers (Perangkat Lunak dan Driver).
3. Download perangkat lunak untuk model printer dan sistem operasi Anda.
4. Jalankan le perangkat lunak dari folder tempat menyimpan le.
5. Ikuti petunjuk di layar untuk menginstal perangkat lunak.
6. Bila diminta untuk memilih jenis sambungan, gunakan pilihan yang tepat
untuk jenis sambungan.
Mengongurasi alamat IP secara manual
Lihat panduan pengguna printer untuk informasi tentang mengongurasi alamat IP secara manual. Untuk informasi lebih lanjut, kunjungi
www.hp.com/support/ljM304 atau www.hp.com/support/ljM404.
5
Loading…
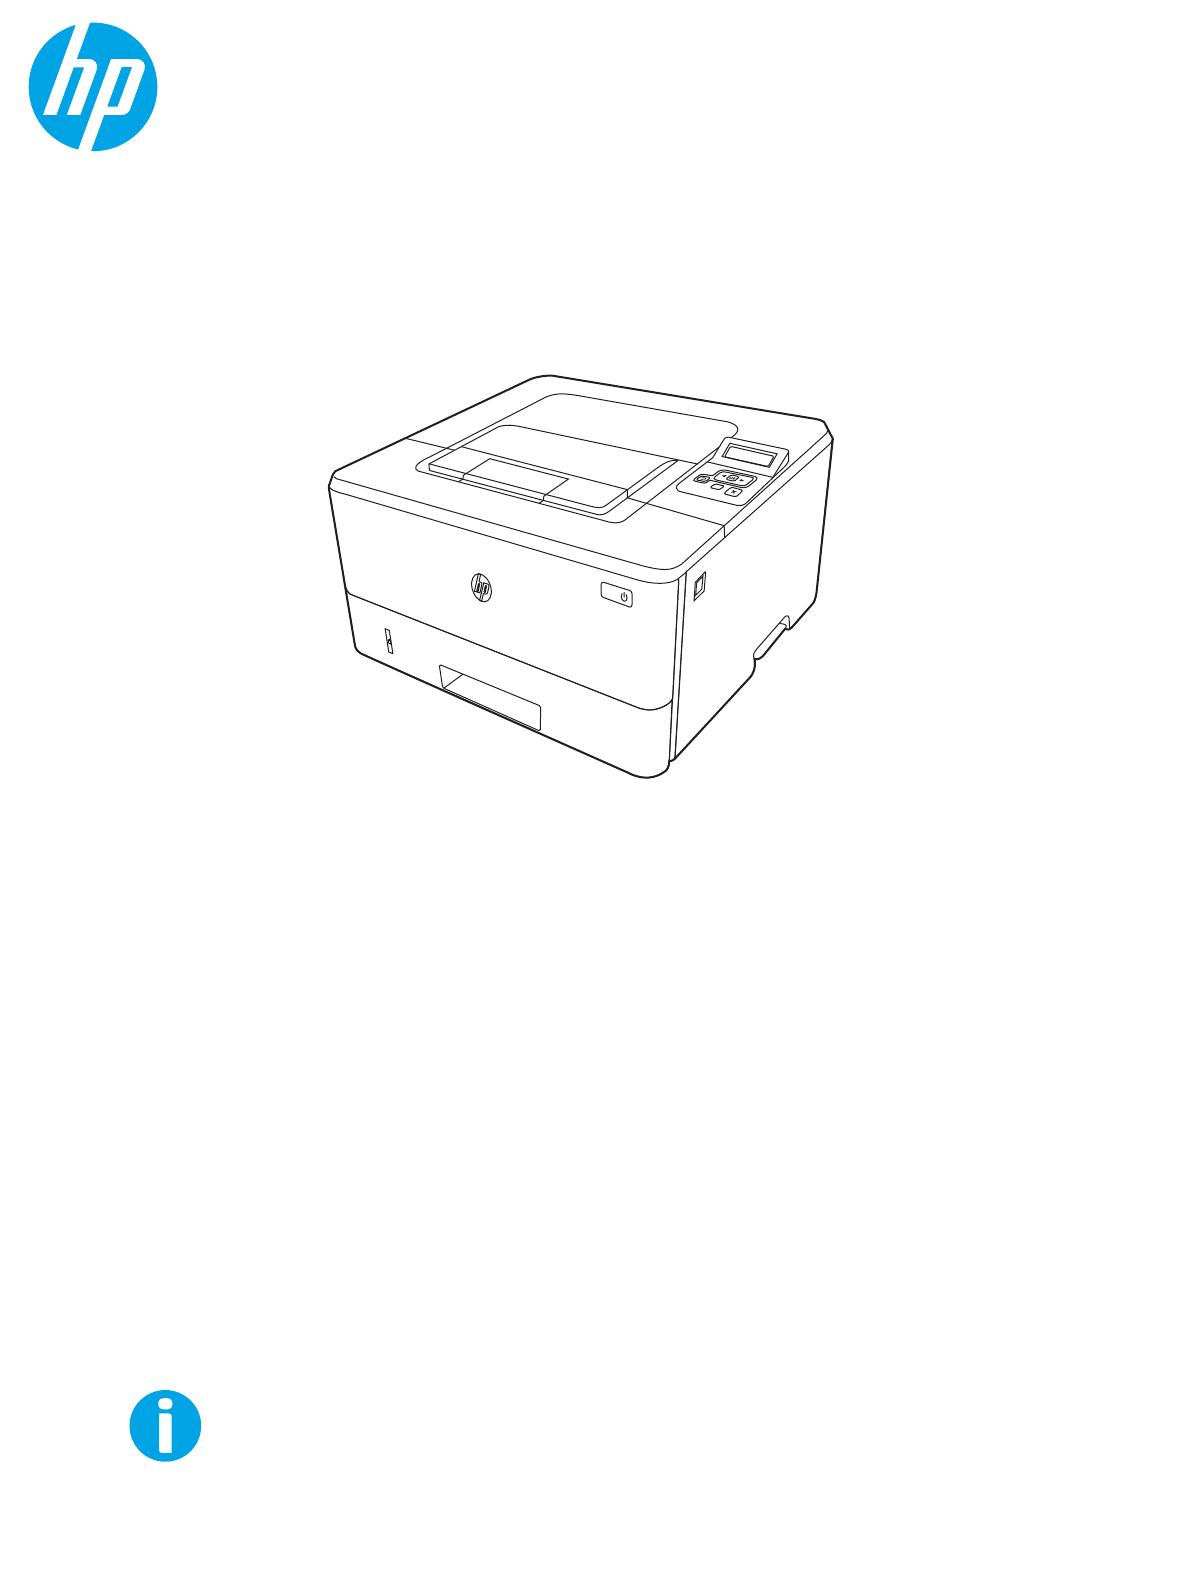
Руководство пользователя
www.hp.com/videos/LaserJet
www.hp.com/support/ljM304
www.hp.com/support/ljM404
HP LaserJet Pro M304-M305, M404-M405


HP LaserJet Pro M304-M305, M404-M405
Руководство пользователя

Лицензия и авторские права
© Copyright 2019 HP Development Company,
L.P.
Воспроизведение, изменение и перевод без
предварительного письменного разрешения
запрещены, за исключением случаев,
разрешенных законом об авторских правах.
Информация, содержащаяся в настоящем
документе, может быть изменена без
предварительного уведомления.
Все гарантии, предоставляемые на продукты
и услуги HP, оговорены в гарантийных
обязательствах, сопровождающих данные
продукты и услуги. Никакие сведения,
содержащиеся в настоящем документе, не
могут рассматриваться как дополнительные
гарантии. HP не несет ответственности за
технические или редакторские ошибки или
упущения, содержащиеся в настоящем
документе.
Edition 2, 8/2019
Сведения о товарных знаках
Adobe
®
, Adobe Photoshop
®
, Acrobat
®
и
PostScript
®
являются товарными знаками
Adobe Systems Incorporated.
Название Apple и логотип Apple являются
товарными знаками компании Apple Inc.,
зарегистрированными в США и других
странах/регионах.
macOS является зарегистрированным
товарным знаком Apple Inc. в США и других
странах/регионах.
AirPrint является зарегистрированным
товарным знаком Apple Inc. в США и в других
странах/регионах.
Google™ является товарным знаком Google
Inc.
Microsoft®, Windows®, Windows® XP и Windows
Vista® являются зарегистрированными в США
товарными знаками Microsoft Corporation.
UNIX
®
является зарегистрированным
товарным знаком консорциума The Open
Group.

Содержание
1 Общие сведения о принтере ……………………………………………………………………………………………………………………………………………. 1
Значки предупреждений …………………………………………………………………………………………………………………………………… 1
Опасность поражения электрическим током ……………………………………………………………………………………………………. 2
Лицензия на ПО с открытым исходным кодом ………………………………………………………………………………………………….. 3
Внешний вид принтера ……………………………………………………………………………………………………………………………………… 4
Вид принтера спереди …………………………………………………………………………………………………………………….. 4
Вид принтера сзади …………………………………………………………………………………………………………………………. 4
Внешний вид панели управления ………………………………………………………………………………………………….. 5
Технические характеристики принтера ……………………………………………………………………………………………………………. 8
Технические характеристики ………………………………………………………………………………………………………….. 8
Поддерживаемые ОС ………………………………………………………………………………………………………………………. 8
Решения для мобильной печати ………………………………………………………………………………………………….. 10
Размеры принтера …………………………………………………………………………………………………………………………. 10
Энергопотребление, электротехнические характеристики и акустическая эмиссия ………………… 12
Условия эксплуатации ……………………………………………………………………………………………………………………. 12
Аппаратная настройка принтера и установка ПО ………………………………………………………………………………………….. 13
2 Лотки для бумаги ……………………………………………………………………………………………………………………………………………………………. 15
Введение ………………………………………………………………………………………………………………………………………………………….. 15
Загрузка бумаги в лоток 1 ……………………………………………………………………………………………………………………………….. 16
Введение ………………………………………………………………………………………………………………………………………… 16
Загрузка бумаги в лоток 1 ……………………………………………………………………………………………………………… 16
Ориентация бумаги в лотке 1 ………………………………………………………………………………………………………… 18
Загрузка бумаги в лоток 2 ……………………………………………………………………………………………………………………………….. 20
Введение ………………………………………………………………………………………………………………………………………… 20
Загрузка бумаги в лоток 2 ……………………………………………………………………………………………………………… 20
Ориентация бумаги в Лотке 2 ……………………………………………………………………………………………………….. 22
Загрузите бумагу в лоток 3 ………………………………………………………………………………………………………………………………. 24
Введение ………………………………………………………………………………………………………………………………………… 24
Загрузка бумаги в лоток 3 (дополнительно) ………………………………………………………………………………… 24
Ориентация бумаги в лотке 3 ………………………………………………………………………………………………………… 26
Загрузка и печать конвертов …………………………………………………………………………………………………………………………… 28
RUWW iii

Введение ………………………………………………………………………………………………………………………………………… 28
Печать конвертов ………………………………………………………………………………………………………………………….. 28
Ориентация конверта ……………………………………………………………………………………………………………………. 28
3 Расходные материалы, дополнительные принадлежности и запасные детали ………………………………………………………… 31
Заказ расходных материалов, дополнительных принадлежностей и запасных деталей …………………………… 32
Оформление заказов …………………………………………………………………………………………………………………….. 32
Расходные материалы и дополнительные принадлежности …………………………………………………….. 32
Детали для самостоятельного ремонта ……………………………………………………………………………………….. 34
Динамическая безопасность …………………………………………………………………………………………………………………………… 34
Настройка параметров расходных материалов HP для защиты картриджей с тонером ……………………………. 36
Введение ………………………………………………………………………………………………………………………………………… 36
Включение и отключение функции «Политика по картриджам» ……………………………………………….. 37
Использование панели управления принтера для включения функции
«Политика по картриджам» ………………………………………………………………………………………… 37
Использование панели управления принтера для отключения функции
«Политика по картриджам» ………………………………………………………………………………………… 37
Использование встроенного веб-сервера HP (EWS) для включения функции
«Политика по картриджам» ………………………………………………………………………………………… 38
Использование встроенного веб-сервера HP (EWS) для отключения функции
«Политика по картриджам» ………………………………………………………………………………………… 38
Включение и отключение функции «Защита картриджей» ………………………………………………………… 40
Использование панели управления принтера для включения функции «Защита
картриджей» ………………………………………………………………………………………………………………… 40
Использование панели управления принтера для отключения функции
«Защита картриджей» …………………………………………………………………………………………………. 40
Использование встроенного веб-сервера HP (EWS) для включения функции
«Защита картриджей» …………………………………………………………………………………………………. 41
Использование встроенного веб-сервера HP (EWS) для отключения функции
«Защита картриджей» …………………………………………………………………………………………………. 41
Сменный картридж с тонером …………………………………………………………………………………………………………………………. 43
Сведения о картридже с тонером …………………………………………………………………………………………………. 43
Извлечение и замена картриджей ………………………………………………………………………………………………… 45
4 Печать ……………………………………………………………………………………………………………………………………………………………………………… 49
Задания на печать (Windows) ………………………………………………………………………………………………………………………….. 50
Как выполнять печать (Windows) …………………………………………………………………………………………………. 50
Автоматическая печать на обеих сторонах (Windows) ………………………………………………………………… 50
Двусторонняя печать в ручном режиме (Windows) ……………………………………………………………………… 51
Печать нескольких страниц на листе (Windows) ………………………………………………………………………….. 51
Выбор типа бумаги (Windows) ………………………………………………………………………………………………………. 52
Дополнительные задания на печать ……………………………………………………………………………………………. 52
iv RUWW

Задания на печать (macOS) ……………………………………………………………………………………………………………………………… 54
Как выполнять печать (macOS) …………………………………………………………………………………………………….. 54
Автоматическая двусторонняя печать (macOS) …………………………………………………………………………… 54
Двусторонняя печать в ручном режиме (macOS) …………………………………………………………………………. 55
Печать нескольких страниц на листе (macOS) …………………………………………………………………………….. 55
Выбор типа бумаги (macOS) ………………………………………………………………………………………………………….. 55
Дополнительные задания на печать ……………………………………………………………………………………………. 56
Хранение заданий на печать на принтере для последующей или конфиденциальной печати …………………. 57
Введение ………………………………………………………………………………………………………………………………………… 57
Перед началом работы …………………………………………………………………………………………………………………. 57
Настройка хранения заданий ……………………………………………………………………………………………………….. 57
Отключение и включение функции хранения заданий ………………………………………………………………. 58
Создание сохраненного задания (Windows) …………………………………………………………………………………. 59
Создание сохраненного задания (macOS) …………………………………………………………………………………….. 60
Печать сохраненного задания ………………………………………………………………………………………………………. 61
Удаление сохраненного задания ………………………………………………………………………………………………….. 62
Удаление задания, сохраненного в принтере ……………………………………………………………. 62
Информация, передаваемая в принтер в целях учета заданий ………………………………………………….. 62
Мобильная печать ……………………………………………………………………………………………………………………………………………. 63
Введение ………………………………………………………………………………………………………………………………………… 63
Печать Wi-Fi Direct (только беспроводные модели) ……………………………………………………………………. 64
Включение Wi-Fi Direct ……………………………………………………………………………………………….. 64
Изменение имени Wi-Fi Direct принтера …………………………………………………………………….. 66
Шаг 1. Открытие встроенного веб-сервера HP ………………………………………. 66
Шаг 2. Изменение имени Wi-Fi Direct ……………………………………………………….. 66
HP ePrint по электронной почте ……………………………………………………………………………………………………. 66
AirPrint …………………………………………………………………………………………………………………………………………….. 67
Встроенное решение для печати в Android …………………………………………………………………………………. 68
5 Управление принтером ………………………………………………………………………………………………………………………………………………….. 69
Изменение типа подключения принтера (Windows) ………………………………………………………………………………………. 69
Расширенная настройка с помощью встроенного веб-сервера HP (EWS) и главной страницы принтера … 71
Способ 1. Открытие встроенного веб-сервера HP (EWS) из программы. ……………………………………. 71
Способ 2. Открытие встроенного веб-сервера HP (EWS) в веб-браузере ………………………………….. 71
Настройка параметров IP-сети ……………………………………………………………………………………………………………………….. 75
Введение ………………………………………………………………………………………………………………………………………… 75
Отказ от обязательств в связи с совместным использованием принтера …………………………………… 75
Просмотр и изменение сетевых параметров ……………………………………………………………………………….. 75
Изменение сетевого имени принтера …………………………………………………………………………………………… 76
Настройка параметров TCP/IP IPv4 вручную с панели управления ……………………………………………. 76
Скорость соединения и параметры двусторонней печати ………………………………………………………….. 77
RUWW v

Функции безопасности принтера ……………………………………………………………………………………………………………………. 78
Введение ………………………………………………………………………………………………………………………………………… 78
Установка или изменение пароля системы с помощью встроенного веб-сервера HP ……………… 78
Параметры энергопотребления ………………………………………………………………………………………………………………………. 79
Введение ………………………………………………………………………………………………………………………………………… 79
Печать в экономичном режиме EconoMode …………………………………………………………………………………. 79
Настройка параметра «Задержка режима ожидания (мин.)» ……………………………………………………… 79
Настройка параметра «Завершение работы после режима ожидания (ч)» ……………………………….. 80
Настройка параметра «Отключение завершения работы» …………………………………………………………. 80
HP Web Jetadmin ………………………………………………………………………………………………………………………………………………. 80
Обновление микропрограммы ………………………………………………………………………………………………………………………… 82
Способ 1. Обновление микропрограммы с панели управления …………………………………………………. 82
Способ 2. Обновление микропрограммы при помощи утилиты обновления принтера HP ………. 82
6 Решение проблем …………………………………………………………………………………………………………………………………………………………… 85
Поддержка клиентов ……………………………………………………………………………………………………………………………………….. 85
Восстановление заводских настроек по умолчанию …………………………………………………………………………………….. 86
На панели управления принтера отображается сообщение об ошибке «Низкий уровень тонера в
картридже» или «Очень низкий уровень тонера в картридже» …………………………………………………………………….. 87
Изменение настроек «Очень низкий уровень» ……………………………………………………………………………… 88
Изменение параметров очень низкого уровня на панели управления ……………………. 88
Заказ расходных материалов ……………………………………………………………………………………………………….. 88
Принтер не захватывает или пропускает захват бумаги ……………………………………………………………………………….. 89
Введение ………………………………………………………………………………………………………………………………………… 89
Принтер не захватывает бумагу ……………………………………………………………………………………………………. 89
Принтером захватывается несколько листов бумаги ………………………………………………………………….. 92
Устранение замятия бумаги ……………………………………………………………………………………………………………………………… 95
Введение ………………………………………………………………………………………………………………………………………… 95
Замятие бумаги случается часто или периодически? ………………………………………………………………….. 95
Места замятия бумаги ……………………………………………………………………………………………………………………. 96
Устранение замятия бумаги в лотке 1 …………………………………………………………………………………………… 97
Устранение замятия бумаги в лотке 2 …………………………………………………………………………………………… 97
Устранение замятия бумаги в лотке 3 …………………………………………………………………………………………. 101
Устранение замятия в области картриджей с тонером и в области термоблока ……………………… 105
Устранение замятия бумаги в выходном лотке ………………………………………………………………………….. 109
Устранение замятия в дуплексере ………………………………………………………………………………………………. 111
Устранение проблем с качеством печати ……………………………………………………………………………………………………… 114
Введение ……………………………………………………………………………………………………………………………………… 114
Устранение проблем с качеством печати …………………………………………………………………………………… 115
Обновление микропрограммы принтера …………………………………………………………………. 115
Печать из другой программы ……………………………………………………………………………………. 115
vi RUWW

Проверка параметра типа бумаги для задания печати …………………………………………… 116
Проверка параметров типа бумаги в принтере …………………………………….. 116
Проверка параметра типа бумаги (Windows) ………………………………………… 116
Проверка параметра типа бумаги (macOS) ……………………………………………. 116
Проверка статуса картриджа с тонером ………………………………………………………………….. 118
Шаг 1. Печать страницы состояния расходных материалов ………………… 118
Шаг 2. Проверка состояния расходных материалов …………………………….. 118
Печать страницы очистки …………………………………………………………………………………………. 118
Осмотр картриджа или картриджей с тонером ……………………………………………………….. 119
Проверка бумаги и среды печати …………………………………………………………………………….. 120
Шаг 1. Использование бумаги, соответствующей требованиям HP ……. 120
Шаг 2. Проверка условий эксплуатации ………………………………………………… 120
Шаг 3. Настройка лотка для бумаги ………………………………………………………. 120
Попробуйте другой драйвер печати ………………………………………………………………………… 121
Проверка параметров режима EconoMode ……………………………………………………………… 121
Регулировка плотности печати ………………………………………………………………………………… 122
Устранение дефектов изображения …………………………………………………………………………………………… 123
Устранение неполадок проводной сети ……………………………………………………………………………………………………….. 132
Введение ……………………………………………………………………………………………………………………………………… 132
Некачественное подключение на физическом уровне …………………………………………………………….. 132
Компьютер не может связаться с принтером …………………………………………………………………………….. 132
В принтере используется неверное подключение и неправильные параметры
двусторонней печати ………………………………………………………………………………………………………………….. 133
Новое программное обеспечение может вызывать неполадки с совместимостью. ……………….. 133
Неправильные настройки компьютера или рабочей станции …………………………………………………. 133
Принтер отключен, или настройки сети неверны ……………………………………………………………………… 133
Решение проблем беспроводной сети …………………………………………………………………………………………………………. 134
Введение ……………………………………………………………………………………………………………………………………… 134
Контрольный список для проверки беспроводного подключения ………………………………………….. 134
Принтер перестает печатать после завершения настройки беспроводного подключения …… 135
Принтер не печатает, а на компьютере установлен брандмауэр стороннего разработчика ….. 135
Беспроводное подключение не работает после перемещения беспроводного
маршрутизатора или принтера …………………………………………………………………………………………………… 135
Невозможно подсоединить дополнительные компьютеры к принтеру с функциями
беспроводной связи ……………………………………………………………………………………………………………………. 136
Принтер с беспроводным соединением теряет связь при подсоединении к виртуальной
частной сети (VPN) ………………………………………………………………………………………………………………………. 136
Сеть не представлена в списке беспроводных сетей ………………………………………………………………… 136
Беспроводная сеть не работает …………………………………………………………………………………………………. 136
Выполнение диагностического теста беспроводной сети ………………………………………………………… 137
Уменьшение помех в беспроводной сети ………………………………………………………………………………….. 137
RUWW vii

Указатель ………………………………………………………………………………………………………………………………………………………………………….. 139
viii RUWW

1 Общие сведения о принтере
Обзор расположения элементов управления на принтере, физических и технических характеристик
принтера, а также информация о том, где найти сведения о настройке.
●
Значки предупреждений
●
Опасность поражения электрическим током
●
Лицензия на ПО с открытым исходным кодом
●
Внешний вид принтера
●
Технические характеристики принтера
●
Аппаратная настройка принтера и установка ПО
Для получения дополнительной информации см.:
Следующая информация является верной на момент публикации. Дополнительные сведения см. в разделе
www.hp.com/support/ljM304 или www.hp.com/support/ljM404.
В полной справке от HP для этого принтера представлена следующая информация:
● Установка и настройка
● Обучение и использование
● Решение проблем
● Загрузка обновлений ПО и микропрограммы
● Участие в форумах технической поддержки
● Поиск гарантийной информации и регламентирующих сведений
Значки предупреждений
Если вы видите на принтере HP значок предупреждения, обратите на него внимание и соблюдайте
осторожность.
● Осторожно! Поражение электрическим током
RUWW 1

● Осторожно! Горячая поверхность
● Осторожно! Не допускайте сближения частей тела с подвижными частями
● Осторожно! Острые края в непосредственной близости
● Предупреждение
Опасность поражения электрическим током
Ознакомьтесь с важной информацией по технике безопасности.
2 Глава 1 Общие сведения о принтере RUWW

● Внимательно ознакомьтесь со следующими инструкциями, чтобы избежать опасности поражения
электрическим током.
● При использовании данного устройства всегда соблюдайте базовые меры безопасности, чтобы
уменьшить риск получения травмы из-за возгорания или удара электрическим током.
● Внимательно ознакомьтесь со всеми инструкциями в данном руководстве пользователя.
● Обращайте внимание на все предупреждения и инструкции, указанные на устройстве.
● Для подключения устройства к источнику питания используйте только заземленную электрическую
розетку. Если вы не знаете, заземлена ли розетка, обратитесь к квалифицированному электрику.
● Не прикасайтесь к контактам разъемов на устройстве. Немедленно заменяйте поврежденные кабели.
● Перед очисткой отключайте устройство от электрической розетки.
● Не устанавливайте и не используйте данное устройство вблизи воды и не трогайте его влажными
руками.
● Надежно установите устройство на устойчивую поверхность.
● Установите устройство в защищенном месте, где никто не наступит на шнур питания и не споткнется
об него.
Лицензия на ПО с открытым исходным кодом
Для получения сведений о программном обеспечении с открытым исходным кодом, используемом в
данном принтере, перейдите по адресу www.hp.com/software/opensource.
RUWW Лицензия на ПО с открытым исходным кодом 3
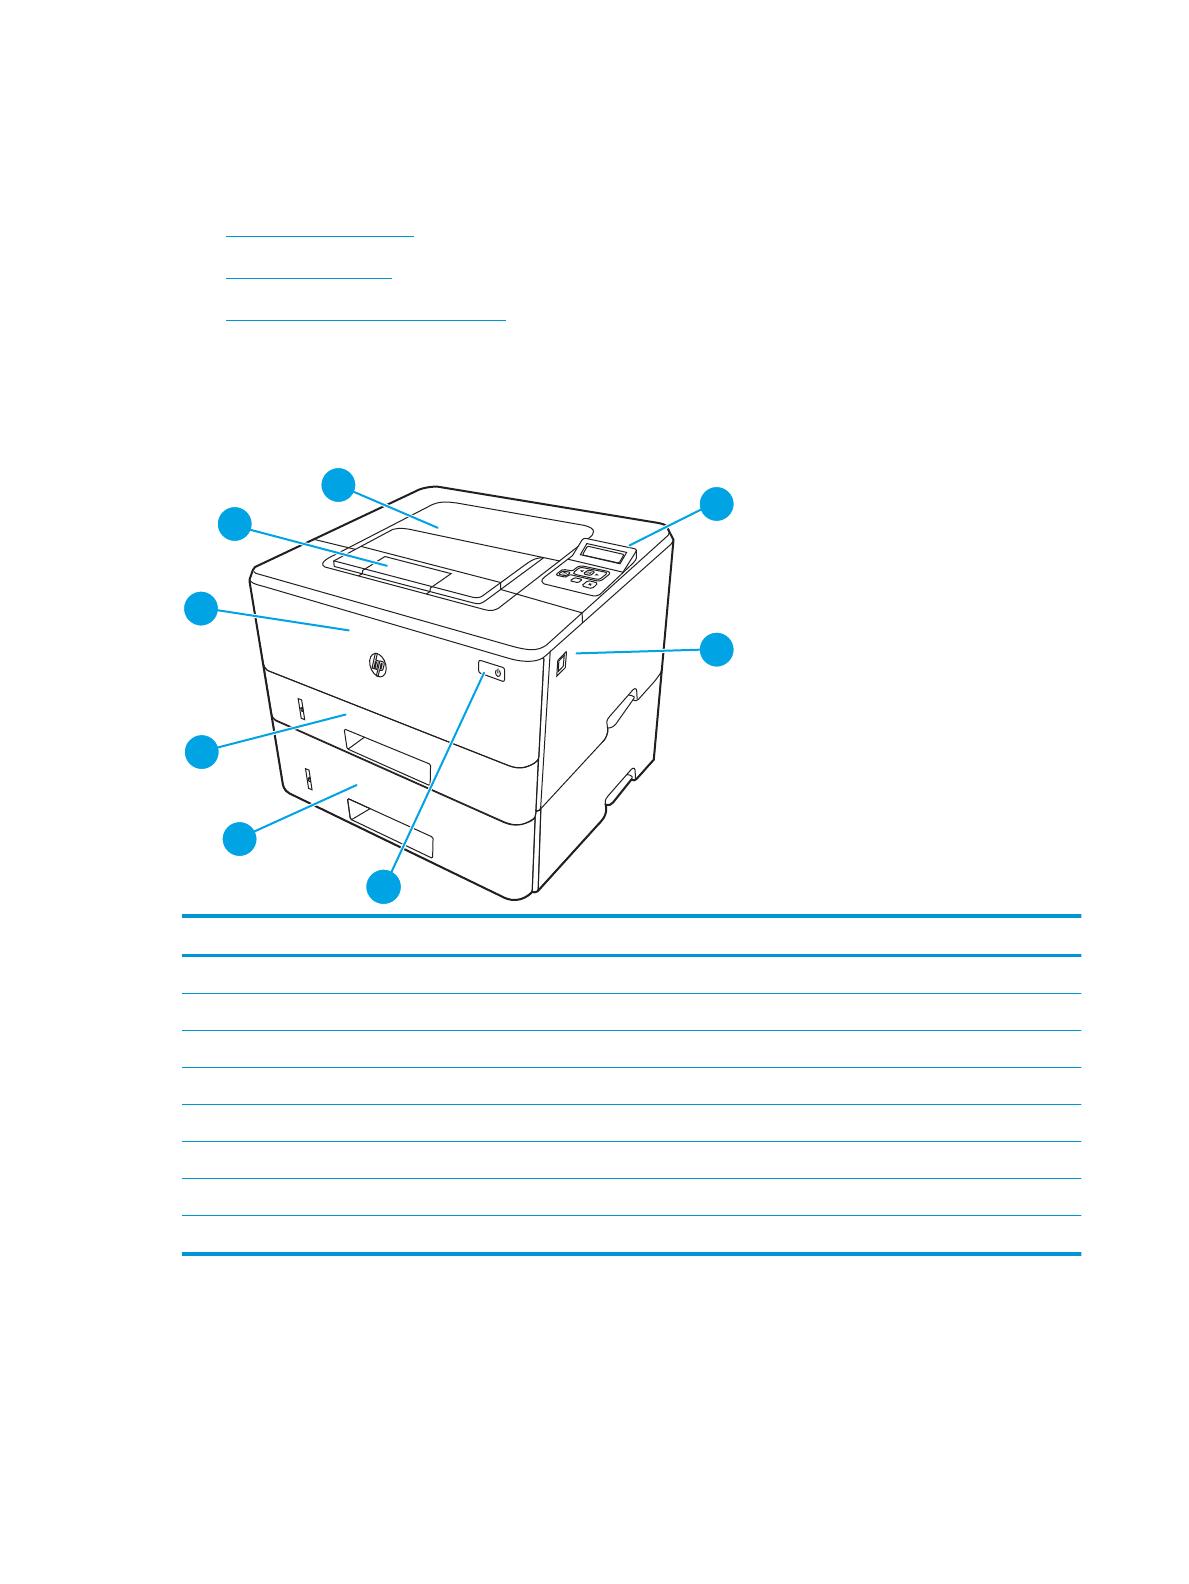
Внешний вид принтера
Ознакомьтесь с расположением отдельных компонентов принтера и кнопок на панели управления.
●
Вид принтера спереди
●
Вид принтера сзади
●
Внешний вид панели управления
Вид принтера спереди
Ознакомьтесь с расположением компонентов на передней стороне принтера.
Рисунок 1-1 Вид принтера спереди
Номер Описание
1 2-строчная панель управления с подсветкой экрана
2 Кнопка открытия передней дверцы (доступ к картриджу с тонером)
3 Кнопка вкл./выкл. питания
4 Лоток 3 (дополнительно)
5 Лоток 2
6 Лоток 1
7 Удлинитель выходного лотка
8 Выходной лоток
Вид принтера сзади
Ознакомьтесь с расположением компонентов на задней панели принтера.
4 Глава 1 Общие сведения о принтере RUWW

Рисунок 1-2 Вид принтера сзади
Номер Описание
1 Порт USB (для хранения заданий и печати личных заданий)
ПРИМЕЧАНИЕ. Порт может быть с заглушкой.
2 Интерфейсный порт USB
3 Порт Ethernet (только для сетевых моделей)
4 Разъем питания
5 Лоток 3 (дополнительно)
ПРИМЕЧАНИЕ. Лоток 3 выступает, когда загружен формат бумаги Legal или A4.
6 Пылезащитная крышка для лотка 2
ПРИМЕЧАНИЕ. Пылезащитная крышка откидывается вверх, когда загружен формат бумаги Legal или A4.
7 Этикетка с серийным номером и кодом продукта
8 Задняя дверца (доступ для устранения замятий)
Внешний вид панели управления
Ознакомьтесь с расположением кнопок и индикаторов на панели управления принтера.
RUWW Внешний вид принтера 5
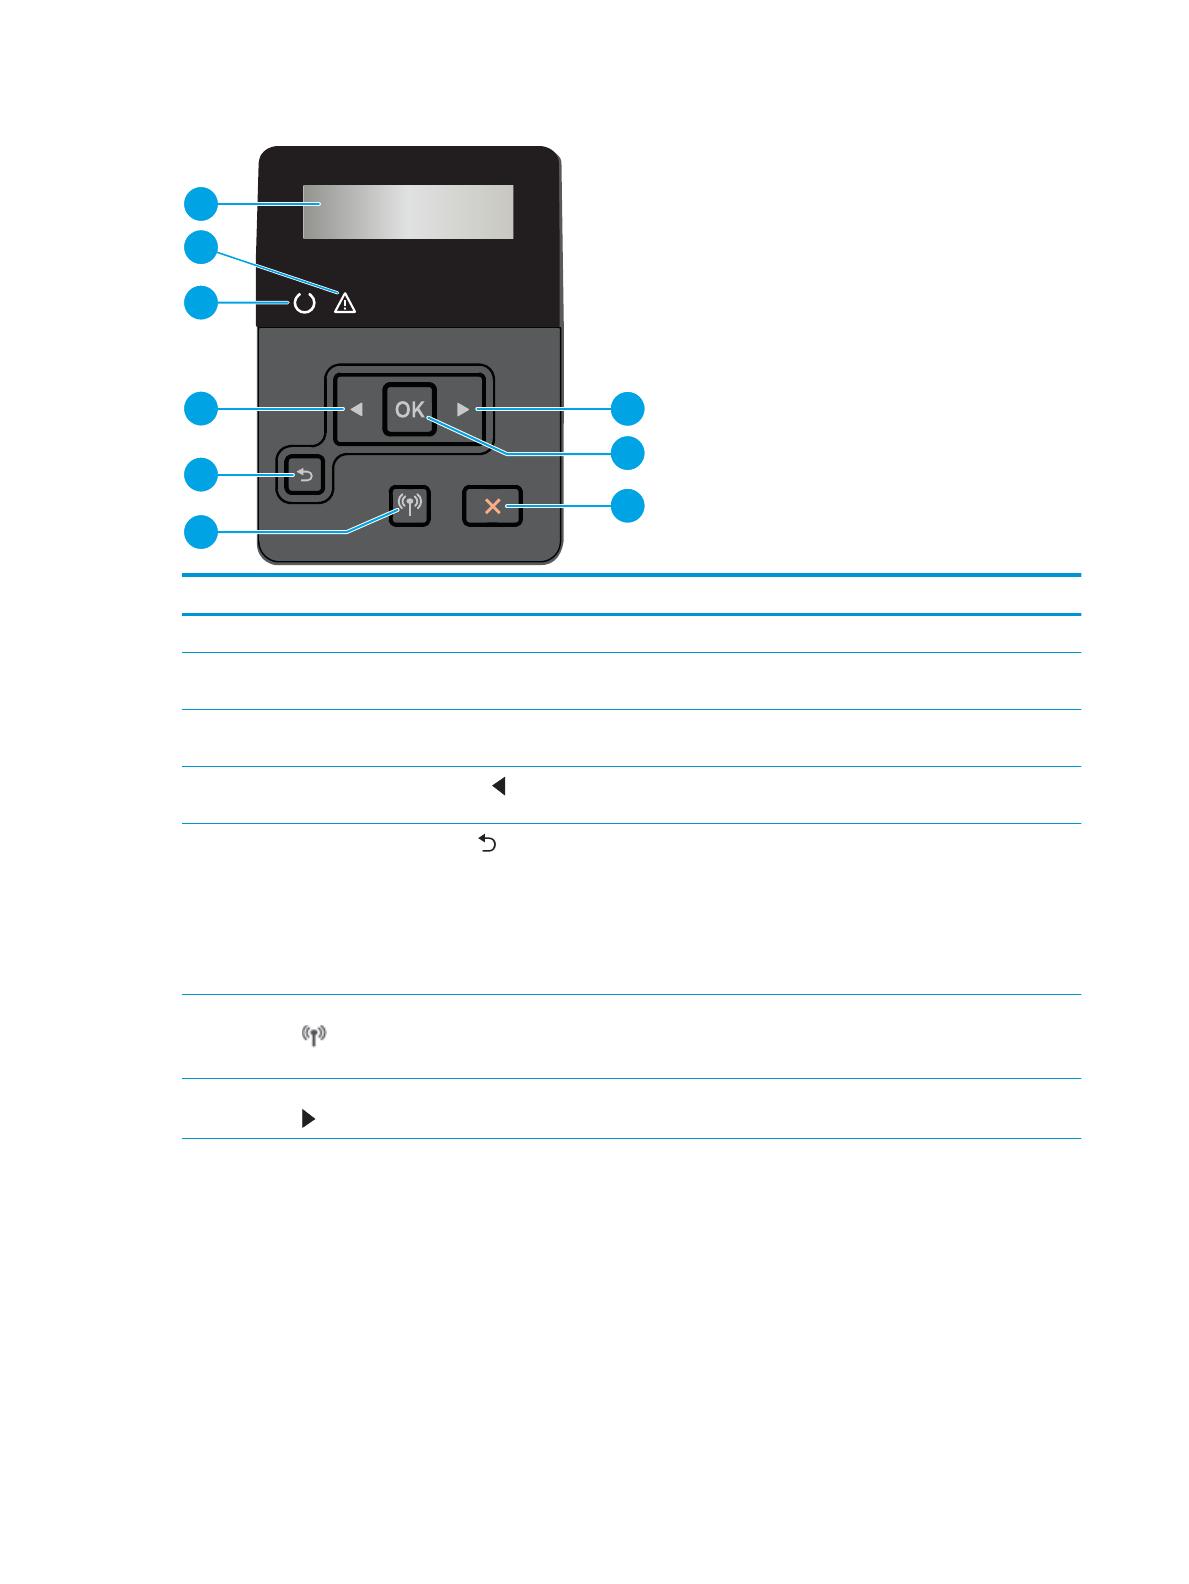
Рисунок 1-3 Панель управления принтера
Номер Позиция Описание
1 Дисплей панели управления На этом дисплее отображается меню и сведения о принтере.
2 Индикатор «Внимание»
(янтарный)
Этот индикатор мигает, когда требуется вмешательство пользователя.
3 Индикатор «Готов» (зеленый) Этот индикатор горит, когда принтер готов к печати. Мигает, если принтер
принимает данные для печати.
4
Клавиша со стрелкой влево
Эта кнопка используется для навигации по меню или для уменьшения значения,
отображаемого на экране.
5
Кнопка со стрелкой назад
Используйте эту кнопку для выполнения следующих действий:
● Выход из меню панели управления.
● Переход к предыдущему меню в списке подменю.
● Переход к предыдущему пункту меню в списке подменю (без сохранения
изменений, внесенных с помощью данного элемента меню).
6 Кнопка «Беспроводная связь»
(только на беспроводных
моделях)
Этой кнопкой открывается меню беспроводного соединения.
7 Клавиша со стрелкой вправо Эта кнопка используется для навигации по меню или для увеличения значения,
отображаемого на экране.
6 Глава 1 Общие сведения о принтере RUWW

Номер Позиция Описание
8 Кнопка OK Кнопка OK используется для следующих действий:
● Открытие меню панели управления
● Открытие подменю, которое отображается на экране панели управления.
● Выбор пункта меню.
● Сброс ошибок.
● Запуск задания на печать в ответ на запрос на панели управления
(например, при появлении на панели управления сообщения Для
продолжения нажмите [OK]).
9
Кнопка «Отмена»
Нажмите эту кнопку, чтобы отменить задание на печать или для выхода из меню
панели управления.
RUWW Внешний вид принтера 7

Технические характеристики принтера
Ознакомьтесь с техническими характеристиками оборудования и программного обеспечения, а также
требованиями к внешним условиям эксплуатации принтера.
●
Технические характеристики
●
Поддерживаемые ОС
●
Решения для мобильной печати
●
Размеры принтера
●
Энергопотребление, электротехнические характеристики и акустическая эмиссия
●
Условия эксплуатации
ВАЖНО! Следующие технические характеристики точны на момент публикации, но они могут
изменяться. Дополнительные сведения см. в разделе www.hp.com/support/ljM304 или www.hp.com/
support/ljM404.
Технические характеристики
Ознакомьтесь с техническими характеристиками принтера.
Актуальная информация доступна по адресу www.hp.com/support/ljM304 или www.hp.com/support/ljM404.
Поддерживаемые ОС
Следующая информация относится к драйверам печати Windows и драйверам конкретных принтеров HP
для macOS, а также к установщику программного обеспечения.
Windows: Установщик программного обеспечения HP устанавливает драйвер PCL 6 V3 или V4 в
зависимости от операционной системы Windows, а также дополнительное программное обеспечение, при
использовании полной версии установщика программного обеспечения. Дополнительные сведения см. в
примечаниях по установке ПО.
macOS: В данном принтере есть поддержка для компьютеров Mac. Загрузите приложение HP Easy Start с
веб-сайта 123.hp.com/LaserJet или со страницы службы поддержки принтеров, после чего воспользуйтесь
им для установки драйвера печати HP. HP Easy Start не входит в комплект установщика программного
обеспечения.
1. Перейдите на сайт 123.hp.com/LaserJet.
2. Выполните указанные действия для загрузки программного обеспечения принтера.
Linux. Для получения информации и драйверов печати для ОС Linux перейдите по адресу www.hp.com/go/
linuxprinting.
UNIX. Для получения информации и драйверов печати для UNIX перейдите по адресу www.hp.com/go/
unixmodelscripts.
8 Глава 1 Общие сведения о принтере RUWW

Таблица 1-1 Поддерживаемые драйверы печати и операционные системы
Операционная система Драйвер печати установлен (с помощью веб-средства
установки)
Windows 7, 32- и 64-разрядные версии Драйвер печати HP PCL 6 (V3) для конкретного принтера
устанавливается для данной ОС в процессе установки
программного обеспечения.
Windows 8, 32- и 64-разрядные версии Драйвер печати HP PCL 6 (V3) для конкретного принтера
устанавливается для данной ОС в процессе установки
программного обеспечения.
1
Windows 8.1, 32- и 64-разрядные версии Драйвер печати HP PCL-6 (V4) для конкретного принтера
устанавливается для данной ОС в процессе установки
программного обеспечения.
2
Windows 10, 32- и 64-разрядные версии Драйвер печати HP PCL-6 (V4) для конкретного принтера
устанавливается для данной ОС в процессе установки
программного обеспечения.
Windows Server 2008 R2, 64-разрядная версия Драйвер печати HP PCL 6 (V3) для конкретного принтера
доступен для загрузки с веб-сайта поддержки принтера.
Загрузите драйвер и используйте функцию Microsoft «Добавить
принтер» для его установки.
3
Windows Server 2008 R2, SP1, 64-разрядная версия Драйвер печати HP PCL 6 (V3) для конкретного принтера
доступен для загрузки с веб-сайта поддержки принтера.
Загрузите драйвер и используйте функцию Microsoft «Добавить
принтер» для его установки.
Windows Server 2012 Драйвер печати HP PCL 6 (V3) для конкретного принтера
доступен для загрузки с веб-сайта поддержки принтера.
Загрузите драйвер и используйте функцию Microsoft «Добавить
принтер» для его установки.
Windows Server 2012 R2 Драйвер печати HP PCL 6 (V3) для конкретного принтера
доступен для загрузки с веб-сайта поддержки принтера.
Загрузите драйвер и используйте функцию Microsoft «Добавить
принтер» для его установки.
Windows Server 2016, 64-разрядная версия Драйвер печати HP PCL 6 (V3) для конкретного принтера
доступен для загрузки с веб-сайта поддержки принтера.
Загрузите драйвер и используйте функцию Microsoft «Добавить
принтер» для его установки.
macOS Sierra v10.12, macOS High Sierra v10.13, macOS
Mojave v10.14
Чтобы установить драйвер печати, загрузите приложение
HP Easy Start с веб-сайта 123.hp.com/LaserJet. Выполните
указанные действия, чтобы установить ПО принтера и драйвер
печати.
1
Поддержка Windows 8 RT обеспечивается с помощью 32-разрядного драйвера из состава ОС Microsoft версии 4.
2
Поддержка Windows 8.1 RT обеспечивается с помощью 32-разрядного драйвера из состава ОС Microsoft версии 4.
3
Компания Microsoft прекратила предоставление базовой поддержки для Windows Server 2008 в январе 2015 г. Компания HP
продолжит предоставление негарантированной поддержки ОС Server 2008.
ПРИМЕЧАНИЕ. Для поддерживаемых в настоящее время ОС на сайте www.hp.com/support/ljM304 или
www.hp.com/support/ljM404 можно получить исчерпывающие сведения по принтеру HP.
RUWW Технические характеристики принтера 9

Таблица 1-2 Минимальные системные требования
Windows 7, 8, 8.1, 10 macOS Sierra v10.12, macOS
High Sierra v10.13, macOS
Mojave v10.14
Мобильные устройства, iOS,
Android
● 32- или 64-разрядная
версия
● 2 ГБ свободного места на
жестком диске
● Microsoft Internet Explorer
● Интернет-подключение
● порт USB
● 2 ГБ свободного места на
жестком диске
● Интернет-подключение
Подключение к
маршрутизатору не требуется
www.hp.com/go/mobileprinting
Решения для мобильной печати
У компании HP есть несколько решений мобильной печати и печати через службу ePrint для удобной
печати на любом принтере HP с ноутбука, планшетного ПК, смартфона или другого мобильного
устройства.
Ознакомиться с полным списком и определиться с выбором можно на сайте www.hp.com/go/MobilePrinting.
● Bluetooth с низким энергопотреблением
● Приложение HP Smart для устройств iOS и Android
● Виртуальный принтер Google
● AirPrint
● Печать в Android
● HP Roam
Размеры принтера
Убедитесь, что размеры среды принтера достаточно большие, чтобы вместить принтер.
10 Глава 1 Общие сведения о принтере RUWW