
Хочу поделится, решением проблемы не запуска игры VICTORIA 3 по причине не поддержки процессорам AVX инструкций.

Перевод с английского
Добрый день,
Разработчики изучают это в данный момент, так как я не думаю, что это сделано намеренно. Я знаю, что у нас была эта проблема с CKIII, и она была исправлена через день или два, поэтому, надеюсь, здесь будет то же самое, хотя я не могу сказать наверняка. Единственные инструкции, которые я нашел до сих пор, — это приведенные ниже.
1. Загрузите эмулятор Intel® Software Development Emulator v9. 2. Установите Winzip, чтобы извлечь загруженный файл с расширением .win.tar.xy.
3. Переместил извлеченную папку в c:\sde\
4. Открыта командная строка cmd и изменена на c:\sde (я использовал командную строку администратора… запуск от имени администратора)
5. Введите: sde.exe -cpx «C:\Program Files (x86)\Steam\steamapps\common \Victoria 3\binaries\victoria3.exe»
6. Долго ждал
7. Обнаружено, что работающее приложение Victoria3 свернуто на панели задач. Открыл. Некоторые меню работают быстро, а некоторые медленно.
8. Установил программу на более новый компьютер.
Способ рабочий проверил, но игра сильно тормоз, у меня, буду ждать нормальной версии, без данной проблемы (наличия AVX инструкций).
I just bought myself the Logitech Brio. in order to put the background changing options to use I tried to download ChromaCam’s software. When I tried to install it, I get a message that my CPU does not support the AVX instruction set.
I’m running Intel core 2 Duo T7250 @2.0 GHZ 64-bit os X64 base processor. Besides getting new hardware, what can I do to get around this problem? I am using Windows 10.
asked Sep 30, 2017 at 17:37
1
I tried to install Chromacam, I get a message that my CPU does not support AVX
The Intel core 2 Duo T7250 chip does not support AVX.
You can either:
-
Replace your CPU or
-
Use some other software (not Chromacam) that doesn’t require ATX to configure your Logitech Brio background options.
answered Sep 30, 2017 at 17:56
DavidPostill♦DavidPostill
162k78 gold badges371 silver badges412 bronze badges
3
You must log in to answer this question.
Start asking to get answers
Find the answer to your question by asking.
Ask question
Explore related questions
See similar questions with these tags.
Enabling AVX support in Windows 10 lets your computer handle more advanced processing tasks, like running certain applications or games that require these instructions. To enable AVX, you’ll need to check if your CPU supports it and then ensure it’s enabled in your BIOS/UEFI settings.
In this tutorial, you’ll learn how to check if your processor supports AVX and how to enable it if it’s not already enabled. These steps are straightforward and don’t require any advanced technical skills.
Step 1: Check CPU Compatibility
First, check if your CPU supports AVX instructions.
Open the Command Prompt and type “wmic cpu get caption, deviceid, name, numberofcores, maxclockspeed, status”. This command will display details about your CPU. Look for the model and search online to verify if it supports AVX.
Step 2: Access BIOS/UEFI Settings
Restart your computer and enter the BIOS/UEFI settings.
To enter your BIOS/UEFI, you usually press a key like F2, F10, DEL, or ESC during the startup process. The exact key depends on your motherboard manufacturer.
Step 3: Locate the CPU or Advanced Settings
Navigate to the CPU or Advanced settings tab in BIOS/UEFI.
In most BIOS/UEFI interfaces, you will find the CPU settings under an “Advanced” tab. Look for a section that mentions CPU features.
Step 4: Enable AVX Support
Find the AVX option and enable it.
Look for an option labeled “AVX” or “Advanced Vector Extensions”. If it’s set to “Disabled”, change it to “Enabled”.
Step 5: Save and Exit BIOS/UEFI
Save your settings and exit the BIOS/UEFI.
Usually, pressing F10 will save your changes and restart your computer. Your BIOS/UEFI interface will likely confirm that you want to save and exit.
After completing these steps, your computer should now have AVX support enabled. This will allow you to run applications and games that require these instructions.
Tips for How to Enable AVX Support in Windows 10
- Check CPU documentation: Always check your CPU documentation or manufacturer’s website for AVX support details.
- Perform a BIOS update: If you can’t find the AVX setting, consider updating your BIOS.
- Backup settings: Before making changes in BIOS, note down the current settings as a backup.
- Avoid overclocking conflicts: Overclocking can sometimes disable AVX, so ensure there’s no conflict between settings.
- Use system information tools: Tools like CPU-Z can also help verify if your CPU supports AVX.
Frequently Asked Questions
What is AVX?
AVX stands for Advanced Vector Extensions. It’s a set of instructions for doing complex mathematical calculations, primarily used in applications like scientific simulations, 3D modeling, and gaming.
How do I know if my CPU supports AVX?
You can check your CPU’s specifications on the manufacturer’s website or use command-line tools like WMIC in Windows.
Can enabling AVX cause issues?
Typically, enabling AVX won’t cause issues, but incorrect BIOS/UEFI settings can. Always ensure you change settings carefully.
Why isn’t AVX enabled by default?
Some BIOS/UEFI versions might have AVX disabled to maintain compatibility with older software or hardware. Enabling it can sometimes resolve issues with newer applications.
Is it safe to update BIOS/UEFI?
Yes, but follow the manufacturer’s instructions carefully. Incorrect updates can potentially harm your system.
Summary
- Check CPU compatibility.
- Access BIOS/UEFI settings.
- Locate the CPU or Advanced Settings.
- Enable AVX support.
- Save and exit BIOS/UEFI.
Conclusion
Enabling AVX support in Windows 10 is a simple process, but it’s essential to ensure your CPU supports these instructions before making any changes. By following the steps outlined, you can unlock the full potential of your processor, allowing it to handle more advanced tasks efficiently.
Whether you’re a gamer, a developer, or someone who uses heavy applications, enabling AVX can provide a noticeable boost in performance. Always double-check your settings, back up your configurations, and consult your CPU documentation if you’re unsure.
Should you encounter any issues, the tips and FAQs provided will help you troubleshoot common problems. Now that you know how to enable AVX support, take the plunge and optimize your system for better performance!
Matt Jacobs has been working as an IT consultant for small businesses since receiving his Master’s degree in 2003. While he still does some consulting work, his primary focus now is on creating technology support content for SupportYourTech.com.
His work can be found on many websites and focuses on topics such as Microsoft Office, Apple devices, Android devices, Photoshop, and more.
From Wikipedia, the free encyclopedia #
Advanced Vector Extensions (AVX) are extensions to the x86 instruction set architecture for microprocessors from Intel and Advanced Micro Devices(AMD). They were proposed by Intel in March 2008 and first supported by Intel with the Sandy Bridge[1] processor shipping in Q1 2011 and later by AMD with the Bulldozer[2] processor shipping in Q3 2011. AVX provides new features, new instructions and a new coding scheme.
In more simple words, AVX is a feature, called “instruction set” , that allows compatible processors to perform more demanding functions with compatible software.
This instruction set is an Hardware feature: that means that it is not possible to perform an upgrade or an update to introduce this feature if your CPU doesn’t support it.
Since 2008, most of “Intel Core” CPU and “AMD Ryzen” models supports AVX.
Anyway, still in 2023, some lighter CPU models, like Intel Pentium, Intel Celeron and other AMD Athlon models (that are lighter CPUs for mobile applications) does not support AVX.
What does that mean for DJUCED ? #
DJUCED (5 or higher) require a CPU that supports the AVX instruction set.
If your computer contains an older CPU without this feature, it is possible that DJUCED will not be able to install, or will not launch once installed.
When you launch DJUCED on a CPU that doesn’t support AVX, you will see this error message :
The application was unable to start correctly (0xc0000142).
How can I know that my processor (CPU) supports AVX ?
#
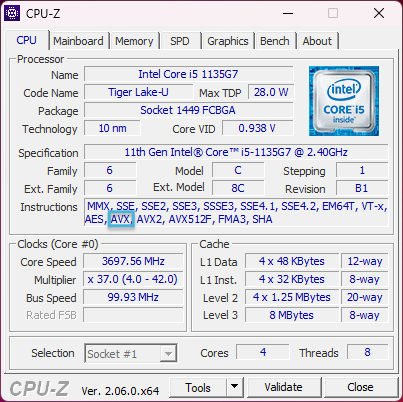
The best way to check AVX support is to use a third-party software, like the free CPU-Z.
This software will scan your computer and provide you precise information about your computer components. (CPU Model, Mainboard, Memory etc.)
On the first tab (CPU), “AVX” will appear in the “Instructions” category. (see pic.)
My CPU doesn’t support AVX, what is the latest version of DJUCED can I use ? #
DJUCED 5 was not supposed to work on CPUs that doesn’t support AVX.
Anyway some systems can handle it.
We invite you to try and test a DJUCED 5 version from our archives page.
Note that each archived versions shows you the compatible controllers.
Stems 2.0 with DJUCED 6.2My M4A and AAC files volume are too low on Windows 11 (update 22H2), what can I do ?