
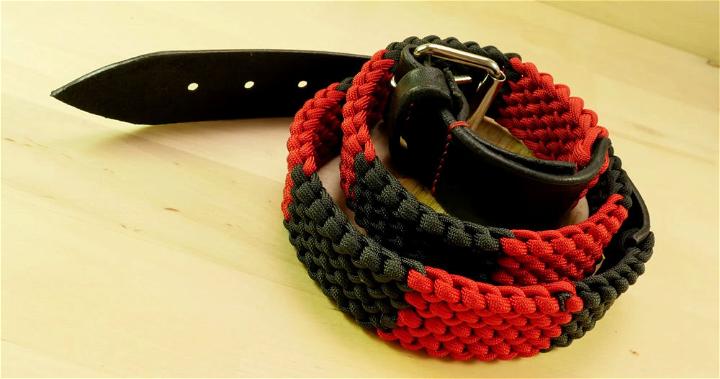
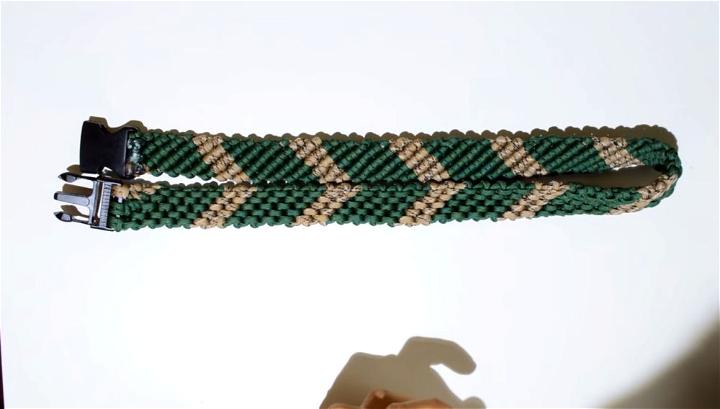
Долго я бился головой об стенку, придумывая как сплести ремень, да не абы какой, а узкий, чтобы вмещался в пряжку с отверстием 2 см. Было много вариантов, но не все нравились заказчику.
И вот… тадааамм! Просматривая в очередной раз книгу «Paracord fusion ties» (переводится дословно как «Парашютные слияния»), наткнулся на плетение «Endless falls» (иначе как «Водопад»), и подумал, не увеличить ли мне ширину до необходимой, добавлением одного отрезка верёвки?! Попробовал на коротких отрезках — канает! Подготовил заказчику несколько вариантов и отправил…
Был выбран 3-тий вариант. Ну что-же, приступим!
1) Сначала отрезаем паракорд (желательно чуть больше чем нужно), два куска одинаковой длины (для ремня в 80 сантиметров я брал два куска по 8 метров, ещё и осталось) и один кусок поменьше (для того же ремня я брал отрезок 5 метров и тоже осталось немного). Если проще, то для двух кусков взять длину ремня, умноженную на десять, а для третьего длину ремня, умноженную на 6 (если уверены, что всё будет ок) или на 6,25 (как собственно я и сделал).
2) Закрепляем верёвки на нашей пряжке вот таким образом. У двух длинных отрезков найдите середины и закрепляйте за них.
3) Берём нашу пряжку, поворачиваем лицевой стороной вниз и зажимаем её где-нибудь покрепче. В моём случае очень удобно получилось зажать с помощью ящика в столе.
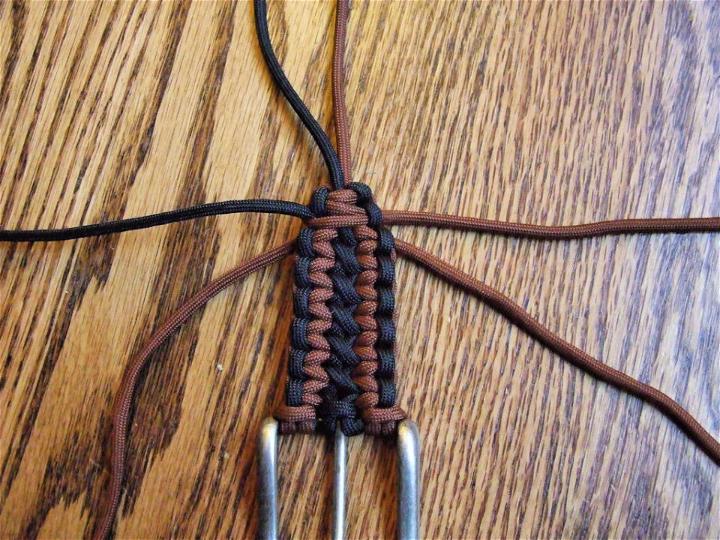
4) Начинаем плести (фото делал не с начала ремня, но плетётся всё одинаково):
А) Перекрещиваем концы поперечной верёвки. Обратите внимание на то, какой конец сверху, так дальше и продолжайте (т.е. если снизу левый, а сверху правый, то так и делаем всё плетение, иначе криво будет выглядеть).
Б) Перекидываем концы продольных (их у нас 4) через перекрещенные концы поперечной. Те, что слева, перекидываем налево от них самих, а правые вправо от них, по фото, я думаю, будет понятно. Для удобства, я собрал концы продольных отрезков в моточки.
В) Затягиваем. Сначала подтяните поперечные концы, затем продольные, и так несколько раз. Чтобы ремень был одной ширины (2 см) нужно затягивать до определённого момента, воспользуйтесь линейкой. Получающиеся «столбики» должны занимать 16-17мм, не больше.
5) Повторяем пункт 4 до нужной нам длины ремня.
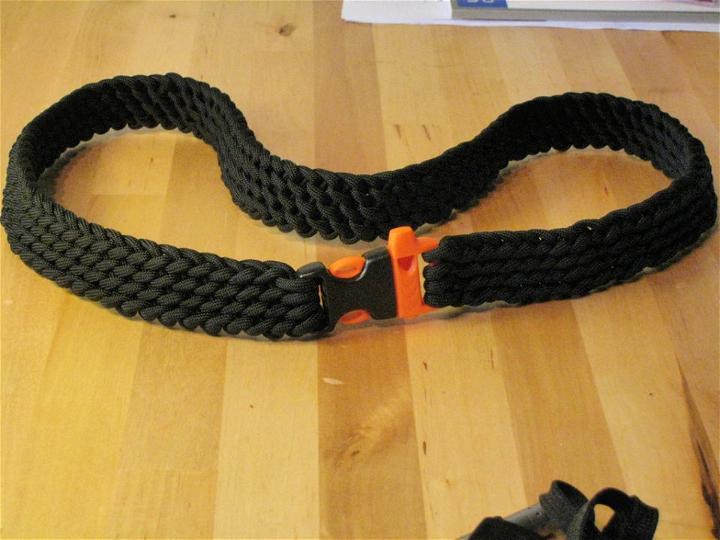
6) Завершаем ремень. Поперечные обрезаем и оплавляем. С оставшимися продольными делаем вот что: крайние перекрещиваем, центральные перекидываем так же, как и в основном плетении, подтягиваем. Обрезаем сначала поперечные и оплавляем, затем продольные.
В итоге получаем вот такой ремешок.
Благодарю за прочтение! Желаю всем удачи в творчестве!
Постила
Что такое Постила О нас Блог Постила ВКонтакте Кнопка «Пост!»
Новые посты Новые доски Открытки
Рецепты Aрхив
Категории Темы Теги Лучшее на Постиле
Рекламодателям
Помощь Правила
Пользовательское соглашение
I once needed a belt that was both strong and could hold up my gear during hikes. That’s when I discovered paracord belts. Making my first paracord belt was quite an adventure. I chose a simple design and got to work. It was easier than I thought, and the end result was not only practical but also looked great. This project sparked my interest in DIY and showed me how rewarding crafting can be.
After that first belt, I couldn’t stop. I tried out different patterns, mixing colors and techniques. Each belt was unique and taught me something new. The process was full of trial and error, but it was always fun. Plus, wearing something I made myself was incredibly satisfying. I realized that with a little patience and simple instructions, anyone could make these belts.
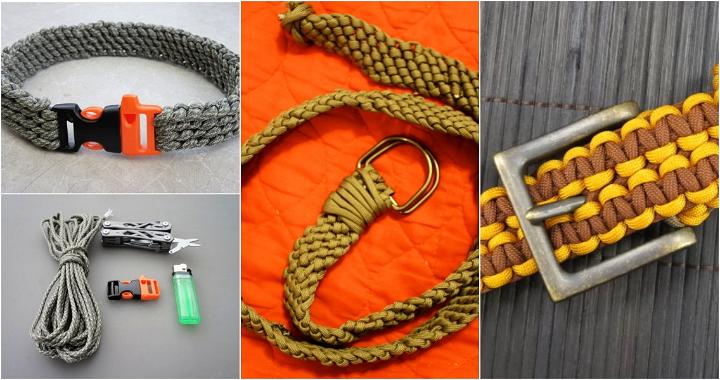
I’m excited to share these 25 DIY paracord belt patterns with you. They come with easy instructions to help get you started on this creative journey. Trust me, it’s a rewarding experience that offers more than just a belt; it’s a way to express your style and learn a handy skill.
1. Make Your Own Paracord Survival Belt
Making your own paracord survival belt can be a rewarding project. Not only does it offer a customized fit, but it also ensures you have a sturdy and reliable piece of survival gear. This innovative design promises durability and practicality, making it a must-have for outdoor adventures.
2. How to Make a Paracord Rescue Belt
A paracord rescue belt is not just a fashion statement; it’s a potential lifesaver. The integration of a strong, versatile cord into a wearable belt gives you quick access to crucial survival tool in emergencies. Its clever design marries functionality with style, ideal for those who love to be prepared.
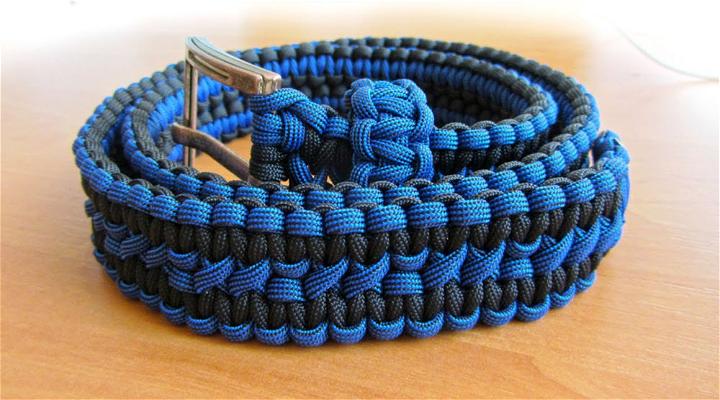
3. DIY Paracord Belt with Buckle
Building a DIY paracord belt with a buckle combines craftsmanship with utility. This project allows for personal expression through a variety of buckles and colors, resulting in a practical accessory that’s uniquely yours. The addition of a buckle enhances ease of use, making it a smart choice for everyday wear.
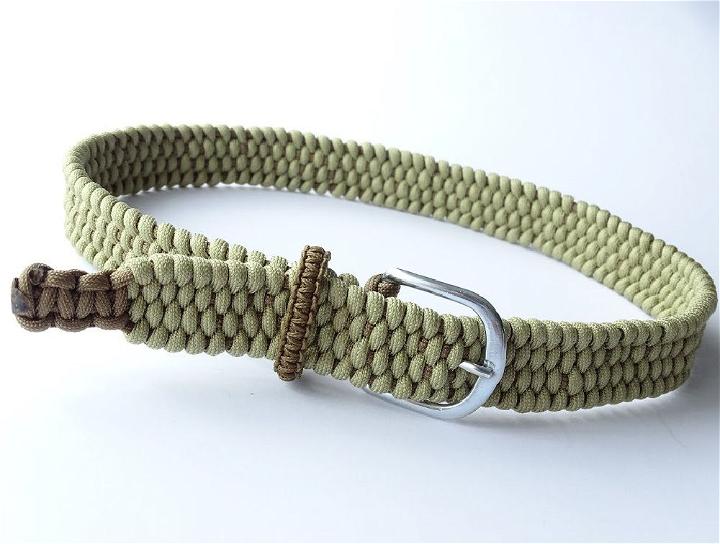
4. Easy Woven Paracord Belt
The easy woven paracord belt is a great beginner project. Simple techniques lead to a product that feels both casual and reliable, perfect for daily use or as a dependable piece of outdoor gear. Its woven design not only looks great but also ensures a comfortable fit.
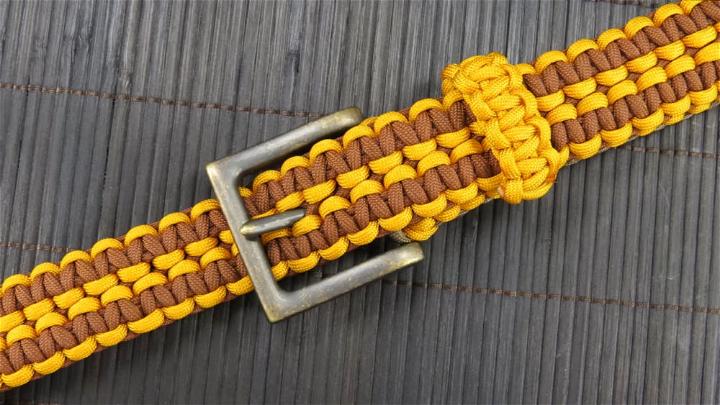
Constructing a paracord belt with a metal buckle step by step is a fulfilling endeavor. The metal buckle adds a touch of elegance and extra durability to your creation. This comprehensive guide ensures that even those new to crafting can achieve a sophisticated and sturdy accessory.
6. Paracord Belt Pattern
Exploring different paracord belt patterns unlocks a world of creativity. Each pattern offers its unique flair and advantages, allowing you to tailor your belt to your specific needs and style preferences. From sleek and simple to intricate designs, the possibilities are endless.
7. Double Cobra Stitch Paracord Belt Instructions
Learning the double cobra stitch for a paracord belt brings your craft to a new level. This method results in a thicker, more rugged belt, providing enhanced strength and a distinctive look. It’s perfect for those who demand a bit more from their gear.
8. Make a Paracord Belt
Embarking on making a paracord belt introduces you to the basics of DIY fashion. This simple project is a gateway to understanding the potential of paracord in making functional, stylish accessories. It’s a great starting point for anyone interested in crafting with paracord.
An easy DIY paracord belt project is a fantastic way to spend your afternoon. It’s astonishing how with just a few knots, you can make something both stylish and practical. This approach is perfect for crafting novices looking for a straightforward yet rewarding venture.
10. DIY Belt Out of Paracord
Making a belt out of paracord is not just about fashion; it’s about function. With its robust nature, this DIY belt can serve you well in a multitude of scenarios, from hiking to unexpected emergencies. Plus, it’s a fun way to repurpose paracord into something useful.
11. Unique DIY Paracord Belt
Designing a unique DIY paracord belt lets your creativity shine. This project encourages you to experiment with colors, textures, and patterns, resulting in a one-of-a-kind accessory that’s as functional as it is fashionable. It’s a great way to express your individual style while adding to your survival gear.
12. Making Paracord Belt with Carabiner Buckle
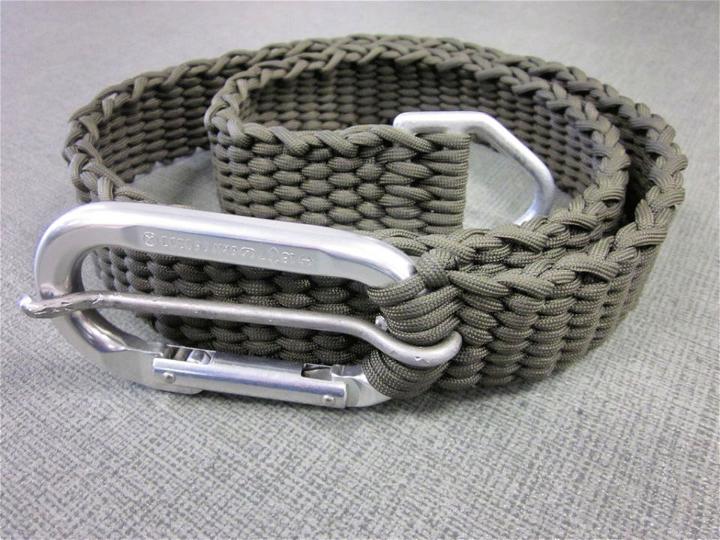
Making a paracord belt with a carabiner buckle merges innovation with practicality. The carabiner adds a multifunctional aspect, allowing you to easily attach gear or keys. This design not only looks cool but also enhances the belt’s utility, making it a favorite among outdoor enthusiasts.
13. 6 Strand Flat Braid Paracord Belt
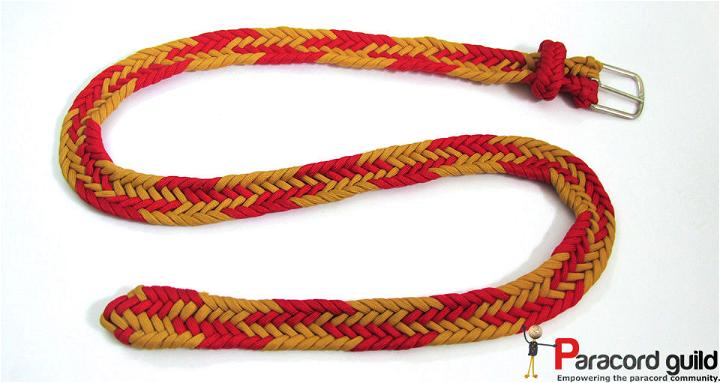
Weaving a 6-strand flat braid paracord belt is a rewarding challenge. This technique produces a sleek, tightly woven belt that’s not only eye-catching but also remarkably strong. It’s an excellent choice for those looking to elevate their paracord crafting skills while making something truly useful.
14. DIY Paracord Double Cobra Belt
A DIY Paracord Double Cobra Belt not only assures strength but also adds a rugged aesthetic to your wardrobe. The double cobra weave gives it extra durability and a distinctive look, making it a practical accessory for outdoor enthusiasts.
15. Simple Paracord Belt Patterns
Exploring Simple Paracord Belt Patterns is like opening a door to creativity. These patterns offer a straightforward approach to crafting a stylish and functional belt, perfect for those who appreciate handmade accessories with a personal touch.
16. Make a Woven Paracord Belt
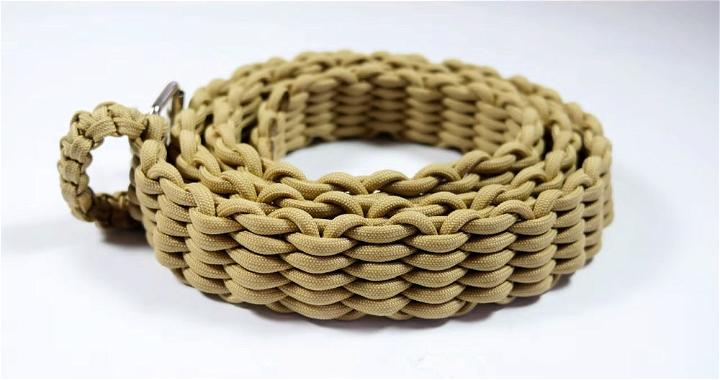
Making a Woven Paracord Belt can be as enjoyable as wearing it. The weaving technique adds flexibility and comfort, ensuring the belt fits snugly around your waist. It’s a great project for those who value both form and function in their gear.
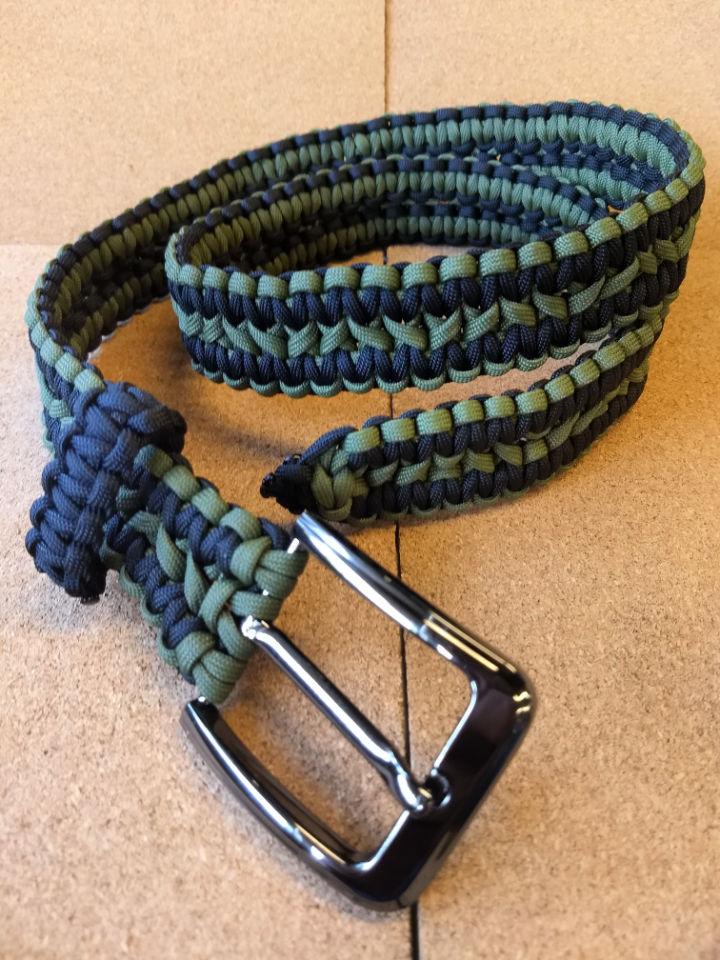
17. Black and Green Paracord Belt
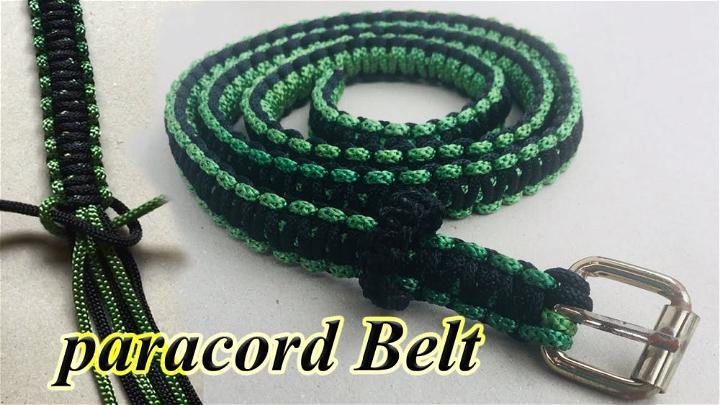
A Black and Green Paracord Belt stands out with its striking color combination. It’s not just visually appealing; the colors can be customized for personal or team identification, adding a layer of versatility to this durable accessory.
18. Wide Solomon Paracord Belt
The Wide Solomon Paracord Belt features a broad, intricate weave that offers exceptional strength and a bold look. Its design is not only practical for outdoor adventures but also adds a statement piece to casual attire.
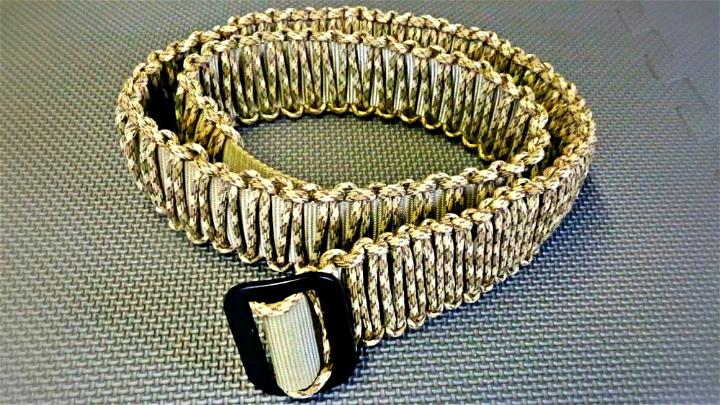
19. Ultamate Paracord Belt
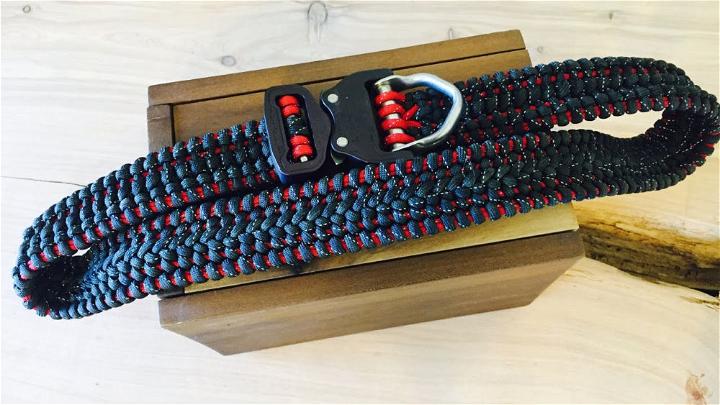
The Ultamate Paracord Belt brings ultimate durability and style to your accessory collection. Its robust design ensures longevity, making it an ideal choice for those who demand both resilience and fashion in their belts.
20. Conquistador Braid Paracord Belt
Making a Conquistador Braid Paracord Belt introduces an element of historical charm to your outfit. The unique braid pattern is not only visually captivating but also provides a sturdy and comfortable fit, blending tradition with practicality.
21. Easy DIY Paracord Belt Mod
An Easy DIY Paracord Belt Mod allows for quick customization and adjustment. This mod approach to belt-making is perfect for beginners looking to make a functional, stylish, and easily adaptable piece.
22. How to Braid a Paracord Belt

Learning How to Braid a Paracord Belt can unlock a new hobby while providing you with a versatile accessory. Braiding offers a hands-on experience in crafting a belt that’s as reliable in the wilderness as it is in casual settings.
23. Easy to Make Paracord Belt
Easy to Make Paracord Belt projects are perfect for DIY beginners. With minimal tools and simple instructions, you can make a functional, stylish belt that’s ready for any adventure or just a trip to the store.
24. Paracord Cobra Weave Belt Loop
The Paracord Cobra Weave Belt Loop adds not just function but flair to your belt. This specific weave enhances the belt’s strength and durability, making it a stylish choice for attaching tools or keys.
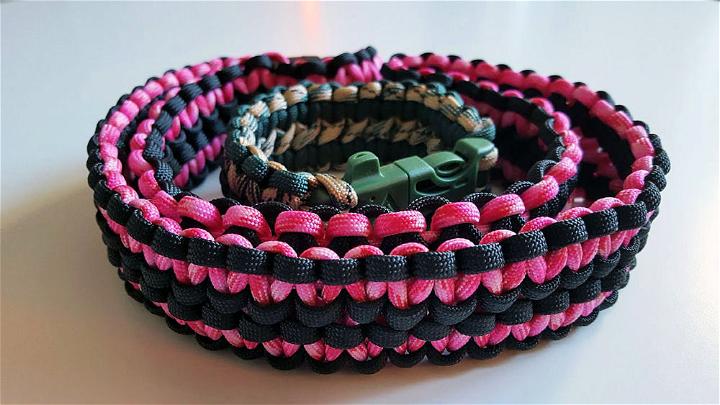
25. DIY Paracord Candy Belt
DIY Paracord Candy Belt brings a fun and colorful twist to traditional paracord projects. This sweet-looking belt is not only a great fashion statement but also retains all the practicality and durability of paracord accessories.
Related DIY Paracord Projects:
Explore creative paracord patterns and ideas for crafting stylish and useful accessories. Learn how to make keychains, belts, necklaces, lanyards and more with DIY paracord projects.
- Paracord Projects and Crafts: Discover creative paracord projects and craft ideas to make fun DIY gifts, ornaments, jewelry, and accessories. Get inspired with our step-by-step tutorials!
- Paracord Monkey Fist Patterns: Learn to craft eye-catching DIY paracord monkey fists with easy step-by-step instructions and clear diagrams. Get creative with these simple yet effective knotting patterns!
- Paracord Watch Band Projects: Make your own stylish DIY paracord watch bands with these projects! Learn how to make unique, custom designs and get creative with different colors and patterns.
- Snake Knot Paracord Projects: Create a unique piece of art with these easy DIY snake knot paracord tutorials! Learn to make an intricate weave that looks like a snake with step-by-step instructions.
- DIY Paracord Handle Wraps: Discover how to make stylish, durable DIY paracord handle wraps with easy-to-follow patterns. Learn the art of knotting, from basic designs to intricate customizations — effortless and stress-free!
- Paracord Dog Collar Patterns: Make custom dog collars with our handmade paracord dog collar patterns. Use your own colors and styles to make something special for your pup.
- DIY Paracord Dog Leash Patterns: Learn how to make your own custom DIY paracord dog leash in simple steps! These straightforward patterns are perfect for any skill level and are stylish and strong.
- DIY Paracord Bracelets: Learn how to make cool paracord bracelets with these free DIY patterns. Step-by-step instructions make learning how to make your own custom bracelet easy.
Conclusion:
Making these belts showed me the value of making something with my own two hands. It’s an enjoyable activity that results in a useful and stylish item. I encourage you to give it a try; these patterns are a great place to start. Who knows? It might open up a new world of DIY projects for you, just like it did for me.
Примерно с декабря прошлого года открыла для себя такое хобби как плетение из паракорда. (Вообще открыла еще раньше, просто в декабре пришел первый моток «веревки»).
Паракорд — это прочный нейлоновый трос из синтетических нитей в оболочке. При желании можете самостоятельно найти что это такое и какой он бывает. Я использую относительно дешевый китайский вариант данного троса (настоящий американский, как минимум в 2 раза дороже). Но для моих целей вполне сгодиться и этот: как парашютную стропу или альпинистскую веревку я его использовать не собираюсь, а для плетения браслетов и брелков самое оно.
Конечно, браслеты это вещь на любителя. Летом еще может можно надеть, но всё время носить… даже не знаю. Поэтому мне интересней было освоить что-нибудь такое, что имеет более практичное применение. После некоторых поисков инструкций в интернете и плетений браслетов, я сначала сплела ошейник и поводок для собаки. Получилось очень даже неплохо. Поэтому дождавшись, когда ко мне из Китая придут новые мотки корда, я взялась за плетение ремня.
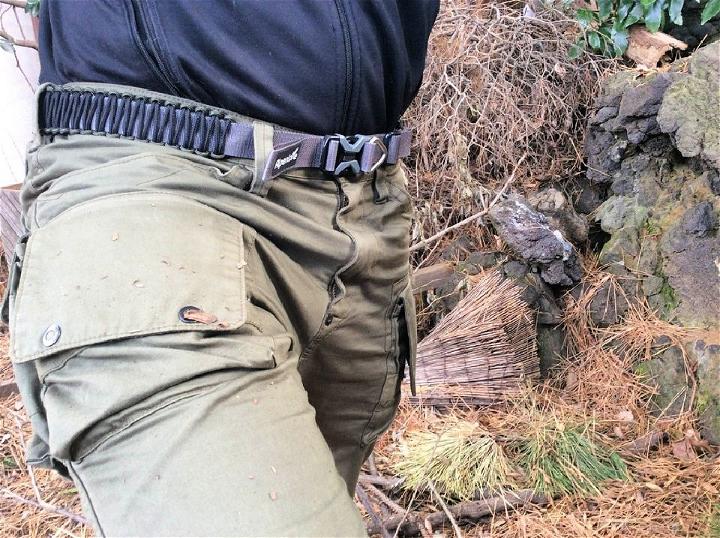
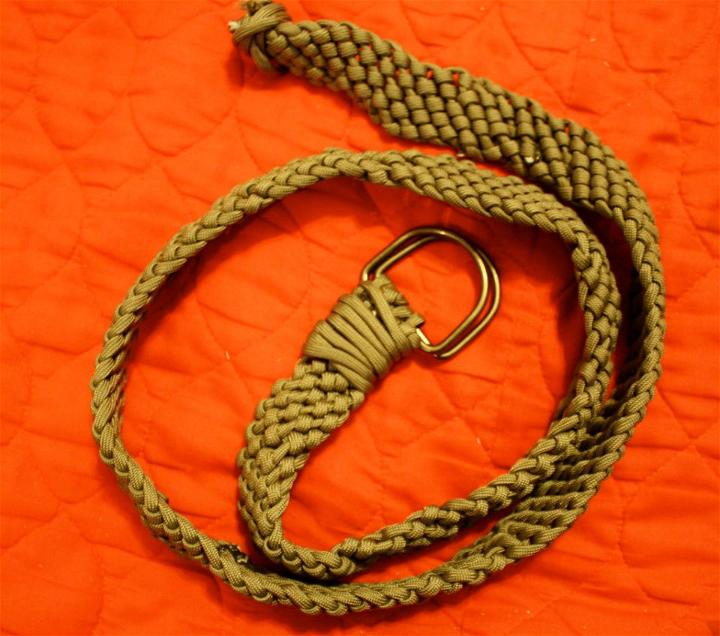
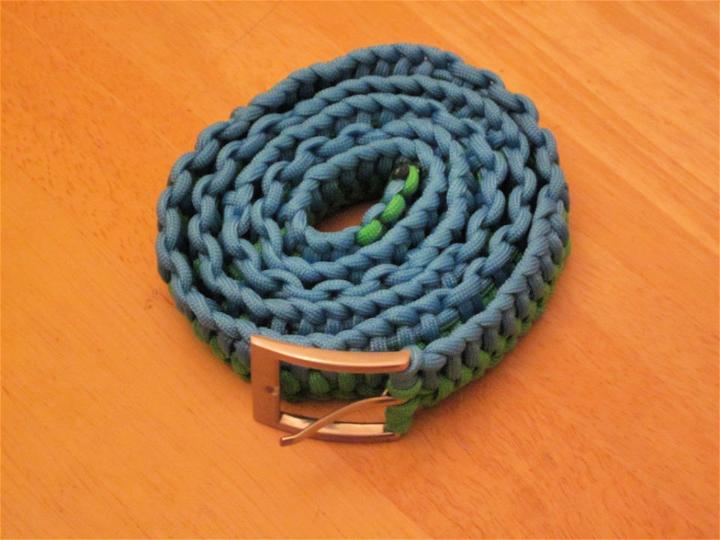
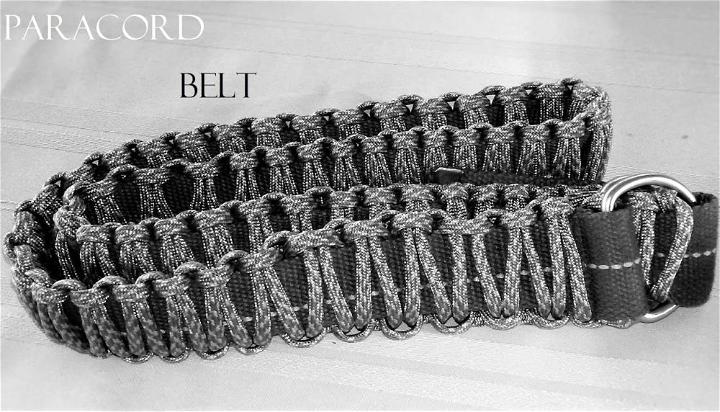
Забегая вперед сразу покажу, что в итоге получилось. Вот такой ремень, полезная длина 100 см.

Далее будет очень много фотографий!
В конце — видео (не моё).
Итак приступим.
Ремень будем плести плетением, которое называется двойное плетение «Кобра» или как его еще называют широкая «Кобра», а также на английском «Wide Solomon Bar». Оно получается шире обычной «Кобры» за счет соединения двух частей вместе. Как плести обычную «Кобру» без труда найдете сами, в интернете роликов и фото очень много. Также плетение «Кобра» есть в книге «Том 1: Paracord Fusion Ties. Straps, Slip Knots, Falls, Bars, & Bundles (2012)». Но как плести «широкую кобру» в этой книге нет.
Для ремня выбрала такие цвета: серый (на фото — больше смахивает на коричневый, но он вправду серый) и синий. На фото мотки по 100 футов (около 30 м) — самое нормальное соотношение цены и количества паракорда.
Берем необходимое количество шнура. Вообще первоначально я отмерила следующее количество: серого — 11 метров, синего — два куска каждый по 7 м. А в итоге всего ушло на 1 м ремня: серого 10,8 м + 1 м на петлю, синего 12,06 м.
В качестве застежки я взяла пряжку от старого ремня. Ширина плетения около 3 см, при выборе пряжки следует это учитывать. Можно взять пряжку и меньшего размера, но застегивать будет немного неудобно.
Также приготовим необходимые инструменты: ножницы и зажигалку. Может еще понадобиться шило.
Продеваем концы корда как на фото. Серый просто складываем пополам. У него концы должны быть одинаковой длины.
Чтобы удобней было плести, сматываем свободные хвосты вот в такие небольшие мотки.
А теперь, внимание! Здесь следует заметить, что концы, обозначенные цифрами 2 и 5, следует делать длиной примерно с будущий ремень, можно добавить 10-15 см запаса, но длина этих хвостов в процессе плетения существенно не измениться, так как это нити вокруг которых происходит всё плетение, это так называемая основа.
Начинаем плести с правой стороны (хотя можно и с левой). Делаем узел как на фото.
Затем ровненько и аккуратно его затягиваем. Пока сильно затягивать не стоит, так как всё может перекоситься.
Теперь еще один узел опять с правой стороны. Затягиваем поплотнее. Теперь этот узел никуда не денется и сам не расплетётся.
Переходим к левой стороне. Повторяем то же самое, что и справа.
Опять всё затягиваем. После того как получилось справа и слева по два узла, перекрещиваем средние «нити» и плетем справа опять точно такой же узел, что и вначале.
Снова затягиваем и делаем справа еще один узел. Здесь уже стоит затягивать хорошо. Следите за средними нитями, чтобы они плотно прилегали.
Теперь снова переходим к левой стороне. Опять делаем такой же узел, как вначале.
Затягиваем узел. Перекрещиваем средние «нити». А вот «рисунок», который получается с изнаночной стороны. При желании можно плести и на эту сторону, достаточно в начале перевернуть пряжку.
Далее продолжаем плести, как было написано выше. Пока еще корда много в запасе, плетем до требуемой длины. Теперь нам нужно сделать «дырочки» для застежки. Вообще можно обойтись без них, так как в плетении присутствуют промежутки, но я решила, что если будут «дырочки» удобней будет застегивать ремень. Чтобы сделать «отверстие» нужно всего лишь не перекрещивать средние (серые) «нити».
Сначала справа делаем один узел, затем еще один. По сути плетем обычную «кобру». Затягиваем справа. Потом тоже самое слева. Получается отверстие. Затем перекрещиваем синие «нити» и опять делаем узел. И так повторяем до нужного количества отверстий. Я сделала 5 отверстий, расстояние между ними получается примерно 2,5 см.
Когда нужная длина достигнута и отверстия сделаны, можно заканчивать ремень. Делаем как показано на фото. Немного ослабляем узлы и продеваем концы в петли. Ослабить можно руками, но проще поддеть шилом. Продеваем, выравниваем и снова затягиваем, чтобы было красиво и более-менее ровно. Затем начинаем плести обычную «кобру» с четырьмя нитями в основании.
Затягиваем первый узел. Затем второй.
Плетем небольшой «хвостик». Теперь лишний корд можно отрезать, а концы оплавить зажигалкой. В принципе ремень готов. Но так как у меня пряжка одинарная, надо сделать петлю для фиксации ремня. Я взяла примерно метровый кусок паракорда серого цвета. Для протяжки шнура использовала специальную иглу для паракорда, но можно и шилом приноровится.
Сначала вверх, потом вниз. Короче делаем петлю из двух «нитей». Размер делала на глаз. Потом снова начинаем плести «кобру», в основе две «нити». Вообще данную петлю получилось сделать только со второго раза. Первый раз банально не хватило шнура. Плетем вокруг петли до конца, а затем как обычно отрезаем кончики и оплавляем их зажигалкой.
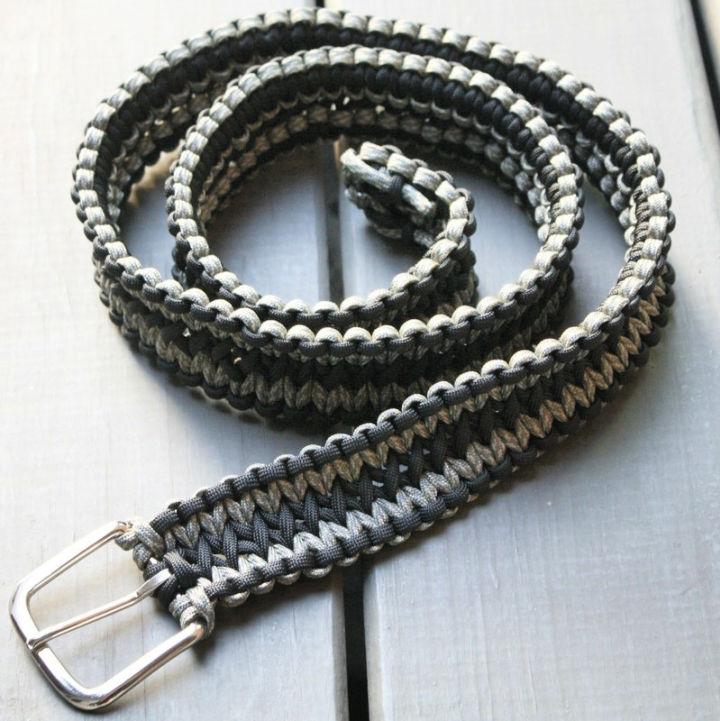
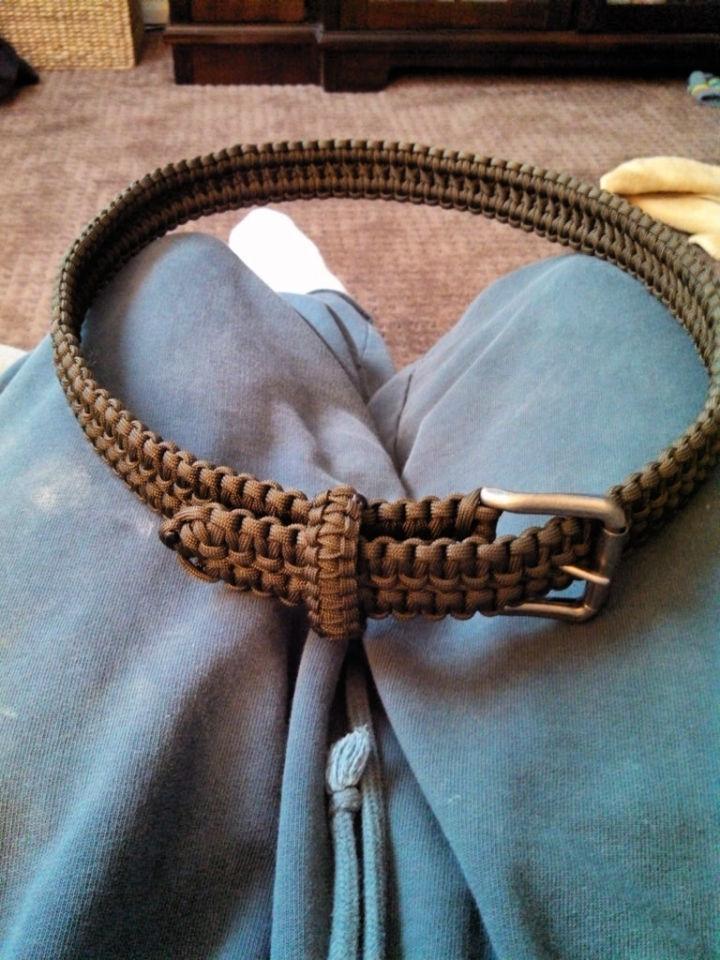
После недельных почти ежевечерних мучений плетений получился вот такой ремень.
Если не понятно из фотографий как плести, вот видео в котором можно наглядно и очень подробно посмотреть как делается основное плетение. Это, кстати, видео автора вышеупомянутой книги. У него вообще очень много видео со всевозможными схемами плетения. Очень сильно рекомендую к ознакомлению.
Introduction: How to Make a Paracord Rescue Belt
This is my first Instructable and i would appreciate your votes in the Paracord Contest!
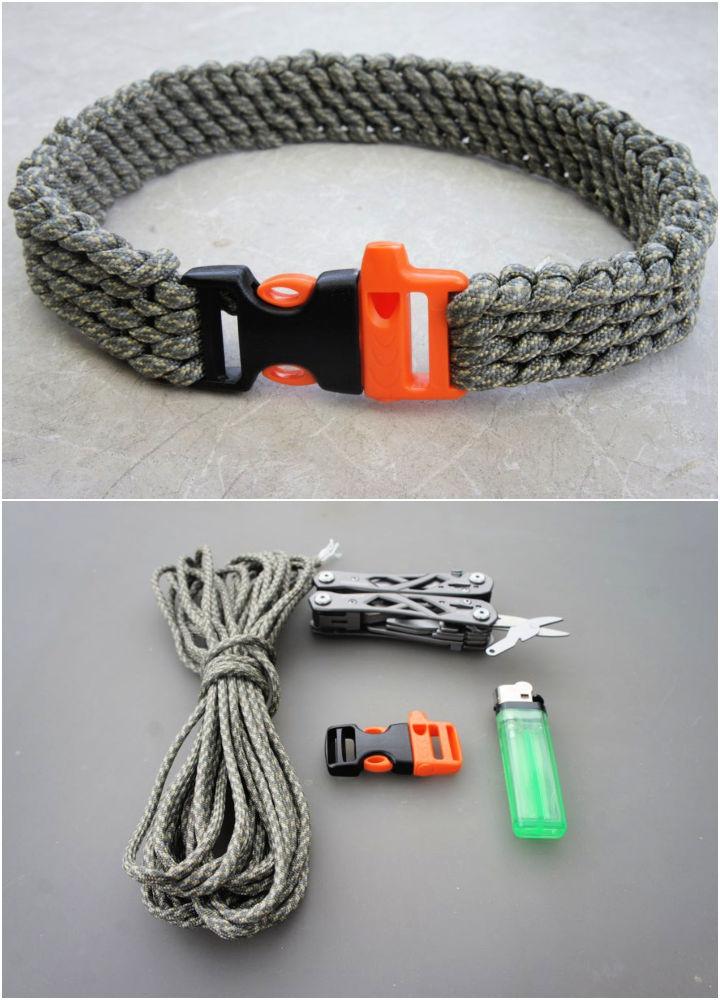
I will be showing you how to create a Paracord Rescue Belt. While bracelets can be useful they simply do not contain enough cord for a real emergency. 8-12 feet can certainly be handy in some situations but think of what you can do with 50 feet!
The belt essentially has two main functions.
1. The buckle is a high decibel whistle for attracting attention
2. The Belt section itself is a single length of 550 Paracord which can be unravelled literally in seconds for a whole manner of rescue techniques.
In my opinion speed is what makes the difference in a survival situation. You can unravel the entire belt with one pull, there is no need to undo a whole series of knots or weaves.
Depending on the method you use to weave and the size of your waist, the belt can supply you with a length upwards of 70 feet of cord, This particular belt used 50 feet for my 32″ waist however i will explain how to increase or decrease the amount of cord you can carry while maintaining the same length of belt.
Although the side release buckle means that the belt is not adjustable, there is about 15% elasticity in the belt so you need not worry if you put on a little holiday weght, your belt should be able to acommodate you. The elasticity also means it will remain tight but flexible if you are wearing it during outdoor pursuits.
Its worth noting that this same technique can also be used to make a bracelet which i have pictured at the end of the instructable.
Step 1: Materials
For best results use genuine 550 Paracord. I purchase mine from supplycaptain.
As with anything in life you get what you pay for, if you are intending on using this as a rescue belt you want to have the best cord available and with suplycaptain they guarantee the quality and authenticity of their cord. Many online retailers sell similar looking but poor quality cord with no guarantees on the breaking strains.
1. 550 Paracord
You can use any colour you like. You will need approximately 50 feet of cord for the belt shown.
2. Fastener
Im using an emergency whistle side release buckle which can be picked up online or in any good outdoors store.
3. Scissors
To cut the cord
4. Lighter
To seal the ends of the cord so they dont fray.
5. Forceps (optional)
Depending on your dexterity you may benefit from using forceps or needle nose pliers to help pull through the cord, i managed the whole belt without.
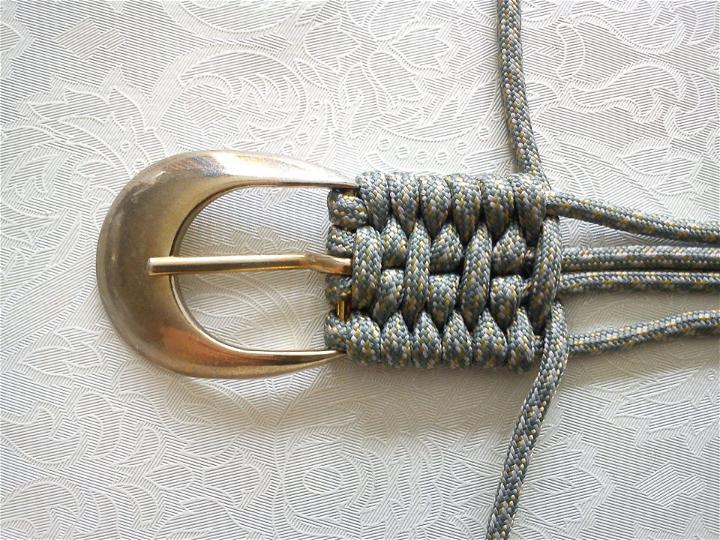
Step 2: Threading Your Buckle
FIrst of all make sure youve sealed the end of your cord with the lighter so it doesnt fray.
You do not have to cut the length of cord to size beforehand as the weaving method used means the cord doesnt need to be cut from the reel until the desired length of belt is reached, this saves wasting cord.
Take your buckle and from left to right make 4 loops through the belt loop..
Ensure that the loops are loose enough to pass some cord through the centre.
Leave a tail of cord on the end a few inches long and secure this to the buckle to prevent the cord working loose during the next steps. ( i passed it through the small hole on the orange section of the buckle to hold it in place)
Ive highlighted the ‘working end’ of the cord in the picture, This is the piece you will be using for all further knots.
Step 3: Your First Loop
Take the working end and make a loop in your hand.
Now thread this through the centre of the 4 loops you made on the buckle.
Leave a couple of inches sticking out the end on the right.
Once you have fed this through then tighten up the 4 loops round the buckle. For consistency you should tighten them from RIGHT to LEFT.
Step 4: More Loops
Gently ease apart the 4 loops you have around the buckle.
Using your fingers or your forceps, pull through the running end of the cord to form a total of 4 loops.
This should consist of three that you pull through and the loop left from the end of the last step.
Twist the loops slightly in an ANTI-CLOCKWISE direction (so the left side of the loop is to the front)
Feed the running end of the cord through all 4 loops as before leaving a few inches sticking out the end again.
Step 5: Complete Your First Row
To complete the first row simply lighten the loops from RIGHT to LEFT
Once you get to the left you pull on the loop sticking out of the end on the right to tighten completely.
IMPORTANT NOTE
Because of all the loops we are putting in the cord it naturally becomes twisted. You need to un-twist the cord as you are tightening each loop. If you dont do this the finished weave will look very messy.
Also do not over tighten your loops. If you do, it will distort the final weave pattern and again your belt will look a mess. Over tightening will also make it harder to pull through the next row of loops.
Step 6: Repeat Repeat Repeat……………..
To continue your belt simply repeat steps 3,4 and 5 over and over and over until you get your desired length.
This 6.5 inch length of belt used 10 feet of cord. So for an average 32inch waist you will use approximately 50 feet.
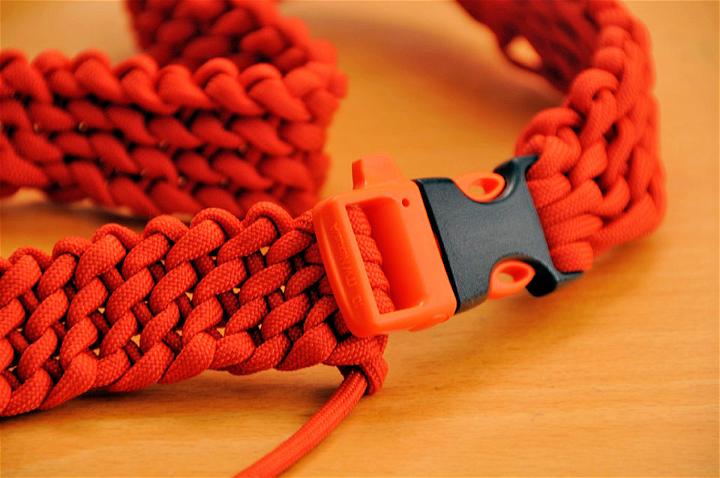
Step 7: Finishing Your Belt
Once you have reached the desired length of belt you can cut your cord from the main reel.
Pull the working end all the way through so its sticking out from the right.
Seperate your loops again slightly
Get the other half of the buckle (make sure its orientated the correct way for fastening)
Loop the working end through the buckle then back through the cord you exposed when seperating the loops. Once you have looped it through the buckle and belt 4 times you are ready to finish the belt.
You have two options for finishing.
1. You can thread the end through any of the loops you like and using the lighter, melt it in place onto the belt.
2. Thread the end through any loop you like and tie an overhand knot in the end to stop it passing back through,
The benefits of the second method are that you do not need scissors or any other item to release the end of the cord if you need to unravel it in a hurry, you simply untie the overhand knot.
Step 8: How to Use Your Belt in an Emergency
To utilise your cord in an emergency simply untie the overhand knot on the end of your cord.
Undo the loops around the buckle ( keep the buckle for attracting attention)
Pull the length of cord back through the first 4 loops to release your working end
Pull hard on the working end and the whole belt will begin to unravel. From start to finish you can undo the entire belt in about 20 seconds (a painful thought when you realise how long it took to make)
Alternatively if you have a knife or a pair of scissors simply cut where shown, remove the end with the buckle and pull on the cord you cut to unravel.
Dont forget to use your emergency whistle to attract help if you need it!
Paracord is fantastic stuff but its no substitute for another pair of helping hands!
Step 9: Bracelet and Knot Diagram,
As i mentioned at the start of the instructable you can utilise more or less cord to make the belt.
If you would like a longer length of cord and more width in your belt simply use 5 or 6 loops in each row instead of the 4 i used. In theory you can use as many loops as you like as long as your buckle is wide enough.
Similarly, if you would like a thinner belt with less cord use 3 loops as demonstrated in the bracelet i made.
I made my belt after finding this diagram on the internet. I would recommend anyone interested in paracord crafts buy some of the many books on decorative and functional knots available.
Also if your interested in more of my paracord crafts check out my website. Its still under construction but it shows a lot of the custom items ive made for people in the past.
www.paracordbracelets.webs.com