
Обзор режущего плоттера Silhouette Curiо
Ответы на часто задаваемые вопросы:
— Что такое Curio?
— Silhouette Curio™ это универсальная машина для творчества (DIY). Это больше, чем цифровой режущий инструмент. Он может резать, тиснить, рисовать, гравировать и создавать рисунок из отверстий — это своего рода швейцарский нож для вашего уголка скрапбукинга и творчества. Воспользуйтесь сочетанием таких возможностей, как Печать и Тиснение, Надсечка и Тиснение, и глубокая резка*. Curio позволит вам на полную использовать возможности программы Silhouette Studio®. Вы сможете задействовать пунктирную и точечную резку (стиплинг), а также раскрыть всю прелесть использования двух инструментов в одной каретке.
*Нож для глубокой резки продается отдельно.
— Заменяет ли Curio мои режущие плоттеры Portrait, CAMEO или другие режущие инструменты Silhouette?
— Нет, ни в коем случае! Curio является уникальным инструментом с набором особых возможностей. С его помощью вы можете создать проекты, которые невозможно реализовать при помощи Portrait или CAMEO. Portrait и CAMEO являются исключительно режущими инструментами. В отличии от Curio на них можно резать без керриера, а также рулонные материалы. На каттере CAMEO вы можете прорезать материалы шириной до 30.5 см и длиной до 3 метров, в то время как максимальный формат резки на Curio – это 21.6 см на 30.5 см.*. В наши планы не входит прекращение выпуска плоттеров Portrait или CAMEO.
*Требуется дополнительная база, продающаяся для Curio отдельно.
— Каково рабочее поле у Curio?
— Максимальный размер материала, который вы можете порезать на Curio — 21.6 см на 30.5 см (с дополнительной базой). Стандартная база, идущая в комплекте с Курио имеет размер 8.5 см на 21.6 см.
— Может ли Curio резать отпечатанное изображение по контуру (Print & Cut)?
-Да! SilhouetteCurio™ обладает оптическим сканером (датчиком), который находит и использует метки для выполнения резки по контуру картинки (Print & Cut jobs).
-Совместим ли Curio с технологией PixScan™?
-Curio будет совместим с технологией PixScan™ осенью 2015.
-Что может сделать Curio, из того, что невозможно на CAMEO, Portrait или других режущих плоттерах?
Рисование контура отверстиями на металле или фольге (стиплинг)
Гравировка металла
Работа двумя инструментами над одним заданием (многозадачность)
Внутреннее или внешнее тиснение
Надсечка, биговка и тиснение
Печать и тиснение
Глубокая резка (резка толстых материалов – кожи, фольги, вспененных материалов и т.д.*
Нанесение контуров различного типа на твердые толстые материалы (например рисование на дереве до 5 мм толщиной)
*Требуется дополнительный нож для глубокой резки.
-Могу ли я резать ткань на моем Curio?
-Да, как и на других цифровых резаках Silhouette вы можете резать ткань, используя фиксатор ткани и специальный нож для ткани.
-Могу ли я резать рулонные материалы на Curio?
-Нет, Curio требует твердого основания для резки и имеет ограниченное поле резки.
-Какие типы металла можно гравировать на Curio?
-Curio может гравировать мягкие металлы, такие как алюминий, медь и латунь. На сегодня нет полного списка металлов, которые можно гравировать на Curio.
-Что такое стиплинг (stippling)?
-Стиплинг позволяет создать макет, состоящий из серии точек. Curio позволяет добиваться различных эффектов точечного нанесения. Вы можете нарисовать точки, используя фетровые маркеры, а можете пробить отверстия в материале, используя инструмент для пробивания отверстий.
-Какова максимальная сила резки у Curio?
-В обычных условиях у Curio давление на нож составляет 210gf.
-Могу ли я использовать аксессуары от Curio в других моих плоттерах — Portrait, CAMEO и других инструментах Silhouette?
-Несмотря на то, что инструменты от Curio технически могут быть установлены на любых машинах Silhouette, они предназначены для использования с Curio. Мы не можем гарантировать результаты их работы в других плоттерах . Silhouetteне рекомендует использование ножа для глубокой резки, инструмента для стиплинга, гравера или эмбоссеров в каттерах кроме Curio.
— C какими инструментами и аксессуарами совместим Curio?
Curio совместим со всеми расходными материалами и аксессуарами, такими как маркеры,фломастеры и ножи, предлагаемые Silhouette.
-Тише ли работает Curio, чем другие машины Silhouette?
-Уровень шума у Curio такой же как и у других резаков Silhouette. Некоторые операции могут производить больше шума – такие как стиплинг по металлу, например.
-Какие материалы можно тиснить (эмбоссировать)?
-Мы пробовали тиснить самые разнообразные материалы. Программа Silhouette Studio® оптимизирована для тиснения фирменной бумаги Silhouette Для Биговки и Тиснения. Пробуйте работать с разными бумагами и картоном – результат может превзойти ваши ожидания.
-Функции Curio в SilhouetteStudio® неактивны и я не могу их использовать. Нужно ли мне покупать расширение Business Edition, чтобы работать с Curio?
-Нет, не нужно. Curio совместим со всеми версиями Silhouette Studio®, включая бесплатную версию. Если у вас установлены Silhouette Studio® Designer Edition или Business Edition, вы можете установить Curio как плоттер по умолчанию, кликнув правой кнопкой и выбрав “Установить как каттер по умолчанию”. При этом функции Curio будут активны всегда, даже когда он не подключен к компьютеру. Если у вас стоит Silhouette Studio® Basic Edition, инструменты Curio будут доступны, только когда ваш Curio подключен к компьютеру. Если они не активны, просто подключите Curio к компьютеру.
-Я не могу определить, сколько платформ нужно использовать. Как это сделать?
— Для этого зайдите в “Установки Резки” и выберите используемый материал. Silhouette Studio® покажет вам сколько платформ требуется для вашего материала. Silhouette Studio® также сообщит вам рекомендуемыеу становки для плоттера.
-Я бы хотел вырезать макеты большего размера. Почему рабочая область у Curio такая маленькая?
-Curio – это одновременно инструмент для резки, тиснения, стиплинга и рисования. Он предназначался для небольших форматов. Это специализированный плоттер и он может служить дополнением для ваших каттеров Silhouette Portrait® или Silhouette CAMEO®. Добавление Curio значительно увеличит ваши возможности для творчества и бизнеса.
-Почему я не могу использовать функции для Curio с моими CAMEO или Portrait?
-Это может повредить или сломать CAMEO или Portrait. Curio специально предназначен для тиснения, стиплинга и гравировки. Большие зазоры и специальная конструкция каретки позволяют Curio совершать операции в вертикальной плоскости, недоступные другим плоттерам.
-Что идет в стандартной комплектации с плоттером Curio?
-В коробке с Curio идут следующие аксессуары:
Silhouette Curio™
база 21.6 x 15.2 см (включая 4 платформы)
керриер для резки 21.6 x 15.2 см
керриер для тиснения 21.6 x 15.2 см
стандартный нож
узкий инcтрумент для тиснения
широкий инcтрумент для тиснения
50 эксклюзивных макетов
адаптер AC
кабель USB
программа Silhouette Studio®
Компания “Лето будет! “ также комплектует плоттер Silhouette Curio инструкцией на русском языке.
Посмотрите видео, демонстрирующую работу на Курио. Они помогут вам понять, что может плоттер Curio и научиться на нем резать:
Начало работы с Silhouette Curio
Печать и тиснение на Silhouette Curio
Биговка и тиснение на Silhouette Curio
Печать и тиснение на Silhouette Curio
Толстые материалы на Silhouette Curio
Тиснение и стиплинг на Silhouette Curio
Who we are
At Silhouette America, we are passionate about empowering creativity and helping individuals bring their artistic visions to life. As a leading provider of cutting-edge crafting machines, powerful design software, and unique materials, we strive to inspire and support artists, makers, crafters, and DIY enthusiasts worldwide. At Silhouette every shape has a purpose, and every idea gets the perfect shape it deserves.
Our mission? To ignite and nurture your creativity. Our innovative products, ranging from precision cutting machines to specialty materials, enable users to unleash their imagination and achieve stunning results.
At Silhouette, we believe in the transformative power of creative expression. Creativity is at the heart of everything we strive to do.
At Silhouette, we’re more than just a brand. We’re a community, a family, bound by a shared passion for creating.
Welcome to the setup guide for your Silhouette CAMEO® electronic cutting machine. These step-by-step instructions will help guide you through the process of setting up your Silhouette.
Step 1: Create Account
Start by taking your machine out of the box. Once the CAMEO is out of the box, you may register your machine at silhouetteamerica.com/setup. On the machine set up page, choose your language, then click on Cameo 3 tab. Fill out required information. To find a unique machine serial number, check the back of the machine. Completing the registration process will also sign you up for your official Silhouette account.
Step 2: Check the box contents and set up the Silhouette Cameo 3
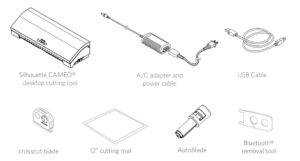
Once your machine has been registered, check to make sure that you have all of the items that should have been included in the box. In addition to the machine, there should be:
- a power cord with an A/C adapter
- a USB cord
- a 12-inch by 12-inch cutting mat
- an Autoblade
- a crosscutter
- and a small multi-use tool which can be used to adjust your blade or remove the Bluetooth adapter from your Silhouette machine.
Once you have confirmed all items are present, discard any tape from the machine that covers the lid and blade carriage, and remove the foam pieces found in the machine.
Plug the included A/C adapter into the right-hand side of the Silhouette and then into a wall socket. Turn on your CAMEO by pressing the power button. Go through the initial setup screens to select your language and other options.
Step 3: Download and Install the Silhouette Studio Software
Now when your machine is setup, you are ready to download and install the Silhouette Studio® software. To download the software, go to silhouetteamerica.com/software or silhouetteamerica.com/setup/en/cameo-3
To download the software, click on the option for your operating system. Make sure when you install the Silhouette software, your computer’s operating system supports the program you are downloading. If your computer’s operating system does not meet the minimal requirements for installation, the Silhouette software will not install.
Once the download is complete, run the installation file and proceed through the onscreen steps to install and setup your software.
Step 4: Access the FREE Library of Shapes for your Silhouette CAMEO 3
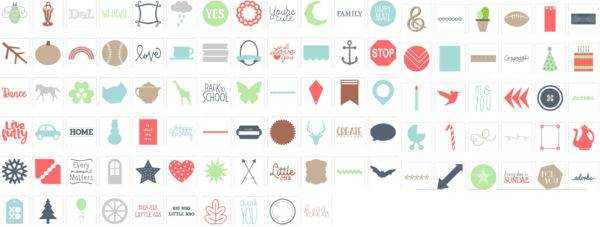
Within Silhouette Studio®, you will have access to your Silhouette account in your library from any machine you log into. When you register your new machine, you will receive access to 100 free shapes in your library. To access your library, click on the Library tab in Silhouette Studio®. When prompted, you will need to sign in to your Silhouette account, so make sure you are connected to the internet. Your 100 free images will automatically be loaded into the library once you connect the USB cable to the Silhouette. If you don’t see them, simply unplug and reconnect the USB cable to your Silhouette machine.
Step 5: Claim Your 1-Month FREE Silhouette Design Store Subscription
In addition to 100 free designs that came with your machine, you also have a free one-month Silhouette Design Store subscription. To redeem your subscription, open the Store tab in Silhouette Studio® and sign in to your Silhouette account. Once signed in, select the “Subscribe and Save” button found at the top of the page.
Select the “Payment and Billing Info” section and enter the promotional code that was emailed to you when you successfully registered your new machine.
Once you’ve entered the code, click “Apply.” This will provide you with a free one-month basic subscription to the Silhouette Design Store. You will receive $25 dollars of design store credits,
which will be valid for 30 days. All content downloaded from the Design Store will become part of your personal library, and any content that is downloaded while you have a subscription is yours to keep even if your subscription ends.
The Silhouette Design Store contains more than 100,000 trendy designs, fonts, quotes, and patterns all designed for use with your Silhouette machine. Search for specific designs and then download them to use them in all your projects. Most images are offered for just $0.99 and are even cheaper with our subscription or Credit Boost discount options.
We independently research our recommended products. We may receive commissions on purchases made from our links.
Nervously staring at an unopened Silhouette box that’s been gathering dust? Still not sure how to get started?
Or… maybe you have the packing material shredded and scattered like confetti around the room as you race to get your new machine into your crafting area?
Either way this tutorial will guide you through how to use your Silhouette Cameo 3, even if you’re a complete beginner.
If you have an older model, the same basics will still apply: I’ll cover everything you need to know.
Tips, tricks, setting it up, and how to make the software easy to use.
At the end I’ll also give you a collection of free SVG files + designs to get started.
(March 2023: Updated with the latest information about the software updates to the Silhouette Design Store.)
Let’s start with the most fun part: unboxing. Are you excited? Yes!
Now let’s get you prepared.
Getting started with your Silhouette Cameo 3
Unboxing
If you don’t have a Silhouette Cameo 3 yet, click here to check out my complete review.
This article will be more of a quick setup guide for those who want to get on their feet fast.
First, let’s make sure all the included items are actually included.
If any are missing you can either contact Silhouette for a replacement or return your CAMEO 3 to where you purchased it for a free exchange.
If you already have it unboxed and set up you can cut ahead to the section on using Silhouette Studio.
You should have:
- Your Silhouette Cameo 3 (if not, here’s the best deal as of September, 2018)
- 12-inch cutting mat. This is going to be how we load most material into our Silhouette machine. It’s adhesive on one side for holding our material securely in place.
- (1) AutoBlade. An easy-to-use accessory that automatically adjusts to the blade setting you choose in the software. You’ll typically replace this every 8 months with regular usage.
- (1) Crosscutter. Super useful for cutting rolls of vinyl.
- Power + USB cables.
After you’ve verified that you have all the included goodies go ahead and register your machine at: silhouetteamerica.com/setup. You’ll find a unique serial number on the back of the machine. After you complete the registration process you’ll also be signed up for an official Silhouette account which comes with a 30-day free trial to the Silhouette Store and a $25 credit for purchasing designs, projects, and fonts for your CAMEO 3.
Go ahead and store the packing materials back in the box. I move my machine around a lot and being able to safely transport it is what gives me that flexibility. If you need to consult the software or machine manuals, you can find them here.
Now is also a good time to check the outside of your box while you have it handy. Later on we’ll be setting up the Bluetooth so just note now whether or not it reads “Bluetooth included” or “Bluetooth compatible.”
If you haven’t already, remove the protective tape covering the lid and the blade carriers. You’ll also find foam pieces inside of the machine, you can toss these into your box.
Connecting your machine to your PC/MAC
Plug the AC adapter into the right side of the Silhouette and turn it on by pressing the power button. You’ll now be met with the initial setup screen on the touchscreen which is visible on the right side. Select your language of choice. Now that you’ve turned on the machine you’re ready to install the Silhouette Studio software.
Silhouette Studio
If you aren’t sure how to use the Silhouette CAMEO 3 with Silhouette Studio, you’re in for a treat. Studio is fantastic, not only can you create your own designs or import designs from friends, but you can also purchase or freely download 100,000’s of designs either from the web or from your Silhouette Design Store account. No more relying on cartridges or manual dies! This is a game-changer if you’ve never used a machine like this before.
Download the software here and select the option for your operating system. Click through the Silhouette Studio setup and install the software, launching it after you finish.
Now that the Silhouette and its software are both installed and ready, let’s get your CAMEO 3 ready for cutting and then explain the basics of Silhouette Studio’s interface.
Using the Silhouette CAMEO 3: Your first design
You’ll start by loading the AutoBlade.
The AutoBlade is your primary cutting tool which is set automatically to the required depth for each job. All you need to do is load it once into the machine. You can follow along with this 10 second video:
- Unlock the blade carriage by pulling the lock lever out.
- Insert the AutoBlade.
- Press the blade carriage forward. Now it’ll be properly fastened while your machine is cutting.
Using Silhouette Studio
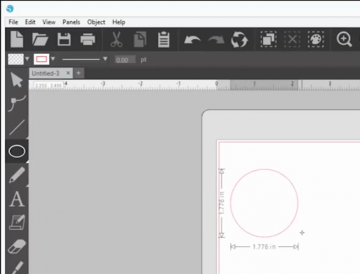
Now let’s go back to the Silhouette Studio program — if you don’t have it open do that now. You’ll see the main screen which is covered with a 12×12 cutting area, the same as the provided cutting mat.
For our Silhouette CAMEO 3 tutorial let’s make something simple, like a basic cut shape.
- Click on the shape tool on the left.
- Click and drag with your mouse in the cutting area to draw a circle. You’ll be shown exactly where on the mat your image will be cut. If you find that it’s drawing an oval instead of a circle, hold shift as you drag and it will magically become a perfect circle.

- Connect the Silhouette CAMEO 3 to your computer using its provided USB cable. If you haven’t removed the protective liner from the cutting mat, remember to do that now. Tip: this worth saving that you can protect your mat later.
- Place your material in the top upper left corner of the mat as shown in Silhouette Studio. In this example, we’ll start with cardstock. Note: the cutting mat will be very sticky, material might stick to it at first. this is normal, it will become conditioned overtime.
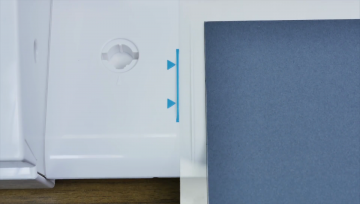
- Align the left edge of your mat with the blue guide marks on the machine. Make sure the cutting mat rests against the white rollers.

- Touch the load button on the touch screen. The cutting mat should now be loaded into your CAMEO 3.
- Now let’s return back to Silhouette Studio. Click the “send” tab on the top right of your screen and choose the appropriate material type. In this example you’ll want to select “Cardstock, Plain.” Select “Cut” as your action and “AutoBlade” as your tool. These should be the default settings but sometimes they can get accidentally changed. Now that you’ve verified everything is in order, click the blue “send” button at the bottom right to start the cut.
Your machine will automatically adjust the blade depth for the material you’ve selected. After your design is cut go ahead and tap “unload” on the touch screen to unload your mat. You can now peel off your newly cut material from the mat.
TADA! It may seem like a lot of work the first time but I promise it gets a lot easier, kind of like driving a car. Okay, driving a car is still a pain-in-the-neck for me so it’s even easier than that!
Still with me? Great!
I’ll cover taking full advantage of Silhouette Design Store in the next section and then I’ll move on to a tutorial on cutting vinyl and more advanced designs.
Silhouette Design Store
Silhouette Design Store is awesome, as I mentioned before you can view and purchase over 100,000 designs to that will automatically be linked to your cloud account. To start, your account will be loaded with 100 free shapes.
Click on your “library” tab in Silhouette Studio. Sign into your account. Your images will be automatically loaded into the library once you connect the USB cable to the Silhouette. If they don’t appear, try unplugging and reconnecting the cable.
If you didn’t register your account earlier now would be a great time to do that because you’ll get $25 to spend in the Silhouette Design Store — most designs cost $.99 so this is basically 25 free designs of your choice.
You should have an email thanking you for registering from Silhouette America with a complimentary trial code inside.
This code also comes with a free 1-month subscription to the Silhouette Design Store. You can search by design, designer, or type of design.
Your Silhouette CAMEO 3 can be used for a lot more than just cutting paper and simple shapes so let’s put it to the test.
Cutting vinyl
Vinyl can be cut with or without a cutting mat. Here I’ll be covering how to load adhesive-backed vinyl without a mat.
Loading the vinyl in
Make sure the rollers are in the proper position. We need to make sure our material is going to be securely grabbed by the CAMEO. This is easy to do:
- Unlock the right grip roller by pulling the lock lever down. You can find this lever on the right side of your machine.
- Twist the right grip roller toward you to unlock it and slide it across to the position appropriate for the size of your material. Now twist it away from you to secure it again.
- Re-lock the lock lever by swinging it back up. You can line up your material with blue markings on the left and make sure the right grip roller meets with your material.
- Go to the page set up panel in Silhouette Studio and under the “cutting mat” option select: none.
- Holding your vinyl in place, select “load” and your vinyl will be loaded into the Silhouette and ready for cutting.
Cutting text
Okay, let’s try something a bit more fancy than a circle cut: text!
- Select the text tool on the left panel and click in the edit area.
- Start typing any text you want to cut. You can use any font on your computer.
- Once you have it looking how you want it, click on the “send” tab in the upper right corner.
- Change the material type to “vinyl, metallic” and ensure that Action is still set to “cut” and the Tool selected is “AutoBlade.” If you’re using a different type of vinyl, just select it here.
- Hit “send” at the bottom to cut out the design.
- Like before, after the cut is complete select “unload” on the machine’s touch screen.
Beautiful!
One of the nicer features of the CAMEO 3 is the ability to use it without having to plug it into a computer. I absolutely hate a messy workspace, so being able to remove even one cable is priceless for me.
I haven’t used it yet, but you’re also supposed to be able to use an iPad and Silhouette Studio Mobile. If anyone has tried it out, leave me a comment below because I’m super curious about how well it works and how far away you can use it.
Okay, now I’ll walk you through setting up Bluetooth!
Setting up Bluetooth
If the outside of your box reads “Bluetooth included” you can communicate wirelessly to the CAMEO 3. If it instead says “Bluetooth compatible” you’ll have to purchase and install a compatible Bluetooth device.
To set up Bluetooth start by powering on the machine. Select the gear icon in the top right corner of the touchscreen. Scroll down to “Bluetooth” and turn bluetooth “on.”
Now go into Silhouette Studio and select the “send” tab in the upper right corner of the screen. In the bottom right corner click on the Bluetooth icon and select “add Bluetooth machine. “After a window pops up, click OK to add the Silhouette CAMEO 3.
If the outside of your box reads “Bluetooth compatible“ you must purchase an adapter and install it. The chip type for the Bluetooth adapter must be: CSR8510 A10. I’ve put together a list of adapters which are compatible with the CAMEO 3. You can find pretty much all of them on Amazon:
- Importer520 Bluetooth 4.0
- DSD TECH Bluetooth USB 4.0
- C-zone Micro USB Bluetooth Adapter
To install, turn the machine over and locate the Bluetooth compartment. Remove the screw and fit the Bluetooth adapter into the slot. Reattach the compartment and close it up. Now you can configure your CAMEO 3 as listed above.
That’s it! You’re ready to start digging in and learning through experimentation! I have a few tricks and tips that I’ve discovered through trial and error and an FAQ of the more common questions and issues people have with the Silhouette CAMEO 3.
What’s next? Do a little dance! Then take some time to browse the Silhouette Studio store for some inspiration.
Or: check out my favorite list of free SVG cut files that you can download right now and use! If you don’t know what an SVG file is, you’re in for a treat. Definitely check out that list because it’ll be life-changing.
Now that you’ve made your first few projects it’ll be much easier in the future and you can start playing around and experimenting, that’s how I learn best.
Tricks and tips
- You’ll notice that Silhouette Studio gives you the exact dimensions of the shape you’re cutting out. By clicking on the shape with the Select tool you can actually specify those dimensions yourself numerically!
- To figure out what a specific tool does in Silhouette Studio, just hover your cursor over it. After a few moments, a tooltip will pop up with a brief description of the tool.
- To see exactly where on the cutting mat grid your object will be placed, you can select the “page setup panel” on the right. Show/hide the cutting mat by clicking and dragging the “Reveal” slider bar.
- Make sure your material is always lined up on the left side of your machine. There are blue lines on the CAMEO 3 or red on the CAMEO 2.
- If you purchase Silhouette Studio Designer Edition you can import in free SVG graphics (I have a huge collection of them available).
- If your blade isn’t cutting properly try poking inside with a pin to dislodge any paper or vinyl which might have accumulated.
- Take the time to really secure your material to the cutting mat.
- Try a test cut. If you have expensive material you might need to take a few tries to calibrate the settings just right. Before ruining that material you can plan out a very small cut on the edge to make sure the settings are correct.
- Check the position of your rollers. If you’re cutting a variety of material or sizes of mats you’ll find yourself adjusting them quite often. Make sure your cutting mat size is correctly set when making these adjustments. Always select “none” if you are loading your material in (like vinyl sheets) without a mat.
- For more information, explore the manuals! They have a wealth of detail and cover the most common issues and projects that might come up.
FAQ
Should I buy the Silhouette Cameo 3 or the Cricut Explore Air 2?
I have a review called “Silhouette Cameo 3 vs Cricut Explore Air 2” which I wrote to answer this very question. Short answer: both are great!
Do you have a review of the Silhouette Cameo 4?
I just reviewed it in September, 2020.
How many computers can I use the Silhouette with? Can I install the software on each of them?
You can download the software on as many computers as you like, Silhouette Cloud will let you sync with up to 5 at a time.
My Silhouette CAMEO 3 isn’t cutting in the right place.
The most common issue is that you’re not using a cutting mat or your cutting mat isn’t gripping properly. See if using a different cutting mat or material fixes the issue.
I don’t see grid marks on my welcome screen.
Go to the menu at the top, click View and then Show Grid.
I’ve selected the type tool but I can’t get any text to appear in the design area.
Make sure after clicking on the type tool to click on the design area where you want your text to appear. After you type it out you can go ahead and switch to the selection tool to adjust its placement, size, and dimensions!