
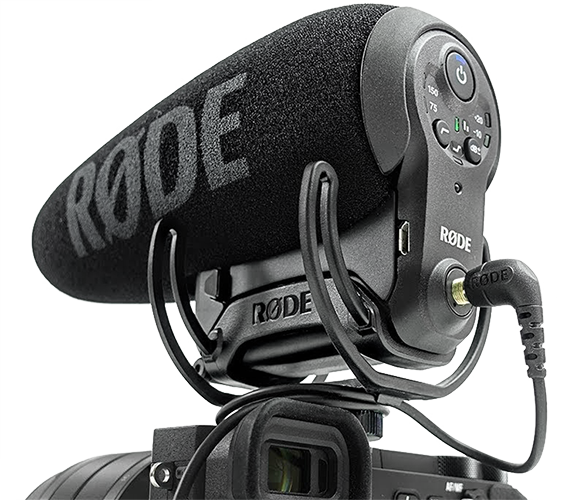
RØDE Microphones выпускает еще один микрофон в супер популярной линейке VideoMic. Новый VideoMic Pro+ задает новый уровень для записи звука для полупрофессионального применения.
Микрофон оборудован первокласным виброподвесом Rycote Lyre, капсюлем VideoMic Pro и ветрозащитой. В дополнение к этому в микрофон добавлены несколько новых функций:
- Функция Автоматического Включения микрофона когда на микрофон поступает напряжение питания от микрофонного входа видеокамеры. Это великолепно для видеосъемки «на бегу», когда микрофон автоматически включится вместе с включением камеры и выключится при отсоединии кабеля от камеры или при выключении камеры.
- Встроенный в крышку отсека для батареек аккумулятор позволяет заменить батарейки в процессе записи без выключения микрофона.
- Питание VideoMic Pro+ может быть от встроенного RØDE LB-1 Lithium-Ion аккумулятора, 2 x AA батареек или через Micro USB разъем.
- Цифровое управление позволяет регулировать параметры записываемого сигнала прямо на микрофоне и уменьшать время затрачиваемое в дальнейшем на постпродакшен и редактирование звука.
- Функции цифрового управления (переключатели) включают в себя:
- 2-ступенчатый фильтр низких частот отсекает низкочастотный гул от автомобильного трафика или от кондиционера.
- 3-ступенчатый усилитель уровня, с +20dB функцией предназначен для усиления уровня выхода для записи на DSLR или беззеркальные фотокамеры.
- Усиление высоких частот подчеркнет детали и улучшит четкость записи звука.
- Дополнительный канал «безопасного звука» с пониженным уровнем сигнала позволит записать второй канал звука без отсечки по уровню при неожиданных резких всплесках уровня.
VideoMic Pro + является новым эталоном накамерных микрофонов. В микрофон добавлены такие восстребованные функции как встроенный аккумулятор, функция автоматического включения микрофона и выход второго канал звука с безопасно-пониженной громкостью.
Руководства пользователя
Самые популярные
Wireless PRO
Wireless GO II
Wireless ME
RØDECaster Pro II
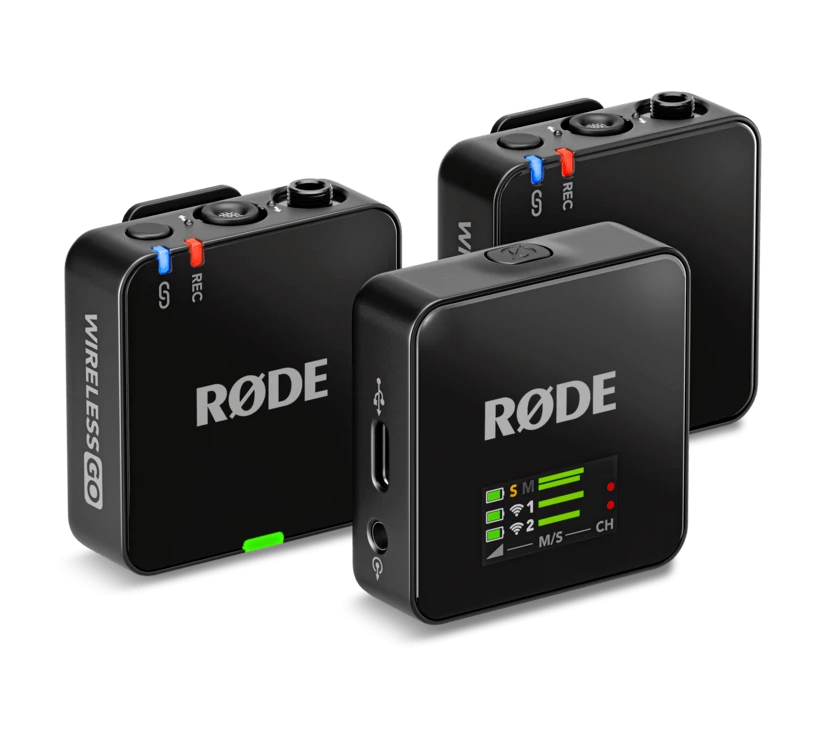
Wireless GO (Gen 3)
RØDECaster Video
Приложения и программное обеспечение
RØDE Connect
RØDE Capture
UNIFY
Руководства по продукции
AI — Micro
Подставка DS2
Interview PRO
Магнитное крепление
NT-USB+
NT-USB Mini
NT-1 5го поколения
NT1-A
NT1 Signature Series
NTH-100
NTH-100M и NTH-Mic
Телефонное крепление
PodMic USB
RØDECaster Duo
Крепление
VESA
RØDECaster Pro II
VideoMic Me-C +
VideoMic NTG
VideoMic GO II
Wireless GO II
Wireless ME
VideoMicro II
Streamer X
Wireless Micro
Wireless PRO
XCM-50
XDM-100
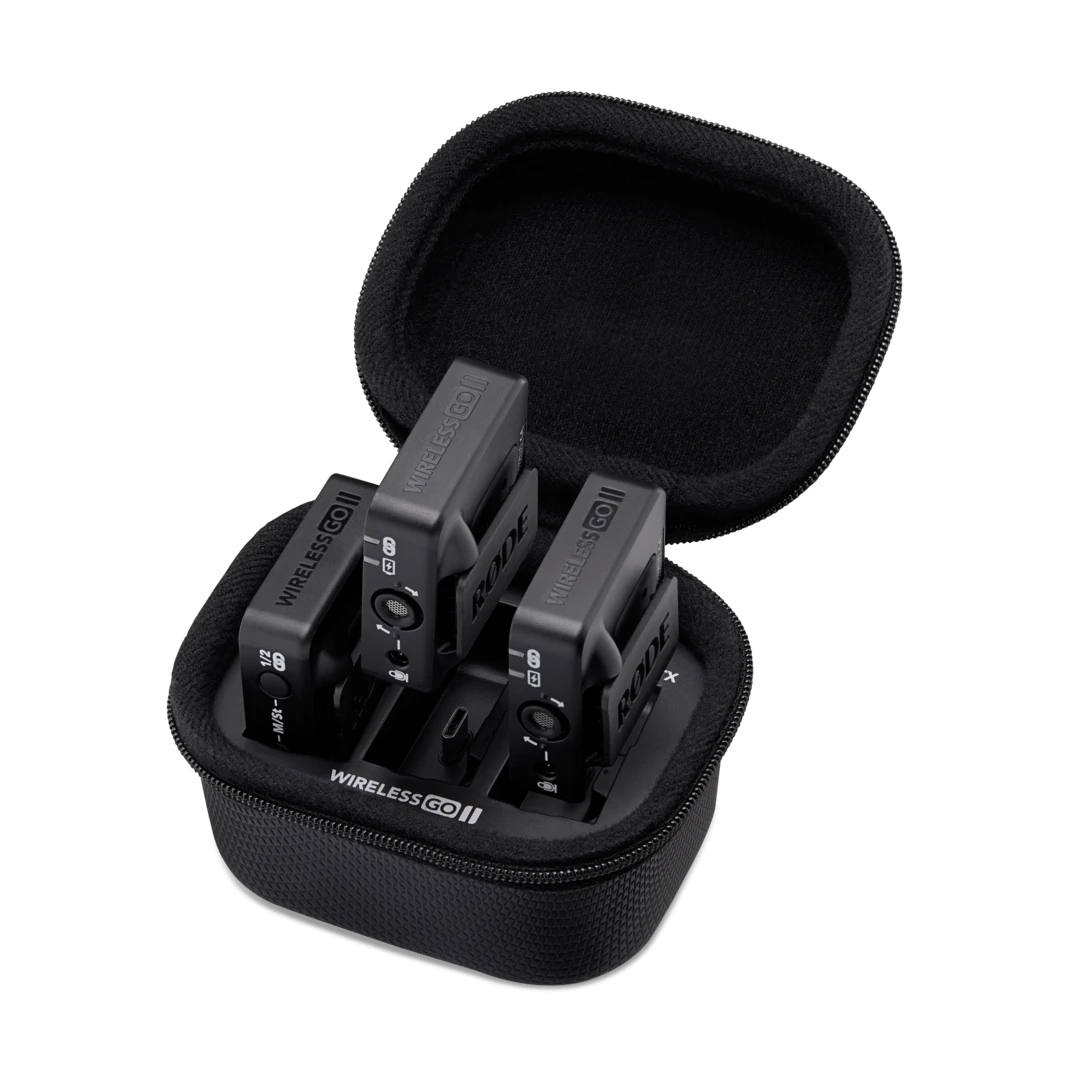
Чехол Wireless GO II
RØDECaster Pro
Советы по технике работы с микрофоном
window.dataLayer = window.dataLayer || [];
function gtag(){
dataLayer.push(arguments);
}
gtag(‘js’, new Date());
var _paq = _paq || [];
var _paq = _paq || []
_paq.push([‘trackEvent’, ‘product’, ‘visit’, ‘16276’]);
0 вопросов
Артикул: 16276

-
Дополнительные функции
усилитель, фильтр низких частот -
Подключение
mini Jack 3.5 мм TRS -
SPL максимальный
133 дБ -
Вес товара без упаковки
122 г

Оплата заказа при получении

Доставим быстро
var country_town = localStorage.getItem(‘formStorage’);
var date = new Date();
let compare_location = »;
obj_town = JSON.parse(country_town);
if (obj_town !== «undefined» && obj_town !== null) {
compare_location = obj_town.user_region;
} else {
compare_location = Cookies.get(‘city-choose-full’)
}
if (compare_location == ‘Россия, Москва’ && date.getHours() < 12) {
$(«#updateDelivery span»).html(«Доставим сегодня»);
} else {
$(«#updateDelivery span»).html(«Доставим быстро»);
}

|
PRO PlusОбновленная версия популярного микрофона VideoMic Pro от легендарных RØDE дополнена сразу несколькими нововведениями, призванными повысить качество записи и удобство в работе. Система контроля питания самостоятельно включит и выключит Pro Plus в соответствии с работой камеры. В задней части расположен блок управления, включающий кнопку включения, со светодиодным индикатором, 2х ступенчатый фильтр низких частот и 3х ступенчатый усилитель сигнала |
Система питания
Также, в данной модели реализованная гибкая система питания. Вы можете использовать две батареи типа АА, и даже сменять их во время записи, микрофон продолжит работать от встроенного аккумулятора. Также, есть возможность зарядить PRO Plus от внешнего аккумулятора посредством micro USB. В комплекте вы найдете перезаряжаемую батарею RØDE LB-1
|
СуперкардиоидныйМодель имеет суперкардиоидную диаграмму направленности. Микрофон воспринимает звук от объекта на который направлен, отсекая посторонние звуки. Также, корпус PRO Plus уже установлен на специальный амортизирующий держатель Rycote Lyre, конструкция которого гасит резкие повороты и движения, благодаря чему на запись не попадут механические шумы |
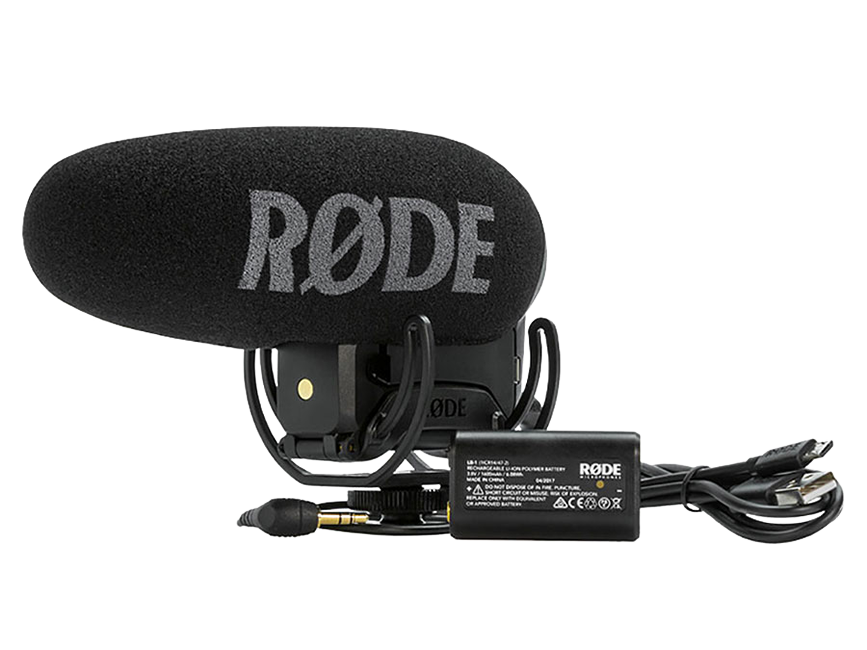
Комплектация:
- микрофон
- аккумулятор LB-1
- аудиокабель
- зарядный кабель microUSB
Характеристики
конденсаторный
суперкардиоидная
моно
усилитель, фильтр низких частот
mini Jack 3.5 мм TRS
-33.6 дБ
Sound Pressure Level — максимальная громкость звука, которую микрофон способен записать без повреждений или ухудшения качества записи
133 дБ
200 Ом
20 — 20000 Гц
АА х2, встроенный аккумулятор
Габаритные размеры самого товара без установленных аксессуаров
111 × 60 × 170 мм
Вес самого товара без установленных дополнений/аксессуаров и упаковки
122 г
F4663
Китай
12 месяцев
336 г
Похожие товары
29 720 ₽
+ 372
Бонусных рублей
Микрофон RODE VideoMic Pro Rycote
Нет оценок
В наличии: 1 шт.
1 090 ₽
+ 33
Бонусных рублей
Микрофон BOYA BY-VM01
Нет оценок
В наличии: 1 шт.
4 890 ₽
+ 97
Бонусных рублей
Микрофон BOYA BY-MM1 PRO
Нет оценок
В наличии: 1 шт.
29 800 ₽
+ 317
Бонусных рублей
Микрофон RODE VideoMic NTG
Нет оценок
В наличии: 1 шт.
9 590 ₽
+ 160
Бонусных рублей
Микрофон BOYA BY-BM3030
Нет оценок
В наличии: 2 шт.
12 590 ₽
+ 269
Бонусных рублей
Микрофон CoMica VM20
Нет оценок
В наличии: более 5 шт.
12 090 ₽
+ 200
Бонусных рублей
Микрофон BOYA BY-BM3031
Нет оценок
В наличии: 1 шт.
76 860 ₽
+ 1009
Бонусных рублей
Микрофон RODE NTG5 Kit
Нет оценок
В наличии: 1 шт.
gtag(‘event’, ‘view_item_list’, {
«send_to»: «UA-32432488-1»,
«ecomm_pagetype»: «Главная»,
«items»: [
{
«id»: 15930,
«name»: «Микрофон RODE VideoMic Pro Rycote»,
«list_name»: «Главная»
},
{
«id»: 15758,
«name»: «Микрофон BOYA BY-VM01»,
«list_name»: «Главная»
},
{
«id»: 23718,
«name»: «Микрофон BOYA BY-MM1 PRO»,
«list_name»: «Главная»
},
{
«id»: 19368,
«name»: «Микрофон RODE VideoMic NTG»,
«list_name»: «Главная»
},
{
«id»: 15762,
«name»: «Микрофон BOYA BY-BM3030 «,
«list_name»: «Главная»
},
{
«id»: 22414,
«name»: «Микрофон CoMica VM20»,
«list_name»: «Главная»
},
{
«id»: 15763,
«name»: «Микрофон BOYA BY-BM3031»,
«list_name»: «Главная»
},
{
«id»: 22170,
«name»: «Микрофон RODE NTG5 Kit»,
«list_name»: «Главная»
},
]
});
$(«.goods .goods_row a»).click(
function(e) {
gtag(‘event’, ‘select_content’, {
«content_type»: «product»,
«send_to»: «UA-32432488-1»,
«ecomm_prodid»: $(this).data(«uidgood»),
«ecomm_totalvalue»: $(this).data(«pricegood»),
«items»: [
{
«id»: $(this).data(«uidgood»),
«name»: $(this).data(«namegood»),
«list_name»: «Главная»,
«ecomm_pagetype»: «Главная»,
}
]
});
}
);
$(‘.lazy’).lazy(
{
beforeLoad: function (element) {
$(element).on(«error», function () {
$(element).addClass(‘no-image’);
});
},
afterLoad: function(element) {
$(element).closest(‘.float-left.first’).find(‘.productShimmerLoader’).hide();
},
onError: function(element) {
$(element).attr(«src»,’/wa-content/img/design/themes/no-image.png’);
$(element).addClass(‘no-image’);
$(element).closest(‘.float-left.first’).find(‘.productShimmerLoader’).hide()
}
});
$(‘.item_action_block .item_like’).off(‘click’).on(‘click’, function() {
let productId = $(this).closest(‘.item_action’).find(‘input[type=»submit»]’).attr(‘data-pid’);
let productPrice = $(this).closest(‘.item_action’).find(‘input[type=»submit»]’).attr(‘data-pprice’);
if (productId == undefined) {
productId = $(this).closest(‘.item_action’).find(‘input[type=»hidden»][name=»product_id»]’).val();
productPrice = parseInt($(this).closest(‘.item_desc’).find(‘.price .current’).text());
}
console.log(productId + ‘ — ‘+ productPrice)
var _tmr = window._tmr || (window._tmr = [])
_tmr.push({
type: ‘reachGoal’,
id: 3325343,
value: productPrice,
goal: ‘addtofavorites’,
params: {
product_id: productId
}
});
_tmr.push({
type: ‘reachGoal’,
id: 3245403,
value: productPrice,
goal: ‘add_to_wishlist’,
params: {
product_id: productId
}
});
});
Удалённый склад
Вы добавили товар с удаленного склада. Это значит, что на доставку такого товара
потребуется на 3-5 дней больше чем расчетное время доставки в корзине
var _tmr = window._tmr || (window._tmr = [])
_tmr.push({
type: ‘reachGoal’,
id: 3325343,
value: ‘37280.0000’,
goal: ‘prosmotrel_kartochku_tovara’,
params: {
product_id: ‘16276’
}
});
$(‘.product_action—like’).off(‘click’).on(‘click’, function() {
var _tmr = window._tmr || (window._tmr = [])
_tmr.push({
type: ‘reachGoal’,
id: 3325343,
value: ‘37280.0000’,
goal: ‘addtofavorites’,
params: {
product_id: ‘16276’
}
});
_tmr.push({
type: ‘reachGoal’,
id: 3245403,
value: ‘37280.0000’,
goal: ‘add_to_wishlist’,
params: {
product_id: ‘16276’
}
});
});
var _tmr = window._tmr || (window._tmr = []);
_tmr.push({
type: «reachGoal»,
id: 3245403,
value: «37280.0000»,
goal: «viewProduct»,
params:
{
product_id: «16276»
}
});
gtag(‘event’, ‘view_item’, {
«send_to»: «UA-32432488-1»,
«ecomm_prodid»: «16276»,
«ecomm_pagetype»: «product»,
«ecomm_totalvalue»: ‘37280.0000’,
«items»: [
{
«id»: «16276»,
«name»: «Микрофон RODE VideoMic PRO Plus»,
«price»: ‘37280.0000’
}
]
});
window.vkAsyncInit = function() {
VK.Retargeting.Init(‘VK-RTRG-1347429-hq2AP’);
const eventParams = {
«products» : [{«id»:»16276″}],};
VK.Retargeting.ProductEvent(240231, «view_product», eventParams);
}
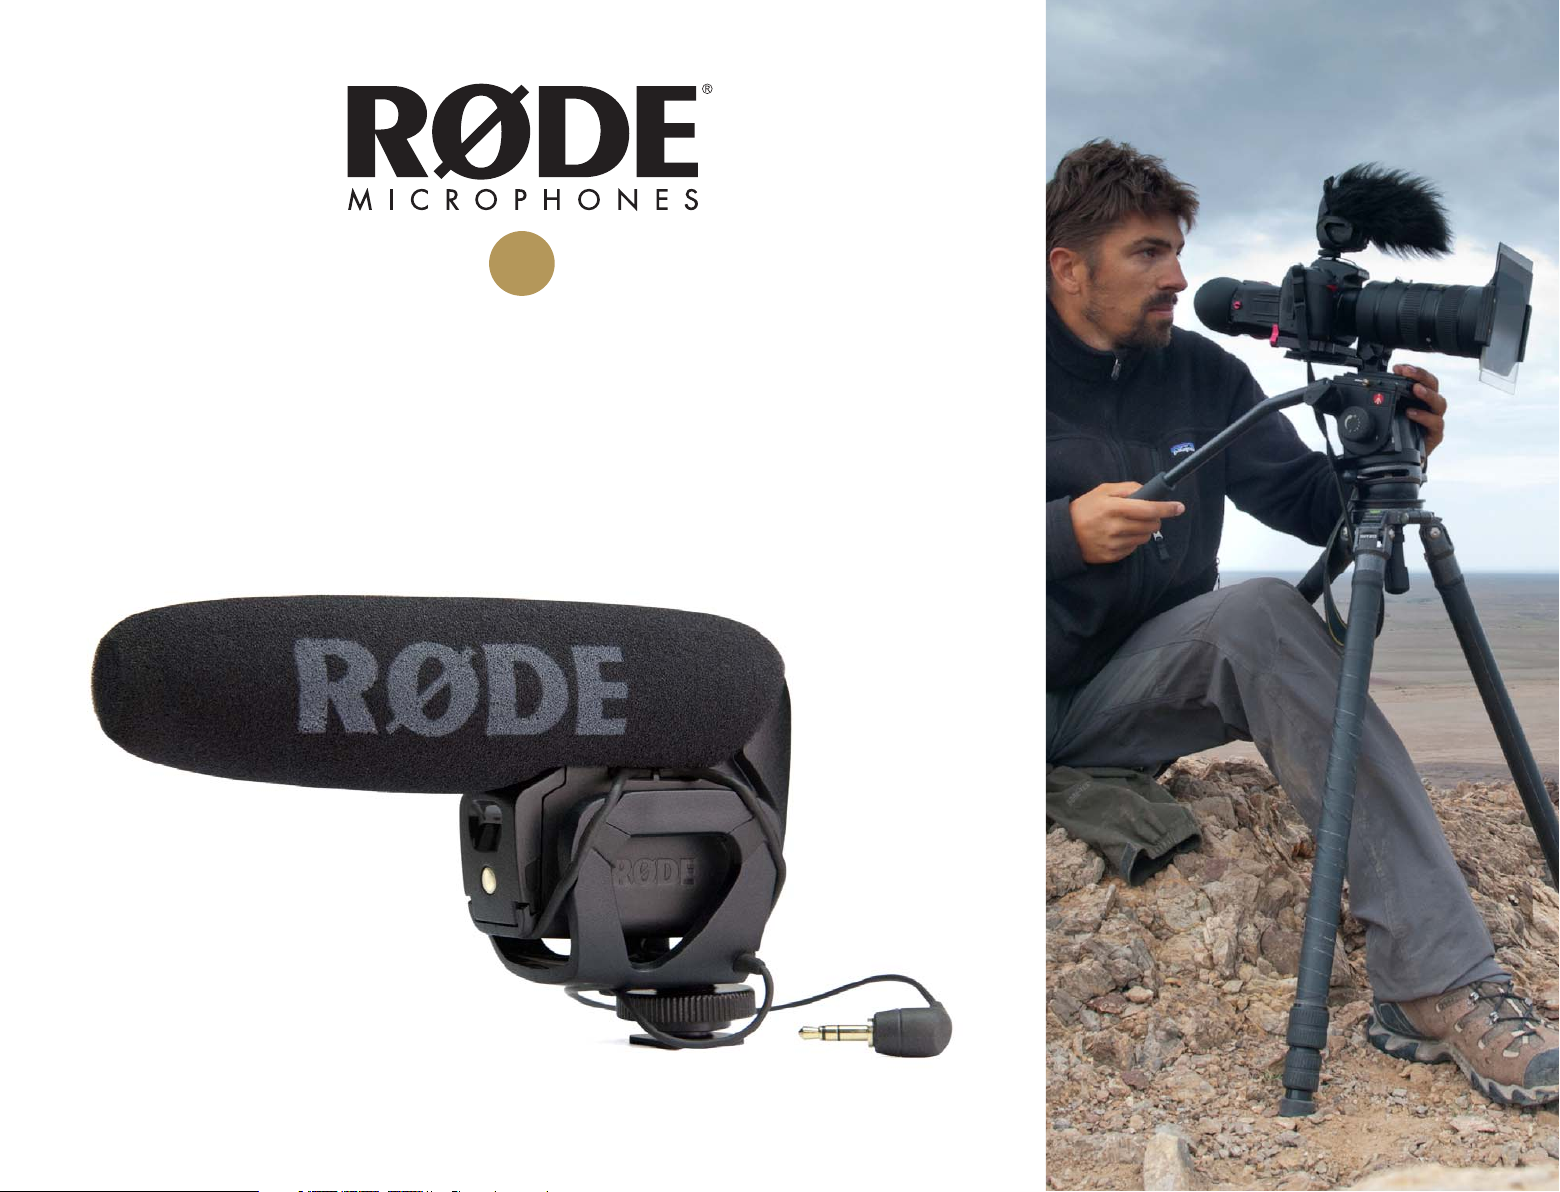
VIDEOMIC PRO
INSTRUCTION MANUAL
www.rodemic.com

INTRODUCTION CONTENTS
Thank you for investing in the RØDE VideoMic Pro.
When RØDE released the original VideoMic in 2004 it was the only mic of
its kind on the market. Just like many great innovations it was born from
a personal need. At the time MiniDV cameras were the latest technology,
offering consumers and independent fi lmmakers unprecedented freedom
and creativity for their video, but neglecting audio quality. I went shopping
for a solution but found that the only offerings were either cheap inferior
quality or high cost shotgun microphones not designed to integrate easily
with the cameras.
Thus the VideoMic was born. Almost a decade later its broadcast audio
quality, integrated shock mounting and accessible price tag has made it the
world’s largest selling microphone for consumer cameras.
However in this time there have been numerous innovations in video cameras,
from hard drive, solid state and network cameras, through to high defi nition
Digital SLR and onwards to large sensor video cameras. The technology has
gotten larger but of course the form factor much smaller, thus the decision
to create the high performance, yet conveniently compact VideoMic Pro.
Creating a high performance microphone as lightweight and manageable
as the VideoMic Pro was quite a technical challenge. Other companies have
attempted and failed, simply because a directional microphone depends on
the length of the microphone barrel to reject the surrounding ambient noise
that you don’t want to pick up.
INTRODUCTION
SPECIFICATIONS
FEATURES
WHAT’S IN THE BOX
VIDEOMIC PRO STRUCTURE
SETUP AND USE
Installing the battery
Mounting and connecting
VideoMic Pro controls
Replacing shock mount bands
Recording Tips
2.
3.
4.
4.
5.
6.
7.
8.
10.
12.
Leveraging the technology developed alongside our award winning NTG1,
NTG2 and NTG3 shotgun microphones we’ve fi nally realised a professional
microphone with a much smaller form factor.
Please take the time to visit www.rodemic.com and register your mic for a
full ten year warranty.
Peter Freedman
RØDE Microphones
Sydney, Australia
OPTIONAL ACCESSORIES
SAFETY / CARE INSTRUCTIONS
TROUBLESHOOTING / FAQ
PRODUCT WARRANTY
SUPPORT AND SERVICE
13.
15.
16.
18.
18.
2.
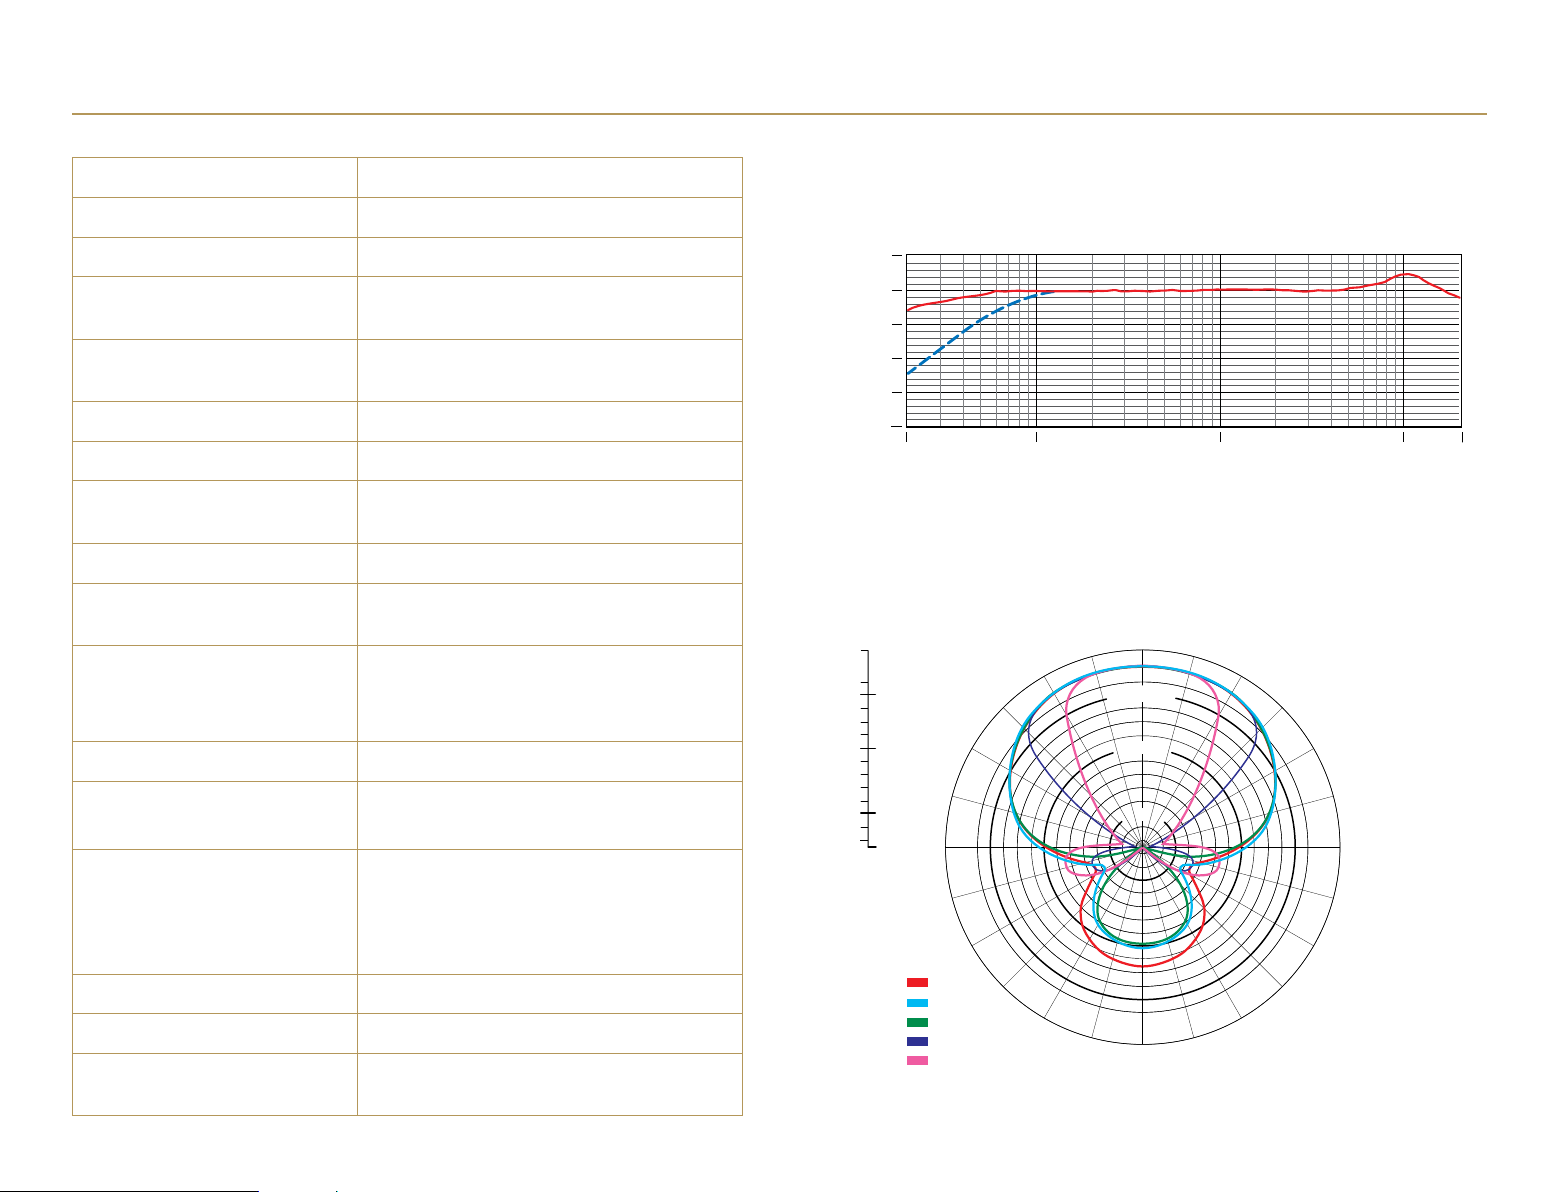
SPECIFICATIONS
Acoustic Principle:
Polar Pattern
Frequency Range:
Frequency Range:
(High Pass Filter)
Variable Level:
Output Impedence
Signal to Noise Ratio:
Equivalent Noise:
Maximum SPL:
Maximum Output:
Sensitivity:
Dynamic Range:
Power requirements:
Output Connection:
Battery Life:
Weight (No Battery):
Dimension (W x L x H):
Line gradient
Super Cardioid
40 Hz ~ 20 000 Hz
Selectable HPF
@ 80 Hz / 12 dB /octave
3 position switch
(-10 dB, 0 dB, +20 dB)
200
74 dB
20 dBA SPL
(A-weighted as per IEC651)
134 dB
+6.9 dBu
(@ 1% THD into 1K load)
-38 dB re 1V/Pa
(12.6mV @ 94 dB SPL)
± 2 dB @ 1kHz
114 dB SPL (as per IEC651)
9V alkaline battery
(Current 7.8mA)
3.5 Stereo mini jack plug
(dual mono)
Tip – left channel
Ring – right channel
> 70 hours
86g (3oz)
43mm x 150mm x 95mm
(1.69” x 6” x 3.74”)
FREQUENCY RESPONSE
10
0
-10
-20
-30
dB re 1 V./Pa
-40
20 Hz 100 1000 10 000 20 000
POLAR PATTERN
+5.0
0.0
-2.0
-4.0
-6.0
-8.0
-10.0
-12.0
-14.0
-16.0
-18.0
-20.0
-22.0
-24.0
-25.0
90˚ 270˚
dB rel. 1V/Pa
Frequency:
500 Hz:
1000 Hz:
2000 Hz:
8000 Hz:
14000 Hz:
0˚
-2.0
-10.0
-20.0
180˚
3.
FEATURES WHAT’S IN THE BOX
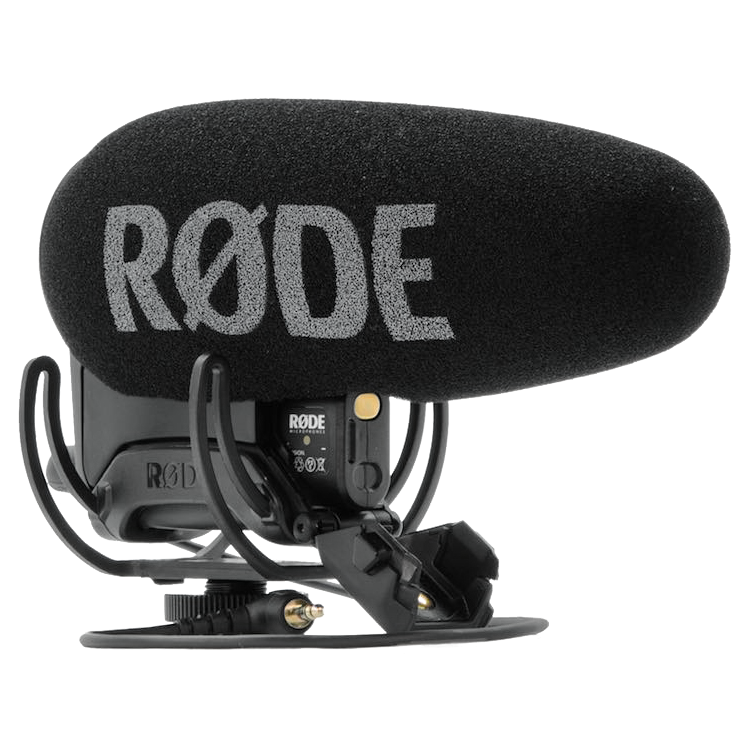
COMPACT SHOTGUN MICROPHONE
• Compact, lightweight body
• Broadcast recording quality
• Condenser microphone
• Integrated shock mount provides isolation
from handling / mechanical noise
• Integrated foam windshield
• 3.5mm stereo mini jack output (dual mono)
• Rugged construction
DETAILED CONTROL
• Two step high-pass fi lter (0, 80 Hz)
• Three position level control (-10dB, 0dB, +20dB)
• LED on / off power indicator
• Integrated billeted metal camera shoe mount
with 3/8” thread for easy boompole mounting
HIGH QUALITY PERFORMANCE
• 9V battery powered – over 70 hours use (alkaline)
• Low noise circuitry
• Flexible and lightweight cable to minimise
handling noise and ensure isolation
• Australian designed and manufactured
• 10 Year Warranty*
*Online product registr ation required.
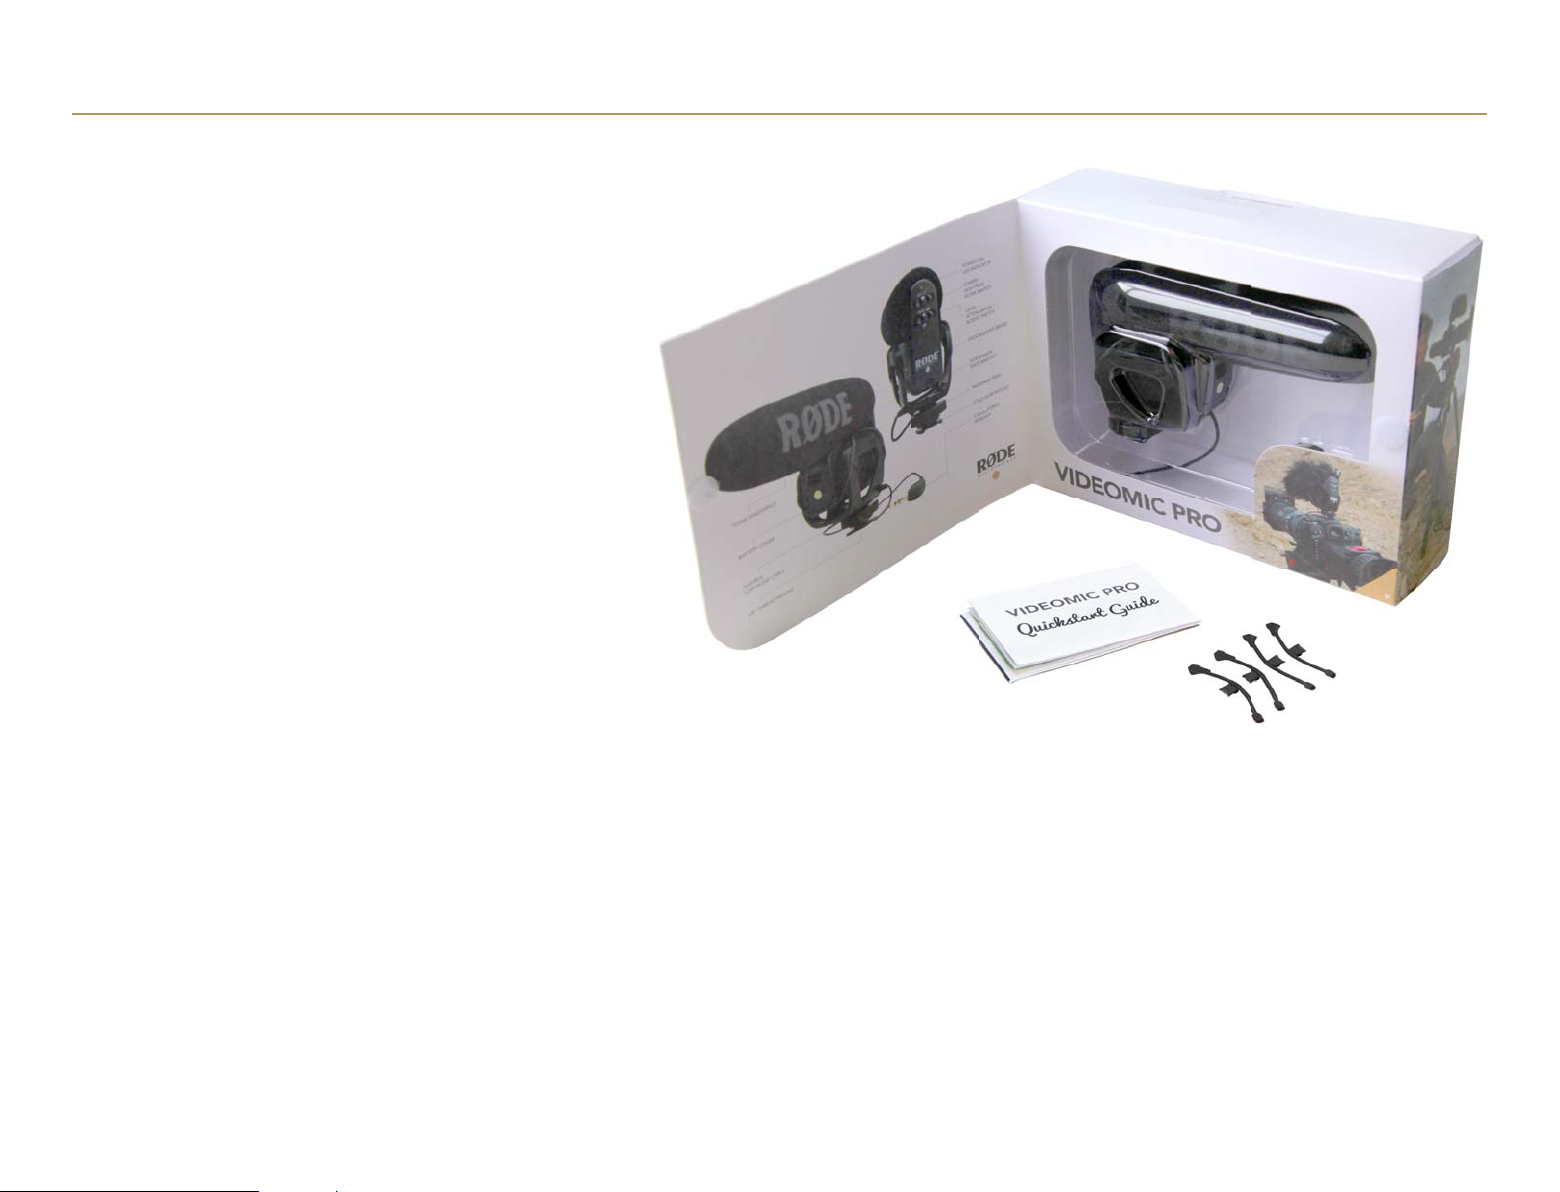
• VideoMic Pro
• Spare shock mount bands (4 pieces)
• VideoMic Pro quick start guide
• Moisture absorbent crystals
4.
VIDEOMIC PRO STRUCTURE
6
4
1
3
1. Foam windshield
2. Shock mount cradle
3. Shock mount band
4. Power / High Pass Filter switch
5. Level attenuation / boost switch
6. Power on / off LED indicator
7. Battery cover
7
2
8. Billeted metal
camera shoe mount
9. Fastening ring
10. 3/8” thread mount
11. Signal output cable
12. 3.5mm stereo mini jack
5
11
9
10 12
8
5.
SETUP AND USE
INSTALLING THE BATTERY
Before you can record with your VideoMic Pro, you will need
to install a standard 9V battery (ANS1:1604A or IEC:6LR61).
RØDE recommends using a high quality lithium or alkaline battery
to achieve the best possible battery life.
To install the battery, open the battery cover that is located on the
front of the VideoMic Pro, just under the windshield foam.
To remove the cover, hold the sides of the cover with your thumb
and third fi nger, and push up on the indentation with your index
fi nger, then pivot the bottom of the cover away.
Insert the battery with the negative terminal on top
Replace the cover by fi rst hooking the top clips in, then press the
bottom clips into place. The cover will push the battery against its
spring terminal during installation.
Push up on the indentation with your index fi nger then pivot the bottom of
the cover away
Insert the battery with the negative terminal (-) on top as shown in
the next diagram. The correct battery orientation is also shown on
the inside of the battery cover. If the battery orientation is incorrect
the cover will not close fully.
6.
Loading…
- June 17, 2024
- Rode
Table of Contents
- VideoMic Pro Plus On Camera Shotgun Microphone
- Product Information
- Specifications
- Product Usage Instructions
- Power and Charging Status
- Powering On
- Battery Release
- VideoMic Pro+ Controls
- FAQ
- Q: What type of battery is recommended for best
- Q: How do I know if my VMP+ is powered on?
- Read User Manual Online (PDF format)
- Download This Manual (PDF format)
VideoMic Pro Plus On Camera Shotgun Microphone
Product Information
Specifications
-
Model: VideoMic Pro+
-
Power Source: LB-1 Lithium-Ion Rechargeable Battery or AA
Batteries -
Connectivity: 3.5mm TRS Output, Micro USB
-
Warranty: 10 years
Product Usage Instructions
Power and Charging Status
The Power Button/Status LED (1) indicates power status via
color. The VMP+ is designed for best performance with the LB-1
Lithium-Ion Rechargeable Battery. When using the LB-1 Battery or AA
Batteries, the Status LED (1) will change color:
-
LB-1 Battery charges while inserted into the VMP+ and connected
to a power source via Micro USB Cable. -
Rechargeable AA Batteries can be used but will not charge in
the VMP+.
Powering On
-
Ensure the LB-1 Battery is fully charged or insert AA
Batteries. -
Connect the included Micro USB Cable.
-
Press and hold the Power Button (1) until the Status LED
indicates power.
Battery Release
To release the battery, follow the manufacturer’s instructions
provided with the LB-1 Lithium-Ion Rechargeable Battery.
VideoMic Pro+ Controls
The VideoMic Pro+ can be connected to a DSLR camera or portable
recorder’s 3.5mm microphone input. To disable plug-in power from
the device, press the Power (1) and HPF Buttons (2) together.
FAQ
Q: What type of battery is recommended for best
performance?
A: The LB-1 Lithium-Ion Rechargeable Battery is recommended for
optimal performance. AA Batteries can also be used but will not
charge within the VMP+.
Q: How do I know if my VMP+ is powered on?
A: The Status LED (1) will indicate power status through its
color. A solid light signifies that the device is powered on.
VideoMic Pro+
quickstart guide
VideoMic Pro+ Kurzanleitung VideoMic Pro+ Guide de démarrage rapide
VideoMic Pro+ Guía de inicio rápido VideoMic Pro+ Guida rapida VideoMic Pro+
VideoMic Pro+ VideoMic Pro+
PARTS GUIDE
Vorstellung / Description/Lista de componentes/Descrizione dei Componenti / /
/ /
Protect Your VideoMic Pro+. Register Online Now For Your 10 Year Warranty.
Tun Sie Ihrem VideoMic Pro+ etwas Gutes. Registrieren Sie es online, um die 10
-Jahres-Garantie zu aktivieren.
Protégez votre VideoMic Pro+. Enregistrez-vous maintenant pour bénéficier
d’une garantie de 10 ans.
Protege tu VideoMic Pro+. Regístrate online para disfrutar de 10 años de
garantía.
Proteggete il vostro VideoMic Pro+. Registratevi ora online per ottenere la
garanzia di 10 anni.
VideoMic Pro+ 10
VideoMic Pro+ 10
VideoMic Pro+ . 10 .
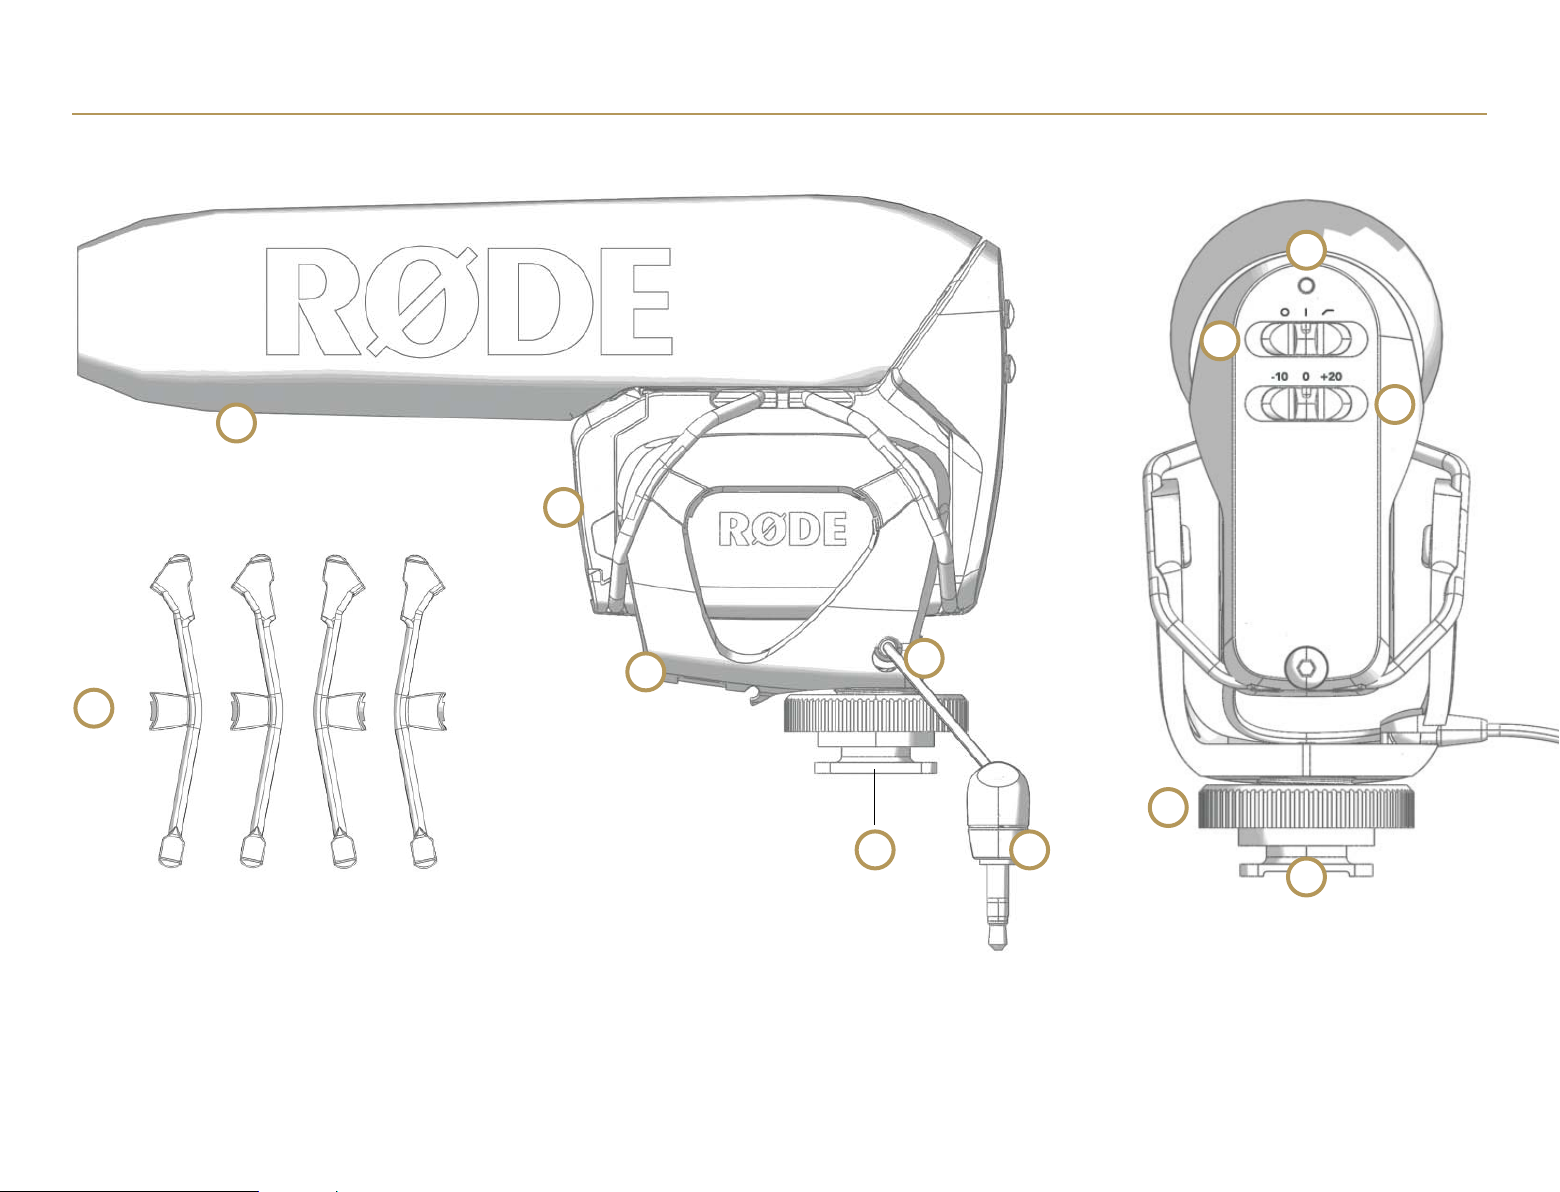
1. Power Button/Status LED 2. Safety Channel LED 3. High Pass Filter (HPF)
Button 4. Output Gain Control Button 5. High Frequency Boost LED 6. LED
Brightness Sensor 7. Battery Compartment Latches 8. 3.5mm Threaded TRS Output
Socket 9. Micro USB Charging Socket 10. Camera Shoe Mount with 3/8″ Thread 11.
3.5mm TRS Output Cable (not shown) 12. Micro USB Cable (not shown) 13. LB-1
Lithium-Ion Rechargeable Battery (not shown) 1. Ein/Aus-Taste mit Status-LED
2. Sicherheitskanal-LED 3. Taste für Hochpassfilter (HPF) 4.
Ausgangslautstärketaste 5. Anzeige-LED für Höhenanhebung 6. LED-
Helligkeitssensor 7. Verriegelungen für Batteriefach 8. Ausgangsbuchse
(Gewindebuchse, 3,5 mm, TRS-Klinke) 9. Ladebuchse (Micro-USB) 10.
Kameraschuhbefestigung (3/8″-Gewinde) 11. Ausgangssignalkabel (3,5 mm, TRS,
nicht abgebildet) 12. Micro-USB-Kabel (nicht abgebildet) 13. Lithium-Ionen-
Akku LB-1 (nicht abgebildet) 1. Bouton Power / Indicateur LED 2. LED de
fonction de canal de sécurité 3. Bouton filtre passe-haut (HPF) 4. Bouton de
réglage du gain de sortie 5. LED d’accentuation des aigus 6. Détecteur pour
brillance LED 7. Languettes de verrouillage du compartiment batterie 8. Prise
filetée de sortie sur mini-jack TRS 3,5 mm 9. Port de charge Micro USB 10.
Adaptateur appareil photo, filetage 3/8″ 11. Câble de sortie jack TRS 3,5 mm
(non représenté) 12. Câble Micro USB (non représenté) 13. Batterie
rechargeable lithium-ion LB-1 (non représentée) 1. Botón de
encendido/Indicador de estado 2. Indicador de canal de seguridad 3. Botón de
filtro de paso alto (HPF) 4. Botón de control de ganancia de salida 5.
Indicador de realce de altas frecuencias 6. Sensor de intensidad de los
indicadores luminosos 7. Pestillos del compartimento de la batería 8. Salida
estéreo (TRS) de 3,5 mm con rosca 9. Puerto de carga micro USB 10. Zapata para
cámara con rosca de 3/8 pulgadas 11. Cable de salida estéreo (TRS) de 3,5 mm
(no mostrado) 12. Cable micro USB (no mostrado) 13. Batería de iones de litio
recargable LB-1 (no mostrada)
1. Pulsante di accensione/LED di stato 2. LED Canale di sicurezza 3. Pulsante
Filtro passa-alto (HPF) 4. Pulsante Controllo guadagno di uscita 5. LED
Incremento alte frequenze 6. Sensore Luminosità LED 7. Linguette del vano
batteria 8. Uscita TRS filettata da 3,5 mm 9. Presa Micro USB per la ricarica
10. Attacco a slitta con filettatura da 3/8″ per montaggio su
fotocamera 11. Cavo di uscita TRS da 3,5 mm (non mostrato) 12. Cavo Micro USB
(non mostrato) 13. Batteria LB-1 agli ioni di litio ricaricabile (non
mostrata)
1. 2. 3. (HPF) 4. 5. 6. 7. 8. 3.5mmTRS 9. Micro USB 10. 3/8″ 11. 3.5mm TRS
12. Micro USB () 13. LB-1
1. /LED 2. LED 3. (HPF) 4. 5. LED 6. LED 7. 8. 3.5mmTRS 9. USB 10. 3/8″ 11.
3.5mm TRS() 12. USB() 13. LB-1()
1. / LED 2. LED 3. (HPF) 4. 5. LED 6. LED 7. 8. 3.5mm TRS 9. USB 10. 3/8″ 11.
3.5mm TRS ( ) 12. USB ( ) 13. LB-1 ( )
POWER AND CHARGING STATUS
Stromspeisung- und Ladestatus/Alimentation et charge/Estado de alimentación y
carga/Stato di Accensione e di Ricarica / / / /
The Power Button/Status LED (1) indicates power status via colour.
Charge · Slow flashing BLUE = charging · Fast flashing BLUE = 75% charged ·
Solid BLUE = 100% charged
Power Usage (LB-1 Battery* & AA Batteries**) The VMP+ is designed for best
performance with the LB-1 Lithium-Ion Rechargeable Battery. When using the
LB-1 Battery or AA Batteries, the Status LED (1) will change colour:
· Solid BLUE indicates LB-1 Battery · Solid GREEN indicates AA Batteries ·
Solid RED = 10 hours charge remaining · Slow flashing RED = 2 hours charge
remaining · Fast flashing RED = 30 minutes charge remaining
The LB-1 Battery charges while inserted into the VMP+ and the included Micro
USB Cable is connected to a power source. Rechargeable AA Batteries can be
used, but will not charge in the VMP+.
- Results may vary depending on environmental conditions. * Results may vary depending on the type of battery used and environmental conditions.
Die LED der Ein/Aus-Taste (1) zeigt den Ladestand durch ihre Farbe an.
Ladevorgang · BLAU, langsam blinkend: Ladevorgang läuft · BLAU, schnell
blinkend: Ladestand 75 % · BLAU, leuchtend: Ladestand 100 %
Stromversorgung (Akku LB-1 und AA-Zellen**) Optimal lässt sich das VMP+ mit
dem Lithium-Ionen-Akku LB-1 betreiben. Bei Verwendung des Akkus LB-1 oder von
AA-Batterien oder -Akkus ändert die Status-LED (1) ihre Farbe wie folgt:
· BLAU leuchtend: Betrieb mit Akku LB-1 · GRÜN leuchtend: Betrieb mit AA-
Zellen · ROT leuchtend: 10 Stunden Ladekapazität verbleiben · ROT, langsam
blinkend: 2 Stunden Ladekapazität verbleiben · ROT, schnell blinkend: 30
Minuten Ladekapazität verbleiben
Der Akku LB-1 wird aufgeladen, wenn er in das VMP+ eingesetzt und das im
Lieferumfang enthaltene Micro-USB-Kabel an eine Stromquelle angeschlossen ist.
Sie können auch AA-Akkus verwenden, doch lassen sich diese nicht im VMP+
aufladen. - Die Betriebsdauer kann je nach Umgebungsbedingungen schwanken. * Die Betriebsdauer kann je nach verwendetem Batterie-/Akkutyp und Umgebungsbedingungen schwanken.
Le voyant LED du bouton Power (1) indique, par sa couleur, le statut
d’alimentation.
Charge · Clignotement lent BLEU = en cours de charge · Clignotement rapide
BLEU = chargé à 75 % ou plus · BLEU fixe = chargé à 100 %
Autonomie (sur batterie LB-1 ou piles LR06 [AA]**) Le VMP+ est conçu pour
assurer les meilleures performances avec la batterie rechargeable lithium-ion
LB-1. Lorsque vous utilisez la batterie LB-1 ou les piles LR06 [AA], la LED
(1) change de couleur :
· BLEU fixe : alimentation sur batterie LB-1 · VERT fixe : alimentation sur
piles LR06 [AA] · ROUGE fixe = autonomie restante 10 heures · Clignotement
lent ROUGE = autonomie restante 2 heures · Clignotement rapide ROUGE =
autonomie restante
30 minutes
La batterie LB-1 se charge dès qu’elle est insérée dans le VMP+ et que le
câble Micro USB livré est connecté à une source d’alimentation. Vous pouvez
utiliser des piles LR06 [AA] rechargeables, mais il est impossible de les
recharger dans le VMP+. - L’autonomie effective peut varier selon les conditions environnementales. ** L’autonomie effective peut varier selon le type de pile utilisé et les conditions environnementales.
El botón de encendido/indicador de estado (1) indica el estado de energía por
colores.
Carga · Parpadeo lento AZUL = cargando · Parpadeo rápido AZUL = 75% de carga ·
AZUL fijo = 100% de carga
Consumo de energía (batería LB-1* y pilas AA**) El VMP+ ha sido diseñado para
funcionar óptimamente con la batería de iones de litio recargable LB-1.
Dependiendo de si se utiliza la batería LB-1 o pilas AA, el indicador de
estado (1) cambia de color:
· AZUL fijo indica batería LB-1 · VERDE fijo indica pilas AA · ROJO fijo =
quedan 10 horas de carga · Parpadeo lento ROJO = quedan 2 horas de carga ·
Parpadeo rápido ROJO = quedan 30 minutos de carga
La batería LB-1 se recarga mientras está dentro del VMP+ y el cable micro USB
está conectado a una fuente de alimentación. Puede utilizar pilas AA
recargables, pero estas no se recargarán en el VMP+.
- Los resultados pueden variar dependiendo de las condiciones ambientales. * Los resultados pueden variar dependiendo del tipo de pilas y las condiciones ambientales.
Il pulsante di accensione/LED di stato (1) segnala lo stato di alimentazione
in base al colore.
Carica · Lampeggio lento BLU = In carica · Lampeggio veloce BLU = Carica al
75% · Fisso BLU = Carica al 100%
Alimentazione (batteria LB-1 e batterie in formato AA**) L’unità VMP+ è stata
progettata per fornire le migliori prestazioni con la batteria agli ioni di
litio ricaricabile LB-1 . L’utilizzo della batteria LB-1 oppure delle batterie
in formato AA viene segnalato dal LED di stato (1) con i seguenti colori:
· Fisso BLU indica l’uso della batteria LB-1 · Fisso VERDE indica l’uso delle
batterie in formato in AA · Fisso ROSSO = autonomia di circa 10 ore ·
Lampeggio lento ROSSO = autonomia di circa 2 ore · Lampeggio veloce ROSSO =
autonomia di circa 30 minuti
Collegando il cavo Micro USB a una sorgente di alimentazione è possibile
ricaricare la batteria LB-1 direttamente nell’unità VMP+. Si possono
utilizzare batterie AA ricaricabili ma non è possibile ricaricarle
direttamente nell’unità VMP+. - I valori stimati possono variare a seconda delle condizioni ambientali. * I valori stimati possono variare a seconda delle condizioni ambientali e del tipo di batterie utilizzato.
1
· BLUE = · BLUE = 75 · BLUE = 100
LB-1 AA** LB-1VMP+RØDE LB-1AA /1
· LB-1 · AA · =10 · =2 · =30
RØDE LB-1VMP+ Micro USBAA VMP + - **
/LED(1)
· = · =75% · =100%
(LB-1*&3**) VMP+LB-1 LB-13 LED(1):
· LB-1 · 3 · =10 · =2 · =30
LB-1VMP+USB 3VMP+
/ LED(1) .
· = · = 75% · = 100%
(LB-1 * AA **) VMP+ LB-1 . LB-1 AA LED (1) .
· LB-1 · AA · = 10 · = 2 · = 30
LB-1 VMP+ USB . AA VMP + .
- . ** .
POWERING ON
Einschalten/Mise sous tension/Activación/Accensione/ // / The VideoMic Pro+
can be powered by the LB-1 Battery, 2 x AA Batteries or via the Micro USB
Charging Socket. 1. Squeeze Battery Compartment Latches (7) to open. 2. Insert
the included LB-1 Battery, 2 x AA Batteries or connect the
included Micro USB Cable. 3. Press and hold the Power Button (1) until the
Status LED
illuminates. Das VideoMic Pro+ kann mit dem Akku LB-1 oder zwei AA-Zellen oder
aber über die Micro-USB-Ladebuchse mit Strom versorgt werden. 1. Drücken Sie
die Verriegelungen (7) des Batteriefachs zusammen. 2. Legen Sie den im
Lieferumfang enthaltenen Akku LB-1 oder
zwei AA-Zellen ein, oder schließen Sie das im Lieferumfang enthaltene Micro-
USB-Kabel an. 3. Drücken Sie die Ein/Aus-Taste (1) so lange, bis die Status-
LED leuchtet. Le VideoMic Pro+ peut être alimenté via la batterie LB-1, 2
piles LR06 [AA] ou le port de charge Micro USB. 1. Pour ouvrir le compartiment
batterie, appuyez sur les languettes (7). 2. Insérez la batterie LB-1 livrée,
2 piles LR06 [AA] ou branchez le câble Micro USB livré. 3. Maintenez enfoncé
le bouton Power (1) jusqu’à ce que sa LED s’allume. El VideoMic Pro+ puede ser
alimentado mediante la batería LB-1, dos pilas AA o el puerto de carga micro
USB. 1. Apretar los pestillos del compartimento de la batería (7) para abrir.
2. Introducir la batería LB-1, dos pilas AA o conectar el cable micro USB. 3.
Mantener presionado el botón de encendido (1) hasta que el indicador de estado
se ilumine. L’unità VideoMic Pro+ può essere alimentata mediante una batteria
LB-1, due batterie in formato AA o attraverso la presa di ricarica Micro USB.
- Premere le linguette del vano batteria (7) per aprirlo. 2. Inserire la
batteria LB-1 inclusa, oppure due batterie in formato AA; in alternativa,
collegare il cavo Micro USB incluso. 3. Tenere premuto il pulsante di
accensione (1) fino a che il LED di stato si illumina. VideoMic Pro+RØDE LB-
12AAMicro USB 1. 2. RØDE LB-1 ()2AAMicro USB 3. (1)LED VideoMic Pro+LB-132USB - (7) 2. LB-132USB 3. LED(1) VideoMic Pro+ LB-1 , AA 2 USB . 1. (7) . 2. LB-1
, AA 2 USB . 3. LED (1) .
BATTERY RELEASE
VIDEOMIC PRO+ CONTROLS
Bedienelemente des VideoMic Pro+/Commandes du VideoMic Pro+/Controles del
VideoMic Pro+/Controlli di VideoMic Pro+ / VideoMic Pro+ /VideoMic Pro+ /
VideoMic Pro+ /
· The High Pass Filter (HPF) will reduce low frequencies such as the
rumble from traffic or air-conditioning. Press the HPF Button (2) to select
one of the two available filter settings (75Hz, 150Hz) or to disable the
filter. When both LEDs are off, the filter is disabled. · The Output Gain
Control Button will switch the microphone output gain between 0, -10 and
+20dB. Press the Output Gain Control Button (3) to cycle through the three
settings. The LED will illuminate indicating the active setting. When both
LEDs are off, the output level is set to 0dB. · The High Frequency Boost will
boost high frequencies above 7kHz by 5dB which enhances clarity and detail in
your recording. This is particularly helpful if you are using a RØDE Deadcat
Windshield or other wind protection. Press the HPF (2) and Output Gain Control
(3) Buttons together to enable or disable the High Frequency Boost. When the
LED (4) is off, the High Frequency Boost is disabled. · The Safety Channel
will lower the output of the RIGHT channel of the dual-mono signal by 10dB.
This will help ensure the signal does
not clip when unexpected spikes in level occur. Press the Output Gain Control
Button (3) and Power Button (1) together to enable or disable the Safety
Channel. When the LED (5) is off, the output on both the Left and Right
channels is the same. · The VMP+ will automatically power on when plugged into
a
DSLR camera or portable recorder’s 3.5mm microphone input if plug-in power is
supplied by the device. To disable this feature, press the Power (1) and HPF
Buttons (2) together. The HPF and Output
Gain Control LEDs will flash green three times to indicate this feature is
disabled and will flash green once when it is enabled.
· Mit dem Hochpassfilter (HPF) lassen sich tieffrequente Störsignale
(Verkehrsgeräusche, Klimaanlage usw.) absenken. Drücken Sie die HPF-Taste (2)
wiederholt, um eine der beiden vorhandenen Filtereinstellungen (75 Hz, 150 Hz)
auszuwählen oder aber das Filter zu deaktivieren. Wenn beide LEDs erloschen
sind, ist das Filter abgeschaltet. · Mit der Ausgangslautstärketaste können
Sie den Ausgangspegel des Mikrofons zwischen 0, 10 und +20 dB umschalten.
Drücken Sie die Ausgangslautstärketaste (3) wiederholt, um die drei
Einstellungen nacheinander aufzurufen. Die aktive Einstellung wird durch die
LEDs signalisiert. Wenn beide LEDs erloschen sind, ist der Ausgangspegel auf 0
dB festgelegt. · Mit der Funktion zur Höhenanhebung wird der Höhenbereich
(über 7 kHz) um 5 dB angehoben. Hierdurch werden Klarheit und Detailtreue
Ihrer Aufnahme verbessert. Dies ist insbesondere bei Verwendung des RØDE
Deadcat oder eines anderen Windschutzes praktisch. Drücken Sie die HPF-Taste
(2) und die Taste für die Ausgangslautstärkeregelung (3) gemeinsam, um die
Höhenanhebung ein- oder auszuschalten. Wenn die LED (4) aus ist, ist die
Höhenanhebung abgeschaltet. · Der Sicherheitskanal senkt die
Ausgangslautstärke des RECHTEN Kanals des Doppelmonosignals um 10 dB ab. Auf
diese Weise wird ein unerwünschtes Übersteuern des Signals bei unerwarteten
Pegelspitzen vermieden. Drücken Sie die Ausgangslautstärketaste (3) und die
Ein-/AusTaste (1) gemeinsam, um den Sicherheitskanal zu aktivieren oder zu
deaktivieren. Wenn die LED (5) aus ist, führen der linke und der rechte Kanal
identische Pegel.
POWER BUTTON 1
SAFETY CHANNEL LED
5
HPF 2 OUTPUT GAIN CONTROL 3
HIGH FREQUENCY BOOST LED 4
· Das VMP+ schaltet sich beim Anschließen an eine DSLR-Kamera oder den
Mikrofoneingang (3,5 mm) eines tragbaren Recorders automatisch ein, sofern der
betreffende Anschluss durch das Gerät mit Spannung versorgt wird. Zum
Deaktivieren dieser Funktion drücken Sie die Ein/Aus-Taste (1) und die HPF-
Taste (2) gemeinsam. Die LEDs der HPF- und der Ausgangslautstärketaste blinken
dreimal grün auf, um anzuzeigen, dass die Funktion deaktiviert wurde. Nach dem
Einschalten der Funktion blinken die LEDs einmal grün auf.
· Le filtre passe-haut (HPF) atténue les fréquences graves (rumeur de trafic,
climatisation…) Appuyez sur le bouton HPF (2) pour choisir l’un des réglages
du filtre (75 Hz, 120 Hz) ou pour le désactiver. Lorsque les deux LED sont
éteintes, le filtre est désactivé. · Le bouton de réglage du gain permet de
choisir le gain de sortie du microphone : 0, -10 ou+20 dB.
Appuyez sur le bouton de réglage du gain (3) pour passer d’une position à
l’autre. La LED correspondante s’allume pour indiquer la valeur en cours. Si
les deux LED sont éteintes, le gain de sortie est de 0 dB. · La fonction
d’accentuation des aigus amplifie de 5 dB les fréquences supérieures à 7 kHz,
ce qui améliore la clarté et les détails dans votre enregistrement. Cette
fonction est particulièrement utile si vous utilisez une bonnette RØDE Deadcat
ou autre. Appuyez simultanément sur les boutons HPF (2) et Gain (3) pour
activer/désactiver l’accentuation des aigus. Lorsque la LED (4) est éteinte,
l’accentuation des aigus est désactivée. · La fonction de canal de sécurité
atténue de 10 dB la sortie du canal DROIT en mode double mono. En cas de
crêtes soudaines de signal, cette fonction peut éviter un écrêtage du signal.
Pour activer/désactiver la fonction de canal de sécurité, appuyez
simultanément sur les boutons Gain (3) et Power (1). Lorsque la LED (5) est
éteinte, le niveau de sortie est identique sur les canaux gauche et droit. ·
Le VMP+ s’allume automatiquement dès insertion sur un appareil reflex
numérique ou branchement sur l’entrée micro jack 3,5 mm d’un enregistreur
portable si l’appareil fournit une tension d’alimentation. Pour désactiver
cette fonction, appuyez simultanément sur les boutons Power (1) et HPF (2).
Les LED HPF et Gain clignotent en vert trois fois pour indiquer la
désactivation de cette fonction, et une seule fois pour indiquer son
activation.
· TEl filtro de paso alto (HPF) reduce las bajas frecuencias como el ruido
sordo del tráfico o del aire acondicionado. Presionar el botón HPF (2) para
seleccionar uno de los dos ajustes disponibles (75 Hz, 150 Hz) o para
desactivar el filtro. Cuando ambos indicadores luminosos están apagados, el
filtro está desactivado. · El botón de control de ganancia de salida conmuta
la ganancia de salida del micrófono entre 0, -10 y +20 dB. Presionar el botón
de control de ganancia de salida (3) para cambiar
entre los diferentes ajustes. El indicador se iluminará indicando el ajuste
activo. Cuando ambos indicadores están apagados, el nivel de salida es 0 dB. ·
El realce de altas frecuencias aumenta 5 dB las altas frecuencias
por encima de 7 kHz, lo cual mejora la claridad y el detalle de las
grabaciones. Esto es particularmente útil si se utiliza el paravientos RØDE
Deadcat o algún otro tipo de protector contra el viento. Presionar los botones
HPF (2) y de control de ganancia de salida (3) al mismo tiempo para activar o
desactivar el realce de altas frecuencias. Cuando el indicador (4) está
apagado, el realce de altas frecuencias está desactivado.
· El canal de seguridad reducirá la salida de canal DERECHO de la señal mono-
dual en 10 dB. Esto ayuda a garantizar que la señal no se recorta si hay algún
pico de nivel inesperado. Presionar el botón de control de ganancia de salida
(3) y el botón de encendido (1) al mismo tiempo para activar o desactivar el
canal de seguridad. Cuando el indicador (5) está apagado, la salida en los
canales izquierdo y derecho es la misma. · El VMP+ se enciende automáticamente
al conectarse a una
cámara réflex digital (DSLR) o al jack (3,5 mm) de entrada de micrófono de un
grabador portátil si el dispositivo suministra alimentación a través del
conector (plug-in power). Para desactivar esta función, presionar los botones
de encendido (1) y HPF (2) al mismo tiempo. Los indicadores HPF y de control
de ganancia de salida parpadearán en verde tres veces para indicar que esta
función está desactivada y parpadearán en verde una vez si está activa.
· Il Filtro passa-alto (HPF) permette di ridurre la sensibilità alle basse
frequenze, come ad esempio quelle generate dal traffico stradale o dall’aria
condizionata. Premere il pulsante HPF (2) per selezionare uno dei due tipi di
filtro disponibili (75 Hz, 150 Hz) oppure per disabilitarlo del tutto. Quando
entrambi i LED sono spenti il filtro è disabilitato. · Il pulsante Controllo
del guadagno di uscita permette di alternare il livello di guadagno del
microfono tra 0, -10 e +20 dB. Premere ripetutamente il pulsante Controllo del
guadagno di uscita
(3) per alternare le tre impostazioni disponibili. Il LED si illuminerà per
indicare l’impostazione selezionata. Se entrambi i LED sono spenti, il livello
di uscita è impostato a 0 dB. · La funzione Incremento alte frequenze permette
di aumentare di 5 dB le frequenze acute sopra i 7 kHz in modo da ottenere una
registrazione più chiara e definita. Ciò risulta particolarmente utile se si
sta utilizzando uno schermo antivento modello RØDE Deadcat o altro tipo di
protezione simile. Per abilitare o disabilitare la funzione Incremento alte
frequenze, premere simultaneamente il pulsante HPF (2) e il pulsante Controllo
del guadagno di uscita (3). Se il LED (4) è spento, la funzione Incremento
alte frequenze è disabilitata. · Il Canale di sicurezza abbassa di 10 dB il
livello di uscita del canale DESTRO del segnale dual mono. In tal maniera si
evita che il segnale subisca una distorsione in presenza di un transiente di
picco. Per abilitare o disabilitare la funzione Canale di sicurezza, premere
simultaneamente il pulsante Controllo del guadagno di uscita (3) e
il pulsante di accensione (1). Se il LED (5) è spento, il livello di uscita
dei canali Sinistro e Destro è identico. · L’unità VMP+ si accende
automaticamente quando la si collega
all’ingresso microfonico da 3,5 mm di una fotocamera DSLR o di un registratore
portatile se questo è in grado di fornire alimentazione. Se si desidera
disabilitare questa caratteristica, premere simultaneamente il pulsante di
alimentazione (1) e il pulsante HPF (2). I LED HPF e Controllo del guadagno di
uscita lampeggiano tre volte
di colore verde per indicare che la caratteristica è stata disattivata e una
volta di colore verde per segnalare che è stata abilitata.
· (HPF) HPF(2)75Hz150Hz LED · 0-10+ 20dB 3 LED LED0dB · 7kHz5dB RØDE Deadcat
HPF23 LED4 · 10dB 31 LED5 · VMP +VMP+ 3.5mm 1HPF2 HPF LED
· (HPF) HPF(2)2(75Hz150Hz) LED · 0-10 +20dB (3)3 LEDLED 0dB · 7kHz5dB RØDE
Deadcat HPF(2)(3) LED(4) · 10dB (3)(1) LED(5) · VMP+3.5mm ( ) (1)HPF(2)HPF LED
LED3 1
· (HPF) )1′
)[
)[
-&% ·
E#
-&%-&%E# · (High Frequency Boost)L)[E# 3%& %FBEDBU )1′
-&%
· E#
-&%
· %4-3 NN7.1
)1′
)1′ -&% .
Read User Manual Online (PDF format)
Read User Manual Online (PDF format) >>
Download This Manual (PDF format)
Download this manual >>