
-
Страница 1
RAFFINERAD RUTINERAD GB DE[…]
-
Страница 2
[…]
-
Страница 3
ENGLISH 4 DEUTSCH 22[…]
-
Страница 4
Contents Safety information 4 Safety instructions 5 Installation 7 Product description 7 Before first use 8 Daily use 8 Clock functions 10 Using the accessor ies 11 Additional functions 12 Helpful hints and tips 13 Care and cleaning 14 What to do if… 16 Technical data 18 Environment concerns 18 IKEA GUARANTEE 19 Subject to change without notice. […]
-
Страница 5
General Safety • Internally the appliance become s hot when in oper ation. Do not touch the heating elements th at are in the appliance. Al- ways use oven gloves to re move or put in accessor ies or ovenware. • Do not use a steam cleaner to clean the appliance. • Before maintenance cut the power supply. • Do not use harsh abrasive clea ners[…]
-
Страница 6
• Use only correct isolation devices: line protecting cut-outs, fuses (screw type fuses removed from the holder), earth leakage trips and contactors. • The electrica l installation must have an isolation device whi c h lets you disconnect the appliance from the mains at all poles. The isolation device must have a contact opening width of minimu[…]
-
Страница 7
Disposal Warning! Risk of injury or suffocation. • Disconnect the appliance from the mains supply. • Cut off the mains cable and discard it. • Remove the door catch to prevent chil- dren and pets to get closed in the appli- ance. Installation Warning! Refer to the Safety chapters. Refer to the Assembly Instructions for the installation. Elect[…]
-
Страница 8
Before first use Warning! Refer to the Safety chapters. Initial cleaning • Remove all accessories and r emovable shelf supports (if applicable ). • Clean the appliance before first use. Important! Refer to the chapter «Care and cleaning». Setting th e time of day The display shows and 12:00 . 12 flash- es. 1. Press + or — to set the c[…]
-
Страница 9
3. To deactivate the appliance, turn the knob for the oven functions to the off position. Oven functions Oven function Application Off position The appliance is off. Forced Air Cook- ing To bake on the maximum temperature on thr ee oven lev- els at the same time. When you use this function, de- crease the oven temperature by 20 — 40 °C from the st[…]
-
Страница 10
Display 1 7 2 3 4 5 6 7 1 Time and temperatur e 2 Heat-up and residual heat indicator 3 Water tank (selected models only) 4 Core temperature sensor (selected models only) 5 Door lock (selected models only) 6 Hours / minut es 7 Clock functions Buttons Button Function Description Clock To set a clock function. , Minus, plus To set the time. Heat-up a[…]
-
Страница 11
6. When the set time ends, the symbol or and the set time flash. The acous- tic signal sounds fo r two minutes. The appliance deactivate s. Press a bu tton or open the appliance door to stop the signal. If you pre ss while setting the time for Duration , the appliance switches to setting the End function. Setting the Minute Min der Used to set a co[…]
-
Страница 12
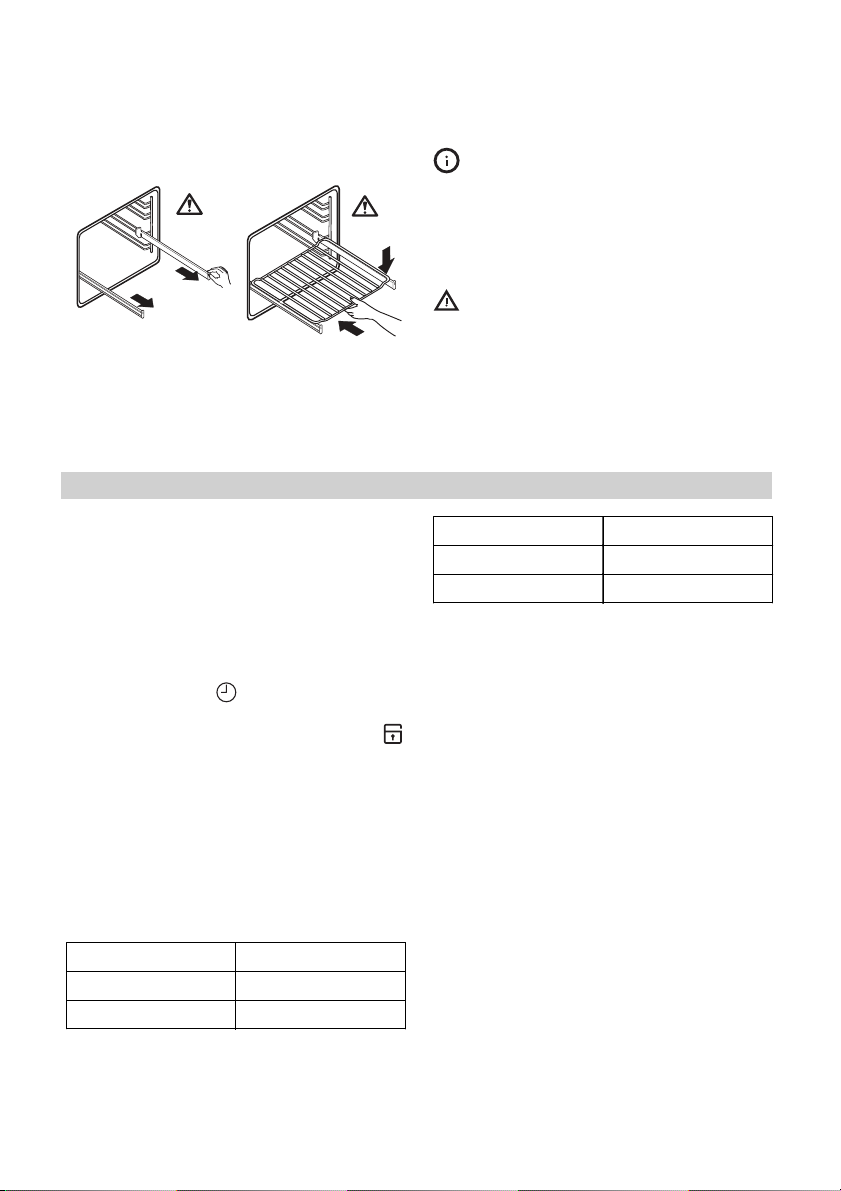
1 °C Pull out the right and left hand tele- scopic runners. 2 °C Put the wire shelf on the telescopic run- ners and carefully push them into the appliance. You can also use the telescopic runners with the trays or pans supplied with the appliance (refer to “P roduct description”). Make sure you push back the telescopic runners fully in the ap[…]
-
Страница 13
Helpful hints and tips • The appliance has four shelf levels. Count the shelf levels from the bottom of the ap- pliance floor. • The appliance has a special system which circulates the air and constantly recycles the steam. With this system you can cook in a steamy environment and keep the food soft inside and crusty outside. It de- creases the[…]
-
Страница 14
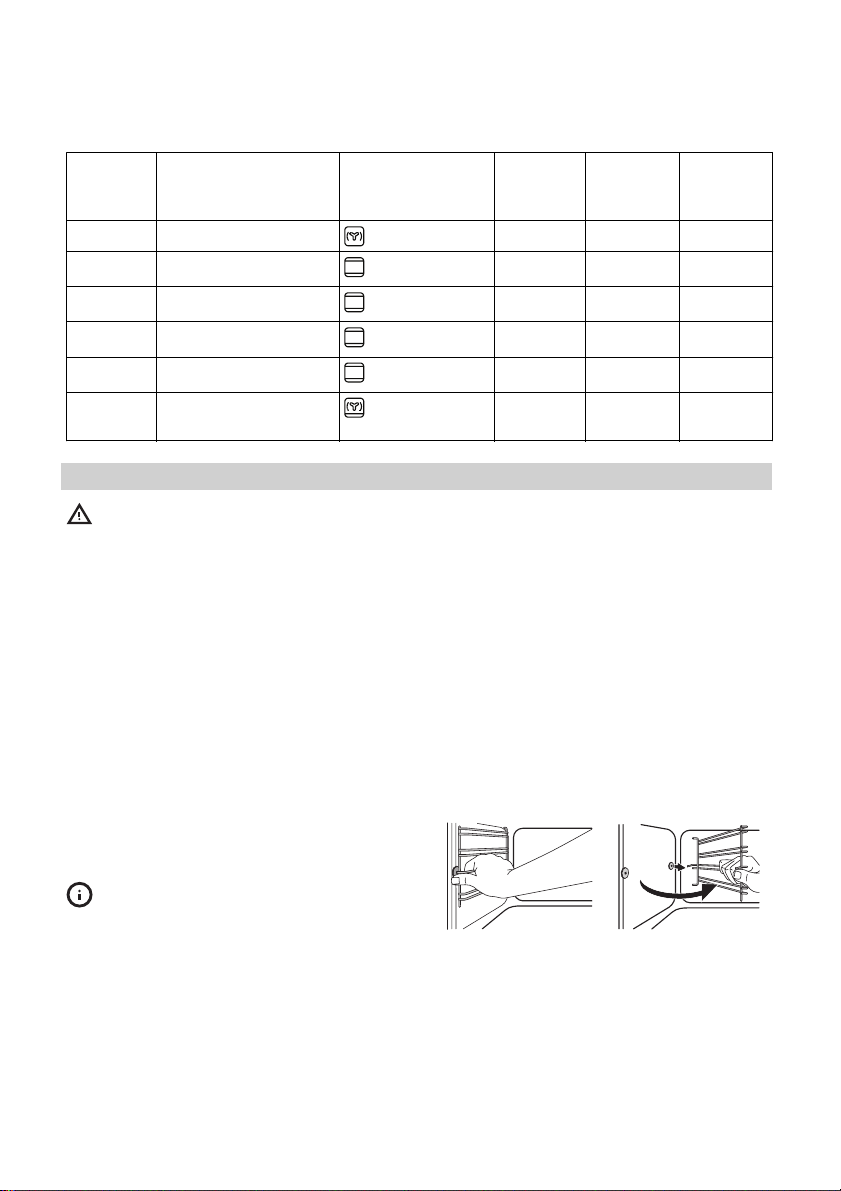
Weight (kg) Food Oven Function Level Oven tempera- ture (°C) Cooking Time (min) Instant cakes 2 160 45 — 55 1P i e s 2 160 80 — 100 Biscuits 3 140 25 — 35 2 Lasagne 2 180 45 — 60 1W h i t e B r e a d 2 190 50 — 60 1P i z z a 1 190 — 200 20 — 30 Care and cleaning Warning! Refer to the Safety chapters. • Clean the front of the appliance with a s[…]
-
Страница 15
The rounded ends of the shelf supports must point to the front. Oven lamp Warning! Be careful wh en you change the oven lamp. There is a risk of electrical shock. Before you change the oven lamp: • Deactivate the oven. • Remove the fuse s in the fuse box or deac- tivate the circuit breaker. Put a cloth on the bottom of the oven to prevent damag[…]
-
Страница 16
7 2 1 Carefully lift (step 1) and remove (step 2) the glass panels one by one. Start from the top panel. Clean the glass panels with water and soap. Dry the glass panels carefully. Installing the door and the glass panels When the cleaning is completed, install the glass panels and the oven door. Do the above steps in the opposite sequence. Make su[…]
-
Страница 17
Problem Possible cause Remedy The oven does not heat up. The display shows Demo . The demo mode is activa- ted. 1. Deactivate the appli- ance. 2. Press and hold the but- ton + . 3. When an acoustic signal sounds, turn the knob for the oven functions to the first function. Demo flashes in the display. 4. Turn the knob for the oven functions to the o[…]
-
Страница 18
Technical data Dimensions (internal) Width Height Depth 437 328 401 Usable volumes 57 l Area of baking tray 1140 cm² Top heating element 800 W Bottom heating element 1000 W Grill 1650 W Fan 2000 W Total rating 2500 W Voltage 230 V Frequency 50 Hz Number of functions 9 Energy Consumption with a standard load, Conventional (Top and Bottom Heat) 0.79[…]
-
Страница 19
IKEA GUAR ANTEE How long is th e IK EA guarantee valid? This guarantee is vali d for five (5) years from the original date of purchase of Y our appliance at IKEA, un less the appliance is named LAGAN in which case two (2) years of guarantee apply. The original sales re- ceipt is required as proof of purchase. If service work i s carried out un der […]
-
Страница 20
• Transportation damages. If a customer transports the produc t to their home or other address, IKEA is not liable for any damage that may occur during transport. However, if IKEA delivers the product to the customer’s delivery address, then damage to the product that occurs during this delivery will be covered by this guar- antee. • Cost […]
-
Страница 21
Do You need extra help? For any additional questions not related to After Sales of your appliances, please con- tact our nearest IKEA store call centre. We recommend you read the appliance d ocu- mentation carefully be fore contacting us. ENGLISH 21[…]
-
Страница 22
Inhalt Sicherheitsinformationen 22 Sicherheitshinweise 23 Montage 25 Gerätebeschreibung 26 Vor der ersten Inbetriebnahme 26 Täglicher Gebrauch 27 Uhrfunktionen 29 Verwendung des Zubehörs 30 Zusatzfunktionen 31 Praktische Tipps und Hinweise 31 Reinigung und Pflege 33 Was tun, wenn … 35 Technische Daten 37 Umwelttipps 37 IKEA Garantie 38 Änderu[…]
-
Страница 23
Allgemeine Sicherheit • Während des Betriebs wird da s Geräteinnere heiss. Berüh- ren Sie nicht die Heizelemente im Gerät. Verwenden Sie zum Anfassen des Zubehörs und der Töpfe wärmeisolierende Handschuhe. • Benutzen Sie zum Reinigen des Geräts keinen Dampfreiniger. • Unterbrechen Sie vor Wartun gsarbeiten die Stromversor- gung. • B[…]
-
Страница 24
• Achten Sie darauf, dass das Netzkabel die Gerätetür nicht be rührt, insbesondere wenn die Tür heiß ist. • Alle Teile, die gegen d irektes Berühren schützen sowie die isol ierten Teile müssen so befestigt werden, d ass sie nicht ohne Werkzeug entfernt werden können. • Stecken Sie den Netzstecker erst nach Abschluss der Monta ge in d[…]
-
Страница 25
Reinigung und Pflege Warnung! Risiko von Verletzungen, Brand oder Beschädigungen am Gerät. • Schalten Sie vor Reinigungsa rbeiten im- mer das Gerät aus und ziehen Sie den Netzstecker aus der Steckdose. • Vergewissern Si e sich, dass das G erät abgekühlt ist. Zusätzlich besteht die Ge- fahr, dass die Glasscheiben brechen. • Ersetzen Sie […]
-
Страница 26
Gerätebeschreibung 1 2 3 5 4 6 8 7 1 Backofen-Einstell knopf 2 Elektronischer Programms peicher 3 Temperaturwahlknopf 4 Lüftungsöffnungen 5 Rost 6 Backofenlampe 7 Gebläse 8 Typenschild Backofenzubehör • Gitterrost x 1 Für Kochgeschirr , Kuchenformen, Br aten. • Kuchenblech x 1 Für Kuchen und Plätzchen. • Kuchenblech hochrandig x 1 Zum[…]
-
Страница 27
4. Lassen Sie das Gerät zehn Minuten lang eingeschaltet. 5. Stellen Sie die Funktion und die Höchsttemperatur ein. 6. Lassen Sie das Gerät zehn Minuten lang eingeschaltet. Das Zubehör kann heißer werden als bei normalem Gebrauch. Das Gerät kann Ge- ruch und Rauch verströmen. Das ist normal. Sorgen Sie für eine ausreichende Belüftung. Mecha[…]
-
Страница 28
Backofenfunktion Anwendung Ober- und Un- terhitze Zum Backen und Braten auf einer Ebene. Grill Zum Grillen flacher Lebensmi ttel in der Mitte des Rostes und zum Toasten. Unterhitze Zum Backen von Kuchen mit krossen Böden und zum Ein- kochen von Lebensmitteln. Umluftgrillen Zum Braten von grösseren Fleischstücken oder Geflügel auf einer Ebene. A[…]
-
Страница 29
Taste Funktion Beschreibung , Minus, Plus Einstellen der Zeit. Aufheiz- und Restwärmeanzeige Wenn Sie eine Backofenfunktion einschal- ten, leuchten die Balken im Display nacheinander auf. Mit den Balken wird der Anstieg bzw. das Fallen der Backofentem- peratur gekennzeichnet. Wenn Sie das Gerät ausschalten, zeigt das Display die Restwärme an, we[…]
-
Страница 30
1. Drücken Sie wiederholt auf , bis und 00 im Display blinken. 2. Stellen Sie den Kurz zeitwecker mit der Taste + oder — ein. Beim ersten Einste l- len werden die Minuten und Sekunden berechnet. Ist die ei ngestellte Zeit län- ger als 60 Minuten, wird im Display das Symbol angezeigt. Das Gerät be- rechnet jetzt die Zeit in Stunden und Minuten. 3[…]
-
Страница 31
Zusatzfunktionen Kindersicherung Wenn die Kindersicherung eingeschaltet ist, kann der Backofen nicht bedient werden. Damit wird sichergestel lt, dass Kinder das Gerät nicht versehentlich einschalten. Ein- und Ausschalten der Kindersicherung: 1. Stellen Sie keine Backofenfunkti on ein. 2. Halten Sie die Tasten und + gleich- zeitig 2 Sekunden lang g[…]
-
Страница 32
Backen von Kuchen • Die Backofentür nicht öffnen, bevor 3/4 der Backzeit abgelaufen ist • Wenn Sie zwei Backblech e gleichzeitig nutzen, lassen Sie ei ne Ebene dazwischen frei. Garen von Fleisch und Fisch • Setzen Sie beim Garen von Speisen mit hohem Fettgehalt eine Brat- und Fett- pfanne ein, damit keine dauerhaften Fle- cken im Backofen v[…]
-
Страница 33
Reinigung und Pflege Warnung! Siehe Sicherheitshinweise. • Feuchten Sie ein wei ches Tuch mit war- mem Wasser und etwas Reinigungsmittel an, und reinigen Sie damit die Vordersei — te des Geräts. • Reinigen Sie die Metalloberflächen mi t einem handelsüblichen Reinigungsmittel. • Reinigen Sie den Innenraum des Back- ofens nach jedem Gebrauch[…]
-
Страница 34
1. Drehen Sie die Glasab deckung gegen den Uhrzeigersinn und nehmen Sie sie ab. 2. Reinigen Sie die Glasa bdeckung. 3. Ersetzen Sie die Backofenl ampe mit ei- ner 25 W, 230 V (50 Hz) und bis zu 300 °C hitzebeständigen Glühbirne (Sockel: E14). 4. Bringen Sie die Gl asabdeckung wieder an. Reinigung der Backofen-Tür Die Backofentür hat drei Glass[…]
-
Страница 35
7 2 1 Heben Sie eine Glasscheibe nach der anderen vor- sichtig an (Schritt 1) und entfernen Sie sie (Schritt 2). Be- ginnen Sie mit der obersten Glasschei — be. Reinigen Sie die Gl asscheiben mit Wasser und Spülmittel. Trocknen Sie di e Glasschei- ben sorgfältig ab. Einsetzen der Backofentür und der Glasscheiben Nach der Reinigung müssen die Ba[…]
-
Страница 36
Problem Mögliche Ursache Abhilfe Der Backofen heizt nicht. Die Sicherung im Siche- rungskasten hat ausgelöst. Prüfen Sie die Sicherung. Falls die Sicherung öfter als einmal auslöst, wenden Sie sich an eine Elektrofachkraft. Die Backofenlampe leuchtet nicht. Die Backofenlampe ist de- fekt. Ersetzen Sie die Backofen- lampe. Der Backofen heizt ni[…]
-
Страница 37
Wir empfehlen, hier folgende Daten zu notieren: Modell (MOD.) ……… …………. ………. ……… Produktnummer (P NC) … ………. ……….. ………… ….. Seriennummer (S.N.) ……… …………. ………. …….. . Technische Daten Abmessungen (innen) Breite Höhe Tiefe 437 328 401 Nutzvolumen 57 Liter Grösse des Kuchenble[…]
-
Страница 38
IKEA Garantie Wie lang ist die IKEA Garantie gültig? Diese Garantie ist für (5) fünf Jahre gültig ab dem Originalkaufdatum Ihres Gerätes bei IKEA; sollte das Gerät die Bezeichnung «LAGAN» tragen, gilt die Garanti e in die- sem Fall nur (2) zwei Jahre. Als Kaufnach- weis ist der Ori ginalkassenbon oder die Originalrec hnung erforderl[…]
-
Страница 39
• Beschädigung folgender Tei le: Glaskera- mik, Zubehör, Geschirr und Besteckkörbe, Zuleitungen und Drainageschläuche-/ rohre, Lampen und Lampenabdeckun- gen, Knöpfe/Wählschalter, Gehäuse und Teile des Gehäuses ; es sei denn, es kann nachgewiesen werden, dass diese Schä- den durch Produktionsfehler verursacht wurden. • Fälle, in denen[…]
-
Страница 40
Um sicherzustel len, dass wir Sie stets opti- mal unterstützen, lesen Sie bitte die Monta- geanleitung und/oder den Bedienungsan- leitungsabschnitt diese r Broschüre durch, bevor Sie sich an uns wenden. Wie können Sie uns erreichen, wenn Sie uns benötigen? Auf der letzten Seite die ser Broschüre fin- den Sie eine vollständi ge Liste mit offiz[…]
-
Страница 41
Country Phone number Call Fee Opening time België 070 24 6 0 1 6 Binnenlandse gespreksk ost en 8 tot 2 0 W eekdagen Belgique T arif des appels nationaux 8 à 20. En semaine България 0 0 3 5 9 8 8 8 1 6 4 0 8 Такса за повикване от страната От 9 до 1 8 ч в работни дни Česká r epublika 2 46 0 1 97 2[…]
-
Страница 42
42[…]
-
Страница 43
43[…]
-
Страница 44
© Inter IKEA Syst ems B.V. 2008 AA-720093-1 892954103-D- 052013[…]

GB
RAFFINERAD
RUTINERAD
DE


ENGLISH 4
DEUTSCH 22
ENGLISH 4
Contents
Safety information 4
Safety instructions 5
Installation 7
Product description 7
Before first use 8
Daily use 8
Clock functions 10
Using the accessories 11
Subject to change without notice.
Additional functions 12
Helpful hints and tips 13
Care and cleaning 14
What to do if… 16
Technical data 18
Environment concerns 18
IKEA GUARANTEE 19
Safety information
Before the installation and use of the appliance, carefully read
the supplied instructions. The manufacturer is not responsible if
an incorrect installation and use causes injuries and damages.
Always keep the instructions with the appliance for future reference.
Children and vulnerable people safety
Warning! Risk of suffocation, injury or permanent disability.
• This appliance can be used by children aged from 8 years
and above and persons with reduced physical, sensory or
mental capabilities or lack of experience and knowledge if
they are supervised by an adult or a person who is responsible for their safety.
• Do not let children play with the appliance.
• Keep all packaging away from children.
• Keep children and pets away from the appliance when it operates or when it cools down. Accessible parts are hot.
• If the appliance has a child safety device, we recommend
that you activate it.
• Cleaning and user maintenance shall not be made by children without supervision.
ENGLISH 5
General Safety
• Internally the appliance becomes hot when in operation. Do
not touch the heating elements that are in the appliance. Always use oven gloves to remove or put in accessories or
ovenware.
• Do not use a steam cleaner to clean the appliance.
• Before maintenance cut the power supply.
• Do not use harsh abrasive cleaners or sharp metal scrapers
to clean the glass door since they can scratch the surface,
which may result in shattering of the glass.
• To remove the shelf supports first pull the front of the shelf
support and then the rear end away from the side walls. Install the shelf supports in the opposite sequence.
Safety instructions
Installation
Warning! Only a qualified person must
install this appliance.
• Remove all the packaging.
• Do not install or use a damaged appli-
ance.
• Obey the installation instruction supplied
with the appliance.
•Always be careful when you move the
appliance because it is heavy. Always
wear safety gloves.
• Do not pull the appliance by the handle.
• Make sure that the appliance is installed
below and adjacent safe structures.
• The sides of the appliance must stay ad-
jacent to appliances or to units with the
same height.
Electrical connection
Warning! Risk of fire and electrical
shock.
• All electrical connections should be made
by a qualified electrician.
• The appliance must be earthed.
• Make sure that the electrical information
on the rating plate agrees with the power
supply. If not, contact an electrician.
• Always use a correctly installed shockproof socket.
• Do not use multi-plug adapters and extension cables.
• Make sure not to cause damage to the
mains plug and to the mains cable. Contact the Service or an electrician to
change a damaged mains cable.
• Do not let mains cables to come in touch
with the appliance door, specially when
the door is hot.
• The shock protection of live and insulated
parts must be fastened in such a way that
it cannot be removed without tools.
• Connect the mains plug to the mains
socket only at the end of the installation.
Make sure that there is access to the
mains plug after the installation.
• If the mains socket is loose, do not connect the mains plug.
• Do not pull the mains cable to disconnect
the appliance. Always pull the mains
plug.
ENGLISH 6
• Use only correct isolation devices: line
protecting cut-outs, fuses (screw type
fuses removed from the holder), earth
leakage trips and contactors.
• The electrical installation must have an
isolation device which lets you disconnect
the appliance from the mains at all poles.
The isolation device must have a contact
opening width of minimum 3 mm.
• This appliance complies with the E.E.C.
Directives
Use
Warning! Risk of injury, burns or
electric shock or explosion.
• Use this appliance in a household environment.
• Do not change the specification of this
appliance.
• Make sure that the ventilation openings
are not blocked.
• Do not let the appliance stay unattended
during operation.
• Deactivate the appliance after each use.
• Be careful, when you open the appliance
door while the appliance is in operation.
Hot air can release.
• Do not operate the appliance with wet
hands or when it has contact with water.
• Do not apply pressure on the open door.
• Do not use the appliance as a work surface or as a storage surface.
• Always keep the appliance door closed
when the appliance is in operation.
• Open the appliance door carefully. The
use of ingredients with alcohol can cause
a mixture of alcohol and air.
• Do not let sparks or open flames to come
in contact with the appliance when you
open the door.
• Do not put flammable products or items
that are wet with flammable products in,
near or on the appliance.
Warning! Risk of damage to the
appliance.
• To prevent damage or discoloration to
the enamel:
– do not put ovenware or other objects in
the appliance directly on the bottom.
– do not put aluminium foil directly on the
bottom of the appliance.
– do not put water directly into the hot
appliance.
– do not keep moist dishes and food in
the appliance after you finish the cooking.
– be careful when you remove or install
the accessories.
• Discoloration of the enamel has no effect
on the performance of the appliance. It is
not a defect in the sense of the warranty
law.
• Use a deep pan for moist cakes. Fruit juices cause stains that can be permanent.
Care and Cleaning
Warning! Risk of injury, fire or damage
to the appliance.
• Before maintenance, deactivate the appliance and disconnect the mains plug
from the mains socket.
• Make sure the appliance is cold. There is
the risk that the glass panels can break.
• Replace immediately the door glass panels when they are damaged. Contact the
Service.
• Be careful when you remove the door
from the appliance. The door is heavy!
• Clean regularly the appliance to prevent
the deterioration of the surface material.
• Remaining fat or food in the appliance
can cause fire.
• If you use an oven spray, obey the safety
instructions on the packaging.
Internal light
• The type of light bulb or halogen lamp
used for this appliance, is only for household appliances. Do not use it for house
lighting.
Warning! Risk of electrical shock.
• Before replacing the lamp, disconnect the
appliance from the power supply.
• Only use lamps with the same specifications.
ENGLISH 7
Disposal
Warning! Risk of injury or suffocation.
• Disconnect the appliance from the mains
supply.
Installation
Warning! Refer to the Safety chapters.
Refer to the Assembly Instructions for
the installation.
Electrical installation
Warning! Only a qualified person must
do the electrical installation.
The manufacturer is not responsible if
you do not follow the safety precau-
tions from the chapter «Safety Information».
This appliance is only supplied with a main
cable.
Cable
Cable types applicable for installation or
replacement: H07 RN-F, H05 RN-F, H05
RRF, H05 VV-F, H05 V2V2-F (T90), H05 BBF.
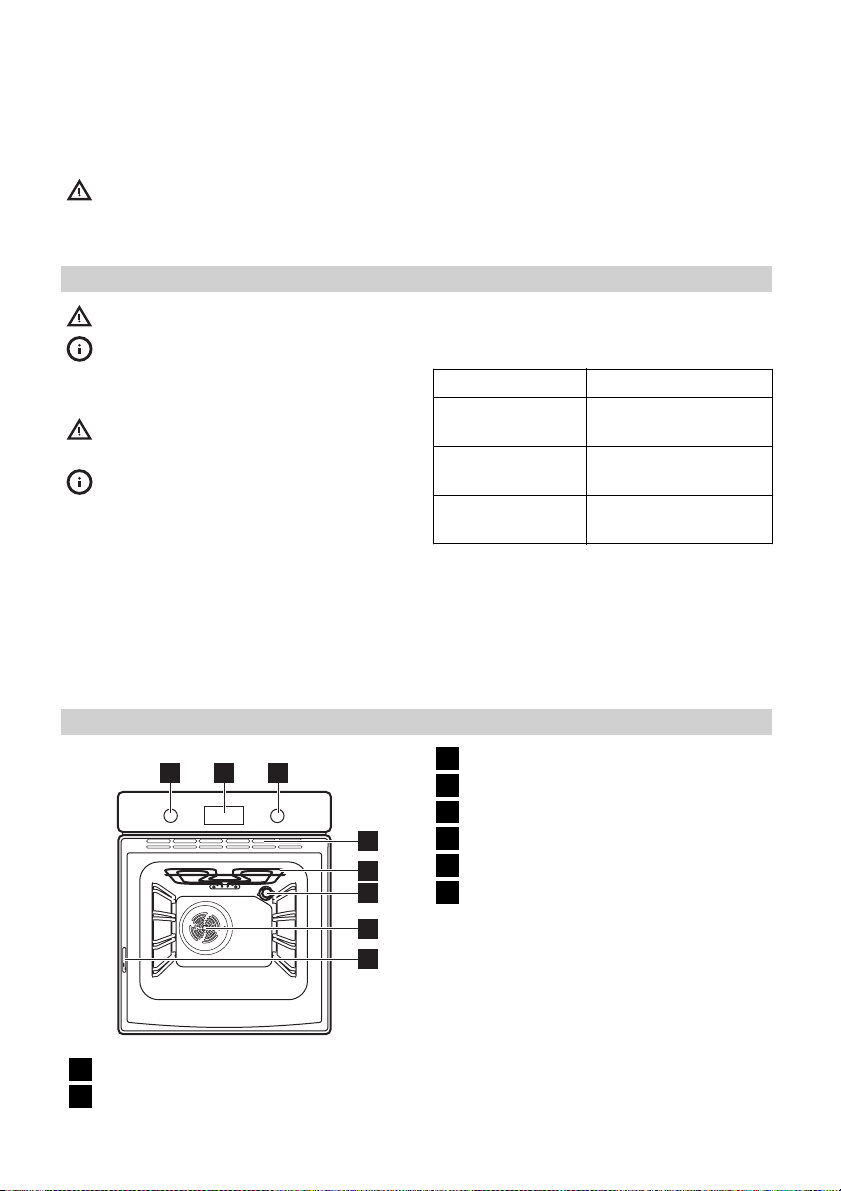
Product description
2
1
Knob for the oven functions
1
Electronic programmer
2
3
4
5
6
7
8
• Cut off the mains cable and discard it.
• Remove the door catch to prevent children and pets to get closed in the appliance.
For the section of the cable refer to the total
power (on the rating plate) and to the table:
Total power Section of the cable
maximum 1380W3 x 0.75 mm²
maximum 2300W3 x 1 mm²
maximum 3680W3 x 1.5 mm²
The earth cord (green / yellow cable) must
be 2 cm longer than phase and neutral cables (blue and brown cables).
Knob for the temperature
3
Ventilation openings
4
Grill
5
Oven lamp
6
Fan
7
Rating plate
8
Oven accessories
• Wire shelf x 1
For cookware, cake tins, roasts.
• Baking tray x 1
For cakes and biscuits.
• Grill- / Roasting pan x 1
To bake and roast or as pan to collect
fat.
• Telescopic runners x 2 sets
For shelves and trays.
ENGLISH 8
Before first use
Warning! Refer to the Safety chapters.
Initial cleaning
• Remove all accessories and removable
shelf supports (if applicable).
• Clean the appliance before first use.
Important! Refer to the chapter «Care and
cleaning».
Setting the time of day
The display shows
es.
1. Press + or — to set the correct hour.
2.
Press
only when you first set the time. Afterwards, the new time value is saved automatically after five seconds.
The display shows
hour. 00 flashes.
3. Press + or — to set the correct minutes.
4.
Press
only when you first set the time. Afterwards, the new time value is saved automatically after five seconds.
The display shows the new time.
Changing the time of day
Press
for the time of day
To set the new time, follow the procedure
given in «Setting the time of day».
Preheating
Preheat the empty appliance to burn off the
remaining grease.
1.
Set the function
temperature.
to confirm. This is necessary
to confirm. This is necessary
You can change the time of day only if
the appliance is off.
again and again until the indicator
and 12:00. 12 flash-
and the set
flashes in the display.
and the maximum
2. Let the appliance operate for one hour.
3.
Set the function
temperature.
4. Let the appliance operate for ten minutes.
5.
Set the function
temperature.
6. Let the appliance operate for ten minutes.
Accessories can become hotter than usual.
The appliance can emit an odour and
smoke. This is normal. Make sure that the
airflow is sufficient.
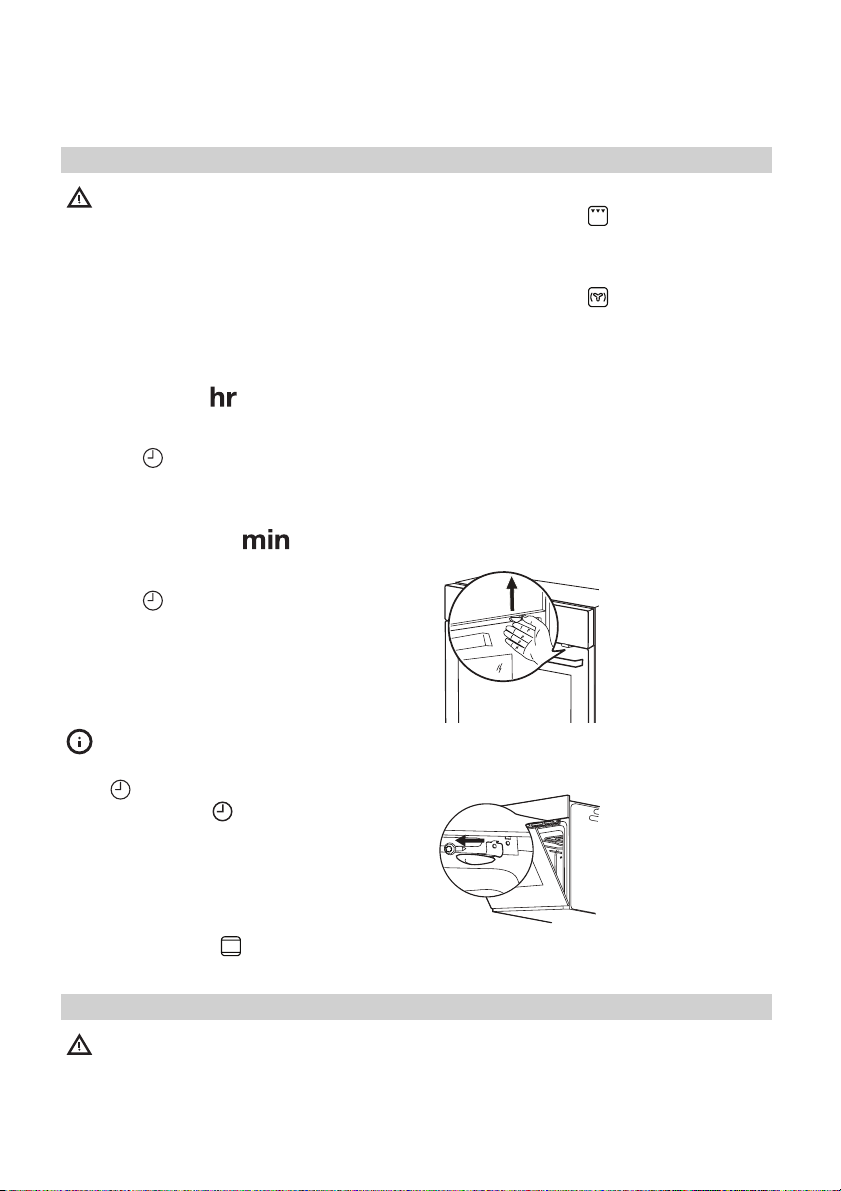
Mechanical child lock
The appliance has the child lock installed
and activated. It is below the control panel
on the right side.
and the maximum
and the maximum
To open the oven
door with the child
lock installed, pull
the child lock handle up as shown in
the picture.
Close the oven door
without pulling the
child lock.
To remove the child
lock, open the oven
door and remove
the child lock with
the torx key. The
torx key is in the
oven fitting bag.
Daily use
Warning! Refer to the Safety chapters.
Activating and deactivating the appliance
1. Turn the knob for the oven functions
clockwise to an oven function.
2. Turn the knob for the temperature to set
the temperature. The display shows the
set temperature.
ENGLISH 9
3. To deactivate the appliance, turn the
knob for the oven functions to the off
position.
Oven functions
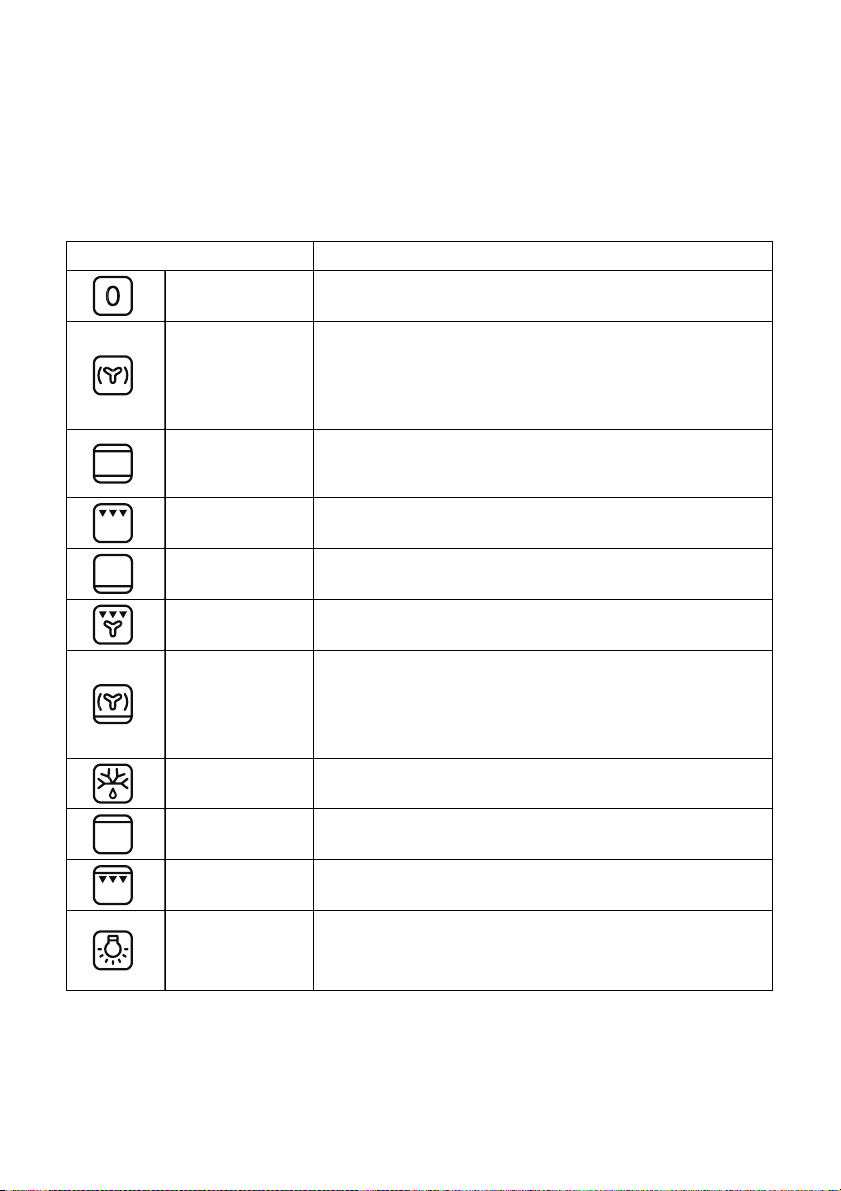
Oven function Application
Off position The appliance is off.
To bake on the maximum temperature on three oven lev-
Forced Air Cook-
ing
Conventional
(Top and Bottom
Heat)
Grilling To grill flat food in the middle of the grill, and to toast.
els at the same time. When you use this function, decrease the oven temperature by 20 — 40 °C from the
standard temperatures you use for Conventional Cooking. Also to dry food.
To bake and roast on one oven level.
Bottom Heat
Grilling with Fan
Bread and Pizza
Baking
Defrost
Top Heat To finish cooked dishes.
Fast Grilling To grill flat food in large quantities, and to toast.
Light
To bake cakes with crispy or crusty bottoms, and to preserve food.
To roast larger joints of meat or poultry on one level. Also to gratinate, and to brown.
To bake food on one oven level for a more intensive
browning and a crispy bottom. When you use this function, decrease the oven temperature by 20 — 40 °C from
the standard temperatures you use for Conventional
Cooking.
To defrost frozen food. The knob for the temperature
must be in the off position.
To activate the oven lamp without a cooking function.
It can be used with residual heat in final cooking phase to
save energy.
ENGLISH 10
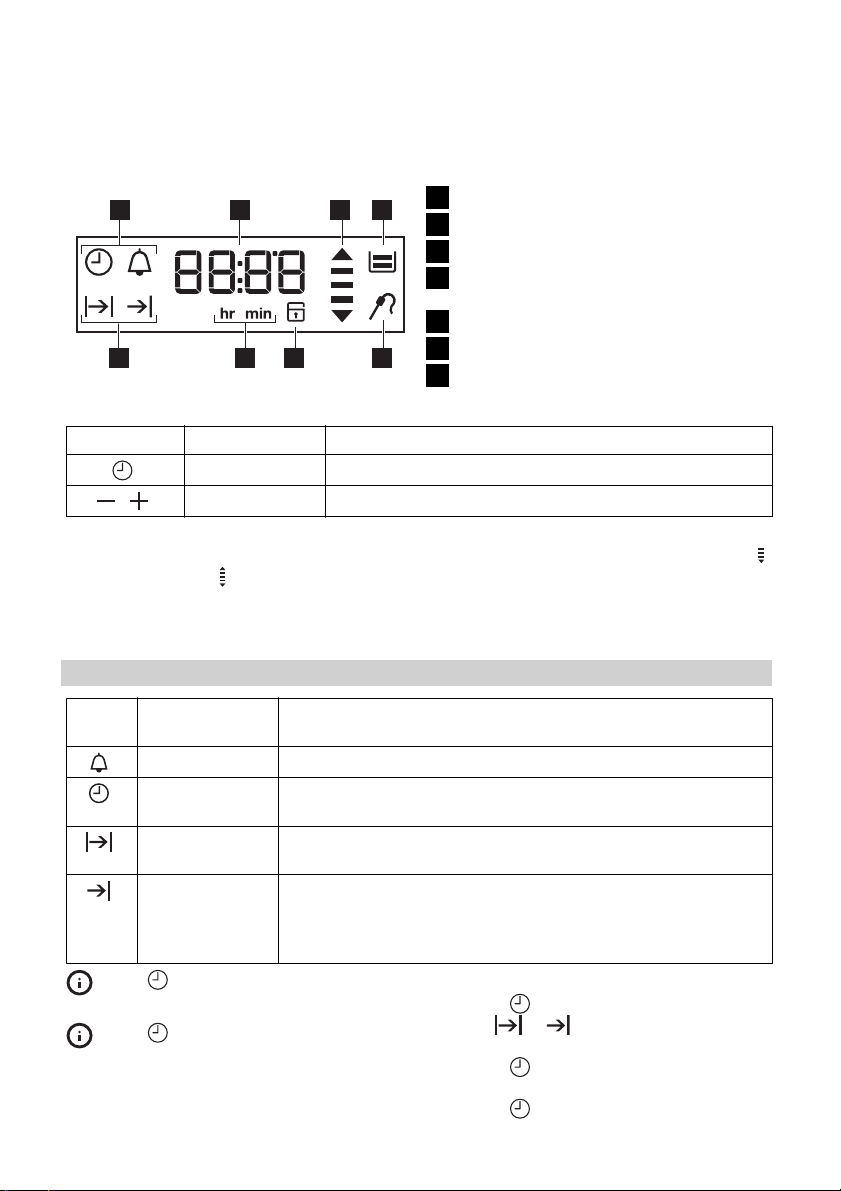
Display
Time and temperature
17 2 3
Buttons
Button Function Description
Clock To set a clock function.
,
Heat-up and residual heat indicator
When you activate an oven function, the
bars in the display
The bars show that the oven temperature
increases or decreases.
Minus, plus To set the time.
come on one by one.
1
Heat-up and residual heat indicator
2
Water tank (selected models only)
3
Core temperature sensor (selected
4
models only)
Door lock (selected models only)
5
Hours / minutes
6
4567
Clock functions
7
When you deactivate the appliance, the
display shows the residual heat indicator
if the temperature in the oven is more than
40 °C. Turn the temperature knob left or
right to show the oven temperature on the
display.
Clock functions
Sym-
bol
Press again and again to change
the clock function.
Press
clock functions, or wait 5 seconds for
the setting to be confirmed automatically.
Function Description
Minute Minder To set a countdown time.
Time of day To set, change or check the time of day. Refer to «Setting the
time of day».
Duration To set how long the appliance must operate. First set an oven
function before you set this function.
End To set when the appliance must be deactivated. First set an
oven function before you set this function. You can use Duration and End at the same time (Time Delay) to set the time
when the appliance must be activated and then deactivated.
to confirm the settings of the
Setting the Duration or End function
1.
Press
bol
2. Press + or — to set the minutes.
3.
Press
4. Press + or — to set the hour.
5.
Press
again and again until the sym-
or flashes in the display.
to confirm.
to confirm.
ENGLISH 11
6.
When the set time ends, the symbol
or and the set time flash. The acous-
tic signal sounds for two minutes. The
appliance deactivates. Press a button
or open the appliance door to stop the
signal.
If you press
for Duration
switches to setting the End
Setting the Minute Minder
Used to set a countdown time. The maximum time you can set is 2 hours 30 minutes.
This function has no effect on the operation
of the oven. You can set the Minute Minder
at any time, also if the appliance is off.
1.
Press
00 flash in the display.
2. Press + or — to set the Minute Minder. At
first the time is calculated in minutes
and seconds. When the time you set is
longer than 60 minutes, the symbol
comes on in the display. The appliance
then calculates the time in hours and
minutes.
while setting the time
, the appliance
function.
again and again until and
Using the accessories
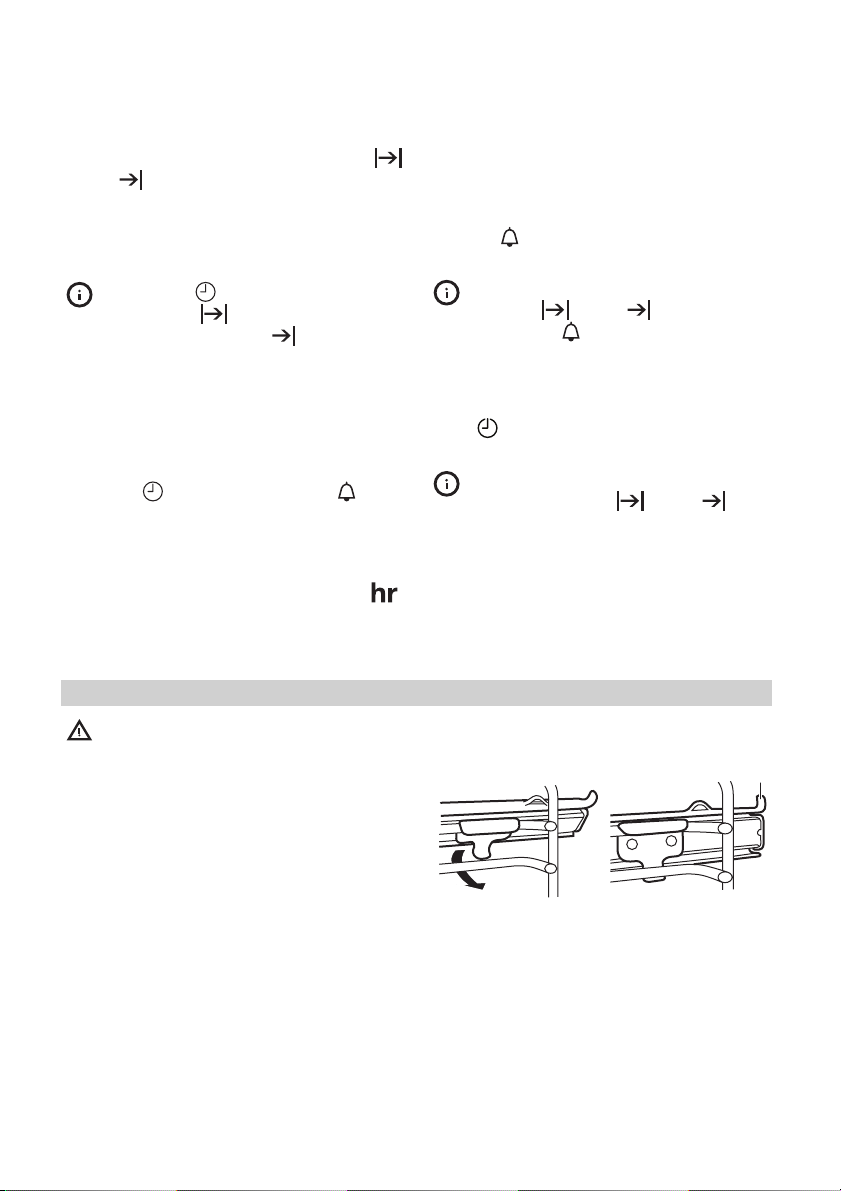
Warning! Refer to the Safety chapters.
Telescopic runners
Installing the telescopic runners
You can put the telescopic runners on each
level.
Make sure that the two telescopic runners
are on the same level.
The stop element (A) that is at one end of
the telescopic runner must point up.
3. The Minute Minder starts automatically
after five seconds.
4. When the set time ends, the acoustic
signal sounds for two minutes. 00:00
flash in the display. Press a but-
and
ton to stop the signal.
If you set the Minute Minder when the
Duration
ates, the symbol
Count Up Timer
Use the Count Up Timer to monitor how
long the oven operates.
Press
shows time without clock symbols.
tion operates.
1 2
Using telescopic runners
With telescopic runners you can put in and
remove the shelves more easily.
again and again until the display
You cannot use the Count Up Timer
when the Duration
or End function oper-
comes on in the display.
or End func-
A
ENGLISH 12
1
Pull out the right
and left hand telescopic runners.
2
°C
Put the wire shelf on
the telescopic runners and carefully
push them into the
appliance.
Additional functions
Child Lock
When the Child Lock is on, you cannot operate the oven. This is to make sure that
children do not accidentally activate the
appliance.
Activating and deactivating the Child
Lock function:
1. Do not set an oven function.
2.
Press and hold
time for two seconds.
3.
An acoustic signal sounds. SAFE and
come on or go out in the display (when
you activate or deactivate the Child
Lock).
Automatic switch-off
For safety reasons the appliance deactivates after some time:
• If an oven function operates.
• If you do not change the oven temperature.
Oven temperature Switch-off time
30 — 115 °C 12,5 h
120 — 195 °C 8.5 h
and + at the same
You can also use the telescopic runners
with the trays or pans supplied with the
appliance (refer to “Product description”).
°C
Make sure you push back the telescopic
runners fully in the appliance before you
close the oven door.
Caution! Do not clean the telescopic
runners in the dishwasher. Do not
lubricate the telescopic runners.
Oven temperature Switch-off time
200 — 245 °C 5.5 h
250 °C 3.0 h
After an automatic switch-off, press a button to activate the appliance again.
Important! The automatic switch-off works
with all oven functions, except Light,
Duration and End.
Cooling fan
When the appliance operates, the cooling
fan activates automatically to keep the surfaces of the appliance cool. If you deactivate the appliance, the cooling fan continues to operate until the temperature in the
appliance cools down.
Safety thermostat
Incorrect operation of the appliance or defective components can cause dangerous
overheating. To prevent this, the oven has a
safety thermostat which interrupts the power supply. The oven activates again automatically when the temperature drops.

ENGLISH 13
Helpful hints and tips
• The appliance has four shelf levels. Count
the shelf levels from the bottom of the appliance floor.
• The appliance has a special system which
circulates the air and constantly recycles
the steam. With this system you can cook
in a steamy environment and keep the
food soft inside and crusty outside. It decreases the cooking time and energy
consumption to a minimum.
• Moisture can condense in the appliance
or on the door glass panels. This is normal. Always stand back from the appliance when you open the appliance door
while cooking. To decrease the condensation, operate the appliance for 10 minutes before cooking.
• Clean the moisture after each use of the
appliance.
• Do not put the objects directly on the appliance floor and do not put aluminium
foil on the components when you cook.
This can change the baking results and
cause damage to the enamel.
Baking cakes
• Do not open the oven door before 3/4 of
the set cooking time is up.
Weight
(kg)
1Pork / lamb
Food Oven Function Level Oven
• If you use two baking trays at the same
time, keep one empty level between
them.
Cooking meat and fish
• Use a deep pan for very fatty food to
prevent the oven from stains that can be
permanent.
• Leave the meat for approximately 15 minutes before carving so that the juice
does not seep out.
• To prevent too much smoke in the oven
during roasting, add some water into the
deep pan. To prevent the smoke condensation, add water each time after it dries
up.
Cooking times
Cooking times depend on the type of food,
its consistency, and volume.
Initially, monitor the performance when you
cook. Find the best settings (heat setting,
cooking time, etc.) for your cookware, recipes and quantities when you use this appliance.
temperature (°C)
2 180 100 — 110
Cooking
Time
(min)
1 Veal / Beef
1,2 Chicken/Rabbit
1,5 Duck
3Goose
4Turkey
1Fish
1 Stuffed Pepperoni
Tomatos / Roasted
Potatos
2 190 70 — 100
2 200 70 — 80
1 160 120 — 150
1 160 150 — 200
1 180 210 — 240
2 190 30 — 40
2 190 50 — 70
ENGLISH 14
Weight
(kg)
Instant cakes
1Pies
Biscuits
2 Lasagne
1White Bread
1Pizza
Food Oven Function Level Oven
Care and cleaning
Warning! Refer to the Safety chapters.
• Clean the front of the appliance with a
soft cloth with warm water and a cleaning agent.
• To clean metal surfaces use a usual
cleaning agent.
• Clean the oven interior after each use.
Then you can remove dirt more easily
and it does not burn on.
• Clean stubborn dirt with a special oven
cleaner.
• Clean all oven accessories after each use
and let them dry. Use a soft cloth with
warm water and a cleaning agent.
• If you have nonstick accessories, do not
clean them using aggressive agents,
sharp-edged objects or a dishwasher. It
can destroy nonstick coating.
Stainless steel or aluminium appliances:
Clean the oven door with a wet sponge only. Dry it with a soft cloth.
Do not use steel wool, acids or abrasive
materials, as they can cause damage to the
oven surface. Clean the oven control panel
with the same precautions.
temperature (°C)
2 160 45 — 55
2 160 80 — 100
3 140 25 — 35
2 180 45 — 60
2 190 50 — 60
1 190 —
Cleaning the door gasket
• Regularly do a check of the door gasket.
The door gasket is around the frame of
the oven cavity. Do not use the appliance
if the door gasket is damaged. Contact
the Service Centre.
• To clean the door gasket, refer to the
general information about cleaning.
Shelf supports
You can remove the shelf supports to clean
the side walls.
Removing the shelf supports
1
Pull the front of the
shelf support away
from the side wall.
Installing the shelf supports
Install the shelf supports in the opposite sequence.
200
2
Pull the rear end of
the shelf support
away from the side
wall and remove it.
Cooking
Time
(min)
20 — 30
2
1
Loading…
Русский
- Bedienungsanleitung Ikea RUTINERAD
- Ikea RUTINERAD User Manual
- Manual Usuario Ikea RUTINERAD
- Mode d’emploi Ikea RUTINERAD
- Istruzioni Ikea RUTINERAD
- инструкция Ikea RUTINERAD
- Ikea RUTINERADの取扱説明書
- Handleiding Ikea RUTINERAD
- Manual de uso Ikea RUTINERAD
Вам нужна инструкция? Мы поможем Вам ее найти и сэкономить Ваше время.
- 44 stron
- 0 mb
Изделие Ikea RUTINERAD, а также другие, которыми Вы пользуетесь ежедневно, наверняка вы получили в комплекте с инструкцией обслуживания. Из опыта наших пользователей мы знаем, что большинство из Вас не уделили этому особого внимания. Большая часть инструкций, сразу же после покупки попадает в корзину для мусора вместе с коробкой — это ошибка. Ознакомьтесь с информацией, касающейся инструкции Ikea RUTINERAD, которая поможет Вам в будущем сэкономить нервы и избежать головной боли.
Важная подсказка — не забывайте хотя бы раз прочитать инструкцию Ikea RUTINERAD
Если вы не хотите каждый раз читать информационные брошюры, касающиеся, тех или Ikea RUTINERAD иных изделий, достаточно, прочитать их раз — сразу же после покупки устройства. Вы получите основное знания, касающиеся поддержания изделия Ikea RUTINERAD в хорошем эксплуатационном состоянии, так, чтобы без проблем достигнуть его планируемого цикла работы. Затем инструкцию можно отложить на полку и вернуться к ней только в случае, если вы не уверены, правильно ли проводится техобслуживание изделия. Правильный уход является необходимым элементом Вашего удовольствия Ikea RUTINERAD.
Раз в году пересмотрите шкафчик, в котором держите инструкции для всех устройств, — выбросите те, которыми вы уже не пользуетесься. Это поможет Вам сохранять порядок в своей домашней базе инструкций обслуживания.
Summary of Contents for Ikea RUTINERAD
Что находится в инструкции Ikea RUTINERAD? Почему стоит ее прочитать?
- Гарантия и подробности, касающиеся техобслуживания изделия
Хорошей идеей будет прикрепить чек к странице инструкции. Если что-то плохое случится во время использования Ikea RUTINERAD, у вас будет комплект документов, необходимый для гарантийного ремонта. В этой части инструкции вы найдете информацию об авторизованных сервисных центрахIkea RUTINERAD а также, как самостоятельно правильно ухаживать за оборудованием — так, чтобы не потерять гарантийных прав. - Указания по монтажу и Setup
Не терять нервов и времени на самостоятельную попытку установки и первого запуска изделия. Воспользуйтесь рекомендациями производителя Ikea RUTINERAD чтобы правильно запустить изделие, без лишнего риска повреждения оборудования. - Информация, касающаяся дополнительных запчастей (входящих в комплект а также являющихся опцией)
Пересматривая эту часть документа вы сможете проверить, доставлен ли ваш Ikea RUTINERAD с полним комплектом аксессуаров. Вы также сможете узнать, какие дополнительные запчасти или аксессуары для Ikea RUTINERAD Вы сможете найти и докупить к своему устройству. - Troubleshooting
Самые частые проблемы, касающиеся Ikea RUTINERAD и методы их решения. Это очень полезная часть руководства по обслуживанию — она позволит Вам сэкономить много времени на поиск решений. 90% проблем с Ikea RUTINERAD повторяется у многих пользователей. - Требования, касающиеся питания и энергетический класс
Информация, касающаяся количества потребляемой энергии, а также рекомендации, касающиеся установки и питания Ikea RUTINERAD. Прочитайте, чтобы оптимально пользоваться Ikea RUTINERAD и не использовать большего количества ресурсов, нежели это необходимо для правильной работы изделия. - Специальные функции Ikea RUTINERAD
Здесь вы можешь узнать, как персонализировать изделие Ikea RUTINERAD. Вы узнаете, какие дополнительные функции могут помочь Вам удобно использовать продукт Ikea RUTINERAD а также, какие функции Вашего устройства оптимальны для выполнения конкретной деятельности.
Как видите в инструкции вы найдете информацию, которая реально поможет Вам в использовании Вашего изделия. Стоит с ней ознакомиться, чтобы избежать разочарований, возникающих из более короткого, нежели предусматривалось, периода исправности изделия Ikea RUTINERAD. Если все же вы не хотите копить инструкции в своем доме, наш сайт поможет Вам в этом — вы должны найти у нас руководство по обслуживанию большинства из своих устройств, а также Ikea RUTINERAD.
Комментарии (0)
-
Contents
-
Table of Contents
-
Troubleshooting
-
Bookmarks
Quick Links
Related Manuals for IKEA RAFFINERAD RUTINERAD
Summary of Contents for IKEA RAFFINERAD RUTINERAD
-
Page 1
RAFFINERAD RUTINERAD… -
Page 3
ENGLISH… -
Page 4: Table Of Contents
Before first use Technical data Daily use Environment concerns Clock functions IKEA GUARANTEE Using the accessories Subject to change without notice. Safety information Before the installation and use of the appliance, carefully read the supplied instructions. The manufacturer is not responsible if an incorrect installation and use causes injuries and damages.
-
Page 5: Safety Instructions
ENGLISH General Safety • Only a qualified person must install this appliance and re- place the cable. • Internally the appliance becomes hot when in operation. Do not touch the heating elements that are in the appliance. Al- ways use oven gloves to remove or put in accessories or ovenware.
-
Page 6
ENGLISH • Do not use multi-plug adapters and ex- • Do not operate the appliance with wet tension cables. hands or when it has contact with water. • Make sure not to cause damage to the • Do not apply pressure on the open door. mains plug and to the mains cable. -
Page 7: Installation
ENGLISH • Be careful when you remove the door • Before replacing the lamp, disconnect the from the appliance. The door is heavy! appliance from the power supply. • Clean regularly the appliance to prevent • Only use lamps with the same specifica- the deterioration of the surface material.
-
Page 8: Before First Use
ENGLISH Before first use Warning! Refer to the Safety chapters. 2. Let the appliance operate for one hour. 3. Set the function and the maximum Initial cleaning temperature. • Remove all accessories and removable 4. Let the appliance operate for ten mi- shelf supports.
-
Page 9: Oven Functions
ENGLISH 2. Turn the knob for the temperature to set 3. To deactivate the appliance, turn the the temperature. The display shows the knob for the oven functions to the off set temperature. position. Oven functions Oven function Application Off position The appliance is off.
-
Page 10: Clock Functions
ENGLISH Display Time and temperature Heat-up and residual heat indicator Water tank (selected models only) Core temperature sensor (selected models only) Door lock (selected models only) Hours / minutes Clock functions Buttons Button Function Description Clock To set a clock function. Minus, plus To set the time.
-
Page 11: Using The Accessories
ENGLISH 6. When the set time ends, the symbol 3. The Minute Minder starts automatically after five seconds. and the set time flash. The acous- 4. When the set time ends, the acoustic tic signal sounds for two minutes. The signal sounds for two minutes.
-
Page 12: Additional Functions
ENGLISH You can also use the telescopic runners with the trays or pans supplied with the appliance (refer to “Product description”). °C °C Make sure you push back the telescopic runners fully in the appliance before you close the oven door. Caution! Do not clean the telescopic runners in the dishwasher.
-
Page 13
ENGLISH in a steamy environment and keep the Cooking meat and fish food soft inside and crusty outside. It de- • Use a deep pan for very fatty food to creases the cooking time and energy prevent the oven from stains that can be consumption to a minimum. -
Page 14: Care And Cleaning
ENGLISH Weight Food Oven Function Level Oven Cooking (kg) tempera- Time ture (°C) (min) Lasagne 45 — 60 White Bread 50 — 60 Pizza 190 — 20 — 30 Care and cleaning Warning! Refer to the Safety chapters. Shelf supports You can remove the shelf supports to clean •…
-
Page 15: Removing Oven Door/Glass Panels
ENGLISH Put a cloth on the bottom of the oven to prevent damage to the oven light and glass cover. 1. Turn the glass cover counterclockwise to remove it. 2. Clean the glass cover. 3. Replace the oven light bulb with a 25 watt, 230V (50Hz), 300 °C heat resist- ant oven light bulb (Connection type: E14).
-
Page 16: What To Do If
ENGLISH Clean the glass panels with water and Make sure that you install the top panel in soap. Dry the glass panels carefully. the seats correctly (refer to the illustration). Installing the door and the glass panels When the cleaning is completed, install the glass panels and the oven door.
-
Page 17: Technical Data
ENGLISH If you cannot find a solution to the problem The necessary data for the service centre is yourself, contact your dealer or the service on the rating plate. The rating plate is on centre. the front frame of the appliance cavity. Do not remove the rating plate from the appli- ance cavity.
-
Page 18: Ikea Guarantee
IKEA GUARANTEE How long is the IKEA guarantee valid? What will IKEA do to correct the problem? IKEA appointed service provider will exam- This guarantee is valid for five (5) years ine the product and decide, at its sole dis- from the original date of purchase of Your cretion, if it is covered under this guarantee.
-
Page 19
IKEA appliances: • Repairs caused by installation which is Please do not hesitate to contact IKEA After faulty or not according to specification. Sales Service to: • The use of the appliance in a non-domes- 1. -
Page 20
Note that the receipt After Sales of your appliances, please con- reports also the IKEA article name and tact our nearest IKEA store call centre. We number (8 digit code) for each of the recommend you read the appliance docu- appliances you have purchased. -
Page 21
Hétköznap 8 és 10 óra között 0900 235 45 32 ma-vr 9.00-21.00 Nederland and/or 0, 1 0 EUR/min (niet lokaal)Incl. BTW zat 9.00-20.00 0900 BEL IKEA zon 9.00-18.00 Norge 815 22052 Takst innland 8 til 20 ukedager Österreich 0810 300486… -
Page 24
© Inter IKEA Systems B.V. 2008 AA-720121-2…
Посмотреть инструкция для Ikea RUTINERAD бесплатно. Руководство относится к категории Печи, 12 человек(а) дали ему среднюю оценку 8.4. Руководство доступно на следующих языках: русский, английский. У вас есть вопрос о Ikea RUTINERAD или вам нужна помощь? Задайте свой вопрос здесь
Не можете найти ответ на свой вопрос в руководстве? Вы можете найти ответ на свой вопрос ниже, в разделе часто задаваемых вопросов о Ikea RUTINERAD.
Правильно ли, что вентилятор продолжает работать, когда духовка уже выключена?
Что происходит при использовании функции «гриль»?
Обязательно ли предварительно разогревать духовку Ikea?
Как очистить духовку от пригоревшего жира?
Какой способ лучше всего подходит для очистки решетки в духовке?
Инструкция Ikea RUTINERAD доступно в русский?
Не нашли свой вопрос? Задайте свой вопрос здесь
Руководстве по эксплуатации Ikea RUTINERAD — вам приходилось его терять? Поскольку вы попали сюда, наверняка с вами это случилось. Но вы не единственный человек, сталкивающийся с проблемами с хранением руководства по эксплуатации всех домашних устройств. Ниже несколько советов, касающихся того, зачем собирать руководства по эксплуатации.
Руководстве по эксплуатации Ikea RUTINERAD это определенный вид технической документации, являющейся неразлучным элементом каждого устройства, которое мы приобретаем. Они отличаются между собой количеством информации, которую можно найти на тему данного устройства: напр. Ikea RUTINERAD. Конечно же, если производитель считает что необходимо передать нам большее количество информации, касающейся устройства Ikea RUTINERAD, то стоит ее хоть раз прочитать — в начале, сразу же после покупки данной вещи. Однако мы считаем, что инструкции должны заключать самую важную, наиболее необходимую информацию о Ikea RUTINERAD, так, чтобы не отнимать желания пользователя прочесть ее уже в самом начале. Несомненно, если устройство Ikea RUTINERAD имеет много продвинутых функций, неизбежно большое количество информации в содержании этого документа.
Które из информации в инструкции Ikea RUTINERAD необходимо обязательно прочитать?
- Информацию, касающуюся правильного использования и ухода за устройством Ikea RUTINERAD — нам необходимо ознакомиться с основными правилами, чтобы в случае проблем с устройством сервисный центр не отказал нам в гарантийном обслуживании, из-за неправильного использования
- Информация, касающаяся самых частых проблем с Ikea RUTINERAD и способы их решения
- Информация, касающаяся гарантии устройства Ikea RUTINERAD и ближайших сервисных центров, способных починить устройство в соответствии с рекомендациям производителя Ikea
Как хранить инструкции дома?
Хорошей идеей является предназначение одного ящика, в котором бы хранилась инструкция Ikea RUTINERAD а также всех других домашних устройств которыми мы пользуемся. Тогда значительно легче вам будет ее найти, чем искать в родных коробках, которые наверняка уже выбросили вы, или другие домочадцы. Раз в год достаточно просмотреть ящик и выбросить инструкции, которые касаются устройств, которыми вы уже не пользуетесь. Таким образом вы избежите хранения ненужных документов, а останутся только актуальные. Вы можете также скачать и распечатать инструкцию Ikea RUTINERAD чтобы разместить ее в своем ящике.
Похожие инструкции
View a manual of the Ikea RUTINERAD below. All manuals on ManualsCat.com can be viewed completely free of charge. By using the ‘Select a language’ button, you can choose the language of the manual you want to view.
MANUALSCAT | EN
Question & answers
Have a question about the Ikea RUTINERAD but cannot find the answer in the user manual? Perhaps the users of ManualsCat.com can help you answer your question. By filling in the form below, your question will appear below the manual of the Ikea RUTINERAD. Please make sure that you describe your difficulty with the Ikea RUTINERAD as precisely as you can. The more precies your question is, the higher the chances of quickly receiving an answer from another user. You will automatically be sent an e-mail to inform you when someone has reacted to your question.
Ask a question about the Ikea RUTINERAD
Page: 1
Contents
Safety information 4
Safety instructions 5
Installation 7
Product description 7
Before first use 8
Daily use 8
Clock functions 10
Using the accessories 11
Additional functions 12
Helpful hints and tips 13
Care and cleaning 14
What to do if… 16
Technical data 18
Environment concerns 18
IKEA GUARANTEE 19
Subject to change without notice.
Safety information
Before the installation and use of the appliance, carefully read
the supplied instructions. The manufacturer is not responsible if
an incorrect installation and use causes injuries and damages.
Always keep the instructions with the appliance for future refer-
ence.
Children and vulnerable people safety
Warning! Risk of suffocation, injury or permanent disability.
• This appliance can be used by children aged from 8 years
and above and persons with reduced physical, sensory or
mental capabilities or lack of experience and knowledge if
they are supervised by an adult or a person who is responsi-
ble for their safety.
• Do not let children play with the appliance.
• Keep all packaging away from children.
• Keep children and pets away from the appliance when it op-
erates or when it cools down. Accessible parts are hot.
• If the appliance has a child safety device, we recommend
that you activate it.
• Cleaning and user maintenance shall not be made by chil-
dren without supervision.
ENGLISH 4
Page: 2
General Safety
• Internally the appliance becomes hot when in operation. Do
not touch the heating elements that are in the appliance. Al-
ways use oven gloves to remove or put in accessories or
ovenware.
• Do not use a steam cleaner to clean the appliance.
• Before maintenance cut the power supply.
• Do not use harsh abrasive cleaners or sharp metal scrapers
to clean the glass door since they can scratch the surface,
which may result in shattering of the glass.
• To remove the shelf supports first pull the front of the shelf
support and then the rear end away from the side walls. In-
stall the shelf supports in the opposite sequence.
Safety instructions
Installation
Warning! Only a qualified person must
install this appliance.
• Remove all the packaging.
• Do not install or use a damaged appli-
ance.
• Obey the installation instruction supplied
with the appliance.
• Always be careful when you move the
appliance because it is heavy. Always
wear safety gloves.
• Do not pull the appliance by the handle.
• Make sure that the appliance is installed
below and adjacent safe structures.
• The sides of the appliance must stay ad-
jacent to appliances or to units with the
same height.
Electrical connection
Warning! Risk of fire and electrical
shock.
• All electrical connections should be made
by a qualified electrician.
• The appliance must be earthed.
• Make sure that the electrical information
on the rating plate agrees with the power
supply. If not, contact an electrician.
• Always use a correctly installed shock-
proof socket.
• Do not use multi-plug adapters and ex-
tension cables.
• Make sure not to cause damage to the
mains plug and to the mains cable. Con-
tact the Service or an electrician to
change a damaged mains cable.
• Do not let mains cables to come in touch
with the appliance door, specially when
the door is hot.
• The shock protection of live and insulated
parts must be fastened in such a way that
it cannot be removed without tools.
• Connect the mains plug to the mains
socket only at the end of the installation.
Make sure that there is access to the
mains plug after the installation.
• If the mains socket is loose, do not con-
nect the mains plug.
• Do not pull the mains cable to disconnect
the appliance. Always pull the mains
plug.
ENGLISH 5
Page: 3
• Use only correct isolation devices: line
protecting cut-outs, fuses (screw type
fuses removed from the holder), earth
leakage trips and contactors.
• The electrical installation must have an
isolation device which lets you disconnect
the appliance from the mains at all poles.
The isolation device must have a contact
opening width of minimum 3 mm.
• This appliance complies with the E.E.C.
Directives
Use
Warning! Risk of injury, burns or
electric shock or explosion.
• Use this appliance in a household envi-
ronment.
• Do not change the specification of this
appliance.
• Make sure that the ventilation openings
are not blocked.
• Do not let the appliance stay unattended
during operation.
• Deactivate the appliance after each use.
• Be careful, when you open the appliance
door while the appliance is in operation.
Hot air can release.
• Do not operate the appliance with wet
hands or when it has contact with water.
• Do not apply pressure on the open door.
• Do not use the appliance as a work sur-
face or as a storage surface.
• Always keep the appliance door closed
when the appliance is in operation.
• Open the appliance door carefully. The
use of ingredients with alcohol can cause
a mixture of alcohol and air.
• Do not let sparks or open flames to come
in contact with the appliance when you
open the door.
• Do not put flammable products or items
that are wet with flammable products in,
near or on the appliance.
Warning! Risk of damage to the
appliance.
• To prevent damage or discoloration to
the enamel:
– do not put ovenware or other objects in
the appliance directly on the bottom.
– do not put aluminium foil directly on the
bottom of the appliance.
– do not put water directly into the hot
appliance.
– do not keep moist dishes and food in
the appliance after you finish the cooking.
– be careful when you remove or install
the accessories.
• Discoloration of the enamel has no effect
on the performance of the appliance. It is
not a defect in the sense of the warranty
law.
• Use a deep pan for moist cakes. Fruit jui-
ces cause stains that can be permanent.
Care and Cleaning
Warning! Risk of injury, fire or damage
to the appliance.
• Before maintenance, deactivate the ap-
pliance and disconnect the mains plug
from the mains socket.
• Make sure the appliance is cold. There is
the risk that the glass panels can break.
• Replace immediately the door glass pan-
els when they are damaged. Contact the
Service.
• Be careful when you remove the door
from the appliance. The door is heavy!
• Clean regularly the appliance to prevent
the deterioration of the surface material.
• Remaining fat or food in the appliance
can cause fire.
• If you use an oven spray, obey the safety
instructions on the packaging.
Internal light
• The type of light bulb or halogen lamp
used for this appliance, is only for house-
hold appliances. Do not use it for house
lighting.
Warning! Risk of electrical shock.
• Before replacing the lamp, disconnect the
appliance from the power supply.
• Only use lamps with the same specifica-
tions.
ENGLISH 6
Page: 4
Disposal
Warning! Risk of injury or suffocation.
• Disconnect the appliance from the mains
supply.
• Cut off the mains cable and discard it.
• Remove the door catch to prevent chil-
dren and pets to get closed in the appli-
ance.
Installation
Warning! Refer to the Safety chapters.
Refer to the Assembly Instructions for
the installation.
Electrical installation
Warning! Only a qualified person must
do the electrical installation.
The manufacturer is not responsible if
you do not follow the safety precau-
tions from the chapter «Safety Information».
This appliance is only supplied with a main
cable.
Cable
Cable types applicable for installation or
replacement: H07 RN-F, H05 RN-F, H05
RRF, H05 VV-F, H05 V2V2-F (T90), H05 BB-
F.
For the section of the cable refer to the total
power (on the rating plate) and to the ta-
ble:
Total power Section of the cable
maximum 1380
W
3 x 0.75 mm²
maximum 2300
W
3 x 1 mm²
maximum 3680
W
3 x 1.5 mm²
The earth cord (green / yellow cable) must
be 2 cm longer than phase and neutral ca-
bles (blue and brown cables).
Product description
1 2 3
5
4
6
8
7
1 Knob for the oven functions
2 Electronic programmer
3 Knob for the temperature
4 Ventilation openings
5 Grill
6 Oven lamp
7 Fan
8 Rating plate
Oven accessories
• Wire shelf x 1
For cookware, cake tins, roasts.
• Baking tray x 1
For cakes and biscuits.
• Grill- / Roasting pan x 1
To bake and roast or as pan to collect
fat.
• Telescopic runners x 2 sets
For shelves and trays.
ENGLISH 7
Page: 5
Before first use
Warning! Refer to the Safety chapters.
Initial cleaning
• Remove all accessories and removable
shelf supports (if applicable).
• Clean the appliance before first use.
Important! Refer to the chapter «Care and
cleaning».
Setting the time of day
The display shows and 12:00. 12 flash-
es.
1. Press + or — to set the correct hour.
2. Press to confirm. This is necessary
only when you first set the time. After-
wards, the new time value is saved au-
tomatically after five seconds.
The display shows and the set
hour. 00 flashes.
3. Press + or — to set the correct minutes.
4. Press to confirm. This is necessary
only when you first set the time. After-
wards, the new time value is saved au-
tomatically after five seconds.
The display shows the new time.
Changing the time of day
You can change the time of day only if
the appliance is off.
Press again and again until the indicator
for the time of day flashes in the display.
To set the new time, follow the procedure
given in «Setting the time of day».
Preheating
Preheat the empty appliance to burn off the
remaining grease.
1. Set the function and the maximum
temperature.
2. Let the appliance operate for one hour.
3. Set the function and the maximum
temperature.
4. Let the appliance operate for ten mi-
nutes.
5. Set the function and the maximum
temperature.
6. Let the appliance operate for ten mi-
nutes.
Accessories can become hotter than usual.
The appliance can emit an odour and
smoke. This is normal. Make sure that the
airflow is sufficient.
Mechanical child lock
The appliance has the child lock installed
and activated. It is below the control panel
on the right side.
To open the oven
door with the child
lock installed, pull
the child lock han-
dle up as shown in
the picture.
Close the oven door
without pulling the
child lock.
To remove the child
lock, open the oven
door and remove
the child lock with
the torx key. The
torx key is in the
oven fitting bag.
Daily use
Warning! Refer to the Safety chapters.
Activating and deactivating the appliance
1. Turn the knob for the oven functions
clockwise to an oven function.
2. Turn the knob for the temperature to set
the temperature. The display shows the
set temperature.
ENGLISH 8
Page: 6
3. To deactivate the appliance, turn the
knob for the oven functions to the off
position.
Oven functions
Oven function Application
Off position The appliance is off.
Forced Air Cook-
ing
To bake on the maximum temperature on three oven lev-
els at the same time. When you use this function, de-
crease the oven temperature by 20 — 40 °C from the
standard temperatures you use for Conventional Cook-
ing. Also to dry food.
Conventional
(Top and Bottom
Heat)
To bake and roast on one oven level.
Grilling To grill flat food in the middle of the grill, and to toast.
Bottom Heat
To bake cakes with crispy or crusty bottoms, and to pre-
serve food.
Grilling with Fan
To roast larger joints of meat or poultry on one level. Al-
so to gratinate, and to brown.
Bread and Pizza
Baking
To bake food on one oven level for a more intensive
browning and a crispy bottom. When you use this func-
tion, decrease the oven temperature by 20 — 40 °C from
the standard temperatures you use for Conventional
Cooking.
Defrost
To defrost frozen food. The knob for the temperature
must be in the off position.
Top Heat To finish cooked dishes.
Fast Grilling To grill flat food in large quantities, and to toast.
Light
To activate the oven lamp without a cooking function.
It can be used with residual heat in final cooking phase to
save energy.
ENGLISH 9
Page: 7
Display
1
7 2 3
4
5
6
7
1 Time and temperature
2 Heat-up and residual heat indicator
3 Water tank (selected models only)
4 Core temperature sensor (selected
models only)
5 Door lock (selected models only)
6 Hours / minutes
7 Clock functions
Buttons
Button Function Description
Clock To set a clock function.
, Minus, plus To set the time.
Heat-up and residual heat indicator
When you activate an oven function, the
bars in the display come on one by one.
The bars show that the oven temperature
increases or decreases.
When you deactivate the appliance, the
display shows the residual heat indicator
if the temperature in the oven is more than
40 °C. Turn the temperature knob left or
right to show the oven temperature on the
display.
Clock functions
Sym-
bol
Function Description
Minute Minder To set a countdown time.
Time of day To set, change or check the time of day. Refer to «Setting the
time of day».
Duration To set how long the appliance must operate. First set an oven
function before you set this function.
End To set when the appliance must be deactivated. First set an
oven function before you set this function. You can use Dura-
tion and End at the same time (Time Delay) to set the time
when the appliance must be activated and then deactivated.
Press again and again to change
the clock function.
Press to confirm the settings of the
clock functions, or wait 5 seconds for
the setting to be confirmed automatically.
Setting the Duration or End function
1. Press again and again until the sym-
bol or flashes in the display.
2. Press + or — to set the minutes.
3. Press to confirm.
4. Press + or — to set the hour.
5. Press to confirm.
ENGLISH 10
Page: 8
6. When the set time ends, the symbol
or and the set time flash. The acous-
tic signal sounds for two minutes. The
appliance deactivates. Press a button
or open the appliance door to stop the
signal.
If you press while setting the time
for Duration , the appliance
switches to setting the End function.
Setting the Minute Minder
Used to set a countdown time. The maxi-
mum time you can set is 2 hours 30 minutes.
This function has no effect on the operation
of the oven. You can set the Minute Minder
at any time, also if the appliance is off.
1. Press again and again until and
00 flash in the display.
2. Press + or — to set the Minute Minder. At
first the time is calculated in minutes
and seconds. When the time you set is
longer than 60 minutes, the symbol
comes on in the display. The appliance
then calculates the time in hours and
minutes.
3. The Minute Minder starts automatically
after five seconds.
4. When the set time ends, the acoustic
signal sounds for two minutes. 00:00
and flash in the display. Press a but-
ton to stop the signal.
If you set the Minute Minder when the
Duration or End function oper-
ates, the symbol comes on in the display.
Count Up Timer
Use the Count Up Timer to monitor how
long the oven operates.
Press again and again until the display
shows time without clock symbols.
You cannot use the Count Up Timer
when the Duration or End func-
tion operates.
Using the accessories
Warning! Refer to the Safety chapters.
Telescopic runners
Installing the telescopic runners
You can put the telescopic runners on each
level.
Make sure that the two telescopic runners
are on the same level.
The stop element (A) that is at one end of
the telescopic runner must point up.
1 2
A
Using telescopic runners
With telescopic runners you can put in and
remove the shelves more easily.
ENGLISH 11
Page: 9
1
°C
Pull out the right
and left hand tele-
scopic runners.
2
°C
Put the wire shelf on
the telescopic run-
ners and carefully
push them into the
appliance.
You can also use the telescopic runners
with the trays or pans supplied with the
appliance (refer to “Product description”).
Make sure you push back the telescopic
runners fully in the appliance before you
close the oven door.
Caution! Do not clean the telescopic
runners in the dishwasher. Do not
lubricate the telescopic runners.
Additional functions
Child Lock
When the Child Lock is on, you cannot op-
erate the oven. This is to make sure that
children do not accidentally activate the
appliance.
Activating and deactivating the Child
Lock function:
1. Do not set an oven function.
2. Press and hold and + at the same
time for two seconds.
3. An acoustic signal sounds. SAFE and
come on or go out in the display (when
you activate or deactivate the Child
Lock).
Automatic switch-off
For safety reasons the appliance deacti-
vates after some time:
• If an oven function operates.
• If you do not change the oven tempera-
ture.
Oven temperature Switch-off time
30 — 115 °C 12,5 h
120 — 195 °C 8.5 h
Oven temperature Switch-off time
200 — 245 °C 5.5 h
250 °C 3.0 h
After an automatic switch-off, press a but-
ton to activate the appliance again.
Important! The automatic switch-off works
with all oven functions, except Light,
Duration and End.
Cooling fan
When the appliance operates, the cooling
fan activates automatically to keep the sur-
faces of the appliance cool. If you deacti-
vate the appliance, the cooling fan contin-
ues to operate until the temperature in the
appliance cools down.
Safety thermostat
Incorrect operation of the appliance or de-
fective components can cause dangerous
overheating. To prevent this, the oven has a
safety thermostat which interrupts the pow-
er supply. The oven activates again auto-
matically when the temperature drops.
ENGLISH 12
Page: 10
Helpful hints and tips
• The appliance has four shelf levels. Count
the shelf levels from the bottom of the ap-
pliance floor.
• The appliance has a special system which
circulates the air and constantly recycles
the steam. With this system you can cook
in a steamy environment and keep the
food soft inside and crusty outside. It de-
creases the cooking time and energy
consumption to a minimum.
• Moisture can condense in the appliance
or on the door glass panels. This is nor-
mal. Always stand back from the appli-
ance when you open the appliance door
while cooking. To decrease the conden-
sation, operate the appliance for 10 mi-
nutes before cooking.
• Clean the moisture after each use of the
appliance.
• Do not put the objects directly on the ap-
pliance floor and do not put aluminium
foil on the components when you cook.
This can change the baking results and
cause damage to the enamel.
Baking cakes
• Do not open the oven door before 3/4 of
the set cooking time is up.
• If you use two baking trays at the same
time, keep one empty level between
them.
Cooking meat and fish
• Use a deep pan for very fatty food to
prevent the oven from stains that can be
permanent.
• Leave the meat for approximately 15 mi-
nutes before carving so that the juice
does not seep out.
• To prevent too much smoke in the oven
during roasting, add some water into the
deep pan. To prevent the smoke conden-
sation, add water each time after it dries
up.
Cooking times
Cooking times depend on the type of food,
its consistency, and volume.
Initially, monitor the performance when you
cook. Find the best settings (heat setting,
cooking time, etc.) for your cookware, rec-
ipes and quantities when you use this appli-
ance.
Weight
(kg)
Food Oven Function Level Oven
tempera-
ture (°C)
Cooking
Time
(min)
1 Pork / lamb 2 180 100 — 110
1 Veal / Beef 2 190 70 — 100
1,2 Chicken/Rabbit 2 200 70 — 80
1,5 Duck 1 160 120 — 150
3 Goose 1 160 150 — 200
4 Turkey 1 180 210 — 240
1 Fish 2 190 30 — 40
1 Stuffed Pepperoni
Tomatos / Roasted
Potatos
2 190 50 — 70
ENGLISH 13
Page: 11
Weight
(kg)
Food Oven Function Level Oven
tempera-
ture (°C)
Cooking
Time
(min)
Instant cakes 2 160 45 — 55
1 Pies 2 160 80 — 100
Biscuits 3 140 25 — 35
2 Lasagne 2 180 45 — 60
1 White Bread 2 190 50 — 60
1 Pizza 1 190 —
200
20 — 30
Care and cleaning
Warning! Refer to the Safety chapters.
• Clean the front of the appliance with a
soft cloth with warm water and a clean-
ing agent.
• To clean metal surfaces use a usual
cleaning agent.
• Clean the oven interior after each use.
Then you can remove dirt more easily
and it does not burn on.
• Clean stubborn dirt with a special oven
cleaner.
• Clean all oven accessories after each use
and let them dry. Use a soft cloth with
warm water and a cleaning agent.
• If you have nonstick accessories, do not
clean them using aggressive agents,
sharp-edged objects or a dishwasher. It
can destroy nonstick coating.
Stainless steel or aluminium applian-
ces:
Clean the oven door with a wet sponge on-
ly. Dry it with a soft cloth.
Do not use steel wool, acids or abrasive
materials, as they can cause damage to the
oven surface. Clean the oven control panel
with the same precautions.
Cleaning the door gasket
• Regularly do a check of the door gasket.
The door gasket is around the frame of
the oven cavity. Do not use the appliance
if the door gasket is damaged. Contact
the Service Centre.
• To clean the door gasket, refer to the
general information about cleaning.
Shelf supports
You can remove the shelf supports to clean
the side walls.
Removing the shelf supports
1
Pull the front of the
shelf support away
from the side wall.
2
2
1
Pull the rear end of
the shelf support
away from the side
wall and remove it.
Installing the shelf supports
Install the shelf supports in the opposite se-
quence.
ENGLISH 14
Page: 12
The rounded ends of the shelf supports
must point to the front.
Oven lamp
Warning! Be careful when you change
the oven lamp. There is a risk of
electrical shock.
Before you change the oven lamp:
• Deactivate the oven.
• Remove the fuses in the fuse box or deac-
tivate the circuit breaker.
Put a cloth on the bottom of the oven
to prevent damage to the oven light
and glass cover.
1. Turn the glass cover counterclockwise to
remove it.
2. Clean the glass cover.
3. Replace the oven light bulb with a 25
watt, 230V (50Hz), 300 °C heat resist-
ant oven light bulb (Connection type:
E14).
4. Install the glass cover.
Cleaning the oven door
The oven door has three glass panels. You
can remove the oven door and the internal
glass panels to clean them.
The oven door can close if you try to
remove the glass panels before you re-
move the oven door.
Removing the oven door and the glass
panels
1
Open the door fully.
2
Lift and turn the lev-
ers on the two hing-
es.
3
Close the oven door
to the first opening
position (halfway).
Then pull forward
and remove it from
its seat.
4
Put the door on a
soft cloth on a sta-
ble surface.
5
Release the locking
system to remove
the glass panels.
6
90°
Turn the two fasten-
ers by 90° and re-
move them from
their seats.
ENGLISH 15
Page: 13
7
2
1
Carefully lift (step 1)
and remove (step 2)
the glass panels
one by one. Start
from the top panel.
Clean the glass panels with water and
soap. Dry the glass panels carefully.
Installing the door and the glass panels
When the cleaning is completed, install the
glass panels and the oven door. Do the
above steps in the opposite sequence.
Make sure that you put the glass panels
back in the correct sequence. The second
panel has a decorative frame. The screen-
printing zone must face the inner side of the
door. Make sure that after the installation
the surface of the glass panel frame on the
screen-printing zones is not rough when you
touch it.
Make sure that you install the top panel in
the seats correctly (refer to the illustration).
What to do if…
Warning! Refer to the Safety chapters.
Problem Possible cause Remedy
The oven does not heat up. The appliance is deactiva-
ted.
Activate the appliance.
The oven does not heat up. The clock is not set. Set the clock. Refer to «Set-
ting the time of day».
The oven does not heat up. The necessary settings are
not set.
Make sure that the settings
are correct.
The oven does not heat up. The automatic switch-off is
on.
Refer to «Automatic switch-
off».
The oven does not heat up. The fuse in the fuse box is
released.
Do a check of the fuse. If the
fuse is released more than
one time, contact a qualified
electrician.
The oven lamp does not op-
erate.
The oven lamp is defective. Replace the oven lamp.
ENGLISH 16
Page: 14
Problem Possible cause Remedy
The oven does not heat up.
The display shows Demo.
The demo mode is activa-
ted.
1. Deactivate the appli-
ance.
2. Press and hold the but-
ton +.
3. When an acoustic signal
sounds, turn the knob
for the oven functions to
the first function. Demo
flashes in the display.
4. Turn the knob for the
oven functions to the off
position.
5. Release the button +.
6. Turn the knob for the
temperature clockwise
three times. The acoustic
signal sounds three
times. The demo mode
is deactivated.
The display shows an error
code.
There is an electronic fault. 1. Deactivate the appli-
ance with the house
fuse or the safety switch
in the fuse box and acti-
vate it again.
2. If the display shows the
error code again, con-
tact the service centre.
Steam and condensation
collect on the food and in
the oven.
You left the dish in the oven
for too long.
Do not keep the dishes in
the oven for longer than 15
— 20 minutes after the cook-
ing ends.
If you cannot find a solution to the problem
yourself, contact your dealer or the service
centre.
The necessary data for the service centre is
on the rating plate. The rating plate is on
the front frame of the appliance cavity. Do
not remove the rating plate from the appli-
ance cavity.
We recommend that you write the data here:
Model (MOD.) …………………………………..
Product number (PNC) …………………………………..
Serial number (S.N.) …………………………………..
ENGLISH 17
Page: 15
Technical data
Dimensions (internal) Width
Height
Depth
437
328
401
Usable volumes 57 l
Area of baking tray 1140 cm²
Top heating element 800 W
Bottom heating element 1000 W
Grill 1650 W
Fan 2000 W
Total rating 2500 W
Voltage 230 V
Frequency 50 Hz
Number of functions 9
Energy Consumption with a standard
load, Conventional (Top and Bottom
Heat)
0.79 kWh
Energy Consumption with a standard
load, Forced Air Cooking
0.78 kWh
Environment concerns
The symbol on the product or on its
packaging indicates that this product may
not be treated as household waste. Instead
it should be taken to the appropriate
collection point for the recycling of electrical
and electronic equipment. By ensuring this
product is disposed of correctly, you will
help prevent potential negative
consequences for the environment and
human health, which could otherwise be
caused by inappropriate waste handling of
this product. For more detailed information
about recycling of this product, please
contact your local council, your household
waste disposal service or the shop where
you purchased the product.
Packaging material
The packaging material is environmentally-
friendly and recyclable. Plastic parts are
marked with international abbreviations
such as PE, PS, etc. Dispose of the packag-
ing material in the containers provided for
this purpose at your local waste manage-
ment facility.
ENGLISH 18
Page: 16
IKEA GUARANTEE
How long is the IKEA guarantee valid?
This guarantee is valid for five (5) years
from the original date of purchase of Your
appliance at IKEA, unless the appliance is
named LAGAN in which case two (2) years
of guarantee apply. The original sales re-
ceipt is required as proof of purchase. If
service work is carried out under guarantee,
this will not extend the guarantee period for
the appliance,
Which appliances are not covered by the
IKEA five (5) years guarantee?
The range of appliances named LAGAN
and all appliances purchased in IKEA be-
fore 1st of August 2007
Who will execute the service?
IKEA service provider will provide the serv-
ice through its own service operations or
authorized service partner network.
What does this guarantee cover?
The guarantee covers faults of the appli-
ance, which have been caused by faulty
construction or material faults from the date
of purchase from IKEA. This guarantee ap-
plies to domestic use only. The exceptions
are specified under the headline “What is
not covered under this guarantee?” Within
the guarantee period, the costs to remedy
the fault e.g. repairs, parts, labour and trav-
el will be covered, provided that the appli-
ance is accessible for repair without special
expenditure. On these conditions the EU
guidelines (Nr. 99/44/EG) and the respec-
tive local regulations are applicable. Re-
placed parts become the property of IKEA.
What will IKEA do to correct the problem?
IKEA appointed service provider will exam-
ine the product and decide, at its sole dis-
cretion, if it is covered under this guarantee.
If considered covered, IKEA service provider
or its authorized service partner through its
own service operations, will then, at its sole
discretion, either repair the defective prod-
uct or replace it with the same or a compa-
rable product.
What is not covered under this
guarantee?
• Normal wear and tear.
• Deliberate or negligent damage, dam-
age caused by failure to observe operat-
ing instructions, incorrect installation or by
connection to the wrong voltage, dam-
age caused by chemical or electro-chem-
ical reaction, rust, corrosion or water
damage including but not limited to dam-
age caused by excessive lime in the wa-
ter supply, damage caused by abnormal
environmental conditions.
• Consumable parts including batteries
and lamps.
• Non-functional and decorative parts
which do not affect normal use of the ap-
pliance, including any scratches and pos-
sible color differences.
• Accidental damage caused by foreign
objects or substances and cleaning or un-
blocking of filters, drainage systems or
soap drawers.
• Damage to the following parts: ceramic
glass, accessories, crockery and cutlery
baskets, feed and drainage pipes, seals,
lamps and lamp covers, screens, knobs,
casings and parts of casings. Unless such
damages can be proved to have been
caused by production faults.
• Cases where no fault could be found dur-
ing a technician’s visit.
• Repairs not carried out by our appointed
service providers and/or an authorized
service contractual partner or where non-
original parts have been used.
• Repairs caused by installation which is
faulty or not according to specification.
• The use of the appliance in a non-domes-
tic environment i.e. professional use.
ENGLISH 19
Page: 17
• Transportation damages. If a customer
transports the product to their home or
other address, IKEA is not liable for any
damage that may occur during transport.
However, if IKEA delivers the product to
the customer’s delivery address, then
damage to the product that occurs during
this delivery will be covered by this guar-
antee.
• Cost for carrying out the initial installation
of the IKEA appliance. However, if an
IKEA service provider or its authorized
service partner repairs or replaces the
appliance under the terms of this guaran-
tee, the service provider or its authorized
service partner will re-install the repaired
appliance or install the replacement, if
necessary.
This restriction do not apply to fault-free
work carried out by a qualified specialist
using our original parts in order to adapt
the appliance to the technical safety specifi-
cations of another EU country.
How country law applies
The IKEA guarantee gives You specific legal
rights, which covers or exceed local de-
mands. However these conditions do not
limit in any way consumer rights described
in the local legislation
Area of validity
For appliances which are purchased in one
EU country and taken to another EU coun-
try, the services will be provided in the
framework of the guarantee conditions nor-
mal in the new country. An obligation to
carry out services in the framework of the
guarantee exists only if the appliance com-
plies and is installed in accordance with:
• the technical specifications of the country
in which the guarantee claim is made;
• the Assembly Instructions and User Man-
ual Safety Information;
The dedicated After Sales Service for
IKEA appliances:
Please do not hesitate to contact IKEA After
Sales Service to:
1. make a service request under this guar-
antee;
2. ask for clarification on installation of the
IKEA appliance in the dedicated IKEA
kitchen furniture. The service won’t pro-
vide clarifications related to:
– the overall IKEA kitchen installation;
– connections to electricity (if machine
comes without plug and cable), to
water and to gas since they have to
be executed by an authorized serv-
ice engineer.
3. ask for clarification on user manual con-
tents and specifications of the IKEA ap-
pliance.
To ensure that we provide you with the best
assistance, please read carefully the As-
sembly Instructions and/or the User Manual
section of this booklet before contacting us.
How to reach us if You need our service
Please refer to the last page of this manual
for the full list of IKEA appointed contacts
and relative national phone numbers.
Important! In order to provide You with a
quicker service, we recommend that You
use the specific phone numbers listed at the
end of this manual. Always refer to the
numbers listed in the booklet of the specific
appliance You need an assistance for.
Before calling us, assure that You have to
hand the IKEA article number (8 digit code)
for the appliance of which you need our
assistance.
Important! SAVE THE SALES RECEIPT! It is
Your proof of purchase and required for the
guarantee to apply. Note that the receipt
reports also the IKEA article name and
number (8 digit code) for each of the
appliances you have purchased.
ENGLISH 20
Page: 18
Do You need extra help?
For any additional questions not related to
After Sales of your appliances, please con-
tact our nearest IKEA store call centre. We
recommend you read the appliance docu-
mentation carefully before contacting us.
ENGLISH 21
Report abuse
Libble takes abuse of its services very seriously. We’re committed to dealing with such abuse according to the laws in your country of residence. When you submit a report, we’ll investigate it and take the appropriate action. We’ll get back to you only if we require additional details or have more information to share.
Product:
Get your user manual by e-mail
Enter your email address to receive the manual of Ikea RUTINERAD in the language / languages: All languages as an attachment in your email.
The manual is 1,63 mb in size.
You will receive the manual in your email within minutes. If you have not received an email, then probably have entered the wrong email address or your mailbox is too full. In addition, it may be that your ISP may have a maximum size for emails to receive.
The manual is sent by email. Check your email
If you have not received an email with the manual within fifteen minutes, it may be that you have a entered a wrong email address or that your ISP has set a maximum size to receive email that is smaller than the size of the manual.
- Главная
- Каталог с отзывами
- Кухня
Offer links may be what’s known as affiliate or referral links which provide us a commission for purchases.
РУТИНЕРАД Духовка с горячим обдувом

3.3/5 оценка (84 голосов)
Артикульный номер 202.451.86
Описание
-Бесплатно 5 лет гарантии. Подробнее об условиях гарантии – в гарантийной брошюре.
-Духовка с горячим обдувом; обеспечивает нагревание духовки и позволяет одновременно готовить различные блюда на нескольких уровнях без смешения вкусов.
-Нагревающие элементы верх+дно+гриль; для приготовления блюд на гриле и медленной варки.
-Двойной гриль; для приготовления стейков, колбасок, овощей и поджаренного хлеба.
-Гриль с вентилятором; позволяет готовить большие порции и прожаривать крупные куски мяса.
-Выпечка хлеба и пиццы; для более интенсивного пропекания и образования хрустящей корочки.
-Разморозка с обудувом; быстро и гигиенично размораживает продукты.
-Электронный дисплей с электронным термостатом в режиме реального времени показывает температуру духовки, рекомендованные температурные настройки для каждой функции, низкое потребление энергии в режиме ожидания.
-Благодаря 2 комплектам зажимных телескопических направляющих выдвигать и задвигать проволочные полки в духовку будет проще и удобнее. Доставать горячую посуду безопаснее, вы можете просто выдвинуть полку.
-Когда пройдет установленное время готовки, прозвучит сигнал таймера, и духовка автоматически выключится.
-Гладкое внутреннее стекло дверцы духовки; дверцу можно снять для мытья.
-Дверца духовки с замком для безопасности детей.
Размеры товара
Ширина: 59.4 см
Глубина: 56.0 см
Высота: 58.9 см
Вес: 35.90 кг
Размеры и вес упаковки
Упаковки:1Упаковки:1Артикульный номер: 202.451.86
Ширина:66см
Высота63см
Длина:67см
Вес:37,2кг
количество 1
Дополнительная информация
Класс потребления энергии: А (традиционный метод нагревания) по шкале от А (наиболее эффективный) до G (наименее эффективный).
9 разных функций.
Обдув.
Нагревательные элементы: верх и дно.
Нагревающий элемент верх.
Нагревательный элемент дно.
Гриль.
Быстрый гриль.
Выпечка хлеба и пиццы.
Размораживание.
1 эмалированный противень прилагается.
1 эмалированный поддон для гриля прилагается.
1 проволочная полка прилагается.
2 комплекта телескопических направляющих прилагаются.
Расход энергии при стандартной загрузке, нагревающие элементы верх+дно: 0,79 кВт/ч.
Расход энергии при стандартной загрузке, обдув: 0,78 кВт*ч.
Размер духовки: Средняя. 35 л <= объем< 65 л.
Уровень шума: 47 дБ(А).
Напряжение: 230 В.
1х25 Вт лампочка.
Площадь самого большого противня: 1140 см².
Установку должен производить квалифицированный специалист.
Цены в магазинах ИКЕА в разных странах
Последнее обновление: 10.03.2023. Цены взяты с сайтов ИКЕА соответствующих стран.
- По цене
- По алфавиту
- Без сортировки
-
Индонезия
- 0 IDR
- 0 EUR
- 0 USD
-
Тайвань
- 0 TWD
- 0 EUR
- 0 USD
В следующих странах товар не представлен на сайте или продается под другим артикулом:
- Бельгия
- Болгария
- Чехия
- Дания
- Германия
- Испания
- Греция
- Франция
- Хорватия
- Исландия
- Ирландия
- Италия
- Кипр
- Латвия
- Литва
- Люксембург
- Венгрия
- Нидерладны
- Норвегия
- Австрия
- Россия
- Польша
- Португалия
- Румыния
- Швейцария
- Словакия
- Финляндия
- Швеция
- Турция
- Великобритания
- Сербия
- Украина
- Эстония
- Канада
- США
- Мексика
- Бахрейн
- Египет
- Кувейт
- Израиль
- Марокко
- Катар
- Саудовская Аравия
- ОАЭ
- Иордания
- Австралия
- Китай
- Гонконг
- Индия
- Япония
- Малайзия
- Сингапур
- Южная Корея
- Таиланд
- Доминиканская республика
- Пуэрто-Рико
История изменения цены на товар
За период начиная с марта 2019 года, с которого отслеживается история изменения цен, товар не продавался ни в одной из стран, в которых присутствует ИКЕА.
-
Инструкции по эксплуатации
3
Ikea РАФФИНЕРЭД инструкция по эксплуатации
(92 страницы)
- Языки:Русский
-
Тип:
PDF -
Размер:
9.47 MB -
Описание:
Комбинир микроволновая печь (СВЧ) с горячим обдувом
Просмотр
Ikea РАФФИНЕРЭД инструкция по эксплуатации
(120 страниц)
- Языки:Русский
-
Тип:
PDF -
Размер:
17.6 MB -
Описание:
Духовка
Просмотр
Ikea РАФФИНЕРЭД инструкция по эксплуатации
(132 страницы)
- Языки:Русский
-
Тип:
PDF -
Размер:
19.28 MB -
Описание:
Духовка пиролитическая
Просмотр
На NoDevice можно скачать инструкцию по эксплуатации для Ikea РАФФИНЕРЭД. Руководство пользователя необходимо для ознакомления с правилами установки и эксплуатации Ikea РАФФИНЕРЭД. Инструкции по использованию помогут правильно настроить Ikea РАФФИНЕРЭД, исправить ошибки и выявить неполадки.
- Регистрация
- Войти
Инструкции » Плиты / Духовки / СВЧ » IKEA
|
Всего инструкций в разделе: 33 |
Отсортировать по: Названию
| инструкция | устройство | размер |
| IKEA ЭЛЬДСЛОГА | поверхность встраиваемая газовая | 7.67 MB |
| IKEA ХЮСХОЛЛА (СВЧ) | микроволновая печь (СВЧ) | 6.58 MB |
| IKEA ФРАМТИД (СВЧ) | микроволновая печь (СВЧ) | 6.58 MB |
| IKEA ФОЛКЛИГ | индукционная панель | 3.95 MB |
| IKEA УТРУЛИГ | индукционная панель | 4.89 MB |
| IKEA ТЬЕНЛИГ | духовка | 13.71 MB |
| IKEA ТРЕВЛИГ | индукционная панель | 3.44 MB |
| IKEA СМАКЛИГ | индукционная панель с функц мост | 12.22 MB |
| IKEA РЕАЛИСТИСК | духовка | 13.71 MB |
| IKEA РАФФИНЕРЭД | духовка пиролитическая | 19.28 MB |
| IKEA РАФФИНЕРЭД | духовка | 17.60 MB |
| IKEA РАФФИНЕРЭД | комбинир микроволновая печь (СВЧ) с горячим обдувом | 9.47 MB |
| IKEA РАФФИНЕРЭД (СВЧ) | микроволновая печь (СВЧ) | 8.74 MB |
| IKEA МИРАКУЛОС (СВЧ) | микроволновая печь (СВЧ) | 369.41 kB |
| IKEA МИРАКУЛОС | духовка пиролитическая | 572.62 kB |
| IKEA МИРАКУЛОС | духовка | 542.00 kB |
| IKEA МЁЙЛИГ | стеклокерамическая панель домино | 11.71 MB |
| IKEA МЁЙЛИГ | индукцион панель домино с ускорит | 12.74 MB |
| IKEA МЁЙЛИГ | газовая панель домино | 7.28 MB |
| IKEA ЛИВСГНИСТА | поверхность встраиваемая газовая черный | 7.35 MB |
| IKEA ЛАГАН OV3 | духовка | 4.69 MB |
| IKEA ЛАГАН HGA4K | поверхность встраиваемая газовая | 4.74 MB |
| IKEA КУЛИНАРИСК | паровая духовка | 888.08 kB |
| IKEA КУЛИНАРИСК | духовка пиролитическая | 360.84 kB |
| IKEA КУЛИНАРИСК | духовка | 382.98 kB |
| IKEA КУЛИНАРИСК (СВЧ) | комбинир микроволновая печь (СВЧ) с горячим обдувом | 437.94 kB |
| IKEA ДАГЛИГ | варочн панель стеклокерамика | 11.22 MB |
| IKEA ГРЭНСЛЁС | комбинир микроволновая печь (СВЧ) с горячим обдувом | 404.88 kB |
| IKEA ГРЭНСЛЁС (СВЧ) | микроволновая печь (СВЧ) | 368.91 kB |
| IKEA ВЭРМА (СВЧ) | микроволновая печь (СВЧ) | 2.78 MB |
| IKEA БЭЮБЛАД (СВЧ) | микроволновая печь (СВЧ) | 8.74 MB |
| IKEA БЭЮБЛАД | духовка стекло | 17.60 MB |
| IKEA БАРМХЭРТИГ | варочн панель стеклокерамика | 8.60 MB |
Что удобнее для чтения книг?
Планшет
Электронная книга
Смартфон
Книга в бумажном переплёте
Не читаю книг
© 2010- ManualBase.ru
- Статьи
- О сайте
- Помощь
- Контакты
© 2010- ManualBase.ru
Посмотреть инструкция для Ikea RUTINERAD бесплатно. Руководство относится к категории печи, 12 человек(а) дали ему среднюю оценку 8.4. Руководство доступно на следующих языках: русский, английский. У вас есть вопрос о Ikea RUTINERAD или вам нужна помощь? Задайте свой вопрос здесь
Не можете найти ответ на свой вопрос в руководстве? Вы можете найти ответ на свой вопрос ниже, в разделе часто задаваемых вопросов о Ikea RUTINERAD.
Правильно ли, что вентилятор продолжает работать, когда духовка уже выключена?
Что происходит при использовании функции «гриль»?
Обязательно ли предварительно разогревать духовку Ikea?
Как очистить духовку от пригоревшего жира?
Какой способ лучше всего подходит для очистки решетки в духовке?
Инструкция Ikea RUTINERAD доступно в русский?
Не нашли свой вопрос? Задайте свой вопрос здесь
-
Ikea RUTINERAD — page 1
RAFFINERAD RUTINERAD GB DE …
-
Ikea RUTINERAD — page 2
…
-
Ikea RUTINERAD — page 3
ENGLISH 4 DEUTSCH 22 …
-
Ikea RUTINERAD — page 4
Contents Safety information 4 Safety instructions 5 Installation 7 Product description 7 Before first use 8 Daily use 8 Clock functions 10 Using the accessor ies 11 Additional functions 12 Helpful hints and tips 13 Care and cleaning 14 What to do if… 16 Technical data 18 Environment concerns 18 IKEA GUARANTEE 19 Subject to change without notice. …
-
Ikea RUTINERAD — page 5
General Safety • Internally the appliance become s hot when in oper ation. Do not touch the heating elements th at are in the appliance. Al- ways use oven gloves to re move or put in accessor ies or ovenware. • Do not use a steam cleaner to clean the appliance. • Before maintenance cut the power supply. • Do not use harsh abrasive clea ners …
-
Ikea RUTINERAD — page 6
• Use only correct isolation devices: line protecting cut-outs, fuses (screw type fuses removed from the holder), earth leakage trips and contactors. • The electrica l installation must have an isolation device whi c h lets you disconnect the appliance from the mains at all poles. The isolation device must have a contact opening width of minimu …
-
Ikea RUTINERAD — page 7
Disposal Warning! Risk of injury or suffocation. • Disconnect the appliance from the mains supply. • Cut off the mains cable and discard it. • Remove the door catch to prevent chil- dren and pets to get closed in the appli- ance. Installation Warning! Refer to the Safety chapters. Refer to the Assembly Instructions for the installation. Elect …
-
Ikea RUTINERAD — page 8
Before first use Warning! Refer to the Safety chapters. Initial cleaning • Remove all accessories and r emovable shelf supports (if applicable ). • Clean the appliance before first use. Important! Refer to the chapter «Care and cleaning». Setting th e time of day The display shows and 12:00 . 12 flash- es. 1. Press + or — to set the c …
-
Ikea RUTINERAD — page 9
3. To deactivate the appliance, turn the knob for the oven functions to the off position. Oven functions Oven function Application Off position The appliance is off. Forced Air Cook- ing To bake on the maximum temperature on thr ee oven lev- els at the same time. When you use this function, de- crease the oven temperature by 20 — 40 °C from the st …
-
Ikea RUTINERAD — page 10
Display 1 7 2 3 4 5 6 7 1 Time and temperatur e 2 Heat-up and residual heat indicator 3 Water tank (selected models only) 4 Core temperature sensor (selected models only) 5 Door lock (selected models only) 6 Hours / minut es 7 Clock functions Buttons Button Function Description Clock To set a clock function. , Minus, plus To set the time. Heat-up a …
-
Ikea RUTINERAD — page 11
6. When the set time ends, the symbol or and the set time flash. The acous- tic signal sounds fo r two minutes. The appliance deactivate s. Press a bu tton or open the appliance door to stop the signal. If you pre ss while setting the time for Duration , the appliance switches to setting the End function. Setting the Minute Min der Used to set a co …
-
Ikea RUTINERAD — page 12
1 °C Pull out the right and left hand tele- scopic runners. 2 °C Put the wire shelf on the telescopic run- ners and carefully push them into the appliance. You can also use the telescopic runners with the trays or pans supplied with the appliance (refer to “P roduct description”). Make sure you push back the telescopic runners fully in the ap …
-
Ikea RUTINERAD — page 13
Helpful hints and tips • The appliance has four shelf levels. Count the shelf levels from the bottom of the ap- pliance floor. • The appliance has a special system which circulates the air and constantly recycles the steam. With this system you can cook in a steamy environment and keep the food soft inside and crusty outside. It de- creases the …
-
Ikea RUTINERAD — page 14
Weight (kg) Food Oven Function Level Oven tempera- ture (°C) Cooking Time (min) Instant cakes 2 160 45 — 55 1P i e s 2 160 80 — 100 Biscuits 3 140 25 — 35 2 Lasagne 2 180 45 — 60 1W h i t e B r e a d 2 190 50 — 60 1P i z z a 1 190 — 200 20 — 30 Care and cleaning Warning! Refer to the Safety chapters. • Clean the front of the appliance with a s …
-
Ikea RUTINERAD — page 15
The rounded ends of the shelf supports must point to the front. Oven lamp Warning! Be careful wh en you change the oven lamp. There is a risk of electrical shock. Before you change the oven lamp: • Deactivate the oven. • Remove the fuse s in the fuse box or deac- tivate the circuit breaker. Put a cloth on the bottom of the oven to prevent damag …
-
Ikea RUTINERAD — page 16
7 2 1 Carefully lift (step 1) and remove (step 2) the glass panels one by one. Start from the top panel. Clean the glass panels with water and soap. Dry the glass panels carefully. Installing the door and the glass panels When the cleaning is completed, install the glass panels and the oven door. Do the above steps in the opposite sequence. Make su …
-
Ikea RUTINERAD — page 17
Problem Possible cause Remedy The oven does not heat up. The display shows Demo . The demo mode is activa- ted. 1. Deactivate the appli- ance. 2. Press and hold the but- ton + . 3. When an acoustic signal sounds, turn the knob for the oven functions to the first function. Demo flashes in the display. 4. Turn the knob for the oven functions to the o …
-
Ikea RUTINERAD — page 18
Technical data Dimensions (internal) Width Height Depth 437 328 401 Usable volumes 57 l Area of baking tray 1140 cm² Top heating element 800 W Bottom heating element 1000 W Grill 1650 W Fan 2000 W Total rating 2500 W Voltage 230 V Frequency 50 Hz Number of functions 9 Energy Consumption with a standard load, Conventional (Top and Bottom Heat) 0.79 …
-
Ikea RUTINERAD — page 19
IKEA GUAR ANTEE How long is th e IK EA guarantee valid? This guarantee is vali d for five (5) years from the original date of purchase of Y our appliance at IKEA, un less the appliance is named LAGAN in which case two (2) years of guarantee apply. The original sales re- ceipt is required as proof of purchase. If service work i s carried out un der …
-
Ikea RUTINERAD — page 20
• Transportation damages. If a customer transports the produc t to their home or other address, IKEA is not liable for any damage that may occur during transport. However, if IKEA delivers the product to the customer’s delivery address, then damage to the product that occurs during this delivery will be covered by this guar- antee. • Cost …
-
Ikea RUTINERAD — page 21
Do You need extra help? For any additional questions not related to After Sales of your appliances, please con- tact our nearest IKEA store call centre. We recommend you read the appliance d ocu- mentation carefully be fore contacting us. ENGLISH 21 …
-
Ikea RUTINERAD — page 22
Inhalt Sicherheitsinformationen 22 Sicherheitshinweise 23 Montage 25 Gerätebeschreibung 26 Vor der ersten Inbetriebnahme 26 Täglicher Gebrauch 27 Uhrfunktionen 29 Verwendung des Zubehörs 30 Zusatzfunktionen 31 Praktische Tipps und Hinweise 31 Reinigung und Pflege 33 Was tun, wenn … 35 Technische Daten 37 Umwelttipps 37 IKEA Garantie 38 Änderu …
-
Ikea RUTINERAD — page 23
Allgemeine Sicherheit • Während des Betriebs wird da s Geräteinnere heiss. Berüh- ren Sie nicht die Heizelemente im Gerät. Verwenden Sie zum Anfassen des Zubehörs und der Töpfe wärmeisolierende Handschuhe. • Benutzen Sie zum Reinigen des Geräts keinen Dampfreiniger. • Unterbrechen Sie vor Wartun gsarbeiten die Stromversor- gung. • B …
-
Ikea RUTINERAD — page 24
• Achten Sie darauf, dass das Netzkabel die Gerätetür nicht be rührt, insbesondere wenn die Tür heiß ist. • Alle Teile, die gegen d irektes Berühren schützen sowie die isol ierten Teile müssen so befestigt werden, d ass sie nicht ohne Werkzeug entfernt werden können. • Stecken Sie den Netzstecker erst nach Abschluss der Monta ge in d …
-
Ikea RUTINERAD — page 25
Reinigung und Pflege Warnung! Risiko von Verletzungen, Brand oder Beschädigungen am Gerät. • Schalten Sie vor Reinigungsa rbeiten im- mer das Gerät aus und ziehen Sie den Netzstecker aus der Steckdose. • Vergewissern Si e sich, dass das G erät abgekühlt ist. Zusätzlich besteht die Ge- fahr, dass die Glasscheiben brechen. • Ersetzen Sie …
-
Ikea RUTINERAD — page 26
Gerätebeschreibung 1 2 3 5 4 6 8 7 1 Backofen-Einstell knopf 2 Elektronischer Programms peicher 3 Temperaturwahlknopf 4 Lüftungsöffnungen 5 Rost 6 Backofenlampe 7 Gebläse 8 Typenschild Backofenzubehör • Gitterrost x 1 Für Kochgeschirr , Kuchenformen, Br aten. • Kuchenblech x 1 Für Kuchen und Plätzchen. • Kuchenblech hochrandig x 1 Zum …
-
Ikea RUTINERAD — page 27
4. Lassen Sie das Gerät zehn Minuten lang eingeschaltet. 5. Stellen Sie die Funktion und die Höchsttemperatur ein. 6. Lassen Sie das Gerät zehn Minuten lang eingeschaltet. Das Zubehör kann heißer werden als bei normalem Gebrauch. Das Gerät kann Ge- ruch und Rauch verströmen. Das ist normal. Sorgen Sie für eine ausreichende Belüftung. Mecha …
-
Ikea RUTINERAD — page 28
Backofenfunktion Anwendung Ober- und Un- terhitze Zum Backen und Braten auf einer Ebene. Grill Zum Grillen flacher Lebensmi ttel in der Mitte des Rostes und zum Toasten. Unterhitze Zum Backen von Kuchen mit krossen Böden und zum Ein- kochen von Lebensmitteln. Umluftgrillen Zum Braten von grösseren Fleischstücken oder Geflügel auf einer Ebene. A …
-
Ikea RUTINERAD — page 29
Taste Funktion Beschreibung , Minus, Plus Einstellen der Zeit. Aufheiz- und Restwärmeanzeige Wenn Sie eine Backofenfunktion einschal- ten, leuchten die Balken im Display nacheinander auf. Mit den Balken wird der Anstieg bzw. das Fallen der Backofentem- peratur gekennzeichnet. Wenn Sie das Gerät ausschalten, zeigt das Display die Restwärme an, we …
-
Ikea RUTINERAD — page 30
1. Drücken Sie wiederholt auf , bis und 00 im Display blinken. 2. Stellen Sie den Kurz zeitwecker mit der Taste + oder — ein. Beim ersten Einste l- len werden die Minuten und Sekunden berechnet. Ist die ei ngestellte Zeit län- ger als 60 Minuten, wird im Display das Symbol angezeigt. Das Gerät be- rechnet jetzt die Zeit in Stunden und Minuten. 3 …
-
Ikea RUTINERAD — page 31
Zusatzfunktionen Kindersicherung Wenn die Kindersicherung eingeschaltet ist, kann der Backofen nicht bedient werden. Damit wird sichergestel lt, dass Kinder das Gerät nicht versehentlich einschalten. Ein- und Ausschalten der Kindersicherung: 1. Stellen Sie keine Backofenfunkti on ein. 2. Halten Sie die Tasten und + gleich- zeitig 2 Sekunden lang g …
-
Ikea RUTINERAD — page 32
Backen von Kuchen • Die Backofentür nicht öffnen, bevor 3/4 der Backzeit abgelaufen ist • Wenn Sie zwei Backblech e gleichzeitig nutzen, lassen Sie ei ne Ebene dazwischen frei. Garen von Fleisch und Fisch • Setzen Sie beim Garen von Speisen mit hohem Fettgehalt eine Brat- und Fett- pfanne ein, damit keine dauerhaften Fle- cken im Backofen v …
-
Ikea RUTINERAD — page 33
Reinigung und Pflege Warnung! Siehe Sicherheitshinweise. • Feuchten Sie ein wei ches Tuch mit war- mem Wasser und etwas Reinigungsmittel an, und reinigen Sie damit die Vordersei — te des Geräts. • Reinigen Sie die Metalloberflächen mi t einem handelsüblichen Reinigungsmittel. • Reinigen Sie den Innenraum des Back- ofens nach jedem Gebrauch …
-
Ikea RUTINERAD — page 34
1. Drehen Sie die Glasab deckung gegen den Uhrzeigersinn und nehmen Sie sie ab. 2. Reinigen Sie die Glasa bdeckung. 3. Ersetzen Sie die Backofenl ampe mit ei- ner 25 W, 230 V (50 Hz) und bis zu 300 °C hitzebeständigen Glühbirne (Sockel: E14). 4. Bringen Sie die Gl asabdeckung wieder an. Reinigung der Backofen-Tür Die Backofentür hat drei Glass …
-
Ikea RUTINERAD — page 35
7 2 1 Heben Sie eine Glasscheibe nach der anderen vor- sichtig an (Schritt 1) und entfernen Sie sie (Schritt 2). Be- ginnen Sie mit der obersten Glasschei — be. Reinigen Sie die Gl asscheiben mit Wasser und Spülmittel. Trocknen Sie di e Glasschei- ben sorgfältig ab. Einsetzen der Backofentür und der Glasscheiben Nach der Reinigung müssen die Ba …
-
Ikea RUTINERAD — page 36
Problem Mögliche Ursache Abhilfe Der Backofen heizt nicht. Die Sicherung im Siche- rungskasten hat ausgelöst. Prüfen Sie die Sicherung. Falls die Sicherung öfter als einmal auslöst, wenden Sie sich an eine Elektrofachkraft. Die Backofenlampe leuchtet nicht. Die Backofenlampe ist de- fekt. Ersetzen Sie die Backofen- lampe. Der Backofen heizt ni …
-
Ikea RUTINERAD — page 37
Wir empfehlen, hier folgende Daten zu notieren: Modell (MOD.) ……… …………. ………. ……… Produktnummer (P NC) … ………. ……….. ………… ….. Seriennummer (S.N.) ……… …………. ………. …….. . Technische Daten Abmessungen (innen) Breite Höhe Tiefe 437 328 401 Nutzvolumen 57 Liter Grösse des Kuchenble …
-
Ikea RUTINERAD — page 38
IKEA Garantie Wie lang ist die IKEA Garantie gültig? Diese Garantie ist für (5) fünf Jahre gültig ab dem Originalkaufdatum Ihres Gerätes bei IKEA; sollte das Gerät die Bezeichnung «LAGAN» tragen, gilt die Garanti e in die- sem Fall nur (2) zwei Jahre. Als Kaufnach- weis ist der Ori ginalkassenbon oder die Originalrec hnung erforderl …
-
Ikea RUTINERAD — page 39
• Beschädigung folgender Tei le: Glaskera- mik, Zubehör, Geschirr und Besteckkörbe, Zuleitungen und Drainageschläuche-/ rohre, Lampen und Lampenabdeckun- gen, Knöpfe/Wählschalter, Gehäuse und Teile des Gehäuses ; es sei denn, es kann nachgewiesen werden, dass diese Schä- den durch Produktionsfehler verursacht wurden. • Fälle, in denen …
-
Ikea RUTINERAD — page 40
Um sicherzustel len, dass wir Sie stets opti- mal unterstützen, lesen Sie bitte die Monta- geanleitung und/oder den Bedienungsan- leitungsabschnitt diese r Broschüre durch, bevor Sie sich an uns wenden. Wie können Sie uns erreichen, wenn Sie uns benötigen? Auf der letzten Seite die ser Broschüre fin- den Sie eine vollständi ge Liste mit offiz …
-
Ikea RUTINERAD — page 41
Country Phone number Call Fee Opening time België 070 24 6 0 1 6 Binnenlandse gespreksk ost en 8 tot 2 0 W eekdagen Belgique T arif des appels nationaux 8 à 20. En semaine България 0 0 3 5 9 8 8 8 1 6 4 0 8 Такса за повикване от страната От 9 до 1 8 ч в работни дни Česká r epublika 2 46 0 1 97 2 …
-
Ikea RUTINERAD — page 42
42 …
-
Ikea RUTINERAD — page 43
43 …
-
Ikea RUTINERAD — page 44
© Inter IKEA Syst ems B.V. 2008 AA-720093-1 892954103-D- 052013 …
Руководстве по эксплуатации Ikea RUTINERAD — вам приходилось его терять? Поскольку вы попали сюда, наверняка с вами это случилось. Но вы не единственный человек, сталкивающийся с проблемами с хранением руководства по эксплуатации всех домашних устройств. Ниже несколько советов, касающихся того, зачем собирать руководства по эксплуатации.
Руководстве по эксплуатации Ikea RUTINERAD это определенный вид технической документации, являющейся неразлучным элементом каждого устройства, которое мы приобретаем. Они отличаются между собой количеством информации, которую можно найти на тему данного устройства: напр. Ikea RUTINERAD. Конечно же, если производитель считает что необходимо передать нам большее количество информации, касающейся устройства Ikea RUTINERAD, то стоит ее хоть раз прочитать — в начале, сразу же после покупки данной вещи. Однако мы считаем, что инструкции должны заключать самую важную, наиболее необходимую информацию о Ikea RUTINERAD, так, чтобы не отнимать желания пользователя прочесть ее уже в самом начале. Несомненно, если устройство Ikea RUTINERAD имеет много продвинутых функций, неизбежно большое количество информации в содержании этого документа.
Które из информации в инструкции Ikea RUTINERAD необходимо обязательно прочитать?
- Информацию, касающуюся правильного использования и ухода за устройством Ikea RUTINERAD — нам необходимо ознакомиться с основными правилами, чтобы в случае проблем с устройством сервисный центр не отказал нам в гарантийном обслуживании, из-за неправильного использования
- Информация, касающаяся самых частых проблем с Ikea RUTINERAD и способы их решения
- Информация, касающаяся гарантии устройства Ikea RUTINERAD и ближайших сервисных центров, способных починить устройство в соответствии с рекомендациям производителя Ikea
Как хранить инструкции дома?
Хорошей идеей является предназначение одного ящика, в котором бы хранилась инструкция Ikea RUTINERAD а также всех других домашних устройств которыми мы пользуемся. Тогда значительно легче вам будет ее найти, чем искать в родных коробках, которые наверняка уже выбросили вы, или другие домочадцы. Раз в год достаточно просмотреть ящик и выбросить инструкции, которые касаются устройств, которыми вы уже не пользуетесь. Таким образом вы избежите хранения ненужных документов, а останутся только актуальные. Вы можете также скачать и распечатать инструкцию Ikea RUTINERAD чтобы разместить ее в своем ящике.