
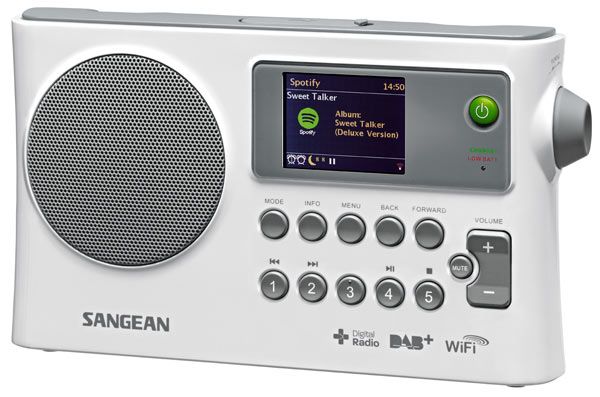
Компактный интернет-радиоприемник Sangean WFR-28C имеет цветной TFT дисплей с высоким разрешением, прием как интернет радиостанций, так и обычного эфирного (87.5-108 МГц) FM вещания с RDS, а так же DAB+.
Sangean WFR-28C продолжает традиции:современный дизайн, лаконичные и стильные органы управления. Современное программное обеспечение позволяет воспроизводить музыку с компьютера, планшета или мобильного телефона. Вы можете легко воспроизводить на приемник музыку со своего смартфона или планшета с помощью приложения UNDOK. Загрузите и установите бесплатное приложение UNDOK ™ прямо из магазина Apple iTunes, App Store или Android Google Play.
Простое подключение к сети интернет, устройство заработает как plug and play, само ищет сеть (network), и все прописывает, что ему необходимо.Самое главное достоинство — это простота. Любой член семьи может пользоваться приемником, даже не читая описания.
Главная отличительная особенность приемника это малые размеры и возможность использования аккумуляторов или батарей.
Удобная система поиска позволяет подобрать радиостанции по годам — десятилетиям, по жанрам музыки, по конкретному исполнителю или названию группы,также новостные станции, спортивные, комедийные,станции для детей и многое многое другое. С WI-FI радиоприемником WFR-28C Вам будут доступны более 15000 вещательных радиостанций со всего мира.
Основные особенности радиоприемника WFR-28C
Цветной дисплей
Радиоприемник оснащен высококачественным 2.4 дюймовым цветным TFT дисплеем, имеющим регулировку яркости.
Интернет радио
Подключаясь к сети Internet, радиоприемник позволяет прослушивать более 15000 различных радиостанций со всего мира. Для удобства поиска, имеется сортировка станций по региону и жанру.
WiFi подключение к Интернет
Радиоприемник WFR-28C подключается к сети через WiFi, для чего имеет антенну с приемом на частотах 2.4 и 5 ГГц
Дистанционное управление
Приемник может управляться как с входящего в комплект пульта дистанционного управления, так и с любого смартфона под управлением iOS (Apple iPHONE) или Android.
15 ячеек памяти
Для сохранения любимых станций, в радиоприемнике имеется 15 ячеек памяти – 5 для интернет станций, 5 для FM станций и 5 для DAB+.
Аудиоплеер
Вы можете подключить приемник к компьютеру через линейный вход или флешку к USB разъему и прослушивать любимую музыку записанную в любом удобном формате MP3, AAC+, WMA.
Заряд аккумуляторов
Радиоприемник оснащен встроенной зарядкой аккумуляторов.
Функции часов
Приемник WFR-28C обладает всеми функциями контроля времени – часы, два будильника, таймер автоматического выключения. Время будет автоматически корректироваться от принимаемых радиостанций.
Встроенные антенны
Радиоприемник поставляется с встроенной WiFi антенной и телескопической антенной для диапазона FM.
Супер ЗВУК
Для воспроизведения радиоприемник оснащен высококачественным динамиком, а для настройки звука имеет регулировку тембра низких и высоких частот и эквалайзер с несколькими предустановками — Flat / Jazz / Rock / Movie / Classic / Pop / News.
Комплектация радиоприемника Sangean WFR-28C
- Радиоприемник;
- Адаптер питания;
- Инструкция по эксплуатации;
- Упаковка.
SANGEAN
WFR-28D
Инструкция по эксплуатации
Версия 1.1

1
СОДЕРЖАНИЕ
стр.
стр.
ПРИСТУПАЯ К РАБОТЕ
Перед использованием
2
Питание от батареек / аккумуляторов 2
Питание от сети через адаптер
2
Схема органов управления
3
Основы управления
4
ПОДКЛЮЧЕНИЕ И НАСТРОЙКА
Первое подключение
5
Настройка сети вручную
6
ИНТЕРНЕТ-РАДИО
Общие сведения
9
Выбор станции по стране
9
Выбор станции по жанру
9
Поиск станции по названию
10
Новые и популярные станции
10
Поиск подкастов
11
Предустановка станций на кнопки
11
Последние прослушанные станции
11
Информационные режимы дисплея
12
Создание учетной записи
12
Избранные и добавленные станции
13
АУДИО-ПЛЕЕР
Воспроизведение с компьютера
14
Управление воспроизведением
15
Повтор треков
16
Случайный порядок
16
Информационные режимы дисплея
16
Работа с плейлистом
17
Пробуждение по локальной сети
18
Обновление списка серверов UPnP
18
Сохранение сетевого подключения
18
Функция Play to в Windows 7
19
Воспроизведение с USB-носителей
20
FM-РАДИО
Поиск станций
21
Информационные режимы дисплея
21
Настройка сканирования
22
Стерео / Моно
22
Предустановка станций на кнопки
22
ЧАСЫ И БУДИЛЬНИК
Автоматическая синхронизация
23
12 или 24-часовой формат
23
Настройка часов вручную
23
Установка будильника
24
Когда будильник сработал
25
Функция «вздремнуть еще»
25
Таймер сна
25
ДИСПЛЕЙ И АУДИО
Эквалайзер
26
Регулировка яркости
26
Регулировка контраста
27
Функция отключения звука
27
Разъем для наушников
27
Линейный выход
27
Аудио-вход (AUX IN)
27
ИНФОРМАЦИЯ
Возврат к заводским установкам
28
Обновление ПО
28
Сетевые профили
29
Аудио-форматы
29
Технические характеристики
30

2
ПРИСТУПАЯ К РАБОТЕ
Перед использованием
Прежде, чем Вы сможете использовать приемник, у Вас должно быть следующее:
широкополосное интернет-подключение (не требуется для DAB, FM и Аудио-плеера).
беспроводная точка доступа WiFi, предпочтительно через роутер. Роутер (маршрутизатор)
и точка доступа WiFi часто объединены в одном устройстве.
Если Ваша беспроводная сеть сконфигурирована с использованием защитных протоколов
WEP или WPA/WPA2, Вы должны знать пароль (ключ) для подключения к сети.
Приемник, подключенный по WiFi, как правило, будет нормально работать в пределах 10 — 20
метров от Вашей точки доступа. Но это зависит от материала и толщины стен, влияния других
беспроводных сетей и иных источников помех. DAB и FM-радио будут работать везде, где
можно принять соответствующий радиосигнал.
Питание от батареек / аккумуляторов
Прежде, чем вставить батарейки или аккумуляторы, удостоверьтесь, что переключатель
NiMH/Alkaline, находящийся в батарейном отсеке, выставлен соответствующим образом
(позиция NiMH — для перезаряжаемых аккумуляторов, позиция Alkaline — для батареек).
Вставьте четыре батарейки или аккумулятора размера D (UM-1), соблюдая полярность
согласно указаниям на корпусе батарейного отсека.
Красный свет индикатора, уменьшение громкости, искажения и «заикающийся звук» являются
признаками необходимости замены батареек.
Не оставляйте батарейки в приемнике, если не планируете использовать его долгое время
(например, уезжаете в отпуск).
Питание от сети через адаптер
Для питания от сети приемнику требуется адаптер постоянного тока со следующими
параметрами: 7.5 В, 1.6 А, центр-плюс.
Разъем питания от сетевого адаптера находится на левой стороне приемника.
Когда используется адаптер, батарейки автоматически отключаются.
Если вставлены перезаряжаемые аккумуляторы, они подзаряжаются (только, когда приемник
выключен). Пока идет зарядка, индикатор мигает зеленым. Если зеленый горит, не мигая –
значит, аккумуляторы заряжены полностью.

3
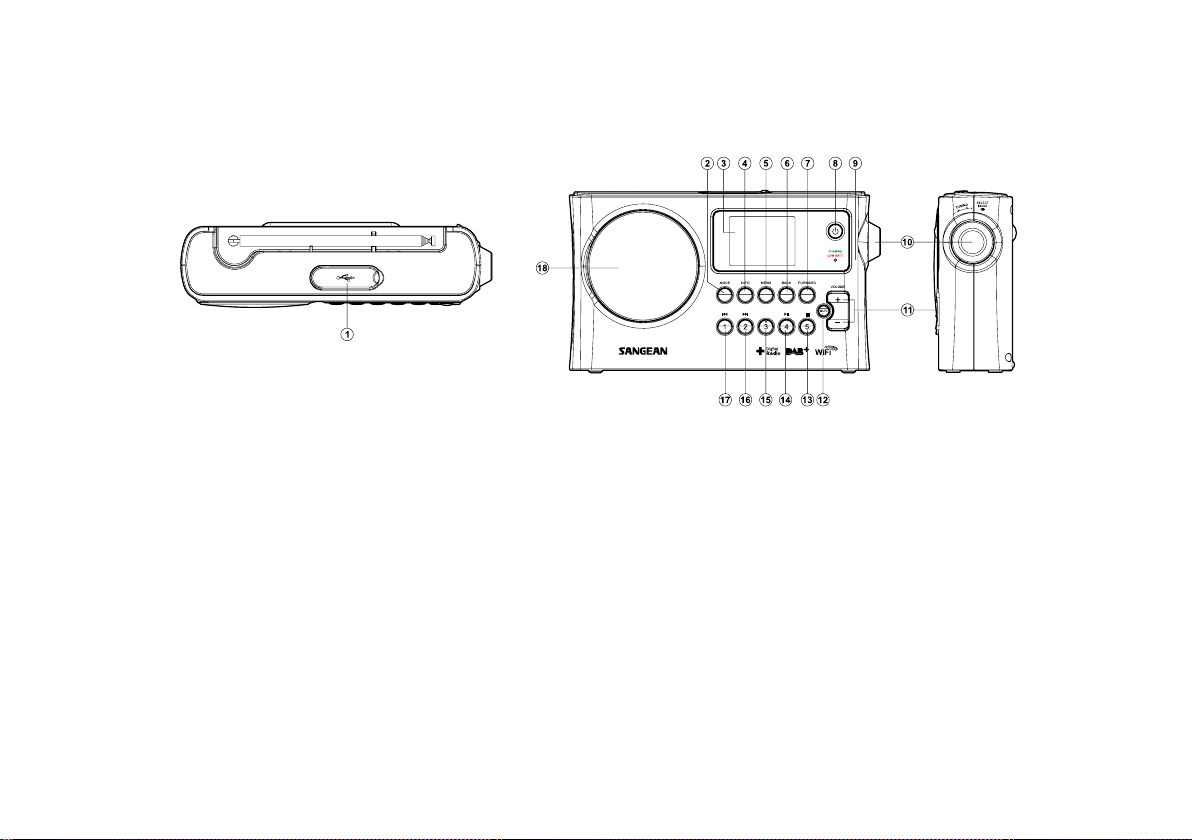
Схема органов управления
1. Разъем USB
2. Кнопка MODE (режимы)
3. Жидкокристаллический дисплей
4. Кнопка INFO (информация)
5. Кнопка MENU (меню)
6. Кнопка BACK (назад)
7. Кнопка FORWARD (вперед)
8. Кнопка включения/выключения
9. Индикатор заряда аккумуляторов /
разряда батарей
10. Колесо настройки / кнопка выбора
11. Кнопка громкости (качелька)
12. Кнопка MUTE (отключение звука)
13. Кнопка предустановки 5 / Стоп
14. Кнопка предустановки 4 / воспр./пауза
15. Кнопка предустановки 3
16. Кнопка предустановки 2 / вперед
17. Кнопка предустановки 1/ назад
18. Динамик
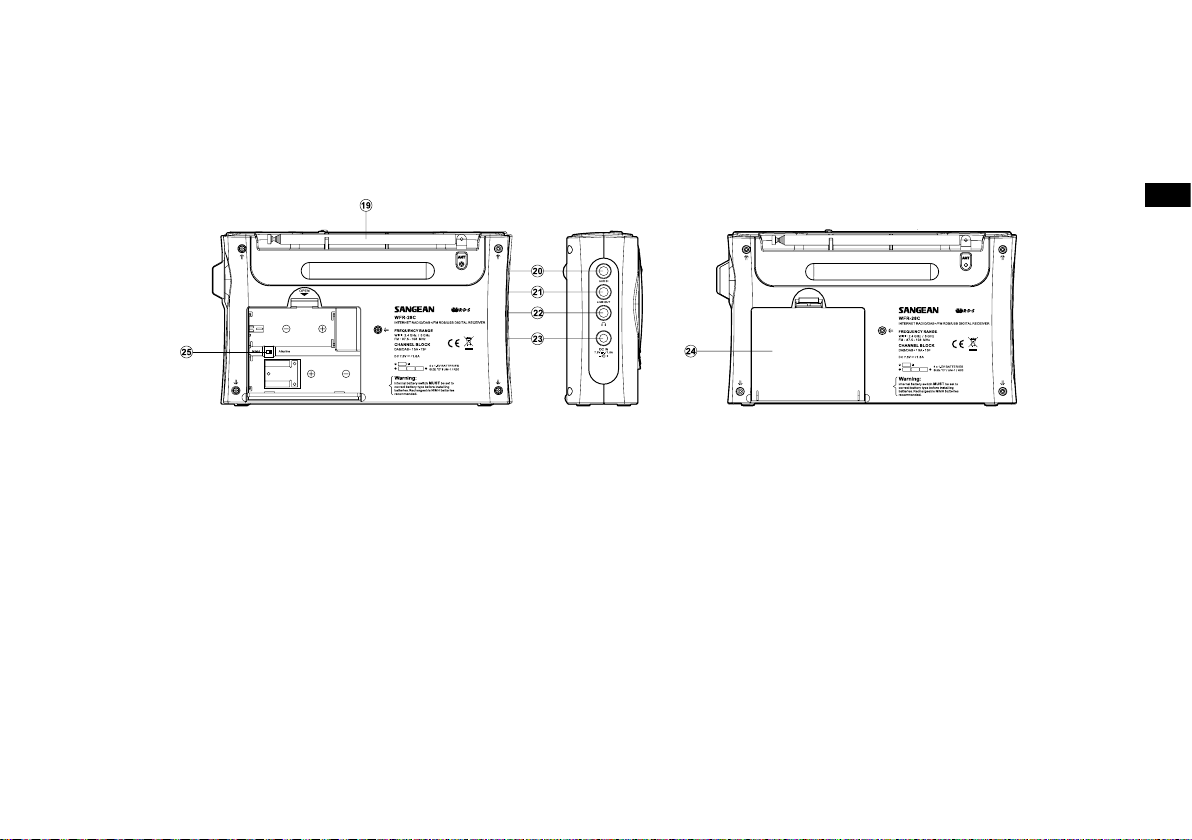
19. Телескопическая антенна для FM
20. Гнездо AUX IN (аудио-вход)
21. Гнездо LINE OUT (линейный выход)
22. Гнездо для наушников
23. Разъем для сетевого адаптера
24. Батарейный отсек
25. Переключатель NiMH/Alkaline

4
Основы управления
Здесь описаны основные средства управления WFR-28D. Команды для каждого режима
рассмотрены более подробно в более поздних разделах инструкции.
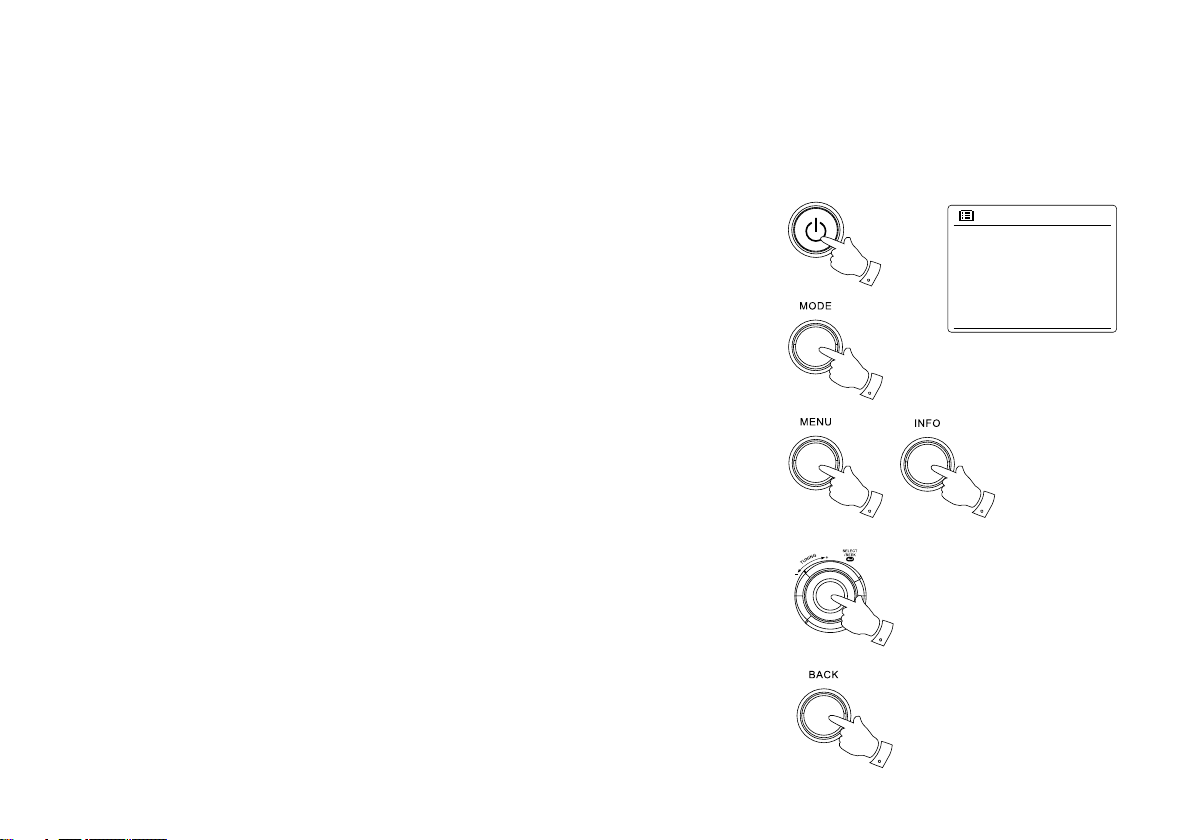
1. Нажатие на кнопку включения/выключения
выводит приемник из режима ожидания.
Повторное нажатие возвращает в режим
ожидания (на дисплее остаются только часы).
2. Кнопка MODE предоставляет возможность
выбрать один из режимов: Интернет-радио,
Аудио-плеер, DAB-радио, FM-радио, AUX IN.
3. Кнопка MENU открывает систему меню.
Кнопка INFO выводит на экран информацию,
касающуюся
текущей
радиостанции
или
воспроизводимого аудио-файла.
4. Чтобы выбрать пункт меню, подсветите его,
вращая колесо настройки, а затем нажмите. Если
в меню более пяти элементов, бегунок на экране
справа покажет позицию отображенной части
меню в списке. Списки прокручиваются по кругу,
что облегчает доступ к элементам в конце
длинных меню, таких как список интернет-
радиостанций или стран.
5. Если выбор был сделан ошибочно, нажмите
кнопку BACK (назад) — она возвращает к
предыдущему меню.

5
ПОДКЛЮЧЕНИЕ И НАСТРОЙКА
Первое подключение
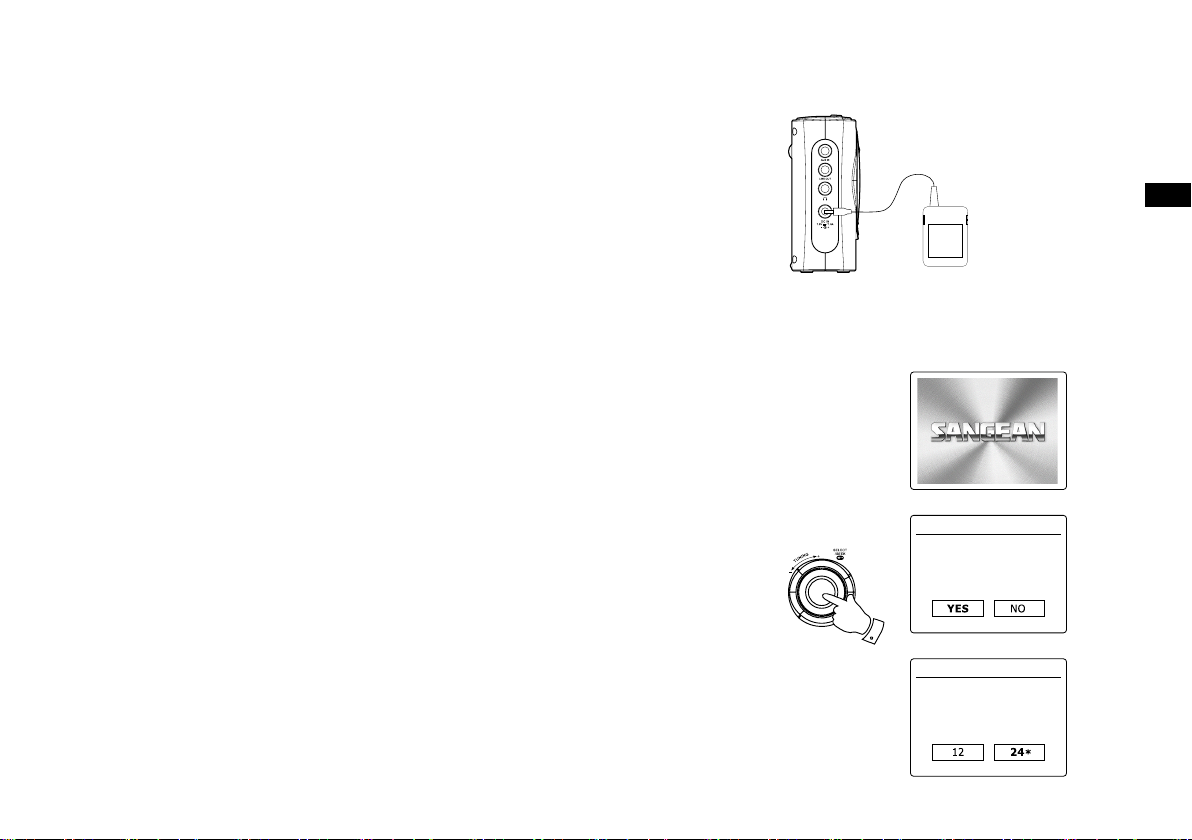
1. После включения на экране появится надпись Sangean starting и индикатор загрузки. При
первом включении приемника (или после возврата к заводским установкам) будет
предложено запустить Мастер Установки (Setup Wizard). Выберите Yes и нажмите колесо
настройки.
2. Вращением колеса настройки выберите желательный формат времени (12-ти или 24-х
часовой) и подтвердите выбор нажатием.
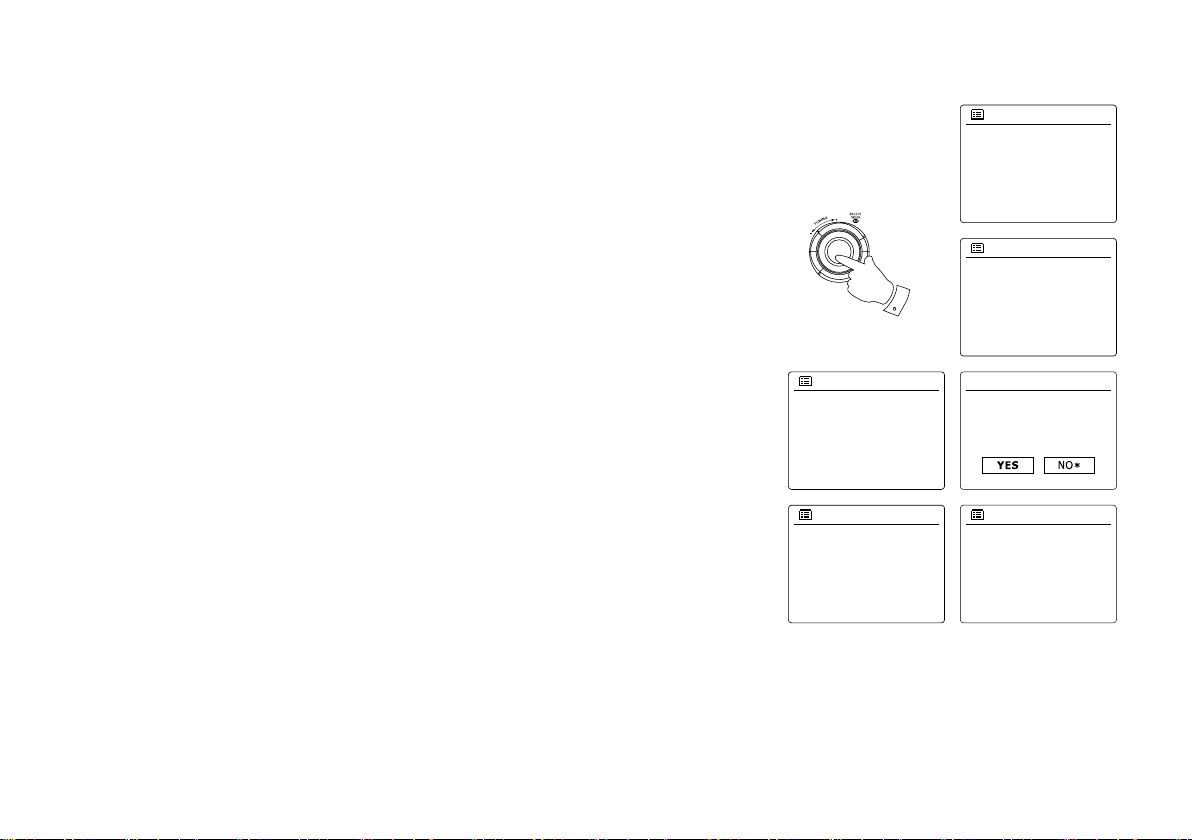
3. На экране появится меню, позволяющее настроить синхронизацию времени с
определенным источником. Вариант from Network будет оптимальным для большинства
пользователей. В этом случае вам понадобится выбрать часовой пояс, соответствующий
вашему местонахождению, а затем указать, нужно ли переходить на летнее/зимнее время
(Daylight savings – по умолчанию отключено).
4. Дисплей отобразит список WiFi-регионов для установок сети. Выберите нужную область;
приемник произведет поиск доступных сетей WiFi и выведет из список на экран. Если
беспроводные сети не найдены, то вам, вероятно, нужно включить и настроить вашу
беспроводную точку доступа (ознакомьтесь с ее инструкцией), либо вы находитесь слишком
далеко от нее. Когда приемник найдет вашу беспроводную сеть, он покажет ее имя (SSID) в
списке найденных сетей на экране. Это имя, присвоенное точке доступа человеком, который
настраивал сеть – например, «Jones family» или «Paul’s network». Вполне вероятно, что ваш
приемник найдет сразу несколько беспроводных сетей. В этом случае вам надо выбрать, к
какой сети подключиться.

6
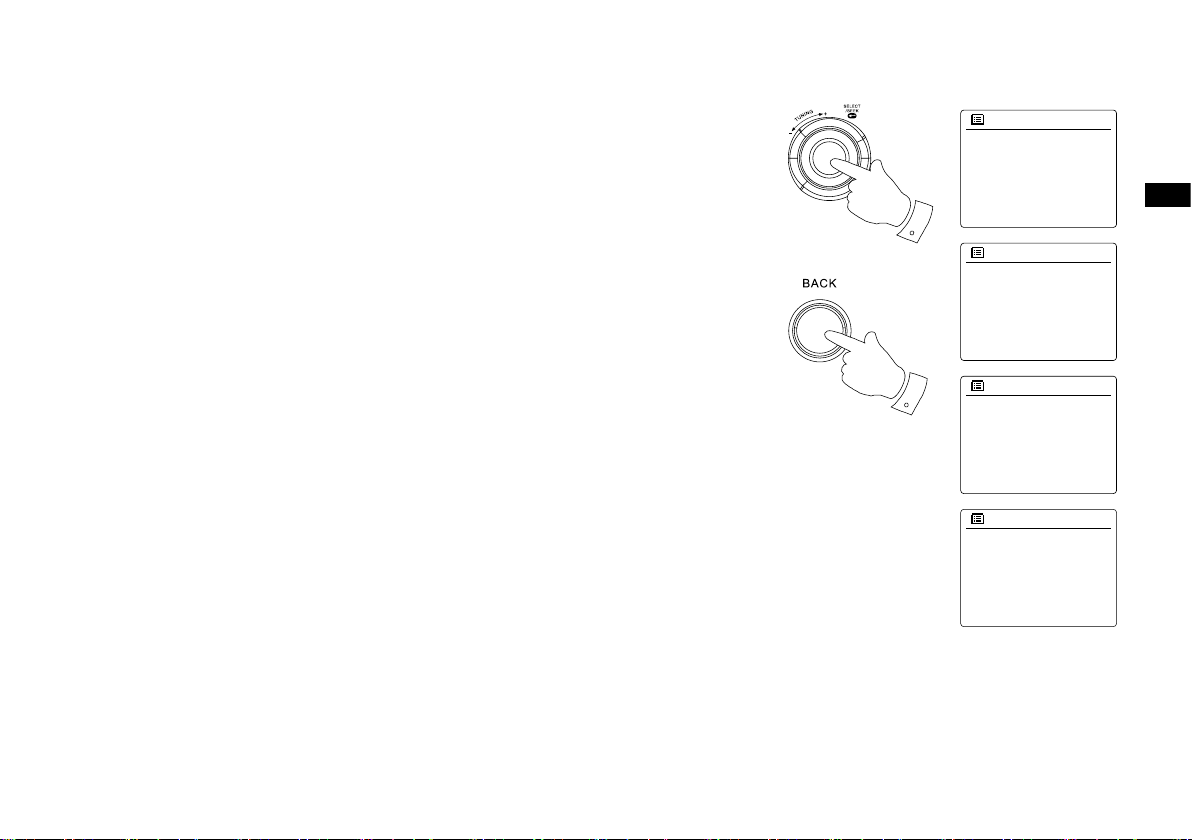
5. Если сеть настроена на защищенное подключение (WiFi Protected Setup — WPS), Вы увидите
дополнительное меню на экране (если нет — переходите к следующему шагу). Выберите одну
из опций WPS в зависимости от настроек Вашего маршрутизатора:
Push Button означает необходимость нажать кнопку WPS на маршрутизаторе и затем
нажать колесо настройки на приемнике, и тогда маршрутизатор передаст кодовый ключ
приемнику.
PIN означает необходимость вручную ввести PIN-код устройства в маршрутизатор через
веб-интерфейс (см. инструкцию к маршрутизатору). Существует также возможность
управления приемником с помощью приложения iSangean на iPhone/iPod. Тогда тоже
понадобится PIN-код. Подробнее об этой функции см. в руководстве к приложению.
Если всё прошло успешно, на экране появится надпись «Connecting», а затем «Setup wizard
completed».
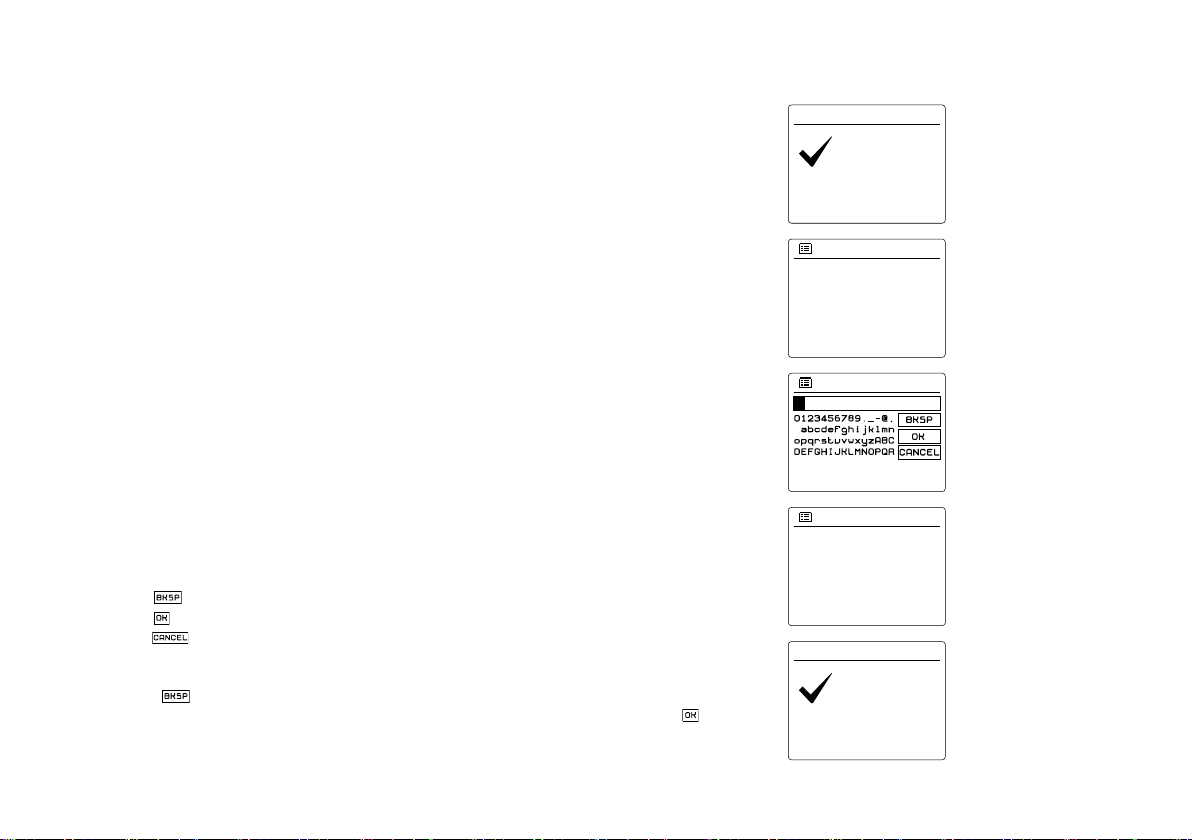
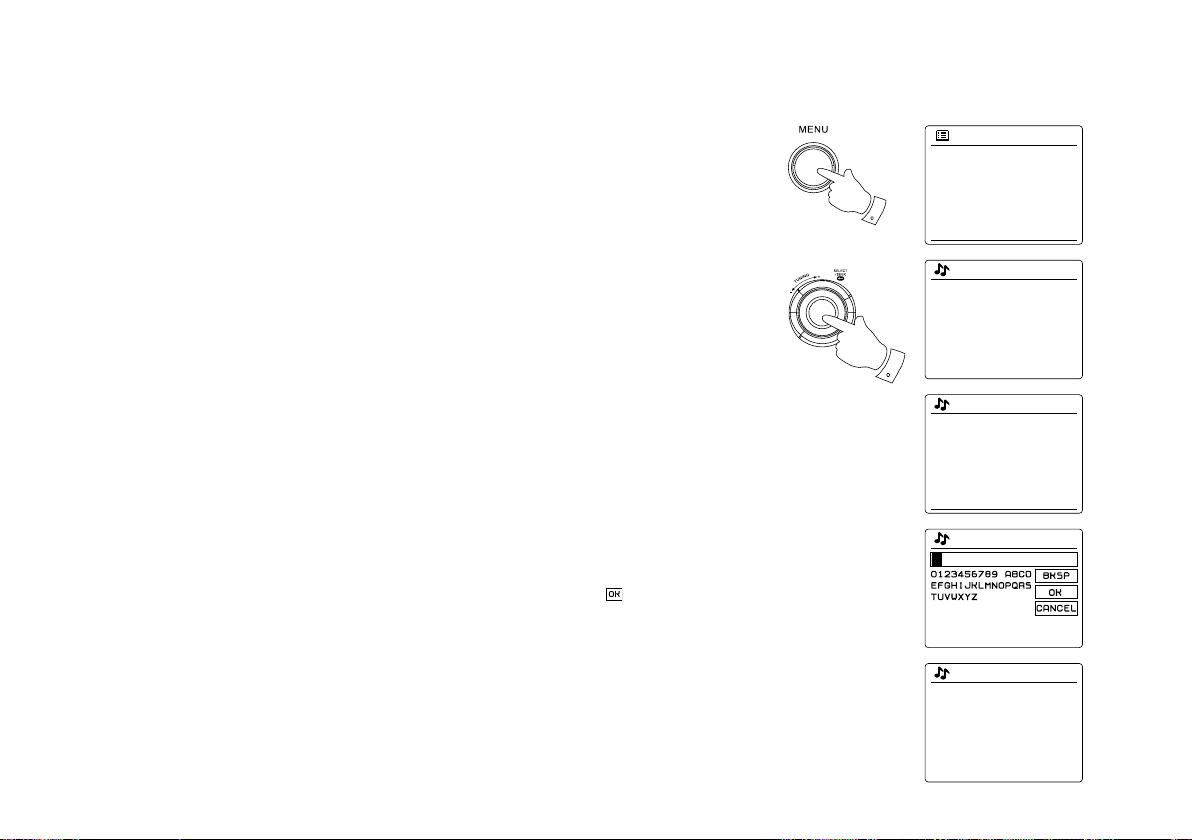
6. Если на экране появилась надпись Key, это означает, что Ваша беспроводная сеть
защищена по протоколу WEP или WPA, и для подключения нужно ввести пароль. Если Вы не
знаете пароля, обратитесь к тому, кто настраивал Вашу сеть. Возможно, остался тот пароль,
который был установлен в маршрутизаторе по умолчанию (обратитесь к документации на
него).
Символы для пароля выбираются и вводятся с помощью колеса настройки. Вращение колеса
подсвечивает символы, а также опции BKSP (backspace — стереть последний символ), OK и
CANCEL (отмена). Ввод подсвеченного символа или команды производится нажатием колеса
настройки. После успешного ввода пароля на экране появится надпись «Connecting», а затем
«Setup wizard completed».
7. Когда приемник подключится к сети, он перейдет в режим ожидания, показывая время
(если оно не верно, см. раздел «Установка часов вручную»).
Теперь Вы можете начинать слушать интернет-радиостанции.
Примечание: когда приемник работает от батареек, он при выключении не переходит в режим
ожидания, а отключается полностью для экономии заряда. Поэтому при следующем
включении время на экране будет сброшено и показано как 00:00. Однако, как только
приемник соединится с WiFi, часы будут синхронизированы автоматически.

7
Настройка сети вручную
Если Ваша сеть не поддерживает автоматическую конфигурацию или сконфигурирована со
скрытым SSID, то Вы должны будете ввести несколько параметров настройки вручную.
1. В меню Network settings выберите Manual settings и затем Wireless.
2. Следующее меню спрашивает, желаете ли Вы использовать протокол DHCP
(автоматическое назначение адреса IP и т.д.). Если да (enable), то переходите сразу к пункту 6.
Если нет (disable), следуйте инструкции по порядку.
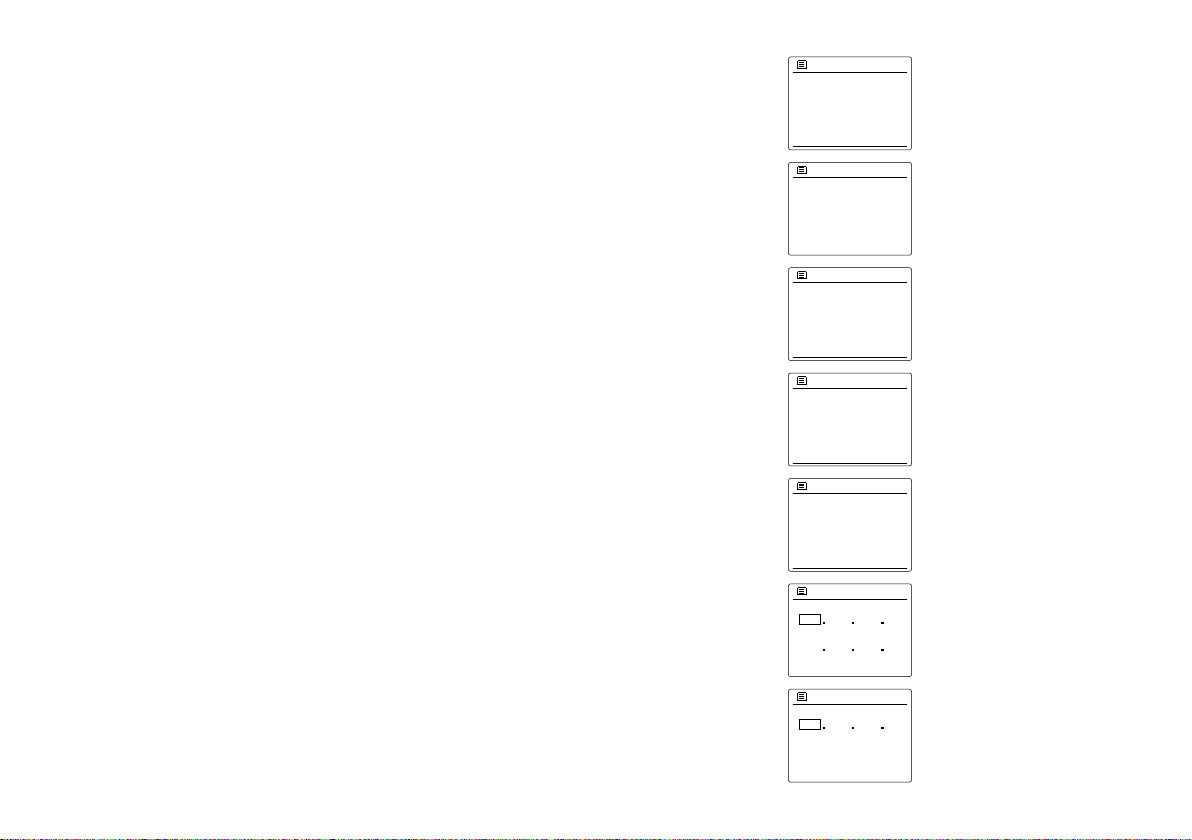
3. Вводимый вручную IP-адрес должен быть уникальным для Вашей сети (первые три группы
цифр будут общими для всех устройств в данной сети, а цифры в последней группе должны
быть разными для каждого устройства). После IP-адреса надо ввести маску подсети — для
большинства сетей это будет 255.255.255.0.
4. Далее вводится Gateway adress — IP-адрес Вашего маршрутизатора.
5. Следующий экран — настройка DNS. Введите те же значения, что и на других устройствах в
Вашей сети.

8
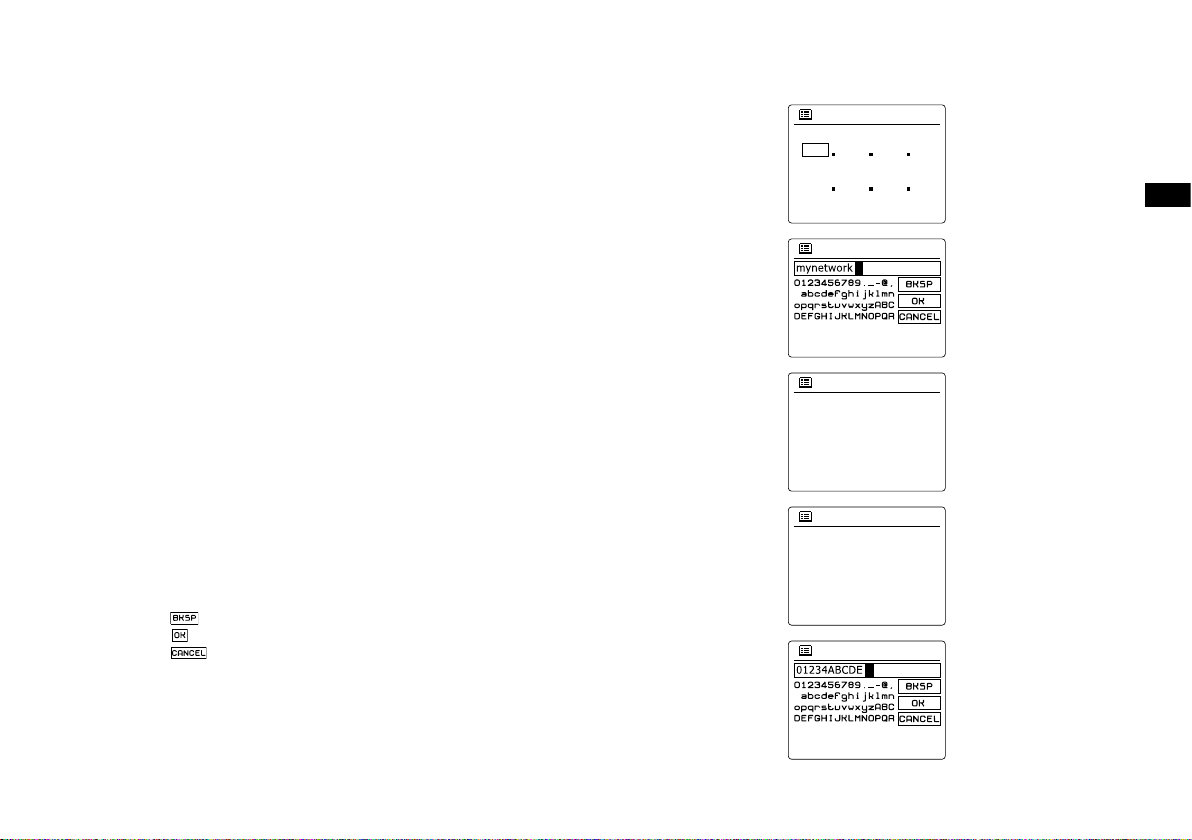
6. На следующем шаге надо точно ввести SSID — имя-идентификатор беспроводной сети (если
не знаете его, посмотрите через веб-интерфейс Вашего маршрутизатора).
7. Если используется незащищенная сеть, то выберите опцию Open. Приемник должен
соединиться с сетью, можно переходить к шагу 10.
8. Если используется WEP, выберите Pre-Shared Key, затем WEP и введите WEP-ключ (пароль).
Приемник должен соединиться с сетью, можно переходить к шагу 10.
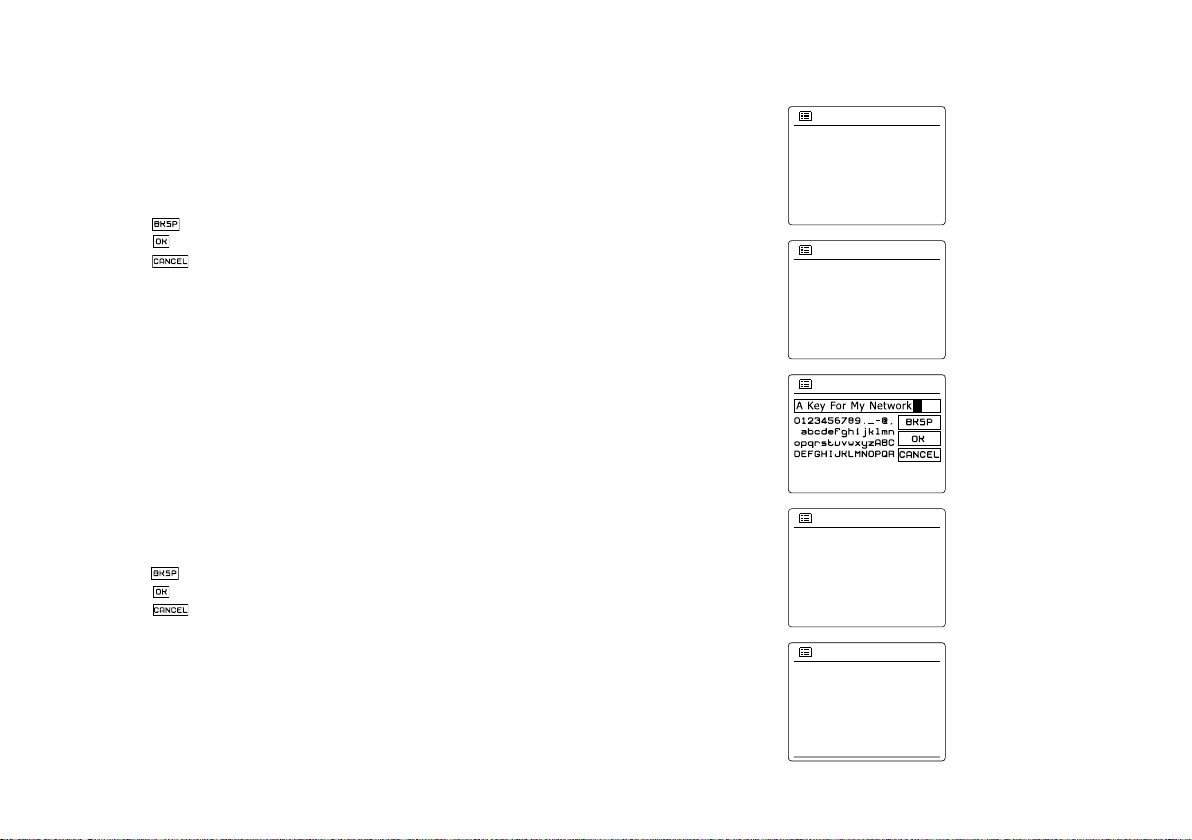
9. Если используется WPA или WPA2 дальнейшие действия аналогичны: выберите нужный
протокол, затем его тип (TKIP или AES) и введите ключ шифрования (пароль).
10. Пока приемник подключается, на экране отобразится надпись Processing (при проверке
ключа), а затем Connecting. Если подключение прошло успешно, приемник вернется в меню
Network settings. Если подключиться не удалось, появится сообщение Failed to connect, и
приемник перейдет к экрану ввода SSID (п. 6).
После подключения к сети сетевые настройки сохраняются в памяти приемника (они будут
сохранены даже при отключении от электропитания).

9
Интернет-Радио
Общие сведения
Для прослушивания интернет-радиостанций необходимо подключить приемник к
компьютерной сети с помощью беспроводного соединения (см. раздел «Подключение»).
Через интернет доступны тысячи станций, а также подкасты. Приемник соединяется с базой
данных и позволяет искать станции несколькими способами: по региону (стране), по жанру,
по названию (в т.ч. частичному), а также популярные и новые станции. Можно сохранять
понравившиеся каналы для быстрого доступа через кнопки предустановки (не более пяти)
или в Избранное (неограниченное количество).
Выбор станции по стране
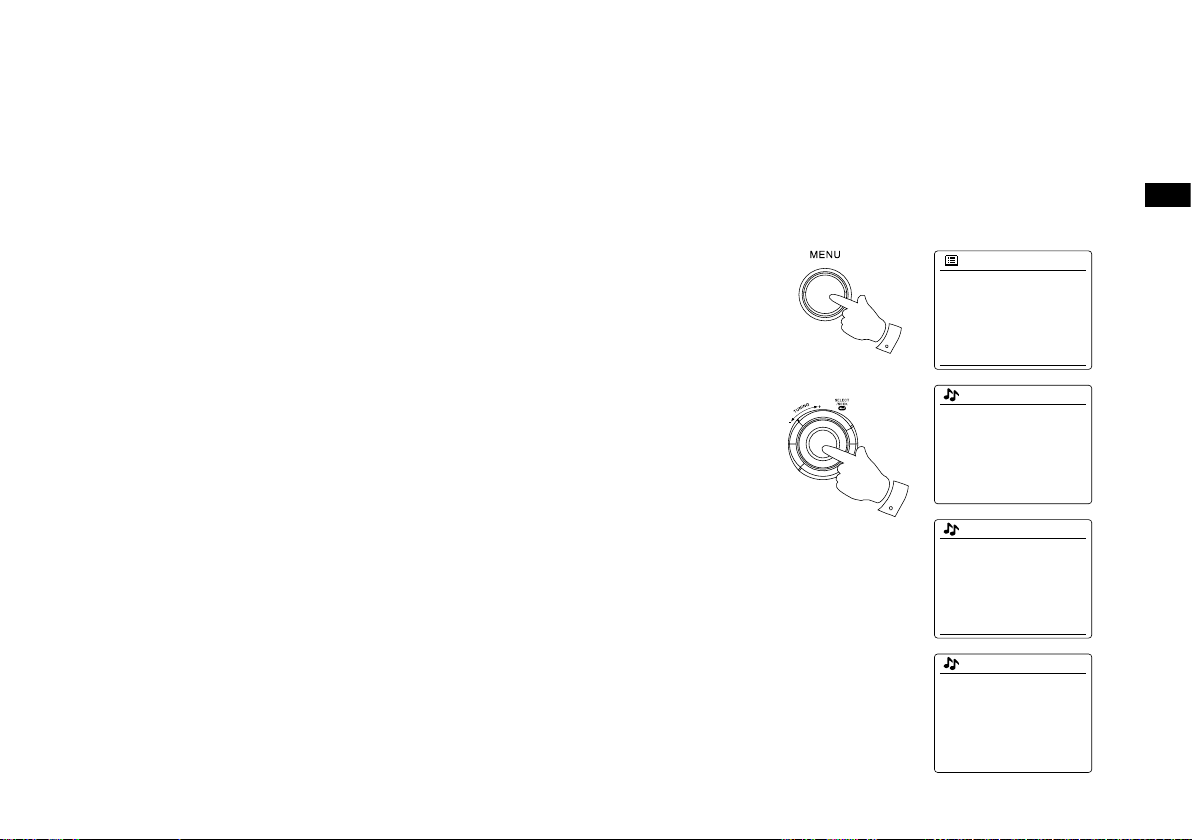
Нажмите кнопку Mode и выберите режим Интернет-радио. Нажмите кнопку Menu, выберите
Station list, затем Station и наконец Location.
Выберите нужный континент и затем страну из списка.
Далее Вы можете выбрать полный список станций данной страны (All Stations) или одну из
категорий по жанрам. Выберите из списка станцию. На экране некоторое время будет
надпись Connecting, а затем начнется воспроизведение.
Некоторые станции передают «контент по запросу», позволяя прослушивать ранее
прозвучавшие программы или подкасты. В этом случае появится дополнительный экран
названием станции и опцией Podcasts, содержимое которой определяется самой станцией.
Выбор станции по жанру
Следуйте вышеописанной процедуре, только вместо Location выберите Genre.

04:35
3 Best WiFi Radio Reviews In 2020
30:04
Sangean WFR-28 FM WiFi Intetnet Radio receiver
28:58
Sangean WFR 28D portable radio review
02:25
Sangean WFR-28D WFR-28 Internet Radio / DAB+ / FM-RDS / USB Network Music Player Digital Receiver
15:08
DAB scan — Sangean WFR-28D, London, UK
02:49
Romote your stream for Sangean WFR-28D
Нажмите на кнопку для помощи
WFR-28C – современный радиоприемник производства фирмы Sangean, подключающийся к интернету через Wi-Fi. Посредством меню, отображаемого на ЖК дисплее, и с помощью кнопок на лицевой панели устройства осуществляется оптимальная настройка всех функций WFR-28C.

Доступ к тысячам радиостанций
Данный радиоприемник позволяет ловить до 15 тыс. радиостанций благодаря подключению к интернету через роутер, а также в диапазонах FM и DAB+.
В память радиоприемника можно внести до 15 радиостанций:
— 5 станций iRadio;
— 5 станций FM диапазона;
— 5 станций DAB+.
Музыкальный плеер
WFR-28C имеет встроенный USB-порт, поэтому он может работать как медиа плеер и воспроизводить музыкальные файлы, записанные на USB-накопители.
Качественный звук
Мощные динамики диаметром 7,5 см и сопротивлением 4 Ом, встроенный усилитель, регулировка тембра и разнообразные режимы эквалайзера обеспечивают качественный и комфортный для слушателя звук. При этом возможно прослушивание через наушники.
Подключается радиоприемник Sangean к электросети через адаптер, а также может работать от 4х перезаряжаемых элементов питания с напряжением 1,5 В.
Специально разработанное приложение iSangean дает возможность управлять радиоприемником прямо со смартфона с ОС Android и с мобильных устройств Apple.
- радиоприемник Sangean WFR-28C
- сетевой адаптер питания
- инструкция
- гарантийный талон
Особенности:
- Высокое разрешение 2.4″ цветной TFT ЖК-дисплей
- Интернет-радио (более 15 000 станций) / DAB+ / FM-RDS диапазона волн
- 15 радиостанций (5 iRadio, 5 DAB+, 5 FM)
- Информационный дисплей для обслуживания данных
- Меню — выбор основных функций
- USB воспроизведение файлов MP3
- MP3, AAC + и WMA совместимый
- Сетевой музыкальный плеер
- Воспроизведение музыки, сохраненной на вашем компьютере
- Поиск по стране, жанру и мое любимое радио
- Подключи и играй
- UPnP / DMR потоковой музыки (DLNA 1.5 совместимый)
- Аудио эквалайзер: Flat / Jazz / Rock / Movie / Classic / Pop / News / My EQ (пользовательские низких и высоких частот)
- 2 будильника Таймер, DAB / FM / интернет-радио или зуммер
- Таймер сна
- Функция Snooze
- Играет на аккумуляторные и сухие батареи
- Встроенный быстрое зарядное устройство
- Встроенный Wi-Fi dual-band 5 ГГц / 2.4 ГГц антенна
- Разъемы I/O: DC in, Aux-in, Line-out, Разъемы для подключения наушников и USB-разъем
Рассмотрим Sangean WFR-28C подробней:
- Радиоприёмник Sangean WFR-28C — это обновленная модель компактного интернет-радиоприёмника с огромными возможностями для прослушивания любых радиостанций о всем мире
- Компактный интернет-радиоприемник с большими возможностями от компании Sangean
- Высоко контрастный цветной информационный TFT LCD дисплей размером 2.4 дюйма
- Детально проработанное меню радиоприёмника позволит легко использовать весь функционал
- Функция RDS с отображение названия радиостанции и исполнителя песни, а также другой полезной информации
- Возможность беспроводного управления радиоприёмником через любое устройство на операционной системе Apple iOS или Android
- Свыше 15000 станций по всему миру, а также DAB + и FM-RDS
- По 15 ячеек памяти (5 iRadio, 5 DAB+, 5 FM) для каждого диапазона
- Поддержка MP3, WMA, AAC+ файлов
- Встроенный USB порт для подключения USB флеш-карт
- Данная модель является мощным сетевым музыкальным проигрывателем
- Легкий поиск по стране, жанру или любимым радиостанциям по всему миру
- Функция Plug and Play
- Поддержка UPnP / DMR потокового аудио (DLNA 1.5-совместимый)
- Возможность регулировки низких и высоких частот
- Мощный эквалайзер с предустановками: Normal, Flat, Jazz, Rock, Movie, Classic, Pop, News, пользовательская установка
- Два встроенных будильника: DAB, FM, Интернет-радио
- Таймер сна. Возможность установки таймера выключения питания
- Функция повтора срабатывания будильника
- Встроенное зарядное устройство для аккумуляторов
- Встроенные разъемы: DC IN, AUX-IN, линейный выход, выход для наушников, USB разъем
- UPnP / DMR потоковая передача музыки (DLNA 1.5 совместимый)
- Встроенная антенна: Wi-Fi dual-band 5 ГГц / 2.4 ГГц
Общие параметры Sangean WFR-28C
- Вес: 851 грамм
- Размеры: 237 на 168 на 62 мм
- Комплектация: радиоприёмник, адаптер питания 220В, инструкция, гарантийный талон
- Официальная гарантия 1 год
В iSangean приложение позволяет дистанционно управлять WFR-28C работает на вашем iPhone, iPod touch или смартфон Android. iSangean является приложением дистанционного управления для Sangean интернет-радио и медиа-стримеры для вашего iPhone, iPod touch или смартфон Android. Приложение позволяет выбрать интернет-радио станций, подбор и управление медиа на UPnP/DLNA-потоковая передача музыки с локального компьютера, сервера или NAS-устройства, а также для управления FM-радио и другие функции (где эти функции присутствуют на радио). Экран » проигрывается » предоставляет радиостанции или носителей информации с прямым управлением Регулировка громкости радио. Скачать iSangean из iTunes (Apple App Store) или Google Play Store прямо сейчас!


C портативным интернет-радиоприемником SANGEAN WFR-28C вы получаете полную свободу передвижения. Ваш приемник более не привязан к конкретному месту, используйте его там, где нужно Вам. Все что необходимо, это наличие точки доступа Wi-Fi и тысячи станций всех жанров и направлений всегда рядом с Вами. WFR-28С обладает полным функционалом настольных моделей, но при этом способен работать как от сети, так и от батареек. Встроенная зарядка аккумуляторов позволит не беспокоиться о смене элементов питания. Захотелось послушать что-то из собственной музыкальной коллекции? – нет проблем. Приемник способен воспроизводить mp3 файлы с USB флеш-накопителя, а также подключаться к домашнему музыкальному медиа-серверу или ноутбуку. На цветном дисплее отображается вся сопутствующая информация, от имени исполнителя и названия передачи до битрейта и логотипа радиостанции. Аналоговое FM радио и цифровое DAB (распространено в Европе), также к Вашим услугам. Скачав приложение «iSangean», Вы сможете управлять приемником со своего смартфона на базе Android или iPhone, как с обычного пульта ДУ. Приемник очень удобен в работе, с интуитивно-понятной навигацией и отличной эргономикой, а элегантный дизайн и теплый звук всегда будут радовать глаз и слух!
НАШИ ПРЕИМУЩЕСТВА ПЕРЕД ДРУГИМИ ИНТЕРНЕТ-МАГАЗИНАМИ, ПРОДАЮЩИМИ РАДИОПРИЕМНИКИ SANGEAN WFR-28C:
Даем гарантию 12 мес;
Полностью открыта и доступна контактная информация;
Постоянные скидки и акции;
Нет скрытых платежей и комиссий
Почему у нас на интернет радиоприемник Sangean WFR-28C цена такая низкая?
Мы закупаем радиоприемники большими партиями, благодаря чему производитель дает очень хорошую цену. Основным фактором является отказ от услуг посредников. Менеджеры интернет магазина посещают ежегодные выставки и напрямую общаются с потенциальными поставщиками, тем самым убедившись в качестве товара.
ЧТО НЕОБХОДИМО СДЕЛАТЬ, ЧТОБЫ ИНТЕРНЕТ РАДИОПРИЕМНИК SANGEAN WFR-28C КУПИТЬ В МСК И ДРУГИХ ГОРОДАХ?
Положить товар в корзину прямо сейчас, указать количество и оформить заказ;
Менеджеры магазина перезвонят и уточнят детали;
Мы отправляем товар в ваше почтовое отделение;
Сообщаем номер посылки;
Вы получаете товар, радуетесь покупке, возвращаетесь к нам на сайт и оставляете отзыв.
Поспешите положить в корзину и тем самым сделать резерв, товар в ограниченном количестве, так как пользуется спросом и активно раскупается.

P.S. Смело берите приемник на отдых, во всех отелях, как правило, есть свободный Wi-Fi доступ!
Приобретайте данный товар и присоединяйтесь к числу довольных покупателей прямо сейчас!

WFR-28C / WFR-28
中文
GB
Revision 1
«Made for iPod,» «Made for iPhone,» and «Made for iPad» mean that an electronic accessory has been designed to connect specically to iPod,
iPhone, or iPad, respectively, and has been certified by the developer to meet Apple performance standards. Apple is not responsible for the
operation of this device or its compliance with safety and regulatory standards. Please note that the use of this accessory with iPod, iPhone, or iPad
may affect wireless performance.
The iSangean App enables remote control of the WFR-28C running on your iPhone, iPod touch, iPad or Android smartphone.
iSangean is the remote control app for Sangean Internet radios and media streamers for your iPhone, iPod touch, iPad or Android smartphone. The
app allows selection of Internet radio stations, selection and control of media for UPnP/DLNA music streaming from a local computer, server or NAS
device, as well as control of FM radio and other functions (where these functions are present on the radio). The Now Playing screen provides radio
station or media information with direct control of the radio volume.
Download iSangean from Apple iTunes (Apple Store) and Google Play now!
1

Contents
Introduction ………………………………………………………………………….. 3-7
Before you can use this product ……………………………………………… 3-4
Controls and connections ……………………………………………………… 5-6
Navigation controls …………………………………………………………………. 7
Network conguration …………………………………………………………. 8-16
Connecting your radio to your computer network ……………………. 8-15
Network remote control options ………………………………………………. 16
Internet Radio mode ………………………………………………………….. 17-31
Internet Radio-the basics ……………………………………………………….. 17
Selecting a radio station by location and genre …………………….. 18-20
Searching for a radio station by name ……………………………………… 21
Searching a new or popular station …………………………………………. 22
Selecting a podcast / BBC Listen Again …………………………………… 23
Presetting stations ………………………………………………………………… 24
Display modes ……………………………………………………………………… 26
Customizing your radio ………………………………………………………….. 27
Selecting favorite stations ………………………………………………….. 29-31
Music Player mode ……………………………………………………………. 32-48
Use with Windows, Apple Mac and Linux …………………………………. 31
Accessing your les via UPnP ……………………………………………. 32-33
Locating and playing media les using UPnP ……………………………. 34
Media selection …………………………………………………………………….. 35
Controlling playback ……………………………………………………………… 36
Display modes ……………………………………………………………………… 38
Playlists ……………………………………………………………………………….. 39
Wake On LAN ………………………………………………………………………. 42
Prune servers ………………………………………………………………………. 42
Windows 7 ‘Play to’ function (UPnP renderer) ………………………. 43-44
Using USB memory devices ………………………………………………. 45-46
DAB mode ………………………………………………………………………… 47-55
Selecting a DAB radio station …………………………………………………. 48
Display modes ……………………………………………………………………… 49
Finding new DAB radio stations ……………………………………………… 50
Manual Tuning ……………………………………………………………………… 51
Dynamic Range Control Settings …………………………………………….. 52
Station order setup ……………………………………………………………….. 53
Prune stations ……………………………………………………………………… 54
FM mode …………………………………………………………………………… 55-60
Manual tuning ………………………………………………………………………. 56
Scan setting …………………………………………………………………………. 58
Stereo / Mono switching ………………………………………………………… 59
Presetting stations in DAB and FM modes ……………………………….. 60
Clock and Alarms ………………………………………………………………. 61-71
Automatically updating the clock ……………………………………………… 61
Setting the clock format …………………………………………………………. 62
Manually setting the clock ………………………………………………….. 63-64
Setting the alarm clock ……………………………………………………… 65-67
Snooze timer ………………………………………………………………………… 69
Disabling alarms …………………………………………………………………… 69
Sleep timer …………………………………………………………………………… 70
Inactive standby ……………………………………………………………………. 71
Display and Auto ……………………………………………………………….. 72-77
Equalizer function …………………………………………………………………. 72
Brightness control …………………………………………………………………. 74
Language selection ……………………………………………………………….. 75
Headphone socket and Line out socket ……………………………………. 76
Auxiliary input socket …………………………………………………………….. 77
Information ……………………………………………………………………….. 78-86
Factory reset ………………………………………………………………………… 78
Software update ……………………………………………………………………. 79
Network proles ……………………………………………………………………. 80
Software version display and Audio FAQ ………………………………….. 81
Accessing your audio files via a UPnP server using Windows Vista
and XP ……………………………………………………………………………. 82-83
Audio codecs ……………………………………………………………………….. 84
Cautions and Specications ………………………………………………. 85-86
GB
2

Before you can use this product
Battery operation
Before you can use your internet radio, you must have the following:
● A broadband Internet connection (not required for DAB, FM or Music
Player functions).
● A wireless access point (WiFi) connection connected to your broadband
Internet Service Provider, preferably via a router. In many cases the
broadband modem, router and wireless access point will be a single
combined unit supplied by your Internet Service Provider or bought
from a computer store.
● If your wireless network is congured to use Wired Equivalent Privacy
(WEP) or WiFi Protected Access (WPA/WPA2) data encryption then
you either need to know the WEP, WPA or WPA2 key used for encryption
so you can get the internet radio to communicate with the network, or
your router needs to offer WiFi Protected Setup (WPS).
If connecting using WiFi, the internet radio will typically work within a
10-20 metre radio from your wireless access point. The actual range
achieved will depend upon the building type, other nearby wireless
netw or k, and possibl e inter fe rence s ou rces. D AB and FM radi o
functions can operate wherever the internet radio is able to receive a
suitable broadcast signal.
IMPORTANT:
Before you continue, make sure that your wireless access point or router
is powered up and working with your broadband Internet service (use your
computer to verify this). To get this part of the system working you must
read the instructions supplied with the wireless access point or router.
3
Battery operation using alkaline batteries
1. Remove the battery cover on the rear of the unit by pressing the catch.
Note:
Before you insert the batteries, if you use non-rechargeable batteries,
make sure the NiMH/Alkaline switch which located inside the battery
compartment is switched to Alkaline position. If you use rechargeable
batteries, make sure to switch NiMH/Alkaline switch to NiMH position.
2. Insert 4 UM-1(D size) batteries into the spaces in the compartment.
3. Take care to ensure all batteries are inserted with correct polarity as
shown on the rear cabinet. Replace the battery cover.
4. Reduced power, distortion and a “stuttering sound” are all signs that
the batteries need replacing.
5. If the radio is not to be used for any extended period of time, it is
recommended that the batteries are removed from the radio.

Battery operation using rechargeable batteries
Using the AC power adaptor
1.
Slide the battery switch to the NiHM position.
2.
Ins ert 4 U M-1 bat teries into sp aces in the compart ment. Make
sure all batteries are inserted with the correct polarity as shown on
the rear cabinet. The radio is also designed to be used with NiMH
rechargeable batteries.
Note:
Do not use a mix of old and new rechargeable batteries.
Do not use a mix of full and empty rechargeable batteries.
Do not use batteries that have a different mAh capacity
Do not use damaged or leaking batteries
Make sure the radio is switched off and connected to the AC adaptor.
3.
When the charge indicator flashes yellow indicating batteries are
charging. Batteries will be fully charged in around 10 hours. The battery
shows steady yellow light when the battery charging is complete.
Note:
Duration for charging your battery fully can be varied according to
the mAh capacity of a battery. Higher mAh batteries required longer
charging time.
Important:
Under some conditions the charging LED indicator may switch off
after flashing briefly. This may happen if the batteries are already
freshly charged, or if the radio detects that you may be attempting
to recharge alkaline batteries or mixed different types or capacity of
rechargeable battery. In these cases the charging will be stopped.
The AC power adaptor required for this unit should be 7.5 volts DC at
1.6A center pin positve.
Insert the adaptor plug into the DC socket on the left side of the radio.
Plug the adaptor into a standard mains socket outlet.
Wh ene ver t he ada pto r is use d, the batte rie s a re autom ati cal ly
disconnected. The AC adaptor should be disconnected from the main
supply when not in use.
GB
4
Controls and connections
1. USB memory socket
2. Mode button
3. LCD display
4. Info button
5. Menu button
6. Back button
7. Forward button
8. Standby button
9. Battery charge indicator / Low battery indicator
5
10. Tuning Control Rotary / Select knob
11. Volume button
12. Mute button
13. Preset 5 / Stop button
14. Preset 4 / play / pause button
15. Preset 3
16. Preset 2 / Rewind button
17. Preset 1 / Fast-forward button
18. Loud speaker
19. FM telescopic aerial
20. Auxiliary input jack
21. Line out jack
22. Headphone jack
23. DC in jack
24. Battery compartment
25. Alkaline / NiMH / NiCad rechargeable battery switch
GB
6
Navigation controls
1
2
3
3
4
5
Internet radio
Music player
DAB
FM
Aux in
Main menu
This page describes the basic means of controlling your WFR-28C internet radio.
Instructions for each operating mode are given in the later section of this book.
1. Pressing the Standby button brings your radio out of Standby mode. Pressing Standby while
the radio is in use will cause it to return to the Standby mode with the clock display.
2. Pressing the Mode button gives you access to each of the operating modes: Internet Radio,
DAB+ radio, Music player, FM radio and Auxiliary Input.
3. Pressing the Menu button will access the menu system, whereas the Info button allows the
display of information relating to the radio station or music le being played.
4. Many operations require the user to make a selection from the menu. Highlight the menu item
using the Tuning Control Rotary on the right side of the radio. Press the Tuning Control Rotary
to select that item. If there are more than ve items in a menu, then the display will automatically
scroll up or down so that the additional items become visible. If there are many items in a menu,
then the radio allows the menu to “wrap around” in either direction. This can make it easier to
reach items at the end of a long menu, such as a list of countries or Internet radio stations.
5. If an error is made when navigating the menus, it is generally possible to go back to a higher
level menu by pressing the Back button.
7
Configuration
Connecting your radio to your computer network
1. Place your radio on a flat surface and plug the mains lead into the mains socket located on the
left side of your radio ensuring that the plug is pushed fully into the socket.
2. Plug the other end of the mains lead into the wall socket and switch on the wall socket.
IMPORTANT: The mains plug is used as the means of connecting the radio to the mains supply.
The mains socket used for the radio must remain accessible during normal use.
In order to disconnect the radio from the mains completely, the mains plug should be removed
from the mains socket outlet completely.
3. When you apply power, the display on the radio will light up and say: ‘SANGEAN’. The first
time that you use your radio (or after Factory Reset) the display will show “Setup wizard” and
“YES” will be highlighted on the screen. Press the Tuning Control Rotary to start the setup
wizard. The screen will ask if you wish to run the setup wizard again at the next start up. This
will lead to the main menu.
WELCOME TO
DIGITAL RADIO
GB
4. Rotate the Tuning Control Rotary on the right hand side of the unit to highlight the desired
clock format (either 12 or 24 hour) then press the Tuning Control Rotary to enter your selection.
A menu allowing you to specify the auto update option for the clock will appear on the display.
The default of ‘Update from Network’ will be the best option for most users.
Setup wizard
Start now?
3,4
Date/Time
12/24 hour format
8
Rotate the Tuning Control Rotary to choose an auto-update option for the clock. This can
5-9
Most of Europe
Wlan region
Smith
Jones
[Rescan]
[Manual config]
SSID
Update from DAB
Update from FM
Update from Network
No update
Auto update
*
UTC+00:00:Dublin,Lon
UTC+00:30:
UTC+01:00:Madrid,Arr…
UTC+01:30:
UTC+02:00:Athens,Ca…
Set timezone
Network wizard
Scanning…
Network settings
Keep network connected?
Network settings
5.
be updated from DAB or FM radio, from the Network, or not updated. The default is to auto
update from the network. If you choose any other option, go to step 8. Otherwise you will rst
need to select the correct time zone and daylight savings setting, see steps 6 and 7. If you
choose “No update” you will need to set the clock manually later( see the section of ‘Manually
setting the clock’). Press the Tuning Control Rotary to conrm your choice.
Rotate the Tuning Control Rotary to highlight the time zone which is applicable to your
6.
location. Press the Tuning Control Rotary to enter the setting.
You will then need to set the Daylight Savings option according to your location (Daylight
7.
Savings is also known as Summer/Winter time ). Rotate the Tuning Control Rotary to
highlight “YES” to turn on daylight savings if required or ‘NO’ if you do not wish to use daylight
savings then press the Tuning Control Rotary to conrm the setting.
You will then need to set ‘Keep network connected.’ By default, your radio will shut down its
8.
WiFi connection when it is in standby. This minimizes power consumption but it does mean
that you will need to switch that radio on manually in order to use either the ‘Play to’ function
or any other remote control software. If you need to be able to remotely control the radio
even when it has been put into standby, then rotate the Tuning Control Rotary to highlight
‘YES’ to activate this function or ‘NO’ to deactivate this function. you can also choose to keep
the network connected by using the ‘Keep connected’ option in the network setting menu.
In the standby mode display either the WiFi signal indicator is shown with or without a cross
through it according to the chosen network settings.
The display will then show a list of WiFi regional options for the network set up. Rotate the
9.
Tuning Control Rotary to highlight the required region and then press the Tuning Control
Rotary to select it. Your radio will then scan for available WiFi networks.
The radio will enter the Network Settings Wizard and will display ‘Scanning…’. After a short
10.
while the display will show a list of the available WiFi networks.
9
11.
11-13
11,12
Jones family
[WPS]Paul’s network
Smith
[Rescan]
[Wired]
SSID
[WPS]Paul’s network
Smith
[Rescan]
[Wired]
[Manual config]
SSID
Push Button
PIN
Skip WPS
>
>
>
WPS Menu
Please wait
Connecting…
Network settings
You will rst need to identify your network in the list of network names presented by the
Network Wizard. If no networks are found then you may have to get your wireless router
working (please see the instructions supplied with it) or you may be too far from the router.
When the radio nds your wireless network, it displays the Network Name (SSID) for the wi-
reless access point on the screen. This is a name that is allocated to the access point in your
router by the person who set up the network – for example: ‘Jones family’ or ‘Paul’s network’.
If the router supports WiFi Proteced Setup, then ‘[WPS]’ will be shown in front of the SSID.
It is possible, and in some locations highly likely, that your radio will nd more than one wireless network, in which case you should choose which one you need to connect to.
12.
Rotate the Tuning Control Rotary to see the SSID for each wireless network that has been
found. If your network is shown proceed to step 14. If it is not shown then proceed to step 12.
If you make a mistake at any point, use the Back button to go back to the previous screen.
13.
If your network is not found, it may be because the router is congured not to broadcast the
SSID. You should then use the Tuning Control Rotary to highlight and select the ‘[Manual
cong]’ option in order to enter the network details manually. This is described in ‘Manual
Network Conguration”. If your network name is being broadcast, and it was not found, then
try re-scanning press the Back button), and if necessary try moving your radio to a location
closer to your access point / router.
14.
When the SSID for the wireless network you wish to connect to is highlighted on the screen,
press the Tuning Control Rotary. If WiFi Pretected Setup (WPS) was indicated, you will see an
additional menu at this point, otherwise proceed to step 14. choose one of the WPS menu options
as required for your router (WPS may be via push button, or using an identication number).
‘Push Button’ – the display prompts you to press the WPS button on your router and then the
Select button on the radio. The two devices should then connect with the encryption key sent
automatically to the radio.
‘PIN’ – the display shows an identication number which you must enter into your router
using a web browser (refer to your router’s user documentation). You should then press the
Select button on the radio.
‘Skip WPS’ – if you wish to enter the encryption key yourself (or if it was previously Entered).
If you choose Push Button or PIN the screen will then show ‘Connecting…’ and then ‘Setup
wizard completed’. Press the Tuning Control Rotary to exit setup wizard.
GB
10
15.
Press SELECT to exit
Setup wizard
completed
Setup wizard
Internet radio
Music player
DAB
FM
Main menu
Key:
Press SELECT to exit
Setup wizard
completed
Setup wizard
Network wizard
Scanning…
Network settings
16.
17.
11
If your network is congured without an encryption key, the screen should say ‘Connecting…’,
and then ‘Setup wizard completed’. Press the Tuning Control Rotary to exit the setup wi-
zard and show the main menu. If this is the case then you have successfully connected your
radio to your network.
If the screen displays ‘Key’ , it is because the network is using one of the encryption systems:
Wired Equivalent Privacy (WEP) or WiFi Protected Access (WPA). You will need to enter the
correct WEP or WPA key into the radio to allow it to communicate with your wireless network.
If you do not have the WEP or WPA key, then you should obtain it from the person who set up
your network. Some wireless routers may come with an encryption key already set up by the
supplier, in which case you should refer to the documentation provided with it. WPA is used
here to also include WPA2. WEP keys are 10 or 26 characters long (using 0 – 9, and A – F).
Some wireless Routers can also use pass-phrases for WEP but these are not supported.
WPA keys are usually set up using a pass-phrase of between 8 and 63 characters. Your radio
accepts pass-phrases for WPA keys.
To enter the WEP or WPA key, characters are selected and entered using the Tuning
Control Rotary. The highlight scrolls through the available characters as well as the three
controls on the right. The character currently highlighted will be entered when you press the
Tuning Control Rotary. Do this as needed until the complete key has been entered. Remember, WEP keys only use the numbers 0-9 and letters A-F. WPA keys are sensitive to upper and lower case characters. You must enter the key exactly or the radio will not connect to
the network. The three controls on the right-hand side of the screen have special functions.
You can quickly access these by pressing the Info button and then use the Up or Down and
Select buttons as needed:
select ‘ ’ to erase a character just entered
select ‘ ’ when the complete key has been entered
select ‘ ’ to cancel an re-run the Network Wizard
If a WEP or WPA key has previously been entered for the selected SSID then the display will
show ‘Key: [Set]’. If you have previously entered a different key, you must clear this by selecting the ‘ ’ symbol. This will remove the ‘[Set]’ indication.
After the nal character of the WEP or WPA key has been entered, highlight the ‘ ’ symbol
and press the Tuning Control Rotary. Then screen will show ‘Connecting…’ and then ‘Setup
wizard completed’. Press the Tuning Control Rotary to exit setup wizard. The radio should
now be able to connect to the network.

18. Once you have connected your radio to the network (and therefore also to the Internet) it will
display the main menu. Press the Tuning Control Rotary to put the radio in Standby mode.
It should then display the time as obtained from the Internet. If the time display is not correct
for any reason, it can easily be adjusted later, see ‘Manually setting the clock’. If you have fol—
lowed the steps on the preceding pages successfully, your radio will have connected to your
router, and then made a connection to the Internet and set its clock. If this is the case, then
you can try listening to radio stations via the Internet.
Note:
To save the radio power consumption while your radio is powered with battery, the radio will
turn off fully when put into standby mode. As a result, if you switch off your radio when it is
power supplied with battery, next time when your radio is switched on, the time on the screen
will be reset and show as ‘00:00’. However, as soon as the radio connects with WiFi, the time
will update automatically from the network.
GB
12
Changing the network connection
Internet radio
Last listened
Station list
System settings
Main menu
>
>
>
Network wizard
View settings
Wlan region
Manual settings
Network profile
Network settings
>
>
>
Wireless
Connection type>1/9
DHCP enable
DHCP disable
DHCP 2/9
Brightness
Contrast
Equaliser
Network
Time/Date
System settings
>
>
>
IP address
Subnet mask
192
IP settings 3/9
168 1 25
255 255 255 0
Grteway address
192
Gateway address 4/9
168 1 1
In the sections above, you chose how your radio would be connected to your network, using a
WiFi connection. From time to time, you may nd that you need to connect to different computer
networks. The Internet setup menu allows you to change your radio’s network settings, scan for
an alternative wireless network, or to manually congure the network parameters.
The steps outlined below describe how you can do this –see also the section ‘Network Proles’.
Conguring the radio to use an alternative WiFi connection
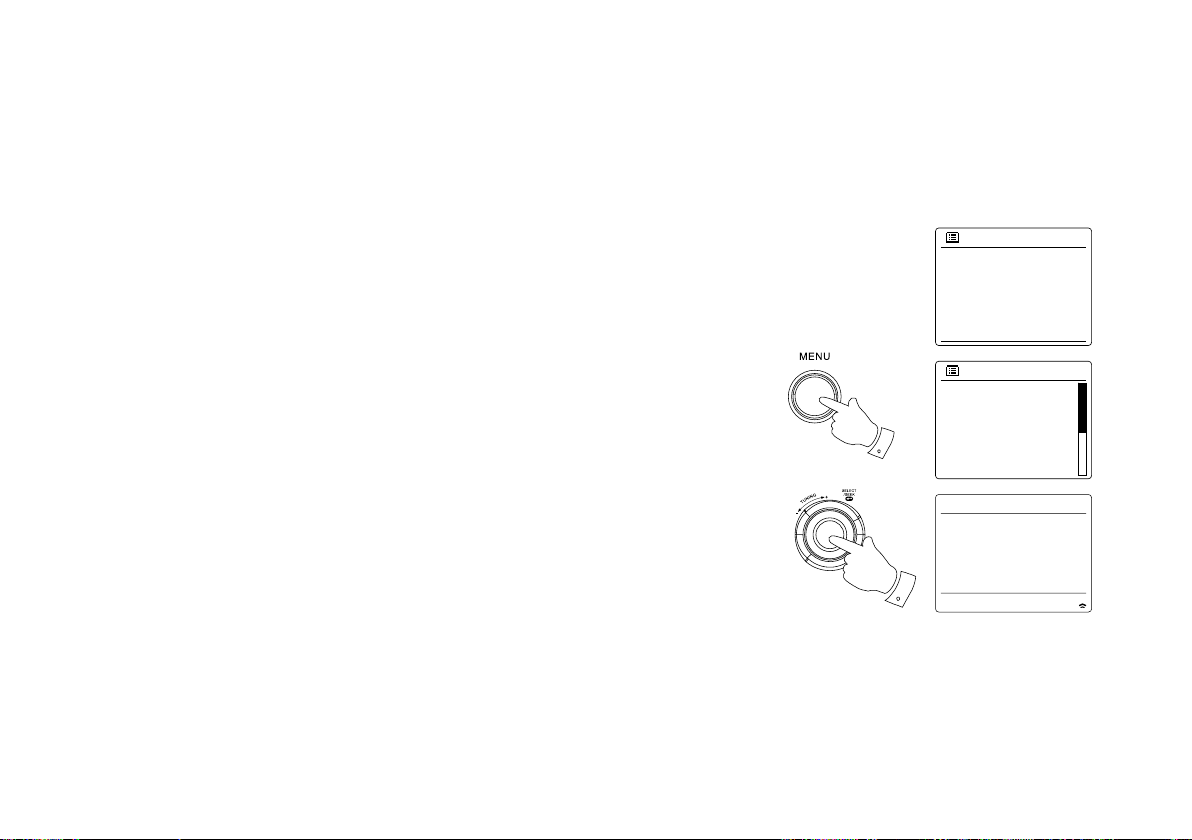
From the Network settings menu select ‘Network wizard’. This will present you with details of any
WiFi networks that are found. Scroll down the list using the Tuning Control Rotary to the desired
network name. Press Tuning Control Rotary to select this network. The radio will then use its
WiFi system to communicate with the network. Depending on the settings for the new network
you may need to enter an encryption key. By default the radio will then acquire an IP address
and other network settings from your router using DHCP.
Manual network conguration
If you do not wish to use DHCP for automatic conguration, or if your network is congured with
a hidden SSID, then you will need to enter some network settings manually. (Note – a hidden
SSID may prevent casual observers from detecting your network, but is not recommended as a
means of network security.)
1. From the radio Network settings menu, select ‘Manual settings’. You must then choose to connect
using ‘Wireless’ connections. Entering this option, there are as many as nine settings screens,
shown by the ‘1 of 9’ progress marker in the top right corner of the display.
2. The next menu asks whether you wish to use DHCP to configure your network parameters
(IP address, subnet mask, gateway address, etc). Unless you are familiar with networking and
related terminology, we recommend that you allow the use of DHCP. Choose ‘DHCP enable’
unless you need to specify the network details manually.
If you chose ‘DHCP enable’, please skip to step 6 in order to set up the wireless connection details.
If you chose ‘DHCP disable’ for either connection method, the next step is to set up the IP address.
13
3.
Primary DNS
Secondary DNS
192
DNS
5/9
168 1 1
0 0 0 0
SSID
6/9
7/9
Open
Pre-Shared Key
WPA
WPA2
Authentication
8/9
Disabled
WEP
Encryption type
9/9Key:
The manually specied IP address should be chosen to be compatible with the settings in your
router and must be a unique address on your network. If you are using DHCP for some devices and static (manually congured) IP addresses for others, the IP address used should fall
outside the range that the router may allocate using DHCP. Typically, the rst three groups
of digits will be the same for all devices on your network. To enter the IP address, rotate the
Tuning Control Rotary to set the value for each group of digits and then press the Tuning
Control Rotary to enter the value and to move on to the next group. When the IP address has
been entered, the subnet mask should be entered. The subnet mask denes which parts of
the IP address are common across your network. For most small networks the subnet mask
will be 255.255.255.0 and this is entered in the same way.
4.
The Gateway address is normally the IP address of the router through which the radio
connects to the internet and is entered in the same way as the previous addresses.
5.
In most installations the DNS settings (DNS = Domain Name Server) will be set to the same IP
address as your router. In this case the secondary DNS may be left at zero. To enter the DNS
address, rotate the Tuning Control Rotary to set the value for each group of digits and then
press the Tuning Control Rotary to enter the value and to move on to the next group. Repeat
this until all eight groups of digits have been entered.
6.
The next step is to set up the WiFi connection, starting with the name of the wireless network
(SSID) followed by the encryption options and password. To enter the SSID, characters are
selected and entered using the Tuning Control Rotary The radio scrolls through the available
characters as well as the three controls on the right. The character currently highlighted will
be entered when you press the Tuning Control Rotary. Do this as needed until the complete
network name has been entered. The SSID setting is sensitive to upper and lower case characters and symbols.
You must enter it exactly as set up in your router. The three controls on the right-hand side of
the screen have special functions:
select ‘ ’ to erase a character just entered
select ‘ ’ when the complete SSID has been entered
select ‘ ’ to cancel and go back to the DNS settings screen
7.
Having entered the SSID, you must enter details of the encryption system used on your wireless network. This should be the same as specied in your router settings. If your network
does not use encryption, then select the ‘Open’ option. Your radio should then connect to the
network, so skip to step 11. If your network uses WEP (Wired Equivalent Privacy) select the
‘Pre-Shared Key’ option then go to step 8. The remaining options are for WPA or WPA2 (WiFi
Protected Access) – see step 9.
GB
14
8.
Open
Pre-Shared Key
WPA
WPA2
Authentication 7/9
TKIP
AES
Encryption type 8/9
Key: 9/9
Please wait
Connecting…
Network settings
Network wizard
View settings
Wlan region
Manual settings
Network profile
Network settings
>
>
9.
10.
11.
15
If you chose ‘Pre-Shared Key’ in step 7, you should then choose the WEP option. The key
should be entered using only the numbers 0-9 and the letters A-F. The key will be 10 charac-
ters long for 64-bit encryption and 26 characters long for 128-bit encryption. The radio will
accept lower-case letters a-f as equivalent to upper-case A-F. Spaces or special symbols are
not permitted in WEP keys.
The three controls on the right-hand side of the screen have special functions:
select ‘ ’ to erase a character just entered (long press to clear); Info again to continue
select ‘ ’ when the complete encryption key has been entered
select ‘ ’ to cancel and go back to the SSID settings screen
Once the key is entered the radio should connect to your network. Please skip to step 11.
WPA and WPA2 are similar, although WPA2 offers a higher level of security. Whichever
you selected in step 7, you then have to specify the variant used. They are TKIP (Temporal
Key Integrity Protocol) and AES (Advanced Encryption Standard). As previously, the setting
should match that used by your router. Some routers allow both to be specied, and the router will use whichever variant is supported by the connected device. AES is regarded as the
more secure option if it is available.
The radio will then require you to enter the encryption key. This must be a string of between 8
and 63 characters and must be identical to the key which has been entered into your router.
Note – the encryption key is sensitive to the use of upper and lower case letters and symbols.
Take care to enter the key exactly, or the radio will not be able to connect to your router. The
three controls on the right-hand side of the screen have special functions. You can access
these by rotating the Tuning Control Rotary and then press the Tuning Control Rotary to
select as you needed:
select ‘ ’ to erase a character just entered (long press to clear ); Info again to continue
select ‘ ’ when the complete encryption key has been entered
select ‘ ’ to cancel and go back to the TKIP / AES options screen
Once the key is entered the radio should connect to the network.
While the radio is trying to connect to the network, it will display ‘Processing…’ when checking the encryption key and then ‘Connecting…’. If the connection is made successfully, the
radio will return to the Network settings menu. If the unit cannot connect, then it will display a
‘Failed to connect’ message and will return to the SSID entry screen (step 6). Once connected, the network settings are stored in the radio. The settings are retained when the radio is
disconnected from the mains. You may now use the Back and Mode buttons to access the
functions of your radio.

Network remote control options
Wlan region
Manual settings
NetRemote PIN Setup
Network profile
Keep network connected
Network settings
>
>
Network Pin setup (Pin number)
Your radio has the option of being controlled by an application installed on an Apple iPhone, iPod
touch or iPod. The Pin number facility allows you to ensure that your radio can only be controlled by
your own Apple device rather than someone else’s.
Details of how this feature can be used with your iPhone or iPod touch are explained in a separate
sheet called ‘The App for controlling your Sangean internet radio’.
GB
16

Internet Radio
Internet Radio – the basics
Before you can use your radio to listen to broadcasts via the Internet, it is necessary to have
connected it to your computer network using the wireless (WiFi) connection.
There are literally many thousands of radio broadcasts available via the internet as well ‘Podcasts’.
Your radio provides several ways of searching for broadcasts in order to make finding and
choosing them easier. Once you have found radio stations which you like, you may either store
them as presets within the radio, or add them to a list of your favorite stations which your radio
can access. The number of presets is limited (there are ve presets in the radio), but you can
store as many favorites as you like.
You may search for an internet radio station by Location. If you know the name of the station and
the country from which a station is broadcast this may be the easiest method to nd a station. It
is also a great way to experience radio from other parts of the world.
You may also search for an internet radio station by Genre. If you prefer a particular type of
music, Blues for example, you may search for a radio station that broadcasts that type of music,
and you can choose from a list of Blues radio stations regardless of location, or taking location
into account.
If you know part of the name of an internet radio station, you can enter it into the radio and it will
search for stations that match that name. This can be helpful if you are unsure of the location or
genre of a particular station.
The WFR-28C radio connects to a radio station database which serves many users in many
countries. This means that there is a very wide range of program content available. You can also
search for stations which have been recently added to those available (new stations) or you can
search for the most popular.
17
Selecting a radio station by location
1
3-6
2
Location
Africa
Asia
Caribbean
Central America
Europe
>
>
>
>
>
United Kingdom
All stations
Highlighted stations
Alternative
Ambient
Celtic
>
>
>
>
>
Internet radio
Last listened
Station list
System settings
Main menu
>
>
>
Internet radio
My Favourites
Local United Kingdom
BBC
Stations
Podcasts
>
>
>
>
>
Stations
Location
Genre
Search stations
Popular stations
New stations
>
>
>
>
Europs
Switzerland
Turkey
Ukraine
United Kingdom
Vatican
>
>
>
>
>
All Stations
Asian sound radio
Aston FM
Atlantic FM
Audio Book Radio
BBC Radio 1
1.
2.
3.
4.
5.
6.
Press the Standby button to switch the radio on. Then press the Mode button and rotate the
Tuning Control Rotary to highlight the internet radio mode display. Press the Tuning Control
Rotary to select the option.
Press the Menu button to enter the main Internet radio menu. Rotate the Tuning Control
Rotary until ‘Station list’ is highlighted on the display and then press the Tuning Control
Rotary to select the option.
Rotate the Tuning Control Rotary until ‘Stations’ is highlighted on the display and then press
the Tuning Control Rotary. Note that the menu may offer one or more local selections based
upon the country in which the unit is being used, according to your internet IP address (‘United
Kingdom’and ‘BBC’ stations, for example).
Rotate the Tuning Control Rotary until ‘Location’ is highlighted on the display and then press
the Tuning Control Rotary to select.
Rotate the Tuning Control Rotary to scroll through the list of continents. When the desired
continent is highlighted press the Tuning Control Rotary to enter your selection.
The display will show a list of countries within the chosen continent. If there are many
countries shown you can scroll through the list continually in either direction. For example, if
the chosen continent was Europe, then to nd the United Kingdom scroll up from the top of the
list to the bottom by rotating the Tuning Control Rotary. Press the Tuning Control Rotary to
choose the desired country.
GB
7.
You will typically find that you then have the option to select either ‘All Stations’ or one of
a number of categories. The lists are always sorted alphabetically, and long lists will wrap
around from top to bottom or bottom to top.
18
8. Rotate the Tuning Control Rotary to highlight your chosen radio station and then press the
BBC Radio 1
BBC Radio 1
Podcasts
>
BBC Radio 1
BBC Radio 1
Podcasts
>
Podcasts
Dick and Dom
Eddie Halliwell
Edith Bowman
Fearne and Reggies
Gilles Peterson
>
>
>
>
>
Internet radio 12:34
Edith Bowman
Show description
Edith Kickstarts your
afternoon with music,
Edith Bowman
28/08/2009 — August 28
27/08/2009 — August 27
26/08/2009 — August 26
25/08/2009 — August 25
Tuning Control Rotary to enter your selection. The display will show ‘Connecting…’ while the
radio connects to the new station. The station should then start playing. Adjust the volume as
needed.
9. If the station has on-demand content, that is, it gives the option of listening to programs which
have already been broadcast or to Podcasts, there will be an additional screen showing the
radio station name as well as a ‘Podcasts’ option. These are selected using additional menus,
determined by the radio station and the content. There may simply be a list of programs, or
there may also be options to choose from broadcasts on particular dates or days of the week.
The examples shown here are typical. Podcasts and Listen Again content can also be accessed
separately from the main Internet Radio menu.
If your radio cannot connect to a radio station
Note:
If your radio is unable to connect to an internet radio station it will generally either display ‘Network
Error’ or ‘Stopped’. This can be for many reasons, but typically will be due to one of the following:
● The radio station may not be broadcasting at the present time.
● The radio station may not be able to accommodate any more connections from internet listeners.
● The broadcaster may limit listening to specic countries or regions.
● There may be network congestion (either locally or at a distance) which is affecting the reliability
of the connection.
reconnect, this may be due to the radio station only having limited connection capacity.
19
If your radio can connect, but the audio is not continuous and the radio keeps having to
Selecting a radio station by genre
2-7
1
Internet radio
My Favourites
Local United Kingdom
BBC
Stations
Podcasts
>
>
>
>
>
Stations
Location
Genre
Search stations
Popular stations
New stations
>
>
>
>
Genre
Alternative
Ambient
Big Band
Bluegrass
Blues
>
>
>
>
>
Blues
All Stations
Highlighted Stations
Belgium
France
Germany
>
>
>
>
>
All Stations
Asian sound radio
Aston FM
Atlantic FM
Audio Book Radio
BBC Radio 1
1.
Press the Menu button to enter the main Internet radio menu.
2.
Rotate the Tuning Control Rotary until ‘Stations’ is highlighted on the display and then press
the Tuning Control Rotary to select.
3.
Rotate the Tuning Control Rotary until ‘Genre’ is highlighted on the display and then press
the Tuning Control Rotary.
GB
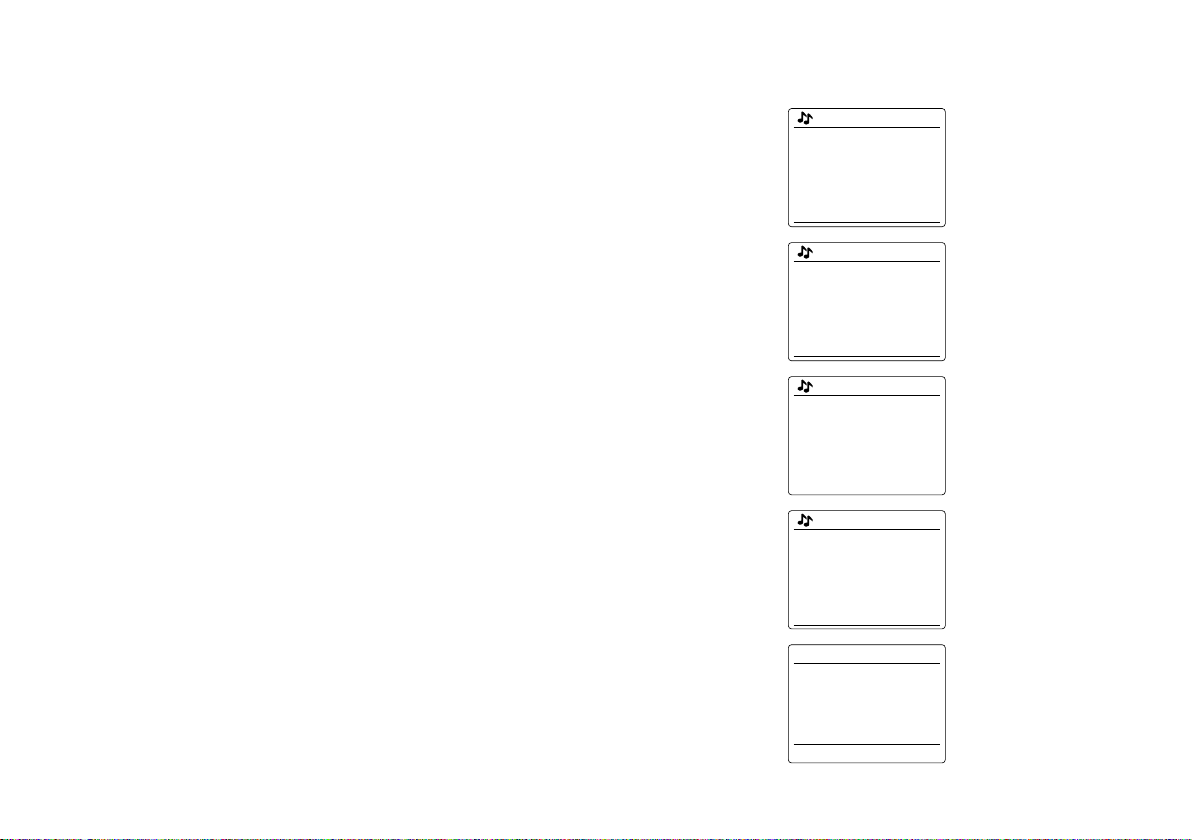
4.
Rotate the Tuning Control Rotary to scroll through the list of content types. This menu is
normally cyclic – you can scroll the list continually in either direction. When the chosen genre
is highlighted, press the Tuning Control Rotary.
5.
You then have the choice of ‘All Stations’ of the chosen genre, or a list of countries. Note if
a country is not shown then the station may still appear in the ‘All Stations’ list. Rotate the
Tuning Control Rotary and the Tuning Control Rotary to choose as needed.
6.
A list of radio stations is then shown. Rotate the Tuning Control Rotary until the desired
station name is highlighted on the display.
7.
Press the Tuning Control Rotary to select the station. The display will show ‘Connecting…’
while it finds the new station. If the radio is unable to connect this may be for one of the
reasons explained previously.
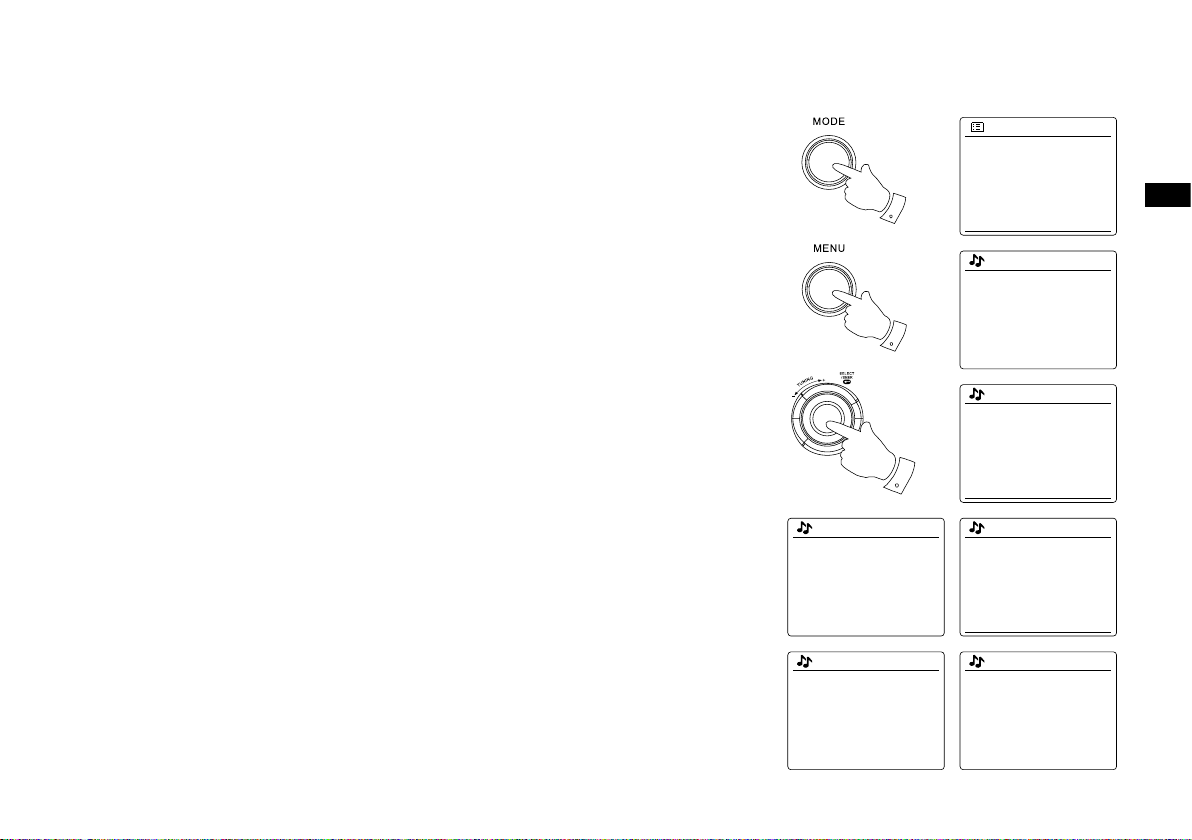
8.
Adjust the Volume as needed to set the listening level.
20
Searching for a radio station by name
4
1-6
1
Internet radio
My Favourites
Local United Kingdom
BBC
Stations
Podcasts
>
>
>
>
>
Internet radio
Last listened
Station list
System settings
Main menu
>
>
>
Stations
Location
Genre
Search stations
Popular stations
New stations
>
>
>
>
Search stations
Radio10 — Top 100 Classic
Rock 100 DIZ
Stations
There may be occasions when you know the name of a radio station but you do not know the
location or genre. This facility allows you to search for the station using a part (or parts) of the
radio station name.
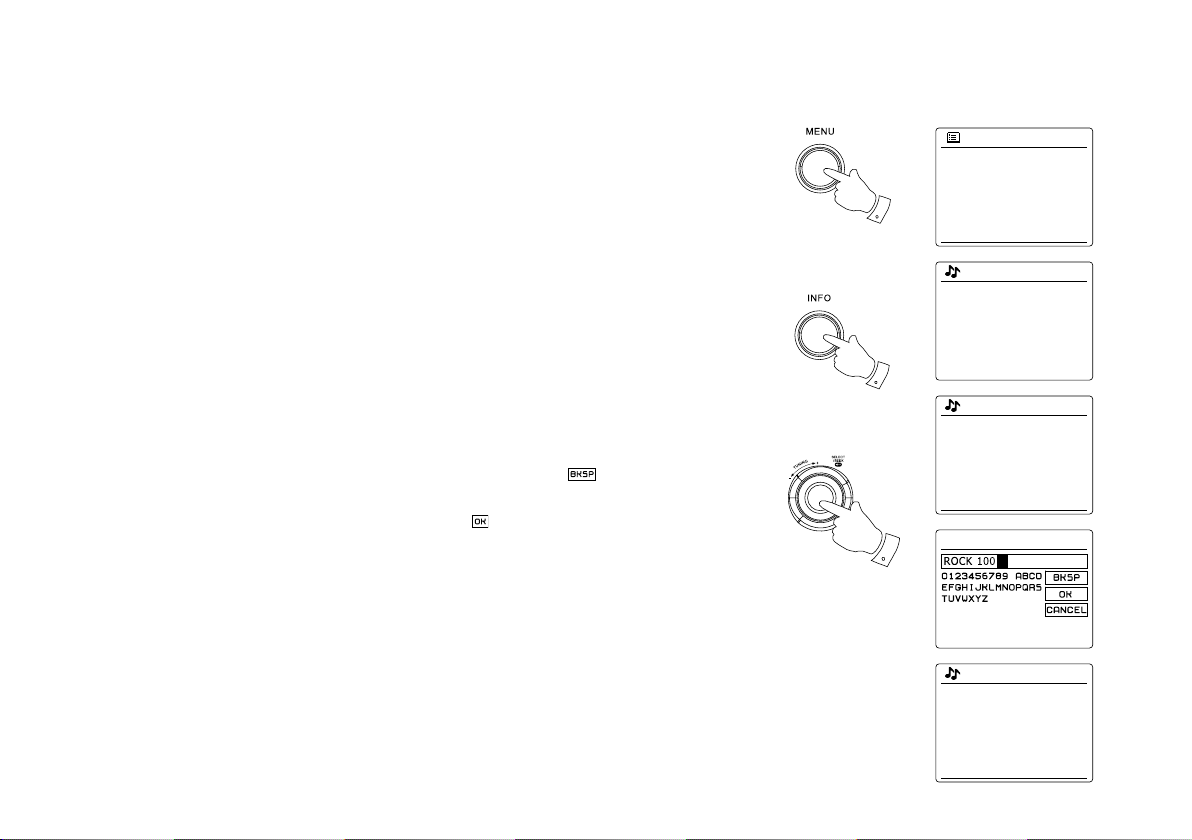
1. Press the Menu button to enter the main Internet radio menu. Rotate the Tuning Control Rotary
until ‘Station list’ is highlighted on the display and then press the Tuning Control Rotary.
2. Rotate the Tuning Control Rotary until ‘Stations’ is highlighted on the display and then press
the Tuning Control Rotary.
3. Rotate the Tuning Control Rotary until ‘Search stations’ is highlighted on the display and then
press the Tuning Control Rotary.
4. To enter the search word(s) press the Tuning Control Rotary on the remote control to highlight
each character for the search in turn, and press the Tuning Control Rotary to enter. If you
make an error press the Info button to access the delete character ‘ ’ on the screen and the
character selection. After the nal character of the search has been entered, use the Info button
and then the Tuning Control Rotary to highlight the ‘ ’ symbol on the screen and then press
the Tuning Control Rotary to nish.
5. The radio will search for radio stations that match your search data. If you include a space
between two search items the radio will look for station names which include both items. Thus
a search for ‘ROCK 100’ could nd a station called ‘100 Classic Rock Hits’ as well as a station
called ‘100.FM Rocks’.
6. Rotate the Tuning Control Rotary to highlight the station that you wish to listen to and press
the Tuning Control Rotary to conrm your choice. The display will show ‘Connecting…’ while it
nds a new station.
21
Selecting a new or popular station
1-4
1
Internet radio
My Favourites
Local United Kingdom
BBC
Stations
Podcasts
>
>
>
>
>
Internet radio
Last listened
Station list
System settings
Main menu
>
>
>
Stations
Location
Genre
Search stations
Popular stations
New stations
>
>
>
>
Stations
BBC Radio 4
ENERGY ZURICH
All Irish Radio
Classic FM
RTL 2
As described in the section ‘Internet Radio – the basics’, your radio connects via the the Internet
to a database of radio stations. This option is provided to highlight stations which are newly
added to the list of those available, or stations which are particularly popular with listeners
around the world. Your radio allows you to easily choose stations from these two categories,
using menus very similar to those used when nding stations by location and genre.
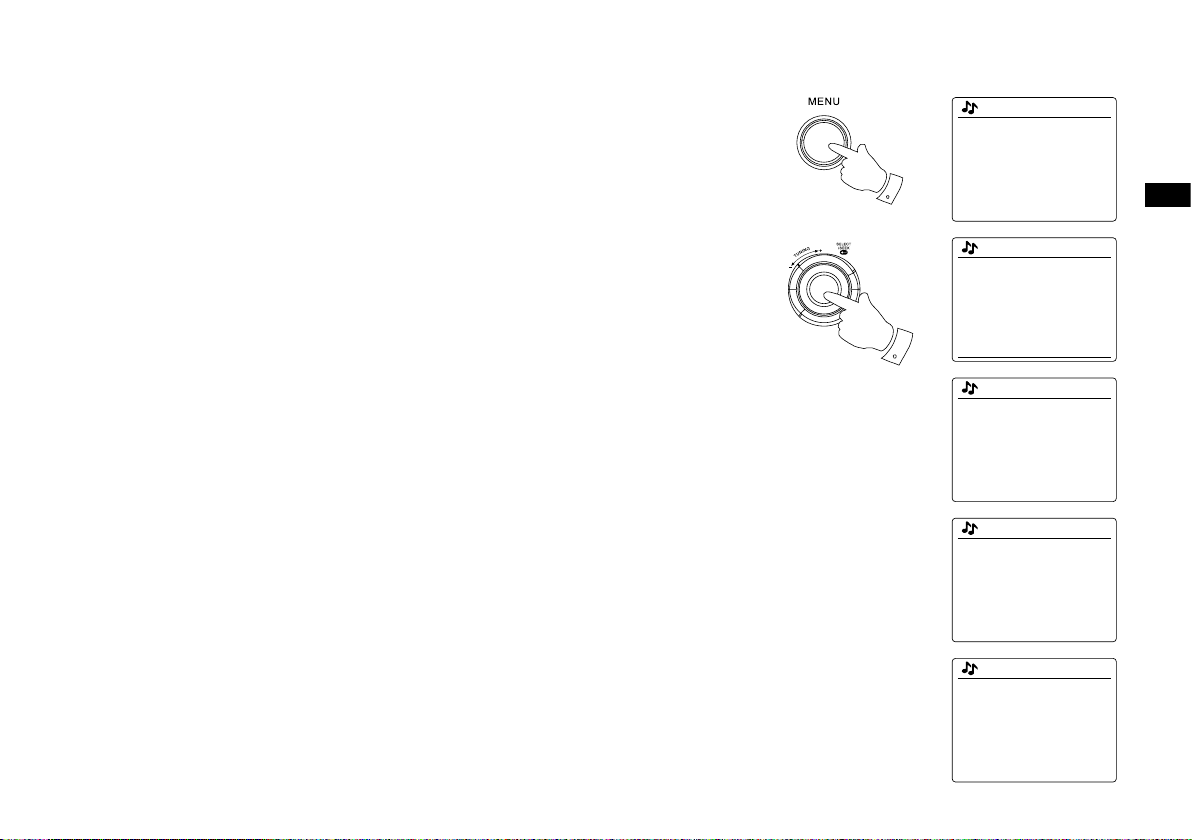
1. Press the Menu button to enter the main Internet radio menu. Rotate the Tuning Control Rotary
until ‘Station list’ is highlighted on the display and then press the Tuning Control Rotary.
GB
2. Rotate the Tuning Control Rotary until ‘Stations’ is highlighted on the display and then press
the Tuning Control Rotary.
3. Rotate the Tuning Control Rotary until ‘Popular stations’ or ‘New stations’ is highlighted on the
display. Press the Tuning Control Rotary to enter your choice.
4. Rotate the Tuning Control Rotary to highlight the station that you wish to listen to and then
press the Tuning Control Rotary to enter your choice. The display will show ‘Connecting…’
while the new station is found.
22
Selecting a podcast / BBC Listen Again
1-4
1
Internet radio
My Favourites
Local United Kingdom
BBC
Stations
Podcasts
>
>
>
>
>
Podcasts
Dick and Dom
Eddie Halliwell
Edith Bowman
Fearne and Reggies
Gilles Peterson
>
>
>
>
>
Internet radio
Last listened
Station list
System settings
Main menu
>
>
>
Stations
Location
Genre
Search stations
>
>
Podcasts
Some radio stations allow you to listen to programs that have already been broadcast. The BBC’
s Listen Again service is an example of this. In addition, radio broadcasters and individuals may
make programs which are intended normally to be downloaded into a computer or copied onto a
portable media player. These are commonly known as Podcasts.
On your radio, both Listen Again programs and Podcasts are grouped together as Podcasts,
and the same menu is used to access and listen to both types of programming. Listen Again
programs are also accessible via the Stations menu.
1. Press the Menu button to enter the main Internet radio menu. Rotate the Tuning Control Rotary
until ‘Station list’ is highlighted on the display and then press the Tuning Control Rotary.
2. Rotate the Tuning Control Rotary until ‘Podcasts’ is highlighted on the display and press the
Tuning Control Rotary.
3. You may then search by location, genre, or using part of the name of the podcast. The searches
operate in exactly the same way as when searching for a conventional radio station. Searching
by location is done rst by continent, then by country. You may then list ‘All shows’ or search
within a country by genre. Searching by genre is more direct, since once the genre is chosen
the next menu display shows a list of available podcasts. Searching by name operates in the
same way as when searching for a named radio station, selecting the ‘ ’ symbol when you
have entered the text. You may enter one or more pieces of text which will be used for the
search.
4. Rotate the Tuning Control Rotary and then press the Tuning Control Rotary to conrm your
chosen podcast. The display will show ‘Connecting…’ while it nds the new program.
23
Presetting stations
1
2
Internet radio 12:34
Aural Moon
Description:
Playing progressive rock
old and new
UPnP
With so many Internet radio stations available, it is desirable to have a means of rapidly selecting
the stations that you listen to most frequently. Your radio has ve memory presets which can
easily be set to store the details of any Internet radio station. The radio station presets are
retained in memory even when the radio is switched off. Please see also the section ‘Last
Listened’ and ‘Conguring My Favorite Stations’.
Storing a preset
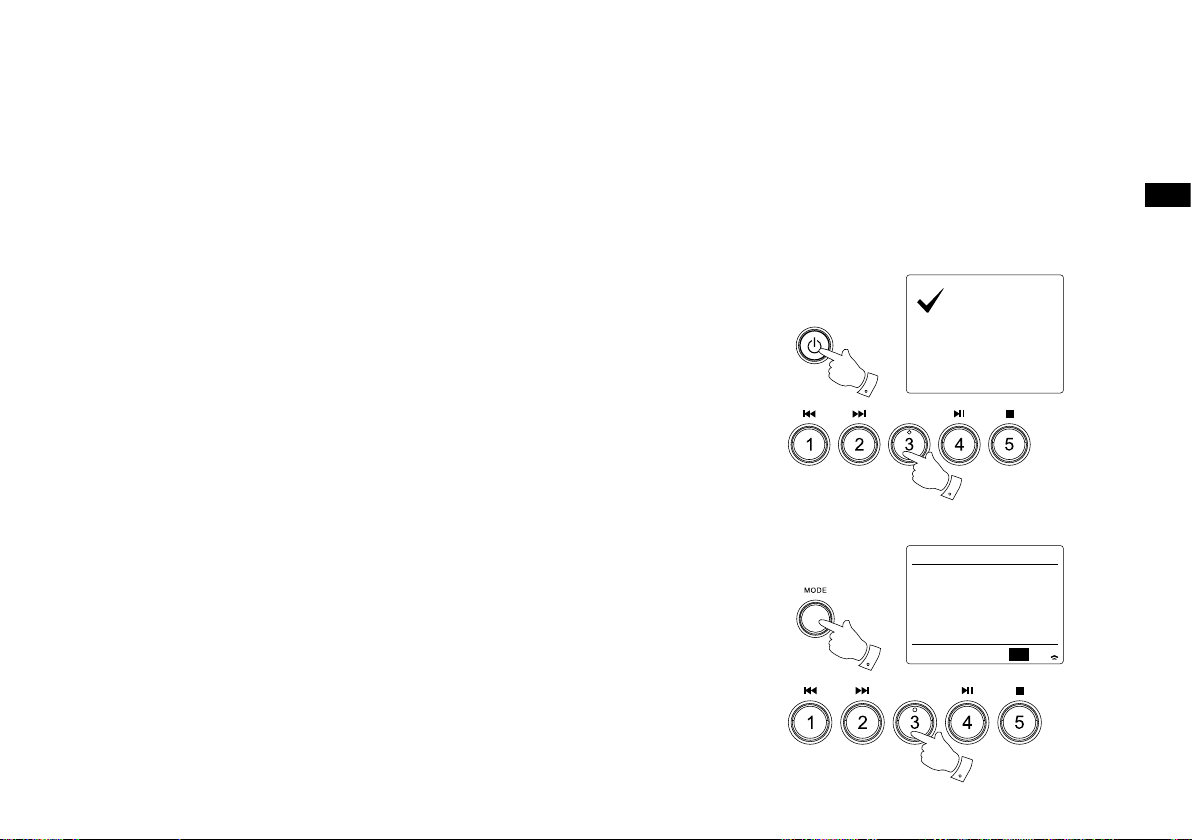
1. Press the Standby button to switch on your radio. Tune to the required station using one of
the methods described on the preceding pages.
2. To store the currently playing radio station as a preset, press and hold the required Preset
button (1 – 5) on the panel until the display shows ‘Preset stored’. The station will be stored
using the chosen preset button. Repeat this procedure as needed for the remaining presets.
3. Stations which are already stored in the presets may be over-written by following the above
procedure.
Recalling a preset
1. Press the Standby button to switch on your radio. Select the Internet radio mode using the
Mode button.
2. Momentarily press the required Preset button on the remote control. Your radio will then connect
to the station stored in preset memory. The preset used will be shown at the bottom of the
display screen.
GB
24
Last Listened
1,2
1
Internet radio
Last listened
Station list
System settings
Main menu
>
>
>
Last listened
Absolute Radio
eurosmoothjazz
Rock Antenne
Radio Luxembourg
EldoRadio
Internet radio 12:34
Radio Luxembourg
Description:
Radio Luxembourg, the
best in classic rock.
It is often helpful to be able to go back to a station that you have already listened to. Your radio has
a ‘Last Listened’ feature which provides you with quick access to the ten most recently listened to
radio stations or podcasts. As each new radio station is listened to the oldest item is deleted from
the list. The Last Listened list is stored when the radio is disconnected from the mains.
1. With the radio switched on and in Internet radio mode, press the Menu button. The rst item on
the menu is ‘Last listened’. With this item highlighted press the Tuning Control Rotary.
2. The display will then show a list of the last ten Internet radio stations or podcasts. Rotate the
Tuning Control Rotary to highlight whichever you wish to listen to and then press the Tuning
Control Rotary to cause your radio to reconnect to that radio station or podcast.
25
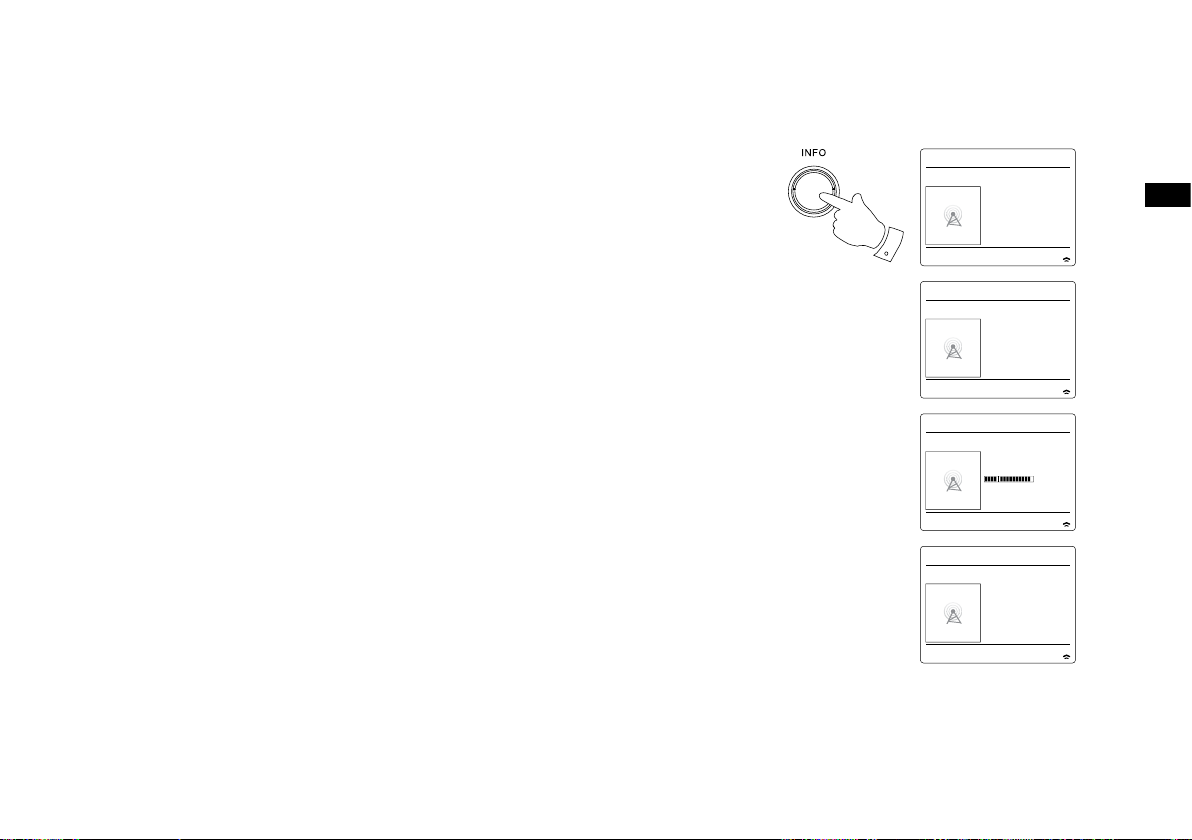
Display modes
1
Internet radio 16:01
Final Fantasy Radio
Reliability:
Excellent
Internet radio 16:01
Final Fantasy Radio
Bit rate: 40 kbps
Codec: MP3
Sampling Rate:
22.0 kHz
Internet radio 16:01
Final Fantasy Radio
Playback buffer
Internet radio 16:01
Final Fantasy Radio
Today’s Date:
28/03/2014
Your radio has a range of display options when in Internet Radio mode. Note that not all
information may be available for all Internet radio stations.
1. Press the Info button to cycle through the different options.
a. Description Displays information about the radio station or scrolling text messages
such as artist/track name, phone number etc.
b. Genre Displays program type information e.g. Pop, Classic, News, etc. and the
location of the current radio station.
c. Reliability Displays the reliability of the data stream from the station currently being
received.
d. Format Displays the bit rate and format of the station being received.
e. Playback buffer Displays status when connecting to and playing a radio station. This
indicates the reliability of the data stream to your radio. If there are no
bars shown to the right of the dividing line then the data stream reliability
f . Date Displays the current date.
may be poor and you may nd that there are many breaks in the audio (this
is not always the case for REAL audio streams).
Additional or alternative information may be displayed when listening to Podcasts, Categories
displayable can include…
Episode name Show description
Show genre Show language
Episode URL Bit rate
Codec Sampling rate
Whenever the radio is displaying an information screen (as opposed to a menu screen), the time
is displayed in the top-right corner of the display, and a WiFi strength indicator is shown in the
bottom-right corner.
GB
26
Loading…
www.radioplaneta.ru
Радио — наша жизнь!
SANGEAN WFR-28 Интернет-приемник
Re: SANGEAN WFR-28 Интернет-приемник
olfrid » 06 авг 2013 22:18
Re: SANGEAN WFR-28 Интернет-приемник
prezent » 06 авг 2013 23:00
Re: SANGEAN WFR-28 Интернет-приемник
Beg17 » 07 авг 2013 20:26
Re: SANGEAN WFR-28 Интернет-приемник
prezent » 07 авг 2013 21:27
Re: SANGEAN WFR-28 Интернет-приемник
olfrid » 07 авг 2013 22:31
Re: SANGEAN WFR-28 Интернет-приемник
prezent » 08 авг 2013 11:42
Re: SANGEAN WFR-28 Интернет-приемник
olfrid » 08 авг 2013 12:31
Re: SANGEAN WFR-28 Интернет-приемник
prezent » 27 окт 2013 00:53
Re: SANGEAN WFR-28 Интернет-приемник
olfrid » 13 дек 2013 00:52
SANGEAN WFR-29D
mapper » 23 апр 2014 10:07
Судя по описаниям в сети, отличается от 28D наличием второго динамика, ручки, отдельный аналоговый (rotary) регулятор громкости и прочими небольшими деталями. Погармоничнее выглядит, чем предшественник. Или это совершенно другой аппарат?
Есть владельцы 29го? он тоже с frontier работает?
Re: SANGEAN WFR-28 Интернет-приемник
mapper » 25 апр 2014 14:46
Re: SANGEAN WFR-28 Интернет-приемник
mapper » 29 апр 2014 09:05
Осваиваю понемногу. Установил на iphone приложение для дистанционного управления приемником — iSangean App. Будильник можно настраивать раздельно на будни и уикенды. Теперь по утрам просыпаюсь под звуки bluegrass country
Цвет, внешний вид — нравится, хотя белый подошел бы лучше.
Осваиваю ресурсы Frontier-Silicon Radio. Встречаются нерабочие ссылки, чего не ожидал.
Теперь о минусах.
К качеству звука появились претензии: не хватает высоких частот;
не очень удобно регулировать тембр через систему меню.
6 батареек C-size — до этого надо додуматься! У меня есть переходники для 4 батарей, думал использовать привычные аккумуляторы АА-size — ан нет, надо что-то додумывать.
В 28 модели вроде 4 батарейки? В принципе, 99% использования будет от сети, не проблема.
5 presets — это крайне мало.
Продолжаю наблюдение
Re: SANGEAN WFR-28 Интернет-приемник
prezent » 29 апр 2014 21:20
Re: SANGEAN WFR-28 Интернет-приемник
mapper » 30 апр 2014 11:48
Re: SANGEAN WFR-28 Интернет-приемник
nuriman » 30 апр 2014 23:21
Re: SANGEAN WFR-28 Интернет-приемник
olfrid » 01 май 2014 12:36
Re: SANGEAN WFR-28 Интернет-приемник
prezent » 03 май 2014 23:20
Re: SANGEAN WFR-28 Интернет-приемник
mapper » 05 май 2014 07:36
Re: SANGEAN WFR-28 Интернет-приемник
mapper » 05 май 2014 09:03
Re: SANGEAN WFR-28 Интернет-приемник
mapper » 08 май 2014 15:30
Написал в службу поддержки PURE,
Hi!
I’m user of PureConnect App on Ipad/IPhone. Recently I bought internet radio Sangean WFR-29D. It works with Frontier-Silicon service. I wonder if I can use my receiver with your product (I couldn’t find Sangean in Download section) .
Thank you!
Thank you for your e-mail.
Unfortunately, with this being a non-Pure radio, it is unable to access the services provided through PURE Connect portal.
The only way you’ll be able to output sound through this receiver is by connecting it to your smart device using an Aux-in cable.
Т.е. получается, нельзя подключиться к PURE.
Re: SANGEAN WFR-28 Интернет-приемник
mapper » 12 май 2014 14:33
Re: SANGEAN WFR-28 Интернет-приемник
prezent » 12 май 2014 20:37
Re: SANGEAN WFR-28 Интернет-приемник
mapper » 14 май 2014 16:01
Re: SANGEAN WFR-28 Интернет-приемник
Beg17 » 17 май 2014 17:01
Re: SANGEAN WFR-28 Интернет-приемник
mapper » 19 май 2014 09:10
Источник
Инструкция и руководство для
Sangean WFR-28D на русском
31 страница подробных инструкций и пользовательских руководств по эксплуатации
3 Best WiFi Radio Reviews In 2020
Sangean WFR-28 FM WiFi Intetnet Radio receiver
Sangean WFR 28D portable radio review
Sangean WFR-28D WFR-28 Internet Radio / DAB+ / FM-RDS / USB Network Music Player Digital Receiver
DAB scan — Sangean WFR-28D, London, UK
Romote your stream for Sangean WFR-28D
Sangean WFR 28C (WiFi/Net/FM Radio) Unbox & Setup
D Инструкция по эксплуатации Версия .
Инструкция по эксплуатации
СОДЕРЖАНИЕ стр. стр. ПРИСТУПАЯ К Р.
ПРИСТУПАЯ К РАБОТЕ
Перед использованием
Питание от батареек / аккумуляторов 2
Питание от сети через адаптер
Схема органов управления
ПОДКЛЮЧЕНИЕ И НАСТРОЙКА
Первое подключение
Настройка сети вручную
ИНТЕРНЕТ-РАДИО
Общие сведения
Выбор станции по стране
Выбор станции по жанру
Поиск станции по названию
Новые и популярные станции
Предустановка станций на кнопки
Последние прослушанные станции
Информационные режимы дисплея
Создание учетной записи
Избранные и добавленные станции
АУДИО-ПЛЕЕР
Воспроизведение с компьютера
Информационные режимы дисплея
Работа с плейлистом
Пробуждение по локальной сети
Обновление списка серверов UPnP
Сохранение сетевого подключения
Функция Play to в Windows 7
Воспроизведение с USB-носителей
FM-РАДИО
Поиск станций
Информационные режимы дисплея
Предустановка станций на кнопки
ЧАСЫ И БУДИЛЬНИК
Автоматическая синхронизация
12 или 24-часовой формат
Настройка часов вручную
Когда будильник сработал
Функция «вздремнуть еще»
ДИСПЛЕЙ И АУДИО
Эквалайзер
Функция отключения звука
Разъем для наушников
Аудио-вход (AUX IN)
ИНФОРМАЦИЯ
Возврат к заводским установкам
ПРИСТУПАЯ К РАБОТЕ Перед использованием Прежде, чем Вы с.
ПРИСТУПАЯ К РАБОТЕ
Прежде, чем Вы сможете использовать приемник, у Вас должно быть следующее:
широкополосное интернет-подключение (не требуется для DAB, FM и Аудио-плеера).
беспроводная точка доступа WiFi, предпочтительно через роутер. Роутер (маршрутизатор)
и точка доступа WiFi часто объединены в одном устройстве.
Если Ваша беспроводная сеть сконфигурирована с использованием защитных протоколов
WEP или WPA/WPA2, Вы должны знать пароль (ключ) для подключения к сети.
Приемник, подключенный по WiFi, как правило, будет нормально работать в пределах 10 — 20
метров от Вашей точки доступа. Но это зависит от материала и толщины стен, влияния других
беспроводных сетей и иных источников помех. DAB и FM-радио будут работать везде, где
можно принять соответствующий радиосигнал.
Питание от батареек / аккумуляторов
Прежде, чем вставить батарейки или аккумуляторы, удостоверьтесь, что переключатель
NiMH/Alkaline, находящийся в батарейном отсеке, выставлен соответствующим образом
(позиция NiMH — для перезаряжаемых аккумуляторов, позиция Alkaline — для батареек).
Вставьте четыре батарейки или аккумулятора размера D (UM-1), соблюдая полярность
согласно указаниям на корпусе батарейного отсека.
Красный свет индикатора, уменьшение громкости, искажения и «заикающийся звук» являются
признаками необходимости замены батареек.
Не оставляйте батарейки в приемнике, если не планируете использовать его долгое время
(например, уезжаете в отпуск).
Питание от сети через адаптер
Для питания от сети приемнику требуется адаптер постоянного тока со следующими
параметрами: 7.5 В, 1.6 А, центр-плюс.
Разъем питания от сетевого адаптера находится на левой стороне приемника.
Когда используется адаптер, батарейки автоматически отключаются.
Если вставлены перезаряжаемые аккумуляторы, они подзаряжаются (только, когда приемник
выключен). Пока идет зарядка, индикатор мигает зеленым. Если зеленый горит, не мигая –
значит, аккумуляторы заряжены полностью.
Схема органов управления .
Схема органов управления
1. Разъем USB
2. Кнопка MODE (режимы)
3. Жидкокристаллический дисплей
4. Кнопка INFO (информация)
5. Кнопка MENU (меню)
6. Кнопка BACK (назад)
7. Кнопка FORWARD (вперед)
8. Кнопка включения/выключения
9. Индикатор заряда аккумуляторов /
разряда батарей
10. Колесо настройки / кнопка выбора
11. Кнопка громкости (качелька)
12. Кнопка MUTE (отключение звука)
13. Кнопка предустановки 5 / Стоп
14. Кнопка предустановки 4 / воспр./пауза
15. Кнопка предустановки 3
16. Кнопка предустановки 2 / вперед
17. Кнопка предустановки 1/ назад
18. Динамик
19. Телескопическая антенна для FM
20. Гнездо AUX IN (аудио-вход)
21. Гнездо LINE OUT (линейный выход)
22. Гнездо для наушников
23. Разъем для сетевого адаптера
24. Батарейный отсек
25. Переключатель NiMH/Alkaline
Основы управления Здесь описаны основные средства управ.
Здесь описаны основные средства управления WFR-28D. Команды для каждого режима
рассмотрены более подробно в более поздних разделах инструкции.
1. Нажатие на кнопку включения/выключения
выводит приемник из режима ожидания.
Повторное нажатие возвращает в режим
ожидания (на дисплее остаются только часы).
2. Кнопка MODE предоставляет возможность
выбрать один из режимов: Интернет-радио,
Аудио-плеер, DAB-радио, FM-радио, AUX IN.
3. Кнопка MENU открывает систему меню.
Кнопка INFO выводит на экран информацию,
касающуюся
4. Чтобы выбрать пункт меню, подсветите его,
вращая колесо настройки, а затем нажмите. Если
в меню более пяти элементов, бегунок на экране
справа покажет позицию отображенной части
меню в списке. Списки прокручиваются по кругу,
что облегчает доступ к элементам в конце
длинных меню, таких как список интернет-
радиостанций или стран.
5. Если выбор был сделан ошибочно, нажмите
кнопку BACK (назад) — она возвращает к
предыдущему меню.
ПОДКЛЮЧЕНИЕ И НАСТРОЙКА Первое подключение .
ПОДКЛЮЧЕНИЕ И НАСТРОЙКА
1. После включения на экране появится надпись Sangean starting и индикатор загрузки. При
первом включении приемника (или после возврата к заводским установкам) будет
предложено запустить Мастер Установки (Setup Wizard). Выберите Yes и нажмите колесо
настройки.
2. Вращением колеса настройки выберите желательный формат времени (12-ти или 24-х
часовой) и подтвердите выбор нажатием.
3. На экране появится меню, позволяющее настроить синхронизацию времени с
определенным источником. Вариант from Network будет оптимальным для большинства
пользователей. В этом случае вам понадобится выбрать часовой пояс, соответствующий
вашему местонахождению, а затем указать, нужно ли переходить на летнее/зимнее время
(Daylight savings – по умолчанию отключено).
4. Дисплей отобразит список WiFi-регионов для установок сети. Выберите нужную область;
приемник произведет поиск доступных сетей WiFi и выведет из список на экран. Если
беспроводные сети не найдены, то вам, вероятно, нужно включить и настроить вашу
беспроводную точку доступа (ознакомьтесь с ее инструкцией), либо вы находитесь слишком
далеко от нее. Когда приемник найдет вашу беспроводную сеть, он покажет ее имя (SSID) в
списке найденных сетей на экране. Это имя, присвоенное точке доступа человеком, который
настраивал сеть – например, «Jones family» или «Paul’s network». Вполне вероятно, что ваш
приемник найдет сразу несколько беспроводных сетей. В этом случае вам надо выбрать, к
какой сети подключиться.
. Если сеть настроена на защищенное подключение .
5. Если сеть настроена на защищенное подключение (WiFi Protected Setup — WPS), Вы увидите
дополнительное меню на экране (если нет — переходите к следующему шагу). Выберите одну
из опций WPS в зависимости от настроек Вашего маршрутизатора:
Push Button означает необходимость нажать кнопку WPS на маршрутизаторе и затем
нажать колесо настройки на приемнике, и тогда маршрутизатор передаст кодовый ключ
приемнику.
PIN означает необходимость вручную ввести PIN-код устройства в маршрутизатор через
веб-интерфейс (см. инструкцию к маршрутизатору). Существует также возможность
управления приемником с помощью приложения iSangean на iPhone/iPod. Тогда тоже
понадобится PIN-код. Подробнее об этой функции см. в руководстве к приложению.
Если всё прошло успешно, на экране появится надпись «Connecting», а затем «Setup wizard
completed».
6. Если на экране появилась надпись Key, это означает, что Ваша беспроводная сеть
защищена по протоколу WEP или WPA, и для подключения нужно ввести пароль. Если Вы не
знаете пароля, обратитесь к тому, кто настраивал Вашу сеть. Возможно, остался тот пароль,
который был установлен в маршрутизаторе по умолчанию (обратитесь к документации на
него).
Символы для пароля выбираются и вводятся с помощью колеса настройки. Вращение колеса
подсвечивает символы, а также опции BKSP (backspace — стереть последний символ), OK и
CANCEL (отмена). Ввод подсвеченного символа или команды производится нажатием колеса
настройки. После успешного ввода пароля на экране появится надпись «Connecting», а затем
«Setup wizard completed».
7. Когда приемник подключится к сети, он перейдет в режим ожидания, показывая время
(если оно не верно, см. раздел «Установка часов вручную»).
Теперь Вы можете начинать слушать интернет-радиостанции.
Примечание: когда приемник работает от батареек, он при выключении не переходит в режим
ожидания, а отключается полностью для экономии заряда. Поэтому при следующем
включении время на экране будет сброшено и показано как 00:00. Однако, как только
приемник соединится с WiFi, часы будут синхронизированы автоматически.
Источник