

Instruction Book


IMPORTANT SAFETY INSTRUCTIONS
This appliance can be used by children aged from 8 years and above and persons with reduced
physical, sensory or mental capabilities or lack of experience and knowledge if they have been given
supervision or instruction concerning use of the appliance in a safe way and understand the hazards
involved. Children shall not play with the appliance. Cleaning and user maintenance shall not be made
by children without supervision.
When using an electrical appliance, basic safety precautions should always be followed, including the
following:
This sewing machine is designed and manufactured for household use only.
Read all instructions before using this sewing machine.
To reduce the risk of electric shock:
DANGER
1. An appliance should never be left unattended when plugged in. Always unplug this sewing
machine from the electric outlet immediately after using and before cleaning.
WARNING
1. Do not allow to be used as a toy. Close attention is necessary when this sewing machine is used
by or near children.
2. Use this appliance only for its intended use as described in this owner’s manual.
Use only attachments recommended by the manufacturer as contained in this owner’s manual.
3. Never operate this sewing machine if it has a damaged cord or plug, if it is not working properly, if
it has been dropped or damaged, or dropped into water.
Return this sewing machine to the nearest authorized dealer or service center for examination,
repair, electrical or mechanical adjustment.
4. Never operate the appliance with any air opening blocked. Keep ventilation openings of this
sewing machine and foot controller free from accumulation of lint, dust and loose cloth.
5. Never drop or insert any object into any opening.
6. Do not use outdoors.
7. Do not operate where aerosol (spray) products are being used or where oxygen is being
administered.
8. To disconnect, turn all controls to the off (“O”) position, then remove plug from outlet.
9. Do not unplug by pulling on cord. To unplug, grasp the plug, not the cord.
10. Keep fingers away from all moving parts. Special care is required around the sewing machine
needle and/or cutting blade.
11. Always use the proper needle plate. The wrong plate can cause the needle to break.
12. Do not use bent needles.
13. Do not pull or push fabric while stitching. It may deflect the needle causing it to break.
14. Switch this sewing machine off (“O”) when making any adjustment in the needle area, such as
threading the needle, changing the needle, threading the bobbin or changing the presser foot, and
the like.
15. Always unplug this sewing machine from the electrical outlet when removing covers, lubricating, or
when making any other adjustments mentioned in this owner’s manual.
—
—
To reduce the risk of burns, fire, electric shock, or injury to persons:
SAVE THESE INSTRUCTIONS
The design and specifications are subject to change without a prior notice.
Please note that on disposal, this product must be safely recycled in accordance with relevant National
legislation relating to electrical/electronic products. If in doubt please contact your retailer for guidance.
(European Union only)

GETTING READY TO SEW
Names of Parts ………………………………………………………… 1-2
Embroidery unit case …………………………………………………… 2
Standard Accessories……………………………………………….. 3-4
Extension Table ………………………………………………………….. 5
Accessory Storage ……………………………………………………… 5
Changeable Frame ……………………………………………………… 5
Connecting the Power Supply ………………………………………. 6
Controlling Sewing Speed ……………………………………………. 7
Speed control slider ………………………………………………….. 7
Foot control ……………………………………………………………… 7
Machine Operating Buttons ………………………………………….. 8
Touch Panel Keys ……………………………………………………….. 9
Setting the Spool of Thread ………………………………………… 10
Winding the Bobbin ………………………………………………. 10-12
Removing the bobbin ………………………………………………. 10
Winding the bobbin …………………………………………………. 11
Inserting the bobbin ………………………………………………… 12
Threading the Machine ………………………………………………. 13
Needle threader ………………………………………………………… 14
Drawing up the Bobbin Thread ……………………………………. 15
Replacing Needles ……………………………………………………. 16
Replacing the Presser Foot ………………………………………… 17
Replacing the Foot Holder ………………………………………….. 18
Replacing the Needle Plate ………………………………………… 19
Raising and Lowering the Presser Foot………………………… 20
Knee lifter ………………………………………………………………… 20
Adjusting the Foot Pressure ……………………………………….. 21
Raising and Dropping the Feed Dog ……………………………. 21
Mode Selection …………………………………………………………. 22
ORDINARY SEWING MODE
Ordinary Stitch Patterns ………………………………………… 23-24
Function Keys in Ordinary Sewing Mode …………………..25-26
Utility Stitches …………………………………………………………… 27
Straight stitches ………………………………………………………… 27
Starting to sew ……………………………………………………….. 27
Sewing from the edge of thick fabric ………………………….. 27
Changing sewing direction ……………………………………….. 27
Turning a square corner …………………………………………… 27
Securing seams ……………………………………………………… 28
Cutting threads ………………………………………………………. 28
Using the seam guide lines ………………………………………… 28
Variety of straight stitches ………………………………………. 29-30
Zigzag stitches ………………………………………………………….. 30
Variety of overcasting stitches ……………………………… 31-32
Manual Stitch Settings …………………………………………… 33-34
Cloth guide ………………………………………………………………. 35
Buttonholes and Specialty Stitches ……………………………… 36
B1 Sensor (Square) buttonhole ………………………………. 37-38
Manual settings ………………………………………………………… 39
Using the Stabilizer Plate …………………………………………… 40
B2 Automatic (square) buttonhole …………………………… 41-42
Other buttonholes ……………………………………………………… 43
Corded buttonhole …………………………………………………….. 44
B7 Darning ………………………………………………………………. 45
B9 Eyelet …………………………………………………………………. 46
Decorative Stitches ……………………………………………….. 47-48
Quilting(Q) ……………………………………………………………….. 49
S1-S12 Decorative satin stitches …………………………………. 50
Twin Needle Sewing ………………………………………………….. 51
Programming a Pattern Combination …………………………… 52
Editing a pattern combination ……………………………………… 53
Startover key ……………………………………………………………. 54
Checking pattern combination length …………………………… 54
Monogramming …………………………………………………………. 55
Function keys …………………………………………………………… 55
Manual thread tension ……………………………………………….. 56
Individual thread tension ………………………………………….. 56
Unified thread tension ……………………………………………… 56
Spacing ……………………………………………………………………. 56
Reducing the size of letters ………………………………………… 56
Programming a monogram …………………………………………. 57
Sewing Application ……………………………………………………. 58
Seaming………………………………………………………………… 59
Overedge ………………………………………………………………. 60
Blind hem ………………………………………………………………. 61
Shell tuck ………………………………………………………………. 62
Rolled hem…………………………………………………………….. 63
Zipper sewing ……………………………………………………. 64-66
TABLE OF CONTENTS
Gathering ………………………………………………………………. 67
Basting ………………………………………………………………….. 67
Button sewing ………………………………………………………… 68
Tacking ………………………………………………………………….. 69
Applique ………………………………………………………………… 70
Patchwork ……………………………………………………………… 71
Quilting……………………………………………………………… 72-74
CUSTOMIZING MACHINE SETTINGS
Common Setting Mode …………………………………………. 75-78
Ordinary Sewing Setting Mode ……………………………….. 79-81
Correcting Deformed Stitch Patterns ……………………………. 82
EMBROIDERY MODE
Embroidery Unit ………………………………………………………… 83
Attaching the embroidery unit …………………………………… 83
Extending the carriage arm ……………………………………… 84
Detaching the embroidery unit ………………………………….. 85
Attaching the Embroidery Foot ……………………………………. 86
Foot pressure …………………………………………………………… 86
Attaching the Straight Stitch Needle Plate …………………….. 87
Special Bobbin Holder for Embroidery …………………………. 88
Embroidery Hoops …………………………………………………….. 89
Stabilizers ………………………………………………………………… 90
Setting the Fabric in an Embroidery Hoop …………………….. 91
Attaching the Embroidery Hoop to the Machine …………….. 92
Selecting Built-in Embroidery Designs …………………………. 93
Monogramming …………………………………………………………. 94
Function keys …………………………………………………………. 95
Programming a monogram ………………………………………. 96
2- Letter monogram ………………………………………………… 97
Editing a monogram ………………………………………………… 98
Ready to Sew Window …………………………………………. 99-102
Starting to sew embroidery ……………………………………….. 103
Fringe designs ……………………………………………………… 104
Applique designs …………………………………………….105-106
Editing Mode …………………………………………………………… 107
Free Arm Hoop (optional item) ………………………………….. 113
CUSTOMIZING MACHINE SETTINGS
Embroidery mode settings ………………………………….. 114-116
FILE MANAGEMENT
Saving and Opening a File ……………………………………….. 117
Saving a file …………………………………………………………. 117
Creating a new folder …………………………………………….. 118
Opening the file…………………………………………………….. 119
Viewing file names ………………………………………………… 119
Changing a name of the file or folder ……………………….. 120
CARE AND MAINTENANCE
Cleaning the Hook Area …………………………………………… 121
Cleaning the Inside of the Thread Guide …………………….. 122
Troubleshooting ………………………………………………… 123-124
STITCH CHART ……………………………………………….125-127
DESIGN CHART ………………………………………………128-131
y
!7
!6
o
q
w
e
r
t
u
!0
i
!1
GETTING READY TO SEW
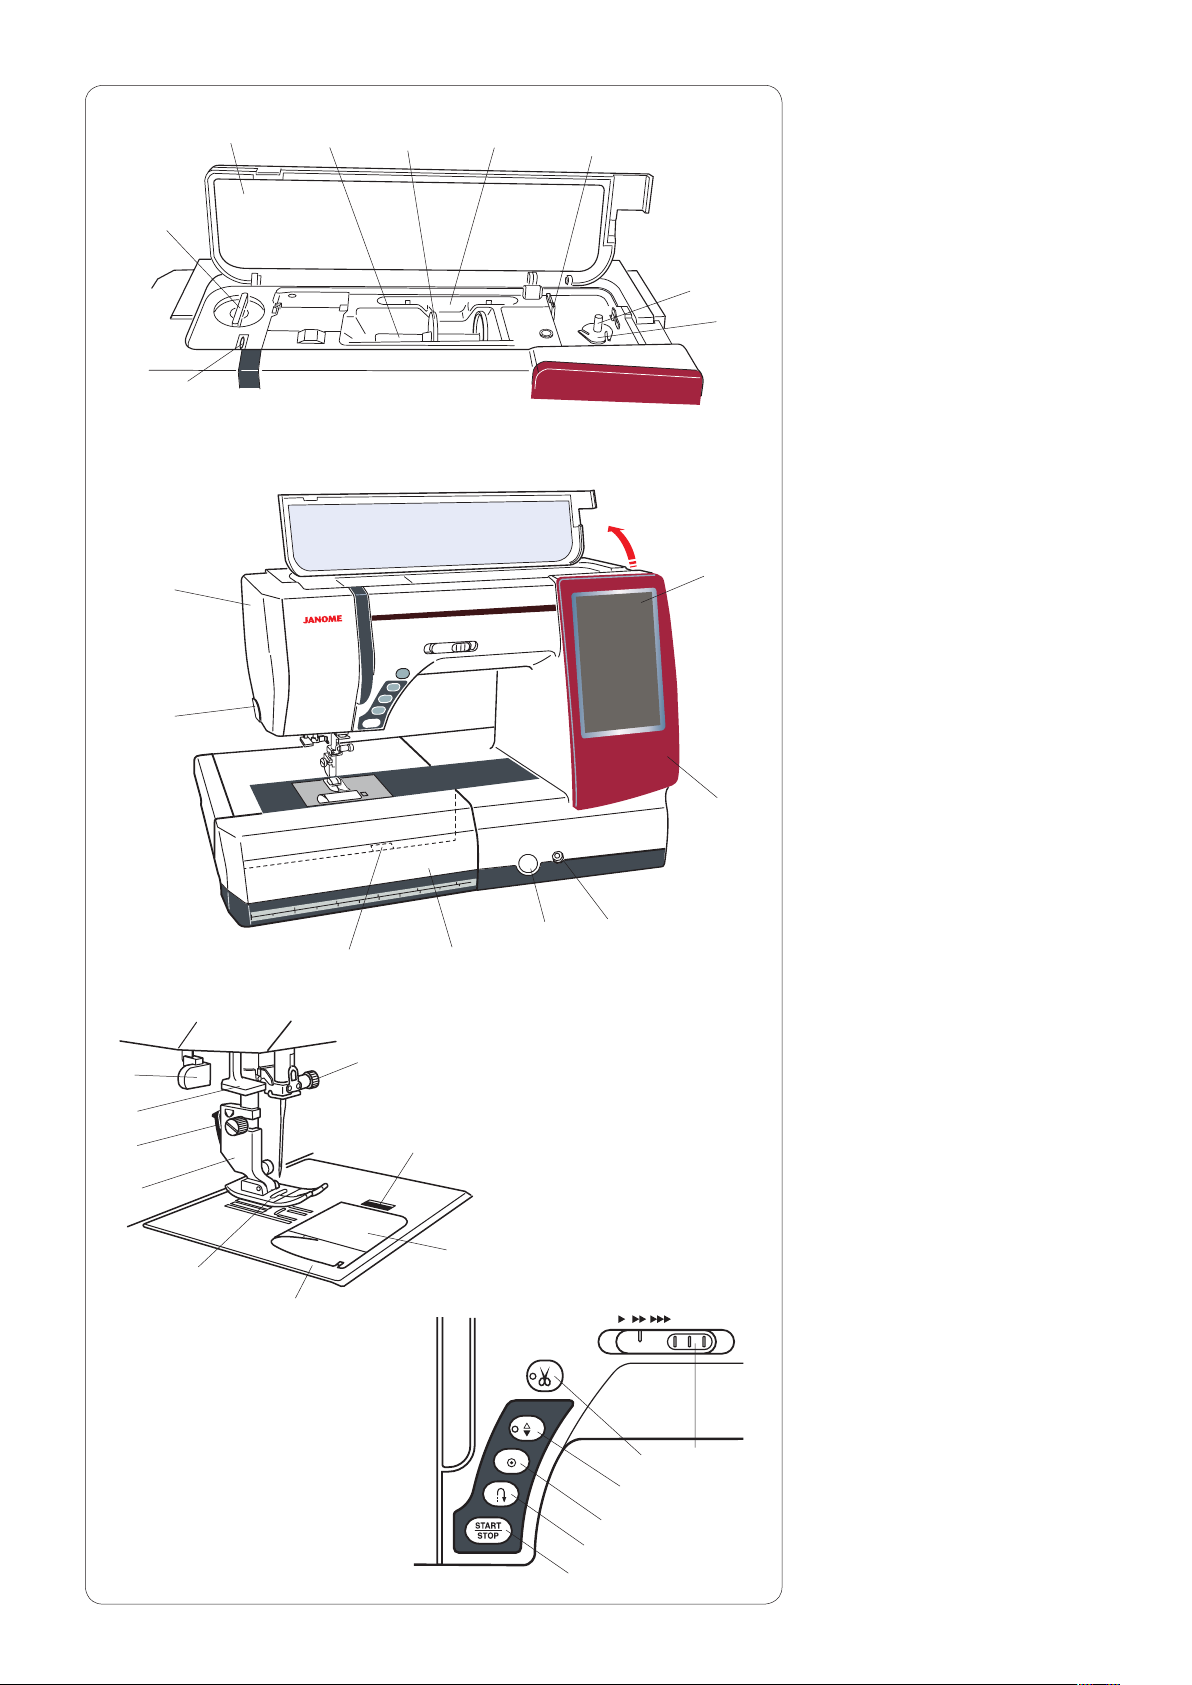
Names of Parts
q
Top cover
w
Spool pin
e
Spool holder (Large)
r
Touch panel stylus holder
t
Bobbin thread cutter B
y
Presser foot pressure dial
u
Bobbin winder spindle
i
Bobbin thread cutter A
o
Thread take-up lever
!0
Visual touch screen
!1
Changeable frame
!2
Knee lifter socket
!3
Feed balancing dial cap
!4
Extension table
(accessory storage)
!5
Needle plate release lever
!6
Thread cutter/holder
!7
Face plate
@5
@4
@3
@2
@1
@0
!5
@6
!8
!4
!9
!3
@7
@8
!2
@9
#0
#1
#2
!8
Hook cover release button
!9
Hook cover plate
@0
Needle plate
@1
Zigzag foot A
@2
Presser foot holder
@3
Lever
@4
Needle threader
@5
Buttonhole lever
@6
Needle clamp screw
@7
Start/stop button
@8
Reverse button
@9
Auto-lock button
#0
Needle up/down button
#1
Thread cutter button
#2
Speed control slider
1

q
w
e
r
t
y
u
i
o
!0
!1
Handwheel
q
Connector for external thread
w
cutter switch
USB port
e
Drop feed dog lever
r
Machine socket
t
Foot control jack
y
Power switch
u
Carrying handle
i
Presser foot lifter
o
Cover
!0
Embroidery unit socket
!1
Embroidery unit
!2
Carriage arm
!3
Carriage arm release lever
!4
q
q
!4
w
w
!3
w
!2
q
Semi-hard fabric cover
w
Embroidery unit case
Embroidery unit case
To use:
Open the flaps.
Attach the supporter as shown.
Place the embroidery unit as shown
so the supporter prevents the
embroidery unit sways inside the
case while carrying.
Flaps
q
Supporter
e
2
w
Embroidery unit
e

q
w
e
r
y u i o
!3
!0
!5
!1
!6
!2 !4
!7
!8
@0 @1 @2
@4
@5
t
!9
@3
@7@6
q
Zigzag foot A (set on the machine)
w
Overedge foot M
e
Satin stitch foot F
r
Blind hemming foot G
t
Zipper foot E
y
Automatic buttonhole foot R
u
Stabilizer plate
i
Rolled hem foot D
o
Darning foot PD-H
!0
Button sewing foot T
!1
1/4˝ seam foot O
!2
Embroidery foot P
!3
Straight stitch needle plate
!4
Bobbin X 5 (1 set on the machine)
!5
Needle set
!6
Screwdriver
!7
Lint brush
!8
Seam ripper (buttonhole opener)
!9
Quilting guide bar
@0
Spool holder X 2 (large) (1 set on the
machine)
@1
Spool holder X 2 (small)
@2
Extra spool pin
@3
Scissors
@4
Button shank plate
@5
Touch panel stylus
@6
Bobbin holder cleaner
@7
Changeable frame X2 (Metallic Green,
Pearl White)
@8
Cloth guide
Standard Accessories
@8
3
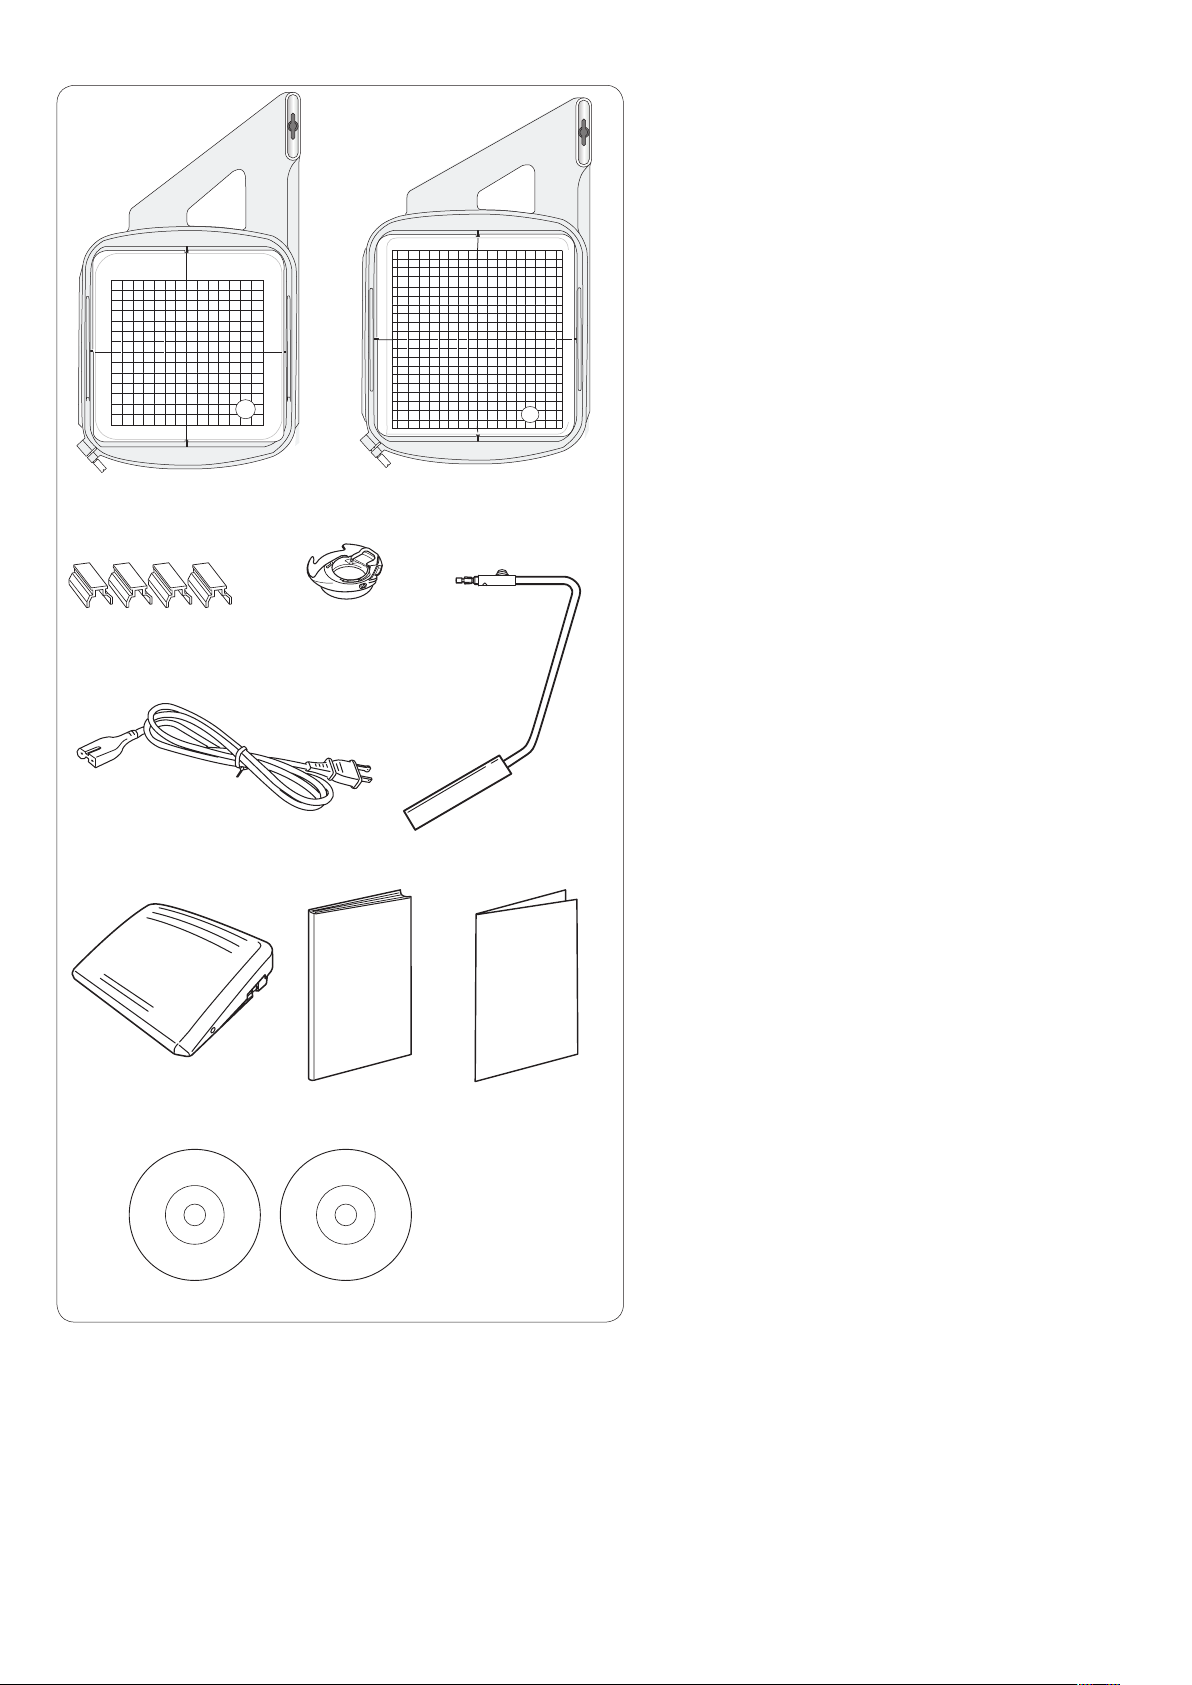
q w
Embroidery hoop SQ14a (with template)
q
Embroidery hoop RE20a (with template)
w
Magnetic clamps (X4)
e
Bobbin holder for embroidery
r
Power supply cable
t
Knee lifter
y
Foot control
u
Instruction book
i
Key icon reference chart
o
Instructional DVD
!0
Template CD
!1
e
r
t y
u
!0
i o
!1
4

Extension Table
The extension table provides an extended sewing area
and can be removed for free arm sewing.
To remove:
Draw the table to the left.
To attach:
Slide the table on the base and push it to the right.
Free arm sewing
The free arm is used for stitching sleeves, waistbands,
pant legs or any other tubular garments.
It is also useful for darning socks or elbows.
w
q
e
Accessory Storage
The accessories can be conveniently stored in the
compartment in the extension table.
Pull the lid towards you to open the accessory storage.
Straight stitch needle plate
q
Extra spool pin
w
Bobbins
e
Other accessories can be stored in the compartment.
Changeable Frame
You can replace the changeable frame with the attached
changeable frames (Pearl white or Metallic green).
To remove:
Hold the changeable frame with your hand, and slide the
frame up.
Remove hooks from holes to remove the frame.
To attach:
Match the hooks to the holes.
Push the frame against the machine and slide it down
along the machine to fit into the place.
5

q
w
z
c
Connecting the Power Supply
z First make sure the power switch q is of f.
x Insert the machine plug w of the power supply cable
into the machine socket e.
c Insert the power supply plug r into the wall outlet t,
and turn the power switch q on.
q Power switch
w Machine plug
e Machine socket
r Power supply plug
t Wall outlet
NOTES:
Make sure to use the power supply cable that came
with the machine.
If you turn off the power switch, wait for 5 seconds
before turning it on again.
q
e w
e
t
r
r
z
v
u
t
If you wish to use the foot control, pull out the cord from
the foot control and insert the pin connector into the jack
on the machine.
z First make sure the power switch q is of f.
x Insert the machine plug w of the power supply cable
c Draw out the cord from the foot control and insert the
v Insert the power supply plug y into the wall outlet u,
q Power switch
w Machine plug
e Machine socket
r Pin connector
t Jack
y Power supply plug
u Wall outlet
WARNING :
While in operation, always keep your eyes on the
sewing area, and do not touch any moving parts such
as the thread take-up lever, handwheel or needle.
Always turn off the power switch and unplug the
machine from the power supply:
— when leaving the machine unattended.
— when attaching or removing parts.
— when cleaning the machine.
Do not place anything on the foot control.
into the machine socket e.
pin connector r into the jack t on the machine.
and turn the power switch q on.
c
y
NOTE:
The start/stop button does not work when the foot
control is connected.
Operating Instructions:
The symbol “O” on the switch indicates the “off” position
of the switch.
For the U.S.A. and Canada only
Polarized plug (one blade wider than the other):
To reduce the risk of electric shock, this plug is intended
to fit in a polarized outlet only one way. If it does not fit
fully in the outlet, reverse the plug. If it still does not fit,
contact a qualified electrician to install the proper outlet.
Do not modify the plug in any way.
6

q
w
Controlling Sewing Speed
Speed control slider
You can limit the maximum sewing speed in both the ordinary sewing mode and embroidery mode with the speed
control slider according to your sewing needs.
To increase the sewing speed, move the slider to the right.
To decrease the sewing speed, move the slider to the left.
The sewing speed can be changed while stitching.
Foot control
Pressing on the foot control can vary sewing speed.
The harder you press the foot control, the faster the
machine runs.
NOTES:
The machine runs at the maximum speed set by the
speed control slider when the foot control is fully
depressed.
This machine is equipped with an automatic shutdown
safety feature to prevent overheating whenever the
machine is running overloaded. Follow the safety
instructions that appear on the visual touch screen.
Cord storage
The cord of the foot control can be conveniently stored in
the cord storage under the base cover of the foot control.
q Base cover
w Cord
e Hooks
e
Operating Instructions:
Foot control model 21380 is for use with this sewing
machine.
7

u
y
q
w
e
r
t
Machine Operating Buttons
q Start/stop button
Press this button to start or stop the machine.
The machine starts running slowly for the first few
stitches, it then runs at the speed set by the speed control
slider. The machine runs slowly as long as this button is
pressed.
The button will turn red when the machine is running, and
green when it has been stopped.
Pressing and holding this button while sewing will slow
down the sewing speed and the machine will stop when
the button is released.
NOTES:
•Thestart/stopbuttoncannotbeusedwhenthefoot
control is connected to the machine.
•Youcanselectthedesiredstart-upspeedfrom
slow, normal or high (refer to page 79).
w Reverse button
When sewing stitch pattern U1, U4, U9, U10, Q1-Q3 or
BR1-5, the machine will sew in reverse as long as the
reverse button is pressed.
If stitch pattern U1, U4, U9, U10, Q1-Q3 or BR1-5, has
been selected and the foot control is not connected,
the machine will start sewing in reverse as long as the
reverse button is pressed.
If you press the reverse button when sewing any other
patterns, the machine will immediately sew locking
stitches and automatically stop.
e Auto-lock button
When sewing stitch pattern U1, U4, U9, U10, Q1-Q3 or
BR1-5, the machine will immediately sew locking stitches
and automatically stop when the auto-lock button is
pressed.
When sewing all other patterns, the machine will sew to
the end of the current pattern, sew locking stitches and
stop automatically.
The machine will trim the threads automatically after
locking the stitch when “Thread Cut after Auto-Lock”
option is turned on (refer to page 81).
r Needle up/down button
Press this button to bring the needle bar up or down.
The machine will stop with the needle in down position.
However, you can change the needle stop position in the
setting mode (refer to page 79).
NOTE:
The LED signal y is turned on when the down position
is selected and vice versa.
t Thread cutter button
Press this button when you finish sewing to trim the
threads. The needle bar automatically rises after trimming
the threads (refer to page 28).
NOTES:
•TheLEDsignalu blinks when the machine trims
threads.
•TheLEDsignalu turns on when “Thread Cut
after Auto-Lock” is ON in setting mode (refer to page
81).
•Usethethreadcutteronthefacecoverifthethread
is #30 or thicker.
8

q
w
e
Touch Panel Keys
CAUTION:
Do not press the touch panel or visual touch screen with
hard or sharp objects like pencils, screwdrivers or the
like. Use the touch panel stylus included in the standard
accessories.
q Home key
Press this key to return to the initial page of the ordinary
sewing mode or embroidery mode.
w Mode switch key
Press this key to enter into embroidery mode or to return
to ordinary sewing mode.
y u
y
r
t
e Open file key
Press this key and the open file window will open.
You can open pattern combinations, monograms and
embroidery designs saved in the machine’s internal
memory or on a USB flash drive.
r Set mode key
Press this key to enter the setting mode. You can
customize the machine settings to your preference.
The machine settings for Common Settings, Ordinary
Sewing, Embroidery and Choose Language are available
in this mode (refer to page 75-81 and 114-116).
t Lockout key
Press this key to lockout the machine when threading the
machine, replacing the accessories etc.
To reduce the risk of injury, all the buttons are
deactivated.
To unlock the machine, press this key again.
y Page keys
Press the page key to display the next page or previous
page. Press and hold the page key to turn the pages
continuously.
u Touch bar
Press on the bar and slide to the right or left to display
the next page or previous page.
9

Setting the Spool of Thread
Open the top cover.
Lift up the spool pin. Place the spool of thread on the
spool pin.
Attach the large spool holder, and press it firmly against
the spool of thread.
NOTE:
Use the small spool holder to hold narrow or small spools
of thread.
Extra spool pin
Use the extra spool pin when you need to wind the
bobbin without unthreading the machine while working on
a sewing project.
Insert the extra spool pin into the hole as shown.
Place a spool of thread on the extra spool pin and fix the
spool with the spool holder.
z
NOTE:
The extra spool pin is also used for twin needle sewing.
Winding the Bobbin
Removing the bobbin
CAUTION:
Press the lockout key or turn the power switch off.
z Slide the hook cover release button to the right, and
remove the hook cover plate.
x Remove the bobbin from the bobbin holder.
x
NOTE:
Use the plastic bobbins (marked with a “J”) for
horizontal hook. Using other bobbins, such as prewound paper bobbins, may cause stitching problems
and/or damage to the bobbin holder.
10

Winding the bobbin
z Pull the thread from the spool.
Hold the thread with both hands and pass the thread
into the guide slot q.
q Guide slot
z
q
x c
e
w
e
w
r
q
t
x Draw the thread to the left and forward around the
thread guide w.
Draw the thread to the rear and to the right around
and under the guide plate e.
Firmly pull the thread to the right while holding it with
both hands.
w Thread guide
e Guide plate
c Put the bobbin on the bobbin winder spindle.
r Bobbin
t Bobbin winder spindle
v
b
n
m
u
v Pass the thread to the bobbin.
Hold the thread with both hands and wind it around
the bobbin clockwise several times.
b Insert the thread into one of the slits u of the flange
plate y and pull the thread to cut.
y Flange plate
u Slit
y
n Push the bobbin to the right. The visual touch screen
will show the bobbin winding sign.
m Start the machine. When the bobbin is fully wound, it
will stop spinning automatically.
Stop the machine and return the bobbin winder to its
original position by moving the spindle to the left.
,
, Remove the bobbin. Cut the thread with bobbin thread
cutter B.
i Bobbin thread cutter B
i
11
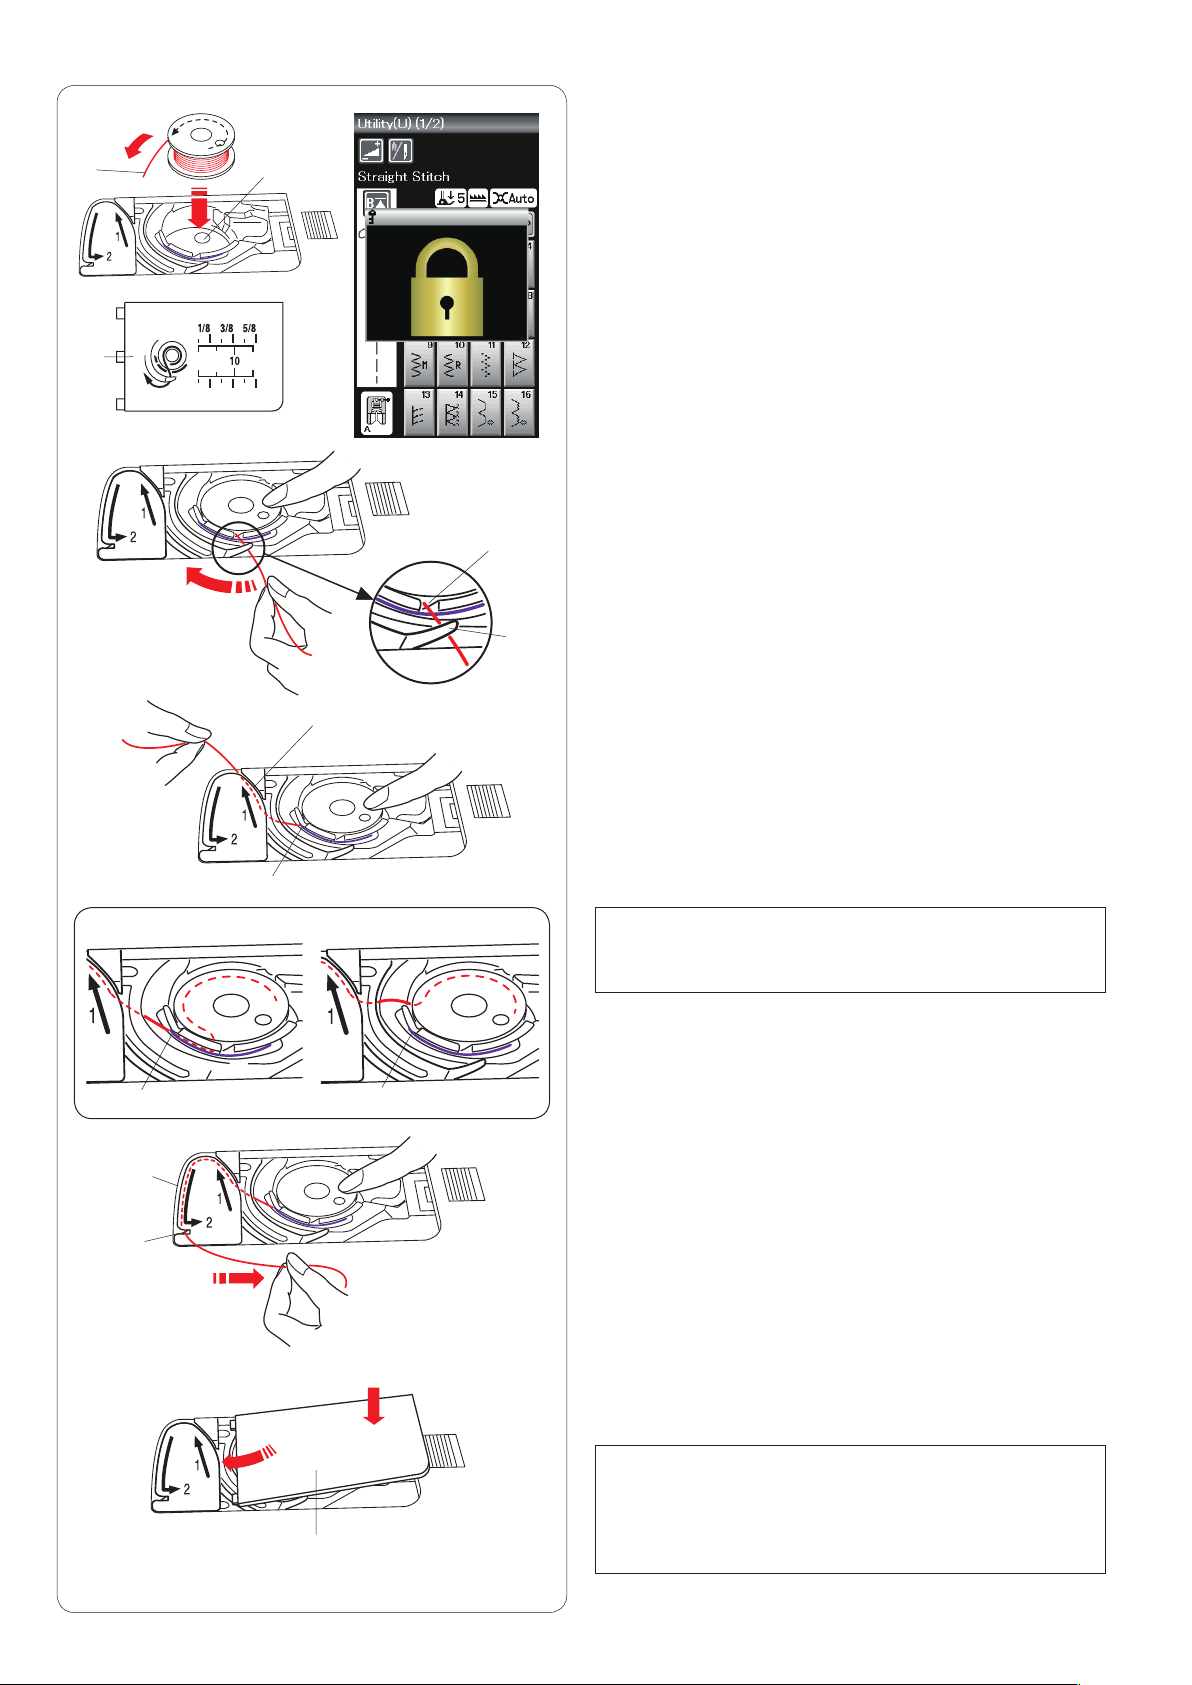
z
Inserting the bobbin
x
c
e
wq
z Press the lockout key.
Place a bobbin in the bobbin holder with the thread
running off counterclockwise as shown on the hook
cover plate.
q End of thread
w Bobbin holder
e Hook cover plate
x Hold the bobbin with fingertip so it does not rotate.
Guide the thread into the front notch of the bobbin
holder.
Pull the thread to the left to pass it under the guide.
r Front notch
t Guide
r
t
y
c Draw the thread to the left to pass it into the guide
path marked “1”.
Make sure that the thread comes out from the side
notch of the bobbin holder.
y Guide path 1
u Side notch
v
b
u
i
o
Correct
u
!0
u
Wrong
NOTE:
If the thread does not come out from the side notch,
rethread from step z.
v Continue to draw the thread along the guide path
marked “2” and pull the thread to the right through the
slit. The thread will be cut to a proper length and held
in place.
i Guide path 2
o Slit (Thread cutter)
b Set the left edge of the hook cover plate into opening.
Push down the hook cover plate to fit in place.
! 0 Hook cover plate
NOTE:
Unless otherwise noted, you can start sewing without
drawing up the bobbin thread.
Refer to page 15 for how to draw up the bobbin
thread.
12
v
x
z
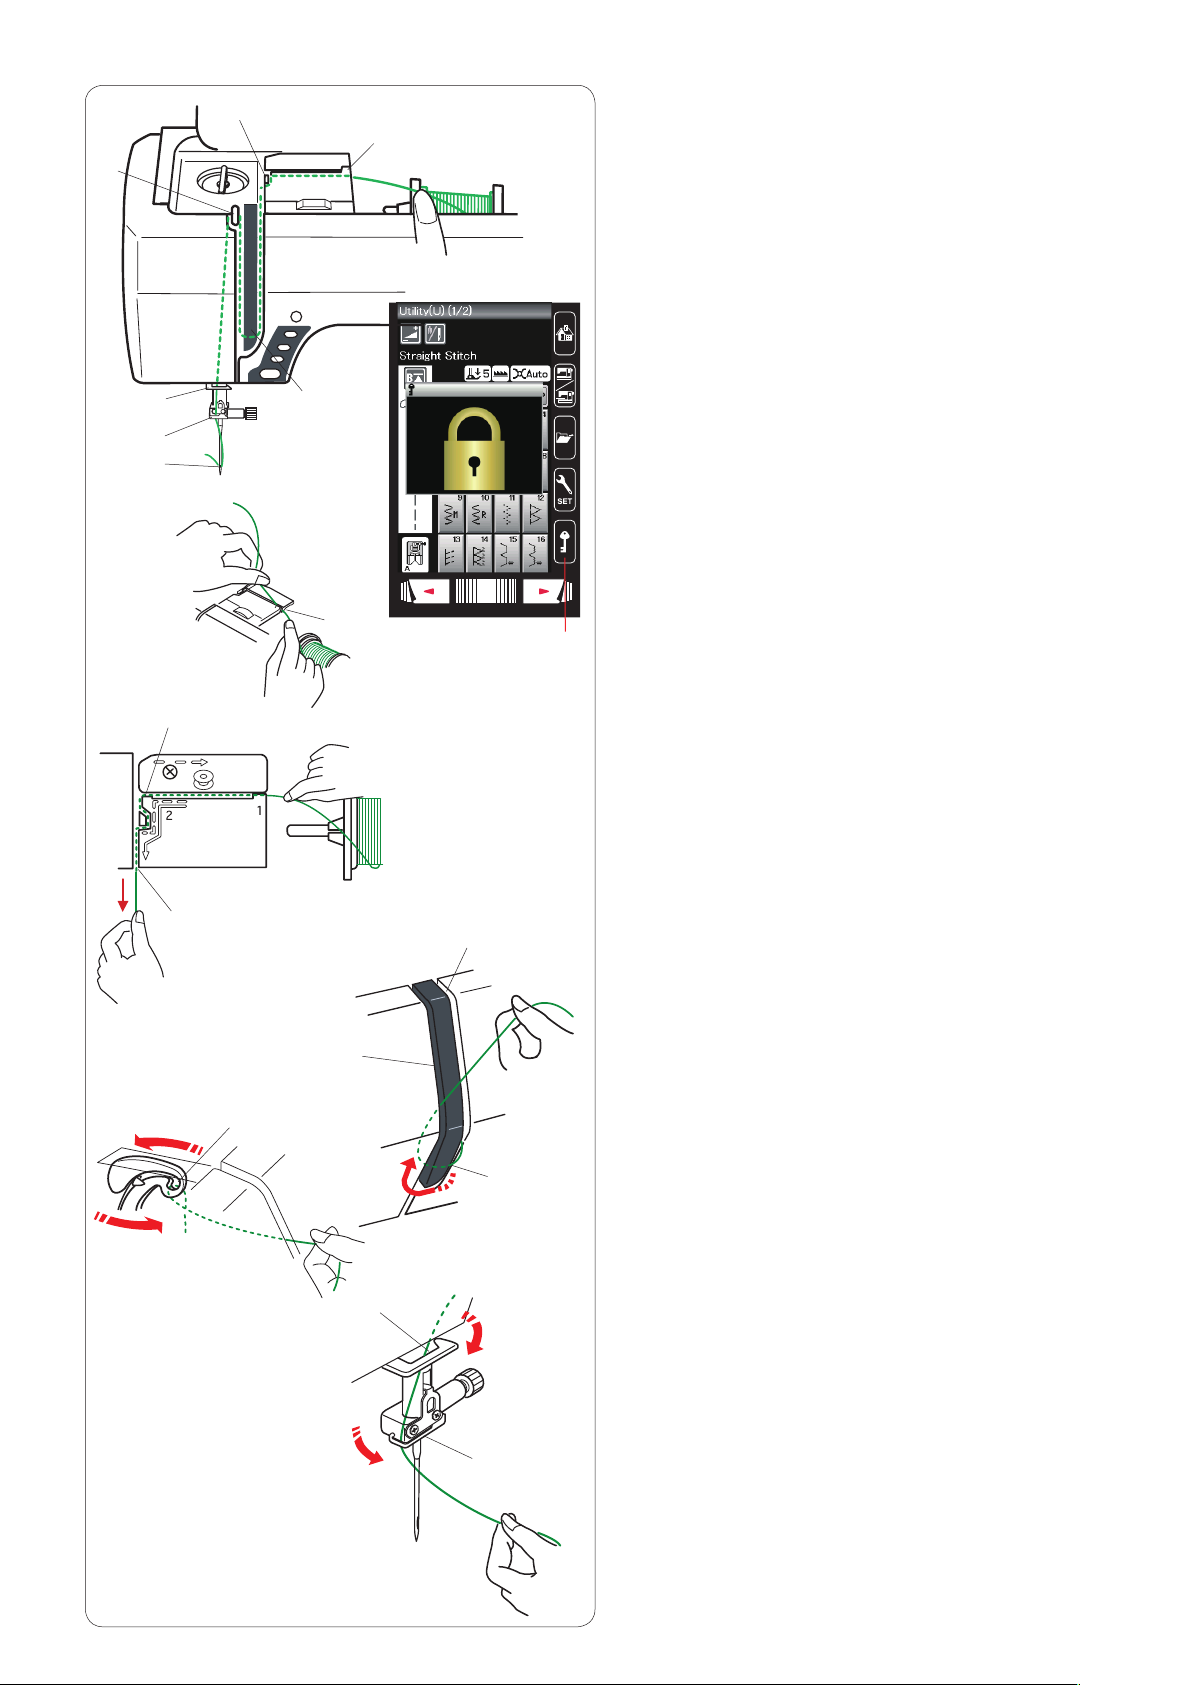
Threading the Machine
Press the needle up/down button to raise the take-up lever
to the highest position.
Press the lockout key to lockout the machine. Raise the
presser foot.
Lockout key
q
Pass the thread in order from z to m.
x
z
b
n
m
e
r
c
w
c r
y
q
Hold the thread with both hands and pass the thread
z
into the guide slot.
Guide slot
w
Hold the thread with both hands and draw the thread
x
around the corner of the guide.
Firmly pull the thread toward you along the right
channel until the thread snaps.
Corner of the guide
e
Right channel
r
Draw the thread down along the right channel and
c
around the bottom of the thread guide plate.
Pull the thread up along the left channel.
Right channel
r
Thread guide plate
t
Left channel
y
v
u
b
n
m
i
o
t
While holding the thread at the spool, firmly draw the
v
thread up and to the back of the take-up lever. Draw
the thread forward to draw it into the eye of the take-up
lever.
Eye of the take-up lever
u
Then pull the thread down along the left channel
b
and through the lower thread guide.
Lower thread guide
i
Slide the thread behind the needle bar thread guide
n
from the left.
Needle bar thread guide
o
Thread the needle with the needle threader (refer to
m
the next page).
13

Needle threader
x
z
q
w
NOTE:
The needle threader can be used with a #11 to #16
needle.
Thread size 50 to 90 is recommended.
Make sure the machine is locked out.
Lower the presser foot.
Pull down the needle threader knob as far as it will go.
z
The threader hook comes out through the needle eye
from behind.
q Threader knob
w Threader hook
Draw the thread from the left to the right, under the left
x
guide, threader hook and right guide.
Draw the thread around the right guide toward you.
e Left guide
r Right guide
c
v
e
t
r
Raise the threader slowly so a loop of the thread is
c
pulled up through the needle eye.
t Thread loop
Pull the thread loop to take the thread end out through
v
the needle eye to the rear.
Press the lockout key to unlock the machine.
NOTE:
The needle threader cannot be used with a twin needle.
14

q
Drawing up the Bobbin Thread
After using auto thread cutting or threading the bobbin
holder, you can start sewing without drawing up the
bobbin thread.
However, you need to draw up the bobbin thread when
sewing gathering stitches etc.
z
x
w
e
z Remove the bobbin. Insert the bobbin into the bobbin
holder again and rethread the bobbin holder according
to the instructions on page 12, but leave a 10 cm (4˝)
tail of bobbin thread as shown.
q Bobbin thread
NOTE:
Do not cut the bobbin thread with the thread cutter.
w Thread cutter
x Raise the presser foot. Hold the needle thread lightly
with your left hand.
e Needle thread
c
v
c Press the needle up/down button twice to lower and
raise the needle to pick up the bobbin thread.
r Needle up/down button
r
v Pull both threads 10 cm (4˝) under and behind the
presser foot.
15

q
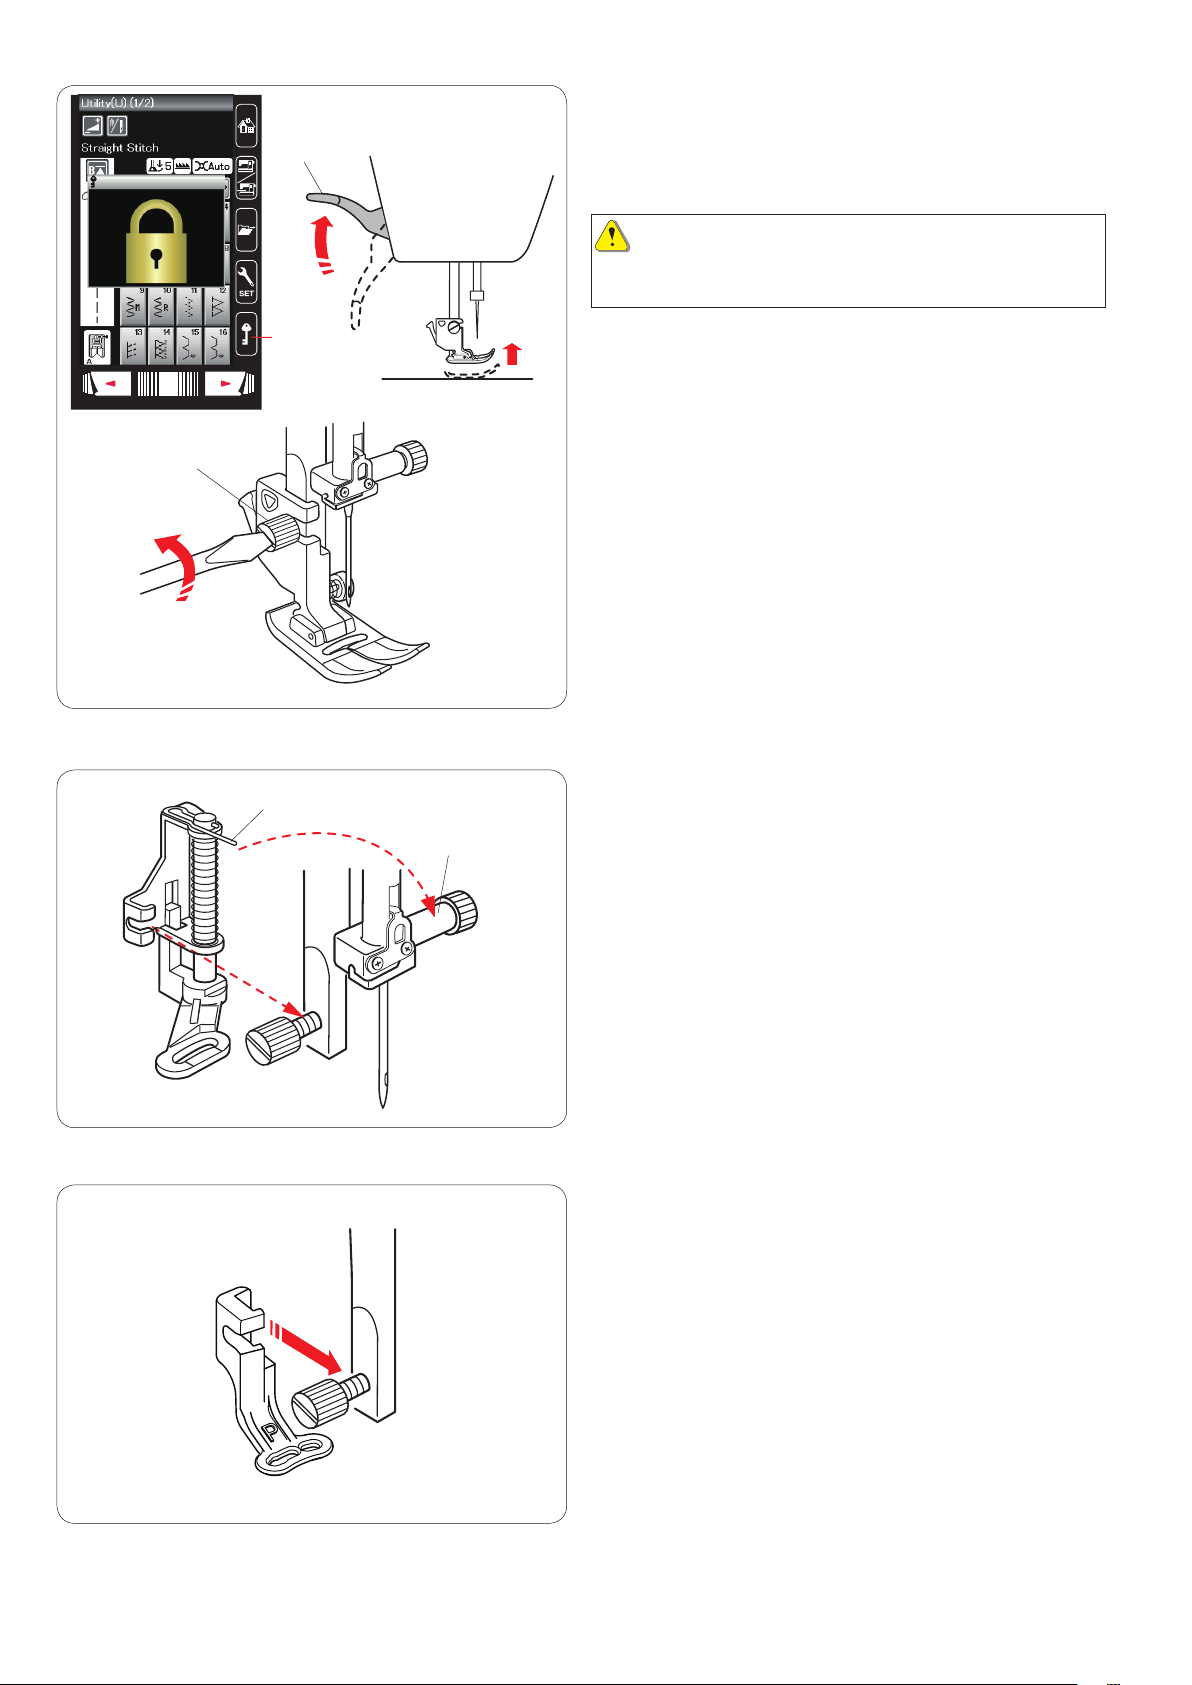
Replacing Needles
CAUTION:
Always make sure to press the lockout key to lockout the
machine or turn the power switch off before replacing the
needle.
Raise the needle by pressing the needle up/down button.
Press the lockout key.
q Lockout key
Loosen the needle clamp screw by turning it counterclockwise.
Remove the needle from the clamp.
w Needle clamp screw
r
Fabric
Fine
Medium
Heavy weight
w
Lawn
Georgette
Tricot
Sheeting
Jersey
Wool
Knit
Denim
Tweed
Coating
Quilting
e
Thread Needle
Silk #80-100
Cotton #80-100
Synthetic #80-100
Silk #50
Cotton #50-80
Synthetic #50-80
Silk #30-50
Cotton #40-50
Synthetic #40-50
Purple tip needle
Insert a new needle into the needle clamp with the flat
side of the needle to the rear.
e Flat side
When inserting the needle into the needle clamp, push it
up against the stopper pin and tighten the needle clamp
screw firmly with a screwdriver.
To check needle straightness, place the flat side of the
needle onto something flat (a needle plate, glass etc.)
The gap between the needle and the flat surface should
be consistent.
r Gap
Never use a blunt needle.
Fabric and Needle Chart
• Forgeneralsewing,useneedlesize
#11/75 or #14/90.
• Finethreadsandneedlesshouldbeused
#9/65-11/75
Blue tip needle
#11/75-14/90
Red tip needle
#14/90-16/100
for sewing fine fabrics.
• Ingeneral,usethesamethreadforboth
needle and bobbin.
• Useabluetipneedleforsewingne
fabrics, stretch fabrics and buttonholes to
prevent skipped stitches.
• Useapurpletipneedleforsewingthick
fabrics, denims, quilt layers and across the
hem to prevent skipped stitches.
• Useastabilizerorinterfaceforstretchor
fine fabrics to prevent seam puckering.
• Alwaystestthethreadandneedlesizeon
a small piece of the same fabric you will
use for actual sewing.
NOTE:
1 x twin needle, 2 x blue tip needle (#11/75), 1 x red tip
needle (#14/90) and 1 x purple tip needle (#14/90) are
included in the needle case.
For embroidery:
• Ingeneral,useabluetipneedle.
• Usearedtipneedlefordensestitchembroidery.
16

w
Replacing the Presser Foot
CAUTION:
Always make sure to press the lockout key to lockout the
machine or turn the power switch off before replacing the
presser foot.
Raise the needle by pressing the needle up/down button.
Press the lockout key.
q Lockout key
q
Raise the presser foot lifter.
w Presser foot lifter
e
t
r
Press the black lever on the backside of the foot holder.
The presser foot will snap off.
e Lever
CAUTION
To avoid damaging the lever, do not push it down.
y
Place the desired foot under the foot holder so that the
pin of the foot lies just under the groove of the foot holder.
Lower the presser foot lifter to lock the foot in place.
r Pin
t Groove
Each foot is marked with an identification letter.
y Identification letter
17
Replacing the Foot Holder
e
q
w
Replace the foot holder, if you use the darning foot or
embroidery foot.
CAUTION:
Press the lockout key to lockout the machine or turn the
power switch off before replacing the foot holder.
Removing the presser foot holder
Raise the needle by pressing the needle up/down button.
Press the lockout key and raise the presser foot with the
presser foot lifter.
q Lockout key
w Presser foot lifter
Loosen the thumbscrew and remove the presser foot
holder.
e Thumbscrew
q
w
Attaching the darning foot PD-H
Attach the darning foot PD-H to the presser bar by putting
the pin on the needle clamp screw.
q Pin
w Needle clamp screw
Tighten the thumbscrew firmly with the screwdriver.
Attaching the embroidery foot P
Attach the embroidery foot P to the presser bar from
behind.
Tighten the thumbscrew firmly with the screwdriver.
18

Replacing the Needle Plate
Use the straight stitch needle plate when sewing fine
fabrics and also when embroidering.
CAUTION:
Always make sure to press the lockout key to lockout
the machine before replacing the needle plate.
q
w
e
Raise the needle and press the lockout key.
Raise the presser foot lifter to raise the presser foot.
Lockout key
q
Slide the extension table to the left to remove it.
Push down the needle plate release lever and the needle
plate will snap off.
Needle plate release lever
w
A message will appear warning that the needle plate is
not secured.
Raise the presser foot lifter to the extra lifted position.
Remove the needle plate to the right.
Extra lifted position
e
Raise the presser foot lifter to the extra lifted position.
Place the straight stitch needle plate on the machine.
Set the left edge of the needle plate into the opening.
Push down on the mark of the needle plate until it locks in
place.
A confirmation message will appear.
Press the X key and the straight stitch is automatically selected.
Turn the hand wheel slowly and make sure that the
needle does not hit the needle plate.
Press the lockout key to unlock.
CAUTION:
Never press the needle plate release lever while running
the machine.
19
q
Raising and Lowering the Presser Foot
The presser foot lifter raises and lowers the presser foot.
q Presser foot lifter
You can raise the presser foot higher than the normal up
position. This allows for changing the needle plate, and
also helps you to place thick layers of fabrics under the
foot.
w Extra lifted position
w
q
w
y
e
r
t
Knee lifter
The knee lifter is extremely helpful when sewing
patchwork, quilting etc., since it allows you to handle the
fabric while your knee controls the presser foot.
Attaching the knee lifter
Match the ribs on the knee lifter with the notches in the
knee lifter socket and insert the knee lifter.
Knee lifter
q
Knee lifter socket
w
Rib
e
Notch
r
Adjusting the knee lifter
The angle of knee lifter can be adjusted to fit your knee.
Loosen the setscrew and slide the angle bar in or out to
adjust the angle of the knee lifter.
Tighten the setscrew to secure the angle bar.
Setscrew
t
Angle bar
y
Using the knee lifter
Push the knee lifter with your knee to move the presser
foot up and down.
You can control how high the foot rises by the amount of
knee pressure you exert.
NOTE:
Do not touch the knee lifter while stitching, otherwise the
fabric will not be fed smoothly.
20
q
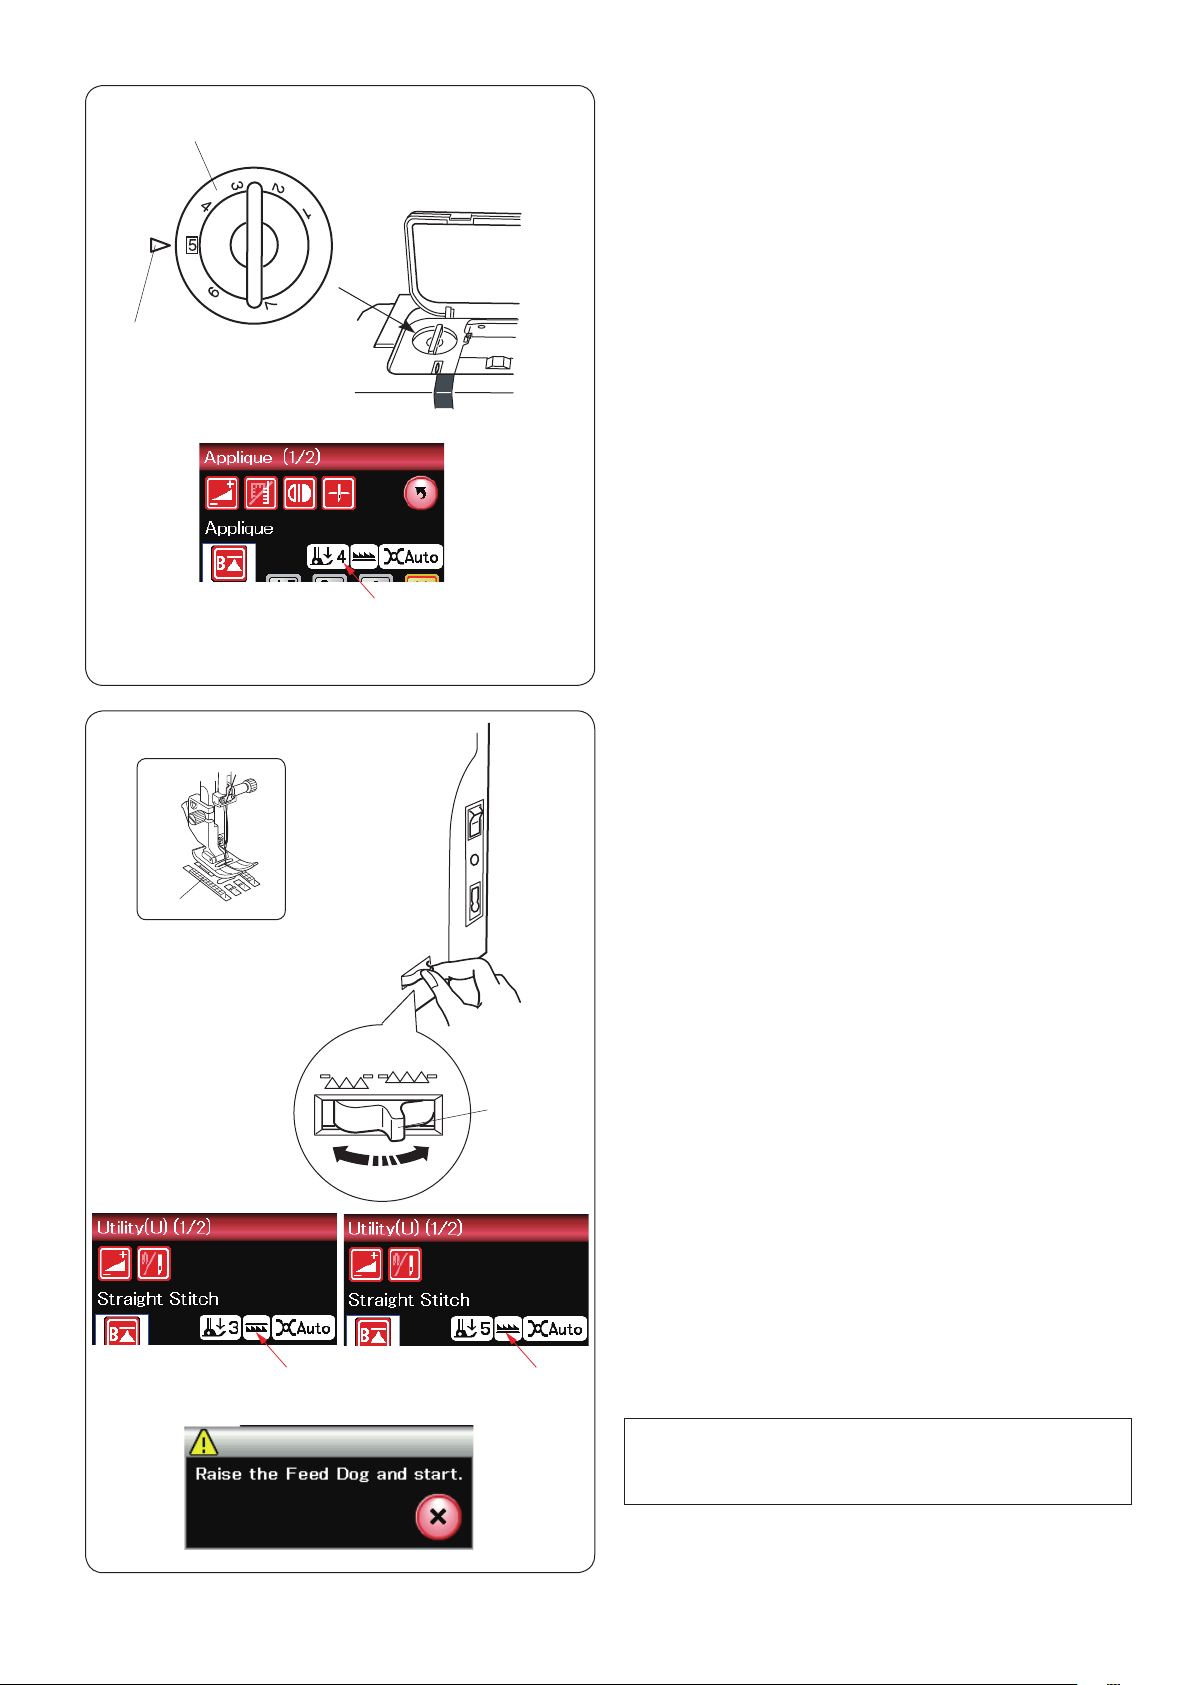
Adjusting the Foot Pressure
The foot pressure can be adjusted with the foot pressure
dial located under the top cover.
The dial has 7 setting positions from 1 to 7.
For ordinary sewing, set 5 at the setting mark.
q Foot pressure dial
w Setting mark
e Recommended setting
w
w
Reduce the pressure when sewing fine synthetics and
stretch fabrics.
To reduce the pressure, set the dial at a lower number.
e
Raising and Dropping the Feed Dog
The feed dog can be lowered for basting, sewing on
buttons, free motion quilting etc.
Shift the drop feed lever toward you to lower the feed
dog.
q Drop feed lever
w Feed dog
Shift the drop feed lever away from you to raise the feed
dog, it will return to the up position when you start the
machine.
e
q
The feed dog position will be show on the visual touch
screen.
e Dropped position
r Raised position
r
NOTE:
If you start the machine with the feed dog lowered, a
message will appear on the visual touch screen.
21

Mode Selection
When you turn the power switch on, the visual touch
screen will show the ordinary sewing mode after a few
seconds.
The machine is set for straight stitch sewing.
w
e
q
NOTE:
After turning on the power, it takes several seconds to
display the opening window.
(This is the required boot up procedure.)
To switch to the embroidery mode, first turn the power
switch off then attach the embroidery unit.
Turn the power switch on and press the mode switch key.
Mode switch key
q
A confirmation message w will appear. Do not press
the OK key or X key. Open the carriage arm and the
message e will appear. Press the OK key to switch to
the embroidery mode and the carriage will move to the
starting position.
To switch back to the ordinary sewing mode, press
the mode switch key and follow the instructions in the
confirmation message.
For embroidery sewing, please refer to embroidery
sewing instruction from page 83.
22

q
w
ORDINARY SEWING MODE
Ordinary Stitch Patterns
In the ordinary sewing mode, there are 4 categories
available.
1. Utility stitches and Buttonholes
2. Decorative and quilting stitches
3. Monogramming
4. Sewing applications
Press one of the icon keys to select the category.
NOTE:
In this manual, the pattern number refers to the
initial for each group.
For example pattern #3 in the Buttonhole is referred
to as pattern B3.
Utility stitches, Buttonholes and
q
speciality stitches
You can select utility stitches (U), buttonholes and
speciality stitches (B) in this category.
(A)
(Q)
(BR)
(H)
(S)
(D)
(L)
(PL)
(P)
e e
Decorative and quilting stitches
w
This category consists of the following 9 groups.
Applique stitches (A)
Heirloom stitches (H)
Quilting stitches (Q)
Satin stitches (S)
Bridge stitches (BR)
Decorative stitches (D)
Long stitches (L)
Pictograph stitches (P)
Play stitches (PL)
Monogramming
You can program lettering as well as a
combination of characters.
23

r
Sewing applications
r
You can select the appropriate stitch for a
specific sewing project and fabric type from the
designated applications in this category.
24

q
w
Function Keys in Ordinary Sewing Mode
Adjust key
q
Press this key to open the manual setting window.
You can adjust the settings of the stitch width, stitch
length, thread tension, and cloth guide position. (refer to
pages 33-35).
Twin needle key
w
Press this key to set the stitch width for twin needle
sewing (refer to page 51).
The key will be grayed out if the selected pattern is not
suitable for twin needle sewing.
Program key
e
Press this key to program a pattern combination.
When this key is pressed, the cursor keys, mirror image
keys, delete key and save file key will appear.
Vertical mirror image key
r
Press this key to sew a vertical mirror image of the
selected pattern (refer to page 52).
e
r
t
Horizontal mirror image key
t
Press this key to sew a horizontal mirror image of the
selected pattern. The key is grayed out if the selected
pattern cannot be turned over (refer to page 52).
uy
Delete key
y
Press this key to delete the pattern from the pattern
combination.
Save file key
u
Press this key to save the pattern combination as a file.
25
!0
i
o
Letter size key
i
Press this key to select the letter size for monograms.
Letter case key
o
Press this key to select upper case or lower case for
monograms.
Cursor keys
!0
Press one of the cursor keys to move the cursor up or
down.
!1
!0
Startover key
!1
This key will appear when you stop sewing.
If you stop sewing in the middle of a stitch pattern and
wish to sew the pattern again from the beginning, press
this key before you start sewing.
Press this key once to startover from the beginning of the
current pattern, or press this key twice to startover from
the beginning of the first pattern of the combination (refer
to page 54).
26
Loading…
View the manual for the Janome Memory Craft 9900 here, for free. This manual comes under the category sewing machines and has been rated by 1 people with an average of a 8.1.
This manual is available in the following languages: English. Do you have a question about the Janome Memory Craft 9900 or do you need help?
Ask your question here
Janome Memory Craft 9900 specifications
Below you will find the product specifications and the manual specifications of the Janome Memory Craft 9900.
The Janome Memory Craft 9900 is a sewing machine that offers a wide range of capabilities for sewing enthusiasts. It features a large LCD touchscreen display for easy navigation and selection of various stitches and designs. The machine also has a built-in memory function that allows users to save and access customized stitch patterns.
With a maximum sewing speed of 1,000 stitches per minute, the Janome Memory Craft 9900 is efficient for completing projects quickly. It has a wide workspace for handling large fabrics and quilts, making it suitable for a variety of sewing tasks. The machine also comes with a range of accessories, including multiple presser feet and a quilting extension table.
Equipped with advanced technology, the Janome Memory Craft 9900 offers precise stitching and consistent results. It has a variety of decorative and utility stitches to choose from, as well as automatic thread tension control for added convenience. Additionally, the machine has a built-in needle threader and thread cutter for efficient sewing.
General
| Brand | Janome |
| Model | Memory Craft 9900 |
| Product | sewing machine |
| Language | English |
| Filetype | User manual (PDF), Datasheet (PDF) |
Frequently Asked Questions
Can’t find the answer to your question in the manual? You may find the answer to your question in the FAQs about the Janome Memory Craft 9900 below.
How do I troubleshoot if the touch panel on the Janome Memory Craft 9900 sewing machine is not responding?
To troubleshoot if the touch panel on the Janome Memory Craft 9900 sewing machine is not responding, you can follow these steps:
1. Check the screen contrast: Press the «+» or «-» key to adjust the contrast of the visual touch screen. Make sure the screen is not too dim or too bright.
2. Verify the sound volume: Press the «+» or «-» key to adjust the buzzer sound volume. Ensure that the sound is not muted and set to an audible level.
3. Confirm the measurement unit: Press the «inch» or «mm» icon key to set the machine’s measurement unit to either inches or millimeters. Make sure the correct unit is selected.
4. Check the standby timer: If you have not used the machine within the set time period, the sewing lights and touch screen may go dark. Press any key to turn them back on. To turn off the standby timer, press and hold the «+» key until «OFF» appears in the timer window.
5. Calibrate the touch screen: If you feel that the touch screen is not responding properly, you can calibrate the key positions. Press the «YES» key to open the calibration window and follow the on-screen instructions to touch the «+» signs with the touch panel stylus.
By following these troubleshooting steps, you can resolve issues with the touch panel not responding on the Janome Memory Craft 9900 sewing machine.
What should I do if the needle threader on the Janome Memory Craft 9900 sewing machine is not working properly?
If the needle threader on the Janome Memory Craft 9900 sewing machine is not working properly, you can try the following steps to troubleshoot the issue:
1. Ensure that the machine is locked out and the presser foot is lowered.
2. Pull down the needle threader knob as far as it will go to bring out the threader hook through the needle eye from behind.
3. Thread the needle thread from left to right, passing it under the left guide, threader hook, and right guide.
4. Draw the thread around the right guide towards you.
5. Slowly raise the threader to pull up a loop of thread through the needle eye.
6. Pull the thread loop to take the thread end out through the needle eye to the rear.
7. Press the lockout key to unlock the machine.
By following these steps, you can troubleshoot and resolve issues with the needle threader on the Janome Memory Craft 9900 sewing machine.
How can I fix the issue of the bobbin thread getting tangled while sewing with the Janome Memory Craft 9900 sewing machine?
To fix the issue of the bobbin thread getting tangled while sewing with the Janome Memory Craft 9900 sewing machine, you can follow these steps:
1. Ensure that the bobbin thread is threaded properly in the bobbin holder.
2. Check for any lint or debris that may have collected in the bobbin holder. Clean it out using a small brush or lint remover.
3. Make sure that the bobbin is not damaged and can turn smoothly. If the bobbin is damaged, replace it with a new one.
4. Check the needle. Ensure that the needle is inserted correctly and is not bent or blunt. If necessary, replace the needle.
5. Adjust the tension of the bobbin thread. If the tension is too tight, it can cause the thread to tangle. Refer to the manual for instructions on adjusting the bobbin thread tension.
6. Use the appropriate needle and thread for the fabric you are sewing. Using the wrong needle or thread can contribute to thread tangling.
By following these steps, you can resolve the issue of the bobbin thread getting tangled while sewing with the Janome Memory Craft 9900 sewing machine.
What should I check if the embroidery design is not stitching out correctly on the Janome Memory Craft 9900 sewing machine?
To troubleshoot if the embroidery design is not stitching out correctly on the Janome Memory Craft 9900 sewing machine, you can follow these steps:
1. Check the fabric and stabilizer: Ensure that you are using the appropriate fabric and stabilizer for the embroidery design. Different fabrics require different types of stabilizers to ensure proper stitching.
2. Verify the hoop attachment: Make sure that the embroidery hoop is securely attached to the machine. If it is loose, tighten the embroidery hoop attaching knob.
3. Check the fabric tension: Ensure that the fabric is stretched tightly and evenly in the embroidery hoop. Loose or uneven fabric tension can cause distortion in the embroidery design.
4. Adjust the stitch length: Make sure that the stitch length is suitable for the fabric being sewn. Adjust the stitch length if necessary to achieve the desired results.
5. Set the feed balancing dial: Properly set the feed balancing dial to ensure balanced stitching. Adjust the dial according to the fabric and design requirements.
6. Use interfacing for stretch fabric: When sewing stretch fabric, use interfacing to stabilize the fabric and prevent distortion in the embroidery design.
If the issue persists after following these steps, it is recommended to refer to the manual for further troubleshooting or contact Janome customer support for assistance.
How do I resolve the issue of the stitches skipping or not forming properly while using the Janome Memory Craft 9900 sewing machine?
To resolve the issue of stitches skipping or not forming properly while using the Janome Memory Craft 9900 sewing machine, you can follow these steps:
1. Check for thread jams: Ensure that there are no thread jams in the hook area. Clear any tangled threads or lint that may be causing the issue.
2. Clean the feed dog: If the feed dog is packed with lint, clean it using a small brush or lint remover to ensure smooth fabric feeding.
3. Verify needle threading: Make sure that the needle thread is threaded properly. Check that the thread is passing through all the necessary guides and tension discs.
4. Adjust needle thread tension: If the needle thread breaks frequently, the tension may be too tight. Adjust the needle thread tension according to the fabric and thread being used.
5. Check needle condition: Inspect the needle for any bending or bluntness. Replace the needle if necessary, ensuring that it is inserted correctly and securely.
6. Select appropriate needle and thread: Ensure that the needle and thread are suitable for the fabric being sewn. Use a needle with the appropriate size and type for the fabric, and choose a thread that matches the fabric weight.
7. Adjust stitch length and width: If the stitches are skipping or not forming properly, adjust the stitch length and width settings to achieve the desired results.
By following these steps, you can troubleshoot and resolve the issue of stitches skipping or not forming properly on the Janome Memory Craft 9900 sewing machine.
How do I thread the Janome Memory Craft 9900 sewing machine?
To thread the Janome Memory Craft 9900 sewing machine, follow these steps:
1. Raise the take-up lever to the highest position by pressing the needle up/down button.
2. Lockout the machine by pressing the lockout key.
3. Raise the presser foot.
4. Hold the thread with both hands and pass it into the guide slot.
5. Draw the thread around the corner of the guide.
6. Pull the thread along the right channel until it snaps.
7. Draw the thread down along the right channel and around the bottom of the thread guide plate.
8. Pull the thread up along the left channel.
9. Firmly draw the thread up and to the back of the take-up lever while holding it at the spool.
10. Draw the thread forward to thread it into the eye of the take-up lever.
11. Pull the thread down along the left channel and through the lower thread guide.
12. Slide the thread behind the needle bar thread guide from the left.
13. Thread the needle using the needle threader.
Please note that these steps are based on the Janome Memory Craft 9900 sewing machine manual.
Why is the thread breaking while sewing with the Janome Memory Craft 9900 sewing machine?
The thread may be breaking while sewing with the Janome Memory Craft 9900 sewing machine due to the following reasons:
1. The needle thread is not threaded properly.
2. The needle thread tension is too tight.
3. The needle is bent or blunt.
4. The needle is inserted incorrectly.
5. The thread is too heavy for the needle.
To troubleshoot and resolve the issue, you can try the following steps:
1. Ensure that the needle thread is threaded correctly according to the machine’s threading instructions.
2. Adjust the needle thread tension by turning the tension dial to a lower number.
3. Replace the needle if it is bent or blunt.
4. Check if the needle is inserted correctly, with the flat side facing the back of the machine.
5. Use a needle that is suitable for the type of fabric and thread you are using. If the thread is heavy, switch to a larger needle size.
Please note that these steps are based on common troubleshooting practices for thread breaking issues with sewing machines.
How do I change the presser foot on the Janome Memory Craft 9900 sewing machine?
To change the presser foot on the Janome Memory Craft 9900 sewing machine, follow these steps:
1. Raise the needle by pressing the needle up/down button.
2. Press the lockout key to lock the machine or turn off the power switch.
3. Raise the presser foot lifter.
4. Press the black lever on the backside of the foot holder to release the current presser foot. Be careful not to push the lever down.
5. Place the desired foot under the foot holder, ensuring that the pin of the foot lies just under the groove of the foot holder.
6. Lower the presser foot lifter to lock the foot in place.
7. Each foot is marked with an identification letter for easy reference.
Please note that these steps are based on the Janome Memory Craft 9900 sewing machine manual.
Why is the needle not picking up the bobbin thread on the Janome Memory Craft 9900 sewing machine?
The needle may not be picking up the bobbin thread on the Janome Memory Craft 9900 sewing machine due to the following reasons:
1. The bobbin thread is not threaded properly in the bobbin holder.
2. Lint has collected in the bobbin holder.
3. The bobbin is damaged and does not turn smoothly.
To troubleshoot and resolve the issue, you can try the following steps:
1. Remove the bobbin and rethread it into the bobbin holder, following the instructions in the manual. Leave a 10 cm (4˝) tail of bobbin thread.
2. Check for any lint or debris in the bobbin holder and clean it if necessary.
3. If the bobbin is damaged or worn out, replace it with a new one.
To draw up the bobbin thread before sewing, follow these steps:
1. Remove the bobbin and rethread it into the bobbin holder, leaving a 10 cm (4˝) tail of bobbin thread.
2. Raise the presser foot and hold the needle thread lightly with your left hand.
3. Press the needle up/down button twice to lower and raise the needle, allowing it to pick up the bobbin thread.
4. Pull both the needle thread and bobbin thread under and behind the presser foot.
Please note that these steps are based on common troubleshooting practices for the Janome Memory Craft 9900 sewing machine.
How do I adjust the tension on the Janome Memory Craft 9900 sewing machine?
To adjust the tension on the Janome Memory Craft 9900 sewing machine, follow these steps:
1. Identify the tension dial located on the front of the machine.
2. Turn the tension dial to a higher number (clockwise) to increase the tension for tighter stitches.
3. Turn the tension dial to a lower number (counterclockwise) to decrease the tension for looser stitches.
4. Test the tension adjustment by sewing a few stitches on a scrap fabric.
5. Evaluate the stitch quality and adjust the tension as needed.
6. Continue making small adjustments until you achieve the desired stitch appearance and tension.
Please note that the tension dial may have numbers or symbols to indicate the tension levels. It is recommended to refer to the machine’s manual for specific instructions on interpreting the tension settings and troubleshooting any tension-related issues.
What size needle should I use?
Which size of needle you can best use depends on the thickness of the fabric you use. With a thick fabric you should use a thick needle. The packaging of your needle states for which substances your needle is suitable.
Why does the needle break while sewing?
There can be several causes for needle breakage:
— Not using the right needle for the right fabric
— The needle is set too low
— The fabric is not properly guided
— The bobbin case is not inserted correctly
How long does a sewing needle last?
Generally, a sewing needle lasts about 7 to 9 hours.
Is the manual of the Janome Memory Craft 9900 available in English?
Yes, the manual of the Janome Memory Craft 9900 is available in English .
Is your question not listed? Ask your question here
California Proposition 65
WARNING
This product contains chemicals known to the State of California to cause cancer and birth defects or other reproductive harm.
Attention California residents: California�s Proposition 65 entitles California consumers to special warnings for products that contain chemicals known to the State of California to cause cancer and birth defects or other reproductive harm if those products expose consumers to such chemicals above certain threshold levels. We know you�re concerned about product safety, and SewingMachinesPlus takes all necessary steps to comply with all applicable safety and health requirements.
On SewingMachinesPlus.com, we provide a Prop 65 link for each item that requires the Prop 65 warning. If a Prop 65 link does not appear in the product info section for the product you wish to purchase, the supplier of the product has indicated that it does not require the Prop 65 warning.
Janome Memory Craft 9900 Instruction Book
Janome Memory Craft 9900 Specification
The Janome Memory Craft 9900 is a versatile sewing and embroidery machine designed for both creative enthusiasts and professional sewists. It features a robust build with a wide array of functionalities that cater to detailed embroidery and intricate sewing projects. The machine is equipped with a maximum embroidery size of 6.7 x 7.9 inches, allowing for substantial creative freedom. It offers 175 built-in embroidery designs and six fonts, ensuring a variety of options for personalization and creativity. The sewing aspect includes 200 built-in stitches, which cover utility, decorative, and buttonhole stitches, providing comprehensive support for diverse sewing needs.
The Memory Craft 9900 is driven by a user-friendly interface that includes a full-color LCD touchscreen, facilitating easy navigation and selection of stitches and embroidery designs. Its advanced editing capabilities allow users to adjust, resize, and combine designs directly on the machine. Precision is further enhanced with the inclusion of an AccuFeed system, ensuring even fabric feeding for top-quality sewing results. The machine operates at a maximum sewing speed of 1000 stitches per minute and an embroidery speed of 800 stitches per minute, balancing speed with precision.
Additional features include an automatic thread cutter, needle threader, and bobbin winding system, which streamline the sewing process and reduce manual intervention. With a USB port, designs can be easily imported, expanding the creative possibilities. The Janome Memory Craft 9900 is built with a compact, sleek design, combining aesthetic appeal with functionality. It provides a reliable, high-performance experience for users seeking a comprehensive, all-in-one sewing and embroidery solution, backed by Janome’s reputation for quality and innovation.
To perform basic maintenance, regularly clean the bobbin area with a small brush to remove lint and threads. Oil the hook race as per the manual’s instructions using sewing machine oil. Ensure the machine is turned off and unplugged before performing maintenance.
Ensure the bobbin is correctly inserted and the bobbin case is properly positioned. Check that the needle is not bent and is installed correctly. Re-thread the machine, both top and bobbin threads, and test again.
Check that the machine is threaded correctly and the bobbin is wound evenly. Adjust the tension dial gradually and test on a scrap fabric. Ensure the needle is appropriate for the fabric type.
Visit the Janome website and download the latest firmware for the Memory Craft 9900. Follow the instructions provided, typically involving transferring the firmware to a USB stick and inserting it into the machine.
Turn off the machine and unplug it. Lower the presser foot and remove the needle by loosening the needle clamp screw. Insert a new needle with the flat side facing the back and tighten the screw securely.
Unusual noises may be due to lint buildup or a need for lubrication. Clean the bobbin area and check for any obstructions. If the issue persists, consider having the machine serviced by a professional.
Attach the embroidery unit and hoop as instructed in the manual. Select the desired design from the machine’s library or import via USB. Ensure the fabric is properly hooped and start the embroidery process.
Check that the needle is the correct type for the fabric and is not bent. Re-thread the machine, ensuring the thread is properly seated in the tension discs. Adjust the tension settings if necessary.
Ensure the screen is clean and free from any obstructions. Restart the machine to reset the system. If the problem persists, consult the manual or contact Janome support for assistance.
It is recommended to use the plastic bobbins that are specifically designed for the Janome Memory Craft 9900 to ensure optimal performance and avoid potential damage to the machine.
Janome Memory Craft 9900 — швейно-вышивальная машина нового поколения. Она имеет 619 встроенных швейных операций с максимальной шириной до 9 мм, большинство из которых можно комбинировать, удлинять и зеркально отображать по вертикали и горизонтали. В вышивальном режиме Janome Memory Craft 9900 имеет 175 встроенных дизайнов, большая часть из которых совершенно новые. Также в швейном и вышивальном режиме есть встроенные алфавиты, включая кириллицу. Janome Memory Craft 9900 имеет компактный вышивальный модуль, со встроенными линейными направителями, обеспечивающими плавность и точность движения. Вы можете расширить вышивальные возможности машины, передав на нее с помощью USB flash новые дизайны. Одно из достоинств Memory Craft 9900 увеличенное пространство справа от иглы — 210 мм, позволяющее работать с объемными проектами. Благодаря трем легкозаменяемым передним панелям Ваша машина всегда будет соответствовать Вашему настроению.
619 швейных операций:
- рабочие строчки
- оверлочные строчки
- трикотажные строчки
- декоративные строчки
- алфавит — 4 вида (в том числе русский)
- петля-автомат — 6 видов и глазок
- программируемая петля 1 вид
Вышивальные операции:
- вышивальные дизайны — 175
- вышивальные алфавиты — 4 вида (в том числе русский)
- монограммы в 2-3 буквы — 2 вида
- бордюры
- обычное шитьё
Особенности:
- Регулировка длины стежка от 0 до 5 мм
- Регулировка ширины зигзага от 0 до 9 мм
- Скорость шитья с педалью 1000ст./мин, с кнопкой старт/стоп 3 мм зиг-заг 1000 ст/мин, с кнопкой старт/стоп 3 мм зиг-заг 1000 ст/мин, 9 мм зиг-заг 600 ст/мин.
- Скорость вышивания 800ст./мин.
- Встроенная память 3MB
- USB port для USB flash
- Максимальный размер вышивки 170×200 мм
- Функция зеркального отображения строчки по вертикали (по горизонтали розовые строчки)
- Функция зеркального отображения вышивки (по горизонтали и по ветикали)
- Увеличение/уменьшение размера вышивки от 80% до 120% (по 1%)
- Поворот вышивки по 1 и по 45 градусов
- Копирование вышивки
- Объединение дизайнов
- Подбор цвета
- Объединение цветов
- Изменение порядка вышивания
- Расположение вышивального алфавита по кругу
- Усиленный прокол иглы
- Горизонтальный челнок
- Улучшенная заправка шпульки
- Сенсорный ЖК дисплей с подсветкой
- Русифицированное меню
- Возможность выбора языка меню
- Возможность выбора любимых вышивальных нитей
- Швейный советник
- Блокировка в целях безопасности
- Встроенный нитеобрезатель намотки шпули
- Кнопка позиционирования иглы
- Кнопка автоматической закрепки
- Кнопка обратного хода
- Кнопка старт/стоп
- Кнопка автоматической обрезки
- Регулятор скорости шитья
- Регулятор давления лапки
- Функция автоматического натяжения
- Регулятор баланса строчки
- Сенсор верхней и нижней нити
- Легко пристегивающаяся лапка
- Легко заменяемая игольная пластина
- Дополнительный подъём лапки
- Возможность подрегулирования размера петли
- Персональные установки параметров стежка
- Три встроенных нитеобрезателя
- Встроенный нитевдеватель
- Рабочая поверхность:
- 210мм справа от иглы
- 120мм слева от иглы
- Свободный рукав
- Отсек для хранения аксессуаров