
4-273-931-42(1)
DSC-S3000
Digital Still Camera / Instruction Manual
GB
Цифровой фотоаппарат / Инструкция по эксплуатации RU
Цифровий фотоапарат / Посібник з експлуатації
UA

GB
2
Owner’s Record
The model and serial numbers are located on the bottom. Record the serial number in the
space provided below. Refer to these numbers whenever you call upon your Sony dealer
regarding this product.
Model No. DSC-S3000
Serial No. ______________________________
To reduce fire or shock hazard, do not expose the unit to rain or
moisture.
If you have any questions about this product, you may call:
Sony Customer Information Center
1-800-222-SONY (7669).
The number below is for the FCC related matters only.
[
Regulatory Information
English
WARNING
For Customers in the U.S.A.
Declaration of Conformity
Trade Name: SONY
Model No.: DSC-S3000
Responsible Party: Sony Electronics Inc.
Address:
16530 Via Esprillo,
San Diego, CA 92127 U.S.A.
Telephone No.: 858-942-2230
This device complies with Part15 of the FCC Rules. Operation is subject to the
following two conditions: (1) This device may not cause harmful interference, and (2)
this device must accept any interference received, including interference that may cause
undesired operation.

GB
3
GB
[
CAUTION
You are cautioned that any changes or modifications not expressly approved in this manual
could void your authority to operate this equipment.
[
Note:
This equipment has been tested and found to comply with the limits for a Class B digital
device, pursuant to Part 15 of the FCC Rules.
These limits are designed to provide reasonable protection against harmful interference in
a residential installation. This equipment generates, uses, and can radiate radio frequency
energy and, if not installed and used in accordance with the instructions, may cause
harmful interference to radio communications. However, there is no guarantee that
interference will not occur in a particular installation. If this equipment does cause harmful
interference to radio or television reception, which can be determined by turning the
equipment off and on, the user is encouraged to try to correct the interference by one or
more of the following measures:
– Reorient or relocate the receiving antenna.
– Increase the separation between the equipment and receiver.
– Connect the equipment into an outlet on a circuit different from that to which the
receiver is connected.
– Consult the dealer or an experienced radio/TV technician for help.
The supplied interface cable must be used with the equipment in order to comply with the
limits for a digital device pursuant to Subpart B of Part 15 of FCC Rules.
[
Notice for the customers in the countries applying EU Directives
The manufacturer of this product is Sony Corporation, 1-7-1 Konan Minato-ku Tokyo,
108-0075 Japan. The Authorized Representative for EMC and product safety is Sony
Deutschland GmbH, Hedelfinger Strasse 61, 70327 Stuttgart, Germany. For any service or
guarantee matters please refer to the addresses given in separate service or guarantee
documents.
This product has been tested and found compliant with the limits set out in the EMC
Directive for using connection cables shorter than 3 meters (9.8 feet).
[
Attention
The electromagnetic fields at the specific frequencies may influence the picture and sound
of this unit.
[
Notice
If static electricity or electromagnetism causes data transfer to discontinue midway (fail),
restart the application or disconnect and connect the communication cable (USB, etc.)
again.
For Customers in Europe

GB
4
[
Disposal of Old Electrical & Electronic Equipment (Applicable in
the European Union and other European countries with separate
collection systems)
This symbol on the product or on its packaging indicates that this product
shall not be treated as household waste. Instead it shall be handed over to
the applicable collection point for the recycling of electrical and electronic
equipment. By ensuring this product is disposed of correctly, you will help
prevent potential negative consequences for the environment and human
health, which could otherwise be caused by inappropriate waste handling
of this product. The recycling of materials will help to conserve natural
resources. For more detailed information about recycling of this product,
please contact your local Civic Office, your household waste disposal service or the shop
where you purchased the product.
[
Disposal of waste batteries (applicable in the European Union
and other European countries with separate collection systems)
This symbol on the battery or on the packaging indicates that the battery
provided with this product shall not be treated as household waste.
On certain batteries this symbol might be used in combination with a
chemical symbol. The chemical symbols for mercury (Hg) or lead (Pb) are
added if the battery contains more than 0.0005% mercury or 0.004% lead.
By ensuring these batteries are disposed of correctly, you will help prevent
potentially negative consequences for the environment and human health which could
otherwise be caused by inappropriate waste handling of the battery. The recycling of the
materials will help to conserve natural resources.
In case of products that for safety, performance or data integrity reasons require a
permanent connection with an incorporated battery, this battery should be replaced by
qualified service staff only. To ensure that the battery will be treated properly, hand over
the product at end-of-life to the applicable collection point for the recycling of electrical
and electronic equipment.
For all other batteries, please view the section on how to remove the battery from the
product safely.
Hand the battery over to the applicable collection point for the recycling of waste batteries.
For more detailed information about recycling of this product or battery, please contact
your local Civic Office, your household waste disposal service or the shop where you
purchased the product.

GB
5
GB
For details on advanced operations, please read “Cyber-shot User Guide”
(HTML) on the CD-ROM (supplied) using a computer.
For Windows users:
1
Click [User Guide]
t [Install].
2
Start “User Guide” from the shortcut on the desktop.
For Macintosh users:
1
Select the [User Guide] and copy [eng] folder stored in the [User Guide]
folder to your computer.
2
After copying is complete, double-click “index.html” in the [eng] folder.
• LR6 (size AA) alkaline batteries (2)
• Dedicated USB cable (Sony Corporation 1-837-597-) (1)
• Wrist strap (1)
• CD-ROM (1)
– Cyber-shot application software
– “Cyber-shot User Guide”
• Instruction Manual (this manual) (1)
Refer to “Cyber-shot User Guide” (HTML) on
supplied CD-ROM
Checking the accessories supplied
Insert the CD-ROM into the CD-ROM drive.

GB
6
A ON/OFF (Power) button
B Shutter button
C ON/OFF (Power) lamp
D Flash
E Microphone
F Self-timer lamp/Smile Shutter
lamp
G Lens
H LCD screen
I
(Playback) button
J Control button
Menu on: v/V/b/B/z
Menu off: DISP/
/
/
K For shooting: W/T (Zoom)
button
For viewing:
(Playback
zoom) button/
(Index) button
L Mode switch
M Hook for wrist strap
N
(USB) / A/V OUT jack
O
(Delete) button
P Access lamp
Q MENU button
R Tripod receptacle
• Use a tripod with a screw less
than 5.5 mm (7/32 inches) long.
Otherwise, you cannot firmly
secure the camera, and damage to
the camera may occur.
S Speaker
T Battery/memory card cover
U Memory card slot
V Battery insertion slot
Identifying parts

GB
7
GB
x
Memory cards that you can use
• In this manual, products in A are collectively referred to as “Memory Stick Duo”
media.
• In this manual, products in B are collectively referred to as SD card.
• When recording movies, it is recommended that you use Class 2 or faster SD
cards.
Inserting the batteries/a memory card (sold
separately)
1
Open the cover.
2
Insert the memory card (sold separately).
• With the notched corner facing as illustrated, insert the memory card
until it clicks into place.
3
Match +/– and insert the batteries.
4
Close the cover.
Memory Card
For still images
For movies
A
Memory Stick PRO Duo
a
a
Memory Stick PRO-HG Duo
a
a
Memory Stick Duo
a
—
B
SD memory card
a
a
SDHC memory card
a
a
Ensure the notched corner faces correctly.

GB
8
x
To remove the memory card/batteries
Memory card: Push the memory card in once.
Batteries: Be sure not to drop the batteries.
• Never open the battery/memory card cover or remove the batteries/memory card
when the access lamp (page 6) is lit. This may cause damage to data in the
memory card/internal memory.
x
Batteries you can and cannot use with your camera
In the table below, a indicates the battery can be used, while — indicates the
one cannot be used.
* Operating performance cannot be ensured if voltage drops or other problems are
caused by the nature of the battery.
x
Battery life and number of images you can record/
view
Note
Battery type
Supplied
Supported
Rechargeable
LR6 (size AA) alkaline
batteries
a
a
—
HR15/51: HR6 (size AA)
Nickel-Metal Hydride
batteries
—
a
a
ZR6 (size AA) Oxy Nickel
Primary batteries
—
a
—
Lithium batteries*
—
—
—
Manganese batteries*
—
—
—
Ni-Cd batteries*
—
—
—
Battery life (min.)
No. of Images
Shooting still images
Approx. 100
Approx. 200
Viewing still images
Approx. 350
Approx. 7000
Shooting movies
Approx. 160
—

GB
9
GB
• The number of images that can be recorded is an approximate number when
shooting with new batteries. The number may be less depending on the
circumstances.
• The number of images that can be recorded is when shooting under the following
conditions:
– Using Sony “Memory Stick PRO Duo” (Mark2) media (sold separately).
– New batteries are used at an ambient temperature of 25°C (77°F).
• The number of still images that can be recorded is based on the CIPA standard,
and is for shooting under the following conditions.
(CIPA: Camera & Imaging Products Association)
– [SteadyShot] is set to [Off].
– DISP (Screen Display Settings) is set to [Normal].
– Shooting once every 30 seconds.
– The zoom is switched alternately between the W and T ends.
– The flash strobes once every two times.
– The power turns on and off once every ten times.
• The battery life for movies is when shooting under the following conditions:
– Recording mode: VGA
– When continuous shooting ends because of set limits (page 16), press the shutter
button down again and continue shooting. Shooting functions such as the zoom
do not operate.
• The values shown for alkaline battery are based on commercial norms, and do not
apply to all alkaline batteries in all conditions. The values may vary, depending on
the battery manufacturer/type, environmental conditions, product setting, etc.
Notes

GB
10
Date & Time setting is displayed when you press the ON/OFF (Power) button
for the first time.
Setting the date and time
1
Press the ON/OFF (Power) button.
Date & Time setting is displayed when you press the ON/OFF (Power)
button for the first time.
• It may take time for the power to turn on and allow operation.
2
Set [Date & Time Format], [Daylight Savings] and [Date
& Time], then press [OK].
• Midnight is indicated as 12:00 AM, and noon as 12:00 PM.
3
Select the desired area following the instructions on the
screen, then press z
t [OK].
4
Select the desired display color and display resolution
mode, following the instructions on the screen.
Select items:
v
/
V
/
b
/
B
Set:
z
Control button
ON/OFF (Power)

01:47
Не включается фотоаппарат: распространённый случай
03:07
Фотокамера Sony DSC S3000
08:10
Не включается / Не выдвигается объектив. Фотокамера Sony DSC-W510. РЕМОНТ
04:44
Видео обзор Sony Cyber-shot DSC-S3000 от Сотмаркета
05:42
Sony Cybershot DSC-S3000 Unboxing
11:16
Чистка фотоаппарата Sony DSC-S3000 после воды / Ultrasonic cleaning of the camera after water
02:01
Фотоаппарат Sony Cyber shot DSC S3000
Нажмите на кнопку для помощи
Cyber-shot User Guide
Top page
Operation Search
Before Use
Shooting
Viewing
Using MENU items (Shooting)
Using MENU items (Viewing)
Changing settings
Viewing images on a TV
Using with your computer
Printing
Troubleshooting
Precautions / About this camera
Contents list
DSC-S3000
User Guide
Use this manual if you encounter any problems, or have any questions about the camera.
Back to top
Copyright 2011 Sony Corporation
Cyber-shot User Guide
Top page > Operation Search
Operation Search
Before Use
Shooting
Viewing
Using MENU items (Shooting)
Using MENU items (Viewing)
Changing settings
Viewing images on a TV
Using with your computer
Printing
Troubleshooting
Precautions / About this camera
Contents list
Operation Search
Operation Search
Search by Operation
Back to top
Copyright 2011 Sony Corporation
Cyber-shot User Guide
Top page > Before Use
Operation Search
Before Use
Shooting
Viewing
Using MENU items (Shooting)
Using MENU items (Viewing)
Changing settings
Viewing images on a TV
Using with your computer
Printing
Troubleshooting
Precautions / About this camera
Contents list
Before Use
How to use this User Guide
How to use this User Guide
The images used in this User Guide
Names of parts and list of icons displayed on the screen
Names of parts
List of icons displayed on the screen
Using the wrist strap
Using the wrist strap
Using the internal memory
Using the internal memory
Back to top
Copyright 2011 Sony Corporation
Cyber-shot User Guide
Top page > Shooting
Operation Search
Before Use
Shooting
Viewing
Using MENU items (Shooting)
Using MENU items (Viewing)
Changing settings
Viewing images on a TV
Using with your computer
Printing
Troubleshooting
Precautions / About this camera
Contents list
Shooting
Shooting still images
Shooting still images
Zoom
Shooting movies
Shooting movies
Setting REC mode
List of mode switch functions
Intelligent Auto
Program Auto
Scene Selection
Sweep Panorama
Movie Mode
Functions not available in some REC modes
Using shooting functions
DISP (Screen Display Settings)
Flash
Smile Shutter
Self-Timer
Copyright 2011 Sony Corporation
Back to top
Cyber-shot User Guide
Top page > Viewing
Operation Search
Before Use
Shooting
Viewing
Using MENU items (Shooting)
Using MENU items (Viewing)
Changing settings
Viewing images on a TV
Using with your computer
Printing
Troubleshooting
Precautions / About this camera
Contents list
Viewing
Viewing still images
Viewing still images
Playback zoom
Image Index
Deleting images
Delete button
Viewing movies
Viewing movies
Viewing panorama images
Scrolling the panorama images for display
Back to top
Copyright 2011 Sony Corporation
Cyber-shot User Guide
Top page > Using MENU items (Shooting)
Operation Search
Before Use
Shooting
Viewing
Using MENU items (Shooting)
Using MENU items (Viewing)
Changing settings
Viewing images on a TV
Using with your computer
Printing
Troubleshooting
Precautions / About this camera
Contents list
Using MENU items (Shooting)
Using MENU items (Shooting)
Using MENU items (Shooting)
MENU items (Shooting)
REC Mode
Scene Selection
Easy Mode
Shooting Direction
Image Size
SteadyShot
Burst Settings
EV
ISO
White Balance
Focus
Metering Mode
Smile Detection Sensitivity
Face Detection
DRO
Shooting MENU list
MENU items not available in some REC modes
Copyright 2011 Sony Corporation
Back to top
Cyber-shot User Guide
Top page > Using MENU items (Viewing)
Operation Search
Before Use
Shooting
Viewing
Using MENU items (Shooting)
Using MENU items (Viewing)
Changing settings
Viewing images on a TV
Using with your computer
Printing
Troubleshooting
Precautions / About this camera
Contents list
Using MENU items (Viewing)
Using MENU items (Viewing)
Using MENU items (Viewing)
MENU items (Viewing)
Easy Mode
Slideshow
Retouch
Delete
Protect
DPOF
Rotate
Select Folder
Playback MENU list
MENU items that cannot be set according to recording media
Back to top
Copyright 2011 Sony Corporation
Cyber-shot User Guide
Top page > Changing settings
Operation Search
Before Use
Shooting
Viewing
Using MENU items (Shooting)
Using MENU items (Viewing)
Changing settings
Viewing images on a TV
Using with your computer
Printing
Troubleshooting
Precautions / About this camera
Contents list
Changing settings
Changing settings
Changing camera settings
Shooting Settings
Grid Line
Disp. Resolution
Digital Zoom
Red Eye Reduction
Main Settings
Beep
Language Setting
Function Guide
Display color
Power Save
Initialize
Video Out
USB Connect
LUN Setting
Memory Card Tool / Internal Memory Tool
Format
Create REC. Folder
Change REC. Folder
Delete REC. Folder
Copy
File Number
Clock Settings
Area Setting
Date & Time Setting
Copyright 2011 Sony Corporation
Back to top
Cyber-shot User Guide
Top page > Viewing images on a TV
Operation Search
Before Use
Shooting
Viewing
Using MENU items (Shooting)
Using MENU items (Viewing)
Changing settings
Viewing images on a TV
Using with your computer
Printing
Troubleshooting
Precautions / About this camera
Contents list
Viewing images on a TV
Viewing an image on a Standard Definition (SD) TV
Viewing an image on a Standard Definition (SD) TV
Back to top
Copyright 2011 Sony Corporation
Cyber-shot User Guide
Top page > Using with your computer
Operation Search
Before Use
Shooting
Viewing
Using MENU items (Shooting)
Using MENU items (Viewing)
Changing settings
Viewing images on a TV
Using with your computer
Printing
Troubleshooting
Precautions / About this camera
Contents list
Using with your computer
Recommended computer environment
Recommended computer environment (Windows)
Recommended computer environment (Macintosh)
Using the software
“PMB (Picture Motion Browser)”
Installing “PMB” (Windows)
Connecting the camera to the computer
Connecting the camera to the computer
Importing images to a computer (Windows)
Importing images to a computer (Macintosh)
Deleting the USB connection
Uploading images to a media service
“PMB Portable”
Starting up “PMB Portable” (Windows)
Starting up “PMB Portable” (Macintosh)
Back to top
Copyright 2011 Sony Corporation
Cyber-shot User Guide
Top page > Printing
Operation Search
Before Use
Shooting
Viewing
Using MENU items (Shooting)
Using MENU items (Viewing)
Changing settings
Viewing images on a TV
Using with your computer
Printing
Troubleshooting
Precautions / About this camera
Contents list
Printing
Printing still images
Printing still images
Printing at a shop
Back to top
Copyright 2011 Sony Corporation
Cyber-shot User Guide
Top page > Troubleshooting
Operation Search
Before Use
Shooting
Viewing
Using MENU items (Shooting)
Using MENU items (Viewing)
Changing settings
Viewing images on a TV
Using with your computer
Printing
Troubleshooting
Precautions / About this camera
Contents list
Troubleshooting
If you have problems
If you have problems
Troubleshooting
Batteries and power
Shooting still images / movies
Viewing images
Deleting
Computers
Memory card
Internal memory
Printing
Others
Warning indicators and messages
Messages
Back to top
Copyright 2011 Sony Corporation
Cyber-shot User Guide
Top page > Precautions / About this camera
Operation Search
Before Use
Shooting
Viewing
Using MENU items (Shooting)
Using MENU items (Viewing)
Changing settings
Viewing images on a TV
Using with your computer
Printing
Troubleshooting
Precautions / About this camera
Contents list
Precautions / About this camera
Precautions
Precautions
On the internal rechargeable backup battery
Batteries
Memory card
On cleaning
On cleaning
Number of still images and recordable time of movies
Number of still images
Recordable time of movies
Using the camera abroad
On TV color systems
Trademarks
Trademarks
Back to top
Copyright 2011 Sony Corporation
Cyber-shot User Guide
Top page > Contents list
Operation Search
Before Use
Shooting
Viewing
Using MENU items (Shooting)
Using MENU items (Viewing)
Changing settings
Viewing images on a TV
Using with your computer
Printing
Troubleshooting
Precautions / About this camera
Contents list
Contents list
Operation Search
Operation Search
Search by Operation
Back to top
Before Use
How to use this User Guide
How to use this User Guide
The images used in this User Guide
Names of parts and list of icons displayed on the screen
Names of parts
List of icons displayed on the screen
Using the wrist strap
Using the wrist strap
Using the internal memory
Using the internal memory
Shooting
Shooting still images
Shooting still images
Zoom
Shooting movies
Shooting movies
Setting REC mode
List of mode switch functions
Intelligent Auto
Program Auto
Scene Selection
Sweep Panorama
Movie Mode
Functions not available in some REC modes
Using shooting functions
DISP (Screen Display Settings)
Flash
Smile Shutter
Back to top

Viewing
Viewing still images
Viewing still images
Playback zoom
Image Index
Deleting images
Delete button
Viewing movies
Viewing movies
Viewing panorama images
Scrolling the panorama images for display
Using MENU items (Shooting)
Using MENU items (Shooting)
Using MENU items (Shooting)
Back to top
Back to top
MENU items (Shooting)
REC Mode
Scene Selection
Easy Mode
Shooting Direction
Image Size
SteadyShot
Burst Settings
EV
ISO
White Balance
Focus
Metering Mode
Smile Detection Sensitivity
Face Detection
DRO
Shooting MENU list
MENU items not available in some REC modes
Back to top
Using MENU items (Viewing)
Using MENU items (Viewing)
Using MENU items (Viewing)
MENU items (Viewing)
Easy Mode

Retouch
Delete
Protect
DPOF
Rotate
Select Folder
Playback MENU list
MENU items that cannot be set according to recording media
Changing settings
Changing settings
Changing camera settings
Shooting Settings
Grid Line
Disp. Resolution
Digital Zoom
Red Eye Reduction
Back to top
Main Settings
Beep
Language Setting
Function Guide
Display color
Power Save
Initialize
Video Out
USB Connect
LUN Setting
Memory Card Tool / Internal Memory Tool
Format
Create REC. Folder
Change REC. Folder
Delete REC. Folder
Copy
File Number
Clock Settings
Area Setting
Date & Time Setting
Back to top
Viewing images on a TV
Viewing an image on a Standard Definition (SD) TV
Viewing an image on a Standard Definition (SD) TV
Back to top

Recommended computer environment
Recommended computer environment (Windows)
Recommended computer environment (Macintosh)
Using the software
“PMB (Picture Motion Browser)”
Installing “PMB” (Windows)
Connecting the camera to the computer
Connecting the camera to the computer
Importing images to a computer (Windows)
Importing images to a computer (Macintosh)
Deleting the USB connection
Uploading images to a media service
“PMB Portable”
Starting up “PMB Portable” (Windows)
Starting up “PMB Portable” (Macintosh)
Printing
Back to top
Printing still images
Printing still images
Printing at a shop
Troubleshooting
If you have problems
If you have problems
Troubleshooting
Batteries and power
Shooting still images / movies
Viewing images
Deleting
Computers
Memory card
Internal memory
Printing
Others
Warning indicators and messages
Messages
Back to top
Back to top
Precautions / About this camera
Precautions
Precautions

On the internal rechargeable backup battery
Batteries
Memory card
On cleaning
On cleaning
Number of still images and recordable time of movies
Number of still images
Recordable time of movies
Using the camera abroad
On TV color systems
Trademarks
Trademarks
Copyright 2011 Sony Corporation
Back to top
Cyber-shot User Guide
Operation Search
Top page > Operation Search > Operation Search > Search by Operation
Before Use
Shooting
Viewing
Using MENU items (Shooting)
Using MENU items (Viewing)
Changing settings
Viewing images on a TV
Using with your computer
Printing
Troubleshooting
Precautions / About this camera
Contents list
Search by Operation
Leaving the settings to the camera
Intelligent Auto
Scene Selection
Shooting portraits
Scene Selection(Soft Snap)
Scene Selection(Twilight Portrait)
Smile Shutter
Face Detection
Red Eye Reduction
Shooting panoramic images
Sweep Panorama
Shooting moving objects
Movie Mode
Burst Settings
Shooting without blur
Scene Selection(High Sensitivity)
Self-Timer(2sec)
ISO
SteadyShot
Shooting with backlight
Flash
On Scene Recognition
DRO
Shooting in dark places
Scene Selection(High Sensitivity)
Flash(Slow Synchro)
ISO
Changing focus position
Focus
Changing image size
Image Size
Changing screen display
DISP (Screen Display Settings)
Function Guide
Display color
Deleting images
Delete
Delete button
Format

Displaying enlarged images
Playback zoom
Retouch(Trimming (Resize))
Editing images
Retouch
Playing back a series of images in order
Slideshow
Printing images with the date
“PMB (Picture Motion Browser)”
Changing clock settings
Date & Time Setting
Initializing settings
Initialize
Printing images
Printing still images
Viewing on TVs
Viewing an image on a Standard Definition (SD) TV
Copyright 2011 Sony Corporation
Back to top
Cyber-shot User Guide
Operation Search
Top page > Before Use > How to use this User Guide > How to use this User Guide
Before Use
Shooting
Viewing
Using MENU items (Shooting)
Using MENU items (Viewing)
Changing settings
Viewing images on a TV
Using with your computer
Printing
Troubleshooting
Precautions / About this camera
Contents list
How to use this User Guide
Selecting a topic to display
Returning to a previous page
Printing out a page
Marks and notations used in this User Guide
This User Guide explains how to use each function of the camera, how to change settings, and
how to troubleshoot a problem.
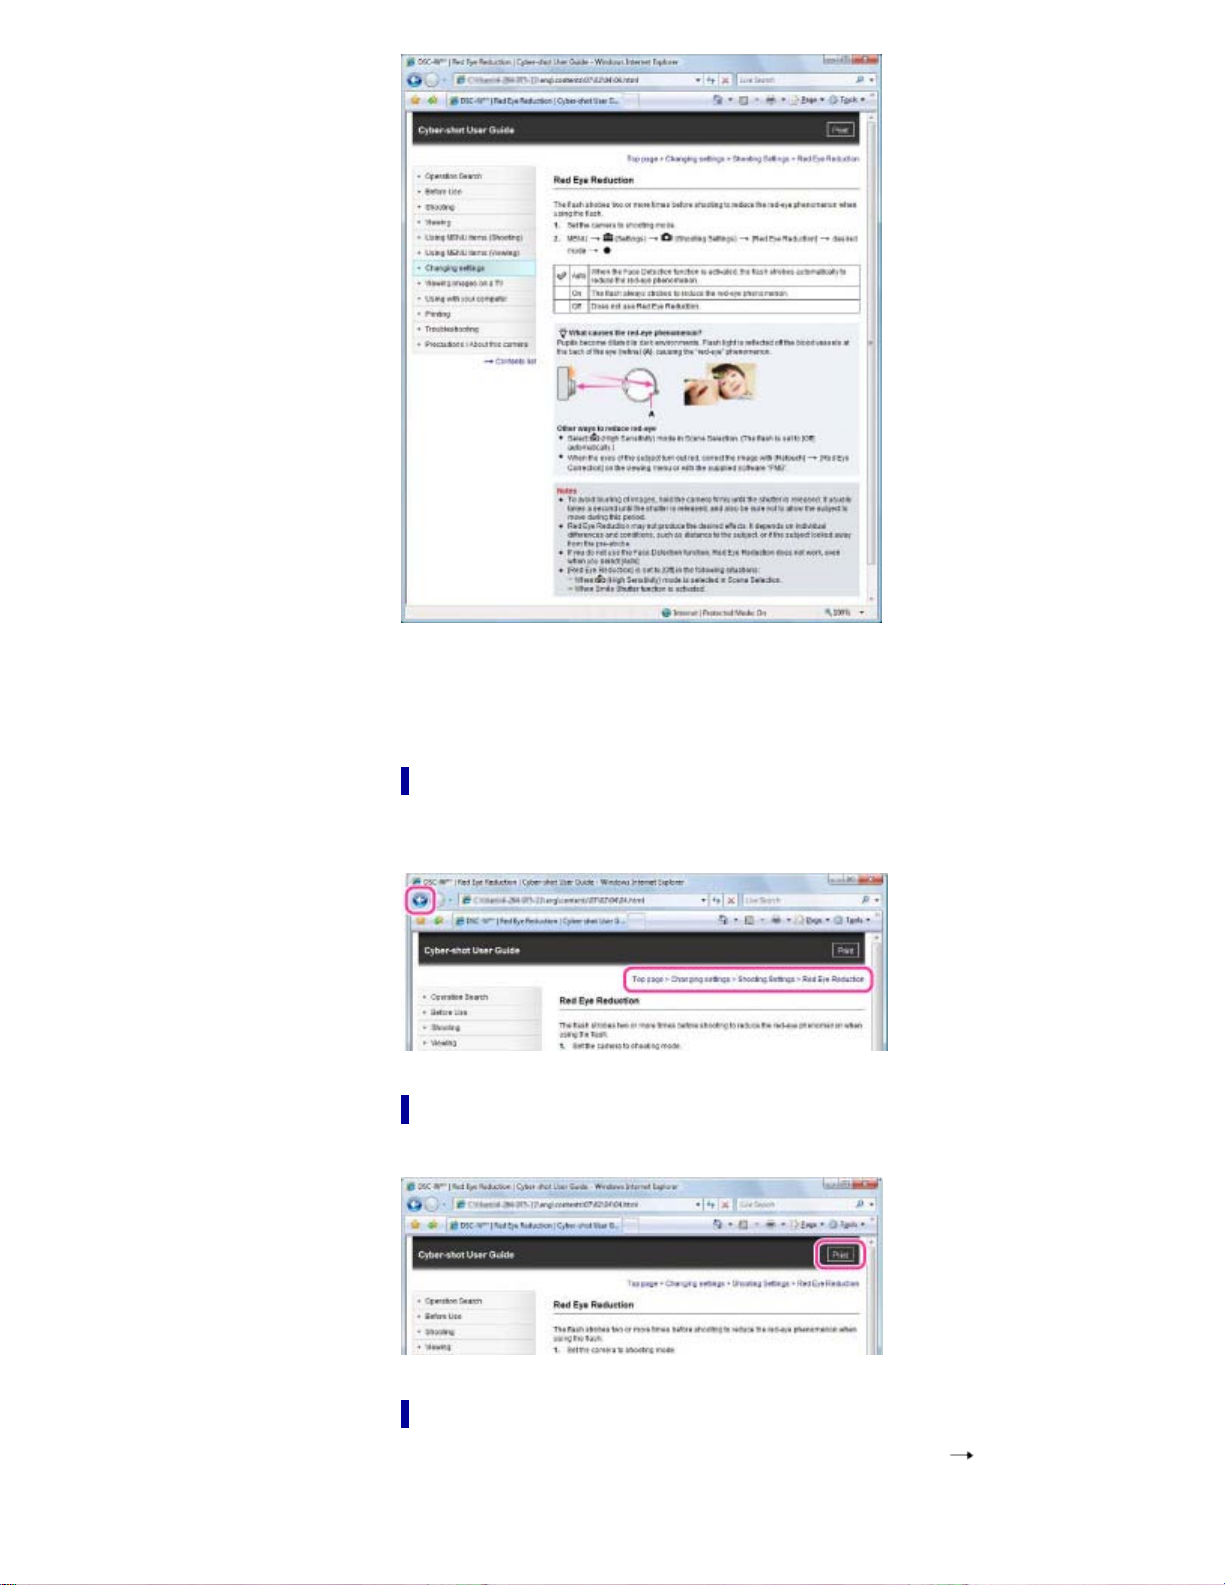
Selecting a topic to display
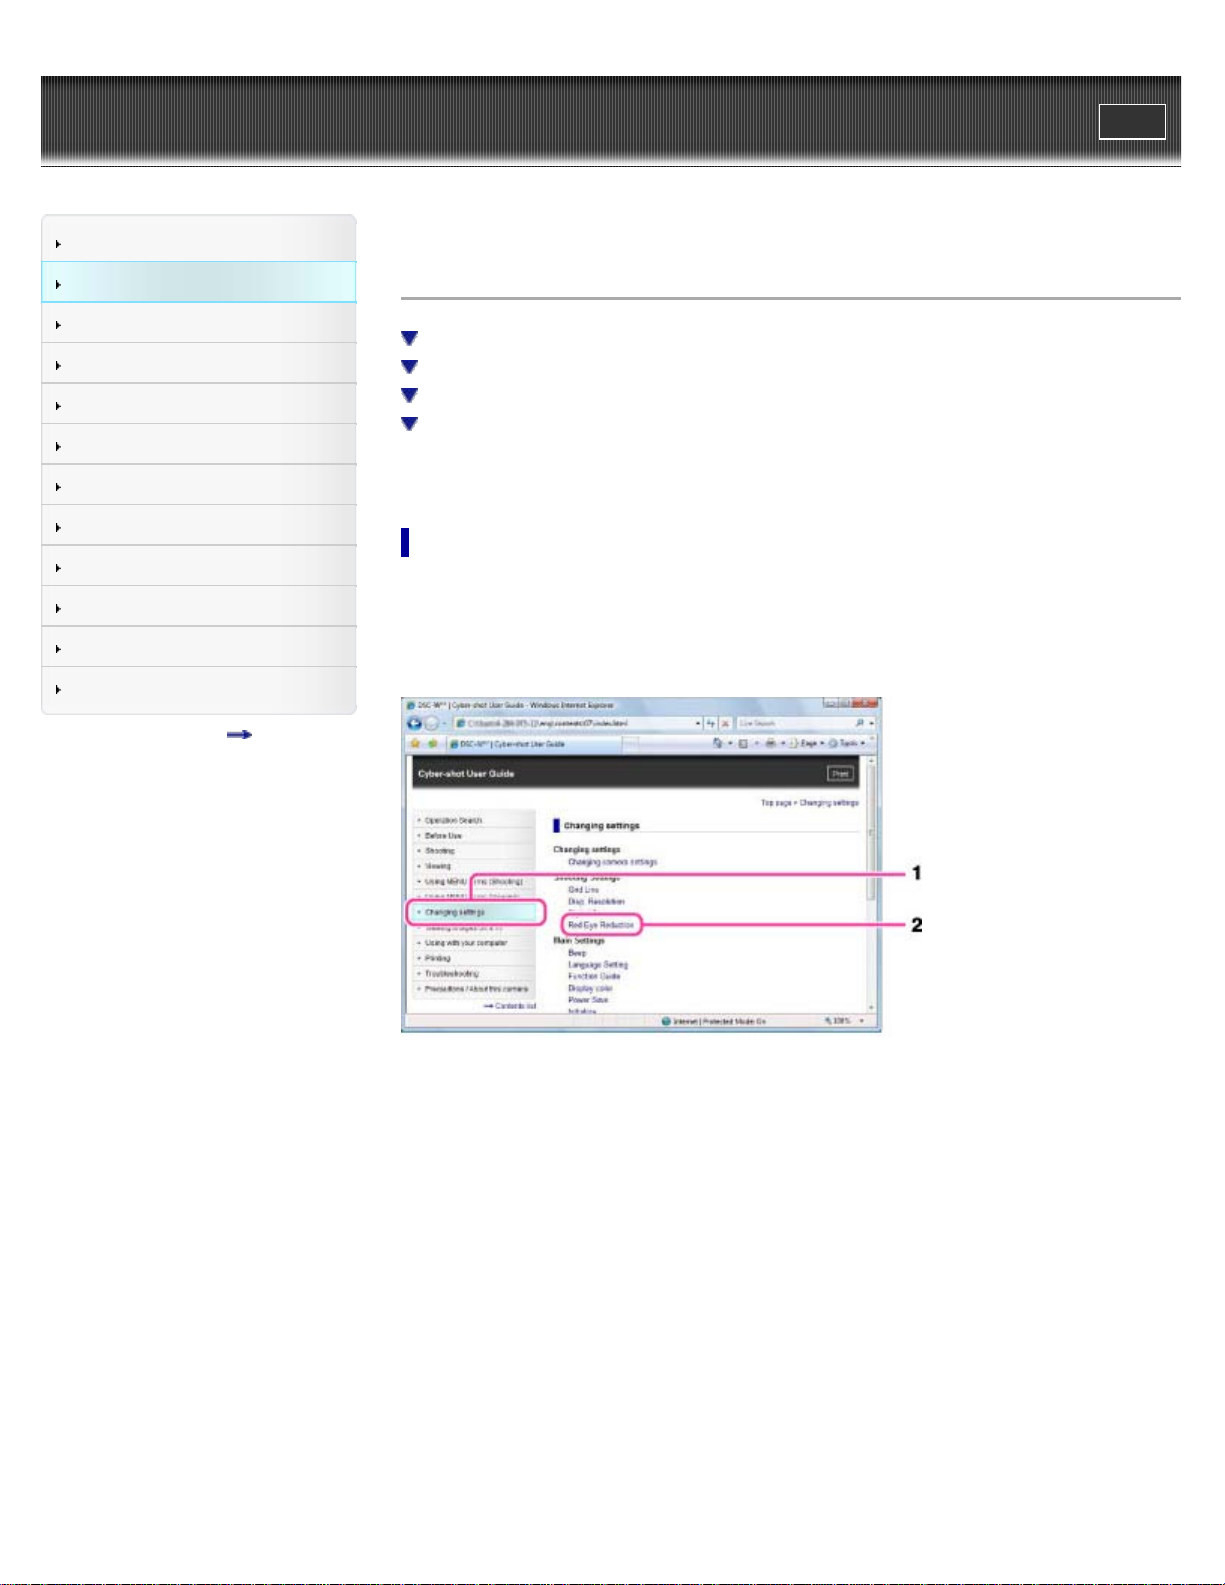
The following illustrations take Internet Explorer 7 as an example.
1. Click a title in the side bar on the left of the browser window.
The title’s topic list appears in the right pane.
2. Click a topic title in the list.
Descriptions appear in the right pane.
Changing the font size
Change the font size by changing the setting of your web browser. For how to change the font
size setting, refer to the Help of your web browser.
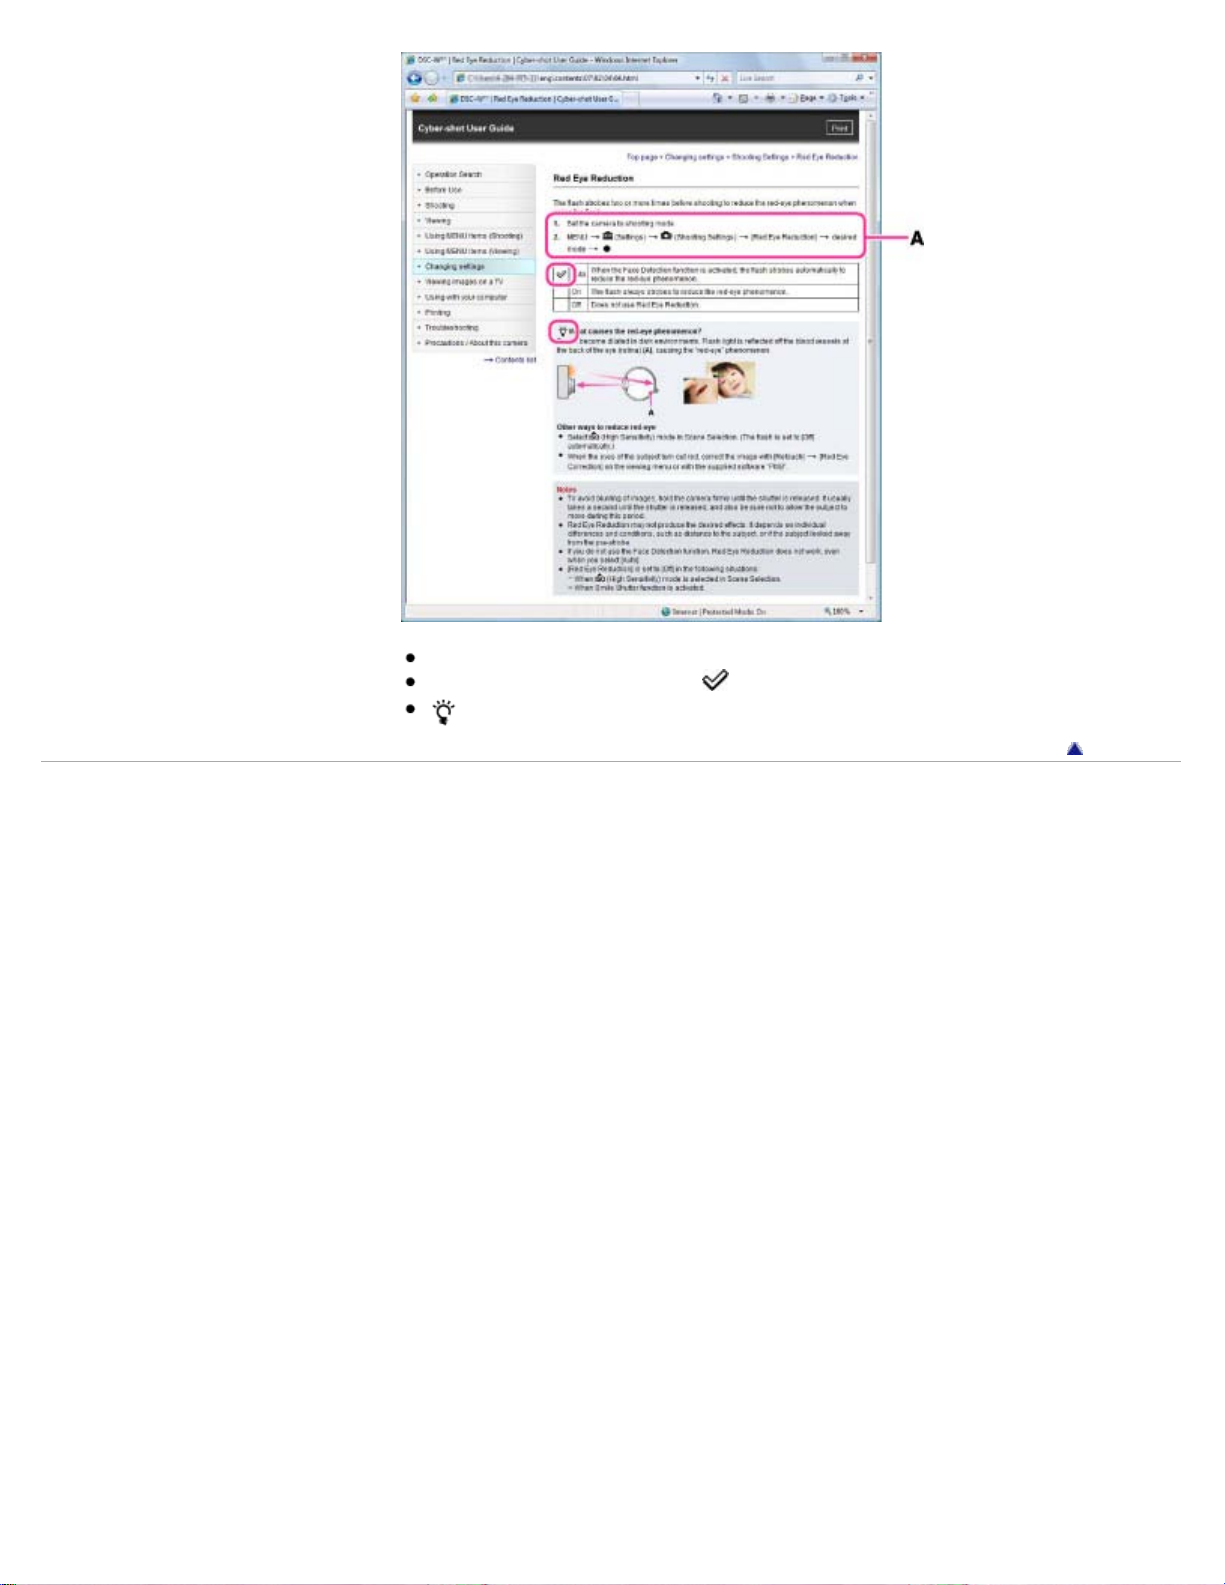
Returning to a previous page
Use the back button of your web browser or the breadcrumb trail navigation to return to a page
you previously viewed.
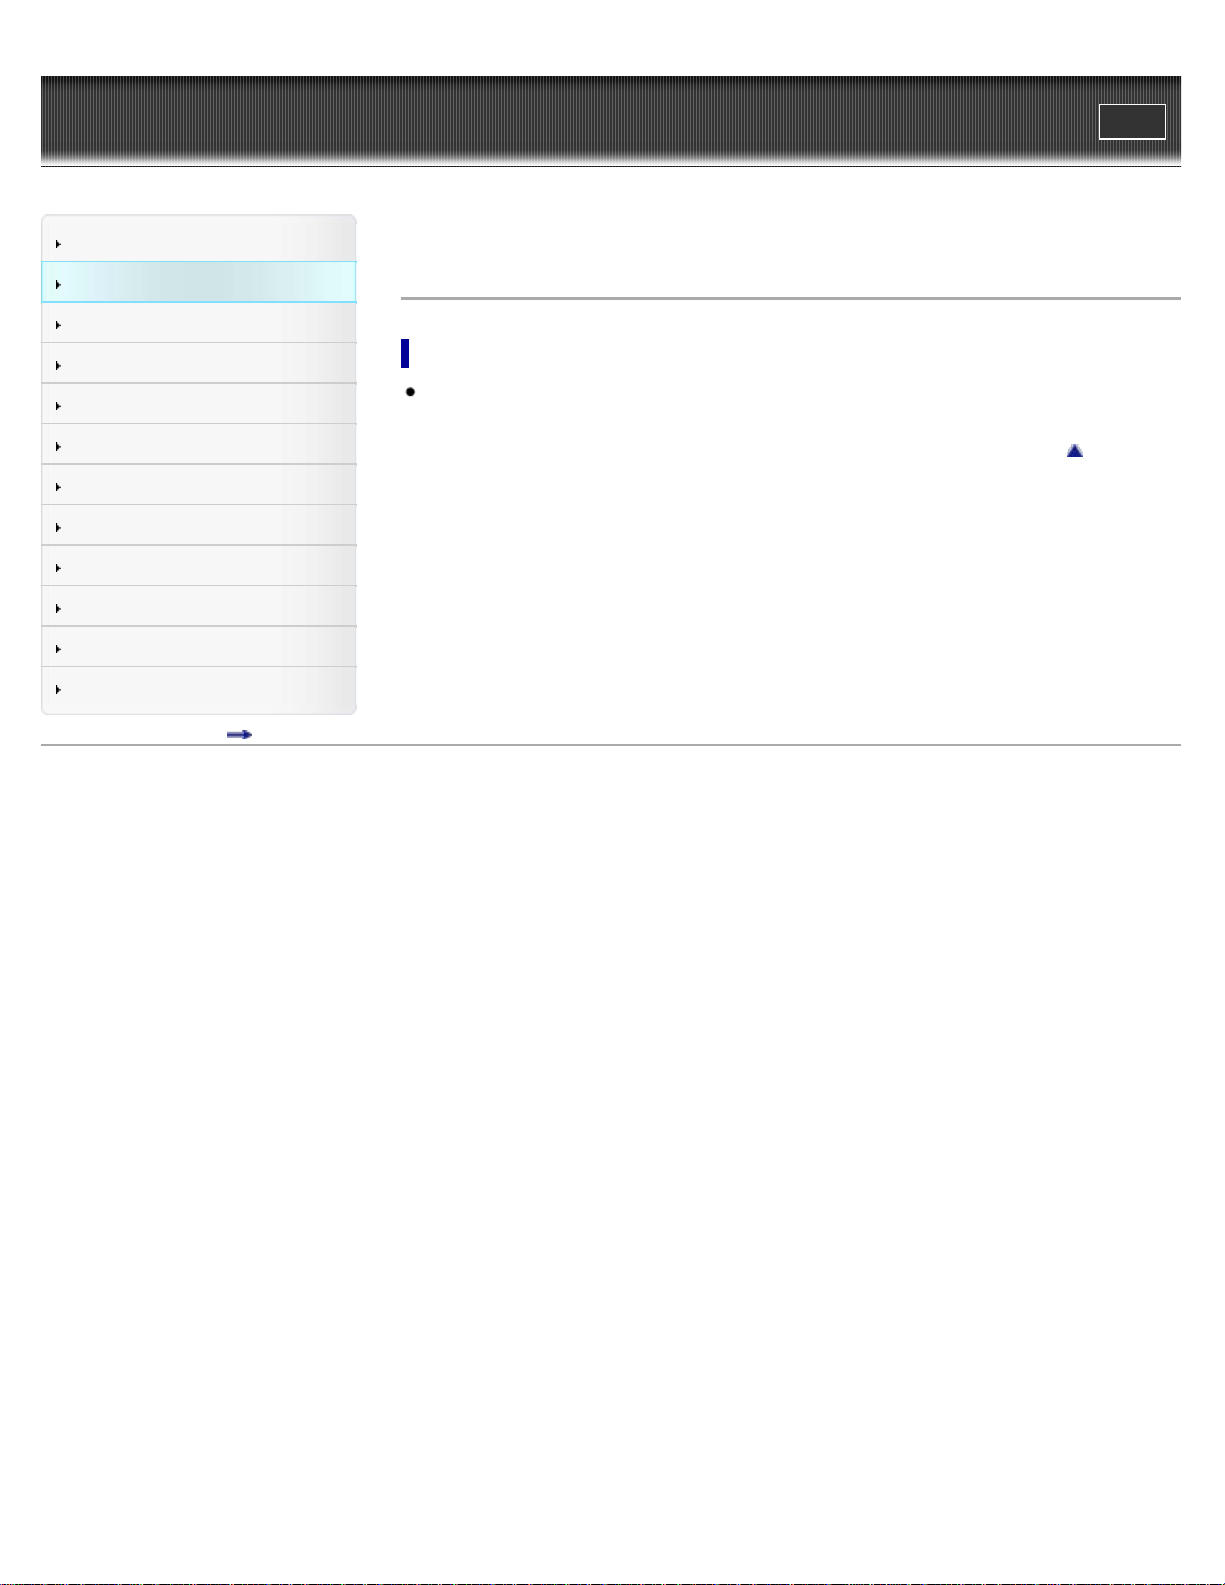
Printing out a page
Click the [Print] button to print out a page you are viewing.
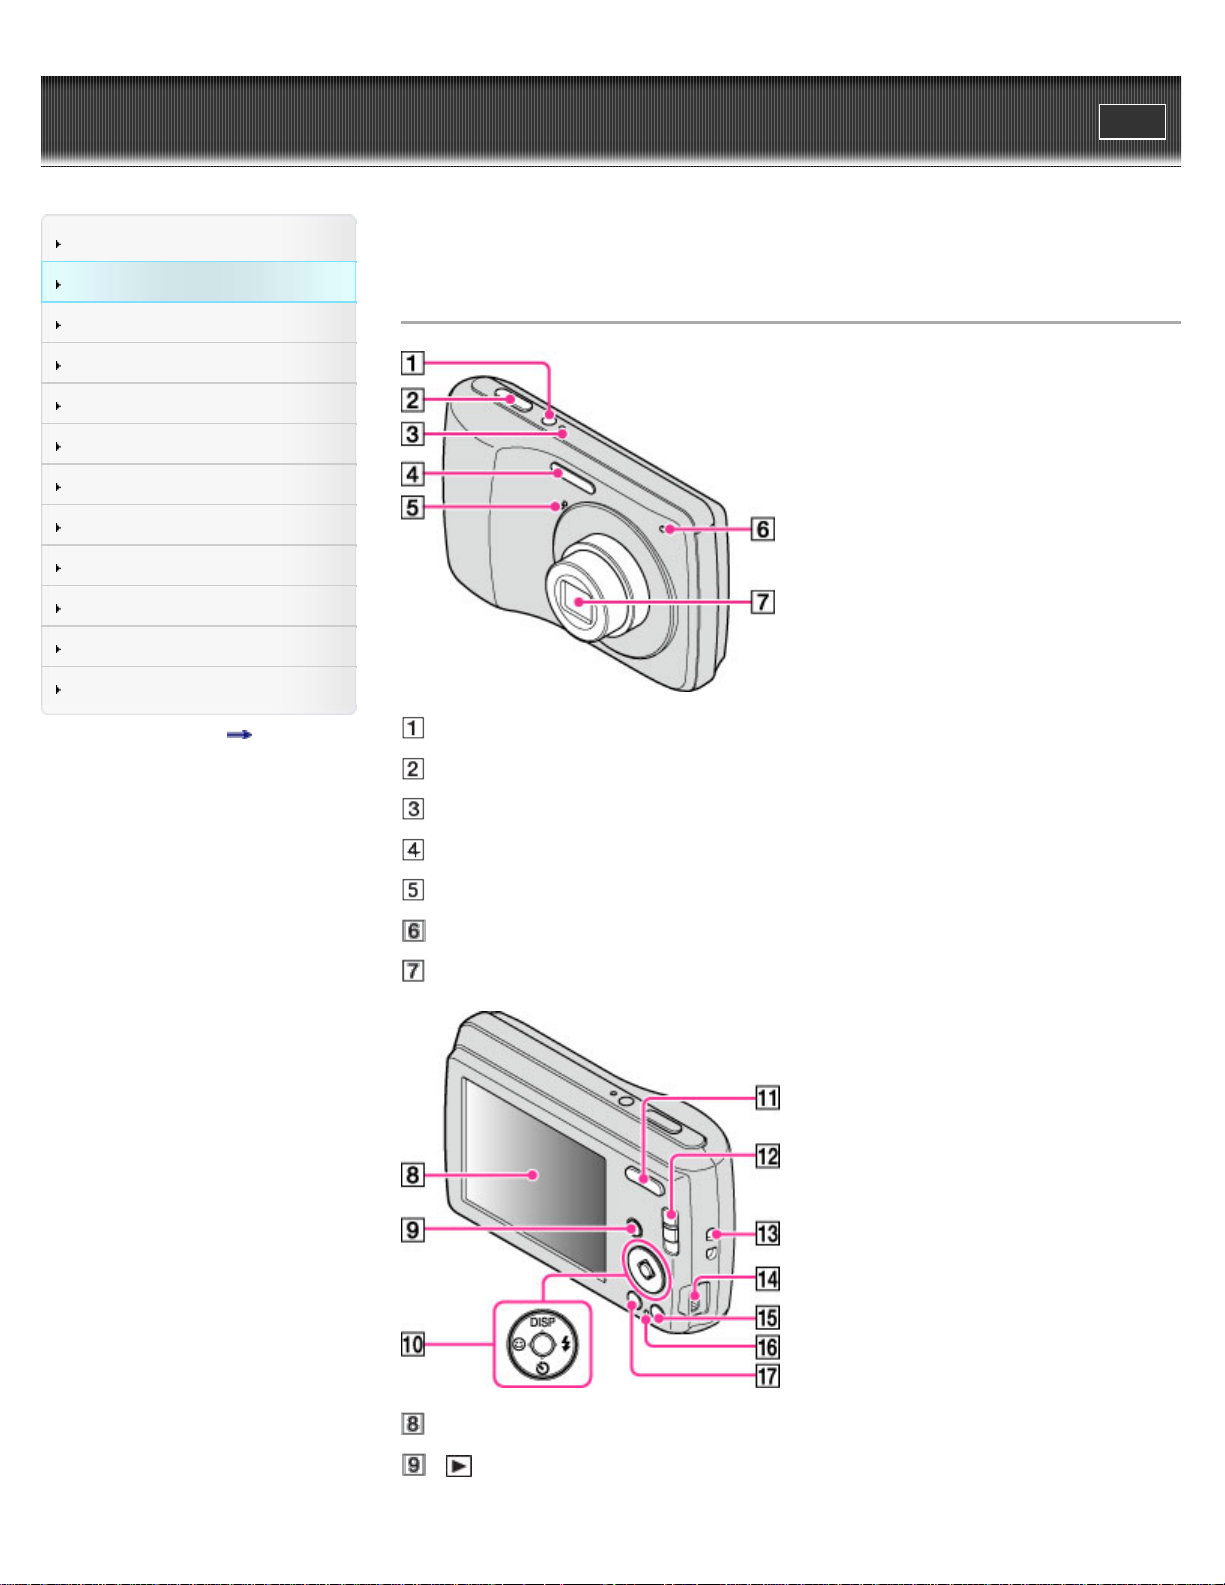
Marks and notations used in this User Guide
In this User Guide, the sequence of operations is shown by arrows ( ) (A).
Operate the camera in the order indicated.
Icons in the operating procedure sentences appear when the camera is in its default settings.
The default setting is indicated by .
indicates information that is useful to know.
Back to top
Copyright 2011 Sony Corporation
Cyber-shot User Guide
Operation Search
Top page > Before Use > How to use this User Guide > The images used in this User Guide
Before Use
Shooting
Viewing
Using MENU items (Shooting)
Using MENU items (Viewing)
Changing settings
Viewing images on a TV
Using with your computer
Printing
Troubleshooting
Precautions / About this camera
Contents list
The images used in this User Guide
Images used in this User Guide
The images used as examples in this User Guide are reproduced images, and are not actual
images shot using this camera.
Back to top
Copyright 2011 Sony Corporation
Cyber-shot User Guide
Operation Search
Top page > Before Use > Names of parts and list of icons displayed on the screen > Names of
parts
Before Use
Shooting
Viewing
Using MENU items (Shooting)
Using MENU items (Viewing)
Changing settings
Viewing images on a TV
Using with your computer
Printing
Troubleshooting
Precautions / About this camera
Contents list
Names of parts
ON/OFF (Power) button
Shutter button
ON/OFF (Power) lamp
Flash
Microphone
Self-timer lamp / Smile Shutter lamp
Lens
LCD screen
(Playback) button
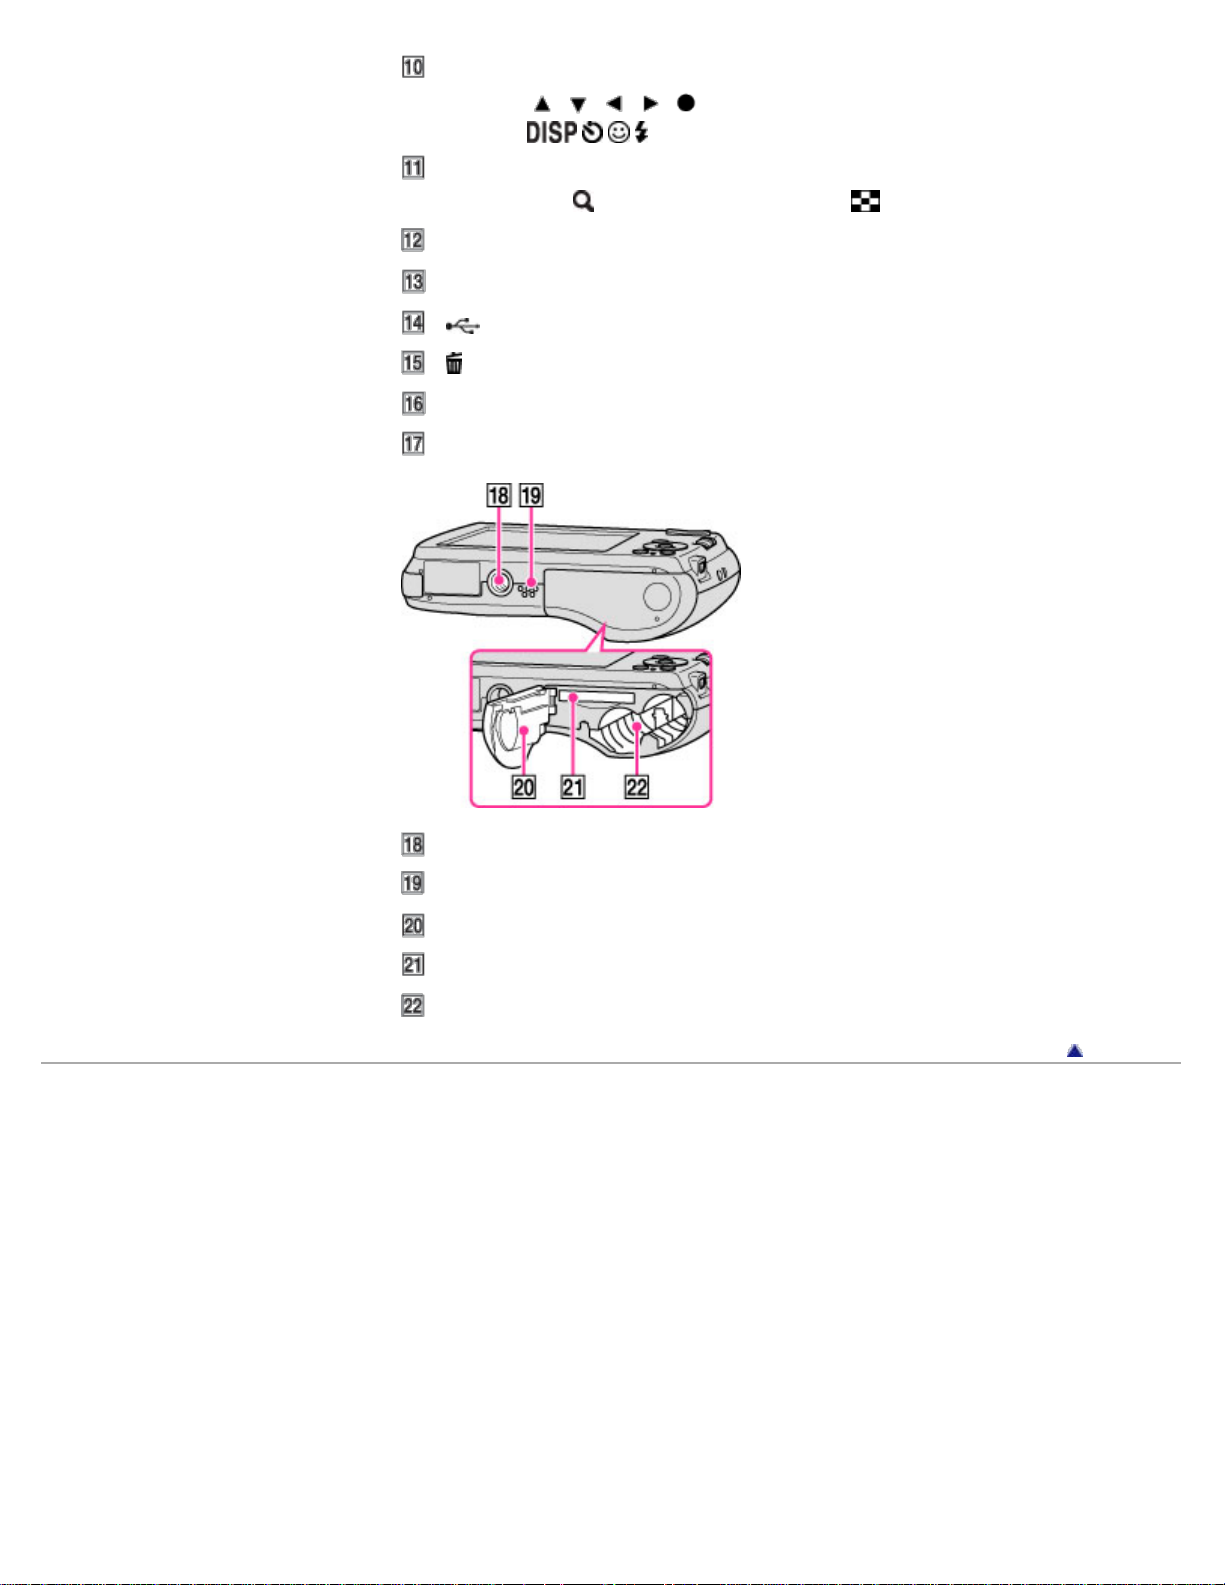
Control button
Menu on:
/ / / /
Menu off: / / /
For shooting: W/T (zoom) button
For viewing:
(Playback zoom) button / (Index) button
Mode switch
Hook for wrist strap
(USB) / A/V OUT jack
(Delete) button
Access lamp
MENU button
Tripod receptacle
Speaker
Battery / Memory card cover
Memory card slot
Battery insertion slot
Copyright 2011 Sony Corporation
Back to top
Cyber-shot User Guide
Operation Search
Top page > Before Use > Names of parts and list of icons displayed on the screen > List of
icons displayed on the screen
Before Use
Shooting
Viewing
Using MENU items (Shooting)
Using MENU items (Viewing)
Changing settings
Viewing images on a TV
Using with your computer
Printing
Troubleshooting
Precautions / About this camera
Contents list
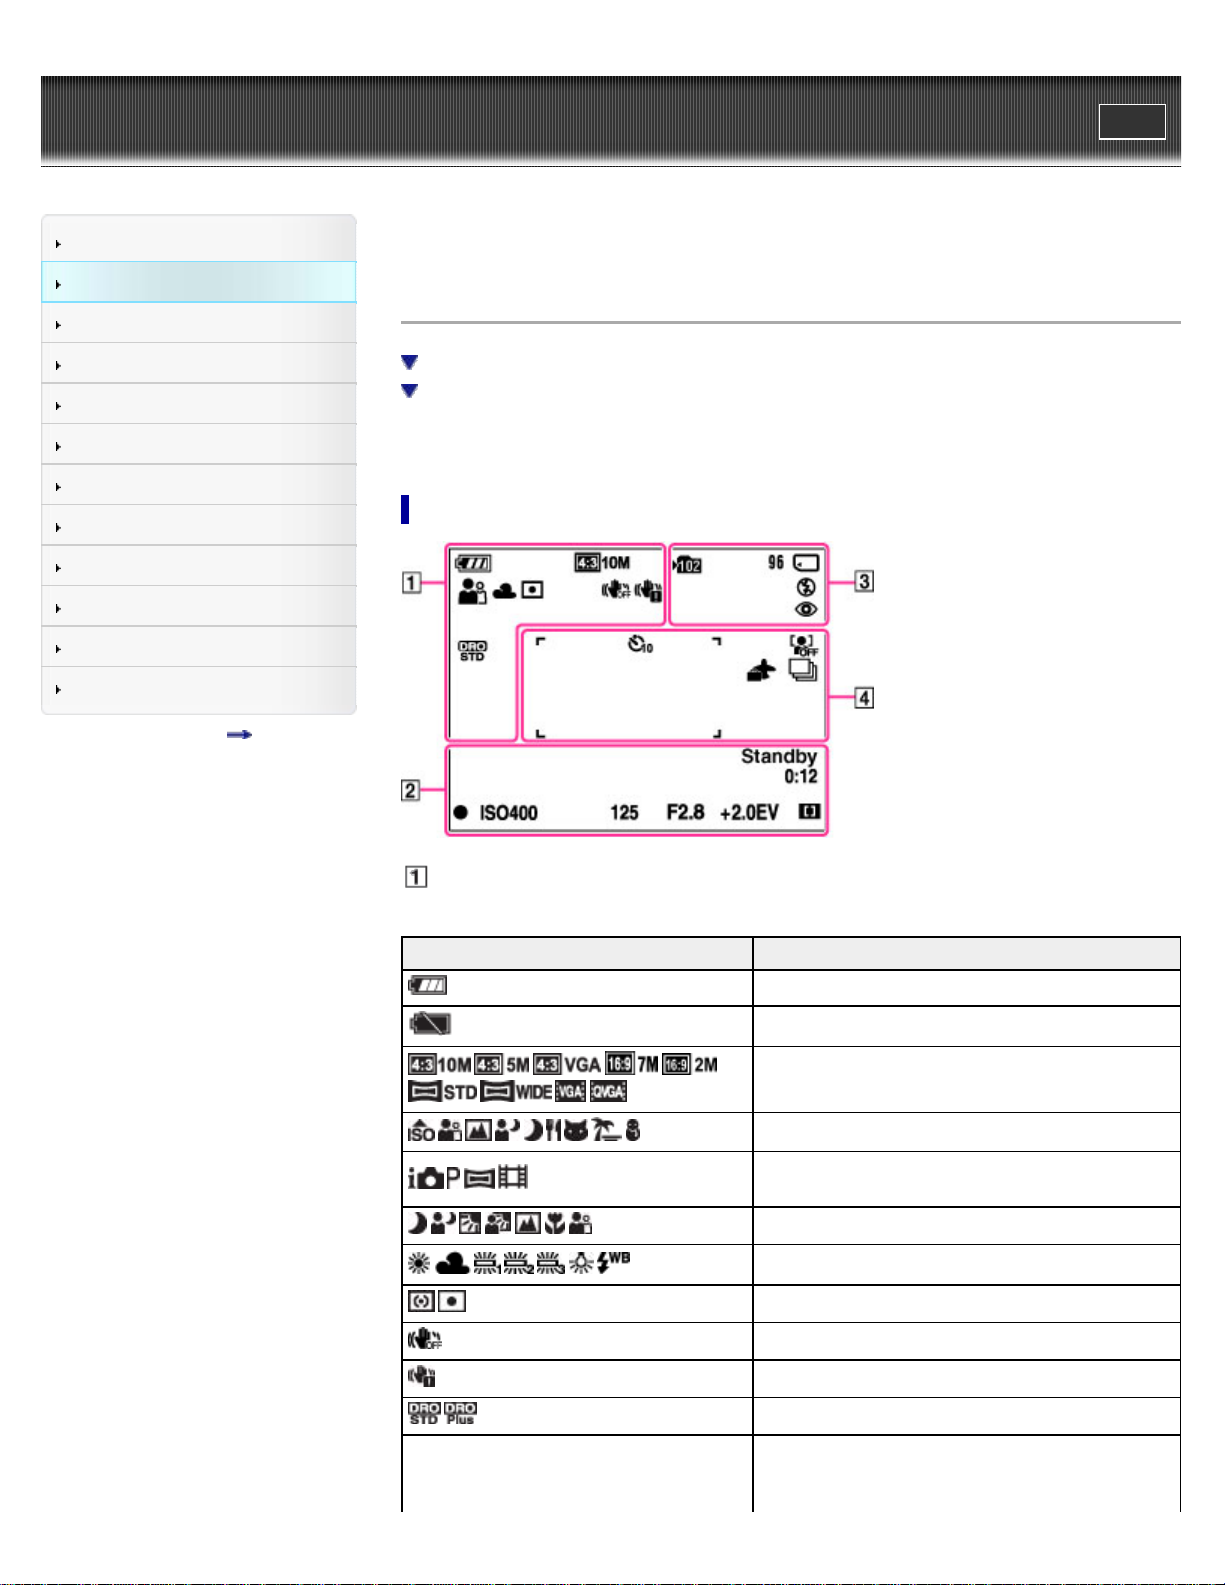
List of icons displayed on the screen
List of shooting mode icons
List of viewing mode icons
Icons are displayed on the screen to indicate the camera status.
You can change the screen display using DISP (Screen Display Settings) on the control button.
List of shooting mode icons
Display Indication
Battery remaining
Low battery warning
Image size
Scene Selection
Shooting mode (Intelligent Auto, Program Auto,
Sweep Panorama, Movie Mode)
Scene Recognition icon
White balance
Metering Mode
SteadyShot
Vibration warning
DRO
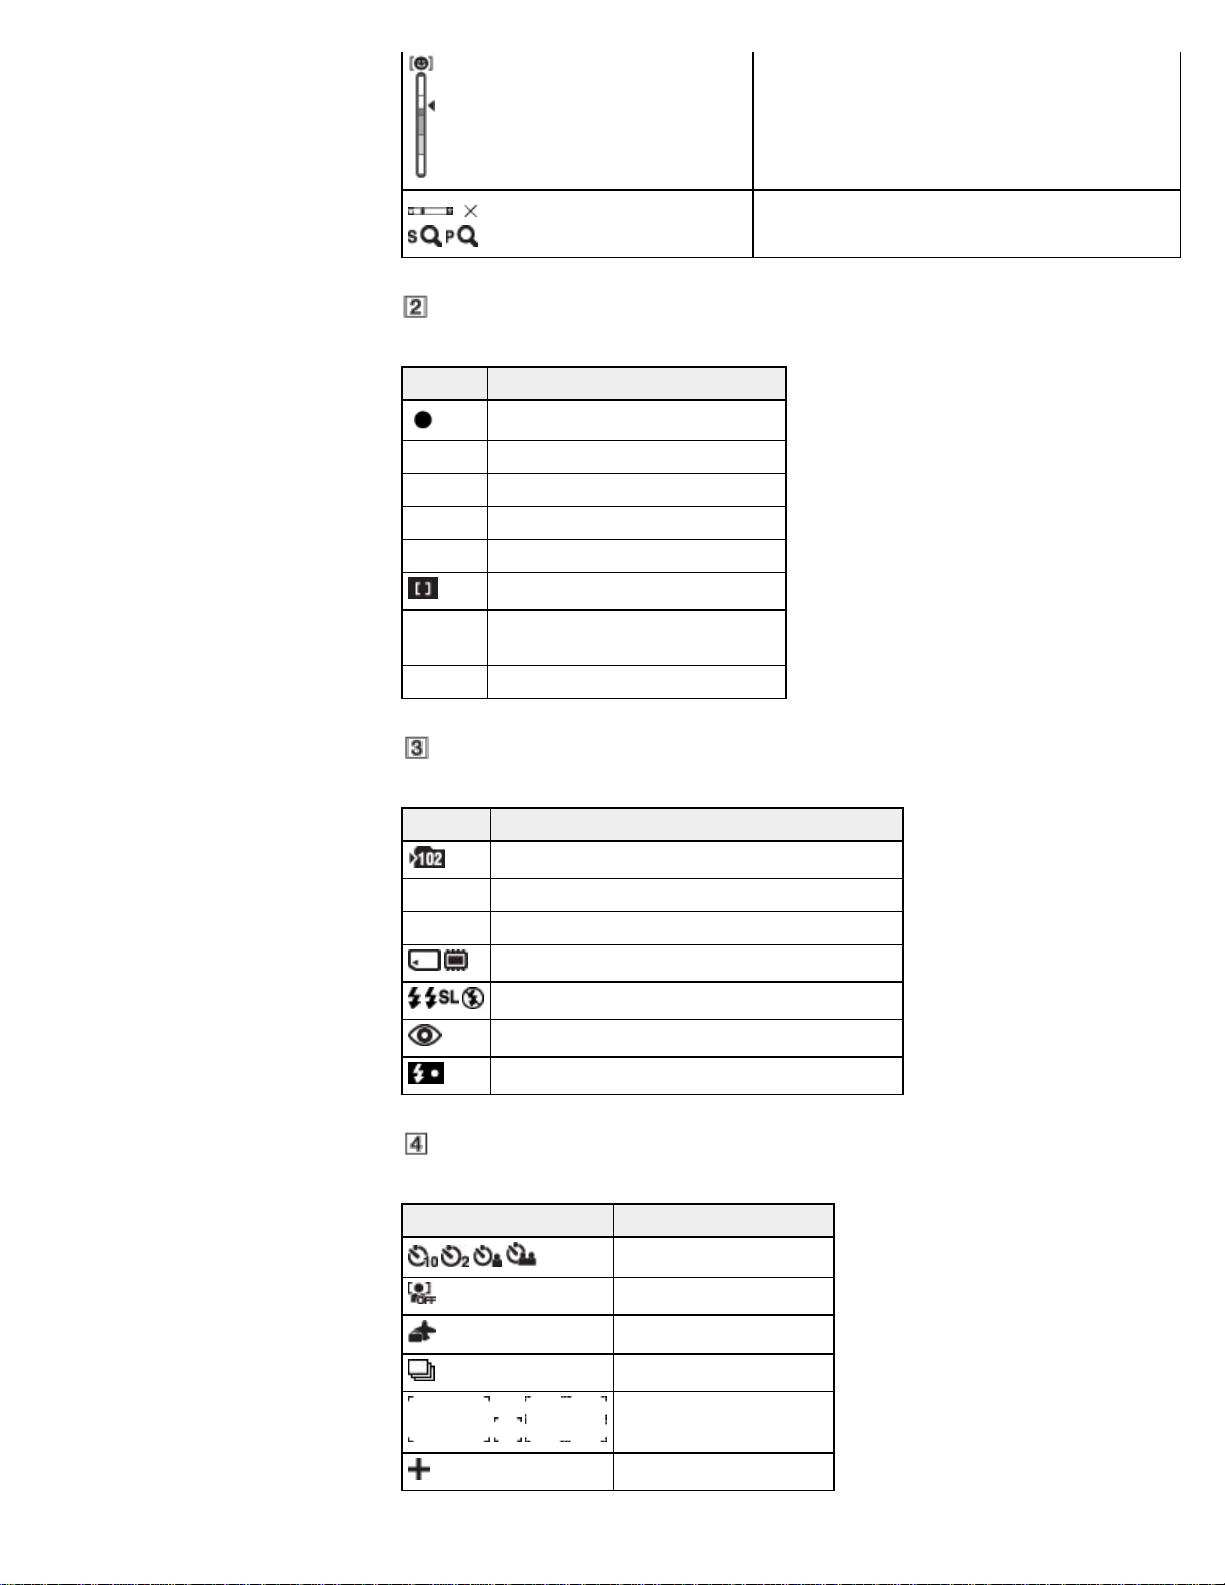
Smile Detection Sensitivity indicator
1.4
Display Indication
AE/AF lock
ISO400 ISO number
125 Shutter speed
F2.8 Aperture value
+2.0EV Exposure value
AF range finder frame indicator
REC
Standby
Recording a movie / Movie standby
0:12 Recording time (m:s)
Zoom scaling
Display Indication
Recording folder
96 Number of recordable images
100Min Recordable time
Recording Media (Memory card, internal memory)
Flash mode
Red-eye reduction
Flash charging
Display Indication
Self-timer
Face detection
Destination
Burst Settings
AF range finder frame
Spot metering cross-hairs
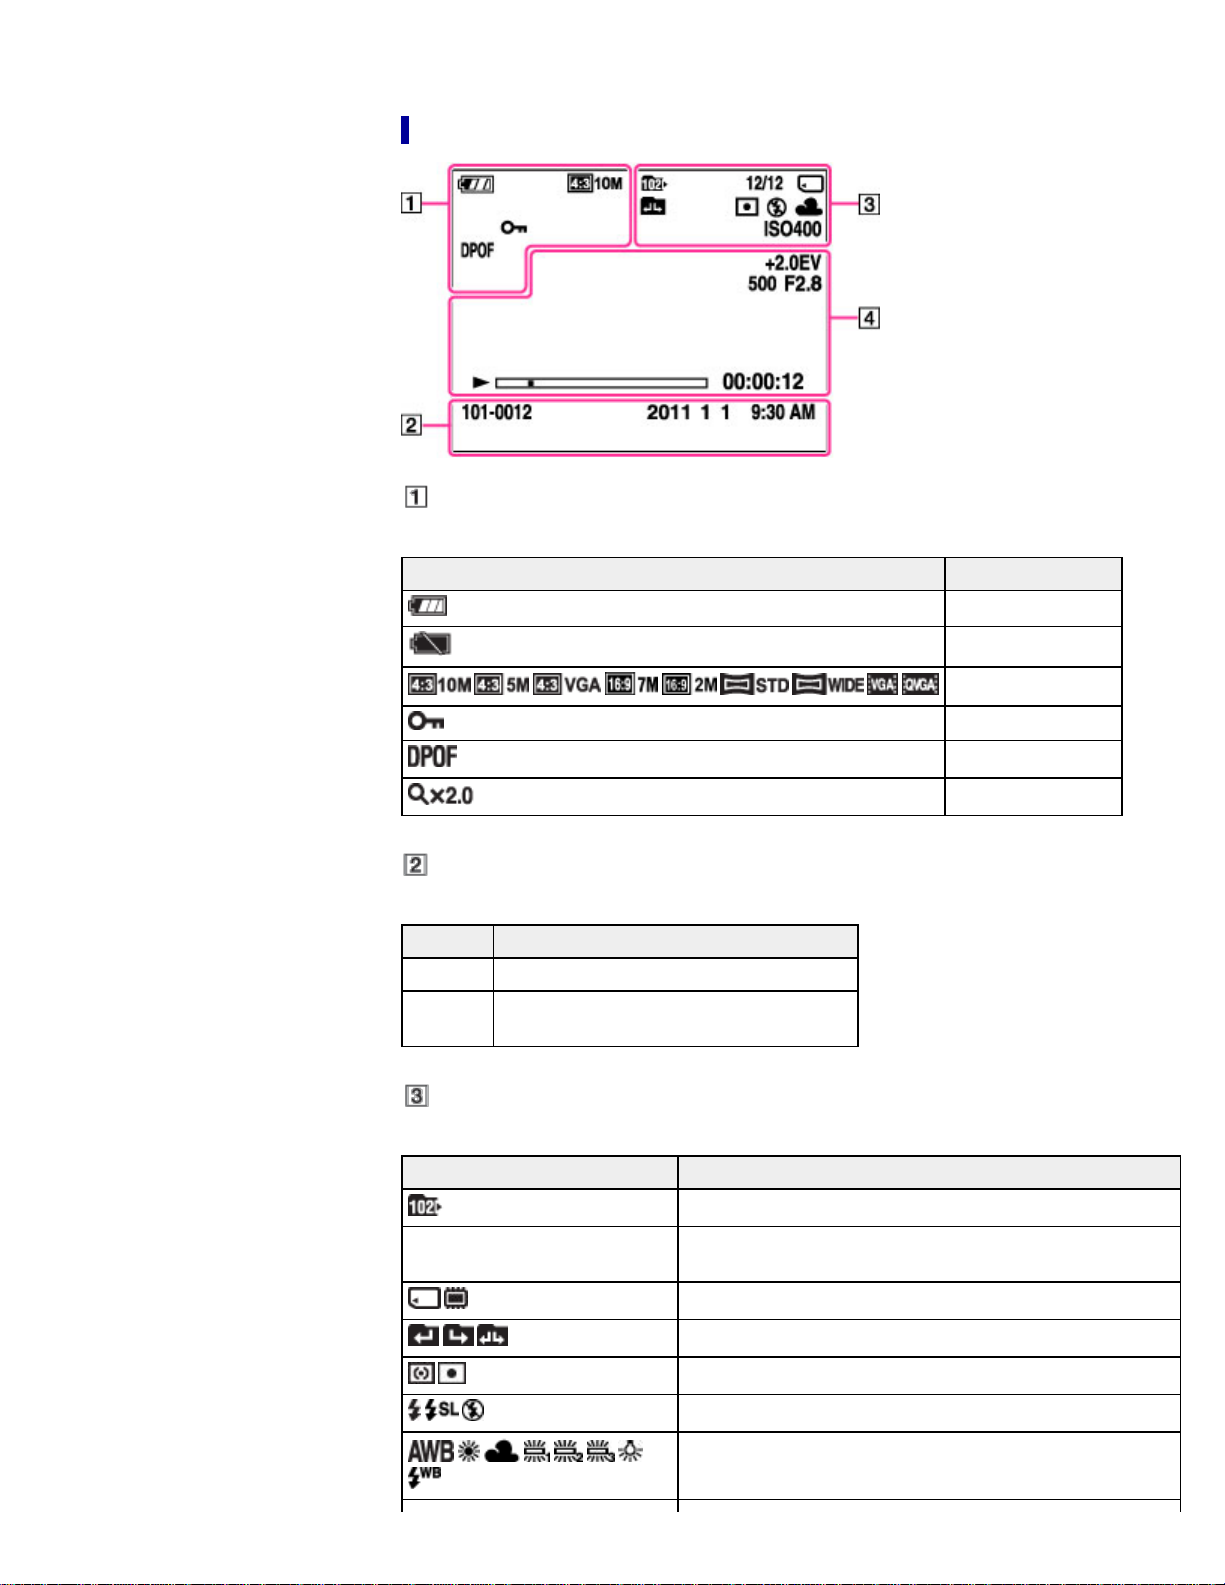
List of viewing mode icons
Display Indication
Battery remaining
Low battery warning
Display Indication
101-0012 Folder-file number
2011 1 1
9:30 AM
Display Indication
12/12
Recorded date / time of the playback image
Playback folder
Image number / Number of images recorded in selected
folder
Image size
Protect
Print order (DPOF)
Playback zoom
Playback Media (Memory card, internal memory)
Changing folder
Metering Mode
Flash mode
White balance
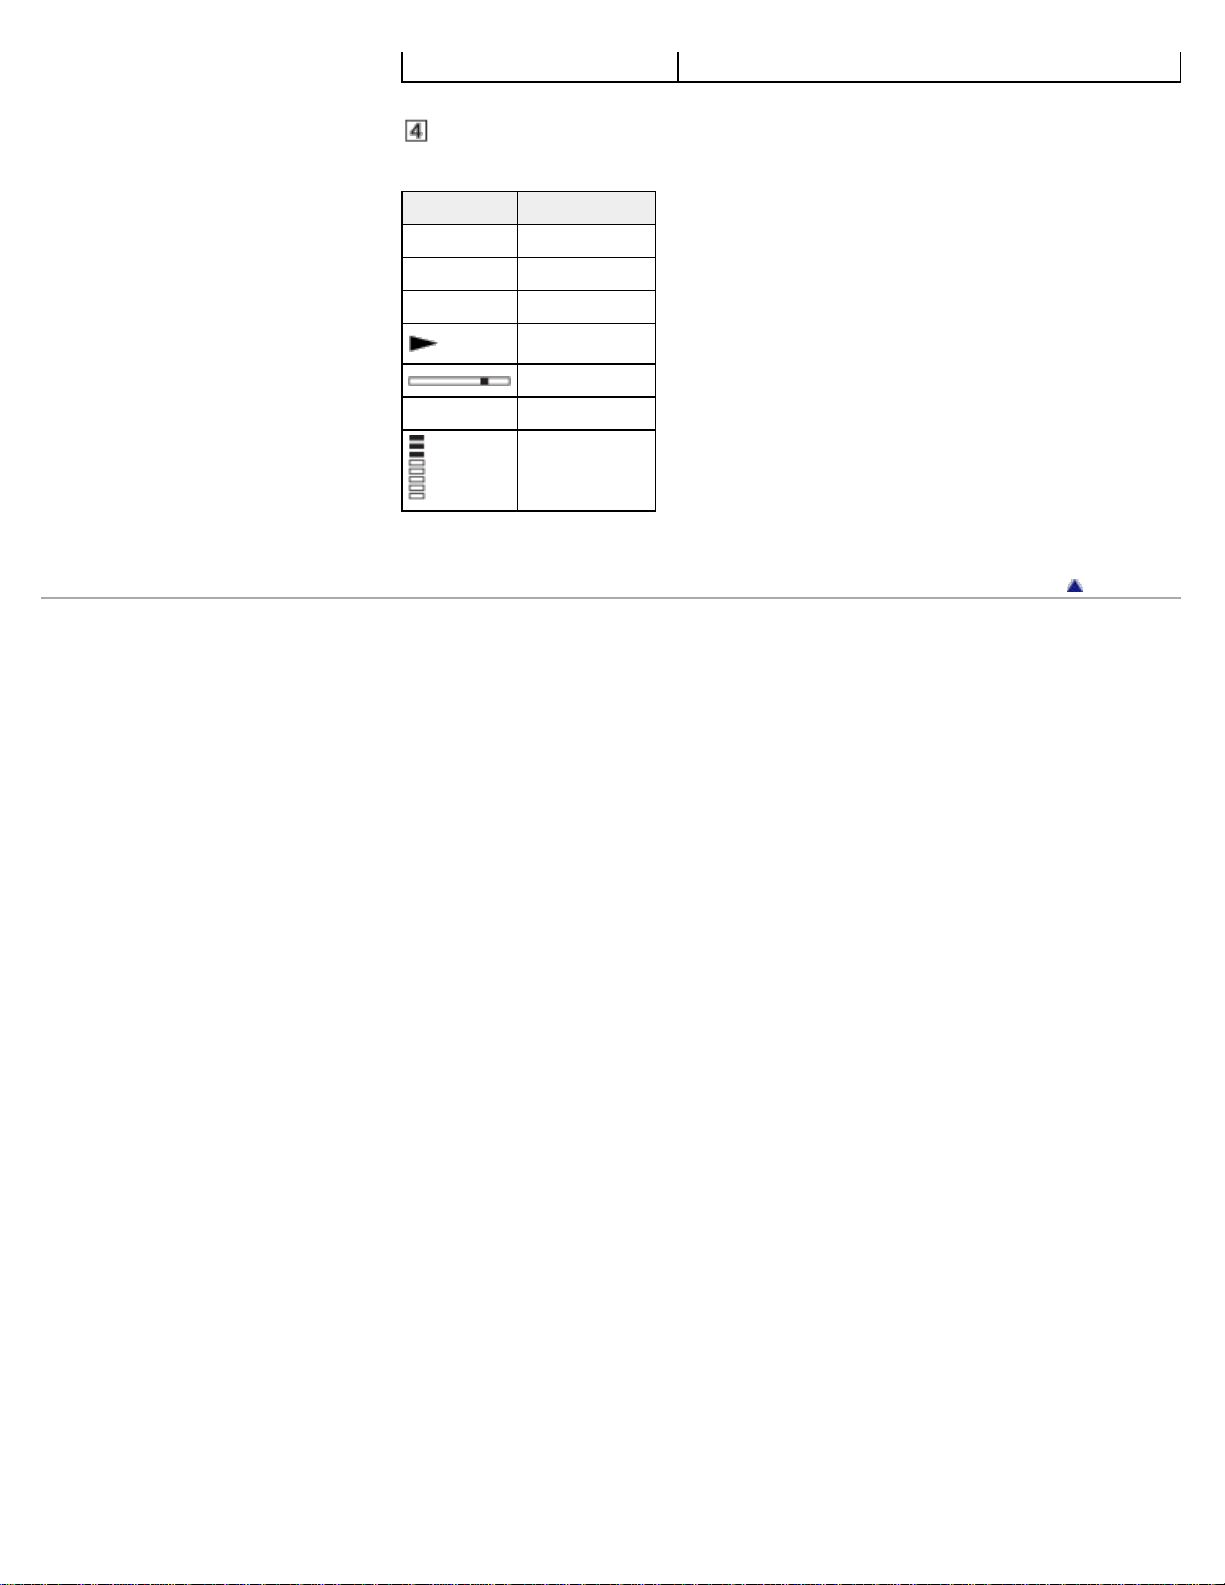
ISO400 ISO number
Display Indication
+2.0EV Exposure value
500 Shutter speed
F2.8 Aperture value
Playback
Playback bar
00:00:12 Counter
Volume
Copyright 2011 Sony Corporation
Back to top
Loading…
Просмотр
Доступно к просмотру 63 страницы. Рекомендуем вам скачать файл инструкции, поскольку онлайн просмотр документа может сильно отличаться от оригинала.
-
4-273-931-42(1)
Digital Still Camera / Instruction Manual  GB
Цифровой фотоаппарат / Инструкция по эксплуатации RU
Цифровий фотоапарат / Посібник з експлуатації  UA
DSC-S3000
-
English
Owner’s Record
The model and serial numbers are located on the bottom. Record the serial number in the
space provided below. Refer to these numbers whenever you call upon your Sony dealer
regarding this product.
Model No. DSC-S3000
Serial No.  ______________________________
WARNING
To reduce fire or shock hazard, do not expose the unit to rain or
moisture.
For Customers in the U.S.A.
If you have any questions about this product, you may call:
Sony Customer Information Center
1-800-222-SONY (7669).
The number below is for the FCC related matters only.
[ Regulatory Information
Declaration of Conformity
Trade Name: SONY
Model No.: DSC-S3000
Responsible Party: Sony Electronics Inc.
Address:  16530 Via Esprillo,
San Diego, CA 92127 U.S.A.
Telephone No.: 858-942-2230
This device complies with Part15 of the FCC Rules. Operation is subject to the
following two conditions: (1) This device may not cause harmful interference, and (2)
this device must accept any interference received, including interference that may cause
undesired operation.
GB
2
-
[ CAUTION
You are cautioned that any changes or modifications not expressly approved in this manual
could void your authority to operate this equipment.
[ Note:
This equipment has been tested and found to comply with the limits for a Class B digital
device, pursuant to Part 15 of the FCC Rules.
These limits are designed to provide reasonable protection against harmful interference in
a residential installation. This equipment generates, uses, and can radiate radio frequency
energy and, if not installed and used in accordance with the instructions, may cause
harmful interference to radio communications. However, there is no guarantee that   GB
interference will not occur in a particular installation. If this equipment does cause harmful
interference to radio or television reception, which can be determined by turning the
equipment off and on, the user is encouraged to try to correct the interference by one or
more of the following measures:
– Reorient or relocate the receiving antenna.
– Increase the separation between the equipment and receiver.
– Connect the equipment into an outlet on a circuit different from that to which the
receiver is connected.
– Consult the dealer or an experienced radio/TV technician for help.
The supplied interface cable must be used with the equipment in order to comply with the
limits for a digital device pursuant to Subpart B of Part 15 of FCC Rules.
For Customers in Europe
[ Notice for the customers in the countries applying EU Directives
The manufacturer of this product is Sony Corporation, 1-7-1 Konan Minato-ku Tokyo,
108-0075 Japan. The Authorized Representative for EMC and product safety is Sony
Deutschland GmbH, Hedelfinger Strasse 61, 70327 Stuttgart, Germany. For any service or
guarantee matters please refer to the addresses given in separate service or guarantee
documents.
This product has been tested and found compliant with the limits set out in the EMC
Directive for using connection cables shorter than 3 meters (9.8 feet).
[ Attention
The electromagnetic fields at the specific frequencies may influence the picture and sound
of this unit.
[ Notice
If static electricity or electromagnetism causes data transfer to discontinue midway (fail),
restart the application or disconnect and connect the communication cable (USB, etc.)
again.
GB
3
- 1
- 2
- 3
- 4
- 63
Раздел: Видео Аудио Фото Оборудование
Тип: Цифровой Фотоаппарат Более 16 Мпикс
Характеристики, спецификации
Тип матрицы:
Super HAD CCD
Разрешение матрицы:
10.3 МПикс
Макс. разрешение:
3648×2736 Пикс
Используемая оптика:
Sony Lens
Фокусное расстояние:
4 — 16 мм
Минимальная дистанция съемки:
от 5 см
Тип карты памяти:
MS Pro DUO, MS Pro-HG DUO, SDHC
Серийная съемка:
0.68 кадр/сек
Автоматическая фокусировка:
Да
Дальность действия вспышки:
6 м
Диапазон выдержки:
2 — 1/2000 сек
Разрешение ЖК дисплея:
230400 Пикс
Скорость видеосъемки:
30 кадр/сек
Тип исп. батареи:
2 x AA (LR 6)
Материал корпуса:
пластик/ металл
Интерфейс связи с ПК:
USB 2.0
Ремень на запястье:
в комплекте
Габаритные размеры (В*Ш*Г):
61*99*30 мм
Краткое описание:
10.3 МПикс;4x;2 x AA (LR 6)
Вид гарантии:
гарантийный талон
Инструкция к Цифровому Фотоаппарату Более 16 Мпикс Sony DSC-S3000 Silver
4-273-931-42(1)
Digital Still Camera / Instruction Manual GB
Цифровой фотоаппарат / Инструкция по эксплуатации
RU
Цифровий фотоапарат / Посібник з експлуатації UA
DSC-S3000

English
Owner’s Record
The model and serial numbers are located on the bottom. Record the serial number in the
space provided below. Refer to these numbers whenever you call upon your Sony dealer
regarding this product.
Model No. DSC-S3000
Serial No. ______________________________
WARNING
To reduce fire or shock hazard, do not expose the unit to rain or
moisture.
For Customers in the U.S.A.
If you have any questions about this product, you may call:
Sony Customer Information Center
1-800-222-SONY (7669).
The number below is for the FCC related matters only.
[ Regulatory Information
Declaration of Conformity
Trade Name: SONY
Model No.: DSC-S3000
Responsible Party: Sony Electronics Inc.
Address: 16530 Via Esprillo,
San Diego, CA 92127 U.S.A.
Telephone No.: 858-942-2230
This device complies with Part15 of the FCC Rules. Operation is subject to the
following two conditions: (1) This device may not cause harmful interference, and (2)
this device must accept any interference received, including interference that may cause
undesired operation.
GB
2

[ CAUTION
You are cautioned that any changes or modifications not expressly approved in this manual
could void your authority to operate this equipment.
[ Note:
This equipment has been tested and found to comply with the limits for a Class B digital
device, pursuant to Part 15 of the FCC Rules.
These limits are designed to provide reasonable protection against harmful interference in
a residential installation. This equipment generates, uses, and can radiate radio frequency
energy and, if not installed and used in accordance with the instructions, may cause
GB
harmful interference to radio communications. However, there is no guarantee that
interference will not occur in a particular installation. If this equipment does cause harmful
interference to radio or television reception, which can be determined by turning the
equipment off and on, the user is encouraged to try to correct the interference by one or
more of the following measures:
– Reorient or relocate the receiving antenna.
– Increase the separation between the equipment and receiver.
– Connect the equipment into an outlet on a circuit different from that to which the
receiver is connected.
– Consult the dealer or an experienced radio/TV technician for help.
The supplied interface cable must be used with the equipment in order to comply with the
limits for a digital device pursuant to Subpart B of Part 15 of FCC Rules.
For Customers in Europe
[ Notice for the customers in the countries applying EU Directives
The manufacturer of this product is Sony Corporation, 1-7-1 Konan Minato-ku Tokyo,
108-0075 Japan. The Authorized Representative for EMC and product safety is Sony
Deutschland GmbH, Hedelfinger Strasse 61, 70327 Stuttgart, Germany. For any service or
guarantee matters please refer to the addresses given in separate service or guarantee
documents.
This product has been tested and found compliant with the limits set out in the EMC
Directive for using connection cables shorter than 3 meters (9.8 feet).
[ Attention
The electromagnetic fields at the specific frequencies may influence the picture and sound
of this unit.
[ Notice
If static electricity or electromagnetism causes data transfer to discontinue midway (fail),
restart the application or disconnect and connect the communication cable (USB, etc.)
again.
GB
3
[ Disposal of Old Electrical & Electronic Equipment (Applicable in
the European Union and other European countries with separate
collection systems)
This symbol on the product or on its packaging indicates that this product
shall not be treated as household waste. Instead it shall be handed over to
the applicable collection point for the recycling of electrical and electronic
equipment. By ensuring this product is disposed of correctly, you will help
prevent potential negative consequences for the environment and human
health, which could otherwise be caused by inappropriate waste handling
of this product. The recycling of materials will help to conserve natural
resources. For more detailed information about recycling of this product,
please contact your local Civic Office, your household waste disposal service or the shop
where you purchased the product.
[ Disposal of waste batteries (applicable in the European Union
and other European countries with separate collection systems)
This symbol on the battery or on the packaging indicates that the battery
provided with this product shall not be treated as household waste.
On certain batteries this symbol might be used in combination with a
chemical symbol. The chemical symbols for mercury (Hg) or lead (Pb) are
added if the battery contains more than 0.0005% mercury or 0.004% lead.
By ensuring these batteries are disposed of correctly, you will help prevent
potentially negative consequences for the environment and human health which could
otherwise be caused by inappropriate waste handling of the battery. The recycling of the
materials will help to conserve natural resources.
In case of products that for safety, performance or data integrity reasons require a
permanent connection with an incorporated battery, this battery should be replaced by
qualified service staff only. To ensure that the battery will be treated properly, hand over
the product at end-of-life to the applicable collection point for the recycling of electrical
and electronic equipment.
For all other batteries, please view the section on how to remove the battery from the
product safely.
Hand the battery over to the applicable collection point for the recycling of waste batteries.
For more detailed information about recycling of this product or battery, please contact
your local Civic Office, your household waste disposal service or the shop where you
purchased the product.
GB
4

Refer to “Cyber-shot User Guide” (HTML) on
supplied CD-ROM
For details on advanced operations, please read “Cyber-shot User Guide”
(HTML) on the CD-ROM (supplied) using a computer.
Insert the CD-ROM into the CD-ROM drive.
GB
For Windows users:
1 Click [User Guide] t [Install].
2 Start “User Guide” from the shortcut on the desktop.
For Macintosh users:
1 Select the [User Guide] and copy [eng] folder stored in the [User Guide]
folder to your computer.
2 After copying is complete, double-click “index.html” in the [eng] folder.
Checking the accessories supplied
• LR6 (size AA) alkaline batteries (2)
• Dedicated USB cable (Sony Corporation 1-837-597-) (1)
• Wrist strap (1)
•CD—ROM (1)
– Cyber-shot application software
– “Cyber-shot User Guide”
• Instruction Manual (this manual) (1)
GB
5
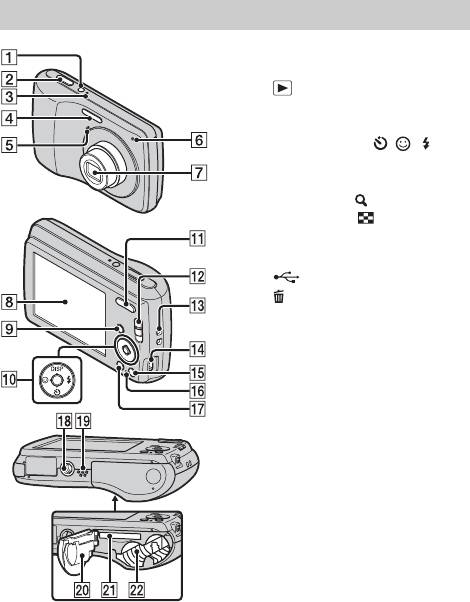
Identifying parts
G Lens
H LCD screen
I (Playback) button
J Control button
Menu on: v/V/b/B/z
Menu off: DISP/ / /
K For shooting: W/T (Zoom)
button
For viewing: (Playback
zoom) button/ (Index) button
L Mode switch
M Hook for wrist strap
N (USB) / A/V OUT jack
O (Delete) button
P Access lamp
Q MENU button
R Tripod receptacle
• Use a tripod with a screw less
than 5.5 mm (7/32 inches) long.
Otherwise, you cannot firmly
secure the camera, and damage to
the camera may occur.
S Speaker
T Battery/memory card cover
U Memory card slot
V Battery insertion slot
A ON/OFF (Power) button
B Shutter button
C ON/OFF (Power) lamp
D Flash
E Microphone
F Self-timer lamp/Smile Shutter
GB
lamp
6
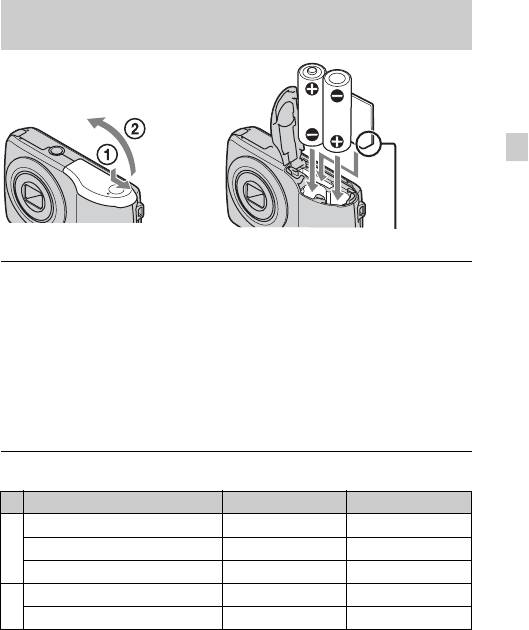
Inserting the batteries/a memory card (sold
separately)
GB
Ensure the notched corner faces correctly.
Open the cover.
1
Insert the memory card (sold separately).
2
• With the notched corner facing as illustrated, insert the memory card
until it clicks into place.
Match +/– and insert the batteries.
3
Close the cover.
4
x
Memory cards that you can use
Memory Card For still images For movies
Memory Stick PRO Duo aa
A
Memory Stick PRO-HG Duo aa
Memory Stick Duo a —
SD memory card aa
B
SDHC memory card aa
In this manual, products in A are collectively referred to as “Memory Stick Duo”
•
media.
• In this manual, products in B are collectively referred to as SD card.
• When recording movies, it is recommended that you use Class 2 or faster SD
cards.
GB
7
x
To remove the memory card/batteries
Memory card: Push the memory card in once.
Batteries: Be sure not to drop the batteries.
Note
• Never open the battery/memory card cover or remove the batteries/memory card
when the access lamp (page 6) is lit. This may cause damage to data in the
memory card/internal memory.
x
Batteries you can and cannot use with your camera
In the table below, a indicates the battery can be used, while — indicates the
one cannot be used.
Battery type Supplied Supported Rechargeable
LR6 (size AA) alkaline
aa—
batteries
HR15/51: HR6 (size AA)
Nickel-Metal Hydride
— aa
batteries
ZR6 (size AA) Oxy Nickel
— a —
Primary batteries
Lithium batteries* — — —
Manganese batteries* — — —
Ni-Cd batteries* — — —
* Operating performance cannot be ensured if voltage drops or other problems are
caused by the nature of the battery.
x
Battery life and number of images you can record/
view
Battery life (min.) No. of Images
Shooting still images Approx. 100 Approx. 200
Viewing still images Approx. 350 Approx. 7000
Shooting movies Approx. 160 —
GB
8

Notes
• The number of images that can be recorded is an approximate number when
shooting with new batteries. The number may be less depending on the
circumstances.
• The number of images that can be recorded is when shooting under the following
conditions:
– Using Sony “Memory Stick PRO Duo” (Mark2) media (sold separately).
– New batteries are used at an ambient temperature of 25°C (77°F).
GB
• The number of still images that can be recorded is based on the CIPA standard,
and is for shooting under the following conditions.
(CIPA: Camera & Imaging Products Association)
– [SteadyShot] is set to [Off].
– DISP (Screen Display Settings) is set to [Normal].
– Shooting once every 30 seconds.
– The zoom is switched alternately between the W and T ends.
– The flash strobes once every two times.
– The power turns on and off once every ten times.
• The battery life for movies is when shooting under the following conditions:
– Recording mode: VGA
– When continuous shooting ends because of set limits (page 16), press the shutter
button down again and continue shooting. Shooting functions such as the zoom
do not operate.
• The values shown for alkaline battery are based on commercial norms, and do not
apply to all alkaline batteries in all conditions. The values may vary, depending on
the battery manufacturer/type, environmental conditions, product setting, etc.
GB
9
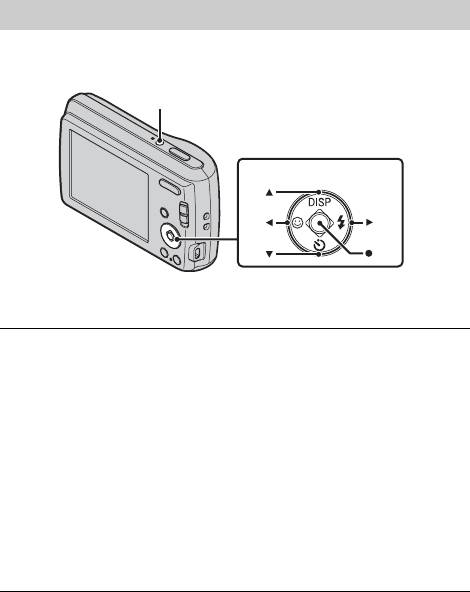
Setting the date and time
Date & Time setting is displayed when you press the ON/OFF (Power) button
for the first time.
ON/OFF (Power)
Control button
Select items: v/V/b/B
Set: z
Press the ON/OFF (Power) button.
1
Date & Time setting is displayed when you press the ON/OFF (Power)
button for the first time.
• It may take time for the power to turn on and allow operation.
Set [Date & Time Format], [Daylight Savings] and [Date
2
& Time], then press [OK].
• Midnight is indicated as 12:00 AM, and noon as 12:00 PM.
Select the desired area following the instructions on the
3
screen, then press z t [OK].
Select the desired display color and display resolution
4
mode, following the instructions on the screen.
GB
10
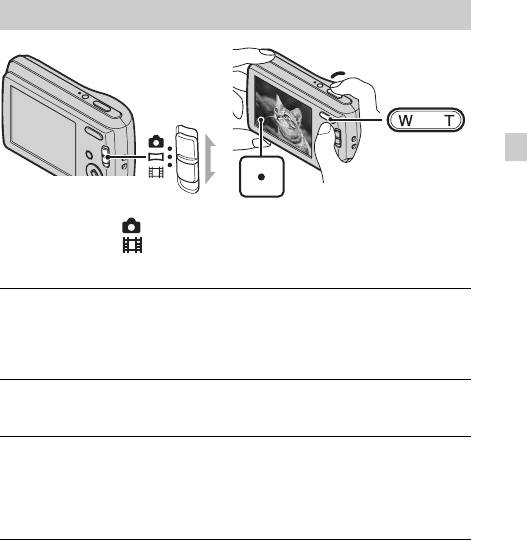
Shooting still images/movies
Shutter button
W: zoom out
GB
T: zoom in
Mode switch
: Still image
: Movie
Shooting still images:
Press the shutter button halfway down to focus.
1
When the image is in focus, a beep sounds and the z indicator lights.
Press the shutter button fully down.
2
Shooting movies:
Press the shutter button fully down to start recording.
1
• You can zoom by pressing the W/T (zoom) button before shooting.
Press the shutter button fully down again to stop
2
recording.
GB
11
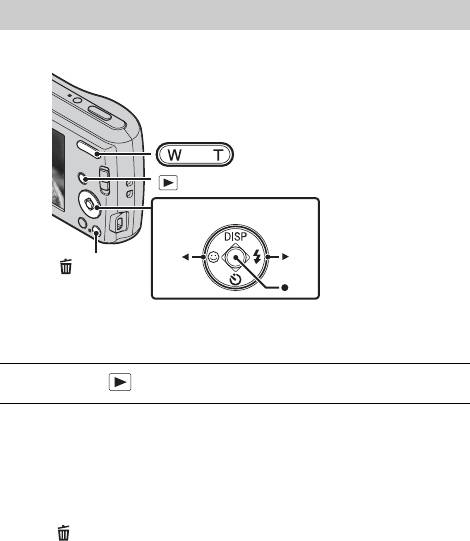
Viewing images
W: zoom out
T: zoom in
(Playback)
Control button
(Delete)
Select images: B (next)/b (previous)
Set: z
Press the (Playback) button.
1
x
Selecting next/previous image
Select an image with B (next)/b (previous) on the control button. Press z in
the center of the control button to view movies.
x
Deleting an image
1 Press (Delete) button.
2 Select [This Image] with v on the control button, then press z.
x
Returning to shooting images
Press the shutter button halfway down.
GB
12
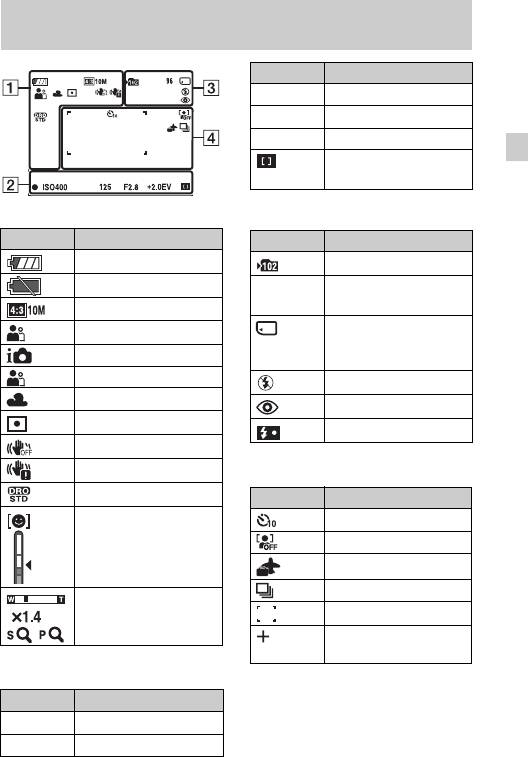
List of icons displayed on the screen
(When shooting still images)
Display Indication
125 Shutter speed
F2.8 Aperture value
+2.0EV Exposure Value
GB
AF range finder frame
indicator
A
C
Display Indication
Display Indication
Battery remaining
Recording folder
Low battery warning
96 Number of recordable
images
Image size
Recording/Playback
Scene Selection
Media (memory card,
Shooting mode
internal memory)
Scene Recognition icon
Flash mode
White balance
Red-eye reduction
Metering Mode
Flash charging
SteadyShot
Vibration warning
D
DRO
Display Indication
Smile Detection
Self-timer
Sensitivity indicator
Face Detection
Destination
Burst Settings
Zoom scaling
AF range finder frame
Spot metering cross-
hairs
B
Display Indication
z
AE/AF lock
GB
ISO400 ISO number
13
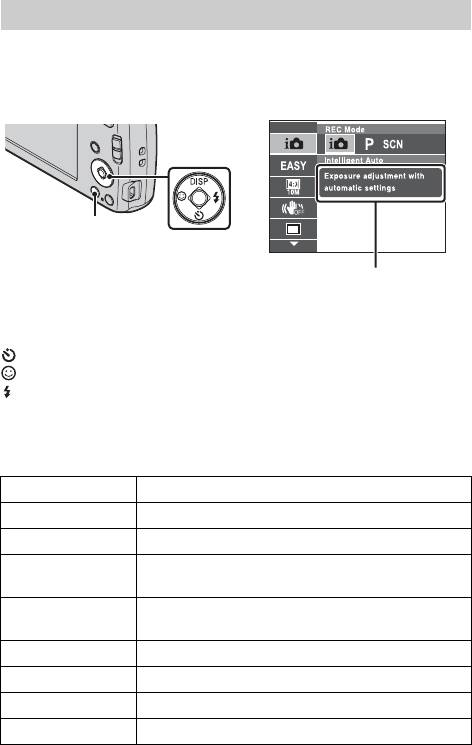
Introduction of other functions
Other functions used when shooting or playing back can be operated using the
Control button or MENU button on the camera. This camera is equipped with
a Function Guide that allows you to easily select from the functions. While
displaying the guide, try the other functions.
Control
button
MENU
Function Guide
x
Control button
DISP (Screen Display Settings): Allows you to change the screen display.
(Self-Timer): Allows you to use the self-timer.
(Smile Shutter): Allows you to use the Smile Shutter mode.
(Flash): Allows you to select a flash mode for still images.
x
Menu Items
Shooting
REC Mode Select recording mode.
Scene Selection Select pre-set settings to match various scene conditions.
Easy Mode Shoot still images using minimal functions.
Set the direction to pan the camera when shooting Sweep
Shooting Direction
Panorama images.
Select the image size for still images, panoramic images
Image Size
or movie files.
SteadyShot Select the anti-blur mode.
Burst Settings Select single-image mode or burst mode.
EV Adjust the exposure manually.
GB
ISO Adjust the luminous sensitivity.
14
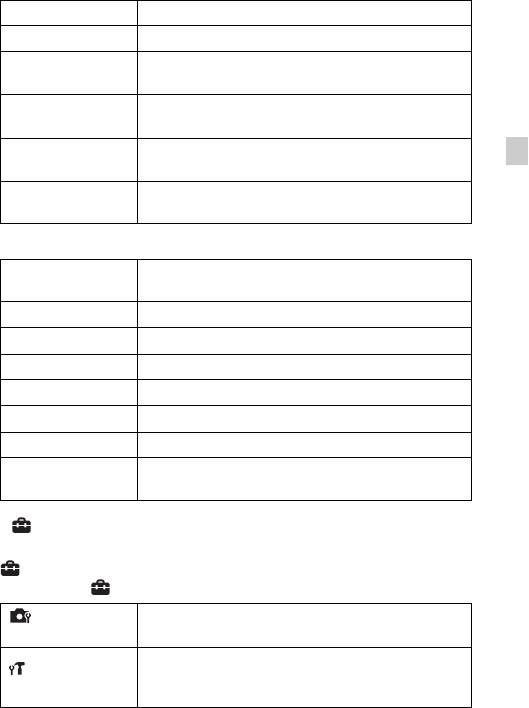
White Balance Adjust color tones of an image.
Focus Select the focus method.
Select the metering mode that sets which part of the
Metering Mode
subject to measure to determine the exposure.
Smile Detection
Set the Smile Shutter function sensitivity for detecting
Sensitivity
smiles.
The camera detects faces and adjusts various settings
GB
Face Detection
automatically.
Set DRO function to correct the brightness and contrast
DRO
and improve the image quality.
Viewing
Set the text-size increases and all indicators become
Easy Mode
easier to see.
Slideshow Select a method of continuous playback.
Retouch Retouch an image using various effects.
Delete Delete an image.
Protect Protect the images.
DPOF Add a print order mark to a still image.
Rotate Rotate a still image to the left or right.
Select a folder which contains the images you want to
Select Folder
play back.
x
Setting items
If you press the MENU button while shooting or during playback,
(Settings) is provided as a final selection. You can change the default
settings on the (Settings) screen.
Grid Line/Disp. Resolution/Digital Zoom/Red Eye
Shooting Settings
Reduction
Beep/Language Setting/Function Guide/Display color/
Power Save/Initialize/Video Out/USB Connect/LUN
Main Settings
Setting
GB
15
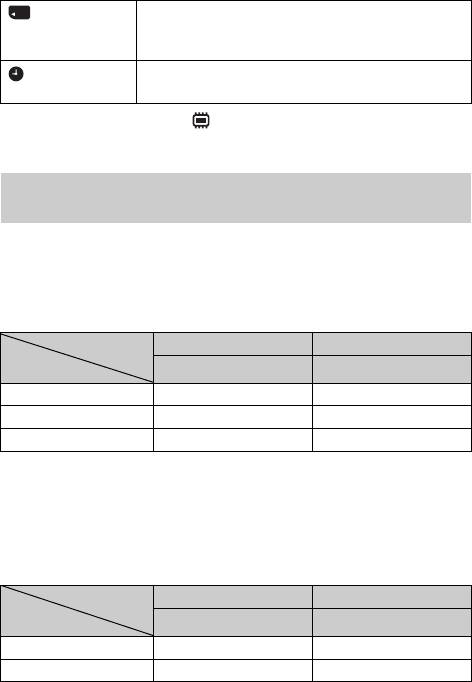
Format/Create REC. Folder/Change REC. Folder/Delete
Memory Card
REC. Folder/Copy/File Number
Tool
*
Area Setting/Date & Time Setting
Clock Settings
* If a memory card is not inserted, (Internal Memory Tool) will be displayed and
only [Format] and [File Number] can be selected.
Number of still images and recordable time of
movies
The number of still images and recordable time may vary depending on the
shooting conditions and the memory card.
x
Still images
(Units: Images)
Capacity
Internal memory Memory card
Size
Approx. 6 MB 2 GB
10M 1 440
VGA 35 11000
16:9(7M) 1 520
x
Movies
The table below shows the approximate maximum recording times. These are
the total times for all movie files. The recordable movie file size is up to
approx. 2 GB for each file.
(Units: hour : minute : second)
Capacity
Internal memory Memory card
Size
Approx. 6 MB 2 GB
VGA 0:00:05 0:25:00
QVGA 0:00:15 1:15:00
GB
16

Notes on using the camera
Changing the language setting
The screen language setting, press the MENU button, then select
(Settings) t (Main Settings) t [Language Setting].
On use and care
Avoid rough handling, disassembling, modifying, physical shock, or impact
such as hammering, dropping or stepping on the product. Be particularly
GB
careful of the lens.
Notes on recording/playback
• Before you start recording, make a trial recording to make sure that the
camera is working correctly.
• The camera is neither dust-proof, nor splash-proof, nor water-proof.
• Avoid exposing the camera to water. If water enters inside the camera, a
malfunction may occur. In some cases, the camera cannot be repaired.
• Do not aim the camera at the sun or other bright light. It may cause the
malfunction of the camera.
• If moisture condensation occurs, remove it before using the camera.
• Do not shake or strike the camera. It may cause a malfunction and you may
not be able to record images. Furthermore, the recording media may become
unusable or image data may be damaged.
Do not use/store the camera in the following places
• In an extremely hot, cold or humid place
In places such as in a car parked in the sun, the camera body may become
deformed and this may cause a malfunction.
• Under direct sunlight or near a heater
The camera body may become discolored or deformed, and this may cause a
malfunction.
• In a location subject to rocking vibration
• Near a location that generates strong radio waves, emits radiation or is
strongly magnetic place. Otherwise, the camera may not properly record or
play back images.
• In sandy or dusty places
Be careful not to let sand or dust get into the camera. This may cause the
camera to malfunction, and in some cases this malfunction cannot be
repaired.
GB
17
On carrying
Do not sit down in a chair or other place with the camera in the back pocket of
your trousers or skirt, as this may cause malfunction or damage the camera.
On the battery
• Avoid rough handling, disassembling, modifying, physical shock, or impact
such as hammering, dropping or stepping on the battery.
• Do not use a deformed or damaged battery.
• Do not mix a used battery together with a new battery or different types of
batteries.
• Remove the batteries from the camera when you do not operate the camera
for long periods, or when the batteries are dead.
Notes on the LCD screen and lens
The LCD screen is manufactured using extremely high-precision technology
so over 99.99% of the pixels are operational for effective use. However, some
tiny black and/or bright dots (white, red, blue or green) may appear on the
LCD screen. These dots are a normal result of the manufacturing process, and
do not affect the recording.
On camera’s temperature
Your camera and battery may get warm due to continuous use, but it is not a
malfunction.
Warning on copyright
Television programs, films, videotapes, and other materials may be
copyrighted. Unauthorized recording of such materials may be contrary to the
provisions of the copyright laws.
No compensation for damaged content or recording failure
Sony cannot compensate for failure to record or loss or damage of recorded
content due to a malfunction of the camera or recording media, etc.
Cleaning the camera surface
Clean the camera surface with a soft cloth slightly moistened with water, then
wipe the surface with a dry cloth. To prevent damage to the finish or casing:
– Do not expose the camera to chemical products such as thinner, benzine, alcohol,
disposable cloths, insect repellent, sunscreen or insecticide.
GB
18
Specifications
Camera
[Input and Output connectors]
(USB)/A/V OUT terminal:
[System]
Video output
Image device:
Audio output (Monaural)
6.14 mm (1/2.9 type) color CCD,
USB communication
Primary color filter
USB communication: Hi-Speed USB
GB
Total pixel number of camera:
(USB 2.0)
Approx. 10.3 Megapixels
Effective pixel number of camera:
[LCD screen]
Approx. 10.1 Megapixels
LCD panel:
Lens: 4× zoom lens
6.7 cm (2.7 type) TFT drive
f = 4.0 mm – 16.0 mm (28 mm –
Total number of dots: 230 400 (960
112 mm (35 mm film equivalent))
× 240) dots
F3.0 (W) – F5.7 (T)
Exposure control: Automatic exposure,
[Power, general]
Scene Selection (9 modes)
Power: LR6 (size AA) alkaline
White balance: Automatic, Daylight,
batteries (2), 3 V
Cloudy, Fluorescent 1/2/3,
HR15/51: HR6 (size AA) Nickel-
Incandescent, Flash
Metal Hydride batteries (2) (sold
Recording interval for Burst mode:
separately), 2.4 V
Approx. 1.5 second
ZR6 (size AA) Oxy Nickel Primary
File format:
batteries (2) (sold separately), 3 V
Still images: JPEG (DCF Ver. 2.0,
Power consumption (during shooting):
Exif Ver. 2.3, MPF Baseline)
1.1 W
compliant, DPOF compatible
Operating temperature: 0°C to 40°C
Movies: AVI (Motion JPEG)
(32°F to 104°F)
Recording media: Internal Memory
Storage temperature: –20°C to +60°C
(approx. 6 MB), “Memory Stick
(–4°F to +140°F)
Duo” media, SD card
Dimensions (CIPA compliant):
Flash: Flash range (ISO sensitivity
99.0 mm × 61.0 mm × 29.3 mm
(Recommended exposure Index)
(4 inches × 2 1/2 inches
set to Auto):
× 1 3/16 inches) (W/H/D)
Approx. 0.5 m to 3.0 m (1 ft 7 3/4
Mass (CIPA compliant): Approx. 167 g
inches to 9 ft 10 1/8 inches) (W)/
(5.9 oz) (including two batteries
approx. 0.5 m to 1.5 m (1 ft 7 3/4
and “Memory Stick Duo” media)
inches to 4 ft 11 1/8 inches) (T)
Microphone: Monaural
Speaker: Monaural
Exif Print: Compatible
PRINT Image Matching III:
GB
Compatible
19
Design and specifications are subject to
Trademarks
change without notice.
• The following marks are trademarks
of Sony Corporation.
, “Cyber-shot,”
“Memory Stick PRO Duo,”
“Memory Stick PRO-HG Duo,”
“Memory Stick Duo”
• Windows is registered trademark of
Microsoft Corporation in the United
States and/or other countries.
• Macintosh is registered trademark of
Apple Inc.
• SDHC logo is trademarks of SD-3C,
LLC.
• In addition, system and product
names used in this manual are, in
general, trademarks or registered
trademarks of their respective
developers or manufacturers.
However, the ™ or ® marks are not
used in all cases in this manual.
Additional information on this
product and answers to frequently
asked questions can be found at
our Customer Support Website.
Printed on 70% or more recycled paper
using VOC (Volatile Organic
Compound)-free vegetable oil based
ink.
GB
20
Оглавление
Аннотации для Цифрового Фотоаппарата Более 16 Мпикс Sony DSC-S3000 Silver в формате PDF
Топ 10 инструкций
Другие инструкции