
Предпросмотр документа
· инструкция (руководство, документация) для музыкального центра Sony MHC-GZR9D
·
28 января 2022 етырий
сервис мануал ( схема ) Ver. 1.1 2005. 12
Файл: man3504-sony_hcd-gnz7d_gnz8d_gnz9d_ver1.1.pdf
Размер: 10.97 Мб
Открыть файл
834 просмотра
добавить комментарий
Mini Hi-Fi
Component
System
Operating Instructions
2-583-714-11(2)
MHC-GNZ9D
MHC-GNZ8D
MHC-GNZ7D
MHC-GNZ5D
©2005 Sony Corporation

WARNING
To prevent fire or shock hazard, do not
expose the unit to rain or moisture.
To prevent fire, do not cover the ventilation of the
apparatus with news papers, table-cloths, curtains, etc.
And don’t place lighted candles on the apparatus.
To prevent fire or shock hazard, do not place objects
filled with liquids, such as vases, on the apparatus.
Do not install the appliance in a confined space,
such as a bookcase or built-in cabinet.
This appliance is
classified as a CLASS 1
LASER product. This
marking is located on the
rear exterior.
Don’t throw away the battery with
general house waste, dispose of it
correctly as chemical waste.
ENERGY STAR
®
ENERGY STAR® is a U.S.
registered mark. As an E
®
TAR
partner, Sony Corporation
S
has determined that this product
meets the E
guidelines for energy efficiency.
NERGY STAR
NERGY
®
Note on power cord plug shapes
(Saudi Arabian model only)
For AC 220 V wall sockets:
1 Make the appropriate voltage setting on the
system. (only for models with a voltage
selector)
2 Make sure that the 13 A 3-pin plug (Type
BF) is securely attached to the power cord.
(The 13 A 3-pin plug is attached when
shipped from the factory.)
For AC 127 V wall sockets
1 Make the appropriate voltage setting on the
system. (only for models with a voltage
selector)
2 Remove the 13 A 3-pin plug using a
screwdriver.
®
is a video file compression technology,
DivX
developed by DivXNetworks, Inc.
DivX, DivX Certified, and associated logos are
trademarks of DivXNetworks, Inc. and are used under
license.
TM
and ® marks are omitted in this manual.
1)
This system incorporates Dolby
Logic (II) adaptive matrix surround decoder, and
2)
Digital Surround System.
DTS
1)
Manufactured under license from Dolby
Laboratories.
“Dolby”, “Pro Logic”, and the double-D symbol are
trademarks of Dolby Laboratories.
2)
Manufactured under license from Digital Theater
Systems, Inc. “DTS” and “DTS Digital Surround”
are registered trademarks of Digital Theater
Systems, Inc.
GB
2
Digital, Dolby Pro
3 Attach the supplied parallel blade plug (Type
A).

Table of Contents
How to use this manual………………………5
Playable discs……………………………………5
Getting Started
Hooking up the system……………………….8
Positioning the speakers……………………12
(MHC-GNZ9D/GNZ8D only)
Setting the clock………………………………14
Performing the Quick Setup………………14
DVD/VIDEO CD/CD/MP3/JPEG/
DivX – Play
Loading a disc…………………………………17
Playing a disc………………………………….17
Creating your own program………………20
— Program Play
Playing in random order……………………21
— Shuffle Play
Playing repeatedly……………………………22
— Repeat Play
Playing DVDs using the menu…………..23
Selecting “ORIGINAL” or “PLAY LIST”
on a DVD-RW …………………………..24
Playing VIDEO CDs with PBC functions
(Ver. 2.0)…………………………………..24
— PBC Play
About MP3 audio tracks and JPEG image
files ………………………………………….25
Playing DATA CDs with MP3 audio track
and JPEG image files………………….26
Playing audio tracks and images as a slide
show with sound………………………..29
Playing DivX® video files………………..31
(Except for MHC-GNZ9D Latin
American model, GNZ8D Latin
American model, GNZ7D and
GNZ5D)
Using the on-screen display to search… 32
Searching by scene…………………………..34
— Picture Navigation
DVD/VIDEO CD/CD/MP3/JPEG/
DivX – Various functions
Changing the sound………………………… 35
Adjusting the delay between the picture
and sound…………………………………. 37
— A/V SYNC
Using the Setup Display ………………….. 37
Setting the display or sound track
language ………………………………….. 38
— LANGUAGE SETUP
Settings for the display ……………………. 39
— SCREEN SETUP
Custom settings………………………………. 42
— CUSTOM SETUP
Speaker settings……………………………… 43
— SPEAKER SETUP (except for
MHC-GNZ5D)
Restricting disc playback…………………. 45
— CUSTOM PARENTAL
CONTROL/PARENTAL
CONTROL
Changing the angles………………………… 49
Displaying the subtitles …………………… 49
Tuner
Presetting radio stations…………………… 50
Listening to the radio………………………. 51
— Preset Tuning
— Manual Tuning
Tape – Play
Loading a tape ……………………………….. 52
Playing a tape…………………………………. 52
Tape – Recording
Recording your favorite CD tracks on a
tape …………………………………………. 53
— CD-TAPE Synchro Recording
Recording on a tape manually ………….. 54
— Manual Recording
continued
GB
3

Sound Adjustment
Adjusting the sound …………………………55
Selecting the sound effect …………………55
Selecting the surround effect ……………. 55
Adjusting the graphic equalizer and
storing ………………………………………57
Singing along: Karaoke……………………. 57
Timer
Falling asleep to music……………………..61
— Sleep Timer
Waking up to music…………………………61
— Play Timer
Timer recording radio programs ……….. 62
— Rec Timer
Display
Turning off the display……………………..63
— Power Saving Mode
Changing the Power illuminator……….. 63
(Except for MHC-GNZ5D)
Viewing information about the disc in the
display……………………………………… 64
Viewing information about the disc in the
on-screen display……………………….65
Checking the date information………….. 67
Troubleshooting
Problems and remedies……………………. 72
Self-diagnosis function……………………. 77
(When letters/numbers appear in
the display)
Messages……………………………………….. 78
Additional Information
Precautions ……………………………………. 79
Specifications ………………………………… 81
Language code list………………………….. 84
List of items that can be displayed and
selected by disc type………………….. 85
System setup item list……………………… 87
Glossary………………………………………… 88
List of button locations and reference
pages……………………………………….. 91
Optional Components
Controlling the TV with the remote…… 68
Using the THEATRE SYNC
function…………………………………….68
Hooking up optional components……… 69
Listening to audio from a connected
component ………………………………..70
(Except for MHC-GNZ5D)
Enjoying the 5.1 channel sound with the
optional amplifier ………………………71
(MHC-GNZ7D/GNZ5D only)
Recording audio from a connected
component ………………………………..71
(Except for MHC-GNZ5D)
Recording on a connected
component ………………………………..71
(Except for MHC-GNZ5D)
GB
4

How to use this manual
Playable discs
• This manual mainly explains operations using
the remote, but the same operations can also
be performed using the buttons on the unit
having the same or similar names.
• The OSD (on-screen display) may vary
depending on the country model.
• The English OSD screen (on-screen display)
is used for illustration purposes only.
• The Setup items may be different depending
on the area or model.
• “DVD” may be used as a general term for
DVD VIDEOs, DVD+RWs/DVD+Rs and
DVD-RWs/DVD-Rs.
• The following symbols are used in this
manual.
Symbol Meaning
Functions available for DVD
VIDEOs, DVD-Rs/DVD-RWs in
video mode, and DVD+Rs/
DVD+RWs
Functions available for
DVD-RWs in VR (Video
Recording) mode
Functions available for VIDEO
CDs (including Super VCDs or
CD-Rs/CD-RWs in video CD
format or Super VCD format)
Functions available for music
CDs or CD-Rs/CD-RWs in music
CD format
Functions available for DATA
CDs (CD-ROMs/CD-Rs/
CD-RWs containing MP3 audio
tracks, JPEG image files and
*
DivX
video files)
*
Functions available for DATA
DVDs (DVD-Rs/DVD-RWs/
DVD+Rs/DVD+RWs)
containing DivX video files
*
Except for MHC-GNZ9D Latin American
model, GNZ8D Latin American model, GNZ7D
and GNZ5D
You can play back the following discs on this
system. Other discs cannot be played back.
List of playable discs
Format of discs Disc logo
DVD VIDEO
DVD-RW
VIDEO CD
Audio CD
CD-R/CD-RW
(audio data/MP3
files/JPEG files)
The “DVD VIDEO” logo and “DVD-RW” logo are
trademarks.
continued
GB
5
Region code of DVDs you can
play on this system
Your system has a region code printed on the
back of the unit and will only play DVDs labeled
with identical region code.
DVDs labeled will also be played on this
ALL
system.
If you try to play any other DVD, the message
“Playback prohibited by area limitations.” will
appear on the TV screen. Depending on the
DVD, no region code indication may be labeled
even though playing the DVD is prohibited by
area restrictions.
X
Region code
MODEL NO. HCD-GNZXX
DVD DECK RECEIVER
AC: 00V 00Hz 00W
SERIAL NO:
Discs that this system cannot
play
• CD-ROMs/CD-Rs/CD-RWs other than those
recorded in the following formats:
– music CD format
– video CD format
– MP3 (MPEG1 Audio Layer-3)/JPEG/
2)
format that conforms to ISO96601)
DivX
Level 1/Level 2 or Joliet
– DivX format
• CD-ROMs recorded in PHOTO CD format
• Data part of CD-Extras
• Super Audio CDs
• DVD-ROMs/DVD-Rs/DVD-RWs/DVD+Rs/
DVD+RWs other than those recorded in
DivX format conforming to Universal Disk
Format (UDF).
• DVD-ROMs/DVD-Rs/DVD-RWs/DVD+Rs/
DVD+RWs recorded in Multi Session
• DVD-RAMs
• DVD Audio discs
• A DVD with a different region code.
• Discs with non-standard shapes (e.g., heart,
square, star) cannot be played on this unit.
Attempting to do so may damage the unit. Do
not use such discs.
2)
2)
• A disc with paper or stickers on it.
• A disc that has the adhesive, cellophane tape,
or a sticker still left on it.
1)
A logical format of files and folders on a
CD-ROMs, defined by ISO (International
Organization for standardization).
2)
Except for MHC-GNZ9D Latin American model,
GNZ8D Latin American model, GNZ7D and
GNZ5D
Notes about CD-R/CD-RW/
DVD-R/DVD-RW/DVD+R/
DVD+RW
• In some cases, CD-Rs, CD-RWs, DVD-Rs,
DVD-RWs, DVD+R or DVD+RW cannot be
played on this system depending upon the
recording quality or physical condition of the
disc, or the characteristics of the recording
device. Furthermore, the disc will not play if
it has not been correctly finalized. For more
information, see the operating instructions for
the recording device.
• A disc recorded in packet write format cannot
be played.
Note on playback operations
of DVDs and VIDEO CDs
Some playback operations of DVDs and VIDEO
CDs may be intentionally set by software
producers. Since this system plays DVDs and
VIDEO CDs according to the disc contents the
software producers designed, some playback
features may not be available. Also, refer to the
instructions supplied with the DVDs or VIDEO
CDs.
GB
6

Music discs encoded with
copyright protection
technologies
Cautions when playing a disc
that is recorded in Multi
Session
This product is designed to playback discs that
conform to the Compact Disc (CD) standard.
Recently, various music discs encoded with
copyright protection technologies are marketed
by some record companies. Please be aware that
among those discs, there are some that do not
conform to the CD standard and may not be
playable by this product.
Note on DualDiscs
• A DualDisc is a two sided disc product which mates
DVD recorded material on one side with digital
audio material on the other side.
• However, since the audio material side does not
conform to the Compact Disc (CD) standard,
playback on this product is not guaranteed.
• This system can play Multi Session CDs
when an MP3 audio track is contained in the
first session. Any subsequent MP3 audio
tracks recorded in later sessions can also be
played back.
• This system can play Multi Session CDs
when a JPEG image file is contained in the
first session. Any subsequent JPEG image
files recorded in later sessions can also be
played back.
• If audio tracks and images in music CD
format or video CD format are recorded in the
first session, only the first session will be
played back.
• CD-R and CD-RW discs recorded in multisession that have not ended by “closing the
session” are not supported.
• With CD-ROMs/CD-Rs/CD-RWs that
contain DivX video files in addition to MP3
audio tracks or JPEG image files, the system
plays only the DivX video files.*
* Except for MHC-GNZ9D Latin American model,
GNZ8D Latin American model, GNZ7D and
GNZ5D
Copyrights
This product incorporates copyright protection
technology that is protected by U.S. patents and
other intellectual property rights. Use of this
copyright protection technology must be
authorized by Macrovision, and is intended for
home and other limited viewing uses only unless
otherwise authorized by Macrovision. Reverse
engineering or disassembly is prohibited.
GB
7
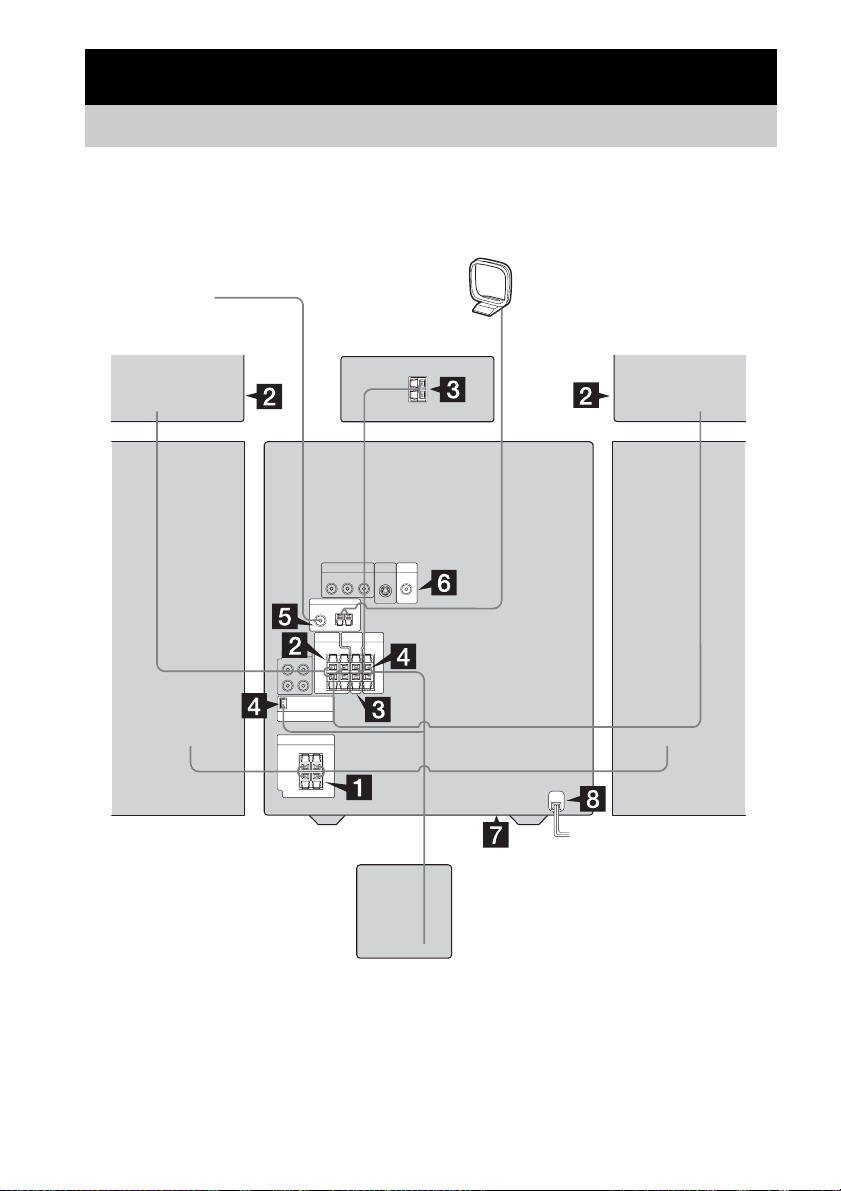
Getting Started
Hooking up the system
Perform the following procedures 1 to 9 to hook up your system using the supplied cords and
accessories. The type of speakers supplied varies according to the model you purchased (see
“Specifications” on page 81). MHC-GNZ9D is used for illustration purposes.
AM loop antenna
FM antenna
Surround speaker
1)
(Right)
Front speaker (Right)
Center speaker
Surround speaker
1)
1)
(Left)
Front speaker (Left)
Subwoofer
1)
MHC-GNZ9D/GNZ8D only
2)
MHC-GNZ9D only
GB
8
2)

1 Connect the front speakers.
Connect the right and left speaker cords to
the FRONT SPEAKER jacks as shown
below.
Insert only the stripped portion
+
3 Connect the center speaker.
(MHC-GNZ9D/GNZ8D only)
Connect the speaker cords to the CENTER
SPEAKER jacks as shown below.
Main unit
Insert only the stripped portion
R
L
+
Getting Started
Gray/Solid
(3)
–
Black/Stripe (#)
2 Connect the surround speakers.
(MHC-GNZ9D/GNZ8D only)
Connect the speaker cords to the
SURROUND SPEAKER jacks as shown
below.
Main unit
Insert only the stripped portion
R
L
+
Gray/Solid
(3)
Black/Stripe (#)
Speakers
Black/Stripe
(#)
–
+
Gray/Solid (3)
Gray/Solid
(3)
Black/Stripe (#)
Speakers
Black/Stripe
(#)
Gray/Solid (3)
4 Connect the subwoofer.
(MHC-GNZ9D only)
Connect the speaker cords to the
SUBWOOFER jacks and SUBWOOFER
CONTROL jack as shown below.
Insert only the stripped portion
R
L
+
SUB
WOOFER
Note
For MHC-GNZ9D, the speaker cords are attached to
the surround speakers. Connect the surround speaker
cords to the main unit only.
SUBWOOFER
CONTROL
Gray/Solid (3)
Black/
Stripe (#)
continued
GB
9

5 Connect the FM and AM antennas.
Set up the AM loop antenna, then connect
it.
Extend the FM lead antenna horizontally
FM
75
COAXIAL
AM loop antenna
Note
AM
Keep the antennas away from the speaker cords.
6 Connect the video input jack of your TV
to the VIDEO OUT jack with the
supplied video cable.
S VIDEO
VIDEO
OUT
OUT
When using a TV
Turn on the TV and select the video input so that you
can view the pictures from this system.
When connecting a video deck
Connect the TV and the video deck using video and
audio cords (not supplied) as shown below.
TV
Note
Do not place the TV on this system.
Tip
For even higher quality video images (except for
MHC-GNZ5D):
– Use an optional component video c ord to connect the
COMPONENT VIDEO input jacks on your TV to
the COMPONENT VIDEO OUT jacks of this
system. If your TV is compatible with progressive
format file signals, use this connection and set
“PROGRESSIVE AUTO” or “PROGRESSIVE
VIDEO” depending on your TV. For details, see
“To change the type of signal output from the
system” (page 40).
– You can use an optional S video cord to connect the
S VIDEO input jack on your TV to the S VIDEO
OUT jack.
7 For models with a voltage selector, set
VOLTAGE SELECTOR to the local
power line voltage. The voltage
selector is located at the bottom of the
unit.
Depending on the model, the VOLTAGE
SELECTOR may differ.
VOLTAGE SELECTOR
*
220V 120V
230-240V
* Saudi Arabian model: 120 – 127 V
8 Connect the power cord to a wall
outlet.
The demonstration appears in the display.
When you press
?/1, the system turns on
and the demonstration automatically ends.
If the supplied adapter on the plug does not
fit your wall outlet, detach it from the plug
(only for models equipped with an adapter).
10
Video deck System
If the picture has disturbance or there is noise in the
audio when a TV, a video deck and this system are all
connected at the same time, disconnect one of them.
GB

9 (Except for Latin American model)
Set the color system to PAL or NTSC
depending on the color system of your
TV.
The color system is factory set to NTSC for
region code 3 models, and PAL for other
region code models. Each time you perform
the procedure below, the color system
changes as follows:
NTSC y PAL
1 Press ?/1 to turn off the system.
2 Press ?/1 on the unit while holding
down X on the unit.
The system turns on and the color
system is changed.
Notes
• Do not place the surround speakers on top of a TV.*
This may cause distortion of the colors in the TV
screen.
• Be sure to connect both left and right surround
speakers.* Otherwise, the sound will not be heard.
• You cannot set the color system in Power Saving
Mode (page 63).
• When you play back a VIDEO CD recorded in a
different color system from the one you set to the
unit, the picture image may be distorted.
* MHC-GNZ9D/GNZ8D only
To connect optional components
See page 69.
Inserting two R6 (size AA)
batteries into the remote
e
E
E
e
Note
If you do not use the remote for a long period of time,
remove the batteries to avoid possible damage from
battery leakage and corrosion.
Tip
With normal use, the batteries should last for about six
months. When the remote no longer operates the
system, replace both batteries with new ones.
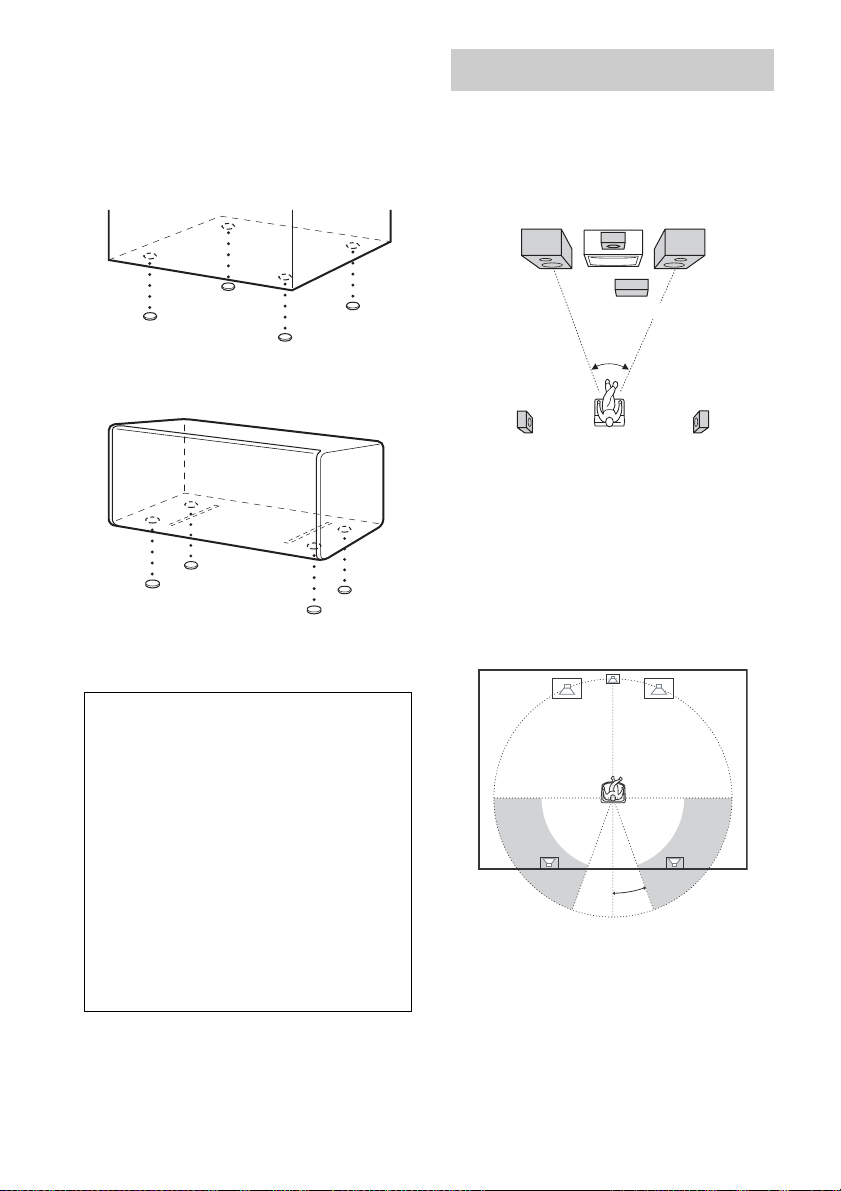
Attaching the speaker pads
Attach the supplied speaker pads to the bottom
of the speakers to stabilize the speakers and
prevent them from slipping.
For MHC-GNZ9D
Small speaker pads for
front speaker ((4) × 2)
surround speaker ((4) × 2)
center speaker (4)
Large speaker pads for
subwoofer (4)
Getting Started
continued
11
GB
For MHC-GNZ8D/GNZ7D/GNZ5D
Front speaker ((4) × 2)
Center speaker
Surround speaker
Front speaker
Surround speaker
Subwoofer
1)
(4)
1)
((4) × 2)
2)
2)
Positioning the speakers
(MHC-GNZ9D/GNZ8D only)
1 Place the front speakers at an angle of
45 degrees from your listening
position.
Front
speaker
(L)
Center speaker
Subwoofer*
Front
speaker
(R)
Center speaker
Surround speaker
1)
MHC-GNZ8D only
2)
MHC-GNZ9D only
3)
MHC-GNZ9D/GNZ8D only
3)
1)
When carrying this system
Perform the following procedure to protect
the DVD mechanism.
Use buttons on the unit for the operation.
1 Press ?/1 to turn on the system, then
press DVD.
2 Make sure that no disc is loaded in the
system and check that “NO DISC”
appears.
3 Hold down x, then press DISC SKIP until
“STANDBY” appears.
Check that “MECHA LOCK” appears.
4 Unplug the power cord.
45˚
Surround speaker
(L)
* MHC-GNZ9D only
Surround speaker
(R)
2 Place the center speaker at about the
same height as the front speakers.
Align the center speaker with the front
speakers or place it slightly behind the front
speakers.
3 Place the surround speakers.
20˚
Position the surround speakers within the
respective gray ranges.
Positioning both surround speakers the
same distance from the listening position is
effective.
12
GB
4 Place the subwoofer (MHC-GNZ9D
only), then press SUBWOOFER ON/
OFF on the subwoofer.
SUBWOOFER indicator
SUBWOOFER
ON/OFF
To obtain a better bass reproduction, we
recommend you to place the subwoofer on
a solid floor where resonance is unlikely to
occur.
Notes
• Do not place the surround speakers on top of a TV.
This may cause distortion of the colors in the TV
screen.
• Always place the subwoofer vertically, keeping it a
few centimeters away from the wall.*
• If the subwoofer is placed in the center of a room, the
bass could be extremely weakened.* This is due to
the influence of the sta nding wave of the room. If this
happens, move the subwoofer away from the center
of the room or eliminate the cause of the standing
wave, by placing a bookshelf against the wall, etc.
* MHC-GNZ9D only
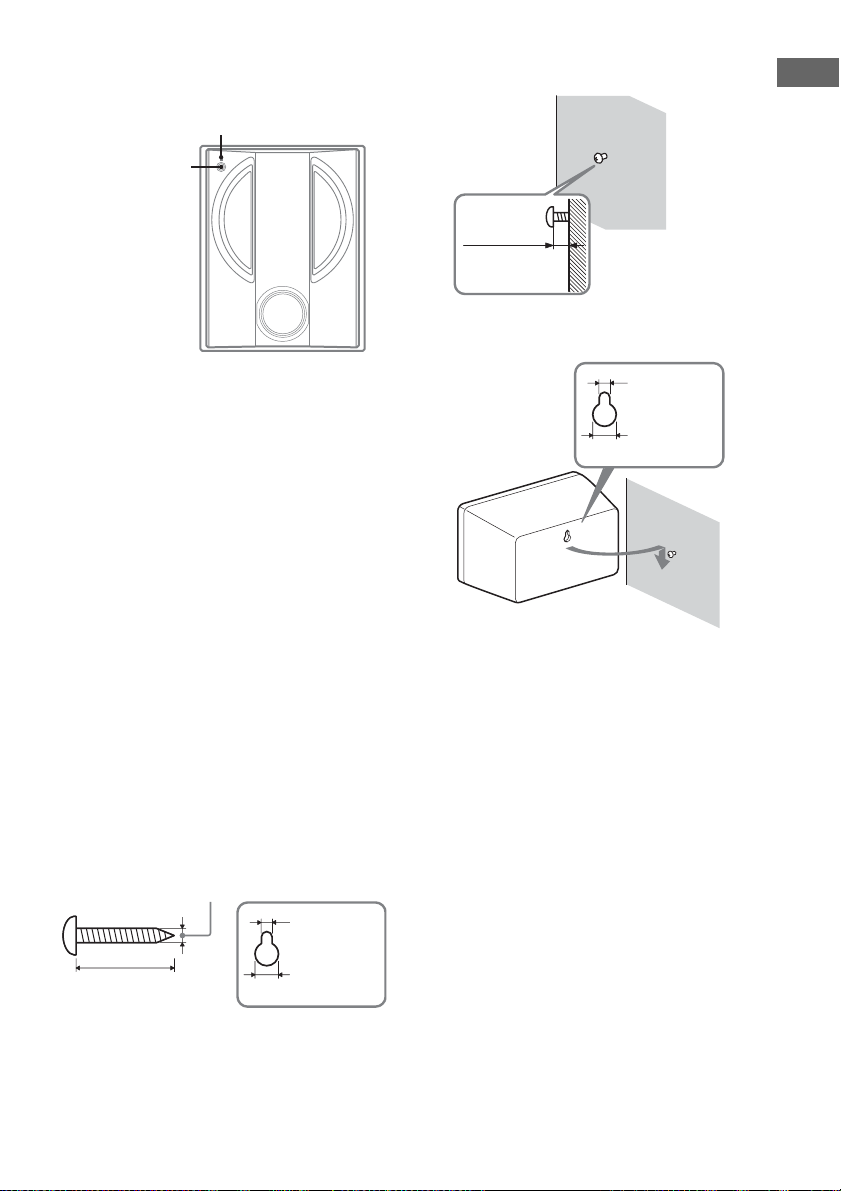
To install the surround
speakers on the wall
(MHC-GNZ8D only)
Prepare screws (not supplied) that are
1
suitable for the hole on the back of each
speaker. See the illustrations below.
4 mm
4.6 mm
more than 25 mm
10 mm
Hole on the back of
the speaker
2 Fasten the screws to the wall.
The screws should protrude 5 to 7 mm.
Getting Started
5 to 7 mm
3 Hang the speakers on the screws.
Hole on the back of the speaker
4.6 mm
10 mm
Notes
• Use screws that are suitable for the wall material and
strength. As a plaster board wall is especially fragile,
attach the screws securely to a beam and fasten them
to the wall. Install the satellite speakers on a vertical
and flat wall where reinforcement is applied.
• Contact a screw shop or installer regarding the wall
material or screws to be used.
• Sony is not responsible for accident or damage
caused by improper installation, insufficient wall
strength or improper screw installation, natural
calamity, etc.
Speaker settings (MHC-GNZ9D/
GNZ8D only)
To enjoy DVDs and other discs with multichannel sound and Dolby surround effects, the
speakers need to be adjusted. Set the distance
from the listening position to the speakers, and
the balance and level. Then use the test tone to
adjust the volume of each speaker to the same
level.
For details, see “Speaker settings” on page 43.
13
GB

Setting the clock Performing the Quick
1 Press ?/1 to turn on the system.
2 Press TIMER MENU.
3 Press M or m repeatedly to set the hour.
4 Press ENTER.
5 Press M or m repeatedly to set the
minute.
6 Press ENTER.
The clock starts working.
To adjust the clock
1 Press TIMER MENU.
2 Press M or m to select “CLOCK SET”, then
press ENTER.
3 Do the same procedures as step 3 to 6
above.
Notes
• The clock settings are canceled when you disconnect
the power cord or if a power failure occurs.
• You cannot set the clock in Power Saving Mode
(page 63).
Setup
You can set the initial settings of “OSD”, “TV
TYPE” and “DISTANCE” (MHC-GNZ9D/
GNZ8D only) step by step.
After performing the Quick Setup, the system is
ready for playing back of movies, music CDs,
etc. To perform further speakers settings, see
“Speaker settings” on page 43.
The Asian model is used for illustration
purposes only.
For MHC-GNZ9D/GNZ8D
1 Turn on the TV and select the video
input.
2 Press ?/1 to turn on the system.
3 Press FUNCTION + or – repeatedly (or
DVD on the unit) to switch the function
to DVD.
The guide message appears on the TV
screen.
Notes
• When a disc is in the system or the disc tray
opens, the guide message does not appear on the
TV screen. Remove the disc.
• When you press CLEAR, the guide message
disappears. When you need to perform the
Quick Setup, see “To recall the Quick Setup
display” (page 16).
• Disconnect the headphone and microphones
when you perform the Quick Setup. You cannot
operate steps after 9 with the headphone or
microphones connected.
4 Press ENTER.
“LANGUAGE SETUP” appears.
LANGUAGE SETUP
OSD:
MENU:
AUDIO:
SUBTITLE:
ENGLISH
ENGLISH
CHINESE 1
CHINESE 2
THAI
14
The language you select in “LANGUAGE
SETUP” is for “OSD”, “MENU” and
“SUBTITLE” (page 38).
GB

5 Press M or m repeatedly to select a
language used in the on-screen
display.
The selectable language is different
depending on the area.
6 Press ENTER.
The setting is selected and “SCREEN
SETUP” appears.
SCREEN SETUP
TV TYPE:
COLOR SYSTEM:
SCREEN SAVER:
BACKGROUND:
4:3 OUTPUT:
4:3 LETTER BOX
16:9
16:9
4:3 PAN SCAN
FULL
7 Press M or m repeatedly to select the
setting that matches your TV type.
x When you connect a 4:3 standard TV
“4:3 LETTER BOX” or “4:3 PAN SCAN”
(page 39)
x When you connect a wide-screen TV
or a 4:3 standard TV with a wide-screen
mode
“16:9” (page 39)
8 Press ENTER.
The setting is selected and “SPEAKER
SETUP” appears.
9 Press M or m repeatedly to select the
front speaker distance from the
listening position, then press ENTER.
You can set from 1.0 to 7.0 m.
SPEAKER SETUP
SIZE:
DISTANCE:
LEVEL(FRONT):
LEVEL(SURROUND):
TEST TONE:
FRONT:
CENTER:
SURROUND:
OFF
*
3.0m
3.0m
3.0m
10Press M or m repeatedly to select the
center speaker distance from the
listening position, then press ENTER.
You can set from 0.0 to 7.0 m.
SPEAKER SETUP
SIZE:
DISTANCE:
LEVEL(FRONT):
LEVEL(SURROUND):
TEST TONE:
FRONT:
CENTER:
SURROUND:
Note
The setting range changes depending on the front
speaker setting.
OFF
*
3.0m
3.0m
3.0m
11Press M or m repeatedly to select the
surround speaker distance from the
listening position.
You can set from 0.0 to 7.0 m.
SPEAKER SETUP
SIZE:
DISTANCE:
LEVEL(FRONT):
LEVEL(SURROUND):
TEST TONE:
FRONT:
CENTER:
SURROUND:
Note
The setting range changes depending on the front
speaker setting.
OFF
*
3.0m
3.0m
3.0m
12Press ENTER.
The Quick Setup is complete.
Getting Started
continued
15
GB

For MHC-GNZ7D/GNZ5D
1 Turn on the TV and select the video
input.
2 Press ?/1 to turn on the system.
3 Press FUNCTION + or – repeatedly (or
DVD on the unit) to switch the function
to DVD.
The guide message appears on the TV
screen.
Notes
• When a disc is in the system or the disc tray
opens, the guide message does not appear on the
TV screen. Remove the disc.
• When you press CLEAR, the guide message
disappears. When you need to perform the
Quick Setup, see “To recall the Quick Setup
display” (page 16).
4 Press ENTER.
“LANGUAGE SETUP” appears.
LANGUAGE SETUP
OSD:
MENU:
AUDIO:
SUBTITLE:
ENGLISH
ENGLISH
CHINESE 1
CHINESE 2
THAI
5 Press M or m repeatedly to select a
language used in the on-screen
display.
The selectable language is different
depending on the area.
6 Press ENTER.
The setting is selected and “SCREEN
SETUP” appears.
SCREEN SETUP
TV TYPE:
COLOR SYSTEM:
SCREEN SAVER:
BACKGROUND:
4:3 OUTPUT:
4:3 LETTER BOX
16:9
16:9
4:3 PAN SCAN
FULL
7 Press M or m repeatedly to select the
setting that matches your TV type.
x When you connect a 4:3 standard TV
“4:3 LETTER BOX” or “4:3 PAN SCAN”
(page 39)
x When you connect a wide-screen TV
or a 4:3 standard TV with a wide-screen
mode
“16:9” (page 39)
8 Press ENTER.
The Quick Setup is complete.
If you make a mistake
Press ., then select the item again.
To quit the Quick Setup
Press DISPLAY in any step.
To recall the Quick Setup display
1 Press DISPLAY in stop mode.
The Control Menu appears.
2 Press M or m repeatedly to select “SETUP”,
then press ENTER.
The options for “SETUP” appear.
3 Press M or m repeatedly to select “QUICK”,
then press ENTER.
The Quick Setup display appears.
Note
If you want to change each setting, see “Using the
Setup Display” (page 37).
16
GB

DVD/VIDEO CD/CD/MP3/JPEG/DivX
– Play
Loading a disc
Use buttons on the unit for the operation.
1 Press Z OPEN/CLOSE.
2 Place a disc with the label side up on
the disc tray.
To insert additional discs, press DISC
SKIP/EX-CHANGE to rotate the disc tray.
3 Press Z OPEN/CLOSE again to close
the disc tray.
Notes
• Do not use a disc with tape, seals or paste on it as this
may cause malfunction.
• Do not forcibly press the disc tray closed with your
finger, as this may cause malfunction.
• Do not place two discs on a single tray.
Playing a disc
*
* Except for MHC-GNZ9D Latin American model,
GNZ8D Latin American model, GNZ7D and
GNZ5D
Before playing a DVD, VIDEO CD, JPEG or
DivX turn on your TV and select the video input.
Depending on the DVD or VIDEO CD, some
operations may be different or restricted. Refer
to the operating instructions supplied with the
disc.
Example: When a DVD disc is loaded
Title or chapter number
Disc tray number
Example: When a CD disc is loaded
Disc presence indicator
Playing time
Playing timeTrack number
DVD/VIDEO CD/CD/MP3/JPEG/DivX – Play
Disc presence indicatorDisc tray number
1 Press FUNCTION + or – repeatedly (or
DVD on the unit) to switch the function
to DVD.
2 Press H (or nN on the unit).
continued
17
GB
Other operations
To Do this
Stop Press x.
Pause Press X.
Press X again or press H (or
nN on the unit) to resume
play.
Select a chapter,
scene or track
(Except for
JPEG)
Select an album
of DATA CDs/
DATA DVDs
Locate a point
quickly in fast
forward or fast
reverse (Scan)
(Except for
JPEG)
Watch frame by
frame
(Slow-motion
Play) (DVD
VIDEO/DVDRW/VIDEO CD/
3)
DivX
only)
Play one frame at
a time (Freeze
frame) (DVD
VIDEO/DVDRW/VIDEO CD
only)
Replay the
previous scene
(Instant Replay)
(DVD VIDEO/
DVD-RW only)
Press . or > repeatedly (or
turn l L on the unit) during
play or pause.
Or, press the number buttons in
stop mode, then press ENTER.
Press ALBUM + or – repeatedly
during play or pause.
3)
Press m or M during play.
Each time you press the button,
searching speed changes
cyclically as follows:
Playback direction
t ×2B
t 3M
Opposite direction
t ×2b
t 3m
To return to Normal Play, press
H (or nN on the unit).
Press X during play, then press
SLOW or SLOW y. Each
time you press the button, the
playback speed changes as
follows:
Playback direction
2 y y 1 y
Opposite direction
VIDEO/DVD-RW only)
2 y 1
To return to Normal Play, press
H (or
Press X during play, then press
STEP C to go to the next frame
or press c STEP to go to the
previous frame (DVD VIDEO/
DVD-RW only).
Press REPLAY during play.
1)
5)
6)
7)
6)
4)
t 1M t 2M
4)
t 1m t 2m

(DVD
nN on the unit).
To Do this
Briefly fast
forward the
Press ADVANCE during
play.
current scene
(Instant
Advance) (DVD
VIDEO/DVDRW only)
Select a disc Press DISC SKIP (or DISC 1 – 3
on the unit).
Switch to DVD
2)
function from
Press DISC 1 – 3 on the unit
(Automatic Source selection).
another source
Exchange other
discs while
Press DISC SKIP/EX-CHANGE
on the unit.
playing
Remove a disc Press Z OPEN/CLOSE on the
unit.
1)
There may be some disturbance in the video image.
2)
Except for MP3/JPEG
3)
Except for MHC-GNZ9D Latin American model,
GNZ8D Latin American model, GNZ7D and
GNZ5D
4)
The ×2B/×2b playback speed is about twice the
normal speed. The 3M/3m playback speed is
faster than the 2M/2m and the 2M/2m
playback speed is faster than the 1M/1m.
5)
DVD VIDEO/CD only.
6)
DVD VIDEO/DVD-RW/VIDEO CD/DivX*
7)
DVD VIDEO only
The 2 y/2 playback speed is slower than
1 y/1 .
* Except for MHC-GNZ9D Latin American model,
GNZ8D Latin American model, GNZ7D and
GNZ5D
Notes
• You cannot perform Instant Replay and Instant
Advance in Repeat Play mode (page 22).
• You cannot search for a still picture on a DVD-RW
in VR mode.
• Depending on the DVD or VIDEO CD, some
operations may be restricted.
• 2 channel sound is heard when using headphones.
• The following discs take a longer time to start
playback.
– a disc recorded with complicated tree structure.
– a disc recorded in Multi Session.
– a disc to which data can be added (non-finalized
disc).
• Some DVD-R/DVD-RW/DVD+R/DVD+RW or
CD-Rs/CD-RWs cannot be played on this system
depending on file format.
18
GB

Tips
• The Instant Replay function is useful when you want
to review a scene or dialogue that you missed.
• The Instant Advance function is useful when you
want to pass over a scene that you do not want to
watch.
• You may not be able to use the Instant Replay or
Instant Advance function with some scenes.
Resuming playback from the
point you stopped the disc
— Resume Play
This system memorizes the point where you
stopped the disc so you can resume from that
point. Resume Play is not canceled when you
turn off the system (except for MP3/JPEG/DivX
video).
1 While playing a disc, press x to stop
playback.
“Resume” appears in the display.
If “Resume” does not appear, Resume Play
is not available.
2 Press H (or nN on the unit).
The player starts playback from the point
you stopped the disc in step 1.
Notes
• You cannot perform Resume Play during Shuffle
Play or Program Play.
• Depending on where you stopped the disc, the
system may resume playback from a different point.
• Resume play is canceled when:
– you press x in stop mode.
– you disconnect the power cord.
– you eject the disc (except for DVD VIDEO/
VIDEO CD when “MULTI-DISC RESUME” in
“CUSTOM SETUP” is set to “ON”).
– you change the play mode.
– you change the settings on the Setup Display.
– you turn off the system (MP3/JPEG/DivX video
only).
– you change the functions (CD/MP3/JPEG/DivX
video only).
To enjoy a disc that is played
before by resume playback
— Multi-disc Resume (DVD VIDEO/VIDEO
CD only)
This system memorizes the point where you
stopped the disc for up to 40 discs and resumes
playback the next time you insert the same disc.
If you store a resume playback point for the 41st
disc, the resume playback point for the first disc
is deleted.
To activate this function, set “MULTI-DISC
RESUME” in “CUSTOM SETUP” to “ON”
(page 42).
Notes
• If “MULTI-DISC RESUME” in “CUSTOM
SETUP” is set to “OFF” (page 42), the resume point
is cleared when you change the function.
• If “MULTI-DISC RESUME” in “CUSTOM
SETUP” is set to “ON” (page 42) and you playback
a recorded disc such as DVD-RW, the system may
playback other recorded discs from the same resume
point. To play from the beginning, press x twice,
then press H (or nN on the unit).
DVD/VIDEO CD/CD/MP3/JPEG/DivX – Play
19
GB
Creating your own
program
— Program Play
You can make a program of up to 99 steps.
1 Press DISPLAY in stop mode.
The Control Menu appears.
2 Press M or m repeatedly to select
“PROGRAM”, then press ENTER.
The options for “PROGRAM” appear.
T
OFF
OFF
SET
ON
6 (14)
2 : 5 0
PLAY
CD
3 Press M or m repeatedly to select “SET
t
”, then press ENTER.
Total time of the programmed tracks
PROGRAM
ALL CLEAR
1. TRACK
– –
2. TRACK
– –
3. TRACK
– –
4. TRACK
– –
5. TRACK
– –
6. TRACK
– –
7. TRACK
Program list Track list on a disc
0:00:00
T
– –
01
02
03
04
05
4 Press ,.
The cursor moves to the track list (in this
case, “01”).
PROGRAM
ALL CLEAR
1. TRACK
2. TRACK
3. TRACK
4. TRACK
5. TRACK
6. TRACK
7. TRACK
– –
– –
– –
– –
– –
– –
– –
0:00:00
T
– –
01
02
03
04
05
5 Press M or m repeatedly to select the
track you want to program, then press
ENTER.
The selected track is programmed and the
cursor moves to the program list.
For example, select track “02”.
Selected track
– –
– –
– –
– –
– –
– –
0:15:30
T
– –
01
02
03
04
05
PROGRAM
ALL CLEAR
1. TRACK 0 2
2. TRACK
3. TRACK
4. TRACK
5. TRACK
6. TRACK
7. TRACK
Total playing time of the programmed tracks
6 Repeat step 4 and 5 to program other
tracks.
The programmed tracks are displayed in the
selected order.
7 Press H (or nN on the unit) to start
Program Play.
Program Play starts.
To cancel Program Play
Press CLEAR, or select “OFF” after step 3.
To play the same program again, select “ON” in
step 3, then press ENTER.
To change a programmed track
1 After step 3, press M or m repeatedly to
select the programmed track you want to
change in the program list, then press ,.
2 Press M or m repeatedly to select the track
you want to program, then press ENTER.
The previously selected track is replaced by
the newly selected track.
To clear a programmed track
1 After step 3, press M or m repeatedly to
select the programmed track you want to
clear in the program list.
2 Press CLEAR.
Or, press ,, then press M repeatedly to
select “– –” in the track list, and then press
ENTER.
20
GB

To clear all the programmed
tracks
In step 4, press M repeatedly to select “ALL
CLEAR” in the program list, then press ENTER.
Notes
• All Discs Repeat is automatically changed into
Program Repeat when you set to program play mode.
You can only program the contents of the current
disc.
• You cannot perform Program Play during PBC
playback of VIDEO CDs (page 24).
• When you change the disc by pressing DISC SKIP
(or DISC 1 – 3 on the unit), programmed tracks are
canceled.
Tip
You can perform Repeat Play or Shuffle Play of
programmed tracks. During Program Play, follow the
steps of Repeat Play (page 22) or Shuffle Play
(page 21).
Playing in random order
— Shuffle Play
You can play tracks on a disc in random order by
using the on-screen display.
1 Press DISPLAY in stop mode.
The Control Menu appears.
2 Press M or m repeatedly to select
“SHUFFLE”, then press ENTER.
The options for “SHUFFLE” appear.
T
OFF
OFF
TRACK
6 (14)
2 : 5 0
PLAY
CD
3 Press M or m to select the item to be
shuffled.
x When the disc is in Normal Play
mode
TRACK: plays tracks on the current disc in
random order.
x When the disc is in Program Play
mode
ON: plays programmed tracks on the
current disc in random order.
4 Press ENTER.
Shuffle Play starts.
To cancel Shuffle Play
Press CLEAR, or select “OFF” in step 3.
To turn off the Control Menu
Press DISPLAY repeatedly until the Control
Menu is turned off.
Note
You cannot perform Shuffle P lay during PBC playback
of VIDEO CDs and Super VCDs (page 24).
Tip
You can set Shuffle Play in stop mode. After selecting
the “SHUFFLE” option, press H (or nN on the
unit) to start Shuffle Play.
DVD/VIDEO CD/CD/MP3/JPEG/DivX – Play
21
GB
Playing repeatedly
Using the on-screen display
— Repeat Play
*
* Except for MHC-GNZ9D Latin American model,
GNZ8D Latin American model, GNZ7D and
GNZ5D
You can play all the titles/tracks/files or a single
title/chapter/track on the discs repeatedly.
You can use a combination of Shuffle or
Program Play modes.
Using the front panel display
Press REPEAT repeatedly during play until
“REP” or “REP1” appears.
REP: For all the titles/tracks/files
disc(s) or a single title
REP1: For chapter
3)
.
3)
/track/DivX video file2)
only.
1)
For JPEG, during Slide show only
2)
DivX video files can be played on except for
MHC-GNZ9D Latin American model, GNZ8D
Latin American model, GNZ7D and GNZ5D.
3)
For DVD, you can check whether a title or chapter is
being repeatedly played on the TV screen.
To cancel Repeat Play
Press REPEAT repeatedly until both “REP” and
“REP1” disappear.
Notes
• Depending on the DVD, you cannot perform Repeat
Play.
• You cannot perform Repeat Play during PBC
playback of VIDEO CDs (page 24).
• You cannot select “REP1” during Program Play and
Shuffle Play.
• When you select “REP1”, that title/chapter/track/
DivX video files* is repeated endlessly until “REP1”
is canceled.
* Except for MHC-GNZ9D Latin American model,
GNZ8D Latin American model, GNZ7D and
GNZ5D
1)2)
on the
1 Press DISPLAY during play.
The Control Menu appears.
2 Press M or m repeatedly to select
“REPEAT”, then press ENTER.
The options for “REPEAT” appear.
6 (14)
T
2 : 5 0
OFF
OFF
ALL DISCS
ONE DISC
TRACK
PLAY
CD
3 Press M or m repeatedly to select the
item to be repeated.
The default setting is underlined.
x When playing a DVD VIDEO/DVD-RW
•OFF: does not play repeatedly.
• ALL DISCS: repeats all of the discs.
• ONE DISC*: repeats all of the titles on the
current disc.
• TITLE: repeats the current title.
• CHAPTER: repeats the current chapter.
* When playing a DVD-RW in VR mode, “ONE
DISC” repeats all of the titles of the selected
type.
x When playing a CD/VIDEO CD
without PBC function
•OFF: does not play repeatedly.
• ALL DISCS: repeats all of the discs.
• ONE DISC: repeats all of the tracks on the
current disc.
• TRACK: repeats the current track.
22
GB

x When playing a DATA CD1)/DATA
1)
DVD
•OFF: does not play repeatedly.
• ALL DISCS
• ONE DISC
1)
: repeats all of the discs.
1)
: repeats all of the albums on
the current disc.
1)
•ALBUM
•TRACK
•FILE
1)
DivX video files and the album(s) containing
DivX video files can be played on except for
MHC-GNZ9D Latin American model, GNZ8D
Latin American model, GNZ7D and GNZ5D.
2)
MP3 audio tracks only
3)
DivX video files only
: repeats the current album.
2)
: repeats the current track.
1)3)
: repeats the current file.
4 Press ENTER.
Repeat Play starts.
To cancel Repeat Play
Press CLEAR, or select “OFF” in step 3.
To turn off the Control Menu
Press DISPLAY repeatedly until the Control
Menu disappears.
Notes
• You cannot perform Repeat Play during PBC
playback of VIDEO CDs and Super VCDs (page 24).
• When “MODE (MP3, JPEG)” is set to “IMAGE
(JPEG)” (page 29), you cannot select “TRACK”.
Tips
• You can set Repeat Play in stop mode. After
selecting the “REPEAT” option, press H (or
nN on the unit) to start Repeat Play.
• You can quickly display the “REPEAT” status by
pressing REPEAT. Each time you press REPEAT,
the “REPEAT” option changes.
Playing DVDs using the
menu
DVD/VIDEO CD/CD/MP3/JPEG/DivX – Play
Some DVDs have menus to help you enjoy the
DVDs. You can play DVDs using these menus
on the TV screen.
• Using the DVD top menu
A DVD is divided into long sections of a picture
or a music feature called “titles”. When you play
a DVD which contains several titles, you can
select the title you want using the DVD top
menu.
• Using the DVD menu
Some DVDs allow you to select the disc
contents using a menu. When you play these
DVDs, you can select items such as the langua ge
for the subtitles and the language for the sound
using the DVD menu.
1 Press TOP MENU or MENU.
The menu appears on the TV screen. The
contents of the menu vary from disc to disc.
2 Press M/m/</, or the number
buttons to select the title or item you
want to play.
3 Press ENTER.
23
GB

Selecting “ORIGINAL” or
Playing VIDEO CDs with
“PLAY LIST” on a DVD-RW
Some DVD-RWs in VR (Video Recording)
mode have two types of titles for playback:
originally recorded titles (“ORIGINAL”) and
titles that can be created on recordable DVD
players for editing (“PLAY LIST”). You can
select the type of title to be played.
1 Press DISPLAY in stop mode.
The Control Menu appears.
2 Press M or m repeatedly to select
“ORIGINAL/PLAY LIST”, then press
ENTER.
The options for “ORIGINAL/PLAY LIST”
appear.
)
1 ( 4 4
(
3
2 8
T
1 : 3 0 : 5 0
PLAY LIST
PLAY LIST
ORIGINAL
)
DVD-RW
3 Press M or m repeatedly to select the
setting you want, then press ENTER.
• PLAY LIST: plays the titles created from
“ORIGINAL” for editing.
• ORIGINAL: plays the titles originally
recorded.
PBC functions (Ver. 2.0)
— PBC Play
You can use PBC* menus on your TV screen to
enjoy the disc’s interactive software. The menu
format and structure may differ depending on
each disc.
* PBC: Playback Control
1 Press H (or nN on the unit) to start
playing a VIDEO CD with PBC
functions (Ver. 2.0).
The PBC menu appears on the TV screen.
2 Press the number buttons to select the
item number you want.
3 Press ENTER.
4 Continue playback according to the
instructions on the menus to enjoy
interactive playback.
Refer to the operating instructions supplied
with the disc, as the operating procedure
may differ according to the VIDEO CD.
To go back to a previous menu
Press O RETURN.
Notes
• Depending on the VIDEO CD, the menu does not
appear in step 1.
• Depending on the VIDEO CD, “Press ENTER” in
step 3 may appear as “Press SELECT” in the
operating instructions supplied with the disc. In this
case, press
Tip
You can cancel playback with PBC functions.
1 In stop mode, press . or > repeatedly or the
number buttons to select a track.
2 Press H (or nN on the unit).
“Play without PBC” appears on the TV screen and
playback starts from the selected track. Still images,
such as the menu screens, will not be shown.
To return to PBC playback, press x twice, then press
H (or nN on the unit).
H (or nN on the unit).
24
GB

About MP3 audio tracks
and JPEG image files
MP3 audio track or JPEG
image file that the system can
play
What is MP3/JPEG?
MP3 is audio compression technology that
satisfies the ISO/MPEG regulations. JPEG is
image compression technology.
Discs that the system can
play
You can play back DATA CDs (CD-ROMs/CDRs/CD-RWs) recorded in MP3 (MPEG1 Audio
Layer 3) and JPEG format. However, the discs
must be recorded according to ISO9660 Level 1,
Level 2 or Joliet format for the system to
recognize the tracks (or files). You can also play
discs recorded in Multi Session.
See the instructions supplied with the CD-R/
CD-RW drives and the recording software (not
supplied) for details on the recording format.
About the multi-session disc
If MP3 audio tracks or JPEG image files are
recorded in the first session, the system will also
play MP3 audio tracks or JPEG image files in
other sessions. If audio tracks and images in
audio CD format or video CD format are
recorded in the first session, only the first
session will be played back.
Note
The system may not be able to play some DATA CDs
created in the Packet Write format. In this case, you
cannot view the JPEG images recorded.
The system can play the MP3 audio tracks or
JPEG image files:
• which have the extension “.MP3” (MP3 audio
track) or “.JPG”/“.JPEG” (JPEG image file)
• which conform to the DCF* image file format
* “Design rule for Camera File system”: Image
standards for digital cameras regulated by Japan
Electronics and Information Technology Industries
Association (JEITA).
Notes
• The system will play any data with the extension
“.MP3,” “.JPG,” or “.JPEG” even if they are not in
MP3 or JPEG format. Playing this data may generate
a loud noise which could damage your speaker
system.
• The system does not conform to audio in MP3PRO
format.
Playback order of MP3 audio
tracks or JPEG image files
The playback order of MP3 audio tracks or
JPEG image files recorded on a DATA CD is as
follows:
x Structure of disc contents
Tree 1 Tree 2 Tree 3 Tree 4 Tree 5
ROOT
Album
Track (MP3
audio) or File
(JPEG image)
DVD/VIDEO CD/CD/MP3/JPEG/DivX – Play
continued
25
GB

When you insert a DATA CD and press H (or
nN on the unit) , the numbered tracks (or
files) are played sequentially, from 1 through
7. Any sub-albums/tracks (or files) contained
within a currently selected album take priority
over the next album in the same tree. (Example:
C contains D so 4 is played before 5.)
Playing DATA CDs with
MP3 audio track and
JPEG image files
When you press MENU and the list of album
names appears (page 26), the album names are
arranged in the following order:
A t B t C t D t F t G. Albums
that do not contain tracks (or files) (such as
album E) do not appear in the list.
Notes
• Depending on the software you use to create the
DATA CD, the playback order may differ from the
illustration.
• The playback order above may not be applicable if
there are more than 200 albums and 300 files in each
album.
• The system can recognize up to 200 albums (the
system will count just albums, including albums that
do not contain MP3 audio tracks and JPEG image
files). The system will not play any albums beyond
the 200th album.
• The system may take longer time to playback, when
progressing to the following album or jump to other
album.
• Some type of JPEG files cannot be played.
Tips
• If you add numbers (01, 02, 03, etc.) to the front of
the track/file names when you store the tracks (or
files) in a disc, the tracks and files will be played in
that order.
• Since a disc with many trees takes longer to start
playback, it is recommended that you create albums
with no more than two trees.
MP3 audio tracks and JPEG image files
recorded on DATA CDs (CD-ROMs/CD-Rs/
CD-RWs) can be played on this system.
Notes
• When “MODE (MP3, JPEG)” is set to “AUTO”, the
system can recognize up to300 MP3 tracks and 300
JPEG files in a single album. When “MODE (MP3,
JPEG)” is set to “AUDIO (MP3)” or “IMAGE
(JPEG)”, the system can recognize up to 600 MP3
and 600 JPEG files in a single album. A maximum of
200 albums can be recognized regardless of the
selected mode.
• Playback is possible up to 8 levels.
• An album that does not include an MP3 audio track
or JPEG image file is skipped.
• If you put the extension “.MP3” to data not in MP3
format, the system cannot recognize the data
properly and will generate a loud noise which could
damage your speaker system.
Tips
• You can view the disc information while playing
MP3 audio tracks and JPEG image files (page 64).
• You can select Repeat Play while playing MP3 audio
tracks and JPEG image files (page 22) and “AUDIO”
setting while playing an MP3 audio track (page 35).
26
GB

Selecting an album
Selecting an MP3 audio track
1 Load a DATA CD.
The album list appears. When an album is
being played, its title is shaded.
(
3 0
)
3
ROCK BEST HIT
KARAOKE
MY FAVOURITE SONG
R&B
JAZZ
CLASSIC
SALSA OF CUBA
BOSSA NOVA
2 Press M or m repeatedly to select the
album you want, then press H (or
nN on the unit).
For MP3, the system starts playing the
selected album.
For JPEG, the system starts a slide show of
the images in the selected album.
To stop play
Press x.
To turn on or off the album list
Press MENU.
Note
The slide show stops when you press M or m.
Tip
You can change the slide show duration
ect
(page 30) while playing JPEG image file.
eff
(page 30) and
1 Load a DATA CD.
The albums list appears. When an album is
being played, its title is shaded.
2 Press M or m repeatedly to select an
album, then press ENTER.
The track list appears.
M Y FAVOURITE SONG
1 ( 2 5 6
WALTZ FOR DEBBY
MY ROMANCE
MILES TONES
MY FUNNY VALENTINE
AUTUM LEAVES
ALL BLUES
SOMEDAY MY PRINCE W…
)
3 Press M or m repeatedly to select a
track, then press ENTER.
The system starts playing the selected track.
To stop play
Press x.
To play the next or previous MP3
audio track
Press .or >. You can select the first track
of the next album by pressing > during
playback of the last track of the current album.
Note that you cannot return to the previous
album by pressing .. To return to the
previous album, select the album from the album
list.
To return to the previous display
Press O RETURN.
To turn on or off the album list
Press MENU.
DVD/VIDEO CD/CD/MP3/JPEG/DivX – Play
continued
27
GB

Selecting a JPEG image file
1 Load a DATA CD.
The albums list appears. When an album is
being played, its title is shaded.
2 Press M or m repeatedly to select an
album, then press PICTURE NAVI.
Images of files in the album appear in 16
subscreens.
1234
5678
9101112
13 14 15 16
To display the hidden image files, select the
bottom image, then press m. To return to
the previous image, select the top image,
then press M.
3 Press M/m/</, repeatedly to select
the image you want to view, then press
ENTER.
To play the next or previous JPEG
image file
Press < or , when the Control Menu is not
displayed. You can select the first file of the next
album by pressing , during playback of the
last file of the current album. Note that you
cannot return to the previous album by pressing
<. To return to the previous album, select the
album from the album list.
To rotate a JPEG image
When a JPEG image file is displayed on the TV
screen, you can rotate the image by 90 degrees.
Press M or m while viewing an image. Each time
you press M, the image rotates counterclockwise
by 90 degrees.
Press CLEAR to return to normal view.
Example: When you press M once
Rotating direction
28
Note
PICTURE NAVI does not work when “MODE
(MP3, JPEG)
” is set to “AUDIO (MP3)”
(page 29).
To stop play
Press x.
GB
Notes
• Nothing happens when you press < while playing
the first image file of the album.
• If you press < or , to select the next or previous
image, the “Rotating a JPEG image” function is
canceled.
Loading…
FAQ: Types of Manuals and Their Contents
Sony MHC-GNZ9D Manuals come in various types, each serving a specific purpose to help users effectively operate and maintain their devices. Here are the common types of Sony MHC-GNZ9D User Guides and the information they typically include:
- User Manuals: Provide comprehensive instructions on how to use the device, including setup, features, and operation. They often include troubleshooting tips, safety information, and maintenance guidelines.
- Service Instructions: Designed for technicians and repair professionals, these manuals offer detailed information on diagnosing and repairing issues with the device. They include schematics, parts lists, and step-by-step repair procedures.
- Installation Guides: Focus on the installation process of the device, providing detailed instructions and diagrams for proper setup. They are essential for ensuring the device is installed correctly and safely.
- Maintenance Manuals: Provide guidance on routine maintenance tasks to keep the device in optimal condition. They cover cleaning procedures, part replacements, and regular servicing tips.
- Quick Start Guides: Offer a concise overview of the essential steps needed to get the device up and running quickly. They are ideal for users who need immediate assistance with basic setup and operation.
Each type of Sony MHC-GNZ9D instruction is designed to address specific needs, ensuring users have the necessary information to use, maintain, and repair their devices effectively.
Related Instructions for Sony MHC-GNZ9D:
3
DVP-S533D — Cd/dvd Player
Operating instructions manual Sony DVD Player Operating instructions manual (File: sony-dvp-s530d-dvd-player-68, 13th Oct 2024)
68
1035
218
6
Dream Machine ICF-C25MK2
2
706
177
7
Trinitron PVM-14M2MDJ
User manual manual PDF User Manual (@CG5XNS), Sony Trinitron PVM-14M2MDJ Monitor (Mon 01.2025)
111
1298
286
9
Handycam DCR-DVD108
33
818
189
Stereo System Devices by Other Brands:
|
Pioneer DEH-P840MP Service Manual PDF Guide (@ELO119), Pioneer DEH-P840MP Car Receiver (Thursday 19-12-2024) PIONEER CORPORATION 19 Dec 2024 | 99 |
|
|
Yamaha STAGEPAS 500 Important Safety Instructions STAGEPAS 500 Important safety instructions — W74415 Remove the mixer 22 Oct 2024 | 2 |
|
|
camry CR 1173 Operation & User’s Manual Stereo System #3X7351 1 27 Jan 2025 | 188 |
|
|
Sony DAV-DZ170 Quick Setup Manual #97F7N6: DAV-DZ170 Home Theater System Quick setup manual 4-165-514-21(1) 04 Feb 2025 | 2 |
Categories:
Drums
Scales
Personal Care Products
Educational Equipment
Enclosure
Industrial Equipment
AI Анализ качества
на основе мнений пользователей товара
Спецификация:
Тип:
минисистема
Тип:
двухкассетная с сенсорным управлением
Мощность тыловых колонок:
2×100 Вт
Мощность центрального канала:
50 Вт
Мощность фронтальных колонок:
2×150 Вт
Мощность сабвуфера:
170 Вт
Основной блок:
одноблочная система
Оптический привод:
DVD
Cпособ загрузки/механика:
на 3 диска
Поддерживаемые носители:
CD, CD-R, CD-RW, DVD
Оценка системы:
4,76
из 10
-0,54
Анализ качества:
|
Характеристики качества и их значения составлены на основе анализа отзывов и обсуждений исследованных системой искусственного интеллекта на просторах инетернет сети
Экспертиза системы iiR: 63,5%
Заключение готово, продолжаем мониторинг.
-
Вид 1 -
Вид 2
Качество верхних частот
Кол-во мнений:
3
67%
Качество нижних частот
Кол-во мнений:
1
100%
Общее качество звука
Кол-во мнений:
3
100%
Функциональность
Кол-во мнений:
4
75%
Удобство эксплуатации
Кол-во мнений:
1
100%
Качество верхних частот
|
плохо
хорошо
Качество нижних частот
|
плохо
хорошо
Общее качество звука
|
плохо
хорошо
Функциональность
|
плохо
хорошо
Удобство эксплуатации
|
плохо
хорошо
Динамика изменения уровня качества
Оценка качества бренда
Рейтинг товара по версии iiRating.ru:
Глобальный рейтинг
| 1 |
|
8,78 |
| 2 |
|
8,52 |
| 3 |
|
8,49 |
| 4 |
|
8,27 |
| 5 |
|
8,24 |
| 6 |
|
8,23 |
| 7 |
|
8,20 |
| 8 |
|
8,19 |
| 9 |
|
8,16 |
| 10 |
|
8,16 |
| 11 |
|
8,10 |
| 12 |
|
8,04 |
| 13 |
|
8,00 |
| 14 |
|
7,95 |
| 15 |
|
7,93 |
| 447 |
|
4,76 |
Рейтинг за последние 90 дней
Динамика изменения рейтинга
-
Характеристики -
Видео обзоры
| Тип | минисистема |
| Тип | двухкассетная с сенсорным управлением |
| Мощность тыловых колонок | 2×100 Вт |
| Мощность центрального канала | 50 Вт |
| Мощность фронтальных колонок | 2×150 Вт |
| Мощность сабвуфера | 170 Вт |
| Основной блок | одноблочная система |
| Оптический привод | DVD |
| Cпособ загрузки/механика | на 3 диска |
| Поддерживаемые носители | CD, CD-R, CD-RW, DVD |
| Поддерживаемые форматы | DivX, MP3 |
| Декодеры | Dolby Digital, Dolby Pro Logic |
| Радио | AM, FM |
| Количество радиостанций в памяти | 30 |
| Поддержка RDS | есть |
| Караоке | есть |
| Цвет основного блока | серебристый/хром/титан |
| Цвет акустических систем | серебристый/хром/титан |
| Комплект акустических систем | 5.1 |
| Входы | микрофон |
| Выходы | на акустику окружающего звучания |
| Особенности | автореверс |
К сожалению для данного товара пока нет видеообзоров
Возможно Ваш обзор станет первым
Желаете поделиться своим видеообзором?
Отправьте нам ссылку на обзор в YouTube и мы опубликуем ее в этом разделе.
Где купить, сколько стоит:
-
Яндекс Маркет -
Яндекс Покупки
Динамика изменения цены:
Другие товары из категории
-
Page 1
2-583-714-11(2) Mini Hi-Fi Component System Operating Instructions MHC-GNZ9D MHC-GNZ8D MHC-GNZ7D MHC-GNZ5D ©2005 Sony Corporation… -
Page 2
® is a U.S. NERGY Remove the 13 A 3-pin plug using a registered mark. As an E NERGY ® screwdriver. partner, Sony Corporation has determined that this product ® meets the E NERGY guidelines for energy efficiency. ® DivX is a video file compression technology, developed by DivXNetworks, Inc. -
Page 3: Table Of Contents
Playing audio tracks and images as a slide Tape – Play show with sound ……29 Playing DivX® video files….31 Loading a tape ……..52 (Except for MHC-GNZ9D Latin Playing a tape……..52 American model, GNZ8D Latin Tape – Recording American model, GNZ7D and…
-
Page 4
Sound Adjustment Troubleshooting Adjusting the sound ……55 Problems and remedies……72 Selecting the sound effect ….. 55 Self-diagnosis function ……77 Selecting the surround effect ….55 (When letters/numbers appear in Adjusting the graphic equalizer and the display) storing ……….57 Messages………. -
Page 5: How To Use This Manual
Functions available for DATA CDs (CD-ROMs/CD-Rs/ CD-RWs containing MP3 audio tracks, JPEG image files and DivX video files) Functions available for DATA DVDs (DVD-Rs/DVD-RWs/ DVD+Rs/DVD+RWs) containing DivX video files Except for MHC-GNZ9D Latin American model, GNZ8D Latin American model, GNZ7D and GNZ5D continued…
-
Page 6
CD-ROMs, defined by ISO (International back of the unit and will only play DVDs labeled Organization for standardization). with identical region code. Except for MHC-GNZ9D Latin American model, DVDs labeled will also be played on this GNZ8D Latin American model, GNZ7D and system. -
Page 7
• With CD-ROMs/CD-Rs/CD-RWs that contain DivX video files in addition to MP3 audio tracks or JPEG image files, the system plays only the DivX video files.* * Except for MHC-GNZ9D Latin American model, GNZ8D Latin American model, GNZ7D and GNZ5D Copyrights This product incorporates copyright protection technology that is protected by U.S. -
Page 8: Getting Started
Perform the following procedures 1 to 9 to hook up your system using the supplied cords and accessories. The type of speakers supplied varies according to the model you purchased (see “Specifications” on page 81). MHC-GNZ9D is used for illustration purposes. AM loop antenna…
-
Page 9
Black/Stripe (#) Insert only the stripped portion Speakers – Black/Stripe Gray/Solid (3) Note For MHC-GNZ9D, the speaker cords are attached to the surround speakers. Connect the surround speaker Black/ cords to the main unit only. Stripe (#) Gray/Solid (3) continued… -
Page 10
5 Connect the FM and AM antennas. Note Do not place the TV on this system. Set up the AM loop antenna, then connect For even higher quality video images (except for MHC-GNZ5D): – Use an optional component video cord to connect the COMPONENT VIDEO input jacks on your TV to the COMPONENT VIDEO OUT jacks of this Extend the FM lead antenna horizontally… -
Page 11: Attaching The Speaker Pads
* MHC-GNZ9D/GNZ8D only For MHC-GNZ9D To connect optional components Small speaker pads for See page 69.
-
Page 12: Positioning The Speakers
45˚ Center speaker Surround speaker Surround speaker Surround speaker * MHC-GNZ9D only Place the center speaker at about the same height as the front speakers. Align the center speaker with the front speakers or place it slightly behind the front speakers.
-
Page 13
• Contact a screw shop or installer regarding the wall material or screws to be used. (MHC-GNZ8D only) • Sony is not responsible for accident or damage Prepare screws (not supplied) that are caused by improper installation, insufficient wall suitable for the hole on the back of each strength or improper screw installation, natural speaker. -
Page 14: Setting The Clock
Setup Press ?/1 to turn on the system. Press TIMER MENU. You can set the initial settings of “OSD”, “TV TYPE” and “DISTANCE” (MHC-GNZ9D/ Press M or m repeatedly to set the hour. GNZ8D only) step by step. Press ENTER.
-
Page 15
Press M or m repeatedly to select a Press M or m repeatedly to select the language used in the on-screen center speaker distance from the display. listening position, then press ENTER. The selectable language is different You can set from 0.0 to 7.0 m. depending on the area. -
Page 16
For MHC-GNZ7D/GNZ5D Press M or m repeatedly to select the setting that matches your TV type. Turn on the TV and select the video x When you connect a 4:3 standard TV input. “4:3 LETTER BOX” or “4:3 PAN SCAN” Press ?/1 to turn on the system. -
Page 17: Dvd/Video Cd/Cd/Mp3/Jpeg/Divx — Play
Playing a disc DVD/VIDEO CD/CD/MP3/JPEG/DivX – Play Loading a disc * Except for MHC-GNZ9D Latin American model, Use buttons on the unit for the operation. GNZ8D Latin American model, GNZ7D and GNZ5D Press Z OPEN/CLOSE. Before playing a DVD, VIDEO CD, JPEG or Place a disc with the label side up on DivX turn on your TV and select the video input.
-
Page 18: Other Operations
The 2 y/2 playback speed is slower than Play) (DVD playback speed changes as 1 y/1 VIDEO/DVD- follows: * Except for MHC-GNZ9D Latin American model, RW/VIDEO CD/ Playback direction GNZ8D Latin American model, GNZ7D and DivX only) 2 y y 1 y…
-
Page 19: Resuming Playback From The Point You Stopped The Disc
Tips To enjoy a disc that is played • The Instant Replay function is useful when you want before by resume playback to review a scene or dialogue that you missed. — Multi-disc Resume (DVD VIDEO/VIDEO • The Instant Advance function is useful when you CD only) want to pass over a scene that you do not want to watch.
-
Page 20: Creating Your Own Program
Press M or m repeatedly to select the Creating your own track you want to program, then press ENTER. program The selected track is programmed and the cursor moves to the program list. — Program Play For example, select track “02”. Selected track You can make a program of up to 99 steps.
-
Page 21: Playing In Random Order
To clear all the programmed Playing in random order tracks In step 4, press M repeatedly to select “ALL — Shuffle Play CLEAR” in the program list, then press ENTER. Notes • All Discs Repeat is automatically changed into You can play tracks on a disc in random order by Program Repeat when you set to program play mode.
-
Page 22: Playing Repeatedly
DISPLAY during play. The Control Menu appears. Press M or m repeatedly to select “REPEAT”, then press ENTER. The options for “REPEAT” appear. * Except for MHC-GNZ9D Latin American model, GNZ8D Latin American model, GNZ7D and 6 (14) PLAY GNZ5D…
-
Page 23: Playing Dvds Using The Menu
DivX video files and the album(s) containing • Using the DVD top menu DivX video files can be played on except for MHC-GNZ9D Latin American model, GNZ8D A DVD is divided into long sections of a picture Latin American model, GNZ7D and GNZ5D.
-
Page 24: Selecting «Original» Or «Play List» On A Dvd-Rw
Selecting “ORIGINAL” or Playing VIDEO CDs with “PLAY LIST” on a DVD-RW PBC functions (Ver. 2.0) — PBC Play Some DVD-RWs in VR (Video Recording) mode have two types of titles for playback: You can use PBC* menus on your TV screen to originally recorded titles (“ORIGINAL”) and enjoy the disc’s interactive software.
-
Page 25: About Mp3 Audio Tracks And Jpeg Image Files
MP3 audio track or JPEG About MP3 audio tracks image file that the system can and JPEG image files play The system can play the MP3 audio tracks or JPEG image files: • which have the extension “.MP3” (MP3 audio What is MP3/JPEG? track) or “.JPG”/“.JPEG”…
-
Page 26: Playing Data Cds With Mp3 Audio Track And Jpeg Image Files
When you insert a DATA CD and press H (or Playing DATA CDs with nN on the unit) , the numbered tracks (or files) are played sequentially, from 1 through MP3 audio track and 7. Any sub-albums/tracks (or files) contained within a currently selected album take priority JPEG image files over the next album in the same tree.
-
Page 27
Selecting an album Selecting an MP3 audio track Load a DATA CD. Load a DATA CD. The album list appears. When an album is The albums list appears. When an album is being played, its title is shaded. being played, its title is shaded. Press M or m repeatedly to select an 3 ( 3 0 ) album, then press ENTER. -
Page 28
To play the next or previous JPEG Selecting a JPEG image file image file Press < or , when the Control Menu is not Load a DATA CD. displayed. You can select the first file of the next The albums list appears. When an album is album by pressing , during playback of the being played, its title is shaded. -
Page 29: Playing Audio Tracks And Images As A Slide Show With Sound
To stop play Playing audio tracks and Press x. images as a slide show To turn on or off the album list with sound Press MENU. To cancel slide show with sound Select “AUDIO (MP3)” or “IMAGE (JPEG)” in step 4. You can play a slide show with sound by first placing both MP3 and JPEG files in the same Notes…
-
Page 30
Specifying the slide show Selecting an effect for image duration (JPEG only) files in the slide show (JPEG only) When you play JPEG image files using slide show, you can specify the duration for slides to When you play a JPEG image file, you can appear on the screen. -
Page 31: Playing Divx® Video Files
DivX video files, it may take some time after you press H (or nN on the unit) for the picture to appear. (Except for MHC-GNZ9D Latin • Depending on the DivX video file, the sound may not American model, GNZ8D Latin match the pictures on the screen.
-
Page 32: Using The On-Screen Display To Search
Press M or m repeatedly to select the album you want, then press ENTER. The file list appears. * Except for MHC-GNZ9D Latin American model, GNZ8D Latin American model, GNZ7D and M Y F A V O U R I T E S…
-
Page 33
( 3 4 ) DVD VIDEO 1 : 3 2 : 5 5 ENTER. * Except for MHC-GNZ9D Latin American model, GNZ8D Latin American model, GNZ7D and GNZ5D Press M or m repeatedly or press the number buttons to select the title, chapter, track, index, scene, etc.,… -
Page 34: Searching By Scene
To return to Normal Play Searching by scene Press O RETURN or DISPLAY. — Picture Navigation Notes • Depending on the disc, you may not be able to select some items. • PICTURE NAVI does not work when “MODE You can divide the screen into 9 subscreens and (MP3, JPEG)”…
-
Page 35: Dvd/Video Cd/Cd/Mp3/Jpeg/Divx — Various Functions
• 1: MAIN+SUB (main and sub sound) • 2: MAIN* • 2: SUB* • 2: MAIN+SUB* * Except for MHC-GNZ9D Latin American model, GNZ8D Latin American model, GNZ7D and * This is not displayed for a disc recorded with GNZ5D only one audio stream.
-
Page 36
(DVD/ GNZ8D Latin American model, GNZ7D and GNZ5D) DivX video* only) Example: MP3 audio * Except for MHC-GNZ9D Latin American model, GNZ8D Latin American model, GNZ7D and MP3 128k GNZ5D Bit rate When you press AUDIO repeatedly during play, the format of the current audio signal (PCM, Dolby Digital, DTS, etc.) is displayed on the TV… -
Page 37: Adjusting The Delay Between The Picture And Sound
For details on each Setup Display item, see pages from 38 to 45. For an overall list of Setup Display items, see page 85. * Except for MHC-GNZ9D Latin American model, Asian model is used for illustration purposes GNZ8D Latin American model, GNZ7D and only.
-
Page 38: Setting The Display Or Sound Track Language
Press M or m repeatedly to select the Setting the display or setup item from the displayed list, then press ENTER. sound track language The setup item is selected. Example: “SCREEN SETUP” — LANGUAGE SETUP Selected item “LANGUAGE SETUP” allows you to set various languages for the on-screen display or SCREEN SETUP TV TYPE:…
-
Page 39: Settings For The Display
Note Settings for the display Depending on the DVD, “4:3 LETTER BOX” may be selected automatically instead of “4:3 PAN SCAN” or — SCREEN SETUP vice versa. x COLOR SYSTEM (except for Latin Select settings according to the TV to be American model) connected.
-
Page 40
To change the type of signal output from the system x BLACK LEVEL (COMPONENT OUT) (MHC-GNZ9D/GNZ8D/GNZ7D Latin — PROGRESSIVE (except for MHC-GNZ5D) American model only) Progressive is the method for displaying TV Selects the black level (setup level) for the video… -
Page 41
x PROGRESSIVE AUTO Note Select this setting when your TV accepts When you play video-based software in progressive signal format, sections of some types of images may progressive signals and the TV is connected to appear unnatural due to the conversion process when the COMPONENT VIDEO OUT jacks. -
Page 42: Custom Settings
“AUDIO DRC” only applies to Dolby Digital sources. x DivX (except for MHC-GNZ9D Latin x TRACK SELECTION (DVD VIDEO only) American model, GNZ8D Latin American Gives the priority to the sound track which…
-
Page 43: Speaker Settings
NONE: Select this when a To return to the default setting subwoofer is not used. Select the item, then press CLEAR. Note that * MHC-GNZ9D/GNZ8D only only the “SIZE” setting does not return to the default setting. Notes x SIZE •…
-
Page 44
DISTANCE (MHC-GNZ9D/GNZ8D only) x LEVEL (FRONT) The default distance setting for the speakers in You can vary the level of front speakers as relation to the listening position is shown below. follows. Be sure to set “TEST TONE” to “ON”… -
Page 45: Restricting Disc Playback
Press M or m repeatedly to select “ON”, then press ENTER. Press DISPLAY in stop mode. For MHC-GNZ9D, you will hear the test The Control Menu appears. tone from each speaker in sequence. Press M or m repeatedly to select For MHC-GNZ8D, you will hear the test “PARENTAL CONTROL”, then press…
-
Page 46: Custom Parental
Enter a 4-digit password using the number To confirm your password, re-enter it using the number buttons, then press ENTER. buttons, then press ENTER. The display for confirming the password To play a disc for which Custom appears. Parental Control is set x When you have already registered a Load the disc for which Custom Parental password…
-
Page 47
Press M or m repeatedly to select Press M or m repeatedly to select “PLAYERt”, then press ENTER. “STANDARD”, then press ENTER. The options for “STANDARD” appear. x If you have not entered a password The display for registering a new password appears. -
Page 48
To change the password Area code Standard Code number In step 3, select “PASSWORDt”, then press ENTER. Argentina 2044 The display for entering the password Australia 2047 appears. Austria 2046 Follow step 3 to enter a new password. Belgium 2057 Brazil 2070 To play a disc for which Parental… -
Page 49: Changing The Angles
Changing the angles Displaying the subtitles If various angles (multi-angles) for a scene are * Except for MHC-GNZ9D Latin American model, recorded on a DVD VIDEO, you can change the GNZ8D Latin American model, GNZ7D and viewing angle. GNZ5D For example, while playing a scene of a train in…
-
Page 50: Tuner
Press M or m repeatedly to select the desired preset number. Tuner Press ENTER. Presetting radio stations “COMPLETE” appears. Repeat steps 1 through 6 to store other You can preset up to 20 FM stations and 10 AM stations. stations. You can then tune in any of those stations simply by selecting the corresponding Manual tuning preset preset number.
-
Page 51: Listening To The Radio
To change the AM tuning interval Listening to non-preset radio (except for Saudi Arabian model) station The AM tuning interval is factory-preset to 9 kHz (or 10 kHz for some areas). To change the — Manual Tuning AM tuning interval, tune in any AM station first, Press FUNCTION + or –…
-
Page 52: Tape — Play
Playing a tape Tape – Play You can use TYPE I (normal) tape. Loading a tape Use buttons on the unit for the operation. Load a tape. Use buttons on the unit for the operation. Press TAPE A/B repeatedly to select Press Z PUSH.
-
Page 53: Tape — Recording
Notes • CD Synchro Recording is not available with DVDs, Tape – Recording DATA CDs and DATA DVDs. • You cannot listen to other sources while recording. Recording your favorite • When you press CD SYNC in step 5, the surround effect may automatically change (see “Selecting the CD tracks on a tape surround effect”…
-
Page 54: Recording On A Tape Manually
Press REC PAUSE/START. Recording on a tape Deck B stands by for recording. “REC” flashes. manually Press REC PAUSE/START, then start — Manual Recording playing the desired source to record. Recording starts. You can record just the portions you like from a disc (DVD, VIDEO CD, DATA CD and DATA To stop recording DVD), tape or radio program on a tape.
-
Page 55: Sound Adjustment
Each time you press the button, the display The GROOVE setting is ideal for music sources, changes cyclically as follows: and the V-GROOVE setting is ideal for video x For MHC-GNZ9D/GNZ8D sources (movie, etc.). When the headphones are not connected Press GROOVE on the unit.
-
Page 56
• PLII MOVIE: Performs Pro Logic II movie Note For some discs, the surround effect may not be as much mode decoding. This setting is ideal for as expected. movies encoded in Dolby Surround. In addition, this mode can reproduce sound in 5.1 channels when watching videos of As the sound field for DVD function differs from that overdubbed or old movies. -
Page 57: Adjusting The Graphic Equalizer And Storing
Adjusting the graphic Singing along: Karaoke equalizer and storing You can enjoy karaoke (singing along with a disc) by setting the system to karaoke mode. You can adjust the sound by raising or lowering You can connect the optional microphone(s) to the levels of specific frequency ranges, then the system.
-
Page 58
Speaker output in Dolby Digital Notes • When the headphones are connected, you cannot Karaoke format activate karaoke mode. Accompaniment Accompaniment • The sound input from the microphone is not output from the DIGITAL OUT OPTICAL (MHC-GNZ7D/ GNZ5D only). Guide melody If howling occurs: –… -
Page 59: Changing The Key
• During Karaoke Pon mode, the stereo effect is – you open the disc tray or change the disc. reduced. – you turn Karaoke Pon mode on. * Except for MHC-GNZ9D Latin American model, – you cancel karaoke mode. GNZ8D Latin American model, GNZ7D and GNZ5D…
-
Page 60
Tips Selecting the vocals • The channel returns to the default setting when: – you turn off the system. — Vocal Select (DVD VIDEO/VIDEO – you change the function. CD/CD only) – you open the disc tray or change the disc. –… -
Page 61: Timer
Waking up to music Timer — Play Timer Falling asleep to music You can wake up to music at a preset time. Make — Sleep Timer sure you have set the clock (see “Setting the clock” on page 14). You can set the system to turn off after a certain Prepare the sound source you want to time, so that you can fall asleep to music.
-
Page 62: Timer Recording Radio Programs
Other operations Timer recording radio Do this programs Check the setting Press TIMER MENU. Press repeatedly until “TIMER SELECT” — Rec Timer appears, then press ENTER. Press repeatedly You can record a preset radio station from a until “PLAY SELECT” specified time.
-
Page 63: Display
Other operations Do this Display Check the setting Press TIMER MENU. Turning off the display Press repeatedly until “TIMER SELECT” appears, then press ENTER. — Power Saving Mode Press repeatedly until “REC SELECT” The demonstration display (display window appears, then press ENTER. flashing even when the system power is off) and Change the setting Start over from step 1.
-
Page 64: (Except For Mhc-Gnz5D) Viewing Information About The Disc In The Display
• If you play a disc containing JPEG image files only, Play. “JPEG” or “NO AUDIO” appears in the display. Each time you press the button, the display * Except for MHC-GNZ9D Latin American model, changes cyclically as follows: GNZ8D Latin American model, GNZ7D and GNZ5D…
-
Page 65: Viewing Information About The Disc In The On-Screen Display
You can also check the DVD/CD text and file/ • Depending on the disc, some DVD/CD text information may not appear. album name recorded on the disc. * Except for MHC-GNZ9D Latin American model, Press TIME/TEXT during play. GNZ8D Latin American model, GNZ7D and GNZ5D…
-
Page 66
Notes • Only alphabet letters and numbers can be displayed. Except for MHC-GNZ9D Latin American model, • Depending on the disc being played, the system can GNZ8D Latin American model, GNZ7D and only display a limited number of characters. Also,… -
Page 67: Checking The Date Information
Checking the date information You can check the date information during play when the Exif* tag is recorded in the JPEG image data. Press DISPLAY twice during play. The Control Menu for JPEG appears. 1 ( 8 ) DATA CD 1 ( 2 0 ) JPEG 01/ 01/ 2003…
-
Page 68: Optional Components
Use the remote for the operation. Notes • This function is only for SONY TV series, however, Press and hold TV/VIDEO while some TV products may also not work. entering the code for the TV’s input •…
-
Page 69: Hooking Up Optional Components
Hooking up optional components To enhance your system, you can connect optional components. Refer to the operating instructions provided with each component. MHC-GNZ7D is used for illustration purposes. TV or satellite tuner, etc. Amplifier TV or projector From the audio output To the digital input To the component jack of the connected…
-
Page 70: Listening To Audio From A Connected Component
Listening to audio from a depending on the connected subwoofer or the type of music being played. For details, consult your nearest connected component Sony dealer. F DIGITAL OUT OPTICAL jack (Except for MHC-GNZ5D) (MHC-GNZ7D/GNZ5D only) Use buttons on the unit for the operation.
-
Page 71: (Except For Mhc-Gnz5D) Enjoying The 5.1 Channel Sound With The Optional Amplifier
Notes Recording audio from a • If you cannot select “SAT” by pressing TV/SAT repeatedly, hold down TV/SAT and then press ?/1 connected component while the power is on. The function will change from “TV” to “SAT”, and “SAT” will appear in the (Except for MHC-GNZ5D) display.
-
Page 72: Troubleshooting
If the problem persists after doing all of the • The system is in pause mode or in slow-motion above, consult your nearest Sony dealer. play mode. Press H (or nN on the unit) to return to normal play mode.
-
Page 73
The disc tray does not open and “LOCKED” SAT on the unit, switch the display to “SAT” (see appears. “Listening to audio from a connected component” • Contact your Sony dealer or local authorized Sony on page 70). service facility. “CANNOT LOCK” appears in the display. -
Page 74
• “AUTO” is selected in “MODE (MP3, JPEG)” • This system cannot play MP3 audio files recorded (page 29). on DATA DVDs. (except for MHC-GNZ9D Latin The DivX video file cannot be played. (except American model, GNZ8D Latin American model,… -
Page 75
Picture The disc title, album title and track title are not displayed correctly. There is no picture. • Use a disc that conforms with ISO9660 Level 1/ • Press DVD on the unit. Level 2, or Joliet in the expansion format. •… -
Page 76: Tape Deck
• Locate the antennas as far away from the speaker cords as possible. • Consult your nearest Sony dealer if the supplied AM antenna has come off the plastic stand. • Try turning off surrounding electrical equipment. A stereo FM program cannot be received in stereo.
-
Page 77: Self-Diagnosis Function
?/1 when resetting the system. ,Contact your nearest Sony Note dealer or local authorized Sony Turn off the subwoofer before you reset the system service facility and give the 5- when you connect the subwoofer (MHC-GNZ8D/ character service number.
-
Page 78: (When Letters/Numbers Appear In The Display) Messages
• The file you want to play has the extension “.AVI” or “.DIVX” but is not in DivX format, or is in DivX format but does not conform to a DivX Certified profiles.* * Except for MHC-GNZ9D Latin American model, GNZ8D Latin American model, GNZ7D and GNZ5D NO DISC There is no disc in the unit.
-
Page 79: Additional Information
– Subject to vibrations If you have any questions or problems concerning your – Subject to direct sunlight. system, please consult your nearest Sony dealer. • Use caution when placing the unit or speakers on surfaces that have been specially treated (with wax, oil, polish, etc.) as staining or discoloration of the…
-
Page 80
Notes on discs When using a tape longer than 90 minutes • Before playing, clean the disc with a cleaning cloth. Wipe the disc from the center out. The tape is very elastic. Do not change the tape operations such as play, stop, and fast-winding •… -
Page 81: Specifications
40 + 40 watts SURROUND SPEAKER (6 ohms at 1 kHz, 10% Use only the supplied THD) speaker SS-RS9D for MHC-GNZ9D, SS-RS8D MHC-GNZ7D for MHC-GNZ8D. The following measured at AC 120, 127, 220, CENTER SPEAKER Use only the supplied 230 – 240 V, 50/60 Hz…
-
Page 82
Disc player section Speaker System Compact disc and digital Front speaker SS-GNZ9D for MHC-GNZ9D/ audio and video system GNZ8D/GNZ7D Laser Semiconductor laser Speaker system 2-way, 2-unit, bass-reflex (DVD: λ=650 nm, type, magnetically CD: λ=790 nm) shielded type Emission duration: Speaker units… -
Page 83
AM loop antenna (1) Mass Approx. 7.0 kg net per FM lead antenna (1) speaker Video cable (1) Speaker pads Front speaker SS-GNZ5D for MHC-GNZ5D MHC-GNZ9D (24) Speaker system 3-way, 3-unit, bass-reflex MHC-GNZ8D (20) type MHC-GNZ7D/GNZ5D (8) Speaker units Surround speaker cable… -
Page 84: Language Code List
Language code list For details, see page 35. The language spellings conform to the ISO639: 1988 (E/F) standard. Code Language Code Language Code Language 1027 Afar 1245 Inupiak 1489 Russian 1028 Abkhazian 1248 Indonesian 1491 Kinyarwanda 1032 Afrikaans 1253 Icelandic 1495 Sanskrit 1039…
-
Page 85: List Of Items That Can Be Displayed And Selected By Disc Type
List of items that can be displayed and selected by disc type When you press DISPLAY, the following control menu items are displayed. Control Menu items Function TITLE (DVD only) Selects the title (DVD), or track (VIDEO CD) to be played. SCENE (VIDEO CD in PBC Displays the scene (VIDEO CD in PBC playback).
-
Page 86
VIDEO, VIDEO CD or CD only) GUIDE MELODY (DVD Listens to the guide melody. VIDEO only) * Except for MHC-GNZ9D Latin American model, GNZ8D Latin American model, GNZ7D and GNZ5D Tips once. • All the Control Menu items cannot be displayed by pressing DISPLAY In this case, press the button twice or more until the desired item appears. -
Page 87: System Setup Item List
0 dB (–6 dB – +6 dB) (except for NORMAL MHC-GNZ5D) TEST TONE The default setting varies, depending on the country model. Except for LatinAmerican model Latin American models only Except for MHC-GNZ9D Latin American model, GNZ8D Latin American model, GNZ7D and GNZ5D MHC-GNZ9D/GNZ8D only…
-
Page 88: Glossary
Compared produced by digital signal processing with the former Dolby Surround system, Dolby technology developed by Sony. Unlike previous Surround Pro Logic reproduces left-to-right surround sound fields mainly directed at the panning more naturally and localizes sounds reproduction of music, Digital Cinema Sound is more precisely.
-
Page 89
Interlace format The picture data uses the MPEG 2 format, one of (Interlaced scanning) the worldwide standards of digital compression technology. The picture data is compressed to The Interlace format is the NTSC standard about 1/40 of its original size. The DVD also method for displaying TV images at 30 frames uses the variable rate coding technology that per second. -
Page 90
This system conforms to Ver. 1.1 and Ver. 2.0 of Track VIDEO CD standards. You can enjoy two kinds Sections of a picture or a music piece on a CD, of playback depending on the disc type. VIDEO CD, MP3 or JPEG. Each track is assigned a track number enabling you to locate VIDEO CDs without PBC functions the track you want. -
Page 91: List Of Button Locations And Reference Pages
?/1 (power) 1 (10, 51, 61, 68, R – Z A – Q REC PAUSE/START wk (for CD SYNC wk (for nN (play) 8 (17, 39, 52, 53) MHC-GNZ9D/GNZ8D/ MHC-GNZ9D/GNZ8D/ X (pause) 8 (11, 18, 52) GNZ7D) GNZ7D) x (stop) 8 (12, 18, 45, 52, 53, wl (for MHC-GNZ5D) (53, e;…
-
Page 92: Remote Control
* The H, number 5 and VOLUME + (TV VOL +) buttons have tactile dots. Use the tactile dots as references when operatihng the system. – – – – – – < < > < < > Sony Corporation Printed in China…