
Сформировать заявку на ремонт можно по телефонам с 8 до 22 часов ежедневно:
+7 (495) 215 – 14 – 41
+7 (903) 722 – 17 – 03
или в любое время суток посредством online-заявки на сайте. В разговоре с менеджером сообщите, пожалуйста, следующую информацию:
- Марку и модель вашей стиралки.
- Признаки неисправности. Например, стиральная машина долго набирает воду, плохо отжимает белье или от нее пахнет горелым.
- Подходящие вам день и время ремонта.
- Ваши имя, адрес и телефон.
В день ремонта мастер свяжется с вами по указанному номеру, чтобы повторно согласовать время ремонта.
Если ваша Miele WT 2670 WPM неисправна, использовать ее категорически не рекомендуется! Поломка одной детали может спровоцировать перегрузку и выход из строя других элементов. Обнаружив неисправность стиральной машины, лучше сразу доверьте ее специалистам «РемБытТех»! Наш мастер приедет в любое удобное вам время в течение суток после вызова и отремонтирует стиралку с гарантией так, что ваша техника прослужит вам ещё долгие годы.
84 страницы подробных инструкций и пользовательских руководств по эксплуатации на русском
Добавление или извлечение
белья
Вы можете добавлять и вынимать
белье в процессе выполнения сле-
дующих программ:
– Хлопок/Лен
– Синтетика
– Автоматическая
– Экспресс
– Накрахмаливание
^ Нажмите кнопку
Дверца, чтобы от-
крылась дверца люка.
,
Внимание: существует опас-
ность ожога из-за высокой тем-
пературы.
^ Добавьте или извлеките часть бе-
лья.
^ Закройте дверцу люка.
Выполнение программы будет про-
должено автоматически.
Обратите внимание:
После запуска программы стираль-
но-сушильная машина не может оп-
ределить изменения в количестве
белья.
Поэтому после добавления или из-
влечения части белья машина всегда
ориентируется на максимальную за-
грузку.
Указанное время выполнения про-
граммы может увеличиться.
Дверца люка не открывается,
если:
– температура моющего раствора
выше 55°C.
– уровень воды превышает опреде-
ленное значение (например, если
выбрана функция
Больше воды).
– машина достигла этапа программы
Отжим.
– включена электронная блокиров-
ка программы.
СТИРКА
21

Отжим
Максимальная скорость вращения
барабана зависит от соответству-
ющей программы стирки.
Программа
Об/мин
Хлопок/Лен
1600
Синтетика
1200
Тонкое белье
600
Шелк
400
Шерсть
1200
Экспресс
1600
Автоматическая
1200
Темное белье
1200
Рубашки
600
Джинсы
900
Спортивное белье
1200
Верхняя одежда
800
Пропитка
1000
Гардины
600
Доп. полоскание
1200
Накрахмаливание
1500
Слив/Отжим
1600
Вы можете уменьшить скорость вра-
щения барабана для последнего от-
жима. Выбор скорости отжима, пре-
вышающей указанную, не возможен.
Отжим с полосканием
Белье отжимается после основной
стирки и между циклами полоскания.
При уменьшении скорости оконча-
тельного отжима скорость отжима с
полосканием при известных усло-
виях также уменьшается. В програм-
ме
Хлопок/лен при скорости враще-
ния барабана менее 700 об/мин до-
бавляется дополнительный цикл по-
лоскания.
Отказ от окончательного отжима
(Без слива)
^ Выберите установку
Без слива.
После последнего цикла полоска-
ния текстильные изделия останут-
ся в воде. Таким образом будет
уменьшено образование складок,
если изделия не будут вынуты из
барабана сразу после окончания
программы.
– Запуск окончательного отжима:
Стирально-сушильная машина
предлагает Вам для отжима мак-
симально допустимую скорость.
Вы можете выбрать более низкую
скорость отжима. С помощью
кнопки
Старт/Стоп запускается
выполнение окончательного отжи-
ма.
– Окончание программы:
Нажмите кнопку
Дверца.
Выполняется слив воды. После
этого снова нажмите кнопку
Дверца, чтобы открыть дверцу
люка.
Отказ от отжима с полосканием и
окончательного отжима
^ Выберите установку
Без отжима.
После последнего цикла полоска-
ния вода откачивается, и включа-
ется функция защиты от сминания.
При этой установке к программам
Хлопок/лен, Синтетика, Экспресс
и Автоматическая добавляется до-
полнительный цикл полоскания.
СТИРКА
22

Обзор программ
Хлопок/лен от 95°C äî 30°C 9876
макс. 5,0 кг
Вид текстиля
Текстильные изделия из хлопка, льна или смесовых
тканей.
Дополнительные
функции
Предварит. стирка или Замачивание, Короткая, Больше
воды
Моющие средства Универсальные моющие средства, средства для стирки
цветных тканей
Синтетика от 60°C äî 30°C 421
макс. 2,5 кг
Вид текстиля
Синтетические ткани, смесовые ткани или обработан-
ный хлопок.
Дополнительные
функции
Предварит. стирка или Замачивание, Короткая, Больше
воды
Моющие средства Универсальные моющие средства, средства для стирки
цветных тканей
Тонкое белье от 60°C до хол. ac
макс. 1,0 кг
Вид текстиля
Чувствительные изделия из синтетических волокон,
смесовых тканей или искусственного шелка.
Дополнительные
функции
Предварит. стирка или Замачивание, Короткая
Моющие средства Мягкое моющее средство
Шелк / от 30°C до хол.
макс. 1,0 кг
Вид текстиля
Шелк и любые изделия, предназначенные для ручной
стирки и не содержащие шерсть.
Указание
Тонкие колготки и бюстгальтеры стирайте в бельевом
мешке.
Дополнительные
функции
Больше воды
Моющие средства Мягкое моющее средство
СТИРКА
23

Шерсть / от 40°C до хол.
макс. 2,0 кг
Вид текстиля
Чистая шерсть и шерсть с добавлением других волокон
Моющие средства Средство для стирки шерсти
Экспресс от 40°C до хол. 76
макс. 2,5 кг
Вид текстиля
Небольшая партия белья, которое необходимо
освежить. Вид текстиля соответствует программе
Хлопок/лен.
Дополнительные
функции
Больше воды
Моющие средства Универсальные моющие средства, средства для стирки
цветных тканей
СТИРКА
24

Автоматическая от 40°C до хол. 7621
макс. 2,5 кг
Вид текстиля
Партия из различных текстильных изделий для про-
грамм
Хлопок/Лен и Синтетика, отсортированных по
расцветке.
Дополнительные
функции
Предварит. стирка или Замачивание, Короткая, Больше
воды
Моющие средства Универсальные моющие средства, средства для стирки
цветных тканей
Темное белье от 40°C до хол.
макс. 2,5 кг
Изделия
Темное белье из хлопка или смесовых тканей.
Указание
Стирать изделия, вывернув их наизнанку.
Моющие средства Жидкое моющее средство для цветных тканей
Рубашки от 60°C до хол.
макс. 2,0 кг
Указание
– Воротнички и манжеты подвергайте предварительной
обработке в зависимости от степени загрязнения.
– Для рубашек и блуз из шелка используйте программу
Шелк.
Моющие средства Универсальные моющие средства, средства для стирки
цветных тканей
Джинсы от 40°C до хол.
макс. 2,5 кг
Указание
– Изделия из джинсового материала стирайте
вывернутыми наизнанку.
– При первой стирке джинсовая одежда часто линяет.
Поэтому темные и светлые изделия стирайте отдельно.
Моющие средства Жидкое моющее средство для цветных тканей
Спортивное белье от 60°C äî 30°C
макс. 2,0 кг
Изделия
Слабозагрязненная спортивная одежда, которую необ-
ходимо выстирать или освежить.
Моющие средства Универсальные моющие средства, средства для стирки
цветных тканей
Верхняя одежда от 40°C до хол.
макс. 2,0 кг
Изделия
Куртки, брюки из тканей с микроволокнами, например,
Gore-Tex
®
, SYMPATEX
®
, WINDSTOPPER
®
и т. д.
Указание
– У курток необходимо застегнуть молнии.
– Не использовать смягчающие ополаскиватели
Моющие средства Мягкое моющее средство
СТИРКА
25

Пропитка 40°C
макс. 3,0 кг
Изделия
Для дополнительной обработки тканей из микроволокон,
лыжных костюмов, тонкого, плотного хлопка (поплина)
или скатертей, если необходимо, чтобы изделия
обладали грязе- и водоотталкивающими свойствами.
Указание
– Изделия должны быть свежевыстиранными и
отжатыми или высушенными.
– Для сохранения оптимального эффекта необходима
заключительная термическая обработка. Это обеспе-
чивается сушкой в сушильной машине или глажением.
Средство
пропитки
– Необходимо использовать только средства для
пропитки с пометкой «подходит для изделий с
водонепроницаемой пленкой», поскольку такие сред-
ства основаны на соединениях фтора. Не допускается
применение парафиносодержащих средств.
– Заполняйте средством пропитки ячейку §.
Гардины от 40°C до хол.
макс. 2,0 кг
Изделия
Гардины, для которых производителем разрешена машин-
ная стирка. Для удаления пыли автоматически выполняет-
ся предварительное полоскание без моющих средств.
Указание
Для сильномнущихся гардин снизьте скорость отжима
или исключите его.
Дополнительные
функции
Больше воды
Моющие сред-
ства
Средство для стирки гардин, универсальное средство
или средство для стирки цветных тканей в виде порошка
Доп. полоскание
макс. 5,0 кг
Дополнительные
функции
Без слива
Накрахмаливание
макс. 5,0 кг
Указание
Белье (скатерти, салфетки, спецодежда) должно быть
свежевыстиранным, но без обработки ополаскивателем.
Средство на-
крахмаливания
Жидкий или порошковый крахмал
Слив/Отжим
макс. 5,0 кг
Указание
Только слив: скорость отжима установить на
Без отжима.
Для отжима текстильных изделий. Обращайте внимание
на число оборотов.
СТИРКА
26

Выполнение программы
Основная стирка
Полоскание
Отжим
Уровень
воды
Ритм
стирки
Уро-
вень
воды
Циклы
полос-
кания
Отжим
с полос-
канием
Послед-
ний от-
жим
Хлопок/Лен
d
a
(
2-3
2)
L
L
Синтетика
d
a
(
2-3
3)
L
L
Тонкое белье
e
b
e
3
–
L
Шелк
e
d
e
2
–
L
Шерсть
(
c
(
2
L
L
Экспресс
d
a
(
2-3
3)
L
L
Автоматическая
(
a
(
2-3
3)
L
L
Темное белье
(
a
(
3
L
L
Рубашки
(
a
(
2
–
L
Джинсы
(
a
(
3
–
L
Спортивное белье
d
a
(
2
L
L
Верхняя одежда
(
b
e
3
L
4)
L
Пропитка
–
–
(
1
–
L
Гардины
1)
(
a
(
3
–
L
Доп. полоскание
–
–
e
2
–
L
Накрахмаливание
–
–
(
1
–
L
Слив/Отжим
–
–
–
–
–
L
d = низкий уровень воды
( = средний уровень воды
e = высокий уровень воды
a= обычный ритм стирки
b= щадящий режим
c= шерсть
d= шелк
Информацию об особенностях хода выполнения программ см. на следую-
щей странице.
СТИРКА
27

Стирально-сушильная машина осна-
щена электронным управлением с
функцией автоматического распоз-
навания загрузки. Машина самостоя-
тельно определяет необходимое для
стирки потребление воды, в зависи-
мости от количества белья и его спо-
собности впитывать воду. Это приво-
дит к различиям в ходе выполнения
программ и продолжительности
стирки.
Приводимые здесь сведения о вы-
полнении программ всегда относятся
к основной программе при макси-
мальной загрузке. Дополнительно
выбираемые функции не учитывают-
ся.
Линейка индикации выполнения про-
граммы Вашей стирально-сушильной
машины постоянно информирует Вас
во время стирки о достигнутом этапе
программы.
Особенности выполнения про-
граммы:
Защита от сминания:
После завершения программы бара-
бан вращается еще максимум 30 ми-
нут, препятствуя таким образом об-
разованию складок. Стирально-
сушильную машину можно открыть в
любое время. Исключение: в про-
грамме
Шерсть функция защиты от
сминания не включается.
1)
Предварительное полоскание: Для
удаления пыли автоматически вы-
полняется предварительное по-
лоскание без моющих средств.
2)
3-й цикл полоскания происходит,
если:
– в барабане образовалось слишком
много пены
– скорость последнего отжима ме-
нее 700 об/мин
– выбран режим Без отжима
3)
3-й цикл полоскания происходит,
если:
выбран режим
Без отжима
4)
В программе
Верхняя одежда от-
жим текстильных изделий выпол-
няется только после основной
стирки.
СТИРКА
28

Моющие средства
Вы можете использовать все совре-
менные моющие средства, которые
предназначены для стиральных ма-
шин, a также жидкие, концентриро-
ванные, в таблетках и комбиниро-
ванные моющие средства (которые
Вы можете составить самостоятель-
но).
Стирку шерстяных и полушерстяных
изделий необходимо проводить c по-
мощью моющих средств для шерсти.
Указания по применению и дозиров-
ке для полной загрузки приводятся
на упаковке моющего средства.
Дозировка зависит от:
– степени загрязненности белья
слабозагрязненное белье
Не заметно загрязнений и пятен.
Одежда, например, пахнет потом.
среднезагрязненное белье
Загрязнения видны и/или имеется
небольшое количество легких пя-
тен.
сильнозагрязненное белье
Очень заметны загрязнения и/или
пятна.
– жесткости воды
Если Вы не знаете уровень жест-
кости воды, запросите данные на
предприятии водоснабжения.
– количества белья (учитывайте ре-
комендации по дозировке).
Жесткость воды
Диапазон
жесткос-
ти
Качество
воды
Общая
жесткос-
ть в
ммоль/л
в немец-
ких граду-
сах
°d
I
мягкая
0 — 1,3
0 — 7
II
средняя
1,3 — 2,5
7 — 14
III
от жест-
кой до
очень
жесткой
свыше 2,5
свыше 14
Смягчитель воды
Для экономии моющего средства при
жесткости воды в диапазонах II è III
Вы можете добавлять смягчитель
воды. Правильная дозировка приво-
дится на упаковке. Сначала дозируй-
те моющее средство, a затем уже
смягчитель.
При этом дозировку моющего сред-
ства Вы можете осуществлять, как
для диапазона жесткости I.
Составное моющее средство
Если Вы стираете, используя не-
сколько компонентов (например, при
самостоятельном составлении мою-
щего средства), заполните ячейку
средствами в следующем порядке
j:
1. Моющее средство
2. Смягчитель
3. Пятновыводитель
Таким образом, будет лучше про-
ходить размыв моющих средств при
стирке.
СТИРКА
29

Ополаскиватель, добавка для
придания формы или жидкий
крахмал
Ополаскиватель придает изделиям
мягкость на ощупь и снижает их ста-
тический заряд при последующей
машинной сушке.
Добавки для придания формы явля-
ются синтетическим средством для
подкрахмаливания изделий, дающим
жесткость на ощупь.
Крахмал придает текстильным изде-
лиям жесткость и плотность.
^ Дозировка этих добавок проводит-
ся согласно рекомендациям изго-
товителей.
Автоматическое использование
добавок
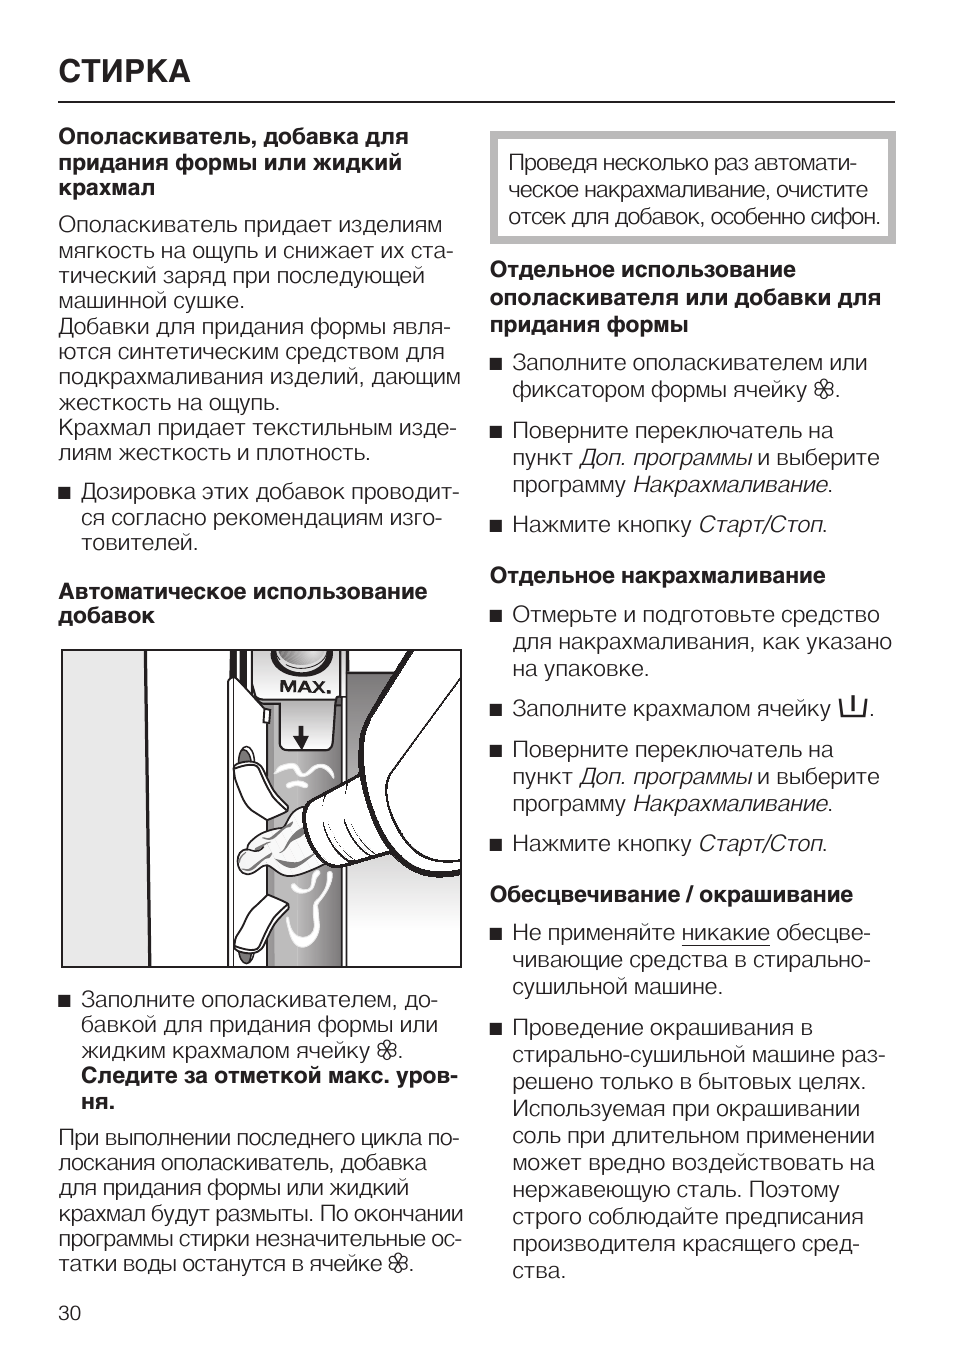
^ Заполните ополаскивателем, до-
бавкой для придания формы или
жидким крахмалом ячейку
§.
Следите за отметкой макс. уров-
ня.
При выполнении последнего цикла по-
лоскания ополаскиватель, добавка
для придания формы или жидкий
крахмал будут размыты. По окончании
программы стирки незначительные ос-
татки воды останутся в ячейке
§.
Проведя несколько раз автомати-
ческое накрахмаливание, очистите
отсек для добавок, особенно сифон.
Отдельное использование
ополаскивателя или добавки для
придания формы
^ Заполните ополаскивателем или
фиксатором формы ячейку
§.
^ Поверните переключатель на
пункт
Доп. программы и выберите
программу
Накрахмаливание.
^ Нажмите кнопку
Старт/Стоп.
Отдельное накрахмаливание
^ Отмерьте и подготовьте средство
для накрахмаливания, как указано
на упаковке.
^ Заполните крахмалом ячейку
i.
^ Поверните переключатель на
пункт
Доп. программы и выберите
программу
Накрахмаливание.
^ Нажмите кнопку
Старт/Стоп.
Обесцвечивание / окрашивание
^ Не применяйте никакие обесцве-
чивающие средства в стирально-
сушильной машине.
^ Проведение окрашивания в
стирально-сушильной машине раз-
решено только в бытовых целях.
Используемая при окрашивании
соль при длительном применении
может вредно воздействовать на
нержавеющую сталь. Поэтому
строго соблюдайте предписания
производителя красящего сред-
ства.
СТИРКА
30
09:03
Miele SoftTronic WT2670
18:18
Miele WT2670 Washer Dryer Review & Demonstration
02:11
Стиральная машина +сушка Miele WT 2670
12:15
Miele Softtronic WT2670 WPM Waschtrockner
27:16
Miele Softtronic W2670 WPM Waschtrockner
03:42
Miele WT 2670 WASHER/DRYER.(dryer not working)
Нажмите на кнопку для помощи
Operating instructions
Washer-dryer
WT 2670
To avoid the risk of accidents
or damage to the machine
it is essential to read
these instructions before it is
installed and used for the first time.
G
M.-Nr. 06 717 280
Caring for the environment
Disposal of the packing material
The transport and protective packing
has been selected from materials which
are environmentally friendly for disposal
and can normally be recycled.
Ensure that any plastic wrappings,
bags etc. are disposed safely and kept
out of the reach of babies and young
children. Danger of suffocation!
Rather than just throwing these
materials away, please ensure they are
offered for recycling.
Disposal of your old appliance
Electrical and electronic appliances
often contain materials which, if
handled or disposed of incorrectly,
could be potentially hazardous to
human health and to the environment.
They are, however, essential for the
correct functioning of your appliance or
machine. Please do not therefore
dispose of it with your household waste.
Please dispose of it at your local
community waste collection / recycling
centre and ensure that it presents no
danger to children while being stored
for disposal.
It should be unplugged or disconnected
from the mains electricity supply by a
competent person. The plug must be
rendered useless and the cable cut off
directly behind it to prevent misuse.
See the «Warning and Safety» section of
this booklet for further details.
2

Contents
Caring for the environment . . . . . . . . . . . . . . . . . . . . . . . . . . . . . . . . . . . . . . . . . . 2
Disposal of the packing material . . . . . . . . . . . . . . . . . . . . . . . . . . . . . . . . . . . . 2
Disposal of your old appliance. . . . . . . . . . . . . . . . . . . . . . . . . . . . . . . . . . . . . . 2
Warning and Safety instructions . . . . . . . . . . . . . . . . . . . . . . . . . . . . . . . . . . . . . 6
Guide to the machine. . . . . . . . . . . . . . . . . . . . . . . . . . . . . . . . . . . . . . . . . . . . . . 10
Control panel . . . . . . . . . . . . . . . . . . . . . . . . . . . . . . . . . . . . . . . . . . . . . . . . . . . . . 10
Display . . . . . . . . . . . . . . . . . . . . . . . . . . . . . . . . . . . . . . . . . . . . . . . . . . . . . . . . . . 11
Use. . . . . . . . . . . . . . . . . . . . . . . . . . . . . . . . . . . . . . . . . . . . . . . . . . . . . . . . . . . . . 11
Before using for the first time. . . . . . . . . . . . . . . . . . . . . . . . . . . . . . . . . . . . . . . 12
Calibrating the load size sensor to zero . . . . . . . . . . . . . . . . . . . . . . . . . . . . . . 13
Washing and drying environmentally . . . . . . . . . . . . . . . . . . . . . . . . . . . . . . . . 14
WASHING . . . . . . . . . . . . . . . . . . . . . . . . . . . . . . . . . . . . . . . . . . . . . . . . . . . . . . . 15
Brief instructions . . . . . . . . . . . . . . . . . . . . . . . . . . . . . . . . . . . . . . . . . . . . . . . . . . 15
Separate washing . . . . . . . . . . . . . . . . . . . . . . . . . . . . . . . . . . . . . . . . . . . . . . . . . 15
Extra options . . . . . . . . . . . . . . . . . . . . . . . . . . . . . . . . . . . . . . . . . . . . . . . . . . . . . 20
Pre-wash. . . . . . . . . . . . . . . . . . . . . . . . . . . . . . . . . . . . . . . . . . . . . . . . . . . . . . 20
Soak . . . . . . . . . . . . . . . . . . . . . . . . . . . . . . . . . . . . . . . . . . . . . . . . . . . . . . . . . 20
Short . . . . . . . . . . . . . . . . . . . . . . . . . . . . . . . . . . . . . . . . . . . . . . . . . . . . . . . . . 20
Water plus. . . . . . . . . . . . . . . . . . . . . . . . . . . . . . . . . . . . . . . . . . . . . . . . . . . . . 20
Buzzer. . . . . . . . . . . . . . . . . . . . . . . . . . . . . . . . . . . . . . . . . . . . . . . . . . . . . . . . 20
Adding or removing laundry after a programme has started . . . . . . . . . . . . . . . . 21
Spinning. . . . . . . . . . . . . . . . . . . . . . . . . . . . . . . . . . . . . . . . . . . . . . . . . . . . . . . . . 22
Rinse and interim spin . . . . . . . . . . . . . . . . . . . . . . . . . . . . . . . . . . . . . . . . . . . 22
To omit the final spin (Rinse hold). . . . . . . . . . . . . . . . . . . . . . . . . . . . . . . . . . . 22
To omit rinse and interim spin and the final spin . . . . . . . . . . . . . . . . . . . . . . . 22
Programme chart . . . . . . . . . . . . . . . . . . . . . . . . . . . . . . . . . . . . . . . . . . . . . . . . . . 23
Programme sequence . . . . . . . . . . . . . . . . . . . . . . . . . . . . . . . . . . . . . . . . . . . . . . 27
Garment care label symbols . . . . . . . . . . . . . . . . . . . . . . . . . . . . . . . . . . . . . . . . . 29
Detergent . . . . . . . . . . . . . . . . . . . . . . . . . . . . . . . . . . . . . . . . . . . . . . . . . . . . . . . . 29
Water softeners. . . . . . . . . . . . . . . . . . . . . . . . . . . . . . . . . . . . . . . . . . . . . . . . . 30
Washing with several components. . . . . . . . . . . . . . . . . . . . . . . . . . . . . . . . . . 30
Fabric conditioners or liquid starch . . . . . . . . . . . . . . . . . . . . . . . . . . . . . . . . . 31
Automatic dispensing of fabric conditioner or liquid starch to laundry at
the end of a programme. . . . . . . . . . . . . . . . . . . . . . . . . . . . . . . . . . . . . . . . . . 31
Adding fabric conditioner separately . . . . . . . . . . . . . . . . . . . . . . . . . . . . . . . . 31
3

Contents
Adding starch separately . . . . . . . . . . . . . . . . . . . . . . . . . . . . . . . . . . . . . . . . . 31
Colour run and dye removers / dyes . . . . . . . . . . . . . . . . . . . . . . . . . . . . . . . . 31
DRYING . . . . . . . . . . . . . . . . . . . . . . . . . . . . . . . . . . . . . . . . . . . . . . . . . . . . . . . . . 32
Separate drying . . . . . . . . . . . . . . . . . . . . . . . . . . . . . . . . . . . . . . . . . . . . . . . . . . . 32
Extra option . . . . . . . . . . . . . . . . . . . . . . . . . . . . . . . . . . . . . . . . . . . . . . . . . . . . . . 35
Low temperature. . . . . . . . . . . . . . . . . . . . . . . . . . . . . . . . . . . . . . . . . . . . . . . . 35
Thermospin. . . . . . . . . . . . . . . . . . . . . . . . . . . . . . . . . . . . . . . . . . . . . . . . . . . . 35
Adding or removing laundry after a programme has started . . . . . . . . . . . . . . . . 35
Programme chart . . . . . . . . . . . . . . . . . . . . . . . . . . . . . . . . . . . . . . . . . . . . . . . . . . 36
WASHING AND DRYING . . . . . . . . . . . . . . . . . . . . . . . . . . . . . . . . . . . . . . . . . . . 40
Washing and drying in a continuous sequence . . . . . . . . . . . . . . . . . . . . . . . . . . 40
After each washing or drying programme. . . . . . . . . . . . . . . . . . . . . . . . . . . . . 42
Rinse out fluff programme . . . . . . . . . . . . . . . . . . . . . . . . . . . . . . . . . . . . . . . . 42
Changing the programme sequence . . . . . . . . . . . . . . . . . . . . . . . . . . . . . . . . . 43
Cancelling a programme . . . . . . . . . . . . . . . . . . . . . . . . . . . . . . . . . . . . . . . . . 43
Interrupting a programme. . . . . . . . . . . . . . . . . . . . . . . . . . . . . . . . . . . . . . . . . 43
Altering a programme. . . . . . . . . . . . . . . . . . . . . . . . . . . . . . . . . . . . . . . . . . . . 43
Electronic programme locking . . . . . . . . . . . . . . . . . . . . . . . . . . . . . . . . . . . . . 44
Delay start. . . . . . . . . . . . . . . . . . . . . . . . . . . . . . . . . . . . . . . . . . . . . . . . . . . . . . . 45
Cleaning and care . . . . . . . . . . . . . . . . . . . . . . . . . . . . . . . . . . . . . . . . . . . . . . . . 46
Cleaning the machine . . . . . . . . . . . . . . . . . . . . . . . . . . . . . . . . . . . . . . . . . . . . . . 46
Cleaning the filter in the water inlet . . . . . . . . . . . . . . . . . . . . . . . . . . . . . . . . . . . . 48
Problem solving guide. . . . . . . . . . . . . . . . . . . . . . . . . . . . . . . . . . . . . . . . . . . . . 49
What to do, if . . . . . . . . . . . . . . . . . . . . . . . . . . . . . . . . . . . . . . . . . . . . . . . . . . . . . 49
The programme does not start. . . . . . . . . . . . . . . . . . . . . . . . . . . . . . . . . . . . . . . . 49
Fault messages in the display . . . . . . . . . . . . . . . . . . . . . . . . . . . . . . . . . . . . . . . . 50
Problems with the load size indicator . . . . . . . . . . . . . . . . . . . . . . . . . . . . . . . . . . 51
General problems . . . . . . . . . . . . . . . . . . . . . . . . . . . . . . . . . . . . . . . . . . . . . . . . . 52
An unsatisfactory wash result . . . . . . . . . . . . . . . . . . . . . . . . . . . . . . . . . . . . . . . . 53
An unsatisfactory drying result . . . . . . . . . . . . . . . . . . . . . . . . . . . . . . . . . . . . . . . 54
The drum door cannot be opened by pressing the
After sales service . . . . . . . . . . . . . . . . . . . . . . . . . . . . . . . . . . . . . . . . . . . . . . . . 59
Future updates (PC) . . . . . . . . . . . . . . . . . . . . . . . . . . . . . . . . . . . . . . . . . . . . . 59
Appliance guarantee . . . . . . . . . . . . . . . . . . . . . . . . . . . . . . . . . . . . . . . . . . . . 59
Optional accessories . . . . . . . . . . . . . . . . . . . . . . . . . . . . . . . . . . . . . . . . . . . . 59
button. . . . . . . . . . . . . . 55
4

Contents
Installation and connection . . . . . . . . . . . . . . . . . . . . . . . . . . . . . . . . . . . . . . . . 60
Front view. . . . . . . . . . . . . . . . . . . . . . . . . . . . . . . . . . . . . . . . . . . . . . . . . . . . . . . . 60
Rear view . . . . . . . . . . . . . . . . . . . . . . . . . . . . . . . . . . . . . . . . . . . . . . . . . . . . . . . . 61
Installation surface. . . . . . . . . . . . . . . . . . . . . . . . . . . . . . . . . . . . . . . . . . . . . . . . . 62
Installing the washer-dryer. . . . . . . . . . . . . . . . . . . . . . . . . . . . . . . . . . . . . . . . . . . 62
Removing the transit fittings . . . . . . . . . . . . . . . . . . . . . . . . . . . . . . . . . . . . . . . . . 62
Levelling the machine . . . . . . . . . . . . . . . . . . . . . . . . . . . . . . . . . . . . . . . . . . . . . . 64
Screwing out and adjusting the feet. . . . . . . . . . . . . . . . . . . . . . . . . . . . . . . . . 65
Building under a continous worktop / in a kitchen run . . . . . . . . . . . . . . . . . . . 65
The Miele water protection system . . . . . . . . . . . . . . . . . . . . . . . . . . . . . . . . . . . . 66
Connection to the water supply . . . . . . . . . . . . . . . . . . . . . . . . . . . . . . . . . . . . . . . 67
Connection to the drainage system. . . . . . . . . . . . . . . . . . . . . . . . . . . . . . . . . . . . 68
Electrical connection U.K. . . . . . . . . . . . . . . . . . . . . . . . . . . . . . . . . . . . . . . . . . . . 69
Consumption data . . . . . . . . . . . . . . . . . . . . . . . . . . . . . . . . . . . . . . . . . . . . . . . . 70
Note for test institutes: . . . . . . . . . . . . . . . . . . . . . . . . . . . . . . . . . . . . . . . . . . . 70
Technical data . . . . . . . . . . . . . . . . . . . . . . . . . . . . . . . . . . . . . . . . . . . . . . . . . . . 71
Settings menu J. . . . . . . . . . . . . . . . . . . . . . . . . . . . . . . . . . . . . . . . . . . . . . . . . . 74
Language J . . . . . . . . . . . . . . . . . . . . . . . . . . . . . . . . . . . . . . . . . . . . . . . . . . . . . . 74
Time of day
Water plus T . . . . . . . . . . . . . . . . . . . . . . . . . . . . . . . . . . . . . . . . . . . . . . . . . . . . 75
Gentle action U . . . . . . . . . . . . . . . . . . . . . . . . . . . . . . . . . . . . . . . . . . . . . . . . . . 76
Suds cooling R . . . . . . . . . . . . . . . . . . . . . . . . . . . . . . . . . . . . . . . . . . . . . . . . . . 76
Door release Ü . . . . . . . . . . . . . . . . . . . . . . . . . . . . . . . . . . . . . . . . . . . . . . . . . . 76
Distribution controller
Alter time . . . . . . . . . . . . . . . . . . . . . . . . . . . . . . . . . . . . . . . . . . . . . . . . . . . . . . . . 77
Lock X . . . . . . . . . . . . . . . . . . . . . . . . . . . . . . . . . . . . . . . . . . . . . . . . . . . . . . . . . 78
Temperature S . . . . . . . . . . . . . . . . . . . . . . . . . . . . . . . . . . . . . . . . . . . . . . . . . . . 79
Buzzer O . . . . . . . . . . . . . . . . . . . . . . . . . . . . . . . . . . . . . . . . . . . . . . . . . . . . . . . 79
Keypad tones P . . . . . . . . . . . . . . . . . . . . . . . . . . . . . . . . . . . . . . . . . . . . . . . . . . 79
Display contrast . . . . . . . . . . . . . . . . . . . . . . . . . . . . . . . . . . . . . . . . . . . . . . . . . . . 79
Display brightness . . . . . . . . . . . . . . . . . . . . . . . . . . . . . . . . . . . . . . . . . . . . . . . . . 79
Standby Q. . . . . . . . . . . . . . . . . . . . . . . . . . . . . . . . . . . . . . . . . . . . . . . . . . . . . . . 80
Memory V . . . . . . . . . . . . . . . . . . . . . . . . . . . . . . . . . . . . . . . . . . . . . . . . . . . . . . 80
Set extended cool-down . . . . . . . . . . . . . . . . . . . . . . . . . . . . . . . . . . . . . . . . . . . . 80
Y. . . . . . . . . . . . . . . . . . . . . . . . . . . . . . . . . . . . . . . . . . . . . . . . . . . . 75
g . . . . . . . . . . . . . . . . . . . . . . . . . . . . . . . . . . . . . . . . . . . . 77
5

Warning and Safety instructions
Technical safety
To avoid the risk of accidents and
damage to the machine please read
these instructions carefully before
using it for the first time. They
contain important information on its
safety, installation, use and
maintenance.
Keep these operating instructions in
a safe place and ensure that new
users are familiar with the content.
Pass them on to any future owner of
the machine.
Correct usage
This washer-dryer must only be
used:
– to wash items which are specified by
the manufacturer to be washable on
the care label.
– to dry textiles which have been
washed in a water solution, marked on
the manufacturer’s care label as being
suitable for tumble drying. «Dry
cleaning kits» for freshening up
garments in a tumble dryer are
increasingly available on the market. If
using, do so at your own risk, and
follow the instructions provided on the
packaging.
Any other applications may be dange
rous. The manufacturer cannot be held
liable for damage caused by improper
or incorrect use of the appliance.
damage. Do not install or use a
damaged machine.
the data plate (voltage and connected
load) matches the mains electricity
supply. If in any doubt, consult a
qualified electrician.
when continuity is complete between
the machine and an effective earthing
system which complies with local and
national safety regulations.
It is most important that this basic
safety requirement is present and
regularly tested and where there is any
doubt the household wiring system
should be inspected by a qualified
electrician.
The manufacturer cannot be held liable
for the consequences of an inadequate
earthing system (e.g. electric shock).
extension lead. Extension leads do not
guarantee the required safety of the
—
appliance (e.g. danger of overheating).
Before setting up the machine,
check it for any externally visible
Before connecting the machine,
ensure that the connection data on
The electrical safety of this
machine can only be guaranteed
Do not connect the appliance to
the mains electricity supply by an
6

Warning and Safety instructions
The machine is built in accordance
with current safety requirements.
Unauthorised repairs could result in
unforeseen dangers for the user, for
which the manufacturer cannot accept
liability. Repairs should only be
undertaken by a Miele approved
technician.
Ensure current is not supplied to the
machine until after maintenance or
repair work has been carried out.
The machine is only completely
isolated from the electricity supply
when:
– it is switched off at the wall socket
and the plug is withdrawn, or
– it is switched off at the mains, or
– the mains fuse is withdrawn, or
– the screw-out fuse is removed in
countries where this is applicable.
This machine must only be
connected to the on-site water
supply using a new hose kit. Old hoses
must not be re-used. Check the hose
regularly for signs of wear and tear.
Change in good time to avoid the risk of
leaks and subsequent damage.
approved service technician to
protect the user from danger.
In countries where there are areas
which may be subject to infestation
by cockroaches or other vermin, pay
particular attention to keeping the
appliance and its surroundings in a
clean condition at all times. Any
damage which may be caused by
cockroaches or other vermin will not be
covered by the appliance guarantee.
Use
This equipment may only be used
in mobile installations such as
ships, caravans, aircraft etc. if a risk
assessment of the installation has been
carried out by a suitably qualified
engineer.
Do not install your machine in
rooms where temperatures below
freezing may occur. Frozen hoses may
burst under pressure.The reliability of
the electronic control unit may be
impaired at temperatures below
freezing point.
If a fault has been identified, the
machine must be examined by a
competent person before further use,
and repaired if necessary.
–
Faulty components must only be
exchanged for Miele original spare
parts. Only when these parts are
fitted can the safety standards of the
machine be guaranteed.
–
If the connection cable is faulty it
must only be replaced by a Miele
7

Warning and Safety instructions
Before using the machine for the
first time, check that the transit
fittings at the rear of the machine have
been removed (see section on
«Installation»). During spinning, a transit
fitting which is still in place may result in
damage to both the machine and
adjacent furniture or appliances.
Turn off the stopcock if the
machine is to be left for any length
of time (e.g. holiday), especially if there
is no floor drain (gully) in the immediate
vicinity.
Flooding danger. If hooking the
drain hose into a wash basin,
check that the water can drain off
quickly enough to prevent the sink from
overflowing. Make sure the drain hose
is secure, so that the force of the water
flowing out of the hose does not
dislodge it.
Take care to ensure that foreign
objects (e.g. nails, pins, coins,
paper clips) do not find their way into
the machine with the laundry. These
may damage components of the
machine (e.g. suds container, drum),
which in turn can result in damage to
the laundry.
If the correct amount of detergent
is dispensed, the machine should
not need to be descaled. If, however,
you do wish to descale the machine
only use proprietary non-corrosive
descaling agents and strictly observe
the instructions on the packaging. If in
doubt contact the Miele Customer Ser
vice Dept. or your Miele Dealer.
Textiles which have been
pre-treated in solvent based
cleaning agents must be thoroughly
rinsed in clean water before being
washed in the machine.
Never use solvent based cleaning
agents in this machine, as this may
result in damage to component parts
and create toxic fumes. Such
detergents also pose a fire and
explosion hazard.
Only use dyes specified by the
manufacturer as being suitable for
use in a domestic washing machine.
Always observe the manufacturer’s
instructions carefully.
Colour run and dye removers
contain sulphur compounds which
can cause damage such as corrosion.
Do not use these products in this
machine.
—
Always make sure the drum is
stationary before reaching in to
remove laundry. Reaching into a
moving drum is extremely dangerous.
8

Warning and Safety instructions
To prevent the risk of fire the
following textiles must not be dried
in this machine:
fabrics which contain a large
–
proportion of rubber, foam rubber or
rubber like materials.
items which contain padding or
–
fillings (e.g. pillows, jackets).
items which have been treated with
–
inflammable cleaning agents.
items which have been splashed with
–
hair lacquer, hair spray, nail varnish
remover or similar substances.
– items which have been soiled with
oils or residues containing grease
(kitchen oils, cosmetics etc.).
– items soiled with wax or other
chemicals (e.g. mops and floor
cloths).
– items which have not been
thoroughly cleaned and which are
still soiled with grease or oil, e.g.
workwear. Such clothing may require
a heavy duty detergent to get them
clean. If necessary, consult the
detergent manufacturer for advice.
Make sure that any dispensing
balls etc. are removed from laundry
before the drying programme. These
dispensers can melt during the drying
programme and cause damage to the
machine and the laundry. Do not use
liquid dispenser balls or similar if you
are planning to wash and then dry in
one continuous sequence.
Take care, the metal cap is hot
after drying. Open the door wide
after the drying cycle. Do not touch the
metal cap located on the inside of the
door glass. It will still be hot and could
cause a burn.
Accessories
Accessory parts may only be fitted
when expressly approved by Miele.
If other parts are used, guarantee,
performance and product liability
claims will be invalidated.
Safety with children
This machine is not a toy! To avoid
the risk of injury do not allow
children to play on or near it or to play
with its controls. Supervise its use by
the elderly or infirm, and supervise
children whilst you are operating the
machine.
Disposal of your old machine
Before discarding an old machine,
switch it off at the wall socket and
unplug it. Render the plug useless. Cut
off the cable directly behind the
machine to prevent misuse. This should
be done by a competent person.
The manufacturer cannot be held
liable for damage caused by
non-compliance with these Warning
and Safety instructions.
9
Guide to the machine
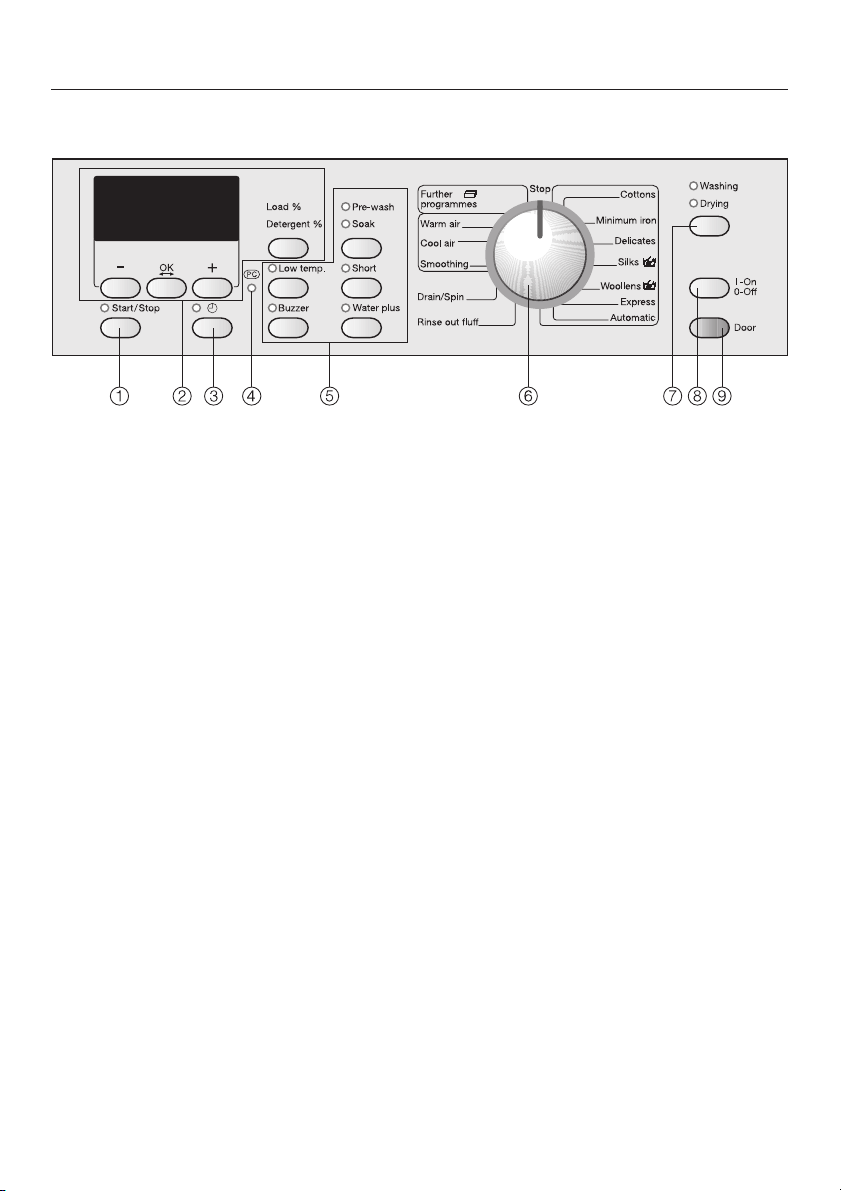
Control panel
a Start/Stop button
For starting the programme selected
and cancelling a programme once it
has started.
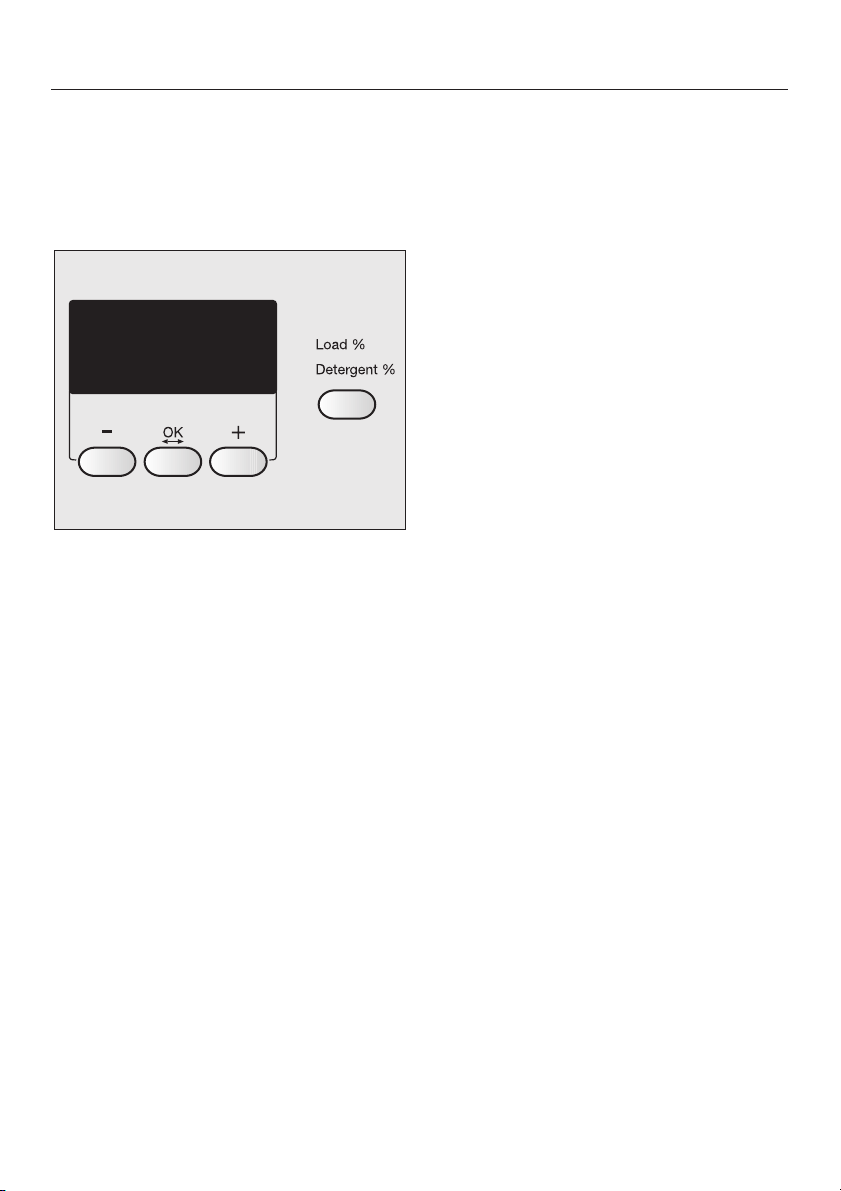
b Display with – , OK, + and
Load/Detergent buttons
See the following page for more
details.
c m button
For selecting delay start and
setting the time of day.
d PC / Optical interface
This is used by service technicians
to run diagnostic checks on your
machine and can also be used to
update programming data in the
future.
e Extra option buttons
with indicator lights
Various extra options can be added
to the programmes.
f Programme selector
For selecting washing and drying
programmes. The programme
selector can be turned clockwise or
anti-clockwise.
g Washing/Drying button
for selecting:
– Washing
– Drying
– Washing and Drying.
h I-On/0-Off button
For switching the washer-dryer on
and off.
i Door button
Opens the machine door.
10
Guide to the machine
Display
When a programme is selected the
display can be used to select and
change programme parameters.
— / + buttons
For altering the parameters highlighted
in the display:
— decreases the parameter or moves
the highlighting upwards
+ increases the parameter or moves
the highlighting downwards.
OK button
For confirming the parameter selected
and choosing the next parameter.
Load/Detergent button
For calling up the load size and the
detergent amount.
With the programme selector at the
Further programmes
select the following programmes via the
display:
Dark garments,Shirts,Denim
Sportswear,Outerwear,Proofing
Curtains,Separate rinse
Delay start and the soak time are
selected via the display.
The display shows the duration of the
programmes and the current time of
day.
The
Settings
via the display.
J menu is also operated
position, you can
,
and
Starch
.
,
Use
This washer-dryer can be used:
– to wash separately
max. load 5 kg (depending on
programme);
– to dry separately
max. load 2.5 kg (depending on
programme);
or
–
to wash and dry in a continuous
sequence
max. load 2.5 kg (depending on
programme).
11

Before using for the first time
Before using the machine for the first
time ensure that it is correctly
installed and connected. See
«Installation and connection». Also
check that the drain filter is securely
tightened to prevent the risk of water
leaks during use.
The washer-dryer has a sensor which
measures the amount of laundry in the
drum. This determines the amount of
detergent required. To allow the load
size indicator to function correctly, you
must first run a wash programme
without any laundry
detergent.
and without
Setting the language
C èeština
F dansk
deutsch
Use the – and + buttons to select the
^
language you want and confirm your
selection by pressing the OK button.
Setting the time of day
The display for setting the time will
appear.
12:00
H
^ Open the stopcock.
^ Press the
If the washer-dryer is being switched on
for the first time, the welcome screen
will appear.
I-On/0-Off
button in.
M
Willkommen
The welcome screen will not appear
again once a programme lasting
longer than 1 hour has been
completed.
After a few seconds the display will
change to show the screen for
selecting your language.
Set the time
^ Set the hour with the – and + buttons
and confirm your setting by pressing
the OK button. Now set the minutes.
After you have confirmed the minute
setting, the display will change to
show the reminder to remove the
transport struts.
12

Before using for the first time
Reminder to remove transport struts
To avoid the risk of damage, the
transport struts must be removed
before the washer-dryer is used for
the first time. See «Installation and
connection» for instructions on how
to do this.
Remove transport
struts
i
OK
After removing the transport struts (if
^
this has not already been done by
your fitter) press the OK button.
Running your first programme
Your washer-dryer is now ready for the
first programme to be run.
15:00
Select programme
Calibrating the load size sensor to
zero
Switch the machine on.
^
Open the drum door.
^
Turn the programme selector to the
^
Cottons
Press and hold the
^
position.
Load/Detergent
button pressed in until the following
message appears in the display:
Zero setting
OK
i
^ Turn the programme selector to
Stop
and switch off the washer-dryer.
The machine is now ready for use.
^
Turn the programme selector to the
Cottons
^
Press the
^
When the programme has finished,
position.
Start/Stop
button.
turn the programme selector to
and switch off the washer-dryer.
The load sensor must then be
calibrated to zero as you would with
bathroom scales.
Stop
13

Washing and drying environmentally
Energy and water consumption
Water consumption and energy
–
usage are determined by the size of
the load.
To make the most out of your
machine, load the maximum dry load
for the programme you are using.
Use the
–
programmes for small loads.
When smaller amounts of laundry are
–
washed using the
programmes, the automatic load
recognition system will reduce the
amount of water, time and energy
used. This may mean that the
programme duration is adjusted
during the course of the wash
programme.
– Using the
instead of the
programme will give energy savings
of between 35% and 45%. This is
sufficient for most levels of soiling.
For stubborn or old stains, use the
Soak
Automatic
Cottons
extra option.
and
Express
Cottons
60°C programme
Cottons
95°C
Detergent
Do not exceed the amounts of
–
detergent recommended by the
manufacturer on the packaging.
Reduce the amount of detergent for
–
smaller loads. Use the
Detergent
Choosing the correct extra option
(Pre-wash, Soak, Short)
Select:
A wash programme together with the
Short
soiling where there are no obvious
marks.
A wash programme without any extra
options for normal to heavy soiling
A wash programme together with the
Soak
laundry.
– Use the extra option
Pre-wash
ately by a main wash, the same suds
are used.
button.
extra option for light to normal
option for heavily soiled
. If Soak is followed immedi-
Load/
Soak
instead of
.
14
When drying straight afterwards
–
Select a high spin speed for the
wash programme, as well as for the
Thermospin, if tumble drying this
laundry afterwards. This saves time
and energy.
Brief instructions
The headings numbered A, B, C, . . .
show the operating sequence and can
be used as brief instructions.
Separate washing
A Sort the laundry
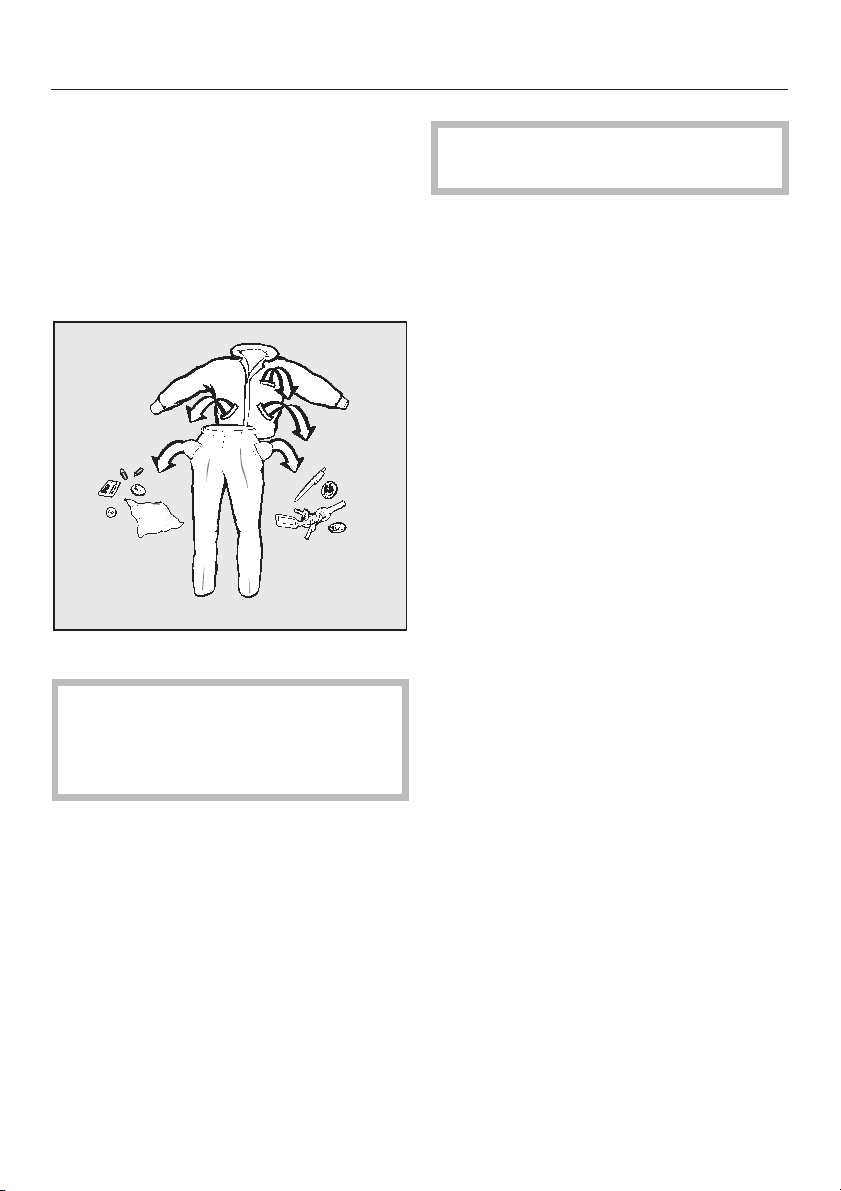
^ Empty all pockets.
,
Foreign objects (e.g. nails,
coins, paper clips, etc.) can cause
damage to garments and
components in the machine.
^
Badly soiled areas, stains etc. should
be cleaned as soon as possible,
preferably whilst still fresh. Spillages
should be carefully dabbed off using
a soft colourfast cloth. Do not rub!
Badly soiled areas can be pre-treated
with liquid detergent, stain removers
etc. first, following the manufacturer’s
instructions. With particularly stubborn
stains ask your dry cleaner for advice.
WASHING
Do not use solvent-based
,
cleaning agents in this machine.
Sort the laundry by colour and by
^
care label. Most garments have a
textile care label in the collar or side
seam.
Dark textiles often contain excess dye
and should be washed separately
several times before being included in
a mixed load. Always wash whites and
coloureds separately.
Curtains: Remove lead weights first
–
or place in a laundry bag.
– Underwiring and collar stiffeners:
Any loose wiring in bras, shirt collar
stiffeners, etc. should be removed or
sewn in.
– Knitted garments, trousers and
jeans, T-shirts and sweat shirts: Turn
inside out, if recommended by the
manufacturer.
–
Close any zips, fasten hooks and
eyes etc before washing.
–
Fasten duvet covers and pillow
cases to prevent small items from
being trapped inside them.
Do not wash any items in this machine
which are specified by the
manufacturer as non-machine
washable on the care label. (h
symbol)
15
WASHING
B Switch the machine on
The interior drum lighting will come on.
C Select a programme
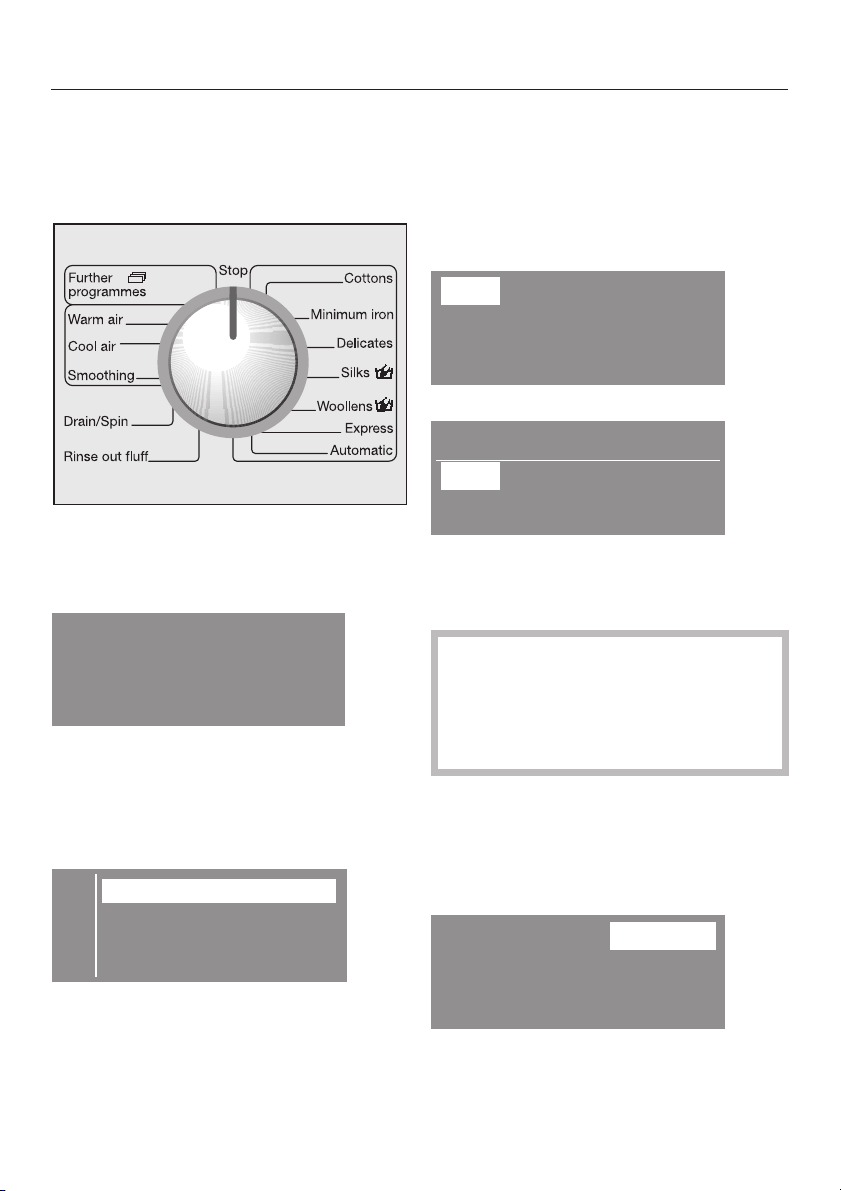
^ Select the programme you want.
The programme selected will appear in
the display.
Minimum iron
Further programmes:
When you turn the programme selector
to
Further programmes
, a list of these
programmes will appear in the display.
Dark garments
E
Denim
Shirts H
Use the — or + button to highlight the
^
programme you wish to select and
confirm your selection by pressing
the OK button.
Wait until the display switches to show
the menu for the programme selected.
40°C 900 rpm
Duration: 1:00 h
or
Denim
40°C 900 rpm
Duration: 1:00 h
^ Press the
Washing/Drying
button
repeatedly until only the Washing
indicator light is lit up.
The
Drying
indicator light must not
be lit up as well as this would mean
that the washing programme would
be followed immediately by the
drying programme.
^
You can alter the highlighted
temperature with the — or + buttons.
Press the OK button to confirm the
temperature you want and move on
to the spin speed.
30°C 900 rpm
16
Duration 0:57 h
^
You can then alter the highlighted
spin speed with the — or + buttons.
WASHING
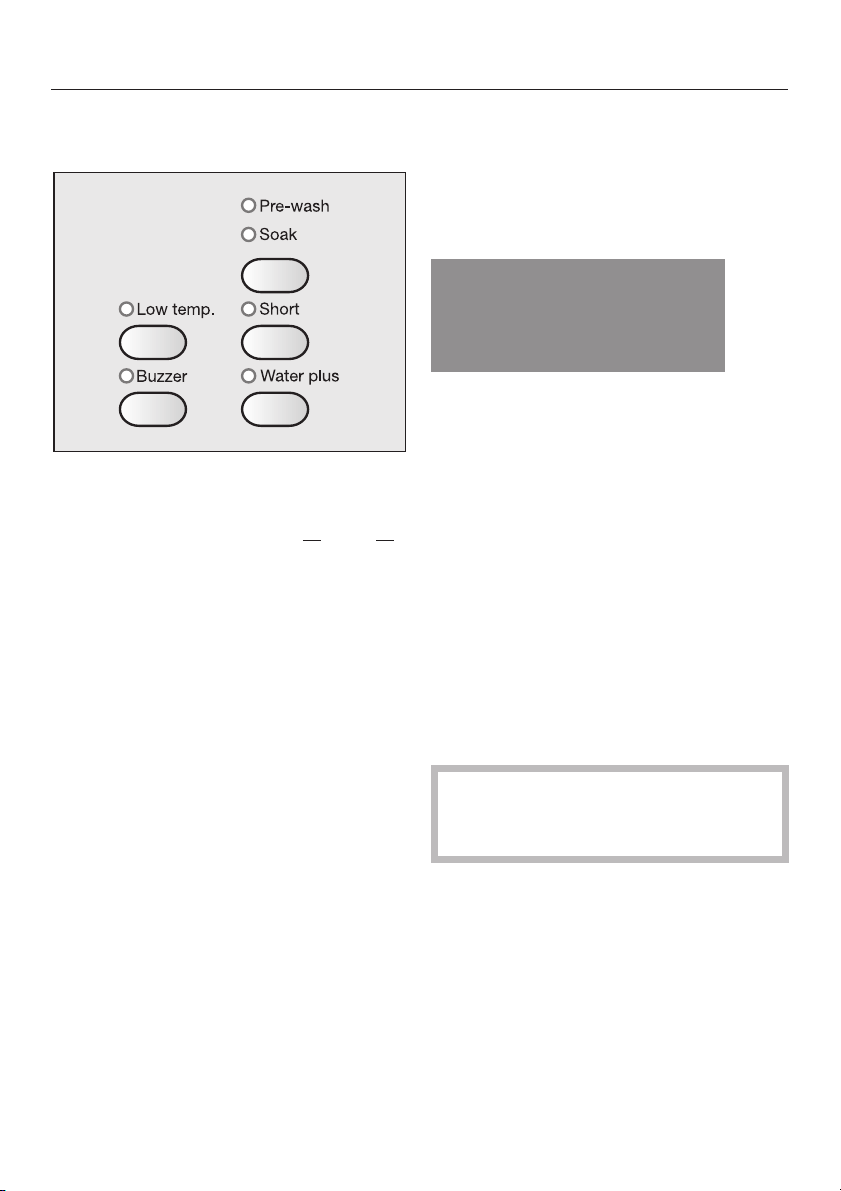
You can select any extras options
^
with the extra option buttons.
^ Each press of the top right hand
button selects the extra option in the
following order:
no option is selected.
Not all the extra options are suitable for
use with every wash programme.
You can only select extra options which
are compatible with the basic
programme being used.
^
Select Delay start, if required.
Pre-washorSoak
or
D Load the drum
Press the
^
drum door.
The load size indicator display will
appear.
Door
button to open the
Load <25%
B
The display shows the amount of
laundry loaded in the drum as a % (in
25% steps) of the maximum load
permissible for the programme
selected.
^ Unfold the laundry and load loosely
in the drum. Mixing both large and
small items gives better wash results
and also helps distribute the load
evenly during spinning.
The most efficient use of energy and
water is achieved when a full load is
washed. However, do not overload as
this causes creases and reduces
cleaning efficiency.
Make sure that no garments are
caught between the drum door and
seal.
^
Shut the door with a gentle swing.
17
WASHING
E Add detergent
The load size indicator display will be
replaced with the detergent percentage
display.
Detergent 75%
A
40%
Add slightly less than half the
amount recommended . . .
50%
Add half the amount
recommended . . .
60%
Add slightly more than half the
amount recommended . . .
75%
Add three quarters of the
amount recommended . . .
100%
Add the full amount
You also need to take the level of
soiling and water hardness into
account.
too little detergent results in:
–
Laundry not getting properly clean
and with time it may become grey
and hard to the touch.
–
Greasy particles clinging to the
laundry.
–
Limescale deposits on the heater
elements.
too much detergent results in:
High water consumption (an
–
additional rinse cycle will
automatically switch in).
A burden to the environment.
–
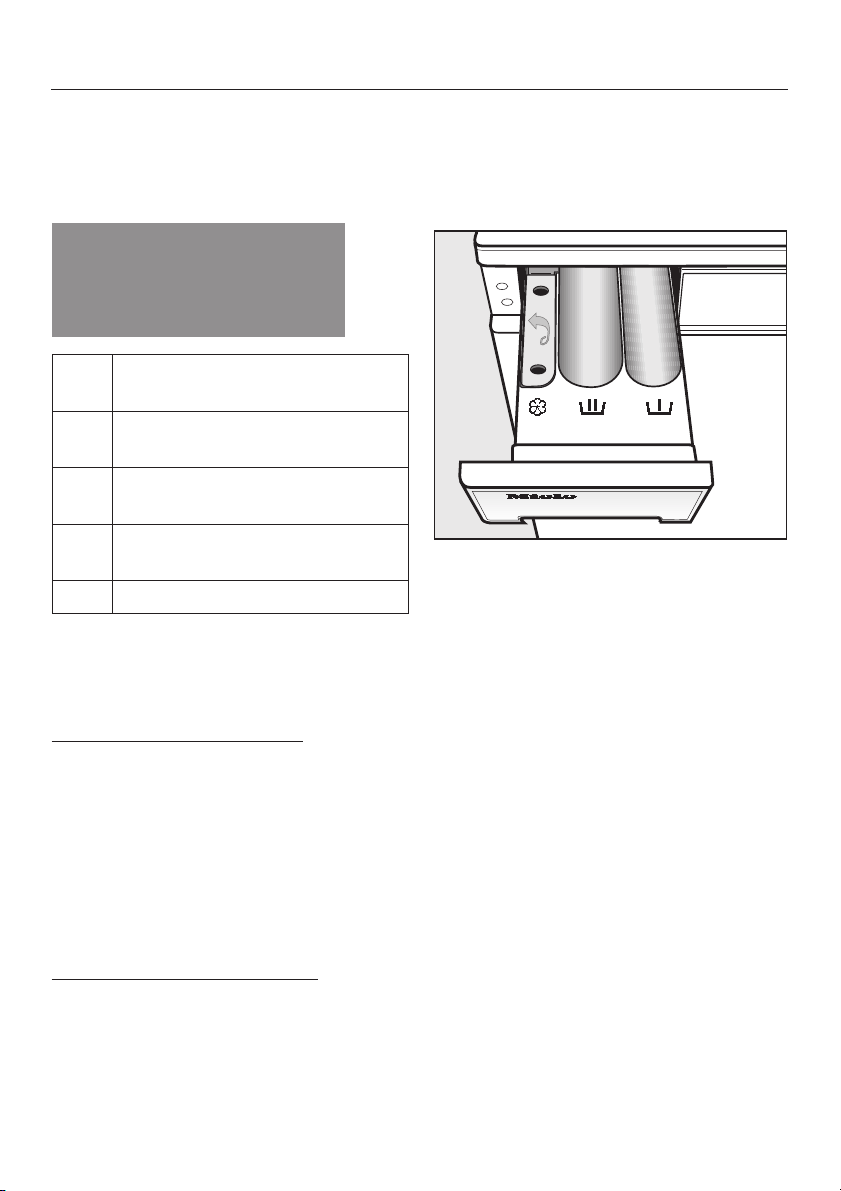
^ Pull out the detergent drawer and
add detergent to the compartments
as follows:
i = Detergent for the pre-wash
1
(
/4of the total amount
recommended). This
compartment is also used for
starch formulations when
starching separately.
j = Detergent for the main wash
including Soak
§ = Fabric conditioner or liquid
starch
^
Close the detergent drawer.
See «Detergent» for further information.
–
Excessive foam which causes a low
level of agitation and poor wash,
rinse and spin results.
18

WASHING
F Start the programme
Press the flashing
^
Start/Stop
button.
The estimated programme duration will
count down in the display in one minute
steps. During the first 10 minutes the
machine measures how much water is
being absorbed by the laundry. The
programme duration may be longer or
shorter depending on this absorbency
rate.
The programme sequence is also
shown in the display. The washer-dryer
shows you when each section of the
programme is reached.
The drum lighting switches off once the
programme has started.
G Remove the laundry when the
programme has finished
In the anti-crease phase after the
programme has finished, the following
will appear alternately in the display:
Anti-crease
and
Remove the laundry.
^
Only remove laundry from the
machine once the drum has
stopped turning. Reaching into a
moving drum is extremely
dangerous and could result in injury.
Check that all items have been
removed from the drum. Items left in
the drum could discolour other items
in the next wash or become
discoloured themselves.
Important! Always remove the
laundry before switching the machine
off. This is important to ensure that
the load size indicator works
correctly.
^ Switch the machine off with the
0-Off
button.
I-On/
See «After each washing or drying
programme» for further information.
Programme finished.
Remove laundry, then
i
switch the machine off.
^
Turn the programme selector to the
Stop
position. Press the
Door
to open the drum door.
button
After washing a full load
If you have washed a full load of
laundry and you wish to dry the
laundry in the washer-dryer
afterwards you will have to remove
half the load. Carry out the drying
procedure in two batches.
19

WASHING
Extra options
You can use the
augment the basic wash programmes.
Pre-wash
For laundry with large amounts of dirt
(e.g. dust, sand).
Soak
For heavily soiled and stained items
with protein stains (e.g. blood, fats
and oils, cocoa).
A length of time of between 30 minutes
and 6 hours can be chosen, in 30
minute periods for the «Soak» process.
To select the soak time
^ After selecting a programme, press
the
Pre-wash/Soak
until the
on.
Extra option
button repeatedly
Soak
indicator light comes
15:06
buttons to
Short
For light to nomal soiling with no
visible staining.
The duration of the main wash is
reduced.
Water plus
The machine is set at the factory so
that the water level in the main wash
and rinses will be increased if the
Water plus
extra option is selected.
However, you can select other settings
Water plus
for
«
Settings
. These are described in
menu J«.
Buzzer
An audible tone sounds repeatedly at
the end of a programme or when
Rinse hold is reached.
The buzzer will sound repeatedly until
the machine is switched off.
Finish:
Soak:
17:04
0.30 h
Use the – and + buttons to enter the
soak time. The display will also show
the corresponding finishing time for the
washing programme. Press the OK
button to confirm the soak time you
want.
To delete the soak time
^
Set the soak time to 0.00 h and
confirm this with the OK button.
20
Once switched on, the buzzer is active
in all programmes until it is switched off
again.
You can switch the buzzer off by
pressing the buzzer button. You can
also change the volume of the buzzer.
These are described in «Settings J«.
The buzzer will always sound when
there is a fault, even if the buzzer has
been switched off.

WASHING
Adding or removing laundry
after a programme has started
Laundry can be added or removed
after the programme has started when
using the following programmes:
Cottons
–
Minimum iron
–
Automatic
–
Express
–
Starch
–
Press the
^
drum door.
,
machine will be very hot and
could cause burning or scalding.
^ Add or remove items.
^ Close the drum door.
The programme will continue
automatically.
Door
button to open the
Warning: The water in the
The door cannot be opened, if:
the suds temperature is above a
–
certain temperature (see «Settings
menu — Door release»).
the water is above a certain level
–
(e.g. when the
option has been selected).
the programme has reached the
–
Final spin
the electronic programme locking
–
has been activated.
stage.
Water plus
extra
Please note:
Once a programme has started the
machine cannot recognise any
adjustment to the load.
For this reason, if laundry is added or
removed after the start of a programme,
the machine will always complete the
programme cycle assuming a full load
which can lead to an increase in the
programme duration shown in the
display.
21
WASHING
Spinning
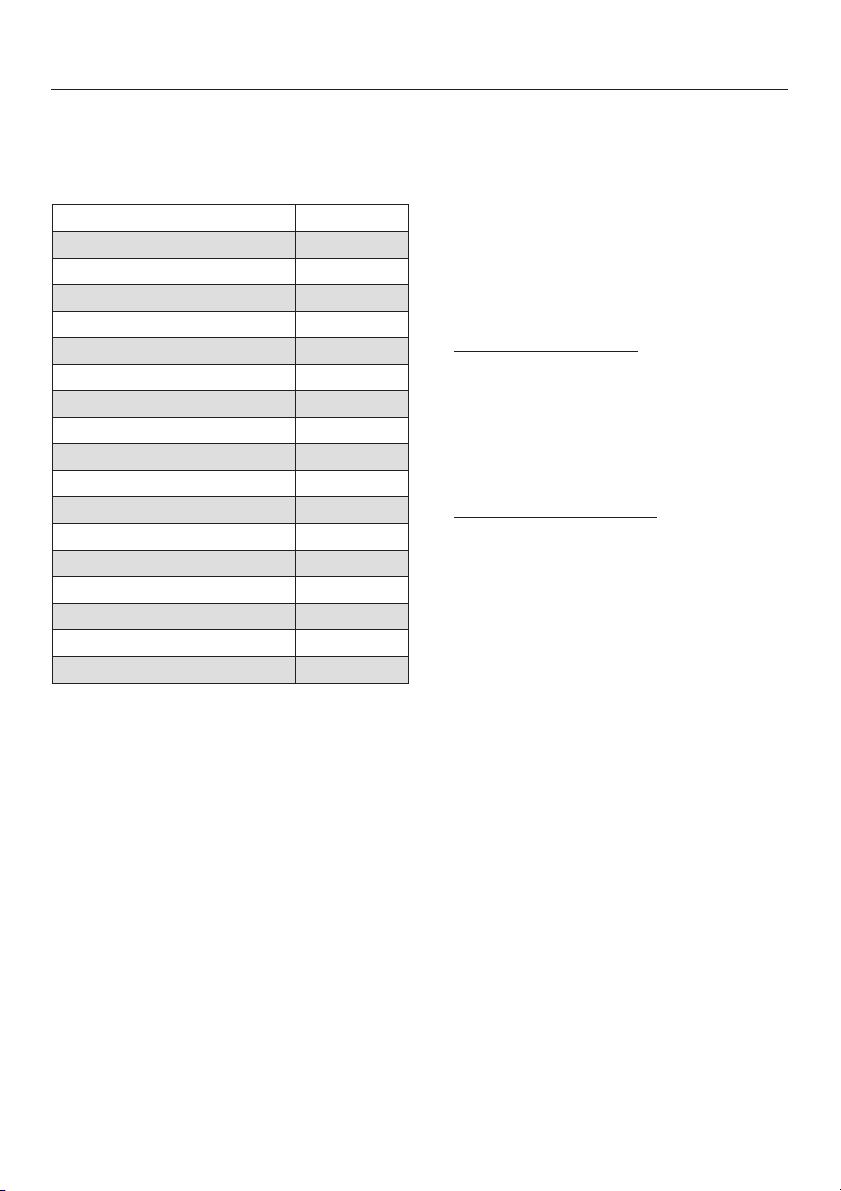
The maximum final spin speed
depends on the programme chosen.
Programme rpm
Cottons 1600
Minimum iron 1200
Delicates 600
Silks 400
Woollens 1200
Express 1600
Automatic 1200
Dark garments 1200
Shirts 600
Denim 900
Sportswear 1200
Outerwear 800
Proofing 1000
Curtains 600
Separate rinse 1200
Starch 1500
Drain/Spin 1600
You can reduce the final spin speed.
However, you cannot select a final spin
speed higher than that shown in the
chart above.
Rinse and interim spin
There is a spin after the main wash and
between the rinses. A reduction in the
final spin speed will also reduce the
interim spin speed. If a spin speed of
less than 700 rpm is selected for a
Cottons
is introduced.
programme, an additional rinse
To omit the final spin (Rinse hold)
Select the
^
Rinse hold
setting. The
laundry will not be spun and will
remain suspended in the final rinse
water. This reduces creasing if the
laundry is not going to be removed
from the drum immediately after the
end of the programme.
To start the final spin
–
:
The machine will display the
maximum spin speed possible. You
can select a spin speed lower than
this. Start the final spin by pressing
the
Start/Stop
– To end the programme
Press the
drain away. Press the
button.
:
Door
button. The water will
Door
button
again to open the door.
To omit rinse and interim spin and
the final spin
^ Select the
Without spin
setting. The
laundry is not spun after the final
rinse. The water will drain away and
the machine will go straight into the
anti-crease stage. An additional rinse
is introduced if this setting is selected
with the
Express
Cottons,Minimum iron
and
Automatic
programmes.
,
22

WASHING
Programme chart
Cottons 30°C to 95°C 9876 max. 5.0 kg
Fabric type Cottons, linens or cotton mix fabrics.
Extra options Pre-wash or Soak, Short, Water plus
Detergent Powder detergent, detergent for coloured fabrics, liquid
detergent, tablet detergent and liquid tab detergent.
Minimum iron 30°C to 60°C 876421 max. 2.5 kg
Fabric type Synthetics, mixed fibres and easy care cottons. If fabrics have a
high proportion of man-made fibres it is advisable to programme
the machine for «Gentle action». See «Settings menu J.
Extra options Pre-wash or Soak, Short, Water plus
Detergent Powder detergent, detergent for coloured fabrics, liquid
detergent, detergent for delicates, tablet detergent and liquid tab
detergent.
Delicates cold to 60°C 421 max. 1.0 kg
Fabric type For delicate garments made of synthetic fibres, mixed fibres,
rayon and easy care cottons.
Extra options Pre-wash or Soak, Short
Detergent Liquid detergent for delicates.
23

WASHING
Silks / cold to 30°C c max. 1.0 kg
Fabric type Silks and other handwashable fabrics with no wool content, e.g.
satin, lace and silk.
Note Place socks, tights, bras etc. in a washing bag.
Extra option Water plus
Detergent Liquid detergent for delicates.
Woollens / cold to 40°C ac max. 2.0 kg
Fabric type Machine-washable or hand-washable wool or wool blend fabrics.
If the care label does not specify a temperature, wash using the
cold setting.
Detergent Liquid detergent for machine-washable woollens.
Express cold to 40°C 76 max. 2.5 kg
Fabric type Small loads of items which require freshening up and which can
be washed in the
Extra option Water plus
Detergent Powder detergent, detergent for coloured fabrics, liquid detergent.
Cottons
programme.
24

WASHING
Automatic cold to 40°C 7621 max. 2.5 kg
Fabric type Mixed loads of garments suitable for the
Minimum iron
programmes. Sort according to colour.
Cottons
Extra option Pre-wash or Soak, Short, Water plus
Detergent Powder detergent, detergent for coloured fabrics, liquid
detergent.
Dark garments cold to 40°C max. 2.5 kg
Garment Dark garments made from cotton or mixed fibres.
Note Wash inside out.
Detergent Liquid detergent for coloured fabrics.
Shirts cold to 60°C max. 2.0 kg
Notes – Pre-treat collars and cuffs if necessary.
Silks
– Wash silk garments in the
programme.
Detergent Powder detergent, detergent for coloured fabrics, liquid
detergent.
Denim cold to 40°C max. 2.5 kg
Notes – Wash denim inside out.
– Denim often contains excess dye and will run during the first
few washes. Wash light and dark coloured items separately.
Detergent Liquid detergent for coloured fabrics.
Sportswear 30°C to 60°C max. 2.0 kg
Garment Lightly soiled sports garments which require washing or
freshening up.
Detergent Powder detergent, detergent for coloured fabrics, liquid
detergent.
Outerwear cold to 40°C max. 2.0 kg
Garment Outerwear made from micro-fibres such as Gore-Tex
®
, WINDSTOPPER®etc.
Notes
SYMPATEX
–
Zip up jackets before washing.
–
Do not use fabric conditioner.
Detergent Specialist or liquid detergent for delicates.
and
®
,
25

WASHING
Proofing 40°C max. 3.0 kg
Item For treating microfibre fabrics, skiwear, fine, closeweave
cotton garments (poplin) or tablecloths to provide a water
and dirt resistant finish.
Notes
Proofing agent
Curtains cold to 40°C max. 2.0 kg
Item Curtains, including net curtains, specified as
Note For curtains which crease easily, reduce the spin speed or
Extra option Water plus
Detergent All purpose powder detergent, powder detergent for coloured
Separate rinse max. 5.0 kg
Extra option Rinse hold
Starch max. 5.0 kg
Note The laundry (table cloths, napkins, overalls) should be
Starching agent Liquid starch, starch formulations, viscous liquid starch,
Drain/Spin max. 5.0 kg
Note For spinning fabrics. Please make sure you select the
The items should be freshly washed and spun or dried
–
before proofing.
For best results, the items should be heat-treated
–
afterwards, either in a tumble dryer or by ironing.
Only use proofing agents which are stated by the
–
manufacturer as being «suitable for use on membrane
textiles» as these consist of fluorochemical compounds.
Do not use proofing agents which contain paraffin.
Add proofing agents to compartment j.
–
machine-washable by the manufacturer. A Pre-rinse without
detergent is carried out automatically to remove dust.
select Without spin.
fabrics or detergent specifically designed for washing
curtains.
washed but not treated with fabric conditioner.
starch
appropriate spin speed.
Drain only: Select
Without spin
. Do not use for woollens.
26
Loading…
-
Page 1
Operating instructions Washer-dryer WT 2670 WPM T o av oid the risk of accidents or damage to the mac hine it is essential to rea d these instructions bef ore it is installed and used for the f ir st time. M.-Nr . 06 533 680 e n-G B[…]
-
Page 2
Disposal of the packing material The tr ansport and protectiv e packing has been selected fr om materials which are en vironmentally friendl y for disposal and can normally be rec ycled. Ensure that an y plastic wr appings , bags etc. are disposed saf ely and kept out of the reac h of babies and young children. Danger of suf focation! Rather than j[…]
-
Page 3
Caring for the environment . . . . . . . . . . . . . . . . . . . . . . . . . . . . . . . . . . . . . . . . . . 2 Warning and safety instructions . . . . . . . . . . . . . . . . . . . . . . . . . . . . . . . . . . . . . 6 Guide to the machine . . . . . . . . . . . . . . . . . . . . . . . . . . . . . . . . . . . . . . . . . . . . . 11 Contr ol panel […]
-
Page 4
DRYING . . . . . . . . . . . . . . . . . . . . . . . . . . . . . . . . . . . . . . . . . . . . . . . . . . . . . . . . . 33 Separ ate drying ……………………………………………3 3 Extr a option ………………………………………………3 6 Low t emperatur e …………………………………………3 6 Thermospin .[…]
-
Page 5
Installation and connection . . . . . . . . . . . . . . . . . . . . . . . . . . . . . . . . . . . . . . . . 61 F r o n tv i e w ………………………………………………..6 1 R e a rv i e w………………………………………………..6 2 Installation surface ………………………………………….6 3 Installing the[…]
-
Page 6
~ It is essential to r ead these instructions . This w asher -dryer conforms to current saf et y requir ements . Inappropriat e use can, ho weve r , lead to per sonal injur y and damage to property . T o av oid the risk of accidents and damage to the w asher -dryer , please read these instru ctions carefully befor e using it for the f irst time . T[…]
-
Page 7
Technical safety ~ Befor e set ting up the washer -dryer , chec k it for any e xternally visible damage. Do not install or use a damaged machine . ~ Befor e connecting the w asher -dr yer , ensure that the connection dat a on the data plat e (voltage and connect ed load) match the mains electricity supply . If in any doubt, consult a qualified elec[…]
-
Page 8
~ This w asher -dryer may onl y be used in mobile installations su ch as ships if a risk assessment of the installation has been carried out by a suit ably qualif ied engineer . ~ In countries where there ar e areas which ma y be subject to infestation b y cockr oaches or other vermin, pay particular att ention to keeping the machine and its surr o[…]
-
Page 9
~ T o pre vent the risk of fir e, the follo wing must not be dried in this w asher -dr yer: – items whic h have not been w ashed. – items , such as workw ear , which hav e not been thoroughl y cleaned and which ar e still soiled with grease, oil or other desposits (suc h as cosmetics , lotions etc). If items ha ve not been thoroughl y cleaned t[…]
-
Page 10
~ Only use dy es specified b y the manuf acturer as being suit able for use in a domestic w ashing machine. Alw ays observe the manuf acturer’s instructions carefull y . ~ Colour run and dye r emov ers contain sulphur compounds which can cause damage suc h as corrosion. Do not use these produ cts in this machine. ~ Make sur e that any dispensi[…]
-
Page 11
Control panel a Start/Stop button F or starting the progr amme selected and cancelling a progr amme once it has started. b Display wit h–,O K ,+a n d Load/Detergent buttons See the follo wing page for mor e details . c m button F or selecting delay start and set ting the time of day . d PC / Optical interface This is used b y service technicians […]
-
Page 12
Display When a pr ogramme is select ed the display can be used t o select and change pr ogramme par ameters . — / + buttons F or altering the par ameters highlight ed in the display: — decreases the par ameter or mo ves the highlighting upw ards + increases the par ameter or mo ves the highlighting down war ds . OK button F or confirming the parame[…]
-
Page 13
Befor e using the machine f or the fir st time ensure that it is corr ectly installed and connect ed. See «Installation and connection». Also chec k that the drain f ilter is secur ely tightened t o prev ent the risk of w ater leaks during use. The w asher -dryer has a sensor which measures the amount of laundr y in the drum. This det erm[…]
-
Page 14
Reminder to remove transport struts T o av oid the risk of damage, the tr anspor t struts must be remo ved befor e the w asher -dr yer is used for the fir st time. See «Installation and connection» for instru ctions on how to do this . i Remove transport struts OK ^ Af ter remo ving the transport struts (if this has not already been done […]
-
Page 15
Energy and water consumption – W ater consumption and energy usage are det er mined by the siz e of the load. T o make the most out of y our machine , load the maximum dry load for the pr ogr amme you are using . – Use the Aut omatic and Express progr ammes for small loads . – When smaller amounts of laundr y are w ashed using the Cot tons pr[…]
-
Page 16
Brief instructions The headings number ed A , B , C ,… show the oper ating sequence and can be used as brief instructions . Separate washing A Sort the laundry ^ Empt y all pock ets . , F oreign objects (e .g. nails , coins , paper clips , etc.) can cause damage to g ar ments and components in the machine . ^ Badly soiled ar eas , stains etc. sho[…]
-
Page 17
B Switch the machine on The int erior drum lighting will come on. C Select a programme ^ Select the progr amme you w ant. The pr ogramme select ed will appear in the display . Minimum iron F urther progr ammes: When y ou tur n the progr amme selector to F urther progr ammes , a list of these progr ammes will appear in the display . E Dark garments […]
-
Page 18
^ Y ou can select any e xtras options with the e xtra option but tons . ^ Each press of the t op right hand but ton selects the e xtra option in the follo wing order: P re-w ash or Soak or no option is selected. Not all the e xtra options ar e suitable for use with ev er y w ash progr amme. Y ou can only select e xtr a options which are compatible […]
-
Page 19
E Add detergent The load siz e indicator display will be replaced with the det ergent percent age display . Detergent 75% A 40% Add slightl y less than half the amount recommended . . . 50% Add half the amount recommended . . . 60% Add slightl y more than half the amount recommended . . . 75% Add thr ee quar ter s of the amount recommended . . . 10[…]
-
Page 20
F Start the programme ^ P ress the f lashing Start/Stop but ton. The estimat ed progr amme duration will count down in the display in one minut e steps . During the fir st 1 0 minutes the machine measur es how muc h w ater is being absorbed by the laundry . The progr amme dur ation may be longer or shorter depending on this absorbency ra te . The p[…]
-
Page 21
Extra options Y ou can use the Extr a option but tons to augment the basic w ash progr ammes . Pre-wash F or lau ndry with large amounts of dirt (e.g . dust, sand). Soak F or heavily soiled and st ained items with prot ein stains (e.g . blood, fats and oils , cocoa). A length of time of bet ween 30 minut es and 6 hours can be c hosen, in 30 minute […]
-
Page 22
Adding or removing laundry after a programme has started Laundr y can be added or remo ved af ter the progr amme has started when using the follo wing progr ammes: – Cot tons – Minimum iron – Aut omatic – Express – Star ch ^ P ress the Door but ton t o open the drum door . , Warning: The water in the machine will be very hot and could cau[…]
-
Page 23
Spinning The maximum f inal spin speed depends on the progr amme chosen. Programme rpm Cot tons 1 600 Minimum iron 1 200 Delicates 600 Silks 400 W oollens 1 200 Express 1 600 Automatic 1 200 Dark g ar ments 1 200 Shirts 600 Denim 900 Sportswear 1 200 Outerw ear 800 P roofing 1 000 Curtains 600 Separ ate rinse 1 200 Starc h 1 500 Dr ain/Spin 1 600 Y[…]
-
Page 24
Programme chart Cottons 30°C to 95°C 9876 max. 5.0 kg F abric type Cot tons , linens or cott on mix fabrics . Extr a options P re-w ash or Soak, Short, W ater plus Deter gent P owder det ergent, deter gent for coloured f abrics , liquid deter gent, t ablet detergent and liquid t ab deter gent. Minimum iron 30°C to 60°C 876421 max. 2.5 kg F abri[…]
-
Page 25
Silks / cold to 30°C c max. 1.0 kg F abric type Silks and other handw ashable fabrics with no wool cont ent, e .g. satin, lace and silk. Note Place socks , tights , br as etc. in a w ashing bag. Extr a option W ater plus Deter gent Liquid deter gent for delicates . Woollens / cold to 40°C ac max. 2.0 kg F abric type Machine-w ashable or hand-w as[…]
-
Page 26
Automatic cold to 40°C 7621 max. 2.5 kg F abric type Mix ed loads of garments suitable for the Cot tons and Minimum iron pr ogrammes . Sort according to colour . Extr a option P re-w ash or Soak, Short, W ater plus Deter gent P owder det ergent, deter gent for coloured f abrics , liquid deter gent. Dark garments cold to 40°C max. 2.5 kg Garment D[…]
-
Page 27
Proofing 40°C max. 3.0 kg Item F or treating microf ibre f abrics , skiwear , fine , close weav e cot ton garments (poplin) or tablecloths t o pro vide a wat er and dir t resist ant finish. Notes – The it ems should be freshly w ashed and spun or dried befor e proof ing. – F or best results , the items should be heat-tr eated af terw ards , ei[…]
-
Page 28
Programme sequence Main wash Rinses Spinning Wa te r lev el W ash rhythm Wa te r leve l Rinses Spinning Final spin Cot tons d a ( 2-3 2) LL Minimum iron d a ( 2-3 3) LL Delicates e b e 3 – L Silks e d e 2 – L W oollens ( c ( 2 LL Express d a ( 2-3 3) LL Aut omatic ( a ( 2-3 3) LL Dark g ar ments ( a ( 3 LL Shirts ( a ( 2 – L Denim ( a ( 3 –[…]
-
Page 29
This w asher -dryer has fully electr onic controls with aut omatic load recognition. It takes in the right amount of w ater requir ed for the progr amme depending on the amount of lau ndry and its absorbency r ate . This means that progr amme cycles and dur ations can v ar y . The pr ogramme sequ ences outlined in the chart are based on the basic p[…]
-
Page 30
Garment care label symbols / Hand w ash (If no temper ature is specified use the lo west temper ature or cold) h Do not w ash apf Dry clean D Do not dry clean x Any oxidising bleac hing agent can be used { Only use an o xygen based bleach or a non-c hlorine bleach z Do not bleach Tumble dry q At normal temper ature r At low t emperatur e s Do not t[…]
-
Page 31
The right amount to dispense will depend on the following: – The soiling le vel of the laundr y Lightly soiled No visible dirt or stains . Normally soiled Visibl y dir ty and/or just a few slight stains . Heavil y soiled Stains and soiling clearl y visible. – The w ater har dness level. Check with y our local wat er supplier if you do not kno w[…]
-
Page 32
Fabric conditioners or liquid starch F abric conditioner s make garments sof t to handle and help pr event static cling when tumble drying. Star ch stif fens and gives body t o items of laundr y , e.g. shir ts , tablecloths and bed linen. ^ Dispense according t o the amou nt specified on the pac kaging. Automatic dispensing of fabric conditioner or[…]
-
Page 33
Separate drying The separ ate drying progr amme must be used if the load in the w ash progr amme is great er than the maximum load permitt ed for drying, or if you onl y want t o dr y part of the load that w as washed. ^ Befor e drying check the drying symbol on the car e label. q Dr y at normal temper ature r Dr y at a low t emperatur e (select th[…]
-
Page 34
A Sort the laundry ^ Sort the lau ndry according to type of fibre / w eave and the r esidual moisture cont ent. T his will help achie ve an ev en drying result. B Switch the machine on The int erior drum lighting will come on. C Select a programme ^ T urn the selector to the drying progr amme you r equire . The pr ogramme select ed will appear in t[…]
-
Page 35
D Load the drum ^ Open the drum door . ^ Load the laundr y loosely int o the drum. Do not ov erload the drum. See the «P rogr amme chart» in the «Dr ying» section for recommended loads f or each progr amme. Ov erloading can cause unnecessar y wear and t ear to the laundr y and give a disappointing drying result. E Close the drum[…]
-
Page 36
Extra option Low temperature The t emperatur e is reduced during the drying progr amme. F or all delicate or minimum iron f abrics with the r symbol on the car e label (e.g . acrylic garments). With the e x ception of the Express progr amme, the ther mospin is not carried out when the Low t emperatur e e xtra option has been select ed. Because the […]
-
Page 37
Programme chart Cottons max. 2.5 kg* Extra dry, Normal+, Normal**, Timed drying 1) F abric type Single and multi-lay ered cot ton f abrics such as t owelling , jerse ywear , underwear , flannelet te bed linen. Note Do not use Extr a dr y for jerse y fabrics as the y hav e a tendency to shrink. Extr a options Low t emperatur e, ther mospin max. 1 60[…]
-
Page 38
Delicates max. 1.0 kg* 8 minutes F abric type F or delicate f abrics made of synthetic fibr es , mix ed fibres , eas y care cot ton shirts and blouses . Note This pr ogramme is for «loosening» up f abrics . The y are not completel y dried in this progr amme. Remov e garments imme — diatel y at the end of the progr amme. Woollens max. 1.0 […]
-
Page 39
Shirts max. 1.0 kg* Normal+, Normal, Hand iron r , Timed drying 1) Garment Shirts and blouses . Extr a option Thermospin max. 600 rpm Denim max. 2.5 kg* Extra dry, Normal+, Normal Hand iron r , Hand iron rr , Machine iron, Timed drying 1) Extr a option Thermospin max. 900 rpm Sportswear max. 2.0 kg* Normal+, Normal, Hand iron r , Timed drying 1) Ga[…]
-
Page 40
Smoothing max. 2.5 kg* 8 minutes F abric type Cot ton and linen f abrics . Minimum ir on items made of mix ed fibr es , cot tons or synthetics , e.g. trousers , jackets , shirts . Note Smooths out creasing caused during the spin c ycle in the w ash progr amme. F abrics are not complet ely dried in this progr amme. Remo ve garments as soon as the pr[…]
-
Page 41
Washing and drying in a continuous sequence Wher e the amou nt of laundr y to be w ashed and dried in one progr amme does not e xceed the maximum weight permit ted for the drying progr amme, washing and drying in one continuous sequ ence is recommended. It is very important to r ead both the «W ashing» and «Dr ying» sections bef[…]
-
Page 42
D Load the drum ^ Open the drum door and load the laundr y loosely in the drum. F ollow the load size indicat or and do not ov erload. Do not use deter gent dispensing aids , e.g . plastic dispenser balls , for w ashing follow ed immediatel y by the drying progr amme. These dispensers can melt during the drying progr amme and cause damage to the ma[…]
-
Page 43
^ Open the drum door fully . , Warning, the metal cap located on the inside of the door glass is very hot after drying. Do not tou ch it. Danger of burning! ^ Remo ve the laundr y . ^ Check the folds in the door seal for an y small articles , e .g. but tons whic h might be lodged there . R emove an y fluf f from drying from around the door seal. Ch[…]
-
Page 44
Cancelling a programme Y ou can cancel a progr amme at any time af ter it has started. ^ P ress the Start/Stop but ton brief ly or turn the progr amme selector to St op . … During w ashing: The su ds will be pumped aw ay and the w ashing progr amme is cancelled. … During drying: The g ar ments will be cooled down befor e the door can be opened.[…]
-
Page 45
Altering the spin speed ^ P ress the OK but ton. The spin speed will be shown highlight ed. Y ou can use the – and + but tons to c hange the spin speed up until the final spin begins . Y ou can change the thermospin speed up until the ther mospin begins . Altering the drying level / drying time Y ou can alter the drying lev el or drying time duri[…]
-
Page 46
With dela y star t you can c hoose when you w ant the progr amme to end. The start of a progr amme can be delayed from 30 minut es up to a maximum of 24 hours , allowing you t o make use of night-time economy electricity r ates , for e xample. The curr ent time of day needs to ha ve been set for dela y start to work correctl y . To select Delay sta[…]
-
Page 47
, Disconnect the machine fr om the electricity supply by s witching off at the w all socket and withdr awing the plug befor e any cleaning and maintenance w ork. Cleaning the machine , Do not use solv ents , abr asive cleaners , glass cleaners or all-purpose cleaning agents . These might damage plastic surfaces and other components because of the c[…]
-
Page 48
^ Clean the siphon. 1 . Remov e the siphon from compartment § and rinse under w ar m running wat er . Clean the siphon tube in the same w ay . 2 . Replace the siphon. If star ching fr equently , thor oughly clean the siphon and siphon tube regularl y . A build-up of starc h will cause them to get clogged. Cleaning the detergent dispenser drawer ho[…]
-
Page 49
Cleaning the porthole glass ^ F rom time t o time you should also clean … – the door glass on the inside using a mild deter gent or soap and wat er . – the metal cap on the inside of the door glass with a suitable pr oprietary stainless st eel cleaning agent follo wing the manuf acturer’s instructions on the pac kaging. ^ Wipe dry using […]
-
Page 50
What to do, i f… With the help of the f ollowing not es , minor f aults in the performance of the appliance, some of which may r esult from incorrect oper ation, can be put right without contacting the Service Department. , Repair w ork to electrical appliances should onl y be carried out by a suitably qualified per son in accordance with local a[…]
-
Page 51
Fault messages in the display Message in the display Possible cause Remedy A q Drain fault – The w ater outlet is block ed or restrict ed. – The dr ain hose has been fix ed too high. – Clean the dr ain filter and the dr ain pump as described in «Opening the drum door in the ev ent of a blocked dr ain outlet and/or pow er f ailure». […]
-
Page 52
Problems with the load size indicator Problem Possible cause Remedy The display indicates a load of <25% or no load size is indicated when the drum is full. Ther e was laundr y in the drum when the machine w as switc hed on. This has decalibr ated the sensor from the zer o setting . T o recalibr ate the sensor t o the zer o setting: – Remo ve […]
-
Page 53
General problems Problem Possible cause Remedy The machine shakes during the spin cycle. The mac hine feet are not lev el. Lev el the machine (see «Installation and connection»). The pump makes strange noises. This is not a f ault! These noises occur at the end of a pump sequence as a normal part of the operation. Large amounts of deterge[…]
-
Page 54
An unsatisfactory wash result Problem Possible cause Remedy Liquid detergent does not give the required result. Liquid deter gents usually contain no bleac hing agents . The y do not remo ve fruit, coff ee and tea st ains . – Use a gener al purpose deter gent containing a bleaching agent. – P our stain remo ver s into compartment j and liquid d[…]
-
Page 55
An unsatisfactory drying result Problem Possible cause Remedy The laundry is still damp after a drying cycle. The load w as too small for the electr onics to assess the residual moisture corr ectly . In future dry small loads in a timed drying progr amme. The laundry has formed a ring in the drum during the spin because it w as distributed unev enl[…]
-
Page 56
The drum door cannot be opened by pressing the Door button Problem Remedy The machine is not connected to the electricity supply and / or is not switched on. Insert the plug in the socket and s witch on and / or switc h the machine on with the I-On/0-Off but ton. The electronic programme locking has been activated. Deactiv ate progr amme locking as[…]
-
Page 57
Opening the drum door in the event of a blocked drain outlet and/or power failure ^ Switc h the machine off . Ther e is a lever behind the det ergent dr awer f ascia panel. ^ Remov e the lever . ^ Use it to open the access f lap. Blocked drain outlet If the dr ain outlet is blocked, up to 25 litres of w ater will be r etained in the machine . , Cau[…]
-
Page 58
Once the flo w of wat er ceases: ^ Remo ve the dr ain filt er completely . ^ Clean it thoroughly . ^ Remo ve any for eign objects (e.g. but tons , coins , etc.) and fluff fr om the filt er housing. T ur n the impeller by hand to c heck that it rotat es freely . ^ P ut the drain f ilter back in place and secure . , Make sur e the drain f ilter is se[…]
-
Page 59
Changing the lamp for the drum lighting The mac hine will still operat e with no lamp in place or if the lighting is f aulty . ^ Remo ve the yellow le ver from behind the deter gent dra wer facia panel. ^ Switc h the machine on and open the drum door . ^ Now disconnect the mac hine from the electricity supply , see «Warning and Saf et y instru[…]
-
Page 60
In the ev ent of any faults whic h you cannot remedy y ourself , please cont act: – your Miele dealer , or – the Miele Service Department (see back co ver for contact det ails). When cont acting the Service Department, please qu ote the model and serial number of your appliance , both of which ar e shown on the data plate visible abo ve the doo[…]
-
Page 61
Front view a Inlet hose (with f le xible, w aterproof metallic out er sleev e) b Electricity supply cable c — f Fle xible dr ain hose (with detac hable swiv el elbow) g C ontrol panel h Det ergent dispenser dr aw er i Drum door j A ccess to dr ain filt er , dr ain pump and emergenc y release k Handle r ecesses for mo ving the machine l F our height[…]
-
Page 62
Rear view a P rotru ding lid for holding when moving the mac hine b Electricity supply cable c T r ansit bar cov ers d Inlet hose (with f le xible, w aterproof metallic out er sleev e) e Dr ain hose Installation and connection 62[…]
-
Page 63
Installation surface A concret e floor is the most suitable installation surface , being f ar less prone t o vibration during the spin cy cle than wooden f loorboards or a carpet ed surface . Please note the f ollowing points: ^ The mac hine must be level and securel y positioned. ^ T o av oid vibr ations during spinning, the machine should not be […]
-
Page 64
^ Using the spanner supplied turn the lef t-hand transit bar 90°, then ^ withdr aw the tr ansit bar . ^ T urn the right-hand transit bar 90°, then ^ withdr aw the tr ansit bar . Installation and connection 64[…]
-
Page 65
, T o av oid the risk of injury the holes for the tr ansit bars must be cov ered af ter the tr ansit bars ha ve been remo ved. ^ Fit the cov ers on to the t wo holes . Then plug the holes as sho wn with the caps . , The mac hine must not be moved without the tr ansit fit tings in place. Stor e them in a safe place for future use. The y must be re-f[…]
-
Page 66
Screwing out and adjusting the feet The f our adjustable screw f eet are used to le vel the machine . All f our feet ar e scre wed in when the machine is deliver ed. ^ Using the spanner supplied tur n counter nut 2 in a clockwise dir ection. Then turn counter nut 2 together with foot 1 t o unscrew . ^ Use a spirit level t o check the machine is st […]
-
Page 67
The Miele water protection system The Miele w ater pr otection sy stem prot ects machine from w ater damage . The s ystem consists of thr ee main components: 1) the inlet hose 2) the electronic unit and the machine housing 3) the dr ain hose 1) Inlet hose – The inlet hose is t ested to withst and pressur e of more than 1 4,000 kPa. – It has a p[…]
-
Page 68
Connection to the water supply The mac hine should be connected to a mains w ater supply in accor dance with local and national safety regulations . The German authorities do not requir e it to ha ve a non-return v alve as the w asher -dr yer has been designed to comply with DIN r egulations . The mac hine is designed to oper ate with a flo w press[…]
-
Page 69
Connection to the drainage system The mac hine drains via a dr ain pump with a delivery head of 1 metre . T he dr ain hose must not be kinked as this restricts dr ainage. The swiv el elbow at the end of the hose can be turned in either direction, or can be detached if requir ed, with a sharp twist and pull. If requir ed the drain hose can be e xten[…]
-
Page 70
Electrical connection U.K. All electrical work should be carried out by a suit ably qualif ied and competent person, in strict accordance with national and local safety regulations . Ensure po wer is not supplied to the appliance until aft er installation work has been carried out. The appliance is supplied with a mains cable with moulded plug read[…]
-
Page 71
Load Consumption data Energy Water Duration in kWh in litres Short Normal Washing Cottons 95°C 5.0 k g 1 .70 42 1 h 53 min 2 h 08 min 60°C 1) 5.0 kg 0.85 42 1 h 29 min 1 h 58 min 40°C 1) 5.0 kg 0.49 42 1 h 29 min 1 h 58 min Minimum iron 40°C 1) 2.5 kg 0.44 49 1 h 05 min 1 h 20 min Delicates 30°C 1 .0 k g 0.33 65 49 min 59 min Automatic 40°C 2[…]
-
Page 72
Height 850 mm Width 595 mm Depth 580 mm Depth with door open 975 mm Height for building under 820 mm Width f or building under 600 mm Depth for building under 600 mm W eight 1 0 1 k g Maximum floor load 1 600 Newton (appr ox. 1 60 kg) Capacity — W ashing Capacity — Drying 5.0 kg dry laundr y 2.5 kg dry laundr y V oltage see data plat e Connect ed l[…]
-
Page 73
The Set tings menu is used to alt er the machine ‘s electronics t o suit changing r equirements . Set tings can be altered at an y time. To open the Settings menu A S witch on the mac hine. T he main menu will appear . 15:03 Select programme B Af ter a f ew seconds an additional line will appear in the display . 15:03 Select programme Settings[…]
-
Page 74
Time of day Y ou fir st hav e to decide whether you w ant the time to show in the displa y . Then y ou have t o select either a 24 hour or 1 2 hour clock. Then set the curr ent time of day . To select a 24 hour or 12 hour clock ^ Use the – and + but tons to select the clock option set ting you w ant and confirm your selection b y pressing the OK […]
-
Page 75
Gentle action Activ ating gentle action redu ces the drum action and is suitable for w ashing slightly soiled items mor e gently . It should be activ ated f or garments with a single bar under the care label and f or articles which feel too har d aft er they hav e been dried. Gentle action can be activ ated for the Cot tons and the Minimum ir on pr[…]
-
Page 76
Distribution controller The maximum f inal spin speed is limited t o prev ent the laundr y sticking to the drum. (This set ting is only av ailable when w ashing and dr ying in a continuous sequ ence). Ther e are 4 diff erent options: 1 200 rpm (fact ory default set ting) 1 1 00 rpm 1 000 rpm 900 rpm. A tick will appear beside the option t o show th[…]
-
Page 77
Lock The s ystem loc k prev ents your machine being used without y our knowledge . When the s ystem loc k has been activ ated, you ha ve to ent er a code af ter switc hing the machine on. Otherwise the machine cannot be oper ated. To activate the lock C Back A X Activate ^ Select Activ ate and confirm your selection. ^ The display will no w request[…]
-
Page 78
Temperature Y ou can choose for the t emperatur e to be displa yed as °C/Celsius or °F/F ahr enheit . A tick will appear beside the option t o show that it has been set. ^ Select the option you w ant and confirm your selection. Buzzer When the buzz er fu nction has been activ ated, an audible t one sou nds at the end of a progr amme or when Rinse[…]
-
Page 79
Standby T o sav e energy , the display goes out af ter 1 0 minutes and the indicat or light for the Start/Stop but ton will st ar t flashing slo wly . Ther e are t wo options: On Standb y is activ ated: – if a progr amme is not selected af ter the machine has been s witched on. – af ter a progr amme has started. – at the end of a progr amme. […]
-
Page 80
Alter ation rights reserved/2208 M.-Nr . 06 533 680 / 02[…]
- Addeddate
- 2021-07-02 15:20:43
- Identifier
- manualzilla-id-7318585
- Identifier-ark
- ark:/13960/t1nh6fz3s
- Ocr
- tesseract 5.0.0-alpha-20201231-10-g1236
- Ocr_autonomous
- true
- Ocr_detected_lang
- en
- Ocr_detected_lang_conf
- 1.0000
- Ocr_detected_script
- Latin
- Ocr_detected_script_conf
- 1.0000
- Ocr_module_version
- 0.0.13
- Ocr_parameters
- -l eng+deu+lat+Latin
- Page_number_confidence
- 86.75
comment
Reviews
There are no reviews yet. Be the first one to
write a review.
100
Views
DOWNLOAD OPTIONS
Temporarily Unavailable
DAISY
For users with print-disabilities
Uploaded by
chris85
on