
GB
HD90-A2959
HD90-A2959S
HD90-A3959
HD80-A3959
HD90-A3959S
User manual
Heat-Pump-Dryer
Thank you EN
2
Disposal
Help protect the environment and human health. Put
the packaging in applicable containers to recycle it.
Help to recycle waste of electrical and electronic ap-
pliances. Do not dispose appliances marked with this
symbol with the household waste. Return the product
to your local recycling facility or contact your municipal
offi ce.
WARNING!
Risk of injury or suff ocation!
Disconnect the appliance from the mains supply. Cut off the mains cable and dispose
of it. Remove the door catch to prevent children and pets to get closed in the appliance.
WARNING!
The appliance must not be supplied through an external switching device, such as a
timer, or connected to a circuit that is regularly switched on and off by a utility.
Legend
Warning! – Important safety information
General information and tips
Environmental information
Thank you for purchasing a Haier Product.
Please read these instructions carefully before using this appliance. The instructions con-
tain important information which will help you get the best out of the appliance and ensure
safe and proper installation, use and maintenance.
Keep this manual in a convenient place so you can always refer to it for the safe and proper
use of the appliance.
If you sell the appliance, give it away, or leave it behind when you move house, make sure
you also pass this manual so that the new owner can become familiar with the appliance
and safety warnings.

EN Content
3
Safety information ………………………………………………………………………………………………………………… 4
Intended use ………………………………………………………………………………………………………………………….. 7
Product description ………………………………………………………………………………………………………………. 8
Control panel ………………………………………………………………………………………………………………………….9
Programmes…………………………………………………………………………………………………………………………12
Consumption ……………………………………………………………………………………………………………………….13
Suggestions and tips ……………………………………………………………………………………………………………14
Daily use ………………………………………………………………………………………………………………………………..16
Care and cleaning ………………………………………………………………………………………………………………… 20
Troubleshooting …………………………………………………………………………………………………………………..22
Installation …………………………………………………………………………………………………………………………….24
Technical data ………………………………………………………………………………………………………………………28
Hon ……………………………………………………………………………………………………………………………………….32
Customer Service ………………………………………………………………………………………………………………..35

EN
1-Safety information
4
WARNING!
Before fi rst use
▶Make sure there is no transport damage.
▶Remove all packaging and keep out of children´s reach.
▶Handle the appliance always with at least two persons because it
is heavy.
Daily use
▶This appliance can be used by children aged from 8 years and
above and persons with reduced physical, sensory or mental ca-
pabilities or lack of experience and knowledge if they have been
given supervision or instruction concerning use of the appliance
in a safe way and understand the hazards involved.
▶Keep away children under 3 years of age from the appliance un-
less they are constantly supervised.
▶Children shall not play with the appliance.
▶Do make sure the room is dry and well ventilated. The ambient
temperature should be between 5 °C and 35 °C.
▶Do not cover any ventilation openings in the base by a carpet or
similar object.
▶Keep the area around the tumble dryer free of dust and lint.
▶Do make sure that there is only laundry inside the appliance and
no pets or children before you use it.
▶Only touch the mains plug with dry hands and do not touch or
use the appliance if you are barefoot or have wet or damp hands
or feet.
▶Only dry textiles washed in water.
▶Do make sure not to load more than nominal load.
▶Remove all items such as lighters and matches from pockets.
▶Use fabric softeners or similar products as specifi ed by the
manufacturer´s packaging.
▶Do not use ore store any flammable sprays or fl ammable gas in
close vicinity to the appliance.
▶Do not place heavy objects or sources of heat or damp on top of
the appliance.
▶Hold the plug, not the cable, when unplugging the appliance.
▶Do not touch the rear wall and the drum during operation; they
are hot.

EN 1-Safety information
5
WARNING!
Daily use
▶Do not dry following items in the appliance:
▶Items which are unwashed.
▶Items which have been contaminated with inflammable sub-
stances such as cooking oil, acetone, alcohol, benzine, petrol,
kerosene, spot removers, turpentine, waxes, wax removers
or other chemicals. The fumes can cause a fi re or explosion.
These items must always be washed fi rst by hand in hot wa-
ter with an extra amount of detergent and then be dried in the
open air before drying in the appliance.
▶Items which contain padding or fillings (e.g. pillows, jackets), as
the filling can get out with the risk of igniting in the dryer.
▶Items which contain a large proportion of rubber, foam rubber
(latex foam) or rubber like materials such as shower caps, wa-
terproof textiles, rubberised articles and items of clothing and
pillows with foam rubber filling.
▶Do not drink the condensed water.
▶Do not use the appliance without the lint filter or condenser fi lter
in place or with damaged filter.
▶Notice that the last part of the drying cycle occurs without heat
(cool down cycle) to ensure remaining the garments at a temper—
ature which does not damage them.
▶Do not leave the appliance unattended during run time for some
time. If a long absence is intended, the drying cycle have to be
interrupted by switching off the unit and unplugging the mains.
▶Do not switch off the appliance except drying cycle is finished,
unless all items are quickly removed and spread out that the heat
can be released.
▶Switch off the appliance after each drying programme to save
electricity and for safety.
Maintenance / cleaning
▶Make sure children are supervised if they carry out cleaning and
maintenance.
▶Disconnect the appliance from the electrical supply before un-
dertaking any routine maintenance.

EN
1-Safety information
6
WARNING!
Maintenance / cleaning
▶Clean the lint filter and the condenser fi lter after each pro-
gramme (see CARE AND CLEANING).
▶Do not use water spray or steam to clean the appliance.
▶Do not use industrial chemicals to clean the appliance.
▶Replace a damaged supply cord only by the manufacturer, its ser—
vice agent or similarly qualifi ed persons in order to avoid a hazard.
▶Do not try to repair the appliance by yourself. In case of repair
please contact our customer service.
Installation
▶Ensure a location which allows opening the door fully. Do not in-
stall the tumble dryer behind a lockable door, a sliding door or a
door with hinges on the opposite side of the tumble dryer door
as this limits the full opening of the tumble dryer door.
▶Install the appliance in a well-ventilated, dry place.
▶Never install the appliance outdoors in a damp place, or in an area
which may be prone to water leaks such as under or near a sink
unit. In the event of a water leak cut power supply and allow the
machine to dry naturally.
▶Install or use the appliance only where the temperature is above
5 °C.
▶Do not place the appliance directly on a carpet, or close to a wall
or furniture.
▶Do not expose the appliance to any frost, heat or direct sunlight
or in the near of heat sources(e.g. stoves, heaters).
▶Make sure that the electrical information on the rating plate
agrees with the power supply. If it does not, contact an electri-
cian.
▶Do not use multi-plug adapters and extension cables.
▶Make sure not to damage the electric cable and the plug. If dam-
aged have it replaced by an electrician.
▶Use a separate earthed socket for the power supply which is easy
accessible after installation. The appliance must be earthed.
▶Only for UK: The appliance’s power cable is fi tted with 3-cord
(grounding) plug that fi ts a standard 3-cord (grounded) socket.
Never cut off or dismount the third pin (grounding). After the ap-
pliance is installed, the plug should be accessible.
EN 2-Intended use
7
Notice
The appliance contains the fl uorinated greenhouse gas HFC-134a (GWP:1430). This
gas is hermetically sealed.
Intended use
This appliance is intended for drying items which have been washed in a water solution and
are marked on the manufacturer‘s care label as being suitable for tumble drying.
It is designed exclusively for domestic use inside the house. It is not intended for commer—
cial or industrial use. Changes or modifi cations to the device are not allowed. Unintended
use may cause hazards and loss of of all warranty and liability claims.
Standards and directives
This product meets the requirements of all applicable EC directives with the correspond-
ing harmonised standards, which provide for CE marking.
Environmentally responsible use
▶Thorough drainage: Spin the laundry with the maximum spin speed.
▶Maximum load: Use the maximum fi lling amount according to the programme table,
but do not overload the dryer. To take advantage of the maximum load, the laundry
which should be dried „READY to STORE“, can be fi rst dried easily with „READY to
IRON“. At the programme end remove the laundry which should be ironed and dry the
remaining laundry then to end.
▶Loosen up the laundry: Shake out the laundry before putting them into the dryer.
▶Avoid excess drying: An excessive drying should be avoided. Select the right pro-
gramme and the appropriate dry level.
▶Softener unnecessary: Do not use softener when washing, because the laundry will
become fl uff y and soft in the dryer .
▶Cleaning of the lint fi lters: Clean the lint fi lters after each cycle.
▶Ventilation: Make sure the appliance is properly ventilated (see INSTALLATION).
▶Condensed water reuse: The collected condensed water can be used for the steam
iron. Before it should be poured through a fi ne sieve or coff ee fi lter paper. Smallest
parts will be retained by the fi lter.
EN
3-Product description
8
A
kg
9
+++
A
i-REFRESH
11 English |
CONTROL PANEL
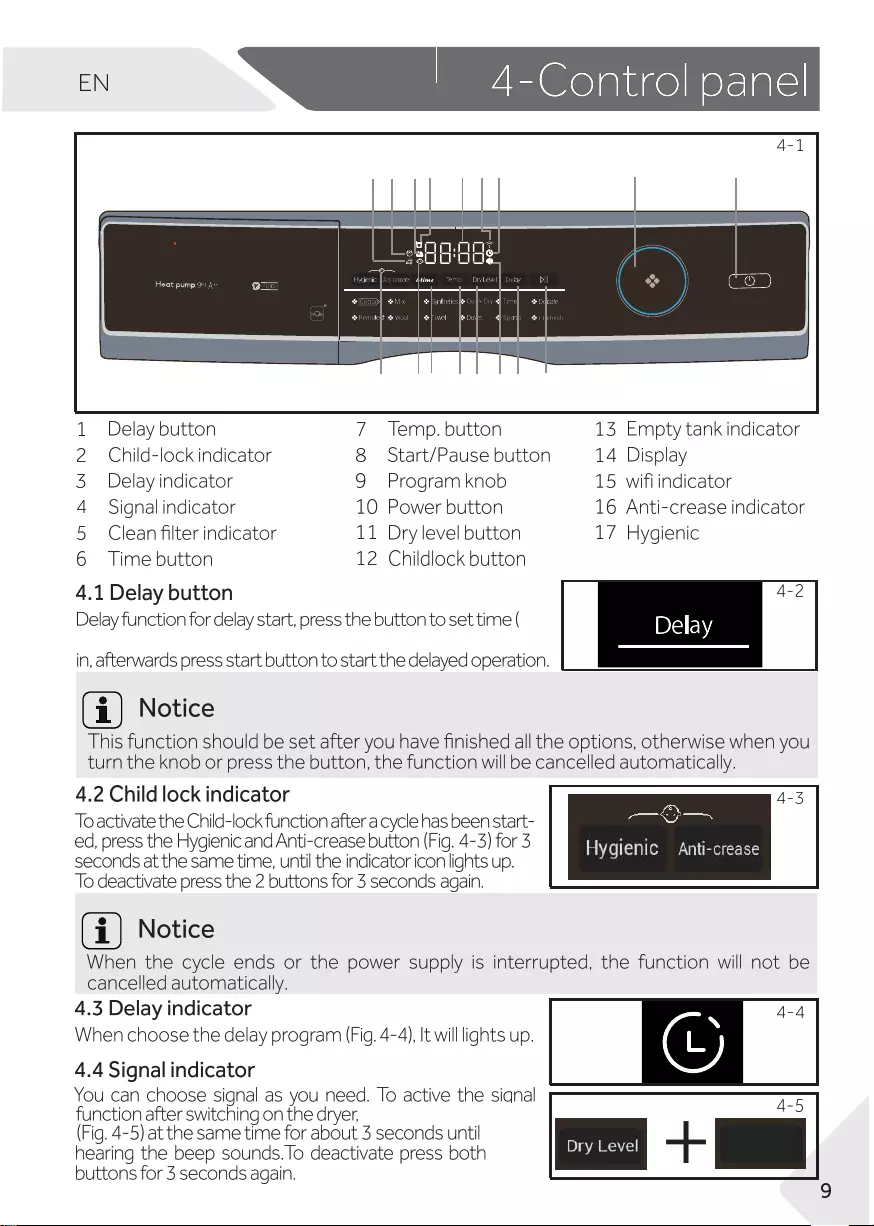
5Filters must be cleaned regularly.
See Lint Filter Cleaning or Condenser
Filter Cleaning section of the manual.
Clean filter
indicator
2Childlock indicator To activate the Child-lock function after a cycle
has been started, press the Childlock button
for 3 sec. until the indicator icon lights up.
To deactivate press the button for 3 sec. again.
Note: When the cycle ends or the power
supply is interrupted, the function will not be
cancelled automatically.
Note: After each cycle, indicator will flash to
remind cleaning the filters.
kg
9A
++
kg
9
++
A
i-REFRESH
Delay function for delay start, press the button to
set time (in 1 intervals up to 12 hours).
The appliance shoule be finished in, afterwards
press to start the delayed operation.
1 Delay button
3Timer indicator When choose the timer program, It will lights up.
Signal indicator You can choose signal as you need. To active
the signal function after switching on the dryer,
press and Temp. for about 3 seconds
until the beep sounds.To deactivate press both
buttons for 3 seconds again until the beep sounds.
4
Note: This function should be set after you
have finished all the options, otherwise when
you turn the knob or press the button, the
function will be delected automatically.
13
2
4
5
6
7
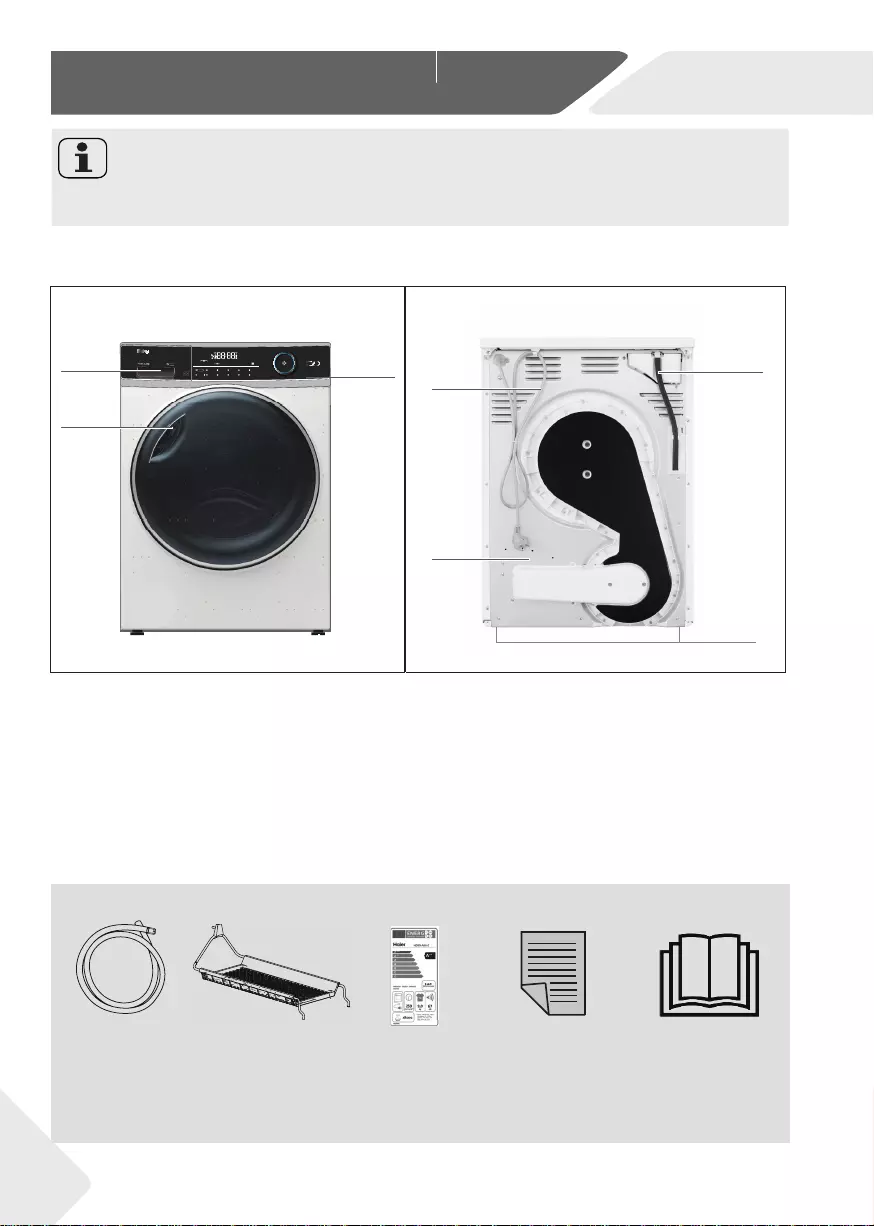
3.1 Picture of appliance
Front (Fig. 3-1): Rear side (Fig. 3-2):
Note:
Due to technical changes and diff erent models, the illustrations in the following chap-
ters may diff er from your model.
3.3
1 Water tank
2 Tumble dryer door
3 Control panel
4 Power supply cord
5 Back plate
6 Drainage outlet
7 Adjustable feet
User manual
Warranty card
Drain hose Energy labelDrying rack
( Only for
France models)
3.2 Accessories
Check the accessories and literature in accordance with this list (Fig.3-3):
3-1 3-23-2
3-3
Cotton Mix Synthetics Quick Dry Timer Delicate
Hygienic DryLevel
Anti-crease Temp. Delay
Remote Wool Sports
DuvetTowel i-Refresh
5910
17
16 3
14 15
13
67
211 18
4
12
Temp.
Temp.
press the 2 buttons
from 0.5 up to 24hours). The appliance should be finished
EN
4-Control panel
10
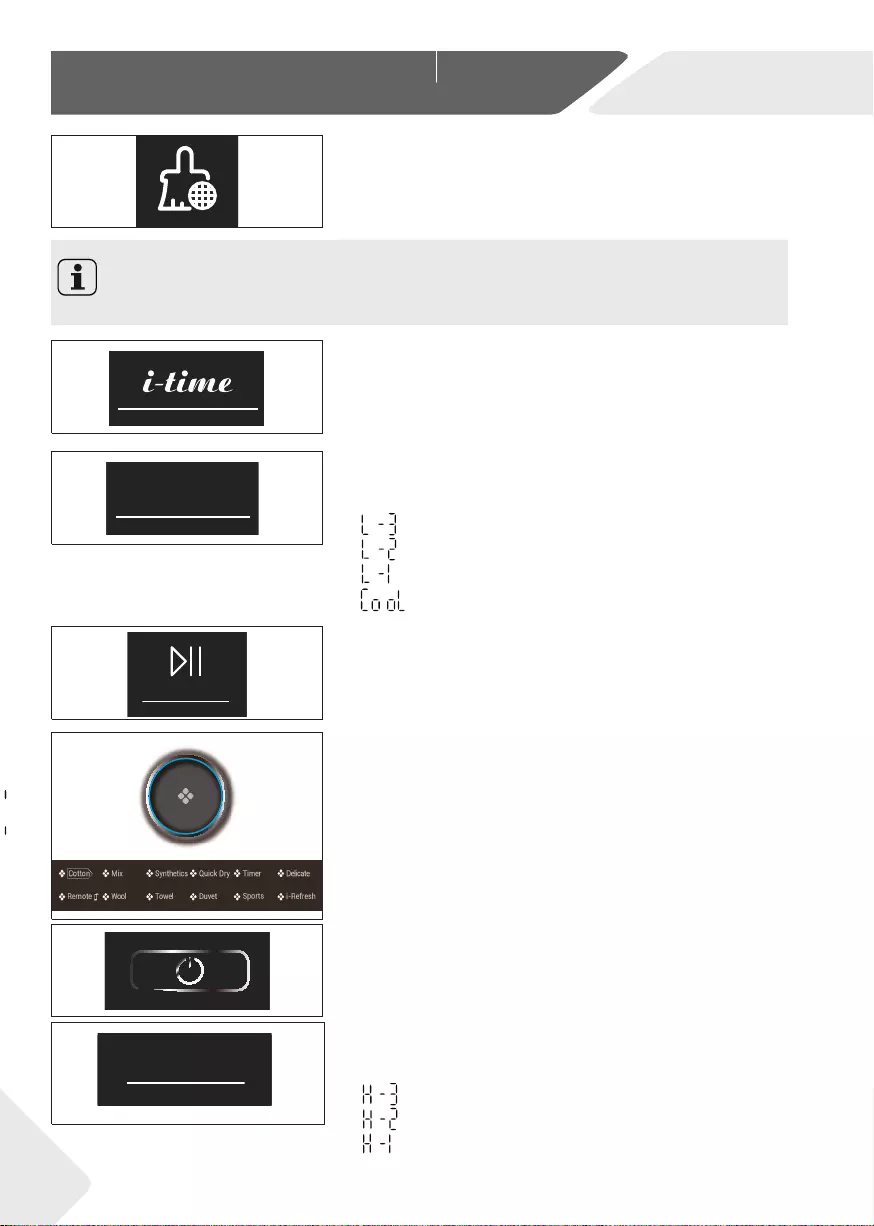
4.8 Start/Pause button
Press Start/Pause (Fig. 4-9) to Start a drying cycle. Press
button again to pause the drying cycle – indicator light is
twinkling. Press button again to continue.
4.6 Time button
When selecting the Timer or Delay or i-Refresh program,
press this button to add or substract the time.
4.7 Temp. button
Press the button (Fig. 4-8) to set the drying tempera-
ture for some programs. The display is shown below:
High temperature.
Middle temperature.
Low temperature.
Cool air.
Notice
After each cycle, indicator will twinkle to remind cleaning the fi lters.
4.5 Clean fi lter indicator
Filters must be cleaned regularly. See Lint Filter Clean-
ing or Condenser Filter Cleaning section of the manual.
4.9 Program knob
Select one of the 12 programs using the knob (Fig.
4—10). The indictor of the respective program lights up.
See Program Modes section of the manual for further
information.
4.10 Power button
Press Power button (Fig. 4-11) to switch on/off the
tumble dryer.
4.11 Dry Level button
Press the button (Fig. 4-12) to set the fi nal moisture
content of the laundry at the end of cycle.
Extra dry
Ready to store
Ready to iron
Temp.
CONTROL PANEL
Dry Level
Delay
Wrinkle Free
Temp.
kg
9A
++
Childl oc k i-Re fr es h
kg
9
++
A
i-REFRESH
4-6
4-7
4-8
4-9
4-11
4-10
Dry Level
4-12
The display is shown below:
EN 4-Control panel
11
Notice
The remaining time is a default value, this time will be re-calculated depending on
additional program settings and the moisture content of the laundry.
Notice
The default time is 1 hour.
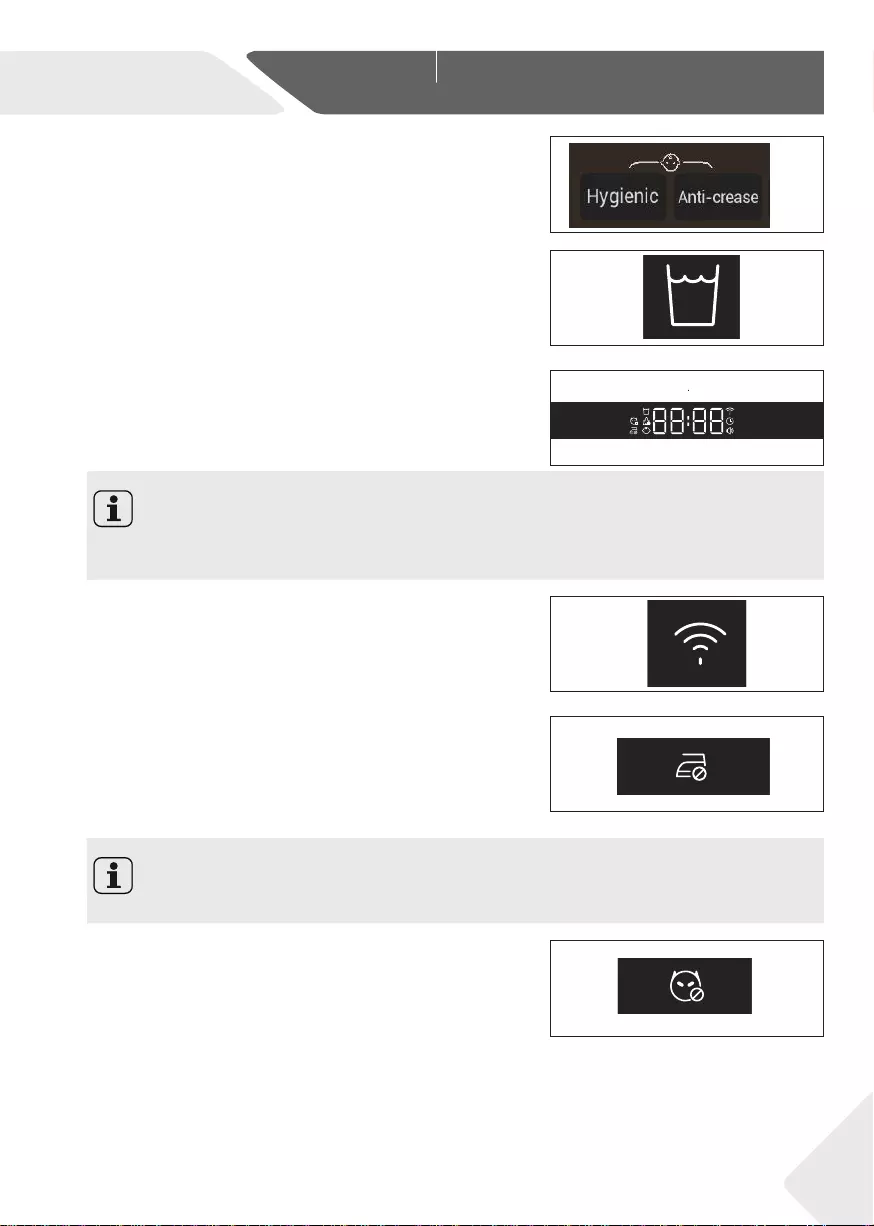
4.12 Childlock button
To activate the Child-lock function after a cycle has been
started, press the 2 buttons (Fig. 4-13) for 3 sec. until the
indicator icon lights up. To deactivate press the 2 buttons
for 3 sec. again.
4.13 Empty tank indicator
Water tank must be emptied (Fig. 4-14).
Important: Empty the water tank after each drying cycle.
See Empty the water tank section of the manual.
4.14 Display
The display shows the remaining time, the delay time and
other related information.
4.15 Wifi indicator
If the wifi connection is successful, this indicator
4.16 Anti-crease indicator
After selecting the program with this function, the icon
lights up, anti-wrinkle default open, when we touch the
Anti-crease button, (Fig. 4-17) icon will go out, this function
closed, and touch again, icon will light up, this function open.
4.17 Hygienic indicator
temperature. when the program ends, automatically
4-13
4-14
4-15
4-16
4-17
4-18
Childlock
automatically change to the highest drying level and
(Fig. 4-16) will light up.
When select the Hygienic program, this indicator
(Fig. 4-18) will light up.The the setting program will
continue drying for another 1.5 hours.

EN
5-Programmes
12
*)
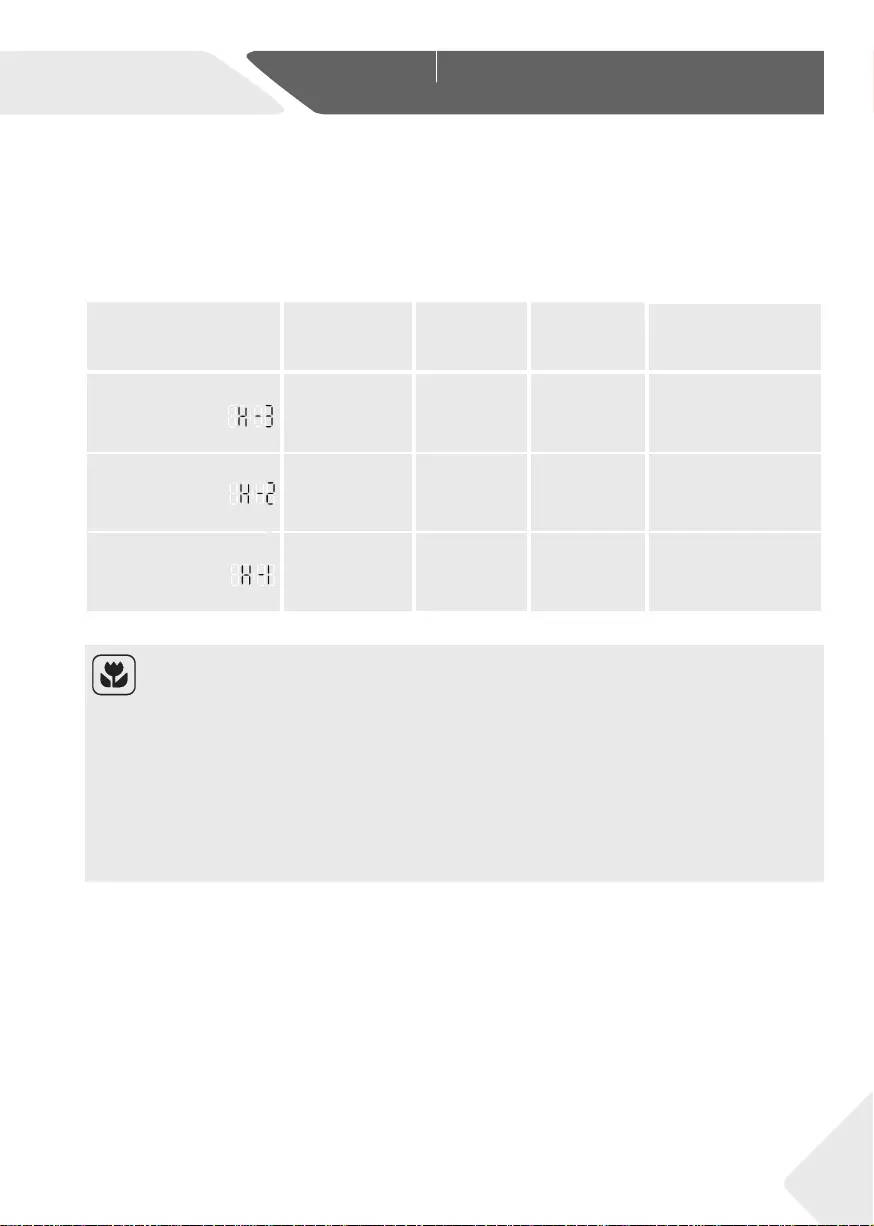
Programme Drying
degree
Laundry Max. Load kg
8 9
Mix Extra dry Heavy fabrics, need further drying 5 6
Synthetics Heavy synthetic 4 4.5
Towel Extra dry Towels 5 6
Duvet /
Feather clothing 1 1
Wool /Woolfell textiles 3 3
Timer /Heavy fabrics, need further drying — —
Delicate Underwear 2 2
i-Refresh Dry clothes
Sports Extra dry Sportswear 4 4.5
Remote
Quick Dry /Sheets 0.5 0.5
Cotton Extra dry Cotton, coats 8 9
*)
EN 61121 test program setting, we recommend that you drain the condensed water
externally through the drain hose when drying a full load using the Cotton program.
This will avoid to empty the water tank during the programme.
— —
/
//— —
Ready to store
Ready to store
Time Temperature
4:30
3:00
1:50
0:30
0:30
1:30
0:20
2:40
1:00
2:30
0:30
60-65C°
60-65C°
50-55C°
60-65C°
60-65C°
50-55C°
50-55C°
60-65C°
60-65C°
60-65C°
50-55C°
4:30 60-65C°
EN 6-Consumption
13
Programme Drying
degree
Laundry Max. Load kg
8 9 10
Mix Extra dry Heavy fabrics, need further drying 5 6 7
Synthetics Extra dry Heavy synthetic 4 4,5 5
Towel **) Extra dry Towels 5 6 7
Duvet /
Feather clothing 1 1 1,5
Wool /Woolfell textiles 3 3 4
Warm up Extra dry Cashmere clothing 3 4 4,5
Timer /Heavy fabrics, need further drying — — —
Delicate Extra dry Underwear 2 2 3
Bulky **) Extra dry Heavy cotton 2 2 3
Shirt Extra dry Shirts 4 4,5 5
Sports Extra dry Sportswear 4 4,5 5
Babycare Extra dry Baby clothing 4 4 5
Quick Dry /Sheets 4 4 5
Cotton Extra dry Cotton, coats 8 9 10
Heat pump technology
The condensation dryer with heat exchanger is outstanding in terms of effi cient energy
consumption. These are guide values determined under standard conditions. The values
may diff er from those given, depending on overvoltage and undervoltage, the type of
fabric, composition of the laundry to be dried, the residual moisture in the fabric and the
size of the load.
Programme
Cotton / Linen
Spin speed
in rpm
Restidual
moisture
in %
Time
in h:min
Energy
consumption
in kWh
Extra Dry 1000 approx. 60 4:40 2.34
Ready to Store 1000 approx. 60 4:29 1.98
Ready to Iron 1000 approx. 60 3:18 1.62
Environmentally responsible use
▶Spin the laundry as dry as possible before putting it into the tumble dryer.
▶Avoid overloading the tumble dryer.
▶Shake the laundry loose before putting it into the tumble dryer.
▶Choose a proper drying program. Make sure the laundry is not dried longer than
needed.
▶Make sure to use the tumble dryer with cleaned fi lters.

EN
7-Suggestions and tips
14
7.1 Starched laundry
Starched laundry leaves a fi lm of starch in the drum and is not suitable for the dryer.
7.2 Softener
Do not use softener when washing, because the laundry will become soft and fl uff y in the
dryer.
7.3 Soft care cloths
The use of “soft care cloths” can lead to a coating at the lint fi lters. This can cause a block—
age of the fi lters. In such cases, we recommend either to abstain from adding soft care
cloths or to choose a diff erent brand. In any case note the manufacturer’s instructions.
7.4 Small amounts of fi lling
In a quantity of less than 1.0 kg, the “Timer”-programme should be selected because the
automatic scanning of the dry level can be captured only still inaccurate.
7.5 Open door
The door should be left ajar during the non-use, so that the door seal indefi nitely remains
in eff ect.
7.6 Drum interior light (Only for France models)
When the appliance is switched on, the drum light will keep on when the door is open.
7.7 Service fl ap
Make sure that the service fl ap is always closed during operation.
7.8 Anti crease protection
If at the end of the programme the laundry is not removed, the drum moves from time to
time to prevent creases. The anti crease protection phase is approx. 60 minutes.
7.9 Laundry which should be ironed
…should be dried with level READY to IRON. This facilitates ironing by hand or using the
machine.
7.10 Remaining time
The programme duration is infl uenced by the following factors: the type of fabric, the fi lling
quantity, absorptive capacity, the desired dry level, as well as the spin speed of the washing
machine. These factors are registered by the electronics during the programme and the
remaining time will be corrected accordingly.
7.11 Extra large pieces
… tend to wind up. If therefore the desired dry level could not be reached, loosen up the
laundry and dry again with the time programme (TIMER ).
7.12 Especially delicate fabrics
Textiles which can easily shrink or lose their shape, as well as e.g. silk stockings, lingerie etc.
should not be put in the dryer. Put delicate garments inside a laundry bag and avoid over
drying them.

EN 7-Suggestions and tips
15
7.13 Jersey and knitwear
should be dried at READY to IRON to avoid shrinkage. A subsequent stretch or pull into
form should be performed.
7.14 Fluff
The amount of lint in the lint fi lters is not attributable to the wash stress in the dryer; rather,
it is extracted fi bres from the wearing and washing. During drying on the line, the fl uff will
be carried away by the wind. By using a tumble dryer the fl uff will be collected in the fi lters.
7.15 Acoustic signal
An acoustic signal sounds:
▶when the water tank is full
▶in case of failures
Additionally the acoustic signal can also be selected for following cases:
▶at the end of programme
▶when pressing a button
▶when turning the programme selector
EN
8-Daily use
16
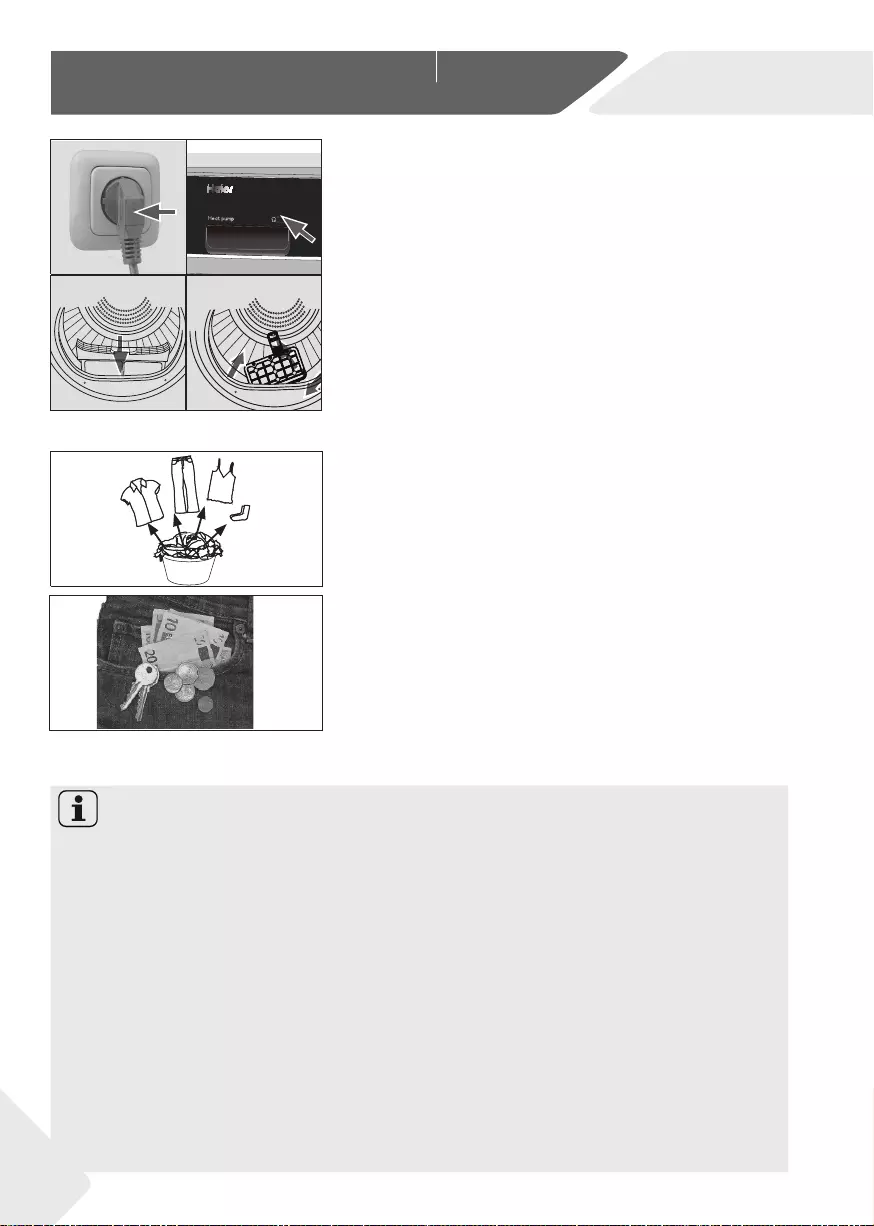
8.2 Preparing the laundry
▶Sort clothes according to fabric
(cotton,synthetics, wool etc.).
Only dry laundry that has been spin.
▶Empty pockets of all sharp or fl ammable objects
such as keys, lighters and matches. Remove
harder decorative objects such as brooches.
▶Close zippers and hooks, make sure the buttons
are sewn on tightly and place small items such as
socks, bras etc. in a wash bag.
▶Unfold large pieces of fabric such as bed sheets,
table cloth etc.
▶Follow the instructions on the laundry label and
dry only machine-dryable garments.
8.1 Preparing the appliance
1. Connect the appliance to a power supply (220V
to 240V~/50Hz) (Fig. 8-1) Please refer also to sec—
tion INSTALLATION.
2. Make sure:
▶the water tank is empty and properly installed.
(Fig. 8-2).
▶the lint filter is clean and properly installed. (Fig.
8-3).
▶the condenser filter is clean and properly
installed (Fig. 8-4).
Tips:
▶Separate white clothes from coloured ones.
▶Unfold large items such as bed sheets, table cloths, etc.
▶Bed linen and pillowcases should be button, so that small parts cannot stuck inside.
▶Close zippers and hooks, and tie loose belts without metal parts, apron strings etc.
together.
▶Place small items such as socks, belts, bras, etc. in a wash bag.
▶Make sure all buttons are sewn on tightly .
▶Sew or remove loose metal parts of garments, such as e.g. metal buttons, bow of
bras before inserting. Otherwise such parts can cause noise and damage the drum.
▶Do not over-dry easy-care linen. Risk of the crease. Allow fi nal drying at the air.
▶Knitwear (e.g. T-shirts, underwear) sometimes run up during drying. Only use dry level
READY to IRON and drag in the form afterwards.
▶For pre-dried, multi-layered garments or for fi nal drying the time-programme
(TIMER ) should be chosen.
kg
9A
++
kg
9
++
A
i-REFRESH
17
8-1
8-3 8-4
8-5
8-6
8-2
EN 8-Daily use
17
CAUTION!
Non-textile, as well as small, loose or sharp-edged items may cause malfunctions and
damage of clothes and appliance.
8.3 Loading the appliance
▶Loosen up and insert presorted laundry.
▶Don‘t overload.
▶Close the door carefully. Make sure that no pieces of laundry are pinched.
8.4 Removing and adding laundry
WARNING!
Never turn the dryer off before the end of the drying cycle unless all items are quickly
removed and spread out that the heat can be released.
To remove or add laundry the programme can be interrupted at any time:
▶Open the door. The cycle interrupts.
Be careful when removing or adding the laundry! The Interior of the drum or the laun-
dry itself may be hot, so that there is danger of burns .
▶To continue the programme, press the “Start/Pause” button after closing the door.
Load Reference
Bed sheet (single) Cotton Approx. 800 g
Blended fabric clothes / Approx. 800 g
Jackets Cotton Approx. 800 g
Jeans / Approx. 800 g
Overalls Cotton Approx. 950 g
Pyjamas / Approx. 200 g
Shirts / Approx. 300 g
Socks Blended fabrics Approx. 50 g
T-Shirts Cotton Approx. 300 g
Underwear Blended fabrics Approx. 70 g
8.5 Loading the dryer
1. Place the laundry evenly in the drum making sure
not to overload the dryer.
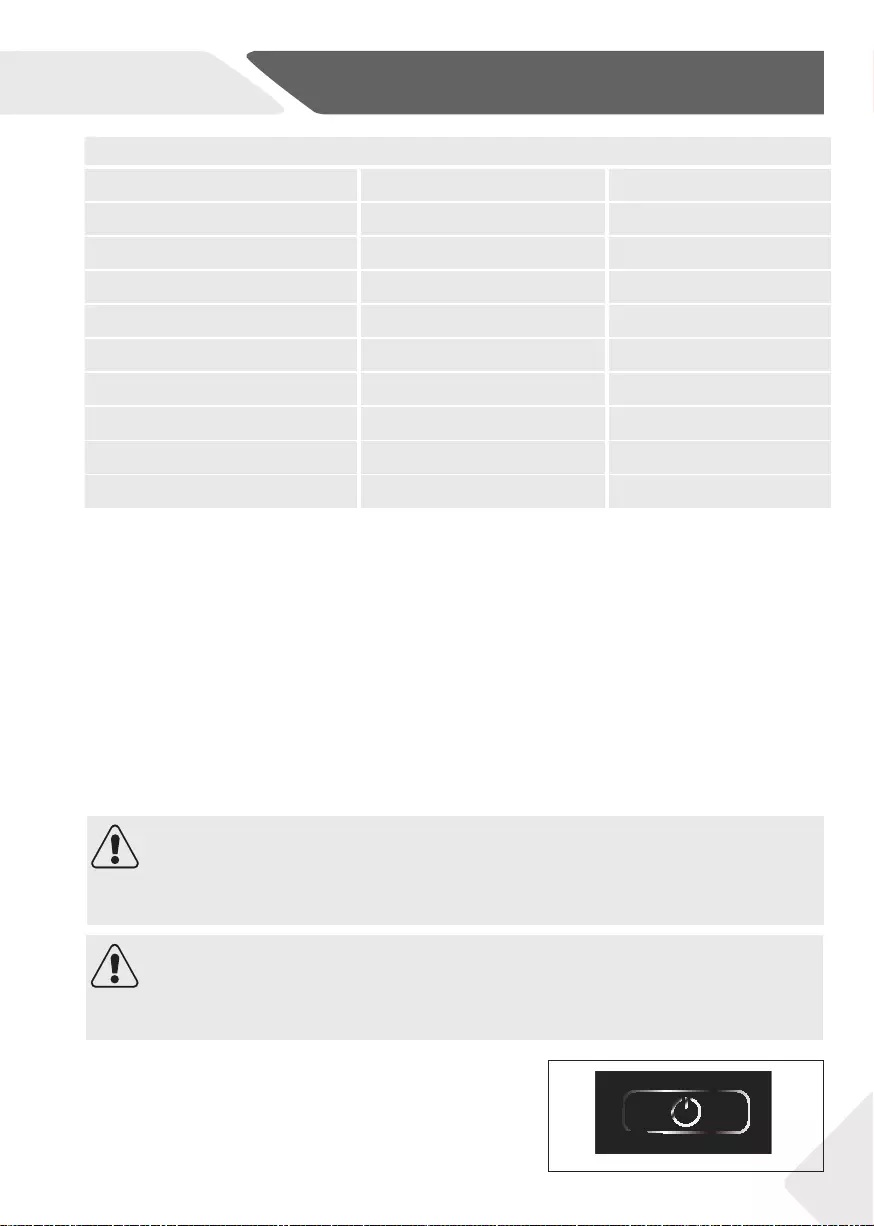
2. Switch on the tumble dryer by pressing the Power
button (Fig. 8-7).
8-7
EN
8-Daily use
18
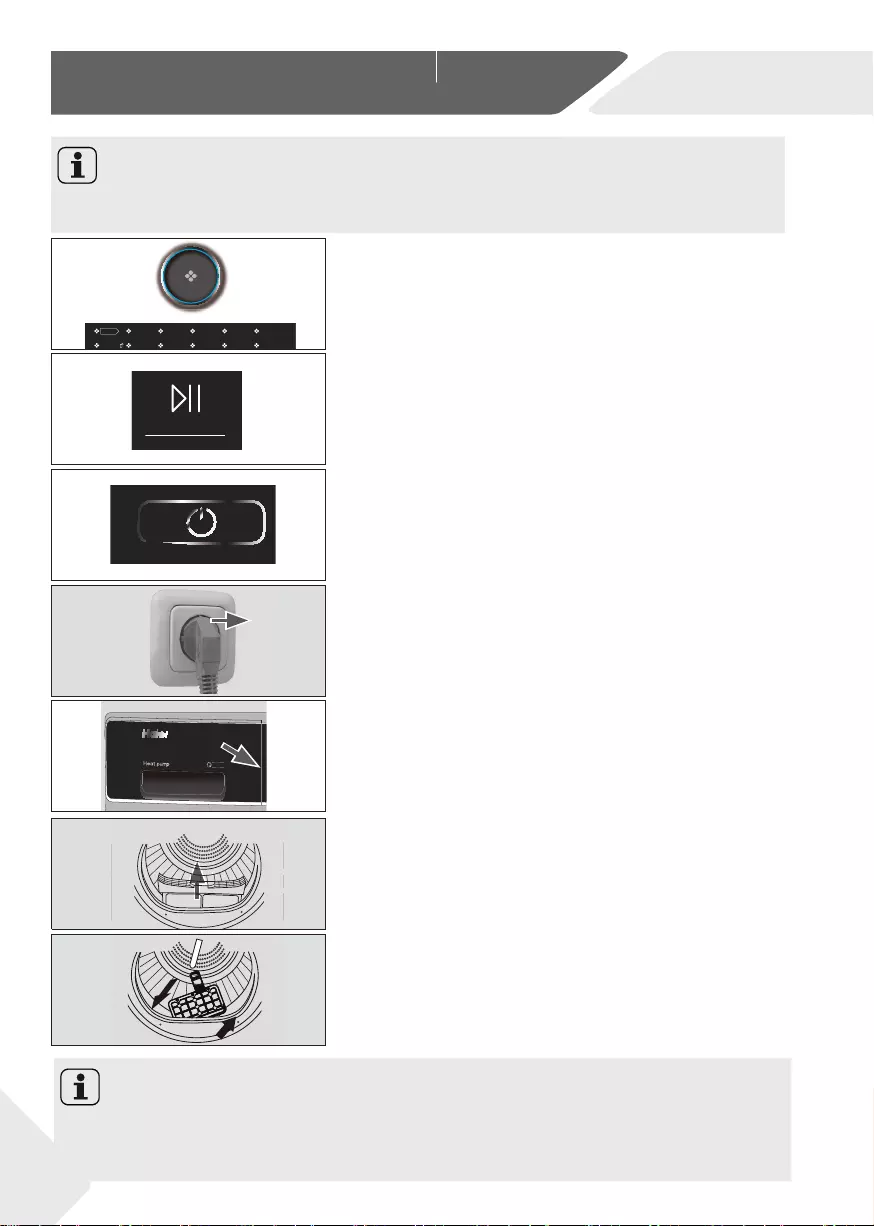
8.6 Set program and start
1. Turn the program knob (Fig. 8—8) to select the
desired program.
2. Set functions such as Temperature, Dry level, De-
lay. Afterwards press theStart/Pause button (Fig.
8—9) to start the dry cycle.
8.7 End of dry cycle
The tumble dryer stops operation automatically
when a dry cycle is complete. The display shows
END about 5S. Open the tumble dryer door and
remove the laundry. If the laundry is not removed
the wrinkle free program starts automatically and the
1. Switch off the tumble dryer by pressing the
Power button (Fig. 8-10).
2. Unplug the tumble dryer from the power socket
(Fig. 8-11).
3. Empty the water tank after each dry cycle (Fig.
8-12) .
4. Clean the lint fi lter after each dry cycle (Fig. 8—13).
5. Clean the condenser fi lter after each dry cycle
(Fig. 8-14).
Notice
Fabric softeners or similar products should be used as specifi ed in the manufacturer’s
instructions.
CONTROL PANEL
Dry Le vel
Delay
Wrink le Free
Te mp.
kg
9A
++
Childl oc k i-Re fres h
kg
9
++
A
i-REFRESH
kg
9A
++
kg
9
++
A
i-REFRESH
ry Le vel
Delay
Wrink le F ree
Te mp.
Ba byca re Quick Dr y
Mix
Cotto n
Duvet
Synt hetics T owe l Warm U p
Shir t
Wool T ime r
Bulk y
Delic ate Spo rts
Childl ock i-Re fres h
8-8
8-9
8-10
8-11
8-12
8-13
8-14
Notice
▶During drying, please make sure the items are placed on the rack with no risk of en-
tangling the baffl es while the drum is rotating.
▶Maximum weight of wet items: 1.5 kg.
display shows 0:00
Cotton Mix Synthetics Quick Dry Timer Delicate
Remote Wool Sports
DuvetTowel i-Refresh
(Only part of the programs).
EN 8-Daily use
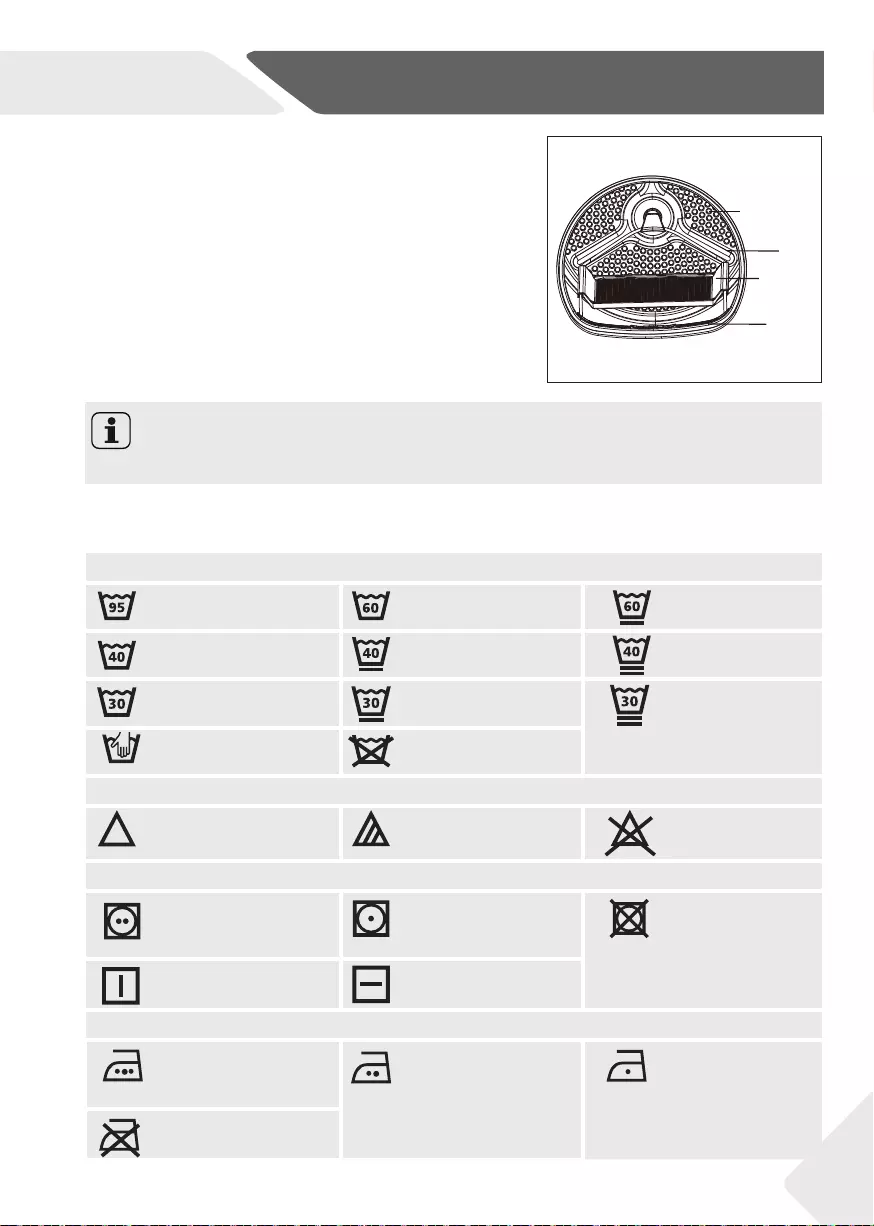
Care chart
Washing
Washable up to 95°C
normal process
Washable up to 60°C
normal process
Washable up to 60°C
mild process
Washable up to 40°C
normal process
Washable up to 40°C
mild process
Washable up to 40°C
very mild process
Washable up to 30°C
normal process
Washable up to 30°C
mild process
Washable up to 30°C
very mild process
Wash by hand
max. 40°C
Do not wash
Bleaching
Any bleaching allowed Only oxygen/
non -chlorine
Do not bleach
Drying
Tumble drying possible
normal temperature
Tumble drying possible
lower temperature
Do not tumble dryr
Line drying Flat drying
Ironing
Iron at a maximum
temperature
up to 200 °C
Iron at a medial tem-
perature
up to 150°C
Iron at a low temper—
ature up to 110 °C;
without steam (steam
ironing may cause irre-
versible damage)
Do not iron
19
8.8 Using the dryer rack
The dryer rack is designed for use with items
which are not recommended for tumble drying
such as trainers, sneakers, sweaters or delicate
lingerie.
1. Open the dryer door.
2. Check that the drum is empty.
3. Put the dryer rack into the drum.
4. Make sure the catches are inserted in the hole of
the lint fi lter and locked in the hole of rear drum.
YER RACK
4. Make sure the catches are
Drum openings
Drum
Dryer rack
Lint filter
8-15
Notice
▶Do not use this dryer rack when there are other clothes in the dryer.
EN
9-Care and cleaning
20
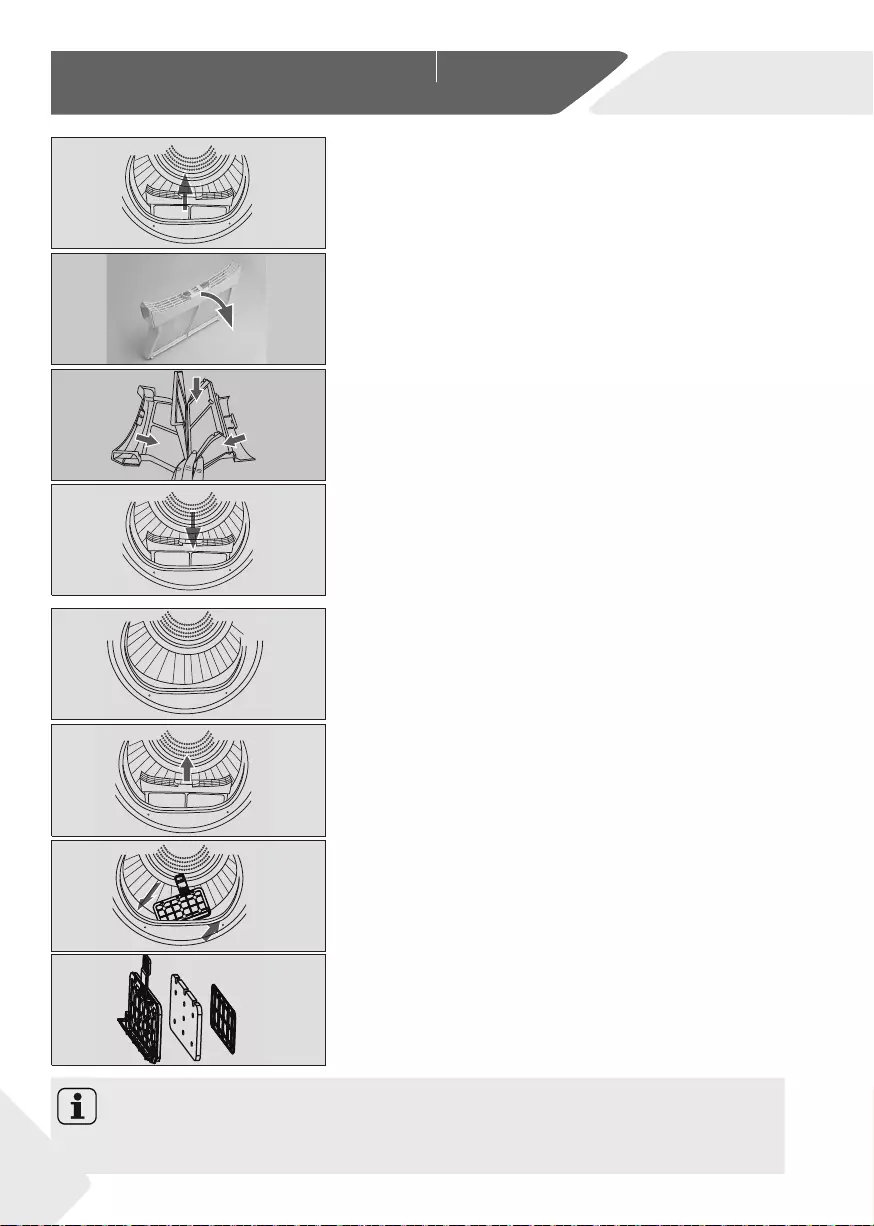
9.1 Lint fi lter cleaning
Clean the lint fi lter after each dry cycle.
1. Remove the lint fi lter from the drum (Fig. 9—1).
2. Open up the lint fi lter (Fig. 9—2).
3. Clean the lint fi lter form any lint residuals (Fig. 9—3).
4. Reinstall the cleaned lint fi lter in the tumble dryer
(Fig. 9-4).
9.2 Condenser fi lter cleaning
Clean the lint fi lter after each dry cycle.
1. Open the door.
2. Pull out the lint fi lter from its housing (Fig. 9—6).
3. Pull out the condenser fi lter from the air duct (Fig.
9-7).
4. Remove the sponge and clean the fi lter screen
form any residuals (Fig. 9—8).
5. Reinstall the sponge to the condenser fi lter.
Notice
If the lint / the condenser fi lter is very dirty, it can be cleaned under running water.
Let it dry thoroughly before use.
9-1
9-2
9-3
9-4
9-5
9-6
9-7
9-8
EN 9-Care and cleaning
21
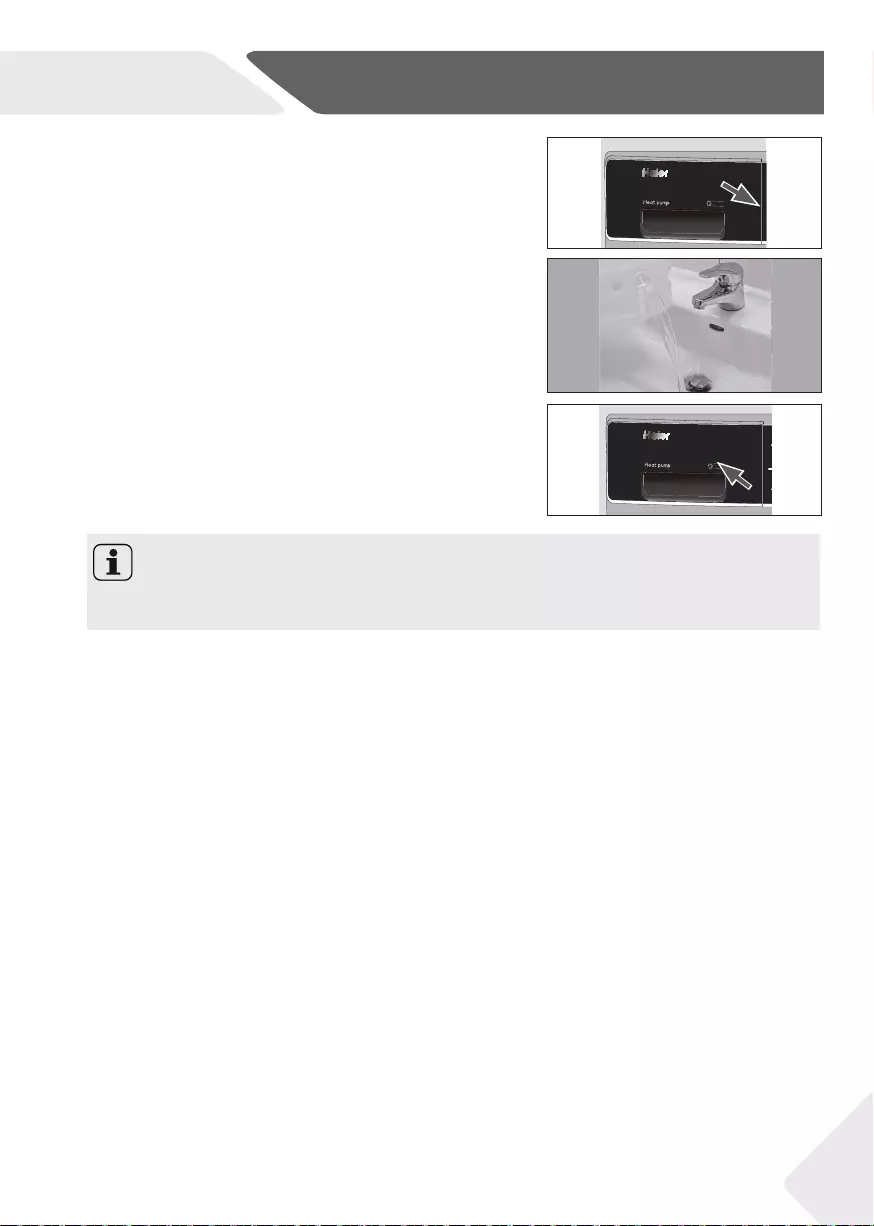
9.3 Empty the water tank
During operation, steam condenses to water which is
collected in the water tank. Empty the water tank after
each drying cycle.
1. Pull out the water tank from its housing (Fig. 9—9).
2. Empty the water tank (Fig. 9—10).
3. Reinstall the water tank to the tumble dryer (Fig.
9-11).
Notice
Do not use the water for any kind of drinking or food processing.
kg
9A
++
kg
9
++
A
i-REFRESH
ry Le vel
Delay
Wrink le F ree
Te mp.
Ba byca re Quick Dr y
ix
Cotto n
Duvet
Synt hetics T owe l Warm U p
Shir t
Wool T ime r
Bulk y
elic ate Spor ts
Childl ock i-Re fres h
kg
9A
++
kg
9
++
A
i-REFRESH
9-9
9-10
9-11
9.4 Tumble dryer
Wipe the outside of the tumble dryer and the control panel with a damp cloth. Do
not use any organic solvent or corrosive agent to avoid damage to the device.
9.5 Drum
After some operation time, fabric care agents or calcium contained in the water
can form an almost invisble fi lm on the inside of the drum. Use a damp cloth and
some detergent to remove it. Do not use any organic solvent or corrosive agent
to avoid damage to the device.
9.5 Evaporator
If the evaporator behind the condenser fi lter is dirty, it can be cleaned by use of
a vacuum cleaner. Make sure not to damage the evaporator while cleaning it.
EN
10-Troubleshooting
22
Many occurring problems could be solved by yourself without specifi c expertise. In case
of a problem please check all shown possibilities and follow below instructions before you
contact an after sales service. See CUSTOMER SERVICE.
WARNING!
▶Before maintenance, deactivate the appliance and disconnect the mains plug from
the mains socket.
▶Electrical equipment should be serviced only by qualifi ed electrical experts, because
improper repairs can cause considerable consequential damages.
▶A damaged power cable should only be replaced by the manufacturer, its service
agent or similarly qualifi ed persons in order to avoid a hazard.
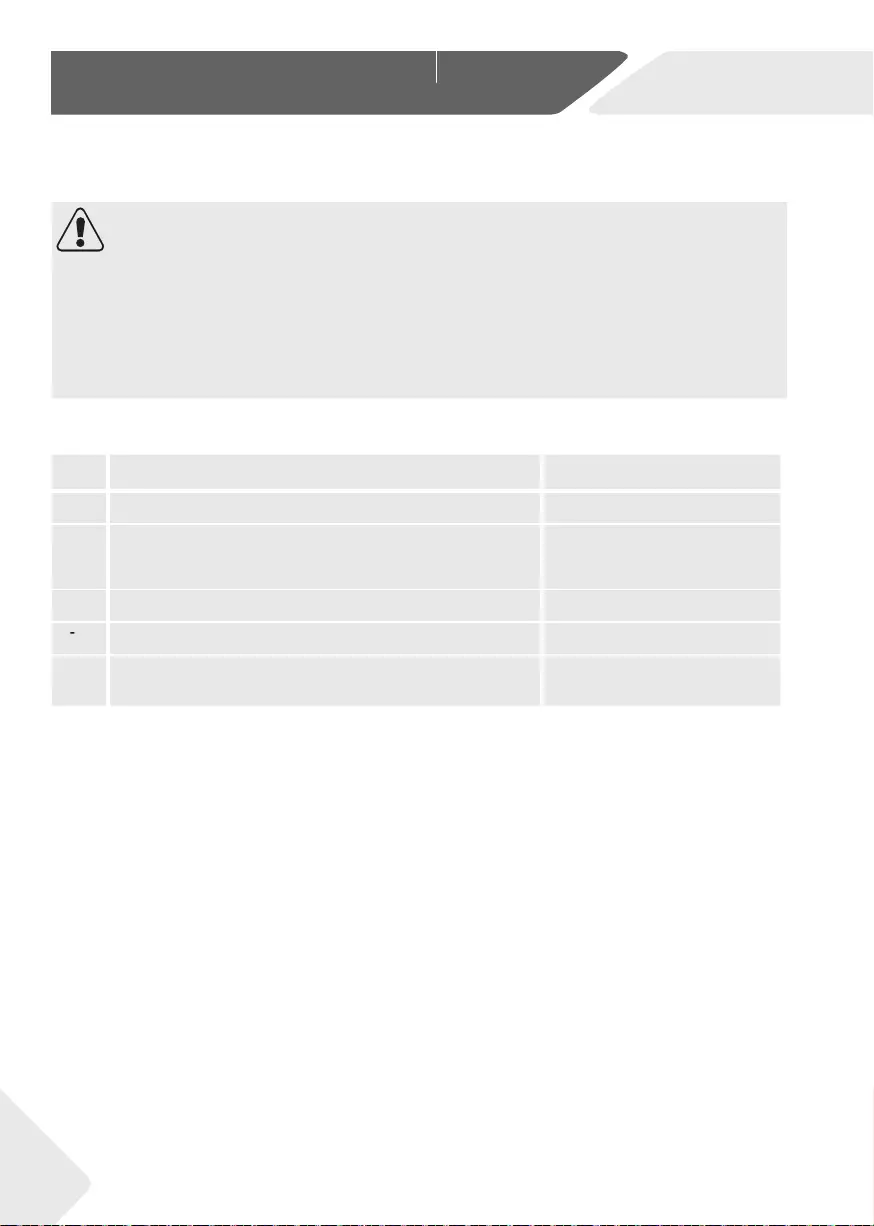
Troubleshooting with display code
Code Cause Solution
Drain pump error. Contact the customer service.
The condenser thermal sensor is open-circuited or
short-circuited.
Contact the customer service.
Temperature of the laundry in the drum does not change. Contact the customer service.
Communication failure between PCB and display. Contact the customer service.
Temperature is too low.
Use the dryer when air tem-
perature is higher than 5 °C.
If the error codes reappear even after the taken measures, switch off the appliance,
disconnect the power supply and contact the customer service.

EN 10-Troubleshooting
23
Troubleshooting without display-codes
Problem Possible cause Possible solution
Tumble dryer
fails to operate.
• Poor connection to the power
supply.
• Power failure.
• No drying program is set.
• Device has not been switched
on.
• The water tank is full.
• The door is not closed properly.
• Check connection to the pow-
er supply.
• Check the power supply.
• Set a drying program.
• Switch the device on.
• Empty the water tank.
• Close the door properly.
Tumble dryer
fails to operate
and the display
shows .
• The laundry has reached the
dry level defi ned by the pro-
gramme?
• There is no laundry in the drum?
• Check if the program setting
is appropriate.
• Check if there is laundry in the
drum.
Drying time is
too long and
the results are
not satisfactory
• The programme setting is not
correct.
• The fi lter is clogged.
• The evaporator is blocked.
• The tumble dryer is overloaded.
• The laundry is too wet.
• The vent duct is blocked.
• Make sure the program is set
correctly.
• Clean the fi lter screen.
• Clean the evaporator.
• Reduce the amount of laun-
dry.
• Spin the laundry properly be-
fore drying.
• Check the vent duct and unblock
it.
Remaining time-
on the display—
stops or skips.
The remaining time will be adjus-
ted continuously based upon the
following factors:
• Type of laundy.
• Loaded amount.
• Moisture degree of the laundry.
• Ambient temperature.
The automatic adjustment is a
normal operation.
EN
11-Installation
24
11.1 Preparation
▶Remove all packaging material. While opening the package, water drops may be
seen. This normal phenomenon results from water tests in the factory.
▶Remove all packaging material including the polystyrene base.
Notice
Dispose of the packaging in an environmentally friendly manner. For information refer-
ring current disposal routes, consult your retailer or the local authorities.
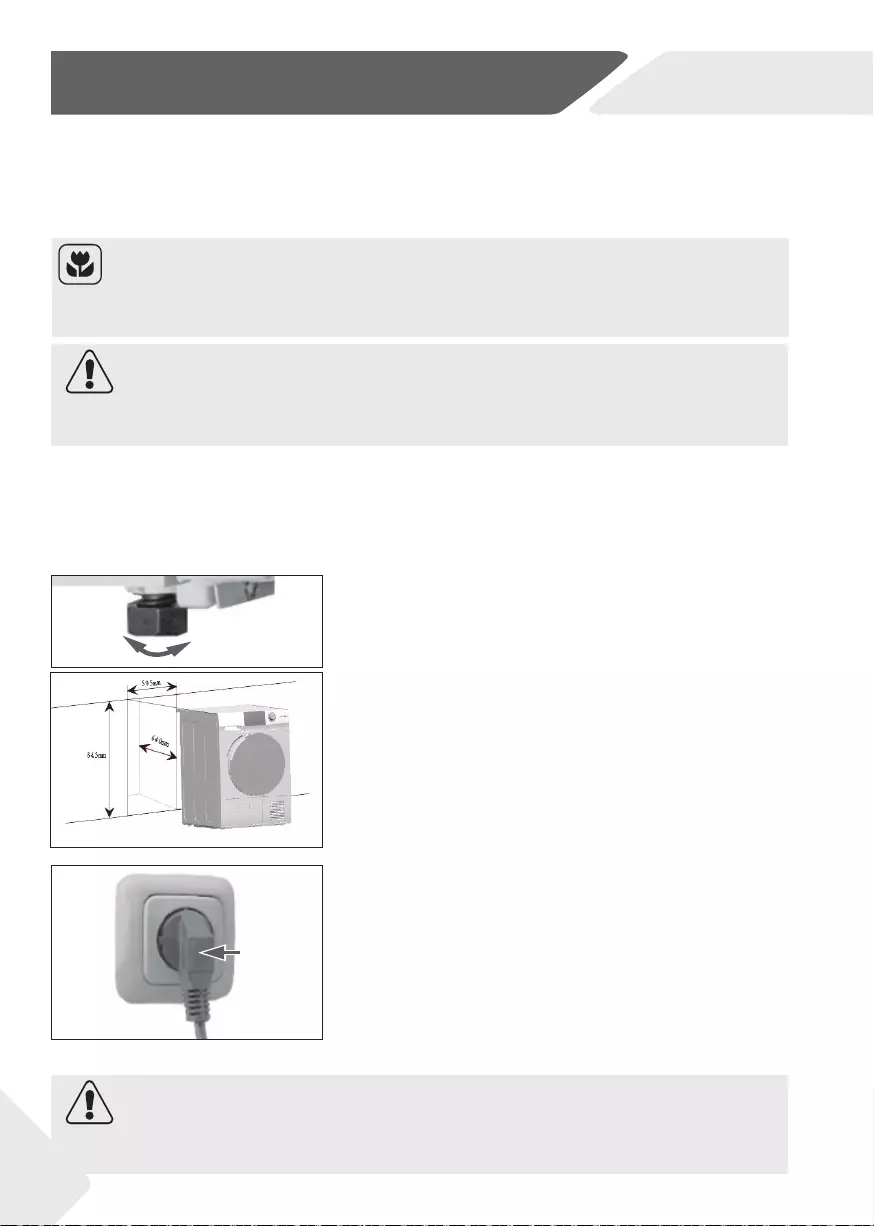
11.4 Installation under worktop
The dimensions of the recess should at least agree
with the dimensions (Fig. 11-2).
1. Put the appliance adjacent to the slot. Make sure that
all connections are easily accessible and functional.
2. Adjust accurately all feet to get a fi rm level position.
3. Install the appliance prudently into the recess.
4. Pay attention to suffi cient ventilation.
11.5 Electrical connection
Before each connection check if:
▶power supply, socket and fusing are appropriate
to the rating plate.
▶
the power socket is earthed and no multi-plug
or extension.
▶
the power plug and socket are strictly according.
▶
Only UK: The UK plug meets BS1363A standard
Put the plug into the socket. (Fig. 11-3).
WARNING!
If the supply cord is damaged, it must be replaced by the service agent (see warranty
card) in order to avoid a hazard!
WARNING!
Following transportation and installation, you MUST leave the dryer to stand for two
hours before use.
11.2 Transport and waiting time
Transport the appliance in horizontal position only. To the maintenance-free lubrication
oil is located in the capsule of the compressor. This oil can get through the closed pipe
system during slanting transport. Before connecting the appliance to the power supply
you have to wait 2 hours so that the oil runs back into the capsule.
11.3 Aligning the appliance
The appliance should be placed on a flat and solid sur—
face. Set the feet to the desired level (Fig. 11-1).
11-1
11-2
11-3
25
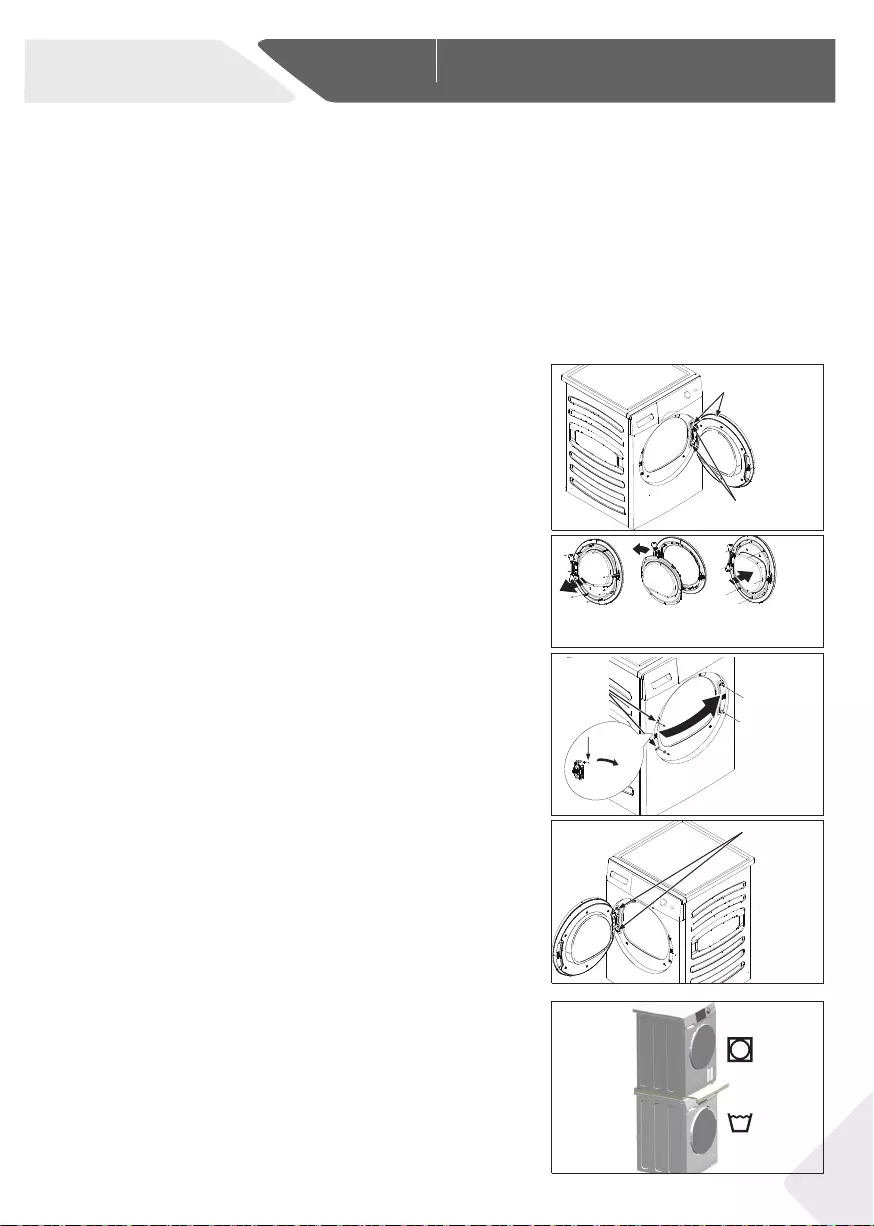
11.6 Reversing the door swing (Only for 8/9kg models)
▶Before you start, unplug the dryer from its electricaloutlet.
▶Handle parts carefully to avoid scratching paint.
▶Provide a non-scratching work surface for the doors.
▶Tools you will need: Phillips-head screwdriver.
▶Once you begin, do not move the cabinet until door-swing reversal is completed.
▶These instructions are for changing the hinges from the right side to the left side.
If you ever want to switch them back to the right side, follow these same instructions
and reverse all references to the left and right.
1. Remove the door assembly
Open the door. Remove the two screws holding the-
hinge/door assembly to the dryer. Carefully set the
hinge/door assembly aside (Fig. 11—4).
2. Remove, rotate and replacethe inner door
Remove the eight stickers and screws securing the
inner door to the outer door. Remove the inner door,
rotate it 180° and reinstall it into the outer door using
the same eight screws and stickers (Fig. 11-5).
3. Remove, rotate and replace the door lock & strike
plate
Remove the two screws holding the strike plate, and
then remove one screw of the door lock, push down
and take out the lock rotated 180° and install it on the
opposite side. the same eight screws and stickers (Fig.
11-6).
4. Rotate and replace the hinge/door assembly
Remove the two screws holding the strike plate, and
then remove one screw of the door lock, push down
and take out the lock rotated 180° and install it on the
opposite side. the same eight screws and stickers (Fig.
11-7).
11.7 Wash-dryer stack
The arrangement to a space saving wash-dryer stack
is possible (Fig. 11-8). Not every washing machine is
suitable for this purpose. Information, as well as the
corresponding mounting kit are available via your local
dealer.
The mounting instructions supplied with the kit care-
fully inform about the installation steps.
Hinge and Door
Assembly
Hold the Door and
Remove Hinge Screws
Replace
the Door lock
and then
Reinstall
Strike Plate
and Screws
1.Push
down
2.rotate an
angle then
can take
out
Remove eight
stickers and
screws
Remove the
Inner door and
rotated 180
o
Replace the
inner door with
eight screws and
stickers
screws and stickers.
11-4
11-5
11-6
11-7
11-8
EN 11-Installation
Wrinkle Free
Temp.
i—Re fresh
26
EN
11-Installation
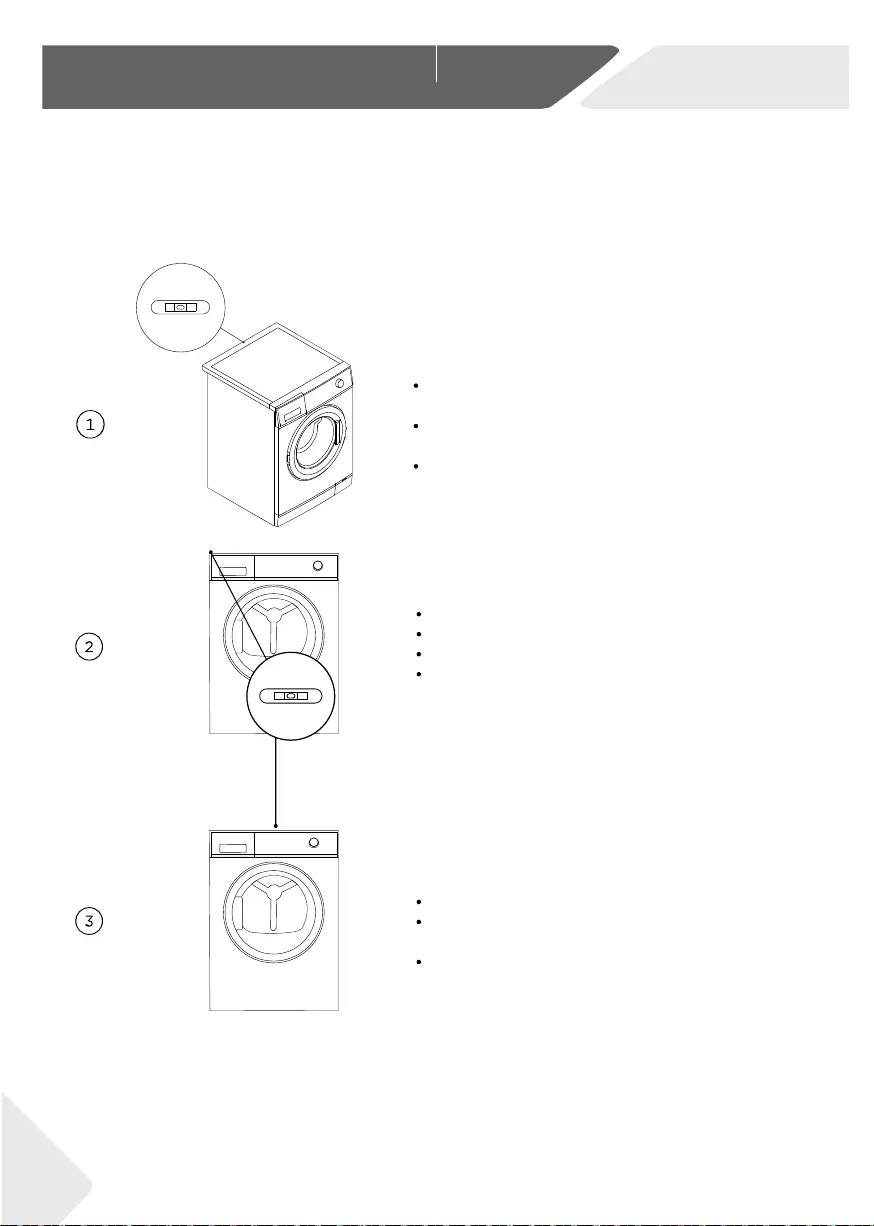
11.8 Levelling the dryer
Place the level at the centre
Level the dryer side to side:
back of the dryer.
level side to side.
Never sunscrew the feet completely from
their housings.
Adjust the rear feet until the dryer is
Level the dryer front to back:
Place the level on the left side.
Adjust the front left foot (wind down).
Repeat the above for the right foot.
There should be equal weight on
both front feet.
Re-check the dryer is level:
Ensure the dryer does not rock
Place the level at the centre front of the dryer.
in any direction.
If dryer is not level repeat the above steps.
After levelling, the corners of the dryer cabinet should be clear of the floor and the dryer.
must not rock in any direction.
Wrinkle Free
Temp.
i—Re fresh
27
EN 11-Installation
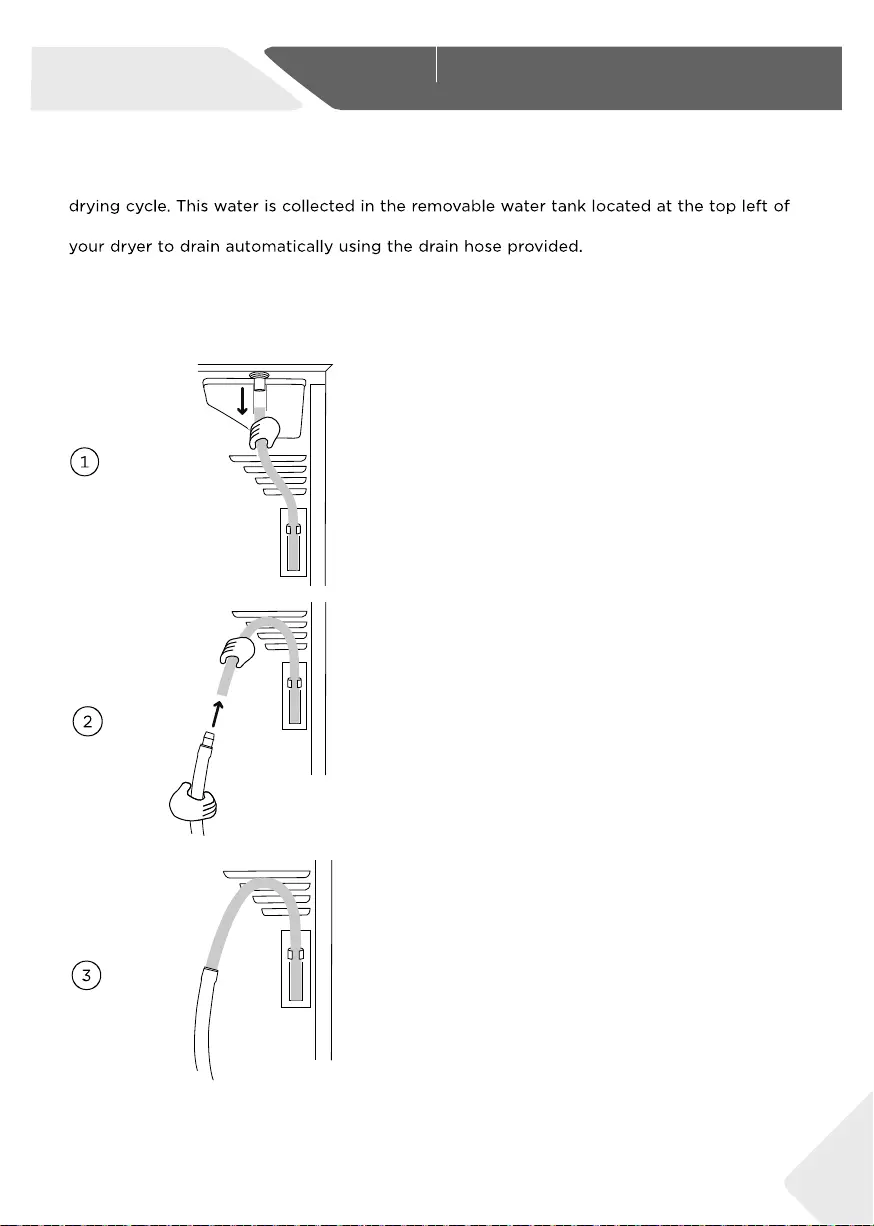
11.9 Draining
Remove the black hose from the connection
Uncoil the drain hose (included with your
at the back of the dryer.
dryer) and connect it to the black hose.
Place the other end of the drain hose into a
tub or standpipe.
EN
12-Technical data
28
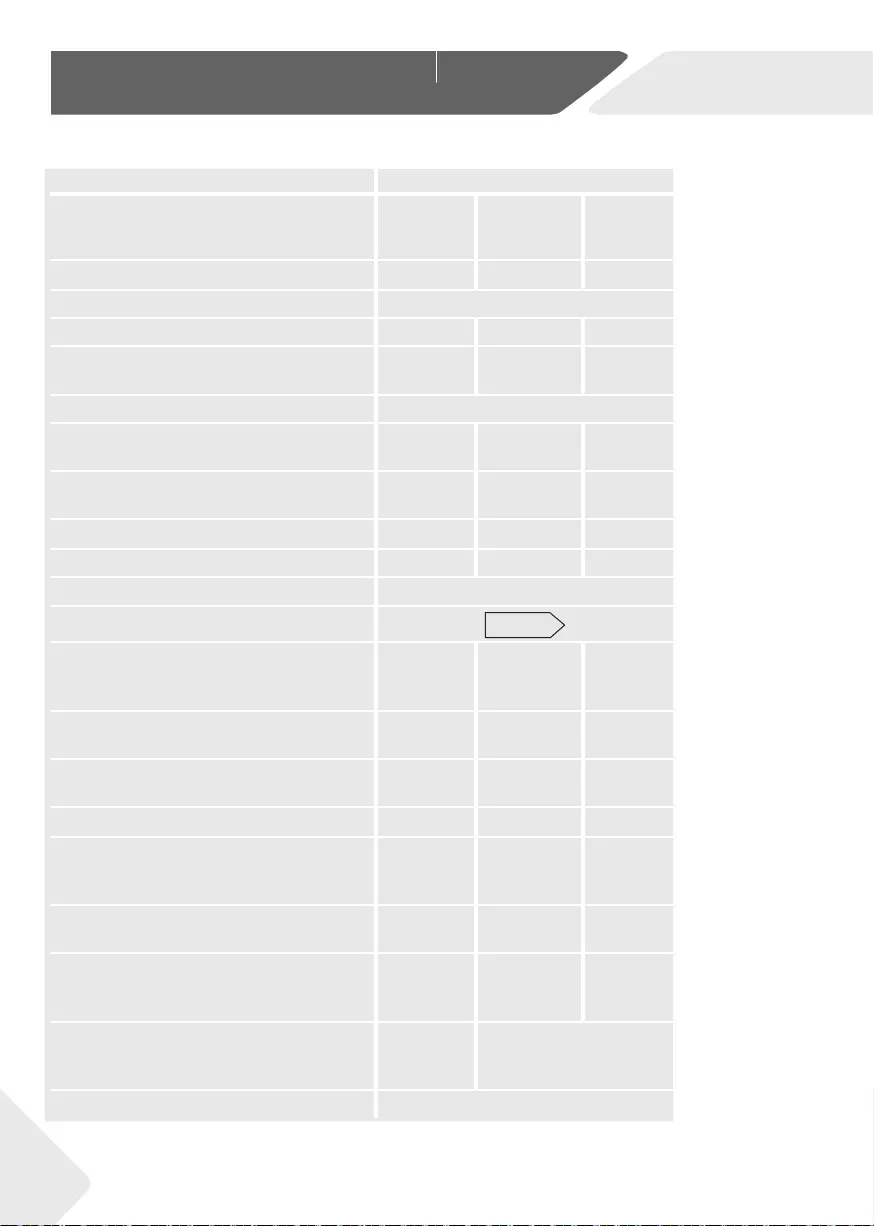
Productfi che (acc. to EU 392/2012)
Trade mark Haier
Model identifi er HD90-A2959 HD80-A3959 HD90 A3959
HD90-A3959S
Rated capacity (kg) 98 9
Kind of tumble drier Condenser
Energy effi ciency class A++ A+++ A+++
Weighted Annual Energy Consumption
(AE
c
in kWh/year
) 1) 252 175 193
Tumble dryer with or without automatic with automatic
Energy consumption of the standard cotton
programme 3) at full load (kWh/cycle) 2.04 1.43 1.58
Energy consumption of the standard cotton
programme 3) at partial load (kWh/cycle) 1.16 0.85 0.93
Power consumption of the off -mode (W) 0.64 0.1 0.1
Power consumption of the left-on mode (W) 0.72 1.19 1.19
Duration of the „left-on mode“ (min) 2) 40
Standard drying programme 3) Cotton
Weighted programme time of the stand-
ard drying programme 3) at full and partial
load (min)
180 215 243
Programme time of the standard cotton
programme 3) at full load (min) 230 273 298
Programme time of the standard cotton
programme 3) at partial load (min) 140 168 182
Condensation effi ciency class 4) BB B
Weighted condensation effi ciency for the
standard cotton programme 3) at full and
partial load (%)
80.5 82 82
Average condensation effi ciency of the
standard cotton programme 3) at full load 81 81 81
Average condensation effi ciency of the
standard cotton programme 3) at partial
load
81 83 83
Weighted sound power level of the
standard cotton programme 3) at full load
(dB)
66
Built-in or freestanding Freestanding/ built under
67
HD90-A2959S
EN 12-Technical data
29
Power supply (refer to rating plate) — voltage / current / input 550 W
Permissible ambient temperature 5°C to 35°C
Fluorinated greenhouse gas
Volume
GWP
Tonne(s) of CO2 equivalent
HFC-134a
0.26 kg
1430
0.6
Additional data
1) Based on 160 drying cycles of the standard cotton programme at full and partial load, and the
consumption of the low-power modes. Actual energy consumption per cycle will depend on how
the appliance is used.
2) In case there is a power management system.
3)
This programme used at full and partial load is the standard drying programme to which the infor—
mation in the label and the fi che relates to. This is the programme suitable for drying normal wet
cotton laundry and it is the most effi cient programme in terms of energy consumption for cotton.
4) Class G is the least effi cient and Class A is the most effi cient.
0.28 kg
(HD90)
(A+++)
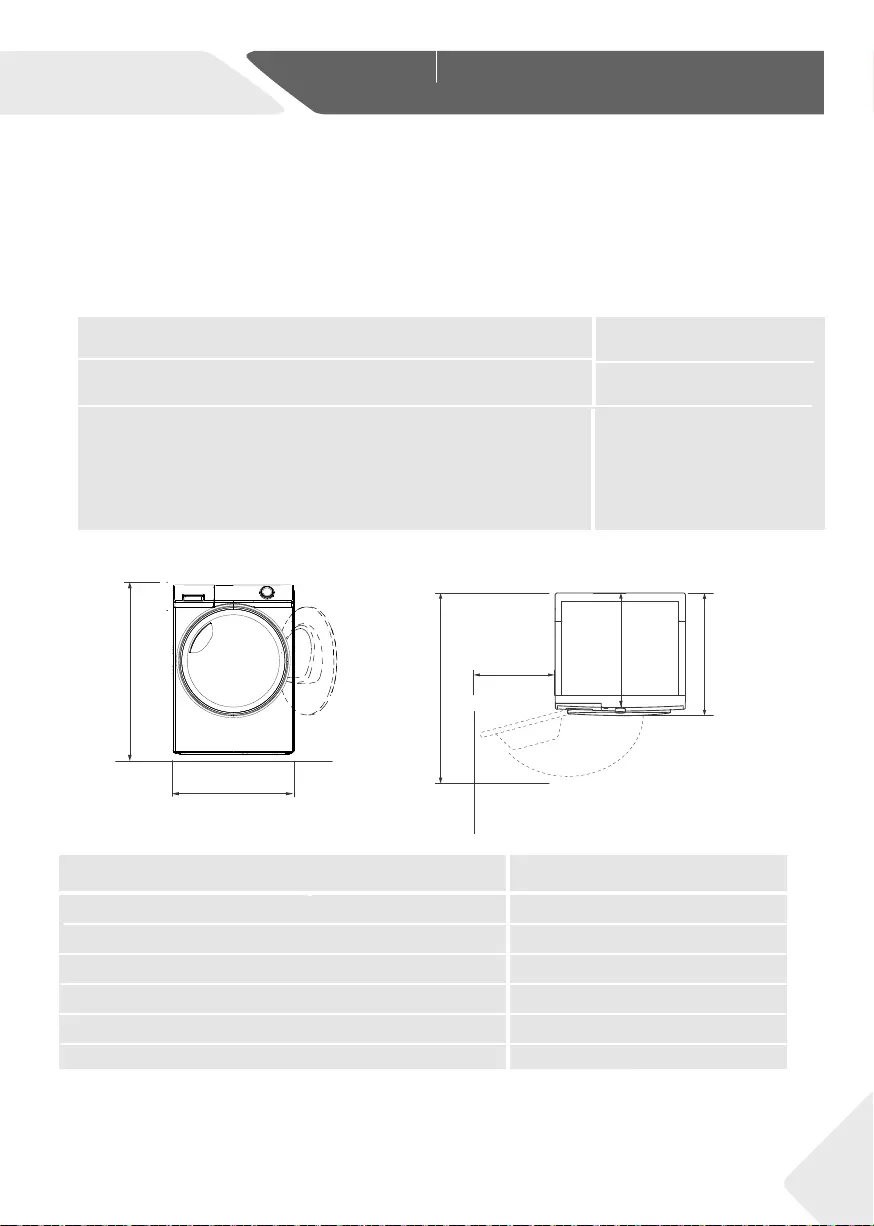
TOP VIEWL
LAW
FRONT VIEW
A
B
F
E
C D
HD90/ 80
PRODUCT DIMENSIONS
B Overall width of product mm
A
Overall height of product mm
C Overall depth of product
Overall depth of product mm
(To main control board size) mm
D
Depth of door open mm
E
FMinimum door clearance
to adjacent wall mm
Product dimensions
850
595
600
675
1135
250
Note: The exact height of your washer is dependent on how far the feet are extended from
the base of the machine. The space where you install your washer needs to be at least
40mm wider and 20mm deeper than its dimensions.
220–240 V~50 Hz/ 2,4A/
(A++)
/650W(HD80)
EN
12-Technical data
30
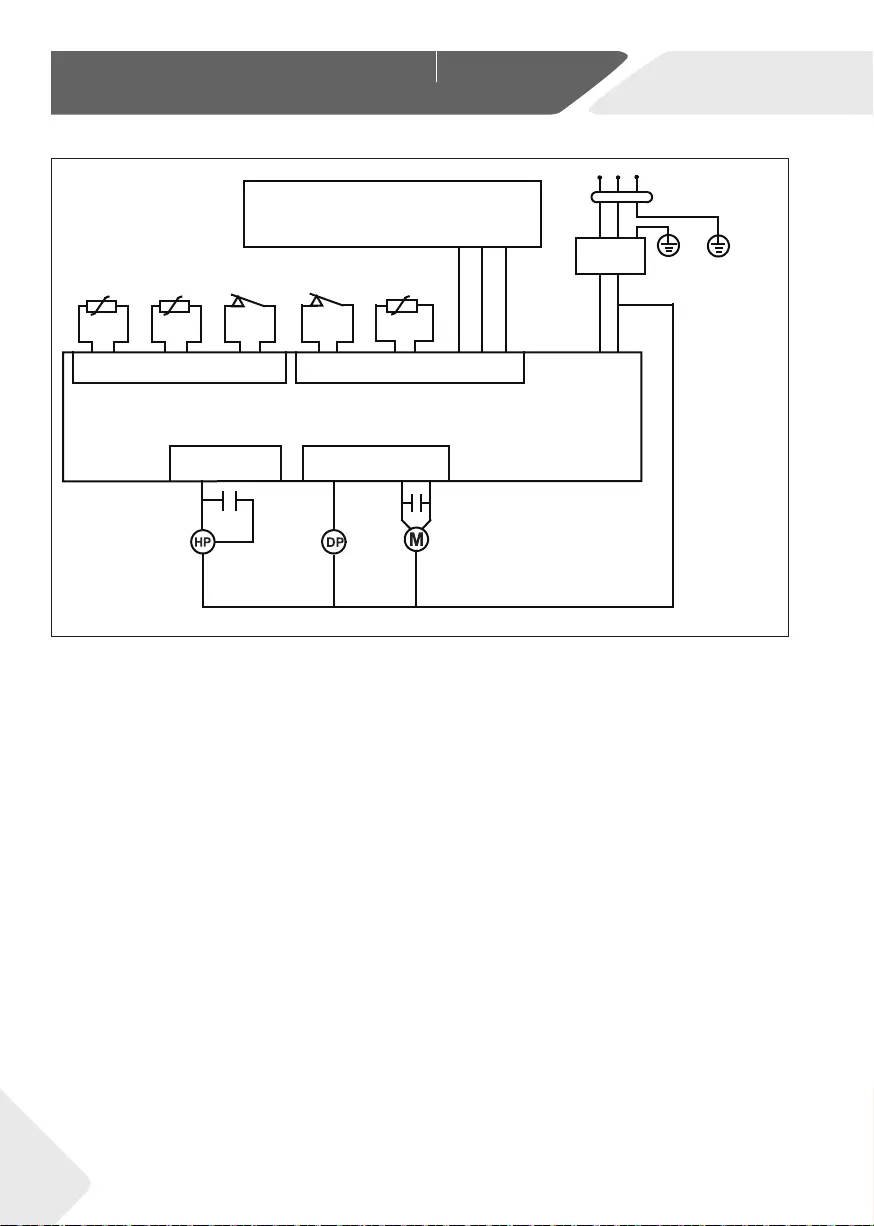
Electric circuit diagram HD90-A2959/HD90-A2959S:
.
NTC2
sensor
NTC3
sensor
Drain pump
Water switch
Display PCB
CN2-3
CN2-2
CN2-1
CN2-1
Motor
Power PCB
Heat pump
Door switch Humidity sensor
CN4-1
123456
Capacitor 12uf
Capacitor 8uf
4678 3 21
PE
PE
Interference
suppressor
CN1
CN2
CN3
CN4
2 4 32
EN 12-Technical data
31
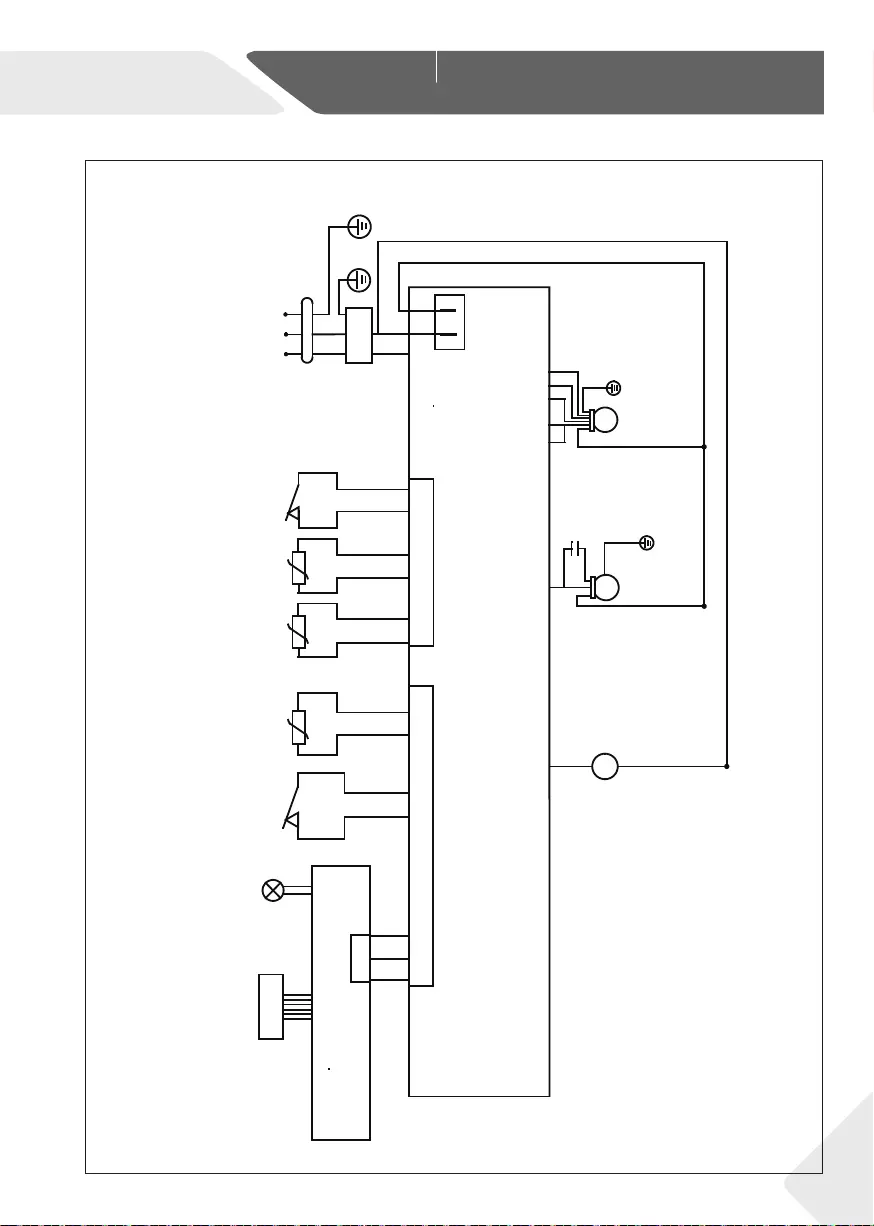
Electric circuit diagram HD80-A3959/HD90-A3959/HD90-A3959S:
.
LN
DP
CN2-2
CN4-5
CN2-1
HP
Lamp
Touch film
PE
NK5-3 NK5-4
PE
PE
PE
NTC2
sensor
NTC3
sensor Water switch
Door switch Humidity sensor
Display PCB
Power PCB
Drain pump Motor
Heat pump
Capacitor 12uf
Interference
suppressor
CN4-2
CN4-4
CN1
CN3
CN9
CN3
CN2
123
1234678123456
M
CN6-1
CN6-2
CN6-3
PE
EN
13- hOn
32
Note: Deviations
PPA eht fo ecafretni yalpsid eht dna snoitcnuf eht ,nOh fo setadpu tnatsnoc ot euD
13.1 General
This appliance is Wi-Fi enabled. With hOn App you can use your smartphone to control
the program.
WARNING!
Please observe the safety precautions in this user manual and make sure that these
are complied even when operating the appliance via the hOn APP whil e you are
away from home. You must also follow the instructions in the hOn.
13.2 Requirements
1. One wireless router (802.11b/g/n protocol) which supports only the frequency band
of 2.4 GHz. Length of Router SSID is 1-31 characters(including 1 and 31), and pas-
sword is 8-64 characters. Minimum length of password must be 8 characters. Rout-
er encryption methods include open, WPA-PSK and WPA2-PSK.
2. The App is available for devices running Android, Huawei or iOS, both for tablets and
for smartphones.
3. The appliance shall be installed in a position where it can receive a strong Wi-Fi signal.
Once the appliance has been correctly associated with the APP, if it’s not properly
connected to the wireless router, no Wi-Fi icon appears on the display
13.3 Download and installation of hOn APP:
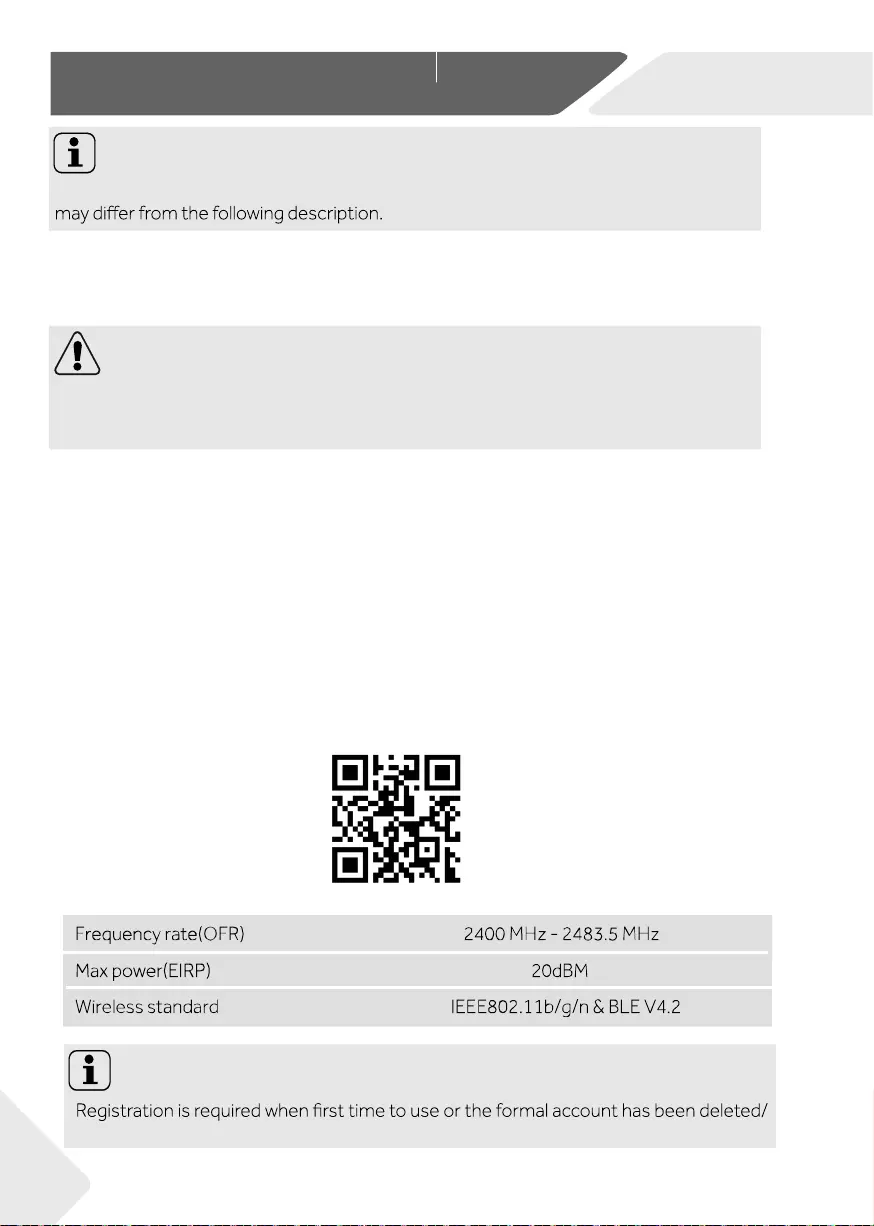
Download the hOn App on your device by framing the following QR code:
Note: Registration
closed. For further use, you need to enter user name and password when you log in.
or by the link: go.haier-europe.com/download-app
EN 13-hOn
33
Note: Wi-Fi network
It is not possible to connect the appliance to a public Wi-Fi network. It may cause
malfunction.
1. Connect the smartphone to the home Wi-Fi network you want to connect the product
to.
2. Open the App
3. Create the user profile (or log-in if it is already created previously)
4. Close the door
5. Pairing the appliance following the instructions on the device display.
Note: Use same Wi—Fi
Connect with your smartphone to the network you want to connect the product.
nable Remote Control
1. Check that the router is switched on and connected to the Internet.
2. Load the laundry and close the door.
3. Chose the Remote button.
4. Start the cycle using the app, control panel will be disabled.
5. Once the cycle has been completed, the remote control turns off.
6. After 2 minutes the appliance goes to off mode.
Note: Remote control expiration
isable Remote Control
1. To exit remote control while a cycle is running, press START/PAUSE button on the
control panel. The cycle will pause and Remote will blink.
2. To resume the cycle, close the door and press START/PAUSE button. The remote
control will be reactivated and Remote will be fixed.
3. Control the appliance using the app.
End of Cycle Remote Control On
1. At the end of the cycle, the remote control will deactivate.
2. After 2 minutes the appliance will automatically switch off.
Once the remote control is activated, if the end user doesn’t start any cycle from app in
10 minutes, the appliance will go to Networked Delay Start Mode, and keeps remote
control up to 24 hours, then shut off.
13.4 Reg istration and Ap p Pairing
13.5 E
13.6 D
13.7
With
EN
13- hOn
34
1. Chose the Remote button.
Follow this procedure only if you are going to sell your dryer.
13.8 Network c redential c ancellation

We recommend our Haier Customer Service and the use of original spare parts.
If you have a problem with your appliance, please fi rst check section TROUBLESHOOTING.
If you cannot fi nd a solution there, please contact
▶your local dealer or
▶the Service & Support area at www.haier.com where you can fi nd telephone numbers
and FAQs and where you can activate the service claim.
To contact our Service, ensure that you have the following data available.
The information can be found on the rating plate.
Model ____________________ Serial No. _____________________
Also check the Warranty Card supplied with the product in case of warranty.
For general business enquiries please fi nd below our addresses in Europe:
European Haier addresses
Country* Postal address Country* Postal address
Italy
Haier Europe Trading SRL
Via De Cristoforis, 12
21100 Verese
ITALY
France
Haier France SAS
53 Boulevard Ornano –
Pleyad 3
93200 Saint Denis
FRANCE
Spain
Portugal
Haier Iberia SL
Pg. Garcia Faria, 49-51
08019 Barcelona
SPAIN
Belgium-FR
Belgium-NL
Netherlands
Luxembourg
Haier Benelux SA
Anderlecht
Route de Lennik 451
BELGIUM
Germany
Austria
Haier Deutschland GmbH
Konrad-Zuse-Platz 6
81829 München
GERMANY
Poland
Czechia
Hungary
Greece
Romania
Russia
Haier Poland Sp. zo.o.
Al. Jerozolimskie 181B
02-222 Warszawa
POLAND
United
Kingdom
Haier Appliances UK Co.Ltd.
302 Bridgewater Place
Birchwood Park
Warrington
*For more information please refer to www.haier.com
WA3 6x
EN 14-Customer service
35

HD90-A2959/HD90-A2959S/HD90-A3959/HD80-A3959/HD90-A3959S
Код: 151056
87 200
рублей
Бесплатная доставка
по Красноярску
?
под заказ
(7-14 дней)
Новости интернет-магазина «Лаукар»:
Дополнительная информация в категории Сушильная машина:
В интернет-магазине бытовой техники «Лаукар» Вы можете скачать инструкцию к товару Сушильная машина Haier HD90-A2959 White совершенно бесплатно.
Все инструкции, представленные на сайте интернет-магазина бытовой техники «Лаукар», предоставляются производителем товара.
Перед началом использования товара рекомендуем Вам ознакомиться с инструкцией по применению.
Для того чтобы скачать инструкцию, Вам необходимо нажать на ссылку «скачать инструкцию», расположенную ниже, а в случае, если ссылки нет,
Вы можете попробовать обратиться к данной странице позднее,
возможно специалисты интернет-магазина бытовой техники «Лаукар» еще не успели загрузить для скачивания инструкцию к товару:
Сушильная машина Haier HD90-A2959 White.

Фирма-производитель оставляет за собой право на внесение изменений в конструкцию, дизайн и комплектацию товара: Сушильная машина Haier HD90-A2959 White. Пожалуйста, сверяйте информацию о товаре с информацией на
официальном сайте компании производителя.
-
Загрузка 9 кг
-
Тепловой насос
-
Четырехслойный фильтр
-
Антиаллергенная опция
Доставим завтра, 24 апреля
Подробнее о модели
Характеристики
Отзывы
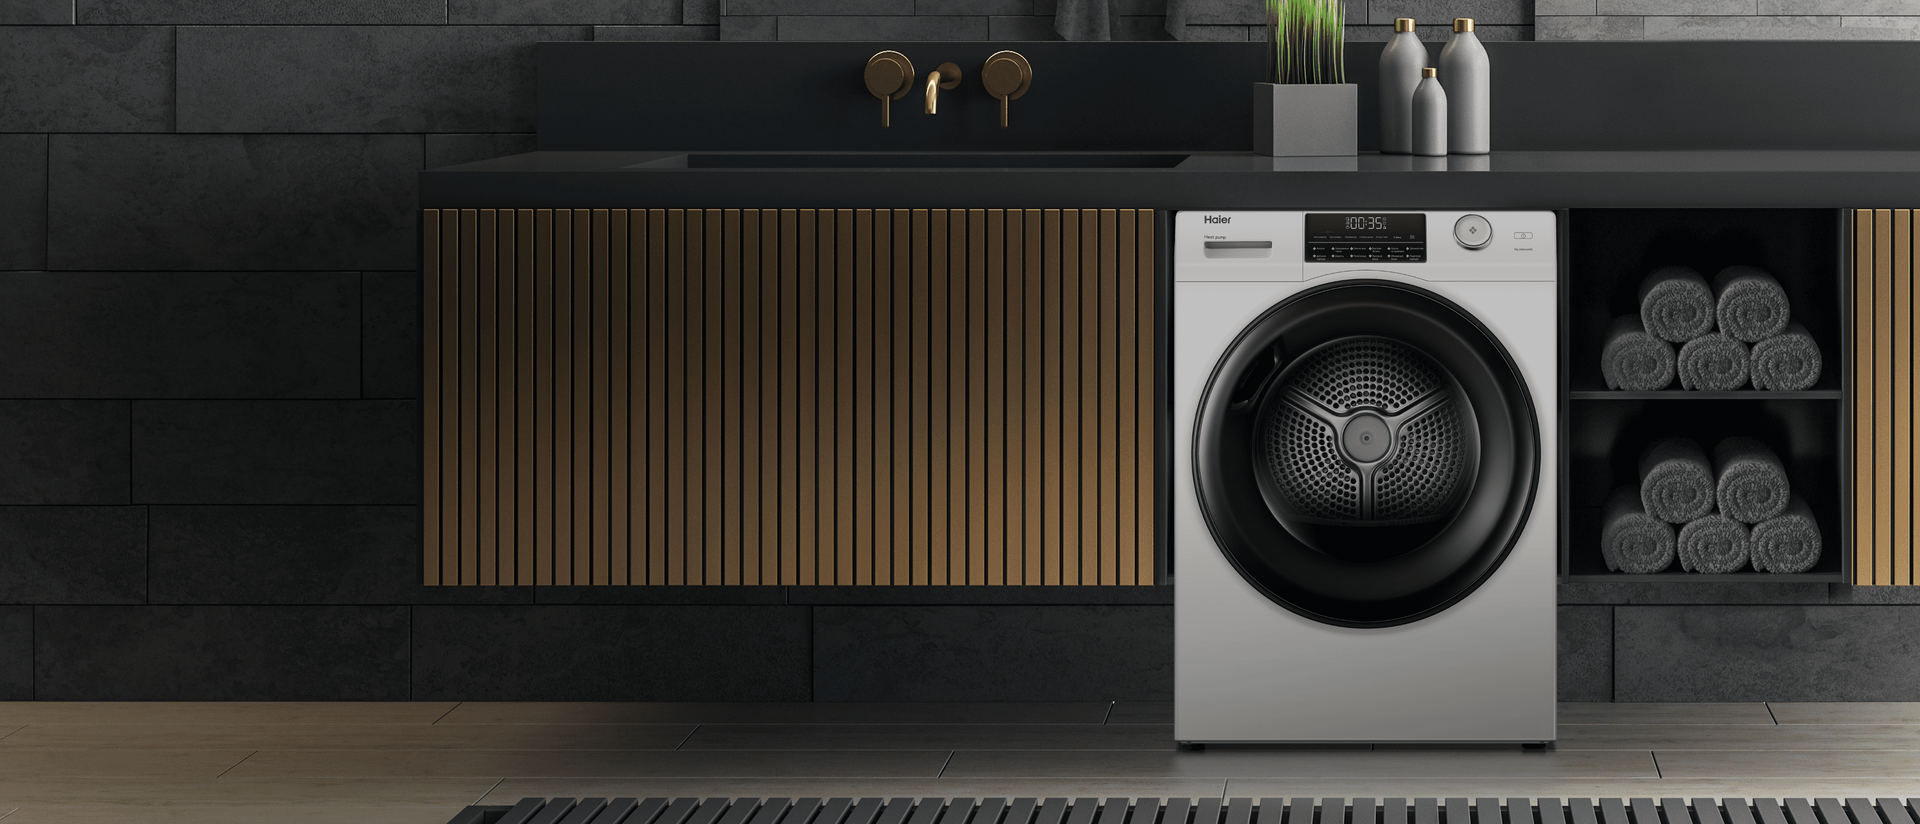
Технология теплового насоса
Благодаря замкнутой системе теплообмена машина потребляет меньше электроэнергии, что позволяет экономить.
Программа подогрева одежды
На программе «Подогрев» машина сделает вещи теплыми. Положите одежду в сушильную машину перед выходом на улицу зимой.
3 степени сушки
«Под утюг», «Экстрасухая одежда» и «В шкаф». Выберите первую, если планируете гладить вещи утюгом, вторую, чтобы сразу надеть одежду, и третью, чтобы сложить в шкаф.
Технология теплового насоса
сокращает затраты на электричество
4-х слойный фильтр
соберет мелкие частицы пыли, ворс, пух, пыльцу
Антиаллергенная опция
эффективное удаление всех основных аллергенов
9 кг белья
большая вместимость

Четырехслойный фильтр
Собирает мелкие частицы пыли, ворс, пух и пыльцу растений. Фильтр удобно чистить — для этого достаньте его из передней части барабана и промойте проточной водой.
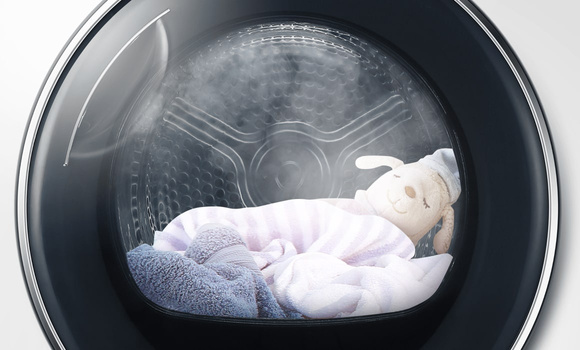
Антиаллергенная опция
Постоянная высокая температура около 60 ℃ в течение примерно 60 минут после окончания основного цикла сушки эффективно убивает бактерии и клещей глубоко в волокнах, обеспечивая гигиеническую защиту.
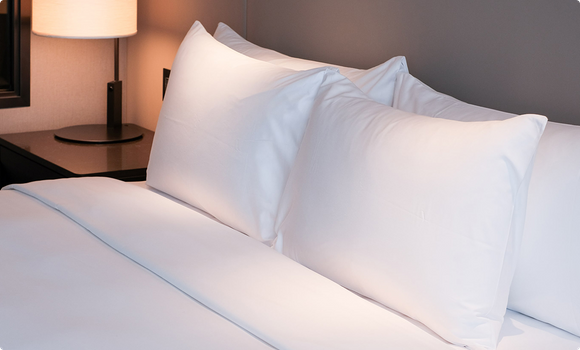
Функция антисминания
За счет реверсивного вращения барабана машинка равномерно просушивает и разглаживает вещи. На одежде не образуются складки.
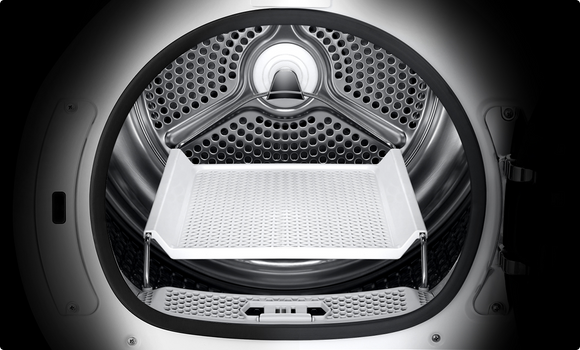
Полка для сушки
Для бережной и эффективной сушки головных уборов, обуви и детских игрушек предусмотрена специальная программа статичной сушки без вращения барабана.
Ваши любимые вещи будут равномерно высушены без потери формы или дефектов ткани.
Сушильная машина HD90-A2959 подготовит вашу одежду для дальнейшего хранения или носки. Выбирайте подходящий из трёх вариантов сушки «Экстра сухая», «Под утюг», в «Шкаф» или сделайте одежду тёплой с программой подогрева. 9-килограммовая загрузка позволит быстро высушить объёмные вещи, например, постельное белье, а специальная полка для сушки подойдёт для головных уборов, обуви и детских игрушек, равномерно высушив их без потери формы или дефектов ткани. Звуковой сигнал уведомит об окончании программы, а блокировка от детей сделает использование машинки безопасным для всех членов семьи. Для двигателя предусмотрена защита от перегрева, которая прекратит работу сушки по достижению пиковой нагрузки.
Благодаря технологии теплового насоса, сушильная машина потребляет меньше электроэнергии — её класс энергоэффективности А++.
Эргономичный дизайн передней панели обладает удобным и интуитивно понятным электронным управлением с кнопками выбора программ и поворотным селектором.
Характеристики
Звуковой сигнал
Да
Уровень шума цикла сушки дБ (А)
67
Объем барабана, л
112
Тип двигателя
Стандартный
Скорость вращения при сушке (об/мин)
55±2
Остаточная влажность
±3%
Температура сушки (с программным управлением)
50-65°C
Количество температурных уровней
4
Номинальное время сушки при полной загрузке
230 мин
Номинальное время сушки при половинной загрузке
140 мин
Отдельностоящая
Да
В колонну
Да
Общие спецификации
Загрузка белья, кг
9
Цвет
Белый
Класс энергоэффективности
A++
Тип дисплея
LED
Цвет дверцы
Черный
i-Time
Да
Управление
Электронное
Совместимость
Стиральная машина Haier HW90-BP14959
Тип хладагента
R134a
Размеры
Размеры (Ш х В х Г см)
59.5 x 84.5 x 60
Ширина х Высота х Глубина в упаковке (см)
66.8 x 89 x 74.8
Программы
Количество программ
12
Деликатная сушка
Да
Синтетика
Да
Смешанные ткани
Да
Шерсть
Да
Детская одежда
Да
Сушка по времени
Да
Объемные вещи
Да
Полотенца
Да
Пуховые вещи
Да
Подогрев одежды
Да
Быстрая 30 мин
Да
Хлопок
Да
Оборудование
Диаметр дверцы (см)
52.5
Передние/задние регулируемые ножки
Да, 4
Технология сушки
Тепловой насос
Тепловой насос
Да
Сенсор влажности
Да
Вращение барабана
С кратковременным реверсом
Корзина для сушки обуви
Да
Материал барабана
Нержавеющая сталь
Перенавешиваемая дверца
Нет
Набор для слива в дренаж
Да
Слив воды в контейнер
Да
Функции
Защита от перегрева двигателя
Да
Отложенный старт
Да
Блокировка от детей
Да
Ворсовый фильтр
Да
Предотвращение сминания
Да
Технические характеристики
Номинальное напряжение/Частота тока
220~240 В / 50 Гц
Потребляемая мощность/Максимальный ток потребления
550 Вт
Максимальное время сушки
360 мин
Энергопотребление при полной нагрузке
2.04 кВт⋅ч
Энергопотребление, частичная нагрузка
1.16 кВт⋅ч
Взвешенное годовое потребление энергии
252 кВт⋅ч
Вес
Вес нетто (кг)
50
Вес брутто (кг)
56
Перейти к контенту

Русские электронные инструкции по эксплуатации
Постоянно обновляемый большой каталог документации по эксплуатации и использованию современных устройств и оборудования на русском языке. Бесплатное скачивание файлов.
Поиск:
Главная
♥ В закладки
Просмотр инструкции в pdf
Инструкция по эксплуатации сушильной машины Haier HD90-A2959S Silver.
Скачать инструкцию к сушильной машине Haier HD90-A2959S Silver (15,55 МБ)
Инструкции по эксплуатации сушильных машин Haier
« Инструкция к умным часам Xiaomi Watch S1 GL Black
» Инструкция к сушильной машине KUPPERSBUSCH TD 1940.0 U3 Titan Rock
Вам также может быть интересно

Инструкция к кондиционеру Haier HSU-18HTM03-R

Инструкция к холодильнику Haier A2F635CRMV

Инструкция к холодильнику Haier CEF537AWG

Инструкция к телевизору Haier LE43K6500TF

Инструкция к телевизору Haier LE43K6700UG

Инструкция к телевизору Haier Smart TV HX

Инструкция к кондиционеру Haier HSU-18HTM203R
Инструкция к смартфону Haier A1 Black
Добавить комментарий
Имя *
Email *
Сайт
Комментарий
Сохранить моё имя, email и адрес сайта в этом браузере для последующих моих комментариев.
- Добавить инструкцию
- Заказать инструкцию
- Политика конфиденциальности