
Скачать
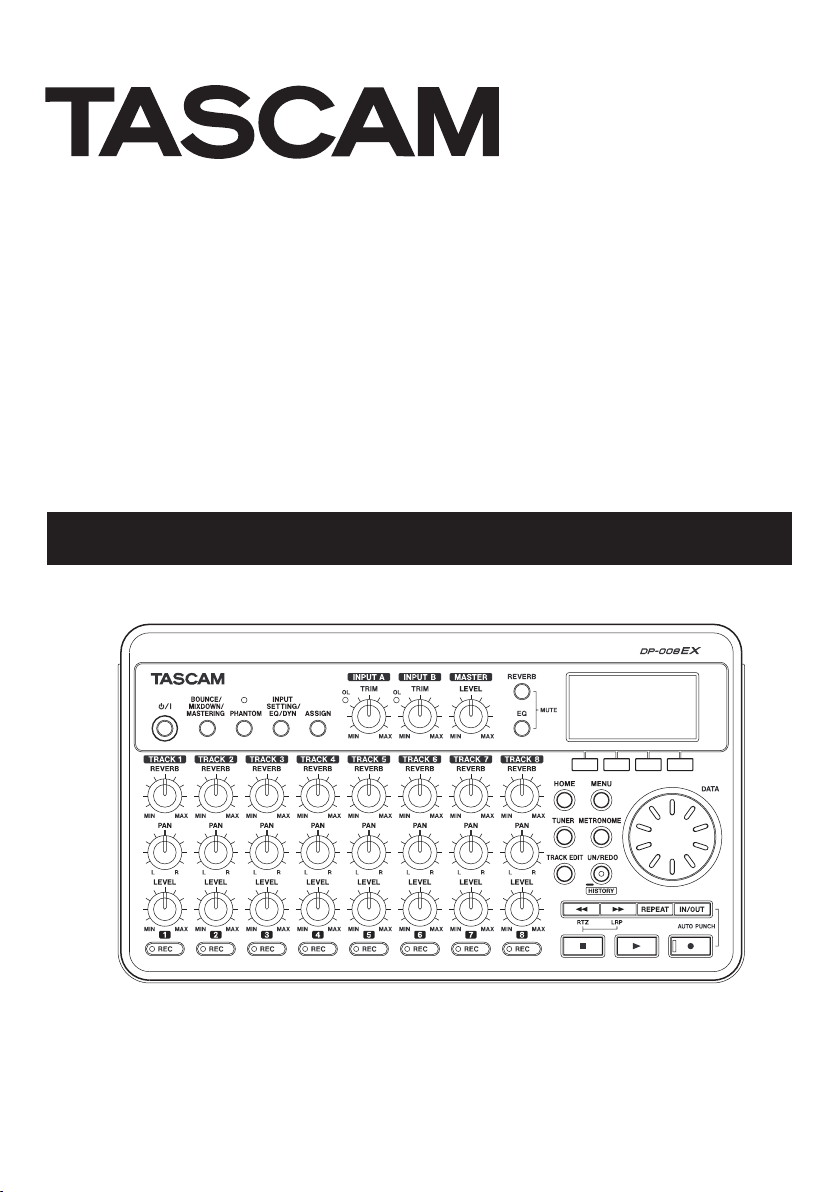
OWNER’S MANUAL
D01175820A
DP-008EX
Digital Multitrack Recorder
Хорошее руководство по эксплуатации
Законодательство обязывает продавца передать покупателю, вместе с товаром, руководство по эксплуатации Tascam DP-008EX. Отсутствие инструкции либо неправильная информация, переданная потребителю, составляют основание для рекламации в связи с несоответствием устройства с договором. В законодательстве допускается предоставлении руководства в другой, чем бумажная форме, что, в последнее время, часто используется, предоставляя графическую или электронную форму инструкции Tascam DP-008EX или обучающее видео для пользователей. Условием остается четкая и понятная форма.
Что такое руководство?
Слово происходит от латинского «instructio», тоесть привести в порядок. Следовательно в инструкции Tascam DP-008EX можно найти описание этапов поведения. Цель инструкции заключается в облегчении запуска, использования оборудования либо выполнения определенной деятельности. Инструкция является набором информации о предмете/услуге, подсказкой.
К сожалению немного пользователей находит время для чтения инструкций Tascam DP-008EX, и хорошая инструкция позволяет не только узнать ряд дополнительных функций приобретенного устройства, но и позволяет избежать возникновения большинства поломок.
Из чего должно состоять идеальное руководство по эксплуатации?
Прежде всего в инструкции Tascam DP-008EX должна находится:
— информация относительно технических данных устройства Tascam DP-008EX
— название производителя и год производства оборудования Tascam DP-008EX
— правила обслуживания, настройки и ухода за оборудованием Tascam DP-008EX
— знаки безопасности и сертификаты, подтверждающие соответствие стандартам
Почему мы не читаем инструкций?
Как правило из-за нехватки времени и уверенности в отдельных функциональностях приобретенных устройств. К сожалению само подсоединение и запуск Tascam DP-008EX это слишком мало. Инструкция заключает ряд отдельных указаний, касающихся функциональности, принципов безопасности, способов ухода (даже то, какие средства стоит использовать), возможных поломок Tascam DP-008EX и способов решения проблем, возникающих во время использования. И наконец то, в инструкции можно найти адресные данные сайта Tascam, в случае отсутствия эффективности предлагаемых решений. Сейчас очень большой популярностью пользуются инструкции в форме интересных анимаций или видео материалов, которое лучше, чем брошюра воспринимаются пользователем. Такой вид инструкции позволяет пользователю просмотреть весь фильм, не пропуская спецификацию и сложные технические описания Tascam DP-008EX, как это часто бывает в случае бумажной версии.
Почему стоит читать инструкции?
Прежде всего здесь мы найдем ответы касательно конструкции, возможностей устройства Tascam DP-008EX, использования отдельных аксессуаров и ряд информации, позволяющей вполне использовать все функции и упрощения.
После удачной покупки оборудования/устройства стоит посвятить несколько минут для ознакомления с каждой частью инструкции Tascam DP-008EX. Сейчас их старательно готовят или переводят, чтобы они были не только понятными для пользователя, но и чтобы выполняли свою основную информационно-поддерживающую функцию.
-
Инструкции по эксплуатации
1
Tascam DP-008EX инструкция по эксплуатации
(92 страницы)
- Языки:Английский
-
Тип:
PDF -
Размер:
7.4 MB
Просмотр
На NoDevice можно скачать инструкцию по эксплуатации для Tascam DP-008EX. Руководство пользователя необходимо для ознакомления с правилами установки и эксплуатации Tascam DP-008EX. Инструкции по использованию помогут правильно настроить Tascam DP-008EX, исправить ошибки и выявить неполадки.
Русский
- Bedienungsanleitung Tascam DP-008EX
- Tascam DP-008EX User Manual
- Manual Usuario Tascam DP-008EX
- Mode d’emploi Tascam DP-008EX
- Istruzioni Tascam DP-008EX
- инструкция Tascam DP-008EX
- Tascam DP-008EXの取扱説明書
- Handleiding Tascam DP-008EX
- Manual de uso Tascam DP-008EX
Вам нужна инструкция? Мы поможем Вам ее найти и сэкономить Ваше время.
- 92 stron
- 3.74 mb
Изделие Tascam DP-008EX, а также другие, которыми Вы пользуетесь ежедневно, наверняка вы получили в комплекте с инструкцией обслуживания. Из опыта наших пользователей мы знаем, что большинство из Вас не уделили этому особого внимания. Большая часть инструкций, сразу же после покупки попадает в корзину для мусора вместе с коробкой — это ошибка. Ознакомьтесь с информацией, касающейся инструкции Tascam DP-008EX, которая поможет Вам в будущем сэкономить нервы и избежать головной боли.
Важная подсказка — не забывайте хотя бы раз прочитать инструкцию Tascam DP-008EX
Если вы не хотите каждый раз читать информационные брошюры, касающиеся, тех или Tascam DP-008EX иных изделий, достаточно, прочитать их раз — сразу же после покупки устройства. Вы получите основное знания, касающиеся поддержания изделия Tascam DP-008EX в хорошем эксплуатационном состоянии, так, чтобы без проблем достигнуть его планируемого цикла работы. Затем инструкцию можно отложить на полку и вернуться к ней только в случае, если вы не уверены, правильно ли проводится техобслуживание изделия. Правильный уход является необходимым элементом Вашего удовольствия Tascam DP-008EX.
Раз в году пересмотрите шкафчик, в котором держите инструкции для всех устройств, — выбросите те, которыми вы уже не пользуетесься. Это поможет Вам сохранять порядок в своей домашней базе инструкций обслуживания.
Summary of Contents for Tascam DP-008EX
Что находится в инструкции Tascam DP-008EX? Почему стоит ее прочитать?
- Гарантия и подробности, касающиеся техобслуживания изделия
Хорошей идеей будет прикрепить чек к странице инструкции. Если что-то плохое случится во время использования Tascam DP-008EX, у вас будет комплект документов, необходимый для гарантийного ремонта. В этой части инструкции вы найдете информацию об авторизованных сервисных центрахTascam DP-008EX а также, как самостоятельно правильно ухаживать за оборудованием — так, чтобы не потерять гарантийных прав. - Указания по монтажу и Setup
Не терять нервов и времени на самостоятельную попытку установки и первого запуска изделия. Воспользуйтесь рекомендациями производителя Tascam DP-008EX чтобы правильно запустить изделие, без лишнего риска повреждения оборудования. - Информация, касающаяся дополнительных запчастей (входящих в комплект а также являющихся опцией)
Пересматривая эту часть документа вы сможете проверить, доставлен ли ваш Tascam DP-008EX с полним комплектом аксессуаров. Вы также сможете узнать, какие дополнительные запчасти или аксессуары для Tascam DP-008EX Вы сможете найти и докупить к своему устройству. - Troubleshooting
Самые частые проблемы, касающиеся Tascam DP-008EX и методы их решения. Это очень полезная часть руководства по обслуживанию — она позволит Вам сэкономить много времени на поиск решений. 90% проблем с Tascam DP-008EX повторяется у многих пользователей. - Требования, касающиеся питания и энергетический класс
Информация, касающаяся количества потребляемой энергии, а также рекомендации, касающиеся установки и питания Tascam DP-008EX. Прочитайте, чтобы оптимально пользоваться Tascam DP-008EX и не использовать большего количества ресурсов, нежели это необходимо для правильной работы изделия. - Специальные функции Tascam DP-008EX
Здесь вы можешь узнать, как персонализировать изделие Tascam DP-008EX. Вы узнаете, какие дополнительные функции могут помочь Вам удобно использовать продукт Tascam DP-008EX а также, какие функции Вашего устройства оптимальны для выполнения конкретной деятельности.
Как видите в инструкции вы найдете информацию, которая реально поможет Вам в использовании Вашего изделия. Стоит с ней ознакомиться, чтобы избежать разочарований, возникающих из более короткого, нежели предусматривалось, периода исправности изделия Tascam DP-008EX. Если все же вы не хотите копить инструкции в своем доме, наш сайт поможет Вам в этом — вы должны найти у нас руководство по обслуживанию большинства из своих устройств, а также Tascam DP-008EX.
Комментарии (0)
D01175820A
DP-008EX
Digital Multitrack Recorder
OWNER’S MANUAL

IMPORTANT SAFETY PRECAUTIONS
CAUTION: TO REDUCE THE RISK OF ELECTRIC SHOCK, DO
NOT REMOVE COVER (OR BACK). NO USER-SERVICEABLE
PARTS INSIDE. REFER SERVICING TO QUALIFIED SERVICE
PERSONNEL.
The lightning flash with arrowhead symbol, within
equilateral triangle, is intended to alert the user to the
presence of uninsulated “dangerous voltage” within the
product’s enclosure that may be of sufficient magnitude to
constitute a risk of electric shock to persons.
The exclamation point within an equilateral triangle is
intended to alert the user to the presence of important
operating and maintenance (servicing) instructions in the
literature accompanying the appliance.
8
For U.S.A
TO THE USER
This equipment has been tested and found to
comply with the limits for a Class B digital device,
pursuant to Part 15 of the FCC Rules. These limits are
designed to provide reasonable protection against
harmful interference in a residential installation.
This equipment generates, uses, and can radiate
radio frequency energy and, if not installed and
used in accordance with the instruction manual,
may cause harmful interference to radio communications. However, there is no guarantee that interference will not occur in a particular installation. If
this equipment does cause harmful interference to
radio or television reception, which can be determined by turning the equipment off and on, the
user is encouraged to try to correct the interference
by one or more of the following measures.
a) Reorient or relocate the receiving antenna.
b) Increase the separation between the
equipment and receiver.
c) Connect the equipment into an outlet on a
circuit different from that to which the receiver
is connected.
d) Consult the dealer or an experienced radio/TV
technician for help.
CAUTION
Changes or modifications to this equipment not
expressly approved by TEAC CORPORATION for
compliance could void the user’s authority to
operate this equipment.
Model Number : DP-008EX
Trade Name : TASCAM
Responsible party : TEAC AMERICA, INC.
Address : 7733 Telegraph Road,
Montebello, California, U.S.A.
Telephone number : 1-323-726-0303
This device complies with Part 15 of the FCC
Rules. Operation is subject to the following two
conditions: (1) this device may not cause harmful
interference, and (2) this device must accept any
interference received, including interference that
may cause undesired operation.
This appliance has a serial number located on the
rear panel. Please record the model number and
serial number and retain them for your records.
Model number
Serial number
8
For Canada
THIS CLASS B DIGITAL APPARATUS COMPLIES WITH
CANADIAN ICES-003.
CET APPAREIL NUMÉRIQUE DE LA CLASSE B EST
CONFORME À LA NORME NMB-003 DU CANADA.
Declaration of Conformity
TASCAM DP-008EX
2
IMPORTANT SAFETY INSTRUCTIONS
1 Read these instructions.
2 Keep these instructions.
3 Heed all warnings.
4 Follow all instructions.
5 Do not use this apparatus near water.
6 Clean only with dry cloth.
7 Do not block any ventilation openings. Install in
accordance with the manufacturer’s instructions.
8 Do not install near any heat sources such
as radiators, heat registers, stoves, or other
apparatus (including amplifiers) that produce
heat.
9 Do not defeat the safety purpose of the polarized
or grounding-type plug. A polarized plug has
two blades with one wider than the other. A
grounding type plug has two blades and a third
grounding prong. The wide blade or the third
prong are provided for your safety. If the provided
plug does not fit into your outlet, consult an
electrician for replacement of the obsolete outlet.
10 Protect the power cord from being walked on
or pinched particularly at plugs, convenience
receptacles, and the point where they exit from
the apparatus.
11 Only use attachments/accessories specified by
the manufacturer.
12 Use only with the cart, stand, tripod, bracket, or
table specified by the manufacturer, or sold with
the apparatus. When a cart is used, use caution
when moving the cart/apparatus combination to
avoid injury from tip-over.
The apparatus draws nominal non-operating
•
power from the AC outlet with its POWER or
STANDBY/ON switch not in the ON position.
The mains plug is used as the disconnect device,
•
the disconnect device shall remain readily
operable.
Caution should be taken when using earphones or
•
headphones with the product because excessive
sound pressure (volume) from earphones or
headphones can cause hearing loss.
If you are experiencing problems with this product,
•
contact TEAC for a service referral. Do not use the
product until it has been repaired.
CAUTION
Do not expose this apparatus to drips or splashes.
•
Do not place any objects filled with liquids, such
•
as vases, on the apparatus.
Do not install this apparatus in a confined space
•
such as a book case or similar unit.
The apparatus should be located close enough
•
to the AC outlet so that you can easily grasp the
power cord plug at any time.
If the product uses batteries (including a battery
•
pack or installed batteries), they should not be
exposed to sunshine, fire or excessive heat.
WARNING
Products with Class construction are equipped with
a power supply cord that has a grounding plug. The
cord of such a product must be plugged into an AC
outlet that has a protective grounding connection.
13 Unplug this apparatus during lightning storms or
when unused for long periods of time.
14 Refer all servicing to qualified service personnel.
Servicing is required when the apparatus has
been damaged in any way, such as power-supply
cord or plug is damaged, liquid has been spilled
or objects have fallen into the apparatus, the
apparatus has been exposed to rain or moisture,
does not operate normally, or has been dropped.
TASCAM DP-008EX
3
Safety Information
8
For European Customers
Disposal of electrical and electronic equipment
(a) All electrical and electronic equipment should
be disposed of separately from the municipal
waste stream via designated collection facilities
appointed by the government or the local
authorities.
(b) By disposing of the electrical and electronic
equipment correctly, you will help save valuable
resources and prevent any potential negative
effects on human health and the environment.
(c) Improper disposal of waste equipment can
have serious effects on the environment and
human health as a result of the presence of
hazardous substances in electrical and electronic
equipment.
(d) The crossed out wheeled dust bin symbol
indicates that electrical and electronic equipment
must be collected and disposed of separately
from household waste.
(e) The return and collection systems are available
to the end users. For more detailed information
about disposal of old electrical and electronic
equipment, please contact your city office, waste
disposal service or the shop where you purchased
the equipment.
Disposal of batteries and/or accumulators
(a) Waste batteries and/or accumulators should
be disposed of separately from the municipal
waste stream via designated collection facilities
appointed by the government or the local
authorities.
(b) By disposing of waste batteries and/or accumu-
lators correctly, you will help save valuable
resources and prevent any potential negative
effects on human health and the environment.
(c) Improper disposal of waste batteries and/or
accumulators can have serious effects on the
environment and human health as a result of the
presence of hazardous substances in batteries
and/or accumulators.
(d) The crossed out wheeled dust bin symbol
indicates that batteries and/or accumulators
must be collected and disposed of separately
from household waste.
If the battery or accumulator contains more than
the specified values of lead (Pb), mercury (Hg),
and/or cadmium (Cd) defined in the Battery
Directive (2006/66/EC), then the chemical
symbols for lead (Pb), mercury (Hg) and/or
cadmium (Cd) will be indicated beneath the
crossed out wheeled dust bin symbol.
TASCAM DP-008EX
4
(e) The return and collection systems are available
to the end users. For more detailed information
about disposal of waste batteries and/or accumulators, please contact your city office, waste
disposal service or the shop where you purchased
them.

CAUTIONS ABOUT BATTERIES
This product uses batteries. Misuse of batteries could
cause a leak, rupture or other trouble. Always abide
by the following precautions when using batteries.
Never recharge non-rechargeable batteries. The
•
batteries could rupture or leak, causing fire or
injury.
When installing batteries, pay attention to the
•
polarity indications (plus/minus (¥/^) orien-
tation), and install them correctly in the battery
compartment as indicated. Putting them in
backward could make the batteries rupture or leak,
causing fire, injury or stains around them.
When you store or dispose batteries, isolate their
•
terminals with insulation tape or something
like that to prevent them from contacting other
batteries or metallic objects.
When throwing used batteries away, follow the
•
disposal instructions indicated on the batteries and
the local disposal laws.
Do not use batteries other than those specified. Do
•
not mix and use new and old batteries or different
types of batteries together. The batteries could
rupture or leak, causing fire, injury or stains around
them.
Safety Information
Do not carry or store batteries together with small
•
metal objects. The batteries could short, causing
leak, rupture or other trouble.
Do not heat or disassemble batteries. Do not put
•
them in fire or water. Batteries could rupture or
leak, causing fire, injury or stains around them.
If the battery fluid leaks, wipe away any fluid on
•
the battery case before inserting new batteries. If
the battery fluid gets in an eye, it could cause loss
of eyesight. If fluid does enter an eye, wash it out
thoroughly with clean water without rubbing the
eye and then consult a doctor immediately. If the
fluid gets on a person’s body or clothing, it could
cause skin injuries or burns. If this should happen,
wash it off with clean water and then consult a
doctor immediately.
The unit power should be off when you install and
•
replace batteries.
Remove the batteries if you do not plan to use
•
the unit for a long time. Batteries could rupture
or leak, causing fire, injury or stains around them.
If the battery fluid leaks, wipe away any fluid on
the battery compartment before inserting new
batteries.
Do not disassemble a battery. The acid inside the
•
battery could harm skin or clothing.
8
For China
产品有毒有害物质或元素的名称及含量
机种 :DP-008EX 有毒有害物质或元素
品名
1 CHASSIS 部份 ○ ○ ○ ○ ○ ○
2 PCB Assy 部份 × ○ ○ ○ ○ ○
3 线材部份 ○ ○ ○ ○ ○ ○
4 附属品部份 × ○ ○ ○ ○ ○
5 SEAL 部份 ○ ○ ○ ○ ○ ○
6 包装部份 ○ ○ ○ ○ ○ ○
○ :表示该有毒有害物质在该部件所有均质材料中的含有量均在 SJ/T11363-2006 标准规定的限量要求以下。
× :表示该有毒有害物质至少在该部件的某一均质材料中的含量超出 SJ/T11363-2006 标准规定的限量要求。
(针对现在代替技术困难的电子部品及合金中的铅 )
铅
(Pb)
汞
(Hg)
镉
(Cd)
六价铬
(Cr6+)
多溴联苯
(PBB)
TASCAM DP-008EX
多溴二苯醚
(PBDE)
5

Contents
1 – Introduction ………………………………………. 8
Features…………………………………………………………………….8
Included items ………………………………………………………… 8
Conventions used in this manual ………………………… 9
Trademarks ………………………………………………………………9
About SD cards ……………………………………………………… 10
Precautions for use …………………………………………..10
Precautions for installation …………………………………10
Beware of condensation ………………………………………10
Cleaning the unit …………………………………………………..10
User registration ……………………………………………………10
2–Quick Start Guides …………………………….. 11
Playback and mixing ……………………………………………. 11
Preparing the unit …………………………………………….11
Listening to the demo song …………………………… 12
From recording to mastering ……………………………..13
Creating a new song ………………………………………..13
Connecting and setting input sources …………14
Setting the guitar as the TRACK 1
recording source ……………………………………………..15
Adjusting the input level and monitoring ……15
Recording guitar to TRACK 1 ………………………….16
Playing back the recording …………………………….17
Record guitar to TRACK 2 ………………………………..17
Record vocals on TRACK 3 ………………………………18
Creating a stereo master track ……………………… 20
Mastering the stereo master track ………………. 22
Transferring the stereo master track to a
computer ………………………………………………………………. 23
Shutting down the unit ……………………………………… 23
3 – Names and functions of parts ……………24
Top Panel ………………………………………………………………..24
Front panel …………………………………………………………….26
Rear panel ………………………………………………………………27
Right side panel …………………………………………………… 28
Bottom panel ……………………………………………………….. 28
Home Screen ……………………………………………………….. 29
Menu structure…………………………………………………….. 30
Screen operations …………………………………………………31
4 – Preparations …………………………………….32
Inserting and removing SD cards……………………….32
Inserting an SD card …………………………………………32
Removing an SD card ………………………………………32
SD card write-protection switches ………………..32
Preparing the power …………………………………………….32
Using batteries ………………………………………………….32
Using an AC adaptor (sold separately) ………….33
Start-up & shutdown …………………………………………….33
Starting up the unit ………………………………………….33
Shutting down ………………………………………………….33
Preparing SD cards for use …………………………………. 34
Recorder modes …………………………………………………… 34
Connecting with other equipment ……………………35
Rear panel connections …………………………………..35
Right side panel connections …………………………35
Adjusting the contrast ………………………………………… 36
Setting the backlight ………………………………………….. 36
5 – Song Management ……………………………37
Partitions and songs……………………………………………..37
Selecting the active partition ……………………………..37
Editing names ………………………………………………………. 38
Loading a saved song …………………………………………. 38
Creating a new song …………………………………………….39
Saving a song …………………………………………………………39
Viewing song information …………………………………..39
Copying songs ……………………………………………………… 40
Erasing songs ……………………………………………………….. 40
Protecting songs …………………………………………………..41
6 – Basic Recording ………………………………..42
Selecting the input source…………………………………..42
Phantom power …………………………………………………….42
Monitoring input signals ……………………………………..43
OL indicators and level meters …………………………..43
Assigning inputs ………………………………………………….. 44
Using the input equalizers …………………………………. 44
Using input dynamics effects ……………………………. 45
Applying dynamics effects……………………………. 45
Using the compressor ……………………………………. 45
Using the exciter ……………………………………………… 46
Using the de-esser ……………………………………………47
Making the first recording …………………………………..47
Multitrack recording …………………………………………… 48
Setting the recording tracks …………………………. 48
Setting TRACK PAN and LEVEL values …………. 48
Input selection and assignment …………………… 48
Setting input levels …………………………………………48
Recording additional tracks ………………………….. 48
Undoing operations (undo)……………………………….. 49
Undoing the last operation (single undo) ….. 49
Undoing a previous operation (multi-undo) …49
Erasing the operation history ……………………….. 50
7 – Recorder Functions …………………………..51
Bouncing tracks …………………………………………………….51
Using the bounce function …………………………….51
Confirming the result ………………………………………52
Locate and search functions ……………………………….52
Direct locate function ……………………………………..52
Returning to the song beginning (RTZ
function) or the point where recording
was last started (LRP function) ………………………52
Search backward/forward ………………………………52
Repeat playback ……………………………………………………53
Setting IN and OUT points ………………………………53
Using repeat playback ……………………………………..53
Setting the time between repetitions
(repeat interval) ………………………………………………. 54
Locating to IN and OUT points……………………… 54
Punching in and out ……………………………………………. 54
Using a foot switch to punch in/out ……………. 54
Setting the foot switch polarity……………………..55
Using automatic punching in/out ……………………..55
Rehearsing with auto punch in/out ………………55
Recording with auto punch in/out ………………..55
8 – Editing Tracks …………………………………..56
TASCAM DP-008EX
6

Contents
Overview of track editing …………………………………… 56
Track editing points ………………………………………… 56
Basic track editing procedures……………………… 56
Track editing function setting items ……………57
COPY/PASTE …………………………………………………………..58
COPY/INSERT ………………………………………………………… 58
MOVE/PASTE ………………………………………………………….59
MOVE/INSERT ………………………………………………………..59
OPEN (insert silence) …………………………………………….59
CUT (remove part) …………………………………………………59
SILENCE (part erase) ……………………………………………. 60
CLONE TRACK (track duplication) …………………….. 60
CLEAN OUT (track erase) …………………………………….. 60
9 – Mixdown and mastering ……………………61
Mixdown …………………………………………………………………61
Level and balance …………………………………………….61
Stereo position (panning) ……………………………….61
Track equalizers ………………………………………………..61
Reverb ………………………………………………………………..61
Muting tracks …………………………………………………… 62
Creating stereo master tracks …………………………… 62
Setting the starting and ending points ………. 63
Creating a stereo master track ……………………… 63
Checking stereo master tracks ………………………….. 64
Mastering stereo master tracks ………………………… 64
Using automatic mastering …………………………… 65
Using manual mastering ……………………………….. 66
Using the mastering equalizer ……………………… 66
Using the mastering compressor …………………..67
Normalizing master tracks…………………………….. 68
Copying a stereo master track ……………………… 68
Exiting mastering mode ………………………………… 68
10 – Miscellaneous Functions …………………69
Metronome …………………………………………………………… 69
Tuner ……………………………………………………………………… 69
Chromatic tuner mode…………………………………… 69
Oscillator mode …………………………………………………70
Automatic power saving function ……………………..70
Restoring preferences to default values …………..71
Viewing information …………………………………………….71
11 – SD Card Management ……………………..72
Overview of partitions ……………………………………….. 72
Formatting SD cards …………………………………………… 72
Reformatting MTR partitions …………………………….. 73
Reformatting FAT partitions ………………………………..74
Initializing SD cards ………………………………………………74
12 – Exchanging Data with a Computer …..75
Supported operating systems ……………………………75
Connecting with a computer ……………………………..75
Disconnecting …………………………………………………..76
Song backup and restoration ……………………………. 77
Backing-up songs …………………………………………… 77
Restoring songs ………………………………………………..78
Track import and export ………………………………………79
Importing to tracks …………………………………………..79
Exporting tracks ……………………………………………… 80
Exporting stereo master tracks…………………………..81
13 – Mastering compressor settings ………82
Mastering compressor preset library ………………. 82
Mastering compressor preset default
parameter settings …………………………………………….. 82
14 – Troubleshooting ……………………………..83
15 – Message Lists ………………………………….84
16 – Specifications …………………………………87
Media and file systems …………………………………………87
Inputs and outputs ……………………………………………….87
Analog audio input and output …………………….87
Data input and output …………………………………….87
Audio performance ………………………………………………87
Operating requirements ……………………………………..87
General ……………………………………………………………………87
Backup memory …………………………………………………… 88
Dimensions …………………………………………………………… 88
Block diagram ………………………………………………………. 89
17 – Commonly-used Functions………………90
TASCAM DP-008EX
7

1 – Introduction
Thank you for your purchase of the TASCAM DP-008EX
Digital Multitrack Recorder.
Before connecting and using the unit, please take
time to read this manual thoroughly to ensure you
understand how to properly set up and connect the
unit, as well as the operation of its many useful and
convenient functions. After you have finished reading
this manual, please keep it in a safe place for future
reference.
You can also download the Owner’s Manual from the
TASCAM web site (http://tascam.com).
Features
Using this unit with an SD card, you can record two
tracks simultaneously and work with up to 8 tracks in
a multitrack project. In addition, you can use the unit’s
mixer, mastering (automatic and manual) and input
dynamics functions to mix multitrack recordings
down to stereo and create a stereo master track.
This stereo master track can then be transferred to a
computer connected by USB. In addition to copying
individual and stereo master tracks from this unit
to a computer, song files can also be backed up to a
computer.
•
Portable 8-track recorder that can record 2 tracks
simultaneously and play back 8 tracks
•
CD-quality recording (16-bit, 44.1kHz)
•
Built-in omnidirectional stereo condenser mic
suppresses pickup of background noise (Low and
High input gain settings)
•
Guitars and basses can be directly connected to 2
mic/line inputs (INPUT A/B)
•
Independent LEVEL, PAN and REVERB knobs for
each track allow intuitive operation
•
Wheel allows rapid location to specific points
(direct location function)
•
Set and use IN and OUT points as you like for
repeat playback and editing
•
Separate stereo master track in addition to 8
independent tracks
•
Bounce function allows recording of more than 8
tracks
•
Punch in/out function allows parts to be
re-recorded as necessary
•
Track editing functions include duplicating and
deleting recorded tracks, partial clearing and
deletion and silence insertion
•
Recording and editing operations can be undone
and redone
•
Chromatic tuner with meters provides visual
feedback during tuning
•
Metronome
•
Transfer files to computers connected by USB 2.0
•
Backup and restore songs
•
Import and export stereo WAV files to stereo tracks
•
Export stereo masters as stereo WAV files
•
Operates on four AA batteries or a TASCAM
PS-P520 AC adaptor (sold separately)
•
2GB SD card included
•
Unit has built-in threads for tripod mounting
Included items
This product includes the following items.
Take care when opening the package not to damage
the items. Keep the packing materials for transportation in the future.
Please contact TASCAM if any of these items are
missing or have been damaged during transportation.
• Main unit ………………………………………………………….. 1
• SD Card (inside unit) ……………………………………….1
• AA alkaline batteries ………………………………………. 4
• USB cable (80cm) ……………………………………………. 1
• Warranty card …………………………………………………..1
• Owner’s Manual (this manual) ……………………….1
TASCAM DP-008EX
8
1 – Introduction
Conventions used in this manual
In this manual, we use the following conventions:
•
When we refer to buttons, connectors and other
parts of this unit and other equipment, we use a
bold font like this: MENU button.
•
The 7 button is indicated as the Play (7) button,
the 8 button as the Stop (8) button and the 0
button as the Record (0) button.
•
Selectable items and messages shown on the
display are indicated like this:
•
The four buttons beneath the LCD display are
called function buttons and are referred to as F1,
F2, F3 and F4 from left to right. Their functions are
shown above them at the bottom of the display
and after the button name in brackets in this
manual.
Examples: F2 [EXEC] button, F4 [t] button
•
SD memory cards are called “SD cards”.
•
Words that appear on the computer display are
shown in quotation marks like this: “DP-008EX”
•
The currently selected MTR partition is called the
“active partition”.
•
Additional information is provided as necessary as
tips, notes and cautions.
TIP
These are tips about how to use the unit.
NOTE
These provide additional explanations and
describe special cases.
CAUTION
Failure to follow these instructions could result
in injury, damage to equipment or lost recording
data, for example.
MENU
Trademarks
•
TASCAM is a registered trademark of TEAC
Corporation.
•
Microsoft, Windows, Windows Vista, and Windows
7 are either registered trademarks or trademarks
of Microsoft Corporation in the United States and/
or other countries.
•
Apple, Macintosh, iMac, Mac OS and Mac OS X are
trademarks of Apple Inc.
•
Other company names, product names and logos
in this document are the trademarks or registered
trademarks of their respective owners.
Any data, including, but not limited to information,
described herein are intended only as illustrations
of such data and/or information and not as the
specifications for such data and/or information.
TEAC Corporation disclaims any warranty that any
use of such data and/or information shall be free
from infringement of any third party’s intellectual
property rights or other proprietary rights, and
further, assumes no liability of whatsoever nature
in the event of any such infringement, or arising
from or connected with or related to the use of
such data and/or information.
This product is designed to help you record
and reproduce sound works to which you own
the copyright, or where you have obtained
permission from the copyright holder or the
rightful licensor. Unless you own the copyright,
or have obtained the appropriate permission
from the copyright holder or the rightful licensor,
your unauthorized recording, reproduction or
distribution thereof may result in severe criminal
penalties under copyright laws and international
copyright treaties. If you are uncertain about
your rights, contact your legal advisor. Under no
circumstances will TEAC Corporation be responsible for the consequences of any illegal copying
performed using the recorder.
TASCAM DP-008EX
9

1 – Introduction
About SD cards
This unit uses SD cards for recording and playback.
SD cards that meet SD/SDHC standards and are at
least 512 MB can be used with this unit.
A list of SD cards that have been confirmed for use
with this unit can be found on the TASCAM website
(http://tascam.com/). Please check this site or contact
TASCAM customer support.
Precautions for use
SD cards are delicate media. In order to avoid
damaging a card or the card slot, please take the
following precautions when handling them.
•
Do not leave them in extremely hot or cold places.
•
Do not leave them in extremely humid places.
•
Do not let them get wet.
•
Do not put things on top of them or twist them.
•
Do not hit them.
Precautions for installation
•
The unit’s nominal operating temperature is from
5º to 35º C (41º–95º F).
•
Do not install in the following types of places.
Doing so could degrade the sound quality or
cause malfunctions.
• Places with significant vibrations
• Near windows or other places exposed to
direct sunlight
• Near heaters or other extremely hot places
• Extremely cold places
• Places with high humidity or bad ventilation
• Dusty places
• Places directly exposed to rain or other water
•
Do not place this unit on top of a power amplifier
or other device that generates heat.
Beware of condensation
If the unit is moved from a cold to a warm place, or
used immediately after a cold room has been heated
or otherwise exposed to a sudden temperature
change, condensation could occur. Should this
happen, leave the unit for one or two hours before
turning the unit on.
Cleaning the unit
To clean the unit, wipe it gently with a soft dry cloth.
Do not wipe with chemical cleaning cloths, paint
thinner, ethyl alcohol or other chemical agents to
clean the unit as they could damage the surface.
User registration
Customers in the USA, please visit the TASCAM
website (http://tascam.com/) to register as a user
online.
TASCAM DP-008EX
10
2–Quick Start Guides
Playback and mixing
First, we will play the demo song on the included SD
card. When the unit is purchased new, the SD card
with the demo song is already in it, but we will start
by explaining how to insert an SD card.
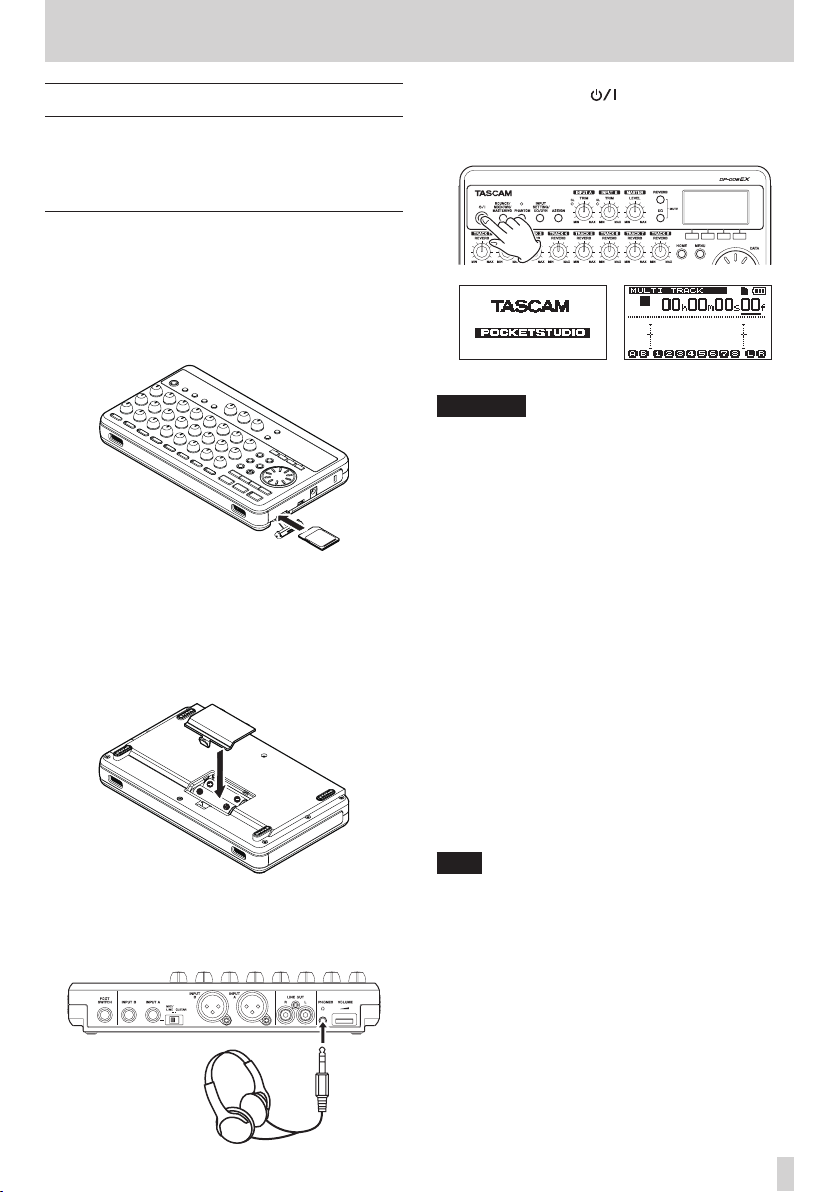
Preparing the unit
1. Open the SD card slot cover on the right side of
the unit and insert the included SD card into the
slot.
Do not insert the card with the wrong orientation
and apply unnecessary force. This could damage
the SD card slot or the card itself.
2. After inserting the SD card, close the SD card slot
cover.
3. Insert four AA batteries into the battery
compartment on the bottom of the unit
according to the ¥ and ^ indications inside the
compartment. In addition to alkaline batteries,
this unit can also use NiMH batteries.
4. Close the battery compartment cover after
installing the batteries.
5. Connect headphones to the PHONES connector
on the back of the unit.
6. Press and hold the button on the top of the
unit until “TASCAM” appears on the display.
After starting up, as shown below, the Home
Screen appears on the display.
Startup screen Home Screen
CAUTION
•
Do not remove or insert the SD card when the
unit’s power is ON.
Make sure the unit’s power is OFF (in standby
mode) before you remove or insert an SD card.
•
If you remove or insert an SD card when the unit’s
power is ON, the unit cannot shut down properly
and all recorded data and setting changes since
the last time the unit was shut down properly or
the song was saved will be lost. These lost data
and settings cannot be recovered.
•
Do not remove the batteries or disconnect the
power cord while the unit’s power is ON.
•
The included alkaline batteries are for confirming
operation of the unit. For this reason, they might
not last very long.
•
Before turning the power ON or OFF (putting it
in standby mode), minimize the volume on any
connected external monitoring system (powered
monitor speakers or an amplifier and speakers).
•
Do not wear headphones connected to the unit
when turning its power ON or OFF (putting it in
standby mode). Doing so could cause loud noises
that might harm your hearing.
TIP
•
This unit can also be powered by a TASCAM
PS-P520 power adaptor (sold separately). (See
“Using an AC adaptor (sold separately)” on page
33“)
•
By connecting an external monitoring system (powered
monitor speakers or an amplifier and speakers) to the
LINE OUT jack on the back of the unit, you can
monitor using speakers.
Headphone
TASCAM DP-008EX
11
2–Quick Start Guides
Listening to the demo song
Before the unit is shipped, a demo song is stored on
its SD card. We are now going to use basic playback
and mixing features with this demo song.
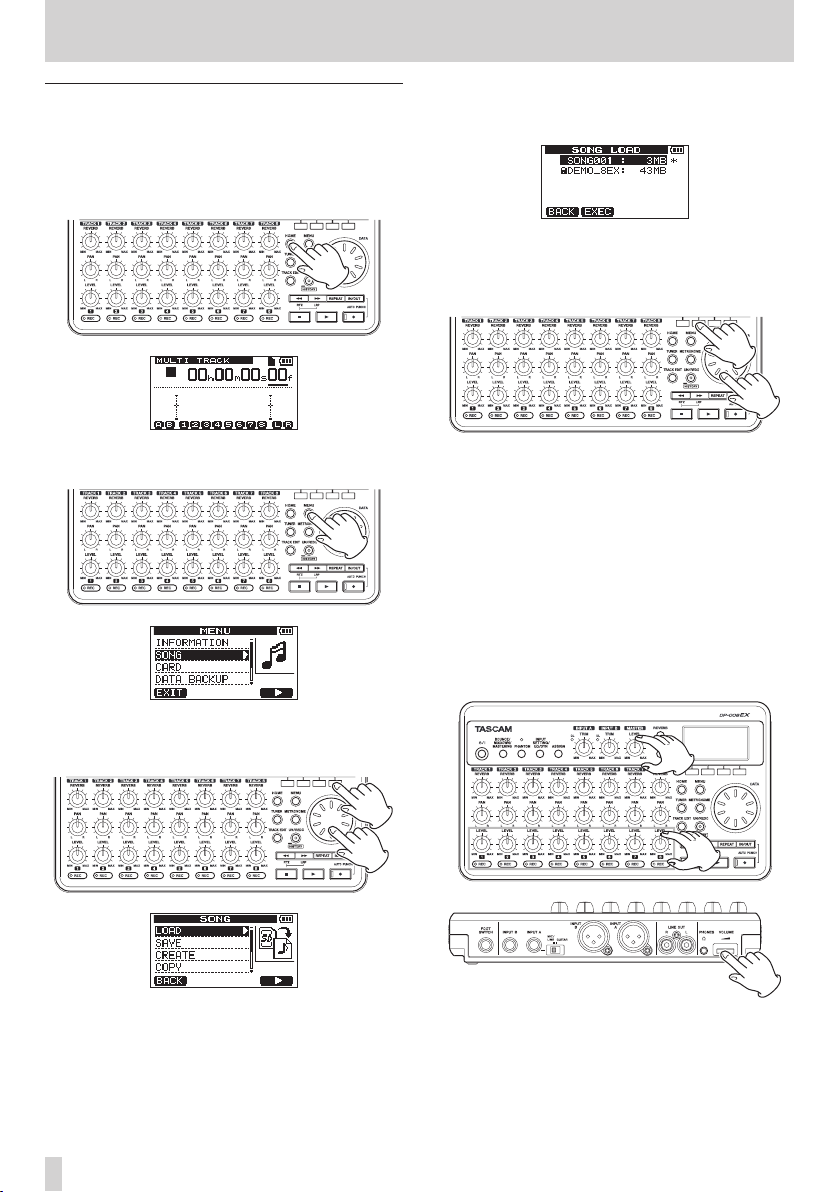
1. Press the HOME button to open the Home
Screen.
2. When the recorder is stopped, press the MENU
button to open the
MENU
screen.
4. Use the D ATA wheel to select (highlight)
and press the F4 [t] button to open the
LOAD
screen that shows a list of songs.
5. Use the D ATA wheel to select (highlight)
DEMO_8EX
The demo song loads and the
reopens.
6. Press the HOME button to return to the Home
Screen.
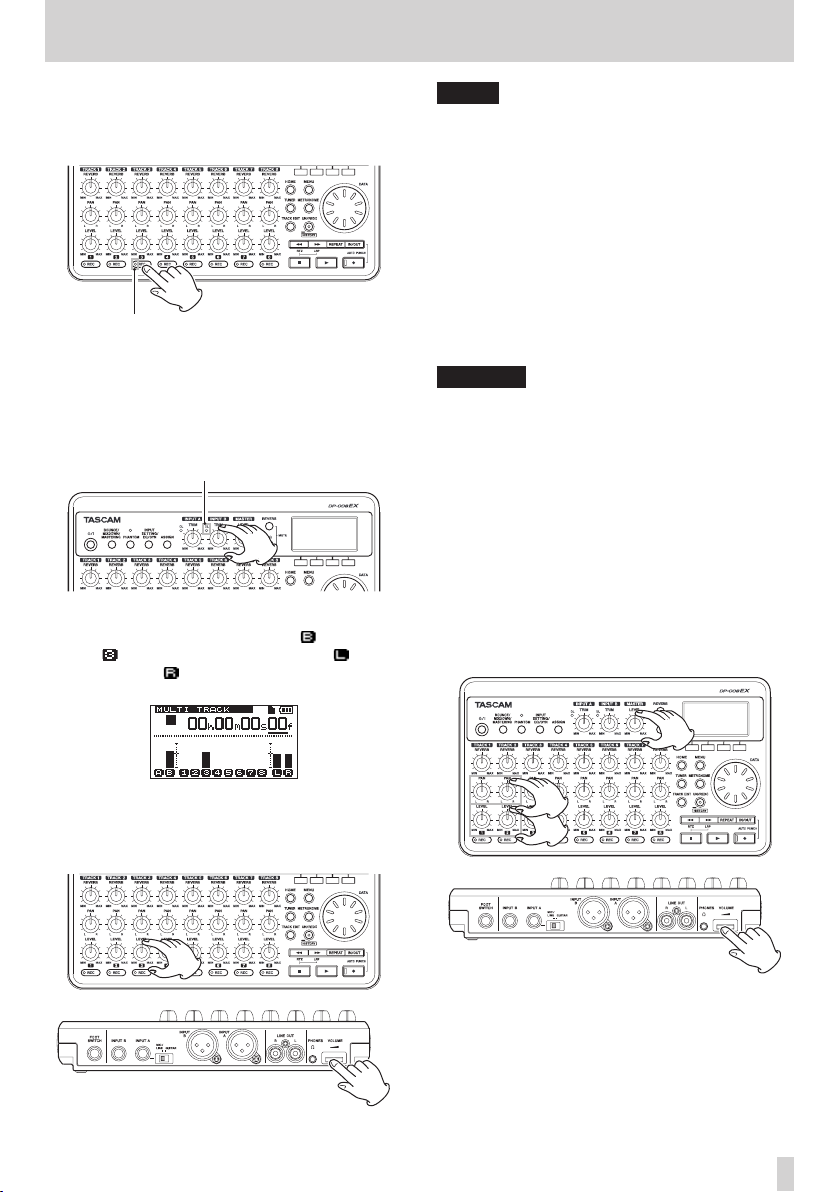
7. Press the Play (7) button and turn up the TRACK
1–8 LEVEL knobs, the MASTER LEVEL knob and
the VOLUME dial on the back of the unit to until
you can hear the demo song.
The MASTER LEVEL knob adjusts the volume of
all eight tracks at the same time. The standard
position of this knob is around 2–3 o’clock.
Use the TRACK 1–8 LEVEL knobs to adjust the
balance among the tracks.
Use the VOLUME dial on the back of the unit to
adjust the final monitoring level.
, and press the F2 [EXEC] button.
SONG
screen
LOAD
SONG
,
3. Use the D ATA wheel to select (highlight)
and press the F4 [t] button to open the
menu screen.
TASCAM DP-008EX
12
SONG
SONG
,
2–Quick Start Guides
8. Use the TRACK 1–8 PAN knobs to adjust the
stereo positions of each track.
TIP
•
Press the m [RTZ] button while pressing and
holding the Stop (8) button to use the return to
zero (RTZ) function to jump to the beginning of the
song (00h00m00s00f).
•
When using a menu, if you make a mistake
pressing a button and the wrong screen appears,
press the HOME button to return to the Home
Screen.
From recording to mastering
Next, we will make a multitrack recording.
In the following example, we will use a guitar to
record a rhythm guitar part on track 1 and a lead
guitar part on track 2. Then, we will use the built-in
mic to record singing on track 3. Finally, we will mix
the tracks down to a stereo track.
We assume that you have already followed the
instructions in the previous “Playback and mixing”
section and that you have already connected
headphones and installed an SD card.
TIP
This example uses the built-in mic for recording
vocals, but you could also connect an external mic
to an INPUT A/B connector on the back of the unit
and record with it instead.
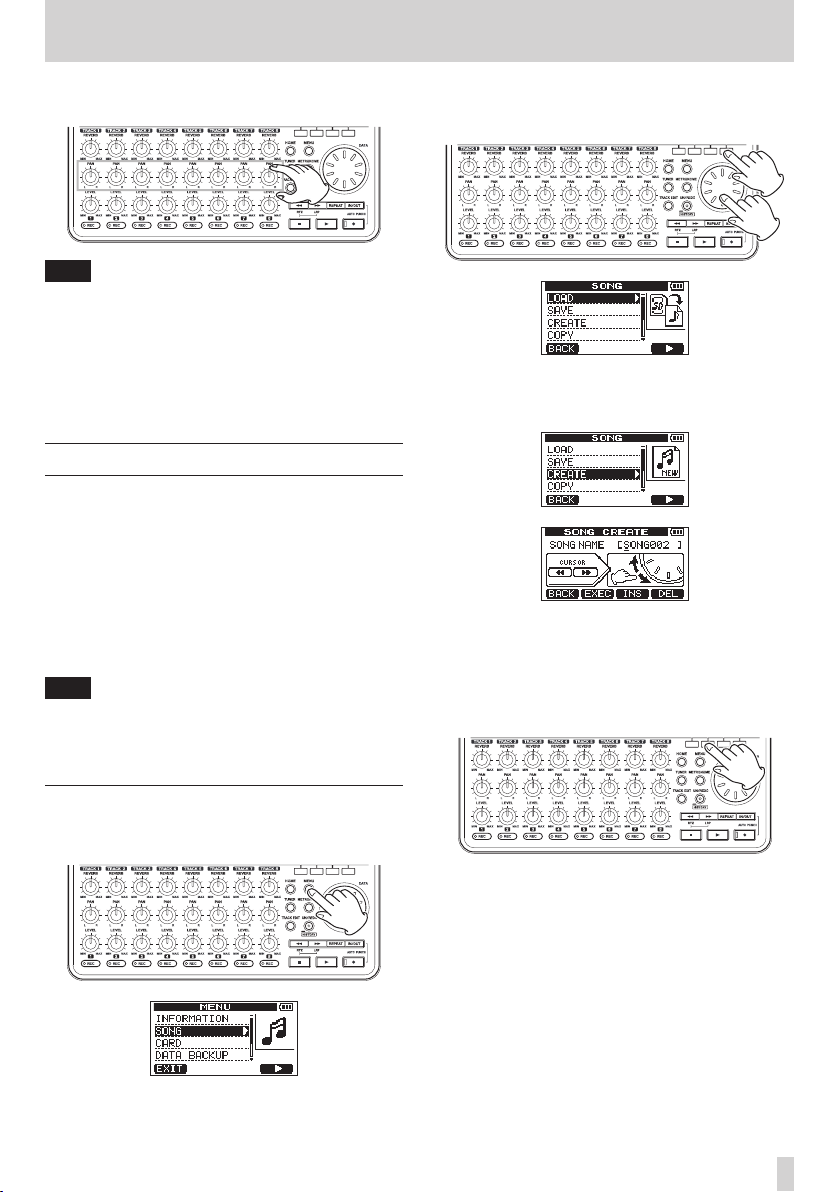
2. Use the D ATA wheel to select (highlight) the
SONG
menu, and press the F4 [t] button to
open the
3. Use the D ATA wheel to select (highlight)
and press the F4 [t] button to open the
CREATE
When a new song is created, it is given the name
(title)”SONG***” (where ***is a number).
4. Change the song name as necessary. (See “Editing
names” on page XX.)
5. Press the F2 [EXEC] button to save the currently
loaded song and create a new song.
SONG
screen.
menu screen.
CREATE
SONG
,
Creating a new song
1. When the recorder is stopped, press the MENU
button to open the
MENU
screen.
6. Press the HOME button to return to the Home
Screen.
TASCAM DP-008EX
13
2–Quick Start Guides
Connecting and setting input sources
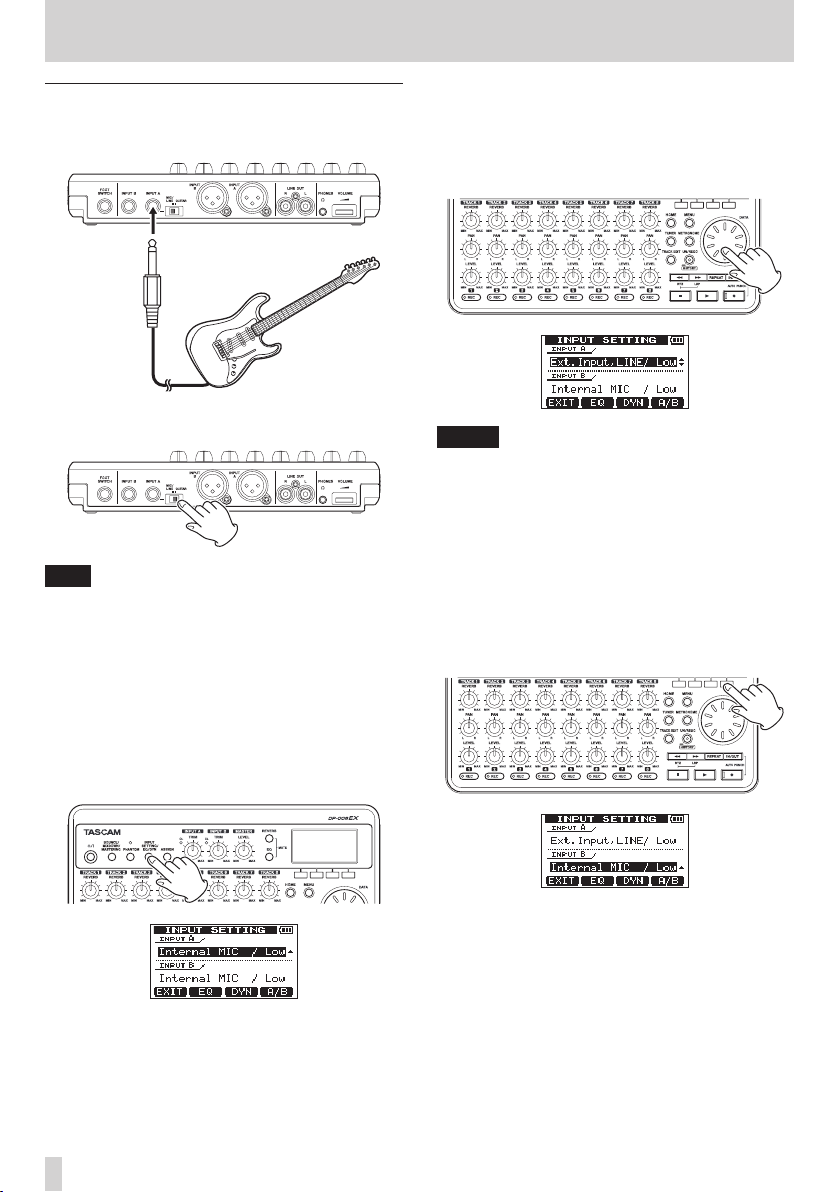
1. Connect a guitar to the INPUT A jack on the rear
panel.
2. Set the MIC/LINE–GUITAR switch on the rear
panel to GUITAR.
TIP
When connecting an electric-acoustic guitar with
a built-in preamp or an active electric guitar, as
well as when connecting an electric guitar with an
effect box between it and this unit, for example,
set the MIC/LINE–GUITAR switch to MIC/LINE.
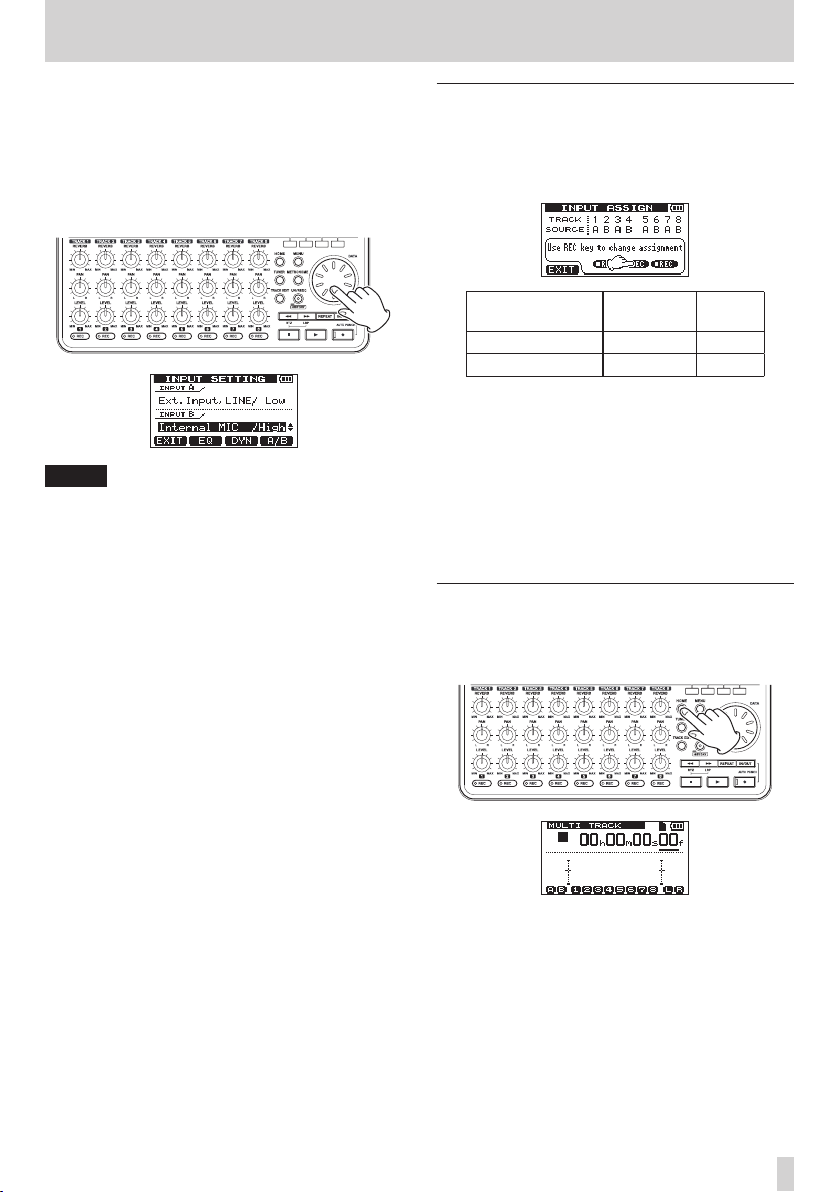
3. Press the INPUT SETTING/EQ/DYN button to
open the
On this screen you can set the input sources for
both INPUT A and INPUT B.
At first, the current input source for INPUT A is
already selected (highlighted).
INPUT SETTING
screen.
4. In order to use the external line input to record
guitar to tracks 1 and 2, use the DATA wheel to
set the INPUT A input source to
LINE/ Low, Ext. Input/Mid
Hig h
(out of five options). (See “Selecting the
input source” on page 42.)
NOTE
•
The input level gain differs for the three settings
(
Ext. Input, LINE/Low, Ext. Input/
Mid
and
Ext. Input/High
the loudness of the input.
If you are not sure which setting to use, choose
Ext.Input, LINE/Low
too low when adjusting it, return to the
SETTING
Input/Mid
to
5. Press the F4 [A/B] button to select (highlight) The
screen and change the setting to
Ext. Input/High
current input for INPUT B.
. If the input level is still too low, set it
.
Ext. Input,
or
Ext. Input/
). Set it according to
. If the input level is
INPUT
Ext.
TASCAM DP-008EX
14
2–Quick Start Guides
6. In order to use the built-in mic to record singing
to track 3, use the DATA wheel to set the INPUT
B input source to
Internal MIC/High
source” on page 42.)
This sets the built-in mic on the right side of the
front panel (MIC B) as the input source for INPUT
B.
NOTE
Internal MIC/Low
change the input gain of the built-in mics. Set it
according to the loudness of the input.
If you are not sure which setting to use, choose
Internal MIC/Low
after adjusting it, return to the
screen and change the setting to
MIC/ High
7. After changing the setting, press the HOME
button to return to the Home Screen.
Internal MIC/Low
and
. If the input level is too low
.
. (See “Selecting the input
or
Internal MIC/High
INPUT SETTING
Internal
Setting the guitar as the TRACK 1
recording source
When the recorder is stopped, press the ASSIGN
button to open the
has the following default values.
Recording track
TRACK 1, 3, 5, 7 INPUT A
TRACK 2, 4, 6, 8 INPUT B
In “Connecting and setting the input sources” above,
we made a guitar the input source for INPUT A and a
built-in mic (MIC B) the input source for INPUT B on
the
INPUT SETTING
Therefore, the guitar is already set to record to tracks
1, 3, 5 and 7 and the built-in mic (MIC B) is ready to
record to tracks 2, 4, 6 and 8.
As a result, there is no need to change the input
source assignments to record the guitar to TRACK 1
in this example.
Adjusting the input level and
INPUT ASSIGN
Recording
source
screen.
screen, which
monitoring
1. Press the HOME button to return to the Home
Screen.
Default
A
B
TASCAM DP-008EX
15
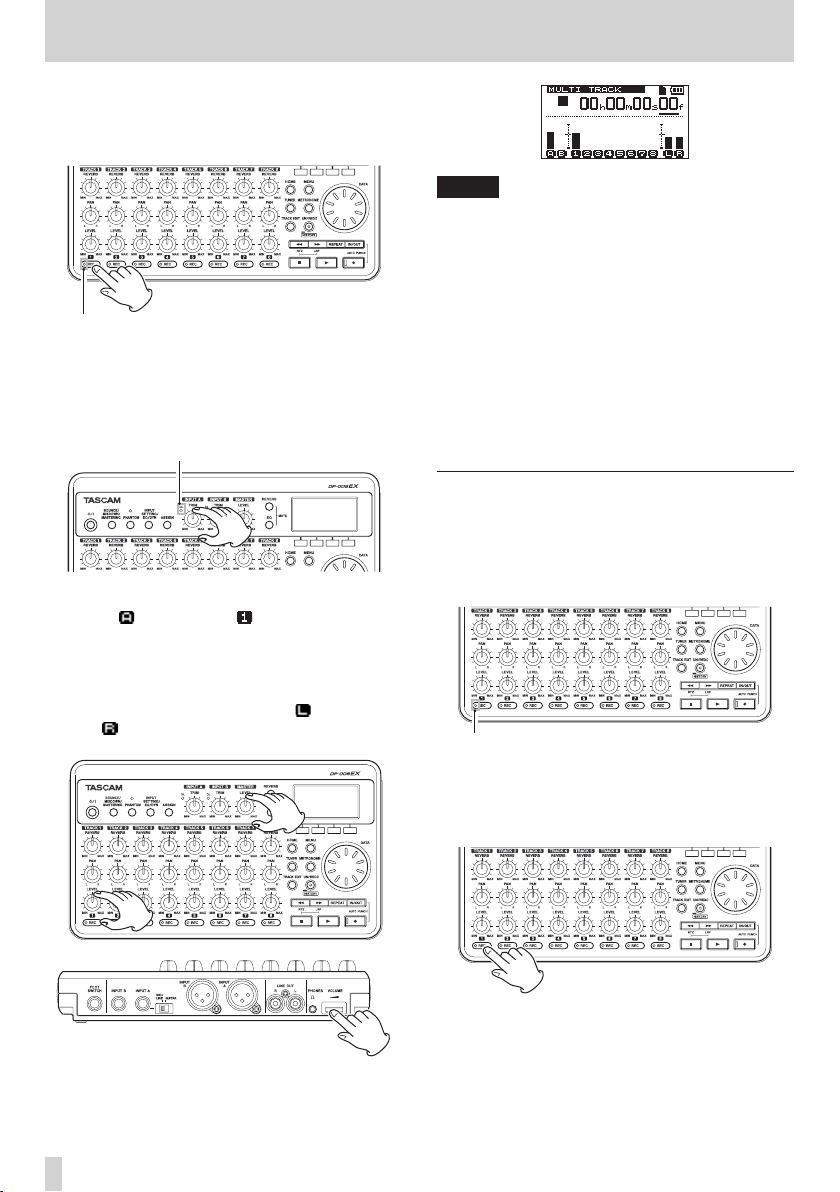
2–Quick Start Guides
2. Press the TRACK 1 REC button to put the track
into recording standby.
The REC indicator blinks when in recording
standby.
3. Use the INPUT A TRIM knob to adjust the guitar
input level.
Set the TRIM knob so that the INPUT A OL
indicator does not light even when the loudest
sound to be recorded is input.
When you play the guitar, the input level is shown
by the (INPUT A) and (TRACK 1) meters on
the display.
Turn up the TRACK 1 LEVEL and MASTER LEVEL
knobs and the VOLUME dial on the back of
the unit to hear the guitar sound through the
headphones. When doing so, the (left channel)
and (right channel) meters on the display
become active.
NOTE
•
If the OL indicator continues to light even when
the TRIM knob is turned down, the guitar signal
itself is too loud. In this case, if the input source
is set to
Ext. Input/High
Input/Mid
input source is set to
to
Ext. Input, LINE/Low
If the OL indicator lights even when set to
Inp ut, LINE /L ow
from the guitar.
•
You can use the TRACK 1 PAN knob to adjust the
stereo position of the signal when monitoring.
•
The input signal cannot be heard if the TRACK 1
REC indicator is not lit.
or
Ext.Input, LINE/Low
, change it to
Ext. Input/Mid
.
, lower the volume output
Ext.
. If the
, change it
Ext.
Recording guitar to TRACK 1
1. Press the Play (7) button while pressing and
holding the Record (0) button to start recording,
and the play the rhythm guitar part.
The Record (0) indicator lights and the TRACK 1
REC indicator stops blinking and stays lit.
2. When you are finished playing, press the Stop ( 
button to stop recording.
3. Press the TRACK 1 REC button to turn its REC
indicator off.
TASCAM DP-008EX
16
2–Quick Start Guides
Playing back the recording
1. Press the m [RTZ] button while pressing and
holding the Stop (8) button to use the return to
zero (RTZ) function to jump to the beginning of
the song (00h00m00s00f).
2. Press the Play (7) button to play the TRACK 1
recording.
3. Use the TRACK 1 LEVEL and MASTER LEVEL
knobs to adjust the monitoring level.
Use the VOLUME dial on the back of the unit to
adjust the final monitoring volume.
TIP
You can use the TRACK 1 PAN knob to adjust the
stereo position of the signal when monitoring.
4. When you are done listening to the recording,
press the Stop (8) button to stop playback.
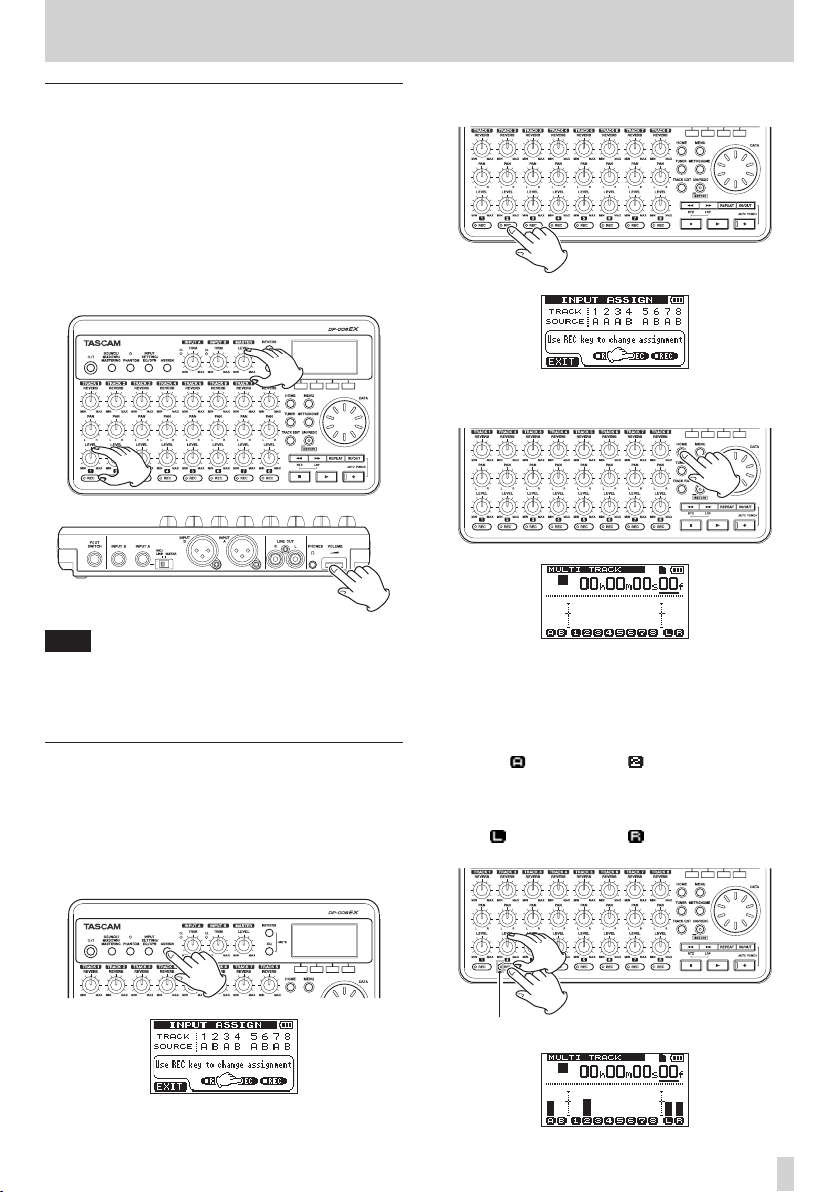
Record guitar to TRACK 2
Now, you will record the lead guitar on TRACK 2
while listening to the rhythm guitar on TRACK 1.
Use the following procedures to change the recording
source for TRACK 2.
1. When the recorder is stopped, press the ASSIGN
button to open the
INPUT ASSIGN
screen.
2. Press the TRACK 2 REC button to set the
2 SOURCE
3. Press the HOME button to return to the Home
Screen.
4. Press the TRACK 2 REC button to put the track
into recording standby.
The REC indicator blinks when in recording
standby.
When you play the guitar, the input level is shown
by the (INPUT A) and (TRACK 2) meters on
the display.
Turn up the TRACK 2 LEVEL to hear the guitar
sound through the headphones. When doing so,
the (left channel) and (right channel) meters
on the display become active.
to A.
TRACK
TASCAM DP-008EX
17
2–Quick Start Guides
5. Return to the beginning of the song
(00h00m00s00f) and press the Play (7) button
to begin playback of the recording on TRACK 1.
Play the lead guitar part along with the already
recorded rhythm guitar.
You can hear both TRACK 1 playing back and
the sound of the input guitar through the
headphones.
6. As necessary, use the TRACK 1 and 2 LEVEL and
PAN knobs, the MASTER LEVEL knob and the
VOLUME dial on the back of the unit to adjust
the monitoring levels and balance.
7. When you are finished checking, press the Stop
(8) button to stop playback.
8. Return to the beginning of the song
(00h00m00s00f) and press the Play (7) button
while pressing and holding the Record (0)
button to begin recording. Play the lead guitar
part.
The Record (0) indicator lights and the TRACK 2
REC indicator stops blinking and stays lit.
9. When you are finished playing, press the Stop (
button to stop recording.
10. Press the TRACK 2 REC button to turn its REC
indicator off.
NOTE
If the indicator continues to light even when the
TRIM knob is turned down, the guitar signal itself
is too loud. In this case, if the input source is set to
Ext. Input/High
Mid
or
Ext.Input, LINE/Low
source is set to
Ext. Input, LINE/Low
lights even when set to
Low
, lower the volume output from the guitar.
, change it to
Ext. Input/Mid
. If the OL indicator
Ext. Inpu t, LINE/
Ext. Input/
. If the input
, change it to
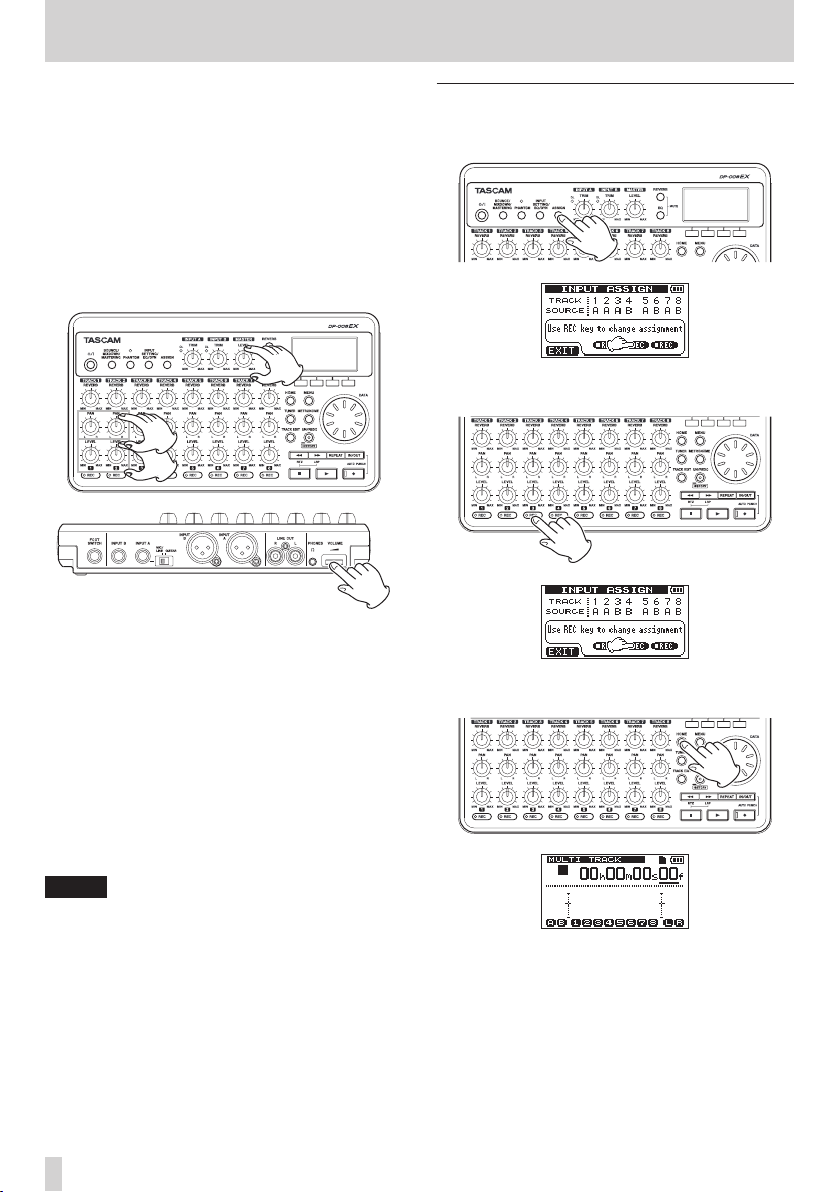
Record vocals on TRACK 3
1. Press the ASSIGN button to open the
ASSIGN
screen.
2. Press the TRACK 3 REC button to set the
3 SOURCE
3. Press the HOME button to return to the Home
Screen.
to B.
INPUT
TRACK
TASCAM DP-008EX
18
2–Quick Start Guides
4. Press the TRACK 3 REC button to put the track
into recording standby.
The REC indicator blinks when in recording
standby.
5. Use the INPUT B TRIM knob to adjust the mic
input level.
Set the TRIM knob so that the INPUT B OL
indicator does not light even when the loudest
sound to be recorded is input.
When you input sound into the built-in mic (MIC
B), the input level is shown by the (INPUT B)
and (TRACK 3) meters as well as the (left
channel) and (right channel) meters on the
display.
NOTE
•
If the OL indicator continues to light even when
the TRIM knob is turned down, the mic signal itself
is too loud. In this case, if the input source is set to
Internal MIC/High
MIC/Low
If the OL indicator lights even when set to
Internal MIC/Low
away from the mic or lower the volume at the
sound source.
•
When the input source is a built-in mic, if the REC
indicator for the TRACK that has the built-in mic
set as its input source is not lit, the input sound
cannot be heard through the headphones or
connected monitoring system.
CAUTION
Always monitor through headphones when using
6. Return to the beginning of the song
You can hear the guitars on TRACK 1 and TRACK
7. As necessary, use the TRACK 1 and 2 LEVEL and
.
a mic. If you monitor through speakers, feedback
could occur.
(00h00m00s00f) and press the Play (7) button
to begin playback of the recordings on TRACK
1 and TRACK 2. Sing along with the already
recorded rhythm and lead guitar parts.
2 playing back and your singing through the
headphones.
PAN knobs, the MASTER LEVEL knob and the
VOLUME dial on the back of the unit to adjust
the monitoring levels and balance.
, change it to
, move the sound source
Internal
With the MASTER LEVEL knob and the VOLUME
dial on the back of the unit already turned up,
turn up the TRACK 3 LEVEL knob to hear the mic
sound through the headphones
8. When you are finished checking, press the Stop
(8) button to stop playback.
TASCAM DP-008EX
19
2–Quick Start Guides
9. Return to the beginning of the song
(00h00m00s00f) and press the Play (7) button
while pressing and holding the Record (0)
button to begin recording. Play the lead guitar
part.
The Record (0) indicator lights and the TRACK 3
REC indicator stops blinking and stays lit.
10. When you are finished playing, press the Stop (
button to stop recording.
11. Press the TRACK 3 REC button to turn its REC
indicator off.
Creating a stereo master track
After finishing the recording, we will mix down the
tracks and create a stereo master track
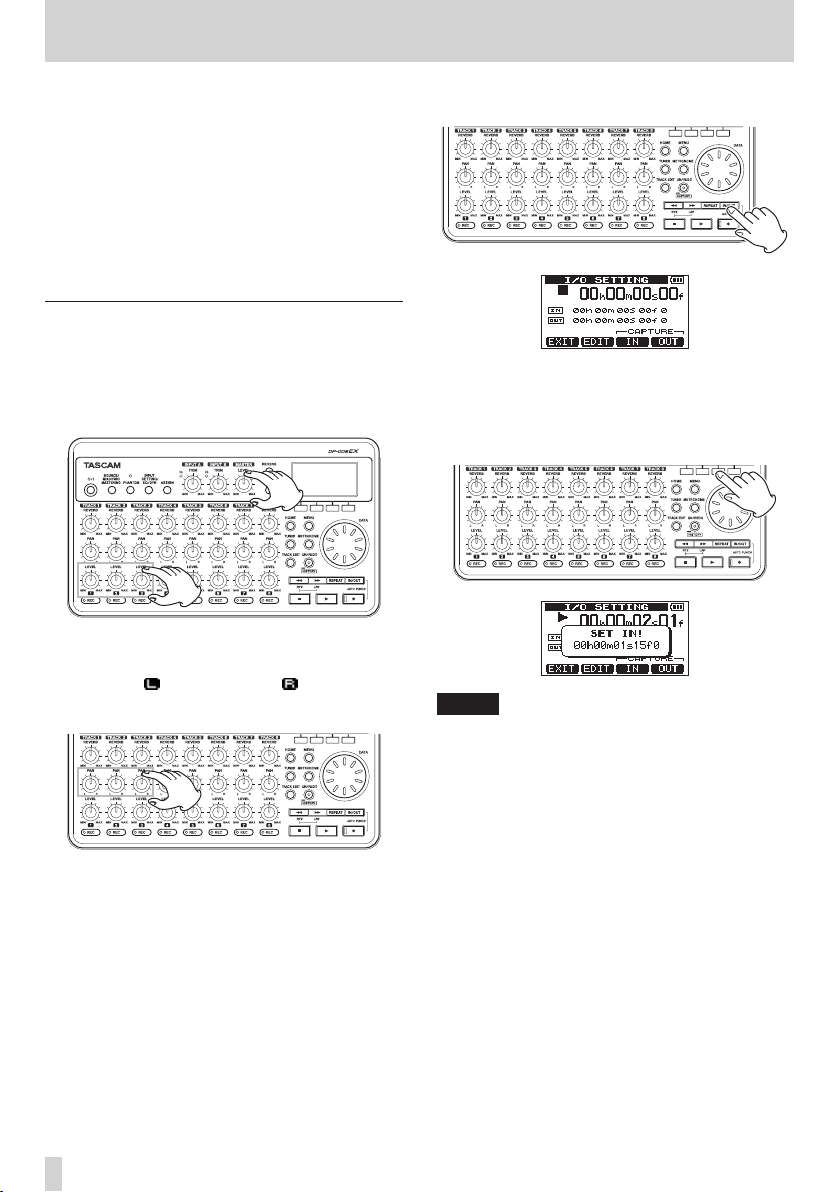
1. Use the TRACK 1-3 LEVEL knobs to adjust the
level. Use the MASTER LEVEL knob to adjust the
overall level.
2. Use the TRACK 1-3 PAN knobs to adjust the
stereo positions.
Watch the (left channel) and (right channel)
level meters on the display as you make these
adjustments.
3. Press the IN/OUT button to open the I/O SETTING
screen.
4. Press the Play (7) button to start playing the
song back, and press the F3 [IN] button to set the
IN point at the point where you want to start the
mix down for the stereo master track.
A
SET IN!
NOTE
The stereo master track will be created by mixing
down the audio between the IN and OUT points.
pop-up message appears.
TASCAM DP-008EX
20
2–Quick Start Guides
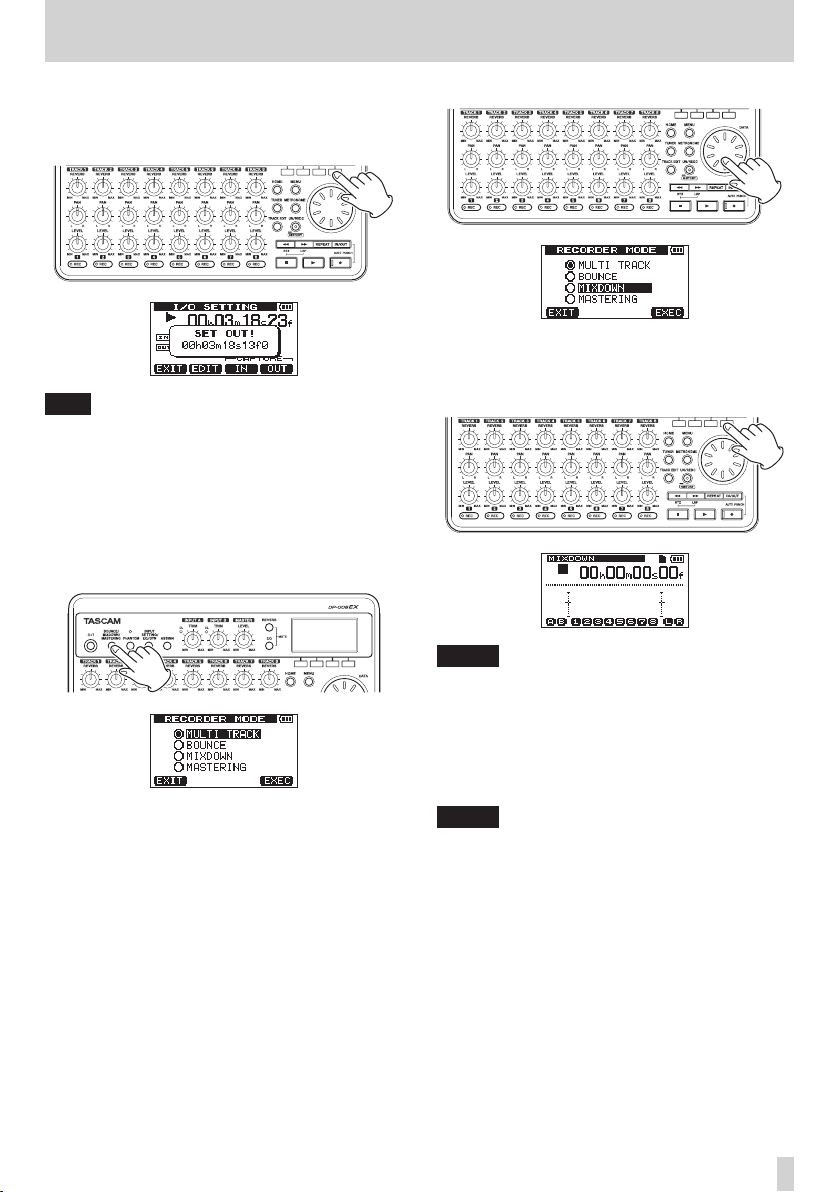
5. Press the F4 [OUT] button to set the OUT point at
the point where you want to end the mix down
for the stereo master track.
A
SET OUT!
TIP
You can also use the F3 [IN] and F4 [OUT] buttons
to set the IN and OUT points when playback is
stopped.
6. When you are done setting the IN and OUT
points, press the Stop (8) button to stop
playback of the song.
7. When the recorder is stopped, press the
BOUNCE/MIXDOWN/MASTERING button to
open the
pop-up message appears.
RECORDER MODE
screen.
8. Use the data wheel to select (highlight)
9. Press the F4 [EXEC] button to put the unit into
MIXDOWN
After a
Home Screen reopens.
NOTE
When the recorder is in MIXDOWN mode,
“MIXDOWN” appears highlighted at the top left of
the Home Screen
10. Press the Record (0) button while pressing and
holding the Play (7) button to start recording
the stereo master track from the IN point.
Recording automatically ends at the OUT point.
NOTE
•
The IN and OUT points must be at least four
seconds apart. If they are less than four seconds
apart, a
pop-up message appears and you will not be able
to change the recorder to
•
You can use the LEVEL knobs to adjust the track
and overall levels as you record.
mode.
Mixd ow n!
Trk Too Sh or t
pop-up message appears, the
(track is too short)
MIXDOWN
MIXDOWN
mode.
.
TASCAM DP-008EX
21
2–Quick Start Guides
Mastering the stereo master track
You can adjust the stereo master track that you
created to make it sound even more to your liking.
This process is called mastering. In this example, we
will use this unit’s automatic mastering feature to
master your songs.
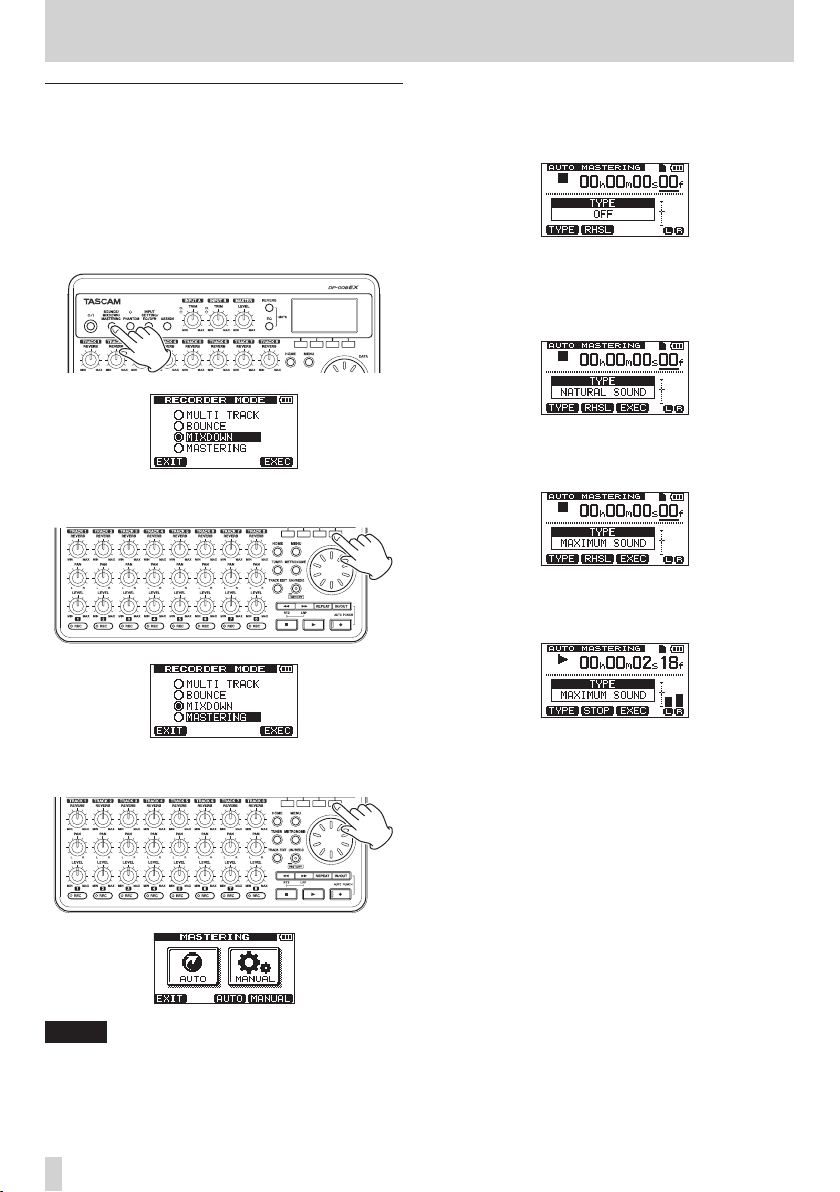
1. When the recorder is stopped, press the
BOUNCE/MIXDOWN/MASTERING button to
open the
2. Use the D ATA wheel to select (highlight)
MASTERING
RECORDER MODE
.
screen.
4. Press the F3 [AUTO] button to switch the recorder
to
MASTERING
pop-up message appears, the
screen opens.
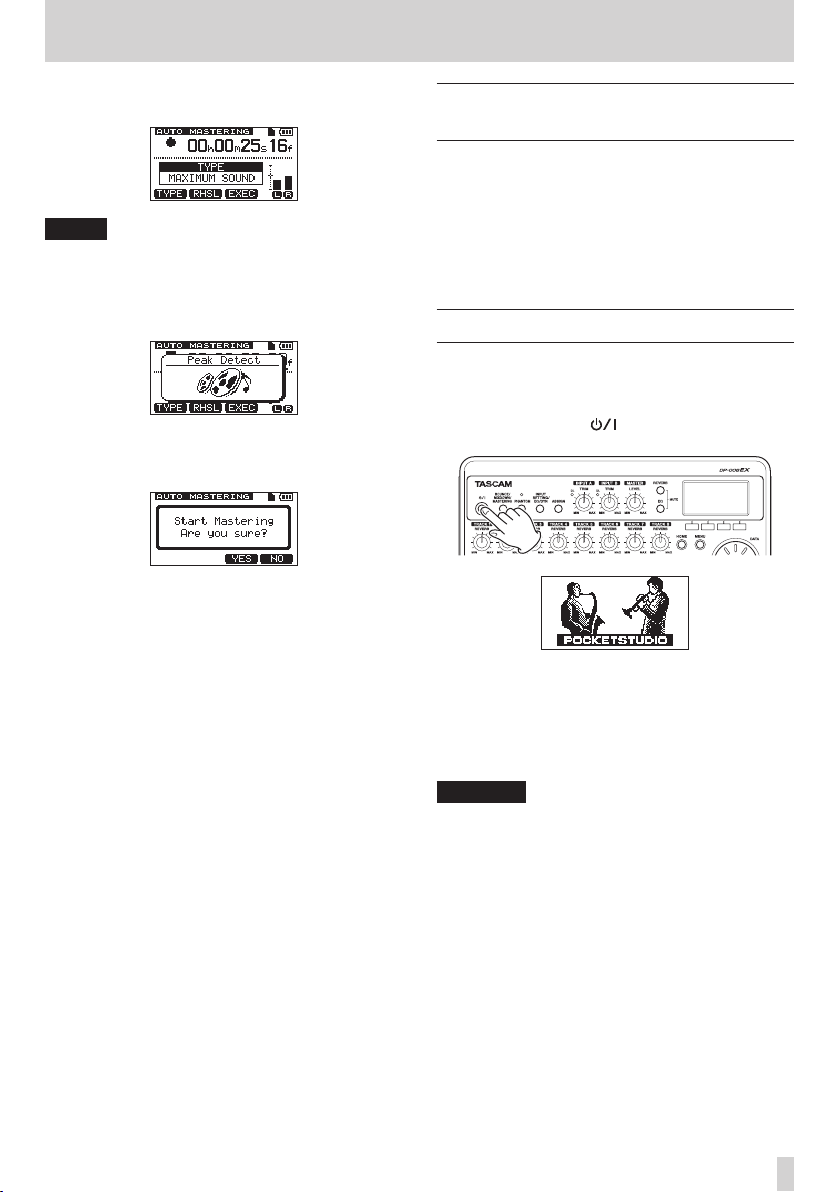
5. Press the F1 [TYPE] button to set the automatic
mastering type to one of the following.
NATURAL SOUND
This setting raises the sound pressure gently.
MAXIMUM SOUND
This setting raises the sound pressure as much
as possible.
6. After setting the automatic mastering type, press
the F2 [RHSL] (Rehearsal) button to start playback
so you can listen to how it sounds.
mode. After a
Mastering!
AUTO MASTERING
3. Press the F4 [EXEC] button to open the
MASTERING
NOTE
If there is no stereo master track, a
Tr k
pop-up message appears and you will not be
able to switch to
22
mode selection screen.
MASTERING
TASCAM DP-008EX
No Master
mode.
After checking the effect of automatic mastering,
press the Stop (8) button to stop playback.
2–Quick Start Guides
7. Press the F3 [EXEC] button to start automatic
mastering.
NOTE
If off-line peak detection has not yet been
conducted for the stereo master track that is being
automatically mastered, a
message appears to show that off-line peak
detection is being conducted.
When off-line peak detection completes, the
following pop-up message appears. Press the F3
[YES] button to start automatic mastering.
Press the F4 [NO] button to cancel automatic
mastering and return to the
screen.
8. When automatic mastering completes, the
MASTERING
OFF
9. When you are done mastering, press the
BOUNCE/MIXDOWN/MASTERING button to
open the
10. Use the DATA wheel to select (highlight)
TRACK
to the
screen reopens with the
.
RECORDER MODE
, and press the F4 [EXEC] button to return
MULTI TRACK
Peak Detect
AUTO MASTERING
screen.
recorder mode.
pop-up
TYPE
MULTI
AUTO
set to
Transferring the stereo master track
to a computer
You can connect this unit to a computer using the
included USB cable and transfer the stereo master
track that you created in “Creating stereo master
tracks” on page 62 in order to, for example, burn it
to a CD.
For instructions about how to transfer a stereo master
track to a computer, see “Exporting stereo master
tracks” on page 81.
Shutting down the unit
When you are finished, shut down the unit.
1. Press the HOME button to open the Home
Screen.
2. Press and hold the button. Release it when
POCKETSTUDIO
The power turns OFF automatically after the unit
completes its shutdown process (saving various
information about operations conducted until
now).
Always follow this procedures to shut down the
unit properly.
CAUTION
If you remove the batteries, disconnect the power
cord or otherwise interrupt the power, the unit
cannot shut down properly and all recorded data
and settings that have been changed since the last
shutdown or song saving operation will be lost.
These data and settings cannot be recovered.
appears on the screen.
TASCAM DP-008EX
23
3 – Names and functions of parts
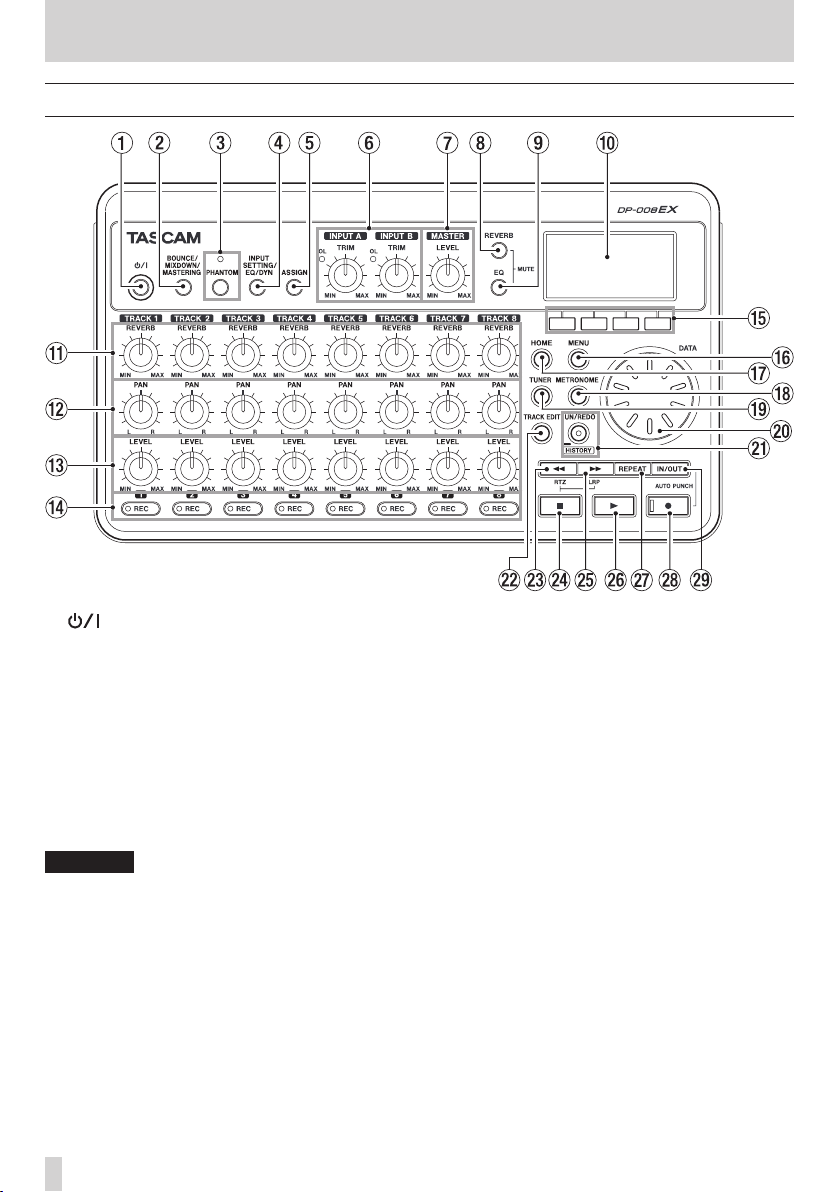
Top Panel
•
1 button / indicator
Press and hold this button to turn the unit ON and
OFF. (See “Start-up & shutdown” on page 33.)
2 BOUNCE / MIXDOWN / MASTERING boutton
Press this button to open the
screen where you can set the recorder mode. (See
“Recorder modes” on page 34.)
3 PHANTOM button/indicator
Press this button to open the
where you can turn phantom power ON and OFF.
The PHANTOM indicator lights when phantom
power is ON. (See “Phantom power” on page 42.)
CAUTION
•
Use the MASTER LEVEL knob to turn the unit’s
output volume down before turning phantom
power ON or OFF. Depending on the mic, a loud
noise could occur, damaging equipment and
harming people’s hearing.
•
Do not connect or disconnect a mic when phantom
power is ON.
•
Turn phantom power ON only when using a
condenser microphone that requires phantom
power.
•
Do not supply phantom power to an unbalanced
dynamic microphone.
RECORDER MODE
PHANTOM
screen
Supplying phantom power to some types of ribbon
microphones could break them. Do not supply
phantom power to a ribbon microphone if you are
in doubt.
4 INPUT SETTING / EQ / DYN button
Press this button to open the
screen where you can set input sources. (See
“Selecting the input source” on page 42.)
Press the F2 [EQ] button when the
SETTING
screen where you can set the input equalizer
Press the F3 [DYN] button when the
SETTING
DYNAMICS
dynamic effects.
5 ASSIGN button
Use this to assign (set) the TRACK inputs (INPUT
A/B). Press this button to open the
ASSIGN
assigned inputs become the recording sources.
(See “Assigning inputs” on page 44.)
screen is open to open the
screen is open to open the
screen where you can set the input
screen on the display. Signals from
INPUT SETTING
INPUT
INPU T EQ
INPUT
INPUT
INPUT
TASCAM DP-008EX
24

3 – Names and functions of parts
6 INPUT A/B TRIM knobs and OL indicators
Use the TRIM knobs to adjust the input levels for
INPUT A/B. (See “Making the first recording” on
page 47.)
If an input source level is too high its OL (overload)
indicator lights. If a TRIM knob is set too high
(higher than 2–3 o’clock usually), the OL indicator
could light even if the volume of the input source
signal is suitable.
7 MASTER LEVEL knob
Adjusts the level of the stereo signal output from
the PHONES and LINE OUT jack.
This knob also adjusts the recording level when
bouncing tracks, mixing down and mastering.
8 REVERB button
Press this button to open the
screen. (See “Reverb” on page 61.)
Press this button and the EQ button at the same
time to open the
“Muting tracks” on page 62.)
9 EQ button
Press to open the
can set the track equalizer. (See “Track equalizers”
on page 61.)
Press this button and the REVERB button at the
same time to open the
“Muting tracks” on page 62.)
0 Display
This shows various information.
q REVERB knobs (TRACK 1–TRACK
Use the REVERB knob for a track to adjust the
level (volume) of its playback signal or assigned
input signal that is sent to the reverb effect.
w PAN knobs (TRACK 1–TRACK
Use to adjust the stereo position of the track
playback signal. (See “Stereo position (panning)”
on page 61.)
e LEVEL knob (TRACK 1–TRACK
Use to adjust the level of the track. (See “Level and
balance” on page 61.)
r REC buttons/indicators (TRACK 1–TRACK
Use to turn the track record function ON (arm for
recording) and OFF. To monitor the input signals
of the internal mics using headphones or an
external monitoring system (powered monitor
speakers or an amplifier and speakers), press that
track’s REC button. When a REC button is ON, its
REC indicator blinks when the recorder is stopped,
and lights when it is recording.
On the
INPUT ASSIGN
to change the assignment.
On the
TRACK MUTE
turn track muting ON and OFF.
TRACK MUTE
EQ SETTING
REVERB SETTING
screen. (See
screen where you
TRACK MUTE
screen, press this button
screen, press this button to
screen. (See
t Function buttons
The functions of these buttons depend on the
current screen. The functions currently assigned
to these buttons are shown at the bottom of the
display screen.
NOTE
•
In this manual, the four function buttons are
referred to as F1, F2, F3 and F4 in order from the
left.
•
The function buttons are assigned the following
functions on the Home Screen.
Stop (8) + F1 buttons: jump to the IN point
Stop (8) + F2 buttons: jump to the OUT point
F3: Set IN point
F4: Set OUT point
y MENU button
Press to open the
structure” on page 30.)
u HOME button
Press to open the the Home Screen. (See “Home
Screen” on page 29.)
When the unit is stopped and the Home Screen is
open, use this button to move the cursor between
time counter divisions. (See “Direct locate
function” on page 52.)
i METRONOME button
Press this button to open the
(See “Metronome” on page 69.)
o TUNER button
Press this button to open the
“Tuner” on page 69.)
p DATA wheel
Use this to select items and change values on the
setting screens.. When the unit is stopped and the
Home Screen is open, turn to change the record/
playback position. (See “Direct locate function” on
page 52.)
a UN/REDO [HISTORY] button / indicator
Press this button to undo the previous action or to
redo the last undone action. (See “Undoing operations (undo)” on page 49.)
Press and hold this button to open the
screen. Use the screen to undo multiple operations at once (multi-undo).
This indicator lights when one or more operations
that have been undone can still be redone.
s TRACK EDIT button
Press this button when the recorder is stopped to
open the
MENU
TRACK EDIT
screen. (See “Menu
screen.
METRONOME
TUNER
screen. (See
HISTORY
screen.
TASCAM DP-008EX
25
3 – Names and functions of parts
d m [RTZ] button
Press when stopped or playing back to search
backward. Press it again to change the speed from
10x to 50x, again for 100x and 1000x.
Press while pressing and holding the Stop (8)
button to locate to the beginning of the song
(00h00m00s00f) using the Return To Zero function
(RTZ). (See “Returning to the song beginning (RTZ
function) or the point where recording was last
started (LRP function)” on page 52.)
f Stop (8) button
Press to stop playback, recording and searching
backward/forward. Press together with the m
[RTZ] button or the , [LRP] button to locate to
the beginning of the song (00h00m00s00f) or the
last recording point (LRP). (See “Returning to the
song beginning (RTZ function) or the point where
recording was last started (LRP function)” on page
52.)
g , [LRP] button
Press when stopped or playing back to search
forward. Press it again to change the speed from
10x to 50x, again for 100x and 1000x.
Press while pressing and holding the Stop (8)
button to locate to the point when recording last
started using the Last Recording Position (LRP)
function. (See “Returning to the song beginning
(RTZ function) or the point where recording was
last started (LRP function)” on page 52.)
h Play (7) button
Press this button to start playback. While pressing
the Record (0) button, press this button to start
recording. Press this button again when recording
to stop recording and start playback (punch out).
j REPEAT button
Turns the repeat playback mode ON and OFF. (See
“Repeat playback” on page 53.)
k Record (0) button / indicator
Press the PLAY (7) button while pressing this
button to start recording. The indicator lights
when recording.
Press when any of the TRACK REC indicators is
blinking, or during playback, to start recording
(punch in). (See “Punching in and out” on page
54.)
Press the IN/OUT button while pressing and
holding this button to start or end auto punch in/
out mode. (See “Using automatic punching in/out”
on page 55.)
l IN/OUT button
Press this button to open the
screen, and to set IN (starting) and OUT (ending)
points for repeat playback and track editing. (See
“Setting IN and OUT points” on page 53.)
The IN and OUT points are also used as the
starting and ending points when creating stereo
master tracks.
Press this button while pressing and holding the
Record (0) button to start or end auto punch in/
out mode. (See “Using automatic punching in/out”
on page 55.)
I/O SETTING
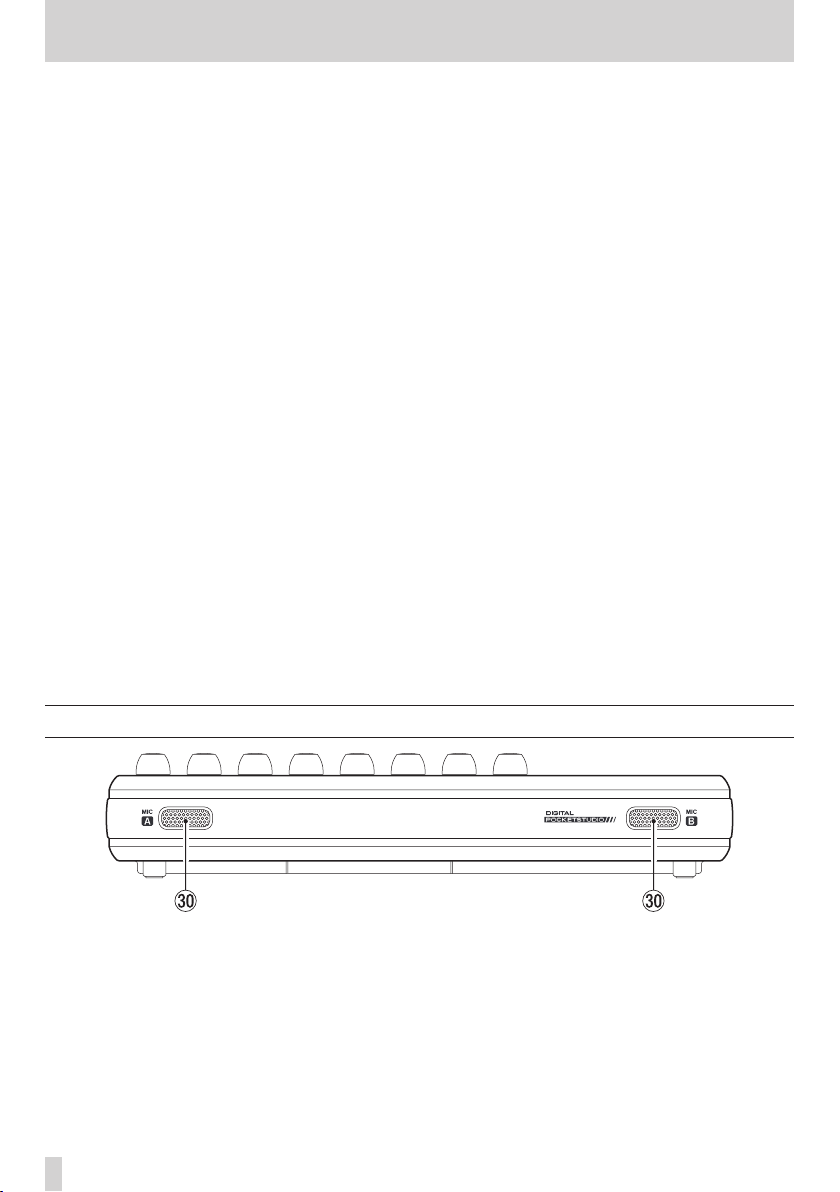
Front panel
; MIC A / MIC B
These are built-in omnidirectional microphones.
They can be used as input sources for INPUT A/B
when set to
MIC/ High
26
Internal MIC/Low
.
TASCAM DP-008EX
or
Internal
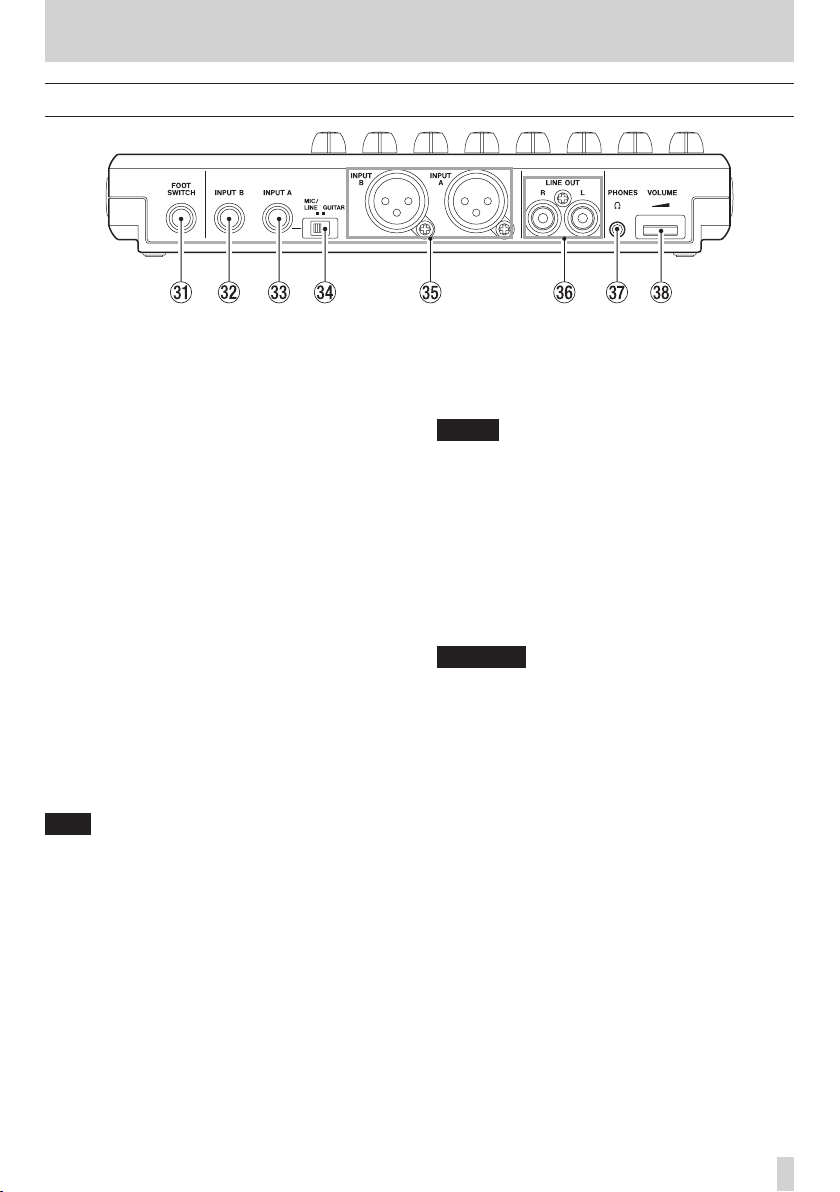
Rear panel
3 – Names and functions of parts
z FOOT SWITCH jack
You can use a foot switch to punch in and out (start
and stop recording).
x INPUT B (standard unbalanced TS)
Use this jack for a line level or mic signal (unbalanced connection).
Use this as an input source by setting
B) on the
input (
external mic (
c INPUT A (standard unbalanced TS)
Use this jack for a guitar, line level or mic signal
(unbalanced connection).
Use this as an input source by setting
A) on the
line level input (
or
Set the MIC/LINE-GUITAR switch on the left side
of the unit according to the input source.
v MIC/LINE-GUITAR switch
Set this switch to match the input signal to the
INPUT A jack on the rear panel. For mic or line
signals, set it to MIC/LINE. For electric guitars
and basses that are connected directly, set it to
GUITAR.
TIP
When connecting an electric-acoustic guitar with
a built-in preamp or an active electric guitar, as
well as when connecting an electric guitar with
effect boxes between it and this unit, set the MIC/
LINE-GUITAR switch to MIC/LINE.
INPUT SETTING
LINE, LINE Mid
MIC
).
INPUT SETTING
GUIT AR/LIN E H
GUIT AR/LIN E, GUIT AR/LIN E M
screen for a line level
or
LINE High
screen for a guitar or
) or an external mic (
IN-B
) or an
IN-A
MIC
(INPUT
(INPUT
).
b INPUT A/ B jacks (balanced XLR)
These are balanced XLR mic/line input jacks.
Condenser microphones that require phantom
power can be connected to these. (1: GND, 2: HOT,
3: COLD)
NOTE
If devices are connected to both the XLR and the
standard TS jacks, the TS jacks are given precedence (the XLR jacks are disabled).
n LINE OUT jacks (unbalanced RCA)
Use these to connect a monitoring system
(powered speakers or an amplifier with speakers).
m PHONES jack (stereo mini)
Use this mini jack to connect stereo headphones.
Use the VOLUME dial next to it to adjust the
volume.
CAUTION
Before connecting headphones, use the VOLUME
dial next to it to minimize the volume. Failure to
do so could cause sudden loud noises that might
harm your hearing, for example.
, VOLUME dial
Use this to adjust the volume output from the
PHONES jack.
TASCAM DP-008EX
27
3 – Names and functions of parts
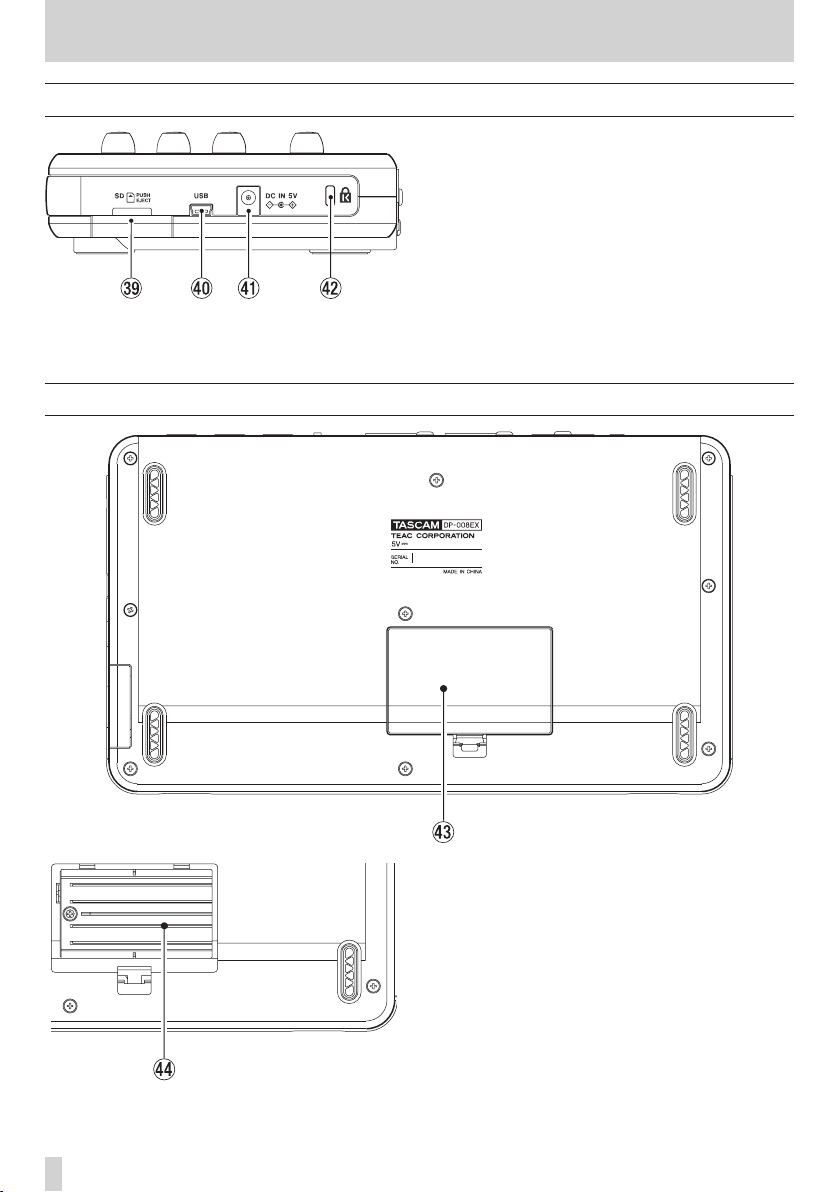
Right side panel
. SD card slot
/ USB connector
! DC IN 5V connector
@ Kensington security slot
Bottom panel
Insert SD cards into this slot.
Connect the unit to a computer using the included
USB cable. This allows to sharing, importing
and exporting files between the unit and the
computer, including backup of the song files. (See
“Connecting with a computer” on page 75.)
Connect a dedicated power adaptor (PS-P520,
sold separately).
TASCAM DP-008EX
28
# Battery compartment cover
$ Battery compartment
The batteries (four AA) that power the unit are
inserted here.
Loading…