
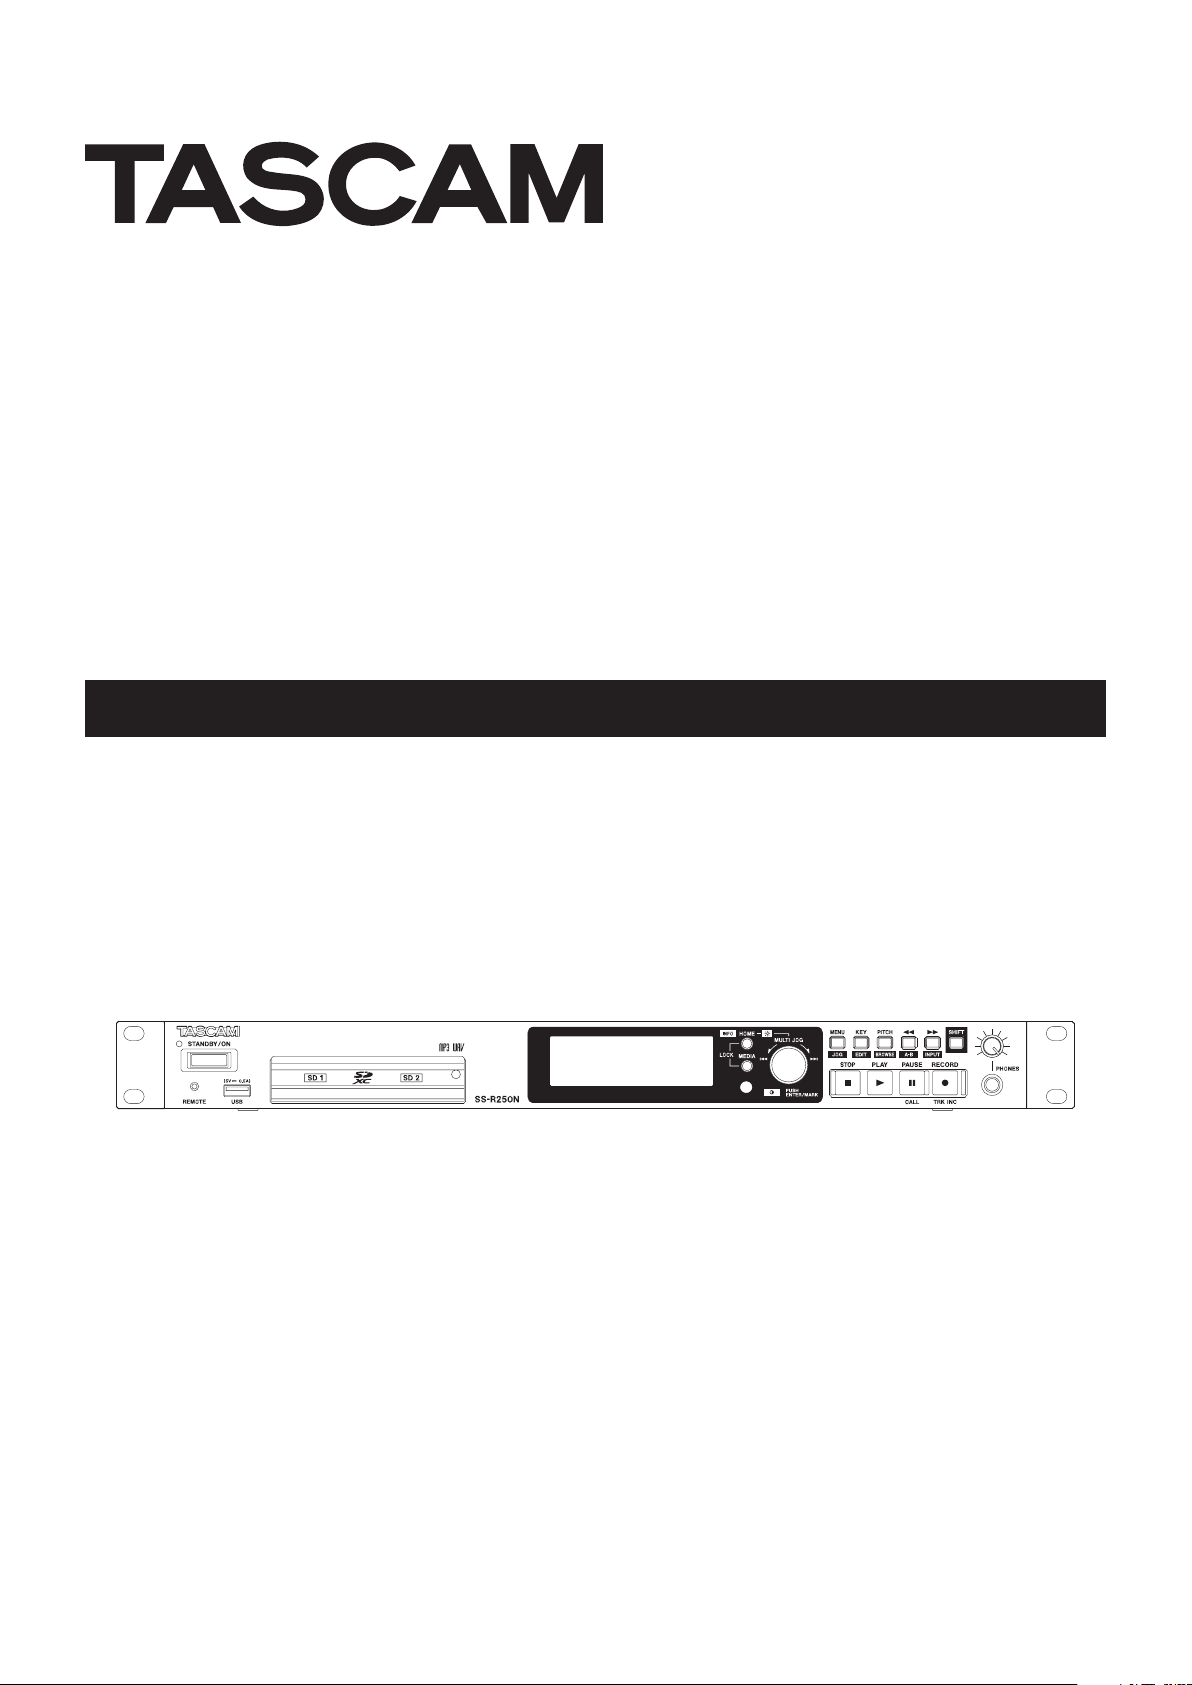
SS-R250N
SOLID STATE RECORDER
OWNER’S MANUAL
D01306320A
IMPORTANT SAFETY PRECAUTIONS
CAUTION: TO REDUCE THE RISK OF ELECTRIC SHOCK, DO NOT REMOVE COVER (OR
BACK). NO USER-SERVICEABLE PARTS INSIDE. REFER SERVICING TO QUALIFIED SERVICE
PERSONNEL.
The lightning flash with arrowhead symbol, within equilateral triangle, is intended to alert
the user to the presence of uninsulated “dangerous voltage” within the product’s enclosure that may be of sufficient magnitude to constitute a risk of electric shock to persons.
The exclamation point within an equilateral triangle is intended to alert the user to the
presence of important operating and maintenance (servicing) instructions in the literature accompanying the appliance.
WARNING: TO PREVENT FIRE OR
SHOCK HAZARD, DO NOT EXPOSE
THIS APPLIANCE TO RAIN OR
MOISTURE.
For U.S.A.
Declaration of Conformity
Model Number: SS-R250N
Trade Name: TASCAM
Responsible party: TEAC AMERICA, INC.
Address: 1834 Gage Road, Montebello, California, U.S.A.
Telephone number: 1-323-726-0303
This device complies with Part 15 of the FCC Rules. Operation
is subject to the following two conditions: (1) this device
may not cause harmful interference, and (2) this device must
accept any interference received, including interference that
may cause undesired operation.
INFORMATION TO THE USER
This equipment has been tested and found to comply
with the limits for a Class B digital device, pursuant to Part
15 of the FCC Rules. These limits are designed to provide
reasonable protection against harmful interference in a
residential installation. This equipment generates, uses, and
can radiate radio frequency energy and, if not installed and
used in accordance with the instruction manual, may cause
harmful interference to radio communications. However,
there is no guarantee that interference will not occur in a
particular installation. If this equipment does cause harmful
interference to radio or television reception, which can be
determined by turning the equipment off and on, the user is
encouraged to try to correct the interference by one or more
of the following measures.
a) Reorient or relocate the receiving antenna.
b) Increase the separation between the equipment and
receiver.
c) Connect the equipment into an outlet on a circuit different
from that to which the receiver is connected.
d) Consult the dealer or an experienced radio/TV technician
for help.
CAUTION
Changes or modifications to this equipment not expressly
approved by TEAC CORPORATION for compliance could void
the user’s authority to operate this equipment.
IN USA/CANADA, USE ONLY ON 120 V SUPPLY.
For Canada
THIS CLASS B DIGITAL APPARATUS COMPLIES WITH CANADIAN
ICES-003.
CET APPAREIL NUMERIQUE DE LA CLASSE B EST CONFORME A
LA NORME NMB-003 DU CANADA.
This product complies with the European
Directives request and the other
Commission Regulations.
CE Marking Information
EN55103-2
a) Applicable electromagnetic environment: E1, E2,
E3, E4
b) The average half-cycle r.m.s. inrush current
1. On initial switch-on: 2.91 Arms
2. After a supply interruption of 5s: 0.15 Arms
TASCAM SS-R250N
2
IMPORTANT SAFETY INSTRUCTIONS
1 Read these instructions.
2 Keep these instructions.
3 Heed all warnings.
4 Follow all instructions.
5 Do not use this apparatus near water.
6 Clean only with dry cloth.
7 Do not block any ventilation openings. Install in
accordance with the manufacturer’s instructions.
8 Do not install near any heat sources such as radiators,
heat registers, stoves, or other apparatus (including
ampliers) that produce heat.
9 Do not defeat the safety purpose of the polarized
or grounding-type plug. A polarized plug has two
blades with one wider than the other. A grounding
type plug has two blades and a third grounding
prong. The wide blade or the third prong are provided for your safety. If the provided plug does not fit
into your outlet, consult an electrician for replacement of the obsolete outlet.
10 Protect the power cord from being walked on or
pinched particularly at plugs, convenience receptacles, and the point where they exit from the apparatus.
11 Only use attachments/accessories specified by the
manufacturer.
12 Use only with the cart, stand, tripod, bracket, or table
specied by the manufacturer, or sold with the apparatus. When a cart is used, use caution when moving
the cart/apparatus combination to avoid injury from
tip-over.
• The apparatus draws nominal non-operating power
from the AC outlet with its POWER or STANDBY/ON
switch not in the ON position.
• The mains plug is used as the disconnect device, the
disconnect device shall remain readily operable.
• Caution should be taken when using earphones or
headphones with the product because excessive
sound pressure (volume) from earphones or
headphones can cause hearing loss.
• If you are experiencing problems with this product,
contact TEAC for a service referral. Do not use the
product until it has been repaired.
CAUTION
• Do not expose this apparatus to drips or splashes.
• Do not place any objects filled with liquids, such as
vases, on the apparatus.
• Do not install this apparatus in a confined space
such as a book case or similar unit.
• The apparatus should be located close enough
to the AC outlet so that you can easily grasp the
power cord plug at any time.
• If the product uses batteries (including a battery
pack or installed batteries), they should not be
exposed to sunshine, fire or excessive heat.
• CAUTION for products that use replaceable lithium
batteries: there is danger of explosion if a battery is
replaced with an incorrect type of battery. Replace
only with the same or equivalent type.
WARNING
• Products with Class ! construction are equipped
with a power supply cord that has a grounding
plug. The cord of such a product must be plugged
into an AC outlet that has a protective grounding
connection.
8
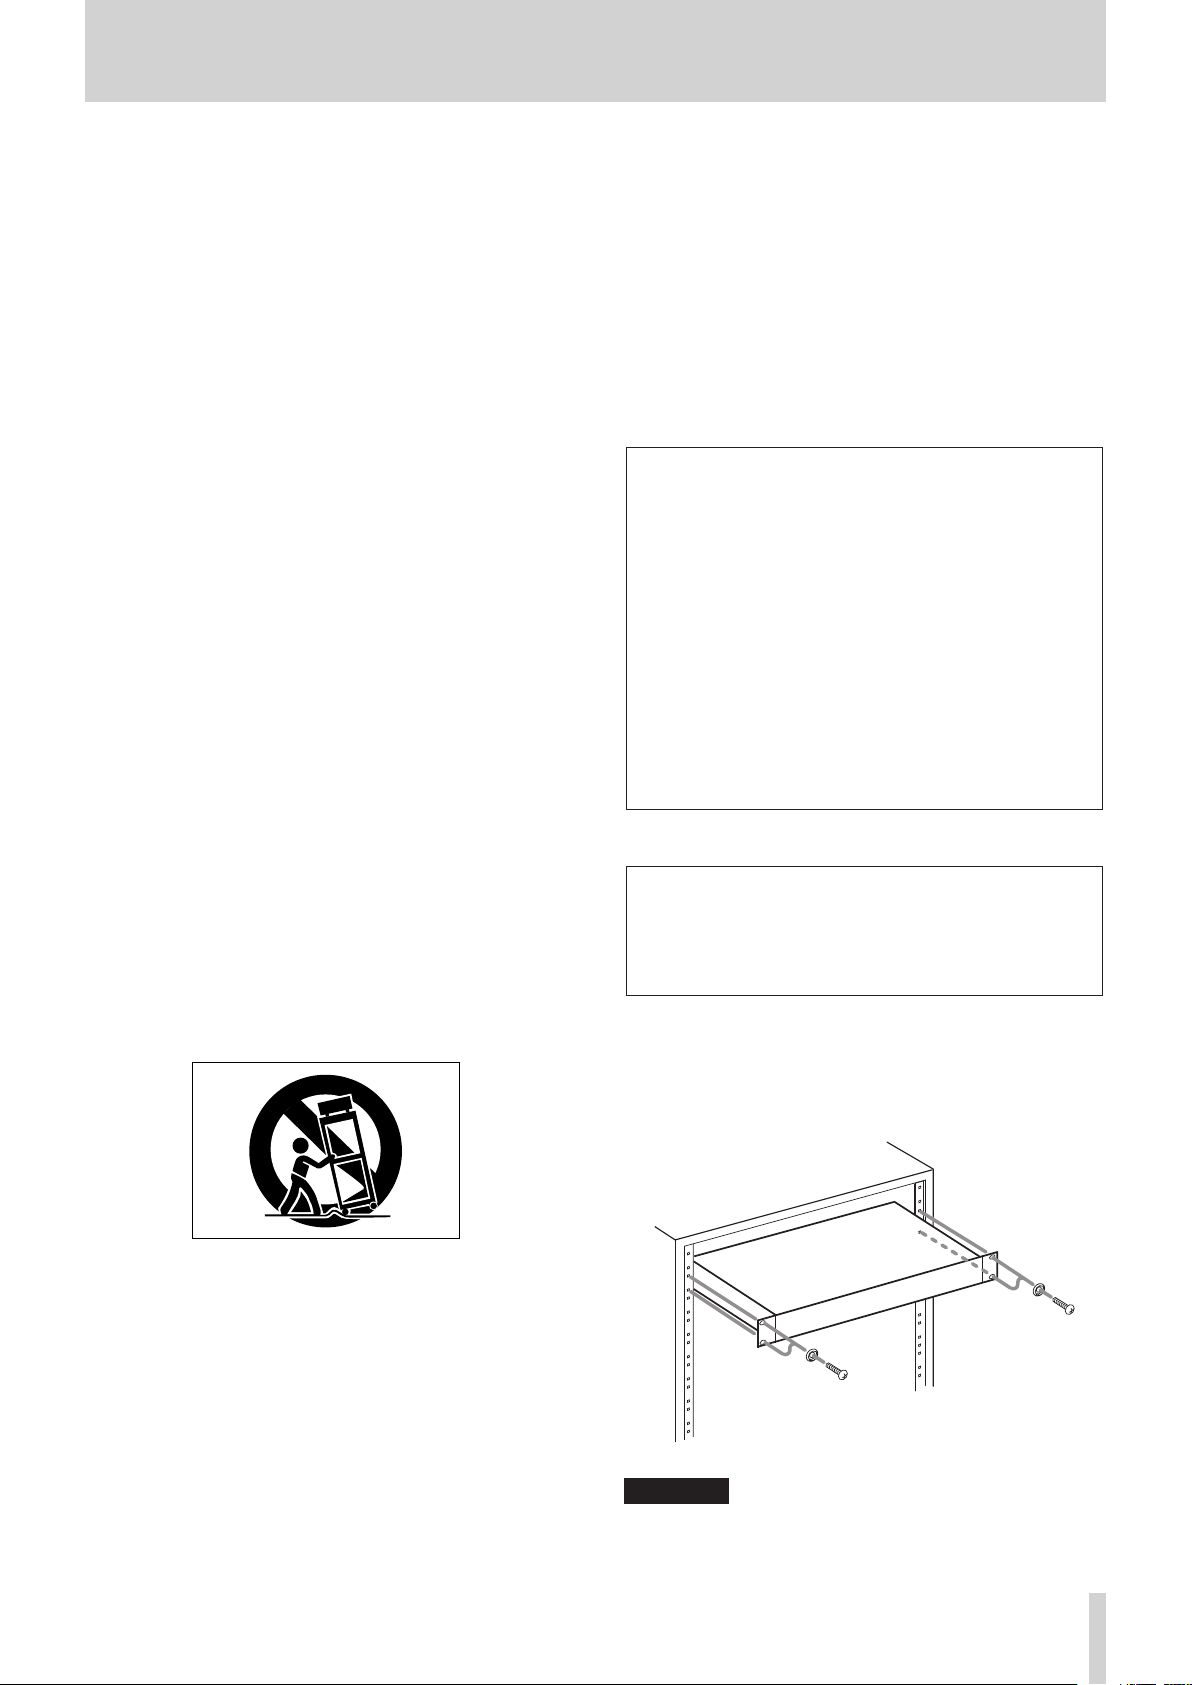
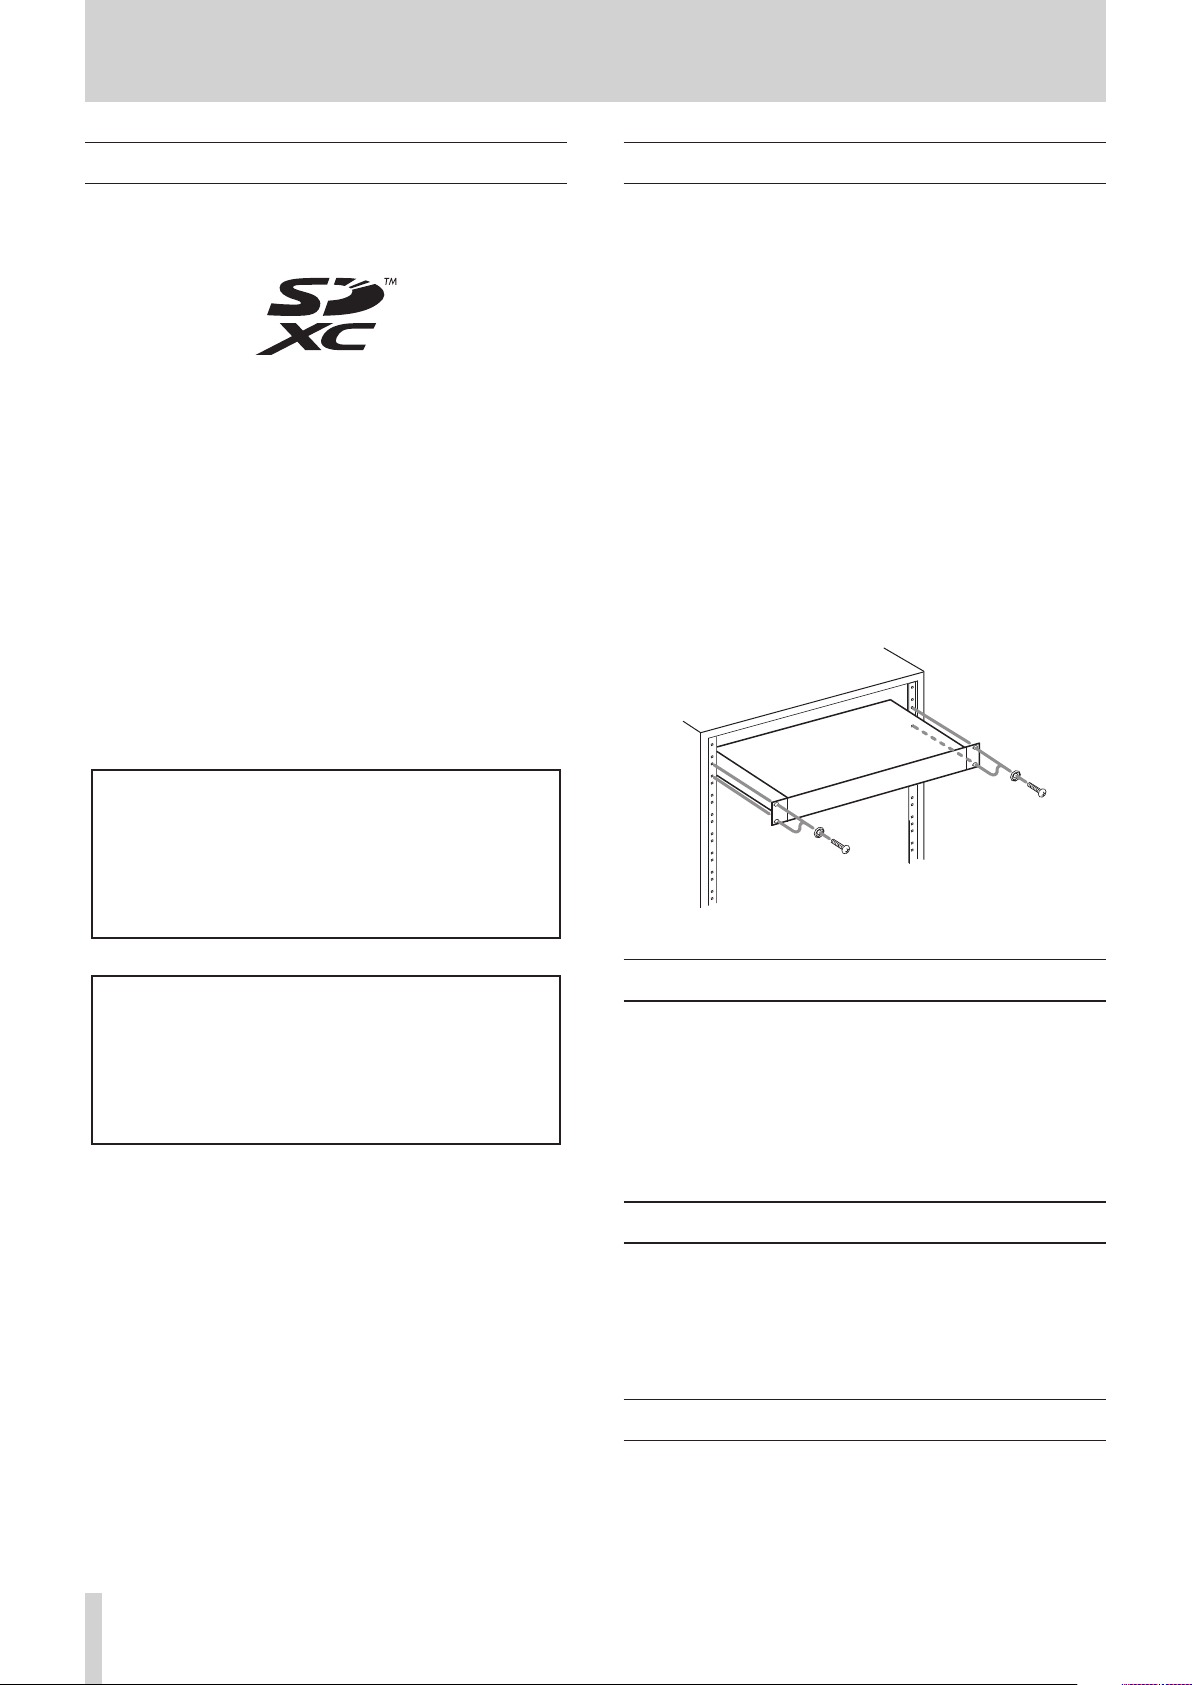
RACK-MOUNTING THE UNIT
Use the supplied rack-mounting kit to mount the unit in a
standard 19-inch rack, as shown below.
Remove the feet of the unit before mounting.
13 Unplug this apparatus during lightning storms or
when unused for long periods of time.
14 Refer all servicing to qualified service personnel.
Servicing is required when the apparatus has been
damaged in any way, such as power-supply cord or
plug is damaged, liquid has been spilled or objects
have fallen into the apparatus, the apparatus has
been exposed to rain or moisture, does not operate
normally, or has been dropped.
CAUTION
•
Leave 1U of space above the unit for ventilation.
•
Allow at least 10 cm (4 in) at the rear of the unit for ventilation.
TASCAM SS-R250N
3

Safety Information
CAUTIONS ABOUT BATTERIES
This product uses batteries. Misuse of batteries could
cause a leak, rupture or other trouble. Always abide by
the following precautions when using batteries.
Never recharge non-rechargeable batteries. The
•
batteries could rupture or leak, causing fire or injury.
When installing batteries, pay attention to the
•
polarity indications (plus/minus (+/–) orientation), and
install them correctly in the battery compartment as
indicated. Putting them in backward could make the
batteries rupture or leak, causing fire, injury or stains
around them.
When you store or dispose batteries, isolate their terminals
•
with insulation tape or something like that to prevent
them from contacting other batteries or metallic objects.
When throwing used batteries away, follow the
•
disposal instructions indicated on the batteries and the
local disposal laws.
Do not use batteries other than those specified. Do not
•
mix and use new and old batteries or different types of
batteries together. The batteries could rupture or leak,
causing fire, injury or stains around them.
V
WARNING
DO NOT INGEST BATTERY, CHEMICAL BURN HAZARD
followed by:
[The remote control supplied with] This product contains a coin/
button cell battery. If the coin/ button cell battery is swallowed,
it can cause severe internal burns in just 2 hours and can lead to
death.
Keep new and used batteries away from children. If the battery
compartment does not close securely, stop using the product
and keep it away from children.
If you think batteries might have been swallowed or placed
inside any part of the body, seek immediate medical attention.
Do not carry or store batteries together with small
•
metal objects. The batteries could short, causing leak,
rupture or other trouble.
Do not heat or disassemble batteries. Do not put them
•
in fire or water. Batteries could rupture or leak, causing
fire, injury or stains around them.
If the batter y fluid leaks, wipe away any fluid on
•
the battery case before inserting new batteries. If
the battery fluid gets in an eye, it could cause loss
of eyesight. If fluid does enter an eye, wash it out
thoroughly with clean water without rubbing the eye
and then consult a doctor immediately. If the fluid
gets on a person’s body or clothing, it could cause skin
injuries or burns. If this should happen, wash it off with
clean water and then consult a doctor immediately.
The unit power should be off when you install and
•
replace batteries.
Remove the batteries if you do not plan to use the unit
•
for a long time. Batteries could rupture or leak, causing
fire, injury or stains around them. If the battery fluid
leaks, wipe away any fluid on the battery compartment
before inserting new batteries.
Do not disassemble a battery. The acid inside the
•
battery could harm skin or clothing.
TASCAM SS-R250N
4
8
For European Customers
Safety Information
Disposal of electrical and electronic equipment
(a) All electrical and electronic equipment should be
disposed of separately from the municipal waste
stream via designated collection facilities appointed
by the government or the local authorities.
(b) By disposing of the electrical and electronic
equipment correctly, you will help save valuable
resources and prevent any potential negative effects
on human health and the environment.
(c) Improper disposal of waste equipment can have
serious effects on the environment and human health
as a result of the presence of hazardous substances in
electrical and electronic equipment.
(d) The crossed out wheeled dust bin symbol indicates
that electrical and electronic equipment must be
collected and disposed of separately from household
waste.
(e) The return and collection systems are available to
the end users. For more detailed information about
disposal of old electrical and electronic equipment,
please contact your city office, waste disposal service
or the shop where you purchased the equipment.
Disposal of batteries and/or accumulators
(a) Waste batteries and/or accumulators should be
disposed of separately from the municipal waste
stream via designated collection facilities appointed
by the government or the local authorities.
(b) By disposing of waste batteries and/or accumulators
correctly, you will help save valuable resources and
prevent any potential negative effects on human
health and the environment.
(c) Improper disposal of waste batteries and/or
accumulators can have serious effects on the
environment and human health as a result of the
presence of hazardous substances in batteries and/or
accumulators.
(d) The crossed out wheeled dust bin symbol indicates
that batteries and/or accumulators must be collected
and disposed of separately from household waste.
If the battery or accumulator contains more than
the specified values of lead (Pb), mercury (Hg), and/
or cadmium (Cd) defined in the Battery Directive
(2006/66/EC), then the chemical symbols for lead (Pb),
mercury (Hg) and/or cadmium (Cd) will be indicated
beneath the crossed out wheeled dust bin symbol.
(e) The return and collection systems are available to
the end users. For more detailed information about
disposal of waste batteries and/or accumulators,
please contact your city office, waste disposal service
or the shop where you purchased them.
8
For China
“仅适用于海拔 2000m 以下地区安全使用”
“仅适用于非熱帯气候条件下安全使用”
“環境保護使用年限”
产品有毒有害物质或元素的名称及含量
机种 :SS-R250N 有毒有害物质或元素
品名
1 CHASSIS 部份 ○ ○ ○ ○ ○ ○
2 FRONT PANEL 部份 ○ ○ ○ ○ ○ ○
3 螺丝部份 ○ ○ ○ ○ ○ ○
4 线材部份 ○ ○ ○ ○ ○ ○
5 PCB Assy 部份 × ○ ○ ○ ○ ○
6 电源部份 ○ ○ ○ ○ ○ ○
7 附属品部份 × ○ ○ ○ ○ ○
8 LABEL 部份 ○ ○ ○ ○ ○ ○
9 包装部份 ○ ○ ○ ○ ○ ○
○ :表示该有毒有害物质在该部件所有均质材料中的含有量均在 GB/T26572 标准规定的限量要求以下。
× :表示该有毒有害物质至少在该部件的某一均质材料中的含量超出 GB/T26572 标准规定的限量要求。
(针对现在代替技术困难的电子部品及合金中的铅 )
铅
(Pb)
汞
(Hg)
镉
(Cd)
六价铬
(Cr6+)
多溴联苯
(PBB)
多溴二苯醚
(PBDE)
TASCAM SS-R250N
5

Contents
1 – Introduction …………………………………………………………….. 9
Features ………………………………………………………………………………………….9
Items included with this product ………………………………………………. 9
Conventions used in this manual……………………………………………….9
Trademarks …………………………………………………………………………………. 10
Precautions for placement and use…………………………………………10
Notes about power supplies ……………………………………………………. 10
Beware of condensation ………………………………………………………….. 10
Cleaning the unit ………………………………………………………………………. 10
SD cards and USB flash drives …………………………………………………. 11
Precautions for use ……………………………………………………………….. 11
SD card write protection………………………………………………………. 11
Note about formatting …………………………………………………………. 11
Using the TEAC Global Site ………………………………………………………. 11
User registration ………………………………………………………………………… 11
2 – Names and Functions of Parts ………………………………….12
Front panel …………………………………………………………………………………. 12
Rear panel …………………………………………………………………………………… 14
PARALLEL connector overview …………………………………………… 15
Wireless remote control (TASCAM RC-10) ……………………………… 16
Home Screen ……………………………………………………………………………… 16
Recording Screen ………………………………………………………………………. 18
Menu structure ………………………………………………………………………….. 19
Basic Menu Screen operations ………………………………………………… 21
Menu operation procedures ……………………………………………….. 22
3 – Preparation ……………………………………………………………..23
Making connections …………………………………………………………………. 23
Preparing the remote control …………………………………………………..24
Installing the coin battery ……………………………………………………. 24
When to replace the battery ……………………………………………….. 24
Battery precautions ………………………………………………………………. 24
Using the wireless remote control ……………………………………… 24
Installing a Dante interface card
(sold separately) ………………………………………………………………………… 25
Turning the unit on and off ……………………………………………………… 25
Setting the built-in clock date and time ………………………………… 26
Adjusting the display………………………………………………………………… 26
Adjusting the display and indicator brightness ……………….. 26
Adjusting the display contrast ……………………………………………. 26
Inserting and removing SD cards …………………………………………… 27
Inserting SD cards …………………………………………………………………. 27
Removing SD cards ……………………………………………………………….. 27
Using the security screw ………………………………………………………. 27
SD card write-protection switches……………………………………… 27
Connecting and disconnecting USB flash drives …………………. 28
Selecting media …………………………………………………………………………. 28
Preparing SD cards and USB flash drives for use ………………….. 28
Setting the lock function …………………………………………………………. 29
Opening the INFORMATION screen ……………………………………….. 29
4 – Playback …………………………………………………………………30
Files that can be played back ………………………………………………….. 30
Tracks and files ………………………………………………………………………. 30
Playback area ……………………………………………………………………………… 30
Setting the playback area…………………………………………………….. 30
Selecting the current folder or current playlist ………………… 30
Setting the play mode ……………………………………………………………… 31
Basic playback operations ……………………………………………………….. 31
Playing tracks …………………………………………………………………………. 31
Selecting tracks for playback …………………………………………………… 31
Skipping to earlier and later tracks …………………………………….. 31
Selecting tracks directly ……………………………………………………….. 31
Searching backward and forward …………………………………………… 32
Jog playback ………………………………………………………………………………. 32
Program playback ……………………………………………………………………… 32
Setting the program ……………………………………………………………… 32
Using the pitch control function …………………………………………….. 33
Using the key control function ……………………………………………….. 33
Using the repeat playback function ……………………………………….. 34
Ordinary repeat playback settings ……………………………………… 34
A-B repeat playback settings ………………………………………………. 34
Using the auto cue function ……………………………………………………. 34
Using the auto ready function ………………………………………………… 35
Using the incremental playback function ……………………………… 35
Playing back in mono ……………………………………………………………….. 35
Using the ducking function …………………………………………………….. 36
Using the EOM function …………………………………………………………… 36
Setting the EOM tally output trigger …………………………………. 36
Using this function ……………………………………………………………….. 36
Using the resume function ………………………………………………………. 37
Using the time skip function …………………………………………………… 37
Setting playback start timing ………………………………………………….. 38
Setting the sampling rate of output audio ……………………………. 38
Using the call function ……………………………………………………………… 38
Setting the call function ………………………………………………………. 38
Using the link playback function ……………………………………………. 39
Making connections for link playback ……………………………….. 39
Making link playback settings …………………………………………….. 39
Using the flash start function ………………………………………………….. 39
5 – Working with Folders and Files (BROWSE screen) ………40
Opening the BROWSE screen ………………………………………………….. 40
Navigating the BROWSE screen ………………………………………………. 40
Icons on the BROWSE screen …………………………………………………… 41
Folder operations ………………………………………………………………………. 41
File operations …………………………………………………………………………… 42
Editing folder and file names ………………………………………………….. 42
Deleting folders and files …………………………………………………………. 43
Undoing folder or file deletion (UNDO) …………………………………. 43
Assigning files to a playlist ………………………………………………………. 43
Creating new folders ………………………………………………………………… 44
Copying folders and files …………………………………………………………. 44
Moving folders and files …………………………………………………………… 45
6 – Editing Playlists ……………………………………………………….46
Playlist editing overview ………………………………………………………….. 46
Opening the playlist screen …………………………………………………….. 46
Opening the playlist screen from the BROWSE screen ……. 46
Opening the current playlist screen from the menu page
Assigning files to a playlist ………………………………………………………. 46
Playlist menu operations …………………………………………………………. 47
Setting the current playlist ………………………………………………….. 47
Editing playlist names ………………………………………………………….. 48
Saving the current playlist with a different name ……………. 48
Deleting playlists …………………………………………………………………… 48
Creating new playlists ………………………………………………………….. 49
Playlist entry menu operations ……………………………………………….. 49
.. 46
TASCAM SS-R250N
6

Contents
Assigning files to playlists ……………………………………………………. 50
Clearing file assignments from playlists ……………………………. 50
RC-SS150 MODE playlist assignment screen ………………………… 51
7 – Recording ……………………………………………………………….52
Unexpected power interruptions …………………………………………… 52
Selecting the input source ………………………………………………………. 52
Input source display………………………………………………………………….. 53
Setting left/right channel inputs separately …………………………. 53
Setting mic/line input sensitivity ……………………………………………. 54
Adjusting input signal levels …………………………………………………… 54
Setting phantom power …………………………………………………………… 55
Setting automatic gain control for mic inputs ……………………… 55
Using the dynamics function ………………………………………………….. 56
Setting the low-cut filter ………………………………………………………….. 56
Setting the recording file format…………………………………………….. 57
Making recording format settings ……………………………………… 57
Setting the second medium for backup and relay recording
WAV file settings ……………………………………………………………………. 58
MP3 file bit rate setting ………………………………………………………… 58
Recording input channel settings ………………………………………. 58
Monitoring input signals ………………………………………………………….. 58
Basic recording operations ………………………………………………………. 58
Setting the file name format……………………………………………………. 59
Editing text …………………………………………………………………………….. 59
Applying dithering to recording …………………………………………….. 60
Using the sampling rate converter …………………………………………. 60
Setting the pause mode …………………………………………………………… 60
Skipping recording standby before recording (direct recording)
Recording a few seconds in advance (pre-recording) …………. 61
Using the synchronized recording function …………………………. 61
Synchronized recording settings ………………………………………… 61
Sync recording operation overview …………………………………… 61
Incrementing track numbers during recording ……………………. 62
Incrementing track numbers manually ……………………………… 62
Incrementing track numbers automatically ……………………… 62
Adding marks manually when recording ……………………………… 63
Adding marks when recording……………………………………………. 63
Adding marks automatically when recording ………………………. 64
Recording duration …………………………………………………………………… 65
8 – Using the Edit Menu…………………………………………………66
Edit menu operations ……………………………………………………………….. 66
Deleting tracks (DELETE) ………………………………………………………….. 66
Dividing tracks (DIVIDE)……………………………………………………………. 67
Combining tracks (COMBINE) ………………………………………………….. 68
Undoing edit menu operations (UNDO) ………………………………. 68
9 – Timer Event Function ………………………………………………. 69
Turning the timer event function on/off ……………………………….. 69
Opening the timer event list screen ………………………………………. 69
Timer event bliss menu operations ………………………………………… 70
Editing timer events ………………………………………………………………….. 70
Setting the event type ………………………………………………………….. 71
Setting the playback area…………………………………………………….. 71
Selecting files/folders for playback by inputting path names
Selecting the input to use when recording ………………………. 72
Setting folders/files to use for FTP server download ………. 72
Selecting files/folders for download by inputting path names
Setting execution schedules for timer events ………………….. 72
.. 57
.. 60
.. 71
… 72
Setting days for timer event execution ……………………………… 73
Setting dates for timer event execution ……………………………. 73
Setting times for timer event execution ……………………………. 73
Setting what happens at the time set for the playback timer event
Setting the frequency intervals of events that repeat …….. 73
Setting the number of event repetitions …………………………… 74
Creating new timer events ………………………………………………………. 74
Deleting timer events ……………………………………………………………….. 74
Deleting all timer events ………………………………………………………….. 74
10 – Mark and Locate Functions ……………………………………. 75
Mark function …………………………………………………………………………….. 75
Adding marks ………………………………………………………………………… 75
Using marks ……………………………………………………………………………. 75
Moving to marks ……………………………………………………………………. 75
Editing mark names ……………………………………………………………… 76
Deleting marks ………………………………………………………………………. 76
Deleting all marks in the current file ………………………………….. 76
Editing mark locations ………………………………………………………….. 76
Viewing mark information …………………………………………………… 76
Locating to a specific time ……………………………………………………….. 77
Locating before completely specifying the time ………………77
11 – Network Functions ………………………………………………..78
Network function settings ……………………………………………………….. 78
FTP client function settings …………………………………………………….. 79
Selecting folders to use by inputting path names …………… 80
FTP server functions …………………………………………………………………. 80
Remote control ………………………………………………………………………….. 81
Setting the SNTP function ……………………………………………………….. 82
12 – Other Settings, Information Screens and Keyboard Op-
erations ……………………………………………………………………….84
Power on action function setting …………………………………………… 84
Adjusting the analog output …………………………………………………… 84
Setting the reference level ………………………………………………………. 84
Using a USB keyboard to operate the unit ……………………………. 84
Setting the keyboard type …………………………………………………… 84
Using the keyboard to input names and values ………………. 85
List of keyboard operations …………………………………………………. 85
Viewing media information …………………………………………………….. 87
Restoring factory default settings ………………………………………….. 87
Saving and loading user settings ……………………………………………. 87
Saving user settings ……………………………………………………………… 87
Loading user settings …………………………………………………………… 87
Exporting/importing system backup data ……………………………. 88
Checking the firmware version ……………………………………………….. 89
Firmware update procedures ………………………………………………….. 89
13– Using the Remote Control Connectors …………………….90
Using the RS-232C connector …………………………………………………. 90
Using a footswitch (TASCAM RC-3F) ………………………………………. 90
Setting up the footswitch ……………………………………………………. 90
Using the footswitch …………………………………………………………….. 90
14 – Messages ……………………………………………………………… 91
15 – Troubleshooting ……………………………………………………94
16 – Specifications ……………………………………………………….. 95
General ……………………………………………………………………………………….. 95
Input and output ………………………………………………………………………. 95
Analog audio input and output ratings …………………………….. 95
.. 73
TASCAM SS-R250N
7

Contents
Digital audio input/output ratings …………………………………….. 95
Control input/output ……………………………………………………………. 96
Audio performance …………………………………………………………………… 96
Other …………………………………………………………………………………………… 96
Dimensional drawings ……………………………………………………………… 97
Block diagrams ………………………………………………………………………….. 98
TASCAM SS-R250N
8

1 – Introduction
Thank you very much for purchasing the TASCAM SS-R250N
Solid State Recorder.
Before using this unit, read this Owner’s Manual carefully so that
you will be able to use it correctly and enjoy working with it for
many years. After you have finished reading this manual, please
keep it in a safe place for future reference.
You can also download this Owner’s Manual from the TEAC
Global Site (http://teac-global.com/).
Features
FTP client/server functions enable the uploading and down-
0
loading of recording/playback files
Event list functions allow recording, playback, downloading
0
and other operations to be conducted automatically at set
times
Time synchronization using the SNTP client function enables
0
even more accurate event execution
Automatic uploading function for recording data
0
Control applications for iOS and Android enable remote con-
0
trol of the transport, browsing and various settings
SD cards (including SDXC cards up to 128 GB) and USB flash
0
drives supported
Dual slots for SD cards enable backup recording and relay
0
recording
Dual format recording allows simultaneous recording of both
0
WAV and MP3 files
Automatic file closing process prevents the loss of recorded
0
data even during sudden power outages
Link playback function enables simultaneous operation of
0
two units
Built-in inputs and outputs include analog XLR and RCA and
0
digital AES/EBU and S/PDIF
Mic input supported and phantom power can be supplied
0
RS-232C serial and 25-pin D-sub parallel connectors built-in
0
IF-DA2 interface card for two-channel Dante input and out-
0
put can be installed (sold separately)
TASCAM RC-SS150 flash start remote control unit supported
0
(sold separately)
As the successor model to the SS-R200 and SS-CDR200, this
0
unit includes their diverse playback and recording functions
Items included with this product
This product includes the following items.
Take care when opening the package to avoid damaging the
items. Keep the packing materials for transportation in the
future.
Please contact the store where you purchased this unit if any of
these items are missing or have been damaged during transportation.
Main unit ………………………………………………………………………………….. × 1
0
Power cord ………………………………………………………………………………..× 1
0
Wireless remote control (TASCAM RC-10) …………………………… × 1
0
Lithium coin battery (CR2025) for remote control (already
0
installed) ………………………………………………………………………………….. × 1
Rackmount screw kit ……………………………………………………………….× 1
0
Security screw kit ……………………………………………………………………. × 1
0
Owner’s Manual (this document) including warranty ……….× 1
0
Conventions used in this manual
In this manual, we use the following conventions:
When we refer to buttons, connectors and other parts of this
0
unit, we use a bold font like this: MENU [JOG] button.
When we show characters that appear on the display, the
0
typeface looks like this: PLAY AREA.
“SD card” indicates SD, SDHC and SDXC memory cards.
0
“USB flash drives” are sometimes called “USB drives”.
0
The medium that is currently selected is called the “current
0
medium”.
The folder that is currently selected is called the “current fold-
0
e r ”.
The playlist that is currently selected is called the “current
0
playlist”.
As necessary, additional information is provided under TIP,
0
NOTE and CAUTION headings.
TIP
These are tips about how to use the unit.
NOTE
These provide additional explanations and describe special
cases.
CAUTION
Failure to follow these instructions could result in injury, damage to equipment or lost recording data, for example.
TASCAM SS-R250N
9
1 – Introduction
Trademarks
TASCAM is a registered trademark of TEAC Corporation.
0
SDXC Logo is a trademark of SD-3C, LLC.
0
MPEG Layer-3 audio coding technology licensed from Fraun-
0
hofer IIS and Thomson.
Supply of this product does not convey a license nor imply
0
any right to distribute MPEG Layer-3 compliant content
created with this product in revenue-generating broadcast
systems (terrestrial, satellite, cable and/or other distribution
channels), streaming applications (via Internet, intranets
and/or other networks), other content distribution systems
(pay-audio or audio-on-demand applications and the like) or
on physical media (compact discs, digital versatile discs, semiconductor chips, hard drives, memory cards and the like).
An independent license for such use is required. For details,
please visit http://mp3licensing.com.
Other company names, product names and logos in this doc-
0
ument are the trademarks or registered trademarks of their
respective owners.
Precautions for placement and use
The operating temperature range of this unit is 5–35 °C.
0
Do not install this unit in the following types of locations. Do-
0
ing so could make the sound quality worse or cause malfunction.
Locations with frequent vibrations
Near windows or other places exposed to direct sunlight
Near heaters or other extremely hot places
Extremely cold places
Very humid or poorly ventilated places
Very dusty places
To enable good heat dissipation, do not place anything on
0
top of the unit.
Do not place the unit on top of a power amplifier or other
0
device that generates heat.
To mount this unit in a rack, use the included rackmount
0
screw kit and mount it as shown in the illustration below.
Leave at least 1U of space open above it in the rack.
Information is given about products in this manual only
for the purpose of example and does not indicate any
guarantees against infringements of third-party intellectual property rights and other rights related to them.
TEAC Corporation will bear no responsibility for infringements on third-party intellectual property rights or their
occurrence because of the use of these products.
With the exception of personal enjoyment and similar
uses, copyrighted materials belonging to third parties
cannot be used without permission from the rights
holders in accordance with copyright law. Please use the
equipment appropriately.
TEAC Corporation will bear no responsibility for rights
infringements committed by users of this product.
Notes about power supplies
Insert the included power cord all the way into the AC IN
0
connector.
Do not connect a power supply other than one that is
0
AC100V (50-60Hz).
Hold the power cord by its plug when connecting or discon-
0
necting it.
Beware of condensation
Condensation could occur if the unit is moved from a cold place
to a warm place, it is used immediately after a cold room has
been heated or it is otherwise exposed to a sudden temperature
change. To prevent this, or if this occurs, let the unit sit for one or
two hours at the new room temperature before using it.
TASCAM SS-R250N
10
Cleaning the unit
Use a dry soft cloth to wipe the unit clean. Do not wipe with
chemical cleaning cloths, thinner, alcohol or other chemical
agents. Doing so could damage the surface or cause discoloration.

1 – Introduction
SD cards and USB flash drives
This unit uses SD cards and USB flash drives for recording and
playback.
A list of SD cards and USB flash drives that have been confirmed
for use with this unit can be found on our web site. Please access
to a product page of this product from the TEAC Global Site
(http://teac-global.com) to find the list or contact the TASCAM
customer support service.
Precautions for use
SD cards and USB flash drives are delicate media.
In order to avoid damaging SD cards and USB flash drives, please
take the following precautions when handling them.
Do not leave them in extremely hot or cold places.
0
Do not leave them in extremely humid places.
0
Do not let them get wet.
0
Do not put things on top of them or twist them.
0
Do not hit them.
0
Do not remove or insert them during recording, playback,
0
data transmission or other access.
When transporting them, put them into cases, for example.
0
Using the TEAC Global Site
You can download the Owner’s Manual necessary for this unit
from the TEAC Global Site (http://teac-global.com/).
Open the TEAC Global Site (http://teac-global.com/).
1.
In the TASCAM Downloads section, click the desired lan-
2.
guage to open the Downloads website page for that language.
NOTE
If the desired language does not appear, click Other Languages.
Click the product name in the “Search by Model Name”
3.
section to open the Downloads page for that product.
Select and download the Owner’s Manual that are needed.
4.
User registration
Customers in the USA, please visit the TASCAM website (http://
tascam.com/) to register as a user online.
SD card write protection
This unit writes track information to the media in order to improve operation performance. Since track information cannot be
written to SD cards that are write-protected, the amount of time
needed to read media will become longer, for example.
Note about formatting
SD cards and USB flash drives formatted by this unit are optimized to improve performance during recording. Use this unit
to format the SD cards and USB flash drives to be used with it.
Errors might occur when recording with this unit using an SD
card or USB flash drive formatted by a computer or other device.
TASCAM SS-R250N
11
2 – Names and Functions of Parts
Front panel
1 STANDBY/ON button and indicator
Press this button to turn the unit on and off (standby).
The STANDBY/ON indicator lights when the unit is off.
CAUTION
Before turning the unit on, lower the volumes of connected
equipment to their minimum levels.
Failure to do so could result in a sudden loud noise that could
harm hearing, for example.
2 Display
This shows a variety of information.
3 HOME [INFO] button
When a Menu or BROWSE screen is open, press this button
i
to return to the Home Screen.
When the Home Screen is open, press this button to
i
change the Home Screen display mode.(see “Home Screen”
on page 16), (see “Recording Screen” on page 18)
Press this button and the MEDIA button at the same time
i
to open the LOCK SETUP screen.(see “Setting the lock function” on page 29)
Press this button while pressing the SHIFT button to show
i
the operation status of the unit.(see “Opening the INFORMATION screen” on page 29)
4 MENU [JOG] button
When the Home Screen is open, press this button to open
i
the Menu Screen.(see “Menu structure” on page 19), (see
“Basic Menu Screen operations” on page 21)
When the Menu Screen is open, press this button to
i
change the menu page.
When the Menu Screen is open, press this button while
i
pressing the SHIFT button to change the menu page in
reverse direction.
When a sub menu screen is open, press this button to go
i
back one step in the menu.
Press this button while pressing the SHIFT button when
i
playing back, in playback standby or stopped on the Home
Screen to enable jog playback mode.(see “Jog playback” on
page 32)
Press this button when a pop-up message is open to close
i
it.
5 KEY [EDIT] button
When the Home Screen is open, press this button to open
i
the key control setting pop-up window.(see “Using the key
control function” on page 33)
When this pop-up is open, press the MULTI JOG dial to
turn the key control function on/off.
When this pop-up is open, turn the MULTI JOG dial to
change the key.
Press this button while pressing the SHIFT button to open
i
the edit menu pop-up.(see “Edit menu operations” on page
66)
6 PITCH [BROWSE] button
When the Home Screen is open, press this button to open
i
the pitch control setting pop-up window.
(see “Using the pitch control function” on page 33)
When this pop-up is open, press the MULTI JOG dial to
turn the pitch control function on/off.
When this pop-up is open, turn the MULTI JOG dial to
change the pitch in 1% increments.
When this pop-up is open, press and turn the MULTI JOG
i
dial to change the pitch in 0.1% increments.
Press this button while pressing the SHIFT button when
i
playing back, in playback standby or stopped to open the
BROWSE screen.
7 m [A-B] button
When playing back or in playback standby, press to skip
i
by the amount of time set with the time skip function.(see
“Using the time skip function” on page 37)
When playing back or in playback standby, press and hold
i
this button to search backward while outputting audio
(review).
When stopped and the playback area is set to FOLDER, press
i
to switch the current folder.
When stopped and the playback area is set to PLAYLIST,
i
press to switch the current playlist.
When the
i
one level.
When the Home Screen is open, press this button while
i
pressing the SHIFT button to turn the A-B repeat playback
function on.(see “A-B repeat playback settings” on page
34)
BROWSE
screen is open, press this button to go up
(see “Navigating the BROWSE screen” on page 40)
TASCAM SS-R250N
12

2 – Names and Functions of Parts
8 , [INPUT] button
When playing back or in playback standby, press to skip
i
by the amount of time set with the time skip function.(see
“Using the time skip function” on page 37)
When playing back or in playback standby, press and hold
i
this button to search forward while outputting audio (cue).
When stopped and the playback area is set to FOLDER, press
i
to switch the current folder.
When stopped and the playback area is set to PLAYLIST,
i
press to select the current playlist.
When the BROWSE screen is open and a folder is selected,
i
press this button to show the contents of that folder.
(see “Navigating the BROWSE screen” on page 40)
Press this button while pressing the SHIFT button to open
i
the input source setting pop-up window. When the input
source setting window is open, turn the MULTI JOG dial
to select the input source. After selection press the MULTI
JOG dial to change the input source.(see “Selecting the
input source” on page 52)
9 SHIFT button
While pressing this button, press a button with a blue label
i
to use that function.
When the Home Screen is open, press this button to scroll
i
file and folder names.
When the BROWSE Screen is open, press this button to scroll
i
file and folder names that are not shown completely.
While pressing this button, turn the MULTI JOG dial to
i
adjust the contrast of the display.
0 PHONES jack and knob
Use this standard stereo jack to connect stereo headphones.
Use an adapter to connect headphones with a mini plug.
Use the PHONES knob to adjust the headphone output level.
CAUTION
Before connecting headphones, minimize the volume with the
PHONES knob. Failure to do so could result in a sudden loud
noise that could harm hearing, for example.
q REMOTE jack (2.5mm TRS)
Connect a TASCAM RC-3F footswitch or TASCAM RC-20 direct
play remote control (both sold separately) here. This enables
remote starting and stopping of playback and other functions.
When a TASCAM RC-3F footswitch is connected, you can
change the functions of the three pedals.(see “Using a
footswitch (TASCAM RC-3F)” on page 90)
w USB port
Connect (and disconnect) USB flash drives here.(see “Connecting and disconnecting USB flash drives” on page 28)
When a USB flash drive is connected, files on it can be played
back and files can be recorded to it. In addition, you can also
connect a USB keyboard here and use it to input folder and
file names, for example, as well as for external control.
By default, the unit is set to use a Japanese (JIS) keyboard.
Since English and Japanese (JIS) keyboards use different
layouts, change the setting on the KEYBOARD TYPE screen if
you are using an English keyboard.(see “Setting the keyboard
type” on page 84)
e SD card slots
Insert SD cards in these slots.(see “Inserting and removing SD
cards” on page 27)
r Remote control signal receiver
Signals from the remote control (TASCAM RC-10) are received
here. When operating the remote control, point it toward this
receiver.
t MEDIA button
When the Home Screen is displayed, press this button to
i
open the MEDIA SELECT Screen.(see “Selecting media” on
page 28)
Press this button and the HOME [INFO] button at the same
i
time to open the LOCK SETUP screen.(see “Setting the lock
function” on page 29)
y MULTI JOG dial
This dial functions as a dial when turned and as a button
when pressed.
Dial functions
When the home screen is open during playback or play-
i
back standby and marks have been added, turn the MULTI
JOG dial to move to marks. When there are no marks, turn
to skip between tracks.
When inputting a program, use to select tracks to assign.
i
When a Menu Screen is open, turn to select items and
i
change setting values.
When editing names, use to select characters.
i
During jog playback, use to move in 10msec intervals.(see
i
“Jog playback” on page 32)
While pressing the SHIFT button, turn the MULTI JOG dial
i
to adjust the contrast of the display.
While pressing the HOME [INFO] button, turn the MULTI
i
JOG dial to adjust the brightness of the display and the
various indicators.
When the BROWSE screen is open, turn to select folders and
i
files within the same folder.(see “Navigating the BROWSE
screen” on page 40)
Button functions
When the Home Screen is open and the unit is stopped,
i
recording, in recording standby, playing back or in playback standby, press this button to add a mark.(see “Adding
marks manually when recording” on page 63),(see “Adding marks” on page 75)
When a Menu Screen is open, press to confirm selections
i
and settings (ENTER button function).
When the BROWSE screen is open, press this to show the
i
pop-up folder/file menu for the selected folder/file.(see
“Folder operations” on page 41),(see “File operations” on
page 42)
u STOP button
Press to stop playback or recording.
i
When the playback area is set to PROGRAM and playback is
i
stopped, press to clear the entire program.
i PLAY button and indicator
Press when stopped or in playback standby to start play-
i
back.
Press when in recording standby to start recording.
i
This button lights during playback and recording.
i
This button blinks during jog playback.
i
TASCAM SS-R250N
13
2 – Names and Functions of Parts
o PAUSE [CALL] button and indicator
Press when stopped or playing back to start playback
i
standby.
Press when recording to start recording standby.
i
This button lights when in playback standby or recording
i
standby.
This button blinks during jog playback.
i
When in playback standby, press this button to search for
i
the call point (last point playback started from playback
standby) and resume playback standby.(see “Using the call
function” on page 38)
Rear panel
a MIC/LINE IN (BALANCED) L/R jacks
These are balanced XLR analog input jacks.
The nominal input level can be set to either +4 dBu (de-
i
fault) or +6 dBu. (1: GND, 2: HOT, 3: COLD),(see “Setting the
reference level” on page 84)
By changing the input sensitivity, you can use these as mic
i
inputs.
(see “Setting mic/line input sensitivity” on page 54)
s ANALOG IN (UNBALANCED) L/R jacks
These are analog RCA pin input jacks.
The nominal input level is -10 dBV.
d ANALOG OUT (UNBALANCED) L/R jacks
These are analog RCA pin output jacks.
The nominal output level is -10 dBV.
f ANALOG OUT (BALANCED) L/R jacks
These are balanced XLR analog output jacks.
The nominal output level can be set to either +4 dBu (default)
or +6 dBu. (1: GND, 2: HOT, 3: COLD) (see “Setting the reference level” on page 84)
g AES/EBU IN jack
This is a balanced XLR AES3-2003/IEC60958-4 (AES/EBU) format
digital audio input jack.
A sampling rate converter that supports 32–192 kHz is builtin.(see “Using the sampling rate converter” on page 60)
To link a second SS-R250N, connect the AES/EBU OUT jack on
the other unit to this jack.(see “Making connections for link
playback” on page 39)
h AES/EBU OUT jack
This is a balanced XLR AES3-2003/IEC60958-4 (AES/EBU) format
digital audio output jack.
To link a second SS-R250N, connect the AES/EBU IN jack on
the other unit to this jack.(see “Making connections for link
playback” on page 39)
p RECORD [TRK INC] button and indicator
Press when stopped to start recording standby.
i
When recording, press to divide the recording by creating a
i
new file (increment the track number).
This button lights when recording or in recording standby.
i
If the currently-selected medium is not loaded, pressing
i
this button starts input monitoring and the selected input
signal will be output. This button blinks during input monitoring.
j SPDIF IN jack
This is a digital audio input jack.
A sampling rate converter that supports 32–192 kHz is built-
in.(see “Using the sampling rate converter” on page 60)
To link a second SS-R250N, connect the SPDIF OUT jack on
the other unit to this jack.(see “Making connections for link
playback” on page 39)
k SPDIF OUT jack
This is a digital audio output jack.
Signals can be output in IEC60958-3 (S/PDIF) format.
To link a second SS-R250N, connect the SPDIF IN jack on
the other unit to this jack.(see “Making connections for link
playback” on page 39)
l RS-232C connector
This is a 9-pin D-sub RS-422 control input/output connector.
Connect a TASCAM RC-SS150 remote control or personal
computer, for example, here.(see “Using the RS-232C connector” on page 90)
; PARALLEL connector
This is a 25-pin D-sub parallel control input/output connector.
Connect a TASCAM RC-SS20 or other external controller here.
z ETHERNET port
This is an Ethernet port. Use this to connect to a network,
transfer files and control the unit externally.
x OPTION slot
Use this slot to install an I/O card (sold separately).
c AC IN connector
Plug the included power cord in here.
TASCAM SS-R250N
14
2 – Names and Functions of Parts
PARALLEL connector overview
The PARALLEL connector on the back allows external control of the unit. (A
TASCAM RC-SS20 can also be connected.)
The pin assignments are as follows.
Pin No. Function
GND
1
PLAY/Flash 1
2
STOP/Flash 2
3
RECORD/Flash 3
4
/
5
6
7
8
9
10
11
12
13
14
15
16
17
18
19
20 Flash Page** IN
21 EOM Tally OUT
22 Device Select Tally 1*** OUT
23
24 Device Select Tally 2*** OUT
25 +5V —
(Next)/Flash 4
.
(Previous)/Flash 5
Flash Load
Fader Start
Flash Tally
Ready Tally
Record Tally
Stop Tally
Play Tally
Remote Select*
Ready/Flash 6
Call/Flash 7
Auto Cue/Flash 8
Auto Ready/Flash 9
Pitch/Flash 10
Ducking Tally
IN: External command reception active low (usually 30
msec or more, 1 sec or more when recording MP3 files,
functions when connected to GND)
OUT: Transport status display signals by open collector (10Ω
output impedance, 20V withstand voltage, 35mA maximum current)
+5V: 50mA maximum supplied current
IN/OUT
–
IN
IN
IN
IN
IN
IN
IN
OUT
OUT
OUT
OUT
OUT
IN
IN
IN
IN
IN
IN
OUT
*Pin 14 (Remote Select)
When high, the first function is enabled when there are two functions
separated by a / for the input pin in the above table (pins 2–6 and
15–19), and it can be used as an ordinary parallel controller.
When low, those input pins function as flash start keys.
**Pin 20 (Flash Page)
When pin 14 (Remote Select) is low, the pin 20 high/low
status determines the assigned tracks as follows.
#14 #20 Flash start tracks
Low High 1–10
Low Low 11–20
In the following connection example, fader starts and stops
control playback of this unit.
GND
Pin 1
STOP
START
***Pin 22/Pin 24 (Device Select Tally 1/2)
PARALLEL 113
Pin 8
The high/low statuses of pins 22 and 24 determine the device
assignments as follows.
#22 #24 Device assignment
Low Low USB
High High SD1
High Low SD2
1425
TASCAM SS-R250N
15
2 – Names and Functions of Parts
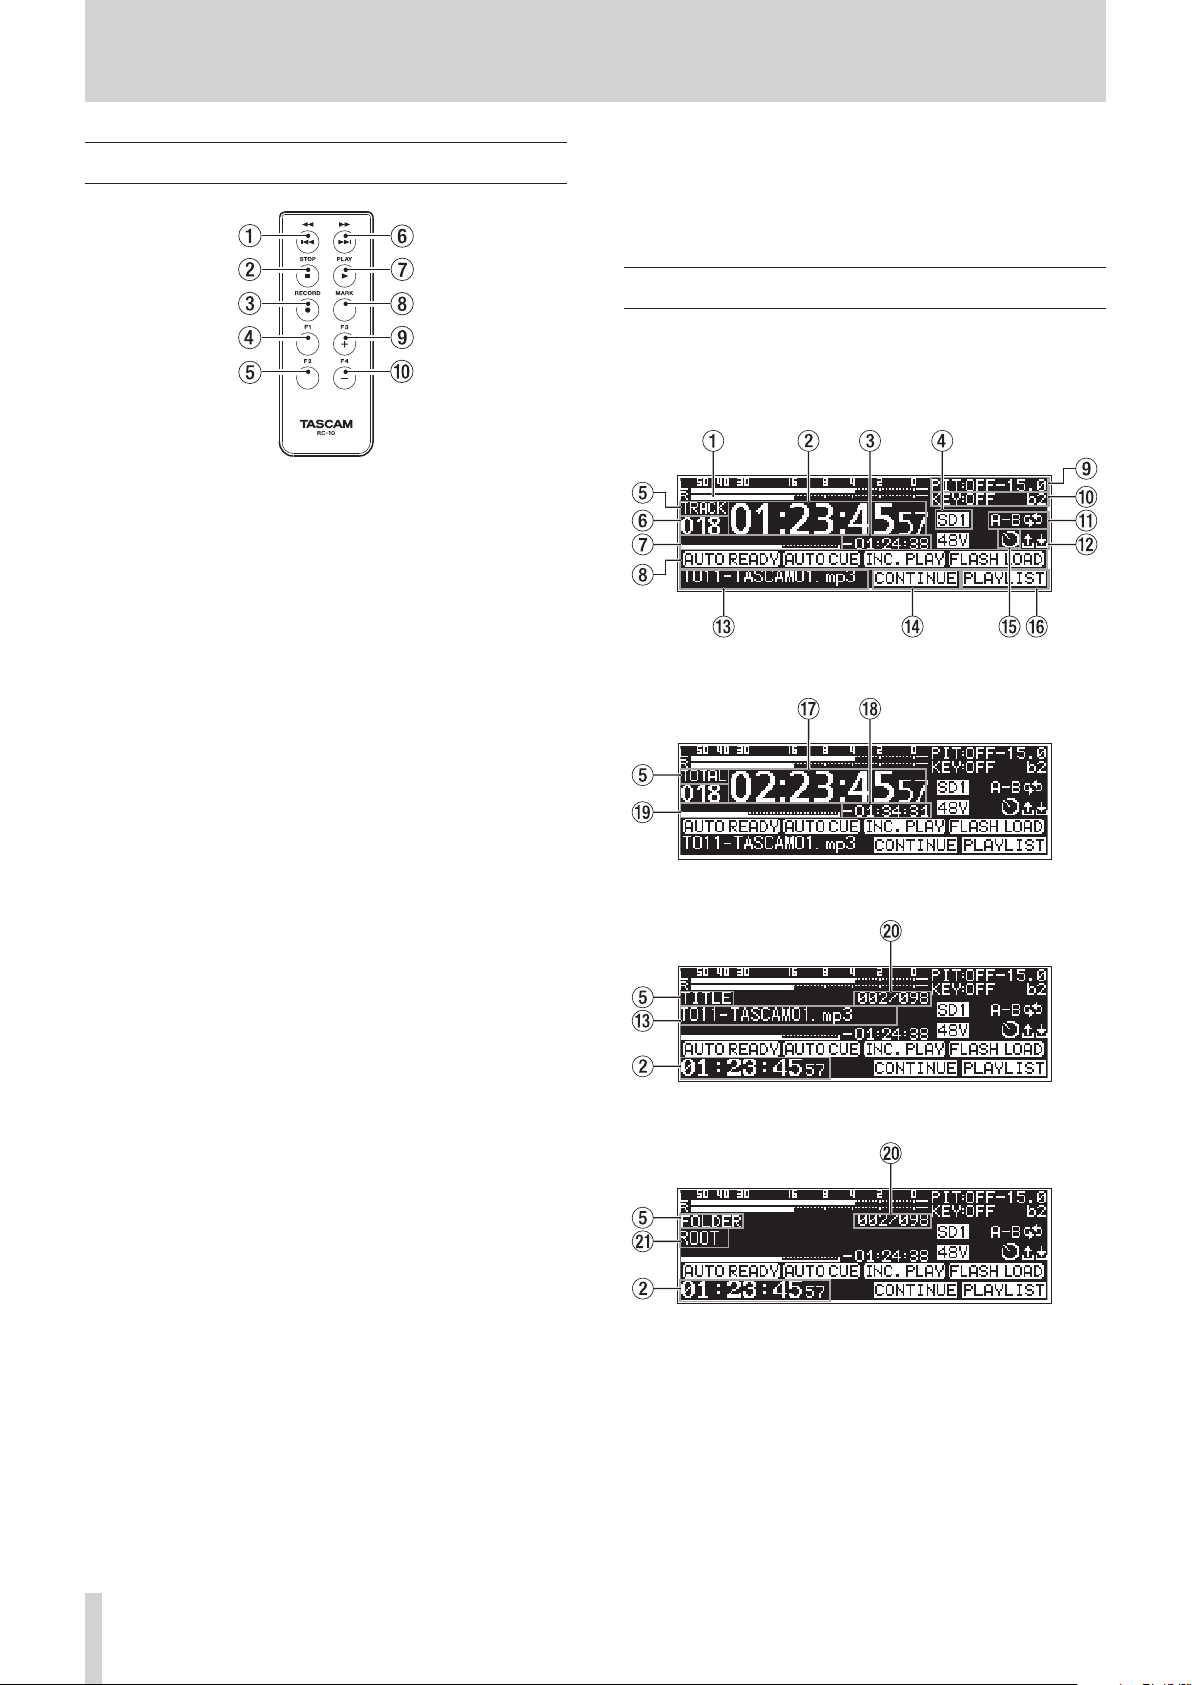
Wireless remote control (TASCAM RC-10)
1 m/. button
Press briefly during playback to skip to the beginning of the
track.
Press briefly when near the beginning of a track to skip to the
beginning of the track before it.
Press and hold to search backwards.
When the BROWSE screen is open, press to move up one level.
(see “Navigating the BROWSE screen” on page 40)
2 STOP [8] button
Press to stop playback or recording.
3 RECORD [0] button
Press when stopped to start recording standby.
When recording, press to increment the track number (create
a new file and continue recording).(see “Incrementing track
numbers manually” on page 62)
4 F1 button
Press when stopped or playing back to start playback standby.
Press when recording to start recording standby.
5 F2 button
When a Menu Screen is open, press this button to return to
the Home Screen.
Press when the Home Screen is open to change the display
mode.(see “Home Screen” on page 16)
6 ,// button
Press briefly to skip to the beginning of the next track.
Press and hold to search forward.
When the BROWSE screen is open and a folder is selected,
press this button to open that folder.
7 PLAY [7] button
Press when stopped or playback ready to start playback.
Press when in recording standby to start recording.
8 MARK button
When stopped, recording, playing back or in playback standby, press this button to add a mark.(see “Adding marks manually when recording” on page 63) ,(see “Adding marks” on
page 75)
9 F3 [+] button
Press to move to the next mark.
When the BROWSE screen is open, press to move the cursor
up.(see “Navigating the BROWSE screen” on page 40)
0 F4 [−] button
Press to move to the mark before the current location.
When the BROWSE screen is open, press to move the cursor
down.(see “Navigating the BROWSE screen” on page 40)
Home Screen
The Home Screen has four display modes: TRACK, TOTAL, TITLE
and FOLDER.
Each time you press the HOME [INFO] button, the display mode
will change.
Home Screen TRACK display mode
Home Screen TOTAL display mode
Home Screen TITLE display mode
Home Screen FOLDER display mode
1 Level meters
This area shows the levels of the input and playback signals.
2 Elapsed time from track beginning
This shows the elapsed time from the beginning of the current track (hours: minutes: seconds).
During jog playback 10msec intervals are also shown.
TASCAM SS-R250N
16
2 – Names and Functions of Parts
3 Remaining time to track end
This shows the remaining time to the end of the current track
(hours: minutes: seconds).
4 Current medium
This shows the name of the currently selected medium.(see
“Selecting media” on page 28)
: USB flash drive selected
: SD card 1 selected
: SD card 2 selected
5 Display mode
This shows the current Home Screen display mode.
6 Track number
This shows the number of the currently playing track.
7 Track playback position
This bar shows the current playback position.
As playback progresses, the bar extends from the left.
8 Playback function activation status
Icons appear for the playback functions that are currently on.
Icon Meaning
Appears when auto ready function is on
Appears when auto cue function is on
Appears when incremental playback function is
on
Appears when already flash loaded
9 Pitch control status
This shows whether the pitch control function is on/off and
the currently set pitch adjustment.
0 Key control status
This shows whether the key control function is on/off and the
currently set key adjustment.
q Repeat playback status
An icon appears when the repeat playback function is on.
: Repeat playback
: A-B repeat playback
w Upload/download status
An icon appears when files, for example, are being uploaded
or downloaded via a network.
: Uploading
: Downloading
e Track title
This shows the title of the current track.
Press the SHIFT button on the unit to scroll this.
r Playback mode
This shows the current playback mode.(see “Setting the play
mode” on page 31)
: Continuous playback mode
: Single playback mode
: Program playback mode
: Random playback mode
t Timer event setting status
The icon appears when the timer event function is on.(see
“Turning the timer event function on/off” on page 69)
y Playback area
This shows the current playback file area.
: All files on the current medium
: All files in the selected folder
: All files assigned to the playlist
u Total track elapsed time
This shows the elapsed time of the play area (hours: minutes:
seconds).
i Total track remaining time
This shows the remaining time of the play area (hours: minutes: seconds).
o Total elapsed playback position
This bar shows the current playback position.
As playback progresses, the bar extends from the left.
p Track number/total number of tracks
This shows the current track number and total number of
tracks in the current playback area.
a Folder name
This shows the name of the folder that contains the current
track.
NOTE
When stopped, the total playback time of the playback area
i
is always shown regardless of the Home Screen display mode
setting.
In PROGRAM mode, the elapsed time and remaining time are
i
shown for the entire program rather than the entire playback
area.
TASCAM SS-R250N
17
2 – Names and Functions of Parts
Recording Screen
The Recording Screen has four display modes: TRACK, TOTAL,
TITLE and FOLDER.
Each time you press the HOME [INFO] button, the display mode
will change.
Recording Screen TRACK display mode
Recording Screen TOTAL display mode
4 File type
This shows the current recording file format.
When dual format recording is on, two file formats are shown
like .(see “Making recording format settings” on
page 57)
5 Display mode
This shows the current Home Screen display mode.
6 Track number
This shows the number of the track currently being recorded.
7 Track recording position
The current recording position is shown by a bar. As recording progresses, the bar extends from the left.
8 Recording function activation status
Icons appear for the recording functions that are currently on.
Icon Meaning
Appears when the dynamics function LIMITER is
on
Appears when the dynamics function COMP_SOFT
is on
Appears when the dynamics function COMP_HARD
is on
Appears when the automatic gain control function
is on
Appears when the sampling rate converter is on
Appears when the sync recording function is on
Appears when the automatic track incrementation
function is on
Appears when the automatic mark function is on
Recording Screen TITLE display mode
Recording Screen FOLDER display mode
1 Input levels
The input sound levels are shown.
2 Elapsed track recording time
This shows the elapsed time of the recorded file (hours: minutes: seconds).
3 Remaining track recording time
This shows the remaining time (hours: minutes: seconds) for
the maximum file size (2 GB).
9 Current medium
This shows the name of the currently selected medium.
When the relay recording function is on, an icon like
will appear that shows the current medium and the next medium to be used for recording.(see “Making recording format
settings” on page 57)
When the backup function is on, an icon like will
appear that shows the two types of media used for recording.
(see “Making recording format settings” on page 57)
0 Track title
This shows the title of the track being recorded.
q Phantom power supply status
When phantom power is on, the icon appears.(see “Setting phantom power” on page 55)
w Low-cut filter setting status
When the low-cut filter is set, the icon appears.(see “Setting
the low-cut filter” on page 56)
e Timer event setting status
The icon appears when the timer event function is on.(see
“Turning the timer event function on/off” on page 69)
TASCAM SS-R250N
18
2 – Names and Functions of Parts
r Input setting status
This shows the name of the currently selected input.
Icon Meaning
Input from ANALOG IN (UNBALANCED)
L/R jacks
Input from MIC/LINE IN (BALANCED)
jacks
Input from AES/EBU IN jack
Input from SPDIF IN jack
Input from IF-DA2 Dante interface card
t Total track elapsed time
This shows the total recording time of everything on the
current medium (hours: minutes: seconds).
y Total track remaining time
This shows the remaining recording time available on the
current medium (hours: minutes: seconds).
u Total recording position
The current recording position is shown by a bar.
As recording progresses, the bar extends from the left.
i Track number/total number of tracks
This shows the current track number and total number of
track in the current playback area.
o Name of track recording folder
This shows the name of the folder where tracks are recorded.
NOTE
The remaining time differs according to the file recording
format.(see “Setting the recording file format” on page 57)
Menu structure
Press the MENU [JOG] button to open the PLAY 1 page of the
menu.
The MENU screen has 21 pages organized by types of menu
items.
Page name Contents
1
PLAY 1
PLAY 2
3
PLAY 3
4
PLAYLIST
5
REC 1
6
REC 2
7
REC 3
8
REC 4
9
REC 5
10
TIMER EVENT
11
MARK LIST
12
NETWORK 1
13
NETWORK 2
14
FTP CLIENT
15
SNTP
16
UTILITY
17
PREFERENCES
18
REMOTE
19
MEDIA
20
SYSTEM 1
21
SYSTEM 2
The various menu items are as follows.
Make playback settings.2
Make playlist settings.
Make recording settings.
Make timer event settings.
Make mark list settings.
Make network settings.
Make FTP settings.
Make SNTP settings.
Make utility settings.
Make preference settings.
Make remote control settings.
Work with media.
Make system settings.
Menu item Function Page
PLAY 1 page
PLAY AREA
PLAY MODE
REPEAT
AUTO CUE
AUTO READY
PLAY 2 page
INCREMENTAL PLAY
MONO MIX
DUCKING
EOM TRACK
EOM MEDIA
PLAY 3 page
RESUME
TIME SKIP
FADER DELAY
Playback area setting see page 30
Playback mode setting see page 31
Repeat playback function
settings
Auto cue function settings see page 34
Auto ready function setting see page 35
Incremental playback function setting
Mono playback function
setting
Ducking function settings see page 36
EOM function settings see page 36
Resume playback function
setting
Time skip function setting see page 37
Playback start timing setting
see page 34
see page 35
see page 35
see page 37
see page 38
TASCAM SS-R250N
19
2 – Names and Functions of Parts
Menu item Function Page
Audio output setting for
OUTPUT RATE
CALL
PLAYLIST page
PLAYLIST EDIT
REC 1 page
INPUT SELECT
REC SET LINK
BAL. INPUT GAIN
INPUT LEVEL
MIC PHANTOM
REC 2 page
MIC AGC
DYNAMICS
LOW CUT
REC 3 page
REC FORMAT
BACKUP/RELAY MEDIA
WAV SETTING
MP3 BITRATE
STEREO/MONO
REC 4 page
FILE NAME
DITHER
SRC
PAUSE MODE
DIRECT REC
REC 5 page
PRE REC
SYNC REC
AUTO TRACK
AUTO MARK
TIMER EVENT page
TIMER EVENT
TIMER EVENT LIST
MARK LIST page
MARK LIST
NETWORK 1 page
external sampling frequency synchronization
Call function setting see page 38
Playlist editing see page 46
Input source selection see page 52
Input channel link setting
Mic input sensitivity setting see page 54
Input volume setting see page 54
Phantom power setting see page 55
Automatic gain control for
mic input function setting
Dynamics function setting see page 56
Low-cut filter setting
Recording file format setting
Backup and relay recording
media settings
WAV file settings see page 58
MP3 file bit rate setting
Recording input channel
setting
Set the file name format see page 59
Dither setting see page 60
Sampling rate converter
setting
Pause mode function setting
Direct record function
setting
Pre-recording function
setting
Synchronized recording
settings
Automatic track incrementation function settings
Automatic mark function
settings
Timer event function setting
Timer event list screen
settings
Mark list editing see page 75
see page 38
see page 53
see page 55
see page 56
see page 57
see page 57
see page 58
see page 58
see page 60
see page 60
see page 60
see page 61
see page 61
see page 62
see page 64
see page 69
see page 69
Menu item Function Page
MAC ADDRESS
IP ADDRESS
DNS ADDRESS
IP SETUP
DNS SETUP
NETWORK 2 page
IP PASSWORD
FTP CLIENT page
TARGET FTP SERV-
ER
FTPS MODE
TARGET FOLDER
NAME
ACCESS TEST
AUTO UPLOAD
SNTP page
SNTP STATUS
SNTP UPDATE
NTP SERVER
TIMEZONE
DAYLIGHT SAVING
UTILITY page
LINK PLAY
POWER ON ACTION
OUTPUT LEVEL
PREFERENCES page
REFERENCE LEVEL
BRIGHTNESS
LCD CONTRAST
KEYBOARD
REMOTE page
RS-232C
RC-3F
MEDIA page
MEDIA FORMAT
MEDIA INFORMATION
View the unit’s MAC address
View the current IP address
View the IP address of the
DNS server
Set the unit’s IP address and
related settings
Set the IP address of the
DNS server
Password setting see page 79
Various settings for FTP
server connections
FTP mode setting
Set default folder for FTP
server uploads and downloads
Test connection with FTP
server
Automatic uploading to
FTP server setting
View the current SNTP
status
Set the SNTP function
update mode
NTP server name setting
Set the time offset from
Coordinated Universal Time
(UTC)
Set the daylight savings
time function
Link playback settings see page 39
Power on action function
setting
Analog output attenuation
function setting
Reference level setting see page 84
Display and indicator
brightness setting
Display contrast setting see page 26
Keyboard type setting see page 84
RS-232C settings see page 90
RC-3F mode setting see page 90
Media formatting settings
View media information see page 87
see page 78
see page 78
see page 79
see page 82
see page 82
see page 84
see page 84
see page 26
see page 28
TASCAM SS-R250N
20
2 – Names and Functions of Parts
Menu item Function Page
SYSTEM 1 page
CLOCK ADJUST
FACTORY PRESET
SAVE USER PRESET
LOAD USER PRESET
SYSTEM BACKUP
Date and time settings see page 26
Restore factory default
settings
see page 87
Write user settings see page 87
Load user settings see page 87
Import/export system
backup data
see page 88
SYSTEM 2 page
VERSION
UPDATE
View the firmware version see page 89
Update the firmware see page 89
NOTE
The settings for all menu items are retained even when the
unit is turned off.
Basic Menu Screen operations
Use the following operations to work with the pages of the
Menu Screen.
Changing menu items by page:
Press the MENU [JOG] button repeatedly until the desired menu
page opens.
The pages will open in the following order.
Y 1
Y 2
Y 3
YLIST EDIT
1
2
3
4
IMER EVENT
SYSTEM 2
SYSTEM 1
MEDIA
REMOTE
PREFERENCE
UTILITY
SNTP
FTP CLIENT
NETWORK 2
NETWORK 1
NOTE
Press the MENU [JOG] button while pressing and holding the
i
SHIFT button to open menu pages in the opposite direction.
Turn the MULTI JOG dial to move up and down on the menu
i
screen one item at a time from the PLAY 1 page PLAY AREA
item to the SYSTEM 2 page UPDATE item.
Selecting items (moving vertically on a page):
Turn the MULTI JOG dial.
Confirming a selected item:
Press the MULTI JOG dial.
Opening a submenu from a page:
Press the MULTI JOG dial.
Selecting an item in a submenu:
Press the MULTI JOG dial or m [A-B]/, [INPUT] button.
Going back one step in a menu:
Press the MENU [JOG] button.
Returning directly to the Home Screen from a menu screen:
Press the HOME [INFO] button.
TASCAM SS-R250N
21
2 – Names and Functions of Parts
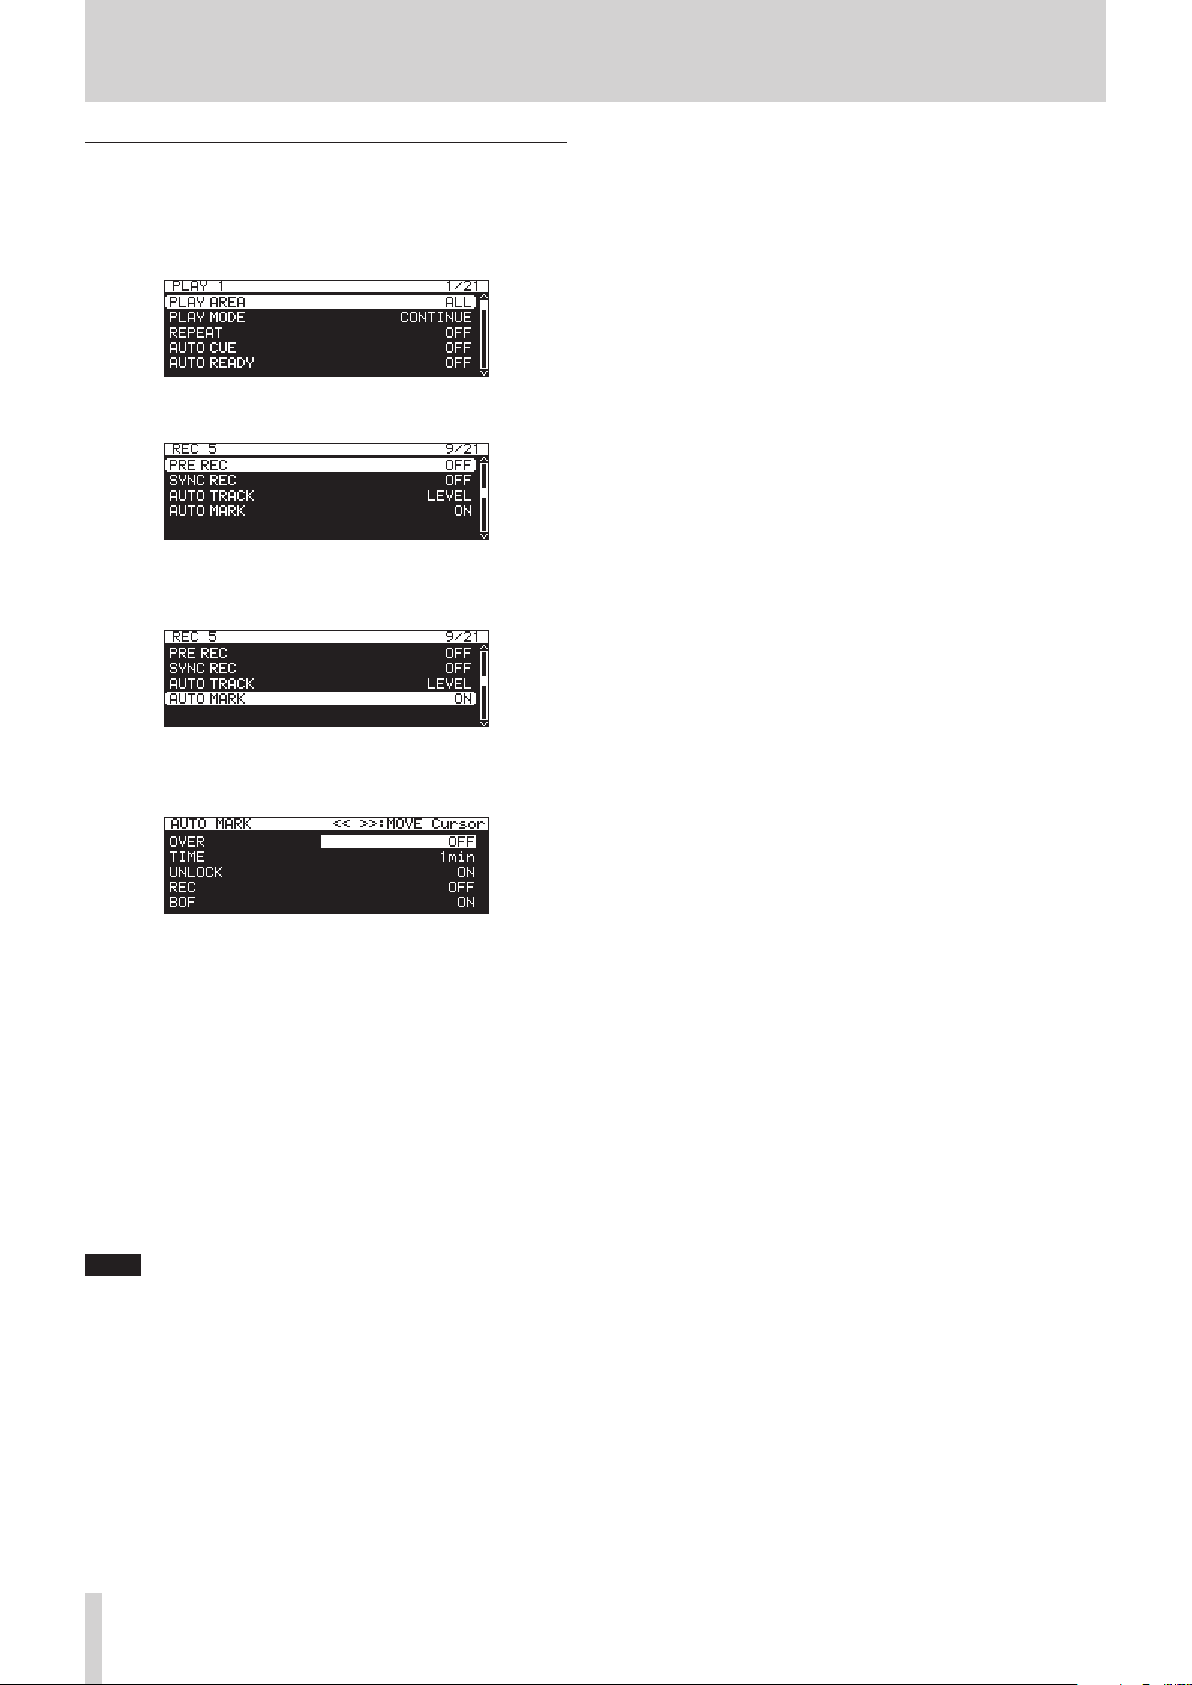
Menu operation procedures
In this example, we explain how to set the auto mark function.
Press the MENU [JOG] button to open the PLAY 1 menu
1.
page.
Press the MENU [JOG] button to open other menu pages.
2.
REC 5 page open
Turn the MULTI JOG dial to select the item to set.
3.
AUTO MARK selected
Press the MULTI JOG dial to open the settings screen.
4.
AUTO MARK screen open
Turn the MULTI JOG dial to change the setting.
5.
To set another item on the same screen, press the MULTI
6.
JOG dial to move the cursor to the next setting.
When you can use the
tons to move the cursor, “<< >>: MOVE Cursor” will appear
at the top right of the screen.
Repeat steps 5 to 6 as necessary to set other items.
7.
Press the MULTI JOG dial to confirm the setting changes
8.
and return to the Menu Screen.
Press the HOME [INFO] button to return to the Home
Screen.
NOTE
Press the MENU [JOG] button to cancel the menu operation
i
and return to the Menu Screen.
In some cases, in step 8, pressing the MULTI JOG dial will
i
return to the Home Screen immediately.
Menu items that cannot be changed are shown inside brack-
i
ets [ ], and cannot be selected using the MULTI JOG dial.
m
[A-B] and
,
[INPUT] but-
TASCAM SS-R250N
22
3 – Preparation
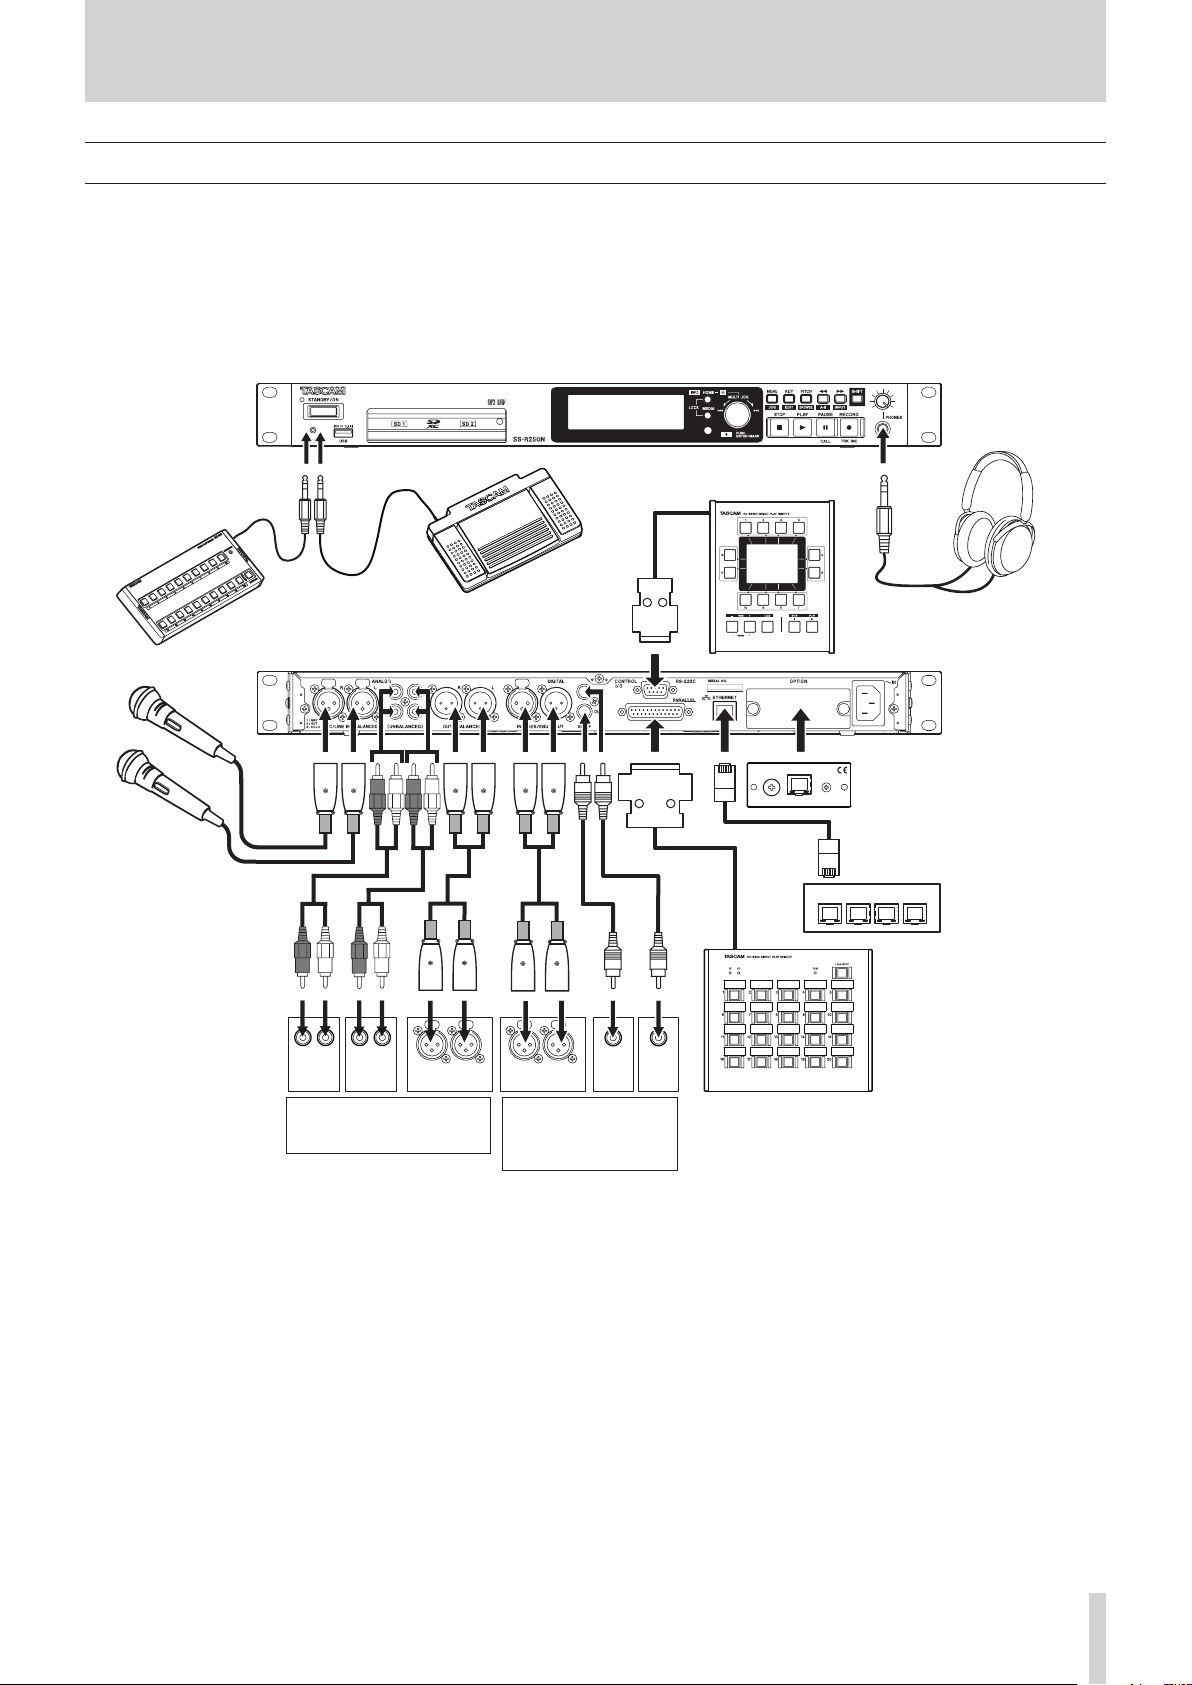
Making connections
This is an example of SS-R250N connections.
Precautions before making connections
Carefully read the operation manuals of the devices to be connected and then connect them correctly.
0
Before making connections, turn this unit and all equipment to be connected off (standby).
0
Install all connected devices, including this unit, so that they are powered from the same line. When using a power strip or similar
0
device, be sure to use one that has high current capacity (thick cable) in order to minimize fluctuations in power voltage.
TASCAM RC-SS150 (sold separately)
TASCAM RC-20
(sold separately)
or computer RS-232C port
Microphones
(or mixer, recorder, amp, etc.)
TASCAM RC-3F (sold separately)
ANALOG
OUT
(UNBALANCED)
IN
(UNBALANCED)
ANALOG IN
(BALANCED)
LR
LR
ANALOG
Mixer, recorder, amp, etc.
LR
IN OUT
AES/EBU
DIGITAL
OUT
(S/PDIF)
Digital mixer, digital
recorder, digital amp,
etc.
DIGITAL
IN
(S/PDIF)
Headphones
Optional card (sold separately)
Network with FTP server, control computer, etc.
TASCAM RC-SS20 (sold separately)
Examples of connections to a SS-R250N
TASCAM SS-R250N
23
3 – Preparation
Preparing the remote control
Installing the coin battery
NOTE
When this unit is purchased a new, a lithium coin battery
(CR2025) is preinstalled in the remote control. To use the
remote control, remove the isolation sheet inserted in the battery holder.
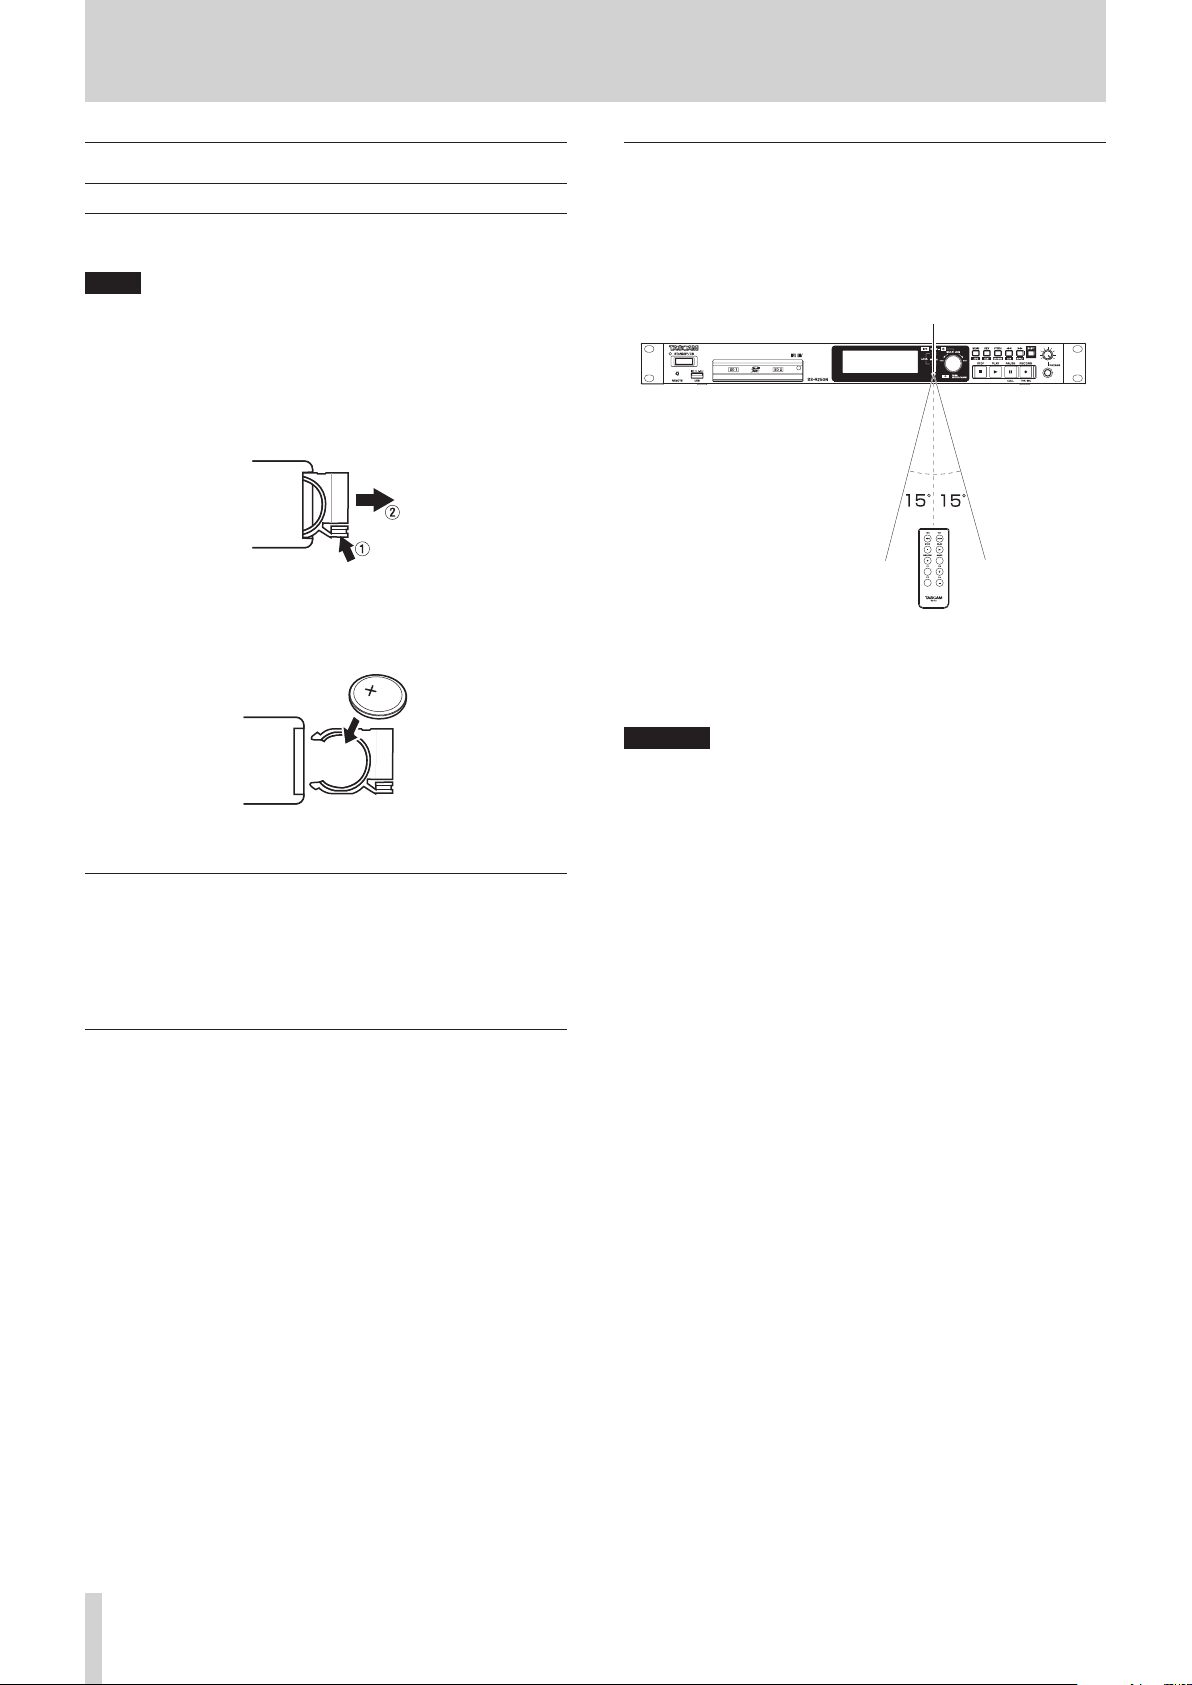
Remove the battery holder from the remote control.
1.
While pressing 1, pull it in the 2 direction.
Being careful to maintain the correct ¥/ ^ orientation,
2.
install the lithium coin battery (CR2025) into the battery
holder.
Insert the battery holder into the remote control.
3.
When to replace the battery
Replace the battery with a new one if the distance from the main
unit that the remote can be used decreases or if the unit stops
responding to the remote buttons.
Use a lithium coin battery (CR2025).
Using the wireless remote control
See Wireless remote control (TASCAM RC-10)page 16 for the
button functions.
When using the remote control, point it toward the receiver on
the unit and use it within the range shown below.
Remote control signal receiver
Remote control operation range
Front: 7 m
Angle: ±15 degrees
CAUTION
The range will vary according to the angle.
i
Operation might not be possible if there are obstacles.
i
Remove the battery if not using the remote control for a long
i
time (a month or more).
It battery fluid should leak, wipe away any fluid inside the
i
case thoroughly and install a new battery.
When using other devices that can be controlled by infrared
i
rays, operation of this remote control could cause those devices to function improperly.
Battery precautions
The accidental swallowing of lithium coin batteries by small
children is extremely dangerous. Keep these batteries and this
remote control in places where small children cannot reach
them. Should a child swallow a battery, consult with a doctor
immediately.
Misuse of batteries could cause them to leak or rupture, for example. Carefully read and follow the caution labels on batteries.
(see “CAUTIONS ABOUT BATTERIES” on page 4)
Install lithium coin batteries with the correct orientation.
0
Do not charge lithium coin batteries.
0
Do not heat or disassemble lithium coin batteries. Do not put
0
them in fire or water.
Do not transport or store lithium coin batteries with small
0
metal objects. Doing so could cause the batteries to short
and leak or rupture, for example.
When storing and disposing of them, isolate their terminals
0
with tape, for example, so that they do not touch other batteries or metal objects.
Dispose of used batteries according to the instructions on
0
them and the requirements set by your local government.
TASCAM SS-R250N
24
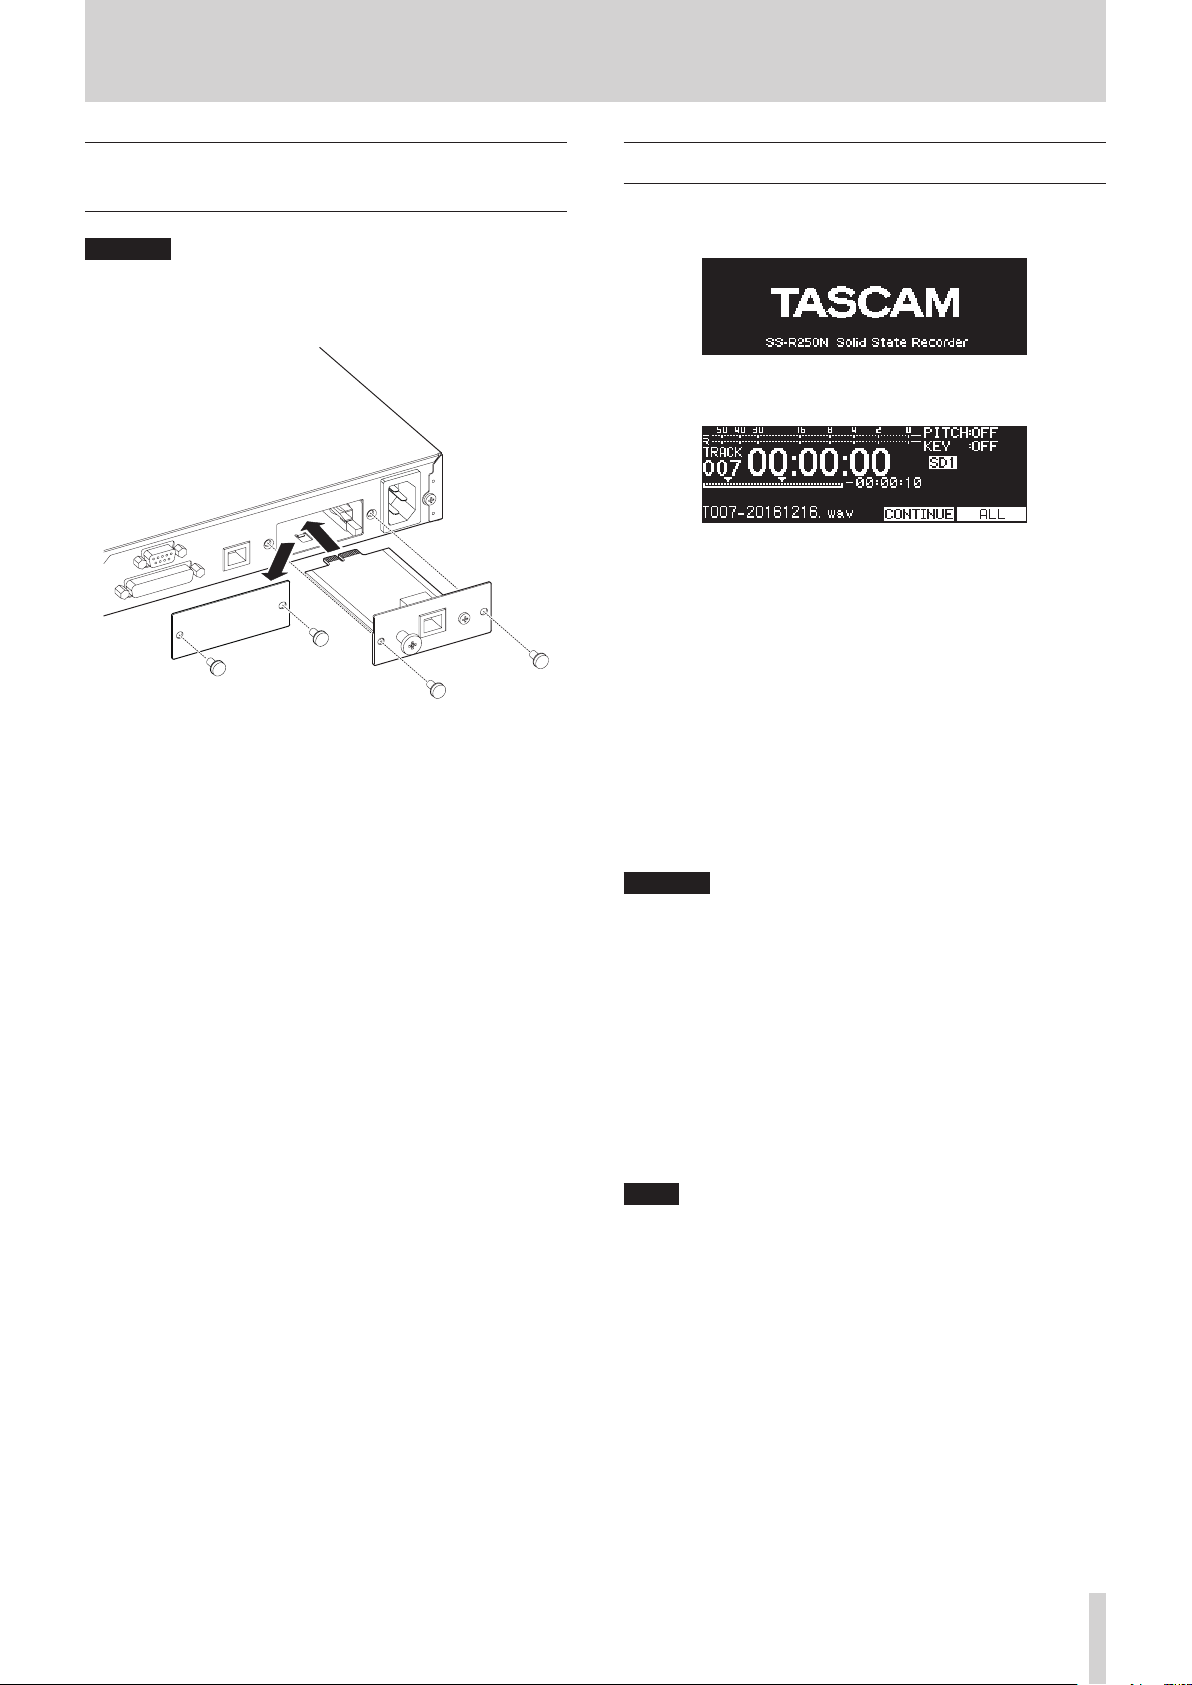
3 – Preparation
Installing a Dante interface card
(sold separately)
CAUTION
Before installing or removing a Dante interface card (sold
separately), disconnect the power cord from the outlet or the
unit.
Remove the two screws from the plain panel and remove
1.
the panel itself.
Insert the Dante interface card into the card slot. Align the
2.
edges of the Dante interface card with the white guides inside the slot and insert it securely. Push the Dante interface
card in until its backplate reaches the back panel of the unit,
leaving no gap, and clicks into place. Do not force the card
into the slot. If you cannot insert the card properly, remove
it once and try reinserting it.
Use the two removed screws to secure the Dante interface
3.
card in place.
Turn this unit on.
4.
When the unit recognizes the Dante interface card, IF-DA2
(DANTE) will become available as an input source setting on
the INPUT SELECT screen.(see “Selecting the input source”
on page 52)
If IF-DA2 (DANTE) does not appear as an option on the
INPUT SELECT screen, the Dante interface card might not
be inserted correctly or the screws might not be tightened
securely. Insert the Dante interface card securely into the
unit again.
Turning the unit on and off
Press the STANDBY/ON button on the front of the unit to turn it
on.
Startup screen
Home Screen
After the unit starts and the startup screen is shown, the Home
Screen will open.
If no current medium is loaded or there are no audio files in the
current folder, the track number and time will not be shown on
the Home Screen.
Turning the unit off:
Press and hold the STANDBY/ON button to open a pop-up
1.
message.
When the confirmation pop-up is open, press and hold the
2.
MULTI JOG dial to turn the unit off.
CAUTION
Do not disconnect the power cord when the unit is operating
i
(including recording, playing back, or writing data to an SD
card or USB flash drive). Doing so could cause proper recording to fail, recorded data to be lost, and sudden loud noises
from monitoring equipment, which might damage the equipment, harm hearing or cause other trouble.
When the unit is started up for the first time (or when the
i
built-in clock is reset after being left unused without power
for a long time), the CLOCK ADJUST screen appears before the
start-up screen to allow the date and time of the built-in clock
to be set.(see “Setting the built-in clock date and time” on
page 26)
NOTE
Press the MENU [JOG] button briefly to not turn the unit off.
TASCAM SS-R250N
25
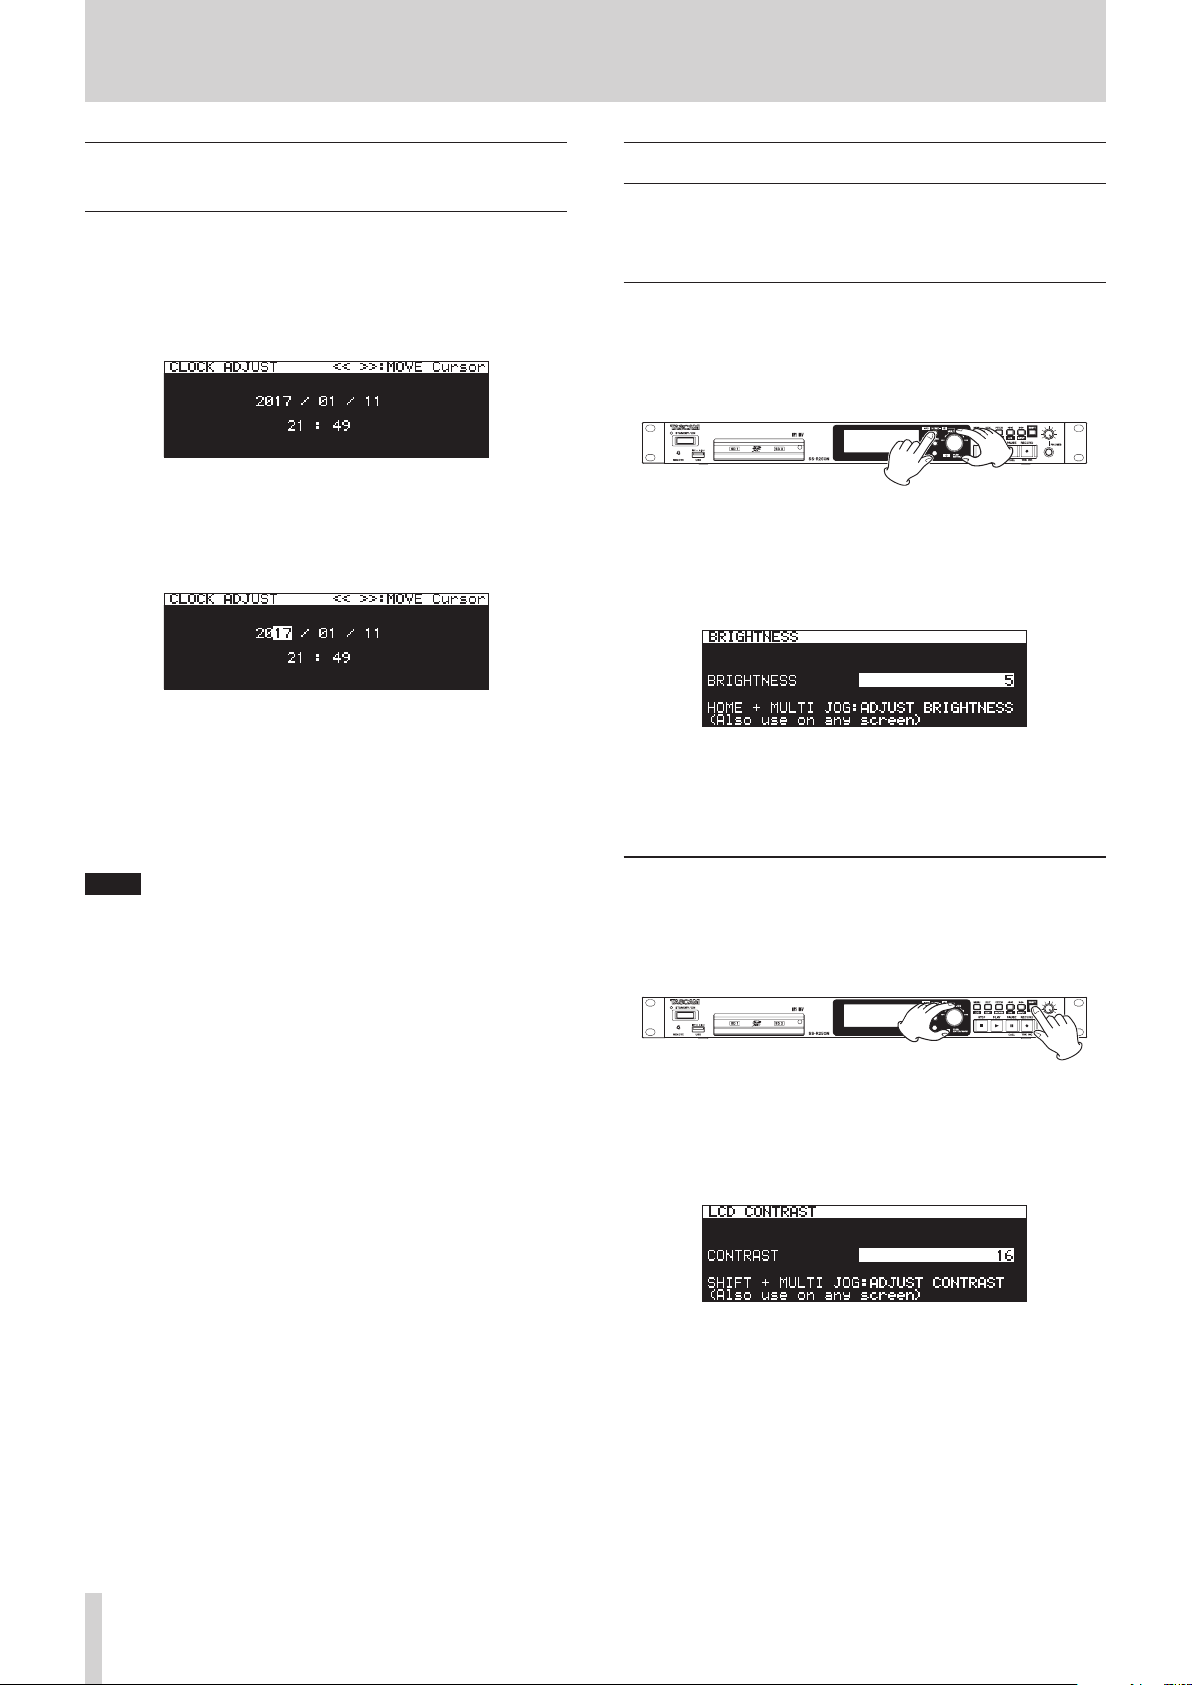
3 – Preparation
Setting the built-in clock date and
time
Using its internal clock, this unit includes the date and time
when a file is recorded.
Select the CLOCK ADJUST item on the SYSTEM 1 page to
1.
open the CLOCK ADJUST screen.(see “Menu operation procedures” on page 22)
Press the MULTI JOG dial to enter setting mode and
2.
show the cursor on the item to be changed.
m
Use the
cursor.
Turn the MULTI JOG dial to change a value, and press the
3.
MULTI JOG dial to confirm it and move the cursor to the
next item.
The cursor will disappear and setting the date and time
4.
will complete after you change the year, month, day,
hour and minute in order.
NOTE
When making a setting, you can press the MENU [JOG] button to cancel the changes and return to the Menu Screen.
Confirm the setting and return to the Menu Screen.
5.
[A-B] and
,
[INPUT] buttons to move the
Adjusting the display
You can adjust the contrast and brightness of the display as well
as the brightness of the PL AY , PAUSE [CALL] and RECORD [TRK
INC] buttons as necessary.
Adjusting the display and indicator brightness
Adjusting with controls
While pressing the HOME [INFO] button, turn the MULTI JOG
dial to adjust the brightness of the display and indicators.
Adjusting with the menu setting
Select BRIGHTNESS on the PREFERENCES page to open the
1.
BRIGHTNESS screen.(see “Menu operation procedures” on
page 22)
Adjust the display and indicator brightness.
2.
Options: 0 – 10 (default: 5)
Confirm the setting and return to the Menu Screen.
3.
Adjusting the display contrast
Adjusting with controls
While pressing the SHIFT button, turn the MULTI JOG dial to
adjust the display contrast.
TASCAM SS-R250N
26
Adjusting with the menu setting
Select LCD CONTRAST on the PREFERENCES page to open the
1.
LCD CONTRAST screen.(see “Menu operation procedures” on
page 22)
Adjust the display contrast.
2.
Options: 0 – 50
Confirm the setting and return to the Menu Screen.
3.
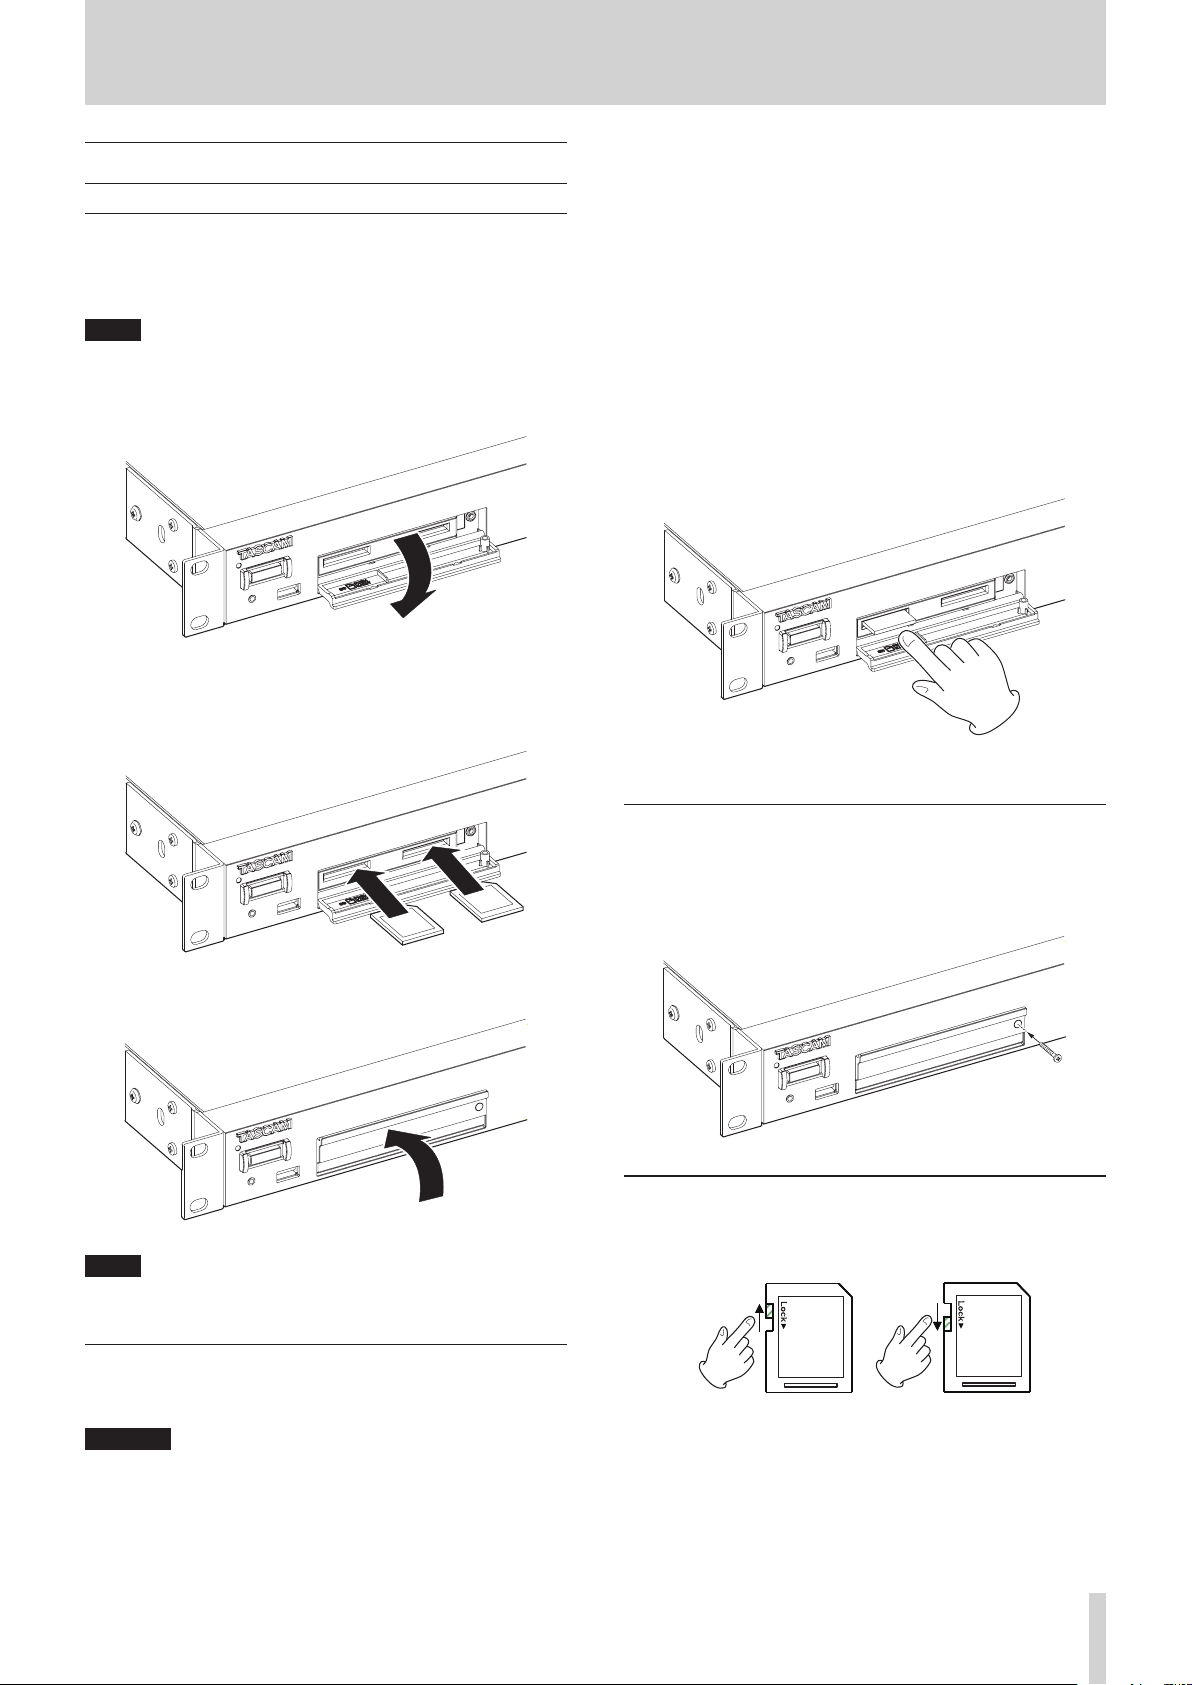
3 – Preparation
Inserting and removing SD cards
Inserting SD cards
Insert an SD card into an SD card slot on the front of the unit to
enable playback and recording by this unit.
NOTE
SD cards can be inserted whether or not the unit is on or off (in
standby).
Pull the SD card slot cover forward to open it.
1.
Inserted SD cards with the correct orientation.
2.
The label should be up and the connector should be inserted toward the back.
cause other trouble.
Moreover, removing a card during FIRMWARE UPDATE execution could result in the unit becoming unable to start up or
operate properly.
When recording
o
During playback
o
During SYSTEM BACKUP IMPORT or EXPORT execution
o
During FIRMWARE UPDATE execution(see “Firmware update
o
procedures” on page 89)
When the BROWSE screen is open and the SD card is being
o
accessed
Pull the SD card slot cover forward to open it.
1.
Press the SD card in gently to make it to come forward.
2.
Close the card slot cover.
3.
NOTE
If the SD card slot cover cannot be closed, remove the SD card
and insert it again.
Pull the SD card out by hand.
3.
Using the security screw
You can use the included security screw to lock the card slot cover switch.
Use a Phillips (+) driver to install/remove the security screw.
SD card write-protection switches
SD cards have write-protection switches that prevent writing
new data to them.
Removing SD cards
Turn the unit off or stop operation before removing an SD card.
CAUTION
Never remove an SD card from the unit when it is being accessed, such as in the cases listed below.
Doing so could cause proper recording to fail, recorded data
to be lost, and sudden loud noises from monitoring equipment, which might damage the equipment, harm hearing or
If you slide the protect switch to the LOCK position, file recording and editing will not be possible. Unlock cards to enable
changing their data, including recording and erasing.
TASCAM SS-R250N
27
3 – Preparation
Connecting and disconnecting USB
flash drives
You can connect and disconnect USB flash drives whether the
unit is on or off.
CAUTION
Never disconnect a USB flash drive when it is being accessed,
such as in the cases listed below.
Doing so could cause proper recording to fail, recorded data
to be lost, and sudden loud noises from monitoring equipment, which might damage the equipment, harm hearing or
cause other trouble.
Moreover, removing a card during FIRMWARE UPDATE execution could result in the unit becoming unable to start up or
operate properly.
When recording
o
During playback
o
During SYSTEM BACKUP IMPORT or EXPORT execution
o
During FIRMWARE UPDATE execution(see “Firmware update
o
procedures” on page 89)
When the BROWSE screen is open and the USB flash drive is
o
being accessed
Selecting media
Before conducting other operations, select the medium to use
(USB, SD1 or SD2).
Follow the procedures below to select the medium.
Press the MEDIA button to open the MEDIA SELECT screen.
1.
Preparing SD cards and USB flash
drives for use
In order to use an SD card or USB flash drive with this unit, you
must use this unit to format it first.
CAUTION
Formatting erases all the data on the SD card or USB flash
i
drive.
Always use this unit to format media to be used with it. Op-
i
eration of this unit might be affected when using an SD card
or USB flash drive that has been formatted by a computer or
other device.
Open the MEDIA SELECT screen, and select the medium to
1.
format.(see “Selecting media” on page 28)
Select the MEDIA FORMAT item on the MEDIA page to open a
2.
format method option pop-up.(see “Menu operation procedures” on page 22)
QUICK FORMAT: Format only system data on the medium.
ERASE FORMAT: Completely format the medium.
NOTE
The ERASE FORMAT item only appears when an SD card is
selected as the current medium.
Select the format method, and press the MULTI JOG dial.
3.
A confirmation pop-up message appears.
Press the MEDIA button to select the medium to use, and
2.
press the MULTI JOG dial to confirm it.
The name of the currently selected medium appears in the
3.
current medium area of the Home Screen.
Current media name
: USB flash drive selected
: SD card 1 selected
: SD card 2 selected
TASCAM SS-R250N
28
NOTE
Press the MENU [JOG] button to cancel formatting.
Press the MULTI JOG dial to start formatting.
4.
The following pop-up message will appear during formatting.
Pop-up when QUICK FORMAT selected
3 – Preparation
When formatting completes, the pop-up disappears and
5.
the Home Screen opens.
NOTE
The writing speeds to SD cards and other storage media
that use flash memory tend to decrease after writing occurs
repeatedly.
If the writing speed decreases, this could have a negative
impact on recording.
Using the ERASE FORMAT function of this unit should restore
the writing speed of an SD card.*
For this reason, we recommend using the ERASE FORMAT
function at the following times.
Whenever the card has been written to until it became
o
completely full
On a regular schedule (about once per month)
o
Before starting important recordings
o
* Writing speed might not be restored depending on the SD
card condition (including malfunction and age).
Setting the lock function
You can set the lock function to prevent this unit from being
controlled from its front panel or an external device.
Press the MEDIA button while pressing the HOME [INFO]
1.
button on the front of the unit to open the LOCK SETUP
screen.
NOTE
The following operations are possible even when set to LOCK.
Showing the Home Screen
o
Changing settings on the LOCK SETUP screen
o
Turning the power off with the STANDBY/ON button
o
Adjusting the brightness of the display and various
o
indicators
Confirm the setting and return to the Menu Screen.
3.
Opening the INFORMATION screen
While pressing the SHIFT button, press the HOME [INFO] button to show the operation status of the unit on the display.
Contents
CLOCK
Sampling frequency currently used for operation
INPUT
Currently set input
FILE
Currently set file type, quantization bit depth and file
mode
Recording date
Current folder now selected
Select the lock function to set, and open the lock function
2.
setting screen.(see “Menu operation procedures” on page
22)
Lock function setting screen when FRONT PANEL item selected
FRONT PANEL
This locks the controls on the front of the unit.
Options: UNLOCK (default), LOCK
232C/PARA/NETWORK
This locks external control from the RS-232C and PARALLEL connectors, as well as file transfer and remote control
by Telnet using an FTP client application.
Options: UNLOCK (default), LOCK
REMOTE/KEYBOARD
This locks operation using a remote control connected to
the REMOTE jack or a USB keyboard or numeric keypad.
Options: UNLOCK (default), LOCK
NOTE
If DIGITAL XLR, DIGITAL COAXIAL or IF-DA2 (DANTE) (only
when IF-DA2 card installed) is selected, recording cannot be
started from recording standby under the following conditions.
If this unit is not digitally locked to the input source, “(UN-
•
LOCK)” will appear at the end of the input source name.
If the input source is not audio, “(Not Audio)” will appear.
•
If the sampling frequency set with the SAMPLE item on the
•
REC 3 page differs from the input source, “(FS UNMATCH)”
will appear at the end of the input source name. If the
sampling rate converter is active, however, recording will
be possible even if the sampling frequency is different.(see
“Using the sampling rate converter” on page 60)
TASCAM SS-R250N
29
4 – Playback
This chapter explains functions for playing back audio files
stored on SD cards and USB flash drives.
This explanation assumes that you have already loaded an SD
card or USB flash drive that contains audio files into the unit, that
the unit is on, and that the current medium is set appropriately.
(see “Selecting media” on page 28)
Files that can be played back
This unit can play back files in the following formats.
MP3: 44.1/48kHz, 64/128/192/256/320kbps
0
WAV/BWF: 44.1/48/96kHz, 16/24-bit
0
CAUTION
MP3 files that use VBR compression
Due to file format limitations, accurate location detection is
not possible in VBR files. For this reason, when using functions that require points to be set in the middle of a track,
including time skipping, call and A-B repeat playback (A point
setting), slight differences might occur between the set point
and the point where playback begins.
TIP
Files of the above formats can be played back by this unit
even if it was not used to record them. For example, you can
use a computer or another audio device to write files that
meet the above specifications to an SD card or USB flash
drive, and then play those files on this unit. This allows you to
efficiently prepare materials for playback on this unit.
Setting the playback area
Use the PLAY AREA item on the PLAY 1 page to set the playback
area.
Select the PLAY AREA item on the PLAY 1 page to open
1.
the PLAY AREA screen.(see “Menu operation procedures” on
page 22)
Set the desired playback area.
2.
Option Meaning
ALL
(default)
FOLDER
PLAYLIST
Confirm the setting and return to the Menu Screen.
3.
NOTE
The current playback area setting appears at the lower right
of the Home Screen.
Play all the files on the medium.
Play all the files in the folder that contains the
currently selected file.
Play all the files that have been assigned to the
playlist.
If there is no playlist defined, a No PLAYLIST
pop-up appears.
Tracks and files
Audio data are recorded as “audio files” on media.
When the CHANNEL item on the STEREO/MONO screen is set to
STEREO, stereo files will be handled as single tracks. When set to
MONO (MIX), mono files will be handled as single tracks. When
set to MONO (2ch), pairs of mono files will be handled as single
tracks.(see “Setting the recording file format” on page 57)
For this reason, when explaining playback and recording in this
document, we call audio files “tracks” (and sometimes “songs”).
When explaining media management and related topics, we call
them “files”. Please understand that they are the same thing.
Playback area
The range of tracks that can be selected for playback on the
Home Screen is called the “playback area”.
Limiting the playback area makes selection of playback tracks
easier when you have numerous recorded files on the SD card or
USB flash drive.
Playback area
Selecting the current folder or current playlist
When the playback area is set to FOLDER or PLAYLIST, the Home
Screen is open and the unit is stopped, you can use the m [A-
B] and , [INPUT] buttons on the unit to select a folder or
playlist as the playback area.
This folder or playlist is called the “current folder” or “current
playlist”.
NOTE
You can also select the current folder or current playlist on
i
the BROWSE screen.(see “5 – Working with Folders and Files
(BROWSE screen)” on page 40)
Up to 999 tracks can be played back by this unit if the formats
i
of the audio files are MP3 or WAV.
If a medium with more than 999 tracks is loaded in this unit,
999 tracks selected according to the unit’s system rules can
be played. Any other tracks will not be playable or editable.
TASCAM SS-R250N
30
Loading…


Артикул: F9501
Tascam рекордер Wav/MP3 плеер на SD card/ USB, XLR/RCA. Опция — карта Dante IF-DA2
- Описание
Tascam SS-R250N рекордер Wav/MP3 плеер на SD card/ USB, XLR/RCA. Опция — карта Dante IF-DA2
Tascam
Арт.
Наименование
Описание
Артикул: F0664
нет в наличии
TASCAM CD-200SB
Tascam CD/SD/USB проигрыватель Wav, MP3, MP2, WMA, AAC , RCA/ XLR/SPDIF, CD-Text, Anti-shock, CD pitch 14%, 2U, пульт ДУ


Note: The design for the rear panel of this product has partly changed since production of May 2022. Please refer to the image with the gray rear panel to check the newest design details.

Note: The design for the rear panel of this product has partly changed since production of May 2022. Please refer to the image with the gray rear panel to check the newest design details.

Note: The design for the rear panel of this product has partly changed since production of May 2022. Please refer to the image with the gray rear panel to check the newest design details.

Note: The design for the rear panel of this product has partly changed since production of May 2022. Please refer to the image with the gray rear panel to check the newest design details.
2-Channel SD/USB Recorder/Player with Network
An extraordinarily versatile two-channel recorder/player for permanent install and network applications
3 Interest-Free Payments Available with Affirm Learn more
for orders $199 and up.
- FTP Client function for automatic file upload/download via server
- Create and Automate Event Lists for recording, playback, download, and other functions
- Automatic Upload function streamlines your workflow by uploading recorded files automatically
- Supports high-resolution recording and playback, up to 24-bit/96kHz
- Dual SD card slots for mirror/relay recording
- Ducking function automatically adjusts playback volume in response to input volume
- Auto Cue/Auto Ready
See All
- Recording Media: SD, USB
- Power Consumption: 20W
- Dimensions: 482.6(W)×45(H)×300.5(D)mm
- Weight: 2.9kg
See All
- SS-R250N × 1
- Power cord × 1
- Wireless remote control (TASCAM RC-10)× 1
- Lithium coin battery (CR2025) for remote control (already installed) × 1
- Rackmount screw kit × 1
- Security screw kit × 1
- Owner’s Manual (including warranty) × 1

The TASCAM SS-R250N is the ideal SD card recorder/players for virtually any installation. Extensive I/O – including balanced, unbalanced and DANTE interconnectivity – are joined by a studio quality microphone preamp with phantom power and ducking. Audio may be recorded to SD Card or USB stick and uploaded automatically to your desired FTP server. In addition, recording and playback can be controlled via SNTP, network control, the optional RC-SS150 remote control or the free iOS/Android app.
FTP Client Function for Automatic Upload or Download of Audio Files From the Server
The unit is equipped with a LAN terminal for easy network connection to an FTP client, enabling you to upload recorded files from the SS-R250N side or download sound files from the server. As the SS- R250N also acts as an FTP server, you can also upload and download from a PC without having to physically exchange SD cards.


Event List for Time-Based Automation of Recording, Playback, File Upload, and Other Functions
The Event List function contains an auto-play feature designed for audio files such as background music and announcements, perfect for use in a retail setting or restaurant. This Event List can also be used to schedule recording and file upload which makes the TASCAM SS-R250N the perfect recorder for town hall meetings, board room installations and government jobs.
Smartphone App for Remote Control
The SS-R250N can be controlled by any iOS or Android mobile device operating on the same network, allowing for remote status updates and transport control.


Easy Recording Via SD Card and USB Flash Memory
The SS-R250N supports recording and playback with SD/SDHC/SDXC card media, supporting up to 128GB cards for hours of recording. The front-panel USB port allows you to make an additional recording to USB flash drive, making it easy for a third party to receive a recording of their event as soon as it has concluded.
Dual SD Memory Card Slots Permit Backup and Relay Recording
Dual SD card slots can be used for backup recording, which records the same data on two cards simultaneously, or relay recording in which recording automatically begins on the second SD card when the first card has reached capacity.


Automatic File Save System Protects Your Data
The automatic file save system protects your recordings in the event of a power failure or other unexpected malfunction.
XLR and RCA Analog I/O as Well as AES/EBU and S/PDIF Digital Connectivity
The SS-R250N is equipped with a wide array of interface options, making it fast and easy to integrate with any touring, install, or live sound application.


Dual Microphone Preamps with Phantom Power
Dual microphone inputs on the rear panel feature +48V phantom power for condenser and dynamic microphones. The SS-R250N also features an integrated ducking circuit, making it ideal for a wide variety of paging, background music and public address applications.
Playback and Recording Features Similar to Industry-Standard SS-R200 / SS-CDR200
Those familiar with previous models such as the TASCAM SS-R200 and SS-CDR200 can rest assured that playback (incremental play, auto-track, auto-cue, auto-ready) and recording functions (such as sync recording) are all present and accounted for.

Additional Features

Link Playback Function Allows Two Units to Operate in Tandem
The link playback function allows synchronized operation of two units, connected using S/PDIF. Ideal for critical situations where a backup is required, both units will record in sync, but also be able to operate independently if the need arises.
Read More
Versatile External Control Options
Equipped with both a D-sub 15-pin parallel terminal and an RS-232C serial terminal for external control, the SS-R250 can integrate quickly and easily into practically any system.
Read More

Ready for Dante Network Connectivity
With the optional IF-DA2 interface card, the TASCAM SS-R250N can be easily incorporated into any Dante network audio environment — and it also makes the SS-R250N one of the least expensive Dante interfaces available.
Read More

Optional Control Unit with Flash Play Mode
By connecting the optional RC-SS150 control unit, you have instant access to up to 96 sound effects, commercial spots or music cuts.
Read More
Features at a Glance
Network Functions / Control Functions
- FTP Client function enables automatic uploading of recorded files or downloading audio files from the server
- Event List for recording, playback, download and other functions can be automated based on the time set
- Time setting via SNTP Client function enables event management with more accuracy
- Automatic Upload function enables recorded files to be uploaded automatically
- iOS / Android / Windows / Mac control apps available, for remote control of transport and various settings
- Optional IF-DA2 interface card for use in Dante network audio environments (sold separately)
- Serial and parallel port connections
- Optional RC-SS150 Flash Play control unit with color LCD screen (sold separately)
Recording Capabilities
- Supports recording and playback of high-resolution files up to 24-bit/96kHz
- Dual SD memory card slots permit mirror and relay recording
- Auto mark function: when an error occurs or input level overloads, the time point will be marked automatically
- PRE REC function helps prevent missing audio material at the start of recording
- Auto track function automatically trims the tracks
- Onboard compressor and limiter to prevent digital clipping and optimize signal levels
- Auto level control function automatically adjusts the input level for recording
- Starts recording as soon as the unit is turned on with Power-on-record function
- Dual XLR microphone input connectors with phantom power for condenser mics
Playback Functions
- Call function saves the position where your last playback started
- Multiple playback modes such as Program, Random, and Single
- Ducking function automatically adjusts the playback volume while the input level increases or decreases
- All repeat / A-B repeat function
- Incremental play function to transport to the beginning of the next track
- Monaural mix playback function
- Auto Cue / Auto Ready
- Pitch control and key control function for speed and key adjustments
- Can set the mark at any position
- EOM (End of message) notification available before the track ends
Other Features
- Sampling rate converter for inputs and outputs are available
- Link playback function allows two units to be operated at the same time
- Automatic file closing process to avoid data loss if there is a sudden power loss during recording
- User presets: up to three sets of optional settings can be stored for such things as switching input and output, sampling rate selection and other functions
- 1U rackmount size
LEARN
Pair with your SS-R250N
Support for Your SS-R250N
Download manuals,
get tutorials, updates and more
LEARN MORE
You might also like
- Application >
- Broadcasting
- Installation Products >
- Amusement Park / Theater
- Installation Products >
- Commercial Facilities / Retail
- Installation Products >
- Conference / Classrooms / Auditoriums
- Application >
- Dante Solution
- Application >
- Live Audio Mixing and Recording
- Application >
- Installation Audio / Video
- Browse by type >
- Dante Processors
- Browse by type >
- Media Player / Recorder
- Browse by type >
- Installation Products
- Network and Record
Spec Description
| Recording/Playback media | |
| SD | SD card (512MB to 2GB) SDHC card (4GB to 32GB) SDXC card (64GB to 128GB) |
| USB | USB Flash memory (512MB to 128GB) |
| File format | |
| MP3 | 44.1k / 48k Hz, 64k / 128k / 192k / 256k / 320k bps |
| WAV | 44.1k / 48k / 96k Hz, 16 / 24-bit |
| Number of channels | 2 (stereo), 1 (mono) |
| Analog Audio inputs | |
| UNBALANCED | |
| Connector | RCA Pin jack× 1 pair |
| Nominal input level | –10dBV (0.316Vrms) |
| Maximum input level | +6dBV (2.0Vrms) |
| Input impedance | 10kΩ |
| BALANCED | |
| Connector | XLR-3-31 (1: GND, 2: HOT, 3: COLD) × 1 pair |
| Line input | |
| Nominal input level | +4dBu (1.23Vrms, Ref.Level other than –9dBFS) +6dBu (1.55Vrms, Ref.Level –9dBFS) |
| Maximum input level | +15dBu (4.36Vrms, Ref.Level –9dBFS) +18dBu (6.16Vrms, Ref.Level –14dBFS) +20dBu (7.75Vrms, Ref.Level –16dBFS) +22dBu (9.76Vrms, Ref.Level –18dBFS) +24dBu (12.28Vrms, Ref.Level –20dBFS) |
| Input impedance | 10kΩ |
| Mic input | |
| Maximum input level | +4dBu (1.23Vrms) |
| Minimum input level | –70dBu (245uVrms) or more |
| Input impedance | 2.2kΩ |
| Analog Audio outputs | |
| UNBALANCED | |
| Connector | RCA Pin jack × 1 pair |
| Nominal output level | –10dBV (0.316Vrms) |
| Maximum output level | +6dBV (2.0Vrms) |
| Output impedance | 200Ω |
| BALANCED | |
| Connector | XLR-3-32 (1: GND, 2: HOT, 3: COLD) × 1 pair |
| Nominal output level | +4dBu (1.23Vrms) |
| Maximum output level | +15dBu (4.36Vrms, Ref.Level –9dBFS) +18dBu (6.16Vrms, Ref.Level –14dBFS) +20dBu (7.75Vrms, Ref.Level –16dBFS) +22dBu (9.76Vrms, Ref.Level –18dBFS) +24dBu (12.28Vrms, Ref.Level –20dBFS) |
| Output impedance | 200Ω |
| Digital Audio inputs | |
| AES/EBU | |
| Connector | XLR-3-31 × 1 |
| Input impedance | 110Ω |
| Format | AES3-2003/IEC60958-4 (AES/EBU) |
| Supported sampling frequencies | 44.1k / 48k / 96k Hz |
| S/PDIF | |
| Connector | RCA Pin jack × 1 |
| Format | IEC60958-3 |
| Supported sampling frequencies | 32k to 96k Hz |
| Digital Audio outputs | |
| AES/EBU | |
| Connector | XLR-3-32 × 1 |
| Output impedance | 110Ω |
| Format | AES3-2003/IEC60958-4 (AES/EBU) |
| Supported sampling frequencies | 44.1k / 48k / 96k Hz |
| S/PDIF | |
| Connector | RCA Pin jack × 1 |
| Format | IEC60958-3 |
| Control input/output | |
| REMOTE (FRONT) | |
| Connector | 2.5mm TRS jack × 1 (TASCAM RC-3F, RC-20 sold separately) |
| RS-232C | |
| Connector | D-sub 9 pin × 1 |
| PARALLEL | |
| Connector | D-sub 25 pin × 1 |
| PHONES | |
| Connector | 1/4″ (6.3mm) Stereo Phone jack × 1 |
| Maximum output | 45mW + 45mW (THD+N 0.1% or less, into 32Ω load) |
| ETHERNET | |
| Connector | RJ-45 × 1 |
| Compatible standard | 100BASE-TX |
| Power | AC 100 — 240V, 50/60Hz |
| Power consumption | 20W |
| Dimensions | 19.0″ × 1.77″ × 11.8″ / 482.6 × 45 × 300.5 mm |
| Weight | 6.4 lbs. / 2.9 kg |
| Operating temperature range | 41˚F to 95˚F / 5˚C to 35˚C |
| Included items | AC power code, RC-10 remote control unit, rack-mounting screw kit, security screw kit, Owner’s manual (with warranty) |
Audio performance
| Frequency response | 20Hz to 20kHz, ±0.5dB(JEITA) 20Hz to 40kHz, +0.5/–3dB (JEITA) |
| Distortion | 0.002% or less (Ref:–16dB/BALANCED, JEITA) |
| S/N ratio | 106dB or more (JEITA) |
| Dynamic range | 106dB or more (JEITA) |
| Crosstalk | 100dB or more (JEITA) |
| EIN (equivalent input noise) | –125dBu or less (40Ω 20kHz LPF) |
Comparison chart
| SS-R250N | SS-CDR250N | SS-R100 | |
| Media (Rec/Play) | SD, USB | SD, USB, CD | SD, CF, USB |
| Ethernet | RJ-45 × 1 | RJ-45 × 1 | – |
| Audio Input/Output | |||
| Analog Input | Balanced × 1 pair Unbalanced × 1 pair |
Balanced × 1 pair Unbalanced × 1 pair |
Unbalanced × 1 pair |
| Analog Output | Balanced × 1 pair Unbalanced × 1 pair |
Balanced × 1 pair Unbalanced × 1 pair |
Unbalanced × 1 pair |
| Digital Input | Coaxial × 1 XLR × 1 |
Coaxial × 1 XLR × 1 |
Coaxial × 1 |
| Digital Output | Coaxial × 1 XLR × 1 |
Coaxial × 1 XLR × 1 |
Coaxial × 1 |
| Phone Output | 1/4″ (6.3mm) Stereo jack × 1 |
1/4″ (6.3mm) Stereo jack × 1 |
1/4″ (6.3mm) Stereo jack × 1 |
| Control I/O | |||
| RS-232C | D-sub 9pin × 1 | D-sub 9pin × 1 | – |
| Parallel | D-sub 25pin × 1 | D-sub 25pin × 1 | – |
| Remote In (RC-SS2) | 1/8″ (3.5mm) TRS jack × 1 | 1/8″ (3.5mm) TRS jack × 1 | 1/8″ (3.5mm) TRS jack × 1 |
| Remote In (RC-20/RC-3F) | 2.5mm TRS jack × 1 | 2.5mm TRS jack × 1 | 2.5mm TRS jack × 1 |
| Keyboard | mini-DIN (PS/2) × 1 | mini-DIN (PS/2) × 1 | mini-DIN (PS/2) × 1 |
Information
| Latest version info | |
| System firmware | V2.14 |
System Firmware V2.14
- When the media was set to CD and the PLAY MODE to SINGLE, selecting and playing another track some time after stopping playback of the first track could cause the sound to break up on rare occasions. This has been fixed.
- When the FILE TYPE in the recording settings was set to MP3 (MONO (2ch)), «Record Error!» would be displayed immediately after recording started, and recording would no longer be possible. This has been fixed.
- When playing back a file that was only about one second long, the audio at the end of the file could be repeated. This has been fixed.
- When playing back files in succession, if the first song was longer than the second song and the second song was less than 10 seconds long, the second song would be played twice in succession. This has been fixed.
- Operation stability has been improved.
- NOTE
- First update the Unit firmware to V2.14, then update the FPGA firmware to V0019.
If the Unit firmware is V2.13 or earlier, the FPGA firmware cannot be updated to V0019.
- Using the TASCAM SS250 CONTROL(V2.0.0) software
- To use the TASCAM SS250 CONTROL (V2.0.0) software, please verify the unit’s system firmware version is above V1.30. If not, please make sure to upload the system firmware to V1.30 or higher.
- Using the RC-900 control remote
- To use the RC-900 control remote, please make sure that the firmware version of the RC-900 unit is above V1.30.

Notices About Products
Documents
Firmware / Software
Compatibility
TASCAM SS-R250N – Это профессиональный 4-канальный рекордер, предназначенный для фиксированной инсталляции в местах, где требуется проводить долгую непрерывную звукозапись или воспроизведение аудиоматериала.
Модель оснащена высококачественными конверторами, богатыми возможностями коммутации, а также простым и доступным интерфейсом с функцией дистанционного управления.
Модель способна воспроизводить и записывать аудио в форматах MP3 (32-320 кбит/с, до 48 кГц) и WAV (16/24 бит, до 96 кГц). Для загрузки и сохранения файлов предусмотрено два слота для SD/SDHC/SDXC-карт (до 128 Гб), а также порт USB-A для флэш-карты (до 64 Гб). Таким образом, можно не только производить долгую звукозапись, используя весь объем внешней памяти, но и вести запись на основную и резервную дорожку для защиты от случайных пиков и других дефектов. Среди возможностей коммутации есть два балансных микрофонных и линейных входа на разъемах XLR, оснащенных фантомным питанием, необходимым конденсаторным микрофонам, а также два линейных входа, сделанных на разъемах RCA. Присутствуют балансный и небалансный стерео выходы, выполненные на разъемах XLR и RCA соответственно. Также в наличии есть входы и выходы для цифровых интерфейсов AES/EBU и S/PDIF, представленные такими же разъемами. Наконец, имеется выход для наушников на разъеме 1/4» Jack TRS, обладающий максимальной мощностью 40 мВт на канал при нагрузке 32 Ом.
Богатый функционал прибора обеспечивает максимально качественный результат на выходе. Среди некоторых опций есть такие, как установка пользовательских меток, автоматический контроль входного уровня, компрессор, лимитер, функции предварительной записи и изменения скорости воспроизведения с опцией настройки высоты тона. Полученные настойки можно сохранить в виде трех пресетов. Для управления на корпусе имеются клавиши, энкодер, а также ЖК-дисплей, отображающий всю актуальную информацию. Также присутствует возможность удаленного управления посредством модулей RC-900 или RC-SS150, пульта Д/У RC-20 или ножного переключателя RC-3F, которые приобретаются отдельно. Опционально можно приобрести 2-канальный Dante-интерфейс IF-DA2. Для коммутации с устройствами Д/У есть два порта D-sub и вход на разъеме 2.5 мм Jack TRS. Есть Ethernet-порт RJ45 для подключения к сети и обмену файлами. Наконец, для дистанционного контроля над рекордером существует приложение SS250 Control, доступное для платформ iOS и Android.
TASCAM SS-R250N представляет собой профессиональный рекордер, оснащенный богатым функционалом и множеством способов подключения, что позволит добиться эффективной работы от прибора для решения любых задач при записи и воспроизведении аудио. Модель оборудована высококачественными конверторами и микрофонными предусилителями, которые обеспечивают чистый и неокрашенный звук. Корпус представляет собой прочную металлическую конструкцию в рэковом формате стандарта 1U. Питание осуществляется от сети, кабель поставляется в комплекте.
Особенности профессионального рекордера TASCAM SS-R250N
- Профессиональный рекордер
- 2 микрофонных/линейных и 2 линейных входа
- Запись и воспроизведение в форматах MP3 (32-320 кбит/с, до 48 кГц) и WAV (16/24 бит, до 96 кГц)
- 2 слота для SD/SDHC/SDXC-карт, порт USB-A для флэш-карты
- Фантомное питание для конденсаторных моделей микрофонов
- Возможность параллельной записи на резервную дорожку
- Компрессор, лимитер и возможность изменения скорости воспроизведения
- Цифровые интерфейсы AES/EBU и S/PDIF
- Балансный и небалансный выходы
- Удаленное управление посредством опциональных устройств или с помощью приложения для смартфонов
- Стальной рэковый корпус высотой 1U
Характеристики профессионального рекордера TASCAM SS-R250N
| Тип | рекордер |
| Каналы | 4 |
| Форматы воспроизведения/записи | MP3 (32-320 кбит/с, до 48 кГц), WAV (16/24 бит, до 96 кГц) |
| Частотный диапазон | 20 Гц – 20 кГц (+/-0.5 дБ, 44.1 и 48 кГц), 20 Гц – 40 кГц (+0.5/-3 дБ, 96 кГц) |
| Коэффициент гармонических искажений | <0.002% |
| Соотношение сигнал/шум | >106 дБ |
| Динамический диапазон | >106 дБ |
| Перекрестные искажения | >100 дБ |
| Эквивалентный уровень шума | <-125 дБн |
| Минимальный входной уровень | -70 дБн (mic in, ch 1-2) |
| Номинальный входной уровень | +4 или +6 дБн (line in, ch 1-2), -10 дБВ (line in, ch 3-4) |
| Максимальный входной уровень | +4 дБн (mic in, ch 1-2), +15, +18, +20, +22 или +24 дБн (line in, ch 1-2), +6 дБВ (line in, ch 3-4) |
| Номинальный выходной уровень | +4 или +6 дБн (balanced out), -10 дБВ (unbalanced out) |
| Максимальный выходной уровень | +15, +18, +20, +22 или +24 дБн (balanced out), +6 дБВ (unbalanced out) |
| Максимальная выходная мощность | 40 мВт + 40 мВт (phones out, 32 Ом) |
| Входное сопротивление | >2.2 кОм (mic in, ch 1-2), >10 кОм (line in, ch 1-4), 110 Ом (AES/EBU digital in) |
| Выходное сопротивление | 200 Ом (balanced/unbalanced out), 110 Ом (AES/EBU digital out) |
| Типы эффектов | компрессор, лимитер |
| Пресеты | 3 |
| Аналоговые входы | 2 x XLR balanced mic/line in (ch 1-2), 2 x RCA unbalanced line in (ch 3-4) |
| Аналоговые выходы | 2 x XLR balanced out, 2 x RCA unbalanced out, 1 x 1/4» Jack TRS phones out |
| Цифровые входы | 1 x XLR AES/EBU in, 1 x RCA S/PDIF in |
| Цифровые выходы | 1 x XLR AES/EBU out, 1 x RCA S/PDIF out |
| Дополнительные разъемы | 1 x 2.5 мм Jack TRS remote control in/out, 1 x 9-pin D-sub remote control serial port (RS-232C), 1 x 25-pin D-sub remote control parallel port, 1 x RJ45 Ethernet network connector |
| USB-интерфейс | 1 x USB-A |
| Внешняя память | 2 слота для SD/SDHC/SDXC-карт (до 128 Гб) |
| Фантомное питание | есть |
| Корпус | металлический, рэковый, 1U |
| Дисплей | есть, ЖК |
| Питание | от сети |
| Потребляемая мощность | 20 Вт |
| Аксессуары в комплекте | сетевой кабель |
| Аксессуары (приобретаются отдельно) | ножной переключатель RC-3F, пульт Д/У RC-20, модули удаленного управления RC-900 или RC-SS150, 2-канальный Dante-интерфейс IF-DA2 |
| Габариты | 483 x 45 x 301 мм |
| Вес | 2.9 кг |
Описание профессионального рекордера TASCAM SS-R250N
TASCAM SS-R250N – это профессиональный 2-канальный рекордер, предназначенный для фиксированной инсталляции в местах, где требуется проводить долгую непрерывную звукозапись или воспроизведение аудиоматериала. Модель оснащена высококачественными конверторами, богатыми возможностями коммутации, а также простым и доступным интерфейсом с функцией дистанционного управления.
Модель способна воспроизводить и записывать аудио в форматах MP3 (32-320 кбит/с, до 48 кГц) и WAV (16/24 бит, до 96 кГц). Для загрузки и сохранения файлов предусмотрено два слота для SD/SDHC/SDXC-карт (до 128 Гб), а также порт USB-A для флэш-карты (до 64 Гб). Таким образом, можно не только производить долгую звукозапись, используя весь объем внешней памяти, но и вести запись на основную и резервную дорожку для защиты от случайных пиков и других дефектов. Среди возможностей коммутации есть два балансных микрофонных и линейных входа на разъемах XLR, оснащенных фантомным питанием, необходимым конденсаторным микрофонам, а также два линейных входа, сделанных на разъемах RCA. Присутствуют балансный и небалансный стерео выходы, выполненные на разъемах XLR и RCA соответственно. Также в наличии есть входы и выходы для цифровых интерфейсов AES/EBU и S/PDIF, представленные такими же разъемами. Наконец, имеется выход для наушников на разъеме 1/4» Jack TRS, обладающий максимальной мощностью 40 мВт на канал при нагрузке 32 Ом.
Богатый функционал прибора обеспечивает максимально качественный результат на выходе. Среди некоторых опций есть такие, как установка пользовательских меток, автоматический контроль входного уровня, компрессор, лимитер, функции предварительной записи и изменения скорости воспроизведения с опцией настройки высоты тона. Полученные настойки можно сохранить в виде трех пресетов. Для управления на корпусе имеются клавиши, энкодер, а также ЖК-дисплей, отображающий всю актуальную информацию. Также присутствует возможность удаленного управления посредством модулей RC-900 или RC-SS150, пульта Д/У RC-20 или ножного переключателя RC-3F, которые приобретаются отдельно. Опционально можно приобрести 2-канальный Dante-интерфейс IF-DA2. Для коммутации с устройствами Д/У есть два порта D-sub и вход на разъеме 2.5 мм Jack TRS. Есть Ethernet-порт RJ45 для подключения к сети и обмену файлами. Наконец, для дистанционного контроля над рекордером существует приложение SS250 Control, доступное для платформ iOS и Android.
TASCAM SS-R250N представляет собой профессиональный рекордер, оснащенный богатым функционалом и множеством способов подключения, что позволит добиться эффективной работы от прибора для решения любых задач при записи и воспроизведении аудио. Модель оборудована высококачественными конверторами и микрофонными предусилителями, которые обеспечивают чистый и неокрашенный звук. Корпус представляет собой прочную металлическую конструкцию в рэковом формате стандарта 1U. Питание осуществляется от сети, кабель поставляется в комплекте.
Особенности профессионального рекордера TASCAM SS-R250N
- Профессиональный рекордер
- 2 микрофонных/линейных и 2 линейных входа
- Запись и воспроизведение в форматах MP3 (32-320 кбит/с, до 48 кГц) и WAV (16/24 бит, до 96 кГц)
- 2 слота для SD/SDHC/SDXC-карт, порт USB-A для флэш-карты
- Фантомное питание для конденсаторных моделей микрофонов
- Возможность параллельной записи на резервную дорожку
- Компрессор, лимитер и возможность изменения скорости воспроизведения
- Цифровые интерфейсы AES/EBU и S/PDIF
- Балансный и небалансный выходы
- Удаленное управление посредством опциональных устройств или с помощью приложения для смартфонов
- Стальной рэковый корпус высотой 1U
Характеристики профессионального рекордера TASCAM SS-R250N
| Тип | рекордер |
| Каналы | 2 |
| Форматы воспроизведения/записи | MP3 (32-320 кбит/с, до 48 кГц), WAV (16/24 бит, до 96 кГц) |
| Частотный диапазон | 20 Гц – 20 кГц (+/-0.5 дБ, 44.1 и 48 кГц), 20 Гц – 40 кГц (+0.5/-3 дБ, 96 кГц) |
| Коэффициент гармонических искажений | <0.002% |
| Соотношение сигнал/шум | >106 дБ |
| Динамический диапазон | >106 дБ |
| Перекрестные искажения | >100 дБ |
| Эквивалентный уровень шума | <-125 дБн |
| Минимальный входной уровень | -70 дБн (mic in, ch 1-2) |
| Номинальный входной уровень | +4 или +6 дБн (line in, ch 1-2), -10 дБВ (line in, ch 3-4) |
| Максимальный входной уровень | +4 дБн (mic in, ch 1-2), +15, +18, +20, +22 или +24 дБн (line in, ch 1-2), +6 дБВ (line in, ch 3-4) |
| Номинальный выходной уровень | +4 или +6 дБн (balanced out), -10 дБВ (unbalanced out) |
| Максимальный выходной уровень | +15, +18, +20, +22 или +24 дБн (balanced out), +6 дБВ (unbalanced out) |
| Максимальная выходная мощность | 40 мВт + 40 мВт (phones out, 32 Ом) |
| Входное сопротивление | >2.2 кОм (mic in, ch 1-2), >10 кОм (line in, ch 1-4), 110 Ом (AES/EBU digital in) |
| Выходное сопротивление | 200 Ом (balanced/unbalanced out), 110 Ом (AES/EBU digital out) |
| Типы эффектов | компрессор, лимитер |
| Пресеты | 3 |
| Аналоговые входы | 2 x XLR balanced mic/line in (ch 1-2), 2 x RCA unbalanced line in (ch 3-4) |
| Аналоговые выходы | 2 x XLR balanced out, 2 x RCA unbalanced out, 1 x 1/4» Jack TRS phones out |
| Цифровые входы | 1 x XLR AES/EBU in, 1 x RCA S/PDIF in |
| Цифровые выходы | 1 x XLR AES/EBU out, 1 x RCA S/PDIF out |
| Дополнительные разъемы | 1 x 2.5 мм Jack TRS remote control in/out, 1 x 9-pin D-sub remote control serial port (RS-232C), 1 x 25-pin D-sub remote control parallel port, 1 x RJ45 Ethernet network connector |
| USB-интерфейс | 1 x USB-A |
| Внешняя память | 2 слота для SD/SDHC/SDXC-карт (до 128 Гб) |
| Фантомное питание | есть |
| Корпус | металлический, рэковый, 1U |
| Дисплей | есть, ЖК |
| Питание | от сети |
| Потребляемая мощность | 20 Вт |
| Аксессуары в комплекте | сетевой кабель |
| Аксессуары (приобретаются отдельно) | ножной переключатель RC-3F, пульт Д/У RC-20, модули удаленного управления RC-900 или RC-SS150, 2-канальный Dante-интерфейс IF-DA2 |
| Габариты | 483 x 45 x 301 мм |
| Вес | 2.9 кг |
- Обсуждение профессионального рекордера TASCAM SS-R250N
Написать свой комментарий
Производитель оставляет за собой право изменить внешний вид, комплектацию или параметры товара, не влияющие на его потребительские свойства.
Если вы заметили на нашем сайте неточность в описании или характеристиках товара, пожалуйста, свяжитесь с нами.