
- Инструкции и руководства
- Бренды
- TEAC
- SR-100I
- Справочник Пользователя
SR-100i
Hi-Fi TABLE RADIO/CD
OWNER’S MANUAL
MODE D’EMPLOI
MANUAL DEL USUARIO
41009606-A101
EN
GL
IS
H
FR
AN
Ç
A
IS
ES
P
A
ÑOL
41009606-A101
SR-100i
Hi-Fi TABLE RADIO/CD
OWNER’S MANUAL
MODE D’EMPLOI
MANUAL DEL USUARIO
ENGLISH FRANÇAIS ESPAÑOL
IMPORTANT SAFETY INSTRUCTIONS
1) Read these instructions.
CAUTION: TO REDUCE THE RISK OF ELECTRIC SHOCK,
DO NOT REMOVE COVER (OR BACK). NO USERSERVICEABLE PARTS INSIDE. REFER SERVICING TO
QUALIFIED SERVICE PERSONNEL.
The lightning flash with arrowhead symbol,
within an equilateral triangle, is intended to
alert the user to the presence of uninsulated
“dangerous voltage” within the product’s
enclosure that may be of sufficient magnitude
to constitute a risk of electric shock to persons.
The exclamation point within an equilateral
triangle is intended to alert the user to the
presence of important operating and
maintenance (servicing) instructions in the
literature accompanying the appliance.
2) Keep these instructions.
3) Heed all warnings.
4) Follow all instructions.
5) Do not use this apparatus near water.
6) Clean only with dry cloth.
7) Do not block any ventilation openings. Install in
accordance with the manufacturer’s instructions.
 Do not install near any heat sources such as radiators,
heat registers, stoves, or other apparatus (including
amplifiers) that produce heat.
9) Do not defeat the safety purpose of the polarized or
grounding-type plug. A polarized plug has two blades
with one wider than the other. A grounding type plug
has two blades and a third grounding prong. The wide
blade or the third prong are provided for your safety. If
the provided plug does not fit into your outlet, consult
an electrician for replacement of the obsolete outlet.
MPEG Layer-3 audio coding technology licensed from
Fraunhofer IIS and Thomson.
This product is protected by certain intellectual property
rights of Microsoft. Use or distribution of such technology
outside of this product is prohibited without a license from
Microsoft.
iPhone, iPod, iPod classic, iPod nano, iPod shuffle, and iPod
touch are trademarks of Apple Inc., registered in the U.S.
and other countries.
“Made for iPod” means that an electronic accessory
has been designed to connect specifically to iPod and
has been certified by the developer to meet Apple
performance standards.
Apple is not responsible for the operation of this device or
its compliance with safety and regulatory standards.
Other company names and product names in this
document are the trademarks or registered trademarks of
their respective owners.
2
10) Protect the power cord from being walked on or
pinched particularly at plugs, convenience receptacles,
and the point where they exit from the apparatus.
11) Only use attachments/accessories specified by the
manufacturer.
12) Use only with the cart, stand,
tripod, bracket, or table specified
by the manufacturer, or sold with
the apparatus. When a cart is used,
use caution when moving the cart/
apparatus combination to avoid
injury from tip-over.
13) Unplug this apparatus during lightning storms or when
unused for long periods of time.
14) Refer all servicing to qualified service personnel.
Servicing is required when the apparatus has been
damaged in any way, such as power-supply cord or
plug is damaged, liquid has been spilled or objects
have fallen into the apparatus, the apparatus has been
exposed to rain or moisture, does not operate normally,
or has been dropped.
< Do not expose this apparatus to drips or splashes.
For U.S.A.
< Do not place any objects filled with liquids, such as
vases, on the apparatus.
< Do not install this apparatus in a confined space such as
a book case or similar unit.
< The apparatus draws nominal non-operating power
from the AC outlet with its POWER or STANDBY/ON
switch not in the ON position.
< The apparatus should be located close enough to the
AC outlet so that you can easily grasp the power cord
plug at any time.
< The mains plug is used as the disconnect device, the
disconnect device shall remain readily operable.
< If the product uses batteries (including a battery pack
or installed batteries), they should not be exposed to
sunshine, fire or excessive heat.
< CAUTION for products that use replaceable lithium
batteries: there is danger of explosion if a battery is
replaced with an incorrect type of battery. Replace only
with the same or equivalent type.
< Caution should be taken when using earphones or
headphones with the product because excessive sound
pressure (volume) from earphones or headphones can
cause hearing loss.
WARNING: TO PREVENT FIRE OR SHOCK
HAZARD, DO NOT EXPOSE THIS APPLIANCE
TO RAIN OR MOISTURE.
This equipment has been tested and found to comply
with the limits for a Class B digital device, pursuant
to Part 15 of the FCC Rules. These limits are designed
to provide reasonable protection against harmful
interference in a residential installation. This equipment
generates, uses, and can radiate radio frequency energy
and, if not installed and used in accordance with the
instructions, may cause harmful interference to radio
communications. However, there is no guarantee that
interference will not occur in a particular installation.
If this equipment does cause harmful interference to
radio or television reception, which can be determined
by turning the equipment off and on, the user is
encouraged to try to correct the interference by one or
more of the following measures:
r Reorient or relocate the equipment and/or the
receiving antenna.
r Increase the separation between the equipment and
receiver.
r Connect the equipment into an outlet on a circuit
different from that to which the receiver is connected.
r Consult the dealer or an experienced radio/TV
technician for help.
CAUTION
Changes or modifications to this equipment not
expressly approved by TEAC CORPORATION for
compliance will void the user’s warranty.
This product has been designed and manufactured
according to FDA regulations “title 21, CFR, chapter 1,
subchapter J, based on the Radiation Control for Health
and Safety Act of 1968“, and is classified as class 1 laser
product. There is not hazardous invisible laser radiation
during operation because invisible laser radiation emitted
inside of this product is completely confined in the
protective housings.
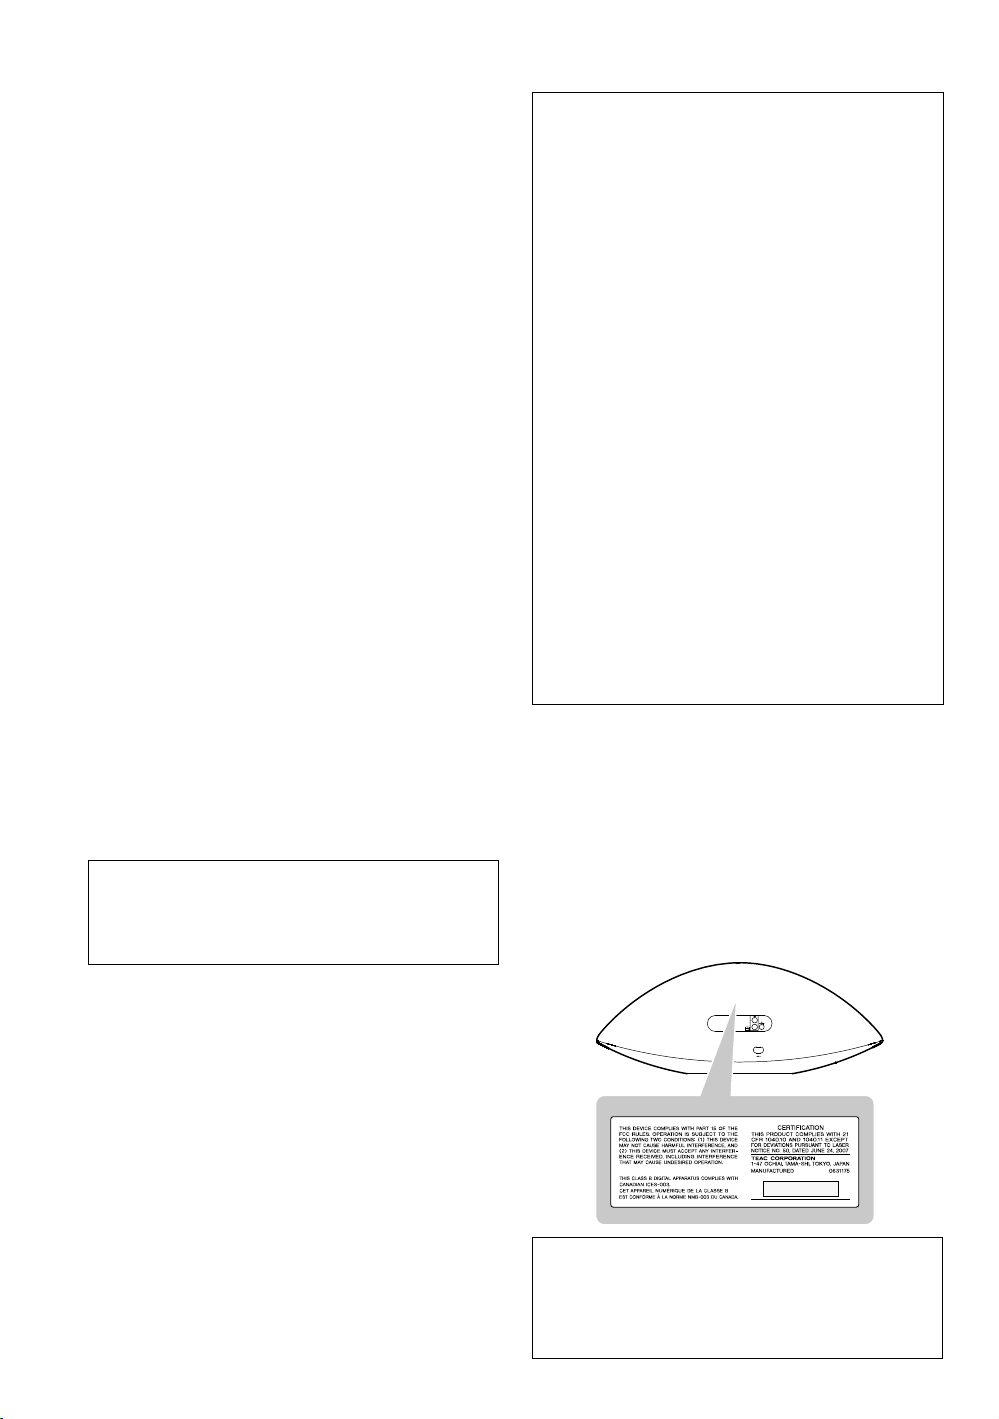
The label required in this regulation is as follows:
For U.S.A.
Back of the unit
CAUTION
< DO NOT REMOVE THE EXTERNAL CASES OR CABINETS
TO EXPOSE THE ELECTRONICS. NO USER SERVICEABLE
PARTS ARE WITHIN!
< IF YOU ARE EXPERIENCING PROBLEMS WITH THIS
PRODUCT, CONTACT TEAC FOR A SERVICE REFERRAL. DO
NOT USE THE PRODUCT UNTIL IT HAS BEEN REPAIRED.
< USE OF CONTROLS OR ADJUSTMENTS OR
PERFORMANCE OF PROCEDURES OTHER THAN THOSE
SPECIFIED HEREIN MAY RESULT IN HAZARDOUS
RADIATION EXPOSURE.
Optical pickup
Type : KHS-313A
Manufacturer : Sony Electronics Inc.
Laser output : 7 mW
Wavelength : 770 — 800 nm
3

Contents
Thank you for choosing TEAC. Read this manual
carefully to get the best performance from this unit.
Before Using the Unit …………………………….5
Discs …………………………………………..6
USB Storage Devices. . . . . . . . . . . . . . . . . . . . . . . . . . . . . . . . . . .7
MP3/WMA Compatibility …………………………7
Compatible iPod ………………………………..8
Connections ……………………………………9
Identifying the Parts (Main Unit) ………………….10
Identifying the Parts (Remote Control Unit) ………..12
Remote Control Unit ……………………………14
Setting the Clock ……………………………….15
Basic Operation ………………………………..16
iPod
Listening to an iPod …………………………….18
CD USB
Listening to a Disc ………………………………20
Listening to a USB Storage Device ………………..21
Basic Playback ………………………………….22
Programmed Playback ………………………….24
Repeat Playback ………………………………..26
Shuffle Playback ………………………………..27
AUX
Listening to an External Source …………………..27
FM
Listening to the FM Radio. . . . . . . . . . . . . . . . . . . . . . . . . . . . .28
Preset Tuning …………………………………..29
Wake Up Timer …………………………………30
Troubleshooting ………………………………..31
MP3/WMA Playback Order ……………………….33
Specifications ………………………………….33
4
Before Using the Unit
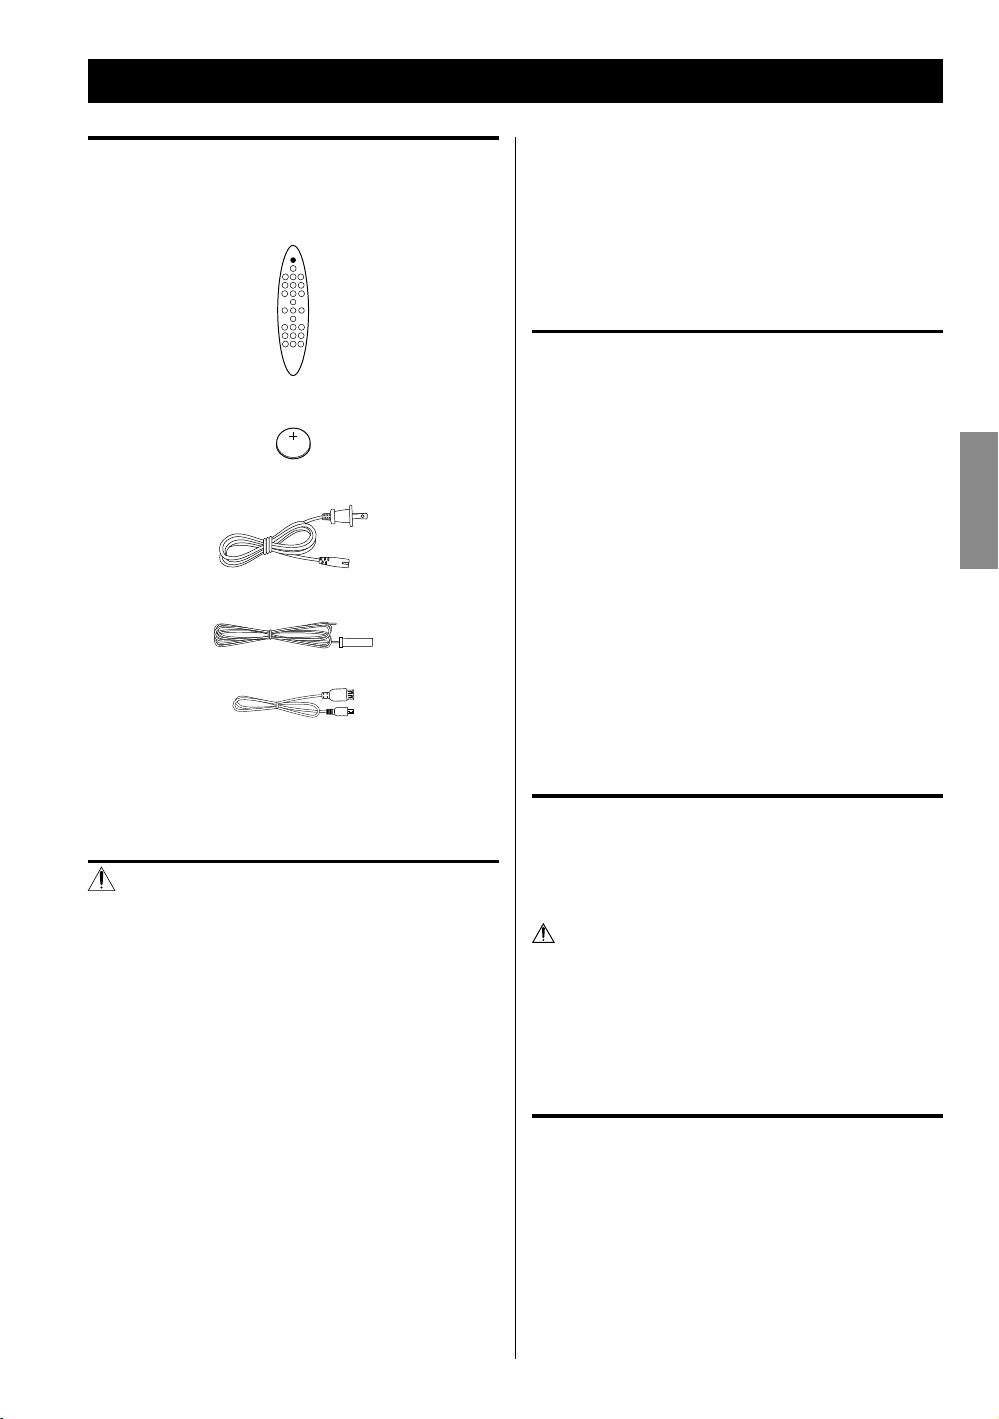
What’s in the box
Confirm the supplied standard accessories.
Remote control unit (RC-1265) x 1
Battery (CR2025) for remote control unit x 1
AC power cord x 1
FM antenna x 1
USB cable x 1
Owner’s manual (this document) x 1
< Keep this manual in a safe place for future reference.
< When removing the AC power plug from the wall
socket, always pull directly on the plug, never yank on
the cord.
< Always remove the disc before relocating or moving
this unit. Moving the unit with a disc inside it could
cause malfunction.
Placement of the unit
< Choose the installation location of your unit carefully.
Avoid placing it in direct sunlight or close to a source of
heat. You should also avoid locations that are subject to
vibration, excessive dust, heat, cold or moisture.
< As the unit may become warm during operation, always
leave sufficient space around it for ventilation.
< Do not place the unit on an amplifier, a receiver or any
other device that generates heat.
< When the unit is turned on, if a TV is turned on nearby
lines might appear on the TV screen depending on the
frequency of the TV broadcast. This is not a malfunction
of the unit or the TV. If you see such lines, move the unit
and the TV further apart.
ENGLISH
Warranty card x 1
CAUTION
< Do not tilt the unit with a disc inserted. It may damage
the disc and cause a malfunction.
< Do not move the unit during disc playback.
During playback, the disc rotates at high speed. Do not
lift or move the unit during playback. Doing so might
damage the disc or the unit.
< The voltage supplied to the unit should match the
voltage as printed on the rear panel. If you are in any
doubt regarding this matter, consult an electrician.
< Do not open the cabinet because this might result in
damage to the circuitry or electrical shock. If a foreign
object should get into the unit, contact your dealer or
service company.
Maintenance
If the surface of the unit gets dirty, wipe with a soft cloth or
use a diluted mild liquid soap. Allow the surface of the unit
to dry completely before using.
For safety, disconnect the power cord from the outlet
before cleaning.
< Never spray liquid directly on this unit.
< Do not use thinner or alcohol as they could damage the
surface of the unit.
Beware of condensation
When the unit is moved from a cold to a warm place,
or used after a sudden temperature change, there is a
danger of condensation on the lens of CD player. Vapour
in the air could condense on internal mechanisms, making
correct operation erratic or impossible. To prevent this,
or if this occurs, leave the unit turned on for one or two
hours. Then the unit will stabilize at the temperature of its
surroundings.
5
Discs
Discs that can be played on this unit
CDs that bear the “COMPACT disc DIGITAL AUDIO”
logo (12 cm).
Do not use 8 cm discs with this unit.
CD-R and CD-RW discs that have been correctly
recorded in the audio CD format and finalized.
Finalized CD-R and CD-RW discs that contain MP3/
WMA files.
Caution:
Playback of any other type of disc could cause
loud noise and damage to speakers as well as
harm hearing. Never play back any other type of
disc.
< Copy-protected discs and other discs that do not
conform to the CD standard might not play correctly
in this player. If you use such discs in this unit, TEAC
Corporation and its subsidiaries will not be responsible
for any consequences or guarantee the quality of
reproduction. If you experience problems with such
non-standard discs, you should contact their issuers.
Caution:
< Do not use 8cm discs. Using them could cause
malfunction or damage the unit.
< Do not play any disc that is warped, deformed or
damaged. Playing such discs could cause irreparable
harm to the playing mechanisms.
< Printable CD-R and CD-RW discs are not recommended
because their label sides could be sticky and damage
the unit.
< Do not stick papers or protective sheets on the discs
and do not use any protective coating sprays.
< Use a soft oil-based felt-tipped pen to write information
on the label side. Never use a ball-point or hard-tipped
pen, as this could cause damage to the recorded side.
< Never use a stabilizer. Using commercially available CD
stabilizers with this unit will damage the mechanisms
and cause them to malfunction.
< Do not use irregularly-shaped discs (octagonal, heart-
shaped, business card size, etc.). CDs with these shapes
could damage the unit.
About CD-R/CD-RW discs
This unit can play back CD-R and CD-RW discs that have
been recorded in the audio CD (CD-DA), MP3, and WMA
format.
< Discs created by a CD recorder must be finalized before
use with this unit.
< Depending on disc quality and recording conditions,
playback of some discs might not be possible. Please
see the manual for the device that you used to create
the disc.
< If you are uncertain about the handling of a CD-R
or CD-RW disc, please contact the seller of the disc
directly.
6
Handling precautions
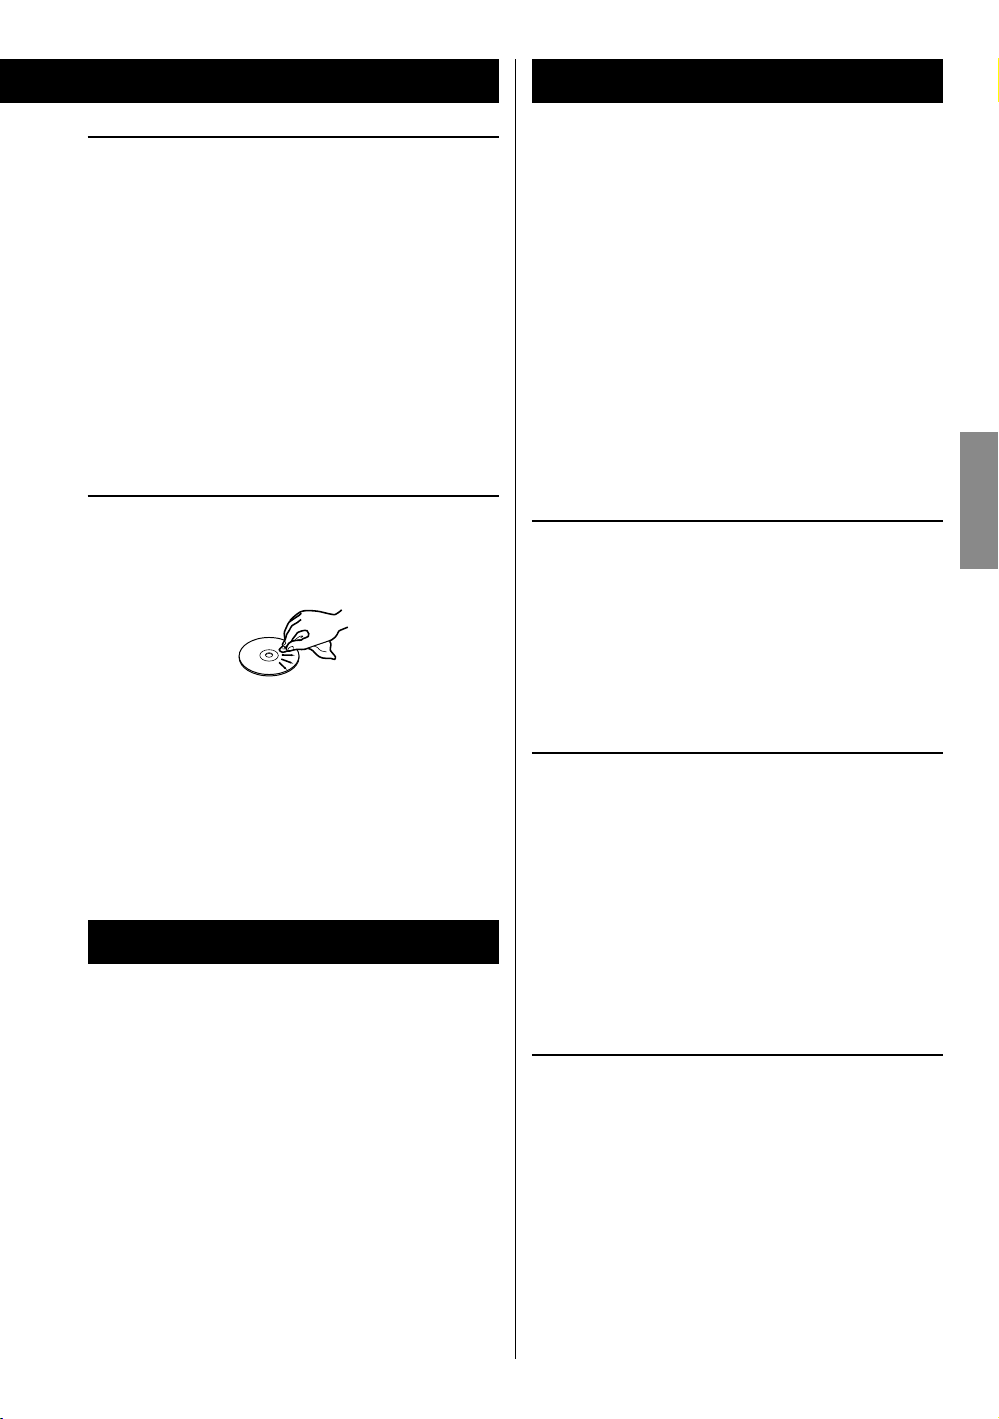
< Always insert a disc with the label side facing you. Only
one side of a Compact Disc can be played.
< To remove a disc from its storage case, press down on
the center of the case and lift the disc out, holding it
carefully by the edges.
How to remove the disc How to hold the disc
MP3/WMA Compatibility
Storage precautions
< Discs should be returned to their cases after use to
avoid dust and scratches that could cause the laser
pickup to “skip.”
< Do not expose discs to direct sunlight or high-
temperature and humidity for extended periods. Long
exposure to high temperatures will warp discs.
< CD-R and CD-RW discs are more sensitive to the effects
of heat and ultraviolet rays than ordinary CDs. It is
important that they are not stored in locations where
they will be exposed to direct sunlight. They should also
be kept away from sources of heat, such as radiators and
heat-generating electrical devices.
Maintenance
< If a disc becomes dirty, wipe its surface radially from the
center hole outward towards the outer edge with a soft,
dry cloth.
< Never clean discs using chemicals such as record sprays,
antistatic sprays and fluids, benzene and thinner. Such
chemicals will do irreparable damage to the disc’s
plastic surface.
This unit can play MP3/WMA files recorded on a CD-R,
CD-RW discs and USB storage device. Refer the instruction
manual of the software when making an MP3 or a WMA
file using a PC.
< This unit can play back monaural and stereo MP3
files that are in the MPEG-1 Audio Layer 3 format with
a sampling rate of 44.1 or 48 kHz and a bit rate of
320 kbps or less.
< WMA file must have a sampling rate of 44.1 kHz, and a
bit-rate of 192 kbps or less.
< This unit is not compatible with discs that have been
recorded using multiple sessions. Only the first session
can be played back.
< This unit cannot play copyright protected files.
File information display
The display of this unit can only show single-byte letters
and numbers.
< If the file information contains Japanese, Chinese or
other double-byte characters, playback is possible but
the name will not be shown correctly.
Cautions when preparing MP3/WMA files using a
computer or other device
ENGLISH
USB Storage Devices
Compatibility
< Only USB flash memory can be used.
< Some flash memory players that charge from a USB
terminal cannot be used for playback.
< Hard disk drives, CD/DVD drives, and other devices
connected via USB cannot be used.
< This unit cannot copy or move files.
< Playable formats: FAT16, FAT32
< NTFS, HFS and HFS+ formats cannot be used.
< Max. number of playable folders: 99
< Max. number of playable files: 99
< Depending on the conditions of a USB storage device,
this unit might not be able to play the files on it or
skipping might occur.
< Always include the extension in the file name. This unit
recognizes MP3 files by their “.mp3”, and WMA files by
their “.wma” file extensions.
< Always close the session (complete disc creation).
This unit cannot play discs if the session has not been
closed.
< Carefully read the manual for the software that you are
using when you create an MP3/WMA disc.
Files that are unplayable or only partially playable
< Files without extensions cannot be played. Files that are
not in the MP3/WMA format cannot be played even if
they have extensions.
< Variable bit rate files might not play back correctly.
< If the disc/USB storage device contains more than
99 files or 99 folders, this unit can not play it back
correctly.
< Depending on disc/USB storage device conditions, this
unit might not be able to play a disc or skipping might
occur.
7
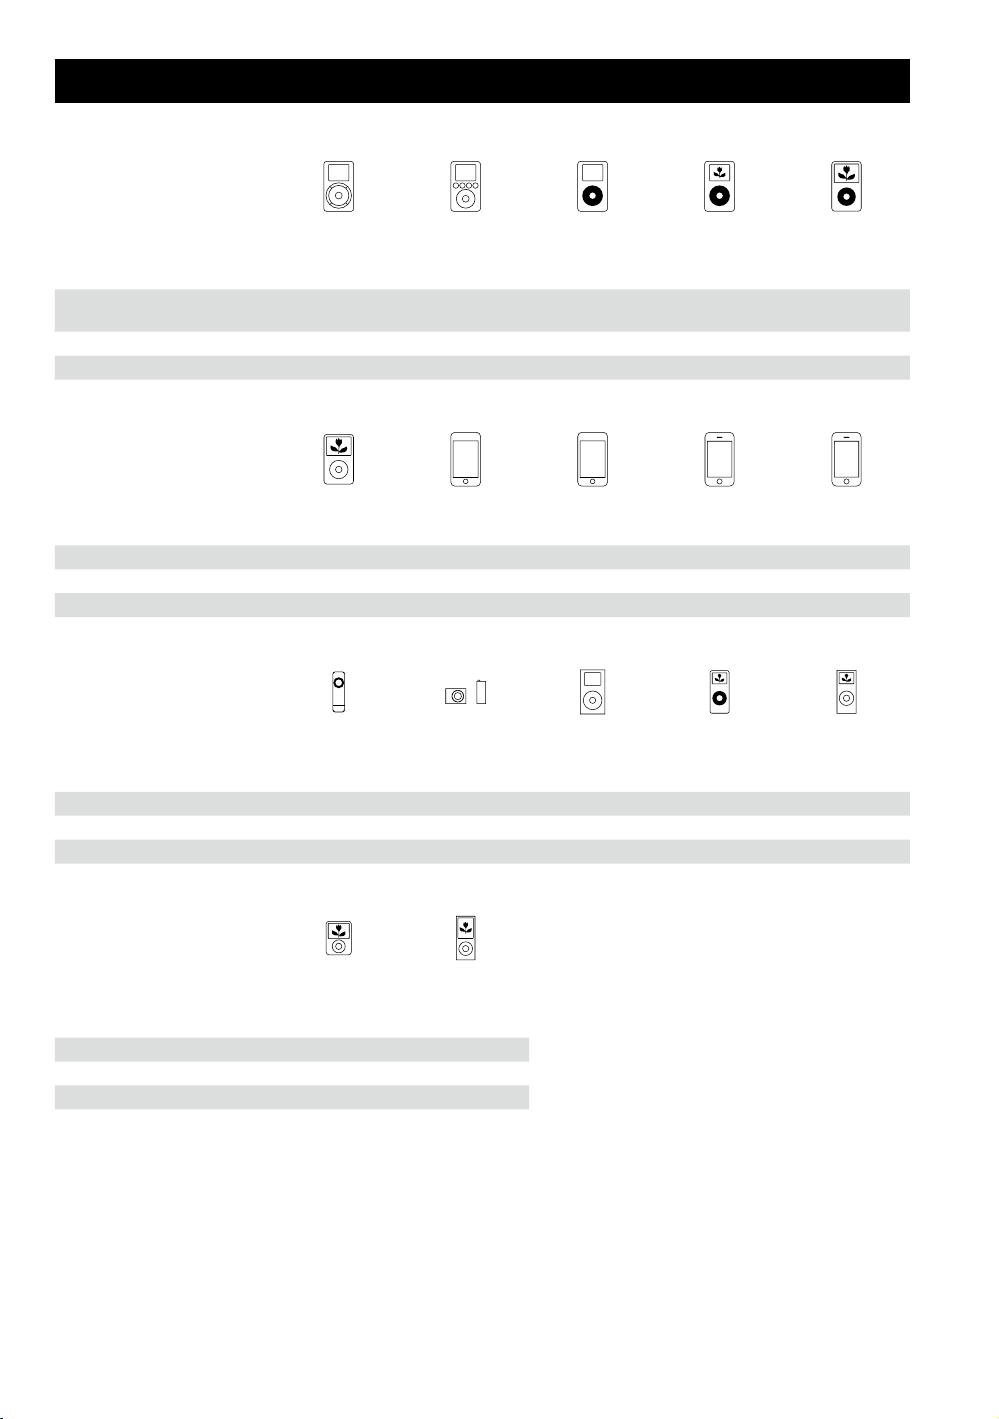
Compatible iPod
iPod
1st + 2nd generation
Capacity 5/10/20GB
Connection to SR-100i AUX Dock Dock Dock Dock
Charging through SR-100i No No Yes Yes Yes
iPod classic
Capacity 80/120/160GB 8/16/32GB 8/16/32/64GB 4/8/16GB 8/16/32GB
Connection to SR-100i Dock Dock Dock Dock** Dock**
Charging through SR-100i Yes Yes Yes Yes Yes
iPod shuffle
1st generation
Capacity 512MB/1GB 1/2/4GB 4/6GB 1/2/4GB 2/4/8GB
Connection to SR-100i AUX AUX Dock Dock Dock
Charging through SR-100i No No Yes Yes Yes
iPod
3rd generation
10/15/20/
30/40GB
iPod touch
1st generation*
iPod shuffle
2nd/3rd generation
iPod
4th generation
20/40G/U2 20/30/40/60GB/U2 30/60/80GB
iPod touch
2nd/3rd generation*
iPod mini
iPod
4th generation
(colo r)
iPhone
1st generation*
iPod nano
1st generation
iPod
5th generation
(video)
iPhone 3G/3GS*
iPod nano
2nd generation
(aluminium)
iPod nano
3rd generation
(video)
Capacity 4/8GB 8/16GB
Connection to SR-100i Dock Dock
Charging through SR-100i Yes Yes
iPod nano
4th/5th generation
* When using an iPod touch/iPhone with this unit, if you use any application other than the iPod application, the SR-100i
power might turn on again soon after it is turned off (put in standby). Since the unit cannot turn the iPod touch/iPhone
power off when such an application is running, you must quit the application before turning SR-100i off (putting it in
standby).
** Works in Airplane mode.
If your iPod does not work with SR-100i or the remote control unit, a software update might solve the problem. Visit the
Apple website and download the latest iPod software.
8
Connections
After all connections are complete, connect the power cord’s plug to the AC wall socket.
< Read the instructions of each device that you intend to use with this unit.
< Be sure to connect each plug securely. To avoid hum and noise, do not bundle the connection cords.
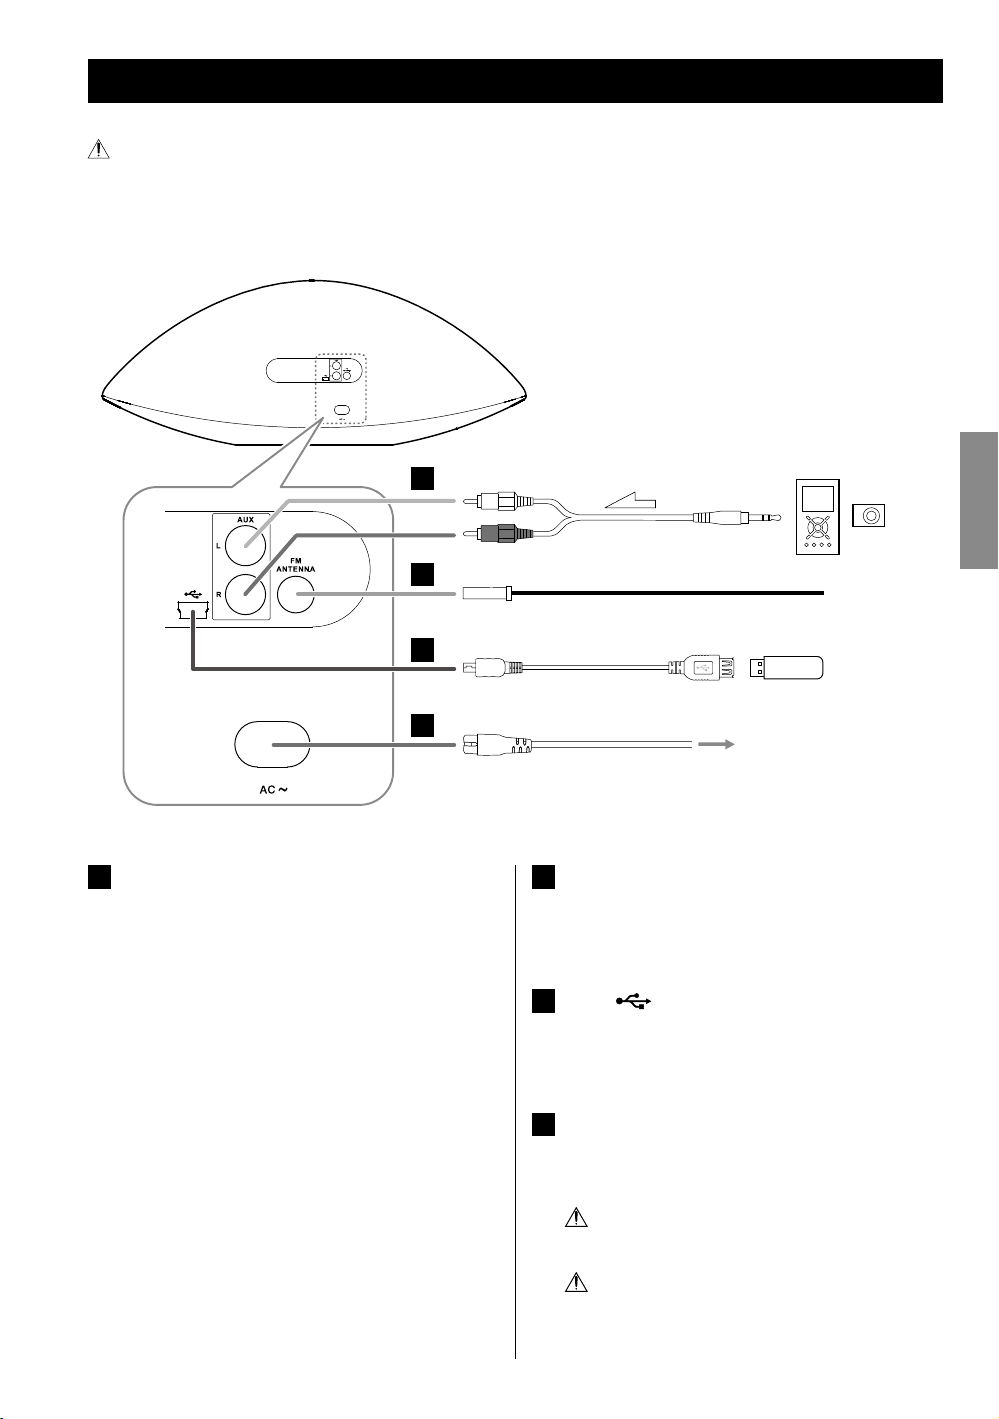
Back
A
(Optional cable)
B
Portable audio
player
ENGLISH
C
D
AUX in jacks
A
These jacks transmit an analog 2-channel audio signal.
Connect a portable audio player using commercially
available RCA pin-stereo mini plug cable.
Be sure to connect the cables as follows:
White plug e White jack (L: left channel)
Red plug e Red jack (R: right channel)
< When using the headphones jack of the component,
if you do not adjust its volume, you might not hear
any sound from SR-100i.
< Turning the volume of the connected component
up too high might cause the sound from SR-100i to
be distorted. In this case, reduce the volume of the
component until the distortion stops and then adjust
the volume level of SR-100i to a comfortable listening
level.
< Be sure to insert each plug securely. To prevent hum
and noise, avoid bundling the signal interconnection
cables together with the AC power cord or speaker
cables.
USB flash memory
AC wall socket
FM ANTENNA terminal
B
Connect the supplied FM antenna. Extend fully and
position for the best reception and attach it to a
window frame or wall with thumbtacks or the like.
USB (
C
You can connect a USB storage device to this port
using the supplied USB cable.
AC in
D
After all other connections have been completed,
connect the plug to an AC wall socket.
Be sure to connect the power cord to an AC outlet
Hold the power plug when plugging or
) port
which supplies the correct voltage.
unplugging the power cord.
9
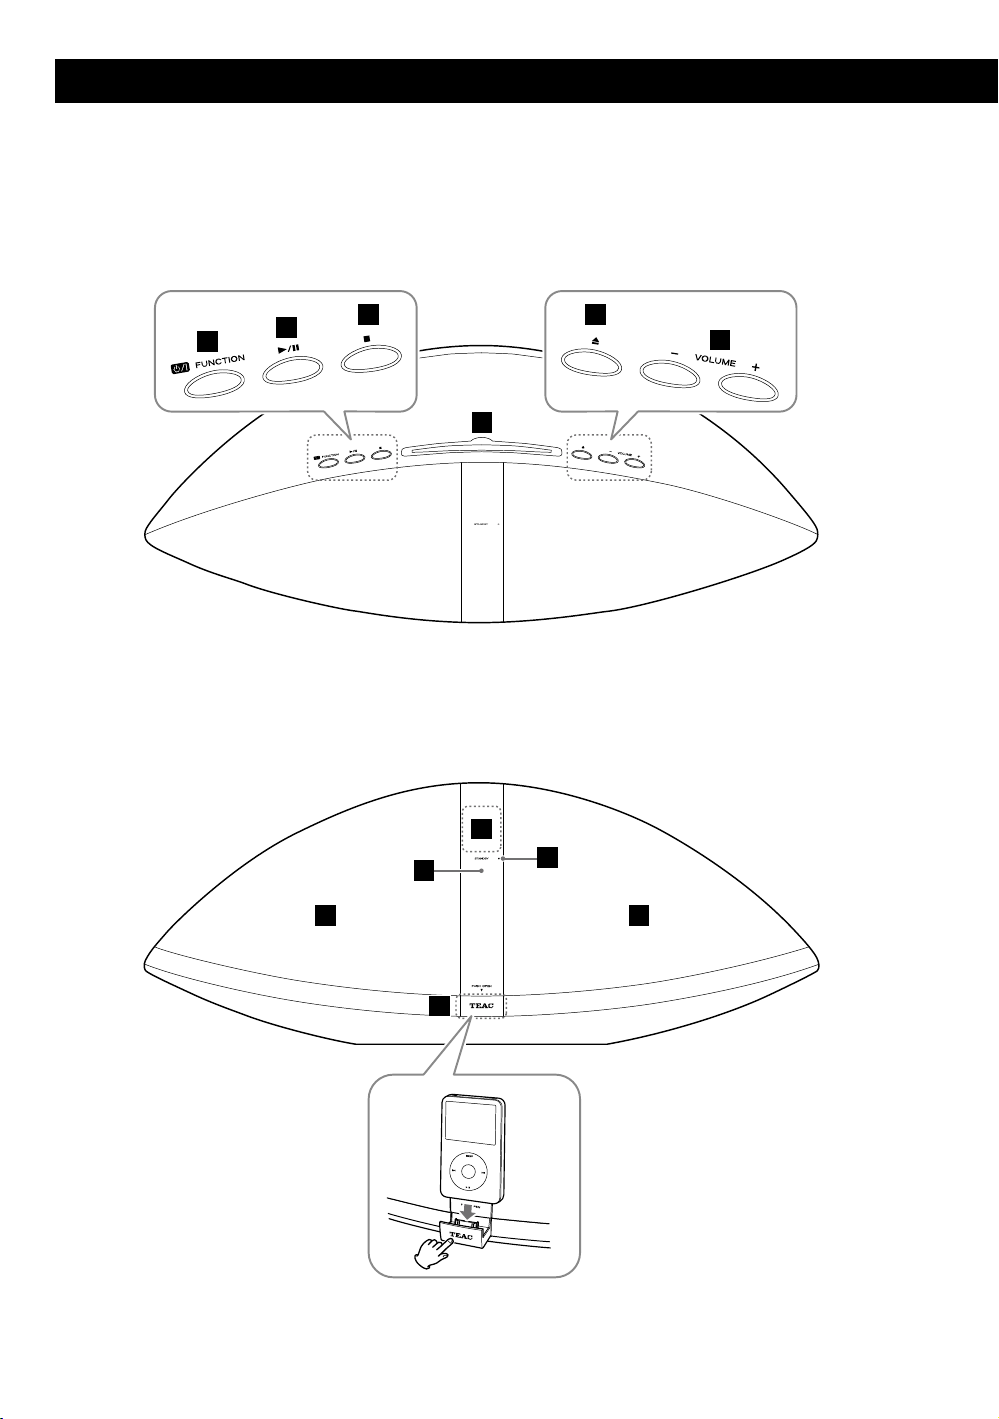
Top
Identifying the Parts (Main Unit)
Front
A
B
C
D
G
H
E
F
I
10
J J
KK

A
Standby/On ( )/FUNCTION
Use this button to turn the unit on and off (standby).
To turn off unit, hold down this button for more than
3 seconds.
When an iPod is not connected to the dock:
e “ECO PWR” appears on the display for a few
seconds. Then the unit is turned off (put in
standby) and the STANDBY indicator lights.
When an iPod is connected to the dock:
e The clock appears on the display and the iPod
battery is charged. If you disconnect the iPod
and no button is pressed for 90 seconds, the unit
is turned off (put in standby) and the STANDBY
indicator lights.
Use this button also to select a source.
B
Play/Pause (y/J)
In CD, USB or iPod mode, use this button to start or
pause playback.
G
Display
Displays the clock, track number, etc.
H
Remote sensor
When operating the remote control unit, point it
towards here.
I
STANDBY indicator
This indicator lights when the unit is in standby mode.
J
Speakers (Stereo)
K
iPod dock
Push the “TEAC” mark to open the dock. Connect an
iPod to the dock connector.
Push to close the dock when not in use.
ENGLISH
C
Stop (H)
In CD or USB mode, use this button to stop playback.
D
Disc insertion slot
Insert a disc with the printed label side facing you.
E
Eject (L)
Use this button to eject the disc.
F
VOLUME ( + / – )
Use these buttons to adjust the volume level.
While setting the clock or the wake up timer, use these
buttons to change the value.
11
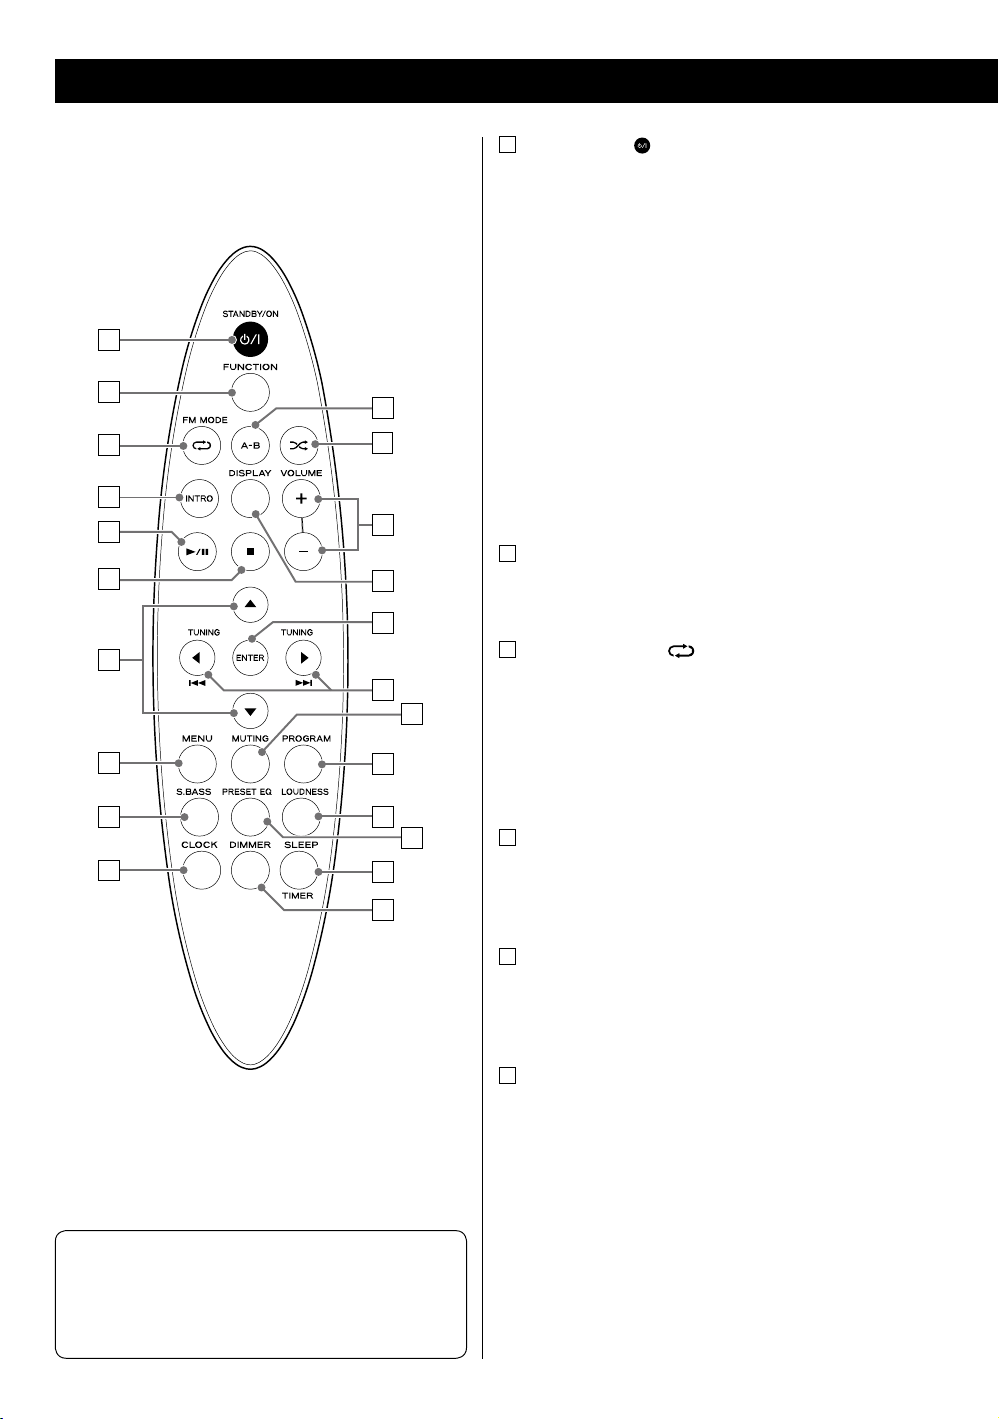
Identifying the Parts (Remote Control Unit)
a
STANDBY/ON ( )
Use this button to turn the unit on and off.
When the unit is turned off, and an iPod is not
connected to the dock:
e “ECO PWR” appears on the display for a few
seconds. Then the unit is turned off (put in
standby) and the STANDBY indicator lights.
a
b
k
c
l
d
e
f
m
n
o
g
p
q
When the unit is turned off, and an iPod is connected
to the dock:
e The clock appears on the display and the iPod
battery is charged. If you disconnect the iPod
and no button is pressed for 90 seconds, the unit
is turned off (put in standby) and the STANDBY
indicator lights.
b
FUNCTION
Use this button to select a source.
c
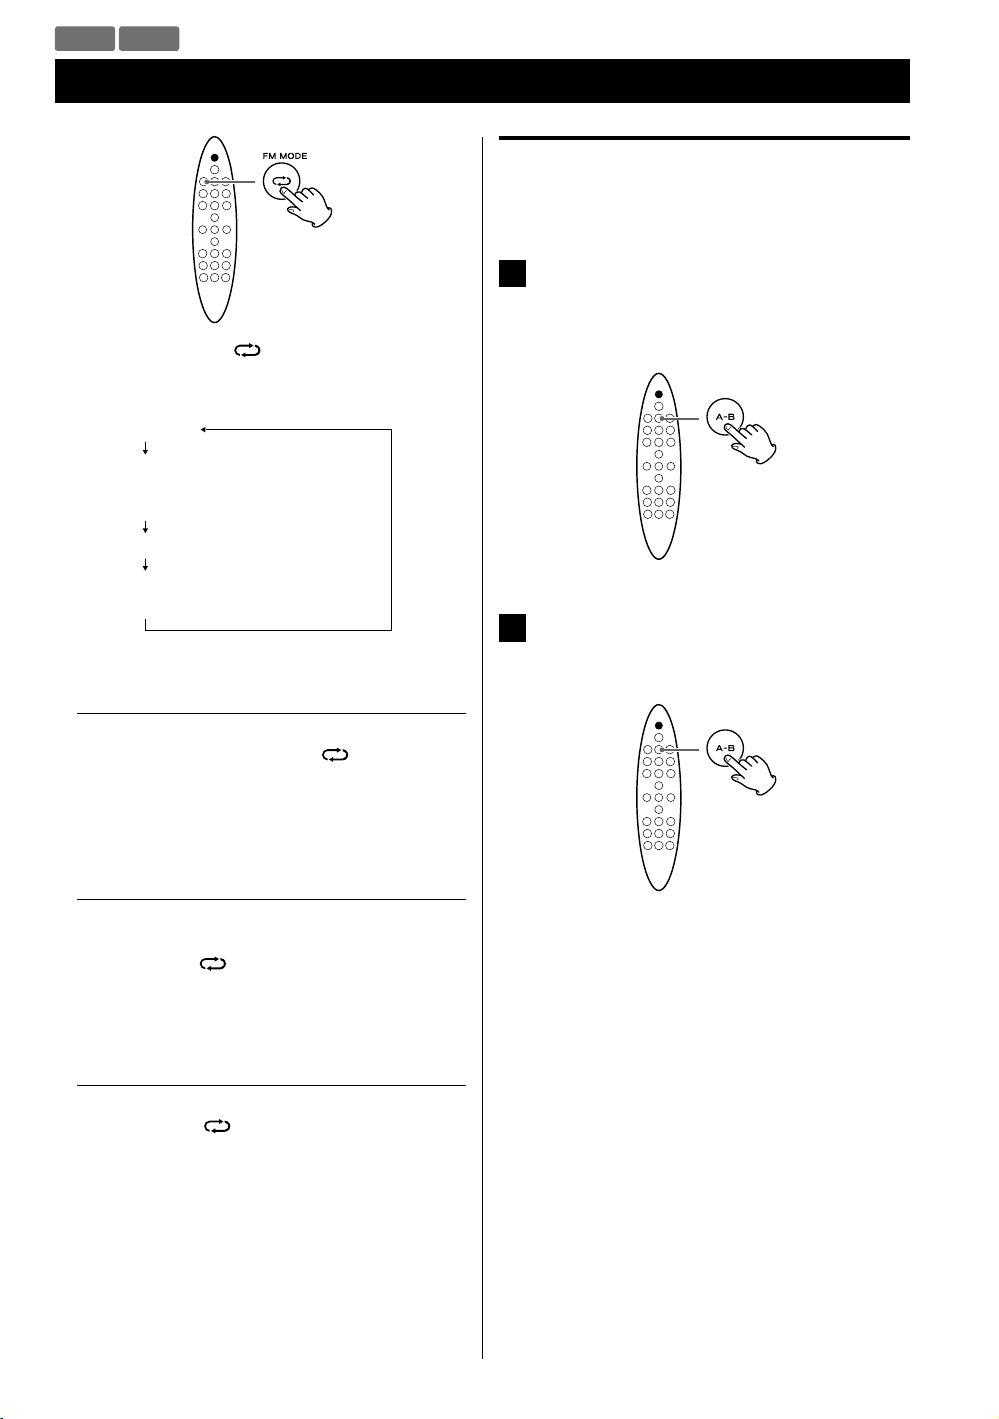
FM MODE/Repeat ( )
In FM mode, use this button to select Auto or Mono
mode.
h
i
r
s
t
j
u
v
Note
To simplify explanations, instructions in this manual
might refer to the main unit or remote control unit only.
In such cases, the same controls on the remote control
and main unit will operate similarly.
In CD, USB or iPod mode, use this button to set the
repeat function.
d
INTRO
In CD or USB mode, use this button to play the
beginning of each track/file consecutively (page 23).
e
Play/Pause (y/J)
In CD, USB or iPod mode, use this button to start or
pause playback.
f
Stop (H)
In CD or USB mode, use this button to stop playback.
12

g
Scroll (˙ / ¥)
In CD or USB mode, use these buttons to select a folder
(MP3/WMA disc and USB storage device only).
In iPod mode, use these buttons to scroll up and down
in a menu. These buttons have the same functions as
the Click Wheel of an iPod.
In FM mode, use these buttons to select a preset
station.
MENU
h
In iPod mode, use this button to go back to the previous
menu. This button has the same functions as its iPod
counterpart.
i
S.BASS
Use this button to reinforce the bass sound.
j
CLOCK
Use this button to display the clock.
When the unit is turned off, use this button to display or
set the clock (page 15).
o
ENTER
In iPod mode, use this button to confirm a selection in a
menu. This button has the same functions as the center
button of the Click Wheel of an iPod.
p
TUNING/Cursor (ß / å)/Skip (.//)
In CD, USB or iPod mode, use these buttons to skip to
the next or previous track/file. Hold these buttons to
search for a specific part of a track/file.
In FM tuner mode, use these buttons to tune in a
station.
q
MUTING
Use this button to mute the sound.
r
PROGRAM
In CD or USB mode, use this button to program tracks/
files (page 24).
In FM tuner mode, use this button to preset stations
(page 29).
ENGLISH
k
A-B
In CD or USB mode, use this button to set the points for
A-B repeat (page 26).
l
Shuffle ( )
In CD, USB or iPod mode, use this button to set the
shuffle function.
m
VOLUME ( +/ – )
Use these buttons to adjust the volume level.
While setting the clock or the wake up timer, use these
buttons to change the value.
n
DISPLAY
During playback of a disc or USB storage device, use this
button to display the track/file information.
s
LOUDNESS
Use this button to increase the bass sound at low
volume.
t
PRESET EQ
Use this button to select a preset equalizer (page 17).
u
SLEEP/TIMER
Use this button to set the sleep timer (page 17).
When the unit is turned off, use this button to set the
wake up timer (page 30).
v
DIMMER
Use this button to set the brightness of the display.
13

Remote Control Unit
The supplied remote control unit allows the unit to be
operated from a distance.
When using the remote control unit, point it towards the
remote sensor within 60° horizontally and 20° vertically of
the front of the unit.
< Even if the remote control is used within its effective
operation range (16ft/5 m), the unit might not respond
to the remote if there are any obstacles between them.
< The remote control might function incorrectly if it is
operated near other products that generate infrared
rays or if other remote control devices that use infrared
rays are operated near the unit. Likewise, the other
products might also function incorrectly.
Battery installation
Battery Precautions
< Be sure to insert the battery with the positive “+” and
negative “ — ” polarities correctly positioned.
< If the battery leaks, wipe away the leakage inside the
battery compartment and replace the battery with a
new one.
< If the remote control unit is not to be used for a long
time (more than a month), remove the battery from the
remote control unit to prevent it from being exhausted.
< Do not use any batteries other than those specified.
< Do not heat or disassemble batteries. Never throw them
in fire or water.
< Do not carry or store batteries with other metallic
objects. The batteries could short circuit, leak or
explode.
Remove the battery compartment cover.
1
Put the lithium-ion battery (CR2025, 3 V) in with the “+”
2
side up.
Close the cover.
3
Battery replacement
If the distance required between the remote control unit
and main unit decreases, the battery is exhausted. In this
case, replace the battery with a new one.
< For information about the collection of batteries, please
contact your local municipality, your waste disposal
service or the place where you purchased them.
14
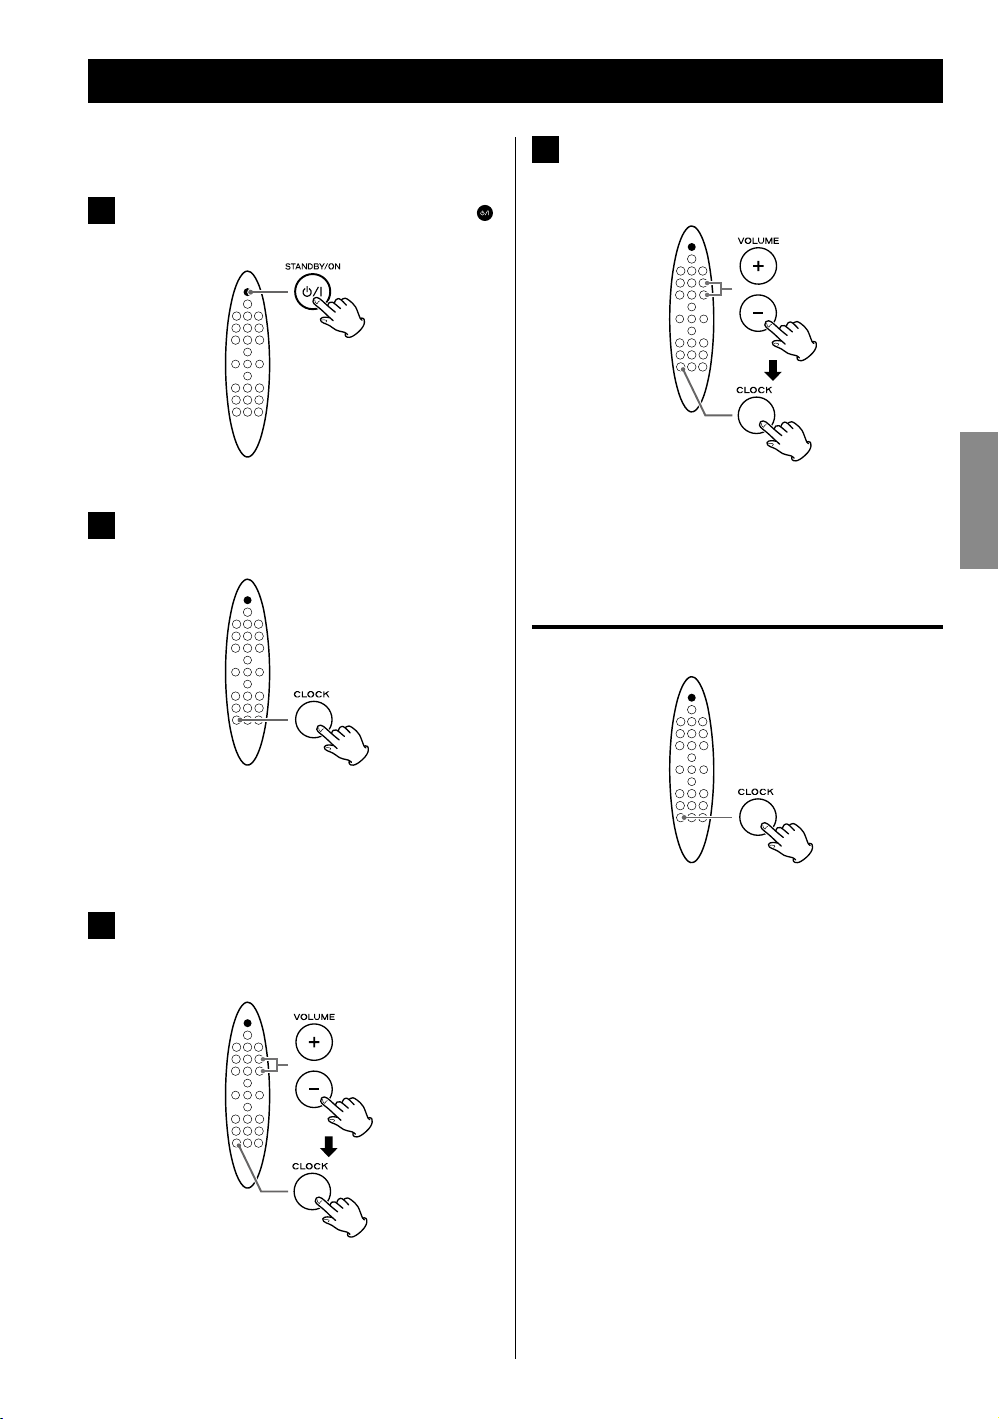
Setting the Clock
Set the clock before any operations.
If the unit is on, press the STANDBY/ON (
1
button to turn it off.
Press the CLOCK button repeatedly until
2
“CLK SET” appears on the display.
Press the VOLUME ( + / – ) buttons repeatedly to
4
set the current minute, then press the CLOCK
)
button.
Setting the clock is now completed, and the clock
starts from 00 seconds.
Checking the clock
ENGLISH
The hour value blinks.
< If no button is pressed for 30 seconds, the clock
setting mode will be cancelled.
Press the VOLUME ( + / – ) buttons repeatedly to
3
set the current hour, then press the CLOCK
button.
The minute value blinks.
Press the CLOCK button and the clock will be shown on
the display for a few seconds.
15

iPod CD USB FM AUX
Basic Operation
This chapter describes the basic operation which is
available in every mode.
Press the Standby/On (
1
unit on.
< The unit turns on with the source that was last
selected.
Press the FUNCTION button (same as the
2
Standby/On button) repeatedly to select a
source.
) button to turn the
Play the source, and adjust the volume using
3
the VOLUME ( + / – ) buttons.
The volume can be adjusted from MIN (0) to MAX
(31).
Reinforcing the bass
You can reinforce the bass sound.
The source changes as follows:
iPod
CD
USB
FM
AUX
< To listen to an external component connected to the
AUX jack, select “AUX”.
16
Press the S.BASS button.
To cancel the function, press the S.BASS button again.
< When the LOUDNESS function is set to on, the S.BASS
function is set to off automatically.
Loudness
You can increase the bass and treble sound effect at low
volume. Set this function to off when listening at normal
levels.
Press the LOUDNESS button.
To cancel the function, press the LOUDNESS button
again.
< When the S.BASS function is set to on, the LOUDNESS
function is set to off automatically.
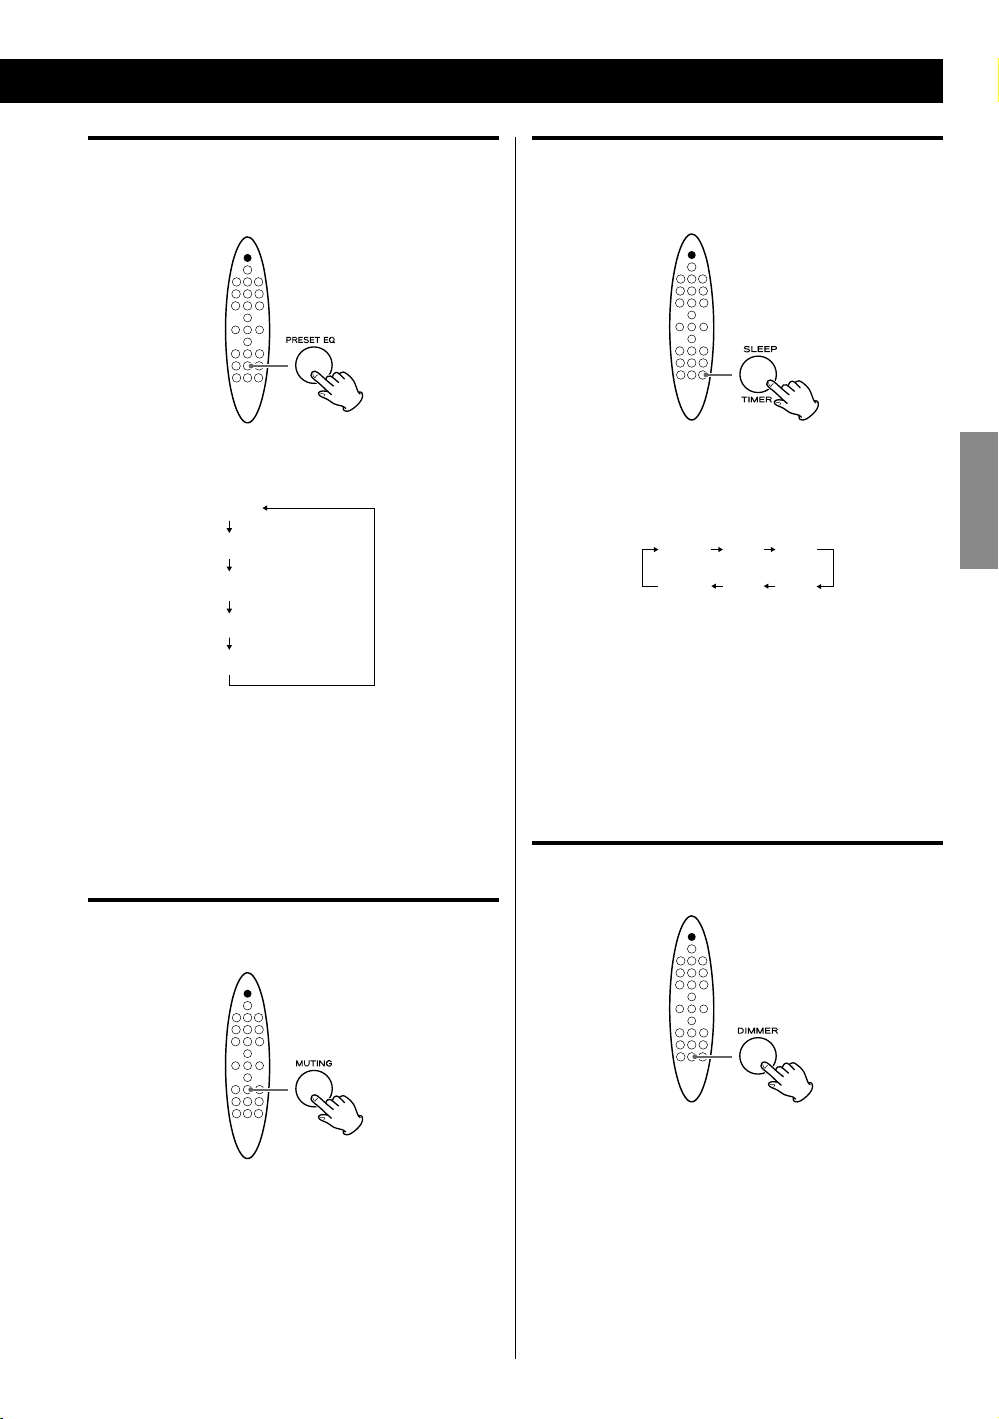
Equalizer
You can adjust the sound according to the genre of the
music or your taste.
Sleep timer
You can set the sleep timer so that the unit turns itself off
after a specified amount of time.
Each time the PRESET EQ button is pressed, the
equalizer is changed as follows:
POP
JAZZ
CLASSIC
ROCK
FLAT (Default)
< If you are also using the equalizer setting on your iPod
or other audio player, the effects will be combined and
might not sound as expected.
We recommend that you use either this unit’s equalizer
or the equalizer on your audio player in most cases.
Muting
You can mute the sound temporarily.
Each time the SLEEP button is pressed, the time is
changed at 10 minute intervals.
The unit will automatically will be turned off when the
time elapses.
10 20 3 0
—
90
(Off )
< If you want to check the remaining time, press the
SLEEP button once.
The remaining time is displayed for a few seconds.
< To cancel the sleep timer, press the SLEEP button
repeatedly until “—” is displayed.
N N N N
Dimmer
You can change the brightness of the display.
ENGLISH
Press the MUTING button.
Press the MUTING button again to restore the sound.
< “MUTE” blinks on the display while muting is engaged.
< If you change the volume or source when the sound is
muted, muting is cancelled.
Press the DIMMER button to set the brightness to one
of three levels.
17
iPod
Listening to an iPod
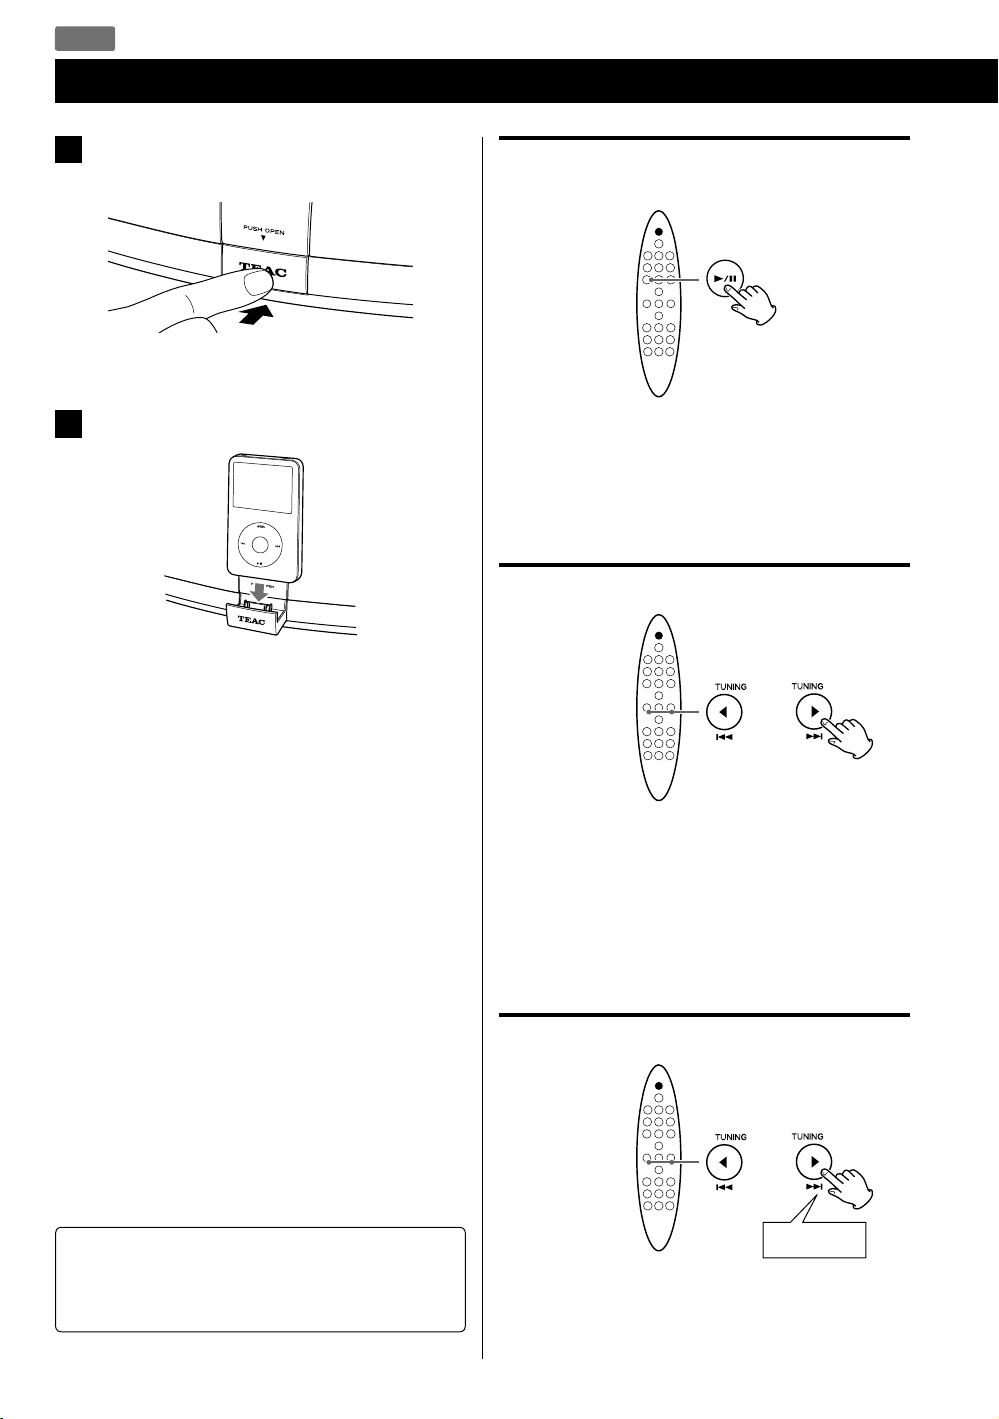
Push the “TEAC” mark on the front of this unit
1
to open the iPod dock.
Stopping playback temporarily
(Pause mode)
Connect an iPod to the dock.
2
The iPod automatically turns on and starts playback
from the iPod’s play list.
If an iPod is already connected, press the FUNCTION
button repeatedly to select “IPod”. Playback starts
automatically.
< The battery of an iPod is recharged whenever the
iPod is docked and SR-100i is connected to the AC
power supply.
Some of the iPod devices cannot be recharged
through the dock. For details of recharging
compatibility, see page 8.
< When you turn off the unit with an iPod connected
to the dock, the clock appears on the display and
the iPod battery is charged. If you disconnect the
iPod and no button is pressed for 90 seconds, the
unit is turned off (put in standby) and the STANDBY
indicator lights.
< If headphones are plugged into the iPod, sound
comes out from both the headphones and the
speakers of SR-100i.
During playback, press the Play/Pause (G/J) button.
Playback stops at the current position.
To resume playback, press the Play/Pause (G/J) button
again.
To skip to the next or previous track
During playback, press the Skip (.//) button
repeatedly until you find the desired song.
The selected song will be played from the beginning.
< If the . button is pressed once during playback, the
current song will be played from the beginning.
Searching for a part of a track
Note for iPod touch
If you want to hear the sound of video from an iPod
touch, connect the iPod touch to the dock first, then
operate SR-100i and the iPod touch.
18
Hold down
During playback, hold the Skip (.//) button to
search a part of a song.
Release it when you find the part you want to listen to.
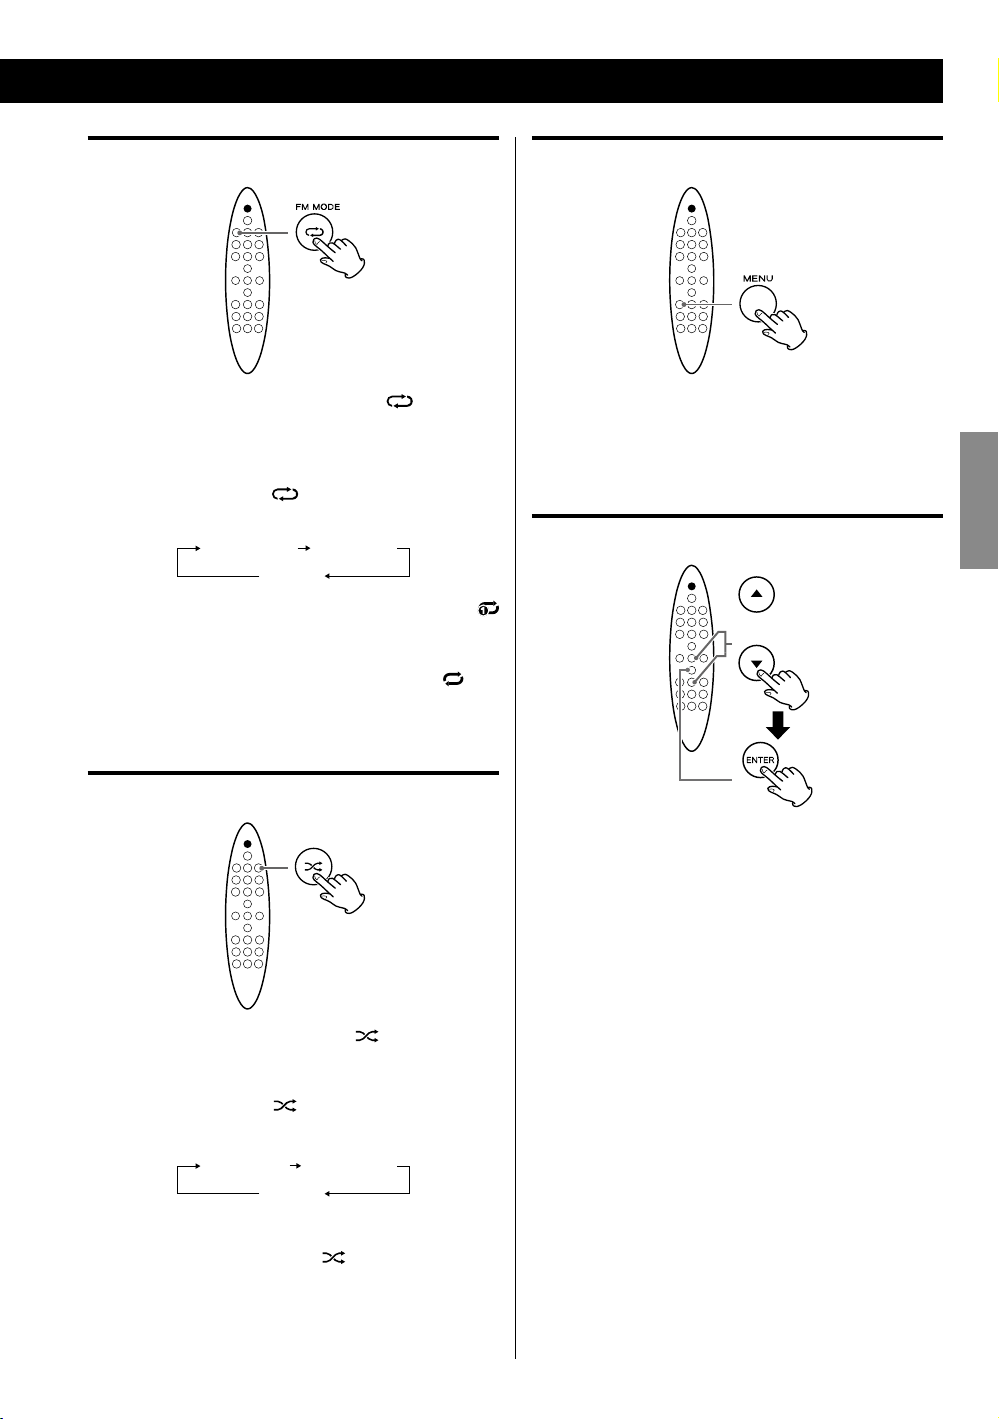
Activating the repeat mode
Returning to the previous iPod menu
During playback, press the Repeat ( ) button to
select the repeat mode. “REP MODE” appears on the
display.
Each time the Repeat (
REPEAT setting changes as follows:
Repeat one Repeat all
< If you select “Repeat one” to play only one song, the
icon appears on the iPod’s display.
< If you select “Repeat all” to play all songs, the
appears on the iPod’s display.
) button is pressed, the iPod
Off
icon
Activating the shuffle mode
Press the MENU button.
This button has the same functions as its iPod
counterpart.
Selecting an iPod menu item
Press the Scroll (˙ / ¥) buttons to select the menu item
you want, then press the ENTER button.
ENGLISH
During playback, press the Shuffle ( ) button to select
the shuffle mode. “RANDOM” appears on the display.
Each time the Shuffle (
SHUFFLE setting changes as follows:
Songs Albums
< During shuffle playback, the icon appears on the
iPod’s display.
) button is pressed, the iPod
Off
19
CD
Listening to a Disc
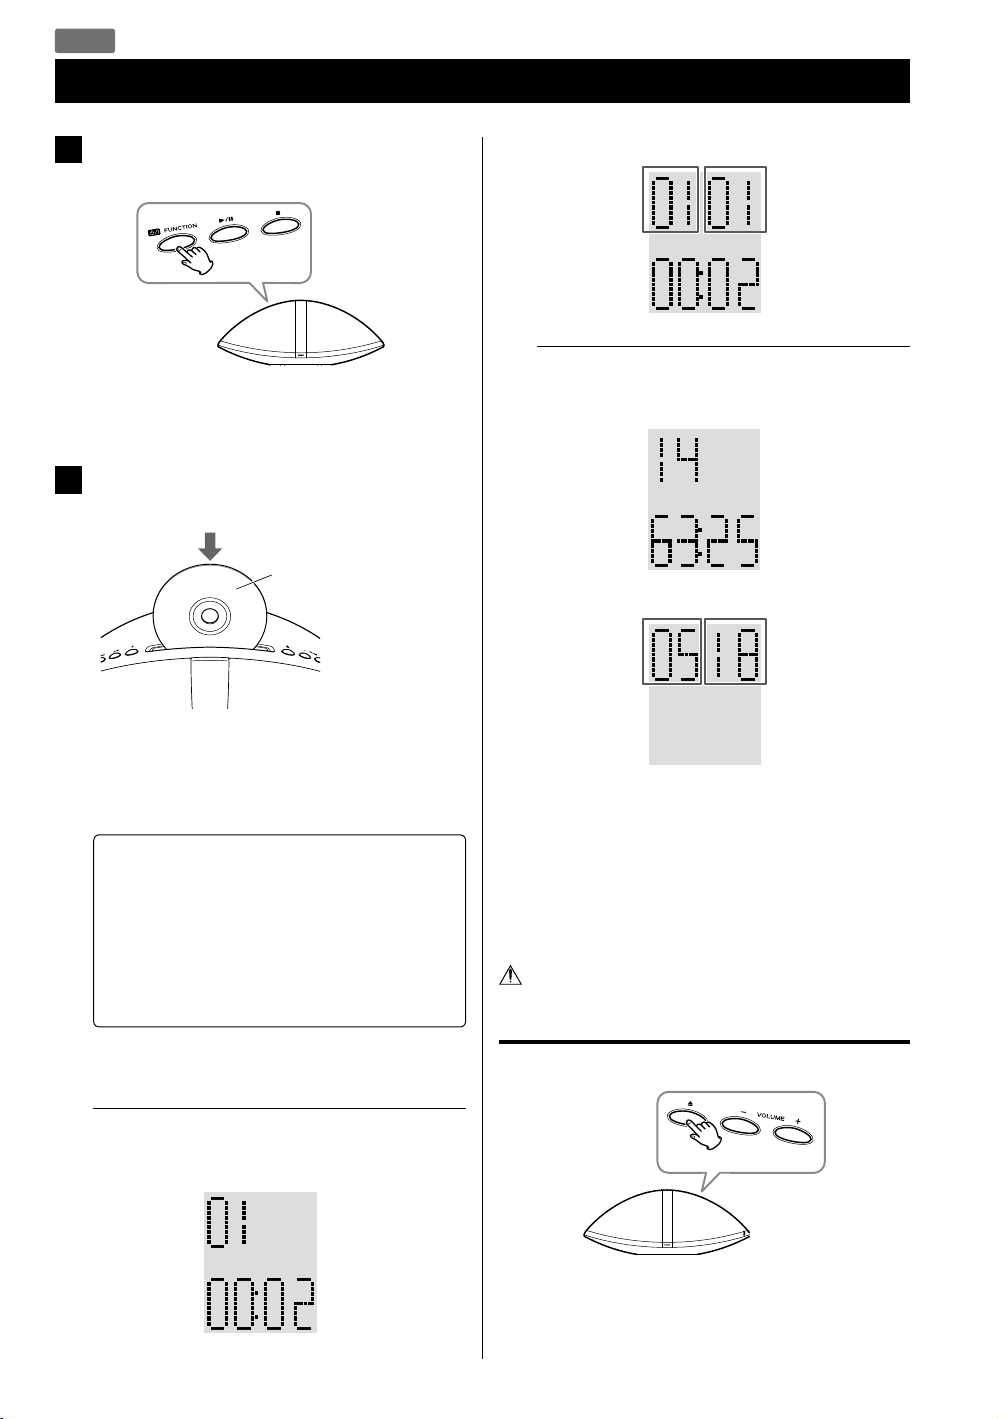
Press the FUNCTION button repeatedly to
1
select “CD”.
< When no disc is loaded, “NO DISC” appears on the
display.
Insert a disc with the printed label side facing
2
you.
Printed label side
MP3/WMA disc
Current folder
number
Elapsed time
of the current
file
Example: Display when playback is stopped
Audio CD
Total number
of tracks
Total playing
time
MP3/WMA disc
Total number
of folders
Current file
number
Total number
of files
The disc is automatically loaded into the player. Let
go of the disc when it starts loading.
Playback starts from the first track/file automatically.
M Do not push the disc forcibly.
M Do not insert more than one disc.
M Do not attach adhesive label, etc. to either side
of the disc.
M Do not use irregular-shaped discs.
Doing so may cause malfunction or damage the
unit.
< It takes a few seconds for the unit to load the disc. No
buttons will work during loading.
Example: Display during playback
Audio CD
Current track
number
Elapsed time
of the current
track
20
< MP3/WMA files that are not placed in folders are
automatically put in the “01 (root)” folder. Playback
starts from the first file in the “01 (root)” folder.
< When playback of all the tracks/files has finished,
playback stops automatically.
< See page 33 for information about the playback order
of MP3/WMA files.
Do not tilt the unit with a disc inserted. It may
damage the disc and cause a malfunction.
Removing the disc
Press the Eject (L) button.
< To reinsert a disc, insert after the disc is completely
ejected.
USB
Listening to a USB Storage Device
Do not use a high-capacity USB hard discs. Only
USB flash memory can be used.
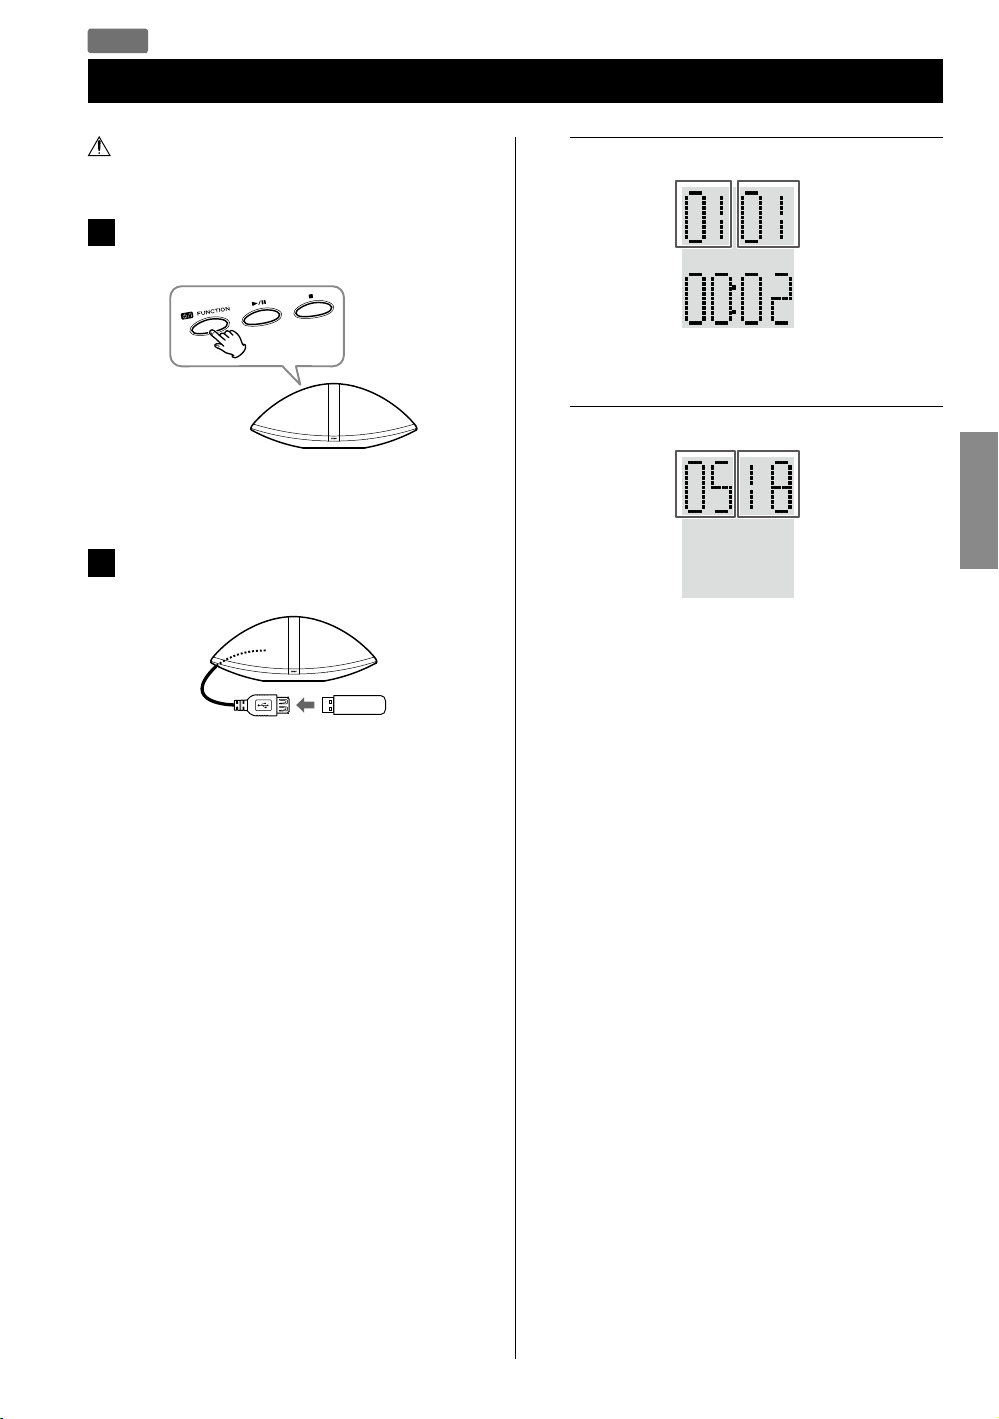
Press the FUNCTION button repeatedly to
1
select “USB”.
< When no USB storage device is connected, “NO USB”
appears on the display.
Connect your USB storage device to the
2
supplied USB cable connected to the unit.
Example: Display during playback
Current folder
number
Elapsed time
of the current
file
Example: Display when playback is stopped
Total number
of folders
< MP3/WMA files that are not placed in folders are
automatically put in the “01 (root)” folder. Playback
starts from the first file in the “01 (root)” folder.
Current file
number
Total number
of files
ENGLISH
Pay attention to the
insertion direction.
Playback starts automatically from the first file on the
USB storage device.
< See page 33 for information about the playback order
of MP3/WMA files.
21
CD USB
Basic Playback
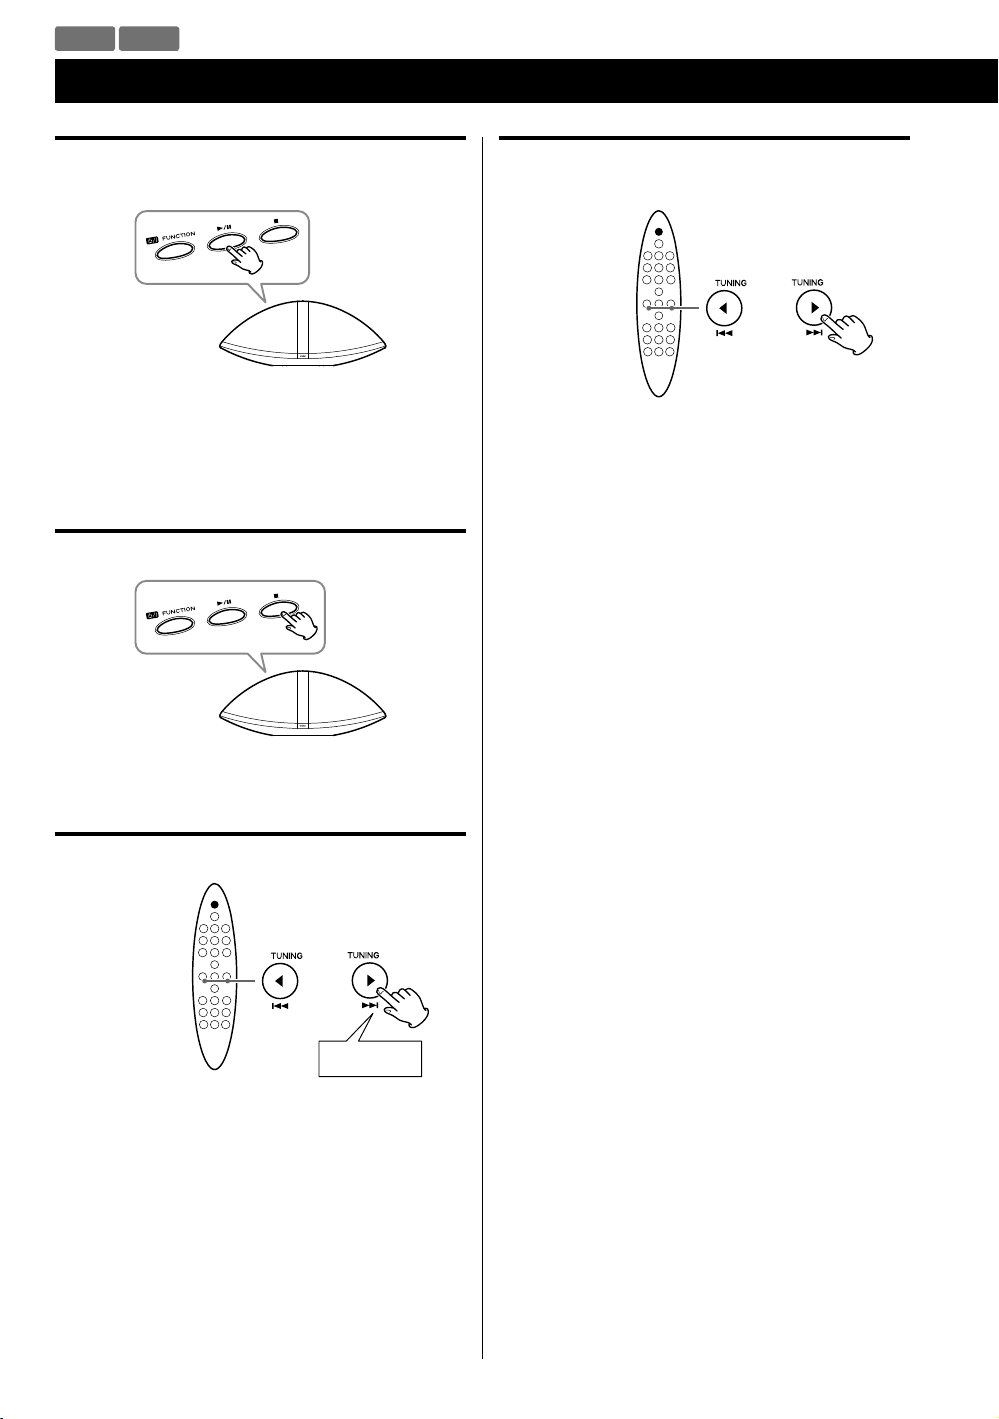
Stopping playback temporarily
(Pause mode)
During playback, press the Play/Pause (y/J) button.
Playback stops at the current position.
To resume playback, press the Play/Pause (y/J) button
again.
Stopping playback
Skipping to the next or a previous track/
file
Press the Skip (.//) button repeatedly until you
find the desired track/file.
The selected track/file will be played from the
beginning.
< If the . button is pressed once during playback,
the track/file being played will be played from the
beginning.
< During programmed playback, the next or previous
track/file in the program is played.
< When playback is stopped, this function does not work
with Audio CDs.
Press the Stop (H) button.
Searching for a part of a track/file
Hold down
During playback, hold the Skip (.//) button.
Release it when you have found the part you want to
listen to.
22
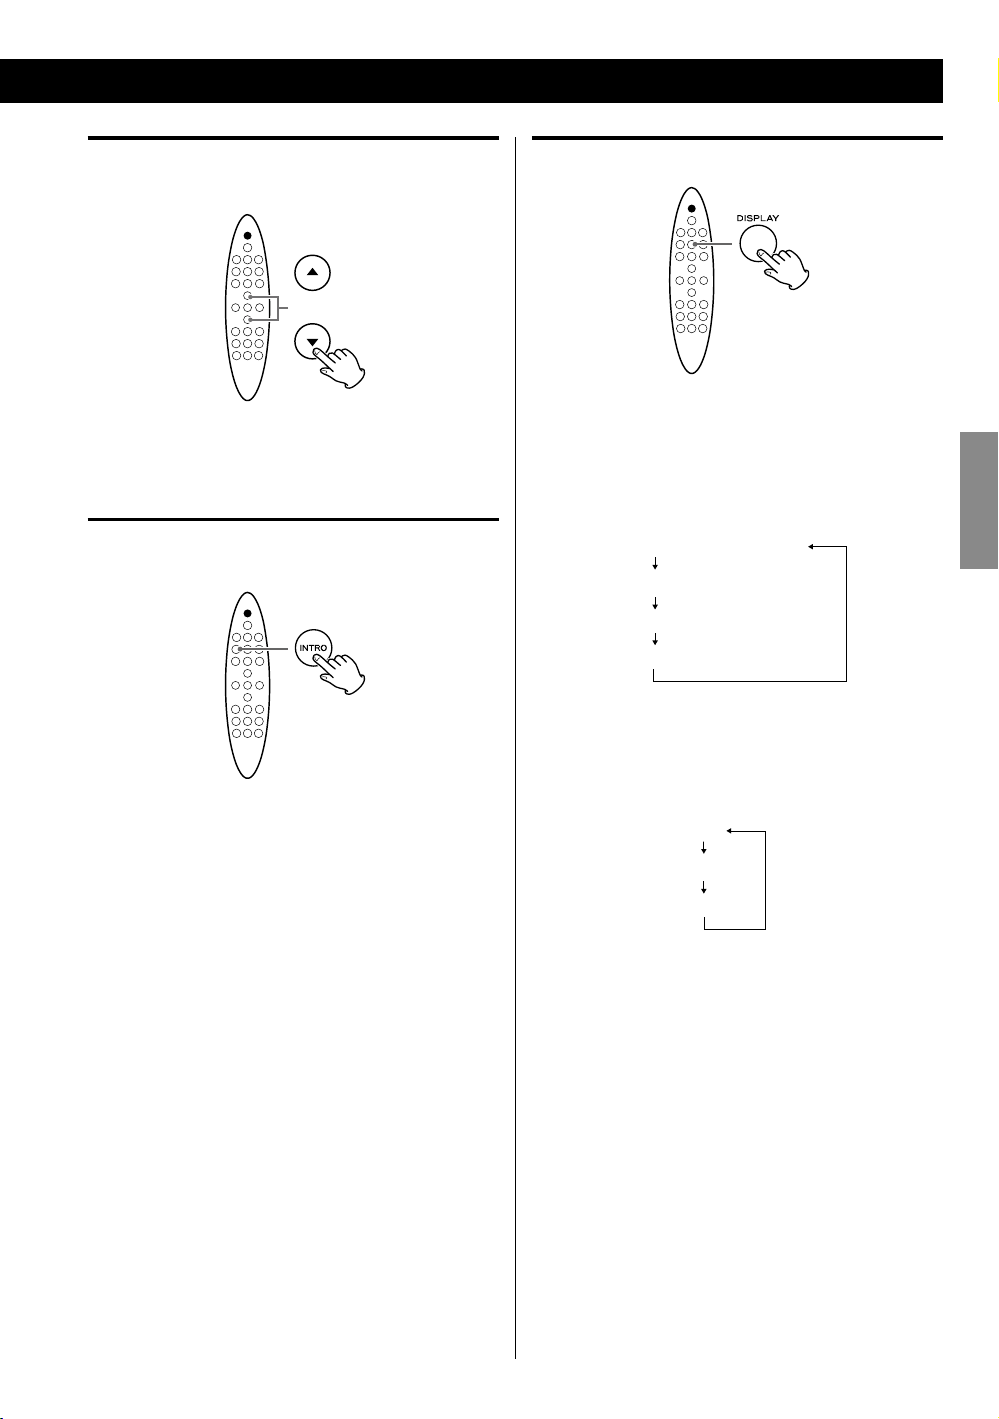
Selecting a folder
(MP3/WMA disc or USB storage device)
Displaying information
Press the Scroll (˙ / ¥) button to skip to the next or
previous folder.
Intro playback
You can play the beginning of each track/file consecutively.
Press the INTRO button to start intro playback.
“INTR ON” appears on the display.
This unit plays back the first 10 seconds of each track/
file consecutively.
To continue listening to the current track/file, press the
INTRO button again. “INTR OFF” appears on the display.
Audio CD
During playback, each time the DISPLAY button is
pressed, the second line of the display changes as
follows:
Elapsed time of current track
Remaining time of current track
Elapsed time of the disc
Remaining time of the disc
MP3/WMA file
During playback, press the DISPLAY button to show
scrolling information about the current file as follows:
Title
Artist
Album
< The first 30 characters of TITLE/ARTIST/ALBUM can be
displayed.
ENGLISH
< The display of this unit can only show single-byte letters
and numbers. If the file information contains Japanese,
Chinese or other double-byte characters, playback is
possible but the name will not be shown correctly.
23
CD USB
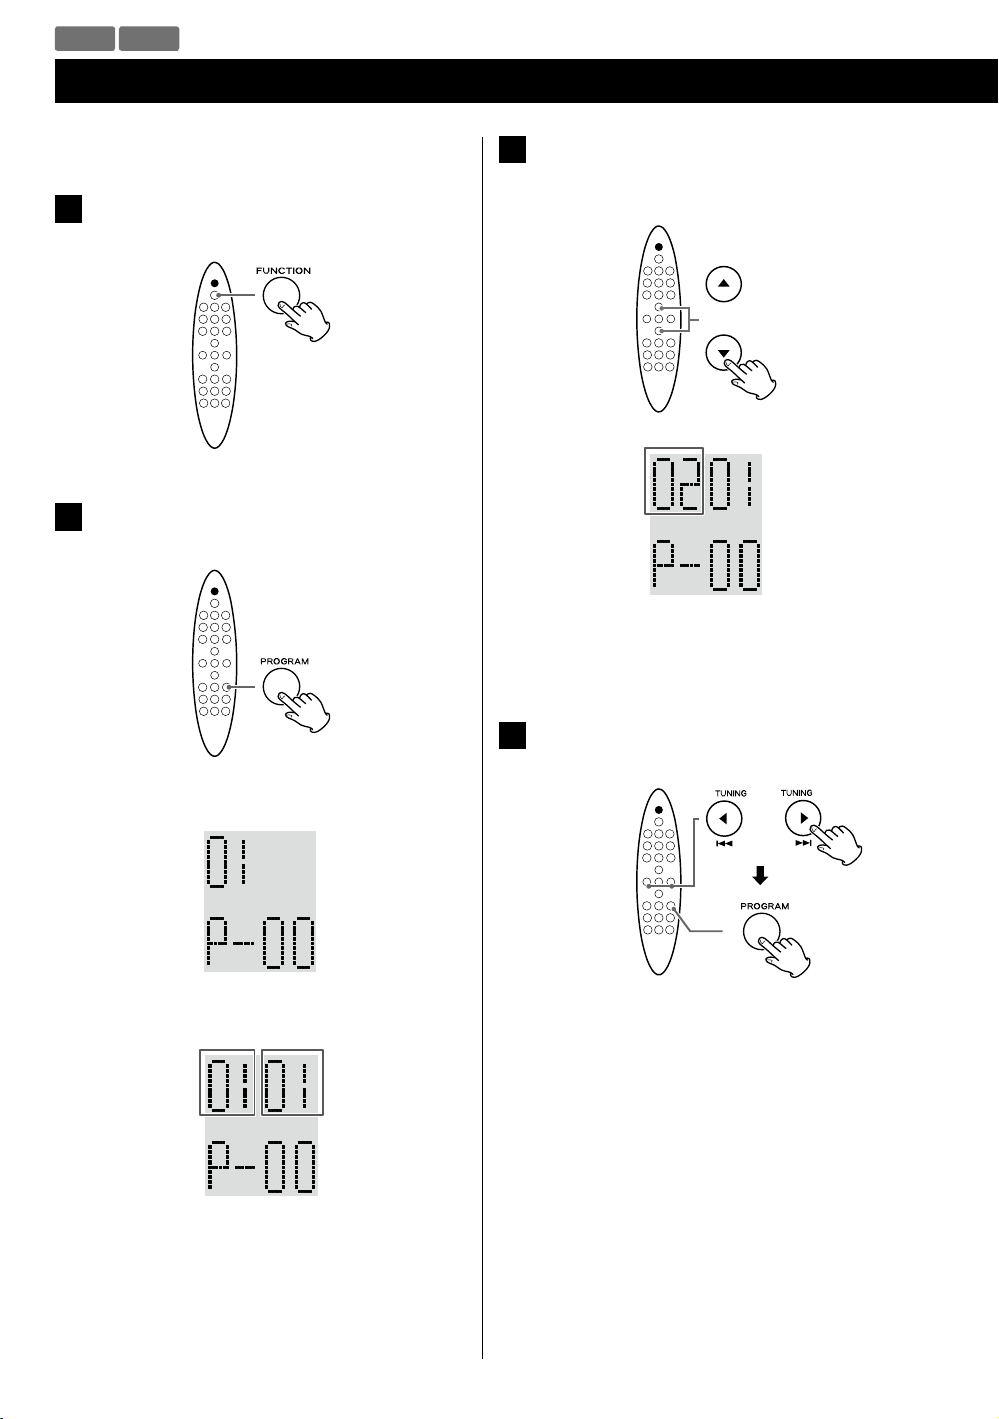
Programmed Playback
Up to 20 tracks/files can be programmed in the desired
order.
Press the FUNCTION button repeatedly to
1
select “CD” or “USB”.
Press the PROGRAM button when playback
2
stops.
(When programming MP3/WMA files)
3
Press the Scroll (˙ / ¥) buttons to select a folder
on the MP3/WMA disc or USB storage device.
Example:
Folder
number
< MP3/WMA files that are not placed in folders are put
in the “01” (root) folder.
Example: Audio CD
Tra ck number
Program
number
Example: MP3/WMA file
Folder
number
Program
number
< To cancel the program mode, press the Stop (H)
button.
File number
Press the Cursor (ß / å) buttons to select a
4
track/file, then press the PROGRAM button.
24
Example: Audio CD
Tra ck number
Example: MP3/WMA file
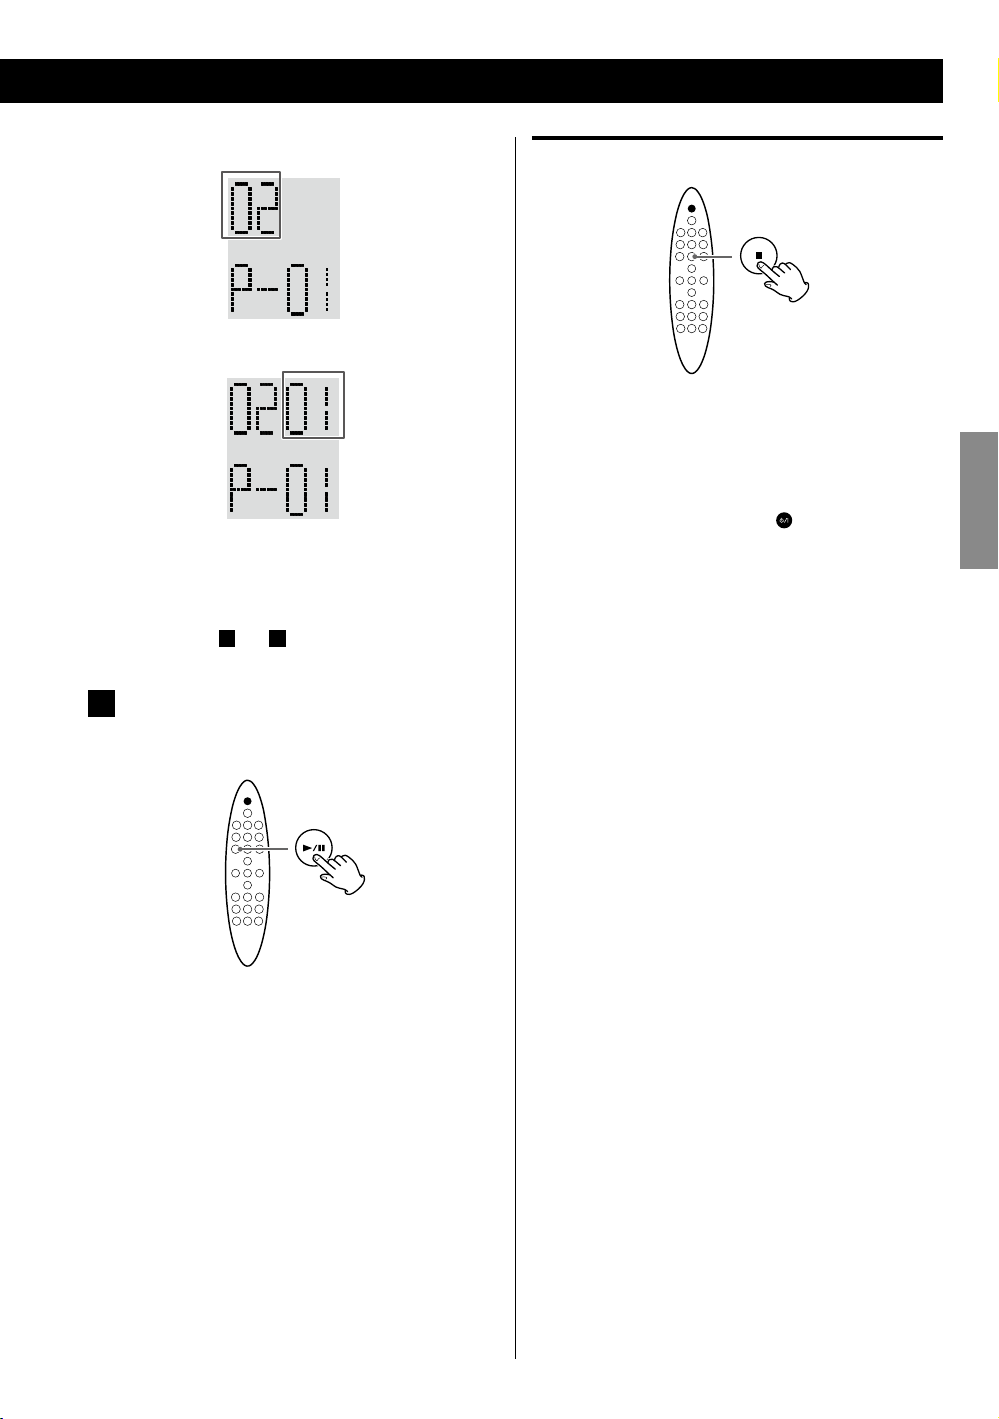
Clearing the program
File
number
The track/file is programmed, and the program
number (“P-01”) is displayed.
3
< Repeat steps
When you have finished selecting track/file
5
numbers, press the Play/Pause (G/J) button
to start program playback.
and 4 to program more tracks/files.
In the stop mode, press the Stop (H) button.
< In the following cases, the programmed contents will
also be cleared:
Changing the source
Pressing the STANDBY/ON (
Ejecting the disc
Disconnecting the USB storage device
Disconnecting the AC power cord
) button
ENGLISH
< After playback of all the programmed tracks/files has
finished or you stop the programmed playback, press
the Play/Pause (G/J) button to play the program
again.
< You can use Skip (.//) button during program
playback to select and play other tracks/files in the
program.
< The shuffle function does not work during
programmed playback.
25
CD USB
Repeat Playback
Each time the Repeat ( ) button is pressed, the mode
is changed as follows:
REP ONE
REP ALB
(MP3/WMA disc/USB storage device
only)
REP ALL
REP OFF
(Repeat of f)
A-B repeat playback
This function allows repeat playback of any desired section
of the track/file.
During playback, designate the point at which
1
repeat playback should start by pressing the
A-B button.
“A-” appears on the display.
When the point at which repeat playback
2
should end is reached, press the A-B button
again.
REP ONE (Repeat one)
During playback, press the Repeat (
“REP ONE” appears on the display.
The track being played will be played repeatedly.
REP ALB (Repeat folder)
(MP3/WMA disc/USB storage device only)
Press the Repeat (
“REP ALB” appears on the display and all the tracks in
the folder will be played repeatedly.
REP ALL (Repeat all)
Press the Repeat (
MP3/WMA files).
“REP ALL” appears on the display and all the tracks will
be played repeatedly.
During programmed playback, the programmed tracks
will be played repeatedly.
) button twice.
) button twice (or three times for
) button once.
The designated section will be played back
repeatedly.
< To return to normal play, press the A-B button or the
Stop (H) button.
< There must be more than 3 seconds between A and
B.
< The starting point and the end point must be in a
same track/file. If the file/track changes after you set
the starting point, the A-B repeat playback mode will
be cancelled.
26
CD USB AUX
Shuffle Playback
During playback, press the Shuffle ( ) button.
“RAN ON” appears on the display and the tracks/files
will be played randomly.
< If the / button is pressed during shuffle playback,
the next track/file will be randomly selected and
played.
If the . button is pressed during shuffle playback,
the currently played track/file will be played from the
beginning.
If the . button is pressed twice or more, another
track/file will be randomly selected and played.
< During shuffle playback, a track/file that has completed
playback will not be played again.
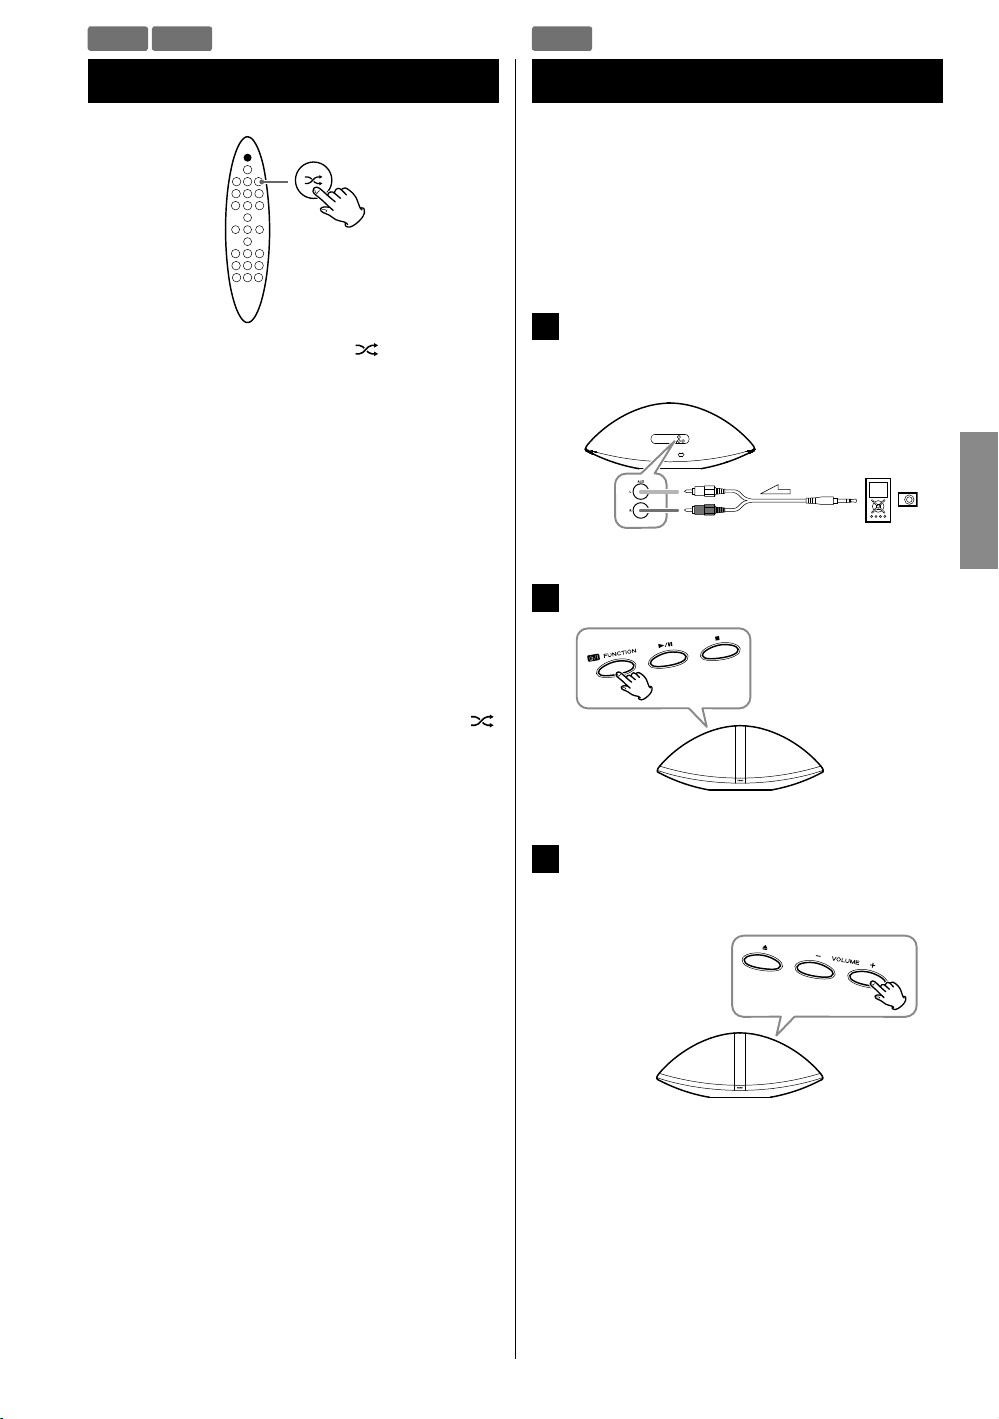
Listening to an External Source
You can listen to the sound from an external portable
audio player connected to the AUX in jacks.
< You can use this means to listen to an iPod that cannot
be connected to the iPod dock. For information on iPod
compatibility, see page 8.
Connect an external portable audio player to
1
the AUX in jacks of SR-100i using commercially
available RCA pin-stereo mini plug cable.
Press the FUNCTION button to select “AUX”.
2
ENGLISH
< To cancel shuffle playback, press the Shuffle (
button. “RAN OFF” appears on the display.
< To stop shuffle playback, press the Stop (H) button. This
operation also cancels shuffle playback.
)
Play the source, and adjust the volume of both
3
SR-100i and the connected external
component.
< When using the headphones jack of the component,
if you do not adjust its volume, you might not hear
any sound from SR-100i.
< Turning the volume of the connected component
up too high might cause the sound from SR-100i to
be distorted. In this case, reduce the volume of the
component until the distortion stops and then adjust
the volume level of SR-100i to a comfortable listening
level.
27
FM
Listening to the FM Radio
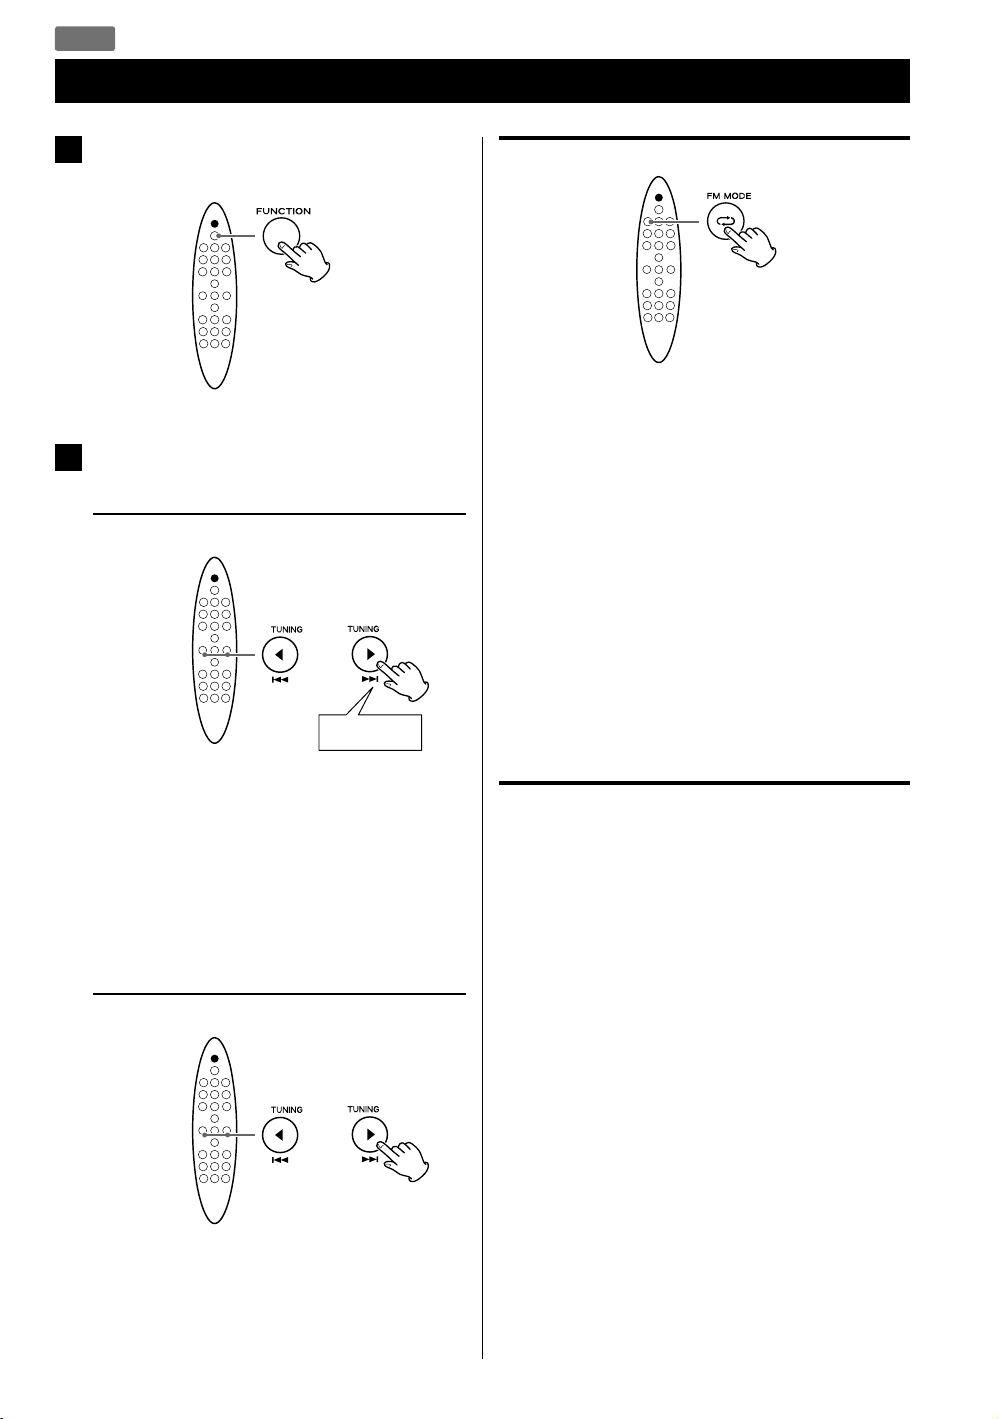
Press the FUNCTION button repeatedly to
1
select “FM”.
FM Mode
Pressing the FM MODE button alternates between Auto
mode and Mono mode.
Select the station you want to listen to.
2
Automatic selection
Hold down
Hold the TUNING button and release it when the
automatic tuning process starts. When a station is
tuned in, the tuning process will stop automatically.
Repeat this step until the station you want to listen to
is found.
< To stop the automatic tuning process, press the
TUNING button briefly.
Manual selection
Auto
When a program is broadcast in stereo, you hear stereo
sound. When in monaural, you hear monaural sound.
< If the sound is distorted, the signal is not strong enough
for good stereo reception. In this case, change to Mono
mode.
Mono
To compensate for weak FM stereo reception, select
this mode. Reception will now be forced into monaural,
reducing unwanted noise.
If the reception is poor
Extend the FM antenna or change its position to
improve the reception of a station.
Press the TUNING button repeatedly.
The frequency changes by a fixed step. Press
repeatedly until the station you want to listen to is
found.
28
FM
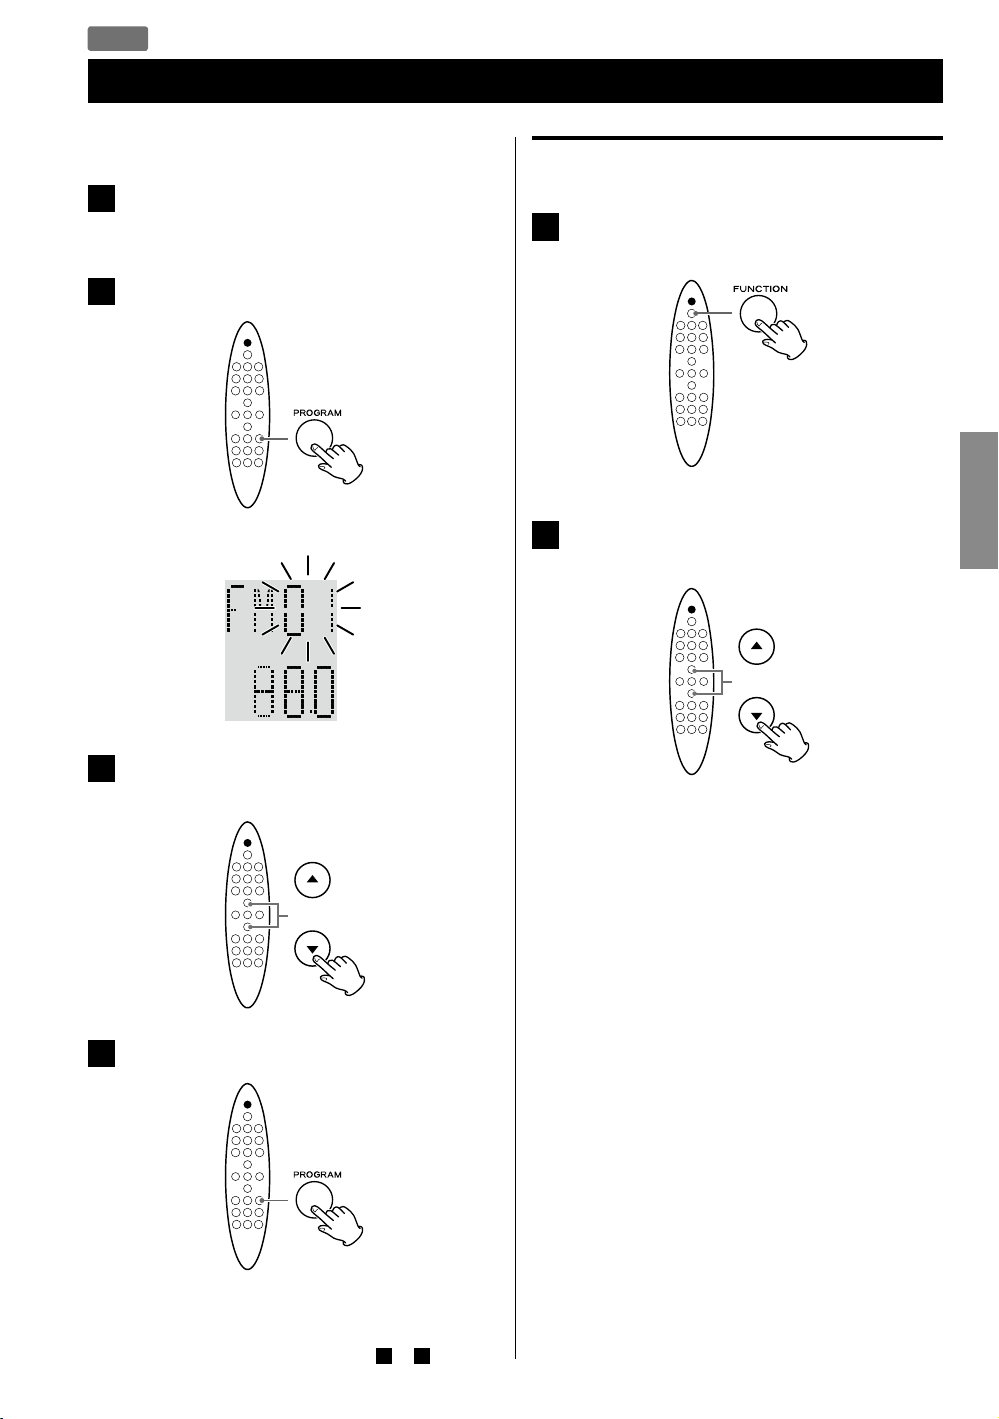
Preset Tuning
You can store up to 20 FM stations.
Tune in to the station you want to store
1
(page 28).
Press the PROGRAM button.
2
The preset number blinks.
Example:
Selecting a preset station
Press the FUNCTION button repeatedly to
1
select “FM”.
Press the Scroll (˙ / ¥) buttons to select the
2
desired preset station.
ENGLISH
Press the Scroll (˙ / ¥) buttons to select a
3
preset number for storing the station.
Press the PROGRAM button.
4
The tuned station is stored in the selected preset
number.
To store more stations, repeat steps
to 4 .
1
29
Loading…
-
Page 1: Teac SR-100I
SR — 1 0 0 i Hi- F i T ABL E R ADIO / CD OWN E R ’S M AN UAL MODE D’EMPL OI MANU A L DEL USU A RIO 41009606-A101 ENGLI SH FR ANÇ AIS ESP AÑOL[…]
-
Page 2: Teac SR-100I
2 IM P O RT ANT SAFET Y IN STRUC TIO N S 1 ) Read these instruc tions. 2) Keep these ins truc tions. 3 ) Hee d all warnings. 4) Follow all instruc tions. 5) Do not use this apparatus near water . 6) Clean only with dry cloth. 7 ) Do not blo ck any ventilation openings. Install in acc ordance with the manufa cturer ’s in s truc tions.
 Do not in[…]
 -
Page 3: Teac SR-100I
3 < Do not ex pose this apparatus to drips or splashes. < D o not place any objects f illed with liquids, such as vases, on the apparatus. < Do not install this apparatus in a confined space such as a boo k case or similar unit. < T he appar atus draws nominal non — operating p ower from the AC outlet with its POWE R or S T ANDB Y / O N[…]
-
Page 4: Teac SR-100I
4 Thank you for choosing TEAC. Read this manual care full y to get t he be st pe rf orman ce from t his un it. C ontents B e f o r e U s i n g t h e U n i t …………………………….5 D i s c s ………………………………………….. 6 US B Storage Devices. . . . . . . . . . . . . . . . . . . . . . . . . . . . . . . . . . . 7 M […]
-
Page 5: Teac SR-100I
5 ENGLI SH What ’ s in t he box Confirm the supplied s tandard acc essories . Remo te contr ol uni t (RC-1265) x 1 Bat ter y (CR2025) for remo te contr ol unit x 1 AC power cord x 1 FM antenna x 1 USB cab le x 1 Own er ’ s ma nual (this do cument) x 1 < Ke ep this manual in a safe place for future reference . Warranty card x 1 CA UT ION <[…]
-
Page 6: Teac SR-100I
6 Disc s that c an be p layed on thi s unit CDs that bear the “COMP AC T disc DIGIT AL AUDIO” logo ( 1 2 cm) . Do not u se 8 cm d iscs w ith t his uni t. CD- R and CD -RW discs that have been correc tly recorded in the audio CD format and finalized. Finalized CD -R and CD -RW disc s that contain MP 3/ WMA f iles . Caution: Pla yback of any othe[…]
-
Page 7: Teac SR-100I
ENGLI SH 7 MP3 / WMA C ompatibilit y Storage precautions < Discs should b e returned to their cases af ter use to avoid dust and scratches that c ould c ause the laser pickup to “ sk ip. ” < Do not exp ose discs to direc t sunlight or high- temperature and humidit y for ex tende d perio ds. Long exp osure t o high temperatures will warp d[…]
-
Page 8: Teac SR-100I
8 Compatible iP od iPod 1 s t + 2nd gener ation iPod 3rd generation iPod 4th genera tion iPod 4th genera tion (co l o r) iPod 5t h generation (vi de o) Capacity 5/ 1 0/20GB 1 0/1 5/ 20/ 30/ 40 GB 20/ 4 0 G/ U2 20/30/40/60G B/U2 30/60/8 0G B Con nection t o SR- 100i A UX Dock Dock Dock Dock Chargi ng through S R-1 0 0i No No Y es Y es Y es iPod clas[…]
-
Page 9: Teac SR-100I
ENGLI SH 9 A B C D AC wall socket USB fl ash me mor y C onnections Portable audio play er (Opt ional cable) A A UX in jacks Thes e jack s transmit an analog 2- channel audio signal. Connec t a por tab le audio player using c ommercially available RCA pin -stereo mini plug cabl e. Be sure to c o nnec t the cabl es as follows: White plug e White jack[…]
-
Page 10: Teac SR-100I
10 D K K J J G I B C F E A H To p Fro n t Identifying the Parts (Mai n Unit )[…]
-
Page 11: Teac SR-100I
11 ENGLI SH A Stan dby/ O n ( ) /FUNCTION Use this button to turn the unit on and of f (standby) . T o tur n of f unit, hold dow n this button for more than 3 seconds. When an iPod is not connec ted to the dock : e “EC O PWR ” appears on the display for a few seconds. Then the unit is turned off (put in standby) and the S T ANDBY indicator ligh[…]
-
Page 12: Teac SR-100I
12 a ST ANDBY /ON ( ) Use this button to turn the unit on and of f. When the unit is turn ed of f, and an iPod is not connec ted to the dock : e “EC O PWR ” appears on the display for a few seconds. Then th e unit is turned of f (put in standby) and the S T ANDBY indicator lights. When the unit is turn ed of f, and an iPod is connected to the d[…]
-
Page 13: Teac SR-100I
13 ENGLI SH g Scroll ( ˙ / ¥ ) In CD or US B mode, use these bu ttons to selec t a folder (MP 3/ WMA disc and U SB storage device only) . In iPod mode, use these but tons to scr o ll up and down in a menu. Thes e but tons ha ve the s ame func tions as the Click Whe el of an iPod. In FM m ode, use these but tons t o sele ct a preset stat ion. h ME[…]
-
Page 14: Teac SR-100I
14 Remote Con trol Unit The supplie d remote c ontrol unit allows the unit to be operated from a distance. When using the remote c ontrol unit, p oint it towar ds the remot e sensor within 60° horizonta lly and 20° ver tically of the front of the unit. < Even if the remote control is use d wi thin it s e f fec t ive operation range ( 1 6f t /5[…]
-
Page 15: Teac SR-100I
15 ENGLI SH Sett ing the Clock Set the clock b efore any operations. 1 If t he unit i s on, pr ess th e ST AND BY /ON ( ) button to turn it off. 2 Press t he CLOCK bu tto n repe atedl y unti l “CLK SET” a ppea rs on t he disp lay . The h our value blink s. < If no but ton i s pressed for 30 se cond s, the clock setting mode will be cancelled[…]
-
Page 16: Teac SR-100I
16 This chapter describ es the basic op eration which is available in ever y mo de. 1 Press t he Sta ndby/On ( ) button to turn the unit on. < The unit turns on with the source that was last selec ted. 2 Press t he FUNC TION b utto n (same as the Standby /On but ton ) repeatedly to select a source. The s ource changes as follows: iPod CD USB FM […]
-
Page 17: Teac SR-100I
17 ENGLI SH Equalizer Y o u can adjust the sound according t o th e genre of the music or your taste. Each time the PRE SET EQ but ton is pressed, the equalizer is change d as follows: POP JAZ Z CLASSI C ROCK FLAT (Defaul t) < If you are also using the e qualizer set ting on your iPod or other audio player , the ef fec ts will b e combined and m[…]
-
Page 18: Teac SR-100I
18 Not e for iPod t ouch If you want to hear the sound of video from an iPod touch, c o nnec t the iPod touch to the dock first, th en operate SR- 1 0 0i and the iPod touch. Stopping pla yback temporarily (P ause mode) During playback , press the Play /Pause ( G / J ) but ton. Playback stops at the current position. T o resume playb ack, press the […]
-
Page 19: Teac SR-100I
19 ENGLI SH Activating the repeat mode During pla yback , press the Repea t ( ) but ton t o selec t the repeat mode. “REP MODE” appears on the display . Each time th e Repeat ( ) but ton is pr ess ed, the iPod REPEA T s et ting changes as follows: Repeat one Repeat all Off < If you select “R epeat one” to pla y only one song, th e icon a[…]
-
Page 20: Teac SR-100I
20 1 Press the FUNCTION button repeatedly to select “CD” . < When no disc is loaded, “NO DISC” appears on the display . 2 Insert a disc with the printed label side facing you. Printed label side The disc is automatically loaded into the player . Let go of the disc when it star t s loading. Playback star ts f rom the first tr ack /file au[…]
-
Page 21: Teac SR-100I
21 ENGLI SH Do not u se a high — capac ity US B hard di scs . Only USB fl ash me mor y can b e use d. 1 Press the FUNCTION button repeatedly to select “USB” . < When no USB storage device is c onne cted, “ NO USB” appears on the display. 2 Conne ct yo ur USB st orage d evice to t he suppl ied USB c able con nec ted to t he uni t. Pay a t[…]
-
Page 22: Teac SR-100I
22 Stopping pla yback temporarily (P ause mode) During playback , press the Play /Pause ( y / J ) bu tton. Playback stops at the current position. T o resume playb ack, press the Play/Pause ( y / J ) but ton again. Stopping pla yback Press the S top ( H ) bu tton. Searching for a part of a t rack /file Hold down During playback , ho ld the Skip ( .[…]
-
Page 23: Teac SR-100I
23 ENGLI SH Select ing a folder (MP 3/WMA disc or USB stor age device ) Press the Scroll ( ˙ / ¥ ) but ton to skip to the nex t or previous folder . Intro playback Y o u can play the beginning of each track /file consecutively. Press the INTRO b ut ton t o s tar t intro playback . “INT R ON” appears on th e display . This unit plays back the […]
-
Page 24: Teac SR-100I
24 Up t o 20 tracks /files can be programmed in the des ired order . 1 Press the FUNCTION button repeatedly to select “CD” or “USB” . 2 Press the PROGRAM button when playback stops. Examp le: Audio CD Program number Tr a c k n u m b e r Example: MP3/WMA file Fold er number File number Program number < T o cancel the program mode, press t[…]
-
Page 25: Teac SR-100I
25 ENGLI SH Examp le: Audio CD Tr a c k n u m b e r Example: MP3/WMA file File number The track /file is programme d, and the program number (“ P- 0 1 ” ) is displayed. < R epeat steps 3 and 4 to program more track s/files . 5 When you have finished selecting track/f ile numbers, press the Play /Pause ( G / J ) button to start program pla yb[…]
-
Page 26: Teac SR-100I
26 Each time th e Repeat ( ) but ton is pr esse d, the mode is changed as fo llows: RE P ON E RE P ALB (MP 3/WMA disc/USB storage de vice only) RE P ALL RE P OFF (Rep eat o f f ) RE P ONE (Re peat o ne) During playback , press the Repeat ( ) but ton onc e. “REP ONE” appears on the display . The track b eing played will be played repeatedly . RE[…]
-
Page 27: Teac SR-100I
ENGLI SH 27 Shuf f le Pla yback During playback , press the Shuf f le ( ) but ton. “R AN ON” appears on th e display and the tracks /files will be pla yed randomly . < If the / but ton is pr essed during shuff le playback, the nex t track /file will be randomly selected and play ed. If the . but ton i s pressed during sh uf f le playback, th[…]
-
Page 28: Teac SR-100I
28 1 Press the FUNCTION button repeatedly to select “FM” . 2 Selec t the station you want to listen to. Automatic selec tion Hold down Hold the T UNING button and release it when the automatic tuning process start s. Wh en a station is tuned in, the tuning process will stop automatically . Repeat this step until the station you want to listen t[…]
-
Page 29: Teac SR-100I
29 ENGLI SH Preset T uning Y o u can store up to 2 0 FM stations. 1 T une in to the station you want to store (pag e 28). 2 Press t he PROG RA M but ton. The preset numb er blink s. 3 Press the Scroll ( ˙ / ¥ ) buttons to select a pres et numb er for st oring t he stat ion. 4 Press t he PROG RA M but ton. The tune d station is stored in the selec[…]
-
Page 30: Teac SR-100I
30 Y o u can set the unit to turn on at specif ic times. < Adjust the clock be fore setting th e wake up timer (page 1 5) . Setting t he wake up timer 1 If t he unit i s on, pr ess th e ST AND BY /ON ( ) button to turn it off. 2 Press t he TIME R but ton re peate dly unti l “ ALM SET” appears on the display . The clo ck hour value blink s. &[…]
-
Page 31: Teac SR-100I
31 ENGLI SH If you a have problem with your system, read this page and tr y to solve the problem yourself before calling your dealer or a TE AC service Cent er. Gener al No pow er e Check the connec tion to the A C p ower supply . Che ck whether or not the AC source i s a s witched socket. If it is, confirm that the switch is turned on. e C onf irm[…]
-
Page 32: Teac SR-100I
32 MP 3 / WMA Cannot play . e Check the MP3 / WMA f ile ex tens ion . This unit recognizes MP3 files by their “ .mp3” , and WMA files by their “ .wma” file extensions. e MP 3/ WMA file data might have been corrupted . e The file dat a format might not be an MP3/ WMA format . e The sampling f requency of th e MP3 file migh t b e other than 4[…]
-
Page 33: Teac SR-100I
ENGLI SH 33 MP 3 / WMA Pla yback Order MP3 / WMA files on a CD or a US B s torage devic e can be stored in folders in the s ame way that files are managed on a computer . Moreover, multiple folders can b e contained inside anot her fold er . Her e is an exa mple o f the f ile and f olde r struc tu re of an MP3/WM A dis c or a USB sto rage dev ice, […]
-
Page 34: Teac SR-100I
34 Nous vous remercions d’a voir choisi TEA C. Lisez ce manuel a vec a t tention pour tirer les meilleures per for mance s de cet app arei l. Sommaire A v a n t d ‘ u t i l i s e r l ‘ a p p a r e i l ………………………… 3 5 D i s q u e s ………………………………………. 3 6 S u p p o r t s U S B ……………[…]
-
Page 35: Teac SR-100I
35 FRAN ÇAI S Contenu de l’ emballage Vé rif iez la présence des acc essoires fournis en standard. T élé comman de (RC-1265) x 1 Pile (CR2025) pour té léco mmand e x 1 Cordon d’ aliment ation x 1 Antenne FM x 1 Câble USB x 1 Mod e d’ em ploi (ce docu ment) x 1 < Conser vez ce livret dans un endroit sûr pour référence ultérie[…]
-
Page 36: Teac SR-100I
36 Dis ques li sible s par ce t appar eil CD qui por tent le logo “C OMP ACT disc DIGI T AL A UDIO” ( 1 2 cm) . N’utilisez pas de disque de 8 cm avec cet appareil. CD- R et CD -RW qui ont été correctement enregistrés au format CD audio et finalisés. CD- R et CD -RW f inalisés cont enant des fichiers MP3/ WMA . Attention : La lecture d[…]
-
Page 37: Teac SR-100I
37 FRAN ÇAI S Compatibilité MP 3/WMA Précautions de rangement < Les disques doivent être rangés dans leurs boîtier s après utilisation afin d’ éviter la po ussière et les rayures qui pourr aient provoquer des “sauts” du capteur laser . < N’exp osez pas les disques direc tement au soleil, à une température élevée et à […]
-
Page 38: Teac SR-100I
38 iPod compatibles iPod 1 re et 2e génération iPod 3e généra tion iPod 4e génération iPod 4e génération (co ul e u r) iPod 5e généra tion (vi dé o) Capacit é 5/ 1 0/20 Go 1 0/1 5/20/ 30/ 40 G o 20/40 G o/U2 20/30/40/ 60 Go/U 2 30/60/80 Go Con nexion a u SR — 1 00i A UX Dock Dock Dock Dock Charge par le SR-1 0 0i Non Non Oui Oui Oui iPo[…]
-
Page 39: Teac SR-100I
39 FRAN ÇAI S A B C D Prise se cte ur Mém oire f lash US B Racc ordements Lecteur audio portable (Câble op tionnel) A Prises AUX Ces prises transmet tent les signaux audio analo giques à 2 canaux . Branchez un le cteur audio por t able à l’ aide d’un câble mini- jack stéréo- RC A du commerce . A s s u r e z — v o u s d e c o n n e[…]
-
Page 40: Teac SR-100I
40 D K K J J G I B C F E A H Vu e supérieure Vue a vant Identification des pa r t ies ( unité principale )[…]
-
Page 41: Teac SR-100I
41 FRAN ÇAI S A Stan dby/ O n ( ) /FUNCTION Utilisez cette touche po ur allumer et éteindre l’ appareil (s ta nd by). Pour éteindre l’ appareil, maintenez enfoncée cette touche plus de 3 secondes. S’il n ‘y a pas d’iPod connec té au dock : e “ECO PWR” s’ af fiche quelques secondes. Pui s l’ app areil s &apos[…]
-
Page 42: Teac SR-100I
42 a ST ANDBY /ON ( ) Utilisez cette touche po ur met tre l’ appareil en et hor s serv ice . Si l’ unité est éteinte et s’il n ‘y a pas d’iPod connec té au dock : e “ECO PWR” s’ af fiche quelques secondes. Pui s l’ app areil s ‘étein t (se met en veille) et le voyant ST ANDBY s’ allume. Si l&apos[…]
-
Page 43: Teac SR-100I
43 FRAN ÇAI S g Défilement ( ˙ / ¥ ) En mode CD ou U SB, utili se z ces t ouches pour sélec tionner un dossier (di sque MP3/ WMA et support USB u niq ue me nt). En mode iPod, utilisez ces touches pour f aire défiler le menu. Ces touches on t les m êmes fonctions que la molet te cliquable d’un iPod. En mode F M , utili se z ces t ouches […]
-
Page 44: Teac SR-100I
44 Boîtier de té lécommande Le boî tier de télécommande fo urni per met la commande à distance de l’appareil. Quand vous uti lisez le boî tier de télécomma nde, pointez-le vers le capt eur de télécommande en res p ec tant u n angle de 60° à l’horizontale et de 20° à la ver ticale par rapp or t à l’avant de l’appare[…]
-
Page 45: Teac SR-100I
45 FRAN ÇAI S Réglage de l’horloge Réglez l’horloge avant toute autr e op ération. 1 Si l’appareil est en service, appuyez sur la touche ST ANDBY /ON ( ) pour le mett re en vei ll e. 2 Appuyez plusieurs fois sur la touche CLOCK jusq u’à ce que “CLK SET ” s’aff ich e. La valeur des “h eures” clignote . < Si a[…]
-
Page 46: Teac SR-100I
46 Ce chapitr e dé crit le foncti onnement de base valable d ans tous les modes. 1 Appuyez sur la touche Standby /On ( ) pour allumer l’ appareil. < L ‘appareil s’ allume avec comme s ource la dernière ayant été sélectionné e. 2 Appuyez sur la touche FUNCTION (la même que la touche Standb y/ O n ) plusieurs fois pour sélectio[…]
-
Page 47: Teac SR-100I
47 FRAN ÇAI S Égaliseur ( correcteur tonal) V ous pouvez af finer le son en fonction du genre de musique ou de v otre goût. Chaque fois que vous appuyez sur la touche PRESET EQ, le réglage d’ é galiseur change comme suit : POP JAZ Z CLASSI C ROCK FLA T (par défaut) < Si vous utilis ez aussi l’égaliseur de votre iPo d ou d’u[…]
-
Page 48: Teac SR-100I
48 Note pour iP od touch Si vous souhaitez entendre le son de la v idéo d’un iPod touch, c onnec tez d’ ab ord l ‘iPod touch au do ck, puis faites fonctionn er le SR- 1 0 0i et l’iP o d touch. Arrêt temporaire de la lecture ( mode de pause) Pendant la lec ture, appuyez sur la touche Le cture /Pause ( G / J ) . L a lec ture s&a[…]
-
Page 49: Teac SR-100I
49 FRAN ÇAI S Activation du mode de lecture e n boucle Penda nt la lec ture , appuyez sur la touche de lecture en boucle ( ) pour séle ctionn er le mode de lec ture en boucle. “REP MODE” s ‘aff iche. Chaque foi s que vous appuyez sur la touche de lec ture en boucle ( ), le r é glage de lecture en boucle de l’iP o d change comme sui[…]
-
Page 50: Teac SR-100I
50 1 Appuyez répétitiv ement sur la touche FUNCTION afin de sélectionner “CD” . < Si aucun disque n’ es t chargé, “NO DISC ” s’aff iche. 2 Insérez un disque avec sa face sérigraphiée vers vou s. Côté sérigraphié Le disque est automatiquement chargé dans le lec teur . Laissez le disque se f aire avaler . La lec ture […]
-
Page 51: Teac SR-100I
51 FRAN ÇAI S N’utilisez pas de disques durs USB haute capacité. Seule une mémoire flash U SB peut être utilisée. 1 Appuyez répétitiv ement sur la touche FUNCTION afin de sélectionner “USB” . < Si aucun s uppor t USB n ‘est connec té, “NO U SB” s’af f i che . 2 Branc hez vot re supp ort US B au câbl e USB fourni […]
-
Page 52: Teac SR-100I
52 Arrêt temporaire de la lecture ( mode de pause) Pendant la lec ture, appuyez sur la touche Le cture /Pause ( y / J ). La lec ture s’ arrête à la position ac tuelle. Pour reprendre la lec ture, appuyez de n ouveau sur la touche Lecture /Pause ( y / J ). Arrêt de la lecture Appuyez sur la touche Stop ( H ). Recherche d’un passage de […]
-
Page 53: Teac SR-100I
53 FRAN ÇAI S Sélec tion d’un dossier ( disque MP3 / WMA ou support USB ) Appuyez sur la t ouche de défilement ( ˙ / ¥ ) p our sauter au dossier s uivant ou précédent. Lecture des int roductions Vous pouvez f aire lire à la suite le début de cha que fichier/ piste . Appuyez sur la touche INT RO pour lancer la lec ture des introduction[…]
-
Page 54: Teac SR-100I
54 20 fichiers/pistes peu vent être programmés dans l’ordre désiré . 1 Appuyez répétitiv ement sur la touche FUNCTION afin de sélectionner “CD” ou “USB” . 2 Appuye z sur la to uche PRO GR AM alo rs que la lec tu re est a rrêt ée. Exe mple : CD aud io Posi ti on dans le program me Numéro de piste Exe mple : Fic hie r MP3/WM A […]
-
Page 55: Teac SR-100I
55 FRAN ÇAI S Exe mple : CD aud io Numéro de piste Exe mple : Fic hie r MP3/WM A Numéro de fich ier La fichier ou la piste est pro grammé, et la position suivante dan s le pro gramme (“P- 02”) s’af fiche. < R épétez les étapes 3 et 4 po ur programmer de s fichiers/ pistes supplémen taires. 5 Une fois la sélection de fichiers/pi[…]
-
Page 56: Teac SR-100I
56 Chaque foi s que vous appuyez sur la touche de lec ture en boucle ( ), le mode change comme suit : RE P ON E RE P ALB (disqu e MP3/WM A ou sup por t USB uniquement) RE P ALL RE P OFF (Répétition hors service ) RE P ONE (l ec tur e en bo ucle d ‘un ti tre) Durant la lec ture, appu yez une fois sur la touche de lec ture en boucle ( ). “R […]
-
Page 57: Teac SR-100I
57 FRAN ÇAI S Lec ture aléatoire Durant la le c ture, appuye z sur la touche de l ec ture aléatoire ( ). “R AN ON” s’ af f iche et les fichiers / pistes sont lus en ordre aléatoi re. < Si vous appuyez sur la touche / durant la lec ture aléatoire, le pro chain f ichie r/ pis te lu s era ch oisi aléatoi rement . Si la t ouche . est […]
-
Page 58: Teac SR-100I
58 1 Appuyez répétitiv ement sur la touche FUNCTION afin de sélectionner “FM” . 2 Sélectionnez la station que v ous souhaitez écouter . Sélect ion automatique Maintenez enfoncée Maintenez enfoncée la touche TUNING et relâchez-la quand le processus de sy nt o nisation automatique a démarré. Quand une station est trouvée, le processus[…]
-
Page 59: Teac SR-100I
59 FRAN ÇAI S S yntonisat ion préréglée (preset ) Vou s p ouvez mémoriser un ma ximum de 20 stations F M . 1 Réglez la station que v o us souhaitez mémoriser (pag e 58). 2 Appuye z sur la to uche PROG R AM. Le numé ro de preset ( mémoire de préréglage ) clignote. 3 Appuye z sur le s touch es de dé fil eme nt ( ˙ / ¥ ) pour sélectionn[…]
-
Page 60: Teac SR-100I
60 Vou s p ouvez régler des heures spécifiques de mise en ser vice de l’ appareil. < Réglez l’horlog e avant de r é gler le réveil (page 4 5). Réglage de l’heure de rév eil 1 Si l’appareil est en service, appuyez sur la touche ST ANDBY /ON ( ) pour le mett re en vei ll e. 2 Appuyez plusieurs fois sur la touche TIMER ju[…]
-
Page 61: Teac SR-100I
61 FRAN ÇAI S Si vous av e z des problèmes avec votre système, lisez cette page et essayez de résoudr e vous-même le problème avant d’ app eler votre revendeur ou un service après-vente TEA C. Généralités Pas d’ alimentation e V érif iez le bran chement à l’ alim entation sec teur . Vérifiez si la source de courant est une […]
-
Page 62: Teac SR-100I
62 MP 3 / WMA Lecture impossible. e V érifiez l’extension de fichier MP 3/WMA . Cet appare il reconnaît les fichier s MP3 par leur extension de fichier “ .mp3” et les fichiers WMA par leur ex tension de fichier “. w m a ”. e L es donn ées du fichier MP3/WMA so nt peut — être endommagées. e L e format de données du fichier n &apos[…]
-
Page 63: Teac SR-100I
63 FRAN ÇAI S Ordre de lec ture d’un disque MP 3/WMA Les fichiers MP3/WMA d’un CD ou d’un support USB peuvent être rangés dans des dossiers de la même façon que les fichiers d’un ordinateur . De p lus, un dossier peut con teni r lui-même pl usieu rs dossi ers. V oici un exemple de struc ture de fichiers et de dossiers dans[…]
-
Page 64: Teac SR-100I
64 Gracia s por el egir TE A C . Lea e ste manua l atentamente para obtener el mejor rendimiento de esta unidad. Índice A n t e s d e u t i l i z a r l a u n i d a d ………………………. 6 5 D i s c o s ………………………………………… 6 6 Dispositivos de almacenamiento US B …………….. 6 7 C o m p a t i b i l i d a d[…]
-
Page 65: Teac SR-100I
65 ESP AÑOL Qué hay en la ca ja Confirme los accesorios suministrados de serie. Man do a dist anci a (RC-1265) x 1 Pila (CR2025) para el m ando a di stan cia x 1 Cable de co rriente x 1 Antena de FM x 1 Cable USB x 1 Manua l del usu ario (este docu mento) x 1 < G uarde este manual en un lugar seguro par a futur as cons ult as . T arjet a de ga[…]
-
Page 66: Teac SR-100I
66 Disc os que pue den se r rep rodu cidos e n est a unida d: CDs que lleven el logo “COMP ACT disc DIGI T AL A UDIO” ( 1 2 cm) . No utilice discos de 8 cm con esta unidad. Discos CD-R y CD -RW que hayan sido correc tamente grabados en formato CD Audio y finalizados. Discos CD- R y CD -RW f inalizad os que contengan archivos MP3 / WM A. Prec au[…]
-
Page 67: Teac SR-100I
67 ESP AÑOL Compatibilidad MP 3/WMA Precauciones de almacenamiento < Los discos deben guardars e en su caja después d e usarlos, para ev itar polvo y ar añazos que pueden provocar que el lector láser “salte” . < N o exponga los discos direc tamente a la luz del sol, ni a altas temperaturas ni a hume dad durante mucho tiempo. La e xpos[…]
-
Page 68: Teac SR-100I
68 Compatible con iP od iPod 1 ª + 2ª gen eración iPod 3ª generac ión iPod 4ª generac ión iPod 4ª generac ión (co l o r) iPod 5ª generación (ví de o) Cap aci dad 5/ 10/20G B 1 0/1 5/20/ 30/ 40 GB 20/ 4 0 G/ U2 20/30/40/60GB/ U2 30/60/80 GB Con exión al SR- 1 00i A UX base Dock ba se Dock base Dock base Dock Carga a tr avés SR- 1 0 0i […]
-
Page 69: Teac SR-100I
69 ESP AÑOL A B C D T oma de electricidad Mem oria fl ash USB Conexiones Reproductor de audio po rtát il (Cable opcional) A T e rminales A UX Estos terminales transmiten una señal de au dio analógico de 2 canales. Conec te un reproduc tor de audio por tátil usando un cable de tip o RC A /mini-jack estéreo de los que se venden en el mercado. A[…]
-
Page 70: Teac SR-100I
70 D K K J J G I B C F E A H Par te sup erio r Fro n t al Identificación de las partes ( unidad principal )[…]
-
Page 71: Teac SR-100I
71 ESP AÑOL A Reposo/ encendido ( ) /FUNCTION Use este botón para encender y apagar (r ep oso) la unidad. Para apagar la unidad, mantenga pulsado es te botón durante más de 3 segundos. Cuando no hay un iP od cone ctado a la b ase Dock : e “ EC O PW R” apare ce en la pantalla durante unos segundos . Después la unidad se apaga (se p one en r[…]
-
Page 72: Teac SR-100I
72 a ST ANDBY /ON ( ) Use este botón para encender y apagar la unidad. Cuando se apaga la unidad y n o hay un iPod conec tado a la base Do ck: e “ EC O PW R” apare ce en la pantalla durante unos segundos . Después la unidad se apaga (se p one en reposo) y se ilumina el indicador ST ANDBY . Cuando se apaga la unidad y n o hay un iPod conec tad[…]
-
Page 73: Teac SR-100I
73 ESP AÑOL g Desplazamiento ( ˙ / ¥ ) En modo CD o US B, use es tos botones para seleccionar una carpeta (discos MP 3/ WMA y dispositivos de almacenamiento U SB solamente) . En modo iPod, utilice estos botones para desplaz arse hacia arriba y hacia abajo po r un menú. Estos botones tienen las mismas funciones que la rue da de clic de un iPod. […]
-
Page 74: Teac SR-100I
74 Mando a distancia El mando a distancia suministrado per mite manejar la unidad desd e la distancia. Cuando uti lice el mando a distancia, oriént elo hacia el sensor de con trol remot o de ntro de un rango de 60 ° horizontalmente y 2 0 ° ver ticalmente del panel frontal de la unidad princip al. < Incluso aunque el mando a distancia se utili[…]
-
Page 75: Teac SR-100I
75 ESP AÑOL Aj uste del reloj Ajuste el reloj ant es de hacer ninguna otra operación . 1 Si la unidad está encendida, pulse el botón ST ANDBY /ON ( ) para apagarla. 2 Pulse e l botó n CLOCK repe tid amente h asta qu e apar ezca e n la pant alla “CLK SE T” . El valor de las horas parpadea. < Si no se pulsa ningún b otón durant e 30 se […]
-
Page 76: Teac SR-100I
76 Este capítulo de scribe el fun cionamiento y o peracion es básicas disponibles en c ada modo. 1 Pulse el botón de Reposo/Encendido ( ) para encender la unidad. < La unida d se enciende con la fuente de sonido que estuviese sele ccionada la última v e z. 2 Pulse el botón F UNCTIO N ( el mismo que el botón de Reposo /Ence ndido) repetidam[…]
-
Page 77: Teac SR-100I
77 ESP AÑOL Ecualizador Usted puede aju s tar el sonido de acuerdo a l género de música o a sus gustos personales. Cada vez que s e pulsa el botón PRESET EQ , el botón cambi a como s igue: POP JAZ Z CLASSI C ROCK FLAT (pla no, po r def ec to) < Si también está utilizando algún ajuste del ecualizador en su iPod u otr o reproduc tor de aud[…]
-
Page 78: Teac SR-100I
78 Nota para iPod touch Si quier e oír el sonido del vídeo de un iPod touch, conec te primero el iP o d touch a la base Dock y después opere con el SR- 1 0 0i y el iPod touch. Detener la reproducc ión temporalmente ( modo de Pausa ) Durante la re producción, pulse el botón de Reproducc ión/ Pausa ( G / J ). La reproducción se detiene en la […]
-
Page 79: Teac SR-100I
79 ESP AÑOL Activar el modo de repetición Durante la repr o ducción, pul se el b otón de Repetición ( ) para selecciona r el mo do de repetición. “REP MODE” aparece en la pantalla. Cada vez que se p ulsa el botón de Repetición ( ), e l ajuste de repetición para el iPod cambia como sigue: Repeat one Repeat all desactivada < Si selecc[…]
-
Page 80: Teac SR-100I
80 1 Pulse el botón FUNCTION repetidamente par a seleccionar “C D ” . < Si no hay ningún disco cargado, “NO DISC” aparecerá en la pantalla. 2 Introduzca un disco con la car a de la etiqueta impr esa mi rando hac ia uste d. Cara de la etiqueta impresa El disco se carg a automáticamente en el repr o ductor. Deje que el disco en tre cua[…]
-
Page 81: Teac SR-100I
81 ESP AÑOL No utilice discos duros U S B de alta capacidad. Solamente se pueden usar tarjetas de memoria flas h US B. 1 Pulse el botón FUNCTION repetidamente par a seleccionar “USB” . < Si no hay ningún disp ositivo de almacenamiento U SB conec tado, “NO USB” aparecerá en la pantalla. 2 Conecte su dispositivo de almacenamiento USB a[…]
-
Page 82: Teac SR-100I
82 Detener la reproducc ión temporalmente ( modo de Pausa ) Durante la re producción, pulse el botón de Reproducc ión/ Pausa ( y / J ). La reproducción se detiene en la posición actual. Para reanudar la r eproducción, pulse de nuevo el botón de Reproducc ión /Pausa ( y / J ). Detener la reproducc ión Pulse el botón de Pa r ada ( H ). Bus[…]
-
Page 83: Teac SR-100I
83 ESP AÑOL Seleccionar una carpeta (Discos MP 3 / WMA o dispositivos de almacenamiento USB ) Pulse los botones de Despla zamiento ( ˙ / ¥ ) para saltar a la carp eta siguiente o an terior. Reproducción de introducc iones Usted puede repr o ducir el pri ncipio de cada pista/ar chivo consecutivament e. Pulse el botón INTRO para comenz ar la rep[…]
-
Page 84: Teac SR-100I
84 Es posible pro gramar hasta un total de 20 pistas/ar chivos en el orden deseado. 1 Pulse el botón FUNCTION repetidamente par a seleccionar “C D” o “USB” . 2 Pulse e l botó n PROGR AM con l a repr oducc ión detenida. Ejempl o: CD de audio Número de programa Número de pista Ejemplo: Archivos MP 3/WMA Número de carpeta Número de arch[…]
-
Page 85: Teac SR-100I
85 ESP AÑOL Ejempl o: CD de audio Número de pista Ejemplo: Archivos MP 3/WMA Número de archivo L a p i s t a / a r c h i v o y a e s t á p r o g r a m a d a y e l n ú m e r o d e programa (“P- 01 ” ) apare ce en la pantalla. < Repita los pasos 3 y 4 para prog ramar má s pistas/ archivos. 5 Cuando ha ya terminado de seleccionar números[…]
-
Page 86: Teac SR-100I
86 Cada vez que se p ulsa el botón de Repetición ( ), e l modo cambi a como sig ue: RE P ON E RE P ALB (Sola ment e disc os MP3/ WMA o dispositivos de almacenamiento USB) RE P ALL RE P OFF (Repetición desactivada) REP ONE ( Repetir una ) Durante la repr o ducción, pul s e una vez el botón de Repetición ( ). “REP ONE” aparecerá en la pant[…]
-
Page 87: Teac SR-100I
87 ESP AÑOL Reproducción aleatoria Durante la re producción, pulse el botón de Reproducc ión Aleatoria ( ). “R AN ON” apare cerá en la pantalla y las pist as/ar chivos se reproducirán al azar . < Si se pu lsa el botón / du rante la r eproducc ión aleatoria, la siguiente pista/archivo será sel eccionada al azar y s e reproducirá. S[…]
-
Page 88: Teac SR-100I
88 1 Pulse el botón FUNCTION repetidamente par a seleccionar “F M” . 2 Sel eccio ne la em isora qu e dese e escu char. Sele cción automát ica Mantener pulsado Mantenga pul sado el b otón TUNING y suéltelo cuando comienc e el proceso de sin tonización automática. Cuando se si ntonice una emi s ora, el proceso se detendrá aut omáticament[…]
-
Page 89: Teac SR-100I
89 ESP AÑOL Sintonización de presintonías Usted puede almacenar hasta un total de 20 emisoras de FM . 1 Sintonice la emisora que desee almacenar (pág ina 8 8). 2 Pulse e l botó n PROGR AM . El número de p resint o nía parp adea. 3 Pulse los botones de Desplazamiento ( ˙ / ¥ ) para seleccionar un número de presintonía para almacenar la em[…]
-
Page 90: Teac SR-100I
90 Usted pued e configurar la unidad par a que se encienda a una hora determin ada. < Aju s te el reloj an tes de ajustar el temporiz ador desper tador (página 7 5) . Ajustar el temporizador despertador 1 Si la unidad está encendida, pulse el botón ST ANDBY /ON ( ) para apagarla. 2 Pulse e l botón TI ME R repe tida mente has ta que “ ALM S[…]
-
Page 91: Teac SR-100I
91 ESP AÑOL Si tiene problemas con su equipo, lea esta página e intent e resolver el problema us ted mismo antes de llamar a su distribuidor o a un ser vicio técnico TE AC. Gener al No hay corriente e C ompr uebe la conexión a la corriente. Compruebe si la toma de corriente es un enchufe c on un interruptor . Si lo es, confirme que el interrupt[…]
-
Page 92: Teac SR-100I
92 MP 3 / WMA No se puede reproducir. e C o m p r u e b e l a e x t e n s i ó n d e a r c h i v o M P 3 / W M A . E s t a unidad reconoce los archivos MP3 por su ex tens ión “ .mp3” y los archivos WMA por su ex tensión “ .wma” . e L os datos del archivo MP 3/ WMA po drían haberse roto. e El forma to de los datos del archivo podría no s[…]
-
Page 93: Teac SR-100I
93 ESP AÑOL Orden de reproducción MP3 / WMA Los archivos MP 3/ WMA de un CD o de un dispositivo de almacenamiento U SB pueden alma cenarse en carp etas de la misma manera que se manejan en un ordenador . Es más, una carp eta pued e a su vez cont ener múltip les carpet as. A continuación un e jemplo de la estructura de arch ivos y carp etas d e[…]
-
Page 94: Teac SR-100I
94[…]
-
Page 95: Teac SR-100I
95[…]
-
Page 96: Teac SR-100I
Z 0710 . MA-1587B This appliance has a serial number located on the rear panel. Please r ecord the serial number and retain it for your r ecords. Mode l name: SR- 1 0 0i Serial numb er TEAC C ORPORA TION 1-47 Ochiai, T ama-shi, T okyo 206-8530 Japan Phone: (042) 356-9156 TEAC AMERICA, INC. 7733 T elegraph Road, Montebello, California 90640 U .S.A. […]
-
Страница 1
SR — 1 0 0 i Hi- F i T ABL E R ADIO / CD OWN E R ’S M AN UAL MODE D’EMPL OI MANU A L DEL USU A RIO 41009606-A101 ENGLI SH FR ANÇ AIS ESP AÑOL[…]
-
Страница 2
2 IM P O RT ANT SAFET Y IN STRUC TIO N S 1 ) Read these instruc tions. 2) Keep these ins truc tions. 3 ) Hee d all warnings. 4) Follow all instruc tions. 5) Do not use this apparatus near water . 6) Clean only with dry cloth. 7 ) Do not blo ck any ventilation openings. Install in acc ordance with the manufa cturer ’s in s truc tions.
Do not in[…] -
Страница 3
3 < Do not ex pose this apparatus to drips or splashes. < D o not place any objects f illed with liquids, such as vases, on the apparatus. < Do not install this apparatus in a confined space such as a boo k case or similar unit. < T he appar atus draws nominal non — operating p ower from the AC outlet with its POWE R or S T ANDB Y / O N[…]
-
Страница 4
4 Thank you for choosing TEAC. Read this manual care full y to get t he be st pe rf orman ce from t his un it. C ontents B e f o r e U s i n g t h e U n i t …………………………….5 D i s c s ………………………………………….. 6 US B Storage Devices. . . . . . . . . . . . . . . . . . . . . . . . . . . . . . . . . . . 7 M […]
-
Страница 5
5 ENGLI SH What ’ s in t he box Confirm the supplied s tandard acc essories . Remo te contr ol uni t (RC-1265) x 1 Bat ter y (CR2025) for remo te contr ol unit x 1 AC power cord x 1 FM antenna x 1 USB cab le x 1 Own er ’ s ma nual (this do cument) x 1 < Ke ep this manual in a safe place for future reference . Warranty card x 1 CA UT ION <[…]
-
Страница 6
6 Disc s that c an be p layed on thi s unit CDs that bear the “COMP AC T disc DIGIT AL AUDIO” logo ( 1 2 cm) . Do not u se 8 cm d iscs w ith t his uni t. CD- R and CD -RW discs that have been correc tly recorded in the audio CD format and finalized. Finalized CD -R and CD -RW disc s that contain MP 3/ WMA f iles . Caution: Pla yback of any othe[…]
-
Страница 7
ENGLI SH 7 MP3 / WMA C ompatibilit y Storage precautions < Discs should b e returned to their cases af ter use to avoid dust and scratches that c ould c ause the laser pickup to “ sk ip. ” < Do not exp ose discs to direc t sunlight or high- temperature and humidit y for ex tende d perio ds. Long exp osure t o high temperatures will warp d[…]
-
Страница 8
8 Compatible iP od iPod 1 s t + 2nd gener ation iPod 3rd generation iPod 4th genera tion iPod 4th genera tion (co l o r) iPod 5t h generation (vi de o) Capacity 5/ 1 0/20GB 1 0/1 5/ 20/ 30/ 40 GB 20/ 4 0 G/ U2 20/30/40/60G B/U2 30/60/8 0G B Con nection t o SR- 100i A UX Dock Dock Dock Dock Chargi ng through S R-1 0 0i No No Y es Y es Y es iPod clas[…]
-
Страница 9
ENGLI SH 9 A B C D AC wall socket USB fl ash me mor y C onnections Portable audio play er (Opt ional cable) A A UX in jacks Thes e jack s transmit an analog 2- channel audio signal. Connec t a por tab le audio player using c ommercially available RCA pin -stereo mini plug cabl e. Be sure to c o nnec t the cabl es as follows: White plug e White jack[…]
-
Страница 10
10 D K K J J G I B C F E A H To p Fro n t Identifying the Parts (Mai n Unit )[…]
-
Страница 11
11 ENGLI SH A Stan dby/ O n ( ) /FUNCTION Use this button to turn the unit on and of f (standby) . T o tur n of f unit, hold dow n this button for more than 3 seconds. When an iPod is not connec ted to the dock : e “EC O PWR ” appears on the display for a few seconds. Then the unit is turned off (put in standby) and the S T ANDBY indicator ligh[…]
-
Страница 12
12 a ST ANDBY /ON ( ) Use this button to turn the unit on and of f. When the unit is turn ed of f, and an iPod is not connec ted to the dock : e “EC O PWR ” appears on the display for a few seconds. Then th e unit is turned of f (put in standby) and the S T ANDBY indicator lights. When the unit is turn ed of f, and an iPod is connected to the d[…]
-
Страница 13
13 ENGLI SH g Scroll ( ˙ / ¥ ) In CD or US B mode, use these bu ttons to selec t a folder (MP 3/ WMA disc and U SB storage device only) . In iPod mode, use these but tons to scr o ll up and down in a menu. Thes e but tons ha ve the s ame func tions as the Click Whe el of an iPod. In FM m ode, use these but tons t o sele ct a preset stat ion. h ME[…]
-
Страница 14
14 Remote Con trol Unit The supplie d remote c ontrol unit allows the unit to be operated from a distance. When using the remote c ontrol unit, p oint it towar ds the remot e sensor within 60° horizonta lly and 20° ver tically of the front of the unit. < Even if the remote control is use d wi thin it s e f fec t ive operation range ( 1 6f t /5[…]
-
Страница 15
15 ENGLI SH Sett ing the Clock Set the clock b efore any operations. 1 If t he unit i s on, pr ess th e ST AND BY /ON ( ) button to turn it off. 2 Press t he CLOCK bu tto n repe atedl y unti l “CLK SET” a ppea rs on t he disp lay . The h our value blink s. < If no but ton i s pressed for 30 se cond s, the clock setting mode will be cancelled[…]
-
Страница 16
16 This chapter describ es the basic op eration which is available in ever y mo de. 1 Press t he Sta ndby/On ( ) button to turn the unit on. < The unit turns on with the source that was last selec ted. 2 Press t he FUNC TION b utto n (same as the Standby /On but ton ) repeatedly to select a source. The s ource changes as follows: iPod CD USB FM […]
-
Страница 17
17 ENGLI SH Equalizer Y o u can adjust the sound according t o th e genre of the music or your taste. Each time the PRE SET EQ but ton is pressed, the equalizer is change d as follows: POP JAZ Z CLASSI C ROCK FLAT (Defaul t) < If you are also using the e qualizer set ting on your iPod or other audio player , the ef fec ts will b e combined and m[…]
-
Страница 18
18 Not e for iPod t ouch If you want to hear the sound of video from an iPod touch, c o nnec t the iPod touch to the dock first, th en operate SR- 1 0 0i and the iPod touch. Stopping pla yback temporarily (P ause mode) During playback , press the Play /Pause ( G / J ) but ton. Playback stops at the current position. T o resume playb ack, press the […]
-
Страница 19
19 ENGLI SH Activating the repeat mode During pla yback , press the Repea t ( ) but ton t o selec t the repeat mode. “REP MODE” appears on the display . Each time th e Repeat ( ) but ton is pr ess ed, the iPod REPEA T s et ting changes as follows: Repeat one Repeat all Off < If you select “R epeat one” to pla y only one song, th e icon a[…]
-
Страница 20
20 1 Press the FUNCTION button repeatedly to select “CD” . < When no disc is loaded, “NO DISC” appears on the display . 2 Insert a disc with the printed label side facing you. Printed label side The disc is automatically loaded into the player . Let go of the disc when it star t s loading. Playback star ts f rom the first tr ack /file au[…]
-
Страница 21
21 ENGLI SH Do not u se a high — capac ity US B hard di scs . Only USB fl ash me mor y can b e use d. 1 Press the FUNCTION button repeatedly to select “USB” . < When no USB storage device is c onne cted, “ NO USB” appears on the display. 2 Conne ct yo ur USB st orage d evice to t he suppl ied USB c able con nec ted to t he uni t. Pay a t[…]
-
Страница 22
22 Stopping pla yback temporarily (P ause mode) During playback , press the Play /Pause ( y / J ) bu tton. Playback stops at the current position. T o resume playb ack, press the Play/Pause ( y / J ) but ton again. Stopping pla yback Press the S top ( H ) bu tton. Searching for a part of a t rack /file Hold down During playback , ho ld the Skip ( .[…]
-
Страница 23
23 ENGLI SH Select ing a folder (MP 3/WMA disc or USB stor age device ) Press the Scroll ( ˙ / ¥ ) but ton to skip to the nex t or previous folder . Intro playback Y o u can play the beginning of each track /file consecutively. Press the INTRO b ut ton t o s tar t intro playback . “INT R ON” appears on th e display . This unit plays back the […]
-
Страница 24
24 Up t o 20 tracks /files can be programmed in the des ired order . 1 Press the FUNCTION button repeatedly to select “CD” or “USB” . 2 Press the PROGRAM button when playback stops. Examp le: Audio CD Program number Tr a c k n u m b e r Example: MP3/WMA file Fold er number File number Program number < T o cancel the program mode, press t[…]
-
Страница 25
25 ENGLI SH Examp le: Audio CD Tr a c k n u m b e r Example: MP3/WMA file File number The track /file is programme d, and the program number (“ P- 0 1 ” ) is displayed. < R epeat steps 3 and 4 to program more track s/files . 5 When you have finished selecting track/f ile numbers, press the Play /Pause ( G / J ) button to start program pla yb[…]
-
Страница 26
26 Each time th e Repeat ( ) but ton is pr esse d, the mode is changed as fo llows: RE P ON E RE P ALB (MP 3/WMA disc/USB storage de vice only) RE P ALL RE P OFF (Rep eat o f f ) RE P ONE (Re peat o ne) During playback , press the Repeat ( ) but ton onc e. “REP ONE” appears on the display . The track b eing played will be played repeatedly . RE[…]
-
Страница 27
ENGLI SH 27 Shuf f le Pla yback During playback , press the Shuf f le ( ) but ton. “R AN ON” appears on th e display and the tracks /files will be pla yed randomly . < If the / but ton is pr essed during shuff le playback, the nex t track /file will be randomly selected and play ed. If the . but ton i s pressed during sh uf f le playback, th[…]
-
Страница 28
28 1 Press the FUNCTION button repeatedly to select “FM” . 2 Selec t the station you want to listen to. Automatic selec tion Hold down Hold the T UNING button and release it when the automatic tuning process start s. Wh en a station is tuned in, the tuning process will stop automatically . Repeat this step until the station you want to listen t[…]
-
Страница 29
29 ENGLI SH Preset T uning Y o u can store up to 2 0 FM stations. 1 T une in to the station you want to store (pag e 28). 2 Press t he PROG RA M but ton. The preset numb er blink s. 3 Press the Scroll ( ˙ / ¥ ) buttons to select a pres et numb er for st oring t he stat ion. 4 Press t he PROG RA M but ton. The tune d station is stored in the selec[…]
-
Страница 30
30 Y o u can set the unit to turn on at specif ic times. < Adjust the clock be fore setting th e wake up timer (page 1 5) . Setting t he wake up timer 1 If t he unit i s on, pr ess th e ST AND BY /ON ( ) button to turn it off. 2 Press t he TIME R but ton re peate dly unti l “ ALM SET” appears on the display . The clo ck hour value blink s. &[…]
-
Страница 31
31 ENGLI SH If you a have problem with your system, read this page and tr y to solve the problem yourself before calling your dealer or a TE AC service Cent er. Gener al No pow er e Check the connec tion to the A C p ower supply . Che ck whether or not the AC source i s a s witched socket. If it is, confirm that the switch is turned on. e C onf irm[…]
-
Страница 32
32 MP 3 / WMA Cannot play . e Check the MP3 / WMA f ile ex tens ion . This unit recognizes MP3 files by their “ .mp3” , and WMA files by their “ .wma” file extensions. e MP 3/ WMA file data might have been corrupted . e The file dat a format might not be an MP3/ WMA format . e The sampling f requency of th e MP3 file migh t b e other than 4[…]
-
Страница 33
ENGLI SH 33 MP 3 / WMA Pla yback Order MP3 / WMA files on a CD or a US B s torage devic e can be stored in folders in the s ame way that files are managed on a computer . Moreover, multiple folders can b e contained inside anot her fold er . Her e is an exa mple o f the f ile and f olde r struc tu re of an MP3/WM A dis c or a USB sto rage dev ice, […]
-
Страница 34
34 Nous vous remercions d’a voir choisi TEA C. Lisez ce manuel a vec a t tention pour tirer les meilleures per for mance s de cet app arei l. Sommaire A v a n t d ‘ u t i l i s e r l ‘ a p p a r e i l ………………………… 3 5 D i s q u e s ………………………………………. 3 6 S u p p o r t s U S B ……………[…]
-
Страница 35
35 FRAN ÇAI S Contenu de l’ emballage Vé rif iez la présence des acc essoires fournis en standard. T élé comman de (RC-1265) x 1 Pile (CR2025) pour té léco mmand e x 1 Cordon d’ aliment ation x 1 Antenne FM x 1 Câble USB x 1 Mod e d’ em ploi (ce docu ment) x 1 < Conser vez ce livret dans un endroit sûr pour référence ultérie[…]
-
Страница 36
36 Dis ques li sible s par ce t appar eil CD qui por tent le logo “C OMP ACT disc DIGI T AL A UDIO” ( 1 2 cm) . N’utilisez pas de disque de 8 cm avec cet appareil. CD- R et CD -RW qui ont été correctement enregistrés au format CD audio et finalisés. CD- R et CD -RW f inalisés cont enant des fichiers MP3/ WMA . Attention : La lecture d[…]
-
Страница 37
37 FRAN ÇAI S Compatibilité MP 3/WMA Précautions de rangement < Les disques doivent être rangés dans leurs boîtier s après utilisation afin d’ éviter la po ussière et les rayures qui pourr aient provoquer des “sauts” du capteur laser . < N’exp osez pas les disques direc tement au soleil, à une température élevée et à […]
-
Страница 38
38 iPod compatibles iPod 1 re et 2e génération iPod 3e généra tion iPod 4e génération iPod 4e génération (co ul e u r) iPod 5e généra tion (vi dé o) Capacit é 5/ 1 0/20 Go 1 0/1 5/20/ 30/ 40 G o 20/40 G o/U2 20/30/40/ 60 Go/U 2 30/60/80 Go Con nexion a u SR — 1 00i A UX Dock Dock Dock Dock Charge par le SR-1 0 0i Non Non Oui Oui Oui iPo[…]
-
Страница 39
39 FRAN ÇAI S A B C D Prise se cte ur Mém oire f lash US B Racc ordements Lecteur audio portable (Câble op tionnel) A Prises AUX Ces prises transmet tent les signaux audio analo giques à 2 canaux . Branchez un le cteur audio por t able à l’ aide d’un câble mini- jack stéréo- RC A du commerce . A s s u r e z — v o u s d e c o n n e[…]
-
Страница 40
40 D K K J J G I B C F E A H Vu e supérieure Vue a vant Identification des pa r t ies ( unité principale )[…]
-
Страница 41
41 FRAN ÇAI S A Stan dby/ O n ( ) /FUNCTION Utilisez cette touche po ur allumer et éteindre l’ appareil (s ta nd by). Pour éteindre l’ appareil, maintenez enfoncée cette touche plus de 3 secondes. S’il n ‘y a pas d’iPod connec té au dock : e “ECO PWR” s’ af fiche quelques secondes. Pui s l’ app areil s &apos[…]
-
Страница 42
42 a ST ANDBY /ON ( ) Utilisez cette touche po ur met tre l’ appareil en et hor s serv ice . Si l’ unité est éteinte et s’il n ‘y a pas d’iPod connec té au dock : e “ECO PWR” s’ af fiche quelques secondes. Pui s l’ app areil s ‘étein t (se met en veille) et le voyant ST ANDBY s’ allume. Si l&apos[…]
-
Страница 43
43 FRAN ÇAI S g Défilement ( ˙ / ¥ ) En mode CD ou U SB, utili se z ces t ouches pour sélec tionner un dossier (di sque MP3/ WMA et support USB u niq ue me nt). En mode iPod, utilisez ces touches pour f aire défiler le menu. Ces touches on t les m êmes fonctions que la molet te cliquable d’un iPod. En mode F M , utili se z ces t ouches […]
-
Страница 44
44 Boîtier de té lécommande Le boî tier de télécommande fo urni per met la commande à distance de l’appareil. Quand vous uti lisez le boî tier de télécomma nde, pointez-le vers le capt eur de télécommande en res p ec tant u n angle de 60° à l’horizontale et de 20° à la ver ticale par rapp or t à l’avant de l’appare[…]
-
Страница 45
45 FRAN ÇAI S Réglage de l’horloge Réglez l’horloge avant toute autr e op ération. 1 Si l’appareil est en service, appuyez sur la touche ST ANDBY /ON ( ) pour le mett re en vei ll e. 2 Appuyez plusieurs fois sur la touche CLOCK jusq u’à ce que “CLK SET ” s’aff ich e. La valeur des “h eures” clignote . < Si a[…]
-
Страница 46
46 Ce chapitr e dé crit le foncti onnement de base valable d ans tous les modes. 1 Appuyez sur la touche Standby /On ( ) pour allumer l’ appareil. < L ‘appareil s’ allume avec comme s ource la dernière ayant été sélectionné e. 2 Appuyez sur la touche FUNCTION (la même que la touche Standb y/ O n ) plusieurs fois pour sélectio[…]
-
Страница 47
47 FRAN ÇAI S Égaliseur ( correcteur tonal) V ous pouvez af finer le son en fonction du genre de musique ou de v otre goût. Chaque fois que vous appuyez sur la touche PRESET EQ, le réglage d’ é galiseur change comme suit : POP JAZ Z CLASSI C ROCK FLA T (par défaut) < Si vous utilis ez aussi l’égaliseur de votre iPo d ou d’u[…]
-
Страница 48
48 Note pour iP od touch Si vous souhaitez entendre le son de la v idéo d’un iPod touch, c onnec tez d’ ab ord l ‘iPod touch au do ck, puis faites fonctionn er le SR- 1 0 0i et l’iP o d touch. Arrêt temporaire de la lecture ( mode de pause) Pendant la lec ture, appuyez sur la touche Le cture /Pause ( G / J ) . L a lec ture s&a[…]
-
Страница 49
49 FRAN ÇAI S Activation du mode de lecture e n boucle Penda nt la lec ture , appuyez sur la touche de lecture en boucle ( ) pour séle ctionn er le mode de lec ture en boucle. “REP MODE” s ‘aff iche. Chaque foi s que vous appuyez sur la touche de lec ture en boucle ( ), le r é glage de lecture en boucle de l’iP o d change comme sui[…]
-
Страница 50
50 1 Appuyez répétitiv ement sur la touche FUNCTION afin de sélectionner “CD” . < Si aucun disque n’ es t chargé, “NO DISC ” s’aff iche. 2 Insérez un disque avec sa face sérigraphiée vers vou s. Côté sérigraphié Le disque est automatiquement chargé dans le lec teur . Laissez le disque se f aire avaler . La lec ture […]
-
Страница 51
51 FRAN ÇAI S N’utilisez pas de disques durs USB haute capacité. Seule une mémoire flash U SB peut être utilisée. 1 Appuyez répétitiv ement sur la touche FUNCTION afin de sélectionner “USB” . < Si aucun s uppor t USB n ‘est connec té, “NO U SB” s’af f i che . 2 Branc hez vot re supp ort US B au câbl e USB fourni […]
-
Страница 52
52 Arrêt temporaire de la lecture ( mode de pause) Pendant la lec ture, appuyez sur la touche Le cture /Pause ( y / J ). La lec ture s’ arrête à la position ac tuelle. Pour reprendre la lec ture, appuyez de n ouveau sur la touche Lecture /Pause ( y / J ). Arrêt de la lecture Appuyez sur la touche Stop ( H ). Recherche d’un passage de […]
-
Страница 53
53 FRAN ÇAI S Sélec tion d’un dossier ( disque MP3 / WMA ou support USB ) Appuyez sur la t ouche de défilement ( ˙ / ¥ ) p our sauter au dossier s uivant ou précédent. Lecture des int roductions Vous pouvez f aire lire à la suite le début de cha que fichier/ piste . Appuyez sur la touche INT RO pour lancer la lec ture des introduction[…]
-
Страница 54
54 20 fichiers/pistes peu vent être programmés dans l’ordre désiré . 1 Appuyez répétitiv ement sur la touche FUNCTION afin de sélectionner “CD” ou “USB” . 2 Appuye z sur la to uche PRO GR AM alo rs que la lec tu re est a rrêt ée. Exe mple : CD aud io Posi ti on dans le program me Numéro de piste Exe mple : Fic hie r MP3/WM A […]
-
Страница 55
55 FRAN ÇAI S Exe mple : CD aud io Numéro de piste Exe mple : Fic hie r MP3/WM A Numéro de fich ier La fichier ou la piste est pro grammé, et la position suivante dan s le pro gramme (“P- 02”) s’af fiche. < R épétez les étapes 3 et 4 po ur programmer de s fichiers/ pistes supplémen taires. 5 Une fois la sélection de fichiers/pi[…]
-
Страница 56
56 Chaque foi s que vous appuyez sur la touche de lec ture en boucle ( ), le mode change comme suit : RE P ON E RE P ALB (disqu e MP3/WM A ou sup por t USB uniquement) RE P ALL RE P OFF (Répétition hors service ) RE P ONE (l ec tur e en bo ucle d ‘un ti tre) Durant la lec ture, appu yez une fois sur la touche de lec ture en boucle ( ). “R […]
-
Страница 57
57 FRAN ÇAI S Lec ture aléatoire Durant la le c ture, appuye z sur la touche de l ec ture aléatoire ( ). “R AN ON” s’ af f iche et les fichiers / pistes sont lus en ordre aléatoi re. < Si vous appuyez sur la touche / durant la lec ture aléatoire, le pro chain f ichie r/ pis te lu s era ch oisi aléatoi rement . Si la t ouche . est […]
-
Страница 58
58 1 Appuyez répétitiv ement sur la touche FUNCTION afin de sélectionner “FM” . 2 Sélectionnez la station que v ous souhaitez écouter . Sélect ion automatique Maintenez enfoncée Maintenez enfoncée la touche TUNING et relâchez-la quand le processus de sy nt o nisation automatique a démarré. Quand une station est trouvée, le processus[…]
-
Страница 59
59 FRAN ÇAI S S yntonisat ion préréglée (preset ) Vou s p ouvez mémoriser un ma ximum de 20 stations F M . 1 Réglez la station que v o us souhaitez mémoriser (pag e 58). 2 Appuye z sur la to uche PROG R AM. Le numé ro de preset ( mémoire de préréglage ) clignote. 3 Appuye z sur le s touch es de dé fil eme nt ( ˙ / ¥ ) pour sélectionn[…]
-
Страница 60
60 Vou s p ouvez régler des heures spécifiques de mise en ser vice de l’ appareil. < Réglez l’horlog e avant de r é gler le réveil (page 4 5). Réglage de l’heure de rév eil 1 Si l’appareil est en service, appuyez sur la touche ST ANDBY /ON ( ) pour le mett re en vei ll e. 2 Appuyez plusieurs fois sur la touche TIMER ju[…]
-
Страница 61
61 FRAN ÇAI S Si vous av e z des problèmes avec votre système, lisez cette page et essayez de résoudr e vous-même le problème avant d’ app eler votre revendeur ou un service après-vente TEA C. Généralités Pas d’ alimentation e V érif iez le bran chement à l’ alim entation sec teur . Vérifiez si la source de courant est une […]
-
Страница 62
62 MP 3 / WMA Lecture impossible. e V érifiez l’extension de fichier MP 3/WMA . Cet appare il reconnaît les fichier s MP3 par leur extension de fichier “ .mp3” et les fichiers WMA par leur ex tension de fichier “. w m a ”. e L es donn ées du fichier MP3/WMA so nt peut — être endommagées. e L e format de données du fichier n &apos[…]
-
Страница 63
63 FRAN ÇAI S Ordre de lec ture d’un disque MP 3/WMA Les fichiers MP3/WMA d’un CD ou d’un support USB peuvent être rangés dans des dossiers de la même façon que les fichiers d’un ordinateur . De p lus, un dossier peut con teni r lui-même pl usieu rs dossi ers. V oici un exemple de struc ture de fichiers et de dossiers dans[…]
-
Страница 64
64 Gracia s por el egir TE A C . Lea e ste manua l atentamente para obtener el mejor rendimiento de esta unidad. Índice A n t e s d e u t i l i z a r l a u n i d a d ………………………. 6 5 D i s c o s ………………………………………… 6 6 Dispositivos de almacenamiento US B …………….. 6 7 C o m p a t i b i l i d a d[…]
-
Страница 65
65 ESP AÑOL Qué hay en la ca ja Confirme los accesorios suministrados de serie. Man do a dist anci a (RC-1265) x 1 Pila (CR2025) para el m ando a di stan cia x 1 Cable de co rriente x 1 Antena de FM x 1 Cable USB x 1 Manua l del usu ario (este docu mento) x 1 < G uarde este manual en un lugar seguro par a futur as cons ult as . T arjet a de ga[…]
-
Страница 66
66 Disc os que pue den se r rep rodu cidos e n est a unida d: CDs que lleven el logo “COMP ACT disc DIGI T AL A UDIO” ( 1 2 cm) . No utilice discos de 8 cm con esta unidad. Discos CD-R y CD -RW que hayan sido correc tamente grabados en formato CD Audio y finalizados. Discos CD- R y CD -RW f inalizad os que contengan archivos MP3 / WM A. Prec au[…]
-
Страница 67
67 ESP AÑOL Compatibilidad MP 3/WMA Precauciones de almacenamiento < Los discos deben guardars e en su caja después d e usarlos, para ev itar polvo y ar añazos que pueden provocar que el lector láser “salte” . < N o exponga los discos direc tamente a la luz del sol, ni a altas temperaturas ni a hume dad durante mucho tiempo. La e xpos[…]
-
Страница 68
68 Compatible con iP od iPod 1 ª + 2ª gen eración iPod 3ª generac ión iPod 4ª generac ión iPod 4ª generac ión (co l o r) iPod 5ª generación (ví de o) Cap aci dad 5/ 10/20G B 1 0/1 5/20/ 30/ 40 GB 20/ 4 0 G/ U2 20/30/40/60GB/ U2 30/60/80 GB Con exión al SR- 1 00i A UX base Dock ba se Dock base Dock base Dock Carga a tr avés SR- 1 0 0i […]
-
Страница 69
69 ESP AÑOL A B C D T oma de electricidad Mem oria fl ash USB Conexiones Reproductor de audio po rtát il (Cable opcional) A T e rminales A UX Estos terminales transmiten una señal de au dio analógico de 2 canales. Conec te un reproduc tor de audio por tátil usando un cable de tip o RC A /mini-jack estéreo de los que se venden en el mercado. A[…]
-
Страница 70
70 D K K J J G I B C F E A H Par te sup erio r Fro n t al Identificación de las partes ( unidad principal )[…]
-
Страница 71
71 ESP AÑOL A Reposo/ encendido ( ) /FUNCTION Use este botón para encender y apagar (r ep oso) la unidad. Para apagar la unidad, mantenga pulsado es te botón durante más de 3 segundos. Cuando no hay un iP od cone ctado a la b ase Dock : e “ EC O PW R” apare ce en la pantalla durante unos segundos . Después la unidad se apaga (se p one en r[…]
-
Страница 72
72 a ST ANDBY /ON ( ) Use este botón para encender y apagar la unidad. Cuando se apaga la unidad y n o hay un iPod conec tado a la base Do ck: e “ EC O PW R” apare ce en la pantalla durante unos segundos . Después la unidad se apaga (se p one en reposo) y se ilumina el indicador ST ANDBY . Cuando se apaga la unidad y n o hay un iPod conec tad[…]
-
Страница 73
73 ESP AÑOL g Desplazamiento ( ˙ / ¥ ) En modo CD o US B, use es tos botones para seleccionar una carpeta (discos MP 3/ WMA y dispositivos de almacenamiento U SB solamente) . En modo iPod, utilice estos botones para desplaz arse hacia arriba y hacia abajo po r un menú. Estos botones tienen las mismas funciones que la rue da de clic de un iPod. […]
-
Страница 74
74 Mando a distancia El mando a distancia suministrado per mite manejar la unidad desd e la distancia. Cuando uti lice el mando a distancia, oriént elo hacia el sensor de con trol remot o de ntro de un rango de 60 ° horizontalmente y 2 0 ° ver ticalmente del panel frontal de la unidad princip al. < Incluso aunque el mando a distancia se utili[…]
-
Страница 75
75 ESP AÑOL Aj uste del reloj Ajuste el reloj ant es de hacer ninguna otra operación . 1 Si la unidad está encendida, pulse el botón ST ANDBY /ON ( ) para apagarla. 2 Pulse e l botó n CLOCK repe tid amente h asta qu e apar ezca e n la pant alla “CLK SE T” . El valor de las horas parpadea. < Si no se pulsa ningún b otón durant e 30 se […]
-
Страница 76
76 Este capítulo de scribe el fun cionamiento y o peracion es básicas disponibles en c ada modo. 1 Pulse el botón de Reposo/Encendido ( ) para encender la unidad. < La unida d se enciende con la fuente de sonido que estuviese sele ccionada la última v e z. 2 Pulse el botón F UNCTIO N ( el mismo que el botón de Reposo /Ence ndido) repetidam[…]
-
Страница 77
77 ESP AÑOL Ecualizador Usted puede aju s tar el sonido de acuerdo a l género de música o a sus gustos personales. Cada vez que s e pulsa el botón PRESET EQ , el botón cambi a como s igue: POP JAZ Z CLASSI C ROCK FLAT (pla no, po r def ec to) < Si también está utilizando algún ajuste del ecualizador en su iPod u otr o reproduc tor de aud[…]
-
Страница 78
78 Nota para iPod touch Si quier e oír el sonido del vídeo de un iPod touch, conec te primero el iP o d touch a la base Dock y después opere con el SR- 1 0 0i y el iPod touch. Detener la reproducc ión temporalmente ( modo de Pausa ) Durante la re producción, pulse el botón de Reproducc ión/ Pausa ( G / J ). La reproducción se detiene en la […]
-
Страница 79
79 ESP AÑOL Activar el modo de repetición Durante la repr o ducción, pul se el b otón de Repetición ( ) para selecciona r el mo do de repetición. “REP MODE” aparece en la pantalla. Cada vez que se p ulsa el botón de Repetición ( ), e l ajuste de repetición para el iPod cambia como sigue: Repeat one Repeat all desactivada < Si selecc[…]
-
Страница 80
80 1 Pulse el botón FUNCTION repetidamente par a seleccionar “C D ” . < Si no hay ningún disco cargado, “NO DISC” aparecerá en la pantalla. 2 Introduzca un disco con la car a de la etiqueta impr esa mi rando hac ia uste d. Cara de la etiqueta impresa El disco se carg a automáticamente en el repr o ductor. Deje que el disco en tre cua[…]
-
Страница 81
81 ESP AÑOL No utilice discos duros U S B de alta capacidad. Solamente se pueden usar tarjetas de memoria flas h US B. 1 Pulse el botón FUNCTION repetidamente par a seleccionar “USB” . < Si no hay ningún disp ositivo de almacenamiento U SB conec tado, “NO USB” aparecerá en la pantalla. 2 Conecte su dispositivo de almacenamiento USB a[…]
-
Страница 82
82 Detener la reproducc ión temporalmente ( modo de Pausa ) Durante la re producción, pulse el botón de Reproducc ión/ Pausa ( y / J ). La reproducción se detiene en la posición actual. Para reanudar la r eproducción, pulse de nuevo el botón de Reproducc ión /Pausa ( y / J ). Detener la reproducc ión Pulse el botón de Pa r ada ( H ). Bus[…]
-
Страница 83
83 ESP AÑOL Seleccionar una carpeta (Discos MP 3 / WMA o dispositivos de almacenamiento USB ) Pulse los botones de Despla zamiento ( ˙ / ¥ ) para saltar a la carp eta siguiente o an terior. Reproducción de introducc iones Usted puede repr o ducir el pri ncipio de cada pista/ar chivo consecutivament e. Pulse el botón INTRO para comenz ar la rep[…]
-
Страница 84
84 Es posible pro gramar hasta un total de 20 pistas/ar chivos en el orden deseado. 1 Pulse el botón FUNCTION repetidamente par a seleccionar “C D” o “USB” . 2 Pulse e l botó n PROGR AM con l a repr oducc ión detenida. Ejempl o: CD de audio Número de programa Número de pista Ejemplo: Archivos MP 3/WMA Número de carpeta Número de arch[…]
-
Страница 85
85 ESP AÑOL Ejempl o: CD de audio Número de pista Ejemplo: Archivos MP 3/WMA Número de archivo L a p i s t a / a r c h i v o y a e s t á p r o g r a m a d a y e l n ú m e r o d e programa (“P- 01 ” ) apare ce en la pantalla. < Repita los pasos 3 y 4 para prog ramar má s pistas/ archivos. 5 Cuando ha ya terminado de seleccionar números[…]
-
Страница 86
86 Cada vez que se p ulsa el botón de Repetición ( ), e l modo cambi a como sig ue: RE P ON E RE P ALB (Sola ment e disc os MP3/ WMA o dispositivos de almacenamiento USB) RE P ALL RE P OFF (Repetición desactivada) REP ONE ( Repetir una ) Durante la repr o ducción, pul s e una vez el botón de Repetición ( ). “REP ONE” aparecerá en la pant[…]
-
Страница 87
87 ESP AÑOL Reproducción aleatoria Durante la re producción, pulse el botón de Reproducc ión Aleatoria ( ). “R AN ON” apare cerá en la pantalla y las pist as/ar chivos se reproducirán al azar . < Si se pu lsa el botón / du rante la r eproducc ión aleatoria, la siguiente pista/archivo será sel eccionada al azar y s e reproducirá. S[…]
-
Страница 88
88 1 Pulse el botón FUNCTION repetidamente par a seleccionar “F M” . 2 Sel eccio ne la em isora qu e dese e escu char. Sele cción automát ica Mantener pulsado Mantenga pul sado el b otón TUNING y suéltelo cuando comienc e el proceso de sin tonización automática. Cuando se si ntonice una emi s ora, el proceso se detendrá aut omáticament[…]
-
Страница 89
89 ESP AÑOL Sintonización de presintonías Usted puede almacenar hasta un total de 20 emisoras de FM . 1 Sintonice la emisora que desee almacenar (pág ina 8 8). 2 Pulse e l botó n PROGR AM . El número de p resint o nía parp adea. 3 Pulse los botones de Desplazamiento ( ˙ / ¥ ) para seleccionar un número de presintonía para almacenar la em[…]
-
Страница 90
90 Usted pued e configurar la unidad par a que se encienda a una hora determin ada. < Aju s te el reloj an tes de ajustar el temporiz ador desper tador (página 7 5) . Ajustar el temporizador despertador 1 Si la unidad está encendida, pulse el botón ST ANDBY /ON ( ) para apagarla. 2 Pulse e l botón TI ME R repe tida mente has ta que “ ALM S[…]
-
Страница 91
91 ESP AÑOL Si tiene problemas con su equipo, lea esta página e intent e resolver el problema us ted mismo antes de llamar a su distribuidor o a un ser vicio técnico TE AC. Gener al No hay corriente e C ompr uebe la conexión a la corriente. Compruebe si la toma de corriente es un enchufe c on un interruptor . Si lo es, confirme que el interrupt[…]
-
Страница 92
92 MP 3 / WMA No se puede reproducir. e C o m p r u e b e l a e x t e n s i ó n d e a r c h i v o M P 3 / W M A . E s t a unidad reconoce los archivos MP3 por su ex tens ión “ .mp3” y los archivos WMA por su ex tensión “ .wma” . e L os datos del archivo MP 3/ WMA po drían haberse roto. e El forma to de los datos del archivo podría no s[…]
-
Страница 93
93 ESP AÑOL Orden de reproducción MP3 / WMA Los archivos MP 3/ WMA de un CD o de un dispositivo de almacenamiento U SB pueden alma cenarse en carp etas de la misma manera que se manejan en un ordenador . Es más, una carp eta pued e a su vez cont ener múltip les carpet as. A continuación un e jemplo de la estructura de arch ivos y carp etas d e[…]
-
Страница 94
94[…]
-
Страница 95
95[…]
-
Страница 96
Z 0710 . MA-1587B This appliance has a serial number located on the rear panel. Please r ecord the serial number and retain it for your r ecords. Mode l name: SR- 1 0 0i Serial numb er TEAC C ORPORA TION 1-47 Ochiai, T ama-shi, T okyo 206-8530 Japan Phone: (042) 356-9156 TEAC AMERICA, INC. 7733 T elegraph Road, Montebello, California 90640 U .S.A. […]
При первом же взгляде на TEAC SR-100i в голову невольно приходят разные сравнения: кому-то она напоминает треуголку Бонапарта, а кому-то – знаменитый В&W Zeppelin. Так или иначе, система довольно крупная: чем таскать ее из комнаты в комнату, лучше сразу подобрать ей место.
При первом же взгляде на TEAC SR-100i в голову невольно приходят разные сравнения: кому-то она напоминает треуголку Бонапарта, а кому-то – знаменитый В&W Zeppelin. Так или иначе, система довольно крупная: чем таскать ее из комнаты в комнату, лучше сразу подобрать ей место.

Фото — gooddigitalshop.com
Док для iPod у TEAC сразу и не заметишь: он скромно прячется под нижней гранью и выдвигается при необходимости – не пылится и не мозолит глаза обладателям плееров других марок. Кстати, любой другой плеер также можно сделать источником звука, подключив его через линейный вход, правда управлять им с пульта ДУ не получится. Музыку можно запустить и с флэшки – сзади имеется вход мини-USB, а в комплекте есть соответствующий шнур-переходник. Качество звучания во всех случаях не вызывает нареканий. В Air on a G-Sring с диска Бранденбургских концертов Баха в исполнении Жака Лусье микросистема демонстрирует хорошие динамику и разрешение: контрабас выпукло выделяется на фортепианном фоне. FM-радио принимается уверенно и чисто, вот только автопоиск тащится по частотам довольно медленно, к счастью, любимые станции можно раз и навсегда сохранить в памяти.

Динамики направлены немного вверх: это помогает избежать отражений звука от поверхности, на которой стоит устройство
В отличие от многих док-станций TEAC проигрывает и CD (в том числе болванки с MP3 и WMA). Задвигаем в вертикальный щелевой загрузчик The Massacre 50 Сent – кажется, под SR-100i даже стол закачался: басы она выдает полновесные и четкие. К счастью, TEAC умеет не только грохотать: шепчущий голос Джейн Биркин с Enfants d’hiver, сопровождаемый таким же негромким аккомпанементом, завораживает, и даже на небольшой громкости все можно прекрасно расслышать, особенно если активизировать тонкомпенсацию (кнопка Loudness).

TEAC – продукт, который можно смело поставить не только на кухню или в спальню, в гостиной SR-100i вполне заменит хорошую микросистему.
Цена: $550
За: Напористое, но не раздражающее звучание с полновесным басом
Против: При изменении громкости иногда на мгновение прерывается звук
Вердикт: Интригующе смотрится, увлекательно звучит, да и стоит дешевле известных прообразов
Языком цифр:
- Носители CD, CD-R/RW
- Мощность 50 Вт
- Входы RCA, USB (mini)
- Форматы файлов MP3, WMA
- Габариты (ВхШхГ) 23×57×22 мм
- Вес 5,4 кг
Подпишитесь на наши новости: