
When you have finished using the mincer, introduce a few pieces of bread to push out the last remaining pieces of meat.
Wash the grille and the blade in soapy water, rinse and carefully dry right away. Coat them with cooking oil to keep them lubricated.
Yes, but you must follow the instructions in your user manual to find out how to dismantle it correctly and which parts you can put in the dishwasher.
• Clean the mincer using a damp cloth.
• You can wash the mincer head, perforated plate, blade and accessories with soapy water. Do not wash them in the dishwasher.
• Grease the perforated plate and the blade with cooking oil to keep them lubricated.
• The meat must be cut into pieces of approximately 2cm.
• Make sure there are no bones, cartilage or nerves in the pieces of meat.
• Check the state of wear of the perforated plate and the blade.
• Check that the blade is mounted in the correct orientation on the screw.
After following the instructions in the user manual for starting the appliance, make sure that your electrical socket is working by plugging another appliance. If it still does not work, do not try to dismantle or repair the appliance yourself, instead, take it to an approved repair centre
Do not use your appliance. To avoid any danger, have it replaced by an approved repair centre.
Your appliance contains valuable materials which can be recovered or recycled. Leave it at a local civic waste collection point.
Please go to the “Accessories” section of the website to easily find whatever you need for your product.
Find more detailed information in the Guarantee section of this website.
If you believe that one part is missing, please call Consumer Services Center and we will help you find a suitable solution.
Ref. 2 642 146/A
F
GB
D
DK
S
N
FIN
TR
GR
ARA
IR
p. 1 — 5
p. 6 — 10
p. 11 — 15
p. 16 — 20
p. 21 — 25
p. 26 — 30
p. 31 — 35
p. 36 — 42
p. 43 — 47
p. 48 — 52
p. 53 — 57
LE HACHOIR 1700 F
GB
D
DK
S
N
FIN
TR
GR
ARA
IR
www.tefal.com
couv_3_volets:Mise en page 1 10/12/09 8:16 Page 1
2
1
3
4
5
6
7
8
9 10
11
12
couv_3_volets:Mise en page 1 10/12/09 8:16 Page 4
1
Utilisation Avant la premire utilisation, lavez tous les accessoires avec de leau savonneuse et essuyez-les soigneusement. La grille et le couteau doivent rester gras. Enduisez les dhuile. Ne faites pas tourner vide si les grilles ne sont pas graisses.
1. 2. 3. 4. 5. 6.
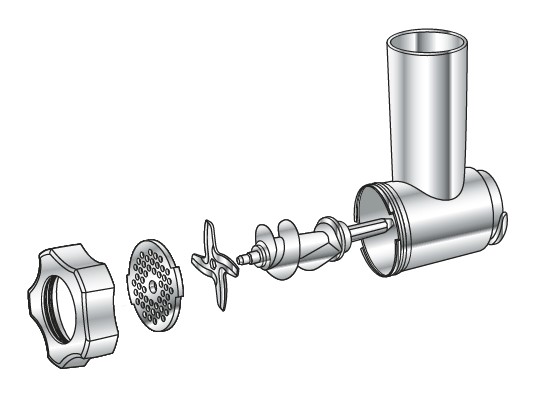
Bloc moteur Poussoir Plateau de remplissage Bouton pour dverrouiller le bloc de hachage Bloc de hachage Vis
7. 8. 9. 10. 11. 12.
Couteau Grilles Ecrou Tube saucisses Accessoire Kb Porte
Consignes de scurit
Cet appareil est conforme aux rgles techniques et aux normes en vigueur. Il est conu pour fonctionner uniquement en courant alternatif. Nous vous demandons avant la premire utilisation de vrifier que la tension du rseau correspond bien celle indique sur la plaque signaltique de lappareil.
Ne pas poser, ni utiliser cet appareil sur une plaque chaude ou proximit dune flamme (cuisinire gaz). Nutilisez le produit que sur un plan de travail stable labri des projections deau. Ne le retournez pas. Lappareil doit tre dbranch :
— sil y a anomalie pendant le fonctionnement, — avant chaque nettoyage ou entretien, — aprs utilisation ou sil est laiss sans surveillance, — chaque changement daccessoire.
Ne jamais dbrancher lappareil en tirant sur le cordon. Nutilisez un prolongateur quaprs avoir vrifi que celui-ci est en parfait tat. Un appareil lectromnager ne doit pas tre utilis :
— sil est tomb par terre, — si le couteau est dtrior ou incomplet.
Si le cble dalimentation est endommag, il doit tre remplac par le fabricant, son service aprs-vente ou une personne de qualification similaire afin dviter un danger.
Le produit a t conu pour un usage domestique, il ne doit en aucun cas tre lobjet dune utilisation professionnelle pour laquelle nous nengageons ni notre garantie ni notre responsabilit.
Ne poussez pas la viande avec les doigts. Utilisez toujours le poussoir. Cet appareil n’est pas prvu pour tre utilis par des personnes (y compris les enfants) dont les capacits physiques, sensorielles ou mentales sont rduites, ou des personnes dnues d’exprience ou de connaissance, sauf si elles ont pu bnficier, par l’intermdiaire d’une personne responsable de leur scurit, d’une surveillance ou d’instructions pralables concernant l’utilisation de l’appareil.
Il convient de surveiller les enfants pour s’assurer qu’ils ne jouent pas avec l’appareil.
Description
F
2
En cas dengorgement : Arrtez le hachoir en mettant linterrupteur sur la position 0. Ouvrez la porte de rangement des accessoires. Appuyez quelques secondes sur linterrupteur reverse afin de dgager les aliments. Mettez ensuite en marche en appuyant sur linterrupteur principal pour terminer le hachage aprs avoir referm la porte.
IMPORTANT : Attendez larrt complet de lappareil avant dactionner les interrupteurs.
Montage du bloc de hachage
Introduisez la vis (6) (axe long en premier) dans le bloc de hachage (5). Positionnez le couteau (7) sur laxe court de la vis en mettant les artes tranchantes vers lextrieur, ct grille. Placez la grille choisie (8) sur le couteau en faisant correpondre les deux ergots avec les deux encoches du bloc. Vissez lcrou (9) fond sans bloquer. Vrifiez le montage. Laxe ne doit avoir ni jeu, ni tre bloqu en rotation. Dans le cas contraire, recommencez les oprations de montage.
Montage du bloc sur le produit
Le produit doit tre dbranch. Inclinez le bloc de hachage vers la droite. Engagez fond le bloc de hachage dans le bloc moteur et tournez le bloc vers la gauche, engagez ensuite le plateau . Fermez la porte. Branchez le produit.
Hachage
Prparez les ingrdients hacher en ayant pralablement reirer les os, le cartilage et les nerfs. Coupez la viande en morceaux (environ 2X 2 cm) et placez-les sur le plateau. Pour une efficacit maxiumum, dcoupez les morceaux de dimensions infrieures la chemine. Mettez un rcipient sous le bloc de hachage. Positionnez linterrupteur situ sur larrire du produit sur I. Introduisez lesmorceaux de viande dans le bloc de hachage et poussez avec le poussoir (2) si ncessaire. Ne poussez jamais avec les doigts.
Nutilisez pas votre appareil plus de 14 min.
I
6
5
7
8
9
7
F
3
Nota : Certaines recettes ncessitent une forte puissance (environ 800 W). Pour ces recettes, ne pas dpasser un temps dutilisation de 30 secondes.
Exemple : Pure de pois casss au lard ou au mouton. Ingrdients : 100 g de lard ou de mouton — 150 g de pois casss crus — 100 g de farine — 50 g deau — 20 g
dail — sel — poivre — huile dolive.
Mlangez dans un rcipient les pois casss et la farine puis incorporez leau progressivement jusqu lobtention dun mlange uniforme. Mettez le tout sur le plateau du hachoir. Mettez votre appareil en marche et poussez progressivement le mlange dans la goulotte laide du poussoir. Introduisez ensuite le lard ou le mouton coup en morceaux de 2 cm x 2 cm avec lail. Versez ce mlange dans un faitout contenant 1,5 litre deau. Mlangez et laissez cuire entre 20 et 30 minutes. Aprs cuisson rajoutez 1/2 verre dhuile dolive et mixez le tout .
«Le hachoir» est protg par un fusible mcanique intgr sur l’axe de la vis (6). Respectez les indications de dcoupe des aliments avant lutilisation du hachoir afin d’viter une surcharge anormale ou un blocage accidentel.
Dmontage
Eteignez et dbranchez lappareil aprs utilisation.
Appuyez sur le bouton de dverrouillage (4) situ sur la face avant de lappareil. Tournez le bloc de hachage vers la droite. Dgagez le bloc compltement en le retirant. Dvissez lcrou du bloc de hachage et retirez les accessoires en poussant sur laxe. Dbranchez lappareil avant chaque nettoyage et avant denlever les divers accessoires. Ne plongez jamais le bloc moteur dans leau. Nettoyez-le avec un chiffon humide. Toutes les autres pices peuvent tre nettoyes leau chaude en utilisant un dtergent vaissellle. Nutilisez jamais de produits abrasifs. Le couteau et les grilles du hachoir viande ne sont pas inoxydables. Il est recommand de les graisser avec de lhuile de table aprs chaque nettoyage. Ne mettez pas la «tte-hachoir» au lave-vaisselle , c’est—dire le bloc de hachage (5), la vis (6), le couteau (7), les grilles (8) et l’crou (9) .
Rangement
Les accessoires peuvent se ranger dans les logements prvus cet effet sous la porte arrire de lappareil. Le cordon peut se loger sous lappareil.
F
4
ACCESSOIRE COULIS ET JUS
Cet accessoire sutilise pour la ralisation de coulis (fruits rouges, tomates) et de jus (pommes, poires, oranges, etc.). Il sadapte sur le bloc de hachage (5).
Montage : Mettez en place le bloc de hachage (5) sur le bloc moteur (1) en vrifiant la prsence du joint dtanchit (E). Mettez en place la vis (A) dans le bloc de hachage (5). Positionnez le filtre choisi en fonction de votre prparation :
— (B), filtre trous mixtes, pour les coulis — ou (C), filtre petits trous, pour les jus.
Vissez lcrou sur le bloc de hachage (5). Positionnez le guide jus (D) sous le filtre mis en place (B ou C).
TUBE SAUCISSES
Cet accessoire sutilise sans grille ni couteau. Il sadapte sur le bloc de hachage et permet de fabriquer facilement de la saucisse.
Montage : Mettez en place la vis dans le bloc. Positionnez le tube saucisses. Vissez lcrou. Montez le bloc sur le produit.
Utilisation : Prparez le hachis et lassaisonnement selon votre got. Faites tremper le boyau dans de leau tide afin quil retrouve son lasticit puis enfilez-le sur le tube (10). Mettez le hachis sur le plateau, mettez lappareil enmarche et appuyez avec le poussoir de faon amener le hachis jusqu lextrmit du tube. Arrtez lappareil et faites un noeud sur le boyau. Remettez enmarche et continuez en poussant le hachis avec le poussoir.
ACCESSOIRE KB
Cet accessoire sutilise sans grille ni couteau. Il sadapte sur le corps de hachage et permet de former un mlange (viande dagneau + boulgour) sous forme de tube. Les tubes obtenus sont coups en courts tronons et garnis dun mlange de viande hach, les extrmits sont pinces. Ces boulettes sont frites.
Montage : idem tube saucisses.
Accessoires supplmentairesF
5
D
A
BC
5
E
F
Utilisation :
Coulis : Utilisez le filtre (B) qui possde 2 diamtres de trous de filtration pour une meilleure extraction. Pour la ralisation des coulis, il est impratif de nutiliser que des fruits frais. Suivant la saison et la qualit des fruits il est conseill de repasser une deuxime fois la pulpe pour extraire le maximum de coulis.
Jus : Utilisez le filtre (C) qui possde un seul diamtre de trou de filtration. Placez un rcipient pour rcuprer le jus sous le guide jus (D) et un autre en bout du filtre (B ou C) pour rcuprer les dchets.
Une fois les accessoires en place, utilisez votre appareil comme habituellement.
Nettoyage :
Toutes les pices doivent tre nettoyes leau chaude sous le robinet en utilisant un dtergent vaisselle. Ne jamais utiliser de produits abrasifs. Les grilles se nettoient facilement laide de la brosse (F) (type goupillon).
ATTENTION : Les pices ne doivent pas tre nettoyes au lave-vaisselle.
Produit lectrique ou lectronique en fin de vie
Participons la protection de lenvironnement !
Votre appareil contient de nombreux matriaux valorisables ou recyclables.
Confiez celui-ci un point de collecte ou dfaut, un autre centre de service agr pour que son traitement soit effectu.
F
6
Use
Before using for the first time, wash all accessories with soapy water and wipe dry carefully. The grill and the knife need to be kept oiled. Coat them with oil. Do not use your appliance empty, if the grill and the knife are not oiled.
1.
2.
3.
4.
5.
6.
Motor unit
Pusher
Feeder tray
Button to unlock chopping unit
Chopping unit
Screw
7.
8.
9.
10.
11.
12.
Blade
Grids
Nut
Funnel for sausages
Kebb mincing tool
Accessory storage cover
Safety instructions
This appliance complies with applicable technical rules and standards at time of manufacture.
It is designed to run only on alternating current. Please check before first use that the mains power supply
corresponds to that indicated on the appliance’s rating plate.
Do not place or use this appliance on a hot plate or close to a flame (gas cooker).
Only use the appliance on a flat stable heat resistant working surface away from water being splashed. Do
not turn it upside down.
Unplug the appliance:
— if it is not working correctly,
— before cleaning or maintenance,
— after use or if it has been left unattended,
— on each accessory change.
Never pull the power cord to unplug the appliance.
Before using an extension lead, always first make sure it is in good condition.
You must not use a household electrical appliance if:
— it has been dropped,
— the blade is damaged or incomplete.
If the power supply cord is damaged, it must be replaced by the manufacturer, the manufacturers
authorised Service Dealer, or a person with similar qualification, to avoid any risk of danger.
This product is designed for domestic use only. Any commercial use, inappropriate use or failure to comply
with the instructions, the manufacturer accepts no responsibility and the guarantee will not apply.
Do not use your fingers to push meat into the grinding unit. Always use the pusher.
This appliance is not intended for use by persons (including children) with reduced physical, sensory or
mental capabilities, or lack of experience and knowledge, unless they have been given supervision or
instruction concerning use of the appliance by a person responsible for their safety. Children should be
supervised to ensure that they do not play with the appliance.
Description
Thank you for choosing to purchase a Tefal Meat Mincer, to obtain the maximum benefits from your new
appliance, please read through the following instructions carefully before using.
GB
7
If clogging occurs:
Set the switch to the 0 position to stop the chopping unit.
Open the accessory storage door.
Press the reverse switch to release the food and then close the door
and start again using the main switch to finish chopping.
IMPORTANT: Wait for the appliance to come to a complete stop
before pressing switches.
Assembling the chopping unit
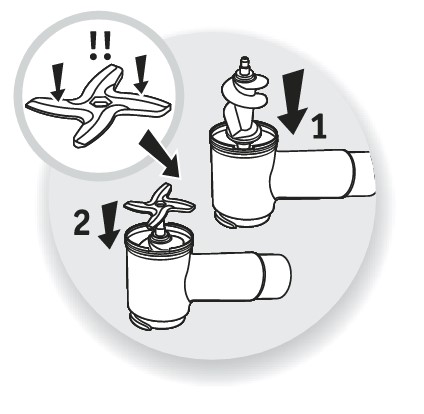
Introduce the screw (6) (long shaft first) into the chopping unit (5).
Position the blade (7) on the short shaft of the screw setting the cutting
edges facing outside on the grid side.
Place the selected grid (8) on the blade and slot the two lugs into the
two slots of the unit.
Screw in the nut (9) fully without sticking.
Check assembly. The axis must neither be loose nor stick in rotation.
If loose or stuck, repeat assembly operations.
Fitting the chopping unit on the appliance
Make sure the appliance is switched off at the mains or unplugged.
Tilt the chopping unit to the right.
Fully engage the chopping unit into the motor unit and turn to the left,
then engage the tray.
Close the door.
Plug in the appliance.
Chopping
Prepare the ingredients to be chopped, first removing bones, cartilage
and sinews.
Cut the meat into pieces (about 2×2 cm) and place them on the feeder
tray.
For maximum efficiency, cut the pieces to a smaller size than the
funnel.
Put a bowl under the chopping unit.
Set the switch on the rear of the appliance to I.
Introduce the pieces of meat into the chopping unit and push in using
the pusher (2) if necessary. Never push using your fingers.
Do not use your appliance for more than 14 minutes at a time.
I
6
5
7
8
9
7
GB
8
Note : Some recipes require high power (about 800 W). For such recipes, do not operate for more than
30 seconds at a time.
Example: Pure of split peas with beef bacon or lamb.
Ingredients: 100 g of beef bacon or lamb — 150 g raw split peas — 100 g flour — 50 ml water — 20 g garlic — salt —
pepper olive oil.
Mix the split peas and flour in a bowl then gradually blend with water to obtain a uniform mix.
Put this mixture into the chopping unit feeder tray.
Start the appliance and gradually push the mix into the tube using the pusher.
Then introduce the beef bacon or lamb cut into pieces 2 cm x 2 cm with the garlic.
Pour this mixture into a stewpot containing 1.5 litres of water. Mix and leave to cook for about 20 to 30 min.
Mix all the ingredients together after cooking and add 5 cl of olive oil.
The chopping unit is protected by a mechanical fuse built into the axis of the screw (6). Read the instructions
for chopping different types of food before using the chopping unit to avoid overloading or clogging.
Dismantling your appliance
Switch off and unplug the appliance after use.
Press the release button (4) located on the front panel of the appliance.
Turn the chopping unit to the right.
Fully release the unit and pull out.
Unscrew the nut from the chopping unit and remove the accessories by pushing on the axis.
Unplug the appliance before cleaning and before removing the various accessories.
Never immerse the motor unit in water. Clean it using a damp cloth.
All other parts can be washed in hot water using washing up liquid. Never use scouring products.
The blade and chopping unit grids are not stainless steel. You are advised to coat them with cooking oil
after each cleaning.
Do not put the chopping head (including the chopping unit (5), screw (6), blade (7), the grid (8) and nut (9)
into the dishwasher
Storage
Store the accessories in the recesse provided under the accessory storage door of the appliance. You can wind
the cord round underneath the appliance.
GB
9
PUREE AND JUICE ACCESSORY
This accessory is used to make pures (soft fruit, tomatoes) and juices (apples, pears, oranges, etc.).
It fits onto the chopping unit (5).
Assembly:
Install the chopping unit (5) on the motor unit (1 making sure that the seal (E) is in place.).
Insert the screw (A) into the chopping unit (5).
Position the appropriate filter for your preparation: — (B), variable-hole filter, for pures, — or (C), small-hole filter, for juices.
Screw the screw into the chopping unit (5).
Position the juice guide (D) under the installed filter (B or C).
SAUSAGE FUNNEL
Use this accessory without the grid or blade. Fit it to the chopping
unit for easy sausage making.
Assembly: Fit the screw to the unit.
Position the sausage funnel.
Screw in the nut.
Assemble the unit on the appliance.
Use : Prepare the sausage meat and season to taste.
Soak the casing in water so it regains elasticity then thread it onto the tube (10).
Put the sausage meat into the feeder tray, start up the appliance and press the meat down using the pusher
to keep it feeding towards the end of the tube.
Stop the appliance and make a knot in the casing to seal.
Start up again and continue pushing the sausage meat with the pusher.
KEBBE ACCESSORY
Use this accessory without the grid or blade. It adapts to the
chopping unit so you can prepare mixes (e.g., lamb + bulgur wheat)
in a tube shape. Cut the tubes obtained into short sections garnished
with a mixture of minced meat and pinch the ends. Fry the meat balls
obtained
Assembly : same as with sausage tube.
Additional accessories
GB
10
D
A
BC
5
E
F
Use:
Pure : Use filter (B) which has 2 filtration hole diameters for better extraction. Only fresh fruit should be used when making a pure. Depending on the season and the quality of the fruit, the pulp should be filtered a second time to extract as much pure as possible.
Juice: Use filter (C) which has a single filtration hole diameter. Place one receptacle under the juice guide (D) to catch the juice and another at the end of the filter (B or C) to catch waste.
Once the accessories are installed, your appliance can be used as usual.
Cleaning: All parts should be cleaned with hot water under the tap using washing up liquid. Never use abrasive
products.The filters are easy to clean, using the brush (F) supplied (bottle brush type).
CAUTION: The parts must not be washed in a dishwasher.
Electrical or electronic product at end of service life
Environment protection first!
Your appliance contains valuable materials which can be recovered or recycled.
Leave it at a local civic waste collection point.
If you have any product problems or queries, please contact our Customer Relations Team first for expert help
and advice:-
HELPLINE:
0845 602 1454 — UK (01) 677 4003 — ROI or consult our website — www.tefal.co.uk
GB
11
D
Anwendung Vor der ersten Verwendung alle Zubehrteile mit warmem Wasser und etwas Splmittel abwaschen und sorg- fltig abtrocknen. Die Lochscheibe und das Messer mssen stets mit einem lfilm bedeckt sein. len Sie diese Teile. Lassen Sie das Gert nicht leer laufen, wenn die Lochscheibe und das Messer nicht gelt sind.
1. 2. 3. 4. 5. 6.
Motorblock Stopfer Einfllschale Taste zum Entriegeln des Fleischwolfs Fleischwolf Schnecke
7. 8. 9. 10. 11. 12.
Messer Lochscheiben Verschlussmutter Wurstfller-Aufsatz Kebbe-Aufsatz Deckel
Sicherheitshinweise Lesen Sie die Gebrauchsanleitung vor der ersten Benutzung aufmerksam durch. Bei Benutzung entgegen der Gebrauchsanleitung bernimmt Tefal keine Garantie und keine Haftung. Dieses Gert entspricht den geltenden technischen Vorschriften und Normen. Entfernen Sie alle Verpackungen und Aufkleber innerhalb und auerhalb des Gertes. Dieses Gert ist nicht dazu bestimmt, ber einen externen Timer oder eine Fernsteuerung eingeschaltet zu werden.
Es ist ausschlielich fr die Verwendung von Wechselstrom geeignet. berprfen Sie vor der ersten Inbetriebnahme, dass die Spannung des Netzanschlusses der auf dem Typenschild am Gert angegebenen Spannung entspricht.
Verwenden Sie dieses Gert nicht auf einer heien Platte oder in der Nhe einer offenen Flamme (Gasherd). Verwenden Sie das Gert nur auf einer stabilen Arbeitsplatte, vor Wasserspritzern geschtzt. Das Gert nicht kopfber verwenden.
In folgenden Situationen ist der Netzstecker zu ziehen: — bei Funktionsstrungen, — vor jeder Reinigung, — nach dem Gebrauch oder wenn das Gert unbeaufsichtigt ist, auch wenn Sie nur fr kurze Zeit den Raum verlassen, bei jedem Auswechseln der Zubehrteile. Nehmen Sie die Zubehrteile erst nach vlligem Stillstand des Gertes ab. — Ziehen Sie den Stecker nie am Kabel aus der Steckdose.
Verwenden Sie ein Verlngerungskabel nur dann, wenn es in ordnungsgemem Zustand ist. Lassen Sie lange Haare, Schals, Krawatten usw. nicht ber das in Betrieb befindliche Gert hngen. Lassen Sie das Kabel nicht herunterhngen, legen Sie es nicht ber eine scharfe Kante, in die Nhe einer Wrmequelle und lassen Sie es nicht in Berhrung mit sich drehenden Teilen kommen.
Ein Elektrogert darf nicht in Betrieb genommen werden, wenn: — es zu Boden gefallen ist, — wenn das Messer beschdigt oder unvollstndig ist. — Wenn das Netzkabel beschdigt ist, muss es aus Sicherheitsgrnden vom Hersteller, seinem Kundendienst oder einer hnlich qualifizierten Person ausgewechselt werden.
Das Produkt ist fr den haushaltblichen und nicht fr professionellen Gebrauch bestimmt. Im Falle einer professionellen Nutzung gilt die Garantie nicht und es kann keine Haftung bernommen werden.
Das Gert, das Kabel oder den Stecker nicht in Wasser oder eine andere Flssigkeit tauchen. Verwenden Sie zur ihrer eigenen Sicherheit nur original Zubehr, passend zu Ihrem Gert. Jeder Eingriff, auer der im Haushalt blichen Reinigung und Pflege durch den Kunden muss durch den Kundendienst erfolgen Verwenden Sie stets den Stopfer, um die Lebensmittel in den Einfllstutzen zu schieben, auf keinen Fall die Finger, eine Gabel, einen Lffel, ein Messer oder sonstige Utensilien. Berhren Sie nie die in Bewegung befindlichen Teile.
berlassen Sie niemals unbeaufsichtigten Kindern oder Personen das Gert, wenn deren physische oder sensorische Fhigkeiten oder Mangel an Erfahrung und Wissen sie am sicheren Gebrauch hindern. Sie mssen stets berwacht werden und zuvor unterwiesen sein.
Kinder mssen beaufsichtigt werden, um sicher zu gehen, dass sie nicht mit dem Gert spielen.
Beschreibung
12
Bei Verstopfung: Halten Sie den Fleischwolf an, indem Sie den Schalter auf die Position «0» stellen. ffnen Sie den Deckel des Zubehrfachs. Drcken Sie einige Sekunden auf den Schalter «reverse», um die Nahrungsmittel aus dem Fleischwolf herauszuholen; schlieen Sie dann den Deckel, und schalten Sie das Gert mit dem Hauptschalter wieder ein, um das Zerkleinern zu beenden.
WICHTIG: Warten Sie nach dem Drcken des «0» Schalters, bis das Gert vollstndig stillsteht, bevor Sie den «reverse» Schalter bettigen.
Montage des Fleischwolfs
Fhren Sie die Schnecke (6) (zuerst die lange Achse) in den Zerkleinerungsblock (5) ein. Bringen Sie das Messer (7) an der kurzen Achse der Schnecke an, so dass die scharfen Kanten nach auen, in Richtung Lochscheibe zeigen. Bringen Sie die gewhlte Lochscheibe (8) am Messer an, so dass die beiden Haltestifte mit den beiden Kerben am Block bereinstimmen. Schrauben Sie die Verschlussmutter (9) vollstndig fest, ohne sie zu blockieren. berprfen Sie die Montage. Die Achse darf weder ein Spiel haben, noch in ihrer Rotation blockiert sein. Andernfalls die Montage erneut beginnen.
Montage des Fleischwolfs auf das Gert
Der Gertestecker muss gezogen sein. Neigen Sie den Fleischwolf nach rechts. Fhren Sie den Fleischwolf ganz in den Motorblock ein, und drehen Sie ihn dann nach links. Bringen Sie dann die Einfllschale an. Schlieen Sie den Deckel. Schlieen Sie das Gert an die Steckdose an.
Zerkleinern
Bereiten Sie die zu zerkleinernden Zutaten vor. Entfernen Sie zuvor Knochen, Knorpel und Sehnen. Schneiden Sie das Fleisch in Stcke (ca. 2 x 2 cm) und legen Sie es in die Einfllschale. Um ein optimales Ergebnis zu erzielen, achten Sie darauf, dass die Fleischstcke kleiner sind als der Schacht. Stellen Sie eine Schssel unter den Fleischwolf. Stellen Sie den Schalter auf der Rckseite des Gerts auf «I». Fhren Sie die Fleischstcke in den Fleischwolf ein und drcken Sie gegebenenfalls mit dem Stopfer (2) nach. Drcken Sie niemals mit den Fingern oder anderen Utensilien. Lassen Sie das Gert nicht lnger als 14 Minuten in Dauerbetrieb.
I
6
5
7
8 9
7
D
13
Anmerkung:Manche Rezepte bentigen eine starke Leistung (ca. 800 W). Fr diese Rezepte das Gert nicht lnger als 30 Sekunden laufen lassen.
Beispiel: Erbsenpree mit Speck oder Hammelfleisch. Zutaten: 100 g Speck oder Hammelfleisch 150 g rohe getrocknete Erbsen 100 g Mehl 50 g Wasser 20 g
Knoblauch Salz Pfeffer — Olivenl
Vermischen Sie die getrockneten Erbsen und das Mehl in einem Behlter, und fgen Sie nach und nach das Wasser hinzu, bis eine gleichmige Mischung entsteht. Geben Sie diese Mischung in die Einfllschale des Fleischwolfs. Schalten Sie das Gert ein, und schieben Sie die Mischung mit dem Stopfer nach und nach allmhlich in den Schacht. Schieben Sie dann den Speck oder das Hammelfleisch in ca. 2 x 2 cm groen Stcken mit dem Knoblauch nach. Geben Sie diese Mischung in einen Kochtopf mit 1,5 Litern Wasser. Rhren Sie um, und lassen Sie alles 20 bis 30 Minuten kochen. Mixen Sie diese Zubereitung nach dem Kochen, und fgen Sie1/2 Glas Olivenl hinzu.
Der Fleischwolf ist mit einer mechanischen Sicherung geschtzt, die in der Achse der Schnecke (6) integriert ist. Schneiden Sie die Nahrungsmittel gem den Angaben, bevor Sie den Fleischwolf bettigen, um eine anormale berlastung oder ein versehentliches Blockieren zu vermeiden.
Zerlegen des Gertes Schalten Sie das Gert nach der Anwendung aus, und ziehen Sie den Netzstecker.
Drcken Sie auf die Entriegelungstaste (4) an der Vorderseite des Gertes. Drehen Sie den Fleischwolf nach rechts. Ziehen Sie den Fleischwolf vollstndig heraus. Lsen Sie die Verschlussmutter vom Fleischwolf, und drcken Sie auf die Achse, um die Zubehrteile abzunehmen. Ziehen Sie immer den Netzstecker, bevor Sie das Gert reinigen und bevor Sie die verschiedenen Zubehrteile abnehmen. Tauchen Sie den Motorblock nie in Wasser. Reinigen Sie ihn mit einem feuchten Tuch. Alle anderen Teile knnen in heiem Wasser mit Geschirrsplmittel gereinigt werden. Verwenden Sie niemals Scheuermittel. Das Messer und die Lochscheiben des Fleischwolfs sind nicht rostfrei. Es wird empfohlen, sie nach jeder Reinigung mit Speisel einzureiben. Reinigen Sie den Fleischwolf-Aufsatz, d.h. Fleischwolfgehuse (5), die Schnecke (6), das Messer (7), die Lochscheiben (8) und die Verschlussmutter (9) nicht in der Geschirrsplmaschine.
Aufbewahrung
Das Zubehr kann in dem dafr vorgesehenen Stauraum an der Rckseite des Gerts aufbewahrt werden. Die Kabelaufwicklung befindet sich im Boden des Gerts.
D
14
ZUBEHR FR DIE ZUBEREITUNG VON COULIS UND SFTEN
Mit diesem Zubehr lassen sich Coulis (rote Frchte, Tomaten) und Sfte (Apfelsaft, Birnensaft, Orangensaft usw.) herstellen. Es wird auf den Fleischwolf (5) aufgesetzt.
Montage:
Setzen Sie den Zerkleinerungsblock (5) auf den Motorblock (1) und versichern Sie sich, dass der Dichtungsring (E) eingelegt ist. Fhren Sie die Schraube (A) in den Fleischwolf (5) ein. Setzen Sie den fr die gewhlte Zubereitung geeigneten Filter ein:
— (B), Filter mit unterschiedlich groen Lchern fr die Zubereitung von Coulis oder — (C), Filter mit kleinen Lchern fr die Zubereitung von Sften.
Schrauben Sie die Verschlussmutter auf den Fleischwolf (5). Setzen Sie die Safttlle (D) unter dem eingesetzten Filter (B oder C) ein.
Wurstfller-Aufsatz
Dieses Zubehr wird ohne Lochscheiben und ohne Messer verwendet. Es wird an den Fleischwolf angesetzt und ermglicht eine einfache Wurstherstellung.
Montage: Setzen Sie die Schnecke in das Fleischwolfgehuse ein. Bringen Sie den Wurstfller an. Schrauben Sie die Verschlussmutter fest. Bringen Sie den Fleischwolf am Gert an.
Anwendung: Bereiten Sie das Hackfleisch zu, und wrzen Sie nach Belieben. Weichen Sie die Wursthaut in warmem Wasser ein, damit sie wieder elastisch wird und ziehen Sie sie ber den Wurstfller Aufsatz (10). Geben Sie das Hackfleisch in die Einfllschale, schalten Sie das Gert ein, und schieben Sie das Hackfleisch mit dem Stopfer, bis es den Wurstfller erreicht. Schalten Sie das Gert aus, und machen Sie einen Knoten in die Wursthaut. Schalten Sie das Gert wieder ein, und schieben Sie das Hackfleisch mit dem Stopfer nach.
KEBBE-AUFSATZ
Dieses Zubehr wird ohne Lochscheiben und ohne Messer verwendet. Der Kebbe-Aufsatz wird am Fleischwolf angebracht und ermglicht es, Schluche aus einer Zubereitung von Lammfleisch und Bulgur zu formen. Die erhaltenen Schluche werden in kurze Stcke geschnitten und mit Hackfleisch gefllt. Die Enden werden zugeklammert. Diese Klchen werden frittiert.
Montage: Gleiche Montage wie beim Wurstfller-Aufsatz.
Weiteres Zubehr
D
15
D
A
BC
5
E
F
Anwendung:
Coulis: Benutzen Sie den Filter (B), dessen Lcher unterschiedlich groe Durchmesser haben, um die Frucht besser auszupressen. Fr die Zubereitung von Coulis drfen nur frische Frchte verwendet werden. Je nach Jahreszeit und Qualitt der Frchte sollte das Fruchtfleisch ein zweites Mal durchgedreht werden, um so viel Coulis wie mglich zu erhalten.
Saft: Benutzen Sie den Filter (C), dessen Lcher alle denselben Durchmesser haben. Stellen Sie zum Auffangen des Saftes ein Gef unter die Safttlle (D) und ein weiteres unter den Filter (B oder C), damit die Fruchtreste (z.B. Schalen, Kerne) hineinfallen knnen.
Nach der Montage des Zubehrs kann das Gert wie gewohnt benutzt werden.
Reinigung: Reinigen Sie alle Teile mit flieendem, heiem Wasser und etwas flssigem Splmittel. Benutzen Sie keine Scheuermittel. Die Einstze lassen sich leicht mit Hilfe der Brste (F) reinigen (Flaschenbrste).
ACHTUNG: Die Teile sind nicht splmaschinenfest!
Entsorgung des Gerts
Denken Sie an den Schutz der Umwelt!
Ihr Gert enthlt wertvolle Rohstoffe, die wieder verwertet werden knnen.
Geben Sie Ihr Gert deshalb bitte bei einer Sammelstelle Ihrer Stadt oder Gemeinde ab.
D
16
Anvendelse
Fr frste anvendelse: Rengr alle tilbehrsdele med sbevand og tr grundigt af. Hulskiven og kniven skal altid vre fedtede. Smr dem med olie. Start ikke apparatet uden fdevarer, hvis hulskiven og kniven ikke er blevet smurt.
1. 2. 3. 4. 5. 6.
Motordel Stder Bakke til pfyldning Knap til fastlsning af hakkedelen Hakkedel Skrue
7. 8. 9. 10. 11. 12.
Knivblade Hulskiver Mtrik Rr til fremstilling af plser Tilbehr til falafel bning
Sikkerhedsanvisninger
Dette apparat overholder tekniske forskrifter og gldende normer. Apparatet skal udelukkende tilsluttes vekselstrm. Det anbefales inden brug at kontrollere, at strmtilslutningen svarer til den angivne p apparatets typeplade.
Apparatet m ikke anbringes eller anvendes p en varm overflade eller i nrheden af ben ild (gaskomfur). Anvend altid kun apparatet p en stabil arbejdsflade og p afstand af vand. Stil aldrig apparatet p hovedet.
Stikket skal tages ud af apparatet: — hvis der opstr uregelmssigheder under brug — fr rengring eller vedligeholdelse — efter brug eller hvis det forlades og er uden opsyn, — hver gang der skiftes tilbehr.
Trk aldrig stikket ud af stikkontakten ved at hive i ledningen. Anvendes der en forlngerledning, skal det kontrolleres, at den er i perfekt stand. Et elektrisk apparat br ikke anvendes:
— hvis det har vret tabt p gulvet — hvis kniven er beskadiget eller har mangler.
Hvis ledningen er beskadiget, skal den af sikkerhedsmssige hensyn udskiftes af fabrikanten, dennes service eller en tilsvarende kvalificeret person.
Apparatet er beregnet til almindeligt husholdningsmssigt brug, og m under ingen omstndigheder anvendes i erhvervsmssigt jemed. I tilflde heraf frafalder vores garanti og ansvar.
Skub aldrig kdet ned med fingrene. Anvend altid stderen hertil. Dette apparat er ikke beregnet til at blive brugt af personer (inklusive brn) med begrnsede fysiske, sanselige eller mentale evner, eller personer uden erfaring med eller kendskab til apparatet, med mindre de er under overvgning eller har fet undervisning i brug af apparatet i forvejen af en person, som er ansvarlig for deres sikkerhed.
Brn skal vre under opsyn, s det sikres, at de ikke leger med apparatet.
Beskrivelse
DK
17
I tilflde af tilstopning: Stop kdhakkemaskinen ved at stille tnd-sluk-knappen p position «0». Luk bningen op til oprydningsrummet for tilbehrsdele. Tryk et par sekunder p knappen «reverse» for at f madstykkerne fri. Start derefter ved at trykke p hovedknappen for at afslutte hakningen efter at have lukket bningen til igen.
VIGTIGT: Vent til apparatet er stoppet helt, inden der trykkes p nogen af tnd-sluk-knapperne.
Montering af hakkedelen
St skruen (6) ind i hakkedelen (5) (det lange stykke frst). Anbring knivbladene (7) p det korte stykke af skruen og srg for at de skarpe kanter til at skre med vender ud af, mod hulskiven. St den valgte hulskive (8) p knivbladene og srg for at de to knaster svarer til de to indsnit p delen. Skru mtrikken (9) godt til uden at fastspnde den helt. Kontrollr monteringen. Skruedelen m ikke vre hverken ls eller fastspndt s meget, at den ikke kan rotere rundt. Er dette tilfldet, skal monteringen startes forfra.
Montering af delen p apparatet
Strmforsyningen til apparatet skal vre afbrudt. Hld hakkedelen mod hjre. St hakkedelen godt ind i motordelen og drej hakkedelen til venstre. St derefter bakken p. Luk bningen til. St apparatet til.
Hakning
Gr ingredienserne klar til at blive hakket ved frst at fjerne ben, brusk og sener. Skr kdet i stykker (ca. 2×2 cm) og anbring det p bakken. Skr kdstykkerne i bidder, der er mindre end skakten, for at f den strste effektivitet. Anbring en skl under hakkedelen. Indstil tnd-sluk-knappen, der sidder bag p apparatet, p «I». Kom kdstykkerne i hakkedelen og skub dem ned med stderen (2) om ndvendigt. Skub dem aldrig ned med fingrene. Anvend ikke apparatet i mere end 14 minutter.
I
6
5
7
8 9
7
DK
18
Bemrk: Visse opskrifter krver en stor styrke (omkring 800 W). Ved sdanne opskrifter m apparatet ikke anvendes i mere end 30 sekunder.
Eksempel: rtecreme med flsk eller lammekd. Ingredienser: 100 g flsk eller lammekd — 150 g r flkkerter — 100 g mel -50 g vand — 20 g hvidlg — salt —
peber — olivenolie
Bland flkkerter og mel i en skl og tilst vand lidt ad gangen, indtil der fs en ensartet blanding. Hld hele blandingen op p hakkemaskinens bakke. Start apparatet og skub gradvist blandingen ned i skakten ved hjlp af stderen. Tilst derefter flsk eller lammekd skret i tern 2 cm x 2 cm samt hvidlg. Hld blandingen i en gryde med 1,5 L vand. Rr rundt og lad det koge i 20-30 minutter. Mix blandingen efter kogningen og tilst 1/2 glas olivenolie.
Kdhakkemaskinen er beskyttet med en mekanisk sikring integreret i skrueakselen (6). Tag hensyn till beskrivelserne af udskring af levnedsmidlerne fr brugen af hakkelsemaskinen for at undg en unormal belastning eller et pludseligt stop.
Afmontering
Sluk apparatet og afbryd strmforsyningen efter brug.
Tryk p fastlsningsknappen (4), der sidder foran p apparatet. Drej hakkedelen mod hjre. Frigr hakkedelen og trk den ud. Skru mtrikken af hakkedelen og fjern tilbehrsdelene fra skruedelen. Afbryd strmforsyningen til apparatet fr rengring og inden de forskellige tilbehrsdele fjernes. Kom aldrig motordelen under vand. Rengr den med en fugtig klud. Alle andre dele kan vaskes med varmt vand og opvaskemiddel. Brug aldrig produkter med skuremiddel Benyt ikke opvaskemaskine til rengring af kdhakkehovedet dvs hakkedelen (5), skruen (6), knivebladet (7), hulskiven (8) og mtrikken (9).
Oprydning
Alle andre dele kan vaskes med varmt vand og opvaskemiddel. Brug aldrig produkter med slibemiddel i. Knivbladene og hulskiverne til kdhakkemaskinen er ikke rustfrie. Det anbefales at smre dem med spiseolie efter hver rengring.
DK
19
TILBEHR TIL FRUGTPUR OG SAFT
Dette tilbehr bruges til at lave frugtpur (blde frugter, tomater) og saft (bler, prer, appelsiner osv.). Det kan sttes p hakkeudstyret (5).
Montering:
St hakkeudstyret (5) p motorblokken (1) og kontroller at pakningen (E) er sat p. St skruen (A) ind i hakkeudstyret (5). Anbring det filter, der svarer til tilberedningen:
— (B), filter med variable huller til pur, — eller (C), filter med sm huller til saft.
St skruen p hakkeudstyret (5). Anbring saftsamleren (D) under det
TEFAL LE HACHOIR 1700 Kitchen Appliances PDF User Guides and Manuals for Free Download: Found (1) Manuals for TEFAL LE HACHOIR 1700 Device Model (Manual )
TEFAL LE HACHOIR 1700 Manual
Details:
- Manufacturer: TEFAL
- Product Name/ID: TEFAL LE HACHOIR 1700 / #1578696
- Category: Kitchen Appliances
- File Path: tefal/le-hachoir-1700_1578696.pdf
- Last Updated: 14 Apr 2025
- Description: Get the most out of your TEFAL LE HACHOIR 1700 with this detailed manual, which includes clear and concise setup instructions, operational tips, and maintenance advice to sustain device performance.
- Document Type: User Manual
- Pages: 49
Download PDF
Read Online
The TEFAL LE HACHOIR 1700 is a versatile kitchen appliance that has been making waves among home cooks and culinary enthusiasts alike. With its sleek design and powerful performance, this kitchen gadget is a valuable addition to any cooking setup. Let’s delve into the features, pros, and potential drawbacks of this food processor to understand why it has garnered such attention.
One of the standout attributes of the TEFAL LE HACHOIR 1700 is its impressive motor power. With 1700 watts, it effortlessly handles a variety of ingredients, making the chopping, mincing, and pureeing processes remarkably quick and efficient. Whether you’re preparing vegetables for a salad, mincing meat for a sauce, or creating a smooth paste, this appliance delivers satisfying results without much effort on your part.
The design of the TEFAL LE HACHOIR 1700 is another highlight. It features a compact footprint, making it easy to store, yet it has a generous bowl capacity that allows users to process large quantities of food at once. The materials used are durable and easy to clean, which is essential for any busy kitchen. The intuitive interface, which includes simple buttons for different operations, enhances the user experience, making it accessible for both novice and experienced cooks.
Another compelling reason to consider the TEFAL LE HACHOIR 1700 is its versatility. Here are some of the key functions it offers:
- Chopping: Effortlessly chop vegetables, fruits, and nuts.
- Mincing: Quickly mince meat for a variety of dishes.
- Pureeing: Create smooth purees for soups and sauces.
- Emulsifying: Perfect for preparing dressings and dips.
Users will appreciate the safety features included in the TEFAL LE HACHOIR 1700. The locking mechanisms ensure that the lid stays securely in place during operation, and the non-slip feet keep the appliance stable on the countertop. These safety measures afford peace of mind while processing food, especially for those who may be concerned about accidents in the kitchen.
However, like any product, the TEFAL LE HACHOIR 1700 is not without its drawbacks. Some users have reported that the device can be somewhat noisy during operation, which may be a consideration for those living in shared spaces or with young children napping nearby. Additionally, while the appliance is designed for easy cleaning, the larger bowl and parts may require a bit more effort to wash than smaller food processors.
In terms of performance, the TEFAL LE HACHOIR 1700 holds its ground impressively. Many reviews highlight the smooth texture it achieves when pureeing, which is often comparable to that of professional-grade food processors. Furthermore, the chopping consistency is commendable, ensuring that you can achieve uniform sizes for all your cooking needs, which is essential for even cooking and presentation.
To summarize, the TEFAL LE HACHOIR 1700 is a powerful, versatile, and elegantly designed kitchen appliance that can significantly enhance your cooking experience. While it’s not entirely devoid of faults, the benefits far outweigh the negatives. It’s an ideal choice for anyone looking to simplify their food preparation process while achieving professional-quality results in the comfort of their own kitchen.
FAQ: Types of Manuals and Their Contents
TEFAL LE HACHOIR 1700 Manuals come in various types, each serving a specific purpose to help users effectively operate and maintain their devices. Here are the common types of TEFAL LE HACHOIR 1700 User Guides and the information they typically include:
- User Manuals: Provide comprehensive instructions on how to use the device, including setup, features, and operation. They often include troubleshooting tips, safety information, and maintenance guidelines.
- Service Instructions: Designed for technicians and repair professionals, these manuals offer detailed information on diagnosing and repairing issues with the device. They include schematics, parts lists, and step-by-step repair procedures.
- Installation Guides: Focus on the installation process of the device, providing detailed instructions and diagrams for proper setup. They are essential for ensuring the device is installed correctly and safely.
- Maintenance Manuals: Provide guidance on routine maintenance tasks to keep the device in optimal condition. They cover cleaning procedures, part replacements, and regular servicing tips.
- Quick Start Guides: Offer a concise overview of the essential steps needed to get the device up and running quickly. They are ideal for users who need immediate assistance with basic setup and operation.
Each type of TEFAL LE HACHOIR 1700 instruction is designed to address specific needs, ensuring users have the necessary information to use, maintain, and repair their devices effectively.
Related Instructions for TEFAL LE HACHOIR 1700:
1
ACTIFRY GENIUS FZ760
Manual PDF Guide (@HDM25Y), TEFAL ACTIFRY GENIUS FZ760 Fryer (22/01/2025)
22
1092
252
2
Blendforce Steel BL320AKR
Manual Blendforce Steel BL320AKR Manual — 2UOJ11
38
1333
267
3
Fuzzy Electronic RK7025
Manual #FVQ529: Fuzzy Electronic RK7025 Rice Cooker Manual
63
1388
334
4
BIEN
Instruction manual PDF User Manual (@R192DR), TEFAL BIEN Scales (Sat 09.2024)
2
198
40
5
DELIRICE Electronic
Manual TEFAL DELIRICE Electronic User Manual (Manual ), @3Z9Y52
48
327
63
7
ULTRA COMPACT MIXER
Manual ULTRA COMPACT MIXER (Other ePDF Guide, #ZZGBD8)
28
1480
267
9
STEAMER AQUATIMER
Quick start manual TEFAL Kitchen Appliance Quick start manual (File: tefal-steamer-aquatimer-kitchen-appliance-8, 21st Jan 2025)
8
401
69
Kitchen Appliances Devices by Other Brands:
|
HPM XLP912WEWE Instruction Manual Manual: HPM XLP912WEWE (N9I35F, Upd.05th Oct 2024) 1 05 Oct 2024 | 3 |
|
|
Bosch C1210ESC Technical Service Bulletin #4891Y5: C1210ESC Industrial Equipment Technical service bulletin Technical Service Bulletin: 13 Mar 2025 | 2 |
|
|
Globe FS12 Instruction Manual PDF User Manual (@S8WI6C), Globe FS12 Kitchen Appliances (26/11/2024) Instruction Manual for the Flywheel Slicer 26 Nov 2024 | 28 |
|
|
Camp Chef PZ90 Instruction Manual Camp Chef PZ90 Manual (Instruction manual), @9Z4774 FOLLOW ALL INSTUCTIONS SUPPLIED WITH STOVE WHEN USING THIS ACCESSORY 14 Apr 2025 | 2 |
Categories:
Controller
Ice Cream Maker
Heater
Fans
Styling Iron
Thermometer
LE Hachoir
Couv3voletsMise en page 1 10/12/09 816
Utilisation
Description Montage du bloc sur le produit
Montage du bloc de hachageHachage
Fermez la porte Branchez le produit Rangement
Démontage Accessoire À Coulis ET JUS
Accessoire KébéTube À Saucisses
Montage Participons à la protection de l’environnement
Produit électrique ou électronique en fin de vieCoulis
Jus Use
Safety instructions Fitting the chopping unit on the appliance
Assembling the chopping unitChopping
Storage
Dismantling your applianceExample Purée of split peas with beef bacon or lamb
Kebbe Accessory
Additional accessoriesPuree and Juice Accessory
Sausage Funnel Cleaning
Electrical or electronic product at end of service lifeUse
Environment protection first Anwendung Beschreibung
Sicherheitshinweise Montage des Fleischwolfs auf das Gerät
Montage des FleischwolfsZerkleinern
Aufbewahrung
Zerlegen des GerätesBeispiel Erbsenpüree mit Speck oder Hammelfleisch
Wurstfüller-Aufsatz
Weiteres ZubehörKEBBE-AUFSATZ
Zubehör FÜR DIE Zubereitung VON Coulis UND Säften Anwendung
Entsorgung des GerätsReinigung
Denken Sie an den Schutz der Umwelt Beskrivelse
SikkerhedsanvisningerAnvendelse
Montering af delen på apparatet
Montering af hakkedelenHakning
Tilfælde af tilstopning Oprydning
AfmonteringEksempel Ærtecreme med flæsk eller lammekød
RØR TIL Fremstilling AF Pølser
Ekstra tilbehørTilbehørsdelen TIL Falafel
Tilbehør TIL Frugtpuré OG Saft DK Brug
Udtjent elektrisk eller elektronisk produktRengøring
Vær med til at beskytte miljøet Användning
Säkerhetsinstruktioner Montering av kvarnblocket på köttkvarnen
Montering av kvarnblocketMalning
Vid tilltäppning Förvaring
DemonteringExempel Ärtpuré med fläsk eller lammkött
Korvhorn
Extra tillbehörTillbehör Kébab
Tillbehör FÖR Juice OCH Puré Användning
När en elektrisk eller elektronisk produkt har tjänat utRengöring
Var rädd om miljön Bruk
Gode råd om sikkerhet Montering av enheten på apparatet
Montering av hakkeenhetenHakking
Sett bryteren bak på apparatet på Eksempel Ertestuing med bacon eller lammekjøtt
Rydde på plassSlå av og koble strømmen fra apparatet etter bruk
KJØTTBOLLE-TILBEHØR
PølsetutSAFT- OG Juicetilbehør
Bruk Rengjøring
BrukLa oss bidra til miljøvern
OBS! Delene må ikke vaskes i oppvaskmaskin Kuvaus FIN
Turvamääräyksiä Osan asennus laitteeseen
Myllyosan asennusMyllyn käyttö
Älä käytä laitetta yli 14 minuuttia Laitteen tukkeutuessa Säilytys
PurkaminenEsimerkki Hernesose rasvan tai lampaan kera
Makkaraputki
LisälaitteetKÉBBÉ-LISÄLAITE
SOSE- JA Mehulisälaitteet Käyttö
Sähkölaitteen tai elektronisen laitteen hävittäminenPuhdistus
Ota huomioon ympäristön suojelu Cihaz tanımı
Güvenlik talimatlarıKullanım
Kıyma aparatının gövdeye takılması
Kıyma aparatının montajıKıyma yapma
Saklama
Cihazı sökmeÖrnek Dana ya da koyun etli bezelye püresi
Sosİs Aparati
Diğer aksesuarlarİçlİ Köfte Aparati
Püre VE Meyve Suyu Aksesuari Temizleme
KullanımPüre
Meyva suları Garantİ Belgesİ
Tefal
Danişma Hatti 444 40 Οδηγιεσ Ασφαλειασ
Συναρµολόγηση του συστήµατος κο̟ής στη συσκευή
Συναρµολόγηση του συστήµατος κό̟τηΛειτουργία
Α̟οθήκευση
Α̟οσυναρµολόγησηΣηµείωση
¶·Ú¿‰ÂÈÁÌ· º¿‚· Ì Ϸډ› ‹ ·ÚÓ¿ÎÈ. Συστατικά Αξεσουάρ Kébbé
Σωλήνας ̟αρασκευής λουκάνικωνΕξάρτηµαγια̟αρασκευήχυµώνκαι̟ουρέ
Συναρµολόγηση Πουρές
Καθαρισµός της συσκευήςΧυµός
̟οτέ µην ̟λένετε τα εξαρτήµατα στο ̟λυντήριο ̟ιάτων