
Yes, indeed you can reheat food. Set the timer around 10 minutes (it depends on the food) and make sure that there is enough water in the tank.
Over time, the strong coloured natural juices from foods such as carrots and beetroot may stain the juice collector. This is normal. It may be cleaned with lemon juice straight after cooking.
We recommend that you put the largest pieces of food, requiring the longest cooking time in the lowest basket.
The ingredients are very dense and have a different cooking time: try to prolong the cooking time.
Too many ingredients are cooked together: put the larger sized ingredients and the ingredients with a longer cooking time in the lower bowl.
Try to not overload the steam bowls.
Descale your appliance.
Cut the ingredients into small pieces.
The flavour of food is much better in a steamer and therefore any seasoning should be used sparingly.
If required, you can sprinkle it lightly on the food, or add herbs to the steam water to add flavour to your food.
Yes. You should never leave a small electrical appliance unattended whilst in operation. However, you do not have to watch the steamer all the time. Simply set the timer and the bell will let you know when your food is ready to eat. There are no risks of burning the food and no need to stir it.
Caution: Do not forget to put water in the tank.
All the juices of the steamed food are collected in the juice collector. This can be used as a basic ingredient for stocks and sauces.
If the cooking times are different for the food in each of the bowls, start cooking the food that requires the most time in the lower bowl and then add the upper bowl(s) while cooking is in progress to complete the cooking cycle.
All frozen vegetables can be steamed from frozen.
We only recommend using canned or precooked pulses and beans in the steamer. They should be drained and rinsed and then placed in the steamer basket. They do not need to be soaked or boiled first.
Yes, you can steam them in a steamer. They take the same time as if you were steaming/simmering in a saucepan. Just keep checking the water level and topping it up.
Yes — if your steamer baskets have removal bases, then you will be able to remove the bases from baskets 2 and 3 and place a small whole chicken inside the lower of the steam baskets ready for steam cooking.
Yes, to give meat, chicken and fish a delicious moist flavour you can marinate them a few hours before steaming.
For recipes with a long cooking time you will need to refill the water tank during the cooking period. To refill the water tank, you should use oven gloves to lift the lid and steamer basket. Carefully lift and empty any water that has collected in the juice collector, then refill the water tank using cold untreated tap water.
The cooking time is the same whether you use one or two levels. Please be careful to not pack food too tightly on the first level to ensure that the steam can reach the second level.
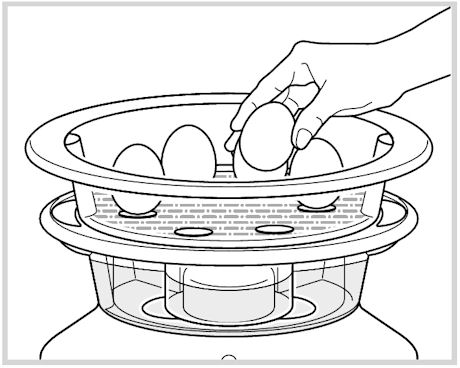
You simply place the eggs in the steamer basket. The cooking time is 12 minutes for 6 hard-boiled eggs, 8 minutes for 6 soft-boiled eggs.
Don’t handle the bowls and verrines during cooking and don’t touch the device when producing steam; always stop it before.
Do not move the appliance when it contains hot liquids or food.
Always use protective gloves to handle the bowls or verrines after cooking.
Try adding fresh herbs, lemon, garlic, oranges or even onion directly to the foods.
To add flavour to chicken, meat and fish made with marinades, use barbecue sauce or spice mixtures.
Yes, especially for recipes with long cooking times.
Also monitor the water level during cooking in case it needs refilling.
Some recipes require the use of cling film for protection, to prevent condensation and protect delicate foods.
Choose a special cling film for cooking, or microwave-safe cling film.
Avoid aluminium foil which tends to increase cooking time.
Put the rice in the rice bowl and fill it with water.
Put the rice bowl in the steam basket or in the largest bowl and start cooking.
Yes, they are dishwasher safe but it is preferable to wash on the lowest heat setting or prewash setting.
Yes, it must be descaled every 7 to 10 uses. To do this, simply fill the water tank with 1/3 white vinegar and 2/3 water.
Leave to act cold for 1 night.
Rinse the inside of the water tank several times with warm water.
Never use abrasive cleaning products.
On average, we recommend descaling your appliance every 7 to 10 uses to maintain an effective flow of steam and extend the life of your appliance.
To do this, simply fill the water tank with 1/3 white vinegar and 2/3 water.
Leave to act cold for 1 night.
Rinse the inside of the water tank several times with warm water.
Never use abrasive cleaning products.
The appliance has not been descaled after 7 to 10 uses: descale it.
[Check 1] Have you put the water in the right place?
Please put the water in the water tank with the grey part in the middle (the heater).
[Check 2] Did you put enough water in the water tank?
If there is not enough water in the water tank, it won’t be able to create steam. Even if just cooking for a short time, you should ensure that the water reaches at least the top of the heater (the grey part). Even if you have put in enough water, it will take some time before it starts steaming.
[Check 3] Is the heater (grey part) dirty?
If there are minerals from the water adhered to the heater, it may not transmit heat correctly and steam may not be created. If there are changes such as discolouration of the heater — brown, black or white — or peeling of the surface, care of the heater will be necessary. Please carry out a descaling.
This is working correctly. The turbo ring surrounds the heater so that the water inside is effectively heated. It is designed so that it doesn’t fit flush and the water from the space in between is used to make the steam. Please make sure that the turbo ring is orientated correctly so the notch is facing down.
The surface of the heater isn’t peeling. It is probably a film that has attached itself to the surface of the heater. Carry out a descaling.
When there’s not enough water in the tank, the device no longer heats.
Fill it again up to the maximum height mark and the device will automatically restart the cooking programme.
Use gloves and be careful not to touch hot surfaces, or foods being cooked, when refilling the tank.
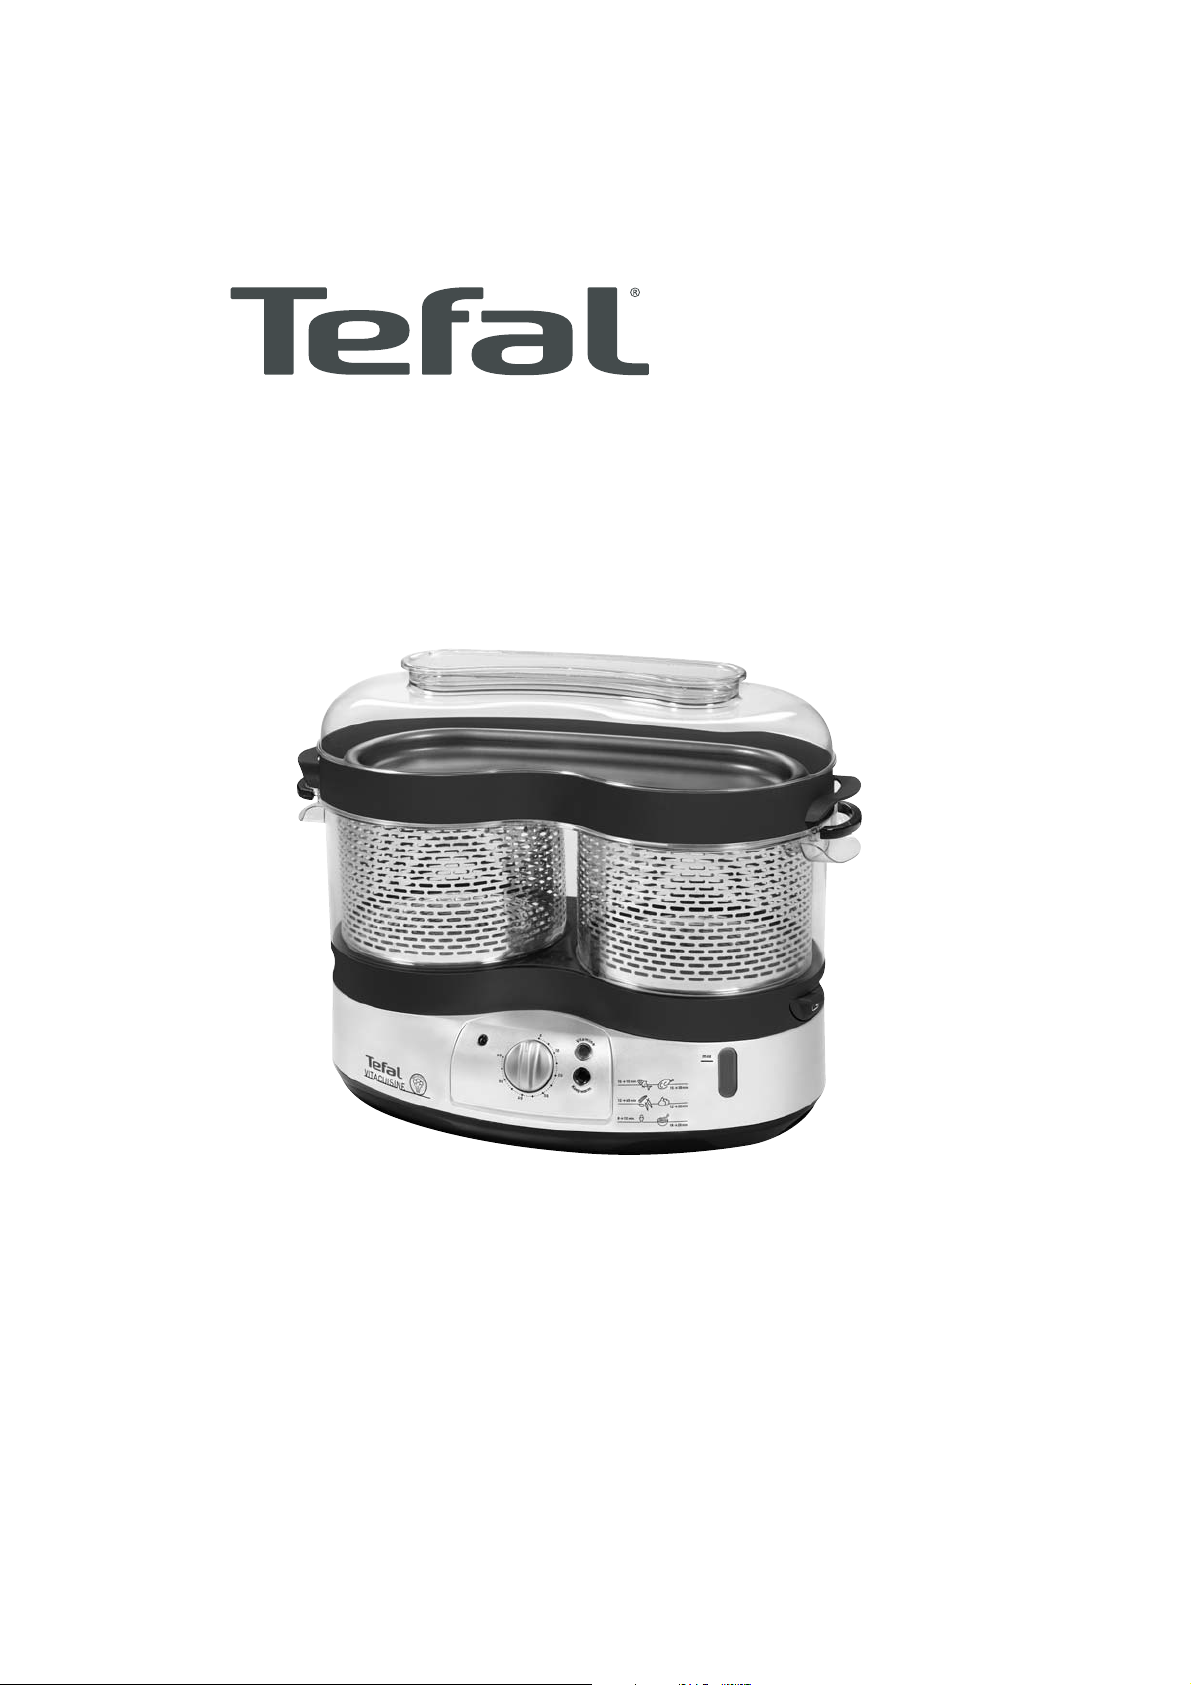
The bowls are equipped with detachable grills, except the drip tray which must always keep its grills.
By removing the grills, you increase the cooking zone to cook bulky foods (whole chickens, artichokes, lobster, cauliflower, broccoli, etc).
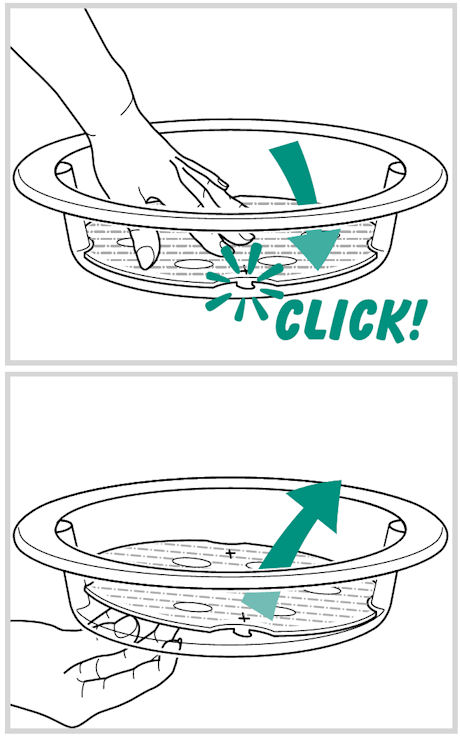
To put the grills into position:
• Keep the grill on the correct side (the clip facing down).
• Put the grill into the bowl.
• Press on the clip zone to attach the bowl.
To remove the grills, press on the top of the grill.

After following the instructions in the user manual for starting the appliance, make sure that your electrical socket is working by plugging another appliance. If it still does not work, do not try to dismantle or repair the appliance yourself, instead, take it to an approved repair centre
Do not use your appliance. To avoid any danger, have it replaced by an approved repair centre.
If your device has a low water alert, you need to press the «on/off» button twice to switch it off.
Never unplug your device by removal from the power socket without first having stopped it normally.
During keep warm, no actions are possible except shutdown.
Therefore, you should stop keep warm and reprogramme the device.
The Vitamin + button automatically goes off when the amount of steam is enough for cooking.
No, you can steam all types of food: meat, fish, eggs, potatoes, desserts rice, couscous etc.
No, the advantage of steam cooking lies in the fact that the flavours of the vegetables are not transmitted to each other, even when they are mixed.
The steam cooker doesn’t cook under pressure, it instead uses the ambient pressure.
The steam in the steam cooker is water boiling temperature, approximately 100°C.
Yes, but not too often, because this results in a drop in temperature and a loss of steam which can slow down the cooking.
Your appliance contains valuable materials which can be recovered or recycled. Leave it at a local civic waste collection point.
Please go to the “Accessories” section of the website to easily find whatever you need for your product.
Find more detailed information in the Guarantee section of this website.
If you believe that one part is missing, please call Consumer Services Center and we will help you find a suitable solution.
Keep warm runs for 60 minutes, as long as the tank contains enough water.
You prefer slower cooking, you can manually stop the Vitamin + programme by pressing on the illuminated light.
The Vitamin + button reduces the cooking time and perfectly preserves all vitamins.
The verrines should always be placed in the upper pan, under the lid, for good cooking results.
For most recipes, cooking takes place with the lid closed or with baking paper covering the verrines, but this is something that should be checked each time.
-
Tefal UK : innovative leader in kitchen and home appliances
>
-
Consumer services
>
-
Instructions for use
>
-
Electrical Cooking
>
-
Steam cooker
>
User manual and frequently asked questions Vitacuisine Compact VS400315
For steam cooking
The Vitacuisine Compact TEFAL steam cooker is ideal for preparing an entire meal, from starters to dessert:
— Just one multipurpose high capacity device to cook everything using steam
— 3 bowls with a maximum capacity of 10.3 litres
— 4 transparent glass recipients with lid and base
— 2 detachable cooking plateaus for simultaneous cooking without exchange of possible flavours and scents: the cooking juices are on each plateau
— Juices tray 0.75 l
— Ultra compact arrangement of the bowls and recipients on the base
Reference : VS400315
Frequent questions
Yes, indeed you can reheat food. Set the timer around 10 minutes (it depends on the food) and make sure that there is enough water in the tank.
Over time, the strong coloured natural juices from foods such as carrots and beetroot may stain the juice collector. This is normal. It may be cleaned with lemon juice straight after cooking.
We recommend that you put the largest pieces of food, requiring the longest cooking time in the lowest basket.
The ingredients are very dense and have a different cooking time: try to prolong the cooking time.
Too many ingredients are cooked together: put the larger sized ingredients and the ingredients with a longer cooking time in the lower bowl.
Try to not overload the steam bowls.
Descale your appliance.
Cut the ingredients into small pieces.
The flavour of food is much better in a steamer and therefore any seasoning should be used sparingly.
If required, you can sprinkle it lightly on the food, or add herbs to the steam water to add flavour to your food.
Yes. You should never leave a small electrical appliance unattended whilst in operation. However, you do not have to watch the steamer all the time. Simply set the timer and the bell will let you know when your food is ready to eat. There are no risks of burning the food and no need to stir it.
Caution: Do not forget to put water in the tank.
All the juices of the steamed food are collected in the juice collector. This can be used as a basic ingredient for stocks and sauces.
If the cooking times are different for the food in each of the bowls, start cooking the food that requires the most time in the lower bowl and then add the upper bowl(s) while cooking is in progress to complete the cooking cycle.
All frozen vegetables can be steamed from frozen.
We only recommend using canned or precooked pulses and beans in the steamer. They should be drained and rinsed and then placed in the steamer basket. They do not need to be soaked or boiled first.
Yes, you can steam them in a steamer. They take the same time as if you were steaming/simmering in a saucepan. Just keep checking the water level and topping it up.
Yes — if your steamer baskets have removal bases, then you will be able to remove the bases from baskets 2 and 3 and place a small whole chicken inside the lower of the steam baskets ready for steam cooking.
Yes, to give meat, chicken and fish a delicious moist flavour you can marinate them a few hours before steaming.
For recipes with a long cooking time you will need to refill the water tank during the cooking period. To refill the water tank, you should use oven gloves to lift the lid and steamer basket. Carefully lift and empty any water that has collected in the juice collector, then refill the water tank using cold untreated tap water.
The cooking time is the same whether you use one or two levels. Please be careful to not pack food too tightly on the first level to ensure that the steam can reach the second level.
You simply place the eggs in the steamer basket. The cooking time is 12 minutes for 6 hard-boiled eggs, 8 minutes for 6 soft-boiled eggs.

Don’t handle the bowls and verrines during cooking and don’t touch the device when producing steam; always stop it before.
Do not move the appliance when it contains hot liquids or food.
Always use protective gloves to handle the bowls or verrines after cooking.
Try adding fresh herbs, lemon, garlic, oranges or even onion directly to the foods.
To add flavour to chicken, meat and fish made with marinades, use barbecue sauce or spice mixtures.
Yes, especially for recipes with long cooking times.
Also monitor the water level during cooking in case it needs refilling.
Some recipes require the use of cling film for protection, to prevent condensation and protect delicate foods.
Choose a special cling film for cooking, or microwave-safe cling film.
Avoid aluminium foil which tends to increase cooking time.
Put the rice in the rice bowl and fill it with water.
Put the rice bowl in the steam basket or in the largest bowl and start cooking.
Yes, they are dishwasher safe but it is preferable to wash on the lowest heat setting or prewash setting.
Yes, it must be descaled every 7 to 10 uses. To do this, simply fill the water tank with 1/3 white vinegar and 2/3 water.
Leave to act cold for 1 night.
Rinse the inside of the water tank several times with warm water.
Never use abrasive cleaning products.
On average, we recommend descaling your appliance every 7 to 10 uses to maintain an effective flow of steam and extend the life of your appliance.
To do this, simply fill the water tank with 1/3 white vinegar and 2/3 water.
Leave to act cold for 1 night.
Rinse the inside of the water tank several times with warm water.
Never use abrasive cleaning products.
The appliance has not been descaled after 7 to 10 uses: descale it.
[Check 1] Have you put the water in the right place?
Please put the water in the water tank with the grey part in the middle (the heater).
[Check 2] Did you put enough water in the water tank?
If there is not enough water in the water tank, it won’t be able to create steam. Even if just cooking for a short time, you should ensure that the water reaches at least the top of the heater (the grey part). Even if you have put in enough water, it will take some time before it starts steaming.
[Check 3] Is the heater (grey part) dirty?
If there are minerals from the water adhered to the heater, it may not transmit heat correctly and steam may not be created. If there are changes such as discolouration of the heater — brown, black or white — or peeling of the surface, care of the heater will be necessary. Please carry out a descaling.
This is working correctly. The turbo ring surrounds the heater so that the water inside is effectively heated. It is designed so that it doesn’t fit flush and the water from the space in between is used to make the steam. Please make sure that the turbo ring is orientated correctly so the notch is facing down.
The surface of the heater isn’t peeling. It is probably a film that has attached itself to the surface of the heater. Carry out a descaling.
When there’s not enough water in the tank, the device no longer heats.
Fill it again up to the maximum height mark and the device will automatically restart the cooking programme.
Use gloves and be careful not to touch hot surfaces, or foods being cooked, when refilling the tank.
The bowls are equipped with detachable grills, except the drip tray which must always keep its grills.
By removing the grills, you increase the cooking zone to cook bulky foods (whole chickens, artichokes, lobster, cauliflower, broccoli, etc).
To put the grills into position:
• Keep the grill on the correct side (the clip facing down).
• Put the grill into the bowl.
• Press on the clip zone to attach the bowl.
To remove the grills, press on the top of the grill.
After following the instructions in the user manual for starting the appliance, make sure that your electrical socket is working by plugging another appliance. If it still does not work, do not try to dismantle or repair the appliance yourself, instead, take it to an approved repair centre
Do not use your appliance. To avoid any danger, have it replaced by an approved repair centre.
If your device has a low water alert, you need to press the «on/off» button twice to switch it off.
Never unplug your device by removal from the power socket without first having stopped it normally.
During keep warm, no actions are possible except shutdown.
Therefore, you should stop keep warm and reprogramme the device.
The Vitamin + button automatically goes off when the amount of steam is enough for cooking.
No, you can steam all types of food: meat, fish, eggs, potatoes, desserts rice, couscous etc.
No, the advantage of steam cooking lies in the fact that the flavours of the vegetables are not transmitted to each other, even when they are mixed.
The steam cooker doesn’t cook under pressure, it instead uses the ambient pressure.
The steam in the steam cooker is water boiling temperature, approximately 100°C.
Yes, but not too often, because this results in a drop in temperature and a loss of steam which can slow down the cooking.
Your appliance contains valuable materials which can be recovered or recycled. Leave it at a local civic waste collection point.
Please go to the “Accessories” section of the website to easily find whatever you need for your product.
Find more detailed information in the Guarantee section of this website.
If you believe that one part is missing, please call Consumer Services Center and we will help you find a suitable solution.
The verrines should always be placed in the upper pan, under the lid, for good cooking results.
Keep warm runs for 60 minutes, as long as the tank contains enough water.
You prefer slower cooking, you can manually stop the Vitamin + programme by pressing on the illuminated light.
The Vitamin + button reduces the cooking time and perfectly preserves all vitamins.
For most recipes, cooking takes place with the lid closed or with baking paper covering the verrines, but this is something that should be checked each time.
EN p. 2 — 10
Re f.
N C
00 02
21 09
0
2/ 20
11
J PM
& A
ss oc
i s
m
ar ke
ti ng
-d es
ig n-
co m
m un
ic at
io n
SEBOU103_Notice VitaCuisine_EN_NC00022109_SEBOU103 10/02/11 10:29 PageI
VITACUISINE COMPACT
www.tefal.co.uk / www.tefal.com.au / www.tefal.co.nz
EN
g g
SEBOU103_Notice VitaCuisine_EN_NC00022109_SEBOU103 10/02/11 10:29 PageII
N
SEBOU103_Notice VitaCuisine_EN_NC00022109_SEBOU103 10/02/11 10:29 PageIII
SEBOU103_Notice VitaCuisine_EN_NC00022109_SEBOU103 10/02/11 10:29 Page1
2
Important safeguards
Safety instructions Read and follow the instructions for use. Keep them safe. This appliance is not intended to be
operated using an external timer or separate remote control system. For your safety, this appliance complies with the safety regulations and directives in effect at the time of manufacture (Low-voltage Directive, Electromagnetic Compatibility, Food Contact Materials Regulations, Environment).
Check that the power supply voltage corresponds to that shown on the appliance (alternating current).
Given the diverse standards in effect, if the appliance is used in a country other than that in which it is purchased, have it checked by an approved service centre.
Do not place the appliance near a heat source or in a hot oven, as serious damage could result. Use a flat, stable, heat-resistant work surface away from any water splashes. Never leave the appliance in operation unattended. Keep away from children. This appliance is not intended for use by persons (including children) with reduced physical,
sensory or mental capabilities, or lack of experience and knowledge, unless they have been given supervision or instruction concerning use of the appliance by a person responsible for their safety.
Children should be supervised to ensure that they do not play with the appliance. Do not leave the cord hanging. Always plug the appliance into an earthed socket. Do not use an extension lead. If you accept liability for doing so, only use an extension lead
which is in good condition, has an earthed plug and is suited to the power of the appliance. Do not unplug the appliance by pulling on the cord. Do not use the appliance if:
— the appliance or the cord is damaged. — the appliance has fallen or shows visible damage or does not work properly. In the event of the above, the appliance must be sent to an approved Service Centre. Do not take the appliance apart yourself.
If the power supply cord is damaged, it must be replaced by the manufacturer, an authorised service centre or a similarly qualified person in order to avoid any danger.
Burns can occur by touching the hot surface of the appliance, the hot water, steam or the food.
Always unplug the appliance: — immediately after use, — when moving it, — prior to any cleaning or maintenance.
Never immerse the appliance in water! Do not place the appliance near a wall or a cupboard: the steam produced by the appliance can
cause damage. Do not move the appliance when it is full of liquids or hot foods. This appliance is designed for domestic use only. In case of professional use, inappropriate use
or failure to comply with the instructions, the manufacturer accepts no responsibility and the guarantee does not apply.
It is not intended to be used in the following applications, and the guarantee will not apply for: — staff kitchen areas in shops, offices and other working environments; — farm houses; — by clients in hotels, motels and other residential type environments; — bed and breakfast type environments.
Cooking times are given as a guide only. Do not touch the appliance when it is steaming and use oven gloves to remove the lid and
steam baskets.
SEBOU103_Notice VitaCuisine_EN_NC00022109_SEBOU103 10/02/11 10:29 Page2
3
EN If one of the steaming cups is damaged do not use it anymore. For any problems or queries please contact our Customer Relations Team or consult our web site:
Helpline: UK 0845 602 1454 www.tefal.co.uk Ireland (01) 677 4003 Australia 02 9748 7944 www.tefal.com.au NZ 0800 700711 www.tefal.co.nz
If your appliance is fitted with a removable power cord: if the power cord is damaged, it must be replaced by a special cord or unit available from a Tefal authorised service centre.
If your appliance is fitted with a fixed power cord: if the power supply cord is damaged, it must be replaced by a Tefal authorised service centre or a similarly qualified person in order to avoid any danger.
Protect the environment Your appliance has been designed to run for many years. However, when you decide to replace
it, remember to think about how you can contribute to protecting the environment. Before discarding your appliance you should remove the battery from the timer and dispose of
it at a local civic waste collection centre (according to model).
Environment protection first! i Your appliance contains valuable materials which can be recovered or recycled. Leave it at a local civic waste collection point.
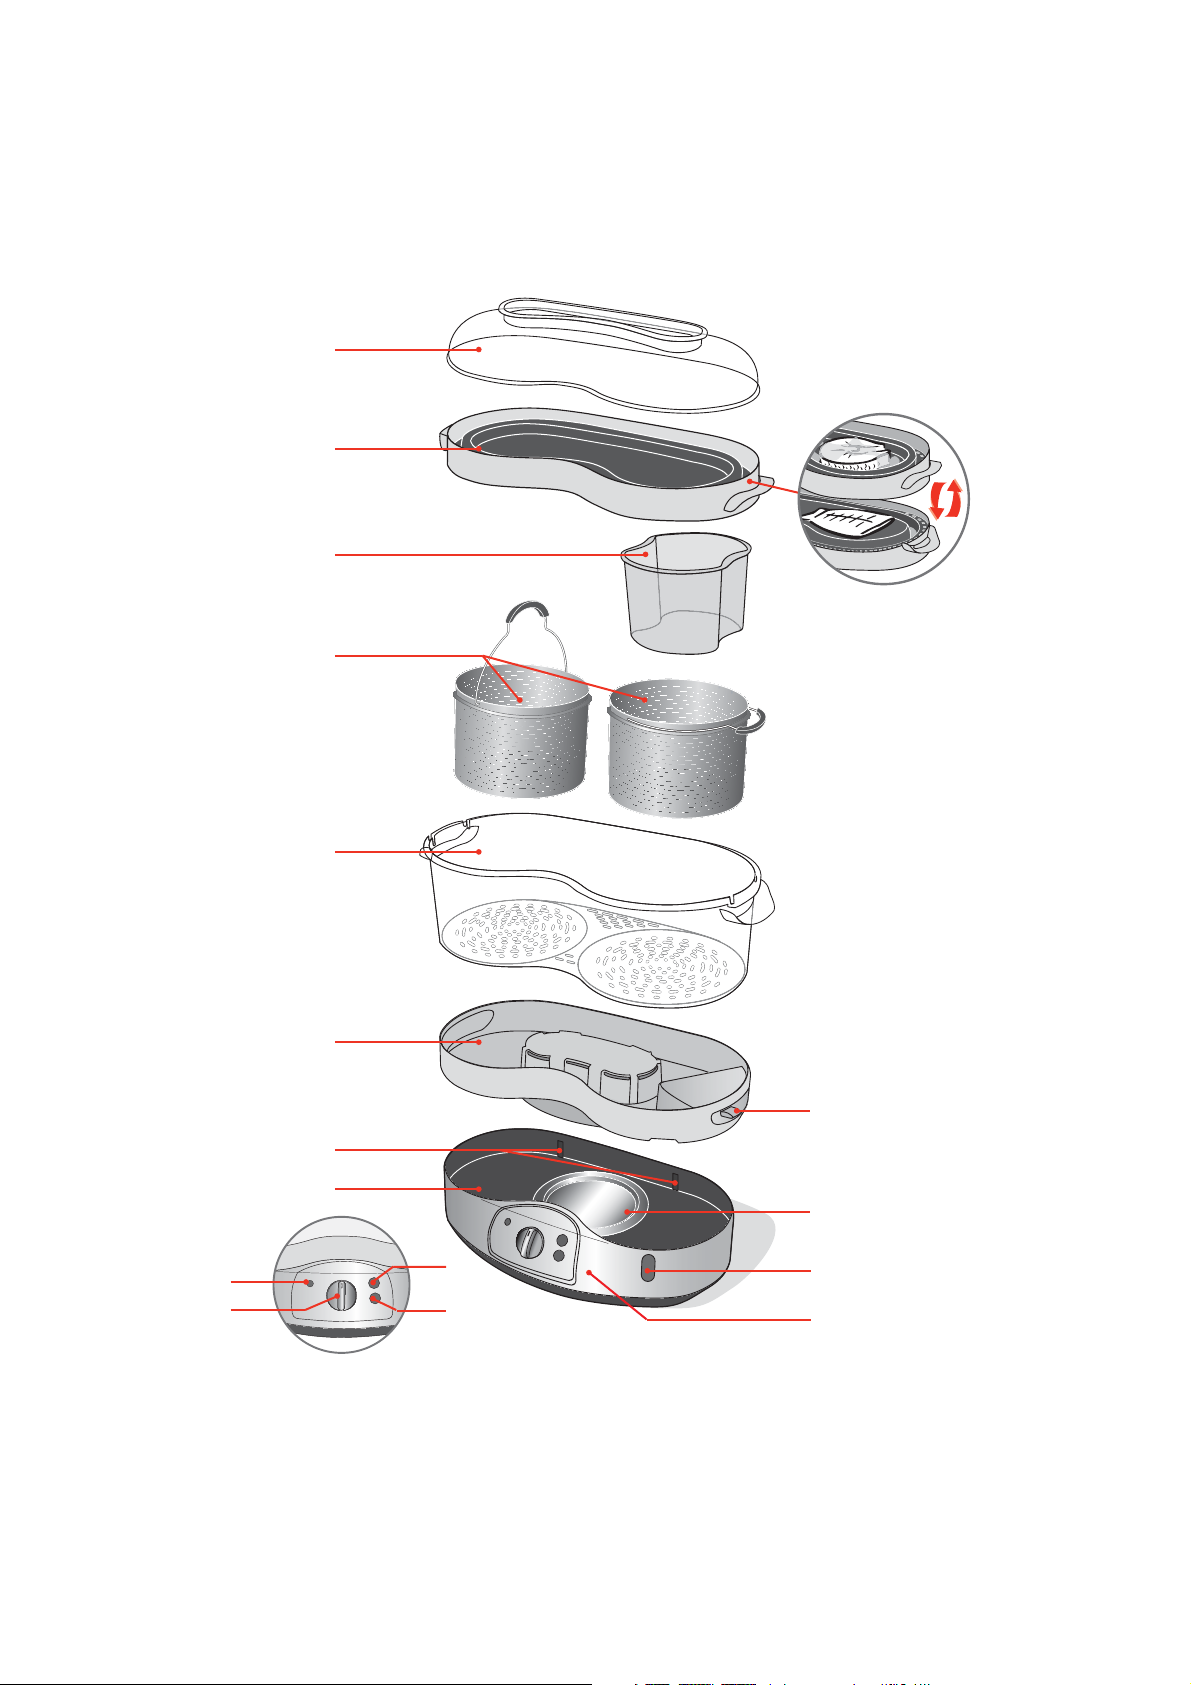
Description 1. Lid 2. Cooking trays 3. Steam baskets numbered 1, 2 & 3 4. Removable base 5. Juice collector 6. Interior water level indicator 7. Heating element 8. Water tank 9. Power supply base 10. Steaming cups and lids 11. Steaming cups holder
12. On/off touchpad 13. Programme touchpad 14. + Touchpad 15. Touchpad 16. LCD screen
a. Cooking level indicator b. Clock c. Low water level indicator d. Timer
17. vitamin + touchpad
SEBOU103_Notice VitaCuisine_EN_NC00022109_SEBOU103 10/02/11 11:21 Page3
4
Do not immerse the power supply base in water.
A long press on the + or touchpad allows you to increase or decrease the cooking time more quickly.
Instructions for Use Before first use Clean the water tank using a damp, non-abrasive sponge
— fig. 1. Wash all removable parts using warm water and washing up
liquid, rinse and dry.
Fill the water tank Pour cold water directly into the water tank up to the
maximum level (1.5 litre) — fig. 2. Position the juice collector on the water tank — fig. 3. Place the removable base (4) in basket 1 and the cooking
trays in baskets 2 and 3, if required — fig. 4. Put baskets 1, 2 and 3 with their bases in position and then
the lid — fig. 5. Use fresh water with each use and check that the water tank
is filled to the maximum level.
Cooking Choose the cooking time Plug the steamer in and switch on: a beep sounds and is
displayed — fig. 6. If no other action is taken, the screen goes blank and the
steamer switches to standby mode after 2 minutes . Set the cooking time using the + and touchpads (max.
60 min) — fig. 7. 20 sec. later (or on a short press of the on/off touchpad)
steam cooking begins. The vitamin + touchpad lights up and the cooking symbol is displayed — fig. 8.
You can alter the cooking time at any point after cooking has started by pressing the + or touchpad — fig. 7.
During cooking, the time displayed reduces by minutes and then by seconds in the last minute.
Using the vitamin + touchpad Your steamer is fitted with a vitamin + touchpad which
reduces cooking time and preserves the full vitamin content. The touchpad lights up when cooking starts. This allows a faster
start to the cooking process owing to a higher steam output. The vitamin + touchpad light goes out automatically when
the quantity of steam is sufficient for the cooking process. If the vitamin + touchpad is not illuminated and you
intervene during the cooking process (such as inserting a basket, removing the lid to check the cooking progress, etc.), press the vitamin + touchpad to replace the lost steam — fig. 9.
Do not use seasoning, herbs or any liquid other than water in the water tank. Ensure that the water tank (8) is filled with water to the maximum level before using the steamer.
After a few minutes cooking, you can manually stop the vitamin + programme by pressing the illuminated touchpad — fig. 9.
SEBOU103_Notice VitaCuisine_EN_NC00022109_SEBOU103 10/02/11 10:29 Page4
5
ENDuring cooking If is displayed (+ sound alarm) — fig. 10 carefully remove
the baskets and juice collector using oven gloves, add water up to the maximum level. The steamer will automatically continue the cooking process.
Delayed start Set the cooking time using the + and touchpads (max. 60) — fig. 7. Press the Prog touchpad — fig. 14. The programming symbol
is displayed and the clock flashes. Select the time period at the end of which you want the cooking to
start — fig. 7. When selecting the time you can increase it by 15 minute periods and then by the hour. If for example, you need your appliance to start in 2 and a half hours time, select 2h because your food will automatically be kept warm until your meal. Once the delayed start time has been programmed, the appliance will automatically run a short cycle to test and detect that water is in the tank, steaming will commence and then stop after approximately 10 seconds. The appliance will automatically start the cooking cycle when the delayed start time is reached.
20 sec. later the delayed start is operational and the clock disappears.
At the end of the delay period, the steamer automatically switches to cooking mode.
Keep warm function A beep sounds twice at the end of the cooking time. The keep warm function starts automatically at the end of
the cooking process, and the keep warm symbol is displayed — fig. 11.
The keep warm time elapsed (since the end of cooking) is displayed.
Removing the food Remove the lid by the handle. Remove the cooking trays and steaming baskets using the
handles — fig. 12 and 13. Serve the food.
To stop the steamer One press on the on :off touchpad stops the keep warm
function — fig. 15. A second press puts the steamer on standby . After 1 hour in keep warm mode, the steamer switches to
standby mode. The light goes out . Unplug the steamer.
Do not touch hot surfaces or hot food during cooking. Use oven gloves. If the water tank is empty, the steamer stops heating.
The delayed start time can be changed at any point.
While the keep warm function is in operation, no other action is possible, except stop when required.
Use oven gloves when handling the baskets, handles and lid.
If you want to switch off your appliance when it is showing the alert status low water level , you need to press twice on the on/off button.
A beep then sounds for a few seconds indicating cooking has been set.
SEBOU103_Notice VitaCuisine_EN_NC00022109_SEBOU103 10/02/11 11:22 Page5
6
Table of cooking times Cooking times are approximate and may vary depending on the size of the food, the space between the food, the amount of food, individual preferences, and the mains voltage.
Meat — Poultry
Fish — Shellfish
Preparation Type Quantity Cooking
time Recommendations
Chicken breast (boneless)
Fresh Whole 350 g 20 min 2 chicken breast in a steam basket
Small pieces 450 g 17 min
Chicken drumsticks
Fresh Whole 2 36 min
Turkey escalope Thin 600 g 24 min
Pork fillet Fresh 700 g 38 min Cut in 1 cm thickness slice
Lamb steak Fresh 500 g 14 min
Frankfurters Fresh 10 10 min
Preparation Type Quantity Cooking
time Recommendations
Thin fish fillets (cod, haddock, plaice, sole, salmon)
Fresh 450 g 15 min
Frozen 370 g 18 min
Fish steaks (cod, haddock, plaice, sole, salmon)
Fresh 400 g 15 min
Whole fish (trout, salmon trout, sea bass)
Fresh 600 g 25 min
Mussels Fresh 1 kg 20 min
Prawns Fresh 200 g 5 min
Scallops Fresh 100 g 5 min
Use oven gloves when handling the baskets during the cooking time.
SEBOU103_Notice VitaCuisine_EN_NC00022109_SEBOU103 10/02/11 10:30 Page6
7
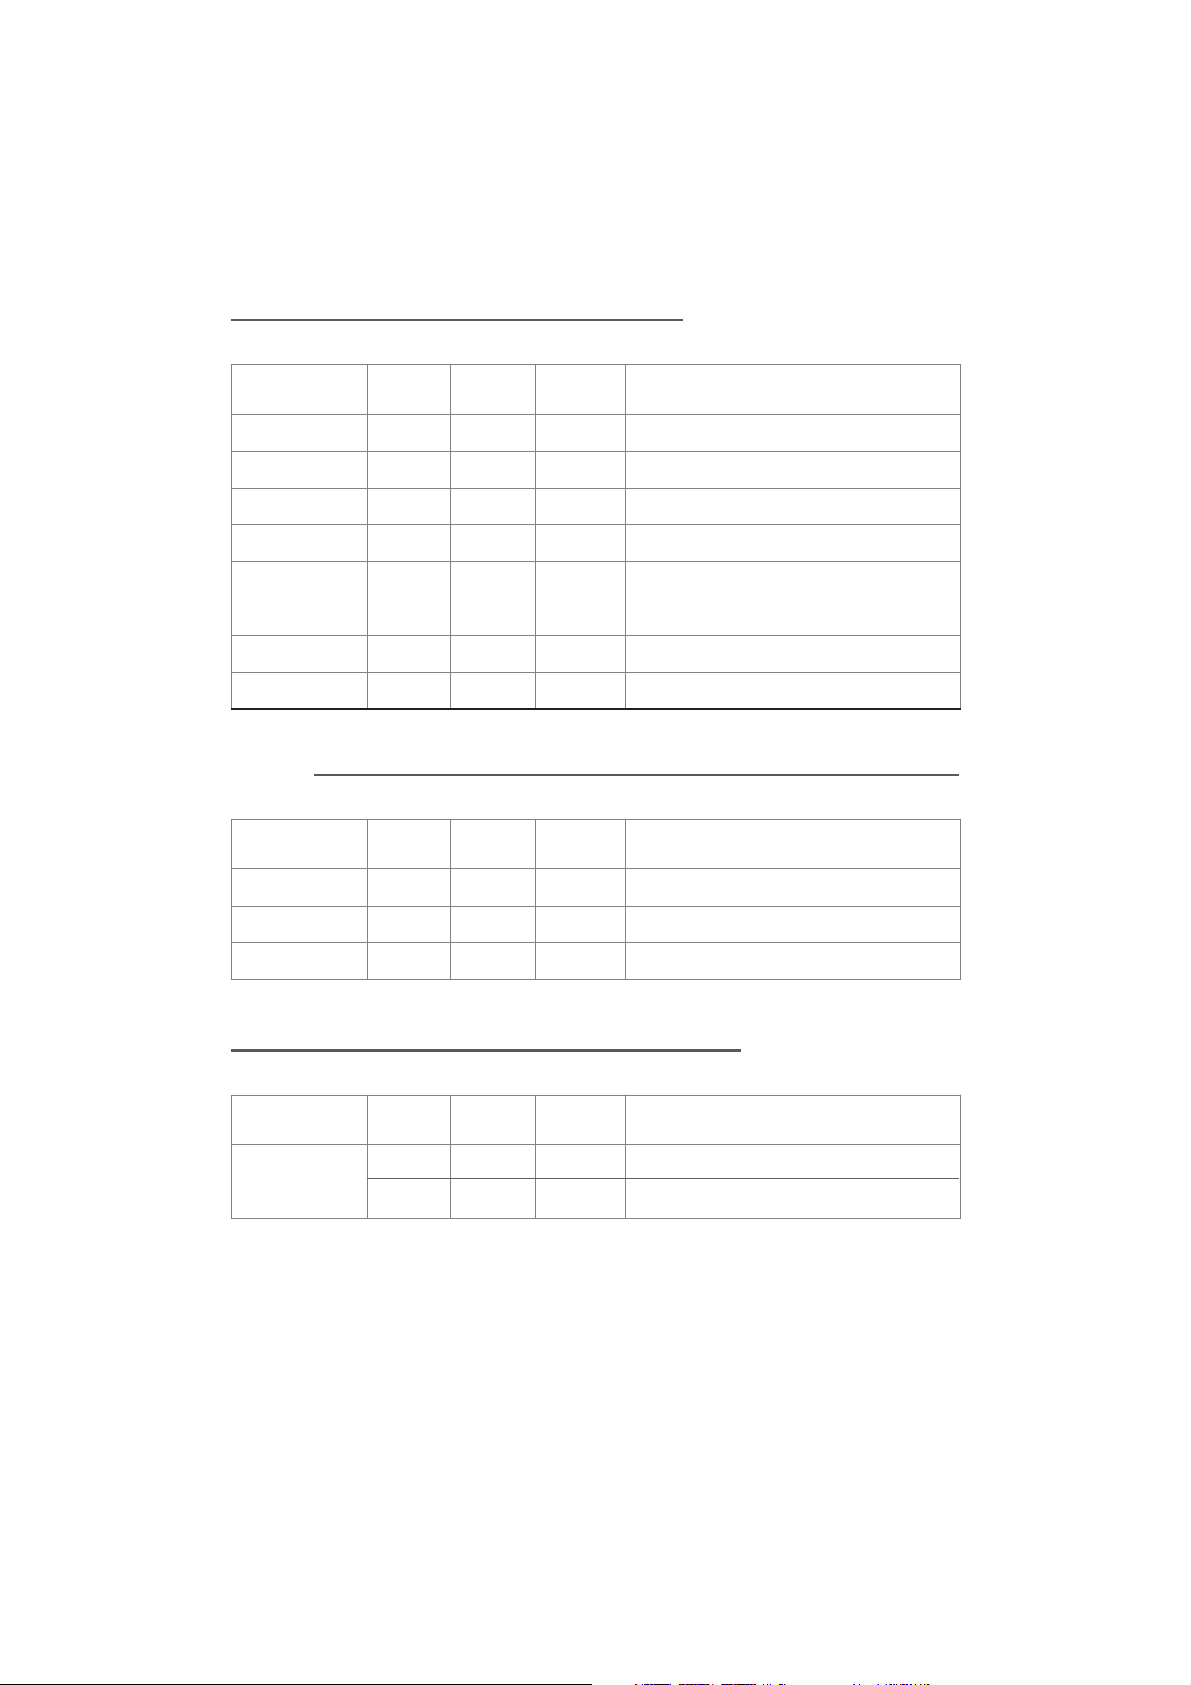
ENVegetables
Food Type Quantity Cooking
time Recommendations
Artichoke Fresh 2 55 min Whole in steam basket 1 and 2 (without cooking trays)
Potatoes Fresh 600 g 20 min Sliced or cubed. Small new potatoes can be cooked whole
Asparagus Fresh 600 g 17 min
Broccoli Fresh 500 g 18 min Small florets
Frozen 500 g 18 min
Celeriac Fresh 350 g 22 min In cubes
Mushrooms Fresh 500 g 22 min Whole
Cauliflower Fresh 1 medium 19 min Small florets
Cabbage (red-green) Fresh 600 g 22 min Sliced
Courgette Fresh 600 g 12 min Sliced
Spinach Fresh 300 g 13 min Toss halfway through cooking
Frozen 300 g 15 min
Fine green beans Fresh 500 g 35 min
Frozen 500 g 35 min
Carotts Fresh 500 g 15 min Thinly sliced
Corn on the cob Fresh 500 g 45 min
Green beans Fresh 500 g 35 min Whole
Leeks Fresh 500 g 30 min Sliced
Sweet peppers Fresh 300 g 20 min Cut in wide strips
Peas Fresh 400 g 20 min Shelled
Frozen 400 g 20 min
Rice
Food Weight Quantity Cooking
time Recommendations
For one cup of white long grain or basmati
30 g 70 ml 20 min
Wash rice well before cooking. Place rice and cold water in the steaming cup without the lid on. Use steam basket n 3
SEBOU103_Notice VitaCuisine_EN_NC00022109_SEBOU103 10/02/11 10:30 Page7
8
Fruits
Food Type Quantity Cooking
time Recommendations
Pears Fresh 4 25 min With steam basket 1 and 2 (without cooking trays). Steam whole or halved
Bananas Fresh 4 15 min Whole
Apples Fresh 5 20 min Quartered
Steaming Tips and Techniques Do not pack food too tightly in the steam baskets. Leave some space for steam to circulate as
much as possible. For best results, use pieces of food of approximately the same size (such as potatoes, vegetables
and chicken breasts) so that they cook at the same time. The size and thickness of the food will alter the cooking time.
Avoid lifting the lid to check on the cooking progress too often, as this allows loss of steam and can lengthen the cooking time.
If recipes require the use of cling film, always use the all purpose type suitable for use in microwave ovens. Cling film is often used to prevent condensation forming and spoiling delicates foods such as egg custards. Avoid using foil as this tends to increase the steaming time.
When choosing food for steaming, select suitable size food to fit the steaming basket, especially if it is cooked whole such as fish.
Subtle flavour can be given to steamed food with the addition of fresh herbs, slices of lemon or orange, garlic and onion. These may be placed either directly underneath or on top of the food in the steaming basket.
To give meat, poultry and fish a delicious flavour plus make then moist and tender, marinade for a few hours before steaming. The marinade can be as simple as a blend of wine and fresh herbs, or it can be a spicy barbecue or tandoori mix.
Frozen vegetables can be steamed from frozen. All shellfish, poultry and meat must be completely thawed before steaming.
For some recipes with a long cooking time, such as steamed sponge pudding, you will need to top up with more cold water during steaming.
Always use oven gloves when handling the baskets or steaming cups during or after cooking.
Steaming Cup Recipes
Preparing steaming cup recipes You can cook recipes in the steaming cups, either from the steamer recipe book or from your own recipes. Put the prepared mixture into the cups, taking care not to overfill them to prevent spillages as some recipes may rise during cooking. Cover the cups if necessary, using the lids. Place the four cups in the holder — fig. 16. Take the holder by the handle and place it in the basket — fig. 17.
The cups must always be placed in the top basket (basket no. 3) immediately under the lid.
SEBOU103_Notice VitaCuisine_EN_NC00022109_SEBOU103 10/02/11 11:23 Page8
9
ENRemoving the steaming cups Use oven gloves. Remove the lid by the handle. Remove the cups using the holder handle. Take the cups out of the holder and remove the lids (if your recipe uses lids). If necessary you can cool the cups by standing them in cold water. Do this using the holder. Wait until the cups are at room temperature before placing them in the refrigerator. Serve the recipe in the cups.
Maintenance and cleaning
Cleaning the steamer Unplug the steamer after use. Allow it to cool completely before cleaning. Check that the steamer has cooled completely before
emptying the juice collector and water tank. Wash all removable parts using warm water and washing up
liquid, rinse and dry. All parts except the power supply base are dishwasher safe.
Descaling your steamer For best results, descale the steamer after every 8 uses. To do this: Remove the juice collector. Pour 1 litre of cold water into the water tank. Add 1 glass (about 150 ml) of white vinegar (available from
hardware stores). Leave it to descale overnight. Rinse out the inside of the water tank several times using
warm water. Do not use other scale removing products.
Storage Store the steaming cups with the lids inside the juice collector. Turn basket 1 upside down on to the base. Put the two cooking trays on top of bowl 1 — fig. 18. Put bowl 2 inside bowl 3, then turn them both upside down
and place them on the base. Put the cups holder on top and then the lid — fig. 19.
Do no immerse the power supply base in water. Do not use abrasive cleaning products.
All parts can be stored inside the steamer.
It is essential to descale your appliance regularly in order for it to function correctly.
SEBOU103_Notice VitaCuisine_EN_NC00022109_SEBOU103 10/02/11 10:30 Page9
10
Technical troubleshooting guide
Problem Cause Solution
There is steam escaping from the sides of the appliance.
Bowls poorly interlocked between each other.
Check that the bowls are placed and fitted in the correct order. Fit bowl 1 first, next fit bowl 2 and then bowl 3.
The cooking starts and then stops straight afterwards.
The appliance is checking that there is water in the tank.
Do not change the program, the appliance will actually start cooking after about a minute.
The cooking wont start, you hear a beeping sound. Not enough water in the tank. Fill the tank with water up to the
maximum level.
Even though youve programmed your appliance to start later on, it starts heating up.
The noise of the appliance heating up indicates that it is testing for water in the tank.
Wait for at least one minute, the heating will stop automatically and steaming will begin at the requested time programmed for the delayed start.
A no water alert comes on even though there is water in the tank.
Heating element needs descaling.
Start descaling the heating element (please refer to maintenance and cleaning paragraph).
I plugged in my appliance but it switched itself off.
You switched the appliance on less than 2 minutes ago and it has gone into standby mode.
Press on the on/off button once to come out of standby mode.
The vitamin button + wont go off even if I press on it.
The cooking started less than 13 minutes ago.
This button light will go out automatically.
Water is coming out of the base. There might be a leak around the heating element.
VITACUISINE
cuiseur vapeur
stoomkoker
Dampfkocher
vaporiera
www.tefal.com
1
2
3
4
5
A
B
13
14
6
7
8
9
10
15
16
11
12
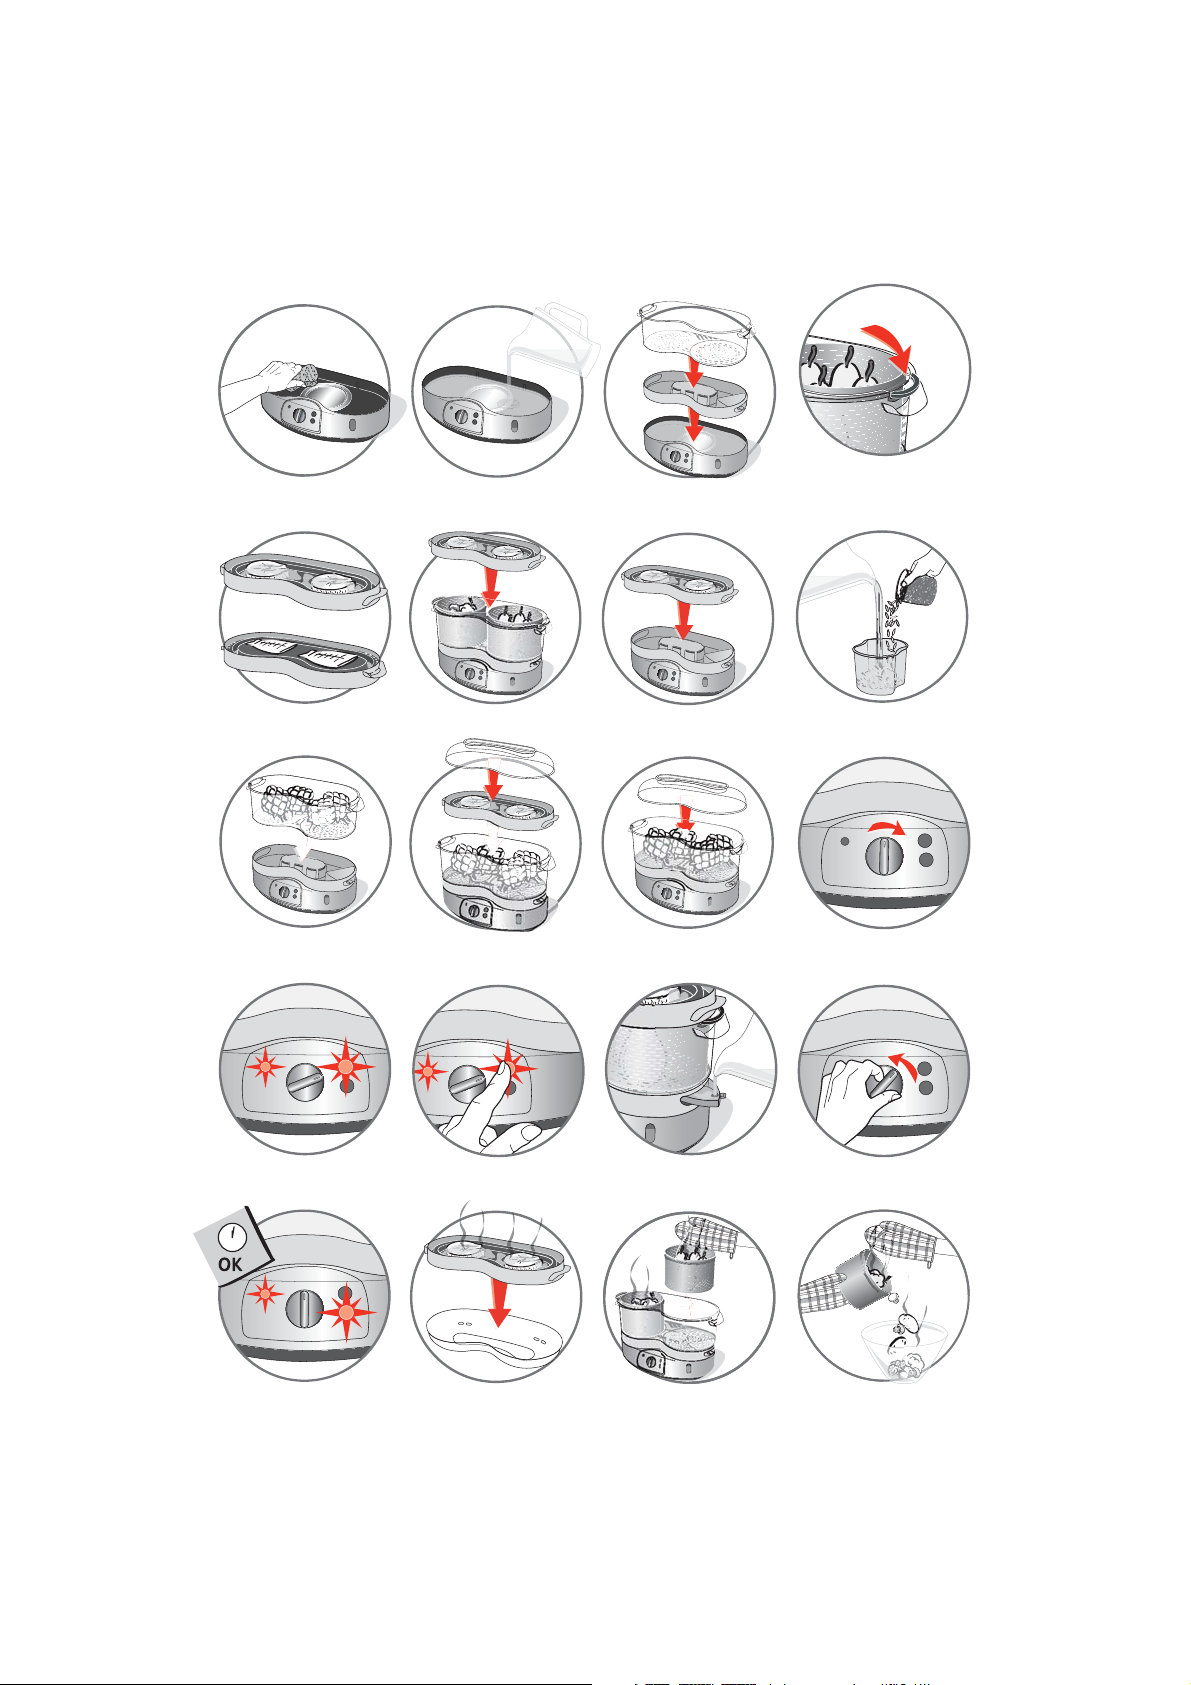
fig. 1 fig. 2 fig. 3 fig. 4
A
B
fig. 5 fig. 6 fig. 7 fig. 8
fig. 9 fig. 10 fig. 11 fig. 12
fig. 13 fig. 14 fig. 15 fig. 16
fig. 17 fig. 18 fig. 19 fig. 20

Recommandations importantes
Lisez attentivement ces instructions et conservez-les soigneusement.
Consignes de sécurité
• Pour votre sécurité, cet appareil est conforme aux normes et réglementations
applicables (Directives Basse Tension, Compatibilité Electromagnétique,
Matériaux en contact des aliments, Environnement, …).
• Vérifiez que la tension du réseau correspond bien à celle indiquée sur l’appareil
(courant alternatif).
• Compte tenu de la diversité des normes en vigueur, si l’appareil est utilisé dans
un autre pays que celui de l’achat, faites-le vérifier par un Centre Service Agréé.
• Cet appareil a été conçu pour un usage domestique uniquement, toute
utilisation professionnelle, non appropriée ou non conforme au mode d’emploi
n’engage ni la responsabilité, ni la garantie du constructeur.
• N’utilisez pas l’appareil si celui-ci ou son cordon est défectueux, si l’appareil est
tombé et présente des détériorations visibles ou des anomalies de
fonctionnement. Dans ces cas, l’appareil doit être envoyé à un Centre Service
Agréé le plus proche de votre domicile.
• Branchez toujours l’appareil sur une prise reliée à la terre.
• N’utilisez pas de rallonge. Si vous en prenez la responsabilité, utiliser une
rallonge en bon état reliée à la terre et adaptée à la puissance de l’appareil.
• Si le câble d’alimentation est endommagé, il doit être remplacé par le fabricant,
son Centre Service Agréé ou une personne de qualification similaire afin d’éviter
tout danger. Ne démontez jamais l’appareil vous-même.
• Ne laissez pas pendre le cordon.
• Ne débranchez pas l’appareil en tirant sur le cordon.
• Débranchez toujours l’appareil : après utilisation, pour le déplacer ou pour le
nettoyer.
Branchement
Fonctionnement
• Utilisez une surface de travail stable, plane, à l’abri des projections d’eau.
• Cet appareil n’est pas prévu pour être utilisé par des personnes (y compris les
enfants) dont les capacités physiques, sensorielles ou mentales sont réduites, ou
des personnes dénuées d’expérience ou de connaissance, sauf si elles ont pu
bénéficier, par l’intermédiaire d’une personne responsable de leur sécurité, d’une
surveillance ou d’instructions préalables concernant l’utilisation de l’appareil.
• Il convient de surveiller les enfants pour s’assurer qu’ils ne jouent pas avec
l’appareil.
• Des brûlures peuvent être occasionnées si l’on touche les surfaces chaudes de
l’appareil, l’eau chaude, la vapeur ou les aliments.
• Ne touchez pas l’appareil lorsqu’il produit de la vapeur et utilisez un torchon ou
un gant pour manipuler les surfaces chaudes.
• Ne déplacez pas l’appareil contenant des liquides ou des aliments chauds.
• Ne placez pas l’appareil près d’une source de chaleur ou dans un four chaud
sous peine de le détériorer gravement.
• Ne plongez jamais l’appareil dans l’eau !
• Ne placez pas l’appareil près d’un mur ou d’un placard : la vapeur produite
pouvant endommager les éléments.
2

Bienvenue dans l’univers de la cuisson vapeur !
Notre priorité étant de répondre au mieux aux nouvelles attentes de nos consommateurs, nous avons créé la
gamme Vitacuisine.
Cette gamme de produits complémentaires vous aidera à préserver votre santé et votre alimentation, tout en
gardant le plaisir de cuisiner et de manger.
Ainsi, votre cuiseur vapeur VitaCuisine et son système de cuisson douce préservent les vitamines et les
micronutriments de vos aliments.
EQUILIBRE ALIMENTAIRE
Le cuiseur vapeur VitaCuisine vous permet de préparer un repas complet et savoureux en une seule cuisson.
Grâce à ses paniers vapeurs individuels et au plateau cuisson, les légumes, le riz, les poissons, les viandes, les
fruits et les desserts peuvent être cuisinés simultanément.
DES VITAMINES PRESERVEES
Un système exclusif de cuisson rapide qui préserve mieux les vitamines, jusqu’à 100% de vitamine B9 (acides
folates), 86 % de vitamine C et 91% de polyphénol (antioxydant) dans 500g de brocolis.
MOINS GRAS, MIEUX GRAS
Idéal pour les poissons, les volailles et les viandes. Plateau de cuisson aide à retenir les acides gras essentiels type
Omega 3.
PLUS DE FRUITS ET LEGUMES
Le système de cuisson vapeur est facile à utiliser et cuit sans surveillance. La cuisson vapeur peut vous aider à
augmenter votre consommation journalière de fruits et légumes.
Maintenant créez votre repas savoureux et équilibré en une seule cuisson !
Description
1. Couvercle
2. Plateau réversible*
a. cuisson court bouillon / sauce
b. cuisson vapeur
3. Bol à riz*
4. Paniers vapeur
5. Bol maxi capacité
6. Récupérateur à jus
7. Trappe de remplissage d’eau en cours de
cuisson
8. Indicateur de niveau d’eau intérieur
9. Réservoir à eau
* selon modèle
10. Elément chauffant
11. Indicateur de niveau d’eau extérieur
12. Base électrique
13. Voyant de fonctionnement
14. Minuterie 60 min
15. Touche Vitamin +
16. Touche maintien au chaud*
3

Préparation
Avant utilisation
• Passez une éponge non abrasive humidifiée pour nettoyer le réservoir à eau —
fig.1.
• Lavez toutes les pièces amovibles à l’eau tiède avec du liquide vaisselle, rincez et
séchez.
Remplissez le réservoir à eau
N’utilisez pas
d’assaisonnement ou de
liquide autre que l’eau
dans le réservoir.
Assurez-vous de la
présence d’eau dans le
réservoir avant la mise en
marche.
• Versez de l’eau directement dans le réservoir à eau jusqu’au niveau maximum —
fig.2.
• Placez le récupérateur à jus sur le réservoir.
• Placez le bol maxi capacité sur le récupérateur à jus —
• Renouvelez l’eau avant chaque utilisation et vérifiez que le réservoir est empli
jusqu’au niveau maximum.
Placez le(s) panier(s) vapeur
• Placez les aliments dans le(s) panier(s).
• Posez le(s) panier(s) dans le bol maxi capacité. Rabattez les poignées dans les
encoches prévues à cet effet — fig.4.
• Posez le couvercle.
Placez le plateau cuisson réversible*
Le plateau cuisson (face
A) peut-être utilisé sans
le bol. Placez-le
directement sur le
récupérateur à jus — fig.7.
• Utilisez la face A du plateau cuisson pour les plats en sauce et la cuisson des
aliments dans leur jus, et la face B pour une cuisson vapeur — fig.5.
• Placez le plateau cuisson réversible sur le bol maxi capacité — fig.6.
• Posez le couvercle.
N’immergez pas la base
électrique.
fig.3.
Préparez du riz
Vous avez la possibilité de cuire du riz
• Mettez le riz et l’eau dans le bol à riz (cf. tableau de cuisson) — fig.8.
• Placez le bol à riz dans un panier vapeur ou dans le bol maxi capacité.
Cuisinez sans les paniers
Pour une maxi capacité, vous pouvez cuisiner sans les paniers
• Enlevez les paniers.
• Placez vos aliments dans le bol maxi capacité.
• Posez le bol maxi capacité sur le récupérateur à jus —
• Mettez soit le plateau cuisson et le couvercle couvercle — fig.11.
4
fig.9.
fig.10, soit directement le
* selon modèle

Cuisson
Sélectionnez le temps de cuisson
• Branchez l’appareil.
• Réglez la minuterie selon les temps recommandés (cf. tableau de cuisson) —
fig.12.
• Le voyant de fonctionnement rouge et la touche VITAMIN+ s’allument et la
cuisson vapeur commence.
Utilisez la touche VITAMIN +
Vous pouvez arrêter
manuellement le
programme Vitamin+ en
appuyant sur le voyant
allumé.
• Exclusif : votre appareil est équipé d’une touche VITAMIN + qui réduit le
temps de cuisson et préserve parfaitement toutes les vitamines.
• En début de cuisson la touche s’allume — fig.13. Cette fonction permet un
démarrage plus rapide de la cuisson grâce à un débit vapeur plus important.
• La touche VITAMIN + s’éteint automatiquement lorsque la quantité de vapeur
est suffisante pour la cuisson.
• Si vous avez ouvert le produit pendant la cuisson, appuyez sur la touche
VITAMIN + — fig.14.
Pendant la cuisson
• Vérifiez le niveau d’eau pendant la cuisson grâce à l’indicateur de niveau d’eau
extérieur.
• Si nécessaire, remettez de l’eau par l’ouverture de remplissage — fig.15.
• Pour arrêter volontairement l’appareil, tournez la minuterie sur la position O —
fig.16.
L’appareil doit être
branché avant
d’actionner la minuterie.
Ne touchez pas les
surfaces chaudes ni les
aliments en cours de
cuisson.
S’il n’y a plus d’eau,
l’appareil ne cuit plus.
Vérifiez pendant le
maintien au chaud qu’il y
a toujours de l’eau dans
le réservoir.
• Un signal sonore retentit.
• Le maintien au chaud se met en marche automatiquement — fig.17.
• L’appareil garde les aliments au chaud pendant 60 minutes.
• Appuyez sur la touche maintien au chaud allumé pour arrêter l’appareil.
Retirez les aliments des paniers
• Retirez le couvercle par sa poignée.
• Posez le plateau cuisson sur le couvercle retourné — fig.18.
• Retirez les paniers à l’aide des poignées — fig.19.
• Servez les aliments — fig.20.
* selon modèle
Maintien au chaud*
Utilisez des gants de
protection pour
manipuler les bols, la
poignée et le couvercle.
5
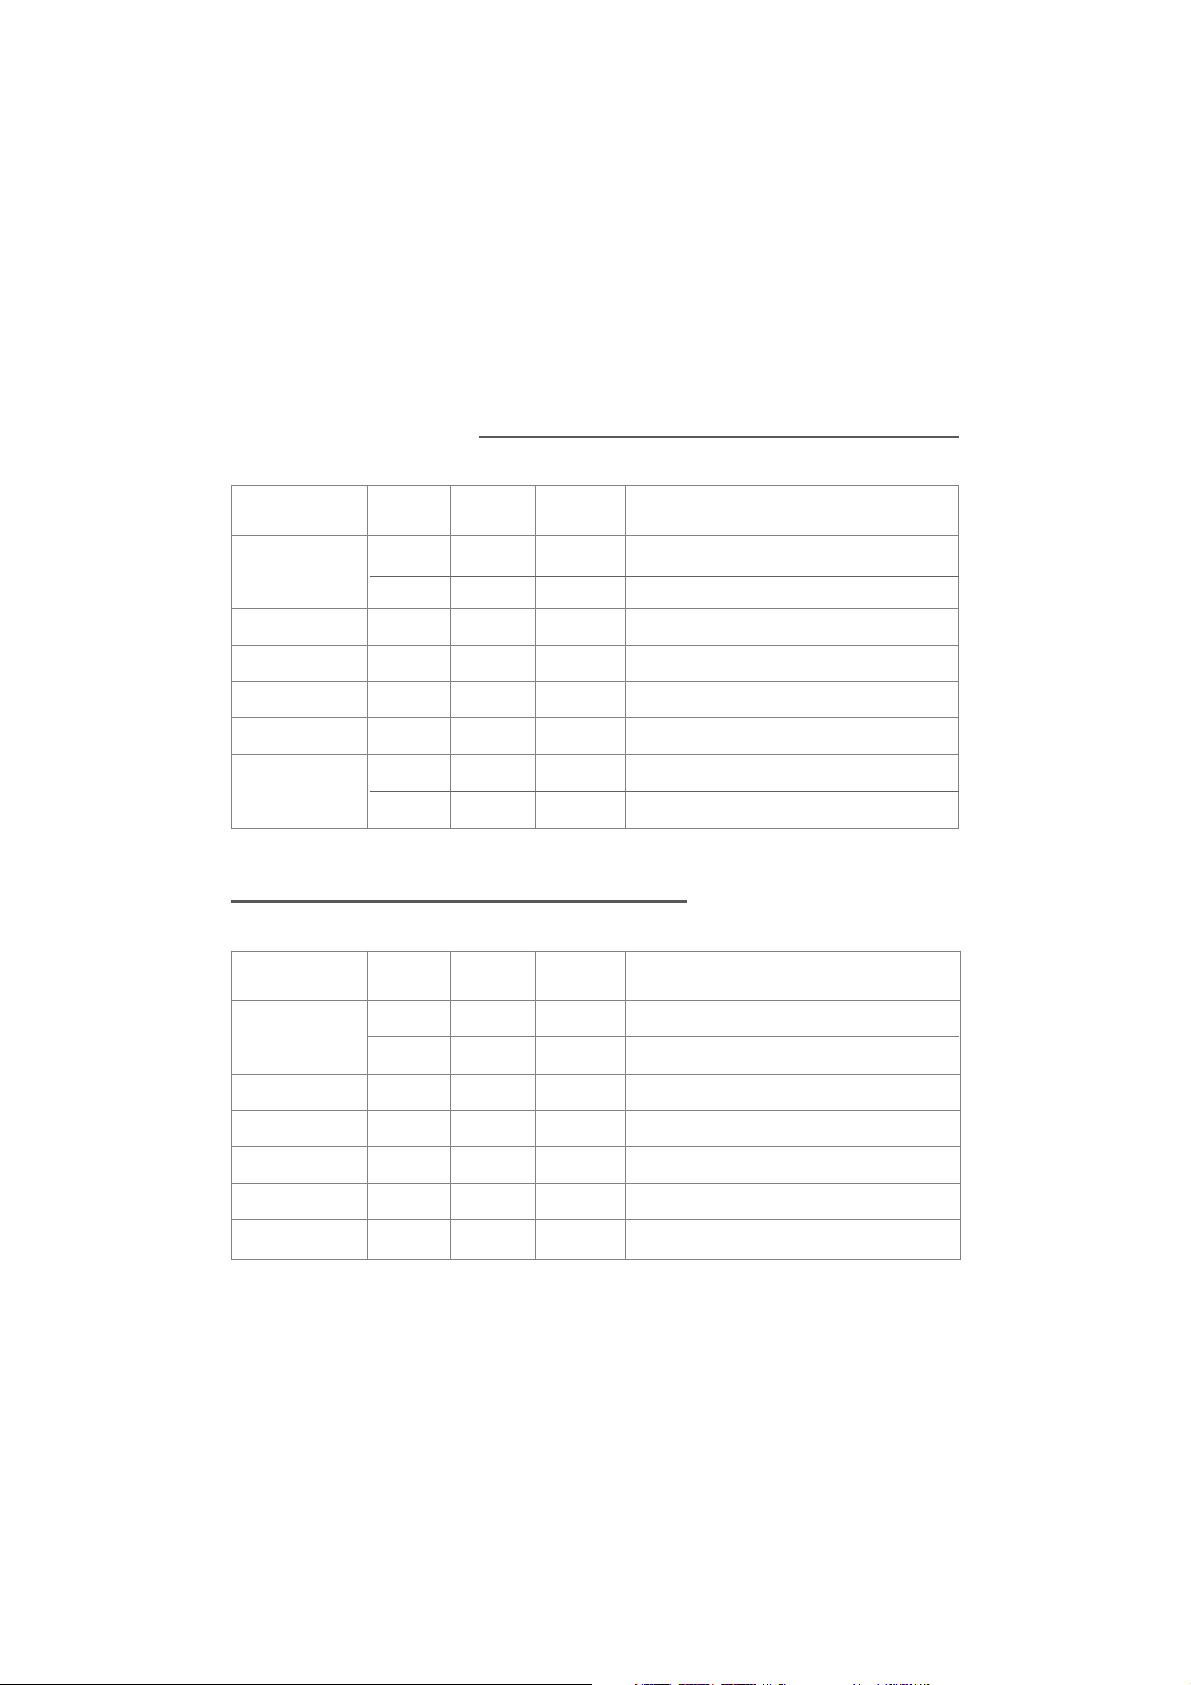
Table des temps de cuisson
Les temps sont donnés à titre indicatif, ils peuvent varier en fonction de la taille des
aliments, de l’espace laissé entre les aliments, des quantités, du goût de chacun et
de la tension du réseau électrique.
Viandes — Volailles
Utilisez des gants de
protection pour
manipuler les bols en
cours de cuisson.
10
10
Temps de
cuisson
15 min
17 min
10 min
10 min
Recommandations
Préparation Type Quantité
Petits
Blanc de poulet
Cuisses de poulet Entières 4 36 min
Escalope de dinde Fines 600 g 24 min
Filets de porc 700 g 38 min Coupez en tranches de 1 cm d’épaisseur
Tranches d’agneau 500 g 14 min
Saucisses
morceaux
En entier
Knack
Francfort
500 g
450 g
Poissons — Crustacés
Préparation Type Quantité
Filets de poisson
Frais
Surgelés
450 g
450 g
Temps de
cuisson
10 min
18 min
Recommandations
Steaks de poisson Frais 400 g 15 min Selon l’épaisseur
Poisson entier Frais 600 g 25 min Selon l’épaisseur
Moules Fraîches 1 kg 15 — 20 min
Crevettes Fraîches 200 g 5 min
Coquilles SaintJacques
Fraîches 100 g 5 min
6

Légumes
Préparation Type Quantité
Artichauts Frais 3 43 min Coupez la base
Asperges Fraîches 600 g 17 min Coupez les plus grosses en 2
Brocolis
Frais
Surgelés
Céleri Frais 350 g 22 min
Champignons Frais 500 g 12 min Coupez les pieds et bien nettoyer
Choux fleur Frais 1 moyen 19 min En petits morceaux
Choux (rouge ou vert) Frais 600 g 22 min En petits morceaux
Courgettes Fraîches 600 g 12 min Emincer
Frais
Epinards
Surgelés
Frais
Haricots verts
Surgelés
Petites carottes Fraîches 500 g 15 min Emincez finement
Maïs entier Frais 500 g 40 min
400 g
400 g
300 g
300 g
500 g
500 g
Temps de
cuisson
18 min
12 min
13 min
15 min
30 min
25 min
Recommandations
Mange tout Frais 500 g 15 min
Poireaux Frais 500 g 30 min Emincez finement
Poivrons Frais 300 g 15 min
Petits pois
Pommes de terre
Binje
Pommes de terre
charlottes
Pommes de terre
rattes
Petits oignons
grelots
Frais
Surgelés
Fraîches 600 g 20 min Coupez en morceaux de 30g
Fraîches 600 g 20 min Emincez ou coupez en cubes
Fraîches Entières 20 min
Frais 400 g 12 min Couper les tiges vertes
400 g
400 g
20 min
20 min
Coupez en larges
bandes
7
Riz — Pâtes — Céréales
Préparation
Riz blanc long grain 150 g 300 ml 30 — 35 min Lavez le riz avant cuisson
Riz basmati 150 g 300 ml 30 — 35 min Mettez dans l’eau bouillante
Riz cuisson rapide 150 g 300 ml 28 — 33 min Egrenez en fin de cuisson avec une fourchette
Riz complet 150 g 300 ml 33 — 38 min Egrenez en fin de cuisson avec une fourchette
Semoule de
couscous
Blé bulgare 150 g 300 ml 15 min Mettez dans l’eau bouillante
Pâte (spaghettis) 200 g 400 ml 20 — 25 min Mettez dans l’eau bouillante
Quantité
de riz
200 g 350 ml 23 min
Quantité
d’eau
Temps de
cuisson
Recommandations
Laisser reposer la semoule 5 min. dans l’eau bouillante avant de cuire
Fruits
Préparation Type Quantité
Bananes Fraîches 3 10 min
Pommes Fraîches 4 12 min
Temps de
cuisson
Recommandations
Poires Fraîches 5 20 min
Préparation Type Quantité
Oeufs
Durs
Mollets
6
6
8
Temps de
cuisson
12 min
8 min
Autres aliments
Recommandations

Entretien et nettoyage
Nettoyez l’appareil
• Après chaque utilisation, débranchez l’appareil.
• Laissez-le refroidir complètement avant le nettoyage.
• Vérifiez que l’appareil a suffisamment refroidi avant de vider le récupérateur à
jus et le bac à eau.
• Lavez toutes les pièces amovibles à l’eau tiède avec du liquide vaisselle, rincez et
séchez.
N’immergez pas la base
électrique.
N’utilisez pas de produits
d’entretien abrasifs.
Détartrez votre appareil
Détartrez toujours votre
appareil à froid.
N’utilisez pas d’autres
produits détartrants.
• Pour un fonctionnement optimal de votre appareil, détartrez-le toutes les 8
utilisations.
• Retirez le récupérateur à jus.
• Versez 3 cuillères à soupe de vinaigre blanc dans la partie creuse de l’élément
chauffant.
• Laissez agir à froid pendant une nuit.
• Rincez l’intérieur du réservoir à eau plusieurs fois avec de l’eau tiède.
Participons à la protection de l’environnement !
Votre appareil contient de nombreux matériaux valorisables ou recyclables.
Confiez celui-ci dans un point de collecte ou à défaut dans un centre service
agréé pour que son traitement soit effectué.
9
Loading…
TEFAL Vitacuisine Compact Grill PDF User Guides and Manuals for Free Download: Found (1) Manuals for TEFAL Vitacuisine Compact Device Model (Operation & User’s Manual)
TEFAL Vitacuisine Compact Operation & User’s Manual
Details:
- Manufacturer: TEFAL
- Product Name/ID: TEFAL Vitacuisine Compact / #687972
- Category: Grill
- File Path: tefal/vitacuisine-compact_687972.pdf
- Last Updated: 10 Apr 2025
- Description: Discover the features of TEFAL Vitacuisine Compact with this manual, which provides detailed setup instructions, user interface tips, and troubleshooting advice to enhance your overall experience.
- Document Type: User Manual
- Pages: 14
Download PDF
Read Online
The TEFAL Vitacuisine Compact is a remarkable kitchen appliance that has quickly become a staple for health-conscious home cooks. Designed with both efficiency and convenience in mind, this multi-level steamer delivers an impressive array of features that make it an essential tool in any modern kitchen. Whether you’re steaming vegetables, fish, or even desserts, the Vitacuisine Compact stands out for its versatility and ease of use.
One of the most significant advantages of the TEFAL Vitacuisine Compact is its well-thought-out design. The compact size is perfect for smaller kitchens, yet it does not compromise on functionality. The three stacked tiers enable you to cook multiple dishes simultaneously, saving you both time and energy. With a total capacity of 9 liters, you can prepare meals for the entire family or meal prep for the week ahead with minimal effort.
The user-friendly control panel is another highlight of the Vitacuisine Compact. Equipped with a digital timer and a cooking progress indicator, it allows you to monitor your meals effortlessly. The automatic shut-off feature adds an extra layer of safety, ensuring that you never have to worry about overcooking your food. The intuitive interface also makes it easy to choose cooking times and settings for different types of food.
When it comes to cooking performance, the TEFAL Vitacuisine Compact does not disappoint. The steaming system utilizes a powerful heating element that generates steam quickly, ensuring that food is cooked evenly and retains its vital nutrients. Steaming is one of the healthiest cooking methods available, and TEFAL has effectively maximized this technique to deliver delicious, nutritious meals.
Another noteworthy aspect of the Vitacuisine Compact is its versatility in cooking options. The appliance comes with several handy features, including:
- Stackable steaming trays: Cook a variety of foods without mixing flavors.
- Rice cooking function: Prepare fluffy rice with ease.
- Egg cooking option: Perfect for soft or hard-boiled eggs.
- Flavor infuser: Add herbs and spices to enhance the flavors of your dishes.
The easy-to-clean components of the TEFAL Vitacuisine Compact also add to its appeal. The steaming trays are dishwasher safe, making post-cooking clean-up a breeze. Additionally, the plastic parts are made from high-quality materials that resist staining and odors. This not only ensures better hygiene but also prolongs the appliance’s lifespan.
As for the pricing, the Vitacuisine Compact offers great value for its features and performance. While it sits in the mid-range category regarding kitchen appliances, the level of convenience and quality it delivers makes it a worthwhile investment. With its robust build and thoughtful design, it promises to deliver meals for years to come.
In conclusion, the TEFAL Vitacuisine Compact is an excellent addition to any kitchen, especially for those looking to adopt healthier cooking methods. Its compact design, ease of use, and excellent steaming performance make it stand out from the competition. Whether you’re a novice cook or an experienced chef, this appliance is sure to impress with its versatility and reliability. For anyone serious about steaming and healthy cooking, the Vitacuisine Compact should be a top contender on your list.