
Huawei eSpace 7910 — IP-телефон с цветным информационным ЖК-экраном. Данная модель предназначена для малого и среднего бизнеса. eSpace 7910 сочетает в себе стиль, высокое качество исполнения и передовые технические решения. IP-телефон Huawei поддерживает PoE
Type Huawei eSpace 7910 IP Phone
Screen 2.83-inch, 320 x 240 pixels, 260,000 colors, color screen
LEDs Line, Message Waiting Indicator (MWI), Mute, Speaker, Call History, Headset, and programmable button LEDs
Angle Adjustment 2 adjustable angles
Buttons
· 2 line buttons
· 5 navigation buttons (up, down, left, right, OK)
· 10 programmable buttons
· 4 soft keys
· 4 fixed function buttons with LEDs (speaker, headset, mute, and call history)
· 7 fixed function buttons without LEDs (home, message, volume, contacts, hold, conference, and transfer
huawei espace 7910 инструкция на русском
По дефолту в аппарате включен dhcp. Телефон будет работать в локальной сети, где dhcp есть. Соответственно заходим браузером на уже известный нам ip девайса и сразу же видим первые грабли:
Зайти естественно получилось только интернет эксплорером.


Выбираем локализацию:

Включаем от безисходности http, чтобы заходить разными браузерами:

Приступаем непосредственно к главным настройкам.
Если есть резервные sip сервера указываем их ip в полях Сервер 2 и Сервер 3 и естественно их порты тоже.
Указываем остальные параметры ldap:
Указываем атрибуты нашего ldap (в большинстве случаев используются стандартные наименования атрибутов):

Сохраняем настройки и перезагружаемся.
Вводим наименование sip аккаунта, имя пользователя и пароль.


Звук кнопок тоже настраивается:

Можно выбирать обои и даже загружать свои:
Выбор аудио источника:

Очень удобный и наглядный интерфейс программирования кнопок:

Просто делаешь двойной правый клик мышкой по кнопке и в открывшемся окне вводишь настройки. Например добавление кнопки линии выглядит так:
Для перехода по всем кнопкам линий нужно нажимать кнопки выделенных стрелочек. Добавление кнопки быстрого набора:

На границе с PSTN какой-то шлюз, в центре сервер приложений и сервер управления. На местах аппаратные телефоны, софт-фоны и аналоговые аппараты, подключаемые через шлюзы.
Из всего этого великолепия у меня на руках пока только телефонный аппарат Huawei eSpace 7910.
Подключать мы его будем (за неимением другого) к CUCM и к Asterisk.
Первый взгляд
На сайте производителя фото аппарата выглядит вот так
У меня на столе он смотрится следующим образом (на заднем плане маячит телефон другой компании, для масштаба)

Самый главный плюс аппарата. Без всякой родной инфраструктуры он спокойно работает как обычный SIP-телефон. Не надо никаких плясок с бубном (это пинок в сторону циски, попробуйте просто так прикрутите к астериску Cisco 9971 с консолькой, развлечение для сильных духом). После подключения к коммутатору Cisco Catalyst 4507 аппарат получил питание по PoE, самостоятельно нашел голосовой VLAN (да, я предусмотрительно включил LLDP, не придирайтесь), получил IP по DHCP и начал требовать введения каких-то “паролей и явок”. Но русская смекалка и WEB-интерфейс (юзер admin, пароль admin123 – по умолчанию) помогли обойти все трудности.
Подробно, про краткие настройки аппарата рассказано здесь. Единственное, что у меня заведено два сервера, и две линии. Во всём остальном – так-же.
Впечатления
Телефон оставляет неоднозначные впечатления.
Особенно меня удивила трубка.
Для сравнения, слева – трубка аппарата Cisco, справа – от Huawei.

При этом к качеству звука претензий нет. Всё четко и чисто.
Так-же слегка удивил спикерфон, он почему-то сделан на задней панели. И громкость его недостаточна для устройств подобного класса.
Клавиатура добротная, кнопки нажимаются с легким, приятным усилием. В паре моментов группировка клавиш вызывает недоумение, но это, видимо, с непривычки. Порадовало наличие десяти аппаратных кнопок быстрого набора. Люди это любят.
Откровенно удивил экран – 3 дюйма, с разрешением 320×240 пикселей, цветной. Возникает вопрос – нахуа Хуану сомбреро?
Он годится что-бы посмотреть на нем выданный IP-адрес, и увидеть имя звонящего. Можно было поставить B/W экранчик. А так, на экране четыре иконки (история, контакты, сообщения и приложения), которые ещё и меняют размер при наведении курсора них. Выглядит – неаккуратно. Но будем надеяться что это поправят в следующих прошивках.
Порадовал подход к русификации, шрифт красивый, ошибок в написании нет, русский CallerID прекрасно показывается без всяких “закорючек и иероглифов”.
Так-же отмечу большой плюс аппарата, гигабитные сетевые порты. Огромное спасибо. А то нередко случается ситуация, когда на предприятии коммутаторы с гигабитными портами, а телефоны закупаются (великая штука – оптимизация расходов) с портами 100Mb/s.
Итого
Собственно, делать итоги рано. Необходимо посмотреть как будет работать комплекс в целом.
Потому что WEB-интерфейс это конечно хорошая штука, но при наличии уже сотни аппаратов, без централизованного управления, работа превращается в кошмар.
В данной статье будет описано как выполнить базовую настройку телефонного аппарата Huawei eSpace 7810.
Перед началом настройки телефонного аппарата, выполним подключение к сети питания и к локальной сети. Дождавшись полной загрузки аппарата, откроем интернет обозреватель(Mozilla Firefox, Google Chrome, Opera) и введем в адресную строку:
И выполним переход, система попросит пройти процедуру авторизации, ввести логин и пароль(по умолчанию admin:admin).
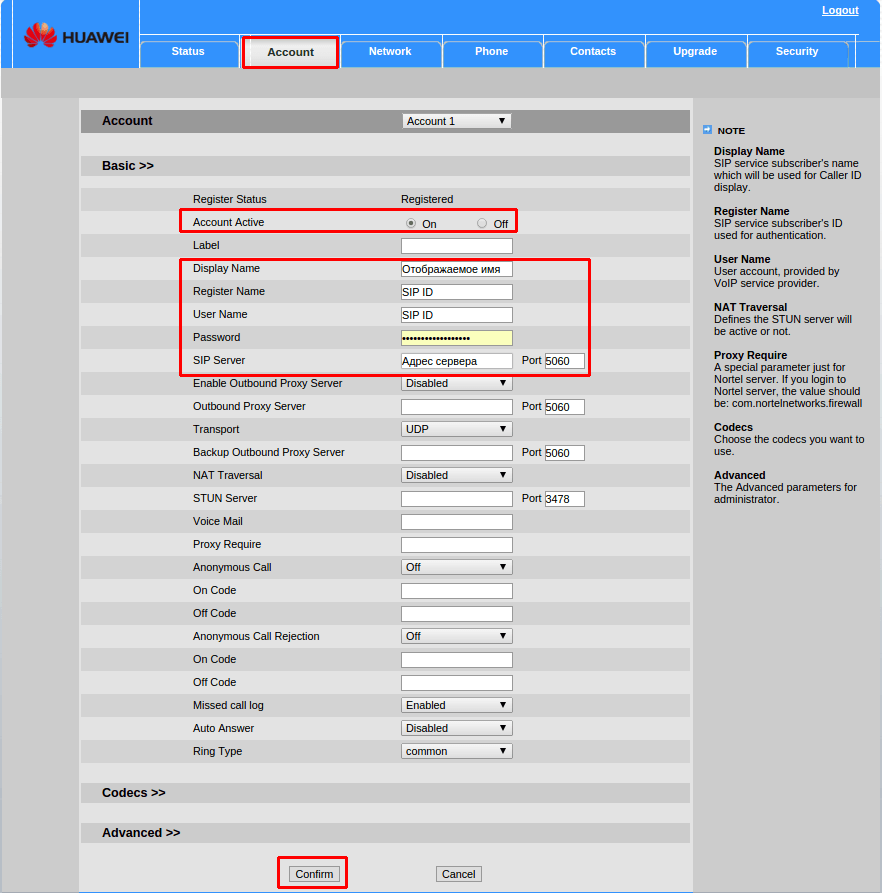
После успешной процедуры авторизации, перейдем на вкладку «Account» и заполним следующие поля:
1. Account Active — On или Off
2. Display Name — Отображаемое имя на экране телефона
3. Register Name — SIP ID
4. User Name — SIP ID
6. SIP Server — адрес сервера телефонии
Для выполнения обновления или сброса настроек телефонного аппарата необходимо перейти во вкладку «Upgrade»:
Источник
Preface
Overview
This document covers the following information about the eSpace 7910/eSpace 7950 IP phone (eSpace 7910/eSpace 7950 for short): service features, networking, batch configurations with and without eSight, configuration methods of common functions, and basic troubleshooting methods.
Intended Audience
Symbol Conventions
The symbols that may be found in this document are defined as follows.
Indicates an imminently hazardous situation which, if not avoided, will result in death or serious injury.
Indicates a potentially hazardous situation which, if not avoided, could result in death or serious injury.
Indicates a potentially hazardous situation which, if not avoided, may result in minor or moderate injury.
Indicates a potentially hazardous situation which, if not avoided, could result in equipment damage, data loss, performance deterioration, or unanticipated results.
NOTICE is used to address practices not related to personal injury.
Calls attention to important information, best practices and tips.
NOTE is used to address information not related to personal injury, equipment damage, and environment deterioration.
Change History
Changes between document issues are cumulative. The latest document issue contains all the changes made in earlier issues.
Issue 17 (2019-11-15)
This issue is the sixteenth official release for eSpace 7910/eSpace 7950 V200R002C30SPCm10, and includes the following changes:
USM is renamed CloudUSM for the EC6.X networking.
Issue 16 (2019-06-20)
This issue is the fifteenth official release for eSpace 7910/eSpace 7950 V200R003C30SPCm10, and includes the following changes:
Updated the content about Network and Others.
Issue 15 (2019-04-03)
This issue is the fourteenth official release for eSpace 7910/eSpace 7950 V200R003C30SPCm00, and includes the following changes:
Issue 14 (2018-12-22)
This issue is the thirteenth official release for eSpace 7910/eSpace 7950 V200R003C30SPCk00, and includes the following changes:
Updated the content about Redundancy and Date and Time.
Issue 13 (2018-11-07)
This issue is the twelfth official release for eSpace 7910/eSpace 7950 V200R003C30SPCj00, and includes the following changes:
Updated the content about Network.
Issue 12 (2018-10-15)
This issue is the eleventh official release for eSpace 7910/eSpace 7950 V200R003C30SPCh00, and includes the following changes:
Updated the content about Multi-Line Support and Account.
Issue 11 (2018-09-04)
This issue is the tenth official release for eSpace 7910/eSpace 7950 V200R003C30SPCf00, and includes the following changes:
Issue 10 (2018-07-13)
This issue is the ninth official release for eSpace 7910/eSpace 7950 V200R003C30SPCf00, and includes the following changes:
Issue 09 (2018-04-28)
This issue is the eighth official release for eSpace 7910/eSpace 7950 V200R003C30SPCc00, and includes the following changes:
Issue 08 (2018-03-22)
This issue is the seventh official release for eSpace 7910/eSpace 7950 V200R003C30SPCa00, and includes the following changes:
Updated the content about Others.
Issue 07 (2018-03-10)
This issue is the sixth official release for eSpace 7910/eSpace 7950 V200R003C30SPC900, and includes the following changes:
Updated the content about SIP Signaling.
Issue 06 (2018-01-31)
This issue is the fifth official release for eSpace 7910/eSpace 7950 V200R003C30SPC800, and includes the following changes:
Issue 05 (2017-12-30)
This issue is the fourth official release for eSpace 7910/eSpace 7950 V200R003C30SPC700, and includes the following changes:
Issue 04 (2017-11-30)
This issue is the third official release for eSpace 7910/eSpace 7950 V200R003C30SPC600, and includes the following changes:
Added the content about Diagnose.
Issue 03 (2017-06-30)
This issue is the second official release for eSpace 7910/eSpace 7950 V200R003C30SPC300, and includes the following changes:
Issue 02 (2017-04-17)
This issue is the first official release for eSpace 7910/eSpace 7950 V200R003C30SPC200, and includes the following changes:
Added the content about Distinctive Ring.
Issue 01 (2016-12-28)
This issue is the FOA release for eSpace 7910/eSpace 7950 V200R003C30SPC100.
Источник
Managing Configuration Files
Configuration file management allows you to modify common parameters in the configuration file template to batch modify IP phone configuration parameters. The configuration files can be used when IP phones are deployed either automatically or manually.
Prerequisites
Procedure
For IP phones in factory default settings, set the following basic parameters. For IP phones not in factory default settings, set required parameters on corresponding tab page based on the site requirements.
Set Configuring Policy to Full if the automatic number allocation function needs to be enabled. Otherwise, automatic number allocation is unavailable during automatic deployment.
For an office that has not deployed the DHCP server, set IPv4 Network Access Mode to Static IP on the Network tab page, as shown in Figure 4-15.
Enter the user name used by eSight to authenticate IP phones. The value must be the same as the authentication user name configured in the eSight configuration file.
Default value: eSight.
Enter the password used by eSight to authenticate IP phones. The value must be the same as the authentication password configured in the eSight configuration file.
Default value: eSight*123(The password cannot contain the special character @).
Enter the TR-069 address of eSight.
Enter the user name used by IP phones to authenticate eSight. You do not need to set this parameter on eSight. IP phones report the user name to eSight.
Default value: huawei
Enter the password used by IP phones to authenticate eSight. You do not need to set this parameter on eSight. IP phones report the password to eSight.
Default value: huawei123
(Optional) STUN Keep-alive Period
Interval for the IP phone to send BindingRequest messages to the STUN server.
Set the parameter based on the onsite number of users. If the SBC is deployed onsite, the STUN keep-alive period needs to be shorter than the NAT table item aging interval.
This parameter is mandatory when the eSight manages the IP phone cross the NAT.
Select a network environment based on the site requirements.
Select an IP phone login mode.
If the number is allocated by eSight, set this parameter to Phone number.
uPortal Server (EC6.X)
Enter uPortal IP address or uPortal domain name.
Set the port number to 443.
Enter the AA server address.
(Optional) Profile Server 1
Enter the personal configuration file server address.
When SIP Transport is set to TLS, you need to configure the time server in Set System parameters or manually set the time to the current time to prevent IP phone registration failure.
If you can find the new configuration file on the Configuration File Management page, the operation is successful, as shown in Figure 4-21.
Источник
Huawei IP Phone eSpace 7910
V100R001C01
User Manual
HUAWEI TECHNOLOGIES CO., LTD.

Huawei Proprietary and Confidential
Copyright © Huawei Technologies Co., Ltd.
Copyright © Huawei Technologies Co., Ltd. 2012. All rights reserved.
No part of this document may be reproduced or transmitted in any form or by any means without prior
written consent of Huawei Technologies Co., Ltd.
Trademarks and Permissions
and other Huawei trademarks are trademarks of Huawei Technologies Co., Ltd.
All other trademarks and trade names mentioned in this document are the property of their respective
holders.
Notice
The purchased products, services and features are stipulated by the contract made between Huawei and
the customer. All or part of the products, services and features described in this document may not be
within the purchase scope or the usage scope. Unless otherwise specified in the contract, all statements,
information, and recommendations in this document are provided «AS IS» without warranties, guarantees or
representations of any kind, either express or implied.
The information in this document is subject to change without notice. Every effort has been made in the
preparation of this document to ensure accuracy of the contents, but all statements, information, and
recommendations in this document do not constitute a warranty of any kind, express or implied.
Huawei Technologies Co., Ltd.
Huawei Industrial Base
Bantian, Longgang
Shenzhen 518129
People’s Republic of China
http://enterprise.huawei.com

Huawei IP Phone eSpace 7910
User Manual
Huawei Proprietary and Confidential
Copyright © Huawei Technologies Co., Ltd.
Contents
1 Safety Precautions …………………………………………………………………………………………………………. 1
2 IP Phone Overview ……………………………………………………………………………………………………….. 3
2.1 Appearance ……………………………………………………………………………………………………………………………………. 3
2.1.1 Button …………………………………………………………………………………………………………………………………… 3
2.1.2 LED ……………………………………………………………………………………………………………………………………… 4
2.2 Screen …………………………………………………………………………………………………………………………………………… 6
2.2.1 Home Screen …………………………………………………………………………………………………………………………. 6
2.2.2 Icons in the Status Bar ……………………………………………………………………………………………………………. 6
2.2.3 Line Button Icon ……………………………………………………………………………………………………………………. 7
3 Phone Settings ………………………………………………………………………………………………………………. 8
3.1 Preferences ……………………………………………………………………………………………………………………………………. 8
3.1.1 Ringtone ……………………………………………………………………………………………………………………………….. 8
3.1.2 Key Tone ………………………………………………………………………………………………………………………………. 8
3.1.3 Brightness …………………………………………………………………………………………………………………………….. 9
3.1.4 Wallpaper ……………………………………………………………………………………………………………….. ……………. 9
3.1.5 Answering Mode ……………………………………………………………………………………………………………….. ….. 9
3.1.6 Auto Dial ………………………………………………………………………………………………………………………………. 9
3.2 Call Features………………………………………………………………………………………………………………………………… 10
3.2.1 Call Forward ……………………………………………………………………………………………………………………….. 10
3.2.2 Call Waiting ………………………………………………………………………………………………………………………… 10
3.3 Buttons ……………………………………………………………………………………………………………………………………….. 10
3.3.1 Programmable Button …………………………………………………………………………………………………………… 10
3.3.2 Line Button …………………………………………………………………………………………………………………………. 11
3.3.3 # as Dial ……………………………………………………………………………………………………………………………… 12
3.3.4 Redial Button ………………………………………………………………………………………………………………………. 12
3.4 System ………………………………………………………………………………………………………………………………………… 12
3.4.1 Date and Time ……………………………………………………………………………………………………………………… 12
3.4.2 Language …………………………………………………………………………………………………………………………….. 12
3.4.3 Power Saving ………………………………………………………………………………………………………………………. 12
3.4.4 Phone Lock …………………………………………………………………………………………………………………………. 14
3.4.5 Restart …………………………………………………………………………………… …………………………………………… 14
3.4.6 Restore Factory Defaults ……………………………………………………………………………………………………….. 15

Huawei IP Phone eSpace 7910
User Manual
Huawei Proprietary and Confidential
Copyright © Huawei Technologies Co., Ltd.
3.5 Status ………………………………………………………………………………………………………………………………………….. 15
3.5.1 Network ……………………………………………………………………………………………………………………………… 15
3.5.2 About Phone ………………………………………………………………………………………………………………………… 15
3.5.3 Certificate ……………………………………………………………………………………………………………………………. 15
3.6 Advanced …………………………………………………………………………………………………………………………………….. 15
3.7 Log Out ………………………………………………………………………………………………………………………………………. 16
4 Web Page Settings ……………………………………………………………………………………………………….. 17
4.1 Logging In to the Web Page …………………………………………………………………………………………………………… 17
4.2 Preferences ………………………………………………………………………………………………………………………………….. 17
4.2.1 Contacts ……………………………………………………………………………………………………………………………… 17
4.2.2 Ringtone ……………………………………………………………………………………………………………………………… 20
4.2.3 Key Tone …………………………………………………………………………………………………………………………….. 20
4.2.4 Wallpaper ……………………………………………………………………………………………………………….. ………….. 20
4.2.5 Answering Mode ……………………………………………………………………………………………………………….. … 21
4.3 Call Features………………………………………………………………………………………………………………………………… 21
4.3.1 Call Forward ……………………………………………………………………………………………………………………….. 21
4.3.2 Hotline ……………………………………………………………………………………………………………………………….. 22
4.3.3 Call Waiting ………………………………………………………………………………………………………………………… 22
4.3.4 Automatic Answering ……………………………………………………………………………………………………………. 22
4.3.5 Auto Dial …………………………………………………………………………………………………………………………….. 22
4.4 Button …………………………………………………………………………………………………………………………………………. 23
4.4.1 Line & Programmable Button ………………………………………………………………………………………………… 23
4.4.2 # as Dial ……………………………………………………………………………………………………………………………… 23
4.4.3 Redail Button ………………………………………………………………………………………………………………………. 23
4.5 System ………………………………………………………………………………………………………………………………………… 24
4.5.1 Date and Time ……………………………………………………………………………………………………………………… 24
4.5.2 Language …………………………………………………………………………………………………………………………….. 24
4.5.3 Power Saving ………………………………………………………………………………………………………………………. 24
4.5.4 Phone Lock …………………………………………………………………………………………………………………………. 25
4.5.5 Restart …………………………………………………………………………………… …………………………………………… 25
4.5.6 Restore Factory Defaults ……………………………………………………………………………………………………….. 26
4.6 Status ………………………………………………………………………………………………………………………………………….. 26
4.6.1 Network ……………………………………………………………………………………………………………………………… 26
4.6.2 Certificate ……………………………………………………………………………………………………………………………. 26
4.6.3 About Phone ………………………………………………………………………………………………………………………… 26
5 Phone Usage ………………………………………………………………………………………………………………… 27
5.1 Multiple Accounts and Lines ………………………………………………………………………………………………………….. 27
5.2 Answering Incoming Calls …………………………………………………………………………………………………………….. 27
5.2.1 Answering Calls Manually …………………………………………………………………………………………………….. 27
5.2.2 Answering Calls Automatically………………………………………………………………………………………………. 27
5.2.3 Rejecting Calls …………………………………………………………………………………………………………………….. 27

Huawei IP Phone eSpace 7910
User Manual
Huawei Proprietary and Confidential
Copyright © Huawei Technologies Co., Ltd.
5.2.4 Muting the Phone …………………………………………………………………………………………………………………. 27
5.2.5 Recording ……………………………………………………………………………………………………………………………. 28
5.3 Making Calls ……………………………………………………………………………………………………………………………….. 28
5.3.1 Making Calls by Typing Numbers ………………………………………………………………………………………….. 28
5.3.2 Making Calls Using the Redial Button ……………………………………………………………………………………. 28
5.3.3 Making Calls Using My Contacts …………………………………………………………………………………………… 29
5.3.4 Making Calls Using History ………………………………………………………………………………………………….. 29
5.3.5 Making Calls Using the Corporate Directory……………………………………………………………………………. 29
5.3.6 Making Calls Using the eSpace Desktop …………………………………………………………………………………. 30
5.3.7 Making Calls Using the Speed Dial Button ……………………………………………………………………………… 30
5.3.8 Making Emergency Calls ………………………………………………………………………………………………………. 30
5.3.9 Auto Dial …………………………………………………………………………………………………………………………….. 30
5.4 Contacts ………………………………………………………………………………………………………………………………………. 31
5.4.1 Adding Contacts …………………………………………………………………………………………………………………… 31
5.4.2 Searching for Contacts ………………………………………………………………………………………………………….. 31
5.4.3 Modifying Contacts ……………………………………………………………………………………………………………… 32
5.4.4 Deleting Contacts …………………………………………………………………………………………………………………. 32
5.4.5 Adding Groups …………………………………………………………………………………………………………………….. 32
5.4.6 Modifying Groups ………………………….. ………………………………………………………. …………………………… 33
5.4.7 Deleting Groups …………………………………………………………………………………………………………………… 33
5.4.8 Deleting Contacts in a Group …………………………………………………………………………………………………. 33
5.4.9 Corporate Directory ……………………………………………………………………………………………………………… 34
5.5 History ………………………………………………………………………………………………………………………………………… 35
5.5.1 Missed Call Notification ……………………………………………………………………………………………………….. 35
5.5.2 Viewing History …………………………………………………………………………………………………………………… 35
5.5.3 Deleting History …………………………………………………………………………………………………………………… 35
5.5.4 Adding Contacts …………………………………………………………………………………………………………………… 36
5.6 Call Hold …………………………………………………………………………………………………………………………………….. 37
5.7 Call Transfer ………………………………………………………………………………………………………………………………… 37
5.8 Call Deflection …………………………………………………………………………………………………………………………….. 38
5.9 Call Forward………………………………………………………………………………………………………………………………… 38
5.10 Call Waiting ……………………………………………………………………………………………………………………………….. 39
5.11 Call Pickup ………………………………………………………………………………………………………………………………… 40
5.11.1 Designated Pickup ………………………………………………………………………………………………………………. 40
5.11.2 Co-Group Pickup ……………………………………………………………………………………………………………….. 40
5.12 Call Park ……………………………………………………………………………………………………………………………………. 40
5.13 Hotline ………………………………………………………………………………………………………………………………………. 41
5.14 Automatic Callback(For eSpace UC2.0) ………………………………………………………………………………………… 41
5.15 Distinctive Ringtone ……………………………………………………………………………………………………………………. 42
5.16 Busy Lamp Field ………………………………………………………………………………………………………………………… 43
5.17 DND …………………………………………………………………………………………………………………………………………. 43
5.18 Local Meetings …………………………………………………………………………………………………………………………… 43

Huawei IP Phone eSpace 7910
User Manual
Huawei Proprietary and Confidential
Copyright © Huawei Technologies Co., Ltd.
5.18.1 Creating Local Meetings ……………………………………………………………………………………………………… 43
5.18.2 Managing Local Meetings …………………………………………………………………………………………………… 44
5.19 Shared Line between the Manager and the Secretary ……………………………………………………………………….. 45
5.20 Message …………………………………………………………………………………………………………………………………….. 46
5.21 Input Method ……………………………………………………………………………………………………………………………… 47
6 eSpace UC-Related Functions ……………………………………………………………………………………… 48
6.1 Association with the eSpace Desktop ………………………………………………………………………………………………. 48
6.1.1 Enabling the Association with the eSpace Desktop …………………………………………………………………… 48
6.1.2 Using the Association with the eSpace Desktop ……………………………………………………………………….. 50
6.2 One-Key Switch (For eSpace UC2.0) ……………………………………………………………………………………………… 55
6.3 Instant Meetings (For eSpace UC2.0) ……………………………………………………………………………………………… 55
6.4 Group Meeting (For eSpace UC2.0) ……………………………………………………………………………………………….. 57
6.5 Status Presence (For eSpace UC2.0) ……………………………………………………………………………………………….. 59
7 FAQs ……………………………………………………………………………………………………………………………. 60
7.1 How to View the Detailed Information of the Phone …………………………………………………………………………. 60
7.2 How to Set the Language ………………………………………………………………………………………………………………. 60
7.3 How to Change the Default Ringtone ……………………………………………………………………………………………… 61
7.4 How to Adjust the Volume of the Ringtone ………………………………………………………………………………………. 61
7.5 How to Transfer Incoming Calls to the Voice Mailbox or an Associated Number ………………………………….. 61
7.6 How to Retrieve Voice Messages ……………………………………………………………………………………………………. 61

Huawei IP Phone eSpace 7910
User Manual
Huawei Proprietary and Confidential
Copyright © Huawei Technologies Co., Ltd.
For safety purposes, read these safety precautions carefully and observe them during
operation.
Basic Requirements
Keep the device dry during storage, transportation, and operation.
Prevent collision of the device during storage, transportation, and operation.
Do not attempt to dismantle the device. In case of any fault, contact an authorized
maintenance center for assistance or repair.
Without prior written consent, no organization or individual is permitted to make any
change to the structure or safety and performance design of the device.
While using the device, observe all applicable laws, directives and regulations, and
respect the legal rights of others.
1 Safety Precautions
Environment Requirements
Place the device in a well-ventilated place. Do not expose the device to direct sunlight.
Keep the device clean, free of dust and stains.
Do not place the device near a water source or in a damp area.
Place the device on a stable surface.
Do not place any object on the top of the device. Reserve sufficient space around the
device for heat dissipation.
Do not place the device on or near inflammable materials such as foam.
Keep the device away from heat source or flames, such as radiators or candles.
Keep the device away from any household appliances that generate strong magnetic or
electromagnetic fields, such as microwave ovens, refrigerators, or mobile phones.
Operation Requirements
Do not allow children to play with the device or accessories. Swallowing the accessories
may be fatal.
Use only accessories (such as the power adapter and the battery) provided or authorized
only by the manufacturer.

Huawei IP Phone eSpace 7910
User Manual
Huawei Proprietary and Confidential
Copyright © Huawei Technologies Co., Ltd.
Ensure that the device does not get wet. If water gets into the device, disconnect the
power supply immediately and unplug all the cables connected to the device, such as the
power cable and the telephone cable, and then contact an authorized maintenance center.
When installing the phone, comply with Limited Power Source (LPS) and local electric
security standards, and use the power supply of saftty extra low voltage (SLEV).
Before connecting or disconnecting any cable, shut down the device and disconnect the
power supply.
While connecting or disconnecting any cable, ensure that your hands are dry.
Do not step on, pull, or bend any cable excessively; doing so may result in the cable may
be damaged, leading to device malfunction.
Do not use old or damaged cables.
Keep the power plug clean and dry, to prevent electric shock or dangerous situations.
During lightning, disconnect the device from the power supply, and unplug all the cables
connected to the device, such as the power cable and the telephone cable, to avoid
lightning strike.
If the device is unused for a long time, disconnect the power supply and unplug the
power plug.
If smoke, sound, or smell is emitted from the device, stop using the device immediately,
disconnect the power supply, and unplug the power supply and other cables. Contact an
authorized maintenance center for advice and repair.
Make sure that no objects (such as metal shavings) enter the device through the speaker.
Cleaning Requirements
Before cleaning the device, stop using it, disconnect the power supply, and unplug all the
cables connected to the device, such as the power cable and the telephone cable.
Do not clean the device exterior with any cleaning solution or cleanser spray. Use a piece
of soft cloth to clean the device shell.
LCD Usage Requirements
Do not expose the LCD to direct sunlight.
Do not press, scratch, or damage the LCD; do not place heavy objects on top of it.
Do not stare at the display screen for a long time. This may harm your eyes or blur your
vision.
LCD Cleaning Requirements
According to the instructions given in the attached manual, use a piece of soft cloth to
remove dust from the surface of the LCD.
Do not clean the screen with volatile solvent, such as alcohol, benzene or dilution agent.
Do not touch the screen with rubber or plastic material for a long time. This will
deteriorate the surface gloss of the LCD.
Environmental Protection
Do not dispose of the device and the accessories in a garbage can. Dispose of the device
according to the local regulations on disposing of packing materials, exhausted batteries and
abandoned devices, and support the recycling activity.
Huawei IP Phone eSpace 7910
User Manual
Huawei Proprietary and Confidential
Copyright © Huawei Technologies Co., Ltd.
2.1 Appearance
Displays the Contacts screen.
Displays the home screen.
2.1.1 Button
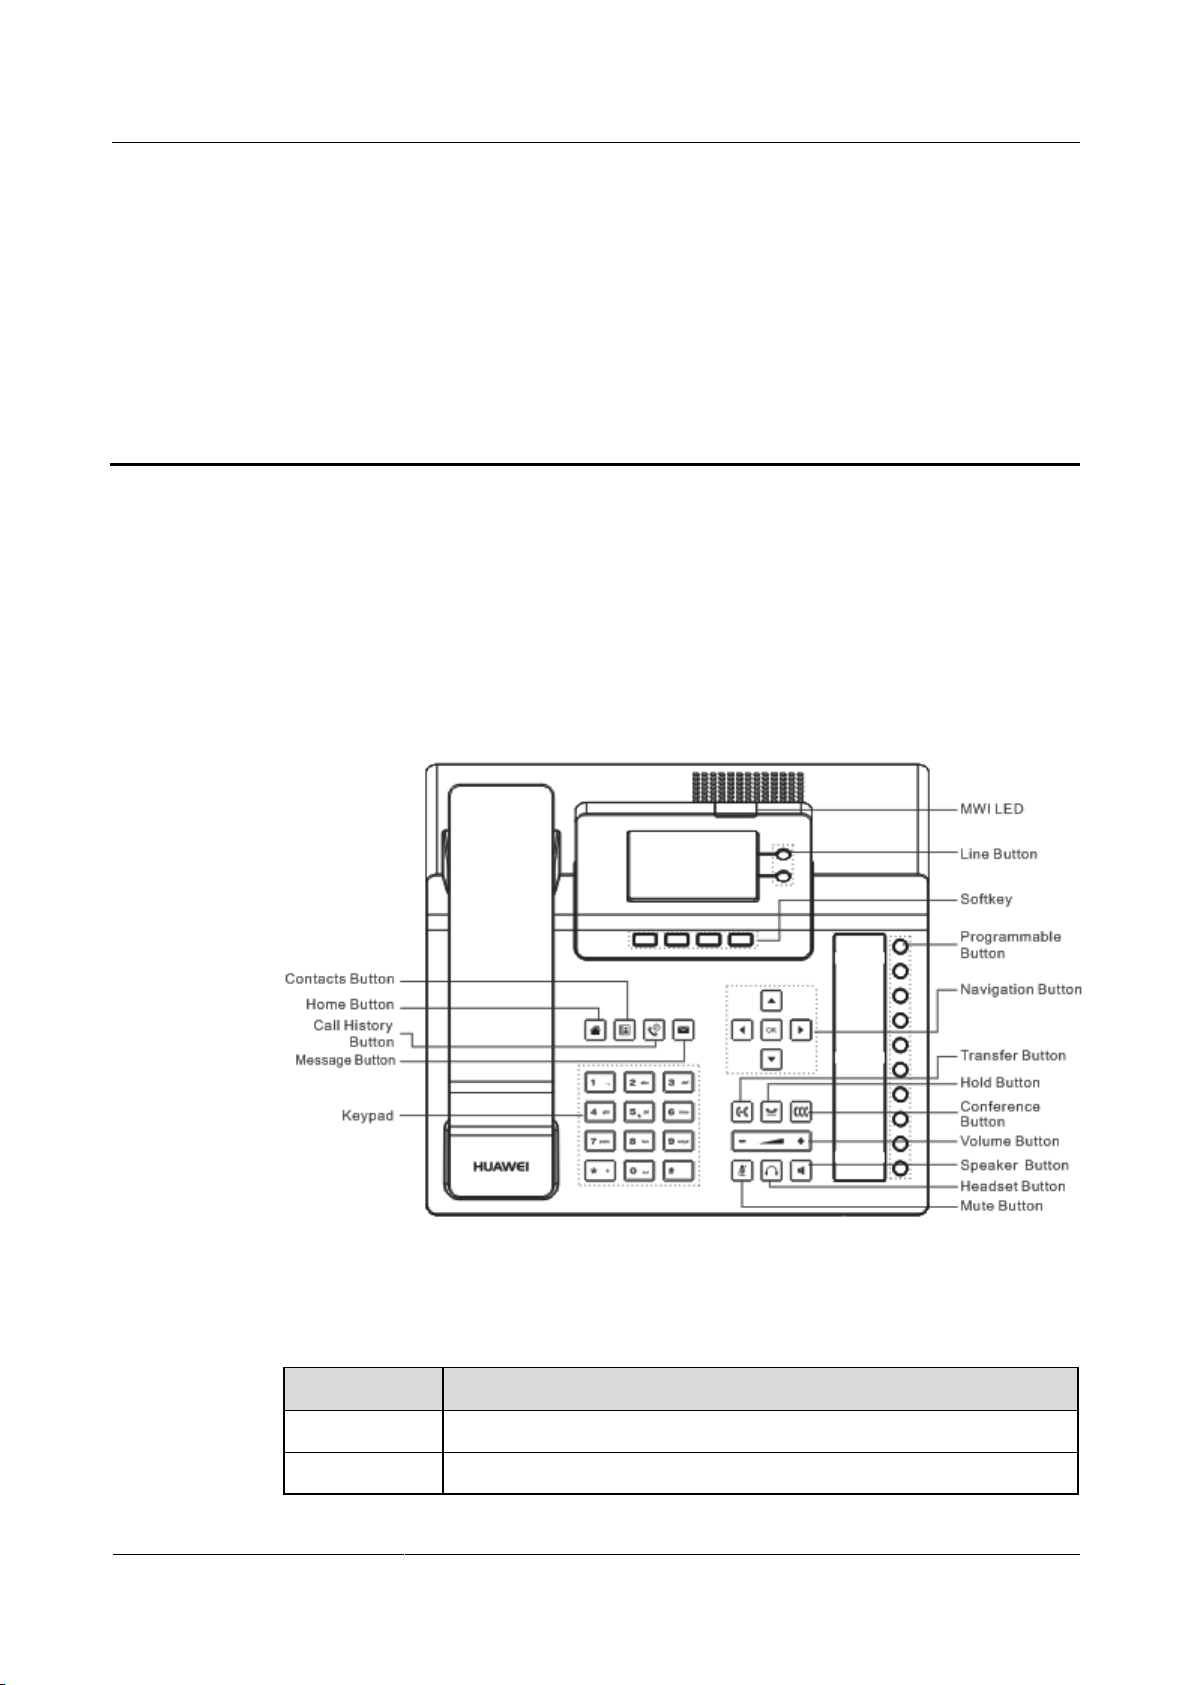
Figure 2-1 shows the appearance of the IP phone.
Figure 2-1 Appearance
2 IP Phone Overview
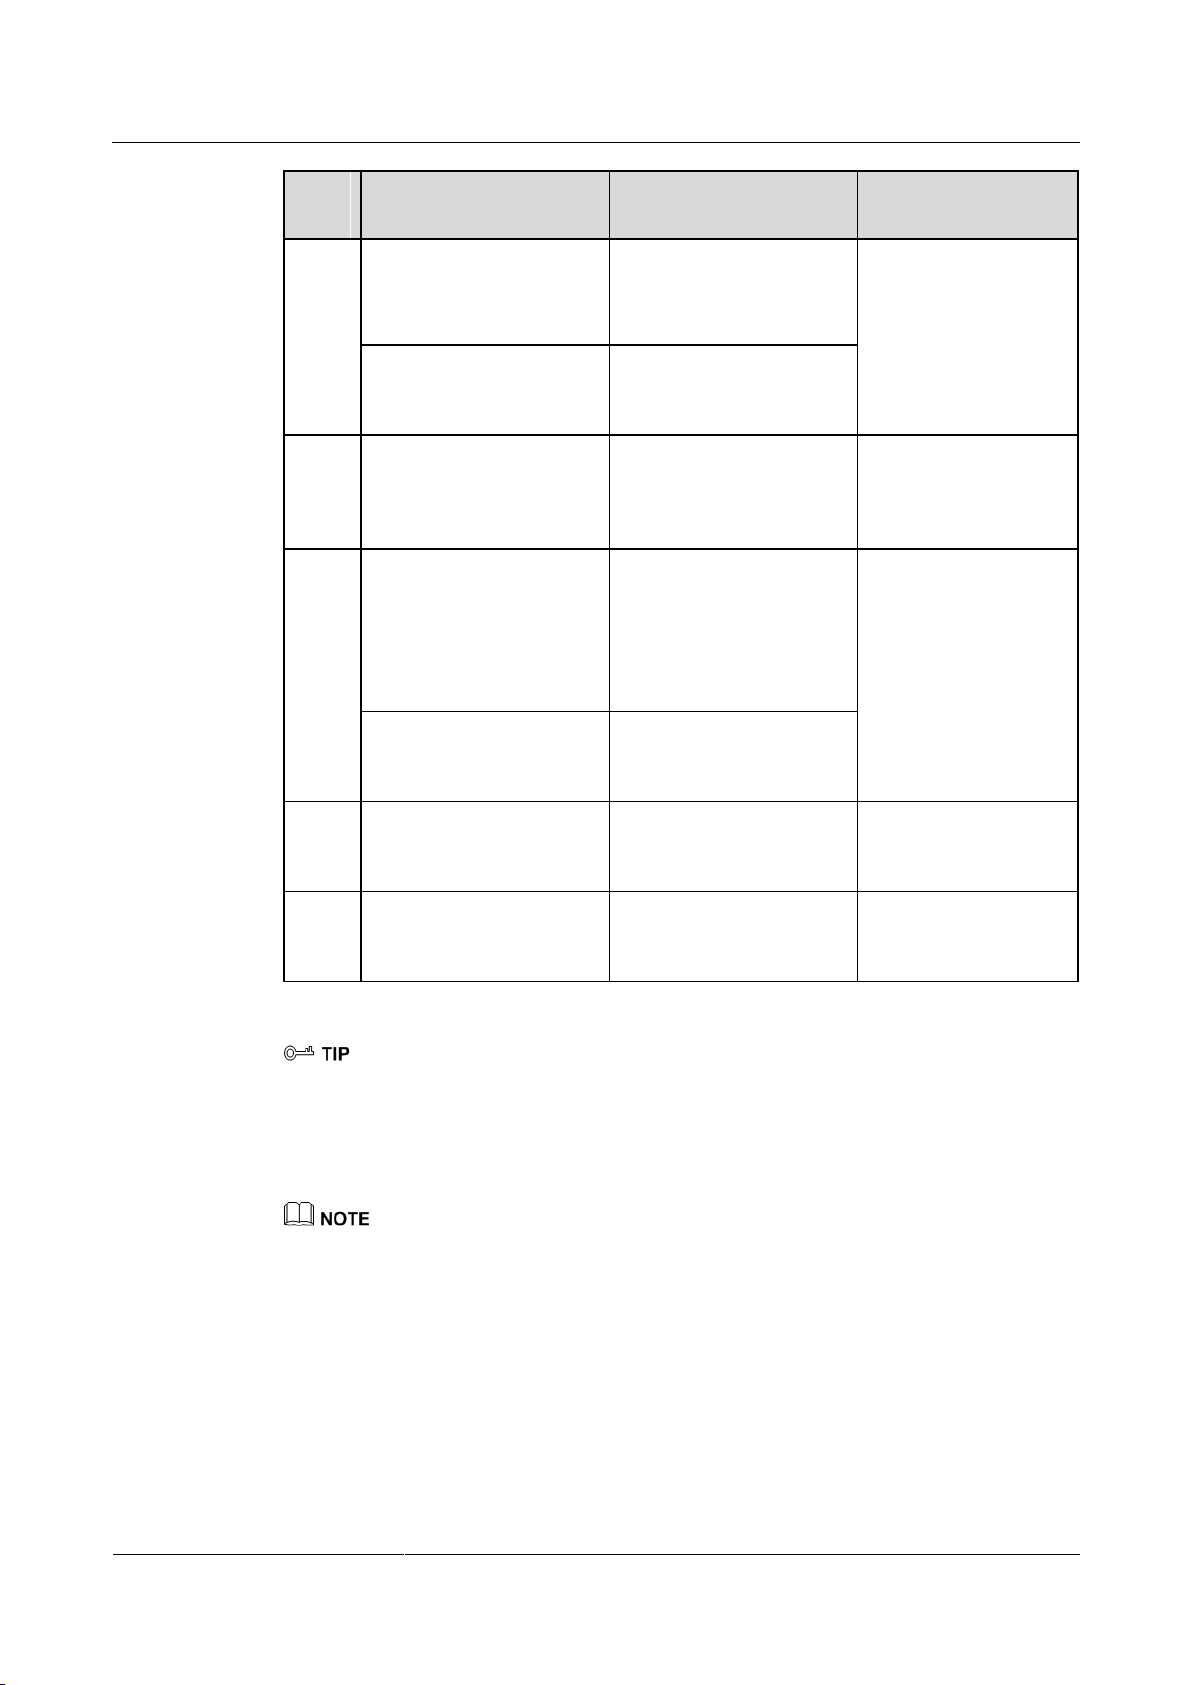
Table 2-1 describes the buttons on the phone.
Table 2-1 button description
Huawei IP Phone eSpace 7910
User Manual
Huawei Proprietary and Confidential
Copyright © Huawei Technologies Co., Ltd.
Displays the History screen.
Message Button
Displays the Message screen.
Allows you to type digits, lowercase or uppercase letters, and special
characters.
Displays the account status and can be set as the shortcut button.
Displays the softkeys on the home screen.
Can be set as the shortcut button of multiple functions such as Speed
Dial, XML App, and Phone Lock.
Provides four direction buttons, that is, Up, Down, Left, and Right, and
one OK button.
The direction buttons allow you to move the cursor on the screen.
The OK button functions as the same as the Softkey on the left,
which displays the selected main menu.
Transfers a call to a third party.
Holds a call.
Resumes a held call.
Creates a conference call.
When the phone is in idle or ringing state, you can:
Press + to turn up the volume of the ringtone.
Press — to turn down the volume of the ringtone.
When the phone is picked up, and in dialing or talking state, you can:
press + to turn up the volume of the handset, headset, and
speakerphone.
press — to turn down the volume of the handset, headset, and
speakerphone.
When there is an incoming call, you can press the button to answer the
call in hands-free mode, and press the button again to end the call.
When there is an incoming call, you can press the button to answer the
call with the headset, and press the button again to end the call.
Mutes or unmutes the phone. When you press the button to mute your
phone, the other party cannot hear you.
2.1.2 LED
Table 2-2 describes the status of the LED.
Huawei IP Phone eSpace 7910
User Manual
Huawei Proprietary and Confidential
Copyright © Huawei Technologies Co., Ltd.
Table 2-2 LED description
When there is an incoming call, the LED blinks in red
every second.
When there is an unread message, the LED blinks in red
every three second.
When the phone is in pickup, dialing, or talking state,
the LED is steady green.
When there is an incoming call, the LED blinks in red.
When the call hold is initiated by yourself, the LED
blinks in green.
When the phone is picked up or in talking state, the LED is
steady red.
When the phone is picked up or in talking state, the LED is
steady red.
When the phone is muted, the LED is steady red.
When there is a missed call, the LED is steady red.
Programmable button LED
or line button LED (The
programmable button or line
button is set as the shortcut
button. The BLF function is
enabled.)
When the monitored account is in idle state, the LED is
steady green.
When the monitored account is picked up, and in
dialing or talking state, the LED is steady red.
When the monitored account is in ringing state, the
LED blinks in red.
When the monitored account is offline, the LED is off.
Programmable button LED
or line button LED (The
programmable button or line
button is set as the shortcut
button. The BLF function is
disabled.)
When the phone is picked up or in talking state, the LED is
steady red.
Line button LED (The line is
shared by the manager and
secretary.)
When there is an incoming call on the shared line, the
LED blinks in read every second.
When the shared line is in talking state, the LED is
steady red.
When the call hold is enabled on the shared line
actively, the LED blinks in red every three seconds.
Huawei IP Phone eSpace 7910
User Manual
Huawei Proprietary and Confidential
Copyright © Huawei Technologies Co., Ltd.
2.2 Screen
No network cable is connected to the phone.
A network cable is connected to the phone, but IP address conflict exists in the
network.
The do not disturb (DND) function is enabled.
The call forwarding function is enabled.
The automatic answering function is enabled.
The automatic callback (ACB) function is enabled.
A call is transferred to the phone.
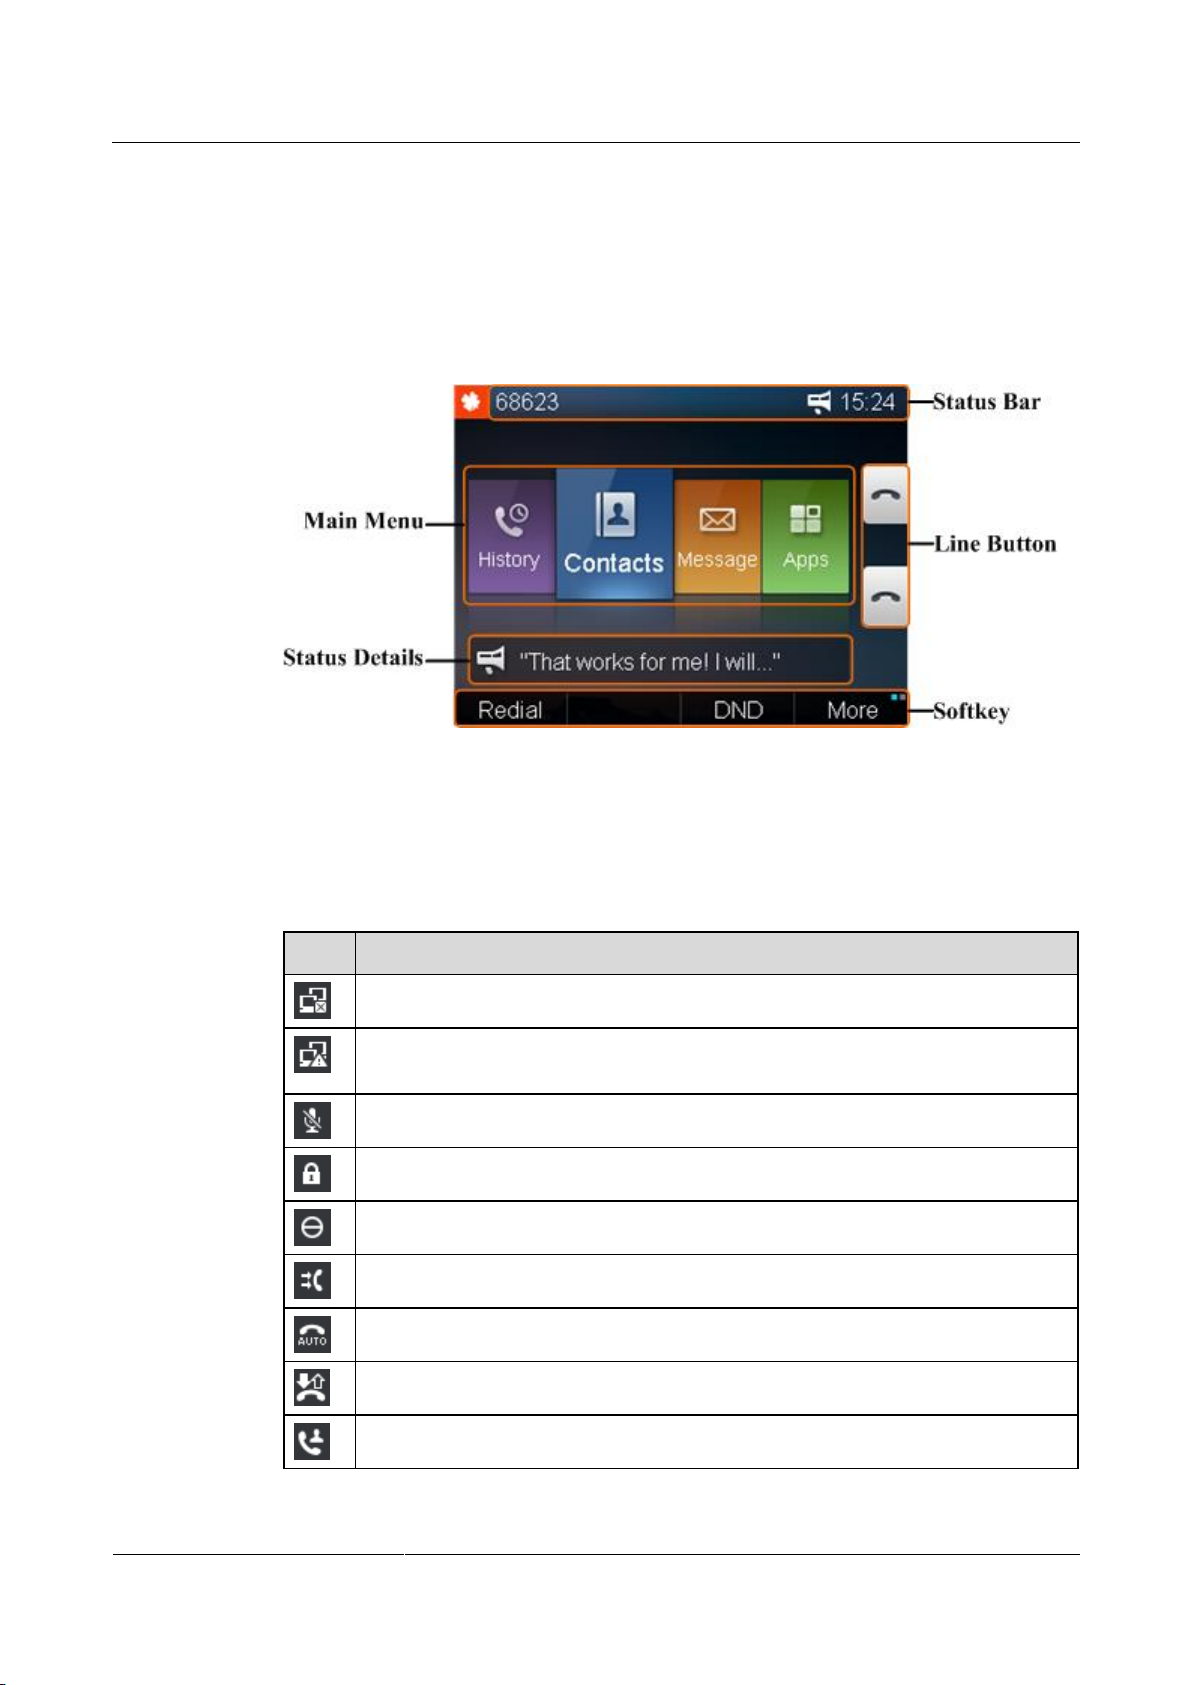
2.2.1 Home Screen
Figure 2-2 shows the home screen.
Figure 2-2 Home screen
2.2.2 Icons in the Status Bar
Table 2-3 describes the icons in the status bar.
Table 2-3 Icons in the status bar
Huawei IP Phone eSpace 7910
User Manual
Huawei Proprietary and Confidential
Copyright © Huawei Technologies Co., Ltd.
Network signals during a call.
Voice output in headset mode.
Voice output in hands-free mode.
To register an account:
When the account is registered successfully, the icon is black.
When the account fails to be registered, the icon is grey.
The account is in dialing state.
The account is in callout state.
The account is in talking state.
The account is in active call hold state.
The account is in a conference call.
The line button is set as the speed dial button.
The line button is set as the grouping button.
The line button is set as the XML request button.
The line button is set as the dormancy button.
The line button is set as the phone lock button.
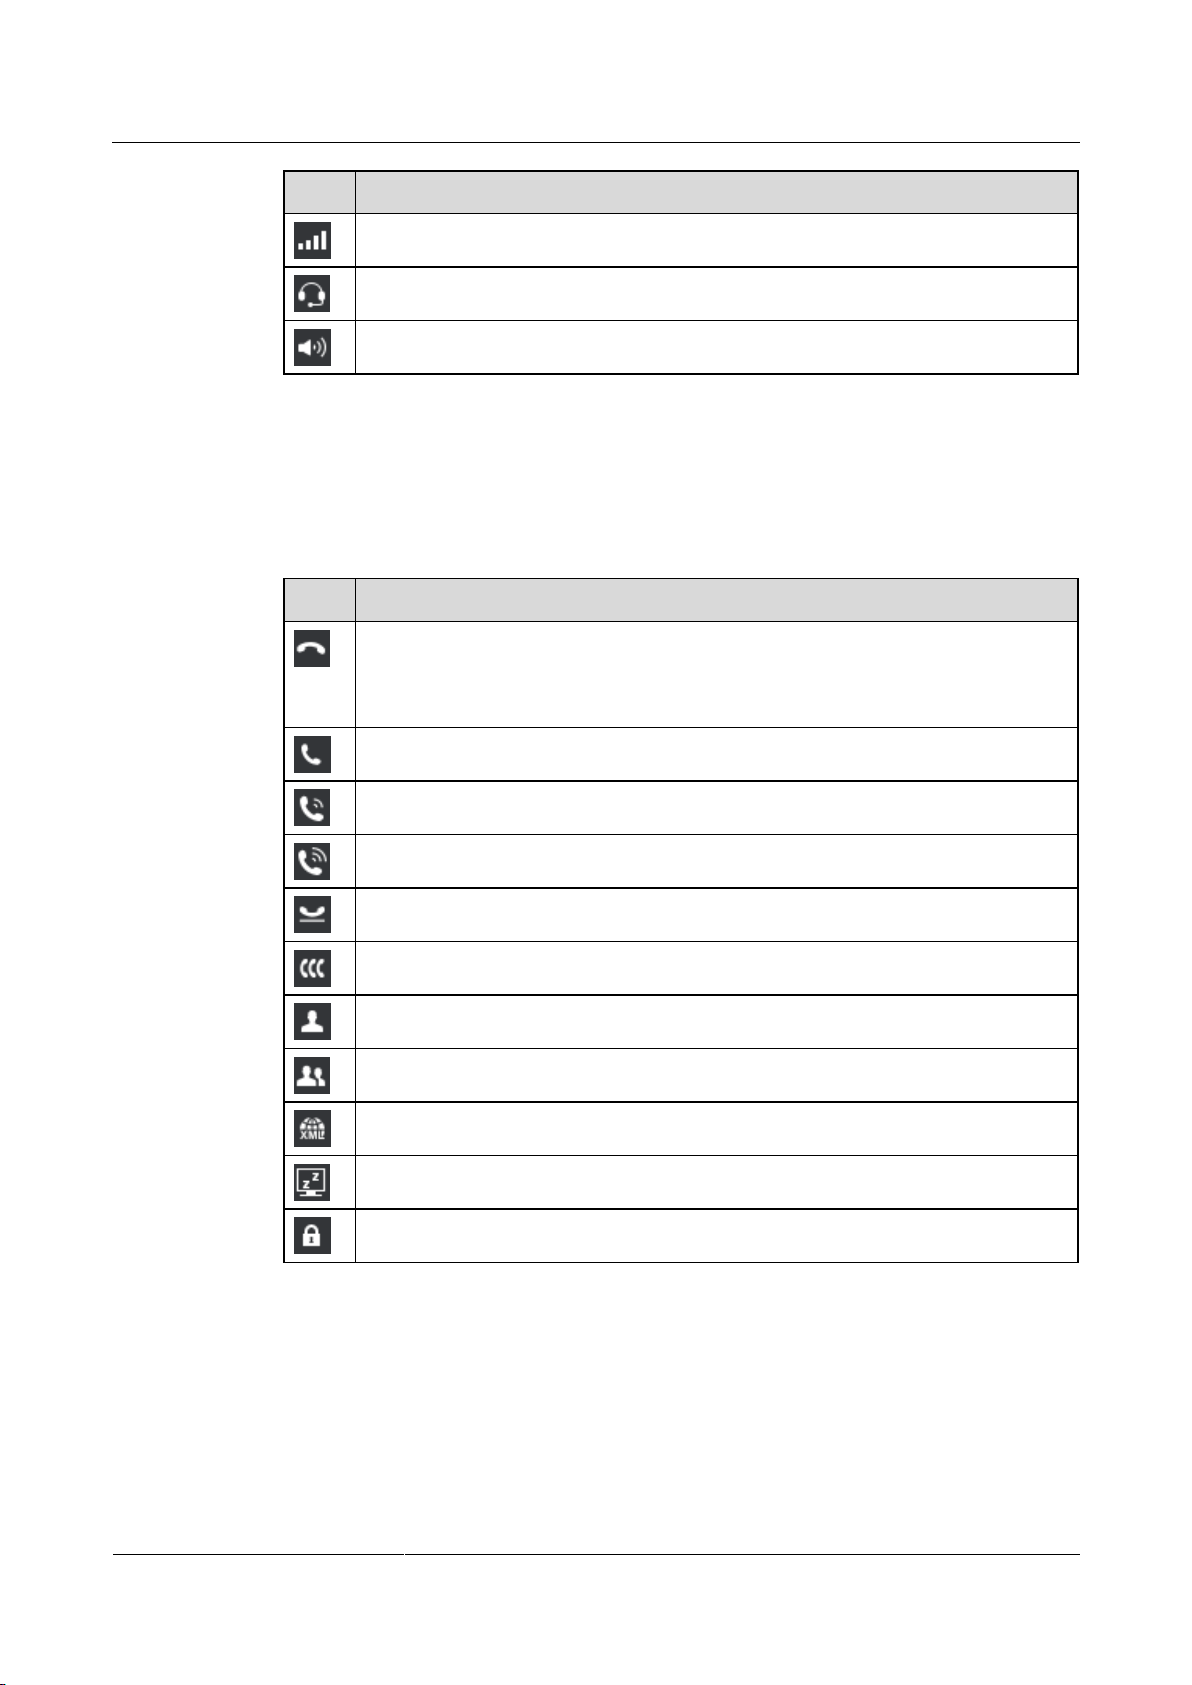
2.2.3 Line Button Icon
Table 2-4 describes the line button icons.
Table 2-4 Line key icon

Huawei IP Phone eSpace 7910
User Manual
Huawei Proprietary and Confidential
Copyright © Huawei Technologies Co., Ltd.
3.1 Preferences
3.1.1 Ringtone
Setting Ringtones
3 Phone Settings
You can perform the following operations to set ringtones.
Step 1 On the home screen, choose Apps > Settings > Preferences > Ringtone.
The Ringtone screen is displayed.
Step 2 Select a ringtone type and press Modify.
Default: If no intranet or extranet ringtone is set for an account, the default ringtone is
played when there is an incoming call.
On-net: When there is an incoming call from an internal user, the intranet ringtone is
played.
Off-net: When there is an incoming call from an external user, the extranet ringtone is
played.
Step 3 Select a ringtone to use.
Step 4 Press Select.
—-End
On the Library screen, you can play or delete imported ringtones. The system ringtones cannot be
deleted.
3.1.2 Key Tone
You can perform the following operations to set the key tone.
Step 1 On the home screen, choose Apps > Settings > Preferences.
Step 2 Select Key Tone, and press Enable or Disable.
—-End

Huawei IP Phone eSpace 7910
User Manual
Huawei Proprietary and Confidential
Copyright © Huawei Technologies Co., Ltd.
3.1.3 Brightness
You can perform the following operations to adjust the screen brightness.
Step 1 On the home screen, choose Apps > Settings > Preferences.
Step 2 Select Brightness and press Modify.
The Brightness dialog box is displayed.
Step 3 Press — or + to adjust the screen brightness.
Step 4 Press Finish.
—-End
3.1.4 Wallpaper
Setting Wallpapers
You can perform the following operations to set wallpapers.
Step 1 On the home screen, choose Apps > Settings > Preferences > Wallpaper.
The Wallpaper screen is displayed.
Step 2 Select a wallpaper to use.
Step 3 Press Select.
—-End
3.1.5 Answering Mode
You can perform the following operations to set the answering mode.
Step 1 On the home screen, choose Apps > Settings > Preferences > Answering Mode.
The Answering Mode dialog box is displayed.
Step 2 Select Speaker or Headset.
Step 3 Press Select.
—-End
3.1.6 Auto Dial
For details about how to set and use the Auto Dial function see 5.3.9 Auto Dial.
Huawei IP Phone eSpace 7910
User Manual
Huawei Proprietary and Confidential
Copyright © Huawei Technologies Co., Ltd.
3.2 Call Features
Allows you to dial the
number directly by
pressing the
programmable button.
Press the
programmable button
to dial the number.
To use the status
monitoring service,
ensure that your
account has been
assigned the status
monitoring right. If
Displays the function
name of the
programmable button.
Monitors the status of the
3.2.1 Call Forward
After the call forward function is enabled, incoming calls are transferred to the voicemail or
number. For details about how to set and use the call forward function, see 5.9 Call Forward.
3.2.2 Call Waiting
After the call waiting function is enabled, the new incoming call is displayed when the phone
is in talking state. For details about how to set and use the call waiting function, see 5.10 Call
Waiting.
3.3 Buttons
3.3.1 Programmable Button
You can perform the following operations to set programmable button . This topic describes
how to set the programmable button to the speed dial key.
Step 1 On the home screen, choose Apps > Settings > Button > Programmable Button.
The Programmable Button screen is displayed.
Step 2 Select a programmable button , and press Modify.
The screen for setting the programmable button is displayed.
Step 3 Select Speed Dial and press Select.
Step 4 Set the parameters.
Table 3-1 describes the parameters of programmable button .
Step 5 Press Finish.
—-End
Table 3-1 Functions of programmable btton
Huawei IP Phone eSpace 7910
User Manual
Huawei Proprietary and Confidential
Copyright © Huawei Technologies Co., Ltd.
phone number in real
time, including idle,
ringing, talking, and
offline.
you have any
questions, contact the
system administrator.
Only Huawei eSpace
UC1.1 solution
supports the status
monitoring function.
Allows you to select an
account to call the phone
number.
If a group has been added,
select a group, and press
Select to save the settings.
Press the
programmable button
to go to the screen of
the specified group.
Indicates the website in
the format of http://IP
address/file name, for
example,
http://192.169.1.72/Menu.
xml.
Press the
programmable button
to go to the specified
website.
Displays the function
name of the
programmable button.
Press the
programmable button
to hibernate the phone.
Press the
programmable button
to lock the phone.
Hold down the programmable button to go to the programmable button setting screen directly.
3.3.2 Line Button
You can perform the following operations to set the line button.
On the line button that has no account can be set to the shortcut key.
Step 1 On the home screen, choose Apps > Settings > Button > Line Button.
The Line Button screen is displayed.
Step 2 Select a line button to import and press Modify.
The line button setting screen is displayed.
Step 3 Select a function to use and set the parameters. For details, see 3.3.1 Programmable Button.
—-End

Huawei IP Phone eSpace 7910
User Manual
Huawei Proprietary and Confidential
Copyright © Huawei Technologies Co., Ltd.
3.3.3 # as Dial
You can perform the following operations to set the pond key (#) as the callout key.
Step 1 On the home screen, choose Apps > Settings > Button.
Step 2 Select # as Dial, and press Enable or Disable.
—-End
3.3.4 Redial Button
The redial button allows you to redial the dialed number. For details about how to set and use
the redial button, see 5.3.2 Making Calls Using the Redial Button.
3.4 System
3.4.1 Date and Time
You can perform the following operations to set the date and time.
Step 1 On the home screen, choose Apps > Settings > System > Date and Time.
The Date and Time screen is displayed.
Step 2 Select NTP, and press Enable to synchronize the network time to the system time.
If you disable NTP, set Date and Time manually.
Step 3 Set the parameters based on site requirements.
—-End
3.4.2 Language
You can perform the following operations to set the language.
Step 1 On the home screen, choose Apps > Settings > System > Language.
The Language screen is displayed.
Step 2 Select a language.
Step 3 Press Select.
—-End
3.4.3 Power Saving
On the Power Saving screen, you can set the following functions:
Auto Sleep
If no operation is performed on the phone within the specified hibernation duration, the
phone changes to the hibernate state.

Huawei IP Phone eSpace 7910
User Manual
Huawei Proprietary and Confidential
Copyright © Huawei Technologies Co., Ltd.
Sleep
Once the hibernation is enabled, the phone changes to the hibernation state instantly.
Auto Brightness
When the phone is in talking state, the screen brightness is lowered automatically.
Enabling the Auto Sleep
You can perform the following operations to enable the Auto Sleep function:
Step 1 On the home screen, choose Apps > Settings > System > Power Saving > Auto Sleep.
The Auto Sleep screen is displayed.
Step 2 Press Enable.
The Sleep After field is displayed.
Step 3 Select a value.
Step 4 Press Select.
—-End
Disabling the Auto Sleep
Sleep
You can perform the following operations to disable the Auto Sleep function:
Step 1 On the home screen, choose Apps > Settings > System > Power Saving > Auto Sleep.
The Auto Sleep screen is displayed.
Step 2 Select Auto Sleep and press Disable.
—-End
You can perform the following operations to set the one-click hibernation function:
Step 1 On the home screen, choose Apps > Settings > System > Power Saving.
The Power Saving screen is displayed.
Step 2 Select Sleep.
Step 3 Press Enable.
—-End
Press any button to disable the hibernation function.
Auto Brightness
You can perform the following operations to set the Auto Brightness function:
Step 1 On the home screen, choose Apps > Settings > System > Power Saving.

Huawei IP Phone eSpace 7910
User Manual
Huawei Proprietary and Confidential
Copyright © Huawei Technologies Co., Ltd.
The Power Saving screen is displayed.
Step 2 Select Auto Brightness.
Step 3 Press Enable or Disable.
—-End
3.4.4 Phone Lock
Enabling the Phone Lock Function
You can perform the following operations to enable the phone lock function:
Step 1 On the home screen, choose Apps > Settings > System > Phone Lock.
The Phone Lock screen is displayed.
Step 2 Press Enable.
The Lock After parameter is displayed.
Step 3 Select a value.
Step 4 Press Select.
—-End
Disabling the Phone Lock Function
You can perform the following operations to disable the phone lock function:
Step 1 On the home screen, choose Apps > Settings > System > Phone Lock.
The Phone Lock screen is displayed.
Step 2 Select Phone Lock.
Step 3 Press Disable.
—-End
3.4.5 Restart
You can perform the following operations to restart the phone:
Step 1 On the home screen, choose Apps > Settings > System.
Step 2 Select Restart and press Select.
A message «Restart Phone?» is displayed.
Step 3 Press Restart.
—-End

Huawei IP Phone eSpace 7910
User Manual
Huawei Proprietary and Confidential
Copyright © Huawei Technologies Co., Ltd.
3.4.6 Restore Factory Defaults
Step 1 On the home screen, choose Apps > Settings > System.
Step 2 Select Restore Factory Defaults and press Select.
A message «All settings will be deteled.Continue?» is displayed.
Step 3 Press Restore.
—-End
3.5 Status
3.5.1 Network
You can perform the following operations to view the network status.
Step 1 On the home screen, choose Apps > Settings > Status.
Step 2 Select Network.
Step 3 Press View.
—-End
3.5.2 About Phone
You can perform the following operations to view the phone information:
Step 1 On the home screen, choose Apps > Settings > Status.
Step 2 Select About Phone.
Step 3 Press View.
—-End
3.5.3 Certificate
You can perform the following operations to view the certificate:
Step 1 On the home screen, choose Apps > Settings > Status.
Step 2 Select Certificate.
Step 3 Press View.
—-End
3.6 Advanced
To use the advanced setting service, ensure that your account must be assigned the
administrator right. If you have any questions, contact the system administrator.
Loading…
Huawei espace 7910 как настроить
По дефолту в аппарате включен dhcp. Телефон будет работать в локальной сети, где dhcp есть. Соответственно заходим браузером на уже известный нам ip девайса и сразу же видим первые грабли:
Зайти естественно получилось только интернет эксплорером.
Выбираем локализацию:
Включаем от безисходности http, чтобы заходить разными браузерами:
Приступаем непосредственно к главным настройкам.
Переходим на вкладку Дополнительно -> Сервер Серверное окружение Asterisk.
Резервирование последовательное. В SIP-сервер -> Сервер 1 указываем ip или доменное имя нашего Asterisk либо другой ippbx или софтсвича, а также sip порт.
Если есть резервные sip сервера указываем их ip в полях Сервер 2 и Сервер 3 и естественно их порты тоже.
Указывем ip и порты основных и резервных sip proxy в полях Прокси-сервер -> Сервер №, Порт. В большинстве случаев это будет ip sip сервера прописанного выше и тот же порт. Указываем сервер корпоративного каталога LDAP.
Указываем остальные параметры ldap:
- ip сервера Ldap (в моем случае это ip контроллера домена в нашей сети);
- порт ldap 389;
- корневой узел в виде dc=name domain, dc=ru;
- имя пользователя и пароль в домене от имени которого будут осуществляться запросы;
- фильтр ldap и атрибут номера Ldap (в моем случае это идентичный атрибут telephoneNumber);
- максимальное кол-во результатов поиска 60;
- время тайм-аута поиска 10.
Указываем атрибуты нашего ldap (в большинстве случаев используются стандартные наименования атрибутов):
- Имя: displayName;
- Департамент: department
- Должность: title;
- Рабочий телефон: telephoneNumber;
- Домашний телефон: homePhone;
- Мобильный телефон: Mobile;
- IP-телефон: ipPhone.
Сохраняем настройки и перезагружаемся.
Переходим к настройкам sip аккаунта. Дополнительно -> Аккаунт.
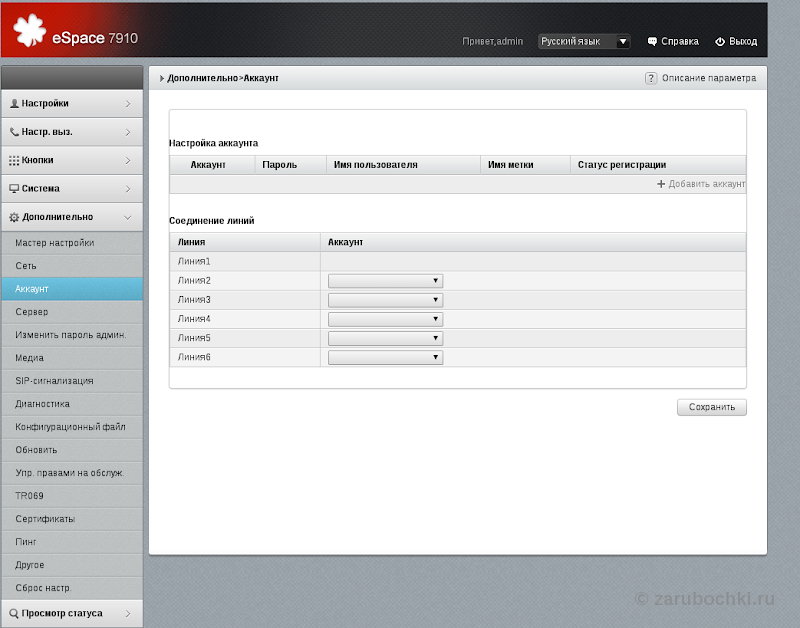
Вводим наименование sip аккаунта, имя пользователя и пароль.
Повторяем операцию для добавления еще аккаунтов если они у нас есть. После этого мы можем повесить созданные аккаунты на кнопки (появятся в выпадающих списках). Должно быть задействовано не менее двух кнопок иначе у абонента не будет возможности перенаправлять вызов и использовать предусмотренную в этом аппарате конференц-связь. В принципе на этом основная настройка аппарата окончена. Ниже скрины еще некоторых дополнительных настроек.
Звук кнопок тоже настраивается:
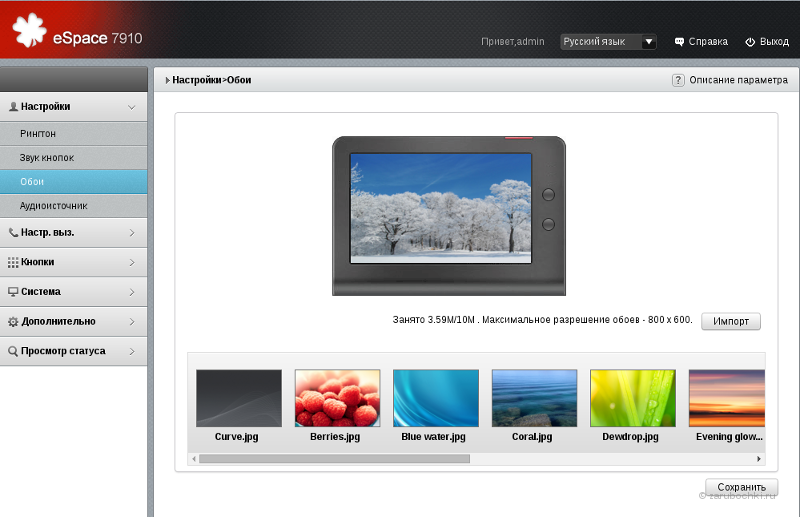
Можно выбирать обои и даже загружать свои:
Выбор аудио источника:
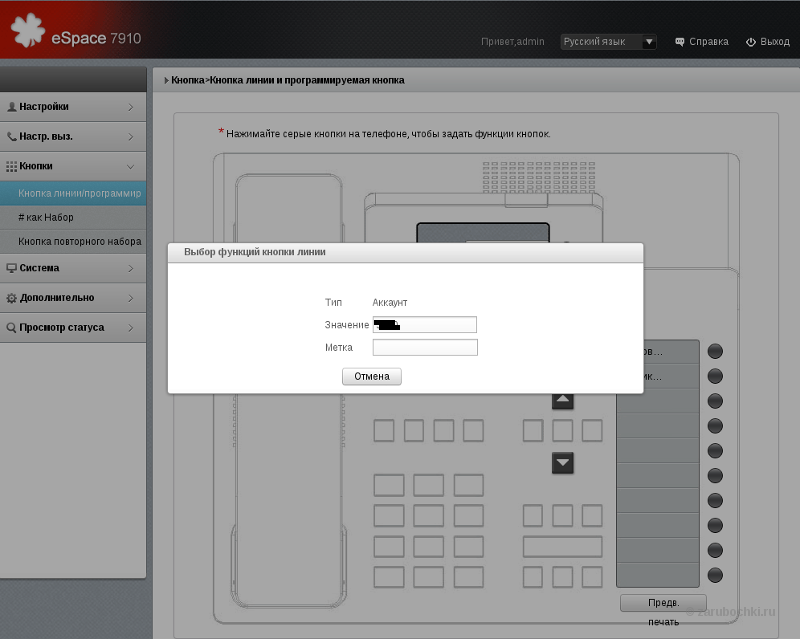
Очень удобный и наглядный интерфейс программирования кнопок:
Просто делаешь двойной правый клик мышкой по кнопке и в открывшемся окне вводишь настройки. Например добавление кнопки линии выглядит так:
Для перехода по всем кнопкам линий нужно нажимать кнопки выделенных стрелочек. Добавление кнопки быстрого набора:
Источник
huawei espace 7910 инструкция на русском
По дефолту в аппарате включен dhcp. Телефон будет работать в локальной сети, где dhcp есть. Соответственно заходим браузером на уже известный нам ip девайса и сразу же видим первые грабли:
Зайти естественно получилось только интернет эксплорером.
Выбираем локализацию:
Включаем от безисходности http, чтобы заходить разными браузерами:
Приступаем непосредственно к главным настройкам.
Переходим на вкладку Дополнительно -> Сервер Серверное окружение Asterisk.
Резервирование последовательное. В SIP-сервер -> Сервер 1 указываем ip или доменное имя нашего Asterisk либо другой ippbx или софтсвича, а также sip порт.
Если есть резервные sip сервера указываем их ip в полях Сервер 2 и Сервер 3 и естественно их порты тоже.
Указывем ip и порты основных и резервных sip proxy в полях Прокси-сервер -> Сервер №, Порт. В большинстве случаев это будет ip sip сервера прописанного выше и тот же порт. Указываем сервер корпоративного каталога LDAP.
Указываем остальные параметры ldap:
- ip сервера Ldap (в моем случае это ip контроллера домена в нашей сети);
- порт ldap 389;
- корневой узел в виде dc=name domain, dc=ru;
- имя пользователя и пароль в домене от имени которого будут осуществляться запросы;
- фильтр ldap и атрибут номера Ldap (в моем случае это идентичный атрибут telephoneNumber);
- максимальное кол-во результатов поиска 60;
- время тайм-аута поиска 10.
Указываем атрибуты нашего ldap (в большинстве случаев используются стандартные наименования атрибутов):
- Имя: displayName;
- Департамент: department
- Должность: title;
- Рабочий телефон: telephoneNumber;
- Домашний телефон: homePhone;
- Мобильный телефон: Mobile;
- IP-телефон: ipPhone.
Сохраняем настройки и перезагружаемся.
Переходим к настройкам sip аккаунта. Дополнительно -> Аккаунт.
Вводим наименование sip аккаунта, имя пользователя и пароль.
Повторяем операцию для добавления еще аккаунтов если они у нас есть. После этого мы можем повесить созданные аккаунты на кнопки (появятся в выпадающих списках). Должно быть задействовано не менее двух кнопок иначе у абонента не будет возможности перенаправлять вызов и использовать предусмотренную в этом аппарате конференц-связь. В принципе на этом основная настройка аппарата окончена. Ниже скрины еще некоторых дополнительных настроек.
Звук кнопок тоже настраивается:
Можно выбирать обои и даже загружать свои:
Выбор аудио источника:
Очень удобный и наглядный интерфейс программирования кнопок:
Просто делаешь двойной правый клик мышкой по кнопке и в открывшемся окне вводишь настройки. Например добавление кнопки линии выглядит так:
Для перехода по всем кнопкам линий нужно нажимать кнопки выделенных стрелочек. Добавление кнопки быстрого набора:
На границе с PSTN какой-то шлюз, в центре сервер приложений и сервер управления. На местах аппаратные телефоны, софт-фоны и аналоговые аппараты, подключаемые через шлюзы.
Из всего этого великолепия у меня на руках пока только телефонный аппарат Huawei eSpace 7910.
Подключать мы его будем (за неимением другого) к CUCM и к Asterisk.
Первый взгляд
На сайте производителя фото аппарата выглядит вот так
У меня на столе он смотрится следующим образом (на заднем плане маячит телефон другой компании, для масштаба)
Самый главный плюс аппарата. Без всякой родной инфраструктуры он спокойно работает как обычный SIP-телефон. Не надо никаких плясок с бубном (это пинок в сторону циски, попробуйте просто так прикрутите к астериску Cisco 9971 с консолькой, развлечение для сильных духом). После подключения к коммутатору Cisco Catalyst 4507 аппарат получил питание по PoE, самостоятельно нашел голосовой VLAN (да, я предусмотрительно включил LLDP, не придирайтесь), получил IP по DHCP и начал требовать введения каких-то «паролей и явок». Но русская смекалка и WEB-интерфейс (юзер admin, пароль admin123 — по умолчанию) помогли обойти все трудности.
Подробно, про краткие настройки аппарата рассказано здесь. Единственное, что у меня заведено два сервера, и две линии. Во всём остальном — так-же.
Впечатления
Телефон оставляет неоднозначные впечатления.
Особенно меня удивила трубка.
Для сравнения, слева — трубка аппарата Cisco, справа — от Huawei.
При этом к качеству звука претензий нет. Всё четко и чисто.
Так-же слегка удивил спикерфон, он почему-то сделан на задней панели. И громкость его недостаточна для устройств подобного класса.
Клавиатура добротная, кнопки нажимаются с легким, приятным усилием. В паре моментов группировка клавиш вызывает недоумение, но это, видимо, с непривычки. Порадовало наличие десяти аппаратных кнопок быстрого набора. Люди это любят.
Откровенно удивил экран — 3 дюйма, с разрешением 320×240 пикселей, цветной. Возникает вопрос — нахуа Хуану сомбреро?
Он годится что-бы посмотреть на нем выданный IP-адрес, и увидеть имя звонящего. Можно было поставить B/W экранчик. А так, на экране четыре иконки (история, контакты, сообщения и приложения), которые ещё и меняют размер при наведении курсора них. Выглядит — неаккуратно. Но будем надеяться что это поправят в следующих прошивках.
Порадовал подход к русификации, шрифт красивый, ошибок в написании нет, русский CallerID прекрасно показывается без всяких «закорючек и иероглифов».
Так-же отмечу большой плюс аппарата, гигабитные сетевые порты. Огромное спасибо. А то нередко случается ситуация, когда на предприятии коммутаторы с гигабитными портами, а телефоны закупаются (великая штука — оптимизация расходов) с портами 100Mb/s.
Итого
Собственно, делать итоги рано. Необходимо посмотреть как будет работать комплекс в целом.
Потому что WEB-интерфейс это конечно хорошая штука, но при наличии уже сотни аппаратов, без централизованного управления, работа превращается в кошмар.
В данной статье будет описано как выполнить базовую настройку телефонного аппарата Huawei eSpace 7810.
Перед началом настройки телефонного аппарата, выполним подключение к сети питания и к локальной сети. Дождавшись полной загрузки аппарата, откроем интернет обозреватель(Mozilla Firefox, Google Chrome, Opera) и введем в адресную строку:
И выполним переход, система попросит пройти процедуру авторизации, ввести логин и пароль(по умолчанию admin:admin).
После успешной процедуры авторизации, перейдем на вкладку «Account» и заполним следующие поля:
1. Account Active — On или Off
2. Display Name — Отображаемое имя на экране телефона
3. Register Name — SIP ID
4. User Name — SIP ID
6. SIP Server — адрес сервера телефонии
Для выполнения обновления или сброса настроек телефонного аппарата необходимо перейти во вкладку «Upgrade»:
Источник
Huawei espace 7910 как настроить
По дефолту в аппарате включен dhcp. Телефон будет работать в локальной сети, где dhcp есть. Соответственно заходим браузером на уже известный нам ip девайса и сразу же видим первые грабли:
Зайти естественно получилось только интернет эксплорером.
Выбираем локализацию:
Включаем от безисходности http, чтобы заходить разными браузерами:
Приступаем непосредственно к главным настройкам.
Переходим на вкладку Дополнительно -> Сервер Серверное окружение Asterisk.
Резервирование последовательное. В SIP-сервер -> Сервер 1 указываем ip или доменное имя нашего Asterisk либо другой ippbx или софтсвича, а также sip порт.
Если есть резервные sip сервера указываем их ip в полях Сервер 2 и Сервер 3 и естественно их порты тоже.
Указывем ip и порты основных и резервных sip proxy в полях Прокси-сервер -> Сервер №, Порт. В большинстве случаев это будет ip sip сервера прописанного выше и тот же порт. Указываем сервер корпоративного каталога LDAP.
Указываем остальные параметры ldap:
- ip сервера Ldap (в моем случае это ip контроллера домена в нашей сети);
- порт ldap 389;
- корневой узел в виде dc=name domain, dc=ru;
- имя пользователя и пароль в домене от имени которого будут осуществляться запросы;
- фильтр ldap и атрибут номера Ldap (в моем случае это идентичный атрибут telephoneNumber);
- максимальное кол-во результатов поиска 60;
- время тайм-аута поиска 10.
Указываем атрибуты нашего ldap (в большинстве случаев используются стандартные наименования атрибутов):
- Имя: displayName;
- Департамент: department
- Должность: title;
- Рабочий телефон: telephoneNumber;
- Домашний телефон: homePhone;
- Мобильный телефон: Mobile;
- IP-телефон: ipPhone.
Сохраняем настройки и перезагружаемся.
Переходим к настройкам sip аккаунта. Дополнительно -> Аккаунт.
Вводим наименование sip аккаунта, имя пользователя и пароль.
Повторяем операцию для добавления еще аккаунтов если они у нас есть. После этого мы можем повесить созданные аккаунты на кнопки (появятся в выпадающих списках). Должно быть задействовано не менее двух кнопок иначе у абонента не будет возможности перенаправлять вызов и использовать предусмотренную в этом аппарате конференц-связь. В принципе на этом основная настройка аппарата окончена. Ниже скрины еще некоторых дополнительных настроек.
Звук кнопок тоже настраивается:
Можно выбирать обои и даже загружать свои:
Выбор аудио источника:
Очень удобный и наглядный интерфейс программирования кнопок:
Просто делаешь двойной правый клик мышкой по кнопке и в открывшемся окне вводишь настройки. Например добавление кнопки линии выглядит так:
Для перехода по всем кнопкам линий нужно нажимать кнопки выделенных стрелочек. Добавление кнопки быстрого набора:
Источник