
Meade Polaris 114mm
MEADE INSTRUCTION MANUAL
Polaris Series German Equatorial Telescopes
POLARIS SERIES
www.meade.com
View the manual for the Meade Polaris 114mm here, for free. This manual comes under the category telescopes and has been rated by 2 people with an average of a 9.
This manual is available in the following languages: English. Do you have a question about the Meade Polaris 114mm or do you need help?
Ask your question here
Product Images (3)

Meade Polaris 114mm specifications
Below you will find the product specifications and the manual specifications of the Meade Polaris 114mm.
The Meade Polaris 114mm telescope is a refractor type telescope with a fixed focal length of 900mm and a lens diameter of 114mm. With a focal ratio of 7.9, this telescope is designed to provide clear and detailed views of the celestial objects it observes.
Featuring a refractor design, the telescope uses lenses to gather and focus light, resulting in sharp and high-quality images. The 114mm lens diameter allows for a significant amount of light to be collected, enhancing the brightness and clarity of the observed objects.
The fixed focal length of 900mm indicates that the telescope produces a high magnification, making it suitable for observing distant stars, planets, and other celestial phenomena. This feature allows astronomers and enthusiasts to explore the night sky in greater detail.
Constructed with precision and durability in mind, the Meade Polaris 114mm telescope is designed to withstand the rigors of outdoor use. The materials used in its construction ensure long-lasting performance and reliability.
It is important to note that this description is based solely on the provided specifications of the Meade Polaris 114mm telescope, and it does not include any subjective opinions or evaluations.
General
| Brand | Meade |
| Model | Polaris 114mm | 216004 |
| Product | telescope |
| EAN | 709942996913, 0709942996913, 0809392583814, 7426101964936 |
| Language | English |
| Filetype | User manual (PDF) |
Technical details
| Type | Refractor |
| Fixed focal length | 900 mm |
| Lens diameter | 114 mm |
| Focal ratio | 7.9 |
Features
show more
Frequently Asked Questions
Can’t find the answer to your question in the manual? You may find the answer to your question in the FAQs about the Meade Polaris 114mm below.
How do I assemble the Meade Polaris 114mm telescope?
Start by attaching the tripod legs securely. Then, attach the altitude control rod to the mount. Place the optical tube assembly onto the mount and tighten the bolt to secure it. Finally, attach the eyepiece and you’re ready to observe!
How can I align the finderscope with the main telescope?
Begin by pointing the telescope towards a distant object during daytime. Adjust the finderscope’s alignment screws until the object appears centered in both the main telescope and the finderscope’s crosshairs.
What should I do if the image through the telescope appears blurred?
First, ensure that the telescope’s focusing knob is turned clockwise to achieve focus. If the image is still blurry, try adjusting the eyepiece’s focus by rotating it clockwise or counterclockwise until the image becomes sharp and clear.
How can I locate specific celestial objects using the Meade Polaris 114mm telescope?
Begin by referring to a star chart or using astronomy software to identify the approximate direction of the desired celestial object. Then, use the telescope’s altitude and azimuth controls to move the telescope until the object is in the field of view. Fine-tune the positioning using the telescope’s slow-motion controls.
What can I do to minimize image shake while observing?
To reduce image shake, make sure the telescope is properly balanced on its mount. Avoid touching the telescope while observing, as even the slightest movement can cause vibrations. Additionally, consider using a sturdy tripod and adjusting the tension control knobs to stabilize the telescope.
Is the Meade Polaris 114mm a refractor telescope?
Yes, the Meade Polaris 114mm is a refractor telescope. This means that it uses lenses to gather and focus light, providing users with clear and sharp images.
What is the lens diameter of the Meade Polaris 114mm?
The lens diameter of the Meade Polaris 114mm is 114 mm. This indicates that it has a relatively large aperture, allowing for a greater amount of light to enter the telescope. This can result in brighter and more detailed views of celestial objects.
What is the focal ratio of the Meade Polaris 114mm?
The focal ratio of the Meade Polaris 114mm is 7.9. This indicates that it has a relatively fast focal ratio, making it suitable for observing a wide range of celestial objects. It also means that it may be more compact and portable compared to telescopes with slower focal ratios.
Is the manual of the Meade Polaris 114mm available in English?
Yes, the manual of the Meade Polaris 114mm is available in English .
Is your question not listed? Ask your question here
Обзор телескопа Meade Polaris 114
Итак, продолжаем нашу рубрику обзоров и переходим к средней по старшинству модели зеркального телескопа линейки Polaris. А именно — Meade Polaris 114. Это зеркальный телескоп, он же рефлектор, с фокусным расстоянием 1000мм и короткой трубой. Для сохранения компактности трубы и ее веса, применяется корректор. Он расположен в трубке фокусера. Таким образом, используя сферическое зеркало + корректор мы получаем на выходе компактный телескоп с большим фокусным расстоянием.
Данный телескоп имеет отличную широкую комплектацию: три окуляра и 2-кратная линза Барлоу. С ней вы получите вдвое большее увеличение с каждым окуляром. Окуляр 6.3мм прекрасно подойдет для Луны и планет, двойных звезд, 9мм для средних увеличений и 26 мм, как обзорник\поисковик, но также он будет прекрасен по протяженным объектам. Также в комплекте искатель Red Dot с красной точкой, регулируемой по яркости. Тренога стальная, монтировка экваториальная, с ручками тонких движений. Труба получила окрас красивого и насыщенного синего цвета.

А теперь переходим непосредственно к характеристикам телескопа Meade Polaris 114 и его детальному обзору.
Характеристики Meade Polaris 114
Основные оптические характеристики
· Диаметр объектива: 114 мм
· Оптическая система: зеркальный телескоп (рефлектор)
· Фокусное расстояние: 1000 мм
· Относительное отверстие: 1/8 , если точно 1\8.7
· Максимальное увеличение (примерно): 228х
· Изображение (при базовой комплектации): перевернутое
· Посадочный диаметр для окуляров: 1,25″
Конструкция трубы
· Фокусировка: кремальера
· Юстировка объектива: предусмотрена винтами
· Крепление к монтировке: кольца\оправа

Конструкция монтировки и установки
· Монтировка: экваториальная
· Управление: ручное с ручками тонких движений
· Приводы: нет
· Штатив: стальной, регулируемый по высоте
Стандартные аксессуары
· Окуляр 6.3 мм, 1,25″ (дает увеличение 158х)
· Окуляр 26 мм, 1,25″ (дает увеличение 38х)
· Окуляр 9 мм, 1,25″ (дает увеличение 111х)
· 2-х кратная линза Барлоу 1,25″
· Искатель Red Dot
· Полочка для аксессуаров
Вес телескопа: 12 кг

В качестве объектива у данного телескопа выступает сферическое зеркало апертурой 114 мм и фокусным расстоянием 1000мм. Оправа зеркала имеет три лапки крепления главного зеркала, юстировка предусмотрена тремя винтами, расположенными на тыльной стороне трубы телескопа. Конструкция предусматривает корректор, что благоприятно сказалось на размерах самой трубы и ее весе, а также для уменьшения сферической аберрации. Вторичное зеркало небольшое, так же юстируется винтами и имеет малое центральное экранирование, что является несомненным плюсом среди зеркальных телескопов. Вторичное зеркало крепится на трех тонких растяжках. Крышка трубы телескопа сидит крепко. На самом телескопе есть наклейка с маркировкой: диаметр 114 мм, фокусное расстояние 1000 мм.
На фокусере отсутствует Т-резьба (М42х0.75). Но если к телескопу присоединить Т-адаптер и установить зеркальную камеру, можно будет делать снимки Луны, планет, созвездий, одиночные снимки ярких объектов Дальнего Космоса, Солнца (через специальный солнечный фильтр), комет или наземных объектов (птицы, животные, пейзажи, дома и иные сооружения). Однако для этого понадобится докупить переходное Т-кольцо к фотоаппарату.
Телескоп Meade Polaris 114 комплектуется искателем типа Red Dot с регулировкой яркости. Данный искатель необходимо соотнести с телескопом. Искатель питается от обычной батарейки CR2032. Данный искатель простой, интуитивно понятный в обращении, многим он кажется удобней классического оптического, но с поправкой на начальный сегмент телескопов. Естественно, если рассматривать варианты телескопа с диаметром объектива\зеркала от 150мм, то стоит отдать предпочтение искателю 8х50мм, так как там он уже будет актуален.

Телескоп Meade Polaris 114 комплектуется тремя окулярами (26 и 9 и 6.3 мм) и 2-х кратной линзой Барлоу.
Окуляр Meade MA 26 mm — трехлинзовый окуляр системы Кельнера. Корпус выполнен из пластика, а юбка из металла. Просветление синее. Поле зрения небольшое порядка 50 градусов.
Окуляр Meade MA 9 mm — трехлинзовый окуляр системы Кельнера. Корпус выполнен из пластика, а юбка металлическая. Просветление синее. Поле зрения небольшое, около 40 градусов.
Окуляр Meade MA 6.3 mm — трехлинзовый окуляр системы Кельнера. Корпус выполнен из пластика, а юбка из металла. Просветление синее. Поле зрения небольшое, около 40 градусов.
Линза Барлоу 2х — двукратная, однолинзовая. Просветления нет. Корпус пластиковый, без Т-резьбы. Естественно, она вносит хроматизм и сферическую аберрацию, как и все дешевые комплектные линзы Барлоу. Желательно заменить её на более качественную с Т-адаптером, которая лучше подойдёт для фото планет и Луны.
Так как это рефлектор (зеркальный телескоп), картинка у него будет перевернутая.
Телескоп укомплектован экваториальной монтировкой на устойчивой металлической треноге (ноги стальные) с возможностью регулировки высоты ног, делая его удобным для наблюдениий независимо от роста человека. Экваториальная монтировка очень удобна в эксплуатации. В телескопе предусмотрены ручки тонких движений по осям для удобства наведения и слежения наблюдаемого объекта.

Подводим итог: Meade Polaris 114 — отличный телескоп для начинающего или продвинутого любителя астрономии, будь то ребенок, подросток или взрослый человек. У данного телескопа яркая, сочная и контрастная картинка. Хроматическая аберрация отсутствует, так как перед нами рефлектор. Основные объекты для такого 114 мм рефлектора — Луна, звездные скопления, двойные звезды, яркие дипскай объекты каталога Мессье. Планеты в него также будут видны, и гораздо большего размера, нежели в телескоп с диаметром 70-80мм, с подробностями и множеством деталей. В данный телескоп получится увидеть кольцо Сатурна, Юпитер, его облачные пояса, большое красное пятно и 4 его спутника, фазы Венеры, полярную шапку на Марсе в момент великого противостояния планеты. А еще этот телескоп можно использовать как мощную подзорную трубу по наземным объектам, но с оборачивающим окуляром.
Если имеется финансовая возможность, и вам хочется прикоснуться и насладиться использованием оптической схемы рефлектора, то настоятельно рекомендуем данную модель телескопа в качестве первого инструмента. При переходе с 70мм телескопа, Meade Polaris 114 позволит увидеть любимые объекты в совершенно новом качестве изображения, улучшенных насыщенности, структуры и контраста выдаваемой картинки. Помните одно правило, чем больше апертура, тем больше и ярче Ваш телескоп покажет!
Хороших наблюдений и ясного неба!
Эксперт магазина Meade.ru, Мясников Андрей.

www.meade.com
MEADE INSTRUCTION MANUAL
Polaris Series German Equatorial Telescopes
POLARIS SERIES
WARNING!
Never use a Meade
Looking at or near the Sun will cause instant and
irreversible damage to your eye. Eye damage is often
painless, so there is no warning to the observer that
damage has occurred until it is too late. Do not point the
telescope at or near the Sun. Do not look through the
telescope or viewfinder as it is moving. Children should
always have adult supervision while observing.
®
Telescope to look at the Sun!

INTRODUCTION
Your telescope is an excellent beginner’s
instrument, and is designed to observe
objects in the sky. It can be your personal
window to the universe allowing you to see
bright galaxies, planets, stars and more.
The telescope is shipped with the following
parts:
• Optical tube
• German equatorial mount
• Stainless-steel tripod with accessory tray
• Three 1.25” eyepieces:
MA25mm, MA9mm, MA6.3mm
• Red dot viewfinder with bracket
• Slow-motion control cables
• 90 degree erect-image diagonal prism
(Refractors only)
The Polaris Series of telescope includes
optical tubes of different sizes and design.
Some optical tubes use lenses to focus the
incoming light and are called refractors. Other
optical tubes use mirrors to bring the incoming
light to focus and are called reflectors.
The lens or mirror diameter of the telescope
is one of the most important pieces of
information about the telescope. The size of
the lens or mirror, also known as “aperture”,
determines how much detail you will be able
to see in your telescope. The optical tubes
focal length information is also important
and will help later on to calculate the viewing
magnification.
Setting up your telescope involves these
simple steps:
•Setup your tripod
•Attach the accessory tray
•Attach the mount
•Attach the counterweight shaft and
counterweight
•Prepare the mount
•Attach the optical tube to the mount
•Attach the red dot viewfinder
•Attach the eyepiece
Study the picture on the next page(s)
and become acquainted with the parts
of your telescope. Figure 1A shows
a typical reflector telescope whereas
Figure 1B shows a refractor. Then
proceed to “Setup your Tripod.”
1
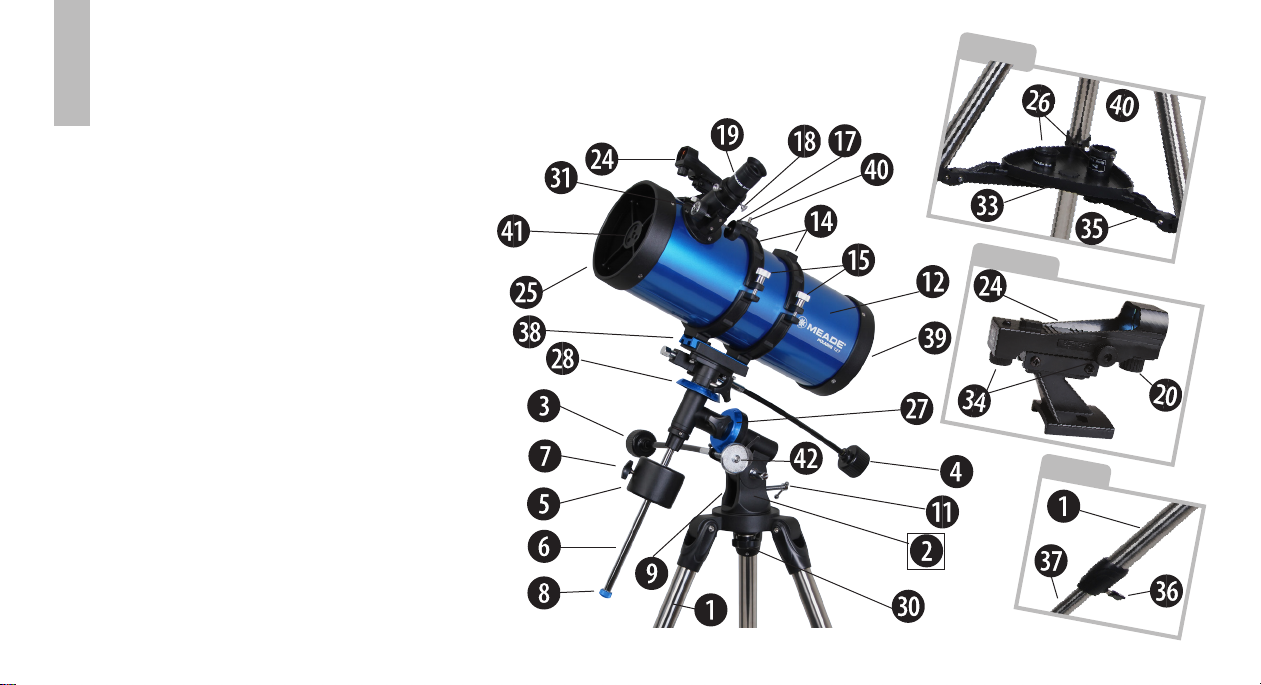
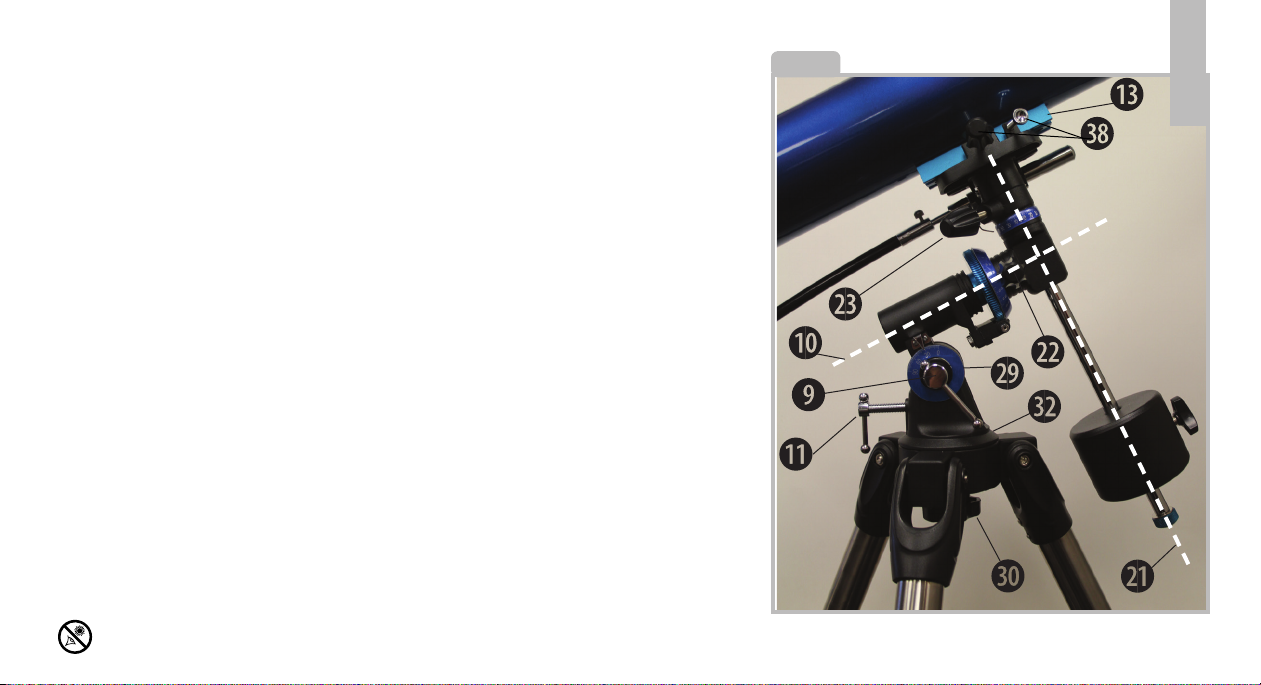
FIGURE 1A
2
1. Tripod legs
2. Large Equatorial Mount
3. Right Ascension control cable
4. Declination control cable
5. Counterweight(s)
6. Counterweight shaft
7. Counterweight lock knobs
8. Counterweight safety knob
9. Latitude adjustment lock (see Fig. 3)
10. Polar axis (see Fig. 3)
11. Latitude adjustment knob
12. Main optical tube (OTA)
13. Optical tube saddle plate (see Fig. 3)
14. Cradle rings
15. Cradle ring lock knobs
16. Red dot viewfinder bracket mounting
thumbscrews (see Fig 4/5)
17. Focuser
18. Focuser thumbscrew
19. Eyepiece
20. Red dot viewfinder On/Off switch
(see Inset B)
21. Declination axis (see Fig. 3)
22. Right Ascension lock (see Fig. 3)
23. Declination lock (see Fig. 3)
24. Red dot viewfinder
25. Front dust cover (not shown)
Figure 1A: Meade Polaris Reflecting Telescope
Inset A: Accessory Tray
Inset B: Red Dot Viewfinder Assembly.
Inset C: Tripod Leg
26. Eyepiece holder slots (see Inset A)
27. Right Ascension setting circle
28. Declination setting circle
29. Latitude dial (see Fig. 3)
30. Azimuth lock
31. Focus knobs
32. Azimuth base (see Fig. 3)
33. Accessory tray (see Inset A)
34. Red dot viewfinder alignment
screws (see Inset B)
35. Leg brace support (see Inset A)
36. Tripod leg lock knob (see Inset C)
37. Sliding leg extension
(see Inset C)
38. OTA saddle plate lock knob(s) (not
visible)
39. Primary Mirror collimation adjustments (not visible)
40. Camera adapter mounting screw
41. Secondary Mirror collimation adjustments
42. Optional motor drive gear (Large EQ
mount only)
Inset A
Inset B
Inset C
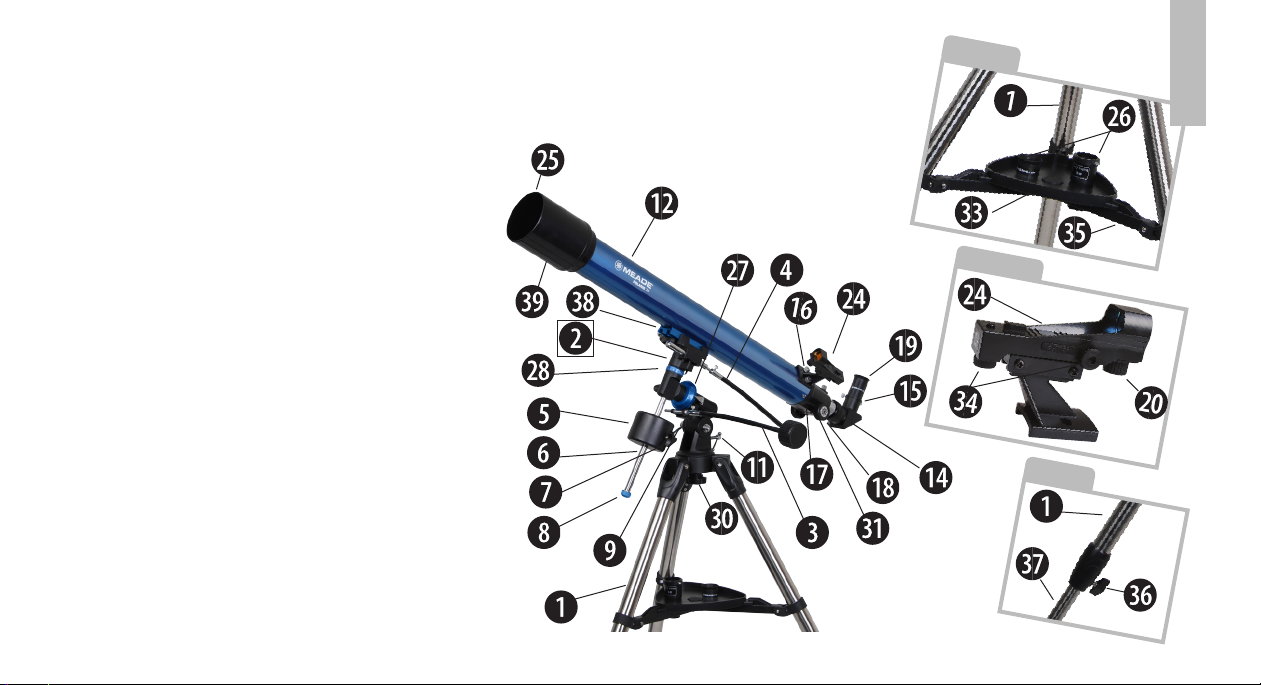
FIGURE 1B
1. Tripod legs
2. Small Equatorial Mount
3. Right Ascension control cable
4. Declination control cable
5. Counterweight(s)
6. Counterweight shaft
7. Counterweight lock knobs
8. Counterweight safety knob
9. Latitude adjustment lock (not visible)
10. Polar axis (see Fig. 3)
11. Latitude adjustment knob
12. Main optical tube (OTA)
13. Optical tube saddle plate (see Fig. 3)
14. 90 Degree Erect-Image Prism
15. 90 Degree Prism Thumb screws
16. Red dot viewfinder bracket mounting
thumbscrews (see Fig 4/5)
17. Focuser
18. Focuser thumbscrew
19. Eyepiece
20. Red dot viewfinder On/Off switch
(see Inset B)
21. Declination axis (see Fig. 3)
22. Right Ascension lock (see Fig. 3)
23. Declination lock (see Fig. 3)
24. Red dot viewfinder
25. Front dust cover (not shown)
Figure 1B: Meade Polaris Refracting Telescope
Inset A: Accessory Tray
Inset B: Red Dot Viewfinder Assembly.
Inset C: Tripod Leg
26. Eyepiece holder slots (see Inset A)
27. Right Ascension setting circle
28. Declination setting circle
29. Latitude dial (see Fig. 3)
30. Azimuth lock
31. Focus knobs
32. Azimuth base (see Fig. 3)
33. Accessory tray
34. Red dot viewfinder alignment
screws (see Inset B)
35. Leg brace support (see Inset A)
36. Tripod leg lock knob (see Inset C)
37. Sliding leg extension
(see Inset C)
38. OTA saddle plate lock knob(s) (not
visible)
39. Dew Shield
Inset A
3
Inset B
Inset C
SETUP YOUR TRIPOD
4
The tripod is the basic support for your
telescope. Its height may be adjusted so that
you can view comfortably. Note: Number in
brackets, e.g., (3), refer to Fig. 1A and 1B
unless noted otherwise. The tripod is shipped
from the factory pre-assembled and needs
only the mount and accessory tray attached.
The accessory tray attaches at the center of
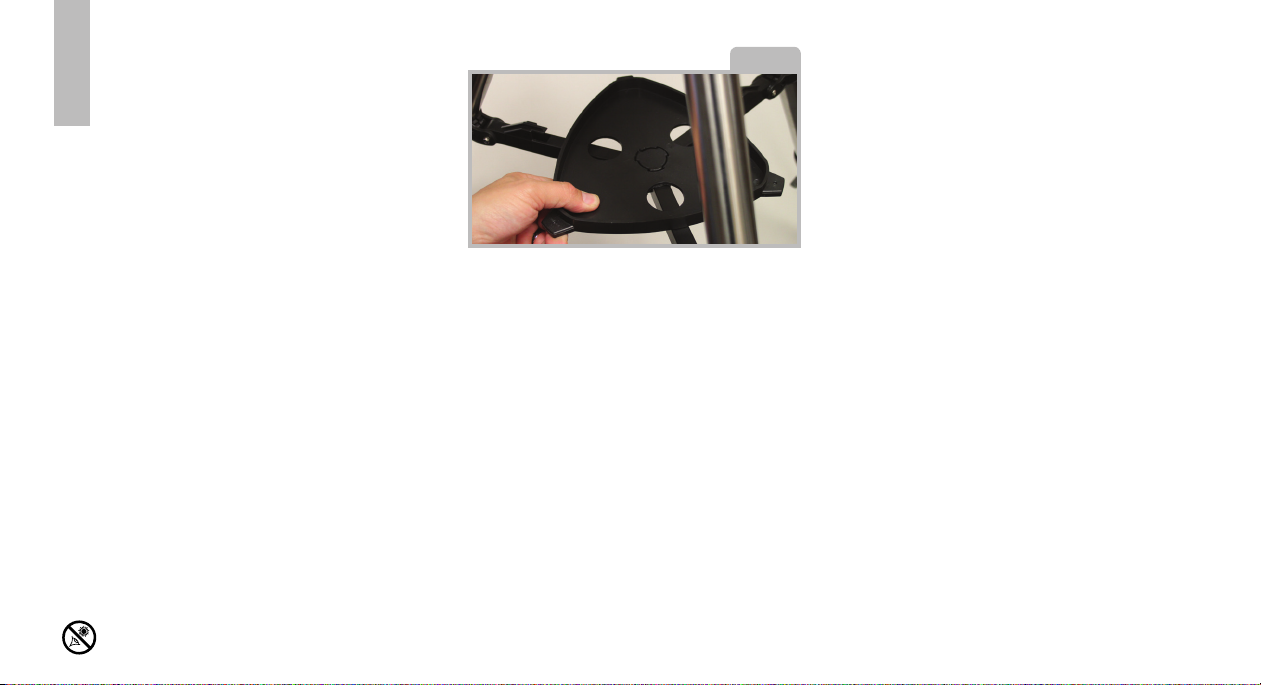
1.Spread the tripod legs out evenly apart.
2. Set the height of your tripod:
a. Rotate and loosen the tripod leg lock
thumbscrew (36) to unlock the sliding leg
extension (37).
b. Slide the inner portion of the leg (37) in or
out to the desired length.
c. Rotate and tighten the leg lock thumbscrew
the tripod legs and is a convenient place to
hold eyepieces and other Meade accessories
while observing, such as the Barlow lens.
To attach, place the hole in the center of the
accessory tray over the attachment point as
shown in Fig 2. Then rotate the tray until the
wings of the tray snap into place on the tripod
leg brace supports.
To remove the tray, rotate the tray so it
unlocks, then remove.
(36) to re-lock the inner tripod leg.
d. Repeat for the other two legs so when
complete, the top of the tripod is level.
ATTACH THE MOUNT
Next, attach the mount body (2) to the tripod
by placing the base of the mount on top of the
ATTACH THE ACCESSORY TRAY
Looking at or near the Sun will cause irreversable damage to your eye. Do not point this telescope at or near the Sun. Do not look through the telescope as it is moving.
tripod. Next, secure the mount to the tripod
Fig. 2
using the large azimuth lock knob (30) at the
top of the tripod. Tighten to a firm feel.
ATTACH THE COUNTERWEIGHT SHAFT
AND COUNTERWEIGHT
1. Thread the counterweight shaft (6) into
the mounts declination axis (21, Fig. 3) until
it stops.
2. Remove the safety knob (8) and set aside.
3. Hold the counterweight (5) firmly in one
hand and slide the counterweight onto the
counterweight shaft (6) so it is about 2” from
the bottom of the shaft.
4. Secure in place by tightening the
counterweight lock knob (7).
5. Thread the safety nut (8) into the
counterweight shaft until tight.
Note: Make sure the safety knob (8) always
remains in place on the shaft. This safety
feature prevents the counterweight from
accidentally falling off the shaft.
PREPARE THE MOUNT
1. Attach the flexible cables (3) and (4).
These cables are secured in place with
a firm tightening of the thumbscrews
located at the attachment ends of each
cable.
2. Tilt the polar axis of the telescope to
roughly a 45° angle with the horizon:
Loosen the latitude adjustment lock (9) so
you can move the mount to the desired
position.
3. Turn the latitude adjusting screw (11)
clockwise until the latitude scale (29) on
the side of the mount reads approximately
45°.
4.Re-tighten the latitude adjustment lock
(9) to secure the mount in place.
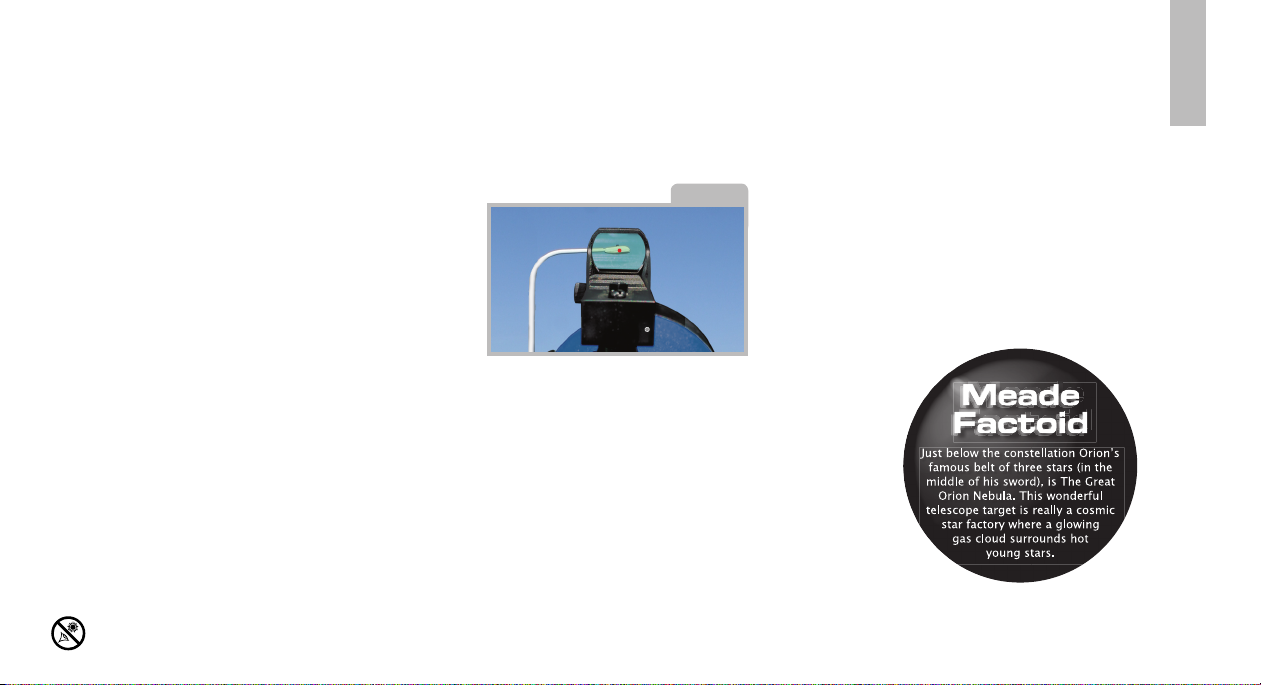
ATTACH THE RED DOT VIEWFINDER
An eyepiece (19) has a narrow field of
view. The red dot viewfinder (24) has
a wider field of view, which makes it
easier to locate objects. Once the red
dot viewfinder is aligned to the optical
tube, the red dot can be used to locate
and place objects more easily in the
telescopes eyepiece.
1. Note the two thumbscrews (16, Fig.
4) thread onto two bolts on the optical
tube. Remove the thumbscrews from
the tube.
2. Line up the two holes on the red dot
viewfinder bracket over the two bolts.
Slide the bracket over the bolts with the
viewfinder lens facing the front of the
telescope.
ATTACH THE OPTICAL TUBE TO THE
MOUNT
1. Lay the optical tube saddle plate (13)
onto the top of the mount as shown in
Fig 1.
2. Tighten the ota saddle plate lock
3. Replace the thumbscrews (16) on to
the bolts and tighten to a firm feel.
NOTE: The Polaris 80 and 90 models
use a dovetail to secure the red dot
viewfinder. For these models, slide the
viewfinder bracket into the viewfinder
holder and secure with the single
knob(s) (38) to a firm feel.
Looking at or near the Sun will cause irreversable damage to your eye. Do not point this telescope at or near the Sun. Do not look through the telescope as it is moving.
Fig. 3
5

locking screw (16, Fig 5).
6
Fig. 4
NEVER USE YOUR TELESCOPE
SUN WARNING!
TO LOOK AT THE SUN!
LOOKING AT OR NEAR THE SUN WILL
CAUSE INSTANT AND IRREVERSIBLE
DAMAGE TO YOUR EYE. EYE DAMAGE
IS OFTEN PAINLESS, SO THERE IS NO
WARNING TO THE OBSERVER THAT
DAMAGE HAS OCCURRED UNTIL IT IS
TOO LATE. DO NOT POINT THE TELE-
Fig. 5
SCOPE OR ITS VIEWFINDER AT OR NEAR
THE SUN. DO NOT LOOK THROUGH THE
TELESCOPE OR ITS VIEWFINDER AS IT
IS MOVING. CHILDREN SHOULD ALWAYS
HAVE ADULT SUPERVISION WHILE OB-
SERVING.
to hold the eyepiece securely.
INSERT THE EYEPIECE
(REFLECTOR MODELS ONLY)
1. Slide the MA25mm eyepiece (19) directly
into eyepiece holder on the focuser (17).
2. Tighten the focuser thumbscrew(s) (18)
Looking at or near the Sun will cause irreversable damage to your eye. Do not point this telescope at or near the Sun. Do not look through the telescope as it is moving.
(REFRACTOR MODELS ONLY)
1. First, slide the 90 degree erect image
prism (14, Fig 1B) directly into the focuser
draw tube (17).
2. Tighten the focuser thumbscrew(s) (18) to
hold the 90 degree prism securely.
3. Then, slide the MA25mm eyepiece (19)
directly into 90 degree erect image prism (14,
Fig 1B).
4. Tighten the 90 degree erect image prism
thumbscrew (15, Fig 1B) to hold the eyepiece
securely.
BALANCING THE TELESCOPE
In order for the telescope to move smoothly
on its mechanical axes, it must first be
balanced as follows:
Note: If the counterweight is positioned as
recommended previously then the telescope
is already approximately balanced.
1. Loosen the right ascension lock (22). The
telescope mount will turn freely about the
polar axis. Rotate the telescope about the
polar axis so that the counterweight shaft (6)
is parallel to the ground (horizontal).
2. Loosen the counterweight locking knob
(7) and slide the counterweight (5) along the
shaft (6) until the telescope remains in any
given position without tending to drift up or
down around the polar axis (10).
NOTE: Always re-tighten the counterweight
lock knob (7) before rotating the RA axis
to prevent the counterweight from sliding
unexpectedly. When the telescope is
balanced, proceed to aligning the red dot
viewfinder.
object, such as the Moon or a bright star, and
use the viewfinder’s alignment screws to
make any necessary refinements.
5. When finished, turn off the red dot
viewfinder by rotating the on/off switch(20)
counter-clockwise.
ALIGN THE RED DOT VIEWFINDER
Perform the first part of this procedure
during the daytime and the last step at night.
1. Point the telescope at an easy-to-find land
object such as the top of a telephone pole or
a distant mountain or tower. Look through
the eyepiece and turn the focuser knob (31)
until the image is sharply focused. Center
the object precisely in the eyepiece’s field
of view.
2. Turn on the red dot viewfinder by turning
the on/off switch(20) clockwise.
3. Look through the red dot viewfinder
(24). Turn one or more of the viewfinder’s
alignment screws (34) until the red dot
is precisely over the same object as you
centered in the eyepiece.
4. Check this alignment at night on a celestial
Looking at or near the Sun will cause irreversable damage to your eye. Do not point this telescope at or near the Sun. Do not look through the telescope as it is moving.
UNDERSTANDING CELESTIAL
MOVEMENTS AND COORDINATES
Understanding where to locate celestial
objects and how those objects move across
the sky is the key to enjoying the hobby
of astronomy. Most amateur astronomers
practice “star-hopping” to locate celestial
objects. They use star charts or astronomical
software to identify bright stars and star
patterns as “landmarks” in their search for
Fig. 6
astronomical objects. Another technique
for locating objects is to use the setting
circles that are provided on your
7
telescope.
UNDERSTANDING HOW CELESTIAL
OBJECTS MOVE
Due to the Earth’s rotation, celestial bodies
appear to move from East to West in a curved
path through the skies.
All stars and celestial objects are mapped
onto an imaginary sphere surrounding the
Loading…
Благодаря световому диаметру объектива 114 мм, телескоп-рефлектор формирует очень яркое и четкое изображение. Входящие в комплект окуляры обеспечивают оптимальный диапазон увеличения: 34,6х (26мм), 100х (9мм) и 142,8х (6.3мм) .Экваториальная монтировка с точным механизмом наведения и удобный искатель с лазерной точкой позволяет легко отслеживать астрономические объекты. Телескоп идеально подходит для начинающих астрономов и имеет отличное соотношение цена качество.
Главные особенности:
- Световой диаметр 114 мм, Светосила F/8.8
- Фокусное расстояние — 900мм
- Экваториальная монтировка с точным механическим наведением
- Устойчивая, надежная металлическая тренога с диаметром опор 38 мм
- В комплекте три окуляра 1,25″ MA (26mm,9mm и 6.3mm)
Комплект поставки:
— Экваториальная монтировка с треногой и противовесами
— Оптическая труба-рефлектор 114мм
— Три окуляра 1,25″ MA (26mm,9mm и 6.3mm)
— Линза барлоу 2х
— Искатель с лазерной точкой
— Диск (электронный планетарий)
— фирменный гарантийный талон 2 года.
Характеристики:
размеры, вес (телескоп в сборе): 885х870х1520mm, 10.2 кг.
размеры, вес (упаковка): 1110х425х200mm, 13.8 кг.
страна производства: Китай.
Телескоп Meade Polaris 114 мм — это легкий телескоп-рефлектор Ньютона с диаметром объектива 114 мм дает яркие, контрастные изображения тысяч объектов ночного неба. Этот длиннофокусный рефлектор на экваториальной монтировке рекомендуется не только начинающему любителю, но и уже продвинутому любителю астрономии. Телескоп отлично подойдет в качестве подарка даже ребенку. Благодаря оптической схеме Ньютона телескоп лишен хроматизма, а вы увидите чистые изображения, без цветных ореолов вокруг ярких звезд и Луны.
Телескоп укомплектован экваториальной монтировкой на прочной стальной треноге с возможностью регулировки высоты ног, делая его удобным при наблюдениях независимо от роста человека. Микрометрические винты, с возможностью установки электродвигателя по часовой оси, обеспечивают плавное ведение телескопа по обеим осям. Для быстрого поиска объектов на трубе телескопа установлен искатель c красной точкой- Red Dot.
Телескоп POLARIS 114 ММ EQ снабжен быстросъемным приспособлением типа «ласточкин хвост» для крепления оптической трубы и удобной полочкой для аксессуаров. В комплект входят три окуляра: 6,3 (143Х) мм, 9(100Х) мм и 25 (36Х) мм.
Максимальное увеличение телескопа 180Х, относительное отверстие 1:7,9, проницающая способность -12,8 m (звездной величины). Это позволит наблюдать в этот телескоп кольца Сатурна, облачные пояса, Большое Красное Пятно Юпитера и 4 его спутника, полярные шапки Марса, россыпи звезд скоплений Плеяды и NGC 869 (более известного как h и x Персея), а также другие астрономические объекты, доступные данному телескопу.
В качестве бонуса в комплект включен диск с программой-планетарием, которая покажет положение созвездий и других объектов на момент вашего наблюдения. Эта программа поможет не только узнать много нового, но и лучше ориентироваться в звездном небе. Продвинутый астроном, школьник, студент или начинающий любитель — каждый найдет для себя полезную информацию.
Основные характеристики телескопа Meade Polaris 114 мм:
- Легкий телескоп-рефлектор Ньютона с диаметром объектива 114 мм
- Усиленная немецкая экваториальная монтировка с возможностью подключения мотора часового ведения
- Удобные механизмы тонких движений по двум осям
- Искатель с «лазерной» точкой
- Стандартное универсальное крепление оптической трубы «ласточкин хвост»
- Устойчивая и надежная металлическая полевая тренога из нержавеющей стали с диаметром опор 32 мм
- 3 окуляра и электронный планетарий на диске в комплекте
| Производитель | Meade |
| Оптическая схема | Рефлектор Ньютона |
| Диаметр объектива, мм | 114 |
| Фокусное расстояние, мм | 900 |
| Относительное отверстие | 1:7,9 |
| Макс. полезное увеличение, х | 230 |
| Макс. звездная величина, m | 12.8 |
| Угловое разрешение, угл. сек. | 1.2 |
| Окуляр 1 | 6,3 мм (увеличение 143х) |
| Окуляр 2 | 9 мм (увеличение 100х) |
| Окуляр 3 | 25 мм (увеличение 36х) |
| Линза Барлоу | В комплекте |
| Искатель | Прямого зрения с красной точкой |
| Монтировка | экваториальная |
| Механизмы тонких движений | винтовой с ограничителем на оси склонений, червячный на оси прямого восхождения |
| Штатив | Стальной, диаметр опор: 32 мм |
| Вес телескопа, кг | 10.12 |
| Уровень пользователя | начинающий любитель |
| Предмет наблюдения | планеты Солнечной системы |
| Размеры упаковки, см | 88,5х87х152 см |