


User Manual
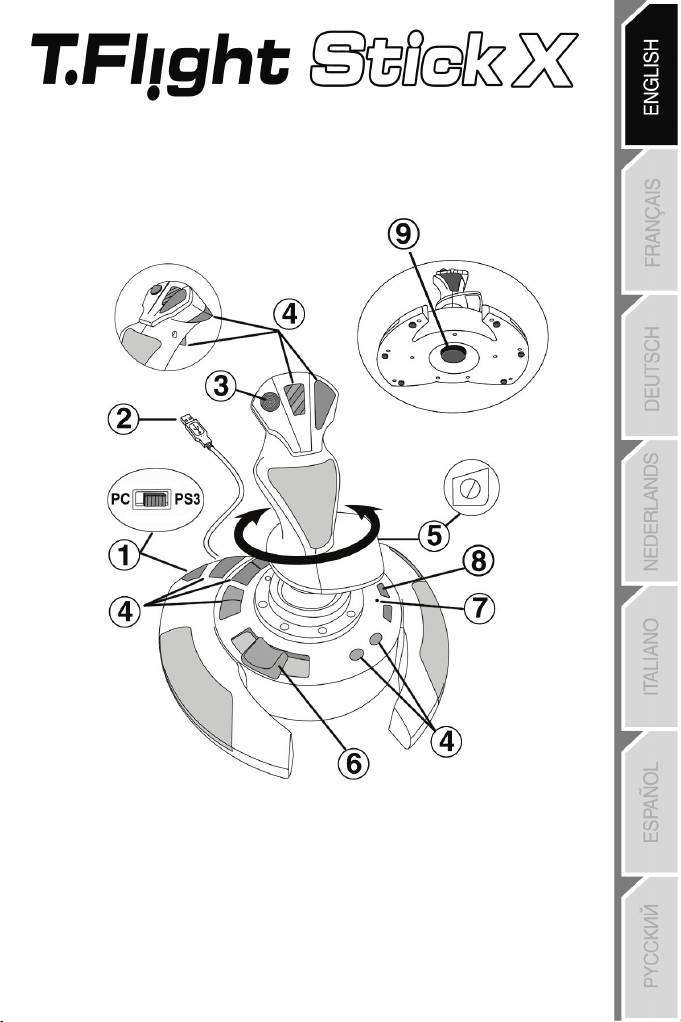
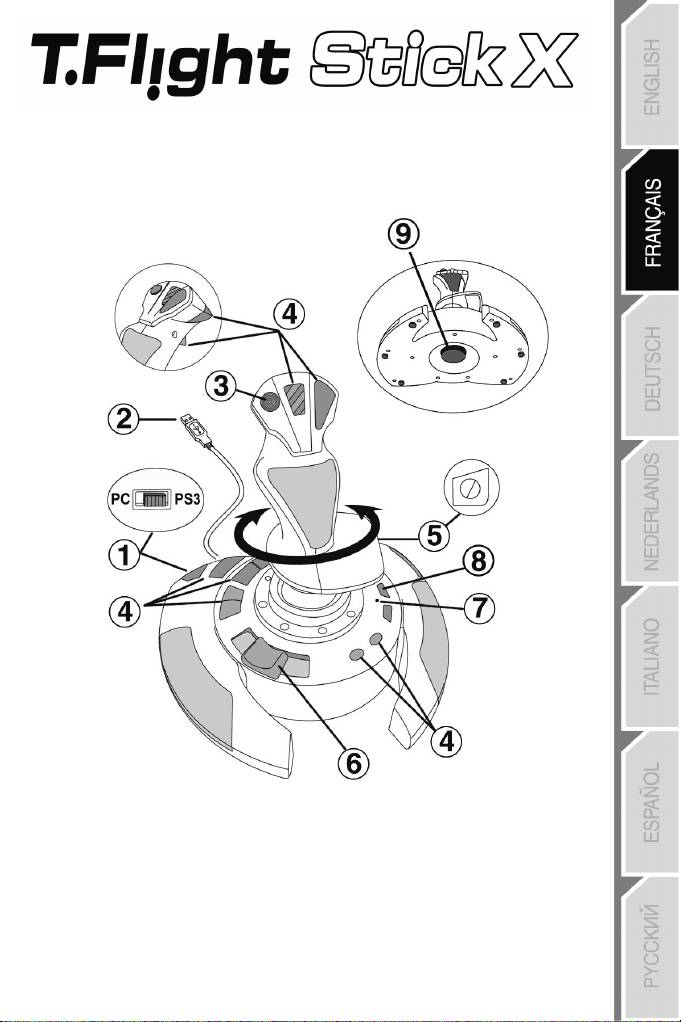
TECHNICAL FEATURES
1. USB selector (PC / PS3) 6. Sliding thumb throttle
2. PC and PlayStation® 3 USB connector 7. LED
3. Multidirectional “Point Of View” hat-switch 8. PRESET button
4. 12 action buttons (to select programming)
5. Rudder function via twisting handle 9. Handle resistance
with locking screw adjustment dial
1/12

PC
INSTALLATION ON PC
1. Set your joystick’s USB selector (1) to the “PC” position.
2. Connect the USB connector (2) to one of your computer’s USB ports. Windows XP or
Vista will automatically detect the new device.
3. The drivers are installed automatically.
Follow the on-screen instructions to complete the installation.
4. Click Start/Settings/Control Panel and then double-click Game Controllers.
The Game Controllers dialog box displays the joystick’s name with OK status.
5. In the Control Panel, click Properties to configure your joystick.
Test device: Lets you test and view all of your joystick’s functions.
You are now ready to play!
IMPORTANT NOTES FOR PC
— Your joystick’s USB selector (1) must always be set to the “PC” position before connecting
your joystick.
— When connecting your joystick: Leave the handle and rudder centered and do not move
them (to avoid any calibration problems).
2/12

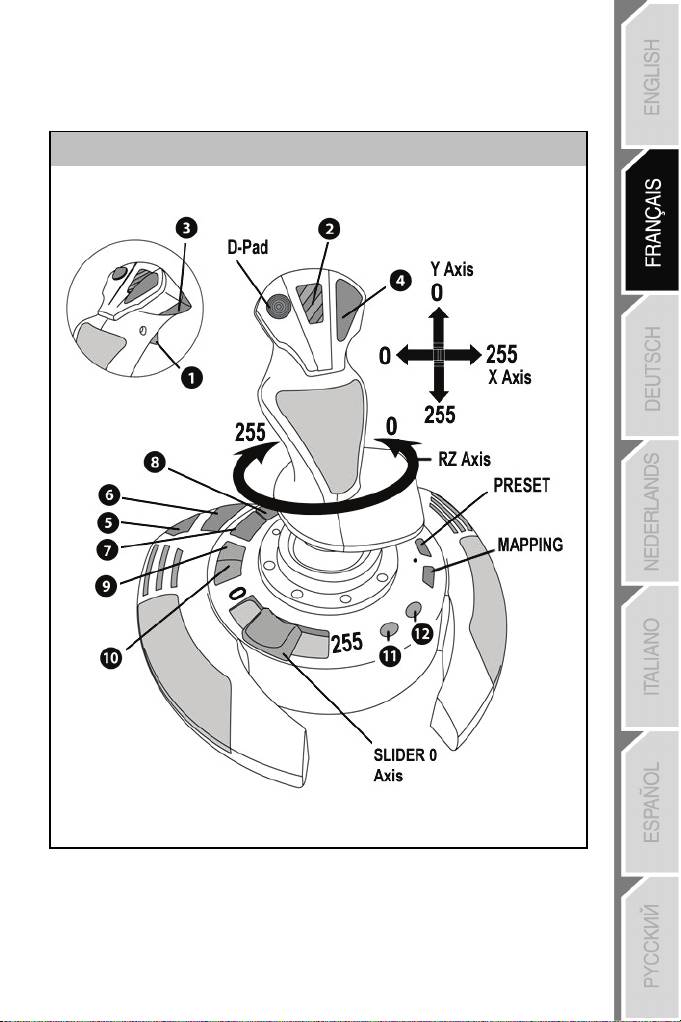
“AUTOMATIC PRESET” CONFIGURATION — PC
“AUTOMATIC PRESET” diagram on PC
RED LED
This preset corresponds to the default configurations for most aerial simulation games on
PC.
It will therefore allow you to start playing your game right away, without having to reconfigure
your joystick.
3/12

PLAYSTATION® 3
INSTALLATION ON PLAYSTATION® 3
1. Set your joystick’s USB selector (1) to the “PS3” position.
2. Connect the USB connector (2) to one of your console’s USB ports.
3. Switch on your console.
4. Launch your game.
You are now ready to play!
USING THE “HOME / PS” BUTTON
Your joystick’s “Home / PS” button allows you to exit your games, access menus and directly
switch off your PlayStation®3 system.
IMPORTANT NOTES FOR PLAYSTATION® 3
— Your joystick’s USB selector (1) must always be set to the “PS3” position before connecting
your joystick.
— In “1 Player” mode: If your official gamepad is on, you must switch it to “controller port 2” in
order for your joystick to be functional.
— On PlayStation® 3, the joystick is only compatible with PlayStation® 3 games (and will not
function with PlayStation® 2 games).
— When connecting your joystick: Leave the handle, rudder and throttle centered and do not move
them (to avoid any calibration problems).
4/12

“AUTOMATIC PRESET” CONFIGURATION — PLAYSTATION® 3
“AUTOMATIC PRESET” diagram on PlayStation® 3
RED LED
This preset corresponds to the default configurations for most aerial simulation games on PlayStation® 3.
It will therefore allow you to start playing your game right away, without having to reconfigure your
joystick.
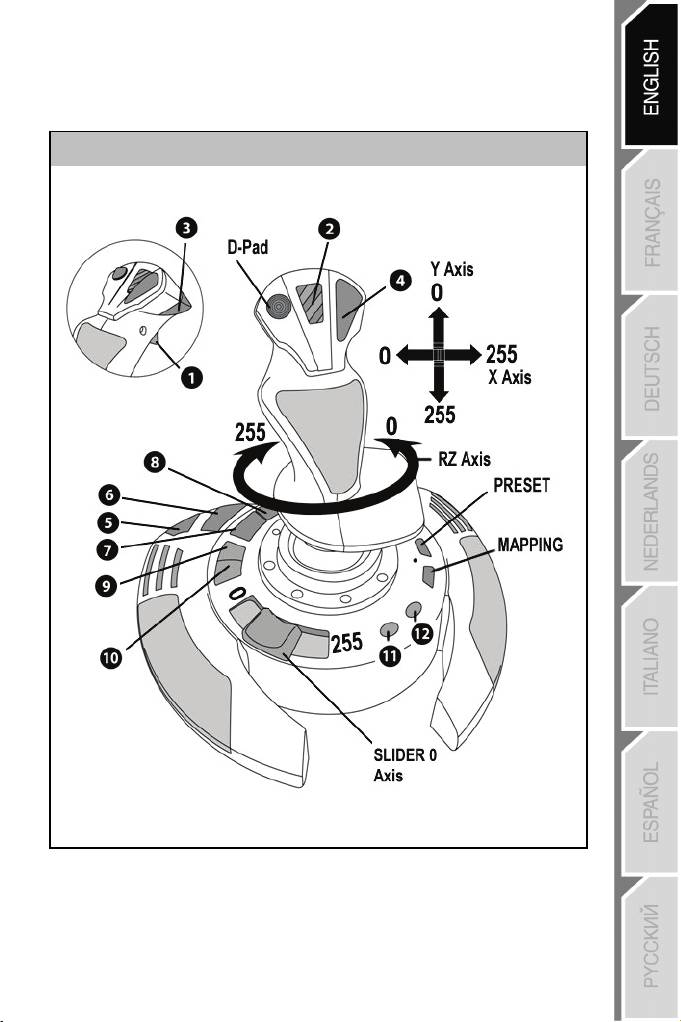
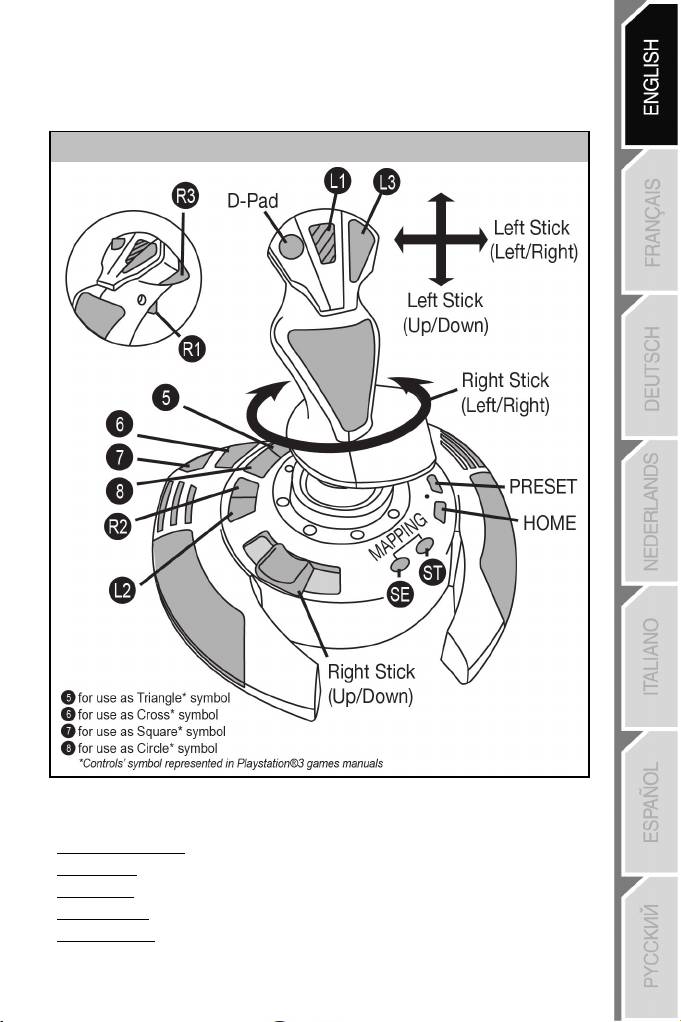
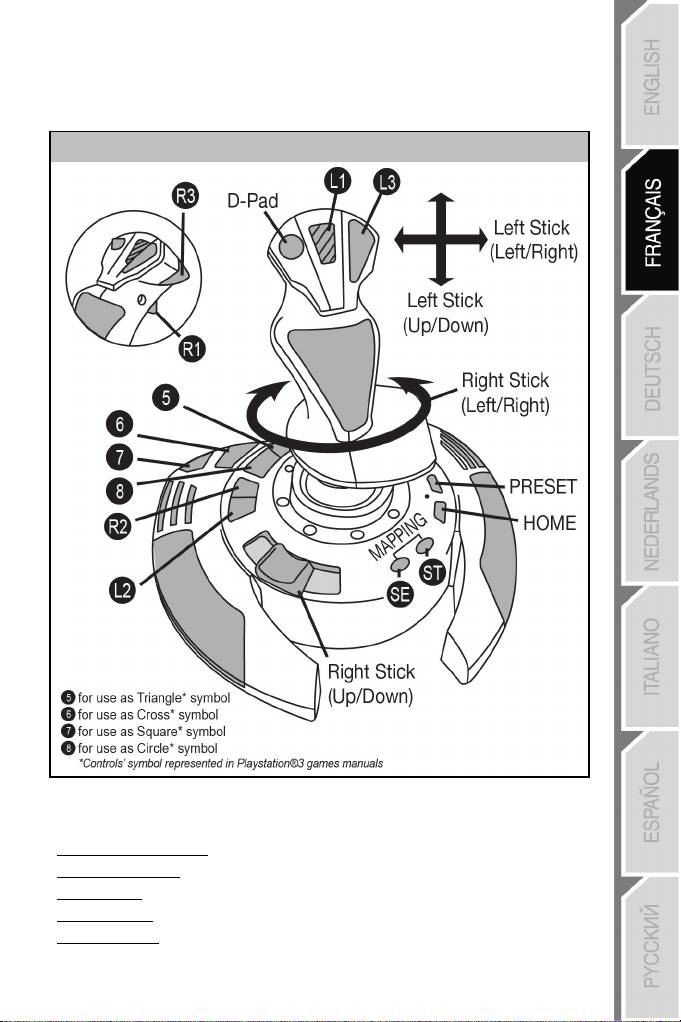
The 4 handle directions: Correspond to the 4 directions on your gamepad’s left mini-stick.
The throttle (6): Corresponds to the Up/Down directions on your gamepad’s right mini-stick.
The rudder (5): Corresponds to the Left/Right directions on your gamepad’s right mini-stick.
MAPPING button: Simultaneously press SELECT (SE) + START (ST).
HOME / PS button: Simply press the button.
5/12

GETTING TO KNOW YOUR JOYSTICK
Adjustable handle resistance
Depending on your gaming style, you may prefer to have an ultra-sensitive joystick, which
responds to the slightest movement, or a firmer joystick, which offers a certain resistance
when you use it.
Your joystick’s handle resistance is adjustable, in order to adapt to all gamers. To adjust it,
use the handle resistance adjustment dial (9) located under your joystick’s base.
Throttle
The throttle is in the form of a thumb slider (6), easily accessible with your left hand resting
on the base of your joystick.
Rudder function
Your joystick features a rudder function, which in a plane corresponds to the pedals used by
the pilot to turn the steering, allowing the plane to pivot around its vertical axis (therefore
making the plane turn left or right). This rudder function is accessible on your joystick by
rotating the handle to the left or right.
If you are not using the rudder function in your games (or if you have programmed it onto
action buttons), you can disable handle rotation thanks to the locking screw (5) located on
the handle’s base.
Use a flat head screwdriver to change the screw’s position and thus lock/unlock the rudder
function.
Multidirectional “Point Of View” hat-switch
Your joystick features a “Point Of View” hat-switch (3) which, as its name indicates, allows
you (in games which permit) to instantly view everything that’s going on around your plane.
To do so, simply go to your game’s configuration menu and program the different views (rear
view, left view, right view, and also external views) onto the directions of the “Point Of View”
hat-switch.
Of course, you can also use the “Point Of View” hat-switch for other functions instead (firing,
etc.).
6/12

2 PROGRAMMING MODES
The PRESET button (8) and LED (7) allow you to view the type of programming selected:
AUTOMATIC (preprogrammed) or MANUAL (programmed by yourself).
A single press of this button will allow you to switch from one programming mode to the
other, even during the course of a game.
• AUTOMATIC PRESET: RED LED
This represents the default programming: the axes, positions of the buttons and of the hatswitch are preprogrammed.
PLEASE REFER TO THE “AUTOMATIC PRESET” CONFIGURATION DIAGRAMS.
• MANUAL PRESET: GREEN LED
This represents your own person programming:
— The buttons, axes and the hat-switch can be switched between themselves.
— You can modify the programming to suit your taste and whenever you like.
— Programming is automatically saved in your joystick (even when it is disconnected).
— When your “MANUAL PRESET” is blank, it is identical to the “AUTOMATIC PRESET”.
PROGRAMMING / MAPPING
You can program your joystick using the MAPPING button.
Attention: This button is not located in the same position on PC and PS3 (please refer to
• Examples of possible applications:
• Exception:
the diagrams):
— On PC: Directly press the button in question.
— On PS3: Simultaneously press START (ST) + SELECT (SE).
— Switching the positions of buttons.
— Switching axes between themselves = directions of the handle, of the throttle or of the
rudder (In this case, you must map the 2 directions of the first axis to those of the
second.)
— Switching the 2 directions of the same axis.
— Switching buttons with a direction of an axis or of the hat-switch.
On PlayStation® 3, the START (ST) and SELECT (SE) buttons also correspond to the
MAPPING button (and therefore may not be reprogrammed).
7/12

PROGRAMMING PROCEDURE
Steps Action LED
1
2 Press and release the MAPPING button. OFF
3 Press and release the button or direction to program. FLASHES GREEN
Press and release the button or direction onto which you
4
EEPROM MEMORY
• Your joystick features an internal chip which saves all of your “MANUAL PRESET”
programming in memory (even when the joystick is switched off or unplugged for a long
period of time).
• You can save a different “MANUAL PRESET” for each platform used (one for PC and one
for PlayStation® 3).
ERASING A “MANUAL PRESET”
Steps Action LED
1 Enable your MANUAL PRESET (8). GREEN
2
Enable MANUAL PRESET (8)
by pressing the button.
wish to place your function.
Your “MANUAL PRESET” is now enabled and up to date
(with your programming carried out).
Press and hold the MAPPING button
for 2 seconds.
FLASHES GREEN
2 SECONDS
Your “MANUAL PRESET” is now blank
(and once again identical to the “AUTOMATIC PRESET”).
GREEN
GREEN
RETURNING TO “FACTORY SETTINGS”
You can erase all of your programming or settings carried out on both PC and
PlayStation® 3 with a single step:
Step Action LED
1
Simultaneously press the buttons
MAPPING + 11 (SE) + 12 (ST)
All of your “MANUAL PRESETS” (PC + PS3) or settings are now blank.
Note: This operation will completely restart your joystick
(on PC, we therefore recommend that you do this outside of games).
8/12
FLASHES GREEN/RED
2 SECONDS

TROUBLESHOOTING AND WARNING
• My joystick doesn’t function correctly or appears to be improperly calibrated:
— Switch off your computer or your console, disconnect your joystick, reconnect your joystick
and then re-launch your game.
— When connecting your joystick: Leave the handle, rudder and throttle centered and do not
move them (to avoid any calibration problems).
— Exit your game, disconnect your joystick, verify that the USB selector (PC / PS3) (1) is set
to the proper position, then reconnect your joystick.
• I can’t configure my joystick:
— In your game’s “Options / Controller / Gamepad or Joystick” menu: Select the most
appropriate configuration or completely reconfigure the controller options.
— Please refer to your game’s user manual or online help for more information.
— You can also use your joystick’s “MAPPING” function to resolve this type of problem.
• My joystick is too sensitive or not sensitive enough:
— Your joystick self-calibrates on its own after you have made a few movements on the
different axes.
— In your game’s “Options / Controller / Gamepad or Joystick” menu: Adjust the sensitivity or
dead zones for your controller (if this option is available).
— Adjust the handle resistance using the dial (9) located under your joystick’s base.
9/12

TECHNICAL SUPPORT
If you encounter a problem with your product, please go to http://ts.thrustmaster.com and
click Technical Support. From there you will be able to access various utilities (Frequently
Asked Questions (FAQ), the latest versions of drivers and software) that may help to resolve
your problem. If the problem persists, you can contact the Thrustmaster products technical
support service (“Technical Support”):
By email:
In order to take advantage of technical support by email, you must first register online. The
information you provide will help the agents to resolve your problem more quickly. Click
Registration on the left-hand side of the Technical Support page and follow the on-screen
instructions. If you have already registered, fill in the Username and Password fields and
then click Login.
By telephone:
United
Kingdom
United
States
Canada
Denmark
Sweden
Finland
08450800942
Charges at local rate
1-866-889-5036
Free
1-866-889-2181
Gratuit / Free
80887690
Free
0200884567
Free
0800 913060
Free
Monday to Friday from Noon to 4pm and 5pm to 10pm
Saturday from 9am to Noon and 1pm to 7pm
Sunday from 9am to Noon and 1pm to 4pm
Monday to Friday from 7am to 11am and from Noon to 5pm
Saturday and Sunday from 7am to Noon
(Eastern Standard Time)
Monday to Friday from 7am to 11am and from Noon to 5pm
Saturday and Sunday from 7am to Noon
(Eastern Standard Time)
Monday to Friday from 1pm to 5pm and 6pm to 11pm (English)
Saturday from 9am to 1pm and 2pm to 8pm
Sunday from 10am to 1pm and 2pm to 5pm
Monday to Friday from 1pm to 5pm and 6pm to 11pm (English)
Saturday from 9am to 1pm and 2pm to 8pm
Sunday from 10am to 1pm and 2pm to 5pm
Monday to Friday from 2pm to 6pm and 7pm to Midnight (English)
Saturday from 10am to 2pm and 3pm to 9pm
Sunday from 11am to 2pm and 3pm to 6pm
10/12

WARRANTY INFORMATION
Worldwide, Guillemot Corporation S.A. (“Guillemot”) warrants to the consumer that this
Thrustmaster product will be free from material defects and manufacturing flaws for a period
of two (2) years from the original date of purchase. Should the product appear to be
defective during the warranty period, immediately contact Technical Support, who will
indicate the procedure to follow. If the defect is confirmed, the product must be returned to
its place of purchase (or any other location indicated by Technical Support).
Within the context of this warranty, the consumer’s defective product will, at Technical
Support’s option, be either repaired or replaced. Where authorized by applicable law, the
full liability of Guillemot and its subsidiaries (including for indirect damages) is limited to the
repair or replacement of the Thrustmaster product. The consumer’s legal rights with respect
to legislation applicable to the sale of consumer goods are not affected by this warranty.
This warranty shall not apply: (1) if the product has been modified, opened, altered, or has
suffered damage as a result of inappropriate or abusive use, negligence, an accident,
normal wear, or any other cause not related to a material defect or manufacturing flaw; (2) in
the event of failure to comply with the instructions provided by Technical Support; (3) to
software not published by Guillemot, said software being subject to a specific warranty
provided by its publisher.
Additional warranty provisions
In the United States of America and in Canada, this warranty is limited to the product’s
internal mechanism and external housing. Any applicable implied warranties, including
warranties of merchantability and fitness for a particular purpose, are hereby limited to two
(2) years from the date of purchase and are subject to the conditions set forth in this limited
warranty. In no event shall Guillemot Corporation S.A. or its affiliates be liable for
consequential or incidental damage resulting from the breach of any express or implied
warranties. Some States/Provinces do not allow limitation on how long an implied warranty
lasts or exclusion or limitation of incidental/consequential damages, so the above limitation
may not apply to you. This warranty gives you specific legal rights, and you may also have
other legal rights which vary from State to State or Province to Province.
11/12

COPYRIGHT
© 2007 Guillemot Corporation S.A. All rights reserved. Thrustmaster® is a registered
trademark of Guillemot Corporation S.A. Playstation® is a registered trademark of Sony
Computer Entertainment, Inc. Windows®, XP and Vista are registered trademarks of
Microsoft Corporation in the United States and/or other countries. All other trademarks and
brand names are hereby acknowledged and are property of their respective owners.
Illustrations not binding. Contents, designs and specifications are subject to change without
notice and may vary from one country to another. Made in China.
ENVIRONMENTAL PROTECTION RECOMMENDATION
At the end of its working life, this product should not be disposed
of with standard household waste, but rather dropped off at a
collection point for the disposal of Waste Electrical and Electronic
Equipment (WEEE) for recycling.
This is confirmed by the symbol found on the product, user
manual or packaging.
Depending on their characteristics, the materials may be
recycled. Through recycling and other forms of processing Waste
Electrical and Electronic Equipment, you can make a significant
contribution towards helping to protect the environment.
Please contact your local authorities for information on the
collection point nearest you.
FAQs, tips and drivers available at www.thrustmaster.com
12/12

Manuel de l’utilisateur
CARACTÉRISTIQUES TECHNIQUES
1. Sélecteur USB « PC » ou « PS3 » 6. Manette des gaz
2. Connecteur « USB » PC et PlayStation® 3 7. Led lumineuse
3. Croix Multidirectionnelle « Point de vue » 8. Bouton PRESET
4. 12 boutons d’action (pour choisir son programme)
5. Palonnier par rotation du manche 9. Molette de réglage
avec vis de blocage de la résistance du manche
1/12

PC
INSTALLATION SUR PC
1. Mettre le sélecteur USB (1) de votre Joystick en position « PC »
2. Reliez le connecteur USB (2) à l’un des ports USB de votre unité centrale.
Windows XP ou Vista détectera automatiquement le nouveau périphérique.
3. L’installation des pilotes est automatique.
Suivez les instructions affichées à l’écran pour terminer l’installation.
4. Sélectionnez Démarrer/Paramètres/Panneau de configuration puis double-cliquez sur
Contrôleurs de jeu
La boîte de dialogue Contrôleurs de jeu affichera le nom du Joystick avec l’état OK.
5. Dans le Control Panel, cliquez sur Propriétés pour configurer votre Joystick.
Test du périphérique : vous permet de tester et visualiser l’ensemble des fonctions.
Vous êtes maintenant prêt à jouer !
REMARQUES IMPORTANTES SUR « PC »
— Le sélecteur USB (1) du votre Joystick doit toujours être positionné sur « PC » avant le
connecter
— Lorsque vous branchez votre Joystick : laissez le manche, le palonnier et la manette des
gaz centrés et évitez de les déplacer (pour éviter tout problème de calibration).
2/12

CONFIGURATION DU « PRESET AUTOMATIQUE » — PC
Schéma du « PRESET AUTOMATIQUE » sur PC
LED ROUGE
Ce preset correspond aux configurations par défaut de la plupart des jeux de simulation
aérienne sur PC.
Il vous permettra donc de lancer directement votre jeu sans avoir à reconfigurer votre
Joystick.
3/12

PLAYSTATION® 3
INSTALLATION SUR « PLAYSTATION® 3 »
1. Mettez le sélecteur USB (1) de votre Joystick en position « PS3 ».
2. Branchez le connecteur USB (2) sur un port USB de la console.
3. Allumez votre console.
4. Lancez le jeu.
Vous êtes maintenant prêt à jouer !
UTILISATION DU BOUTON « HOME / PS »
Le bouton « Home / PS » de votre Joystick vous permettra de quitter vos jeux, d’accéder aux
menus et d’éteindre directement votre système PlayStation®3
REMARQUES IMPORTANTES SUR PLAYSTATION® 3
— Le sélecteur USB (1) de votre Joystick doit toujours être positionné sur « PS3 » avant de le
connecter.
— En mode « 1 Joueur » si votre manette officielle est allumée, il est alors nécessaire de basculer
celle-ci en « port manette 2 » afin que votre Joystick soit fonctionnel.
— Sur PlayStation® 3, le Joystick n’est compatible qu’avec les jeux PlayStation® 3
(et ne fonctionnera pas avec les jeux PlayStation® 2).
— Lorsque vous branchez votre Joystick : laissez le manche et le palonnier centrés et évitez de les
déplacer (pour éviter tout problème de calibration).
4/12

CONFIGURATION DU « PRESET AUTOMATIQUE » — PLAYSTATION® 3
Schéma du « PRESET AUTOMATIQUE » sur PlayStation® 3
LED ROUGE
Ce preset correspond aux configurations par défaut de la plupart des jeux de simulation aérienne sur
PlayStation® 3. Il vous permettra de lancer directement votre jeu sans avoir à reconfigurer votre Joystick.
Les 4 directions du manche : Correspondent aux 4 directions du mini-stick gauche de votre manette.
La manette des gaz (6) : Correspond à la direction Haut/Bas du mini-stick droit de votre manette.
Le palonnier (5) : Correspond à la direction Gauche/Droite du mini-stick droit de votre manette.
Bouton MAPPING : Appuyez simultanément sur SELECT (SE) + START (ST).
Bouton HOME / PS : Appuyez simplement sur le bouton.
5/12

À LA DÉCOUVERTE DE VOTRE JOYSTICK
Résistance du manche ajustable
Selon votre façon de jouer, vous voudrez un joystick ultra-sensible, qui réponde à la moindre
impulsion, ou au contraire un joystick plus dur, qui présente une certaine résistance lorsque
vous le manipulez.
La résistance du manche de votre Joystick est ajustable pour s’adapter à tous les joueurs.
Utilisez pour cela la molette de réglage de la résistance (9) située sous la base de votre
joystick.
Manette des gaz
La manette des gaz est représentée sous la forme d’une molette (6), facilement accessible
avec la main gauche reposant sur la base de votre Joystick.
Fonction Palonnier
Votre Joystick dispose d’une fonction palonnier, qui correspond dans un avion aux pédales
actionnées par le pilote pour faire braquer la gouverne de direction, qui permet de faire
pivoter l’avion autour de son axe vertical (entraînant ainsi un virage de l’avion vers la gauche
ou la droite). Cette fonction palonnier est accessible sur votre joystick par rotation du
manche vers la gauche ou la droite.
Si vous n’utilisez pas la fonction palonnier dans vos jeux (ou que vous l’avez programmée
sur des boutons d’action), vous pouvez désactiver la rotation du manche grâce à la vis de
blocage (5) située à la base du manche.
Utilisez un tournevis à tête plate pour modifier sa position et ainsi verrouiller/déverrouiller la
fonction palonnier.
Croix Multidirectionnelle « Point de vue »
Votre Joystick est doté d’une Croix Point de vue (3) qui, comme son nom l’indique, vous
permettra (dans les jeux le permettant) de surveiller instantanément tout ce qui se passe
autour de votre avion. Il vous suffit pour cela, depuis le menu de configuration de votre jeu,
de programmer les différentes vues (vue arrière, vue sur la gauche, vue sur la droite, mais
aussi vues externes) sur les directions de la croix Point de vue.
Vous pouvez bien entendu réserver la Croix Point de vue à d’autres utilisations (tir, etc.).
6/12

2 MODES DE PROGRAMMATION
Le bouton PRESET (8) et la Led Lumineuse (7) vous permettent de visualiser le type de
programmation choisi : AUTOMATIQUE (préprogrammé) ou MANUEL (programmé par
vous-même).
Une simple pression sur ce bouton vous permettra (même en cours de jeu) de basculer
d’une programmation à l’autre.
• PRESET AUTOMATIQUE : Led ROUGE
Il s’agit ici de la programmation par défaut : les axes, la position des boutons et de la croix
sont préprogrammés
REPORTEZ-VOUS AUX SCHEMAS « CONFIGURATION DU PRESET AUTOMATIQUE ».
• PRESET MANUEL : Led VERTE
Il s’agit ici de vos programmations personnelles :
— Les boutons, les axes et la croix peuvent être inversés entre eux.
— Vous pouvez modifier à votre convenance et à volonté ces programmations.
— Elles sont automatiquement sauvegardées à l’intérieur de votre Joystick (même
débranché).
— Lorsque que votre «PRESET MANUEL» est vierge, il est alors identique au «PRESET
AUTOMATIQUE».
PROGRAMMATION / MAPPING
Vos programmations s’effectuent à l’aide du bouton MAPPING.
Attention : Sur PC ou sur PS3, ce bouton n’a pas le même emplacement
• Exemples d’applications possibles :
• Exception :
(reportez vous aux schémas) :
— Sur PC : appuyez directement sur le bouton concerné
— Sur PS3 : appuyez simultanément sur START (ST) + SELECT (SE)
— Inverser la position des boutons
— Inverser des axes entre eux = directions du manche, de la manette des gaz ou du
palonnier (Dans ce cas, vous devez basculer les 2 directions du 1er axe vers le
second.)
— Inverser les 2 directions du même axe
— Inverser des boutons avec la direction d’un axe ou de la croix
Sur PlayStation® 3, les boutons START(ST) et SELECT(SE) correspondent également
au bouton MAPPING (et ne peuvent donc pas être reprogrammés)
7/12

PROCÉDURE DE PROGRAMMATION
Etapes Action
1
Activez PRESET MANUEL (8)
en appuyant sur le bouton.
2 Pressez et relâchez le bouton MAPPING. ETEINT
3
Pressez et relâchez le bouton ou la direction sur lequel
4
Pressez et relâchez le bouton
ou la direction à programmer.
ou laquelle vous désirez placer votre fonction.
Votre « PRESET MANUEL » est désormais actif et actualisé
(avec votre programmation effectuée).
MEMOIRE EEPROM
• Votre Joystick dispose d’une puce interne qui garde en mémoire l’ensemble de vos
programmations « PRESET MANUEL » (même Joystick éteint ou débranché pendant
une longue période).
• Vous pouvez enregistrer un « PRESET MANUEL » différent sur chaque support utilisé
(un sur PC et un sur PlayStation® 3)
EFFACER UN « PRESET MANUEL »
Etapes Action
1
2
Activez votre PRESET MANUEL (8)
Pressez et maintenez appuyé le bouton MAPPING
pendant 2 secondes.
Votre « PRESET MANUEL » est désormais vierge
(et redevenu identique au « Preset Automatique »).
Couleur
de la LED
VERT
CLIGNOTE VERT
VERT
Couleur
de la LED
VERT
CLIGNOTE VERT
2 SECONDES
RETOUR AU « PARAMETRAGE D’USINE »
Effacez en une seule manipulation l’ensemble de vos programmations ou réglages effectués
à la fois sur PC et sur PlayStation® 3 :
Etapes Action Couleur de la LED
1
Appuyez simultanément sur les boutons
MAPPING + 11(SE) + 12(ST)
CLIGNOTE
VERT/ROUGE
2 SECONDES
L’ensemble de vos « PRESET MANUEL » (PC + PS3) ou réglages sont désormais vierges.
Remarque : Cette manipulation a pour effet de redémarrer complètement votre Joystick
(sur PC, il est donc recommandé d’effectuer cette opération en dehors des jeux).
8/12

DEPANNAGE ET AVERTISSEMENT
• Mon Joystick ne fonctionne pas correctement ou semble mal calibré :
— Eteignez votre ordinateur ou votre console, déconnectez votre Joystick, rebranchez et
relancez votre jeu.
— Lorsque vous branchez votre Joystick : laissez le manche, le palonnier et la manette des
gaz centrés et évitez de les déplacer (pour éviter tout problème de calibration).
— Quittez votre jeu, débranchez votre Joystick, vérifier la bonne position du sélecteur USB
« PC/PS3 » (1), puis rebranchez le tout.
• Je n’arrive pas à configurer mon Joystick :
— Dans le menu « Options / Contrôleur / Manettes ou Joystick » de votre jeu : choisissez la
configuration appropriée ou reconfigurez complètement les options du contrôleur.
— Reportez-vous au manuel de l’utilisateur ou à l’aide en ligne de votre jeu pour plus
d’informations.
— Vous pouvez également utiliser la fonction « MAPPING » de votre Joystick pour résoudre
ce type de problème.
• Mon Joystick est trop ou pas assez sensible :
— Votre Joystick s’auto-calibre de manière autonome après quelques mouvements effectués
sur les différents axes.
— Dans le menu « Options / Contrôleur / Manettes ou Joystick » de votre jeu : ajustez la
sensibilité et les zones mortes de votre Contrôleur (si l’option est disponible).
— Ajustez la résistance du manche à l’aide de la molette (9) située sous la base de votre
joystick.
9/12

SUPPORT TECHNIQUE
Si vous rencontrez un problème avec votre produit, rendez-vous sur le site
http://ts.thrustmaster.com et cliquez sur Support Technique. Vous aurez alors accès à
différents services (Foire Aux Questions (FAQ), dernières versions des pilotes et logiciels)
susceptibles de résoudre votre problème. Si le problème persiste, vous pouvez contacter le
support technique des produits Thrustmaster (« Support Technique ») :
Par e-mail :
Pour bénéficier du support technique par e-mail, vous devez d’abord vous enregistrer en ligne.
Les informations fournies vont permettre aux techniciens de résoudre plus rapidement votre
problème. Cliquez sur Enregistrement à gauche de la page Support technique et suivez les
instructions à l’écran. Si vous êtes déjà enregistré, renseignez les champs Nom d’utilisateur et
Mot de passe puis cliquez sur Connexion.
Par téléphone (si vous n’avez pas d’accès Internet) :
Canada
France
Suisse
Belgique
* Tarif indicatif (hors coût de mise en relation)
1-866-889-2181
Gratuit
0 826 09 21 03
Numéro Indigo®
(0,15€ TTC/minute*)
0842 000 022
Tarif d’une communication locale
078 16 60 56
Tarif d’une communication nationale
Du lundi au vendredi de 7h à 11h et de 12h à 17h
Le samedi et le dimanche de 7h à 12h
(Heure de l’Est)
Du lundi au vendredi de 13h à 17h et de 18h à 22h
Le samedi de 9h à 13h et de 14h à 20h
Le dimanche de 10h à 13h et de 14h à 17h
Du lundi au vendredi de 13h à 17h et de 18h à 22h
Le samedi de 9h à 13h et de 14h à 20h
Le dimanche de 10h à 13h et de 14h à 17h
Du lundi au vendredi de 13h à 17h et de 18h à 22h
Le samedi de 9h à 13h et de 14h à 20h
Le dimanche de 10h à 13h et de 14h à 17h
10/12

INFORMATIONS RELATIVES À LA GARANTIE
Dans le monde entier, Guillemot Corporation S.A. (« Guillemot ») garantit au consommateur
que le présent produit Thrustmaster est exempt de défauts matériels et de vices de
fabrication, et ce, pour une période de deux (2) ans à compter de la date d’achat d’origine.
Si, au cours de la période de garantie, le produit semble défectueux, contactez
immédiatement le Support Technique qui vous indiquera la procédure à suivre. Si le défaut
est confirmé, le produit devra être retourné à son lieu d’achat (ou tout autre lieu indiqué par
le Support Technique).
Dans le cadre de la garantie, le consommateur bénéficiera, au choix du Support Technique,
du remplacement ou de la réparation du produit défectueux. Lorsque la loi applicable
l’autorise, toute responsabilité de Guillemot et ses filiales (y compris pour les dommages
indirects) se limite à la réparation ou au remplacement du produit Thrustmaster. Les droits
légaux du consommateur au titre de la législation applicable à la vente de biens de
consommation ne sont pas affectés par la présente garantie.
Cette garantie ne s’appliquera pas : (1) si le produit a été modifié, ouvert, altéré, ou a subi
des dommages résultant d’une utilisation inappropriée ou abusive, d’une négligence, d’un
accident, de l’usure normale, ou de toute autre cause non liée à un défaut matériel ou à un
vice de fabrication ; (2) en cas de non-respect des instructions du Support Technique ; (3)
aux logiciels non-édités par Guillemot, lesdits logiciels faisant l’objet d’une garantie
spécifique accordée par leurs éditeurs.
Stipulations additionnelles à la garantie
Aux États-Unis d’Amérique et au Canada, cette garantie est limitée au mécanisme interne et
au boîtier externe du produit. Toute garantie implicite applicable, incluant les garanties de
qualité marchande ou d’adaptation à un usage particulier, est limitée à deux (2) ans à
compter de la date d’achat et soumise aux conditions de la présente garantie limitée. En
aucun cas, Guillemot Corporation S.A. ou ses sociétés affiliées ne sauraient être tenues
responsables envers qui que ce soit de tous dommages indirects ou dommages accessoires
résultant du non-respect des garanties expresses ou implicites. Certains États/Provinces
n’autorisent pas la limitation sur la durée d’une garantie implicite, ou l’exclusion ou la
limitation de responsabilité pour les dommages indirects ou accessoires, de sorte que les
limitations ou exclusions ci-dessus peuvent ne pas vous être applicables. Cette garantie vous
confère des droits spécifiques ; vous pouvez également bénéficier d’autres droits qui peuvent
différer d’un État/Province à l’autre.
11/12

COPYRIGHT
© 2007 Guillemot Corporation S.A. Tous droits réservés. Thrustmaster® est une marque
déposée de Guillemot Corporation S.A. PlayStation® est une marque déposée de Sony
Computer Entertainment, Inc. Windows®, XP et Vista sont des marques déposées de
Microsoft Corporation aux Etats-Unis et/ou dans d’autres pays. Toutes les autres marques
déposées et noms commerciaux sont reconnus par les présentes et sont la propriété de leurs
propriétaires respectifs. Illustrations non contractuelles. Le contenu, la conception et les
spécifications sont susceptibles de changer sans préavis et de varier selon les pays. Fabriqué
en Chine.
RECOMMANDATION RELATIVE À LA PROTECTION DE L’ENVIRONNEMENT
En fin de vie, ce produit ne doit pas être éliminé avec les déchets
ménagers normaux mais déposé à un point de collecte des déchets
d’équipements électriques et électroniques en vue de son recyclage.
Ceci est confirmé par le symbole figurant sur le produit, le manuel
utilisateur ou l’emballage.
En fonction de leurs caractéristiques, les matériaux peuvent être
recyclés. Par le recyclage et par les autres formes de valorisation
des déchets d’équipements électriques et électroniques, vous
contribuez de manière significative à la protection de
l’environnement.
Veuillez consulter les autorités locales qui vous indiqueront le point
de collecte concerné.
FAQ, astuces et pilotes sur www.thrustmaster.com
12/12

Benutzerhandbuch
TECHNISCHE FEATURES
1. USB Wahlschalter(PC / PS3) 6. Daumenschieber-Drosselklappe
2. PC und PlayStation® 3 USB Stecker 7. LED
3. Multidirektionaler “Point Of View” Kopfschalter 8. PRESET (Voreinst.-)Button
4. 12 Actionbuttons (zur Programmauswahl)
5. Ruderfunktion via Drehgriff 9. Justierungsschraube für
mit Feststellschraube Griffwiederstand
1/12
Loading…
View the manual for the Thrustmaster T.Flight Stick X here, for free. This manual comes under the category consoles and has been rated by 1 people with an average of a 6.3.
This manual is available in the following languages: English. Do you have a question about the Thrustmaster T.Flight Stick X or do you need help?
Ask your question here
Thrustmaster T.Flight Stick X specifications
Below you will find the product specifications and the manual specifications of the Thrustmaster T.Flight Stick X.
the thrustmaster t.flight stick x is a joystick designed for gaming enthusiasts looking for a precise and customizable control experience. with 12 programmable buttons and 4 axes, this wired device offers extensive options for tailoring gameplay to individual preferences. compatible with both pc and playstation 3 platforms, the joystick is a versatile choice for a variety of gaming setups.
featuring a unique plug and play design, the t.flight stick x allows for simple and quick installation with preconfigured settings for immediate use. the joystick also boasts adjustable resistance control, a weighted base for enhanced stability, and an ergonomic throttle lever for comfort during long gaming sessions. the rotating handle with a built-in locking system provides smooth control over plane rudder movements.
further enhancing the gaming experience are the airbrake trigger for civilian flight simulations and rapid fire trigger for military flight games, along with a multidirectional hat for a panoramic view. the exclusive mapping button enables users to easily rearrange functions, while the internal memory stores all programmed configurations even when the joystick is disconnected from the device.
overall, the thrustmaster t.flight stick x offers a reliable and customizable gaming control solution for users seeking precision and comfort during gameplay. at 1347 grams in weight and with a package width of 220 millimeters, this joystick is a substantial yet versatile addition to any gaming setup.
Connectivity technology
Wired
Product color
Black, Red, Silver
Harmonized System (HS) code
8471607000
General
| Brand | Thrustmaster |
| Model | T.Flight Stick X | 4160526 |
| Product | console |
| EAN | 3362932913443, 3362934108199, 5054629548554 |
| Language | English |
| Filetype | User manual (PDF) |
Input device
| Buttons quantity | 12 |
| Device type | Joystick |
| Gaming platforms supported | PC, Playstation 3 |
| Gaming control function buttons | — |
| Number of axis | 4 |
| Programmable buttons | Yes |
| Gaming control technology | Analogue |
Ports & interfaces
| Connectivity technology | Wired |
| Device interface | USB |
Ergonomics
| Product color | Black, Red, Silver |
| Plug and Play | Yes |
Technical details
Logistics data
| Harmonized System (HS) code | 8471607000 |
| Quantity per pallet | 48 pc(s) |
| Country of origin | China |
| Master (outer) case height | 550 mm |
| Master (outer) case length | 260 mm |
| Master (outer) case width | 690 mm |
| Master (outer) case net weight | 8722 g |
Weight & dimensions
| Weight | 1347 g |
| Height | 2.4 mm |
| Width | 222 mm |
| Depth | 257 mm |
Packaging data
| Package width | 220 mm |
| Package weight | 1568 g |
| Package height | 235 mm |
| Package depth | 236 mm |
show more
Frequently Asked Questions
Can’t find the answer to your question in the manual? You may find the answer to your question in the FAQs about the Thrustmaster T.Flight Stick X below.
How many buttons does the Thrustmaster T.Flight Stick X have?
The Thrustmaster T.Flight Stick X has 12 buttons. This provides users with ample customization options and easy access to various functions during gameplay.
Is the Thrustmaster T.Flight Stick X a wired device?
Yes, the Thrustmaster T.Flight Stick X is a wired joystick. This ensures a stable and reliable connection, eliminating any potential wireless interference.
On which gaming platforms is the Thrustmaster T.Flight Stick X compatible?
The Thrustmaster T.Flight Stick X is compatible with PC and Playstation 3. This versatility allows users to enjoy their favorite flight simulation games on multiple platforms.
How many axes does the Thrustmaster T.Flight Stick X have?
The Thrustmaster T.Flight Stick X has 4 axes. This enables precise and realistic control over aircraft movements, enhancing the overall gaming experience.
Can the buttons on the Thrustmaster T.Flight Stick X be programmed?
Yes, the buttons on the Thrustmaster T.Flight Stick X are programmable. This feature allows users to personalize their controls according to their preferences and gameplay style, providing greater convenience and flexibility.
How can I adjust the handle resistance of the Thrustmaster T.Flight Stick X console?
To adjust the handle resistance of the Thrustmaster T.Flight Stick X console, follow these steps:
1. Locate the handle resistance adjustment dial. It is located under the base of the joystick.
2. Use your fingers to turn the handle resistance adjustment dial. By turning it clockwise, you can increase the resistance, and by turning it counterclockwise, you can decrease the resistance.
3. Adjust the handle resistance according to your preference. If you prefer a more sensitive joystick that responds to slight movements, decrease the resistance. If you prefer a firmer joystick with more resistance, increase the resistance.
4. Test the joystick after making the adjustment to ensure that the handle resistance is to your liking. If necessary, repeat the adjustment process until you achieve the desired handle resistance.
Remember that the handle resistance adjustment dial allows you to customize the joystick’s feel and adapt it to your gaming style.
Why is the handle resistance of my Thrustmaster T.Flight Stick X console not changing when I adjust the dial?
The handle resistance of your Thrustmaster T.Flight Stick X console may not be changing when you adjust the dial due to the following reasons:
1. Incorrect adjustment: Ensure that you are turning the handle resistance adjustment dial located under the base of the joystick in the correct direction. Turning it clockwise increases the resistance, while turning it counterclockwise decreases the resistance.
2. Mechanical issue: Check if there are any obstructions or debris that may be preventing the handle resistance adjustment mechanism from functioning properly. Clean the area around the dial and ensure smooth movement.
3. Calibration: If the handle resistance is still not changing, try recalibrating the joystick. Disconnect the joystick, reconnect it, and launch your game or application again. Make sure to leave the handle, rudder, and throttle centered during the connection process to avoid calibration issues.
If the issue persists after following these steps, refer to the troubleshooting section of the manual or contact Thrustmaster customer support for further assistance.
How do I use the throttle on the Thrustmaster T.Flight Stick X console?
To use the throttle on the Thrustmaster T.Flight Stick X console, follow these steps:
1. Locate the throttle on the base of the joystick. It is in the form of a thumb slider.
2. Place your left hand on the base of the joystick, ensuring that your thumb is positioned on the throttle slider.
3. Slide the throttle forward to increase the power or speed in your game or simulation. Sliding it backward will decrease the power or speed.
4. Use the throttle to control the acceleration and deceleration of your aircraft or vehicle. Pushing the throttle forward will make your aircraft or vehicle go faster, while pulling it back will slow it down.
5. Adjust the throttle position according to your desired speed or power level. The throttle is designed to provide precise control over your aircraft or vehicle’s speed.
Remember to practice using the throttle in different scenarios to become familiar with its functionality and to enhance your gaming or simulation experience.
Why is the throttle on my Thrustmaster T.Flight Stick X console not responding?
If the throttle on your Thrustmaster T.Flight Stick X console is not responding, you can try the following steps to troubleshoot the issue:
1. Check the connection: Ensure that the joystick is properly connected to your computer or console. Disconnect and reconnect the joystick to make sure it is securely connected.
2. Calibrate the joystick: Sometimes, recalibrating the joystick can resolve issues with the throttle. Disconnect the joystick, reconnect it, and launch your game or application again. Make sure to leave the throttle centered during the connection process to avoid calibration problems.
3. Verify the USB selector: If you are using the joystick on a PC and PlayStation®3, check that the USB selector (PC/PS3) is set to the proper position.
4. Adjust sensitivity settings: In your game’s «Options/Controller/Gamepad or Joystick» menu, adjust the sensitivity or dead zones for your controller. This can help fine-tune the throttle response.
5. Handle resistance adjustment: If the throttle is still not responding, check the handle resistance adjustment dial located under the joystick’s base. Ensure that it is not set to the maximum resistance, as this can restrict throttle movement.
If the issue persists after following these steps, you may need to refer to the troubleshooting section of the manual or contact Thrustmaster customer support for further assistance.
How do I activate the rudder function on the Thrustmaster T.Flight Stick X console?
To activate the rudder function on the Thrustmaster T.Flight Stick X console, follow these steps:
1. Locate the handle of the joystick and grip it firmly.
2. Rotate the handle to the left or right to activate the rudder function. This function allows the plane to pivot around its vertical axis, enabling it to turn left or right.
3. If you do not wish to use the rudder function or have programmed it onto action buttons, you can disable handle rotation. Locate the locking screw on the handle’s base.
4. Use a flat head screwdriver to change the position of the screw and lock or unlock the rudder function.
Note: The rudder function is particularly useful in flight simulation games where precise control over steering is required. By using the handle to rotate and activate the rudder function, you can enhance your gaming experience and maneuver your aircraft more effectively.
Why is the rudder function not working on my Thrustmaster T.Flight Stick X console?
If the rudder function is not working on your Thrustmaster T.Flight Stick X console, you can try the following troubleshooting steps:
1. Check the joystick connection: Ensure that the joystick is properly connected to your computer or console. Disconnect and reconnect the joystick to make sure it is securely connected.
2. Restart your computer or console: Switch off your computer or console, disconnect the joystick, and then reconnect it. Afterward, relaunch your game or application.
3. Verify the USB selector: If you are using the joystick on a PC and PlayStation®3, check that the USB selector (PC/PS3) is set to the proper position.
4. Calibration: Leave the handle, rudder, and throttle centered when connecting the joystick to avoid calibration problems. If necessary, recalibrate the joystick according to the instructions provided in the manual.
5. Adjust sensitivity settings: In your game’s «Options/Controller/Gamepad or Joystick» menu, adjust the sensitivity or dead zones for your controller. This can help fine-tune the rudder function’s responsiveness.
If the issue persists after following these steps, you may need to refer to the troubleshooting section of the manual or contact Thrustmaster customer support for further assistance.
How do I program different views onto the «Point Of View» hat-switch of the Thrustmaster T.Flight Stick X console?
To program different views onto the «Point Of View» hat-switch of the Thrustmaster T.Flight Stick X console, follow these steps:
1. Enter programming mode: Press the PRESET button on the joystick. The LED will indicate the programming mode. A red LED represents the automatic preset, while a green LED represents the manual preset.
2. Switch to manual preset: If the LED is red, press the PRESET button again to switch to the manual preset. The LED should turn green.
3. Use the MAPPING button: Locate the MAPPING button on the joystick. On a PC, press the MAPPING button directly. On a PlayStation®3, simultaneously press the START (ST) and SELECT (SE) buttons.
4. Program the hat-switch: With the MAPPING button activated, you can program the different views onto the «Point Of View» hat-switch. Examples of possible applications include switching the positions of buttons, switching axes between themselves, switching the directions of the same axis, or switching buttons with a direction of an axis or the hat-switch.
Note: The START (ST) and SELECT (SE) buttons on a PlayStation®3 correspond to the MAPPING button and cannot be reprogrammed.
By following these steps, you can program and customize the different views on the «Point Of View» hat-switch according to your preferences and gaming needs.
Why is the «Point Of View» hat-switch not changing views on my Thrustmaster T.Flight Stick X console?
If the «Point Of View» hat-switch is not changing views on your Thrustmaster T.Flight Stick X console, you can try the following troubleshooting steps:
1. Check the joystick connection: Ensure that the joystick is properly connected to your computer or console. Disconnect and reconnect the joystick to make sure it is securely connected.
2. Verify the joystick mode: Some games or applications may require you to switch the joystick mode to enable the «Point Of View» hat-switch functionality. Check the game’s settings or options menu to ensure that the joystick mode is set correctly.
3. Calibrate the joystick: If the «Point Of View» hat-switch is still not changing views, try recalibrating the joystick. Disconnect the joystick, reconnect it, and launch your game or application again. Make sure to follow the calibration instructions provided in the manual or in the game’s settings.
4. Test the hat-switch functionality: Use the joystick’s software or control panel to test the «Point Of View» hat-switch. If it is not responding in the software, there may be a hardware issue with the joystick. In this case, you may need to contact Thrustmaster customer support for further assistance.
By following these steps, you can troubleshoot and resolve issues with the «Point Of View» hat-switch not changing views on your Thrustmaster T.Flight Stick X console.
What technical features are provided in the user manual of the Thrustmaster T.Flight Stick X console?
The user manual for the Thrustmaster T.Flight Stick X console provides the following technical features:
1. USB selector (PC/PS3): The joystick has a USB selector that allows you to switch between PC and PlayStation®3 modes.
2. PC and PlayStation®3 USB connector: The joystick is equipped with a USB connector that can be used to connect it to a PC or PlayStation®3.
3. Multidirectional «Point Of View» hat-switch: The joystick features a hat-switch that can be moved in multiple directions to provide different views or functions in games or simulations.
4. 12 action buttons: The joystick has 12 action buttons that can be programmed for various in-game actions or functions.
5. Rudder function via twisting handle: The joystick’s handle can be twisted to activate the rudder function, allowing for precise control over the aircraft’s yaw movement.
6. Sliding thumb throttle: The joystick includes a sliding thumb throttle that can be used to control the aircraft’s speed or power.
7. LED: The joystick is equipped with an LED indicator that provides visual feedback or status information.
8. PRESET button: The joystick has a PRESET button that can be used to select different programming options.
9. Handle resistance adjustment with locking screw: The joystick’s handle resistance can be adjusted using a dial, and it can be locked in place using a screw.
These technical features enhance the functionality and customization options of the Thrustmaster T.Flight Stick X console, providing a more immersive gaming or simulation experience.
What is the weight of the Thrustmaster T.Flight Stick X?
The Thrustmaster T.Flight Stick X has a weight of 1347 g.
Can bluetooth devices of different brands be connected to each other?
Yes, bluetooth is a universal method that allows different devices equipped with bluetooth to connect to each other.
What is the height of the Thrustmaster T.Flight Stick X?
The Thrustmaster T.Flight Stick X has a height of 2.4 mm.
What is the width of the Thrustmaster T.Flight Stick X?
The Thrustmaster T.Flight Stick X has a width of 222 mm.
What is bluetooth?
Bluetooth is a way of exchanging data wirelessly between electronic devices via radio waves. The distance between the two devices that exchange data can in most cases be no more than ten metres.
What is the depth of the Thrustmaster T.Flight Stick X?
The Thrustmaster T.Flight Stick X has a depth of 257 mm.
What is HDMI?
HDMI stands for High-Definition Multimedia Interface. An HDMI cable is used to transport audio and video signals between devices.
How can I best clean my console?
A slightly damp cleaning cloth or soft, dust-free cloth works best to remove fingerprints. Dust in hard-to-reach places is best removed with compressed air.
Is the manual of the Thrustmaster T.Flight Stick X available in English?
Yes, the manual of the Thrustmaster T.Flight Stick X is available in English .
Is your question not listed? Ask your question here

7/12
2 РЕЖИМА ПРОГРАММИРОВАНИЯ
Кнопка ПРЕДУСТАНОВКИ (PRESET) (8) с индикатором (7) позволяет просмотреть
выбранный режим программирования: АВТОМАТИЧЕСКИЙ (встроенный) или
РУЧНОЙ (пользовательский).
Однократное нажатие на эту кнопку позволит переключаться из одного режима в
другой даже во время игры.
АВТОМАТИЧЕСКАЯ ПРЕДУСТАНОВКА (AUTOMATIC PRESET): КРАСНЫЙ
ИНДИКАТОР
Режим настроек по умолчанию: оси,
положения командных кнопок и переключатель вида
заданы по умолчанию.
СМ. СХЕМЫ КОНФИГУРАЦИИ РЕЖИМА АВТОМАТИЧЕСКИХ ПРЕДУСТАНОВОК
РУЧНАЯ ПРЕДУСТАНОВКА (MANUAL PRESET): ЗЕЛЕНЫЙ ИНДИКАТОР
Эти установки назначаются пользователем:
— Функции кнопок, оси и переключателя вида могут быть переключены между
собой.
— Изменяйте функции кнопок по вашему желанию в любое время.
— Настройки джойстика сохранятся автоматически (даже если джойстик не
подключен).
— — Когда пользовательские предустановки “MANUAL PRESET” не заданы,
настройки аналогичны режиму автоматических предустановок “AUTOMATIC
PRESET”.
ПРОГРАММИРОВАНИЕ/ПЕРЕОПРЕДЕЛЕНИЕ
Программируйте джойстик, используя кнопку переопределения (MAPPING).
Внимание: Чтобы обнаружить эту кнопку обратитесь к схеме:
—
На ПК: Просто нажмите данную кнопку.
—
На PS3: Одновременно нажмите кнопки START (ST) + SELECT (SE).
Примеры возможного применения:
— Переключение положений кнопок.
— Переключение оси между собой = управление рукояткой, управление скоростью
или штурвалом (В этом случае, переопределите 2 направления для первой оси
на направления второй.)
— Установите 2 направления для одной и той же оси.
— Переключение кнопок с направлениями осей или переключателем вида.
Исключение:
В PlayStation®3 кнопки START (ST) и SELECT (SE) соответствуют кнопке
ПЕРЕОПРЕДЕЛЕНИЕ (и не могут перепрограммироваться).
1/12
User Manual
TECHNICAL FEATURES
1. USB selector (PC / PS3) 6. Sliding thumb throttle
2. PC and PlayStation®3 USB connector 7. LED
3. Multidirectional “Point Of View” hat—switch 8. PRESET button
4. 12 action buttons (to select programming)
5. Rudder function via twisting handle 9. Handle resistance
with locking screw adjustment dial

2/12
PC
INSTALLATION ON PC
1. Set your joystick’s USB selector (1) to the “PC” position.
2. Connect the USB connector (2) to one of your computer’s USB ports. Windows will
automatically detect the new device.
3. The drivers are installed automatically.
Follow the on—screen instructions to complete the installation.
4. Click Start/Settings/Control Panel and then double—click Game Controllers.
The Game Controllers dialog box displays the joystick’s name with OK status.
5. In the Control Panel, click Properties to configure your joystick.
Test device: Lets you test and view all of your joystick’s functions.
You are now ready to play!
IMPORTANT NOTES FOR PC
— Your joystick’s USB selector (1) must always be set to the “PC” position before connecting
your joystick.
— When connecting your joystick: Leave the handle and rudder centered and do not move
them (to avoid any calibration problems).
3/12
“AUTOMATIC PRESET” CONFIGURATION — PC
“AUTOMATIC PRESET” diagram on PC
RED LED
This preset corresponds to the default configurations for most aerial simulation games on
PC.
It will therefore allow you to start playing your game right away, without having to reconfigure
your joystick.

4/12
PLAYSTATION®3
INSTALLATION ON PLAYSTATION®3
1. Set your joystick’s USB selector (1) to the “PS3” position.
2. Connect the USB connector (2) to one of your console’s USB ports.
3. Switch on your console.
4. Launch your game.
You are now ready to play!
USING THE “HOME / PS” BUTTON
Your joystick’s “Home / PS” button allows you to exit your games, access menus and directly
switch off your PlayStation®3 system.
IMPORTANT NOTES FOR PLAYSTATION®3
— Your joystick’s USB selector (1) must always be set to the “PS3” position before connecting
your joystick.
— In “1 Player” mode: If your official gamepad is on, you must switch it to “controller port 2” in
order for your joystick to be functional.
— On PlayStation®3, the joystick is only compatible with PlayStation®3 games (and will not
function with PlayStation® 2 games).
— When connecting your joystick: Leave the handle, rudder and throttle centered and do not move
them (to avoid any calibration problems).
5/12
“AUTOMATIC PRESET” CONFIGURATION — PLAYSTATION®3
“AUTOMATIC PRESET” diagram on PlayStation®3
RED LED
This preset corresponds to the default configurations for most aerial simulation games on PlayStation®3.
It will therefore allow you to start playing your game right away, without having to reconfigure your
joystick.
The 4 handle directions: Correspond to the 4 directions on your gamepad’s left mini—stick.
The throttle (6): Corresponds to the Up/Down directions on your gamepad’s right mini—stick.
The rudder (5): Corresponds to the Left/Right directions on your gamepad’s right mini—stick.
MAPPING button: Simultaneously press SELECT (SE) + START (ST).
HOME / PS button: Simply press the button.

6/12
GETTING TO KNOW YOUR JOYSTICK
Adjustable handle resistance
Depending on your gaming style, you may prefer to have an ultra—sensitive joystick, which
responds to the slightest movement, or a firmer joystick, which offers a certain resistance
when you use it.
Your joystick’s handle resistance is adjustable, in order to adapt to all gamers. To adjust it,
use the handle resistance adjustment dial (9) located under your joystick’s base.
Throttle
The throttle is in the form of a thumb slider (6), easily accessible with your left hand resting
on the base of your joystick.
Rudder function
Your joystick features a rudder function, which in a plane corresponds to the pedals used by
the pilot to turn the steering, allowing the plane to pivot around its vertical axis (therefore
making the plane turn left or right). This rudder function is accessible on your joystick by
rotating the handle to the left or right.
If you are not using the rudder function in your games (or if you have programmed it onto
action buttons), you can disable handle rotation thanks to the locking screw (5) located on
the handle’s base.
Use a flat head screwdriver to change the screw’s position and thus lock/unlock the rudder
function.
Multidirectional “Point Of View” hat—switch
Your joystick features a “Point Of View” hat—switch (3) which, as its name indicates, allows
you (in games which permit) to instantly view everything that’s going on around your plane.
To do so, simply go to your game’s configuration menu and program the different views (rear
view, left view, right view, and also external views) onto the directions of the “Point Of View”
hat—switch.
Of course, you can also use the “Point Of View” hat—switch for other functions instead (firing,
etc.).

7/12
2 PROGRAMMING MODES
The PRESET button (8) and LED (7) allow you to view the type of programming selected:
AUTOMATIC (preprogrammed) or MANUAL (programmed by yourself).
A single press of this button will allow you to switch from one programming mode to the
other, even during the course of a game.
• AUTOMATIC PRESET: RED LED
This represents the default programming: the axes, positions of the buttons and of the hat—
switch are preprogrammed.
PLEASE REFER TO THE “AUTOMATIC PRESET” CONFIGURATION DIAGRAMS.
• MANUAL PRESET: GREEN LED
This represents your own person programming:
— The buttons, axes and the hat—switch can be switched between themselves.
— You can modify the programming to suit your taste and whenever you like.
— Programming is automatically saved in your joystick (even when it is disconnected).
— When your “MANUAL PRESET” is blank, it is identical to the “AUTOMATIC PRESET”.
PROGRAMMING / MAPPING
You can program your joystick using the MAPPING button.
Attention: This button is not located in the same position on PC and PS3 (please refer to
the diagrams):
— On PC: Directly press the button in question.
— On PS3: Simultaneously press START (ST) + SELECT (SE).
• Examples of possible applications:
— Switching the positions of buttons.
— Switching axes between themselves = directions of the handle, of the throttle or of the
rudder (In this case, you must map the 2 directions of the first axis to those of the
second.)
— Switching the 2 directions of the same axis.
— Switching buttons with a direction of an axis or of the hat—switch.
• Exception:
On PlayStation®3, the START (ST) and SELECT (SE) buttons also correspond to the
MAPPING button (and therefore may not be reprogrammed).
8/12
PROGRAMMING PROCEDURE
Steps
Action
LED
1
Enable MANUAL PRESET (8)
by pressing the button.
GREEN
2
Press and release the MAPPING button.
OFF
3
Press and release the button or direction to program.
FLASHES GREEN
4
Press and release the button or direction onto which you
wish to place your function.
GREEN
Your “MANUAL PRESET” is now enabled and up to date
(with your programming carried out).
EEPROM MEMORY
• Your joystick features an internal chip which saves all of your “MANUAL PRESET”
programming in memory (even when the joystick is switched off or unplugged for a long
period of time).
• You can save a different “MANUAL PRESET” for each platform used (one for PC and one
for PlayStation®3).
ERASING A “MANUAL PRESET”
Steps
Action
LED
1
Enable your MANUAL PRESET (8).
GREEN
2
Press and hold the MAPPING button
for 2 seconds.
Your “MANUAL PRESET” is now blank
(and once again identical to the “AUTOMATIC PRESET”).
RETURNING TO “FACTORY SETTINGS”
You can erase all of your programming or settings carried out on both PC and PlayStation®3
with a single step:
Step
Action
LED
1
Simultaneously press the buttons
MAPPING + 11 (SE) + 12 (ST)
FLASHES GREEN/RED
2 SECONDS
All of your “MANUAL PRESETS” (PC + PS3) or settings are now blank.
Note: This operation will completely restart your joystick
(on PC, we therefore recommend that you do this outside of games).

9/12
TROUBLESHOOTING AND WARNING
• My joystick doesn’t function correctly or appears to be improperly calibrated:
— Switch off your computer or your console, disconnect your joystick, reconnect your joystick
and then re—launch your game.
— When connecting your joystick: Leave the handle, rudder and throttle centered and do not
move them (to avoid any calibration problems).
— Exit your game, disconnect your joystick, verify that the USB selector (PC / PS3) (1) is set
to the proper position, then reconnect your joystick.
• I can’t configure my joystick:
— In your game’s “Options / Controller / Gamepad or Joystick” menu: Select the most
appropriate configuration or completely reconfigure the controller options.
— Please refer to your game’s user manual or online help for more information.
— You can also use your joystick’s “MAPPING” function to resolve this type of problem.
• My joystick is too sensitive or not sensitive enough:
— Your joystick self—calibrates on its own after you have made a few movements on the
different axes.
— In your game’s “Options / Controller / Gamepad or Joystick” menu: Adjust the sensitivity or
dead zones for your controller (if this option is available).
— Adjust the handle resistance using the dial (9) located under your joystick’s base.

10/12
Consumer warranty information
Worldwide, Guillemot Corporation S.A., whose registered office is located at Place du Granier, B.P.
97143, 35571 Chantepie, France (hereinafter “Guillemot”) warrants to the consumer that this
Thrustmaster product shall be free from defects in materials and workmanship, for a warranty period
which corresponds to the time limit to bring an action for conformity with respect to this product. In the
countries of the European Union, this corresponds to a period of two (2) years from delivery of the
Thrustmaster product. In other countries, the warranty period corresponds to the time limit to bring an
action for conformity with respect to the Thrustmaster product according to applicable laws of the country
in which the consumer was domiciled on the date of purchase of the Thrustmaster product (if no such
action exists in the corresponding country, then the warranty period shall be one (1) year from the original
date of purchase of the Thrustmaster product).
Notwithstanding the above, rechargeable batteries are covered by a warranty period of six (6) months
from the date of original purchase.
Should the product appear to be defective during the warranty period, immediately contact Technical
Support, who will indicate the procedure to follow. If the defect is confirmed, the product must be returned
to its place of purchase (or any other location indicated by Technical Support).
Within the context of this warranty, the consumer’s defective product shall, at Technical Support’s option,
be either replaced or returned to working order. If, during the warranty period, the Thrustmaster product is
subject to such reconditioning, any period of at least seven (7) days during which the product is out of use
shall be added to the remaining warranty period (this period runs from the date of the consumer’s request
for intervention or from the date on which the product in question is made available for reconditioning, if
the date on which the product is made available for reconditioning is subsequent to the date of the
request for intervention). If permitted under applicable law, the full liability of Guillemot and its subsidiaries
(including for consequential damages) is limited to the return to working order or the replacement of the
Thrustmaster product. If permitted under applicable law, Guillemot disclaims all warranties of
merchantability or fitness for a particular purpose.
This warranty shall not apply: (1) if the product has been modified, opened, altered, or has suffered
damage as a result of inappropriate or abusive use, negligence, an accident, normal wear, or any other
cause unrelated to a material or manufacturing defect (including, but not limited to, combining the
Thrustmaster product with any unsuitable element, including in particular power supplies, rechargeable
batteries, chargers, or any other elements not supplied by Guillemot for this product); (2) in the event of
failure to comply with the instructions provided by Technical Support; (3) to software, said software being
subject to a specific warranty; (4) to consumables (elements to be replaced over the product’s lifespan:
disposable batteries, audio headset or headphone ear pads, for example); (5) to accessories (cables,
cases, pouches, bags, wrist—straps, for example); (6) if the product was sold at public auction.
This warranty is nontransferable.
The consumer’s legal rights with respect to laws applicable to the sale of consumer goods in his or her
country are not affected by this warranty.
Additional warranty provisions
During the warranty period, Guillemot shall not provide, in principle, any spare parts, as Technical Support
is the only party authorized to open and/or recondition any Thrustmaster product (with the exception of
any reconditioning procedures which Technical Support may request that the consumer carry out, by way
of written instructions – for example, due to the simplicity and the lack of confidentiality of the
reconditioning process – and by providing the consumer with the required spare part(s), where
applicable).
Given its innovation cycles and in order to protect its know—how and trade secrets, Guillemot shall not
provide, in principle, any reconditioning notification or spare parts for any Thrustmaster product whose
warranty period has expired.
In the United States of America and in Canada, this warranty is limited to the product’s internal
mechanism and external housing. In no event shall Guillemot or its affiliates be held liable to any third
party for any consequential or incidental damages resulting from the breach of any express or implied
warranties. Some States/Provinces do not allow limitation on how long an implied warranty lasts or
exclusion or limitation of liability for consequential or incidental damages, so the above limitations or
exclusions may not apply to you. This warranty gives you specific legal rights, and you may also have
other rights which vary from State to State or Province to Province.

11/12
Liability
If permitted under applicable law, Guillemot Corporation S.A. (hereinafter “Guillemot”) and its subsidiaries
disclaim all liability for any damages caused by one or more of the following: (1) the product has been
modified, opened or altered; (2) failure to comply with assembly instructions; (3) inappropriate or abusive
use, negligence, an accident (an impact, for example); (4) normal wear. If permitted under applicable law,
Guillemot and its subsidiaries disclaim all liability for any damages unrelated to a material or
manufacturing defect with respect to the product (including, but not limited to, any damages caused
directly or indirectly by any software, or by combining the Thrustmaster product with any unsuitable
element, including in particular power supplies, rechargeable batteries, chargers, or any other elements
not supplied by Guillemot for this product).
12/12
FCC STATEMENT
1. This device complies with Part 15 of the FCC Rules. Operation is subject to the following two
conditions:
(1) This device may not cause harmful interference, and
(2) This device must accept any interference received, including interference that may cause
undesired operation.
2. Changes or modifications not expressly approved by the party responsible for compliance could void the
user’s authority to operate the equipment.
COPYRIGHT
© 2015 Guillemot Corporation S.A. All rights reserved. Thrustmaster® is a registered trademark of
Guillemot Corporation S.A. PlayStation® is a registered trademark of Sony Computer Entertainment, Inc.
Windows® is a registered trademark of Microsoft Corporation in the United States and/or other countries.
All other trademarks are the property of their respective owners. Illustrations not binding. Contents, designs
and specifications are subject to change without notice and may vary from one country to another. Made in
China.
ENVIRONMENTAL PROTECTION RECOMMENDATION
At the end of its working life, this product should not be disposed of with standard
household waste, but rather dropped off at a collection point for the disposal of Waste
Electrical and Electronic Equipment (WEEE) for recycling.
This is confirmed by the symbol found on the product, user manual or packaging.
Depending on their characteristics, the materials may be recycled. Through recycling
and other forms of processing Waste Electrical and Electronic Equipment, you can make
a significant contribution towards helping to protect the environment.
Please contact your local authorities for information on the collection point nearest you.
Retain this information. Colours and decorations may vary.
This product conforms to all standards regarding children 14 years of age and older. This product is not
suitable for use by children less than 14 years of age.
www.thrustmaster.com
TECHNICAL SUPPORT
http://ts.thrustmaster.com
1/12
Manuel de l’utilisateur
CARACTERISTIQUES TECHNIQUES
1. Sélecteur USB « PC » ou « PS3 » 6. Manette des gaz
2. Connecteur « USB » PC et PlayStation®3 7. Led lumineuse
3. Croix Multidirectionnelle « Point de vue » 8. Bouton PRESET
4. 12 boutons d’action (pour choisir son programme)
5. Palonnier par rotation du manche 9. Molette de réglage
avec vis de blocage de la résistance du manche

2/12
PC
INSTALLATION SUR PC
1. Mettre le sélecteur USB (1) de votre Joystick en position « PC »
2. Reliez le connecteur USB (2) à l’un des ports USB de votre unité centrale.
Windows détectera automatiquement le nouveau périphérique.
3. L’installation des pilotes est automatique.
Suivez les instructions affichées à l’écran pour terminer l’installation.
4. Sélectionnez Démarrer/Paramètres/Panneau de configuration puis double—cliquez sur
Contrôleurs de jeu
La boîte de dialogue Contrôleurs de jeu affichera le nom du Joystick avec l’état OK.
5. Dans le Control Panel, cliquez sur Propriétés pour configurer votre Joystick.
Test du périphérique : vous permet de tester et visualiser l’ensemble des fonctions.
Vous êtes maintenant prêt à jouer !
REMARQUES IMPORTANTES SUR « PC »
— Le sélecteur USB (1) de votre Joystick doit toujours être positionné sur « PC » avant de le
connecter
— Lorsque vous branchez votre Joystick : laissez le manche, le palonnier et la manette des
gaz centrés et évitez de les déplacer (pour éviter tout problème de calibration).
3/12
CONFIGURATION DU « PRESET AUTOMATIQUE » — PC
Schéma du « PRESET AUTOMATIQUE » sur PC
LED ROUGE
Ce preset correspond aux configurations par défaut de la plupart des jeux de simulation
aérienne sur PC.
Il vous permettra donc de lancer directement votre jeu sans avoir à reconfigurer votre
Joystick.

4/12
PLAYSTATION®3
INSTALLATION SUR « PLAYSTATION®3 »
1. Mettez le sélecteur USB (1) de votre Joystick en position « PS3 ».
2. Branchez le connecteur USB (2) sur un port USB de la console.
3. Allumez votre console.
4. Lancez le jeu.
Vous êtes maintenant prêt à jouer !
UTILISATION DU BOUTON « HOME / PS »
Le bouton « Home / PS » de votre Joystick vous permettra de quitter vos jeux, d’accéder aux
menus et d’éteindre directement votre système PlayStation®3
REMARQUES IMPORTANTES SUR PLAYSTATION®3
— Le sélecteur USB (1) de votre Joystick doit toujours être positionné sur « PS3 » avant de le
connecter.
— En mode « 1 Joueur » si votre manette officielle est allumée, il est alors nécessaire de basculer
celle—ci en « port manette 2 » afin que votre Joystick soit fonctionnel.
— Sur PlayStation®3, le Joystick n’est compatible qu’avec les jeux PlayStation®3
(et ne fonctionnera pas avec les jeux PlayStation® 2).
— Lorsque vous branchez votre Joystick : laissez le manche et le palonnier centrés et évitez de les
déplacer (pour éviter tout problème de calibration).
5/12
CONFIGURATION DU « PRESET AUTOMATIQUE » — PLAYSTATION®3
Schéma du « PRESET AUTOMATIQUE » sur PlayStation®3
LED ROUGE
Ce preset correspond aux configurations par défaut de la plupart des jeux de simulation aérienne sur
PlayStation®3. Il vous permettra de lancer directement votre jeu sans avoir à reconfigurer votre Joystick.
Les 4 directions du manche : Correspondent aux 4 directions du mini—stick gauche de votre manette.
La manette des gaz (6) : Correspond à la direction Haut/Bas du mini—stick droit de votre manette.
Le palonnier (5) : Correspond à la direction Gauche/Droite du mini—stick droit de votre manette.
Bouton MAPPING : Appuyez simultanément sur SELECT (SE) + START (ST).
Bouton HOME / PS : Appuyez simplement sur le bouton.

6/12
A LA DECOUVERTE DE VOTRE JOYSTICK
Résistance du manche ajustable
Selon votre façon de jouer, vous voudrez un joystick ultra—sensible, qui réponde à la moindre
impulsion, ou au contraire un joystick plus dur, qui présente une certaine résistance lorsque
vous le manipulez.
La résistance du manche de votre Joystick est ajustable pour s’adapter à tous les joueurs.
Utilisez pour cela la molette de réglage de la résistance (9) située sous la base de votre
joystick.
Manette des gaz
La manette des gaz est représentée sous la forme d’une molette (6), facilement accessible
avec la main gauche reposant sur la base de votre Joystick.
Fonction Palonnier
Votre Joystick dispose d’une fonction palonnier, qui correspond dans un avion aux pédales
actionnées par le pilote pour faire braquer la gouverne de direction, qui permet de faire
pivoter l’avion autour de son axe vertical (entraînant ainsi un virage de l’avion vers la gauche
ou la droite). Cette fonction palonnier est accessible sur votre joystick par rotation du
manche vers la gauche ou la droite.
Si vous n’utilisez pas la fonction palonnier dans vos jeux (ou que vous l’avez programmée
sur des boutons d’action), vous pouvez désactiver la rotation du manche grâce à la vis de
blocage (5) située à la base du manche.
Utilisez un tournevis à tête plate pour modifier sa position et ainsi verrouiller/déverrouiller la
fonction palonnier.
Croix Multidirectionnelle « Point de vue »
Votre Joystick est doté d’une Croix Point de vue (3) qui, comme son nom l’indique, vous
permettra (dans les jeux le permettant) de surveiller instantanément tout ce qui se passe
autour de votre avion. Il vous suffit pour cela, depuis le menu de configuration de votre jeu,
de programmer les différentes vues (vue arrière, vue sur la gauche, vue sur la droite, mais
aussi vues externes) sur les directions de la croix Point de vue.
Vous pouvez bien entendu réserver la Croix Point de vue à d’autres utilisations (tir, etc.).

7/12
2 MODES DE PROGRAMMATION
Le bouton PRESET (8) et la Led Lumineuse (7) vous permettent de visualiser le type de
programmation choisi : AUTOMATIQUE (préprogrammé) ou MANUEL (programmé par
vous—même).
Une simple pression sur ce bouton vous permettra (même en cours de jeu) de basculer
d’une programmation à l’autre.
• PRESET AUTOMATIQUE : Led ROUGE
Il s’agit ici de la programmation par défaut : les axes, la position des boutons et de la croix
sont préprogrammés
REPORTEZ—VOUS AUX SCHEMAS « CONFIGURATION DU PRESET AUTOMATIQUE ».
• PRESET MANUEL : Led VERTE
Il s’agit ici de vos programmations personnelles :
— Les boutons, les axes et la croix peuvent être inversés entre eux.
— Vous pouvez modifier à votre convenance et à volonté ces programmations.
— Elles sont automatiquement sauvegardées à l’intérieur de votre Joystick (même
débranché).
— Lorsque que votre «PRESET MANUEL» est vierge, il est alors identique au «PRESET
AUTOMATIQUE».
PROGRAMMATION / MAPPING
Vos programmations s’effectuent à l’aide du bouton MAPPING.
Attention : Sur PC ou sur PS3, ce bouton n’a pas le même emplacement
(reportez vous aux schémas) :
— Sur PC : appuyez directement sur le bouton concerné
— Sur PS3 : appuyez simultanément sur START (ST) + SELECT (SE)
• Exemples d’applications possibles :
— Inverser la position des boutons
— Inverser des axes entre eux = directions du manche, de la manette des gaz ou du
palonnier (Dans ce cas, vous devez basculer les 2 directions du 1er
axe vers le
second.)
— Inverser les 2 directions du même axe
— Inverser des boutons avec la direction d’un axe ou de la croix
• Exception :
Sur PlayStation®3, les boutons START(ST) et SELECT(SE) correspondent également au
bouton MAPPING (et ne peuvent donc pas être reprogrammés)
ManualsPro
THRUSTMASTER
THRUSTMASTER T.Flight Stick X Joystick with Rudder Control User Manual
- June 5, 2024
- THRUSTMASTER
Table of Contents
- TECHNICAL FEATURES
- PC
- INSTALLATION ON PC
- IMPORTANT NOTES FOR PC
- “AUTOMATIC PRESET” CONFIGURATION – PC
- PLAYSTATION®3
- INSTALLATION ON PLAYSTATION®3
- USING THE “HOME / PS” BUTTON
- IMPORTANT NOTES FOR PLAYSTATION®3
- “AUTOMATIC PRESET” CONFIGURATION – PLAYSTATION®3
- GETTING TO KNOW YOUR JOYSTICK
- Adjustable handle resistance
- Throttle
- Rudder function
- Multidirectional “Point Of View” hat-switch
- 2 PROGRAMMING MODES
- PROGRAMMING / MAPPING
- PROGRAMMING PROCEDURE
- EEPROM MEMORY
- RETURNING TO “FACTORY SETTINGS”
- TROUBLESHOOTING AND WARNING
- CONSUMER WARRANTY INFORMATION
- Additional warranty provisions
- Liability
- FCC STATEMENT
- ENVIRONMENTAL PROTECTION RECOMMENDATION
- Documents / Resources
- References
- Read User Manual Online (PDF format)
- Download This Manual (PDF format)
THRUSTMASTER T.Flight Stick X Joystick with Rudder Control User Manual

TECHNICAL FEATURES

- USB selector (PC / PS3)
- PC and PlayStation®3 USB connector
- Multidirectional “Point Of View” hat-switch
- 12 action buttons
- Rudder function via twisting handle with locking screw.
- Sliding thumb throttle
- LED
- PRESET button (to select programming)
- Handle resistance adjustment dial
PC
INSTALLATION ON PC
-
Set your joystick’s USB selector (1) to the “PC” position.
-
Connect the USB connector (2) to one of your computer’s USB ports. Windows will automatically detect the new device.
-
The drivers are installed automatically.
Follow the on-screen instructions to complete the installation. -
Click Start/Settings/Control Panel and then double-click Game Controllers.
The Game Controllers dialog box displays the joystick’s name with OK
status. -
In the Control Panel, click Properties to configure your joystick. Test device: Lets you test and view all of your joystick’s functions.
You are now ready to play!
IMPORTANT NOTES FOR PC
- Your joystick’s USB selector (1) must always be set to the “PC” position before connecting your joystick.
- When connecting your joystick: Leave the handle and rudder centered and do not move them (to avoid any calibration problems).
“AUTOMATIC PRESET” CONFIGURATION – PC
“AUTOMATIC PRESET” diagram on PC

This preset corresponds to the default configurations for most aerial
simulation games on PC.
It will therefore allow you to start playing your game right away, without
having to reconfigure your joystick.
PLAYSTATION®3
INSTALLATION ON PLAYSTATION®3
- Set your joystick’s USB selector (1) to the “PS3” position.
- Connect the USB connector (2) to one of your console’s USB ports.
- Switch on your console.
- Launch your game.
You are now ready to play!
USING THE “HOME / PS” BUTTON
Your joystick’s “Home / PS” button allows you to exit your games, access menus
and directly switch off your PlayStation®3 system.
IMPORTANT NOTES FOR PLAYSTATION®3
- Your joystick’s USB selector (1) must always be set to the “PS3” position before connecting your joystick.
- In “1 Player” mode: If your official gamepad is on, you must switch it to “controller port 2” in order for your joystick to be functional.
- On PlayStation®3, the joystick is only compatible with PlayStation®3 games (and will not function with PlayStation® 2 games).
- When connecting your joystick: Leave the handle, rudder and throttle centered and do not move them (to avoid any calibration problems)
“AUTOMATIC PRESET” CONFIGURATION – PLAYSTATION®3
“AUTOMATIC PRESET” diagram on PlayStation®3

This preset corresponds to the default configurations for most aerial
simulation games on PlayStation®3. It will therefore allow you to start
playing your game right away, without having to reconfigure your joystick.
The 4 handle directions: Correspond to the 4 directions on your gamepad’s
left mini-stick.
The throttle (6): Corresponds to the Up/Down directions on your gamepad’s
right mini-stick.
The rudder (5): Corresponds to the Left/Right directions on your
gamepad’s right mini-stick.
MAPPING button: Simultaneously press SELECT (SE) + START (ST).
HOME / PS button: Simply press the button
GETTING TO KNOW YOUR JOYSTICK
Adjustable handle resistance
Depending on your gaming style, you may prefer to have an ultra-sensitive
joystick, which responds to the slightest movement, or a firmer joystick,
which offers a certain resistance when you use it.
Your joystick’s handle resistance is adjustable, in order to adapt to all
gamers. To adjust it, use the handle resistance adjustment dial (9) located
under your joystick’s base.
Throttle
The throttle is in the form of a thumb slider (6), easily accessible with your
left hand resting on the base of your joystick.
Rudder function
Your joystick features a rudder function, which in a plane corresponds to the
pedals used by the pilot to turn the steering, allowing the plane to pivot
around its vertical axis (therefore making the plane turn left or right). This
rudder function is accessible on your joystick by rotating the handle to the
left or right. If you are not using the rudder function in your games (or if
you have programmed it onto action buttons), you can disable handle rotation
thanks to the locking screw (5) located on the handle’s base.
Use a flat head screwdriver to change the screw’s position and thus
lock/unlock the rudder function.
Multidirectional “Point Of View” hat-switch
Your joystick features a “Point Of View” hat-switch (3) which, as its name
indicates, allows you (in games which permit) to instantly view everything
that’s going on around your plane. To do so, simply go to your game’s
configuration menu and program the different views (rear view, left view,
right view, and also external views) onto the directions of the “Point Of
View” hat-switch.
Of course, you can also use the “Point Of View” hat-switch for other functions
instead (firing, etc.)
2 PROGRAMMING MODES
The PRESET button (8) and LED (7) allow you to view the type of
programming selected: AUTOMATIC (preprogrammed) or MANUAL (programmed by
yourself). A single press of this button will allow you to switch from one
programming mode to the other, even during the course of a game.
AUTOMATIC PRESET: RED LED
This represents the default programming: the axes, positions of the buttons
and of the hatswitch are preprogrammed.
PLEASE REFER TO THE “AUTOMATIC PRESET” CONFIGURATION DIAGRAMS.
MANUAL PRESET: GREEN LED
This represents your own person programming:
- The buttons, axes and the hat-switch can be switched between themselves.
- You can modify the programming to suit your taste and whenever you like.
- Programming is automatically saved in your joystick (even when it is disconnected).
- When your “MANUAL PRESET” is blank, it is identical to the “AUTOMATIC PRESET”.
PROGRAMMING / MAPPING
You can program your joystick using the MAPPING button.
Attention: This button is not located in the same position on PC and PS3
(please refer to the diagrams):
- On PC: Directly press the button in question.
- On PS3: Simultaneously press START (ST) + SELECT (SE).
Examples of possible applications:
- Switching the positions of buttons.
- Switching axes between themselves = directions of the handle, of the throttle or of the rudder (In this case, you must map the 2 directions of the first axis to those of the second.)
- Switching the 2 directions of the same axis.
- Switching buttons with a direction of an axis or of the hat-switch.
Exception:
On PlayStation®3, the START (ST) and SELECT (SE) buttons also correspond to
the MAPPING button (and therefore may not be reprogrammed).
PROGRAMMING PROCEDURE
Steps
| Action|
LED
—|—|—
1
| Enable MANUAL PRESET (8) by pressing the button.| GREEN
2| Press and release the MAPPING button.|
OFF
3
| Press and release the button or direction to program.| FLASHES GREEN
4| Press and release the button or direction onto which you wish to
place your function.|
GREEN
Your “MANUAL PRESET” is now enabled and up to date (with your programming
carried out).
EEPROM MEMORY
- Your joystick features an internal chip which saves all of your “MANUAL PRESET” programming in memory (even when the joystick is switched off or unplugged for a long period of time).
- You can save a different “MANUAL PRESET” for each platform used (one for PC and one for PlayStation®3).
ERASING A “MANUAL PRESET”
Steps
| Action|
LED
—|—|—
1| Enable your MANUAL PRESET (8).| GREEN
2| Press and hold the MAPPING button for 2 seconds.| FLASHES GREEN 2
SECONDS
Your “MANUAL PRESET” is now blank (and once again identical to the “AUTOMATIC
PRESET”).
RETURNING TO “FACTORY SETTINGS”
You can erase all of your programming or settings carried out on both PC and
PlayStation®3 with a single step:
| Step | Action | LED |
|---|---|---|
| 1 | Simultaneously press the buttons MAPPING + 11 (SE) + 12 (ST) |
FLASHES GREEN/RED 2 SECONDS
All of your “MANUAL PRESETS” (PC + PS3) or settings are now blank.
Note: This operation will completely restart your joystick (on PC, we
therefore recommend that you do this outside of games)
TROUBLESHOOTING AND WARNING
- My joystick doesn’t function correctly or appears to be improperly calibrated:
- Switch off your computer or your console, disconnect your joystick, reconnect your joystick and then re-launch your game.
- When connecting your joystick: Leave the handle, rudder and throttle centered and do not move them (to avoid any calibration problems).
- Exit your game, disconnect your joystick, verify that the USB selector (PC / PS3) (1) is set to the proper position, then reconnect your joystick.
I can’t configure my joystick:
-
* In your game’s “Options / Controller / Gamepad or Joystick” menu: Select the most appropriate configuration or completely reconfigure the controller options.- Please refer to your game’s user manual or online help for more information.
- You can also use your joystick’s “MAPPING” function to resolve this type of problem.
My joystick is too sensitive or not sensitive enough:
-
* Your joystick self-calibrates on its own after you have made a few movements on the different axes.- In your game’s “Options / Controller / Gamepad or Joystick” menu: Adjust the sensitivity or dead zones for your controller (if this option is available).
- Adjust the handle resistance using the dial (9) located under your joystick’s base.
CONSUMER WARRANTY INFORMATION
Worldwide, Guillemot Corporation S.A., whose registered office is located at
Place du Granier, B.P. 97143, 35571 Chantepie, France (hereinafter
“Guillemot”) warrants to the consumer that this Thrustmaster product shall be
free from defects in materials and workmanship, for a warranty period which
corresponds to the time limit to bring an action for conformity with respect
to this product. In the countries of the European Union, this corresponds to a
period of two (2) years from delivery of the Thrustmaster product. In other
countries, the warranty period corresponds to the time limit to bring an
action for conformity with respect to the Thrustmaster product according to
applicable laws of the country in which the consumer was domiciled on the date
of purchase of the Thrustmaster product (if no such action exists in the
corresponding country, then the warranty period shall be one (1) year from the
original date of purchase of the Thrustmaster product). Notwithstanding the
above, rechargeable batteries are covered by a warranty period of six (6)
months from the date of original purchase.
Should the product appear to be defective during the warranty period,
immediately contact Technical Support, who will indicate the procedure to
follow. If the defect is confirmed, the product must be returned to its place
of purchase (or any other location indicated by Technical Support).
Within the context of this warranty, the consumer’s defective product shall,
at Technical Support’s option, be either replaced or returned to working
order. If, during the warranty period, the Thrustmaster product is subject to
such reconditioning, any period of at least seven (7) days during which the
product is out of use shall be added to the remaining warranty period (this
period runs from the date of the consumer’s request for intervention or from
the date on which the product in question is made available for
reconditioning, if the date on which the product is made available for
reconditioning is subsequent to the date of the request for intervention). If
permitted under applicable law, the full liability of Guillemot and its
subsidiaries (including for consequential damages) is limited to the return to
working order or the replacement of the Thrustmaster product. If permitted
under applicable law, Guillemot disclaims all warranties of merchantability or
fitness for a particular purpose.
This warranty shall not apply:
- if the product has been modified, opened, altered, or has suffered damage as a result of inappropriate or abusive use, negligence, an accident, normal wear, or any other cause unrelated to a material or manufacturing defect (including, but not limited to, combining the Thrustmaster product with any unsuitable element, including in particular power supplies, rechargeable batteries, chargers, or any other elements not supplied by Guillemot for this product);
- if the product has been used for any use other than home use, including for professional or commercial purposes (game rooms, training, competitions, for example);
- in the event of failure to comply with the instructions provided by Technical Support;
- To software, said software being subject to a specific warranty;
- to consumables (elements to be replaced over the product’s lifespan: disposable batteries, audio headset or headphone ear pads, for example);
- to accessories (cables, cases, pouches, bags, wrist-straps, for example);
- if the product was sold at public auction.
This warranty is nontransferable.
The consumer’s legal rights with respect to laws applicable to the sale of
consumer goods in his or her country are not affected by this warranty.
Additional warranty provisions
During the warranty period, Guillemot shall not provide, in principle, any
spare parts, as Technical Support is the only party authorized to open and/or
recondition any Thrustmaster product (with the exception of any reconditioning
procedures which Technical Support may request that the consumer carry out, by
way of written instructions – for example, due to the simplicity an the lack
of confidentiality of the reconditioning process – and by providing the
consumer with the required spare part(s), where applicable). Given its
innovation cycles and in order to protect its know-how and trade secrets,
Guillemot shall not provide, in principle, any reconditioning notification or
spare parts for any Thrustmaster product whose warranty period has expired.
In the United States of America and in Canada, this warranty is limited to the
product’s internal mechanism and external housing. In no event shall Guillemot
or its affiliates be held liable to any third party for any consequential or
incidental damages resulting from the breach of any express or implied
warranties. Some States/Provinces do not allow limitation on how long an
implied warranty lasts or exclusion or limitation of liability for
consequential or incidental damages, so the above limitations or exclusions
may not apply to you. This warranty gives you specific legal rights, and you
may also have other rights which vary from State to State or Province to
Province.
Liability
If permitted under applicable law, Guillemot Corporation S.A. (hereinafter
“Guillemot”) and its subsidiaries disclaim all liability for any damages
caused by one or more of the following: (1) the product has been modified,
opened or altered; (2) failure to comply with assembly instructions; (3)
inappropriate or abusive use, negligence, an accident (an impact, for
example); (4) normal wear; (5) the use of the product for any use other than
home use, including for professional or commercial purposes (game rooms,
training, competitions, for example). If permitted under applicable law,
Guillemot and its subsidiaries disclaim all liability for any damages
unrelated to a material or manufacturing defect with respect to the product
(including, but not limited to, any damages caused directly or indirectly by
any software, or by combining the Thrustmaster product with any unsuitable
element, including in particular power supplies, rechargeable batteries,
chargers, or any other elements not supplied by Guillemot for this product).
TECHNICAL SUPPORT

https://support.thrustmaster.com
FCC STATEMENT
- This device complies with Part 15 of the FCC Rules. Operation is subject to the following two conditions:
- This device may not cause harmful interference, and
- This device must accept any interference received, including interference that may cause undesired operation.
- Changes or modifications not expressly approved by the party responsible for compliance could void the user’s authority to operate the equipment.
COPYRIGHT
© 2022 Guillemot Corporation S.A. All rights reserved. Thrustmaster® is a
registered trademark of Guillemot Corporation S.A. All other trademarks are
the property of their respective owners. Illustrations not binding. Contents,
designs and specifications are subject to change without notice and may vary
from one country to another. Made in China.
WARNING: This product can expose you to chemicals including Bisphenol A
(BPA) which is known to the State of California to cause birth defects or
other reproductive harm. For more information go to
http://www.p65warnings.ca.gov/
ENVIRONMENTAL PROTECTION RECOMMENDATION
In the European Union: At the end of its working life, this product should not
be disposed of with standard household waste, but rather dropped off at a
collection point for the disposal of Waste Electrical and Electronic Equipment
(WEEE) for recycling.
This is confirmed by the symbol found on the product, user manual or
packaging.
Depending on their characteristics, the materials may be recycled. Through
recycling and other forms of processing Waste Electrical and Electronic
Equipment, you can make a significant contribution towards helping to protect
the environment. Please contact your local authorities for information on the
collection point nearest you. For all other countries: Please adhere to local
recycling laws for electrical and electronic equipment.
Retain this information. Colours and decorations may vary.
Plastic fasteners and adhesives should be removed from the product before it
is used.
www.thrustmaster.com
_*Applicable to EU, UK and Turkey only.

_
Documents / Resources
|
THRUSTMASTER T.Flight Stick X Joystick with Rudder
Control
[pdf] User Manual
T.Flight Stick X, Joystick with Rudder Control, T.Flight Stick X Joystick with
Rudder Control
—|—
References
- p65warnings.ca.gov/
- Thrustmaster | Wheels, Joysticks and Gamepads for video games
- Thrustmaster — Technical support website
Read User Manual Online (PDF format)
Read User Manual Online (PDF format) >>
Download This Manual (PDF format)
Download this manual >>