
- Частным лицам
- Помощь и поддержка
- домашний билайн
- домашний интернет
- Настройка роутера
- TP-link Archer C54

|
Имя беспроводной (SSID) |
Диапазон 2,4 ГГц; TP-LINK_XXXXXX (где X — последовательность символов) Диапазон 5 ГГц; TP-LINK_XXXXXX_5G (где X — последовательность символов) |
|
Пароль сети по умолчанию |
Указан на дне роутера |
|
|
Адрес роутера |
192.168.0.1 |
|
|
Доступ на веб-интерфейс |
Логин — admin |
|
|
Официальный сайт |
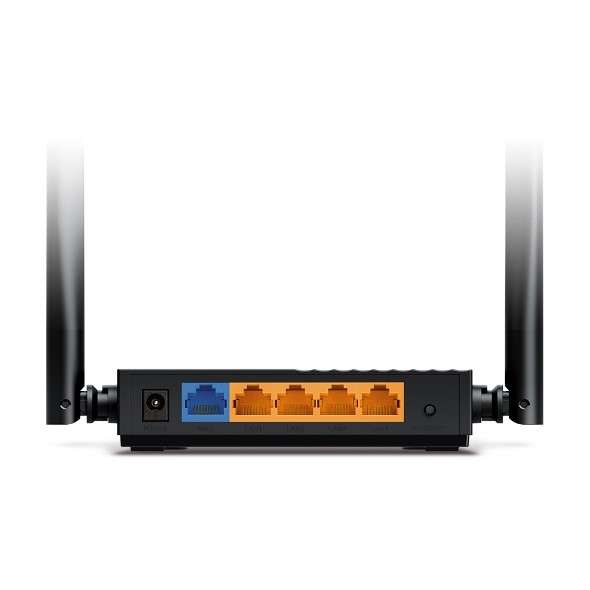
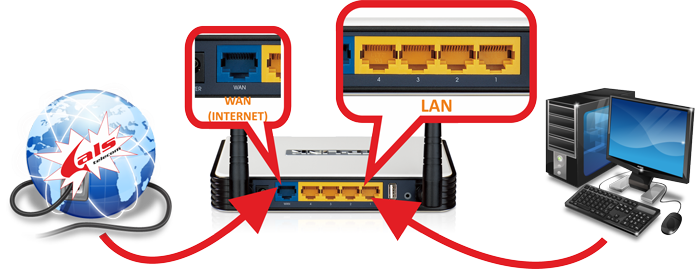
Подключите кабель, который вам провели в квартиру наши монтажники, к порту WAN, а компьютер — к любому из LAN-портов. Ещё можете соединить ваш ПК с роутером по беспроводной сети, но на первичном этапе настройки лучше использовать кабель.
Если при попытке открыть страницу авторизации видите настройки роутера, следуйте пошаговой инструкции и установите пароль администратора, а если система потребует — название и пароль Wi-Fi-сети. Примените настройки. Затем снова попробуйте открыть страницу авторизации по инструкции ниже.
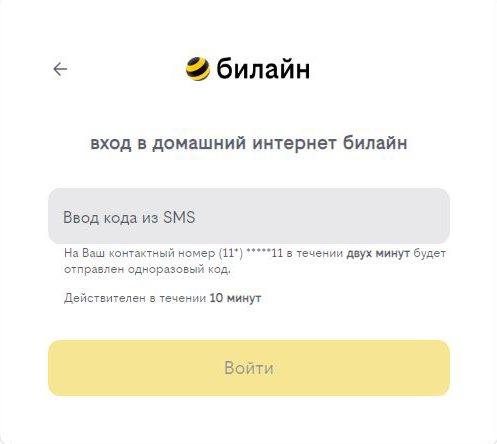
Попробуйте открыть любую страницу в браузере или введите в адресную строку login.beeline.ru или 83.102.180.167 — откроется страница авторизации, на которой вводим «Логин» — имя пользователя по договору (089/085) — и нажимаем «Войти».

После чего появится поле для ввода пароля. Вводим постоянный пароль от логина (договора) и нажимаем «Войти».

Если не помните текущий пароль, воспользуйтесь услугой «Получить одноразовый код для авторизации»: на номер для смс-уведомлений поступит код — введите его в поле «Код из SMS» и нажмите «Войти».
Появится окно с уведомлением, что вход выполнен.
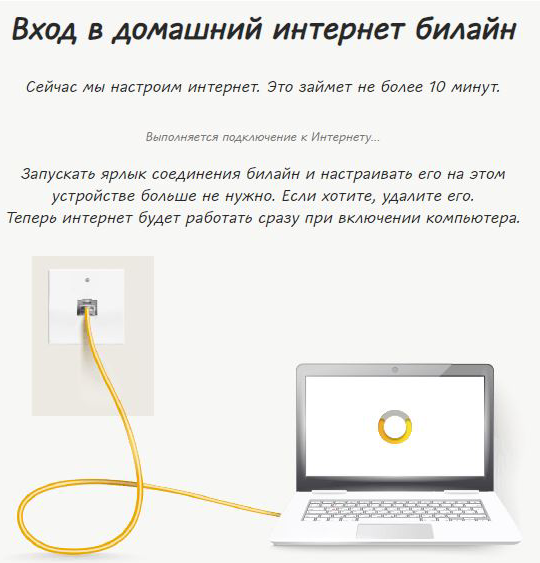
Подождите 10 минут и затем попробуйте воспользоваться интернетом. Если не сработало, перезагрузите роутер и повторите попытку.
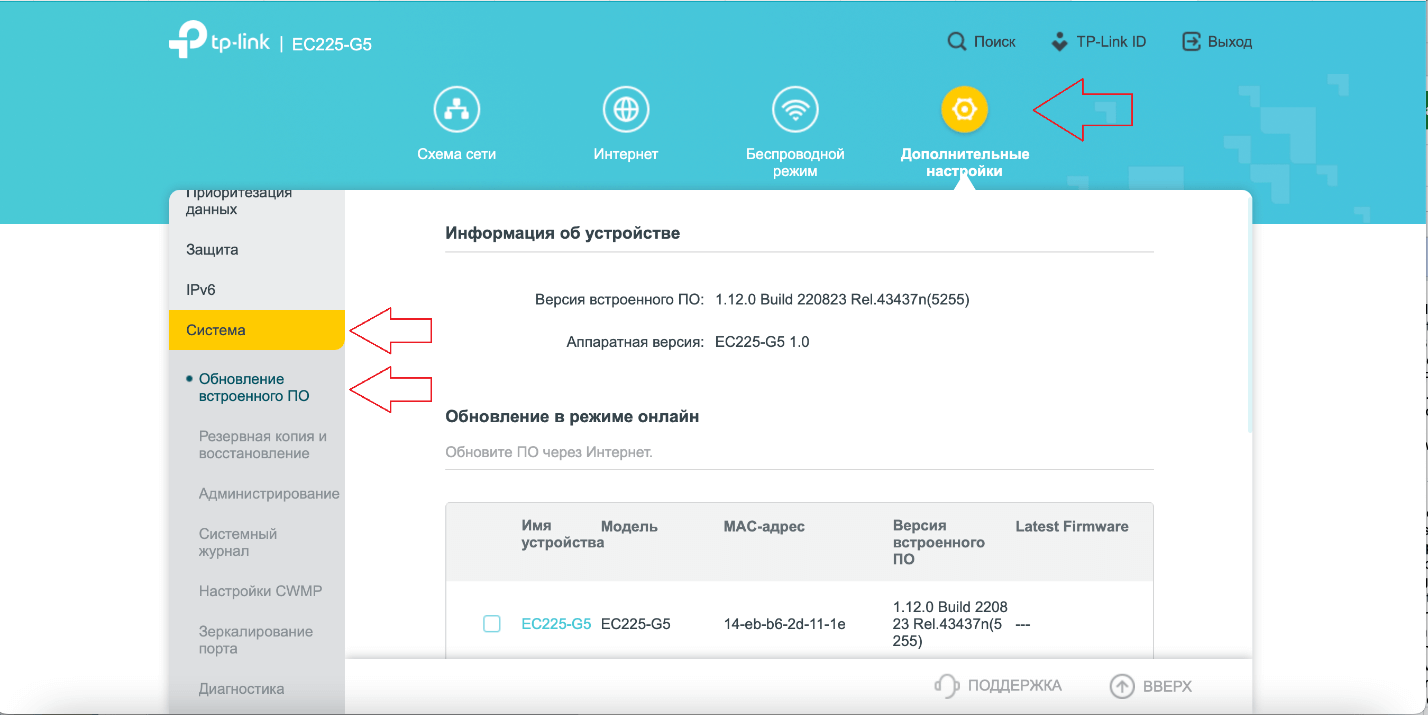
Для обновления прошивки или же установки другой её версии в верхнем меню выбираем пункт «Дополнительные настройки» → «Система» → «Обновление встроенного ПО».
Используйте аппаратный сброс настроек, если требуется настроить устройство заново (удалить все пользовательские настройки), нет доступа к веб-странице интерфейса настроек роутера, после настройки роутера интернет-соединение не установилось или пароль доступа к нему утерян.
Внимание! Аппаратный сброс откатит все пользовательские настройки до заводских.
На корпусе устройства есть углублённая кнопка «СБРОС» (RESET, RESTORE), позволяющая сбросить настройки до заводских установок. Её сможете найти на той же стороне корпуса роутера, где располагаются остальные разъёмы и кнопки. В редких случаях — на дне роутера.
Чтобы сбросить настройки роутера, выполните следующие действия:
— Включите питание роутера и дождитесь полной загрузки устройства.
— Нажмите «СБРОС» (RESET, RESTORE) при помощи тонкого заострённого предмета (например, скрепки) и удерживайте 30 секунд, затем отпустите кнопку. После этого роутер перезагрузится с установками по умолчанию (заводскими настройками) и потребуется повторная его настройка.
После настройки роутера проверьте работу интернета, открыв любую веб-страницу.
Тарифы на Домашний интернет в Москве
для дома 200 Акция ›
200
Мбит/с
Wi-Fi-роутер
не входит в тариф
В тариф не входит Wi-Fi-роутер. Вы можете взять Wi-Fi-роутер в аренду за 100,00 ₽/мес!
для дома 500 Акция ›
500
Мбит/с
Wi-Fi-роутер
не входит в тариф
В тариф не входит Wi-Fi-роутер. Вы можете взять Wi-Fi-роутер в аренду за 100,00 ₽/мес!
для игр ›
600
Мбит/с
Wi-Fi-роутер
не входит в тариф
В тариф не входит Wi-Fi-роутер. Вы можете взять Wi-Fi-роутер в аренду за 50,00 ₽/мес!
Домашний интернет с ТВ и мобильной связью ещё выгоднее
150242
На этой странице вы можете ознакомиться с моей подробной инструкцией по настройке роутеров TP-Link Archer C24 и TP-Link Archer C54. Это два практически одинаковых роутера, поэтому я решил показать процесс подключения и настройки в одной статье. Старшая модель C54 отличается от C24 более высокой скоростью беспроводной сети, черным корпусом и поддержкой некоторых технологий.

Более подробно ознакомиться с этими роутерами можно в моих обзорах: Archer C24 и Archer C54. Веб-интерфейс (страница с настройками) у этих моделей одинаковый. А это значит, что процесс настройки отличаться не будет.
Перед настройкой я рекомендую обратить внимание на два момента:
- Если ваш Archer C24 или Archer C54 уже был настроен, были попытки его настроить, или вы забыли пароль, то желательно сделать сброс настроек. Если он новый, только с магазина – можете не делать. Чтобы сбросить настройки нужно включить роутер, подождать около минуты, зажать кнопку WPS/Reset и подержать ее примерно 5 секунд (вы увидите как погаснут индикаторы на роутере).
- Нужно узнать, какой тип подключения к интернету использует ваш интернет-провайдер. И в зависимости от типа подключения – необходимые настройки (имя пользователя, пароль, адрес сервера). Обычно эта информация указана в договоре о подключении к интернету.
Подключение
Нужно включить роутер (подключить адаптер питания и включить его в розетку). Интернет (сетевой кабель) который проложен в ваш дом от оборудования провайдера, или от ADSL модема подключаем к Archer C24/Archer C54 в WAN-порт. Он синего цвета.

Дальше нужно подключиться к роутеру с устройства, с которого мы будем его настраивать. Это может быть ПК, ноутбук, телефон, планшет. Есть два варианта подключения:
- С помощью Ethernet кабеля. Он есть в комплекте с роутером. Один конце подключаем в один из LAN-портов на роутере, а второй в сетевую карту на ПК или ноутбуке.

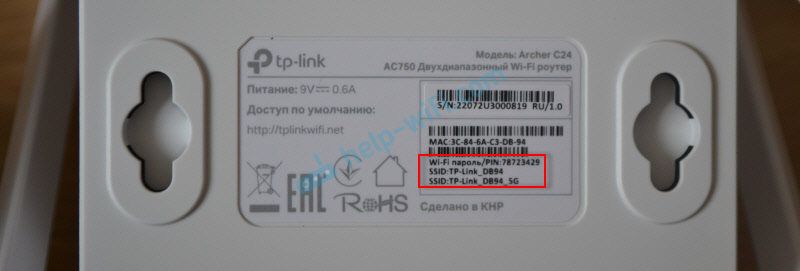
- По Wi-Fi. Роутер сразу после включения раздает Wi-Fi сеть. К ней можно подключиться с любого устройства: ноутбук, смартфон, планшет и т. д. И уже с этого устройства выполнить настройку. Заводское имя Wi-Fi сети (SSID) и пароль Wi-Fi пароль можно посмотреть снизу Archer C24 или Archer C54 на наклейке.

Нужно просто выбрать эту сеть на своем устройстве, ввести заводской пароль и подключиться. Так же я заметил, что на Archer C54 снизу на наклейке есть QR-код для подключения к Wi-Fi сети. Просто наведите на него камеру вашего смартфона и он предложит подключиться к этой сети.

Оба роутера поддерживают приложение Tether. Это приложение можно установить на телефон с App Store или Google Play и с его помощью выполнить настройку роутера. А в дальнейшем через это приложение можно выполнять управление роутером. Это очень удобно.
Вход в настройки
После подключения к роутеру на подключенном устройстве нужно запустить браузер и перейти по адресу http://tplinkwifi.net. Важно! Адрес нужно вводить не в строке поиска, а в адресной строке браузера.
Должна открыться страница нашего роутера с предложением создать пароль администратора. Это значит, что мы все сделали правильно. Нужно придумать пароль и указать его два раза. Это не пароль от Wi-Fi! Это пароль, который будет защищать страницу с настройками роутера. Обязательно его где-то запишите. Если забудете, то не сможете зайти в настройки роутера и придется делать сброс настроек.

Если вместо страницы роутера (которая на скриншоте выше) появляется ошибка, результаты поиска в поисковой системе или другая страница, то вы что-то сделали не так. Тут вам пригодятся эти статьи: как зайти в настройки роутера TP-Link и tplinkwifi.net – вход в настройки маршрутизатора.
Быстрая настройка роутера Archer C24 и Archer C54
После нажатия на кнопку «Приступим к работе» откроется мастер быстрой настройки. С его помощью буквально в несколько шагов можно задать все необходимые настройки.
Первый шаг – часовой пояс.

Дальше роутер предложит выбрать страну, город, интернет-провайдера и тип подключения. Выбираем. Если провайдера нет в списке, то ставим галочку возле «Выберите тип подключения вручную».
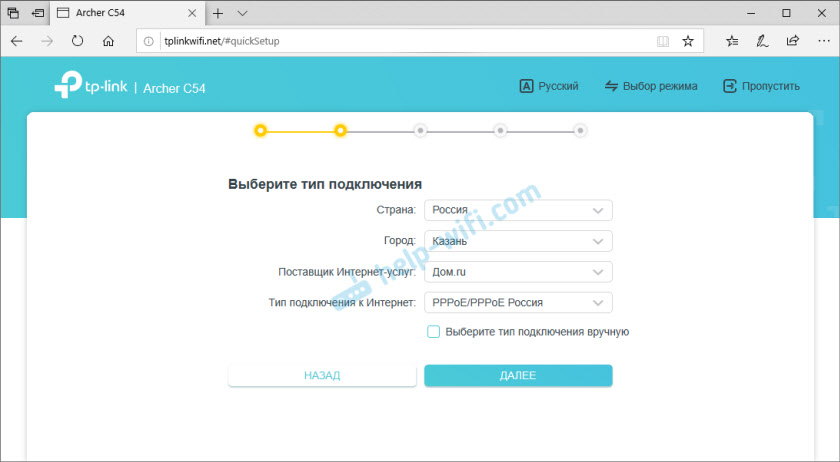
Если нужно – выбираем тип подключения вручную.
Тип подключения и другие данные для настройки (имя пользователя, пароль, имя сервера, IP-адреса) вы можете посмотреть в договоре о подключении к интернету, или узнать у своего интернет-провайдера. Если у вас тип подключения «Динамический IP-адрес», то так же желательно узнать, не делает ли провайдер привязку по MAC-адресу.
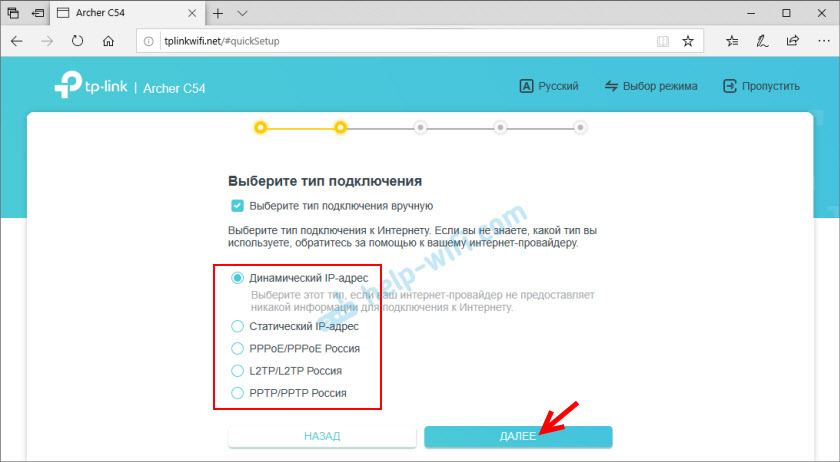
Если у вас «Динамический IP-адрес», то после нажатия на кнопку «Далее» не нужно будет вводить никакие данные. Если «Статический IP-адрес», то нужно будет указать IP-адреса (их выдает провайдер). Если PPPoE, то понадобится указать имя пользователя и пароль (их так же выдает ваш интернет-провайдер). А если у вас PPTP или L2TP, то кроме имени пользователя и пароля нужно указать еще адрес сервера.
Для примера: настройки PPPoE:
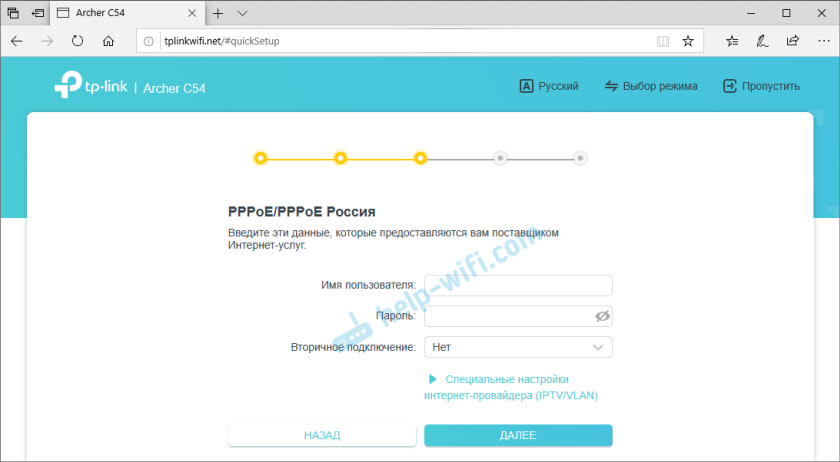
Напомню, что имя пользователя и пароль вам выдает ваш интернет-провайдер. Обратите внимание (на скриншоте выше), что там сразу можно задать настройки IPTV. Прописать VLAN. Если это необходимо.
Так как у меня тип подключения «Динамический IP-адрес», то продолжив настройку роутер предлагает изменить MAC-адрес роутера. Это нужно делать только в том случае, если ваш провайдер делает привязку по MAC-адресу. В этом случае нужно либо прописать у провайдера MAC-адрес нового роутера, либо сменить MAC-адрес роутера на тот, к которому привязан интернет.

Следующий шаг – настройка WI-FI сети. Здесь все просто. Так как роутер двухдиапазонный (раздает Wi-Fi на частоте 2.4 ГГц и 5 ГГц), то нужно сменить имя сети (SSID) в каждом диапазоне и задать пароль для каждой сети. Пароль можно задать один. Если необходимо, можно отключить сеть в одном из диапазонов.

Нажимаем «Далее».

Ждем пока произойдет перезапуск сети Wi-Fi. Так как мы сменили настройки Wi-Fi, то подключенные устройства будут отключены. Нужно подключиться к Wi-Fi сети роутера заново.
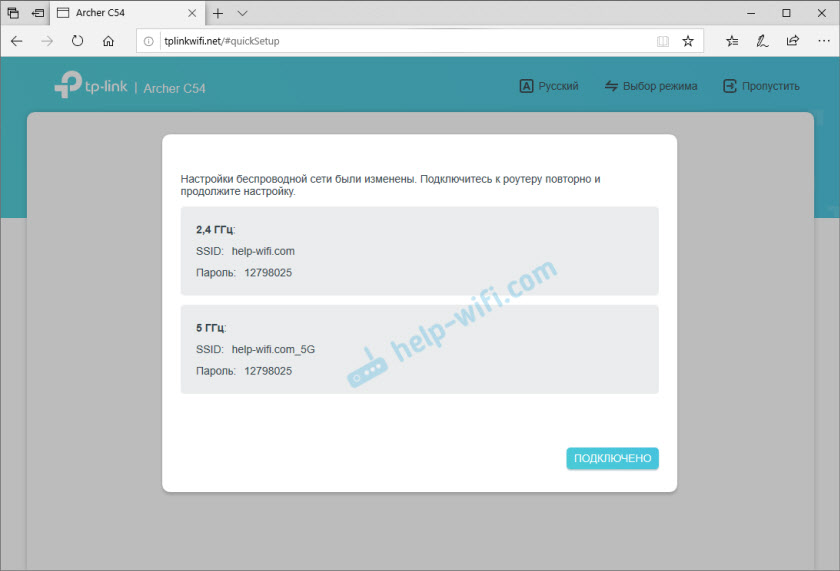
И если вы заново подключились к роутеру и нажали на кнопку «Подключено», то должно появится сообщение, что настройка завершена. Нажимаем на кнопку «Завершить» и попадает на главную страницу с настройками роутера.
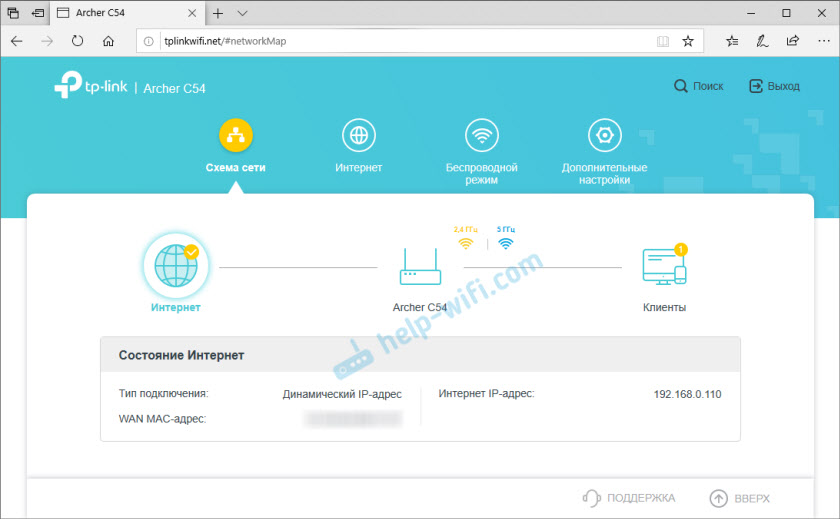
Здесь можно посмотреть статус подключения к интернету (у меня все Ok), подключенные устройств (клиенты), или перейти в другие разделы для настройки других функций.
Если после завершения настройки на устройствах нет доступа к интернету, а индикатор «Интернет» на роутере горит оранжевым, то вы скорее всего неправильно указали параметры подключения к интернету. Либо есть какие-то проблемы на стороне провайдера. Сменить параметры подключения к интернету можно в отдельном разделе, об этом я расскажу ниже. Так же советую посмотреть статью почему на роутере TP-Link индикатор интернета (WAN) горит оранжевым.
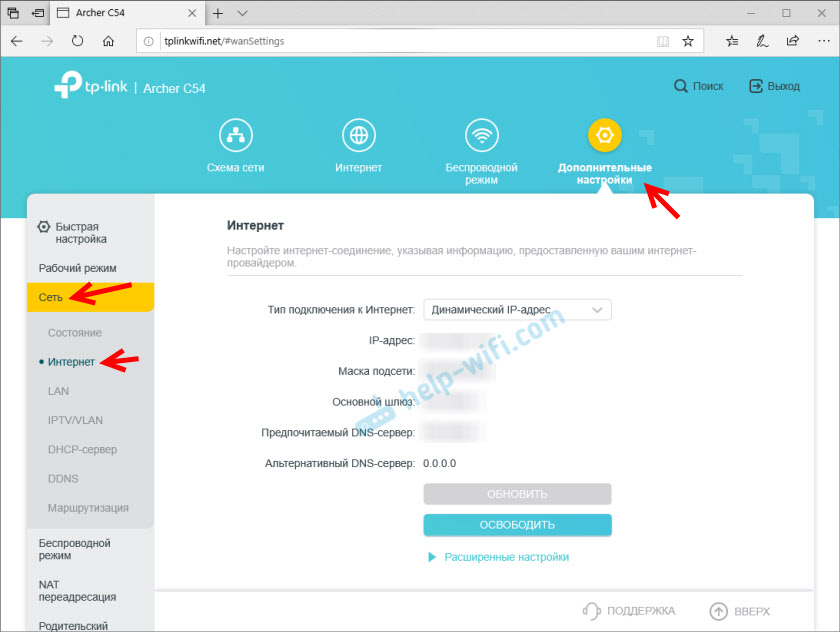
Настройка подключения к интернету (провайдеру)
Перейдите в раздел «Дополнительные настройки» — «Сеть» — «Интернет». Там можно сменить тип подключения к интернету и задать необходимые параметры. Если на этой странице вы зададите неправильные настройки, то интернет через роутер работать не будет. Какие настройки задать – зависит от вашего интернет-провайдера. Смотрим договор или звоним в поддержку.
Настройка Wi-Fi сети
Настройки Wi-Fi находятся в разделе «Дополнительные настройки» — «Беспроводной режим». Там можно сменить множество параметров для сети в каждом диапазоне (2,4 ГГц и 5 ГГц).

Я рекомендую оставить там все настройки по умолчанию (ничего не менять). Можете сменить только имя сети (SSID) и пароль. Если вы не меняли их в процессе быстрой настройки.
Канал и ширину канала лучше оставить на «Авто». Защита и шифрование по умолчанию там выставлены правильно. Режим сети лучше оставить «смешанный b/g/n». А если в доме нет старых устройств, которые вы будете подключать к Wi-Fi сети, то можно поставить «Только 802.11n».
Настройка IPTV/VLAN
Эти настройки на Archer C24/C54 находятся в разделе «Дополнительные настройки» — «Сеть» — «IPTV/VLAN». Включаем функцию «IPTV/VLAN» и выбираем режим: вручную или мост. Если «Мост», то нужно выбрать LAN-порт, в который затем подключить IPTV приставку. А если «Вручную», то нужно прописать VLAN ID. Их можно узнать у вашего интернет провайдера.
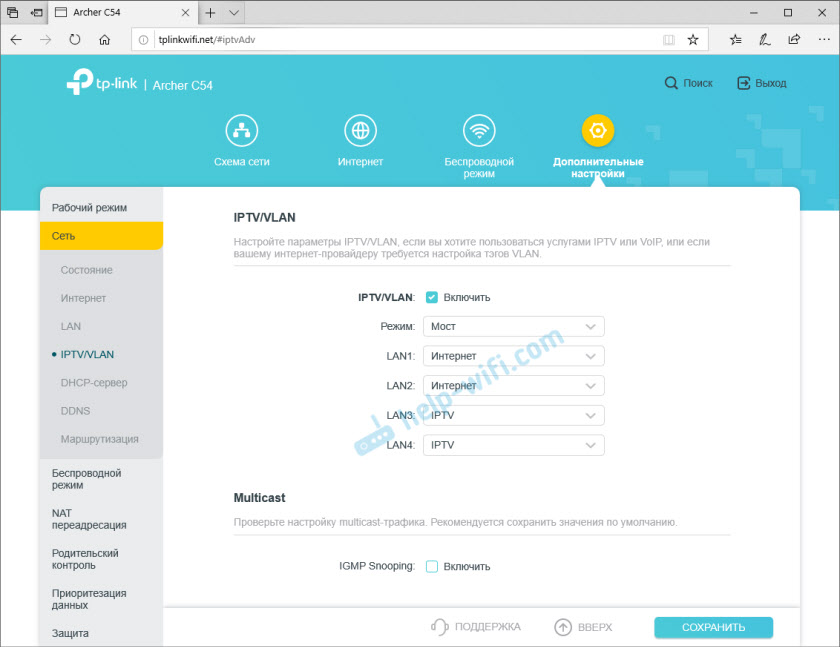
Там же можно включить IGMP Snooping. Более подробно в этой статье: настройка IPTV на роутерах TP-Link.
Обновление прошивки
Чтобы обновить прошивку роутера TP-Link Archer C24 или TP-Link Archer C54 нужно сначала скачать прошивку с сайта TP-Link.
Важно! Обновлять прошивку можно только при подключении к роутеру по сетевому кабелю.
Важно! На момент написания этой статьи есть только одна аппаратная версия этих роутеров – V1. Возможно, в дальнейшем будут и другие аппаратные версии. Посмотреть ее можно снизу корпуса на наклейке. Например: RU/1.0 означает, что роутер для региона Россия и первая аппаратная версия. Именно для этого региона и аппаратной версии нужно скачивать прошивку с сайта TP-Link (там может быть меню выбора аппаратной версии).
- Для Archer C24 – https://www.tp-link.com/ru/support/download/archer-c24/#Firmware
- Для Archer C54 – https://www.tp-link.com/ru/support/download/archer-c54/#Firmware
Загружаем файл с последней прошивкой и сохраняем на компьютер. Открываем архив и извлекаем оттуда файл прошивки (примерно с таким именем: c54v1-up-noboot_2020-08-06_20.33.16.bin).
В настройках роутера переходим в раздел «Дополнительные настройки» — «Система» — «Обновление встроенного ПО». Нажимаем на кнопку «Обзор» и выбираем файл с прошивкой (с расширением .bin). Нажимаем на кнопку «Обновить».

Ничего не трогаем и не отключаем. После завершения обновления прошивки роутер будет перезагружен.
Настройка в режиме репитера или точки доступа
TP-Link Archer C54 и младшая модель Archer C24 может работать в режиме усилителя Wi-Fi сигнала или точки доступа. В настройках есть функция смены режима работы маршрутизатора.
Например, чтобы использовать один из этих роутеров в качестве репитера нужно в веб-интерфейсе перейти в раздел «Дополнительные настройки» — «Рабочий режим». Выбрать режим «Режим усилителя Wi-Fi сигнала» и сохранить настройки.

После перезагрузки рутера снова заходим в настройки по адресу tplinkwifi.net и нас сразу встречает мастер быстрой настройки роутера в режиме усилителя Wi-Fi сигнала.
Нужно выбрать уже существующую Wi-Fi сеть сигнал которой нужно усилить и ввести от нее пароль. Сначала можно подключиться к сети в диапазоне 2.4 ГГц, а затем в диапазоне 5 ГГц. Если, например, нужно усиливать сеть только в диапазоне 2.4 ГГц, то подключение к сети в диапазоне 5 ГГц можно пропустить. И наоборот.

Настройка очень простая. Думаю, что проблем быть не должно. Чтобы вернуть роутер в обычный режим работы нужно либо сменить режим в настройках, либо сделать сброс настроек (Reset).
Если что-то не получается настроить – спрашивайте в комментариях.
Расчетное время чтения: < 1 мин
Под данную инструкцию попадают практически все модели Wi-Fi роутеров TP-Link, в зависимости от модели и версии прошивки, расположение некоторых настроек может отличаться от данной инструкции, но принцип настройки на всех роутерах один и тот же.
Данная инструкция предоставляется как есть, администрация сайта не несет ответственности за неправильные действия пользователя при настройке, если Вы не уверены в своих действиях, лучше обратитесь к специалисту..
В процессе настройки вам будет предложено несколько раз перезагрузить роутер, отказываемся, перезагрузку выполним по завершению всех настроек.
Рекомендации.
1. По умолчанию, Логин admin, пароль admin.
2. Курьеры-настройщики должны в настройках изменять пароль на Серийный номер, указанный на коробке (S/N). При перенастройке рекомендуется также использовать в качестве пароля на роутер и wi-fi S/N (серийный номер).
3. Сброс настроек роутера производится путем нажатия и удержания кнопки Reset на задней панели роутера в течении 10 секунд.
Авторизация.
Для того, что бы попасть в веб-интерфейс роутера, необходимо открыть ваш Интернет браузер и в строке адреса набрать http://192.168.0.1, User Name admin , Password – admin (при условии, что роутер имеет заводские настройки, и его IP не менялся).
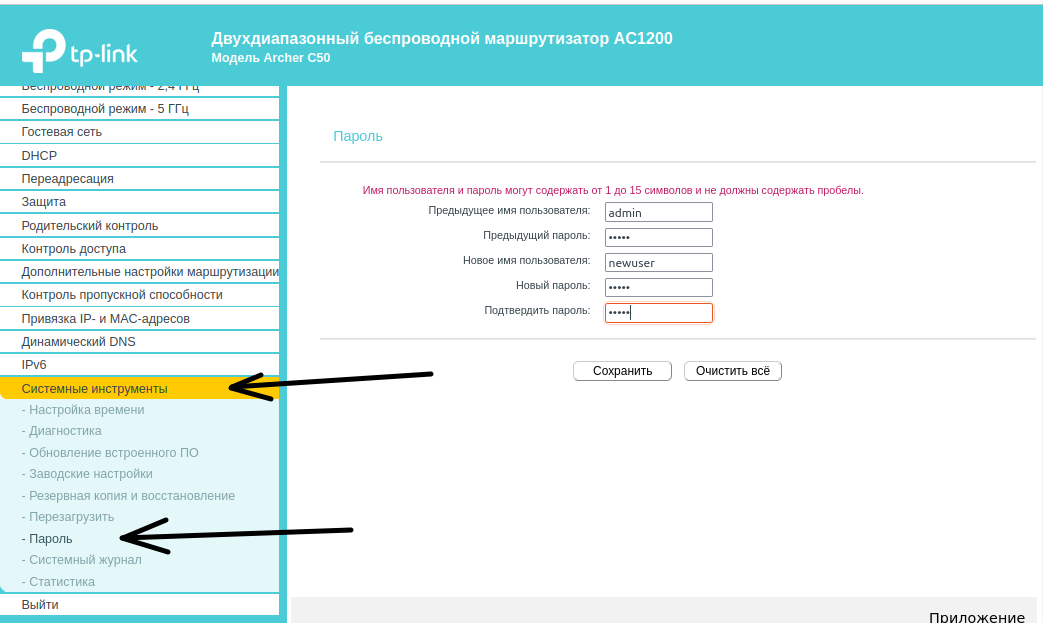
Смена заводского пароля.
- В целях безопасности рекомендуется сменить заводской пароль.
- По умолчанию: Логин admin, пароль admin.
- В интерфейсе роутера необходимо зайти во вкладку Системные инструменты, и выбрать Пароль.
- В поле Предыдущее имя пользователя введите admin, Предыдущий пароль введите admin.
- В поля Новое имя пользователя, Новый пароль, Подтвердите пароль введите новый логин (можно оставить прежний «аdmin»), а также новый пароль, и повтор пароля.
- Затем нажмите кнопку «Сохранить».
В интерфейсе маршрутизатора необходимо выбрать вкладку слева «Беспроводной режим», в открывшемся списке выбираем «Настройки беспроводного режима».
Выставляем параметры следующим образом:
1. Поле «Имя сети беспроводной сети»: вводим название беспроводной сети;
2. Канал: Авто;
3. Режим: 11bgn смешанный;
4. Ширина канала: Авто;
5. Ставим галки: «Включить беспроводное вещание роутера» и «Включить широковещание SSID».
6. Нажимаем ниже кнопку «Сохранить».
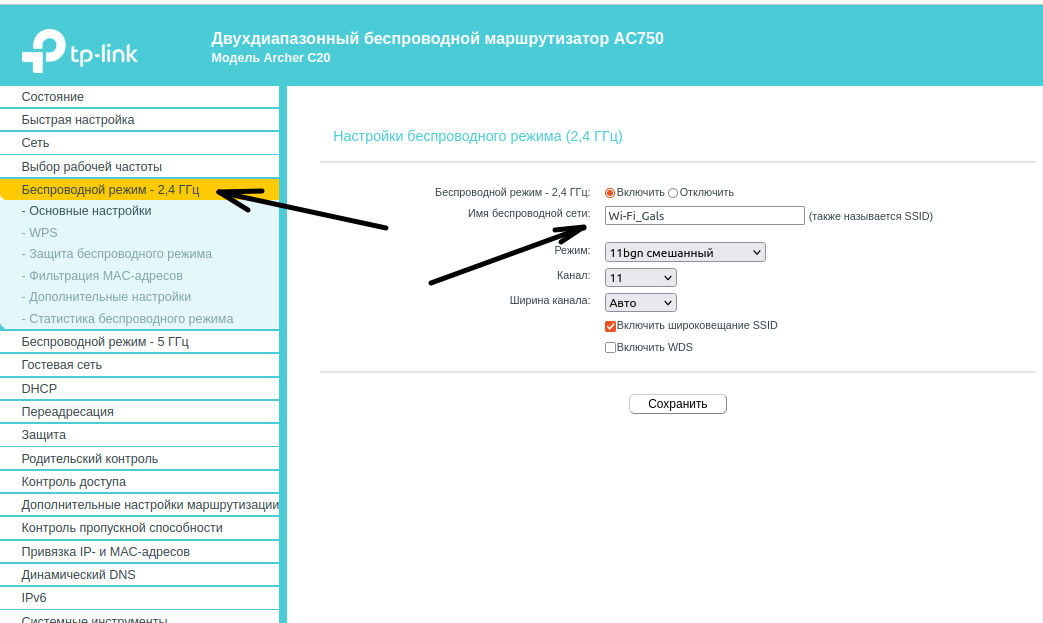
Те же манипуляции проводите и с разделом «Беспроводной режим — 5 ГГЦ»
Установка пароля на беспроводной режим
Слева в меню выбираем «Беспроводной режим», далее «Защита беспроводного режима» и выставляем параметры:
1. Устанавливаем точку на WPA-Personal/WPA2-Personal;
2. Версия: WPA2-Personal;
3. Шифрование: Автоматическая;
4. Пароль PSK: здесь необходимо ввести любой набор цифр, длиной от 8 до 63. Их также необходимо запомнить, чтобы Вы могли указать их при подключении к сети.
5. Нажимаем ниже кнопку «Сохранить».

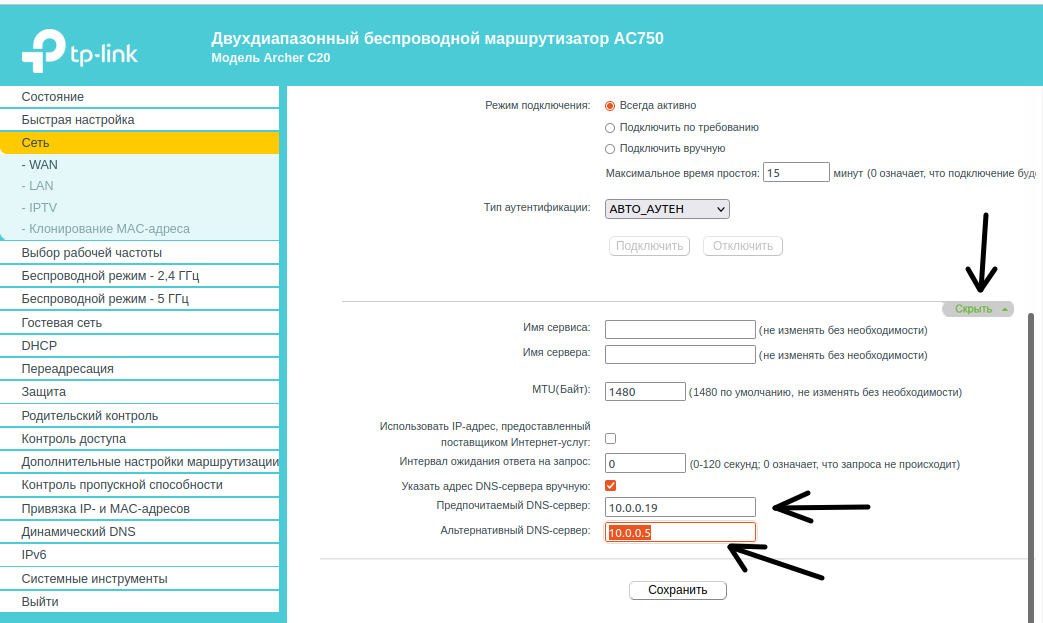
Настройка подключения к Интернет.
Настройка PPPoE подключения.
- Слева выбираем меню Сеть, далее WAN;
- Тип WAN соединения: PPPoE / Россия PPPoE;
- В строку «Имя пользователя»: Необходимо ввести Ваш логин из договора;
- В строки «Пароль» и «Подтвердите пароль»: Необходимо ввести Ваш пароль из договора;
- Вторичное подключение: Включить;
- Режим WAN подключения: Подключить автоматически;
- Нажимаем кнопку «Сохранить».
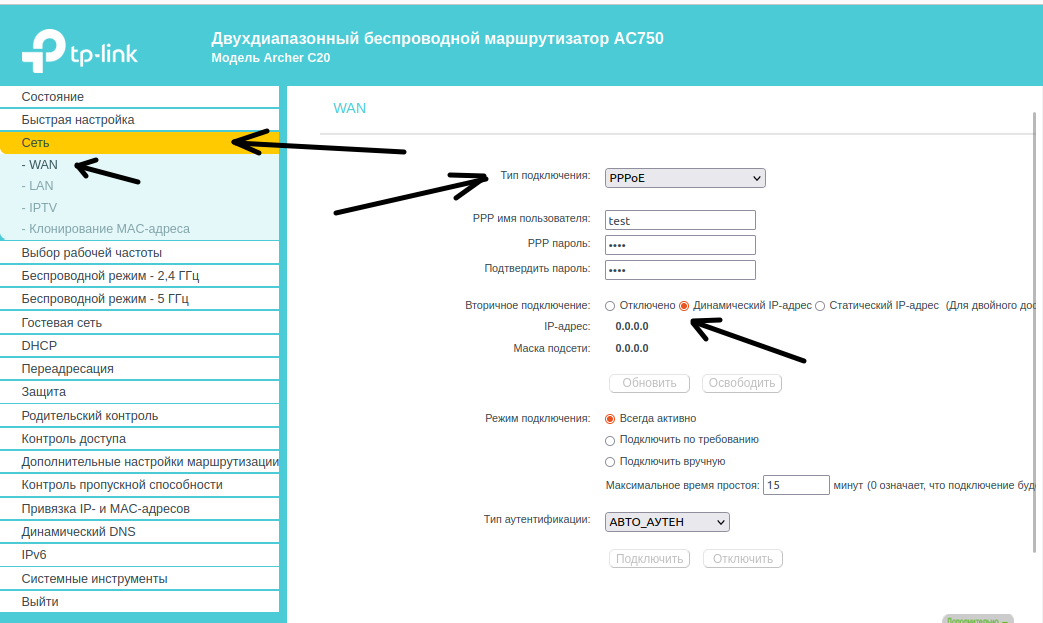
Далее нажимаем кнопку «Дополнительно» и прописываем DNS сервера 10.0.0.19 и 10.0.0.5.
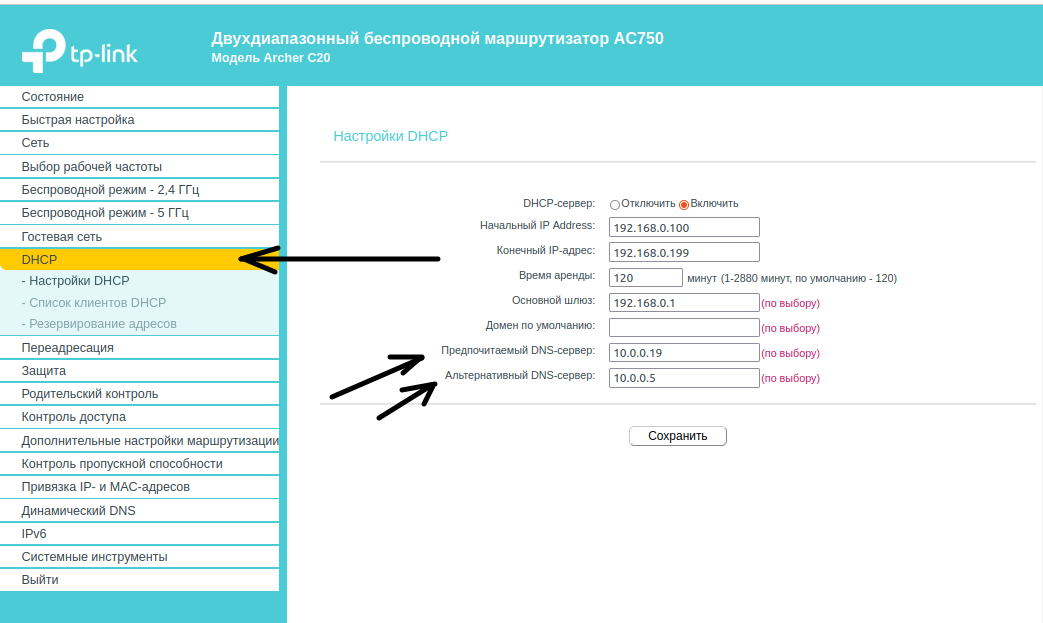
Настройка DHCP.
- Слева выбираем меню DHCP, далее Настройки DHCP;
- Вбиваем Первичный DNS: 10.0.0.19
- Вбиваем Вторичный DNS: 10.0.0.5
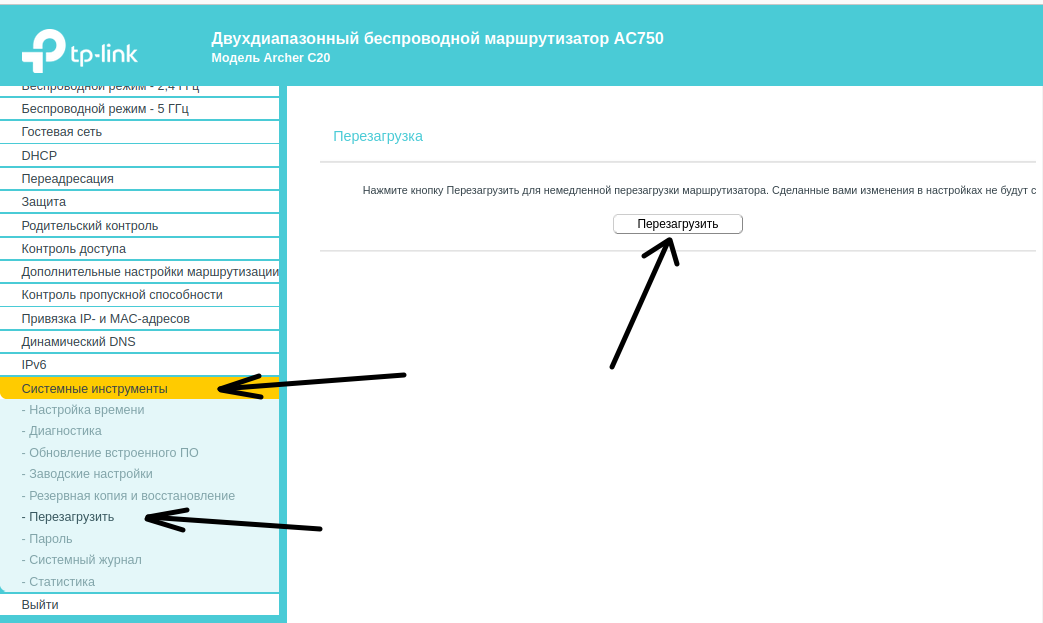
Завершение
Настройка завершена, можно перезагрузить роутер. Заходим в Системные настройки, Перезагрузка и нажимаем кнопку Перезагрузка. Роутер будет перезагружен и настройки вступят в силу.
После настройки роутера, обратитесь в службу технической поддержки для привязки MAC адреса Вашего роутера.
Сохранение/восстановление настроек роутера.
После проведения настройки, рекомендуется сохранить их, чтобы в случае возникновения проблем, можно было их восстановить. Для этого необходимо зайти во вкладку Системные инструменты, меню Резервная копия и восстановление.
— Для сохранения текущих настроек роутера необходимо нажать кнопку Резервная копия. Файл с настройками будет сохранен в указанное место на жёстком диске.
— Для восстановления настроек настроек из файла, необходимо нажать кнопку выбора файла, указать путь к файлу с настройками, затем нажать кнопку Восстановить.
Wi-Fi роутер TP-LINK Archer C54, AC1200, черный
- Входной интерфейс: 10/100BASE-TX
- Частоты Wi-Fi: 2.4/5 ГГц
- Стандарты Wi-Fi 802.11: Wi-Fi 1 (b), Wi-Fi 2 (a), Wi-Fi 3 (g), Wi-Fi 4 (n), Wi-Fi 5 (ac)
- Класс Wi-Fi: AC1200
- Порты: 10/100BASE-TX х 4
- Антенны: 4х внешние, несъемные
Появились вопросы о товаре?
- Входной интерфейс: 10/100BASE-TX
- Частоты Wi-Fi: 2.4/5 ГГц
- Стандарты Wi-Fi 802.11: Wi-Fi 1 (b), Wi-Fi 2 (a), Wi-Fi 3 (g), Wi-Fi 4 (n), Wi-Fi 5 (ac)
- Класс Wi-Fi: AC1200
- Порты: 10/100BASE-TX х 4
- Антенны: 4х внешние, несъемные
Появились вопросы о товаре?

User Guide
AC1200 Dual Band Wi-Fi Router
Archer C54
REV1.0.0 1910012708

Contents
About This Guide . . . . . . . . . . . . . . . . . . . . . . . . . . . . . . . . . . . . . . . . . . . . . . . . . . . . .1
Chapter 1. Get to Know About Your Router . . . . . . . . . . . . . . . . . . . . . . . . . . . 3
1. 1. Product Overview. . . . . . . . . . . . . . . . . . . . . . . . . . . . . . . . . . . . . . . . . . . . . . . . . . . . . . . . . . . . 4
1. 2. Appearance . . . . . . . . . . . . . . . . . . . . . . . . . . . . . . . . . . . . . . . . . . . . . . . . . . . . . . . . . . . . . . . . . 4
1. 2. 1. Top Panel . . . . . . . . . . . . . . . . . . . . . . . . . . . . . . . . . . . . . . . . . . . . . . . . . . . . . . . . . . . . . 4
1. 2. 2. The Back Panel. . . . . . . . . . . . . . . . . . . . . . . . . . . . . . . . . . . . . . . . . . . . . . . . . . . . . . . . 5
1. 2. 3. The Bottom . . . . . . . . . . . . . . . . . . . . . . . . . . . . . . . . . . . . . . . . . . . . . . . . . . . . . . . . . . . 6
Chapter 2. Connect to the Internet . . . . . . . . . . . . . . . . . . . . . . . . . . . . . . . . . . .7
2. 1. Position Your Router . . . . . . . . . . . . . . . . . . . . . . . . . . . . . . . . . . . . . . . . . . . . . . . . . . . . . . . . . 8
2. 2. Connect to the Internet . . . . . . . . . . . . . . . . . . . . . . . . . . . . . . . . . . . . . . . . . . . . . . . . . . . . . . 9
2. 2. 1. Wireless Router Mode. . . . . . . . . . . . . . . . . . . . . . . . . . . . . . . . . . . . . . . . . . . . . . . . . 9
2. 2. 2. Range Extender Mode. . . . . . . . . . . . . . . . . . . . . . . . . . . . . . . . . . . . . . . . . . . . . . . . 11
2. 2. 3. Access Point Mode. . . . . . . . . . . . . . . . . . . . . . . . . . . . . . . . . . . . . . . . . . . . . . . . . . . 12
Chapter 3. Log In to the Router . . . . . . . . . . . . . . . . . . . . . . . . . . . . . . . . . . . . . 14
Chapter 4. Configure the Router in Wireless Router Mode . . . . . . . . . . 16
4. 1. Operation Mode . . . . . . . . . . . . . . . . . . . . . . . . . . . . . . . . . . . . . . . . . . . . . . . . . . . . . . . . . . . . 17
4. 2. Network . . . . . . . . . . . . . . . . . . . . . . . . . . . . . . . . . . . . . . . . . . . . . . . . . . . . . . . . . . . . . . . . . . . . 17
4. 2. 1. Status. . . . . . . . . . . . . . . . . . . . . . . . . . . . . . . . . . . . . . . . . . . . . . . . . . . . . . . . . . . . . . . . 17
4. 2. 2. Internet . . . . . . . . . . . . . . . . . . . . . . . . . . . . . . . . . . . . . . . . . . . . . . . . . . . . . . . . . . . . . . 19
4. 2. 3. MAC Clone . . . . . . . . . . . . . . . . . . . . . . . . . . . . . . . . . . . . . . . . . . . . . . . . . . . . . . . . . . . 25
4. 2. 4. LAN . . . . . . . . . . . . . . . . . . . . . . . . . . . . . . . . . . . . . . . . . . . . . . . . . . . . . . . . . . . . . . . 26
4. 2. 5. IPTV. . . . . . . . . . . . . . . . . . . . . . . . . . . . . . . . . . . . . . . . . . . . . . . . . . . . . . . . . . . . . . . . 26
4. 2. 6. DHCP Server. . . . . . . . . . . . . . . . . . . . . . . . . . . . . . . . . . . . . . . . . . . . . . . . . . . . . . . . . 27
4. 2. 7. Dynamic DNS . . . . . . . . . . . . . . . . . . . . . . . . . . . . . . . . . . . . . . . . . . . . . . . . . . . . . . . . 29
4. 2. 8. Static Routing . . . . . . . . . . . . . . . . . . . . . . . . . . . . . . . . . . . . . . . . . . . . . . . . . . . . . . . . 30
4. 3. Wireless . . . . . . . . . . . . . . . . . . . . . . . . . . . . . . . . . . . . . . . . . . . . . . . . . . . . . . . . . . . . . . . . . . . . 31
4. 3. 1. Wireless Settings . . . . . . . . . . . . . . . . . . . . . . . . . . . . . . . . . . . . . . . . . . . . . . . . . . . . 31
4. 3. 2. Guest Network . . . . . . . . . . . . . . . . . . . . . . . . . . . . . . . . . . . . . . . . . . . . . . . . . . . . . . . 33
4. 3. 3. Wireless Schedule . . . . . . . . . . . . . . . . . . . . . . . . . . . . . . . . . . . . . . . . . . . . . . . . . . . 34
4. 3. 4. WPS. . . . . . . . . . . . . . . . . . . . . . . . . . . . . . . . . . . . . . . . . . . . . . . . . . . . . . . . . . . . . . . . 35
4. 3. 5. Additional Wireless Settings. . . . . . . . . . . . . . . . . . . . . . . . . . . . . . . . . . . . . . . . . . 37
4. 4. NAT Forwarding. . . . . . . . . . . . . . . . . . . . . . . . . . . . . . . . . . . . . . . . . . . . . . . . . . . . . . . . . . . . . 38

4. 4. 1. Port Forwarding . . . . . . . . . . . . . . . . . . . . . . . . . . . . . . . . . . . . . . . . . . . . . . . . . . . . . . 38
4. 4. 2. Port Triggering . . . . . . . . . . . . . . . . . . . . . . . . . . . . . . . . . . . . . . . . . . . . . . . . . . . . . . . 40
4. 4. 3. UPnP. . . . . . . . . . . . . . . . . . . . . . . . . . . . . . . . . . . . . . . . . . . . . . . . . . . . . . . . . . . . . . . . 41
4. 4. 4. DMZ. . . . . . . . . . . . . . . . . . . . . . . . . . . . . . . . . . . . . . . . . . . . . . . . . . . . . . . . . . . . . . . . 41
4. 5. Parental Controls . . . . . . . . . . . . . . . . . . . . . . . . . . . . . . . . . . . . . . . . . . . . . . . . . . . . . . . . . . . 42
4. 6. QoS . . . . . . . . . . . . . . . . . . . . . . . . . . . . . . . . . . . . . . . . . . . . . . . . . . . . . . . . . . . . . . . . . . . . . . . . 45
4. 7. Security . . . . . . . . . . . . . . . . . . . . . . . . . . . . . . . . . . . . . . . . . . . . . . . . . . . . . . . . . . . . . . . . . . . . 46
4. 7. 1. Firewall. . . . . . . . . . . . . . . . . . . . . . . . . . . . . . . . . . . . . . . . . . . . . . . . . . . . . . . . . . . . . . . 46
4. 7. 2. Access Control. . . . . . . . . . . . . . . . . . . . . . . . . . . . . . . . . . . . . . . . . . . . . . . . . . . . . . . 46
4. 7. 3. IP & MAC Binding . . . . . . . . . . . . . . . . . . . . . . . . . . . . . . . . . . . . . . . . . . . . . . . . . . . . . 49
4. 8. ALG (Application Layer Gateway). . . . . . . . . . . . . . . . . . . . . . . . . . . . . . . . . . . . . . . . . . . . 50
4. 9. IPv6 . . . . . . . . . . . . . . . . . . . . . . . . . . . . . . . . . . . . . . . . . . . . . . . . . . . . . . . . . . . . . . . . . . . . . . . . 50
4. 9. 1. IPv6 Status. . . . . . . . . . . . . . . . . . . . . . . . . . . . . . . . . . . . . . . . . . . . . . . . . . . . . . . . . . . 50
4. 10. System . . . . . . . . . . . . . . . . . . . . . . . . . . . . . . . . . . . . . . . . . . . . . . . . . . . . . . . . . . . . . . . . . . . . . 53
4. 10. 1. Firmware Upgrade . . . . . . . . . . . . . . . . . . . . . . . . . . . . . . . . . . . . . . . . . . . . . . . . . . 53
4. 10. 2. Backup & Restore . . . . . . . . . . . . . . . . . . . . . . . . . . . . . . . . . . . . . . . . . . . . . . . . . . . 55
4. 10. 3. Change Password. . . . . . . . . . . . . . . . . . . . . . . . . . . . . . . . . . . . . . . . . . . . . . . . . . . 56
4. 10. 4. Local Management . . . . . . . . . . . . . . . . . . . . . . . . . . . . . . . . . . . . . . . . . . . . . . . . . 56
4. 10. 5. Remote Management . . . . . . . . . . . . . . . . . . . . . . . . . . . . . . . . . . . . . . . . . . . . . . . 57
4. 10. 6. System Log. . . . . . . . . . . . . . . . . . . . . . . . . . . . . . . . . . . . . . . . . . . . . . . . . . . . . . . . . 59
4. 10. 7. Diagnostic . . . . . . . . . . . . . . . . . . . . . . . . . . . . . . . . . . . . . . . . . . . . . . . . . . . . . . . . . . 59
4. 10. 8. Time Settings. . . . . . . . . . . . . . . . . . . . . . . . . . . . . . . . . . . . . . . . . . . . . . . . . . . . . . . 61
4. 10. 9. Reboot . . . . . . . . . . . . . . . . . . . . . . . . . . . . . . . . . . . . . . . . . . . . . . . . . . . . . . . . . . . . . 62
4. 10. 10. LED Control . . . . . . . . . . . . . . . . . . . . . . . . . . . . . . . . . . . . . . . . . . . . . . . . . . . . . . . 63
Chapter 5. Configure the Router in Access Point Mode . . . . . . . . . . . . . 65
5. 1. Operation Mode . . . . . . . . . . . . . . . . . . . . . . . . . . . . . . . . . . . . . . . . . . . . . . . . . . . . . . . . . . . . 66
5. 2. Firmware Upgrade . . . . . . . . . . . . . . . . . . . . . . . . . . . . . . . . . . . . . . . . . . . . . . . . . . . . . . . . . . 66
5. 3. Backup & Restore. . . . . . . . . . . . . . . . . . . . . . . . . . . . . . . . . . . . . . . . . . . . . . . . . . . . . . . . . . . 67
5. 4. Administration. . . . . . . . . . . . . . . . . . . . . . . . . . . . . . . . . . . . . . . . . . . . . . . . . . . . . . . . . . . . . . 68
5. 4. 1. Change Password. . . . . . . . . . . . . . . . . . . . . . . . . . . . . . . . . . . . . . . . . . . . . . . . . . . . 68
5. 4. 2. Local Management. . . . . . . . . . . . . . . . . . . . . . . . . . . . . . . . . . . . . . . . . . . . . . . . . . . 68
5. 5. System Log. . . . . . . . . . . . . . . . . . . . . . . . . . . . . . . . . . . . . . . . . . . . . . . . . . . . . . . . . . . . . . . . . 69
5. 6. Diagnostic. . . . . . . . . . . . . . . . . . . . . . . . . . . . . . . . . . . . . . . . . . . . . . . . . . . . . . . . . . . . . . . . . . 70
5. 7. Time Settings. . . . . . . . . . . . . . . . . . . . . . . . . . . . . . . . . . . . . . . . . . . . . . . . . . . . . . . . . . . . . . . 71
5. 8. Reboot . . . . . . . . . . . . . . . . . . . . . . . . . . . . . . . . . . . . . . . . . . . . . . . . . . . . . . . . . . . . . . . . . . . . . 73
5. 9. LED Control . . . . . . . . . . . . . . . . . . . . . . . . . . . . . . . . . . . . . . . . . . . . . . . . . . . . . . . . . . . . . . . . 73
Chapter 6. Configure the Router in Range Extender Mode . . . . . . . . . . 75

6. 1. Operation Mode . . . . . . . . . . . . . . . . . . . . . . . . . . . . . . . . . . . . . . . . . . . . . . . . . . . . . . . . . . . . 76
6. 2. Firmware Upgrade . . . . . . . . . . . . . . . . . . . . . . . . . . . . . . . . . . . . . . . . . . . . . . . . . . . . . . . . . . 76
6. 3. Backup & Restore. . . . . . . . . . . . . . . . . . . . . . . . . . . . . . . . . . . . . . . . . . . . . . . . . . . . . . . . . . . 77
6. 4. Administration. . . . . . . . . . . . . . . . . . . . . . . . . . . . . . . . . . . . . . . . . . . . . . . . . . . . . . . . . . . . . . 78
6. 4. 1. Change Password. . . . . . . . . . . . . . . . . . . . . . . . . . . . . . . . . . . . . . . . . . . . . . . . . . . . 78
6. 4. 2. Local Management. . . . . . . . . . . . . . . . . . . . . . . . . . . . . . . . . . . . . . . . . . . . . . . . . . . 78
6. 5. System Log. . . . . . . . . . . . . . . . . . . . . . . . . . . . . . . . . . . . . . . . . . . . . . . . . . . . . . . . . . . . . . . . . 79
6. 6. Time Settings. . . . . . . . . . . . . . . . . . . . . . . . . . . . . . . . . . . . . . . . . . . . . . . . . . . . . . . . . . . . . . . 80
6. 7. Reboot . . . . . . . . . . . . . . . . . . . . . . . . . . . . . . . . . . . . . . . . . . . . . . . . . . . . . . . . . . . . . . . . . . . . . 81
6. 8. LED Control . . . . . . . . . . . . . . . . . . . . . . . . . . . . . . . . . . . . . . . . . . . . . . . . . . . . . . . . . . . . . . . . 82
FAQ . . . . . . . . . . . . . . . . . . . . . . . . . . . . . . . . . . . . . . . . . . . . . . . . . . . . . . . . . . . . . . . . . 84
About This Guide
This guide is a complement of Quick Installation Guide. The Quick Installation Guide
instructs you on quick internet setup, and this guide provides details of each function
and shows you the way to configure these functions appropriate to your needs.
When using this guide, please note that features available of the router may vary by
model and software version. Router‘s availability may also vary by region or ISP. All
images, steps, and descriptions in this guide are only examples and may not reflect
your actual experience.
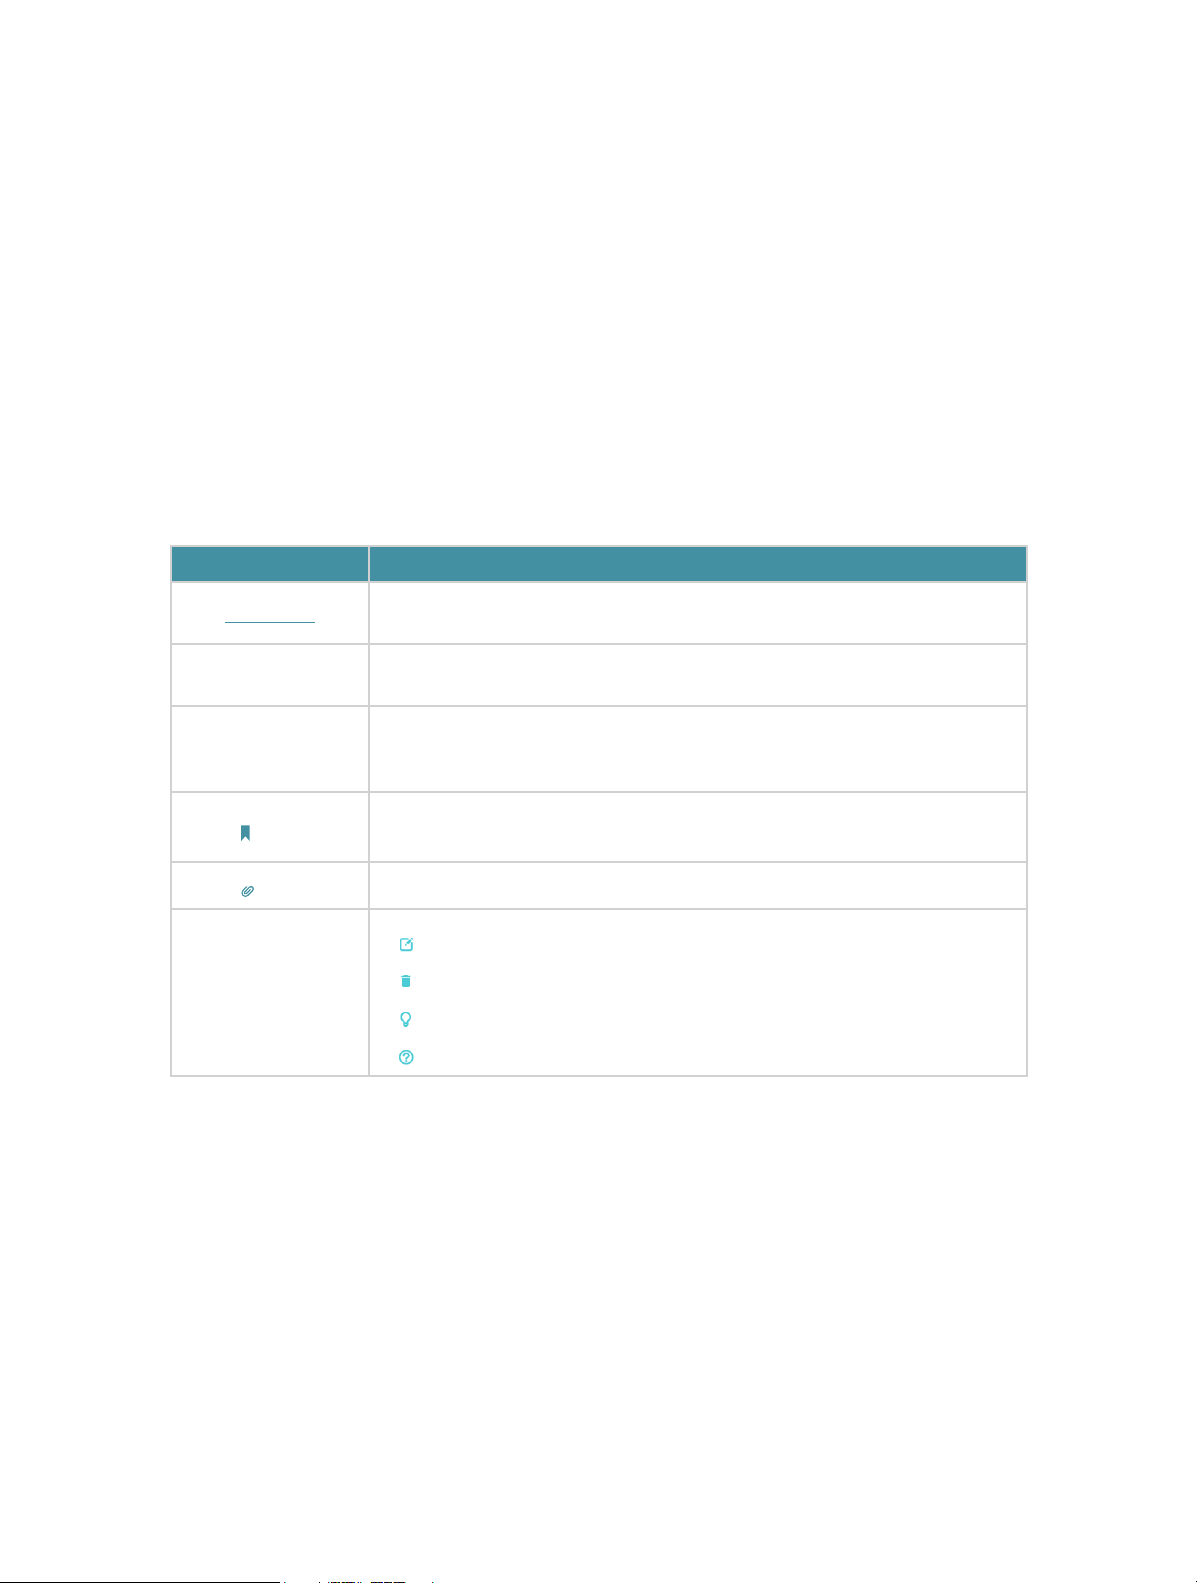
Conventions
In this guide the following conventions are used:
Convention Description
Underlined
Teal
>
Note:
Tips:
Symbols on the web
page
*Maximum wireless signal rates are the physical rates derived from IEEE Standard 802.11
specifications. Actual wireless data throughput and wireless coverage are not guaranteed and
will vary as a result of network conditions, client limitations, and environmental factors, including
building materials, obstacles, volume and density of traffic, and client location.
Underlined words or phrases are hyperlinks. You can click to redirect to a
website or a specific section.
Contents to be emphasized and texts on the web page are in teal, including the
menus, items, buttons, etc.
The menu structures to show the path to load the corresponding page.
For example, Advanced > Wireless > MAC Filtering means the MAC Filtering
function page is under the Wireless menu that is located in the Advanced tab.
• Ignoring this type of note might result in a malfunction or damage to the
device.
Indicates important information that helps you make better use of your device.
• Click to edit the corresponding entry.
• Click to delete the corresponding entry.
• Click to enable or disable the corresponding entry.
• Click to view more information about items on the page.
*Use of MU-MIMO requires clients to also support MU-MIMO.
1

More Info
• The latest software, management app and utility can be found at Download Center at
https://www.tp-link.com/support.
• The Quick Installation Guide can be found where you find this guide or inside the
package of the router.
• Specifications can be found on the product page at https://www.tp-link.com.
• A TP-Link Community is provided for you to discuss our products at
https://community.tp-link.com.
• Our Technical Support contact information can be found at the Contact Technical
Support page at https://www.tp-link.com/support.
2

Chapter 1
Get to Know About Your
Router
This chapter introduces what the router can do and shows its appearance.
It chapter contains the following sections:
• Product Overview
• Appearance

Chapter 1
Get to Know About Your Router
1. 1. Product Overview
Enjoy internet with the dual-band Wi-Fi and 4 fast LAN ports. Equipped with 4 omnidirectional antennas, Archer C54 generates a 2.4 GHz Wi-Fi across your house and a
fast 5 GHz Wi-Fi, letting the whole family enjoy reliable Wi-Fi on every device.
Moreover, it is simple and convenient to set up and use the TP-Link router due to its
intuitive web interface and the powerful Tether app.
1. 2. Appearance
1. 2. 1. Top Panel
The router’s LEDs (view from left to right) are located on the front. You can check the
router’s working status by following the LED Explanation table.
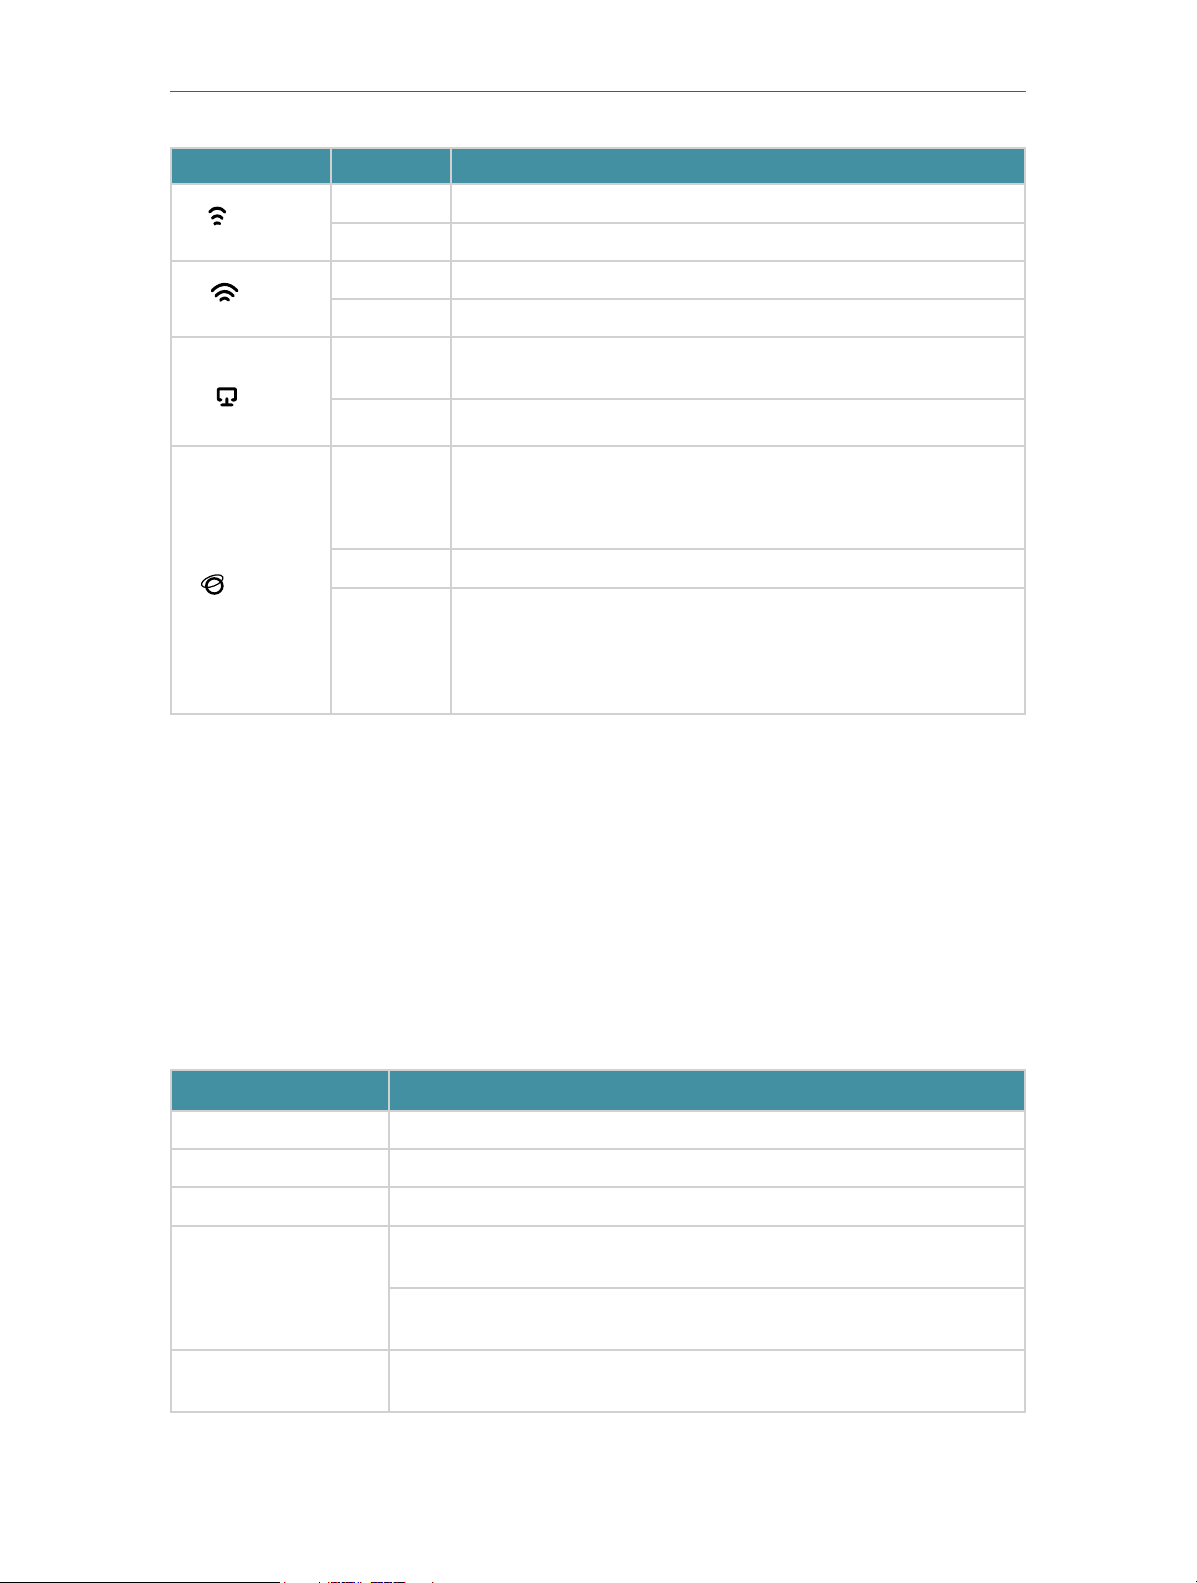
LED Explanation:
LED Status Indication
On Power is on.
Blinking slowly:
(Power)
Blinking
Off Power is off.
The system is starting up or firmware upgrade is in progress.
Blinking quickly:
WPS connection is in progress.
4
Chapter 1
LED Status Indication
Get to Know About Your Router
(2.4GHz
Wireless)
(5GHz
Wireless)
(LAN)
(Internet)
On The 2.4GHz wireless band is enabled.
Off The 2.4GHz wireless band is disabled.
On The 5GHz wireless band is enabled.
Off The 5GHz wireless band is disabled.
On
Off No powered-on device is connected to the router’s LAN port.
Green On
Orange On The WAN port is connected, but internet is not available.
Off
At least one powered-on device is connected to the router’s LAN
port.
Router Mode: Internet is available.
Access Point Mode: The WAN port is connected.
Range Extender Mode: The router is connected to the host network.
Router Mode: The WAN port is not connected.
Access Point Mode: The WAN port is not connected.
Range Extender Mode: The router is not connected to the host
network.
1. 2. 2. The Back Panel
The following parts (view from left to right) are located on the back panel.
Button and Port Explanation
Item Description
Power Port For connecting the router to a power socket via the provided power adapter.
WAN Port For connecting to a DSL/Cable modem, or an Ethernet jack.
LAN Ports (1/2/3/4) For connecting your PC or other wired devices to the router.
Press the button for 1 second, and immediately press the WPS button on
WPS/RESET Button
your client to start the WPS process.
Press and hold the button until all LEDs turn off to reset the router to its
factory default settings.
Antennas
Used for wireless operation and data transmit. Upright them for the best
Wi-Fi performance.
5
Chapter 1
Get to Know About Your Router
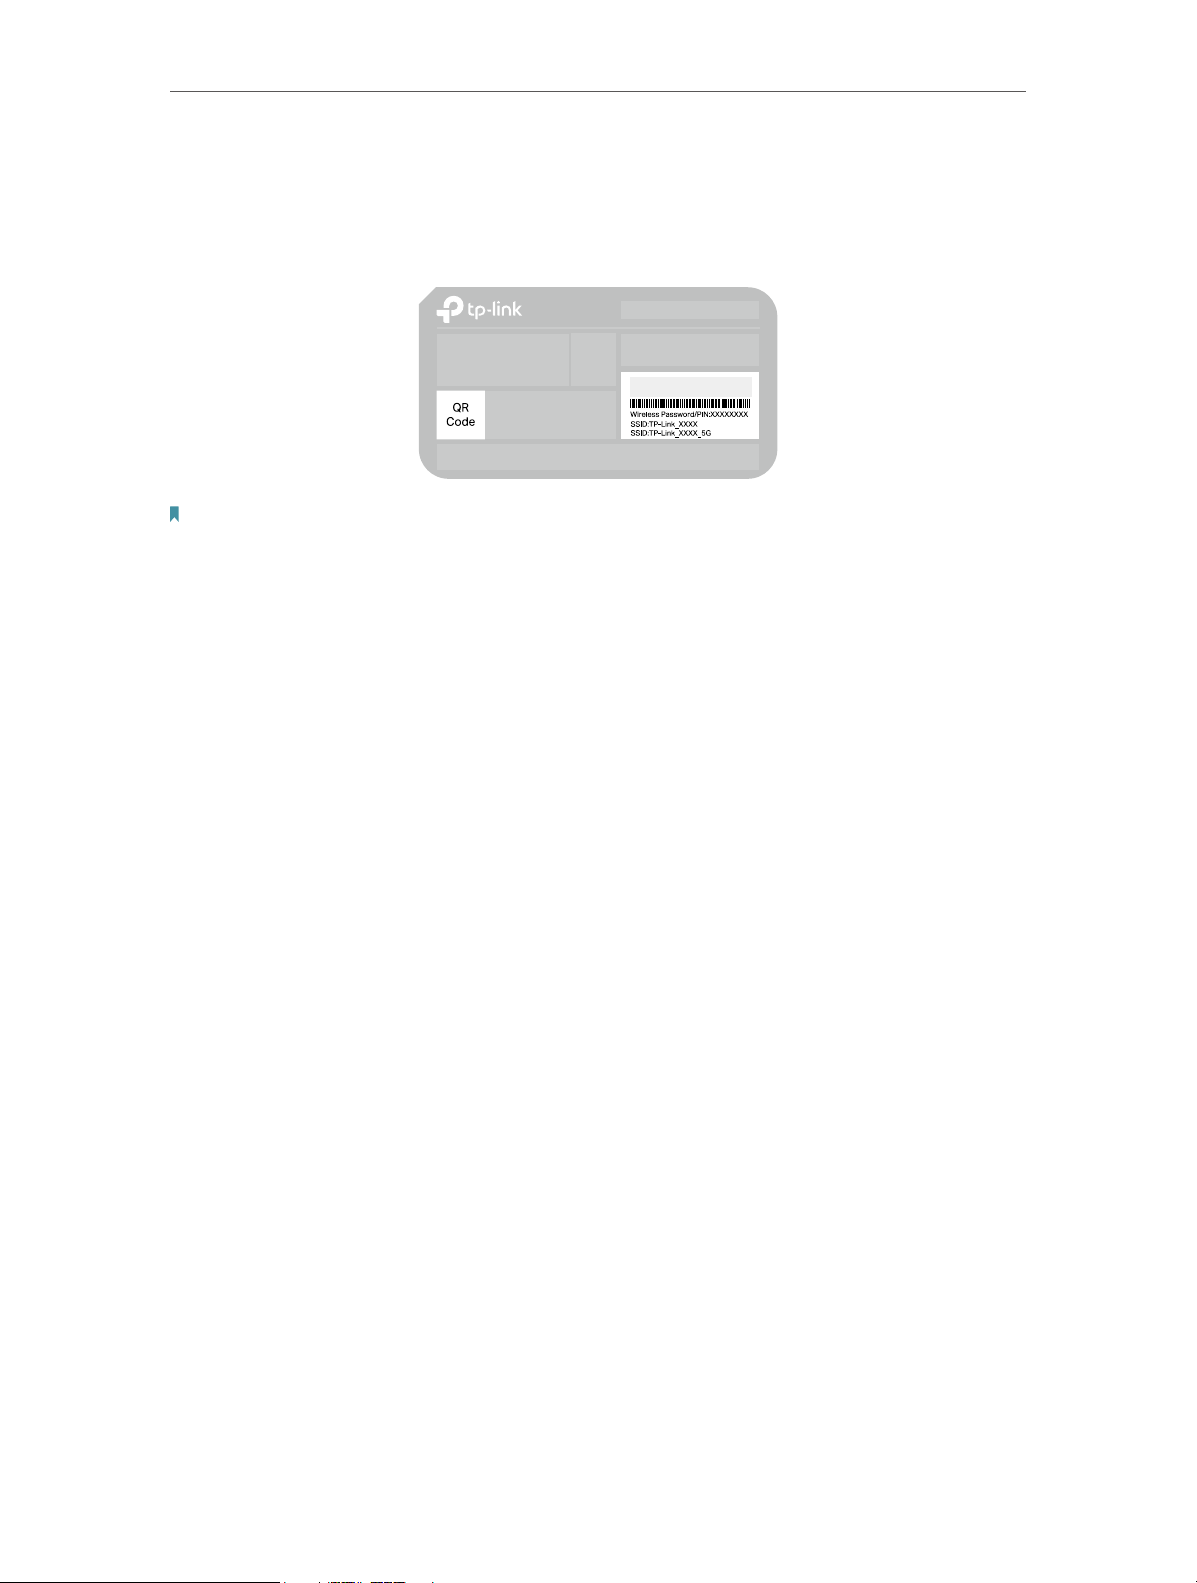
1. 2. 3. The Bottom
You can find the product label at the bottom of the router, then use default information
on it to connect to the router.
Note:
1. Use the default network names (SSIDs) and password to join the networks. Or scan the QR code to join the preset
2.4 GHz network directly.
2. Internet is not available until network setup completed.
6

Chapter 2
Connect to the Internet
This chapter contains the following sections:
• Position Your Router
• Connect to the Internet
Chapter 2
80
14
1. 2
3
A
A(2/ 1)
D
NOTE:
4.87<D<10.37mm
H
H<3mm
Connect to the Internet
2. 1. Position Your Router
With the router, you can access your network from anywhere within the wireless network
coverage. However, the wireless signal strength and coverage vary depending on the
actual environment of your router. Many obstacles may limit the range of the wireless
signal, for example, concrete structures or thick walls.
For your security and best Wi-Fi performance, please:
• Do NOT locate the router in a place where it will be exposed to moisture or excessive
heat.
• Keep away from the strong electromagnetic radiation and the device of
electromagnetic sensitive.
• Place the router in a location where it can be connected to the various devices as
well as to a power source.
• Make sure the cables and power cord are safely placed out of the way to avoid a
tripping hazard.
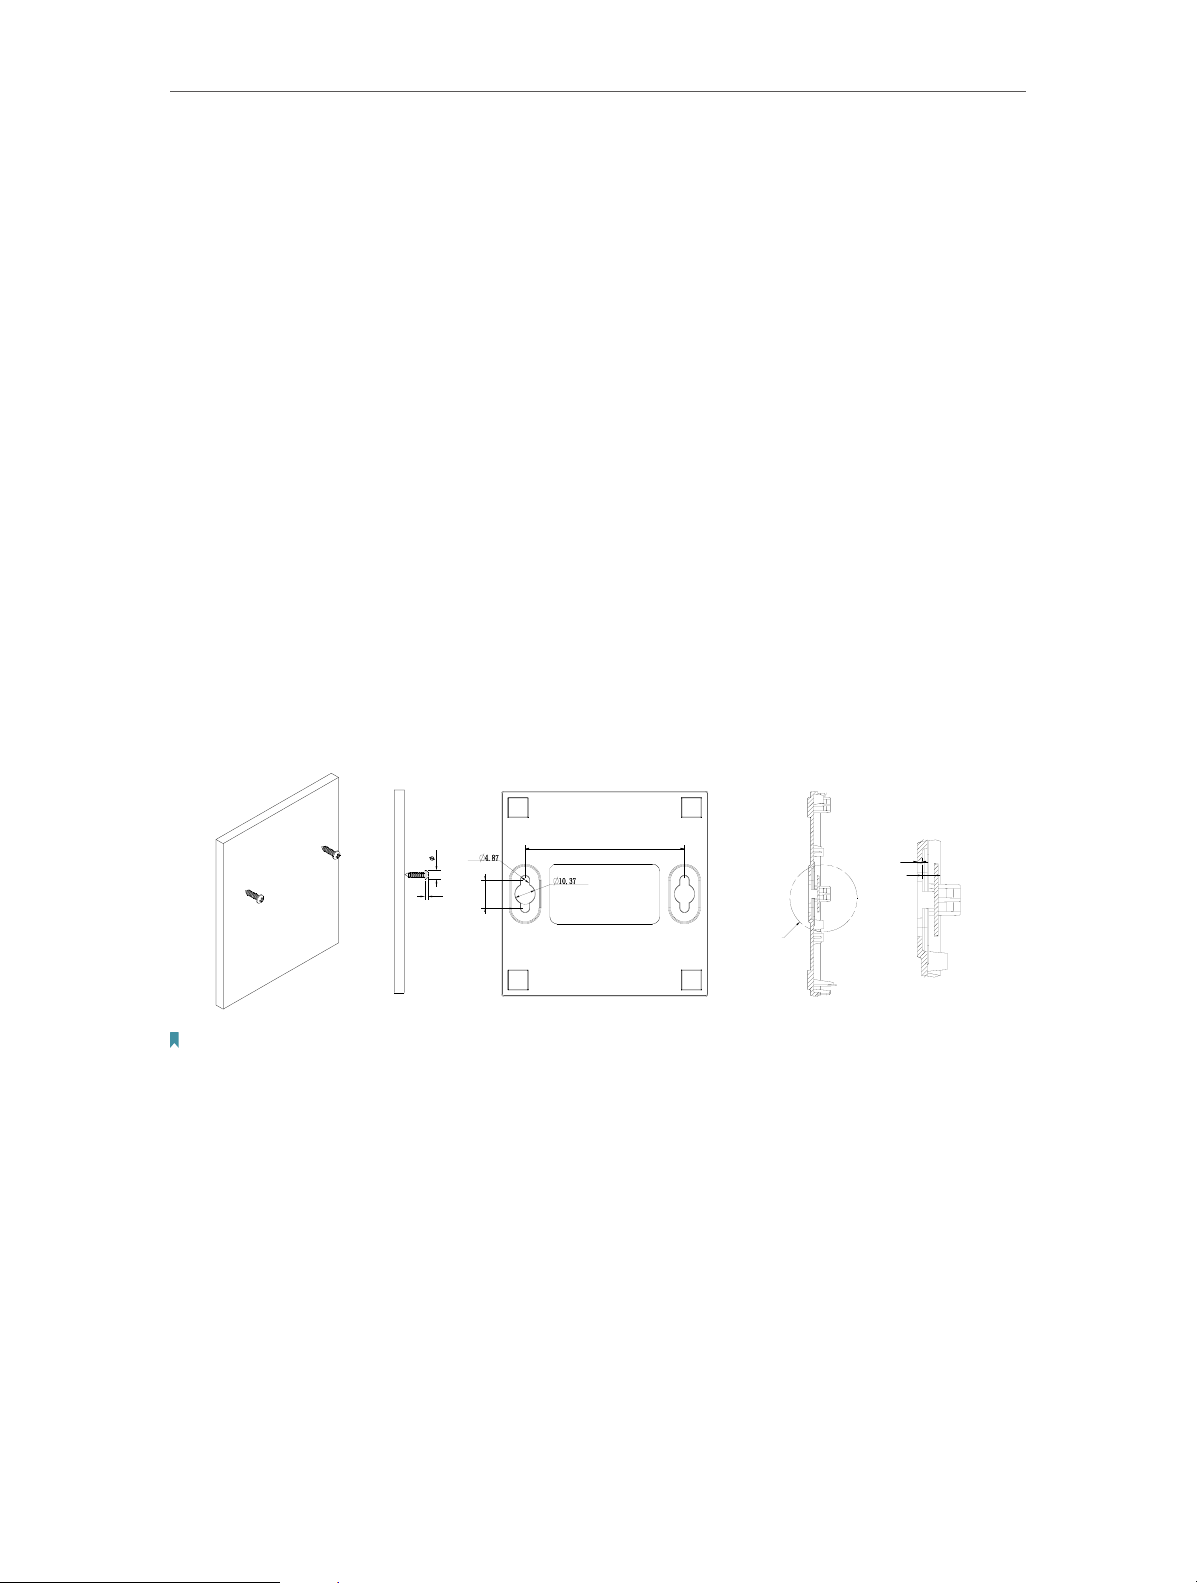
Generally, the router is placed on a horizontal surface, such as on a shelf or desktop.
The device also can be mounted on the wall as shown in the following figure.
Note:
The diameter of the screw, 4.87mm<D<10.37mm, and the distance of two screws is 80mm. The screw that project from
the wall need around 4mm based, and the length of the screw need to be at least 20mm to withstand the weight of the
product.
8
Chapter 2
Connect to the Internet
2. 2. Connect to the Internet
The Router provides three working modes: Wireless Router, Range Extender and Access
Point. You can choose the mode to better suit your network needs and follow the guide
to complete the configuration.
2. 2. 1. Wireless Router Mode
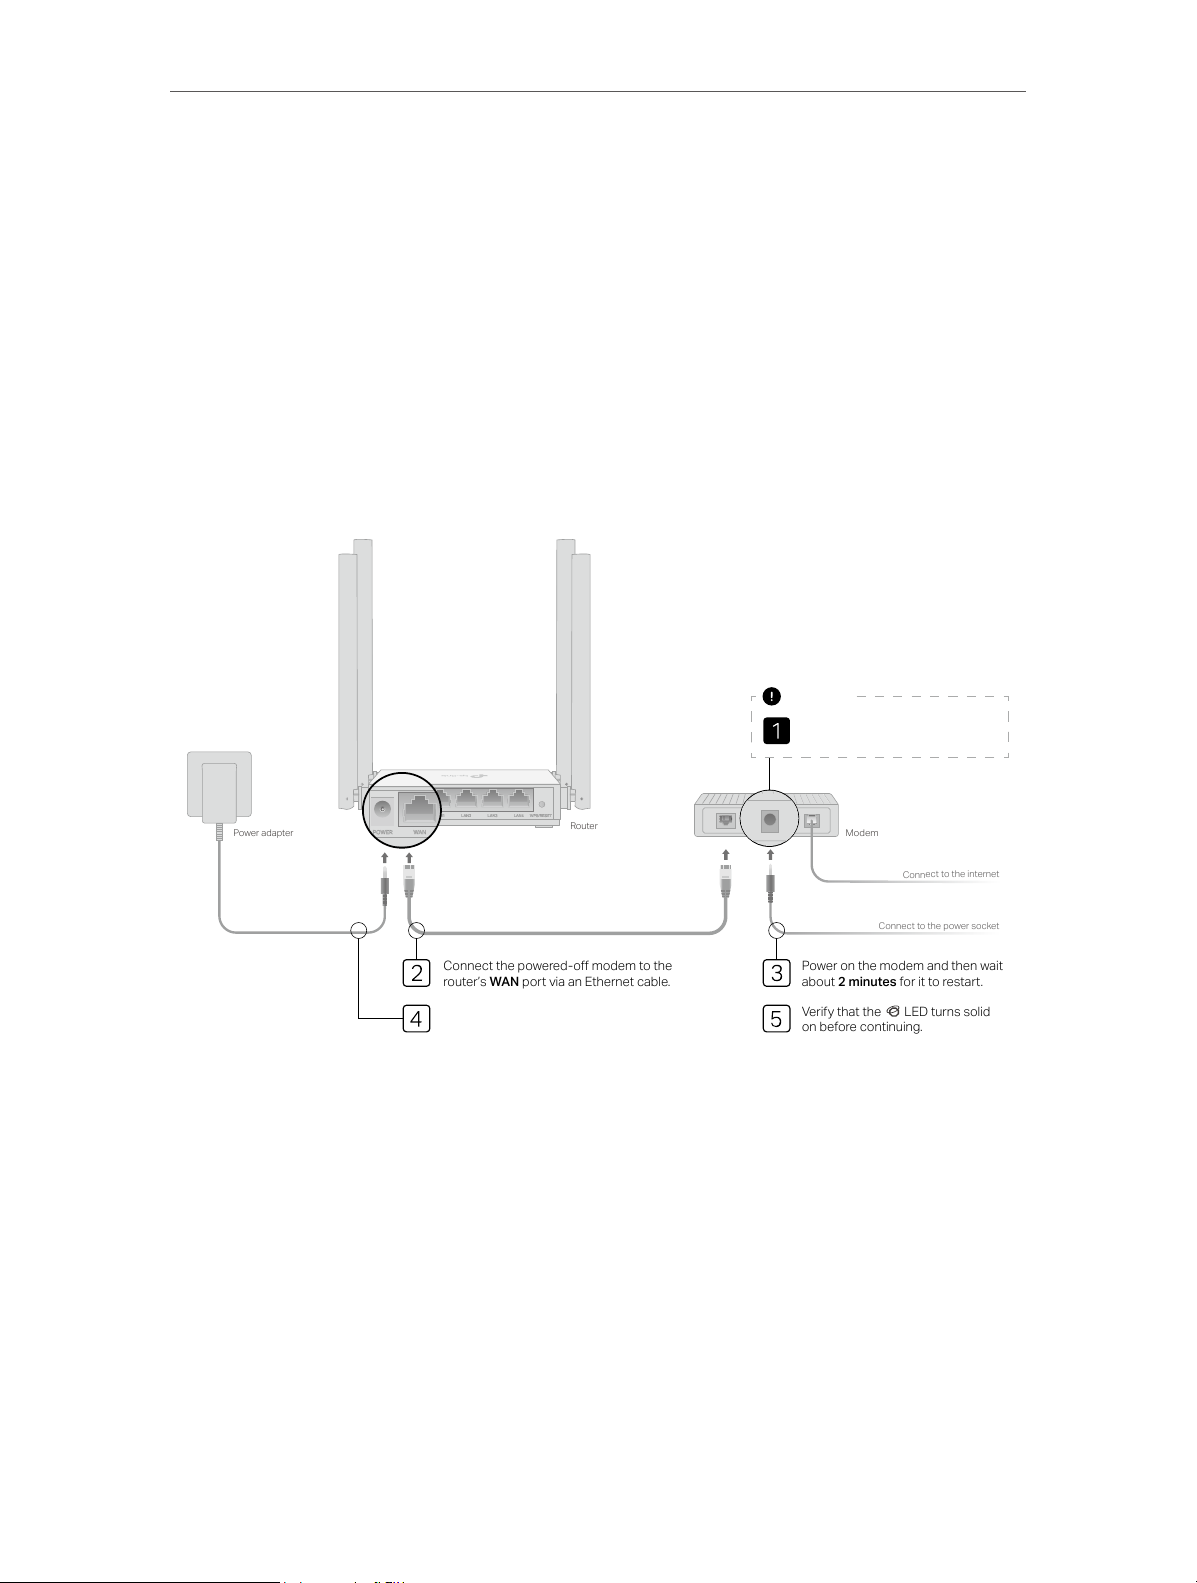
1. Follow the steps below to connect your router.
If your internet connection is through an Ethernet cable from the wall instead of through
a DSL / Cable / Satellite modem, connect the Ethernet cable directly to the router’s
WAN port, and then follow Step 4 and 5 to complete the hardware connection.
Important
Unplug your modem, and remove
the backup battery if it has one.
Power adapter
Connect the powered—o modem to the
router’s WAN port via an Ethernet cable.
Connect the power adapter to the router.
Router
Modem
Connect to the internet
Connect to the power socket
Power on the modem and then wait
about 2 minutes for it to restart.
Verify that the LED turns solid
on before continuing.
1 ) Power off the modem, and remove the backup battery if it has one.
2 ) Connect the powered-off modem to the router’s WAN port with an Ethernet
cable.
3 ) Turn on the modem, and then wait about 2 minutes for it to restart.
4 ) Connect the power adapter to the router.
5 ) Verify that the internet LED turns solid before continuing with the configuration.
2. Connect your computer to the router.
• Method 1: Wired
Turn off the Wi-Fi on your computer and connect your computer to the router’s
LAN port.
9
Chapter 2
Connections are available
Wireless Network Connection
Connect to the Internet
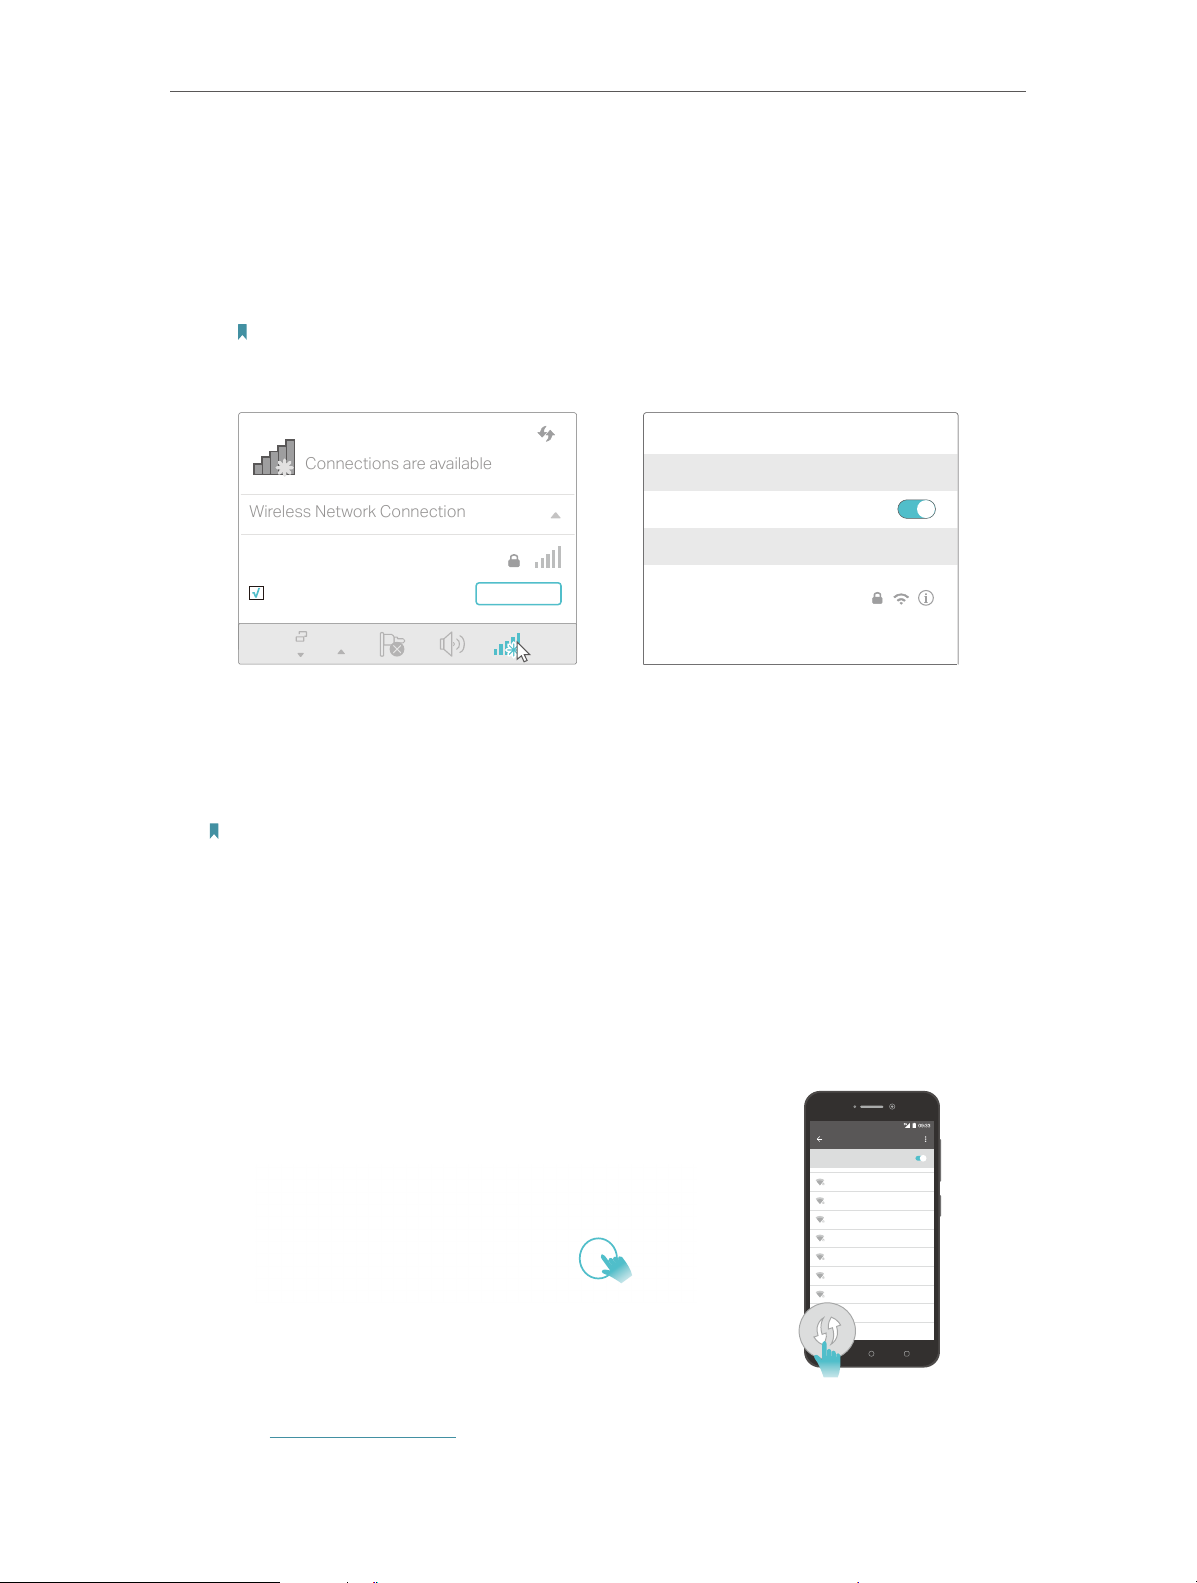
• Method 2: Wireless
1 ) Connect your device to the router’s Wi-Fi using the SSID (network name) and
Wireless Password printed on the label at the bottom of the router.
2 ) Click the network icon of your computer or go to Wi-Fi Settings of your smart
device, and then select the SSID to join the network.
Note: If you are using a smart device, you can also scan the QR code to join the preset 2.4 GHz network
directly.
Smart DeviceComputer
Wi-Fi
TP-Link_XXXX
Connect automatically Connect
OR
< Settings
Wi-Fi
CHOOSE A NETWORK…
TP-Link_XXXX
Other…
• Method 3: Use the WPS button
Wireless devices that support WPS, including Android phones, tablets, most USB
network cards, can be connected to your router through this method.
Note:
• WPS is not supported by iOS devices.
• The WPS function cannot be configured if the wireless function of the router is disabled. Also, the WPS function
will be disabled if your wireless encryption is WEP. Please make sure the wireless function is enabled and is
configured with the appropriate encryption before configuring the WPS.
1 ) Tab the WPS icon on the device’s screen. Here we take an Android phone as an
example.
3. Enter http://tplinkwifi.net in the address bar of a web browser. Create a password
2 ) Immediately press the WPS button on your router.
Close to
to log in.
WLAN
On
TP-Link
HomeNetwork
Oce
TP-Link_123
TP-Link_ABC
MyHome
Test
10

Chapter 2
Connect to the Internet
Note:
If the above screen does not pop-up, it means that your IE Web-browser has been set to a proxy. Go to menu Tools
> Internet Options > Connections > LAN Settings, in the screen that appears, untick the Using Proxy checkbox,
and click OK.
4. Follow the Quick Setup to set up the internet connection.
5. Enjoy! For wireless devices, you may have to reconnect to the wireless network if you
have customized the SSID (wireless name) and password during the configuration.
2. 2. 2. Range Extender Mode
This mode boosts your home wireless coverage.
1. Connect the power adapter to the router.
2. Connect a computer to the router via an Ethernet cable or wirelessly by using the
SSID (wireless name) and password printed on the bottom label of the router.
3. Enter http://tplinkwifi.net in the address bar of a web browser. Create a password
to log in.
11
Chapter 2
DevicesHost Router Router
DevicesRouterWired Router
Connect to the Internet
4. Click Change Mode in the top right corner and select Range Extender Mode. Wait
for the router to reboot.
5. Follow the Quick Setup to set up the internet connection.
6. Relocate: Place the router between your host router and the Wi-Fi dead zone. The
location you choose must be within the range of your existing host network.
Extended NetworkHost Network
7. Enjoy! You can customize the SSID and password of the extended network.
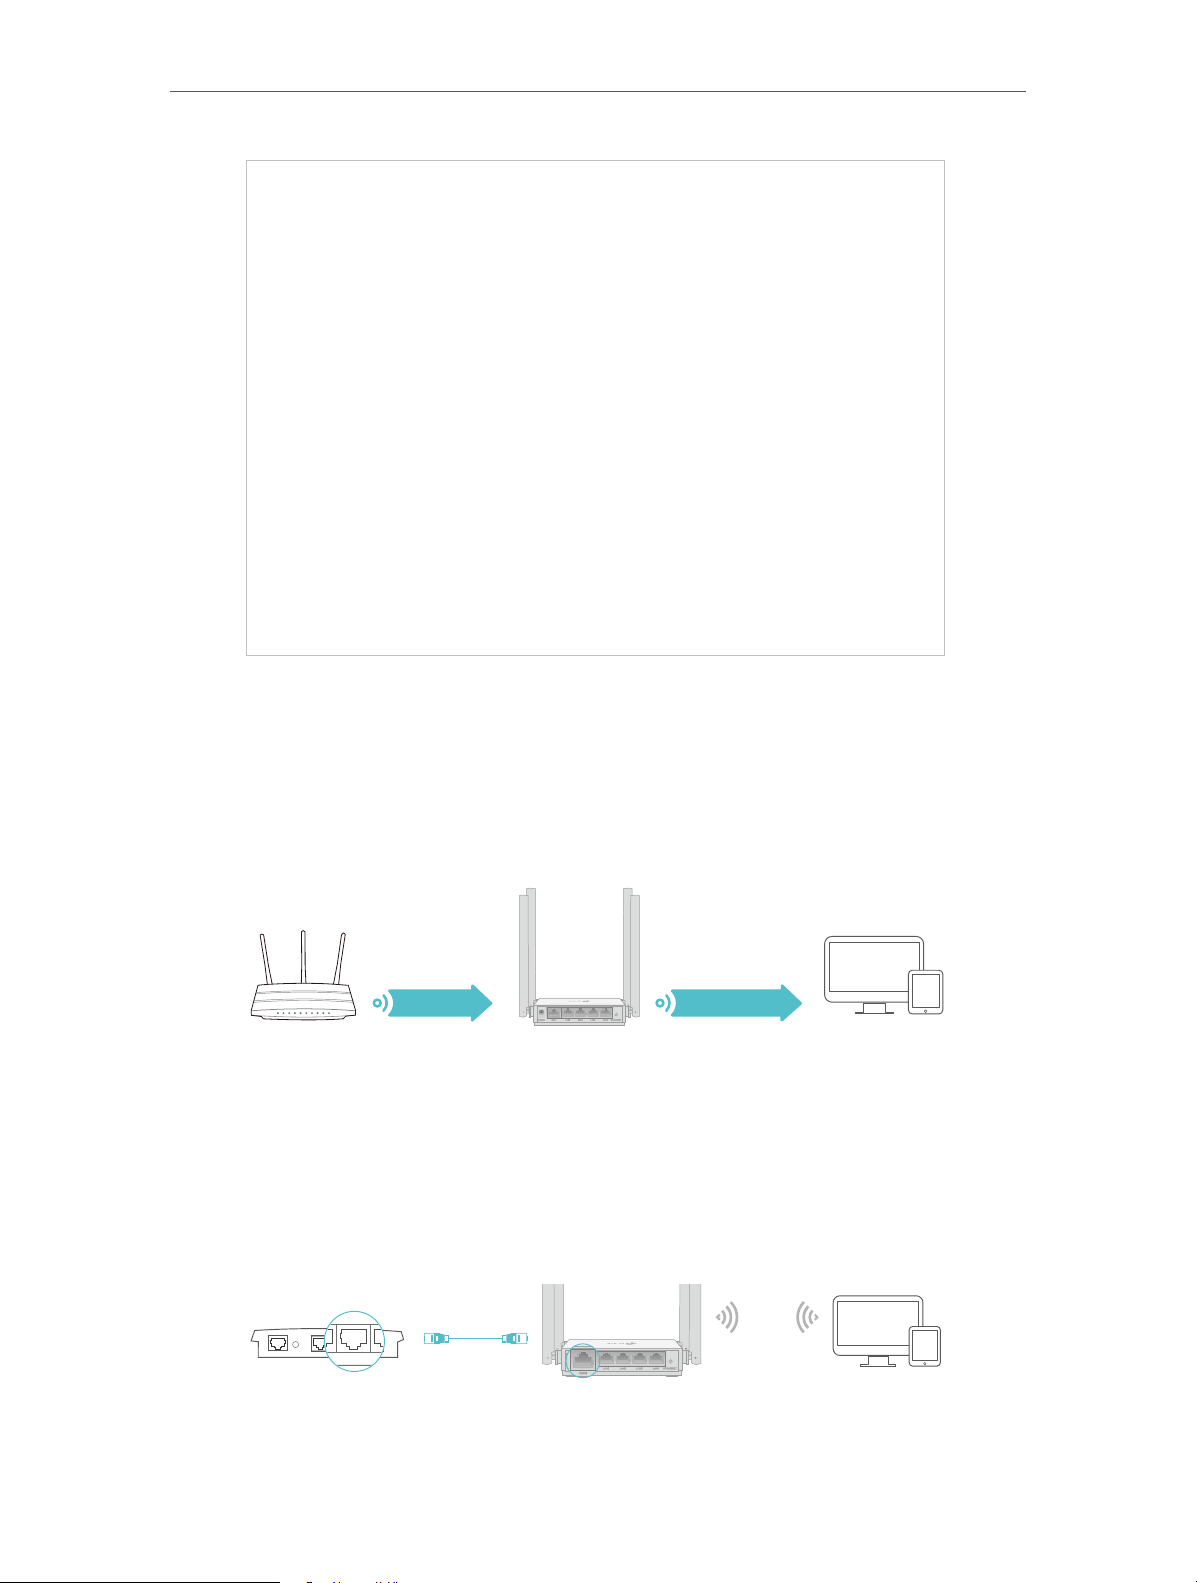
2. 2. 3. Access Point Mode
This mode transforms your existing wired network to a wireless network.
Ethernet4Ethernet3Ethernet1Ethernet2Internet
1. Connect the power adapter to the router.
12

Chapter 2
Connect to the Internet
2. Connect the router to your wired host router’s Ethernet port via an Ethernet cable
as shown above.
3. Connect a computer to the router via an Ethernet cable or wirelessly by using the
SSID (network name) and password printed on the bottom label of the router.
4. Enter http://tplinkwifi.net in the address bar of a web browser. Create a password
to log in.
Note:
If the above screen does not pop-up, it means that your IE Web-browser has been set to a proxy. Go to menu Tools
> Internet Options > Connections > LAN Settings, in the screen that appears, untick the Using Proxy checkbox,
and click OK.
5. Click Change Mode in the top right corner and select Access Point Mode. Wait for
the router to reboot.
6. Follow the Quick Setup to set up the internet connection.
7. Enjoy! Connect to the wireless network by using the SSID (network name) and
password of the router.
13

Chapter 3
Log In to the Router
This chapter introduces how to log in to the web management page of the router.

Chapter 3
Log In to the Router
With the web-based utility, it is easy to configure and manage the router. The webbased utility can be used on any Windows, Macintosh or UNIX OS with a Web browser,
such as Microsoft the Internet Explorer, Mozilla Firefox or Apple Safari.
Follow the steps below to log in to your router.
1. Set up the TCP/IP Protocol in Obtain an IP address automatically mode on your
computer.
2. Visit http://tplinkwifi.net, and log in with the password you set for the router.
Note:
If the login window does not appear, please refer to the FAQ section.
15

Chapter 4
Configure the Router in
Wireless Router Mode
This chapter presents how to configure the various features of the router working as a
wireless router.
It contains the following sections:
• Operation Mode
• Network
• Wireless
• NAT Forwarding
• Parental Controls
• QoS
• Security
• IPv6
• System

Chapter 4
Configure the Router in Wireless Router Mode
4. 1. Operation Mode
1. Visit http://tplinkwifi.net, and log in with the password you set for the router.
2. Go to Advanced > Operation Mode.
3. Select the working mode as needed and click SAV E.
4. 2. Network
4. 2. 1. Status
1. Visit http://tplinkwifi.net, and log in with password you set for the router.
2. Go to Advanced > Network > Status. You can view the current status information of
the router.
17

Chapter 4
Configure the Router in Wireless Router Mode
• Internet — This field displays the current settings of the internet, and you can configure
them on the Advanced > Network > Internet page.
• Status — Indicates whether the router has been connected to the internet.
• Internet Connection Type — Indicates the way in which your router is connected
to the internet.
• IP Address — The WAN IP address of the router.
• Subnet Mask — The subnet mask associated with the WAN IP address.
• Default Gateway — The Gateway currently used is shown here. When you use
Dynamic IP as the internet connection type, click Renew or Release here to
obtain new IP parameters dynamically from the ISP or release them.
• Primary & Secondary DNS — The IP addresses of DNS (Domain Name System)
server.
18

Chapter 4
Configure the Router in Wireless Router Mode
• LAN — This field displays the current settings of the LAN, and you can configure them
on the Advanced > Network > LAN page.
• MAC Address — The physical address of the router.
• IP Address — The LAN IP address of the router.
• Subnet Mask — The subnet mask associated with the LAN IP address.
• DHCP Server — This field displays the current settings of DHCP (Dynamic Host
Configuration Protocol) Server, and you can configure them on the Network > DHCP
Server page.
• DHCP Server — Indicates whether the DHCP server is enabled of disabled. It is
enabled by default and the router acts as a DHCP server.
• IP Address Pool — The IP address range for the DHCP server to assign IP
addresses.
• Dynamic DNS — This field displays the current settings of the Dynamic DNS (Domain
Name System), and you can configure them on the Advanced > Network > Dynamic
DNS page.
• Service Provider — The Dynamic DNS service provider you have signed up for.
• Host Name — The Domain Name you have entered in the Dynamic DNS page.
• Status — The status of the Dynamic DNS service conenction.
4. 2. 2. Internet
1. Visit http://tplinkwifi.net, and log in with the password you set for the router.
2. Go to Advanced > Network > Internet.
3. Set up the internet connection and click SAV E.
Dynamic IP
If your ISP provides the DHCP service, please select Dynamic IP, and the router will
automatically get IP parameters from your ISP.
Click Renew to renew the IP parameters from your ISP.
Click Release to release the IP parameters.
19
Chapter 4
Configure the Router in Wireless Router Mode
• MTU Size — The normal MTU (Maximum Transmission Unit) value for most Ethernet
networks is 1500 Bytes. It is not recommended that you change the default MTU size
unless required by your ISP.
• Host Name -This option specifies the name of the router.
• Get IP with Unicast DHCP — A few ISPs’ DHCP servers do support the broadcast applications.
If you cannot get the IP address normally, you can choose this option (it is rarely required).
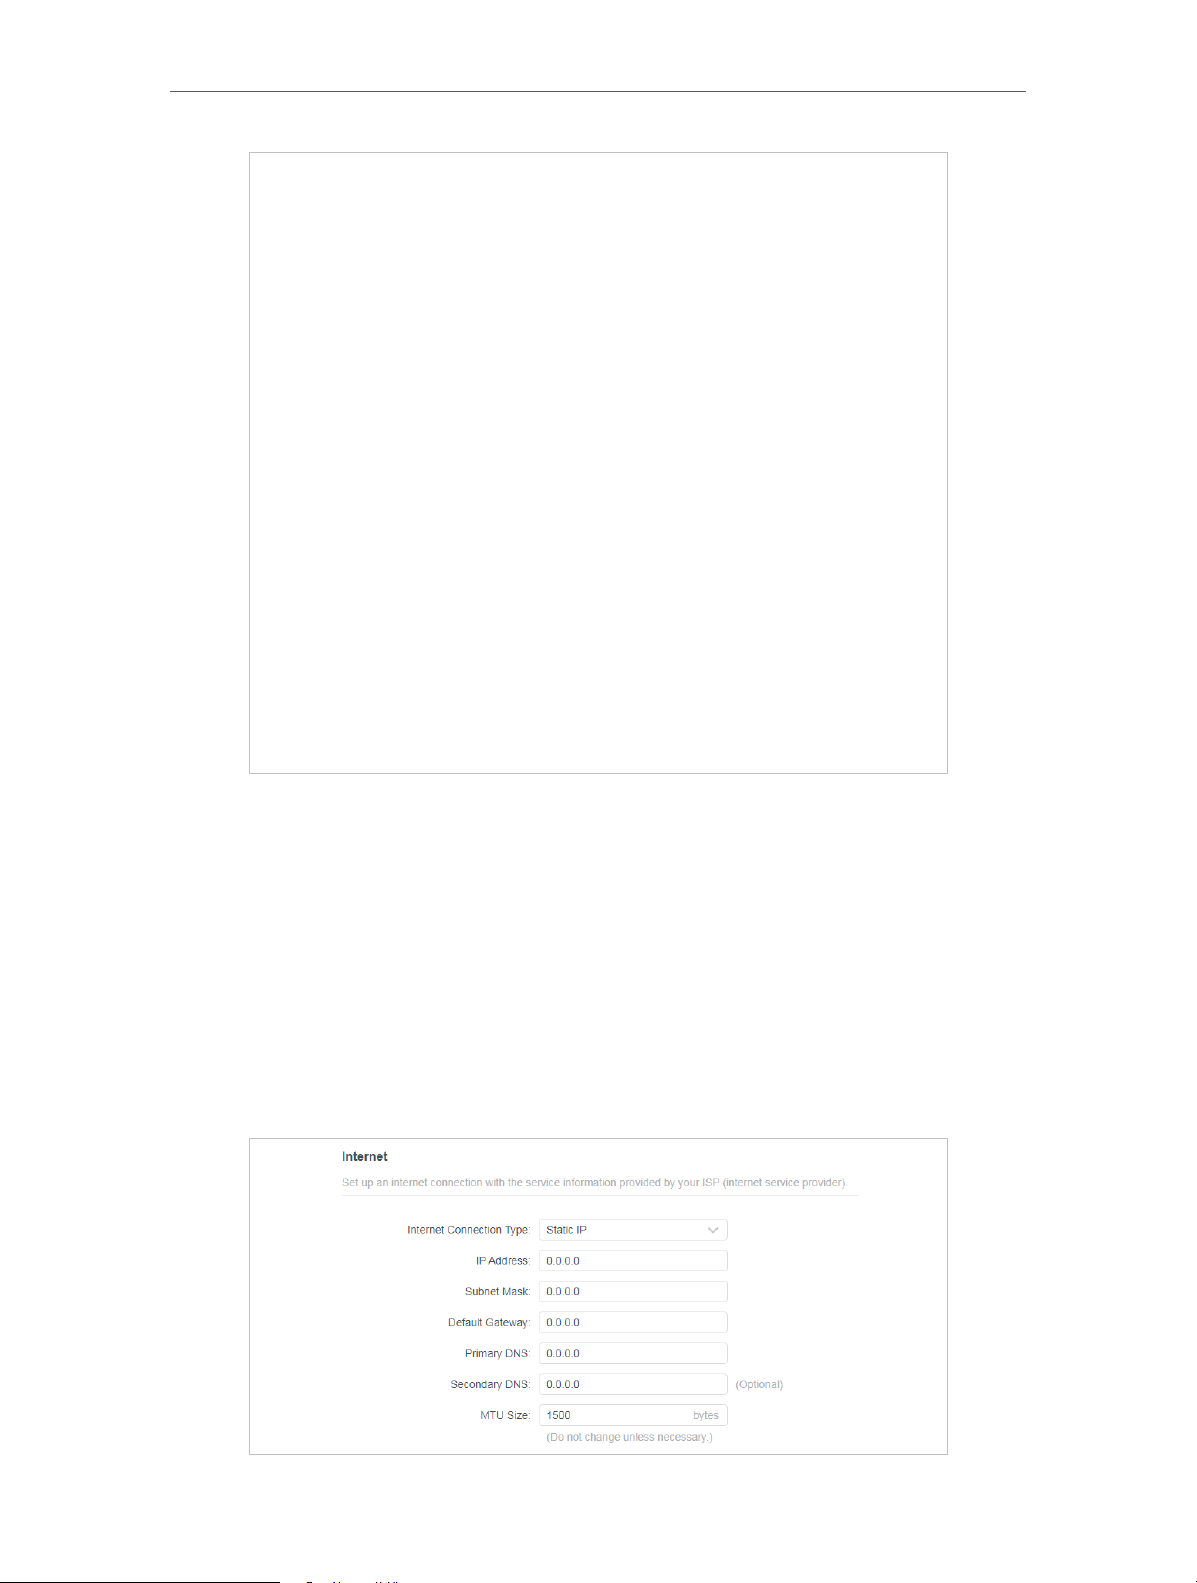
Static IP
If your ISP provides a static or fixed IP address, subnet mask, default gateway and DNS
setting, please select Static IP.
20

Chapter 4
Configure the Router in Wireless Router Mode
• IP Address — Enter the IP address in dotted-decimal notation provided by your ISP.
• Subnet Mask — Enter the subnet mask in dotted-decimal notation provided by your
ISP. Normally 255.255.255.0 is used as the subnet mask.
• Default Gateway — Enter the gateway IP address in dotted-decimal notation provided
by your ISP.
• Primary/Secondary DNS — (Optional) Enter one or two DNS addresses in dotted-
decimal notation provided by your ISP.
• MTU Size — The normal MTU (Maximum Transmission Unit) value for most Ethernet
networks is 1500 Bytes. It is not recommended that you change the default MTU size
unless required by your ISP.
PPPoE
If your ISP provides PPPoE connection, select PPPoE.
21

Chapter 4
Configure the Router in Wireless Router Mode
• User Name/Password — Enter the user name and password provided by your ISP.
These fields are case-sensitive.
• Secondary Connection — It’s available only for PPPoE connection. If your ISP provides
an extra connection type, select Dynamic IP or Static IP to activate the secondary
connection.
• MTU Size — The default MTU size is 1480 bytes. It is not recommended that you change
the default MTU size unless required by your ISP.
• Service Name — The service name should not be configured unless you are sure it is
necessary for your ISP. In most cases, leaving these fields blank will work.
• Access Concentrator Name — The access concentrator name should not be configured
unless you are sure it is necessary for your ISP. In most cases, leaving these fields
blank will work.
• Detect Online Interval — The router will detect Access Concentrator online at every
interval. The default value is 10. You can input the value between 0 and 120. The value
0 means no detect.
• IP Address — The default setting is to get an IP address dynamically from your ISP. If
your ISP does not automatically assign IP addresses to the router, please select Use
the Following IP Address and enter the IP address provided by your ISP in dotted-
decimal notation.
• DNS Address — The default setting is to get an IP address dynamically from your ISP.If
your ISP does not automatically assign DNS addresses to the router, please select Use
the Following DNS Addresses and enter the IP address in dotted-decimal notation of
your ISP’s primary DNS server. If a secondary DNS server address is available, enter
it as well.
• Connection Mode — Select an appropriate connection mode that determines how to
connect to the internet.
• Auto — In this mode, the internet connection reconnects automatically any it
gets disconnected.
• On Demand — In this mode, the internet connection will be terminared
automatically after a specified inactivity period (Max Idle Time) and be reestablished when you attempt to access the internet again.
• Time-based — In this mode, the internet connection is only established in a
specific timeframe. If this option is selected, enter the start time and end time.
Both are in HH:MM format.
• Manual — In this mode, the internet connection is controlled manually by clicking
the Connect/Disconnect button. This mode also supports the Max Idle Time
function as On Demand mode. Enter a maximum time (in minutes), the internet
connection can be inactive before it is terminated into the Max Idle Time. The
22

Chapter 4
Configure the Router in Wireless Router Mode
default value is 15 minutes. If you want the internet connection remains active
all the time, enter 0 (zero).
Note:
Sometimes the connection cannot be terminated although you have specified the Max Idle Time because some
applications are visiting the internet continually in the background.
L2TP
If your ISP provides L2TP connection, please select L2TP.
• Username/Password — Enter the username and password provided by your ISP. These
fields are case-sensitive.
• VPN Server IP/ Domain Name — Enter the VPN server’s IP address or domain name
provided by your ISP.
• MTU Size — The default MTU size is “1460” bytes, which is usually fine. It is not
recommended that you change the default MTU Size unless required by your ISP.
• Connection Mode
• Auto — In this mode, the internet connection reconnects automatically any it
gets disconnected.
23

Chapter 4
Configure the Router in Wireless Router Mode
• On Demand — In this mode, the internet connection will be terminared
automatically after a specified inactivity period (Max Idle Time) and be reestablished when you attempt to access the internet again.
• Manual — In this mode, the internet connection is controlled manually by clicking
the Connect/Disconnect button. This mode also supports the Max Idle Time
function as On Demand mode. Enter a maximum time (in minutes), the internet
connection can be inactive before it is terminated into the Max Idle Time. The
default value is 15 minutes. If you want the internet connection remains active
all the time, enter 0 (zero).
Note:
Sometimes the connection cannot be terminated although you have specified the Max Idle Time because some
applications are visiting the internet continually in the background.
PPTP
If your ISP provides PPTP connection, please select PPTP.
• Username/Password — Enter the username and password provided by your ISP. These
fields are case-sensitive.
24
Chapter 4
Configure the Router in Wireless Router Mode
• VPN Server IP/ Domain Name — Enter the VPN server’s IP address or domain name
provided by your ISP.
• MTU Size — The default MTU size is “1420” bytes, which is usually fine. It is not
recommended that you change the default MTU Size unless required by your ISP.
• Connection Mode
• Auto — In this mode, the internet connection reconnects automatically any it
gets disconnected.
• On Demand — In this mode, the internet connection will be terminared
automatically after a specified inactivity period (Max Idle Time) and be reestablished when you attempt to access the internet again.
• Manual — In this mode, the internet connection is controlled manually by clicking
the Connect/Disconnect button. This mode also supports the Max Idle Time
function as On Demand mode. Enter a maximum time (in minutes), the internet
connection can be inactive before it is terminated into the Max Idle Time. The
default value is 15 minutes. If you want the internet connection remains active
all the time, enter 0 (zero).
Note:
Sometimes the connection cannot be terminated although you have specified the Max Idle Time because some
applications are visiting the internet continually in the background.
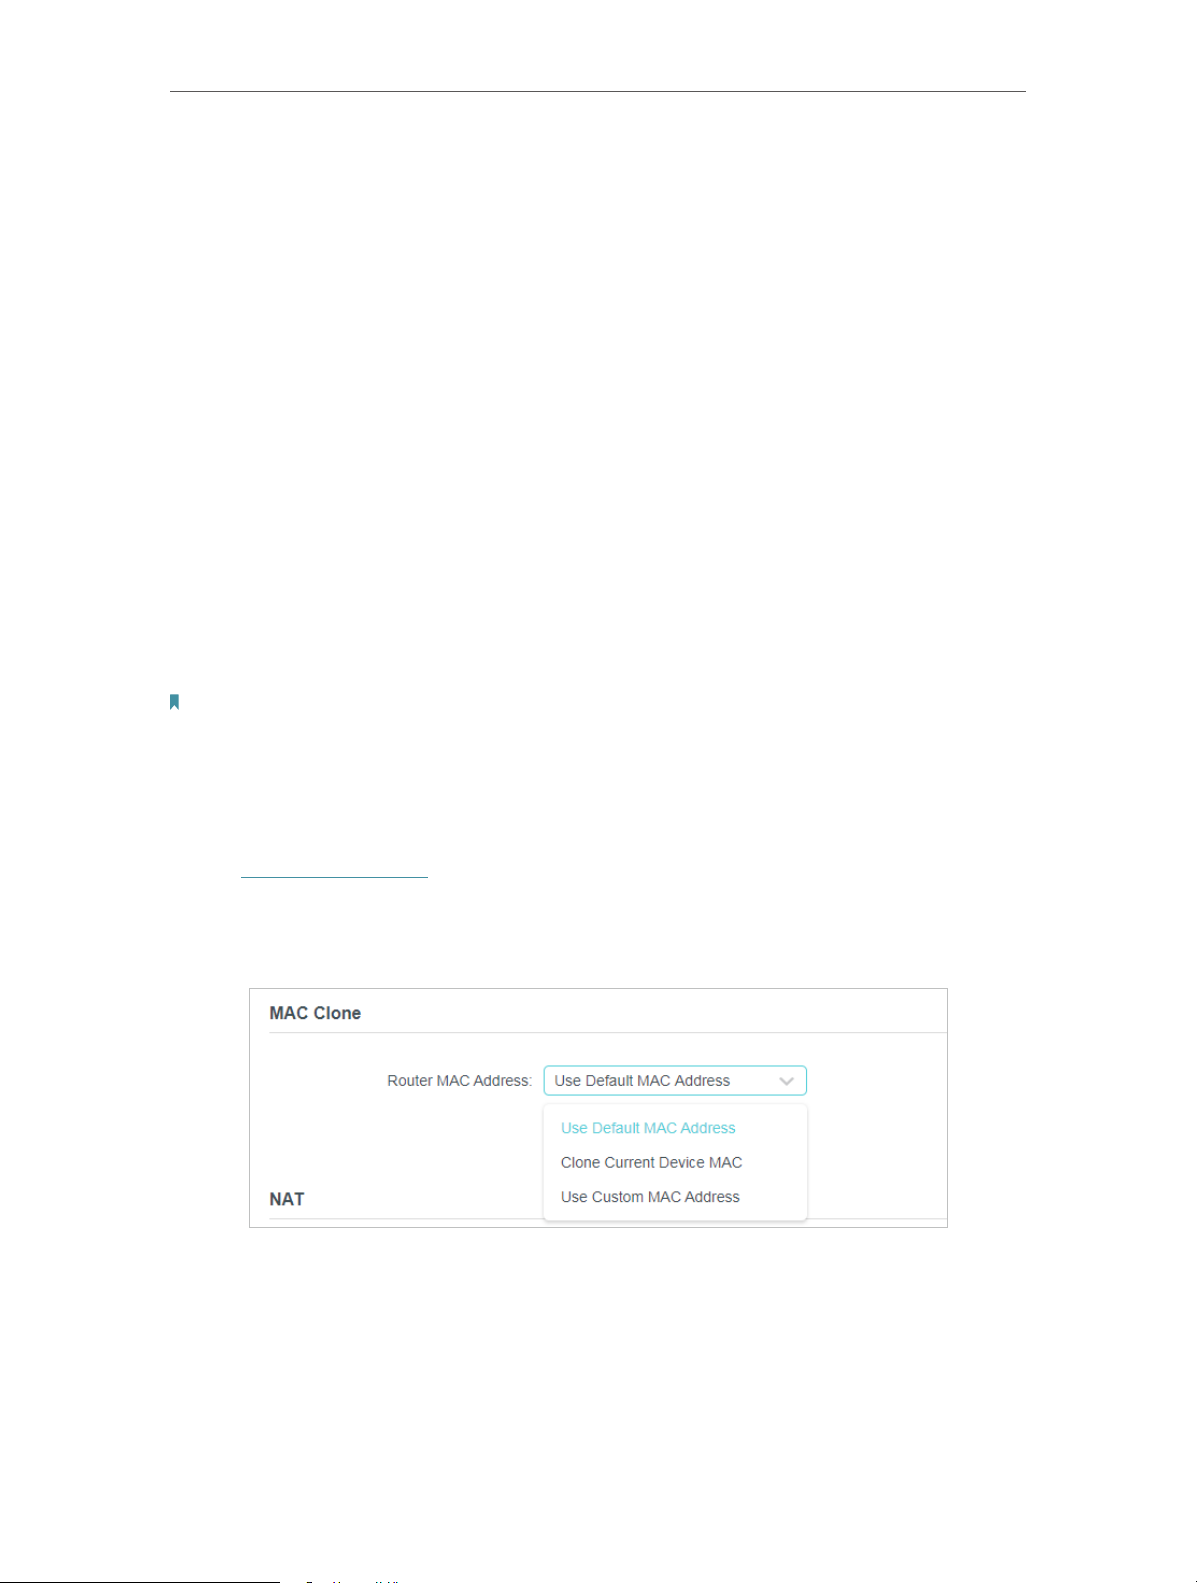
4. 2. 3. MAC Clone
1. Visit http://tplinkwifi.net, and log in with the password you set for the router.
2. Go to Advanced > Network > Internet and locate the MAC Clone section.
3. Configure the WAN MAC address and click SAVE .
• Use Default MAC Address — Do not change the default MAC address of your
router in case the ISP does not bind the assigned IP address to the MAC
address.
• Use Current MAC Address — Select to copy the current MAC address of the
computer that is connected to the router, in case the ISP binds the assigned IP
address to the MAC address.
25
Chapter 4
Configure the Router in Wireless Router Mode
• Use Custom MAC Address — Select if your ISP requires you to register the MAC
address and enter the correct MAC address in this field, in case the ISP binds
the assigned IP address to the specific MAC address.
Note:
• You can only use the MAC Address Clone function for PCs on the LAN.
• If you have changed the WAN MAC address when the WAN connection is PPPoE, it will not take effect until the
connection is re-established.
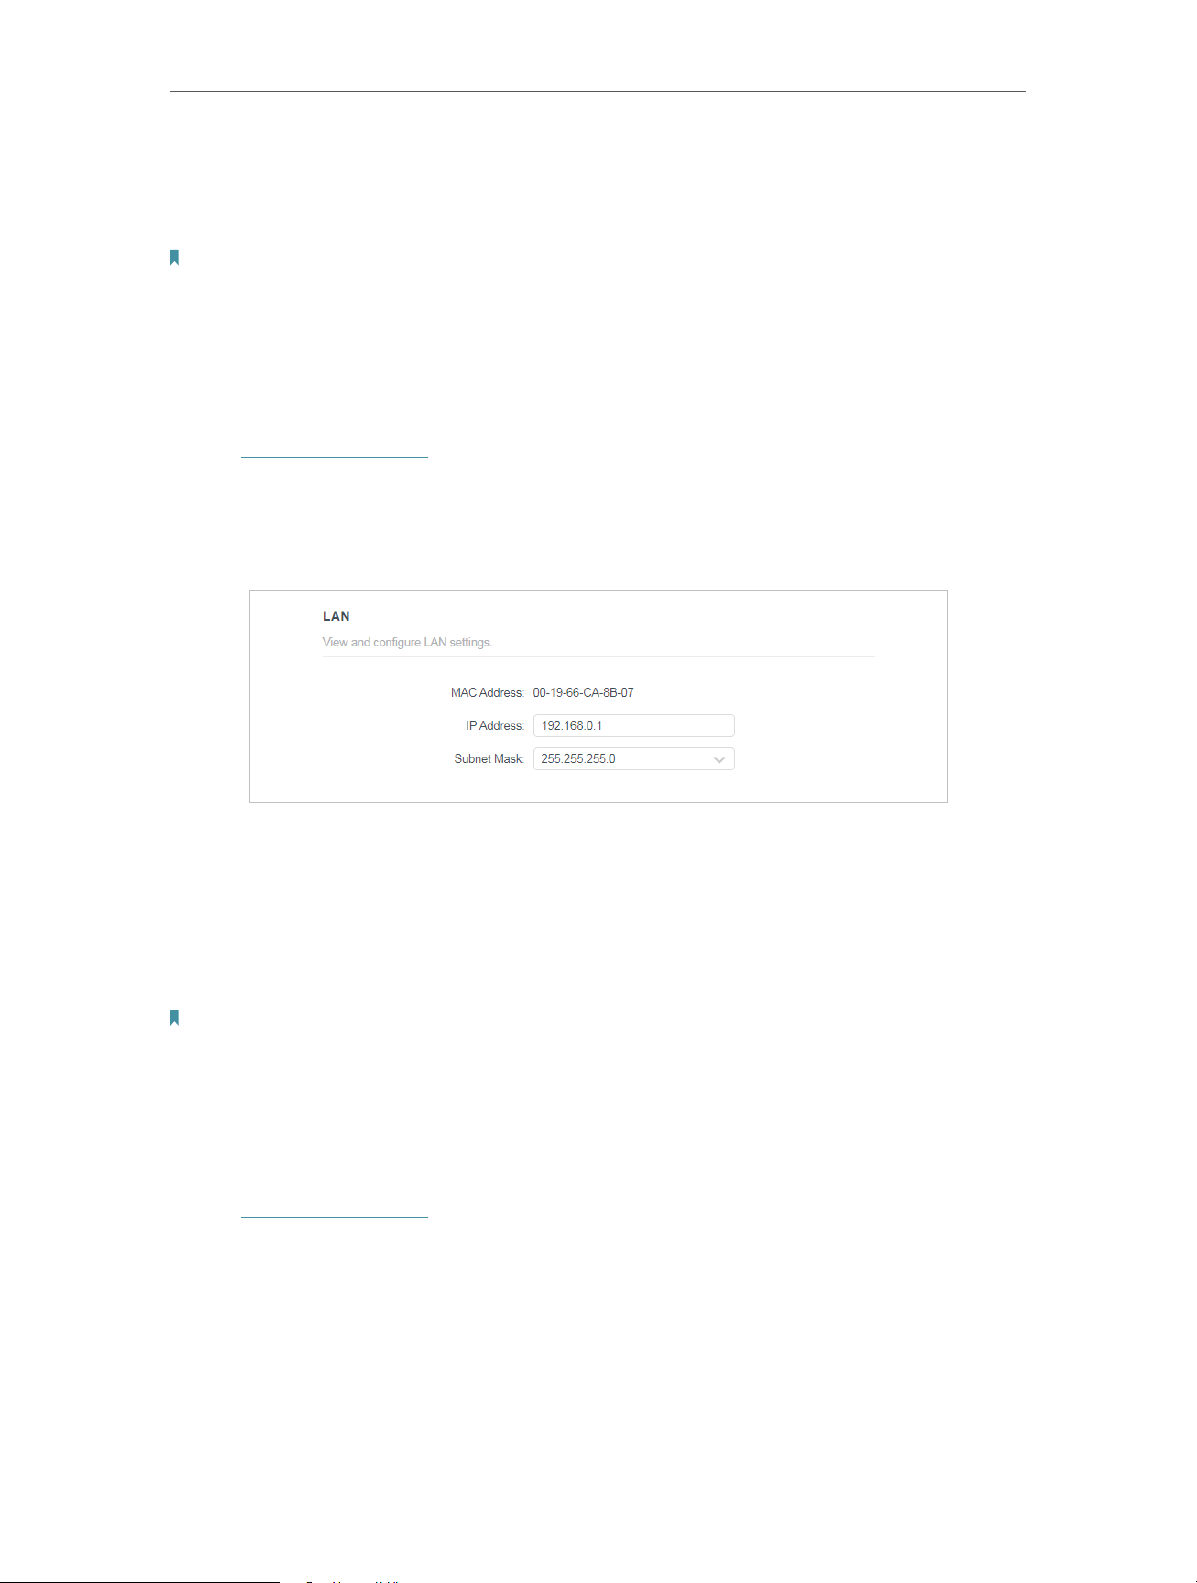
4. 2. 4. LAN
1. Visit http://tplinkwifi.net, and log in with the password you set for the router.
2. Go to Advanced > Network > LAN.
3. Configure the IP parameters of the LAN and click SAVE .
• MAC Address — The physical address of the LAN ports. The value can not be changed.
• IP Address — Enter the IP address in dotted-decimal notation of your router (the default
one is 192.168.0.1).
• Subnet Mask — An address code that determines the size of the network. Normally
255.255.255.0 is used as the subnet mask.
Note:
• If you have changed the IP address, you must use the new IP address to log in.
• If the new IP address you set is not in the same subnet as the old one, the IP address pool in the DHCP Server will be
configured automatically, but the Virtual Server and DMZ Host will not take effect until they are re-configured.
4. 2. 5. IPTV
1. Visit http://tplinkwifi.net, and log in with the password you set for the router.
2. Go to Advanced > Network > IPTV/VLAN.
3. Configure the WAN MAC address and click Save.
26
Loading…