
20
БЕСПРОВОДНАЯ ПЕРЕДАЧА ДАННЫХ
Автоматическая настройка:
1. Данная функция позволяет производить автоматическую настройку
ресивера и происходит в течение 3 минут после первой установки
батарей питания.
2. В течение этого времени ресивер принимает информацию о
температуре и влажности от дистанционного датчика и отображает
данные.
Ручная настройка (Прием сигнала датчика):
В случае подключения нового дистанционного датчика или в случае
потери сигнала (мерцание внешнего дисплея), функция настройки
должна быть запущенна повторно.
1. Нажмите и удерживайте кнопку CHN (КАНАЛ) в течение 3 секунд для
запуска.
2. Звуковой сигнал оповестит о начале настройки.
3. Загорится знак Channel (Канал) и блок будет подавать сигнал при
обнаружении каждого передатчика.
4. Информация о
температуре и
влажности
передаваемая
дистанционными
датчиками отобразится
на экране основного
блока.
РУССКИЙ
3536.qxd 30.08.2004 14:48 Page 20

БЕСПРОВОДНАЯ ПЕРЕДАЧА
Во время работы приборов возможно временное ухудшение качества
при¸ма из-за факторов влияния окружающей среды, домашнего
электрооборудования, например пультов дистанционного управления,
систем безопасности и компьютеров. Это обычное явление и не влияет
на качество работы системы. Стабильный при¸м восстанавливается
сразу по исчезновении помех.
Для оптимальной эксплуатации:
• Поставьте ресивер и дистанционный датчик на расстоянии 1 метр
друг от друга. В течение 10 минут аппараты будут синхронизировать
свою работу. После этого дистанционный датчик можно перенести
на постоянное место.
• Дистанционный датчик рекомендуется размещать в сухом
затен¸нном месте. Проводной сенсор вывести на улицу.
ПРИМЕЧАНИЕ: туман и дымка не влияют на работу дистанционного
датчика, но попадание прямых струй дождя может вывести его из
строя.
• Устанавливайте передатчик вертикально, избегая металлических
объектов, рам и наружных подоконников. Убедитесь, что между
ресивером и дистанционным датчиком нет препятствий, типа ЛЭП
или холма, которые могут вызвать помехи и нарушить связь между
приборами. Ресивер следует располагать минимум на расстоянии
двух метров от электроприборов, таких как телевизор, компьютер,
беспроводной телефон и прочего электро и радио оборудования.
• Возможно, что для лучшей передачи и более устойчивого сигнала
Вам потребуется сменить расположение дистанционного датчика —
сместить его ближе или дальше.
• При появлении на дисплее индикатора разрядки батарей замените
их новыми. Смотрите раздел УСТАНОВКА.
РУССКИЙ
21
3536.qxd 30.08.2004 14:48 Page 21
22
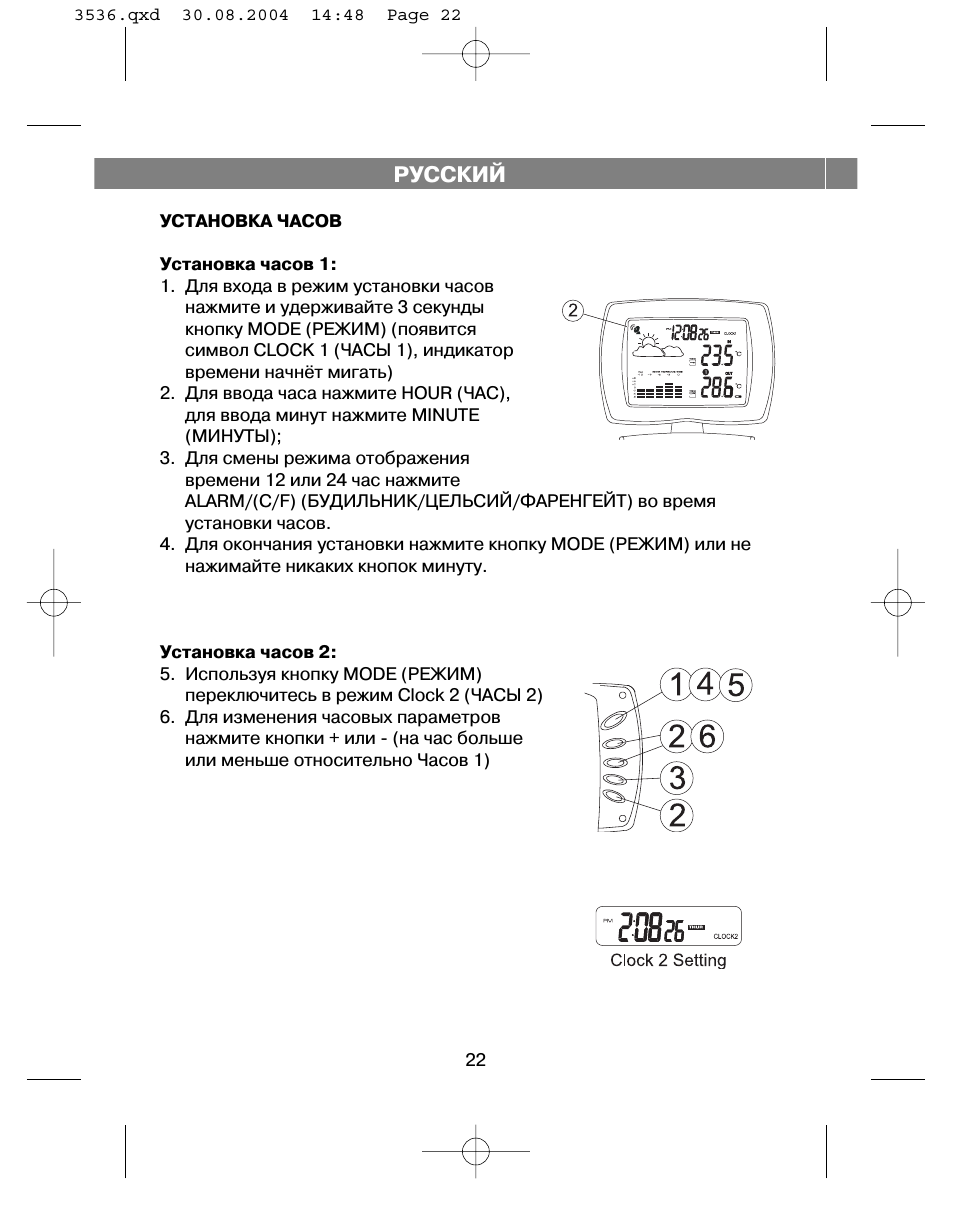
УСТАНОВКА ЧАСОВ
Установка часов 1:
1. Для входа в режим установки часов
нажмите и удерживайте 3 секунды
кнопку MODE (РЕЖИМ) (появится
символ CLOCK 1 (ЧАСЫ 1), индикатор
времени начн¸т мигать)
2. Для ввода часа нажмите HOUR (ЧАС),
для ввода минут нажмите MINUTE
(МИНУТЫ);
3. Для смены режима отображения
времени 12 или 24 час нажмите
ALARM/(C/F) (БУДИЛЬНИК/ЦЕЛЬСИЙ/ФАРЕНГЕЙТ) во время
установки часов.
4. Для окончания установки нажмите кнопку MODE (РЕЖИМ) или не
нажимайте никаких кнопок минуту.
Установка часов 2:
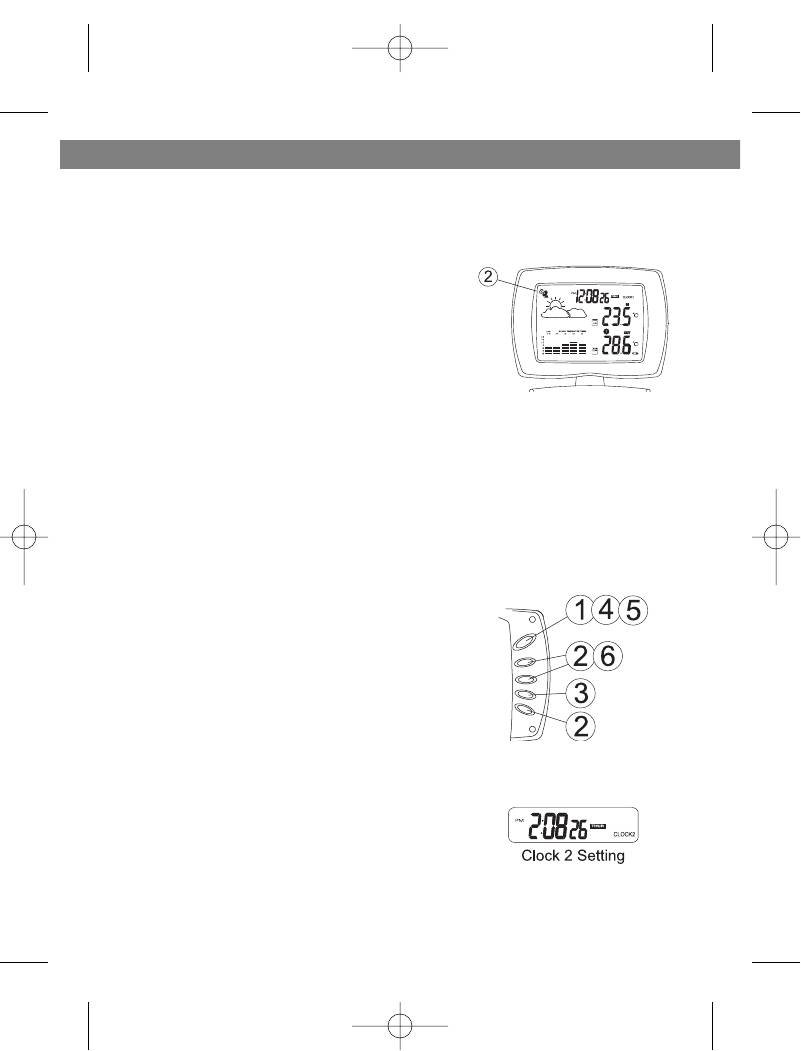
5. Используя кнопку MODE (РЕЖИМ)
переключитесь в режим Clock 2 (ЧАСЫ 2)
6. Для изменения часовых параметров
нажмите кнопки + или — (на час больше
или меньше относительно Часов 1)
РУССКИЙ
3536.qxd 30.08.2004 14:48 Page 22
23
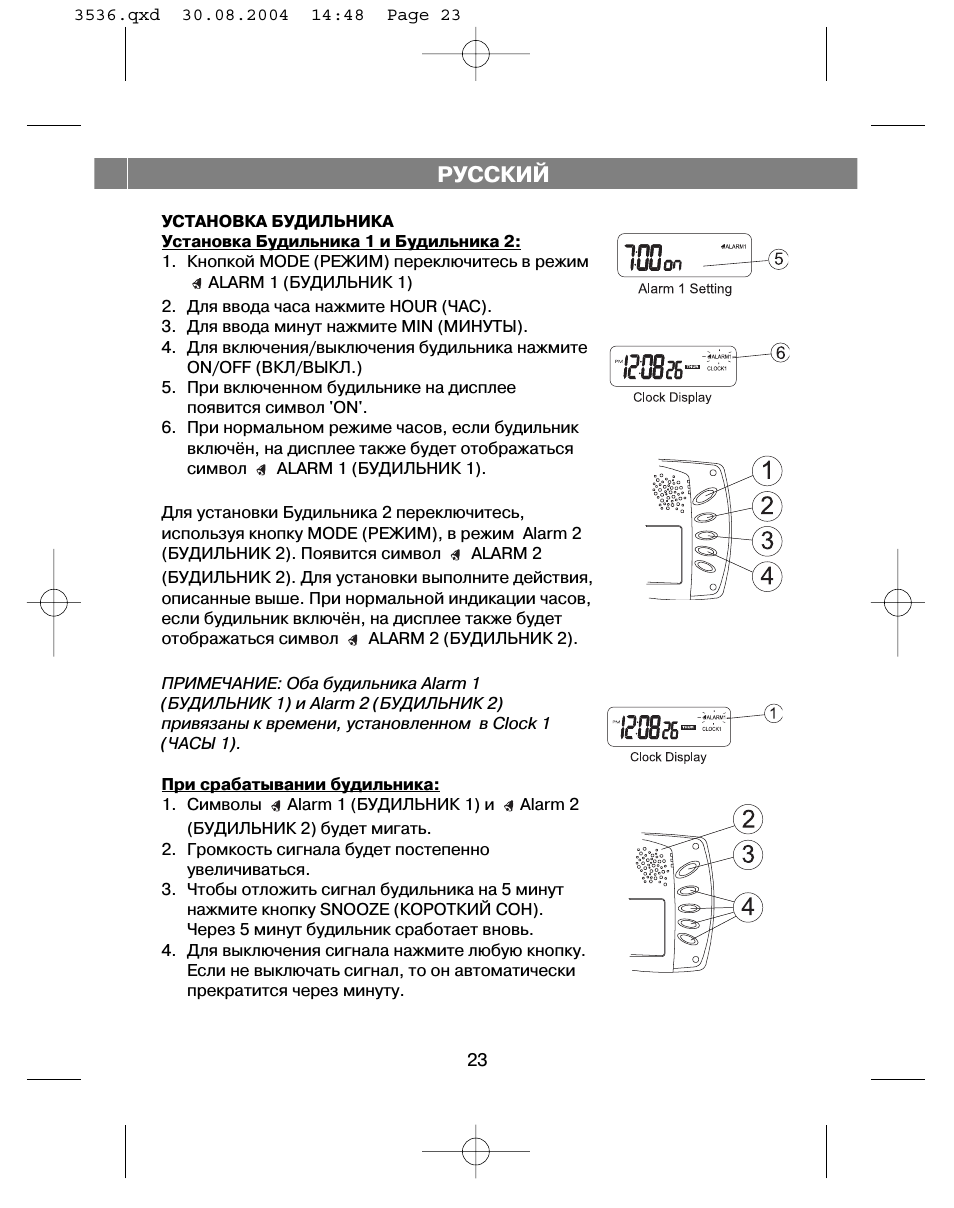
УСТАНОВКА БУДИЛЬНИКА
Установка Будильника 1 и Будильника 2:
1. Кнопкой MODE (РЕЖИМ) переключитесь в режим
ALARM 1 (БУДИЛЬНИК 1)
2. Для ввода часа нажмите HOUR (ЧАС).
3. Для ввода минут нажмите MIN (МИНУТЫ).
4. Для включения/выключения будильника нажмите
ON/OFF (ВКЛ/ВЫКЛ.)
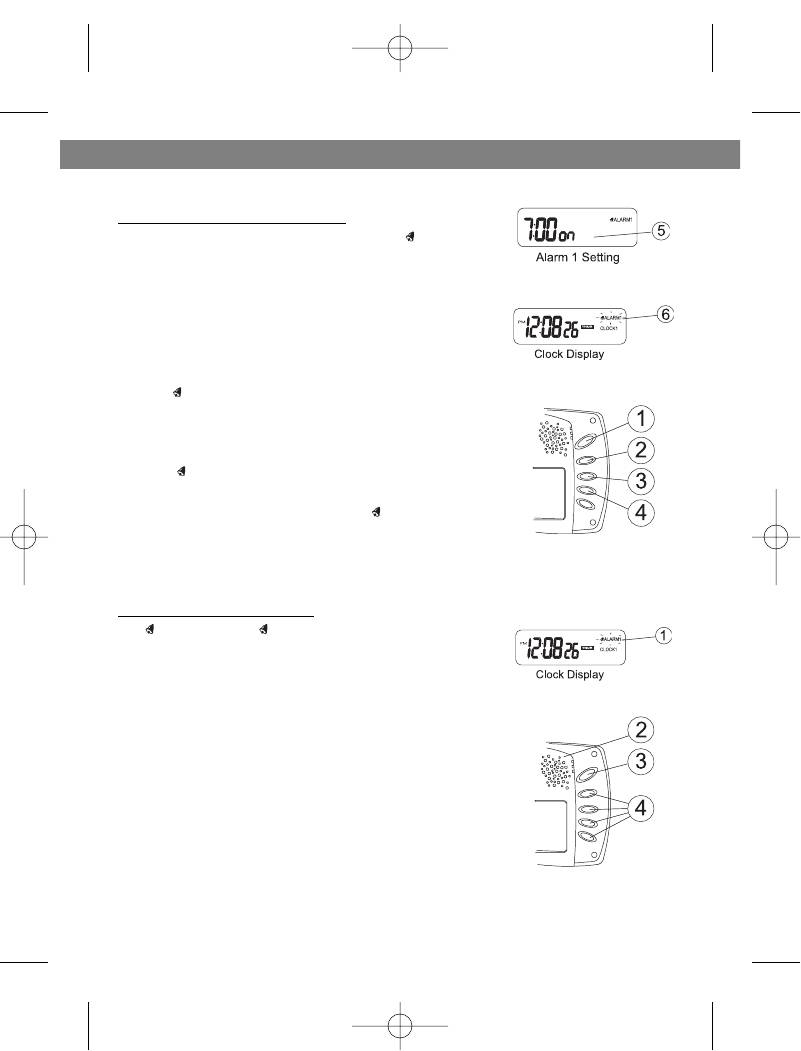
5. При включенном будильнике на дисплее
появится символ ‘ON’.
6. При нормальном режиме часов, если будильник
включ¸н, на дисплее также будет отображаться
символ
ALARM 1 (БУДИЛЬНИК 1).
Для установки Будильника 2 переключитесь,
используя кнопку MODE (РЕЖИМ), в режим Alarm 2
(БУДИЛЬНИК 2). Появится символ
ALARM 2
(БУДИЛЬНИК 2). Для установки выполните действия,
описанные выше. При нормальной индикации часов,
если будильник включ¸н, на дисплее также будет
отображаться символ
ALARM 2 (БУДИЛЬНИК 2).
ПРИМЕЧАНИЕ: Оба будильника Alarm 1
(БУДИЛЬНИК 1) и Alarm 2 (БУДИЛЬНИК 2)
привязаны к времени, установленном в Clock 1
(ЧАСЫ 1).
При срабатывании будильника:
1. Символы
Alarm 1 (БУДИЛЬНИК 1) и
Alarm 2
(БУДИЛЬНИК 2) будет мигать.
2. Громкость сигнала будет постепенно
увеличиваться.
3. Чтобы отложить сигнал будильника на 5 минут
нажмите кнопку SNOOZE (КОРОТКИЙ СОН).
Через 5 минут будильник сработает вновь.
4. Для выключения сигнала нажмите любую кнопку.
Если не выключать сигнал, то он автоматически
прекратится через минуту.
РУССКИЙ
3536.qxd 30.08.2004 14:48 Page 23
24
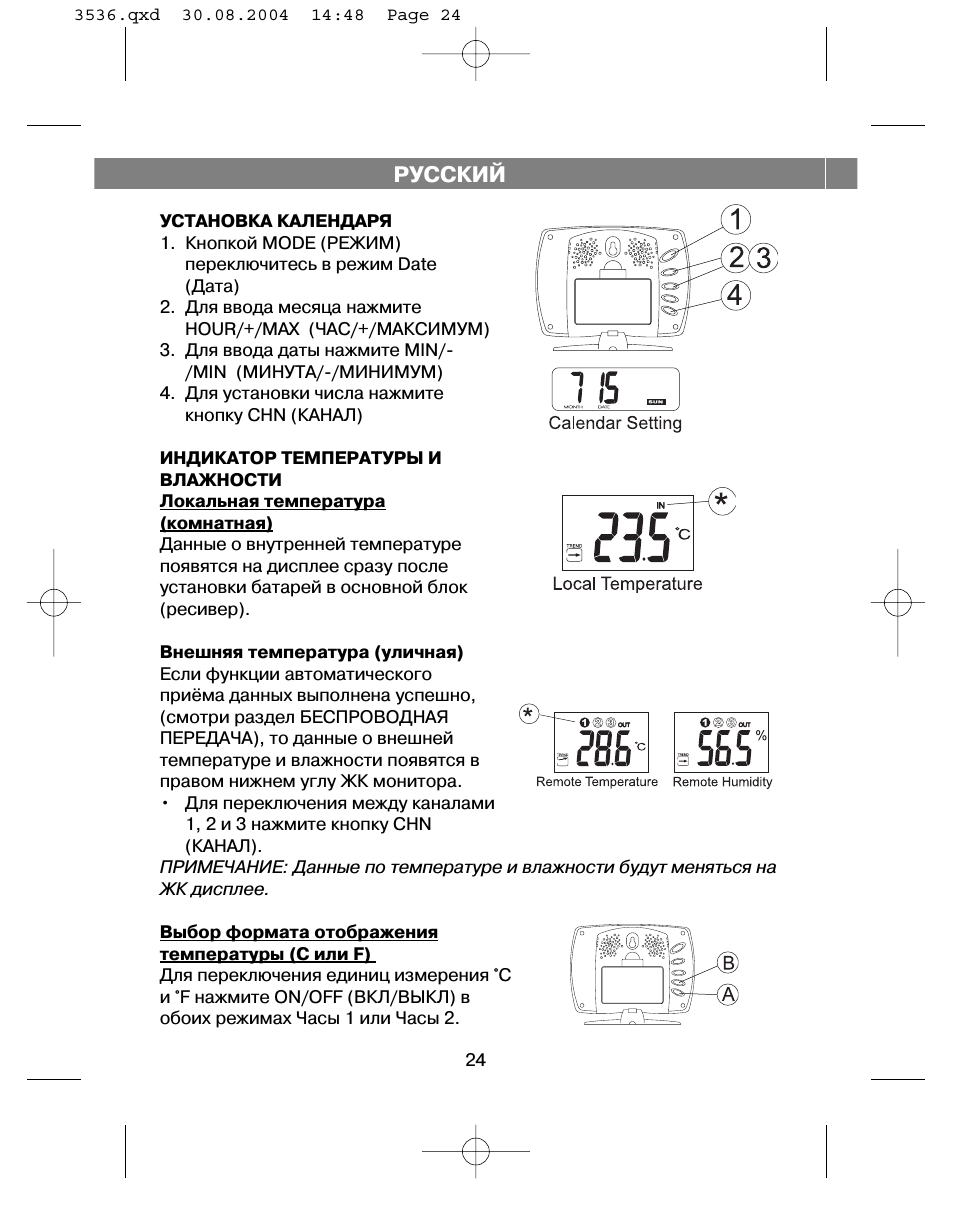
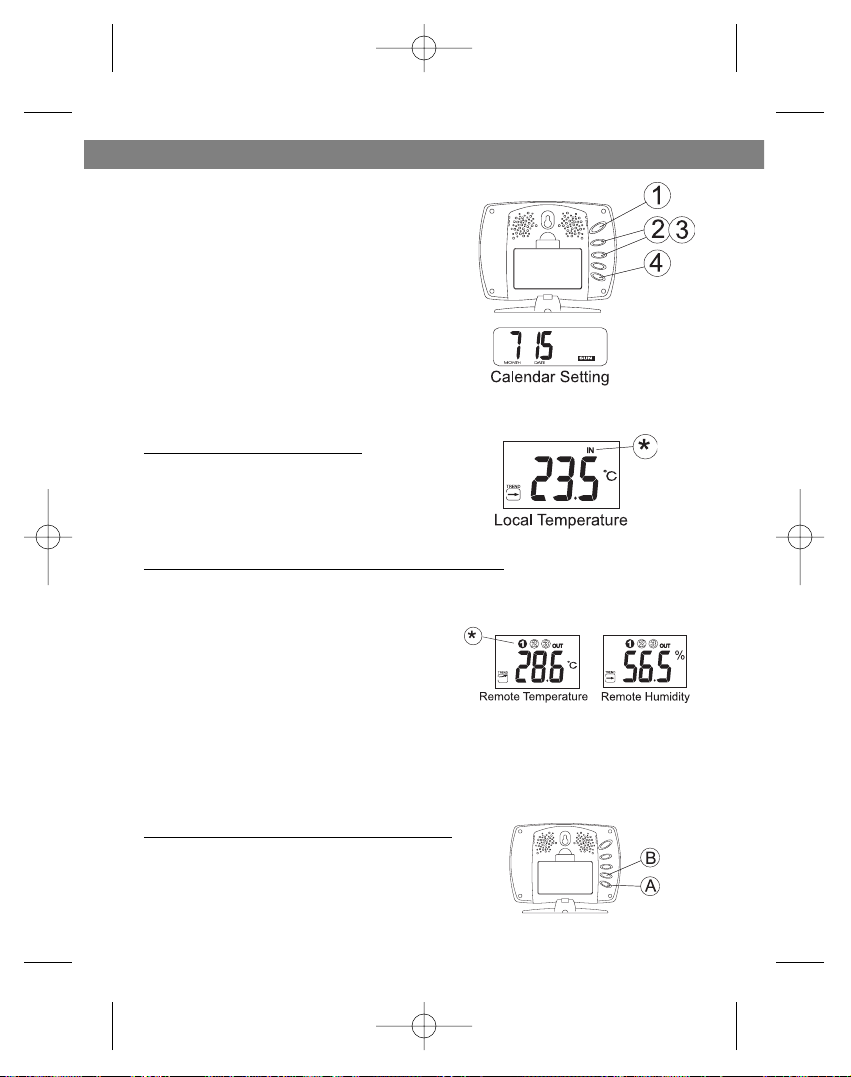
УСТАНОВКА КАЛЕНДАРЯ
1. Кнопкой MODE (РЕЖИМ)
переключитесь в режим Date
(Дата)
2. Для ввода месяца нажмите
HOUR/+/MAX (ЧАС/+/МАКСИМУМ)
3. Для ввода даты нажмите MIN/-
/MIN (МИНУТА/-/МИНИМУМ)
4. Для установки числа нажмите
кнопку CHN (КАНАЛ)
ИНДИКАТОР ТЕМПЕРАТУРЫ И
ВЛАЖНОСТИ
Локальная температура
(комнатная)
Данные о внутренней температуре
появятся на дисплее сразу после
установки батарей в основной блок
(ресивер).
Внешняя температура (уличная)
Если функции автоматического
при¸ма данных выполнена успешно,
(смотри раздел БЕСПРОВОДНАЯ
ПЕРЕДАЧА), то данные о внешней
температуре и влажности появятся в
правом нижнем углу ЖК монитора.
• Для переключения между каналами
1, 2 и 3 нажмите кнопку CHN
(КАНАЛ).
ПРИМЕЧАНИЕ: Данные по температуре и влажности будут меняться на
ЖК дисплее.
Выбор формата отображения
температуры (C èëè F)
Для переключения единиц измерения °C
è °F нажмите ON/OFF (ВКЛ/ВЫКЛ) в
обоих режимах Часы 1 или Часы 2.
РУССКИЙ
3536.qxd 30.08.2004 14:48 Page 24
25
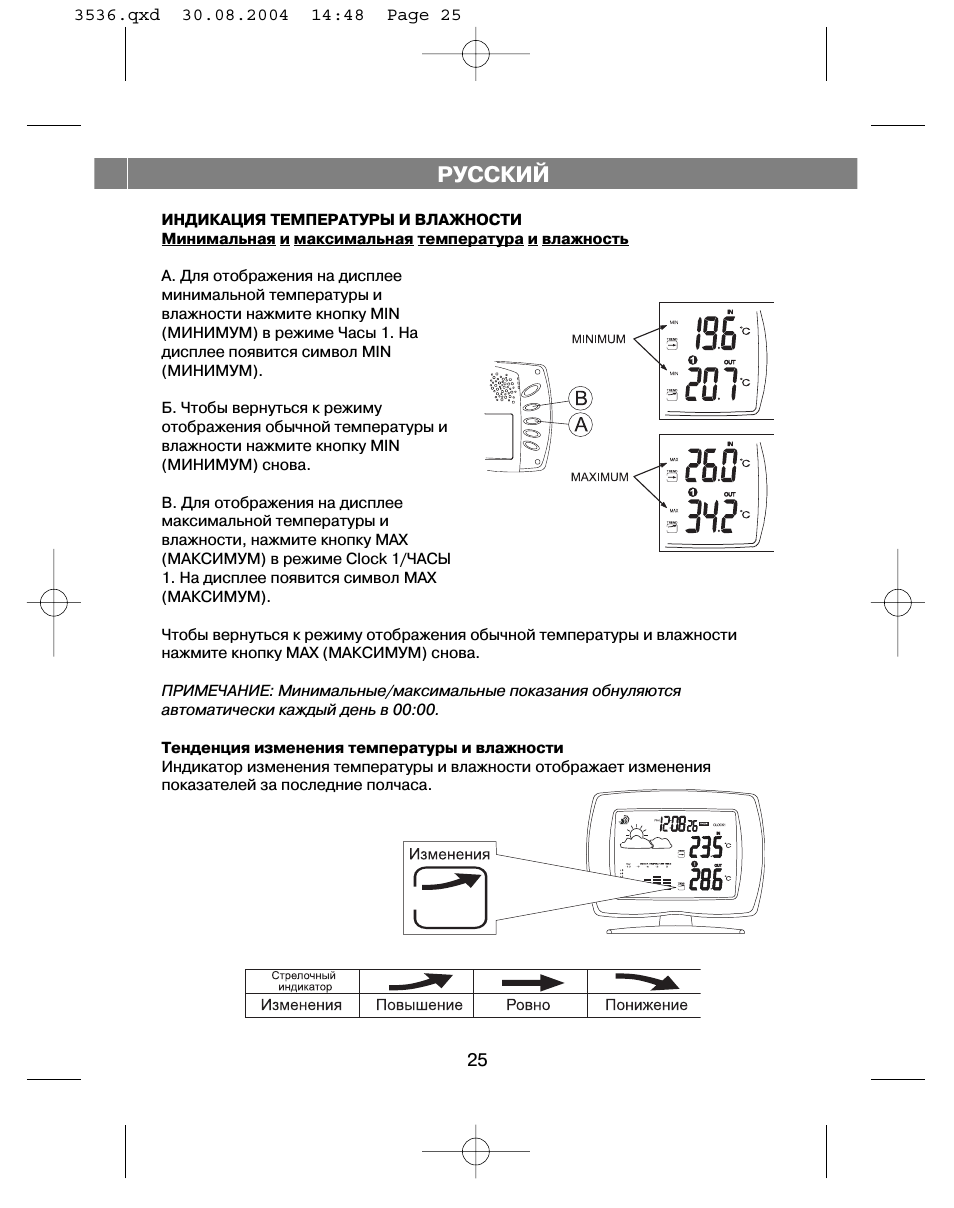
ИНДИКАЦИЯ ТЕМПЕРАТУРЫ И ВЛАЖНОСТИ
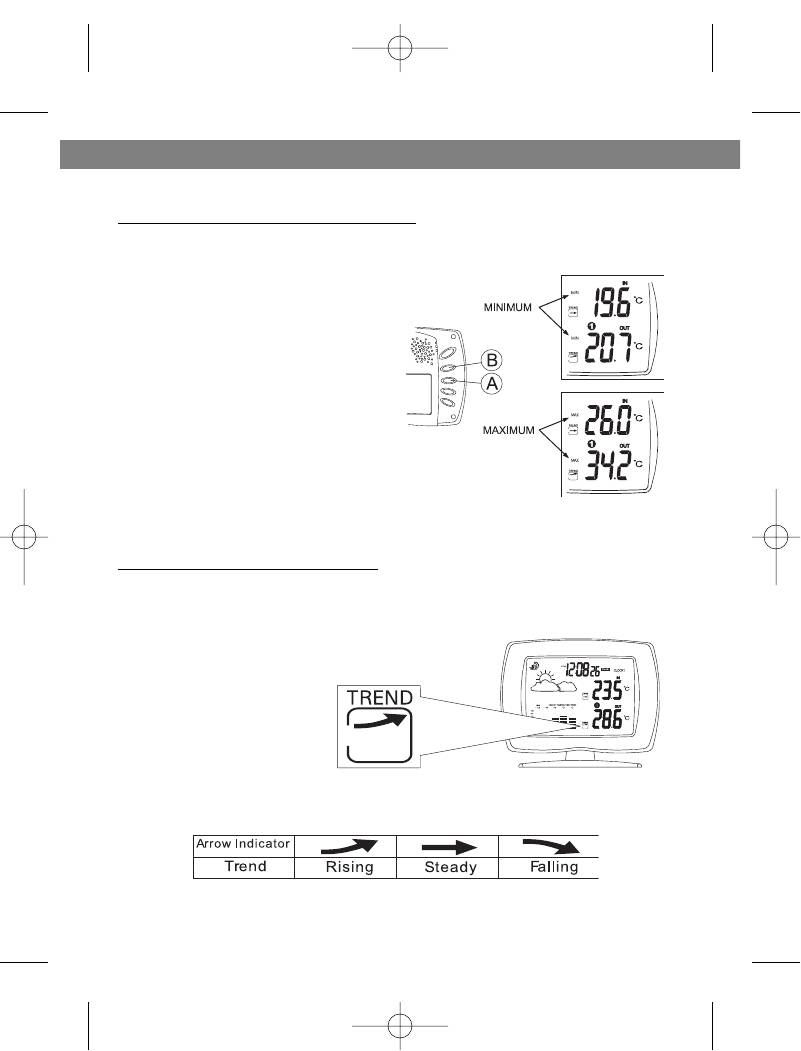
Минимальная и максимальная температура и влажность
А. Для отображения на дисплее
минимальной температуры и
влажности нажмите кнопку MIN
(МИНИМУМ) в режиме Часы 1. На
дисплее появится символ MIN
(МИНИМУМ).
Б. Чтобы вернуться к режиму
отображения обычной температуры и
влажности нажмите кнопку MIN
(МИНИМУМ) снова.
B. Для отображения на дисплее
максимальной температуры и
влажности, нажмите кнопку MAX
(МАКСИМУМ) в режиме Clock 1/ЧАСЫ
1. На дисплее появится символ MAX
(МАКСИМУМ).
Чтобы вернуться к режиму отображения обычной температуры и влажности
нажмите кнопку MAX (МАКСИМУМ) снова.
ПРИМЕЧАНИЕ: Минимальные/максимальные показания обнуляются
автоматически каждый день в 00:00.
Тенденция изменения температуры и влажности
Индикатор изменения температуры и влажности отображает изменения
показателей за последние полчаса.
РУССКИЙ
3536.qxd 30.08.2004 14:48 Page 25
26
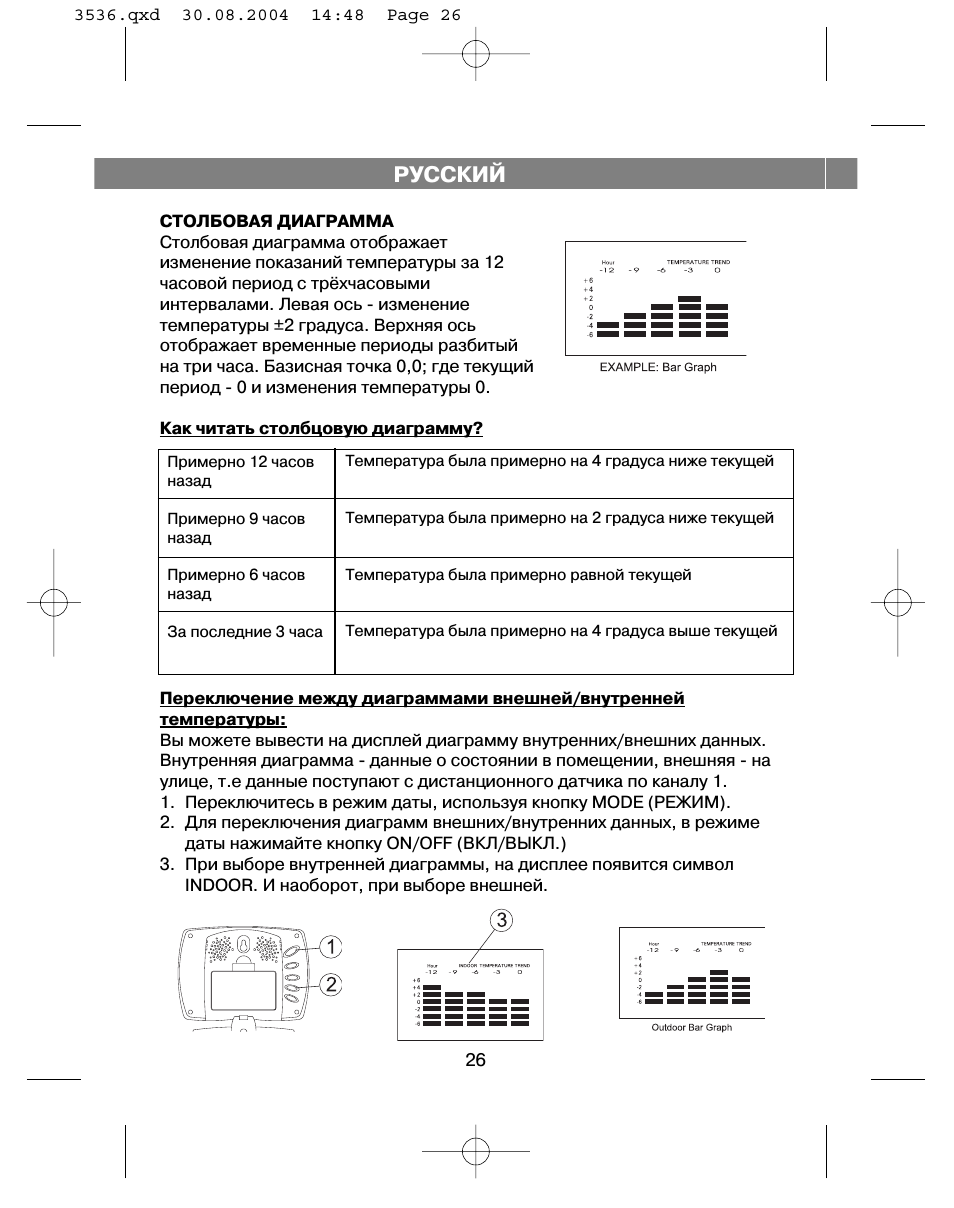
СТОЛБОВАЯ ДИАГРАММА
Столбовая диаграмма отображает
изменение показаний температуры за 12
часовой период с тр¸хчасовыми
интервалами. Левая ось — изменение
температуры ±2 градуса. Верхняя ось
отображает временные периоды разбитый
на три часа. Базисная точка 0,0; где текущий
период — 0 и изменения температуры 0.
Как читать столбцовую диаграмму?
Переключение между диаграммами внешней/внутренней
температуры:
Вы можете вывести на дисплей диаграмму внутренних/внешних данных.
Внутренняя диаграмма — данные о состоянии в помещении, внешняя — на
улице, т.е данные поступают с дистанционного датчика по каналу 1.
1. Переключитесь в режим даты, используя кнопку MODE (РЕЖИМ).
2. Для переключения диаграмм внешних/внутренних данных, в режиме
даты нажимайте кнопку ON/OFF (ВКЛ/ВЫКЛ.)
3. При выборе внутренней диаграммы, на дисплее появится символ
INDOOR. И наоборот, при выборе внешней.
Примерно 12 часов
назад
Примерно 9 часов
назад
Примерно 6 часов
назад
За последние 3 часа
Температура была примерно на 4 градуса ниже текущей
Температура была примерно на 2 градуса ниже текущей
Температура была примерно равной текущей
Температура была примерно на 4 градуса выше текущей
РУССКИЙ
3536.qxd 30.08.2004 14:48 Page 26
27
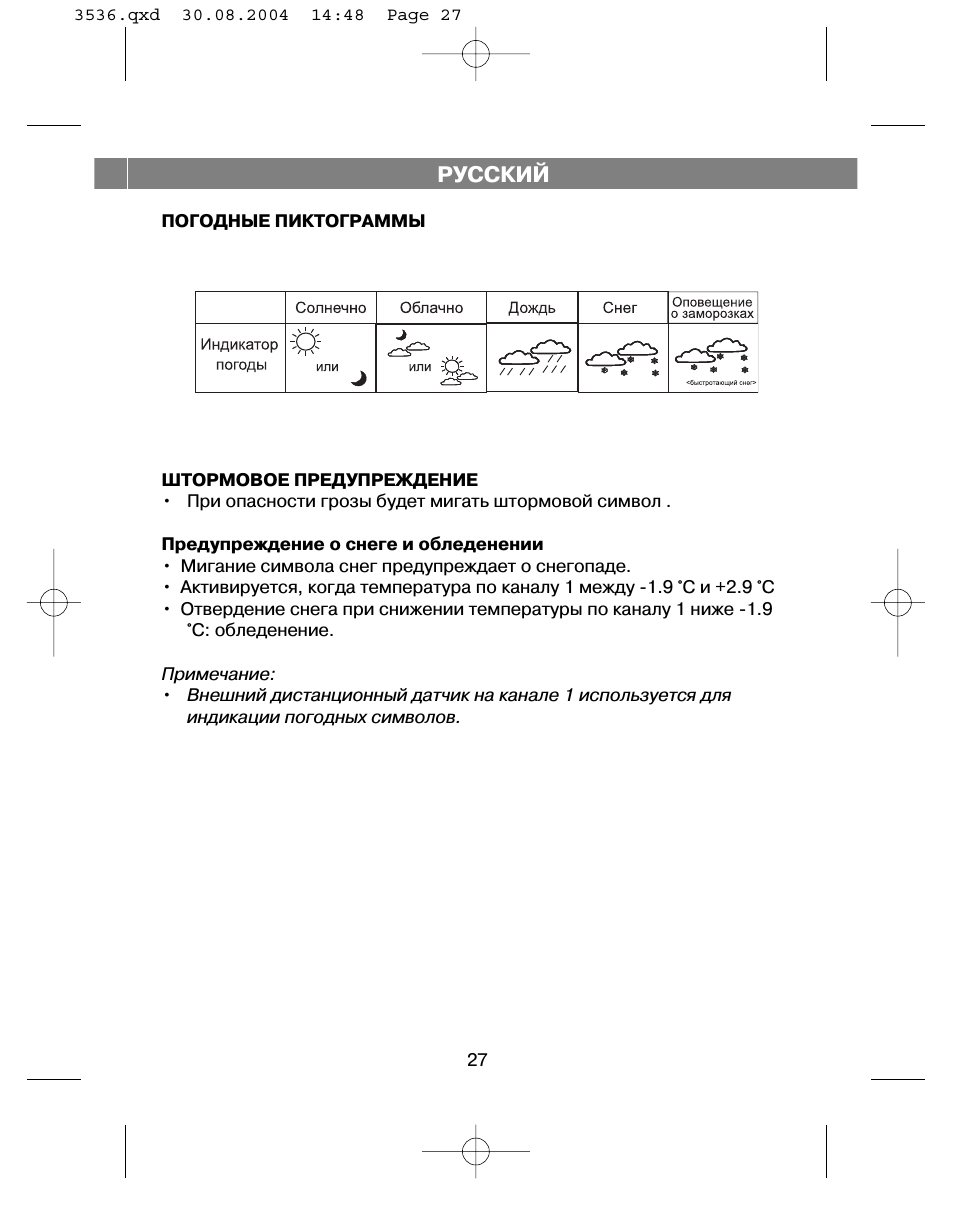
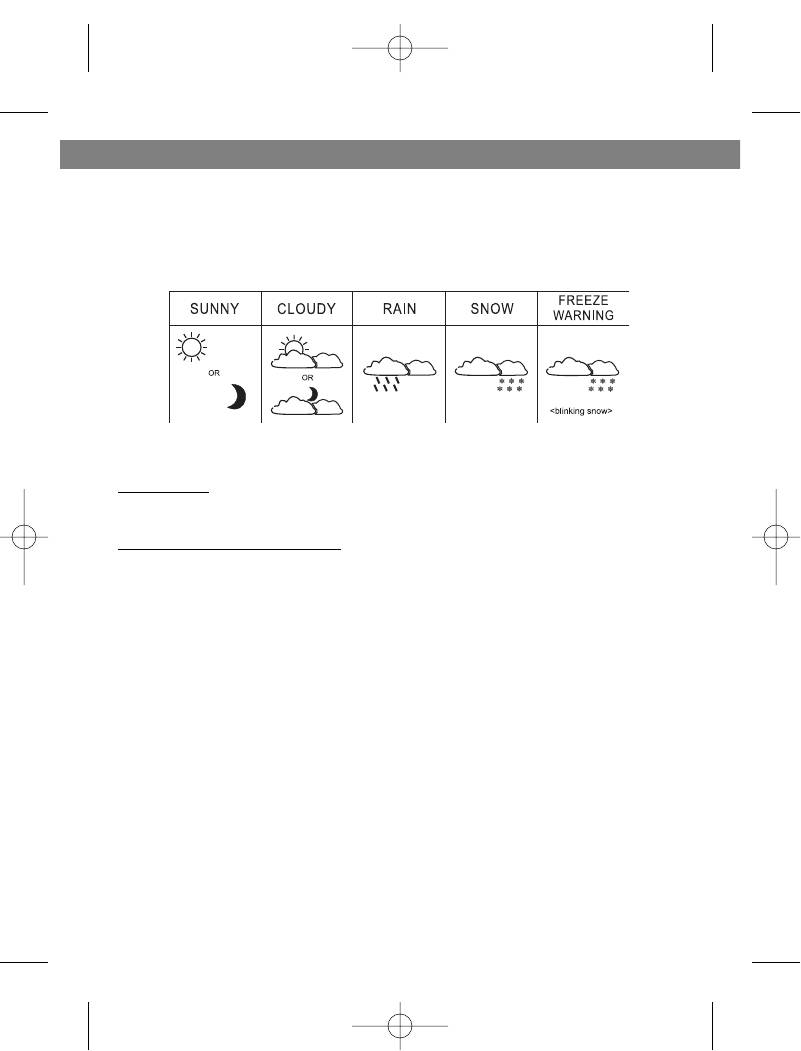
ПОГОДНЫЕ ПИКТОГРАММЫ
ШТОРМОВОЕ ПРЕДУПРЕЖДЕНИЕ
• При опасности грозы будет мигать штормовой символ .
Предупреждение о снеге и обледенении
• Мигание символа снег предупреждает о снегопаде.
• Активируется, когда температура по каналу 1 между -1.9 °C è +2.9 °C
• Отвердение снега при снижении температуры по каналу 1 ниже -1.9
°C: обледенение.
Примечание:
• Внешний дистанционный датчик на канале 1 используется для
индикации погодных символов.
РУССКИЙ
3536.qxd 30.08.2004 14:48 Page 27
28
СИГНАЛ ПРЕДУПРЕЖДЕНИЯ ОБ ИЗМЕНЕНИИ ТЕМПЕРАТУРЫ
Температурная сигнализация идеальна при использовании прибора в
оранжереях, теплицах, винных погребах и прочих местах, где
необходимо строго контролировать температуру. Если функция
включена, то прибор будет издавать сигнал при повышении/понижении
температуры относительно заданной пользователем. Вы можете
установить сигнализатор на внутреннюю температуру (основной
ресивер) и на один из внешних каналов, раздельно.
ВЕРХНИЙ ТЕМПЕРАТУРНЫЙ ПРЕДЕЛ: При повышении температуры
до верхнего предельного значения, прибор издает предупреждающий
сигнал.
НИЖНИЙ ТЕМПЕРАТУРНЫЙ ПРЕДЕЛ: При понижении температуры
до нижнего предельного значения, прибор издает предупреждающий
сигнал.
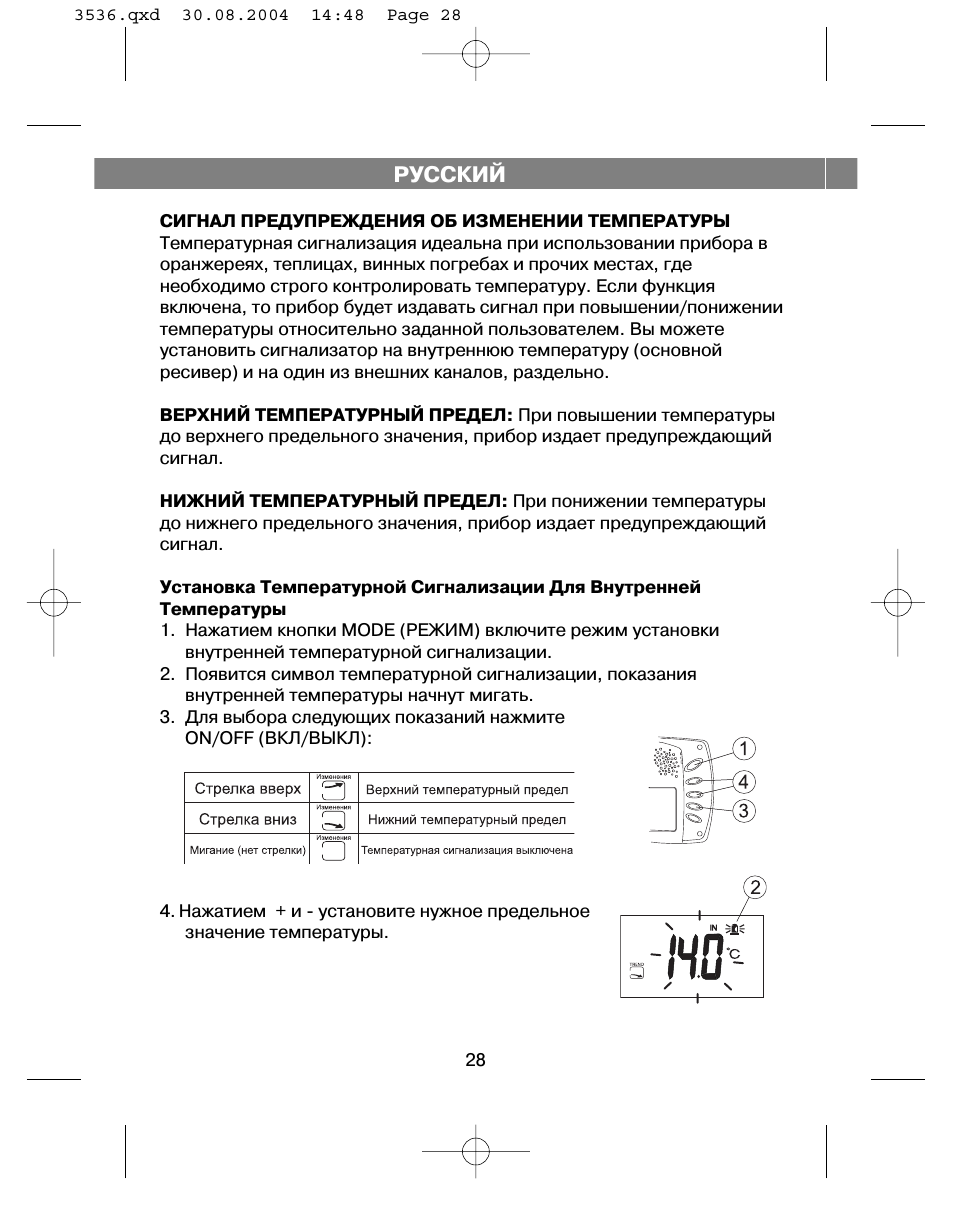
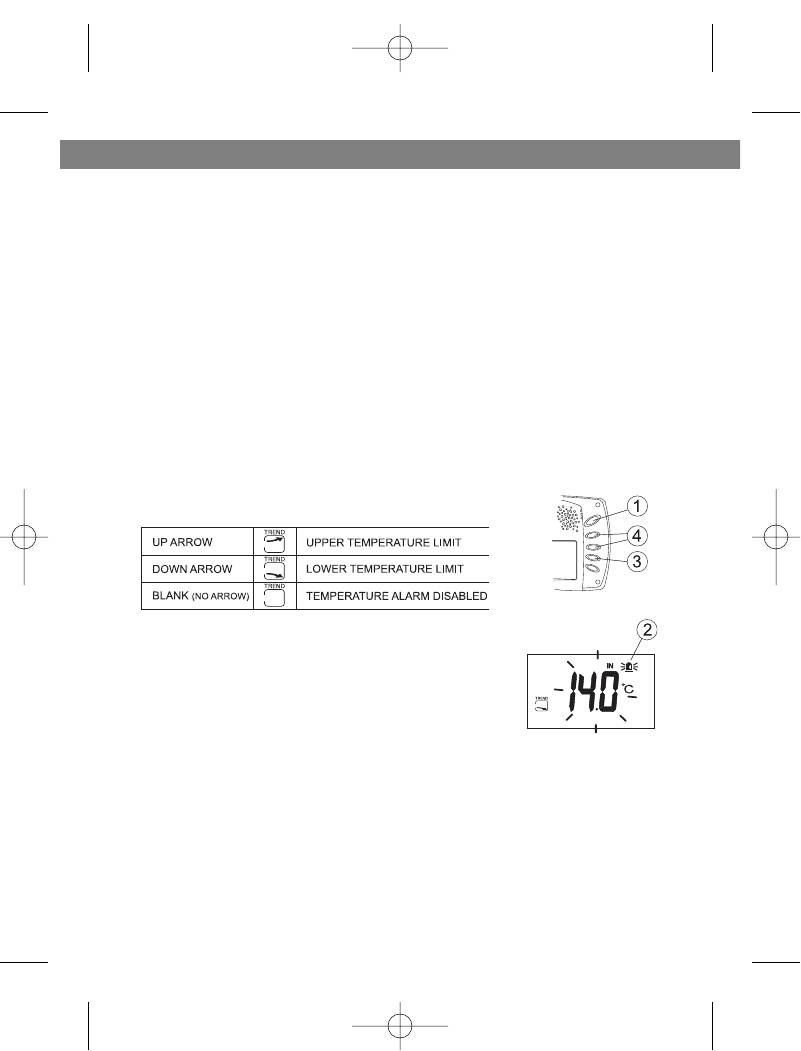
Установка Температурной Сигнализации Для Внутренней
Температуры
1. Нажатием кнопки MODE (РЕЖИМ) включите режим установки
внутренней температурной сигнализации.
2. Появится символ температурной сигнализации, показания
внутренней температуры начнут мигать.
3. Для выбора следующих показаний нажмите
ON/OFF (ВКЛ/ВЫКЛ):
4. Нажатием + и — установите нужное предельное
значение температуры.
РУССКИЙ
3536.qxd 30.08.2004 14:48 Page 28
29
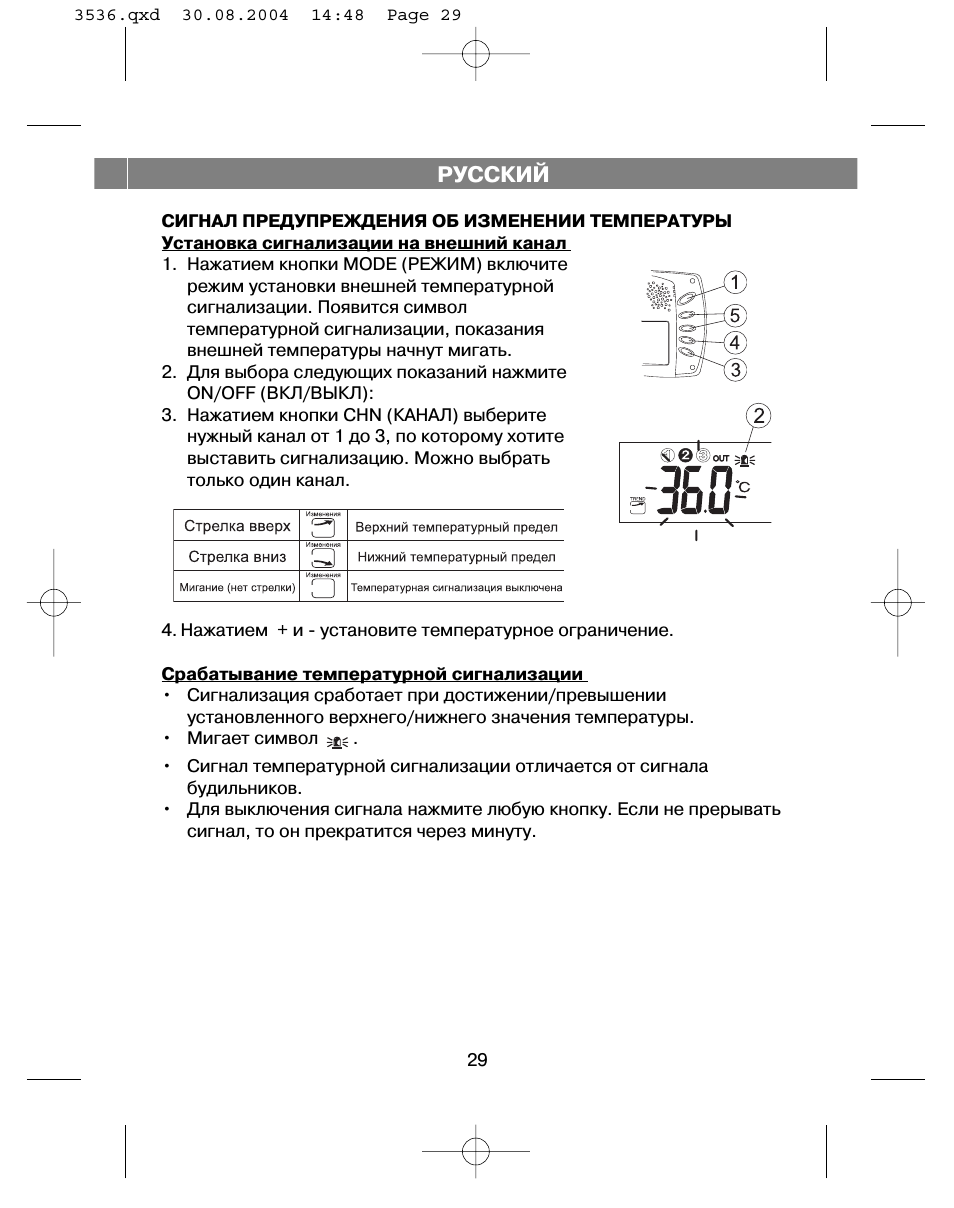
СИГНАЛ ПРЕДУПРЕЖДЕНИЯ ОБ ИЗМЕНЕНИИ ТЕМПЕРАТУРЫ
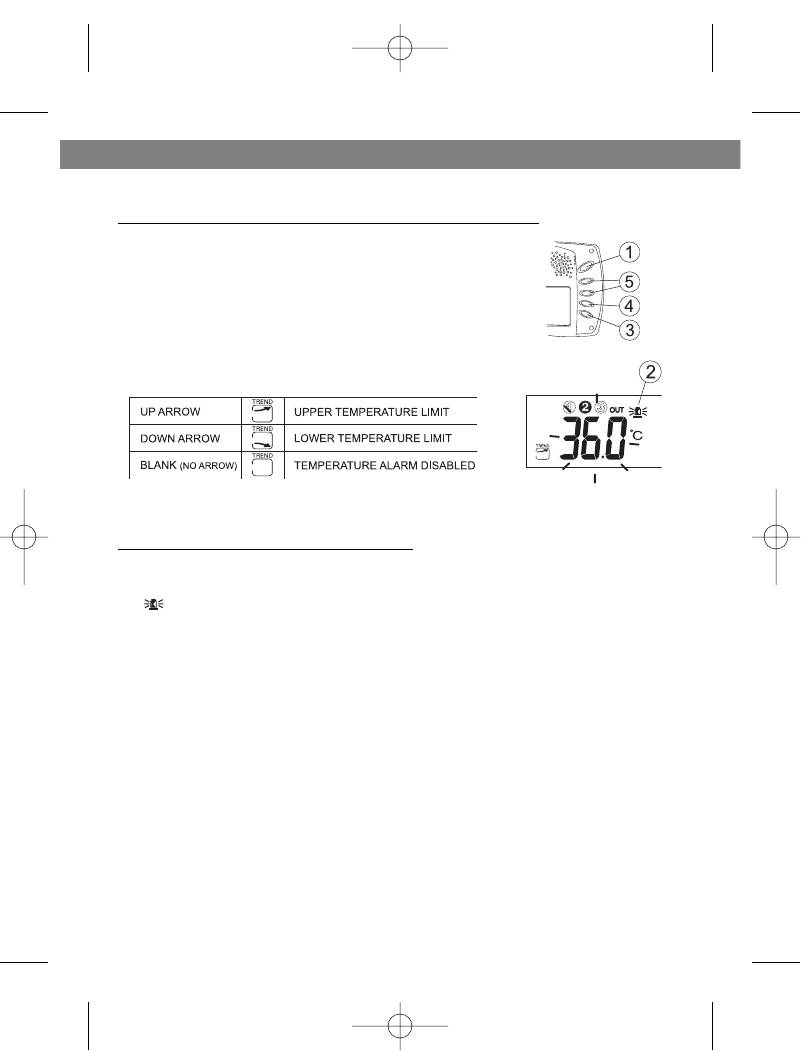
Установка сигнализации на внешний канал
1. Нажатием кнопки MODE (РЕЖИМ) включите
режим установки внешней температурной
сигнализации. Появится символ
температурной сигнализации, показания
внешней температуры начнут мигать.
2. Для выбора следующих показаний нажмите
ON/OFF (ВКЛ/ВЫКЛ):
3. Нажатием кнопки CHN (КАНАЛ) выберите
нужный канал от 1 до 3, по которому хотите
выставить сигнализацию. Можно выбрать
только один канал.
4. Нажатием + и — установите температурное ограничение.
Срабатывание температурной сигнализации
• Сигнализация сработает при достижении/превышении
установленного верхнего/нижнего значения температуры.
• Мигает символ
.
• Сигнал температурной сигнализации отличается от сигнала
будильников.
• Для выключения сигнала нажмите любую кнопку. Если не прерывать
сигнал, то он прекратится через минуту.
РУССКИЙ
3536.qxd 30.08.2004 14:48 Page 29
05:23
Обзор мультиварки Vitek VT-4209
10:32
Кофеварка эспрессо Vitek 1511
10:08
█ Разборка Фена СКРЫТЫЕ ЗАЩЁЛКИ / КОНТАКТНАЯ ГРУППА / Hairdryer repair
05:50
Ремонт фена для волос своими руками
10:10
Ремонт фена для волос
03:21
Как снять крыльчатку с фена
05:59
ПОЛНЫЙ ОБЗОР БЛЕНДЕРА, VITEK VT-1477 PR ОТ МАРИНЫ, РЕЦЕПТЫ ДЛЯ МУЛЬТИВАРКИ # ОБЗОР БЛЕНДЕРА
Нажмите на кнопку для помощи
Перейти к контенту
Часы Vitek
- Размер инструкции: 1.25 Мб
- Формат файла: pdf
Если вы потеряли инструкцию от часов Vitek VT-3536, можете скачать файл для просмотра на компьютере или печати.
Инструкция для часов Vitek VT-3536 на русском языке. В руководстве описаны возможности и полезные функции, а также правила эксплуатации. Перед использованием внимательно ознакомьтесь с инструкцией.
Чтобы не читать всю инструкцию вы можете выполнить поиск по содержимому внутри инструкции и быстро найти необходимую информацию. Рекомендации по использованию помогут увеличить срок службы часов Vitek VT-3536. Если у вас появилась проблема, то найдите раздел с описанием неисправностей и способами их решения. В нем указаны типичные поломки и способы их решения.

3536.qxd 30.08.2004 14:48 Page 2
ИНСТРУКЦИЯ ПО ЭКСПЛУАТАЦИИ
MANUAL INSTRUCTION
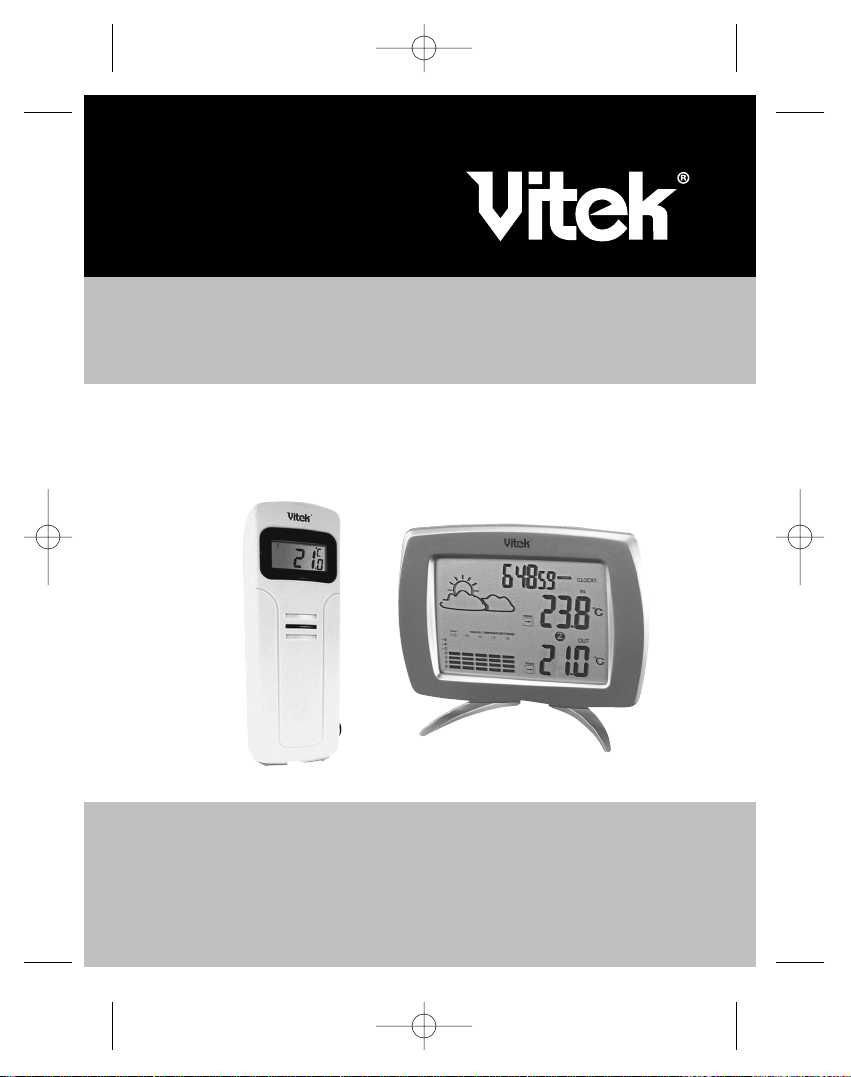
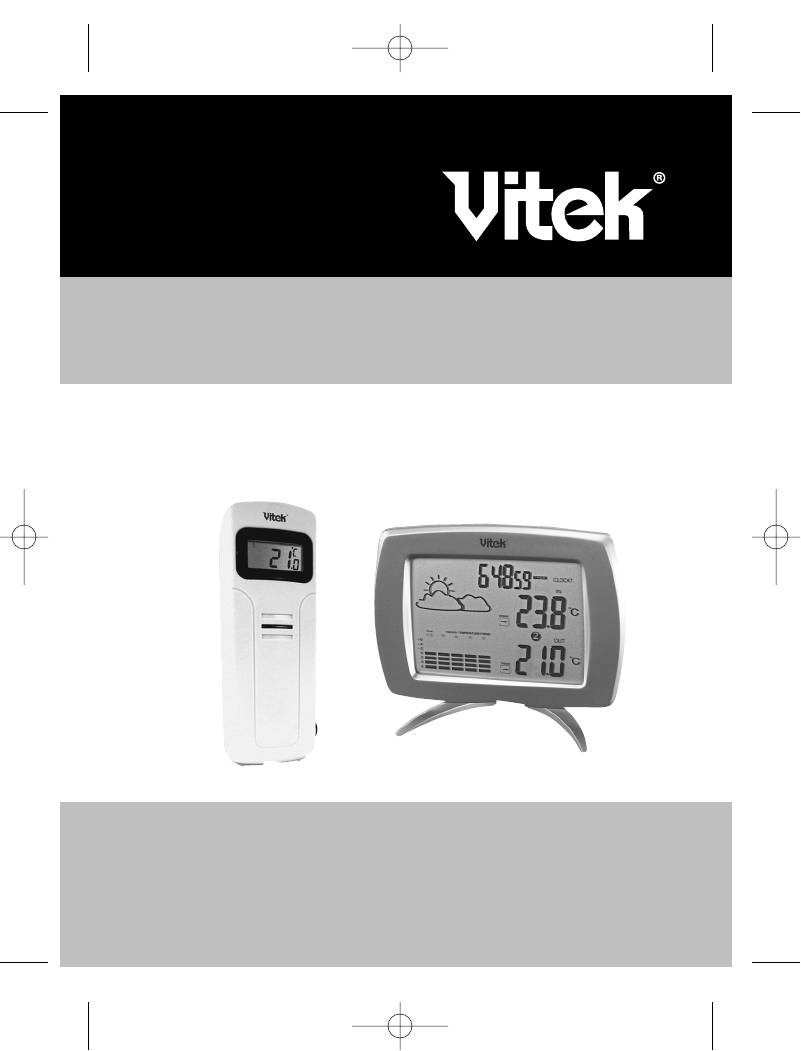
МОДЕЛЬ VT-3536
ALARM CLOCK / WIRELESS WEATHER STATION
ЧАСЫ — БУДИЛЬНИК / БЕСПРОВОДНАЯ МЕТЕОСТАНЦИЯ С
ОТОБРАЖЕНИЕМ ДАННЫХ О ПОГОДЕ
3536.qxd 30.08.2004 14:48 Page 3
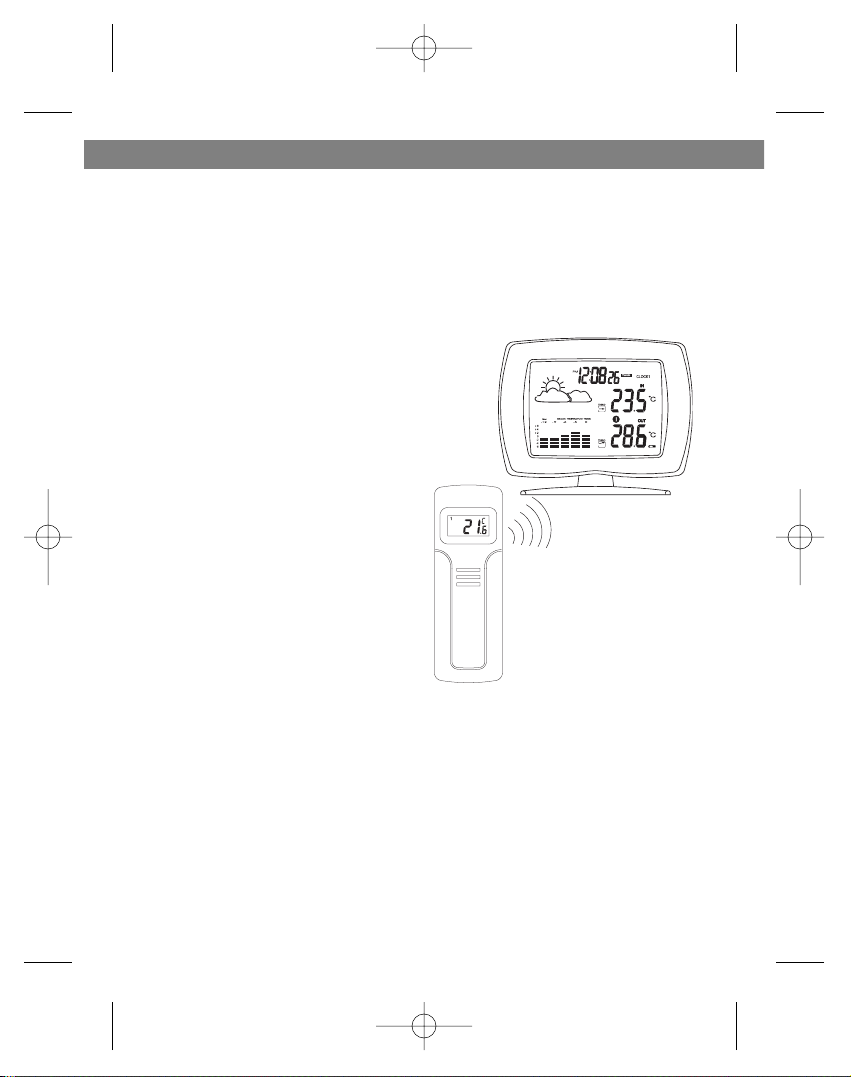
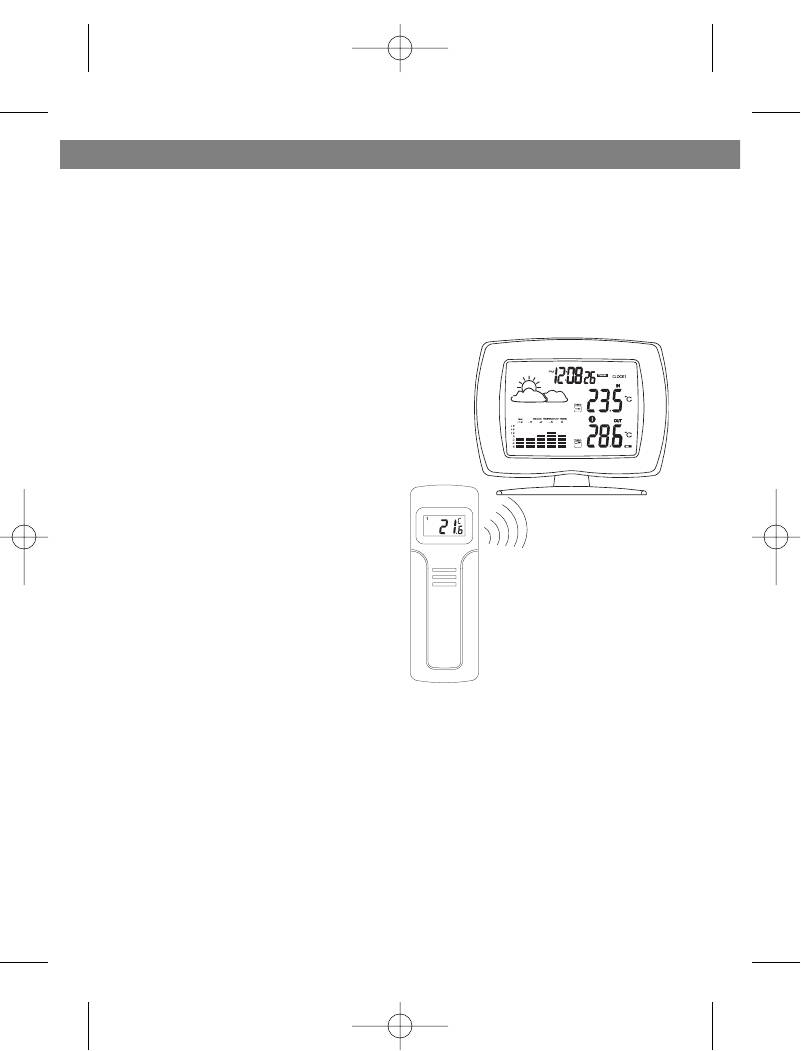
Wireless Weather Station with weather report
Congratulations on your purchase of this weather station. Please take the
time to read and understand this manual so you can begin to enjoy the convenience and features this product has to offer.
The unit is a weather station device that has several weather related functions. The main features are:
Remote Transmitter
• drip-proof design with LCD
• socket of external sensor probe
• temperature display in user-selectable °C or °F
• humidity display
• transmission range: up to 40 meters in open area
• battery type: 2 x AA size
ENGLISH
2
FEATURES
Main Display Unit:
• dual clock and dual alarm
• calendar (month/day/date)
• local temperature display
• receives and displays temperature and humidity readings from
up to 3 remote transmitters via
RF technology of 433MHz
• minimum and maximum temperature and humidity memory
• temperature and humidity trend
indicator
• temperature history (bar graph
for past 12 hours)
• weather icons
• user-selectable C or F
• table stand or wall mountable
• battery type: 2 x AA
VT-3536
receiver
VT-3536
transmitter
3536.qxd 30.08.2004 14:48 Page 2
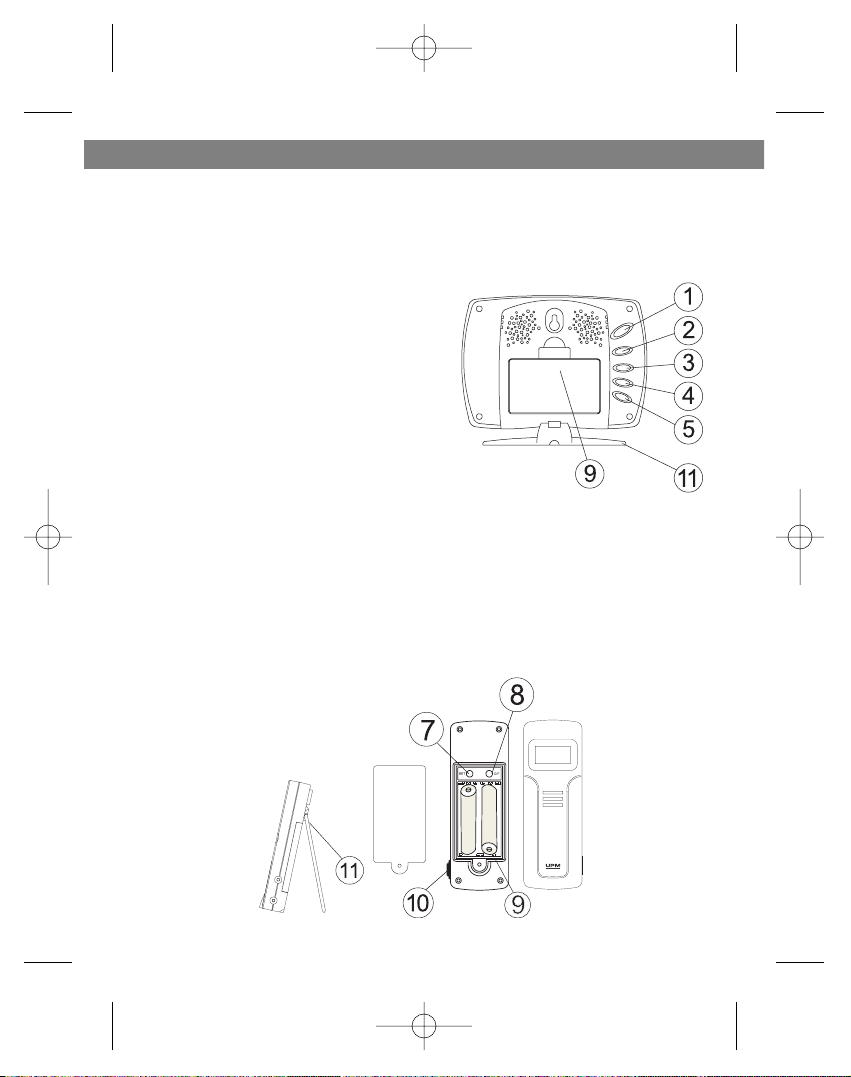
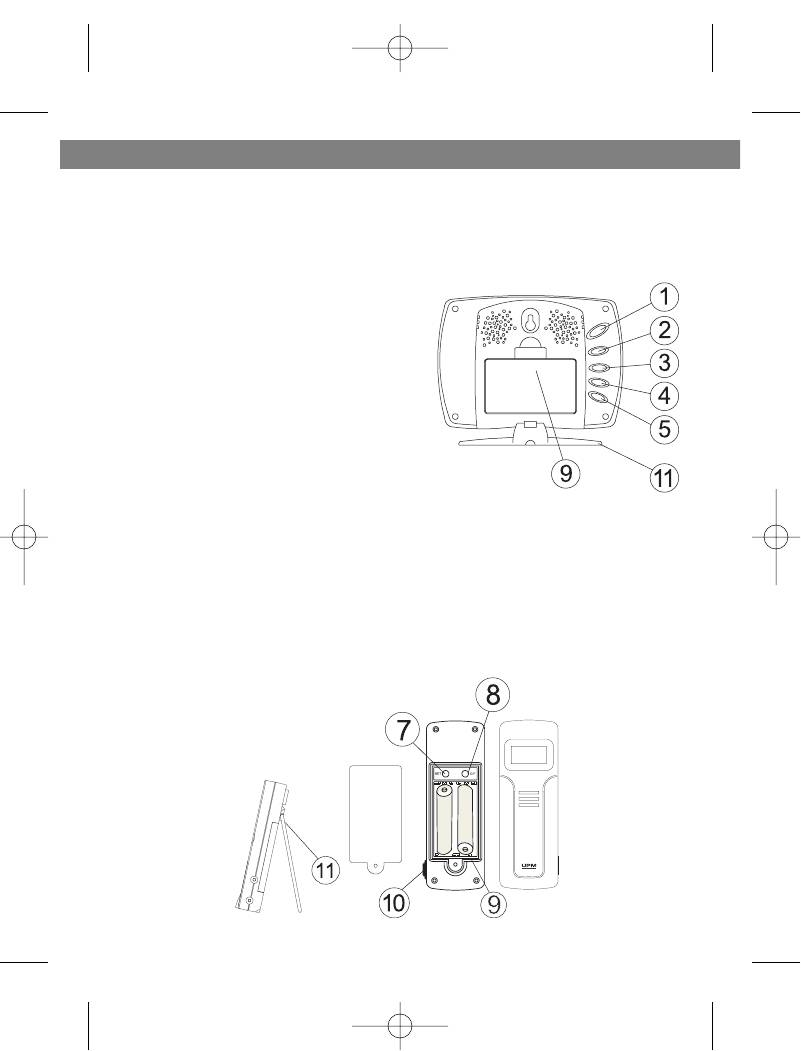
GETTING STARTED
1. MIN/-/MIN: shows minimum temperature & humidity; adjusts clock,
alarm, date and temperature alarm
values
2. ON/OFF: toggles between °C and °F,
12 and 24 hour format, Alarm 1 & 2
on and off, and bar graph indoor and
outdoor selection; scrolls through
temperature alarm settings
(off/high/low)
3. CHN: scrolls through remote channels (1 to 3); adjusts time and date
values
4. HOUR/+/MAX: shows maximum temperature & humidity; adjusts clock,
alarm, date and temperature alarm
values
5. SNOOZE/MODE: scrolls through Clock 1 & 2, Alarm 1 & 2, Date and
Temperature Alarm mode; snooze for alarm
6. LCD display
7. SET: enter to House code and Channel setting mode
8. C/F: change between °C or °F, change channel and house code
9. Battery compartment
10.Socket for external sensor probe.
11.Wall Mount Holder & Table Stand
ENGLISH
3
Button placement
3536.qxd 30.08.2004 14:48 Page 3
SETTING UP
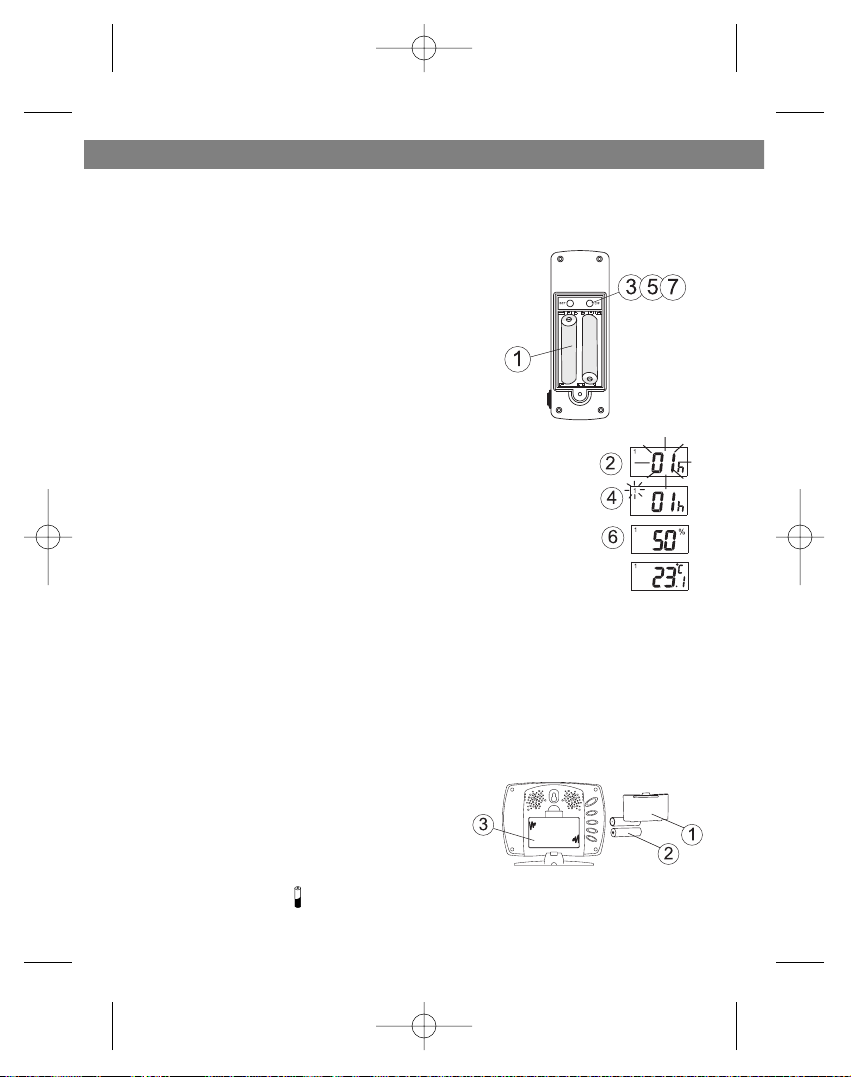
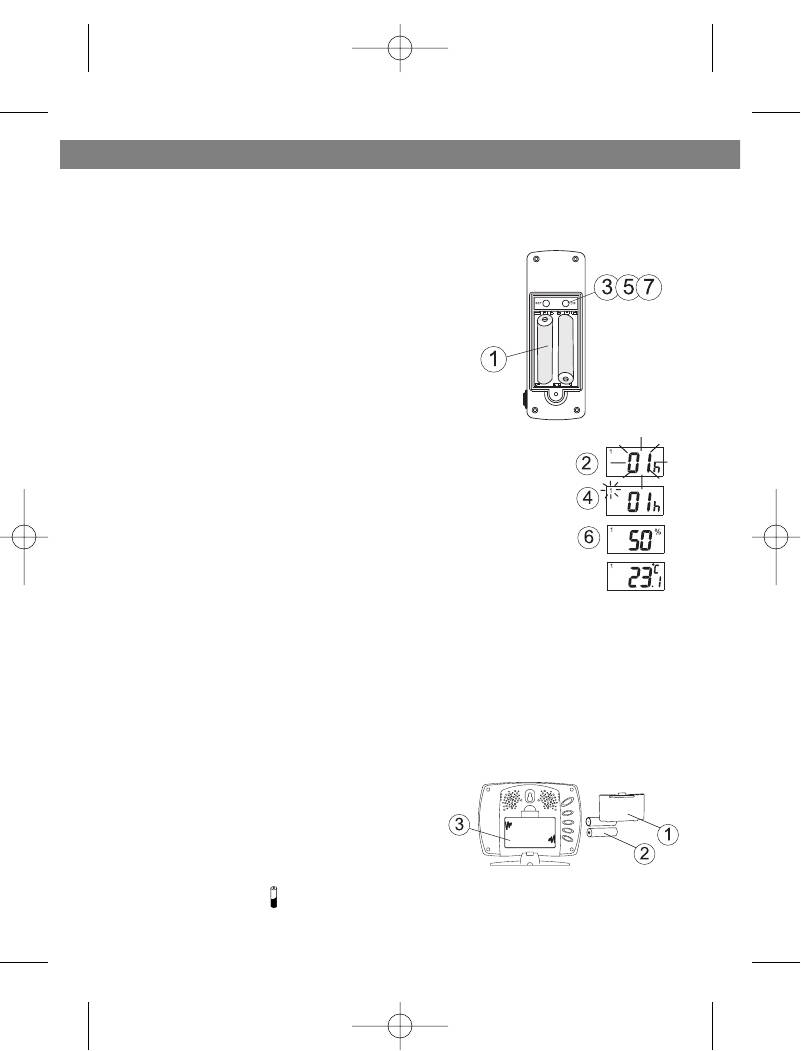
Set up the transmitter(s) before setting up the
receiver
1. Remove battery cover and insert batteries
to start setup
AA size batteries (included) Insert batteries
into compartment observing proper polarity
2. HOUSE CODE will flash for 8 seconds
3. Select HOUSE CODE (1-15) by pressing
C/F and pressing SET to CHANNEL setting
If you have multiple transmitters for a single
receiver, set each transmitter to the same House code
4. CHANNEL will flash for 8 seconds
5. Select CHANNEL(1-3) by pressing C/F
If you have multiple transmitters for a single receiver, set
each transmitter to a different Channel code
6. Humidity & Temperature will alternatively display on LCD
screen
7. Select °C or °F of Temperature by pressing C/F
• Use a different house code if your weather station detects other signals
from neighboring sources
• Factory default: house code = 01 and channel = 01
1. Remove battery cover
2. 2 AA size batteries (included)
3. Insert batteries into compartment,
observing proper polarity; replace cover
LOW BATTERY INDICATION:
Receiver: Low battery indicator will display
continuously when batteries need replac-
ing. On transmitter, will be displayed
ENGLISH
4
Setting up transmitter(s)
Setting up receiver
3536.qxd 30.08.2004 14:48 Page 4
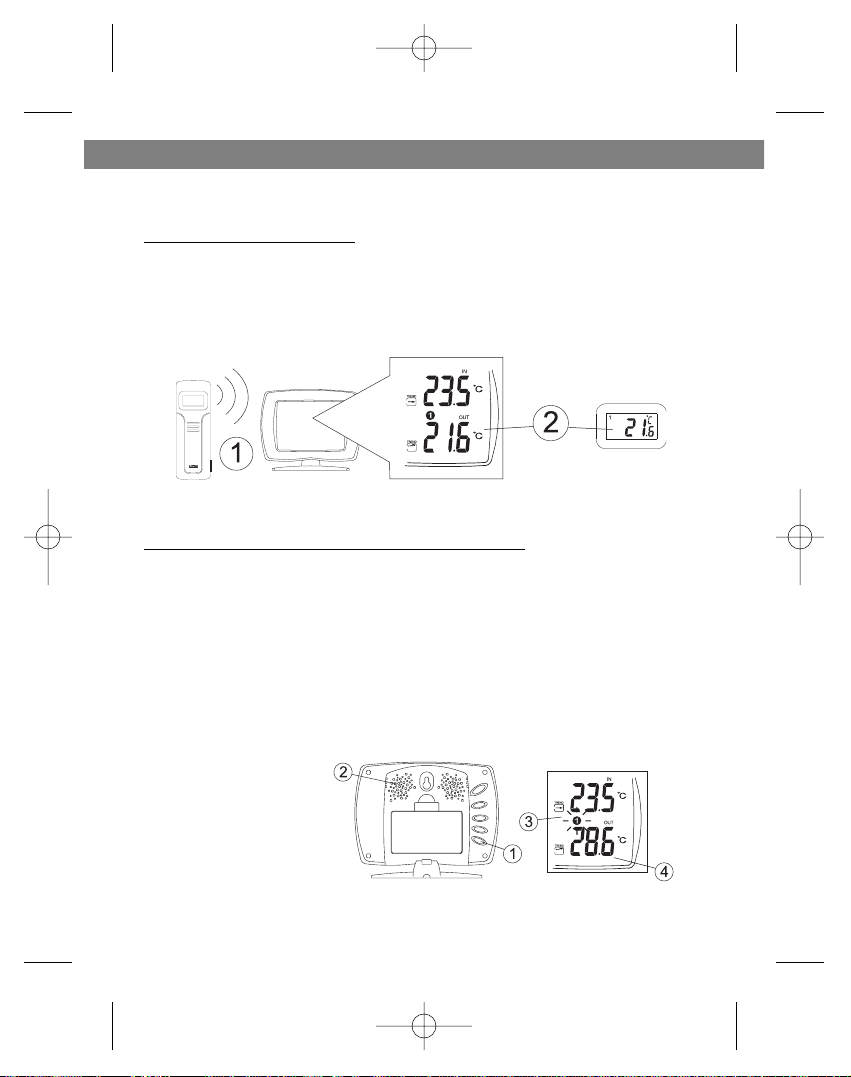
WIRELESS TRANSMISSION
Automatic Learn Function:
The learn function starts automatically and runs for approximately 3 minutes
when batteries are first installed in the receiver.
Within these 3 minutes, the receiver will pick up the temperature and humidity
signals from the remote transmitter and display the reading.
Manual Learn Function (Remote Signal Search):
If a new remote transmitter is added or if signal is lost (outdoor read out on
the receiver is blinking), the learn function must be executed again.
1. Press and hold CHN for 3 seconds to start.
2. Unit will beep to indicate that learn function has started.
3. Channel symbol will blink and unit will continue to beep as each remote
transmitter is detected.
4. Within 3 minutes, the temperature and humidity reading of the remote
transmitter will display on the receiver.
ENGLISH
5
3536.qxd 30.08.2004 14:48 Page 5

WIRELESS TRANSMISSION
Environmental factors and signals from other household devices, such as
remote entry controls, security systems, and computers, may interfere with
the wireless transmission of this product and cause temporary reception
loss. This is normal and does not affect the general performance of this
product. Stable reception will resume once the interference ends.
For optimal performance:
• Place the receiver and remote transmitter side by side about 1 metre
apart, and allow the receiver and remote transmitter to synchronize for 10
minutes before you place the remote transmitter outdoors.
• The remote transmitter should be placed in a dry shaded area.
NOTE: Fog andmist will not harm the remote transmitter but direct rain
must be avoided.
• Mount the remote transmitter upright avoiding metallic objects and
frames, such as window sills. Verify that there are no obstacles like a
transmission tower or steep hill that can cause interference and blockage
between the remote transmitter and receiver.
• Place the receiver unit at least 2 metres away from any electrical devices,
such as your television set, computer, cordless phone, or any radio controlled equipment.
• 1Replace unit(s) with fresh batteries when the Low Battery Indicator lights
up.
• Refer to the SETTING UP section.
• You may need to reposition the remote transmitter to a different location
and/or closer to the receiver for the best transmission.
ENGLISH
6
3536.qxd 30.08.2004 14:48 Page 6
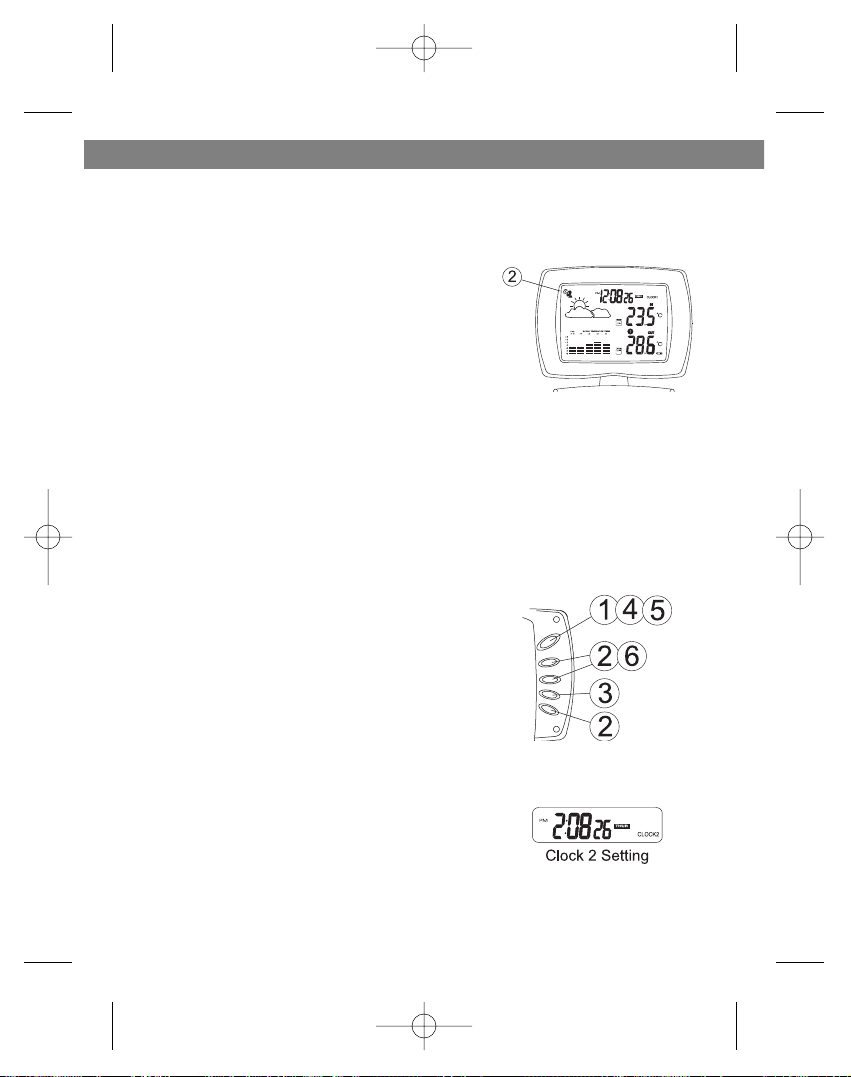
CLOCK SETTING
Manual clock setting
Clock 1 Setting:
1. Press and hold MODE for 3 seconds to
enter the clock setting mode (the CLOCK 1
symbol appears and the time will flash)
2. Press HOUR to set the hour and MINUTE to
set the minute;
3. Press ALARM/(C/F) during clock setting, to
change between 12 and 24 hour display.
This also will end clock setting.
4. Press MODE or do not press any key for 1
minute to finish clock setting.
Clock 2 Setting:
5. Scroll to Clock 2 mode using MODE
6. Press + or — key to change the hour (in one
hour increments/decrements relative to
Clock 1)
ENGLISH
7
3536.qxd 30.08.2004 14:48 Page 7
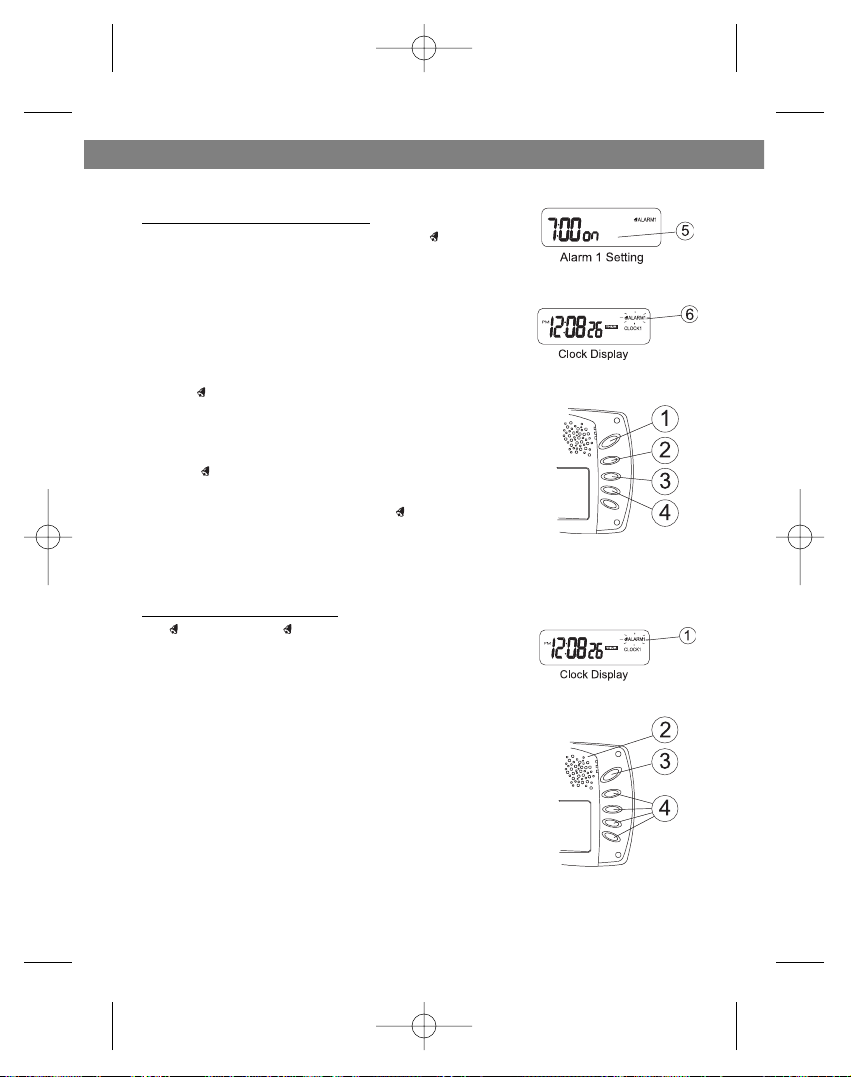
ALARM SETTING
Alarm 1 and Alarm 2 Setting:
1. Scroll to Alarm 1 using MODE. The ALARM 1
symbol will appear.
2. Press HOUR to set hour.
3. Press MIN to set minute.
4. Press ON/OFF to toggle alarm on and off.
5. When the alarm is set ON, the ‘on’ symbol will
appear.
6. In the normal clock display, if the alarm is set ON,
the ALARM 1 symbol will also appear on the
display.
• To set Alarm 2, scroll to Alarm 2 using MODE.
• The ALARM 2 symbol will appear. Follow the
same steps as above to set. In normal clock dis-
play, if the alarm is set ON, the ALARM 2 symbol will also appear on the display.
NOTE: Both Alarm 1 and Alarm 2 are based on the time set on Clock 1.
When the Alarm Sounds:
• ALARM 1 or ALARM 2 symbol will blink.
• The crescendo alarm will gradually increase in
loudness.
• Press SNOOZE to snooze the alarm for 5 minutes.
• After that the alarm will sound again.
• Press ANY other key to stop the alarm. Or without
interruption, the alarm will automatically stop
after one minute.
ENGLISH
8
3536.qxd 30.08.2004 14:48 Page 8
CALENDAR SETTING
1. Scroll to Date mode using MODE
2. Press HOUR/+/MAX to set month
3. Press MIN/-/MIN to set date
4. Press CHN to set day
TEMPERATURE & HUMIDITY
DISPLAY
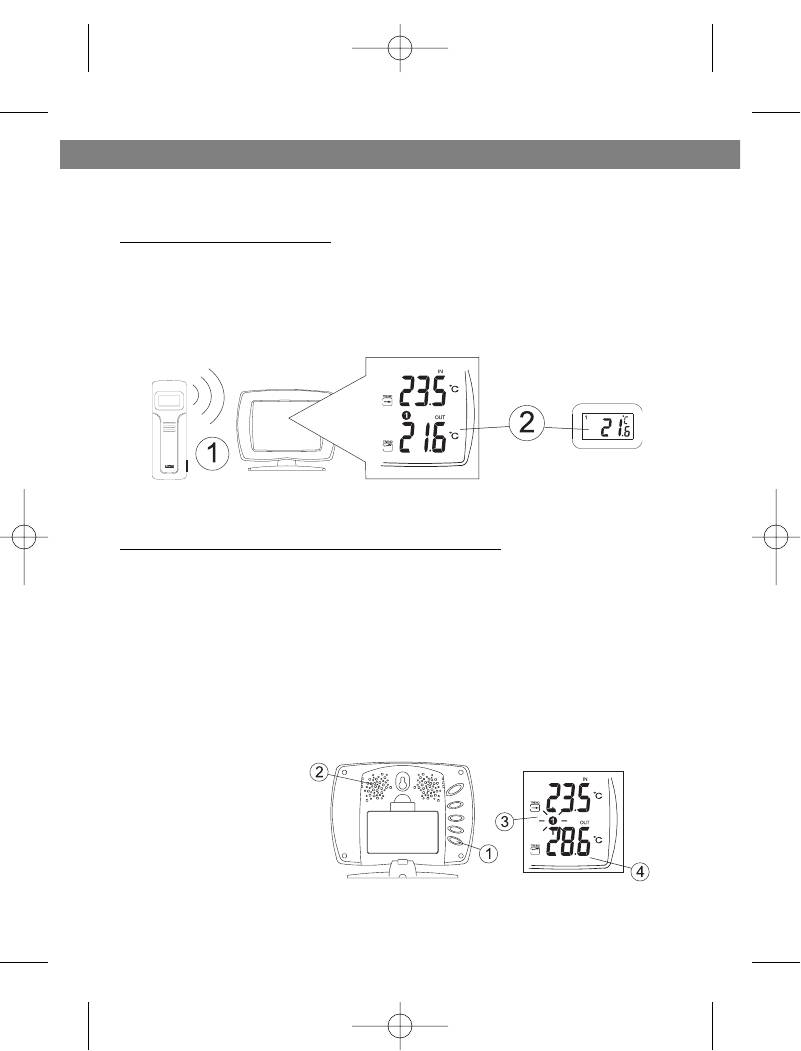
Local (Indoor) Temperature
The local (indoor) temperature will display instantly after batteries are inserted
into the receiver.
Remote (Outdoor) Temperature and Humidity
If the Learn Function is performed successfully (refer to the WIRELESS TRANSMISSION section), the remote (outdoor)
temperature and humidity will display in
the bottom-right corner of the LCD
screen.
Press CHN to toggle between Channels
1, 2 and 3.
NOTE: The temperature and humidity
data will alternate on the LCD screen.
Selecting °C or °F Temperature Display
Toggle between °C and °F by pressing
ON/OFF in either Clock 1 or Clock 2 mode.
ENGLISH
9
3536.qxd 30.08.2004 14:48 Page 9
Loading…

3536.qxd 30.08.2004 14:48 Page 2
ÈÍÑÒÐÓÊÖÈß ÏÎ ÝÊÑÏËÓÀÒÀÖÈÈ
MANUAL INSTRUCTION
ALARM CLOCK / WIRELESS WEATHER STATION
×ÀÑÛ — ÁÓÄÈËÜÍÈÊ / ÁÅÑÏÐÎÂÎÄÍÀß ÌÅÒÅÎÑÒÀÍÖÈß Ñ
ÎÒÎÁÐÀÆÅÍÈÅÌ ÄÀÍÍÛÕ Î ÏÎÃÎÄÅ
ÌÎÄÅËÜ VT-3536
3536.qxd 30.08.2004 14:48 Page 3
ENGLISH
Wireless Weather Station with weather report
Congratulations on your purchase of this weather station. Please take the
time to read and understand this manual so you can begin to enjoy the con-
venience and features this product has to offer.
The unit is a weather station device that has several weather related func-
tions. The main features are:
FEATURES
Main Display Unit:
• dual clock and dual alarm
• calendar (month/day/date)
• local temperature display
• receives and displays tempera-
ture and humidity readings from
up to 3 remote transmitters via
RF technology of 433MHz
• minimum and maximum temper-
VT-3536
ature and humidity memory
receiver
• temperature and humidity trend
indicator
• temperature history (bar graph
for past 12 hours)
• weather icons
• user-selectable C or F
VT-3536
• table stand or wall mountable
transmitter
• battery type: 2 x AA
Remote Transmitter
• drip-proof design with LCD
• socket of external sensor probe
• temperature display in user-selectable °C or °F
• humidity display
• transmission range: up to 40 meters in open area
• battery type: 2 x AA size
2
3536.qxd 30.08.2004 14:48 Page 2
ENGLISH
GETTING STARTED
1. MIN/-/MIN: shows minimum temper-
Button placement
ature & humidity; adjusts clock,
alarm, date and temperature alarm
values
2. ON/OFF: toggles between °C and °F,
12 and 24 hour format, Alarm 1 & 2
on and off, and bar graph indoor and
outdoor selection; scrolls through
temperature alarm settings
(off/high/low)
3. CHN: scrolls through remote chan-
nels (1 to 3); adjusts time and date
values
4. HOUR/+/MAX: shows maximum tem-
perature & humidity; adjusts clock,
alarm, date and temperature alarm
values
5. SNOOZE/MODE: scrolls through Clock 1 & 2, Alarm 1 & 2, Date and
Temperature Alarm mode; snooze for alarm
6. LCD display
7. SET: enter to House code and Channel setting mode
8. C/F: change between °C or °F, change channel and house code
9. Battery compartment
10.Socket for external sensor probe.
11.Wall Mount Holder & Table Stand
3
3536.qxd 30.08.2004 14:48 Page 3
ENGLISH
SETTING UP
Set up the transmitter(s) before setting up the
Setting up transmitter(s)
receiver
1. Remove battery cover and insert batteries
to start setup
AA size batteries (included) Insert batteries
into compartment observing proper polarity
2. HOUSE CODE will flash for 8 seconds
3. Select HOUSE CODE (1-15) by pressing
C/F and pressing SET to CHANNEL setting
If you have multiple transmitters for a single
receiver, set each transmitter to the same House code
4. CHANNEL will flash for 8 seconds
5. Select CHANNEL(1-3) by pressing C/F
If you have multiple transmitters for a single receiver, set
each transmitter to a different Channel code
6. Humidity & Temperature will alternatively display on LCD
screen
7. Select °C or °F of Temperature by pressing C/F
• Use a different house code if your weather station detects other signals
from neighboring sources
• Factory default: house code = 01 and channel = 01
1. Remove battery cover
Setting up receiver
2. 2 AA size batteries (included)
3. Insert batteries into compartment,
observing proper polarity; replace cover
LOW BATTERY INDICATION:
Receiver: Low battery indicator will display
continuously when batteries need replac-
ing. On transmitter, will be displayed
4
3536.qxd 30.08.2004 14:48 Page 4
ENGLISH
WIRELESS TRANSMISSION
Automatic Learn Function:
The learn function starts automatically and runs for approximately 3 minutes
when batteries are first installed in the receiver.
Within these 3 minutes, the receiver will pick up the temperature and humidity
signals from the remote transmitter and display the reading.
Manual Learn Function (Remote Signal Search):
If a new remote transmitter is added or if signal is lost (outdoor read out on
the receiver is blinking), the learn function must be executed again.
1. Press and hold CHN for 3 seconds to start.
2. Unit will beep to indicate that learn function has started.
3. Channel symbol will blink and unit will continue to beep as each remote
transmitter is detected.
4. Within 3 minutes, the temperature and humidity reading of the remote
transmitter will display on the receiver.
5
3536.qxd 30.08.2004 14:48 Page 5

ENGLISH
WIRELESS TRANSMISSION
Environmental factors and signals from other household devices, such as
remote entry controls, security systems, and computers, may interfere with
the wireless transmission of this product and cause temporary reception
loss. This is normal and does not affect the general performance of this
product. Stable reception will resume once the interference ends.
For optimal performance:
• Place the receiver and remote transmitter side by side about 1 metre
apart, and allow the receiver and remote transmitter to synchronize for 10
minutes before you place the remote transmitter outdoors.
• The remote transmitter should be placed in a dry shaded area.
NOTE: Fog andmist will not harm the remote transmitter but direct rain
must be avoided.
• Mount the remote transmitter upright avoiding metallic objects and
frames, such as window sills. Verify that there are no obstacles like a
transmission tower or steep hill that can cause interference and blockage
between the remote transmitter and receiver.
• Place the receiver unit at least 2 metres away from any electrical devices,
such as your television set, computer, cordless phone, or any radio con-
trolled equipment.
• 1Replace unit(s) with fresh batteries when the Low Battery Indicator lights
up.
• Refer to the SETTING UP section.
• You may need to reposition the remote transmitter to a different location
and/or closer to the receiver for the best transmission.
6
3536.qxd 30.08.2004 14:48 Page 6
ENGLISH
CLOCK SETTING
Manual clock setting
Clock 1 Setting:
1. Press and hold MODE for 3 seconds to
enter the clock setting mode (the CLOCK 1
symbol appears and the time will flash)
2. Press HOUR to set the hour and MINUTE to
set the minute;
3. Press ALARM/(C/F) during clock setting, to
change between 12 and 24 hour display.
This also will end clock setting.
4. Press MODE or do not press any key for 1
minute to finish clock setting.
Clock 2 Setting:
5. Scroll to Clock 2 mode using MODE
6. Press + or — key to change the hour (in one
hour increments/decrements relative to
Clock 1)
7
3536.qxd 30.08.2004 14:48 Page 7
ENGLISH
ALARM SETTING
Alarm 1 and Alarm 2 Setting:
1. Scroll to Alarm 1 using MODE. The ALARM 1
symbol will appear.
2. Press HOUR to set hour.
3. Press MIN to set minute.
4. Press ON/OFF to toggle alarm on and off.
5. When the alarm is set ON, the ‘on’ symbol will
appear.
6. In the normal clock display, if the alarm is set ON,
the ALARM 1 symbol will also appear on the
display.
• To set Alarm 2, scroll to Alarm 2 using MODE.
• The ALARM 2 symbol will appear. Follow the
same steps as above to set. In normal clock dis-
play, if the alarm is set ON, the ALARM 2 sym-
bol will also appear on the display.
NOTE: Both Alarm 1 and Alarm 2 are based on the time set on Clock 1.
When the Alarm Sounds:
• ALARM 1 or ALARM 2 symbol will blink.
• The crescendo alarm will gradually increase in
loudness.
• Press SNOOZE to snooze the alarm for 5 min-
utes.
• After that the alarm will sound again.
• Press ANY other key to stop the alarm. Or without
interruption, the alarm will automatically stop
after one minute.
8
3536.qxd 30.08.2004 14:48 Page 8

ENGLISH
CALENDAR SETTING
1. Scroll to Date mode using MODE
2. Press HOUR/+/MAX to set month
3. Press MIN/-/MIN to set date
4. Press CHN to set day
TEMPERATURE & HUMIDITY
DISPLAY
Local (Indoor) Temperature
The local (indoor) temperature will dis-
play instantly after batteries are inserted
into the receiver.
Remote (Outdoor) Temperature and Humidity
If the Learn Function is performed suc-
cessfully (refer to the WIRELESS TRANS-
MISSION section), the remote (outdoor)
temperature and humidity will display in
the bottom-right corner of the LCD
screen.
Press CHN to toggle between Channels
1, 2 and 3.
NOTE: The temperature and humidity
data will alternate on the LCD screen.
Selecting °C or °F Temperature Display
Toggle between °C and °F by pressing
ON/OFF in either Clock 1 or Clock 2 mode.
9
3536.qxd 30.08.2004 14:48 Page 9
ENGLISH
TEMPERATURE & HUMIDITY DISPLAY
Min and Max Temperature & Humidity
A Press MIN in Clock 1 mode to
display minimum temperature
and humidity.
The MIN symbol will appear.
To return to normal temperature and
humidity display, press MIN again.
B Press MAX in Clock 1 mode to
display maximum temperature
and humidity.
The MAX symbol will appear.
To return to normal temperature and
humidity display,press MAX again.
NOTE: Min/Max readings are auto-
matically cleared daily at 00:00
Temperature and Humidity Trend
The trend indicator shows the trend of the temperature and humidity in the
past half-hour interval.
Example: The following indicates that the temperature is rising.
10
3536.qxd 30.08.2004 14:48 Page 10

ENGLISH
HISTORICAL TEMPERATURE BAR GRAPH
The bar graph lets you see the temperature
trend over a period of 12 hours in 3-hour
intervals. The left axis denotes the change in
temperature in ±2 degrees. The top axis
denotes the time period broken into 3-hour
intervals. The reference point is at (0,0);
where the current period is time zero and the
change in temperature is zero.
How to read the bar graph?
About 12 hours ago
The temperature was approximately 4 degrees
cooler than the current temperature
About 9 hours ago
The temperature was approximately 2 degrees
cooler than the current temperature
About 6 hours ago
The temperature was approximately the same
as the current temperature
Within the last 3 hours
The temperature was approximately 2 degrees
warmer than the current temperature
Selecting Indoor or Outdoor Bar Graph:
You can select to view the indoor or outdoor bar graph. The indoor bar graph
is based on the local temperature and the outdoor bar graph is based on the
remote (outdoor) temperature of Channel 1.
1. Scroll to Date mode using MODE.
2. Toggle between the indoor and outdoor bar graph by pressing ON/OFF in
date mode.
3. If you have selected the indoor bar graph, the INDOOR symbol will appear
on the display. Otherwise, you have selected the outdoor bar graph.
11
3536.qxd 30.08.2004 14:48 Page 11
ENGLISH
WEATHER ICONS
Based on the temperature and humidity data collected from the remote
transmitter (Channel 1), the receiver will display the following weather icons
on the LCD screen.
Storm Alert
• Storm symbol will flash to warn of thunderstorm.
About Snow Freeze Warning
• Snow symbol will flash to warn of ‘snowing’.
• Activated when Channel 1’s temperature is between -1.9 °C and +2.9 °C
• Snow will appear solid if and when Channel 1’s temperature falls below —
1.9 °C: it is freezing.
Note:
• Remote sensor Channel 1 will be used for weather symbols indication.
12
3536.qxd 30.08.2004 14:48 Page 12
ENGLISH
TEMPERATURE ALARM
• The temperature alarm is an ideal feature to be used for greenhouses and
wine cellars, or any place that you require controlled temperature. Once
activated, the temperature alarm would sound when the room gets too
warm or too cold depending on your settings.
• You can set the temperature alarm for the local temperature (main receiv-
er unit) and/or for one of the remote (outdoor) channels separately.
• UPPER TEMPERATURE LIMIT: If the temperature gets too warm and
reaches the upper temperature limit, the alarm would sound.
• LOWER TEMPERATURE LIMIT: If the temperature gets too cold and
reaches the lower temperature limit, the alarm would sound.
Setting the Temperature Alarm for the Local Temperature
1. Scroll to the local temperature alarm setting mode by pressing MODE.
2. The Temperature Alarm symbol will appear and the indoor temperature
will be blinking.
3. Press ON/OFF to select the following settings:
4. Press + or — key to set the desired value for the
temperature limit.
13
3536.qxd 30.08.2004 14:48 Page 13
ENGLISH
TEMPERATURE ALARM
Setting the Temperature Alarm for a Remote Channel
1. Scroll to the remote temperature alarm setting
mode by pressing MODE.
2. The Temperature Alarm symbol will appear and
the remote temperature will be blinking.
3. Press ON/OFF to select the following settings:
4. Press CHN to select the desired remote channel
(1, 2 or 3) that you wish the temperature alarm to
be set on. Only one channel can be selected.
5. Press + or — key to set the desired value for the temperature limit.
When the Temperature Alarm Sounds
• The temperature alarm will sound when the actual temperature has
reached (or exceeded) the upper or lower temperature limit.
• symbol will blink
• The temperature alarm has a distinctive tone different to that of Alarm 1 or
Alarm 2.
• Press ANY key to stop the temperature alarm. Or without interruption, the
temperature alarm will automatically stop after one minute.
14
3536.qxd 30.08.2004 14:48 Page 14

ENGLISH
TROUBLESHOOTING
PROBLEM
SOLUTION
The temperature and
This may occur when you move the remote transmitter
humidity data on the
from one environment to another. For example, when you
remote transmitter does
bring the transmitter from inside the warm house out to
not match the data dis-
the cold exterior. In such a case, there will be a big
played on the receiver.
change in temperature. The transmitter will record this
change in temperature much quicker than it is able to
transmit the data to the receiver (which is done once
every minute). Therefore, you will temporarily get a differ-
ence in reading between the remote transmitter and
receiver.
The temperature and
The solution is to allow the remote transmitter some time
humidity data on the
to sit in its new location to reach equilibrium. This may
remote transmitter does
take several minutes. Once the data is stable, the data
not match the data dis-
displayed on the remote transmitter should match that
played on the receiver.
displayed on the receiver.
This may also be the result of a temporary loss of recep-
tion due to interfering sources. Normal reception should
resume once the interference ends. Refer to the WIRE-
LESS TRANSMISSION section.
The remote (outdoor)
Re-synchronize the remote transmitter and receiver by
readout on the receiver is
pressing and holding CHN on the receiver for 3 seconds
blinking.
until a beep is heard. The temperature and humidity data
from the remote transmitter will display on the receiver
within 3 minutes. Refer to the WIRELESS TRANSMISSION
(Manual Learn Function) section.
The remote (outdoor)
Ensure the remote transmitter is away from any possible
readout on the receiver is
source of interference and electrical disturbances. You
blinking. The receiver will
may try to reposition the remote transmitter in a different
not detect or receive the
location and/or closer to the receiver. The remote trans-
temperature and humidity
mitter does have a maximum range of 40 metres, but any
data from the remote
walls or windows the signal has to pass through will
transmitter, even after the
reduce the distance. Due to the nature of the batteries,
Manual Learn Function has
extreme cold temperatures may also affect the transmis-
been executed.
sion range.
Refer to the WIRELESS TRANSMISSION section and
repeat the Manual Learn Function with the remote
transmitter in a new location.
15
3536.qxd 30.08.2004 14:48 Page 15

ENGLISH
SPECIFICATIONS
Weather Station Receiver
Battery Type: 2 x 1.5V AA batteries
Temp. Range: -9.9°C to +55°C
Weather Station Transmitter
Battery Type: 2 x 1.5V AA batteries
Temp. Range: -30°C to +70°C
Humidity Range: 15 to 95%
Transmission Frequency: 433.92 MHz
Transmission Range: up to 40 meters in open area
The manufacturer reserves the right to change the characteristics of
the device without prior warning
SERVICE LIFE OF THE UNIT NOT LESS 3 YEARS
16
3536.qxd 30.08.2004 14:48 Page 16
3536.qxd 30.08.2004 14:48 Page 2
3536.qxd 30.08.2004 14:48 Page 3 ÈÍÑÒÐÓÊÖÈß ÏÎ ÝÊÑÏËÓÀÒÀÖÈÈ MANUAL INSTRUCTION ALARM CLOCK / WIRELESS WEATHER STATION ×ÀÑÛ — ÁÓÄÈËÜÍÈÊ / ÁÅÑÏÐÎÂÎÄÍÀß ÌÅÒÅÎÑÒÀÍÖÈß Ñ ÎÒÎÁÐÀÆÅÍÈÅÌ ÄÀÍÍÛÕ Î ÏÎÃÎÄÅ ÌÎÄÅËÜ VT-3536
3536.qxd 30.08.2004 14:48 Page 2 ENGLISH Wireless Weather Station with weather report Congratulations on your purchase of this weather station. Please take the time to read and understand this manual so you can begin to enjoy the convenience and features this product has to offer. The unit is a
3536.qxd 30.08.2004 14:48 Page 3 ENGLISH GETTING STARTED 1. MIN/-/MIN: shows minimum temperButton placement ature & humidity; adjusts clock, alarm, date and temperature alarm values 2. ON/OFF: toggles between °C and °F, 12 and 24 hour format, Alarm 1 & 2 on and off, and bar graph indoor and outdoor
3536.qxd 30.08.2004 14:48 Page 4 ENGLISH SETTING UP Set up the transmitter(s) before setting up the receiver Setting up transmitter(s) 1. Remove battery cover and insert batteries to start setup AA size batteries (included) Insert batteries into compartment observing proper polarity 2. HOUSE CODE
3536.qxd 30.08.2004 14:48 Page 5 ENGLISH WIRELESS TRANSMISSION Automatic Learn Function: The learn function starts automatically and runs for approximately 3 minutes when batteries are first installed in the receiver. Within these 3 minutes, the receiver will pick up the temperature and humidity
3536.qxd 30.08.2004 14:48 Page 6 ENGLISH WIRELESS TRANSMISSION Environmental factors and signals from other household devices, such as remote entry controls, security systems, and computers, may interfere with the wireless transmission of this product and cause temporary reception loss. This is
3536.qxd 30.08.2004 14:48 Page 7 ENGLISH CLOCK SETTING Manual clock setting Clock 1 Setting: 1. Press and hold MODE for 3 seconds to enter the clock setting mode (the CLOCK 1 symbol appears and the time will flash) 2. Press HOUR to set the hour and MINUTE to set the minute; 3. Press ALARM/(C/F)
3536.qxd 30.08.2004 14:48 Page 8 ENGLISH ALARM SETTING Alarm 1 and Alarm 2 Setting: 1. Scroll to Alarm 1 using MODE. The ALARM 1 symbol will appear. 2. Press HOUR to set hour. 3. Press MIN to set minute. 4. Press ON/OFF to toggle alarm on and off. 5. When the alarm is set ON, the ‘on’ symbol will
3536.qxd 30.08.2004 14:48 Page 9 ENGLISH CALENDAR SETTING 1. Scroll to Date mode using MODE 2. Press HOUR/+/MAX to set month 3. Press MIN/-/MIN to set date 4. Press CHN to set day TEMPERATURE & HUMIDITY DISPLAY Local (Indoor) Temperature The local (indoor) temperature will display instantly after
3536.qxd 30.08.2004 14:48 Page 10 ENGLISH TEMPERATURE & HUMIDITY DISPLAY Min and Max Temperature & Humidity A Press MIN in Clock 1 mode to display minimum temperature and humidity. The MIN symbol will appear. To return to normal temperature and humidity display, press MIN again. B Press MAX in
3536.qxd 30.08.2004 14:48 Page 11 ENGLISH HISTORICAL TEMPERATURE BAR GRAPH The bar graph lets you see the temperature trend over a period of 12 hours in 3-hour intervals. The left axis denotes the change in temperature in ±2 degrees. The top axis denotes the time period broken into 3-hour
3536.qxd 30.08.2004 14:48 Page 12 ENGLISH WEATHER ICONS Based on the temperature and humidity data collected from the remote transmitter (Channel 1), the receiver will display the following weather icons on the LCD screen. Storm Alert • Storm symbol will flash to warn of thunderstorm. About Snow
3536.qxd 30.08.2004 14:48 Page 13 ENGLISH TEMPERATURE ALARM • The temperature alarm is an ideal feature to be used for greenhouses and wine cellars, or any place that you require controlled temperature. Once activated, the temperature alarm would sound when the room gets too warm or too cold
3536.qxd 30.08.2004 14:48 Page 14 ENGLISH TEMPERATURE ALARM Setting the Temperature Alarm for a Remote Channel 1. Scroll to the remote temperature alarm setting mode by pressing MODE. 2. The Temperature Alarm symbol will appear and the remote temperature will be blinking. 3. Press ON/OFF to select
3536.qxd 30.08.2004 14:48 Page 15 ENGLISH TROUBLESHOOTING PROBLEM SOLUTION The temperature and humidity data on the remote transmitter does not match the data displayed on the receiver. This may occur when you move the remote transmitter from one environment to another. For example, when you bring
3536.qxd 30.08.2004 14:48 Page 16 ENGLISH SPECIFICATIONS Weather Station Receiver Battery Type: 2 x 1.5V AA batteries Temp. Range: -9.9°C to +55°C Weather Station Transmitter Battery Type: 2 x 1.5V AA batteries Temp. Range: -30°C to +70°C Humidity Range: 15 to 95% Transmission Frequency: 433.92 MHz
3536.qxd 30.08.2004 14:48 Page 17 ÐÓÑÑÊÈÉ ×àñû — áóäèëüíèê / áåñïðîâîäíàÿ ìåòåîñòàíöèÿ ñ îòîáðàæåíèåì äàííûõ î ïîãîäå Ïîæàëóéñòà, ïðî÷òèòå äàííîå ðóêîâîäñòâî, ñ òåì, ÷òîáû â ïîëíîé ìåðå èñïîëüçîâàòü âîçìîæíîñòè óñòðîéñòâà è îöåíèòü óäîáñòâî ðàáîòû ñ íåé. Äàííîå óñòðîéñòâî ïðåäíàçíà÷åíî äëÿ
3536.qxd 30.08.2004 14:48 Page 18 ÐÓÑÑÊÈÉ ÂÂÅÄÅÍÈÅ 1. SNOOZE/MODE (ÊÎÐÎÒÊÈÉ Ðàñïîëîæåíèå êíîïîê ÑÎÍ/ÐÅÆÈÌ): âûáîð óñòàíîâîê ÷àñîâ 1 è 2, óñòàíîâîê áóäèëüíèêà 1 è 2, äàòû è ñèãíàë ïðåäóïðåæäåíèÿ èçìåíåíèÿ òåìïåðàòóðû; ïîâòîð ñèãíàëà áóäèëüíèêà 2. HOUR/+/MAX (×ÀÑ/+/ÌÀÊÑÈÌÓÌ): îòîáðàæåíèå ìàêñèìàëüíîé
3536.qxd 30.08.2004 14:48 Page 19 ÐÓÑÑÊÈÉ ÓÑÒÀÍÎÂÊÀ Óñòàíîâèòå ïåðåäàò÷èê(è) äî óñòàíîâêè îñíîâíîãî áëîêà (ðåñèâåðà) Åñëè ó Âàñ íåñêîëüêî ïåðåäàò÷èêîâ è îäèí ðåñèâåð, íàñòðîéòå âñå ïåðåäàò÷èêè íà îäèí è òîò æå äîìàøíèé êîä 1. ×òîáû íà÷àòü íàñòðîéêó ñíèìèòå êðûøêó ñ îòäåëåíèÿ äëÿ áàòàðåé è âñòàâüòå
3536.qxd 30.08.2004 14:48 Page 20 ÐÓÑÑÊÈÉ ÁÅÑÏÐÎÂÎÄÍÀß ÏÅÐÅÄÀ×À ÄÀÍÍÛÕ Àâòîìàòè÷åñêàÿ íàñòðîéêà: 1. Äàííàÿ ôóíêöèÿ ïîçâîëÿåò ïðîèçâîäèòü àâòîìàòè÷åñêóþ íàñòðîéêó ðåñèâåðà è ïðîèñõîäèò â òå÷åíèå 3 ìèíóò ïîñëå ïåðâîé óñòàíîâêè áàòàðåé ïèòàíèÿ. 2.  òå÷åíèå ýòîãî âðåìåíè ðåñèâåð ïðèíèìàåò èíôîðìàöèþ î
3536.qxd 30.08.2004 14:48 Page 21 ÐÓÑÑÊÈÉ ÁÅÑÏÐÎÂÎÄÍÀß ÏÅÐÅÄÀ×À Âî âðåìÿ ðàáîòû ïðèáîðîâ âîçìîæíî âðåìåííîå óõóäøåíèå êà÷åñòâà ïðè¸ìà èç-çà ôàêòîðîâ âëèÿíèÿ îêðóæàþùåé ñðåäû, äîìàøíåãî ýëåêòðîîáîðóäîâàíèÿ, íàïðèìåð ïóëüòîâ äèñòàíöèîííîãî óïðàâëåíèÿ, ñèñòåì áåçîïàñíîñòè è êîìïüþòåðîâ. Ýòî îáû÷íîå
3536.qxd 30.08.2004 14:48 Page 22 ÐÓÑÑÊÈÉ ÓÑÒÀÍÎÂÊÀ ×ÀÑΠÓñòàíîâêà ÷àñîâ 1: 1. Äëÿ âõîäà â ðåæèì óñòàíîâêè ÷àñîâ íàæìèòå è óäåðæèâàéòå 3 ñåêóíäû êíîïêó MODE (ÐÅÆÈÌ) (ïîÿâèòñÿ ñèìâîë CLOCK 1 (×ÀÑÛ 1), èíäèêàòîð âðåìåíè íà÷í¸ò ìèãàòü) 2. Äëÿ ââîäà ÷àñà íàæìèòå HOUR (×ÀÑ), äëÿ ââîäà ìèíóò íàæìèòå
3536.qxd 30.08.2004 14:48 Page 23 ÐÓÑÑÊÈÉ ÓÑÒÀÍÎÂÊÀ ÁÓÄÈËÜÍÈÊÀ Óñòàíîâêà Áóäèëüíèêà 1 è Áóäèëüíèêà 2: 1. Êíîïêîé MODE (ÐÅÆÈÌ) ïåðåêëþ÷èòåñü â ðåæèì ALARM 1 (ÁÓÄÈËÜÍÈÊ 1) 2. Äëÿ ââîäà ÷àñà íàæìèòå HOUR (×ÀÑ). 3. Äëÿ ââîäà ìèíóò íàæìèòå MIN (ÌÈÍÓÒÛ). 4. Äëÿ âêëþ÷åíèÿ/âûêëþ÷åíèÿ áóäèëüíèêà íàæìèòå
3536.qxd 30.08.2004 14:48 Page 24 ÐÓÑÑÊÈÉ ÓÑÒÀÍÎÂÊÀ ÊÀËÅÍÄÀÐß 1. Êíîïêîé MODE (ÐÅÆÈÌ) ïåðåêëþ÷èòåñü â ðåæèì Date (Äàòà) 2. Äëÿ ââîäà ìåñÿöà íàæìèòå HOUR/+/MAX (×ÀÑ/+/ÌÀÊÑÈÌÓÌ) 3. Äëÿ ââîäà äàòû íàæìèòå MIN//MIN (ÌÈÍÓÒÀ/-/ÌÈÍÈÌÓÌ) 4. Äëÿ óñòàíîâêè ÷èñëà íàæìèòå êíîïêó CHN (ÊÀÍÀË) ÈÍÄÈÊÀÒÎÐ
3536.qxd 30.08.2004 14:48 Page 25 ÐÓÑÑÊÈÉ ÈÍÄÈÊÀÖÈß ÒÅÌÏÅÐÀÒÓÐÛ È ÂËÀÆÍÎÑÒÈ Ìèíèìàëüíàÿ è ìàêñèìàëüíàÿ òåìïåðàòóðà è âëàæíîñòü À. Äëÿ îòîáðàæåíèÿ íà äèñïëåå ìèíèìàëüíîé òåìïåðàòóðû è âëàæíîñòè íàæìèòå êíîïêó MIN (ÌÈÍÈÌÓÌ) â ðåæèìå ×àñû 1. Íà äèñïëåå ïîÿâèòñÿ ñèìâîë MIN (ÌÈÍÈÌÓÌ). Á. ×òîáû âåðíóòüñÿ
3536.qxd 30.08.2004 14:48 Page 26 ÐÓÑÑÊÈÉ ÑÒÎËÁÎÂÀß ÄÈÀÃÐÀÌÌÀ Ñòîëáîâàÿ äèàãðàììà îòîáðàæàåò èçìåíåíèå ïîêàçàíèé òåìïåðàòóðû çà 12 ÷àñîâîé ïåðèîä ñ òð¸õ÷àñîâûìè èíòåðâàëàìè. Ëåâàÿ îñü — èçìåíåíèå òåìïåðàòóðû ±2 ãðàäóñà. Âåðõíÿÿ îñü îòîáðàæàåò âðåìåííûå ïåðèîäû ðàçáèòûé íà òðè ÷àñà. Áàçèñíàÿ òî÷êà
3536.qxd 30.08.2004 14:48 Page 27 ÐÓÑÑÊÈÉ ÏÎÃÎÄÍÛÅ ÏÈÊÒÎÃÐÀÌÌÛ ØÒÎÐÌÎÂÎÅ ÏÐÅÄÓÏÐÅÆÄÅÍÈÅ • Ïðè îïàñíîñòè ãðîçû áóäåò ìèãàòü øòîðìîâîé ñèìâîë . Ïðåäóïðåæäåíèå î ñíåãå è îáëåäåíåíèè • Ìèãàíèå ñèìâîëà ñíåã ïðåäóïðåæäàåò î ñíåãîïàäå. • Àêòèâèðóåòñÿ, êîãäà òåìïåðàòóðà ïî êàíàëó 1 ìåæäó -1.9 °C è +2.9 °C
3536.qxd 30.08.2004 14:48 Page 28 ÐÓÑÑÊÈÉ ÑÈÃÍÀË ÏÐÅÄÓÏÐÅÆÄÅÍÈß ÎÁ ÈÇÌÅÍÅÍÈÈ ÒÅÌÏÅÐÀÒÓÐÛ Òåìïåðàòóðíàÿ ñèãíàëèçàöèÿ èäåàëüíà ïðè èñïîëüçîâàíèè ïðèáîðà â îðàíæåðåÿõ, òåïëèöàõ, âèííûõ ïîãðåáàõ è ïðî÷èõ ìåñòàõ, ãäå íåîáõîäèìî ñòðîãî êîíòðîëèðîâàòü òåìïåðàòóðó. Åñëè ôóíêöèÿ âêëþ÷åíà, òî ïðèáîð áóäåò
3536.qxd 30.08.2004 14:48 Page 29 ÐÓÑÑÊÈÉ ÑÈÃÍÀË ÏÐÅÄÓÏÐÅÆÄÅÍÈß ÎÁ ÈÇÌÅÍÅÍÈÈ ÒÅÌÏÅÐÀÒÓÐÛ Óñòàíîâêà ñèãíàëèçàöèè íà âíåøíèé êàíàë 1. Íàæàòèåì êíîïêè MODE (ÐÅÆÈÌ) âêëþ÷èòå ðåæèì óñòàíîâêè âíåøíåé òåìïåðàòóðíîé ñèãíàëèçàöèè. Ïîÿâèòñÿ ñèìâîë òåìïåðàòóðíîé ñèãíàëèçàöèè, ïîêàçàíèÿ âíåøíåé òåìïåðàòóðû
3536.qxd 30.08.2004 14:48 Page 30 ÐÓÑÑÊÈÉ ÓÑÒÐÀÍÅÍÈÅ ÍÅÈÑÏÐÀÂÍÎÑÒÅÉ ÏÐÎÁËÅÌÀ ÓÑÒÐÀÍÅÍÈÅ Äàííûå ïî òåìïåðàòóðå è âëàæíîñòè íà ïåðèôåðèéíîì ïåðåäàò÷èêå íå ñîîòâåòñòâóþò äàííûì, îòîáðàæàåìûì íà îñíîâíîì áëîêå (ðåñèâåðå). Ýòî ìîæåò ïðîèçîéòè ïðè ïåðåìåùåíèè ïåðåäàò÷èêà èç îäíîé ñðåäû â äðóãóþ.
3536.qxd 30.08.2004 14:48 Page 31 ÐÓÑÑÊÈÉ ÑÏÅÖÈÔÈÊÀÖÈß Ðåñèâåð ìåòåîñòàíöèè Òèï áàòàðåè: Äèàïàçîí òåìïåðàòóð: 2 x 1.5 AA îò -9.9°C äî +55°C Ïåðåäàò÷èê ìåòåîñòàíöèè Òèï áàòàðåè: 2 x 1.5 AA Äèàïàçîí òåìïåðàòóð: îò -30°C äî +70°C Äèàïàçîí âëàæíîñòè: îò 15 äî 95% ×àñòîòà ïåðåäàò÷èêà: 433.92 ÌÃö