
Table of Contents
- Introduction
- Components
- Receiver Features
- Transmitter Features
- Installing Batteries
- Turn On/Off Unit
- Alarm
- Operating Instructions
- Quick Setting Guide
- Loss Link Alert
- Automatic Shutdown Function
- Synchronize/Pair Transmitter & Receiver
- Helpful Hints
- Cautions
- Cleaning
- FCC Compliance
- Declaration of Conformity
- Disposal
- Limited One-Year Warranty
- Read User Manual Online (PDF format)
- Download This Manual (PDF format)
Remote Food Thermometer with Dual Probe

TP08C Digital Wireless
Introduction
Congratulations on your purchase of the Professional Remote Food Thermometer.
You will now be able to remotely monitor the temperature of food and the
temperature inside your grill, oven or smoker from anywhere in your home.
Components
1 x Receiver
1 x Transmitter
2 x Stainless Steel Temperature Probes
1x Stainless Steel Probe Clip
4x AAA Batteries
1xUser Maunal
Receiver Features

- LCD (Liquid Crystal Display) – Displays all icons, temperature, and time.
- Alarm Indicator – Indicates if alarm is enabled/disabled
- Low Battery Indicator – Informs you if batteries in receiver are low power.
- Circular Arrow – Display will rotate between the HI & LO temperature settings every 4 seconds.
- Signal Icon ~ Signal Icon will flash if receiver enters synchronization mode.
- Soft Rubber Sleeve – Shockproof and more comfortable hand feel.
- Tabletop Stand – Allows you to stand the receiver on a tabletop
- Battery Compartment – Holds 2 AAA batteries.
- Hanging Wall Hole – Allows you to hang device on a hook.
3.1 Buttons
- PROBE1/ALARM: Press once to activate PROBE 1 temperature setting, the set temperature will be flashing. To disable/enable the alarm function, press and hold PROBE1/ALARM button for 3 seconds.
- PROBE2/TIMER: Press once to activate PROBE 2 temperature setting, the set temperature will be flashing. Press and hold PROBE2/TIMER button for 3 seconds to switch between Thermometer or Timer mode.
- /HR: Press the /HR button to increase your target set temperature by 1 degree, o press and hold the /HR button to increase by 10 degrees per second. When in Timer Mode, press to increase the Hour for the count-down timer.
- /MIN: Press the /MIN button to decrease your target set temperature by 1 degree, or press and hold the /MIN button to decrease by 10 degrees per second. When in Timer Mode, press to increase the MINUTE for the count-down timer.
- /°F./°C: Press to turn ON the LCD back light for 10 seconds. Press and hold button for 2 seconds to display receiver temperature in either °C or °F.
- BBQ/FOOD/ST./SP./CLEAR: Press to switch PROBE2 between FOOD and BBQ HI/LO temperature range setting for monitoring grill/smoker; In TIMER MODE, press to start or stop the countdown or count up timer. When the timer is stopped, press and hold to clear the timer setting back to 0:00.
- /SYNC: Press to turn ON/OFF the receiver. Press and hold for 2 seconds to synchronize/pair with transmitter.
Transmitter Features

- LCD (Liquid Crystal Display) – PROBET and PROBE2 current temperature appear on the display
- Low Battery Indicator – Informs you if batteries in transmitter are low power.
- WIRE STAND – Allows you to stand the transmitter upright on atabletop or can be reserved to use as a hanger.
- BATTERY COMPARTMENT – Holds 2 AAA batteries.
4.1 Button
°F/°C/ – Press to turn ON/OFF the transmitter. Press and hold button for 2
seconds to display receiver temperature in either °C or °F.
Button: Press once to turn ON the LCD back light for 10 seconds
Installing Batteries
Open the battery compartment of the receiver and insert 2 AAA batteries with
correct polarity. Open the battery compartment of the transmitter and insert 2
AAA batteries with correct polarity.
Turn On/Off Unit
Press /SYNC button on the receiver to turn on/off the receiver; Press °F/°C/
button on the transmitter to turn on/off the transmitter.
Alarm
- By default, the alarm is enabled every time you turn on the thermometer.
- Todisable the alarm, press and hold the PROBE1/ALARM button for 3 seconds. The alarm icon will disappear when you disable the alarm.
- Receiver will flash with the backlight on and beep when the current temperature reaches your set temperature. Press any key to stop the alarm
Operating Instructions
- Plug the temperature probes into the corresponding probe sockets of the transmitter.And Install battery into the transmitter
- Install battery into the receiver the LCD screen will display all icons for 2 seconds and you will hear a “beep”.
- If you do not insert the probes into the transmitter, both the LCD screen of transmitter&receiver will display “……”.
- When 2 probes are inserted into the transmiter, it will display the current temperature of each probe.
Quick Setting Guide
9.1 Setting your target FOOD temperature for probe 1
- Press the PROBE1/ALARM button once to activate the temperature setting.
- Press the /HR or /MIN buttons to increase or decrease your desired set temperature. Press and hold the /HR or /MIN buttons to rapidly scroll through digits.
- Press the PROBE1/ALARM button again to confirm your set temperature.
9.2 Setting Your Target FOOD Temperature for Probe 2
- Press the PROBE2/TIMER button once to activate the temperature setting.
- Press the /HR or /MIN buttons to increase or decrease your desired set temperature. Press and hold the /HR or /MIN buttons to rapidly scroll through digits.
- Press the PROBE2/TIMER button again to confirm your set temperature.
9.3 Setting BBQ HI/LO Temperature Range for Probe 2 .
- Press the BBQ/FOOD/ST./SP./CLEAR button to switch from PROBE2 to BBQ HI/LO temperature range setting.
- Press the PROBE2/TIMER button to activate BBQ HI temperature setting
- Press the /HR or /MIN buttons to increase or decrease your desired set temperature. Press and hold the /HR or /MIN buttons to rapidly scroll through digits.
- Press the PROBE2/TIMER button to confirm your BBQ HI temperature and the receiver automatically enter into BBQ LO temperature setting.
- Press the /HR or /MIN buttons to increase or decrease your desired set temperature. Press and hold the /HR or /MIN buttons to rapidly scroll through digits.
- Press the PROBE2/TIMER button to confirm your BBQ LO temperature. BBQ HI/LO temperature range setting is complete.
NOTE:
- Circular arrow – The display will rotate between the HI & LO temperature setting every 4 seconds. If you don’t wish for the display to loop , press the PROBE2/TIMER button.
- The unit will not allow you to set the BBQ HI temperature below the minimum BBQ LO temperature. Please ensure the BBQ HI temperature at least 1 degree higher than BBQ LO temperature.
9.4 Setting a Count-Down Timer
Important: To help you monitor both food temp and time progress, the
count -down timer and probe 2 alarm can be used simultaneously.
- Press and hold PROBE2/TIMER button for 3 seconds to enter timer mode.
- Press the /HR button to increase the HOUR.
- Press the /MIN button to increase the MINUTE.
- Press the BBQ/FOOD/ST./SP./CLEAR button to start your count -down timer.
If you need to view the probe 2 temperature setting, press and hold the
PROBE2/TIMER button for 3 seconds to back
Thermometer mode. The count-down timer alarm will still be running, indicated
by “Timer” flashing on the LCD display. When the timer is complete, the
receiver will beep with “Timer” flashing
9.5 Setting a Count Up Timer
- Press and hold the PROBE2/TIMER button for 3 seconds to enter into the timer mode.
- With the timer stopped, then press and hold to clear the timer back to 0:00.
- Press the BBQ/FOOD/ST./SP./CLEAR button to start your count up timer.
Loss Link Alert
- If the receiver is taken out of range, abnormal external interference or after shutting OFF the transmitter, the receiver may not be able to receive the transmission from the transmitter. If this happens for over 4 minutes, the unit will alert you by beeping once every 4 seconds to tell you the signal is lost. Pressing any button on receiver will stop the loss link beep.
- To regain transmission signal, move the receiver close to the transmitter, the link should be automatically restored, and the temperatures should appear on the receiver display.
Automatic Shutdown Function
If the transmitter receives no button presses for 2 hours and the temperature
is also below 40°C, it will automatically power off.
The receiver will automatically shut down after receiving no signal for 30
minutes.
Note: When there is TIMER running, the receiver will not shut down
automatically.
Synchronize/Pair Transmitter & Receiver
The transmitter and receiver were already paired at our manufacturing
facility. Usually you do NOT need to resynchronize or re-pair the units. You
just plug in the probes, insert batteries, turn on the receiver and the
transmitter and wait for a few seconds, you will see the temperatures shown on
both receiver and transmitter and the units are ready for use.
However, in some unusual cases, the transmitter and receiver are no longer
paired, then you may need to re-synchronize them by following the below steps:
a. Insert the stainless-steel probes into the corresponding probe sockets in
the transmitter.
b. Press and hold/SYNC button on receiver for 2~3 seconds to enter the
synchronization mode which will last for 60 seconds. The display shows a
flashing “…….”
c. Wait for a moment until the temperature reading shows on the receiver
display, it means the synchronization/Pairing is complete. Your professional
remote cooking thermometer is now ready for use
Note : The synchronization between the transmitter and the receiver won’t
be lost even if you replace the batteries.
Helpful Hints
- If the receiver and/or the transmitter display LLL or HHH instead of the probe temperature, wait for probe to reach room temperature. If LLL or HHH is still displayed or you get a false temperature, squeeze the probe jacks harder into the transmitter and twist them back and forth so they make good contact. If the problem still persists it is likely the intenal probe wire has shorted out either through moisture or heat damage.
- Within the warranty period, contact us and we will send you a replacement probe with no charge.
- If the temperature displayed seems to read too high or the temperature seems to increase too quickly, check to make sure the probe tip i not poking through the food to outside. Reposition the probe tip in the center of the thickest part of food. Avoid touching bone or heavy fat areas.
Cautions
- Always wear a heat resistant glove to touch the stainless steel probe sensors or wires during or just after cooking. Do not touch with bare hands.
- Keep the stainless steel probe sensors and wires away from children.
- Clean the stainless steel probes and dry thoroughly after each and every use. Do not use the receiver in the rain. Itis NOT rain proof. The transmitter is rain proof but not water tight. Do not immerse in water.
- Do not expose the plugs of the stainless steel probes or the plug in holes of the transmitter to water or any liquid. This will resultin a bad connecting and faulty readings.
- Do not expose the receiver or transmitter to direct heat or surface.
- Do not use stainless steel probes in microwave oven
- The Barbecue Thermometer registers temperatures as low as 329F (0°C) and as high as 572°F (300°C). LLL will be displayed below 32°F and HHH will be displayed above 572°F. Do not use the stainless probe sensor above 572°F. Doing so will deteriorate the wire.
- Not Intended for Use by Persons ages 12 and Under.
Cleaning
- Always wear a heat resistant glove to touch the stainless steel probe sensors or wires during or just after cooking. Do not touch with bare hands.
- Keep the stainless steel probe sensors and wires away from children.
- Wash the metal probe tips with hot soapy water and dry thoroughly. Do not immerse the probe in water while cleaning
- Wipe the transmitter and receiver with damp cloth. Do not immerse either in water.
FCC Compliance
Information to User
Warning: Changes or modifications to this unit not expressly approved by
the party responsible for compliance could void the users’ authority to
operate the equipment
Note: This equipment has been tested and found to comply with the limits
for a Class B digital device, pursuant to part 15 of the FCC Rules. These
limits are designed to provide reasonable protection against harmful
nterference in a residentialinstallation.
This equipment generates, uses and can radiate radio frequency energy and, if
not installed and used in accordance with the instructions, may cause harmful
interference to radio communications.
However, there i no guarantee that interference will not occur in a particular
installation. If this equipment does cause harmful interference to radio or
television reception, which can be determined by turning the equipment off and
on, the user is encouraged to try to correct the interference by one or more
of the following measures:
- Reorient or relocate the receiving antenna.
- Increase the separation between the equipment and receiver.
- Connect the equipment into an outlet on a circuit different from that to which the receiver is connected.
- Consult the dealer or an experienced radio/TV technician for help.
This device complies with part 15 of the FCC Rules. Operation is subject to
the following two conditions:
(1) This device may not cause harmful interference, and (2) This device must
accept any interference received, including interference that may cause
undesired operation
Declaration of Conformity
Hereby, the manufacturer declares that this product complies with the basic
requirements and applicable regulations of the Radio Equipment Directive
2014/53/EU, the EMC Directive 2014/30/EU. The complete declaration of
conformity can be found at: https://buythermopro.com/eu-declaration-of-
conformity/
Disposal
Meaning of the “Dustbin” Symbol
- Protect our environment: do not dispose of electrical equipment in the domestic waste.
- Please return any electrical equipment that you will no longer use to the collection points provided for their disposal.
- This helps avoid the potential effects of incorrect disposal on the environment and human health.
- This will contribute to the recycling and other forms of reutilisation of electrical and electronic equipment.
- Information concerning where the equipment can be disposed of can be obtained from your local authority.
CAUTION: Batteries/rechargeable batteries must not be disposed of with
household waste!
- The batteries must be removed from the appliance.
- Take spent batteries to the appropriate collection point or to adealer.
- Your town or local authority can provide information about public collection points.
This symbol can be found on batteries/rechargeable batteries which contain
hazardous:
- pb= contains lead
- Cd = contains cadmium
- Hg = contains mercury
- Li=contains lithium
Limited One-Year Warranty
ThermoPro warrants this product to be free of defects in parts, materials and
workmanship for a period of one year, from date of purchase.
Should any repairs or servicing under this warranty be required, contact
Customer Service by phone or email for instructions on how to pack and ship
the product to ThermoPro.
This warranty gives you specific legal rights and you may also have other
rights which vary from state to state.
Customer Service
Call to text: 1-877-515-7797 (USA &
Canada only)
44-808-164-1683(UK)
Email: service@buythermopro.com
Hours: Weekdays 8:00AM- 8:00PM EST(USA & Canada only)
1:00PM – 12:00PM CET(UK)
Food Doneness Temperature Table
MEAT| Rare| Med Rare| Medium| Med Well| Well
Done
—|—|—|—|—|—
Ground Beef| | | 160°F/71°C| |
Ground
Poultry| | | 165°F/74°C| |
Beef| 125°F/52°C| 140°F/60°C| 150°F/66°C| 160°F/71°C| 170°F/77°C
Veal| 125°F/52°C| 140°F/60°C| 150°F/66°C| 160°F/71°C| 165°F/74°C
Chicken| | | 165°F/74°C| |
Pork| | | 160°F/71°C| 165°F/74°C| 170°F/77°C
Poultry| | | 165°F/74°C| |
Lamb| 140°F/60°C| 145°F/63°C| 160°F/71°C| 165°F/74°C| 170°F/77°C
Fish| | | 145°F/63°C| |
Program| | 145°F/63°C| | |
Warning: The USDA (U.S. Department of Agriculture) recommends beef, pork,
veal & lamb to be cooked to 145°F (or 63°C) minimum and then rested for at
least 3 minutes. We provide the Food Doneness Temperature Table as a
recommendation for people
with different personal preference. Always be sure to check with your
thermometer.
Read User Manual Online (PDF format)
Read User Manual Online (PDF format) >>
Download This Manual (PDF format)
Download this manual >>
Инструкция к беспроводному термощупу
Функции термощупа:
- Возможность задавать необходимую температуру
- Сигнал при достижении заданной температуры
- Отображает текущую и заданную температуру
- Секундомер и таймер (минуты и секунды)
- Беспроводная передача данных до 20 метров
- Зонд из нержавеющей стали с жаростойкой проволокой 1 мм
- Температурный диапазон от 0°C до 250°C (32°F — 482°F)
Температура термометра предварительно запрограммирована на различные степени прожарки различных видов мяса.
Диапазон температур по заданным условиям:
|
Мясо/Степень прожарки |
Прожаренное |
Почти прожаренное |
Средняя прожарка |
Слабая прожарка |
С кровью |
|
Говядина |
76°C |
73°C |
71°C |
62°C |
60°C |
|
Ягненок |
76°C |
73°C |
71°C |
62°C |
|
|
Телятина |
76°C |
71°C |
62°C |
60°C |
|
|
Гамбургер |
71°C |
||||
|
Свинина |
76°C |
73°C |
71°C |
||
|
Индейка/курица |
79°C |
||||
|
Рыба |
58°C |
Включение термометра:
В монитор и в датчик вставьте батарейки ААА. Затем переключите выключатели на мониторе и передатчике в положение ON. После включения красная лампочка на передатчике загорится и мигнет 3 раза, после чего на дисплее отразится текущая температура.
Примечание: Если щуп не подключен к передатчику, он будет показывать минусовую температуру.
Важно: Передатчик передает температуру каждые 30 секунд, если она не изменяется. После изменения температуры данные датчика автоматически обновляются.
Выбор вида мяса и степени прожарки:
Чтобы выбрать мясо, которое вы будете готовить нажмите кнопку «MEAT». На мониторе отобразится вид мяса, на который настроен термометр. При последующем нажатии этой кнопки будут изменяться виды мяса в следующей последовательности: говядина, ягненок, телятина, гамбургер, свинина, индейка, курица, рыба.
Чтобы выбрать уровень степени прожарки нажмите кнопку «TASTE». Заданная температура, соответствующая степени прожарки отображается на мониторе как «Target Temp».
Можно установить необходимую температуру, для этого нажмите и удерживайте кнопку «MODE» в течение 3 секунд, начнет мигать «Target Temp». Нажимайте кнопку «MIN» или «SEC», чтобы выбрать нужную температуру. Нажмите кнопку «MODE», чтобы подтвердить настроенную температуру.
Примечание: Как только температура будет достигнута, монитор подаст звуковой сигнал и начнет мигать «Current Temp». Чтобы временно остановить сигнал оповещения – нажмите «MODE». Для полного отключения сигнала необходимо достать зонд из мяса.
Для переключения с градусов на фаренгейты и обратно, нажимайте кнопку «MODE».
Включение таймера/секундомера:
Секундомер и таймер работают независимо от датчика температуры. Для запуска секундомера нажмите «START/STOP», когда на дисплее показывает 00:00. Для запуска таймера сначала установите минуты и секунды с помощью кнопок «MIN» и «SEC». После чего нажмите кнопку «START/STOP» для запуска таймера. Для сброса нажмите кнопку «CLEAR». Как только время у таймера закончится, прозвучит звуковой сигнал и на экране замигают «MIN:SEC». Нажмите любую кнопку, чтобы отключить таймер.
Меры предосторожности:
Всегда надевайте жаропрочную перчатку, чтобы прикоснуться к щупу или проволоке во время или сразу после приготовления.
Тщательно промывайте щуп после каждого использования. Мыть щуп в посудомоечной машине нельзя.
Держите термометр в недоступном для детей месте.
Если температура мяса не отображается на экране, а щуп вставлен в мясо, проверьте, чтобы штекер от щупа был надежно вставлен в датчик.
Не размещайте экран под прямыми солнечными лучами, также не допускайте соприкосновения с влажными и горячими поверхностями.
НЕ ИСПОЛЬЗУЙТЕ термометр в микроволновой печи.
Не погружайте щуп в воду полностью. Влага попавшая внутрь щупа может давать неверные результаты.
Не подносите щуп или провод зонда к открытому огню или углям, это может привести к выходу из строя.
SMART WIRELESS BBQ THERMOMETER
USER MANUAL
AT-02

IP64 Water-resistant design
iPhone & Android phone Supported Search ‘ ToGrill‘ in App Store or Google play
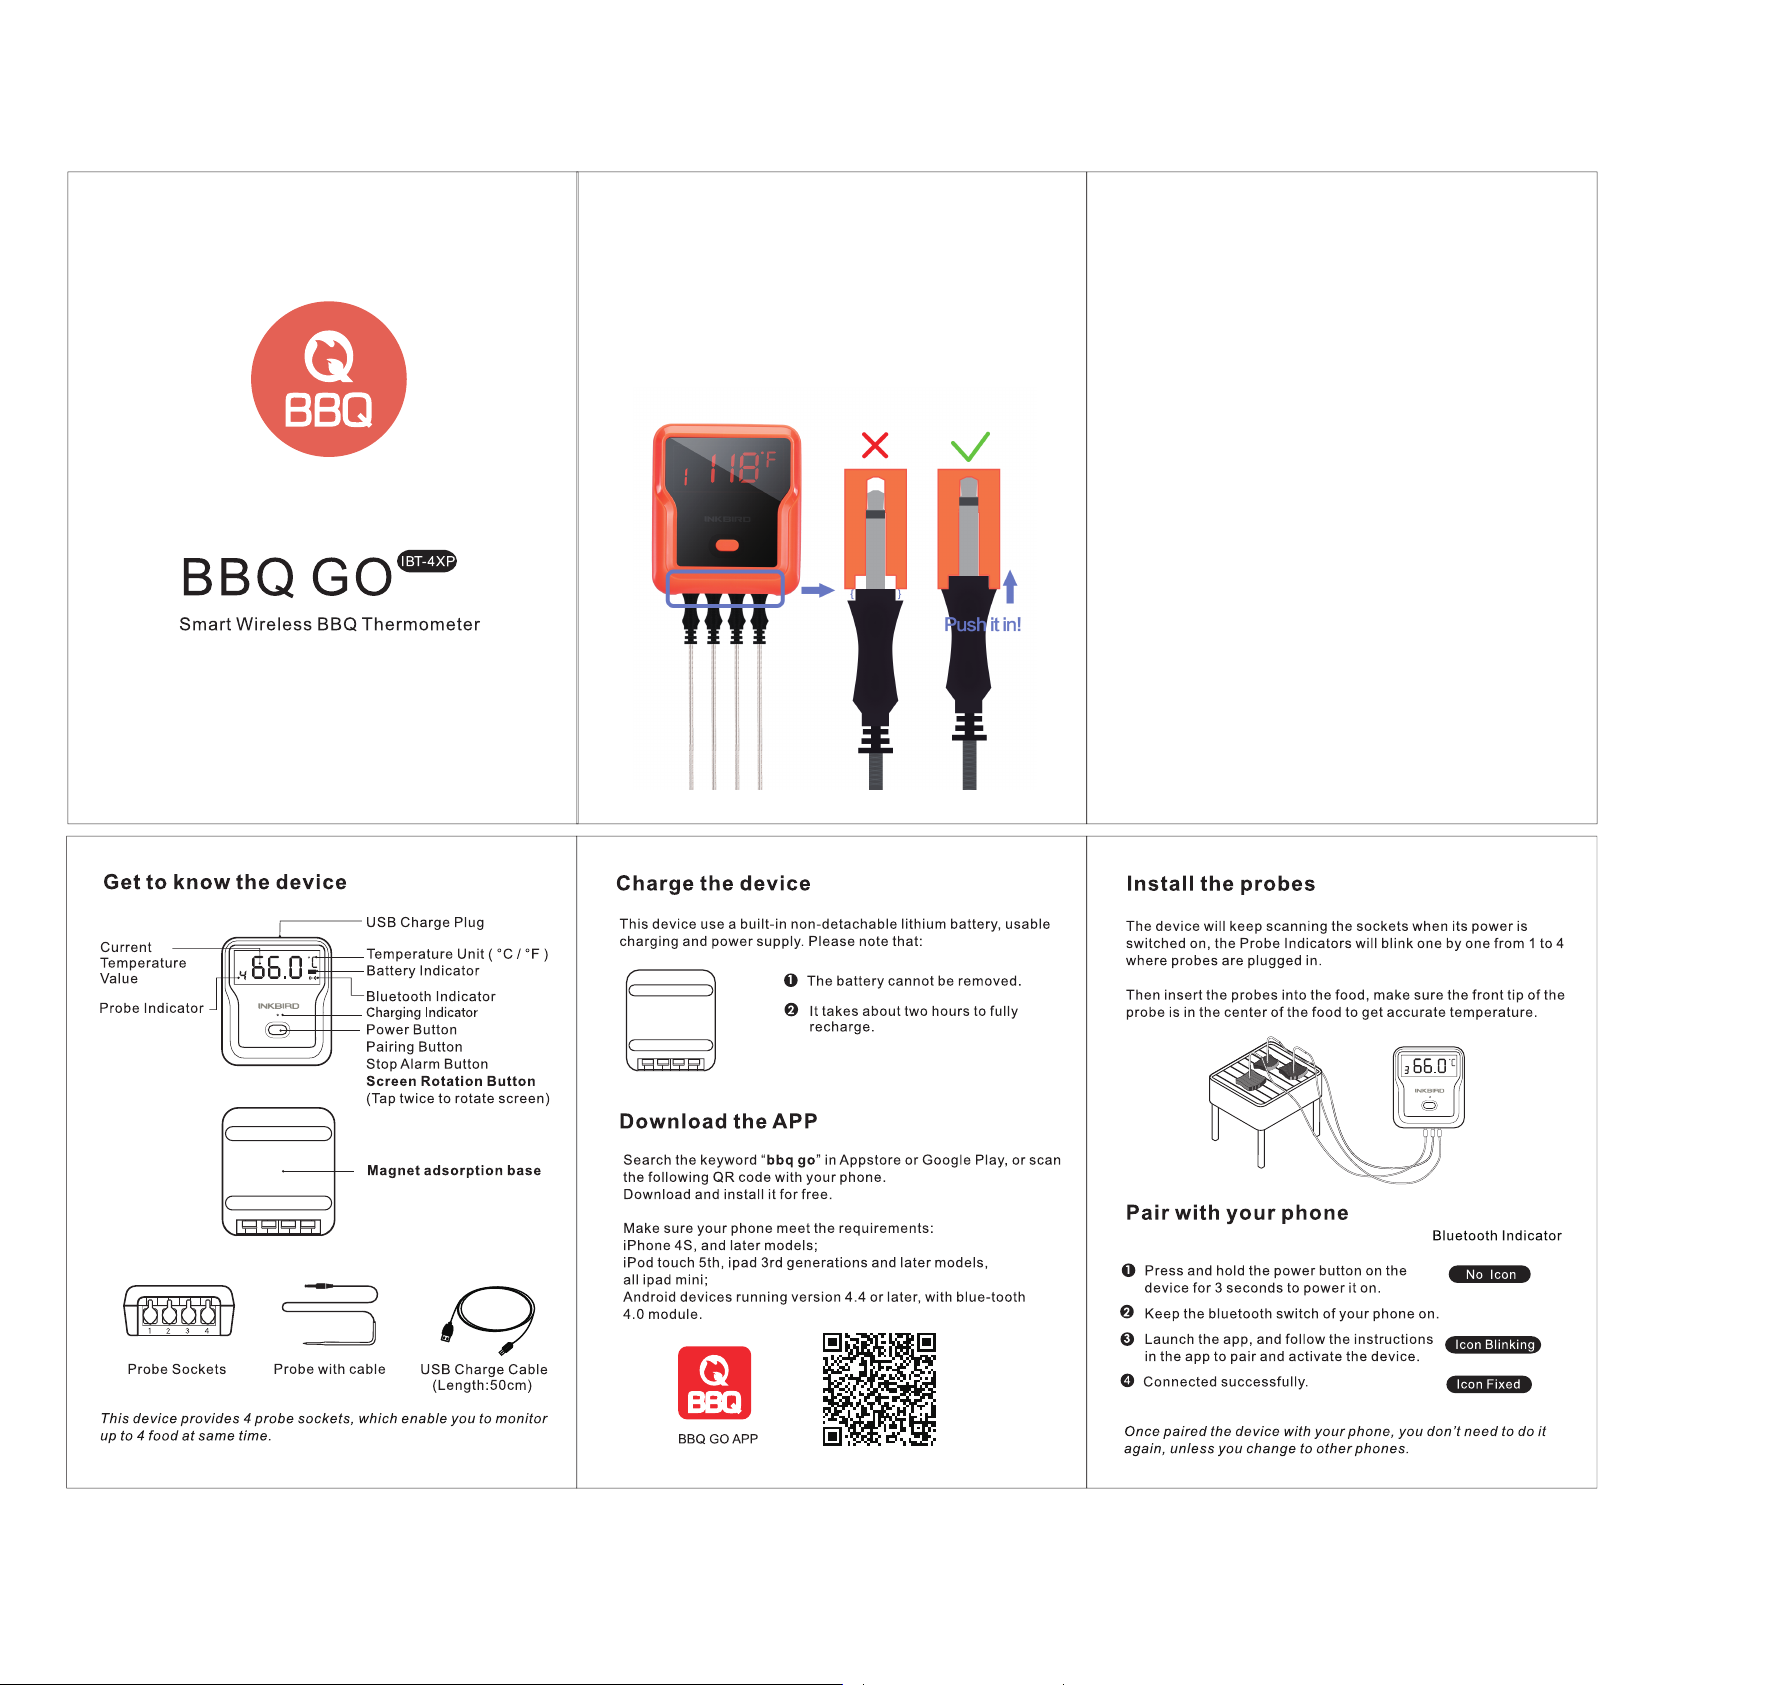
Get to know the device
- Battery cover
- Ambient temp. Probe Contacts
- Meat Temp. Probes Sockets
- Ambient temp. Probe

- Power ON/OFF Pairing / stop Alarm Button Back-light ON
- LCD
- Unlock
- Lock
The device provides 4 sockets for probes, which enable you monitor 4 items at once.
Put in the Battery
2 AA size batteries are needed for this device. Make sure they are put in the right direction by following the icons on the unit.
1 Slide the battery cover to open.
2 Put in batteries, noticing the icons which show directions.
3 Slide back the battery cover.
Install the probes
The device will keep scanning the sockets when its power is switched on, the Probe icons on LCD will display one by one from 1 to 4 where probes are plugged in.
Then insert the probes into the food, make sure the front tip of the probe is in the center of the food to get accurate temperature.
Screen introduction

- Battery Level
- Wireless Connection
- Doneness
- Temperature Unit
- Timer
- Alarm Signal
- Probe Number
- Meat type
How to install
STEP 1: Remove The Original Analog thermometer

1 START
Find the original analog thermometer on the lid

2
Loosen the fixing nut from the back of the lid (Counterclockwise)

3
Analog Thermometer removed
STEP 2: Install the New Smart Wireless thermometer on the lid

A
Hole Diameter: 8.5~14mm/0.33~0.55in
Hole Depth: 1~27mm/0.04~1.06in
1
Install the ambient temperature probe through the Oven hole on the lid

2
Add a metal gasket from the back of the oven while tightening the nut (Clockwise)

3
Done
END
Download the APP
Search the keyword ‘ToGrill’ in App store or Google Play, or scan the following QR code with your phone.
Download and install it for free.
Make sure your phone meets the requirements:
iOS devices running version 11.0 or later
Android devices running version 5.0 or later with blue-tooth 4.0 module.
APP DOWNLOAD
Power ON/OFF
- Press and hold the button for more than 3 seconds when it is in OFF mode, it will be powered on. And the LCD display will show‘ON’.
- if you do the same when it is in ON mode, it will be powered off.
- When there is no probe inserted in the device, it will be powered off automatically.
Activate device and pair with your phone
1 Switch on your device and keep the blue-tooth switch of your phone on.
2 Activate device:
- Launch the ‘ToGrill’ app,
- Enable mobile phone permissions
- Follow the instructions in the app to activate the device
Use ToGrill APP to Scan
Scan the QR Code on the device or right
DEVICE ACTIVATION
3 Pairing:
i: Chose the product you have on app
ii: Press the Pairing/Stop Alarm Button (on the top of the device)
4 Connected successfully.
Once Paired the device with your phone, you don’t need to do it again, unless you change to other phones.
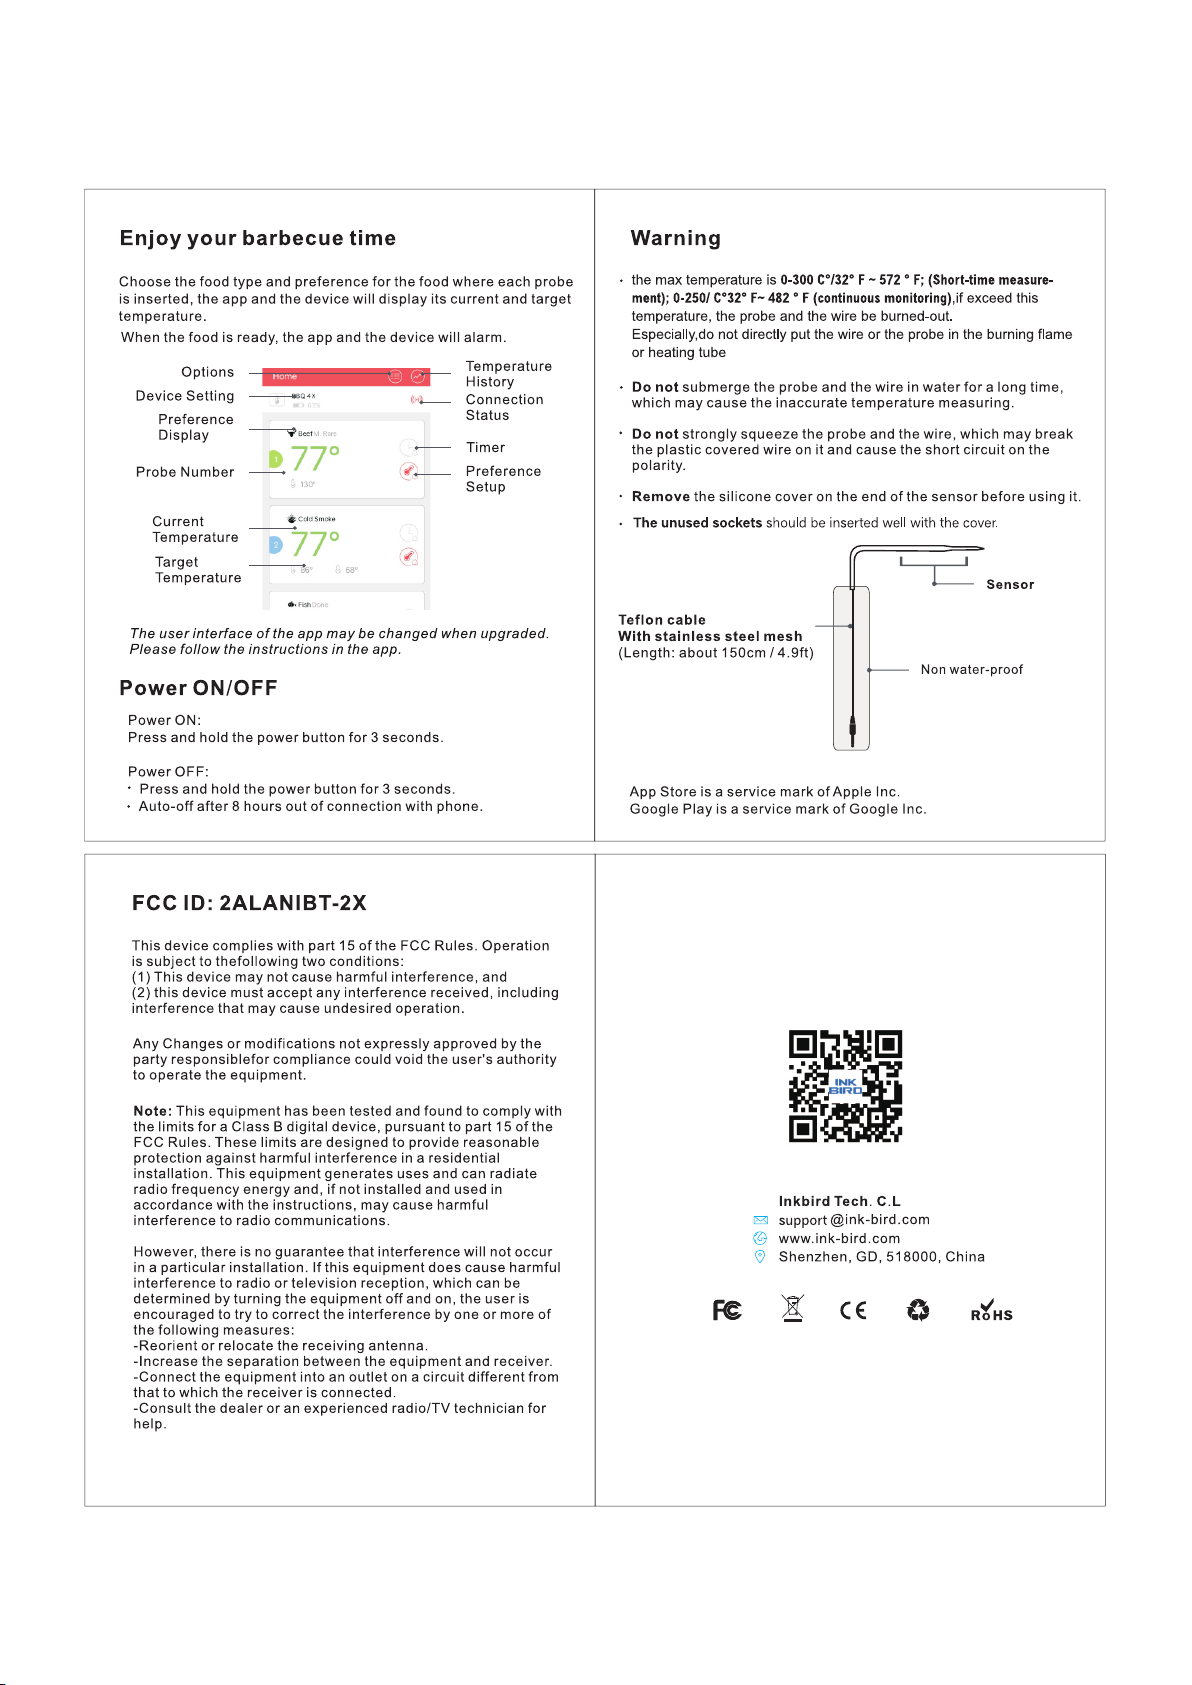
Enjoy your barbecue time
Choose food type and preference for the food where each probe is inserted, the app and the device will display its current and target temperature.
When the food is ready, the app and the device will alarm.
- Options
- Probe number & probe color configuration
- Current Food Temp.
- Current probe Temp.
- Current ambient Temp.
- Temp. History
- Device status
- Edit Probe infor.
- Target Temperature
- Preset Meat Info
- Preset Setup
- Timer Setup
The user interface of the app may be changed when upgrade.
Please follow the instructions in the app.
Probe color configuration
It’s difficult for you to distinguish different probes when you have several probes in using in the same time.
The app provides 6 colors for each channel, which enables users set them to be identical to the color of the probes.
The probes come in 6 colors as well.
WARNING
The heat resistance varies in different components of the probe,
DO NOT put the probes directly in fire flame.
DO NOT put the wrap into oven, or it will melt!
And robes are NOT dishwasher safe.
- Sensor
Measurement range 0~300°C/32~572°F - Silicone handle
Withstands heat up to 250°C/482°F - Metal handle
Withstands heat up to 380°C/716°F - Teflon cable with stainless steel mesh
Withstands heat up to 380°C/176°F - Ambient Sensor
Withstands heat up to 380°C/716°F - ABS Wrap
80°C/176°F
Attention: Temp Probes above for reference only,subject to the actual probes.
App Store is a service mark of Apple Inc.
Google Play is a service mark of Google Inc.

FCC Caution.
This device complies with part 15 of the FCC Rules. Operation is subject to the following two conditions: (1) This device may not cause harmful interference, and (2) this device must accept any interference received, including interference that may cause undesired operation.
15.21 Information to user.
Any Changes or modifications not expressly approved by the party responsible for compliance could void the user’s authority to operate the equipment.
15.105 Information to the user.
Note: This equipment has been tested and found to comply with the limits for a Class B digital device, pursuant to part 15 of the FCC Rules. These limits are designed to provide reasonable protection against harmful interference in a residential installation. This equipment generates uses and can radiate radio frequency energy and, if not installed and used in accordance with the instructions, may cause harmful interference to radio communications. However, there is no guarantee that interference will not occur in a particular installation. If this equipment does cause harmful interference to radio or television reception, which can be determined by turning the equipment off and on, the user is encouraged to try to correct the interference by one or more of the following measures:
— Reorient or relocate the receiving antenna.
— Increase the separation between the equipment and receiver.
— Connect the equipment into an outlet on a circuit different from that to which the receiver is connected.
— Consult the dealer or an experienced radio/TV technician for help.
This equipment complies with FCC radiation exposure limits set forth for an uncontrolled environment. This equipment should be installed and operated with minimum distance 20cm between the radiator & your body.
Documents / Resources
tags: AT-02, AT-02 Smart Wireless BBQ Thermometer, Food Prep Group, Smart Wireless BBQ Thermometer, Thermometer, Wireless BBQ Thermometer,
Oregon Scientific
Wireless Bbq Thermometer AW129BLRS Инструкция по эксплуатации
Популярность:
1180 просмотры
Подсчет страниц:
1 страницы
Тип файла:
Размер файла:
239 Kb
FAQ
1.Why the probes display inaccurate temperature? Such as 572F or
display ‘——‘?
Answer: First please check the probes whether firmly inserted in the unit
and make sure no gaps. Customers really need push it hard in. Then
change probes to insert in different ports to check if the probe itself has
problem. Please make sure your probes firmly inserted, otherwise will
display’——‘ even if the cell phone pair with Bluetooth successfully.
2.Can I put this unit in high temperature places?
Answer: No, it can’t. The plastic back magnet temperature should not over
80℃/176F. Otherwise the unit will melt. Probe temperature range: 32° F ~
572 ° F; (Short-time measurement); 32° F~ 482 ° F (continuousmonitoring).
3.Why cell phone can not search the app?
Answer: Please make sure your GPS is on(Android phone).
4.Why I need a 4 number pin code? What’s correct steps to pair with
cell phone?
Answer: This unit no need for pin code. Here are two solutions:
First, for some customers who have used our Inkbird other thermometers
before, you have to delete the before record, then to pair with this product.
Because one cell phone can only connect one unit at one time. Second,
The correct procedure is activate your Bluetooth on your phone first, open
the BBQGO APP to press the bottom start button to search, then press the
on button of your unite for about 4 seconds it should connect.
5.Can this unit be submerged into water?
Answer: No, customers can use at outdoor when raining. The unused
sockets should be inserted well. Please don’t submerge this unit into
water.
6.Are the probes and wires waterproof?
Answer: Yes.
7.Does this unit have low/high temperature alarm function?
Answer: Yes
8.Is there any graphing or save of previous cook data?
Answer: It can only display the current cooking data. Which can’t be saved
or download.
Loading…