
Скачать
Version 1.0
Software version 6.0.x
August 2010
Xerox
®
Wide Format
FreeFlow
®
Accxes
®
Indexer/
FreeFlow
®
Accxes
®
Copy
User Guide

FreeFlow® Accxes® Print Server V15.0
August 2010
701P50900
Xerox® Wide Format 6604/6605
™
Solution
User Guide

© 2010 Xerox Corporation. All rights reserved. XEROX® and Xerox and Design®,
6604/6605 Solution™, Accxes® and FreeFlow®, are trademarks of Xerox Corporation in
the US and/or other countries.
Microsoft Windows® is a trademark of Microsoft Corporation in the United States and/or
other countries. Adobe®, PostScript®, PostScript®3™, and PostScript Logo® are
trademarks of Adobe Systems Incorporated in the US and/or other countries. AutoCAD®
is a registered trademark of Autodesk, Inc. Product status, build status, and/or
specifications are subject to change without notice.

Table of Contents
1 Product Overview……………………………………………………………………………1-1
Product Software Tools Overview……………………………………………………………………….1-1
Machine Components…………………………………………………………………………………………..1-2
Front View …………………………………………………………………………………………………..1-2
Rear View…………………………………………………………………………………………………….1-4
Front View (Doors Open)………………………………………………………………………….1-4
Controller Front View…………………………………………………………………………………………….1-5
Controller Rear View……………………………………………………………………………………………..1-6
Controller Back Panel Connectors……………………………………………………………………….1-7
Controller Cables and Connectors………………………………………………………………………1-8
Scanner……………………………………………………………………………………………………………………1-8
Loading Documents………………………………………………………………………………….1-8
Scanner Panel……………………………………………………………………………………………..1-9
Opening and Closing the Scanner………………………………………………………..1-10
To Open the Scanner………………………………………………………………………………1-10
To Close the Scanner………………………………………………………………………………1-11
Media Exit Deflectors……………………………………………………………………………..1-11
User Interface (UI)……………………………………………………………………………………………..1-12
Touch Screen………………………………………………………………………………………………………..1-13
Using the Touch Screen………………………………………………………………………….1-13
Touch Screen Features and Functions…………………………………………………1-15
Keyboards…………………………………………………………………………………………………1-16
Control Panel………………………………………………………………………………………………………..1-17
Control Panel…………………………………………………………………………………………….1-17
Language………………………………………………………………………………………………….1-18
Powering the System On…………………………………………………………………………………….1-18
Using the Power Saver Feature……………………………………………………………..1-18
System Power On ……………………………………………………………………………………1-20
Document Input………………………………………………………………………………………………….1-20
Precautions When Handling Documents……………………………………………1-21
Copy Strategies for Special Documents………………………………………………1-21
Media Source……………………………………………………………………………………………………….1-23
To Specify the Media Source…………………………………………………………………1-23
Media Types and Loading………………………………………………………………………………….1-24
Printable Media ………………………………………………………………………………………1-25
Handling and Storing Media…………………………………………………………………1-27
Xerox® Wide Format 6604/6605 Solution
User Guide
™
i

Table of Contents
Handling Media……………………………………………………………………………1-27
Storing Media……………………………………………………………………………….1-27
Loading Roll Media………………………………………………………………………………….1-27
To Load Roll Media………………………………………………………………………………….1-28
Manual Feed-in Shelf (Bypass)……………………………………………………………..1-31
To Print Cut Sheets………………………………………………………………………………….1-32
Cutting Roll Media…………………………………………………………………………………..1-32
To Cut Roll Media…………………………………………………………………………………….1-33
Media Settings…………………………………………………………………………………………………….1-35
To Set Up the Media…………………………………………………………………………………………..1-36
2 Printing and Copying Documents……………………………………………….2-1
Print from Device……………………………………………………………………………………………………2-1
Copying Procedures……………………………………………………………………………………………….2-3
Step 1: Selecting Features………………………………………………………………………..2-3
Basic Copy Tab……………………………………………………………………………….2-3
Image Quality Tab…………………………………………………………………………2-4
Advanced Settings Tab…………………………………………………………………2-5
Step 2: Entering the Copy Quantity……………………………………………………….2-5
Step 3: Copying the Original……………………………………………………………………2-6
Step 4: Stopping the Copy Job………………………………………………………………..2-7
Making Copies Using the Manual Feed-in Shelf (Bypass)……………………………..2-7
Setting Up the Copy Selections…………………………………………………………………………..2-9
Reduce/Enlarge………………………………………………………………………………………………………2-9
Reduce/Enlarge Using the Scale Factor………………………………………………2-10
Reduce/Enlarge Using Presets and More…………………………………………….2-10
Original Type………………………………………………………………………………………………………..2-11
Media Source……………………………………………………………………………………………………….2-11
Output Format …………………………………………………………………………………………………….2-11
Collation………………………………………………………………………………………………………………..2-12
Collation (Making Sets)………………………………………………………………………………………2-13
Copy Set Specifications (photos only)…………………………………………………………….2-13
Copy Set Specifications……………………………………………………………………………………..2-14
Check Plot……………………………………………………………………………………………………………..2-15
Printer Interrupt…………………………………………………………………………………………………..2-16
Scan Display…………………………………………………………………………………………………………2-17
Setting Up the Image Quality Selections……………………………………………………….2-17
Density………………………………………………………………………………………………………2-17
Contrast…………………………………………………………………………………………………….2-18
ii
Xerox® Wide Format 6604/6605 Solution
User Guide
™

Table of Contents
Background Suppression………………………………………………………………………..2-18
Setting Up the Advanced Settings Selections……………………………………………….2-19
Media Type……………………………………………………………………………………………….2-20
Sample Copy…………………………………………………………………………………………….2-20
Mirror Image…………………………………………………………………………………………….2-20
Image Inversion………………………………………………………………………………………2-21
Image Location……………………………………………………………………………………….2-21
Scanner Media Thickness………………………………………………………………………2-22
Margins……………………………………………………………………………………………………..2-23
Scan Width ………………………………………………………………………………………………2-23
Scan Offset……………………………………………………………………………………………….2-24
Copy Quality…………………………………………………………………………………………….2-25
Finishing……………………………………………………………………………………………………2-26
Setting Up the Recall Selections………………………………………………………………………2-26
Recall Tab………………………………………………………………………………………………….2-26
View Last Scan…………………………………………………………………………………………2-27
3 Scanning Documents ……………………………………………………………………3-1
Preparation for Scanning……………………………………………………………………………………..3-1
Establish the Network Setup……………………………………………………………………………….3-2
Creating a Mailbox………………………………………………………………………………………………..3-2
Selecting Mailboxes………………………………………………………………………………………………3-3
Standard Mailbox Document Lists…………………………………………………………3-4
Document List…………………………………………………………………………………………….3-5
Settings………………………………………………………………………………………………………..3-5
Deleting a Mailbox…………………………………………………………………………………….3-5
Mailbox Passwords ……………………………………………………………………………………3-6
Rename Mailboxes…………………………………………………………………………………….3-6
Setting up a Default Mailbox…………………………………………………………………..3-6
Delete…………………………………………………………………………………………………………..3-7
Deleting Documents from a Mailbox…………………………………………………….3-7
Delete All Documents……………………………………………………………………………….3-7
Delete a Document……………………………………………………………………………………3-7
Removable Device Document Lists…………………………………………….3-8
Scanning To a Standard Mailbox……………………………………………………………3-9
Step 1: Selecting a Mailbox and Using Templates………………..3-10
Step 2: Selecting Scan to Mailbox Features……………………………3-12
Step 3: Select Image Quality Features…………………………………….3-13
Density……………………………………………………………………………….3-13
Xerox® Wide Format 6604/6605 Solution
User Guide
™
iii

Table of Contents
Scan to Removable Devices………………………………………………………………………………3-23
Scan to Device……………………………………………………………………………………………………..3-24
Scan Multiple Pages to Device………………………………………………………………………….3-25
Scan to FTP…………………………………………………………………………………………………………..3-26
Color Calibration………………………………………………………………………………………………….3-27
Scan to Remote Printer………………………………………………………………………………………3-30
Contrast……………………………………………………………………………..3-14
White Point……………………………………………………………………….3-14
Step 4: Select Advanced Settings Features…………………………….3-15
Image Inversion………………………………………………………………3-15
Scan Offset……………………………………………………………………….3-16
Scanner Media Thickness……………………………………………….3-17
Mirror Image…………………………………………………………………….3-18
Scan to Printer………………………………………………………………….3-19
Preview Generation…………………………………………………………3-19
Scan Width ………………………………………………………………………3-20
Resolution………………………………………………………………………….3-20
Step 5: Scanning the Document……………………………………………….3-21
Step 6: Stopping a Scan Job………………………………………………………3-22
Step 7: Retrieving Files Stored in a Mailbox……………………………3-22
Naming Scanned Files………………………………………………………………..3-22
How to Scan to an FTP Site……………………………………………………………………3-27
Creating a new Color Calibration…………………………………………………………3-28
Problems During Color Calibration ………………………………………………………3-29
How to Scan to Remote Printer…………………………………………………………….3-31
4 Job Information……………………………………………………………………………..4-1
All Tab………………………………………………………………………………………………………………………4-1
Active Tab……………………………………………………………………………………………………4-1
Held Tab……………………………………………………………………………………………………….4-2
Administrator Managed Queue………………………………………………………………4-2
Job Reprint………………………………………………………………………………………………………………4-3
Reprint Jobs with Edits………………………………………………………………………………………….4-3
Edit Job Settings………………………………………………………………………………………..4-4
Reduce/Enlarge………………………………………………………………………………4-4
Media Types……………………………………………………………………………………4-4
Media Source………………………………………………………………………………….4-4
Output Format………………………………………………………………………………..4-4
Output Format (Print Jobs)…………………………………………………………..4-5
iv
Xerox® Wide Format 6604/6605 Solution
User Guide
™

Table of Contents
Output Format (Copy Jobs)……………………………………………………………………..4-5
Collation………………………………………………………………………………………………………4-5
Finishing………………………………………………………………………………………………………4-6
Remove Selected Jobs……………………………………………………………………………….4-6
Job Reprint from Web Printer Management Tool …………………………………………..4-6
5 System Administrator …………………………………………………………………..5-1
System Administration…………………………………………………………………………………………5-1
System Administration Overview………………………………………………………………………..5-1
Entering System Administration Mode………………………………………………….5-2
Login Options……………………………………………………………………………………………..5-2
System Administrator ………………………………………………………………………………5-4
Job Accounting…………………………………………………………………………………………..5-4
Exiting System Administration Mode…………………………………………………….5-5
General Administration Settings…………………………………………………………………………5-5
Setting the Date and Time………………………………………………………………………5-6
Changing the Administrator Password………………………………………………….5-7
Job Accounting Overview…………………………………………………………………………5-7
Entering Job Accounting Mode…………………………………………………..5-8
Logging in as a Job Accounting User…………………………………………5-8
Configure Job Reprint……………………………………………………………………………….5-9
System Power Off ……………………………………………………………………………………..5-9
Power Outage Job Status……………………………………………………………………….5-10
If Job Reprint is enabled:……………………………………………………………………….5-10
Checking the Circuit Breaker…………………………………………………………………5-10
Shutdown from the User Interface………………………………………………………5-11
Shutdown from the Web Printer Management Tool…………………………5-12
Image Recall…………………………………………………………………………………………….5-13
Immediate Image Overwrite………………………………………………………………..5-13
Immediate Image Overwrite Algorithm……………………………………………..5-14
Scan Display……………………………………………………………………………………………..5-14
Set Thumbnail Creation…………………………………………………………………………5-14
Administrator Managed Queue……………………………………………………………5-15
Control Panel Settings………………………………………………………………………………………..5-15
Sound Settings ………………………………………………………………………………………..5-16
Configure Timers…………………………………………………………………………5-16
Low Power Timeout…………………………………………………………5-16
Sleep Timeout…………………………………………………………………..5-17
Feature Timeout………………………………………………………………5-17
Xerox® Wide Format 6604/6605 Solution
User Guide
™
v

Table of Contents
Network Setup……………………………………………………………………………………………………..5-20
Copy Options………………………………………………………………………………………………………..5-24
File Deletion Timeout……………………………………………………..5-18
Print Interrupt Timeout………………………………………………….5-18
Set Start Scan Mode……………………………………………………………………5-19
Calibrate Touch Screen……………………………………………………………….5-20
Setting up a Static IP Address………………………………………………………………5-21
Setting up IP Gateway……………………………………………………………………………5-22
Setting up Netmask………………………………………………………………………………..5-23
Setting up DHCP………………………………………………………………………………………5-23
Select Output Media Series……………………………………………………………………5-25
Select Custom Reduction and Enlargement………………………………………5-25
Set Reduction Line Preservation……………………………………………………………5-27
Configure Custom Output Formats……………………………………………………..5-28
Auto Rotate………………………………………………………………………………………………5-30
Scanner Set Up………………………………………………………………………………………..5-30
Normalization ……………………………………………………………………………..5-31
Stitch Alignment………………………………………………………………………….5-31
6 Machine Info ………………………………………………………………………………….6-1
Overview of Machine Info……………………………………………………………………………………6-1
Media Status and Setup ………………………………………………………………………….6-2
How to Access Media Settings………………………………………………………………..6-4
Print Reports Tab………………………………………………………………………………………..6-6
Print Reports………………………………………………………………………………………………..6-7
From the User Interface……………………………………………………………….6-7
From the Web Printer Management Tool………………………………….6-7
Configuration Test Sample Report (Printer)………………………………………….6-9
Setup Test Print Sample Report (Printer Settings)…………………………….6-10
Pen Settings………………………………………………………………………………………………6-11
PostScript Test Sample Report………………………………………………………………6-12
Machine Configuration Tab………………………………………………………………………………6-12
How to Access Machine Configuration……………………………………………….6-12
Administration Tab……………………………………………………………………………………………..6-13
How to Access Administration………………………………………………………………6-13
7 Maintenance…………………………………………………………………………………..7-1
Replacing Consumables………………………………………………………………………………………..7-1
Handling Consumables…………………………………………………………………………….7-1
Loading Toner…………………………………………………………………………………………….7-2
vi
Xerox® Wide Format 6604/6605 Solution
User Guide
™

Table of Contents
Replacing the Waste Toner Bottle…………………………………………………………..7-5
Cleaning the Machine…………………………………………………………………………………………..7-8
To Clean the Scanner………………………………………………………………………………..7-9
To Clean the User Interface (UI)………………………………………………………….7-11
To Clean the Machine…………………………………………………………………………….7-12
Scanner Setup………………………………………………………………………………………………………7-12
Normalization…………………………………………………………………………………………..7-12
Stitch Alignment………………………………………………………………………………………7-12
8 Problem Solving……………………………………………………………………………..8-1
General Problems…………………………………………………………………………………………………..8-1
Problems During Copying…………………………………………………………………………………….8-2
Problems During Scanning…………………………………………………………………………………..8-8
Problems During Printing…………………………………………………………………………………..8-10
Error Messages…………………………………………………………………………………………………….8-13
Scanner Jam Message………………………………………………………………………………………..8-14
Document Jam…………………………………………………………………………………………………….8-14
Media Jams…………………………………………………………………………………………………………..8-17
Media Jams in Roll 1 or Roll 2……………………………………………………………………………8-17
Media Jams in Manual Feed-in Shelf (Bypass)………………………………………………8-21
Media Jams in Upper Unit…………………………………………………………………………………8-21
Media Jams in Fuser Unit…………………………………………………………………………………..8-24
Xerox® Wide Format 6604/6605 Solution
User Guide
™
vii

Table of Contents
viii
Xerox® Wide Format 6604/6605 Solution
User Guide
™

1
Product Overview
This chapter describes the major components of the Xerox Wide Format 6604/6605
Solution, the way to power the machine on and off correctly, use the Power Saver feature,
and use the User Interface.
This chapter also describes the characteristics of the originals that may be copied and
scanned, the types of media that can be used, andthe way to make the media size, type,
and thickness settings.
• Machine Components
• Controller
• Scanner
• User Interface
• Touch Screen
• Control Panel
• Powering the System On/Off
• Originals (Input Documents)
• Media Source
• Media Types
• Loading Media
• Media Settings
Product Software Tools Overview
Instructions for printing are located in the appropriate documentation for the tool that
is being used to send the print job to the printer, such as Windows Drivers, Web Printer
Management Tool, Accxes Client Tools, etc. Refer to the documentation for the
appropriate tool.
Xerox® Wide Format 6604/6605 Solution
User Guide
™
1-1
Product Overview
Machine Components
This section describes the main components of the Xerox Wide Format 6604/6605
Solution.
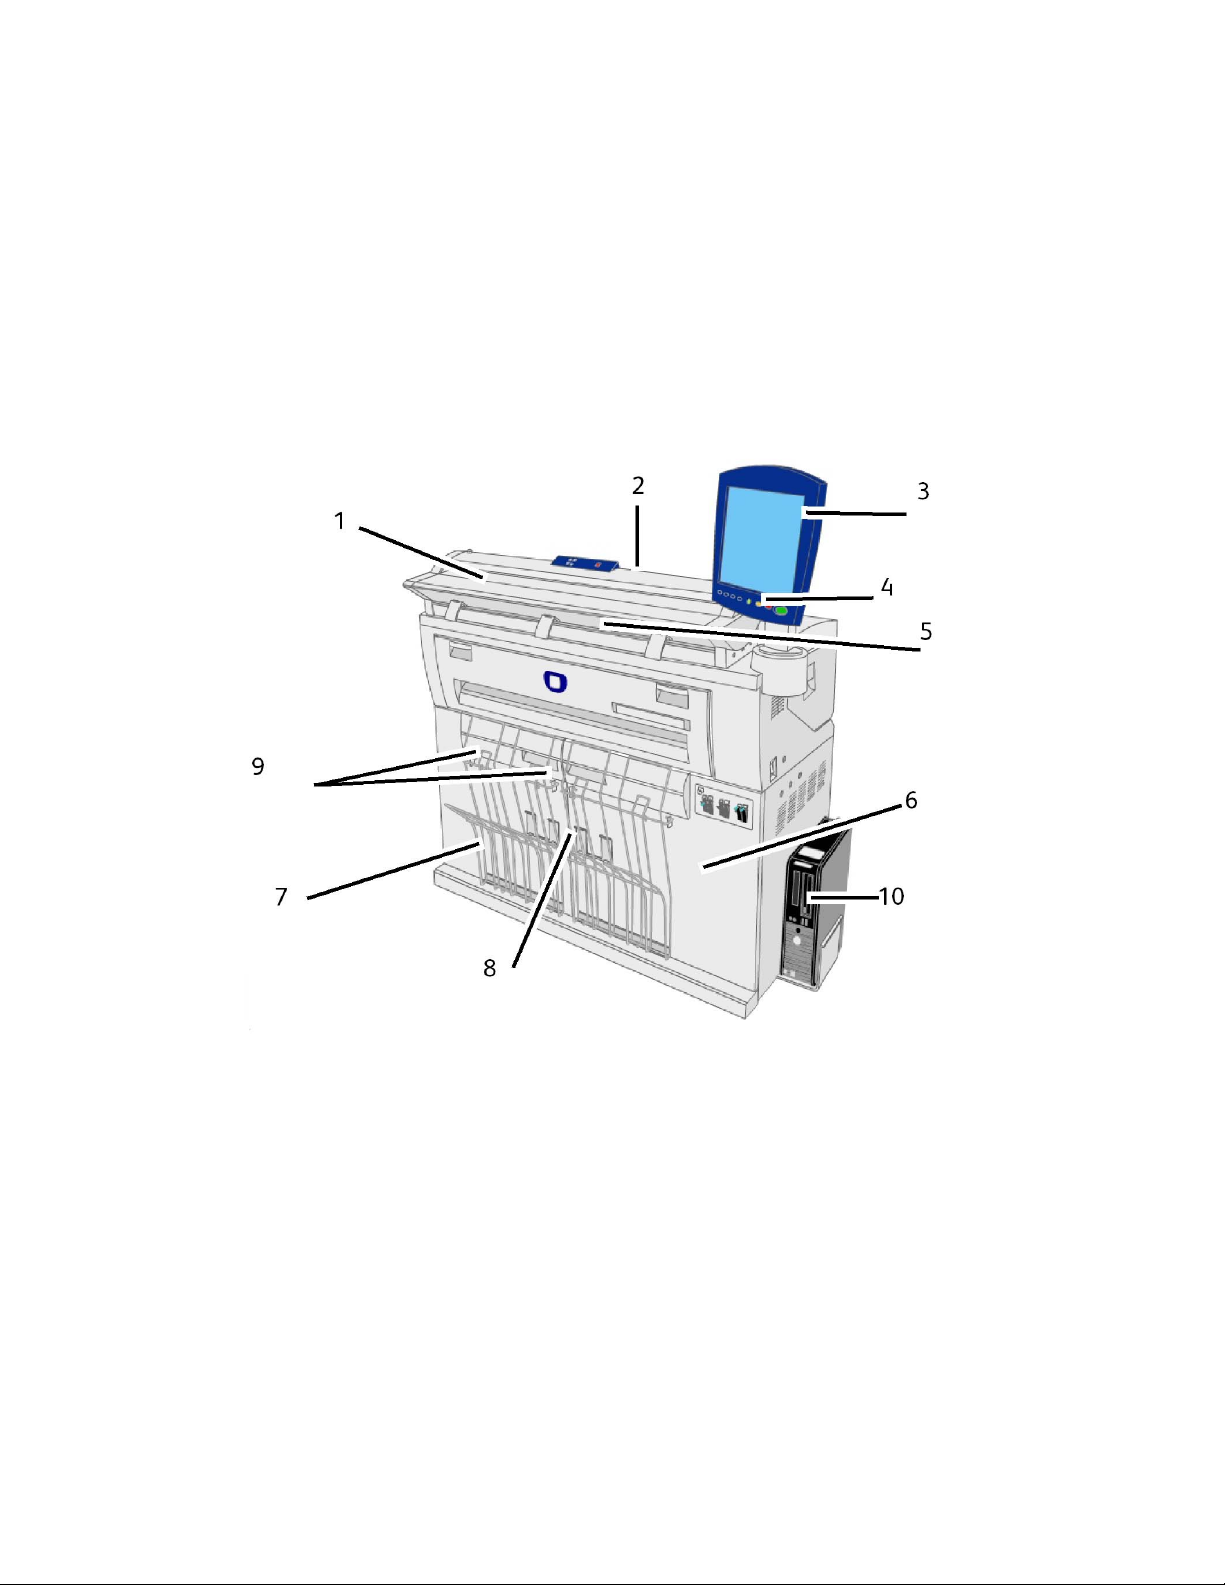
Front View
1-2
Xerox® Wide Format 6604/6605 Solution
User Guide
™
Table 1: Machine Components (Front View)
Product Overview
FunctionComponentNum.
Load original here, face up.Scanner Feed-in Shelf1
Scanner2
Lift the Scanner Lid to clean the main roller
and sensors or to remove a paper jam.
User Interface3
Also known as the UI, contains the Touch
Screen and the Control Panel. This is where
the operator programs jobs and configures
the Xerox Wide Format 6604/6605
Solution settings.
Control Panel4
Contains selection buttons and
copy/print/scan services access.
Printer Exit Port5
Copies and prints are delivered here, face
up.
Front Doors6
Open these doors to clear media jams and
load media.
Small Size Paper Flaps (4 total)7
Receives and stacks small size copies and
prints (8.5″ to 18″/216 mm to 457 mm)
when in the open position. About 20 sheets
of Bond paper can be stacked. Refer to the
label for usage information.
Document Catch Guides8
Assembly that receives and stacks medium
and large size copies and prints. The
assembly accommodates copies/prints of
17″ to 48″/432 mm to 1219 mm when the
Extender Assemblies are hooked at the
rear of the wireform, and 48″/1219 mm
and larger when the Extender Assemblies
are unhooked. About 20 sheets of Bond
paper can be stacked. Refer to the label
on the front of the machine for usage
information.
Extender Assemblies9
Accxess Controller10
Xerox® Wide Format 6604/6605 Solution
User Guide
When unhooked from the rear of the copy
catch tray wireform, accommodate 48″
(1219 mm) and longer copies and prints.
Contains communication software for the
Print Engine.
™
1-3
Product Overview
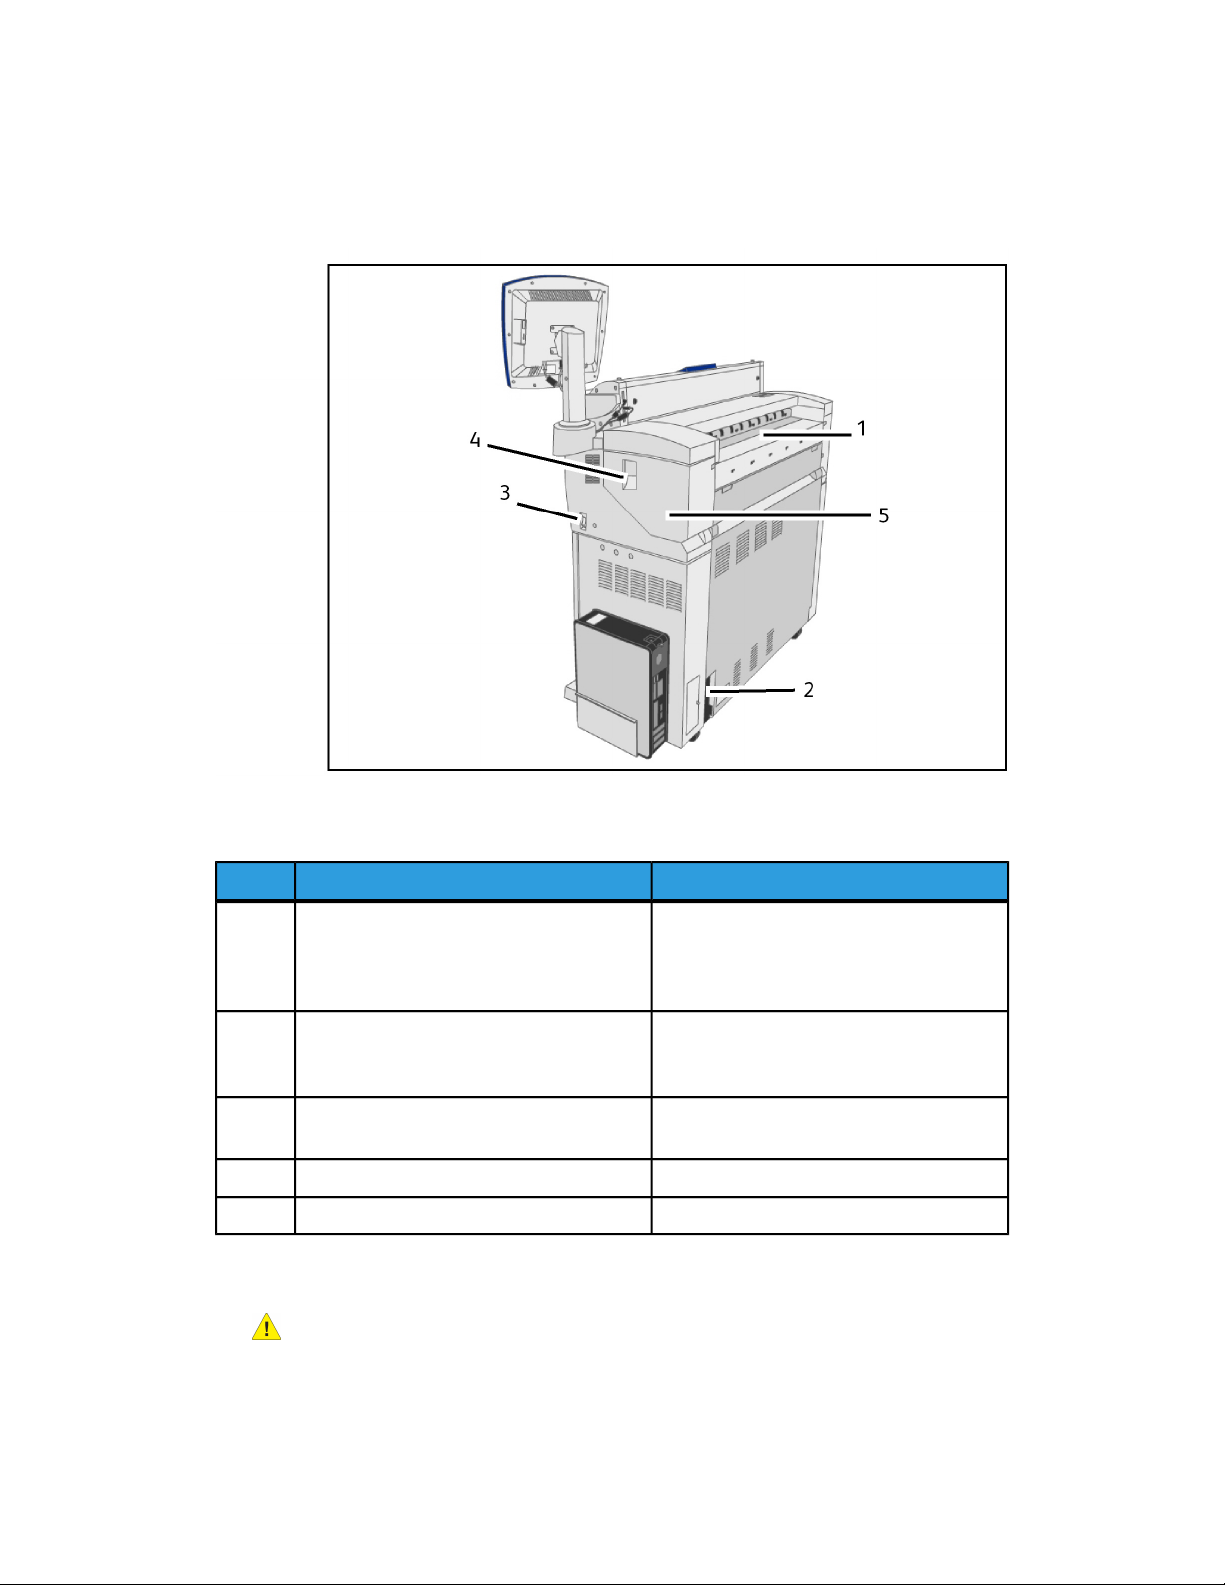
Rear View
Table 2: Machine Components (Rear View)
FunctionComponentNum.
Toner Supply Port1
Circuit Breaker2
Power Switch3
Toner is added through this port. Open the
toner door to access the port. Refer to
Loading Toner in the Maintenance chapter
for details.
Switches the input power to the machine
on /off, and provides overcurrent and short
circuit protection.
Switches the machine power on/off. (Also
called the Standby switch.)
Lift this lever to open the Upper Unit.Upper Unit Release Lever4
Open this to clear a paper jam.Upper Unit5
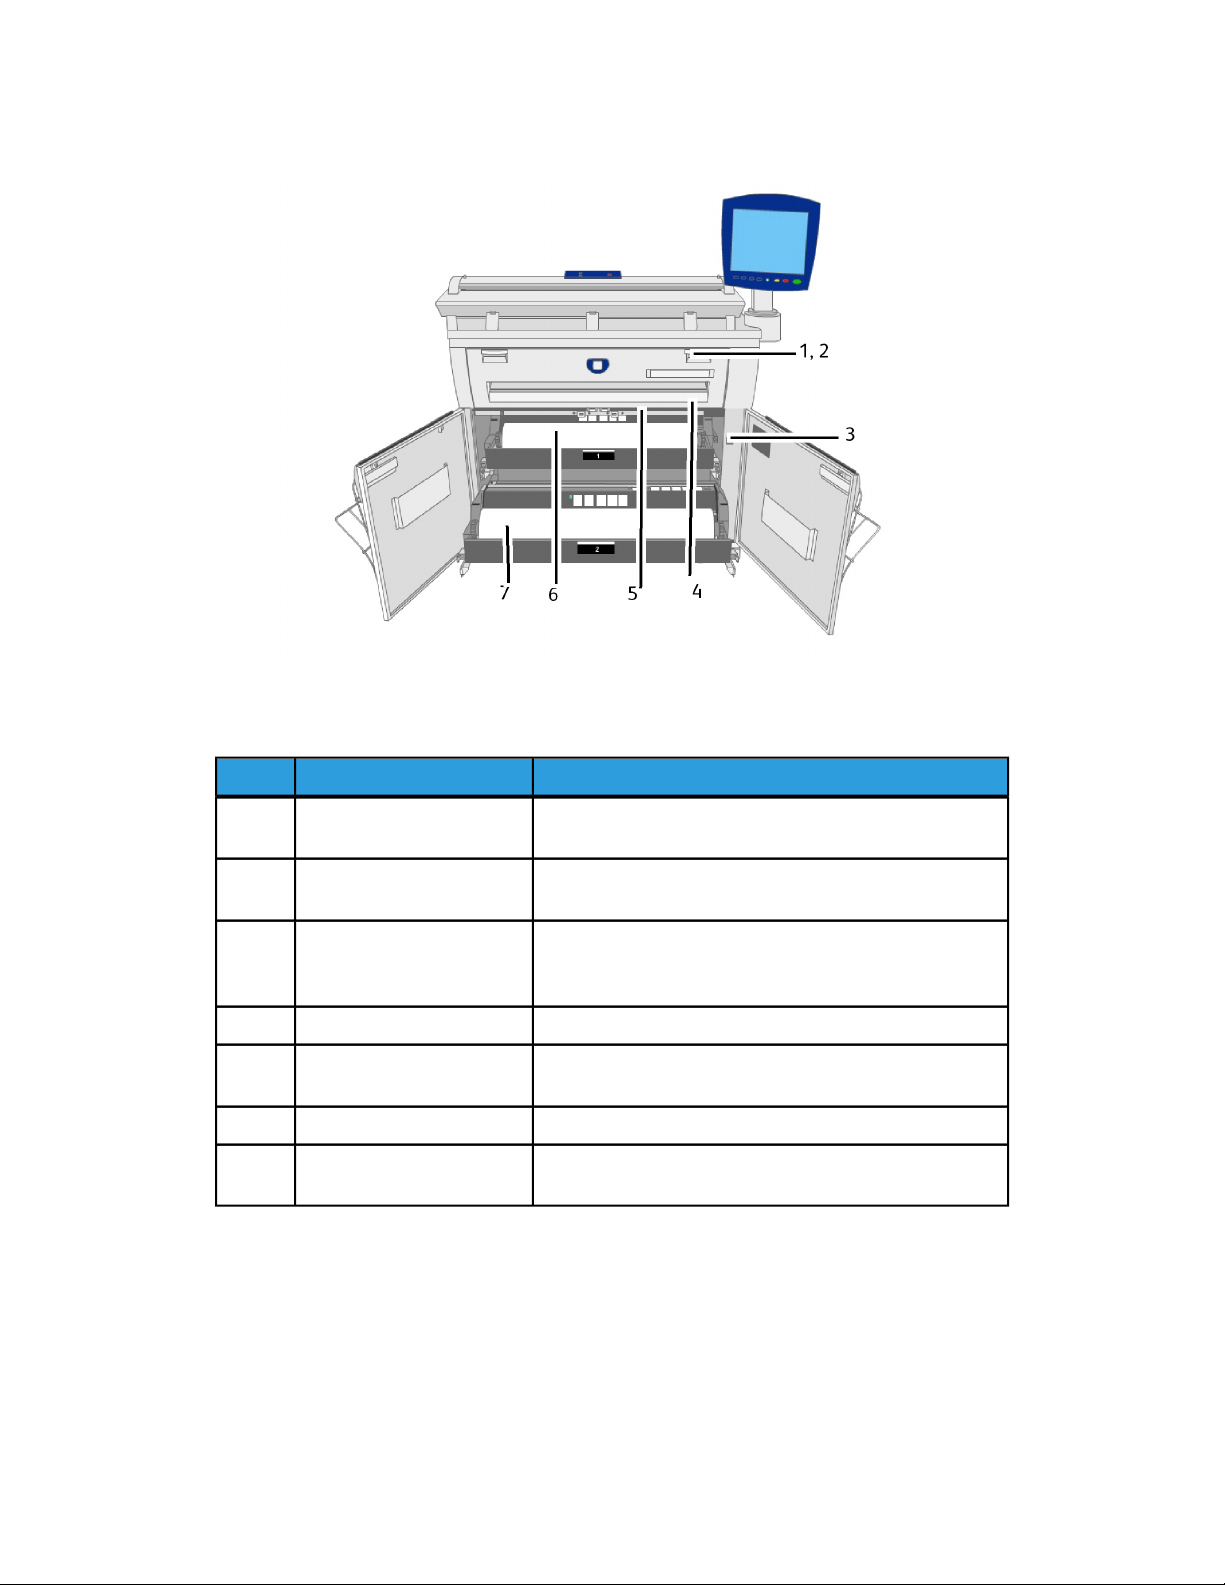
Front View (Doors Open)
WARNING
Never touch an area labeled hot or sharp parts. You may receive a burn or incur
other injuries.
1-4
Xerox® Wide Format 6604/6605 Solution
User Guide
™
Product Overview
Table 3: Machine Components (Front View Doors Open)
FunctionComponentNum.
1
Manual Feed-in Shelf
(Bypass)
Fuser Cover2
Media Heater Switch3
Cutter Cover5
Roll 27
Open and load media here when making manual feed
copies or prints.
Open the Manual Feed-in Shelf and then the Fuser Cover
to clear a paper jam in the fuser.
Switches the media heater on/off. Powering on the media
heater helps prevent the media from wrinkling. The media
heater switch is normally on.
Cuts the lead edge of roll media.Cutter Button4
Covers the cutter to cut media. Normally, do not open
this cover.
Load the roll media here.Roll 16
A second roll (shown here) may be installed below Roll
1. This roll is optional.
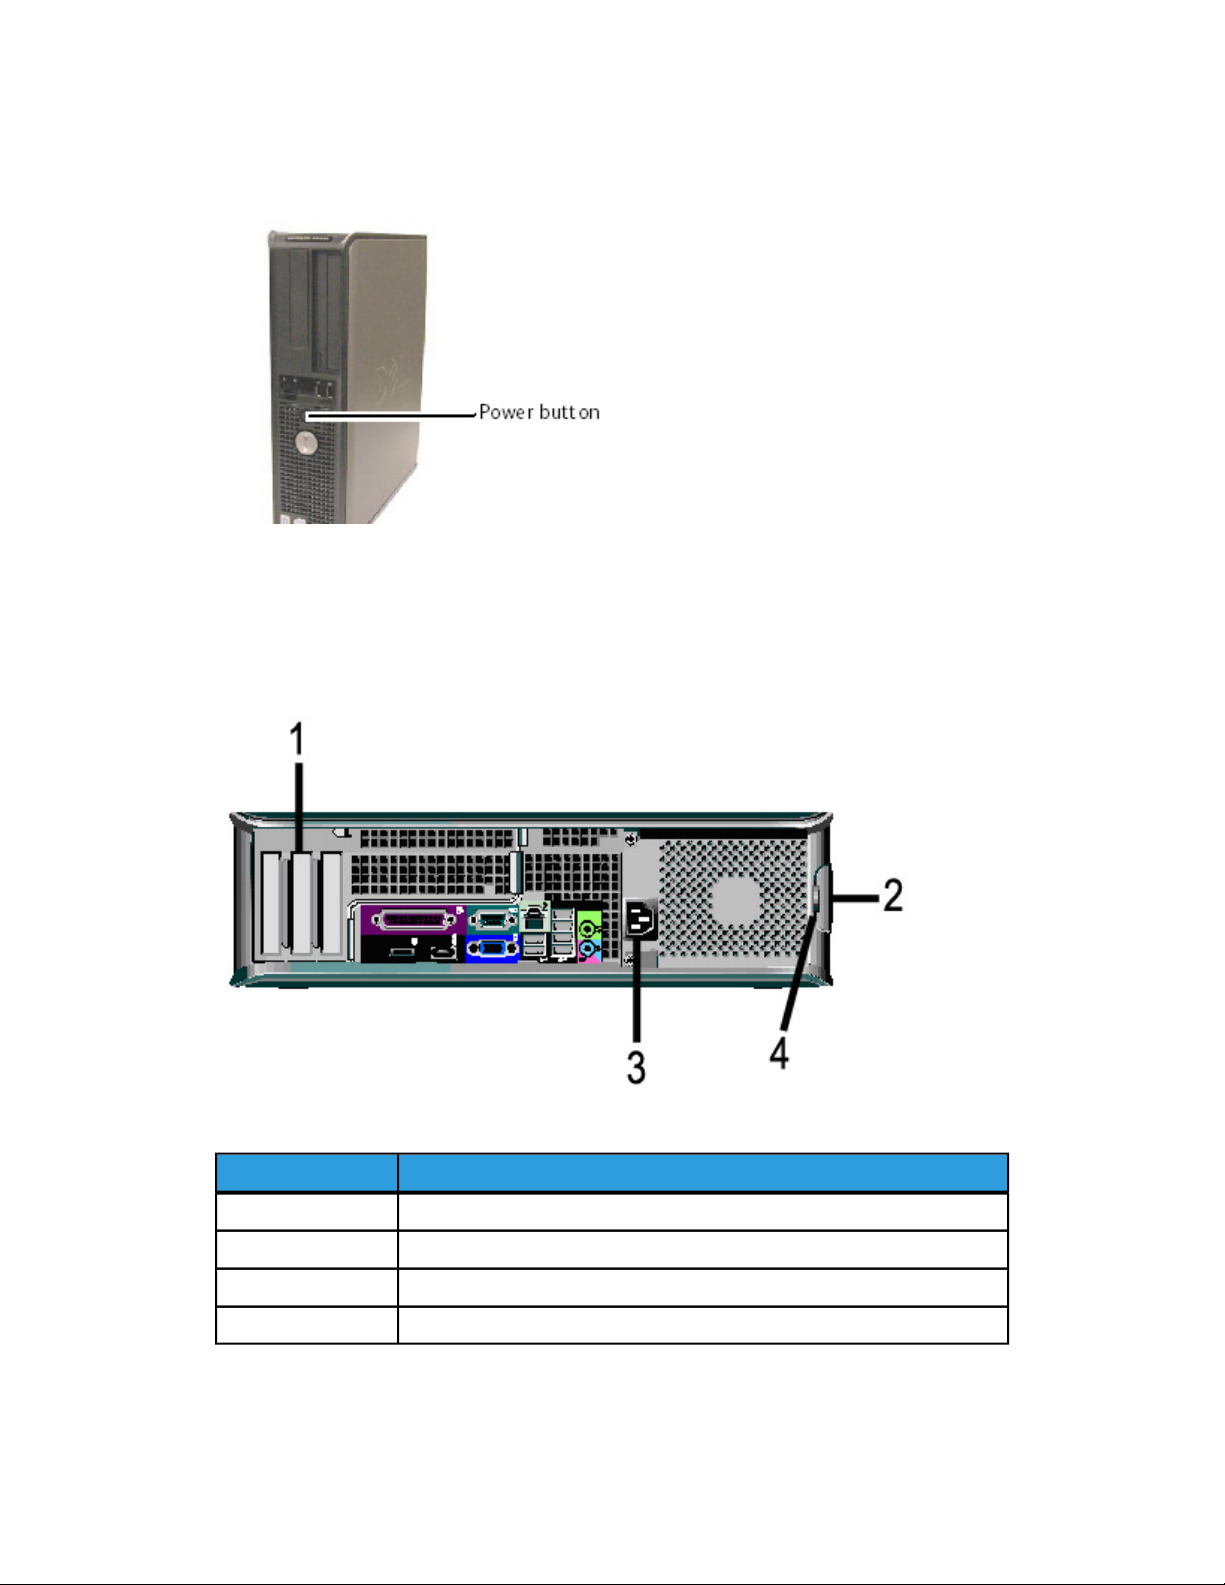
Controller Front View
The Accxes Controller communicates with the Print Engine/machine via the Command
Status Interface. The Command Status Interface software provides status messages
about the operation of the print engine.
Xerox® Wide Format 6604/6605 Solution
User Guide
™
1-5
Product Overview
Controller Rear View
This design may vary depending on your model.
Table 4: Controller Rear View
DescriptionNo.
Card Slide (location may vary depending on Controller model)1
Cover Release Latch2
1-6
Power Connector3
Padlock Ring4
Xerox® Wide Format 6604/6605 Solution
User Guide
™
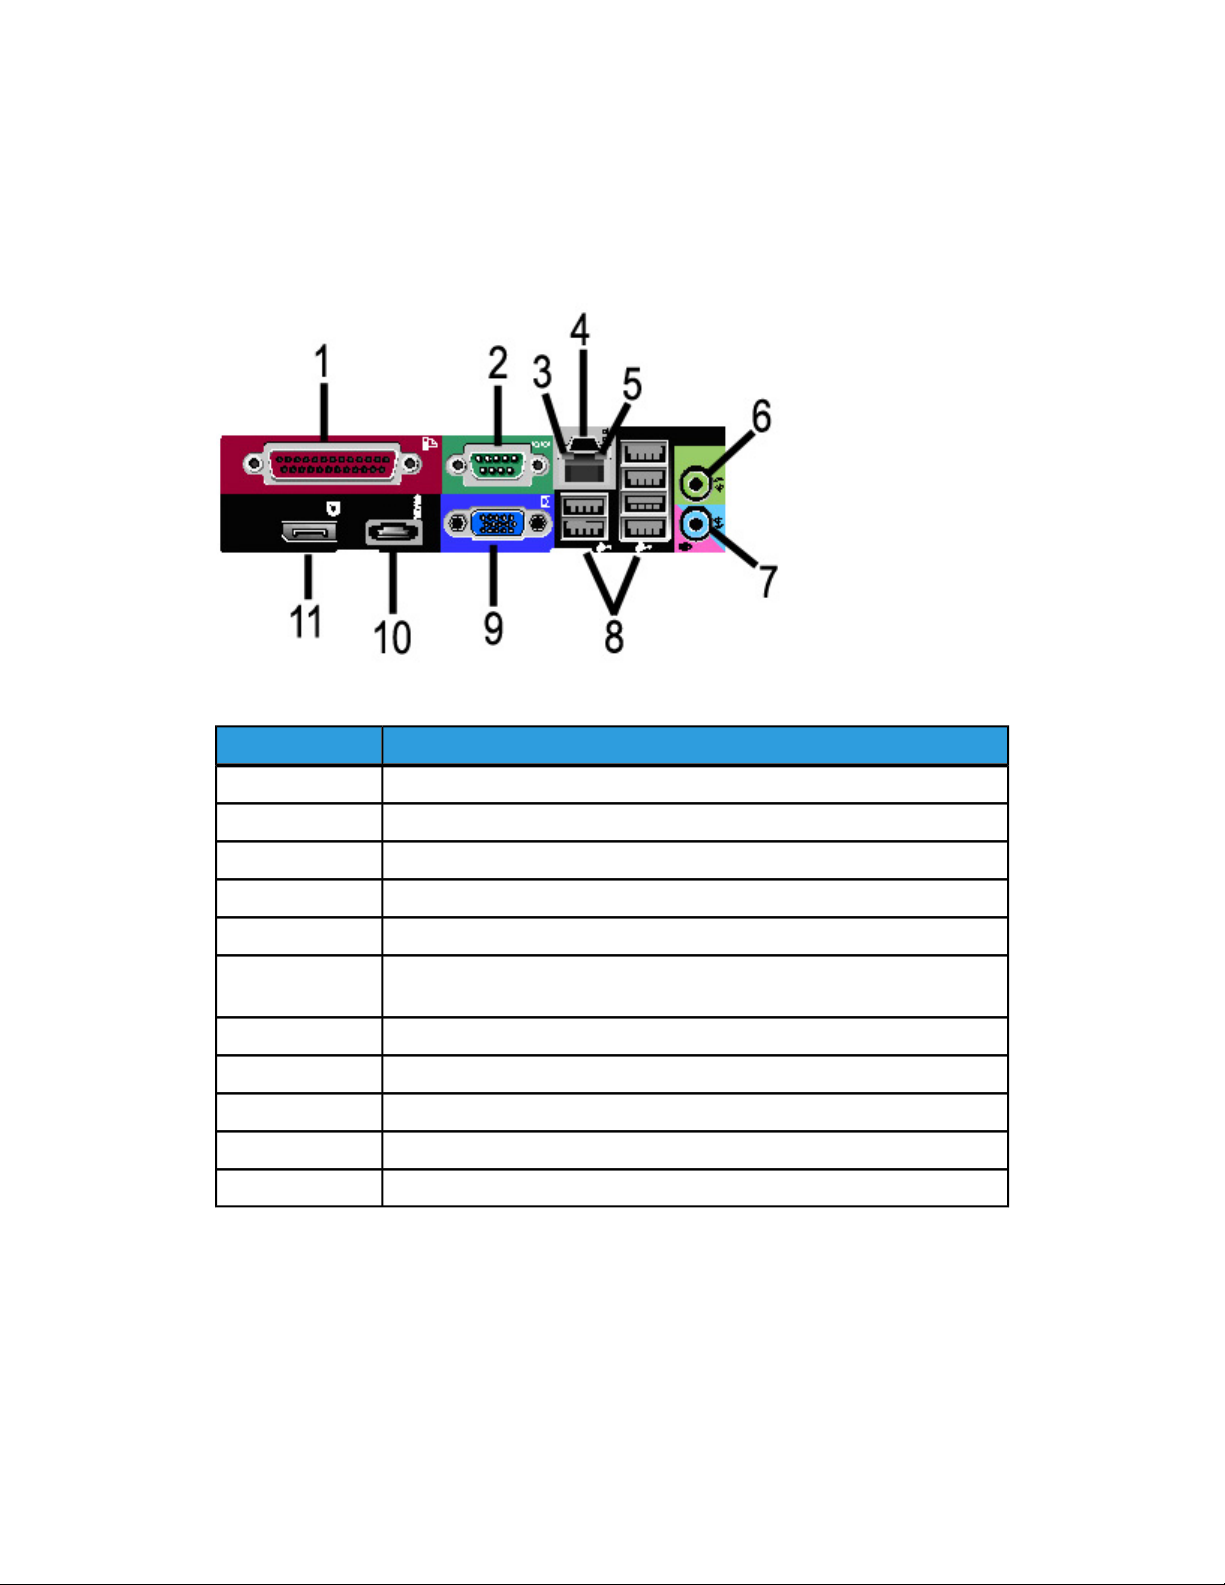
Controller Back Panel Connectors
This design may vary depending on your model.
Product Overview
Table 5: Back Panel Connectors
DescriptionNo.
Parallel Connector (not used)1
Serial Connector2
Link Integrity Light3
Network Adapter Connector4
Network Activity Light5
6
Line-out Connector
(Audio)
Line-in/Microphone Connector (not used)7
USB 2.0 Connectors (6)8
VGA Video Connector9
eSATA Connector (not used)10
DisplayPort Connector (not used)11
NOTE
On a system that is working normally and has a good network connection, the Link
Integrity Light illuminates continuously; the Network Activity Light blinks in response
to network activity.
Xerox® Wide Format 6604/6605 Solution
User Guide
™
1-7

Product Overview
Controller Cables and Connectors
The six communication pathway cables (called out as item 8 on the Back Panel Connector)
are described below.
• USB — Scanner to Controller — provides status and image information.
• USB — Printer to Controller — provides status and image information.
• USB — Power Module to Controller — provides status of the front Power Switch and
enables power to the Printer.
• USB — User Interface to the Controller.
• Audio Cable — UI to Controller for speaker tones, such as key beeps and alert tones.
• Video Cable — UI to Controller for displaying monitor screen contents.
Both Video Data and Command Status information is transmitted via the same USB
Interface. The Accxes Controller downloads Printer software/firmware through the
command status interface on the USB Port.
Scanner
The Xerox Wide Format 6604/6605 Solution is an integrated solution for basic copying
and electronically scanning and printing copies of the images for engineering and
architectural size documents. The scanner produces images up to 40 inches wide (1016
mm) and can send the image to a mailbox, a File Transfer Protocol (FTP) location or a
remote printer.
Loading Documents
To minimize wasted media due to image quality defects, properly loading the original
document is emphasized.
Documents are properly loaded when aligned with the Left Side Justified Line rather
than center justified. Load image side face up into the Scanner. Take notice of feeding
the document evenly so both left and right sides enter simaltaneously.The document
feed has an instant detection mechanizm so inserting the document quickly ensures it
is properly grasped and fed.
1-8
Xerox® Wide Format 6604/6605 Solution
User Guide
™
Product Overview
NOTE
Look for the No Paper Zone Symbol for the left hand boundary. Original documents
loaded in this area may become damaged.
NOTE
Also notice the Left Side Justification Line. Any image in this area will be missing
in the output.
Should the document skew while feeding as indicated, clean the internal Scanner areas
according to the maintenance procedure.
Scanner Panel
The Scanner Panel consists of the following buttons:
• Stop — During scanning, press the Stop button on the Scanner Panel to stop the
Scanner or abort a scan.
• Forward — Press the Forward button to advance a document forward.
• Back — Press the Back button to rewind a scanned document back toward the user.
Xerox® Wide Format 6604/6605 Solution
User Guide
™
1-9

Product Overview
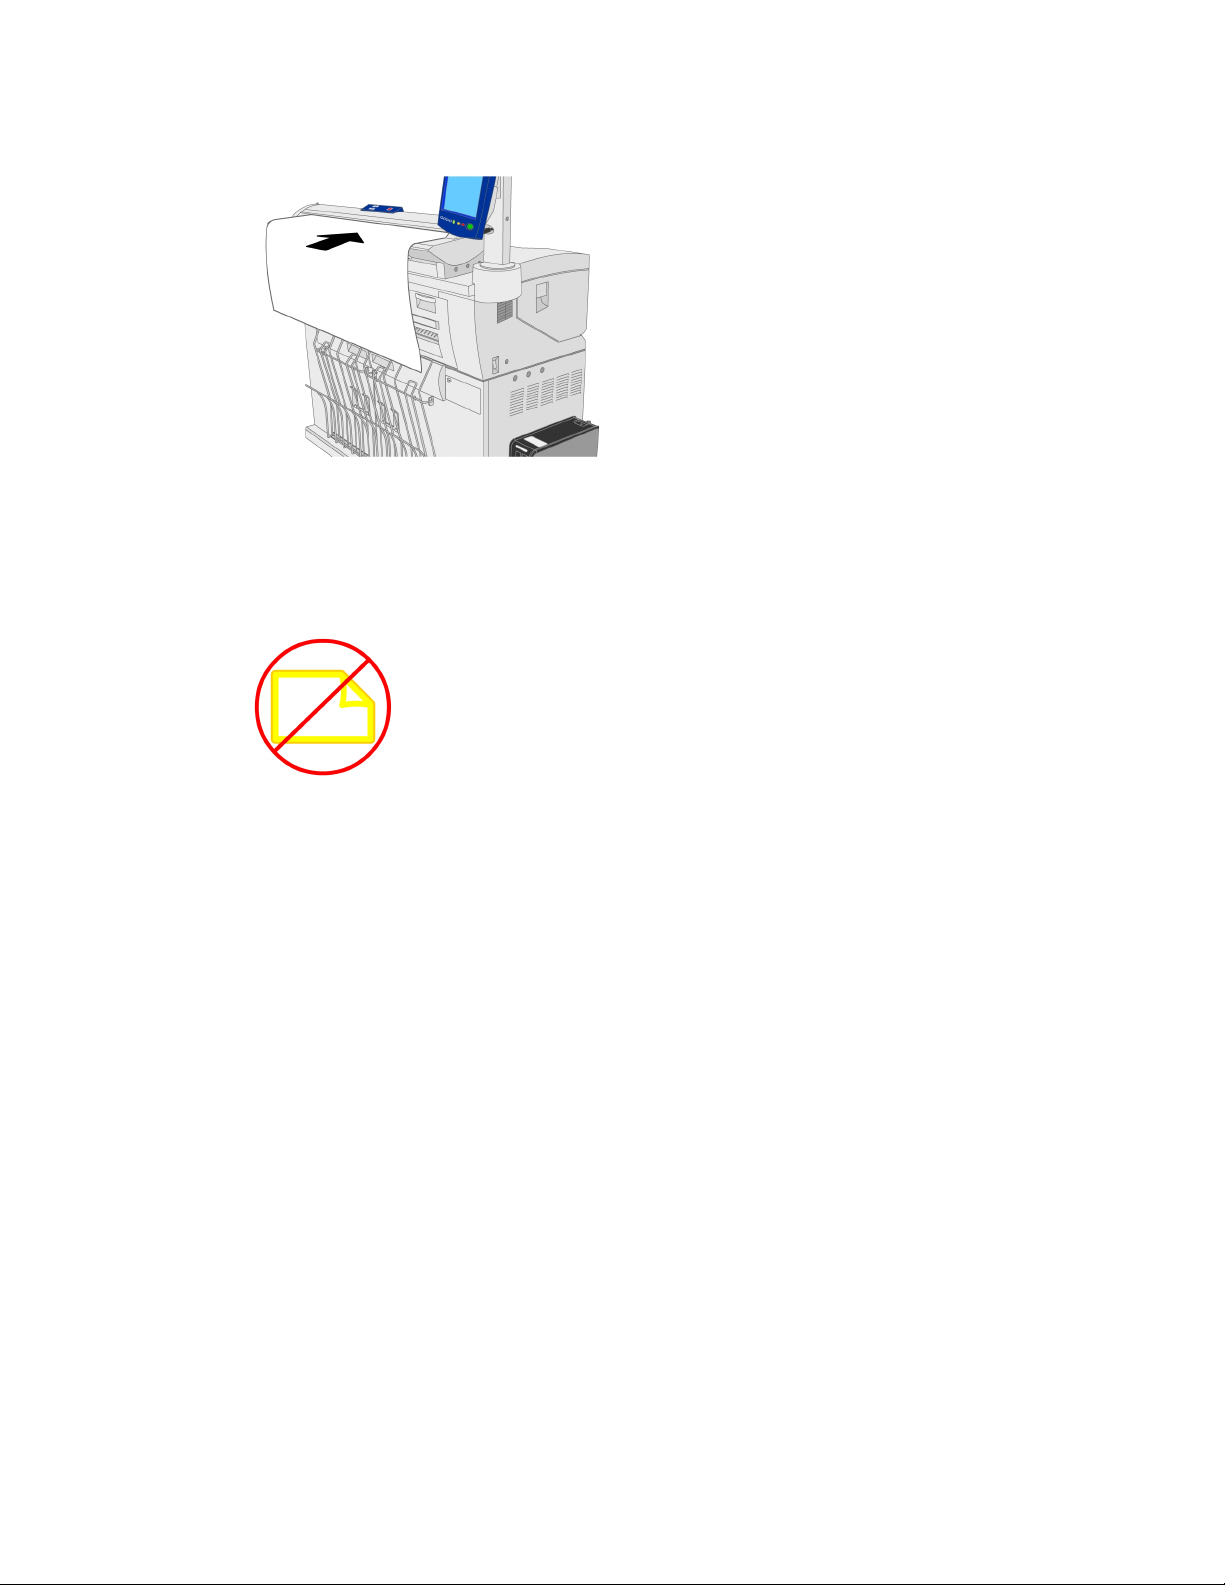
Opening and Closing the Scanner
The Scanner has a single part lid that opens toward the back of the Scanner. Opening
the lid provides access to the five Scanner Contact Image Sensors and Main Roller,
allowing them to be inspected or cleaned.
To Open the Scanner
1. Push down on the two buttons on each side of the Scanner Lid.
2. With both hands, push the lid up and away from you. The lid can support itself in the
fully open position.
NOTE
Opening the Scanner Lid reveals the white, solid Main Roller and the five Contact
Image Sensors. Refer to the Maintenance chapter for details on cleaning the
Main Roller and Contact Image Sensors.
1-10
Xerox® Wide Format 6604/6605 Solution
User Guide
™
Product Overview
To Close the Scanner
With both hands, grasp each side of the Scanner Lid and lower it, allowing it to close
gently under its own weight. Ensure that each side clicks into the locked position by
pressing firmly on both the left and right ends.
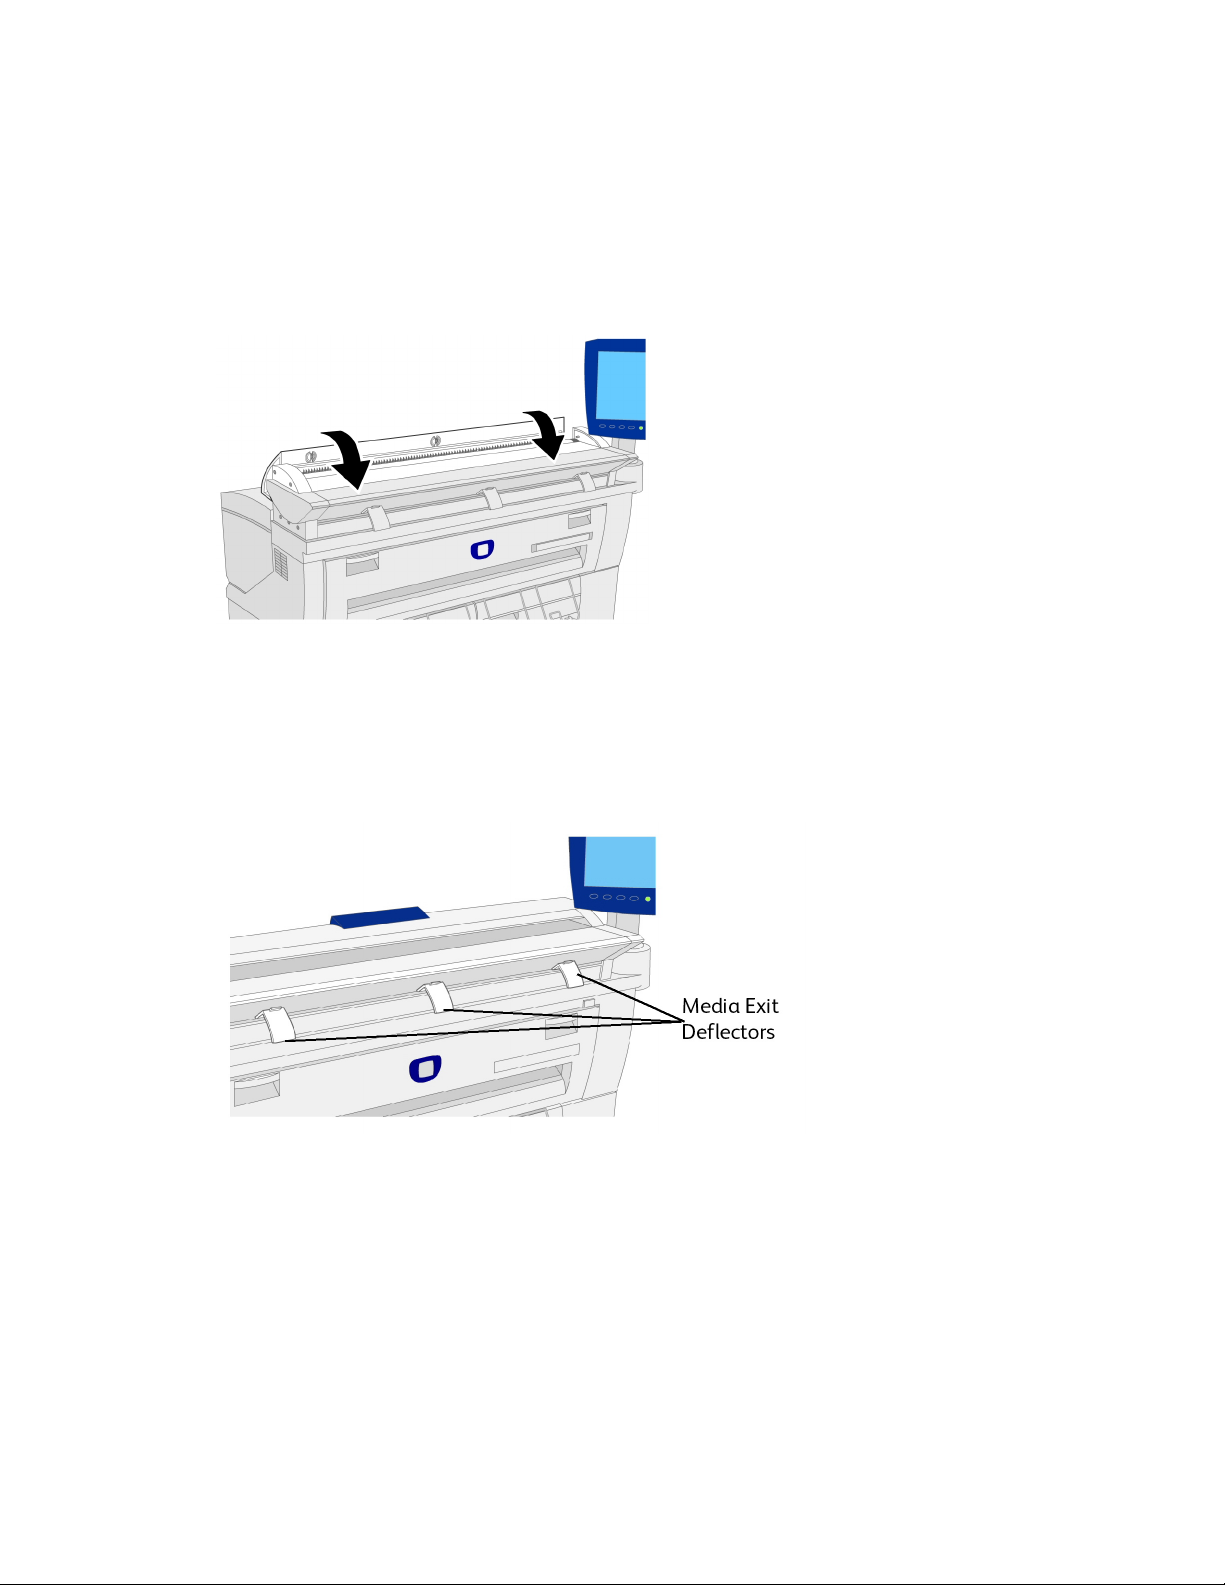
Media Exit Deflectors
The Media Exit Deflectors are designed to allow a rolled original to be deflected
downward as it exits the Scanner.
Take each of the three Media Exit Deflectors and attach them to the brackets on the
underside front of the Scanner. Ensure that they click fully into position.
NOTE
If the Paper Exit Deflectors are improperly installed, they will cause document feed
jams. Contact your Xerox Customer Support Center for installation.
Xerox® Wide Format 6604/6605 Solution
User Guide
™
1-11
Product Overview
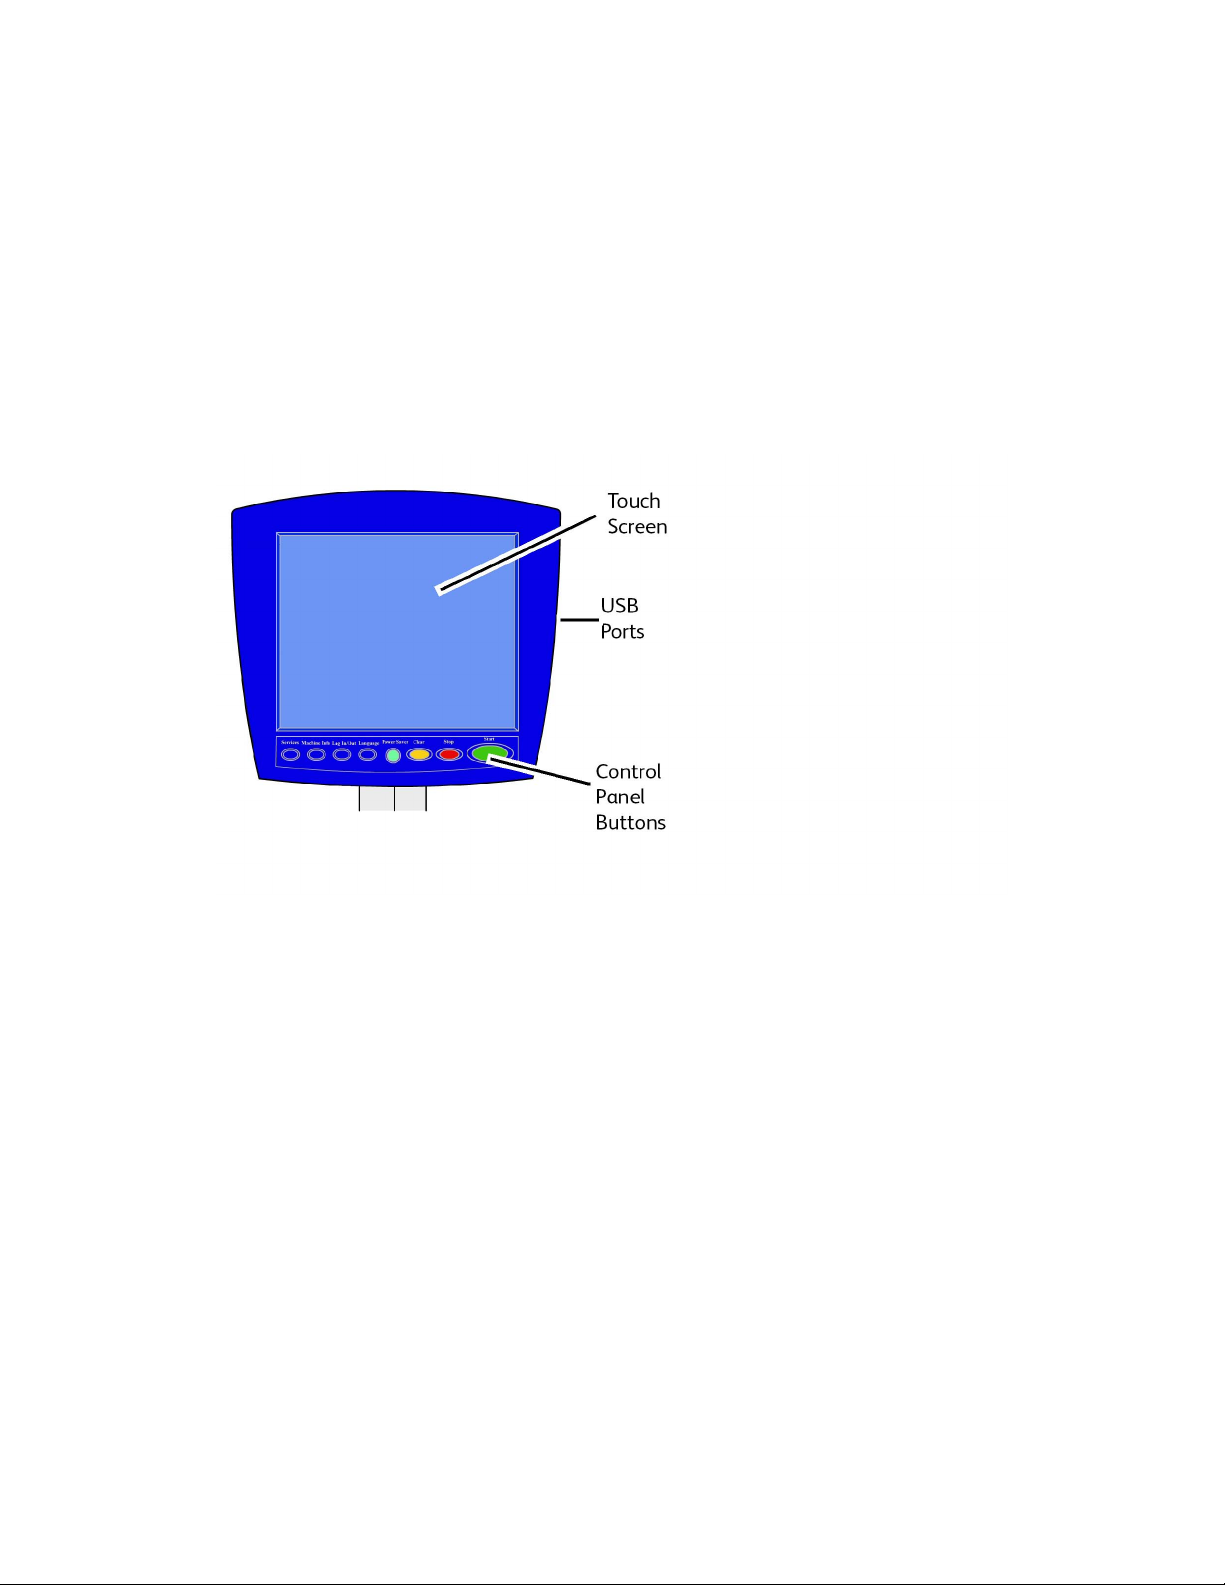
User Interface (UI)
The Printer User Interface and Web Printer Management Tool, accessed with a Web
Browser, are the two sources that enable users to set up and perform print service
operations.
The Printer User Interface is used to perform a variety of tasks using the Touch Screen
and Control Panel Buttons.
1-12
Xerox® Wide Format 6604/6605 Solution
User Guide
™

Table 6: User Interface Components
Product Overview
FunctionComponent
Touch Screen
USB Ports
Control Panel Buttons
Displays messages and on-screen buttons for selecting
features. Touch the screen to select features and options.
Connect accessories like keyboards, mouse and USB storage
devices to the Accxes Controller.
Contains the Services, Machine Info, Log In/Out, Language,
Power Saver, Clear, Stop, and Start buttons.
Touch Screen
Some capabilities of the User Interface are:
• Media setup for roll media and the Manual Feed-in Shelf
• System Parameter Setup
• Printing of test patterns to verify Printer operation
• Job log and error log management
• Display of billing meter information
The Touch Screen displays messages and contains the selection and feature buttons for
setting up copy and scan jobs. Touch the screen to select a feature or option.
NOTE
The features that display may vary, depending on the model, the options installed,
and the machine settings.
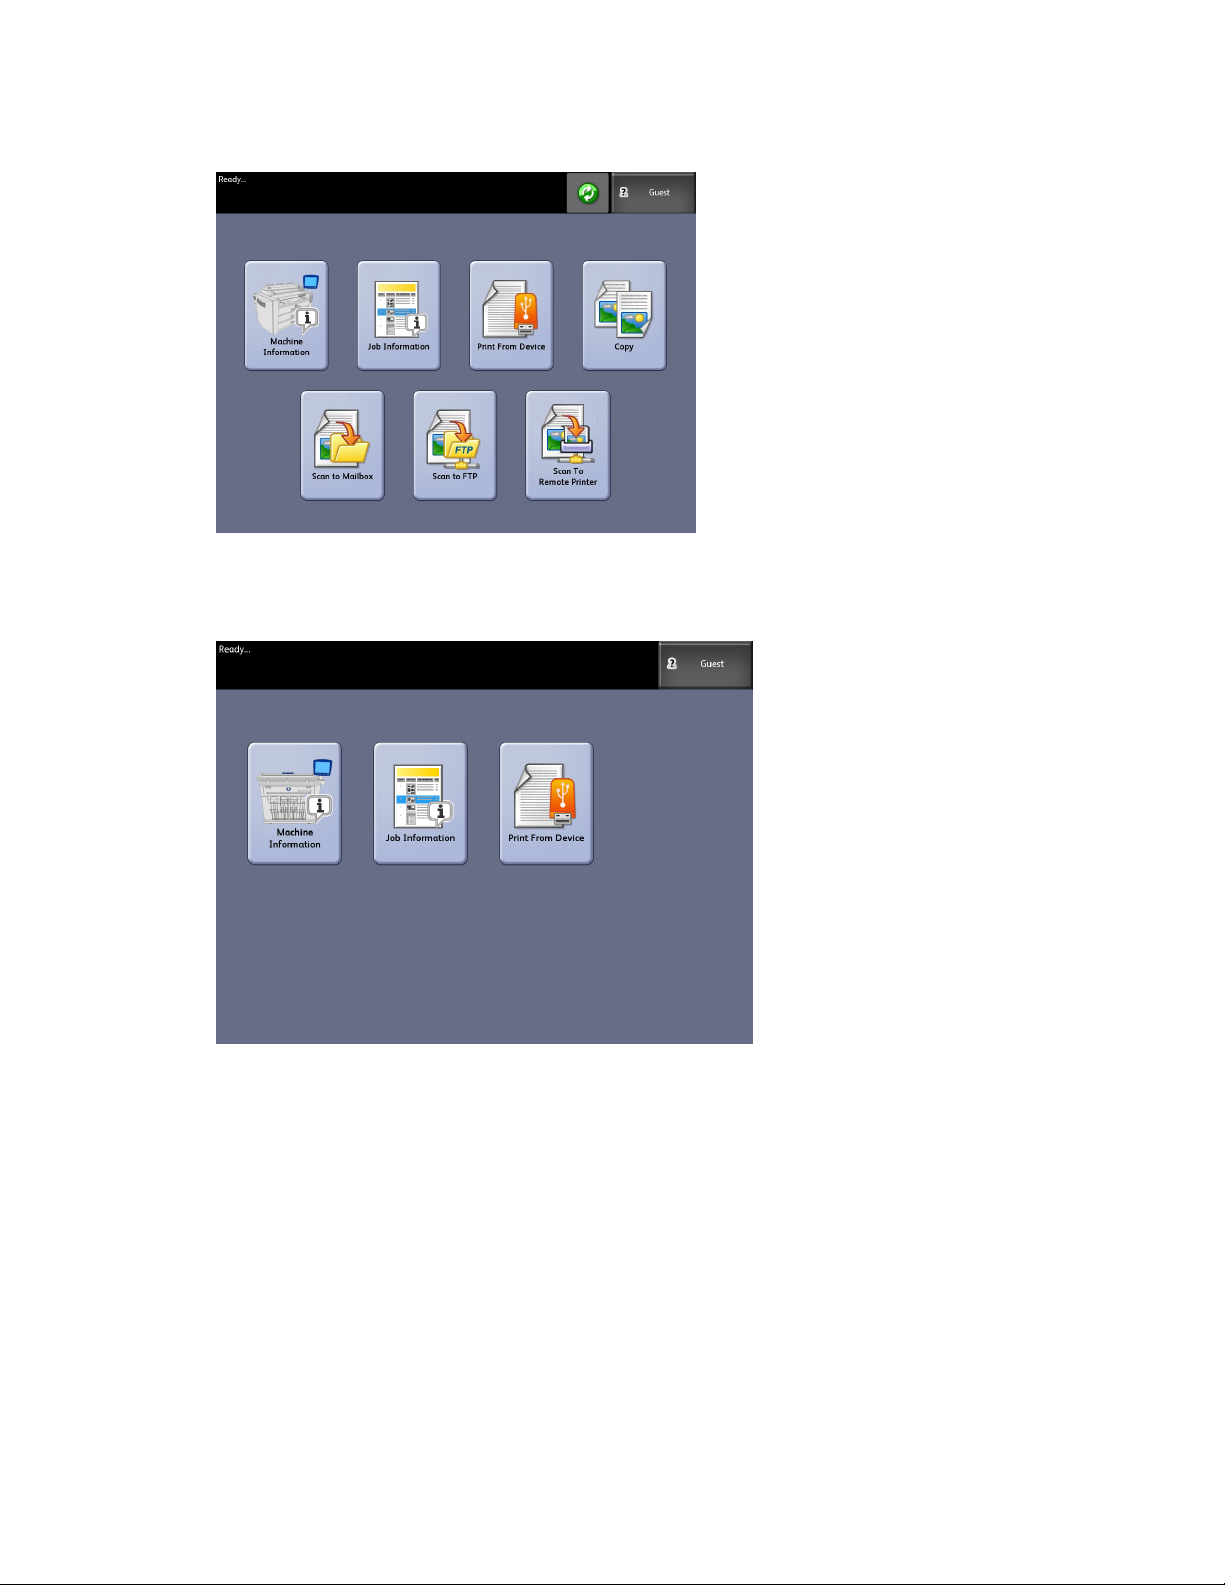
Using the Touch Screen
Features on the Services Menu
The Services Menu is the default page for the User Interface. It appears after the machine
is powered on or exits the Power Saver mode, and when the machine exits the System
Administration mode.
The screen below displays the copy/scan features. There is a scanner connected.
Xerox® Wide Format 6604/6605 Solution
User Guide
™
1-13
Product Overview
The following screen displays the printer only features. There is no scanner connected.
1-14
Xerox® Wide Format 6604/6605 Solution
User Guide
™
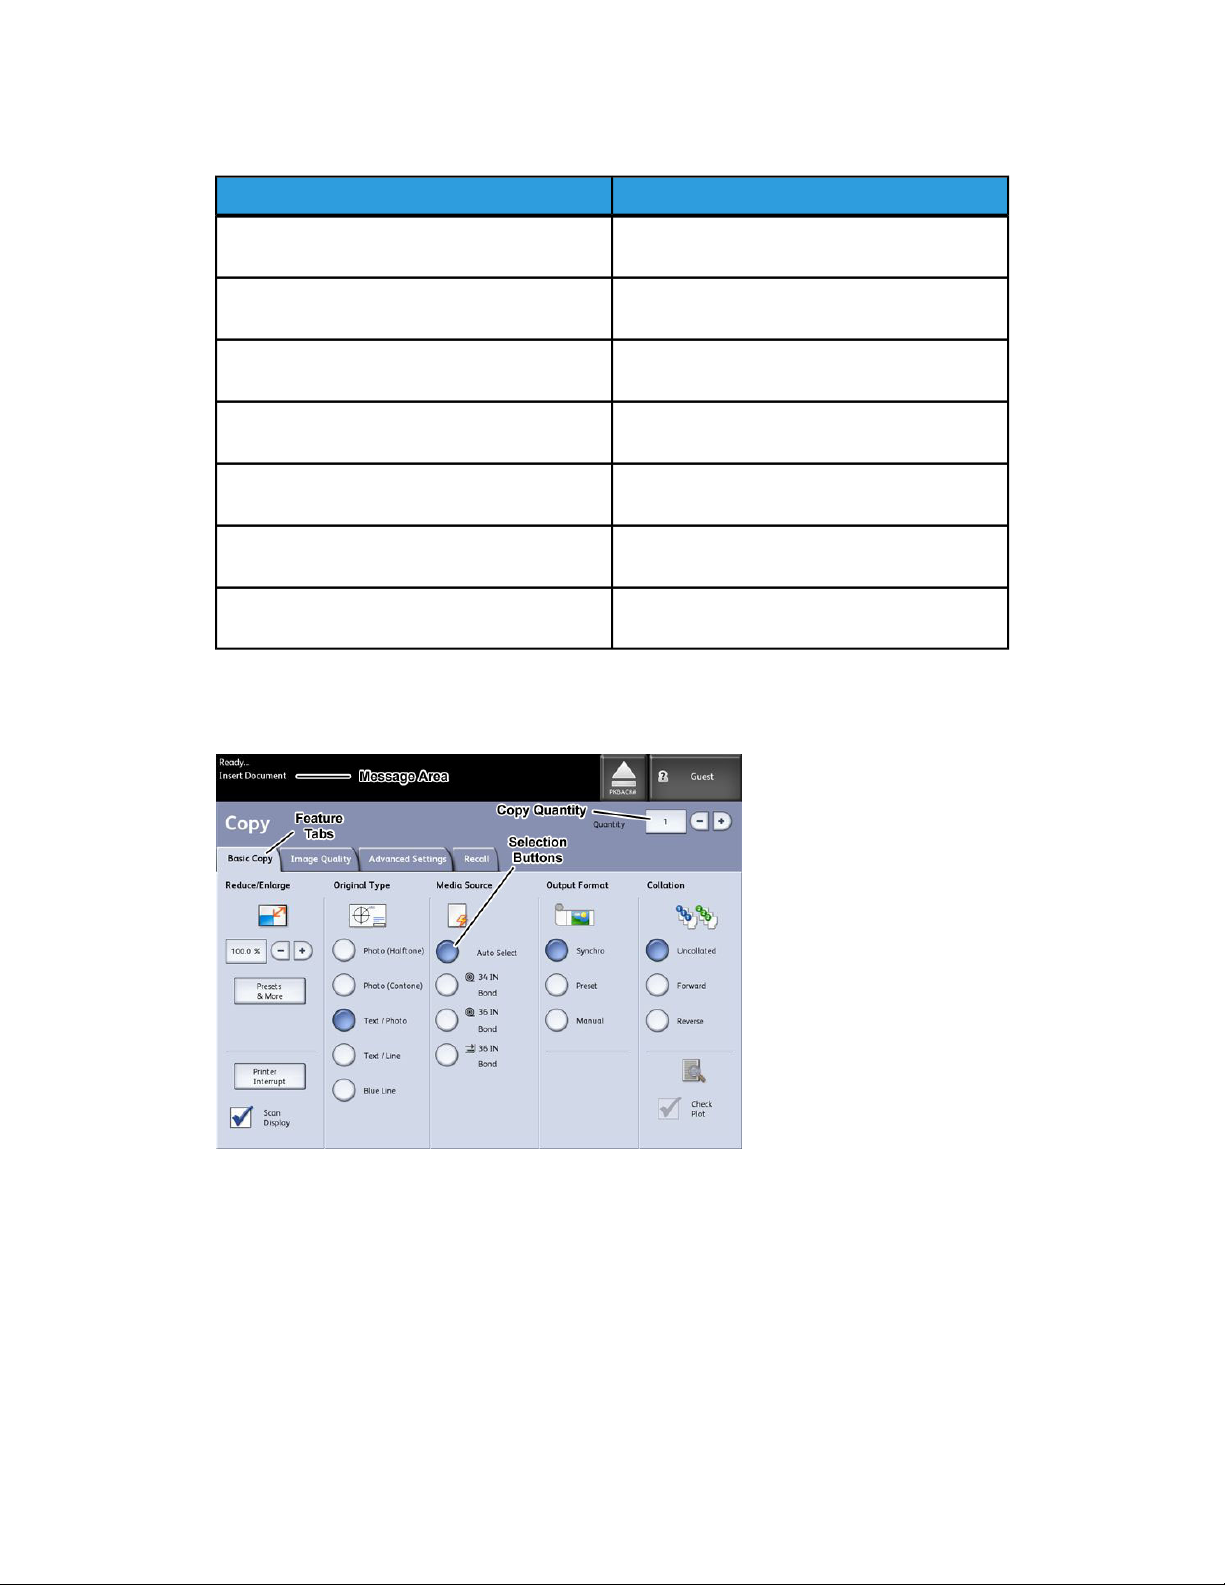
Table 7: Services Menu
Product Overview
FunctionService
Machine Info
Where system settings and configurations are
enabled and changed.
Job Information
Jobs are listed with status. Users can reprint
jobs from the queue list.
Print from Device
Scan to and print from a removable media
device (USB).
Copy
Displays the Basic Copy tab, Image Quality tab,
Advanced Settings tab and Recall tab.
Scan-to-Mailbox
Allows users to store scanned jobs in a mailbox
for later retrieval and printing.
Scan-to-FTP
Allows users to send scan jobs to a networked
file server destination.
Scan-to-Remote Printer
Allows users to send scan jobs to a remote
printer.
Touch Screen Features and Functions
Xerox® Wide Format 6604/6605 Solution
User Guide
™
1-15
Product Overview
Table 8: Touch Screen
FunctionTouch Screen Component
Message Area
Feature Tabs
Copy Quantity
Selection Buttons
Displays status information, user instructions and login
access.
Touch tabs to select and display the Menu and
additional features.
Enter the number of copies using the numeric keypad.
The number of copies can be set from 1 to 999. Press
the Control Panel Clear button to clear an incorrect
entry.
Touch to select an option. When selected, the button
highlights.
Use the arrow buttons to scroll to and select a value.Scroll Buttons
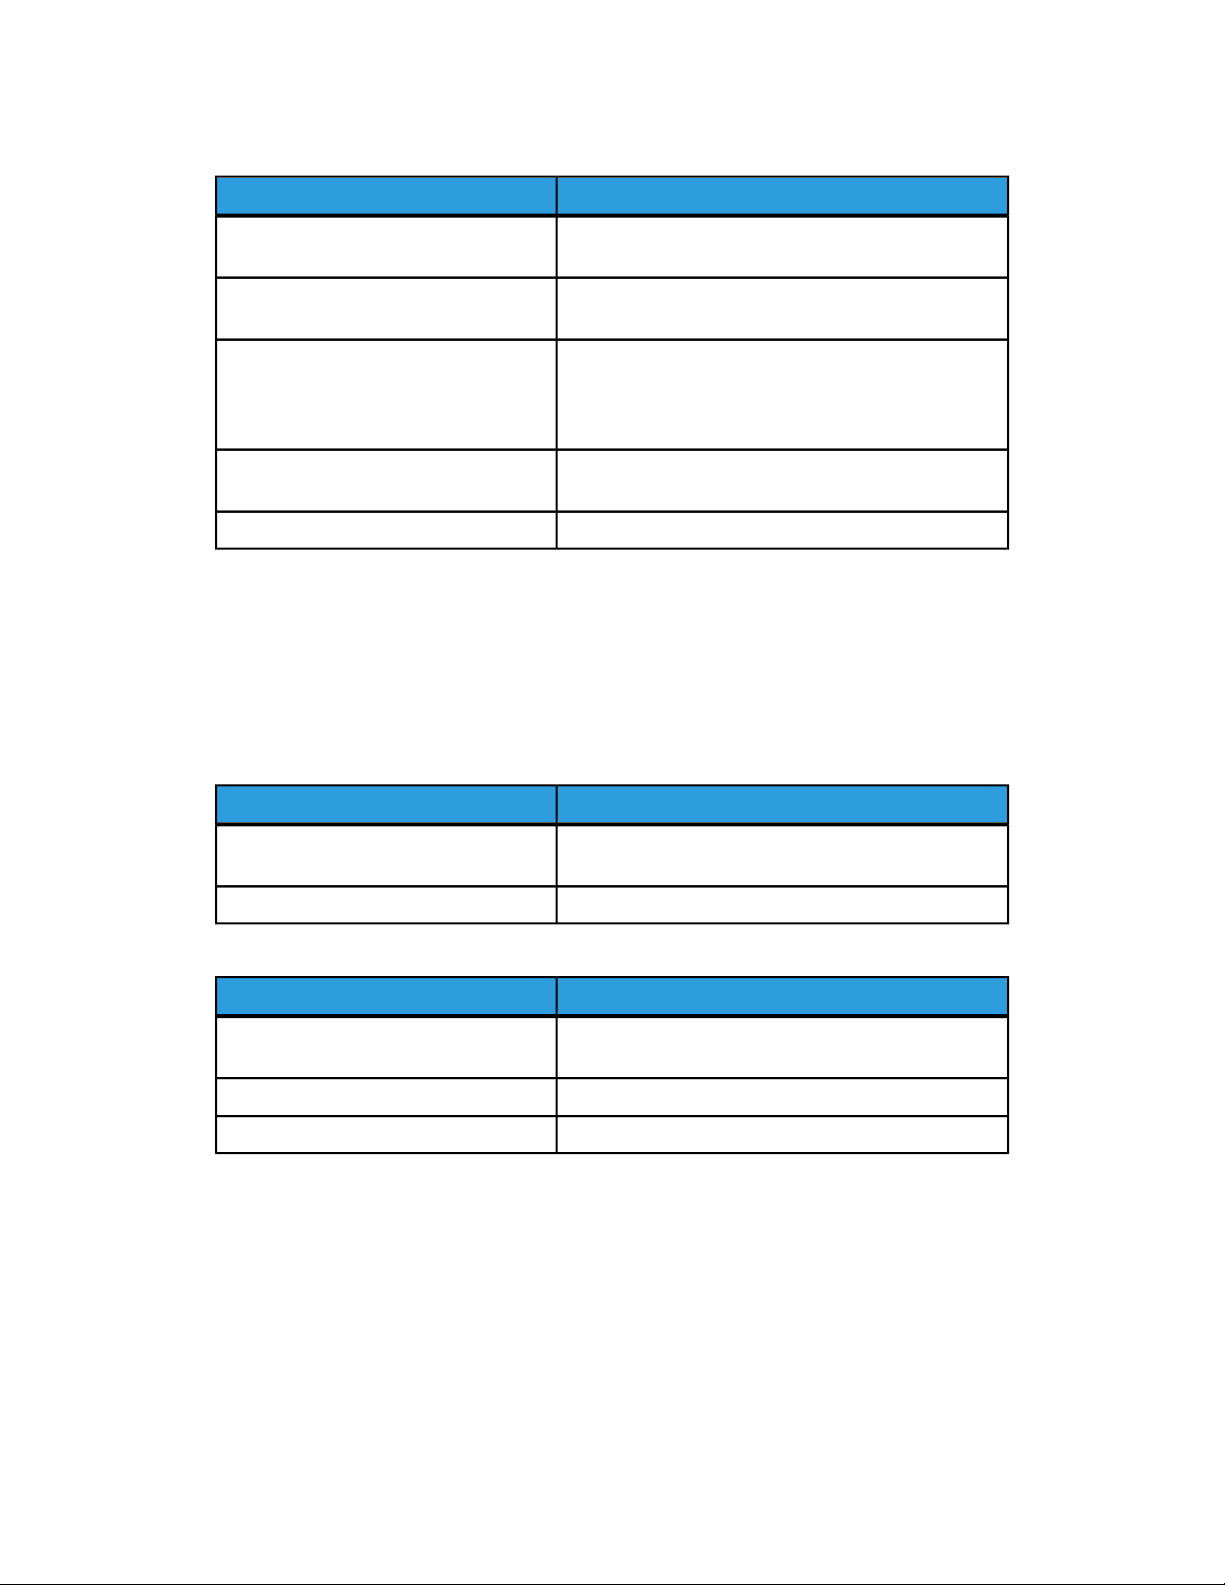
Keyboards
Entering Text
Screens may display that require you to enter text. This section of the keyboard is used
to enter text.
Table 9: Keyboard layout
FunctionComponent
Entry Area
Table 10: Keyboard procedures
Entering alphabetic characters and
numbers
Displays the characters entered on the numeric
keypad.
Use the cursor buttons to move to and insert text.Cursor Buttons
ProcedureFunction
Touch the desired characters. Select Shift to switch
between lowercase and uppercase characters.
Select Backspace to delete one character at a time.Deleting a character
Select Cancel or Save, as appropriate.Canceling or saving your input
NOTE
You may get an Invalid Entry error message if you select a character that is
unacceptable in the feature. For instance, when naming a mailbox, you may not use
an apostrophe.
1-16
Xerox® Wide Format 6604/6605 Solution
User Guide
™
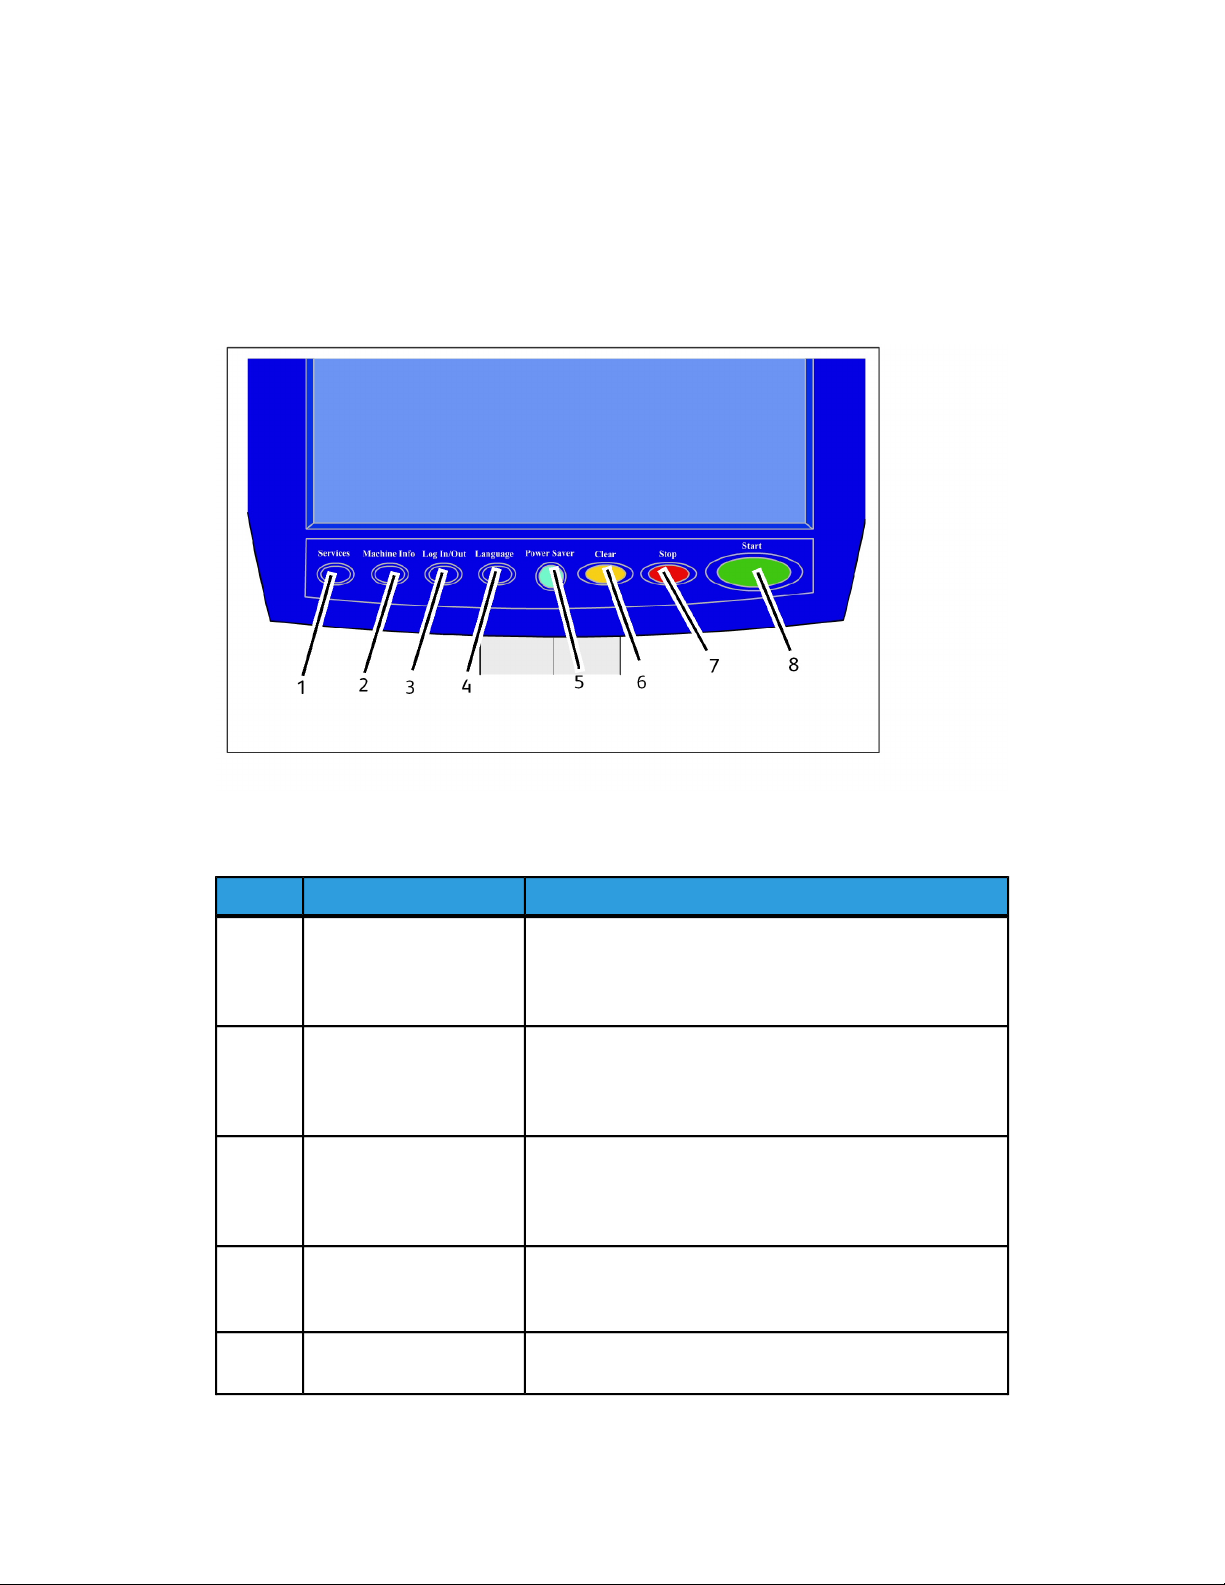
Control Panel
Control Panel
Product Overview
Table 11: Control Panel
Services1
Machine Information2
Login/out3
Language4
Power Saver5
FunctionButton NameNum.
Displays the Services Menu, which has a button for
Machine Information, Job Information, Copying, Scan to
Mailbox, Scan to FTP and Scan to Remote Printer. These
are the primary services.
Displays the machine status, media status, billing meter
readings and serial number, system description
(Configuration) and recent faults. Also enables the printing
of configuration and settings information.
Enables System Administrator and Job Accounting Login
access. Administrator access requires a secured password.
Job Accounting access requires an account name and User
ID. Guest access does not require a login.
Screen allows users to change text to an alternative
language, select inches or millimeters for Units and select
an Imperial or International Date Format.
The <Power Saver> button illuminates when the system
is in the Low Power or Sleep modes.
Xerox® Wide Format 6604/6605 Solution
User Guide
™
1-17

Product Overview
FunctionButton NameNum.
Clear6
Clears incorrect values entered when using the numeric
keypad, and is used to reset scan defaults in any of the
scan modes.
Used to Stop the scanning of an original.Stop7
Used to Start the scanning of a copy or scan job.Start8
Language
The Language feature enables you to select the default language, units of measurement,
and date format that displays on the Touch Screen, web interface, controller-generated
test prints, banner sheets, configuration pages, and so forth.
1. Press the Language button on the Control Panel.
2. Select the radio button of the desired language.
3. Select the Inches or the Millimeters radio button to set up the default units of
measurement.
4. Select the appropriate radio button from the Date Format choices.
• Imperial: The date displays in the format MM/DD/YYYY.
• International: The date displays in the format DD/MM/YYYY.
5. Select Save to close the Language screen and return to the Services menu.
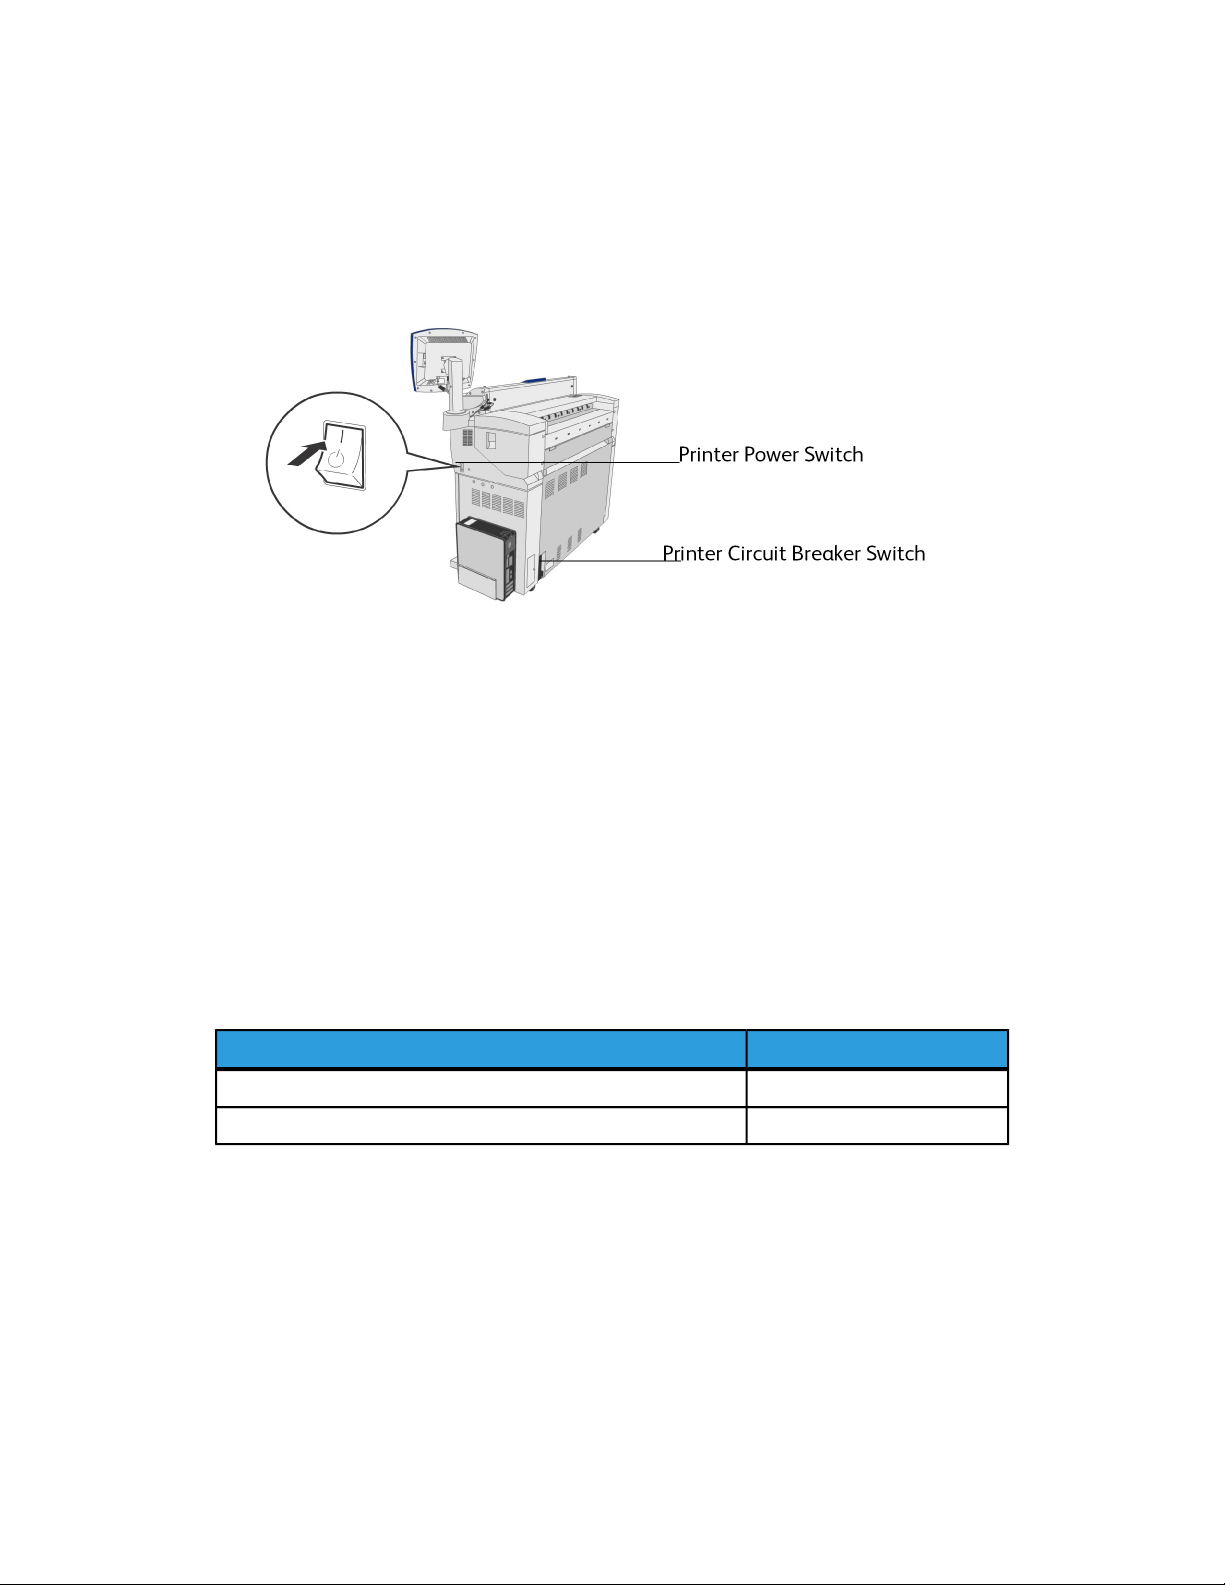
Powering the System On
The Printer and Controller are each equipped with a Power Switch. The Circuit Breaker
Switch must be in the On (up) position to switch the Scanner and Printer power on and
off.
Using the Power Saver Feature
The Power Saver feature automatically reduces the power consumption when no print
data is received within a preset period. The Power Saver feature has two modes, Low
Power Mode and Sleep Mode.
The machine enters the Low Power Mode after a preset period elapses. The machine
transitions to the Sleep Mode from the Low Power Mode if the machine remains idle for
an additional period.
NOTE
Refer to the Timers section to learn how to customize the Power Saver mode settings.
1-18
Xerox® Wide Format 6604/6605 Solution
User Guide
™

Product Overview
Low Power Mode
In this mode, the power to the control panel and the fuser is reduced. As the machine
enters the Low Power Mode, the Touch Screen shuts down and the Power Saver button
on the control panel illuminates.
Sleep Mode
In this mode, the power is reduced more than in the Low Power Mode. During the
transition from the Low Power mode to the Sleep mode, the Touch Screen remains dark
and the Power Saver button remains illuminated.
Entering the Power Saver Mode
The Power Saver Mode may be entered either automatically or manually.
Automatic Method
The machine enters the Low Power Mode after a preset period elapses. The machine
enters the Sleep Mode from the Low Power Mode if the machine remains idle for an
additional, preset period.
Manual Method
Press the Power Saver button on the Control Panel. The button illuminates, the machine
enters the Low Power Mode and the Touch Screen backlight extinguishes.
Exiting the Power Saver Mode
The Power Saver mode may be exited either manually or automatically.
Manual Method
With the machine in the Power Saver mode, press the illuminated Power Saver button.
The button’s indicator light extinguishes, the Touch Screen displays the message Warming
Up, and the machine begins its warm up cycle.
Automatic Method
The machine exits the Power Saver mode when it detects a print job in the active queue.
NOTE
Refer to the System Administration chapter to learn how to customize the Power
Saver mode settings. This is a System Administrator only setting.
Xerox® Wide Format 6604/6605 Solution
User Guide
™
1-19
Product Overview
System Power On
The procedure below describes the process for powering up the system from a cold start
(the system assumes that both the Printer and the Controller are powered down
completely).
1. Move the Printer Circuit Breaker Switch up, to the On [ | ] position.
2. Move the Printer Power Switch to the On [ | ] position.
3. Press the Power Button on the front of the Controller.
The Power Button light illuminates. After about one-half minute, the Control Panel
displays the Printer Warming Up message. The machine becomes print ready in about
three minutes.
Document Input
Documents that match any of the following sizes may be used.
Table 12: Document Input
ThicknessOriginal Size
Flat paper (0.05 — 3.2 mm)Width: 4.5 — 41 inches (114 — 1050 mm) (1016 mm Active Scan)
(0.3 mm max)Length: 7.8 — 644 inches (200-16510 mm)
NOTE
The maximum length that can be scanned to the network is 650 inches. The
maximum copy length is 590.55 inches (15 meters).
1-20
Xerox® Wide Format 6604/6605 Solution
User Guide
™
Loading…
Перейти к контенту
МФУ (многофункциональные устройства) Xerox
- Размер инструкции: 12.05 Мб
- Формат файла: pdf
Если вы потеряли инструкцию от МФУ (многофункционального устройства) Xerox WorkCentre 6605, можете скачать файл для просмотра на компьютере или печати.
Инструкция для МФУ (многофункционального устройства) Xerox WorkCentre 6605 на русском языке. В руководстве описаны возможности и полезные функции, а также правила эксплуатации. Перед использованием внимательно ознакомьтесь с инструкцией.
Чтобы не читать всю инструкцию вы можете выполнить поиск по содержимому внутри инструкции и быстро найти необходимую информацию. Рекомендации по использованию помогут увеличить срок службы МФУ (многофункционального устройства) Xerox WorkCentre 6605. Если у вас появилась проблема, то найдите раздел с описанием неисправностей и способами их решения. В нем указаны типичные поломки и способы их решения.
© 2012 Xerox Corporation. Все права защищены. Права на неопубликованные материалы охраняются законами о защите
авторских прав США. Содержание настоящего документа не может быть воспроизведено ни в какой форме без разрешения
корпорации Xerox.
Охрана авторских прав распространяется на все виды материалов и информации, защита которых разрешена
существующим законодательством, в том числе на экранные материалы, генерируемые программным способом, например
стили, шаблоны, значки, изображения и т. п.
®
®
®
®
®
®
®
XEROX , XEROX и фигуративный знак , Phaser , PhaserSMART , PhaserMatch , PhaserCal , PhaserMeter™, CentreWare ,
®
®
®
®
®
®
®
®
®
PagePack , eClick , PrintingScout , Walk-Up , WorkCentre , FreeFlow , SMARTsend , Scan to PC Desktop , MeterAssistant ,
®
®
®
®
SuppliesAssistant , Xerox Secure Access Unified ID System , Xerox Extensible Interface Platform , ColorQube , Global Print
®
®
Driver  и Mobile Express Driver  являются товарными знаками корпорации Xerox Corporation в США и других странах.
®
®
®
®
®
®
®
®
Adobe  Reader , Adobe  Type Manager , ATM™, Flash , Macromedia , Photoshop  и PostScript  являются товарными знаками
Adobe Systems Incorporated в США и/или других странах.
®
®
®
®
®
®
®
Apple , AppleTalk , Bonjour , EtherTalk , Macintosh , Mac OS  и TrueType  являются товарными знаками Apple Inc.,
зарегистрированными в США и других странах.
®
®
®
HP-GL , HP-UX  и PCL  являются товарными знаками Hewlett-Packard Corporation в США и/или других странах.
®
®
IBM  и AIX  являются товарными знаками International Business Machines Corporation в США и/или других странах.
®
®
®
®
Microsoft , Windows Vista , Windows  и Windows Server  являются товарными знаками Microsoft Corporation в США и других
странах.
®
®
®
®
Novell , NetWare , NDPS , NDS , IPX™ и Novell Distributed Print Services™ являются товарными знаками Novell, Inc. в США и
других странах.
®
®
SGI и IRIX  являются товарными знаками Silicon Graphics International Corp. или ее филиалов в США и/или других странах.
Sun, Sun Microsystems и Solaris являются товарными знаками или зарегистрированными товарными знаками компании
Oracle и/или ее дочерних компаний в США и других странах.
®
UNIX  является товарным знаком, зарегистрированной в США и других странах, и предоставляется по лицензии только
через посредничество компании X/Open Limited.
®
PANTONE  и другие товарные знаки Pantone Inc являются собственностью компании Pantone Inc.
Версия документа 1.1: Сентябрь 2012
Страницы и текст этой инструкции
Руководство пользователя МФУ (многофункционального устройства) Xerox WorkCentre 6605
Информация отображена на картинке
Информация отображена на картинке
Информация отображена на картинке
Информация отображена на картинке
Как использовать наш сайт инструкций OnlineManuals.ru
Наша цель состоит в том, чтобы предоставить вам быстрый доступ к содержанию инструкции для МФУ (многофункционального устройства) Xerox WorkCentre 6605.
С помощью онлайн просмотра, Вы можете быстро просмотреть содержимое инструкции и найти решение проблемы с МФУ (многофункционального устройства) Xerox WorkCentre 6605.
Для Вашего удобства
Если листать руководство пользователя МФУ (многофункционального устройства) Xerox WorkCentre 6605 прямо на сайте, не очень удобно для Вас, есть два возможных решения:
• Просмотр в полноэкранном режиме — легко просмотреть руководство пользователя (без загрузки его на свой компьютер), Вы можете использовать режим полноэкранного просмотра.
Для просмотра инструкции пользователя МФУ (многофункционального устройства) Xerox WorkCentre 6605 на полном экране, используйте кнопку «Открыть в Pdf-viewer».
• Загрузка на компьютер — Вы можете также скачать Руководство пользователя МФУ (многофункционального устройства) Xerox WorkCentre 6605 на свой компьютер и сохранить его в файлах.
Многие люди предпочитают читать документы не на экране, а в печатной версии.
Возможность печати руководства пользователя также была предусмотрена на нашем сайте,
и вы можете использовать ее, нажав на иконку «печать» в Pdf-viewer.
Нет необходимости печатать все руководство МФУ (многофункционального устройства) Xerox WorkCentre 6605, можно выбрать только нужные страницы инструкции.