
| Название | Русский | English |
|---|---|---|
| R-N303/R-N303D Owner’s Manual | — |
[1.6MB] |
| Supplement for DEEZER flyer | — |
[849KB] |
| Supplement for JUKE flyer | — |
[519KB] |
| Supplement for Qobuz flyer | — |
[689KB] |
| Supplement for Spotify flyer | — |
[654KB] |
| Supplement for TIDAL_flyer | — |
[656KB] |
Хорошее руководство по эксплуатации
Законодательство обязывает продавца передать покупателю, вместе с товаром, руководство по эксплуатации Yamaha R-N303. Отсутствие инструкции либо неправильная информация, переданная потребителю, составляют основание для рекламации в связи с несоответствием устройства с договором. В законодательстве допускается предоставлении руководства в другой, чем бумажная форме, что, в последнее время, часто используется, предоставляя графическую или электронную форму инструкции Yamaha R-N303 или обучающее видео для пользователей. Условием остается четкая и понятная форма.
Что такое руководство?
Слово происходит от латинского «instructio», тоесть привести в порядок. Следовательно в инструкции Yamaha R-N303 можно найти описание этапов поведения. Цель инструкции заключается в облегчении запуска, использования оборудования либо выполнения определенной деятельности. Инструкция является набором информации о предмете/услуге, подсказкой.
К сожалению немного пользователей находит время для чтения инструкций Yamaha R-N303, и хорошая инструкция позволяет не только узнать ряд дополнительных функций приобретенного устройства, но и позволяет избежать возникновения большинства поломок.
Из чего должно состоять идеальное руководство по эксплуатации?
Прежде всего в инструкции Yamaha R-N303 должна находится:
— информация относительно технических данных устройства Yamaha R-N303
— название производителя и год производства оборудования Yamaha R-N303
— правила обслуживания, настройки и ухода за оборудованием Yamaha R-N303
— знаки безопасности и сертификаты, подтверждающие соответствие стандартам
Почему мы не читаем инструкций?
Как правило из-за нехватки времени и уверенности в отдельных функциональностях приобретенных устройств. К сожалению само подсоединение и запуск Yamaha R-N303 это слишком мало. Инструкция заключает ряд отдельных указаний, касающихся функциональности, принципов безопасности, способов ухода (даже то, какие средства стоит использовать), возможных поломок Yamaha R-N303 и способов решения проблем, возникающих во время использования. И наконец то, в инструкции можно найти адресные данные сайта Yamaha, в случае отсутствия эффективности предлагаемых решений. Сейчас очень большой популярностью пользуются инструкции в форме интересных анимаций или видео материалов, которое лучше, чем брошюра воспринимаются пользователем. Такой вид инструкции позволяет пользователю просмотреть весь фильм, не пропуская спецификацию и сложные технические описания Yamaha R-N303, как это часто бывает в случае бумажной версии.
Почему стоит читать инструкции?
Прежде всего здесь мы найдем ответы касательно конструкции, возможностей устройства Yamaha R-N303, использования отдельных аксессуаров и ряд информации, позволяющей вполне использовать все функции и упрощения.
После удачной покупки оборудования/устройства стоит посвятить несколько минут для ознакомления с каждой частью инструкции Yamaha R-N303. Сейчас их старательно готовят или переводят, чтобы они были не только понятными для пользователя, но и чтобы выполняли свою основную информационно-поддерживающую функцию.

AB
Owner’s Manual
EN
Network Receiver
• The R-N303 and R-N303D network receivers allow you to play back sound in
high-quality stereo at your own home.
• This manual explains preparations and operations for everyday users of the unit.

English
PRECAUTIONS
PLEASE READ CAREFULLY BEFORE USE. BE SURE TO FOLLOW THESE INSTRUCTIONS.
The precautions listed below are to prevent risk of harm to the user and others, as well as to prevent property
damage, and to help the user use this unit properly and safely. Be sure to follow these instructions.
After reading this manual, be sure to keep it in a safe place where
it can be referenced at any time.
• Be sure to request inspections or repairs from the dealer
where you purchased the unit or from qualified Yamaha
service personnel.
• Yamaha cannot be held responsible for damage caused by
improper use or modifications to the unit.
• This product is for ordinary homes. Do not use for
applications requiring high reliability, such as managing
lives, health care or high-value assets.
This content indicates “risk of serious injury or death.”
■ Power supply/power cord
• Do not do anything that could damage the power cord.
— Do not place it near a heater.
— Do not bend it excessively or alter it.
— Do not scratch it.
— Do not place it under a heavy object.
Using the power cord with the core of the cord exposed could
cause electric shocks or a fire.
• Do not touch the power plug or cord if there is a chance of
lightning. Failure to observe this may cause electric shocks.
• Use this unit with the power supply voltage printed on it.
Failure to connect to an appropriate AC outlet may cause a fire,
electric shocks, or malfunctions.
• Check the electric plug periodically and remove any dirt or dust
which may have accumulated on it. Failure to observe this may
cause a fire or electric shocks.
• When setting up the unit, make sure that the AC outlet you are
using is easily accessible. If some trouble or malfunction
occurs, immediately turn off the power switch and disconnect
the plug from the AC outlet. Even when the power switch is
turned off, as long as the power cord is not unplugged from the
wall AC outlet, the unit will not be disconnected from the
power source.
• If you hear thunder or suspect approaching lightning, quickly
turn off the power switch and pull the power plug from the AC
outlet. Failure to observe this may cause a fire or malfunctions.
• If not using the unit for long periods of time, be sure to pull the
power plug from the AC outlet. Failure to observe this may
cause a fire or malfunctions.
■ Do not disassemble
• Do not disassemble or modify this unit. Failure to observe this
may cause a fire, electric shocks, injury, or malfunctions. If you
notice any irregularities, be sure to request an inspection or
repair from the dealer where you purchased the unit or from
qualified Yamaha service personnel.
■ Water warning
• Do not expose the unit to rain, use it near water or in damp or
wet conditions, or place on it any containers (such as vases,
bottles or glasses) containing liquids which might spill into any
openings. A liquid such as water getting into the unit may cause
a fire, electric shocks, or malfunctions. If any liquid such as
water seeps into the device, turn off the power immediately and
unplug the power cord from the AC outlet. Then, request an
inspection from the dealer where you purchased the unit or from
qualified Yamaha service personnel.
• Never insert or remove an electric plug with wet hands. Do not
handle this unit with wet hands. Failure to observe this may
cause electric shocks or malfunctions.
■ Fire warning
• Do not place any burning items or open flames near the unit,
since they may cause a fire.
■ Maintenance and care
• Do not use aerosols or spray-type chemicals that contain
combustible gas for cleaning or lubrication. The combustible
gas will remain inside the unit, which may cause explosion or
fire.
■ Battery use
• Do not disassemble a battery. If the contents of the battery get
on your hands or in your eyes, it can cause blindness or
chemical burns.
• Do not dispose of batteries in fire. Doing so may result in the
battery bursting, causing a fire or injury.
• Do not expose a battery to high temperatures, such as direct
sunlight or a fire. The battery may burst, causing a fire or injury.
• Do not attempt to recharge batteries that are not intended to be
charged. Charging could cause the battery to burst or leak,
which can cause blindness, chemical burns, or injury.
• If the batteries do leak, avoid contact with the leaked fluid.
If the battery fluid should come in contact with your eyes,
mouth, or skin, wash immediately with water and consult a
doctor. Battery fluid is corrosive and may possibly cause loss of
sight or chemical burns.
■ Wireless unit
• Do not use this unit near medical devices or inside medical
facilities. Radio waves from this unit may affect electromedical
devices.
• Do not use this unit within 15 cm (6 in) of persons with a heart
pacemaker implant or a defibrillator implant. Radio waves from
this unit may affect electro-medical devices, such as a heart
pacemaker implant or defibrillator implant.
■ If you notice any abnormality
• If any of the following abnormalities occur, immediately turn
off the power and disconnect the power plug. If you are using
batteries, remove the batteries from this unit.
— The power cord/plug is damaged.
— An unusual smell or smoke is emitted from the unit.
— Foreign material gets into the interior of the unit.
— There is a loss of sound during use.
— There is a crack or damage in the unit.
Continued use could cause electric shocks, a fire, or
malfunctions. Immediately request an inspection or repair from
i En

the dealer where you purchased the unit or from qualified
Yamaha service personnel.
• Be careful not to drop or apply strong impact to this unit. If you
suspect the unit may have been damaged due to dropping or
impact, immediately turn off the power and pull the power plug
from the AC outlet. Failure to observe this may cause electric
shocks, a fire, or malfunctions. Immediately request an
inspection from the dealer where you purchased the unit or from
qualified Yamaha service personnel.
This content indicates “risk of injury.”
■ Power supply/power cord
• Do not use an AC outlet where the power plug fits loosely when
inserted. Failure to observe this may cause a fire, electric
shocks, or burns.
• When removing the electric plug from an AC outlet, always
hold the plug itself and not the cord. Pulling by the cord can
damage it and cause electric shocks or a fire.
• Insert the power plug firmly all the way into the AC outlet.
Using the unit when it is not plugged in sufficiently can cause
dust to accumulate on the plug, causing a fire or burns.
■ Installation
• Do not place the unit in an unstable position where it might
accidentally drop or fall over and cause injuries.
• Do not block this unit’s ventilation holes (cooling slits). This
unit has ventilation holes on the top/bottom to prevent the
internal temperature from becoming too high. Failure to
observe this may trap heat inside the unit, causing a fire or
malfunctions.
• When installing this unit:
— Do not cover it with any cloth.
— Do not install it on a carpet or rug.
— Make sure the top surface faces up; do not install on its sides
or upside down.
— Do not use the device in a confined, poorly-ventilated
location.
Failure to observe the above may trap heat inside the unit,
causing a fire or malfunctions. Ensure that there is adequate
space around the unit: at least 30 cm (11-3/4 in) on top, 20 cm
(7-7/8 in) on the sides, and 20 cm (7-7/8 in) on the rear.
• Ensure that the top is facing upwards. Failure to observe this
may cause malfunctions or for the unit to fall and cause injury.
• Do not place the unit in a location where it may come into
contact with corrosive gases or salt air. Doing so may result in
malfunction.
• Avoid being near the unit during a disaster, such as an
earthquake. Since the unit may turn over or fall and cause
injury, quickly move away from the unit and go to a safe place.
• Before moving this unit, be sure to turn off the power switch and
disconnect all connection cables. Failure to observe this may
damage the cables or cause you or someone else to trip and fall.
• When turning on the AC power in your audio system, always
turn on the unit LAST, to avoid hearing loss and speaker
damage. When turning the power off the unit should be turned
off FIRST for the same reason. Failure to observe the above
may cause hearing impairment or speaker damage.
■ Maintenance
• Remove the power plug from the AC outlet when cleaning the
unit. Failure to observe this may cause electric shocks.
■ Handling caution
• Do not insert foreign materials such as metal or paper into the
ventilation holes of this unit. Failure to observe this may cause a
fire, electric shocks, or malfunctions. If foreign material gets
into the unit, immediately shut off the power and pull the power
plug from the AC outlet / then turn off any amplifiers and
receivers and request an inspection from the dealer where you
purchased the unit or from qualified Yamaha service personnel.
• Do not rest your weight on the unit or place heavy objects on it.
Avoid applying excessive force to the buttons, switches or
connectors. Failure to observe the above may cause injury or
unit damage.
• Avoid pulling the connected cables to prevent injuries or
damage to the unit by causing it to fall.
■ Battery use
• Always replace all batteries at the same time. Do not use new
batteries together with old ones. Using new ones with old ones
could cause a fire, burns, or inflammation due to fluid leaks.
• Do not mix battery types, such as alkaline batteries with
manganese batteries, or batteries from different makers, or
different types of batteries from the same maker, since this can
cause a fire, burns, or inflammation due to fluid leaks.
• Keep batteries away from children. A child could accidentally
swallow a battery. Failure to observe this may also cause
inflammation due to battery fluid leaks.
• Do not put in a pocket or bag, carry, or store batteries together
with pieces of metal. The battery could short, burst, or leak,
causing a fire or injury.
• Always make sure all batteries are inserted in conformity with
the +/- polarity markings. Failure to do so might result in a fire,
burns, or inflammation due to fluid leaks.
• When the batteries run out, or if the unit is not to be used for a
long time remove the batteries from the remote control to
prevent possible leakage of the battery fluid.
• When storing or discarding batteries, insulate the terminal area
by applying tape, or some other protection. Mixing them with
other batteries or metal objects can cause a fire, burns, or
inflammation due to fluid.
Caution
Do not touch the surface marked with
this label.
The surface may become hot during
operation.
■ Hearing loss
• Do not use the unit/speakers or headphones for a long period of
time at a high or uncomfortable volume level, since this can
cause permanent hearing loss. If you experience any hearing
loss or ringing in the ears, consult a physician.
• Before connecting the unit to other devices, turn off the power
for all devices. Also, before turning the power of all devices on
or off, make sure that all volume levels are set to the minimum.
Failing to do so may result in hearing loss, electric shock, or
device damage.
English
ii En

Notice and Information
Notice
Indicates points that you must observe in order to
prevent product failure, damage or malfunction and
data loss, as well as to protect the environment.
■ Power
• Indicates points that you must observe in order to prevent
product failure, damage or malfunction and data loss, as well as
to protect the environment.
■ Installation
• Do not use this unit in the vicinity of other electronic
equipment, such as a TV, radio or mobile phone. Failure to
observe this may cause this unit or the TV or radio to produce
noise.
• Do not use this unit in a location that is exposed to direct
sunlight (such as a vehicle interior), that becomes extremely
hot, such as near a heater, or extremely cold, or that is subject to
excessive dust or vibration. Failure to observe this may cause
the unit’s panel to become deformed, the internal components to
malfunction, or for operation to become unstable.
• Install this unit as far away from other electronic equipment as
possible. Digital signals from this unit may interfere with other
electronic equipment.
• If using a wireless network or Bluetooth, avoid installing this
unit near metal walls or desks, microwave ovens, or other
wireless network devices.
■ Connections
• If connecting external units, be sure to thoroughly read the
manual for each unit and connect them in accordance with the
instructions. Failure to properly handle a unit in accordance
with the instructions could cause malfunctions.
• Do not connect this unit to industrial units. Digital audio
interface standards for consumer use and industrial use are
different. This unit has been designed to connect to a consumeruse digital audio interface. Connections to an industrial-use
digital audio interface could not only cause this unit to
malfunction, but could also damage the speakers.
Information
Indicates information of note regarding this product.
■ About content in this manual
• The illustrations and screens in this manual are for instructional
purposes only.
• The company names and product names in this manual are the
trademarks or registered trademarks of their respective
companies.
• Software may be revised and updated without prior notice.
• Information marked by the “ WARNING” icon indicates
points that may lead to death or serious injury if not observed.
• Information marked with the “ CAUTION” icon indicates
points that may lead to injury if not observed.
• Information in the “Notice” sections indicates points that you
must observe to prevent product failure, damage or malfunction
and data loss.
• Information listed in the “Note” sections indicates
supplementary information.
• This manual describes the “iPod touch”, “iPhone” and “iPad”
collectively as the “iPhone”. (“iPhone” refers to the “iPod
touch”, “iPhone” and “iPad”, unless otherwise specified.)
• In this manual, illustrations of English menu screens are used as
examples.
■ Handling
• Do not place vinyl, plastic, or rubber products on this unit.
Failure to observe this may cause discoloration or deformation
in the panel of this unit.
• If the ambient temperature changes drastically (such as during
unit transportation or under rapid heating or cooling) and there
is a chance condensation may have formed in the unit, leave the
unit for several hours without turning on the power until it is
completely dry before use. Using the unit while there is
condensation can cause malfunctions.
■ Maintenance
• When cleaning the unit, use a dry, soft cloth. Using chemicals
such as benzine or thinner, cleaning agents, or chemical
scrubbing cloths can cause discoloration or deformation.
■ Batteries
• Be sure to discard used batteries in accordance with local
regulations.
iii En

Contents
Contents
INTRODUCTION
What you can do with this unit …………………………… 2
Sources that can be played back on this unit …………….. 2
Supplied accessories …………………………………………… 3
Controls and functions ……………………………………….. 4
Front panel …………………………………………………………… 4
Front display ………………………………………………………… 6
Rear panel ……………………………………………………………. 7
Remote control……………………………………………………… 8
PREPARATION
Connections ……………………………………………………… 10
Connecting audio devices …………………………………….. 10
Connecting the speakers ………………………………………. 11
Connecting the FM/AM antennas (R-N303) …………… 12
Connecting the DAB/FM antenna (R-N303D) ………… 12
Connecting the network cable ………………………………. 13
Preparing a wireless antenna ………………………………… 13
Connecting power cord………………………………………… 13
Turning on the unit ……………………………………………… 13
Connecting to a network …………………………………… 14
Sharing the iOS device setting………………………………. 15
Configuring with the router’s WPS push button ……… 16
Set the wireless network connection manually………… 16
Connecting a mobile device to the unit directly
(Wireless Direct) …………………………………………….. 17
Verify the network connection status …………………….. 18
Configuring MusicCast………………………………………… 19
BASIC OPERATION
Playback ………………………………………………………….. 20
Playing a source………………………………………………….. 20
Switching information on the front display …………….. 20
Using the sleep timer …………………………………………… 21
Listening to FM/AM radio………………………………… 22
FM/AM tuning……………………………………………………. 22
Using preset functions …………………………………………. 22
Radio Data System tuning
(Only for U.K. and Europe models) …………………… 25
Listening to DAB radio (R-N303D)……………………. 26
Preparing the DAB tuning ……………………………………. 26
Selecting a DAB radio station for reception……………. 26
Using preset function…………………………………………… 27
Displaying the DAB information…………………………… 28
Checking reception strength of each DAB channel
label ………………………………………………………………. 29
Playing back music via Bluetooth………………………. 30
Connecting a Bluetooth device (pairing) ………………… 30
Playing back Bluetooth device contents …………………. 30
Disconnecting a Bluetooth connection …………………… 31
Playing back music stored on media servers
(PCs/NAS) ……………………………………………………. 32
Setting the media sharing of music files …………………. 32
Playback of PC music contents……………………………… 33
Listening to Internet radio ………………………………… 34
Playing back music with AirPlay ………………………. 35
Playback of iTunes/iPhone music contents …………….. 35
Registering the current playback song/station
(Preset function) …………………………………………….36
Registering to a preset …………………………………………. 36
Recalling a preset………………………………………………… 36
Clearing a preset …………………………………………………. 36
ADVANCED OPERATION
Configuring playback settings for different
playback sources (OPTION menu)………………….37
OPTION menu items …………………………………………… 37
Configuring various functions (SETUP menu) ……39
SETUP menu items …………………………………………….. 39
Network …………………………………………………………….. 40
Bluetooth …………………………………………………………… 41
Balance ……………………………………………………………… 41
Max Volume ………………………………………………………. 41
InitialVolume……………………………………………………… 42
AutoPowerStby (Auto Power Standby)………………….. 42
Configuring the system settings
(ADVANCED SETUP menu)………………………….43
ADVANCED SETUP menu items ………………………… 43
Checking the firmware version (VERSION)…………… 43
Selecting the remote control ID (REMOTE ID)………. 43
Setting tuner frequency step (TU) …………………………. 43
Restoring the default settings (INIT) ……………………… 43
Updating the firmware (UPDATE) ……………………….. 44
Updating the unit’s firmware……………………………..45
ADDITIONAL INFORMATION
Troubleshooting…………………………………………………46
Supported devices and file formats …………………….52
Supported devices……………………………………………….. 52
Supported file formats …………………………………………. 52
Specifications …………………………………………………….53
Trademarks ………………………………………………………55
Index …………………………………………………………………56
PREPARATION INTRODUCTION
BASIC
OPERATION
ADVANCED
OPERATION
ADDITIONAL
INFORMATION
English
1 En

INTRODUCTION
This unit
1 Internet
2 Streaming service
Modem
Router*
3 PC
5 AirPlay (iTunes)
4 NAS
5 AirPlay (iPhone/iPad/iPod touch)
6 Bluetooth
7 CD player etc.
Mobile
device
8 Radio
What you can do with this unit
This unit is a network receiver compatible with a network source such as a media server and mobile device.
It supports playback from not only analog sources such as a CD player or AM/FM radio, but also from Bluetooth devices
and network streaming services.
Sources that can be played back on this unit
Wi
Fi
DISPLAY MODE
MEMORY BAND
SPEAKERSPHONES
BASS
BLUETOOTH
PRESET
TUNING
TREBLE
INPUT
VOLUME
SELECT
PUSH ENTER
RETURN
CONNECT
*
You need a commercially available wireless router (access point) when you use a mobile device.
1 Play back the Internet radio (p. 34)
2 Play back the streaming service
(See the supplement for each service.)
3 Play back music files stored on your PC (p. 32)
4 Play back music files stored on your NAS
(p. 32)
For details on connecting the external devices, see “Connections” (p. 10).
2 En
5 Play back music files with AirPlay (p. 35)
6 Play back audio content from Bluetooth
devices (p. 30)
7 Play back your external component (p. 10)
8 Listening to radio (p. 22, 26)
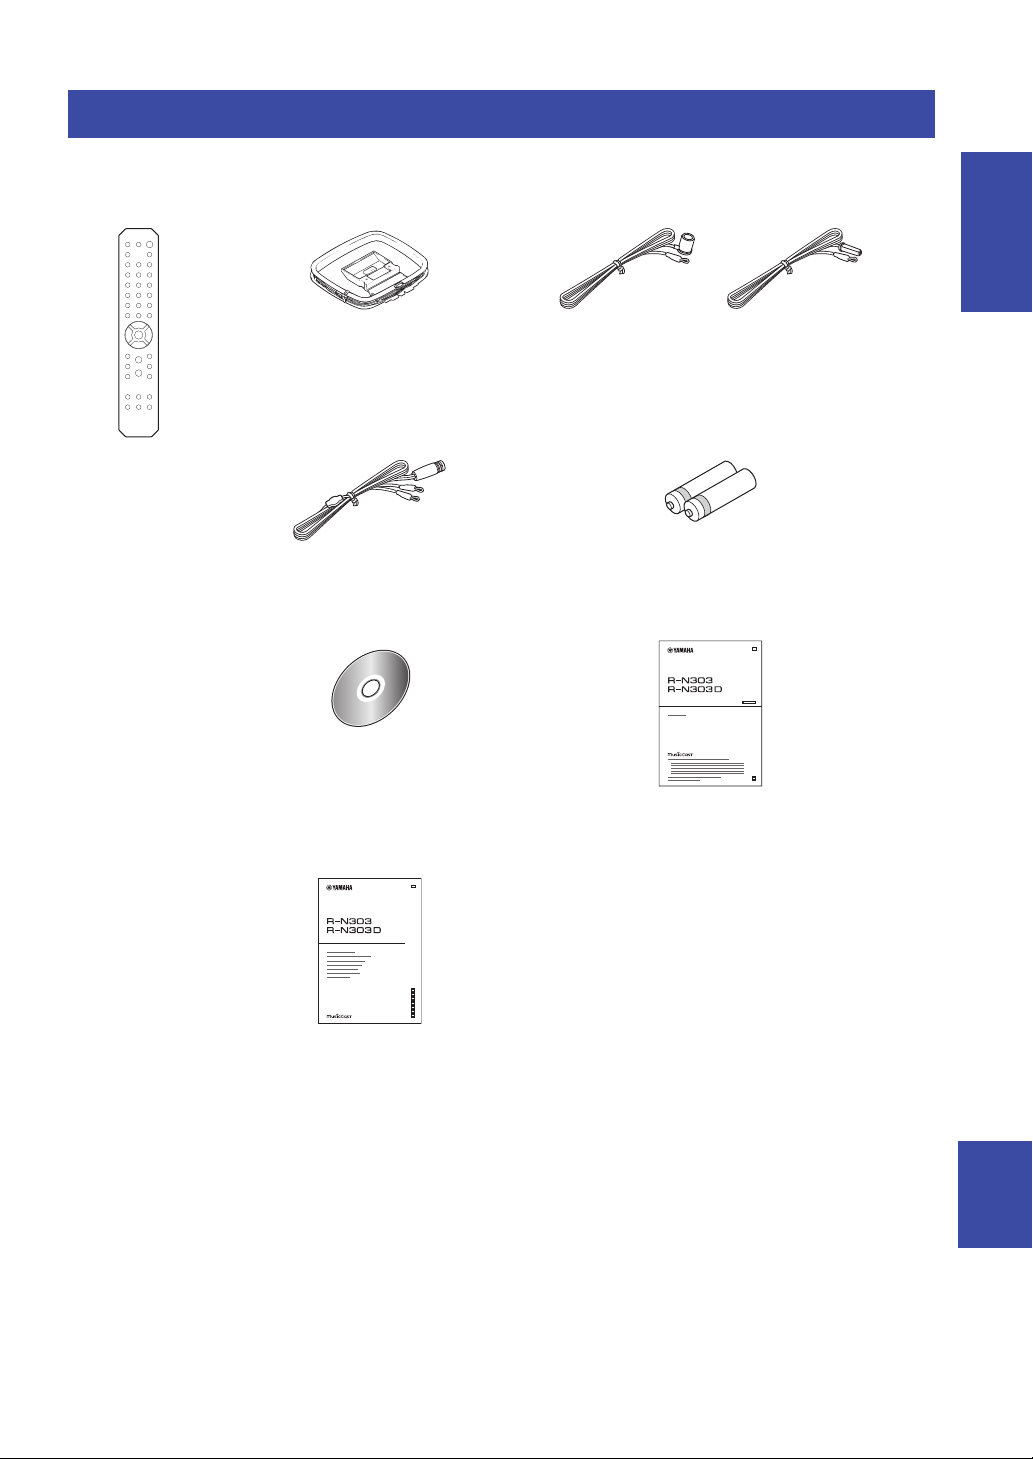
Supplied accessories
Remote control FM antenna (R-N303)AM antenna (R-N303)
Batteries (x2)
(AA, R6, UM-3)
DAB/FM antenna
(R-N303D)
*
One of the above is supplied depending
on the region of purchase.
R-N303/R-N303D Owner’s Manual
CD-ROM (Europe model)
R-N303/R-N303D Owner’s Manual
(except Europe model, this book)
R-N303/R-N303D Quick Start Guide
(Europe model)
G
■
■
■
■
Network Receiver
Check that the following accessories are supplied with the product.
What you can do with this unit
INTRODUCTION
G
Network Receiver
Réseau Ampli-Tuner
English
3 En
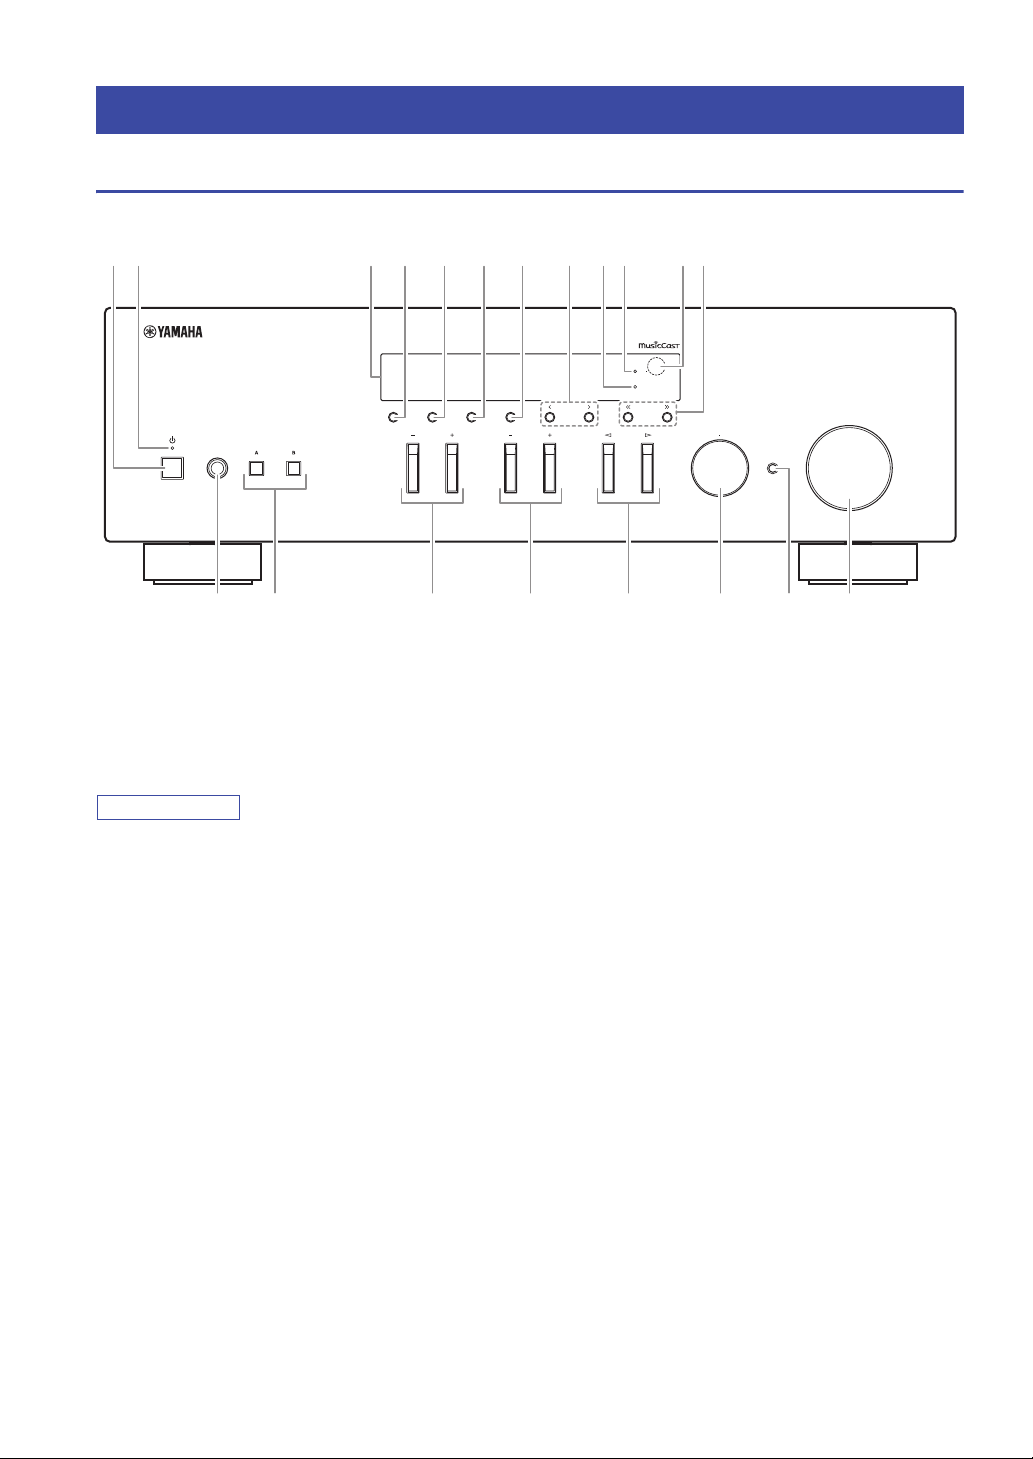
Front panel
Controls and functions
1 2 3 0954 6 7
DISPLAY MODE
SPEAKERSPHONES
MEMORY BAND
BASS
ED F G
1 A (power)
Turns on/off (standby) the unit.
2 STANDBY/ON indicator
Brightly lit: Power is on
Dimly lit: Standby mode
When not using this unit for an extended period of time, be sure
to unplug it from the power outlet. This unit uses a minimal
amount of power even in standby mode.
3 Front display
Shows information about the operational status of this
unit (p. 6).
4 DISPLAY
Selects the information displayed on the front display
(p. 20).
5 MODE
Sets the FM band reception mode to automatic stereo
or monaural (p. 22).
8 BA
Wi
Fi
BLUETOOTH
PRESET
TREBLE
TUNING
SELECT
INPUT
PUSH ENTER
RETURN
CONNECT
VOLUME
H JIC
8 PRESET j / i
Recalls a preset radio station (p. 24, 22) or song/
streaming station (p. 36).
9 BLUETOOTH indicator
Lights up when the unit is connecting to a Bluetooth
device.
0 Wi-Fi indicator
This lights when connecting to a wireless network, or
when the unit is operating as an access point.
It also lights up if you register the unit with the
MusicCast CONTROLLER app, even if the unit is
connected to a wired network.
A Remote control sensor
Receives infrared signals from the remote control.
B TUNING jj / ii
Selects the tuning frequency (p. 22) or a DAB radio
station (p. 26) when TUNER is selected as the input
source.
6 MEMORY
7 BAND
4 En
Registers the current radio station as a preset when
TUNER is selected as the input source (p. 23, 27).
Registers the current playback song or streaming
station as a preset when NET are selected as the input
source (p. 36).
Sets the radio tuner band when TUNER is selected as
the input source. (p. 22, 26)

C PHONES jack
Outputs audio to your headphones for private
listening.
D SPEAKERS A/B
Turns on or off the speaker set connected to the
SPEAKERS A and/or SPEAKERS B terminals on the
rear panel each time the corresponding button is
pressed.
E BASS +/–
Increases or decreases the low frequency response.
Control range: –10 to +10 (20 Hz)
F TREBLE +/–
Increases or decreases the high frequency response.
Control range: –10 to +10 (20 kHz)
G INPUT l / h
Selects the input source you want to listen to.
H SELECT/ENTER (jog dial)
Turn the dial to select a numeric value or setting, and
press the dial to confirm.
I RETURN
Returns to the previous indication of the front display.
CONNECT
Use to control the unit using the dedicated MusicCast
CONTROLLER app for mobile devices.
See MusicCast Setup Guide for details.
J VOLUME control
Increases or decreases the sound output level.
Controls and functions
INTRODUCTION
5 En
English

Controls and functions
STEREO SP
MUTE
A
TUNED
SP
SLEEP
B
1
42 3 5 6
Front display
You can change the brightness level of the front display by pressing DIMMER (p. 8).
1 Information display
Displays the current status (such as input name).
You can switch the information that is displayed when
you press DISPLAY (p. 20).
2 STEREO indicator
Lights up when the unit is receiving a stereo FM radio
signal.
3 TUNED indicator
Lights up when the unit is receiving an FM/AM radio
station signal.
AM radio is available only for R-N303.
4 Speaker indicators
“SP A” lights up when the SPEAKERS A output is
enabled and “SP B” lights up when the SPEAKERS B
output is enabled.
5 MUTE indicator
Blinks when audio is muted.
6 SLEEP indicator
Lights up when the sleep timer is on (p. 21).
6 En
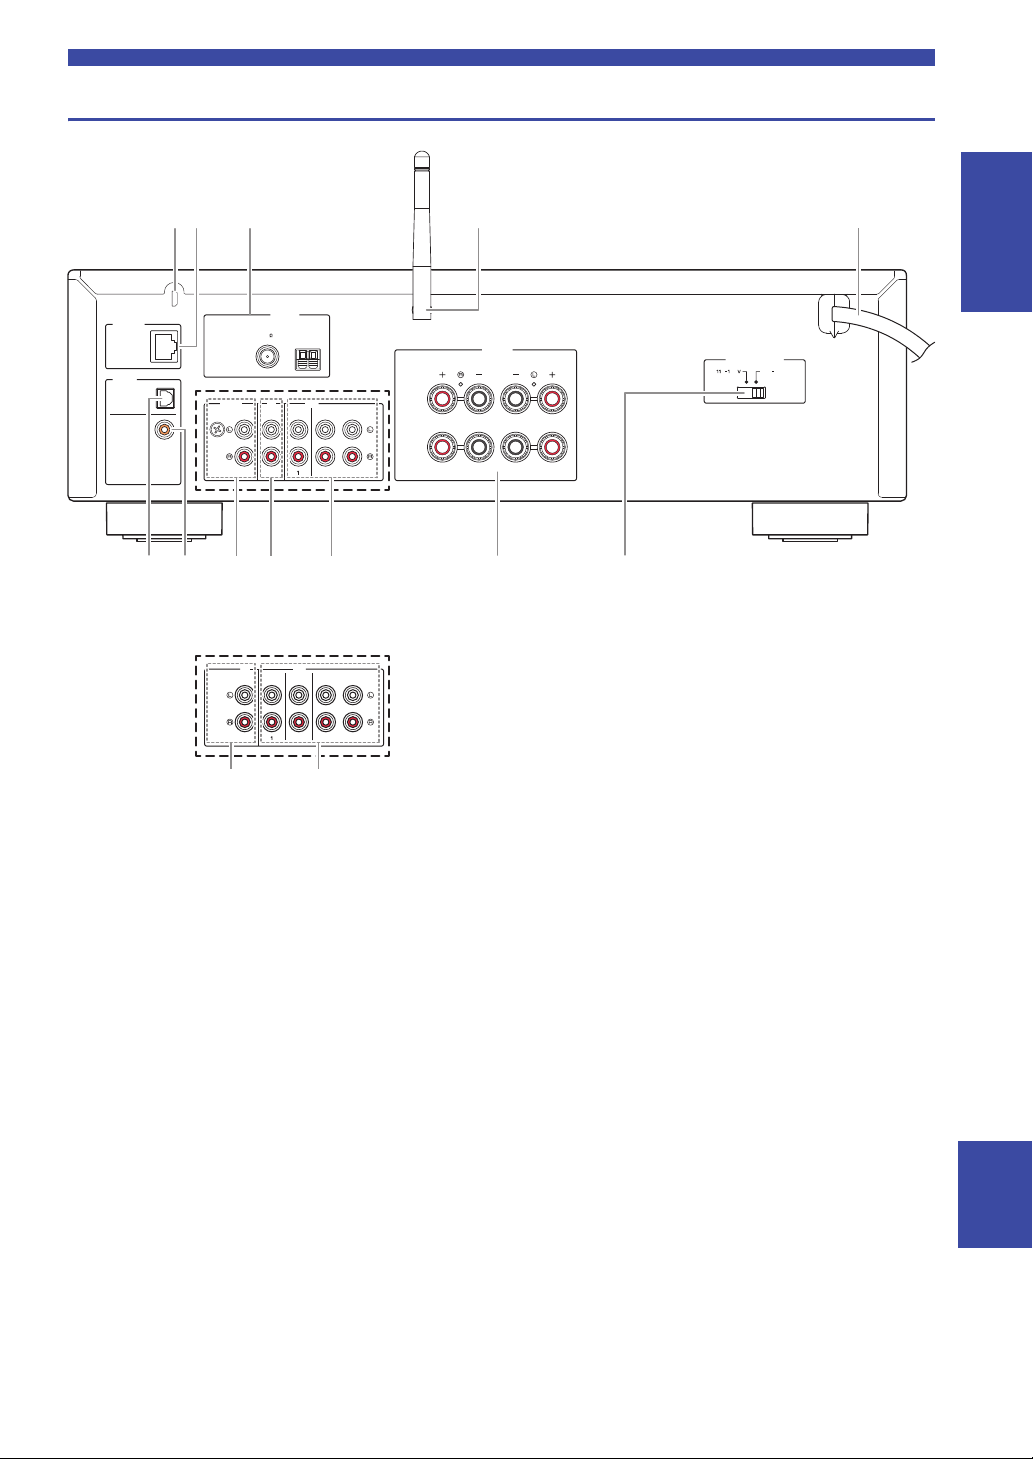
Rear panel
SPEAKERS
ANTENNA
CD
GND
PHONO LINE
IN
OUT
CLASS 2 WIRING
CABLAGE CLASSE 2
A OR B:8ΩMIN./SPEAKER
A
B
NETWORK
SERVICE
DIGITAL
OPTICAL
COAXIAL
AM
FM
75
2
VOLTAGE SELECTOR
22020
240 V
0
CD LINE
IN
OUT
32
76A
B
1324 5
089
9 0
(R-N303 except Europe model)
* The R-N303 Europe model and R-N303D are as shown below.
Controls and functions
INTRODUCTION
1 SERVICE jack
This jack is for support use, and is normally not used.
2 NETWORK jack
For connecting to a network with a network cable
(p. 13).
3 ANTENNA terminals
For connecting to the radio antennas (p. 12).
4 Wireless antenna
For connecting to a network device wirelessly (p. 13).
5 Power cord
For connecting to an AC wall outlet (p. 13).
6 OPTICAL jack
For connecting to audio components equipped with
optical digital output (p. 10).
7 COAXIAL jack
For connecting to audio components equipped with a
coaxial digital output (p. 10).
8 PHONO jacks (R-N303 except Europe model)
For connecting to a turntable (p. 10).
9 CD jacks
For connecting to a CD player (p. 10).
0 LINE 1-3 jacks
(R-N303 Europe model, R-N303D)
LINE 1-2 jacks (R-N303 except Europe model)
For connecting to analog audio components (p. 10).
A SPEAKERS terminals
Used to connect speakers (p. 11).
B VO LTAGE S E LEC TOR
(Only for General model)
7 En
English

1
2
3
4
B
C
H
I
D
J
5
8
7
9
0
E
A
F
G
6
(R-N303, except Europe model)
Controls and functions
Remote control
DIMMER
SLEEP
BA
SPEAKERS
COAXIAL
LINE 2 PHONO
BLUETOOTH
TUNING
PRESET
ENTER
RETURN
OPTION
VOLUME
SHUFFLE
CD
MUTE
OPTICAL
LINE 1
TUNER NET
BAND
MEMORY
CLEAR MODE DISPLAY
HOME
SETUP
NOW PLAYING
REPEAT
1 Infrared signal transmitter
Sends infrared signals.
2 A (power)
Turns on/off (standby) the unit.
3 SLEEP
Sets the sleep timer (p. 21).
4 DIMMER
Changes the brightness level of the front display.
Choose brightness from 5 levels by pressing this key
repeatedly.
5 SPEAKERS A/B
Turns on and off the set of speakers connected to the
SPEAKERS A and/or SPEAKERS B terminals on the
rear panel of this unit when the corresponding key is
pressed.
6 Input selection keys
Select the input source you want to listen to.
NET key is for network source. Press repeatedly to select a
desired network source.
7 Radio keys
Operate the radio.
BAND Sets the radio tuner band when
TUNER is selected as the input
source (p. 22, 26).
TUNING jj / ii Selects the tuning frequency
(p. 22) or a DAB radio station
(p. 26) when TUNER is selected
as the input source.
8 MEMORY
Registers the current radio station as a preset when
TUNER is selected as the input source (p. 23, 27).
Registers the current playback song or streaming
station as a preset when NET are selected as the input
source (p. 36).
9 CLEAR
Deletes the preset memory (p. 24, 28, 36).
0 MODE
Sets the FM band reception mode to automatic stereo
or monaural (p. 22).
A Menu operation keys
Cursor keys Selects a menu, setting value or
other parameter.
ENTER Confirms a selected item.
RETURN Returns to the previous state.
B HOME
Moves up top level when selecting music files,
folders, etc.
C SETUP
Displays the “SETUP” menu (p. 39).
D NOW PLAYING
Displays music information when selecting music
files, folders, etc.
8 En
Controls and functions
Approximately
6 m (20 ft)
Remote control
E Playback keys
Let you play back and perform other operations for
network sources and Bluetooth devices.
Yamaha does not guarantee the operation of all Bluetooth devices.
F PRESET j / i
Recalls a preset radio station (p. 24, 22) or song/
streaming station (p. 36).
G DISPLAY
Selects the information displayed on the front display
(p. 20).
H OPTION
Displays the “OPTION” menu (p. 37).
I MUTE
Mutes the audio output.
J VOLUME +/–
Increases or decreases the sound output level.
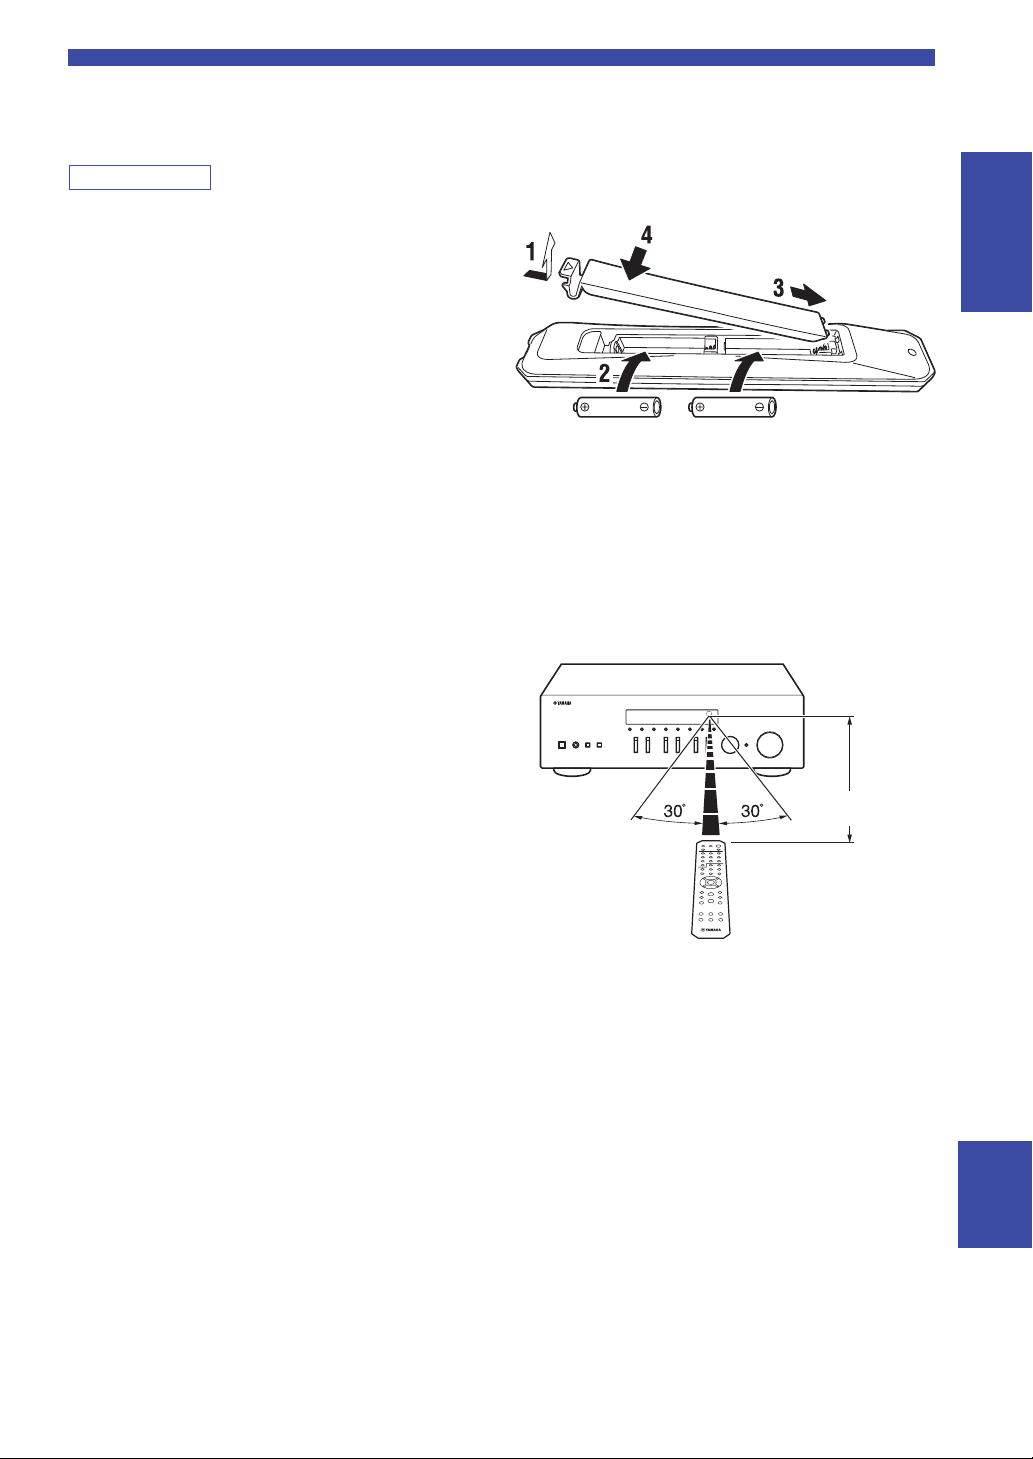
■ Installing batteries
Change all batteries if you notice the operation range of
the remote control narrows. Before inserting new
batteries, wipe the battery compartment clean.
INTRODUCTION
■ Operation range
Point the remote control at the remote control sensor on
this unit and remain within the operating range shown
below. The area between the remote control and this unit
must be clear of large obstacles.
English
9 En

PREPARATION
Audio
input
Audio
output
Speakers B
DVD player, etc.
Audio output
(digital coaxial)
Audio output
(digital optical)
CD player, etc.
Audio
output
CD player
CD recorder, etc.
Speakers A
(R-N303 except Europe model)
Turntable
Audio
output
GND
Connections
Connecting audio devices
Make sure to connect L (left) to L, R (right) to R, “+” to “+” and “–” to “–”. If the connections are faulty, no sound will
be heard from the speakers, and if the polarity of the speaker connections is incorrect, the sound will be unnatural and
lack bass. Refer to the owner’s manual for each of your components.
Make sure to use RCA cables to connect audio components.
• Do not connect this unit or other components to the main power until all connections between components are
complete.
• Do not let bare speaker wires touch each other or any metal part of this unit. This could damage this unit and/or the
speakers.
NETWORK
DIGITAL
OPTICAL
COAXIAL
SERVICE
PHONO LINE
GND
ANTENNA
FM
AM
75
CD
IN
OUT
2
The input jacks are different on the R-N303 Europe model and on the R-N303D (p. 7).
Only PCM signals can be input to the digital (OPTICAL/COAXIAL) jacks of this unit.
SPEAKERS
A OR B:8ΩMIN./SPEAKER
A
CLASS 2 WIRING
B
CABLAGE CLASSE 2
10 En
• Do not bundle audio cables and speaker cables together with the
10 mm
(3/8″)
Red:positive (+)
Black:negative (–)
SPEAKERSPHONES
VOLUME
SELECT
RETURN
PUSH ENTER
CONNECT
DISPLAY MODE
MEMORY BAND
PRESET
TUNING
BASS
TREBLE
INPUT
power cord. Doing so may generate noise.
• The PHONO jacks are designed for connecting a turntable with
an MM cartridge.
• Connect your turntable to the GND terminal to reduce noise in
the signal. However, for some turntables, you may hear less
noise without the GND connection.
• On the R-N303D and R-N303 Europe models, to prevent sound
loops, no sound will be outputted from the LINE 3(OUT) jack
while the LINE 3 input is selected. On other models, no sound
will be outputted from the LINE 2(OUT) jack while the LINE 2
input is selected.
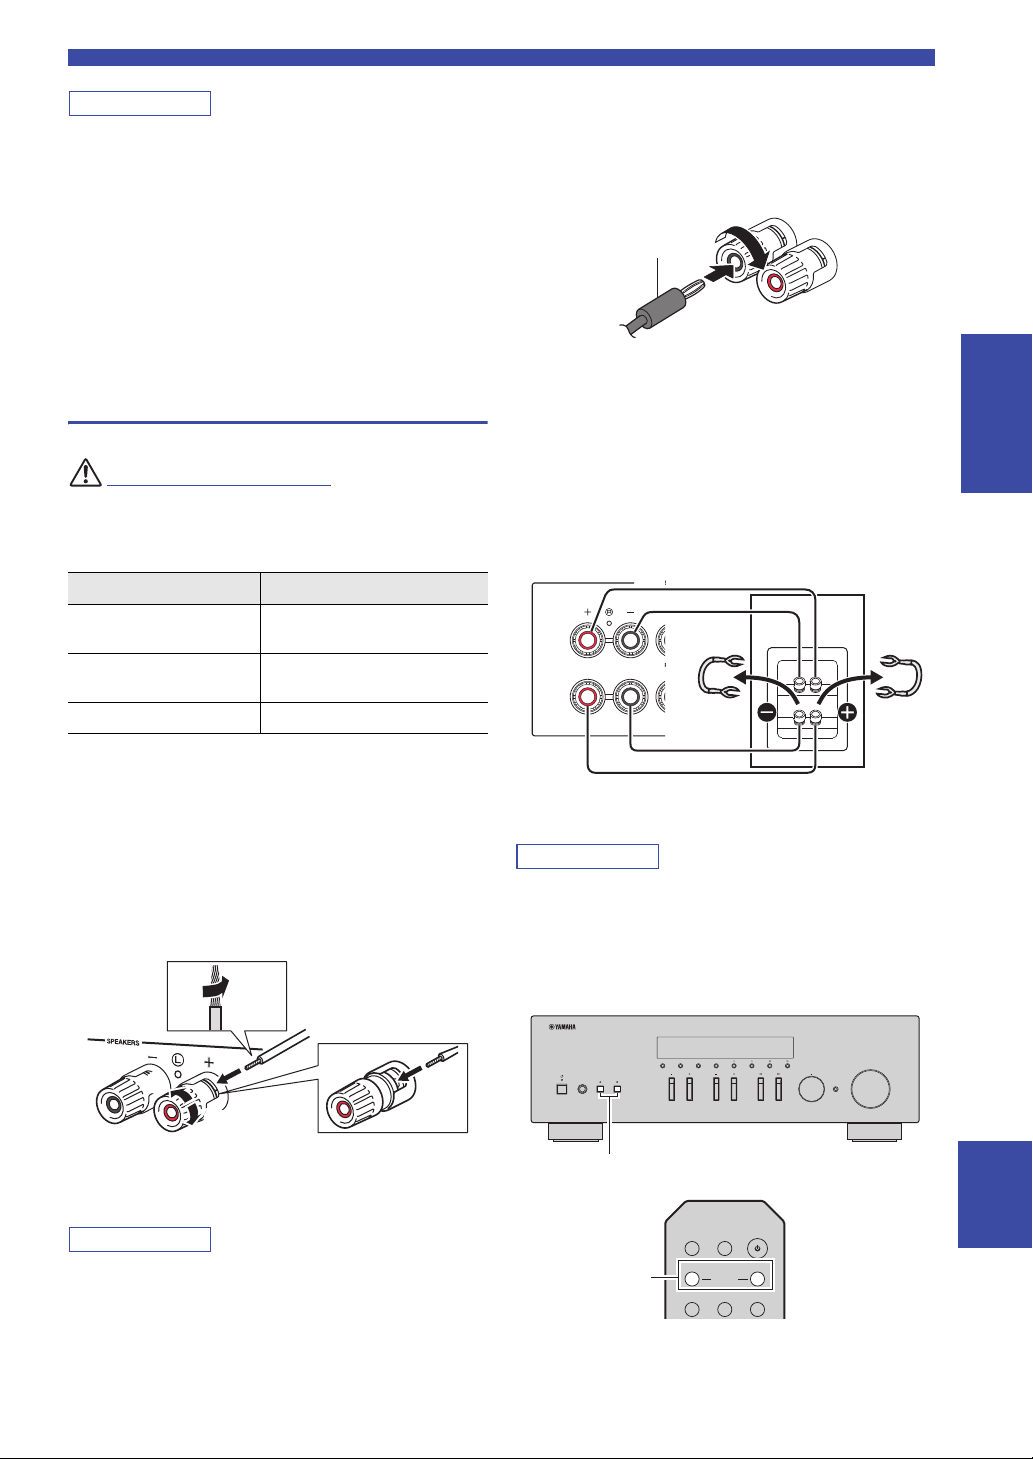
Connecting the speakers
Connect the speakers with an impedance as shown below.
If you connect speakers with an excessively low
impedance, this unit may overheat.
Speaker connection Speaker impedance
SPEAKERS A or
SPEAKERS B
SPEAKERS A and
SPEAKERS B
Bi-wiring 8 or higher
8 or higher
16 or higher
(except for North America model)
Connections
■ Connecting via banana plug
(North America, Australia,
General models only)
Tighten the knob and then insert the banana plug into the
end of the corresponding terminal.
■ Bi-wire connection
Bi-wire connection separates the woofer from the
combined midrange and tweeter section. A bi-wire
compatible speaker has four binding post terminals. These
two sets of terminals allow the speaker to be split into two
independent sections. With these connections, the mid and
high frequency drivers are connected to one set of terminals
and the low frequency driver to another set of terminals.
SPEAKER
A OR B:8ΩMIN./S
A
CLASS 2 WI
CABLAGE CL
B
PREPARATION
■ Connecting speaker cables
aRemove approximately 10 mm (3/8″) of insulation
from the ends of the speaker cable and twist the bare
wires of the cable firmly together.
bLoosen the speaker terminal.
cInsert the bare wires of the cable into the gap on the
side (upper right or bottom left) of the terminal.
dTighten the terminal.
When inserting speaker cables into the speaker terminals, insert
only the bare speaker wire. If insulated cable is inserted, the
connection may be poor and sound may not be heard.
Connect the other speaker to the other set of terminals in
the same way.
• When making bi-wire connections, remove the shorting bridges
or cables on the speaker. Refer to the speakers’ instruction
manuals for more information.
• To use the bi-wire connections, press SPEAKERS A and
SPEAKERS B (p.  so that both speaker indicators (“SP A”
and “SP B”) light up on the front display.
DIMMER
SLEEP
BA
SPEAKERS
COAXIAL
CD
OPTICAL
English
11 En

Connections
ANTENNA
CD
GND
PHONO LINE
IN
OUT
NETWORK
SERVICE
DIGITAL
OPTICAL
COAXIAL
AM
FM
75
FM antenna AM antenna
(except Europe model)
ANTENNA
CD
IN
OUT
NETWORK
SERVICE
DIGITAL
OPTICAL
COAXIAL
AM
FM
75
LINE
Connecting the FM/AM antennas
(R-N303)
Connect the supplied FM/AM antenna to this unit.
Fix the end of the FM antenna to a wall, and place the AM
antenna.
Connecting the DAB/FM antenna
(R-N303D)
Connect the supplied DAB/FM antenna to this unit and fix
the antenna ends to a wall.
• If you experience poor reception quality, install an outdoor
antenna.
• Unwind only the length of cable needed from the AM antenna
unit.
• The wires of the AM antenna have no polarity.
■ Assembling the supplied AM antenna
■ Connecting the wires of the AM antenna
• If you experience poor reception quality, install an outdoor
antenna.
• The antenna should be stretched out horizontally.
12 En
Connections
ANTENNA
NETWORK
SERVICE
AM
FM
75
Network Attached
Storage
(NAS)
Internet
Modem
Router
Network cable
PC
This unit (rear)
Mobile device
(such as iPhone)
(R-N303)
VOLTAGE SELECTOR
22020
240 V
0
To the AC wall outlet
with the power cord
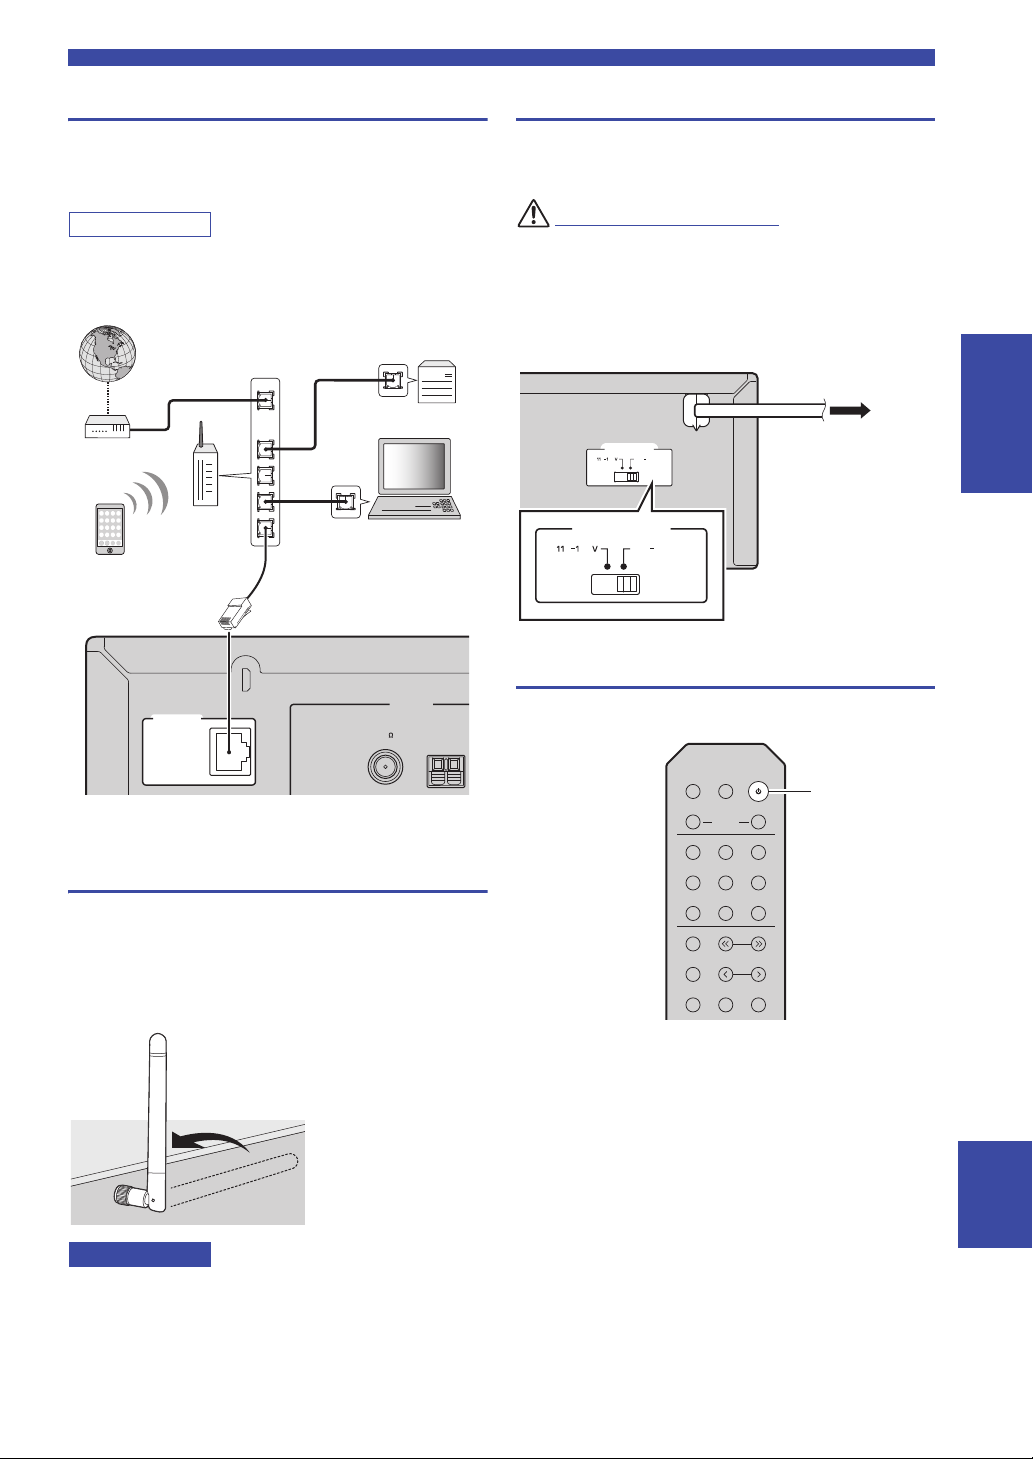
Connecting the network cable
Connect the unit to your router with a commerciallyavailable STP network cable (CAT-5 or higher straight
cable).
Use STP (Shielded Twisted Pair) cable to prevent
electromagnetic interference.
Connecting power cord
Plug the power cord into an AC wall outlet after all other
connections are complete.
Only for General model:
Before connecting the power cord, make sure you set
VOLTAGE SELECTOR of this unit according to your
local voltage. Improper setting of VOLTAGE SELECTOR
may cause fire and damage to this unit.
VOLTAGE SELECTOR
0
MAINS
22020
240 V
Turning on the unit
PREPARATION
Preparing a wireless antenna
If you connect the unit wirelessly, erect the wireless
antenna. For information on how to connect the unit to a
wireless network, see “Connecting to network” (p. 14).
For more information on using this unit with a Bluetooth
device, see “Playing back music via Bluetooth” (p. 30).
Do not apply excessive force on the wireless antenna. Doing so
may damage the antenna.
Press A (power) to turn on the unit.
DIMMER
SLEEP
SPEAKERS
COAXIAL
LINE 2 PHONO
BLUETOOTH
TUNING
PRESET
CD
OPTICAL
LINE 1
TUNER NET
BAND
MEMORY
CLEAR MODE DISPLAY
A
BA
English
13 En

Connecting to a network
Connecting using the Wi-Fi setting of the iOS
device (iPhone / iPad / iPod touch)
Share the Wi-Fi setting of the iOS
device (p. 15)
Connecting using WPS push button configuration
on the wireless router (or access point)
Use the WPS push button
configuration (p. 16)
Connecting with a wireless router (access point)
without WPS push button configuration
Set the network connection
manually (p. 16)
Connecting with the MusicCast CONTROLLER
app
See “Configuring MusicCast”
(p. 19) for details.
Connecting using the DHCP server function of the
router
You can connect to the network by
simply making a wired connection
(p. 13)
There are several methods to connect the unit to a network. Select a connection method according to your environment.
• Some security software installed on your PC or the firewall settings of network devices (such as a router) may block the access of the
unit to the network devices or the Internet. In these cases, configure the security software or firewall settings appropriately.
• Each server must be connected to the same subnet as the unit.
• To use the service via the Internet, broadband connection is strongly recommended.
• When playing a high-resolution audio source via the network, we recommend connecting by cable to the router for stable playback.
WAC (Wireless Accessory Configuration)
If you turn on the power to the unit right after you purchase or
initialize it, the unit will automatically use the network settings of the
iOS device (iPhone/iPad/iPod touch) and try to connect to a wireless
LAN (unless the unit is already connected to a wired LAN).
If you have an iOS device, follow the procedure from Step 6 in the section “Sharing the iOS device setting” (p. 15).
If you plan to connect the unit wirelessly by another method, press RETURN to exit the current screen, and then proceed to one of
the sections below.
■ Connecting with a wireless router (access point)
Connect to the network with the method listed below that corresponds to your environment.
WAC
R-N303 XXXXXX
■ Connecting to a router using a cable
• For information on how to set the IP address and other menu items, please refer to page 40.
• To switch from a wireless LAN connection to a wired LAN connection, set the “Connection” under the “Network” setup menu to
“Wired” (p. 40).
14 En

Connecting to a network
Connecting wirelessly to a mobile device
(Wireless Direct)
Connect wirelessly with Wireless
Direct (p. 17)
The name of this unit
Example (iOS 10)
Tap here to start setup
The network currently
selected
■ Connecting without a wired router or wireless router (access point)
When the unit is connected to the network with Wireless Direct, it cannot connect to any other wireless router (access point). To play
back contents from the Internet or to update the firmware of this unit over the network, connect the unit to a network with a wired router
or wireless router (access point).
Sharing the iOS device setting
You can easily setup a wireless connection by applying the
connection settings on iOS devices (iPhone/iPad/iPod
touch).
Before proceeding, confirm that your iOS device is
connected to a wireless router (access point).
• If you perform the following procedure, all network settings will be
initialized.
• This configuration does not work if the security protocol of your
wireless router (access point) is WEP. In this case, use another
connection method.
CLEAR MODE DISPLAY
ENTER
VOLUME
RETURN
OPTION
MUTE
HOME
SETUP
NOW PLAYING
1 Press SETUP.
5 Use the cursor keys ( / ) to select “Share
Setting” and then press ENTER twice.
When connected to a wired network, the front display will show
the messages “LAN CBL” and “Pls disconnect”. Unplug the
network cable from the unit, and press the ENTER key.
6 On the iOS device, select the unit as the
AirPlay speaker in the Wi-Fi screen.
7 Check that the “Network” field is set to your
preferred network, and then tap “Next”.
PREPARATION
2 Use the cursor keys ( / ) to select
“Network” and press ENTER.
To return to the previous state, press RETURN.
3 Use the cursor keys ( / ) to select
“Connection” and press ENTER.
4 Use the cursor keys ( / ) to select
“Wireless” and press ENTER.
WIRELESS
¡WPS
When the sharing process finishes, the unit is
automatically connected to the selected network
(access point).
When the setting finishes, verify whether the unit is
connected to a wireless network (p. 18).
15 En
English

Connecting to a network
Configuring with the router’s WPS
push button
You can easily set up a wireless connection with one push
of the WPS button.
This configuration does not work if the security method of your
wireless router (access point) is WEP or WPA2-TKIP. In this
case, use another connection method.
CLEAR MODE DISPLAY
ENTER
VOLUME
RETURN
OPTION
MUTE
HOME
SETUP
NOW PLAYING
1 Press SETUP.
2 Use the cursor keys ( / ) to select
“Network” and press ENTER.
To return to the previous state, press RETURN.
3 Use the cursor keys ( / ) to select
“Connection” and press ENTER.
4 Use the cursor keys ( / ) to select
“Wireless” and press ENTER.
Set the wireless network connection
manually
Before performing the following procedure, check the
security method and security key on the wireless router
(access point).
CLEAR MODE DISPLAY
ENTER
ENTER
SETUP
HOME
SETUP
NOW PLAYING
VOLUME
RETURN
OPTION
MUTE
RETURN
1 Press SETUP.
2 Use the cursor keys ( / ) to select
“Network” and press ENTER.
To return to the previous state, press RETURN.
3 Use the cursor keys ( / ) to select
“Connection” and press ENTER.
4 Use the cursor keys ( / ) to select
“Wireless” and press ENTER.
5 Use the cursor keys ( / ) to select
“ManualSetting” and press ENTER.
MANUAL
¡SSID
5 Press ENTER twice.
“Connecting” appears on the front display.
6 Push the WPS button on the wireless router
(access point).
When the connection process finishes, “Completed”
appears on the front display. When the setting
finishes, verify whether the unit is connected to a
wireless network (p. 18).
If “Completed” does not appear, repeat from Step 1 or
try another connection method.
7 To exit from the menu, press SETUP.
About WPS
WPS (Wi-Fi Protected Setup) is a standard established by the
Wi-Fi Alliance, which allows easy establishment of a
wireless home network.
16 En
6 Use the cursor keys ( / ) to select “SSID”
and press ENTER.
Loading…
EN
Network Receiver
Réseau Ampli-Tuner
ES
FR
Owner’s Manual
Mode d’emploi
Manual de instrucciones
URL
• The R-N303 and R-N303D network receivers allow you to play back sound in
high-quality stereo at your own home.
• This manual explains preparations and operations for everyday users of the unit.
• Les récepteurs réseau R-N303 et R-N303D vous permettent de lire des sources audio en
bénéficiant d’un son stéréo de qualité supérieure dans le confort de votre salon.
• Ce manuel décrit les préparatifs et les procédures pour l’usage quotidien de cette unité.
• Los receptores de red R-N303 y R-N303D permiten reproducir sonido estéreo de alta
calidad en casa.
• En este manual se explican los preparativos y el funcionamiento de la unidad en el día a
día.
Русский
- Bedienungsanleitung Yamaha R-N303
- Yamaha R-N303 User Manual
- Manual Usuario Yamaha R-N303
- Mode d’emploi Yamaha R-N303
- Istruzioni Yamaha R-N303
- инструкция Yamaha R-N303
- Yamaha R-N303の取扱説明書
- Handleiding Yamaha R-N303
- Manual de uso Yamaha R-N303
Вам нужна инструкция? Мы поможем Вам ее найти и сэкономить Ваше время.
- 65 stron
- 1.59 mb
Изделие Yamaha R-N303, а также другие, которыми Вы пользуетесь ежедневно, наверняка вы получили в комплекте с инструкцией обслуживания. Из опыта наших пользователей мы знаем, что большинство из Вас не уделили этому особого внимания. Большая часть инструкций, сразу же после покупки попадает в корзину для мусора вместе с коробкой — это ошибка. Ознакомьтесь с информацией, касающейся инструкции Yamaha R-N303, которая поможет Вам в будущем сэкономить нервы и избежать головной боли.
Важная подсказка — не забывайте хотя бы раз прочитать инструкцию Yamaha R-N303
Если вы не хотите каждый раз читать информационные брошюры, касающиеся, тех или Yamaha R-N303 иных изделий, достаточно, прочитать их раз — сразу же после покупки устройства. Вы получите основное знания, касающиеся поддержания изделия Yamaha R-N303 в хорошем эксплуатационном состоянии, так, чтобы без проблем достигнуть его планируемого цикла работы. Затем инструкцию можно отложить на полку и вернуться к ней только в случае, если вы не уверены, правильно ли проводится техобслуживание изделия. Правильный уход является необходимым элементом Вашего удовольствия Yamaha R-N303.
Раз в году пересмотрите шкафчик, в котором держите инструкции для всех устройств, — выбросите те, которыми вы уже не пользуетесься. Это поможет Вам сохранять порядок в своей домашней базе инструкций обслуживания.
Summary of Contents for Yamaha R-N303
Что находится в инструкции Yamaha R-N303? Почему стоит ее прочитать?
- Гарантия и подробности, касающиеся техобслуживания изделия
Хорошей идеей будет прикрепить чек к странице инструкции. Если что-то плохое случится во время использования Yamaha R-N303, у вас будет комплект документов, необходимый для гарантийного ремонта. В этой части инструкции вы найдете информацию об авторизованных сервисных центрахYamaha R-N303 а также, как самостоятельно правильно ухаживать за оборудованием — так, чтобы не потерять гарантийных прав. - Указания по монтажу и Setup
Не терять нервов и времени на самостоятельную попытку установки и первого запуска изделия. Воспользуйтесь рекомендациями производителя Yamaha R-N303 чтобы правильно запустить изделие, без лишнего риска повреждения оборудования. - Информация, касающаяся дополнительных запчастей (входящих в комплект а также являющихся опцией)
Пересматривая эту часть документа вы сможете проверить, доставлен ли ваш Yamaha R-N303 с полним комплектом аксессуаров. Вы также сможете узнать, какие дополнительные запчасти или аксессуары для Yamaha R-N303 Вы сможете найти и докупить к своему устройству. - Troubleshooting
Самые частые проблемы, касающиеся Yamaha R-N303 и методы их решения. Это очень полезная часть руководства по обслуживанию — она позволит Вам сэкономить много времени на поиск решений. 90% проблем с Yamaha R-N303 повторяется у многих пользователей. - Требования, касающиеся питания и энергетический класс
Информация, касающаяся количества потребляемой энергии, а также рекомендации, касающиеся установки и питания Yamaha R-N303. Прочитайте, чтобы оптимально пользоваться Yamaha R-N303 и не использовать большего количества ресурсов, нежели это необходимо для правильной работы изделия. - Специальные функции Yamaha R-N303
Здесь вы можешь узнать, как персонализировать изделие Yamaha R-N303. Вы узнаете, какие дополнительные функции могут помочь Вам удобно использовать продукт Yamaha R-N303 а также, какие функции Вашего устройства оптимальны для выполнения конкретной деятельности.
Как видите в инструкции вы найдете информацию, которая реально поможет Вам в использовании Вашего изделия. Стоит с ней ознакомиться, чтобы избежать разочарований, возникающих из более короткого, нежели предусматривалось, периода исправности изделия Yamaha R-N303. Если все же вы не хотите копить инструкции в своем доме, наш сайт поможет Вам в этом — вы должны найти у нас руководство по обслуживанию большинства из своих устройств, а также Yamaha R-N303.