
29 апреля 2021
Проверенные и заряженные аккумуляторы и 5000+ устройств для обслуживания аккумуляторов в наличии, до 10% скидка на покупку в интернет-магазине www.bs12v.ru. Кодовое слово DRIVE2
Москва, Россия
Подписаться
Видео инструкция к OptiMate 7 SELECT GOLD (TM250 v3) — быстро, понятно и максимально подробно!
Что означают индикаторы, как отображаются ошибки, как использовать управляющие кнопки
Наша страница на DRIVE2:

Войдите или зарегистрируйтесь, чтобы писать комментарии, задавать вопросы и участвовать в обсуждении.
- June 15, 2024
- OPTIMATE 7
Table of Contents
- OPTIMATE 7 TM250 Staged Battery Charger
- INSTRUCTIONS FOR USE
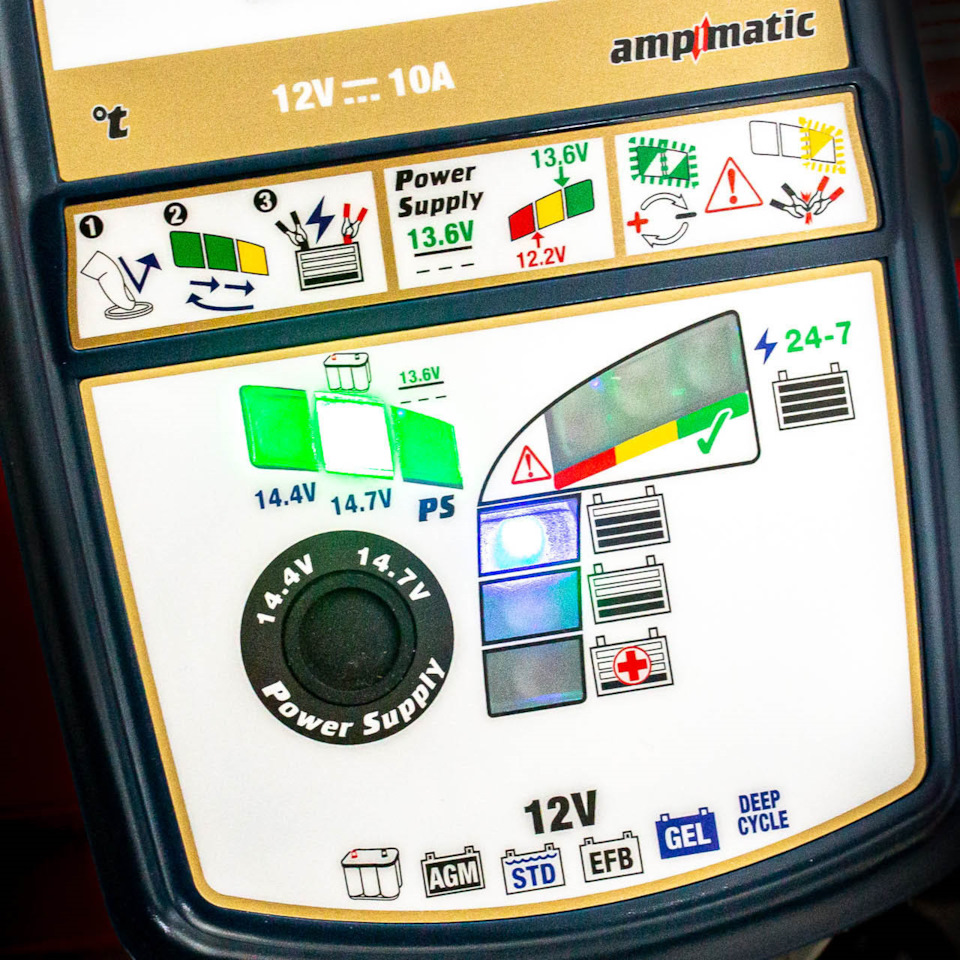
- LEDs / Select
- IMPORTANT SAFETY INSTRUCTIONS FOR CANADA & USA
- AUTOMATIC DIAGNOSTIC CHARGER FOR 12V LEAD-ACID BATTERIES.
- CONNECTING THE CHARGER TO THE BATTERY
- PROCEEDING TO CHARGE
- LIMITED WARRANTY
- References
- Read User Manual Online (PDF format)
- Download This Manual (PDF format)
OPTIMATE 7 TM250 Staged Battery Charger
Specifications
- Model : TM250 (v3) / TM251 (v3) TM252 (v3) / TM257 / TM258 (v3)
- DC: 120W 12V 10A Thermally adjusted
- Compatible Battery Types : 12V STD / AGM-MF / GEL
- Battery Capacity: 3 – 240Ah (max. Ah rating based on 24 hour charge)
Important Safety Instructions
It is important to read and follow these safety instructions before using
the product:
- DO NOT USE FOR NiCd, NiMH, Li-Ion OR NON-RECHARGEABLE BATTERIES.
- Do not connect the charger to ground.
- Avoid exposing the charger to rain or snow.
- Only use attachments recommended by the battery charger manufacturer to avoid the risk of fire, electric shock, or injury.
- When disconnecting the charger, pull by the plug rather than the cord to prevent damage to the electric plug and cord.
- Avoid using an extension cord unless absolutely necessary. If an extension cord must be used, ensure it has the same number, size, and shape of pins as the charger’s plug, is properly wired and in good electrical condition, and has a conductor wire size that is large enough for the AC ampere rating of the charger.
- If the charger is damaged or requires service or repair, do not disassemble it yourself. Take it to a qualified serviceman.
- Always unplug the charger from the outlet before attempting any maintenance or cleaning. Clean the charger with a slightly moist cloth, avoiding solvents.
- Be aware of the risk of explosive gases when working near a lead-acid battery. Follow the instructions provided by the battery manufacturer and any equipment manufacturer used in the vicinity of the battery.
- Take appropriate personal precautions when working with batteries.
INSTRUCTIONS FOR USE
Read completely before charging
charger for 12V lead-acid batteries
LEDs / Select

SELECT
ERROR!

SOC% / State Of Charge %

IMPORTANT SAFETY INSTRUCTIONS FOR CANADA & USA
SAVE THESE INSTRUCTIONS. THIS PORTION OF THE MANUAL CONTAINS IMPORTANT SAFETY
INSTRUCTIONS FOR THE OPTIMATE 7 BATTERY CHARGER. IT IS OF THE UTMOST
IMPORTANCE THAT EACH TIME, BEFORE USING THE CHARGER, YOU READ AND EXACTLY
FOLLOW THESE INSTRUCTIONS.
Automatic charger for 12V lead-acid batteries
DO NOT USE FOR NiCd, NiMH, Li-Ion OR NON-RECHARGEABLE BATTERIES.
-
CAUTION : DO NOT CONNECT TO GROUND.
-
Do not expose charger to rain or snow.
-
Use of an attachment not recommended or sold by the battery charger manufacturer may result in a risk of fire, electric shock, or injury to persons.
-
To reduce risk of damage to electric plug and cord, pull by plug rather than cord when disconnecting charger.
-
An extension cord should not be used unless absolutely necessary. Use of improper extension cord could result in a risk of fire and electric shock. If extension cord must be used make sure that :
- pins on plug of extension cord are the same number, size and shape as those of plug on charger.
- the extension cord is properly wired and in good electrical condition, and
- the conductor wire size is large enough for the AC ampere rating of the charger as specified in the table below.

-
Do not operate charger with damaged cord or plug – replace the cord or plug immediately.
-
Do not operate charger if it has received a sharp blow, been dropped ,or otherwise damaged in any way; take it to a qualified serviceman.
-
Do not disassemble charger; take it to a qualified serviceman when service or repair is required.
Incorrect reassembly may result in a risk of electric shock or fire. -
. To reduce risk of electric shock, unplug the charger from outlet before attempting any maintenance or cleaning.
Turning off controls will not reduce this risk .Clean only with slightly
moist, not wet, cloth .Do not use solvents. -
WARNING – RISK OF EXPLOSIVE GASES.
-
WORKING IN VICINITY OF A LEAD-ACID BATTERY IS DANGEROUS. BATTERIES GENERATE EXPLOSIVE GASES
DURING NORMAL BATTERY OPERATION. FOR THIS REASON, IT IS OF UTMOST IMPORTANCE
THAT YOU FOLLOW THE
INSTRUCTIONS EACH TIME YOU USE THE CHARGER. -
To reduce risk of battery explosion, follow these instructions and those published by the battery manufacturer and manufacturer of any equipment you intend to use in vicinity of the battery. Review cautionary marking on these products and on engine.
-
-
PERSONAL PRECAUTIONS.
- Someone should be within range of your voice OR close enough to come to your aid when you work near a lead-acid battery.
- Have plenty of fresh water and soap nearby in case battery acid contacts skin, clothing or eyes.
- Wear complete eye protection and clothing protection. Avoid touching eyes while working near battery.
- If battery acid contacts or enters eye, flood eye with cold running water for at least 10 minutes and get medical attention immediately. If battery acid contacts skin or clothing, wash immediately with soap and water. If acid enters an eye, immediately flood eye with running cold water for at least 10 minutes and get medical attention immediately.
- NEVER smoke or allow a spark or flame in vicinity of battery or engine.
- Be extra cautious to reduce risk of dropping a metal tool onto battery. It might spark or short-circuit battery or other electrical part that may cause explosion.
- Remove personal metal items such as rings, bracelets, necklaces, and watches when working with a lead-acid battery. A lead-acid battery can produce a short-circuit current high enough to weld a ring or the like to metal, causing a severe burn
-
PREPARING TO CHARGE
-
If necessary to remove battery from vehicle to charge, always remove grounded terminal from battery first.
-
Make sure all accessories in the vehicle are off, so as not to cause an arc.
-
Be sure area around battery is well ventilated while battery is being charged. Gas can be forcefully blown away by using a piece of cardboard or other non-metallic material as a fan.
-
Clean battery terminals. Be careful to keep corrosion from coming in contact with eyes.
-
Add distilled water in each cell until battery acid reaches level specified by battery manufacturer. This helps purge
excessive gas from cells. Do not overfill. For a battery without cell caps,
such as valve regulated lead acid (VRLA) or absorbed glass mat (AGM)
batteries, carefully follow manufacturer’s recharging instructions. -
Study all battery manufacturer’s specific precautions such as removing or not removing cell caps while charging
and recommended rates of charge. -
Determine voltage of battery by referring to vehicle or battery user’s manual and BEFORE MAKING THE BATTERY CONNECTIONS, MAKE SURE THAT THE VOLTAGE OF THE BATTERY YOU ARE GOING TO CHARGE MATCHES THE OUTPUT VOLTAGE OF THE CHARGER
-
-
CHARGER LOCATION.
- Locate charger as far away from battery as DC cables permit.
- Never place charger directly above batterv being charged; gases from battery will corrode and damage the charger.
- Never allow battery acid to drip on charger when reading gravity or filling battery. Do not operate charger in a closed-in area or restrict ventilation in any way.
- Do not set a battery on top of charger. IMPORTANT : Place charger on a hard flat surface or mount onto a vertical surface. Do not place on plastic, leather or textile surface.
-
DC CONNECTION PRECAUTIONS
- Connect and disconnect DC output clips only after setting any charger switches to off position and removing AC cord from electric outlet. Never allow clips to touch each other, however should this happen no damage will result to the charger circuit & the automatic charging programme will just reset to «start».
- Attach clips to battery and chassis as indicated in 15(e), 15(f), and 16(b) through 16(d).
- NOTE : This battery charger has an automatic safety feature that will prevent it from operating if the battery has been inversely connected. Set charger switches to off position and/or remove AC cord from electrical outlet, disconnect the battery clips, then reconnect correctly according to the instructions below.
-
1FOLLOW THESE STEPS WHEN BATTERY IS INSTALLED IN VEHICLE. A SPARK NEAR A BATTERY MAY CAUSE BATTERY EXPLOSION. TO REDUCE RISK OF A SPARK NEAR BATTERY :
- Position AC and DC cords so as to reduce risk of damage by hood, door or moving engine part.
- Stay clear of fan -blades, belts,pulleys,and other parts that can cause injury to persons.
- Check polarity of battery posts.POSITIVE (POS, P, +) battery post usually has larger diameter than NEGATIVE (NEG, N,–) post.
- Determine which post of battery is grounded (connected) to the chassis. If negative post is grounded to chassis (as in most vehicles), see (e). If positive post is grounded to the chassis, see (f).
- For negative-grounded vehicle, connect POSITIVE (RED) clip from battery charger to POSITIVE (POS, P, + ) ungrounded post of battery. Connect NEGATIVE (BLACK) clip to vehicle chassis or engine block away from battery. Do not connect clip to carburetor, fuel lines, or sheet-metal body parts. Connect to a heavy gage metal part of the frame or engine block.
- For positive-grounded vehicle, connect NEGATIVE (BLACK) clip from battery charger to NEGATIVE (NEG. N , -) ungrounded post of battery. Connect POSITIVE (RED) clip to vehicle chassis or engine block away from battery.
- Do not connect clip to carburetor, fuel lines, or sheet-metal body parts. Connect to a heavy gage metal part of the frame or engine block.
- When disconnecting charger, turn switches to off, disconnect AC cord, remove clip from vehicle chassis, and then remove clip from battery terminal.
- See operating instructions for length of charge information
-
FOLLOW THESE STEPS WHEN BATTERY IS OUTSIDE VEHICLE. A SPARK NEAR THE BATTERY MAY CAUSE BATTERY EXPLOSION. TO REDUCE RISK OF A SPARK NEAR BATTERY :
- Check polarity of battery posts. POSITIVE (POS, P, +) battery post usually has a larger diameter than NEGATIVE (NEG,N, -) post.
- This battery charger has an automatic safety feature that will prevent it from operating if the battery has been inversely connected. The charger does not allow charge current unless a voltage of at least 2V is sensed.
- Connect POSITIVE (RED) charger clip to POSITIVE (POS, P, +) post of battery.
- Connect NEGATIVE (BLACK) charger clip to NEGATIVE (NEG, N, -) battery post of the battery.
- Do not face battery when making final connection.
- When disconnecting charger, always do so in reverse sequence of connecting procedure & break first connection while as far away from battery as practical.
- A marine (boat) battery must be removed & charged on shore. To charge it on board requires equipment specially designed for marine use

AUTOMATIC DIAGNOSTIC CHARGER FOR 12V LEAD-ACID BATTERIES.
DO NOT USE FOR NiCd, NiMH, Li-Ion OR NON-RECHARGEABLE BATTERIES.
IMPORTANT: READ THE FOLLOWING INSTRUCTIONS BEFORE USING THE CHARGER
- This appliance can be used by children aged from 8 years and above and persons with reduced physical, sensory or mental capabilities or lack of experience and knowledge if they have been given supervision or instruction concerning use of the appliance in a safe way and understand the hazards involved. Children shall not play with the appliance. Cleaning and user maintenance shall not be made by children without supervision.
SAFETY WARNING AND NOTES
Batteries emit EXPLOSIVE GASES – prevent flame or sparks near batteries.
Disconnect AC power supply before making or breaking DC/battery connections.
Battery acid is highly corrosive. Wear protective clothing and eyewear and
avoid contact. In case of accidental contact, wash immediately with soap and
water. Check that the battery posts are not loose; if so, have the battery
professionally assessed. If the battery posts are corroded, clean with a
copper wire brush; if greasy or dirty clean with a rag damped in detergent.
Use the charger only if the input and output leads and connectors are in good,
undamaged condition. If the input cable is damaged, it is essential to have it
replaced without delay by the manufacturer, his authorized service agent or a
qualified workshop, to avoid danger. Protect your charger from acid and acid
fumes and from damp and humid conditions both during use and in storage.
Damage resulting from corrosion, oxidation or internal electrical short-
circuiting is not covered by warranty. Distance the charger from the battery
during charging to avoid contamination by or exposure to acid or acidic
vapours. If using it in the horizontal orientation, place the charger on a
hard, flat surface, but NOT on plastic, textile or leather. Use the fixing
holes provided in the enclosure base to attach the charger to any convenient,
sound vertical surface.
EXPOSURE TO LIQUIDS
This charger is designed to withstand exposure to liquids accidentally spilled
or splashed onto the casing from above, or to light rainfall. Prolonged
exposure to falling rain is inadvisable and longer service life will be
obtained by minimizing such exposure. Failure of the charger due to oxidation
resulting from the eventual penetration of liquid into the electronic
components, connectors or plugs, is not covered by warranty.
CONNECTING THE CHARGER TO THE BATTERY
- Disconnect AC power supply before making or breaking DC / battery connections.
- If charging a battery in the vehicle with the battery clips, before making connections, first check that the battery clips can be safely and securely positioned clear from surrounding wiring, metal tubing or the chassis. Make connections in the following order: First connect to the battery terminal not connected to the chassis (normally positive), then connect the other battery clip (normally negative) to the chassis well away from the battery and fuel line. Always disconnect in reverse sequence.
- When charging a battery out of the vehicle with the battery clips, place it in a well ventilated area. Connect the charger to the battery: RED clamp to POSITIVE (POS, P or +) terminal and BLACK clamp to NEGATIVE (NEG, N or –) terminal. Make sure the connections are firm and secure. Good contact is important.
- If the battery is deeply discharged (and possibly sulphated), remove from the vehicle and inspect the battery before connecting the charger for a recovery attempt. Visually check the battery for mechanical defects such as a bulging or cracked casing, or signs of electrolyte leakage. If the battery has filler caps and the plates within the cells can be seen from the outside, examine the battery carefully to try to determine if any cells seem different to the others (for example, with white matter between the plates, plates touching). If mechanical defects are apparent do not attempt to charge the battery, have the battery professionally assessed.
- If the battery is new, before connecting the charger read the battery manufacturer’s safety and operational instructions carefully. If applicable, carefully and exactly follow acid filling instructions.
PROCEEDING TO CHARGE
- CHARGING TIME : Charge time on a flat but otherwise undamaged battery: a 100Ah 12V should take no more than about 18 hours to progress to the self-discharge check. Deep-discharged batteries may take significantly longer, a full charge may not be achieved within the 72 hour charge safety limit.
- °The charge voltage is inversely regulated according to ambient temperature i.e. voltage is increased at lower temperature, decreased at higher temperature. Adjustment: -0.004V / cell / °C above or below 20°C (68°F).
- C HARGE (14.4V / 14.7V) : Two charge voltage levels are available for selection, both delivering Magmatic controlled charge with all STEPS active, suitable for recharge and long term maintenance of any size battery.
- POWER SUPPLY : Delivers stable power at maximum current for vehicle system reprogramming, show room vehicle demo or retaining memorized settings when battery cables are disconnected, either to fit powered accessories directly to the battery or when battery is replaced.


-
VERY FLAT NEGLECTED BATTERIES: If the battery is deeply discharged (and possibly sulfated), remove from the vehicle or equipment and inspect the battery before connecting the charger for a recovery attempt.
The charger’s TURBO recovery mode cannot engage if it senses that the battery
is still connected to a circuit which effectively offers a lower electrical
resistance than the battery on its own. However, if the deep-discharged
battery is not removed for recovery, neither battery nor vehicle or equipment
electronics will be damaged. Pay particularly close attention to the following
A battery left deep-discharged for an extended period may develop permanent
damage in one or more cells. Such batteries may heat up excessively during
high current charging. Monitor the battery temperature during the first hour,
then hourly there-after. -
Check for unusual signs, such as bubbling or leaking electrolyte, heightened activity in one cell compared to others, or hissing sounds. If at any time the battery is uncomfortably hot to touch or you notice any unusual signs, DISCONNECT THE CHARGER IMMEDIATELY.
-
MAINTAINING A BATTERY FOR EXTENDED PERIODS: For accurate temperature regulated charging and long term maintenance place Optimate as close as possible to the battery under charge. For example, if the battery is within a vehicle or craft stored outside in direct sun or cold, place the OptiMate inside the vehicle or craft (or its battery compartment) so that charge voltage can be adjusted according to the same environment temperature that the battery would experience.
-
The OptiMate will maintain a battery whose basic condition is good, for months at a time. At least once every two weeks, check that the connections between the charger and battery are secure, and, in the case of batteries with filler caps on each cell, disconnect the battery from the charger, check the level of the electrolyte and if necessary, top up the cells (with distilled water, NOT acid), then reconnect. When handling batteries or in their vicinity, always take care to observe the SAFETY WARNINGS above.
-
NOTES ON TEST RESULTS: The voltage of a cooled battery is directly proportional to its State Of Charge percentage (SOC%). Immediately following charging a battery may briefly hold a higher voltage, as charging raises the temperature of chemical elements within the battery. A battery recovered from a deep discharged state may need longer to cool and voltage to settle and reflect its true state of charge (SOC%).
- For any test result other than green #6 (or green #6 and yellow #7 together if the battery is a STD type with filler caps), disconnect the battery from the electrical system it supports, and reconnect the OptiMate. If a better test result is now obtained, this suggests that the power losses are partly due to an electrical problem in the electrical system and not in the battery itself.
- If the red LED #8 alone, or the yellow #7 & red LED #8 indicate together, or yellow #7 LED alone for a sealed battery, a significant problem exists. The battery is unable to retain sufficient charge or is losing charge very fast due to connected circuitry. A sudden load being switched on while the charger is connected can also cause the battery voltage to dip significantly.
- GOOD TEST RESULT, but the battery cannot deliver sufficient power: Degraded inter-cell connections or poor external connection at battery posts may cause severe voltage drop when high current is demanded from the battery. Check external battery connections or have battery professionally assessed (load tested).
ECO POWER SAVING MODE WHEN THE CHARGER IS CONNECTED TO AC SUPPLY
The power converter switches to ECO mode when the charger is not connected to
a battery resulting in a very low power draw of less than 0.5W, equivalent to
power consumption of 0.012 kWh per day. When a battery is connected to the
charger power consumption depends on the current demand of the battery and its
connected vehicle / electronic circuitry. After the battery has been charged
and the charger is in long term maintenance charge mode (to keep the battery
at 100% charge) the total power consumption is estimated to be 0.024kWh or
less per day.
LIMITED WARRANTY
TecMate (International) SA, Ambachtenlaan 6 B-3300 Tienen, Belgium, offers
this limited warranty to the original purchaser at retail of this product.
This limited warranty is not transferable. TecMate (International) warrants
this battery charger for three years from date of purchase at retail against
defective material or workmanship. If such should occur the unit will be
repaired or replaced at the option of the manufacturer. It is the obligation
of the purchaser to forward the unit together with proof of purchase (see
NOTE), transportation or mailing costs prepaid, to the manufacturer or its
authorized representative. This limited warranty is void if the product is
misused, subjected to careless handling, or repaired by anyone other than the
factory or its authorized representative. The manufacturer makes no warranty
other than this limited warranty and expressly excludes any implied warranty
including any warranty for consequential damages.
- THIS IS THE ONLY EXPRESS LIMITED WARRANTY AND THE MANUFACTURER NEITHER ASSUMES NOR AUTHORIZES ANYONE TO ASSUME OR MAKE ANY OTHER OBLIGATION TOWARDS THE PRODUCT OTHER THAN THIS EXPRESS LIMITED WARRANTY. YOUR
- STATUTORY RIGHTS ARE NOT AFFECTED.
NOTE: Details at
www.tecmate.com/warranty.
WARRANTY in Canada, USA, Central America and South America
- TecMate North America, Oakville, ON, Canada, as a wholy owned subsidiary of TecMate International, assumes the responsibility for product warranty in these regions.
- More information on TecMate products can be found at www.tecmate.com.
optimate1.com

References
- Home — OptiMate
- テックメイトジャパン㈱ 公式HP OptiMate充電器 – TecMate社製 オプティメイト バッテリー充電器・アクセサリ
- TecMate – High Performance Battery Chargers, Tools & Accessories
- Service and Warranty – TecMate
Read User Manual Online (PDF format)
Read User Manual Online (PDF format) >>
Download This Manual (PDF format)
Download this manual >>


Напряжение заряжаемого АКБ, В
12
Максимальный ток заряда, А
10
Ёмкость заряжаемой АКБ, А*ч
50 — 200
Все характеристики
- Преимущества
- Характеристики
- Документация
- Доставка и оплата
- Отзывы (7)
- Аналоги (0)
Преимущества
- Влагозащищенное исполнение IP54
- 3 режима работы
- 3 режима восстановления аккумуляторов
- Тестирование аккумулятора до и после зарядки
- Хранение аккумулятора в режиме 24/7/365
Данная модель является заменой снятой с производства «Зарядное устройство OptiMate 7 SELECT TM250
Зарядное устройство OptiMate 7 Select Gold, TM250 V3 — это третья версия зарядного устройства Optimate 7 с током 10А, которая заряжает все виды свинцово-кислотных аккумуляторов 12В, в т.ч. AGM, GEL, EFB, Ca.
Выберите напряжение заряда для любого типа свинцово-кислотных аккумуляторов от стандартных залитых до премиальных AGM аккумуляторов или режим источника питания. Выбор режима остается в памяти зарядного устройства, даже если питание зарядного устройства пропадет. Зарядка продолжится после появления питания.
- 14,4В для большинства аккумуляторов, в т.ч. GEL
- 14,7В для аккумуляторов премиум-класса, AGM, спиральных и других аккумуляторов
- PS — режим источника питания
Вес, кг:
Длина, мм:
Ширина, мм:
Высота, мм:
- Зарядное устройство Optimate 7 Select Gold TM250 V3 — 1 шт.
- Инструкция по эксплуатации — 1 шт.
- Упаковка — 1 шт.
- Зарядные устройства OptiMate
- Зарядные устройства для аккумуляторов
Характеристики
-
Тип
Зарядное устройство -
Напряжение заряжаемого АКБ, В
12 -
Максимальный ток заряда, А
10 -
Ёмкость заряжаемой АКБ, А*ч
50 — 200 -
Тип заряжаемых АКБ
GEL / AGM / WET -
Метод заряда
Импульсный -
Входное напряжение, В
100 — 240 -
Режим работы
Автоматическое -
Количество каналов заряда, шт.
1 -
Индикация
Светодиодная -
Поддерживаемые режимы
Восстановление АКБ, тестирование, хранение, режим источника питания -
Защита
От переполюсовки, от короткого замыкания, от перегрузки -
Тип устройства
Сетевое -
Длина, мм
240 -
Ширина, мм
125 -
Высота, мм
65 -
Вес, кг
1 -
Температура эксплуатации, °C
-40…+40 -
Страна производства
Китай -
Гарантия, мес.
36
Документация
Доставка и оплата
Доставка и оплата
Зарядное устройство Optimate 7 Select Gold TM250 V3
Доставка
Доставка в Другой
Доставка в регионы осуществляется курьерскими службами:
- DPD
- КИТ
- CДEK
- другими ТК по предпочтению клиента
Сроки и стоимость доставки рассчитываются автоматически и отображаются в карточке товара.
Оплата
- Оплата картой (в магазине или при доставке)
- Онлайн оплата на сайте
- Безналичный расчет (запросить счет для юр. лиц)
- Наличный расчет (в магазине или курьеру)
- Наложенный платеж
- Лизинг (оформить заявку)
Отзывы 4 (7)
Зарядное устройство Optimate 7 Select Gold TM250 V3
Участвует в подборках
- Зарядные устройства OptiMate
- Зарядные устройства для аккумуляторов
Аналоги (0)
Профессиональная установка, пуско-наладочные работы и сервисное обслуживание
Наша команда всегда готова помочь в подборе оборудования, наиболее подходящего под ваш запрос
Выгодные условия долгосрочной аренды с возможностью дальнейшего выкупа или возврата
Сертификат


Гибридная СЭС мощностью 15 кВт
для обеспечения бесперебойного питания частного дома
Заказчик: частное лицо
Расположение: г. Сочи
Задача: обеспечить частный дом бесперебойным питанием и снизить затраты на электроэнергию через генерацию электроэнергии из возобновляемых источников
Решение: поставка и монтаж гибридной солнечной станции мощностью 15 кВа
Поставка новых тяговых аккумуляторов
для коленчатых подъемников Genie Z-33/18
Заказчик: Музейный комплекс УГМК
Расположение: г. Верхняя Пышма
Задача: заменить отслужившую аккумуляторную батарею на коленчатых подъемниках Genie Z-33/18
Решение: поставка и монтаж аккумуляторных батарей NBA MAXXIMA PLUS
Поставка и монтаж ИБП мощностью 40кВа
для организации резервного питания в стоматологической клинике
Заказчик: стоматологическая клиника
Расположение: г. Екатеринбург
Задача: обеспечить резервным питанием стоматологическое оборудование, выполнить пусконаладочные работы ИБП
Решение: поставка и монтаж ИБП Hiden мощностью 40 кВа

Сетевая СЭС суммарной мощностью 190 кВт
на птицефабрике в г. Тюмень
Заказчик: птицефабрика
Расположение: г. Тюмень
Задача: снизить затраты на электроэнергию через генерацию электроэнергии из возобновляемых источников
Решение: поставка и монтаж сетевой солнечной станции мощностью 190 кВа
Многофункциональный инвертор Asterion PLUS 6K on-line
для обеспечения бесперебойного питания частного дома
Заказчик: частное лицо
Расположение: Свердловская обл., г. Курганово
Задача: обеспечить бесперебойное питание частного дома, оборудование устанавливается в неотапливаемом помещении.
Решение: поставка гибридной электростанции и изготовление термошкафа.
ON-LINE ИБП мощностью 40кВА
для обеспечения бесперебойного питания станка лазерной резки металла
Заказчик: ООО «ТД КРОНИД»
Расположение: Ленинградская обл., г. Мурино
Задача: обеспечить бесперебойное питание станка лазерной резки металла
Решение: поставка и ПНР ИБП HIDEN KC3340S 40000VA/36000W
ON-LINE ИБП мощностью 40кВА
для обеспечения бесперебойного питания оборудования в офисе
Заказчик: государственное учреждение
Расположение: Новосибирская обл., г. Купино
Задача: выполнение ремонта и ТО ИБП RIELLO 40кВА, замена АКБ
Решение: поставка и замена АКБ, выполнение ремонта и ТО ИБП RIELLO 40кВА
Сетевая СЭС мощностью 25 кВт на крыше ИКЕА
с целью снижения затрат на электроэнергию
Заказчик: ТРЦ Мега
Расположение: г. Екатеринбург
Задача: снизить затраты на электроэнергию через генерацию электроэнергии из возобновляемых источников
Решение: поставка и монтаж сетевой солнечной станции мощностью 25 кВа
Система резервного электроснабжения в коттедже
с возможностью подключения солнечных панелей
Заказчик: частное лицо
Расположение: г. Челябинск
Задача: обеспечить загородный дом стабильным напряжением с возможностью в будущем подключить к системе солнечные панели
Решение: поставка и монтаж инвертора SmartWatt, стабилизаторов напряжения Штиль и LiFePO4 аккумулятора Vektor Energy
СЭС мощностью 10 кВт в частном доме
с целью снижения затрат на электроэнергию
Заказчик: частное лицо
Расположение: п. Рассоха
Задача: обеспечить частный дом бесперебойным питанием и снизить затраты на электроэнергию через генерацию электроэнергии из возобновляемых источников
Решение: поставка и монтаж солнечной станции мощностью 10,8 кВт
ИБП мощностью 10 кВа в частный дом
в качестве источника резервного питания
Заказчик: частное лицо
Расположение: п. Рассоха
Задача: обеспечить загородный дом резервным электроснабжением на случай перебоев в основной сети
Решение: поставка и монтаж ИБП Hiden и аккумуляторов Vektor Energy
СЭС на крышу суммарной мощностью 5,4 кВт
в дом постоянного проживания
Заказчик: частное лицо
Расположение: г. Арамиль
Задача: обеспечить частный дом бесперебойным питанием и снизить затраты на электроэнергию через генерацию электроэнергии из возобновляемых источников
Решение: поставка и монтаж солнечной станции мощностью 5,4 кВт
Система резервного электроснабжения на 10 кВа
в загородном доме
Заказчик: частное лицо
Расположение: г. Арамиль
Задача: обеспечить загородный дом резервным электроснабжением на случай перебоев в основной сети
Решение: поставка и монтаж ИБП Hiden и аккумуляторов Vektor Energy
Солнечная станция мощностью 5 кВт
для обеспечения бесперебойного питания
Заказчик: частное лицо
Расположение: г. Краснотурьинск
Задача: обеспечить частный дом электропитанием на случай перебоев в поставких из сети
Решение: поставка и монтаж солнечной станции мощностью 5,8 кВт
Солнечная станция на 31,5 кВт
для обеспечения бесперебойного питания
Заказчик: гостинница
Расположение: г. Адлер
Задача: обеспечить гостинницу бесперебойным питанием и снизить затраты на электроэнергию через генерацию электроэнергии из возобновляемых источников
Решение: поставка и монтаж солнечной станции мощностью 31,5 кВт

СЭС на крышу суммарной мощностью 7,1 кВт
для обеспечения бесперебойного питания
Заказчик: частное лицо
Расположение: г. Калуга
Задача: обеспечить частный дом бесперебойным питанием и снизить затраты на электроэнергию через генерацию электроэнергии из возобновляемых источников
Решение: поставка и монтаж солнечной станции мощностью 7,1 кВт
Установка стабилизатора в НИИ
для поддержания выходного напряжения на заданном уровне
Заказчик: завод
Расположение: г. Горный Щит
Задача: защитить электроприборы на предприятии от перепадов напряжения и короткого замыкания.
Решение: установка трехфазного стабилизатора 60 кВА
Солнечная станция мощностью 5,4 кВт
для обеспечения бесперебойного питания
Заказчик: частное лицо
Расположение: г. Таватуй
Задача: обеспечить частный дом бесперебойным питанием и снизить затраты на электроэнергию через генерацию электроэнергии из возобновляемых источников
Решение: поставка и монтаж солнечной станции мощностью 5,4 кВт
Доставка любого заказа от 3000 руб. производится бесплатно по Москве! При заказе на сумму меньше 3000 руб. доставка платная и составляет 350 руб.
Срок доставки товара по Москве до Клиента составляет 1-3 рабочих дня.
Внимание!
Доставка за пределы МКАД производится при заказе на сумму от 3500 руб.
Доставка по Москве в розничный магазин «AGA-АВТОМАГ» (услуга «Самовывоз с дисконтом»).
Стоимость доставки – БЕСПЛАТНО, предоставляется скидка на весь заказ в размере 5%. Если Вы хотите получить скидку в размере 5% на всю покупку, предлагаем Вам воспользоваться услугой «Самовывоз с дисконтом». Данная услуга позволяет самостоятельно забрать интересующий товар в одном из 35 магазинов «AGA-АВТОМАГ» при условии оформления данной услуги через Интернет-магазин «АВТОМАГ — запчасти». Оплата за товар принимается только в рублях. Оформляется товарный и кассовый чек. На сегодняшний день почти в каждом районе Москвы есть хотя бы один наш магазин. Ежеквартально открывается еще по 2-3 новых магазина. Из любой точки города до фирменного магазина «AGA-АВТОМАГ» – не более 15 минут езды. Магазины работают по выходным, есть круглосуточные магазины.
Доставка в регионы РФ.
Доставка в регионы осуществляется только по предоплате, минимальная сумма заказа составляет 3500 руб. Доставка товара осуществляется до склада транспортной компании в Москве и составляет 350 руб. Доставка до Вашего города оплачивается отдельно транспортной компании при получении товара. Точная сумма доставки зависит от тарифа выбранной транспортной компании. Доставка за МКАД и в регионы РФ осуществляется по предоплате. После оформления заказа с доставкой в регионы РФ с Вами свяжется ответственный менеджер и подтвердит наличие товара. Далее товар ставится в резерв и оговаривается вид оплаты заказа. После прибытия груза в ваш город, транспортная компания известит вас, позвонив на указанный в заказе номер телефона. Заказ будет вручен непосредственно Вам или лицам, указанным в бланке заказа, только при предъявлении документа удостоверяющего личность. Если, получателем заказа выступает юридическое лицо, то для получения груза необходима доверенность от организации-плательщика, оформленная надлежащим образом. Срок доставки товара до Клиента составляет 4-6 рабочих дней.
Рекомендованные транспортные компании:
- «ПЭК» (www.pecom.ru).
- «Грузовозофф» (www.gruzovozoff.ru).
- «Автотрейдинг» (www.ae5000.ru).
- «Деловые линии» (https://www.dellin.ru/).
- «Желдорэкспедиция» (https://www.jde.ru/).
Как оплатить заказ из регионов?
1. Банковская карта (Visa, MasterCard).. Оплата осуществляется через интернет сразу после оформления заказа. К оплате принимаются банковские карты платежных систем Visa, MasterCard. Безопасность транзакций гарантирована высокой степенью защиты платежной системы, все данные, предоставляемые владельцем банковской карты, надежно защищены.
2. Оплата по счету через Банк (для физических лиц). Доступна форма оплаты извещение (счет) для оплаты в Сбербанке РФ или любом другом банке, предоставляющем аналогичные услуги. При оплате по извещению в отделении Сбербанка, банк удерживает с покупателя комиссию в размере 3% от суммы платежа.
3. Оплата по счету через Банк (для юридических лиц). Доступна форма оплаты по безналичному расчету. Для оформления доставки в регионы в заказе необходимо указать почтовый индекс, адрес доставки, контактный телефон клиента и e-mail (на который будет выслан счет на оплату товара). Резервирование заказанного и неоплаченного товара производится не более чем на 5 банковских дней. Доставка заказов осуществляется любой транспортной компанией по выбору Клиента во все обслуживаемые города Российской Федерации.
За дополнительной информацией обращайтесь по телефонам (499)788-73-70 или по e-mail contact@amag.ru.
Зарядка, десульфатация и тестирование всех 12 В аккумуляторных батарей
Ежегодно более 1,000,000 потребителей выбирают проверенные временем, а также одобренные множеством производителей транспортных средств импульсные зарядные устройства от компании TecMate.
С 1995 года серия зарядных устройств OptiMate имеет репутацию простого и надежного устройства для зарядки, тестирования и обслуживания аккумуляторных батарей в автоматическом режиме, без риска их перезарядки.
Использование зарядных устройств TecMate 100% автоматически и 100% безопасно.
Особенности:
«ampmatic™» Микропроцессорное управление
Герметичный водонипроницаемый корпус для защиты от атмосферного воздействия
Зарядное устройство способно обнаружить мельчайшие проблемы с аккумуляторной батареей
Сенсорная кнопка для переключения режимов 14.4В/14.7В
Режим источника питания для замещения АКБ во время сервисных работ или смены АКБ
OptiMate 7 Select, с 10A током заряда — это передовое энергосберегающее зарядное устройство, тестер и устройство для хранения автомобильных, морских и мото аккумуляторов 24 часа 7 дней в неделю. Optimate 7 Select помещен в надежный закрытый корпус с настенным креплением, способный защитить ваше зарядное устройство от атмосферных воздействий даже при температуре -40С. Optimate 7 Select подходит для всех пользователей особенно при необходимости зарядки вашего транспортного средства на воде или в снегу.
Реанимирует аккумуляторы тогда, когда Вы уже решили, что он уже мертв.
Проверенный годами режим десульфатации сохранит жизнь аккумулятору, в то время когда другие зарядные устройства бессильны.
Получите максимальную мощность от Вашего аккумулятора!
Уникальный «Ampmatic» Микропроцессор автоматически выберет лучшую программу и будет регулировать ток зарядки каждый раз, когда вы подключите батарею, гарантируя самый быстрый и полный заряд. Режим балансировки напряжения каждой ячейки оптимизирует производительность батареи, а также правильно подготавливает новую батарею для первого использования.
Увеличивает срок службы аккумулятора до 400%!
OptiMate 7 Select будет поддерживать ваши аккумуляторы с 100% готовностью к использованию в течение нескольких месяцев подряд, благодаря чрезвычайно эффективному методу технического обслуживания «заряд и отдых»
Предупреждает о проблемах с аккумулятором заранее!
Ежедневные тесты контроля состояния аккумулятора и величины тока утечки в цепи автомобиля; проблемы понятным образом отображаются при помощи светодиодов на лицевой панели устройства.
Рекомендуется для зарядки обслуживаемых аккумуляторов (со съемными крышками), необслуживаемых аккумуляторов, герметичных аккумуляторов типа AGM, гелевых и спиральных 12В свинцово-кислотных аккумуляторных батарей емкостью от 3 до 400Ач.
Полностью автоматический режим работы, что включает в себя все функции безопасности, такие как защита от обратной полярности и без искровое соединение.
Включает в себя 2 комплекта проводов для подключения:
O11 разъем постоянного подключения — кольца с влагозащищенной крышкой под болт М8 и O4 зажимы типа «крокодил»