
FR — NOTICE D’UTILISATION
EN — INSTRUCTIONS FOR USE
DE — GEBRAUCHSANWEISUNG
GR 1 : 9 — 18 kg
La responsabilité du
fabricant ne saurait être
engagée, que dans le cadre
de l’attribution du Règlement
Européen (R44). Cette
Homologation n’exclut pas
la prudence et le respect du
code de la route.

FR — Mode d’emploi pages 3 à 20 / Garantie page 21
EN — Instructions for use pages 3 — 20 / Guarantee page 21
DE — Gebrauchsanweisung Seite 22 — 37 / Garantie Seite 38
NOTICE D’UTILISATION — INSTRUCTIONS FOR USE
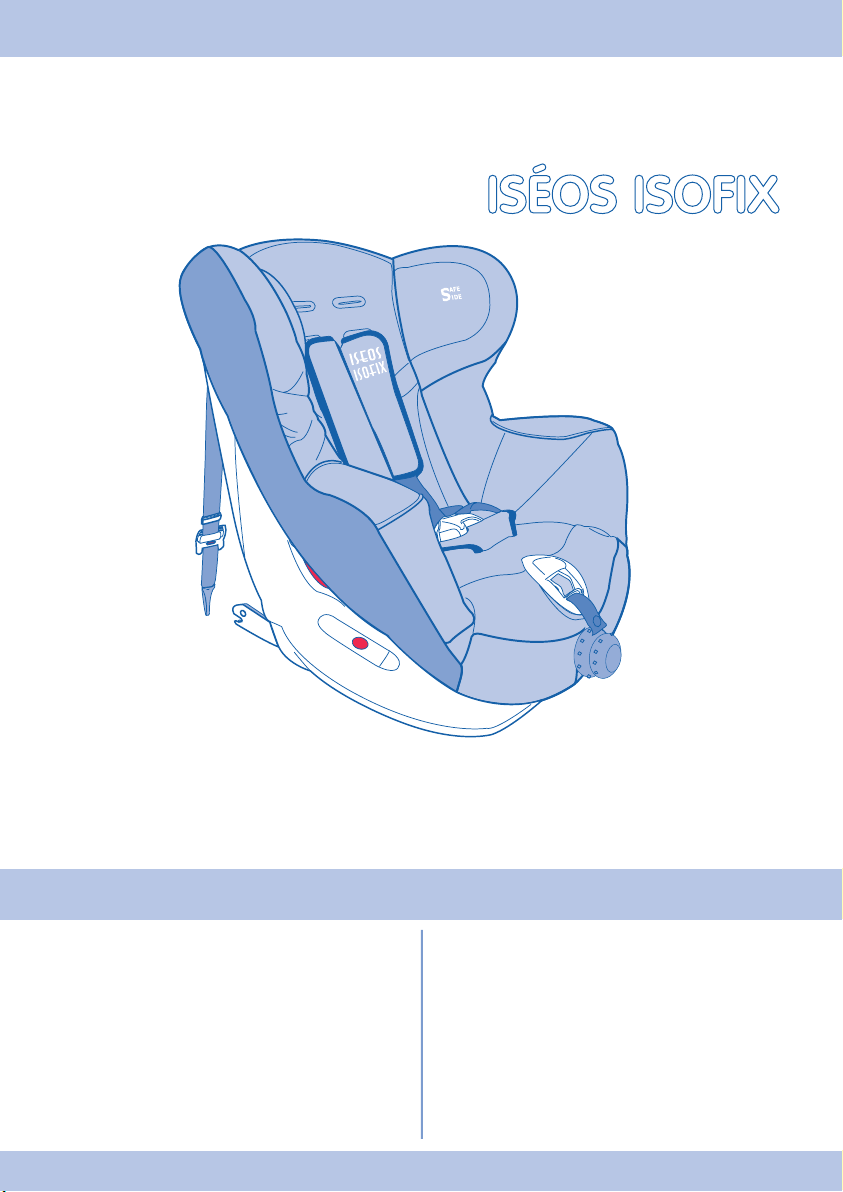
ISÉOS ISOFIX
SOMMAIRE
• IMPORTANT : p.5 à 9.
• Préparez l’installation ISOFIX p 10.
• Installation ISOFIX p 11 -12.
• Démontage ISOFIX p 13.
• Installation avec ceinture p 14 — 15.
• Installation de l’enfant p 15 — 16.
• Réglage du harnais p 17 — 18.
• Réglages de l’assise p 19.
• Déhoussage et entretien p 19 — 20.
• Accessoires p 20.
• Garantie p 21.
CONTENTS
• IMPORTANT: pp.5 to 9.
• Preparing to install the ISOFIX p 10.
• Installing the ISOFIX p 11 — 12.
• Dismantling/removing ISOFIX p 13.
• Installation with a seat-belt pp 14 — 15.
• Putting the child in the seat pp 15 — 16.
• Adjusting the harness pp 17 — 18.
• Adjusting the seating comfort p 19.
• Removal and care of the seat cover pp 19 — 20.
• Accessories p 20.
• Guarantee p 21.
3
FR — EN
DESCRIPTION
DESCRIPTION
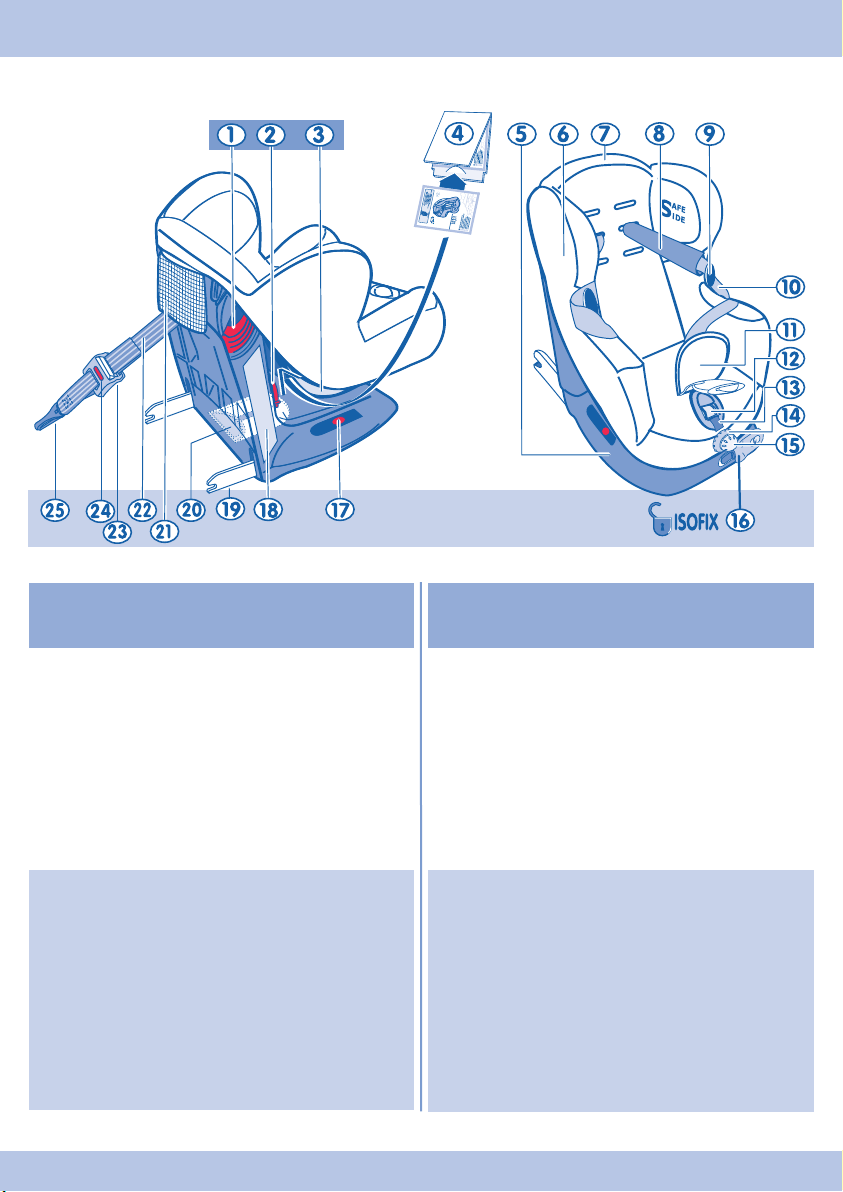
1 — Crochet (utilisation avec ceinture 3 points du véhicule)
2 — Bride sangle (utilisation avec ceinture 3 points du
véhicule)
3 — Etiquette d’installation avec ceinture 3 points du véhicule
4 — Conservez la notice dans sa pochette (au dos de
l’assise)
5 — Socle
6 — Joue
7 — Confection
8 — Protection d’épaule
9 — Support harnais
10 — Harnais 5 points
11 — Protection de boucle de harnais
12 — Ajusteur de réglage harnais
13 — Sangle de réglage harnais
14 — Bouton de réglage de la largeur du siège
15 — Bouton de réglage de l’inclinaison du siège
16 — Système de déverrouillage des pinces d’ancrages
inférieurs ISOFIX
17 — Témoin de fixation des pinces pour ancrages inférieurs
ISOFIX
18 — Etiquette d’installation ISOFIX
19 — Pinces pour ancrages inférieurs ISOFIX
20 — Poignée d’extraction des pinces ISOFIX (sous le socle)
21 — Filet de rangement pour sangle d’ancrage pour fixation
supérieure ISOFIX “Top Tether”
22 — Sangle d’Ancrage pour fixation supérieure
ISOFIX “Top Tether”
23 — Ajusteur de tension de la “Top Tether”
24 — Témoin de tension de la “Top Tether”
25 — Mousqueton pour l’ancrage de la “Top Tether”
1 — Clip (for use with 3 point car seat-belt)
2 — Strap buckle (for use with 3 point car seat-belt)
3 — Installation sticker for use with 3 point car seat-belt
4 — Keep the instructions in the special pocket (on the back
of the seat)
5 — Base
6 — Side piece
7 — Fabric
8 — Chest pad
9 — Harness support
10 — 5 point harness
11 — Harness buckle cover
12 — Adjuster for harness fit
13 — Strap for harness fit
14 — Adjuster knob for seat width
15 — Adjuster knob for seat angle
16 — Release system for ISOFIX lower anchorage latches
17 — Installation indicator for ISOFIX lower anchorage latches
18 — ISOFIX Installation sticker
19 — ISOFIX lower anchorage latches
20 — Handle for retracting ISOFIX latches (under the base)
21 — Storage net for anchorage strap for upper ISOFIX
installation
22 — Anchoring strap for upper ISOFIX installation “Top
Tether”
23 — “Top Tether” tension adjuster
24 — “Top Tether” tension indicator
25 — Clasp to anchor the “Top Tether”
FR — EN
4
IMPORTANT
• Les produits Bébé Confort ont été conçus et testés avec
soin pour la sécurité et le confort de votre bébé. N’utilisez
que des accessoires vendus ou approuvés par Bébé
Confort. L’utilisation d’autres accessoires peut s’avérer
dangereuse.
• Nous vous conseillons de lire attentivement cette notice et
de manipuler votre produit avant de l’utiliser.
• Conservez toujours la notice pour une utilisation ultérieure,
une pochette de rangement a été prévue à cet effet sur le
siège pour enfants.
SYSTEME ISOFIX UNIVERSEL :
• Siège de groupe 1 (enfants de 9 à 18 Kg) — Classe de
taille ISOFIX B1 — Homologué ISOFIX UNIVERSEL.
• Pour l’utilisation du système d’attache ISOFIX UNIVERSEL
lisez IMPÉRATIVEMENT le manuel d’utilisation du
véhicule, avant d’installer votre siège pour enfant. Il vous
indiquera les places compatibles avec la classe de taille du
siège pour enfant, homologué ISOFIX UNIVERSEL.
• ATTENTION : ne jamais combiner les deux systèmes
d’attache ISOFIX et ceinture du véhicule pour installer
votre siège pour enfant.
• ATTENTION : en utilisation ISOFIX la fixation des pinces
pour ancrage inférieurs au véhicule n’est pas suffisante.
Il est impératif de fixer la “Top Tether” au point d’ancrage
supérieur prévu par le constructeur du véhicule.
SYSTEME UNIVERSEL AVEC CEINTURE 3 POINTS :
• ATTENTION : ne jamais combiner les deux systèmes
d’attache ISOFIX et ceinture du véhicule pour installer
votre siège pour enfant.
• Lorsque le siège est utilisé en combinaison avec une
ceinture de sécurité pour adulte. Il ne peut être installé
que dans les véhicules indiqués, équipés de ceintures
de sécurité 3 points/statiques/à rétracteur, conformes au
Règlement CEE N° 16 ou à d’autres normes équivalentes.
• Après avoir installé votre enfant, assurez-vous que la
ceinture du véhicule soit correctement tendue en tirant sur
la sangle. Assurez-vous également que la sangle ne se
vrille pas.
ENFANT :
• Ne laissez jamais votre enfant sans surveillance.
• Même minimes, les chocs subits par un véhicule peuvent
transformer l’enfant en un véritable projectile.
• Pour votre sécurité et celle de votre enfant, installez-le
toujours dans le siège pour enfant quel que soit le trajet
que vous avez à effectuer.
• Veiller à ce que les sangles sous-abdominales soient
portées aussi bas que possible, pour bien maintenir le
bassin.
• La température à l’intérieur d’un véhicule peut être très
élevée, notamment après une longue exposition au soleil.
Il est fortement recommandé, dans ces conditions, de
recouvrir le siège auto d’un tissu ou autre qui empêchera
les fixations du harnais, et plus particulièrement les pièces
métalliques, de chauffer et de brûler l’enfant.
AUTRES INSTRUCTIONS :
• Le siège sera monté face à la route. Ne jamais installer ce
siège dos à la route.
• La responsabilité du fabricant ne saurait être engagée,
que dans le cadre de l’attribution du Règlement Européen
(R44). Cette homologation n’exclut pas la prudence et le
respect du code de la route.
• Ce dispositif de retenue pour enfants est efficace
uniquement lors du respect des instructions d’utilisation.
• Attachez toujours le dispositif de retenue pour enfants
même lorsque l’enfant n’y est pas installé.
• L’utilisateur doit toujours veiller à ce que les bagages
et autres objets susceptibles de causer des blessures
à l’occupant du siège en cas de choc soient solidement
arrimés.
• Ne placez jamais d’objets lourds sur la tablette arrière, afin
d’éviter les projections en cas d’accident.
• Les éléments rigides et les pièces en matière plastique
d’un dispositif de retenue pour enfants doivent être situés
et installés de telle manière qu’ils ne puissent pas, dans
les conditions normales d’utilisation du véhicule, se coincer
sous un siège mobile ou dans la porte du véhicule.
• Vérifiez toujours si une partie du siège ou du harnais n’est
pas coincée sous un siège ou dans la porte du véhicule.
• Le siège doit impérativement être remplacé après un
accident.
• Ne modifiez jamais la construction ou les matériaux du
siège et de la ceinture sans avoir consulté le fabricant.
• N’utilisez pas le dispositif de retenue pour enfants sans
la housse. Ne pas remplacer la housse du siège par une
autre housse que celle recommandée par le constructeur,
car elle intervient directement dans le comportement du
dispositif de retenue.
• Il est conseillé à l’usager de se mettre en rapport avec le
distributeur ou le fabricant du système de retenue pour
enfants, s’il a un doute sur l’installation ou l’utilisation
correctes du système.
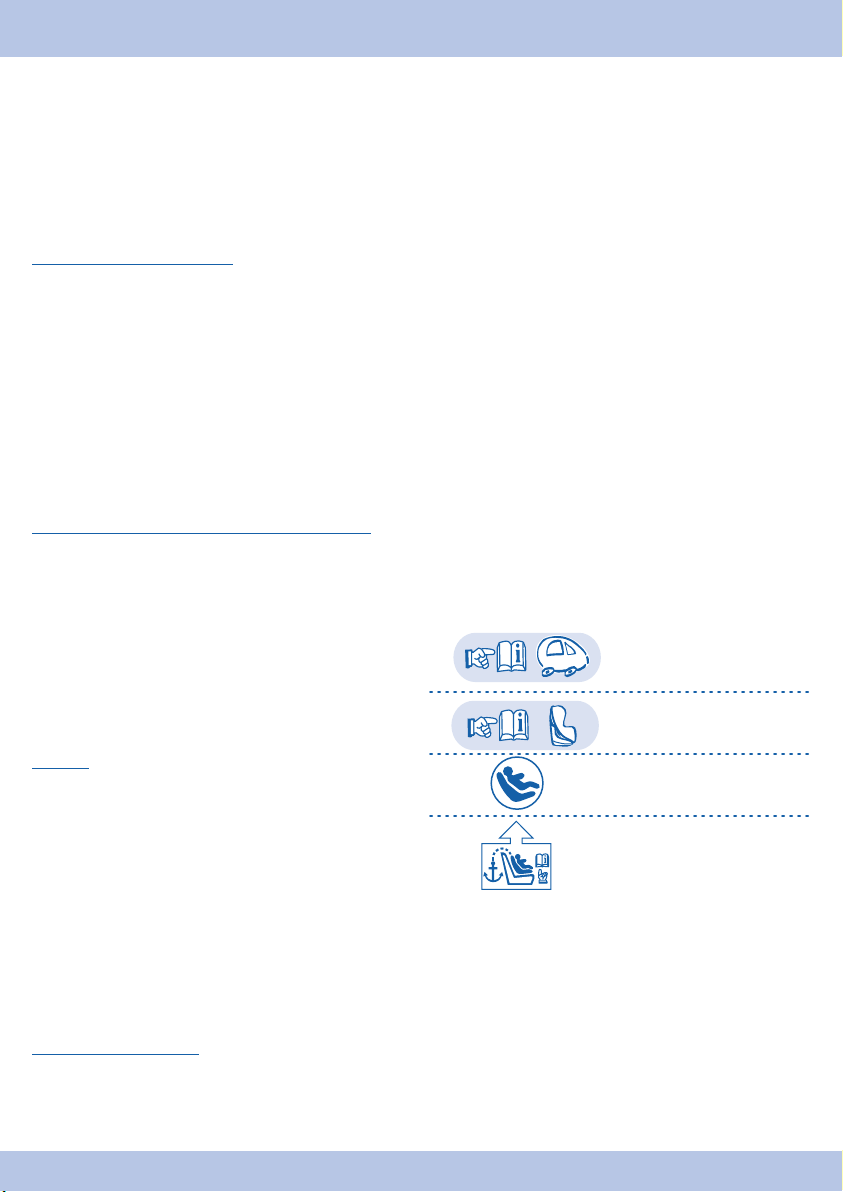
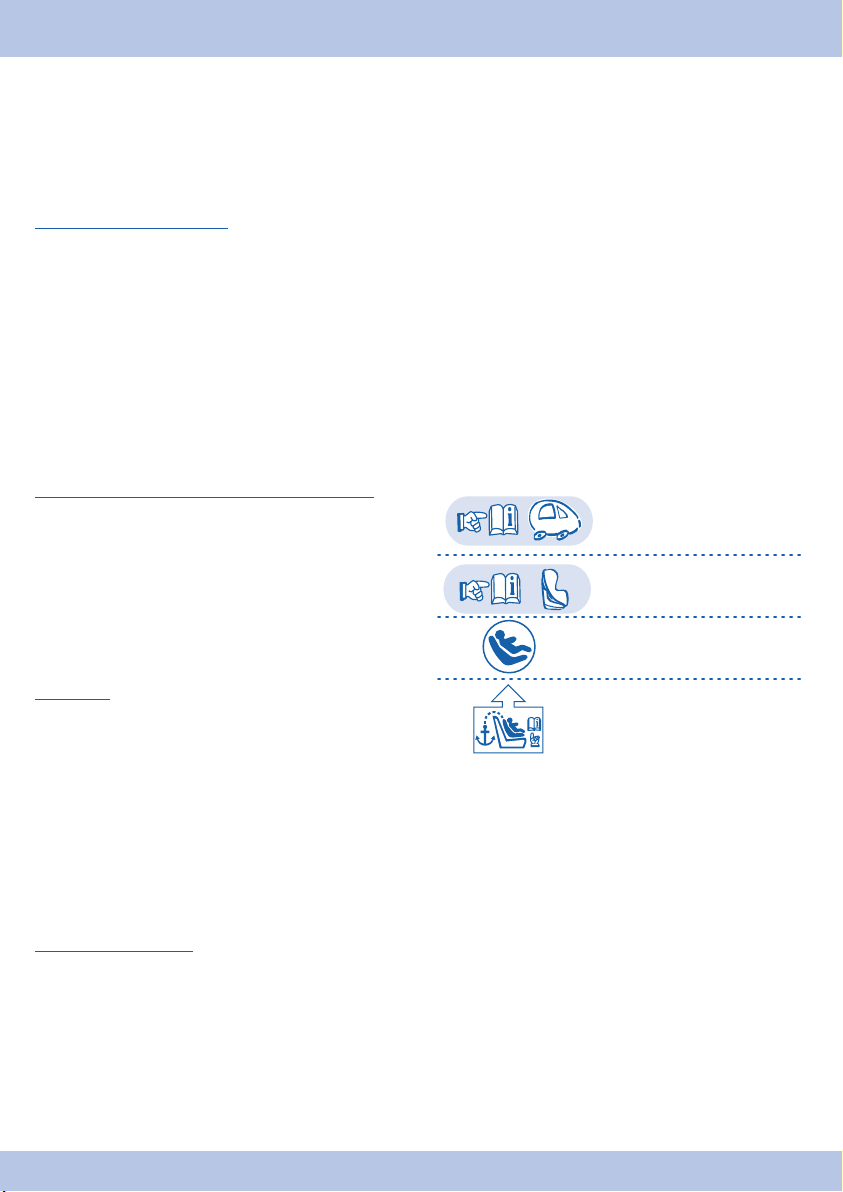
PICTOGRAPHIE:
Consultez le mode d’emploi
du véhicule
Consultez le mode d’emploi
du siège-auto
Logo ISOFIX
(voir étiquette d’installation)
Siège utilisant un ancrage
supérieur ISOFIX «Top
tether»
5
FR
IMPORTANT
• All Bébé Confort products have been carefully designed
and tested for your baby’s safety and comfort. Use only
accessories sold or approved by Bébé Confort.
• Using other accessories may prove to be dangerous.
• Please read these instructions carefully and make yourself
familiar with the child seat before using it.
• Always keep the instructions for future reference; there is a
storage pocket specifically provided on the child seat.
UNIVERSAL ISOFIX SYSTEM:
• Group 1 car seat (children from 9 to 18 Kg) — ISOFIX
classification B1 — ISOFIX UNIVERSAL approved.
• To use the ISOFIX UNIVERSAL fixing system, it is
ESSENTIAL to read the car handbook, before installing the
child car seat.
• It will show you which points are compatible with the
classification of the ISOFIX UNIVERSAL approved child
car seat.
• IMPORTANT: never use both the ISOFIX fixing system and
the car seat-belt to install the child car seat
• IMPORTANT: when using ISOFIX it is not enough to
connect just the lower anchorage latches to the vehicle. It
is essential to fix the “Top Tether” to the upper anchorage
provided by the vehicle manufacturer.
UNIVERSAL SYSTEM WITH A 3 POINT SEAT-BELT:
• IMPORTANT: never use both the ISOFIX fixing system
and the car seat-belt to install the child car seat.
• When the car seat is used in combination with an adult
safety belt, It can be installed only in the vehicles listed,
equipped with 3 point/static/inertia reel safety-belts that
conform to EEC Regulation N° 16 or other equivalent
standards.
• After putting the child in the car seat, ensure that the car
seat-belt is sufficiently taut by pulling the belt. Ensure also
that the belt does not become twisted
THE CHILD:
• Never leave a child unsupervised.
•
Even a gentle impact on a vehicle can turn a child into a
projectile.
• For your own safety and that of your child, always put the
child in the child car seat, however short your journey may be.
• Ensure that the straps under the stomach lie as low as
possible, to properly support the pelvis.
•
The temperature inside a vehicle may become very high,
particularly after a long period of exposure to the sun. It
is strongly recommended, under such conditions, to cover
the seat of the car with a piece of material or something
equivalent to prevent the harness fixings, and in particular
the metal parts, from becoming hot and burning the child.
OTHER INSTRUCTIONS:
• The child car seat is to be installed facing forwards. Never
install this child car seat facing backwards.
• The manufacturer’s liability is limited to what is covered
under the European Regulation (R44). This approval does
not remove the necessity for care and respect for the
Highway Code.
• This child restraint is effective only if the instructions for
use are respected.
• Always fasten the child restraint even when the child is not
sitting in it.
• The user must always check that any luggage and other
objects likely to cause injury to the occupant of the car seat
in the case of impact are properly secured.
• Never place heavy objects on the rear parcel shelf, to avoid
the danger of projectiles in the event of an accident.
• The rigid parts and the plastic sections of a child restraint
device should be positioned and installed in such a way
that they cannot, under normal conditions of use of the
vehicle, become trapped under a moving seat or in the
vehicle door.
• Always check that no part of the seat or the harness is
trapped under a seat or in the vehicle door.
• It is essential that the car seat be replaced after an
accident.
• Never modify the construction or the materials of the car
seat and its straps without consulting the manufacturer.
•
Do not use the child restraint device without the cover.
Do not replace the seat cover with a cover other than that
recommended by the manufacturer, because it will have a
direct effect on the functioning of the child restraint.
• If in any doubt about the correct installation or use of the
system, the user is advised to contact the distributor or the
manufacturer of the child restraining device system.
SYMBOLS:
Consult the vehicle handbook
Consult the car seat
instructions
The ISOFIX logo
(see installation sticker)
Seat using an ISOFIX «Top
tether» upper anchoring
strap
EN
6
IMPORTANT
IMPORTANT
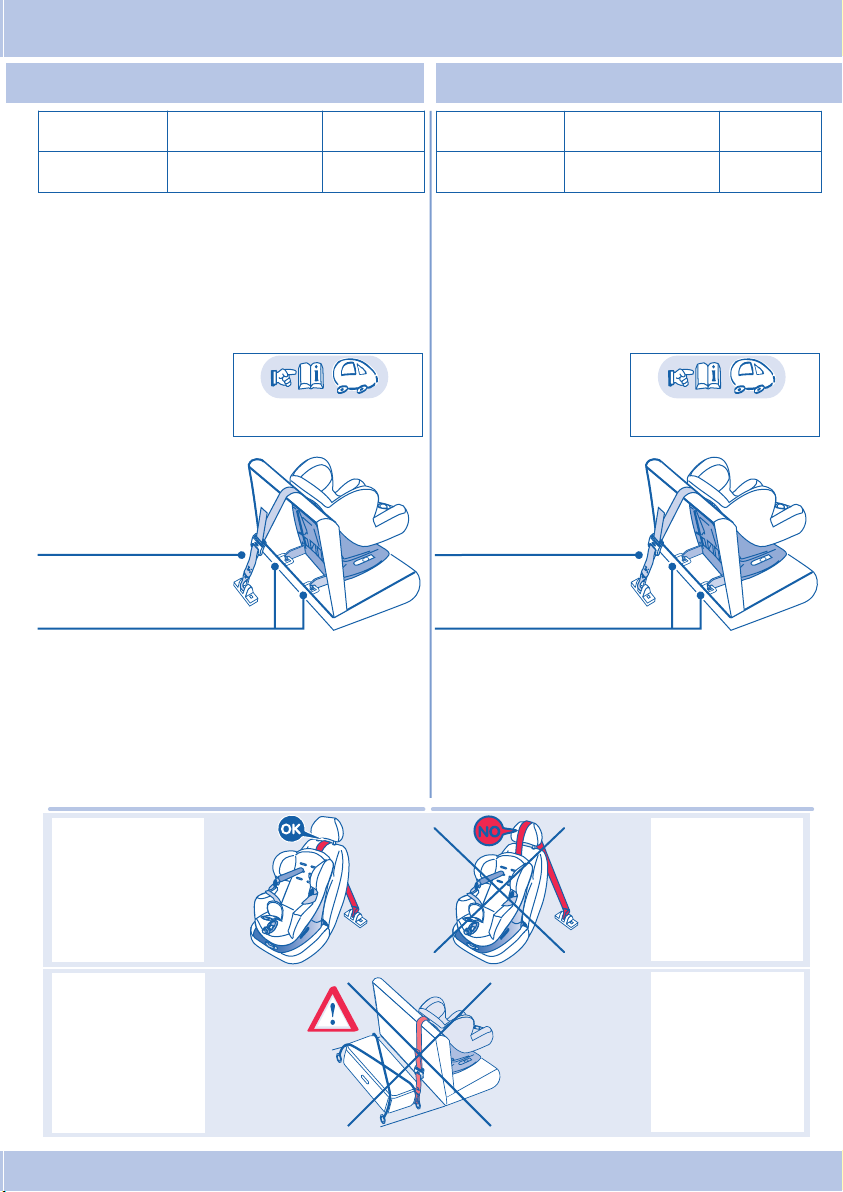
ISEOS ISOFIX UNIVERSEL
Sens Places arrière* Groupe 1
Face à la route Classe de taille B1** 9 à 18 kg
* Le siège doit être placé sur la banquette arrière du
véhicule ou exceptionnellement à l’avant selon la
législation en vigueur dans le pays d’utilisation. (en France
: selon les conditions énoncées dans le décret n° 91-1321
du 27-12-1991)
Votre siège ISEOS est homologué ISOFIX UNIVERSEL.
Il est approprié à tous les véhicules suivant les dernières
évolutions réglementaires intégrant le système ISOFIX
UNIVERSEL.
** Consultez le mode
d’emploi du véhicule, le
constructeur y aura indiqué
l’emplacement des 3 points
d’ancrage du siège sur le
véhicule.
Sangle d’ancrage supérieur
ISOFIX (Top Tether)
Pinces d’ancrages inférieurs ISOFIX
A QUELLE PLACE ?
• Consultez le mode d’emploi du véhicule vous y retrouver
les places conseillées par le constructeur pour l’installation
d’un siège ISOFIX UNIVERSEL, de classe taille B1.
• Vérifiez que la place choisie corresponde à la classe de
taille votre siège (classe taille B1).
•
Avancez le siège passager avant pour que l’enfant ne le
heurte pas.
Consultez le mode d’emploi
du véhicule
ISEOS ISOFIX UNIVERSAL
Direction Rear seat * Group 1
facing forwards Classification B1** 9 to18 kg
* The child seat must be placed on the rear seat of the
vehicle or, exceptionally, in the front depending on the
current legislation in the country of use.
Your ISEOS car seat is ISOFIX UNIVERSAL approved.
Under the latest changes in regulations, it is suitable for all
vehicles that have the ISOFIX UNIVERSAL system built in.
** Consult the vehicle
handbook, where the
manufacturer will have
indicated the position of the
3 seat anchorage points in
the vehicle.
Upper anchoring strap for
ISOFIX (Top Tether)
Lower ISOFIX anchorage latches
WHERE SHOULD IT BE FITTED?
• Consult the vehicle handbook where you will find the positions
recommended by the manufacturer for the installation of an
ISOFIX UNIVERSAL car seat, classification B1.
• Check that the position selected corresponds to the
classification of your car seat (classification B1).
•
Move the front passenger seat forward so that the child
does not bump into it.
Consult the vehicle handbook
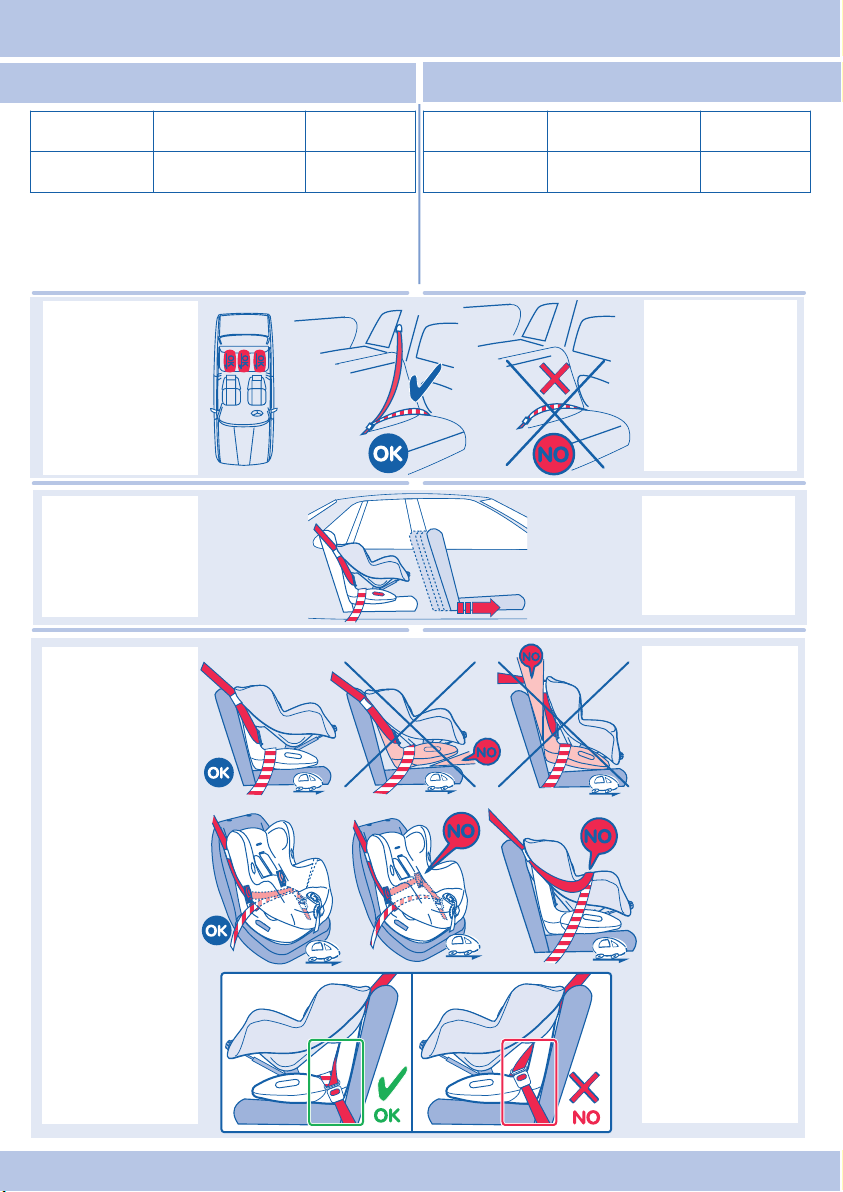
Passez la «Top
Tether» entre le haut
du dossier du siège du
véhicule et l’appui-tête.
Ne jamais passer la
Top Tether par dessus
l’appui-tête du véhicule
IMPORTANT :
assurez-vous que
l’ancrage utilisé pour la
“Top Tether” est bien
un point d’ancrage
prévu à cet effet.
Veillez à ne pas le
confondre avec un
anneau prévu pour
arrimer les bagages.
Pass the «Top Tether»
between the top of the
back of the vehicle
seat and the headrest.
Never pass the Top
Tether over the vehicle
headrest.
IMPORTANT: ensure
that the anchorage
point used for the
“Top Tether” is in
fact an anchorage
point intended for this
purpose. Check that
you do not confuse it
with a ring intended for
securing luggage.
7
FR — EN
IMPORTANT
WARNING
ISEOS AVEC CEINTURE
Sens Places Groupe 1
Face à la route Arrières * 9 à 18 kg
* Le siège doit être placé sur la banquette arrière du
véhicule ou exceptionnellement à l’avant selon la
législation en vigueur dans le pays d’utilisation.
(en France : selon les conditions énoncées dans le décret
n° 91-1321 du 27-12-1991)
Ce dispositif est
seulement utilisable sur
les véhicules approuvés
équipés de ceintures
de sécurité 3 points /
statiques / à enrouleur,
homologuées,
conformément au
règlement CEE N°16 /
ONU ou d’une norme
équivalente.
Avancez le siège
passager avant pour
que l’enfant ne le
heurte pas.
ISEOS WITH A SEAT-BELT
Direction Position Group 1
facing forwards Rear seats * 9 to18 kg
* The child seat must be placed on the rear seat of the
vehicle or exceptionally on the front seat depending on the
current legislation in the country of use.
This device should be
used only on approved
vehicles equipped
with 3 point/static/
inertia reel seat-belts
that are approved in
accordance with EEC/
UN regulation N° 16
or other equivalent
standard.
Move the front
passenger seat forward
so that the child does
not bump into it.
Vérifiez l’installation
correcte du siège.
Le passage correct
de la ceinture est
très important pour
la sécurité de votre
enfant. La ceinture du
véhicule doit être fixée
le long des marquages/
repères rouges sur le
siège Iséos Isofix Bébé
Confort.
Consulter aussi
l’étiquette située sur
le côté du siège Iséos
Isofix Bébé Confort.
N’utilisez jamais un
autre passage de
ceinture que celui
indiqué.
FR — EN
Check that the child
seat is properly
installed.
It is important for your
child’s safety that you
fit the belt correctly.
The vehicle belt must
be fixed along the red
markings/ location
points on the isofix
bebe confort iseos seat.
Please also read the
label on the side of the
isofix bebe confort iseos
seat. Never fit the belt
in any way other than
that shown.
8
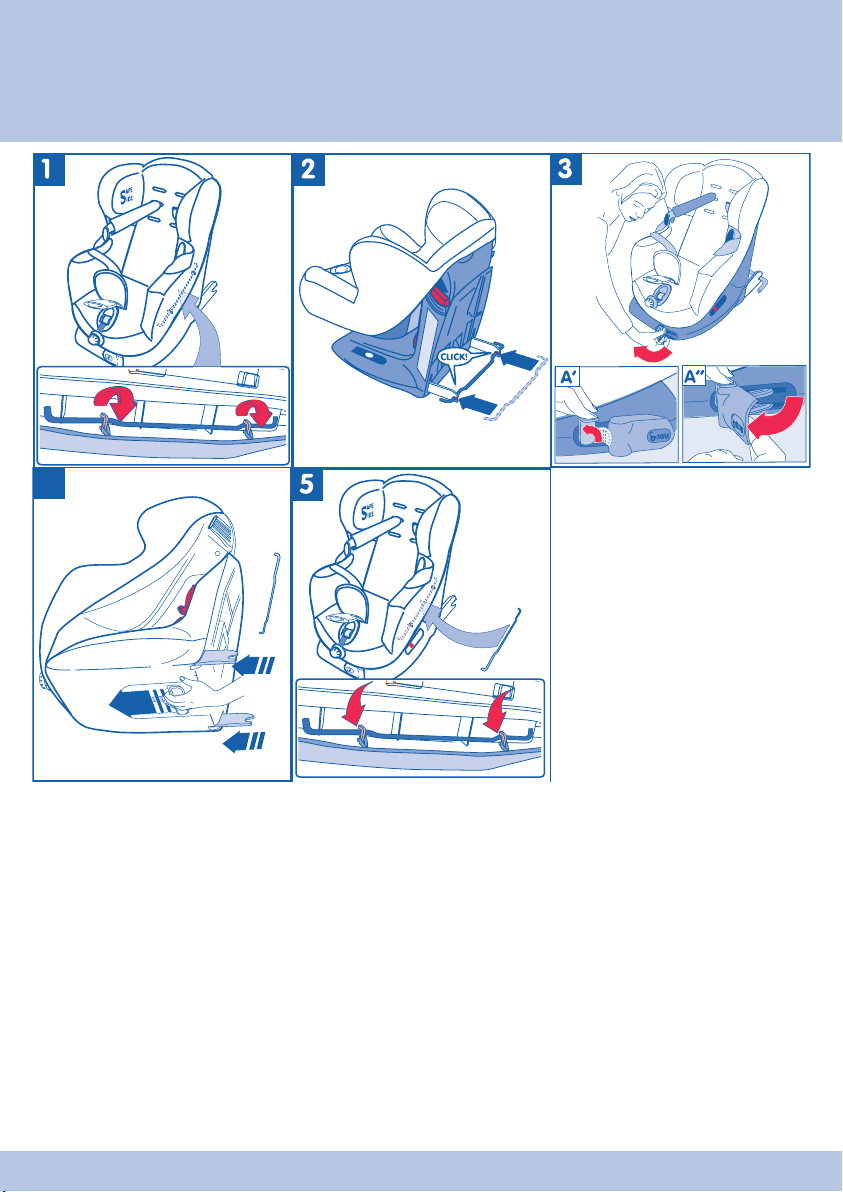
IMPORTANT : Suivez uniquement cette procédure pour ranger les pinces isofix à
l’intérieur du socle si vous les avez sorties par erreur.
IMPORTANT : Only use this procedure to return the isofix latches inside the
base if you have brought them out in error.
4
FR
1 — Décrochez l’accessoire de déverrouillage
maintenu par deux crochets sous le côté gauche
de l’assise.
2 — Clippez l’accessoire de déverrouillage sur les
pinces ISOFIX.
3 — A’ Basculez le loquet jaune vers le haut.
A» Tout en maintenant le loquet relevé, tirez sur
la manette noire jusqu’au «clic» de déverrouillage
des deux pinces.
4 — Retirez l’accessoire puis rentrez les pinces dans
le socle du siège
5 — Conservez cet accessoire rangé sous le côté de
l’assise.
.
EN
1 — Unhook the release tool held by two hooks on the
left side of the seat.
2 — Clip the release tool onto the isofix latches.
3 — A’ Slide the yellow catch upwards
A» While holding the catch in this position, pull
the black lever until you hear the click of the two
latches being released.
4 — Remove the tool and push the latches into the
base of the seat
5 — Keep this tool stored on the side of the seat.
9
.
FR — EN
PREPAREZ L’INSTALLATION ISOFIX — PREPARING TO INSTALL ISOFIX
ISOFIX ?
Consultez le mode
d’emploi du véhicule.
ISOFIX ?
Consult the vehicle
handbook
1 — Veuillez rechercher
l’emplacement des points
d’ancrages inférieurs
ISOFIX sur le manuel de
votre véhicule.
2 — Clippez les guides “pinces
ISOFIX” sur chaque points
d’ancrages inférieurs
ISOFIX du siège du
véhicule. L’utilisation des
guides est facultative.
Elle n’intervient pas sur
l’efficacité du siège
pour enfant. Les guides
permettent un accès
plus facile aux fixations
inférieures ISOFIX.
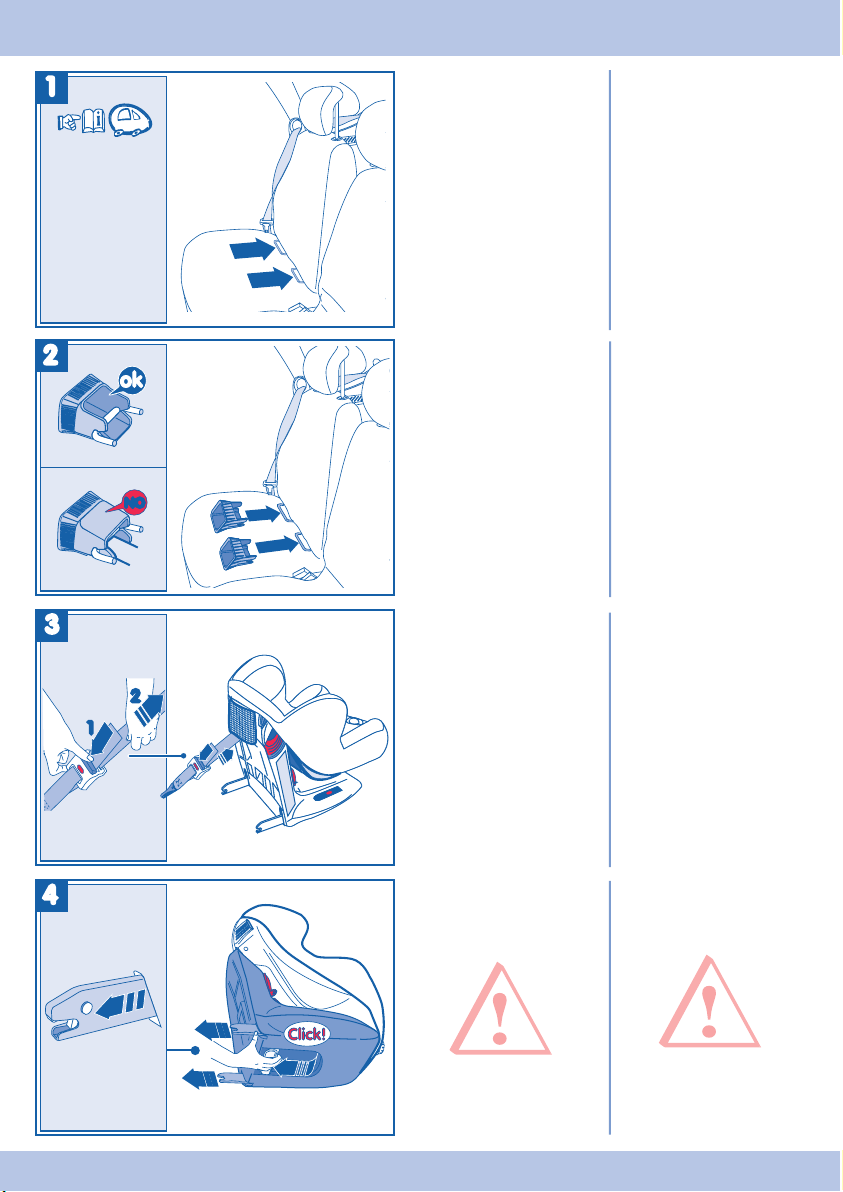
3 — Sortez la “Top Tether”
du filet. Allongez la “Top
Tether” en appuyant sur le
bouton (1) de l’ajusteur de
tension, puis (2) tirez sur
la sangle.
1 — Find the lower ISOFIX
anchorage points in your
vehicle handbook.
2- Clip the «ISOFIX latch»
guides onto each of the
ISOFIX lower anchorage
points on the vehicle
seat. Use of the guides
is optional. It makes
no difference to the
effectiveness of the child
car seat. The guides make
it easier to access the
lower ISOFIX anchorage
points.
3 — Take the “Top Tether” out
of the net. Pull out the
“Top Tether” by pressing
the button (1) of the
tension adjuster, and then
(2) pulling the belt.
FR — EN
4 — Utilisez la poignée située
sous le siège pour extraire
les pinces d’ancrages
inférieurs ISOFIX.
ATTENTION : Les pinces
ne peuvent être rentrées
qu’après clippage, puis
déclippage du siège sur
le véhicule ou à l’aide de
l’outil de déverrouillage
fourni (voir notice annexe).
10
4 — Use the handle under the
car seat to bring out the
ISOFIX lower anchorage
latches.
WARNING! The latches
can only be retracted
after the car seat has
been clipped into and
then unclipped from the
vehicle, or by using the
release tool provided (see
attached instructions).
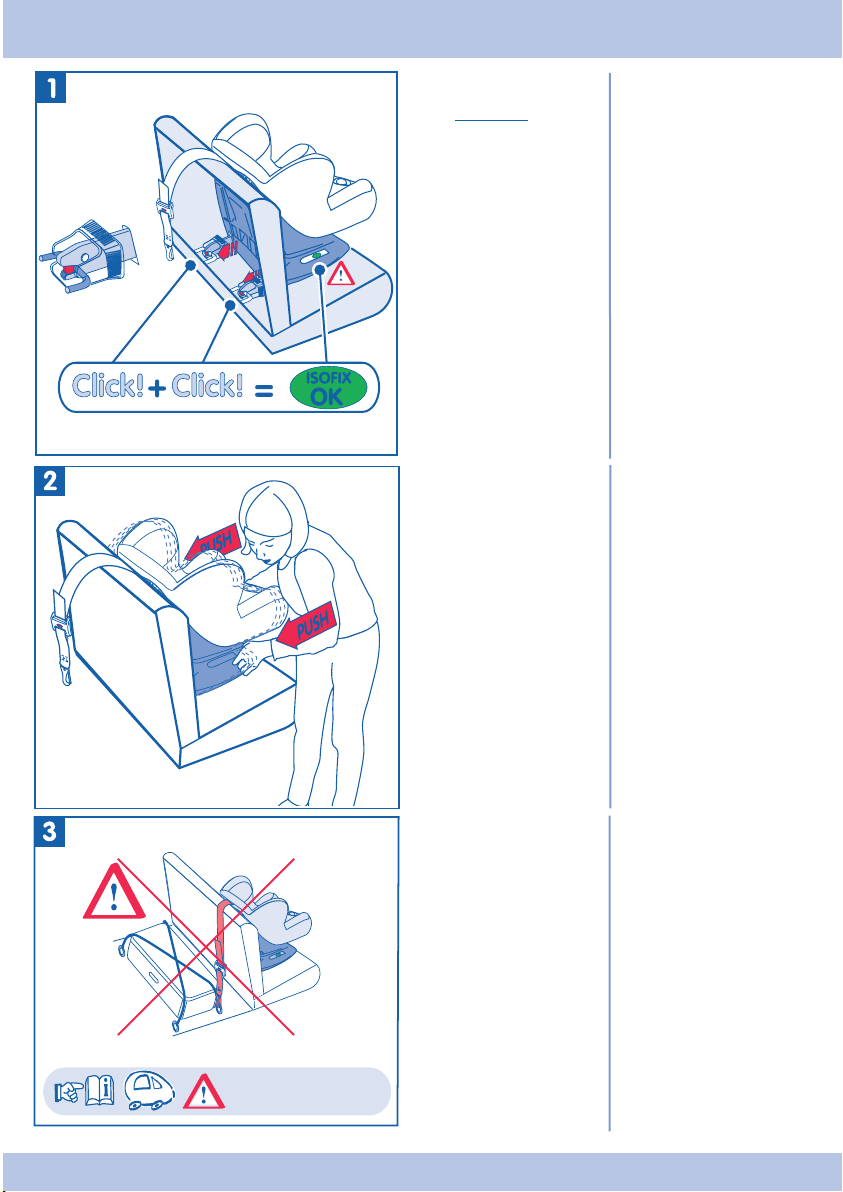
INSTALLATION ISOFIX — INSTALLING ISOFIX
Installation dans un
véhicule équipé du système
ISOFIX UNIVERSEL. Avant
l’installation tous les témoins
ISOFIX doivent être au rouge.
1 — Clippez les pinces ISOFIX
sur les deux points
d’ancrages inférieurs
ISOFIX du véhicule.
IMPORTANT : l’indicateur
ISOFIX passe au vert,
uniquement lorsque les
2 pinces ISOFIX sont
correctement verrouillées.
Installation in a vehicle
2 — Plaquez le siège-auto
ISEOS ISOFIX contre
le dossier du siège du
véhicule, en poussant sur
le socle énergiquement et
uniformément.
equipped with the ISOFIX
UNIVERSAL system. Before
installation all the ISOFIX
indicators must be showing
red.
1 — Clip the ISOFIX latches
into the two ISOFIX lower
anchorage points on the
vehicle.
IMPORTANT: the ISOFIX
indicator changes to show
green, only when the 2 ISOFIX
latches are correctly locked
in place.
2 — Press the ISEOS ISOFIX
car seat firmly against the
back of the vehicle seat,
by pushing evenly and
firmly on the base.
Je nach Fahrzeug
3 — Fixation de la «Top
Tether», selon véhicule.
Consultez le mode
d’emploi de votre véhicule,
afin de repérer le point
d’ancrage de la “Top
Tether”.
IMPORTANT : assurezvous que l’ancrage utilisé,
pour la “Top Tether” est
bien un point d’ancrage
prévu à cet effet. Veillez à
ne pas le confondre avec
un anneau prévu pour
arrimer les bagages.
11
3 — «Top tether» anchoring
point/ anchoring device
(depending on the
vehicle).
Consult your vehicle
handbook, to find the “Top
Tether” anchorage point.
IMPORTANT: ensure
that the anchorage point
used for the “Top Tether”
is in fact an anchorage
point intended for this
purpose. Check that you
do not confuse it with a
ring intended for securing
luggage.
FR — EN
INSTALLATION ISOFIX — INSTALLING ISOFIX
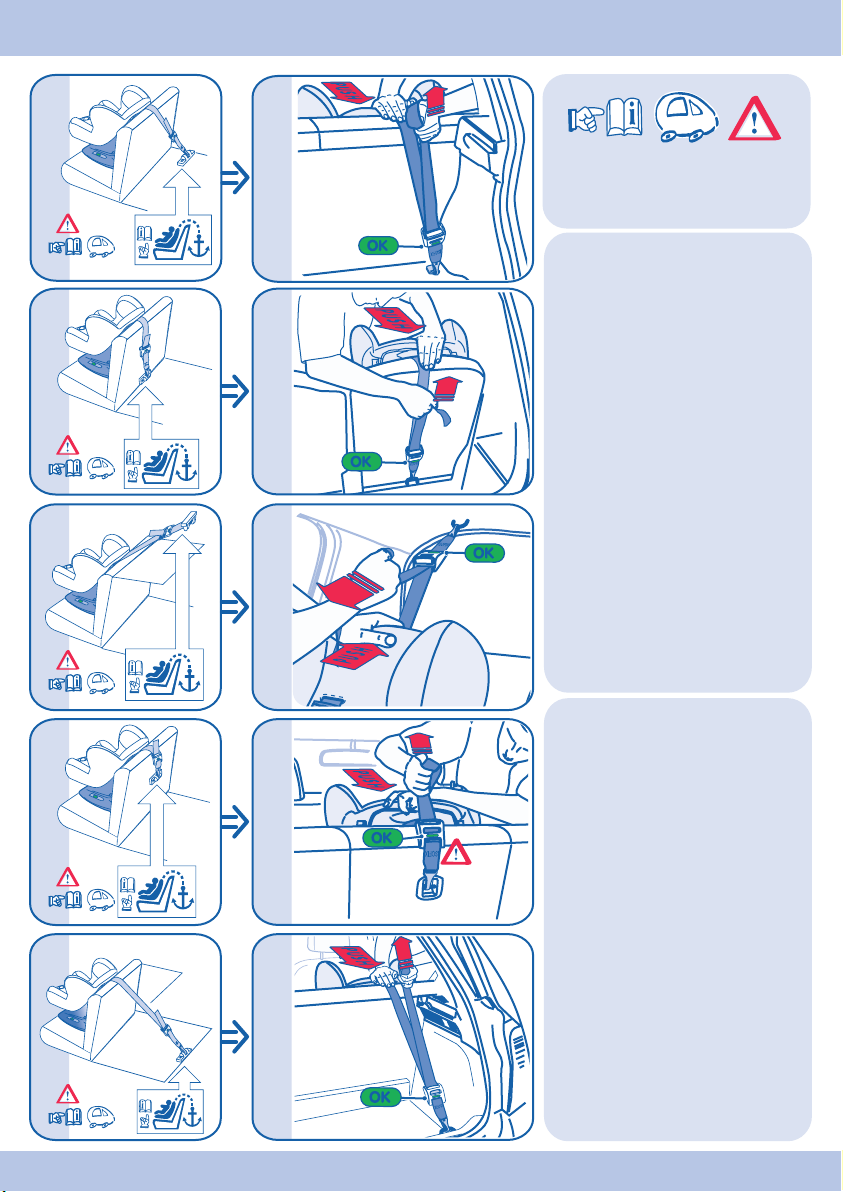
4a
4b
4c
4a
4b
4c
Selon véhicule
Depending on vehicle
4a / 4b / 4c / 4d / 4e
4 — Accrocher la sangle “Top Tether”
avec le mousqueton au point
d’ancrage prévu. Pour tendre la
sangle d’accrochage “Top Tether”
avec plus de facilité, appuyez le
haut du siège contre la banquette du
véhicule. IMPORTANT : l’indicateur
passe au vert.
ATTENTION ! veillez à ce qu’aucun
bagage ne perturbe la tension ou le
réglage de la sangle “Top Tether”.
Veuillez ranger le brin libre de la
sangle après l’installation de la
Top Tether soit dans le filet de
rangement, soit dans le coffre, mais
ne pas le laisser à la portée de
l’enfant.
ATTENTION : vous avez terminé
l’installation “ISOFIX” de votre siège
ISEOS.
• Vérifiez que les indicateurs
d’installations ISOFIX sont au vert.
• Veillez à ce que la sangle “Top
Tether” ne vrille pas.
• N’utilisez pas le siège si l’un des
témoins reste au rouge.
4d
4e
FR — EN
4d
4e
12
4 — Hook the “Top Tether” strap to the
anchorage point as shown with the
spring hook. To tighten the top
tether strap more easily pull the top
of the seat towards the vehicle seat.
IMPORTANT: the indicator changes
to show green.
IMPORTANT! Ensure that no
luggage interferes with the tension
or the adjustment of the “Top
Tether” strap. After fitting the Top
Tether please store the loose end of
the strap either in the storage net or
in the boot but not within the child’s
reach.
IMPORTANT : you have completed
the installation of “ISOFIX” for your
ISEOS car seat.
• Check that the ISOFIX installation
indicators are showing green.
•
Ensure that the “Top Tether” strap
does not become twisted.
• Do not use the seat if either of the
warning indicators remains at red.
Loading…
BEBE CONFORT ISEOS ISOFIX Car Seat PDF User Guides and Manuals for Free Download: Found (1) Manuals for BEBE CONFORT ISEOS ISOFIX Device Model (User Manual Manual)
BEBE CONFORT ISEOS ISOFIX User Manual Manual
Details:
- Manufacturer: BEBE CONFORT
- Product Name/ID: BEBE CONFORT ISEOS ISOFIX / #1811954
- Category: Car Seat
- File Path: bebe-confort/iseos-isofix_1811954.pdf
- Last Updated: 15 Apr 2025
- Description: Unlock the capabilities of your BEBE CONFORT ISEOS ISOFIX with this manual, providing a complete guide to installation, daily use, and preventive maintenance to keep your device running smoothly.
- Document Type: User Manual
- Pages: 40
Download PDF
Read Online
The BEBE CONFORT ISEOS ISOFIX car seat is a noteworthy product designed for the safety and comfort of young children during car travels. This car seat offers a perfect solution for parents who prioritize not only the security of their little ones but also ease of use and practicality.
One of the standout features of the BEBE CONFORT ISEOS ISOFIX is its innovative ISOFIX system. This design allows for a secure and stable installation into compatible vehicles, significantly reducing the risk of incorrect installation—a common concern among parents. Using ISOFIX anchors, the car seat can connect firmly to the car chassis, offering a sturdy base that reassures parents about their child’s safety.
Comfort is also a crucial aspect of the ISEOS ISOFIX. The seat is designed with soft, high-quality materials that provide a cozy environment for children during long drives. The padding is sufficiently thick, ensuring that little passengers remain comfortable, whether they are sleeping or enjoying the view outside the window. Additionally, the seat has multiple reclining positions, which can be adjusted easily to provide a better angle for relaxation.
The BEBE CONFORT ISEOS ISOFIX is suitable for children from approximately 9 months to 4 years old. This range makes it a versatile option for families, as it can grow with your child. The adjustable headrest and harness system allow the seat to accommodate your child as they grow, thus extending the usability of the product and providing excellent value for the investment.
In terms of safety, the BEBE CONFORT ISEOS ISOFIX includes various features designed to protect children in the event of a collision. These include:
- Side Impact Protection: Ensures additional safety in case of lateral collisions.
- Five-Point Harness System: Keeps your child secure and snug in their seat.
- High Safety Ratings: The product has undergone rigorous testing to meet international safety standards.
The design of the BEBE CONFORT ISEOS ISOFIX is user-friendly and modern. The aesthetics are appealing, and the chair integrates well with car interiors, providing a sleek look without compromising functionality. Maintenance is also simplified, as the seat covers are removable and washable, allowing for easy cleanup of spills and messes often associated with young children.
However, there are a few considerations to keep in mind. The BEBE CONFORT ISEOS ISOFIX may have a larger footprint compared to some other car seats, so it’s advisable to check the compatibility with your vehicle’s space before purchase. Additionally, while the price point is reflective of its features and safety measures, budget-conscious parents may find it a bit more expensive than other options on the market.
In conclusion, the BEBE CONFORT ISEOS ISOFIX car seat represents a strong combination of safety, comfort, and user-friendly features. Its ISOFIX installation provides peace of mind regarding security, while its thoughtful design caters to the needs of growing children. For parents who are looking for a reliable and stylish car seat, the BEBE CONFORT ISEOS ISOFIX stands as a solid choice worth considering.
View the manual for the Bebe Confort Iseos+ here, for free. This manual comes under the category car seats and has been rated by 1 people with an average of a 7.5. This manual is available in the following languages: English. Do you have a question about the Bebe Confort Iseos+ or do you need help?
Ask your question here
Frequently Asked Questions
Can’t find the answer to your question in the manual? You may find the answer to your question in the FAQs about the Bebe Confort Iseos+ below.
Is it safe for a baby to sleep in a car seat?
No, the baby could suffocate. If a baby falls asleep in the car seat, the baby should be removed from the car seat and placed in a cradle. Once asleep, take the baby out and put it in its own cradle as soon as possible.
What is the safest place for a car seat?
The safest place for a car seat is in the centre of the rear seat, so that there is sufficient distance from the airbags.
Does my two-year-old child need a car seat on the plane?
No, you can keep a child on your lap for up to 24 months during flights.
Is the manual of the Bebe Confort Iseos+ available in English?
Yes, the manual of the Bebe Confort Iseos+ is available in English .
Is your question not listed? Ask your question here
FAQ: Types of Manuals and Their Contents
BEBE CONFORT ISEOS ISOFIX Manuals come in various types, each serving a specific purpose to help users effectively operate and maintain their devices. Here are the common types of BEBE CONFORT ISEOS ISOFIX User Guides and the information they typically include:
- User Manuals: Provide comprehensive instructions on how to use the device, including setup, features, and operation. They often include troubleshooting tips, safety information, and maintenance guidelines.
- Service Instructions: Designed for technicians and repair professionals, these manuals offer detailed information on diagnosing and repairing issues with the device. They include schematics, parts lists, and step-by-step repair procedures.
- Installation Guides: Focus on the installation process of the device, providing detailed instructions and diagrams for proper setup. They are essential for ensuring the device is installed correctly and safely.
- Maintenance Manuals: Provide guidance on routine maintenance tasks to keep the device in optimal condition. They cover cleaning procedures, part replacements, and regular servicing tips.
- Quick Start Guides: Offer a concise overview of the essential steps needed to get the device up and running quickly. They are ideal for users who need immediate assistance with basic setup and operation.
Each type of BEBE CONFORT ISEOS ISOFIX instruction is designed to address specific needs, ensuring users have the necessary information to use, maintain, and repair their devices effectively.
Related Instructions for BEBE CONFORT ISEOS ISOFIX:
3
Beryl
User manual manual User Manual: BEBE CONFORT Beryl (FBD142, Upd.21/10/2024)
70
1424
356
5
Kore Pro
Manual #HV68D4: Kore Pro Baby & Toddler Furniture Manual
34
809
154
6
Nova
Manual BEBE CONFORT Nova Manual (Manual ), @T7JA19
56
1039
260
7
Kore Pro i-Size
Manual Kore Pro i-Size Manual — S9IB7L
34
98
16
8
CHAISE WOODLINE
Manual PDF User Manual (@O43917), BEBE CONFORT CHAISE WOODLINE Other (19th Jan 2025)
36
163
28
9
Lila Duo Kit
Manual Lila Duo Kit (Stroller ePDF Guide, #E3X7W5)
60
982
148
10
COCON EVOLUTION
User manual manual BEBE CONFORT Other User manual manual (File: bebe-confort-cocon-evolution-user-manual-manual-32, Monday 16-12-2024)
32
126
19
Car Seat Devices by Other Brands:
|
CYBEX PallaS Operation & User’s Manual Car Seat #8PG14S CYBEX Industrial Ltd. 21 Nov 2024 | 12 |
|
|
tuc tuc ZENIT BASIC GREY Instruction Manual PDF User Manual (@542935), tuc tuc ZENIT BASIC GREY Car Seat (27th Jan 2025) 1 27 Jan 2025 | 136 |
|
|
Peg-Perego Base Fissa User Manual Manual Peg-Perego Base Fissa Guide (User manual manual), @7YP93E FI000601I76 06 Apr 2025 | 68 |
|
|
Nachfolger HY5.1 TT Operation & User’s Manual #Q8VT81: HY5.1 TT Car Seat Operation & user’s manual HY5 .1TT 01 Jan 2025 | 91 |
Categories:
Baby Carrier
Thermometer
Car Seat
Other
Sling
Baby Accessories