
First remove the protective foil from the underside of the cooler.
Spread the thermal paste (17) on the surface of the CPU. The
amount supplied is sufficient for one or two applications.
Caution: The thermal paste supplied is not suitable for human
consumption. If swallowed, drink lots of water and urgently
seek medical attention. Keep it out of the reach of children.
Avoid contact with skin and eyes.
Position the cooler mounting bridge (7) centrally on the cooler.
Next place the cooler unit over the CPU. Loosen both heatpipe
caps that are found in the middle of the top side of the cooler.
Insert the Intel/AMD mounting bridge fastening screws (12)
from above into the cooler mounting bridge and then screw
these alternately tight.
You can use the cross-tip screwdriver (16) for this.
Subsequently retighten both heatpipe caps on the top side of
the cooler.
Fasten the 120mm fan (3) using fan clips (18) onto the front
side of the cooler. Slide the 135mm fan (2) between the two
heatsinks and also fasten this with fan clips (18). Connect
both fans using the the Y cable (20). Connect this to the
CPU fan connector on the motherboard.
When dismantling the fans, push the notches of the fan
clips (18) away from the fan.
Position the cooler mounting bridge (7) centrally on the cooler
(1). Next place the cooler unit over the CPU. Loosen both
heatpipe caps that are found in the middle of the topside of the
cooler (rotate as illustrated). Insert the Intel/AMD mounting
bridge fastening screws (12) from above into the cooler
mounting bridge (7) and then screw these alternately tight. You
can use the cross-tip screwdriver (16) for this.
Subsequently retighten both heatpipe caps on the top side of
the cooler.
Fasten the 120mm fan (3) using fan clips (18) onto the front
side of the cooler. Slide the 135mm fan (2) between the two
heatsinks and also fasten this with fan clips (18). Connect
both fans using the the Y cable (20). Connect this to the
CPU fan connector on the motherboard.
When dismantling the fans, push the notches of the fan
clips (18) away from the fan.
Introduction: Thank you for deciding to purchase a be quiet!
product. The following instructions will guide you through the
installation process. If you do encounter installation problems,
please don’t hesitate to contact our customer services by
mailing service@bequiet.com. Please note that be quiet!
cannot accept liability for damage caused by compatibility
problems.
Warranty:
• 3 years manufacturer guarantee for consumers (original
purchase from authorized be quiet! dealers only)
• Guarantee work can only be processed with an included
copy of the purchase receipt from an authorized be quiet!
dealer
• Manipulation and structural changes of any kind as well
as damages through external mechanical forces lead to a
complete voiding of the guarantee
• Our General Warranty Conditions apply, which can be
viewed on bequiet.com
Listan GmbH & Co.KG . Biedenkamp 3a . 21509 Glinde
Germany
For further information contact us via e-mail:
service@bequiet.com
SCOPE OF DELIVERY
General
We recommend preparatory mounting of the
cooler outside the PC case for subsequent
installation.
The following parts are needed for this:
1x Dark Rock Pro 4 CPU cooler (1), 1x 135mm fan (2), 1x 120mm
fan (3), 2x Intel mounting brackets (5), 1x cooler mounting
bridge (7), 4x Intel spacer nuts (8), 4x mounting bracket
fastening screws (11), Intel/AMD mounting bridge fastening
screws (12), 1x cross-tip screwdriver (16), 1x thermal paste
(17), 4x fan clips (18), 1x Y cable (20)
Assembly of the cooler mounting frame
First screw the Intel spacer nuts (8) onto the threads of the
socket frame. Place the Intel mounting brackets (5) over the
Intel spacer nuts and screw these tight with the mounting
bracket fastening screws (11). You can use the cross-tip
screwdriver (16) for this.
First remove the protective foil from the underside of the cooler.
Spread the thermal paste (17) on the surface of the CPU. The
amount supplied is sufficient for one or two applications.
Caution: The thermal paste supplied is not suitable for
human consumption. If swallowed, drink lots of water and
urgently seek medical attention. Keep it out of the reach of
children. Avoid contact with skin and eyes.
Installation video
1366, 2011(-3) square ILM, 2066
1150, 1151, 1155, 1156
General
We recommend preparatory mounting of the
cooler outside the PC case for subsequent
installation.
The following parts are needed for this:
1x Dark Rock Pro 4 CPU cooler (1), 1x 135mm fan (2), 1x 120mm
fan (3), 1x Intel backplate (4), 2x Intel mounting brackets (5),
1x cooler mounting bridge (7), 4x Intel 115X/1366 nuts (9), 4x
mounting bracket fastening screws (11), 2x Intel/AMD mounting
bridge fastening screws (12), 4x Intel backplate screws (13), 4x
O-rings (15), 1x cross-tip screwdriver (16), 1x thermal paste (17),
4x fan clips (18), 1x Y cable (20)
Mounting the backplate
Position the Intel backplate screws (13) in the notches situated
on the rear side of the Intel backplate (4). Pay attention in so
doing to align with the holes specially drilled for each socket.
For fixing the backplate screws onto the Intel backplate use
the O-rings (15). Once assembly of the Intel backplate for the
respective Intel socket is complete, position it under the
motherboard. In so doing make sure that the Intel backplate
screws (13) are precisely positioned inside the motherboard
holes.
Assembly of the cooler mounting frame
Screw the Intel 115X/1366 nuts (9) onto the previously
positioned Intel backplate (4). Then position the Intel mounting
brackets (5) over the Intel 115X/1366 nuts and affix these with
the mounting bracket fastening screws (11). You can use the
cross-tip screwdriver for this (16).
1366, 2011(-3) square ILM, 2066
1150, 1151, 1155, 1156
Intel LGA 2011(-3) square ILM / LGA 2066
Intel LGA 1150 / 1151 / 1155 / 1156 / 1366
We recommend removal of the cooler prior to transportation.
January 2018
!
Part name Quantity
be quiet! Dark Rock Pro 4 cooler 1
135mm fan 1
120mm fan 1
Intel backplate 1
Intel mounting brackets 2
Short AMD mounting brackets 2
Cooler mounting bridge 1
Intel spacer nuts 4
Intel 115X/1366 nuts 4
Part name Quantity
AMD spacer nuts 4
Mounting bracket fastening
screws
4
Intel/AMD mounting bridge
fastening screws
2
Intel backplate screws 4
AMD backplate screws 4
O-rings 4
Cross-tip screwdriver 1
Thermal paste 1
Fan clips 2
AM3 washers 4
Y cable 1
2
3
4
5
6
7
8
9
10
11
12
13
14
15
16
17
18
19
20
Installation video
1366
1150, 1151,
1155, 1156
First remove the protective foil from the underside of the cooler.
Spread the thermal paste (17) on the surface of the CPU. The
amount supplied is sufficient for one or two applications.
Caution: The thermal paste supplied is not suitable for human
consumption. If swallowed, drink lots of water and urgently
seek medical attention. Keep it out of the reach of children.
Avoid contact with skin and eyes.
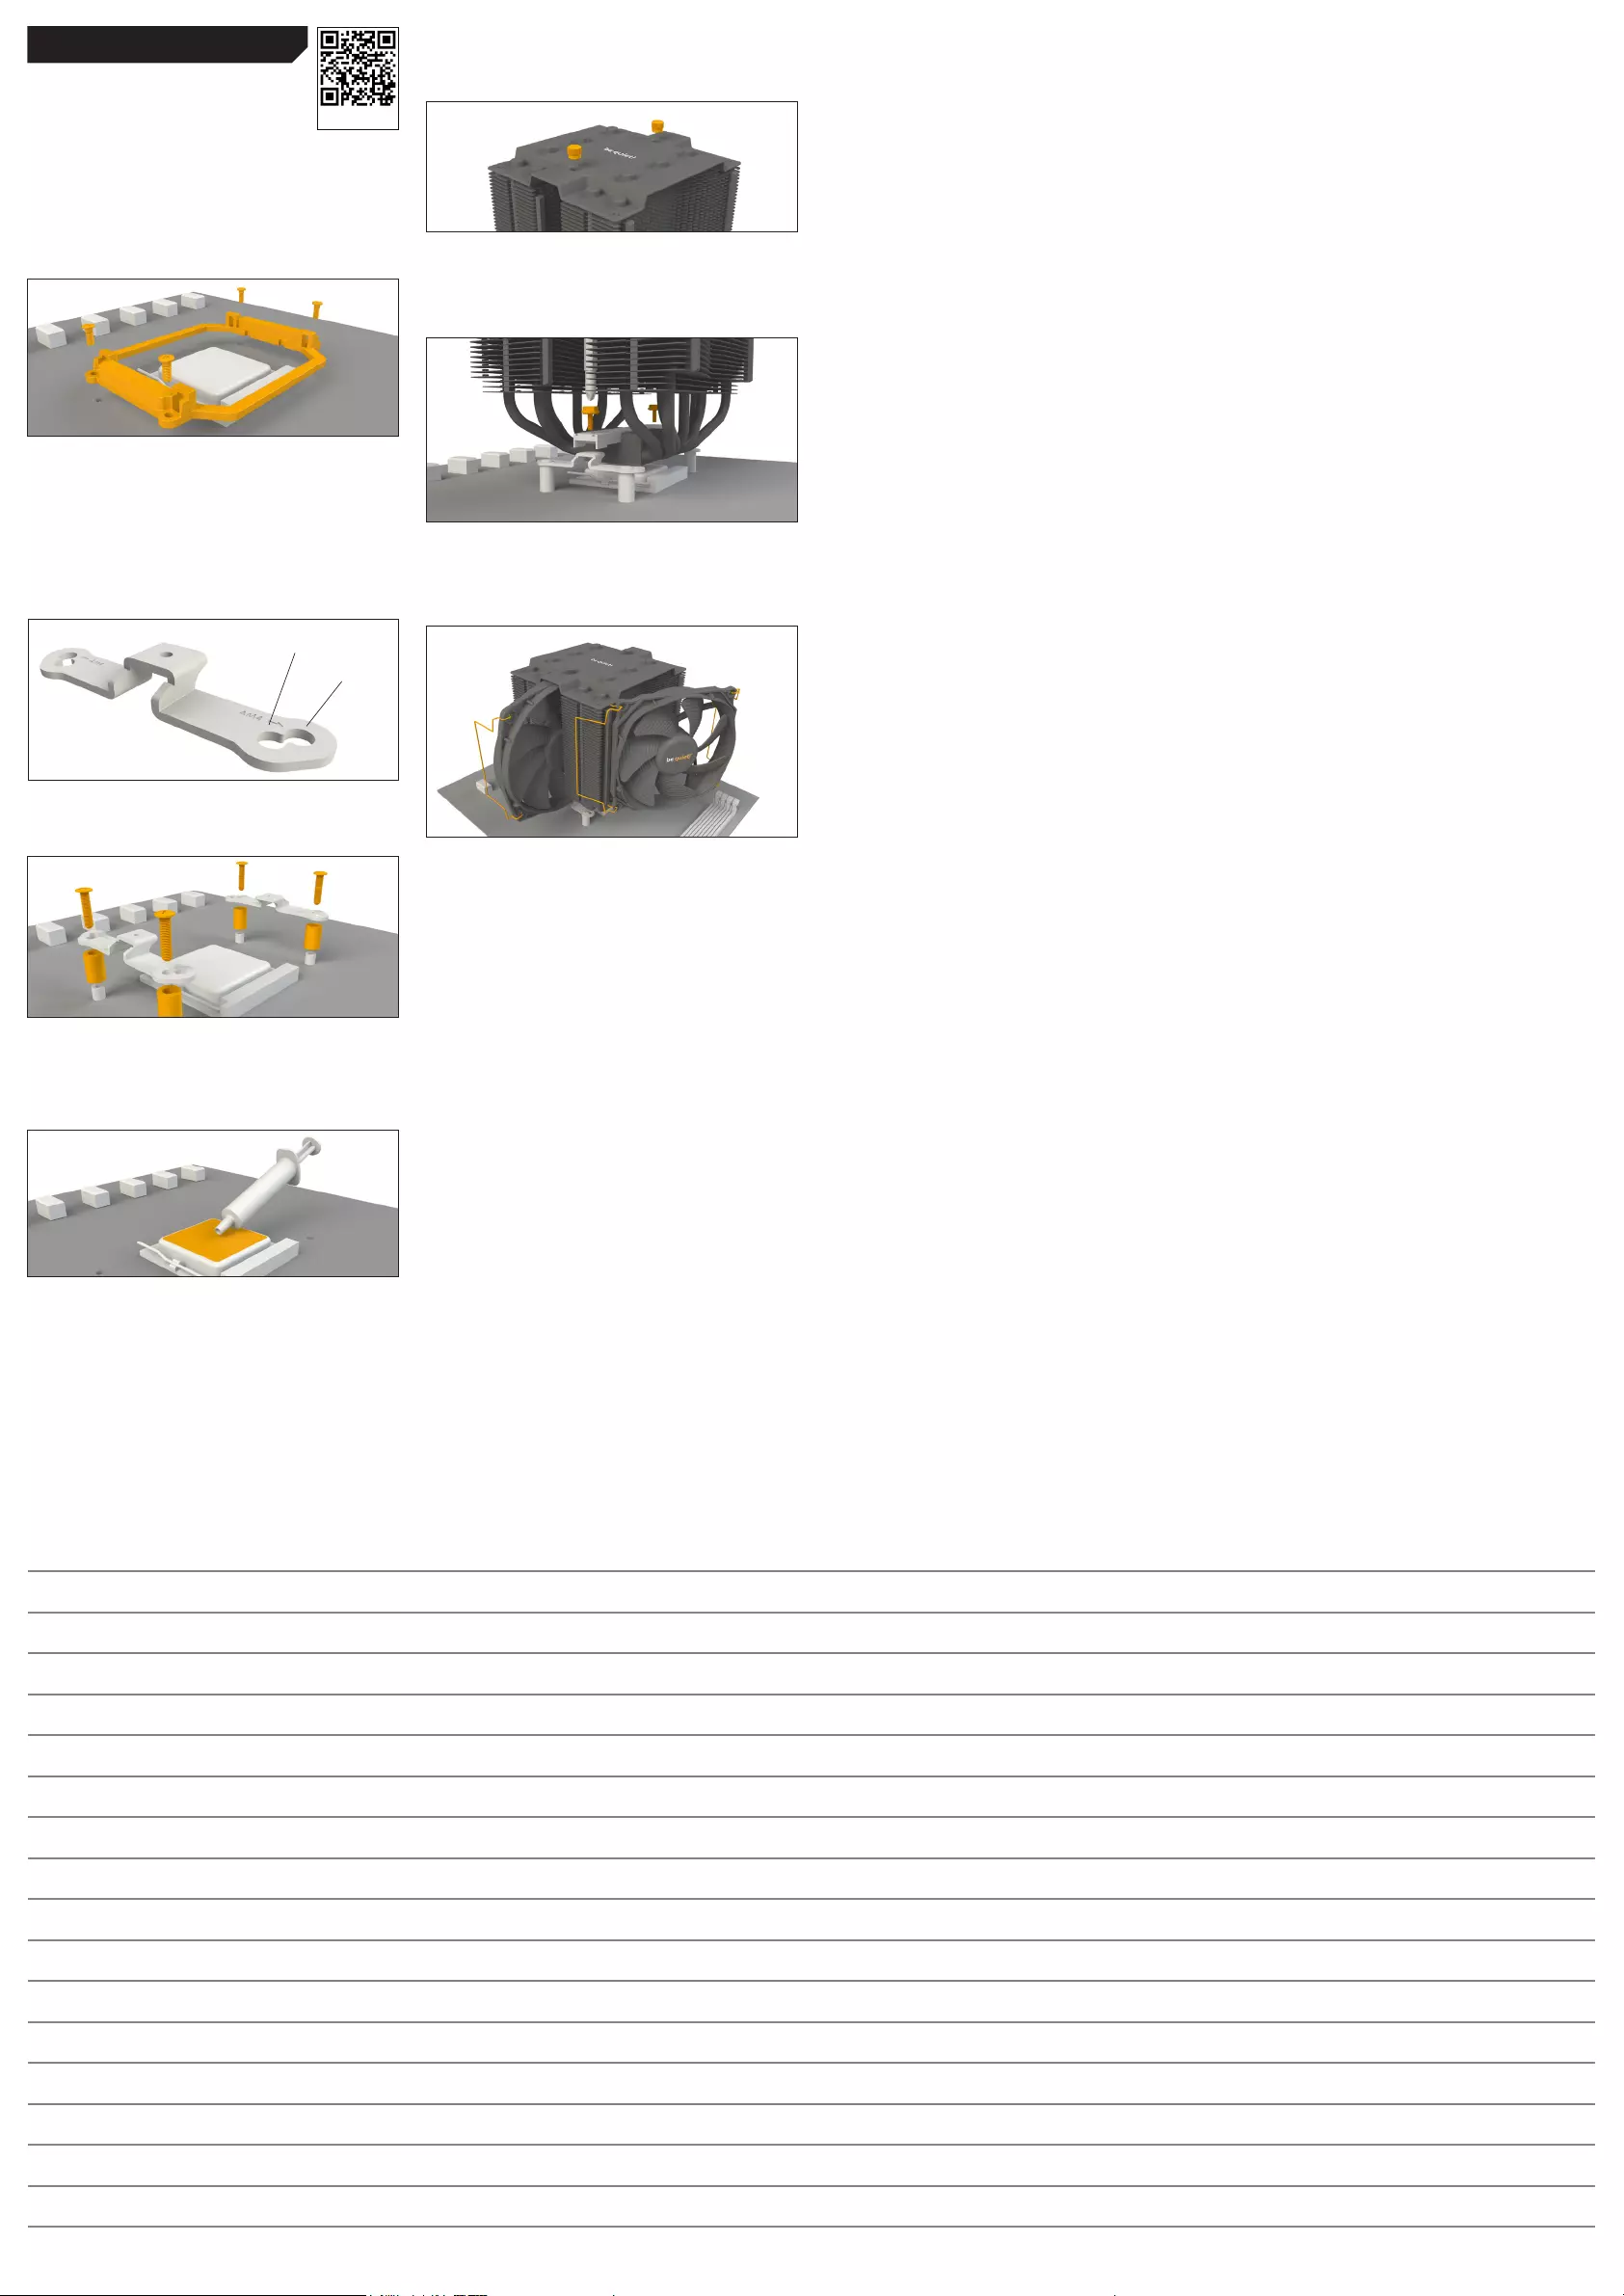
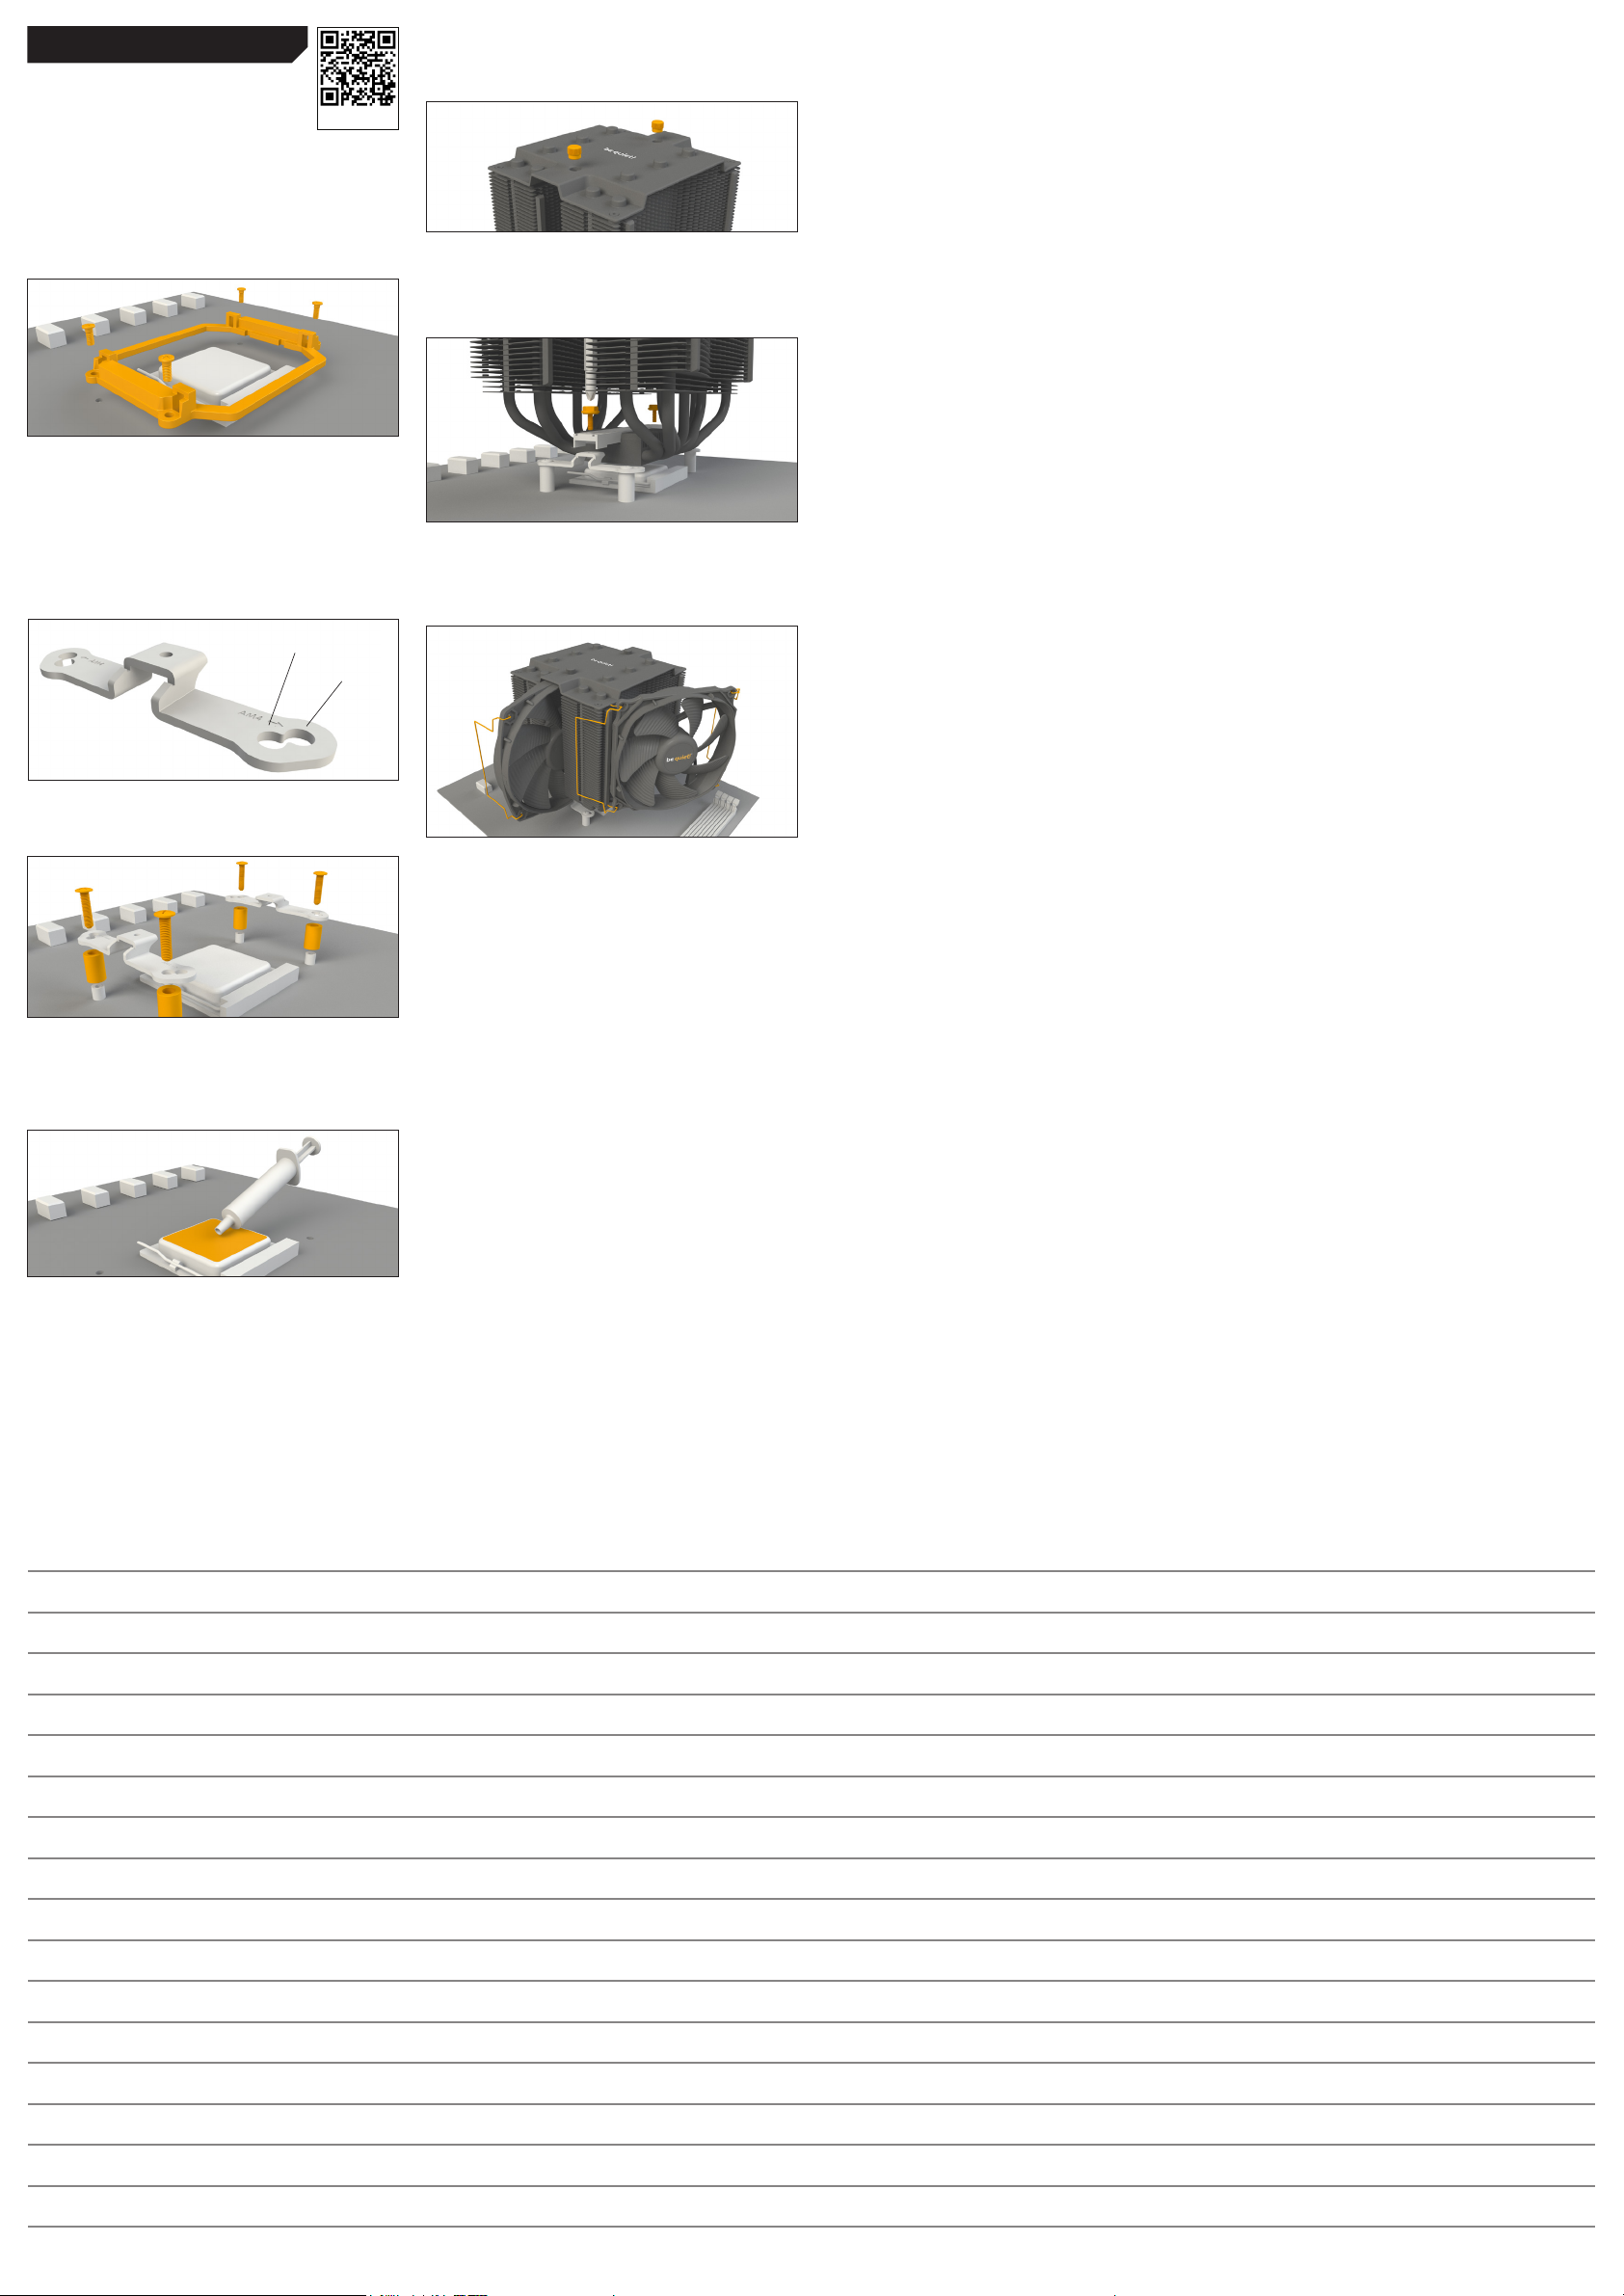
Position the cooler mounting bridge (7) centrally on the cooler.
Next place the cooler unit over the CPU. Loosen both heatpipe
caps that are found in the middle of the top side of the cooler.
Insert the Intel/AMD mounting bridge fastening screws (12)
from above into the cooler mounting bridge and then screw
these alternately tight.
You can use the cross-tip screwdriver (16) for this.
Subsequently retighten both heatpipe caps on the top side of
the cooler.
Fasten the 120mm fan (3) using fan clips (18) onto the front
side of the cooler. Slide the 135mm fan (2) between the two
heatsinks and also fasten this with fan clips (18). Connect
both fans using the the Y cable (20). Connect this to the
CPU fan connector on the motherboard.
When dismantling the fans, push the notches of the fan
clips (18) away from the fan.
Position the cooler mounting bridge (7) centrally on the cooler
(1). Next place the cooler unit over the CPU. Loosen both
heatpipe caps that are found in the middle of the topside of the
cooler (rotate as illustrated). Insert the Intel/AMD mounting
bridge fastening screws (12) from above into the cooler
mounting bridge (7) and then screw these alternately tight. You
can use the cross-tip screwdriver (16) for this.
Subsequently retighten both heatpipe caps on the top side of
the cooler.
Fasten the 120mm fan (3) using fan clips (18) onto the front
side of the cooler. Slide the 135mm fan (2) between the two
heatsinks and also fasten this with fan clips (18). Connect
both fans using the the Y cable (20). Connect this to the
CPU fan connector on the motherboard.
When dismantling the fans, push the notches of the fan
clips (18) away from the fan.
Introduction: Thank you for deciding to purchase a be quiet!
product. The following instructions will guide you through the
installation process. If you do encounter installation problems,
please don’t hesitate to contact our customer services by
mailing service@bequiet.com. Please note that be quiet!
cannot accept liability for damage caused by compatibility
problems.
Warranty:
• 3 years manufacturer guarantee for consumers (original
purchase from authorized be quiet! dealers only)
• Guarantee work can only be processed with an included
copy of the purchase receipt from an authorized be quiet!
dealer
• Manipulation and structural changes of any kind as well
as damages through external mechanical forces lead to a
complete voiding of the guarantee
• Our General Warranty Conditions apply, which can be
viewed on bequiet.com
Listan GmbH & Co.KG . Biedenkamp 3a . 21509 Glinde
Germany
For further information contact us via e-mail:
service@bequiet.com
SCOPE OF DELIVERY
General
We recommend preparatory mounting of the
cooler outside the PC case for subsequent
installation.
The following parts are needed for this:
1x Dark Rock Pro 4 CPU cooler (1), 1x 135mm fan (2), 1x 120mm
fan (3), 2x Intel mounting brackets (5), 1x cooler mounting
bridge (7), 4x Intel spacer nuts (8), 4x mounting bracket
fastening screws (11), Intel/AMD mounting bridge fastening
screws (12), 1x cross-tip screwdriver (16), 1x thermal paste
(17), 4x fan clips (18), 1x Y cable (20)
Assembly of the cooler mounting frame
First screw the Intel spacer nuts (8) onto the threads of the
socket frame. Place the Intel mounting brackets (5) over the
Intel spacer nuts and screw these tight with the mounting
bracket fastening screws (11). You can use the cross-tip
screwdriver (16) for this.
First remove the protective foil from the underside of the cooler.
Spread the thermal paste (17) on the surface of the CPU. The
amount supplied is sufficient for one or two applications.
Caution: The thermal paste supplied is not suitable for
human consumption. If swallowed, drink lots of water and
urgently seek medical attention. Keep it out of the reach of
children. Avoid contact with skin and eyes.
Installation video
1366, 2011(-3) square ILM, 2066
1150, 1151, 1155, 1156
General
We recommend preparatory mounting of the
cooler outside the PC case for subsequent
installation.
The following parts are needed for this:
1x Dark Rock Pro 4 CPU cooler (1), 1x 135mm fan (2), 1x 120mm
fan (3), 1x Intel backplate (4), 2x Intel mounting brackets (5),
1x cooler mounting bridge (7), 4x Intel 115X/1366 nuts (9), 4x
mounting bracket fastening screws (11), 2x Intel/AMD mounting
bridge fastening screws (12), 4x Intel backplate screws (13), 4x
O-rings (15), 1x cross-tip screwdriver (16), 1x thermal paste (17),
4x fan clips (18), 1x Y cable (20)
Mounting the backplate
Position the Intel backplate screws (13) in the notches situated
on the rear side of the Intel backplate (4). Pay attention in so
doing to align with the holes specially drilled for each socket.
For fixing the backplate screws onto the Intel backplate use
the O-rings (15). Once assembly of the Intel backplate for the
respective Intel socket is complete, position it under the
motherboard. In so doing make sure that the Intel backplate
screws (13) are precisely positioned inside the motherboard
holes.
Assembly of the cooler mounting frame
Screw the Intel 115X/1366 nuts (9) onto the previously
positioned Intel backplate (4). Then position the Intel mounting
brackets (5) over the Intel 115X/1366 nuts and affix these with
the mounting bracket fastening screws (11). You can use the
cross-tip screwdriver for this (16).
1366, 2011(-3) square ILM, 2066
1150, 1151, 1155, 1156
Intel LGA 2011(-3) square ILM / LGA 2066 Intel LGA 1150 / 1151 / 1155 / 1156 / 1366
We recommend removal of the cooler prior to transportation.
January 2018
!
Part name Quantity
be quiet! Dark Rock Pro 4 cooler 1
135mm fan 1
120mm fan 1
Intel backplate 1
Intel mounting brackets 2
Short AMD mounting brackets 2
Cooler mounting bridge 1
Intel spacer nuts 4
Intel 115X/1366 nuts 4
Part name Quantity
AMD spacer nuts 4
Mounting bracket fastening
screws 4
Intel/AMD mounting bridge
fastening screws 2
Intel backplate screws 4
AMD backplate screws 4
O-rings 4
Cross-tip screwdriver 1
Thermal paste 1
Fan clips 2
AM3 washers 4
Y cable 1
2
3
4
5
6
7
8
9
10
11
12
13
14
15
16
17
18
19
20
Installation video
1366
1150, 1151,
1155, 1156
Position the cooler mounting bridge (7) centrally on the cooler.
Next place the cooler unit onto the CPU. Loosen both heatpipe
caps that are found in the middle of the topside of the cooler
(rotate as illustrated).
Insert the Intel/AMD mounting bridge fastening screws (12)
from above into the cooler mounting bridge and then screw
these alternately tight. You can use the cross-tip screwdriver
(16) for this. Subsequently retighten both heatpipe caps on the
topside of the cooler.
Fasten the 120mm fan (3) using fan clips (18) onto the front
side of the cooler. Slide the 135mm fan (2) between the two
heatsinks and also fasten this with fan clips (18). Connect
both fans using the Y cable (20). Connect this to the CPU
fan connector on the motherboard.
When dismantling the fans, push the notches of the fan clips
(18) away from the fan.
General
We recommend preparatory mounting of the
cooler outside the PC case for subsequent
installation.
The following parts are needed for this:
1x Dark Rock Pro 4 CPU cooler (1), 1x 135mm fan (2), 1x 120mm
fan (3), 2x short AMD mounting brackets (6), 1x cooler mounting
bridge (7), 4x AMD spacer nuts (10), 2x Intel/AMD mounting
bridge fastening screws (12), 4x AMD backplate screws (14), 1x
cross-tip screwdriver (16), 1x thermal paste (17), 4x fan clips (18),
4x AM3 washers (19), Y cable (20)
Assembly of the cooler mounting frame
To permit mounting of the cooler please remove both the
plastic retainers of the AMD retention module. The factory-
fitted backplate affixed to the rear side of the motherboard will
be needed for subsequent installation of the cooler.
Note: To mount the Dark Rock Pro 4 on an AM3 motherboard,
please use the AM3 washers (19), placing these over the
backplate bolts protruding through the front side of the
motherboard.
Place the 4x AMD spacer nuts (10) onto the backplate bolts
protruding through the front side and affix both short AMD
mounting brackets (6) with the AMD backplate screws (14).
Mounting the CPU cooler:
First remove the protective foil from the underside of the
cooler. Spread the thermal paste (17) on the surface of the
CPU. The amount supplied is sufficient for one or two
applications.
Caution: The thermal paste supplied is not suitable for human
consumption. If swallowed, drink lots of water and urgently
seek medical attention. Keep it out of the reach of children.
Avoid contact with skin and eyes.
AMD AM2(+) / AM3(+) / AM4 / FM1 / FM2(+)
AM4
AM2(+) / AM3(+) / FM1 / FM2(+)
Notes
bequiet.com
Installation video
Limited Warranty
Per the terms and conditions of this limited warranty as given below,
be quiet! warrants its new products to be free of defects resulting
from faulty materials and faulty manufacturing for the length of the
warranty period.
I. APPLICABILITY
This non-transferable warranty is applicable to newly purchased,
previously unopened be quiet! products and is enforceable by only
the original consumer purchaser. Proof of purchase is required for
warranty service, so should be retained. be quiet! does not provide
warranty registration services.
II. WARRANTY PERIOD
For eligible products, parts and labor are warranted for the appli-
cable warranty period from the date of purchase. The applicable
warranty period varies by product model, and is identied in your
user documentation, on the product package, or as listed below.
Should any of these warranty periods dier, the longest specied
warranty period will apply. Replaced products will be warranted
for the remainder of the original warranty period or thirty days,
whichever is longer.
III. EXCLUSIONS
The following are not covered by the warranty:
1. Normal wear and tear.
2. Any product which has been modied without permission from
be quiet!, or on which the serial number or warranty sticker has been
defaced, modied, or removed.
3. Damage, deterioration or malfunction resulting from:
Accident, abuse, misuse or improper use, neglect, connection to
an improper voltage source, unauthorized product modication, or
failure to follow instructions included with the product.
Fire, water, lightning, or other acts of nature.
Repair or attempted repair by anyone not authorized by be quiet!.
Shipping or transport damage (claims must be made with the carrier).
Any other cause which does not relate to a defect in materials or
manufacturing workmanship.
4. Cartons, cases, batteries, cabinets, tapes, accessories or other
consumables used with this product.
5. be quiet!, Inc. does not warrant that this product will meet your
requirements. It is your responsibility to determine the suitability of
this product for your purpose.
6. Removal or installation charges.
7. Shipping charges.
8. Any incidental charges.
IV. EXCLUSION OF DAMAGES
be quiet!‘s sole obligation and liability under this warranty is limited
to the repair or replacement of a defective product at its option.
be quiet! shall not, in any event, be liable for any special, incidental,
indirect, or consequential damages whatsoever, including but not
limited to loss of prots, revenue, or data (whether direct or indirect),
damages resulting from interruption of service and loss of business,
or for liability in tort relating to this product or resulting from its use
or possession, even if be quiet! has been advised previously of the
possibility of such damages.
V. LIMITATIONS OF IMPLIED WARRANTIES
There are no other warranties, expressed or implied, including but not
limited to those of merchantability or tness for a particular purpose.
The duration of implied warranties is limited to the warranty length
specied in Paragraph II.50
VI. LOCAL LAW AND YOUR WARRANTY
This warranty gives you specic legal rights. You may also have other
rights granted under local law. These rights may vary.
VII. NO OTHER WARRANTY
No be quiet! employee, dealer, or other agent is authorized to make
any modication, extension, or addition to this warranty.
VIII. TO OBTAIN TECHNICAL SUPPORT OR WARRANTY SERVICE
Please see your product owner’s manual or visit the Online Support
section at www.bequiet.com for details and contact information. You
will need to provide proof of purchase for warranty service.
bequiet.com
Introduction: Thank you for deciding to purchase a be quiet!
product. The following instructions will guide you through the
installation process. If you do encounter installation problems,
please don’t hesitate to contact our customer services by
mailing service@bequiet.com. Please note that be quiet!
cannot accept liability for damage caused by compatibility
problems.
Warranty:
• 3 years manufacturer guarantee for consumers (original
purchase from authorized be quiet! dealers only)
• Guarantee work can only be processed with an included
copy of the purchase receipt from an authorized be quiet!
dealer
• Manipulation and structural changes of any kind as well
as damages through external mechanical forces lead to a
complete voiding of the guarantee
• Our General Warranty Conditions apply, which can be
viewed on bequiet.com
Listan GmbH & Co.KG . Biedenkamp 3a . 21509 Glinde
Germany
For further information contact us via e-mail:
service@bequiet.com
SCOPE OF DELIVERY
We recommend removal of the cooler prior to transportation.
!
January 2018
Part name Quantity
10
Part name Quantity
AMD spacer nuts 4
be quiet! Dark Rock Pro 4 cooler 1
11
2
135mm fan 1
3
12
13
120mm fan 1
4
14
Mounting bracket fastening
screws
Intel/AMD mounting bridge
fastening screws
Intel backplate screws 4
AMD backplate screws 4
4
2
Intel backplate 1
15
5
Intel mounting brackets 2
6
Short AMD mounting brackets 2
7
16
17
18
Cooler mounting bridge 1
8
19
Intel spacer nuts 4
O-rings 4
Cross-tip screwdriver 1
Thermal paste 1
Fan clips 2
AM3 washers 4
Intel LGA 2011(-3) square ILM / LGA 2066
General
We recommend preparatory mounting of the
cooler outside the PC case for subsequent
Installation video
installation.
The following parts are needed for this:
1x Dark Rock Pro 4 CPU cooler (1), 1x 135mm fan (2), 1x 120mm
fan (3), 2x Intel mounting brackets (5), 1x cooler mounting
bridge (7), 4x Intel spacer nuts (8), 4x mounting bracket
fastening screws (11), Intel/AMD mounting bridge fastening
screws (12), 1x cross-tip screwdriver (16), 1x thermal paste
(17), 4x fan clips (18), 1x Y cable (20)
1366, 2011(-3) square ILM, 2066
1150, 1151, 1155, 1156
Assembly of the cooler mounting frame
First screw the Intel spacer nuts (8) onto the threads of the
socket frame. Place the Intel mounting brackets (5) over the
Intel spacer nuts and screw these tight with the mounting
bracket fastening screws (11). You can use the cross-tip
screwdriver (16) for this.
Position the cooler mounting bridge (7) centrally on the cooler
(1). Next place the cooler unit over the CPU. Loosen both
heatpipe caps that are found in the middle of the topside of the
cooler (rotate as illustrated). Insert the Intel/AMD mounting
bridge fastening screws (12) from above into the cooler
mounting bridge (7) and then screw these alternately tight. You
can use the cross-tip screwdriver (16) for this.
Subsequently retighten both heatpipe caps on the top side of
the cooler.
Fasten the 120mm fan (3) using fan clips (18) onto the front
side of the cooler. Slide the 135mm fan (2) between the two
heatsinks and also fasten this with fan clips (18). Connect
both fans using the the Y cable (20). Connect this to the
CPU fan connector on the motherboard.
9
Intel LGA 1150 / 1151 / 1155 / 1156 / 1366
Intel 115X/1366 nuts 4
General
We recommend preparatory mounting of the
cooler outside the PC case for subsequent
Installation video
installation.
The following parts are needed for this:
1x Dark Rock Pro 4 CPU cooler (1), 1x 135mm fan (2), 1x 120mm
fan (3), 1x Intel backplate (4), 2x Intel mounting brackets (5),
1x cooler mounting bridge (7), 4x Intel 115X/1366 nuts (9), 4x
mounting bracket fastening screws (11), 2x Intel/AMD mounting
bridge fastening screws (12), 4x Intel backplate screws (13), 4x
O-rings (15), 1x cross-tip screwdriver (16), 1x thermal paste (17),
4x fan clips (18), 1x Y cable (20)
Mounting the backplate
Position the Intel backplate screws (13) in the notches situated
on the rear side of the Intel backplate (4). Pay attention in so
doing to align with the holes specially drilled for each socket.
1150, 1151,
1155, 1156
1366
For fixing the backplate screws onto the Intel backplate use
the O-rings (15). Once assembly of the Intel backplate for the
respective Intel socket is complete, position it under the
motherboard. In so doing make sure that the Intel backplate
screws (13) are precisely positioned inside the motherboard
holes.
20
Y cable 1
First remove the protective foil from the underside of the cooler.
Spread the thermal paste (17) on the surface of the CPU. The
amount supplied is sufficient for one or two applications.
Caution: The thermal paste supplied is not suitable for human
consumption. If swallowed, drink lots of water and urgently
seek medical attention. Keep it out of the reach of children.
Avoid contact with skin and eyes.
Position the cooler mounting bridge (7) centrally on the cooler.
Next place the cooler unit over the CPU. Loosen both heatpipe
caps that are found in the middle of the top side of the cooler.
Insert the Intel/AMD mounting bridge fastening screws (12)
from above into the cooler mounting bridge and then screw
these alternately tight.
You can use the cross-tip screwdriver (16) for this.
Subsequently retighten both heatpipe caps on the top side of
the cooler.
First remove the protective foil from the underside of the cooler.
Spread the thermal paste (17) on the surface of the CPU. The
amount supplied is sufficient for one or two applications.
Caution: The thermal paste supplied is not suitable for
human consumption. If swallowed, drink lots of water and
urgently seek medical attention. Keep it out of the reach of
children. Avoid contact with skin and eyes.
When dismantling the fans, push the notches of the fan
clips (18) away from the fan.
1366, 2011(-3) square ILM, 2066
1150, 1151, 1155, 1156
Assembly of the cooler mounting frame
Screw the Intel 115X/1366 nuts (9) onto the previously
positioned Intel backplate (4). Then position the Intel mounting
brackets (5) over the Intel 115X/1366 nuts and affix these with
the mounting bracket fastening screws (11). You can use the
cross-tip screwdriver for this (16).
Fasten the 120mm fan (3) using fan clips (18) onto the front
side of the cooler. Slide the 135mm fan (2) between the two
heatsinks and also fasten this with fan clips (18). Connect
both fans using the the Y cable (20). Connect this to the
CPU fan connector on the motherboard.
When dismantling the fans, push the notches of the fan
clips (18) away from the fan.
AMD AM2(+) / AM3(+) / AM4 / FM1 / FM2(+)
General
We recommend preparatory mounting of the
cooler outside the PC case for subsequent
installation.
The following parts are needed for this:
1x Dark Rock Pro 4 CPU cooler (1), 1x 135mm fan (2), 1x 120mm
fan (3), 2x short AMD mounting brackets (6), 1x cooler mounting
bridge (7), 4x AMD spacer nuts (10), 2x Intel/AMD mounting
bridge fastening screws (12), 4x AMD backplate screws (14), 1x
cross-tip screwdriver (16), 1x thermal paste (17), 4x fan clips (18),
4x AM3 washers (19), Y cable (20)
Installation video
Position the cooler mounting bridge (7) centrally on the cooler.
Next place the cooler unit onto the CPU. Loosen both heatpipe
caps that are found in the middle of the topside of the cooler
(rotate as illustrated).
Insert the Intel/AMD mounting bridge fastening screws (12)
from above into the cooler mounting bridge and then screw
these alternately tight. You can use the cross-tip screwdriver
(16) for this. Subsequently retighten both heatpipe caps on the
topside of the cooler.
Limited Warranty
Per the terms and conditions of this limited warranty as given below,
be quiet! warrants its new products to be free of defects resulting
from faulty materials and faulty manufacturing for the length of the
warranty period.
I. APPLICABILITY
This non-transferable warranty is applicable to newly purchased,
previously unopened be quiet! products and is enforceable by only
the original consumer purchaser. Proof of purchase is required for
warranty service, so should be retained. be quiet! does not provide
warranty registration services.
II. WARRANTY PERIOD
For eligible products, parts and labor are warranted for the applicable warranty period from the date of purchase. The applicable
warranty period varies by product model, and is identied in your
user documentation, on the product package, or as listed below.
Should any of these warranty periods dier, the longest specied
warranty period will apply. Replaced products will be warranted
for the remainder of the original warranty period or thirty days,
whichever is longer.
Assembly of the cooler mounting frame
To permit mounting of the cooler please remove both the
plastic retainers of the AMD retention module. The factoryfitted backplate affixed to the rear side of the motherboard will
be needed for subsequent installation of the cooler.
Note: To mount the Dark Rock Pro 4 on an AM3 motherboard,
please use the AM3 washers (19), placing these over the
backplate bolts protruding through the front side of the
motherboard.
AM2(+) / AM3(+) / FM1 / FM2(+)
AM4
Place the 4x AMD spacer nuts (10) onto the backplate bolts
protruding through the front side and affix both short AMD
mounting brackets (6) with the AMD backplate screws (14).
Mounting the CPU cooler:
First remove the protective foil from the underside of the
cooler. Spread the thermal paste (17) on the surface of the
CPU. The amount supplied is sufficient for one or two
applications.
Fasten the 120mm fan (3) using fan clips (18) onto the front
side of the cooler. Slide the 135mm fan (2) between the two
heatsinks and also fasten this with fan clips (18). Connect
both fans using the Y cable (20). Connect this to the CPU
fan connector on the motherboard.
When dismantling the fans, push the notches of the fan clips
(18) away from the fan.
III. EXCLUSIONS
The following are not covered by the warranty:
1. Normal wear and tear.
2. Any product which has been modied without permission from
be quiet!, or on which the serial number or warranty sticker has been
defaced, modied, or removed.
3. Damage, deterioration or malfunction resulting from:
Accident, abuse, misuse or improper use, neglect, connection to
an improper voltage source, unauthorized product modication, or
failure to follow instructions included with the product.
Fire, water, lightning, or other acts of nature.
Repair or attempted repair by anyone not authorized by be quiet!.
Shipping or transport damage (claims must be made with the carrier).
Any other cause which does not relate to a defect in materials or
manufacturing workmanship.
4. Cartons, cases, batteries, cabinets, tapes, accessories or other
consumables used with this product.
5. be quiet!, Inc. does not warrant that this product will meet your
requirements. It is your responsibility to determine the suitability of
this product for your purpose.
6. Removal or installation charges.
7. Shipping charges.
8. Any incidental charges.
IV. EXCLUSION OF DAMAGES
be quiet!‘s sole obligation and liability under this warranty is limited
to the repair or replacement of a defective product at its option.
be quiet! shall not, in any event, be liable for any special, incidental,
indirect, or consequential damages whatsoever, including but not
limited to loss of prots, revenue, or data (whether direct or indirect),
damages resulting from interruption of service and loss of business,
or for liability in tort relating to this product or resulting from its use
or possession, even if be quiet! has been advised previously of the
possibility of such damages.
V. LIMITATIONS OF IMPLIED WARRANTIES
There are no other warranties, expressed or implied, including but not
limited to those of merchantability or tness for a particular purpose.
The duration of implied warranties is limited to the warranty length
specied in Paragraph II.50
Caution: The thermal paste supplied is not suitable for human
consumption. If swallowed, drink lots of water and urgently
seek medical attention. Keep it out of the reach of children.
Avoid contact with skin and eyes.
Notes
VI. LOCAL LAW AND YOUR WARRANTY
This warranty gives you specic legal rights. You may also have other
rights granted under local law. These rights may vary.
VII. NO OTHER WARRANTY
No be quiet! employee, dealer, or other agent is authorized to make
any modication, extension, or addition to this warranty.
VIII. TO OBTAIN TECHNICAL SUPPORT OR WARRANTY SERVICE
Please see your product owner’s manual or visit the Online Support
section at www.bequiet.com for details and contact information. You
will need to provide proof of purchase for warranty service.
bequiet.com
bequiet.com


Dark Rock Pro 4 подходит для современных флагманских процессоров, таких как Core i9 от Intel или Ryzen 9 от AMD.
Дополнительная информация.
DARK ROCK PRO 4
БЕСКОМПРОМИССНАЯ ТИШИНА И ЭФФЕКТИВНОСТЬ ОХЛАЖДЕНИЯ
Dark Rock Pro 4 обеспечивает максимальную производительность охлаждений 250Вт TDP и практически бесшумную работу. Идеальный выбор для разогнанных систем и требовательных рабочих станций.
- Два практически бесшумных вентилятора Silent Wings PWM
- Воронкообразный воздухозаборник фронтального вентилятора для высокого давления воздуха
- Уровень шума не превышает 24.3 дБ (А) при максимальных оборотах
- Семь высокопроизводительных медных тепловых трубок
- Оптимизированный для лучшего воздушного потока контур пластин радиатора с вырезами для максимальной совместимости с ОЗУ
- Комплект креплений черного цвета обеспечивает удобный монтаж сверху материнской платы
- Шлифованная алюминиевая верхняя крышка
- 3 года гарантии от производителя
- Немецкая разработка, дизайн и контроль качества
Функциональные Cookies не настроены..
Вы не можете продолжать без функциональных cookies. Пожалуйста, активируйте их..
Больше информации.
ПРАКТИЧЕСКИ БЕСШУМНАЯ РАБОТА
Даже при 100% скорости вентиляторов уровень шума не превышает 24.3 дБ(A)
Два вентилятора Silent Wings PWM оснащены улучшенным гидродинамическим подшипником, плавным 6-полюсным моторчиком и оптимизированными для лучшего воздушного потока лопастями. Воронкообразный воздухозаборник фронтального вентилятора Silent Wings 3 обеспечивает очень высокое давление воздуха. Независимое крепление вентиляторов с изолирующими вибрации элементами, установленными на радиаторе.
ОГРОМНАЯ МОЩНОСТЬ ОХЛАЖДЕНИЯ
Невероятное соотношение производительности и тишины работы
Бескомпромиссная тишина и эффективность охлаждения для разогнанных систем и требовательных графических станций! Dark Rock Pro 4 обеспечивает впечатляющую эффективность охлаждения 250Вт TDP и низкую температуру даже при пиковой производительности процессора.
ПРОГРЕССИВНАЯ КОНСТРУКЦИЯ
Ключевая особенность высокой эффективности охлаждения
Dark Rock Pro 4 имеет семь высокопроизводительных медных тепловых трубок, обеспечивающих максимальный отвод тепла. Оптимизированный волновой контур пластин радиатора и микро-точки на их поверхности улучшают циркуляцию воздуха. Специальное черное покрытие с керамическими частицами обеспечивает идеальную передачу тепла.
ДВУХБАШЕННАЯ КОНСТРУКЦИЯ
Мощное охлаждение вашей системы
Dark Rock Pro 4 оснащен двумя радиаторами из алюминия. Ребра радиатора имеют вырезы для максимальной совместимости с ОЗУ. Установлены два вентилятора и поддерживается установка дополнительного 120-мм вентилятора для наилучшего охлаждения.
УДОБСТВО И ЭЛЕГАНТНОСТЬ
Стиль и легкость установки
Комплект креплений Dark Rock Pro 4 полностью черного цвета идеально сочетается с дизайном кулера и обеспечивает удобный монтаж сверху материнской платы. Шлифованная алюминиевая верхняя крышка подчеркивает привлекательность high-end кулера.
“Олицетворение высокого класса: Dark Rock Pro 4 — это лучшее из воздушных систем охлаждения, что может предложить be quiet!. Он гарантированно охлаждает даже самые требовательные, разогнанные сборки.”
Marius Sabisz, Head of BU Cooling
Краткий обзор всех моделей:
Серия продуктов
Общая информация
| Модель | Dark Rock Pro 4 |
| TDP (Ватт) | 250 |
| Варианты цвета | Black |
| Общие размеры без крепления (Д x Ш x В), (мм) | 121 x 136 x 163 |
| Общий вес (кг) | 1.13 |
| Совместимость с сокетами Intel | 1700 / 1200 / 2066 / 1150 / 1151 / 1155 / 2011(-3) Square ILM |
| Совместимость с сокетами AMD | AM5 / AM4 |
| Уровень шума (dB(A)) @ 50/75/100% (об/мин) | 12.8 / 17.9 / 24.3 |
| Number of fans | 2 |
| Разъем подсветки | — |
Инфографика
| Размеры (Д x Ш x Г), (мм) | 146 x 136 x 163 |
| Материал радиатора | Aluminum |
| Обработка покрытия | Ceramic coating |
| Материал основания | Copper |
| Обработка основания | CNC machined |
| Кол-во тепловых трубок, диаметр (мм) | 7 / 6 |
| Антивибрационное крепление вентилятора | ✓ |
| Модель вентилятора | Silent Wings 3 120mm PWM / Silent Wings 135mm PWM |
| Размеры вентилятора (мм) | 135 x 135 x 22 / 120 x 120 x 25 |
| Speed @ 100% PWM (rpm) | 1200 / 1500 |
| Поток воздуха при 100% PWM / 12В (CFM / м3/ч) | — |
| Воздушное давление при 100% PWM / 12В (мм H2O) | — |
| Технология подшипника | Fluid Dynamic Bearing |
| Технология моторчика | 6-pole fan motor |
| Номинальное напряжение постоянного тока (V) | 12 |
| Ток при номинальном напряжении ток (A) | — |
| Безопасный уровень тока (A) | 0.08 / 0.08 |
| Потребляемая мощность (W) | 0.96 / 0.96 |
| Разъем | 4-pin PWM |
| Разъем подсветки | — |
| Длина кабеля (мм) | 220 / 220 |
| Время работы (ч / 25°C) | 300,000 |
| Y-кабель | — |
| Thermal grease (Type) | Included |
| Набор креплений | Intel & AMD |
| Крестообразная отвертка | ✓ |
| Y-кабель | ✓ |
| Языки руководства пользователя | CN, DE, EN, ES, FR, JP, PL, RU, TW |
| Гарантия (лет) | 3 |
| Международная горячая линия / Бесплатно | ✓ / DE, FR, US |
| Артикул | BK022 |
| Код EAN | 4260052186268 |
| Размеры, упаковка (Д х Ш х В), (мм) | 181 x 205 x 212 |
| Вес брутто, упаковка (кг) | 1.39 |
| Штук в упаковке | 12 |
| Размеры, упаковочная коробка (Д x Ш x В), (мм) | 427 x 561 x 459 |
| Вес брутто, упаковочная коробка (кг) | 22.1 |
| РРЦ ( € ) | 92.90 |
DARK ROCK PRO 4
Артикул: BK022
Сохранить в pdf:
Изображения
Видео
Свойства
Лучше всего сочетается с
be quiet! Dark Rock Pro 4 Cooler Specification
The be quiet! Dark Rock Pro 4 is a high-performance CPU cooler designed for enthusiasts and professionals seeking optimal thermal management. It features a dual-tower design that accommodates seven high-performance copper heat pipes and two virtually inaudible Silent Wings PWM fans. The primary fan is a 135mm Silent Wings 3 model, offering advanced fluid-dynamic bearings and a smooth six-pole motor for minimal vibration and whisper-quiet operation, while the secondary fan is a 120mm Silent Wings model providing additional cooling efficiency.
The cooler supports a maximum cooling capacity of 250W TDP, making it suitable for overclocked systems and demanding applications. The heat sinks are embellished with a special black ceramic coating that enhances heat dissipation. Its wave-contoured cooling fins are equipped with small dots on their surfaces to increase air circulation, further enhancing the heat dissipation process.
Installation is facilitated by a user-friendly mounting kit that supports a wide range of Intel and AMD sockets including Intel LGA 1200, 1150, 1151, 1155, 1156, 2066, 2011(-3) Square ILM, and AMD AM4, AM3(+), AM2(+), FM2(+), FM1. The cooler’s dimensions accommodate most standard ATX cases, although its substantial size requires checking for compatibility with RAM clearance.
The Dark Rock Pro 4 combines robust cooling performance with a sleek design. Its brushed aluminum top cover with diamond-cut finish and the included black fan clips contribute to an aesthetic that matches high-end gaming and workstation builds. The cooler is engineered to deliver top-tier cooling with near-silent operation, making it an ideal choice for users prioritizing both thermal performance and acoustics.
be quiet! Dark Rock Pro 4 Cooler F.A.Q.
To install the Dark Rock Pro 4 on an AMD socket, first attach the AMD mounting brackets to the cooler. Then, prepare the motherboard by securing the backplate. Use the included spacers and screws to secure the cooler, ensuring it is aligned properly with the CPU. Finally, attach the fans and connect them to the CPU_FAN header.
To clean the Dark Rock Pro 4, first ensure the computer is powered off and unplugged. Use compressed air to remove dust from the heatsink fins and the fan blades. If necessary, gently wipe the surfaces with a soft cloth. Avoid using any liquid cleaners directly on the cooler.
Ensure that the cooler is properly mounted and that the thermal paste is applied correctly. Check if the fans are running and connected to the correct motherboard headers. Additionally, verify that there is adequate airflow in the case and that the cooler is not obstructed by other components.
Yes, the Dark Rock Pro 4 is capable of cooling overclocked CPUs. Its high-performance design with dual fans and a large heatsink allows it to handle increased thermal loads effectively. However, ensure adequate case ventilation to complement the cooler’s performance.
To replace the fans, first remove the cooler from the CPU. Unclip the fan brackets and disconnect the fan cables. Attach the new fans using the provided clips, ensuring they are oriented correctly for airflow. Reinstall the cooler and connect the new fans to the motherboard.
Yes, it is recommended to clean off the old thermal paste and apply a fresh layer whenever you remount the cooler. This ensures optimal thermal conductivity between the CPU and the cooler.
The Dark Rock Pro 4 allows for RAM modules up to 40mm in height without any fan adjustments. If you have taller RAM modules, you may need to adjust the front fan position to accommodate them.
To verify fan functionality, ensure they are connected to the motherboard’s CPU_FAN or SYS_FAN headers. Boot the system and check in the BIOS or use monitoring software to confirm the fans are spinning and operating at the expected RPMs.
The Dark Rock Pro 4 can typically be mounted in any orientation; however, the optimal orientation is with the fans aligned to push air towards the rear exhaust of the case. Ensure there is enough clearance for optimal airflow and component fit.
The installation of the Dark Rock Pro 4 requires a Phillips-head screwdriver. All other necessary components and mounting hardware are included with the cooler.