
QUICK
START
PAUSE/
RESET
ENTER
CLEAR
1
2
3
4
5
6
7
8
9
0
PROGRAMS
PROGRAMS
MANUAL
HEART
RATE
PERFORMANCE
INTERVAL
VARIETY
WEIGHT LOSS
Before beginning any fitness program, see
your physician for a thorough physical examination. Seek advice from
your physician to learn the target heart rate appropriate for your fitness
level. Do not allow children or those unfamiliar with its operation on or
near this equipment. Read the product owner’s manual or consult a
qualified instructor before operating this equipment. Improper use of
this equipment can result in serious injury. If you feel pain, faintness, or
dizziness, stop exercising immediately.
HEART RATE
SmartRate
OK
PAUSE/
RESET
Product Owner’s Manual
Commercial Products
Treadmills:
• 932i
• 954i
Ellipticals:
• EFX534i
• EFX532i
Cycle:
• 842i
-
Страница 1
QUICK ST ART P AUSE/ RESET ENTER CLEAR 1 2 3 45 6 7 8 9 0 PROGRAMS PROGRAMS MANUAL HEART RA TE PERFORMANCE INTERVAL V ARIETY WEIGHT LOSS Before beginning any tness pr ogram, see your physician for a thorough ph ysical examination. Seek ad vice from your physician to learn the tar get heart rate appropriate for your tness level. Do not allow […]
-
Страница 2
[…]
-
Страница 3
Important Safety Instructions When using Precor equipment, always take basic precautions, including the following: y y y y y y y y y y Read all instructions before using the equipment. These instructions are written to educa te patrons and other users in the proper use of the equipment. Other sections in this manual pr ovide more details of safety […]
-
Страница 4
y y y y y y y Never operate the equipment if it is damaged, not w orking properly, when it has been droppe d, or has been immersed in water. Return the equipment to a service center for examination and repair. Keep the power cord or optiona l power adapter and plug away from heated surfaces. Do not operate the equipment where aerosol (spray) produc[…]
-
Страница 5
Educating Users Take time to educate users on the safety instructions found in both the User’s Reference Manual and Product Owner’s Manual . Explain to your club or fac ility patrons that they should: y y y y Hold onto a stationary handrail or handlebar while stepping onto the equipment or when getting comf ortably seated on the cycle. Face the[…]
-
Страница 6
Radio Frequency Interference (RFI) Federal Communications Commission, Part 15 This equipment has been tested and found to comply with the limits for a Class A digital device, pursuant to Part 15 of the FCC Rules. These limits are designed to provid e reasonable protection against harmful interference in a commercia l installation. The equipment gen[…]
-
Страница 7
Treadmill Grounding Instructions The treadmill must be grounded. If the equipment malfunctions or breaks down, grounding provides a path of least resistance for electric current, which reduces t he risk of electrical shock. The treadmill has a power cord ha ving an equipment-grounding conductor and a grounding plug. The plug must be inserted into a[…]
-
Страница 8
Product Owner’s Manual: Im portant Safety Instructions 6 Obtaining Service You should not attempt to se rvice the equipment except for maintenance tasks described in th is manual. For information about product operation or service, see the Precor web site at www.precor.com. Should you need more information regarding customer support numbers or[…]
-
Страница 9
Table of Contents Important Safety Instructions …………………………………….. 1 Safety Code…………………………………………………………………………. 2 Safety Approval …………………………………………………………………… 2 Educating Users …………………………………….[…]
-
Страница 10
Treadmill Safety Features Before allowing users on Precor equipment, review the Important Safety Instructions found at the beginning of this manual. You should also teach your patrons ho w to safely use the equipment following the guidelines in Educating Users . Entering the Safety Code When the equipment is shipped from the factory, t he safety co[…]
-
Страница 11
Product Owner’s Manual: Treadmill Safety Features 9 Turning the Treadmill On and Off To turn the treadmill On and Off, use the power switch located beneath the hood, near the power cord receptacle. Important: When it is not being us ed, turn the treadmill Off. Weight Limit You should not allow runners ove r 350 lb. (160 kg) or walkers heavier […]
-
Страница 12
Self-Powered Features On self-powered equipment, the batte ry initializes and displays the Precor banner when a user starts exercising. A minimum rate of motion must be maintained for t he banner to appear, as shown in the following table. When a pers on meets the requirements, the power that is generated allows t he equipment to f unction properly[…]
-
Страница 13
Symptoms of a Low Battery If no one has used the equipmen t for an exten ded period of time, the battery may need recharging. Symptoms of a low battery include: y y A flickering or erratic display User and program information is lost once the user stops exercising. No workout summary or notification of pending shutdown occurs. Important: To maintai[…]
-
Страница 14
Product Owner’s Manual: Self-Powered Featu res 12 The Optional Power Adapter Kit If you purchase the optional pow er adapter, you must also purchase the internal cable kit. Th e kit supplies the cable, bracket, and fasteners that connect t he power adapter to the lower electronics board. CAUTION: The internal cable kit mu st be installed by au[…]
-
Страница 15
Club Features These next few pages explain how to customize the equipment for your club or facility and view usef ul product information. All these features remain hidde n to the patrons and can only be accessed using special key presses. Read this section if you want to: y y y y y y y y y y y y y y Enable or disable the safety code (treadmill) Cha[…]
-
Страница 16
Product Owner’s Manual: Club Featur es 14 y y y y Club Programming Tips Always start at the Precor banner. Electrical power must be supplied. For self-powered equipment, a constant power source is ava ilable if you us e the optional power adapter, otherwise you will have to maintain the minimum rate of motion. Refer to Self-Powered Features . […]
-
Страница 17
Table 2. Club custom features and settings Equipment Club Programming Prompt Factory Default Setting Changes you can m ake Treadmill SAFETY CODE Disabled An enabled safety code requires a 4-digit entry code bef ore users can access any exercise programs. All * SELECT LANGUAGE English Several languages affect th e display prompts. Choose one. All * […]
-
Страница 18
Accessing Club Programming Mode and Changing the Settings Read the Club Programming Tips to identify useful information about customizing your Precor equipment. To access the available menus and change the program settings, perform the following steps: At the Precor banner , press the following keys in sequence without pausing between selections: R[…]
-
Страница 19
Use the following flowchart to navigate through the menu settings on treadmills. SELECT UNITS SET MAX WORKOUT TIME PAUSE/RESET, 5, 6, 5, 1, 5, 6, 5 SELECT LANGUAGE OK [ ENGLISH ] [ U.S. ] [ 60 MIN ] OK ▼ OK OK ▼ OK ▼ PRECOR DIAGS – SET CLUB PARAMETERS OK SAFETY CODE [ DISABLED ] OK OK ▼ SET INCLINE LIMIT [ INCLINE 15.0 ] OK HIDDEN PROGRAM[…]
-
Страница 20
Use the following flowchart to na vigate through the menu settings on ellipticals. SELECT UNITS SET MAX PAUSE TIME SET MAX WORKOUT TIME RESET, 5, 6, 5, 1, 5, 6, 5 SELECT LANGUAGE OK [ ENGLIS H ] [ U.S. ] [ 60 MIN ] [ 120 SEC. ] OK ▼ OK OK ▼ OK OK ▼ ▼ PRECOR SET COOL DOWN TIME [ 5 MIN. ] DIAGS – SET CLUB PARAMETERS OK OK OK ▼ OK SET CROS[…]
-
Страница 21
Treadmill: Selecting Safety Code Protection When the equipment is shipped from the factory, t he safety code protection feature is disabled. If you enable the sa fety code, your patrons will need to enter four num ber keys in sequence to begin their exercise session and, on the tr eadmill, start the running belt. If the correct keys are not pressed[…]
-
Страница 22
Selecting a U.S. Standard or Metric Display The equipment can display measurem ents in either Metric or U.S. Standard. The default fact ory setti ng is to display U.S. Standard. To change this setting, perfor m the following steps: 1. 2. 1. 2. At the SELECT UNITS prompt, press OK. Us e the navigational arrow keys to select a unit of measure ( US or[…]
-
Страница 23
Setting a Pause Time Limit You can limit how long a user ca n pause while exercising on the equipment by entering a time between 1 and 120 seconds (two minutes). For example, if you set a pause time limit of 60 seconds, the display automatically resets to the Precor banner if no movement is detected and no key press occurs for one minute. Important[…]
-
Страница 24
Treadmill: Determining the Club Speed Limit You can set a maximum speed for t he treadmill. This limits how fast the running belt moves and, co nsequently, the number of speed settings that are available to the user. The speed is displayed in miles per hour (mph) or kilometers per hour (kph) depending upon the units of measure (U.S. standard or Met[…]
-
Страница 25
Treadmill: Accessing Performance Programs The performance-based Gerkin Fitne ss Test on the treadmill can be hidden from the user’s view and, consequently, be unavailable during an exercise session. If you keep the default factory setting, the Track program appears when the PERFORMANCE key is pressed. If you wish to change this setti ng, perform […]
-
Страница 26
EFX: Changing the Auto-Level Setting You can set a specific ramp incli ne so that the EFX automatically returns to it at the end of a wo rkout session. Whatever incline you set, the EFX ramp returns to the setting if a user continues pedaling, once the program sessi on has ended, and presses RESET to return to the Precor banner. Note: This setting […]
-
Страница 27
Product Owner’s Manual: Club Featur es 25 Table 4. Resistance range settings on cycles Setting Description HI or HIGH Provides the full range of resistance available. If an upright cycle user chooses th e high-end resistance lev els, the cycle provides enough resistance to simulate sprin ting or hill climbing for users wishing to stand on the […]
-
Страница 28
Informational Displays The equipment provides informat ion about its use (odom eter and hour meter), as well as software versions and part numbers, serial number, usage log, and error log. In general, you would only acces s this information if directed to do so by Precor Cu stomer Support. To navigate through the informatio nal displays, use the fo[…]
-
Страница 29
Table 5. Informational Displays Product Display Description All ODOMETER The odometer value c orrelates to the type of Precor product and the stan dard of units, U.S. or Metric, selected in the club programs. Treadmill shows the number of cumulative miles or kilo meters logged to date. EFX or AMT show s the number of total stride s logged to da te.[…]
-
Страница 30
Error Log Quick access to the informational display is available if error messages have appeared on the di splay and have been recorded in the error log. This feature is usually reserved for service personnel. At the Pr ecor banner, press and hold RESET for 4 seconds. If DIAGS — INFORMAT ION DISPLAY or ERROR LOG appears, press OK. If no errors are […]
-
Страница 31
Product Owner’s Manual: Club Featur es 29 User ID Entry with CSAFE Equipment The equipment is fully compatible with CSAFE protocols. When the equipment is connected to a CSAF E master device, the user is prompted to press ENTER and begi n an identification process. The user ID is displayed as five zeros and indicates the st arting point. The f[…]
-
Страница 32
Maintenance It is important to perform the minor maintenance tasks described below. Failure to maintain the equipment as described in this section could void the Pr ecor Limited Warranty. DANGER To reduce the risk of electrical shock, always unplug the equipment from its power source (an optional power adapter in the case of self-powered equipment)[…]
-
Страница 33
EFX: Cleaning the Ramp Whenever the ramp becomes soiled, clean the exposed surfaces of the ramp and roller wheels by taking the following steps. Note: If your equipment has a ramp cover, remove it before performing the following steps. Refer to the EFX Assembly Guide. 1. 2. 3. 4. 5. Moisten a clean, soft cloth in a m ild solution of soap and water.[…]
-
Страница 34
Treadmill: Checking the Alignment of the Running Belt Proper belt alignment allows t he belt to remain centered and ensures smooth operation. Realigning the belt takes a few simple adjustments. If you are unsure ab out this procedure, call Precor Customer Support. Refer to Obtaining Service . CAUTION: Special care must be taken when aligning the ru[…]
-
Страница 35
Treadmill: Adjusting the Running Belt If you are unsure about adjusting the running belt, call Precor Customer Support (refer to Obtaining Service ). CAUTION: For your safety, use the power switch to turn Off the treadmill before making any adjustments. Do not adjust the running belt when someone is standing on the equipment. 1. Locate the right be[…]
-
Страница 36
2. Upright Cycle: Adjusting the Seat Tilt To adjust the seat tilt on an upright cycle, ta ke the following steps. 1. Use a ¹¹⁄₁₆ -inch (17 mm) box-end wr ench or crescent wrench to loosen the nut beneath t he seat as shown in the following figure. Figure 5: Loosen nut to adjust seat tilt Adjust the seat tilt (forward or backward) as shown i[…]
-
Страница 37
3. Recumbent Cycle: Realigning the Seat If the seat rocks side-to-side, yo u need to realign the center wheel underneath the seat. Adjustment sc rews are located on the left side of the seat rail. To remove seat wobble (side-to-sid e movement), take the following steps. 1. 2. Obtain a ³⁄₁₆ -inch and ⁵⁄₁₆ -inch hex key. Use the ³⁄?[…]
-
Страница 38
Product Owner’s Manual: Maintena nce 36 Moving the Equipment It is important, if you plan to mo ve the equipment, that you obtain adult help and use proper lifting techniques. The equipment is very heavy. Take advantage of the ro ller wheels on the equipment when moving it to a new location. Important: The plastic end cap, on the treadmill, is[…]
-
Страница 39
Precor Commercial Equipment Limited Warranty PLEASE READ THESE WARRANTY TERMS AND CONDITIONS CAREFULLY BEFORE USING YOUR PRECOR INCORPORATED PRODUCT. BY USING THE EQUIPMENT, YOU ARE CONSENTI NG TO BE BOUND BY THE FOLLOWING WARRANTY TERMS AND CONDITI ONS. Limited Warranty. Precor Incorporated warrants all new Precor products to be free from defects […]
-
Страница 40
Product Owner’s Manual: Precor C ommercial Equipment Limited Warranty 38 This Limited Warranty shall not apply to: 1. Software (PROM) version upgrades. 2. Normal wear and tear, consumables and cosmetic items, including, but not limited to the following: gr ips, seats, and labels. 3. Repairs performed on Precor equipment missing a serial number[…]
-
Страница 41
W e are confident that y ou will be pleased with your purchase and that y our new Precor equipment will help satisfy y our customers’ fitness needs, while helping y ou meet y our business goals. T o allo w us to ser ve y ou better , please take a f e w moments to complete and retur n your warr anty registration. Y OU MA Y ALSO REGISTER ONLINE A T[…]
-
Страница 42
Which best describes this purc hase (check all that appl y): ❑ First Precor product ❑ Replaces a Precor product of the same type ❑ Replaces same type of product – different br and ❑ Enhancement to equipment already owned How did y ou FIRST become a ware of this pr oduct (choose only one): ❑ A uthorized Precor dealer ❑ Precor sales rep[…]
-
Страница 43
[…]
-
Страница 44
PO M C-V 49336-104, en W arranty # 3 628 6-112, en Registratio n Card# 45 622-101 , en 03 March 2008 Precor , C, CrossRamp, E FX, M, Move Beyo nd, and SmartR ate are registered trademar ks of Precor Incorporated. Crosstrainer , Quic kStart, and StretchT r ainer are trademarks of Precor Incorporated. Copyright 2008 Precor Incorporated. Specification[…]
-
Страница 45
C 8 42i User’s Reference Manual Commercial Cycle[…]
-
Страница 46
[…]
-
Страница 47
User’s Reference Manual: Im portant Safety Instructions 1 I MPOR T ANT S AFETY I NSTRUCTIONS Important Safety Instructions W hen using the C842i Upright or Recumbent Cycle, alw ays t ake basic precautions, including the following: • Read all instructions before usin g the cycle. These instructions are written for your s afety and to protect the[…]
-
Страница 48
User’s Reference Manual: Table of Contents 2 T able of Contents Important Safety Instructions ……………………………………….. 1 Obtaining Service …………………….. …………………………………………. 1 Cycle Features ………………………………………………………………… 3 Self-Powered F[…]
-
Страница 49
User’s Reference Ma nual: Cycle Features 3 Cycle F eatures T he cycle is equipped with certain items that , when used properly , help sustain an enjoyable wo rkout. These items include: • Self-powered features • Seat adjustments Impor tant: B efore exercising, review the Import ant Safety Instructions found at the beginn ing of this manual. S[…]
-
Страница 50
User’s Reference Manual: Heart Rate Features 4 Heart Rate F eatures Heart rate and SmartRate ® features are availabl e when you wear the chest strap. W hen a heartbeat is detected, the H EART RA TE display shows your heart rate and, if your age has been entered, the SmartRate LE D pu lses and indicates your t arget zone. Important Use and Sa fet[…]
-
Страница 51
User’s Reference Manual: Heart Rate Features 5 • After you put on the chest stra p, face the display console for a minimum of 15 seconds. This allows the receiver in the console to recognize the signal from the chest strap. If Hr blinks in the H E ART RA TE display , the cycle is detecting a signal, but has not yet determined your heart r ate. […]
-
Страница 52
User’s Reference Manual: Heart Rate Features 6 T he calculation used to determine yo ur maximum aerobic heart ra te is (220 minus your age). W hen you multi ply it by the percent indicated in T able 1, you can underst and the rela tionship between the puls ating LE D and your t arget heart rate. C AUTION: Y our heart rate shou ld never exceed 8 5[…]
-
Страница 53
User’s Reference Manual: Heart Rate Features 7 Exercise to Y our T arget Heart Rate A heart r ate receiver is an integr al part of the display so you can monitor your heart r ate wh ile exercising. If you we ar a chest strap, your heart r ate (beats per minut e) appears on the display . T he Precor web site (www .precor .co m) has sever al sugges[…]
-
Страница 54
User’s Reference Manua l: Display Console 8 Display Console ENTER CLEAR 1 2 3 45 6 7 8 9 0 842i TIME ELAPSED TIME REMAINING CALORIES DIST ANCE SPEED RPM 2006 Precor Incorporated, en PROGRAMS PROGRAMS MANUAL HEART RA TE PERFORMANCE INTERV AL V ARIETY WEIGHT LOSS P AUSE/ RESET Before beginning any fitness program, see your physician for a thorough […]
-
Страница 55
User’s Reference Manua l: Display Console 9 More Information about the Center Display T he progr am profile appears during an exercise session in the center portion of the display . Y our heart r ate appears if you are using the chest strap. Refer to Heart R ate Features . During a workout, the progr am profile r aises or lowers according to whic[…]
-
Страница 56
User’s Reference Manua l: Display Console 10 Column 2: R E S I ST AN CE RESIS T AN C E —displays the resist ance yo u feel while pedaling. The R ES I ST AN C E arrow keys affect the br ake and let you set a resist ance between 1 and 25. Column 3: D I ST AN CE, S PE E D, R PM DI ST ANCE —shows the linear dist ance in ei ther miles or kilometer[…]
-
Страница 57
User’s Reference Manua l: Display Console 11 K eypads Use the keypads to enter your work out session selections to affect what appears on the display and to est ablish the pedal resist ance. F our distinct keypads exist on the display and are discussed in this section: • Lower Display keypad and the Selection keys • Navigational keypad in t h[…]
-
Страница 58
User’s Reference Manua l: Display Console 12 PA U S E / R E S E T : Press this key to end t he exercise session and view your workout summary . An exception to this rule exists if you have entered the 3 0-secon d shutdown period. W hen you press P AUS E / R E SE T , the displa y returns to the banner . Refer to Pausing During a W orkout or the C […]
-
Страница 59
User’s Reference Manua l: Display Console 13 PR OG RAM S K eypad Diagram 7: PR OG RAM S keypad T he P RO G RAM S keypad provide s access to all the exercise progr ams. Choosing a category and pressing the associated PR O G RAM S key , accesses the menu selections. Refer to T able 2. F or a description of ea ch program, refer to Programs . Note: U[…]
-
Страница 60
User’s Reference Manua l: Display Console 14 Number K eypad Diagram 8: Number keypad T he number keypad has several func tions depending on what is connected to the cycle. The CLEAR and E NTE R keys provide the following functions: CL EAR: Use the C LEAR key to remove the last number being displayed. EN T ER : Use the E NTE R key to accept the n […]
-
Страница 61
User’s Reference Manual: Workout Options 15 W ork out Options C AUTION: Befor e beginning an y fitness program, see your physician for a complete physic a l examination. Know your physician-recommended he art rate target zone. 1. Sit on the seat and place your shoes inside the pedal str aps. 2. W hen you are comfortably situated, begin pedaling. […]
-
Страница 62
User’s Reference Manual: Workout Options 16 Choosing QU I CK ST ART 1. W hile the Precor banner scrolls, press QU I C KS T ART to begin the Manual Progr am. QU I C KS T ART applies t he following defaults: 2. Use the R E SI ST AN C E arrow ke ys to change the resistance. 3. Maintain a consistent pedaling speed while exercising. Find a comfort abl[…]
-
Страница 63
User’s Reference Manual: Workout Options 17 Selecting a P rogram 1. W hile the Precor banner scro lls, press a P R OG RAM S key and then, press O K. 2. A workout time blinks in the cent er display . Use the navigational arrow keys or the number keys to adjust the minutes (1 — 6 0) and then press OK. Note: T he workout time prompt is skipped if yo[…]
-
Страница 64
User’s Reference Manual: Workout Options 18 Cooling Down A fter a W ork out Incorpor ate a cool-down period into your workout to h elp lower y our heart r ate and minimize muscle stiffness or soreness. W hen you complete a program with a time limit or specified goal, you automatically enter a cool-down peri od. T he resistance is reduced by 20%. […]
-
Страница 65
User’s Reference Manual: Workout Options 19 Ending a W ork out C AUTION: Hold on to a handleba r when you near th e end of your exercise session. 1. Y ou can slow your pedaling w hen you complete the cool-down period, but maint ain, at minimum, 20 revolutions per minute to view your workout summary . T he workout summary appear s and shows your c[…]
-
Страница 66
User’s Reference Manual: Programs 20 Pr o g r a m s T his section describes the progr ams available on th e C842i Upright and Recumbent Cycles. Use this sectio n as a reference tool to better understan d each program’s purpose. Choosing a P rogram Choosing a progr am depends on your goals. If you are a beginner or returning to regular exercise,[…]
-
Страница 67
User’s Reference Manual: Programs 21 Manual P rogram T he Manual Progr am profile, availa ble by pressing the MAN UAL key , begins as a flat line. Y ou cont rol resistance settings using the R ES I ST AN C E arrow keys. The progr am profile reflects any changes. T he blinking column indicates your position in the progr am. T he workout time refle[…]
-
Страница 68
User’s Reference Manual: Programs 22 Basic H R C Program T he Basic Heart Rate Progr am, av ailable by pressing the H EART RA TE key , lets you set a t arget fo r your heart r ate. The progr am adjusts the resist ance to maint ain your heart r ate within two beats per minute of the t arget heart r ate while you exercise. T o use this program, you[…]
-
Страница 69
User’s Reference Manual: Programs 23 W eight Loss P rogram W ith the W eight Loss Progr am, t he workout time is fixed at 28 minutes and consists of seven 4-minute intervals. Y o u are not prompted for a workout time. Use the arrow keys to change the resistance for the rest or work interval. W hen you make c hanges, the progr am repeats the setti[…]
-
Страница 70
User’s Reference Manual: Programs 24 Notes:[…]
-
Страница 71
[…]
-
Страница 72
C842 i U R M 4 9335-102, e n 14 August 2006 Precor , C, CrossRamp, E FX, M, Move Beyo nd, and SmartR ate are registered trademar ks of Precor Incorporated. Crosstrainer , Quic kStart, and StretchT r ainer are trademarks of Precor Incorporated. Copyright 2006 Precor Incorporated. Specifications subj ect to change without notice. www .pr ecor . com N[…]
-
Страница 73
C 846 i C 8 42i Assembly Guide Commercial Upright Cycle C8 46i[…]
-
Страница 74
[…]
-
Страница 75
C846i/C842i Upright Cy cle Assembly Guide 1 Thank you for choosing Precor . For proper installation, please read this guide thoroughly and follow the assembly inst ructions. If you do not assemble the cycle according to these guidelines, you could void the Precor Limite d Wa r r a n t y. Obtaining Service Y ou should not attempt to service the cycl[…]
-
Страница 76
C846i/C842i Upright Cy cle Assembly Guide 2 Hardware Kit (not to scale) Fas t e ne r s Quantity (A) Hex head cap screw (5-inch) 2 (B) W asher (½-inch) 2 (C) Buttonhead screw (1 ³⁄₄ -inch) Important: Y ou can discard the buttonhead screws because they are not used in this assembly . 4 (D) Phillips-head screw (¾-inc h) 3 1 — Rubber bib (E)[…]
-
Страница 77
C846i/C842i Upright Cy cle Assembly Guide 3 Assembly Steps Position the rubber bib (E) so the flared side faces the floor (as shown in the illustration) and slide it into the base of the upright support. Place the upright support on the ba se crossbar so that the lip of the rubber bib rests on the crossbar and is p arall el to the floor. Have your […]
-
Страница 78
C846i/C842i Upright Cy cle Assembly Guide 4 Adjust the seat. Pull up on the seat to raise it. T o lower the seat, hold onto the seat pad while you pull out the pop pin. Slide the seat into position and reinsert the pop pin. C A UTI ON: Always apply downward pressure to the upright cycle seat to make sure it is securely in place before a user sits o[…]
-
Страница 79
[…]
-
Страница 80
©200 7 Precor Incorporated www .precor .com C84 6i/C8 42i Uprig ht AG 49101-103, en 19 February 200 7 Precor Incorporated 20031 142nd Avenue NE P. O . B o x 7 2 0 2 W o odinville, WA USA 9 8 0 7 2-4002[…]
-
Page 1: Precor 954i
QUICK ST ART P AUSE/ RESET ENTER CLEAR 1 2 3 45 6 7 8 9 0 PROGRAMS PROGRAMS MANUAL HEART RA TE PERFORMANCE INTERVAL V ARIETY WEIGHT LOSS Before beginning any tness pr ogram, see your physician for a thorough ph ysical examination. Seek ad vice from your physician to learn the tar get heart rate appropriate for your tness level. Do not allow […]
-
Page 2: Precor 954i
[…]
-
Page 3: Precor 954i
Important Safety Instructions When using Precor equipment, always take basic precautions, including the following: y y y y y y y y y y Read all instructions before using the equipment. These instructions are written to educa te patrons and other users in the proper use of the equipment. Other sections in this manual pr ovide more details of safety […]
-
Page 4: Precor 954i
y y y y y y y Never operate the equipment if it is damaged, not w orking properly, when it has been droppe d, or has been immersed in water. Return the equipment to a service center for examination and repair. Keep the power cord or optiona l power adapter and plug away from heated surfaces. Do not operate the equipment where aerosol (spray) produc[…]
-
Page 5: Precor 954i
Educating Users Take time to educate users on the safety instructions found in both the User’s Reference Manual and Product Owner’s Manual . Explain to your club or fac ility patrons that they should: y y y y Hold onto a stationary handrail or handlebar while stepping onto the equipment or when getting comf ortably seated on the cycle. Face the[…]
-
Page 6: Precor 954i
Radio Frequency Interference (RFI) Federal Communications Commission, Part 15 This equipment has been tested and found to comply with the limits for a Class A digital device, pursuant to Part 15 of the FCC Rules. These limits are designed to provid e reasonable protection against harmful interference in a commercia l installation. The equipment gen[…]
-
Page 7: Precor 954i
Treadmill Grounding Instructions The treadmill must be grounded. If the equipment malfunctions or breaks down, grounding provides a path of least resistance for electric current, which reduces t he risk of electrical shock. The treadmill has a power cord ha ving an equipment-grounding conductor and a grounding plug. The plug must be inserted into a[…]
-
Page 8: Precor 954i
Product Owner’s Manual: Im portant Safety Instructions 6 Obtaining Service You should not attempt to se rvice the equipment except for maintenance tasks described in th is manual. For information about product operation or service, see the Precor web site at www.precor.com. Should you need more information regarding customer support numbers or[…]
-
Page 9: Precor 954i
Table of Contents Important Safety Instructions …………………………………….. 1 Safety Code…………………………………………………………………………. 2 Safety Approval …………………………………………………………………… 2 Educating Users …………………………………….[…]
-
Page 10: Precor 954i
Treadmill Safety Features Before allowing users on Precor equipment, review the Important Safety Instructions found at the beginning of this manual. You should also teach your patrons ho w to safely use the equipment following the guidelines in Educating Users . Entering the Safety Code When the equipment is shipped from the factory, t he safety co[…]
-
Page 11: Precor 954i
Product Owner’s Manual: Treadmill Safety Features 9 Turning the Treadmill On and Off To turn the treadmill On and Off, use the power switch located beneath the hood, near the power cord receptacle. Important: When it is not being us ed, turn the treadmill Off. Weight Limit You should not allow runners ove r 350 lb. (160 kg) or walkers heavier […]
-
Page 12: Precor 954i
Self-Powered Features On self-powered equipment, the batte ry initializes and displays the Precor banner when a user starts exercising. A minimum rate of motion must be maintained for t he banner to appear, as shown in the following table. When a pers on meets the requirements, the power that is generated allows t he equipment to f unction properly[…]
-
Page 13: Precor 954i
Symptoms of a Low Battery If no one has used the equipmen t for an exten ded period of time, the battery may need recharging. Symptoms of a low battery include: y y A flickering or erratic display User and program information is lost once the user stops exercising. No workout summary or notification of pending shutdown occurs. Important: To maintai[…]
-
Page 14: Precor 954i
Product Owner’s Manual: Self-Powered Featu res 12 The Optional Power Adapter Kit If you purchase the optional pow er adapter, you must also purchase the internal cable kit. Th e kit supplies the cable, bracket, and fasteners that connect t he power adapter to the lower electronics board. CAUTION: The internal cable kit mu st be installed by au[…]
-
Page 15: Precor 954i
Club Features These next few pages explain how to customize the equipment for your club or facility and view usef ul product information. All these features remain hidde n to the patrons and can only be accessed using special key presses. Read this section if you want to: y y y y y y y y y y y y y y Enable or disable the safety code (treadmill) Cha[…]
-
Page 16: Precor 954i
Product Owner’s Manual: Club Featur es 14 y y y y Club Programming Tips Always start at the Precor banner. Electrical power must be supplied. For self-powered equipment, a constant power source is ava ilable if you us e the optional power adapter, otherwise you will have to maintain the minimum rate of motion. Refer to Self-Powered Features . […]
-
Page 17: Precor 954i
Table 2. Club custom features and settings Equipment Club Programming Prompt Factory Default Setting Changes you can m ake Treadmill SAFETY CODE Disabled An enabled safety code requires a 4-digit entry code bef ore users can access any exercise programs. All * SELECT LANGUAGE English Several languages affect th e display prompts. Choose one. All * […]
-
Page 18: Precor 954i
Accessing Club Programming Mode and Changing the Settings Read the Club Programming Tips to identify useful information about customizing your Precor equipment. To access the available menus and change the program settings, perform the following steps: At the Precor banner , press the following keys in sequence without pausing between selections: R[…]
-
Page 19: Precor 954i
Use the following flowchart to navigate through the menu settings on treadmills. SELECT UNITS SET MAX WORKOUT TIME PAUSE/RESET, 5, 6, 5, 1, 5, 6, 5 SELECT LANGUAGE OK [ ENGLISH ] [ U.S. ] [ 60 MIN ] OK ▼ OK OK ▼ OK ▼ PRECOR DIAGS – SET CLUB PARAMETERS OK SAFETY CODE [ DISABLED ] OK OK ▼ SET INCLINE LIMIT [ INCLINE 15.0 ] OK HIDDEN PROGRAM[…]
-
Page 20: Precor 954i
Use the following flowchart to na vigate through the menu settings on ellipticals. SELECT UNITS SET MAX PAUSE TIME SET MAX WORKOUT TIME RESET, 5, 6, 5, 1, 5, 6, 5 SELECT LANGUAGE OK [ ENGLIS H ] [ U.S. ] [ 60 MIN ] [ 120 SEC. ] OK ▼ OK OK ▼ OK OK ▼ ▼ PRECOR SET COOL DOWN TIME [ 5 MIN. ] DIAGS – SET CLUB PARAMETERS OK OK OK ▼ OK SET CROS[…]
-
Page 21: Precor 954i
Treadmill: Selecting Safety Code Protection When the equipment is shipped from the factory, t he safety code protection feature is disabled. If you enable the sa fety code, your patrons will need to enter four num ber keys in sequence to begin their exercise session and, on the tr eadmill, start the running belt. If the correct keys are not pressed[…]
-
Page 22: Precor 954i
Selecting a U.S. Standard or Metric Display The equipment can display measurem ents in either Metric or U.S. Standard. The default fact ory setti ng is to display U.S. Standard. To change this setting, perfor m the following steps: 1. 2. 1. 2. At the SELECT UNITS prompt, press OK. Us e the navigational arrow keys to select a unit of measure ( US or[…]
-
Page 23: Precor 954i
Setting a Pause Time Limit You can limit how long a user ca n pause while exercising on the equipment by entering a time between 1 and 120 seconds (two minutes). For example, if you set a pause time limit of 60 seconds, the display automatically resets to the Precor banner if no movement is detected and no key press occurs for one minute. Important[…]
-
Page 24: Precor 954i
Treadmill: Determining the Club Speed Limit You can set a maximum speed for t he treadmill. This limits how fast the running belt moves and, co nsequently, the number of speed settings that are available to the user. The speed is displayed in miles per hour (mph) or kilometers per hour (kph) depending upon the units of measure (U.S. standard or Met[…]
-
Page 25: Precor 954i
Treadmill: Accessing Performance Programs The performance-based Gerkin Fitne ss Test on the treadmill can be hidden from the user’s view and, consequently, be unavailable during an exercise session. If you keep the default factory setting, the Track program appears when the PERFORMANCE key is pressed. If you wish to change this setti ng, perform […]
-
Page 26: Precor 954i
EFX: Changing the Auto-Level Setting You can set a specific ramp incli ne so that the EFX automatically returns to it at the end of a wo rkout session. Whatever incline you set, the EFX ramp returns to the setting if a user continues pedaling, once the program sessi on has ended, and presses RESET to return to the Precor banner. Note: This setting […]
-
Page 27: Precor 954i
Product Owner’s Manual: Club Featur es 25 Table 4. Resistance range settings on cycles Setting Description HI or HIGH Provides the full range of resistance available. If an upright cycle user chooses th e high-end resistance lev els, the cycle provides enough resistance to simulate sprin ting or hill climbing for users wishing to stand on the […]
-
Page 28: Precor 954i
Informational Displays The equipment provides informat ion about its use (odom eter and hour meter), as well as software versions and part numbers, serial number, usage log, and error log. In general, you would only acces s this information if directed to do so by Precor Cu stomer Support. To navigate through the informatio nal displays, use the fo[…]
-
Page 29: Precor 954i
Table 5. Informational Displays Product Display Description All ODOMETER The odometer value c orrelates to the type of Precor product and the stan dard of units, U.S. or Metric, selected in the club programs. Treadmill shows the number of cumulative miles or kilo meters logged to date. EFX or AMT show s the number of total stride s logged to da te.[…]
-
Page 30: Precor 954i
Error Log Quick access to the informational display is available if error messages have appeared on the di splay and have been recorded in the error log. This feature is usually reserved for service personnel. At the Pr ecor banner, press and hold RESET for 4 seconds. If DIAGS — INFORMAT ION DISPLAY or ERROR LOG appears, press OK. If no errors are […]
-
Page 31: Precor 954i
Product Owner’s Manual: Club Featur es 29 User ID Entry with CSAFE Equipment The equipment is fully compatible with CSAFE protocols. When the equipment is connected to a CSAF E master device, the user is prompted to press ENTER and begi n an identification process. The user ID is displayed as five zeros and indicates the st arting point. The f[…]
-
Page 32: Precor 954i
Maintenance It is important to perform the minor maintenance tasks described below. Failure to maintain the equipment as described in this section could void the Pr ecor Limited Warranty. DANGER To reduce the risk of electrical shock, always unplug the equipment from its power source (an optional power adapter in the case of self-powered equipment)[…]
-
Page 33: Precor 954i
EFX: Cleaning the Ramp Whenever the ramp becomes soiled, clean the exposed surfaces of the ramp and roller wheels by taking the following steps. Note: If your equipment has a ramp cover, remove it before performing the following steps. Refer to the EFX Assembly Guide. 1. 2. 3. 4. 5. Moisten a clean, soft cloth in a m ild solution of soap and water.[…]
-
Page 34: Precor 954i
Treadmill: Checking the Alignment of the Running Belt Proper belt alignment allows t he belt to remain centered and ensures smooth operation. Realigning the belt takes a few simple adjustments. If you are unsure ab out this procedure, call Precor Customer Support. Refer to Obtaining Service . CAUTION: Special care must be taken when aligning the ru[…]
-
Page 35: Precor 954i
Treadmill: Adjusting the Running Belt If you are unsure about adjusting the running belt, call Precor Customer Support (refer to Obtaining Service ). CAUTION: For your safety, use the power switch to turn Off the treadmill before making any adjustments. Do not adjust the running belt when someone is standing on the equipment. 1. Locate the right be[…]
-
Page 36: Precor 954i
2. Upright Cycle: Adjusting the Seat Tilt To adjust the seat tilt on an upright cycle, ta ke the following steps. 1. Use a ¹¹⁄₁₆ -inch (17 mm) box-end wr ench or crescent wrench to loosen the nut beneath t he seat as shown in the following figure. Figure 5: Loosen nut to adjust seat tilt Adjust the seat tilt (forward or backward) as shown i[…]
-
Page 37: Precor 954i
3. Recumbent Cycle: Realigning the Seat If the seat rocks side-to-side, yo u need to realign the center wheel underneath the seat. Adjustment sc rews are located on the left side of the seat rail. To remove seat wobble (side-to-sid e movement), take the following steps. 1. 2. Obtain a ³⁄₁₆ -inch and ⁵⁄₁₆ -inch hex key. Use the ³⁄?[…]
-
Page 38: Precor 954i
Product Owner’s Manual: Maintena nce 36 Moving the Equipment It is important, if you plan to mo ve the equipment, that you obtain adult help and use proper lifting techniques. The equipment is very heavy. Take advantage of the ro ller wheels on the equipment when moving it to a new location. Important: The plastic end cap, on the treadmill, is[…]
-
Page 39: Precor 954i
Precor Commercial Equipment Limited Warranty PLEASE READ THESE WARRANTY TERMS AND CONDITIONS CAREFULLY BEFORE USING YOUR PRECOR INCORPORATED PRODUCT. BY USING THE EQUIPMENT, YOU ARE CONSENTI NG TO BE BOUND BY THE FOLLOWING WARRANTY TERMS AND CONDITI ONS. Limited Warranty. Precor Incorporated warrants all new Precor products to be free from defects […]
-
Page 40: Precor 954i
Product Owner’s Manual: Precor C ommercial Equipment Limited Warranty 38 This Limited Warranty shall not apply to: 1. Software (PROM) version upgrades. 2. Normal wear and tear, consumables and cosmetic items, including, but not limited to the following: gr ips, seats, and labels. 3. Repairs performed on Precor equipment missing a serial number[…]
-
Page 41: Precor 954i
W e are confident that y ou will be pleased with your purchase and that y our new Precor equipment will help satisfy y our customers’ fitness needs, while helping y ou meet y our business goals. T o allo w us to ser ve y ou better , please take a f e w moments to complete and retur n your warr anty registration. Y OU MA Y ALSO REGISTER ONLINE A T[…]
-
Page 42: Precor 954i
Which best describes this purc hase (check all that appl y): ❑ First Precor product ❑ Replaces a Precor product of the same type ❑ Replaces same type of product – different br and ❑ Enhancement to equipment already owned How did y ou FIRST become a ware of this pr oduct (choose only one): ❑ A uthorized Precor dealer ❑ Precor sales rep[…]
-
Page 43: Precor 954i
[…]
-
Page 44: Precor 954i
PO M C-V 49336-104, en W arranty # 3 628 6-112, en Registratio n Card# 45 622-101 , en 03 March 2008 Precor , C, CrossRamp, E FX, M, Move Beyo nd, and SmartR ate are registered trademar ks of Precor Incorporated. Crosstrainer , Quic kStart, and StretchT r ainer are trademarks of Precor Incorporated. Copyright 2008 Precor Incorporated. Specification[…]
-
Page 45: Precor 954i
C 8 42i User’s Reference Manual Commercial Cycle[…]
-
Page 46: Precor 954i
[…]
-
Page 47: Precor 954i
User’s Reference Manual: Im portant Safety Instructions 1 I MPOR T ANT S AFETY I NSTRUCTIONS Important Safety Instructions W hen using the C842i Upright or Recumbent Cycle, alw ays t ake basic precautions, including the following: • Read all instructions before usin g the cycle. These instructions are written for your s afety and to protect the[…]
-
Page 48: Precor 954i
User’s Reference Manual: Table of Contents 2 T able of Contents Important Safety Instructions ……………………………………….. 1 Obtaining Service …………………….. …………………………………………. 1 Cycle Features ………………………………………………………………… 3 Self-Powered F[…]
-
Page 49: Precor 954i
User’s Reference Ma nual: Cycle Features 3 Cycle F eatures T he cycle is equipped with certain items that , when used properly , help sustain an enjoyable wo rkout. These items include: • Self-powered features • Seat adjustments Impor tant: B efore exercising, review the Import ant Safety Instructions found at the beginn ing of this manual. S[…]
-
Page 50: Precor 954i
User’s Reference Manual: Heart Rate Features 4 Heart Rate F eatures Heart rate and SmartRate ® features are availabl e when you wear the chest strap. W hen a heartbeat is detected, the H EART RA TE display shows your heart rate and, if your age has been entered, the SmartRate LE D pu lses and indicates your t arget zone. Important Use and Sa fet[…]
-
Page 51: Precor 954i
User’s Reference Manual: Heart Rate Features 5 • After you put on the chest stra p, face the display console for a minimum of 15 seconds. This allows the receiver in the console to recognize the signal from the chest strap. If Hr blinks in the H E ART RA TE display , the cycle is detecting a signal, but has not yet determined your heart r ate. […]
-
Page 52: Precor 954i
User’s Reference Manual: Heart Rate Features 6 T he calculation used to determine yo ur maximum aerobic heart ra te is (220 minus your age). W hen you multi ply it by the percent indicated in T able 1, you can underst and the rela tionship between the puls ating LE D and your t arget heart rate. C AUTION: Y our heart rate shou ld never exceed 8 5[…]
-
Page 53: Precor 954i
User’s Reference Manual: Heart Rate Features 7 Exercise to Y our T arget Heart Rate A heart r ate receiver is an integr al part of the display so you can monitor your heart r ate wh ile exercising. If you we ar a chest strap, your heart r ate (beats per minut e) appears on the display . T he Precor web site (www .precor .co m) has sever al sugges[…]
-
Page 54: Precor 954i
User’s Reference Manua l: Display Console 8 Display Console ENTER CLEAR 1 2 3 45 6 7 8 9 0 842i TIME ELAPSED TIME REMAINING CALORIES DIST ANCE SPEED RPM 2006 Precor Incorporated, en PROGRAMS PROGRAMS MANUAL HEART RA TE PERFORMANCE INTERV AL V ARIETY WEIGHT LOSS P AUSE/ RESET Before beginning any fitness program, see your physician for a thorough […]
-
Page 55: Precor 954i
User’s Reference Manua l: Display Console 9 More Information about the Center Display T he progr am profile appears during an exercise session in the center portion of the display . Y our heart r ate appears if you are using the chest strap. Refer to Heart R ate Features . During a workout, the progr am profile r aises or lowers according to whic[…]
-
Page 56: Precor 954i
User’s Reference Manua l: Display Console 10 Column 2: R E S I ST AN CE RESIS T AN C E —displays the resist ance yo u feel while pedaling. The R ES I ST AN C E arrow keys affect the br ake and let you set a resist ance between 1 and 25. Column 3: D I ST AN CE, S PE E D, R PM DI ST ANCE —shows the linear dist ance in ei ther miles or kilometer[…]
-
Page 57: Precor 954i
User’s Reference Manua l: Display Console 11 K eypads Use the keypads to enter your work out session selections to affect what appears on the display and to est ablish the pedal resist ance. F our distinct keypads exist on the display and are discussed in this section: • Lower Display keypad and the Selection keys • Navigational keypad in t h[…]
-
Page 58: Precor 954i
User’s Reference Manua l: Display Console 12 PA U S E / R E S E T : Press this key to end t he exercise session and view your workout summary . An exception to this rule exists if you have entered the 3 0-secon d shutdown period. W hen you press P AUS E / R E SE T , the displa y returns to the banner . Refer to Pausing During a W orkout or the C […]
-
Page 59: Precor 954i
User’s Reference Manua l: Display Console 13 PR OG RAM S K eypad Diagram 7: PR OG RAM S keypad T he P RO G RAM S keypad provide s access to all the exercise progr ams. Choosing a category and pressing the associated PR O G RAM S key , accesses the menu selections. Refer to T able 2. F or a description of ea ch program, refer to Programs . Note: U[…]
-
Page 60: Precor 954i
User’s Reference Manua l: Display Console 14 Number K eypad Diagram 8: Number keypad T he number keypad has several func tions depending on what is connected to the cycle. The CLEAR and E NTE R keys provide the following functions: CL EAR: Use the C LEAR key to remove the last number being displayed. EN T ER : Use the E NTE R key to accept the n […]
-
Page 61: Precor 954i
User’s Reference Manual: Workout Options 15 W ork out Options C AUTION: Befor e beginning an y fitness program, see your physician for a complete physic a l examination. Know your physician-recommended he art rate target zone. 1. Sit on the seat and place your shoes inside the pedal str aps. 2. W hen you are comfortably situated, begin pedaling. […]
-
Page 62: Precor 954i
User’s Reference Manual: Workout Options 16 Choosing QU I CK ST ART 1. W hile the Precor banner scrolls, press QU I C KS T ART to begin the Manual Progr am. QU I C KS T ART applies t he following defaults: 2. Use the R E SI ST AN C E arrow ke ys to change the resistance. 3. Maintain a consistent pedaling speed while exercising. Find a comfort abl[…]
-
Page 63: Precor 954i
User’s Reference Manual: Workout Options 17 Selecting a P rogram 1. W hile the Precor banner scro lls, press a P R OG RAM S key and then, press O K. 2. A workout time blinks in the cent er display . Use the navigational arrow keys or the number keys to adjust the minutes (1 — 6 0) and then press OK. Note: T he workout time prompt is skipped if yo[…]
-
Page 64: Precor 954i
User’s Reference Manual: Workout Options 18 Cooling Down A fter a W ork out Incorpor ate a cool-down period into your workout to h elp lower y our heart r ate and minimize muscle stiffness or soreness. W hen you complete a program with a time limit or specified goal, you automatically enter a cool-down peri od. T he resistance is reduced by 20%. […]
-
Page 65: Precor 954i
User’s Reference Manual: Workout Options 19 Ending a W ork out C AUTION: Hold on to a handleba r when you near th e end of your exercise session. 1. Y ou can slow your pedaling w hen you complete the cool-down period, but maint ain, at minimum, 20 revolutions per minute to view your workout summary . T he workout summary appear s and shows your c[…]
-
Page 66: Precor 954i
User’s Reference Manual: Programs 20 Pr o g r a m s T his section describes the progr ams available on th e C842i Upright and Recumbent Cycles. Use this sectio n as a reference tool to better understan d each program’s purpose. Choosing a P rogram Choosing a progr am depends on your goals. If you are a beginner or returning to regular exercise,[…]
-
Page 67: Precor 954i
User’s Reference Manual: Programs 21 Manual P rogram T he Manual Progr am profile, availa ble by pressing the MAN UAL key , begins as a flat line. Y ou cont rol resistance settings using the R ES I ST AN C E arrow keys. The progr am profile reflects any changes. T he blinking column indicates your position in the progr am. T he workout time refle[…]
-
Page 68: Precor 954i
User’s Reference Manual: Programs 22 Basic H R C Program T he Basic Heart Rate Progr am, av ailable by pressing the H EART RA TE key , lets you set a t arget fo r your heart r ate. The progr am adjusts the resist ance to maint ain your heart r ate within two beats per minute of the t arget heart r ate while you exercise. T o use this program, you[…]
-
Page 69: Precor 954i
User’s Reference Manual: Programs 23 W eight Loss P rogram W ith the W eight Loss Progr am, t he workout time is fixed at 28 minutes and consists of seven 4-minute intervals. Y o u are not prompted for a workout time. Use the arrow keys to change the resistance for the rest or work interval. W hen you make c hanges, the progr am repeats the setti[…]
-
Page 70: Precor 954i
User’s Reference Manual: Programs 24 Notes:[…]
-
Page 71: Precor 954i
[…]
-
Page 72: Precor 954i
C842 i U R M 4 9335-102, e n 14 August 2006 Precor , C, CrossRamp, E FX, M, Move Beyo nd, and SmartR ate are registered trademar ks of Precor Incorporated. Crosstrainer , Quic kStart, and StretchT r ainer are trademarks of Precor Incorporated. Copyright 2006 Precor Incorporated. Specifications subj ect to change without notice. www .pr ecor . com N[…]
-
Page 73: Precor 954i
C 846 i C 8 42i Assembly Guide Commercial Recumbent Cycle C84 6i[…]
-
Page 74: Precor 954i
[…]
-
Page 75: Precor 954i
C846i/C842i Re cumbent Cycle Assembl y Guide 1 Thank you for choosing Precor . For proper installation, please read this guide thoroughly and follow the assembly inst ructions. If you do not assemble the cycle according to these guidelines, you could void the Precor Limite d Wa r r a n t y. Obtaining Service Y ou should not attempt to service the c[…]
-
Page 76: Precor 954i
C846i/C842i Re cumbent Cycle Assembl y Guide 2 Hardware Kit (not to scale) Fas t e ne r s Quantity (A) Hex head cap screw (5-inch) 2 (B) W asher (½-inch) 2 (C) Buttonhead screw (1 ³⁄₄ -inch) 4 (D) Phillips-head screw (¾-inc h) Important: Y ou can discard the Phillips-head screws because they are not used in this assembly . 3 1 — Rubber bib[…]
-
Page 77: Precor 954i
C846i/C842i Re cumbent Cycle Assembl y Guide 3 Assembly Steps Position the rubber bib (E) so the fl ared side faces the floor (as shown in the illustr ation) and slide it in to the base of the upright support. Place the upright support on the base crossbar so that the lip of the rubber bib rests on the crossbar an d is para llel to the floor . Have[…]
-
Page 78: Precor 954i
C846i/C842i Re cumbent Cycle Assembl y Guide 4 Rest the seat pad against the seat fr ame posts. Insert the four buttonhead screws (C) and finger tighten. C A UTI ON: It is critical that yo u use your fi nger s to thread the four buttonhead screws before alternately tightening them with the hex k ey (F). T he nut inserts on the bac k of the seat pad[…]
-
Page 79: Precor 954i
C846i/C842i Re cumbent Cycle Assembl y Guide 5 Level the cycle. Before allowing users on the cycle, make sure it does not wobble from side to side. T o remove any side-to-side move ment, take the f ollowing step s. 1. Ask your assist ant to tip the unit on its side. 2. Locate the two height adjust ers at the rear of the unit. 3. Rota te the height […]
-
Page 80: Precor 954i
©200 7 Precor Incorporated www .precor .com C84 6i/C8 42i Recumbent AG 49102-103, en 19 February 200 7 Precor Incorporated 20031 142nd Avenue NE P. O . B o x 7 2 0 2 W o odinville, WA USA 9 8 0 7 2-4002[…]

Commercial Treadmill Owner’s Manual
COMMERCIAL PRODUCTS DIVISION

COMMERCIAL PRODUCTS DIVISION
IMPORTANT SAFETY INSTRUCTIONS
When using the C956i or C954i treadmill, always follow basic precautions, including the
following:
• To ensure your safety and to protect the unit, read all the instructions before assembling and using the treadmill.
• To ensure the proper use and safety of the treadmill, make sure that all users read
this manual. Please make this manual a part of your club’s training program.
Remind the club users that before beginning any fitness program, they should
obtain complete physical examinations from their physicians.
Il est conseillé de subir un examen médical complet avant d’entre-prendre tout
programme d’exercise. Si vous avez des étourdissements ou des faiblesses, arrêtez
les exercices immédiatement.
DANGER —
WARNING —
• Do not allow children or those unfamiliar with its operation on or near the treadmill.
Do not leave children unsupervised around the treadmill.
• Never leave the treadmill unattended. Unplug the unit from the power outlet when it
is not in use, before cleaning it, and before putting on or taking off parts. Do not
adjust the running belt when someone is standing on the unit.
• Assemble and operate the treadmill on a solid, level surface. Locate the treadmill a
few feet from walls or furniture. (The minimum space requirement is one meter by two
meters directly behind the running belt.) Check the unit before each use and verify
that all fasteners are secure. Maintain the treadmill in good working condition.
• Use the treadmill only for its intended use as described in this manual. Do not use
accessory attachments that are not recommended by the manufacturer; such attachments might cause injuries.
• If you purchased the optional chest strap, review the guidelines found in the
Heart Rate Option Owner’s Manual
• Never operate the unit if it is damaged, if it is not working properly, if it has been
dropped, or if it has been dropped in water. Return the unit to a service center for
examination and repair.
• Keep all electrical components such as the motor, power cord, and I/O switch, away
from liquids to prevent shock. Do not set anything on the handrail, display console,
or hood. Place liquids, magazines and books in the appropriate receptacles.
• Keep the power cord away from heated surfaces.
• Do not operate the treadmill where aerosol (spray) products are being used or where
IMPORTANT SAFETY INSTRUCTIONS
oxygen is being administered.
• Do not use outdoors.
• The security clip must be attached at waist level prior to beginning a workout. A
cord connects the security clip to the red STOP button on the console. If a user
encounters difficulties, a strong tug on the security cord or a quick tap on the red
STOP button will stop the running belt.
To reduce the risk of electrical shock, always unplug the unit from its
power source before cleaning or performing any maintenance tasks.
To reduce the risk of burns, fire, electric shock, or injury to
persons, take the following precautions:
that is supplied with that option.
Precor
page 2
SAVE THESE INSTRUCTIONS

COMMERCIAL PRODUCTS DIVISION
IMPORTANT SAFETY INSTRUCTIONS
• Use care when getting on or off the treadmill. Use the stationary handrail and straddle
the running belt. Step onto the running belt when the speed is at or below 1 mph
(1.5 kph).
• Never step off the treadmill while the running belt is moving. Keep your body and
head facing forward. Never attempt to turn around on the treadmill.
• Never turn ON the treadmill when someone is standing on the machine.
• Never block the air openings on the hood while operating the treadmill. Keep the air
openings clean and free of lint, hair, or anything that might impeded the free flow of
air. Never drop or insert objects into any opening.
• Wear proper exercise clothing and shoes during a workout—no loose clothing. Tie
long hair back. Keep all loose towels away from the running surface. The running
belt will not stop immediately if an object becomes caught in the belt or rollers.
• Do not rock the unit. Do not stand on the display console or hood.
• Do not overexert yourself or work to exhaustion. If you feel any pain or abnormal
symptoms, stop your workout immediately and consult your physician.
PASSWORD SECURITY
To help prevent unauthorized use, the treadmill is equipped with password protection. The
password involves entering three keys in sequence. If the correct keys are not pressed within
two minutes, further access is denied and the running belt will not move. For more information, refer to
Club Information
.
MAXIMUM USER WEIGHT
You should not allow runners over 160 kg or walkers heavier than 225 kg on the treadmill.
SAFETY APPROVAL
When identified with the ETL-c logo, the treadmill has been tested and conforms to the requirements of CAN/CSA-E-335-1/3-94, Safety of Household and Similar Electrical Appliances.
IMPORTANT SAFETY INSTRUCTIONS
SAVE THESE INSTRUCTIONS
page 3
COMMERCIAL PRODUCTS DIVISION
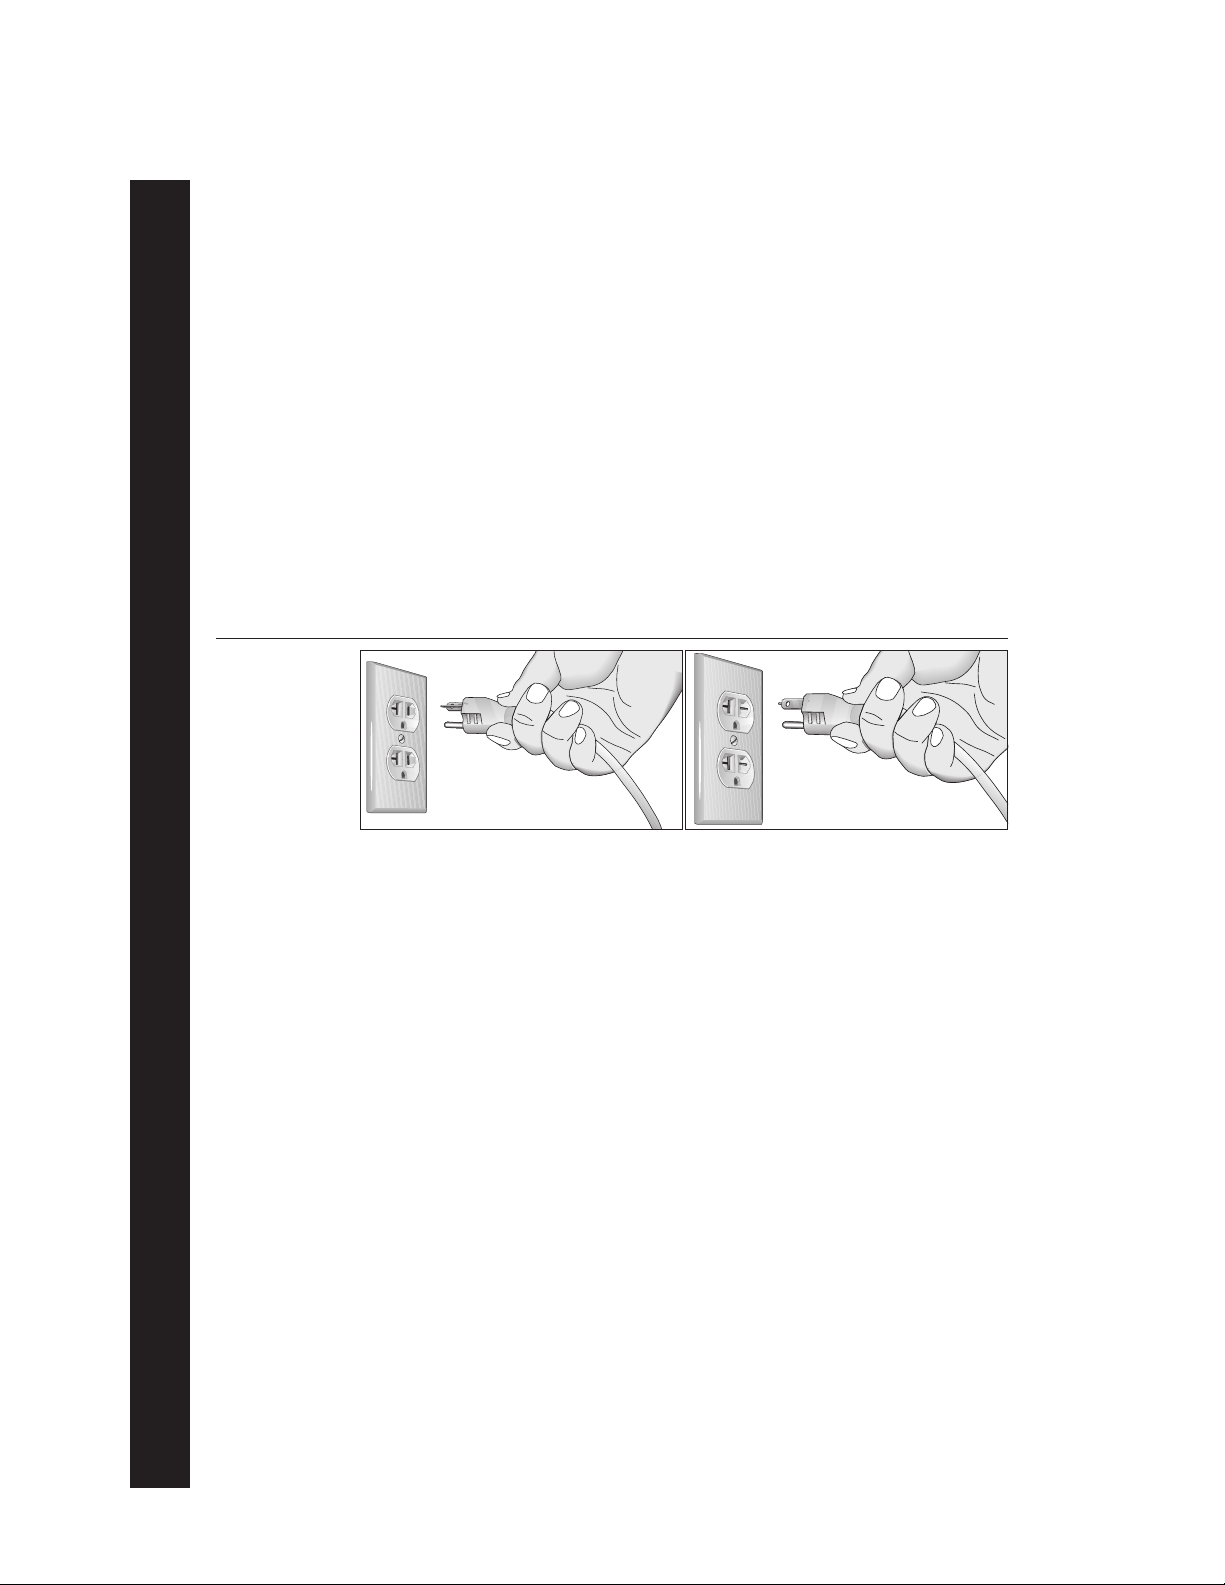
GROUNDING INSTRUCTIONS
The C956i or C954i treadmill must be grounded. If it should malfunction or break down, grounding provides a path of least resistance for electric current which reduces the risk of electrical
shock. The C956i or C954i treadmill is equipped with a power cord having an equipment-grounding conductor and a grounding plug. The plug must be inserted into an appropriate outlet that is
properly installed and grounded in accordance with all local codes and ordinances Refer to
Diagram 1. If you do not follow these
Warranty.
Grounding Instructions
, you could void the Precor Limited
DANGER —
cian or service person if you are in doubt as to whether the treadmill is properly grounded.
Do not modify the plug provided with the treadmill or use an adapter. If the plug doesn’t
fit the outlet, get a proper outlet installed by a qualified technician.
Diagram 1
Correct power
outlet for U.S.
Markets:
120-volt and
240-volt plugs.
120-volt grounding plug 240-volt grounding plug
120V Units and 240V Units Designated for U.S. Markets
The C956i or C954i treadmill must be connected to a dedicated, grounded circuit. A 20 amp
dedicated circuit is recommended.
Improper connection of the equipment-grounding conductor can
result in a risk of electric shock. Check with a qualified electri-
IMPORTANT SAFETY INSTRUCTIONS
page 4
SAVE THESE INSTRUCTIONS

COMMERCIAL PRODUCTS DIVISION
Table of Contents
Important Safety Instructions ………………………………………………………. 2
Password Security …………………………………………………………………………………… 3
Maximum User Weight …………………………………………………………………………….. 3
Safety Approval ………………………………………………………………………………………. 3
Grounding Instructions ……………………………………………………………………………..4
Radio Frequency Interference (RFI) ……………………………………………………………7
European Applications …………………………………………………………………………….. 7
Obtaining Service ……………………………………………………………………………………. 8
About this Manual ……………………………………………………………………………………. 8
Unpacking the Treadmill ………………………………………………………………. 9
Standard Equipment ………………………………………………………………………………… 9
Other Equipment …………………………………………………………………………………….. 9
Hardware Kit ………………………………………………………………………………………….10
Setting Up the Treadmill……………………………………………………………… 11
Installation Requirements ……………………………………………………………………….. 11
Additional tools needed …………………………………………………………………………..11
Assembly Instructions …………………………………………………………………………….11
Turning the Unit ON and OFF …………………………………………………………………..21
Checking the Alignment of the Running Belt ………………………………………………21
Club Information………………………………………………………………………… 22
Treadmill Location within the Club ……………………………………………………………. 22
Weight Limitations ………………………………………………………………………………….22
Changing the Club Settings ……………………………………………………………………..22
Selecting the Language ………………………………………………………………………….. 24
Determining the Units of Measure …………………………………………………………….24
Selecting Password Protection …………………………………………………………………24
Determining the Club SPEED Limit …………………………………………………………..25
Setting a Workout Time Limit ……………………………………………………………………25
Setting a Pause Time Limit ………………………………………………………………………25
Setting a Cool Down Time Limit ………………………………………………………………. 25
Removing or providing a fitness test ………………………………………………………… 26
Changing the C956i Custom Programs ……………………………………………………..26
Viewing the Odometer, Hours of Use, Software
Version and Error Log ……………………………………………………………………………. 27
Using CSAFE Standard Equipment ………………………………………………………….. 28
page 5

COMMERCIAL PRODUCTS DIVISION
Table of Contents
The C956i/C954i Display …………………………………………………………….. 29
Features on the Display Console …………………………………………………………….. 29
Top Display Windows……………………………………………………………………………… 30
Upper Display (C956i only)………………………………………………………………………30
Center Display (C956i and C954i) …………………………………………………………….30
Keys on the Display Console …………………………………………………………………… 32
Keypad Tips………………………………………………………………………………………….. 32
Exercising on the Treadmill ………………………………………………………… 36
Using the Security Clip ……………………………………………………………………………36
Entering a Password ……………………………………………………………………………… 36
Pause, Cool Down, Summary and Exit Features ……………………………………….. 36
Quick Steps to Working Out ……………………………………………………………………. 38
Workout Tips ………………………………………………………………………………………… 38
Cooling Down After a Workout ………………………………………………………………… 40
Programs…………………………………………………………………………………… 41
The Heart Rate Feature …………………………………………………………………………. 41
Using the SmartRate Feature …………………………………………………………………..41
Manual Mode and the QUICKSTART Key ………………………………………………….43
C956i Track Course ………………………………………………………………………………..43
Programs with Preset Inclines …………………………………………………………………. 43
C956i Interval Program ………………………………………………………………………….. 44
C956i Custom Programs …………………………………………………………………………45
Random Program …………………………………………………………………………………..45
C956i Heart Rate Program ……………………………………………………………………… 45
C956i Weight Loss Program ……………………………………………………………………. 46
C956i Goal-based Programs …………………………………………………………………… 47
Fitness Test ………………………………………………………………………………………….. 47
Fitness Test Guidelines ……………………………………………………………………. 47
Maintenance………………………………………………………………………………. 49
Inspection ……………………………………………………………………………………………..49
Cleaning the Equipment ………………………………………………………………………….49
Aligning and Adjusting the Running Belt …………………………………………………… 50
Storing the Chest Strap …………………………………………………………………………..51
Servicing the Treadmill …………………………………………………………………………… 51
Long Term Storage …………………………………………………………………………………51
Warranty Registration Card …………………………………………………………………….. 53
Precor Limited Warranty ………………………………………………………………………….55
Specifications …………………………………………………………………………… back cover
page 6

COMMERCIAL PRODUCTS DIVISION
RADIO FREQUENCY INTERFERENCE (RFI)
Federal Communications Commission Part 15
The treadmill has been tested and found to comply with:
• The IEC EMC Directive (international electromagnetic compatibility certification)
• The limits for a Class A digital device, pursuant to Part 15 of the FCC Rules.
These limits are designed to provide reasonable protection against harmful
interference in a commercial installation. The treadmill generates, uses, and
can radiate radio frequency energy and, if not installed and used in accordance with the owner’s manual instructions, may cause harmful interference
to radio communications. Operation of the treadmill in a residential area is
likely to cause harmful interference. If this occurs, the user will be required to
correct the interference at his or her own expense.
CAUTION —
Per FCC rules, changes or modifications to the
treadmill not expressly approved by Precor, could
void the user’s authority to operate the equipment.
Canadian Department of Communications
This digital apparatus does not exceed the Class A limits for radio noise emissions
from digital apparatus set out in the Radio Interference Regulations of the Canadian
Department of Communications.
Le présent appareil numérique n’émet pas de bruits radioéélectriques dépassant les
limites applicables aux appareils numériques de la Class A prescrites dans le
Règlement sur le brouillage radioélectrique édicté par le ministére des Communications du Canada.
EUROPEAN APPLICATIONS
This treadmill is a Class S/B certified machine according to EN957-1,6 standards.
This treadmill conforms to the requirements of the European Council Directive
89/336/EEC,
standards:
EN55022, Limits & Methods of Measurement of Radio Interference, Information
Technology Equipment. Per the standard, the treadmill is a Class A product. In a
domestic environment, this product may cause radio interference, in which case
the user is responsible to take adequate measures to alleviate the interference.
Electromagnetic Compatibility
and has been tested to the following
EN50082-1, Generic Immunity Standard for Residential, Commercial and Light
Industrial Products.
This treadmill additionally conforms to the requirements of the European Council
Directive 73/23/EEC,
standard:
IEC 335-1, Safety of Household and similar Electrical Appliances.
Low Voltage Directive
and has been tested to the following
page 7

COMMERCIAL PRODUCTS DIVISION
OBTAINING SERVICE
Do not attempt to service the treadmill yourself except for the maintenance tasks
described in this manual. The treadmill does not contain any user-serviceable parts.
For information about product operation or service, visit the Precor Web Site at
www.precor.com or contact an authorized Precor Commercial Products Customer
Support Representative at 1-888-665-4404.
To help customer support personnel expedite your call, have your serial number
available. The serial number can be found on the shipping container or on the label
near the power receptacle. If you have any questions regarding the treadmill, use
the model and serial numbers whenever you call a Precor dealer or Commercial
Products Customer Support Representative.
Model number: C956i or C954i
Unit number: _____ Serial number: ______________________________
Unit number: _____ Serial number: ______________________________
Unit number: _____ Serial number: ______________________________
ABOUT THIS MANUAL
This manual includes instructions for installing and using the treadmill. To maximize
the use of the treadmill, please study this manual thoroughly. The manual uses the
following conventions for identifying special information:
Note: Contains additional information.
Important: Indicates information to which you should pay special attention.
CAUTION: Indicates steps or information necessary to prevent harm to your-
self or damage to the equipment.
WARNING:
equipment and injuries to yourself.
DANGER:
Provides instructions to prevent electrical damage to the
Indicates steps you must take to prevent electrical shock.
page 8

COMMERCIAL PRODUCTS DIVISION
Unpacking the Treadmill
Thank you for purchasing the Precor C956i or C954i treadmill. Built to the exacting
standards of the health club environment, the treadmill is intended for commercial
use and can withstand the rigors of daily club use with little maintenance.
Important: Before using the treadmill, we urge you to familiarize yourself and
your staff with the entire Owner’s Manual. Understanding this manual will help
you and your customers use the treadmill safely and successfully.
CAUTION: This unit weighs over 350 pounds (158 kilograms). To prevent injury
to yourself or damage to the equipment, obtain appropriate assistance before
removing the unit from the pallet.
The treadmill is carefully inspected before shipment so it should arrive in good
operating condition. Precor ships the unit in the following pieces:
❑ Base frame assembly with hood ❑ Two handrails (left and right)
❑ Two upright supports ❑ Hardware kit
❑ Display console with cable ❑ Owner’s Manual
If any items are missing, refer to
STANDARD EQUIPMENT
The treadmill incorporates the Precor SmartRate® and Heart Rate features into its
display console. Devices, such as FitLinxx®, that are CSAFE compatible, can also
be attached.
The Precor heart rate feature is standard on the C956i and provides electrode
strips, called “grips,” on the center handrail. When a user grasps the metal
portion of the center handrail, a heart rate is transmitted to the receiver.
Note: If a user does not wish to use the touch-sensitive hand grips, an optional
chest strap can be purchased and worn. The chest strap transmits the user’s
heart rate and it appears as a number in the Heart Rate display.
Important: The Precor “touch” heart rate is not available on the C954i treadmill,
but the SmartRate and heart rate features will appear on the display if the user
wears the optional chest strap.
Password security is standard on the treadmill. Club patrons have two minutes to
enter a specific key sequence before the running belt will move. For more information, refer to
Club Information
OTHER EQUIPMENT
Obtaining Service
.
.
Optional equipment available through your dealer includes:
• Chest strap.
• Long handrails.
If you are interested in obtaining Precor option kits for your unit, check with your
dealer. For customer support, see
Obtaining Service
.
page 9
COMMERCIAL PRODUCTS DIVISION
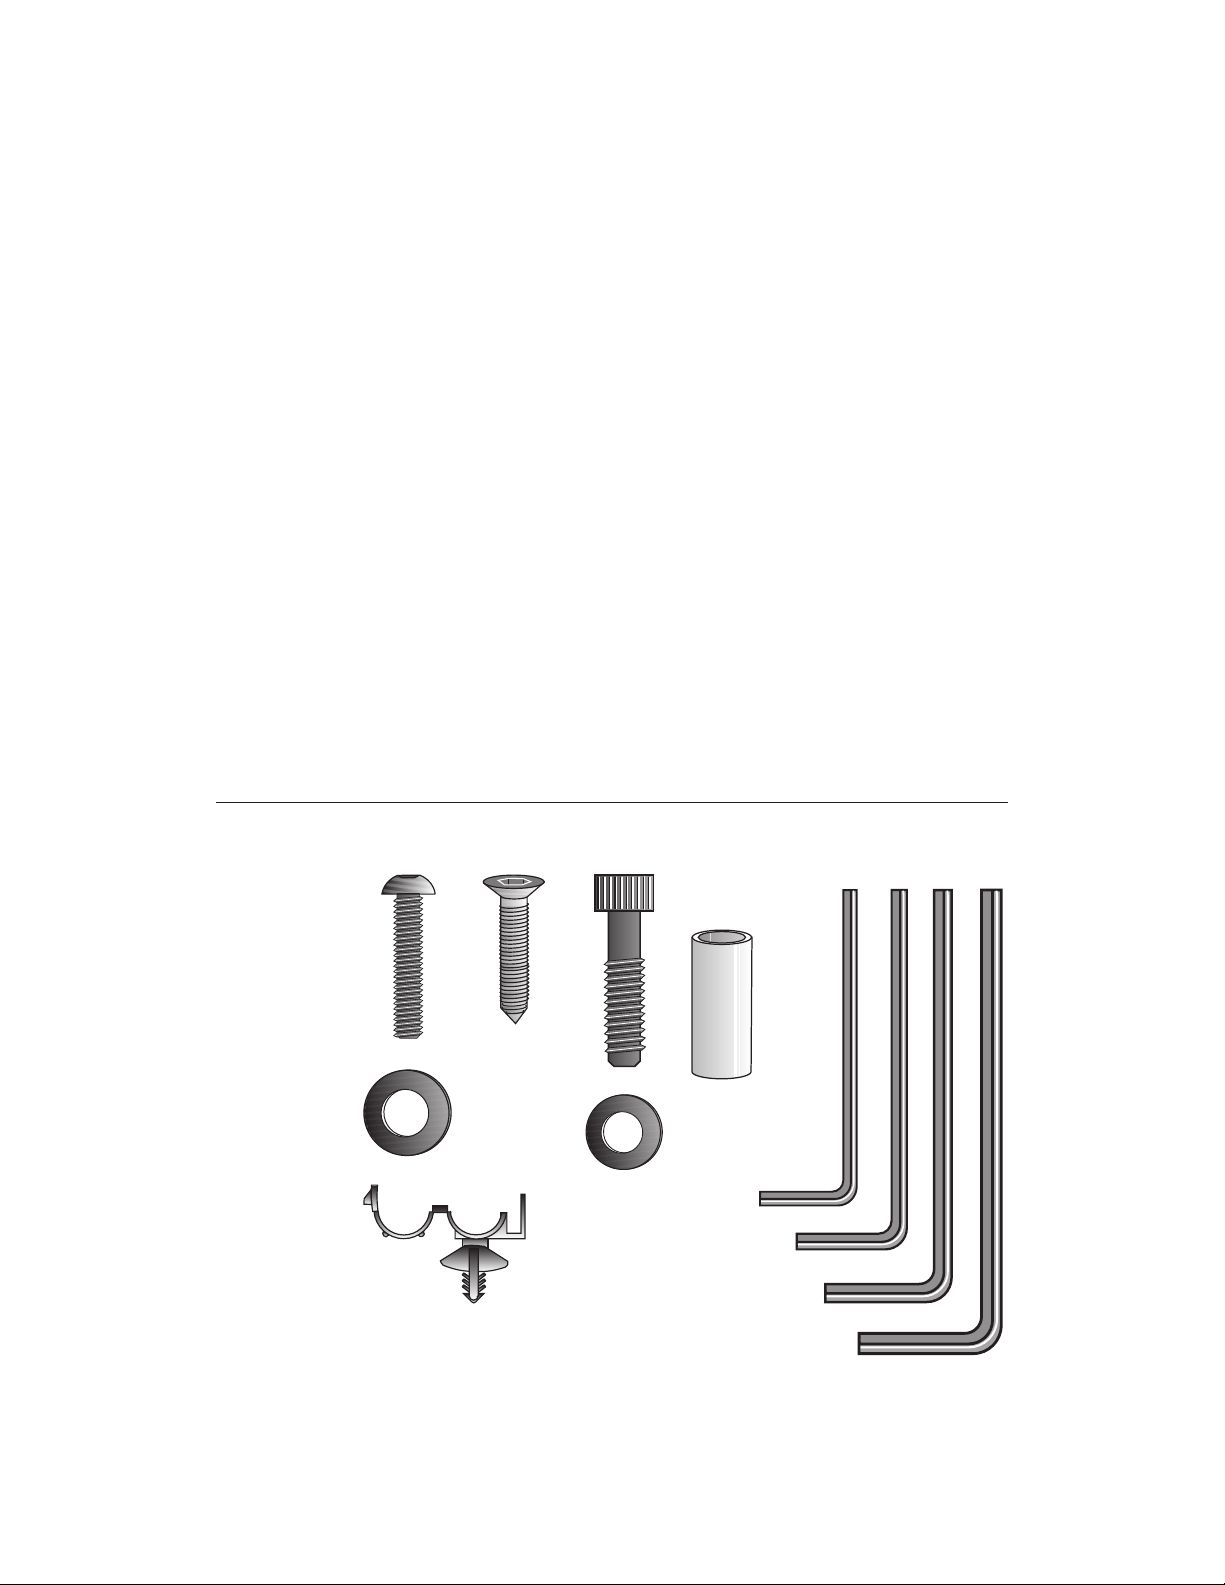
HARDWARE KIT
After unpacking the treadmill, open the hardware kit and make sure that you have
the following items shown in Diagram 2.
❑ (A) twelve 1-inch buttonhead hex screws
❑ (B) sixteen stainless steel washers — place on 1-inch screws
❑ (C) four ⁵⁄₈-inch flat head hex screws — attach to upper handrails
❑ (D) four 3¹⁄₂-inch socket head screws — install upright supports
❑ (E) four black washers — fasteners for upright supports
❑ (F) four barrel spacers — place on 3¹⁄₂-inch socket head screws after washers
❑ (G) ⁵⁄₃₂-inch hex key — attach handrails to display frame
❑ (H) ³⁄₁₆-inch hex key — attach hood, mount upright supports, attach display
and handrails to base frame
❑ (J) ¹⁄₄-inch hex key — attach upright supports to base mounting brackets
Diagram 2
❑ (K) ⁵⁄₁₆-inch hex key — adjust running belt
❑ (L) six power cord clips
Hardware kit (not shown to scale).
A
C
D
B
E
L
F
G
H
J
K
page 10
Note: After assembling the treadmill, be sure to store the hex keys in a secure
place. The tools are used for specific maintenance procedures that are described
in this manual.

COMMERCIAL PRODUCTS DIVISION
Setting Up the Treadmill
You do not need any special knowledge or experience to set up the treadmill.
However, because of its size and weight, you will need to obtain assistance.
INSTALLATION REQUIREMENTS
Follow these installation requirements when installing the treadmill.
If you do not
install the treadmill according to the following guidelines, you could void the Precor
limited warranty.
• Set up the treadmill on a solid, flat surface. Unpack and assemble the tread-
mill close to where you plan to use it. Make sure that the flat surface under the unit
is smooth and level. A level unit is required for the user’s safety and proper operation.
• Provide ample space around the unit. It is important to keep the area
around the treadmill open and free from encumbrances. The minimum space
requirement needed for user safety and proper maintenance is one meter
by two meters square, directly behind the running belt.
• Fill out and mail the limited warranty card. The serial number can be found
on the shipping container or on the label near the power receptacle. Write the
serial number onto the Precor limited warranty card found on the back cover of
this manual and in the
• Use the appropriate voltage, dedicated circuit, and grounding as speci-
fied on the treadmill. The treadmill is available in both 120-volt and 240-volt
models. Refer to the treadmill’s identification label to determine the voltage
that your treadmill requires. Both the 120-volt and 240-volt models require a
dedicated circuit. A 20 amp circuit is recommended.
CAUTION: Do not use a non-grounded outlet or transformer. Do not
remove or otherwise bypass the plug with an adapter. Electrical damage
can occur and void the Precor limited warranty if the treadmill is
connected to an improper power source. Refer to
Obtaining Service
section.
Grounding Instructions
.
ADDITIONAL TOOLS NEEDED
Obtain the following tools
❑ Wire cutter ❑ Medium weight string
❑ Bubble level ❑ ¹⁄₂-inch box end wrench
❑ SAE standard socket set with a ratchet or 8-inch crescent wrench
before
ASSEMBLY INSTRUCTIONS
Take the following steps to assemble the treadmill.
CAUTION: To avoid injury and ensure your safety, get assistance
before moving the treadmill off the pallet. Do not drop the unit.
1. Think about the site and location. Have your assistants help place the shipping
carton close to the location where you plan to use the treadmill. Break down the
side walls of the shipping carton so that they lie flat. Remove the loose contents.
assembling the treadmill.
page 11
COMMERCIAL PRODUCTS DIVISION
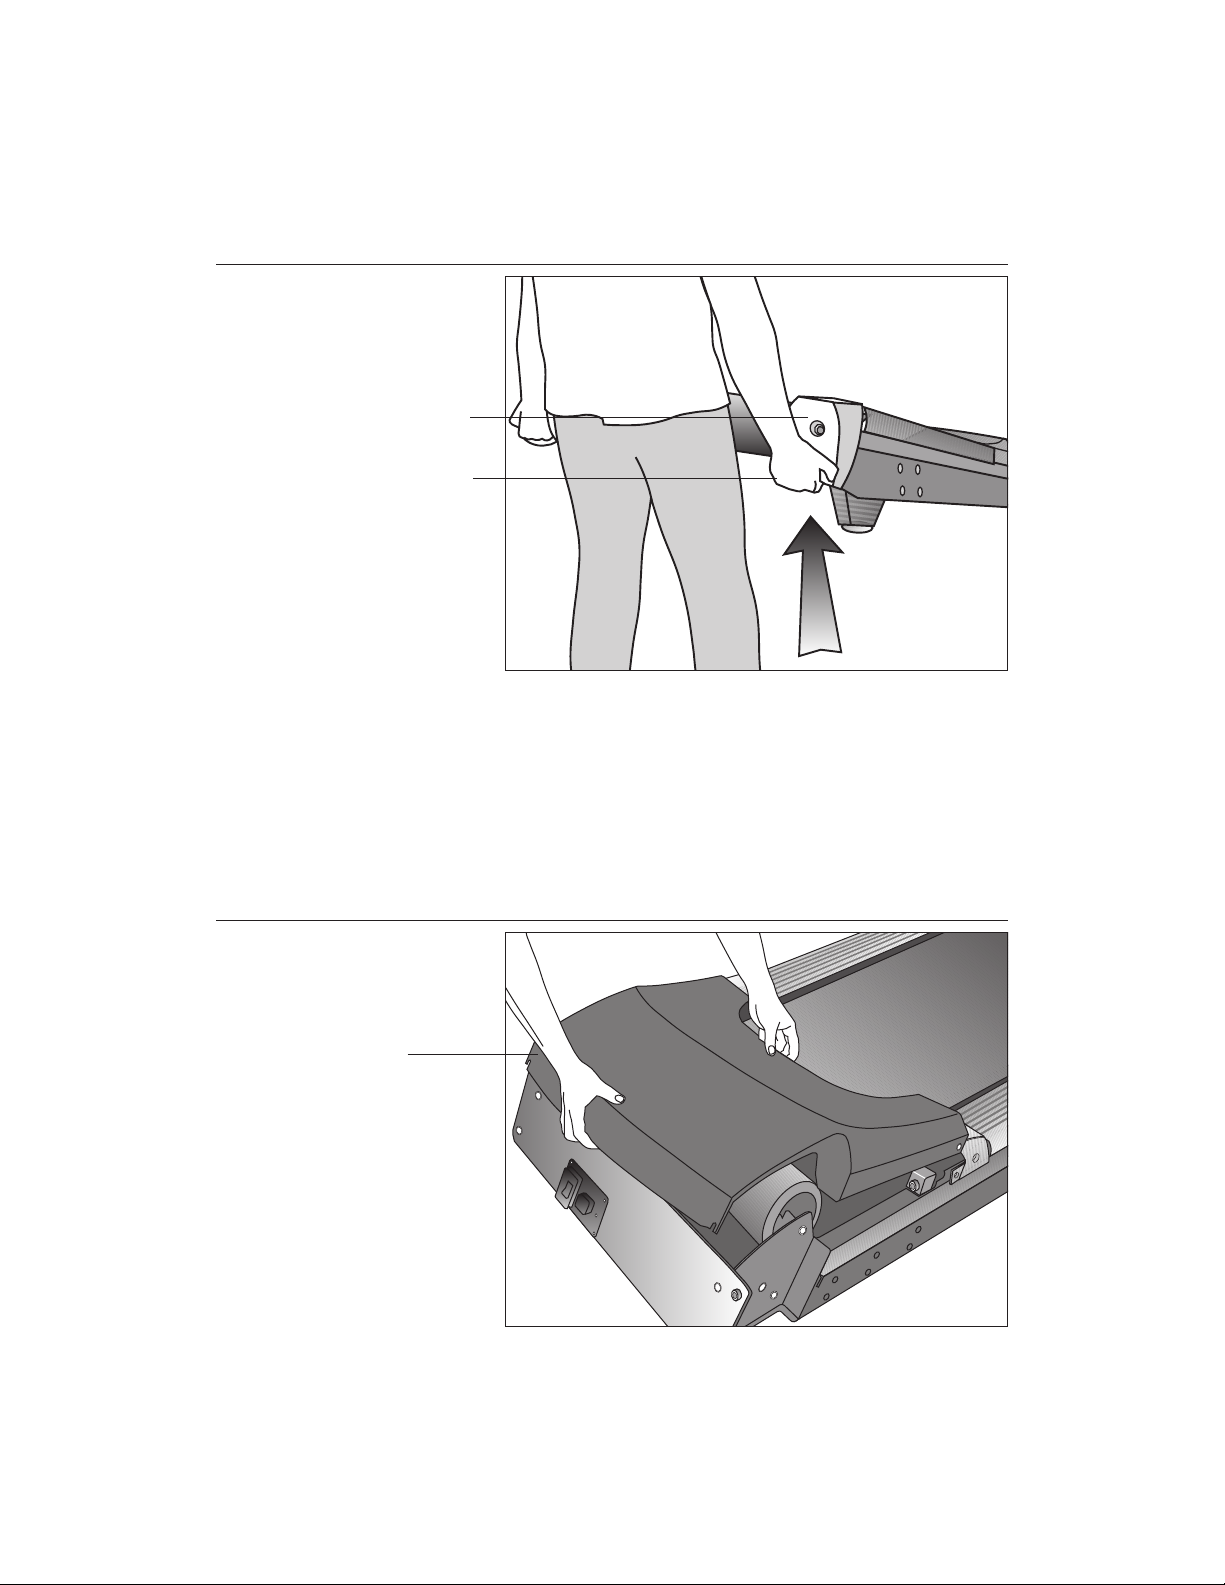
Diagram 3
Lift the rear of
the unit and roll
it to its assembly
location.
Rear end cap
Lift the unit by
grasping the
hand holds
inside the rear
end caps.
2. Make sure that the power switch is OFF. Check the ON/OFF power switch
on the front of the treadmill. Place the switch in the O (OFF) position. Make
sure that the treadmill is not plugged into a power source.
3. Move the treadmill. Diagram 3. Grasp the hand holds inside the rear end
caps and use proper lifting techniques to lift the rear end so that you can roll
the treadmill on its front wheels. To avoid injury to yourself or damage to the
unit, ask for help in maneuvering the treadmill.
Diagram 4
page 12
Remove the
hood.
Hood
4. Remove the hood. Diagram 4. Gently, lift the hood off the treadmill and set it
aside.
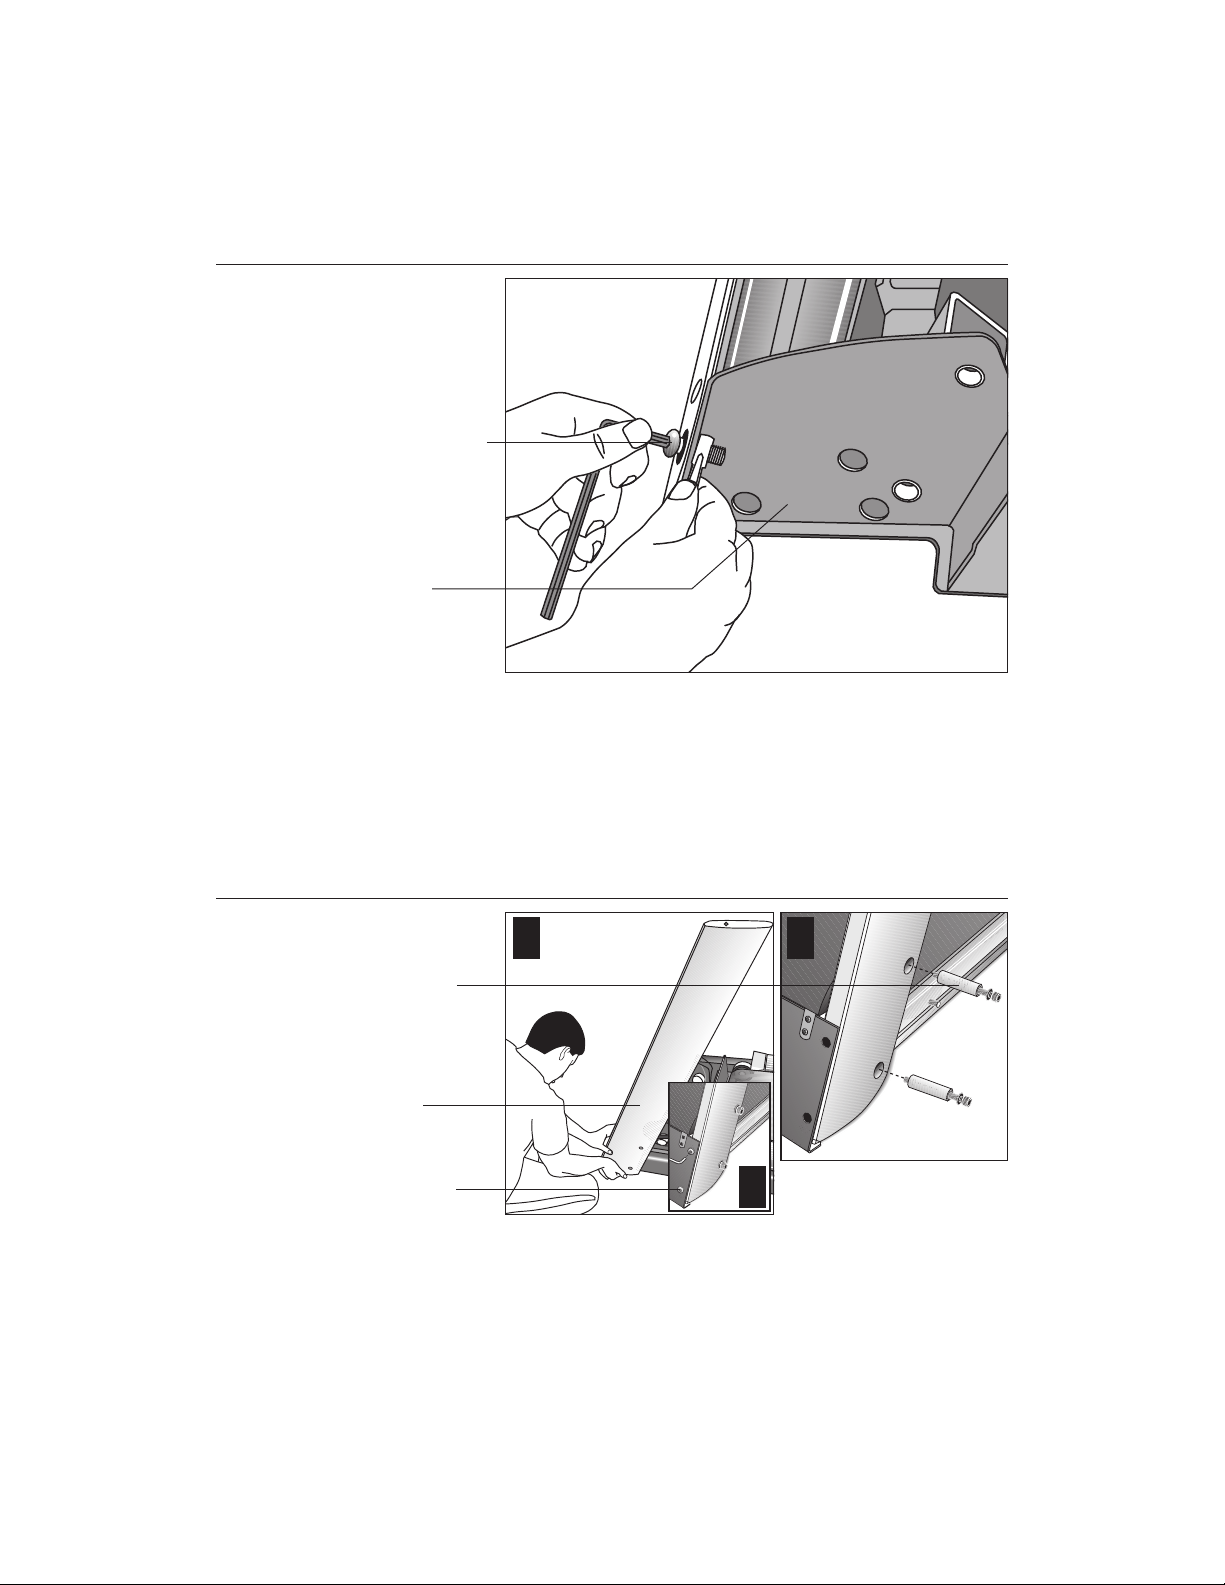
COMMERCIAL PRODUCTS DIVISION
Diagram 5
Remove the
shipping
fasteners from
the left side front
panel.
Shipping
fasteners found
on left and right
sides of the front
panel.
Left side
mounting bracket
5. Attach the left side upright support. Diagram 5. Take the following steps.
a. Remove the shipping fasteners from the front panel. With the supplied
hex key and a ½-inch box end wrench, loosen and remove the two bolts
and nuts on the left side of the front panel. These fasteners hold the front
panel in place during shipping. (The front panel will drop slightly when
you remove the fasteners.) Discard the nuts, but keep the bolts.
Diagram 6
Secure the left
upright support.
Screws (D),
washers (E),
and barrel
spacers (F)
Left upright
support
Shipping
fasteners with
washers (B)
1 2
3
b. Attach the left upright support by placing it inside the base mount and align-
ing the mounting holes. Obtain two long sockethead screws (D), washers (E)
and barrel spacers (F) from the Hardware kit. Place a washer and barrel
sleeve on each screw and insert the fasteners through the side of the upright
support and into the base mounts. Use the ¼-inch hex key to secure the
screws, but leave room for adjustments. See Diagram 6, #1 and #2.
c. Remove two stainless steel washers (B) from the Hardware kit and place
a washer on each of the two shipping fasteners. Reinsert the two shipping
fasteners removed in step 5a, and finger tighten. See Diagram 6, #3.
page 13
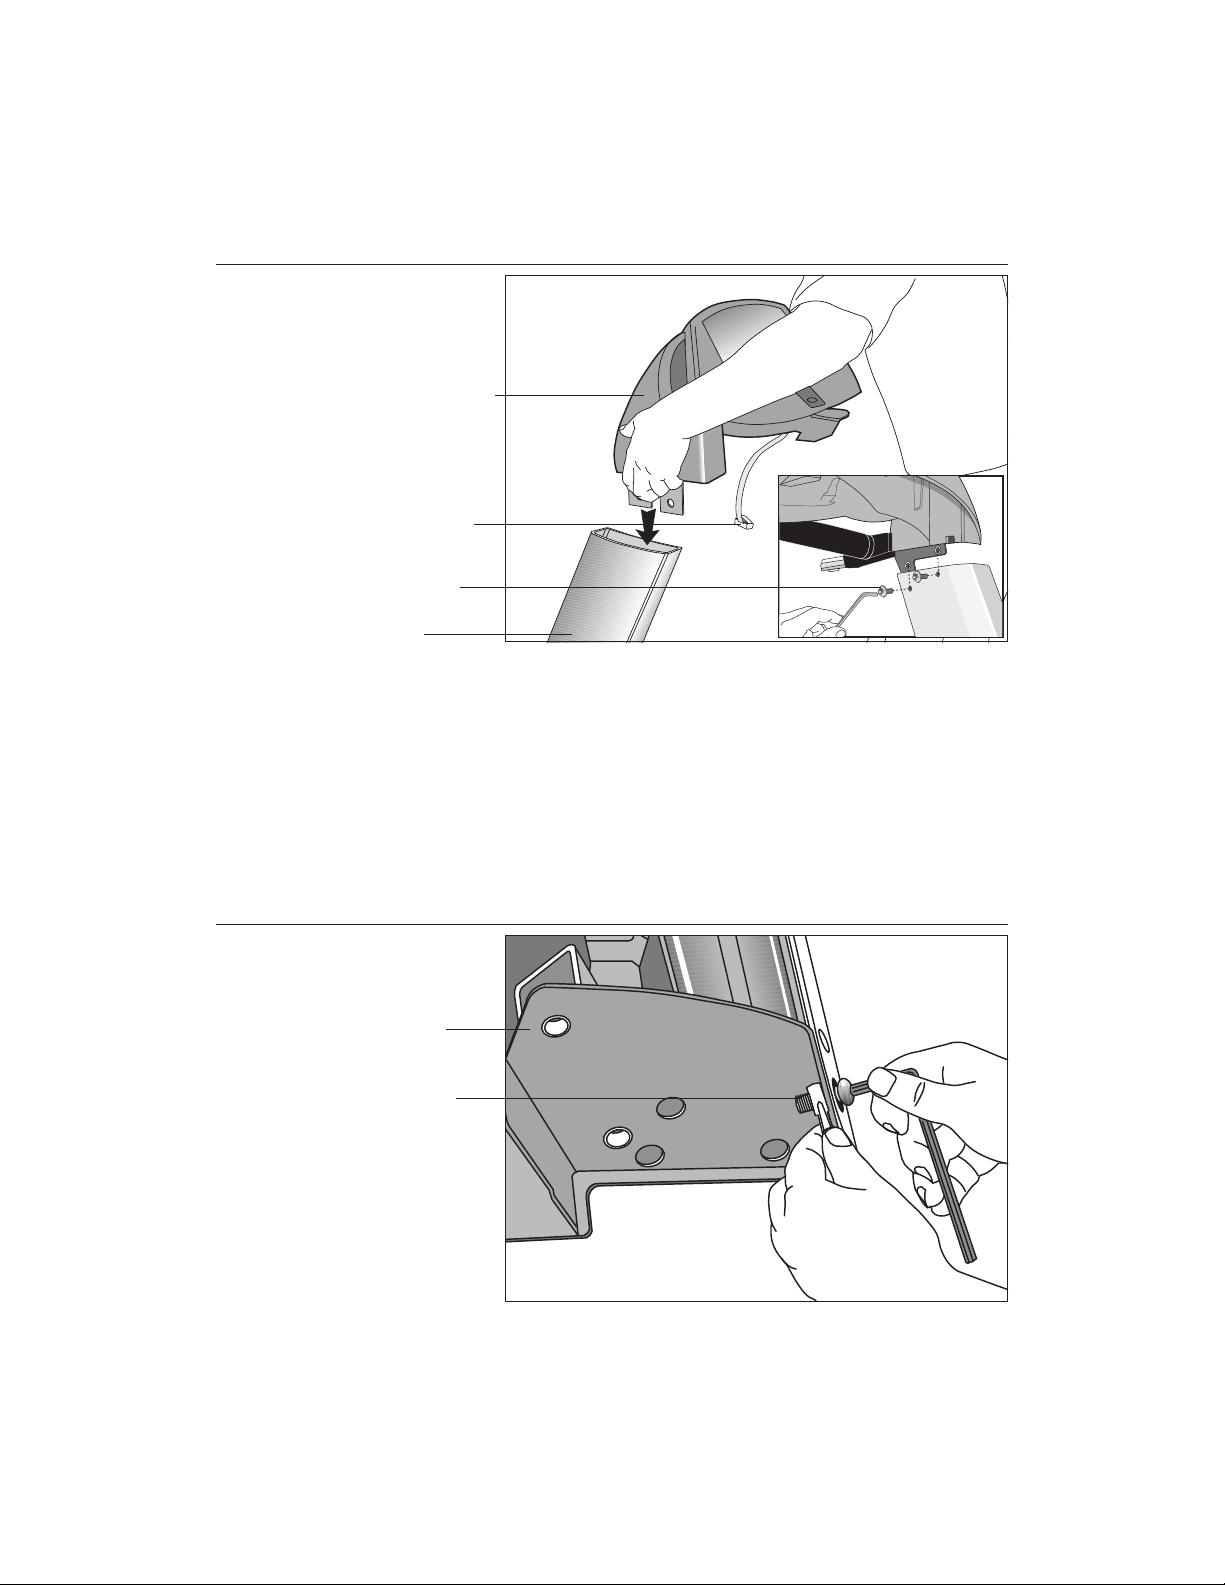
COMMERCIAL PRODUCTS DIVISION
Diagram 7
Attach the
display console
to the left upright
support.
Display console
Display cable
Screws (A) with
washers (B)
Left side upright
support
CAUTION: To avoid damage to the display cable, read the following steps
carefully. Damage to the cable due to improper assembly is not covered
by the Precor limited warranty.
6. Secure the display console to the left upright support. Diagram 7.
Remove any tape or wire ties that secure the display cable. Unwrap the
cable to remove kinks. Ask an assistant to hold the display console in place
while you attach it to the left upright support using two buttonhead screws
(A) with washer (B). Finger tighten.
Diagram 8
page 14
Remove right
side front panel
screws.
Right side
mounting bracket
Front panel
fasteners
7. Prepare to attach the right side upright. Diagram 8. Take the following steps:
a. Remove the shipping fasteners from the right front panel. Follow the same
process as in step 5a. With the supplied hex key and a ¹⁄₂-inch box end wrench,
loosen and remove the two bolts and nuts on the right side of the front panel.
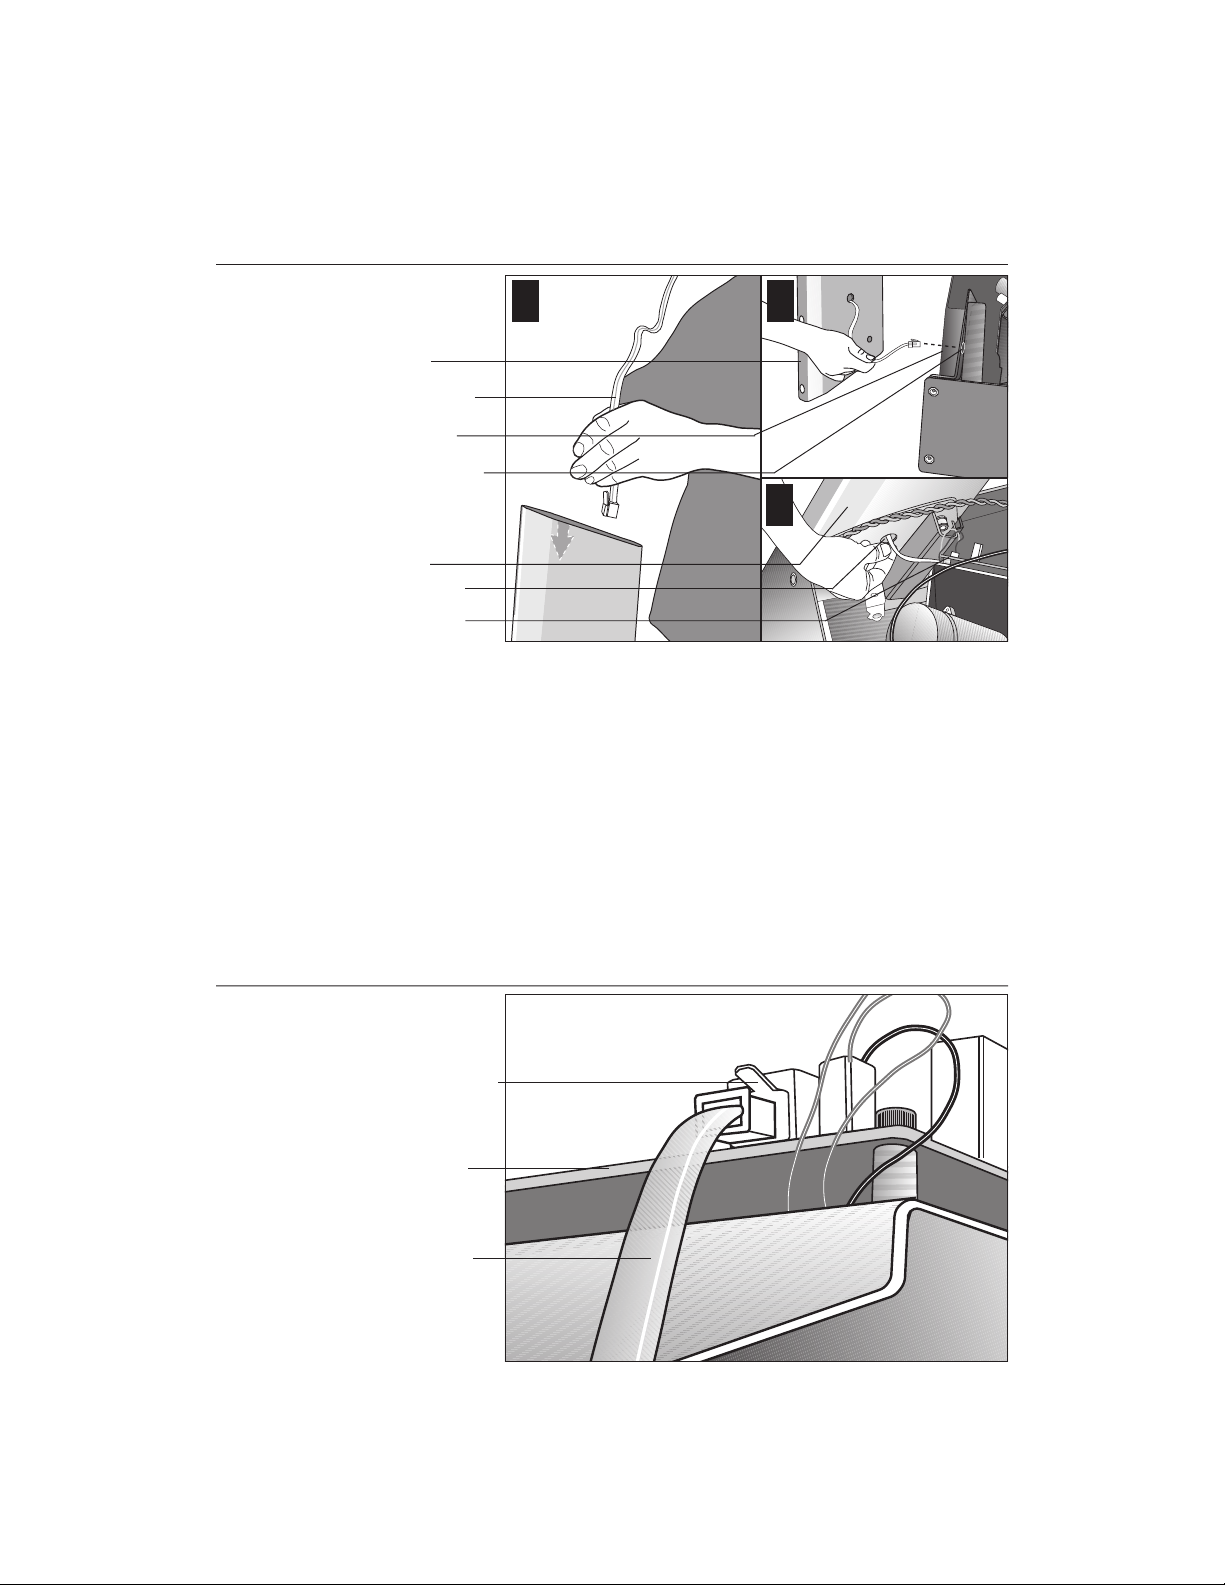
COMMERCIAL PRODUCTS DIVISION
Diagram 9
Route the cable.
1
Right upright
support
Display cable
Base frame
Base mounting
bracket
Right upright
support
Bracket hole
Lower board
2
3
b. Route the display cable through the right upright support. Ask an assistant to
hold the upright support close to the right side mounting bracket. Route the
cable through the upright support (see Diagram 9, #1) and pull it out of the
large hole on the side of the support near its base. Diagram 9, #2.
Note: If you encounter difficulties with the cable, try tying a string to the
end of the cable. Attach a washer to the opposite end for weight and route
it through the upright support.
Diagram 10
c. Ask your assistant to position the right upright support inside the base mount-
ing bracket and align the mounting holes as you pull the cable through the
mounting bracket hole in the base frame. See Diagram 9, #3.
Connect the
cable.
Cable connector
Lower board
Display cable
d. Plug the cable connector into its receptacle on the lower board near the
motor. See Diagram 10. A definite “click” is heard when the cable is properly
attached. If you do not hear and feel the connector snap into place, reinsert it.
page 15
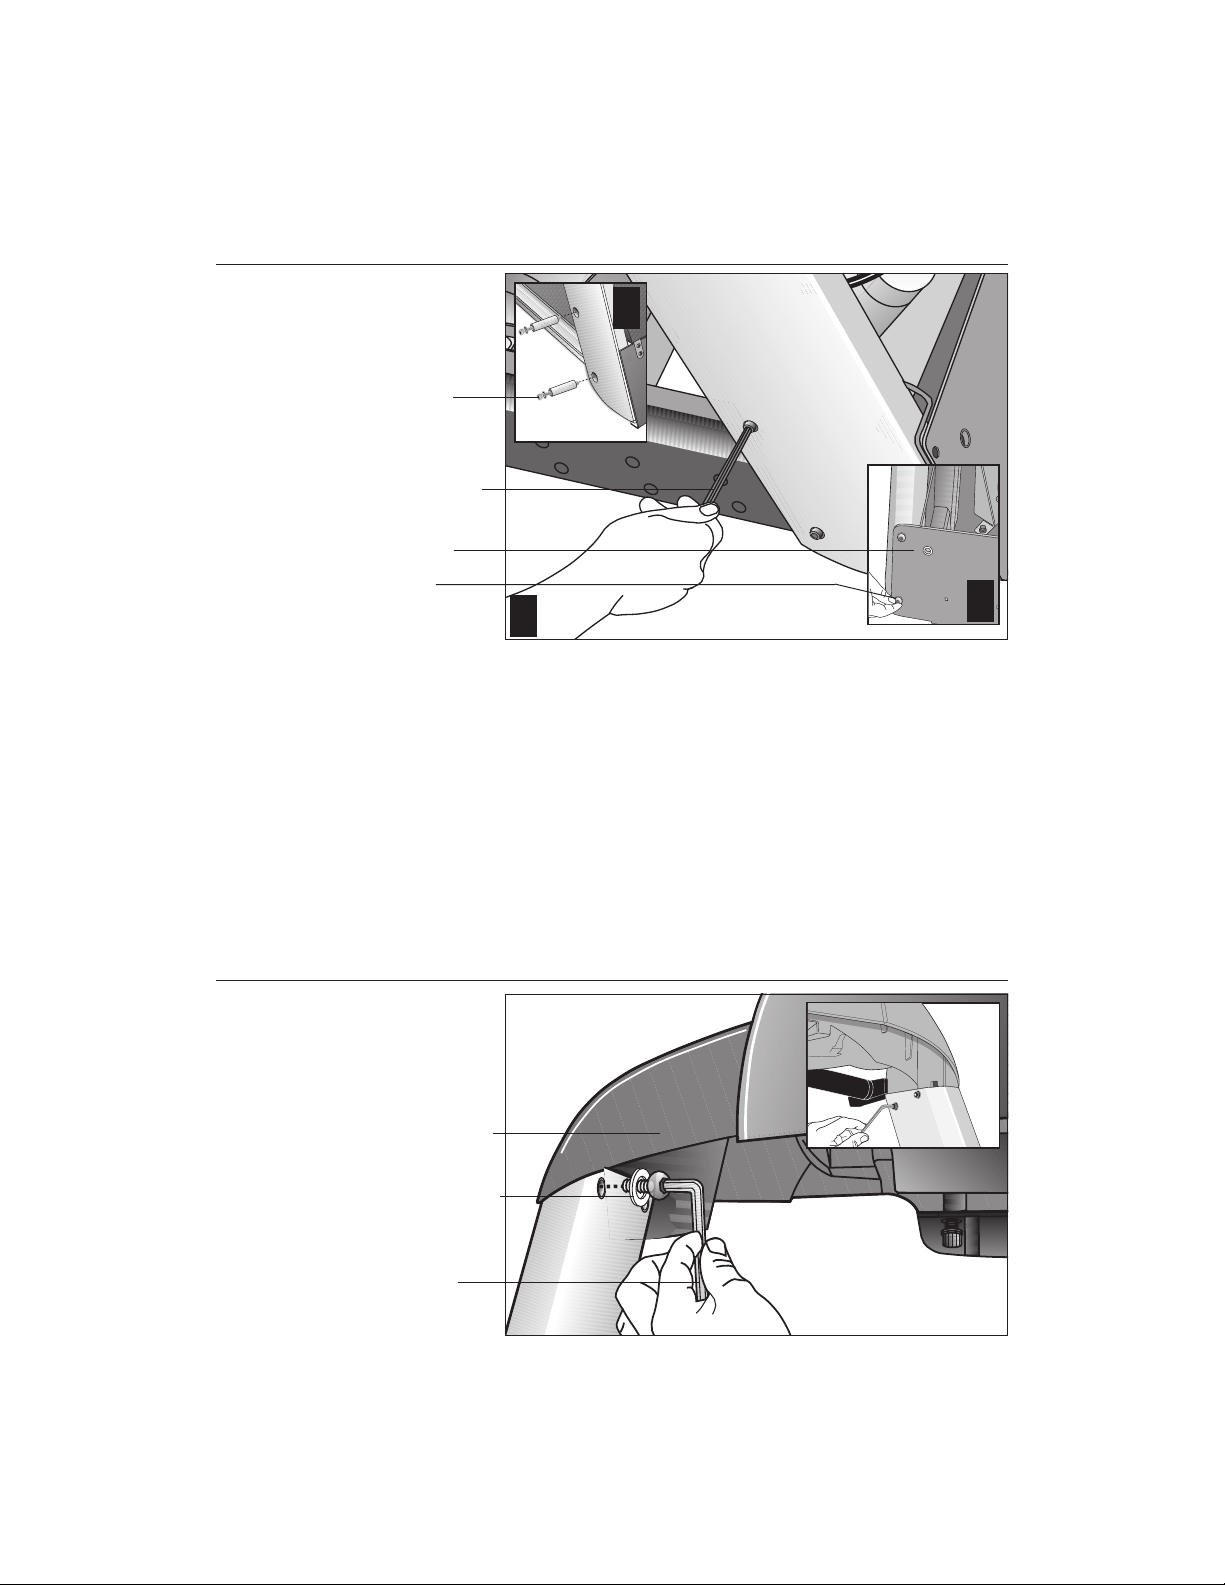
COMMERCIAL PRODUCTS DIVISION
Diagram 11
Secure the right
upright support.
Screws (D),
washers (E),
and barrel
spacers (F)
Tighten so that
the upright is
secure, but
leave room for
adjustments.
Front panel
Shipping
fasteners with
washers (B)
2
1
3
8. Secure the right side upright support. Diagram 11. Obtain two long
sockethead screws (D), washers (E) and barrel spacers (F) from the Hardware
kit. Place a washer and barrel sleeve on each bolt and insert the fasteners
through the side of the upright support and into the base mounts. Diagram 11,
#1. Secure the upright support using the ¼-inch hex key. See Diagram 11, #2.
Important: Do not securely tighten the screws until after the unit has been fully
assembled. Make sure that the bolt and spacer do not pinch the cable.
Diagram 12
page 16
9. Remove two stainless steel washers (B) from the Hardware kit and place one on
each of the two bolts removed in step 7a. Reinsert the bolts and finger tighten.
Diagram 11, #3.
Secure the
display console.
Display console
1-
inch screws (A)
with washers (B)
Tighten the
screws, but
leave room for
adjustments.
10. Secure the display console to the upright supports. Diagram 12, #1. Align
the display console with the right side upright support mounts. Insert two 1-inch
screws (A) with washers (B) and finger tighten. Use the supplied hex key to
secure the screws on both upright supports, but leave room for adjustments.
See inset in Diagram 12, #2.
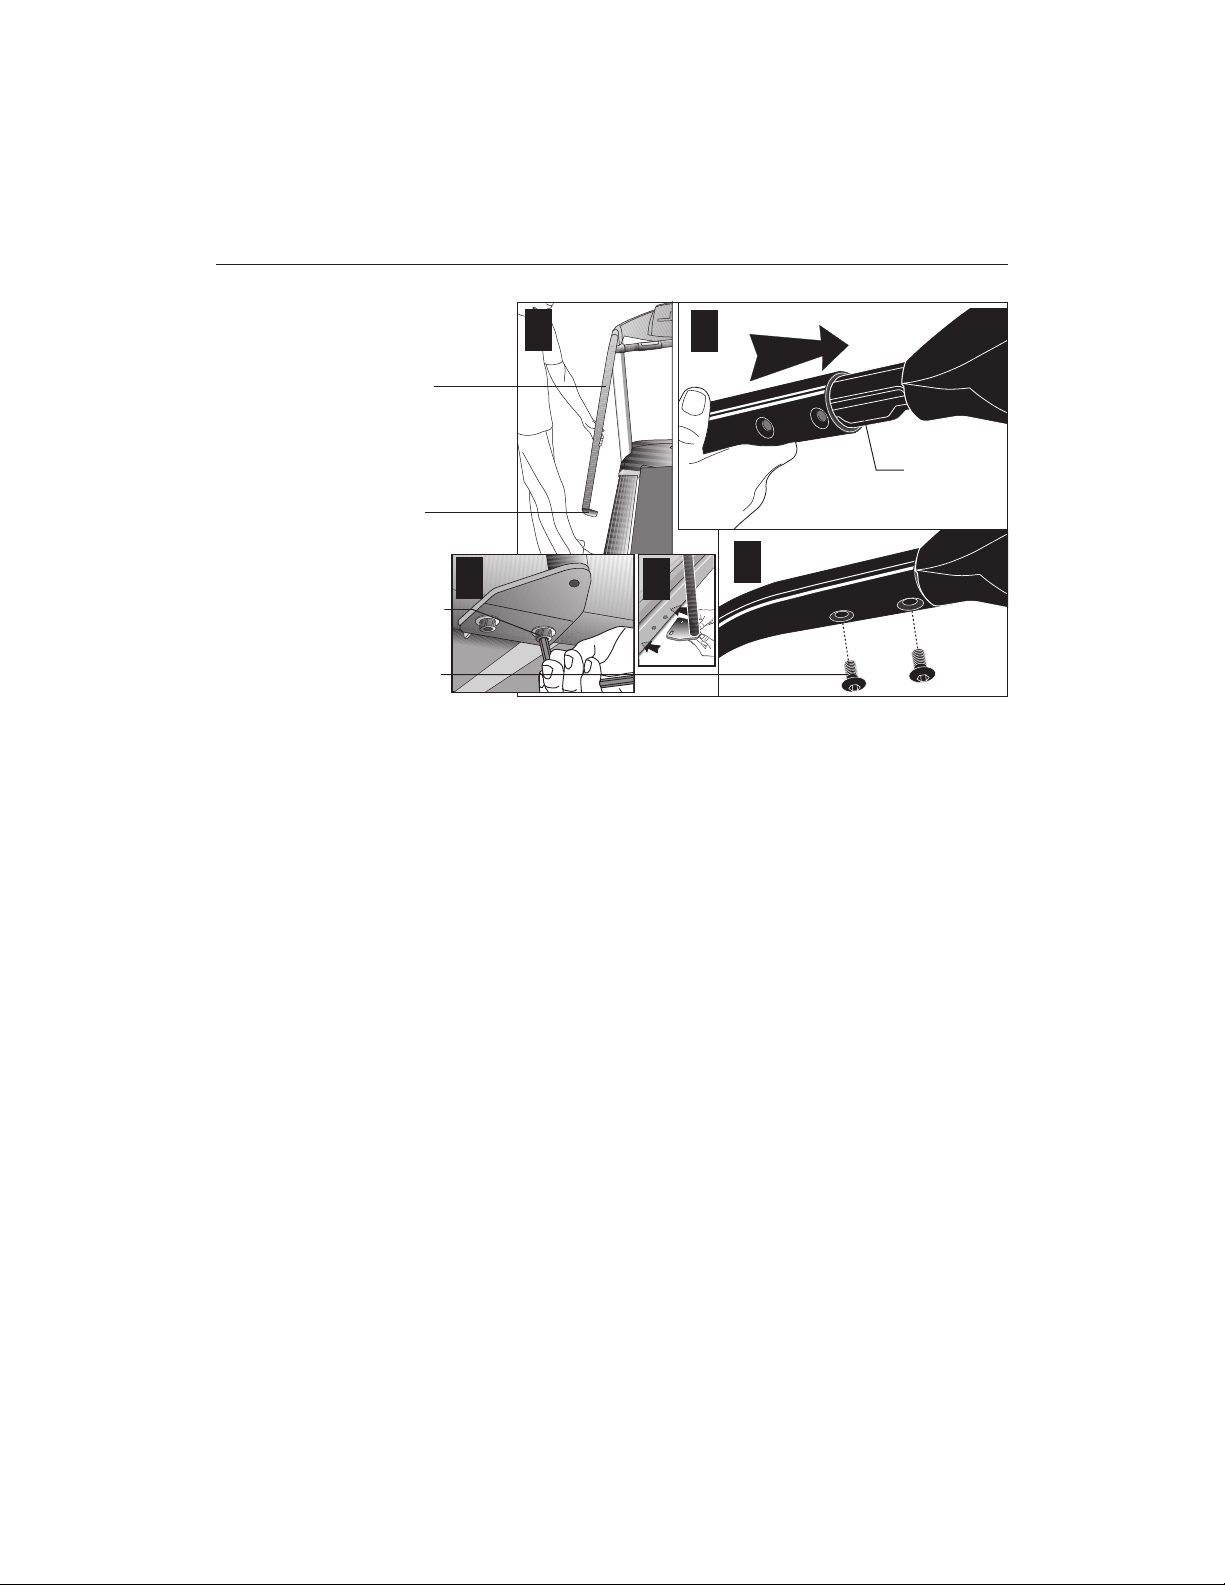
COMMERCIAL PRODUCTS DIVISION
Diagram 13
Handrail alignment and installation.
Handrail
Lower
handrail
bracket
Screw (A)
and
washer (B)
Screw (C)
1
5
2
Console
extension
3
4
Important: With the handrails attached, the width of the treadmill is 36.75
inches (93 cm). It will not fit through a standard 32-inch doorway.
11. Attach the handrails. Diagram 13. For ease of assembly, place the side rails
or adjustable rear feet on blocks. Obtain assistance to lift the treadmill. Do
not place blocks beneath the running bed.
To attach the handrails, perform the following steps on
one side at a time
:
a. Position the handrail as shown in Diagram 13, #1 and #2 and slide it onto the
console extension. Insert two flat head screws (C) into the upper handrail
mounts and finger tighten. See Diagram 13, #3.
b. Align the lower handrail bracket with the two base mounts and insert two
screws (A) with washers (B). See Diagram 13, #4. Tighten the screws
with the hex key. See Diagram 13, #5.
c. Return to the upper handrail screws and securely tighten each one.
d. Perform steps a. through c. on the opposite side.
e. Obtain assistance and remove the blocks from beneath the base.
page 17
Loading…
Почему вы выбрали именно этот товар?
Для каких целей планируете использовать?
Устраивает ли вас соотношение цены и качества?
Не терпим нечестные отзывы, а также:
Мат, ругательства, оскорбления и угрозы
Контактную информацию, рекламу и прочее, не относящиеся к теме
Обсуждение цены товара и ее изменение
Отзывы по обслуживанию и сервису следует оставлять через раздел Гарантийное обслуживание, там они будут рассмотрены в обязательном порядке