
MT-2 Метал Зон
Спасибо за ваш выбор данного звукового эффекта BOSS MT-2.
• Компактная педаль МТ-2 позволяет получить энергичный характер перегруженного звучания с отличным
сустейном, специализированного для музыкального стиля Хэви Метал.
• МТ-2 имеет 3-полосный эквалайзер – обрезные фильтры высоких и низких частот, и параметрический
эквалайзер для средних частот.
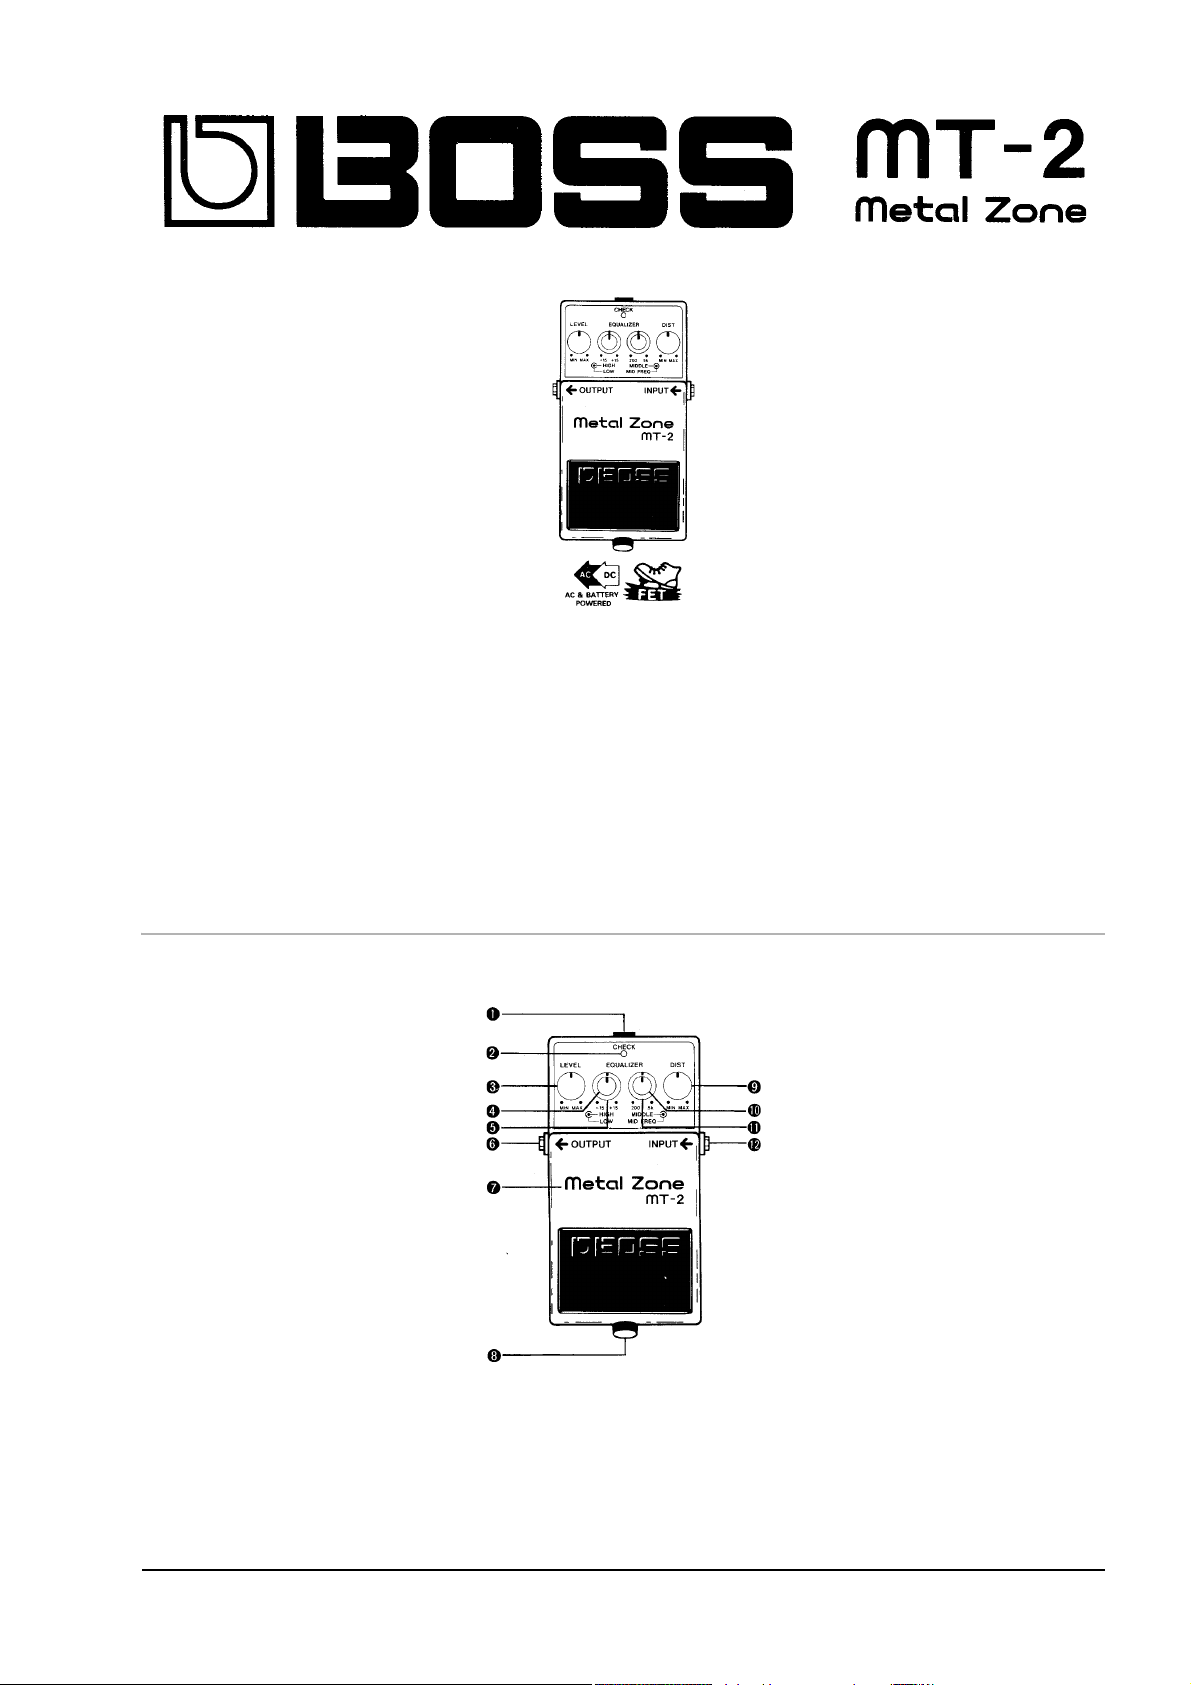
Описание панели управления
1. Гнездо АС адаптера
Педаль МТ-2 может работать как от батарейки, так и от АС адаптера (BOSS PSA-серии), подключенного к сети
электропитания переменного тока. При подключении адаптера к гнезду АС адаптера на корпусе педали,
происходит отключение батарейки от электронного контура педали и гарантируется бесперебойное
электропитание педали в процессе работы.
Boss MT-2. Руководство пользователя 1

2. Светодиодный индикатор
Светодиодный индикатор служит для отображения рабочего режима эффекта и нормального штатного
напряжения батарейки.
* Если диод мигает или не светится, то необходимо заменить старую батарейку на новую.
3. Регулятор громкости LEVEL
Регулятор громкости LEVEL используется для компенсации различия уровня прямого сигнала и сигнала
эффекта. Вращение данного регулятора по часовой стрелке увеличивает уровень сигнала эффекта, и
наоборот, против часовой стрелки – уменьшает.
4. Регулятор высоких частот HIGH
Данный регулятор используется для коррекции высоких частот эффекта дисторшен. Вращение ручки
регулятора по часовой стрелке вызывает подчеркивание звучания высоких частот (до +/- 15 dB) и, наоборот,
при вращении против часовой стрелки.
5. Регулятор низких частот LOW
Данный регулятор используется для коррекции низких частот эффекта дисторшен. Вращение ручки регулятора
по часовой стрелке вызывает подчеркивание звучания низких частот (до +/- 15 dB) и, наоборот, при вращении
против часовой стрелки.
6. Выходное гнездо OUTPUT
С данного выхода сигнал с эффекта дисторшен подается на усилитель.
7. Педальный переключатель
Используется для включения или выключения эффекта дисторшен.
8. Винт
Данный винт необходимо отвернуть, чтобы получить доступ к внутренней части педали при замене батарейки.
Однако, не выворачивайте до конца из крышки этот винт, чтобы не потерять его.
9. Регулятор эффекта дисторшен
Данным регулятором устанавливается глубина эффекта дисторшен и время длительности звучания (сустейн).
При вращении ручки регулятора по часовой стрелке увеличивается количество искажений и звучание
становится более насыщенным и мощным, а при вращении против часовой стрелки – уменьшается количество
искажений и эффект дисторшен звучит более мягко.
* При слишком большой глубине эффекта дисторшен возможно появление избыточного шума в основном
сигнале.
10. Регулятор уровня сигнала диапазона средних частот MIDDLE
Данным регулятором 10 усиливается или подавляется, установленная регулятором 11, несущая частота
диапазона средних частот. Вращение этого регулятора по часовой стрелке усиливает сигнал
среднечастотного диапазона, а против часовой стрелки – ослабляет.
11. Регулятор средних частот MIDDLE
Этим регулятором выбирается несущая частота (200 Гц – 5 кГц) среднечастотного диапазона
12. Входное гнездо
Этот вход служит для подачи выходного гитарного сигнала или сигнала другого электронного инструмента на
эффект дисторшен.
* Питание педали замыкается при подсоединенном джеке гитарного шнура во входное гнездо педали. Если вы
не пользуетесь педалью, отсоединяйте джек гитарного кабеля из входного гнезда педали.
2 Boss MT-2. Руководство пользователя
Подробно об эффекте:
Количество разновидностей педалей перегруза, выпускаемых компанией BOSS очень велико, но поистине культовый статус среди всех них имеет, пожалуй, только одна — Metal Zone. Почему же дело обстоит именно так, а не иначе? Все дело в том, что BOSS в свое время первыми, как говорится, попали прямо в яблочко, откликнувшись на крик души металлеров всего мира. А что же им было нужно? Всего-навсего две вещи — большой гейн, но без «песка», и возможность укрощать середину. И BOSS, выпустив Metal Zone, предоставили им и то и другое.
BOSS, наверное были первыми, кто смог уместить в формате компактной педальки больше 4 настроек. Достигнуто это было при помощи сдвоенных ручек настройки. Ручки уровня и гейна у MT-2 обыкновенные, а вот ручки настройки тембра — имеют независимые наружную и внутреннюю части. Таким образом, в пространстве, где обычно умещаются две ручки по факту размещается трехполосный эквалайзер с параметрикой средних частот. Именно параметрика средних частот так полюбилась металлерам.
Особенность тяжелой музыки такова, что для достижения мощного саунда приходится в той или иной степени «давить» середину. Парадокс заключается в том, что средние частоты — фундамент гитарного звука вообще, и, убрав их слишком сильно, мы можем потеряться в миксе. Параметрика средних частот позволяет более гибко распоряжаться серединой и находить требуемый баланс, исходя из особенностей инструмента и общего звучания группы. Такой пустяк — сделать звук чуть-чуть приятнее для своего уха, а как много он значит:
Ну, конечно, не только он. Злой, но качественный дисторшн, также способствовал успеху Metal Zone. BOSS удалось добиться весьма экстремального при большом гейне звучания, но при этом весьма плотного и вполне музыкального, и благодаря этому MT-2 достаточно долго удерживал звание «лучшего дисторшн для металлиста».
Оборудованный специальной схемой двойного усиления, MT-2 обеспечивает сверхдлинный сустейн с тяжелой серединой и низами, как у перегруженного усилителя. При помощи трехполосного эквалайзера Вы можете изменять текстуру искажений.
автор статьи — Александр Авдуевский
Технические характеристики:
Разъемы: Input, Output,
Регуляторы: «Distortion», «EQ» X 2 и «Level».
AC Adaptor Источник питания: DC 9В Dry
Battery, AC Adaptor (PSA-Series) Потребляемый ток: 20 мА (DC 9В)
Габариты (ширина х высота х глубина): 70x125x55 мм
Масса: 410 г.
Boss MT-2 Metal Zone Specification
The Boss MT-2 Metal Zone is a high-gain distortion pedal renowned for its intense sound and versatile tonal shaping capabilities, making it a staple among metal and hard rock musicians. At its core, the MT-2 features a dual-gain circuit, which provides a rich, full-bodied distortion that excels in producing sustain and clarity at high gain levels. This pedal allows users to sculpt their sound with precision, thanks to its advanced EQ section. The EQ is semi-parametric, offering control over the midrange frequencies with a sweepable mid-frequency knob, allowing for precise adjustments between 200 Hz and 5 kHz. Additionally, the MT-2 includes a level control, a distortion knob, and separate high and low EQ controls, enabling users to customize their sound from a tight, crunchy distortion to a scooped, aggressive tone.
The pedal is housed in Boss’s iconic compact and rugged chassis, ensuring durability and reliability for both studio and live performances. The MT-2 operates on a 9V battery or an optional AC adapter, providing flexibility in power supply options. Its buffered bypass ensures that the pedal maintains signal integrity when not in use, preserving the guitar’s natural tone. The Boss MT-2 Metal Zone is celebrated for its ability to deliver a wide range of heavy distortion sounds, making it a versatile tool for guitarists seeking both classic and modern metal tones. Its enduring popularity is a testament to its robust design and exceptional sound-shaping capabilities.
Boss MT-2 Metal Zone F.A.Q.
To achieve a heavy metal sound, start with the gain around 2 o’clock, bass at 3 o’clock, mids at 10 o’clock, and treble at 2 o’clock. Adjust the EQ to taste to suit your guitar and amplifier.
Feedback can often be reduced by lowering the gain and adjusting the EQ settings, particularly by reducing the mids. Also, ensure that your guitar is not too close to the amplifier.
Yes, the MT-2 can be used with a clean amp. It is designed to produce distortion on its own, so a clean amp can provide a good platform for its effects.
Keep the pedal clean and dry. Store it in a cool, dry place when not in use. Regularly check the battery compartment for corrosion and use a power supply to preserve battery life.
Use a 9V DC power supply with a negative center pin. Boss PSA adapters are recommended for compatibility and reliability.
Check the power source, ensure the battery is not dead, or that the power supply is properly connected. Also, inspect the input jack; the pedal needs an input signal to power on.
Ensure all cables are properly connected and not faulty. Check the battery level or power supply. Clean the input and output jacks with contact cleaner.
For live performances, connect the pedal to your amp via the effects loop for better sound quality. Fine-tune the EQ settings to match the venue’s acoustics.
For a modern metal sound, set the gain to 3 o’clock, bass to 2 o’clock, mid frequency to 11 o’clock, and treble to 1 o’clock. Adjust to suit your specific guitar and amp.
While primarily designed for electric guitars, the MT-2 can be used with a bass guitar for an aggressive tone. However, it may lose some low-end definition. Adjust the EQ to maintain clarity.
Owner’s Manual
Before using this unit, carefully read the sections entitled: “USING THE UNIT SAFELY” and “IMPORTANT NOTES” (supplied on a separate sheet).
After reading, keep the document(s) where it will be available for immediate reference.
AC Adaptor
(PSA series; sold separately)
Electric Guitar
English
LEVEL knob
This knob adjusts the volume of the eect sound. Set this knob so that there will
be no dierence in volume between the eect and straight sounds.
* No sound will be heard when this knob is rotated completely
counterclockwise.
7 The MT-2 is compact yet creates powerful eect pedal which, through the use of high-level gain circuits, creates heavy distortion and sustain eects.
7 The MT-2 includes a three-band equalizer, Low, Middle and High. The middle band EQ is adopted for parametric type.
OUTPUT jack
Connect an amplier or other eect unit to this
jack.
Guitar Amplier
DC IN jack
Accepts connection of an AC Adaptor (PSA series; sold separately). By using an AC Adaptor, you can play
without being concerned about how much battery power you have left.
* We recommend that you keep batteries installed in the unit even though you’ll be powering it
with the AC adaptor. That way, you’ll be able to continue a performance even if the cord of the
AC adaptor gets accidentally disconnected from the unit.
* Use only the specied AC adaptor (PSA-series).
* If the AC adaptor is connected while power is on, the power supply is
drawn from the AC adaptor.
CHECK indicator
This indicator shows whether an eect is ON/OFF, and doubles as the Battery Check indicator.
The indicator lights when an eect is ON.
* If this indicator goes dim or no longer lights while an eect is ON, the battery is near
exhaustion and should be replaced immediately.
* The CHECK indicator shows whether the eect is on or o, and indicates the dierent
functions. It does not indicate whether the power to the device is on or not.
EQUALIZER HIGH knob
This knob controls the tone of the eect sound at higher frequencies.
Rotating the knob clockwise boosts the higher frequencies, while rotating it
counterclockwise cuts the higher frequencies. Higher frequencies have a variable
range of ±15 dB.
Pedal Switch
This switch turns the eects ON/OFF.
Thumbscrew
When this screw is loosened, the pedal will open, allowing you to change the
battery.
* For instructions on changing the battery, refer to “Changing the
Battery.”
Panel Descriptions
Main Features
Precautions When Connecting
* To prevent malfunction and equipment failure, always turn
down the volume, and turn o all the units before making any
connections.
* Once the connections have been completed, turn on power
to your various devices in the order specied. By turning on
devices in the wrong order, you risk causing malfunction and/
or damage to speakers and other devices.
When powering up: Turn on the power to your guitar amp last.
When powering down: Turn o the power to your guitar amp rst.
* Before turning the unit on/o, always be sure to turn the
volume down. Even with the volume turned down, you might
hear some sound when switching the unit on/o. However,
this is normal and does not indicate a malfunction.
Operating the Unit
1. When you have made the
necessary connections, set
the knobs as shown in the
illustration.
2. Press the Pedal Switch.
Make sure the CHECK indicator lights.
3. Adjust the level of distortion
using the DIST knob.
Rotating the knob clockwise
increases the distortion level
while rotating it counterclockwise
decreases it.
* If this knob is set too high, the noise
will increase and oscillation may occur.
4. Adjust the tone of the middle
range with the EQUALIZER
MIDDLE knob.
Rotating the knob clockwise boosts
the frequency while rotating it
counterclockwise cuts it.
5. Set the middle frequency (to be boosted or cut) with the
EQUALIZER MID FREQ knob.
* When the EQUALIZER MIDDLE knob is set to the center position, moving
the EQUALIZER MID FREQ konb does not aect the sound.
6. Adjust the tone of the high range
with the EQUALIZER HIGH knob.
Rotating the knob clockwise boosts
the higher frequencies while rotating
it counterclockwise cut them.
7. Adjust the tone of the low range
with the EQUALIZER LOW knob.
Rotating the knob clockwise boosts the lower frequencies while
rotating it counterclockwise cut them.
8. Using the LEVEL knob, adjust the
volume of the eect sound so
that there will be no dierence in
volume between the eect and
straight sounds.
Use of Battery
* A battery was installed in the unit before it left the factory. The
life of this battery may be limited, however, since its primary
purpose was to enable testing.
* If you handle batteries improperly, you risk explosion and uid
leakage. Make sure that you carefully observe all of the items
related to batteries that are listed in “USING THE UNIT SAFELY”
and “IMPORTANT NOTES” (supplied on a separate sheet).
* When operating on battery power only, the unit’s indicator will
become dim when battery power gets too low. Replace the
battery as soon as possible.
* Batteries should always be installed or replaced before
connecting any other devices. This way, you can prevent
malfunction and damage.
Changing the Battery
1. Hold down the
pedal and loosen
the thumbscrew,
then open the
pedal upward.
* The pedal can be
opened without
detaching the
thumbscrew
completely.
2. Remove the old
battery from the
battery housing,
and remove the snap cord connected to it.
3. Connect the snap cord to the new battery, and place
the battery inside the battery housing.
* Be sure to carefully observe the battery’s polarity (+ versus -).
4. Slip the coil spring onto the spring base on the back of
the pedal, and then close the pedal.
* Carefully avoid getting the snap cord caught in the pedal, coil spring, and
battery housing.
5. Finally, insert the thumbscrew into the guide bush
hole and fasten it securely.
Main Specications
BOSS MT-2: Metal Zone
Nominal Input Level -20 dBu
Input Impedance 1 MΩ
Nominal Output Level -20 dBu
Output Impedance
1 kΩ
Recommended Load
Impedance
10 kΩ or greater
Power Supply DC 9 V: Dry battery 6F22 (9 V) type (carbon),
AC Adaptor (PSA-series: optional)
Current Draw 30 mA
* Expected battery life under continuous use:
Carbon: Approx. 12.5 hours
Alkaline: Approx. 23.5 hours
These gures will vary depending on the
actual conditions of use.
Dimensions 73 (W) x 129 (D) x 59 (H) mm
2-7/8 (W) x 5-1/8 (D) x 2-3/8 (H) inches
Weight
385 g/14 oz
(including battery)
Accessories Owner’s Manual, Leaet (“USING THE UNIT
SAFELY,” “IMPORTANT NOTES,” and “Informa—
tion”), Dry battery/9 V type (6F22)
Options AC adaptor (PSA-series)
* 0 dBu = 0.775 Vrms
* This document explains the specications of the product at the
time that the document was issued. For the latest information,
refer to the Roland website.
Thumbscrew
Battery Housing
Pedal
Spring Base
Coil Spring
Guide Bush
Hole
Battery Snap
Cord
Battery
Snap
9 V Battery
EQUALIZER MIDDLE knob
This knob boosts or cuts the frequency you set with the EQUALIZER MID FREQ
knob. Rotating the knob clockwise boosts the level of the middle frequencies,
while rotating it counterclockwise cuts the level of the middle frequencies.
EQUALIZER MID FREQ knob
This knob sets the frequency of the middle range (200 Hz to 5 kHz). Rotating the
knob clockwise raises the frequency. Rotating it counterclockwise lowers the
frequency.
* When the EQUALIZER MID FREQ knob is set to the center position,
the EQUALIZER MID FREQ knob does not aect the sound.
DIST knob
This knob controls the intensity of the distortion eect. Rotating the knob
clockwise increases the distortion level.
* If you set this knob too high, the noise will increase and oscillation
may occur.
Sample Settings
Heavy Metal
Hard Rock
Overdrive
Fuzz
British Rock
Rock 1
Rock’n’roll
Rock 2
EQUALIZER LOW knob
This knob controls the tone of the eect sound at lower frequencies. Rotating the
knob clockwise boosts the lower frequencies, while rotating it counterclockwise
cuts the lower frequencies. The lower frequencies have a variable range of ±15
dB.
INPUT jack
This jack accepts input signals (coming from a guitar, some other musical
instrument, or another eects unit).
* The INPUT jack also serves as the power
switch. Power is turned on whenever a plug
is inserted into the INPUT jack, and is turned
o when the plug is disconnected. When
not using the unit, you should disconnect
any cord connected to the INPUT jack.
* 5 1 0 0 0 6 9 0 3 1 — 0 1 *
© 2016 Roland Corporation
FAQ: Types of Manuals and Their Contents
Boss MT-2 Metal Zone Manuals come in various types, each serving a specific purpose to help users effectively operate and maintain their devices. Here are the common types of Boss MT-2 Metal Zone User Guides and the information they typically include:
- User Manuals: Provide comprehensive instructions on how to use the device, including setup, features, and operation. They often include troubleshooting tips, safety information, and maintenance guidelines.
- Service Instructions: Designed for technicians and repair professionals, these manuals offer detailed information on diagnosing and repairing issues with the device. They include schematics, parts lists, and step-by-step repair procedures.
- Installation Guides: Focus on the installation process of the device, providing detailed instructions and diagrams for proper setup. They are essential for ensuring the device is installed correctly and safely.
- Maintenance Manuals: Provide guidance on routine maintenance tasks to keep the device in optimal condition. They cover cleaning procedures, part replacements, and regular servicing tips.
- Quick Start Guides: Offer a concise overview of the essential steps needed to get the device up and running quickly. They are ideal for users who need immediate assistance with basic setup and operation.
Each type of Boss MT-2 Metal Zone instruction is designed to address specific needs, ensuring users have the necessary information to use, maintain, and repair their devices effectively.
Related Instructions for Boss MT-2 Metal Zone:
1
FDR-1
Owner’s manual PDF Manual (@85TJYI), Boss FDR-1 Battery Charger (Fri 01.2025)
24
21
5
5
752UAB
Operation & user’s manual Boss Car Receiver Operation & user’s manual (File: boss-752uab-operation-user-s-manual-17, 18th Sep 2024)
17
162
36
7
ME-20
Owner’s manual ME-20 (Music Equipment ePDF User Manual, #XUDX62)
40
890
143
10
ME-25
Owner’s manual PDF User Manual (@B193WL), Boss ME-25 Music Pedal (26.09.2024)
104
652
98
Musical Instrument Amplifier Devices by Other Brands:
|
SWR LA 8 Operation & User’s Manual User Guide: SWR LA 8 (6H74U5, Upd.Saturday 08-03-2025) S 08 Mar 2025 | 7 |
|
|
Zoom GFX-1 Operation Manual GFX-1 (Musical Instrument Amplifier ePDF Manual, #8W41ID) Introduction 07 Jan 2025 | 40 |
|
|
Zoom BFX-708 Operation Manual Zoom Musical Instrument Amplifier Operation manual (File: zoom-bfx-708-musical-instrument-amplifier-24, 19/10/2024) Operation Manual 19 Oct 2024 | 24 |
|
|
Crate BX-15 Owner’s Manual #V85P49: BX-15 Musical Instrument Amplifier Owner’s manual BX-15 BASS 17 Feb 2025 | 8 |
Categories:
Measuring Instruments
Juicer
Freezer
Snow Blower Accessories
Hand Mixer
Water Pump