
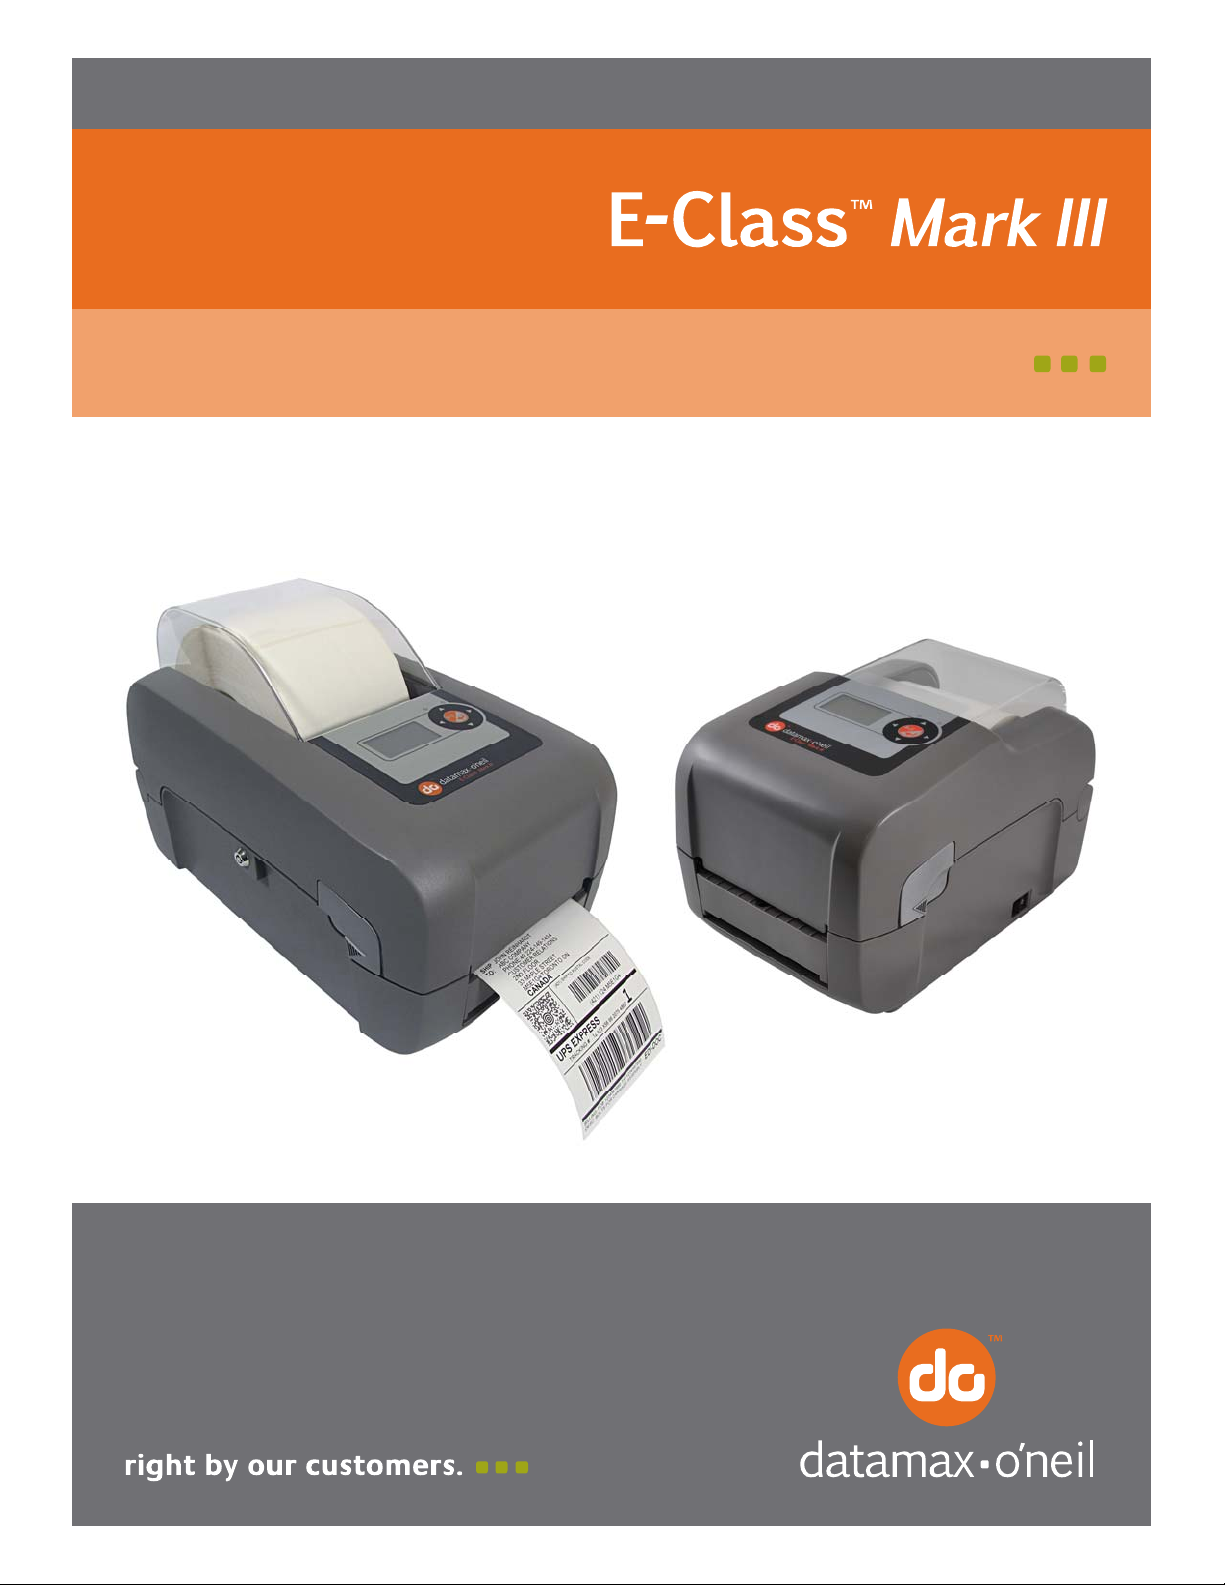
Operator’s Manual
Professional and Professional+ Models
Professiona
Professiona


Copyright Information
CG Triumvirate is a trademark of Agfa Corporation.
CG Times based upon Times New Roman under license from the Monotype Corporation.
Windows is a registered trademark of the Microsoft Corporation.
All other brand and product names are trademarks, service marks, registered trademarks, or registered service
marks of their respective companies.
Limitation of Liability
In no event shall Datamax-O’Neil be liable to the purchaser for any indirect, special or consequential damages or
lost profits arising out of or relating to Datamax-O’Neil’s products, or the performance or a breach thereof, even
if Datamax-O’Neil has been advised of the possibility thereof. Datamax-O’Neil’s liability, if any, to the purchaser
or to the customer of the purchaser hereunder shall in no event exceed the total amounts paid to DatamaxO’Neil hereunder by the purchaser for a defective product.
In no event shall Datamax-O’Neil be liable to the purchaser for any damages resulting from or related to any
failure or delay of Datamax-O’Neil in the delivery or installation of the computer hardware, supplies or software
or in the performance of any services.
Some states do not permit the exclusion of incidental or consequential damages, and in those states the
foregoing limitations may not apply. The warranties here give you specific legal rights, and you may have other
legal rights which vary from state to state.
Firmware (Software) Agreement
The enclosed Firmware (Software) resident in the Printer is owned by Licensor or its suppliers and is licensed for
used only on a single printer in the user’s Trade or Business. The User agrees not to, and not to authorize
or permit any other person or party to, duplicate or copy the Firmware or the information contained
in the non-volatile or programmable memory. The firmware (Software) is protected by applicable copyright
laws and Licensor retains all rights not expressly granted. In no event will Licensor or its suppliers be liable for
any damages or loss, including direct, incidental, economic, special, or consequential damages, arising out of
the use or inability to use the Firmware (Software).
Information in this document is subject to change without notice and does not represent a commitment on the
part of Datamax-O’Neil Corporation. No part of this manual may be reproduced or transmitted in any form or by
any means, for any purpose other than the purchaser’s personal use, without the expressed written permission
of Datamax-O’Neil Corporation.
Important Safety Instructions
This printer has been carefully designed to provide years of safe reliable performance. As with all types of
electrical equipment, however, there are a few basic precautions that should be taken to avoid personal
injury or damage to the device:
• Carefully read the installation and operating instructions provided with the printer.
• Read and follow all warning and instruction labels on the printer.
• Place the printer on a flat, stable surface.
• Do not insert anything into the ventilation slots or openings on the printer.
• Do not place the printer on or near a heat source.
• Do not use the printer near water. Never spill liquid into the printer.
• Be certain the power source is within the voltage rating and frequency listed for the printer. If you are unsure,
check with your dealer, an electrician, or local power company.
• Do not place the power cord where it can be stepped on. If the power cord becomes damaged or frayed,
replace it immediately.
• Only qualified, trained service technicians should attempt to repair the printer.
Cut-outs are not intended for wall-mount use.
Agency Compliance and Approvals
C US
Listed
FCC: This device complies with FCC CFR 47 Part 15 Class A.
Note: This equipment has been tested and found to comply with the limits for a Class A digital
UL60950-1, Second Edition, Information Technology Equipment
CSA C22.2 No. 60950-1-03, Second Edition
The manufacturer declares under sole responsibility that this product conforms to the
following standards or other normative documents:
EMC: EN 55022 (2006) Class A
EN 50024 (1998)
IEC 60950-1 :2001, Second Edition
Safety: This product complies with the requirements of IEC 60950-1:2001, Second Edition
Gost-R
GB4943-2001, GB9254-1998, GB17625.1-2003
device, pursuant to Part 15 of the FCC Rules. These limits are designed to provide
reasonable protection against harmful interference when the equipment is operated in a
commercial environment. This equipment generates, uses, and can radiate radio
frequency energy, and if not installed and used in accordance with the instructions in
this manual, it may cause harmful interference to radio communications. Operation of
this equipment in a residential area is likely to cause harmful interference in which case
the user will be required to correct the interference at his own expense.
All rights reserved
Copyright © 2013, Datamax-O’Neil
Part Number: 88-2358-01, Rev B

s
t
n
e
t
n
o
C
C
C
1
G
1
G
1
G
1.1 Introduction ………………………………………………………………………………………….. 1
1.2 Unpacking the Printer ………………………………………………………………………………. 1
1.3 Kensington Security Slot …………………………………………………………………………… 2
2
P
2
P
2
P
2.1 Introduction ………………………………………………………………………………………….. 3
2.2 Connecting the Printer ……………………………………………………………………………… 3
2.3 Loading Media………………………………………………………………………………………… 5
n
o
n
o
e
t
t
i
n
e
r
r
r
g
t
t
i
n
e
g
t
t
i
n
g
i
n
t
e
r
i
n
t
e
r
i
n
t
e
r
2.2.1
2.2.2 Interface Connections ……………………………………………………………………… 4
e
t
e
t
S
t
a
r
t
e
S
t
S
t
S
e
S
e
S
e
Power Connections …………………………………………………………………………. 3
d
a
r
t
e
a
r
t
e
t
u
p
.
t
u
p
.
t
u
p
.
n
n
.
.
d
.
.
d
.
.
.
.
.
.
.
.
.
.
.
.
t
t
.
.
.
.
.
.
.
.
.
.
.
.
.
.
.
.
.
.
.
.
.
.
.
.
.
.
.
.
.
.
.
.
.
.
.
.
.
.
s
s
.
.
.
.
.
.
.
.
.
.
.
.
.
.
.
.
.
.
.
.
.
.
.
.
.
.
.
.
.
.
.
.
.
.
.
.
.
.
.
.
.
.
.
.
.
.
.
.
.
.
.
.
.
.
.
.
.
.
.
.
.
.
.
.
.
.
.
.
.
.
.
.
.
.
.
.
.
.
.
.
.
.
.
.
.
.
.
.
.
.
.
.
.
.
.
.
.
.
.
.
.
.
.
.
.
.
.
.
.
.
.
.
.
.
.
.
.
.
.
.
.
.
.
.
.
.
.
.
.
.
.
.
.
.
.
.
.
.
.
.
.
.
.
.
.
.
.
.
.
.
.
.
.
.
.
.
.
.
.
.
.
.
.
.
.
.
.
.
.
.
.
.
.
.
.
.
.
.
.
.
.
.
.
.
.
.
.
.
.
.
.
.
.
.
.
.
.
.
.
.
.
.
.
.
.
.
.
.
.
.
.
.
.
.
.
.
.
.
.
.
.
.
.
.
.
.
.
.
.
.
.
.
.
.
.
.
.
.
.
.
.
.
.
.
.
.
.
.
.
.
.
.
.
.
.
.
.
.
.
.
.
.
.
.
.
.
.
.
.
.
.
.
.
.
.
.
.
.
.
.
.
.
.
.
.
.
.
.
.
.
.
.
.
.
.
.
.
.
.
.
.
.
.
.
.
.
.
.
.
.
.
.
.
.
.
.
.
.
.
.
.
.
.
.
.
.
.
.
.
.
.
.
.
.
.
.
.
.
.
.
.
.
.
.
.
.
.
.
.
.
.
.
.
.
.
.
.
.
.
.
.
.
.
.
.
.
.
.
.
.
.
.
.
.
.
.
.
.
.
.
.
.
.
.
.
.
.
.
.
.
.
.
.
.
.
.
.
.
.
.
.
.
.
.
.
.
.
.
.
.
.
.
.
.
.
.
.
.
.
.
.
.
.
.
.
.
.
.
.
.
.
1
.
.
.
.
.
.
.
.
.
.
.
.
.
.
.
.
.
.
1
.
.
.
.
.
1
.
.
.
.
3
.
.
.
.
.
3
.
.
.
.
.
3
Loading Roll Media………………………………………………………………………….. 5
2.3.1
2.3.2 Loading — External Media ………………………………………………………………….. 7
2.3.3 Loading Media with the Peel and Present Option………………………………………. 9
2.3.4 Loading Media with the Cutter Option…………………………………………………. 10
2.3.5 Adjustable Media Core Hangers (Pro+ models only)………………………………… 11
2.4 Loading Ribbon …………………………………………………………………………………….. 12
Using the Ribbon Core Adapters ……………………………………………………….. 15
2.4.1
3
P
r
i
n
t
e
r
O
p
e
r
a
t
i
o
n
.
.
.
.
.
.
.
.
.
.
.
.
.
.
.
.
.
.
.
.
.
.
.
.
.
.
.
.
.
.
.
.
.
.
.
.
.
.
.
.
.
.
.
.
.
.
.
.
.
.
.
.
.
.
.
.
.
.
.
.
.
.
.
.
.
.
.
.
.
.
.
.
.
.
.
3
P
r
i
n
t
e
r
O
p
e
r
a
t
i
o
n
.
.
.
.
.
.
.
.
.
.
.
.
.
.
.
.
.
.
.
.
.
.
.
.
.
.
.
.
.
.
.
.
.
.
.
.
.
.
.
.
.
.
.
.
.
.
.
.
.
.
.
.
.
.
.
.
.
.
.
.
.
.
.
.
.
.
.
3
P
r
i
n
t
e
r
O
p
e
r
a
t
i
o
n
.
.
.
.
.
.
.
.
.
.
.
.
.
.
.
.
.
.
.
.
.
.
.
.
.
.
.
.
.
.
.
.
.
.
.
.
.
.
.
.
.
.
.
.
.
.
.
.
.
.
.
.
.
.
.
.
.
.
.
.
3.1 Introduction ………………………………………………………………………………………… 17
3.2 LED Indicators ……………………………………………………………………………………… 17
3.3 User Interface………………………………………………………………………………………. 18
Feed/Pause Mode …………………………………………………………………………. 18
3.3.1
3.3.2 Test Mode ………………………………………………………………………………….. 18
3.3.3 Menu Mode…………………………………………………………………………………. 19
3.4 Printer Configuration Tools ………………………………………………………………………. 20
.
.
.
.
.
.
.
.
.
.
.
.
.
.
.
.
.
.
.
.
.
.
.
.
.
.
.
.
.
.
1
7
.
.
.
.
.
.
.
.
1
7
.
.
.
1
7
Printer Configuration Utility (NETira CT)……………………………………………………….. 21
3.5
3.6 Windows Driver…………………………………………………………………………………….. 24
3.7 Media Calibration ………………………………………………………………………………….. 26
3.7.1 Quick Calibration………………………………………………………………………….. 26
3.7.2 Manual Calibration………………………………………………………………………… 27
3.7.3 Advanced Entry Calibration……………………………………………………………… 28
i

4
M
e
n
u
S
y
s
t
e
m
.
.
.
.
.
.
.
.
.
.
.
.
.
.
.
.
.
.
.
.
.
.
.
.
.
.
.
.
.
.
.
.
.
.
.
.
.
.
.
.
.
.
.
.
.
.
.
.
.
.
.
.
.
.
.
.
.
.
.
.
.
.
.
.
.
.
.
.
.
.
.
.
.
.
.
.
.
.
.
.
.
4
M
e
n
u
S
y
s
t
e
m
.
.
.
.
.
.
.
.
.
.
.
.
.
.
.
.
.
.
.
.
.
.
.
.
.
.
.
.
.
.
.
.
.
.
.
.
.
.
.
.
.
.
.
.
.
.
.
.
.
.
.
.
.
.
.
.
.
.
.
.
.
.
.
.
.
.
.
.
.
.
.
.
.
4
M
e
n
u
S
y
s
t
e
m
.
.
.
.
.
.
.
.
.
.
.
.
.
.
.
.
.
.
.
.
.
.
.
.
.
.
.
.
.
.
.
.
.
.
.
.
.
.
.
.
.
.
.
.
.
.
.
.
.
.
.
.
.
.
.
.
.
.
.
.
.
.
.
.
.
.
4.1 Menu System Overview…………………………………………………………………………… 35
4.2 The User Menu……………………………………………………………………………………… 35
4.3 The Advanced Menu……………………………………………………………………………….. 36
4.4 Menu Details ……………………………………………………………………………………….. 37
5
M
a
i
n
t
e
n
a
n
c
e
&
A
d
j
u
s
t
m
e
n
t
s
.
.
.
.
.
.
.
.
.
.
.
.
.
.
.
.
.
.
.
.
.
.
.
.
.
.
.
.
.
.
.
.
.
.
.
.
.
.
.
.
.
.
.
5
M
a
i
n
t
e
n
a
n
c
e
&
A
d
j
u
s
t
m
e
n
t
s
.
.
.
.
.
.
.
.
.
.
.
.
.
.
.
.
.
.
.
.
.
.
.
.
.
.
.
.
.
.
.
.
.
.
.
5
M
a
i
n
t
e
n
a
n
c
e
&
A
d
j
u
s
t
m
e
n
t
s
.
.
.
.
.
.
.
.
.
.
.
.
.
.
.
.
.
.
.
.
.
.
.
.
.
.
.
.
5.1 Introduction ………………………………………………………………………………………… 51
5.2 Cleaning the Printhead……………………………………………………………………………. 52
5.3 Ribbon Tension Adjustment ……………………………………………………………………… 54
5.4 Adjustable Media Sensor …………………………………………………………………………. 55
5.5 Printhead Replacement …………………………………………………………………………… 56
5.6 Platen Roller Replacement ……………………………………………………………………….. 58
5.7 Updating Firmware ………………………………………………………………………………… 59
.
.
.
.
.
.
.
.
.
.
.
.
.
.
.
.
.
.
.
.
.
.
.
.
.
.
.
.
.
.
.
.
.
.
.
.
.
.
.
.
.
.
.
.
.
.
.
.
.
.
.
.
.
.
.
.
.
.
.
.
.
.
.
.
.
.
.
.
.
.
.
.
.
.
.
.
.
.
.
.
.
.
.
.
.
.
.
.
.
.
.
.
.
.
.
.
.
.
3
5
.
.
.
.
.
.
.
.
.
.
.
.
.
.
.
.
.
.
3
5
.
.
.
3
5
.
.
5
1
.
.
.
5
1
.
.
.
5
1
5.7.1 Boot 1 and Boot 2 Boot Loaders………………………………………………………… 59
6
T
r
o
u
b
l
e
s
h
o
o
t
i
n
g
.
.
.
.
.
.
.
.
.
.
.
.
.
.
.
.
.
.
.
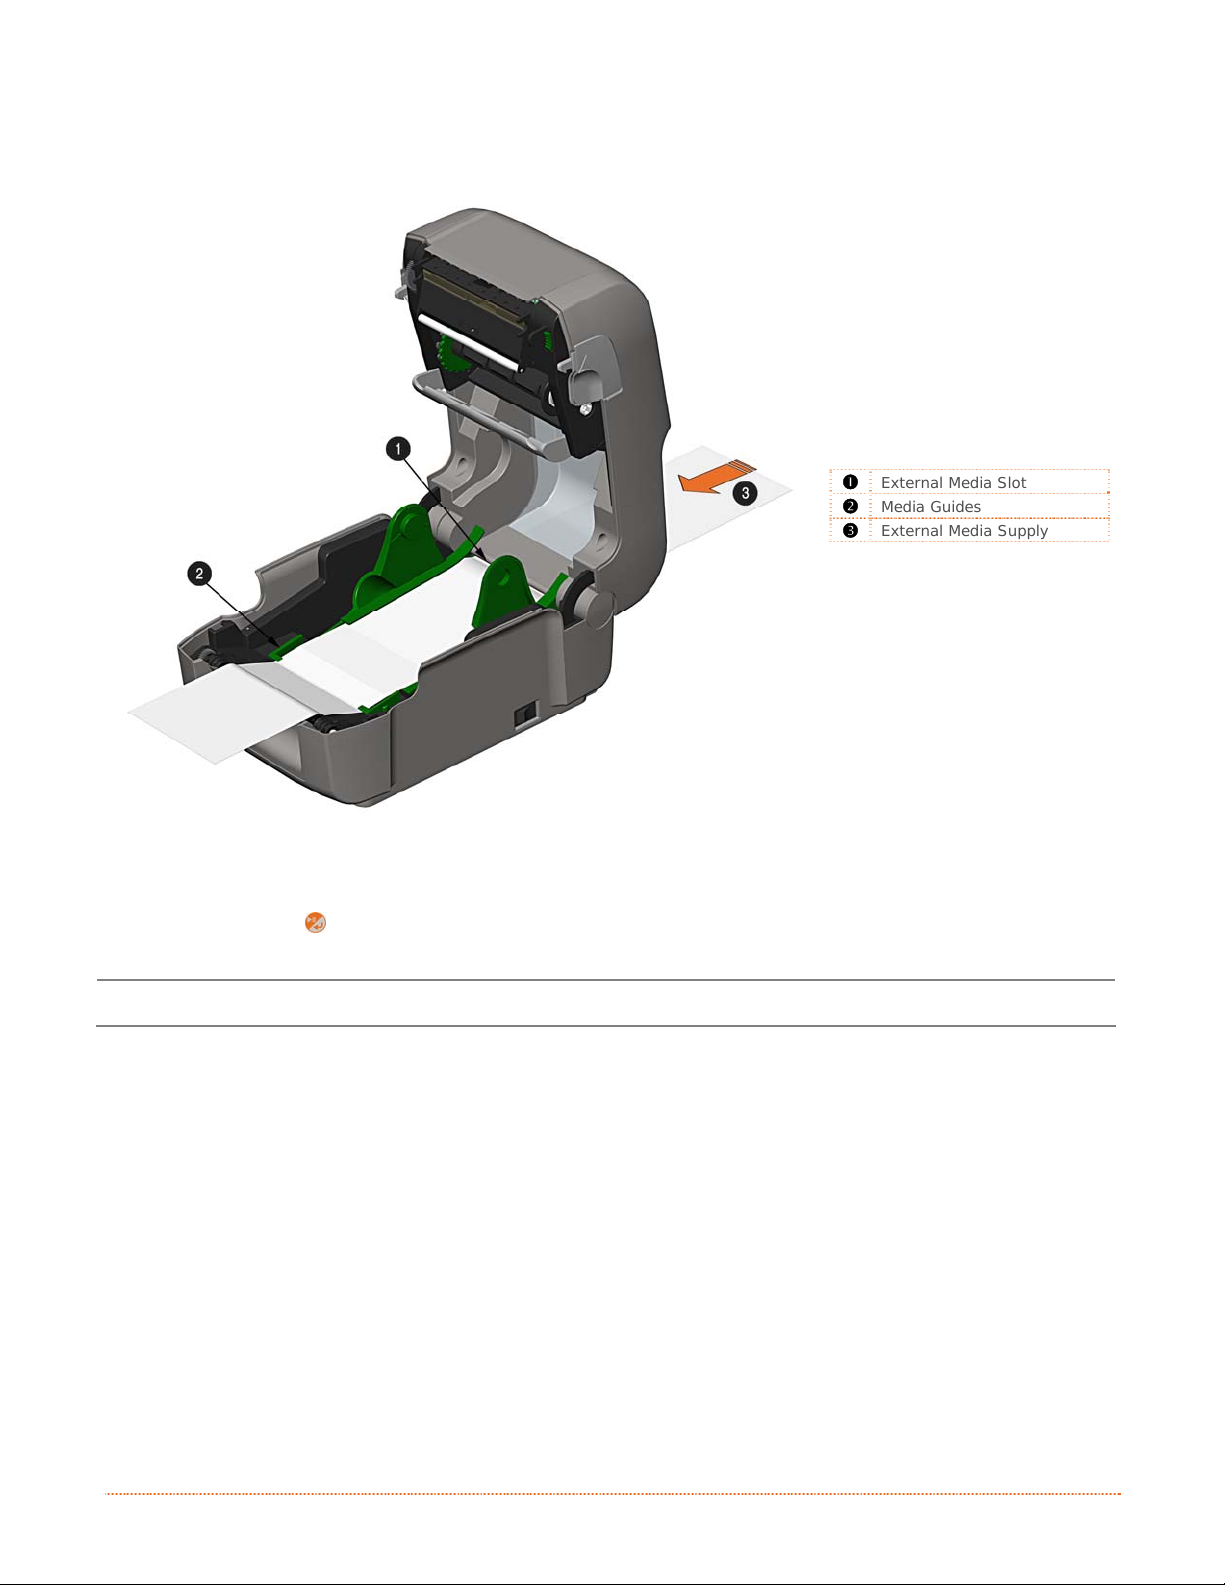
.
.
.
.
.
.
.
.
.
.
.
.
.
.
.
.
.
.
.
.
.
.
.
.
.
.
.
.
.
.
.
.
.
.
.
.
.
.
.
.
.
.
.
.
.
.
.
.
.
.
.
.
.
.
.
.
.
6
T
r
o
u
b
l
e
s
h
o
o
t
i
n
g
.
.
.
.
.
.
.
.
.
.
.
.
.
.
.
.
.
.
.
.
.
.
.
.
.
.
.
.
.
.
.
.
.
.
.
.
.
.
.
.
.
.
.
.
.
.
.
.
.
.
.
.
.
.
.
.
.
.
.
.
.
.
.
.
.
.
.
.
6
T
r
o
u
b
l
e
s
h
o
o
t
i
n
g
.
.
.
.
.
.
.
.
.
.
.
.
.
.
.
.
.
.
.
.
.
.
.
.
.
.
.
.
.
.
.
.
.
.
.
.
.
.
.
.
.
.
.
.
.
.
.
.
.
.
.
.
.
.
.
.
.
.
.
.
.
6.1 Introduction ………………………………………………………………………………………… 61
6.2 Troubleshooting Tips………………………………………………………………………………. 61
6.3 Hex Dump Mode …………………………………………………………………………………… 63
A
S
p
e
c
i
f
i
c
a
t
i
o
n
s
.
.
.
.
.
.
.
.
.
.
.
.
.
.
.
.
.
.
.
.
.
.
.
.
.
.
.
.
.
.
.
.
.
.
.
.
.
.
.
.
.
.
.
.
.
.
.
.
.
.
.
.
.
.
.
.
.
.
.
.
.
.
.
.
.
A
S
p
e
c
i
f
i
c
a
t
i
o
n
s
.
.
.
.
.
.
.
.
.
.
.
.
.
.
.
.
.
.
.
.
.
.
.
.
.
.
.
.
.
.
.
.
.
.
.
.
.
.
.
.
.
.
.
.
.
.
.
.
.
.
.
.
.
.
.
.
.
A
S
p
e
c
i
f
i
c
a
t
i
o
n
s
.
.
.
.
.
.
.
.
.
.
.
.
.
.
.
.
.
.
.
.
.
.
.
.
.
.
.
.
.
.
.
.
.
.
.
.
.
.
.
.
.
.
.
.
.
.
.
.
.
.
B
W
i
r
e
l
e
s
s
a
n
d
W
i
r
e
d
L
A
N
S
e
t
u
p
.
.
.
.
.
.
.
.
.
.
.
.
.
.
.
.
.
.
.
.
.
.
.
.
B
W
i
r
e
l
e
s
s
a
n
d
W
i
r
e
d
L
A
N
S
e
t
u
p
.
.
.
.
.
.
.
.
.
.
.
.
.
.
.
.
B
W
i
r
e
l
e
s
s
a
n
d
W
i
r
e
d
L
A
N
S
e
t
u
p
.
.
.
.
.
.
.
.
.
B.1 Network Card Setup ………………………………………………………………………………. 69
B.2 Wireless Setup……………………………………………………………………………………… 70
B.2.1 Wireless Setup – Infrastructure………………………………………………………… 71
B.2.1 Wireless Setup – Ad-Hoc ………………………………………………………………… 72
B.3 Installing the Printer Driver………………………………………………………………………. 74
C
B
l
u
e
t
o
o
t
h
S
e
t
u
p
.
.
.
.
.
.
.
.
.
.
.
.
.
.
.
.
.
.
.
.
.
.
.
.
.
.
.
.
.
.
.
.
C
C
B
l
u
e
t
o
o
t
h
S
e
t
u
p
.
.
.
.
.
.
.
.
.
.
.
.
.
.
.
.
.
.
.
.
.
.
.
.
B
l
u
e
t
o
o
t
h
S
e
t
u
p
.
.
.
.
.
.
.
.
.
.
.
.
.
.
.
.
.
.
.
.
.
.
.
.
.
.
.
.
.
.
.
.
.
.
.
.
.
.
.
.
.
.
.
.
.
.
.
.
.
.
.
.
.
.
.
.
.
.
.
.
.
.
.
.
.
.
.
.
.
.
.
.
.
.
.
.
.
.
.
.
.
.
.
.
.
.
.
.
.
.
.
.
.
.
.
.
.
.
.
.
.
.
.
.
.
.
.
.
.
.
.
.
.
.
.
.
.
.
.
.
.
.
.
.
.
.
.
.
.
.
.
.
.
.
.
.
.
.
.
.
.
.
.
.
.
.
.
.
.
.
.
.
.
.
.
.
.
.
.
.
.
.
.
.
.
.
.
.
.
.
.
.
.
.
.
.
.
.
.
.
.
.
.
.
.
.
.
.
.
.
.
.
.
.
.
.
.
.
.
.
.
.
.
.
.
.
.
.
.
.
.
.
.
.
.
.
.
.
.
.
.
.
.
.
.
.
.
.
.
.
.
.
.
.
.
.
.
.
.
.
.
.
.
.
.
.
.
.
.
.
.
.
.
.
.
.
.
.
.
.
.
.
.
.
.
.
.
.
.
.
.
.
.
.
.
.
.
.
.
.
.
.
.
.
.
.
.
.
.
.
.
.
.
.
.
.
.
.
.
.
.
.
.
.
.
.
.
.
.
.
.
.
.
.
.
.
.
.
.
.
.
.
.
.
.
.
.
.
.
.
.
.
.
.
.
.
.
.
.
.
.
.
.
.
.
.
.
.
.
.
.
.
.
.
.
.
.
.
.
.
.
.
.
.
.
.
.
.
.
.
.
.
.
.
.
.
.
.
.
.
.
.
.
.
.
.
.
.
6
1
.
.
.
.
.
.
.
.
.
.
.
.
.
.
.
.
.
.
.
.
.
.
.
.
.
.
.
.
.
.
.
.
.
.
.
.
6
1
.
.
.
6
1
.
.
6
5
.
.
.
6
5
.
.
.
6
5
.
.
6
9
.
.
.
6
9
.
.
.
6
9
7
.
.
7
7
.
.
.
7
7
.
.
.
7
C.1 Bluetooth Setup ……………………………………………………………………………………. 77
D
M
e
n
u
L
a
n
g
u
a
g
e
.
.
.
.
.
.
.
.
.
.
.
.
.
.
.
.
.
.
.
.
.
.
.
.
.
.
.
.
.
.
.
.
.
.
.
.
.
.
.
.
.
.
.
.
.
.
.
.
.
.
.
.
.
.
.
.
.
.
.
.
.
.
.
.
.
.
.
.
.
.
.
.
.
.
.
.
.
D
M
e
n
u
L
a
n
g
u
a
g
e
.
.
.
.
.
.
.
.
.
.
.
.
.
.
.
.
.
.
.
.
.
.
.
.
.
.
.
.
.
.
.
.
.
.
.
.
.
.
.
.
.
.
.
.
.
.
.
.
.
.
.
.
.
.
.
.
.
.
.
.
.
.
.
.
.
.
.
.
.
D
M
e
n
u
L
a
n
g
u
a
g
e
.
.
.
.
.
.
.
.
.
.
.
.
.
.
.
.
.
.
.
.
.
.
.
.
.
.
.
.
.
.
.
.
.
.
.
.
.
.
.
.
.
.
.
.
.
.
.
.
.
.
.
.
.
.
.
.
.
.
.
.
.
.
D.1 Changing the Menu Language …………………………………………………………………… 79
D.2 Advanced File Handling Information……………………………………………………………. 82
.
.
.
.
.
.
.
.
.
.
.
.
.
.
.
.
.
.
.
.
.
.
.
.
ii
.
.
.
.
.
7
9
.
.
.
.
.
.
.
.
.
7
9
.
.
.
7
9

d
e
t
r
a
t
S
g
n
i
t
t
e
G
G
G
1
1
1
1
.
1
1
.
1
1
.
1
The E-Class Mark III printer (hereafter referred to as “the printer”) is user-friendly thermal printing device
that blends quality and durability in an affordable package to meet all of your labeling needs. This manual
provides the information necessary to operate and maintain the printer.
To begin printing labels or tags, refer to the instructions included with your software labeling program. For
your convenience, a Windows printer driver can be found on the Accessories CD-ROM, or it can be
downloaded from our website at http://www.datamax-oneil.com
label formats, a copy of the Programmer’s Manual also is included for your reference, or the manual can be
downloaded.)
1
.
2
1
.
2
1
.
2
I
n
t
r
o
d
u
c
t
k
k
u
u
k
i
c
t
i
c
t
i
i
n
g
i
n
g
i
n
g
I
n
t
r
o
n
n
d
t
r
o
d
p
a
c
p
a
c
p
a
c
I
n
U
n
U
U
e
e
o
n
o
o
t
t
t
n
n
h
h
h
t
t
e
P
e
P
e
P
t
t
r
r
r
n
i
n
i
i
n
t
e
r
n
t
e
r
t
e
r
i
n
i
g
g
S
S
t
t
r
a
r
a
. (If you wish to write custom programs or
t
t
e
e
d
d
After removing the printer from the packaging material, check the contents of the box. In addition to the
printer, the following items should be present:
Power Supply
Accessories CD-ROM
Any special or additionally ordered items
Additional Requirements
The following items are necessary to generate labels:
Parallel, Serial, USB, or Ethernet cable, see
Section 2.2.2 for details.
Applicable media; see Appendix A for details.
Contact customer support or your sales representative
for advice on the media and software that may best be
suited for your application.
It is a good idea to save all packaging material for future use.
312
Chapter 1 – Getting Started 1
1
1
1
.
3
K
e
n
s
i
n
g
t
o
n
S
e
c
u
r
i
t
y
S
l
o
t
.
3
K
e
n
s
i
n
g
t
o
n
S
e
c
u
r
i
t
y
.
3
K
e
n
s
i
n
g
t
o
n
S
e
c
u
r
i
t
y
S
S
l
o
t
l
o
t
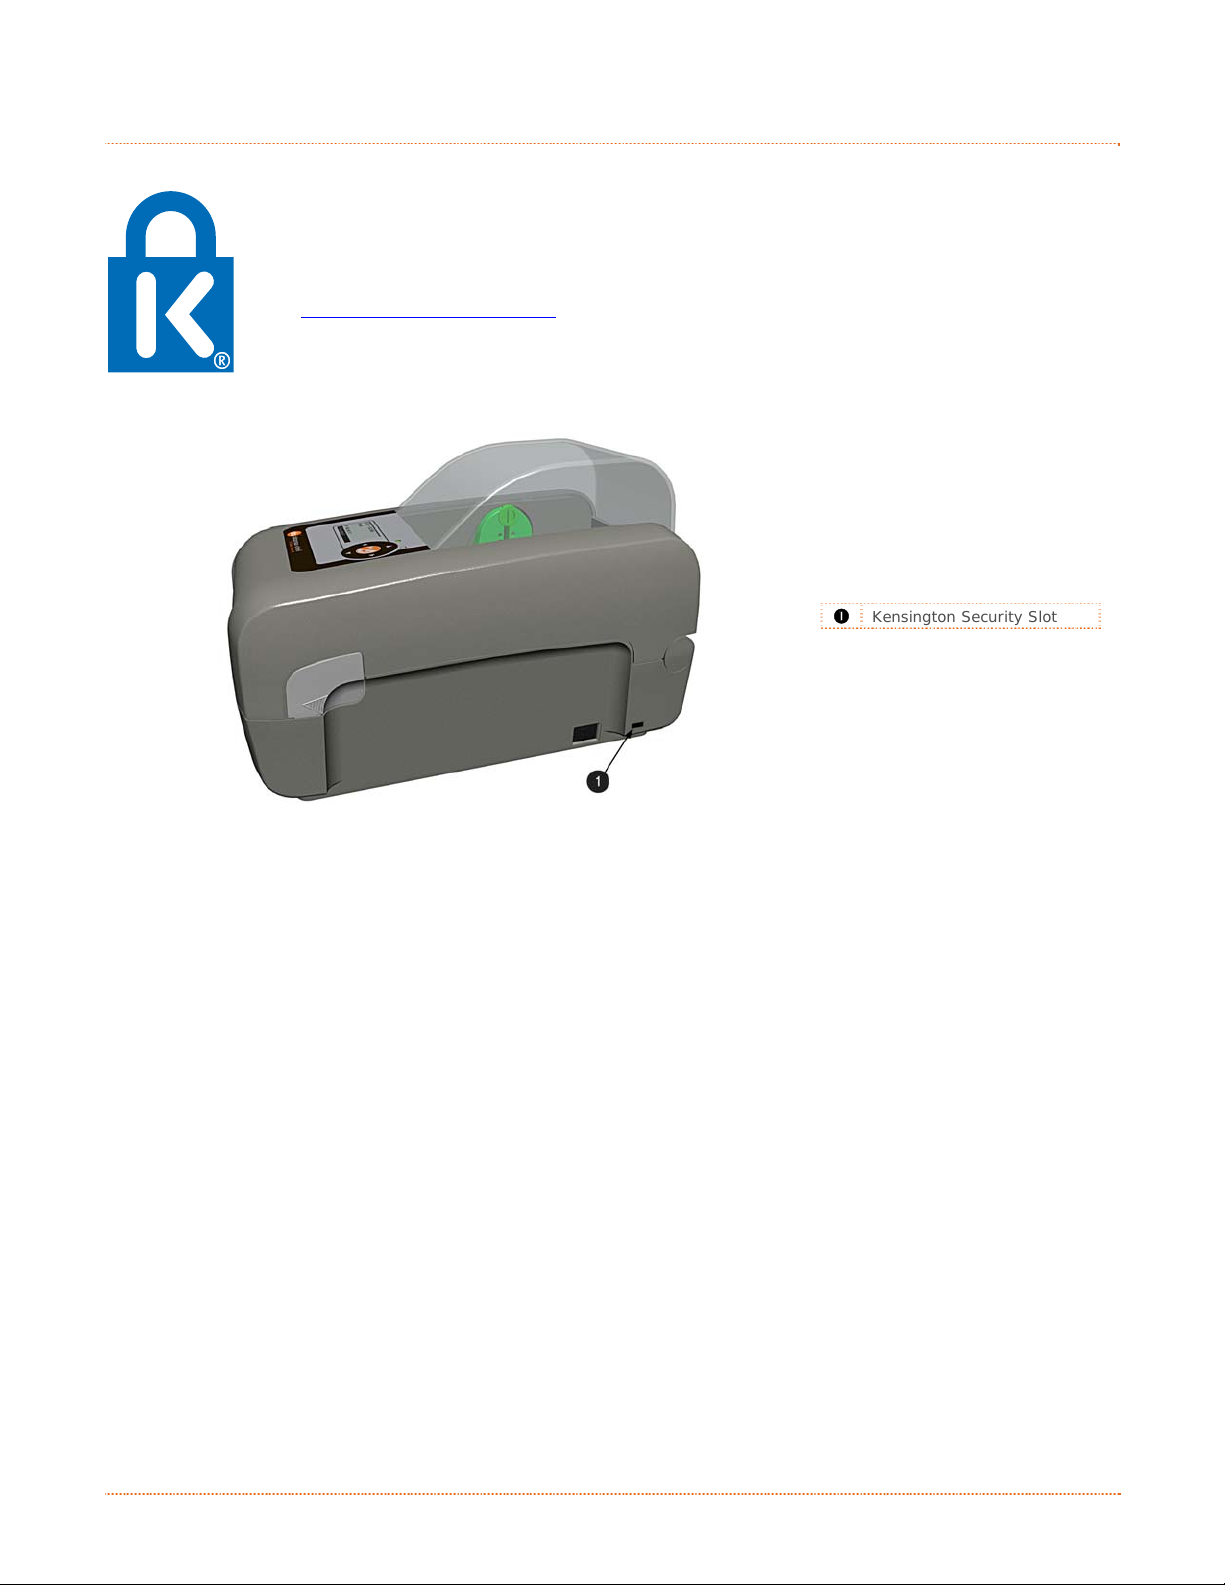
Professional + modules equipped with the Key Lock Option also include a built-in Kensington
Security Slot with a metal backing plate. The Kensington slot allows you to physically secure
the printer from being stolen by tethering it to a larger object like a desk or counter. There
are many security solutions offered by Kensington that are compatible with the slot.
Visit http://www.kensington.com
The Kensington Security Slot has been the industry standard since 1990, giving customers the
best option for physical security of computer and electronic equipment.
312
for a full line of locking options and accessories.
Kensington Security Slot
2 Chapter 1 – Getting Started
p
u
t
e
S
r
e
t
n
i
r
P
r
P
P
2
2
2
2
.
1
2
.
1
2
.
This section explains how to connect your printer and load media (including ribbon, if equi pped for thermal
transfer operation).
2
.
2
2
.
2
2
.
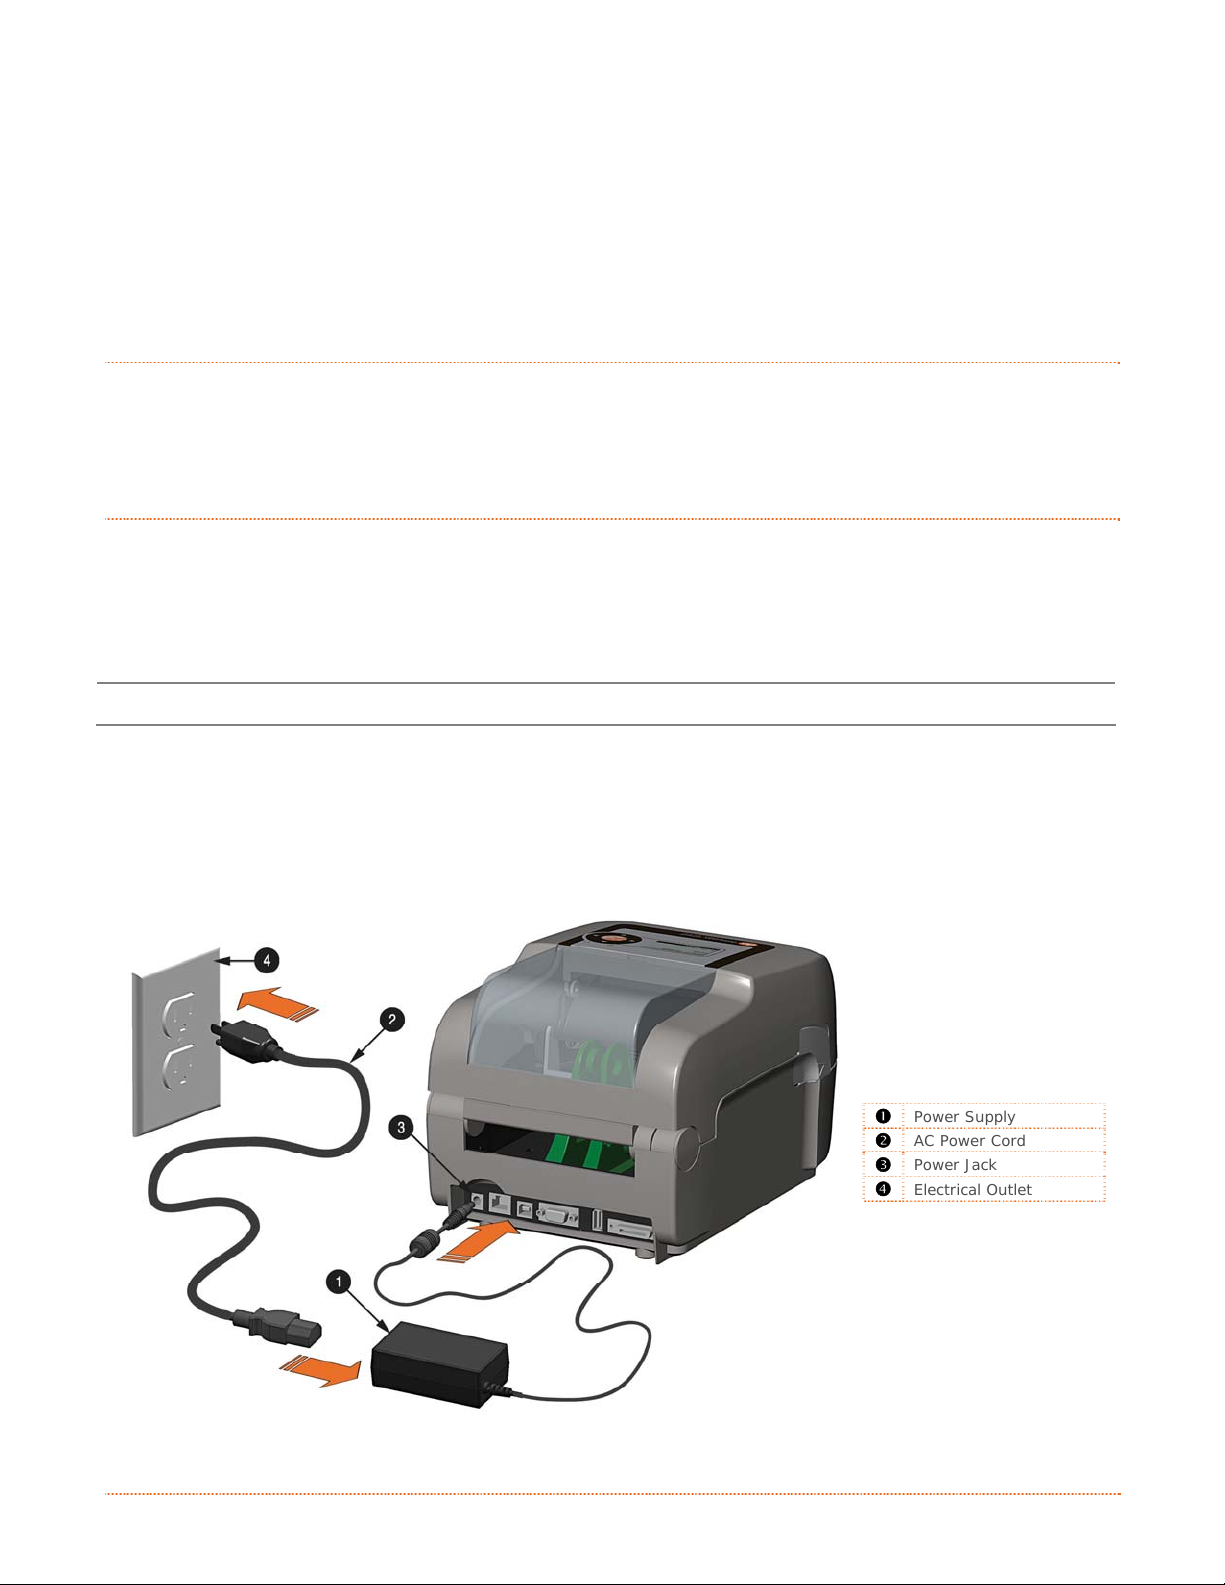
2.2.1 Power Connections
The printer is powered by an external auto-ranging power supply, which connects between the printer and an
electrical outlet. Ensure that the operating ranges of the power supply are compatible with your electrical
service, (see Appendix A for details) then connect power as follows:
I
n
t
r
o
d
u
c
t
c
c
u
u
c
i
c
t
i
c
t
i
t
i
n
t
i
n
t
i
n
I
n
t
r
o
o
t
n
n
n
d
r
o
d
n
e
n
e
n
e
1
I
n
C
o
C
o
2
C
Before connecting power to the printer, ensure that the Power Switch is in the OFF (O) position.
1) Connect the Power Supply to Power Jack of the printer.
r
o
o
o
g
g
g
n
n
n
t
t
i
t
i
h
h
h
n
n
e
e
e
e
t
e
t
P
r
i
n
P
t
r
i
n
t
r
i
n
t
P
e
e
e
r
r
r
r
r
S
S
e
e
t
t
u
u
p
p
2) Connect the AC Power Cord to the Power Supply.
3) Connect the AC Power Cord to an Electrical Outlet.
312
Power Supply
AC Power Cord
Power Jack
Electrical Outlet
Chapter 2 – Printer Setup 3
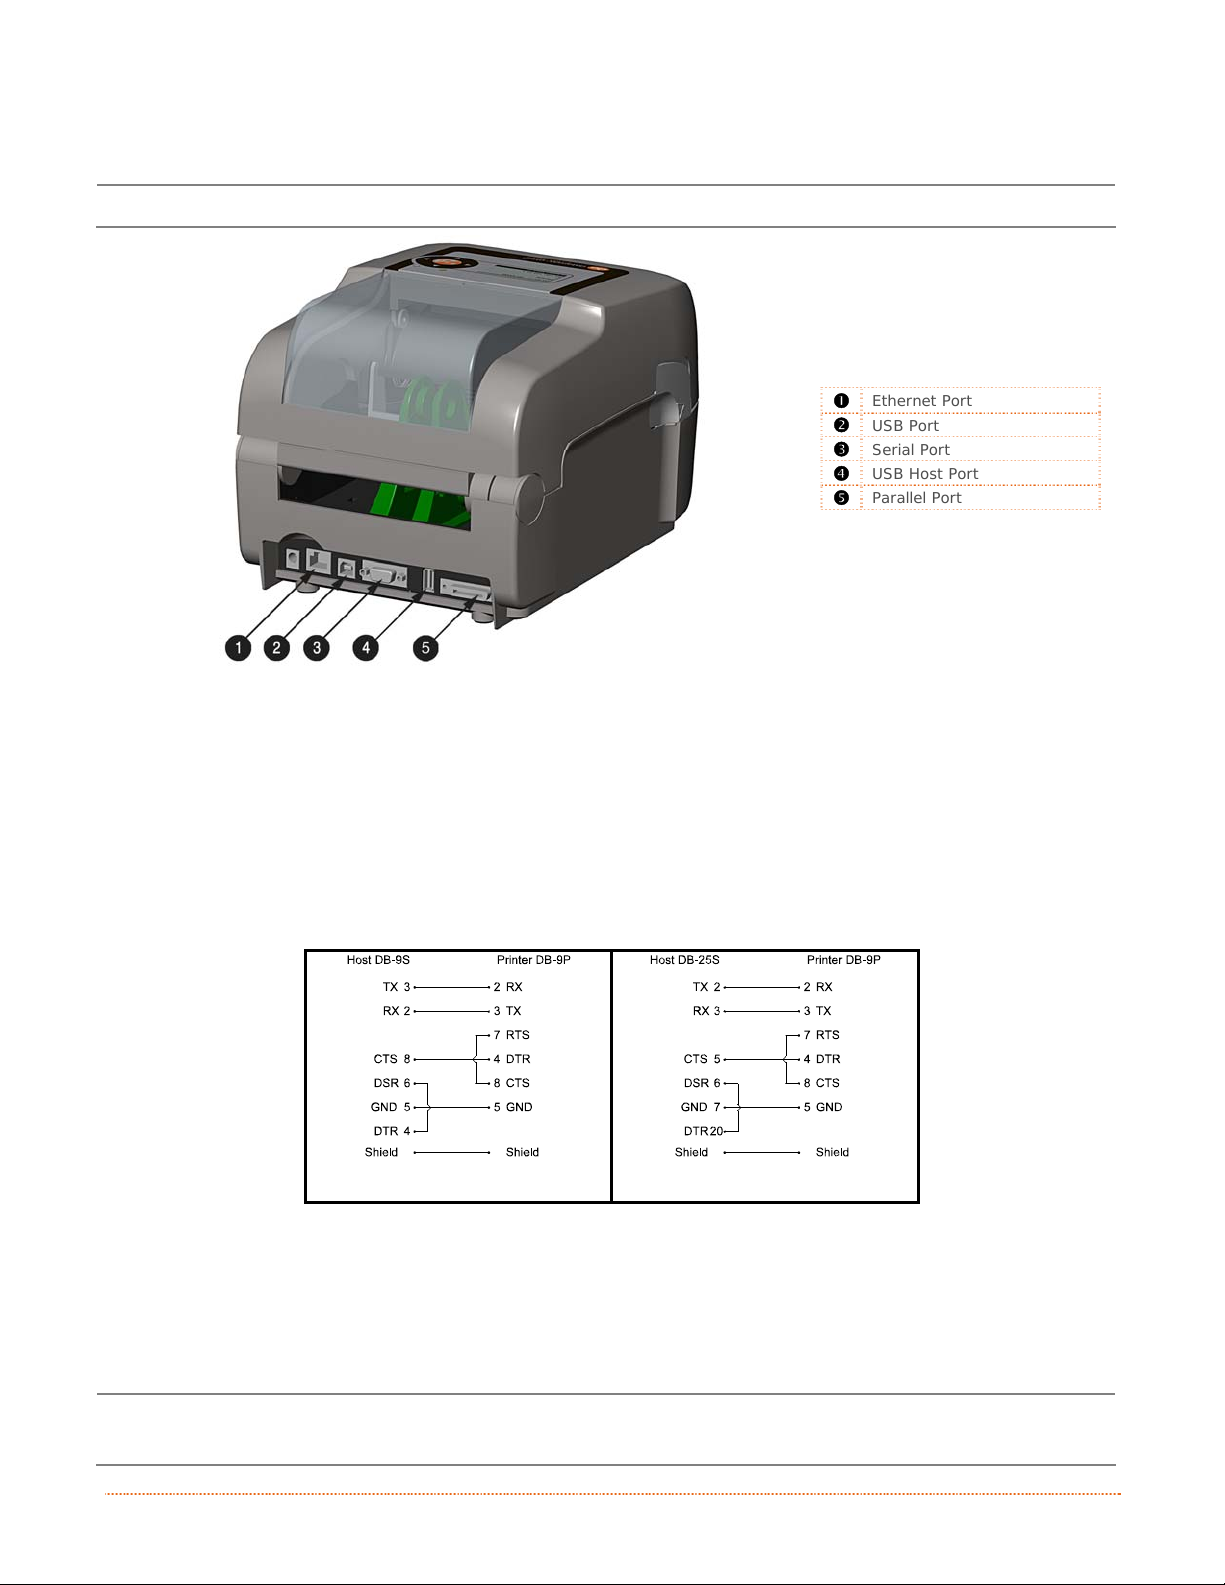
2.2.2 Interface Connections
Before connecting interface cables to the printer, ensure that the Power Switch is in the OFF (O) position.
312
Ethernet Port
USB Port
Serial Port
USB Host Port
Parallel Port
Cable Requirements
Choose the correct cable when interfacing the printer to the host:
The Parallel Port (optional) supports parallel communications via a 36-pin male mini-Centronics
connector. Bi-directional communications (forward and reverse channels) is supported when an IEEE
1284 compliant cable and supporting host software is used.
The Ethernet Port supports Wired LAN communications (see Appendix B for information).
The Serial Port supports RS-232C communications via a DB-9 connector with specif ic pin-outs
(interface cable part numbers and pin-outs are given below; contact your reseller to order). Serial port
settings are menu-selectable and must match the host settings.
Part # 32-2483-01
Part # 32-2301-01
The USB Port supports high-speed serial communications and requires a standard USB interface
cable.
The USB Host Port (optional). The USB Host Port allows the printer to accept external USB memory
devices for storing graphics, label formats, fonts, and firmware. The port can also accept an USB
keyboard for standalone, direct data (Line mode) input applications; see the Programmer’s Manual for
more information on how to utilize the port.
The printer automatically establishes communications with the first port through which valid data is
received. Afterward, a timeout period must be exceeded (or power must be cycled OFF and ON) to change
the established communications port.
4 Chapter 2 – Printer Setup
2
.
3
L
o
a
d
i
n
g
M
e
d
i
a
2
.
2
.
3
L
o
a
d
i
n
g
M
3
L
o
a
d
i
n
The printer is equipped with an Adjustable Media Sensor and may require adjustment to match your
media choice, refer to Section 4.4.
g
e
M
e
d
d
i
a
i
a
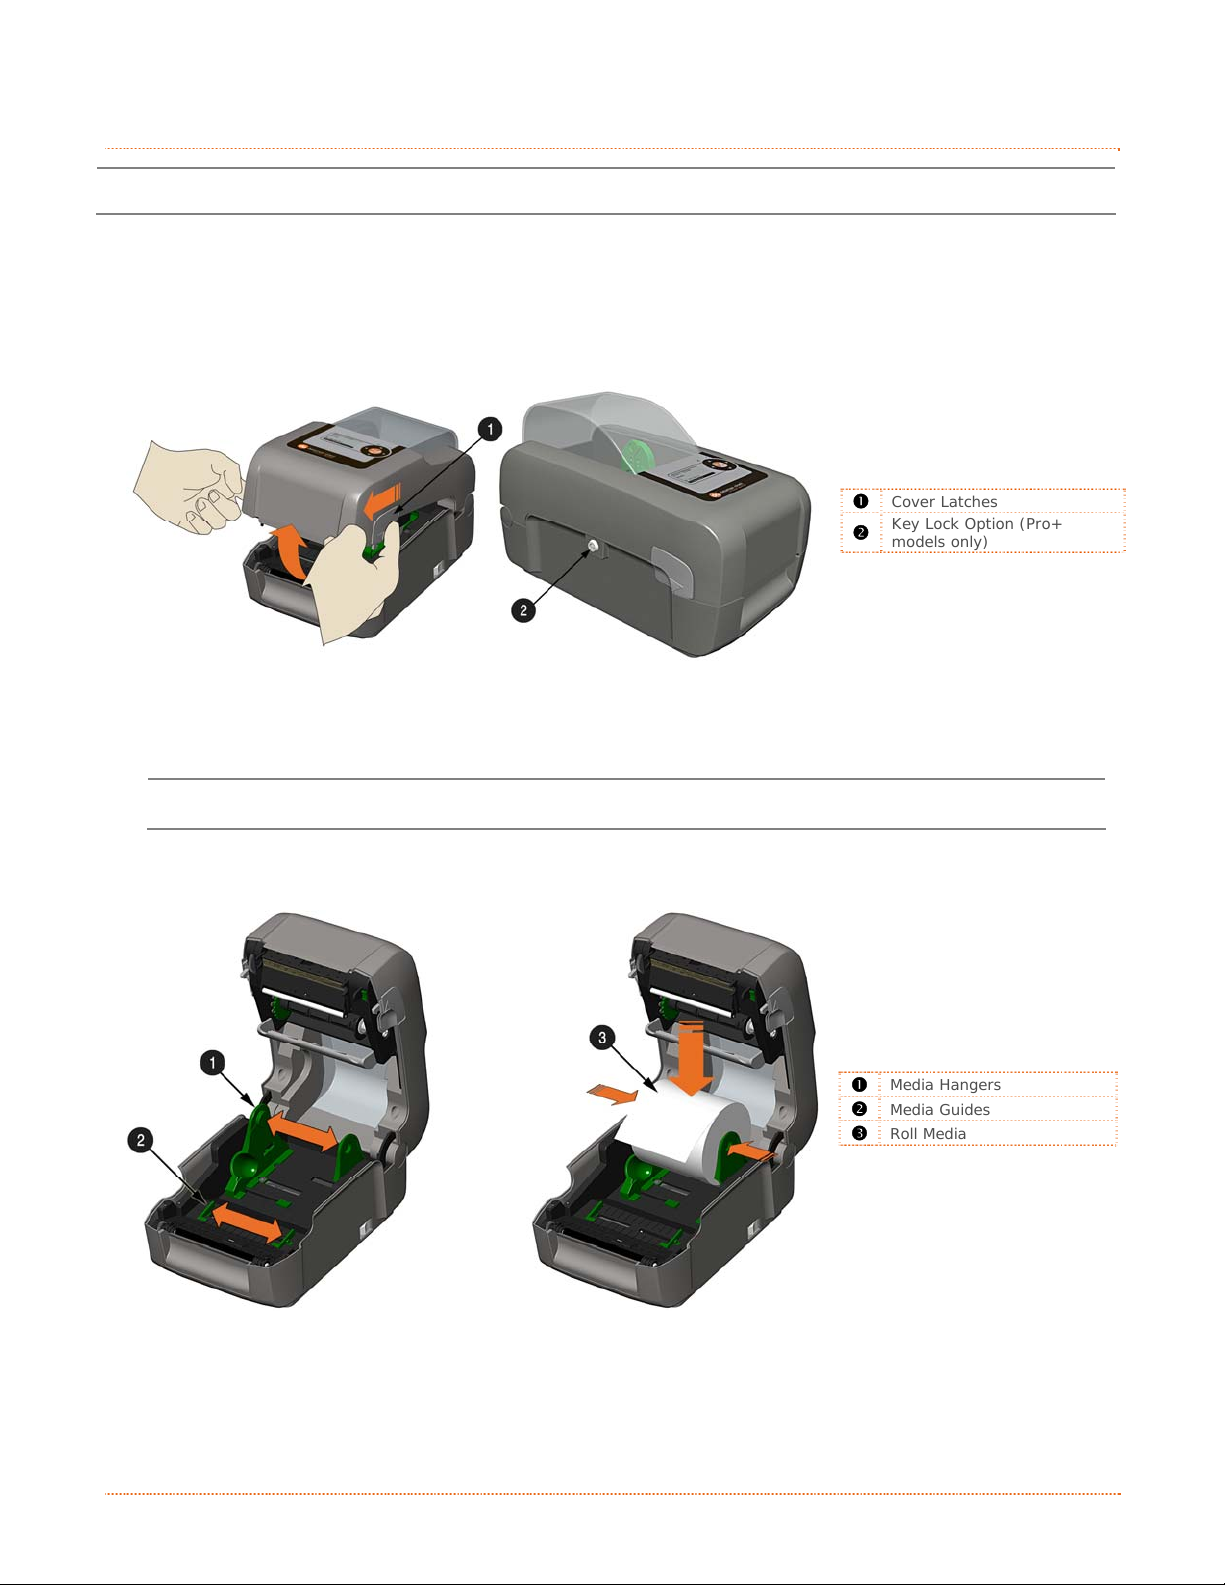
2.3.1 Loading Roll Media
Load media as follows:
1) Pull forward on the Cover Latches and lift up on the cover. Pro+ models have Key Lock option that
must be unlocked before the cover can be opened.
312
Cover Latches
Key Lock Option (Pro+
models only)
2) Slide the Media Guides outward.
Pro+ model Media Guides are equipped with Adjustable Media Core Hangers, see section 2.3.5.
3) Slide the Media Hangers outward and insert the Roll Media as shown. Allow the Media Hangers to
retract and grasp the media roll.
312
Media Hangers
Media Guides
Roll Media
Chapter 2 – Printer Setup 5
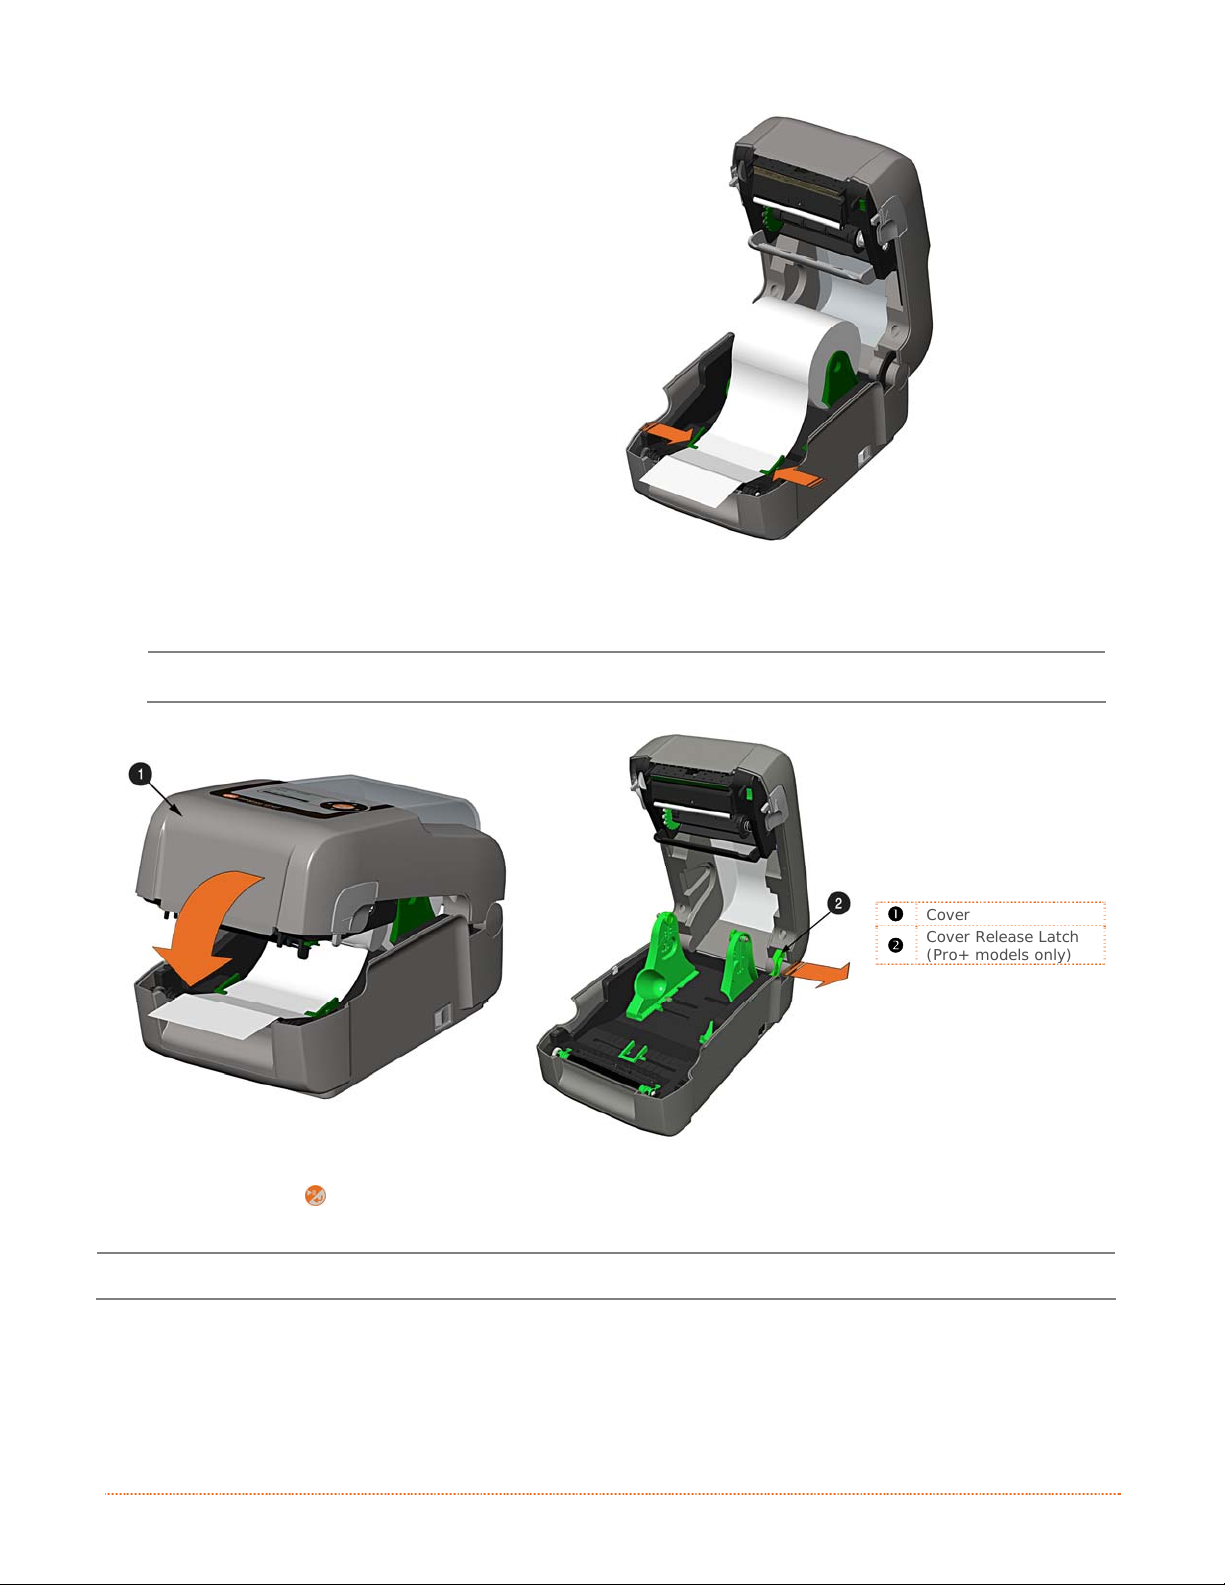
4) Pull out enough media to exit the front of
the printer. Adjust the Media Guides so
they are lightly touching the edge of the
media.
5) If using thermal transfer media (ribbon) proceed to Section 2.4 Loading Ribbon. Otherwise close
the printer’s Cover and press downward until latched. Pro
Pro+ models are equipped with a Cover Release Latch. Press outward on the latch to release cover.
312
Cover
Cover Release Latch
(Pro+ models only)
6) Press the
button to advance the media (if the Fault Light is lit, see Section 3.7.)
The printer is factory set to use gap media. If using another media type (for example, continuous
media), printer setup must be reconfigured; see Section 3.4
.
6 Chapter 2 – Printer Setup
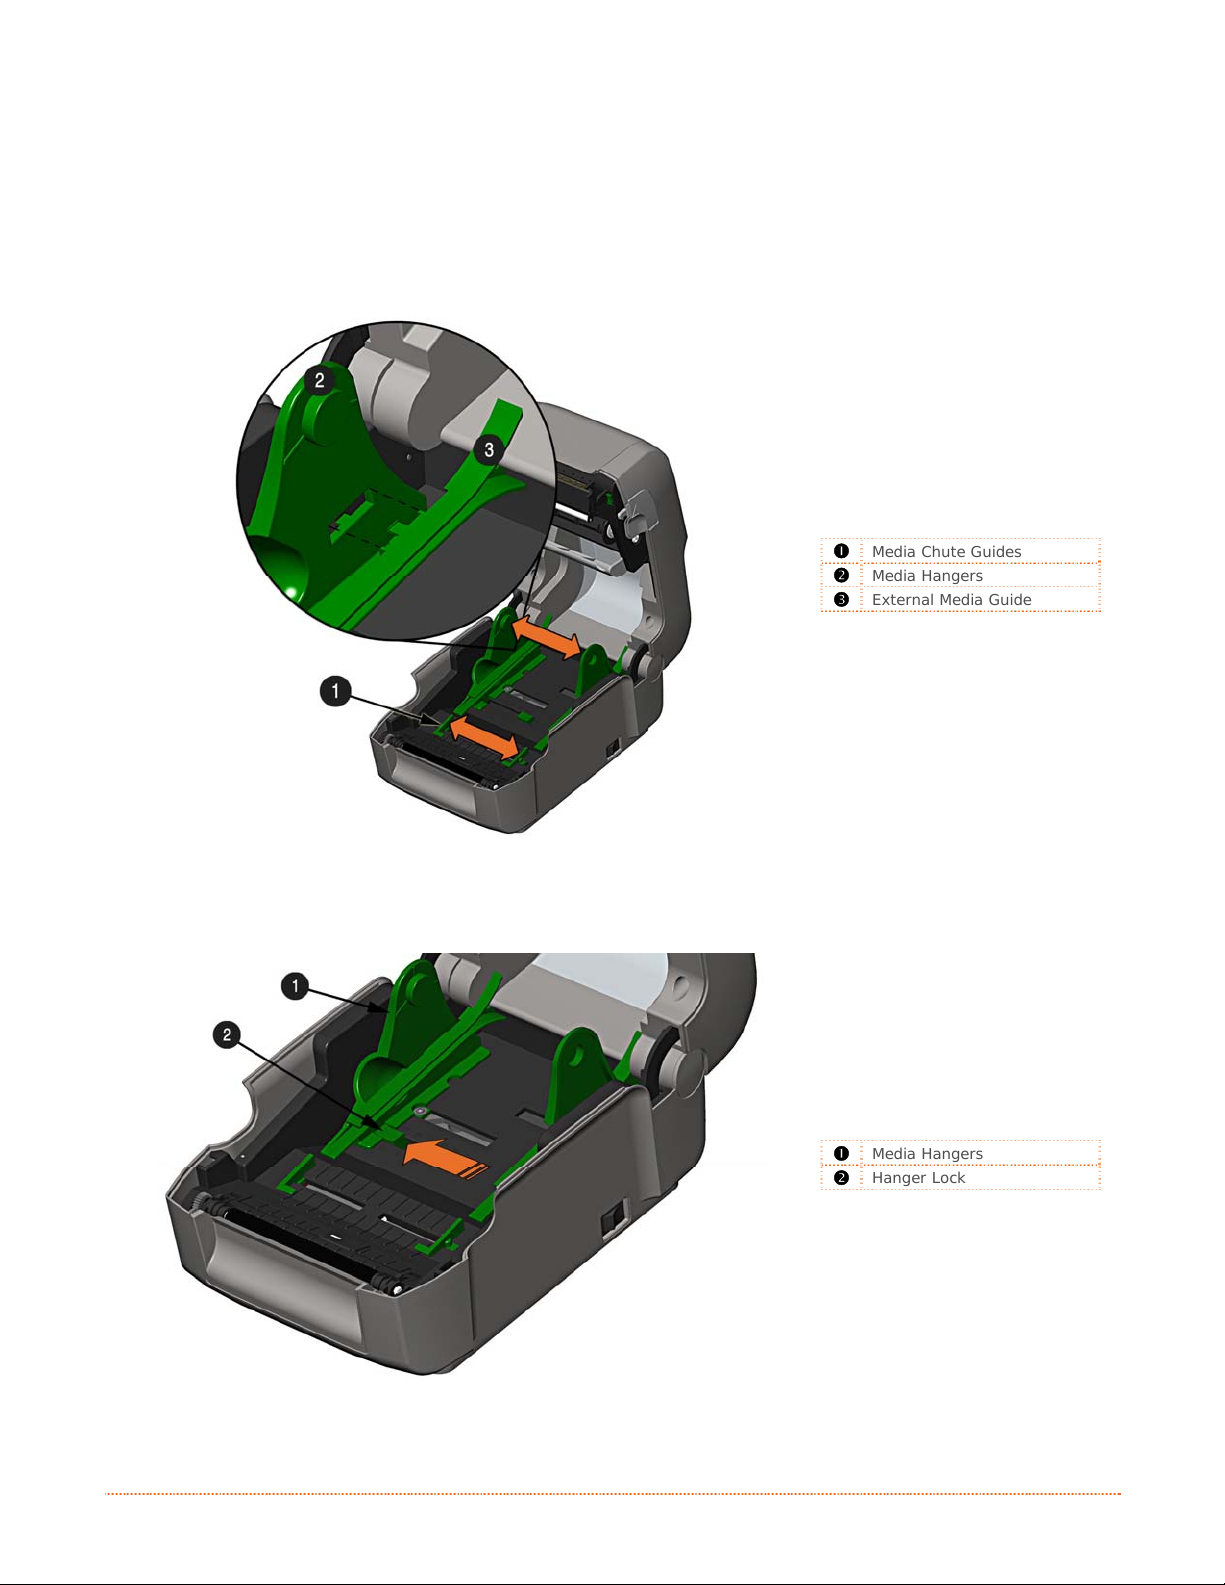
2.3.2 Loading — External Media
Using Internal Media Chute Guides Accessory (Professional model only)
Load media as follows:
1) Slide the Media Guides outward.
2) Slide the Media Hangers outward and install the two Media Chute Guides into the Media Hangers.
Media Chute Guides
Media Hangers
External Media Guide
3) Position the Media Hangers to match the width of the media being used. Slide the Hanger Lock
against the Media Hanger to hold this position.
Media Hangers
Hanger Lock
Chapter 2 – Printer Setup 7
4) Route the media through the External Media Slot in the rear of the printer. Pull out enough media
to exit the front of the printer. Adjust the Media Guides so they are lightly touching the edge of
the media.
External Media Slot
Media Guides
External Media Supply
5) If using Thermal Transfer media (ribbon) proceed to Section 2.4 Loading Ribbon. Otherwise close
the printer’s Cover and press downward until latched.
6) Press the button to advance the media (if the Fault Light is lit, see Section 3.7.)
The printer is factory set to use gap media. If using another media type (for example, continuous
media), printer setup must be reconfigured; see Section 3.4
.
8 Chapter 2 – Printer Setup
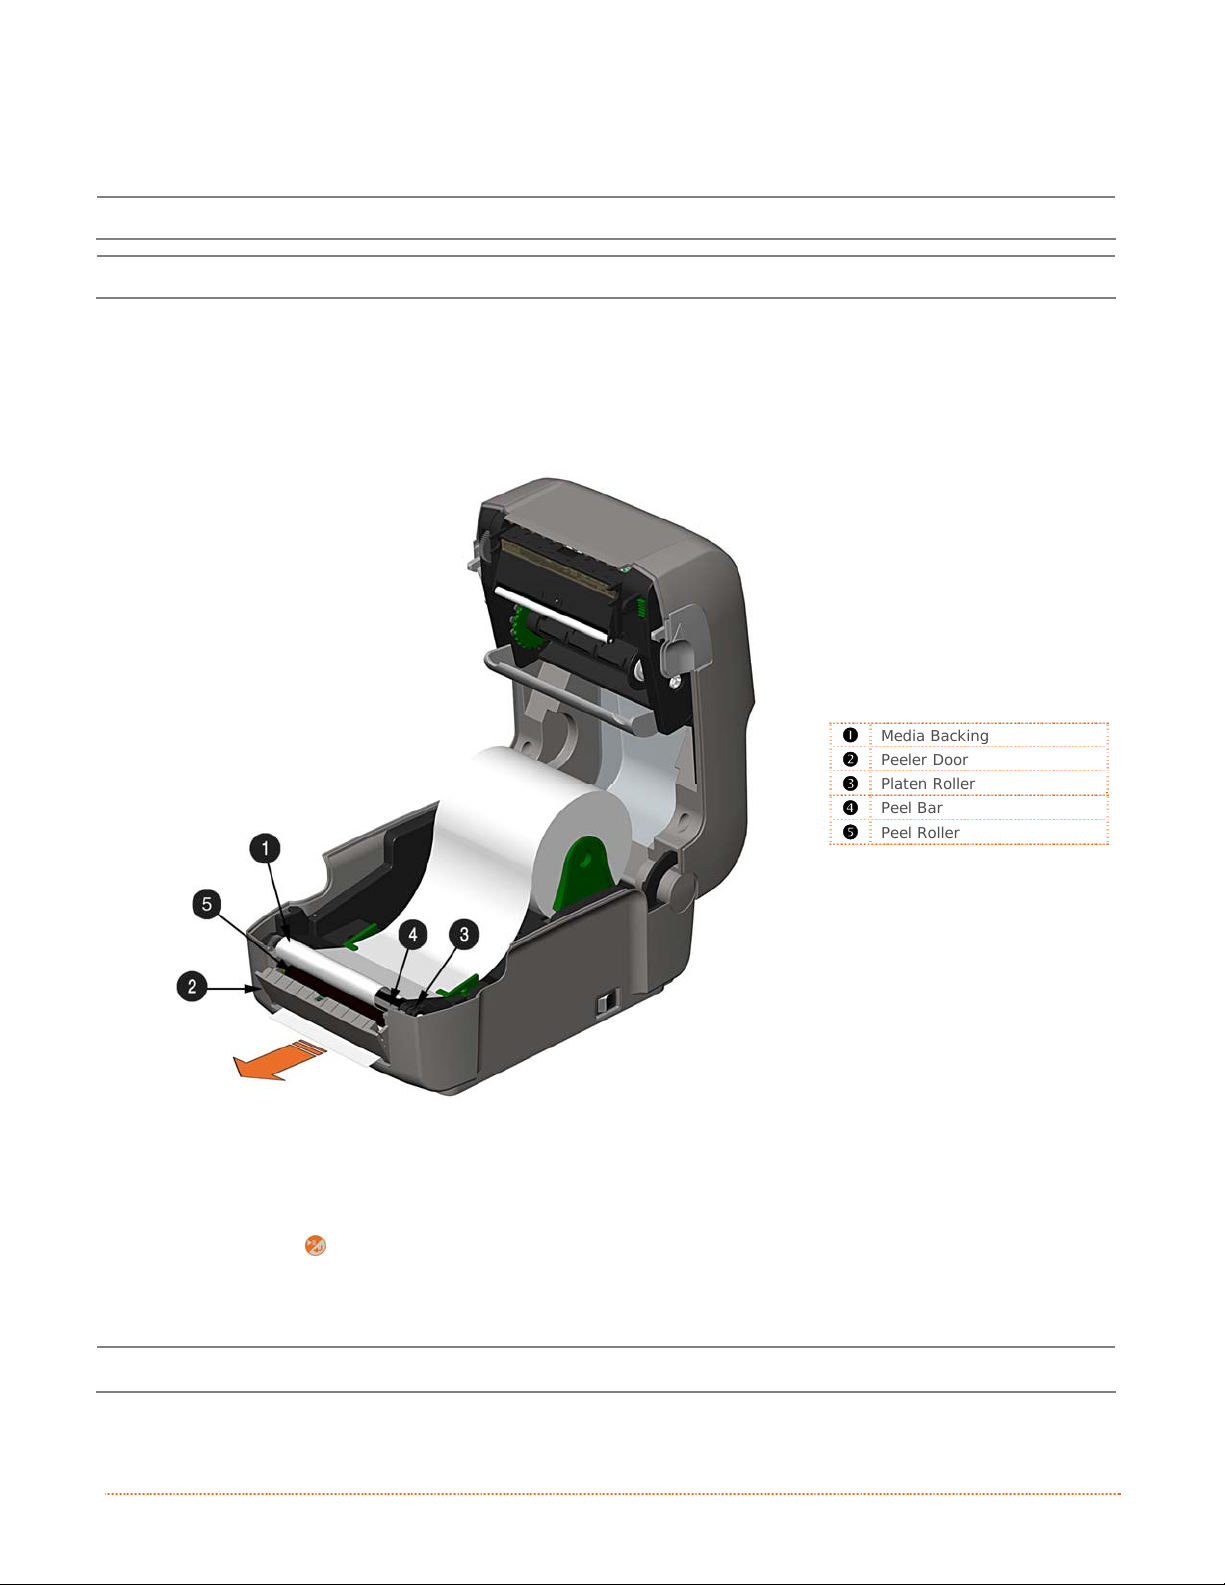
2.3.3 Loading Media with the Peel and Present Option
Load media for peeling (if the printer is equipped with the option) as follows:
When using the Peel Mechanism do not exceed a print speed of 4 IPS.
To utilize “Tear mode” with Peel and Present Option installed; move the Peeler Door to its open position.
1) Load media as described in Section 2.3, (steps 1-3).
2) Remove about 8 inches (200mm) of labels from the Media Backing.
3) Open the Peeler Door. Route the Media Backing over the Platen Roller and Peel Bar, and then
behind the Peel Roller and Peeler Door, as shown below.
312
Media Backing
Peeler Door
Platen Roller
Peel Bar
Peel Roller
4) Close the Peeler Door.
5) If using Thermal Transfer media (ribbon) proceed to Section 2.4 Loading Ribbon. Otherwise cl ose
the printer’s Cover and press downward until latched.
6) Press the
7) The printer will now peel each label and present it to the operator for removal. The indicator light
will flash orange and the next label will not feed/print until the previous label is removed.
The printer is factory set to use gap media. If using another media type (for example, continuous
media), printer setup must be reconfigured; see Section 3.4
button to advance the media (if the Fault Light is lit, see Section 3.7.)
.
Chapter 2 – Printer Setup 9
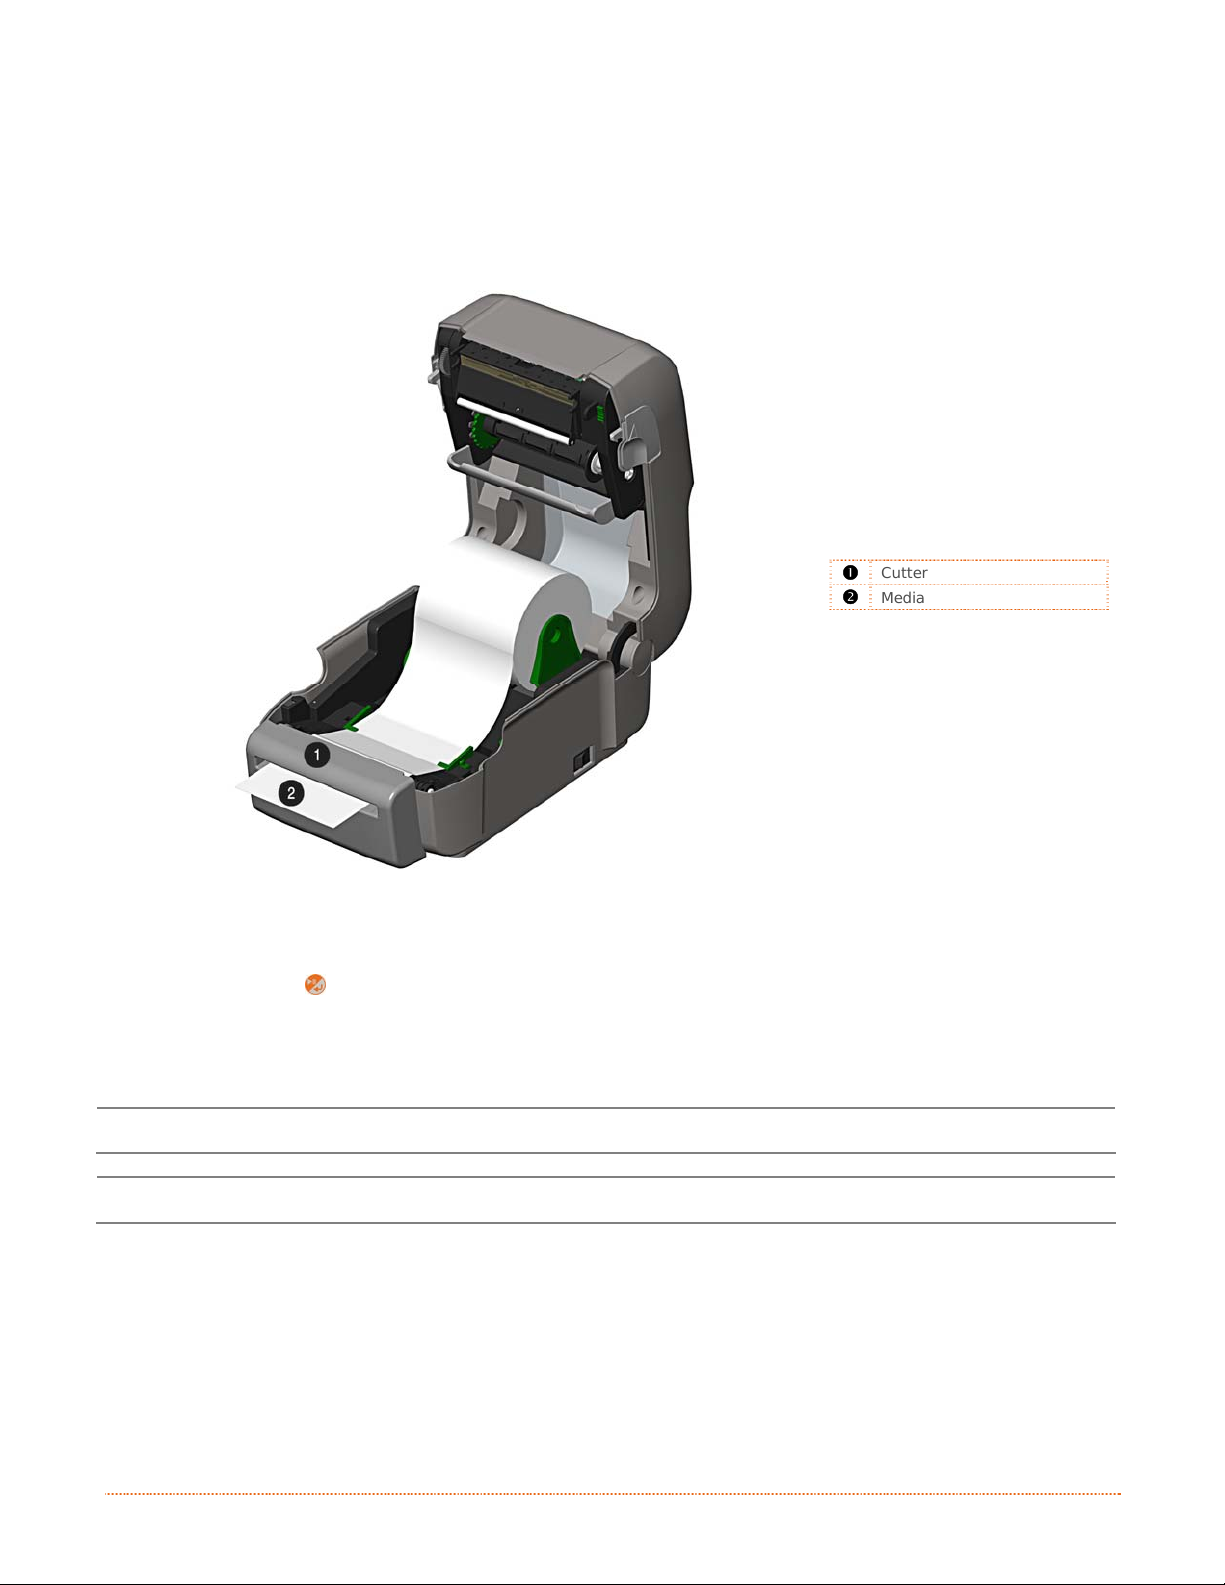
2.3.4 Loading Media with the Cutter Option
Load media for cutting (if the printer is equipped with the option) as follows:
1) Load media as described in Section 2.3, (steps 1-3).
2) Route the media through the opening in the Cutter.
312
Cutter
Media
3) If using Thermal Transfer media (ribbon) proceed to Section 2.4 Loading Ribbon. Otherwise close
the printer’s Cover and press downward until latched.
4) Press the button to advance the media (if the Fault Light is lit, see Section 3.7.). The printer
will now cut each label as it exits from the printer.
7) The printer will now peel each label and present it to the operator for removal.
If the printer is equipped with the Present Sensor Option, the indicator light will flash orange and the
next label will not feed/print until the previous label is removed.
The printer is factory set to use gap media. If using another media type (for example, continuous
media), printer setup must be reconfigured; see Section 3.4
.
10 Chapter 2 – Printer Setup
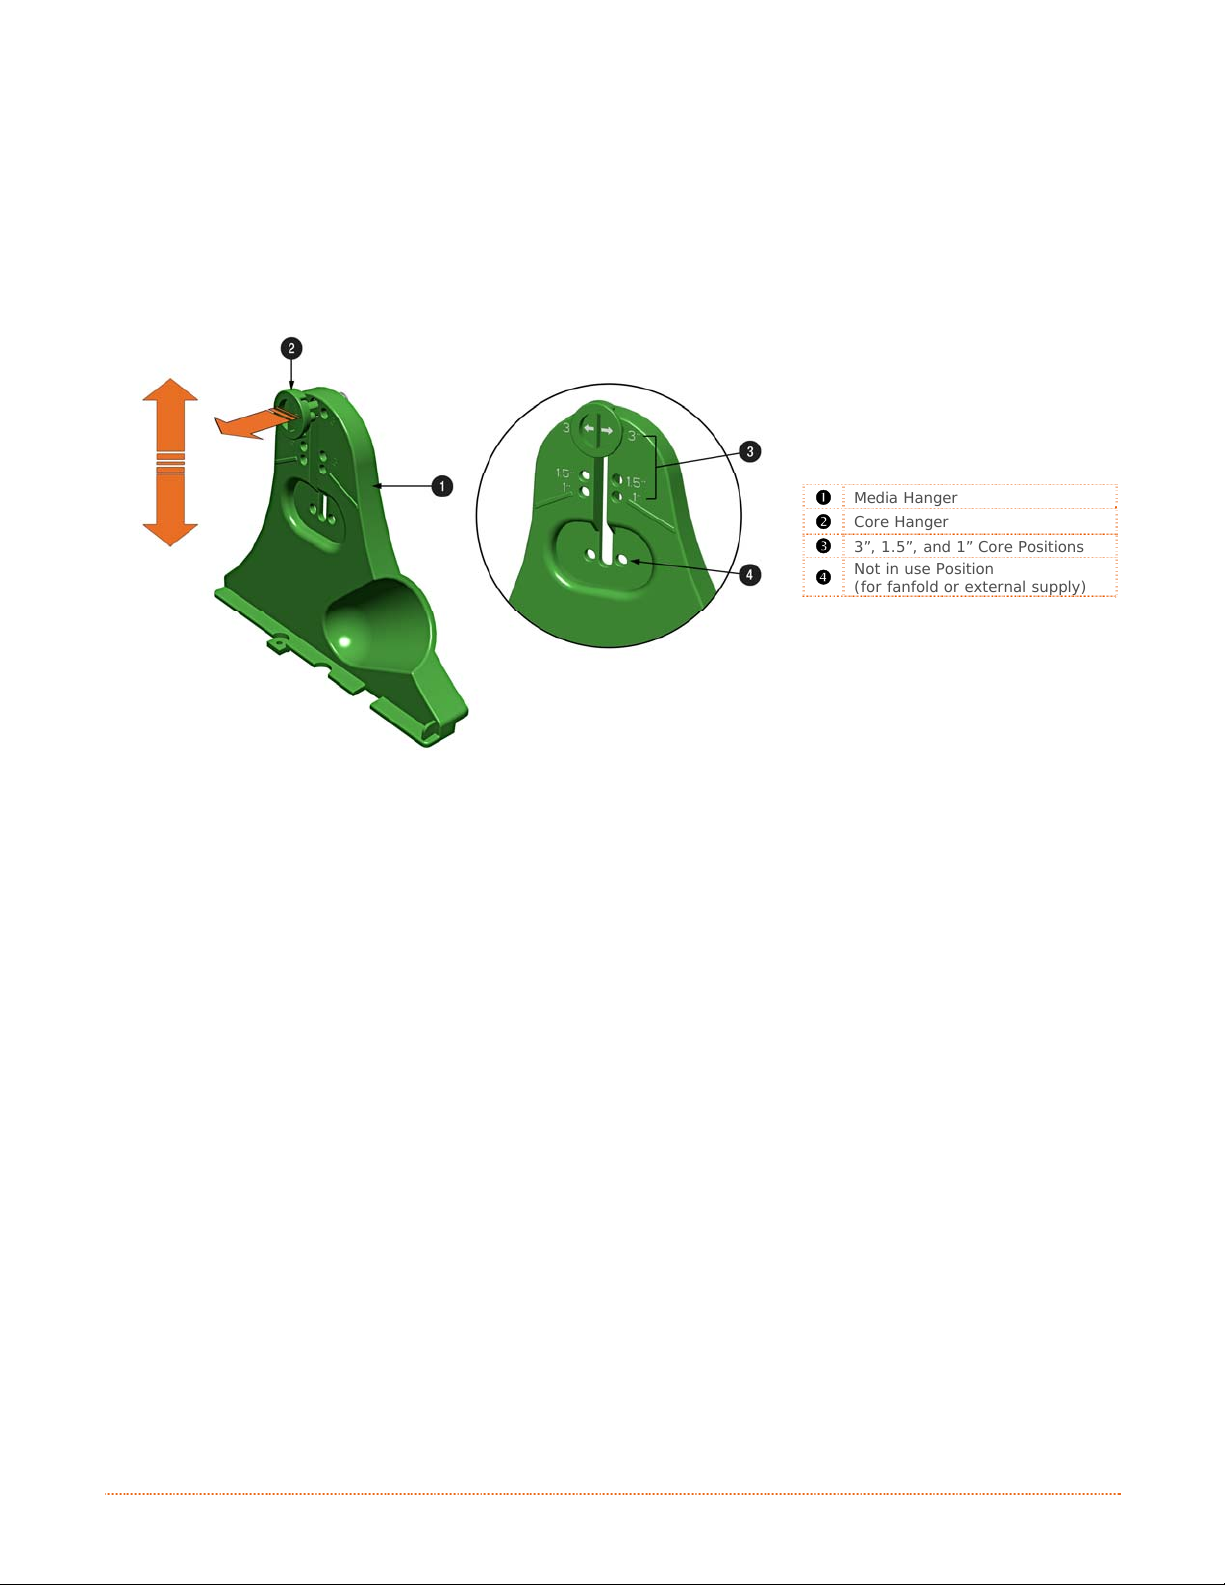
2.3.5 Adjustable Media Core Hangers (Pro+ models only)
The Adjustable Media Core Hangers allow for support of media rolls with 3”, 1.5”, or 1” cores.
To adjust:
1) Pull outward in on the Core Hanger and slide the Core Hanger up or down to the desired setting.
Be sure both core hangers are set to the same position.
312
Media Hanger
Core Hanger
3”, 1.5”, and 1” Core Positions
Not in use Position
(for fanfold or external supply)
Chapter 2 – Printer Setup 11
2
.
4
L
o
a
d
i
n
g
R
i
b
b
o
n
2
.
4
L
o
a
d
i
n
g
R
i
b
2
.
4
L
o
a
d
i
n
g
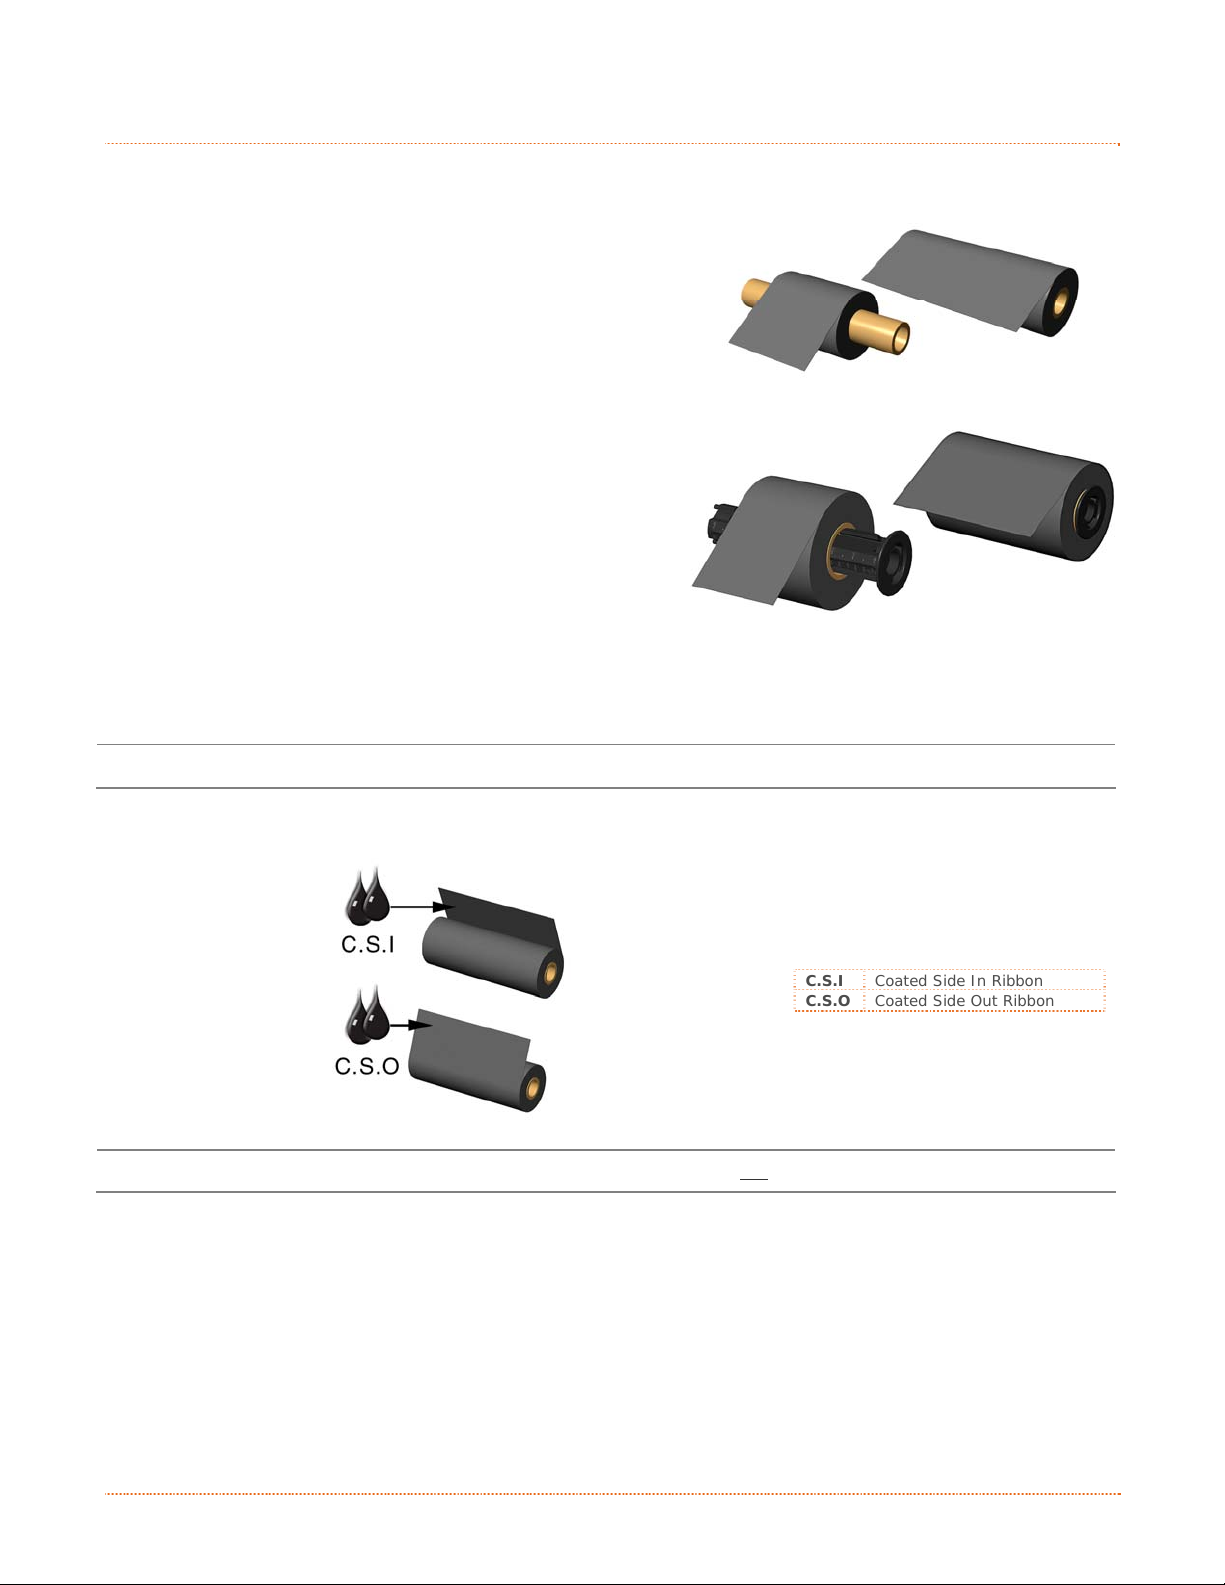
The printer is capable of using C.S.I (Coated Side In) and C.S.O (Coated Side Out) ri bbons in the following
configurations:
½” Core Ribbons
Ribbon Core Width: 4.3 inches (110mm)
Ribbon Width: 1.0 — 4.3 inches (25 — 110mm); Centered on core
1” Core Ribbons (with Ribbon Core Adapters, see section 2.4.1.)
Ribbon Core Width: 1.0 — 4.3 inches (25 — 110mm); Centered
on Ribbon Core Adapters
Ribbon Width: 1.0 — 4.3 inches (25 — 110mm); Centered on core
Load ribbon as follows:
If equipped with the thermal transfer option, the printer is factory set to use ribbon; see Section 3.4 to
change this setting if using direct thermal media.
1) Determine the type of ribbon (C.S.I or C.S.O) you are using.
b
R
i
b
b
o
o
n
n
312
C.S.I Coated Side In Ribbon
C.S.O Coated Side Out Ribbon
Ensure the inked side of the ribbon faces toward the label media, not the printhead.
12 Chapter 2 – Printer Setup
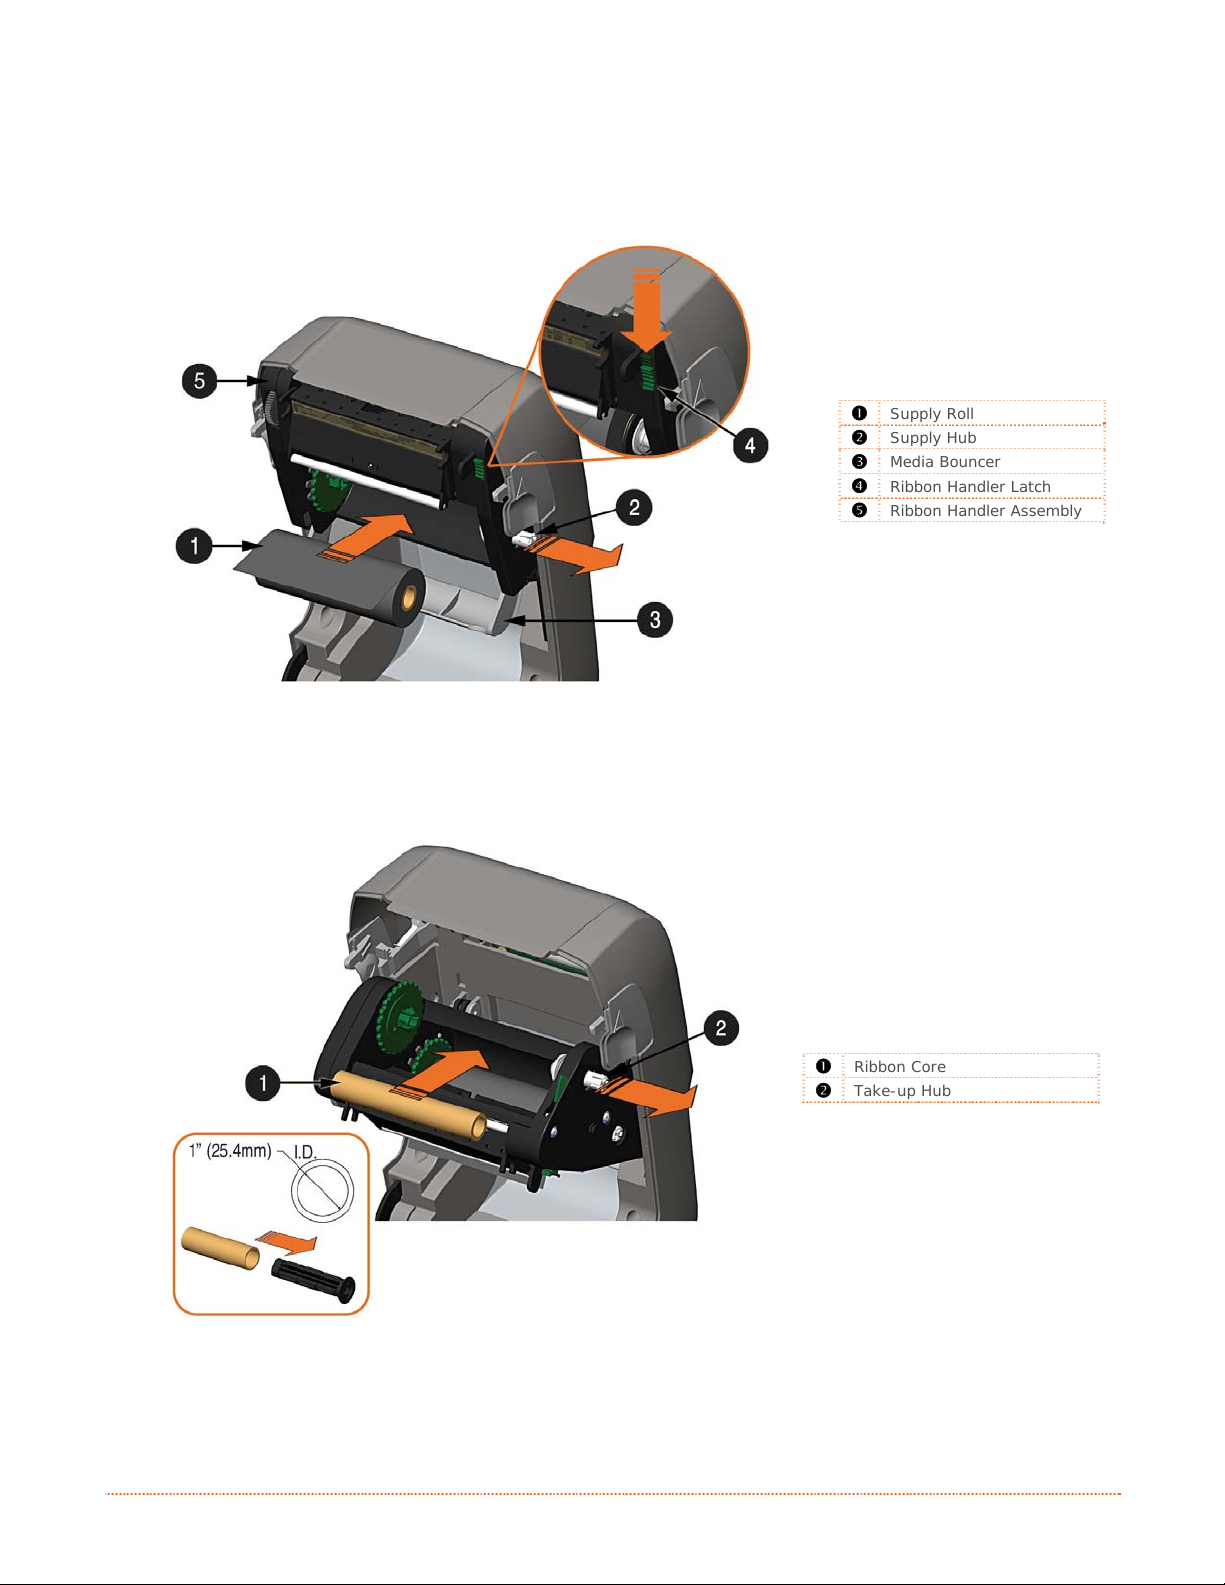
2) Push out the Supply Hub and load the Supply Roll into the printer as shown. Depending on the
size of the Supply Roll, the Media Bouncer may need to be pushed out of the way.
3) Once the Supply Roll is loaded, slide the Ribbon Handler Latch downward to unlatch the Ribbon
Handler Assembly.
312
Supply Roll
Supply Hub
Media Bouncer
Ribbon Handler Latch
Ribbon Handler Assembly
4) Push out the Take-up Hub and load an empty Ribbon Core into the printer as shown.
312
Ribbon Core
Take-up Hub
Chapter 2 – Printer Setup 13
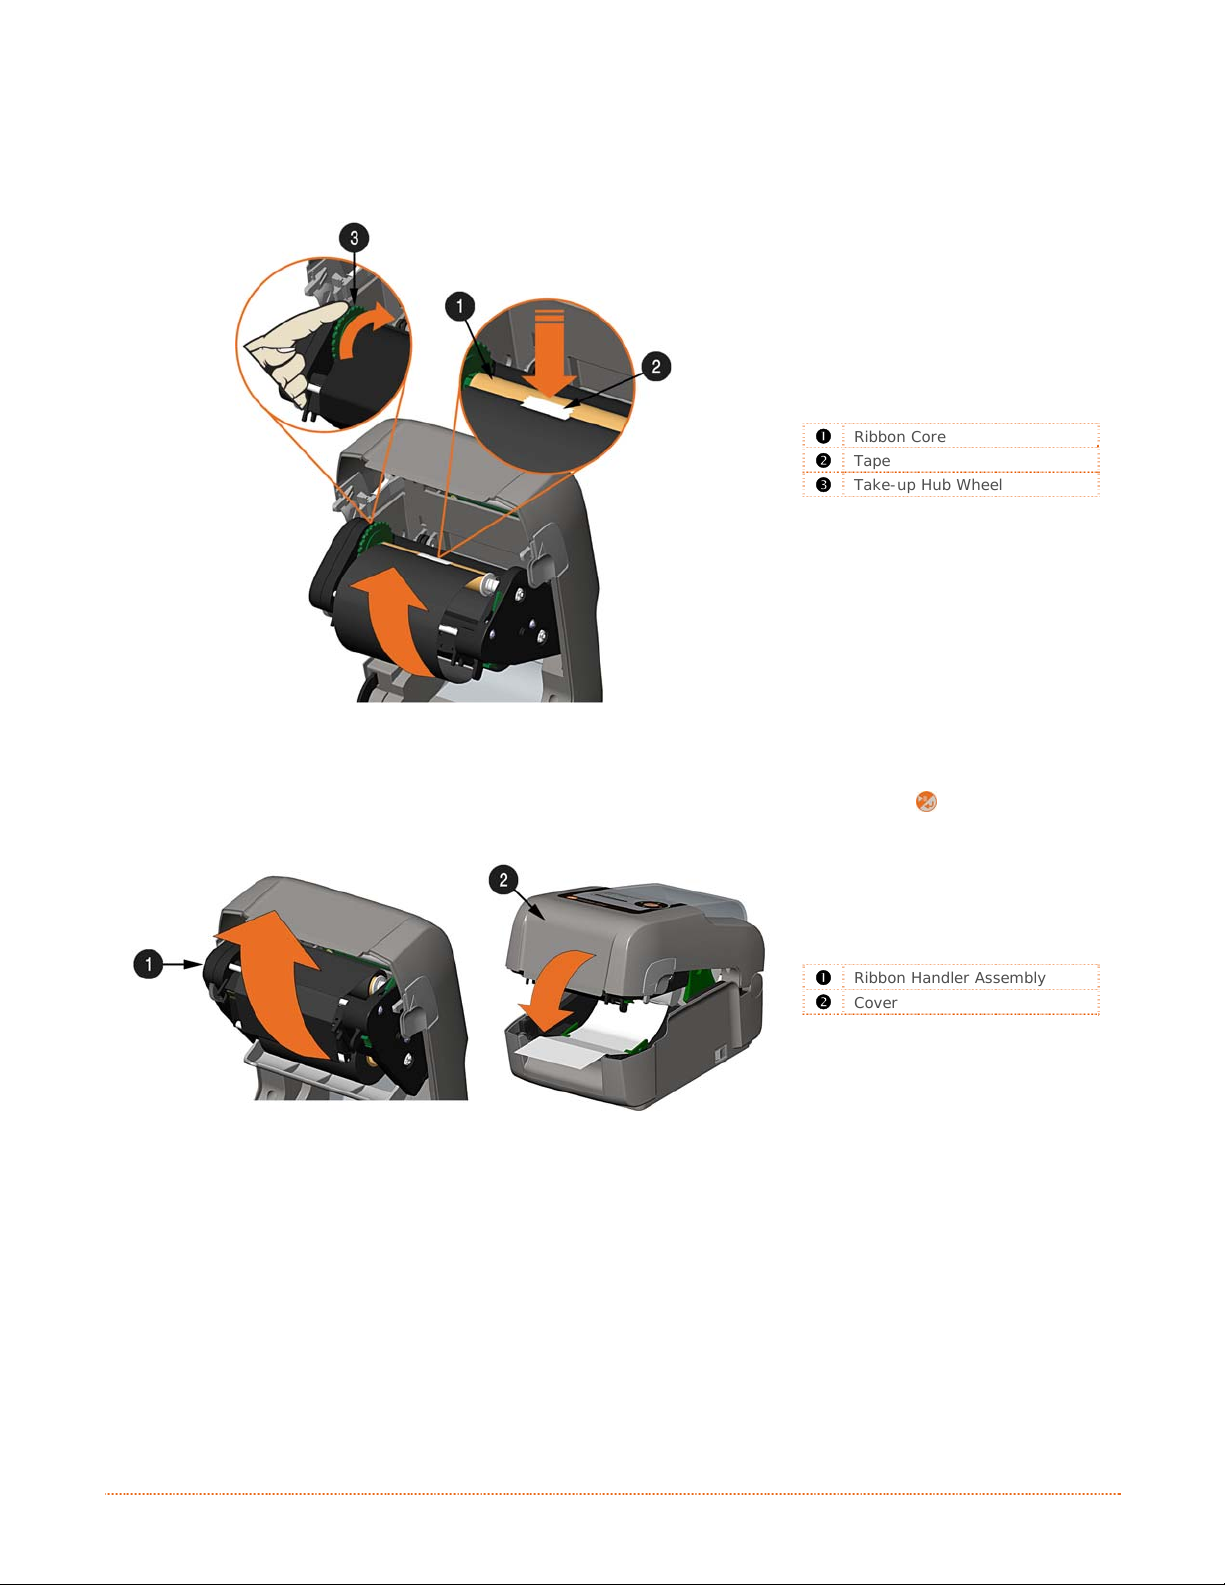
5) Route the ribbon from the supply roll to the Ribbon Core, as shown below.
6) If not already attached, affix the leader of the ribbon to the Ribbon Core using Tape. Rotate the
Take-up Hub Wheel several times to secure the ribbon.
312
Ribbon Core
Tape
Take-up Hub Wheel
7) Raise and latch the Ribbon Handler Assembly. Close the cover and press the
button to advance
the media (if the Fault Light is lit, see Section 3.7.)
312
Ribbon Handler Assembly
Cover
14 Chapter 2 – Printer Setup
2.4.1 Using the Ribbon Core Adapters
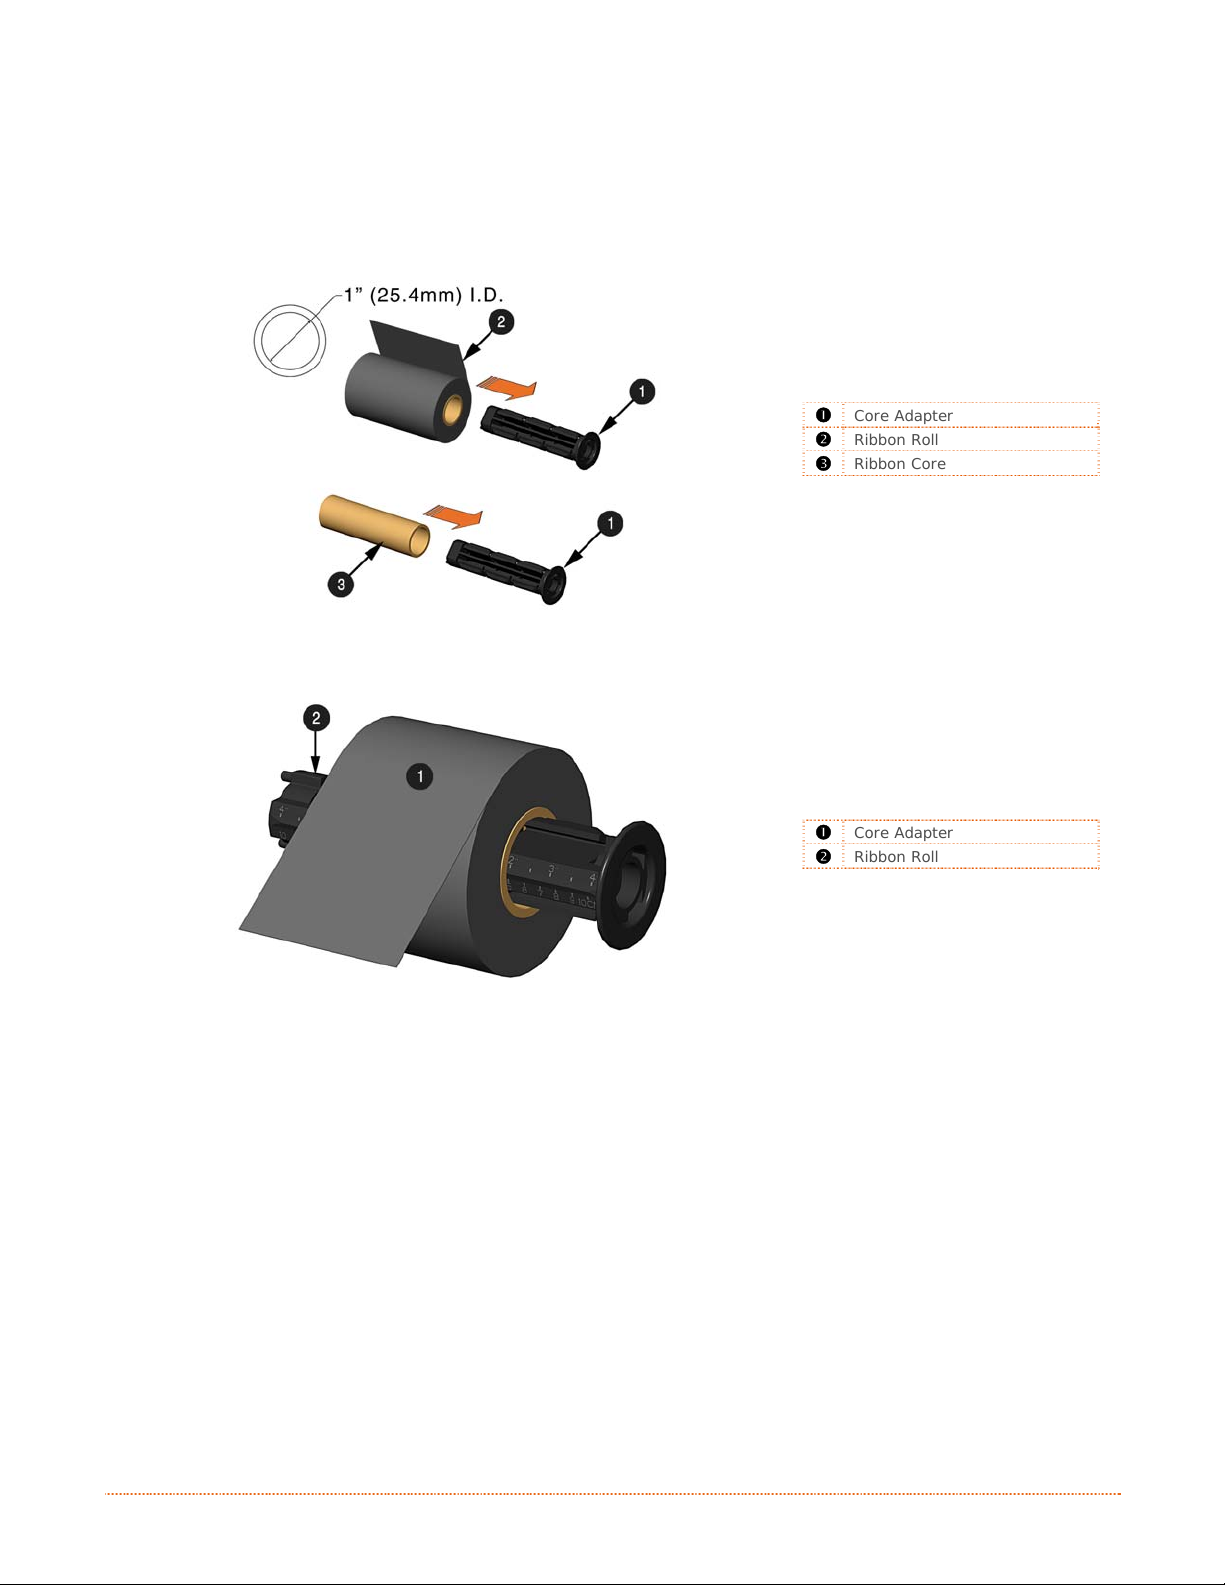
When using ribbons with a 1” (25.4mm) I.D. core, a Core Adapter must be used.
1) Slide the Ribbon Roll (with the leader positioned as shown above) onto a Core Adapter. Slide an
empty Ribbon Core onto the remaining Core Adapter.
312
Core Adapter
Ribbon Roll
Ribbon Core
2) If using a narrow ribbon, position the Ribbon Roll so that it is centered on the Core Adapter. The
Core Adapters are marked in both inches and centimeters to aid in proper positioning.
Core Adapter
Ribbon Roll
312
Chapter 2 – Printer Setup 15

16 Chapter 2 – Printer Setup
n
o
i
t
a
r
e
O
O
p
p
p
e
e
r
r
a
a
Green/Orange Status LED
Red Error LED
Graphic Display
Directional Arrow Buttons
Multi—function Button
t
i
o
o
i
t
n
n
P
r
P
P
3
3
3
3
.
1
3
.
1
3
.
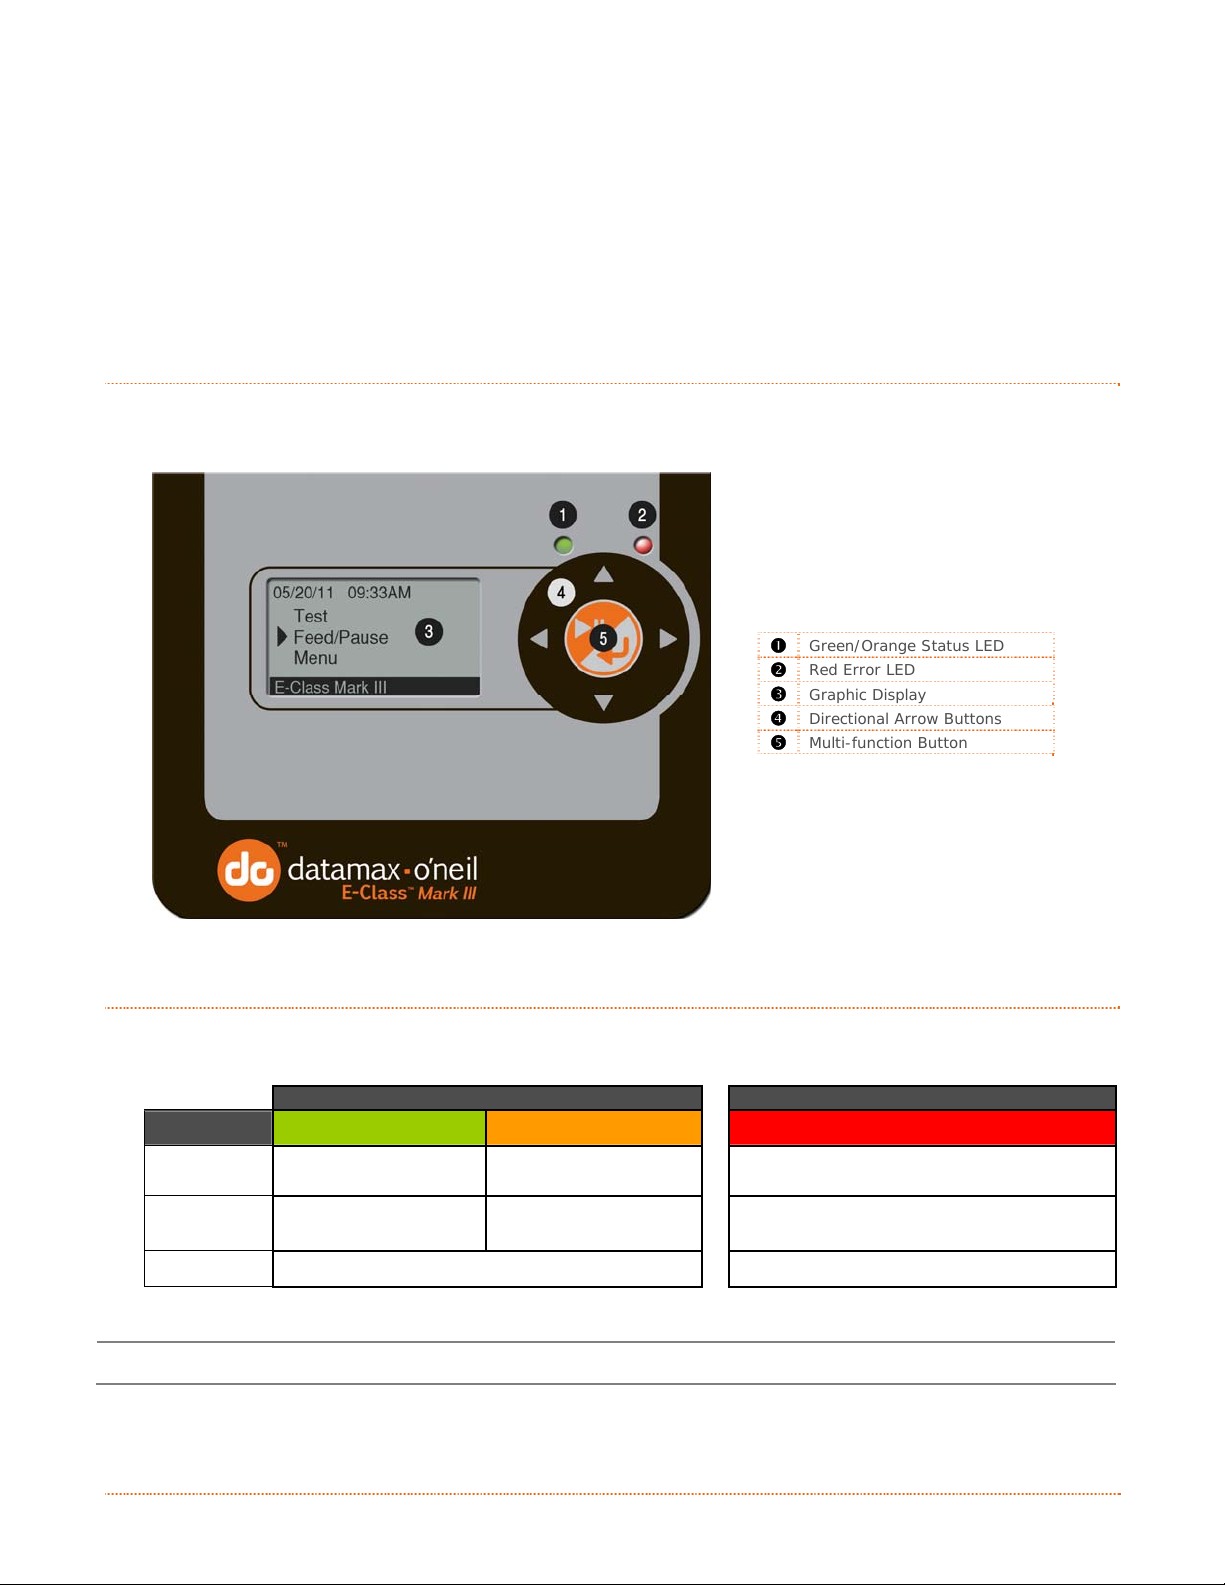
The Front Panel consists of a graphic display, two indicator lights, four directional arrow buttons and one
multi-function button, as detailed in the following sections.
1
I
n
t
r
o
d
u
c
t
I
n
t
r
o
I
n
d
t
r
o
d
u
u
c
c
i
t
i
t
i
r
o
o
o
n
n
n
i
i
n
n
312
t
t
e
e
r
r
O
r
e
t
n
i
r
3
.
2
L
E
D
I
n
d
i
c
a
t
3
.
2
L
E
D
I
n
3
.
2
L
E
D
Two LED indicator lights provide a quick visual reference of printer operations and conditions, as defined
below:
Color Green Orange
Solid
Flashing
Off
Both indicators will be ON during power-up initialization and following a reset.
d
I
n
d
o
i
c
a
t
o
i
c
a
t
o
Ready to print
Processing/busy Paused/busy Out of stock\labels or printer jam..
r
s
r
s
r
s
LED 1 LED 2
Paused or Present
Sensor is blocked.
No power
TOF sensing error. Next TOF not Found.
Red
No Error
Chapter 3 – Printer Operation 17
3
.
3
U
s
e
r
I
n
t
e
r
f
a
c
e
3
.
3
U
s
e
r
I
n
t
e
r
3
.
3
U
s
e
r
I
n
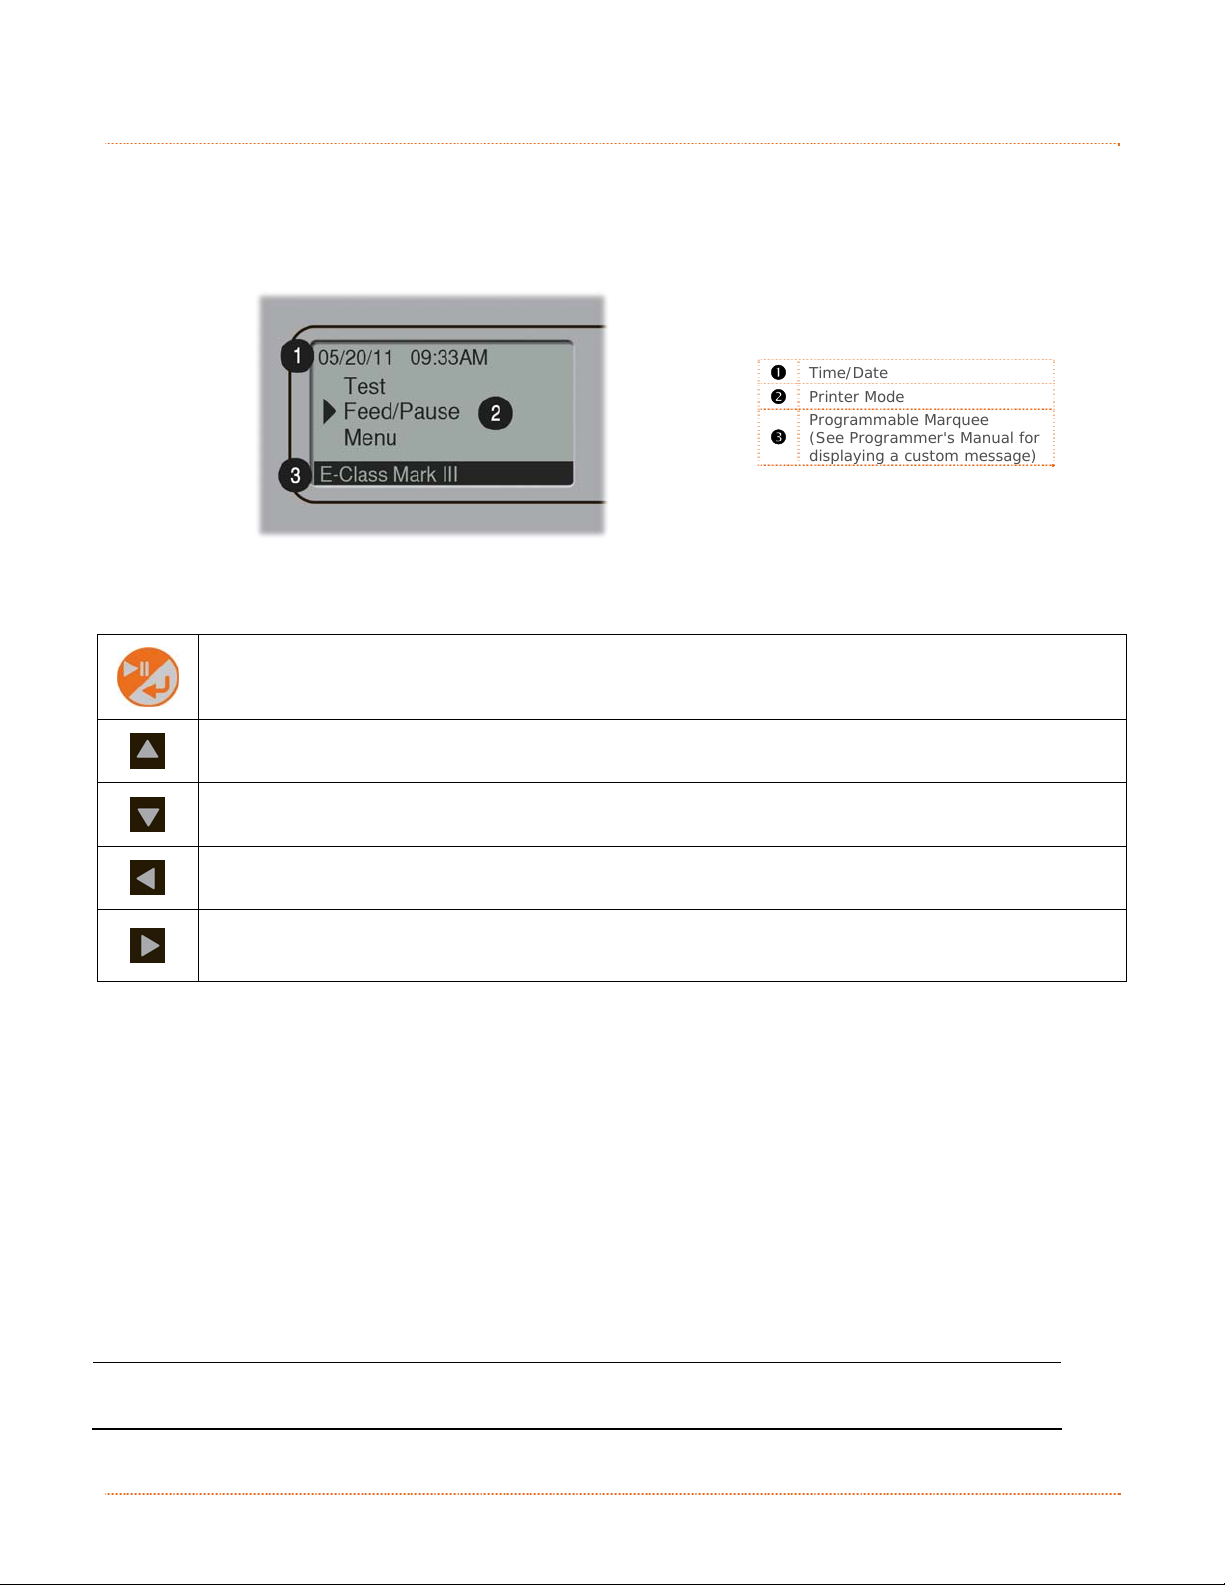
The User Interface is divided in three sections, Feed/Pause, Test, and Menu. Button functions are dependent
on the mode currently in use.
Use the Up and Down arrow buttons to scroll to the item and then press the center button to enter that menu
mode.
f
t
e
r
f
a
a
c
c
e
e
312
Time/Date
Printer Mode
Programmable Marquee
(See Programmer’s Manual for
displaying a custom message)
3.3.1 Feed/Pause Mode
At idle: Feeds the media to the next label.
When printing: Pauses current print job; prompts user to resume or cancel
Scrolls upward to the next menu item
Scrolls downward to the next menu item
N/A
N/A
3.3.2 Test Mode
The Test Mode contains test and informational label selections:
Print Quality Label
Print Configuration
Ribbon Test Label
Test Label
Validation Label
Print Last Label
Network Report
Internally generated, these labels are printed at pre-selected media type, speed, and heat settings. Changes
to these print settings can be made via the Menu System or through host commands. When printing, use full
width media to capture the entire format; otherwise, adjust the printer and set the Label Width menu setting.
(1) Press the CANCEL KEY to stop printing.
(2) A printing delay can be set; see Print Test Rate in the Diagnostics menu branch.
18 Chapter 3 – Printer Operation
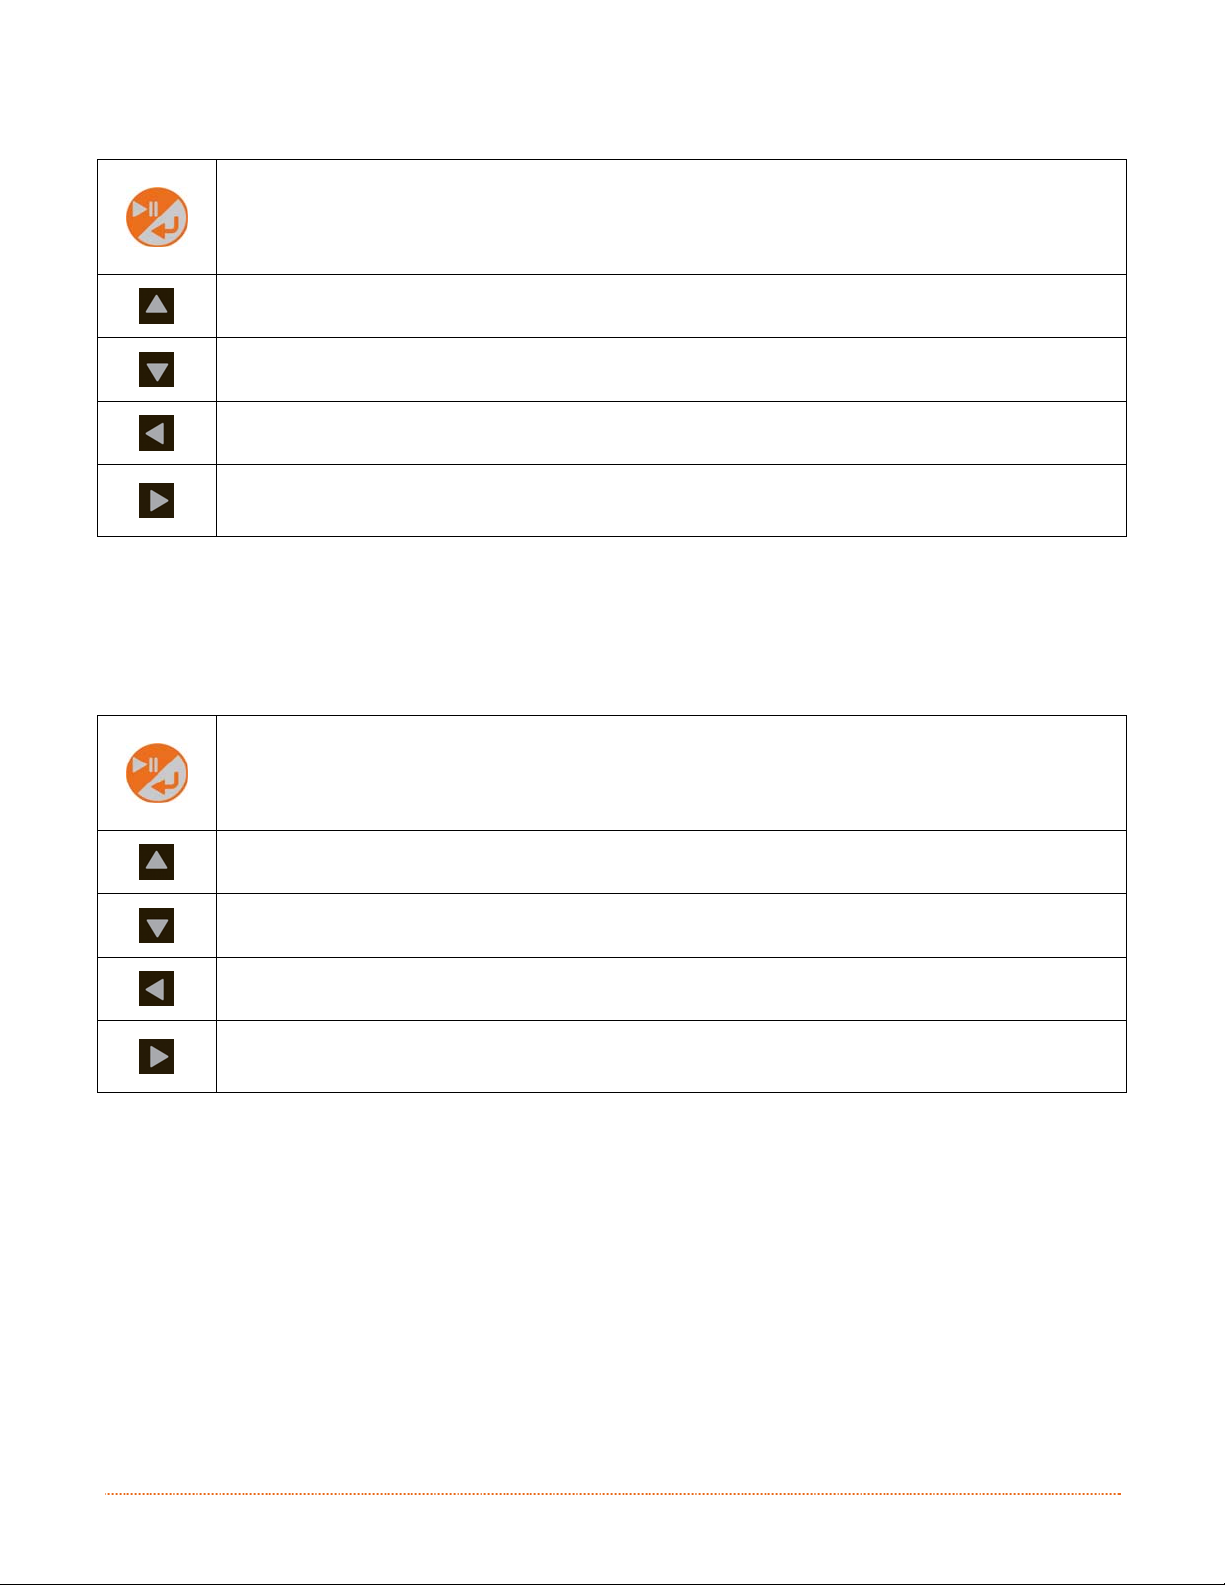
Enters the Test mode menu/sub-menu items. Prints the chosen test label.
Scrolls upward to the next menu item. Increments the Count value.
Scrolls downward to the next menu item. Decrements the Count value.
Exits the Test menu mode
Displays the ‘Count’ screen.
3.3.3 Menu Mode
The menu mode is covered in detail in Chapter 4.
Enters the Menu mode menu/sub-menu items. Enter/Accepts current prompt.
Scrolls upward to the next menu item. Increments the current value.
Scrolls downward to the next menu item. Decrements the current value.
Exits to the previous menus level
Enters the next menu/sub-menu item.
Chapter 3 – Printer Operation 19

3
.
4
P
r
i
n
t
e
r
C
o
n
f
i
g
u
r
a
t
i
o
n
T
o
o
l
s
3
.
4
P
r
i
n
t
e
r
C
o
n
f
i
g
u
r
a
t
i
o
n
T
3
.
4
P
r
i
n
t
e
r
C
o
n
f
i
g
u
r
a
t
i
o
The printer contains many user adjustable parameters. These parameters are configurable using a few
methods. The table below lists the most popular ways of configuring the printer and the advantages of each.
Choose the method that best addresses your application.
Method Description Pros Cons For More Info
NETira CT (located on the
Accessories CD-ROM) is a
Windows based configuration
NETira CT
Program*
Internal Web
Pages*
utility that allows the user to
make changes to the existing
printer setup via a direct
connection to the host computer’s
serial, USB, Ethernet, or parallel
connection.
Internal web pages are simple
HTML pages that can be accessed
with any web browser via the
optional Ethernet port.
n
o
T
o
o
l
s
o
l
s
Easy to use, gives the
user the most control
of the printer.
Easy to use. Printer
can be configured from
any host connected to
the network regardless
of physical location or
host operating system.
No additional software
required.
Software must be
installed on a Windows
based host computer.
Printer must be
equipped with an
Ethernet or Wi-FI
option.
Depending on the
complexity of the
network, initial
connection may not be
possible until network
parameters are set via
another method.
See
Section 3.5
See
Appendix B
Windows
Driver
DPL
Programming
Commands
* Recommended methods
The Windows printer driver
(located on the Accessories CDROM).
DPL Programming Language
commands can be built into
custom label formats or sent
individually to the printer.
Many applications
require use of driver
for printing from 3
party applications. This
can be an all in one
solution for some users
that do not require
advanced setups.
DPL commands can be
built directly into label
formats which can
configure the printer
on the fly.
rd
Requires installation of
a driver on a Windows
based host.
Only basics parameters
can be configured.
DPL programming
knowledge needed.
See
Section 3.6
See the
Programmer’s
Manual
20 Chapter 3 – Printer Operation
3
.
5
P
r
i
n
t
e
r
C
o
n
f
i
g
u
r
a
t
i
o
n
U
t
3
.
5
P
r
i
n
t
e
r
C
o
n
f
i
g
u
r
a
t
i
o
3
.
5
P
r
i
n
t
e
r
C
o
n
f
i
g
u
r
NETira CT (located on the Accessories CD-ROM) is a Windows-based configuration utility that allows the user
to make changes to the existing printer setup via a direct connection to the host computer’s serial, USB,
Ethernet, or parallel ports.
NETira Features:
USB and Parallel Port Connection Requirements
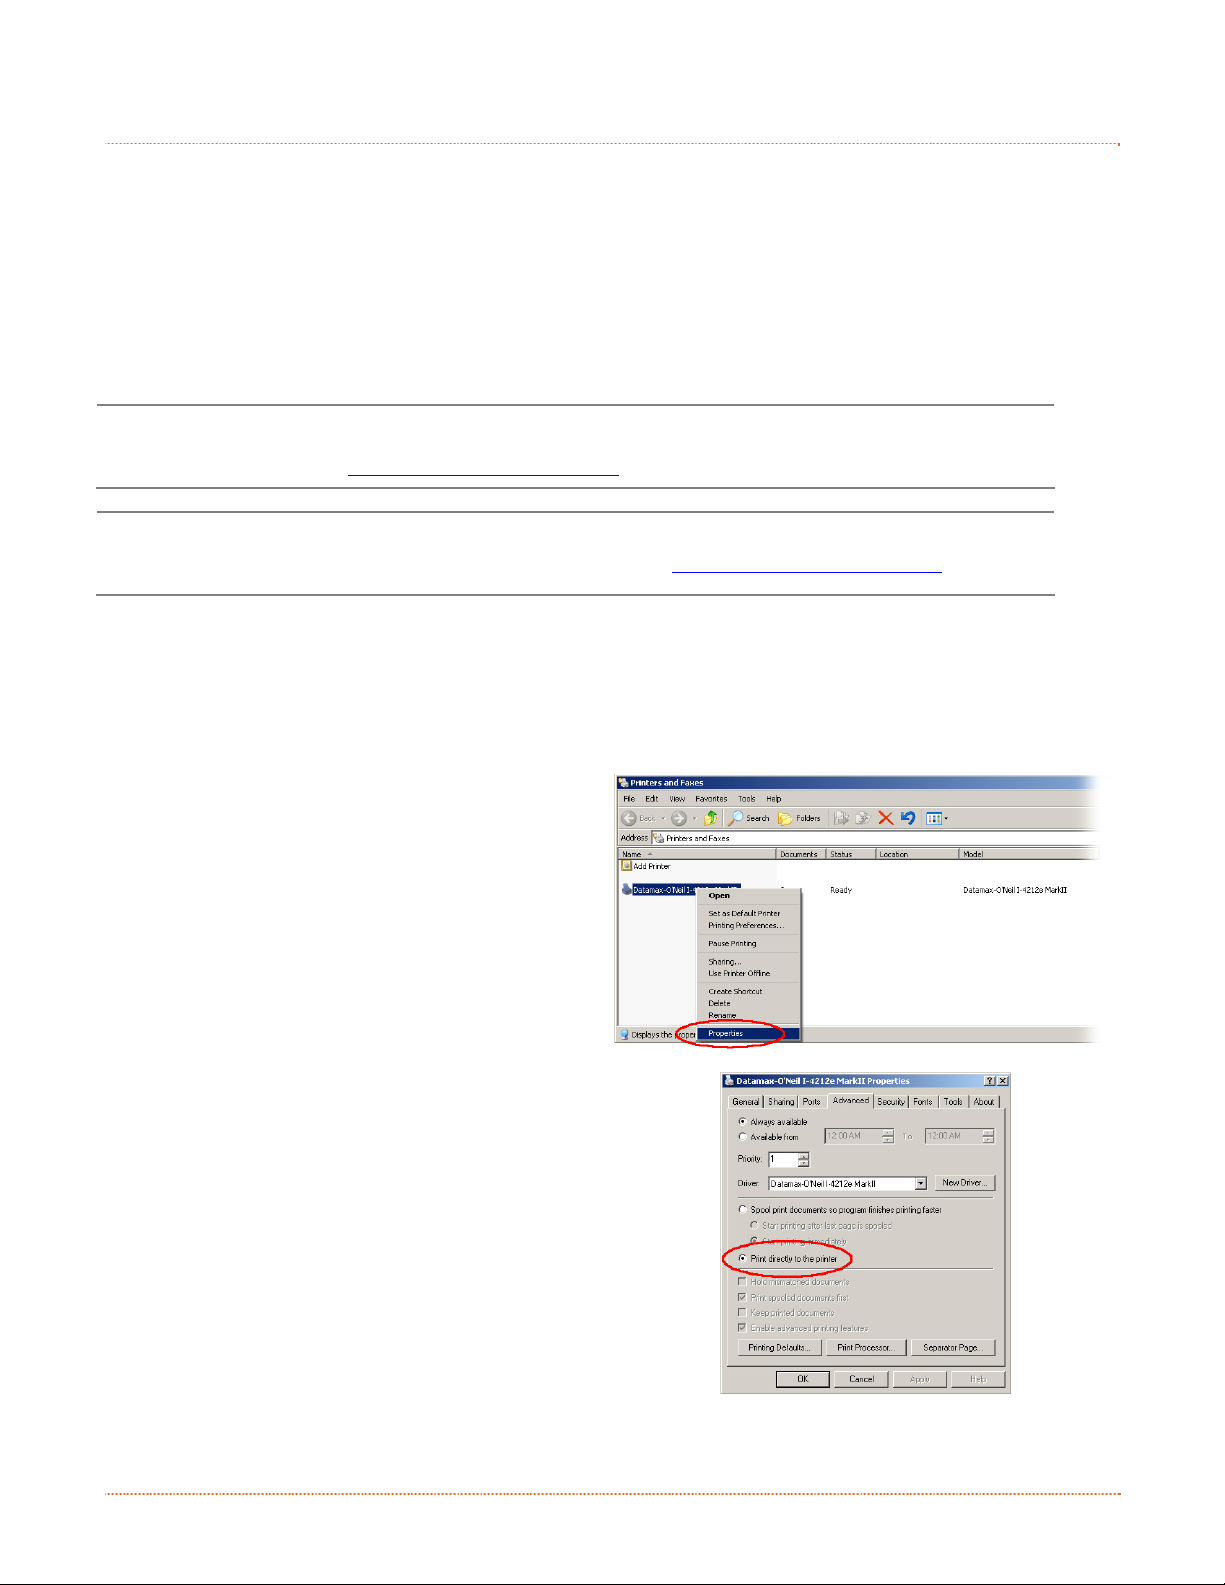
Using Netira CT with an USB or parallel port connection requires a Windows driver to be installed and the
driver to be set to “Print directly to the printer”. Install the Windows driver as described in section 3.6. Then
follow the steps below to set the driver setting:
1) Open the list of installed printers on your PC.
2) Right click on the printer and select Properties
3) In the Driver Properties window, click on the
4) Click the “Print directly to the printer” radio
USB and parallel port connections will now be
available for use with Netira CT.
Allows Real-Time Control/Query of Printer Configuration
Define and Save Optimal Configurations for Applications
Saved Configurations can be Shared with other Printers and Sent via Email
Download Files, Formats and Fonts
Query Memory Modules
Be sure to use the NETira utility located on the Accessories CD-ROM that is included with your
printer. Older versions might not operate correctly with some printers. For the latest version please
visit our web site at http://www.datamax-oneil.com
Be sure your printer’s firmware version is 9.03_0016B or greater. Firmware is available from our
website, for the latest version please visit our web site at http://www.datamax-oneil.com
Windows XP
Open Printer and Faxes by clicking the Start
button, and then Settings, and then click on Printer
and Faxes.
Windows 7
Open Devices and Printers by clicking the Start
button, and then click on Devices and Printers.
from the drop down menu.
Advanced tab.
button. Then click OK.
a
n
t
i
o
n
i
U
t
i
U
t
i
(
N
E
T
i
r
a
C
T
)
l
i
t
y
(
N
E
T
i
r
a
l
i
t
y
(
N
l
i
t
y
E
T
i
r
a
C
C
T
T
)
)
Chapter 3 – Printer Operation 21
Loading…

Operator’s Manual
Professional and Professional+ Models
Professional
Professional+
Наш адрес: г. Москва, ул. Полярная, д. 31, стр. 1. Телефон: +7 495 649 16 77 (Skype, ICQ). Режим работы: понедельник — пятница с 9:00 до 18:00; суббота и воскресенье — выходной. Доставка по России, Белоруссии, Украине, Казахстану: Москва, Подольск, Сергиев Посад, Истра, Рязань, Курск, Липецк, Тула, Иваново, Воронеж, Ярославль, Тверь, Смоленск, Калуга, Белгород, Орел,
Тамбов, Кострома, Брянск, Красноярск, Норильск, Кемерово, Новокузнецк, Новосибирск, Омск, Барнаул, Иркутск, Братск, Бийск, Улан-Удэ, Томск, Абакан, Чита, Горно-Алтайск, Кызыл, Санкт-Петербург,
СПб, Выборг, Вологда, Череповец, Мурманск, Сыктывкар, Ухта, Архангельск, Северодвинск, Великий Новгород, Петрозаводск, Гомель, Гродно, Витебск, Могилев, Брест, Минск, Алма-Ата, Астана,
Ереван, Киев, Днепропетровск, Львов, Ташкент, Могилев, Псков, Калининград, Нарьян-Мар, Уфа, Стерлитамак, Самара, Тольятти, Сызрань, Нижний Новгород, Арзамас, Саратов, Энгельс, Пермь,
Ижевск, Казань, Набережные Челны, Бугульма, Пенза, Оренбург, Орск, Чебоксары, Новочебоксарск, Ульяновск, Киров, Йошкар-Ола, Саранск, Екатеринбург, Верхняя Пышма, Серов, Челябинск,
Магнитогорск, Снежинск, Тюмень, Курган, Нижневартовск, Сургут, Надым, Ростов-на-Дону, Волгодонск, Таганрог, Волгоград, Волжский, Краснодар, Армавир, Астрахань, Майкоп, Владивосток,
Уссурийск, Хабаровск, Комсомольск-на-Амуре, Советская Гавань, Южно-Сахалинск, Благовещенск, Петропавловск-Камчатский, Мирный, Ставрополь, Минеральные Воды, Махачкала, Нальчик, Алушта, Армянск, Джанкой, Евпатория, Керчь, Севастополь, Симферополь, Судак, Крым, Феодосия, Ялта. Сайт отвечает на вопросы: Как отремонтировать, настроить, установить оборудование? Где скачать документацию (инструкцию, мануал)? Где посмотреть партномер? Где купить запчасти (запасные
части, зип), комплектующие, аксессуары и термоэтикетка, чековая лента для весов, термопринтеров штрих-кода, чековых принтеров? Обслуживание весов, кассовых аппаратов, термопринтеров,
терминалов сбора данных, сканеров штрих-кода: каким образом возможно своими силами? Вас интересует наличие, цена, купить запчасти за наличный и безналичный расчет? — сделайте запрос
нашим менеджерам. Официальный сайт компании Zipstore.ru.
Datamax O’Neil Mark III E-4305A
Operator’s Manual
Professional and Professional
+
Models
Professiona
Professiona
View the manual for the Datamax O’Neil Mark III E-4305A here, for free. This manual comes under the category label printers and has been rated by 1 people with an average of a 7.5.
This manual is available in the following languages: English. Do you have a question about the Datamax O’Neil Mark III E-4305A or do you need help?
Ask your question here
Product Images (3)

Datamax O’Neil Mark III E-4305A specifications
Below you will find the product specifications and the manual specifications of the Datamax O’Neil Mark III E-4305A.
The Datamax O’Neil Mark III E-4305A is a label printer with a maximum resolution of 300 x 300 DPI. It has a maximum print height of 2,514 millimeters and a maximum printing width of 106 millimeters. The print technology used is direct thermal, which does not require ink or toner.
This label printer has a print speed of 127 millimeters per second, allowing for quick and efficient printing. It is equipped with an Ethernet LAN connection for easy network connectivity, making it suitable for use in office environments. However, it does not have built-in Wi-Fi capability.
The Datamax O’Neil Mark III E-4305A is also network-ready and can be connected via wired connectivity technology. It features one parallel port and one RS-232 interface for additional connectivity options. Furthermore, it has one USB 2.0 port for convenient data transfer.
Although the printer does not support Bluetooth, it offers reliable and durable performance. Its design and construction ensure long-lasting functionality, while the use of premium materials enhances its overall quality.
In summary, the Datamax O’Neil Mark III E-4305A is a label printer that provides high-quality printing with a maximum resolution of 300 x 300 DPI. It offers efficient printing speeds and features wired connectivity options, including Ethernet LAN, one parallel port, one RS-232 interface, and one USB 2.0 port. Its direct thermal technology eliminates the need for ink or toner. While it lacks Wi-Fi and Bluetooth capabilities, it is a reliable and durable option for various labeling needs.
Maximum resolution
300 x 300 DPI
Compatible operating systems
Windows NT\r\nWindows XP\r\nWindows Vista
General
| Brand | Datamax O’Neil |
| Model | Mark III E-4305A | EA3-00-0E001A00 |
| Product | label printer |
| EAN | 3609740036019 |
| Language | English |
| Filetype | User manual (PDF) |
Printing
| Maximum resolution | 300 x 300 DPI |
| Maximum print height | 2514 mm |
| Maximum printing width | 106 mm |
| Print technology | Direct thermal |
| Color | No |
| Print speed | 127 mm/sec |
| Printing colors | Black |
Ports & interfaces
| Ethernet LAN | Yes |
| Wi-Fi | No |
| Connectivity technology | Wired |
| Parallel ports quantity | 1 |
| RS-232 interface | Yes |
| USB 2.0 ports quantity | 1 |
| Bluetooth | No |
| RS-232 ports | 1 |
| USB port | Yes |
Other features
| Network ready | Yes |
| Networking features | Fast Ethernet |
| Supported network protocols | DHCP, TCP/IP, UDP, DNS, BOOTP |
| LED indicators | Yes |
Performance
| Internal memory | 16 MB |
| Flash memory | 64 MB |
| Built-in barcodes | 1D, 2D, CODABAR (NW-7), Code 128 (A/B/C), Code 93, EAN128, EAN13, EAN8, Interleaved 2/5, MaxiCode, PDF417, POSTNET, QR Code, TLC39, UPC-A, UPC-E |
| Page description languages | BPL, EPL, IPL, ZPL |
| Image formats supported | BMP, IMG, PCX |
Weight & dimensions
| Width | 203.5 mm |
| Depth | 282 mm |
| Height | 187 mm |
| Weight | 2400 g |
System requirements
| Compatible operating systems | Windows NT\r\nWindows XP\r\nWindows Vista |
Design
Paper handling
| Maximum roll diameter | 127 mm |
| Media thickness | 0.06 — 0.25 mm |
| Media thickness (imperial) | 0.0025 — 0.01 « |
| Supported paper width | 106 mm |
| Supported paper width (imperial) | 4.16 « |
| Maximum media length | 2514 mm |
| Maximum media length (imperial) | 99 « |
| Core diameter | 38 mm |
show more
Frequently Asked Questions
Can’t find the answer to your question in the manual? You may find the answer to your question in the FAQs about the Datamax O’Neil Mark III E-4305A below.
Why is my label printer not turning on?
Make sure the power cord is securely plugged into both the printer and a power outlet. Check that the outlet is functioning properly by testing it with another device. If the issue persists, check if the power switch on the printer is in the “on” position.
How can I load label stock into the printer?
Open the printer cover by pressing the latch or lever. Insert the roll of label stock onto the supply spindle and slide it onto the printer. Make sure the label stock unwinds in the correct direction. Close the printer cover, ensuring it latches securely.
What should I do if the labels are not feeding properly?
Ensure that the label roll is correctly loaded with the labels facing up and feeding from underneath the roll. Adjust the label guides to ensure the labels are aligned properly during feeding. If the issue persists, clean the label path to remove any debris that may be obstructing the feeding mechanism.
How do I calibrate the printer to ensure accurate label positioning?
By pressing and holding the feed button until the status indicator flashes, the printer will enter calibration mode. It will automatically detect the label gap and adjust the label positioning accordingly. Once the labels are aligned properly, release the feed button to complete the calibration process.
What should I do if the print quality is poor or the labels are blurry?
First, check the printhead to ensure it is clean. If it is dirty, gently clean it using a soft cloth or a printhead cleaning pen. Also, make sure that the label stock is of good quality and suitable for the printer. Adjust the darkness or print speed settings in the printer’s driver software to optimize the print quality. If the issue persists, consider replacing the printhead if it is worn or damaged.
Is the Datamax O’Neil Mark III E-4305A capable of printing high-quality labels?
Yes, with a maximum resolution of 300 x 300 DPI, it can produce detailed and clear labels, providing high-quality output for users.
Does the Datamax O’Neil Mark III E-4305A offer a wide range of connectivity options?
Yes, with Ethernet LAN and RS-232 interface, the printer ensures easy integration into various network environments and is compatible with different devices and systems.
Does the Datamax O’Neil Mark III E-4305A have wireless capabilities?
No, it does not have Wi-Fi or Bluetooth capabilities. However, with its wired connectivity options such as Ethernet and USB, users can still connect and operate the printer efficiently.
How fast can the Datamax O’Neil Mark III E-4305A print labels?
It can print at a speed of 127 mm/sec, which allows for quick and efficient label production, saving time for users who require fast printing speeds.
How much internal memory does the Datamax O’Neil Mark III E-4305A have?
It has a built-in internal memory of 16 MB, which allows for storing and processing a considerable amount of label data without the need for external devices or additional memory resources.
What is the weight of the Datamax O’Neil Mark III E-4305A?
The Datamax O’Neil Mark III E-4305A has a weight of 2400 g.
What is the height of the Datamax O’Neil Mark III E-4305A?
The Datamax O’Neil Mark III E-4305A has a height of 187 mm.
What is the width of the Datamax O’Neil Mark III E-4305A?
The Datamax O’Neil Mark III E-4305A has a width of 203.5 mm.
What is the depth of the Datamax O’Neil Mark III E-4305A?
The Datamax O’Neil Mark III E-4305A has a depth of 282 mm.
What does DPI stand for?
DPI stands for Dots Per Inch and is the number of ink droplets (per inch) that end up on the paper when printing.
Is the manual of the Datamax O’Neil Mark III E-4305A available in English?
Yes, the manual of the Datamax O’Neil Mark III E-4305A is available in English .
Is your question not listed? Ask your question here
-
Page 1
Operator’s Manual Basic and Advanced Models[…]
-
Page 2
[…]
-
Page 3
Copyright Information CG Triumvirate is a trademark of Agfa Corporation. CG Times based upon Times New Roman under license from the Monotype Corporation. Windows is a registered trademar k of the Microsoft Corporation. All other brand and product names are trademarks, service marks, registered trademarks, or registered service marks of their respec[…]
-
Page 4
Agency Compliance and Approvals C US Listed UL60950-1, Second Edition, Info rmation Technology Equipment CSA C22.2 No. 60950-1-03, Second Edition The manufacturer declares under sole responsi bility that this product conforms to the following standards or other normative documents: EMC: EN 55022 (2006) Class A EN 50024 (1998) IEC 60950-1 :2001, Sec[…]
-
Page 5
i C C C o o o n n n t t t e e e n n n t t t s s s 1 1 1 G G G e e e t t t t t t i i i n n n g g g S S S t t t a a a r r r t t t e e e d d d . . . . . . . . . . . . . . . . . . . . . . . . . . . . . . . . . . . . . . . . . . . . . . . . . . . . . . . . . . . . . . . . . . . . . . . . . . . . . . . . . . . . . . . . . . . . . . . . . . . . . . . . . […]
-
Page 6
ii 4 4 4 M M M a a a i i i n n n t t t e e e n n n a a a n n n c c c e e e & & & A A A d d d j j j u u u s s s t t t m m m e e e n n n t t t s s s . . . . . . . . . . . . . . . . . . . . . . . . . . . . . . . . . . . . . . . . . . . . . . . . . . . . . . . . . . . . . . . . . . . . . . . . . . . . . . . . . . . . . . . . . . . . . . . .[…]
-
Page 7
Chapter 1 – Getting Started 1 1 1 1 G G G e e e t t t t t t i i i n n n g g g S S S t t t a a a r r r t t t e e e d d d 1 1 1 . . . 1 1 1 I I I n n n t t t r r r o o o d d d u u u c c c t t t i i i o o o n n n The E-Class Mark III printer (hereafter referred to as “the printer”) is user-fri endly thermal printi ng device that blen ds quality […]
-
Page 8
2 Chapter 1 – Getting Started[…]
-
Page 9
Chapter 2 – Printer Setup 3 2 2 2 P P P r r r i i i n n n t t t e e e r r r S S S e e e t t t u u u p p p 2 2 2 . . . 1 1 1 I I I n n n t t t r r r o o o d d d u u u c c c t t t i i i o o o n n n This section explains how to connect your pri nter and load media (including ri bbon, if equipped for thermal transfer operation). 2 2 2 . . . 2 2 2 C C[…]
-
Page 10
4 Chapter 2 – Printer Setup 2.2.2 Interface Connections The printer can be connected to the host system via the parallel , serial, Ethernet or USB ports. Before connecting interface cables to the printer, ensure that the Power Switch is in the OFF (O) position. 312 Ethernet Port USB Port Serial Port Para llel Por t Cable Requi[…]
-
Page 11
Chapter 2 – Printer Setup 5 2 2 2 . . . 3 3 3 L L L o o o a a a d d d i i i n n n g g g M M M e e e d d d i i i a a a If the printer is equipped with an A djustable Media Sensor it may require adj ustment to match your media choice. If the printer i s equipped with this type of sensor, proceed to Secti on 4.4. 2.3.1 Loading Roll Media Load me[…]
-
Page 12
6 Chapter 2 – Printer Setup 4) If using thermal transfer media (ri bbon) proceed to Section 2.4 Loading Ri bbon. Otherwise close the printer’s Cover and press downward until latched. 312 Cover 5) Press the button several times to advance the media (if the Faul t Light is lit, see Secti on 3.7.) The printer is factory set to use gap medi[…]
-
Page 13
Chapter 2 – Printer Setup 7 2.3.2 Loading External or Fan-Fold Media Load media as follows: 1) Slide the Media Gui des outward. 2) Slide the Media Hangers outward and i nstall the two Media Chute Gui des into the Media Hangers. Media Chute Guides Media Hangers External Media Guide 3) Position the Media Hangers to match the width of th[…]
-
Page 14
8 Chapter 2 – Printer Setup 4) Route the media through the External Media Sl ot in the rear of the printer. Pull out enough medi a to exit the front of the printer. Adjust the Media Guides so they are lightly touching the edge of the media. External Media Slot Media Guides External Media Supply 5) If using Thermal Transfer media (ri b[…]
-
Page 15
Chapter 2 – Printer Setup 9 2.3.3 Loading Media with th e Peel and Present Option Load media for peeling (if the pri nter is equipped with the opti on) as follows: When using the Peel Mechanism do not exceed a print speed of 4 IPS. To utilize “Tear mode” with Peel and Present Option inst alled; move the Peeler Door to its open positio[…]
-
Page 16
10 Chapter 2 – Printer Setup 2.3.4 Loading Media with the Cutter Option Load media for cutting (if the printer i s equipped with the option) as fol lows: 1) Load media as described in Secti on 2.3, (steps 1-3). 2) Route the media through the opening in the Cutter. 312 Cutter Media 3) If using Thermal Transfer media (ri bbon) proceed to Se[…]
-
Page 17
Chapter 2 – Printer Setup 11 2 2 2 . . . 4 4 4 L L L o o o a a a d d d i i i n n n g g g R R R i i i b b b b b b o o o n n n The printer is capable of using C. S.I (Coated Side In) and C.S. O (Coated Side Out) ribbons in the fol lowing configurations: ½” Core Ribbons Ribbon Core Width: 4.3 inches (110mm) Ribbon Width: 1.0 — 4.3 inch es (25 — 1[…]
-
Page 18
12 Chapter 2 – Printer Setup 2) Push out the Supply Hub and load the Suppl y Roll into the pri nter as shown. Depending on the size of the Supply Roll , the Media Bouncer may need to be pushed out of the way. 3) Once t he Supply Roll is loaded, slid e the Ribb on Handler Latch down ward to unlatc h the Ribb on Handler Ass embly. 312 Supp ly R[…]
-
Page 19
Chapter 2 – Printer Setup 13 5) Route the ribbon from the supply roll to the Ri bbon Core, as shown below. 6) If not already attached, affix the leader of the ribbon to the Ri bbon Core using Tape. Rotate the Take-up Hub Wheel several times to secure the ribbon. 312 Ribbon Core Tape Take-up Hub Wheel 7) Raise and latch the Ribbon Hand[…]
-
Page 20
14 Chapter 2 – Printer Setup 2.4.1 Using the Ribbon Core Adapters When using ribbons with a 1” (25.4mm) I. D. core, a Core Adap ter must be used. 1) Slide the Ribbon Roll (with the leader positi oned as shown above) onto a Core Adapter. Slide an empty Ribbon Core onto the remaining Core Adapter. 312 Core Adapter Ribbon Roll Ribbon C[…]
-
Page 21
Chapter 3 – Printer Operation 15 3 3 3 P P P r r r i i i n n n t t t e e e r r r O O O p p p e e e r r r a a a t t t i i i o o o n n n 3 3 3 . . . 1 1 1 I I I n n n t t t r r r o o o d d d u u u c c c t t t i i i o o o n n n The Fro nt Panel c onsists o f two indica tor lights a nd one mult i-function b utton, as detailed in the following section[…]
-
Page 22
16 Chapter 3 – Printer Operation 3 3 3 . . . 3 3 3 M M M u u u l l l t t t i i i — — — F F F u u u n n n c c c t t t i i i o o o n n n B B B u u u t t t t t t o o o n n n The multi-function button perform different functi ons depending upon the mode of the printer: Button Action LED 1 – Green Ready/Idle LED 1 – Green Printing LED 1 – Orange[…]
-
Page 23
Chapter 3 – Printer Operation 17 3 3 3 . . . 4 4 4 P P P r r r i i i n n n t t t e e e r r r C C C o o o n n n f f f i i i g g g u u u r r r a a a t t t i i i o o o n n n T T T o o o o o o l l l s s s The printer contains many user adjustable paramete rs. These parameters are configurable using a few methods. The table below li sts the most popul[…]
-
Page 24
18 Chapter 3 – Printer Operation 3 3 3 . . . 5 5 5 P P P r r r i i i n n n t t t e e e r r r C C C o o o n n n f f f i i i g g g u u u r r r a a a t t t i i i o o o n n n U U U t t t i i i l l l i i i t t t y y y ( ( ( D D D M M M X X X C C C o o o n n n f f f i i i g g g ) ) ) DMXConfig (loc ated on th e Accesso ries CD-ROM) is a Windows -based […]
-
Page 25
Chapter 3 – Printer Operation 19 Once you ha ve installed the DMXConfig u tility: 1) Connect the host to the printer with a serial, par allel, or (USB cab le if driver is installe d). 2) Turn ON the printer and launch the DMXConfig utilit y. 3) Click on the port or the printer you wish to connect to from the list. 4) Query the printer by using th[…]
-
Page 26
20 Chapter 3 – Printer Operation 3 3 3 . . . 6 6 6 W W W i i i n n n d d d o o o w w w s s s D D D r r r i i i v v v e e e r r r The Windows driver is located on the Accessori es CD-ROM included with your printer. For the latest versi on please visit our web site at http://www.datamax-oneil.com Installin g the Wind ows Driver: 1) Place the Access[…]
-
Page 27
Chapter 3 – Printer Operation 21 Important Notes: The Wind ows driver fu nctions the same as an y other Wind ows printe r. While built -in help files p rovide information on all setting s, there ar e some impor tant se tting parameters that should be observed for trouble free printing: Page Setup Tab: Stock It is important that the Stock setting […]
-
Page 28
22 Chapter 3 – Printer Operation 3 3 3 . . . 7 7 7 M M M e e e d d d i i i a a a C C C a a a l l l i i i b b b r r r a a a t t t i i i o o o n n n Calibration ensures correct media detecti on. 3.7.1 Quick Calibration The Quick Ca libration can be perfor med using th e DMXConfig Utility ( see Sectio n 3.5) or by holding down the multi-functio n bu[…]
-
Page 29
Chapter 3 – Printer Operation 23 3.7.2 Media Calibration Wizard The Med ia Calibration Wizar d can be pe rformed using the DMXConfig Ut ility (see Sect ion 3.5). Once you have installed the DMXConfig utility and th e printer is proper ly loaded with media, proc eed with ca libration as follows: 1) Connect the host to the printer with a serial, pa[…]
-
Page 30
24 Chapter 3 – Printer Operation 7) The Calib ration Wizard will n ow prompt you to Load Backing. Peel off a few labels and position the backing material over the media sensor. Close the cover and click OK. 6) The Calib ration Wizard will n ow prompt you to Load Stock. Ensure that media is properly loaded in the printer then cl ose the cover and […]
-
Page 31
Chapter 3 – Printer Operation 25 3 3 3 . . . 8 8 8 I I I n n n t t t e e e r r r n n n a a a l l l L L L a a a b b b e e e l l l s s s The followin g sectio n details t he reside nt informat ion and te st labels . 3.8.1 Database Configuration Label The Data base Con figuration Label pr ovides info rmation including t he printer firmware versio n,[…]
-
Page 32
26 Chapter 3 – Printer Operation[…]
-
Page 33
Chapter 4 – Maintenance and Adjustments 27 4 4 4 M M M a a a i i i n n n t t t e e e n n n a a a n n n c c c e e e & & & A A A d d d j j j u u u s s s t t t m m m e e e n n n t t t s s s 4 4 4 . . . 1 1 1 I I I n n n t t t r r r o o o d d d u u u c c c t t t i i i o o o n n n This sec tion deta ils the clean ing, adjust ing, and tro u[…]
-
Page 34
28 Chapter 4 – Maintenance Adjustments 4 4 4 . . . 2 2 2 C C C l l l e e e a a a n n n i i i n n n g g g t t t h h h e e e P P P r r r i i i n n n t t t h h h e e e a a a d d d Never use a sharp, hard, or abra sive object on the printhead. If print quality decli nes (symptoms can include unreadable bar codes or streaks through text and graphi cs)[…]
-
Page 35
Chapter 4 – Maintenance and Adjustments 29 Cleaning Card Procedure If printing with direct thermal media, thermal transfer media with wax/resi n ribbon combinations, or i f the Cotton Swab technique was not successful, clean the printhead as fol lows: 1) Open the printer. Wait briefly for the Printhead to cool. 2) Remove media and ribbon then pla[…]
-
Page 36
30 Chapter 4 – Maintenance Adjustments 4 4 4 . . . 3 3 3 R R R i i i b b b b b b o o o n n n T T T e e e n n n s s s i i i o o o n n n A A A d d d j j j u u u s s s t t t m m m e e e n n n t t t The adjustable ribbon handler feature, found on printers equipped with the thermal transfer option, al lows the optimum amount tension to be supplied by […]
-
Page 37
Chapter 4 – Maintenance and Adjustments 31 4 4 4 . . . 4 4 4 A A A d d d j j j u u u s s s t t t a a a b b b l l l e e e M M M e e e d d d i i i a a a S S S e e e n n n s s s o o o r r r The optional Adjustable Media Sensor (AMS) al lows the printer to accept a wider variety of media configurations. The table belo w defines general AMS positi ons[…]
-
Page 38
32 Chapter 4 – Maintenance Adjustments 4 4 4 . . . 5 5 5 P P P r r r i i i n n n t t t h h h e e e a a a d d d R R R e e e p p p l l l a a a c c c e e e m m m e e e n n n t t t If the Printhead becomes damaged or worn, replace it as fol lows: Always follow proper El ectro Static Discharge procedures when replaci ng the printhead. 1) Turn O FF[…]
-
Page 39
Chapter 4 – Maintenance and Adjustments 33 5) Loosen the Printhead Screw and allow the Pri nthead to fall free. 6) Remove the Printhead Cable. 312 Printh ead Shield Printhead Screw Printhead Printhead Cable Sensor Installation: 1) Carefully connect the Printhead Cabl e to the new Printhead. 2) Position the Printhead i n the Pr[…]
-
Page 40
34 Chapter 4 – Maintenance Adjustments 4 4 4 . . . 6 6 6 P P P l l l a a a t t t e e e n n n R R R o o o l l l l l l e e e r r r R R R e e e p p p l l l a a a c c c e e e m m m e e e n n n t t t The Platen Roller can be easil y removed for cleaning, replacement, or clearing media jams. 1) Turn OF F the print er and remove the media if ins talled.[…]
-
Page 41
Chapter 4 – Maintenance and Adjustments 35 4 4 4 . . . 7 7 7 D D D o o o w w w n n n l l l o o o a a a d d d i i i n n n g g g F F F i i i r r r m m m w w w a a a r r r e e e a a a n n n d d d F F F o o o n n n t t t s s s The operating programs and fonts for the printer are stored in Fl ash memory on the Main PCB. When program updates and/or new[…]
-
Page 42
36 Chapter 4 – Maintenance Adjustments[…]
-
Page 43
Chapter 5 – Troubleshooting 37 5 5 5 T T T r r r o o o u u u b b b l l l e e e s s s h h h o o o o o o t t t i i i n n n g g g 5 5 5 . . . 1 1 1 I I I n n n t t t r r r o o o d d d u u u c c c t t t i i i o o o n n n Occasio nally, situatio ns arise t hat req uire troub leshootin g. Possib le proble m situation s and po tential so lutions are lis[…]
-
Page 44
38 Chapter 5 – Troubleshooting Skips every other label (print q uality is goo d, but eve ry other lab el is skipp ed): The label is formatted too close to the top edge of the l abel: Leave white space equal to 8-dot rows (about .02 inch [.5mm]) at the top of the label. The media is not calibrated: Cal ibrate it (see Section 3.7 or 3. 3). […]
-
Page 45
Appendix A – Specifications 39 A A A S S S p p p e e e c c c i i i f f f i i i c c c a a a t t t i i i o o o n n n s s s Mechanical Width 8.01 inches (20.4 cm) Depth 7.36 inches (28.2 cm) Height 11.10 inches (28.2 cm) Weight 5.25 pounds (2.4 kg) Operating Temperature 40 to 95 F (4 to 35 C) AC Input Voltage Power Supply 105 VAC to 250 VAC / 50-60 […]
-
Page 46
40 Appendix A – Specifications Media / Ribbon Media Types Roll-Fed, Die-Cut, Continuous, Fan-Fol d Max. Media Width 4.4 inches (110mm) Min. Media Width 0.75 inches (19mm) Max. Print Width 203 DPI Models: 4.25 inches (108mm) 300 DPI Models: 4.12 inches (106mm) Print Length Range .236 – 99 inches (6 — 2514mm) Minimum Label Height Tear: 0.5 inches[…]
-
Page 47
Appendix A – Specifications 41 Approved Media To achieve o ptimum print qua lity and maximum print head life, Datama x-O’Neil spe cifies the use of Datamax- O’Neil brand media and ribbons. These supplies are speciall y formulated for use in our pri nters; use of other supplies may affect the print quality, p erformance , and life of the print[…]
-
Page 48
42 Appendix A – Specifications[…]
-
Page 49
Appendix B – Ethernet Setup 43 B B B E E E t t t h h h e e e r r r n n n e e e t t t S S S e e e t t t u u u p p p B B B . . . 1 1 1 N N N e e e t t t w w w o o o r r r k k k C C C a a a r r r d d d S S S e e e t t t u u u p p p The Print Server makes IP requests at power-up, so before making a network connection to the printer consider how your […]
-
Page 50
44 Appendix B – Ethernet Setup B.1.1 Wired Configuration — Static IP Address: DMXConfig (loc ated on th e Accesso ries CD-ROM) is a Windows based co nfiguration u tility that allows the user to make changes to the existing printer setup via a di rect connection to the host computers serial and paral lel connec tion. This is a vital tool for the u[…]
-
Page 51
Appendix B – Ethernet Setup 45 6) Click on the Wired Ethernet Configuration button. First select the ‘Disabled’ radi o button. Then enter valid values (within your network’s range) for the following fields: — Printer IP Address — Printer Subnet Mask — Printer Gateway 7) Send the settings to the printer using the Configure Printer toolbar bu[…]
-
Page 52
46 Appendix B – Ethernet Setup B B B . . . 2 2 2 P P P r r r i i i n n n t t t e e e r r r ’ ’ ’ s s s I I I n n n t t t e e e r r r n n n a a a l l l W W W e e e b b b P P P a a a g g g e e e s s s 1. Open your web browser. Type in the IP A ddress of the printer. The Default IP is: 192. 168.10.26. Note: If you (or DHCP) have assigned a[…]
-
Page 53
Appendix B – Ethernet Setup 47 Generic Network Configuration Page NetBIOS (WINS) Settings NetBIOS Name Is the name used to reference the pr inter instead of the IP address. A WINS or DNS server is required for this capability . Primary WINS Server The IP addr ess of the primary WINS Server. Secondary WINS Server The IP addr ess of a secondary WIN[…]
-
Page 54
48 Appendix B – Ethernet Setup Wired Ethernet Configuration Page DHCP DHCP Controls IP Address discovery, where: Enabled: Broadcasts over the network to receive addresses from the responsible server at startup. Manual modifications to IP Address, Subnet Mask, or Gateway are not allowed; and, if no server is fo und, the specified static value will[…]
-
Page 55
Appendix B – Ethernet Setup 49 B B B . . . 3 3 3 I I I n n n s s s t t t a a a l l l l l l i i i n n n g g g t t t h h h e e e P P P r r r i i i n n n t t t e e e r r r D D D r r r i i i v v v e e e r r r Install the Printer Driver as follows (screen shots belo w are samples taken using Windows 2000; other versions will be similar): 1 Start the W[…]
-
Page 56
50 Appendix B – Ethernet Setup 9 Insert the Accessories CD- ROM and click Browse. 10 Browse to the DRIVERS folder on the CD-ROM. Ensure the file “Datamax- O’Neil.inf” is selected then click OK. 11 Click OK. 12 Choose your printer from the list and then click Next>. 13 Assign a name in the Printer name field and select whether or not it[…]
-
Page 57
Glossary 51 G G G l l l o o o s s s s s s a a a r r r y y y alphanumeric Consisting of alphabetic, numeri c, punctuation and other symbols. backing material The silico n-coated paper ca rrier mater ial to which labe ls with adhes ive backing a re affixed. Also referred to as “liner”. bar code A repres entation of a lphanumeric information in a […]
-
Page 58
52 Glossary font A set of alphanumeric characters that share a particular typeface. gap A space between die-cut or notched labels used to sense the top of form. IPS (inches per second) Imperial measurement of printer speeds. label A paper or synthetic printing material , typically with a pressure sensiti ve adhesive backing. label length The distan[…]