

26
Инструкции по экспуатации кухонной плиты
Выбор различных функций кухонной плиты производится
при помощи рукояток и регуляторов, расположенных на
панели управления кухонной плиты .
Внимание: перед началом эксплуатации духового шкафа
и гриля следует включить их примерно на 30 минут.
Проверьте, чтобы духовой шкаф был пустым, установите
термостат на максимальную температуру, откройте дверцу
духовки и обеспечьте надлежащую вентиляцию
помещения. Запах, который может появиться в процессе
этой операции, образуется в результате испарения
веществ, использованных для предохранения духовки и
гриля в период от производства до установки.
Внимание: Используйте первый нижний уровень только
для приготовления блюд на вертеле (там, где он имеется).
Для других функций никогда не используйте самый нижний
уровень и никогда не помещайте никаких предметов на
дно духовки в процессе приготовления, так как это может
повредить эмалированное покрытие. Всегда ставьте вашу
посуду для приготовления блюд (жаровни, алюминиевые
листы и т.д.) на прилагающуюся решетку, установленную
на опорные направляющие духовки.
Регуляторы духового шкафа
Духовой шкаф 5 cuochi сочетает в себе преимущества
традициональной статической духовки и современной
вентилированной.
Духовой шкаф 5 cuochi универсален и предлагает 5
различных простых и надежных режимов приготовления
блюд. Для выбора различных функций приготовления,
имеющихся в духовке 5 cuochi, используйте рукоятки.
N- рукоятка выбора программ
M — рукоятка термостата
Если вы установите рукоятку выбора программ в любое
положение кроме исходного o, включится освещение
духового шкафа. Рукоятка в положении, отмеченном
символом , позволяет включить освещение духового
шкафа, не включая никаких нагревательных элементов.
Если вы установите рукоятку в положении, обозначенном
символом &, вы сможете включить освещение духового
шкафа, не включая никаких нагревательных элементов.
Включенное освещение духового шкафа означает, что
духовой шкаф включен. Освещение будет гореть до тех
пор, пока будет работать духовой шкаф.
Функция «Размораживание»
Положение рукоятки термостата M: любое
Вентилятор, расположенный снизу духовки, производит
циркуляцию воздуха комнатной температуры вокруг
приготавливаемого продукта. Эта функция используется
для размораживания любых продуктов, и в особенности
для размораживания деликатных продуктов, не
требующих тепла, таких как: тортов-мороженое, пирожных
с кремом или со сливками, фруктовых тортов. Эта функция
позволяет сократить время размораживания примерно в
два раза. При размораживании мяса, рыбы или хлеба этот
процесс может быть ускорен за счет универсальной
функции multicottura, задав температуру от 80° до 100°C.
Статическая духовка
Положение рукоятки термостата M: Между 50°C и Макс.
В этом положении включаются два нагревательных
элемента: нижний и верхний. Это типичная «бабушкина»
духовка, которая, однако, была оснащена отличной
системой термораспределения и позволяет сократить
расход электроэнергии. Статическая духовка остается
непревзойденной для приготовление блюд с двумя и более
ингредиентами, составляющими единое блюдо, таких,
например, как: капуста со свиными ребрами, треса по-
испански, треска по-анконетански, кусочки телятины с
рисом и т.д. Отличный результат получается при
приготовлении мясных блюд из телятины или говядины,
таких как: тушеное мясо, мясное рагу, гуляш, блюда из
дичи, свиной окорок и филейная часть свинины и т.д.,
требующих медленного тушения с постоянной поливкой
соком от жарки. Такая система остается оптимальной для
кондитерской выпечки, для приготовления фруктов и для
тушения в специальных закрытых емостях для духовки.
В процессе приготовления блюд в статической духовке
используйте только один уровень, так как при
одновременном использовании нескольких уровней
получается плохое термораспределение. Используя
разные имеющиеся уровни, можно распределить жар
между верхней и нижней частью духового шкафа. Если
для приготовления какого-либо блюда требуется больший
жар снизу или сверху, следует использовать
соответственно нижние или верхние уровни.
Вентилированная духовка
Положение рукоятки термостата M: Между 50°C и Макс.
Включаются нагревательные элементы и вентилятор. Так
как жар является постоянным и однородным во всем
духовом шкафу, воздух обеспечивает однородное
приготовление и зажаривание продукта. Кроме того можно
одновременно приготовить разные виды продуктов, при
условии что для их приготовления требуется одинаковая
температура. Можно использовать максимум 2 уровня
для одновременного приготовления, следуя специальным
инструкциям, приведенным в параграфе «Одновременное
приготовление на нескольких уровнях». Эта функция в
особенности рекомендуется для приготовления блюд,
требующих подрумянивания, или продолжительного
приготовления, на пример: лазанья, запеканка из макарон,
жареная курица с картошкой и т.д. Значительные
преимущества получаются при приготовлении жаркого из
мяса, так как оптимальное распределение жара позволяет
использовать более низкие температуры, что позволяет
сократить потерю мясного сока, сохраняя мясо нежным
и сочным с минимальным ужариванием. Вентилированная
функция в особенности подходит для приготовления рыбы,
которую готовят с минимальным добавлением приправ,
сохраняя таким образом ее естественный вид и вкус.
Десерт: отличные результаты получаются при выпечке
кондитерских изделий из теста, замешанного на пивных
или химических дрожжах.
Функция «вентилированный» может также использоваться
для быстрой разморозки белого и красного мяса, хлеба,
установив температуру 80°C. Для разморозки более
деликатных продуктов установить температуру 60°C или
включить только циркуляцию холодного воздуха,
установив рукоятку термостата на 0°C.
Нагрев сверху
Положение рукоятки термостата M: Между 50°C и Макс.
Включается верхний нагревательный элемент.
Эта функция может быть использована для доводки
готовых блюд.
Гриль
Положение рукоятки термостата M: Между 50°C и Макс.
Включается центральный верхний нагревательный
элемент и вентилятор.

Cooker
Installation and use
Herd
Installation un gebrauch
Êóõoннaя плита
Установка и пользование
Kuchenka
instalacje i obs³uga
Cuisinière
Installation et emploi
Fornuis
Installatie en gebruik
K3C55/R

Cooker with electric multifunction oven
5 programms
Instructions for installation and use 3
Herd mit Multifunktions-Backofen und Glaskeramik-
DE
Kochfeld
Installations- und Gebrauch 13
Плита с многофункциональной духовкой
Инструкции по установке и использованию 23
Kuchnia z elektrycznym piekarnikiem „Siedmiu kucharzy”
PL
Instrukcja instalacji i obs³ugi 33
Cuisinière avec four multifonction et table
vitrocéramique
Instruction pour l’installation et l’emploi 43
Fornuis met multifunctie-oven en keramische
kookplaat
Instructies voor het installeren en gebruik 52

Caution
In order to guarantee that your appliance operates in a safe and efficient manner:
• seek help only from authorised technical assistance centres;
• always insist on the use of original spare parts.
1 This appliance was designed for domestic use inside the
home.
2 These instructions are only valid for the countries whose
symbols appear in the manual and on the serial number plate
located on the appliance.
3 This is a class 1 (insulated) or class 2 — subclass 1
(recessed between 2 cabinets) appliance.
4 Before using the appliance, please read this instruction
booklet carefully as it contains important information regarding
the safe installation, use and maintenance of the cooker . Keep
this booklet in a safe place so that, if necessary, it may be
consulted at a later date.
5 After the packaging has been removed, ensure that the
appliance is intact and not damaged in any way. If there is any
doubt, contact a professionally qualified technician and do
not use the appliance. All packaging (plastic bags, polystyrene
foam, staples, etc.) should be kept out of reach of children as
it is potentially dangerous.
6 The appliance must be installed by a qualified person in
compliance with the instructions provided. The manufacturer
shall not be held responsible for any harm caused to persons
or animals or for any damage to personal property resulting
from incorrect installation.
7 The electrical safety of this appliance is only guaranteed when
it has been correctly connected to an efficient earthed electricity
supply in compliance with current electrical safety regulations.
This is a fundamental safety requirement that must be checked
and, if there is any doubt, you should ask a professionally
qualified technician to carry out a thorough check of the supply
system. The manufacturer may not be held responsible for
any damage caused by a mains supply that has not been
earthed correctly.
8 Before connecting the appliance, make sure its rating (which
can be found on the appliance itself and/or on the packaging)
corresponds to the power supply.
9 Make sure that the mains supply and the electrical sockets
can withstand the maximum power of the appliance, which is
indicated on the serial number plate. If there is any doubt,
contact a professionally qualified technician.
10 The appliance must be connected to the mains by means of
an omnipolar switch with a minimum contact opening of 3
mm.
11 If the socket is incompatible with the plug, ask a professionally
qualified technician to replace it with a suitable one. The
technician should also make sure that the power cables
attached to the socket can withstand the maximum power of
the appliance. In general, it is not advisable to use adaptors,
multiple sockets and/or extension cords. If this cannot be
avoided, only use single or multiple adaptors and extension
cords that comply with current safety regulations. Never exceed
the maximum current capacity indicated on the single adaptor
or extension cord, or the maximum power level indicated on
the multiple adaptor.
12 Do not leave the appliance plugged in if it is not in use. Shut
off the main switch for the appliance when it is not being used.
13 The openings used for ventilation and dispersion of heat must
never be covered.
14 Do not attempt to replace the power supply cable yourself. If
the cable is damaged or needs replacing, contact a technical
assistance centre that has been authorised by the
manufacturer.
15 This appliance should only be used for the purpose for which
it was designed. Any other purpose (for example, heating the
room) constitutes improper use of the oven and is dangerous.
The manufacturer may not be held responsible for any
damage caused as a result of improper, incorrect and
unreasonable use of the appliance.
16 All users of electrical appliances should observe several basic
rules. These include:
• Do not touch the appliance with wet or damp hands or
feet.
• Do not use the appliance when barefoot.
• Do not use extension cords. If this cannot be avoided, be
especially careful.
• When unplugging the appliance always pull the plug from
the mains socket, do not pull on the cable.
• Do not leave the appliance exposed to atmospheric
agents (rain, sunlight, etc.)
• Do not allow children or disabled individuals to operate
the appliance without supervision.
17 Always disconnect the appliance from the mains supply (either
by unplugging it or by shutting off the switch) before cleaning
it or carrying out any maintenance work.
18 Before disposing of the appliance, make it unusable by
unplugging it and cutting off the power supply cable. It is also
advisable to remove any potentially hazardous parts,
especially with regard to children who may use the old
appliance as a toy.
19 Do not use unstable or misshapen pans on the electric cooking
zones; this will help to avoid accidental spills. Make sure pan
handles are turned towards the centre of the hob in order to
avoid accidental burns.
20 Do not use flammable liquids (alcohol, petrol, etc…) near the
appliance while it is in use.
21 If you are using small domestic appliances near the hob,
ensure that their power supply cables do not come into contact
with the hot parts of the surface.
22 Always make sure that the knobs are in the “<B>•”/“l”/“¡”
position when the appliance is not in use.
23 The heating elements and certain parts of the oven door
become extremely hot when the appliance is in use. Do
not touch these parts yourself and keep children well away
from the appliance.
24 If the cooker is placed on a pedestal, take all necessary
precautions to ensure that the appliance does not slide off
this pedestal.
25 If the surface of the glass cracks, unplug the appliance
immediately . F or any repairs , contact only an authorised aftersales service centre and demand original spare parts. Failure
to comply with the above may compromise the safety appliace.
26 The glass ceramic hob is resistent to thermal and mechanical
shocks. However, it may break due to a shock caused by a
sharp object, such as tool for example. In this case, unplug
the appliance immediately and contact an authorised aftersales service centre to have it repaired.
27 Rememer that the heating area stays hot for at least half
an hour after being turned off; please refrain from placing
any cookware or other items on the cooking zone while
still hot
3

Installation
The following instructions should be carried out by a qualified
technician to ensure that the appliance is installed, adjusted
and technically serviced correctly in compliance with current
regulations.
Important: always disconnect the cooker from the power
supply cable before carrying out any maintenance operations
or adjustments, etc.
Positioning
The appliance may be installed next to cabinets that are not
taller than the worktop. The following precautions must be
taken when installing the cooker:
a) Kitchen cabinets adjacent to the appliance and taller than
the worktop must be at least 200 mm from the edge of
the top.
b) Hoods must be installed according to their relative
installation instruction manuals and at a minimum distance
of 650 mm from the worktop.
c) Position the wall cabinets adjacent to the hood at a
minimum height of 420 mm from the worktop (see figure).
d) If the hob is installed beneath a wall cabinet, the latter
must be situated at a minimum of 700 mm (millimetres)
above the worktop as shown in the figure.
e) The installation cavity should have the dimensions
indicated in the figure.
Levelling
Adjustable feet (see fig. 1) are supplied with the cooker in
order to ensure it is perfectly level. These may be screwed
into the holes provided on each corner of the base of the
cooker.
H05RR-F 5×2.5 CEI-UNEL 35363
400 3N
400V 2N
H05RR-F 4×2.5 CEI-UNEL 35363
230V 1N
H07RN-F 3×4 CEI-UNEL 35364
1 2
R
S
12345
R
1
2
4
3
T
S
3
R
5
N
N
4
5
N
Installing the power supply cable
To open the terminal board:
• Loosen the screw “ V”.
• Remove the junction block cover by pulling it.
T o install the pow er supply cable, f ollow the instructions below:
• position the small A-B connection according to the type
of connection you wish to carry out, following the diagram
in figure 3.
Note: the Factory prepares small connections for 230V singlephase connection (contacts 1-2-3 are connected to each
other). The 4-5 jumper is located on the lower area of the
terminal board.
V
HOOD
Min. mm.
600
mm.
420
Min.
mm. with hood
420
650
Min. mm.
min.
mm. without hood
700
min.
Electrical connection
The cable should be suited to the type of electrical connection
used (see connection diagram below).
• Position the cables (N and
6) as demonstrated in the
figure and tighten the corresponding screws.
• Fasten the remaining cables to terminals 1-2-3.
• Secure the power supply cable by fastening the cable
clamp screw then replace the cover using the screw “V”.
Connecting the supply cable to the mains
Install a standardised plug corresponding to the load indicated
on the data plate. If the appliance is directly connected to the
mains supply, an omnipolar circuit-breaker (switch) should
be fitted, with a minimum contact opening of 3 mm. This
switch must be able to withstand the maximum load of the
appliance and must conform to all current safety regulations
(the earth wire should not be interrupted by the switch). The
power supply cable should be positioned in such a way that
it does not reach temperatures of more than 50°C over the
temperature of the room, along its whole length. Before
connecting the appliance to the power supply, make sure
that:
• The modulating valve and the electricity supply can
withstand the maximum power of the appliance (see data
plate for details).
• The power supply has an efficient ear thing system that
conforms to current regulations.
• the socket or the switch is easily accessible once the
cooker has been installed.
4

Technical characteristics
Oven
Measurements (LxDxH) 39x41x34 cm
V olume 54 l
Max. oven consumption 2100 W
Ceramic hob
Front Left 1200 W
Back Left 1700 W
Back Right 1200 W
Front Right 1700 W
Max. ceramic hob consumption 5800 W
ENERGY LABEL
Directive 2002/40/EC on the label of electric ovens
Standard EN 50304
Forced convection energy consumption
heating mode:
Declared natural convection energy consumption
heating mode: Static
Voltage and Frequency
Useful measurements relating to the oven compartment:
Fan-assisted
see data plate
Width: 42 cm
Depth: 44 cm
Height: 23 cm
7
This appliance conforms to the following European
Economic Community directives:
— 73/23/EEC dated 19/02/73 (Low V oltage) and subsequent
amendments;
— 89/336/EEC dated 03/05/89 (Electromagnetic
Compatibility) and subsequent amendments;
— 93/68/EEC dated 22/07/93 and subsequent amendments.
104
60
Disposal of old electrical appliances
The European Directive 2002/96/EC on Waste Electrical and
Electronic Equipment (WEEE), requires that old household
electrical appliances must not be disposed of in the normal
unsorted municipal waste stream. Old appliances must be
collected separately in order to optimise the recovery and
recycling of the materials they contain and reduce the
impact on human health and the environment. The crossed
out “wheeled bin” symbol on the product reminds you of
your obligation, that when you dispose of the appliance it
must be separately collected.
Consumers may take their old appliance to public waste
collection areas, other communal collection areas, or if
national legislation allows return it to a retailer when
purchasing a similar new product.
All major household appliance manufacturers are active in
the creation of systems to manage the collection and
disposal of old appliances.
50
85/90
Cooker with multifunctional oven and glass ceramic hob
D. Dripping pan or baking sheet
E. Control panel
F. Adjustable feet or legs
H. Cooking zone indicator light
I. Control knobs for cooking zones
K. Oven grill rack
L. Thermostat indicator light
M. Thermostat knob
N. Selector knob
Q. Clock with timer function
M
E
K
D
F
5

Using the cooker
The various features of cooker may be controlled using the
knobs and buttons located on the control panel.
Warning: before using the oven and grill for the first time,
leave it to heat up for approximately 30 minutes. Check that
the oven is empty, the thermostat is set to maximum, the
door is shut and that the room is well-ventilated. The oven
may emit a slightly unpleasant odour during this time due to
the evaporation of the protective substances applied to the
oven and grill at the end of the manufacturing process.
Warning: Only use the lowest shelf when cooking with the
turnspit (if provided). Never use the lowest shelf for any other
type of cooking, and never place any objects on the bottom
of the oven while it is operating, as this could damage the
enamel coating. Always place cookware (dishes, aluminium
trays, etc.) on the rack provided, ensuring the rack is correctly
positioned using the guide rails inside the oven.
Oven control knobs
The “5-programme” oven combines the advantages of a
traditional “static” oven with those of a modern “fan-assisted”
oven.
The “5-programme” oven is extremely versatile and offers 5
different cooking modes that are both simple and safe. Use
the knobs to select the different cooking functions offered by
the “5-programme” oven.
N — Programme selector knob
M — Thermostat knob
If the selector knob is in any other position than the off position
(marked with “o”), the oven light will illuminate; if the knob is
turned to the position the light may be switched on without
any of the heating elements being activated. The position
marked with the 8 symbol enables the light to be switched on
without any of the heating elements being activated. When
the oven light is on, this shows that the oven is in use; the
light will remain on until the oven is switched off.
“Defrosting” programme
Turn the ther mostat knob “M”: to any position
The fan at the bottom of the oven circulates room-temperature air around the food. This programme is suitable for
defrosting any type of food, especially delicate items that
should not be heated, for example: ice-cream cakes or cakes
made with custard, cream or fruit. The defrosting time will be
approximately halved. When defrosting meat, fish or bread,
the process may be accelerated by using the “multi-cooking”
mode and setting a temperature between 80°C and 100°C.
Static oven
Position the thermostat knob “M”: Between 50°C and Max.
This position activates both the top and bottom heating
elements. This is the classic traditional oven that has been
modified to ensure an exceptional level of heat distribution
while limiting the amount of energy consumed. The static
oven remains unsurpassed in the cooking of dishes with
ingredients consisting of two or more elements, which are
combined to make a single dish, for example: cabbage with
pork ribs, Spanish-style dried cod, Ancona-style stockfish,
tender veal with rice, etc… This cooking mode is the best
way of cooking beef or veal-based dishes, for example: braised
meat, stews, goulash, game meat, pork leg and loin, etc…
as these must be cooked slowly, with liquid added regularly.
It is also the best way of cooking deserts, fruit and dishes
that require covered recipients designed for use in the oven.
When using the oven in static mode, use only one shelf (using
more than one shelf may adversely affect heat distribution).
By using the different shelves available, the heat distribution
between the top and bottom of the oven may be balanced as
desired. If a dish requires more heat at the top or bottom of
the oven, use the lower or upper shelves respectively.
Fan-assisted oven
Turn the ther mostat knob “M”: Between 50°C and Max.
The heating elements and the fan are activated. Because
the heat is distributed evenly throughout the oven, the air
cooks and browns food in a unifo rm manner. You may also
cook different dishes at the same time, provided that the
cooking temperatures are similar. It is possible to use a
maximum of 2 racks at the same time, following the
instructions given in the paragraph entitled “Cooking on several
shelves simultaneously”.
This function is particularly suitable for cooking dishes “au
gratin”, or for dishes requiring a reasonably long cooking time,
for example: lasagne, pasta bake dishes, roast chicken and
potatoes, etc… There are substantial advantages to this mode
when cooking roast meats, as the improved temperature
distribution enables lower temperatures to be set, thus
reducing the amount of juices that escape from the meat,
making it less likely to shrink in the oven and more tender to
eat. The fan-assisted mode is particularly useful when cooking
fish, which can be cooked in this way with a minimal amount
of liquid added, therefore maintaining its original taste and
appearance.
Dessert: this mode is completely safe to use when cooking
leavened cakes.
The “fan-assisted” function may also be used for defrosting
red or white meat or bread quickly, by setting the temperature to 80°C. To defrost more delicate foods, set the temperature to 60°C or use the cold air circulation by setting the temperature knob to 0°C.
“Top” oven
Turn the ther mostat knob “M”: Between 50°C and Max.
The top heating element comes on.
This mode can be used to brown food at the end of cooking.
Grill
Position the thermostat knob “M”: Between 50°C and Max.
The central top heating element and the turnspit will be
activated.
The extremely high and direct temperature of the grill makes
it possible to brown the surface of meats and roasts while
locking in the juices to keep them tender. The grill is also
highly recommended for dishes that require a high surface
temperature: such as beef steaks, veal, rib steak, fillets,
hamburgers etc…
Some grilling examples are included in the “Practical cooking
advice” section.
Fan-assisted Grill
Position the thermostat knob “M”: Between 50°C and Max.
The central top heating element and the fan will be activated.
This combination of features increases the effectiveness of
the unidirectional thermal radiation of the heating elements
through forced circulation of the air throughout the oven. This
helps prevent food from burning on the surface, allowing the
heat to penetrate right into the food. Excellent results are
obtained by using the fan-assisted grill to cook mixed meat
and vegetable kebabs, sausages, pork ribs, lamb cutlets,
spicy chicken, sage-dressed quail, pork fillet etc…
Cook dishes “au gratin” in this mode with the oven door
6

closed.
“Gratin” is the best way of cooking sliced perch, tuna,
swordfish, stuffed squid, etc…
The turnspit
To activate the turnspit, follow the instructions below:
a) Place the dripping pan on the 1st rack.
b) Position the rotisserie support on the 3rd rack and insert
the spit towards the rear, threading it through the hole
provided.
c) Start the rotisserie by turning knob “N” to the position.
Oven light
This is switched on by turning knob “N” to the symbol. The
oven lights up and remains lit as long as any of the electric
heating elements of the oven are in operation.
Thermostat indicator light (L)
This indicates the heating-up phase of the oven; as soon as
the inside of the oven reaches the set temperature the light
switches off. At this point the indicator light will switch on
and off intermittently; this shows that the thermostat is
operating correctly in order to maintain a constant temperature inside the oven.
The electronic timer (Q)
Warning
Keep children away from the oven door as it can become
extremely hot when the oven is in operation.
This function displays the time and works as a timer which
counts down to zero.
Note: all functions will be implemented approximately 7
seconds after they have been set.
Resetting the clock
After the appliance has been connected to the power supply,
or after a power cut, the clock display will automatically reset
to 0:00 and begin to blink.
• Press button n and then buttons s and t to set the
exact time. Press and hold the buttons to quicken the count
upwards.
Any necessary modifications can be made by repeating the
above process.
Timer feature
This function may be accessed by pressing the
after which the display will show the symbol “n”. Every time
the t button is pressed it corresponds to a time increase of
10 seconds, until it reaches 99 minutes and 50 seconds.
After this point, each press of the button represents an
increase of one minute, up to a maximum of 10 hours.
v button,
Pressing the s button reduces the time.
After the time period has been set, the timer will begin to
count down. When the timer reaches zero, the buzzer will
sound (this may be stopped by pressing any button).
The time may be displayed by pressing the
the “n” symbol indicates that the timer function has been
set. After approximately 7 seconds, the display will
automatically revert to the timer.
Cancelling a time that has already been set
Press the s button until the display shows 0•00.
Adjusting the buzzer volume
After selecting and confirming the clock settings, use the s
button to adjust the volume of the alarm buzzer.
v button, and
7

Practical cooking advice
The oven offers a wide range of options, enabling each food
to be cooked in the most suitable way. It takes time to
understand how to get the best out of this versatile appliance,
therefore the notes below are only intended as a set of
guidelines, which may then be expanded as you gain more
personal experience.
Baking cakes
The oven must be preheated when a cake is placed inside;
wait for the preheating phase to finish (approximately 10-15
minutes). Cooking temperatures for cakes vary between 160°C
and 200°C. Do not open the door while you are baking a cake
as this could cause it to collapse.
Cake is too dry
Next time you bake a cake, set the temperature 10°C
higher and reduce the cooking time.
Cake collapses
Use less liquid or lower the temperature by 10°C.
Cake is burnt on to
Place it on a lower rack, set a lower temperature and
extend the cooking time.
Cooked well on the outside, but sticky in the
centre
Use less liquid, reduce the temperature and increase
the cooking time.
Cake sticks to the mould
Grease the mould well and dust with a little flour, or
use baking paper.
Having used several rack positions (in the “fanassisted” mode), not all the cakes are cooking at
the same rate
Set a lower temperature.
Racks inserted at the same time should not
necessarily be taken out at the same time.
Cooking fish and meat
Use low temperatures when cooking white meat, game and
fish. (150°C-175°C). If you wish red meat to be cooked well
on the outside but juicy on the inside, start with a high temperature (200-220°C) for a short time and then reduce it. As a
general rule, the more meat there is, the lower the temperature and the longer the cooking time should be. Place the
meat in the centre of the rack and position a container
underneath to collect drops of fat. Place the rack in the centre
of the oven. If the cooking method requires more heat coming
from below the meat, use the lowest shelf.
Cooking on several shelves simultaneously
Whenever it is necessary to use two racks, only use the
“fan-assisted oven” function, which is really the only option
available when cooking in this manner.
• The oven has 5 different rack positions. Only use the two
central positions when cooking in the fan-assisted mode:
the outer rack positions (higher and lower) receive more
direct heat and more delicate foods may burn.
• In general, use the second and fourth rack positions (when
counting from the bottom of the oven upwards), placing
the food that needs more heat on the second rack position.
For example: if you wish to cook a roast with another
type of food, put the roast on the second rack position
and the more delicate food on the fourth.
• When cooking foods that require different cooking times
and temperatures, set the temperature to a value halfway
between the two recommended values and place the more
delicate food on the fourth rack position. Remove the
food that needs less cooking time first.
• Place the dripping pan on the lowest rack position and
the grill on the highest.
• When cooking pizzas on more than one rack with the
temperature set to 220°C, remember to preheat the oven
for at least 15 minutes. Generally, cooking on the four th
rack takes longer; for this reason it is advisable to remove
the pizza on the lower shelf first, leaving the other pizza
inside for a few minutes.
Using the grill
The oven offers two different grilling methods: Use the
“top oven” function for small items. The energy consumption
for this mode is only 1200 W. It is therefore ideal for grilling
smaller dishes: for example toast, hot dogs, etc.
Position the food in the centre of the grill, as only the
central part of the top heating element will be switched
on in this mode. Food placed at the corners of the grill
will not be cooked.
The “grill” position enables the whole surface of the
grill to be used. Use this mode when there is a uniform
distribution of food and you wish to brown the top of the food
evenly.
Important: To obtain the best results and to save energy
(approximately 10%), always keep the oven door closed when
using the grill function.
When using the grill function, we recommend that you set
the thermostat to its maximum value. Howeve r, this does not
mean that you cannot use lower temperatures.
When using the grill function, position the grill on the highest
shelf (see cooking advice table) and place the dripping pan
underneath it to collect any drips of fat.
The “Fan-assisted grill” position is extremely useful
for grilling foods quickly as it distributes the heat emitted by
the grill, allowing the surface of the food to brown while the
inside is actually being cooked. It enables large pieces of
meat or poultry to be grilled without using the turnspit. It can
also be used in the final part of the cooking process for dishes
that require a little browning on the surface, for example it is
an ideal way of browning the top of a baked pasta dish after
it has been cooked.
When cooking in this mode place the grill on the 2nd or 3rd
rack position from the bottom of the oven (see cooking advice
table), then position a dripping pan on the lowest shelf to
collect drips of fat and avoid the formation of smoke. By
using this mode in conjunction with the spit (selected models
only) it is possible to cook dishes in the dripping pan on the
lowest shelf, for example: potatoes, etc…
8

Instructions for using glass ceramic hobs
Description
The hob is fitted with electric heating elements located just
under the surface of the hob (in the areas that become red
when the elements are switched on).
A. Cooking zone (A).
B. Lights indicating that the temperature of the corresponding
elements have exceeded 60°; these remain lit even if the
hob has been switched off.
AA
B
Description of the heating elements
The radiant heating elements are circular and become red
10 — 20 seconds after they have been switched on.
Instructions for using glass ceramic hobs
To obtain the best possible results from your hob, follow a
few simple rules when preparing or cooking food.
• All types of saucepan or frying pan can be used on glass
ceramic hobs. However, the base of the pan must be
perfectly flat. Of course, the thicker the base of the
saucepan or frying pan, the more evenly heat will be
distributed.
• Make sure that the base of the pan completely covers
the ring: this enables all the emitted heat to be used.
• Always make sure that the base of the pan is clean and
dry: this not only guarantees optimal contact between the
base of the pan and the hob, but also means they will
suffer less wear and tear and ultimately last longer.
• Do not use pans that have been used on gas burners, as
the heat from this type of burner can distort the base of
the pan, which, if then used on a glass ceramic hob, will
be less effective than a pan with a completely flat base.
9

Practical advice on using the cooking zones
Control knobs for the cooking zones on the hob (I)
Cookers may be fitted with a series of rapid and automatic
cooking zones in various combinations (rapid cooking zones
may be distinguished from the others by a red spot in the
centre while the automatic zones have an aluminium disc in
the centre).
To avoid heat loss and damage to the cooking zones, use
cookware with a flat base, whose diameter is no smaller than
that of the cooking zone itself.
The table shows the relationship between the position of the
knobs and the type of cooking recommended for cooking
zones.
Pos. Normal or rapid cooking zone
Off
0
Cooking fish and vegetables
1
Cooking potatoes (steaming), soups, pulses
2
Continuing to cook large quantities of food,
3
chunky soups
Roasting (medium)
4
Roasting (well done)
5
Browning or reaching boiling point in a short
6
period of time
Cooking zone indicator light
This light illuminates when a cooking zone has been
activated.
10

Practical cooking advice
Selector knob
position
Defrosting
Static
Fan-assisted
Top oven
Grill
Fan-assisted
grill
N.B.:
cooking with the grill or the fan-assisted grill, the dripping pan should be placed on the lowest shelf.
The cooking times listed above are intended as guidelines only and may be modified according to personal tastes. When
Food to be cooked
All frozen foods
Duck
Roast veal or beef
Roast pork
Biscuits (shortcrust pastry)
Tarts
Pizza (on 2 racks)
Lasagne
Lamb
Roast chicken + potatoes
Mackerel
Sponge cake made with yoghurt
Cream puffs (on 2 racks)
Biscuits (on 2 racks)
Sponge cake (on 1 rack)
Sponge cake (on 2 racks)
Savoury pies
Browning food as a finishing touch — 3/4 15 220 —
Sole and cuttlefish
Squid and prawn kebabs
Cod fillet
Grilled vegetables
Veal steak
Cutlets
Hamburgers
Mackerel
Toast
With the turnspit
Spit-roast veal
Spit-roast chicken
Spit-roast lamb
Grilled chicken
Cuttlefish
Weight
(in kg)
1
1
1
—
1
1
1
1
1
1
1
0.5
0.5
0.5
1.0
1.5
1
1
1
1
1
1
1
1
n.° 4
1.0
1.5
1.0
1.5
1.5
Rack
position to
be used
(counting up
from the
bottom)
3
3
3
3
3
2-4
3
2
2-4
2
2
2-4
2-4
2
2-4
3
4
4
4
3/4
4
4
4
4
4
—
—
—
3
3
Preheating
time
(minutes)
15
15
15
15
15
15
10
10
10
10
10
10
10
10
10
15
5
5
5
5
5
5
5
5
5
5
5
5
5
5
Thermostat
knob
position
200
200
200
180
180
220
200
180
180
180
170
190
180
170
170
200
Max
Max
Max
Max
Max
Max
Max
Max
Max
Max
Max
Max
200
200
Cooking
time
(minutes)
65-75
70-75
70-80
15-20
30-35
15-20
30-35
50-60
60-75
30-35
40-50
20-25
10-15
15-20
20-25
25-30
8-10
6-8
10
10-15
15-20
15-20
7-10
15-20
2-3
80-90
70-80
70-80
55-60
30-35
11

Routine maintenance and cleaning
Disconnect the oven from the electricity supply before
cleaning it or carrying out any maintenance work. Clean
the oven thoroughly and regularly in order to increase its
durability, following the instructions below:
• Do not use steam cleaners on the appliance.
• The enamel-coated parts and self-cleaning panels should
be washed in hot water. Do not use abrasive powder
detergents or corrosive substances as these could damage
the finish.
• The inside of the oven should be cleaned at regular intervals while it is still warm, using hot water and detergent
then rinsing and drying it thoroughly.
• Stainless steel can be marked by hard water that has
been left on the surface for a long time, or by aggressive
detergents containing phosphorus. After cleaning, rinse
well and dry thoroughly. Any water spills should also be
dried.
• Prevent a build-up of dirt and grease on the control
panel by cleaning it frequently. Use a non-abrasive
sponge or a soft cloth to avoid scratching the shiny steel
or enamel-coated parts.
Special glass ceramic
cleaning products
Razor blade scraper and
replacement blades
Stahl-Fix
SWISSCLEANER
WK TOP
Other special glass ceramic
products
Where to buy them
Art & Craft shops and
Hardware stores
Home shops
DIY stores
Hardware stores
Supermarkets
Cleaning the surface of the hob
The surface of the hob should be cleaned with a damp cloth
before cooking to remove dust or food residues. The surface
of the hob should be cleaned regularly with a solution of warm
water and light detergent. It may occasionally be necessary
to use a special glass ceramic cleaning product. First
remove all food and grease spills using a window scraper,
preferably a razor blade-type scraper
supplied) or, failing that, a fixed razor blade type scraper.
Then clean the hob with a paper towel and a suitable detergent
while it is still hot to touch. Lastly, rinse the hob thoroughly
and dry it with a clean cloth. If a piece of plastic or aluminium
foil accidentally melts on the surface of the hob, remove it
from the hot cooking zone immediately using a scraper in
order to avoid damaging the surface. If any sugar (or sugary
food) is spilt on the hob, follow the above instructions. Do not
use steel wool or any type of abrasive sponge. Do not use
corrosive cleaning products such as oven cleaning sprays or
stain removers.
B (not
Changing the oven light bulb
• Remove the plug from the mains socket (if accessible) or
disconnect the appliance from the electricity supply by
shutting off the multipolar switch connecting the two.
• Remove the glass lid covering the lamp socket.
• Unscrew the bulb and replace it with a new one that can
withstand high temperatures (up to 300°C) and that has
the following characteristics:
— Voltage: 230/240 V
— Po w er 25 W
— E14 attachment
• Replace the glass cover and reconnect the oven to the
power supply.
12

Hinweise
Um die Leistungsfähigkeit und Sicherheit Ihres Gerätes zu gewährleisten, bitten wir , Folgendes zu beachten:
• Wenden Sie sich ausschließlich an unsere anerkannten Kundendienst-Zentren
• V erlangen Sie, dass nur Original-Ersatzteile verwendet wer den.
1 Dieses Gerät ist für den nicht professionellen Einsatz im
privaten Haushalt bestimmt.
2 Nachfolgende Anleitungen gelten nur für die
Bestimmungsländer, deren Symbole im Handbuch und
auf dem Typenschild des Gerätes abgebildet sind.
3 Dieses Gerät bezieht sich auf ein Gerät der Klasse 1
(isoliert), oder der Klasse 2 — Unterklasse 1 (Einbau
zwischen 2 Unterschränken)
4 Lesen Sie bitte vor Gebrauch des Gerätes die in diesem
Handbuch enthaltenen Hinweise aufmerksam durch. Sie
enthalten wichtige Angaben hinsichtlich der Sicherheit bei
der Installation, dem Gebrauch und der Wartung. Bewahren
Sie dieses Handbuch sorgfältig auf, damit Sie es jederzeit
zu Rate ziehen können.
5 Überprüfen Sie das Gerät nach dem Auspacken auf
eventuelle Beschädigungen. Im Zweifelsfall raten wir
Ihnen, das Gerät nicht zu benutzen und sich an
Fachpersonal zu wenden. Bewahren Sie das
Verpackungsmaterial wie Plastikbeutel, Schaumstoffe,
Nägel usw. nicht in Reichweite von Kindern auf, es könnte
eine mögliche Gefahrenquelle darstellen.
6 Die Installation ist von Fachpersonal und gemäß den
Anweisungen des Herstellers durchzuführen. Eine
unsachgemäße Installation kann zu Schäden an
Personen, Tieren oder Gegenständen führen, für die der
Hersteller jegliche Haftung zurückweist.
7 Die elektrische Sicherheit dieses Gerätes ist nur dann
gewährleistet, wenn es sachgemäß und gemäß den
geltenden Sicherheitsvorschriften an eine leistungsfähige
Erdungsanlage angeschlossen wird. Die Gegebenheit
dieser grundlegenden Sicherheitsanforderung muss
überprüft werden, im Zweifelsfalle ist eine Kontrolle durch
Fachpersonal anzufordern. Der Hersteller kann für
eventuelle, durch Fehlen einer Erdungsanlage verursachte
Schäden nicht verantwortlich gemacht werden.
8 Vor Anschluss des Gerätes kontrollieren Sie bitte, dass
die auf dem Typenschild (befindlich auf dem Gerät und/
oder auf der Verpackung) angegebenen Daten mit denen
des Stromversorgungsnetzes übereinstimmen.
9 Vergewissern Sie sich, dass die elektrische Leistung der
Anlage und der Steckdosen der maximalen, auf dem
Typenschild angegebenen Leistungsaufnahme des
Gerätes entspricht. Im Zweifelsfalle ziehen Sie bitte einen
Fachmann zu Rate.
10 Bei der Installation muss ein allpoliger Schalter mit einer
Kontaktweite von 3 mm oder höher vorgeschaltet werden.
11 Falls Netzsteckdose und Netzstecker des Gerätes nicht
übereinstimmen sollten, ist die Netzsteckdose von einem
Fachmann durch eine andere geeigneten Typs zu
ersetzen. Dieser muss bei der Gelegenheit auch
überprüfen, dass der Steckdosen-Kabelquerschnitt der
Leistungsaufnahme des Gerätes entspricht. Allgemein ist
die Verwendung von Adaptern, Vielfachsteckdosen und/
oder Verlängerungen nicht ratsam. Falls deren Gebrauch
jedoch unvermeidlich sein sollte, dürfen nur Einfach- oder
Vielfachadapter und Verlängerungen verwendet werden,
die den geltenden Sicherheitsvorschriften entsprechen;
achten Sie darauf, dass die auf dem Einfachadapter und
den Verlängerungen angegebene Stromleistungsgrenze
und die auf dem Vielfachadapter angegebene
Höchstleistungsgrenze nicht überschritten wird.
12 Lassen Sie das Gerät nicht unnötigerweise eingeschaltet.
Schalten Sie den Hauptschalter aus, wenn das Gerät nicht
gebraucht wird.
13 Öffnungen und Schlitze für Belüftung und Wärmeableitung
dürfen nicht verstopft werden.
14 Das Netzkabel dieses Gerätes darf vom Benutzer nicht
ausgewechselt werden. Sollte das Kabel beschädigt sein,
oder sollte es ausgewechselt werden müssen, dann
wenden Sie sich ausschließlich an eine vom Hersteller
anerkannte Kundendienststelle.
15 Dieses Gerät darf nur für den Zweck, für den es
geschaffen wurde, eingesetzt werden. Jeder andere
Gebrauch (z.B. zum Beheizen von Räumen) ist als
unsachgemäß und gefährlich anzusehen. Der Hersteller
kann für eventuelle, durch unsachgemäßen, falschen oder
unangemessenen Gebrauch verursachte Schäden nicht
verantwortlich gemacht werden.
16 Die Verwendung eines jeden Elektrogerätes setzt die
Einhaltung einiger wichtiger Grundregeln voraus,
insbesondere folgender:
• Berühren Sie das Gerät nicht mit nassen oder feuchten
Händen oder Füßen;
• Benutzen Sie das Gerät nicht barfuß;
• Verwenden Sie keine Verlängerungen, es sei denn mit
besonderer Vorsicht;
• Ziehen Sie den Netzstecker nicht am Versorgungskabel
oder gar an dem Gerät selbst aus der Steckdose.
• Setzen Sie das Gerät nicht der Witterung aus (Regen,
Sonne usw.).
• Lassen Sie das Gerät nicht von unbeaufsichtigten Kindern
oder unbefugten Personen benutzen.
17 Vor jeder Reinigungs- und Wartungsmaßnahme muss das
Gerät entweder durch Herausziehen des Netzsteckers
oder durch Ausschalten des Hauptschalters der
Hausanlage stromlos gemacht werden.
18 Soll das Gerät nicht mehr verwendet werden empfehlen
wir, dieses durch Durchschneiden des Netzkabels, nach
Herausziehen des Netzsteckers aus der Steckdose,
unbrauchbar zu machen. Ferner raten wir, jene Geräteteile
zu vernichten, die vor allem für Kinder, die das
unbrauchbare Gerät zum Spielen benutzen könnten, eine
Gefahr darstellen.
19 Stellen Sie keine unstabilen oder verformten Töpfe auf
die Kochzonen, um Unfälle durch Umkippen der Töpfe zu
vermeiden. Stellen Sie Stieltöpfe so auf das Kochfeld,
dass ein unbeabsichtigtes Anstoßen vermieden wird.
20 Benutzen Sie keine brennbaren Flüssigkeiten (Alkohol,
Benzin …) in der Nähe des eingeschalteten Gerätes.
21 Achten Sie bitte darauf, dass bei Benutzen von kleinen
Elektrohausgeräten in Kochstellennähe das Netzkabel
nicht mit heißen Herdteilen in Berührung kommt.
22 Vergewissern Sie sich stets, dass sich die Reglerknöpfe
auf Position “l”/“¡” befinden, wenn sich das Gerät nicht
in Gebrauch befindet.
23 Bei in Betrieb befindlichem Gerät werden die
Heizelemente und einige Ofentürteile sehr heiß.
Berühren Sie sie nicht und halten Sie Kinder vom
Ofen fern.
24 Wird der Herd auf einem Sockel aufgestellt, dann achten
Sie bitte darauf, dass das Gerät auch nicht
herunterrutschen kann.
13
DE

Installation
Die nachstehend aufgeführten Anweisungen sind an den
Fachinstallateur gerichtet und gelten als Leitlinien zur
korrekten technischen Installation, Einstellung und Wartung
gemäß den geltenden Richtlinien.
Wichtig: Vor jeder Einstellung, Wartung usw . muss das Gerät
vom Stromnetz getrennt werden.
Aufstellung
Das Gerät kann neben Unterschränke installiert werden, deren
Höhe die des Kochfeldes nicht überragt. Um eine korrekte
Installation des Herdes zu gewährleisten, sind folgende
V orsichtsmaßregeln zu beachten:
a) Die angrenzenden Schränke, deren Höhe die des
Kochfeldes überschreiten, müssen einen Abstand von
mindestens 200 mm vom Rand des Kochfeldes
aufweisen.
b) Dunstabzugshauben sind gemäß den in den
Gebrauchsanleitungen der Dunstabzugshaube
aufgeführten Anweisungen zu installieren und zwar in
einem Abstand von mindestens 650 mm.
c) Die an die Dunstabzugshaube angrenzenden
Hängeschränke müssen in einem Abstand von
mindestens 420 mm vom Kochfeld aufgehängt werden
(siehe Abbildung).
Sollte der Herd unter einem Hängeschrank installiert
werden, muss bei Anbringen letzteren ein Abstand von
mindestens 700 mm (Millimeter) vom K ochfeld eingehalten
werden, wie auf der Abbildung veranschaulicht.
e) Der Ausschnitt muss die in der Abbildung angegebenen
Abmessungen aufweisen.
H05RR-F 5×2.5 CEI-UNEL 35363
400 3N
400V 2N
H05RR-F 4×2.5 CEI-UNEL 35363
230V 1N
H07RN-F 3×4 CEI-UNEL 35364
1 2
R
S
12345
R
1
2
4
3
T
S
3
R
5
N
N
4
5
N
Elektroanschluss
Das Netzkabel ist je nach der Art des Elektroanschlusses
zu bemessen (siehe nachfolgendes Anschlussschema).
Installation des Netzkabels
Öffnen des Klemmengehäuses:
• Die Schraube “V” ausschrauben.
• Deckel des Klemmengehäuses öffnen (Deckel des
Unterteils abziehen)
Zur Installation des Netzkabels verfahren Sie nun wie folgt:
• Die Anschlüsse A-B je nach Art des gewünschten
Anschlusses gemäß dem Schaltbild der Abbildung 3
herstellen.
V
HOOD
Min. mm.
600
mm.
420
Min.
mm. with hood
420
650
Min. mm.
min.
mm. without hood
700
min.
Nivellieren
Um den Herd eben ausrichten zu können, werden
höhen verstellbare Stellfüße mitgeliefert (siehe Abb. 1), die in
die entsprechenden Sitze (in den unteren Geräteecken)
eingeschraubt werden können.
Anmerkung: Diese Anschlüsse sind werkseitig für einen 230
V Einphasen-Anschluss vorgesehen ( die Kontakte 1-2-3 sind
untereinander verbunden). Die Brücke 4-5 befindet sich im
unteren Teil des Klemmengehäuses.
• Die Drähte (N und $) wie auf der Abbildung
veranschaulicht anschließen und mittels der
entsprechenden Schrauben befestigen.
• Die restlichen Drähte an den Klemmen 1-2-3 befestigen.
• Das Netzkabel in der entsprechenden Kabelklemme
befestigen, den Deckel wieder schließen und mittels der
Schraube “V” befestigen.
Anschluss des Netzkabels an das Stromnetz
Versehen Sie das Netzkabel mit einem Normstecker für die
auf dem Typenschild angegebene Belastung. Wird das Gerät
direkt an das Stromnetz angeschlossen, ist ein allpoliger
Schalter mit einer Kontaktweite von mindestens 3 mm
vorzuschalten. Dieser Schalter muss der Strombelastung und
den geltenden Richtlinien entsprechen (der Erdleiter darf nicht
durch den Schalter unterbrochen werden). Das Netzkabel
muss so verlaufen, dass es an keiner Stelle eine Temperatur
erreicht, die 50°C über der Raumtemperatur liegt. Vor dem
Anschluss stellen Sie bitte sicher, dass:
• der Leitungsschutzschalter (Sicherungen etc.) und die
Hausanlage die Belastung durch das Gerät tragen können
(siehe Typenschild);
• die Versorgungsanlage mit einer den gesetzlichen
Bestimmungen und Vorschriften entsprechenden Erdung
versehen ist;
• die Steckdose oder der allpolige Schalter bei installiertem
Herd leicht zugänglich ist.
DE
14

Technische Eigenschaften
Backofen
Abmessungen (BxTxH) 39x41x34 cm
Nutzvolumen 54 Liter
Bedarfsspitze des Backofens 2100 W
Glaskeramik-Kochfeld
Vorne links 1200 W
Hinten links 1700 W
Hinten rechts 1200 W
Vorne rechts 1700 W
Bedarfsspitze des Glaskeramik-Kochfeldes 5800 W
ENERGIE-ETIKETT
Richtlinie 2002/40/EG über die Etikettierung von
Elektrobacköfen
Norm EN 50304
Energieverbrauch Erzwungene Konvektion
Heizfunktion: Heißluft
Deklarierte Energieverbrauchsklasse Natürliche Konvektion
Heizfunktion: Statisch
Spannung und Frequenz
siehe Typenschild
Nutzabmessungen des Geschirrwagens:
Breite: 42 cm
Tiefe: 44 cm
Höhe: 23 cm
%
Dieses Gerät entspricht den folgenden EG-Richtlinien:
— 73/23/EWG vom 19.02.1973 (Niederspannung) und
nachfolgenden Änderungen;
— 89/336/EWG vom 03.05.1989 (elektromagnetische
Verträglichkeit) und nachfolgenden Änderungen;
— 93/68/EWG vom 22.07.1993 und nachfolgenden
Änderungen;
Entsorgung von Elektroaltgeräten
Gemäß der Europäischen Richtlinie 2002/96/EC über
Elektro- und Elektronik-Altgeräte (WEEE) dürfen
Elektrohaushalts-Altgeräte nicht über den herkömmlichen
Haushaltsmüllkreislauf entsorgt werden. Altgeräte müssen
separat gesammelt werden, um die Wiederverwertung und
das Recycling der beinhalteten Materialien zu optimieren
und die Einflüsse auf die Umwelt und die Gesundheit zu
reduzieren. Das Symbol „durchgestrichene Mülltonne“ auf
jedem Produkt erinnert Sie an Ihre Verpflichtung, dass
Elektrohaushaltsgeräte gesondert entsorgt werden
müssen.
Endverbraucher können sich an Abfallämter der Gemeinden
wenden, um mehr Informationen über die korrekte
Entsorgung ihrer Elektrohaushaltsgeräte zu erhalten.
Herd mit Multifunktions-Backofen und Glaskeramik-Kochfeld
D. Fettpfanne bzw. Bac kblech
E. Schalterblende
F. V erstellbare Füße bzw. Beine
H. Kochzonen-Betriebsanzeigeleuchte
I. Kochzonen-Schalter
K. Backofenrost
L. T emperatur -K ontrollleuc hte
M. Temperaturregler
N. Funktionswähler
Q. Uhr mit Minutenzähler
M
L
N
Q
E
K
H
D
I
15
F
DE

Inbetriebnahme
Die Wahl der einzelnen Funktionen erfolgt mittels der auf der
Schalterblende angeordneten Schalter.
Achtung:Vor erstmaligem Gebrauch des Backofens und des
Grills sollten diese für ca. 30 Minuten in Betrieb gesetzt
werden. Achten Sie dabei darauf, dass sich kein Backgut im
Backofen befindet, der Temperaturregler auf Höchsttemperatur
eingestellt ist, die Gerätetür geschlossen ist, und die Küche
währenddessen ausreichend gelüftet wird. Der hierbei evtl.
entstehende Geruch wird durch das Verdunsten der zum
Schutz des Backofens und des Grills während des Zeitraums
zwischen Produktion und erster Inbetriebnahme aufgetragenen
Stoffe verursacht.
Achtung: Verwenden Sie die unterste Einschubhöhe bitte
nur bei Einsatz des Bratspießes (wo vorhanden). Für alle
anderen Gararten ist diese Führungsschiene nicht zu
verwenden. Stellen Sie bei in Betrieb befindlichem Backofen
auch niemals Kochgeschirr auf den Backofenboden, Sie
könnten hierdurch das Email beschädigen. Stellen Sie Ihr
Kochgeschirr (Auflaufformen, Alufolien, usw.) auf die mit dem
Gerät gelieferten und in die Führungsschienen eingesetzten
Backofenroste.
Backofenregler
Der ‘5 Cuochi’ -Backofen vereint in einem einzigen Gerät die
Vorzüge der herkömmlichen „statischen“ Backöfen und die
der modernen “Heißluft”-Backöfen.
Es handelt sich um ein äußerst vielseitiges Gerät, das es
Ihnen ermöglicht, zwischen 5 einfachen und sicheren Brat-/
Backmethoden wählen zu können. Eingestellt werden die
Garfunktionen des “5 Cuochi” mittels der beiden Drehknöpfe:
N — Funktionswähler
M — Temperaturregler
Bei jeder von der mit dem Symbol “o” gekennzeichneten
Position ‘AUS’ abweichenden Einstellung des
Funktionswählers schaltet sich die Backofenbeleuchtung ein.
Drehen Sie den Schalter auf & ein, schaltet sich die
Backofenbeleuchtung ein, auch wenn kein Heizelement
aktiviert wurde. Die Beleuchtung bleibt während des Bratens
bzw. Backens eingeschaltet, und ist ein Zeichen dafür, dass
sich der Backofen in Betrieb befindet.
Auftauen
Temperaturregler “M”: beliebige Einstellung
Dank des an der Backofenrückwand installierten Gebläses
zirkuliert Luft in Raumtemperatur um das aufzutauende
Gut. Auf diese Weise können alle Arten von Speisen
aufgetaut werden, vor allem jedoch empfindliche Speisen,
die keine Hitze vertragen, wie beispielsweise: Eistorten,
Creme- oder Sahnetorten, Obsttorten usw. Auf diese Weise
ersparen Sie die Hälfte der Zeit, die Sie normalerweise
zum Auftauen benötigen. Bei Fisch, Fleisch oder Brot
können Sie das Auftauen mit Hilfe der Funktion “Heißluft”
beschleunigen. Stellen Sie hierzu eine Temperatur von 80°
— 100°C ein.
Statisch
Temperaturregler “M”: zwischen 50°C und Max.
Auf dieser Einstellung schalten sich die beiden Heizelemente,
das untere und das obere, ein. Dies ist der klassische
Backofen unserer Großmütter, der jedoch, was
Wärmeverteilung und Energieeinsparung anbelangt, auf ein
außergewöhnliches Niveau gebracht wurde. Der statische
Backofen ist unübertrefflich bei der Zubereitung von
Eintopfgerichten wie: Kohl mit Schweinerippchen, Stockfisch
auf spanische Art, Stockfisch mit Tomatensoße,
Kalbsgeschnetzeltes mit Reis usw…. Ausgezeichnete
Resultate erzielen Sie bei der Zubereitung von Rind- und
Kalbfleischgerichten wie: Schmorbraten, Ragout, Gulasch,
Wild, Lammkeule, Schweinslende usw., die eine lange Garzeit
und ständige Zugabe von Flüssigkeit erfordern. Diese
Backofenfunktion bietet immer noch das beste System zum
Backen von Kleingebäck und Kuchen, zum Garen von Obst,
sowie zum Garen von Auflaufgerichten bzw. Gerichten in
geschlossenen Backformen. Bei Einsatz des statischen
Backofens schieben Sie bitte jedes Mal nur ein Backblech
ein, da ein gleichzeitiges Garen bzw. Backen auf mehreren
Ebenen keine gleichmäßige Hitzeverteilung gewährleistet. Je
nach Einsatz der verschiedenen Einschubhöhen, kann die
Unter- bzw. Oberhitze optimal genutzt werden. Verwenden
Sie die oberen Einschubhöhen, wenn mehr Oberhitze verlangt
wird, und die unteren, wenn mehr Unterhitze verlangt wird.
Heißluft
Temperaturregler “M”: zwischen 50°C und Max.
Die Heizelemente schalten sich ein und das Gebläse wird in
Betrieb genommen. Dank der konstant gehaltenen und im
Backofen gleichmäßig verteilten Heißluft werden die Speisen
sehr gleichmäßig gegart bzw. gebacken. Es können auch
gleichzeitig mehrere Gerichte unterschiedlicher Art gegart
werden, vorausgesetzt es werden keine unterschiedlichen
Gartemperaturen verlangt. Es können bis zu 2 Einschubhöhen
gleichzeitig verwendet werden. Beachten Sie hierzu die
Hinweise des Abschnitts “Gleichzeitiges Garen auf mehreren
Einschubhöhen”.
Diese Funktion eignet sich besonders für Gratin-Gerichte,
wie auch für Speisen, die längere Garzeiten erfordern, wie:
Lasagna, Nudelaufläufe, Brathähnchen mit Kartoffeln usw.
Bei Fleischgerichten eignen sich ganz besonders gut Braten
zum Garen im Heißluftbackofen. Dank der optimalen
Hitzeverteilung können niedrigere Temperaturen eingestellt
werden, es tritt weniger Fleischsaft aus, das Fleisch bleibt
demnach zarter und der Gewichtsverlust wird eingeschränkt.
Besonders geschätzt wird der Heißluftbackofen bei der
Zubereitung von Fisch, der auf diese Weise mit wenig Zutaten
gegart werden kann, wodurch Aussehen und Geschmack
unveränderlich erhalten bleiben.
Dessert: Hefekuchen gelingen ganz besonders im
Heißluftbackofen.
Die “Heißluft”-Funktion kann auch zum Auftauen von Fleisch
und Brot eingesetzt werden. Stellen Sie hierzu den
Temperaturregler auf 80°C ein. Zum Auftauen delikater
Speisen stellen Sie jedoch entweder eine Temperatur von
60°C ein, oder verwenden nur die kalte Umluft
(Temperaturregler demnach auf 0°C).
Oberhitze
Temperaturregler «M”: zwischen 50°C und Max.
Das obere Heizelement schaltet sich ein.
Diese Funktion kann zum kurzen Überbacken bereits gegarter
Speisen verwendet werden.
Grill
Temperaturregler “M”: zwischen 50°C und Max.
Das mittlere obere Heizelement schaltet sich ein und der
Drehspieß wird in Betrieb genommen.
Durch die äußerst hohe Temperatur und die direkt auf das
Grillgut gerichtete Hitze wird das Fleisch auf der Oberseite
rasch gebräunt, somit tritt kein Fleischsaft aus und das
Fleisch bleibt zarter. Die Grillfunktion eignet sich ganz
besonders für solche Speisen, die eine äußerst hohe Oberhitze
verlangen: Rinder- und Kalbssteaks, Entrecôte, Fleischfilet,
Hamburger usw. …
Der Abschnitt “Praktische Back-/Brathinweis” enthält einige
Beispiele zum Einsatz des Backofens.
DE
16

Umluftgrill
Temperaturregler “M”: zwischen 50°C und Max.
Das mittlere obere Heizelement schaltet sich ein und das
Gebläse wird in Betrieb genommen.
Außer der einseitigen Strahlungshitze zirkuliert Heißluft im
Innern des Backofens. Hierdurch wird ein Verbrennen der
Speisenoberflächen verhindert, die Hitze dringt tiefer in die
Speisen ein. Der Umluftgrill garantiert ein absolutes Gelingen
von: Fleisch/Gemüsespießen, Bratwürsten,
Schweinerippchen, Lammkoteletts, pikantes Huhn, Wachteln
mit Salbei, Schweinefilet usw. …
Grillen Sie bitte bei geschlossener Backofentür.
Die Grill-Funktion ist unübertrefflich bei der Zubereitung
folgender Fischgerichte: Barsch-, Thunfisch- und
Schwertfischschnitten, gefüllte Tintenfische usw. …
Drehspieß
Zur Inbetriebnahme des Drehspießes verfahren Sie wie folgt:
a) Schieben Sie die Fettpfanne auf die 1. (unterste) Führung;
b) schieben Sie die Drehspießhalterung auf die 3. Führung
(von unten) und stecken Sie den Spieß durch das
entsprechende Loch in die auf der Backofenrückwand
befindliche Vorrichtung;
c) setzen Sie den Drehspieß durch Drehen des
Funktionswählers “N” auf in Betrieb.
Die Backofenbeleuchtung
Diese wird durch Drehen des Funktionswählers “N” auf das
Symbol eingeschaltet. Sie beleuchtet das Ofeninnere und
bleibt eingeschaltet, solange sich irgendein elektrisches
Backofenheizelement in Betrieb befindet.
Elektronischer Minutenzähler (Q)
Achtung
Bei eingeschaltetem Backofen könnte die Tür sehr heiß
werden, demnach sollten Kinder ferngehalten werden.
Der Minutenzähler fungiert als Uhr und auch als Minutenuhr
mit rückwärtig ablaufender Zeitrechnung.
Anmerkung: Sämtliche Funktionen werden nach ca. 7
Sekunden ab der Einstellung aktiv.
Einstellen der Uhr
Nach dem Netzanschluss oder nach einem Stromausfall blinkt
auf dem Display die Anzeige: 0 00
• Drücken Sie die Taste v und stellen Sie daraufhin
mittels der Tasten s und J die genaue Uhrzeit ein. Zum
Schnelllauf halten Sie die Tasten gedrückt.
Für ein eventuelles Neueinstellen der Uhrzeit ist Vorstehendes
zu wiederholen.
Minutenzähler-Funktion
Durch Drücken der Taste n erhalten Sie Zugriff auf diese
Funktion, auf dem Display erscheint die Anzeige “n”. Jeder
Druck auf die Taste t entspricht einer Erhöhung der Zeit
um 10 Sekunden, bis 99 Minuten und 50 Sekunden.
Drücken Sie diese T aste w eiter, erf olgt die Zeiterhöhung in
1 Minuten-Schritten, bis maximal 10 Stunden.
Mittels der Taste s schalten Sie die Zeit zurück.
Nach Einstellen der gewünschten Zeit startet die
rücklaufende Zeitrechnung. Ist die Zeit abgelaufen,
vernehmen Sie ein kurzes Tonsignal, das durch Drücken
einer beliebigen Taste ausgeschaltet werden kann.
Die eingestellte Zeit kann eingeblendet und somit abgelesen
werden, indem Sie die T aste v drücken, durch das Symbol
“n” wird angezeigt, dass die Minutenzähler-Funktion
eingestellt wurde. Nach ca. 7 Sekunden schaltet das
Display automatisch wieder auf die Minutenanzeige zurück.
Löschen einer bereits eingestellten Zeit
Drücken Sie die Taste s bis 0 l 00 angezeigt wird.
Lautstärkenregelung des Alarmsignals
Nach Einstellung der Uhr und entsprechender Bestätigung
kann mittels der Taste s die Lautstärke des Alarmsignals
reguliert werden.
Temperatur-Kontrollleuchte (L)
Diese zeigt die Aufheizphase an; die Kontrollleuchte erlischt
nach Erreichen der mittels des Temperaturreglers eingestellten
Temperatur im Backofeninnern. Das nun abwechselnde
Aufleuchten und Erlöschen der Kontrolllampe ist ein Zeichen
dafür, dass der Thermostat korrekt arbeitet, und demnach
die Backofentemperatur konstant gehalten wird.
17
DE
Praktische Back-/Brathinweise
Der Backofen stellt Ihnen eine umfangreiche Programmpalette
zur Verfügung, um jede Speise optimal garen zu können. Im
Laufe der Zeit werden Sie dieses vielseitige Gerät optimal zu
nutzen wissen, demnach gelten die nachstehenden
Anleitungen nur als Richtlinie, die Sie durch Ihre persönliche
Erfahrung erweitern können.
Backen
Schieben Sie das Backwerk immer in den heißen Backofen;
halten Sie die Vorheizzeit (10-15 Minuten) stets ein. Die
Temperaturen liegen normalerweise bei 160 — 200°C. Öffnen
Sie während des Backens nicht die Backofentür, um ein
Zusammenfallen des Kuchens zu vermeiden.
Der Kuchen ist zu trocken
Stellen Sie das nächs t e Ma l eine um 10°C höhere
Backtemperatur ein und verkürzen Si e die Bac kzeit.
Der Kuchen fällt zusammen
Verwenden Sie weniger Flüssigkeit und stellen Sie
eine um 10°C niedrigere Backtemperatur ein.
Der Kuchen ist an der Oberseite zu dunkel
Wählen Sie eine niedrigere Einschubhöhe, eine
niedrigere Temperatur und verlängern Sie die
Backzeit.
Der Kuchen ist außen gut gebacken aber innen
noch klebrig
Verwenden Sie weniger Flüssigkeit, reduzieren Sie die
Temperatur, verlängern Sie die Backzeit.
Der Kuchen löst sich nicht aus der Form
Fetten Sie die Kuchenform gut ein und bestäub en Sie
sie mit etwas Mehl oder legen Sie Backpapier in die
Form.
Ich habe (bei Heißluftbetrieb) auf mehreren Ebenen
gegart, und nicht alle Gerichte sind gleichförmig
gar
Stellen Sie eine niedrigere Temperatur ein.
Es ist nicht erforderlich, die auf mehreren Ebenen
gegarten Speisen gleichzeitig aus dem Of en zu
nehmen.
Fisch und Fleisch
Für Geflügel und Fisch ist eine niedrigere Temperatur
einzustellen. (150°C — 175°C) Für Rinderbraten, der außen
gut angebraten, innen aber saftig bleiben soll, ist das Fleisch
bei hoher Temperatur (200220°C) rasch anzubraten, um dann
auf eine niedrigere Temperatur überzugehen. Als Richtlinie
gilt: Je größer der Braten, desto niedriger die Temperatur und
um so länger die Bratzeit. Legen Sie das Fleisch auf die
Mitte des Rostes und schieben Sie die Fettpfanne darunter.
Schieben Sie den Rost so ein, dass er sich in der Mitte des
Backofens befindet. Sollte mehr Unterhitze erforderlich sein,
dann verwenden Sie die unterste Einschubhöhe.
Gleichzeitiges Garen auf mehreren Einschubhöhen
Soll auf zwei Einschubhöhen gegart werden, dann wählen
Sie bitte nur die Funktion “Heißluft”, denn nur diese
ermöglicht ein solches Garen.
• Ihr Backofen hat insgesamt 5 Einschubhöhen. Beim
Heißluftgaren verwenden Sie jedoch bitte nur die beiden
mittleren Einschubhöhen, die oberste und die unterste ist
zu direkt der Heißluft ausgesetzt, wodurch empfindliche
Gerichte leicht verbrennen könnten.
• Verwenden Sie im Allgemeinen die 2. und die 4.
Einschubhöhe von unten, wobei die 2. für die Speisen
verwendet werden sollte, die mehr Hitze verlangen. Zum
Beispiel: Bei gleichzeitigem Zubereiten von Fleischbraten
für den Braten und die 4. für empfindliche Speisen.
• Sollen Gerichte, die unterschiedliche Gartemperaturen und
-zeiten verlangen, gleichzeitig gegart werden, dann stellen
Sie eine mittlere der beiden erforderlichen Gartemperaturen
ein, und garen die empfindlichere Speise auf der vierten
Ebene (von unten). Nehmen Sie die Speise, die eine
kürzere Garzeit erfordert, zuerst aus dem Backofen.
• Schieben Sie die Fettpfanne auf die unterste und den
Grillrost auf die oberste Führung.
• Soll auf mehr als einer Ebene Pizza gebacken werden,
dann stellen Sie den Thermostaten auf 220°C; vergessen
Sie nicht, dass der Backofen mindestens 15 Minuten gut
vorgeheizt werden muss. Im allgemeinen wird die auf der
vierten Einschubhöhe befindliche Pizza etwas später gar,
nehmen Sie deshalb die Pizza, die sich auf der zweiten
Ebene befindet, etwas früher aus dem Backofen und
lassen die andere noch für ein paar Minuten weitergaren.
Gebrauch des Grills
Der Backofen ermöglicht Ihnen zwei unterschiedliche
Grillarten. Verwenden Sie die Funktion “Oberhitze” für
kleine Portionen. Auf dieser Einstellung liegt der
Energieverbrauch bei nur 1200 W, und ist demnach ideal für
kleines Grillgut, wie: z.B- überbackenes Toastbrot,
Würstchen usw.
Legen Sie das Grillgut auf die Mitte des Rostes, da nur
der mittlere Teil des oberen Heizwiderstandes
eingeschaltet ist. Grillgut auf den Eckzonen des Grills
wird nicht gar .
Die Funktion “Grill” ermöglicht das Garen auf der
gesamten Rostoberfläche. Schalten Sie diese Funktion ein,
wenn der ganze Rost mit Grillgut belegt ist und eine
gleichmäßige Bräunung gewünscht wird.
Wichtig: Grillen Sie bei geschlossener Backofentür, dadurch
erzielen Sie nicht nur optimale Ergebnisse, sondern sparen
auch Energie (ca. 10%).
Bei Einsatz der Grillfunktionen sollte der Thermostat auf die
höchste Stufe eingestellt werden. Dies bedeutet jedoch nicht,
dass, falls erforderlich, nicht auch niedrigere Temperaturen
eingestellt werden können.
Setzen Sie den Grillrost in die oberen Führungen (siehe Tabelle) ein, und schieben Sie die Fettpfanne unter das Grillgut
(unterste Führung), um abtropfendes Fett aufzufangen und
Rauchbildung zu vermeiden.
Die Einstellung “Umluftgrill” ist äußerst praktisch für
rasches Grillen, die vom Grill ausgestrahlte Heißluft wird
besser verteilt, wodurch gleichzeitig die Oberseite gebräunt
und die Unterseite gegart wird. Der Umluftgrill ermöglicht das
Garen großer Braten oder Geflügel, ohne Einsatz des
Bratspießes. Auf dieser Einstellung können bereits gegarte
Gerichte noch kurz überbacken werden. (Nudelaufläufe usw.)
Setzen Sie den Grillrost auf die 2. oder 3. Führung (siehe
Tabelle), und schieben Sie die Fettpfanne unter das Grillgut,
um abtropfendes Fett aufzufangen und Rauchbildung zu
vermeiden. Bei gleichzeitigem Einsatz dieser Funktion und
dem Bratspieß (nur bei einigen Modellen) kann auch auf dem
Backblech (1. Ebene) gegart werden, wie z.B.: Kartoffeln usw.
DE
18

Anleitungen zum Einsatz des Glaskeramik-Kochfeldes
Beschreibung
Die Kochfelder sind mit elektrischen Heizstrahlern bestückt,
die sich unter den Kochzonen befinden, die bei Inbetriebnahme
aufglühen.
A. Kochzone (A).
B. Kontrolllampen, die darauf aufmerksam machen, dass die
entsprechenden Zonen eine Temperatur von 60°C
übersteigen, auch wenn die Kochzone bereits
ausgeschaltet wurde.
AA
B
Beschreibung der Heizelemente
Die Strahlungsbeheizung erfolgt mittels runder
Heizelemente, die innerhalb von nur 10-20 Sekunden nach
dem Einschalten rot aufglühen.
Anleitungen zum Einsatz des GlaskeramikKochfeldes
Um optimale Leistungen Ihres Glaskeramik-Kochfeldes zu
gewährleisten, sind beim Kochen einige grundsätzliche
Maßnahmen zu beachten.
• Auf Glaskeramik-Kochfeldern kann jede Art von
Kochgeschirr verwendet werden. Die Böden müssen
jedoch perfekt glatt sein. Ein stärkerer Boden garantiert
jedoch eine gleichmäßigere Hitzeverteilung.
• Achten Sie darauf, dass der Topfboden die Kochzone
gänzlich ausfüllt: sonst geht ungenutzte Energie verloren.
• Achten Sie darauf, dass der Boden des Geschirrs trocken
und sauber ist: Hierdurch wird eine optimale Auflage auf
der Kochzone sowie eine längere Lebensdauer Ihres
Glaskeramik-Kochfeldes und Ihrer Töpfe gewährleistet.
• Vermeiden Sie den Einsatz von Kochgeschirr, das bereits
auf Gasherden verwendet wurde. Durch die stark
konzentrierte Hitze der Gasbrenner könnten sich die Böden
etwas verformt haben, und somit keine optimalen
Kochresultate bei Einsatz auf einem GlaskeramikKochfeld mehr gewährleisten.
19
DE
Loading…
Перейти к контенту
Плиты Indesit
- Размер инструкции: 1.62 Мб
- Формат файла: pdf
Если вы потеряли инструкцию от плиты Indesit K3C55_R, можете скачать файл для просмотра на компьютере или печати.
Инструкция для плиты Indesit K3C55_R на русском языке. В руководстве описаны возможности и полезные функции, а также правила эксплуатации. Перед использованием внимательно ознакомьтесь с инструкцией.
Чтобы не читать всю инструкцию вы можете выполнить поиск по содержимому внутри инструкции и быстро найти необходимую информацию. Рекомендации по использованию помогут увеличить срок службы плиты Indesit K3C55_R. Если у вас появилась проблема, то найдите раздел с описанием неисправностей и способами их решения. В нем указаны типичные поломки и способы их решения.
Раздел: Бытовая, кухонная техника, электроника и оборудование
Тип: Плита
Характеристики, спецификации
Металлическая решетка:
1 шт
Электромеханический вертел:
Да
Тип освещения:
лампа накаливания
Звуковой таймер:
до 99 минут
Инд. остаточного тепла:
Да
Материал варочной поверхности:
стеклокерамика
Ближняя, левая конфорка:
17 см
Дальняя, левая конфорка:
20.5 см
Дальняя, правая конфорка:
17 см
Ближняя, правая конфорка:
20.5 см
Тип управления:
механический
Ящик для посуды:
выдвижной
Потребляемая мощность:
7900 Вт
Класс энергоэффективности:
B
Габаритные размеры (В*Ш*Г):
85*50*60 см
Максимальная температура:
240 *С
Внутреннее покрытие:
эмаль
Стекло дверцы духовки:
2-слойное
Инструкция к Плите Indesit K3C55/R

Cooker
K3C55/R
Installation and use
Herd
Installation un gebrauch
Êóõoííaÿ ïëèòà
Óñòàíîâêà è ïîëüçîâàíèå
Kuchenka
instalacje i obs³uga
Cuisinière
Installation et emploi
Fornuis
Installatie en gebruik
Cooker with electric multifunction oven
5 programms
Instructions for installation and use 3
Herd mit Multifunktions-Backofen und Glaskeramik-
DE
Kochfeld
Installations- und Gebrauch 13
Ïëèòà ñ ìíîãîôóíêöèîíàëüíîé äóõîâêîé
Èíñòðóêöèè ïî óñòàíîâêå è èñïîëüçîâàíèþ 23
PL
Kuchnia z elektrycznym piekarnikiem „Siedmiu kucharzy”
Instrukcja instalacji i obs³ugi 33
Cuisinière avec four multifonction et table
vitrocéramique
Instruction pour l’installation et l’emploi 43
Fornuis met multifunctie-oven en keramische
kookplaat
Instructies voor het installeren en gebruik 52

Caution
In order to guarantee that your appliance operates in a safe and efficient manner:
• seek help only from authorised technical assistance centres;
• always insist on the use of original spare parts.
1 This appliance was designed for domestic use inside the
15 This appliance should only be used for the purpose for which
home.
it was designed. Any other purpose (for example, heating the
2 These instructions are only valid for the countries whose
room) constitutes improper use of the oven and is dangerous.
symbols appear in the manual and on the serial number plate
The manufacturer may not be held responsible for any
located on the appliance.
damage caused as a result of improper, incorrect and
3 This is a class 1 (insulated) or class 2 — subclass 1
unreasonable use of the appliance.
(recessed between 2 cabinets) appliance.
16 All users of electrical appliances should observe several basic
4 Before using the appliance, please read this instruction
rules. These include:
booklet carefully as it contains important information regarding
• Do not touch the appliance with wet or damp hands or
the safe installation, use and maintenance of the cooker. Keep
feet.
this booklet in a safe place so that, if necessary, it may be
• Do not use the appliance when barefoot.
consulted at a later date.
• Do not use extension cords. If this cannot be avoided, be
5 After the packaging has been removed, ensure that the
especially careful.
appliance is intact and not damaged in any way. If there is any
• When unplugging the appliance always pull the plug from
doubt, contact a professionally qualified technician and do
the mains socket, do not pull on the cable.
not use the appliance. All packaging (plastic bags, polystyrene
• Do not leave the appliance exposed to atmospheric
foam, staples, etc.) should be kept out of reach of children as
agents (rain, sunlight, etc.)
it is potentially dangerous.
• Do not allow children or disabled individuals to operate
6 The appliance must be installed by a qualified person in
the appliance without supervision.
compliance with the instructions provided. The manufacturer
17 Always disconnect the appliance from the mains supply (either
shall not be held responsible for any harm caused to persons
by unplugging it or by shutting off the switch) before cleaning
or animals or for any damage to personal property resulting
it or carrying out any maintenance work.
from incorrect installation.
18 Before disposing of the appliance, make it unusable by
7 The electrical safety of this appliance is only guaranteed when
unplugging it and cutting off the power supply cable. It is also
it has been correctly connected to an efficient earthed electricity
advisable to remove any potentially hazardous parts,
supply in compliance with current electrical safety regulations.
especially with regard to children who may use the old
This is a fundamental safety requirement that must be checked
appliance as a toy.
and, if there is any doubt, you should ask a professionally
19 Do not use unstable or misshapen pans on the electric cooking
qualified technician to carry out a thorough check of the supply
zones; this will help to avoid accidental spills. Make sure pan
system. The manufacturer may not be held responsible for
handles are turned towards the centre of the hob in order to
any damage caused by a mains supply that has not been
avoid accidental burns.
earthed correctly.
20 Do not use flammable liquids (alcohol, petrol, etc…) near the
8 Before connecting the appliance, make sure its rating (which
appliance while it is in use.
can be found on the appliance itself and/or on the packaging)
21 If you are using small domestic appliances near the hob,
corresponds to the power supply.
ensure that their power supply cables do not come into contact
9 Make sure that the mains supply and the electrical sockets
with the hot parts of the surface.
can withstand the maximum power of the appliance, which is
22 Always make sure that the knobs are in the “<B>•”/“l”/“¡”
indicated on the serial number plate. If there is any doubt,
position when the appliance is not in use.
contact a professionally qualified technician.
23 The heating elements and certain parts of the oven door
10 The appliance must be connected to the mains by means of
become extremely hot when the appliance is in use. Do
an omnipolar switch with a minimum contact opening of 3
not touch these parts yourself and keep children well away
mm.
from the appliance.
11 If the socket is incompatible with the plug, ask a professionally
24 If the cooker is placed on a pedestal, take all necessary
qualified technician to replace it with a suitable one. The
precautions to ensure that the appliance does not slide off
technician should also make sure that the power cables
this pedestal.
attached to the socket can withstand the maximum power of
25 If the surface of the glass cracks, unplug the appliance
the appliance. In general, it is not advisable to use adaptors,
immediately. For any repairs, contact only an authorised after-
multiple sockets and/or extension cords. If this cannot be
sales service centre and demand original spare parts. Failure
avoided, only use single or multiple adaptors and extension
to comply with the above may compromise the safety appliace.
cords that comply with current safety regulations. Never exceed
26 The glass ceramic hob is resistent to thermal and mechanical
the maximum current capacity indicated on the single adaptor
shocks. However, it may break due to a shock caused by a
or extension cord, or the maximum power level indicated on
sharp object, such as tool for example. In this case, unplug
the multiple adaptor.
the appliance immediately and contact an authorised after-
12 Do not leave the appliance plugged in if it is not in use. Shut
sales service centre to have it repaired.
off the main switch for the appliance when it is not being used.
27 Rememer that the heating area stays hot for at least half
13 The openings used for ventilation and dispersion of heat must
an hour after being turned off; please refrain from placing
never be covered.
any cookware or other items on the cooking zone while
14 Do not attempt to replace the power supply cable yourself. If
still hot
the cable is damaged or needs replacing, contact a technical
assistance centre that has been authorised by the
manufacturer.
3
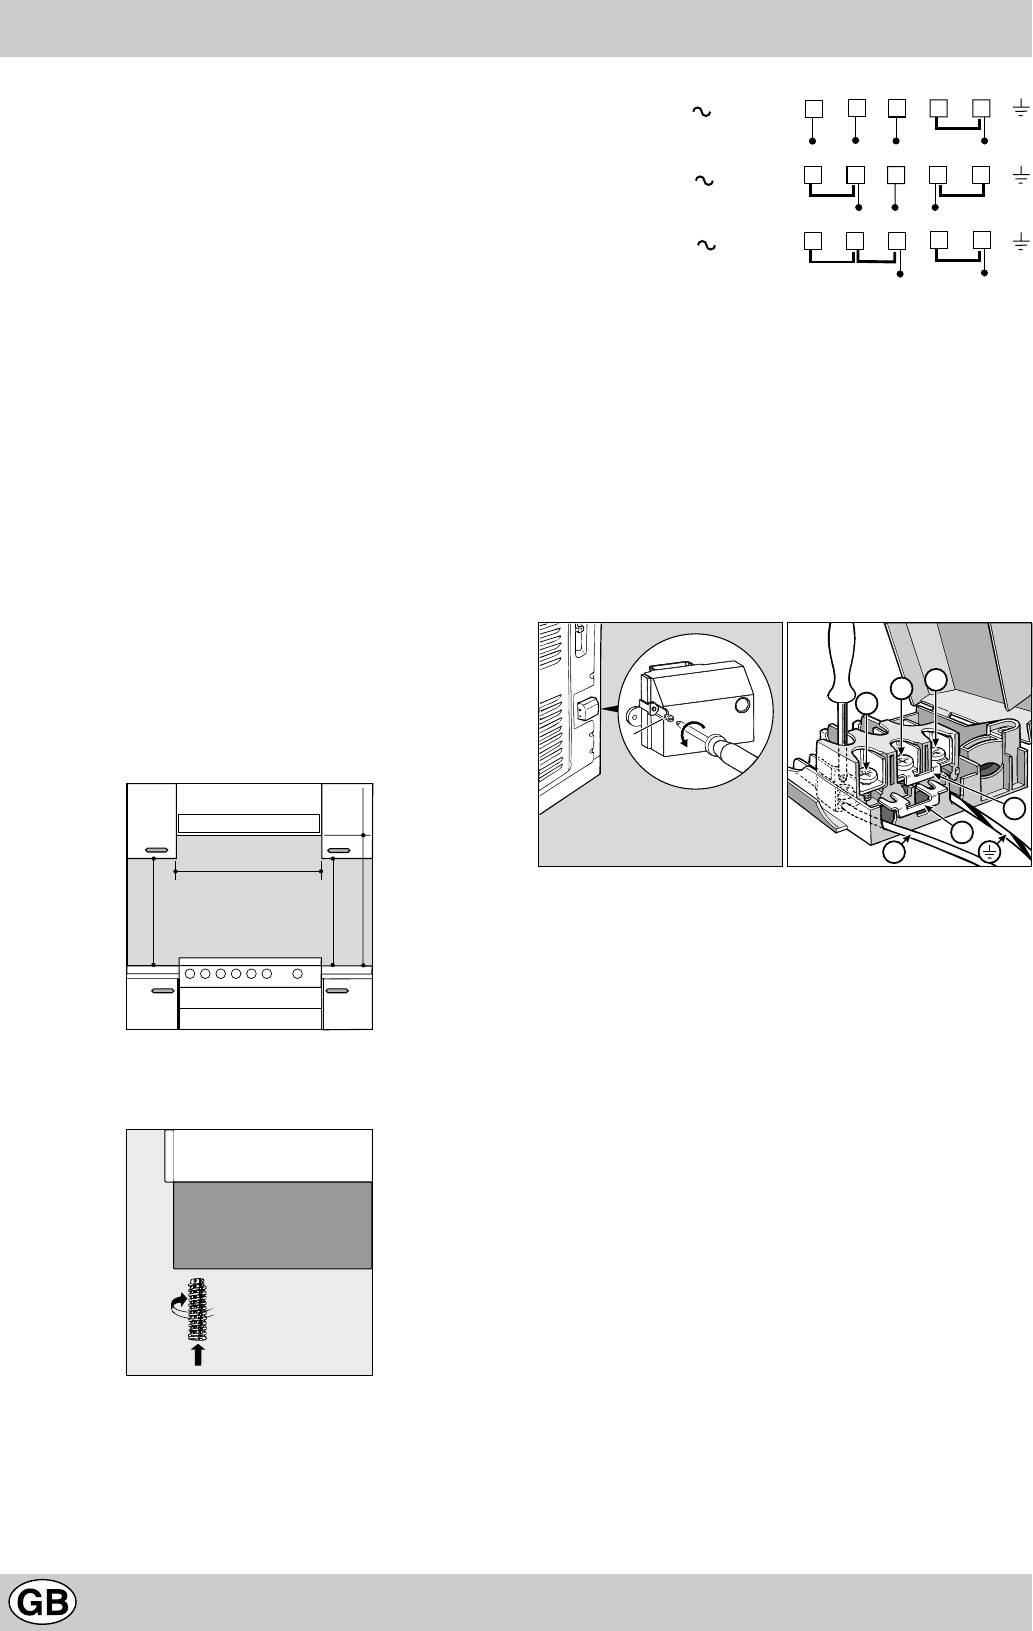
V
HOOD
Min. mm.
600
mm.
420
420
mm. with hood
mm. without hood
650
700
Min.
Min. mm.
min.
min.
4
Installation
The following instructions should be carried out by a qualified
400 3N
1 2
3
4
5
technician to ensure that the appliance is installed, adjusted
H05RR-F 5×2.5 CEI-UNEL 35363
and technically serviced correctly in compliance with current
R
S
T
N
regulations.
400V 2N
12345
Important: always disconnect the cooker from the power
H05RR-F 4×2.5 CEI-UNEL 35363
R
S
N
supply cable before carrying out any maintenance operations
or adjustments, etc.
230V 1N
1
2
3
4
5
H07RN-F 3×4 CEI-UNEL 35364
Positioning
R
N
The appliance may be installed next to cabinets that are not
taller than the worktop. The following precautions must be
taken when installing the cooker:
Installing the power supply cable
a) Kitchen cabinets adjacent to the appliance and taller than
To open the terminal board:
the worktop must be at least 200 mm from the edge of
• Loosen the screw “V”.
the top.
• Remove the junction block cover by pulling it.
b) Hoods must be installed according to their relative
To install the power supply cable, follow the instructions below:
installation instruction manuals and at a minimum distance
• position the small A-B connection according to the type
of 650 mm from the worktop.
of connection you wish to carry out, following the diagram
c) Position the wall cabinets adjacent to the hood at a
in figure 3.
minimum height of 420 mm from the worktop (see figure).
Note: the Factory prepares small connections for 230V single-
d) If the hob is installed beneath a wall cabinet, the latter
phase connection (contacts 1-2-3 are connected to each
must be situated at a minimum of 700 mm (millimetres)
other). The 4-5 jumper is located on the lower area of the
above the worktop as shown in the figure.
terminal board.
e) The installation cavity should have the dimensions
indicated in the figure.
Levelling
Adjustable feet (see fig. 1) are supplied with the cooker in
order to ensure it is perfectly level. These may be screwed
into the holes provided on each corner of the base of the
cooker.
• Position the cables (N and
6) as demonstrated in the
figure and tighten the corresponding screws.
• Fasten the remaining cables to terminals 1-2-3.
• Secure the power supply cable by fastening the cable
clamp screw then replace the cover using the screw “V”.
Connecting the supply cable to the mains
Install a standardised plug corresponding to the load indicated
Electrical connection
on the data plate. If the appliance is directly connected to the
The cable should be suited to the type of electrical connection
mains supply, an omnipolar circuit-breaker (switch) should
used (see connection diagram below).
be fitted, with a minimum contact opening of 3 mm. This
switch must be able to withstand the maximum load of the
appliance and must conform to all current safety regulations
(the earth wire should not be interrupted by the switch). The
power supply cable should be positioned in such a way that
it does not reach temperatures of more than 50°C over the
temperature of the room, along its whole length. Before
connecting the appliance to the power supply, make sure
that:
• The modulating valve and the electricity supply can
withstand the maximum power of the appliance (see data
plate for details).
• The power supply has an efficient earthing system that
conforms to current regulations.
• the socket or the switch is easily accessible once the
cooker has been installed.
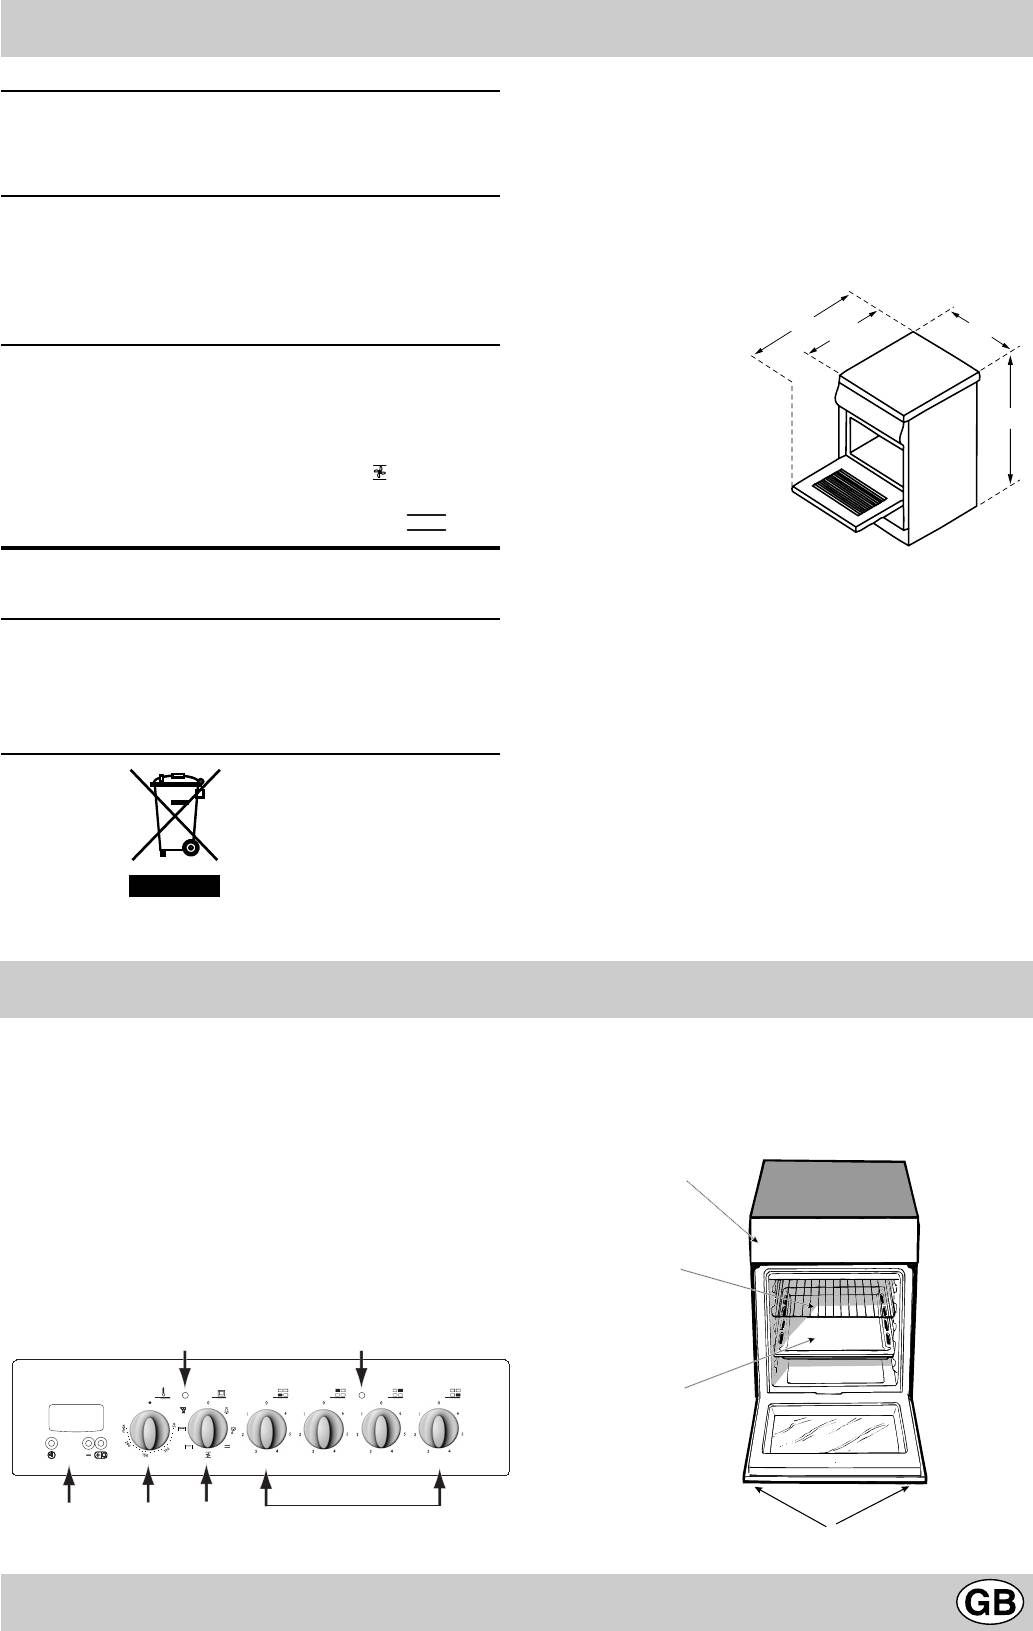
Technical characteristics
This appliance conforms to the following European
Oven
Economic Community directives:
Measurements (LxDxH) 39x41x34 cm
Volume 54 l
— 73/23/EEC dated 19/02/73 (Low Voltage) and subsequent
Max. oven consumption 2100 W
amendments;
Ceramic hob
— 89/336/EEC dated 03/05/89 (Electromagnetic
Front Left 1200 W
Compatibility) and subsequent amendments;
Back Left 1700 W
— 93/68/EEC dated 22/07/93 and subsequent amendments.
Back Right 1200 W
Front Right 1700 W
104
Max. ceramic hob consumption 5800 W
60
50
ENERGY LABEL
Directive 2002/40/EC on the label of electric ovens
Standard EN 50304
85/90
Forced convection energy consumption
heating mode:
Fan-assisted
Declared natural convection energy consumption
heating mode: Static
Disposal of old electrical appliances
Voltage and Frequency
The European Directive 2002/96/EC on Waste Electrical and
see data plate
Electronic Equipment (WEEE), requires that old household
electrical appliances must not be disposed of in the normal
Useful measurements relating to the oven compartment:
unsorted municipal waste stream. Old appliances must be
Width: 42 cm
collected separately in order to optimise the recovery and
recycling of the materials they contain and reduce the
Depth: 44 cm
impact on human health and the environment. The crossed
Height: 23 cm
out “wheeled bin” symbol on the product reminds you of
your obligation, that when you dispose of the appliance it
must be separately collected.
Consumers may take their old appliance to public waste
collection areas, other communal collection areas, or if
7
national legislation allows return it to a retailer when
purchasing a similar new product.
All major household appliance manufacturers are active in
the creation of systems to manage the collection and
disposal of old appliances.
Cooker with multifunctional oven and glass ceramic hob
D. Dripping pan or baking sheet
E. Control panel
F. Adjustable feet or legs
H. Cooking zone indicator light
I. Control knobs for cooking zones
K. Oven grill rack
E
L. Thermostat indicator light
M. Thermostat knob
N. Selector knob
Q. Clock with timer function
K
D
M
F
5

Using the cooker
The various features of cooker may be controlled using the
By using the different shelves available, the heat distribution
knobs and buttons located on the control panel.
between the top and bottom of the oven may be balanced as
Warning: before using the oven and grill for the first time,
desired. If a dish requires more heat at the top or bottom of
leave it to heat up for approximately 30 minutes. Check that
the oven, use the lower or upper shelves respectively.
the oven is empty, the thermostat is set to maximum, the
Fan-assisted oven
door is shut and that the room is well-ventilated. The oven
Turn the thermostat knob “M”: Between 50°C and Max.
may emit a slightly unpleasant odour during this time due to
The heating elements and the fan are activated. Because
the evaporation of the protective substances applied to the
the heat is distributed evenly throughout the oven, the air
oven and grill at the end of the manufacturing process.
cooks and browns food in a uniform manner. You may also
Warning: Only use the lowest shelf when cooking with the
cook different dishes at the same time, provided that the
turnspit (if provided). Never use the lowest shelf for any other
cooking temperatures are similar. It is possible to use a
type of cooking, and never place any objects on the bottom
maximum of 2 racks at the same time, following the
of the oven while it is operating, as this could damage the
instructions given in the paragraph entitled “Cooking on several
enamel coating. Always place cookware (dishes, aluminium
shelves simultaneously”.
trays, etc.) on the rack provided, ensuring the rack is correctly
This function is particularly suitable for cooking dishes “au
positioned using the guide rails inside the oven.
gratin”, or for dishes requiring a reasonably long cooking time,
Oven control knobs
for example: lasagne, pasta bake dishes, roast chicken and
The “5-programme” oven combines the advantages of a
potatoes, etc… There are substantial advantages to this mode
traditional “static” oven with those of a modern “fan-assisted”
when cooking roast meats, as the improved temperature
oven.
distribution enables lower temperatures to be set, thus
The “5-programme” oven is extremely versatile and offers 5
reducing the amount of juices that escape from the meat,
different cooking modes that are both simple and safe. Use
making it less likely to shrink in the oven and more tender to
the knobs to select the different cooking functions offered by
eat. The fan-assisted mode is particularly useful when cooking
the “5-programme” oven.
fish, which can be cooked in this way with a minimal amount
N — Programme selector knob
of liquid added, therefore maintaining its original taste and
M — Thermostat knob
appearance.
If the selector knob is in any other position than the off position
Dessert: this mode is completely safe to use when cooking
(marked with “o”), the oven light will illuminate; if the knob is
leavened cakes.
turned to the position the light may be switched on without
The “fan-assisted” function may also be used for defrosting
any of the heating elements being activated. The position
red or white meat or bread quickly, by setting the temperatu-
marked with the 8 symbol enables the light to be switched on
re to 80°C. To defrost more delicate foods, set the temperatu-
without any of the heating elements being activated. When
re to 60°C or use the cold air circulation by setting the tempe-
the oven light is on, this shows that the oven is in use; the
rature knob to 0°C.
light will remain on until the oven is switched off.
“Top” oven
“Defrosting” programme
Turn the thermostat knob “M”: Between 50°C and Max.
Turn the thermostat knob “M”: to any position
The top heating element comes on.
The fan at the bottom of the oven circulates room-tempera-
This mode can be used to brown food at the end of cooking.
ture air around the food. This programme is suitable for
Grill
defrosting any type of food, especially delicate items that
Position the thermostat knob “M”: Between 50°C and Max.
should not be heated, for example: ice-cream cakes or cakes
The central top heating element and the turnspit will be
made with custard, cream or fruit. The defrosting time will be
activated.
approximately halved. When defrosting meat, fish or bread,
The extremely high and direct temperature of the grill makes
the process may be accelerated by using the “multi-cooking”
it possible to brown the surface of meats and roasts while
mode and setting a temperature between 80°C and 100°C.
locking in the juices to keep them tender. The grill is also
Static oven
highly recommended for dishes that require a high surface
Position the thermostat knob “M”: Between 50°C and Max.
temperature: such as beef steaks, veal, rib steak, fillets,
This position activates both the top and bottom heating
hamburgers etc…
elements. This is the classic traditional oven that has been
Some grilling examples are included in the “Practical cooking
modified to ensure an exceptional level of heat distribution
advice” section.
while limiting the amount of energy consumed. The static
Fan-assisted Grill
oven remains unsurpassed in the cooking of dishes with
ingredients consisting of two or more elements, which are
Position the thermostat knob “M”: Between 50°C and Max.
combined to make a single dish, for example: cabbage with
The central top heating element and the fan will be activated.
pork ribs, Spanish-style dried cod, Ancona-style stockfish,
This combination of features increases the effectiveness of
tender veal with rice, etc… This cooking mode is the best
the unidirectional thermal radiation of the heating elements
way of cooking beef or veal-based dishes, for example: braised
through forced circulation of the air throughout the oven. This
meat, stews, goulash, game meat, pork leg and loin, etc…
helps prevent food from burning on the surface, allowing the
as these must be cooked slowly, with liquid added regularly.
heat to penetrate right into the food. Excellent results are
It is also the best way of cooking deserts, fruit and dishes
obtained by using the fan-assisted grill to cook mixed meat
that require covered recipients designed for use in the oven.
and vegetable kebabs, sausages, pork ribs, lamb cutlets,
When using the oven in static mode, use only one shelf (using
spicy chicken, sage-dressed quail, pork fillet etc…
more than one shelf may adversely affect heat distribution).
Cook dishes “au gratin” in this mode with the oven door
6
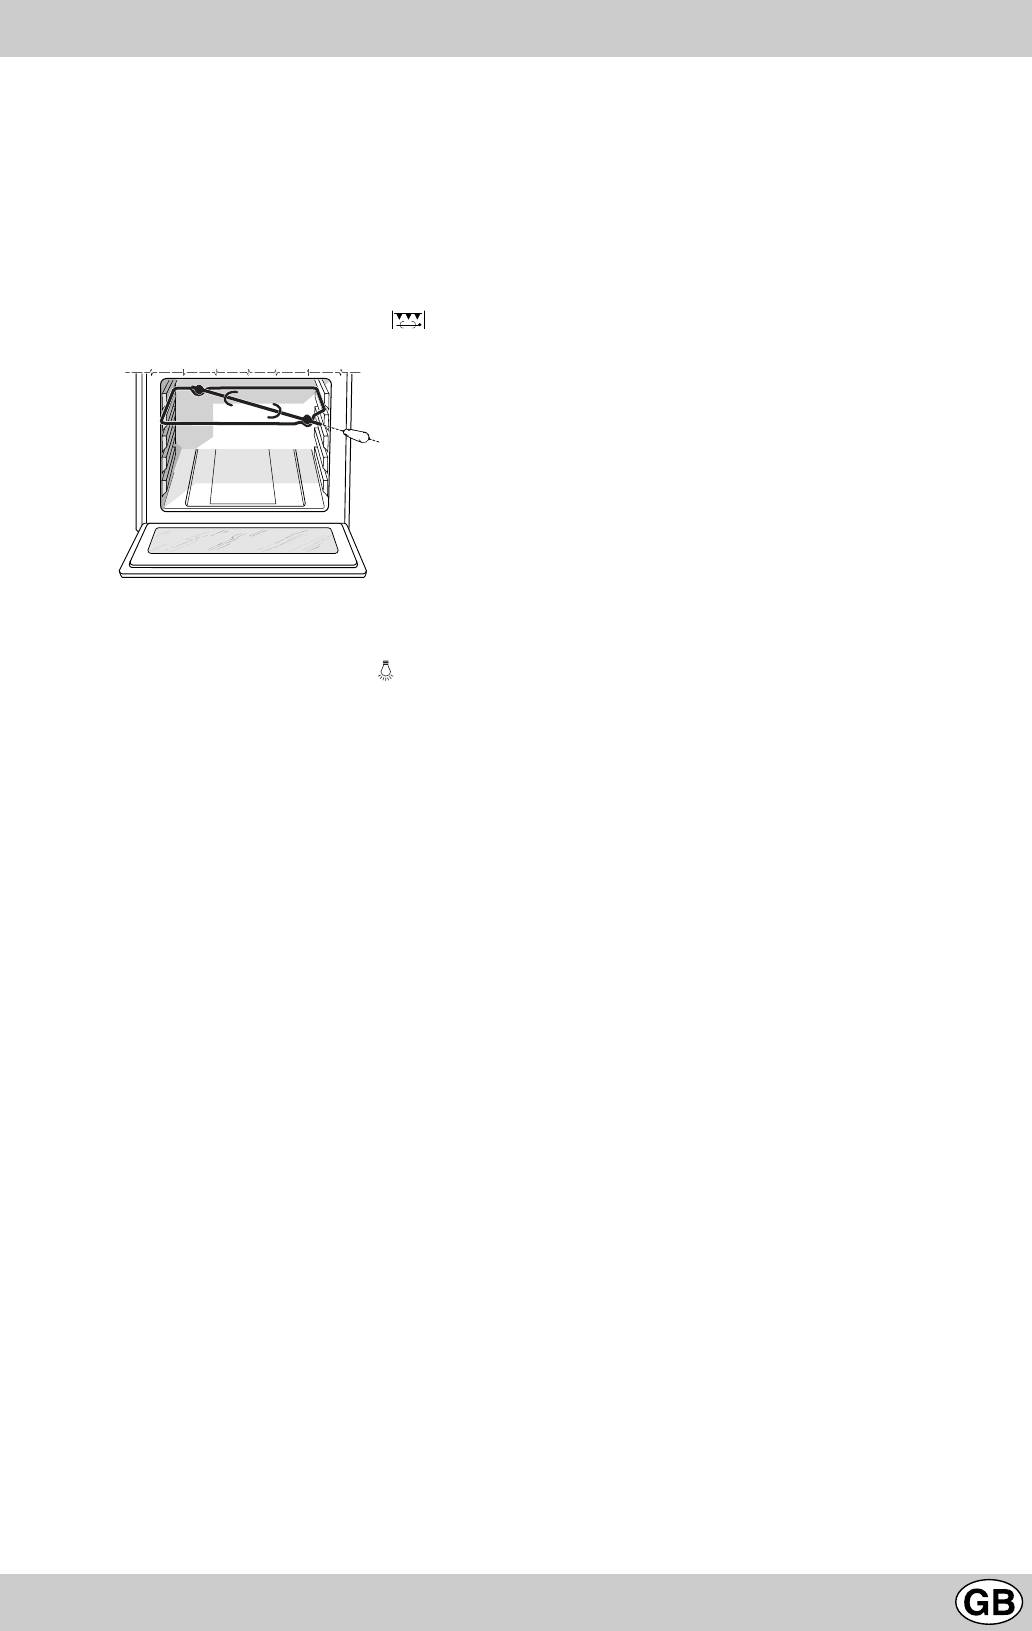
closed.
The electronic timer (Q)
“Gratin” is the best way of cooking sliced perch, tuna,
Warning
swordfish, stuffed squid, etc…
Keep children away from the oven door as it can become
extremely hot when the oven is in operation.
The turnspit
This function displays the time and works as a timer which
To activate the turnspit, follow the instructions below:
counts down to zero.
a) Place the dripping pan on the 1st rack.
Note: all functions will be implemented approximately 7
b) Position the rotisserie support on the 3rd rack and insert
seconds after they have been set.
the spit towards the rear, threading it through the hole
Resetting the clock
provided.
After the appliance has been connected to the power supply,
c) Start the rotisserie by turning knob “N” to the position.
or after a power cut, the clock display will automatically reset
to 0:00 and begin to blink.
• Press button n and then buttons s and t to set the
exact time. Press and hold the buttons to quicken the count
upwards.
Any necessary modifications can be made by repeating the
above process.
Timer feature
This function may be accessed by pressing the
v button,
after which the display will show the symbol “n”. Every time
the t button is pressed it corresponds to a time increase of
10 seconds, until it reaches 99 minutes and 50 seconds.
After this point, each press of the button represents an
increase of one minute, up to a maximum of 10 hours.
Oven light
Pressing the s button reduces the time.
This is switched on by turning knob “N” to the symbol. The
After the time period has been set, the timer will begin to
oven lights up and remains lit as long as any of the electric
count down. When the timer reaches zero, the buzzer will
heating elements of the oven are in operation.
sound (this may be stopped by pressing any button).
Thermostat indicator light (L)
The time may be displayed by pressing the
v button, and
This indicates the heating-up phase of the oven; as soon as
the “n” symbol indicates that the timer function has been
the inside of the oven reaches the set temperature the light
set. After approximately 7 seconds, the display will
switches off. At this point the indicator light will switch on
automatically revert to the timer.
and off intermittently; this shows that the thermostat is
Cancelling a time that has already been set
operating correctly in order to maintain a constant tempera-
Press the s button until the display shows 0•00.
ture inside the oven.
Adjusting the buzzer volume
After selecting and confirming the clock settings, use the s
button to adjust the volume of the alarm buzzer.
7
Practical cooking advice
The oven offers a wide range of options, enabling each food
the outer rack positions (higher and lower) receive more
to be cooked in the most suitable way. It takes time to
direct heat and more delicate foods may burn.
understand how to get the best out of this versatile appliance,
• In general, use the second and fourth rack positions (when
therefore the notes below are only intended as a set of
counting from the bottom of the oven upwards), placing
guidelines, which may then be expanded as you gain more
the food that needs more heat on the second rack position.
personal experience.
For example: if you wish to cook a roast with another
type of food, put the roast on the second rack position
Baking cakes
and the more delicate food on the fourth.
The oven must be preheated when a cake is placed inside;
• When cooking foods that require different cooking times
wait for the preheating phase to finish (approximately 10-15
and temperatures, set the temperature to a value halfway
minutes). Cooking temperatures for cakes vary between 160°C
between the two recommended values and place the more
and 200°C. Do not open the door while you are baking a cake
delicate food on the fourth rack position. Remove the
as this could cause it to collapse.
food that needs less cooking time first.
• Place the dripping pan on the lowest rack position and
Cake is too dry
the grill on the highest.
Next time you bake a cake, set the temperature 10°C
• When cooking pizzas on more than one rack with the
higher and reduce the cooking time.
temperature set to 220°C, remember to preheat the oven
for at least 15 minutes. Generally, cooking on the fourth
rack takes longer; for this reason it is advisable to remove
Cake collapses
the pizza on the lower shelf first, leaving the other pizza
Use less liquid or lower the temperature by 10°C.
inside for a few minutes.
Using the grill
Cake is burnt on to
The oven offers two different grilling methods: Use the
Place it on a lower rack, set a lower temperature and
“top oven” function for small items. The energy consumption
extend the cooking time.
for this mode is only 1200 W. It is therefore ideal for grilling
smaller dishes: for example toast, hot dogs, etc.
Cooked well on the outside, but sticky in the
Position the food in the centre of the grill, as only the
centre
central part of the top heating element will be switched
on in this mode. Food placed at the corners of the grill
Use less liquid, reduce the temperature and increase
will not be cooked.
the cooking time.
The “grill” position enables the whole surface of the
grill to be used. Use this mode when there is a uniform
Cake sticks to the mould
distribution of food and you wish to brown the top of the food
Grease the mould well and dust with a little flour, or
evenly.
use baking paper.
Important: To obtain the best results and to save energy
(approximately 10%), always keep the oven door closed when
Having used several rack positions (in the “fan-
using the grill function.
assisted” mode), not all the cakes are cooking at
When using the grill function, we recommend that you set
the same rate
the thermostat to its maximum value. However, this does not
mean that you cannot use lower temperatures.
Set a lower temperature.
When using the grill function, position the grill on the highest
Racks inserted at the same time should not
shelf (see cooking advice table) and place the dripping pan
necessarily be taken out at the same time.
underneath it to collect any drips of fat.
Cooking fish and meat
The “Fan-assisted grill” position is extremely useful
Use low temperatures when cooking white meat, game and
for grilling foods quickly as it distributes the heat emitted by
fish. (150°C-175°C). If you wish red meat to be cooked well
the grill, allowing the surface of the food to brown while the
on the outside but juicy on the inside, start with a high tem-
inside is actually being cooked. It enables large pieces of
perature (200-220°C) for a short time and then reduce it. As a
meat or poultry to be grilled without using the turnspit. It can
general rule, the more meat there is, the lower the tempera-
also be used in the final part of the cooking process for dishes
ture and the longer the cooking time should be. Place the
that require a little browning on the surface, for example it is
meat in the centre of the rack and position a container
an ideal way of browning the top of a baked pasta dish after
underneath to collect drops of fat. Place the rack in the centre
it has been cooked.
of the oven. If the cooking method requires more heat coming
When cooking in this mode place the grill on the 2nd or 3rd
from below the meat, use the lowest shelf.
rack position from the bottom of the oven (see cooking advice
table), then position a dripping pan on the lowest shelf to
Cooking on several shelves simultaneously
collect drips of fat and avoid the formation of smoke. By
Whenever it is necessary to use two racks, only use the
using this mode in conjunction with the spit (selected models
“fan-assisted oven” function, which is really the only option
only) it is possible to cook dishes in the dripping pan on the
available when cooking in this manner.
lowest shelf, for example: potatoes, etc…
• The oven has 5 different rack positions. Only use the two
central positions when cooking in the fan-assisted mode:
8
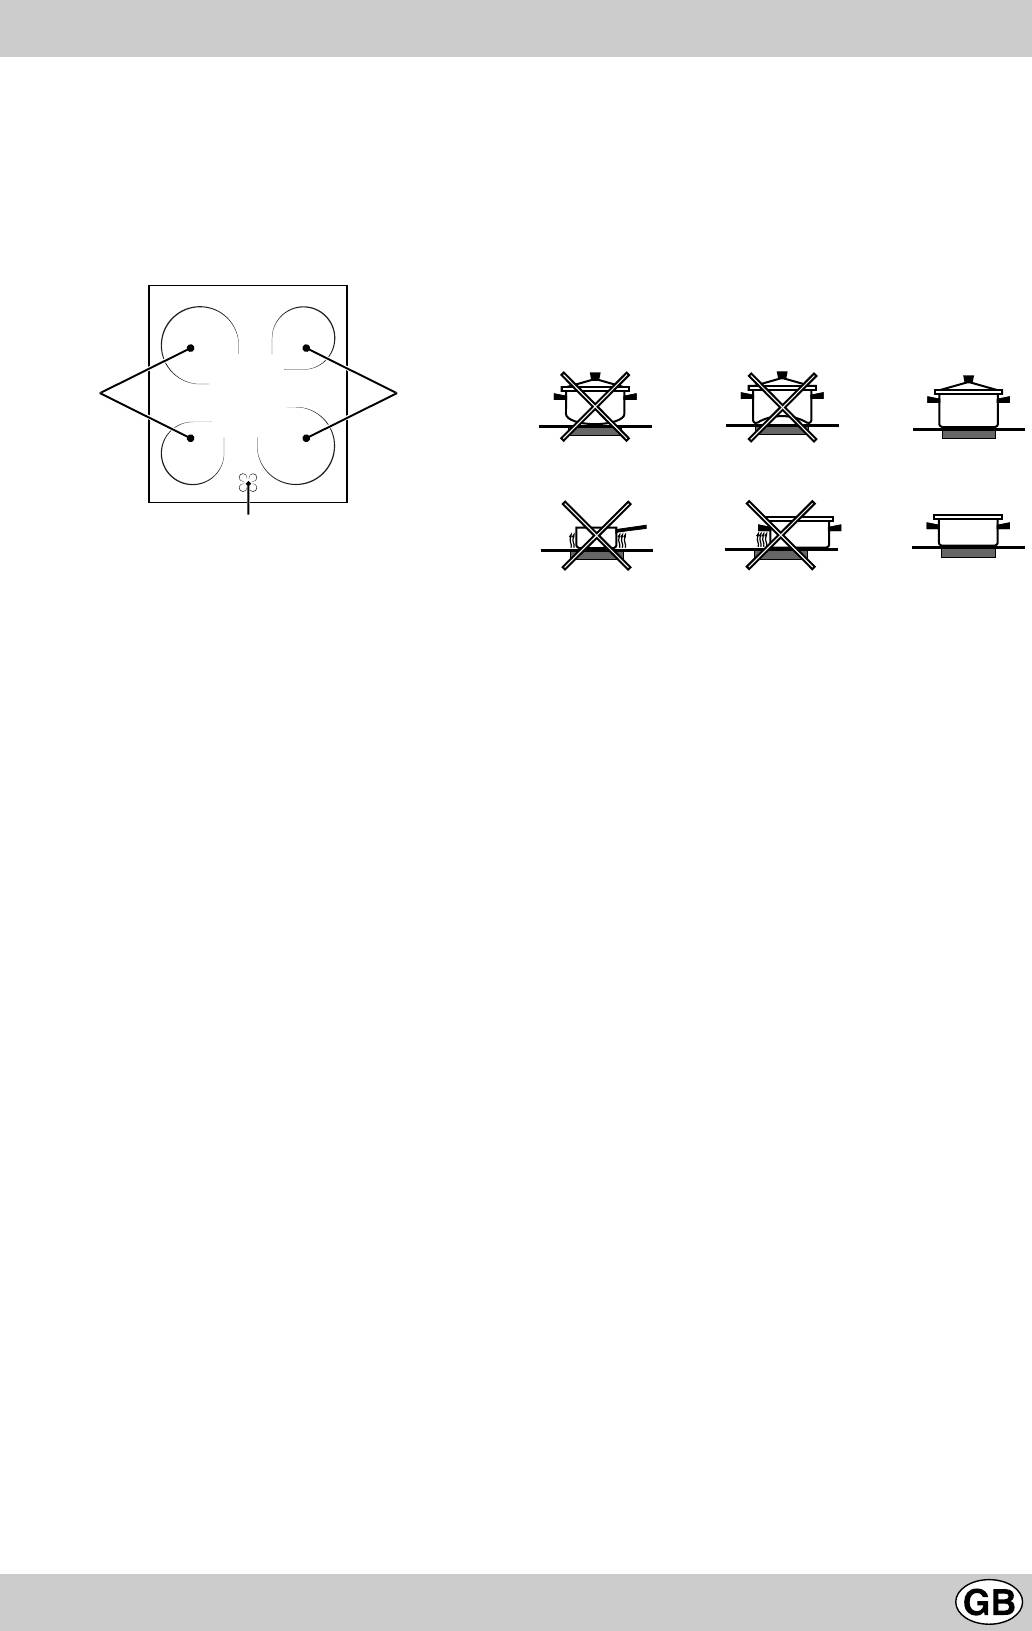
Instructions for using glass ceramic hobs
Description
Description of the heating elements
The hob is fitted with electric heating elements located just
The radiant heating elements are circular and become red
under the surface of the hob (in the areas that become red
10 — 20 seconds after they have been switched on.
when the elements are switched on).
Instructions for using glass ceramic hobs
A. Cooking zone (A).
To obtain the best possible results from your hob, follow a
B. Lights indicating that the temperature of the corresponding
few simple rules when preparing or cooking food.
elements have exceeded 60°; these remain lit even if the
• All types of saucepan or frying pan can be used on glass
hob has been switched off.
ceramic hobs. However, the base of the pan must be
perfectly flat. Of course, the thicker the base of the
saucepan or frying pan, the more evenly heat will be
distributed.
AA
• Make sure that the base of the pan completely covers
the ring: this enables all the emitted heat to be used.
B
• Always make sure that the base of the pan is clean and
dry: this not only guarantees optimal contact between the
base of the pan and the hob, but also means they will
suffer less wear and tear and ultimately last longer.
• Do not use pans that have been used on gas burners, as
the heat from this type of burner can distort the base of
the pan, which, if then used on a glass ceramic hob, will
be less effective than a pan with a completely flat base.
9
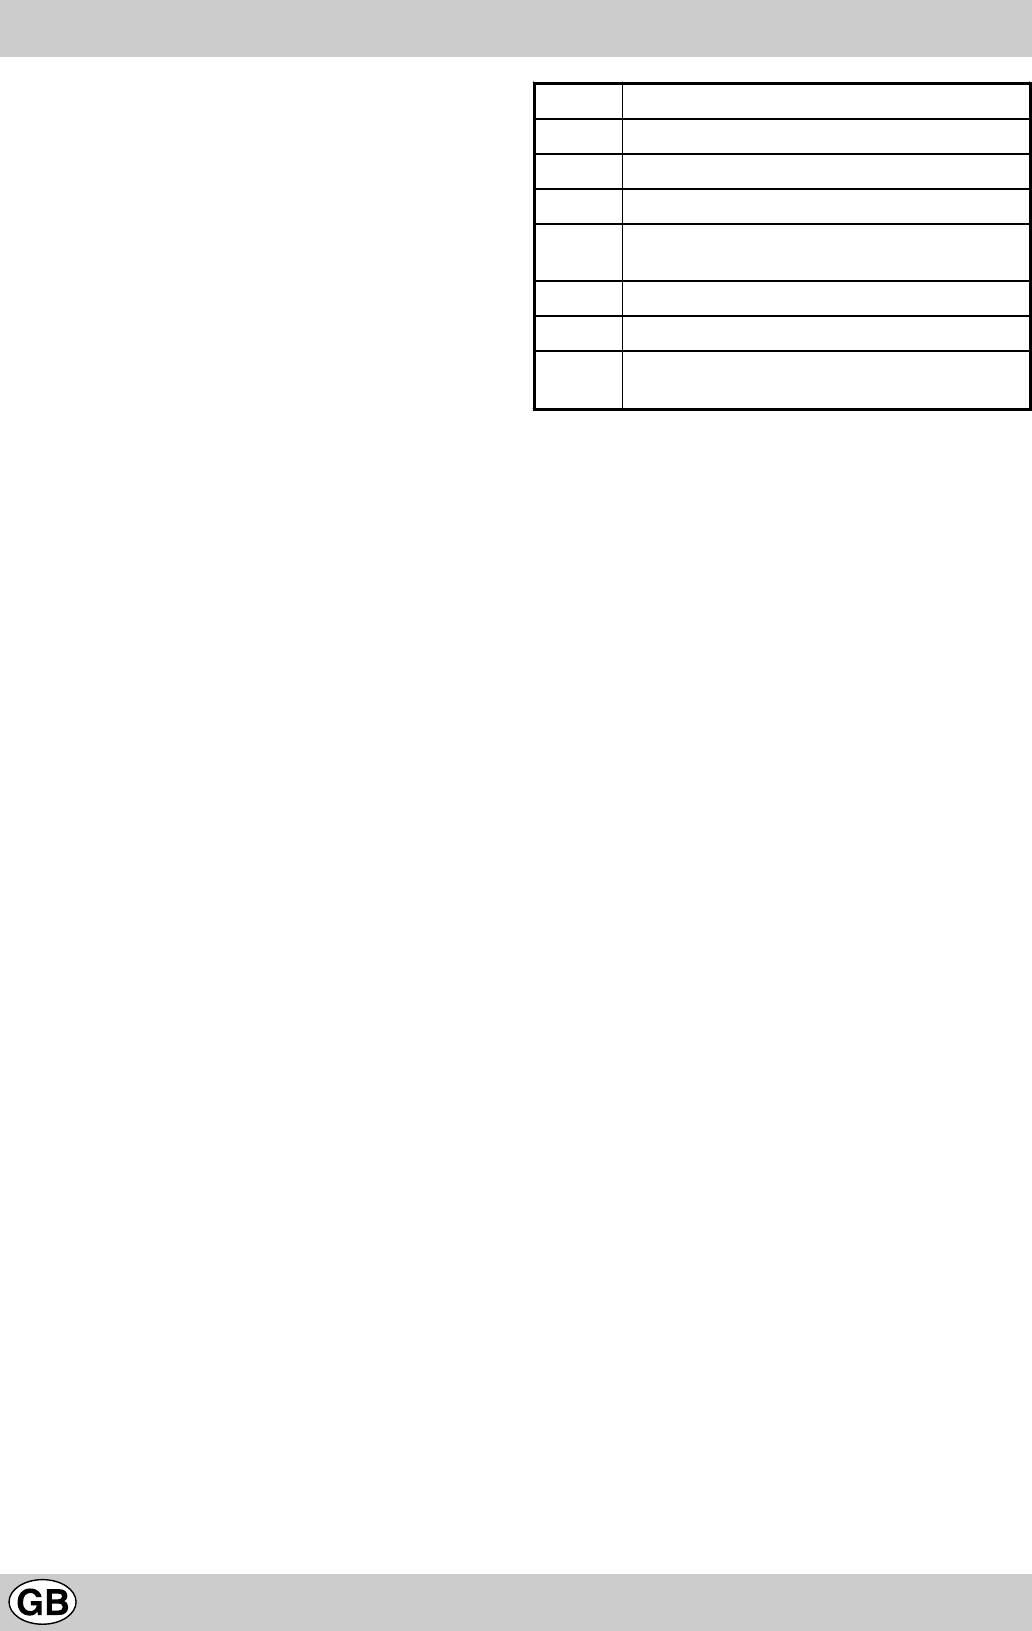
Practical advice on using the cooking zones
Control knobs for the cooking zones on the hob (I)
Pos. Normal or rapid cooking zone
Cookers may be fitted with a series of rapid and automatic
cooking zones in various combinations (rapid cooking zones
0
Off
may be distinguished from the others by a red spot in the
1
Cooking fish and vegetables
centre while the automatic zones have an aluminium disc in
the centre).
2
Cooking potatoes (steaming), soups, pulses
To avoid heat loss and damage to the cooking zones, use
3
Continuing to cook large quantities of food,
cookware with a flat base, whose diameter is no smaller than
chunky soups
that of the cooking zone itself.
The table shows the relationship between the position of the
4
Roasting (medium)
knobs and the type of cooking recommended for cooking
5
Roasting (well done)
zones.
6
Browning or reaching boiling point in a short
period of time
Cooking zone indicator light
This light illuminates when a cooking zone has been
activated.
10
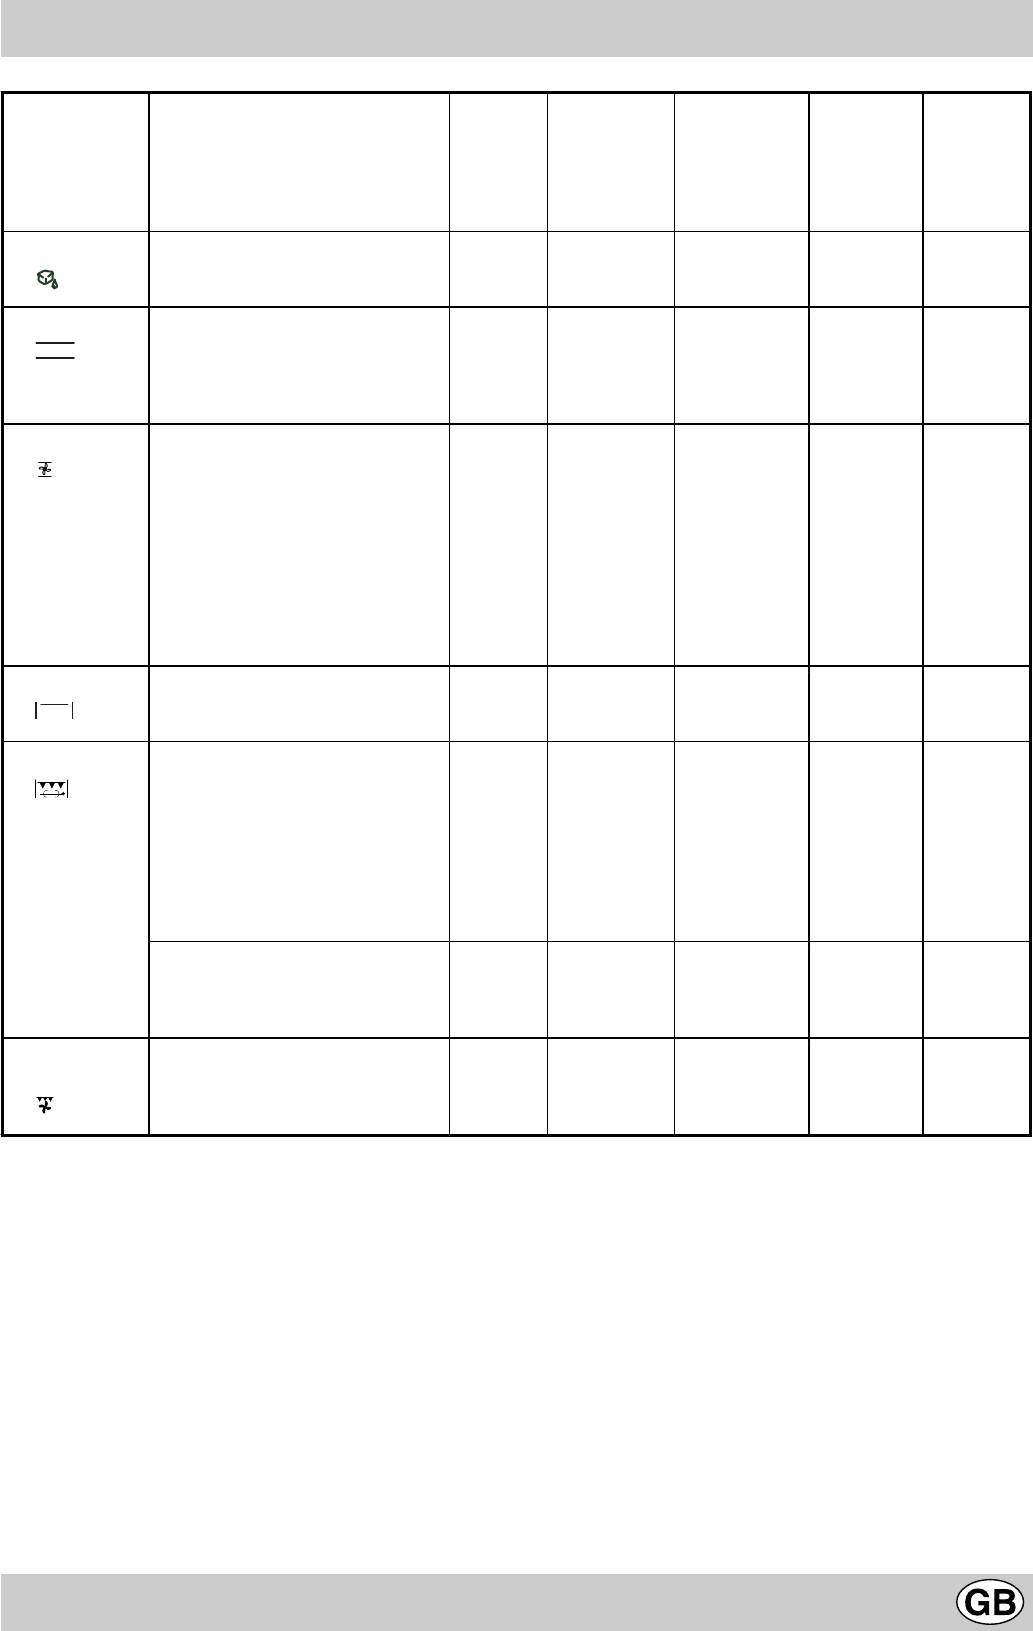
Practical cooking advice
Selector knob
Food to be cooked
Weight
Rack
Preheating
Thermostat
Cooking
position
(in kg)
position to
time
knob
time
be used
(minutes)
position
(minutes)
(counting up
from the
bottom)
Defrosting
All frozen foods
Static
Duck
1
3
15
200
65-75
Roast veal or beef
1
3
15
200
70-75
Roast pork
1
3
15
200
70-80
Biscuits (shortcrust pastry)
—
3
15
180
15-20
Tarts
1
3
15
180
30-35
Fan-assisted
Pizza (on 2 racks)
1
2-4
15
220
15-20
Lasagne
1
3
10
200
30-35
Lamb
1
2
10
180
50-60
Roast chicken + potatoes
1
2-4
10
180
60-75
Mackerel
1
2
10
180
30-35
Sponge cake made with yoghurt
1
2
10
170
40-50
Cream puffs (on 2 racks)
0.5
2-4
10
190
20-25
Biscuits (on 2 racks)
0.5
2-4
10
180
10-15
Sponge cake (on 1 rack)
0.5
2
10
170
15-20
Sponge cake (on 2 racks)
1.0
2-4
10
170
20-25
Savoury pies
1.5
3
15
200
25-30
Top oven
Browning food as a finishing touch — 3/4 15 220 —
Grill
Sole and cuttlefish
1
4
5
Max
8-10
Squid and prawn kebabs
1
4
5
Max
6-8
Cod fillet
1
4
5
Max
10
Grilled vegetables
1
3/4
5
Max
10-15
Veal steak
1
4
5
Max
15-20
Cutlets
1
4
5
Max
15-20
Hamburgers
1
4
5
Max
7-10
Mackerel
1
4
5
Max
15-20
Toast
n.° 4
4
5
Max
2-3
With the turnspit
Spit-roast veal
1.0
—
5
Max
80-90
Spit-roast chicken
1.5
—
5
Max
70-80
Spit-roast lamb
1.0
—
5
Max
70-80
Fan-assisted
Grilled chicken
1.5
3
5
200
55-60
grill
Cuttlefish
1.5
3
5
200
30-35
N.B.:
The cooking times listed above are intended as guidelines only and may be modified according to personal tastes. When
cookin
11
g
with the
g
rill or the fan-assisted
g
rill
,
the drippin
g
pan should be placed on the lowest shelf.
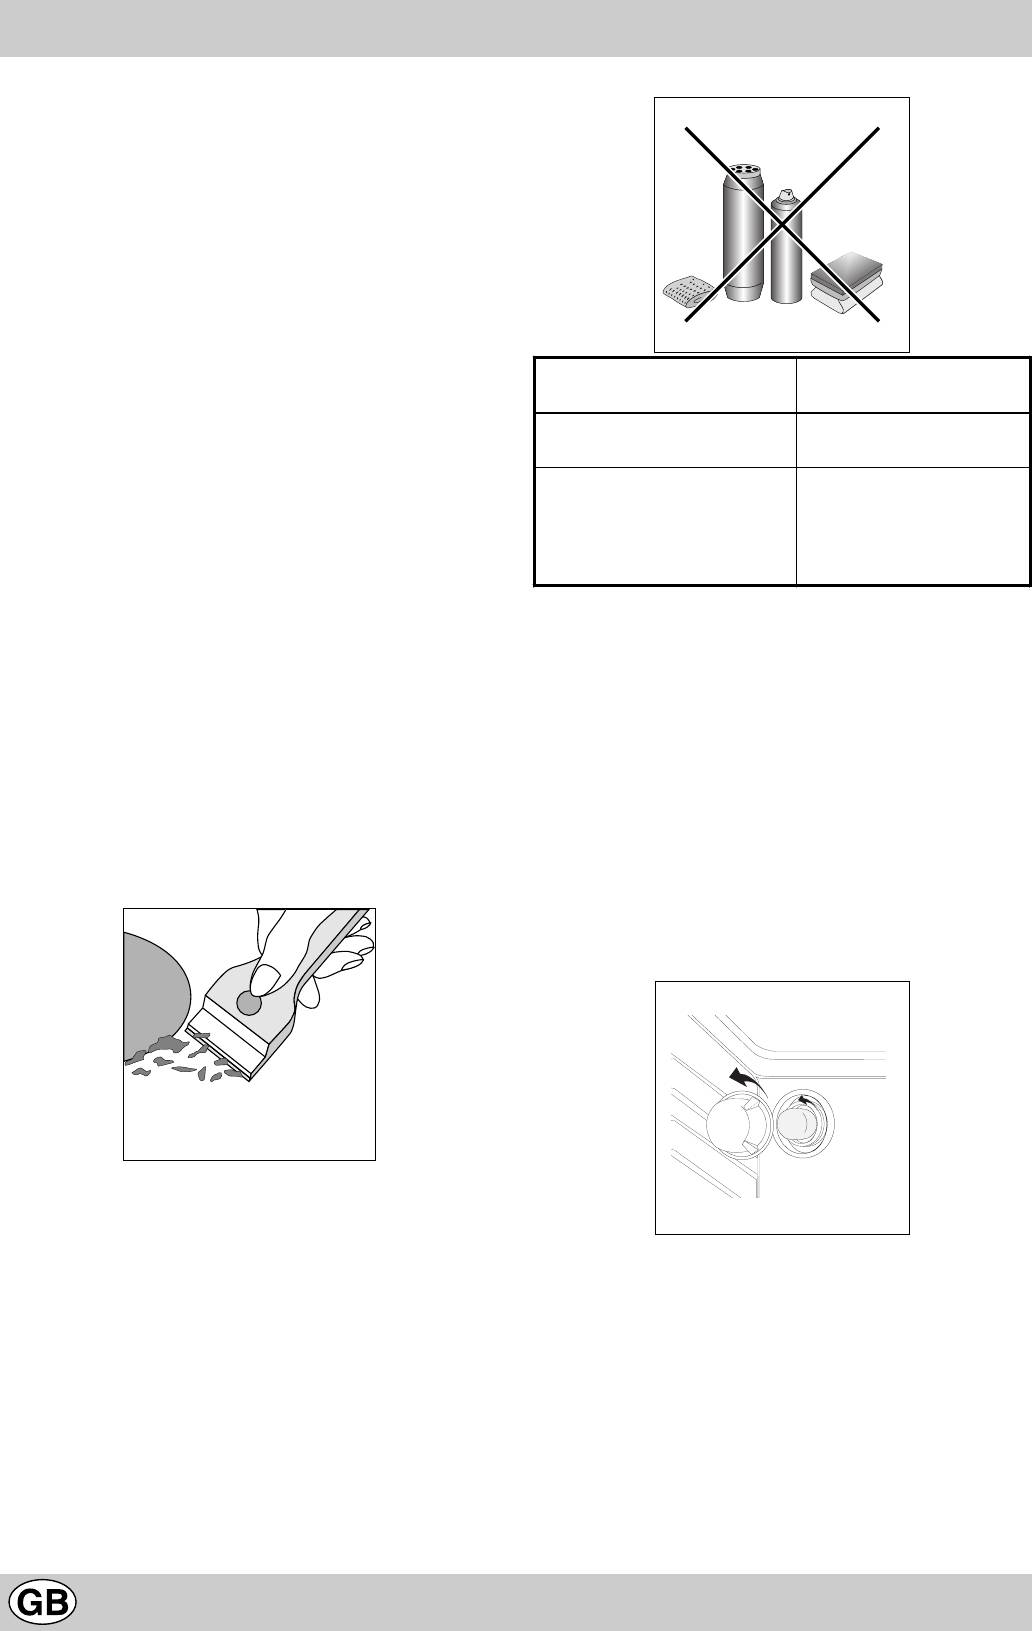
Routine maintenance and cleaning
Disconnect the oven from the electricity supply before
cleaning it or carrying out any maintenance work. Clean
the oven thoroughly and regularly in order to increase its
durability, following the instructions below:
• Do not use steam cleaners on the appliance.
• The enamel-coated parts and self-cleaning panels should
be washed in hot water. Do not use abrasive powder
detergents or corrosive substances as these could damage
the finish.
• The inside of the oven should be cleaned at regular inter-
vals while it is still warm, using hot water and detergent
then rinsing and drying it thoroughly.
Special glass ceramic
Where to buy them
• Stainless steel can be marked by hard water that has
cleaning products
been left on the surface for a long time, or by aggressive
Razor blade scraper and
Art & Craft shops and
detergents containing phosphorus. After cleaning, rinse
replacement blades
Hardware stores
well and dry thoroughly. Any water spills should also be
dried.
Stahl-Fix
Home shops
• Prevent a build-up of dirt and grease on the control
SWISSCLEANER
DIY stores
panel by cleaning it frequently. Use a non-abrasive
WK TOP
Hardware stores
Other special glass ceramic
Supermarkets
sponge or a soft cloth to avoid scratching the shiny steel
products
or enamel-coated parts.
Cleaning the surface of the hob
The surface of the hob should be cleaned with a damp cloth
Changing the oven light bulb
before cooking to remove dust or food residues. The surface
• Remove the plug from the mains socket (if accessible) or
of the hob should be cleaned regularly with a solution of warm
disconnect the appliance from the electricity supply by
water and light detergent. It may occasionally be necessary
shutting off the multipolar switch connecting the two.
to use a special glass ceramic cleaning product. First
• Remove the glass lid covering the lamp socket.
remove all food and grease spills using a window scraper,
• Unscrew the bulb and replace it with a new one that can
preferably a razor blade-type scraper
B (not
withstand high temperatures (up to 300°C) and that has
the following characteristics:
supplied) or, failing that, a fixed razor blade type scraper.
— Voltage: 230/240 V
Then clean the hob with a paper towel and a suitable detergent
— Power 25 W
while it is still hot to touch. Lastly, rinse the hob thoroughly
— E14 attachment
and dry it with a clean cloth. If a piece of plastic or aluminium
• Replace the glass cover and reconnect the oven to the
power supply.
foil accidentally melts on the surface of the hob, remove it
from the hot cooking zone immediately using a scraper in
order to avoid damaging the surface. If any sugar (or sugary
food) is spilt on the hob, follow the above instructions. Do not
use steel wool or any type of abrasive sponge. Do not use
corrosive cleaning products such as oven cleaning sprays or
stain removers.
12

Hinweise
Um die Leistungsfähigkeit und Sicherheit Ihres Gerätes zu gewährleisten, bitten wir, Folgendes zu beachten:
• Wenden Sie sich ausschließlich an unsere anerkannten Kundendienst-Zentren
• Verlangen Sie, dass nur Original-Ersatzteile verwendet werden.
1 Dieses Gerät ist für den nicht professionellen Einsatz im
12 Lassen Sie das Gerät nicht unnötigerweise eingeschaltet.
privaten Haushalt bestimmt.
Schalten Sie den Hauptschalter aus, wenn das Gerät nicht
2 Nachfolgende Anleitungen gelten nur für die
gebraucht wird.
Bestimmungsländer, deren Symbole im Handbuch und
13 Öffnungen und Schlitze für Belüftung und Wärmeableitung
auf dem Typenschild des Gerätes abgebildet sind.
dürfen nicht verstopft werden.
3 Dieses Gerät bezieht sich auf ein Gerät der Klasse 1
14 Das Netzkabel dieses Gerätes darf vom Benutzer nicht
(isoliert), oder der Klasse 2 — Unterklasse 1 (Einbau
ausgewechselt werden. Sollte das Kabel beschädigt sein,
zwischen 2 Unterschränken)
oder sollte es ausgewechselt werden müssen, dann
4 Lesen Sie bitte vor Gebrauch des Gerätes die in diesem
wenden Sie sich ausschließlich an eine vom Hersteller
Handbuch enthaltenen Hinweise aufmerksam durch. Sie
anerkannte Kundendienststelle.
enthalten wichtige Angaben hinsichtlich der Sicherheit bei
15 Dieses Gerät darf nur für den Zweck, für den es
der Installation, dem Gebrauch und der Wartung. Bewahren
geschaffen wurde, eingesetzt werden. Jeder andere
Sie dieses Handbuch sorgfältig auf, damit Sie es jederzeit
Gebrauch (z.B. zum Beheizen von Räumen) ist als
zu Rate ziehen können.
unsachgemäß und gefährlich anzusehen. Der Hersteller
5 Überprüfen Sie das Gerät nach dem Auspacken auf
kann für eventuelle, durch unsachgemäßen, falschen oder
eventuelle Beschädigungen. Im Zweifelsfall raten wir
unangemessenen Gebrauch verursachte Schäden nicht
Ihnen, das Gerät nicht zu benutzen und sich an
verantwortlich gemacht werden.
Fachpersonal zu wenden. Bewahren Sie das
16 Die Verwendung eines jeden Elektrogerätes setzt die
Verpackungsmaterial wie Plastikbeutel, Schaumstoffe,
Einhaltung einiger wichtiger Grundregeln voraus,
Nägel usw. nicht in Reichweite von Kindern auf, es könnte
insbesondere folgender:
eine mögliche Gefahrenquelle darstellen.
• Berühren Sie das Gerät nicht mit nassen oder feuchten
6 Die Installation ist von Fachpersonal und gemäß den
Händen oder Füßen;
Anweisungen des Herstellers durchzuführen. Eine
• Benutzen Sie das Gerät nicht barfuß;
unsachgemäße Installation kann zu Schäden an
• Verwenden Sie keine Verlängerungen, es sei denn mit
Personen, Tieren oder Gegenständen führen, für die der
besonderer Vorsicht;
Hersteller jegliche Haftung zurückweist.
• Ziehen Sie den Netzstecker nicht am Versorgungskabel
7 Die elektrische Sicherheit dieses Gerätes ist nur dann
oder gar an dem Gerät selbst aus der Steckdose.
gewährleistet, wenn es sachgemäß und gemäß den
• Setzen Sie das Gerät nicht der Witterung aus (Regen,
geltenden Sicherheitsvorschriften an eine leistungsfähige
Sonne usw.).
Erdungsanlage angeschlossen wird. Die Gegebenheit
• Lassen Sie das Gerät nicht von unbeaufsichtigten Kindern
dieser grundlegenden Sicherheitsanforderung muss
oder unbefugten Personen benutzen.
überprüft werden, im Zweifelsfalle ist eine Kontrolle durch
17 Vor jeder Reinigungs- und Wartungsmaßnahme muss das
Fachpersonal anzufordern. Der Hersteller kann für
Gerät entweder durch Herausziehen des Netzsteckers
eventuelle, durch Fehlen einer Erdungsanlage verursachte
oder durch Ausschalten des Hauptschalters der
Schäden nicht verantwortlich gemacht werden.
Hausanlage stromlos gemacht werden.
8 Vor Anschluss des Gerätes kontrollieren Sie bitte, dass
18 Soll das Gerät nicht mehr verwendet werden empfehlen
die auf dem Typenschild (befindlich auf dem Gerät und/
wir, dieses durch Durchschneiden des Netzkabels, nach
oder auf der Verpackung) angegebenen Daten mit denen
Herausziehen des Netzsteckers aus der Steckdose,
des Stromversorgungsnetzes übereinstimmen.
unbrauchbar zu machen. Ferner raten wir, jene Geräteteile
9 Vergewissern Sie sich, dass die elektrische Leistung der
zu vernichten, die vor allem für Kinder, die das
Anlage und der Steckdosen der maximalen, auf dem
unbrauchbare Gerät zum Spielen benutzen könnten, eine
Typenschild angegebenen Leistungsaufnahme des
Gefahr darstellen.
Gerätes entspricht. Im Zweifelsfalle ziehen Sie bitte einen
19 Stellen Sie keine unstabilen oder verformten Töpfe auf
Fachmann zu Rate.
die Kochzonen, um Unfälle durch Umkippen der Töpfe zu
10 Bei der Installation muss ein allpoliger Schalter mit einer
vermeiden. Stellen Sie Stieltöpfe so auf das Kochfeld,
Kontaktweite von 3 mm oder höher vorgeschaltet werden.
dass ein unbeabsichtigtes Anstoßen vermieden wird.
11 Falls Netzsteckdose und Netzstecker des Gerätes nicht
20 Benutzen Sie keine brennbaren Flüssigkeiten (Alkohol,
übereinstimmen sollten, ist die Netzsteckdose von einem
Benzin …) in der Nähe des eingeschalteten Gerätes.
Fachmann durch eine andere geeigneten Typs zu
21 Achten Sie bitte darauf, dass bei Benutzen von kleinen
ersetzen. Dieser muss bei der Gelegenheit auch
Elektrohausgeräten in Kochstellennähe das Netzkabel
überprüfen, dass der Steckdosen-Kabelquerschnitt der
nicht mit heißen Herdteilen in Berührung kommt.
Leistungsaufnahme des Gerätes entspricht. Allgemein ist
22 Vergewissern Sie sich stets, dass sich die Reglerknöpfe
die Verwendung von Adaptern, Vielfachsteckdosen und/
auf Position “l”/“¡” befinden, wenn sich das Gerät nicht
oder Verlängerungen nicht ratsam. Falls deren Gebrauch
in Gebrauch befindet.
jedoch unvermeidlich sein sollte, dürfen nur Einfach- oder
23 Bei in Betrieb befindlichem Gerät werden die
Vielfachadapter und Verlängerungen verwendet werden,
Heizelemente und einige Ofentürteile sehr heiß.
die den geltenden Sicherheitsvorschriften entsprechen;
Berühren Sie sie nicht und halten Sie Kinder vom
achten Sie darauf, dass die auf dem Einfachadapter und
Ofen fern.
den Verlängerungen angegebene Stromleistungsgrenze
24 Wird der Herd auf einem Sockel aufgestellt, dann achten
und die auf dem Vielfachadapter angegebene
Sie bitte darauf, dass das Gerät auch nicht
Höchstleistungsgrenze nicht überschritten wird.
herunterrutschen kann.
13
DE
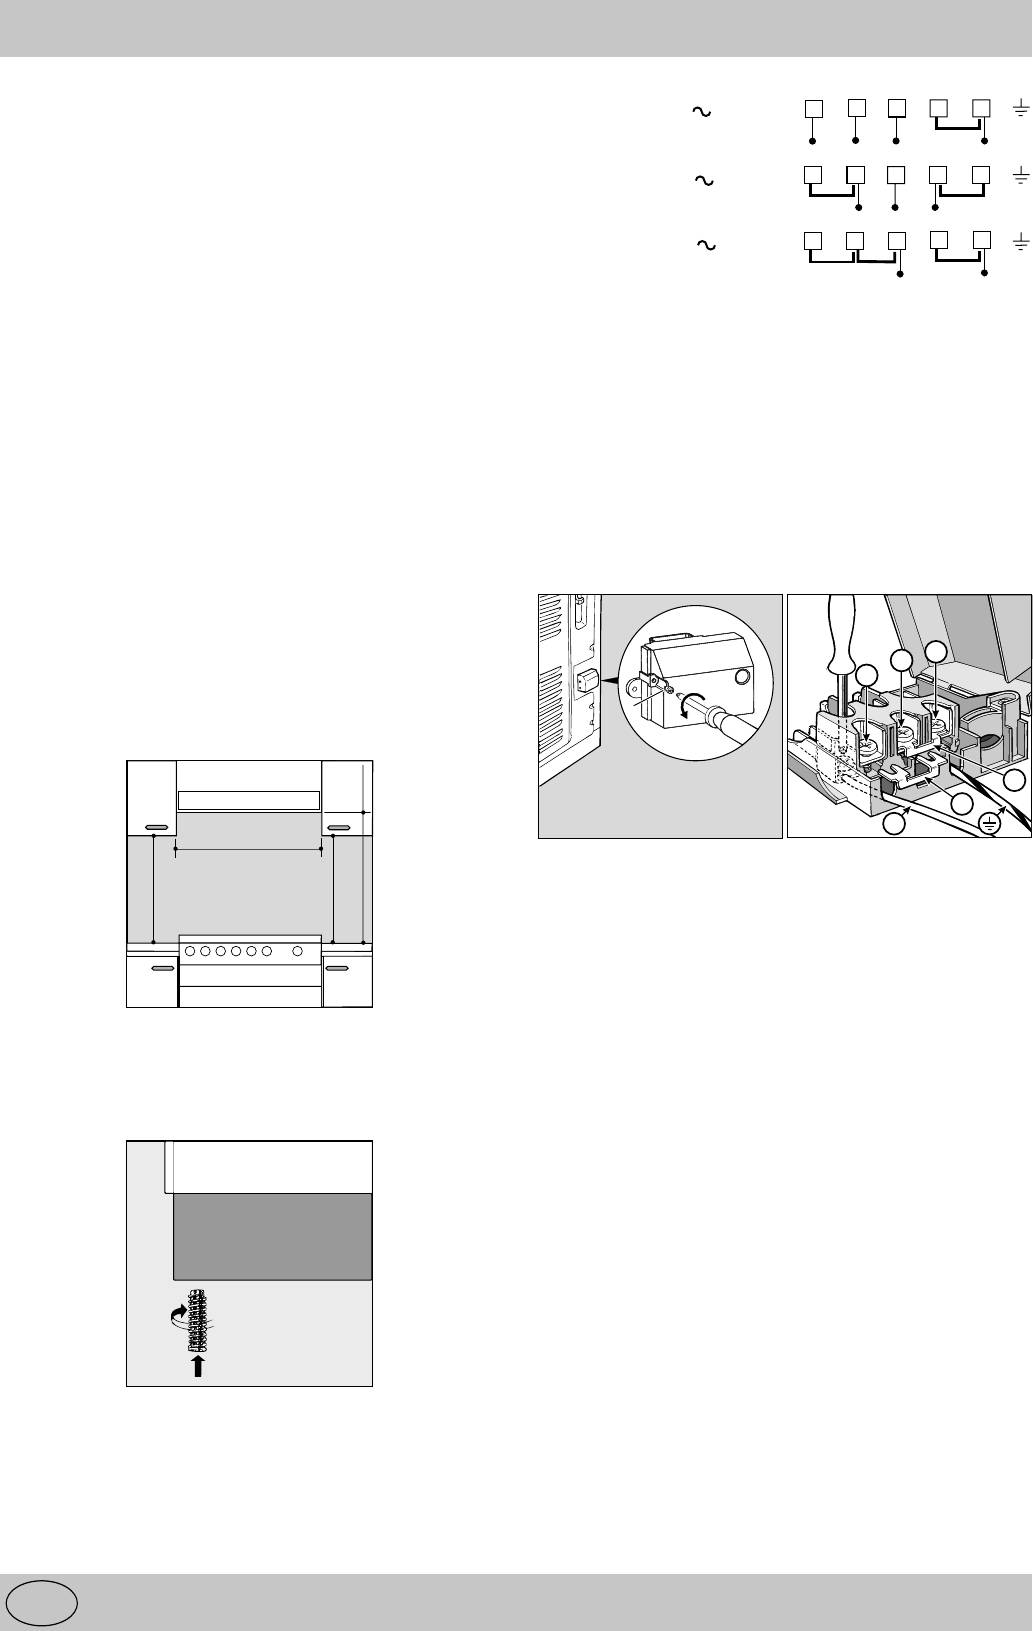
V
HOOD
Min. mm.
600
mm.
420
420
mm. with hood
mm. without hood
650
700
Min.
Min. mm.
min.
min.
14
DE
Installation
Die nachstehend aufgeführten Anweisungen sind an den
400 3N
1 2
3
4
5
Fachinstallateur gerichtet und gelten als Leitlinien zur
H05RR-F 5×2.5 CEI-UNEL 35363
korrekten technischen Installation, Einstellung und Wartung
R
S
T
N
gemäß den geltenden Richtlinien.
400V 2N
12345
Wichtig: Vor jeder Einstellung, Wartung usw. muss das Gerät
H05RR-F 4×2.5 CEI-UNEL 35363
R
N
vom Stromnetz getrennt werden.
S
Aufstellung
230V 1N
1
2
3
4
5
Das Gerät kann neben Unterschränke installiert werden, deren
H07RN-F 3×4 CEI-UNEL 35364
R
N
Höhe die des Kochfeldes nicht überragt. Um eine korrekte
Installation des Herdes zu gewährleisten, sind folgende
Elektroanschluss
Vorsichtsmaßregeln zu beachten:
Das Netzkabel ist je nach der Art des Elektroanschlusses
a) Die angrenzenden Schränke, deren Höhe die des
zu bemessen (siehe nachfolgendes Anschlussschema).
Kochfeldes überschreiten, müssen einen Abstand von
Installation des Netzkabels
mindestens 200 mm vom Rand des Kochfeldes
Öffnen des Klemmengehäuses:
aufweisen.
• Die Schraube “V” ausschrauben.
b) Dunstabzugshauben sind gemäß den in den
• Deckel des Klemmengehäuses öffnen (Deckel des
Gebrauchsanleitungen der Dunstabzugshaube
Unterteils abziehen)
aufgeführten Anweisungen zu installieren und zwar in
Zur Installation des Netzkabels verfahren Sie nun wie folgt:
einem Abstand von mindestens 650 mm.
• Die Anschlüsse A-B je nach Art des gewünschten
c) Die an die Dunstabzugshaube angrenzenden
Anschlusses gemäß dem Schaltbild der Abbildung 3
Hängeschränke müssen in einem Abstand von
herstellen.
mindestens 420 mm vom Kochfeld aufgehängt werden
(siehe Abbildung).
Sollte der Herd unter einem Hängeschrank installiert
werden, muss bei Anbringen letzteren ein Abstand von
mindestens 700 mm (Millimeter) vom Kochfeld eingehalten
werden, wie auf der Abbildung veranschaulicht.
e) Der Ausschnitt muss die in der Abbildung angegebenen
Abmessungen aufweisen.
Anmerkung: Diese Anschlüsse sind werkseitig für einen 230
V Einphasen-Anschluss vorgesehen ( die Kontakte 1-2-3 sind
untereinander verbunden). Die Brücke 4-5 befindet sich im
unteren Teil des Klemmengehäuses.
• Die Drähte (N und $) wie auf der Abbildung
veranschaulicht anschließen und mittels der
entsprechenden Schrauben befestigen.
Nivellieren
• Die restlichen Drähte an den Klemmen 1-2-3 befestigen.
Um den Herd eben ausrichten zu können, werden
• Das Netzkabel in der entsprechenden Kabelklemme
höhenverstellbare Stellfüße mitgeliefert (siehe Abb. 1), die in
befestigen, den Deckel wieder schließen und mittels der
die entsprechenden Sitze (in den unteren Geräteecken)
Schraube “V” befestigen.
eingeschraubt werden können.
Anschluss des Netzkabels an das Stromnetz
Versehen Sie das Netzkabel mit einem Normstecker für die
auf dem Typenschild angegebene Belastung. Wird das Gerät
direkt an das Stromnetz angeschlossen, ist ein allpoliger
Schalter mit einer Kontaktweite von mindestens 3 mm
vorzuschalten. Dieser Schalter muss der Strombelastung und
den geltenden Richtlinien entsprechen (der Erdleiter darf nicht
durch den Schalter unterbrochen werden). Das Netzkabel
muss so verlaufen, dass es an keiner Stelle eine Temperatur
erreicht, die 50°C über der Raumtemperatur liegt. Vor dem
Anschluss stellen Sie bitte sicher, dass:
• der Leitungsschutzschalter (Sicherungen etc.) und die
Hausanlage die Belastung durch das Gerät tragen können
(siehe Typenschild);
• die Versorgungsanlage mit einer den gesetzlichen
Bestimmungen und Vorschriften entsprechenden Erdung
versehen ist;
• die Steckdose oder der allpolige Schalter bei installiertem
Herd leicht zugänglich ist.
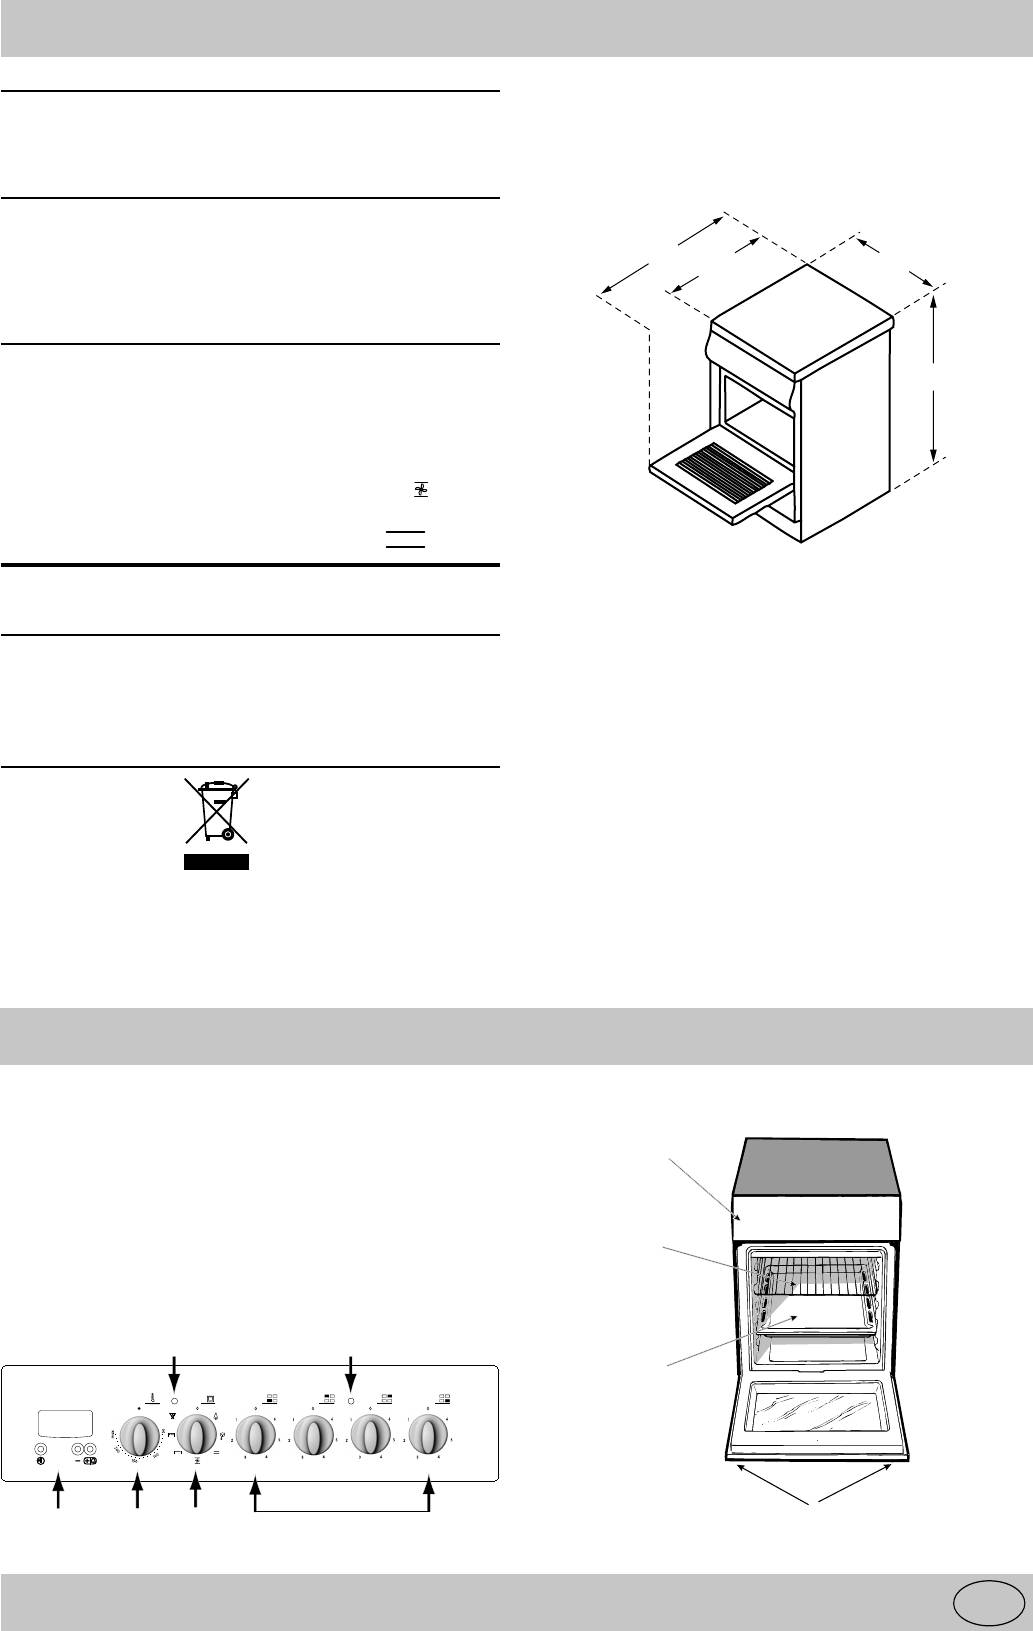
15
DE
Technische Eigenschaften
— 89/336/EWG vom 03.05.1989 (elektromagnetische
Backofen
Verträglichkeit) und nachfolgenden Änderungen;
Abmessungen (BxTxH) 39x41x34 cm
— 93/68/EWG vom 22.07.1993 und nachfolgenden
Nutzvolumen 54 Liter
Änderungen;
Bedarfsspitze des Backofens 2100 W
Glaskeramik-Kochfeld
Vorne links 1200 W
Hinten links 1700 W
Hinten rechts 1200 W
Vorne rechts 1700 W
Bedarfsspitze des Glaskeramik-Kochfeldes 5800 W
ENERGIE-ETIKETT
Richtlinie 2002/40/EG über die Etikettierung von
Elektrobacköfen
Norm EN 50304
Energieverbrauch Erzwungene Konvektion
Heizfunktion: Heißluft
Deklarierte Energieverbrauchsklasse Natürliche Konvektion
Heizfunktion: Statisch
Entsorgung von Elektroaltgeräten
Spannung und Frequenz
Gemäß der Europäischen Richtlinie 2002/96/EC über
siehe Typenschild
Elektro- und Elektronik-Altgeräte (WEEE) dürfen
Nutzabmessungen des Geschirrwagens:
Elektrohaushalts-Altgeräte nicht über den herkömmlichen
Haushaltsmüllkreislauf entsorgt werden. Altgeräte müssen
Breite: 42 cm
separat gesammelt werden, um die Wiederverwertung und
Tiefe: 44 cm
das Recycling der beinhalteten Materialien zu optimieren
Höhe: 23 cm
und die Einflüsse auf die Umwelt und die Gesundheit zu
reduzieren. Das Symbol „durchgestrichene Mülltonne“ auf
jedem Produkt erinnert Sie an Ihre Verpflichtung, dass
Elektrohaushaltsgeräte gesondert entsorgt werden
%
müssen.
Endverbraucher können sich an Abfallämter der Gemeinden
Dieses Gerät entspricht den folgenden EG-Richtlinien:
wenden, um mehr Informationen über die korrekte
Entsorgung ihrer Elektrohaushaltsgeräte zu erhalten.
— 73/23/EWG vom 19.02.1973 (Niederspannung) und
nachfolgenden Änderungen;
Herd mit Multifunktions-Backofen und Glaskeramik-Kochfeld
D. Fettpfanne bzw. Backblech
E. Schalterblende
F. Verstellbare Füße bzw. Beine
H. Kochzonen-Betriebsanzeigeleuchte
E
I. Kochzonen-Schalter
K. Backofenrost
L. Temperatur-Kontrollleuchte
M. Temperaturregler
K
N. Funktionswähler
Q. Uhr mit Minutenzähler
L
H
D
Q
M
N
F
I

Inbetriebnahme
Die Wahl der einzelnen Funktionen erfolgt mittels der auf der
Resultate erzielen Sie bei der Zubereitung von Rind- und
Schalterblende angeordneten Schalter.
Kalbfleischgerichten wie: Schmorbraten, Ragout, Gulasch,
Achtung:Vor erstmaligem Gebrauch des Backofens und des
Wild, Lammkeule, Schweinslende usw., die eine lange Garzeit
Grills sollten diese für ca. 30 Minuten in Betrieb gesetzt
und ständige Zugabe von Flüssigkeit erfordern. Diese
werden. Achten Sie dabei darauf, dass sich kein Backgut im
Backofenfunktion bietet immer noch das beste System zum
Backofen befindet, der Temperaturregler auf Höchsttemperatur
Backen von Kleingebäck und Kuchen, zum Garen von Obst,
eingestellt ist, die Gerätetür geschlossen ist, und die Küche
sowie zum Garen von Auflaufgerichten bzw. Gerichten in
währenddessen ausreichend gelüftet wird. Der hierbei evtl.
geschlossenen Backformen. Bei Einsatz des statischen
entstehende Geruch wird durch das Verdunsten der zum
Backofens schieben Sie bitte jedes Mal nur ein Backblech
Schutz des Backofens und des Grills während des Zeitraums
ein, da ein gleichzeitiges Garen bzw. Backen auf mehreren
zwischen Produktion und erster Inbetriebnahme aufgetragenen
Ebenen keine gleichmäßige Hitzeverteilung gewährleistet. Je
Stoffe verursacht.
nach Einsatz der verschiedenen Einschubhöhen, kann die
Achtung: Verwenden Sie die unterste Einschubhöhe bitte
Unter- bzw. Oberhitze optimal genutzt werden. Verwenden
nur bei Einsatz des Bratspießes (wo vorhanden). Für alle
Sie die oberen Einschubhöhen, wenn mehr Oberhitze verlangt
anderen Gararten ist diese Führungsschiene nicht zu
wird, und die unteren, wenn mehr Unterhitze verlangt wird.
verwenden. Stellen Sie bei in Betrieb befindlichem Backofen
Heißluft
auch niemals Kochgeschirr auf den Backofenboden, Sie
könnten hierdurch das Email beschädigen. Stellen Sie Ihr
Temperaturregler “M”: zwischen 50°C und Max.
Kochgeschirr (Auflaufformen, Alufolien, usw.) auf die mit dem
Die Heizelemente schalten sich ein und das Gebläse wird in
Gerät gelieferten und in die Führungsschienen eingesetzten
Betrieb genommen. Dank der konstant gehaltenen und im
Backofenroste.
Backofen gleichmäßig verteilten Heißluft werden die Speisen
sehr gleichmäßig gegart bzw. gebacken. Es können auch
Backofenregler
gleichzeitig mehrere Gerichte unterschiedlicher Art gegart
Der ‘5 Cuochi’ -Backofen vereint in einem einzigen Gerät die
werden, vorausgesetzt es werden keine unterschiedlichen
Vorzüge der herkömmlichen „statischen“ Backöfen und die
Gartemperaturen verlangt. Es können bis zu 2 Einschubhöhen
der modernen “Heißluft”-Backöfen.
gleichzeitig verwendet werden. Beachten Sie hierzu die
Es handelt sich um ein äußerst vielseitiges Gerät, das es
Hinweise des Abschnitts “Gleichzeitiges Garen auf mehreren
Ihnen ermöglicht, zwischen 5 einfachen und sicheren Brat-/
Einschubhöhen”.
Backmethoden wählen zu können. Eingestellt werden die
Diese Funktion eignet sich besonders für Gratin-Gerichte,
Garfunktionen des “5 Cuochi” mittels der beiden Drehknöpfe:
wie auch für Speisen, die längere Garzeiten erfordern, wie:
N — Funktionswähler
Lasagna, Nudelaufläufe, Brathähnchen mit Kartoffeln usw.
M — Temperaturregler
Bei Fleischgerichten eignen sich ganz besonders gut Braten
Bei jeder von der mit dem Symbol “o” gekennzeichneten
zum Garen im Heißluftbackofen. Dank der optimalen
Position ‘AUS’ abweichenden Einstellung des
Hitzeverteilung können niedrigere Temperaturen eingestellt
Funktionswählers schaltet sich die Backofenbeleuchtung ein.
werden, es tritt weniger Fleischsaft aus, das Fleisch bleibt
Drehen Sie den Schalter auf & ein, schaltet sich die
demnach zarter und der Gewichtsverlust wird eingeschränkt.
Backofenbeleuchtung ein, auch wenn kein Heizelement
Besonders geschätzt wird der Heißluftbackofen bei der
aktiviert wurde. Die Beleuchtung bleibt während des Bratens
Zubereitung von Fisch, der auf diese Weise mit wenig Zutaten
bzw. Backens eingeschaltet, und ist ein Zeichen dafür, dass
gegart werden kann, wodurch Aussehen und Geschmack
sich der Backofen in Betrieb befindet.
unveränderlich erhalten bleiben.
Dessert: Hefekuchen gelingen ganz besonders im
Auftauen
Heißluftbackofen.
Temperaturregler “M”: beliebige Einstellung
Die “Heißluft”-Funktion kann auch zum Auftauen von Fleisch
und Brot eingesetzt werden. Stellen Sie hierzu den
Dank des an der Backofenrückwand installierten Gebläses
Temperaturregler auf 80°C ein. Zum Auftauen delikater
zirkuliert Luft in Raumtemperatur um das aufzutauende
Speisen stellen Sie jedoch entweder eine Temperatur von
Gut. Auf diese Weise können alle Arten von Speisen
60°C ein, oder verwenden nur die kalte Umluft
aufgetaut werden, vor allem jedoch empfindliche Speisen,
(Temperaturregler demnach auf 0°C).
die keine Hitze vertragen, wie beispielsweise: Eistorten,
Creme- oder Sahnetorten, Obsttorten usw. Auf diese Weise
Oberhitze
ersparen Sie die Hälfte der Zeit, die Sie normalerweise
Temperaturregler «M”: zwischen 50°C und Max.
zum Auftauen benötigen. Bei Fisch, Fleisch oder Brot
Das obere Heizelement schaltet sich ein.
können Sie das Auftauen mit Hilfe der Funktion “Heißluft”
Diese Funktion kann zum kurzen Überbacken bereits gegarter
Speisen verwendet werden.
beschleunigen. Stellen Sie hierzu eine Temperatur von 80°
— 100°C ein.
Grill
Temperaturregler “M”: zwischen 50°C und Max.
Statisch
Das mittlere obere Heizelement schaltet sich ein und der
Temperaturregler “M”: zwischen 50°C und Max.
Drehspieß wird in Betrieb genommen.
Auf dieser Einstellung schalten sich die beiden Heizelemente,
Durch die äußerst hohe Temperatur und die direkt auf das
das untere und das obere, ein. Dies ist der klassische
Grillgut gerichtete Hitze wird das Fleisch auf der Oberseite
Backofen unserer Großmütter, der jedoch, was
rasch gebräunt, somit tritt kein Fleischsaft aus und das
Wärmeverteilung und Energieeinsparung anbelangt, auf ein
Fleisch bleibt zarter. Die Grillfunktion eignet sich ganz
außergewöhnliches Niveau gebracht wurde. Der statische
besonders für solche Speisen, die eine äußerst hohe Oberhitze
Backofen ist unübertrefflich bei der Zubereitung von
verlangen: Rinder- und Kalbssteaks, Entrecôte, Fleischfilet,
Eintopfgerichten wie: Kohl mit Schweinerippchen, Stockfisch
Hamburger usw. …
auf spanische Art, Stockfisch mit Tomatensoße,
Der Abschnitt “Praktische Back-/Brathinweis” enthält einige
Kalbsgeschnetzeltes mit Reis usw…. Ausgezeichnete
Beispiele zum Einsatz des Backofens.
16
DE
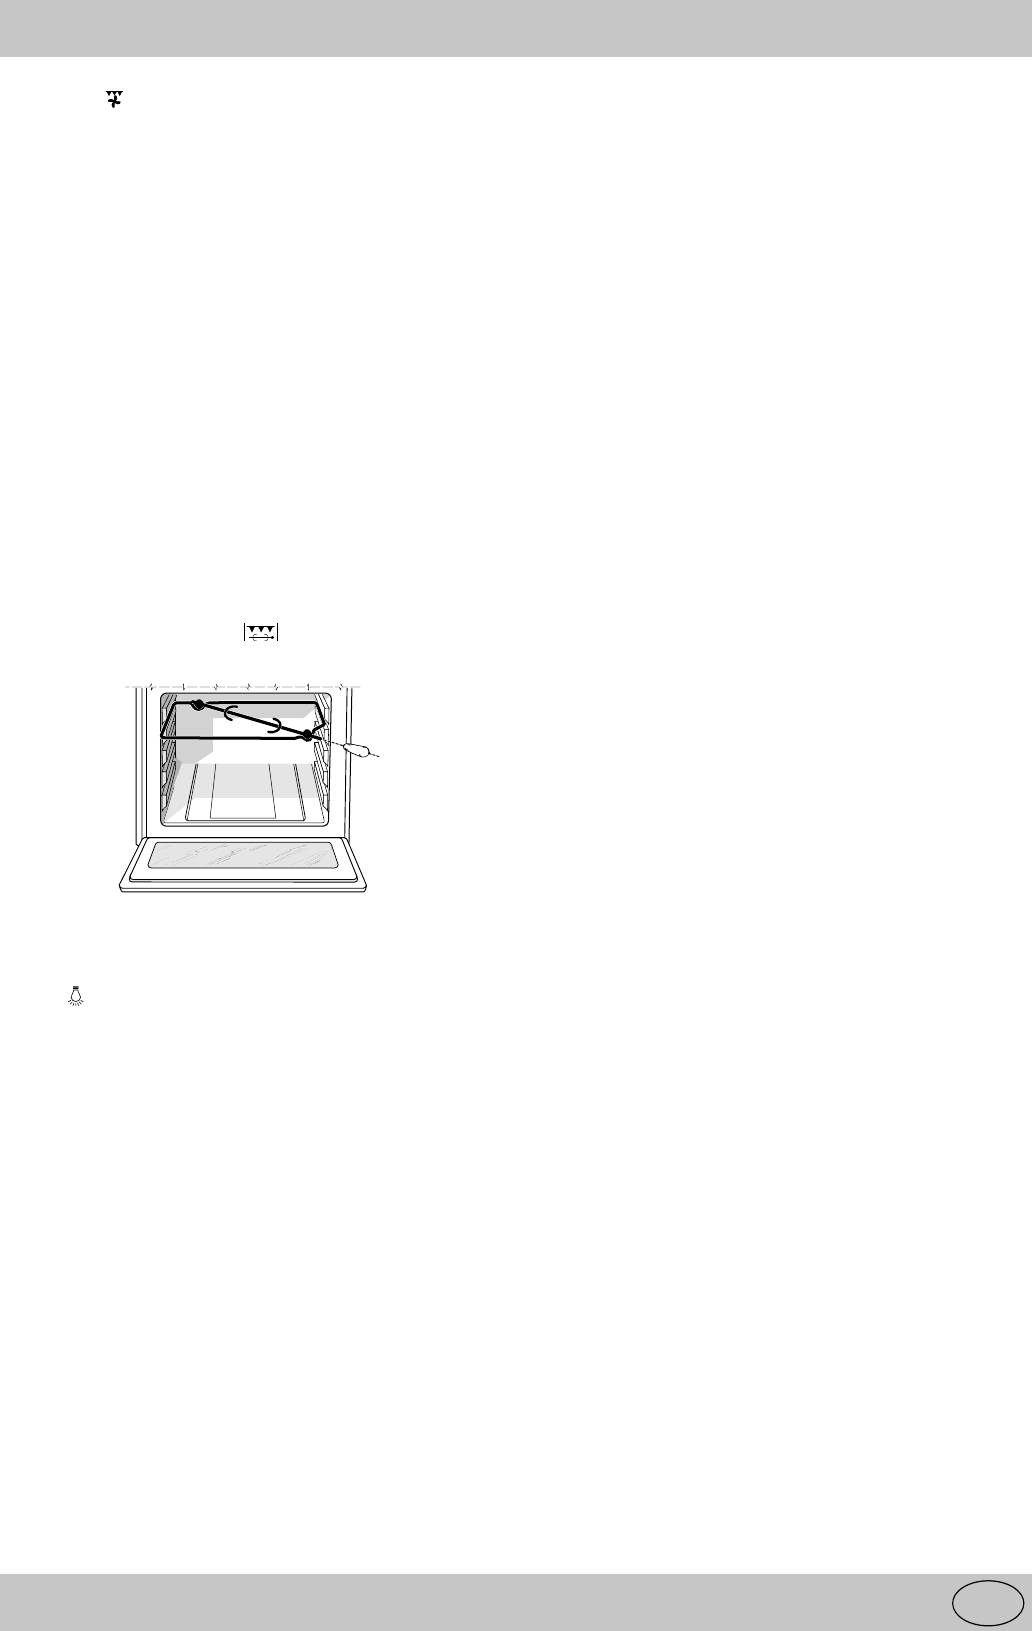
Umluftgrill
Elektronischer Minutenzähler (Q)
Temperaturregler “M”: zwischen 50°C und Max.
Achtung
Das mittlere obere Heizelement schaltet sich ein und das
Bei eingeschaltetem Backofen könnte die Tür sehr heiß
Gebläse wird in Betrieb genommen.
werden, demnach sollten Kinder ferngehalten werden.
Außer der einseitigen Strahlungshitze zirkuliert Heißluft im
Der Minutenzähler fungiert als Uhr und auch als Minutenuhr
Innern des Backofens. Hierdurch wird ein Verbrennen der
mit rückwärtig ablaufender Zeitrechnung.
Speisenoberflächen verhindert, die Hitze dringt tiefer in die
Anmerkung: Sämtliche Funktionen werden nach ca. 7
Speisen ein. Der Umluftgrill garantiert ein absolutes Gelingen
Sekunden ab der Einstellung aktiv.
von: Fleisch/Gemüsespießen, Bratwürsten,
Einstellen der Uhr
Schweinerippchen, Lammkoteletts, pikantes Huhn, Wachteln
Nach dem Netzanschluss oder nach einem Stromausfall blinkt
mit Salbei, Schweinefilet usw. …
auf dem Display die Anzeige: 0 00
Grillen Sie bitte bei geschlossener Backofentür.
• Drücken Sie die Taste v und stellen Sie daraufhin
Die Grill-Funktion ist unübertrefflich bei der Zubereitung
mittels der Tasten s und J die genaue Uhrzeit ein. Zum
folgender Fischgerichte: Barsch-, Thunfisch- und
Schnelllauf halten Sie die Tasten gedrückt.
Schwertfischschnitten, gefüllte Tintenfische usw. …
Für ein eventuelles Neueinstellen der Uhrzeit ist Vorstehendes
Drehspieß
zu wiederholen.
Zur Inbetriebnahme des Drehspießes verfahren Sie wie folgt:
Minutenzähler-Funktion
a) Schieben Sie die Fettpfanne auf die 1. (unterste) Führung;
Durch Drücken der Taste n erhalten Sie Zugriff auf diese
b) schieben Sie die Drehspießhalterung auf die 3. Führung
Funktion, auf dem Display erscheint die Anzeige “n”. Jeder
(von unten) und stecken Sie den Spieß durch das
Druck auf die Taste t entspricht einer Erhöhung der Zeit
entsprechende Loch in die auf der Backofenrückwand
um 10 Sekunden, bis 99 Minuten und 50 Sekunden.
befindliche Vorrichtung;
Drücken Sie diese Taste weiter, erfolgt die Zeiterhöhung in
c) setzen Sie den Drehspieß durch Drehen des
1 Minuten-Schritten, bis maximal 10 Stunden.
Funktionswählers “N” auf in Betrieb.
Mittels der Taste s schalten Sie die Zeit zurück.
Nach Einstellen der gewünschten Zeit startet die
rücklaufende Zeitrechnung. Ist die Zeit abgelaufen,
vernehmen Sie ein kurzes Tonsignal, das durch Drücken
einer beliebigen Taste ausgeschaltet werden kann.
Die eingestellte Zeit kann eingeblendet und somit abgelesen
werden, indem Sie die Taste v drücken, durch das Symbol
“n” wird angezeigt, dass die Minutenzähler-Funktion
eingestellt wurde. Nach ca. 7 Sekunden schaltet das
Display automatisch wieder auf die Minutenanzeige zurück.
Löschen einer bereits eingestellten Zeit
Drücken Sie die Taste s bis 0 l 00 angezeigt wird.
Lautstärkenregelung des Alarmsignals
Die Backofenbeleuchtung
Nach Einstellung der Uhr und entsprechender Bestätigung
Diese wird durch Drehen des Funktionswählers “N” auf das
kann mittels der Taste s die Lautstärke des Alarmsignals
Symbol eingeschaltet. Sie beleuchtet das Ofeninnere und
reguliert werden.
bleibt eingeschaltet, solange sich irgendein elektrisches
Backofenheizelement in Betrieb befindet.
Temperatur-Kontrollleuchte (L)
Diese zeigt die Aufheizphase an; die Kontrollleuchte erlischt
nach Erreichen der mittels des Temperaturreglers eingestellten
Temperatur im Backofeninnern. Das nun abwechselnde
Aufleuchten und Erlöschen der Kontrolllampe ist ein Zeichen
dafür, dass der Thermostat korrekt arbeitet, und demnach
die Backofentemperatur konstant gehalten wird.
17
DE
Praktische Back-/Brathinweise
Der Backofen stellt Ihnen eine umfangreiche Programmpalette
• Ihr Backofen hat insgesamt 5 Einschubhöhen. Beim
zur Verfügung, um jede Speise optimal garen zu können. Im
Heißluftgaren verwenden Sie jedoch bitte nur die beiden
Laufe der Zeit werden Sie dieses vielseitige Gerät optimal zu
mittleren Einschubhöhen, die oberste und die unterste ist
nutzen wissen, demnach gelten die nachstehenden
zu direkt der Heißluft ausgesetzt, wodurch empfindliche
Anleitungen nur als Richtlinie, die Sie durch Ihre persönliche
Gerichte leicht verbrennen könnten.
Erfahrung erweitern können.
• Verwenden Sie im Allgemeinen die 2. und die 4.
Einschubhöhe von unten, wobei die 2. für die Speisen
Backen
verwendet werden sollte, die mehr Hitze verlangen. Zum
Schieben Sie das Backwerk immer in den heißen Backofen;
Beispiel: Bei gleichzeitigem Zubereiten von Fleischbraten
halten Sie die Vorheizzeit (10-15 Minuten) stets ein. Die
für den Braten und die 4. für empfindliche Speisen.
Temperaturen liegen normalerweise bei 160 — 200°C. Öffnen
• Sollen Gerichte, die unterschiedliche Gartemperaturen und
Sie während des Backens nicht die Backofentür, um ein
-zeiten verlangen, gleichzeitig gegart werden, dann stellen
Zusammenfallen des Kuchens zu vermeiden.
Sie eine mittlere der beiden erforderlichen Gartemperaturen
ein, und garen die empfindlichere Speise auf der vierten
Der Kuchen ist zu trocken
Ebene (von unten). Nehmen Sie die Speise, die eine
Stellen Sie das nächste Mal eine um 10°C höhere
kürzere Garzeit erfordert, zuerst aus dem Backofen.
Backtemperatur ein und verkürzen Sie die Backzeit.
• Schieben Sie die Fettpfanne auf die unterste und den
Grillrost auf die oberste Führung.
Der Kuchen fällt zusammen
• Soll auf mehr als einer Ebene Pizza gebacken werden,
dann stellen Sie den Thermostaten auf 220°C; vergessen
Verwenden Sie weniger Flüssigkeit und stellen Sie
Sie nicht, dass der Backofen mindestens 15 Minuten gut
eine um 10°C niedrigere Backtemperatur ein.
vorgeheizt werden muss. Im allgemeinen wird die auf der
vierten Einschubhöhe befindliche Pizza etwas später gar,
Der Kuchen ist an der Oberseite zu dunkel
nehmen Sie deshalb die Pizza, die sich auf der zweiten
Ebene befindet, etwas früher aus dem Backofen und
Wählen Sie eine niedrigere Einschubhöhe, eine
lassen die andere noch für ein paar Minuten weitergaren.
niedrigere Temperatur und verlängern Sie die
Backzeit.
Gebrauch des Grills
Der Backofen ermöglicht Ihnen zwei unterschiedliche
Der Kuchen ist außen gut gebacken aber innen
Grillarten. Verwenden Sie die Funktion “Oberhitze” für
noch klebrig
kleine Portionen. Auf dieser Einstellung liegt der
Energieverbrauch bei nur 1200 W, und ist demnach ideal für
Verwenden Sie weniger Flüssigkeit, reduzieren Sie die
kleines Grillgut, wie: z.B- überbackenes Toastbrot,
Temperatur, verlängern Sie die Backzeit.
Würstchen usw.
Legen Sie das Grillgut auf die Mitte des Rostes, da nur
Der Kuchen löst sich nicht aus der Form
der mittlere Teil des oberen Heizwiderstandes
eingeschaltet ist. Grillgut auf den Eckzonen des Grills
Fetten Sie die Kuchenform gut ein und bestäuben Sie
wird nicht gar.
sie mit etwas Mehl oder legen Sie Backpapier in die
Form.
Die Funktion “Grill” ermöglicht das Garen auf der
gesamten Rostoberfläche. Schalten Sie diese Funktion ein,
Ich habe (bei Heißluftbetrieb) auf mehreren Ebenen
wenn der ganze Rost mit Grillgut belegt ist und eine
gegart, und nicht alle Gerichte sind gleichförmig
gleichmäßige Bräunung gewünscht wird.
gar
Wichtig: Grillen Sie bei geschlossener Backofentür, dadurch
erzielen Sie nicht nur optimale Ergebnisse, sondern sparen
Stellen Sie eine niedrigere Temperatur ein.
auch Energie (ca. 10%).
Es ist nicht erforderlich, die auf mehreren Ebenen
Bei Einsatz der Grillfunktionen sollte der Thermostat auf die
gegarten Speisen gleichzeitig aus dem Ofen zu
höchste Stufe eingestellt werden. Dies bedeutet jedoch nicht,
nehmen.
dass, falls erforderlich, nicht auch niedrigere Temperaturen
eingestellt werden können.
Setzen Sie den Grillrost in die oberen Führungen (siehe Ta-
Fisch und Fleisch
belle) ein, und schieben Sie die Fettpfanne unter das Grillgut
Für Geflügel und Fisch ist eine niedrigere Temperatur
(unterste Führung), um abtropfendes Fett aufzufangen und
einzustellen. (150°C — 175°C) Für Rinderbraten, der außen
Rauchbildung zu vermeiden.
gut angebraten, innen aber saftig bleiben soll, ist das Fleisch
bei hoher Temperatur (200220°C) rasch anzubraten, um dann
Die Einstellung “Umluftgrill” ist äußerst praktisch für
auf eine niedrigere Temperatur überzugehen. Als Richtlinie
rasches Grillen, die vom Grill ausgestrahlte Heißluft wird
gilt: Je größer der Braten, desto niedriger die Temperatur und
besser verteilt, wodurch gleichzeitig die Oberseite gebräunt
um so länger die Bratzeit. Legen Sie das Fleisch auf die
und die Unterseite gegart wird. Der Umluftgrill ermöglicht das
Mitte des Rostes und schieben Sie die Fettpfanne darunter.
Garen großer Braten oder Geflügel, ohne Einsatz des
Schieben Sie den Rost so ein, dass er sich in der Mitte des
Bratspießes. Auf dieser Einstellung können bereits gegarte
Backofens befindet. Sollte mehr Unterhitze erforderlich sein,
Gerichte noch kurz überbacken werden. (Nudelaufläufe usw.)
dann verwenden Sie die unterste Einschubhöhe.
Setzen Sie den Grillrost auf die 2. oder 3. Führung (siehe
Tabelle), und schieben Sie die Fettpfanne unter das Grillgut,
Gleichzeitiges Garen auf mehreren Einschubhöhen
um abtropfendes Fett aufzufangen und Rauchbildung zu
Soll auf zwei Einschubhöhen gegart werden, dann wählen
vermeiden. Bei gleichzeitigem Einsatz dieser Funktion und
Sie bitte nur die Funktion “Heißluft”, denn nur diese
dem Bratspieß (nur bei einigen Modellen) kann auch auf dem
ermöglicht ein solches Garen.
Backblech (1. Ebene) gegart werden, wie z.B.: Kartoffeln usw.
18
DE
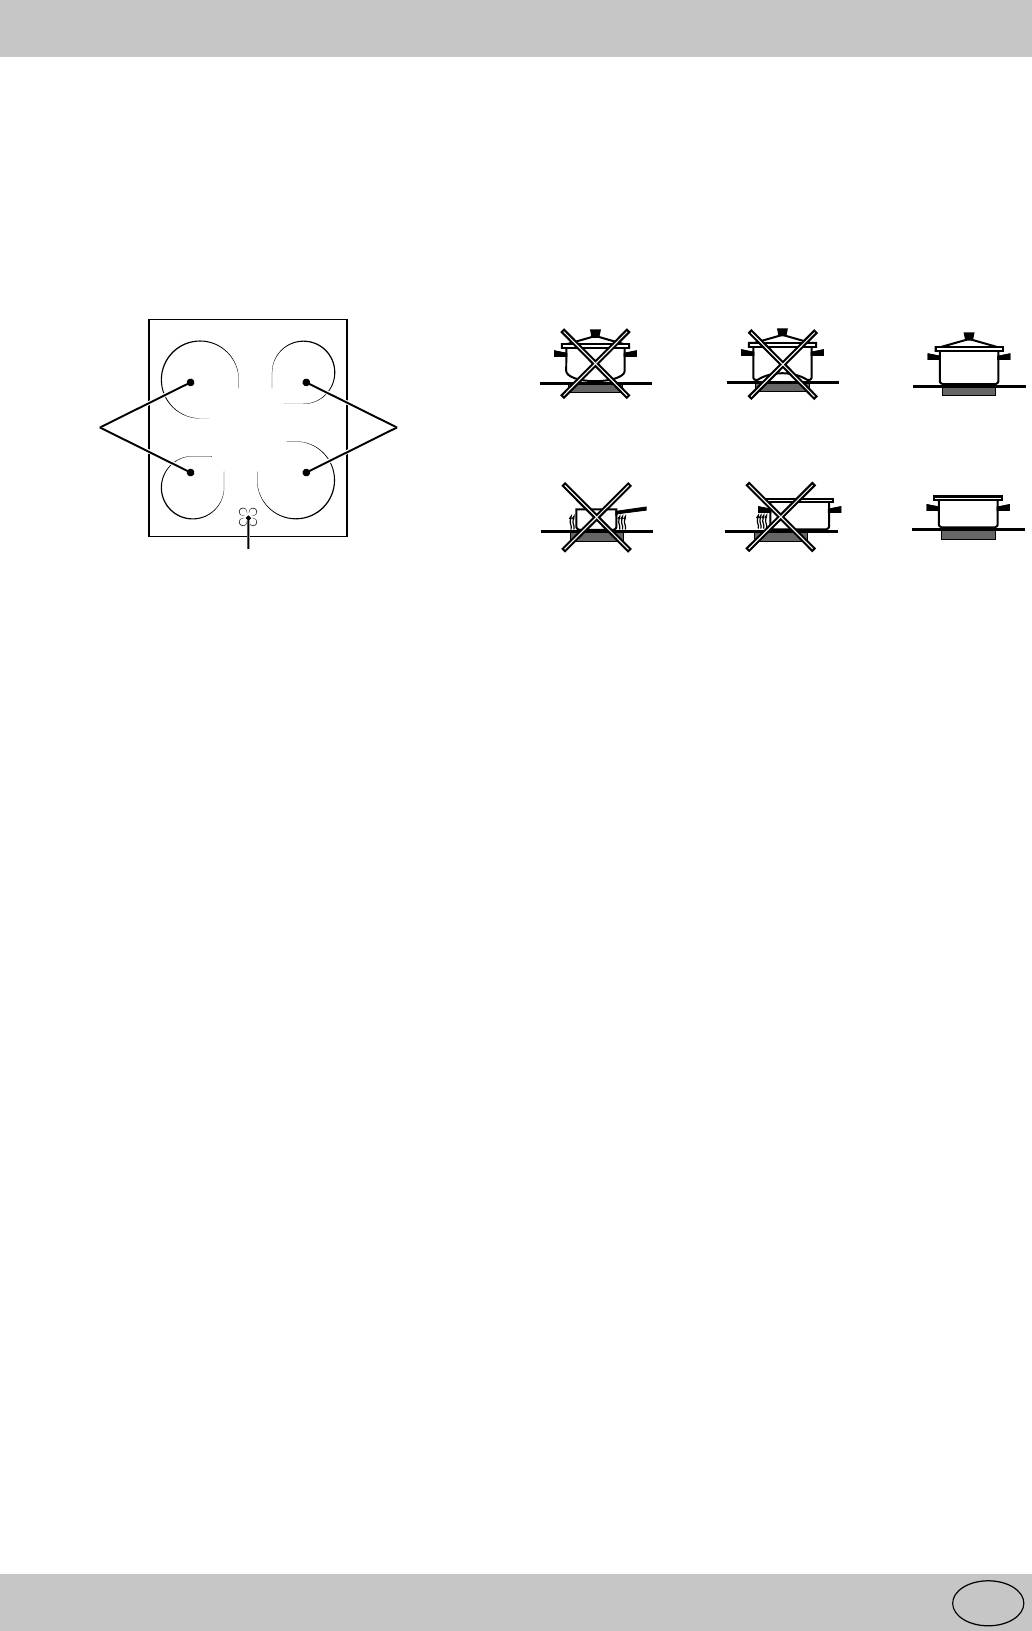
Anleitungen zum Einsatz des Glaskeramik-Kochfeldes
Beschreibung
Beschreibung der Heizelemente
Die Kochfelder sind mit elektrischen Heizstrahlern bestückt,
Die Strahlungsbeheizung erfolgt mittels runder
die sich unter den Kochzonen befinden, die bei Inbetriebnahme
Heizelemente, die innerhalb von nur 10-20 Sekunden nach
aufglühen.
dem Einschalten rot aufglühen.
A. Kochzone (A).
Anleitungen zum Einsatz des Glaskeramik-
B. Kontrolllampen, die darauf aufmerksam machen, dass die
Kochfeldes
entsprechenden Zonen eine Temperatur von 60°C
Um optimale Leistungen Ihres Glaskeramik-Kochfeldes zu
übersteigen, auch wenn die Kochzone bereits
gewährleisten, sind beim Kochen einige grundsätzliche
ausgeschaltet wurde.
Maßnahmen zu beachten.
AA
• Auf Glaskeramik-Kochfeldern kann jede Art von
Kochgeschirr verwendet werden. Die Böden müssen
B
jedoch perfekt glatt sein. Ein stärkerer Boden garantiert
jedoch eine gleichmäßigere Hitzeverteilung.
• Achten Sie darauf, dass der Topfboden die Kochzone
gänzlich ausfüllt: sonst geht ungenutzte Energie verloren.
• Achten Sie darauf, dass der Boden des Geschirrs trocken
und sauber ist: Hierdurch wird eine optimale Auflage auf
der Kochzone sowie eine längere Lebensdauer Ihres
Glaskeramik-Kochfeldes und Ihrer Töpfe gewährleistet.
• Vermeiden Sie den Einsatz von Kochgeschirr, das bereits
auf Gasherden verwendet wurde. Durch die stark
konzentrierte Hitze der Gasbrenner könnten sich die Böden
etwas verformt haben, und somit keine optimalen
Kochresultate bei Einsatz auf einem Glaskeramik-
Kochfeld mehr gewährleisten.
19
DE
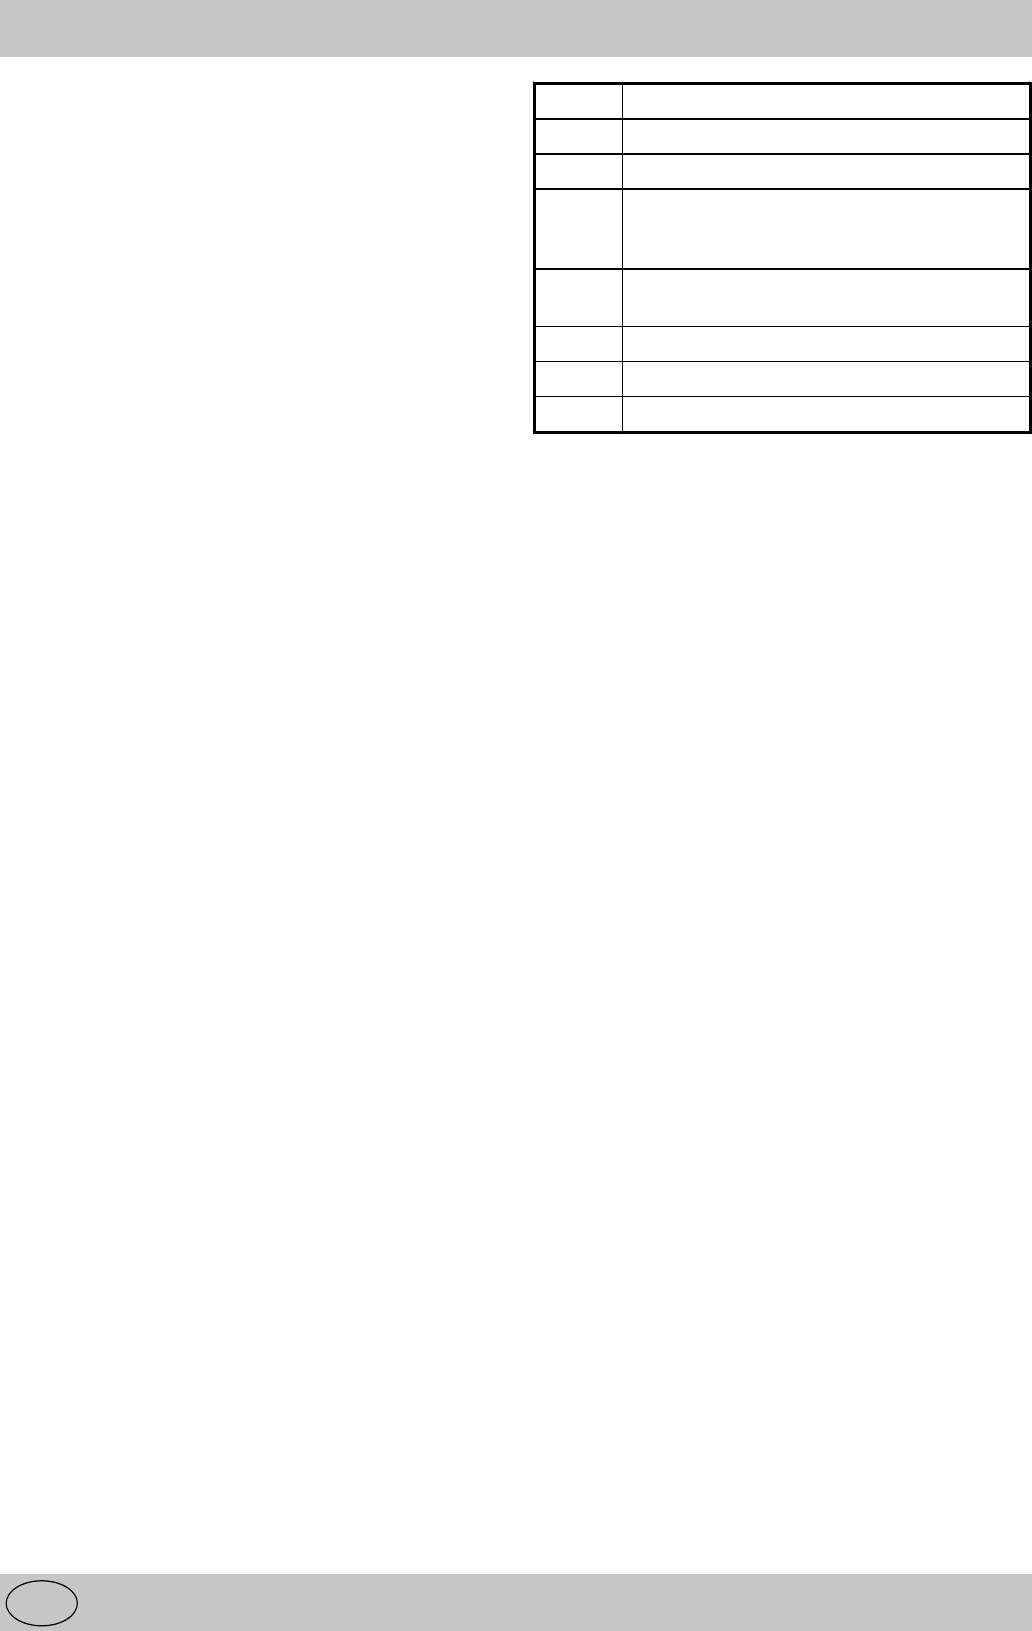
Praktische Ratschläge zum Einsatz der Kochzonen
Kochzonenschalter (I)
Pos. Normal- oder Schnellkochzone
Die Herde können mit Standard-, Schnellaufheiz- und
Automatik-Kochzonen in unterschiedlichen Kombinationen,
0
Aus
bestückt sein (die Schnellaufheizkochzone ist durch einen
1
Zum Garen von Gemüse und Fisch
roten Punkt gekennzeichnet, die Automatik-Kochzone durch
eine Alu-Diskette in der Mitte).
Zum langsamen Garen von Kartoffeln
Um zu große Wärmeverluste und Schäden an den Kochzonen
2
(Dämpfen), Gemüsesuppen, Hülsefrüchten
zu vermeiden, sollten Sie Töpfe und Pfannen mit glattem
etc.
Boden verwenden, deren Durchmesser nicht kleiner ist, als
der der Kochzone.
Zum Fertiggaren großer Speisemengen,
3
Der Tabelle können Sie entnehmen, welche Kochzone und
Gemüsesuppen
welche Einstellung für eine gewählte Garart am besten
4
Zum Braten (mittlere Hitze)
geeignet ist.
5
Zum Braten (starke Hitze)
6
Zum Anbraten oder zum schnellen Aufkochen
Kochzonen-Betriebsanzeigeleuchte
Diese Anzeigeleuchte blinkt auf, wenn eine Kochzone
eingeschaltet wird.
20
DE
Аннотации для Плиты Indesit K3C55/R в формате PDF
Топ 10 инструкций
Другие инструкции
View the manual for the Indesit K3C55(X)/R here, for free. This manual comes under the category stoves and has been rated by 7 people with an average of a 7.2.
This manual is available in the following languages: English. Do you have a question about the Indesit K3C55(X)/R or do you need help?
Ask your question here
Indesit K3C55(X)/R specifications
Below you will find the product specifications and the manual specifications of the Indesit K3C55(X)/R.
The Indesit K3C55(X)/R is a gas-powered stove with a single oven and a total interior capacity of 54 liters. It features a grill with a power of 2100 watts and a hob with four gas cooking zones. The stove is designed to be easy to clean, making maintenance and upkeep hassle-free.
The oven operates on natural gas, providing an efficient and reliable power source for cooking. With its 54-liter gross capacity, it offers ample space for baking, roasting, and other culinary needs.
The hob of the Indesit K3C55(X)/R is equipped with four cooking zones, allowing for simultaneous preparation of multiple dishes. The first cooking zone has a power of 1200 watts, while the second cooking zone offers a higher power of 1700 watts, accommodating a variety of cooking requirements.
The stove’s power capacity is 5800 watts, ensuring quick and efficient cooking. It is suitable for a range of cooking styles and needs, providing versatility in the kitchen.
Constructed with high-quality materials, the Indesit K3C55(X)/R is designed for durability and long-lasting performance. Its sleek and modern design seamlessly blends into any kitchen decor.
Overall, the Indesit K3C55(X)/R is a reliable and efficient gas-powered stove with a spacious oven and convenient features.
Total oven(s) interior capacity
54 L
Product type
Built-in cooker
General
| Brand | Indesit |
| Model | K3C55(X)/R | K3C55XR |
| Product | stove |
| Language | English |
| Filetype | User manual (PDF) |
Oven
| Total oven(s) interior capacity | 54 L |
| Total oven power | — W |
| Oven power source | Natural gas |
| Number of ovens | 1 |
| Oven gross capacity | 54 L |
| Oven power | — W |
| Grill power | 2100 W |
| Defrost function | Yes |
| Grill | Yes |
| Oven net capacity | 54 L |
Other features
| Hob included | Yes |
| Display | No |
| Oven included | Yes |
Hob
| Hob type | Gas |
| Number of cooking zones | 4 zone(s) |
| Cooking zone 1 power | 1200 W |
| Cooking zone 2 power | 1700 W |
| Cooking zone 1 type | Small |
| Cooking zone 2 type | Medium |
Design
| Product type | Built-in cooker |
| Integrated clock | No |
| Control type | Rotary |
| Control position | Front |
Ergonomics
Power
| Power | 5800 W |
| Power consumption (typical) | 5800 W |
| AC input voltage | 230 — 240 V |
Weight & dimensions
| Width | 500 mm |
| Depth | 500 mm |
| Height | 850 mm |
show more
Frequently Asked Questions
Can’t find the answer to your question in the manual? You may find the answer to your question in the FAQs about the Indesit K3C55(X)/R below.
How do I set the correct temperature for my oven?
To set the desired temperature, turn the thermostat dial to the desired temperature value indicated in degrees Celsius or Fahrenheit. Preheat the oven for approximately 10-15 minutes before placing your food inside for optimal results.
How do I select the appropriate cooking mode on my stove?
Choose the desired cooking function by turning the mode selection dial to the corresponding symbol, such as conventional baking, grilling, or fan-assisted cooking. Each symbol represents a specific cooking method suited for different types of dishes.
How do I properly clean the surface of my stove?
To clean the stove surface, wait until it cools down completely, then wipe it with a soft damp cloth and mild detergent. Avoid using abrasive cleaners or harsh chemical solutions as they may damage the surface. Additionally, never spray water directly onto the control panel or knobs.
How can I prevent my food from burning on the stove?
Ensure that you are using appropriate cookware for the specific heat source, making sure the diameter of the cookware matches the size of the burner. Adjust the heat level to the desired intensity by using the burner control knobs. Additionally, stirring or flipping your food regularly can help prevent burning.
How do I troubleshoot if the stove is not heating up?
If the stove is not heating up, check that it is properly connected to a power source. Ensure the circuit breaker or fuse for the stove is not tripped or blown. If the issue persists, it is advisable to contact a qualified technician to inspect and repair any potential electrical or component faults.
Is the Total oven(s) interior capacity of Indesit K3C55(X)/R 54 L?
Yes, the Total oven(s) interior capacity of Indesit K3C55(X)/R is 54 L. This means that the oven has a decent amount of space for cooking and baking.
Does Indesit K3C55(X)/R use Natural gas as its power source for the oven?
Yes, Indesit K3C55(X)/R uses Natural gas as its power source for the oven. This means that it may be more cost-effective and environmentally friendly compared to using electricity.
Is there only one oven in Indesit K3C55(X)/R?
Yes, there is only one oven in Indesit K3C55(X)/R. This means that it may not be suitable for users who require multiple ovens for cooking different dishes simultaneously.
Does Indesit K3C55(X)/R have a Grill power of 2100 W?
Yes, Indesit K3C55(X)/R has a Grill power of 2100 W. This means that it can produce high heat for grilling food, which may result in quick and even cooking.
Is the Hob type of Indesit K3C55(X)/R Gas?
Yes, the Hob type of Indesit K3C55(X)/R is Gas. This means that it provides instant heat and precise temperature control during cooking, allowing for efficient and effective cooking.
What is the height of the Indesit K3C55(X)/R?
The Indesit K3C55(X)/R has a height of 850 mm.
What is the width of the Indesit K3C55(X)/R?
The Indesit K3C55(X)/R has a width of 500 mm.
What is the depth of the Indesit K3C55(X)/R?
The Indesit K3C55(X)/R has a depth of 500 mm.
How do I reset my induction hob?
Most induction hobs can be reset by disconnecting the hob from power by unplugging it from the power outlet. You will then have to wait at least 60 minutes.
What is a Perilex connection?
A Perilex connection is a special connection that can handle more power than a normal connection. This connection has five holes instead of two and is often used for induction hobs.
Can I use my pans on induction?
Nowadays almost all pans are suitable for induction. You can easily test whether your old pans can also be used on induction by holding a magnet against the bottom of the pan. If the magnet stays on the pan, your old pan is suitable for induction.
Is cooking on induction dangerous?
No, cooking on induction is not dangerous.
Is the manual of the Indesit K3C55(X)/R available in English?
Yes, the manual of the Indesit K3C55(X)/R is available in English .
Is your question not listed? Ask your question here