
User Guide
FA 0900-01
www.focusrite.com

IMPORTANT SAFETY INSTRUCTIONS
1. Read these instructions.
2. Keep these instructions.
3. Heed all warnings.
4. Follow all instructions.
5. Do not use this apparatus near water.
6. Clean only with dry cloth.
7. Do not block any ventilation openings. Install in accordance with the manufacturer’s
instructions.
8. Do not install near any heat sources such as radiators, heat registers, stoves, or other
apparatus (including amplifiers) that produce heat.
9. Do not defeat the safety purpose of the polarized or grounding-type plug. A polarized plug has
two blades with one wider than the other. A grounding type plug has two blades and a third
grounding prong. The wide blade or the third prong are provided for your safety. If the provided
plug does not fit into your outlet, consult an electrician for replacement of the obsolete outlet.
10. Protect the power cord from being walked on or pinched particularly at plugs, convenience
receptacles, and the point where they exit from the apparatus.
11. Only use attachments/accessories specified by the manufacturer.
12.
13. Unplug this apparatus during lightning storms or when unused for long periods of time.
14. Refer all servicing to qualified service personnel. Servicing is required when the apparatus
has been damaged in any way, such as power-supply cord or plug is damaged, liquid has
been spilled or objects have fallen into the apparatus, the apparatus has been exposed to rain
or moisture, does not operate normally, or has been dropped.
15. No naked flames, such as lighted candles, should be placed on the apparatus.
The appliance coupler is used as the disconnect device, the disconnect device shall remain readily
operable.
Do not use a damaged or frayed power cord.
If the mains plug supplying the apparatus incorporates a fuse then it should only be replaced with a
fuse of identical or lower rupture value.
Use only with the cart, stand, tripod, bracket, or table specified by the manufacturer,
or sold with the apparatus. When a cart is used, use caution when moving the cart/
apparatus combination to avoid injury from tip-over
2

GB
The apparatus shall be connected to a mains socket outlet with a protective
earthing connection.
FIN
Laite on liitettävä suojamaadoituskoskettimilla va rustettuumpistorasiaan.
NOR
Apparatet må tikoples jordet stikkontakt.
SWE
Apparaten skall anslutas till jordat uttag.
CAUTION: TO REDUCE THE RISK OF ELECTRIC SHOCK, DO NOT REMOVE
COVER (OR BACK). NO USER-SERVICEABLE PARTS INSIDE.
REFER SERVICING TO QUALIFIED SERVICE PERSONNEL.
The lightning flash with arrowhead symbol, within equilateral triangle,
is intended to alert the user to the presence of uninsulated “dangerous
voltage” within the product’s enclosure that may be of sufficient magnitude
to constitute a risk of electric shock to persons.
The exclamation point within an equilateral triangle is intended to
alert the user to the presence of important operating and maintenance
(servicing) instructions in the literature accompanying the appliance.
WARNING: TO REDUCE THE RISK OF FIRE OR ELECTRIC SHOCK, DO NOT EXPOSE THIS APPARATUS TO
RAIN OR MOISTURE AND OBJECTS FILLED WITH LIQUIDS SUCH AS VASES, SHOULD NOT BE PLACED
ON THIS APPARATUS.
3

ENVIRONMENTAL DECLARATION
Compliance Information Statement: Declaration of Compliance procedure
Product Identification: Focusrite Scarlett 6i6
Responsible party: American Music and Sound
Address: 4325 Executive Drive
Suite 300
Southaven
MS 38672
Telephone: 800-431-2609
This device complies with part 15 of the FCC Rules. Operation is subject to the following two conditions: (1) This device may not
cause harmful interference, and (2) this device must accept any interference received, including interference that may cause
undesired operation.
For USA
To the User:
1. Do not modify this unit! This product, when installed as indicated in the instructions contained in
this manual, meets FCC requirements. Modifications not expressly approved by Focusrite may void your
authority, granted by the FCC, to use this product.
2. Important: This product satisfies FCC regulations when high quality shielded cables are used to connect
with other equipment. Failure to use high quality shielded cables or to follow the installation instructions
within this manual may cause magnetic interference with appliances such as radios and televisions and
void your FCC authorization to use this product in the USA.
3. Note: This equipment has been tested and found to comply with the limits for a Class A digital device,
pursuant to part 15 of the FCC Rules. These limits are designed to provide reasonable protection against
harmful interference in a commercial environment. This equipment generates, uses and can radiate radio
frequency energy and, if not installed and used in accordance with the instructions, may cause harmful
interference to radio communications. Operation of this equipment in a residential area is likely to cause
harmful interference in which the user will be required to correct the interference at his own expense.
For Canada
To the User:
This Class A digital apparatus complies with Canadian ICES-003.
Cet appareil numérique de la classe A est conforme à la norme NMB-003 du Canada.
RoHS Notice
Focusrite Audio Engineering Limited has conformed where applicable, to the European Union’s Directive 2002/95/EC on
Restrictions of Hazardous Substances (RoHS) as well as the following sections of California law which refer to RoHS, namely
sections 25214.10, 25214.10.2, and 58012, Health and Safety Code; Section 42475.2, Public Resources Code.
WARNING: Excessive sound pressure levels from earphones and headphones can cause hearing loss.
WARNING: This equipment must only be connected to USB 2.0-compliant ports.
4

TABLE OF CONTENTS
IMPORTANT SAFETY INSTRUCTIONS ………………………………………. 2
OVERVIEW…………………………………………………………… 6
Introduction ………………………………………………………..6
Features . . . . . . . . . . . . . . . . . . . . . . . . . . . . . . . . . . . . . . . . . . . . . . . . . . . . . . . . . . . . . . . . . . . . 6
Box Contents ……………………………………………………….7
System requirements …………………………………………………7
Mac OS ……………………………………………………………..7
Windows …………………………………………………………….7
GETTING STARTED …………………………………………………….8
Software Installation ………………………………………………….8
HARDWARE FEATURES…………………………………………………. 9
Front Panel…………………………………………………………9
Rear Panel ………………………………………………………..10
Connecting your Scarlett 6i6 …………………………………………..11
Power ……………………………………………………………..11
USB ……………………………………………………………….11
Mac OS only: …………………………………………………………11
Windows only:………………………………………………………..11
Audio Setup in your DAW ……………………………………………..12
Example of Usage …………………………………………………..14
Connecting a microphone or instrument…………………………………….14
Low Latency Monitoring ………………………………………………..15
Connecting Scarlett 6i6 to loudspeakers …………………………………….16
Scarlett MixControl …………………………………………………… 18
Mixer ……………………………………………………………19
Mixer Tab……………………………………………………………19
Input Channel ……………………………………………………….20
Output Channel ………………………………………………………23
Routing Presets ………………………………………………………25
Monitor Section ………………………………………………………26
Device Status section ………………………………………………….29
Settings Menu………………………………………………………..30
File Menu …………………………………………………………..31
Scarlett 6i6 Performance Specifications …………………………………..33
Physical and Electrical Characteristics ……………………………………34
Troubleshooting…………………………………………………….34
COPYRIGHT AND LEGAL NOTICES ………………………………………34
5

OVERVIEW
Introduction
Thank you for purchasing this Scarlett 6i6, one of the family of Focusrite professional computer audio
interfaces incorporating high quality Focusrite analogue pre-amplifiers. You now have a compact yet
highly versatile solution for routing high quality audio to and from your computer. You can also use
the Scarlett 6i6 as a “stand-alone” interface to any other type of recording device, once you have
configured it using Scarlett MixControl software.
This User Guide provides a detailed explanation of the hardware and software to help you achieve a
thorough understanding of the product’s operational features. We recommend that you take the time
to read through the user guide, whether you’re new to computer recording or a more experienced
user, so that you are fully aware of all the possibilities that the Scarlett 6i6 and accompanying
software have to offer. If the main User Guide sections do not provide the information you need, be
sure to consult http://www.focusrite.com/answerbase, which contains a comprehensive collection of
answers to common technical support queries.
Features
The Scarlett 6i6 hardware interface provides the means for connecting microphones, musical
instruments, line level audio signals and S/PDIF digital audio signals to a computer running
compatible versions of Mac OS or Windows via one of the computer’s USB ports. The signals at the
physical inputs can be routed to your audio recording software / digital audio workstation (referred
to throughout this user guide as the “DAW”) at up to 24-bit, 96 kHz resolution; similarly, the DAW’s
monitor or recorded output signals can be configured to appear at the unit’s physical outputs.
Audio sources – mics, instruments, etc. — connected to the physical inputs can be recorded in your
DAW and then replayed from there to the physical outputs. The physical outputs can be connected
to amplifiers and speakers, powered monitors, headphones, an audio mixer or any other analogue
or digital audio equipment that you wish to use. Although all inputs and outputs on the Scarlett 6i6
are routed directly to and from your DAW for recording and playback, you can configure the routing
within your DAW in order to meet your precise needs.
The accompanying software application, Scarlett MixControl, provides further routing and
monitoring options, as well as the ability to control global hardware settings such as sample rate
and synchronisation.
All inputs on the Scarlett 6i6 are routed directly to your DAW software for recording, but Scarlett
MixControl also allows you to route these signals internally within the device to the outputs so that
you can monitor the audio signals with ultra-low latency — before they arrive at your DAW.
The Scarlett 6i6 also has connectors for sending and receiving MIDI data; this lets you use it as a MIDI
“hub” between your computer’s USB port and other items of MIDI equipment in your system.
6

Box Contents
Along with your Scarlett 6i6 you should have:
• AC mains adaptor (DC PSU)
• USB cable
• Getting Started Guide
• Software Activation card, with codes for accessing the following on-line resources:
– Scarlett MixControl (6i6 edition) – includes Mac/Windows USB drivers
– Scarlett Plug-in Suite for Mac and Windows
– Ableton Live Lite
– LoopMasters sample library
– Novation Bass Station
System requirements
Mac OS
Apple Macintosh with a high-speed USB 2.0-compliant USB port
OS: Mac OS X 10.7, OS X 10.8, or later
Windows
Windows compatible computer with a USB 2.0-compliant USB port
OS: Windows 7 (all versions) or Windows 8 (excluding Windows 8 RT)
7

GETTING STARTED
IMPORTANT: PLEASE ENSURE THAT YOU INSTALL SCARLETT MIXCONTROL
BEFORE CONNECTING THE INTERFACE TO YOUR COMPUTER.
Software Installation
All software required by the Scarlett 6i6 — and several powerful and useful extras — are available for
download from the Focusrite website (www.focusrite.com/register). The Software Activation card
provided with your Scarlett 6i6 contains validation codes which you will need to enter at the above
web address. This procedure ensures that you will have the most up-to-date software versions.
Can’t get started?
If you have any trouble with this product
do not go back to the place of purchase.
Contact our support team on:
US:
1-855-24-FOCUS (1-855-243-6287)
Support available Monday — Friday 8am – 6pm (PST)
UK &
+44 1494 462246
International:
Support available Monday — Friday 9:30am – 6pm (GMT/BST)
Online:
www.focusrite.com/support
www.novationmusic.com/support
PLACE SERIAL NUMBER STICKER HERE
FA0736-01
1. Using your usual browser, go to http://www.focusrite.com/register/.
2. Follow the on-screen instructions, entering the “Product Bundle Code” into the form where
prompted. Your “Product Bundle Code” can be found on the Software Download Card packed with
the unit.
3. You will then be able to access the “My Products” page, where the software products to which your
registration entitles you are available for download, complete with activation codes where applicable.
4. Download and install Scarlett MixControl. Follow all on-screen instructions.
5. When the installation is complete, restart your computer.
6. After restart, connect the Scarlett 6i6 to your computer with the USB cable supplied.
7. Power your Scarlett 6i6 using the supplied mains adaptor.
8
HARDWARE FEATURES
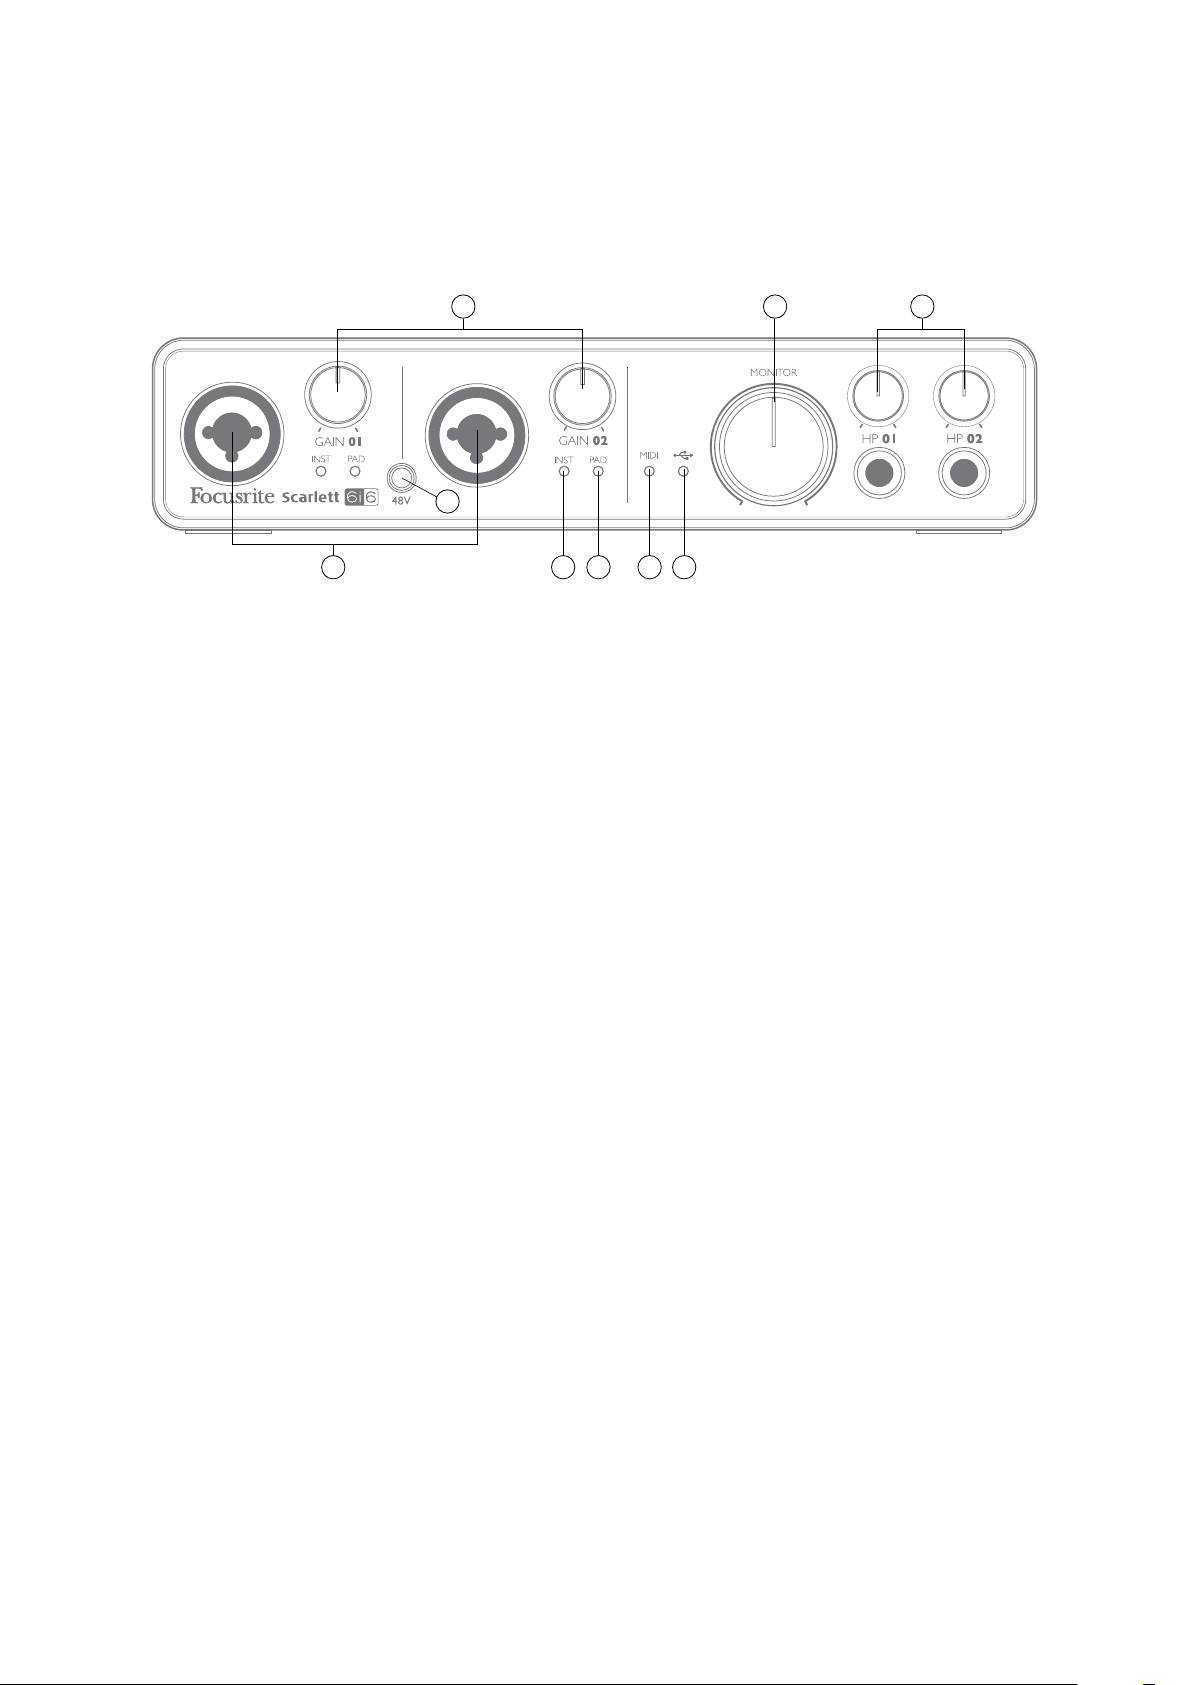
Front Panel
3
2
1
4 7 65
8 9
The Front Panel includes input connectors for Mic, Line and Instrument signals, the input gain and
monitoring controls, and sockets for headphones.
1. Inputs 1 and 2 – XLR Combo type input sockets — connect microphones, instruments (e.g.,
guitar), or line level signals via XLR or ¼” (6.35 mm) jacks as appropriate. Either ¼” TRS
(balanced) or TS (unbalanced) jack plugs can be used for instruments or line level signals.
2. 48V – a switch enabling 48 V phantom power at the XLR contacts (mic inputs) of the Combo
connectors. The switch illuminates when phantom power is selected.
3. GAIN 01 and GAIN 02 — adjust the input gain for the signals at Inputs 1 and 2 respectively. The
gain controls have concentric bi-colour LED ‘rings’ to confirm signal level: green indicates
an input level of at least -24 dBFS (i.e., ‘signal present’), the ring then turns red when signal
level reaches 0 dBFS.
4. INST – the input configuration for the jack contacts at Inputs 1 and 2 can be selected via
software from Scarlett MixControl. The green LEDs illuminate when INST is selected. With
INST selected, the gain range and input impedance are altered (relative to LINE), and the
input is made unbalanced. This optimises it for the direct connection of instruments (usually
via a 2-pole (TS) jack plug). When INST is off, the inputs are suitable for the connection of line
level signals. Line level signals may be connected either in balanced form via a 3-pole (TRS)
jack or unbalanced, via a 2-pole (TS) jack.
5. PAD – a 10 dB pad may be inserted in each of the input signal paths; these are controlled via
software from Scarlett MixControl. The pad increases the headroom of the input stage, and
should be used to reduce mic or line level signals which are ‘too hot’. It is not intended for use
with the Instrument inputs. The red LEDs illuminate when PAD is selected.
6.
USB — a green LED which illuminates when the unit is recognised by the computer to
which it is connected.
7. MIDI LED – a green LED illuminates when MIDI data is received at the MIDI IN port.
8. MONITOR — main monitor output level control – this is an analogue control and adjusts the
level at Outputs 1 and 2 on the rear panel.
9. HP 01 and HP 02 – connect one or two pairs of stereo headphones at the two ¼” (6.25 mm)
TRS jack sockets below the controls. The headphone outputs always carry the signals that are
currently routed to analogue outputs 1 & 2 and 3 & 4 respectively (as stereo pairs) in Scarlett
MixControl.
9
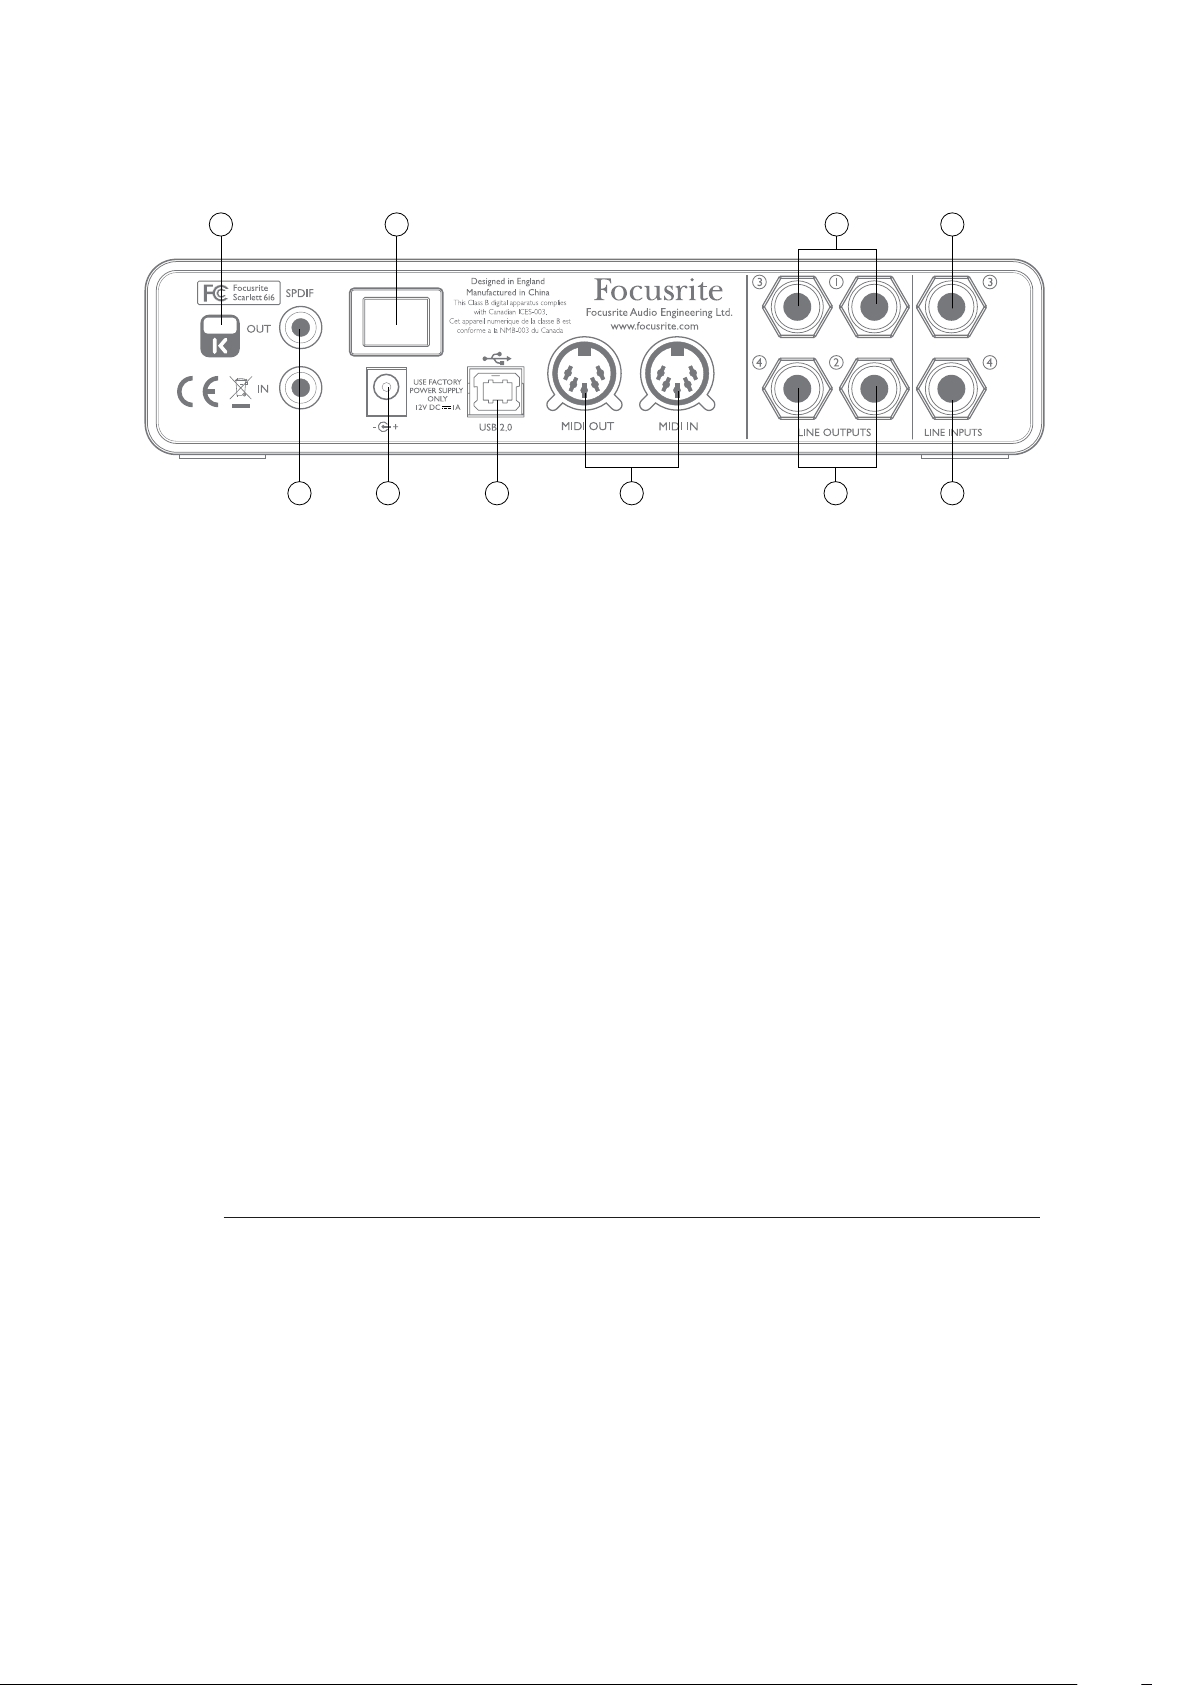
Rear Panel
101617 11
14 15 12 10
13 11
10. LINE INPUTS 3 and 4 — inputs 3 and 4. The inputs are balanced, on ¼” (6.35 mm) jack sockets.
Connect further line level sources here, using either ¼” TRS (balanced) or TS (unbalanced)
jack plugs.
11. LINE OUTPUTS 1 to 4 – four balanced analogue line outputs on ¼” (6.35 mm) jack sockets;
use TRS jacks for a balanced connection or TS jacks for unbalanced. Outputs 1 and 2 will
normally be used to drive the primary monitoring system, though the signals available at all
these outputs may be defined in Scarlett MixControl. Outputs 3 and 4 can typically be used for
driving alternative speakers (i.e., midfield, nearfield, etc.), or to drive outboard FX processors.
12. USB 2.0 port – Type B connector; connect the Scarlett 6i6 to your computer with the cable
supplied.
13. MIDI IN and MIDI OUT – standard 5-pin DIN sockets for connection of external MIDI equipment.
The Scarlett 6i6 acts as a “Break-out (and Break-in) Box”, allowing MIDI data to/from your
computer to be distributed to additional MIDI devices.
14. SPDIF IN and OUT – two phono (RCA) sockets carrying two-channel digital audio signals in
or out of the Scarlett 6i6 in S/PDIF format. These are essentially Inputs and Outputs 5 and 6
to/from the unit. Like all the other inputs and outputs, signals at these connectors may be
routed in Scarlett MixControl.
15. External DC power input – power the Scarlett 6i6 via a separate AC adaptor (PSU) rated at
12 V DC and 1 A. Note that the Scarlett 6i6 cannot be powered via its USB port from the host
computer.
16. Power On/Off switch.
17. Kensington security slot– secure your Scarlett 6i6 to a suitable structure if desired. Please
see http://www.kensington.com/kensington/us/us/s/1704/kensington-security-slot.aspx for
further information on how to use this feature.
10

Connecting your Scarlett 6i6
IMPORTANT: Before you connect your Scarlett 6i6 to your computer,
please complete the software installation according to the
instructions on page 8. This will ensure that the hardware uses the
correct drivers, and will prevent unexpected behaviour.
Power
Your Scarlett 6i6 should be powered from an external 12 V DC, 1 A mains adaptor. A suitable adaptor
is supplied with the unit.
IMPORTANT: We very strongly recommend that you only use the supplied mains adaptor. Failure to
use this adaptor is likely to permanently damage the unit and will also invalidate your warranty.
USB
Your Scarlett 6i6 has a single USB 2.0 port (on the rear panel). Once the software installation is
complete, simply connect it to your computer using the USB cable provided. (Note that Scarlett 6i6 is
a USB 2.0 device, and thus the USB connection requires a USB 2.0-compliant port on your computer.
It will not operate correctly with USB 1.0/1.1 ports.)
Mac OS only:
Your OS should automatically switch the computer’s default audio outputs to be the USB port to
which the Scarlett 6i6 is connected. To verify this, go to
that the input and output are set to Scarlett 6i6. For more detailed setup options on a Mac, open
Applications > Utilities > Audio MIDI Setup.
Windows only:
Your OS should automatically switch the computer’s default audio outputs to be the USB port to
which the Scarlett 6i6 is connected. To verify this:
• On Windows 7 — go to:
Audio Devices and ensure that Default Playback and Recording are set to Focusrite 2.0
Driver.
• on Windows 8, navigate to Control Panel and then select Hardware and Sound > Sound >
Manage Audio Devices and ensure that Default Playback and Recording are set to Focusrite
2.0 Driver.
Start > Control Panel > Hardware and Sound > Sound > Manage
System Preferences > Sound, and ensure
11
Loading…
Скачать
User Guide
www.focusrite.com
FFFA001426-01
Focusrite Scarlett 6i6 User Guide

OVERVIEW
Introduction
Thank you for purchasing this Second Generation Scarlett 6i6, one of the family of Focusrite professional audio interfaces incorporating high quality Focusrite analogue pre-amplifiers. In conjunction with the unit’s accompanying software application, Focusrite Control, you now have a compact yet highly versatile solution for routing high quality audio to and from your computer. You can also use the Scarlett 6i6 as a “stand-alone” interface to any other type of recording device, once you have configured it using Focusrite Control. Focusrite Control, and several other exciting and useful software applications, can be downloaded free of charge once you have registered your product. Note that a separate Focusrite Control User Guide is also available; we strongly recommend that you download this as well.
In developing the Second Generation series of Scarlett interfaces, we have enhanced both the performance and feature set including support for sample rates up to 192 kHz, improved mic preamp performance with low noise and plenty of gain, and upgraded instrument inputs with additional headroom for recording the loudest guitar parts without clipping.
Your Second Generation Scarlett interface is compatible with the new Focusrite Control software application: this lets you control various hardware features, set up monitor mixes and configure routings. There is a Focusrite Control installer for both Mac and Windows platforms, and no driver is required for Macs. The Windows version of the installer contains the driver, so in either case, you only need to install Focusrite Control to get up and running.
This User Guide provides a detailed explanation of the hardware to help you achieve a thorough understanding of the product’s operational features. We recommend that you take the time to read through the user guide, whether you’re new to computer-based recording or a more experienced user, so that you are fully aware of all the possibilities that the Scarlett 6i6 and accompanying software have to offer. If the main User Guide sections do not provide the information you need, be sure to consult support.focusrite.com, which contains a comprehensive collection of answers to common technical support queries.
Features
The Scarlett 6i6 audio interface provides the means for connecting microphones, musical instruments, line level audio signals and S/PDIF digital audio signals to a computer running compatible versions of Mac OS X or Windows via one of the computer’s USB ports. The signals at the physical inputs can be routed to your audio recording software / digital audio workstation (referred to throughout this user guide as the “DAW”) at up to 24-bit, 192 kHz resolution; similarly, the DAW’s monitor or recorded output signals can be configured to appear at the unit’s physical outputs.
The outputs can be connected to amplifiers and speakers, powered monitors, headphones, an audio mixer or any other analogue or digital audio equipment that you wish to use. Although all inputs and outputs on the Scarlett 6i6 are routed directly to and from your DAW for recording and playback, you can configure the routing within your DAW in order to meet your precise needs.
The accompanying software application, Focusrite Control, provides further routing and monitoring options, as well as the ability to control global hardware settings such as sample rate and synchronisation. 4 All inputs on the Scarlett 6i6 are routed directly to your DAW software for recording, but Focusrite Control also allows you to route these signals internally within the device to the outputs so that you can monitor the audio signals with ultra-low latency — before they arrive at your DAW, should you need to do so.
The Scarlett 6i6 also has connectors for sending and receiving MIDI data; this lets you use it as a MIDI “hub” between your computer’s USB port and other items of MIDI equipment in your system.
Box Contents
Along with your Scarlett 6i6 you should find:
- Bundle code* for accessing the following on-line resources:
- Focusrite Control (also available from www.focusrite.com/downloads)
- Focusrite Red 2 & 3 Plug-in Suite
- ProTools | First
- Ableton Live Lite
- LoopMasters sample library
- USB cable
- Getting Started Guide and Important Safety Information*
System requirements
Mac OS & Windows
For information on System Requirements for the Scarlett and the optional bundled software, please visit:
support.focusrite.com
GETTING STARTED
IMPORTANT: PLEASE ENSURE THAT YOU INSTALL FOCUSRITE CONTROL BEFORE CONNECTING THE INTERFACE TO YOUR COMPUTER.
NOTE THAT THE SECOND GENERATION SCARLETT 6i6 DOES NOT REQUIRE SEPARATE USB DRIVERS TO BE INSTALLED FOR EITHER MAC OR WINDOWS. FOCUSRITE CONTROL INCLUDES THE NECESSARY DRIVERS.
Software Installation
All software required by the Scarlett 6i6 — and several powerful and useful extras — are available for download from the Focusrite website (www.focusrite.com/register). You will find a “Bundle Code” printed on the inside of the box your Scarlett 6i6 comes in, and the Serial number can be found on the underside of the unit. You will need to enter these when you access the downloads area of the website; this procedure ensures that you will have the most up-to date software versions.
DOWNLOADING THE INCLUDED SOFTWARE
To download the included software, you will need to register your Scarlett 6i6 at focusrite.com/register
You will need the product serial number, found on the bottom of your 6i6 hardware Once you have entered the serial number, you will be asked to enter your BUNDLE CODE, found below:
PRODUCT BUNDLE CODE
- Using your usual browser, go to www.focusrite.com/register/.
- Follow the on-screen instructions, entering the Serial number and then the Bundle Code
(XXXXXX-XXXXXX-XXXXXX) into the form where prompted. Your Bundle Code is printed on the insideof the gift box. - You will then be able to access the “My Products” page, where Focusrite Control and the other software products to which your registration entitles you are available for download, complete with activation codes where applicable.
- Download and install the Focusrite Control version (Mac or Windows) appropriate for your computer. Follow all on-screen instructions.
- When the installation is complete, restart your computer.
- After restart, connect the Scarlett 6i6 to your computer with the USB cable supplied.
This information is accurate as of May 2016, however we are constantly striving to improve the customer experience and as a result this process is subject to change. If anything appears to have changed please refer to www.focusrite.com/get-started for the latest info.
HARDWARE FEATURES
Front Panel

The Front Panel includes input connectors for Mic, Line and Instrument signals, the input gain and monitoring controls, and sockets for headphones.
- Inputs 1 and 2 – XLR Combo type input sockets — connect microphones, instruments (e.g., guitar), or line level signals via XLR or ¼” (6.35 mm) jacks as appropriate. Either ¼” TRS(balanced) or TS (unbalanced) jack plugs can be used for instruments or line level signals.
- 48V – a switch enabling 48 V phantom power at the XLR contacts (mic inputs) of the Combo connectors. The switch illuminates when phantom power is selected.
- GAIN 1and GAIN 2 – adjust the input gain for the signals at Inputs 1 and 2 respectively. The gain controls have LED ‘rings’ to confirm signal level: green indicates an input level of at least -24 dBFS (i.e., ‘signal present’), the ring then turns red when signal level reaches 0 dBFS.
- INST – the input configuration for the jack contacts at Inputs 1 and 2 can be selected via software from Focusrite Control. The green LEDs illuminate when INST is selected. With INST selected, the gain range and input impedance are altered (relative to LINE), and the input is made unbalanced. This optimises it for the direct connection of instruments (usually via a 2-pole (TS) jack plug). When INST is off, the inputs are suitable for the connection of line level signals. Line level signals may be connected either in balanced form via a 3-pole (TRS) jack or unbalanced, via a 2-pole (TS) jack.
- PAD – a 10 dB pad may be inserted in each of the input signal paths; these are controlled via software from Focusrite Control. The pad increases the headroom of the input stage, and should be used to reduce mic or line level signals which are ‘too hot’ (i.e., when the gain halo is turning red while at minimum gain). It is not intended for use with the Instrument inputs. The red LEDs illuminate when PAD is selected.
- USB LED – a green LED which illuminates when the unit is recognized by the computer to which it is connected.
- MIDI LED – a green LED illuminates when MIDI data is received at the MIDI IN port.
- MONITOR – main monitor output level control – this is an analogue control and adjusts the level at Outputs 1 and 2 on the rear panel. The Monitor control does not control the level at outputs 3 and 4.
- connect one or two pairs of stereo headphones at the two ¼” (6.25 mm) TRS jack sockets below the headphone volume controls. The headphone outputs always carry the signals that are currently routed to analogue outputs 1 & 2 and 3 & 4 respectively (as stereo pairs) in Focusrite Control.
Rear Panel

- INE INPUTS 3 and 4 – The inputs are balanced, on ¼” (6.35 mm) jack sockets. Connect further line level sources here, using either ¼” TRS (balanced) or TS (unbalanced) jack plugs.
- LINE OUTPUTS 1 to 4 – four balanced analogue line outputs on ¼” (6.35 mm) jack sockets; use TRS jacks for a balanced connection or TS jacks for unbalanced. Outputs 1 and 2 will normally be used for monitors, though the signals available at all these outputs may be defined in Focusrite Control. The Monitor Control only affects the signal sent to Outputs 1 and 2. Outputs 3 and 4 can drive alternative speakers (i.e., midfield, nearfield, etc.), or to use outboard FX processors.
- USB 2.0 port – Type B connector; connect the Scarlett 6i6 to your computer with the cable supplied.
- MIDI IN and MIDI OUT – standard 5-pin DIN sockets for connection of external MIDI equipment. The Scarlett 6i6 acts as a “Break-out (and Break-in) Box”, allowing MIDI data to/from your computer to be distributed to additional MIDI devices.
- SPDIF IN and OUT – two phono (RCA) sockets carrying two-channel digital audio signals in or out of the Scarlett 6i6 in S/PDIF format. These are essentially Inputs and Outputs 5 and 6 to/from the unit. Like all the other inputs and outputs, signals at these connectors may be routed in Focusrite Control.
- External DC power input – power the Scarlett 6i6 via a separate AC adaptor (PSU) rated at
12 V DC and 1 A. Note that the Scarlett 6i6 canot be powered via its USB port from the host computer. - Power On/Off switch.
- K (Kensington security lock) – secure your Scarlett 6i6 to a suitable structure if desired. Please see www.kensington.com/kensington/us/us/s/1704/kensingto -security-slot.aspx for further information on how to use this feature.

IMPORTANT — Line Outputs 1 — 4 do not have anti-thump, please make sure you power on your amplifier or monitor speakers last to avoid thumps, pops or clicks when you power on your computer and interface.
Connecting your Scarlett 6i6
IMPORTANT: Before you connect your Scarlett 6i6 to your computer, please complete the software installation according to the instructions at page 5. This will ensure that the hardware uses the correct drivers, and will prevent unexpected behavior.
Power
Your Scarlett 6i6 should be powered from an external 12 V DC, 1 A mains adaptor. A suitable adaptor is supplied with the unit.
IMPORTANT: We very strongly recommend that you only use the supplied mains adaptor. Failure to use this adaptor is likely to permanently damage the unit and will also invalidate your warranty.
USB
Your Scarlett 6i6 has a single USB 2.0 port (on the rear panel). Once the software installation is complete, simply connect it to your computer; we recommend you use the USB cable provided. (Note that Scarlett 6i6 is a USB 2.0 device, and thus the USB connection requires a USB 2.0-compliant port on your computer. It will not operate correctly with USB 1.0/1.1 ports, however typically a USB 3.0 port will support a USB 2.0 device.)
Mac OS only:
Your OS should automatically switch the computer’s default audio inputs & outputs to the Scarlett 6i6. To verify this, go to System Preferences > Sound, and ensure that the input and output are set to Scarlett 6i6. For more detailed setup options on a Mac, open Applications > Utilities > Audio MIDI Setup.
Windows only:
Your OS should automatically switch the computer’s default audio inputs and outputs to be the Scarlett 6i6. To verify this go to: Start > Control Panel > Hardware and Sound > Sound > Manage Audio Devices and ensure that ‘Default Playback’ and ‘Recording’ are set to ‘Scarlett 6i6.
Audio Setup in your DAW

The Scarlett 6i6 is compatible with any Windows-based DAW that supports ASIO or WDM or any Mac-based DAW that uses Core Audio. After installing Focusrite Control and connecting the hardware, you can start using your Scarlett 6i6 with the DAW of your choice. To allow you to get started if you do not already have a DAW application installed on your computer, both Pro Tools | First and Ableton Live Lite are included; these will be available to you once you’ve downloaded and activated your software online. To install either DAW, download and save the relevant installer file from your registered Focusrite “My Products” page as described on page 5, and then run it, following all on-screen instructions.
Operating instructions for Ableton Live Lite and Pro Tools | First are beyond the scope of this User Guide, but both applications include a full set of Help files. You can also find a video tutorial on getting started with Ableton Live Lite at www.focusrite.com/getting-started
.Please note — your DAW may not automatically select the Scarlett 6i6 as its default I/O device. In this case, you must manually select the driver on your DAW’s Audio Setup* page (select Scarlett 6i6 for Mac or Focusrite USB 2.0 driver for Windows). Please refer to your DAW’s documentation (or Help files) if you are unsure where to select the ASIO/Core Audio driver. The example below shows the correct configuration in the Ableton Live Lite Preferences panel (Mac version shown).
Once the Scarlett 6i6 is set as the preferred Audio Device* in your DAW, all six inputs and twelve outputs (this is the maximum number of DAW outputs that can route to the Focusrite Control software) will appear in your DAW’s Audio I/O preferences (note however that Ableton Live Lite is limited to a maximum of four mono input channels and four mono output channels). Depending on your DAW, you may need to enable certain inputs or outputs before use. The two examples below show two inputs and two outputs enabled in Ableton Live Lite Audio Preferences.

Typical name. Terminology may differ slightly between DAWs.
Example of Usage
The Scarlett 6i6 is an excellent choice for several different recording and monitoring applications. Some typical configurations are shown below.
Connecting microphones and instruments

This setup illustrates a configuration for recording two singers and a keyboard with DAW software on Mac or PC. In this case, Inputs 1 and 2 are used for the two vocalists, while Inputs 3 and 4 receive the stereo output of the keyboard. These sources will all be recorded on separate tracks of the DAW. During recording, a mix of the keyboard and the two vocalists — plus the playback of any tracks already recorded on the DAW — can be monitored on headphones. Alternatively, one of two pairs of loudspeakers can be used if the vocalists are in a separate room. The mix itself is set up in Focusrite Control.
The front panel input sockets are XLR Combo type, which accept either an XLR male connector (you will probably have one on the end of your microphone cable) or a ¼” (6.35 mm) jack plug. Note the Scarlett 6i6 has no “Mic/line” switch – the Focusrite preamplifier stage is automatically configured for a microphone when you plug an XLR into the input, and for a line or instrument when you connect a jack plug. Select INST in Focusrite Control (on the Device Settings page) if you are connecting a musical instrument (like a guitar) via an ordinary 2-pole guitar jack, or to LINE if you are connecting a line level source such as the balanced output of an external audio mixer via a 3-pole (TRS) jack.
Note the Combo connector accepts both types of jack plug.
If you are using capacitor (condenser) microphones, press the 48V button to supply phantom power to the mics. We recommend you don’t turn this on if you’re using any other type of mic, as some models can be damaged by the application of phantom power. As the 48V button enables phantom power at both inputs, if you are using one condenser mic and one non-condenser, you should check the non-condenser mic’s technical data first to be certain that the mic is able to accept phantom power without damage.
Each channel of the Scarlett 6i6 has a PAD facility, selectable from Focusrite Control (on the Device Settings page); switching the Pad into circuit reduces the input sensitivity by 10 dB. You may find this useful if you are feeding the input from a line-level source when the output is particularly “hot”.
Low Latency Monitoring
You will frequently hear the term “latency” used in connection with digital audio systems. In the case of the simple DAW recording application described above, latency will be the time it takes for your input signals to pass through your computer and audio software, and back out again via your audio interface. While not an issue for most simple recording situations, under some circumstances, latency can be a problem for a performer who wishes to record while monitoring their input signals. This might be the case if you need to increase the size of your DAW’s recording buffer, which could be necessary when you record overdubs on a particularly large project using many DAW tracks, software instruments and FX plug-ins. Common symptoms of a buffer setting that is too low could be glitching audio (clicks and pops), or a particularly high CPU load within your DAW (most DAWs have CPU read outs). If you experience this on a Mac, you can raise the buffer size from within the DAW application itself, but on a PC you will most likely need to change this from within the “MiniControlPanel” which can usually be accessed from your DAW setup preferences.
The Scarlett 6i6, in conjunction with Focusrite Control, allows “low latency monitoring”, which overcomes this problem. You can route your input signals directly to the Scarlett 6i6’s headphone and line outputs. This enables the musicians to hear themselves with ultra-low latency – i.e., effectively in “real time” – along with the computer playback. The input signals to the computer are not affected in any way by this setting. However, note that any effects being added to the live instruments by software plug-ins will not be heard in the headphones in this case, although the FX will still be present on the recording.
In the example below, each of the band members is receiving a monitor mix. Focusrite Control lets you define up to four separate mono mixes (or two stereo), and these mixes may include previously recorded DAW tracks as well the current input signals.

When using Direct Monitoring, ensure that your DAW software is not set to route any inputs (what you are currently recording) to any outputs. If it is, the musicians will hear themselves “twice”, with one signal audibly delayed as an echo.
Connecting Scarlett 6i6 to loudspeakers

The 1/4” jack outputs on the rear panel will normally be used to drive monitoring speakers. Self-powered (active) monitors incorporate internal amplifiers, and may be connected directly. Passive loudspeakers will require a separate stereo amplifier; in this case, the rear panel outputs should be connected to the amplifier’s inputs.
All the line output connectors are 3-pole (TRS) ¼” (6.35 mm) jack sockets, and are electronically balanced. Typical consumer (hi-fi) amplifiers and small powered monitors will probably have unbalanced inputs, either on phono (RCA) sockets, or via a 3.5 mm 3-pole jack plug intended for direct connection to a computer. In either case, use a suitable connecting cable with jack plugs at one end.
Professional active monitors and professional power amplifiers will generally have balanced inputs.
When mixing, you can connect two pairs of speakers (midfield. nearfield, etc.) to outputs 1/2 and 3/4 and use Focusrite Control to route your mix to the different output pairs as desired, to check your mix on the different types of speaker.
NOTE: You run the risk of creating an audio feedback loop if loudspeakers are active at the same time as a microphone! We recommend that you always turn off (or turn down) monitoring loudspeakers while recording, and use headphones when overdubbing.
Using the Scarlett 6i6 as a stand-alone mixer
he Scarlett 6i6 has the ability to store a mix configuration defined in Focusrite Control within the hardware. This feature lets you configure it – for example, as an on-stage sub-mixer – using your computer, and then upload the configuration to the device itself. Then you can use the Scarlett 6i6 as a simple local mixer as part of your equipment rig to control the overall mix of multiple instruments

In the example illustrated, one guitar plus two stereo and one mono keyboards are connected to the six inputs of the Scarlett 6i6; Outputs 1 and 2 go to the main PA system. The player can set up a rough mix in Focusrite Control and then adjust the levels of the two mono sources against the stereo ones from the front panel.
FOCUSRITE CONTROL
Focusrite Control software allows flexible mixing and routing of all audio signals to the physical audio outputs, as well as control of output monitor levels. Sample rate selection and digital sync options are also available from Focusrite Control.
NOTE: Focusrite Control is a generic product, and may be used withother Focusrite hardware interfaces. When you connect an interface to your computer and launch Focusrite Control, the model of interface is automatically detected, and the software configured to suit the number of inputs and outputs, and other facilities, available on the hardware.
IMPORTANT: A separate Focusrite Control User Guide can be downloaded once you have completed the on-line registration process. This describes the use of Focusrite Control in full detail, together with examples of application.
To open Focusrite Control:
Installing Focusrite Control on your computer will place an FC icon on the dock or desktop. Click the icon to launch Focusrite Control.
Assuming that your Scarlett interface is connected to your computer with the USB cable, the Focusrite Control GUI (Graphical User Interface) will appear as shown below (Mac version illustrated).

The following table provides the channel routings when preset option “Direct Routing” is selected in Focusrite Control.
| CH NO. | INPUTS | OUTPUTS |
| 1 | Input 1 | Output 1 |
| 2 | Input 2 | Output 2 |
| 3 | Input 3 | Output 3 |
| 4 | Input 4 | Output 4 |
| 5 | S/PDIF 1 | S/PDIF 1 |
| 6 | S/PDIF 2 | S/PDIF 2 |
Please refer to the Focusrite Control User Guide for further details.
SPECIFICATIONS
Performance Specifications
| Configuration | |
| Inputs | 6: analogue (4), S/PDIF (2) |
| Outputs | 6: analogue (4), S/PDIF (2) |
| Mixer | Fully assignable 6-in/12-out software mixer (Focusrite Control) |
| Digital Performance | |
| Supported sample rates | 44.1 kHz, 48 kHz, 88.2 kHz, 96 kHz, 176.4 kHz and 192 kHz |
| Clock jitter | <250 ps |
| Microphone Inputs | |
| Frequency Response | 20 Hz to 20 kHz, +0.5/-1.5 dB |
| Dynamic Range | 109 dB (‘A’-weighted) |
| THD+N | < 0.002% |
| Noise EIN | –127 dBu |
| Maximum Input Level | +8.5 dBu (without pad) |
| Gain Range | 50 dB |
| Line Inputs 1 & 2 | |
| Frequency Response | 20 Hz to 20 kHz, +0.5/-1.5 dB |
| Dynamic Range | 109 dB (‘A’-weighted) |
| THD+N | < 0.003% |
| Maximum Input Level | +22 dB |
| Gain Range | 50 dB |
| Line Inputs 3 & 4 | |
| Frequency Response | 20 Hz to 20 kHz, +0.5/-1.5 dB |
| Dynamic Range | 109 dB (‘A’-weighted) |
| THD+N | < 0.003% |
| Maximum Input Level | +16 dB |
| Instrument Inputs | |
| Frequency Response | 20 Hz to 20 kHz, +0.5/-1.5 dB |
| Dynamic Range | 109 dB (‘A’-weighted) |
| THD+N | < 0.003% |
| Maximum Input Level | +12 dBu |
| Gain Range | 50 dB |
| Line Outputs 1 to 4 | |
| Frequency Response | 20 Hz to 20 kHz, +/-0.5 dB |
| Dynamic Range | 108 dB (‘A’-weighted) |
| THD+N | < 0.001% |
| Maximum Output Level (0 dBFS) | +16 dBu, balanced |
| Headphone Outputs | |
| Frequency Response | 20 Hz to 20 kHz, +/-0.5 dB |
| Dynamic Range | 108 dB (‘A’-weighted) |
| THD+N | < 0.001% |
| Maximum Output Level (0 dBFS) | +13 dBu, balanced |
Physical and Electrical Characteristics
| Analogue Inputs 1 & 2 | |
| Connectors | XLR Combo type: Mic/Line/Inst, on front panel |
| Mic/Line switching | Automatic |
| Line/Instrument switching | Via software from Focusrite Control |
| Phantom power | Shared +48 V phantom power switch for inputs 1 and 2 |
| Analogue Inputs 3 & 4 | |
| Connectors | 2 x balanced ¼” TRS jacks on rear panel |
| Analogue Outputs 1 to 4 | |
| Connectors | 4 x balanced ¼” TRS jacks on rear panel |
| Stereo headphone outputs | 2 x ¼” TRS jack on front panel |
| Main monitor output level control |
On front panel |
| Headphones level controls | |
| Other I/O | |
| S/PDIF I/O | 2 x phono (RCA) |
| USB | 1 x USB 2.0 Type B connector |
| MIDI I/O | 2 x 5-pin DIN sockets |
| Weight and Dimensions | |
| W x D x H | 195 mm x 50 mm x 212 mm
7.68” x 1.97” x 8.35” |
| Weight | 1.4 kg
3.09 lb |
TROUBLESHOOTING
For all troubleshooting queries, please visit the Focusrite Help Centre where you will find articles covering numerous troubleshooting examples: support.focusrite.com
COPYRIGHT AND LEGAL NOTICES
Focusrite is a registered trade mark and Scarlett 6i6 is a trade mark of Focusrite Audio Engineering Limited.
All other trade marks and trade names are the property of their respective owners. 2016 © Focusrite Audio Engineering Limited. All rights reserved.
Documents / Resources
References
-
Focusrite | Focusrite Downloads
-
Please log in | Customer Portal
-
Focusrite | Focusrite Downloads
-
Get Started | Get Started
-
Getting started | Focusrite
-
Focusrite
-
Re-direct | Kensington Chevron Icon Chevron Icon Icon/Chevron Shape Chevron Icon Icon/Social/Twitter Icon/Social/Facebook YouTube Icon/Social/LinkedIn Instagram icon Spiceworks_48px_grey Pinterest icon
tags: Focusrite, Scarlett 6i6,
Товар снят с производства
Аналоги
Товар снят с производства!
Внешняя звуковая карта Focusrite Scarlett 6i6 2nd Gen создана специально для использования небольшими группами или в домашних студиях, где есть необходимость параллельной записи вокала и инструментов. Устройство позволяет подключить микрофон, гитару или MIDI клавиатуру, и начать запись где угодно, сразу обрабатывая звук с помощью эффектов. Это возможно благодаря чрезвычайно низкой задержке, уникальной для звуковых карт в подобном классе.
Несмотря на свою компактность, Scarlett 6i6 2nd Gen имеет большое количество разъемов. Два комбинированных входа XLR/TRS на передней панели дополнены двумя линейными входами с задней стороны прибора. Инструментальные входы спроектированы специально для работы с активными датчиками, а регулировка усиления с подсветкой позволит не переживать об овергейне.
На задней панели устройства расположены четыре балансных выхода, позволяющих подключение студийных мониторов. Помимо этого, здесь располагаются вход и выход MIDI, а также вход и выход SPDIF. Это дает возможность полноценно работать как с аналоговым, так и с цифровым звуком. Высококлассные A/D конвертеры в конструкции звуковой карты гарантируют максимальную четкость и чистоту записи при любой громкости.
USB-аудиоинтерфейс Focusrite Scarlett 6i6 2nd Gen абсолютно универсален по своим системным требованиям, и работает при подключении через любую DAW, как с MacOS, так и с Windows. В комплекте поставляется широкий спектр музыкального программного обеспечения.
Особенности звуковой карты Scarlett 6i6 2nd Gen:
- 2х комбинированных входа XLR/TRS с микрофонными предусилителями Scarlett;
- 2х усовершенствованных линейных входа с повышенным сопротивлением при пиковых нагрузках;
- сверхнизкая цифровая задержка в 2,74 мс при частоте дискретизации 96 кГц, позволяющая накладывать эффекты в режиме реального времени;
- частота дискретизации 24 бит/192 кГц;
- 4х линейных выхода для подключения студийных мониторов, а также выход для мониторных наушников;
- вход/выход MIDI и цифрового аудиосигнала SPDIF;
- питание через шину USB;
- в комплекте поставляется дополнительное ПО (в виде кодов на скачивание с официального сайта) ProTools|First Focusrite Creative Pack, Ableton Live Lite, пакеты плагинов Focusrite’s Red Plug-In Suite, Softube Time and Tone Bundle, а также доступ к библиотеке сэмплов Loopmasters (ограниченная специальная версия 2 Гб).
Драйвера:
- скачать бесплатно драйвер Focusrite Scarlett 6i6 2nd Gen для Windows 7/8/10 с официального сайта производителя;
- работа с MacOS в режиме plug’n’play.
- Focusrite
- Студия Focusrite
- Звуковые карты Focusrite
Файлы для скачивания
- Руководство быстрого запуска Scarlett 6i6 2nd Gen (PDF 45.571 Кб)
- Инструкция к Focusrite Scarlett 6i6 2nd Gen (на англ.) (PDF 2 Мб 558 Кб)
Технические характеристики Scarlett 6i6 2nd Gen:
Общие характеристики:
- тип: внешняя звуковая карта;
- входы/выходы: 2х комбинированных входа (1/4″ TRS/XLR), 2х линейных TRS-входа, 4х балансных выхода 1/4″ TRS для мониторов, 1х 1/4″ стерео jack для наушников, MIDI i/o, SPDIF i/o, USB B 2.0;
- частота сэмплирования: 44.1, 48, 88.2, 96, 176.4 и 192 кГц;
- питание: от шины USB, для микрофонных входов возможно фантомное питание 48 В;
- минимальные системные требования: Mac OSX10.10 Yosemite/10.11 El Capitan; Windows 7 (64-bit)/8.1/10;
- размеры: 500х195х212 мм;
- вес: 1,22 кг.
Микрофонный вход:
- диапазон рабочих частот: 20-20000 Гц;
- динамический диапазон: 109 дБА;
- THD+N: < 0,002% ;
- эквивалентный уровень шума: -127 дБА;
- предельный входной уровень: +8,5 дБн;
- диапазон усиления: 50 дБ;
- сопротивление: 3 кОм.
Линейные входы 1-2:
- диапазон рабочих частот: 20-20000 Гц;
- динамический диапазон: 109 дБА;
- THD+N: < 0,003%;
- предельный входной уровень: +22 дБн;
- диапазон усиления: 50 дБ;
- сопротивление: 52 кОм.
Линейные входы 3-4:
- диапазон рабочих частот: 20-20000 Гц;
- динамический диапазон: 110 дБА;
- THD+N: < 0,003%;
- предельный входной уровень: +16 дБн;
- сопротивление: 52 кОм.
Инструментальный вход:
- диапазон рабочих частот: 20-20000 Гц;
- динамический диапазон: 109 дБА;
- THD+N: < 0,003%;
- предельный входной уровень: +12 дБн;
- диапазон усиления: 50 дБ;
- сопротивление: 1 МОм.
Мониторные выходы (1-2):
- частотный диапазон: 20-20000 Гц;
- динамический диапазон: 108 дБА;
- предельный выходной уровень: +16 дБн;
- THD+N: < 0,001%;
- сопротивление: 94 Ом.
Линейные выходы (3-4):
- частотный диапазон: 20-20000 Гц;
- динамический диапазон: 108 дБА;
- предельный выходной уровень: +14,5 дБн;
- THD+N: < 0,001%;
- сопротивление: 94 Ом.
Выход на наушники:
- динамический диапазон: 108 дБА;
- THD+N: < 0,002%;
- предельный выходной уровень: +9 дБн;
- сопротивление: 10 Ом.
В комплекте:
- аудиоинтерфейс Focusrite Scarlett 6i6 2nd Gen;
- кабель USB;
- коды для загрузки ПО.
View the manual for the Focusrite Scarlett 6i6 here, for free. This user manual comes under the category hi-fi systems and has been rated by 2 people with an average of a 9.6. This manual is available in the following languages: English. Do you have a question about the Focusrite Scarlett 6i6?
Ask your question here
Frequently asked questions
Can’t find the answer to your question in the manual? You may find the answer to your question in the FAQs about the Focusrite Scarlett 6i6 below.
Can bluetooth devices of different brands be connected to each other?
Yes, bluetooth is a universal method that allows different devices equipped with bluetooth to connect to each other.
What is bluetooth?
Bluetooth is a way of exchanging data wirelessly between electronic devices via radio waves. The distance between the two devices that exchange data can in most cases be no more than ten metres.
What is HDMI?
HDMI stands for High-Definition Multimedia Interface. An HDMI cable is used to transport audio and video signals between devices.
When is my volume too loud?
A volume above 80 decibels can be harmful to hearing. When the volume exceeds 120 decibels, direct damage can even occur. The chance of hearing damage depends on the listening frequency and duration.
How can I best clean my hi-fi system?
A slightly damp cleaning cloth or soft, dust-free cloth works best to remove fingerprints. Dust in hard-to-reach places is best removed with compressed air.
Wat is Dolby Atmos?
Dolby Atmos is a technology that ensures that the sound is reflected from the ceiling to where you are listening. This makes it possible to create a 5.1 effect with only 1 speaker.
Is the manual of the Focusrite Scarlett 6i6 available in English?
Yes, the manual of the Focusrite Scarlett 6i6 is available in English .
Is your question not listed? Ask your question here