
YAMAHA
РУКОВОДСТВО
ПОЛЬЗОВАТЕЛЯ

Поздравляем!
Вы — владелец прекрасной жлектронной клавиатуры. Yamaha PSR-550 PortaTone
объединяет в себе наиболее современную технологию генератора тона с совершенной
цифровой
электроникой,
обеспечивает
превосходное
звучание
и
максимальное
удовольствие от исполнения. Большой графический дисплей и простой в использовании
интерфейс существенно упрощают использование этого современного инструмента. Для
извлечения максимальных возможностей из PSR-550 мы рекомендуем внимательно
ознакомиться с руководством и опробовать различные описанные возможности. Всегда
держите руководство под рукой для справки.
Комплектация
Пожалуйста, проверьте комплектацию PSR-550:
* PSR-550
* Подставка для нот (с. 9)
* Дискета с данными для PSR-S50
ТШ1
руководство пользователя
JJ
(Обратитесь к разделам «Прилагающаяся дискета с
данными» на с, 59 и «MIDI на выходы ТО HOST»
на с. !07)

Как пользоваться руководством
и Настройка
й
Важные
возможности
■ Базовые
операции
в Содержание
Регулировки
панели
Ицднкация
панели дисилея
Дерево
функций
■ Приложения
я Устранение
неисправностей
в Указатель
стр, 12
Перед переходом к любой другой части руководства мы настоятельно
рекомендуем ознакомиться сначала с этим разделом. Он покажет вам как
подготовится к использованию вашего нового инструмент PSR-550.
стр. 8
Как только вы настроите PSR-550, вы должны прочитать этот раздел и изучить
страницы,
упомянутые
в
ссылках,
для
ознакомления
с
разнообразием
возможностей и функцией PSR-550,
стр.17
Этот раздел знакомит с базовыми операциями PSR-550, такими как изменение
значений и настроек и показывает функцию помощи и прямого доступа.
стр. б
в нем перечислены все разделы, возможности, функции в той последовательности,
в которой они встречаются в руководстве.
стр. 10
Этот раздел содержит информацию относительно всех кнопок и регуляторов PSR-
550.
стр. 16
Этот раздел разъясняет индикацию дисплея PSR-550 и ее.. прочтение для
оптимизации функционирования PSR-550.
стр. 22
Перечисляет все функции PSR-550 в соответствии с их иерархической сзруктурой,
позволяя проследить взаимосвязь между различными функциями и быстро найти
нужную информацию.
стр. 123
Содержит различные важные списки, такие как список голосов, текущих сгипей,
эффектов, форматов данных MIDI и схему применения MIDI.
cip. 126
Если PSR-550 функционирует с отклонениями или возникли какие-то проблемы,
обратитесь к этому разделу перед посещением центра обслуживания компании
Yamaha. Наиболее типичные проблемы и их решения приведены здесь наряду с
простыми и понятными способами их решения.
стр. 130
Этот раздел содержит темы, функции, возможности и операции в алфавитном
порядке с указанием соответствующих страниц, что позволяет просто и быстро
получить необходимую информацию.
Иллюстрации и экраны дисплеев приводятся в руководстве только как примеры и могут отличаться от
фактически возникающих на инструменте.____________________________________________________ _________


Важные возможности, Базовые операции, Автоматический аккомпаиемепт (стнлн)
Прослунипаняе psr-s50, Музыкальная база данных, Многочнслевные электронные ударные, Исполнение на р8я-550, Регастрация к памяти, Запись иесин Чат поддержки
- Изображение
- Текст
Важные возможности
Поскольку PЯR-550 имеет множество современных возможностей и функций, которыми вы не умеете
полмоваться. Но не беспокойтесь. Р8К-550 легко использовать, а каждую функцию несложно реализовать.
Вот какие цели у данного раздела. Он поможет вам овладеть Р8К-550, познакомит с важными возможностями и
даст указания на страницы. Прочитайте информацию о возможностях, затем перейдите к тем частям
руководства, где приведено подробное объяснение.
Базовые операции
* Р5К-550 имеег совершенные функции и
возможности, хотя он крайне прост в
использовании. Благодаря функции навигации
управление панелью быстрое и простое —
необходимые для нажатия кнопки
подсвечиваются, а дисплей со специальной
подсветкой изменяет цвет в зависимости от
выбранного режима (с. 16,16).
* Удобная функция прямого доступа позволяет
мгновенно вызывать определенные меню или
дисплеи, (С. 21)
■ Автоматический аккомпаиемепт (стнлн)
*
Функция автоматического аккомпанемента
позволяет при помощи пальцев вызывать
звучание целого оркестра. В вашем
распоряжении — 112 стилей (паттернов ритма и
аккомпанемента). (С. 32)
* Функция настройки в одно нажатие позволяет
мгновенно вызвать соответствующий голос,
эффект и другие настройки для выбранного
стиля аккомпанемента — нажатием одной кнопки.
(С. 42)
* Вы также можете создавать собственные стили
аккомпанемента, записывая их непосредственно
с клавиатуры. (С. 96)
Прослунипаняе PSR-S50
*
PSR-550 имеет широкий спектр песен в различных
музыкальных жанрах. (С. 15)
* Дополнительно 10 песен записаны на
комплектующийся диск. (С. 59)
* Эффективная функция автоматического
аккомпанемента обеспечивает 112 стилей
(паттерны ритмов и аккомпанемента) для
профессионального сопровождения вашего
исполнения (с. 112).
*
Многочисленные специальные электронные
ударные
позволяют
исполнять
короткие
ритмические и мелодические секвенции для
дополнительного совершенствования исполнения.
(С. 43)
Музыкальная база данных
* PSR-550 имеет встроенную музыкальную базу
данных для автоматического выбора стиля,
голоса и настройки эффекта, которые лучше
подходят
для
определенного
музыкального
жанра. Если вы не знаете, какой стиль или голос
подойдут лучше, музыкальная база данных
поможет вам, (С. 14).
Многочнслевные электронные ударные
* просто нажмите одну из кнопок MULTI PAD
(разнообразные музыкальные фразы) и вы
сможете исполнить короткие ритмические или
мелодические фразы. (С. 43).
* Вы также можете создавать собственные фразы,
записывая их непосредственно с клавиатуры. (С.
92)
Исполнение на Р8Я-550
* Клавиатура PSR-550 имеет 61 клавишу с
возможностью отклика на полное нажатие, что
позволяет исполнять с необычайной
выразительностью и управлением
динамичностью, (С. 26)
* Р5Е-550 позволяет использовать огромное
разнообразие голосов музыкальных
инструментов. (С. 26)
Также существует два различных типа голосов:
голоса панели (исходные голоса PSR-550) и
голоса ХО.
* геК-550 имеет 219 голосов панели, 14 наборов
ударных и 480 голос ХО.
* Голоса Rl, R2 и Ь позволяют исполнять,
накладывая различные голоса или даже
исполнять два различных голоса левой и правой
руками. (С. 27 и 28).
Регастрация к памяти
*
Удобная возможность позволяет сохранять
практически все настройки панели в одной из 128
ячеек памяти. Настройки, занесенные в память,
могут быть вызваны мгновенно нажатием одной
кнопки. (С. 54)
Запись иесин
* Эффективная возможность создания собственных
композиций,
с
полной
оркестровкой,
и
сохранения
их
на
дискете
как
песни
пользователя.
Каж/^
песня
может
быть
записана на 16 дорожках. (С. 78)
Для быстрой и простой реализации ваших
музыкальных идей используйте способ быстрой
записи. (С. 80)
*
Для создания песни партия за партией и дорожка
за дорожкой используйте способ записи на
нескольких дорожках. (С. 82)
* Вы также можете выполнить «тонкую настройку»
данных песни при помоиди усовершенствованной
функции редаюмроваиия песни. (С. 84-91)
8

Цяф|Ю1ие эффекты
^ Огромный набор эффектов, обеспечивающих
профессиональное звучание позволяет улучшать
ваше исполнение различные способами, которые
включают
реверберацию,
хорус,
DSP
н
гармонню/это. (С. 46).
*
Реверберация создает объемное звучание,
соответствующее различным условиям,
. например, концертным залам или помещениям
ночных клубов. (С, 46).
* Хорус улучшает голоса, придавая им теплоту и
насыщенность, как будто одновременно идет
исполнение на нескольких инструментах. (С.
48).
* Эффект DSP позволяет обрабатывать звук
различным нетрадиционными способами —
приложением
искажения
или
тремоло
к
определенным партиям. (С. 49)
*
Гармония/это позволяют совершенствовать
мелодии,
исполняемые
правой
рукой,
применяя эффекты гармонии и эхо. (С. 50)
Дискокод
*
PSR-S50
имеет
встроенный
дисковод,
позволяющих сохранять важные данные (песни
пользователя, музыкальные фразы пользователя,
данные ячеек памяти и т.п.) на дискете для
дальнейшего использования. (С. 57)______________
МШЕ
*
MIDI
(цифровой
интерфейс
музыкальных
1ШСтруме«тов)
—
распространенных
стандартный
интер^йс,
позволяющий
взаимодействовать
между
собой
различным
инструментам,
компьютерам и иным устройствам. Функция
MIDI
позволяет
включать
PSR-550
в
многочисленные системы:
* Управлять другими инструментами с PSR-550
(с. Ш8)
*
Исполнять
на
PSR-550
(включая
автоматический
аккомпанемент)
с
подключенной клавиатуры. (С. 108)
*
Подключать PSR-550 непосредственно к
компьютеру для шписи, редактирования и
воспроизведения данных песен. (С. 110)
* Использовать ранее подготовленные шаблоны
для мгновенного конфигурирования PSR-SS0
для специфических систем MIDI. (С. 112)
Лмолшы
Логотипы, напечатанные на панели Р8Р-550, указывают
на стандартные форматы, которые инструмент
поддерживает.
GM
система, уровень
1
Это дополнительный стандарт MIDI, который
гарантирует, что любые данные, соответствующие
данному стандарту, будут восприняты любым GM-
совместнмым генератором тона или синтезатором
любого производителя.
XG
XG — MIDI формат Yamaha, который существенно
улучшает и расширяет возможности формата GM уровня
1,
обеспечивая лучшее управление голосами,
выразительностью исполнения и эффектами при полном
сохранении совместимости с GM. Используя голоса XG
PSR-550 можно записать файлы песен, совместимых с
XG.
I Подсткви для мнсфумевт1
DOC
Этот формат обеспечивает воспроизведение данных,
совместимых с широким диапазонов инструментов
Yamaha и устройств MIDI, включая серию Clavinova.
Формат файла стилей
формат SPF — орипшальньгй формат компании Yamaha
которые иоюльзует уникальную систему преобразования
для обеспечения высококачественного автоматического
аккомпаиаиентв на базе широкого диапазона аккордов.
PSR-5S0 использует э
1
от формат внутри себя, считывает
дополнительные дискеты сО стилями SFF и создаег стили
этого формата, используя функцию записи стилей.
РЗК’550 комплекту’стся музыкальной подставкой,
которая может быть вставлеьса в прорезь на задней
стороне панели управления.

Регуляторы и разъемы панели, Регуляторы и выходы панели, Ш разъем для недальнего переключателя footswitch
Разъем для ваувгаикоя phones/outpl^t Чат поддержки
- Изображение
- Текст
Регуляторы и разъемы панели
ir li- а— И- «г ii» к?- iv- ггг ёг ipir- Ì-f й- sr S?- w *- é-
flr А- fi- )«■ ijt» Л’ »’■ №• й
1
’
4
,- gt,- A- «• iS- if Xf ir w
й» ^ «;■ ff- .tu- >■ т
Ш Разъем для недальнего переключателя
FOOTSWITCH
Функция
поддержания
звучания
реализуется
посредством нажатия педального переключателя.
Включите
дополнительный
педальный
переключатель Yamaha FC4 или 5 в разъем и
используйте
его
для
включения/выключеиия
поддержания звучания. Этот переключатель также
может быть настроен на фу
1
жцнонирование в
качестве некоторых кнопок панели, выполняя,
например, запуск или остановку аккомпанемента
(с. 121).
ПРИМЕЧАНИЕ:
*
Еудыпе уверены, что вы не нажали педальный
переключатель
е
процессе
включения
питания.
В
противном случае сплатус включения
обратным.
*
При испольювйнии педальных функщй поддержания imt
сдерживания звучания (с. 1 2 1 ) , некоторые голоса могут
щучати
непрерывно
или
иметь
длительное
штухание
после отпускания клавиш при нажатой педали.
Разъем для ваувгаикоя PHONES/OUTPl^T
Стандартные
стереонаушники
могут
быть
подключены к этому разъев для практикования в
позднее время или при желании персонального
прослушивания. Система встроенных динамиков
автоматически выключится при подключении
наушников к данному разъему. Не используйте
высокую громкость для наушников длитель.пое
время, это может ухудшить слух.
! ВНИМАНИЕ
^
Подключение
ко виешие.ну устройству можно
проводить только после отключения питания на всех
устройствах, ВО избежание повреждения динамиков
задайте уровень гролкоспш на внешних устройствах
минимальным. Несоблюдение этой предосторожности
.может привести к удару токо.н или повреждению
оборудования.
10

ш Регуляторы верхней части панели
1. Выключатель STANDBY/ON
(питание) 13
2. Регулятор Master Volume (общая
__^
громкость) 13
3. Кнопка DEMO (демонстрация) 13,17
4. Кнопка RECORD (запись) 25 78 96
5. Кнопка DIRECT ACCESS (прямой
доступ) 21,24
6. Кнопка DSP 49
7. Кнопка FAST/SLOW (быстро/
медленно)49
8. Кнопка TOUCH (нажатие) 120
9. Кнопка SUSTAIN (поддержание
звучания)30
10. Кнопка HARMONY/ECHO
(гармония/это) 50
П. Кнопки BACK (назад) NEXT (вперед)
17
12. Жидкокристаллический дисплей 16
13. Кнопка VOICE СНАКОЕ(измснсние
голоса) 17,75
Кнопка MIXER (микшер) 17,76
14. Кнопки TRACK 1-16 (дорожки) 37, 70
15 Кнопка Song (песня) 17, 25,68
16. Кнопка STYLE (стиль) ] 7,25, 32
17. Кнопка MUSIC DATABASE
(музыкальная база данных) 14,17
18. Кнопка VOICE L (голос L) 17,28
19. Кнопка VOICE R1 (голос R 1)17, 26
20. Кнопка VOICE R2 (голос R2) 17,26
21. Кнопка АСМР ON/OFF (включение/
выключение аккомпанемента) 25,3.3
22. Кнопка ACMP/SONG VOLUME
(громкость аккомпанемечта/песни)! 7.
37, 70
ш Регуляторы ннжней ч&стя
вшнелм
45. Разъем PHONES/OU rPUT
(наушннкн/выход) 10
46. Разъем FOOTSWITCH (педальный
переключатель) 10
47. Соединитель ТО HOST (к
компьютеру) 107
48. Переключатель HOST SELECT
(Выбор компьютера) 110
49. Соединители MIDI IN/OUT
(вход/выход MIDI) 10?
50. DC IN (вход постоянного тока) 10-12
В 12
23. Кнопка ТЕМРО/ТАР
(темп/настукивание) 17,36
24. Кнопка TRANSPOSE
(транспозиция) 17, 30
25. Кнопка FUNCTION (функция) 17,
118
26. PART ON/OFF (вкл/выкл партии)
Кнопка VOICE L (голос L) 28
Кнопка VOICE Rl (голос R I) 26
Кнопка VOICE R2 (голос R2) 27
27. Цифровые кнопки
[1]…(0], -/NO (нет), +/YES (да)20
28. Кнопка EXIT (выход) 17
29. Регулировка ввода данных 20
30. Кнопка DISK LOAD (загрузка
дискеты) 17,62
31. Кнопка DISK SAVE (сохранение
на дискете) 17,60
32. Кнопка DISK UTILITY (Сервис
дискеты) 17,64, 67
33. Кнопка SYNC STOP
(синхронизация остановки) 41
34. Кнопка SYNC
8ТАКТ(синхроннзация пуска) 32,69
35. Кнопка START/STOP
(пуск/остановка) 32,69
36. Кнопка Intro (вступление) 34
37. Кнопка MAIN/AUTO FILL А
(Основной/ автоматическая вставка
A) 34
38. Кнопка MAIN7AUTO FILL В
(Основной/ автоматическая вставка
B) ЗД
39. Кнопка Ending/rit. (Концовка) 34
40. Кнопки REGISTRATION
MEMORY (регистрация в памяти)
54
41. Кнопки ONE TOUCH SETTING
(настройки в одно нажатие) 42
42. Кнопки MULTI PAD
(разнообразные музыкальные
(^азы) 43
43. Дисковод 58
44. Регулятор PITCH BEND (изгиб
высоты гана) 30
Ш
11

Подключение, Испол1»зом1ние дополш1тельного пе|№мен110го токя, Исвользомние батареек
Ш важные прнмечання по мсподьзонаяию батареек, Испол, Ние дополш, Тельного пе|№мен, Го токя адаоггера Чат поддержки
- Изображение
- Текст
Подключение
Этот раздел содержит информацию относительно настройки Р5к-550 и подготовки к
Внимательно познакомьтесь с представленной ннформациеЙ перед включением питания.
исполнению.
PSR-550 будет работать и от дополнительного адаптера переменного тока, и от батареек. Компания Yamaha
рекомендует использовать адаптер для более безопасной работы. Следуйте приведенным ниже указаниям в
зависимости от источника пиз ания.
Испол
1
»зом
1
ние
дополш
1
тельного
пе|№мен
110
го токя
адаоггера
/. Убедитесь, что переключатель
STANDBY/ON
(питание)
установлен в положение STANDBY.
2*
Подключите адаптер (РА-6 или
другой
рекомендованный
компанией Yamaha) к разъему
инструмента.
3*
Подключите адаптер к стенной
розетке.
0СИЧ>1»
I ВНИМАНИЕ
* Никогда не откмочайте питание (не
еынимаШпе батарейки ими
внимючлйте
в процессе записи! Это может
приеести к утраш данных
! ПРЕДУПРЕЖДЕНИЕ
*
Используйте адаптеры только РА-
6АС
(иди
другие
рекомендоеаннш
компанией
Yamaha)
для
подключения
инструмента
к
сети.
Использование
других адаптеров может повредить и
адаптер, и PSk-SSO.
*
Отключайте адаптер, когда FSR~550
длитетнюе время не используется или
в грозу.
Исвользомние батареек
Требуются шесть батареек на 1,5 В типа «D’\ R20P (LR20) или
ана.г|Огичные. Когда следует заменить батарей):и, в верхней части дисплея
^■:pэ.ткG8peмeннo появляется сообщение ’’Batter],’ L
cm
‘» (батарейки сели).
Громкость может упасть, звук может искажаться, могут возникнуть
другие проблемы. Замените батарейки следующим образом:
/. ^>гкройтс отделение для
батареек, расположенное на нижней
стороне инструмента.
2. Усгавовите 6 батареек,
соблюдая полярность.
5щ
Установнте крышку на место и
задвиньте до щелчка.
ВНИМАНИЕ
~ Когда базгшрейки сели, замените их но
шесть
новых
бвзпареек.
Никогда
не
смвишвайзпе
старые
и
новые
батарейки.
^
Не
иснользуйте
батарейки
разных
типов
(например,
щелочные
и
марганцевые) вместе.
»
Если инструмент не использу ттсл
длительное время, выньте батарейки,
чтобы исключить их протекание.
^
Вкяючение/выкяюченне
аданзпера
при
устамовяенных
батараЩах
приводит
к
переключения
на
насщройки
**по
умолчанию**.
ш Важные прнмечання по мсподьзонаяию батареек
Поскольку PSR-550 потребляет много энергии
компания Yamaha рекомендует использовать
адаптер. Батарейки следует рассматривать как
вспомогательный источник питания.
Дисковод,
в
частности,
потребляет
много
энергии, поэтому при использовании операций с
диском — сохранения/записи/воспроизведения, —
всегда следует использовать адаптер.
Если вы будете выполнять эти операции от
батареек и они сядут, вы утратите данные во
встроенной памяти инструмента, включая стили
пользователя, фрагменты пользователя, данные в
ячейках памяти и пр.
Принимая
сказанное
во внимание, всегда
используйте
адаптер
с
Р8К-550
при
ответственном исполнении или создании важных
данных.
_____
12

30:45
Yamaha PSR-550 (Test sounds)
02:38
Синтезатор Yamaha PSR-550.
01:58
Style — Стиль на синтезатор YAMAHA PSR-550
03:45
Катя Катерина Державин Игра на синтезаторе Yamaha psr 550
01:56
Yamaha psr-550″Мираж»Мухтар Жалилов
08:36
PSR-S550 Demonstration Movie
Нажмите на кнопку для помощи


SPECIAL MESSAGE SECTION
This product utilizes batteries or an external power supply
(adapter). DO NOT connect this product to any power supply or adapter other than one described in the manual, on
the name plate, or specifically recommended by Yamaha.
This product should be used only with the components
supplied or; a cart, rack, or stand that is recommended by
Yamaha. If a cart, etc., is used, please observe all safety
markings and instructions that accompany the accessory
product.
SPECIFICATIONS SUBJECT TO CHANGE:
The information contained in this manual is believed to be
correct at the time of printing. However, Yamaha reserves
the right to change or modify any of the specifications without notice or obligation to update existing units.
This product, either alone or in combination with an amplifier and headphones or speaker/s, may be capable of producing sound levels that could cause permanent hearing
loss. DO NOT operate for long periods of time at a high
volume level or at a level that is uncomfortable. If you experience any hearing loss or ringing in the ears, you should
consult an audiologist.
IMPORTANT: The louder the sound, the shorter the time
period before damage occurs.
NOTICE:
Service charges incurred due to a lack of knowledge relating to how a function or effect works (when the unit is operating as designed) are not covered by the manufacturer’s
warranty, and are therefore the owners responsibility.
Please study this manual carefully and consult your dealer
before requesting service.
ENVIRONMENTAL ISSUES:
Yamaha strives to produce products that are both user safe
and environmentally friendly. We sincerely believe that our
products and the production methods used to produce
them, meet these goals. In keeping with both the letter and
the spirit of the law, we want you to be aware of the following:
This product may also use “household” type batteries.
Some of these may be rechargeable. Make sure that the
battery being charged is a rechargeable type and that the
charger is intended for the battery being charged.
When installing batteries, do not mix batteries with new, or
with batteries of a different type. Batteries MUST be installed correctly. Mismatches or incorrect installation may
result in overheating and battery case rupture.
Warning:
Do not attempt to disassemble, or incinerate any battery.
Keep all batteries away from children. Dispose of used
batteries promptly and as regulated by the laws in your
area. Note: Check with any retailer of household type batteries in your area for battery disposal information.
Disposal Notice:
Should this product become damaged beyond repair, or for
some reason its useful life is considered to be at an end,
please observe all local, state, and federal regulations that
relate to the disposal of products that contain lead, batteries, plastics, etc. If your dealer is unable to assist you,
please contact Yamaha directly.
NAME PLATE LOCATION:
The name plate is located on the bottom of the product.
The model number, serial number, power requirements,
etc., are located on this plate. You should record the model
number, serial number, and the date of purchase in the
spaces provided below and retain this manual as a permanent record of your purchase.
Model
Serial No.
Purchase Date
Battery Notice:
This product MAY contain a small non-rechargeable battery
which (if applicable) is soldered in place. The average life
span of this type of battery is approximately five years.
When replacement becomes necessary, contact a qualified
service representative to perform the replacement.
92-BP (bottom)
PLEASE KEEP THIS MANUAL
2
PRECAUTIONS
PLEASE READ CAREFULLY BEFORE PROCEEDING
* Please keep these precautions in a safe place for future reference.
WARNING
Always follow the basic precautions listed below to avoid the possibility of serious injury or even death from electrical shock,
short-circuiting, damages, fire or other hazards. These precautions include, but are not limited to, the following:
• Do not open the instrument or attempt to disassemble the internal parts or
modify them in any way. The instrument contains no user-serviceable parts. If
it should appear to be malfunctioning, discontinue use immediately and have it
inspected by qualified Yamaha service personnel.
• Do not expose the instrument to rain, use it near water or in damp or wet
conditions, or place containers on it containing liquids which might spill into
any openings.
• If the AC adaptor cord or plug becomes frayed or damaged, or if there is a
sudden loss of sound during use of the instrument, or if any unusual smells or
smoke should appear to be caused by it, immediately turn off the power switch,
CAUTION
Always follow the basic precautions listed below to avoid the possibility of physical injury to you or others, or damage to the
instrument or other property. These precautions include, but are not limited to, the following:
• Do not place the AC adaptor cord near heat sources such as heaters or radiators,
and do not excessively bend or otherwise damage the cord, place heavy objects
on it, or place it in a position where anyone could walk on, trip over, or roll
anything over it.
• When removing the electric plug from the instrument or an outlet, always hold
the plug itself and not the cord.
• Do not connect the instrument to an electrical outlet using a multiple-connector.
Doing so can result in lower sound quality, or possibly cause overheating in
the outlet.
• Unplug the AC power adaptor when not using the instrument, or during electrical
storms.
• Always make sure all batteries are inserted in conformity with the +/- polarity
markings. Failure to do so might result in overheating, fire, or battery fluid
leakage.
• Always replace all batteries at the same time. Do not use new batteries together
with old ones. Also, do not mix battery types, such as alkaline batteries with
manganese batteries, or batteries from different makers, or different types of
batteries from the same maker, since this can cause overheating, fire, or battery
fluid leakage.
• Do not dispose of batteries in fire.
• Do not attempt to recharge batteries that are not intended to be charged.
• When the batteries run out, or if the instrument is not to be used for a long time,
remove the batteries from the instrument to prevent possible leakage of the
battery fluid.
• Keep batteries away from children.
• If the batteries do leak, avoid contact with the leaked fluid. If the battery fluid
should come in contact with your eyes, mouth, or skin, wash immediately with
water and consult a doctor. Battery fluid is corrosive and may possibly cause
loss of sight or chemical burns.
• Before connecting the instrument to other electronic components, turn off the
power for all components. Before turning the power on or off for all components,
set all volume levels to minimum. Also, be sure to set the volumes of all
components at their minimum levels and gradually raise the volume controls
while playing the instrument to set the desired listening level.
• Do not expose the instrument to excessive dust or vibrations, or extreme cold
or heat (such as in direct sunlight, near a heater, or in a car during the day) to
prevent the possibility of panel disfiguration or damage to the internal
components.
(4)-7
1
disconnect the adaptor plug from the outlet, and have the instrument inspected
by qualified Yamaha service personnel.
• Use the specified adaptor (PA-6 or an equivalent recommended by Yamaha)
only. Using the wrong adaptor can result in damage to the instrument or
overheating.
• Before cleaning the instrument, always remove the electric plug from the outlet.
Never insert or remove an electric plug with wet hands.
• Check the electric plug periodically and remove any dirt or dust which may
have accumulated on it.
• Do not use the instrument near other electrical products such as televisions,
radios, or speakers, since this might cause interference which can affect proper
operation of the other products.
• Do not place the instrument in an unstable position where it might accidentally
fall over.
• Before moving the instrument, remove all connected adaptor and other cables.
• When cleaning the instrument, use a soft, dry cloth. Do not use paint thinners,
solvents, cleaning fluids, or chemical-impregnated wiping cloths. Also, do not
place vinyl, plastic or rubber objects on the instrument, since this might discolor
the panel or keyboard.
• Do not rest your weight on, or place heavy objects on the instrument, and do
not use excessive force on the buttons, switches or connectors.
• Use only the stand specified for the instrument. When attaching the stand or
rack, use the provided screws only. Failure to do so could cause damage to the
internal components or result in the instrument falling over.
• Do not operate the instrument for a long period of time at a high or uncomfortable
volume level, since this can cause permanent hearing loss. If you experience
any hearing loss or ringing in the ears, consult a physician.
■DATA BACK-UP AND STORAGE
• Yamaha recommends that you regularly save data using a floppy disk in a safe,
cool, dry place. YAMAHA CANNOT BE HELD RESPONSIBLE FOR THE
ACCIDENTAL LOSS OF IMPORTANT MUSIC DATA! Regarding the data you
have created, as long as fresh batteries are inserted in (or an AC power adaptor
is connected to) the instrument, the data will be retained, even when the power
is turned off. It will also be retained long enough to exchange an old set of
batteries for a new set. If you have important data in the instrument which you
don’t want to lose, please take care to keep fresh batteries inserted in (or keep
an AC power adaptor connected to) the instrument, and to regularly save data.
Yamaha cannot be held responsible for damage caused by improper use or
modifications to the instrument, or data that is lost or destroyed.
Always turn the power off when the instrument is not in use.
Make sure to discard used batteries according to local regulations.
3

Congratulations!
You are the proud owner of a fine electronic keyboard. The Yamaha PSR-550
PortaTone combines the most advanced tone generation technology with state-of-theart digital electronics and features to give you stunning sound quality with maximum
musical enjoyment. A large graphic display and easy-to-use interface also greatly
enhance the operability of this advanced instrument. In order to make the most of your
PortaTone’s features and extensive performance potential, we urge you to read the
manual thoroughly while trying out the various features described. Keep the manual in
a safe place for later reference.
Packing List
Please check that these items have been packed with your PSR-550.
• PSR-550 • Music Stand (page 9)
• PSR-550 Data Disk • Owner’s Manual
(Refer to “Included Data Disk”
on page 59, and “MIDI and TO
HOST Terminals” on page
107.)
4
2
How to use the manual
Setting Up
Important Features
Basic Operation
Contents
Panel Controls
page 12
Before going on to any other part of the manual, we strongly suggest
you read this section first. It shows you how to get started playing and
using your new PSR-550.
page 8
Once you’ve set up the PSR-550, you should read through this section
— and explore the relevant page references — to familiarize yourself
with the enormous variety of features and functions of the PSR-550.
page 17
This section introduces you to the basic operating conventions of the
PSR-550, such as editing values and changing settings, and shows
you how to use the convenient Help and Direct Access functions.
page 6
All topics, features, functions and operations are listed here in the
order they appear in the manual, for easy reference.
page 10
Use this section to find out about all of the buttons and controls of the
PSR-550.
Panel Display Indications
Function T ree
Appendix
Troubleshooting
Index
page 16
This section explains the display indications of the PSR-550 and how
to read them for optimum operation.
page 22
This lists all functions of the PSR-550 according to their hierarchical
structure, letting you easily see the relationship of the various functions and quickly locate desired information.
page 123
This contains various important lists such as the Voice list, Preset
Style list, Effect list, MIDI data format and MIDI implementation chart.
page 135
If the PSR-550 does not function as expected or you have some
problem with the sound or operation, consult this section before calling
your Yamaha dealer or service center. Most common problems and
their solutions are covered here in a very simple and easy-to-understand way.
page 153
This section alphabetically lists virtually all topics, features, functions
and operations with their respective page numbers, letting you quickly
and easily find the information you need.
The illustrations and LCD screens as shown in this owner’s manual are for instructional purposes only, and may be different from your instrument.
3
5

Contents
Packing List 4
How to use the manual 5
Important Features 8
Panel logos…………………………………………… 9
Music stand ………………………………………… 10
Panel Controls and Terminals 10
FOOTSWITCH jack……………………………… 10
PHONES/OUTPUT jack ……………………….. 10
Top Panel Controls…………………………………………. 11
Rear Panel Controls……………………………………….. 11
Setting Up 12
Power supply connections ………………………………. 12
Demo Song Playback 13
Playing Voices 26
Selecting a Voice …………………………………………… 26
Playing Two Voices (R1, R2) Simultaneously……… 27
Playing Different Voices with
the Left (L) and Right (R1, R2) Hands …………. 28
Functions of the Keyboard………………………………. 29
Transpose …………………………………………………….. 30
Pitch Bend Wheel ………………………………………….. 30
Sustain…………………………………………………………. 30
Keyboard Percussion ……………………………………… 31
Auto Accompaniment 32
Using Auto Accompaniment (rhythm track only) …. 32
Using Auto Accompaniment (all tracks)…………….. 33
Accompaniment Sections ……………………………….. 34
Tempo/Tap ……………………………………………………. 36
Accompaniment T rac k Muting ………………………….. 37
Accompaniment V olume Control………………………. 37
Chord Fingerings …………………………………………… 38
Accompaniment Split Point……………………………… 40
Synchro Stop ………………………………………………… 41
One T ouch Setting …………………………………………. 42
Using the Music Database 14
Panel Display Indications 16
Basic Operation 17
Calling up the Operation Displays…………………….. 17
How to Read the Menu/Message Display and
“Easy Navigator”……………………………………….. 18
Menu Selection ……………………………………………… 19
Changing (Editing) Values ………………………………. 20
Naming ………………………………………………………… 21
Direct Access………………………………………………… 21
Function Tree 22
Direct Access Chart 24
Mode 25
Style Mode……………………………………………………. 25
Song Mode …………………………………………………… 25
Record Mode ………………………………………………… 25
Disk Mode…………………………………………………….. 25
The Multi Pads 43
Playing the Multi Pads ……………………………………. 43
Chord Match …………………………………………………. 43
Selecting a Multi Pad Bank……………………………… 44
Turning Chord Match On/Off……………………………. 44
Multi Pad Bank List………………………………. 45
Digital Effects 46
Reverb …………………………………………………………. 46
Chorus …………………………………………………………. 48
DSP …………………………………………………………….. 49
System Effects and Insertion Effects ………………… 50
Harmony/Echo ………………………………………………. 50
Registration Memory 54
Registering the Panel Settings ………………………… 55
Recalling the Registered Panel Settings …………… 55
Selecting a Registration Bank………………………….. 56
Naming the Registration Banks ……………………….. 56
Disk Operations 57
Using the Floppy Disk Drive (FDD) and
Floppy Disks ………………………………….. 58
Included Data Disk…………………………………………. 59
Format …………………………………………………………. 60
Save…………………………………………………………….. 60
Load…………………………………………………………….. 62
Song Copy ……………………………………………………. 64
Delete ………………………………………………………….. 67
6
4

Contents
Disk Song Playback 68
Song Playback………………………………………………. 68
Song T rac k Muting …………………………………………. 70
Song Volume Control ……………………………………… 70
Playing from a Specified Measure ……………………. 71
Repeat Play (A-B Repeat) ………………………………. 72
Song T ranspose…………………………………………….. 73
Part Settings 74
Voice Change ……………………………………………….. 75
Mixer ……………………………………………………………. 76
Song Recording 78
Quick Recording ……………………………………………. 80
Multi Track Recording …………………………………….. 82
Re-recording — Punch In/Out and Start Measure. 84
Quantize ………………………………………………………. 86
Editing Setup Data…………………………………………. 88
Naming User Songs……………………………………….. 90
Clearing User Song Data………………………………… 91
Multi Pad Recording 92
Multi Pad Recording……………………………………….. 92
Chord Match …………………………………………………. 94
Naming User Pads…………………………………………. 94
Clearing User Pad Data………………………………….. 95
Style Recording 96
Style Recording — Rhythm Track …………………….. 98
Style Recording —
Bass/Phrase/Pad/Chord Tr acks…………………. 100
Quantize …………………………………………………….. 102
Naming User Styles ……………………………………… 104
Clearing User Style Data ………………………………. 104
Other Functions (Utility) 118
Metronome………………………………………………….. 118
Upper Octave………………………………………………. 119
Master Tuning ……………………………………………… 119
Scale T uning ……………………………………………….. 119
Split Point……………………………………………………. 120
Touch Sensitivity ………………………………………….. 120
Voice Set…………………………………………………….. 120
Footswitch…………………………………………………… 121
Pitch Bend Range………………………………………… 122
Assignable ………………………………………………….. 122
Backlight …………………………………………………….. 122
Appendix 123
Voice List ……………………………………………………. 123
Panel V oice List …………………………………. 123
XG V oice List …………………………………….. 125
Drum Kit List ……………………………………………….. 128
Style List …………………………………………………….. 130
Music Database List …………………………………….. 131
About the Digital Effects (Reverb/Chorus/DSP)… 132
Reverb Type List ………………………………… 133
Chorus Type List ………………………………… 133
DSP T ype List ……………………………………. 133
Harmony/Echo T ype List ……………………………….. 134
T roub leshooting …………………………………………… 135
Data Backup & Initialization …………………………… 136
Alert Message List ……………………………………….. 137
MIDI Data Format ………………………………………… 139
MIDI Implementation Chart……………………………. 151
Index ………………………………………………………….. 153
Specifications………………………………………………. 156
MIDI Functions 106
What’s MIDI? ………………………………………………. 106
What You Can Do With MIDI………………………….. 108
MIDI Data Compatibility ………………………………… 109
Connecting to a Personal Computer……………….. 110
MIDI Template……………………………………………… 112
MIDI Transmit Setting……………………………………. 114
MIDI Receive Setting ……………………………………. 115
Local Control……………………………………………….. 116
Clock………………………………………………………….. 116
Initial Data Send ………………………………………….. 117
5
7

Important Features
Since the PSR-550 has such a wealth of advanced features and functions, you may be at a loss as to how to
explore its capabilities and how to best use them for your music. You needn’t worry. The PSR-550 is very easy
to play and use, and each function — no matter how advanced — can be mastered easily.
That’s what this section is designed for. It will help you master the PSR-550. It introduces you to the important
features of the PSR-550 with short explanations and page references. Read through the features you’re
interested in, then turn to the relevant pages in the manual for instructions and other details.
Basic operations
• The PSR-550 is packed with
sophisticated feature and
functions, yet it’s also exceptionally
easy to use. Using the panel controls is quick,
easy and intuitive — thanks to the Easy navigator
feature, which indicates the buttons you should
press, and the special backlit LCD, which changes
color according to the selected mode. (→ Pages
16, 18)
• A convenient Direct Access function lets you
instantly call up the specific menu or display you
need. (→ Page 21)
Listening to the PSR-550
• The PSR-550 features a wide
variety of songs in various
musical genres. (→ Page 15)
• In addition, 10 songs are provided in
the included disk. (→ Page 59)
• The powerful auto accompaniment function gives
you a total of 112 styles (rhythm and accompaniment patterns), providing professional sounding
backing parts for your performance.
(→ Page 112)
•
Special Multi Pads let you instantly and easily play short
rhythmic and melodic sequences for adding impact and
variety to your performance. (→ Page 43)
Playing the PSR-550
• The PSR-550 keyboard has 61
keys with full touch-response
capability that lets you play with
extraordinary expressiveness and dynamic control.
(→ Page 26)
• The PSR-550 lets you perform with a huge variety
of musical instrument voices. (→ Page 26)
There are two different types of voices: panel
voices (the original PSR-550voices) and XG
voices.
* The PSR-550 features 219 panel voices, 14 drum kits
and 480 XG voices
• With the R1, R2 and L voices, you can play two
different voices in a layer, and even play two
different voices with your right and left hands.
(→ Pages 27, 28)
Auto accompaniment (styles)
• The auto accompaniment feature puts a full backing band
at your fingertips, with a total of 112 styles (rhythm and
accompaniment patterns). (→ Page 32)
• The One Touch Setting feature lets you instantly call up
the appropriate voice, effect and other settings for the
selected accompaniment style — with the touch of a
single button. (→ Page 42)
• You can also create your original accompaniment styles
by recording them directly from the keyboard. (→ Page
96)
Music Database
• The PSR-550’s built-in Music Database gives you a
convenient way to automatically select the style, voice,
and effect settings that best suit a particular type of music.
If you don’t know which style or voice would be appropriate, the Music Database can help you out. (→ Page 14)
Multi Pads
• By simply pressing one of the Multi Pads, you can play
short rhythmic or melodic phrases. (→ Page 43)
• You can also create your original Multi Pad phrases by
recording them directly from the keyboard. (→ Page 92)
Registration Memory
• The convenient Registration Memory feature lets you save
virtually all panel settings to one of 128 Registration
Memory settings, and then instantly recall all your custom
panel settings by pressing a single button. (→ Page 54)
Song Recording
• Use the powerful song recording features create your own
complete, fully orchestrated compositions and save them
floppy disk as a User song. Each User song lets you
record up to sixteen independent tracks. (→ Page 78)
* To quickly and easily mold your musical ideas into
complete songs, use the Quick Recording method. (
Page 80)
* To build up a song part-by-part and track-by-track, use
the Multi Track Recording method. (→ Page 82)
* You can also “fine tune” the recorded song data with the
PSR-550’s comprehensive song editing functions. (
Pages 84-91)
→
→
8
6

Important Features
Digital Effects
• A comprehensive set of professional-sounding digital
effects are built into the PSR-550, letting you enhance the
sound of your performance in a wide variety of ways.
These include Reverb, Chorus, DSP and Harmony/Echo.
(→ Page 46)
* Reverb recreates the rich spacial ambiance of various
performance environments, such as a concert hall or a
night club. (→ Page 46)
* Chorus enriches the voices by making them sound
warmer and thicker — as if several instruments were
playing together at the same time. (→ Page 48)
* The DSP effects let you process the sound in special,
unusual ways — such as applying distortion or tremolo
to a specific part. (→ Page 49)
* Harmony/Echo lets you enhance your right-hand
melodies with a variety of harmony and echo effects.
(→ Page 50)
Disk Drive
• The PSR-550 also features a built-in disk drive that lets
you save all your important original data (such as User
songs, User styles, User Multi P ads, Registration Memory,
etc.) to floppy disk for future recall. (→ Page 57)
MIDI
• MIDI (Musical Instrument Digital Interface) is a worldwide
standard interface that allows various electronic music
instruments, computers and other devices to communicate with each other. The MIDI features let you
seamlessly integrate the PSR-550 into a variety of
systems and applications:
* Play other instruments from the PSR-550. (→ Page
108)
* Play the sounds of the PSR-550 (including the auto
accompaniment) from a connected keyboard. (→ Page
108)
* Connect the PSR-550 directly to a computer, for
advanced recording, editing and playing back of song
data. (→ Page 110)
* Use pre-programmed templates to instantly configure
the PSR-550 for your specific MIDI system/application.
(→ Page 112)
Panel logos
The logos printed on the PSR-550 panel indicate standards/
formats it supports and special features it includes.
GM System Level 1
“GM System Level 1” is an addition to the MIDI standard
which guarantees that any data conforming to the standard will
play accurately on any GM-compatible tone generator or
synthesizer from any manufacturer.
XG
XG is a new Yamaha MIDI specification which significantly
expands and improves on the GM System Level 1 standard
with greater voice handling capacity, expressive control and
effect capability while retaining full compatibility with GM.
By using the PSR-550’s XG voices, it is possible to record
XG-compatible song files.
DOC
The DOC voice allocation format provides data playback
compatibility with a wide range of Yamaha instruments and
MIDI devices, including the Clavinova series.
Style File Format
The Style File Format — SFF — is Yamaha’s original style
file format which uses a unique conversion system to provide
high-quality automatic accompaniment based on a wide range
of chord types. The PSR-550 uses the SFF internally, reads
optional SFF style disks, and creates SFF styles using the
Style Recording feature.
Music stand
The PSR-550 is supplied with a music stand that can be attached
to the instrument by inserting it into the slot at the rear of the
control panel.
7
9

Panel Controls and Terminals
u
i
$4
#3
#4
q
#5 #6
#7
y
o
w
#8 #9
!1
e
t
!0
!3
r
$0
$1
001 Grand Piano
CHORD
!2
dim
mM
TRANSPOSE
REC2REC3REC4REC5REC6REC7REC8REC9REC10REC11REC12REC13REC14REC15REC16REC
1
NEXT
BACK
119
6
KEYBOARDSTART/STOP
513
augsus4
7
REGIST-
TEMPO
RATION
!4
!5
!6 !7 !8 !9 @0
@1 @2 @3@4@5
NAVIGATOR
EASY
MEASURE
STYLE
G
ON
S
PART
DIAL
/YES
MUSIC DATABASE
DSP(FAST)
TOUCH
BEAT
HARMONY
SUSTAIN
@7
2
R1
L
ICE
VO
TRACK(1~16)
0~9
@8
#0
#1
#2
@6
$2
@9
$3
C1
D138E1
36T37S39F141
CLICK
G1
43
42 44A145
40 46 49
R
L
B1
C2
47
48
L
M
H
D2
E2
F2
50
51
M
G2
52
53
5554 56A257
H
L
H
L
■ FOOTSWITCH jack
The sustain function lets you produce a natural
sustain as you play by pressing a footswitch. Plug
an optional Yamaha FC4 or FC5 footswitch into
this jack and use it to switch sustain on and off.
The footswitch connected to this jack can also be
set to replicate the functions of some panel buttons,
doing things like starting and stopping accompaniment (page 121).
• Be sure that you do not press the footswitch while turning the power
on. If you do, the ON/OFF status of the footswitch will be reversed.
• When the sustain or sostenuto pedal functions are being used
(page 121), some voices may sound continuously or have a long
decay after the notes have been released while the pedal is held.
B2
C3
59
60
58 61
M
M
L
H
D3
E364F3
62
63
C
1
65R66G367S68 70C472H73
R
H
1
A3
B3
D4
E4
F4
G4
69
71
74 75
76
C
R
2
L
2
77H78
H
L
A4
79H80
L
L
■ PHONES/OUTPUT jack
A standard pair of stereo headphones can be
plugged in here for private practice or late-night
playing. The internal stereo speaker system is
automatically shut off when a pair of head phones is
plugged into the PHONES/OUTPUT jack.
Do not listen with the headphones at high volume
for long periods of time. Doing so may cause
hearing loss.
CAUTION
• Connect the PSR-550 to external equipment only after
turning off power for all devices. To prevent damage to
the speakers, set the volume of the external devices at
the minimum setting before connecting them. Failure to
observe these cautions may result in electric shock or
equipment damage.
81 82
B4
H
83
C5
84L85S87D586
E5
F5
G5
88
89
90
L
91 92
H
L M
O
10
$7 $8 $9 $6 $5 %0
8
Panel Controls and Terminals
A5
93 94B595C696
Top Panel Controls
q STANDBY/ON switch ……………………………13
w MASTER VOLUME control ……………………13
e DEMO button …………………………………13, 17
r RECORD button……………..17, 25, 78, 92, 96
t DIRECT ACCESS button…………………21, 24
y DSP button………………………………………….49
u FAST/SLOW button……………………………..49
i TOUCH button …………………………………..120
o SUSTAIN button…………………………………..30
!0 HARMONY/ECHO button ……………………..50
!1 BACK button, NEXT button ……………………17
!2 LCD display…………………………………………16
!3 VOICE CHANGE button…………………..17, 75
MIXER button…………………………………17, 76
!4 TRACK 1 — 16 buttons……………………..37, 70
!5 SONG button…………………………….17, 25, 68
!6 STYLE button……………………………17, 25, 32
!7 MUSIC DATABASE button ……………….14, 17
!8 VOICE L button ………………………………17, 28
!9 VOICE R1 button ……………………………17, 26
@0 VOICE R2 button ……………………………17, 27
@1 ACMP ON/OFF button …………………….25, 33
@2 ACMP/SONG VOLUME button ……17, 37, 70
@3 TEMPO/TAP button…………………………17, 36
@4 TRANSPOSE button……………………….17, 30
@5 FUNCTION button…………………………17, 118
@6 PART ON/OFF
VOICE L button……………………………….28
VOICE R1 button …………………………….26
VOICE R2 button …………………………….27
@7 Number buttons
[1]-[0], [-/NO], [+/YES] ………………………20
@8 EXIT button …………………………………………17
@9 Data dial……………………………………………..20
#0 DISK LOAD button………………………….17, 62
#1 DISK SAVE button ………………………….17, 60
#2 DISK UTILITY button …………………17, 64, 67
#3 SYNC STOP button ……………………………..41
#4 SYNC START button…………………………….33
#5 START/STOP button ……………………….32, 69
#6 INTRO button………………………………………34
#7 MAIN/AUTO FILL A button…………………….34
#8 MAIN/AUTO FILL B button…………………….34
#9 ENDING/rit. button ……………………………….34
$0 REGISTRATION MEMORY buttons………..54
$1 ONE TOUCH SETTING buttons …………….42
$2 MULTI PAD buttons ………………………………43
$3 Disk Drive……………………………………………58
$4 PITCH BEND wheel……………………………..30
Rear Panel Controls
$5 PHONES/OUTPUT jack………………………..10
$6 FOOTSWITCH jack………………………………10
$7 TO HOST connector …………………………..107
$8 HOST SELECT switch ………………………..110
$9 MIDI IN/OUT connectors……………………..107
%0 DC IN 10-12V jack ……………………………….12
9
11

Setting Up
This section contains information about setting up your PSR-550 and preparing to play.
Be sure to go through this section carefully before turning the power on.
Power supply connections
Although the PSR-550 will run either from an optional AC adaptor or batteries, Yamaha recommends use of the
more environmentally safe AC adaptor. Follow the instructions below according to the power source you intend
to use.
■ Using An Optional AC Power Adaptor
1
Make sure that the STANDBY/ON switch
of the PSR-550 is set to STANDBY.
CAUTION
• Never interrupt the power
supply (e.g. remove the
batteries or unplug the AC
adaptor) during any PSR-550
record operation! Doing so
can result in a loss of data.
2
Connect the AC adaptor (PA-6 or other
adaptor specifically recommended by
Yamaha) to the power supply jack.
3
Plug the AC adaptor into an AC outlet.
When turning the power OFF, simply reverse
the procedure.
■ Using Batteries
For battery operation the PSR-550 requires six 1.5V “D” size, R20P (LR20) or
equivalent batteries. When the batteries need to be replaced, “Battery Low” may
appear on top of the display, the volume may be reduced, the sound may be
distorted, and other problems may occur. When this happens, turn the power off
and replace the batteries.
Replace the batteries as follows:
1
Open the battery compartment
cover located on the instrument’s
bottom panel.
2
Insert the six new batteries, being
careful to follow the polarity
markings on the inside of the
compartment.
WARNING
• Use ONLY a Yamaha PA-6 AC
Power Adaptor (or other
adaptor specifically recommended by Yamaha) to power
your instrument from the AC
mains. The use of other
adaptors may result in
irreparable damage to both
the adaptor and the PSR-550.
• Unplug the AC Power Adaptor
when not using the PSR-550,
or during electrical storms.
CAUTION
• When the batteries run down,
replace them with a complete
set of six new batteries.
NEVER mix old and new
batteries.
• Do not use different kinds of
batteries (e.g. alkaline and
manganese) at the same time.
• If the instrument is not to be
in use for a long time, remove
the batteries from it, in order
to prevent possible fluid
leakage from the battery.
• Plugging or unplugging the
AC power adaptor while the
batteries are installed will
reset the PSR-550 to the
defaults.
3
Replace the compartment cover,
making sure that it locks firmly in
place.
Important Notes on Battery Use
• Since the PSR-550 consumes a considerable amount of power,
Yamaha recommends the use of an AC power adaptor rather than
batteries. The batteries should be considered an auxiliary power
source for data backup.
• The floppy disk drive, in particular, uses a large amount of power, so
it is important to always use an AC power adaptor when performing
disk-intensive operations such as song recording/playback or data
12
load/save. If you attempt to use battery power for these operations
and the batteries do fail, you will lose not only the data you’re
recording or saving, but also other data in internal memory including
user styles, user pads, registration memory, etc.
• Taking the above precautions into consideration, always use an AC
power adaptor when using the PSR-550 for an important performance or when creating important data.
10
Demo Song Playback
Once you’ve set up your PSR-550, try listening to the pre-programmed demonstration songs. A total of 9
demo songs are provided. As the song plays back, the backlit LCD of the PSR-550 changes color.
1
Turn the power ON by pressing the [STANDBY/ON] switch.
Press the [STANDBY/ON] switch again to turn the power OFF.
001 Grand Piano
CHORD
119
6
dim
mM
TRANSPOSE
REC2REC3REC4REC5REC6REC7REC8REC9REC10REC11REC12REC13REC14REC15REC16REC
1
Press the [DEMO] button to start demo playback.
2
augsus4
7
START/STOP
513
REGISTRATION
BACK
NEXT
KEYBOARD
TEMPO
EASY
NAVIGATOR
MEASURE
TRACK(1~16)
PART
1 Sweet Tenor
Set a volume level with the [MASTER VOLUME] control.
3
DIAL
CAUTION
• Even when the switch is in
the “STANDBY” position,
electricity is still flowing to
the instrument at the
minimum level. When you
0~9
BEAT
/YES
LE
Y
T
S
G
N
O
S
MUSIC DATABASE
DSP(FAST)
TOUCH
HARMONY
SUSTAIN
2
1
R
L
E
IC
O
V
are not using the PSR-550
for a long time, make sure
you unplug the AC power
adaptor from the wall AC
outlet, and/or remove the
batteries from the
instrument.
• The LCD changes color
during Demo song playback
only if the Backlight mode is
set to “Auto” (page 122).
• If you play the PSR-550 with
the volume at its maximum
level when the batteries are
used, the life of the batteries
will be shorter.
Skip to the beginning of a different demo song.
4
Use the data dial, the [+/YES] button, the [-/NO] button or the number buttons
[1]-[0].
2 SweetTrumpet
Press the [DEMO] button again to stop the demo song.
5
11
13

Using the Music Database
If you want to play in a certain genre of music but don’t know which style (page 32) and voice (page 26)
settings would be appropriate, simply select the desired genre from the Music Database. The PSR-550
automatically makes all appropriate panel settings to let you play in that music style!
Press the [MUSIC DATABASE] button.
1
The MUSIC DATABASE menu appears in the display.
001 Alive Fever
Select a ‘‘Music Database.’’
2
CHORD
119
6
dim
513
augsus4
mM
7
BACK
NEXT
KEYBOARDSTART/STOP
Use the data dial, the [+/YES] button, the [-/NO] button or the number buttons
[1]-[0].
002 Alive Synth
CHORD
119
6
dim
513
mM
augsus4
7
EASY
NAVIGATOR
BACK
TRACK(1~16)
PART
NEXT
KEYBOARDSTART/STOP
DIAL
BEAT
NAVIGATOR
0~9
/YES
TRACK(1~16)
EASY
PART
S
M
E
AS
B
A
T
A
D
IC
S
U
O
V
0~9
STY
O
/YES
S
S
U
M
DIAL
BEAT
2
1
R
L
E
IC
O
V
LE
Y
T
S
G
N
O
12
R
E L
IC
LE
G
N
E
S
A
B
A
T
A
D
IC
• Press the [MUSIC
DATABASE] button to switch
into the Style mode, turn
AUTO ACCOMPANIMENT
on, and turn SYNCHRONIZED START on. See page
25 for details.
The PSR-550 has 220 panel setups in the Music Database and they are divided
into eleven different categories. You can select different Music Database
categories in succession by using the Direct Access function.
To select the first Music Database of the next available category, first press the
[DIRECT ACCESS] button, then press the [MUSIC DATABASE] button.
Direct Access
029 Days of Sax
See page 21 for details about the Direct Access function.
In this example, we’ll select #220 “Xmas Night” and play the song “Silent
Night.” (The sheet music is provided on the next page.)
220 Xmas Night
Music Database List
(page 131)
POP HITS
001 Alive Fever
002 Alive Synth
003 Croco Rock
028 YesterGuitar
SWING & JAZZ
029 Days of Sax
056 Wonderland
EVERGREEN
057 Black Forest
086 Wonder World
Play the chords with your left hand and the melody lines with
3
your right hand along with the music.
As soon as you play a chord with your left hand, the auto accompaniment
starts.
For information on how to enter chords, see ‘‘Chord Fingerings’’ on page 38.
14
• See pages 32 through 41 for
details about the Auto
Accompaniment.
12

Using the Music Database
When you reach the point in the music indicated by the arrow
4
above, press the [ENDING] button.
When the ending is finished, the auto accompaniment automatically stops.
Data stored by the Music Database
Each of the Music Database settings has been specially programmed to match the selected style and each
features the best suited voice (or combination of voices), style, and other settings for that style. Pressing the
[MUSIC DATABASE] button and selecting a style lets you instantly reconfigure all relevant settings, conveniently allowing you to start playing in the desired genre with all the appropriate sounds — without having to
make each setting one by one. For each parameter, refer to the following pages.
■ V OICE PARAMETERS
• Part on/off (Voice R1/R2/L) …………………………………………………………….. page 29
• Voice change setting (Voice R1/R2/L) ………………………………………………. page 75
• Mixer setting (Voice R1/R2/L)………………………………………………………….. page 76
• DSP on/off, FIRST/SLOW on/off, DSP Type and Return Level …………….. page 49
• HARMONY/ECHO on/off, type, volume, part …………………………………….. page 50
• Pitch Bend Range ……………………………………………………………………….. page 122
• Upper Octave setting……………………………………………………………………. page 119
■ AUTO ACCOMPANIMENT PARAMETERS
• Auto accompaniment (ACMP) on/off………………………………………………… page 33
• Synchro Start = ON* ……………………………………………………………………… page 33
• Style Number………………………………………………………………………………… page 32
• Main A/B section …………………………………………………………………………… page 34
• T empo………………………………………………………………………………………….. page 36
• Accompaniment Volume …………………………………………………………………. page 37
• T r ack on/off …………………………………………………………………………………… page 37
• Voice Change setting……………………………………………………………………… page 75
• Mixer setting …………………………………………………………………………………. page 75
• Multi Pad Bank number ………………………………………………………………….. page 43
• Reverb setting ……………………………………………………………………………….page 46
• Chorus setting ……………………………………………………………………………….page 48
* Set only when the accompaniment is not playing.
13
Auto Accompaniment
section
15

Panel Display Indications
The PSR-550 features a large multi-function display that shows all important settings for the instrument.
This backlit LCD also changes color depending on the selected mode, making operation even easier and
more intuitive. For details about the LCD’s Backlight mode, see page 122.
The section below briefly explains the various icons and indications in the display.
e Easy Navigator
!3 Chord
r T ranspose
001 Grand Piano
CHORD
119
6
dim
M
m
TRANSPOSE
REC2REC3REC4REC5REC6REC7REC8REC9REC10REC11REC12REC13REC14REC15REC16REC
1
t Registration bank
and number
augsus4
7
START/STOP
513
REGISTRATION
NEXT
BACK
y Tempo u Measure i Beat indicators
KEYBOARD
TEMPO
NAVIGATOR
EASY
MEASURE
TRACK(1~16)
PART
DIAL
q Menu/message display
This shows the menu for each function of the PSR-550.
It also displays the relevant messages for the current
operation.
See the “Basic Operation” section (page 17) for details
on the menu/message display.
w Menu indication
This indicates the items shown in the menu display, and
the button to be pressed. Refer to “Basic Operation”
(page 17) for details.
e Easy Navigator
This indicates the buttons to be pressed. Refer to
“Basic Operation” (page 18) for details.
r T ranspose
Shows the current transpose value (page 30).
t Registration bank-number
Shows the current selected registartion memory bank
and number (page 56).
y Tempo
Shows the current tempo of accompaniment/song
playback (page 36).
u Measure
Indicates the current
measure number during
song recording and
playback.
1st beat
2nd beat
3rd beat
4th beat
4/4 time 3/4 time
i Beat indicators
Flashes at the current tempo and indicates the current
beat during accompaniment and song playback.
q Menu/message display
• If the power is left on
and the PSR-550
remains untouched for
three minutes or
longer, the LCD will
change color every
three seconds (when
Backlight mode is set
to “Auto”).
BEAT
0~9
/YES
E
IC
O
V
L
Y
T
S
G
N
O
S
USIC DATABASE
M
DSP(FAST)
SUSTAIN
L
E
R
TOUCH
HARMONY
12
w Menu
indication
o DSP (FAST)
!0 TOUCH
!1 SUSTAIN
!2 HARMONY
!4 Song tracks /
Accompaniment
tracks
o DSP (FAST)
“DSP” appears when the DSP effect is turned on (page
49).
“FAST” appears when the DSP FAST/SLOW effect is
turned on (page 49).
!0 TOUCH
Appears when the touch sensitivity is turned on (page
120).
!1 SUSTAIN
Appears when the sustain is turned on (page 30).
!2 HARMONY
Appears when the HARMONY effect is turned on
(page 50).
!3 Chord
Displays the current chord
name during AUTO ACCOM-
Cm
PANIMENT playback or
SONG recording/playback
(page 33).
!4 Song tracks / Accompaniment tracks
• In the Song mode (page 25) and the Demo Song
mode (page 15):
The icons of all tracks indicate the on/off status and
volume/velocity settimgs.
• In the Style mode (page 25):
The icons of tracks 9 — 16 indicate the on/off status
and volume/velocity settings for each of the eight
accompaniment tracks.
• In the Record mode (page 25):
The icons of all tracks indicate the on/off status and
volume/velocity settimgs. The “REC” marks
indicate the recording status.
Chord typeRoot
16
14

Basic Operation
This section introduces you to the basic operations common to the various functions of the PSR-550.
In particular, you’ll learn how to use the menu/message display at the center of the front panel.
• Calling up the Operation Displays ……………………………………………………………page 17
• How to read the Menu/message display and the “Easy Navigator” ………………. page 18
• Menu Selection…………………………………………………………………………………….. page 19
• Changing (Editing) Values ………………………………………………………………………page 20
• Naming ………………………………………………………………………………………………..page 21
• Direct Access………………………………………………………………………………………..page 21
Calling up the Operation Displays
Press the buttons listed below in order to call up the appropriate displays for the
various functions of the PSR-550.
• DEMO button ……………………………………………… page 13
• RECORD button ……………………….. pages 25, 78, 92, 96
• SONG button ……………………………………………… page 25
• STYLE button………………………………………. pages 25, 32
• MUSIC DATABASE button ……………………………. page 14
• VOICE L button …………………………………………… page 28
• VOICE R1 button ………………………………………… page 26
• VOICE R2 button ………………………………………… page 27
• VOICE CHANGE button……………………………….. page 75
• MIXER button……………………………………………… page 76
• ACMP/SONG VOL button ……………………… pages 37, 70
• TEMPO/TAP button……………………………………… page 36
• TRANSPOSE button ……………………………………. page 30
• FUNCTION button …………………………………….. page 118
• DISK LOAD button……………………………………… page 62
• DISK SAVE button ……………………………………… page 60
• DISK UTILITY button …………………………… pages 64, 67
Pressing one of these buttons instantly calls up the relevant display for the selected
function.
See the function tree chart for details (page 22).
If you’ve selected several different functions’ displays in succession, you can “retrace
your steps” and revisit each display by using the [BACK] and [NEXT] buttons at the
left side of the display. Of course you can also directly select the desired displays by
pressing the appropriate buttons (as listed above).
How to leave the current display
As shown in the function tree chart (page 22), there is a wide varierty of functions on
the PSR-550, each with its own corresponding display. In order to leave the display of
each function press the [EXIT] button.
Since the PSR-550 has so many different displays, you may occasionally find yourself
confused as to which operation’s display is currently shown. If this happens, you can
return to “home base” by pressing the [EXIT] button several times. This returns the
PSR-550 to the default display — the same display that appears when the power is
turned on.
15
17

Basic Operation
How to Read the Menu/Message Display and “Easy Navigator”
Depending on the selected function or operation, the PSR-550 shows a variety of
displays and indications. Included in these are “Easy Navigator” messages that guide
you through the various operations.
Let’s take a look at some examples:
● V oice
Press the [VOICE R1] button.
● Style
● Song
001 Grand Piano
CHORD
EASY
NAVIGATOR
TRACK(1~16)
PART
DIAL
dim
mM
augsus4
7
START/STOP
513
KEYBOARD
NEXT
BACK
119
6
0~9
/YES
IC
O
V
Y
T
S
N
O
S
MUSIC DATABASE
Press the [STYLE] button.
001 8Beat 1
CHORD
EASY
NAVIGATOR
TRACK(1~16)
PART
DIAL
dim
mM
augsus4
7
START/STOP
513
KEYBOARD
NEXT
BACK
119
6
0~9
/YES
IC
O
V
Y
T
S
N
O
S
MUSIC DATABASE
This message also means: “You can
start the accompaniment by pressing
the [START/STOP] button.”
2
1
R
L
E
LE
G
This message means: “The current voice for voice R1
(Grand Piano) is shown at top. You can change this
voice by using the data dial, the [+/YES] button, the
[-/NO] button or the number buttons [1]-[0].”
This message means: “The current style (8Beat 1) is
2
1
R
L
E
LE
G
shown at top. You can change this style by using the
data dial, the [+/YES] button, the [-/NO] button or the
number buttons [1]-[0].”
Insert the included data disk
into the disk drive.
001 CLUB XG
CHORD
6
dim
mM
7
119
513
augsus4
BACK
START/STOP
KEYBOARD
NEXT
_
EASY
NAVIGATOR
TRACK(1~16)
PART
DIAL
This message also means: “You can
start the current song by pressing the
[ST AR T/ST OP] button.”
18
0~9
/YES
R
L
E
IC
O
V
LE
Y
T
S
G
N
O
S
MUSIC DATABASE
12
This message means: “The current song (CLUB_XG)
is shown at top. You can change this song by using the
data dial, the [+/YES] button, the [-/NO] button or the
number buttons [1]-[0].”
16

● Disk
Basic Operation
Insert an unformatted
disk into the disk drive.
Format OK?
CHORD
119
6
dim
mM
augsus4
7
START/STOP
513
BACK
NEXT
KEYBOARD
EASY
NAVIGATOR
TRACK(1~16)
PART
DIAL
0~9
/YES
R
E L
IC
O
V
E
L
TY
S
G
N
O
S
MUSIC DATABASE
2
1
This message means: “Press the [+/YES] button to
execute the Format operation.”
Menu Selection
For certain operations on the PSR-550 (such as selecting voices, demo songs and
styles), you’ll need to select different menus in the display.
For example, the display below (for selecting the function) appears when you press the
[FUNCTION] button.
F1 Multi Pad
CHORD
dim
mM
augsus4
7
START/STOP
513
KEYBOARD
NEXT
BACK
119
6
EASY
NAVIGATOR
TRACK(1~16)
PART
DIAL
0~9
/YES
In this case you can select the function by turning the data dial, or move the cursor by
pressing the [+/YES]/[-/NO] buttons.
F1 Multi Pad
CHORD
dim
mM
augsus4
7
START/STOP
513
KEYBOARD
NEXT
BACK
119
6
EASY
NAVIGATOR
TRACK(1~16)
PART
DIAL
0~9
/YES
R
L
E
IC
O
V
E
L
Y
T
S
G
N
O
S
MUSIC DATABASE
L
E
IC
O
V
LE
Y
T
S
G
N
O
S
MUSIC DATABASE
12
12
R
[+/YES] button [-/NO] button
F2 Regist Memory
CHORD
EASY
NAVIGATOR
TRACK(1~16)
PART
dim
513
augsus4
mM
7
KEYBOARDSTART/STOP
NEXT
BACK
119
6
DIAL
0~9
/YES
R
L
E
IC
O
V
LE
Y
T
S
G
N
O
S
MUSIC DATABASE
2
1
[+/YES] button [-/NO] button
F3 DigitalEffect
CHORD
EASY
NAVIGATOR
TRACK(1~16)
PART
dim
513
mM
augsus4
7
KEYBOARDSTART/STOP
NEXT
BACK
119
6
DIAL
0~9
/YES
R
L
E
IC
O
V
E
L
Y
T
S
G
N
O
S
MUSIC DATABASE
12
[+/YES] button [-/NO] button
The display below (for selecting voices) appears when you press the [VOICE R1]
button.
001 Grand Piano
CHORD
EASY
NAVIGATOR
TRACK(1~16)
PART
dim
mM
7
513
augsus4
START/STOP
KEYBOARD
NEXT
BACK
119
6
DIAL
0~9
/YES
R
L
E
IC
O
V
LE
Y
T
S
G
N
O
S
MUSIC DATABASE
2
1
In this case you can also select the voice by using the data dial or the [+/YES]/[-/NO]
buttons as above; you can also input the voice number directly by using the number
buttons [1]-[0] (see the next page).
17
19

Basic Operation
Changing (Editing) Values
This section shows you how to set numeric values on the PSR-550, such as voice
number, song/style number and various parameters. Input the values by using the
number buttons [1]-[0] or the [+/YES]/[-/NO] buttons.
Number buttons [1]-[0]
described below.
Rotating the data dial
to the right (clockwise)
increases the value,
while rotating it to the
left (counter-clockwise) decreases it.
Pressing the [+/YES] button increases the displayed
value by 1. Pressing the [-/NO] button decreases the
displayed value by 1. Pressing and holding either button
causes a continuous increase and decrease.
For items that have initial default values, pressing the [+/
YES] and the [-/NO] buttons together at the same time
will return the setting to the initial value.
Numeric entry
The explanations here apply only to numbers that have a maximum of three digits,
such as those for voices and styles.
• Entering one- or two-digit numbers
One- or two-digit voice numbers can be entered with leading zeroes: e.g. “12” can be
entered as “012” by pressing the [0], [1] and [2] buttons in sequence.
• One- or two-digit numbers
can also be entered without
leading zeroes.
To select number “12”, for
example, simply press the [1]
button and then the [2]
button. The bars below the
number on the display will
flash for a few seconds, and
then disappear when the
selected number has been
recognized by the PSR-550.
• Entering three-digit numbers
The number buttons can be used to directly enter the number of the desired voice,
thereby immediately selecting that voice without having to step through a number of
other voices. To select number 106, for example, press the [1], [0] and [6] number
buttons in sequence.
20
18

Naming
The allows you to create your own original data such as songs, styles and registration
memory settings. You can also freely name the data as desired.
The following data types can be named.
• Disk files (User songs, etc) …………………………. pages 61, 65, 66, 90
• User Styles ………………………………………………………………. page 104
• User Pad banks ………………………………………………………….. page 94
• Registration Memory banks ………………………………………….. page 56
The example display below appears when naming a song on a floppy disk (page 90).
–Nam=xxxxxxxx
Cursor
To enter an original name, use the keyboard.
Letters and characters are marked
above the corresponding keys.
Basic Operation
C1
Entering a character Each key on the keyboard enters a different character, as
marked directly above the ke y.
Moving the cursor The A#5 and B5 keys move the cursor backward and
forward within the file name.
Entering a lower-case character The C1 key functions as a shift key that shifts between
lower- and upper-case characters: hold the Shift key
while pressing a character key to enter the lower-case
character.
Delete The Delete key (C6) deletes the character at the cursor
position.
Direct Access
By using the [DIRECT ACCESS] button, you can instantly call up the desired display.
For example, pressing the [DIRECT ACCESS] button and press the
[REGISTRARTION MEMORY] button automatically selects the display for inputting the Registration Memory bank name.
• Lowercase letters cannot be
used for disk file names.
Direct Access
See page 24 for the Direct Access Chart.
19
–RegName Regist01
Cursor
21

Function Tree
Button Menu/message display Function See page
DEMO Sweet Tenor……………………………… Demo song selection……………………………………………………………………………. 13
VOICE R1 001 Grand Piano ………………………. Voice R1 selection……………………………………………………………………………….. 26
VOICE R2 001 Grand Piano ………………………. Voice R2 selection……………………………………………………………………………….. 27
VOICE L 001 Grand Piano ……………………….Voice L selection …………………………………………………………………………………. 28
STYLE 001 8Beat 1……………………………… Accompaniment Style selection …………………………………. 1………………. 32
SONG 001 CLUB_XG………………………….. Song selection…………………………………………………………………………………….. 68
MUSIC DATABASE 001 Alive Fever…………………………………………………………………………………………………………… 4………………. 14
VOICE CHANGE R1=001 Grand Pno …………………… Voice selection of R1/R2/L/Style track/Song track ……………………………………. 75
MIXER Volume R1 ……………………………….. Volume adjustment of Voice R1/R2/L ………………………….. 5,6,7…………. 76
ACMP/SONG VOL Acmp Volume …………………………… Accompaniment Volume setting …………………………………………………………….. 37
SngMenu …………………………………. Song menu selection……………………………………………………………………………. 69
PlayMode………………………..Song play method selection ……………………………………….
Measure …………………………Song Measure from which to start playback ……………………….…………………… 71
AbRepeat ……………………….Song repeat setting …………………………………………………..
S.Trans ………………………….. Song transpose setting ……………………………………………..
Volume Ph1……………………………… Volume adjustment of the accompaniment track……………
Volume T01 ……………………………… Volume adjustment of the song track …………………………..
Octave R1………………………………..Octave setting of voice R1/R2/L………………………………….
Octave T01 ……………………………… Octave setting of song track………………………………………….....…………………… 77
Pan R1 ……………………………………Pan setting of voice R1/R2/L…………………………………………………………………. 77
Pan RhM …………………………………Pan setting of accompaniment track ………………………………………………………. 77
Pan T01 ………………………………….. Pan setting of song track………………………………………………………………………. 77
RevDepth R1…………………………… Reverb depth setting of voice R1/R2/L………………………..
RevDepth RhM………………………… Reverb depth setting of accompaniment track ………………
RevDepth T01 …………………………. Reverb depth setting of song track………………………………
ChoDepth R1…………………………… Chorus depth setting of voice R1/R2/L ……………………….
ChoDepth RhM………………………… Chorus depth setting of accompaniment track………………
ChoDepth T01 …………………………. Chorus depth setting of song track ……………………………..
DspDepth R1…………………………… DSP depth setting of voice R1/R2/L……………………………
DspDepth RhM………………………… DSP depth setting of accompaniment track …………………
DspDepth T01 …………………………. DSP depth setting of song track…………………………………
Song Volume ……………………………. Song Volume setting ……………………………………………………………………………. 70
…………………. 69
2………………. 72
3………………. 73
…………………. 76
…………………. 76
8,9,10……….. 77
27…………….. 77
27…………….. 77
27…………….. 77
30…………….. 77
30…………….. 77
30…………….. 77
33…………….. 77
33…………….. 77
33…………….. 77
TRANSPOSE Transpose ………………………………… Transpose setting ………………………………………………………………………………… 30
TEMPO/TAP Tempo……………………………………… Tempo setting ……………………………………………………………………………………… 36
DISK LOAD Ld ……………………………………………Loading data from a disk ………………………………………………………………………. 62
DISK SAVE Sv …………………………………………… Saving data to a disk ……………………………………………………………………………. 60
DISK UTILTY Menu
SongCopy………………………. Copying a song in a disk ………………………………………………………………………. 64
Delete ……………………………. Deleting a file in a disk ………………………………………………………………………….67
Format …………………………… Formatting a disk………………………………………………………
11…………….. 60
• The icon in the chart indicates that the relevant function or parameter can be called up via
the Direct Access function, and the numbers beside the icon correspond to the ones in the Direct
Access Chart on page 24. All functions indicated with this mark (other than Style selection,
Music Database selection, and Disk Format) can be user-assigned to the [+/YES] button, [-/NO]
button and the number buttons [1]—[0] — allowing you to instantly select the desired function/
parameter.
• When you call up the Mixer screens (other than Volume and Octave) via the Direct Access, the
previously edited part (page 74) will be displayed.
• Concerning
1 and 4, the screens that are called up actually are different from the ones
described at the left. See the Direct Access Chart on page 24.
22
20

Function Tree
Button Menu/message display Function See page
FUNCTION F1 Multi Pad
PBnk ……………………………. Multi pad bank selection…………………………………………….
CdMatch ………………………… Chord match on/off setting …………………………………………
F2 Regist Memory
RBnk ……………………………. Registration Memory bank selection …………………………..
RegName ………………………. Namimg Registration Memory bank ……………………………
F3 DigitalEffect
Reverb
Chorus
Dsp
Harmony
F4 Midi
Template ………………………… MIDI template vselection ……………………………………………………………………… 112
Transmit Ch …………………….MIDI transmit channel setting……………………………………..
Recive Ch ………………………. MIDI receive channel setting ………………………………………
LocalContrl …………………….. Local control on/off setting …………………………………………
Clock ……………………………. External /Internal clock selection ………………………………..
Init Send …………………………Initial data send ………………………………………………………..
12…………….. 44
13…………….. 43
14…………….. 56
15…………….. 56
RevType ……………….. Reverb type selection ………………………………………………..
RevRetnLevel ………..Reverb return level setting …………………………………………
ChoType ……………….Chorus type selction ………………………………………………….
ChoRetnLevel……….. Chorus return level setting …………………………………………
DspType ……………….. DSP type selection……………………………………………………
DspRetnLevel ……….. DSP return level setting……………………………………………..
HTyp ……………………. Harmony/Echo type selection …………………………………….
Harmony Vol …………. Harmony /Echo volume setting …………………………………..
HarmPart ……………… Harmony part setting …………………………………………………
MidiTemplatLoad? ….Loading the selected MIDI template setting ……………………………………………. 112
25…………….. 46
26…………….. 47
28…………….. 48
29…………….. 48
16,31………… 49
32…………….. 49
17,34………… 50
24…………….. 52
35…………….. 53
………………… 114
………………… 115
………………… 116
………………… 116
………………… 117
F5 Utility
RECORD Song
Style
Metronom ………………………. Metronome on/off setting …………………………………………..
UpperOct ……………………….. Upper octave setting …………………………………………………
Tuning ……………………………. Master tuning setting ………………………………………………… ………………… 119
SC.Tune …………………………. Scale tuning setting…………………………………………………………………………….. 119
Template ……………….Scale tuning template selection ……………………………………………………………. 119
NoteEdit……………….. Individual note tuning ………………………………………………..
Split …………………………….Split point setting ………………………………………………………
Fingerng …………………………Fingering selection ……………………………………………………
TouchSns……………………….. Touch sensitivity setting ……………………………………………. 21……………. 120
VoiceSet …………………………Voice set on/off setting ………………………………………………
Pedal …………………………….Selecting footswitch function ………………………………………
PitchBnd ………………………… Pitch bend range setting ……………………………………………
Assignbl …………………………. Direct Access setting …………………………………………………………………………… 122
BackLigt…………………………. LCD’s backlight color setting ………………………………………
QuickRec ………………………..User Song Quick recording …………………………………………………………………… 80
MultiRec …………………………User Song Multi track recording …………………………………………………………….. 82
Punch In/Out…………. Punch in/out setting……………………………………………………………………………… 84
RecStart Mes………… Measure from which to start playback…………………………………………………….. 84
Edit
Quantize ………………. Quantize …………………………………………………………………………………………….. 86
Setup Dt……………….. Setup data editing ……………………………………………………………………………….. 88
Name …………………… Naming User Songs …………………………………………………………………………….. 90
Clear ……………………. Clearing user song data ……………………………………………………………………….. 91
Record ……………………………User Style recording …………………………………………………………………………….. 96
Edit
Quantize ………………. Quantize ……………………………………………………………………………………………. 102
Name …………………… Namimg User Styles …………………………………………………………………………..104
Clear ……………………. Clearing user style data ……………………………………………………………………….104
18……………. 118
………………… 119
………………… 119
19……………. 120
20…………….. 38
22……………. 120
………………… 121
………………… 122
23……………. 122
MultiPad
Record ……………………………User Pad recording ……………………………………………………………………………… 92
Edit
ChdMatch …………….. Chord match on/off setting ……………………………………………………………………. 94
Name …………………… Naming user pads ……………………………………………………………………………….. 94
Clear ……………………. Clearing user pad data…………………………………………………………………………. 95
21
23

Direct Access Chart
Function Tree number/function Operation: + button listed below
1 Next style category selection [STYLE]
2 Song repeat setting [SONG]*
3 Song transpose setting [TRANSPOSE]*
4 Next Music database category selection [MUSIC DATABASE]
5 Volume adjustment of Voice R1 [VOICE R1]
6 Volume adjustment of Voice R2 [VOICE R2]
7 Volume adjustment of Voice L [VOICE L]
8 Octave setting of Voice R1 PART ON/OFF [VOICE R1]
9 Octave setting of Voice R2 PART ON/OFF [VOICE R2]
10 Octave setting of Voice L PART ON/OFF [VOICE L]
11 Formatting a disk [UTILITY]
12 Multi pad bank selection MULTI PAD [STOP]
13 Chord match on/off setting MULTI PAD [1]~[4]
14 Registration Memory bank selecton REGISTRATION MEMORY [1]~[4]
15 Naming Registration Memory bank REGISTRATION MEMORY [MEMORY]
16 DSP type selection [DSP] or [FAST/TAP]
17 Harmony/Echo type selection [HARMONY]
18 Metoronome on/off setting [TEMPO/TAP]
19 Split point settiong [SONG/ACMP VOLUME]
20 Fingering selection [ACMP ON/OFF]
21 Touch sensitivity setting [TOUCH]
22 Voice set on/off setting [FUNCTION]
23 LCD’s backlight color setting [DEMO]
24 Harmony/Echo volume setting Number button [0]
25 Reverb type selection Number button [1]
26 Reverb return level setting Number button [2]
27 Reverb depth setting Number button [3]
28 Chorus type selection Number button [4]
29 Chorus return level setting Number button [5]
30 Chorus depth setting Number button [6]
31 DSP type selection Number button [7]
32 DSP return level setting Number button [8]
33 DSP depth setting Number button [9]
34 Harmony/Echo type selection Number button [-/NO]
35 Harmony part setting Number button [+/YES]
* Available only in the Song mode.
Various functions other than ones listed above can be accessed by assigning them to the [+/YES]
button, [-/NO] button and the number buttons [1]-[0].
The functions listed above are default settings.
See the Function Tree on pages 22 and 23 for the available functions.
See page 122 about how to assign the available functions.
24
22

Mode
Depending on the panel operation used, the PSR-550 has several fundamentally different conditions (or
methods of operation). Each of these condition is called a mode. This section explains the main modes
of the instrument.
Style Mode page 32
Select this mode by pressing the [STYLE] button or the [MUSIC DATABASE] button.
(This is the default mode when the power is turned on.)
The Style mode is used for playing the full keyboard normally, and when using the auto
accompaniment.
Styles are the rhythm/accompaniment pattterns which are played by the auto accompaniment feature.
In the Style mode, the backlight color is set to blue as the factory default.
● Auto accompaniment (ACMP) on/off
……………………………………….page 33
The [ACMP ON/OFF] button
switches on and off.
When auto accompaniment
is on, the left side of the
keyboard is used for playing/
indicating chords.
● Synchronized Start standby
(SYNC START) on/off ……………..page 33
The [SYNC START] button
switches on and off.
When Synchronized Start
standby is on, the auto
accompaniment starts as
soon as you play a key on
the keyboard.
BEAT
Song Mode page 68
Select this mode by pressing the [SONG] button or inserting the disk that contains song
data into the disk drive.
The Song mode is used for playing the full keyboard normally, and for playing back the
songs.
In the Song mode, the backlight color is set to purple as the factory default.
Record Mode
Select this mode by pressing the [RECORD] button.
In the Record mode you can record your own original performances and songs, create
original styles and Multi Pad phrases.
In the Record mode, the backlight color is set to red as the factory default.
● Song record mode …………………page 78
• Rehearsal mode (Sync Start off)
• Record (Synchronized Start) standby
• Recording
● Style record mode………………….page 96
• Rehearsal mode (Sync Start off)
• Record (Synchronized Start) standby
• Recording
When Record (Synchronized Start) standby is on, the recording starts as soon as you play
a key on the keyboard.
● Pad record mode ……………………page 92
• Rehearsal mode (Sync Start off)
• Record (Synchronized Start) standby
• Recording
Disk Mode page 57
Select this mode by pressing the [LOAD] button, [SAVE] button or the [UTILITY]
button.
In the Disk mode you can save and load important data.
In the Disk mode, no panel operations can be executed (except for disk operations).
In the Disk mode, the backlight color is set to blue as the factory default.
23
25

Playing Voices
The PSR-550 has a huge selection of various musical instrument voices which you can play. Try out the
different voices referring to the voice list at the end of this manual (page 123).
Select and play the voices of different musical instruments
• Selecting a Voice……………………………………………………………………………….. page 26
• Keyboard Percussion …………………………………………………………………………. page 31
Assign three different voices to the keyboard and play them
• Playing Two Voices (R1, R2) Simultaneously …………………………………………. page 27
• Playing Different Voices with the Left (L) and Right (R1, R2) Hands …………. page 28
• Functions of the Keyboard ………………………………………………………………….. page 29
Other voice-related functions
• Pitch Bend Wheel ……………………………………………………………………………… page 30
• T ranspose…………………………………………………………………………………………. page 30
• Sustain …………………………………………………………………………………………….. page 30
• T ouch Sensitivity ……………………………………………………………………………… page 120
Selecting a Voice
Press the [VOICE R1] button.
1
001 Grand Piano
Select a voice.
2
CHORD
119
6
dim
mM
TRANSPOSE
REC2REC3REC4REC5REC6REC7REC8REC9REC10REC11REC12REC13REC14REC15REC16REC
1
augsus4
7
START/STOP
513
REGISTRATION
BACK
NEXT
KEYBOARD
TEMPO
EASY
NAVIGATOR
MEASURE
TRACK(1~16)
PART
DIAL
BEAT
Use the data dial, the [+/YES] button, the [-/NO] button or the number buttons
[1]-[0].
Refer to the Voice List (page 123).
002 Bright Piano
Play the keyboard and adjust the volume.
3
0~9
/YES
R
L
E
IC
O
V
E
L
Y
T
S
G
N
O
S
MUSIC DATABASE
DSP(FAST)
TOUCH
HARMONY
SUSTAIN
• The voice selected here is
2
1
called voice R1 (RIGHT 1).
See page 29 for more
information on voice R1.
26
24

Playing Two Voices (R1, R2) Simultaneously
Press the [PART ON/OFF VOICE R2] button.
1
Play the voices.
2
Two different voices are sounded simultaneously in a layer.
Voice R1 (RIGHT 1) is the first voice of the layer and is meant to be played
with the right hand. The second voice is called voice R2 (RIGHT 2) and is also
played with the right hand.
Playing Voices
Selecting a voice for VOICE R2
Press the [VOICE R2] button.
1
098 Slow Strings
Select a voice.
2
Use the data dial, the [+/YES] button, the [-/NO] button or the number buttons
[1]-[0].
Refer to the Voice List (page 123).
The voices available for selection here (VOICE R2) are the same as those
available for VOICE R1 (selected on page 26).
Play the voice.
3
25
27

Playing Voices
Playing Different Voices with the Left (L) and Right (R1, R2) Hands
Press the [PART ON/OFF VOICE L] button.
1
Play the voices.
2
The notes you play with your right and left hands sound two different voices.
• The point on the keyboard
that separates voice L and
Split Point
voice R1 is called the “split
point” (page 29).
Voice L
Voice R1 (RIGHT 1) is meant to be played with the right hand. Voice L
(LEFT) is played with the left hand.
Voice R1
Selecting a voice for VOICE L
Press the [VOICE L] button.
1
095 String Ensbl
Select a voice.
2
Use the data dial, the [+/YES] button, the [-/NO] button or the number buttons
[1]-[0].
Refer to the Voice List (page 123).
The voices available for selection here (VOICE L) are the same as those
available for VOICE R1 (selected on page 26).
Play the voices.
3
Split Point
Voice L
28
Voice R1
26

Split Point
The point on the keyboard that separates voice L and voice R1/R2 is called the “split
point”.
The split point is set to F#2 at the factory setting, however you can set this to any key
you wish. Refer to page 120 for instructions on setting the split point.
Split Point (F#2)
Playing Voices
• Each key has a note name;
for example, the lowest
(farthest left) key on the
keyboard corresponds to C1,
and the highest (farthest
right) key to C6. (See below
for details.)
Voice L
Voice R1/R2
Functions of the Keyboard
As explained above, the keyboard of the PSR-550 can sound three different voices. Here’s a short summary of the
various ways of playing voices.
● Playing a Single Voice
Voice R1
● Playing Two Voices
Voice R1 + R2
● Playing Separate Voices
with the Right and Left
Hands
Voice L
Voice L
Voice R1
Voice R1 + R2
In addition, the keyboard of the PSR-550 has other important functions besides playing voices (as shown below).
● Auto Accompaniment Section
When the auto accompaniment is set to on (page 33), the key range of voice L becomes the range for playing/
indicating chords.
Auto accompaniment
Split Point
section
● Naming
The keyboard can also be used to name song files on a floppy disk, User Styles,
User Pad banks and Registration Memory banks (page 21).
Each key has a note name; for example, the lowest (farthest left) key on the keyboard corresponds to C1, and the
highest (farthest right) key to C6.
C#1D#1F#1G#1A#1
C1
D1 E1 F1 G1 A1 B1
C1 — B1
27
C2 — B2 C3 — B3 C4 — B4 C5 — B5 C6
Voice R1/R2
29

Playing Voices
Transpose
This function allows the overall pitch of the PSR-550 to be transposed up or down by a
maximum of one octave in semitone increments. The transpose range is from -12 to
+12.
Press the [TRANSPOSE] button.
1
Transpose = 0
Set the transposition.
2
Use the data dial, the [+/YES] button, the [-/NO] button or the number buttons
[1]-[0].
• The T ranspose function
cannot be applied when a
drum kit is the selected voice
(page 31).
• Press the [+/YES] and [-/NO]
buttons simultaneously to
instantly reset the transpose
value to “0”.
• The new TRANSPOSE value
will take effect from the next
key played.
• Minus values can be entered
by using the number buttons
while holding the [-/NO]
button.
Transpose = 4
Pitch Bend Wheel
Use the PSR-550 pitch bend wheel to bend notes up (roll the wheel away from you) or
down (roll the wheel toward you) while playing the keyboard. The pitch bend wheel is
self-centering and will automatically return to nornal pitch when released.
Sustain
• The maximum pitch bend
range can be set via the
Pitch Bend Range function in
the Utility function group
(page 122).
When the Sustain features is ON, all notes played on the keyboard have a longer
sustain. Press the [SUSTAIN] button to turn the SUSTAIN effect ON or OFF.
DSP(FAST)
SUSTAIN
30
TOUCH
HARMONY
28
Loading…
View the manual for the Yamaha PSR-550 here, for free. This user manual comes under the category keyboards and has been rated by 23 people with an average of a 8.8. This manual is available in the following languages: English. Do you have a question about the Yamaha PSR-550?
Ask your question here
Yamaha PSR-550 specifications
Below you will find the product specifications and the manual specifications of the Yamaha PSR-550.
The Yamaha PSR-550 is an electronic keyboard that was first released in 2001. It features a 61-key keyboard with touch response and various effects such as sustain, reverb, and chorus. The PSR-550 also includes a built-in sequencer that allows users to record up to 6 tracks, making it ideal for recording and arranging music.
With its 480 XG and 256 GM voices, the PSR-550 offers a wide range of sound options for musicians. It also has 135 accompaniment styles, covering a variety of musical genres including pop, jazz, and Latin. Additionally, the keyboard includes a pitch bend wheel and assignable knobs that can be used to control various parameters.
The PSR-550 also has several connectivity options, including MIDI In/Out, headphone jack, and two line outputs. It also has a SmartMedia slot for saving and loading voices, songs and styles.
Overall, the Yamaha PSR-550 is a versatile and reliable keyboard that provides users with a range of features and options for creating and recording music.
General
| Brand | Yamaha |
| Model | PSR-550 |
| Product | keyboard |
| Language | English |
| Filetype | Manual (PDF) |
Frequently asked questions
Can’t find the answer to your question in the manual? You may find the answer to your question in the FAQs about the Yamaha PSR-550 below.
How can I best clean my keyboard?
A slightly damp cleaning cloth or soft, dust-free cloth works best to remove fingerprints. Dust in hard-to-reach places is best removed with compressed air.
Is the manual of the Yamaha PSR-550 available in English?
Yes, the manual of the Yamaha PSR-550 is available in English .
Is your question not listed? Ask your question here
Главная >
Синтезаторы >
Yamaha >
PSR-550
Поделиться
Раздел: Музыкальное Оборудование
Тип: Синтезатор
Инструкция к Синтезатору Yamaha PSR-550
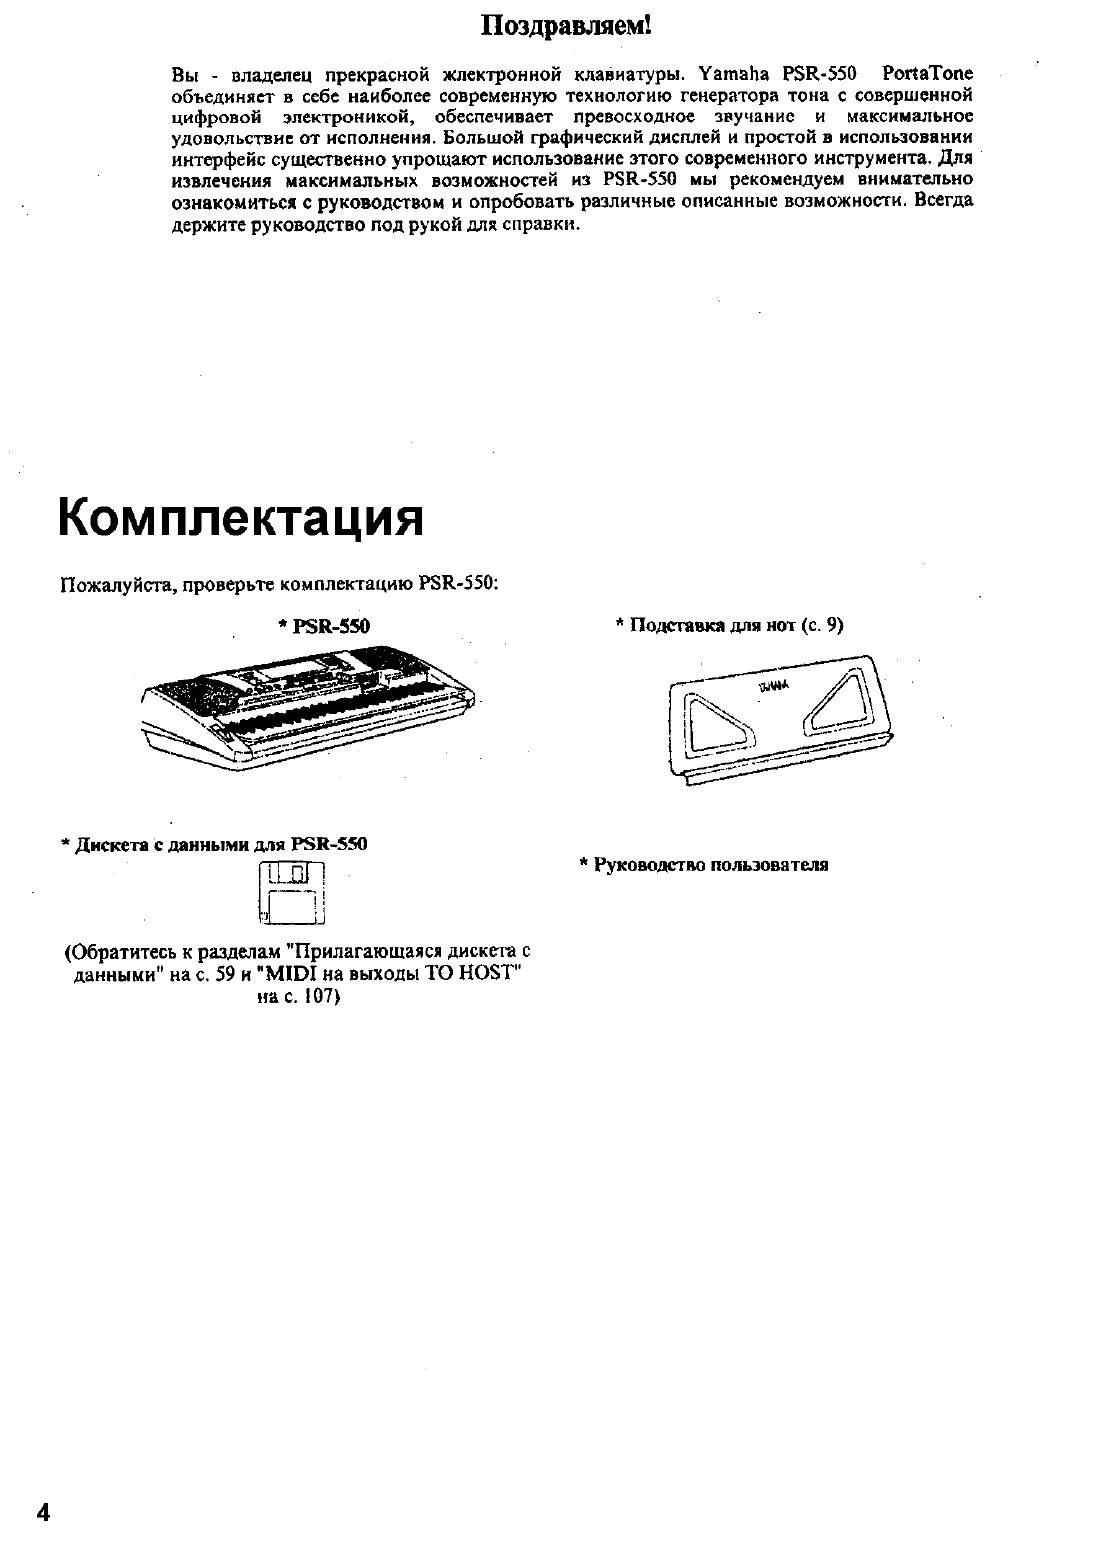
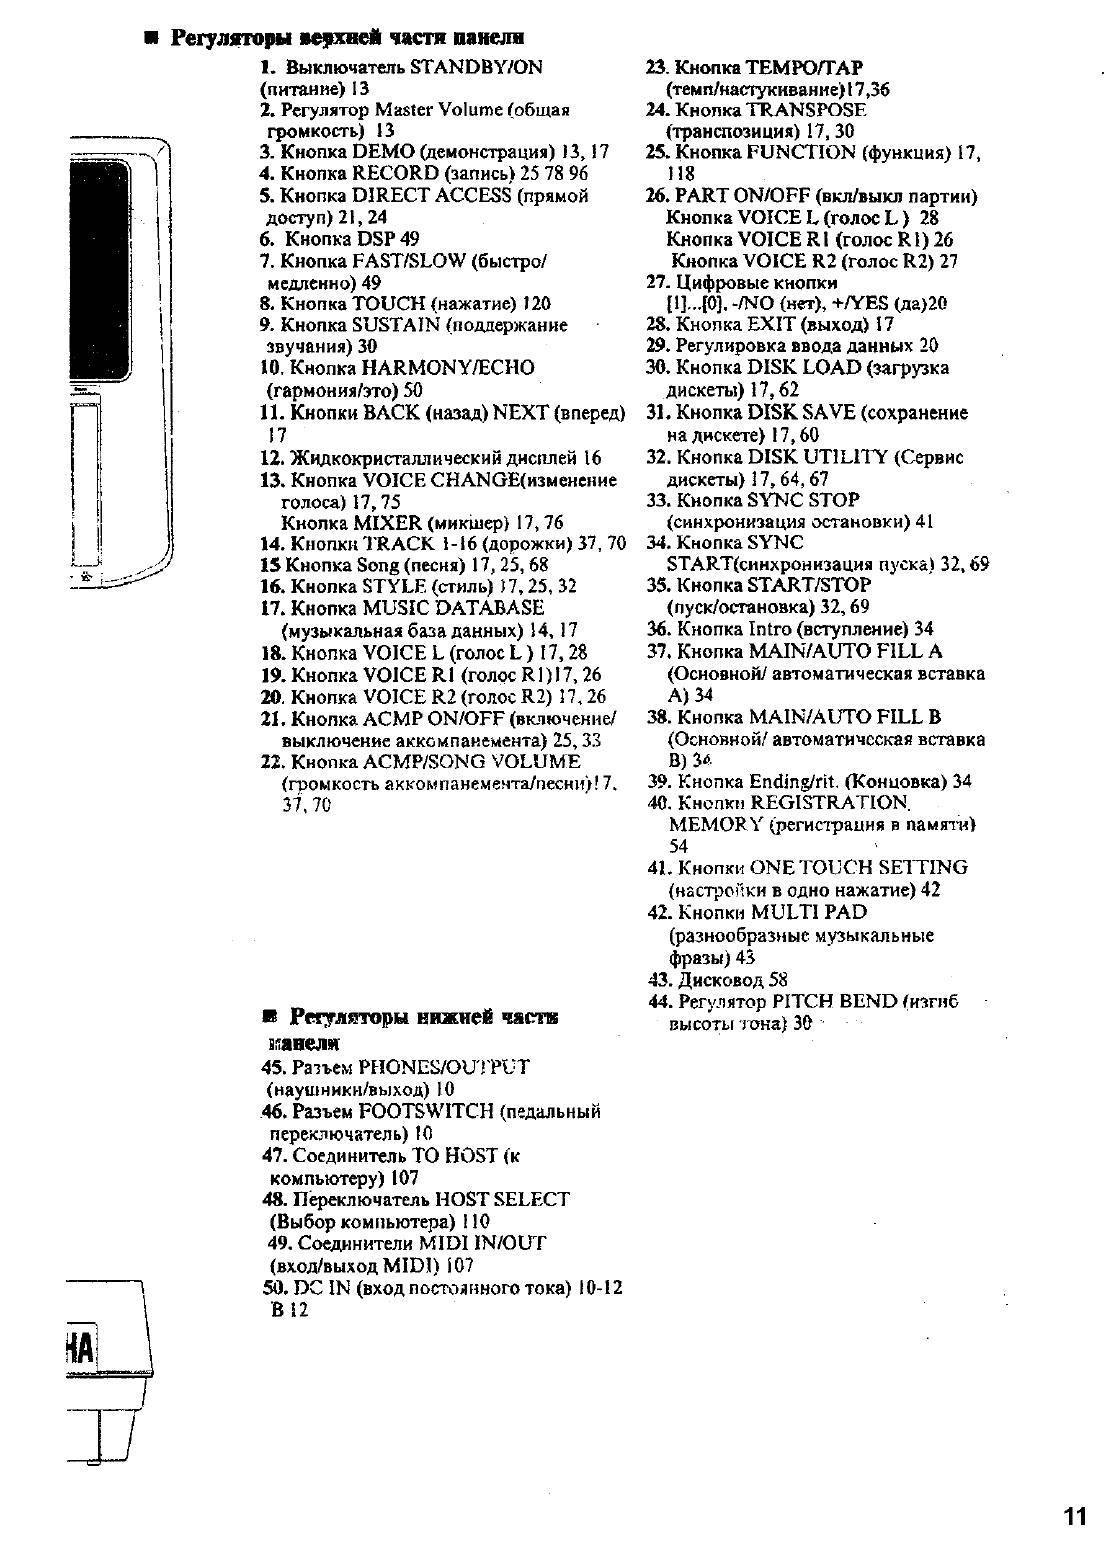
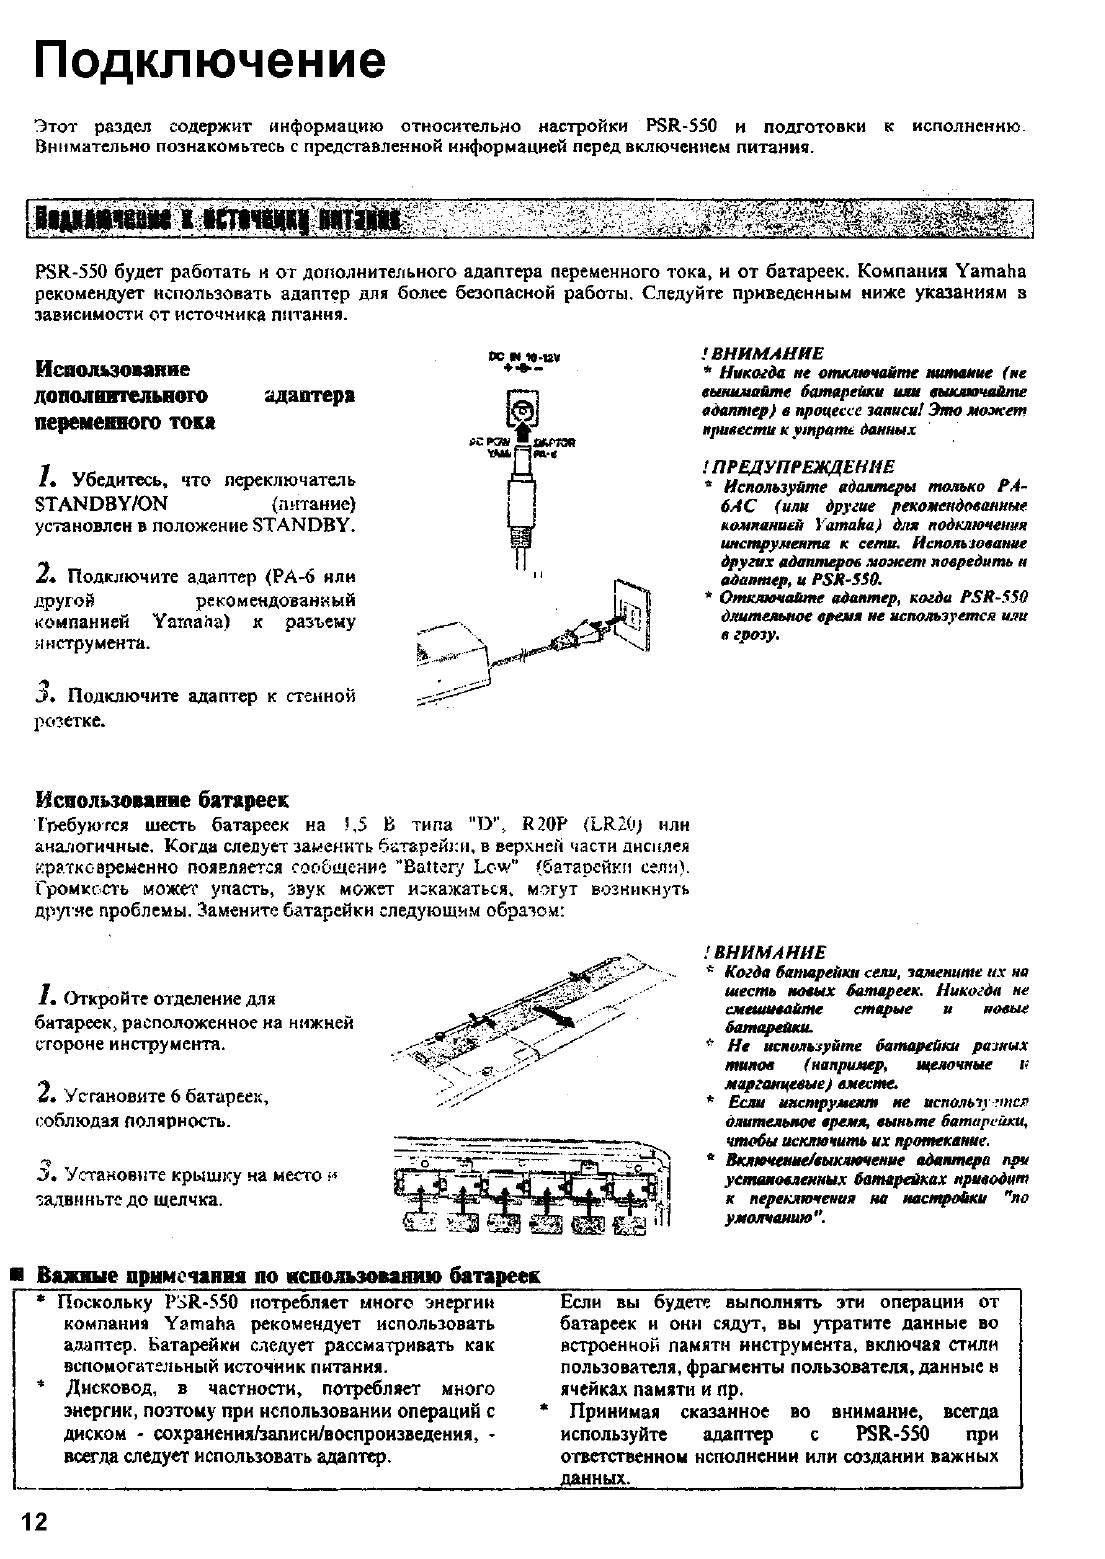
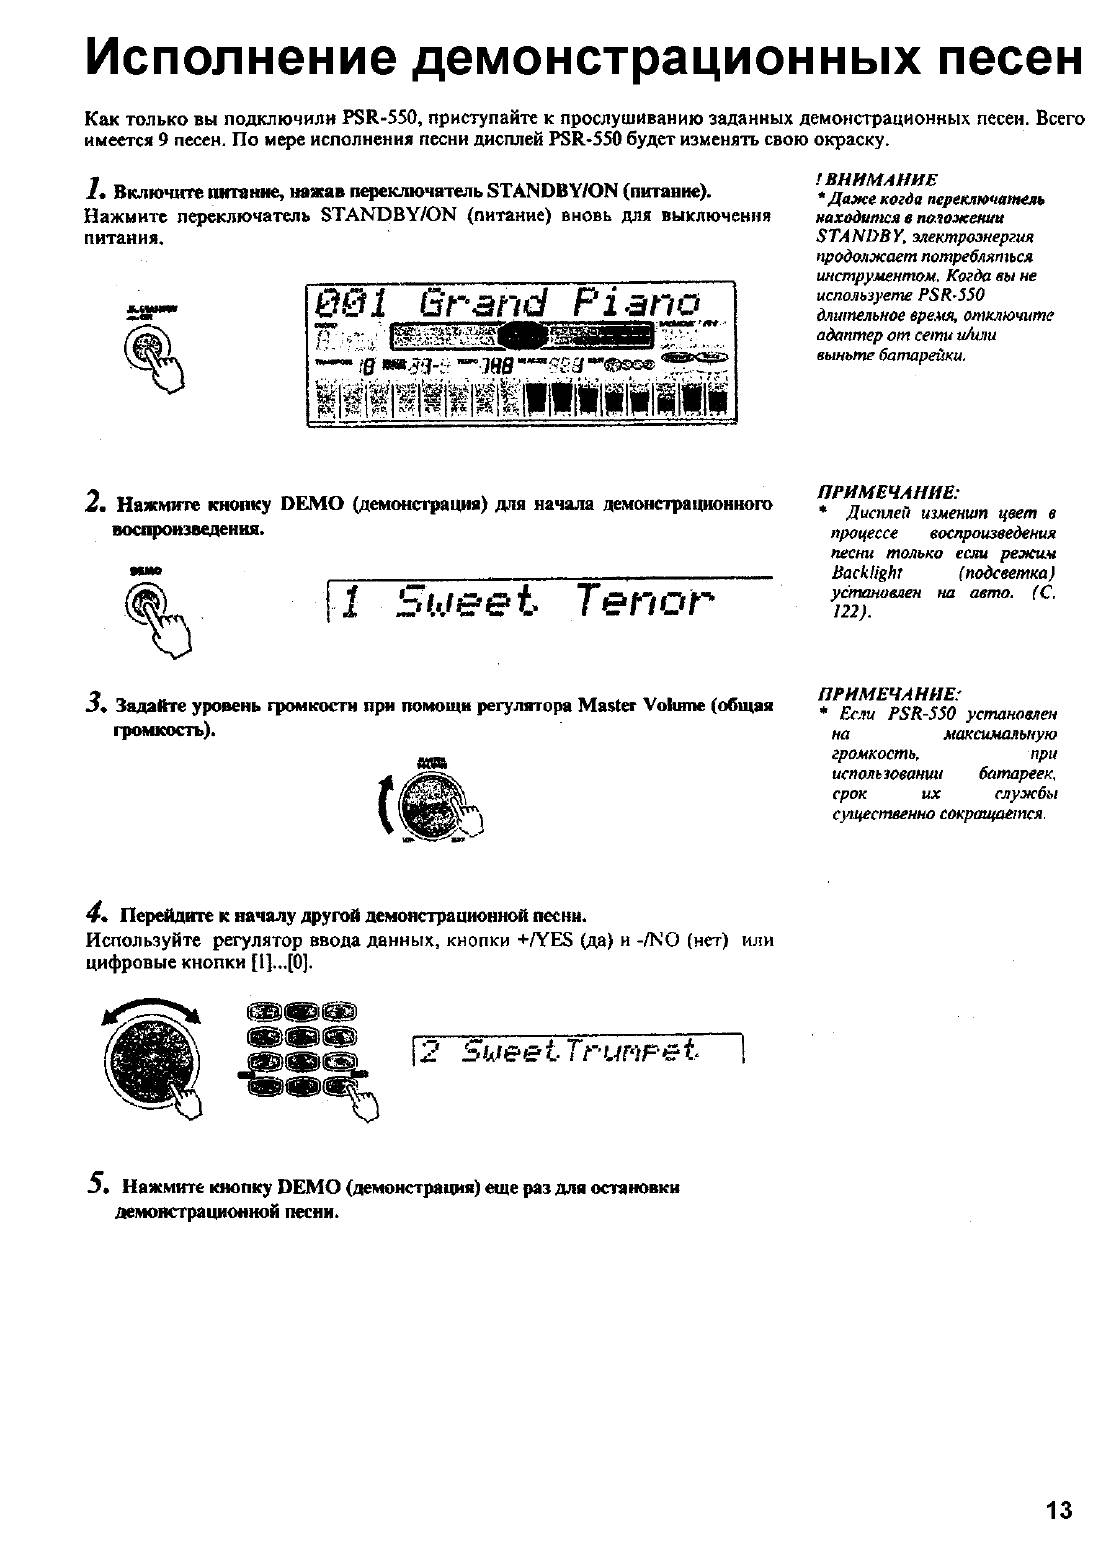
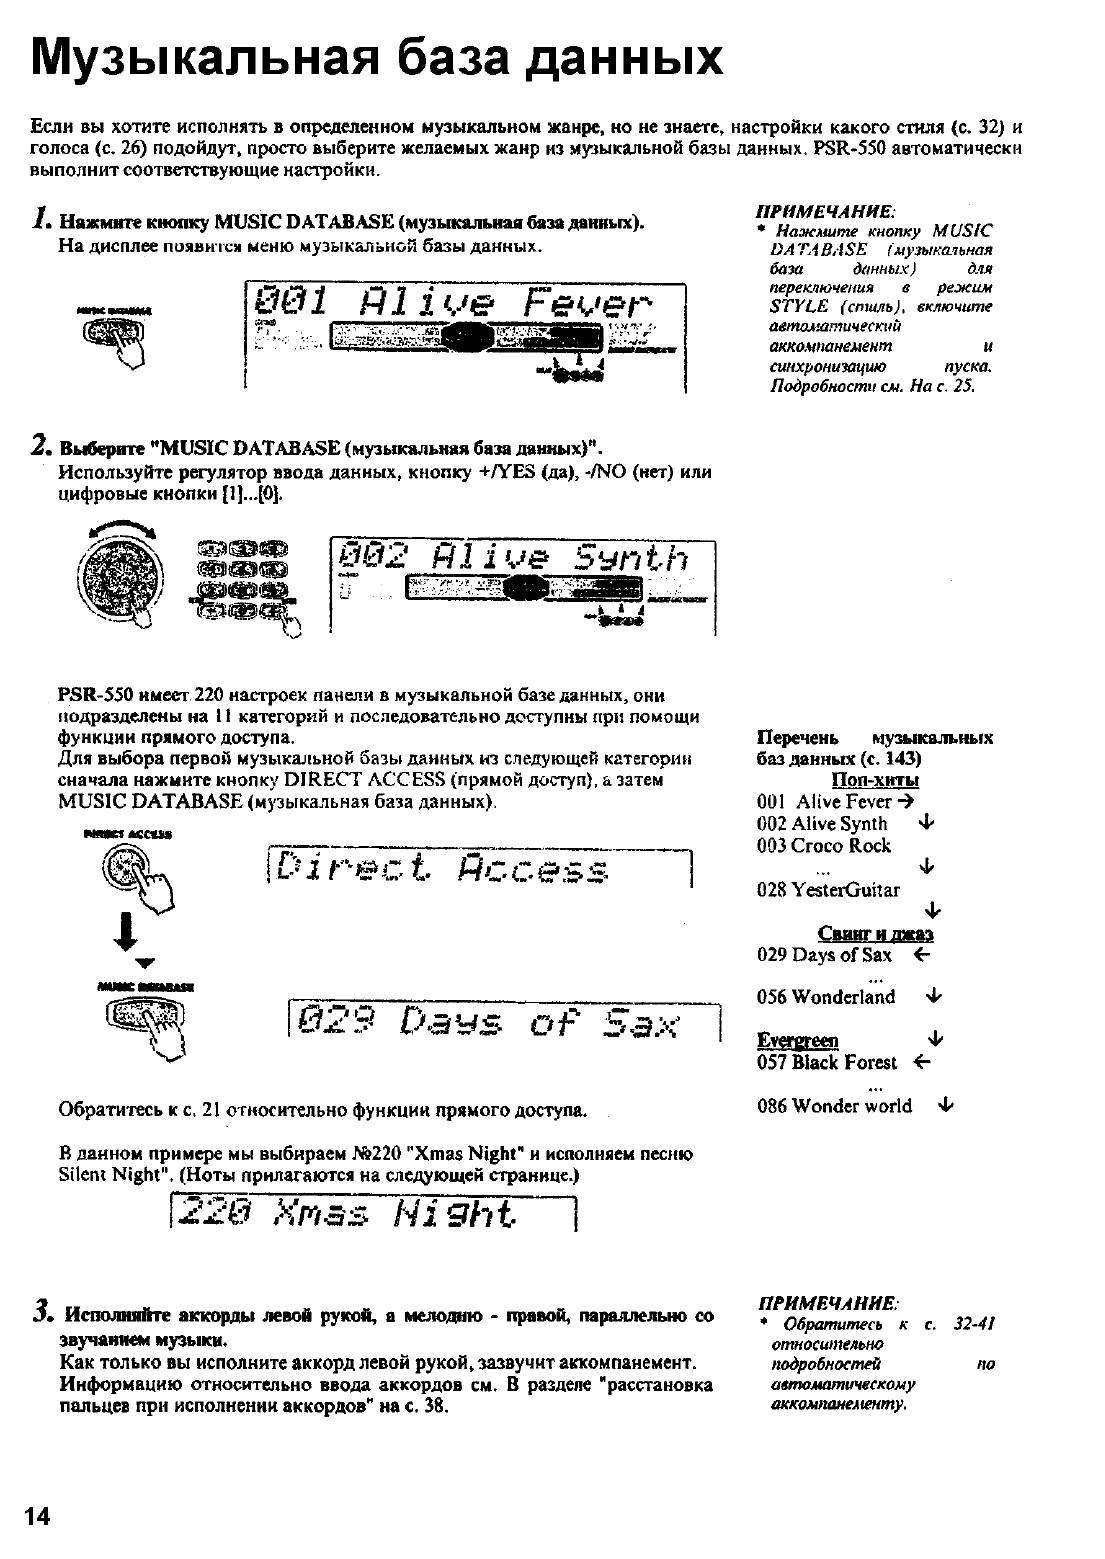
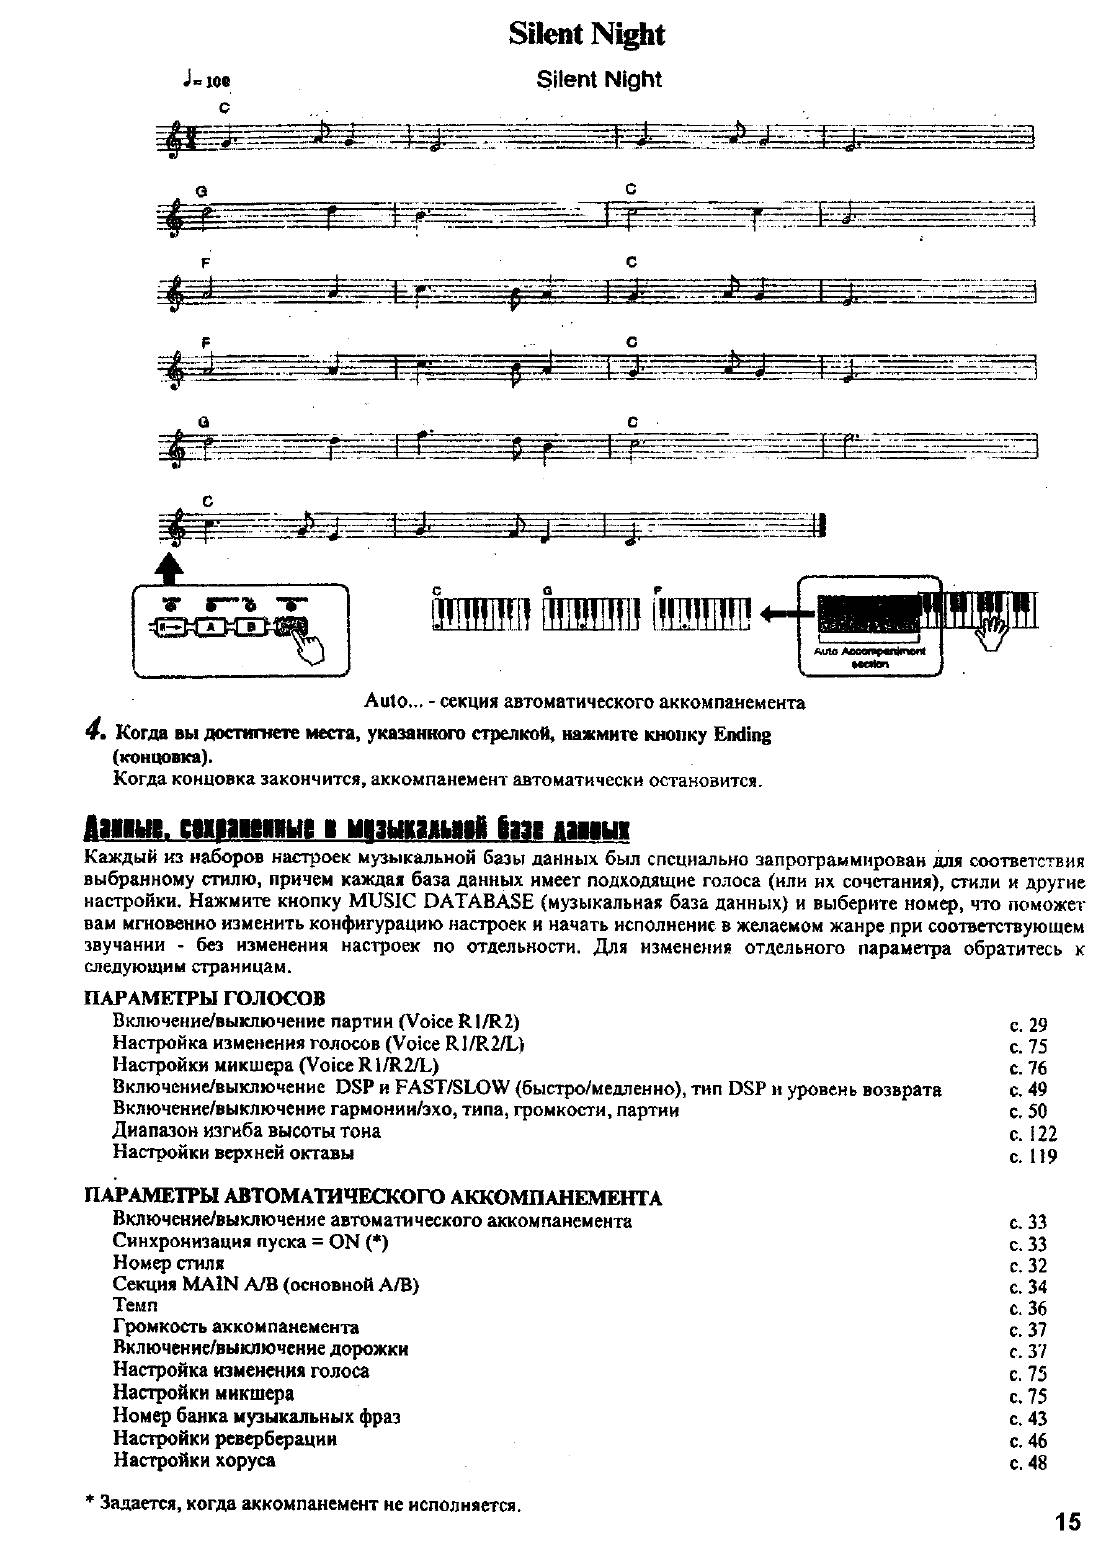
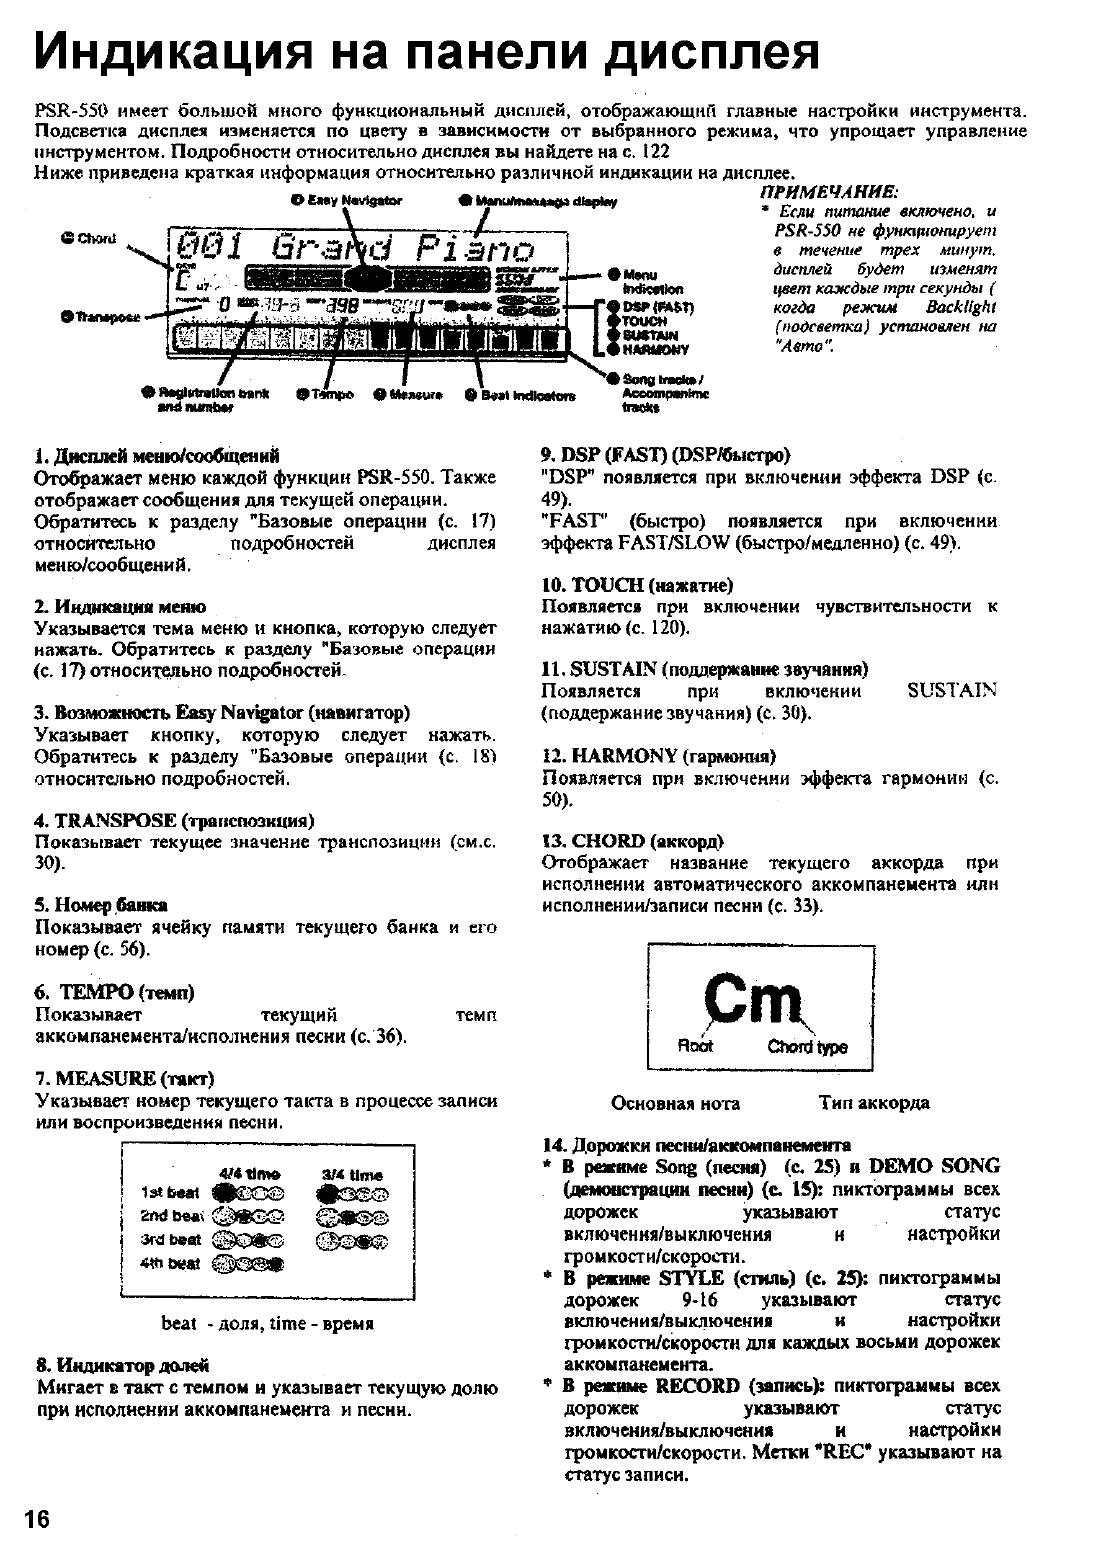
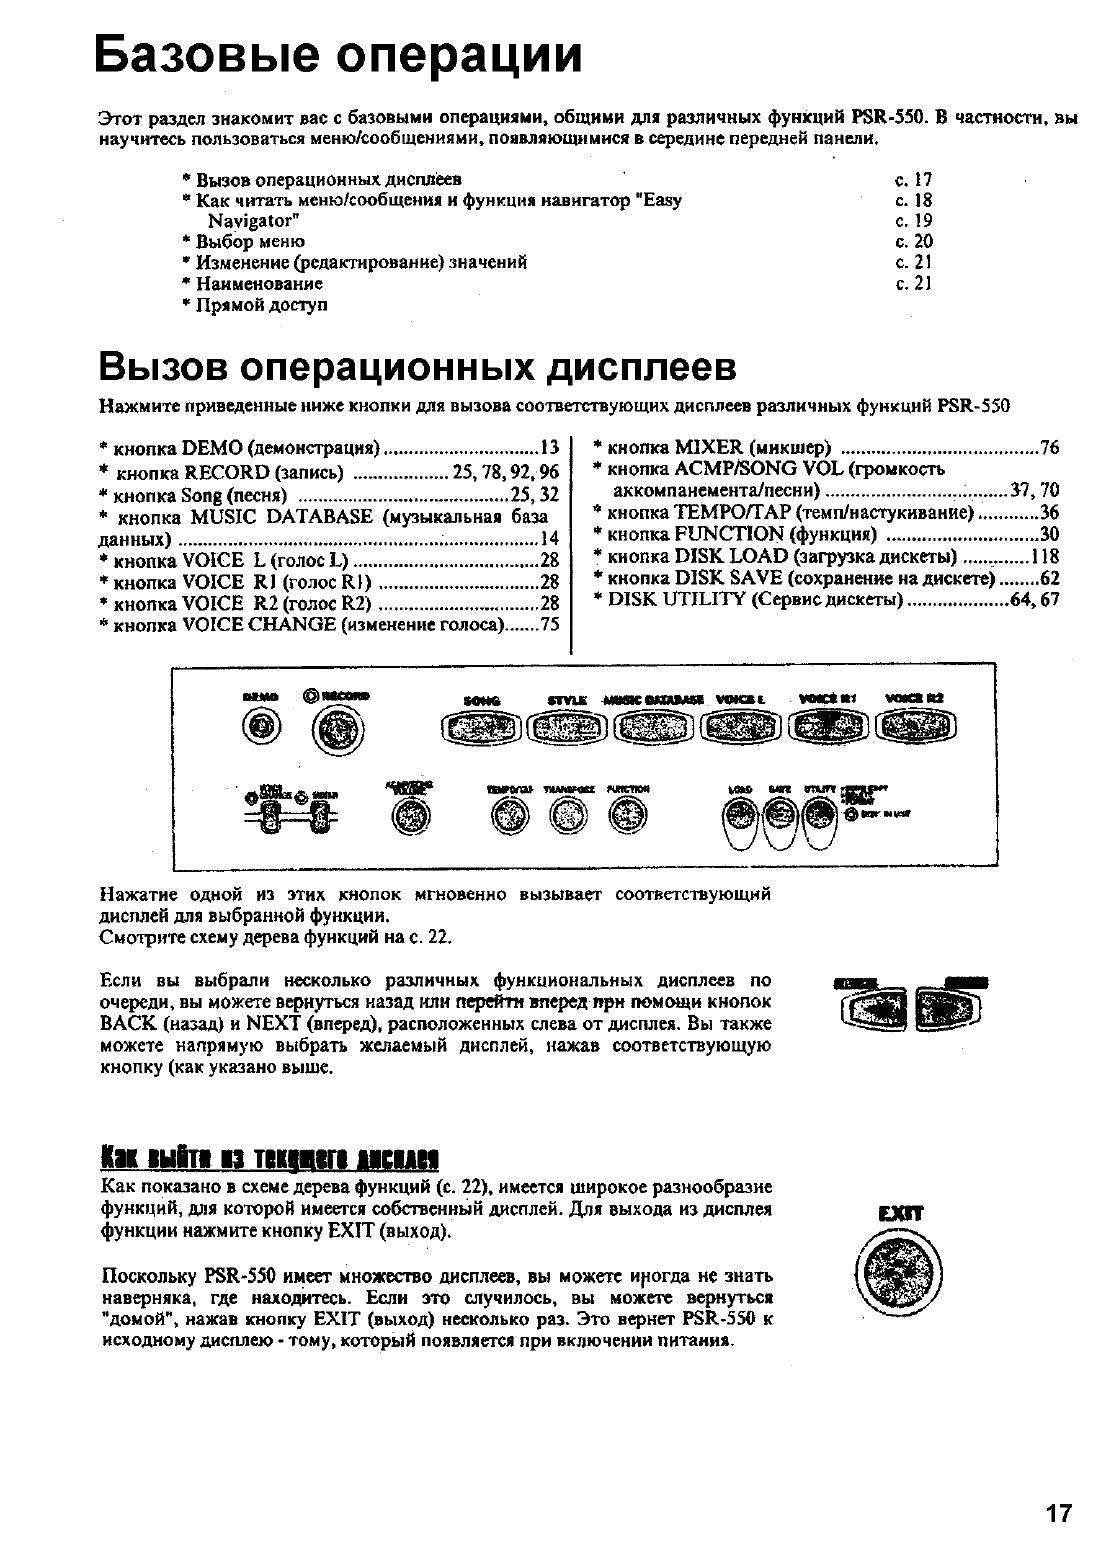
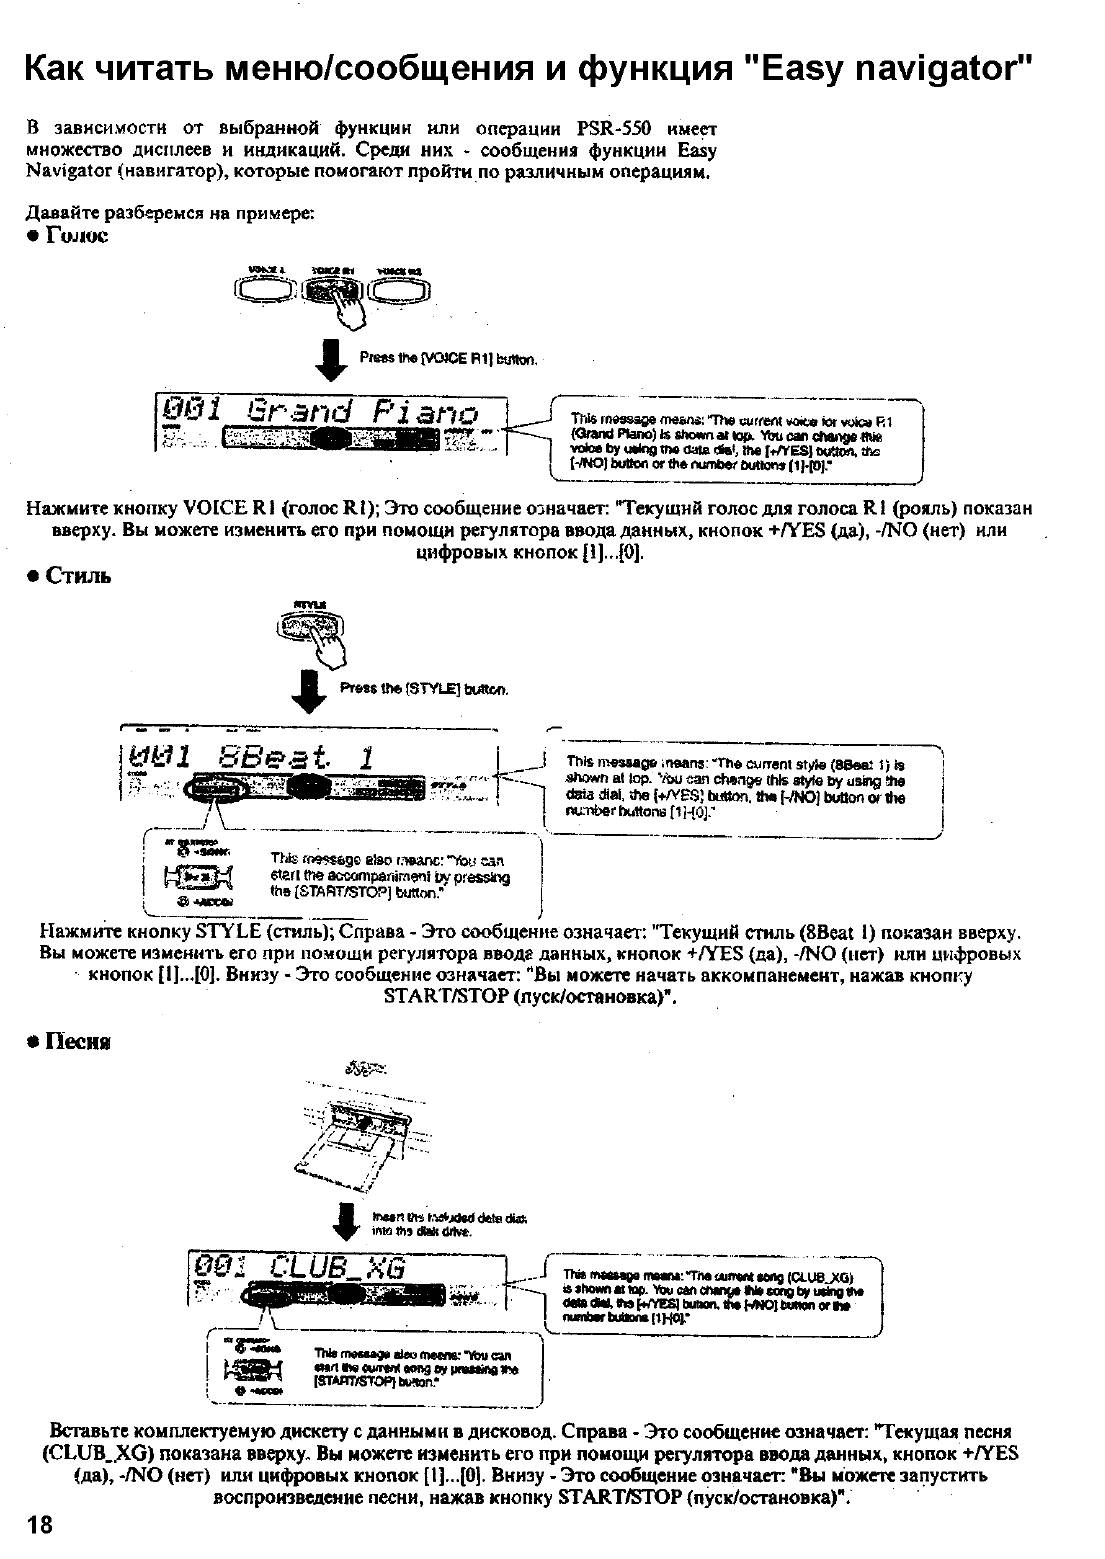
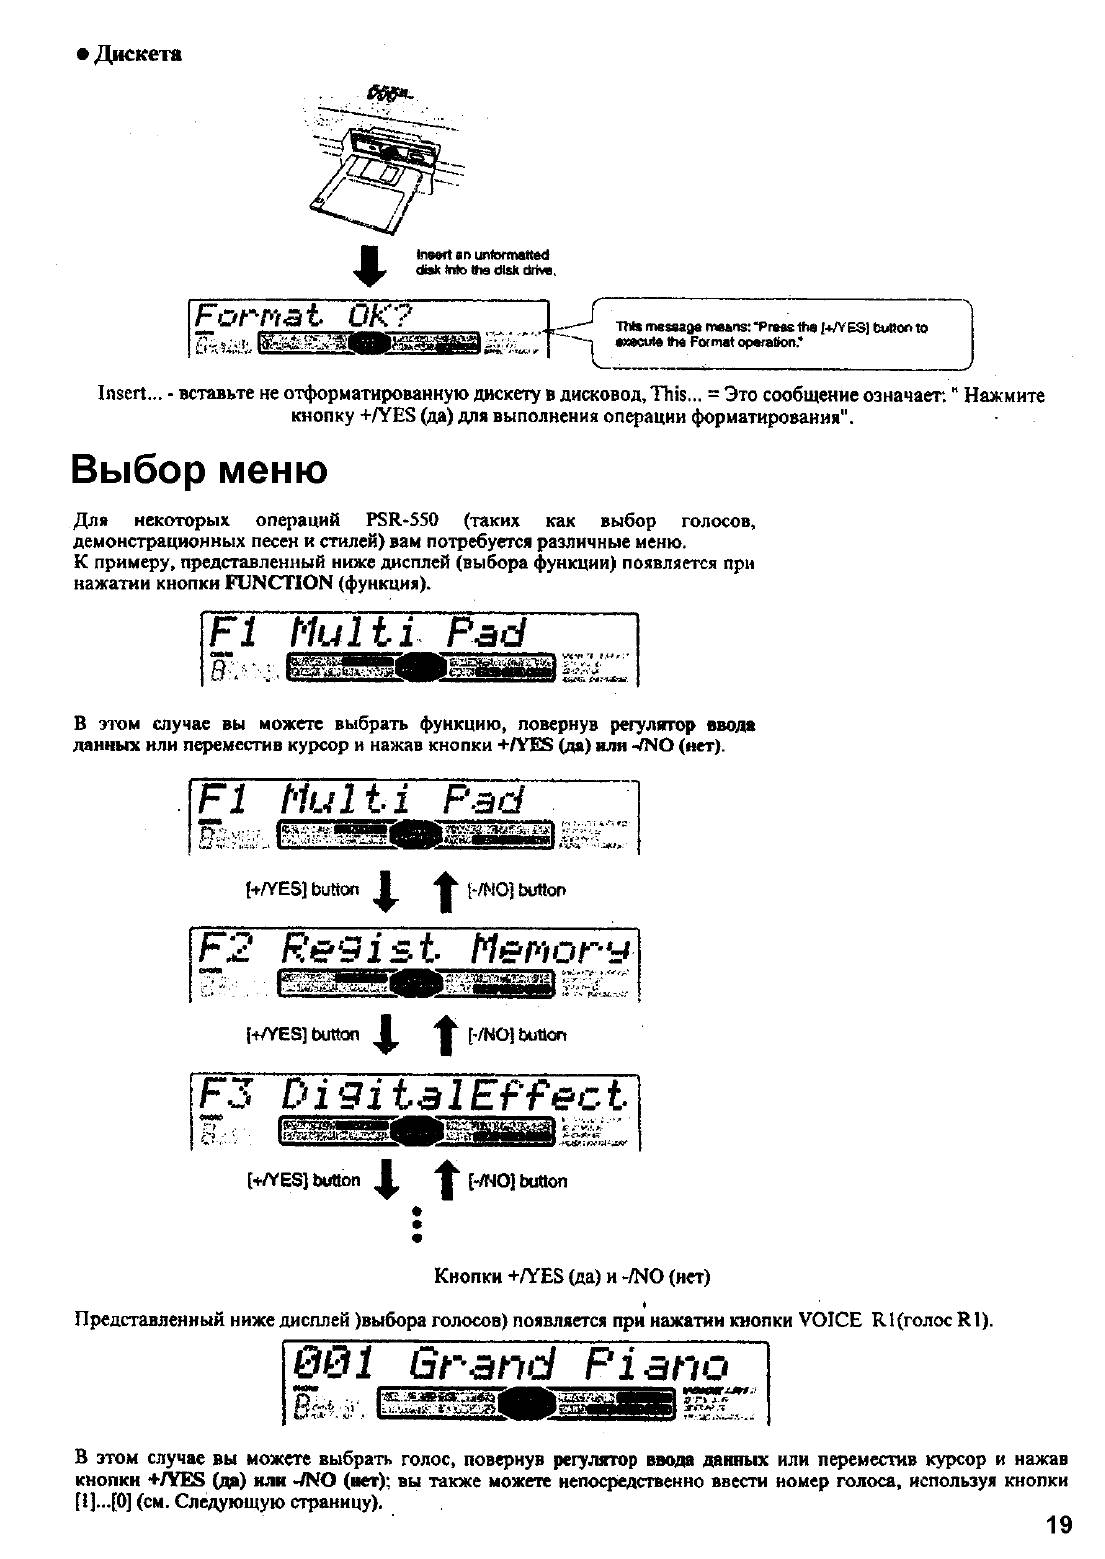
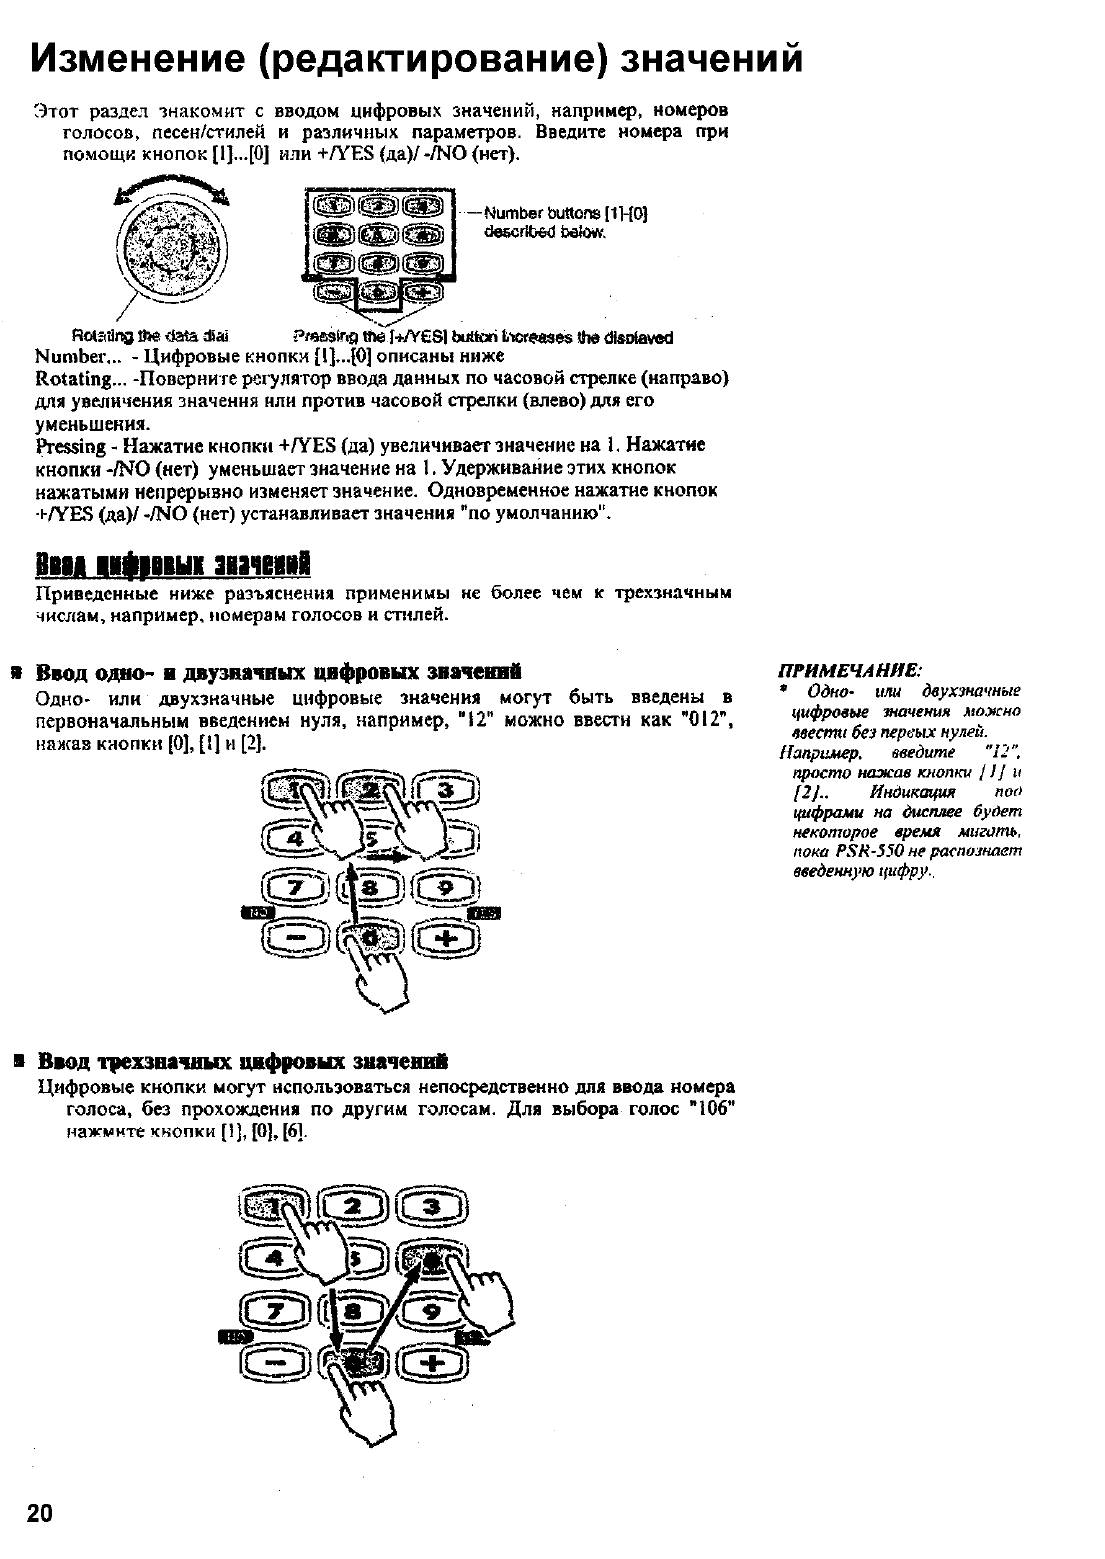
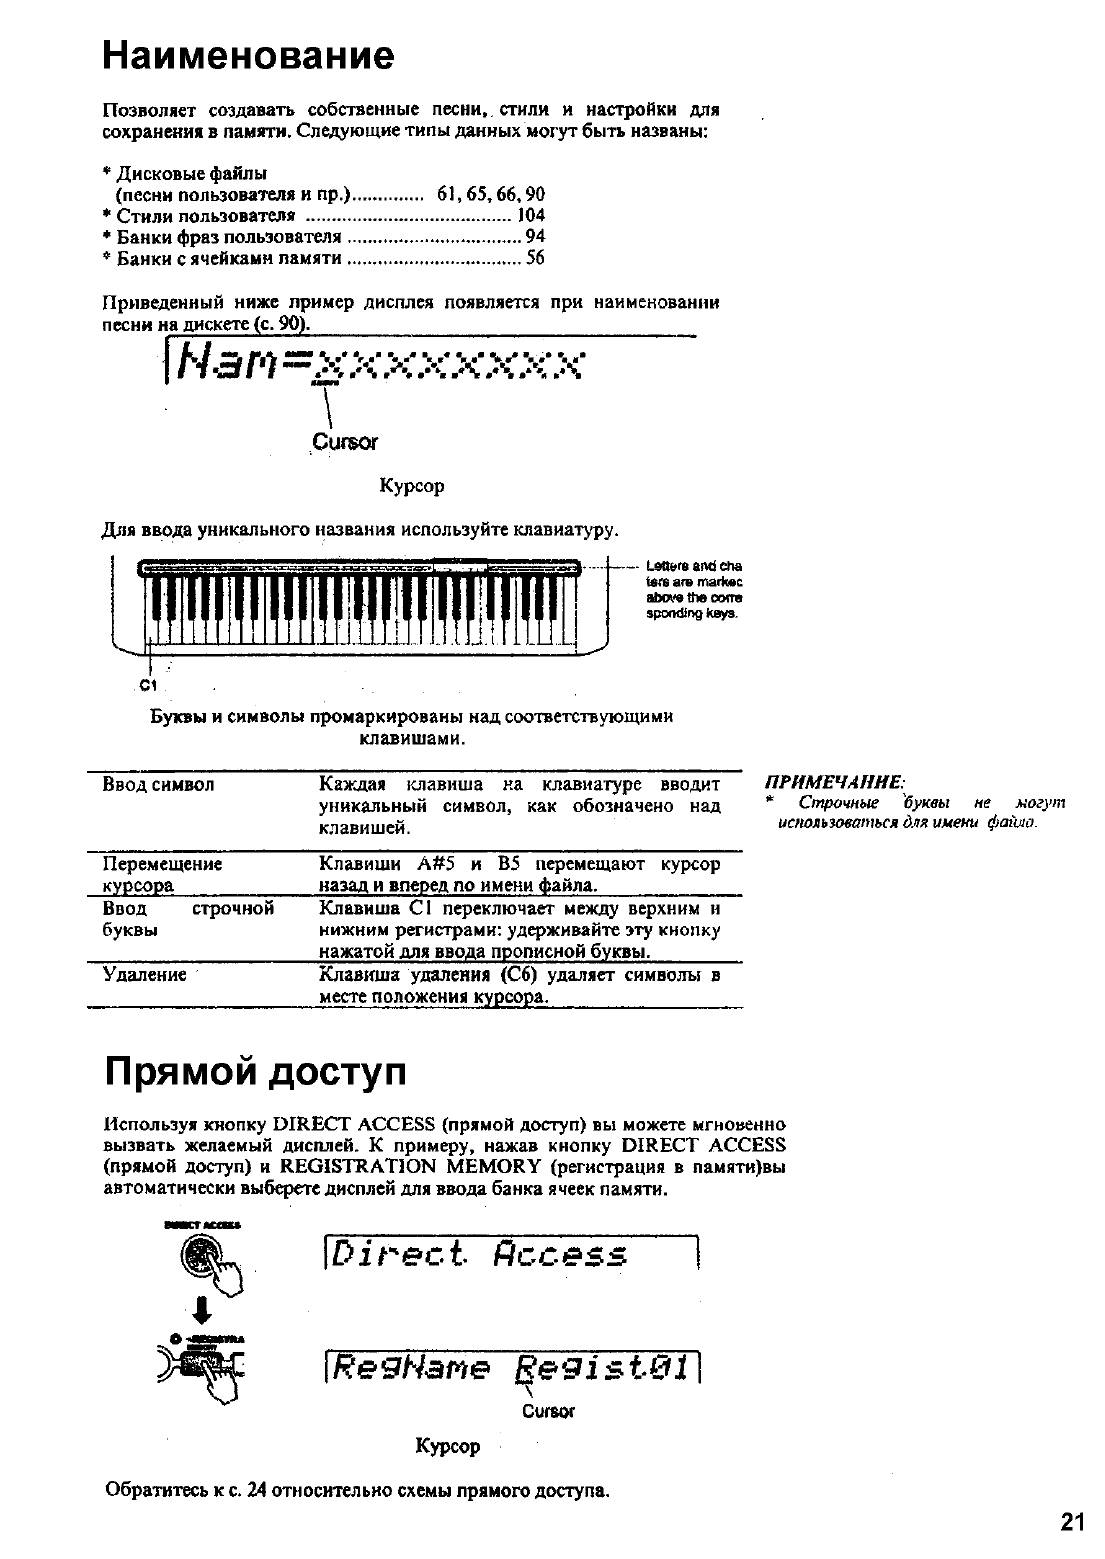
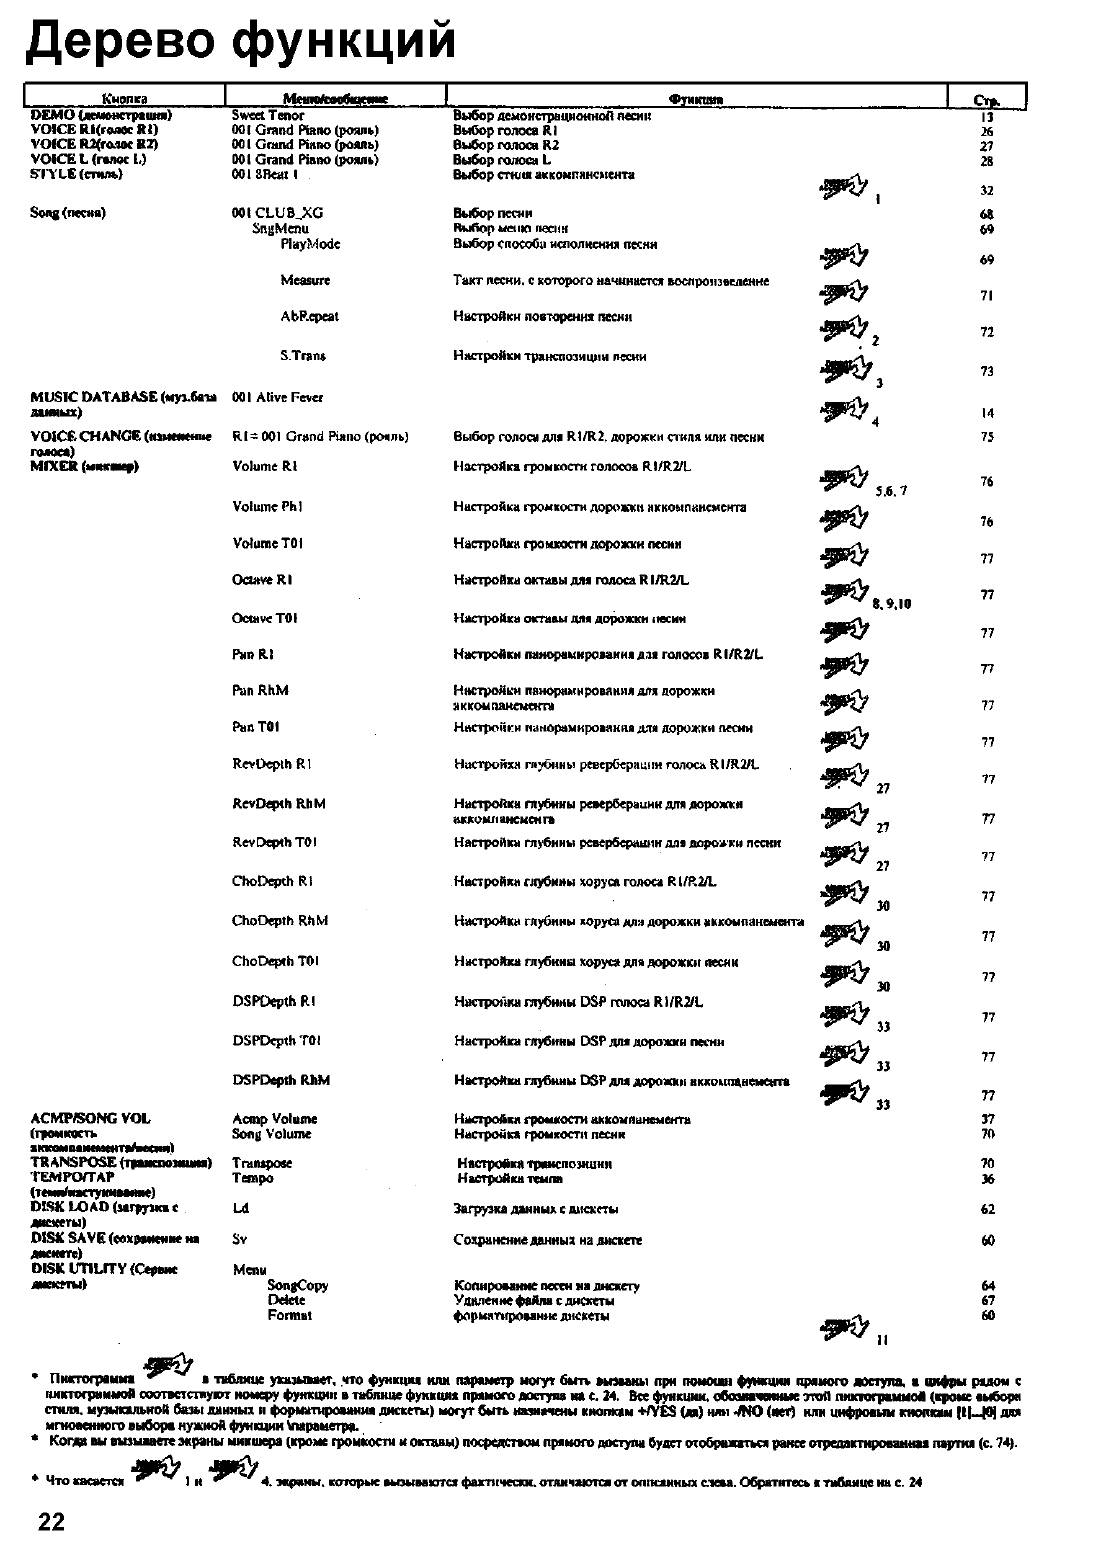
- 1
- 2
- 3
- 4
- 5
- 6
- 7
Аннотация для Синтезатора Yamaha PSR-550 в формате PDF
Топ 10 инструкций
100.00
MB QUART DSG 213
99.98
Skil 0790 RA
99.98
Bosch KGN39VW21
99.97
Sony CDX-CA750X RU
99.97
Braun 310 Series 3
99.96
Asus P3-PE5
99.96
Siemens MQ 5 N 298
99.96
YUKON EXTEND LRS-1000
99.96
Bosch GWS 22-230 JH Professional
99.96
Philips Lunettes 3D Active
К рейтингу инструкций и мануалов →
Другие инструкции
Yamaha PSR-500
Yamaha PSR-530
Yamaha PSR-A300
Yamaha PSR-E203
Panasonic RR-US510
LG f 12u2hds5