

HP Ink Tank 310 series


Table of contents
1 HP Ink Tank 310 series Help ……………………………………………………………………………………………………………. 1
2 Get started …………………………………………………………………………………………………………………………………. 2
Printer parts ……………………………………………………………………………………………………………………………………….. 3
Get to know the ink tank system …………………………………………………………………………………………………………… 5
Control panel features …………………………………………………………………………………………………………………………. 6
Control panel lights and display icons status …………………………………………………………………………………………. 8
Load media ………………………………………………………………………………………………………………………………………. 13
Load an original on the scanner glass ………………………………………………………………………………………………….. 17
Paper basics ……………………………………………………………………………………………………………………………………… 18
Open the HP printer software (Windows) ……………………………………………………………………………………………… 20
Sleep mode ………………………………………………………………………………………………………………………………………. 21
Quiet Mode ……………………………………………………………………………………………………………………………………….. 22
Auto-O …………………………………………………………………………………………………………………………………………… 23
3 Print ……………………………………………………………………………………………………………………………………….. 24
Print from your computer …………………………………………………………………………………………………………………… 25
Tips for print success …………………………………………………………………………………………………………………………. 30
4 Copy and scan ……………………………………………………………………………………………………………………………. 33
Copy documents ……………………………………………………………………………………………………………………………….. 34
Scan using the HP printer software ……………………………………………………………………………………………………… 35
Tips for copy and scan success ……………………………………………………………………………………………………………. 38
5 Manage ink and printhead ……………………………………………………………………………………………………………. 39
Ink levels ………………………………………………………………………………………………………………………………………….. 40
Rell ink tanks ………………………………………………………………………………………………………………………………….. 41
Order ink supplies ……………………………………………………………………………………………………………………………… 44
Print with black ink only …………………………………………………………………………………………………………………….. 45
Tips for working with ink and printhead ………………………………………………………………………………………………. 46
Move printer ……………………………………………………………………………………………………………………………………… 47
ENWW iii

6 Connect your printer …………………………………………………………………………………………………………………… 48
Connect your printer to your computer with a USB cable (non-network connection) ………………………………… 49
7 Solve a problem …………………………………………………………………………………………………………………………. 50
Jams and paper-feed issues ……………………………………………………………………………………………………………….. 51
Printhead issues ……………………………………………………………………………………………………………………………….. 58
Printing issues ………………………………………………………………………………………………………………………………….. 64
Copy issues ………………………………………………………………………………………………………………………………………. 73
Scan issues ……………………………………………………………………………………………………………………………………….. 74
Printer hardware issues ……………………………………………………………………………………………………………………… 75
Control panel error codes …………………………………………………………………………………………………………………… 76
HP support ……………………………………………………………………………………………………………………………………….. 77
Appendix A Technical information ……………………………………………………………………………………………………. 79
HP Company notices ………………………………………………………………………………………………………………………….. 80
Specications ……………………………………………………………………………………………………………………………………. 81
Regulatory notices …………………………………………………………………………………………………………………………….. 83
Environmental product stewardship program ………………………………………………………………………………………. 87
Index …………………………………………………………………………………………………………………………………………. 94
iv ENWW

1 HP Ink Tank 310 series Help
Learn how to use your printer.
●
Get started on page 2
●
Print on page 24
●
Copy and scan on page 33
●
Manage ink and printhead on page 39
●
Connect your printer on page 48
●
Solve a problem on page 50
●
Technical information on page 79
ENWW 1

2 Get started
●
Printer parts
●
Get to know the ink tank system
●
Control panel features
●
Control panel lights and display icons status
●
Load media
●
Load an original on the scanner glass
●
Paper basics
●
Open the HP printer software (Windows)
●
●
●
Sleep mode
Quiet Mode
Auto-O
2 Chapter 2 Get started ENWW
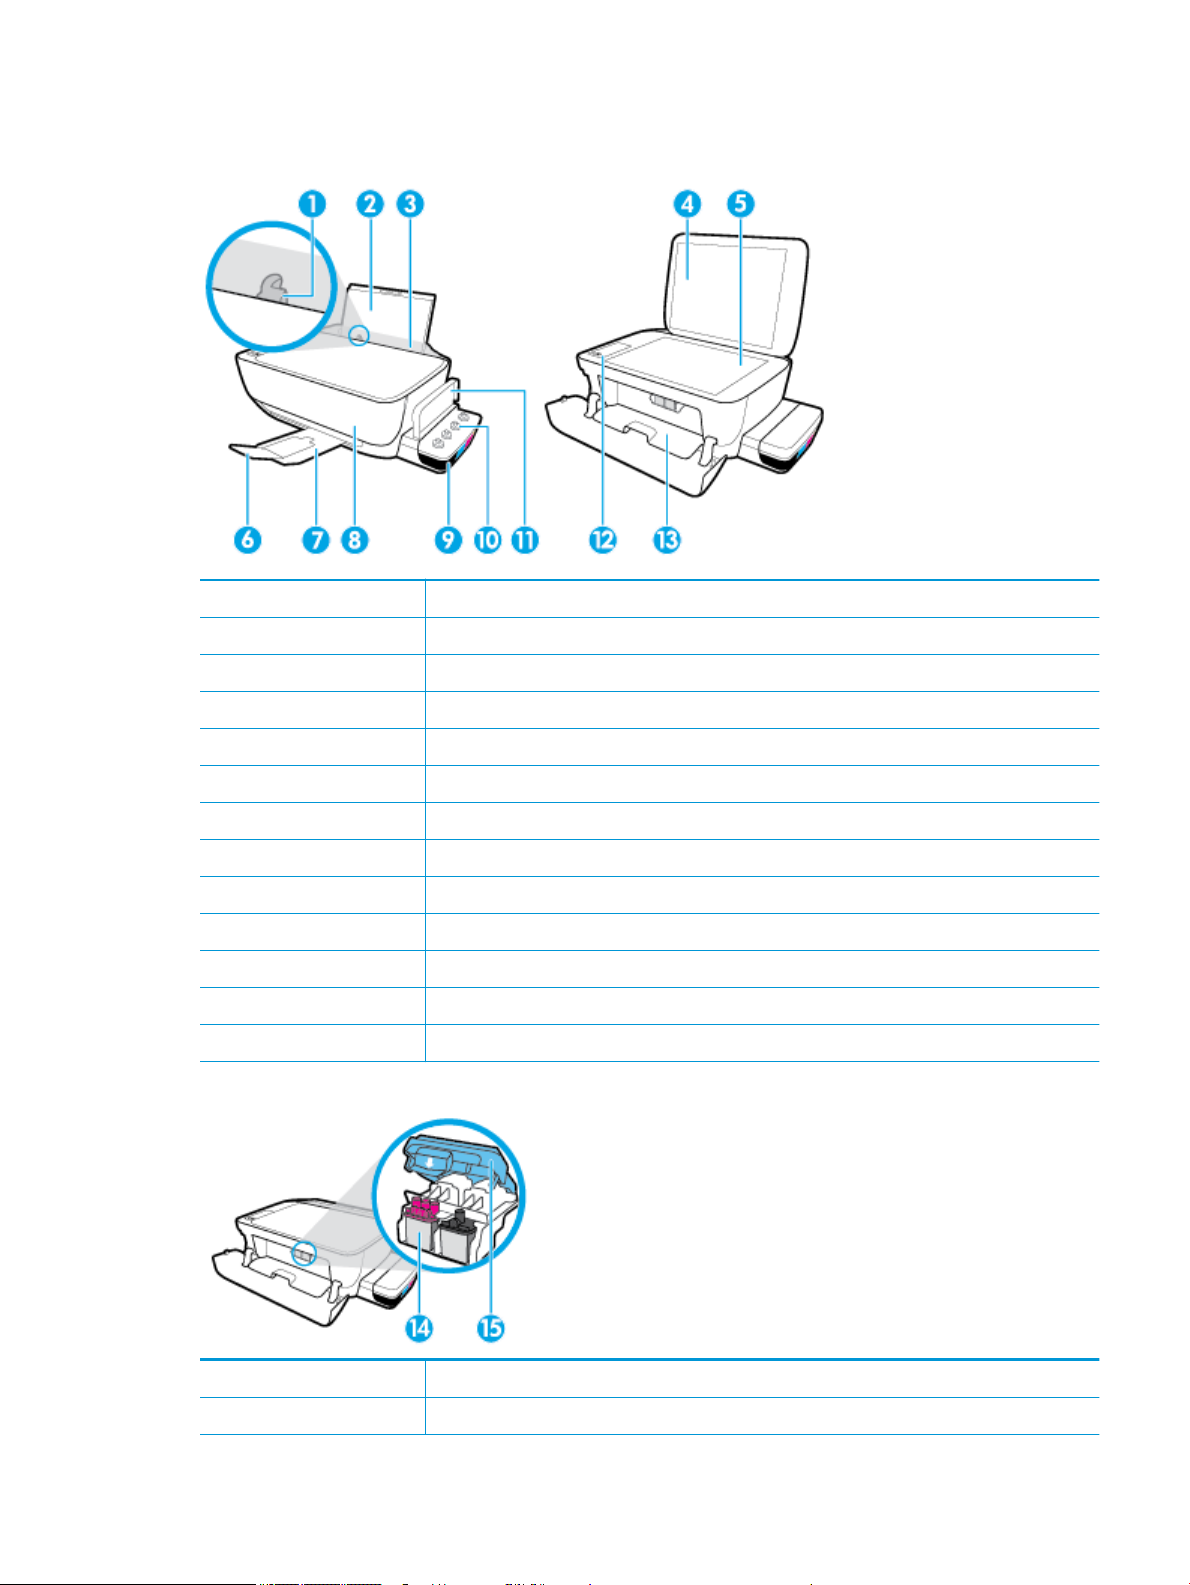
Printer parts
1 Paper-width guide
2 Input tray
3 Input tray shield
4 Scanner lid
5 Scanner glass
6 Output tray extender (also referred to as the tray extender)
7 Output tray
8 Front door
9 Ink tank
10 Ink tank caps
11 Ink tank lid
12 Control panel
13 Printhead access door
14 Printheads
15 Printhead latch
ENWW Printer parts 3

16 Power connection
17 USB port
4 Chapter 2 Get started ENWW
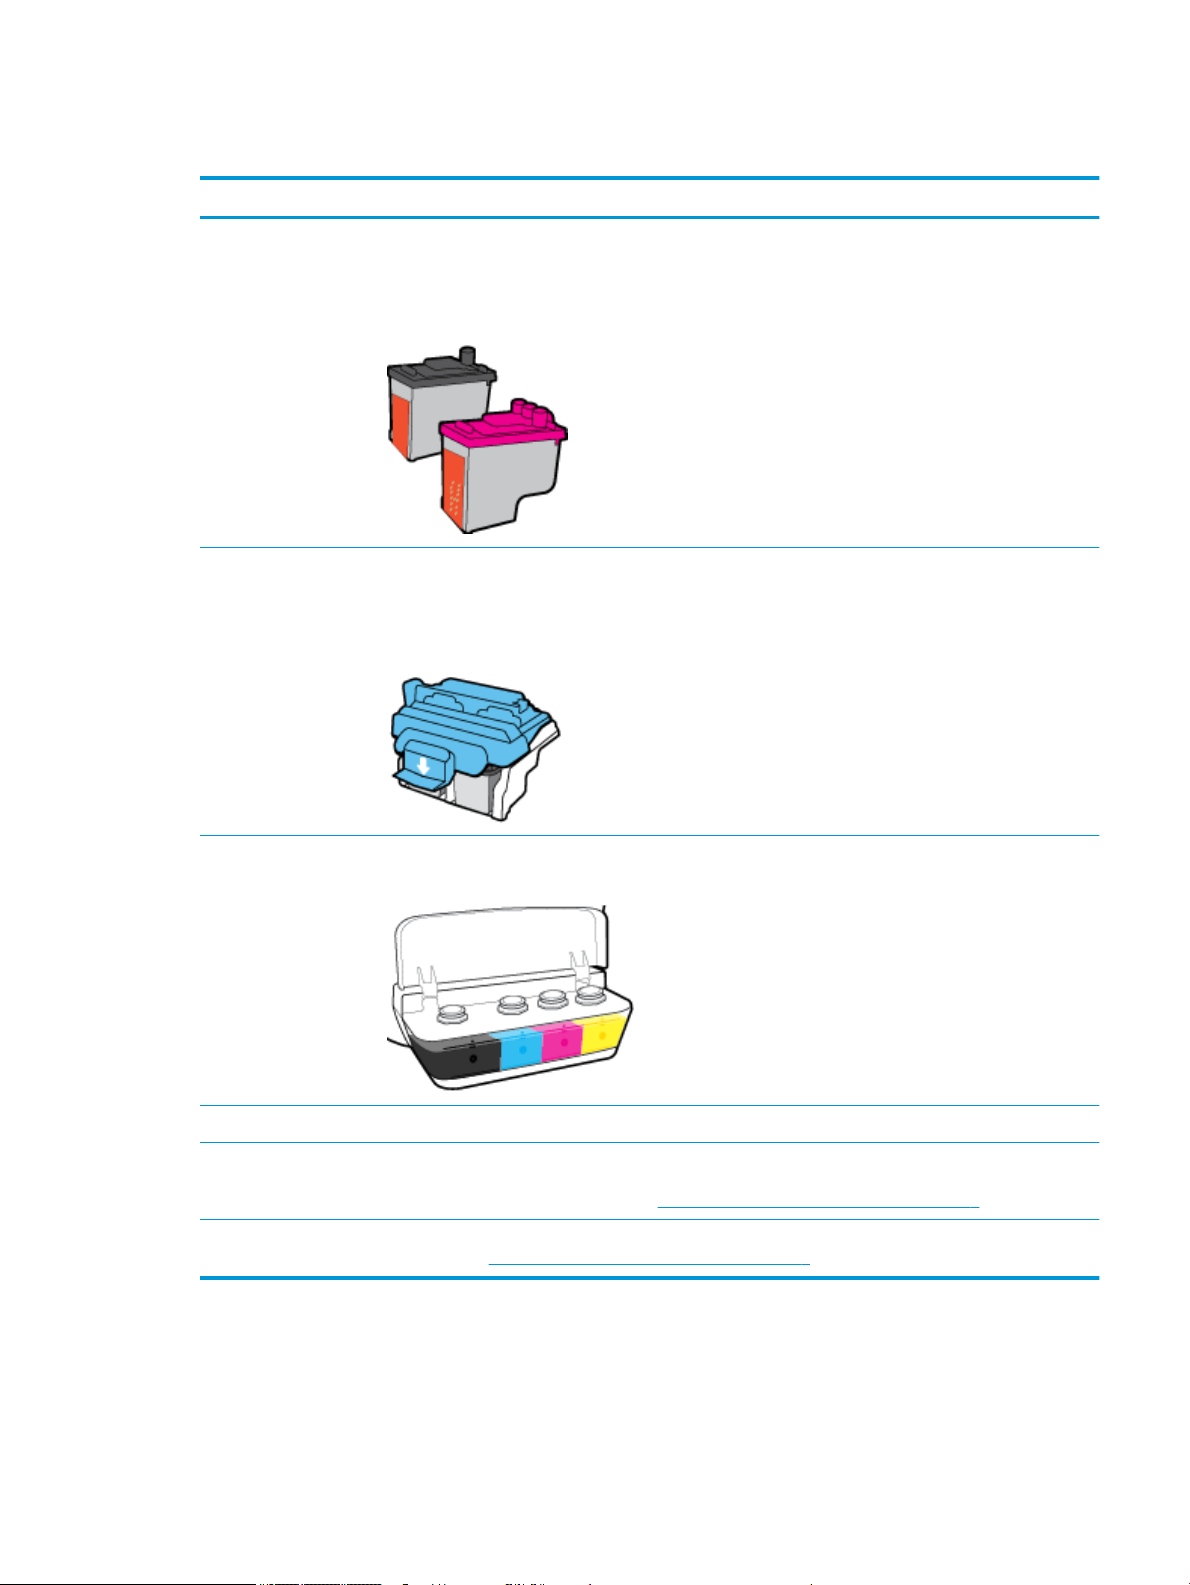
Get to know the ink tank system
Term Denition
Printheads The printheads are the components in the print mechanism that apply ink to the paper. There are two
printheads: a black ink printhead and a tri-color ink printhead.
CAUTION: After the printheads are installed and primed with ink, do not open the printhead latch unless
you are installing new printheads or moving the printer outside your home or oice.
Printhead latch The printhead latch on the carriage secures the printheads in the carriage. Make sure the printhead latch is
properly closed to avoid problems such as carriage jams.
CAUTION: After the printheads are installed and primed with ink, do not open the printhead latch unless
you are installing new printheads or moving the printer outside your home or oice.
Ink tanks Ink tanks are external ink reservoirs located at the right side of the printer. There are four ink tanks. Each
ink tank corresponds to an individual color: black, cyan, magenta, and yellow.
Ink tank caps Ink tank caps are rubber plugs that seal each ink tank.
Priming Priming is the process of lling the ink supply tubes that run between the ink tanks and the printheads.
This process occurs when you install new printheads and start the priming process from the control panel.
For more information about priming, see Printhead priming and alignment icons on page 9.
Alignment Alignment is a process of aligning the printheads to improve print quality. For more information about
alignment, see Printhead priming and alignment icons on page 9.
ENWW Get to know the ink tank system 5
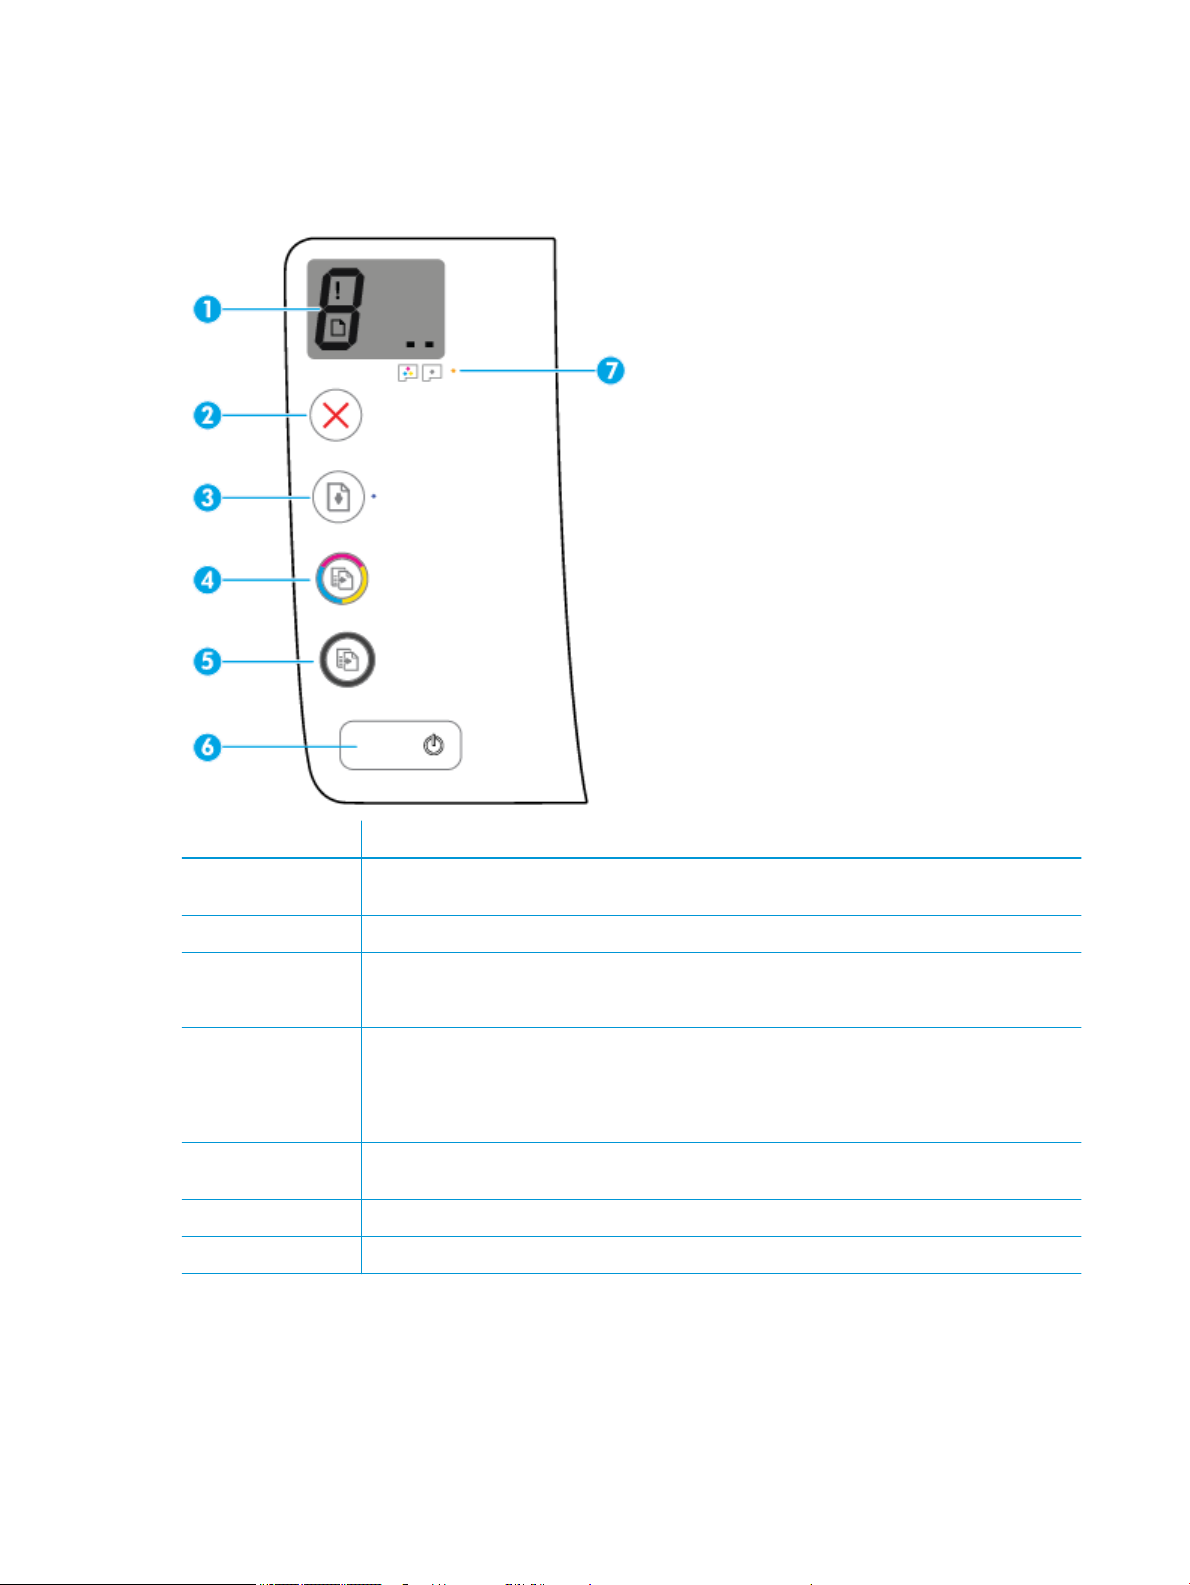
Control panel features
Overview of buttons and lights
Feature Description
1 Control Panel Display : Indicates number of copies, printhead priming status, media errors, and printhead
problems.
2 Cancel button: Stops the current operation.
3 Resume button: Resumes a job after a disruption (for example, after loading paper or clearing a paper jam).
Resume light: Indicates the printer is in a warning or error state.
4 Color Copy button: Starts a color copy job. To increase the number of color copies, press the button
multiple times. Copying will start two seconds after the last button press.
NOTE: You can generate a print quality diagnostics report by pressing and holding the Color Copy button
for three seconds.
5 Black Copy button: Starts a black-and-white copy job. To increase the number of black-and-white copies,
press the button multiple times. Copying will start two seconds after the last button press.
6 Power button: Turns the printer on or o.
7 Printhead Alert light: Indicates printhead problems.
6 Chapter 2 Get started ENWW
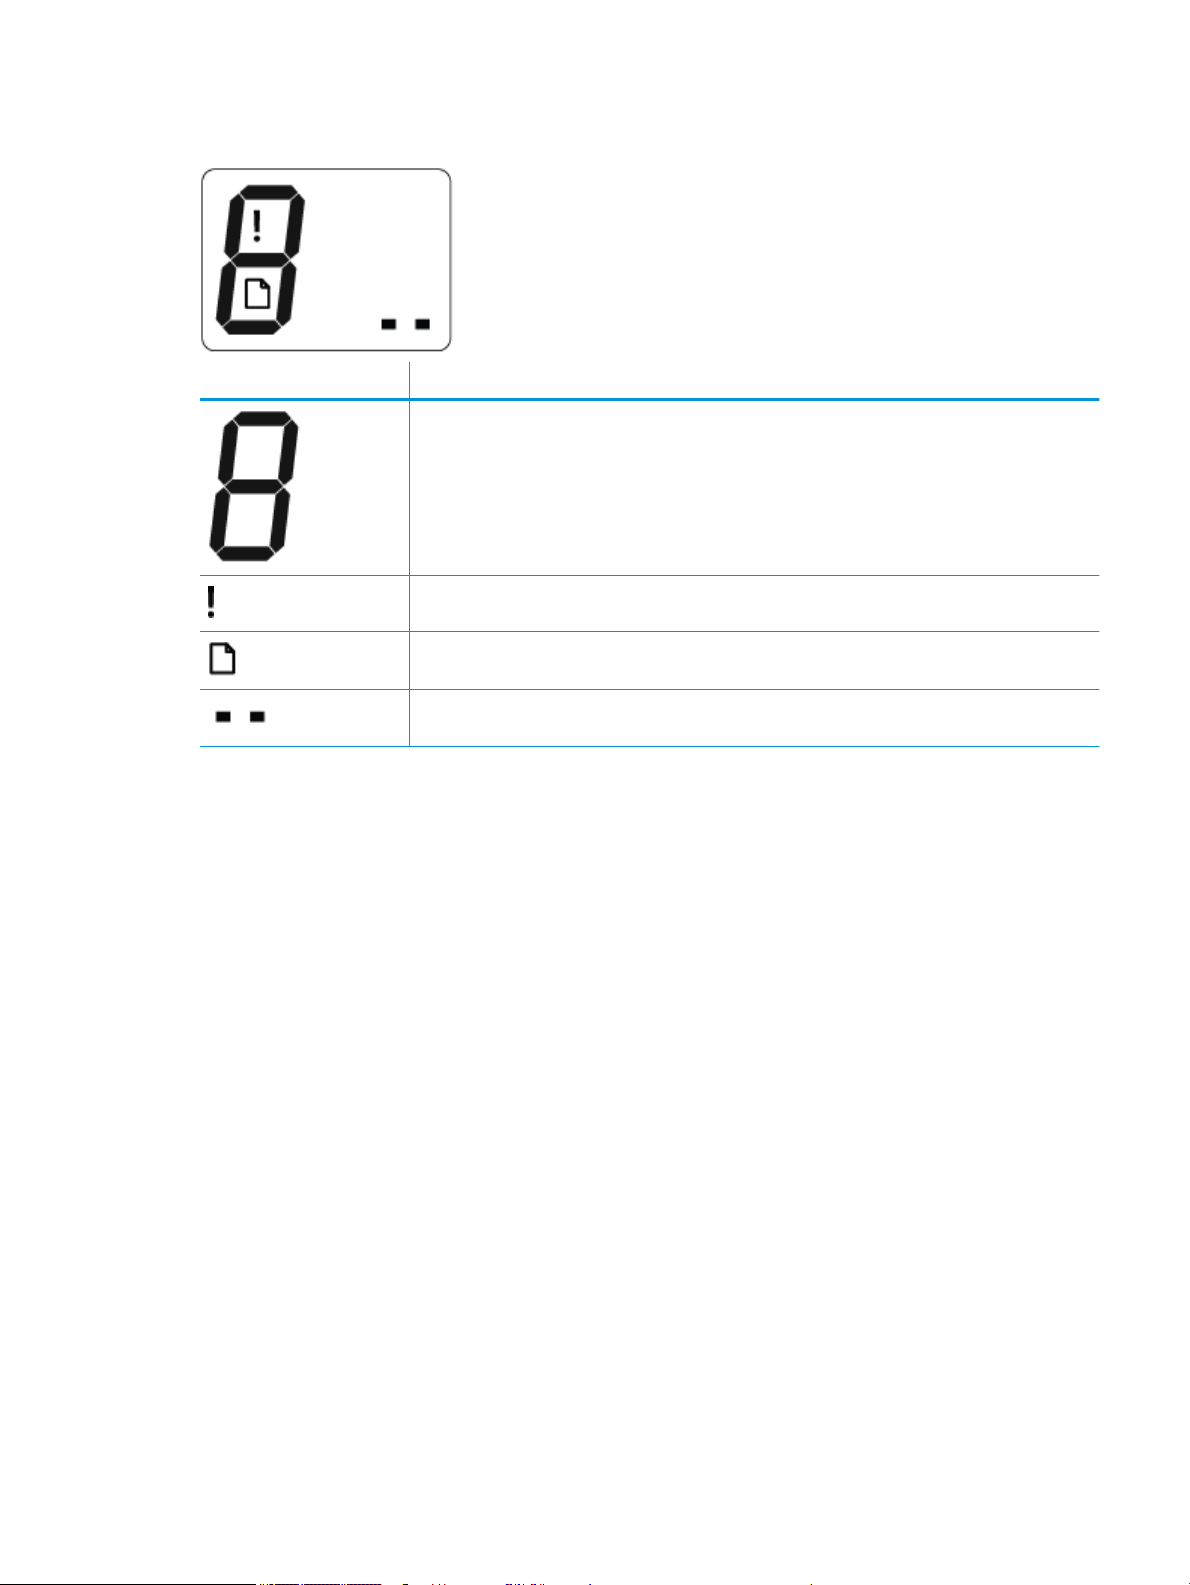
Control panel display icons
Icon Description
Number of copies icon: Shows the number of copies when you are copying documents, changes to the
letter P when the printer needs priming, and alternates between the letter E and a number when the
printer is in an error state.
Error icon: Indicates an error.
Paper Error icon: Indicates a paper-related error.
Printhead icons: The left printhead icon ashing shows an error related to the tri-color printhead, and
the right icon ashing shows an error related to the black printhead.
ENWW Control panel features 7
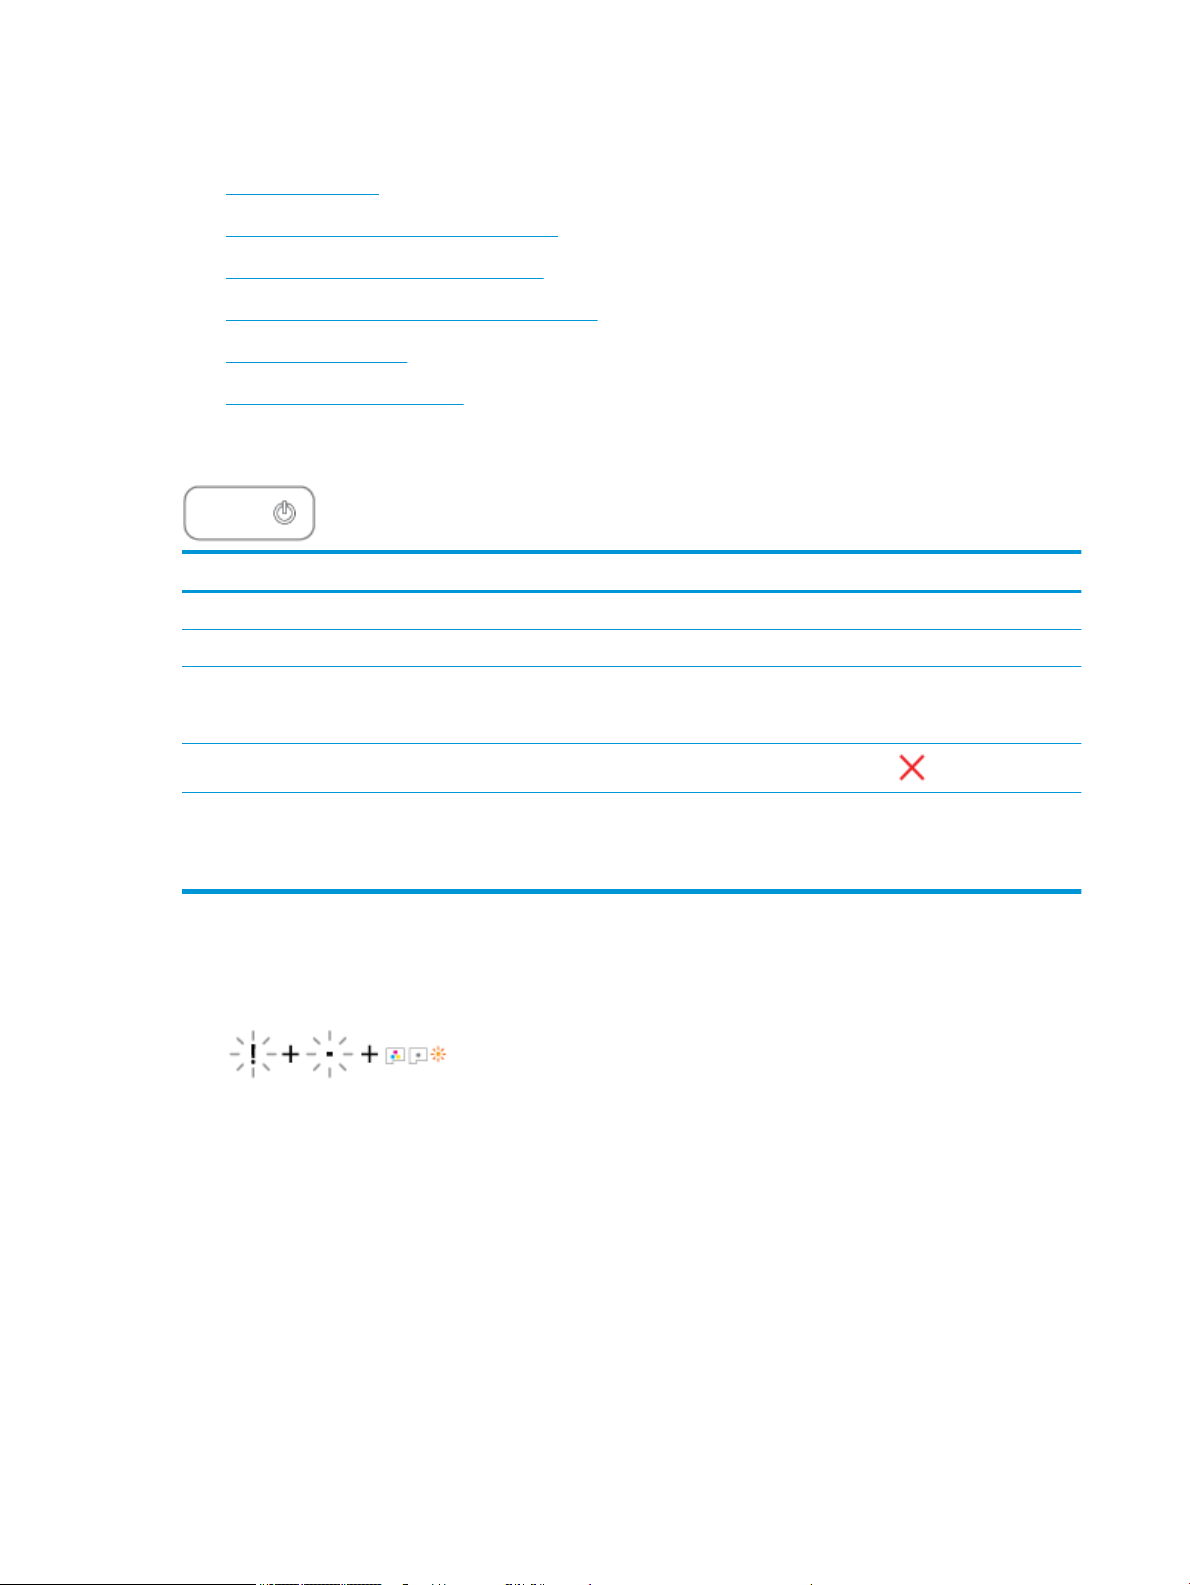
Control panel lights and display icons status
●
Power button light
●
Printhead icons and Printhead Alert light
●
Printhead priming and alignment icons
●
Error icon, Paper Error icon, and Resume light
●
Number of copies icon
●
Ink system maintenance icon
Power button light
Status Description
On The printer is on.
O The printer is powered o.
Dimmed Indicates the printer is in Sleep mode. The printer automatically enters Sleep mode after 5 minutes
of inactivity. After 2 hours of inactivity, the printer automatically turns o if not connected to a
computer.
Blinking
Fast blinking If the printhead access door is open, close it. If the printhead access door is closed and the light is
The printer is processing a job. To cancel the job, press the Cancel button ( ).
blinking fast, the printer is in an error state that you can resolve by following the on-screen
messages from the computer. If you do not see any on-screen messages, try printing a document to
generate an on-screen message.
Printhead icons and Printhead Alert light
●
The Error icon, one of the Printhead icons, and the Printhead Alert light are blinking.
8 Chapter 2 Get started ENWW

Cause Solution
One of the following might have occurred.
—
The corresponding printhead is missing.
—
The corresponding printhead is installed incorrectly.
—
The corresponding printhead still has orange plastic tape
or the plug on it.
●
The Error icon, both Printhead icons, and the Printhead Alert light are blinking.
Cause Solution
One of the following might have occurred.
—
Both printheads are missing.
—
Both printheads are installed incorrectly.
—
Both printheads still have orange plastic tapes or plugs
on them.
—
Both printheads are incompatible or damaged.
—
If one of the printheads is missing, insert the
corresponding printhead.
—
If both printheads are installed in the printer, remove the
corresponding printhead, make sure there is no plug or
plastic tape on it, and then reinsert the printhead
securely.
CAUTION: These instructions are only applicable when
you install printheads during initial printer setup. If
printheads have been primed with ink, do not open the
printhead latch unless installing new printheads or
moving the printer outside your home or oice.
For more information, see Fix printhead problems
on page 58.
—
If there are no printheads installed in the printer, install
the printheads.
—
If both printheads are installed in the printer, remove the
printheads, make sure there is no plug or plastic tape on
them, and then reinsert the printheads securely.
CAUTION: These instructions are only applicable when
you install printheads during initial printer setup. If
printheads have been primed with ink, do not open the
printhead latch unless installing new printheads or
moving the printer outside your home or oice.
—
Make sure that you are using the correct HP printheads
for your printer.
—
If the error persists, contact HP Support for help.
Printhead priming and alignment icons
Printheads ready for priming
●
The Number of copies icon changes to a blinking P during initial printer setup. At the same time all other
icons on the control panel display are turned o.
ENWW Control panel lights and display icons status 9
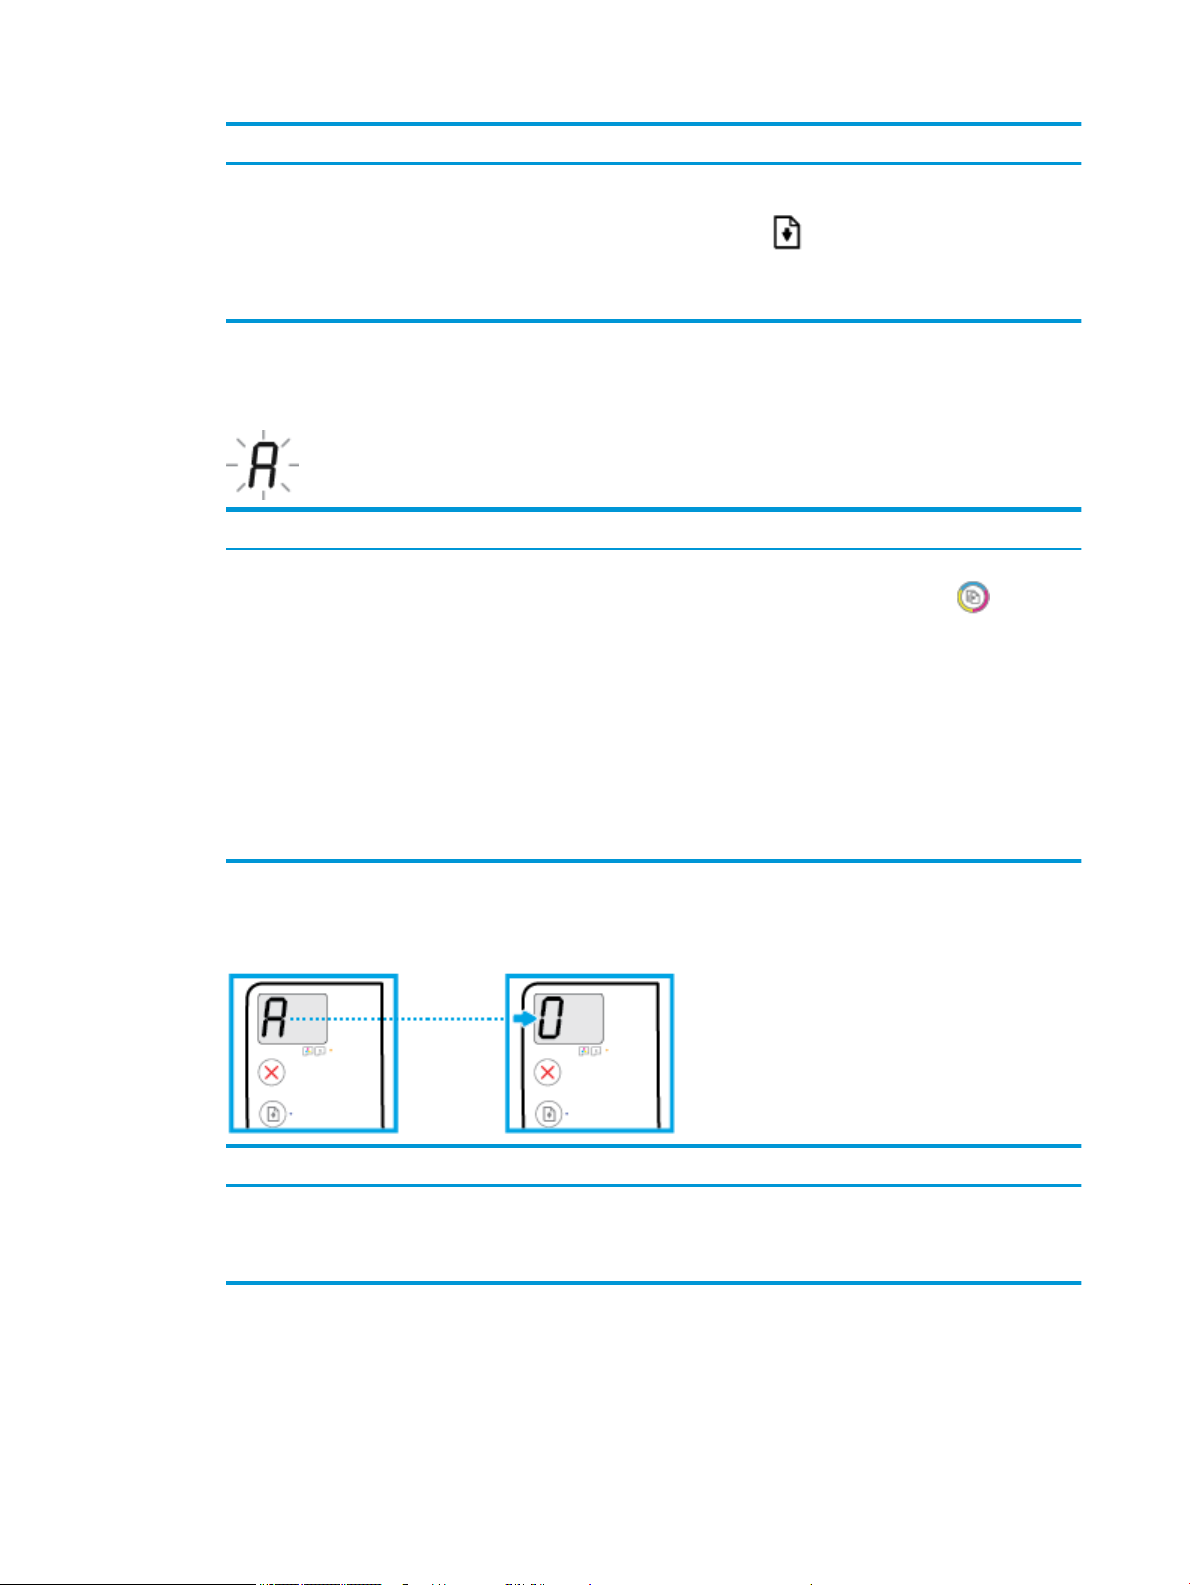
Cause Solution
During initial setup, the printer detects that the new
printheads are installed and the ink system is ready for
priming.
Alignment status icon
●
The Number of copies icon becomes a blinking A.
Cause Solution
The alignment page is printing and waiting to scan. Place the alignment page print side down on the scanner
Make sure all ink tanks are lled above the minimum line, and
the printhead latch is closed rmly. Press and hold the
Resume button ( ) for three seconds to start ink priming.
NOTE: Priming will occur in the background and will not
block printing, copying, or scanning.
glass, and then press the Color Copy button ( ) on the
control panel to align.
NOTE: When scan starts, blinking «A» changes to solid «A».
Alignment is complete after the scan.
—
If alignment event occurs as part of the priming process
during initial printer setup, the solid «A» changes to «0»
once alignment is complete.
Priming in progress
●
Printhead priming is in progress.
Cause Solution
Printhead priming is in progress. Priming can take place in the background when the printer is
Error icon, Paper Error icon, and Resume light
The Error icon, the Paper Error icon, and the Resume light are blinking.
—
If alignment event occurs after initial printer setup, the
control panel display returns to normal state once
alignment is complete.
idle. Priming is complete when the display shows «0».
When priming is in progress, you can still print, scan, or copy.
10 Chapter 2 Get started ENWW
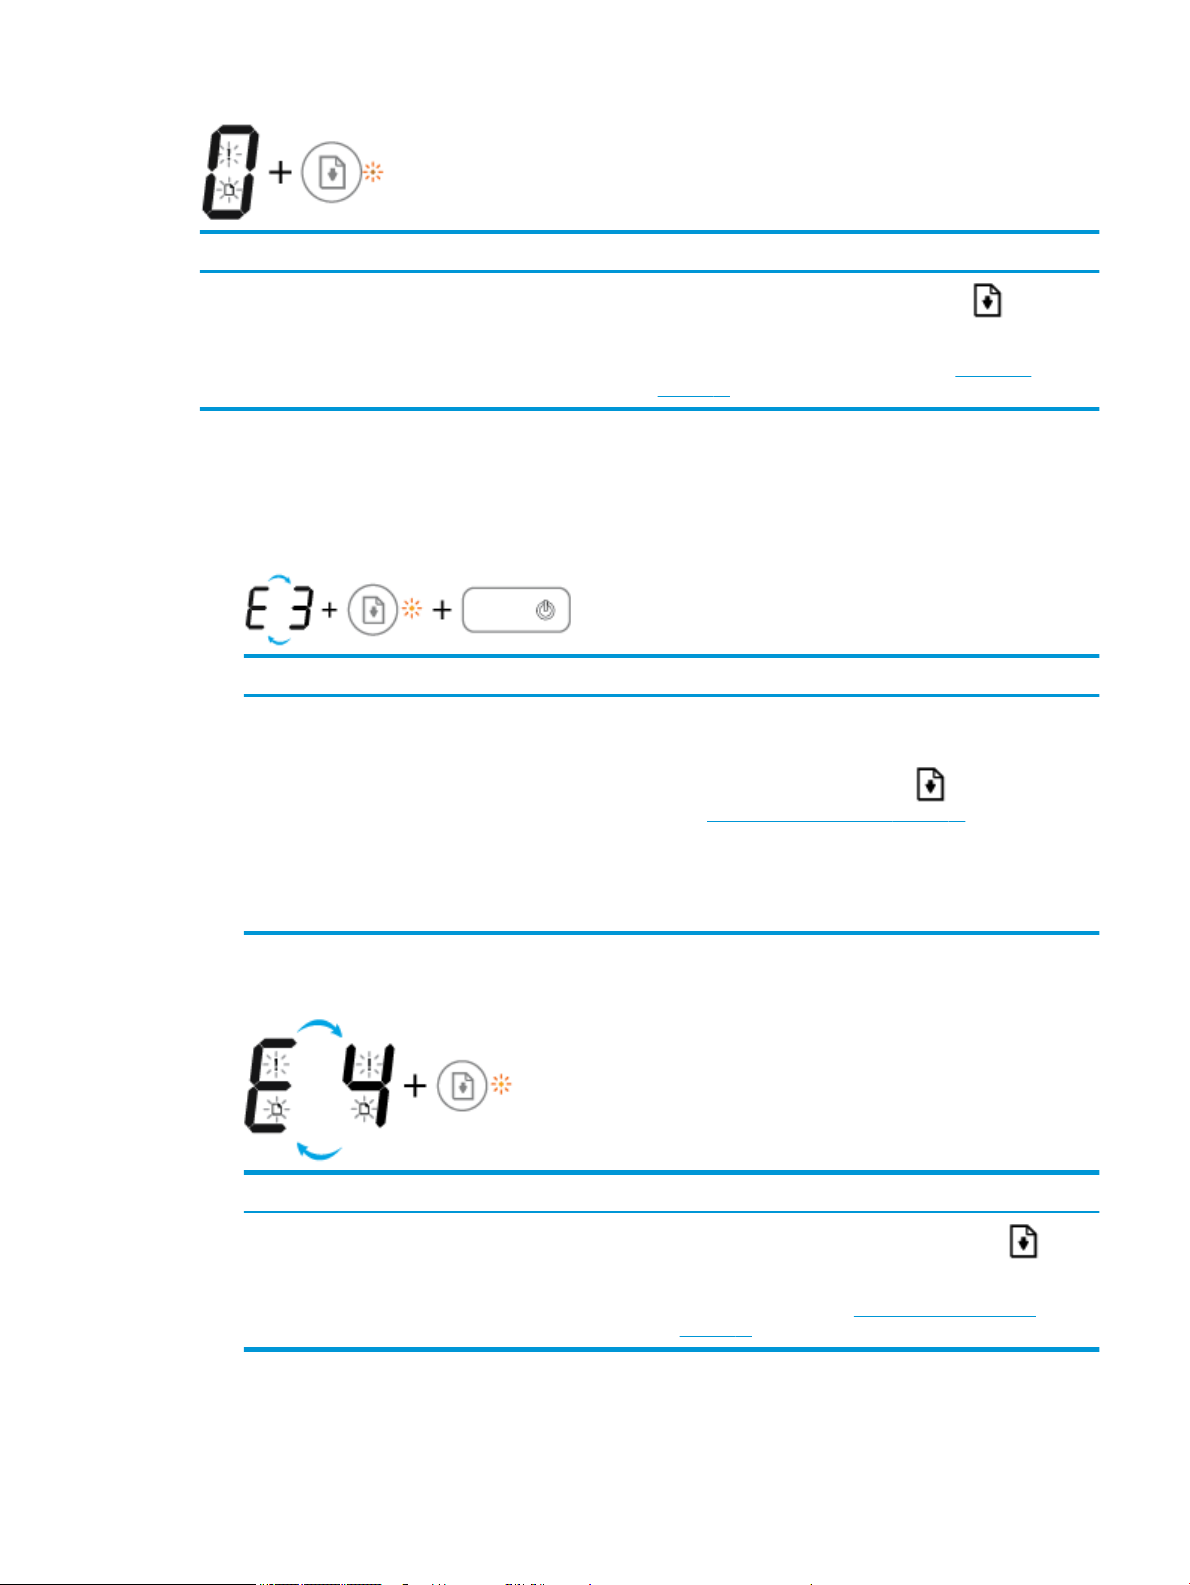
Cause Solution
The printer receives a printing job, and detects that there is no
paper in the input tray.
Number of copies icon
●
The Number of copies icon is alternating between the letter E and the number 3. At the same time, the
Resume light is blinking, and the Power button light is on.
Cause Solution
The carriage inside the printer has stalled. Open the printhead access door, make sure the printhead latch
Load paper, and then press the Resume button ( ) to continue
printing.
For information about how to load paper, see Load media
on page 13.
is properly closed and the print carriage is not obstructed.
Move the carriage to the right, close the printhead access door,
and then press the Resume button ( ) to continue printing.
See
Jams and paper-feed issues on page 51 for more
information.
CAUTION: Do not open the printhead latch unless you are
installing new printheads or moving the printer outside your
home or oice.
●
The Number of copies icon is alternating between the letter E and the number 4. At the same time, the
Error icon, the Paper Error icon, and the Resume light are blinking.
Cause Solution
There is a paper jam.
●
The Number of copies icon is alternating between the letter E and the number 5. At the same time, all
Clear the jam, and then press the Resume button ( ) to
continue printing.
For more information, see Jams and paper-feed issues
on page 51.
lights on the control panel are blinking.
ENWW Control panel lights and display icons status 11
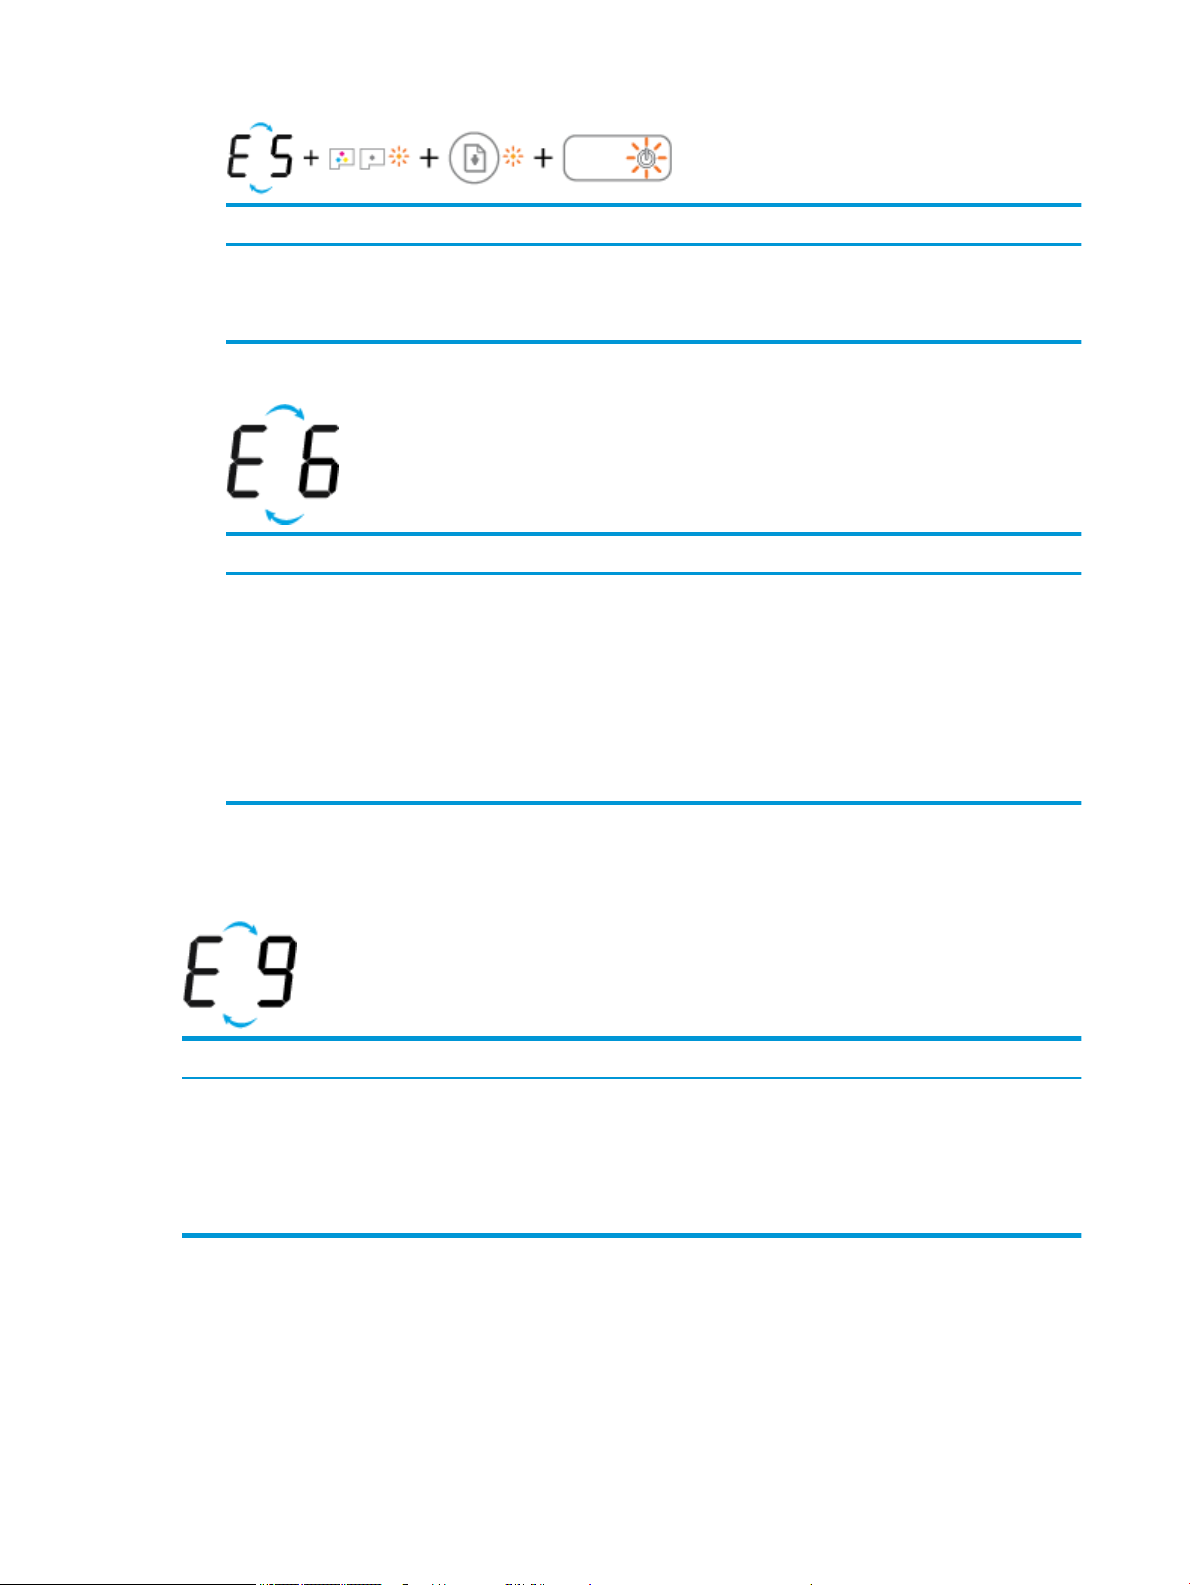
Cause Solution
The scanner is not working. Turn o and turn on the printer.
If the problem persists, contact HP. The printer still prints even
if the scanner is not working.
●
The Number of copies icon is alternating between the letter E and the number 6.
Cause Solution
The printer is in an error state. Reset the printer.
1. Turn o the printer.
2. Unplug the power cord.
3. Wait a minute, and then plug the power cord back in.
4. Turn on the printer.
If the problem persists, contact HP.
Ink system maintenance icon
The Number of copies icon is alternating between the letter E and the number 9.
Cause Solution
The printer detects that ink system maintenance is required. Open the printhead access door completely, and then close it
immediately. This process helps remove ink buildup and
maintains the best print quality throughout the life of the printer.
CAUTION: Do not open the printhead latch during this process
unless you are installing new printheads or moving the printer
outside your home or oice.
12 Chapter 2 Get started ENWW
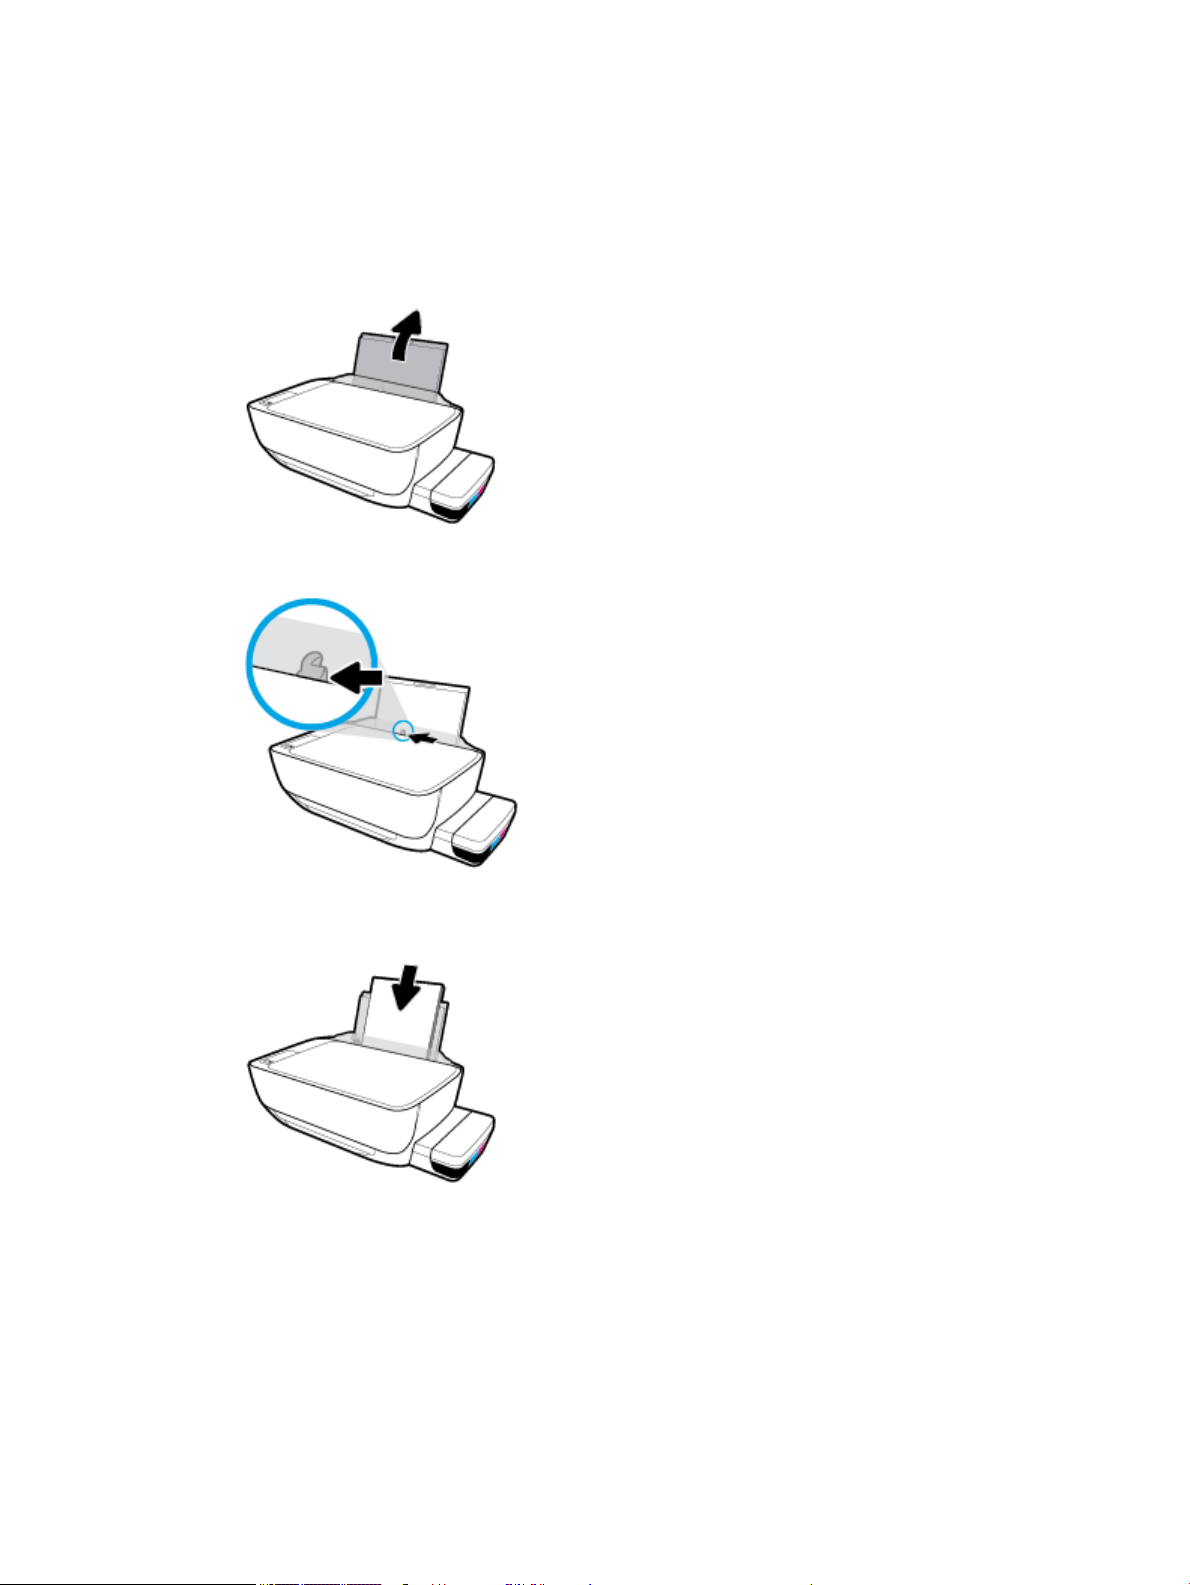
Load media
Select a paper size to continue.
To load full-size paper
1. Raise the input tray.
2. Slide the paper-width guide to the left.
3. Insert a stack of paper into the input tray with the short edge down and the print side up, and slide the
stack of paper down until it stops.
ENWW Load media 13
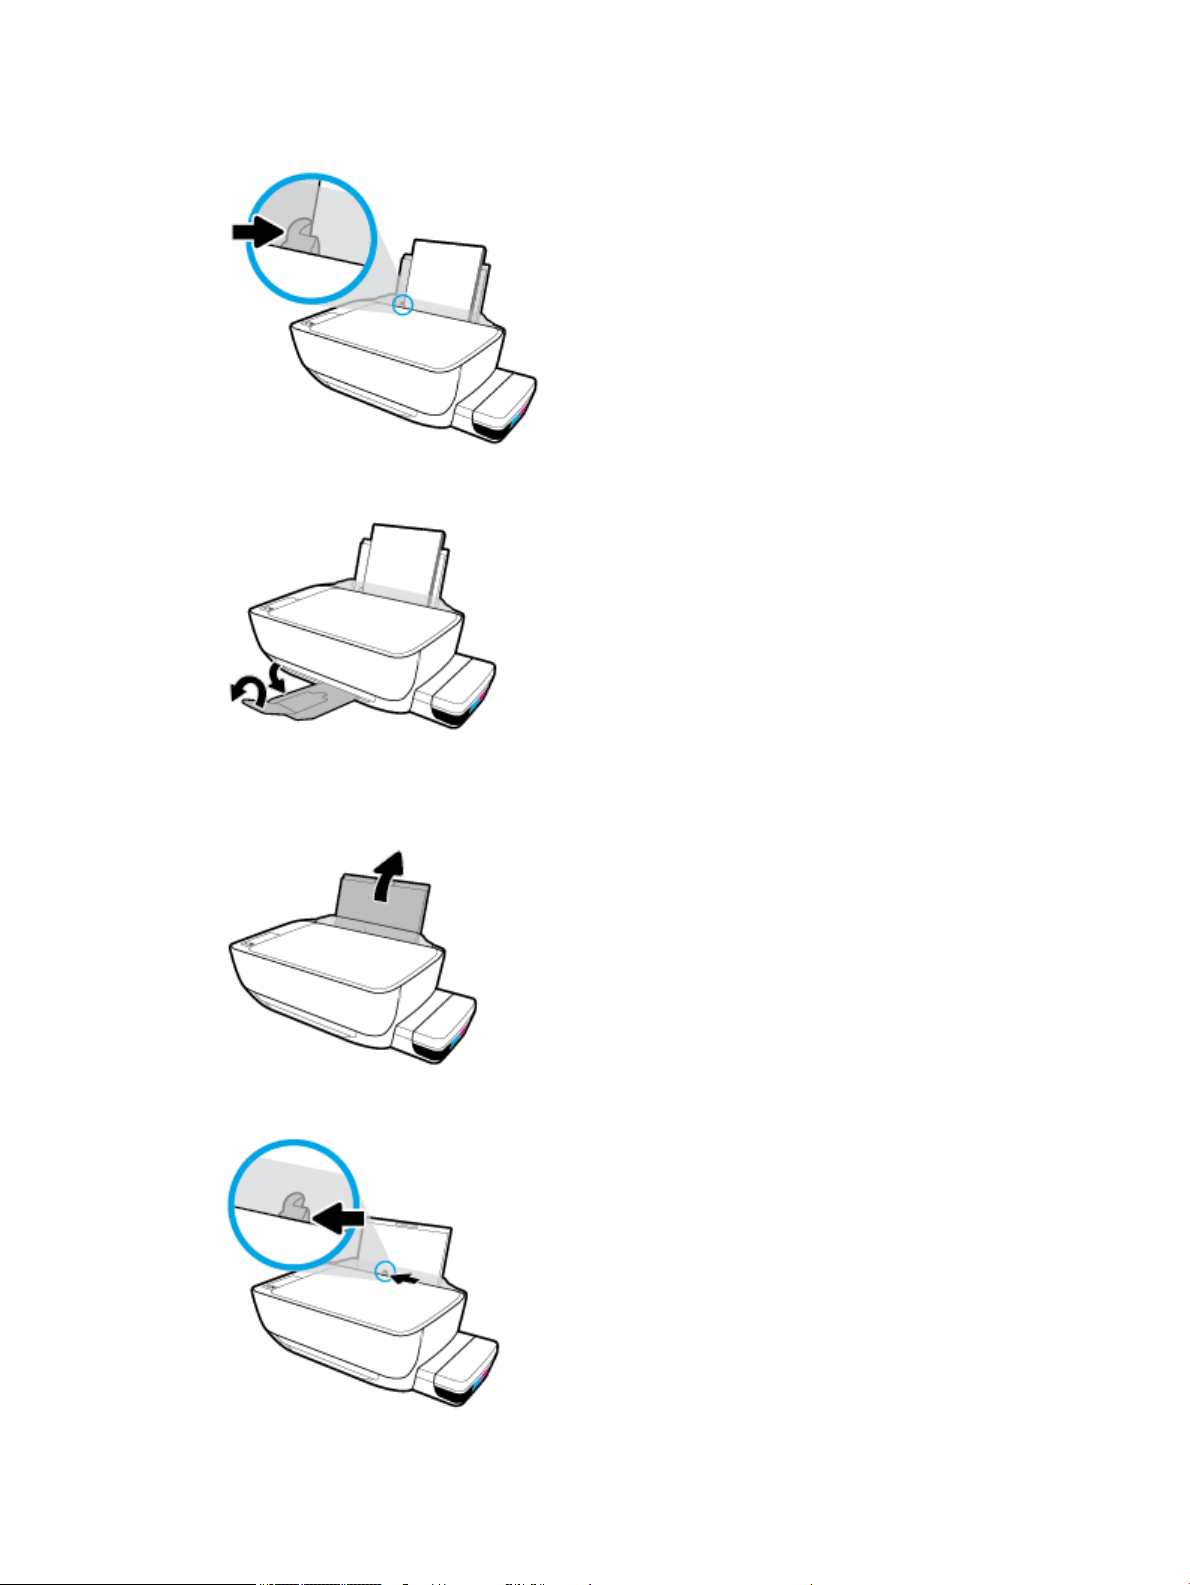
4. Slide the paper-width guide to the right until it stops at the edge of the paper.
5. Pull out the output tray and the tray extender.
To load small-size paper
1. Raise the input tray.
2. Slide the paper-width guide to the left.
14 Chapter 2 Get started ENWW
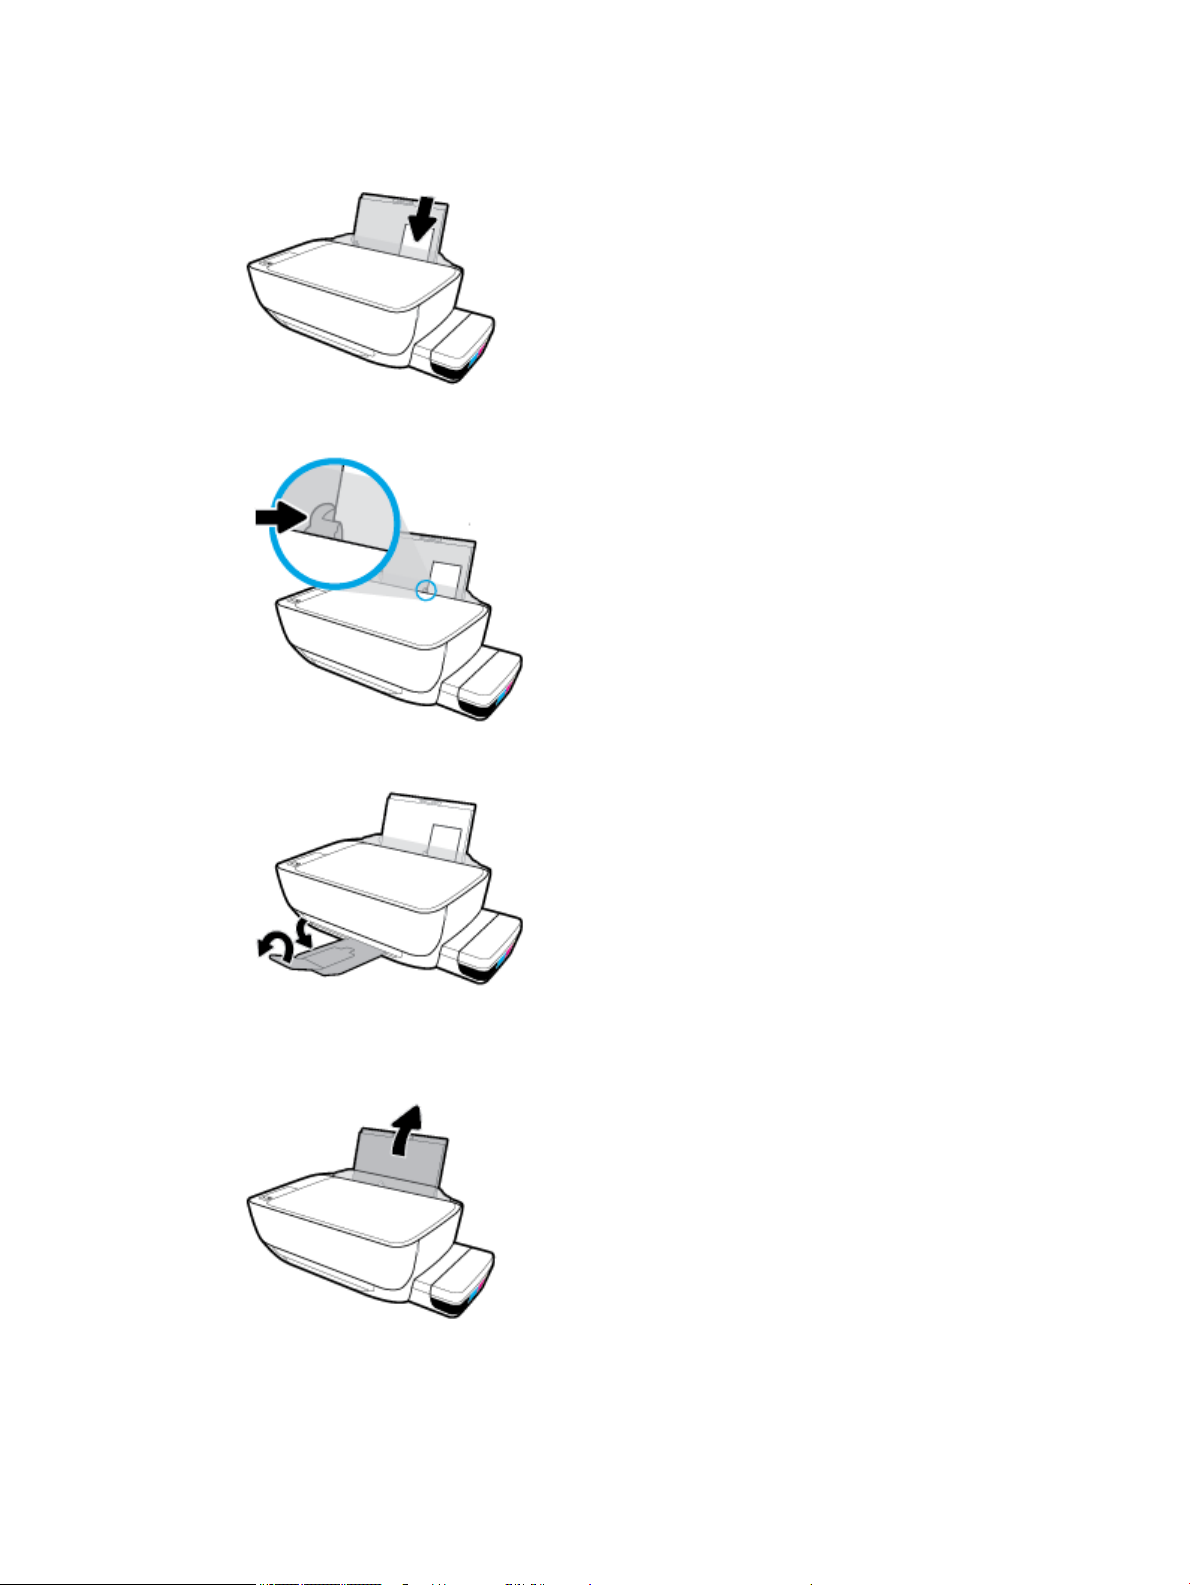
3. Insert a stack of small-size paper (like photo paper) into the far-right side of the input tray with the
short edge down and the print side up, and slide the stack of paper down until it stops.
4. Slide the paper-width guide to the right until it stops at the edge of the paper.
5. Pull out the output tray and the tray extender.
To load envelopes
1. Raise the input tray.
ENWW Load media 15
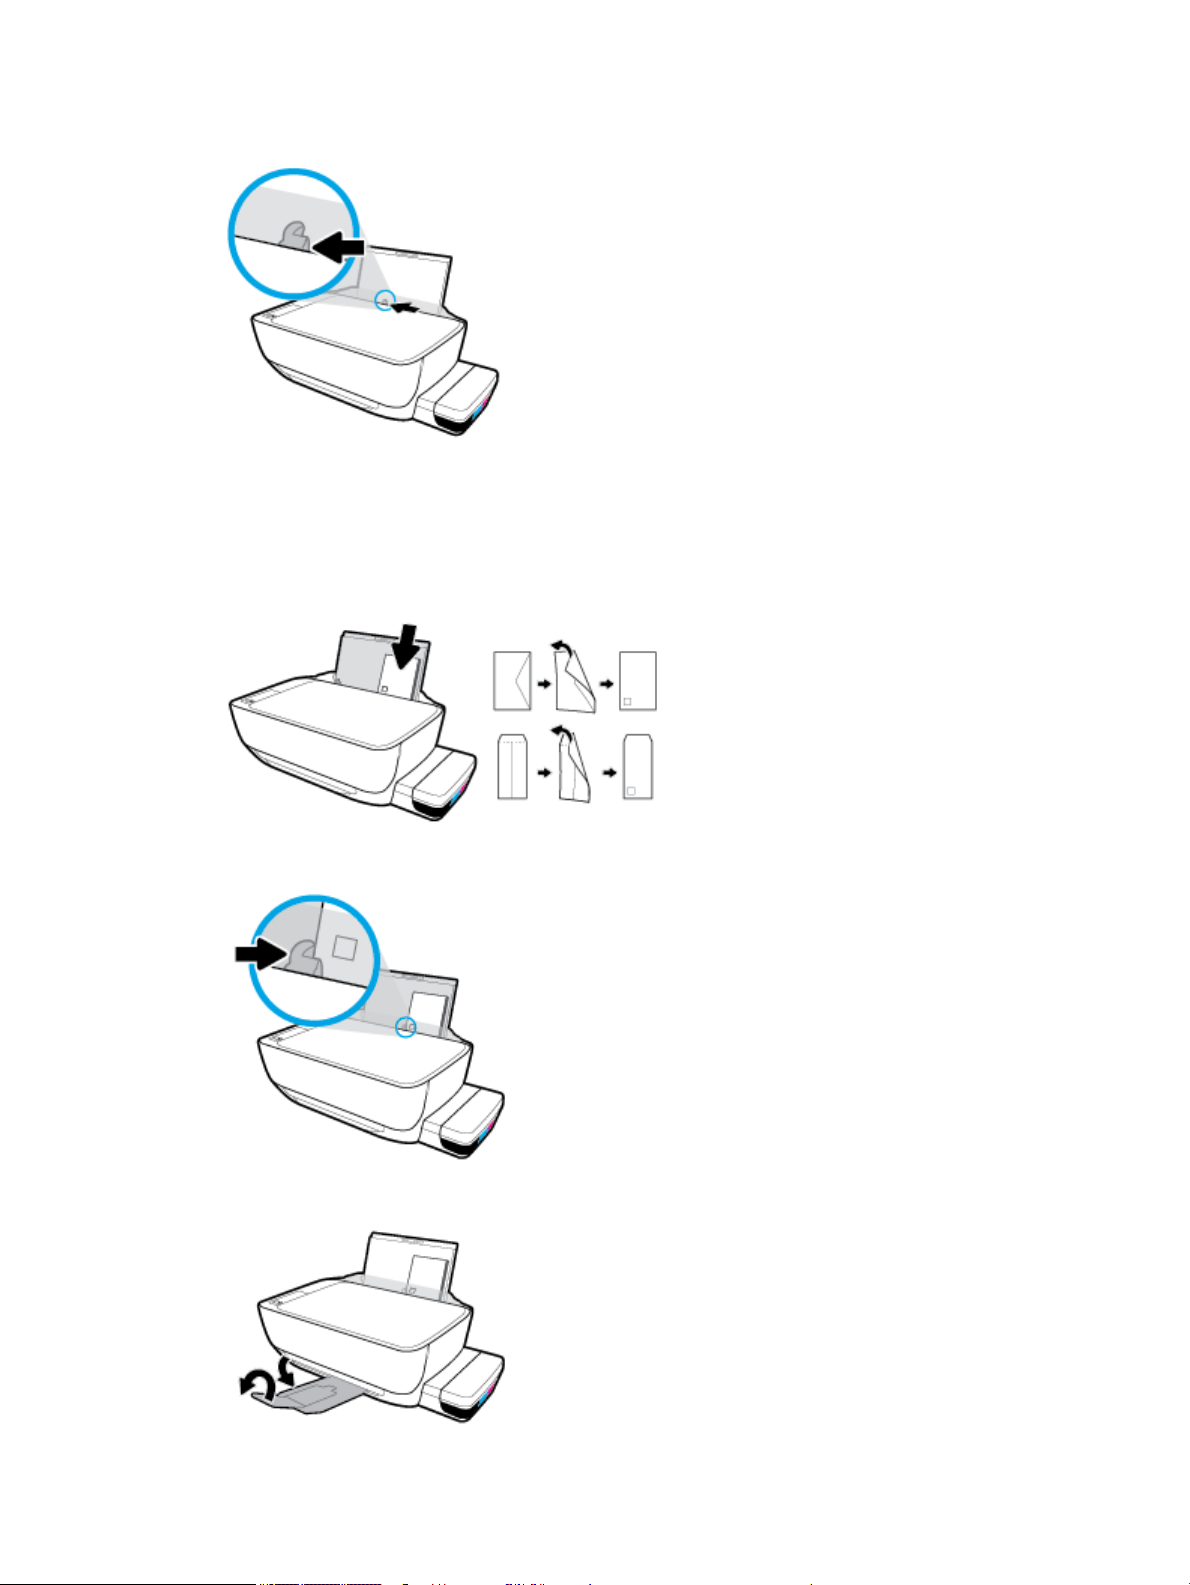
2. Slide the paper-width guide to the left.
3. Insert one or more envelopes into the far-right side of the input tray and slide the stack of envelopes
down until it stops.
The side to be printed on should face up. For envelope with ap on the long edge, insert the envelope
vertically with the ap on the left side and facing down. For envelope with the ap on the short edge,
insert the envelope vertically with the ap on the top and facing down.
4. Slide the paper-width guide to the right against the stack of envelopes until it stops.
5. Pull out the output tray and the tray extender.
16 Chapter 2 Get started ENWW
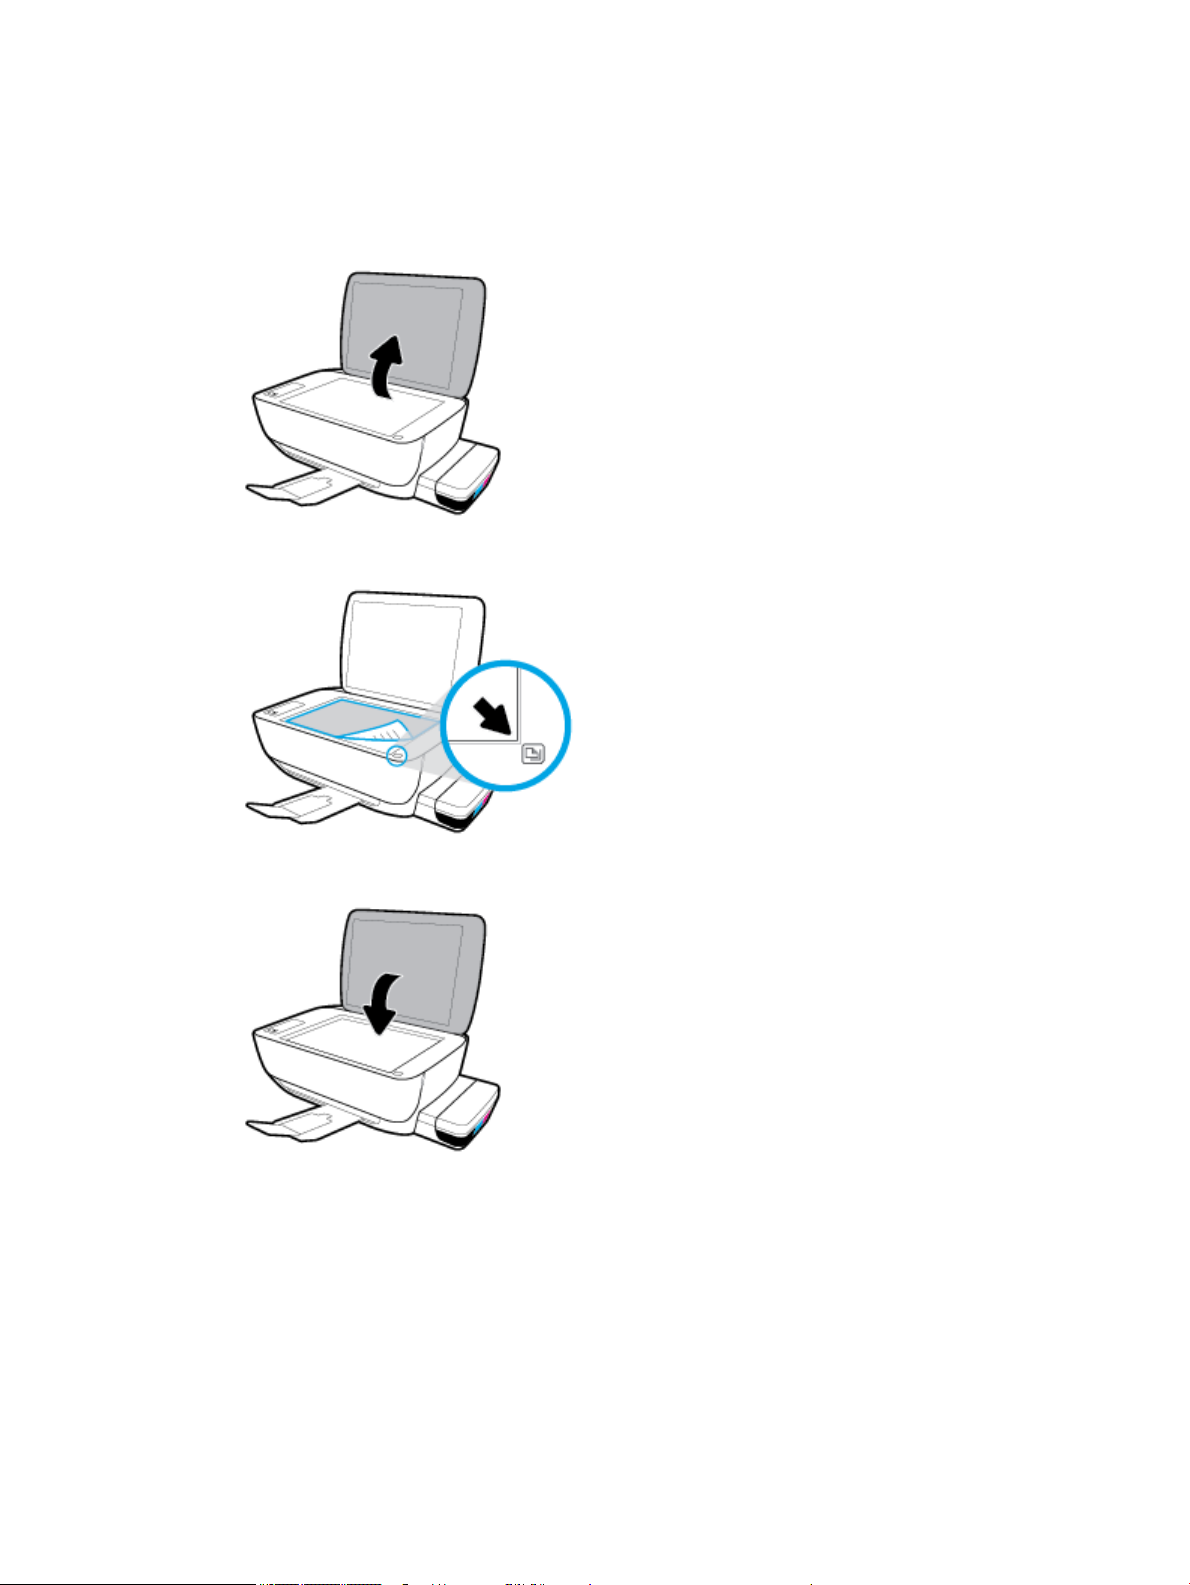
Load an original on the scanner glass
To load an original on the scanner glass
1. Lift the scanner lid.
2. Load the original print-side down on the right corner of the scanner glass.
3. Close the scanner lid.
ENWW Load an original on the scanner glass 17

Paper basics
The printer is designed to work well with most types of oice paper. It is best to test a variety of print paper
types before buying large quantities. Use HP paper for optimum print quality. Visit the HP website at
www.hp.com for more information about HP paper.
HP recommends plain papers with the ColorLok logo for printing everyday documents. All
papers with the ColorLok logo are independently tested to meet high standards of
reliability and print quality, and produce documents with crisp, vivid color, bolder blacks,
and that dry faster than ordinary plain papers. Look for papers with the ColorLok logo in
a variety of weights and sizes from major paper manufacturers.
This section contains the following topics:
●
Recommended papers for printing
●
Order HP paper supplies
Recommended papers for printing
If you want the best print quality, HP recommends using HP papers that are specically designed for the type
of project you are printing.
Depending on your country/region, some of these papers might not be available.
Photo printing
●
●
●
HP Premium Plus Photo Paper
HP Premium Plus Photo Paper is HP’s highest-quality photo paper for your best photos. With HP
Premium Plus Photo Paper, you can print beautiful photos that are instant-dry so you can share them
right o the printer. It is available in several sizes, including A4, 8.5 x 11 inches, 4 x 6 inches (10 x 15
cm), 5 x 7 inches (13 x 18 cm), and in two nishes — glossy or soft gloss (semi-gloss). Ideal for framing,
displaying, or gifting your best photos and special photo projects. HP Premium Plus Photo Paper delivers
exceptional results with professional quality and durability.
HP Advanced Photo Paper
This glossy photo paper features an instant-dry nish for easy handling without smudging. It resists
water, smears, ngerprints, and humidity. Your prints have a look and feel comparable to a storeprocessed photo. It is available in several sizes, including A4, 8.5 x 11 inches, 10 x 15 cm (4 x 6 inches),
13 x 18 cm (5 x 7 inches). It is acid-free for longer lasting documents.
HP Everyday Photo Paper
Print colorful, everyday snapshots at a low cost, using paper designed for casual photo printing. This
aordable photo paper dries quickly for easy handling. Get sharp, crisp images when you use this paper
with any inkjet printer. It is available in glossy nish in several sizes, including A4, 8.5 x 11 inches, 5 x 7
inches, and 4 x 6 inches (10 x 15 cm). It is acid-free for longer lasting documents.
●
HP Photo Value Packs
HP Photo Value Packs conveniently package original HP ink cartridges and HP Advanced Photo Paper to
save you time and take the guesswork out of printing aordable, lab-quality photos with your HP
18 Chapter 2 Get started ENWW

printer. Original HP inks and HP Advanced Photo Paper have been designed to work together so your
photos are long lasting and vivid, print after print. Great for printing out an entire vacation’s worth of
photos or multiple prints to share.
Business documents
●
HP Premium Presentation Paper 120g Matte or HP Professional Paper 120 Matt
This paper is a heavy two-sided matte paper perfect for presentation, proposals, reports, and
newsletters. It is heavyweight for an impressive look and feel.
●
HP Brochure Paper 180g Glossy or HP Professional Paper 180 Glossy
These papers are glossy-coated on both sides for two-sided use. They are the perfect choice for nearphotographic reproductions and business graphics for report covers, special presentations, brochures,
mailers, and calendars.
●
HP Brochure Paper 180g Matte or HP Professional Paper 180 Matte
These papers are matte-coated on both sides for two-sided use. They are the perfect choice for nearphotographic reproductions and business graphics for report covers, special presentations, brochures,
mailers, and calendars.
Everyday printing
All the papers listed for everyday printing feature ColorLok Technology for less smearing, bolder blacks, and
vivid colors.
●
HP Bright White Inkjet Paper
HP Bright White Inkjet Paper delivers high-contrast colors and sharp text. It is opaque enough for twosided color usage with no show-through, which makes it ideal for newsletters, reports, and yers.
●
HP Printing Paper
HP Printing Paper is a high-quality multifunction paper. It produces documents that look and feel more
substantial than documents printed on standard multipurpose or copy paper. It is acid-free for longer
lasting documents.
●
HP Oice Paper
HP Oice Paper is a high-quality multifunction paper. It is suitable for copies, drafts, memos, and other
everyday documents. It is acid-free for longer lasting documents.
●
HP Oice Recycled Paper
HP Oice Recycled Paper is a high-quality multifunction paper made with 30% recycled ber.
Order HP paper supplies
The printer is designed to work well with most types of oice paper. Use HP paper for optimum print quality.
To order HP papers and other supplies, go to www.hp.com . At this time, some portions of the HP website are
available in English only.
HP recommends plain papers with the ColorLok logo for printing and copying of everyday documents. All
papers with the ColorLok logo are independently tested to meet high standards of reliability and print quality,
and produce documents with crisp, vivid color, bolder blacks and shorter dry-time than ordinary plain papers.
Look for papers with the ColorLok logo in a variety of weights and sizes from major paper manufacturers.
ENWW Paper basics 19

Open the HP printer software (Windows)
After installing the HP printer software, double-click the printer icon on the desktop or do one of the following
to open the printer software:
●
Windows 10: From the computer desktop, click Start, select HP from the app list, and then select the
icon with the printer name.
●
Windows 8.1: Click the down arrow in lower left corner of the Start screen, and then select the printer
name.
●
Windows 8: Right-click an empty area on the Start screen, click All Apps on the app bar, and then select
the printer name.
●
Windows 7, Windows Vista, and Windows XP: From the computer desktop, click Start, select All
Programs, click HP, click the folder for the printer, and then select the icon with the printer name.
NOTE:
●
If you have not installed the HP printer software, enter 123.hp.com in a web browser on your computer
to download and install the HP printer software.
●
You can also use the HP printer software CD, or download the HP printer software at
www.support.hp.com.
20 Chapter 2 Get started ENWW

Sleep mode
●
Power usage is reduced while in Sleep mode.
●
After initial setup of printer, the printer will enter Sleep mode after 5 minutes of inactivity.
●
The Power button light is dimmed and the printer control panel display is o in Sleep mode.
●
Pressing any button on the control panel, or sending a print or scan job can wake up the printer from
sleep mode.
ENWW Sleep mode 21

Quiet Mode
Quiet Mode slows down printing to reduce overall noise without aecting print quality. Quiet Mode only works
for printing with Normal print quality on plain paper. To reduce printing noise, turn on Quiet Mode. To print at
normal speed, turn Quiet Mode o. Quiet Mode is o by default.
NOTE: In Quiet Mode, if you print on plain paper with the Draft or Best print quality, or if you print photos or
envelopes, the printer works in the same way as when Quiet Mode is o.
To turn Quiet Mode on or o from the printer software (Windows)
1. Open the HP printer software. For more information, see Open the HP printer software (Windows)
on page 20.
2. Click the Quiet Mode tab.
3. Click On or O.
4. Click Save Setting.
To turn Quiet Mode on or o from the printer software (OS X and macOS)
1. Open HP Utility.
NOTE: HP Utility is located in the HP folder in the Applications folder.
2. Select the printer.
3. Click Quiet Mode .
4. Select On or O .
5. Click Apply Now.
22 Chapter 2 Get started ENWW

Auto-O
This feature turns the printer o after 2 hours of inactivity to help reduce energy use. Auto-O turns the
printer o completely, so you must use the Power button to turn the printer back on. If your printer
supports this energy saving feature, Auto-O is automatically enabled or disabled depending on printer
capabilities and connection options. Even when Auto-O is disabled, the printer enters Sleep mode after 5
minutes of inactivity to help reduce energy use.
●
●
Auto-O is enabled when the printer is turned on, if the printer does not have network or fax capability,
or is not using these capabilities.
Auto-O is disabled when a printer’s wireless or Wi-Fi Direct capability is turned on or when a printer
with fax, USB, or Ethernet network capability establishes a fax, USB, or Ethernet network connection.
ENWW Auto-O 23

3 Print
●
Print from your computer
●
Tips for print success
24 Chapter 3 Print ENWW

Print from your computer
●
Print documents
●
Print photos
●
Print envelopes
●
Print using the maximum dpi
Print documents
Before printing documents, make sure you have paper loaded in the input tray and the output tray is open.
For more information about loading paper, see Load media on page 13.
To print a document (Windows)
1. From your software, select Print.
2. Make sure your printer is selected.
3. Click the button that opens the Properties dialog box.
Depending on your software application, this button might be called Properties, Options, Printer Setup,
Printer Properties, Printer, or Preferences.
4. Select the appropriate options on the Printing Shortcuts or Printing Shortcut tab.
To change other print settings, click the other tabs.
For more printing tips, see Printer settings tips on page 31.
NOTE: If you change the paper size, be sure to load the correct paper in the input tray and set the
paper size on the printer control panel.
5. Click OK to close the Properties dialog box.
6. Click Print or OK to begin printing.
To print documents (OS X and macOS)
1. From the File menu in your software, choose Print.
2. Make sure your printer is selected.
3. Set the print options.
If you do not see options on the Print dialog, click Show Details.
●
Choose the appropriate paper size in the Paper Size pop-up menu.
NOTE: If you change the paper size, ensure that you have loaded the correct paper.
●
Select the orientation.
●
Enter the scaling percentage.
4. Click Print.
ENWW Print from your computer 25

To print on both sides of the page (Windows)
1. From your software, select Print.
2. Make sure your printer is selected.
3. Click the button that opens the Properties dialog box.
Depending on your software application, this button might be called Properties, Options, Printer Setup,
Printer Properties, Printer, or Preferences.
4. On the Printing Shortcuts or Printing Shortcut tab, select the Two-sided (Duplex) Printing shortcut,
and then select an option from the
To change other print settings, click the other tabs.
For more printing tips, see Printer settings tips on page 31.
NOTE: If you change the paper size, be sure to load the correct paper in the input tray and set the
paper size on the printer control panel.
5. Click OK to close the Properties dialog box.
6. Click Print or OK to begin printing.
To print on both sides of the page (OS X and macOS)
Print On Both Sides Manually drop-down list.
1. From the File menu in your software, choose Print.
2. In the Print dialog, choose Paper Handling from the pop-up menu and set Page Order to Normal.
3. Set Pages to Print to Odd Only.
4. Click Print.
5. After all of the odd numbered pages have printed, remove the document from the output tray.
6. Reload the document so that the end that came out of the printer is now going into the printer and the
blank side of the document is facing toward the front of the printer.
7. In the Print dialog, return to the Paper Handling pop-up menu and set the page order to Normal and the
pages to print to Even Only.
8. Click Print.
Print photos
Before printing photos, make sure you have photo paper loaded in the input tray and the output tray is open.
For more information about loading paper, see Load media on page 13.
To print a photo on photo paper (Windows)
1. From your software, select Print.
2. Make sure your printer is selected.
3. Click the button that opens the Properties dialog box.
Depending on your software application, this button might be called Properties, Options, Printer Setup,
Printer Properties, Printer, or Preferences.
26 Chapter 3 Print ENWW
Loading…
-
Драйверы
8
-
Инструкции по эксплуатации
59
Языки:
HP Ink Tank 310 инструкция по эксплуатации
(102 страницы)
- Языки:Русский
-
Тип:
PDF -
Размер:
1.97 MB
Просмотр
HP Ink Tank 310 инструкция по эксплуатации
(102 страницы)
- Языки:Русский
-
Тип:
PDF -
Размер:
1.77 MB
Просмотр
HP Ink Tank 310 инструкция по эксплуатации
(98 страниц)
- Языки:Английский
-
Тип:
PDF -
Размер:
1.7 MB
Просмотр
HP Ink Tank 310 инструкция по эксплуатации
(12 страниц)
- Языки:Английский
-
Тип:
PDF -
Размер:
1.6 MB
Просмотр
HP Ink Tank 310 инструкция по эксплуатации
(98 страниц)
- Языки:Английский
-
Тип:
PDF -
Размер:
1.67 MB
Просмотр
HP Ink Tank 310 инструкция по эксплуатации
(17 страниц)
- Языки:Английский
-
Тип:
PDF -
Размер:
1.58 MB
Просмотр
HP Ink Tank 310 инструкция по эксплуатации
(100 страниц)
- Языки:Словенский
-
Тип:
PDF -
Размер:
1.91 MB
Просмотр
HP Ink Tank 310 инструкция по эксплуатации
(99 страниц)
- Языки:Корейский
-
Тип:
PDF -
Размер:
2.21 MB
Просмотр
HP Ink Tank 310 инструкция по эксплуатации
(105 страниц)
- Языки:Украинский
-
Тип:
PDF -
Размер:
2.05 MB
Просмотр
HP Ink Tank 310 инструкция по эксплуатации
(103 страницы)
- Языки:Венгерский
-
Тип:
PDF -
Размер:
1.92 MB
Просмотр
HP Ink Tank 310 инструкция по эксплуатации
(100 страниц)
- Языки:Португальский
-
Тип:
PDF -
Размер:
1.91 MB
Просмотр
HP Ink Tank 310 инструкция по эксплуатации
(104 страницы)
- Языки:Болгарский
-
Тип:
PDF -
Размер:
2.06 MB
Просмотр
HP Ink Tank 310 инструкция по эксплуатации
(100 страниц)
- Языки:Эстонский
-
Тип:
PDF -
Размер:
1.9 MB
Просмотр
HP Ink Tank 310 инструкция по эксплуатации
(99 страниц)
- Языки:Хорватский
-
Тип:
PDF -
Размер:
1.94 MB
Просмотр
HP Ink Tank 310 инструкция по эксплуатации
(102 страницы)
- Языки:Латышский
-
Тип:
PDF -
Размер:
1.92 MB
Просмотр
HP Ink Tank 310 инструкция по эксплуатации
(103 страницы)
- Языки:Румынский
-
Тип:
PDF -
Размер:
2.07 MB
Просмотр
HP Ink Tank 310 инструкция по эксплуатации
(95 страниц)
- Языки:Иврит
-
Тип:
PDF -
Размер:
2.29 MB
Просмотр
HP Ink Tank 310 инструкция по эксплуатации
(16 страниц)
- Языки:Китайский
-
Тип:
PDF -
Размер:
2.37 MB
Просмотр
HP Ink Tank 310 инструкция по эксплуатации
(103 страницы)
- Языки:Литовский
-
Тип:
PDF -
Размер:
1.93 MB
Просмотр
HP Ink Tank 310 инструкция по эксплуатации
(100 страниц)
- Языки:Датский
-
Тип:
PDF -
Размер:
1.91 MB
Просмотр
HP Ink Tank 310 инструкция по эксплуатации
(101 страница)
- Языки:Нидерландский
-
Тип:
PDF -
Размер:
1.9 MB
Просмотр
HP Ink Tank 310 инструкция по эксплуатации
(96 страниц)
- Языки:Китайский
-
Тип:
PDF -
Размер:
2.06 MB
Просмотр
HP Ink Tank 310 инструкция по эксплуатации
(102 страницы)
- Языки:Индонезийский
-
Тип:
PDF -
Размер:
1.9 MB
Просмотр
HP Ink Tank 310 инструкция по эксплуатации
(101 страница)
- Языки:Тайский
-
Тип:
PDF -
Размер:
2.29 MB
Просмотр
HP Ink Tank 310 инструкция по эксплуатации
(100 страниц)
- Языки:Шведский
-
Тип:
PDF -
Размер:
1.9 MB
Просмотр
HP Ink Tank 310 инструкция по эксплуатации
(99 страниц)
- Языки:Турецкий
-
Тип:
PDF -
Размер:
2 MB
Просмотр
HP Ink Tank 310 инструкция по эксплуатации
(99 страниц)
- Языки:Чешский
-
Тип:
PDF -
Размер:
1.91 MB
Просмотр
HP Ink Tank 310 инструкция по эксплуатации
(102 страницы)
- Языки:Польский
-
Тип:
PDF -
Размер:
1.91 MB
Просмотр
HP Ink Tank 310 инструкция по эксплуатации
(103 страницы)
- Языки:Французский
-
Тип:
PDF -
Размер:
1.93 MB
Просмотр
HP Ink Tank 310 инструкция по эксплуатации
(98 страниц)
- Языки:Арабский
-
Тип:
PDF -
Размер:
2.27 MB
Просмотр
HP Ink Tank 310 инструкция по эксплуатации
(102 страницы)
- Языки:Испанский
-
Тип:
PDF -
Размер:
1.91 MB
Просмотр
HP Ink Tank 310 инструкция по эксплуатации
(101 страница)
- Языки:Финский
-
Тип:
PDF -
Размер:
1.89 MB
Просмотр
HP Ink Tank 310 инструкция по эксплуатации
(106 страниц)
- Языки:Греческий
-
Тип:
PDF -
Размер:
2.04 MB
Просмотр
HP Ink Tank 310 инструкция по эксплуатации
(100 страниц)
- Языки:Словенский
-
Тип:
PDF -
Размер:
1.69 MB
Просмотр
HP Ink Tank 310 инструкция по эксплуатации
(99 страниц)
- Языки:Турецкий
-
Тип:
PDF -
Размер:
1.74 MB
Просмотр
HP Ink Tank 310 инструкция по эксплуатации
(60 страниц)
- Языки:Сербский
-
Тип:
PDF -
Размер:
5.36 MB
Просмотр
HP Ink Tank 310 инструкция по эксплуатации
(100 страниц)
- Языки:Эстонский
-
Тип:
PDF -
Размер:
1.68 MB
Просмотр
HP Ink Tank 310 инструкция по эксплуатации
(106 страниц)
- Языки:Греческий
-
Тип:
PDF -
Размер:
1.79 MB
Просмотр
HP Ink Tank 310 инструкция по эксплуатации
(101 страница)
- Языки:Тайский
-
Тип:
PDF -
Размер:
2.03 MB
Просмотр
HP Ink Tank 310 инструкция по эксплуатации
(24 страницы)
- Языки:Китайский
-
Тип:
PDF -
Размер:
2.38 MB
Просмотр
HP Ink Tank 310 инструкция по эксплуатации
(96 страниц)
- Языки:Китайский
-
Тип:
PDF -
Размер:
1.88 MB
Просмотр
HP Ink Tank 310 инструкция по эксплуатации
(102 страницы)
- Языки:Индонезийский
-
Тип:
PDF -
Размер:
1.68 MB
Просмотр
HP Ink Tank 310 инструкция по эксплуатации
(100 страниц)
- Языки:Португальский
-
Тип:
PDF -
Размер:
1.69 MB
Просмотр
HP Ink Tank 310 инструкция по эксплуатации
(98 страниц)
- Языки:Арабский
-
Тип:
PDF -
Размер:
2.23 MB
Просмотр
HP Ink Tank 310 инструкция по эксплуатации
(102 страницы)
- Языки:Латышский
-
Тип:
PDF -
Размер:
1.69 MB
Просмотр
HP Ink Tank 310 инструкция по эксплуатации
(99 страниц)
- Языки:Шведский
-
Тип:
PDF -
Размер:
1.68 MB
Просмотр
HP Ink Tank 310 инструкция по эксплуатации
(104 страницы)
- Языки:Французский
-
Тип:
PDF -
Размер:
1.7 MB
Просмотр
HP Ink Tank 310 инструкция по эксплуатации
(103 страницы)
- Языки:Румынский
-
Тип:
PDF -
Размер:
1.81 MB
Просмотр
HP Ink Tank 310 инструкция по эксплуатации
(102 страницы)
- Языки:Венгерский
-
Тип:
PDF -
Размер:
1.7 MB
Просмотр
HP Ink Tank 310 инструкция по эксплуатации
(105 страниц)
- Языки:Болгарский
-
Тип:
PDF -
Размер:
1.82 MB
Просмотр
HP Ink Tank 310 инструкция по эксплуатации
(100 страниц)
- Языки:Чешский
-
Тип:
PDF -
Размер:
1.69 MB
Просмотр
HP Ink Tank 310 инструкция по эксплуатации
(105 страниц)
- Языки:Украинский
-
Тип:
PDF -
Размер:
1.82 MB
Просмотр
HP Ink Tank 310 инструкция по эксплуатации
(95 страниц)
- Языки:Иврит
-
Тип:
PDF -
Размер:
2.06 MB
Просмотр
HP Ink Tank 310 инструкция по эксплуатации
(101 страница)
- Языки:Нидерландский
-
Тип:
PDF -
Размер:
1.68 MB
Просмотр
HP Ink Tank 310 инструкция по эксплуатации
(99 страниц)
- Языки:Датский
-
Тип:
PDF -
Размер:
1.68 MB
Просмотр
HP Ink Tank 310 инструкция по эксплуатации
(100 страниц)
- Языки:Финский
-
Тип:
PDF -
Размер:
1.68 MB
Просмотр
HP Ink Tank 310 инструкция по эксплуатации
(103 страницы)
- Языки:Литовский
-
Тип:
PDF -
Размер:
1.7 MB
Просмотр
HP Ink Tank 310 инструкция по эксплуатации
(100 страниц)
- Языки:Хорватский
-
Тип:
PDF -
Размер:
1.68 MB
Просмотр
HP Ink Tank 310 инструкция по эксплуатации
(99 страниц)
- Языки:Корейский
-
Тип:
PDF -
Размер:
2.05 MB
Просмотр
На NoDevice можно скачать инструкцию по эксплуатации для HP Ink Tank 310. Руководство пользователя необходимо для ознакомления с правилами установки и эксплуатации HP Ink Tank 310. Инструкции по использованию помогут правильно настроить HP Ink Tank 310, исправить ошибки и выявить неполадки.
HP Ink Tank 310 series User Manual
HP Ink Tank 310 series Table of contents
1. HP Ink Tank 310 series Help
2. Get started
- Printer parts
- Get to know the ink tank system
- Control panel features
- Control panel lights and display icons status
- Load media
- Load an original on the scanner glass
- Paper basics
- Open the HP printer software (Windows)
- Sleep mode
- Quiet Mode
- Auto-Off
3. Print
- Print from your computer
- Tips for print success
4. Copy and scan
- Copy documents
- Scan using the HP printer software
- Tips for copy and scan success
5. Manage ink and printhead
- Ink levels
- Refill ink tanks
- Order ink supplies
- Print with black ink only
- Tips for working with ink and printhead
- Move printer
6. Connect your printer
- Connect your printer to your computer with a USB cable (non-network connection)
7. Solve a problem
- Jams and paper-feed issues
- Printhead issues
- Printing issues
- Copy issues
- Scan issues
- Printer hardware issues
- Control panel error codes
- HP support
Appendix A Technical information
- HP Company notices
- Specifications
- Regulatory notices
- Environmental product stewardship program
Index
HP Ink Tank 310 Printer Part

1. Paper-width guide
2. Input tray
3. Input tray shield
4. Scanner lid
5. Scanner glass
6. Output tray extender (also referred to as the tray extender)
7. Output tray
8. Front door
9. Ink tank
10. Ink tank caps
11. Ink tank lid
12. Control panel
13. Printhead access door
14. Printheads
15. Printheads lact
16. Power connection
17. USB port
Readmore and Download HP Ink Tank 310 series User Manual
| Title | : HP Ink Tank 310 series User Manual |
| Format | |
| Pages | : 98 Pages |
| Language | : English |
| File Size | : 2 MB |

Принтеры HP Ink Tank 310 Series — это надежные и высокопроизводительные устройства, которые обеспечивают высококачественную печать с низкими затратами на чернила. Но чтобы использовать все преимущества этого принтера, вам понадобится правильно его настроить.
Это пошаговое руководство поможет вам настроить принтер HP Ink Tank 310 Series без особых проблем. В нем представлены все необходимые шаги, начиная от распаковки принтера и подключения к компьютеру, до установки драйверов и настройки печати.
Шаг 1: Распаковка и подключение
Первым шагом является распаковка принтера и подключение его к источнику питания. Проверьте, что комплект поставки содержит все необходимые компоненты, а затем включите принтер и выполните простую процедуру настройки подключения к компьютеру.
Шаг 2: Установка драйверов и программного обеспечения
Чтобы использовать принтер HP Ink Tank 310 Series, вам также потребуется установить драйверы и программное обеспечение. В основном это можно сделать путем загрузки необходимых файлов с официального веб-сайта HP. Следуйте инструкциям на экране, чтобы успешно установить все необходимое.
Шаг 3: Настройка печати
После установки драйверов и программного обеспечения вы можете приступить к настройке печати. Проверьте настройки принтера, чтобы установить желаемые параметры и опции печати. Убедитесь, что принтер сконфигурирован для работы с вашим компьютером и готов к печати документов.
Следуя этому шаг за шагом руководству, вы сможете настроить принтер HP Ink Tank 310 Series без особых сложностей. Будьте внимательны и следуйте инструкциям, чтобы получить отличное качество печати и максимальную производительность вашего принтера.
Шаг 1: Распакуйте принтер
Перед началом настройки принтера HP Ink Tank 310 Series необходимо его распаковать.
1. Внимательно изучите внешний вид упаковки и убедитесь, что она не повреждена.
2. Аккуратно откройте коробку и извлеките принтер.
3. Удалите все упаковочные материалы, включая противоударную подушку и защитные пленки.
4. Проверьте, есть ли в комплекте все необходимые элементы, такие как блок питания, кабель USB и чернильные баки.
5. Убедитесь, что принтер размещен на ровной и устойчивой поверхности.
Теперь ваш принтер готов к процессу настройки.
Шаг 2: Подключите принтер к питанию
Перед тем, как начать настройку принтера, убедитесь, что у вас есть все необходимые кабели и аксессуары. Для подключения принтера к питанию выполните следующие шаги:
Шаг 1: Разместите принтер на ровной поверхности вблизи розетки.
Шаг 2: Возьмите кабель питания и вставьте один его конец в разъем питания, расположенный на задней панели принтера. Затем вставьте другой конец кабеля в розетку электросети.
Шаг 3: Убедитесь, что кабель питания надежно подсоединен и нет повреждений или перегибов.
Примечание: Используйте только оригинальные кабели и аксессуары, предоставленные с принтером, чтобы избежать неполадок и повреждений оборудования.
После того как вы подключили принтер к питанию, можно переходить к следующему шагу — установке чернильных баков.
Шаг 3: Установите чернильные баки
Процесс установки чернильных баков может немного отличаться в зависимости от модели принтера HP Ink Tank 310 Series, однако в целом действия примерно одинаковы.
Вот как установить чернильные баки на принтере:
| Шаг 1: | Откройте крышку принтера и найдите отсек для чернильных баков. |
| Шаг 2: | Поднимите крышку чернильного бака и вытащите его из упаковки. |
| Шаг 3: | Установите чернильный бак в соответствующее отверстие, убедившись, что лоток правильно установлен. |
| Шаг 4: | Повторите эти шаги для остальных чернильных баков. |
| Шаг 5: | Закройте крышку чернильного бака. |
После установки чернильных баков убедитесь, что они надежно зафиксированы и правильно установлены. Если чернильные баки не установлены правильно, принтер может не работать корректно.
Шаг 4: Заправьте чернильные баки
Перед началом процедуры заправки убедитесь, что у вас есть набор чернил для заправки HP Ink Tank 310 Series. Также проверьте, что вы располагаете в достаточном количестве времени и имеете под рукой тряпочку или бумажные салфетки для удаления возможных пятен или разливов.
Вот как заправить чернильные баки принтера HP Ink Tank 310 Series:
- Откройте крышку чернильной системы, которая находится сверху принтера. Она должна быть безопасно зафиксирована механизмом блокировки, чтобы предотвратить случайное открытие во время работы принтера.
- Возьмите бутылку с чернилами и открутите крышку. Будьте осторожны и не переворачивайте бутылку во время откручивания.
- Вставьте конец заправочного шланга в отверстие на бутылке с чернилами.
- Вставьте другой конец заправочного шланга в соответствующий отверстие чернильного бака принтера. Каждый цвет имеет свое отдельное отверстие.
- Медленно наклоняйте бутылку с чернилами, чтобы заправочные шланги наполнились чернилами. Будьте осторожны, чтобы не разлить чернила.
- Когда чернильные баки полностью заполнятся чернилами, остановите процесс и аккуратно выньте заправочные шланги из отверстий.
- Тщательно протрите отверстия чернильных баков и части принтера, которые могли попасть во время заправки чернилами.
- Плотно закройте крышку чернильной системы и убедитесь, что она надежно зафиксирована.
Поздравляем! Вы успешно заправили чернильные баки своего принтера HP Ink Tank 310 Series. Теперь вы готовы к использованию принтера и печати документов.
Шаг 5: Установите программное обеспечение
Для полноценной настройки принтера HP Ink Tank 310 Series необходимо установить соответствующее программное обеспечение. Это позволит получить доступ ко всем функциям принтера и использовать его на полную мощность.
Для начала, загрузите драйверы принтера с официального веб-сайта HP. Зайдите в раздел поддержки и найдите страницу с драйверами для модели HP Ink Tank 310 Series. Скачайте драйверы, подходящие для вашей операционной системы.
После загрузки драйверов, запустите установочный файл и следуйте инструкциям на экране. Убедитесь, что принтер подключен к компьютеру или сети и включен.
Процесс установки может занять несколько минут. После завершения установки, перезагрузите компьютер и проверьте, что принтер правильно подключен и опознан системой.
Теперь вы можете использовать принтер HP Ink Tank 310 Series для печати документов, сканирования изображений и других задач. Для удобства, установите программу управления принтером, предоставляемую HP, чтобы более гибко управлять настройками принтера и получать уведомления о состоянии чернил.
Шаг 6: Подключите принтер к компьютеру
После того, как вы установили чернильные картриджи и закрыли крышку принтера, настало время подключить принтер к компьютеру с помощью USB-кабеля.
1. Найдите USB-порт на задней панели принтера.
2. Вставьте один конец USB-кабеля в USB-порт принтера.
3. Найдите свободный USB-порт на компьютере и вставьте другой конец USB-кабеля в него.
4. Убедитесь, что кабель хорошо зафиксирован и надежно подключен как к принтеру, так и к компьютеру.
5. Включите принтер и компьютер.
6. Дождитесь, пока операционная система компьютера распознает новое подключенное устройство и установит необходимые драйверы.
Примечание: В случае отсутствия автоматической установки драйверов вам можно вручную загрузить их с официального сайта производителя принтера.
Теперь ваш принтер готов к использованию и подключен к компьютеру.
Шаг 7: Настройте принтер в операционной системе
После успешного подключения принтера к компьютеру необходимо настроить его в операционной системе. Это позволит вам использовать все функции принтера и изменять его параметры в соответствии с вашими потребностями.
Для начала откройте раздел «Устройства и принтеры» в операционной системе Windows. Это можно сделать, щелкнув правой кнопкой мыши на значке «Пуск» в левом нижнем углу экрана и выбрав соответствующий пункт меню.
После открытия раздела «Устройства и принтеры» вы увидите список установленных принтеров. Найдите в этом списке принтер HP Ink Tank 310 Series и щелкните на нем правой кнопкой мыши.
В контекстном меню, которое появится после щелчка правой кнопкой мыши, выберите пункт «Свойства принтера». В открывшемся окне пройдите на вкладку «Настройки устройства».
Вкладка «Настройки устройства» содержит различные параметры принтера, которые можно изменять. Здесь вы можете настроить качество печати, формат бумаги, тип подачи и другие параметры в зависимости от ваших требований.
После внесения необходимых изменений сохраните настройки, нажав кнопку «Применить» или «ОК». Теперь ваш принтер готов к работе в операционной системе и готов к печати документов.
Обратите внимание, что настройки принтера могут зависеть от конкретной операционной системы. Если у вас возникнут сложности с настройкой принтера, обратитесь к документации операционной системы или свяжитесь с поддержкой HP для получения дополнительной помощи.
Шаг 8: Выполните пробную печать
После завершения всех предыдущих шагов настройки принтера HP Ink Tank 310 Series, вы можете проверить его работоспособность, выполнив пробную печать.
Для этого следуйте инструкциям ниже:
- Убедитесь, что принтер включен и подключен к компьютеру или другому устройству.
- Откройте документ или изображение, которое вы хотите напечатать.
- Нажмите на команду «Печать» в программе, откуда вы хотите распечатать документ. Обычно она находится в меню «Файл».
- Выберите принтер HP Ink Tank 310 Series в списке доступных принтеров.
- Нажмите кнопку «Печать» или подобную команду, чтобы начать печать.
- Дождитесь окончания печати.
- Убедитесь, что напечатанный документ или изображение выглядят правильно и соответствуют вашим ожиданиям.
Если пробная печать не прошла успешно, убедитесь, что принтер правильно настроен и подключен к компьютеру или другому устройству. Проверьте, все ли картриджи заправлены, а бумага правильно установлена в лоток принтера.
Проверьте также настройки печати в программе, из которой вы пытаетесь распечатать документ, и убедитесь, что они соответствуют вашим требованиям.
Если вы все проверили и проблемы с принтером все еще остаются, обратитесь к документации к принтеру или свяжитесь со службой поддержки HP для получения дополнительной помощи.
HP Ink Tank 310 manual download, user guide. Help, instructions, installation, configuration, USB connection, how to print and scan, maintenance, troubleshooting, error codes, etc.
- Hardware: HP Ink Tank 310.
- Category: All in one printer (Multifunction).
- Functions: Print, scan, copy.
- Connectivity: USB.
- Wireless (Wi-Fi): No.
- Mobile printing: Not supported.
- Compatible Operating Systems: Windows / Mac.
| HP Ink Tank 310 | User Manual | Getting Started Guide |
| English | English, Spanish, Portuguese | |
| 1.7 MB | 1.6 MB | |
| 98 pages | 17 pages | |