
Перейти к контенту
Принтеры лазерные Samsung
- Размер инструкции: 6.64 Мб
- Формат файла: pdf
Если вы потеряли инструкцию от лазерного принтера Samsung ML-2165, можете скачать файл для просмотра на компьютере или печати.
Инструкция для лазерного принтера Samsung ML-2165 на русском языке. В руководстве описаны возможности и полезные функции, а также правила эксплуатации. Перед использованием внимательно ознакомьтесь с инструкцией.
Чтобы не читать всю инструкцию вы можете выполнить поиск по содержимому внутри инструкции и быстро найти необходимую информацию. Рекомендации по использованию помогут увеличить срок службы лазерного принтера Samsung ML-2165. Если у вас появилась проблема, то найдите раздел с описанием неисправностей и способами их решения. В нем указаны типичные поломки и способы их решения.
Основные операции печати
41
2.
Обзор основных функций
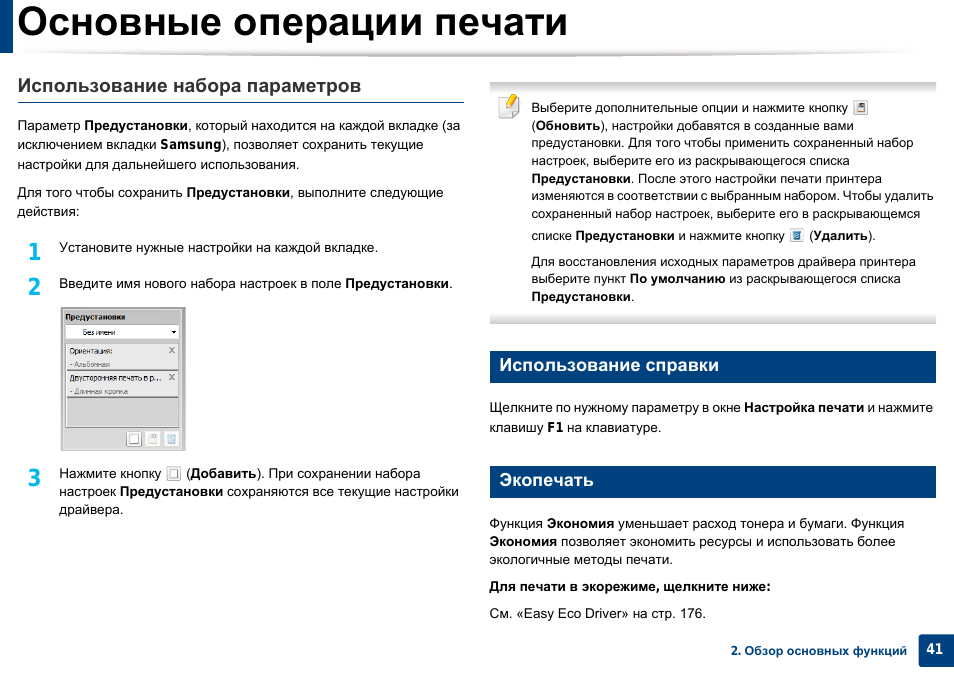
Использование набора параметров
Параметр
Предустановки, который находится на каждой вкладке (за
исключением
вкладки Samsung), позволяет сохранить текущие
настройки
для дальнейшего использования.
Для
того чтобы сохранить Предустановки, выполните следующие
действия
:
1
Установите
нужные настройки на каждой вкладке.
2
Введите
имя нового набора настроек в поле Предустановки.
3
Нажмите
кнопку (Добавить). При сохранении набора
настроек
Предустановки сохраняются все текущие настройки
драйвера
.
Выберите
дополнительные опции и нажмите кнопку
(Обновить), настройки добавятся в созданные вами
предустановки
. Для того чтобы применить сохраненный набор
настроек
, выберите его из раскрывающегося списка
Предустановки
. После этого настройки печати принтера
изменяются
в соответствии с выбранным набором. Чтобы удалить
сохраненный
набор настроек, выберите его в раскрывающемся
списке
Предустановки и нажмите кнопку
(Удалить).
Для
восстановления исходных параметров драйвера принтера
выберите
пункт По умолчанию из раскрывающегося списка
Предустановки
.
9
Использование справки
Щелкните
по нужному параметру в окне Настройка печати и нажмите
клавишу
F1 на клавиатуре.
10
Экопечать
Функция
Экономия уменьшает расход тонера и бумаги. Функция
Экономия
позволяет экономить ресурсы и использовать более
экологичные
методы печати.
Для печати в экорежиме, щелкните ниже:
См
. «Easy Eco Driver» на стр. 176.

43
3.
Обслуживание
Заказ расходных материалов и дополнительных компонентов
Набор
доступных компонентов может изменяться в зависимости от страны продажи. Список доступных расходных материалов и компонентов
можно
получить у местного торгового представителя.
Для
того чтобы заказать расходные материалы, компоненты и запчасти, сертифицированные компанией Samsung, свяжитесь с местным
представителем
Samsung или розничным продавцом, у которого было приобретено устройство. Кроме того, для получения информации можно
посетить
сайт www.samsung.com/supplies и выбрать страну и регион для получения информации по техническому обслуживанию.

44
3.
Обслуживание
Доступные материалы
Когда
срок службы расходных материалов заканчивается, для устройства можно заказать материалы указанных ниже типов:
Срок
службы картриджа зависит от установленных параметров, площади печатаемого изображения и также режима обработки заданий.
Новые
картриджи и другие расходные материалы следует приобретать в той же стране, где приобреталось устройство. В противном случае
картриджи
и расходные материалы могут быть несовместимыми с данным устройством, поскольку конфигурация картриджа и расходных
материалов
отличается для разных стран.
Компания
Samsung не рекомендует использовать неоригинальные картриджи Samsung, в том числе повторно заправленные или
восстановленные
. Кроме того, компания Samsung не гарантирует качественную печать при использовании неоригинальных картриджей
Samsung. В случае, если использование неоригинального картриджа Samsung послужило причиной поломки устройства, ремонт и
обслуживание
по гарантии не предоставляются.
Тип
Средний ресурс
a
a. Заявленный ресурс в соответствии со стандартом ISO/IEC 19752.
Наименование компонента
Карт. с тонером
Около
1 500 страниц
MLT-D101S

45
3.
Обслуживание
Доступные сменные компоненты
По
поводу приобретения сменных компонентов обращайтесь туда, где было приобретено устройство. Настоятельно рекомендуется поручить
замену
компонентов уполномоченному поставщику услуг, дилеру или организации, у которых было приобретено устройство. Гарантия не
распространяется
на замену сменных компонентов после выработки среднего ресурса.
Изнашивающиеся
компоненты необходимо заменять через определенные промежутки времени, чтобы избежать ухудшения качества печати и
проблем
с подачей бумаги. См. таблицу ниже. Цель таблицы — помочь вам поддерживать ваше устройство в работоспособном состоянии.
Компоненты
, перечисленные ниже, необходимо заменить, когда срок их службы подошел к концу.
Компоненты
Средний ресурс
a
a. Скорость печати зависит от операционной системы, быстродействия компьютера, используемых приложений, способа подключения, типа и размера материала для печати
и
сложности задания печати.
термофиксатор
Около
30 000 страниц
ролик переноса
Около
30 000 страниц
Ролик подачи
Около
30 000 страниц
Ролик подачи
Около
30 000 страниц

46
3.
Обслуживание
Хранение картриджей
Картридж
содержит компоненты, чувствительные к воздействию света, температуры и влажности. Для обеспечения оптимальной
производительности
, наивысшего качества печати и долгого срока службы картриджа компания Samsung рекомендует пользователям
выполнять
следующие инструкции.
Храните
картриджи с тонером в тех же условиях, в которых будет использоваться принтер. Это должно быть помещение с контролируемыми
температурой
и уровнем влажности. До установки картридж должен находиться в оригинальной закрытой упаковке. Если оригинальная упаковка
отсутствует
, накройте верхнее отверстие картриджа листом бумаги и храните его в темном месте.
Хранение
неиспользуемого картриджа в открытой упаковке значительно сокращает его срок службы и хранения. Не храните его на полу. При
извлечении
картриджа из принтера храните его так, как указано ниже.
• Внутри защитного пакета из оригинальной упаковки.
• Храните его в горизонтальном положении (не на боку); вверх должна быть направлена та же сторона, что и при установке в устройстве.
• Не храните расходные материалы в следующих условиях:
— при температуре выше 40 °C.
— Влажность менее 20 % и более 80 %.
— в помещении, подверженном резким перепадам влажности и температуры.
— при воздействии прямого солнечного или комнатного света.
— в пыльных помещениях.
— в автомобиле в течение длительного времени.
— в помещениях с источниками агрессивных газов.
— в помещениях с соленым воздухом.

Хранение картриджей
47
3.
Обслуживание
1
Инструкция по использованию
• Не прикасайтесь к поверхности фотобарабана картриджа.
• Не подвергайте его вибрации или ударам.
• Не поворачивайте барабан вручную, особенно в направлении,
противоположном
вращению, — это может привести к
внутреннему
повреждению картриджа и просыпанию тонера.
2
Работа с картриджем
Компания
Samsung Electronics не рекомендует и не одобряет
использование
в принтере не оригинальных картриджей Samsung,
включая
универсальные и картриджи магазинных марок, повторно
заправленные
или восстановленные картриджи.
В
случае, если использование картриджей стороннего
производителя
, повторно заправленных или отремонтированных
картриджей
послужило причиной поломки устройства, компания
Samsung не предоставляет ремонт и обслуживание по гарантии.
3
Предположительный срок службы картриджа
Предположительный
срок службы картриджа (ресурс картриджа)
зависит
от количества тонера, необходимого для выполнения заданий
печати
. Фактическое количество напечатанных страниц может быть
разным
и зависит от плотности печати, условий эксплуатации,
площади
изображений, интервалов печати, а также типа и размера
материала
для печати. Например, при печати большого количества
графических
изображений, расход тонера увеличится, и замена
картриджа
будет производиться чаще.

48
3.
Обслуживание
Перераспределение тонера
Когда
ресурс картриджа почти исчерпан, происходит следующее:
• Отпечатки становятся блеклыми или на них появляются белые полосы и(или) на разных сторонах плотность печати отличается.
• Индикатор Тонер мигает оранжевым.
В
этом случае качество печати можно временно улучшить, перераспределив оставшийся в картридже тонер. Иногда блеклая печать или белые
полосы
остаются и после перераспределения тонера.
• Прежде, чем открывать верхнюю крышку, закройте подставку выходного лотка.
• Если тонер попал на одежду, стряхните его сухой тряпкой и выстирайте одежду в холодной воде. Под воздействием горячей воды тонер
въедается
в ткань.
1
2

49
3.
Обслуживание
Замена картриджа
• Прежде, чем открывать верхнюю крышку, закройте подставку выходного лотка.
• Не вскрывайте упаковку картриджа ножом, ножницами или другими острыми предметами, Они могут повредить барабан.
• Если тонер попал на одежду, стряхните его сухой тряпкой и выстирайте одежду в холодной воде. Под воздействием горячей воды тонер
въедается
в ткань.
• Для того чтобы улучшить начальное качество печати, аккуратно встряхните картридж.
• Не прикасайтесь к нижней части картриджа, окрашенной в зеленый цвет. Для этого держите его за ручку.

Замена картриджа
50
3.
Обслуживание
Когда
срок службы картриджа с тонером истечет, устройство перестанет печатать.

08:53
Vídeo Recarga Toner Samsung D101 | ML 2165 | SCX 3405 | MLT D101S — Vídeo Aula Valejet.com
03:56
Принтер Samsung ML-2165W
05:10
Samsung ML 2165W WIFI (TEST)
02:14
Samsung ML 2165 | Driver
04:27
Replace a Printer Pickup Roller Samsung ML 2165, SCX 3405f, scx 3400 and others
02:05
How to Print test page Samsung ML-2165
01:39
RESET ML-2160, ML-2165, ML-2165W by RECICLEMAIS CARTUCHOS
01:45
CAMBIANDO EL TONER DE LA IMPRESORA LASER SAMSUNG ML-2165
Нажмите на кнопку для помощи

BASIC
User’s Guide
ML-216x Series
ML-216xW Series
BASIC
User’s Guide
This guide provides information concerning installation, basic operation and
troubleshooting on windows.
ADVANCED
This guide provides information about installation, advanced configuration, operation and
troubleshooting on various OS environments.
Some features may not be available depending on models or countries.

1. Introduction
Key benefits 4
Features by models 6
Useful to know 8
About this user’s guide 9
Safety information 10
Machine overview 15
Control panel overview 18
Turning on the machine 20
Installing the driver locally 21
Reinstalling the driver 22
2. Learning the Basic Usage
Printing a demo page 24
Media and tray 25
Basic printing 34
3. Maintenance
Ordering supplies and accessories 38
Available supplies 39
Available maintenance parts 40
Storing the toner cartridge 41
Redistributing toner 43
Replacing the toner cartridge 44
Cleaning the machine 46
Tips for moving & storing your machine 49
4. Troubleshooting
Tips for avoiding paper jams 51
Clearing paper jams 52
Understanding the status LED 55
5. Appendix
Specifications 59
Regulatory information 68
Copyright 78

1. Introduction
This chapter provides information you need to know before using the machine.
•Key benefits 4
• Features by models 6
• Useful to know 8
• About this user’s guide 9
• Safety information 10
• Machine overview 15
• Control panel overview 18
• Turning on the machine 20
• Installing the driver locally 21
• Reinstalling the driver 22
Key benefits
Environmentally friendly
• To save toner and paper, this machine supports the Eco feature (see «Easy
Eco Driver» on page 159).
• To save paper, you can print multiple pages on a single sheet of paper (see
«Using advanced print features» on page 141).
• To save paper, you can print on both sides of the paper (manual doublesided printing) (see «Using advanced print features» on page 141).
• To save electricity, this machine automatically conserves electricity by
substantially reducing power consumption when not in use.
Print with excellent quality and speed
• You can print with a resolution of up to 1,200 x 1,200 dpi effective output.
• Fast, on-demand printing.
— For single-side printing, 20 ppm (A4) or 21 ppm (Letter).
Convenience
• Easy Capture Manager allows you to easily edit and print whatever you
captured using the Print Screen key on the keyboard (see «Understanding
Easy Capture Manager» on page 160).
• Samsung Easy Printer Manager and Samsung Printer Status (or Smart Panel)
are a program that monitors and informs you of the machine’s status and
allows you to customize the machine’s settings (see «Using Samsung Easy
Printer Manager» on page 164).
• AnyWeb Print helps you screen-capture, preview, scrap, and print the
screen more easily than when you use the ordinary program (see «Samsung
AnyWeb Print» on page 158).
• Smart Update allows you to check for the latest software and install the
latest version during the printer driver installation process. This is available
only for Windows OS users.
• If you have Internet access, you can get help, support application, machine
drivers, manuals, and order information from the Samsung website,
www.samsung.com > find your product > Support or Downloads.
Key benefits
Wide range of functionality and application support
• Supports various paper sizes (see «Print media specifications» on page 61).
• Print watermark: You can customize your documents with words, such as
“Confidential” (see «Using advanced print features» on page 141).
• Print posters: The text and pictures of each page of your document are
magnified and printed across the multiple sheets of paper and can then be
taped together to form a poster (see «Using advanced print features» on
page 141).
• You can print in various operating systems (see «System requirements» on
page 64).
• Your machine is equipped with a USB interface.
Supports various wireless network setting method
• Using the WPS (Wi-Fi Protected Setup™) button
— You can easily connect to a wireless network using the WPS button on the
machine and the access point (a wireless router).
• Using the USB cable or a network cable
— You can connect and set various wireless network settings using a USB
cable or a network cable.
• Using the Wi-Fi Direct
— You can conveniently print from your mobile device using the Wi-Fi or WiFi Direct feature.
See «Introducing wireless set up methods» on page 105.
Features by models
Some features and optional goods may not be available depending on model or country.
Operating System
Software
Operating System ML-216x Series ML-216xW Series
Windows ● ●
Macintosh ● ●
Linux ● ●
Unix
Software ML-216x Series ML-216xW Series
PCL printer driver
SPL printer driver ● ●
PS printer driver
XPS printer driver
a
a. For XPS driver, it is only supported for windows through the Samsung website (www.samsung.com)
● ●
Samsung Easy Printer Manager ● ●
SyncThru™ Web Service ●
Features by models
Variety feature
(●: Included, Blank: Not available)
Features ML-216x Series ML-216xW Series
Hi-Speed USB 2.0 ● ●
Network Interface Ethernet 10/100 Base TX wired LAN
Network Interface 802.11b/g/n wireless LAN ●
IPv6 ●
Eco printing(Easy Eco Driver)
a
a. Setting the ECO settings is available from the windows driver.
● ●
Wi-Fi Protected Setup™ (WPS) ●
Manual duplex (2-sided) printing ● ●
Where can I download the machine’s driver?
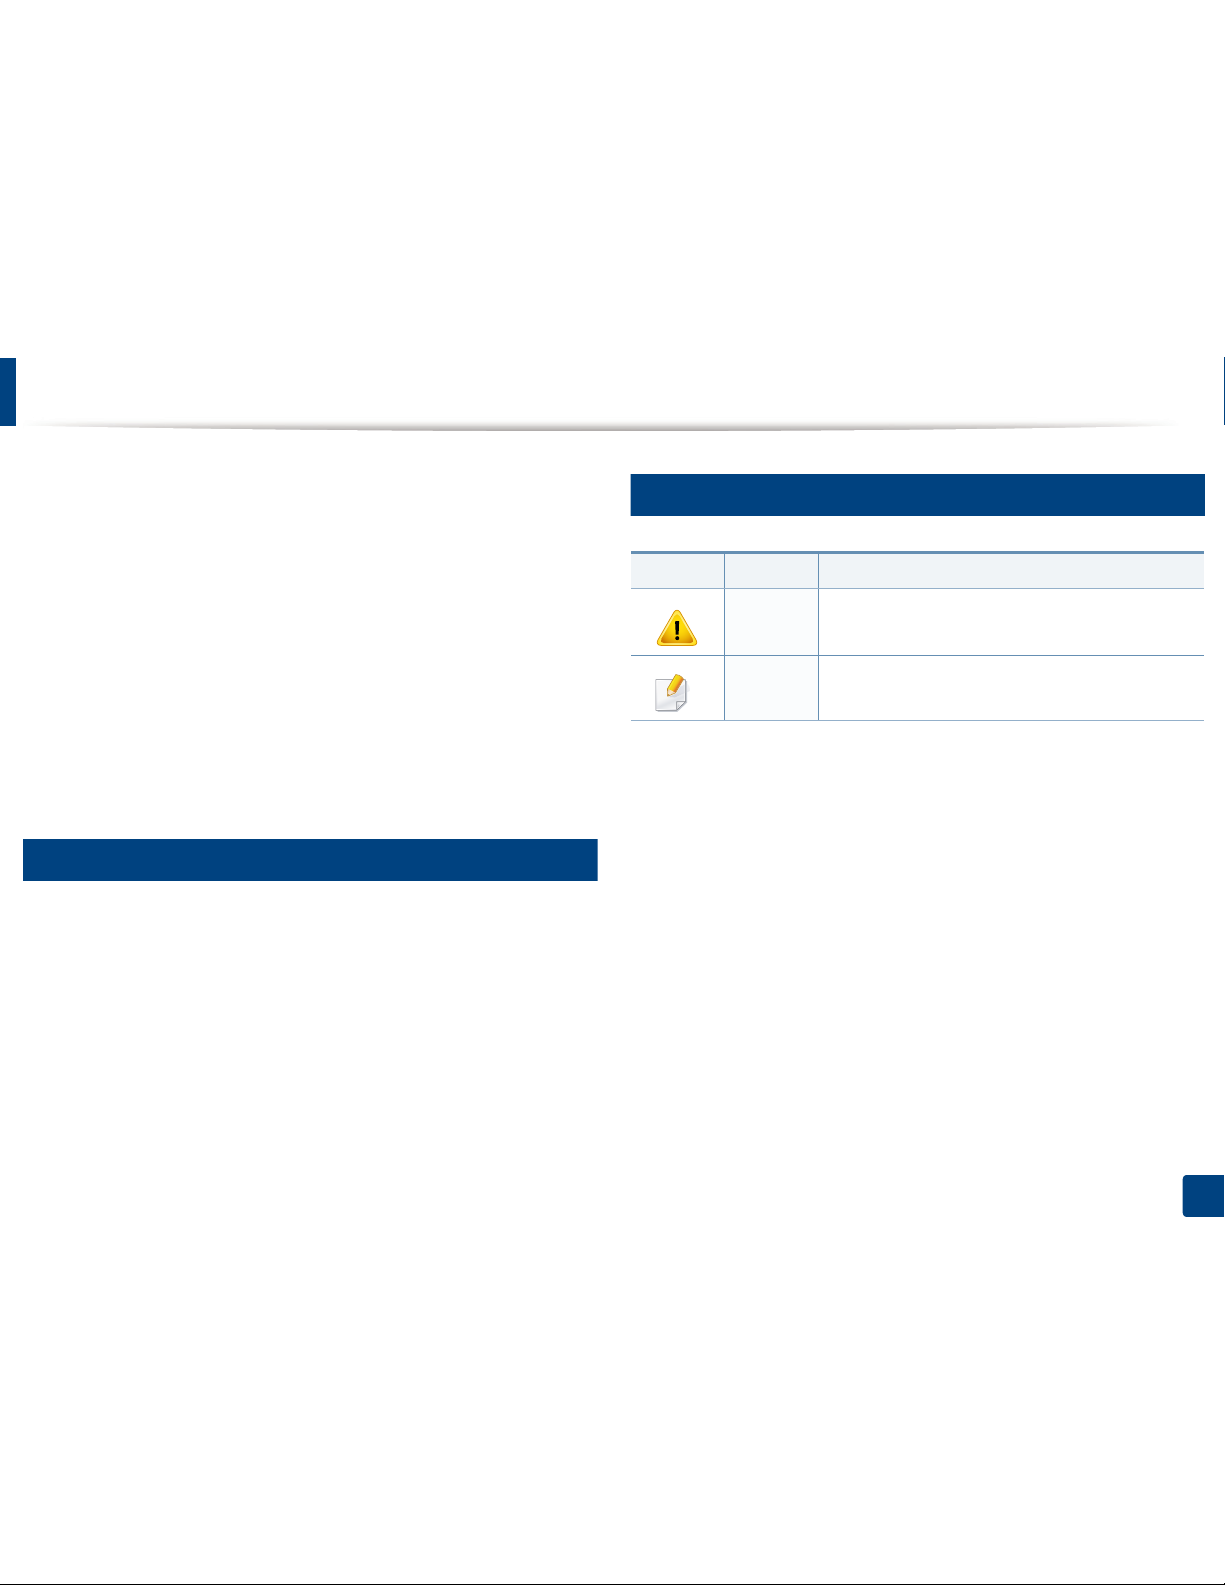
•Visit www.samsung.com/printer to download the latest
machine’s driver, and install it on your system.
Where can I purchase accessories or supplies?
•Inquire at a Samsung distributor or your retailer.
•Visit www.samsung.com/supplies. Select your country/region to
view product service information.
The status LED flashes or remains constantly on.
•Turn the product off and on again.
•Check the meanings of LED indications in this manual and
troubleshoot accordingly (see «Understanding the status LED»
on page 55).
A paper jam has occurred.
•Open and close the top cover (see «Front view» on page 16).
•Check the instructions on removing jammed paper in this
manual and troubleshoot accordingly (see «Clearing paper
jams» on page 52).
Printouts are blurry.
•The toner level might be low or uneven. Shake the toner
cartridge.
•Try a different print resolution setting.
•Replace the toner cartridge.
The machine does not print.
•Open the print queue list and remove the document from the list
(see «Canceling a print job» on page 35).
•Remove the driver and install it again (see «Installing the driver
locally» on page 21).
•Select your machine as your default machine in your Windows.
9
1. Introduction
About this user’s guide
This user’s guide provides information for your basic understanding of the
machine as well as detailed steps to explain machine usage.
• Read the safety information before using the machine.
• If you have a problem using the machine, refer to the troubleshooting
chapter.
• Terms used in this user’s guide are explained in the glossary chapter.
• All illustrations in this user’s guide may differ from your machine depending
on its options or model you purchased.
• The screenshots in this user’s guide may differ from your machine
depending on the machine’s firmware/driver version.
• The procedures in this user’s guide are mainly based on Windows 7.
1
Conventions
Some terms in this guide are used interchangeably, as below:
• Document is synonymous with original.
• Paper is synonymous with media, or print media.
• Machine refers to printer or MFP.
2
General icons
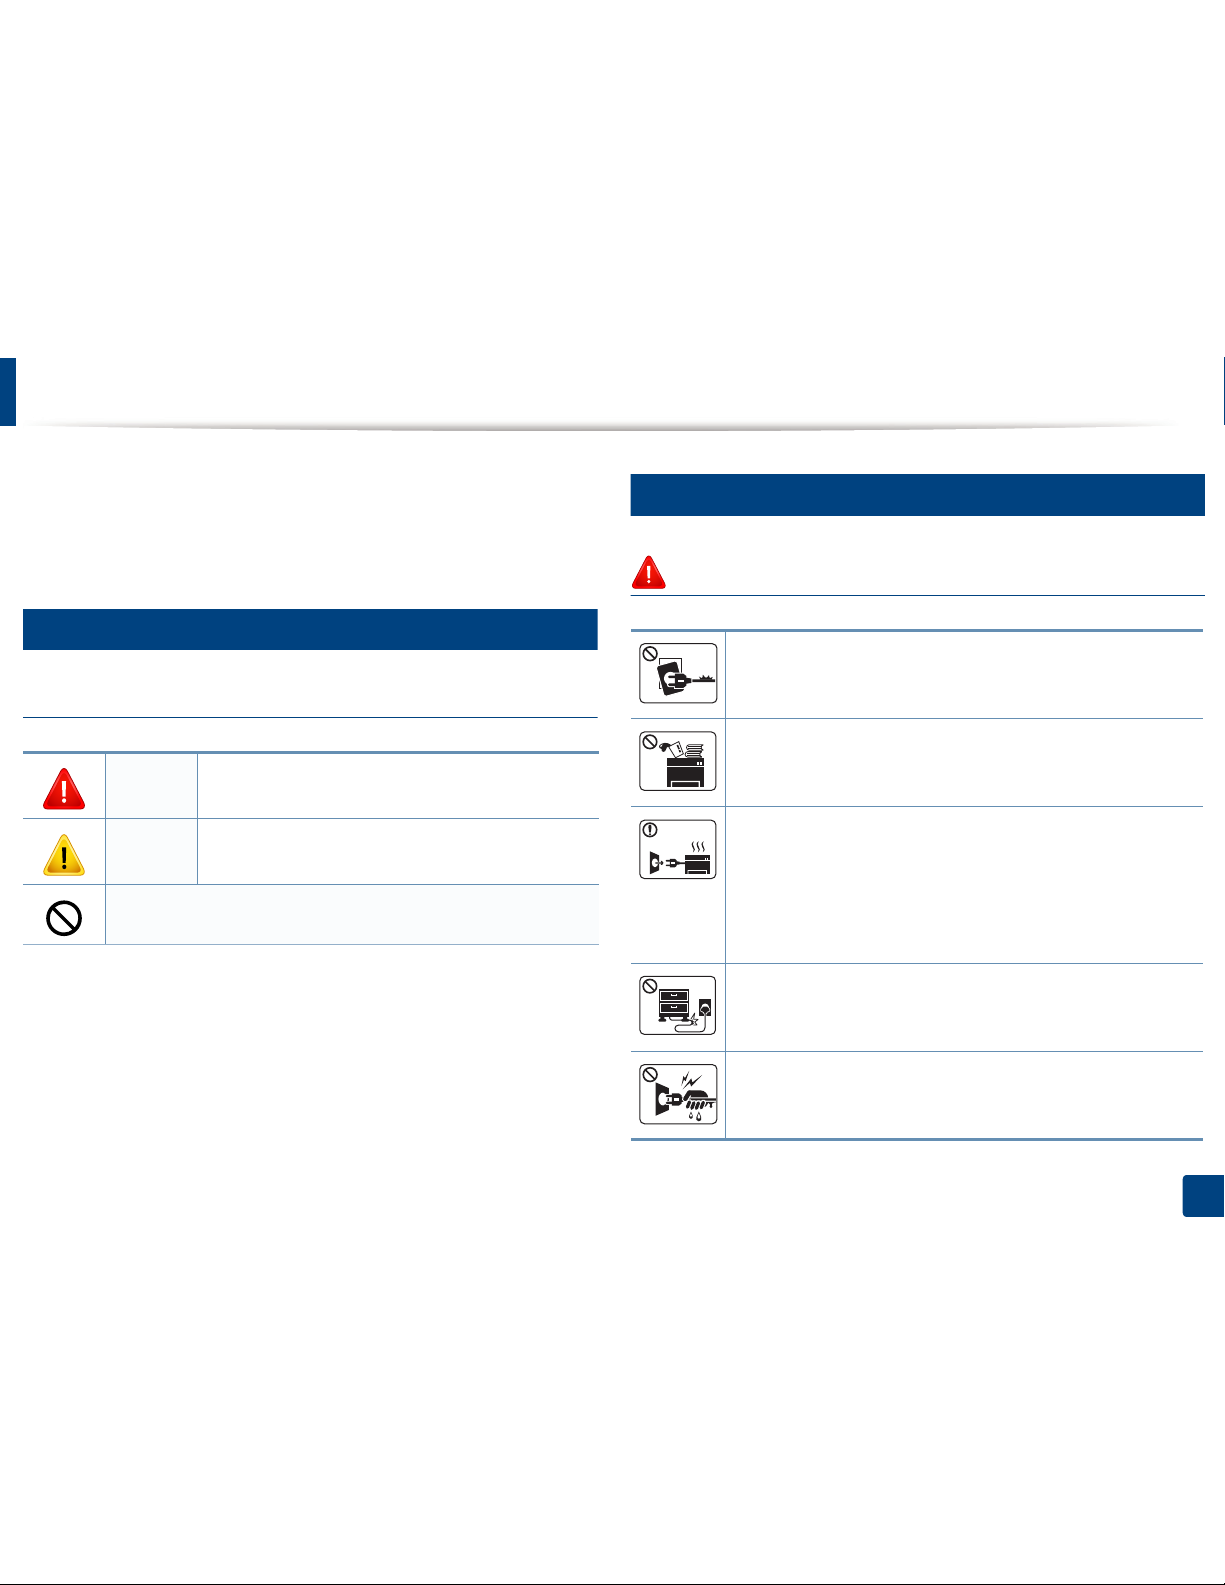
Icon Text Description
Caution
Gives users information to protect the machine from
possible mechanical damage or malfunction.
Note
Provides additional information or detailed
specification of the machine function and feature.
10
1. Introduction
Safety information
These warnings and precautions are included to prevent injury to you and
others, and to prevent any potential damage to your machine. Be sure to read
and understand all of these instructions before using the machine. After reading
this section, keep it in a safe place for future reference.
3
Important safety symbols
Explanation of all icons and signs used in this chapter
4
Operating environment
Warning
Warning
Hazards or unsafe practices that may result in severe
personal injury or death.
Caution
Hazards or unsafe practices that may result in minor
personal injury or property damage.
Do not attempt.
Do not use if the power cord is damaged or if the electrical outlet is
not grounded.
This could result in electric shock or fire.
Do not place anything on top of the machine (water, small metal or
heavy objects, candles, lit cigarettes, etc.).
This could result in electric shock or fire.
• If the machine gets overheated, it releases smoke, makes
strange noises, or generates an odd odor, immediately turn off
the power switch and unplug the machine.
• The user should be able to access the power outlet in case of
emergencies that might require the user to pull the plug out.
This could result in electric shock or fire.
Do not bend, or place heavy objects on the power cord.
Stepping on or allowing the power cord to be crushed by a heavy
object could result in electric shock or fire.
Do not remove the plug by pulling on the cord; do not handle the
plug with wet hands.
This could result in electric shock or fire.
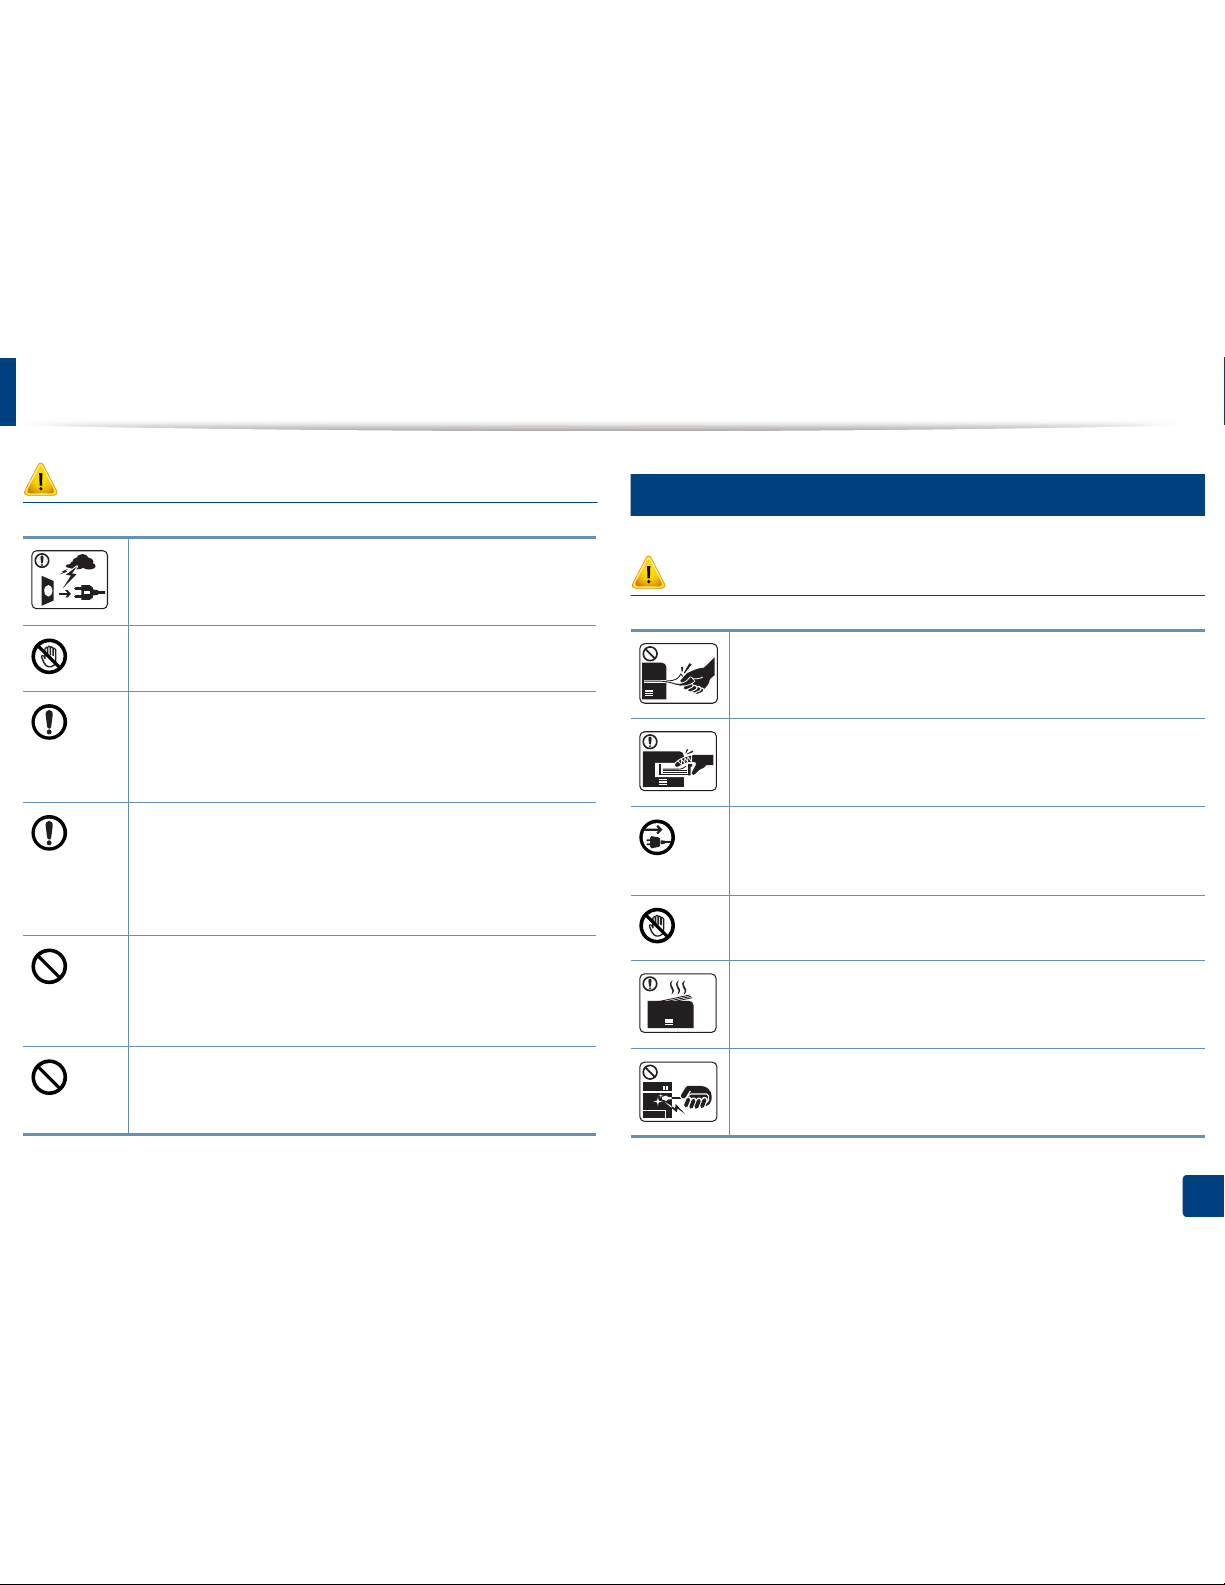
Safety information
11
1. Introduction
Caution
5
Operating method
Caution
During an electrical storm or for a period of non-operation,
remove the power plug from the electrical outlet.
This could result in electric shock or fire.
Be careful, the paper output area is hot.
Burns could occur.
If the machine has been dropped, or if the cabinet appears
damaged, unplug the machine from all interface connections and
request assistance from qualified service personnel.
Otherwise, this could result in electric shock or fire.
If the machine does not operate properly after these instructions
have been followed, unplug the machine from all interface
connections and request assistance from qualified service
personnel.
Otherwise, this could result in electric shock or fire.
If the plug does not easily enter the electrical outlet, do not
attempt to force it in.
Call an electrician to change the electrical outlet, or this could
result in electric shock.
Do not allow pets to chew on the AC power, telephone or PC
interface cords.
This could result in electric shock or fire and/or injury to your pet.
Do not forcefully pull the paper out during printing.
It can cause damage to the machine.
Be careful not to put your hand between the machine and paper
tray.
You may get injured.
This machine’s power reception device is the power cord.
To switch off the power supply, remove the power cord from the
electrical outlet.
Be care when replacing paper or removing jammed paper.
New paper has sharp edges and can cause painful cuts.
When printing large quantities, the bottom part of the paper
output area may get hot. Do not allow children to touch.
Burns can occur.
When removing jammed paper, do not use tweezers or sharp metal
objects.
It can damage the machine.
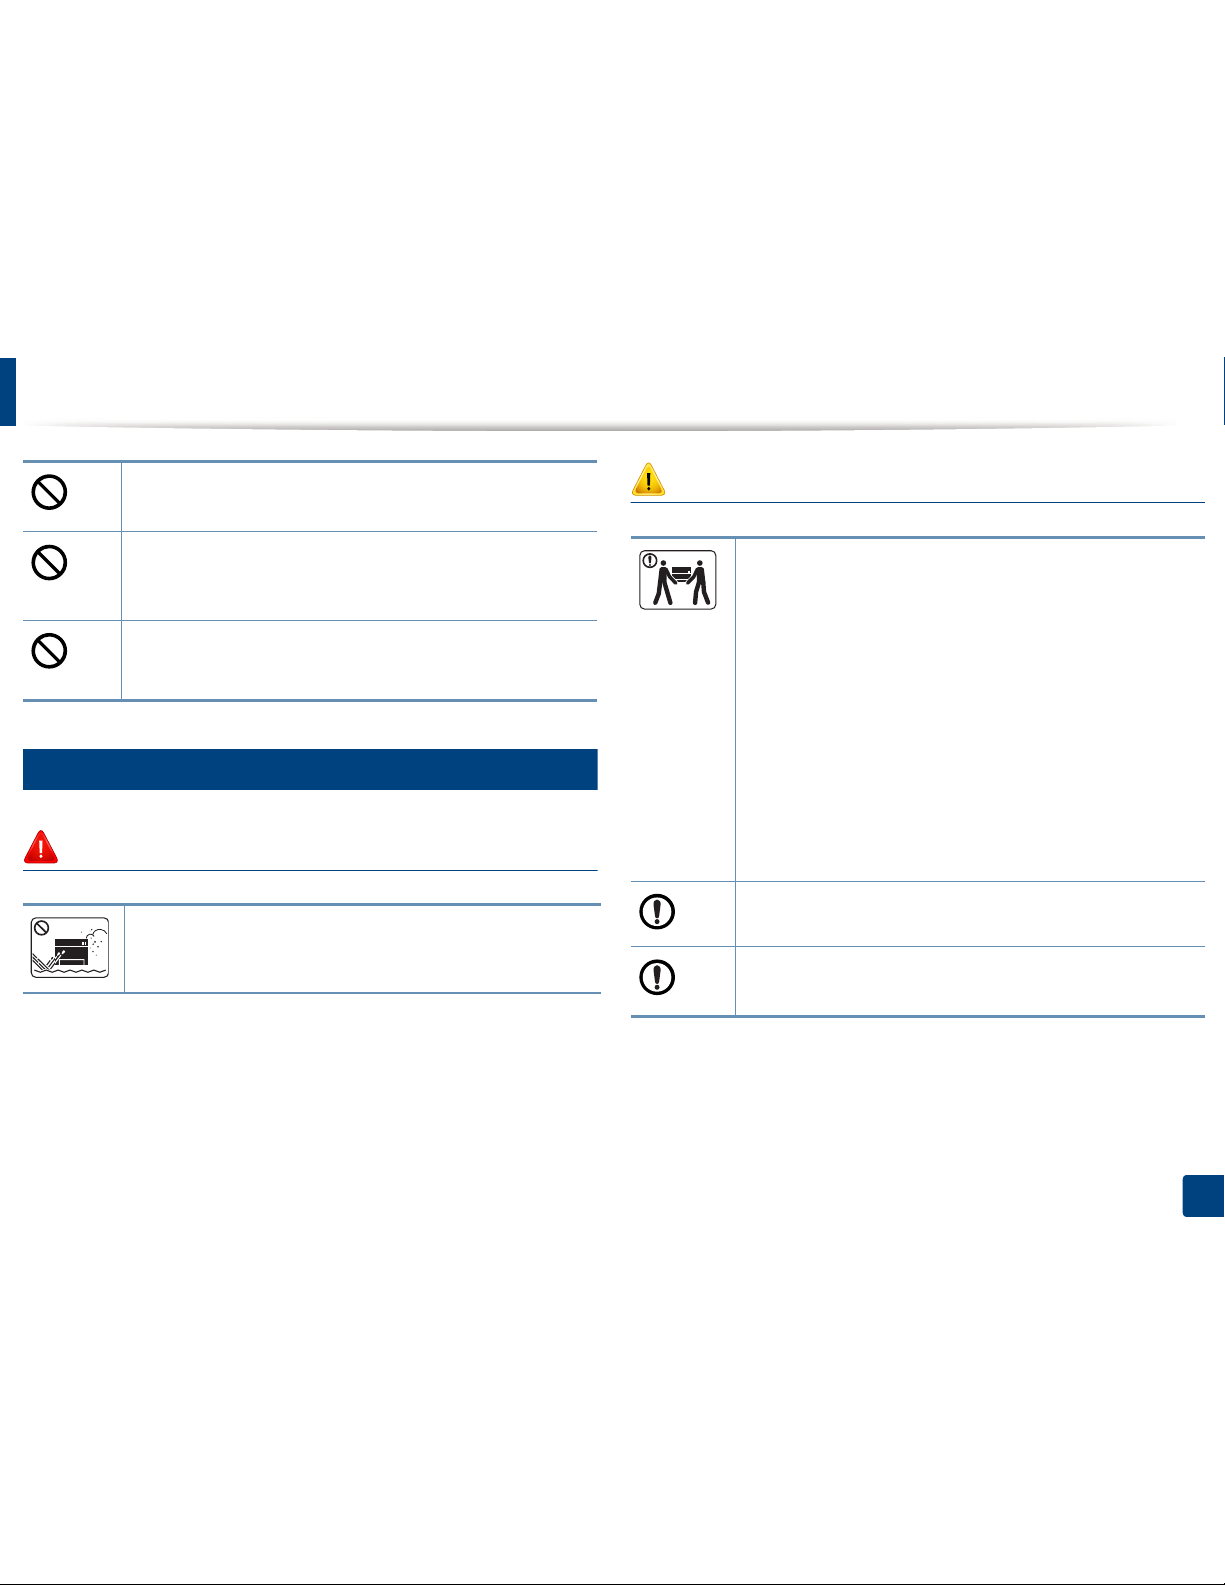
Safety information
12
1. Introduction
6
Installation / Moving
Warning
Caution
Do not allow too many papers to stack up in the paper output tray.
It can damage the machine.
Do not block or push objects into the ventilation opening.
This could result in elevated component temperatures which can
cause damage or fire.
Use of controls or adjustments or performance of procedures other
than those specified herein may result in hazardous radiation
exposure.
Do not place the machine in an area with dust, humidity, or water
leaks.
This could result in electric shock or fire.
Before moving the machine, turn the power off and disconnect all
cords. The information below are only suggestions based on the
units weight.
If you have a medical condition that prevents you from lifting, do
not lift the machine. Ask for help, and always use the appropriate
amount of people to left the device safety.
Then lift the machine:
• If the machine weighs under 20 kg (44.09 lbs), lift with 1 person.
• If the machine weighs 20 kg (44.09 lbs) — 40kg (88.18 lbs), lift
with 2 people.
• If the machine weighs more than 40 kg (88.18 lbs), lift with 4 or
more people.
The machine could fall, causing injury or machine damage.
Do not place the machine on an unstable surface.
The machine could fall, causing injury or machine damage.
Use only No.26 AWG
a
or larger, telephone line cord, if necessary.
Otherwise, it can cause damage to the machine.
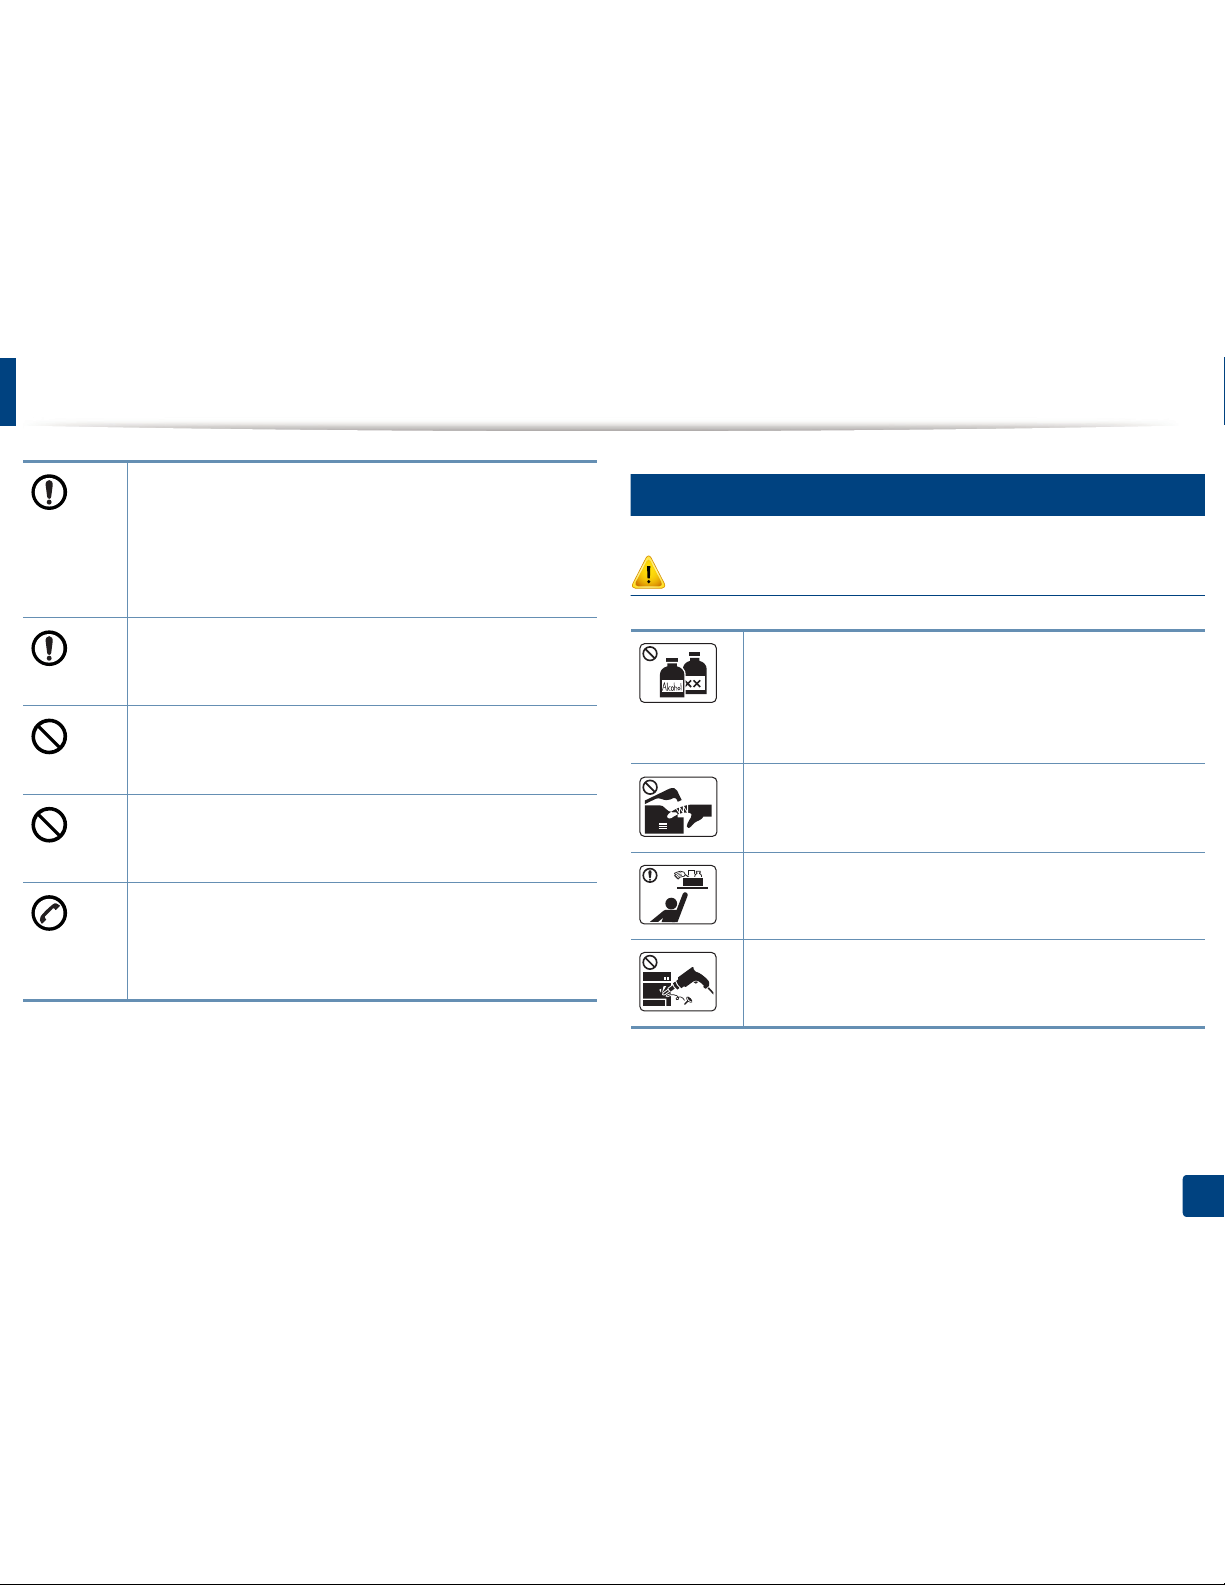
Safety information
13
1. Introduction
7
Maintenance / Checking
Caution
Use the power cord supplied with your machine for safe
operation. If you are using a cord which is longer than 2 meters (6
feet) with a 110 V machine, then the gauge should be 16 AWG or
larger.
Otherwise, it can cause damage to the machine, and could result
in electric shock or fire.
Make sure you plug the power cord into a grounded electrical
outlet.
Otherwise, this could result in electric shock or fire.
Do not overload wall outlets and extension cords.
This can diminish performance, and could result in electric shock
or fire.
Do not put a cover over the machine or place it in an airtight
location, such as a closet.
If the machine is not well-ventilated, this could result in fire.
The machine should be connected to
the power level which is specified on the label.
If you are unsure and want to check the power level you are using,
contact the electrical utility company.
a. AWG: American Wire Gauge
Unplug this product from the wall outlet before cleaning the
inside of the machine. Do not clean the machine with benzene,
paint thinner or alcohol; do not spray water directly into the
machine.
This could result in electric shock or fire.
When you are working inside the machine replacing supplies or
cleaning the inside, do not operate the machine.
You could get injured.
Keep cleaning supplies away from children.
Children could get hurt.
Do not disassemble, repair or rebuild the machine by yourself.
It can damage the machine. Call a certified technician when the
machine needs repairing.
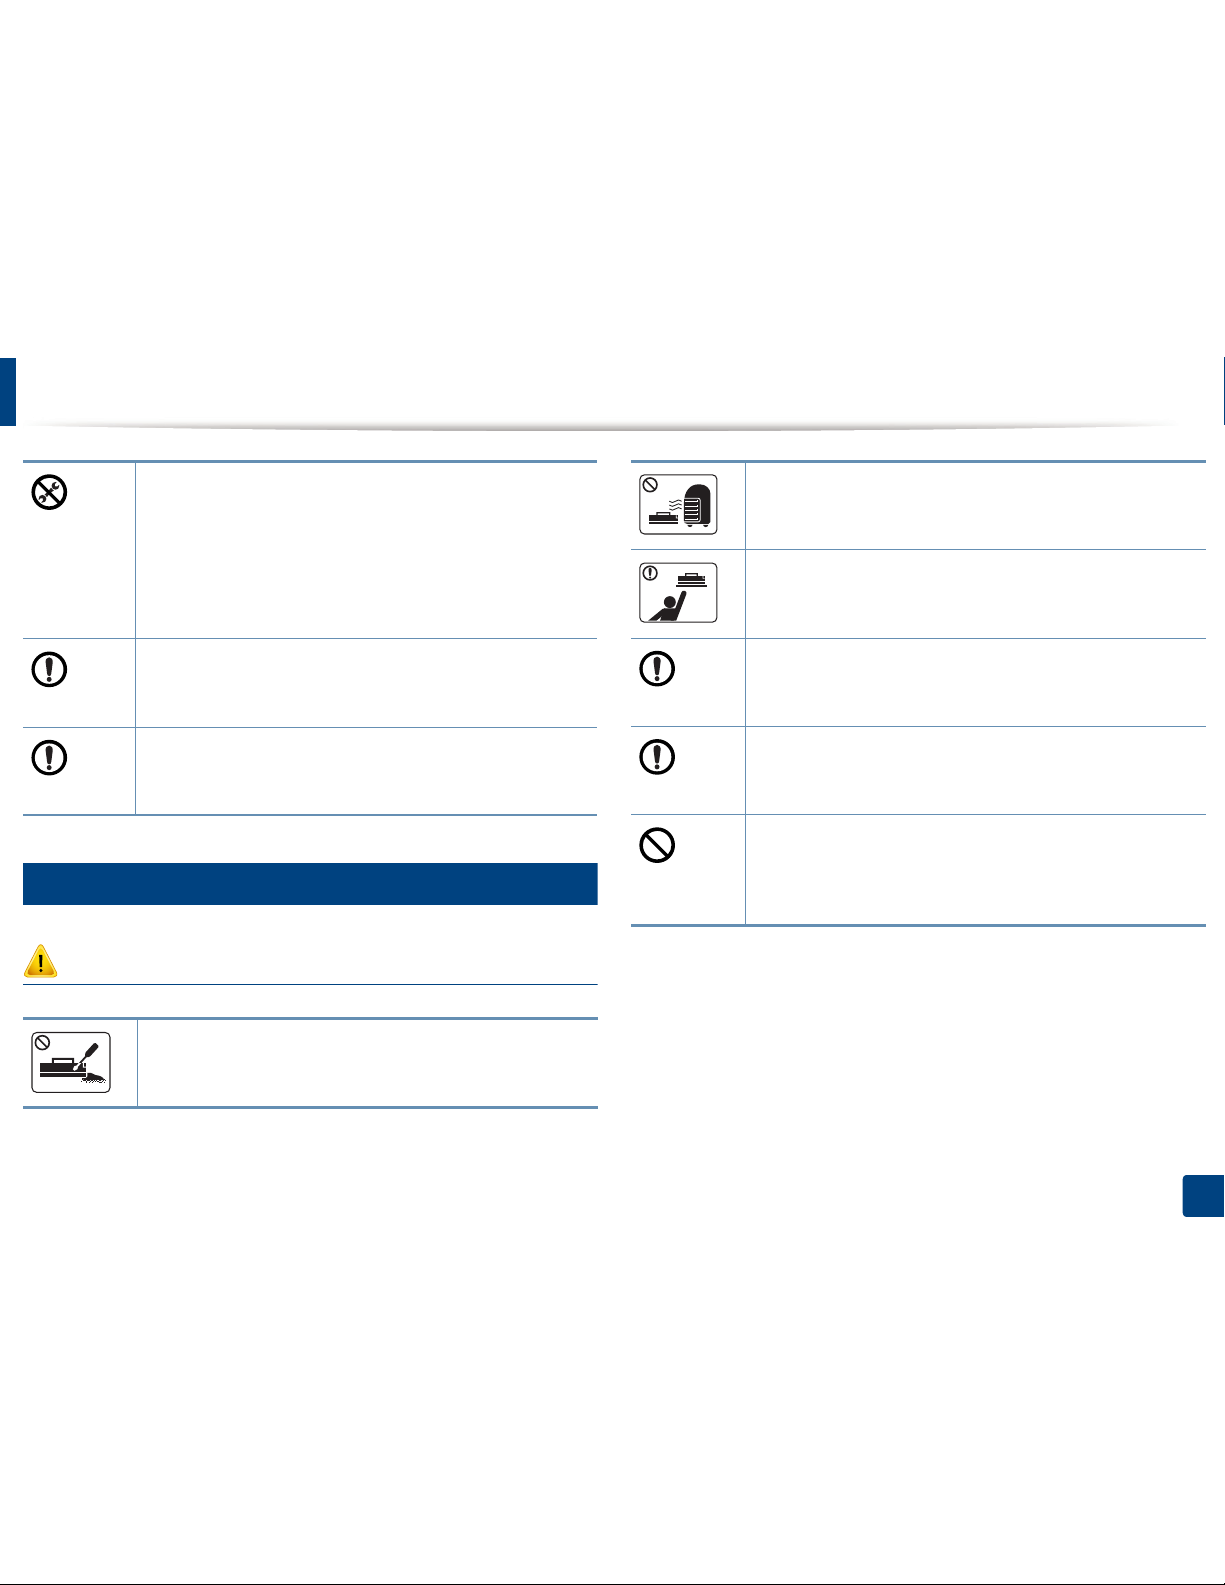
Safety information
14
1. Introduction
8
Supply usage
Caution
• Do not remove any covers or guards that are fastened with
screws.
• Fuser units should only be repaired by a certified service
technician. Repair by non-certified technicians could result in
fire or electric shock.
• The machine should only be repaired by a Samsung service
technician.
To clean and operate the machine, strictly follow the user’s guide
provided with the machine.
Otherwise, you could damage the machine.
Keep the power cable and the contact surface of the plug clean
from dust or water.
Otherwise, this could result in electric shock or fire.
Do not disassemble the toner cartridge.
Toner dust can be dangerous if inhaled or ingested.
Do not burn any of the supplies such as toner cartridge or fuser
unit.
This could cause an explosion or uncontrollable fire.
When storing supplies such as toner cartridges, keep them away
from children.
Toner dust can be dangerous if inhaled or ingested.
When changing the toner cartridge or removing jammed paper,
be careful not to let toner dust touch your body or clothes.
Toner dust can be dangerous if inhaled or ingested.
When toner gets on your clothing, do not use hot water to wash
it.
Hot water sets toner into fabric. Use cold water.
Using recycled supplies, such as toner, can cause damage to the
machine.
In case of damage due to the use of recycled supplies, a service
fee will be charged.
15
1. Introduction
Machine overview
9
Accessories
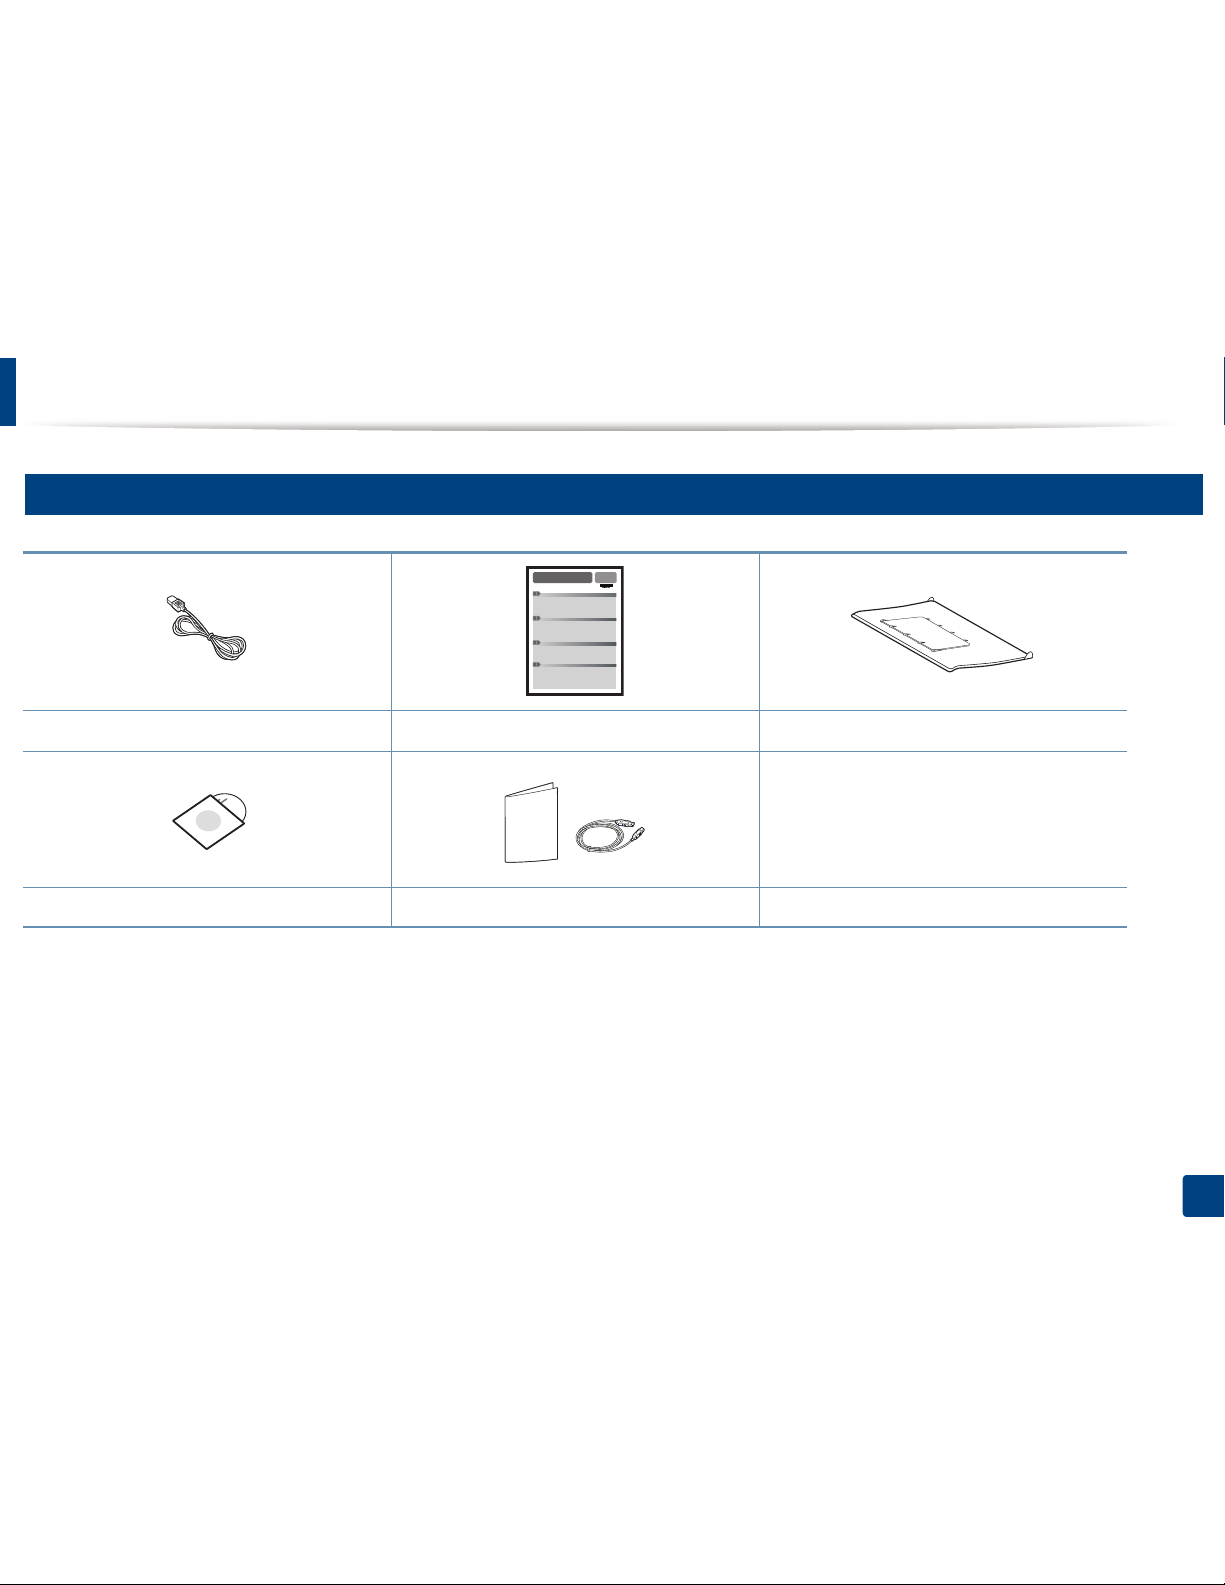
Power cord Quick installation guide
Output stacker
a
a. Refer to the Quick Install Guide to attach the output stacker to the machine.
Software CD
b
b. The software CD contains the printer drivers and software applications.
Misc. accessories
c
c. Miscellaneous accessories included with your machine may vary by country of purchase and specific model.
Machine overview
16
1. Introduction
10
Front view
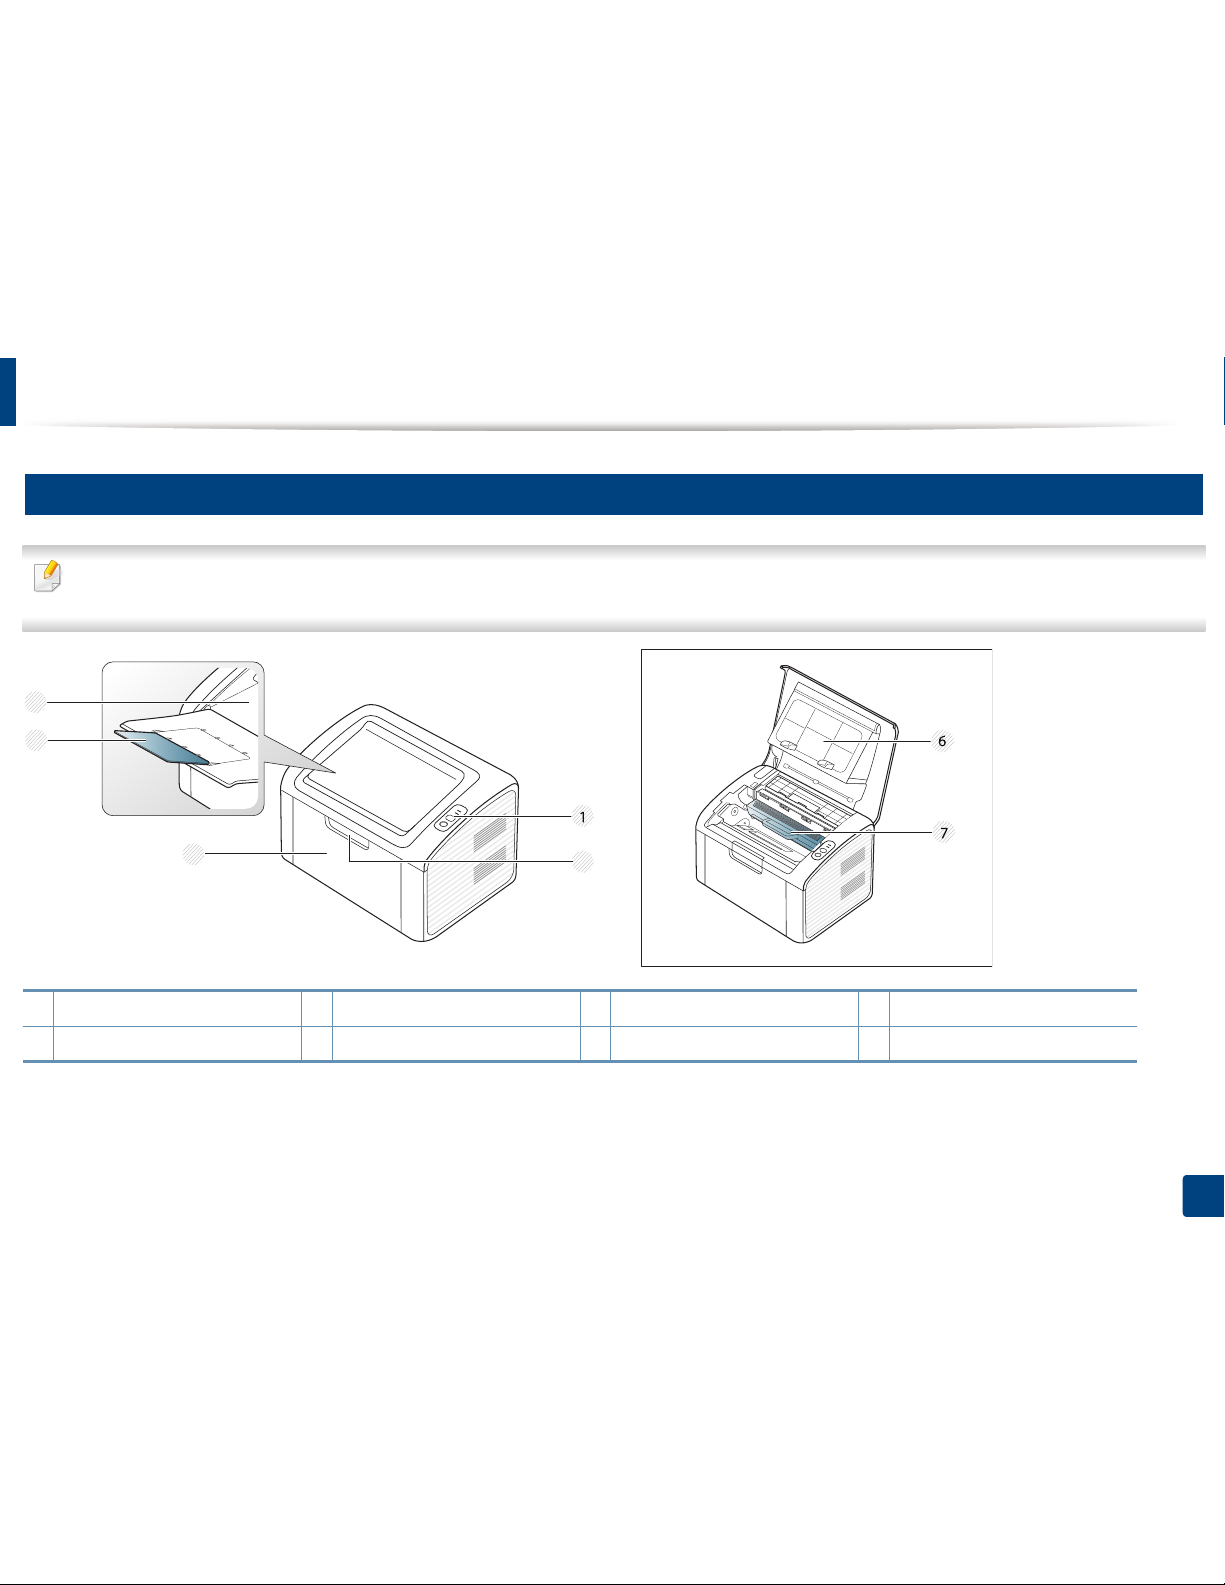
• This illustration may differ from your machine depending on its model.
• Some features and optional goods may not be available depending on model or country (see «Features by models» on page 6).
1 Control panel 3 Tray 5 Output support 7 Toner cartridge
2 Tray handle 4 Output tray 6 Top cover
2
4
3
5
Machine overview
17
1. Introduction
11
Rear view
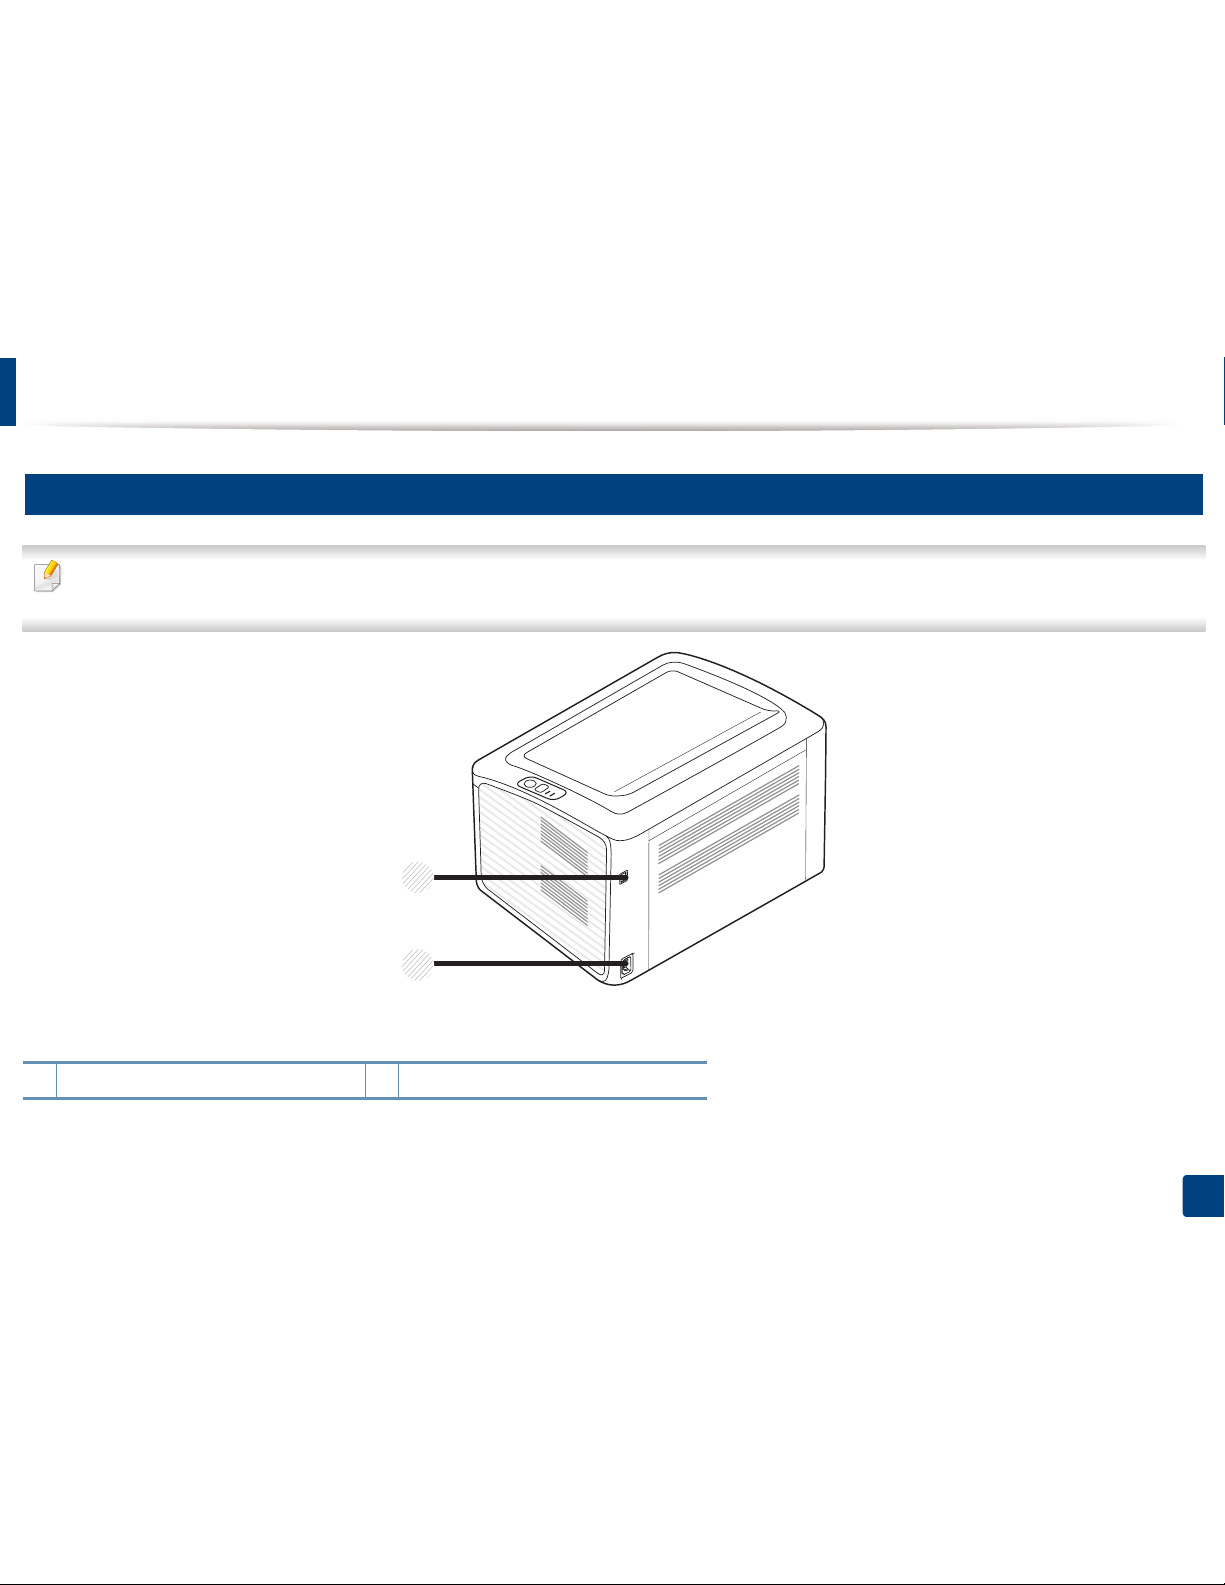
• This illustration may differ from your machine depending on its model.
• Some features and optional goods may not be available depending on model or country (see «Features by models» on page 6).
1USB port 2Power receptacle
1
2
18
1. Introduction
Control panel overview
This control panel may differ from your machine depending on its model.
There are various types of control panels.
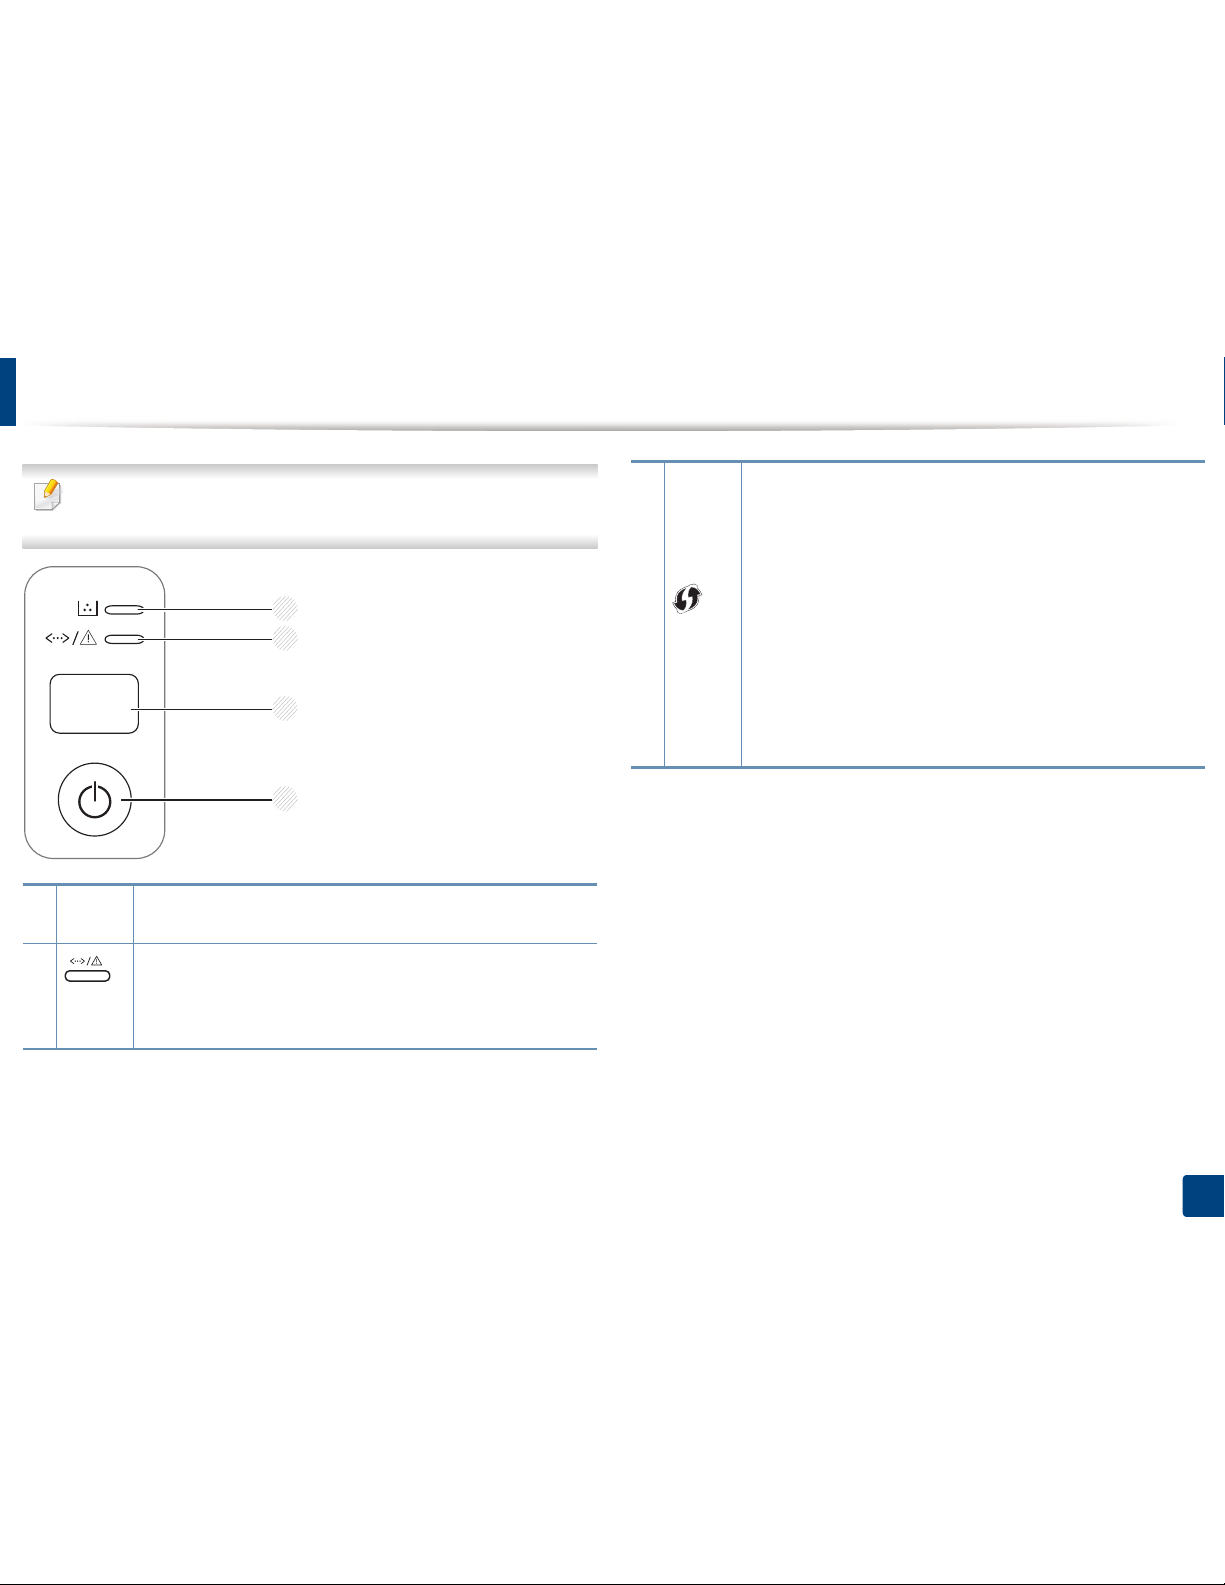
1 Toner
LED
Shows the status of the toner (see «Status LED» on page 56).
2
(Status
LED)
Shows the status of your machine (see «Status LED» on page 56).
1
2
3
4
3
(WPS)
Configures the wireless network connection easily without a
computer (see «Wireless network setup» on page 104).
• Configuration sheet
— Press and hold this button for about 10 seconds until the
green LED blinks slowly, and release.
• Prints supplies info report / error report
— Press and hold this button for about 15 seconds until the
green LED on, and release.
• Manual print
— Press this button each time you load a sheet of paper in the
tray if you have selected Manual Feeder for Source in your
printer driver.
Control panel overview
19
1. Introduction
3
(Print
screen)
• Prints the screen
— Press this button and the green LED will start blinking. If you
want to print only the active screen, release the button
when the green LED stops blinking. If you want to print the
whole screen, release the button while it’s blinking.
• Print Screen can only be used in the Windows and
Macintosh operating systems.
• You can only use this function with USB-connected
machine.
• When printing the active window/whole monitor
screen using the print screen button, the machine may
use more toner depending on what is being printed.
• You can only use this function if the machine’s Easy
Printer Manager program is installed if you are a
macintosh OS user, you need to enable Screen Print
Settings from the Easy Printer Manager to use the
Print Screen feature.
• Configuration sheet
— Press and hold this button for about 10 seconds until the
green LED blinks slowly, and release.
• Prints supplies info report / error report
— Press and hold this button for about 15 seconds until the
green LED on, and release.
• Manual print
— Press this button each time you load a sheet of paper in the
tray if you have selected Manual Feeder for Source in your
printer driver.
4
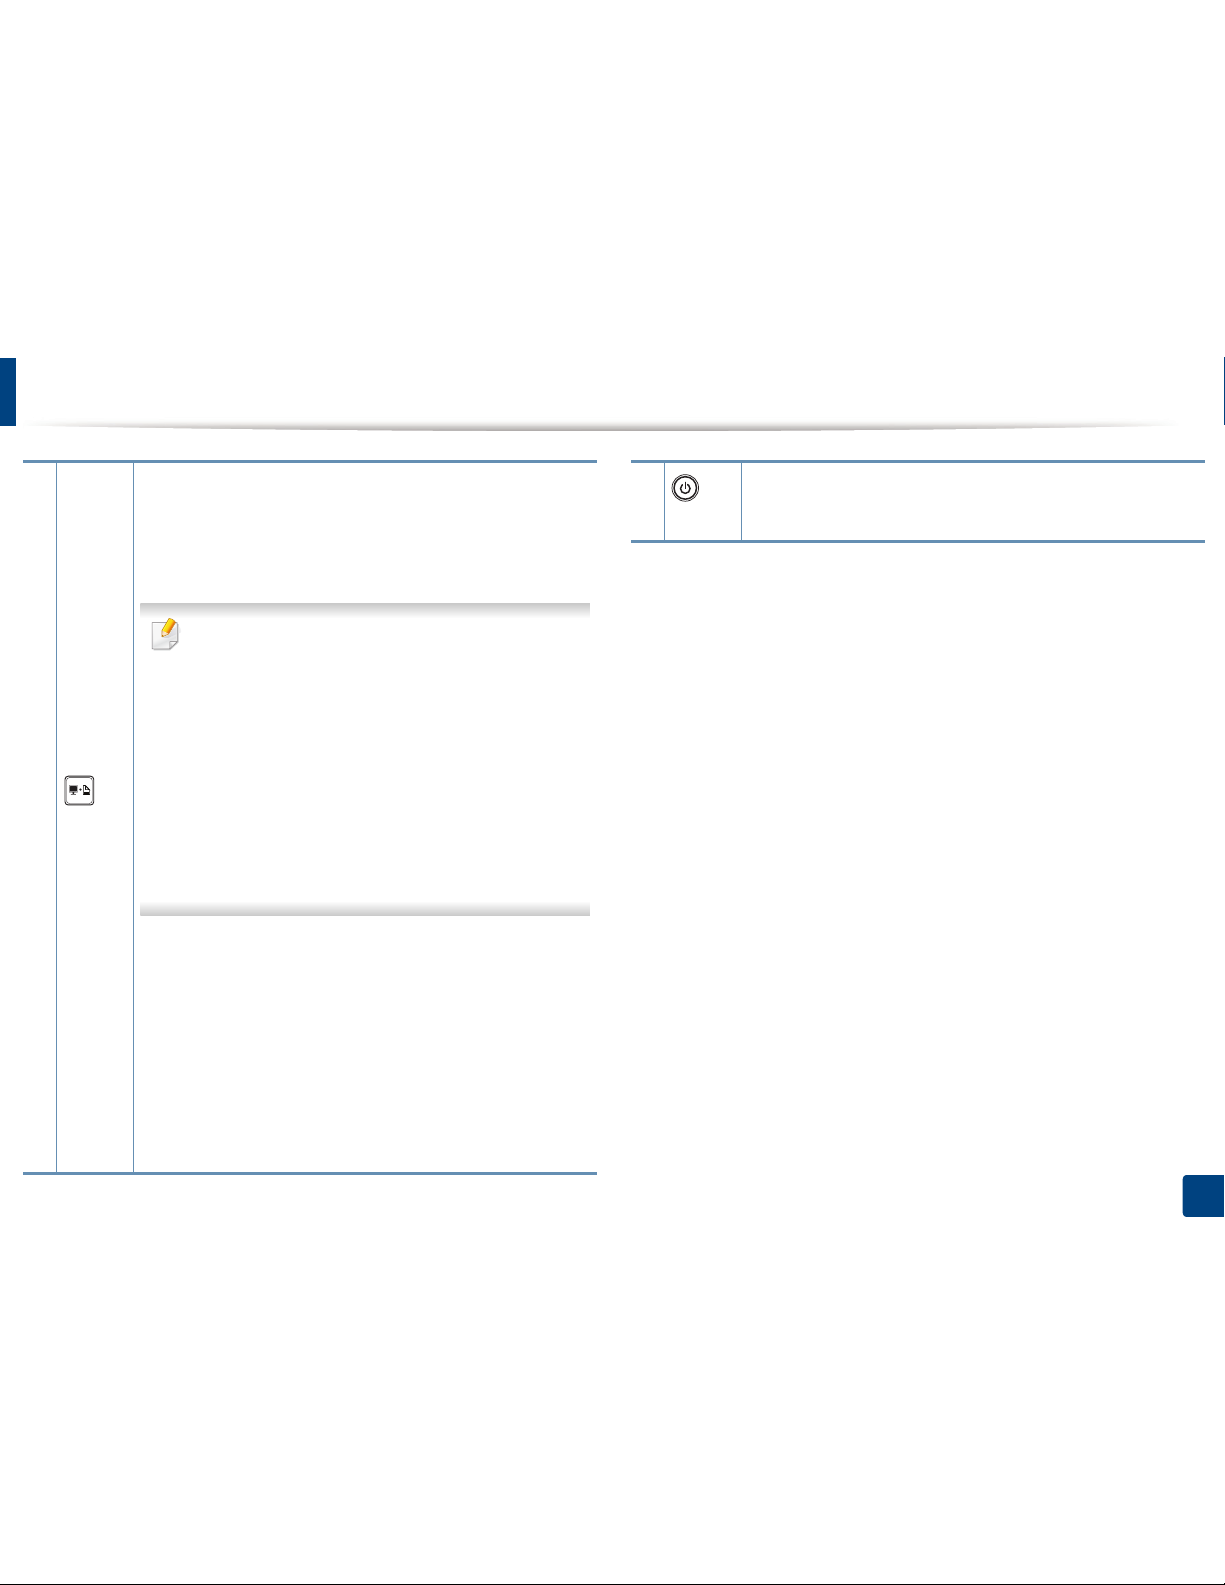
(Power)
You can turn the power off or wake the machine up from the
sleep mode with this button.
20
1. Introduction
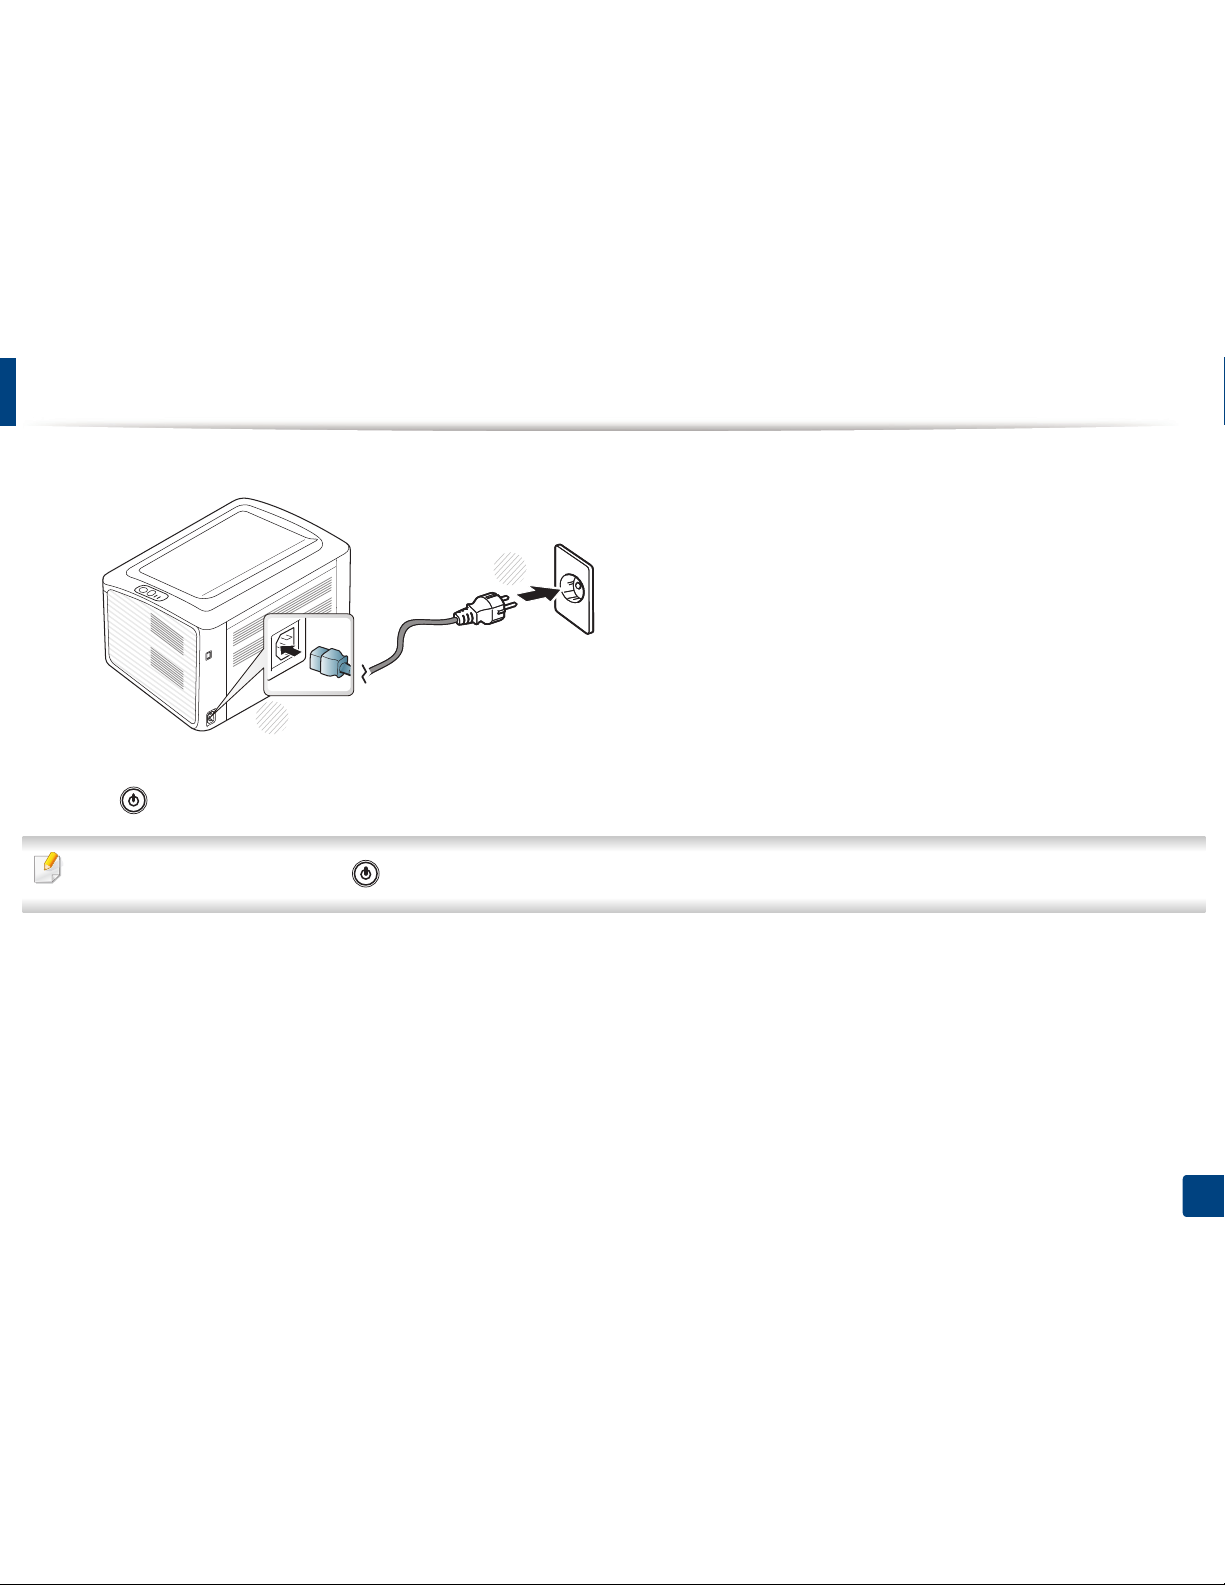
Turning on the machine
1
Connect the machine to the electricity supply first.
2
press (power) on the control panel.
If you want to turn the power off, press (power) on the control panel.
1
2
21
1. Introduction
Installing the driver locally
A locally connected machine is a machine directly attached to your computer
using the cable. If your machine is attached to a network, skip the following
steps below and go on to installing a network connected machine’s driver (see
Advanced Guide).
• If you are a Macintosh or Linux OS user, refer to the «Software installation»
on page 82.
• The installation window in this User’s Guide may differ depending on the
machine and interface in use.
• Selecting Custom Installation allows you to choose which programs to
install.
• Only use a USB cable no longer than 3 meters (118 inches).
12
Windows
1
Make sure that the machine is connected to your computer and
powered on.
If the “Found New Hardware Wizard” appears during the installation
procedure, click Cancel to close the window.
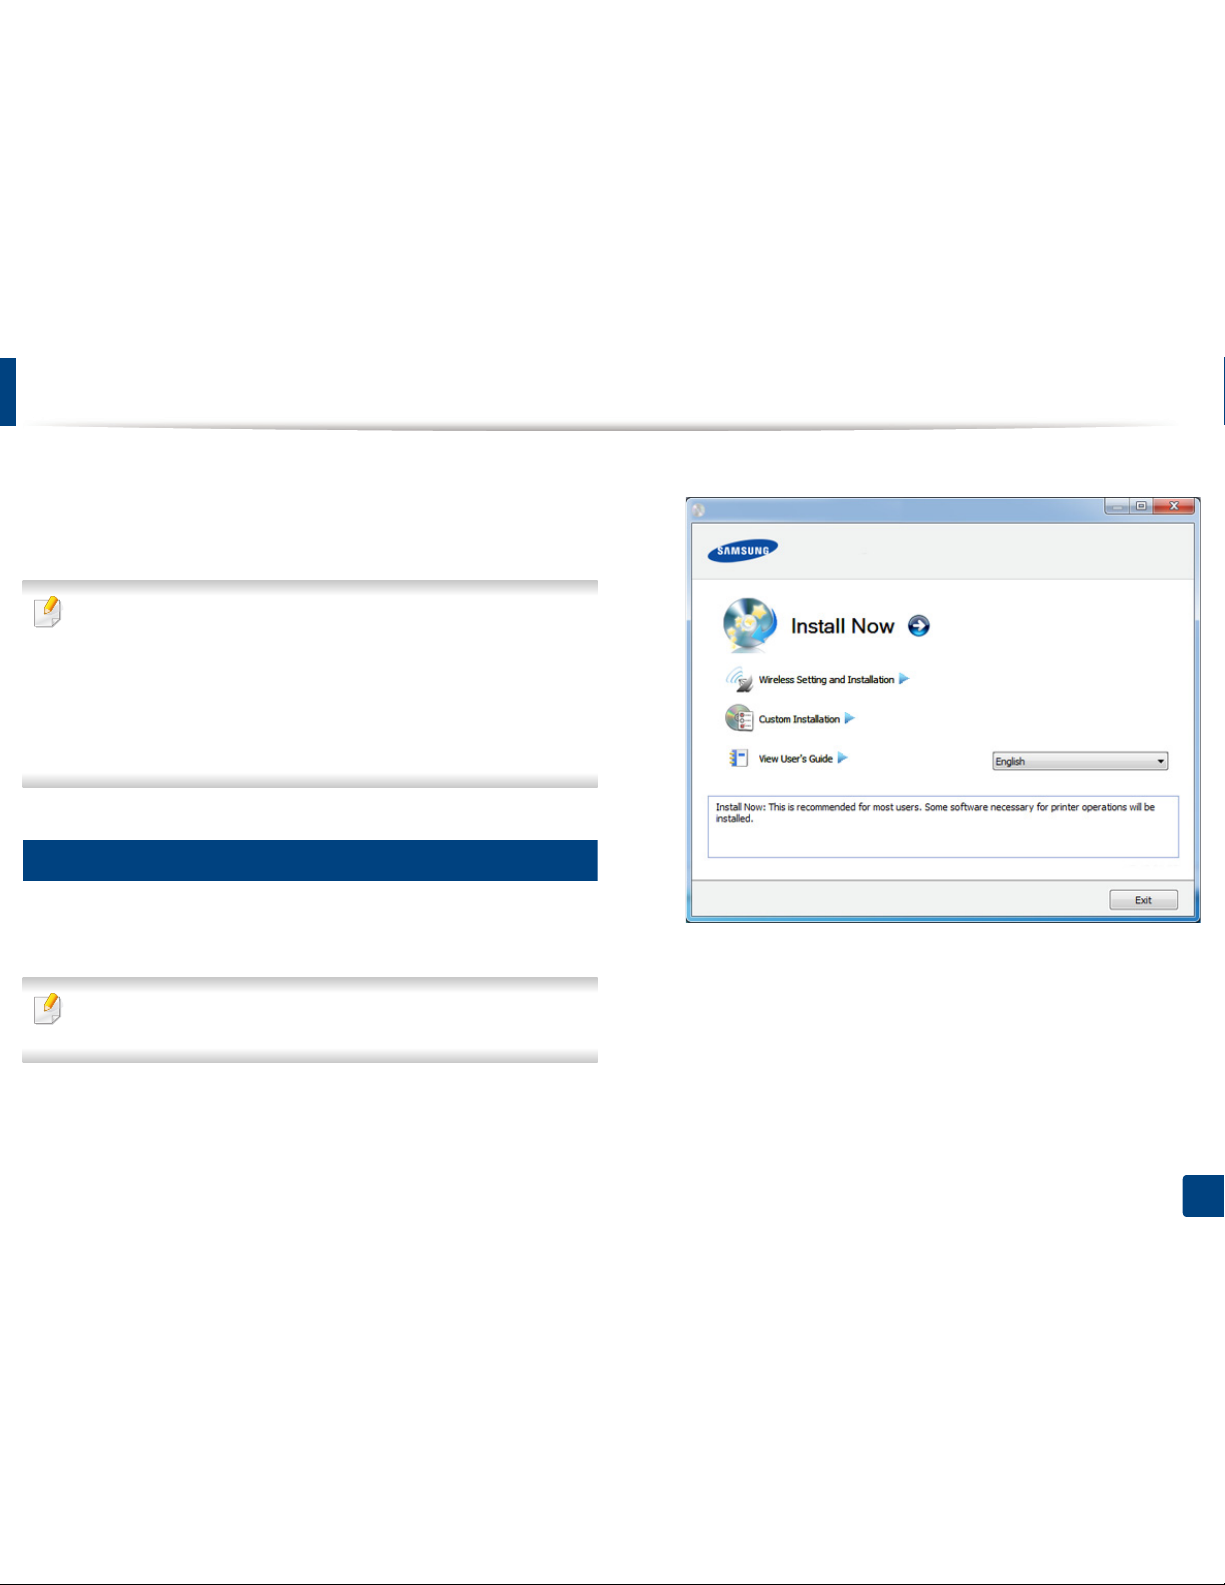
2
Insert the supplied software CD into your CD-ROM drive.
The software CD should automatically run and an installation window
will appear.
3
Select Install Now.
4
Read License Agreement, and select I accept the terms of the License
Agreement. Then, click Next.
5
Follow the instructions in the installation window.

22
1. Introduction
Reinstalling the driver
If the printer driver does not work properly, follow the steps below to reinstall
the driver.
13
Windows
1
Make sure that the machine is connected to your computer and
powered on.
2
From the Start menu, select Programs or All Programs > Samsung
Printers > your printer driver name > Uninstall.
3
Follow the instructions in the installation window.
4
Insert the software CD into your CD-ROM drive and install the driver
again (see «Installing the driver locally» on page 21).

2. Learning the Basic Usage
After installation is complete, you may want to set the machine’s default settings. Refer to the next section if you would
like to set or change values. This chapter provides information about the overall menu structure and the basic setup
options.
• Printing a demo page 24
• Media and tray 25
• Basic printing 34

24
2. Learning the Basic Usage
Printing a demo page
Print a demo page to make sure that the machine is operating correctly (Windows only).
To print a demo page:
• Open the Printing Preferences (see «Opening printing preferences» on page 35) > Samsung tab > Demo page
25
2. Learning the Basic Usage
Media and tray
This chapter provides information on how to load print media into your
machine.
• Using print media that does not meet these specifications may cause
problems or require repairs. Such repairs are not covered by Samsung’s
warranty or service agreements.
• Make sure not to use the inkjet photo paper with this machine. It could
cause damage to the machine.
• Using inflammable print media can cause a fire.
• Use designated print media (see «Print media specifications» on page
61).
The use of inflammable media or foreign materials left in the printer may
lead to overheating of the unit and, in rare cases may cause a fire.
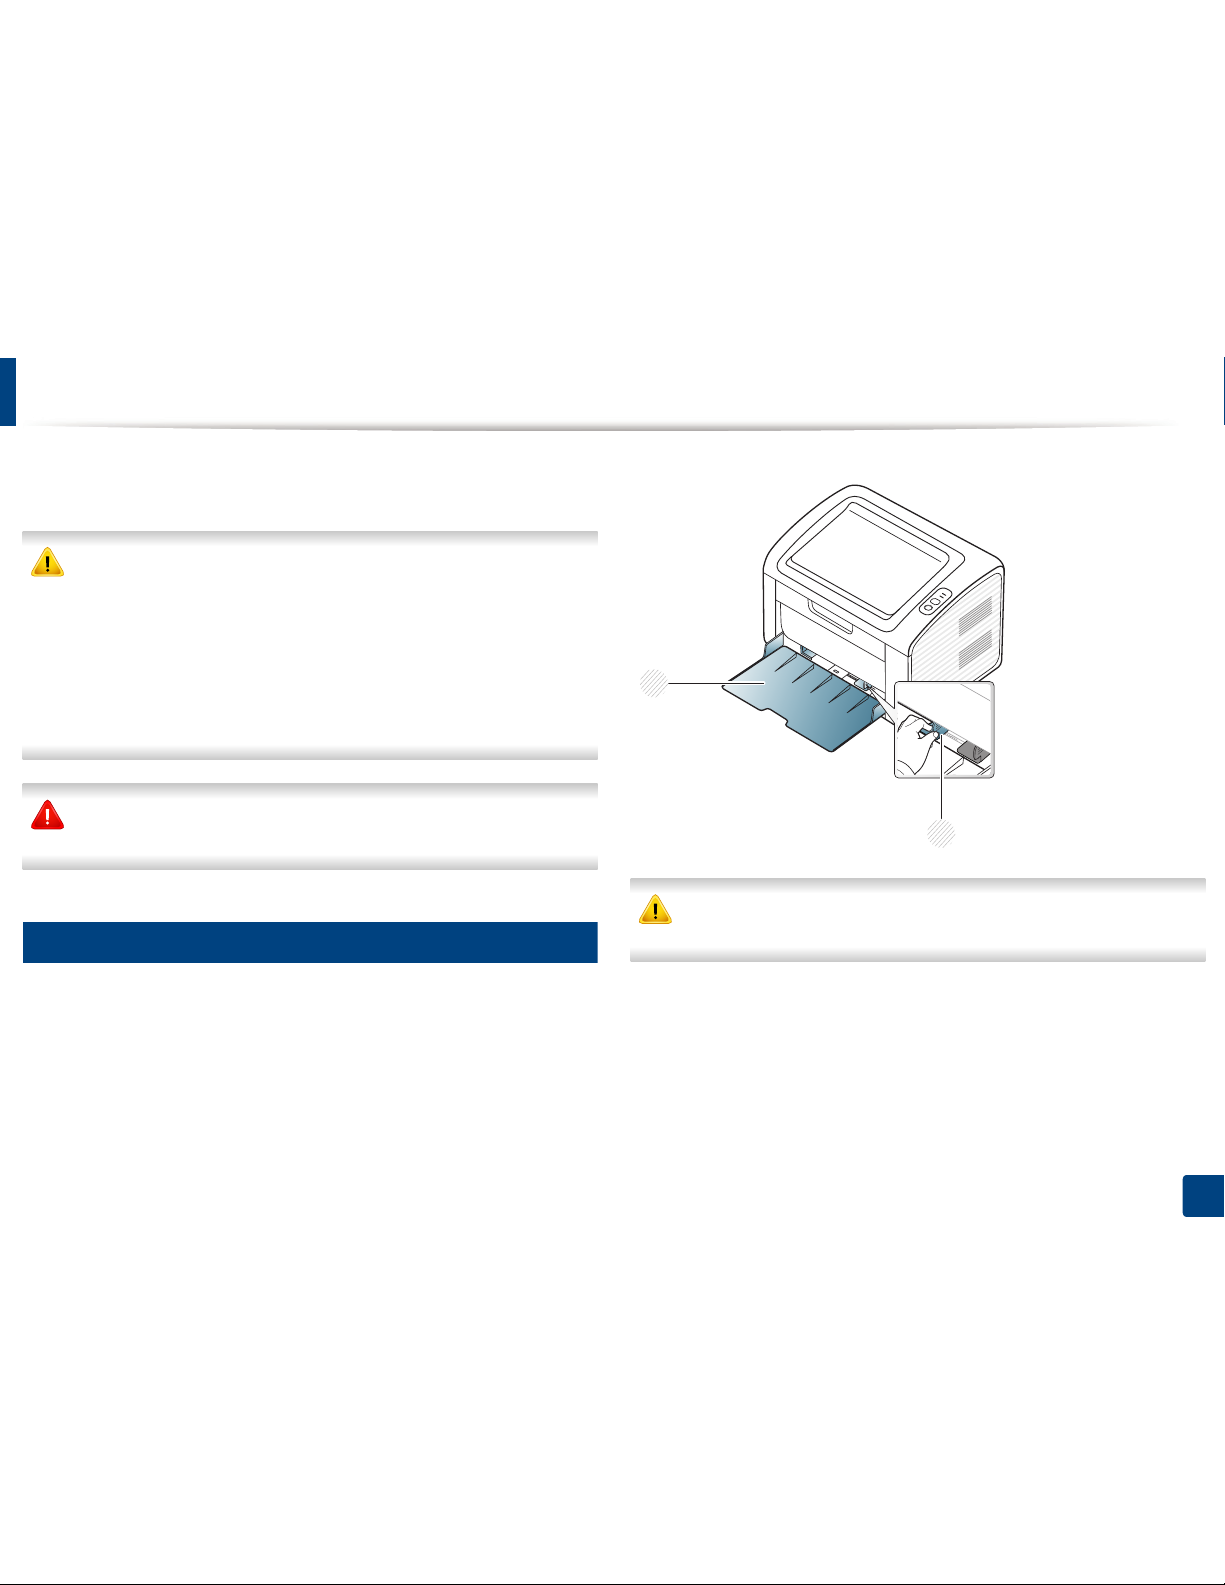
1
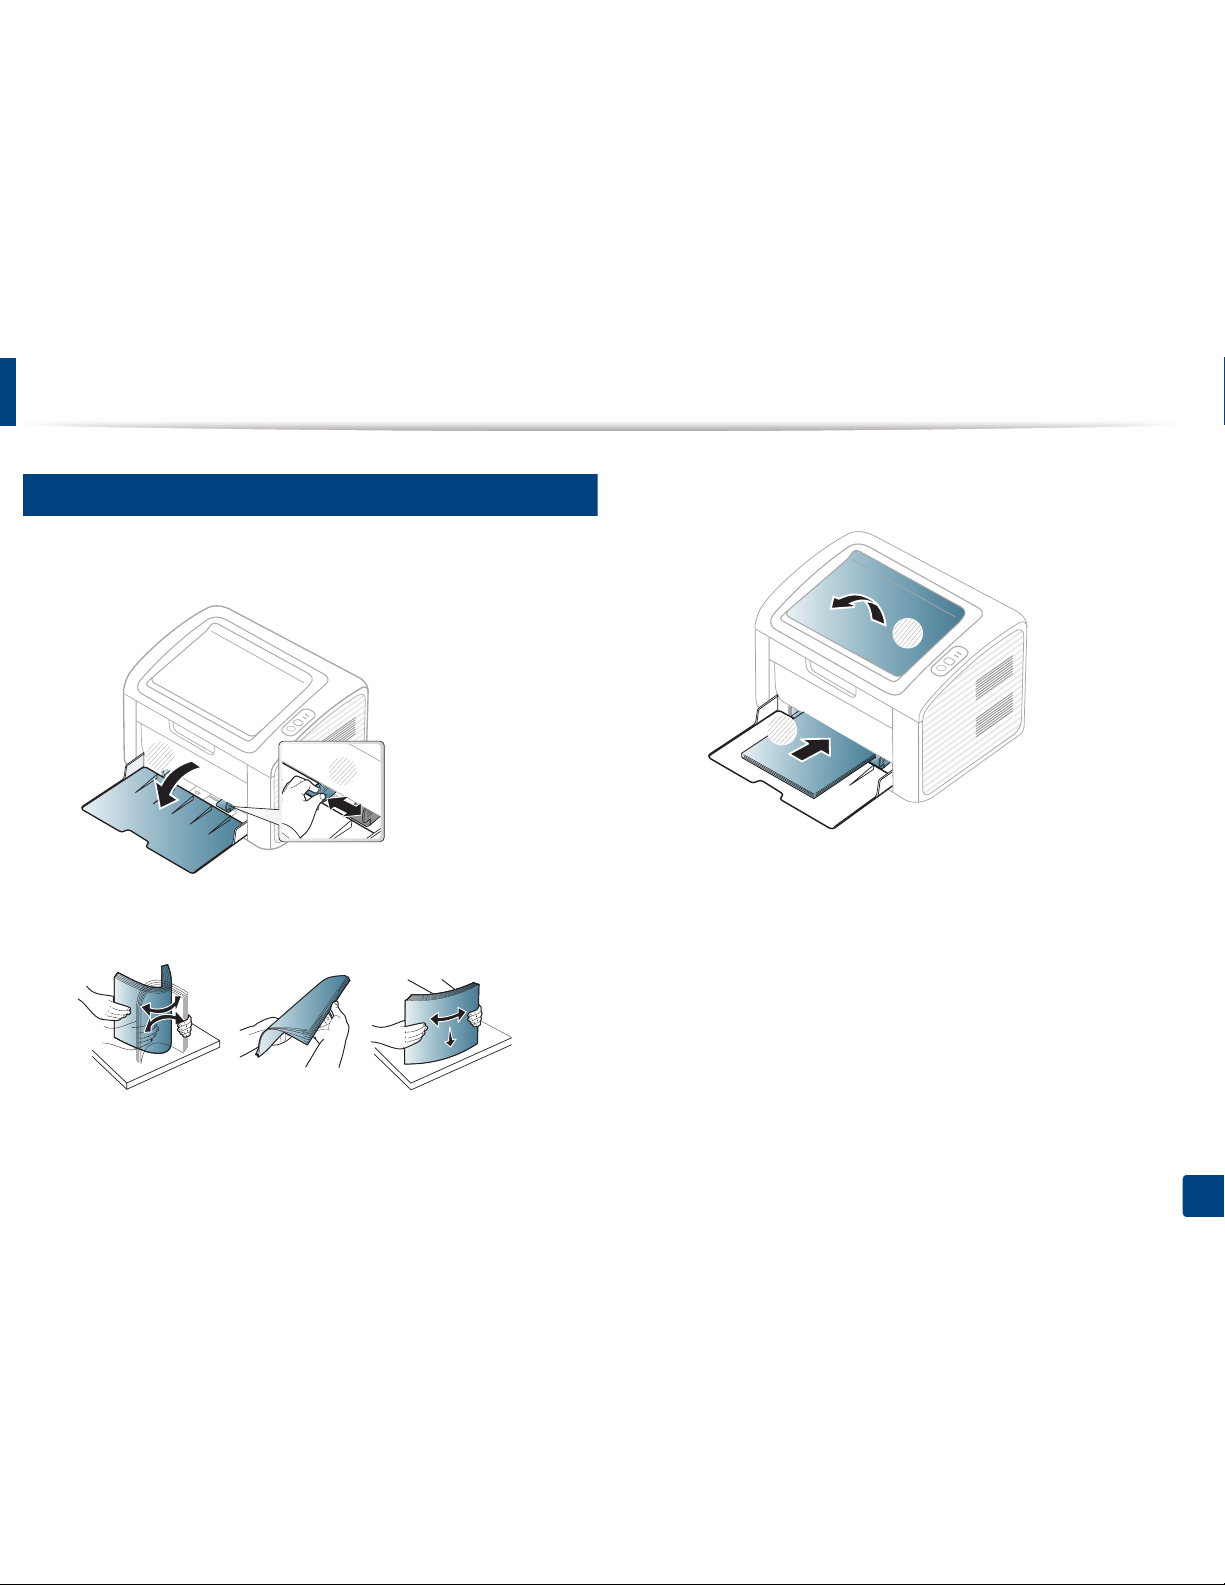
Tray overview
To change the size, you need to adjust the paper guide.
If you do not adjust the guide, it may cause paper registration, image skew,
or jamming of the paper.
1 Paper width guide
2 Tray
2
1
Media and tray
26
2. Learning the Basic Usage
2
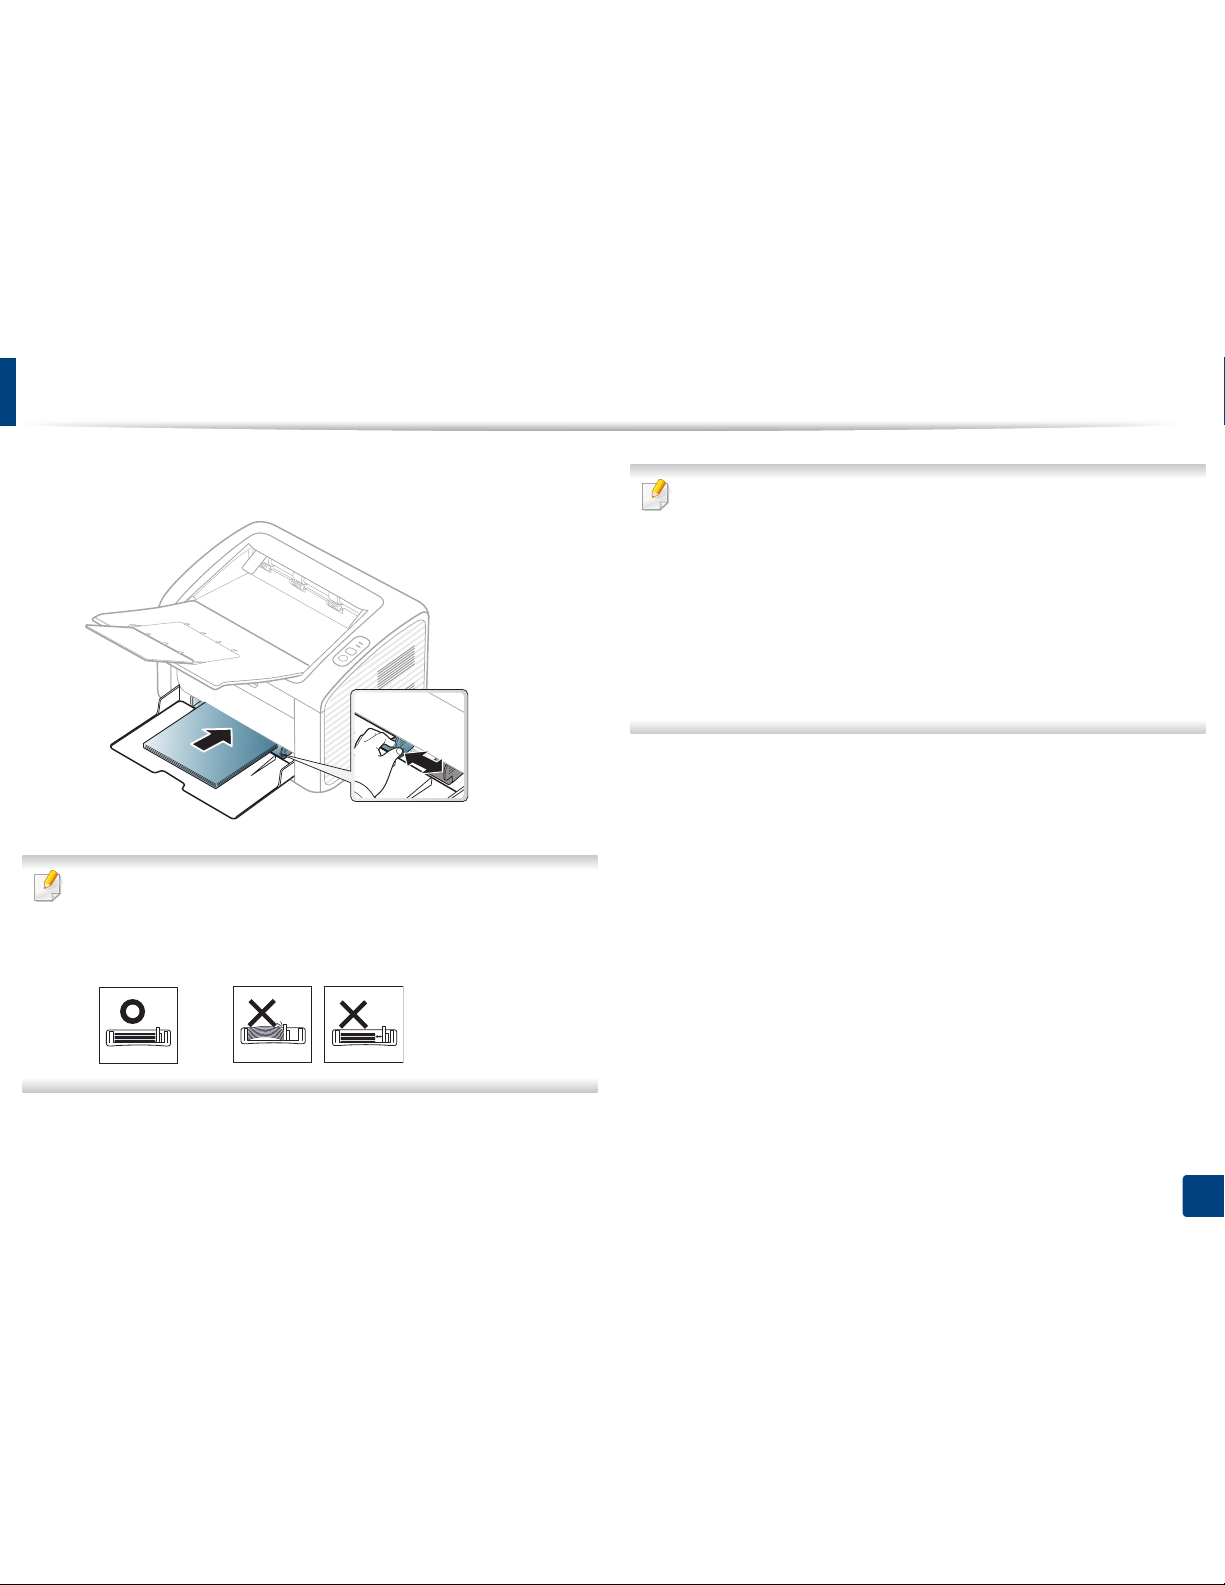
Loading paper in the tray
1
Open the tray. Then, adjust the tray size to the media size you are loading
(see «Tray overview» on page 25).
2
Flex or fan the edge of the paper stack to separate the pages before
loading papers.
3
Place the paper with the side you want to print facing up and
open the output tray.
Media and tray
27
2. Learning the Basic Usage
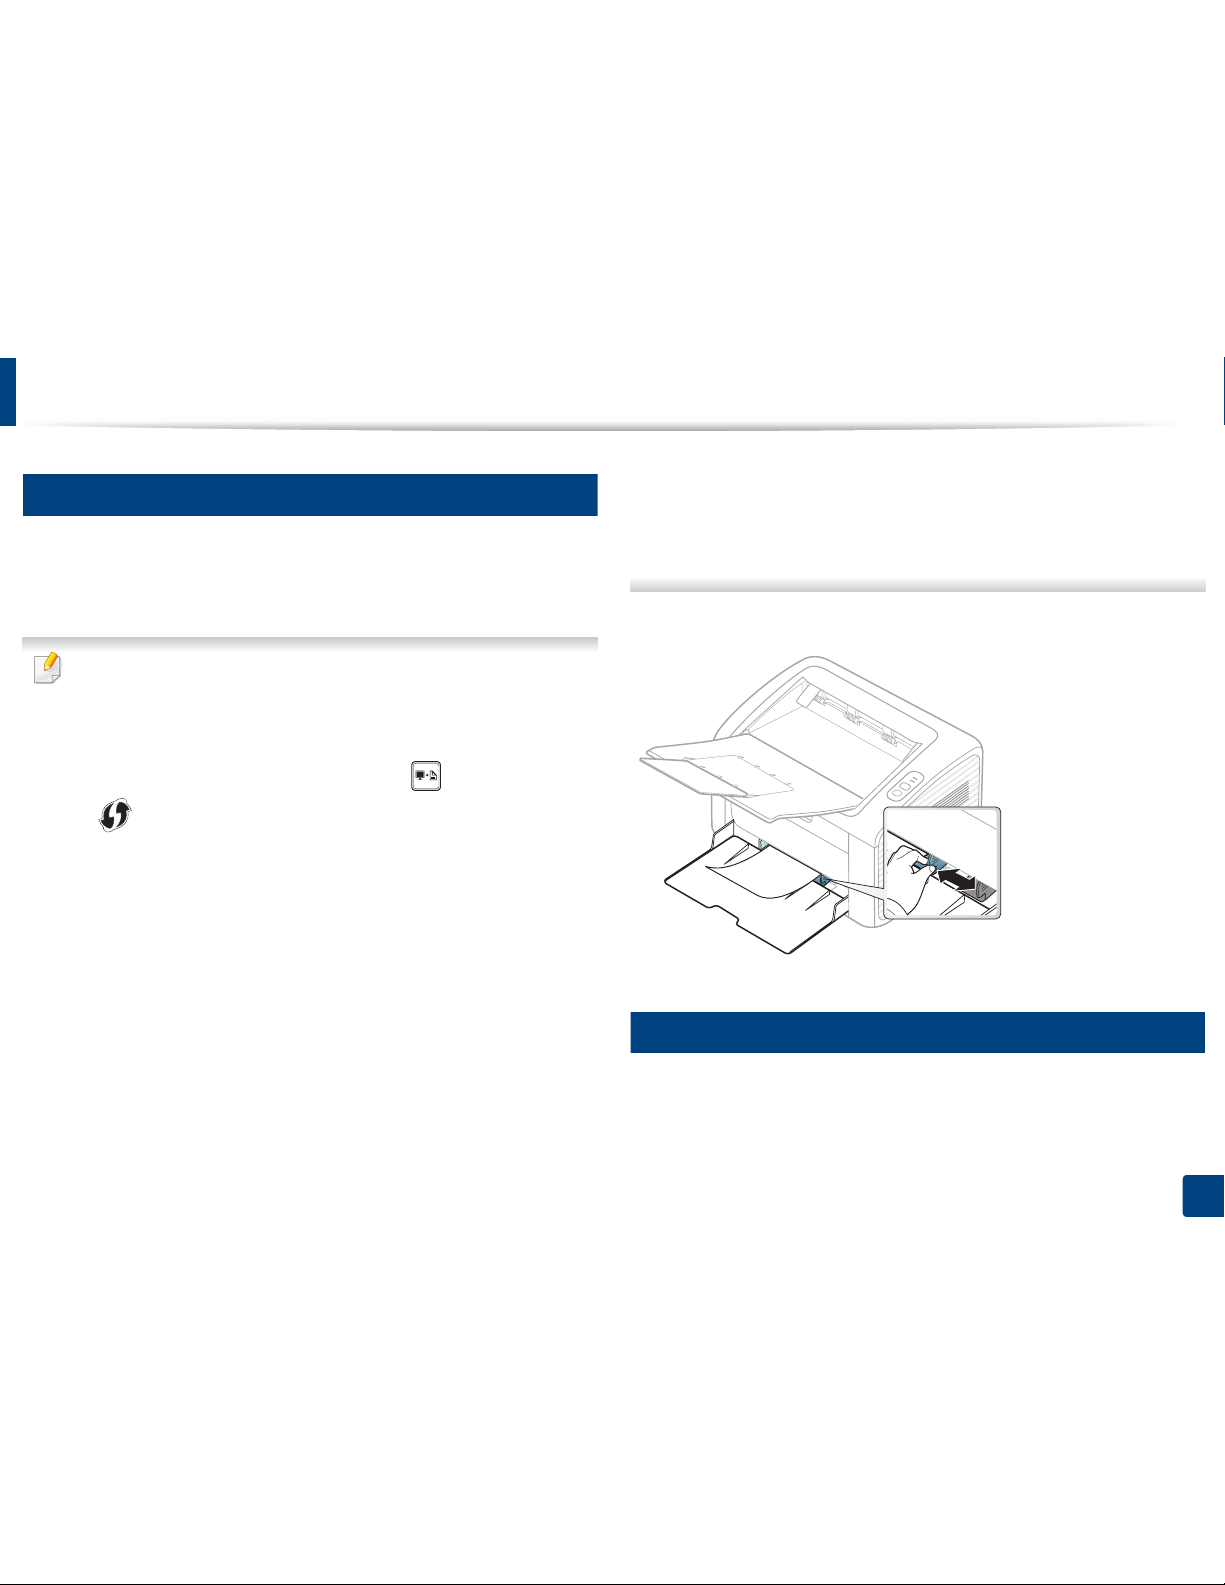
4
Squeeze the paper width guide and slide it to the edge of the paper stack
without causing it to bend.
• Do not push the paper width guide too far causing the media to warp.
• Do not use a paper with a leading-edge curl, it may cause a paper jam or
the paper can be wrinkled.
• If you do not adjust the paper width guide, it may cause paper jams.
5
When you print a document, set the paper type and size for the tray (see
«Setting the paper size and type» on page 33).
The settings made from the machine driver override the settings on the
control panel.
a To print in application, open an application and start the print menu.
b Open Printing Preferences (see «Opening printing preferences» on
page 35).
c Press the Paper tab in Printing Preferences, and select an appropriate
paper type.
For example, if you want to use a label, set the paper type to Label.
d Select Manual Feeder in paper source, then press OK.
e Start printing in application.
Media and tray
28
2. Learning the Basic Usage
3
Manual feeding in the tray
The manual feeder can hold special sizes and types of print material, such as
postcards, note cards, and envelopes (see «Print media specifications» on page
61).
Tips on using the manual feeder
• Load only one type, size and weight of print media at time in the manual
feeder.
•If you select Paper > Source > Manual Feeder for the paper source in
your software application, you need to press (Print screen) or
(WPS) button each time you print a page and load only one type,
size and weight of print media at a time on the manual tray.
• To prevent paper jams, do not add paper while printing when there is still
paper in the manual feeder.
• Print media should be loaded face up with the top edge going into the
manual feeder first and be placed in the center of the tray.
• To ensure printing quality and to prevent paper jams, only load the
available paper (see «Print media specifications» on page 61).
• Flatten any curl on postcards, envelopes, and labels before loading them
into the manual feeder.
• When printing on special media, you must follow the loading guidelines
(see «Printing on special media» on page 28).
• When the machine is in a power save mode, the machine does not feed
paper from the manual feeder. Wake up the machine by pressing the
power button before using the manual feeder.
4
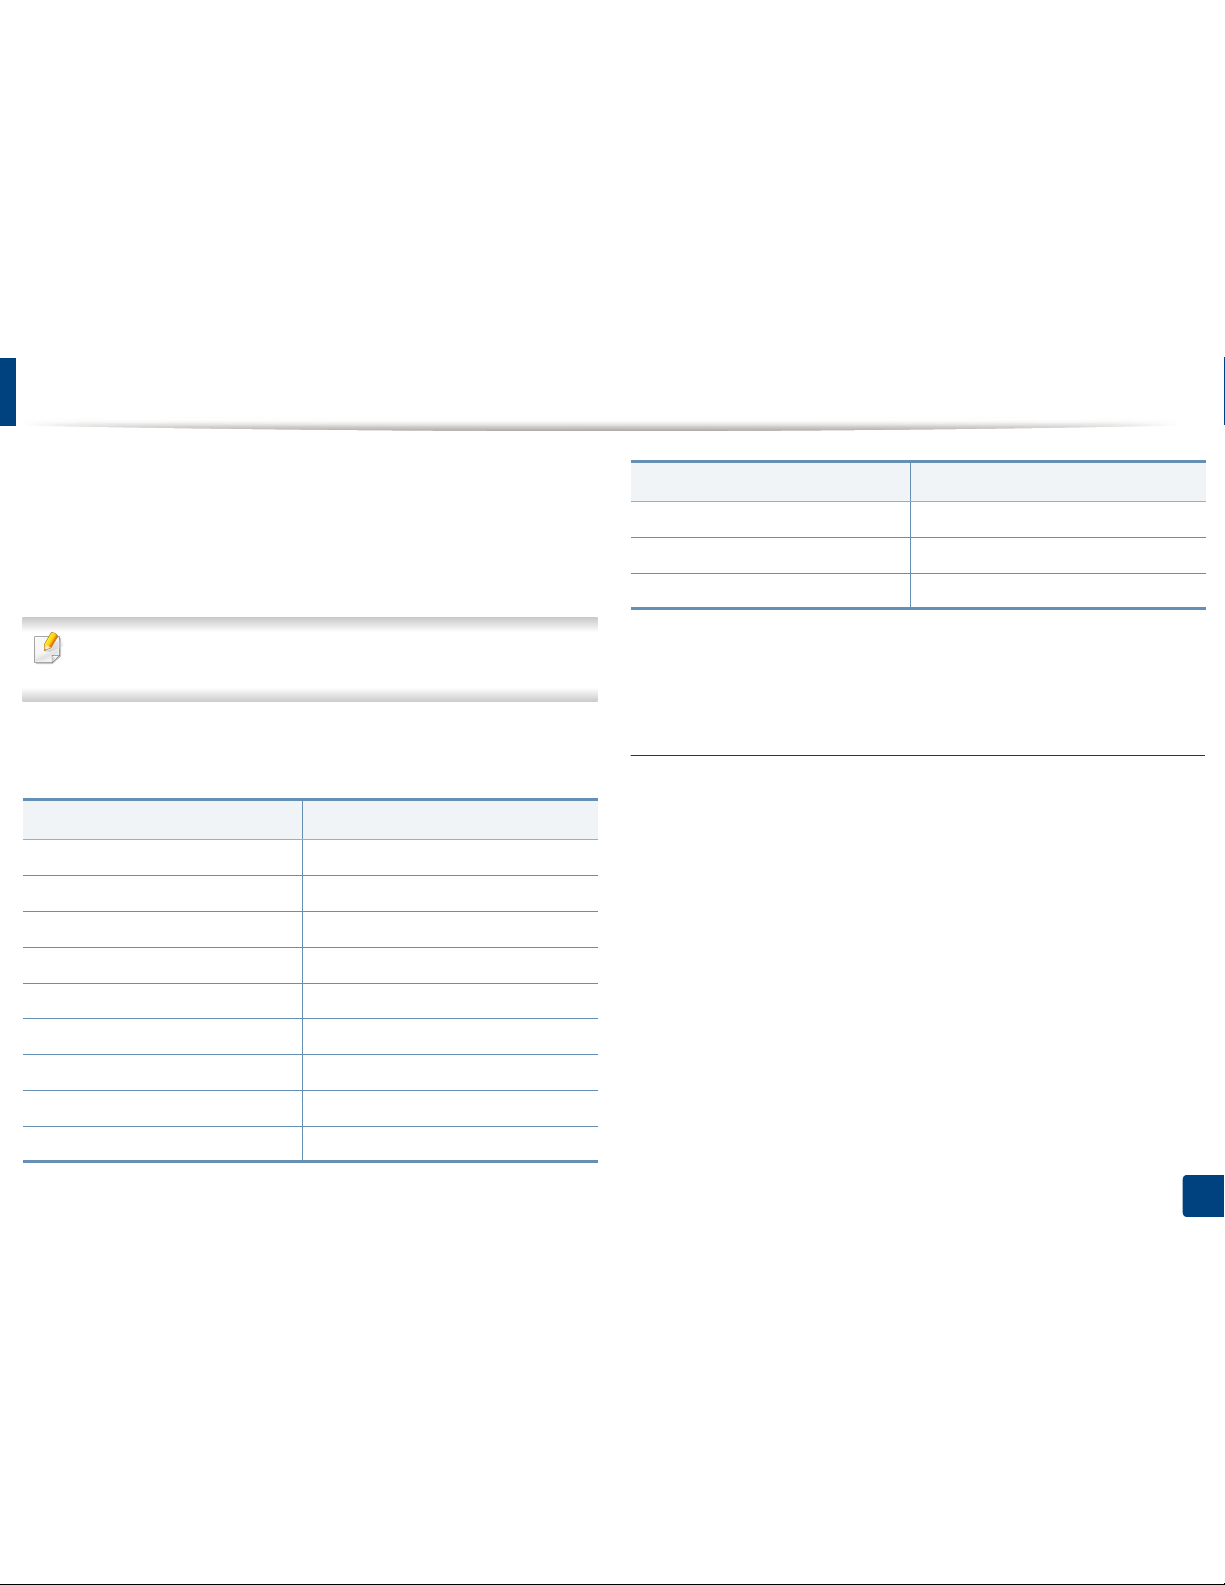
Printing on special media
The table below shows the special media usable in each tray.
Media and tray
29
2. Learning the Basic Usage
The media types are shown in the Printing Preferences. To get the higest
printing quality, select the proper media type from the Printing Preferences
window > Paper tab > Paper Type (see «Opening printing preferences» on page
35).
For example, if you want to print on labels, select Labels for Paper Type.
When using special media, we recommend you feed one sheet at a time (see
«Print media specifications» on page 61).
To see for paper weights for each sheet, refer to «Print media specifications» on
page 61.
(●: Included, Blank: Not available)
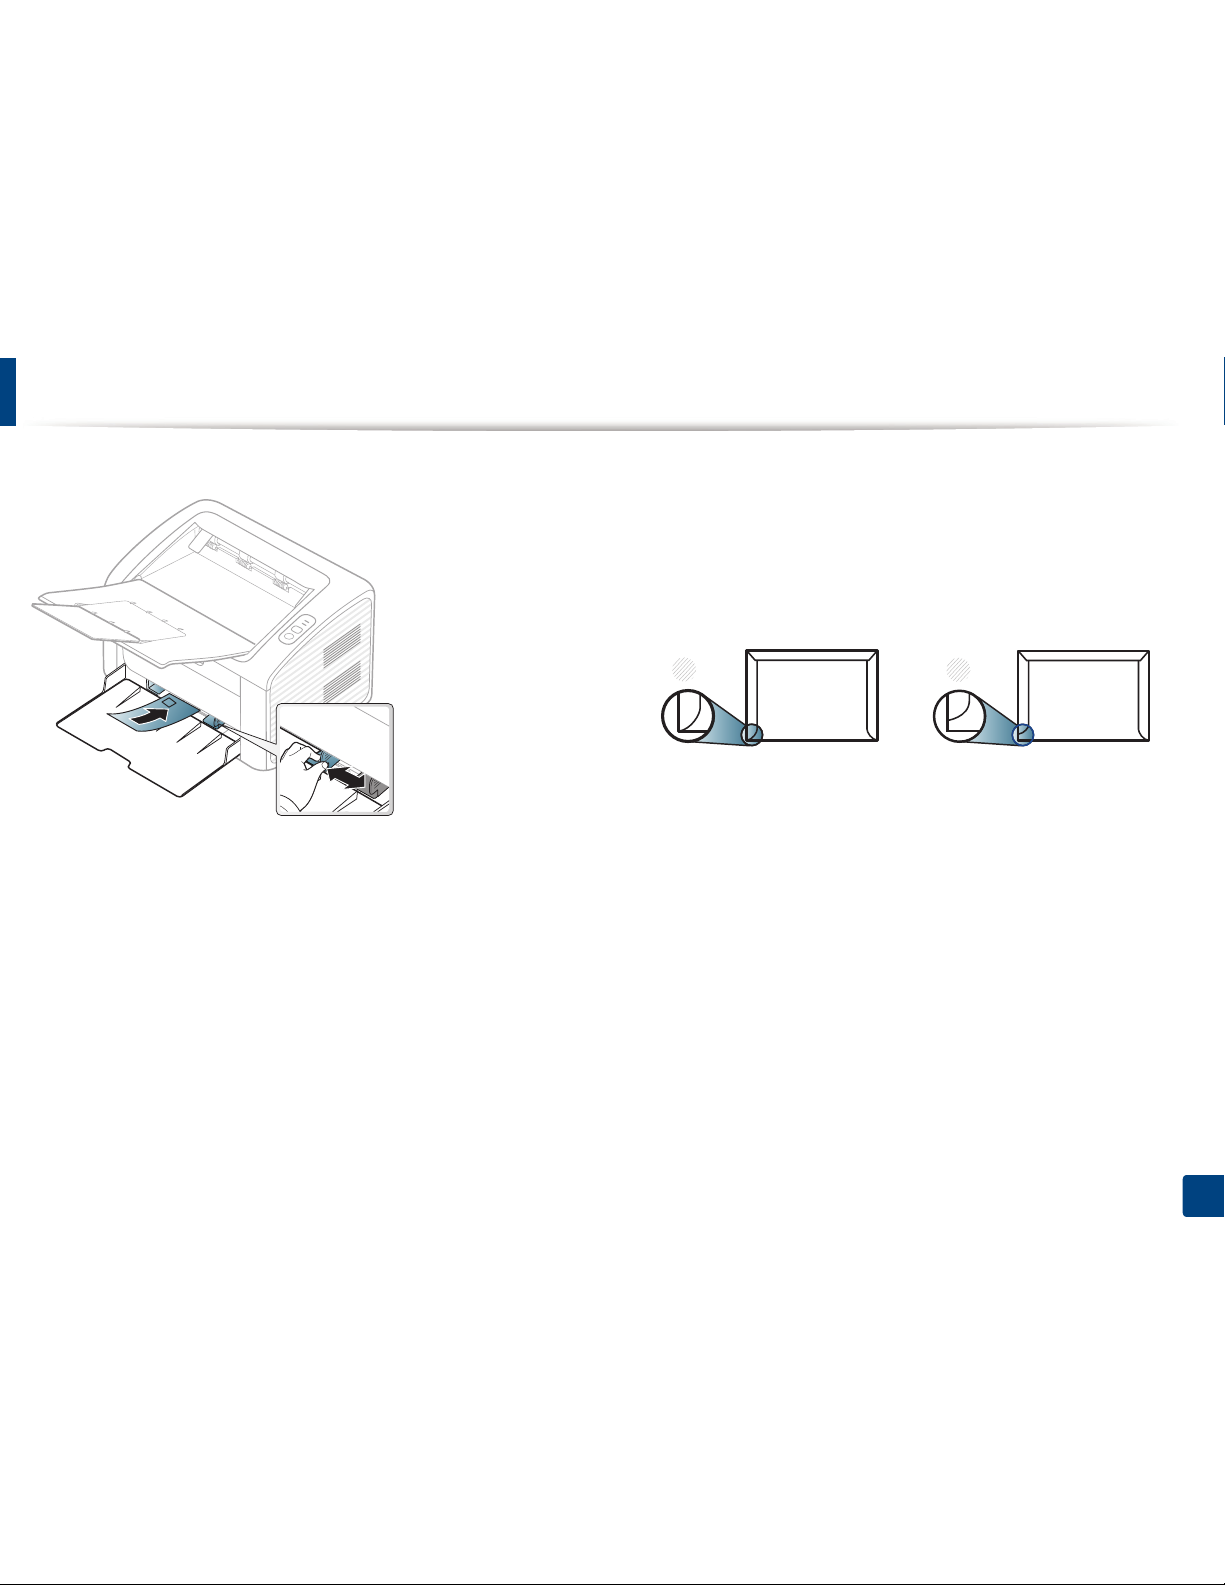
Envelope
Printing successfully on envelopes depends upon the quality of the envelopes.
Types
Tray
a
Plain ●
Thick ●
Thin ●
Bond ●
Color ●
CardStock ●
Labels ●
Envelope ●
Preprinted ●
Cotton ●
Recycled ●
Archive ●
a. The paper types available manual feeding in tray.
Types
Tray
a
Media and tray
30
2. Learning the Basic Usage
To print an envelope, place it as shown in the following figure.
If you select Envelope from the Printing Preferences window, but the printed
images get easily erased, select Thick Envelope and try printing again.
However, this might cause some noise when printing.
• When selecting envelopes, consider the following factors:
—Weight: should not exceed 90 g/m
2
otherwise; jams may occur.
—Construction: should lie flat with less than 6 mm curl and should not
contain air.
—Condition: should not be wrinkled, nicked, nor damaged.
—Temperature: should resist the heat and pressure of the machine during
operation.
• Use only well-constructed envelopes with sharp and well-creased folds.
• Do not use stamped envelopes.
• Do not use envelopes with clasps, snaps, windows, coated lining, selfadhesive seals, or other synthetic materials.
• Do not use damaged or poorly made envelopes.
• Be sure the seam at both ends of the envelope extends all the way to the
corner of the envelope.
1 Acceptable
2 Unacceptable
• Envelopes with a peel-off adhesive strip or with more than one flap that
folds over to seal must use adhesives compatible with the machine’s fusing
temperature for 0.1 second (about 170°C (338 °F)). The extra flaps and strips
might cause wrinkling, creasing, or jams, and may even damage the fuser.
• For the best print quality, position margins no closer than 15 mm from the
edges of the envelope.
• Avoid printing over the area where the envelope’s seams meet.
1
2
Loading…
-
Samsung ML-2165 Specifications (2 pages)
-
Samsung ML-2165 Operation & user’s manual (211 pages)
Samsung ML-2165 Manuals come in various types, each serving a specific purpose to help users effectively operate and maintain their devices. Each type of Samsung ML-2165 instruction is designed to address specific needs, ensuring users have the necessary information to use, maintain, and repair their devices effectively.
Related Instructions for Samsung ML-2165:
Xpress C480 Series, CPL-310N, ML-2855ND, CLP-415NW, ML 3050 — B/W Laser Printer
- Samsung Xpress C480 Series
- Samsung CPL-310N
- Samsung ML-2855ND
- Samsung CLP-415NW
- Samsung ML 3050 — B/W Laser Printer
- Samsung 6050 Series
- Samsung SCX-5×15 Series
- Samsung SF-4700
- Samsung 550 Series
- Samsung CLX-4195N
- Samsung ProXpress M3320ND
- Samsung ML-331xD
Printer Devices by Other Brands:
| Brand | Device Model | Type of Document | Pages | Size | Views | Downloads | Updated |
|---|---|---|---|---|---|---|---|
| Epson |
Stylus SX420W Series |
Epson Stylus SX420W Series Product manual |
2 | 1.56 Mb | 377 | 72 | 27-12-2024 |
| Thermopatch |
Deco-Print DP2000T |
Thermopatch Deco-Print DP2000T Operator’s manual |
53 | 1376 | 207 | 02-02-2025 | |
| Lexmark |
6500e |
Lexmark 6500e Setup manual |
37 | 560 | 107 | 25-09-2024 | |
| Oki |
Okipage 8z |
Oki Okipage 8z Service handbook |
127 | 23 | 6 | 28-11-2024 | |
| Amaco |
D-MOTION SINGLE COLOR G4 |
Amaco D-MOTION SINGLE COLOR G4 Manual |
49 | 36 | 6 | 18-11-2024 |
Categories:
Chassis
Video Gaming Accessories
UPS
Electric range
Dome camera
Home Lighting
В настоящем руководстве пользователя приведены основные сведения о принтере Samsung ML-2160 / ML-2165 , а также детальное описание порядка его использования.
• перед началом эксплуатации устройства следует ознакомиться с информацией о безопасности;
• решение проблем, связанных с эксплуатацией устройства, приведено в разделе, посвящённом устранению неисправностей;
• описание терминов, используемых в данном руководстве, смотрите в глоссарии;
• в зависимости от модели и комплектации конкретного устройства его вид может отличаться от иллюстраций в данном руководстве пользователя;
• в зависимости от версии драйвера/микропрограммы конкретного устройства, вид меню может отличаться от иллюстраций в данном руководстве пользователя;
• операции, приведенные в данном руководстве, в основном предназначены для выполнения в среде Windows 7.
Скачать руководство пользователя Samsung ML-216x Series