
На заказ
От 1-го дня (уточняйте срок у менеджера)
Почему выбирают нас?
Федеральная сеть салонов по России! Уже 21 год на рынке!
Бесплатная демонстрация и обучение при самовывозе
Собственные Сервисные Центры по России
Обмен возврат в течение 14 дней
Возможность приобрести товар в кредит
- Описание
-
Характеристики
Характеристики -
Отзывы
Отзывы -
Инструкция
Инструкция
Описание
Швейная машина Brother Innov-Is 950 — это модель, которая подойдёт для пользователя с любым уровнем подготовки.
Машина наделена всеми самыми современными опциями, имеет оптимальный набор функций, она гарантирует высокое качество выполняемых операций и долгий срок службы.
Швейная машина способна выполнять вышивку с максимальным размером дизайна 10 х 17 см.
Машина позволяет подключать её к персональному компьютеру и работать с программным обеспечением типа PE Design Next. В комплект поставки входит жёсткий чехол.
Основные характеристики и особенности:
- 129 операции;
- Горизонтальный челнок;
- Петля в автоматическом режиме;
- Плавная регулировка длины стежка до 5 мм;
- Плавная регулировка ширины строчки до 7 мм;
- Автоматическая намотка шпульки;
- Автоматический нитевдеватель верхней нити;
- Шитьё двойной иглой;
- Шитьё назад (реверс)
- Светодиодная подсветка рабочей зоны;
- Вес нетто – 11,8 кг;
- Работает со всеми типами тканей.
В комплект поставки входят:
- Вспарыватель
- Вышивальный блок
- Двойная игла
- Дополнительный стержень для катушки
- Коробка для принадлежностей
- Лапка для вышивания
- Лапка для декоративных строчек
- Лапка для петель
- Лапка для потайного шва
- Лапка для пришивания пуговиц
- Набор игл
- Ножницы
- Оверлочная лапка
- Отвёртка
- Педаль
- Приставной столик
- Пяльцы для вышивки
- Сетка для катушек
- Стилус
- Универсальная лапка
- Шпульки
- Щёточка для очистки
- Инструкция на русском языке.
Характеристики
| Торговая марка | BROTHER |
| Страна производителя | ЯПОНИЯ |
| Страна производства | КИТАЙ |
| Мощность, W | 45 |
| Вес брутто: | 12.7 |
| Вес нетто | 11.8 |
| Срок гарантии | 1 год |
| Чехол | жёсткий |
| Подсветка рабочей зоны | светодиодная |
| Длина электрического шнура | 1.8 |
| Материал корпуса | пластик |
| Свободный рукав | Да |
| Инструкция на DVD | Да |
| Увеличенный подъём лапки | Да |
| Тип челнока | горизонтальный |
| Количество выполняемых операций | 129 |
| Обмётывание петли | автоматическое |
| Максимальная длина стежка, мм | 5 |
| Максимальная ширина зигзага, мм | 7 |
| Нитевдеватель верхней нити | автоматический |
| Педаль | Да |
| Швейный подсказчик | Да |
| Регулировка длины стежка | Плавная |
| Регулировка ширины зигзага | Плавная |
| Намотка шпульки | Автоматическая |
| Блокировка нижней зубчатой рейки | Рычагом |
| Шитьё двойной иглой | Да |
| Боковое продвижение ткани | Да |
| Максимальный подъём лапки, мм | 15 |
| Нижняя зубчатая рейка, сегментов | 7 |
| Возможность шитья без педали | Да |
| Реверс (шитье назад) | Да |
| Автоматическая закрепка | Да |
| Позиционирование иглы | Да |
| ЖК дисплей | Да |
| Количество пяльцев в комплекте | 1 |
| Максимальное поле вышивки, см | 10х10 |
| Вышивальные операции | 196 |
| Встроенные алфавиты | Англиский Abc; Цифры 123; Знаки &!? |
| USB порт | Да |
| Слот для карты памяти BROTHER | Да |
| Touch Screen | Да |
| Возможность создания собственных рисунков | Да |
| Комплектация | Шпульки; Иглы; Распарыватель; Двойная игла; Щеточка для очистки; Отвёртка (большая); Ножницы; Стилус; Дополнительный столик; Катушкодержатель (средний)); DVD; Вышивальный блок |
| Лапки в комплекте | Лапка для строчки » Зигзаг» ; Лапка для декоративных строчек; Лапка для обработки края; Лапка для обметывания петель; Лапка для вшивания молнии; Лапка для монограмм; Лапка для потайной строчки; Лапка для вышивки и штопки; Лапка для пуговиц |
| Виды строчек | прямая по центру; прямая слева; зигзаг; рабочие; трикотажные; декоративные |
| Виды петель | Прямая бельевая петля; Петля трикотажная; Петля с глазком для среднего материала; Петля блузочная; Петля блузочная с закругленными краями; Декоративная петля |
Источник: Яндекс.Маркет
Достоинства:
При покупке в 2010 году -это была эйфория — первая машинка и сразу — швейно- вышивальная. Конечно, сразу набросилась на вышивку, тогда мало что можно было скачать, зато удалось найти крякнутую программу Pe-design — по-моему так она называлась — счасть не было предела. Сейчас массу картинок на любой вкус скачать можно в интернете. А уж про количество строчек, их разнообразие — вообще молчу.
Недостатки:
У неё оказался очень сложный характер. Но она выдержала почти 8 лет вообще без тех обслуживания. Только ворсу вычищала новой кистью для румян, потому что кисточка в комплекте для смеха, в основном. Ниткообрезываетль ею можно почистить. Могла прерваться (да и сейчас может) посреди вышивания( но там есть функционал, чтобы вернуться на то место, где она прервалась, вплоть до стежка) , при включении может начать шить обратным ходом( лечится перезагрузкой, или парой перезагрузок). Насчёт толстых тканей типа джинсы в несколько слоёв (2 и более) — очень сложно, придётся попыхтеть — то же с толстыми нитками специально для джинсы. декоративные строчки на разных тканях смотрятся по-разному. Площадка, на которую крепится челнок со шпулей имеет магнитик для крепления челнока, так вот, этот магнит легко смещается пальцем. Обнаружив это была в шоке, зато поломку сама отремонтировала, отцентрировав магнитик. Пластиковая шпуля при такой сборке, скорее плюс — однажды игла у меня в неё воткнулась. На интуитивное понимание — не нужно расчитывать, за это можно поплатиться. Все в обнимку с инструкцией)). Да и много было по-мелочи.
Комментарий:
Тех обслуживание, в итоге, сделала сама, когда машина шить категорически отказалась. Потому как сервис далеко, везти на тот момент было проблематично. Разобрала, почистила, смазала — заработала как после покупки. При разборе фотографировала каждый этап, чтобы потом ничего не перепутать. При этом я далека от инженерии и механики. Пяльца побольше на неё можно купить на Али, вполне, как и спец нитки для вышивания, чтобы итоговая работа не была грубой. Даже нашла запасную площадку, закрывающую отделение со шпулей, так как потеряла прозрачную часть этой площадки при переезде. Уровень безопасности, по-моему супер, чуть что — уходит в защиту, Вас и саму себя не покалечит, в случае чп. В общем- дорогая игрушка. Но бытовое шитьё на ней выполнять — одно удовольствие(но можно для этого преобрести экземпляр подешевле). Краеобметачные швы выполняет приемлемо. Таковые имеются на разные типы тканей- очень радует. Покупала в то время за 24,5. Самый был бюджетный вариант все-в-одном. Если у Вас масса терпения, не так много денег на модель подороже, руки растут откуда положено, то можете попробовать. Я уже сроднилась с ней, другую покупать не планирую. Хотя, в свете нового желания пошить на ней кожу,- ничего нельзя загадывать)).
2 июня 2018
Анна Л.
Источник: Яндекс.Маркет
Достоинства:
бюджетная, тихая, много функций
Недостатки:
сначала их не было, все идеально, но ближе к году использования она сломалась, НИКТО не берется ее делать, потому что она вышивальная, я ОЧЕНЬ расстроена. Возила ее в другой город не один раз и ничего.
Комментарий:
разочаровалась в этой фирме, скорее подделка, которая сломалась. буду брать менее известную
1 апреля 2018
Имя скрыто
Источник: Яндекс.Маркет
Достоинства:
универсальность — шьет и вышивает, цена/качество.
Недостатки:
требует очень уж деликатного обращения и обслуживания, очень требовательна к качеству ниток и пр, «Комбинированное» англо-русское меню, Механик и сервис должны быть в шаговой доступности.
Комментарий:
очень хрупкий и тонкий «инструмент». требует деликатного обращения. Совершенно не для бизнеса и совсем не для «чистых гуманитариев». машинка не на все случаи жизни — «брезент и кожу» шить даже и не мечтайте — она сможет, но сдохнет моментально.
25 декабря 2017
Татьяна К.
Источник: Яндекс.Маркет
Достоинства:
Все! Идеальная машинка, оправдала все ожидания и даже больше.
Недостатки:
Нет.
Комментарий:
Мой опыт шитья на этой машинке составляет год, шью на ней много и часто. Это моя первая швейная машина и должна сказать, что для начинающей швеи, как многие меня убеждали — это дорогая и бессмысленная покупка. Вроде сначала нужно было купить что-то попроще. Нет, нет и нет! Когда сразу учишься работать на таком прекрасном инструменте, так и процесс доставляет удовольствие и результат всегда отличный! Кроме того я знала, что из простенькой быстро вырасту, а тут возможности для самовыражения не ограничены. Эта всеравно что сравнивать езду на феррари с запорожцем. Она никогда не подведёт. Строчки идеальные, в том числе декоративные, вышивка, автоматические петли, пуговицы пришивает, масса тонких настроек, ее можно настроить до миллиметра под себя, набор лапок в комплекте прекрасный, даже не нужно ничего докупать, есть все! Шьёт очень плавно, с места не срывается, регулировка скорости плавная, очень простой интерфейс и куча подсказок. Есть такая строчка, которую от оверлочной не отличишь. Обхожусь без оверлока. И с изнанки изделие выглядит как из магазина. Может и куплю оверлок со временем, но пока хватает и этого. Трикотаж шьёт отлично и шёлк. А теперь пару слов тем, кто ругает машинку. Вам совет: если ничего не помогает, ребята, читайте инструкцию!!! Там все чётко и по делу написано. Инструкция кстати классная, молнию училась вшивать по ней сразу получилось идеально. Эта машинка чувствительна к правильному выбору и соответствию нити, иглы и типа ткани. Тогда все отлично. Хотя большинство тканей шьёт стандартной иглой отлично. Все в инструкции опять же написано. У кого там декоративные строчки зажевываются: используйте подходящую ткань или флизелин, опять же в инструкции про это есть. С флизелином я и на шёлке вышиваю, никаких проблем. У кого там через год сломалась после шитья брезента. Ну друзья, тут нужно соображать, что машинку для вышивки не нужно травмировать шитьем чехлов на танки! Это логично. Она как дорогой инструмент требует к себе любви и бережного ухода. Если будете работать бережно будет вам счастье. Всем удачи и красивых проектов!
20 февраля 2017
Татьяна
Источник: Яндекс.Маркет
Достоинства:
Все! Идеальная машинка, оправдала все ожидания и даже больше.
Недостатки:
Нет.
Комментарий:
Мой опыт шитья на этой машинке составляет год, шью на ней много и часто. Это моя первая швейная машина и должна сказать, что для начинающей швеи, как многие меня убеждали — это дорогая и бессмысленная покупка. Вроде сначала нужно было купить что-то попроще. Нет, нет и нет! Когда сразу учишься работать на таком прекрасном инструменте, так и процесс доставляет удовольствие и результат всегда отличный! Кроме того я знала, что из простенькой быстро вырасту, а тут возможности для самовыражения не ограничены. Эта всеравно что сравнивать езду на феррари с запорожцем. Она никогда не подведёт. Строчки идеальные, в том числе декоративные, вышивка, автоматические петли, пуговицы пришивает, масса тонких настроек, ее можно настроить до миллиметра под себя, набор лапок в комплекте прекрасный, даже не нужно ничего докупать, есть все! Шьёт очень плавно, с места не срывается, регулировка скорости плавная, очень простой интерфейс и куча подсказок. Есть такая строчка, которую от оверлочной не отличишь. Обхожусь без оверлока. И с изнанки изделие выглядит как из магазина. Может и куплю оверлок со временем, но пока хватает и этого. Трикотаж шьёт отлично и шёлк. А теперь пару слов тем, кто ругает машинку. Вам совет: если ничего не помогает, ребята, читайте инструкцию!!! Там все чётко и по делу написано. Инструкция кстати классная, молнию училась вшивать по ней сразу получилось идеально. Эта машинка чувствительна к правильному выбору и соответствию нити, иглы и типа ткани. Тогда все отлично. Хотя большинство тканей шьёт стандартной иглой отлично. Все в инструкции опять же написано. У кого там декоративные строчки зажевываются: используйте подходящую ткань или флизелин, опять же в инструкции про это есть. С флизелином я и на шёлке вышиваю, никаких проблем. У кого там через год сломалась после шитья брезента. Ну друзья, тут нужно соображать, что машинку для вышивки не нужно травмировать шитьем чехлов на танки! Это логично. Она как дорогой инструмент требует к себе любви и бережного ухода. Если будете работать бережно будет вам счастье. Всем удачи и красивых проектов!
20 февраля 2017
Имя скрыто
Источник: Яндекс.Маркет
Достоинства:
Удобная, качество строчки хорошее.
Недостатки:
по для нее стоит дороже чем сама машинка в 1,5-2 раза
Комментарий:
машинка шьет и выполняет декоративные строчки, делает вышивки (ограниченное количество), но если вы хотите вышить что то свое, то надо докупить п.о. (50-60 тыс руб). Иначе это просто швейная машинка с декоративными строчками, а такую можно и подешевле купить.
19 ноября 2016
Нина Ш.
Источник: Яндекс.Маркет
Достоинства:
Как ни странно, она вышивает. Довольно тихая, есть регулировка скорости. Останавливается при обнаружении неисправности (нитки намотались, застряли) Наличие юсб входа. Понятное меню.
Недостатки:
То, для чего она задумывалась, она выполняет. Все остальное — от лукавого.
Комментарий:
Машина для начинающих и скромных энтузиастов — поле вышивки не очень большое, но можно приспособиться путем применения гигапялец. Сама очень компактная. Относить это к минусам или к плюсам каждый решает сам. Мне через какое-то время стало не хватать пространства справа от иглы. В ней всего 45w. Я, честно сказать, удивилась, когда узнала. У меня машина шьет все. Джинсу, кожу, таже тезу (ПВХ ткань из которой детские санки-ватрушки шьют или тенты для фур) в два слоя шила совершенно спокойно. Но повторять не планирую — жалко. Поиграться с расшивкой детской одежды или украшением взрослой вполне можно. Делать корпоративную вышивку во всю спину уже намного сложнее, но тоже возможно. Прошлым летом машина стояла спокойно в шкафу, а когда я ее достала, она отказалась шить. В сервисе по гарантии все сделали, но никто так и не понял, что случилось и главное почему. В общем, если вы хотите шить в свободное время себе, детям, соседу и при этом иногда вам хочется что-то вышить, то машина для вас. Если вы планируете шить активно, то лучше купите что попроще. Я, видимо, так и поступлю, но эту оставлю на вышивку. Оценку ставлю, исходя из ожиданий и реальности. Машина бытовая, об этом не стоит забывать.
7 февраля 2016
nat n.
Источник: Яндекс.Маркет
Достоинства:
Компактная, тихая, многофункциональная
Недостатки:
не качественно шьет декоративные строчки, через 1год сломалась
Комментарий:
Шью только для себя и для ребенка, стала ерундить практически сразу (например: при вышивании рвется нить, может не двигать ткань, застрянет на одном месте и намотает комок нитки.) в итоге машинка стала строчить только прямую строчку, последней каплей стало то, что я не могла пришить аппликацию зигзагом. Отвезли в сервис, сделали ТО 4тыс руб. и вынесли вердикт, что эта машинка только для души…. И что это значит?????? Я на нее должна смотреть и любоваться???? Очень разочарована. Больше не буду покупать комби. И Brother тоже.
17 декабря 2015
Riska L.
Источник: Яндекс.Маркет
Достоинства:
Занимает мало места, имея большую функциональность. Шьет и вышивает очень тихо «шуршит»
Недостатки:
Маловат максимальный размер вышивки, нельзя комбинировать дизайны в машине.
Комментарий:
Компактная и тихая, эти два критерия были важны при выборе машины в подарок. Размер поля вышивки небольшой, поэтому сразу приобрели пяльца 170х100. Для работы с дизайнами пока используется бесплатная программка и конвертер дизайнов, этого достаточно для комбинирования или деления дизайнов, благо в инете можно скачать много дизайнов в подходящем формате.
В подарок к машине подарили флешку с коллекцией дизайнов, мелочь, а приятно. Инструкция была на русском, а тем у кого на английском можно скачать русскую на сайте бразера, она в свободном доступе.
1 октября 2015
Елена С.
Источник: Яндекс.Маркет
Достоинства:
богатая комплектация лапками, много строчек
Недостатки:
маленькая и лёгкая не подойдёт для толстых тканей, пяльцы очень маленькие, заявленных в инструкции как доп.оборудование 10*17ни где ни купить, нет в продаже карт с рисунками, скачать рисунки ни где нельзя. Слабое челночное устройство. Меню непонятное на английском языке.
Комментарий:
Эта машинка для портних неумех, или как очень дорогая игрушка для детей. Если вам много шить, или открыть небольшой бизнес, в плане где то что о подшить или вышить, такая машина не подойдёт. Короче это дорогая «хрень». Удивляет что за столько лет продажи в РФ, не могли меню сделать на Русском языке, хорошо хоть не на японском. В общем для желающих шить не только детские но и взрослые вещи, я такую не советую. Выброшенные деньги на ветер. А что касается тут хвалебных отзывов, то писали либо дилетанты, либо люди которым хорошо заплатили!
5 апреля 2015
- Аксессуары к швейным машинкам
Похожие товары
ОСНОВНЫЕ ОПЕ Р АЦИ И ОСНОВНЫЕ СТРОЧКИ ВЫШИВАНИЕ ПРИЛОЖЕ…
Руководство пользователя, Т оварный код, Product code ( ) Чат поддержки
- Изображение
- Текст
ОСНОВНЫЕ
ОПЕ Р АЦИ И
ОСНОВНЫЕ
СТРОЧКИ
ВЫШИВАНИЕ
ПРИЛОЖЕНИЕ
ПОДГОТОВКА
К РАБОТЕ
Компьютеризованная швейновышивальная машина
Т оварный код
Product Code (
)
885-V95/V97
Посетите наш сайт по адресу
» http://solutions.b r othe r .com «, г де вы
сможете получить консул ь тацию службы
технической поддержки и ответы на
часто задаваемые вопросы ( F AQs) .
Руководство пользователя

1
— — — — — — — — — — — — — — — — — — — — — — — — — — — — — — — — — — — — — — — — — — — — — — — — — — — —
Введение
Благодарим за покупку швейно-вышивальной машины. Перед эксплуатацией машины внимательно
изучите «ИНСТРУКЦИИ ПО ТЕХНИКЕ БЕЗОПАСНОСТИ» и руководство по применению различных
функций.
Храните руководство в легкодоступном месте, чтобы при необходимости получить всю необходимую
информацию.
ИНСТРУКЦИИ ПО ТЕХНИКЕ БЕЗОПАСНОСТИ
Обязательно прочитайте эти инструкции по технике безопасности перед
использованием швейной машины.
ОПАСНО!
Во избежание поражения электрическим током
1
Всегда отключайте машину от электрической сети сразу после использования, при
чистке, при выполнении любых регулировок, разрешенных пользователю и описанных в
данном руководстве, или перед тем как оставить машину без присмотра.
ВНИМАНИЕ!
Во избежание возгорания, поражения электрическим током, ожогов или травм:
2
Всегда отсоединяйте машину от электросети при выполнении любых регулировок,
описанных в данном руководстве.
• Для отключения машины от электрической сети установите сетевой выключатель в
положение «O», соответствующее выключению, и затем выньте вилку кабеля питания из
розетки. При отключении машины от сети не вытягивайте вилку за кабель питания.
• Включайте вилку кабеля питания прямо в розетку электросети. Не пользуйтесь
удлинителями.
• Всегда отключайте машину от сети при отключении электропитания.
3
Никогда не используйте швейную машину, если у нее поврежден кабель питания или
вилка, если машина плохо работает, если ее уронили или повредили, или если в
машину попала вода. В этих случаях машину следует сдать дилеру или в
авторизованный сервисный центр для проверки, ремонта и наладки ее электрической
или механической части.
• Если во время хранения или непосредственной эксплуатации машины, были замечены
необычные признаки: появление запаха, нагревание, изменение цвета или деформация,
немедленно прекратите использование машины и выньте силовой кабель из розетки.
• При переноске машины используйте ручку. Подъем машины с помощью посторонних
предметов может повредить машину или привести к неисправностям, опасным для
здоровья.
•
При подъеме машины не делайте резких или неожиданных движений. В противном
случае вы можете травмировать спину или колени.

2
— — — — — — — — — — — — — — — — — — — — — — — — — — — — — — — — — — — — — — — — — — — — — — — — — — —
4
Всегда содержите рабочее место в чистоте:
• Запрещается работать на машине при закрытых вентиляционных отверстиях. Следите
за чистотой вентиляционных отверстий машины и педали, своевременно очищайте их от
пыли, грязи, обрывков ткани и ворса.
• Не кладите на педаль никаких предметов.
• Не используйте удлинители. Включайте вилку кабеля питания прямо в розетку
электросети.
• Не роняйте в отверстия машины и не вставляйте в них никакие посторонние
предметы.
• Не используйте машину в помещениях, в которых распыляются какие-либо аэрозоли
или применяется чистый кислород.
• Не используйте машину вблизи источников тепла (таких как плита или утюг); в
противном случае машина, кабель питания или швейное изделие могут загореться, что
приведет к пожару или поражению электрическим током.
• Не устанавливайте машину на неустойчивые поверхности, например, на наклонные
столы. В противном случае машина может упасть и причинить травмы.
5
Особая осторожность требуется при шитье:
• Всегда обращайте особое внимание на иглу. Не используйте погнутые или
поврежденные иглы.
• Держите пальцы на расстоянии от всех движущихся частей машины. Будьте особенно
осторожны при работе в непосредственной близости к игле.
• При выполнении любых операций в зоне иглы выключите машину, установив
выключатель питания в положение “O”.
• Не используйте поврежденную или ненадлежащую игольную пластину, поскольку это
может привести к поломке иглы.
• Не тяните и не толкайте материал во время шитья. Прострачивая материал в ручном
режиме, строго следуйте инструкциям, чтобы не погнуть и не сломать иглу.
6
Не допускается использование машины в качестве игрушки:
• Необходимо быть особенно внимательным, когда машина используется детьми или
когда во время работы на машине рядом находятся дети.
• Полиэтиленовый пакет, в котором поставляется машина, должна храниться вдали от
детей, либо должна быть уничтожена. Не позволяйте детям играть с ним; это может
привести к удушью детей.
• Не используйте машину для работы вне помещений.
7
Для обеспечения длительного срока эксплуатации машины:
• Не храните машину под прямыми солнечными лучами или в условиях высокой
влажности. Не используйте и не храните машину вблизи электрообогревателя,
включенного утюга, галогенной лампы или других источников тепла.

3
— — — — — — — — — — — — — — — — — — — — — — — — — — — — — — — — — — — — — — — — — — — — — — — — — — — —
• Для чистки корпуса используйте только нейтральные мыльные растворы и моющие
средства. Категорически запрещается использование бензина, растворителя и
абразивных чистящих порошков, поскольку это может привести к повреждению корпуса
машины.
• Перед заменой или установкой прижимной лапки, иглы или любых других частей следует
обязательно просмотреть руководство по эксплуатации, чтобы правильно выполнять все
необходимые операции.
8
Для ремонта или наладки машины:
• При поломке осветительного устройства оно должно быть заменено авторизованным
дилером.
• При поломке машины или необходимости ее наладки следует перед самостоятельным
выполнением осмотра и регулировки машины сначала просмотреть таблицу поиска
неисправностей в Приложении данного руководства по эксплуатации. Если
самостоятельно устранить неисправность не удается, обратитесь к авторизованному
дилеру Brother.
Используйте машину только в целях, указанных в данном руководстве.
Используйте только те принадлежности, которые рекомендованы изготовителем и
указаны в данном руководстве.
Содержание настоящего руководства и эксплуатационные характеристики могут
быть изменены без предварительного уведомления.
Дополнительную информацию о продукции и обновленные данные можно найти на
нашем сайте www.brother.com.
СОХРАНИТЕ ДАННЫЕ ИНСТРУКЦИИ
Эта машина предназначена для домашнего использования.
ТОЛЬКО ДЛЯ ВЕЛИКОБРИТАНИИ,
ИРЛАНДИИ, МАЛЬТЫ И КИПРА
ВНИМАНИЕ!
• В случае замены пробкового предохранителя, используйте предохранитель,
соответствующий стандартам ASTA и BS 1362, т.е. имеющий маркировку
и
характеристики, указанные на вилке.
• Обязательно установите крышку предохранителя. Запрещается использовать вилку, если
не установлена крышка предохранителя.
• Если имеющаяся розетка электросети не подходит к вилке кабеля питания машины,
обратитесь к дилеру для получения соответствующего кабеля питания.

4
— — — — — — — — — — — — — — — — — — — — — — — — — — — — — — — — — — — — — — — — — — — — — — — — — — —
ДЛЯ МЕКСИКИ И СТРАН, ГДЕ НАПРЯЖЕНИЕ В
СЕТИ ПЕРЕМЕННОГО ТОКА 220-240 В
Данное устройство не предназначено для использования детьми; людям с ограниченной
трудоспособностью, а также не имеющим навыков работы с машиной, может потребоваться
посторонняя помощь. Не оставляйте детей без присмотра, не разрешайте им играть с
машиной.

5
— — — — — — — — — — — — — — — — — — — — — — — — — — — — — — — — — — — — — — — — — — — — — — — — — — — —
Содержание
Введение ……………………………………………………………………………………………………………1
ИНСТРУКЦИИ ПО ТЕХНИКЕ БЕЗОПАСНОСТИ ……………………………………………………1
Характеристики швейной машины ……………………………………………………………………8
Принадлежности ……………………………………………………………………………………………….9
Принадлежности в комплекте поставки …………………………………………………………………………………………. 9
Дополнительные принадлежности ……………………………………………………………………………………………….. 10
Узлы и детали машины и их функции ……………………………………………………………..11
Вид спереди ……………………………………………………………………………………………………………………………….. 11
Зона иглы и прижимной лапки ……………………………………………………………………………………………………… 12
Вид справа/сзади ………………………………………………………………………………………………………………………… 12
Кнопки управления ……………………………………………………………………………………………………………………… 13
Панель управления …………………………………………………………………………………………………………………….. 14
ПОДГОТОВКА К РАБОТЕ
15
Включение и выключение машины …………………………………………………………………16
Меры предосторожности, относящиеся к электропитанию ……………………………………………………………. 16
Включение машины …………………………………………………………………………………………………………………….. 17
Выключение машины ………………………………………………………………………………………………………………….. 17
Эксплуатация ЖК-дисплея (жидкокристаллического дисплея) ………………………18
Просмотр ЖК-дисплея ………………………………………………………………………………………………………………… 18
Изменение настроек машины ………………………………………………………………………………………………………. 18
Проверка рабочих процедур машины …………………………………………………………………………………………… 21
Намотка и установка шпульки …………………………………………………………………………22
Меры предосторожности …………………………………………………………………………………………………………….. 22
Намотка шпульки ………………………………………………………………………………………………………………………… 22
Установка шпульки ……………………………………………………………………………………………………………………… 27
Заправка верхней нити ……………………………………………………………………………………31
Информация о катушках с нитью …………………………………………………………………………………………………. 31
Заправка верхней нити ……………………………………………………………………………………………………………….. 32
Использование двойной иглы ……………………………………………………………………………………………………… 36
Замена иглы …………………………………………………………………………………………………….39
Меры предосторожности при обращении с иглами ……………………………………………………………………….. 39
Выбор иглы зависит от нити и типа материала …………………………………………………………………………….. 39
Проверка иглы ……………………………………………………………………………………………………………………………. 40
Замена иглы ……………………………………………………………………………………………………………………………….. 41
Замена прижимной лапки ………………………………………………………………………………..43
Меры предосторожности при работе с прижимной лапкой ……………………………………………………………. 43
Замена прижимной лапки ……………………………………………………………………………………………………………. 43
Удаление и установка держателя прижимной лапки …………………………………………………………………….. 45
Шитье цилиндрических и больших изделий ………………………………………………….46
«Свободный рукав» ……………………………………………………………………………………………………………………… 46
Использование удлиненного стола ………………………………………………………………………………………………. 46
ОСНОВНЫЕ ОПЕРАЦИИ
49
Шитье ………………………………………………………………………………………………………………50
Общий порядок действий ……………………………………………………………………………………………………………. 50
Типы строчек ………………………………………………………………………………………………………………………………. 51
Выбор строчки ……………………………………………………………………………………………………………………………. 51
Размещение материала ………………………………………………………………………………………………………………. 54
Начало шитья …………………………………………………………………………………………………………………………….. 55
Закрепление строчки …………………………………………………………………………………………………………………… 57
Обрезание нитей ………………………………………………………………………………………………………………………… 59
Настройка строчек …………………………………………………………………………………………..61
Настройка ширины строчки …………………………………………………………………………………………………………. 61
Настройка длины стежка …………………………………………………………………………………………………………….. 62
Регулировка натяжения нити ……………………………………………………………………………………………………….. 62

— — — — — — — — — — — — — — — — — — — — — — — — — — — — — — — — — — — — — — — — — — — — — — — — — — —
6
Полезные функции ………………………………………………………………………………………….64
Автоматическое выполнение обратных и закрепляющих стежков …………………………………………………. 64
Автоматическое обрезание нитей ………………………………………………………………………………………………… 65
Зеркальное отображение строчек ………………………………………………………………………………………………… 66
Сохранение настроек строчек ……………………………………………………………………………………………………… 67
Полезные советы …………………………………………………………………………………………….68
Пробное шитье …………………………………………………………………………………………………………………………… 68
Изменение направления шитья …………………………………………………………………………………………………… 68
Шитье по кривой линии ……………………………………………………………………………………………………………….. 68
Работа с толстым материалом ……………………………………………………………………………………………………. 68
Пришивание застежки типа «крючок и петля» ……………………………………………………………………………….. 69
Работа с тонким материалом ………………………………………………………………………………………………………. 70
Работа с эластичным материалом ………………………………………………………………………………………………. 70
Шитье с одинаковым припуском на шов ……………………………………………………………………………………….. 70
ОСНОВНЫЕ СТРОЧКИ
71
Схема настройки строчек ………………………………………………………………………………..72
Основные строчки ………………………………………………………………………………………………………………………. 72
Другие виды строчек …………………………………………………………………………………………………………………… 76
Краеобметочные строчки ………………………………………………………………………………..78
Обметывание краев с краеобметочной лапкой «G» ……………………………………………………………………….. 78
Обметывание краев с лапкой для строчки «зигзаг» «J» …………………………………………………………………… 79
Обметывание краев с помощью бокового ножа (дополнительный узел) ………………………………………… 80
Простые строчки ……………………………………………………………………………………………..82
Наметывание ……………………………………………………………………………………………………………………………… 82
Простые строчки …………………………………………………………………………………………………………………………. 82
Потайные подшивочные строчки ……………………………………………………………………84
Обметывание петель/пришивание пуговиц …………………………………………………….87
Обметывание петель ………………………………………………………………………………………………………………….. 88
Пришивание пуговиц …………………………………………………………………………………………………………………… 92
Вшивание молнии ……………………………………………………………………………………………94
Вшивание центральной молнии …………………………………………………………………………………………………… 94
Вшивание боковой молнии ………………………………………………………………………………………………………….. 96
Работа с эластичным материалом и эластичной тесьмой ……………………………..99
Эластичная строчка ……………………………………………………………………………………………………………………. 99
Пришивание эластичной тесьмы ……………………………………………………………………………………………….. 100
Выполнение аппликаций, лоскутного шитья и выстегивания ………………………101
Пришивание аппликаций …………………………………………………………………………………………………………… 102
Лоскутное шитье ……………………………………………………………………………………………………………………….. 103
Стачивание ………………………………………………………………………………………………………………………………. 103
Выстегивание ……………………………………………………………………………………………………………………………. 104
Выстегивание со свободной подачей материала ………………………………………………………………………… 106
Атласное шитье с использованием регулятора скорости …………………………………………………………….. 107
Закрепление …………………………………………………………………………………………………..108
Тройная эластичная строчка ……………………………………………………………………………………………………… 108
Закрепки …………………………………………………………………………………………………………………………………… 108
Штопка ……………………………………………………………………………………………………………………………………… 111
Обметывание глазков ……………………………………………………………………………………113
Декоративная строчка ……………………………………………………………………………………114
Строчка-мережка ………………………………………………………………………………………………………………………. 115
Фестонная строчка ……………………………………………………………………………………………………………………. 116
Украшение сборками или буфами ……………………………………………………………………………………………… 117
Строчка-ракушка ……………………………………………………………………………………………………………………….. 118
Декоративное стачивание …………………………………………………………………………………………………………. 119
Мережки …………………………………………………………………………………………………………………………………… 119
Выполнение различных встроенных декоративных рисунков …………………….122
Выполнение красивых декоративных строчек …………………………………………………………………………….. 122
Вышивание рисунков ………………………………………………………………………………………………………………… 122
Изменение плотности строчки ……………………………………………………………………………………………………. 123
Изменение размера рисунка ……………………………………………………………………………………………………… 123
Изменение длины атласных строчек ………………………………………………………………………………………….. 124

7
— — — — — — — — — — — — — — — — — — — — — — — — — — — — — — — — — — — — — — — — — — — — — — — — — — — —
Настройка пробела между символами ……………………………………………………………………………………….. 124
Калибровка рисунка ………………………………………………………………………………………………………………….. 125
Комбинирование рисунков …………………………………………………………………………………………………………. 126
Сохранение рисунков ………………………………………………………………………………………………………………… 129
Разработка рисунка (My Custom Stitch) …………………………………………………………131
Создание эскиза рисунка …………………………………………………………………………………………………………… 131
Ввод данных рисунка ………………………………………………………………………………………………………………… 132
Изменение данных рисунка ……………………………………………………………………………………………………….. 133
Примеры создаваемых рисунков ……………………………………………………………………………………………….. 134
ВЫШИВАНИЕ
135
Аккуратное вышивание …………………………………………………………………………………136
Что подготовить ………………………………………………………………………………………………………………………… 136
Вышивание шаг за шагом ………………………………………………………………………………………………………….. 137
Установка лапки для вышивания ………………………………………………………………….138
Установка лапки для вышивания ……………………………………………………………………………………………….. 138
Удаление лапки для вышивания ……………………………………………………………………………………………….. 140
Установка модуля вышивания ………………………………………………………………………141
Соблюдайте осторожность при установке модуля вышивания …………………………………………………….. 141
Установка модуля вышивания …………………………………………………………………………………………………… 141
Удаление модуля вышивания ……………………………………………………………………………………………………. 143
Подготовка ткани …………………………………………………………………………………………..144
Крепление стабилизирующего материала к ткани ………………………………………………………………………. 144
Установка ткани в пяльцы …………………………………………………………………………………………………………. 145
Установка пялец …………………………………………………………………………………………….148
Установка пялец ……………………………………………………………………………………………………………………….. 148
Удаление модуля вышивания ……………………………………………………………………………………………………. 149
Выбор рисунков вышивания …………………………………………………………………………150
Авторское право ……………………………………………………………………………………………………………………….. 150
Типы рисунков вышивания ………………………………………………………………………………………………………… 150
Эксплуатация ЖК-дисплея (жидкокристаллического дисплея) …………………………………………………….. 151
Выберите буквенно-цифровые символы …………………………………………………………………………………….. 154
Выбор рисунка вышивания ………………………………………………………………………………………………………… 155
Выбор рисунка обрамления ………………………………………………………………………………………………………. 155
Использование карты вышивания ……………………………………………………………………………………………… 156
Вышивание …………………………………………………………………………………………………….157
Проверка рисунков перед вышиванием ……………………………………………………………………………………… 157
Вышивание рисунка ………………………………………………………………………………………………………………….. 158
Выполнение аппликаций …………………………………………………………………………………………………………… 160
Редактирование и сохранение рисунков ……………………………………………………….162
Изменение расположения и размера …………………………………………………………………………………………. 162
Регулировка натяжения нити ……………………………………………………………………………………………………… 164
Соединение рисунков с символами ……………………………………………………………………………………………. 165
Повторное шитье ………………………………………………………………………………………………………………………. 166
Нить закончилась в процессе вышивания рисунка ……………………………………………………………………… 167
Остановка во время вышивания ………………………………………………………………………………………………… 167
Использование функции запоминания ………………………………………………………….169
Меры предосторожности при работе с данными вышивания ………………………………………………………. 169
Пересылка рисунков вышивания с компьютера на машину …………………………………………………………. 171
Сохранение рисунков ………………………………………………………………………………………………………………… 174
ПРИЛОЖЕНИЕ
175
Уход и техническое обслуживание ………………………………………………………………..176
Наружная очистка машины ………………………………………………………………………………………………………… 176
Очистка челночного устройства …………………………………………………………………………………………………. 176
Поиск и устранение неисправностей …………………………………………………………….178
Сообщения об ошибках …………………………………………………………………………………………………………….. 183
Настройка ЖК-дисплея ……………………………………………………………………………………………………………… 187
Звуковая сигнализация ……………………………………………………………………………………………………………… 187
Обновление программного обеспечения машины при помощи USB с медиа данными …. 188
Указатель ……………………………………………………………………………………………………….189

8
— — — — — — — — — — — — — — — — — — — — — — — — — — — — — — — — — — — — — — — — — — — — — — — — — — —
Характеристики швейной машины
a
Автоматическое обрезание нитей
После шитья нити могут обрезаться автоматически (с. 59, 65).
b
Система быстрой намотки шпульки
Система быстрой и простой намотки шпульки позволяет наматывать шпульки с помощью одного нажатия кнопки (с. 22).
c
Встроенные строчки
Можно выбрать встроенные строчки из имеющихся, в том числе из основных и декоративных (с. 72).
d
USB-порт
Образцы рисунков вышивания, сохраненные на флеш-накопителе USB (флэш-памяти USB), можно
импортировать на машину, подключив флэш-накопитель USB прямо к USB-порту
(с. 172).
e
Комплект принадлежностей
Комплект принадлежностей можно хранить внутри рукавной платформы машины, как показано на рисунке.
В
этом отсеке можно хранить прижимные лапки, шпульки, вспарыватель и т.д.
f
Зажим для шпульки
Зажим для катушки можно использовать для предотвращения наматывания слабо натянутой нити на шпульку.
Зажимы для шпулек могут храниться внутри отсека для принадлежностей.
g
Яркая подсветка
Удобная светодиодная лампа упрощает шитье на темных тканях.
h
Семиточечные гребенки транспортера
Обеспечивает плавную и равномерную подачу многослойных материалов и материалов различного веса (с. 12).
i
Шпулька быстрой установки
Приступать к шитью можно без предварительного вытягивания нижней нити (с. 27).
j
Простой в использовании нитенаправитель иглы
Одно нажатие на рычаг позволяет легко заправить нить в иглу (с. 32).
k
Подсветка кнопки Пуск/Стоп
Если горит зеленая подсветка, машина готова к шитью. Красная или оранжевая подсветка указывает на
ошибку или на процесс нагревания машины (с. 13).
l
Вышивание
Машина позволяет вышивать установленные рисунки вышивания, буквенно-цифровые символы,
декоративные обрамления и рисунки с дополнительных карт вышивания (с. 135).
m
Удлиненный стол (Крышка модуля вышивания)
Крышку модуля вышивания можно использовать в качестве удлиненного стола при обработке больших
отрезов материала (с. 46).

27:44
Brother Innov-is 950. Основные швейный операции.
10:31
Новая швейная машинка Brother Innovis 950
26:07
Brother Innov-is 4000. Разборка, устройство, назначение узлов и датчиков
06:43
ТОП ЛУЧШИХ КОМПЬЮТЕРНЫХ ШВЕЙНЫХ МАШИН
27:27
Как шить и вышивать? Швейно вышивальная машина Brother Innov-is F480.
10:23
Вышивка на машинке Brother Innovis 950
05:24
Швейно-вышивальная машина Brother innov-is 950 и пяльца EF71
06:52
Швейно-вышивальная машина Brother Innov-is 950 (NV 950)
Нажмите на кнопку для помощи

Computerized Embroidery and Sewing Machine
Operation Manual
Product Code 885-V95/V96/V97/V98
GETTING READY
SEWING BASICS
UTILITY STITCHES
EMBROIDERY
APPENDIX
Be sure to read this document before using the machine.
We recommend that you keep this document nearby for future reference.


— — — — — — — — — — — — — — — — — — — — — — — — — — — — — — — — — — — — — — — — — — — — — — — — — — — —
Introduction
Thank you for purchasing this embroidery and sewing machine. Before using this machine, carefully read the
«IMPORTANT SAFETY INSTRUCTIONS», and then study this manual for the correct operation of the various
functions.
In addition, after you have finished reading this manual, store it where it can quickly be accessed for future
reference.
IMPORTANT SAFETY INSTRUCTIONS
Please read these safety instructions before attempting to use the machine.
DANGER — To reduce the risk of electric shock
1Always unplug the machine from the electrical outlet immediately after using, when cleaning,
when making any user servicing adjustments mentioned in this manual, or if you are leaving the
machine unattended.
WARNING — To reduce the risk of burns, fire, electric shock, or
injury to persons.
2Always unplug the machine from the electrical outlet when making any adjustments mentioned
in the instruction manual.
• To unplug the machine, switch the machine to the symbol “O” position to turn it off, then grasp
the plug and pull it out of the electrical outlet. Do not pull on the cord.
• Plug the machine directly into the electrical outlet. Do not use an extension cord.
• Always unplug your machine if the power is cut.
3 Electrical Hazards:
• This machine should be connected to an AC power source within the range indicated on the
rating label. Do not connect it to a DC power source or inverter. If you are not sure what kind of
power source you have, contact a qualified electrician.
• This machine is approved for use in the country of purchase only.
4 Never operate this machine if it has a damaged cord or plug, if it is not working properly, if it has
been dropped or damaged, or water is spilled on the unit. Return the machine to the nearest
authorized dealer or service center for examination, repair, electrical or mechanical adjustment.
• While the machine is stored or in use if you notice anything unusual, such as an odor, heat,
discoloration or deformation, stop using the machine immediately and unplug the power cord.
• When transporting the sewing machine, be sure to carry it by its handle. Lifting the sewing
machine by any other part may damage the machine or result in the machine falling, which could
cause injuries.
1

— — — — — — — — — — — — — — — — — — — — — — — — — — — — — — — — — — — — — — — — — — — — — — — — — — —
• When lifting the sewing machine, be careful not to make any sudden or careless movements,
otherwise you may injure your back or knees.
5 Always keep your work area clear:
• Never operate the machine with any air openings blocked. Keep ventilation openings of the
sewing machine and foot control free from the build up of lint, dust, and loose cloth.
• Do not store objects on the foot controller.
• Do not use extension cords. Plug the machine directly into the electrical outlet.
• Never drop or insert any object into any opening.
• Do not operate where aerosol (spray) products are being used or where oxygen is being
administered.
• Do not use the machine near a heat source, such as a stove or iron; otherwise, the machine,
power cord or garment being sewn may ignite, resulting in fire or an electric shock.
• Do not place this sewing machine on an unstable surface, such as an unsteady or slanted table,
otherwise the sewing machine may fall, resulting in injuries.
6 Special care is required when sewing:
• Always pay close attention to the needle. Do not use bent or damaged needles.
• Keep fingers away from all moving parts. Special care is required around the machine needle.
• Switch the sewing machine to the symbol “O” position to turn it off when making any adjustments
in the needle area.
• Do not use a damaged or incorrect needle plate, as it could cause the needle to break.
• Do not push or pull the fabric when sewing, and follow careful instruction when freehand
stitching so that you do not deflect the needle and cause it to break.
7 This machine is not a toy:
• Your close attention is necessary when the machine is used by or near children.
• The plastic bag that this sewing machine was supplied in should be kept out of the reach of
children or disposed of. Never allow children to play with the bag due to the danger of
suffocation.
• Do not use outdoors.
8 For a longer service life:
• When storing this machine, avoid direct sunlight and high humidity locations. Do not use or store
the machine near a space heater, iron, halogen lamp, or other hot objects.
• Use only neutral soaps or detergents to clean the case. Benzene, thinner, and scouring powders
can damage the case and machine, and should never be used.
• Always consult the operation manual when replacing or installing any assemblies, the presser feet,
needle, or other parts to assure correct installation.
9 For repair or adjustment:
• If the light unit is damaged, it must be replaced by an authorized dealer.
• In the event a malfunction occurs or adjustment is required, first follow the troubleshooting table
in the back of the operation manual to inspect and adjust the machine yourself. If the problem
persists, please consult your local authorized Brother dealer.
2

— — — — — — — — — — — — — — — — — — — — — — — — — — — — — — — — — — — — — — — — — — — — — — — — — — — —
Use this machine only for its intended use as described in the manual.
Use accessories recommended by the manufacturer as contained in this manual.
The contents of this manual and specifications of this product are subject to change without notice.
For additional product information and updates, visit our web site at www.brother.com
SAVE THESE INSTRUCTIONS
This machine is intended for household use.
This appliance is not intended for use by persons (including children) with reduced physical, sensory
or mental capabilities, or lack of experience and knowledge, unless they have been given
supervision or instruction concerning use of the appliance by a person responsible for their safety.
Children should be supervised to ensure that they do not play with the appliance.
This appliance can be used by children aged from 8 years and above and persons
with reduced physical, sensory or mental capabilities or lack of experience and
knowledge if they have been given supervision or instruction concerning use of the
appliance in a safe way and understand the hazards involved. Children shall not
play with the appliance. Cleaning and user maintenance shall not be made by
children without supervision.
FOR USERS IN THE UK, EIRE,
MALTA AND CYPRUS ONLY
IMPORTANT
• In the event of replacing the plug fuse, use a fuse approved by ASTA to BS 1362, i.e. carrying
the mark, rating as marked on plug.
• Always replace the fuse cover. Never use plugs with the fuse cover omitted.
• If the available electrical outlet is not suitable for the plug supplied with this equipment, you should
contact your authorized dealer to obtain the correct lead.
3

— — — — — — — — — — — — — — — — — — — — — — — — — — — — — — — — — — — — — — — — — — — — — — — — — — —
Contents
Introduction ………………………………………………………………………………………………………… 1
IMPORTANT SAFETY INSTRUCTIONS …………………………………………………………………….1
Machine Features ………………………………………………………………………………………………….8
Accessories ………………………………………………………………………………………………………….. 9
Included accessories ……………………………………………………………………………………………………………………….. 9
Optional accessories ……………………………………………………………………………………………………………………… 10
Names of Machine Parts and Their Functions …………………………………………………………. 11
Front view ……………………………………………………………………………………………………………………………………. 11
Needle and presser foot section ………………………………………………………………………………………………………. 12
Right-side/rear view ………………………………………………………………………………………………………………………. 12
Operation buttons …………………………………………………………………………………………………………………………. 13
Operation panel ……………………………………………………………………………………………………………………………. 14
GETTING READY 15
Turning the Machine On/Off …………………………………………………………………………………16
Power supply precautions ………………………………………………………………………………………………………………. 16
Turning on the machine …………………………………………………………………………………………………………………. 17
Turning off the machine …………………………………………………………………………………………………………………. 17
LCD (Liquid Crystal Display) Operation ………………………………………………………………….18
Viewing the LCD …………………………………………………………………………………………………………………………… 18
Changing the machine settings ……………………………………………………………………………………………………….. 18
Checking machine operating procedures ………………………………………………………………………………………….. 21
Winding/Installing the Bobbin ………………………………………………………………………………. 22
Bobbin precautions ……………………………………………………………………………………………………………………….. 22
Winding the bobbin ………………………………………………………………………………………………………………………. 22
Installing the bobbin ……………………………………………………………………………………………………………………… 27
Upper Threading …………………………………………………………………………………………………31
About the spool of thread ……………………………………………………………………………………………………………….. 31
Threading the upper thread …………………………………………………………………………………………………………….. 32
Using the twin needle ……………………………………………………………………………………………………………………. 36
Replacing the Needle …………………………………………………………………………………………..39
Needle precautions ……………………………………………………………………………………………………………………….. 39
Selecting the needle depending on the thread and fabric types ……………………………………………………………. 39
Checking the needle ……………………………………………………………………………………………………………………… 40
Replacing the needle ……………………………………………………………………………………………………………………… 41
Replacing the Presser Foot …………………………………………………………………………………… 43
Presser foot precautions …………………………………………………………………………………………………………………. 43
Replacing the presser foot ………………………………………………………………………………………………………………. 43
Removing and attaching the presser foot holder …………………………………………………………………………………. 45
Sewing Cylindrical Pieces and Large Pieces …………………………………………………………….. 46
Free-arm sewing ……………………………………………………………………………………………………………………………. 46
Using extension table …………………………………………………………………………………………………………………….. 46
SEWING BASICS 49
Sewing ………………………………………………………………………………………………………………. 50
General sewing procedure ……………………………………………………………………………………………………………… 50
Stitch types …………………………………………………………………………………………………………………………………… 51
Selecting stitching …………………………………………………………………………………………………………………………. 51
Positioning the fabric …………………………………………………………………………………………………………………….. 54
Starting to sew ………………………………………………………………………………………………………………………………. 55
Securing the stitching …………………………………………………………………………………………………………………….. 57
Cutting the thread …………………………………………………………………………………………………………………………. 59
Setting the Stitch ………………………………………………………………………………………………… 61
Adjusting the stitch width ……………………………………………………………………………………………………………….. 61
Adjusting the stitch length ………………………………………………………………………………………………………………. 62
Adjusting the thread tension ……………………………………………………………………………………………………………. 62
4

— — — — — — — — — — — — — — — — — — — — — — — — — — — — — — — — — — — — — — — — — — — — — — — — — — — —
Useful Functions ………………………………………………………………………………………………….64
Automatic sewing reverse/reinforcement stitches ……………………………………………………………………………….. 64
Automatically cutting the thread ……………………………………………………………………………………………………… 65
Mirroring stitches ………………………………………………………………………………………………………………………….. 66
Saving stitch settings ……………………………………………………………………………………………………………………… 67
Useful Sewing Tips ……………………………………………………………………………………………… 68
Trial sewing …………………………………………………………………………………………………………………………………. 68
Changing the sewing direction ………………………………………………………………………………………………………… 68
Sewing curves ………………………………………………………………………………………………………………………………. 68
Sewing thick fabrics ………………………………………………………………………………………………………………………. 68
Sewing hook-and-loop fastener ……………………………………………………………………………………………………….. 69
Sewing thin fabrics ………………………………………………………………………………………………………………………… 70
Sewing stretch fabrics …………………………………………………………………………………………………………………….. 70
Sewing an even seam allowance ……………………………………………………………………………………………………… 70
UTILITY STITCHES 71
Stitch Setting Chart ……………………………………………………………………………………………..72
Utility stitches ………………………………………………………………………………………………………………………………. 72
Other stitches ……………………………………………………………………………………………………………………………….. 76
Overcasting Stitches ……………………………………………………………………………………………. 78
Sewing overcasting stitches using overcasting foot «G» ………………………………………………………………………… 78
Sewing overcasting stitches using zigzag foot «J» ………………………………………………………………………………… 79
Sewing overcasting stitches using the optional side cutter ……………………………………………………………………. 80
Basic Stitching …………………………………………………………………………………………………….82
Basting ………………………………………………………………………………………………………………………………………… 82
Basic stitching ………………………………………………………………………………………………………………………………. 82
Blind Hem Stitching …………………………………………………………………………………………….84
Buttonhole Stitching/Button Sewing ……………………………………………………………………….87
Buttonhole sewing ………………………………………………………………………………………………………………………… 88
Button sewing ………………………………………………………………………………………………………………………………. 92
Zipper Insertion ………………………………………………………………………………………………….. 94
Inserting a centered zipper ……………………………………………………………………………………………………………… 94
Inserting a side zipper ……………………………………………………………………………………………………………………. 96
Sewing Stretch Fabrics and Elastic Tape …………………………………………………………………. 99
Stretch stitching …………………………………………………………………………………………………………………………….. 99
Elastic attaching ………………………………………………………………………………………………………………………….. 100
Appliqué, Patchwork and Quilt Stitching ………………………………………………………………101
Appliqué stitching ……………………………………………………………………………………………………………………….. 102
Patchwork (crazy quilt) stitching ……………………………………………………………………………………………………. 103
Piecing ………………………………………………………………………………………………………………………………………. 103
Quilting …………………………………………………………………………………………………………………………………….. 104
Free-motion quilting …………………………………………………………………………………………………………………….. 106
Satin stitching using the sewing speed controller ………………………………………………………………………………. 107
Reinforcement Stitching …………………………………………………………………………………….. 108
Triple stretch stitching ………………………………………………………………………………………………………………….. 108
Bar tack stitching …………………………………………………………………………………………………………………………. 108
Darning ……………………………………………………………………………………………………………………………………… 111
Eyelet Stitching …………………………………………………………………………………………………. 113
Decorative Stitching ………………………………………………………………………………………….. 114
Fagoting …………………………………………………………………………………………………………………………………….. 115
Scallop stitching ………………………………………………………………………………………………………………………….. 116
Smocking …………………………………………………………………………………………………………………………………… 117
Shell tuck stitching ………………………………………………………………………………………………………………………. 118
Joining ………………………………………………………………………………………………………………………………………. 119
Heirloom stitching ………………………………………………………………………………………………………………………. 119
Sewing the Various Built-in Decorative Patterns …………………………………………………….122
Sewing beautiful patterns ……………………………………………………………………………………………………………… 122
Sewing patterns …………………………………………………………………………………………………………………………… 122
Changing the stitch density …………………………………………………………………………………………………………… 123
Changing the pattern size ……………………………………………………………………………………………………………… 123
Changing the length for satin stitches ……………………………………………………………………………………………… 124
5

— — — — — — — — — — — — — — — — — — — — — — — — — — — — — — — — — — — — — — — — — — — — — — — — — — —
Adjusting the character spacing ……………………………………………………………………………………………………… 124
Realigning the pattern ………………………………………………………………………………………………………………….. 125
Combining patterns ……………………………………………………………………………………………………………………… 126
Saving patterns ……………………………………………………………………………………………………………………………. 129
Designing a Pattern (My Custom Stitch) ………………………………………………………………..131
Drawing a sketch of the pattern ……………………………………………………………………………………………………… 131
Entering the pattern data ………………………………………………………………………………………………………………. 132
Editing the pattern data ………………………………………………………………………………………………………………… 133
Examples of designs …………………………………………………………………………………………………………………….. 134
EMBROIDERY 135
Embroidering Neatly …………………………………………………………………………………………. 136
What to prepare ………………………………………………………………………………………………………………………….. 136
Embroidery step by step ……………………………………………………………………………………………………………….. 137
Attaching the Embroidery Foot …………………………………………………………………………… 138
Attaching the embroidery foot ………………………………………………………………………………………………………. 138
Removing the embroidery foot ……………………………………………………………………………………………………… 140
Attaching the Embroidery Unit ……………………………………………………………………………. 141
Embroidery unit precautions …………………………………………………………………………………………………………. 141
Attaching the embroidery unit ……………………………………………………………………………………………………….. 141
Removing the embroidery unit ………………………………………………………………………………………………………. 143
Preparing the Fabric ………………………………………………………………………………………….. 144
Attaching a stabilizer material to the fabric ……………………………………………………………………………………… 144
Setting the fabric in the embroidery frame ……………………………………………………………………………………….. 145
Attaching the Embroidery Frame …………………………………………………………………………. 148
Attaching the embroidery frame …………………………………………………………………………………………………….. 148
Removing the embroidery frame ……………………………………………………………………………………………………. 149
Selecting Embroidery Patterns …………………………………………………………………………….. 150
Copyright information ………………………………………………………………………………………………………………….. 150
Embroidery pattern types ………………………………………………………………………………………………………………. 150
LCD (liquid crystal display) operation …………………………………………………………………………………………….. 151
Selecting alphanumeric characters …………………………………………………………………………………………………. 154
Selecting an embroidery pattern …………………………………………………………………………………………………….. 155
Selecting a frame pattern ………………………………………………………………………………………………………………. 155
Using an embroidery card …………………………………………………………………………………………………………….. 156
Embroidering …………………………………………………………………………………………………….157
Checking the pattern before embroidering ………………………………………………………………………………………. 157
Embroidering a pattern …………………………………………………………………………………………………………………. 158
Appliquéing ………………………………………………………………………………………………………………………………. 160
Editing and Saving Patterns …………………………………………………………………………………162
Adjusting the layout and the size ……………………………………………………………………………………………………. 162
Adjusting the thread tension ………………………………………………………………………………………………………….. 164
Connecting character patterns ……………………………………………………………………………………………………….. 165
Resewing …………………………………………………………………………………………………………………………………… 166
Thread runs out partway through a design ……………………………………………………………………………………….. 167
Stopping while embroidering ………………………………………………………………………………………………………… 167
Using the Memory Function ………………………………………………………………………………..169
Embroidery data precautions …………………………………………………………………………………………………………. 169
Transferring embroidery patterns from the computer to machine …………………………………………………………. 171
Saving patterns ……………………………………………………………………………………………………………………………. 174
APPENDIX 175
Care and Maintenance ………………………………………………………………………………………. 176
Restrictions on oiling…………………………………………………………………………………………………………………….. 176
Cleaning the machine surface ……………………………………………………………………………………………………….. 176
Precautions on storing the machine…………………………………………………………………………………………………. 176
Cleaning the race ………………………………………………………………………………………………………………………… 176
Troubleshooting ………………………………………………………………………………………………..178
Frequent troubleshooting topics ……………………………………………………………………………………………………… 178
Upper thread tightened up …………………………………………………………………………………………………………….. 178
Tangled thread on wrong side of fabric ……………………………………………………………………………………………. 179
6

— — — — — — — — — — — — — — — — — — — — — — — — — — — — — — — — — — — — — — — — — — — — — — — — — — — —
Incorrect thread tension ………………………………………………………………………………………………………………… 182
Fabric is caught in the machine and cannot be removed…………………………………………………………………….. 183
When the thread became tangled under the bobbin winder seat ………………………………………………………….. 186
List of symptoms ………………………………………………………………………………………………………………………….. 188
Error messages ……………………………………………………………………………………………………………………………. 193
Adjusting the LCD ……………………………………………………………………………………………………………………….. 197
Operation beep …………………………………………………………………………………………………………………………… 197
Upgrading Your Machine’s Software Using USB Media ………………………………………….. 198
Index ………………………………………………………………………………………………………………. 199
7

— — — — — — — — — — — — — — — — — — — — — — — — — — — — — — — — — — — — — — — — — — — — — — — — — — —
Machine Features
a Automatic thread cutting
The thread can be cut automatically after sewing (page 59, 65).
b Fast bobbin winding system
With the fast and simple bobbin winder, you can wind bobbins with one press of a button (page 22).
c Built-in stitches
You can select from the built-in stitches available, including utility stitches and decorative stitches (page 72).
d USB port
Embroidery patterns saved in a USB flash drive (USB flash memory) can be imported to the machine by plugging the USB
flash drive directly into the USB port (page 172).
e Accessory case
You can store the accessory case inside the arm of the machine as shown in the figure.
ripper, etc. can be stored in this case.
f Bobbin clip
You can use the bobbin clip to prevent the end of the thread wound onto the bobbin from loosening. Bobbin clips can be
stored inside of the accessory case cover.
g Bright light
The convenient LED lamp makes it easy to work on dark fabrics.
h Seven-point feed dogs
Ensure smooth, even feeding of multiple fabric layers and a variety of fabric weights (page 12).
i Quick-set bobbin
You can start sewing without pulling up the bobbin thread (page 27).
j Easy-to-use needle threader
You can thread the needle easily by one press of a lever (page 32).
k Lighting Start/Stop button
When the green light is on, the machine is ready to sew. A red or orange light indicates an error or that the machine is
warming up (page 13).
l Embroidery
You can embroider built-in embroidery patterns, alphanumeric characters, framed decorations, and designs from optional
embroidery cards (page 135).
m Extension table (Cover of the embroidery unit)
You can use the cover of the embroidery unit as the extension table when you sew a large material (page 46).
Presser foot, bobbins, a seam
8

— — — — — — — — — — — — — — — — — — — — — — — — — — — — — — — — — — — — — — — — — — — — — — — — — — — —
Accessories
After opening the box, check that the following accessories are included. If any item is missing or
damaged, contact your dealer.
Included accessories
Note
z Foot controller: Model T
This foot controller can be used on the machine with product code 885-V95/V96/V97/V98.
The product code is mentioned on the machine rating plate.
z The securing screw on the side of the presser foot holder is available through your authorized dealer.
(Part code: 132730-122)
*
12.3.4.5.6.7.8.9.
10.
1
11. 12. 13. 14. 15. 16. 17. 18.
20. 21. 22. 23.
24.
25. 26. 27.
19
.
28. 29. 30. 31. 32.
*
1 75/11 2 needles, 90/14 2 needles , 90/14 2 needles: Ball point needle (gold colored)
No. Part Name
1 Buttonhole foot «A» XC2691-023 17
2 Overcasting foot «G» XE6305-101 18 Spool cap (small) 130013-124
3 Monogramming foot «N» XD0810-031 19 Extra spool pin XE2241-001
4 Zipper foot «I» X59370-021 20 Spool net XA5523-020
5 Zigzag foot «J» (on machine) XZ5134-001 21 Foot controller
6 Blind stitch foot «R» XE2650-001 22 Scissors XC1807-121
7 Button fitting foot «M» XE2137-001 23 Disc-shaped screwdriver XC1074-051
8 Seam ripper XZ5082-001 24 Embroidery foot «Q» XD0474-151
Bobbin (4)
9
Bobbin clip (4)
10 Needle set X58358-021 27 Accessory case XE3062-003
11 Twin needle X59296-121
12 Cleaning brush X59476-021
13 Eyelet punch XZ5051-001 29 Operation manual XE7929-101
14 Screwdriver XC4237-021 30 Quick reference guide XE7930-001
15 Touch pen XE3069-001 31 Grid sheet set
16 Spool cap (large) 130012-024 32 Felt with stabilizer 182986-024
Part Code
Americas Others Americas Others
SA156
SABOBCLIP
(U.S.A.)
SABOBCLIPC
(Canada)
No. Part Name
SFB 25
BCL 26
28 Hard case
Spool cap (medium) (on
machine)
Embroidery set (medium)
H 10 cm X W 10 cm
(H 4 inches X W 4 inches)
Embroidery bobbin thread
(white)
Part Code
XE1372-001
XD0501-021 (EU area)
XC8816-071 (other areas)
SA432 EF62
SAEBT EBT-CEN
XE3862-001
(885-V95/V96/V97)
XF7617-001 (885-V98)
SA527
GS4
9

— — — — — — — — — — — — — — — — — — — — — — — — — — — — — — — — — — — — — — — — — — — — — — — — — — —
Optional accessories
The following are available as optional accessories.
1. 2. 3.
4. 5.
6. 7. 8.
9.
No. Part Name
Embroidery bobbin
1
thread (black)
2 Embroidery card
Embroidery set (small)
×
3
H 2 cm
(H 1 inch × W 2-1/2 inches)
Embroidery set (large)
H 17 cm × W 10 cm
4
(H 6-7/10 inches × W 4
inches)
Water soluble stabilizer SA520 BM5
5
Stabilizer material for
embroidery
6 Walking foot SA140 F033N
7 Open toe quilting foot SA187 F061
8 Side cutter «S» SA177 F054
9 Quilting guide SA132 F016N
W 6 cm
Part Code
Americas Others
SAEBT999 EBT-CEBN
SA431 EF61
SA434 EF71
SA519 BM3
Memo
z To obtain optional accessories or parts, contact your sales representative, the nearest authorized service
center or visit the website at
z
All specifications are correct at the time of printing. The part codes are subject to change without notice.
z Visit your nearest authorized dealer for a complete listing of optional accessories available for your
machine.
“ http://www.brother.com/ ”.
10

— — — — — — — — — — — — — — — — — — — — — — — — — — — — — — — — — — — — — — — — — — — — — — — — — — — —
Names of Machine Parts and Their Functions
The names of the various parts of the sewing machine and their functions are described below. Before using the
sewing machine, carefully read these descriptions to learn the names of the machine parts.
Front view
a Thread guide cover (page 24, 33)
Pass the thread under this thread guide cover when
winding the bobbin thread and threading the machine.
b Thread guide (page 24, 33)
Pass the thread under this thread guide when winding
the bobbin thread and threading the machine.
c Spool pin (page 23, 32)
Place a spool of thread on the spool pin.
d Bobbin winder (page 22)
Use the bobbin winder when winding the bobbin.
e LCD (liquid crystal display) (touch panel) (page 18)
Setting for the selected stitch or pattern and error
messages appear in the LCD.
f Operation panel (page 14)
Use the keys on this panel to select stitches or
embroidery patterns, or check how to use the sewing
machine, etc.
g Embroidery unit connector slot (page 141)
Plug in the connector for the embroidery unit.
h Presser foot lever (page 54)
Raise and lower the presser foot lever to raise and lower
the presser foot .
i Operation buttons (page 13)
Use these buttons to operate the machine.
j Flat bed attachment (page 46)
Remove the flat bed attachment when sewing
cylindrical pieces such as sleeve cuffs.
k Thread cutter (page 60)
Pass the threads through the thread cutter to cut them.
l Needle threader lever (page 35)
Use the needle threader lever to thread the needle.
m Thread tension dial (page 62, 164)
Adjust the upper thread tension with this dial.
n Thread take-up lever (page 34)
o Bobbin-winding thread guide and pretension disc
(page 24)
Pass the thread under this thread guide and around the
pretension disc when winding the bobbin thread.
11

— — — — — — — — — — — — — — — — — — — — — — — — — — — — — — — — — — — — — — — — — — — — — — — — — — —
Needle and presser foot
section
a Buttonhole lever (page 90)
Lower the buttonhole lever when sewing buttonholes
and bar tacks.
b Thread guide disk (page 34)
Pass the thread through the thread guide disk when
using the needle threader to thread the needle.
c Needle bar thread guide (page 34)
Pass the upper thread through the needle bar thread
guide.
d Needle plate (page 70)
The needle plate is marked with guides for sewing
straight seams.
e Needle plate cover (page 177)
Remove the needle plate cover to clean the bobbin case
and race.
f Bobbin cover/bobbin case (page 28)
Remove the bobbin cover, and then insert the bobbin
into the bobbin case.
g Feed dogs (page 92)
The feed dogs feed the fabric in the sewing direction.
h Presser foot (page 43, 54)
The presser foot applies pressure consistently on the
fabric as the sewing takes place. Attach the appropriate
presser foot for the selected stitching.
i Presser foot holder (page 45)
The presser foot is installed onto the presser foot holder.
Right-side/rear view
a Handle
Carry the sewing machine by its handle when
transporting the machine.
b Handwheel (page 54)
Turn the handwheel toward you (counterclockwise) to
raise and lower the needle to sew one stitch.
c Embroidery card slot (page 156)
Insert the embroidery card.
d USB port (for a USB flash drive (USB flash memory))
In order to import patterns from a USB flash drive (USB
flash memory), plug the USB media directly into the
USB port.
e Air vent
The air vent allows the air surrounding the motor to be
exchanged. Do not cover the air vent while the sewing
machine is being used.
f Main power switch (page 17)
Use the main power switch to turn the sewing machine
on and off.
g Foot controller jack (page 56)
Insert the plug on the end of the foot controller cable
into the foot controller jack.
h Power supply jack (page 17)
Insert the plug on the power supply cord into the power
supply jack.
i Drop feed lever (page 92)
Use the drop feed lever to lower the feed dogs.
12
Memo
z Refer to pages 11 through 14 while you are
learning to use your machine.

— — — — — — — — — — — — — — — — — — — — — — — — — — — — — — — — — — — — — — — — — — — — — — — — — — — —
Operation buttons
The operation buttons help you to easily perform various basic sewing machine operations.
a Start/stop button
Press the start/stop button to start or stop sewing. The
machine sews at a slow speed at the beginning of
sewing while the button is pressed. When sewing is
stopped, the needle is lowered in the fabric. For details,
refer to «Starting to sew» (page 55).
The button changes color according to the machine’s
operation mode.
Green: The machine is ready to sew or is
Red: The machine can not sew.
Orange: The machine is winding the bobbin
sewing.
thread, or the bobbin winder shaft is
moved to the right side.
Memo
z When the foot controller is plugged in,
(Start/stop button) cannot be used to
start sewing.
b Needle position button
Press the needle position button to raise or lower the
needle. Be sure to raise the needle before threading the
needle. Use this button to change the sewing direction
or for detailed sewing in small areas. Pressing the
button twice sews one stitch.
c Reverse/reinforcement stitch button
Press the reverse/reinforcement stitch button to sew
reverse stitches or reinforcement stitches. Reverse
stitches are sewn by keeping the button pressed down to
sew in the opposite direction. Reinforcement stitches
are sewn by sewing 3 to 5 stitches on top of each other.
For details, refer to «Securing the stitching» (page 57).
CAUTION
● Do not press the thread cutter button
after the threads have already been cut,
otherwise the needle may break, the
threads may become tangled or damage
to the machine may occur.
Note
z Do not press the thread cutter button if there
is no fabric under the presser foot or while
the machine is sewing, otherwise damage to
the machine may occur.
z When cutting nylon thread or other special
threads, use the thread cutter on the side of
the machine. For details, refer to «Using the
thread cutter» (page 60).
e Sewing speed controller
Slide the sewing speed controller to adjust the sewing
speed.
d Thread cutter button
Press the thread cutter button after sewing is stopped to
cut both the upper thread and the bobbin threads. For
details, refer to «Cutting the thread» (page 59).
13

— — — — — — — — — — — — — — — — — — — — — — — — — — — — — — — — — — — — — — — — — — — — — — — — — — —
Operation panel
The front operation panel has an LCD (liquid crystal display) and operation keys.
a LCD (liquid crystal display) (touch panel)
Setting for the selected stitch or pattern and error
messages appear in the LCD.
Touch the keys displayed on the LCD with your finger
or the touch pen to perform operations.
For details, refer to «LCD (Liquid Crystal Display)
Operation» (page 18).
b Back key
Press to return to the previous screen.
c Previous page key
Displays the previous page when there are items that
are not displayed on the LCD.
d Next page key
Displays the next page when there are items that are not
displayed on the LCD.
e Memory key
Press to save character embroidery, combined stitch
patterns, My Custom Stitch patterns, etc. in the sewing
machine’s memory.
f Utility stitch key
Press this key to select a utility stitch or decorative stitch
or to design a stitch pattern using the My Custom Stitch
function.
g Embroidery key
Press this key to sew embroidery.
h Settings key
Press to set the needle stop position, the buzzer sound,
and more.
i Sewing machine help key
Press to get help on using the sewing machine. Displays
simple explanations of setting upper thread / bobbin
winding / setting bobbin thread / needle replacement /
embroidery unit attachment / embroidery frame
attachment / embroidery foot attachment / presser foot
replacement.
14

1 GETTING READY
The various preparations required before starting to sew are described in this chapter.
Turning the Machine On/Off ……………………………………………………………………….16
LCD (Liquid Crystal Display) Operation…………………………………………………………18
Winding/Installing the Bobbin………………………………………………………………………22
Upper Threading ………………………………………………………………………………………..31
Replacing the Needle ………………………………………………………………………………….39
Replacing the Presser Foot …………………………………………………………………………..43
Sewing Cylindrical Pieces and Large Pieces…………………………………………………….46

GETTING READY — — — — — — — — — — — — — — — — — — — — — — — — — — — — — — — — — — — — — — — — — — — —
Turning the Machine On/Off
This section explains how to turn the sewing machine on and off.
Power supply precautions
Be sure to observe the following precautions concerning the power supply.
WARNING
● Use only regular household electricity for the power source. Using other power sources may
result in fire, electric shock, or damage to the machine.
● Make sure that the plugs on the power cord are firmly inserted into the electrical outlet and
the power supply jack on the machine. Otherwise, a fire or electric shock may result.
● Do not insert the plug on the power cord into an electrical outlet that is in poor condition.
● Turn off the main power and remove the plug in the following circumstances:
• When you are away from the machine
• After using the machine
• When the power fails during use
• When the machine does not operate correctly due to a bad connection or a disconnection
• During electrical storms
CAUTION
● Use only the power cord included with this machine.
● Do not use extension cords or multi-plug adapters with many other appliances plugged in to
them. Fire or electric shock may result.
● Do not touch the plug with wet hands. Electric shock may result.
● When unplugging the machine, always turn off the main power first. Always grasp the plug to
remove it from the outlet. Pulling on the cord may damage the cord, or lead to fire or electric
shock.
● Do not allow the power cord to be cut, damaged, modified, forcefully bent, pulled, twisted,
or bundled. Do not place heavy objects on the cord. Do not subject the cord to heat. These
things may damage the cord and cause fire or electric shock. If the cord or plug is damaged,
take the machine to your authorized dealer for repairs before continuing use.
● Unplug the power cord if the machine is not to be used for a long period of time. Otherwise a
fire may result.
16

— — — — — — — — — — — — — — — — — — — — — — — — — — — — — — — — — — — — — — — — — — — — — — — — — — — —
Turning on the machine
Prepare the included power cord.
Make sure that the sewing machine is turned
off (the main power switch is set to « «), and
then plug the power supply cord into the
power supply jack on the right side of the
machine.
Insert the plug of the power supply cord into a
household electrical outlet.
1
a Power supply jack
Turning off the machine
When you have finished using the sewing machine,
turn it off. In addition, before transporting the sewing
machine to another location, be sure to turn it off.
Make sure that the machine is not sewing.
a
Press the left side of the main power switch on
the right side of the machine to turn the
machine off (set it to « «).
X The light, LCD and (Start/stop button) go
off when the machine is turned off.
Unplug the power supply cord from the
electrical outlet.
Grasp the plug when unplugging the power
supply cord.
1
Press the right side of the main power switch
on the right side of the machine to turn the
machine on (set it to «|»).
X The light, LCD and (Start/stop button)
light up when the machine is turned on.
Memo
z When the machine is turned on, the needle
and the feed dogs will make sound when
they move; this is not a malfunction.
Unplug the power cord from the power supply
jack.
Note
z If a power outage occurs while the sewing
machine is being operated, turn off the
sewing machine and unplug the power
supply cord. When restarting the sewing
machine, follow the necessary procedure to
correctly operate the machine.
(For U.S.A. only)
z This appliance has a polarized plug (one
blade wider than the other). To reduce the
risk of electrical shock, this plug is intended
to fit in a polarized outlet only one way. If
the plug does not fit fully in the outlet,
reverse the plug. If it still does not fit, contact
a qualified electrician to install the proper
outlet. Do not modify the plug in any way.
Turning the Machine On/Off 17

GETTING READY — — — — — — — — — — — — — — — — — — — — — — — — — — — — — — — — — — — — — — — — — — — —
LCD (Liquid Crystal Display) Operation
Selected stitch, pattern settings and messages are displayed on the LCD (liquid crystal display) on the front
of the sewing machine. Change the screen on the LCD using the keys on the right side of the LCD, and
make operations by directly touching the icons with your finger or a
«Operation panel» (page 14).
Viewing the LCD
When the power is turned on, the LCD comes on. When you touch the LCD screen according to the message
displayed on the screen with your finger or a touch pen, the following utility stitch selection screen is displayed.
touch pen. For details, refer to
1
2
3
4
5
a Selected stitch
b Presser foot to be used
c Stitches
d Stitch settings and twin needle sewing
e Stitch width
f Stitch length
g Number of the selected stitch
h Number of stitches contained
i Horizontal mirror image
j Automatic thread cutting
k Automatic reverse/reinforcement
l Single/twin needle sewing and needle stop
position
l
k
0
9
8
7
6
Memo
z Press (Utility stitch key) to display the screen for selecting the stitch type. The details are
explained in «Stitch types» (page 51).
z A different screen is displayed when the embroidery unit is attached. The details are explained in
«Selecting an embroidery pattern» (page 155).
z Refer to «Error messages» (page 193) for messages displayed on the LCD.
z Depending on the model of sewing machine, an animation may be displayed when the power is turned
on. When an animation is displayed, the screen above will be displayed if you touch the LCD with
your finger.
Changing the machine settings
Various sewing machine operations and sewing settings can be changed.
The stitch or machine attributes that can be set are listed below. For details on operation, refer to page 20.
Attribute Icon Details Settings
Needle position
Stitch width
control
Vertical pattern
adjustment
18
Specifies where the needle is positioned when
the sewing machine is stopped.
Allows the stitch width to be adjusted with the
sewing speed controller (page 107).
Adjusts the up and down position of the pattern
(page 125 ).
Down Up
-9 to +9

— — — — — — — — — — — — — — — — — — — — — — — — — — — — — — — — — — — — — — — — — — — — — — — — — — — —
Attribute Icon Details Settings
Character
spacing
Thread color
display
Display unit
Buzzer
Opening screen
Initial needle
position
Adjusts the space between characters when
sewing alphanumeric characters. (page 124)
Changes the thread color display on the
embroidery screen (page 151).
(When «Thread No.#123» is selected)
Selects the measurement units that are
displayed (only for embroidering) (page 152).
Specifies whether or not a beep is sounded with
each operation (page 197).
Sets whether or not to display the opening
screen when the power is turned on.
(There are models where this cannot be
changed.)
Selects whether «
3
Straight stitch (middle)» that is
»
automatically selected when the machine is
turned on.
1
Straight stitch (left)» or
0 to 10
Thread color/Time to
embroider/Needle count/
Thread number (#123)
Embroidery/Country/Madeira
poly/Madeira rayon/Sulky/
Robison Anton
mm/INCH
1
English/German/French/
Language
LCD brightness Adjust the brightness of the LCD (page 197).
Stitch counter
Product number NO.:
Program version Version: Displays the program version. —
Allows the language used in the screens to be
changed.
Displays the service count and the total number
of embroidery stitches. The service count is a
reminder to take your machine in for regular
servicing. (Contact your authorized dealer for
details.)
The «NO.» is the number for the embroidery and
sewing machine.
Italian/Dutch/Spanish/
Japanese/Danish/Norwegian/
Finnish/Swedish/Portuguese/
Russian/Korean/Thai/others
Lighter Darker
Memo
z The item shown in reverse highlighting are the settings at the time of purchase.
—
—
LCD (Liquid Crystal Display) Operation 19

GETTING READY — — — — — — — — — — — — — — — — — — — — — — — — — — — — — — — — — — — — — — — — — — — —
Turn on the sewing machine.
The highlighted display is the initi al setting.
a
X The LCD comes on.
Example: Changing the needle stop position
Press (Settings key) on the display
b
panel.
X The setting screen appears.
Press the item to be set.
c
Switch the screen using (Previous page
key) and (Next page key).
• The following screens show their default
settings.
When settings are complete, press
d
(Back key).
X The initial stitch screen appears again.
Memo
z «NO.» is the individual number for the
sewing machine.
z «VERSION» is the program version which is
installed in the sewing machine.
z Settings that are changed are saved even if
the power is turned off.
20

— — — — — — — — — — — — — — — — — — — — — — — — — — — — — — — — — — — — — — — — — — — — — — — — — — — —
Press (Next page key) to switch to the
Checking machine operating
procedures
Simple explanations can be referred on the LCD
display for the following items.
Displays simple explanations of setting upper thread /
bobbin winding / setting bobbin thread / needle
replacement / embroidery unit attachment /
embroidery frame attachment / embroidery foot
attachment / presser foot replacement on the LCD.
Turn on the sewing machine.
X The LCD comes on.
Press (Sewing machine help key) on
the display panel.
next page.
If you press (Previous page key), you
return to the previous page.
Press (Back key) to return to the item
selection screen.
Example: Upper threading
1
X The sewing machine help screen appears.
Press the item to be displayed.
a Upper threading
b Bobbin winding
c Bobbin installation
d Needle replacement
e Presser foot replacement
f Embroidery foot attachment
g Embroidery frame attachment
h Embroidery unit attachment
X The first screen describing the procedure for
the selected topic appears.
a
h
bc
g
f
d
e
After you finish viewing, press (Back
key) two times.
X The initial stitch screen appears again.
Memo
z For details on each topic, refer to the
corresponding page in this Operation
Manual.
LCD (Liquid Crystal Display) Operation 21

GETTING READY — — — — — — — — — — — — — — — — — — — — — — — — — — — — — — — — — — — — — — — — — — — —
Winding/Installing the Bobbin
This section describes how to wind the thread onto the bobbin, and then insert the bobbin thread.
Bobbin precautions
Be sure to observe the following precautions concerning the bobbin.
CAUTION
● Only use the Bobbin (part code: SA156, SFB) designed specifically for this sewing machine.
Use of any other bobbin may result in injuries or damage to the machine.
● The included bobbin was designed specifically for this sewing machine. If bobbins from other
models are used, the machine will not operate correctly. Use only the included bobbin or
bobbins of the same type (part code: SA156, SFB).
Actual size
11.5 mm
(7/16 inch)
This model
Other model
Winding the bobbin
Wind the thread around the bobbin to prepare the bobbin thread.
a
a Bobbin-winding thread guide
b Bobbin winder shaft
c Bobbin
b
c
22

— — — — — — — — — — — — — — — — — — — — — — — — — — — — — — — — — — — — — — — — — — — — — — — — — — — —
Turn on the sewing machine.
Place the bobbin on the bobbin winder shaft so
that the spring on the shaft fits into the notch
in the bobbin.
Press down on the bobbin until it snaps into
place.
a
b
a Notch
b Bobbin winder shaft spring
Slide the bobbin winder in the direction of the
arrow until it snaps into place.
Place the spool of thread for the bobbin onto
the spool pin.
Slide the spool onto the pin so that the spool is
horizontal and the thread unwinds to the front
at the bottom.
Memo
z For embroidering, use the embroidery
bobbin thread.
Note
z If the spool is not positioned so that the
thread unwinds correctly, the thread may
become tangled around the spool pin.
Slide the spool cap onto the spool pin and
f
return the spool pin to its original position.
Slide the spool cap as far as possible to the right
as shown, with the rounded side on the left.
1
X (Start/stop button) lights up in orange.
Pick up the spool pin and remove the spool
cap that is inserted onto the spool pin.
a
a Spool cap
b Spool pin
b
CAUTION
● If the spool or the spool cap is not
positioned correctly, the thread may
become tangled around the spool pin or
the machine may be damaged.
● Three spool cap sizes are available,
allowing you to choose a spool cap that
best fits the size of spool being used. If the
spool cap is too small for the spool being
used, the thread may catch on the slit in
the spool or the machine may be
damaged.
●
Winding/Installing the Bobbin 23

GETTING READY — — — — — — — — — — — — — — — — — — — — — — — — — — — — — — — — — — — — — — — — — — — —
Pass the thread behind the thread guide cover
Note
z When sewing with fine, cross-wound thread,
use the small spool cap, and leave a small
space between the cap and the spool.
and to the front.
While holding the thread near the spool with
your right hand, pull the thread with your left
hand as shown below.
c
b
a
a Spool cap (small)
b Spool (cross-wound thread)
c Space
z When using thread that winds off quickly,
such as transparent nylon thread or metallic
thread, place the spool net over the spool
before placing the spool of thread onto the
spool pin. If the spool net is too long, fold it
to fit the size of the spool.
When the spool net is used, the upper thread
tension may become tighter. Before sewing,
refer to «Adjusting the thread tension» (page
62).
a
b
a
a Thread guide cover
Pull the thread to the right, pass it under the
hook of the bobbin-winding thread guide, and
then wind the thread counterclockwise under
the pretension disc, pulling it in as far as
possible.
c
d
a Spool net
b Spool
c Spool cap
d Spool pin
Pull the thread from the spool and pass the
g
thread under the hook of thread guide.
a
a Thread guide
24
a
a Bobbin-winding thread guide
Make sure that the thread passes under the
pretension disk.
b
c
b Hook
c Pretension disk
d Pull it in as far as possible.
d
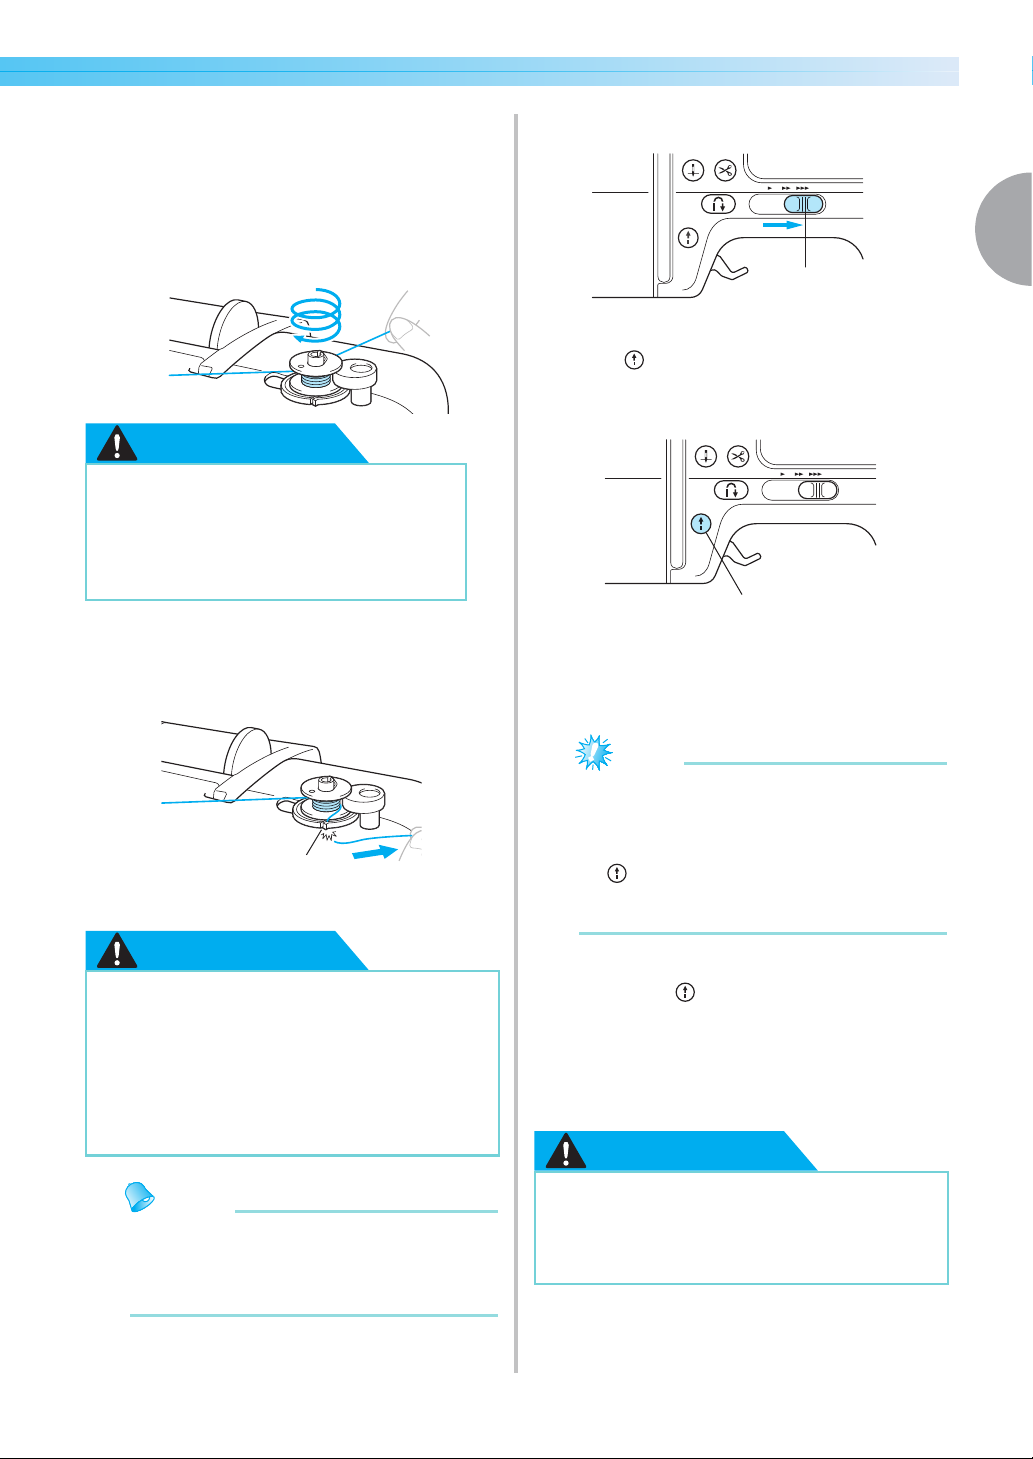
— — — — — — — — — — — — — — — — — — — — — — — — — — — — — — — — — — — — — — — — — — — — — — — — — — — —
Wind the end of the thread clockwise around
the bobbin five or six times.
While using your left hand to hold the thread
that was passed through the bobbin-winding
thread guide, use your right hand to wind the
end of the thread.
Wind five or six times.
CAUTION
● Be sure to pull the thread tightly and
wind it clockwise. If the thread is
wound counterclockwise, the thread
may wind around the bobbin winder
shaft.
Pass the end of the thread through the guide
slit in the bobbin winder seat, and then pull
the thread to the right to cut it.
Slide the sewing speed controller to the right.
l
a
a Speed controller
Press (Start/stop button) once.
When the foot controller is plugged in, press
down on the foot controller.
a
a Start/stop button
X The bobbin starts winding and «Winding
bobbin thread…» is displayed on the LCD
screen.
1
a
a Guide slit in bobbin winder seat
(with built-in cutter)
CAUTION
● Be sure to cut the thread as described. If
the bobbin is wound without cutting the
thread using the cutter built into the slit
in the bobbin winder seat, the thread may
become tangled in the bobbin or the
needle may bend or break when the
bobbin thread starts to run out.
Memo
z Make sure that the thread is correctly set
before starting the bobbin winding.
Otherwise the thread may become tangled
and fail to wind the thread.
Note
z Do not get away from the machine while
winding the bobbin. Make sure the bobbin
thread is being wound correctly. If the
bobbin thread is wound incorrectly, press
(Start/stop button) or operate the foot
controller immediately to stop the bobbin
winding.
When the bobbin winding stops or becomes
n
slow, press (Start/stop button) once to
stop the machine.
When the foot controller is plugged in, remove
your foot from the foot controller.
X The bobbin winding will stop.
CAUTION
● When the bobbin winding stops or
becomes slow, stop the machine.
Otherwise, the sewing machine may be
damaged.
Winding/Installing the Bobbin 25

GETTING READY — — — — — — — — — — — — — — — — — — — — — — — — — — — — — — — — — — — — — — — — — — — —
Cut the thread with scissors, slide the bobbin
winder shaft to the left, and then remove the
bobbin from the shaft.
Memo
z If the bobbin winder shaft is set to the right
side, the needle will not move. (Sewing is
impossible.)
Slide the sewing speed controller back to its
p
original position.
■ When the thread became tangled under the
bobbin winder seat.
If the bobbin winding starts when the thread is not
passed under the pretension disk of the bobbinwinding thread guide correctly, the thread may
become tangled under the bobbin winder seat.
In such a case, wind off the thread according to the
following procedure.
b
a
a Thread
b Bobbin winder seat
CAUTION
● Do not remove the bobbin winder seat
even if the thread become tangled under
the bobbin winder seat. It may result in
injuries.
● Do not remove the screw of the bobbin
winder presser, otherwise the machine
may be damaged; you cannot wind off the
thread by removing the screw.
Memo
z When the sewing machine is started or the
handwheel is turned after winding the
bobbin, the machine will make a clicking
sound; this is not a malfunction.
a Screw of the bobbin winder presser
If the thread become tangled under the bobbin
a
winder seat, press (Start/stop button) once
to stop the bobbin winding.
When the foot controller is plugged in, remove
your foot from the foot controller.
a
a Start/stop button
a
26

— — — — — — — — — — — — — — — — — — — — — — — — — — — — — — — — — — — — — — — — — — — — — — — — — — — —
Cut the thread with scissors beside the bobbinwinding thread guide.
a
Installing the bobbin
Install the bobbin wound with thread.
CAUTION
● Use a bobbin that has been correctly
wound with thread, otherwise the needle
may break or the thread tension will be
incorrect.
a Bobbin-winding thread guide
Slide the bobbin winder shaft to the left, and
then remove the bobbin from the shaft.
● The included bobbin was designed
specifically for this sewing machine. If
bobbins from other models are used, the
machine will not operate correctly. Use
only the included bobbin or bobbins of
the same type (part code: SA156, SFB).
1
Hold the thread end with your left hand, and
wind off the thread clockwise near the bobbin
with your right hand as shown below.
Wind the bobbin again.
Note
z Make sure that the thread passes under the
pretension disk of the bobbin-winding
thread guide correctly (page 24).
Actual size
11.5 mm
(7/16 inch)
This model
Other model
Memo
z The order that the bobbin thread should be
passed through the bobbin case is indicated
by marks that surround the bobbin case.
Winding/Installing the Bobbin 27

GETTING READY — — — — — — — — — — — — — — — — — — — — — — — — — — — — — — — — — — — — — — — — — — — —
Press (Needle position button) once or
twice to raise the needle, and then raise the
presser foot lever.
a
b
a Needle position button
b Presser foot lever
Turn off the sewing machine.
Slide the bobbin cover latch to the right.
a
b
Insert the bobbin into the bobbin case with
your right hand.
• Be sure to insert the bobbin correctly.
CAUTION
● Be sure to insert the bobbin and depress it
to the bottom with your finger.
Otherwise, the thread may break or the
thread tension will be incorrect.
● Be sure to thread the machine as
indicated. Otherwise, the thread may
break or the thread tension will be
incorrect.
Lightly hold down the bobbin with your right
hand, and then guide the thread as shown with
your left hand.
a Bobbin cover
b Latch
X The bobbin cover opens.
Remove the bobbin cover.
Hold the bobbin with your right hand and hold
the end of the thread with your left hand.
• Be careful not to drop the bobbin.
28
Pass the thread through the slot as shown, and
then pull the thread out toward the front.
a
a Cutter
X The cutter cuts the thread.
Loading…
Инструкции
Здесь вы сможете скачать pdf-файлы инструкций к технике из нашего каталога.
Инструкция для швейной машины Brother Innov-is 10А
Универсальное руководство по эксплуатации
Язык: русский
Инструкция для швейной машины Brother Innov-is 150
Универсальное руководство по эксплуатации
Язык: русский
Инструкция для швейной машины Brother Innov-is 350
Универсальное руководство по эксплуатации
Язык: русский
Инструкция для швейной машины Brother Innov-is 550
Универсальное руководство по эксплуатации
Язык: русский
Инструкция для швейно-вышивальной машины Brother Innov-is 950
Универсальное руководство по эксплуатации
Язык: русский
Инструкция для швейно-вышивальной машины Brother Innov-is 1250
Универсальное руководство по эксплуатации
Язык: русский
Инструкция для швейной машины Brother Comfort 15
Универсальное руководство по эксплуатации
Язык: русский
Инструкция для швейной машины Brother Elite 45
Универсальное руководство по эксплуатации
Язык: русский
Инструкция для швейной машины Brother Elite 55
Универсальное руководство по эксплуатации
Язык: русский
Инструкция для швейной машины Brother JSL 18
Универсальное руководство по эксплуатации
Язык: русский
Report abuse
Libble takes abuse of its services very seriously. We’re committed to dealing with such abuse according to the laws in your country of residence. When you submit a report, we’ll investigate it and take the appropriate action. We’ll get back to you only if we require additional details or have more information to share.
Product:
Get your user manual by e-mail
Enter your email address to receive the manual of Brother Innov-is 950 in the language / languages: English as an attachment in your email.
The manual is 5,86 mb in size.
You will receive the manual in your email within minutes. If you have not received an email, then probably have entered the wrong email address or your mailbox is too full. In addition, it may be that your ISP may have a maximum size for emails to receive.
The manual is sent by email. Check your email
If you have not received an email with the manual within fifteen minutes, it may be that you have a entered a wrong email address or that your ISP has set a maximum size to receive email that is smaller than the size of the manual.