
Инструкция и руководство для
Yamaha PSR-S500
100 страниц подробных инструкций и пользовательских руководств по эксплуатации на русском
2
PSR-S500 уководство пользователя
PLEASE KEEP THIS MANUAL
This product utilizes batteries or an external power supply (adapter).
DO NOT connect this product to any power supply or adapter other
than one described in the manual, on the name plate, or specifically
recommended by Yamaha.
This product should be used only with the components supplied or; a
cart, rack, or stand that is recommended by Yamaha. If a cart, etc., is
used, please observe all safety markings and instructions that accom-
pany the accessory product.
SPECIFICATIONS SUBJECT TO CHANGE:
The information contained in this manual is believed to be correct at the
time of printing. However, Yamaha reserves the right to change or mod-
ify any of the specifications without notice or obligation to update exist-
ing units.
This product, either alone or in combination with an amplifier and head-
phones or speaker/s, may be capable of producing sound levels that
could cause permanent hearing loss. DO NOT operate for long periods
of time at a high volume level or at a level that is uncomfortable. If you
experience any hearing loss or ringing in the ears, you should consult
an audiologist.
IMPORTANT: The louder the sound, the shorter the time period before
damage occurs.
NOTICE:
Service charges incurred due to a lack of knowledge relating to how a
function or effect works (when the unit is operating as designed) are not
covered by the manufacturer’s warranty, and are therefore the owners
responsibility. Please study this manual carefully and consult your
dealer before requesting service.
ENVIRONMENTAL ISSUES:
Yamaha strives to produce products that are both user safe and envi-
ronmentally friendly. We sincerely believe that our products and the pro-
duction methods used to produce them, meet these goals. In keeping
with both the letter and the spirit of the law, we want you to be aware of
the following:
Battery Notice:
This product MAY contain a small non-rechargeable battery which (if
applicable) is soldered in place. The average life span of this type of
battery is approximately five years. When replacement becomes neces-
sary, contact a qualified service representative to perform the replace-
ment.
This product may also use “household” type batteries. Some of these
may be rechargeable. Make sure that the battery being charged is a
rechargeable type and that the charger is intended for the battery being
charged.
When installing batteries, do not mix batteries with new, or with batter-
ies of a different type. Batteries MUST be installed correctly. Mis-
matches or incorrect installation may result in overheating and battery
case rupture.
Warning:
Do not attempt to disassemble, or incinerate any battery. Keep all bat-
teries away from children. Dispose of used batteries promptly and as
regulated by the laws in your area. Note: Check with any retailer of
household type batteries in your area for battery disposal information.
Disposal Notice:
Should this product become damaged beyond repair, or for some rea-
son its useful life is considered to be at an end, please observe all local,
state, and federal regulations that relate to the disposal of products that
contain lead, batteries, plastics, etc. If your dealer is unable to assist
you, please contact Yamaha directly.
NAME PLATE LOCATION:
The name plate is located on the bottom of the product. The model
number, serial number, power requirements, etc., are located on this
plate. You should record the model number, serial number, and the date
of purchase in the spaces provided below and retain this manual as a
permanent record of your purchase.
Model
Serial No.
Purchase Date
SPECIAL MESSAGE SECTION
92-BP
(bottom)

PSR-S500 уководство пользователя
3
1. IMPORTANT NOTICE: DO NOT MODIFY THIS UNIT!
This product, when installed as indicated in the instructions con-
tained in this manual, meets FCC requirements. Modifications not
expressly approved by Yamaha may void your authority, granted by
the FCC, to use the product.
2. IMPORTANT:
When connecting this product to accessories and/
or another product use only high quality shielded cables. Cable/s
supplied with this product MUST be used. Follow all installation
instructions. Failure to follow instructions could void your FCC
authorization to use this product in the USA.
3. NOTE:
This product has been tested and found to comply with the
requirements listed in FCC Regulations, Part 15 for Class “B” digital
devices. Compliance with these requirements provides a reason-
able level of assurance that your use of this product in a residential
environment will not result in harmful interference with other elec-
tronic devices. This equipment generates/uses radio frequencies
and, if not installed and used according to the instructions found in
the users manual, may cause interference harmful to the operation
of other electronic devices. Compliance with FCC regulations does
not guarantee that interference will not occur in all installations. If
this product is found to be the source of interference, which can be
determined by turning the unit “OFF” and “ON”, please try to elimi-
nate the problem by using one of the following measures:
Relocate either this product or the device that is being affected by
the interference.
Utilize power outlets that are on different branch (circuit breaker or
fuse) circuits or install AC line filter/s.
In the case of radio or TV interference, relocate/reorient the
antenna. If the antenna lead-in is 300 ohm ribbon lead, change the
lead-in to co-axial type cable.
If these corrective measures do not produce satisfactory results,
please contact the local retailer authorized to distribute this type of
product. If you can not locate the appropriate retailer, please contact
Yamaha Corporation of America, Electronic Service Division, 6600
Orangethorpe Ave, Buena Park, CA90620
The above statements apply ONLY to those products distributed by
Yamaha Corporation of America or its subsidiaries.
FCC INFORMATION (U.S.A.)
* This applies only to products distributed by YAMAHA CORPORATION OF AMERICA.
(class B)
OBSERVERA!
Apparaten kopplas inte ur växelströmskällan (nätet) så länge som den ar
ansluten till vägguttaget, även om själva apparaten har stängts av.
ADVARSEL: Netspæendingen til dette apparat er IKKE afbrudt, sålæenge
netledningen siddr i en stikkontakt, som er t endt — også selvom der or
slukket på apparatets afbryder.
VAROITUS: Laitteen toisiopiiriin kytketty käyttökytkin ei irroita koko laitetta
verkosta.
(standby)
This product contains a high intensity lamp that contains
a small amount of mercury. Disposal of this material
may be regulated due to environmental considerations.
For disposal information in the United States, refer to the Electronic
Industries Alliance web site:
www.eiae.org
(mercury)
* This applies only to products distributed by YAMAHA CORPORATION OF AMERICA.
IMPORTANT NOTICE FOR THE UNITED KINGDOM
Connecting the Plug and Cord
IMPORTANT. The wires in this mains lead are coloured in accordance
with the following code:
BLUE
: NEUTRAL
BROWN : LIVE
As the colours of the wires in the mains lead of this apparatus may not
correspond with the coloured makings identifying the terminals in your
plug proceed as follows:
The wire which is coloured BLUE must be connected to the terminal
which is marked with the letter N or coloured BLACK.
The wire which is coloured BROWN must be connected to the termi-
nal which is marked with the letter L or coloured RED.
Making sure that neither core is connected to the earth terminal of the
three pin plug.
• This applies only to products distributed by Yamaha-Kemble Music (U.K.) Ltd.
(2 wires)

4
PSR-S500 уководство пользователя
(3)-10
1/2
икДЗагД нЦпзада ЕЦбйиДлзйлна
ЗзаеДнЦгъзй икйуанДвнЦ, икЦЬСЦ уЦе икалнмиДнъ д щдлигмДнДсаа
* п ‡МЛЪВ ˝ЪУ ЫНУ‚У‰ТЪ‚У ‚ ·ВБУФ‡ТМУП ПВТЪВ. йМУ ‚‡П В˘В ФУМ‡‰У·ËÚÒfl.
икЦСмикЦЬСЦзаЦ
ЗУ ЛБ·ВК‡МЛВ ТВ ¸ВБМ˚ı Ъ ‡‚П Л ‰‡КВ ТПВ ЪЛ УЪ Ы‰‡ ‡ ˝ОВНЪ Л˜ВТНЛП ЪУНУП, ‡ Ъ‡НКВ НУ УЪНУ„У Б‡П˚Н‡МЛfl,
ФУ‚ ВК‰ÂÌËfl У·У Ы‰У‚‡МЛfl, ФУК‡ ‡ Л ‰ Ы„Лı Ë̈ˉВМЪУ‚ ‚ТВ„‰‡ ТУ·О˛‰‡ИЪВ ТОВ‰Ы˛˘ЛВ ПВ ˚ ·ВБУФ‡ТМУТЪЛ:
• аТФУО¸БЫИЪВ ЪУО¸НУ М‡Ф flÊÂÌËÂ, Б‡‰‡ММУВ ‰Оfl ЛМТЪ ЫПВМЪ‡.
щЪУ М‡Ф flÊÂÌË ЫН‡Б‡МУ М‡ ЛМТЪ ЫПВМЪВ.
• аТФУО¸БЫИЪВ ЪУО¸НУ ЫН‡Б‡ММ˚И ‡‰‡ФЪВ (PA-301, PA-300 ЛОЛ ‡М‡ОУ„Л˜-
М˚И, ВНУПВМ‰У‚‡ММ˚И НУ ФУ ‡ˆËÂÈ Yamaha). аТФУО¸БУ‚‡МЛВ МВФ ‡-
‚ЛО¸МУ„У ‡‰‡ФЪВ ‡ ПУКВЪ Ф Л‚ВТЪЛ Н ФУ‚ ВК‰ВМЛ˛ ЛОЛ ФВ В„ В‚Ы
ЛМТЪ ЫПВМЪ‡.
• иВ ЛУ‰Л˜ВТНЛ Ф У‚В flÈÚ ‚ЛОНЫ ˝ОВНЪ УЛМТЪ ЫПВМЪ‡ Л Ы‰‡ÎflÈÚÂ Т МВВ
„ flБ¸ Л Ф˚О¸.
• тМЫ ‡‰‡ФЪВ ‡ ФВ ВПВММУ„У ЪУН‡ МВ ‰УОКВМ М‡ıУ‰ЛЪ¸Тfl fl‰УП Т ЛТ-
ЪУ˜МЛН‡ПЛ ЪВФО‡ (М‡„ В‚‡ÚÂÎflÏË, ‡‰Л‡ЪУ ‡ПЛ Л ‰ .). зВ ‰УФЫТН‡ИЪВ
Ъ‡НКВ ˜ ВБПВ МУ„У Т„Л·‡МЛfl Л ФУ‚ ВК‰ÂÌËfl ¯МЫ ‡, МВ ТЪ‡‚¸ЪВ М‡ МВ„У
ÚflÊÂÎ˚В Ф В‰ПВЪ˚ Л ‰В КЛЪВ В„У ‚ Ъ‡НУП ПВТЪВ, „‰В М‡ МВ„У МВО¸Бfl
М‡ТЪЫФЛЪ¸, Б‡‰ВЪ¸ МУ„УИ ЛОЛ ˜ЪУ-МЛ·Ы‰¸ ФУ МВПЫ ФВ ВН‡ЪЛЪ¸.
• зВ УЪН ˚‚‡ИЪВ ЛМТЪ ЫПВМЪ Л МВ Ф˚Ъ‡ИЪВТ¸ ‡БУ· ‡Ъ¸ ЛОЛ ПУ‰ËÙˈË-
У‚‡Ъ¸ В„У ‚МЫЪ ВММЛВ НУПФУМВМЪ˚. З ЛМТЪ ЫПВМЪВ МВЪ НУПФУМВМЪУ‚,
НУЪУ ˚В ‰УОКВМ У·ТОЫКЛ‚‡Ъ¸ ФУО¸БУ‚‡ЪВО¸. и Л ФУfl‚ОВМЛЛ МВЛТФ ‡‚-
МУТЪЛ МВПВ‰ОВММУ Ф ВН ‡ЪЛЪВ ˝НТФОЫ‡Ъ‡ˆЛ˛ Л У· ‡ЪЛЪВТ¸ Б‡ ФУПУ˘¸˛
Н Н‚‡ÎËÙËˆË У‚‡ММ˚П ÒÔˆˇОЛТЪ‡П ˆÂÌÚ ‡ ÚÂıÌ˘ВТНУ„У У·ТОЫКЛ‚‡-
МЛfl НУ ФУ ‡ˆЛЛ Yamaha.
• ЕВ В„ЛЪВ ЛМТЪ ЫПВМЪ УЪ ‰УК‰fl, МВ ЛТФУО¸БЫИЪВ В„У fl‰УП Т ‚У‰УИ,
‚ ЫТОУ‚Лflı Т˚ УТЪЛ Л ФУ‚˚¯ВММУИ ‚О‡КМУТЪЛ; МВ ТЪ‡‚¸ЪВ М‡ МВ„У
ВПНУТЪЛ Т КЛ‰НУТЪ¸˛, НУЪУ ‡fl ПУКВЪ ‡БОЛЪ¸Тfl Л ФУФ‡ТЪ¸ ‚МЫЪ ¸.
• зЛНУ„‰‡ МВ ‚ТЪ‡‚ÎflÈÚÂ Л МВ ‚˚МЛП‡ИЪВ ‚ЛОНЫ ˝ОВНЪ УЛМТЪ ЫПВМЪ‡
ПУН ˚ПЛ ЫН‡ПЛ.
• зВ ТЪ‡‚¸ЪВ М‡ ЛМТЪ ЫПВМЪ „У fl˘ЛВ Ф В‰ПВЪ˚, М‡Ф ЛПВ Т‚В˜Л.
ЙУ fl˘ЛИ Ф В‰ПВЪ ПУКВЪ ЫФ‡ТЪ¸ Л ‚˚Б‚‡Ъ¸ ФУК‡ .
• З ТОЫ˜‡В ЛБМУТ‡ Л ФУ‚ ВК‰ÂÌËfl ¯МЫ ‡ ЛОЛ ‚ЛОНЛ ‡‰‡ФЪВ ‡ ФВ ВПВММУ-
„У ЪУН‡, ‡ Ъ‡НКВ Ф Л ‚МВБ‡ФМУП ЛТ˜ВБМУ‚ВМЛЛ Б‚ЫН‡ ‚У ‚ ВПfl ˝НТФОЫ‡-
Ъ‡ˆЛЛ, Ф Л ФУfl‚ОВМЛЛ МВУ·˚˜МУ„У Б‡Ф‡ı‡ Л ‰˚П‡ МВПВ‰ОВММУ УЪНО˛˜Л-
ЪВ ˝ОВНЪ УФЛЪ‡МЛВ, ‚˚М¸ЪВ ‚ЛОНЫ ‡‰‡ФЪВ ‡ ЛБ УБВЪНЛ Л У· ‡ЪЛЪВТ¸ Б‡
ФУПУ˘¸˛ Н ÒÔˆˇОЛТЪ‡П ˆÂÌÚ ‡ ÚÂıÌ˘ВТНУ„У У·ТОЫКЛ‚‡МЛfl НУ ФУ ‡-
ˆЛЛ Yamaha.
ЗзаеДзаЦ!
ЗУ ЛБ·ВК‡МЛВ М‡ÌÂÒÂÌËfl ТВ ¸ВБМ˚ı Ъ ‡‚П ТВ·В Л УН ЫК‡˛˘ЛП, ‡ Ъ‡НКВ ФУ‚ ВК‰ÂÌËfl ЛМТЪ ЫПВМЪ‡ Л ‰ Ы„У„У
ЛПЫ˘ВТЪ‚‡, ФУПЛПУ Ф У˜Лı ‚ТВ„‰‡ ТУ·О˛‰‡ИЪВ ТОВ‰Ы˛˘ЛВ УТМУ‚М˚В ПВ ˚ ·ВБУФ‡ТМУТЪЛ:
• и Л УЪНО˛˜ВМЛЛ Н‡·ВОfl УЪ ЛМТЪ ЫПВМЪ‡ ЛОЛ УЪ ˝ОВНЪ УТВЪЛ ·В ЛЪВТ¸
Б‡ ‚ЛОНЫ, ‡ МВ Б‡ Н‡·ВО¸.
• дУ„‰‡ ЛМТЪ ЫПВМЪ МВ ЛТФУО¸ÁÛÂÚÒfl, ‡ Ъ‡НКВ ‚У ‚ ВПfl „ УБ˚ УЪНО˛˜‡И-
ЪВ ‡‰‡ФЪВ ФВ ВПВММУ„У ЪУН‡.
• зВ ФУ‰НО˛˜‡ИЪВ ЛМТЪ ЫПВМЪ Н У‰МУИ ˝ОВНЪ Л˜ВТНУИ УБВЪНВ Т ‰ Ы„ЛПЛ
ЫТЪ УИТЪ‚‡ПЛ (М‡Ф ЛПВ , ˜В ВБ Ъ УИМЛН). щЪУ ПУКВЪ Ф Л‚ВТЪЛ Н ТМЛ-
КВМЛ˛ Н‡˜ВТЪ‚‡ Б‚ЫН‡ ЛОЛ ФВ В„ В‚Ы УБВЪНЛ.
• ЗУ ЛБ·ВК‡МЛВ ‰ВЩУ П‡ˆЛЛ Ф‡МВОЛ Л ФУ‚ ВК‰ÂÌËfl ‚ÌÛÚ ÂÌÌËı НУПФУ-
МВМЪУ‚ ·В В„ЛЪВ ЛМТЪ ЫПВМЪ УЪ ˜ ВБПВ МУИ Ф˚ОЛ Л ТЛО¸МУИ ‚Л· ‡ˆЛЛ
Л МВ ЛТФУО¸БЫИЪВ В„У Ф Л У˜ВМ¸ ‚˚ТУНУИ ЛОЛ МЛБНУИ ЪВПФВ ‡ЪЫ В (М‡Ф-
ЛПВ , М‡ ÒÓÎ̈Â, fl‰УП Т М‡„ В‚‡ЪВОВП ЛОЛ ‚ П‡¯ЛМВ ‚ ‰МВ‚МУВ ‚ ВПfl).
• зВ ЛТФУО¸БЫИЪВ ЛМТЪ ЫПВМЪ ‚ МВФУТ В‰ТЪ‚ВММУИ ·ОЛБУТЪЛ УЪ ЪВОВ‚Л-
БУ ‡, ‡‰ЛУФ ЛВПМЛН‡, ТЪВ ВУУ·У Ы‰У‚‡МЛfl, ПУ·ЛО¸МУ„У ЪВОВЩУМ‡ Л
‰ Ы„Лı ˝ОВНЪ УФ Л·У У‚. З Ф УЪЛ‚МУП ТОЫ˜‡В ‚ ЛМТЪ ЫПВМЪВ, ЪВОВ‚Л-
БУ В ЛОЛ ‡‰ЛУФ ЛВПМЛНВ ПУ„ЫЪ ‚УБМЛНМЫЪ¸ ÔÓÏÂıË.
• ЗУ ЛБ·ВК‡МЛВ ТОЫ˜‡ИМУ„У Ф‡‰ÂÌËfl ЛМТЪ ЫПВМЪ‡ МВ УТЪ‡‚ÎflÈÚÂ В„У
‚ МВЫТЪУИ˜Л‚УП ФУОУКВМЛЛ.
• иВ В‰ ФВ ВПВ˘ВМЛВП ЛМТЪ ЫПВМЪ‡ УЪТУВ‰ЛМЛЪВ ФУ‰НО˛˜ВММ˚И Н МВПЫ
‡‰‡ФЪВ Л ‰ Ы„ЛВ Н‡·ВОЛ.
• иВ В‰ М‡ТЪ УИНУИ ЛБ‰ÂÎËfl Ы·В‰ЛЪВТ¸, ˜ЪУ ЛТФУО¸БЫВП‡fl
˝ОВНЪ У УБВЪН‡ ОВ„НУ ‰УТЪЫФМ‡. З ТОЫ˜‡В ‚УБМЛНМУ‚ÂÌËfl ͇НЛı-ОЛ·У
МВФУО‡‰УН МВПВ‰ОВММУ ‚˚НО˛˜ЛЪВ ЛМТЪ ЫПВМЪ Л УЪНО˛˜ЛЪВ В„У УЪ
˝ОВНЪ УТВЪЛ. С‡КВ ВТОЛ ФЛЪ‡МЛВ ‚˚НО˛˜ВМУ, ЛБ‰ВОЛВ Ф У‰УОК‡ВЪ
ФУЪ В·ОflЪ¸ ˝ОВНЪ У˝МВ „Л˛ ‚ ПЛМЛП‡О¸МУП НУОЛ˜ВТЪ‚В. ЦТОЛ ЛБ‰ВОЛВ
МВ ЛТФУО¸ÁÛÂÚÒfl ‚ ЪВ˜ВМЛВ ‰ОЛЪВО¸МУ„У ‚ ВПВМЛ, УЪНО˛˜ЛЪВ ¯МЫ
ФЛЪ‡МЛfl УЪ ˝ОВНЪ УТВЪЛ.
• аТФУО¸БЫИЪВ ЪУО¸НУ ФУ‰ТЪ‡‚НЫ, ÒÔÂˆË‡О¸МУ Ф В‰М‡БМ‡˜ВММЫ˛ ‰Оfl
ЛМТЪ ЫПВМЪ‡. СОfl Н ÂÔÎÂÌËfl ТЪУИНЛ ЛОЛ ФУ‰ТЪ‡‚НЛ ЛТФУО¸БЫИЪВ ЪУО¸НУ
‚ЛМЪ˚, ФУТЪ‡‚ÎflÂÏ˚В ‚ НУПФОВНЪВ. З Ф УЪЛ‚МУП ТОЫ˜‡В ‚УБ
ПУКМУ
ФУ‚ ВК‰ВМЛВ ‚МЫЪ ÂÌÌËı НУПФУМВМЪУ‚ Л Ф‡‰ВМЛВ ЛМТЪ ЫПВМЪ‡.
аТЪУ˜МЛН ФЛЪ‡МЛfl/‡‰‡ФЪВ ФВ ВПВММУ„У ЪУН‡
зВ УЪН ˚‚‡Ъ¸
ЕВ В˜¸ УЪ ‚У‰˚
ЕВ В˜¸ УЪ У„Мfl
ЗМВ¯Ъ‡ЪМ˚В ТЛЪЫ‡ˆЛЛ
аТЪУ˜МЛН ФЛЪ‡МЛfl/‡‰‡ФЪВ ФВ ВПВММУ„У ЪУН‡
еВТЪУ ЫТЪ‡МУ‚НЛ

PSR-S500 уководство пользователя
5
(3)-10
2/2
• иВ В‰ ФУ‰НО˛˜ВМЛВП ЛМТЪ ЫПВМЪ‡ Н ‰ Ы„ЛП ˝ОВНЪ УММ˚П НУПФУМВМ-
Ъ‡П УЪНО˛˜ЛЪВ Лı ФЛЪ‡МЛВ. иВ В‰ ‚НО˛˜ВМЛВП ЛОЛ УЪНО˛˜ВМЛВП
˝ОВНЪ УММ˚ı НУПФУМВМЪУ‚ ЫТЪ‡МУ‚ЛЪВ ПЛМЛП‡О¸М˚И Ы У‚ВМ¸ „ УП-
НУТЪЛ. м·В‰ЛЪВТ¸ Ъ‡НКВ ‚ ЪУП, ˜ЪУ М‡ ‚ТВı НУПФУМВМЪ‡ı ЫТЪ‡МУ‚ОВМ
ПЛМЛП‡О¸М˚И Ы У‚ВМ¸ „ УПНУТЪЛ, ‡ ‚У ‚ ВПfl Л„ ˚ М‡ ЛМТЪ ЫПВМЪВ
ФУТЪВФВММУ Ы‚ВОЛ˜¸ЪВ „ УПНУТЪ¸ ‰У МЫКМУИ.
• СОfl ˜ЛТЪНЛ ЛМТЪ ЫПВМЪ‡ ФУО¸БЫИЪВТ¸ Пfl„НУИ ÒÛıÓÈ ЪН‡М¸˛. зЛНУ„‰‡ МВ
ЛТФУО¸БЫИЪВ ÔflÚÌÓ‚˚‚У‰ЛЪВОЛ, ‡ТЪ‚У ЛЪВОЛ, КЛ‰НЛВ У˜ЛТЪЛЪВОЛ ЛОЛ
˜ËÒÚfl˘ЛВ Т‡ОЩВЪНЛ Т Ф УФЛЪНУИ.
• зЛНУ„‰‡ МВ ‚ТЪ‡‚ÎflÈÚÂ Л МВ ÓÌflÈÚ ·ЫП‡„Ы, ПВЪ‡ООЛ˜ВТНЛВ Л Ф У˜ЛВ
Ф В‰ПВЪ˚ ‚ УЪ‚В ÒÚËfl М‡ Ф‡МВОЛ Л НО‡‚Л‡ЪЫ В. ЦТОЛ ˝ЪУ ТОЫ˜ЛОУТ¸,
МВПВ‰ОВММУ ‚˚НО˛˜ЛЪВ ЛМТЪ ЫПВМЪ Л ‚˚М¸ЪВ Н‡·ВО¸ ФЛЪ‡МЛfl ЛБ
УБВЪНЛ. б‡ЪВП У· ‡ЪЛЪВТ¸ Б‡ ФУПУ˘¸˛ Н ÒÔˆˇОЛТЪ‡П ˆÂÌÚ ‡
ÚÂıÌ˘ВТНУ„У У·ТОЫКЛ‚‡МЛfl НУ ФУ ‡ˆЛЛ Yamaha.
• зВ НО‡‰ЛЪВ М‡ ЛМТЪ ЫПВМЪ Ф В‰ПВЪ˚ ЛБ ‚ЛМЛО‡, ФО‡ТЪП‡ТТ˚ ЛОЛ
ВБЛМ˚: ˝ЪУ ПУКВЪ ‚˚Б‚‡Ъ¸ ‚˚ˆ‚ВЪ‡МЛВ Ф‡МВОЛ ЛОЛ НО‡‚Л‡ЪЫ ˚.
• зВ У·ОУН‡˜Л‚‡ИЪВТ¸ М‡ ЛМТЪ ЫПВМЪ, МВ ТЪ‡‚¸ЪВ М‡ МВ„У ÚflÊÂÎ˚В Ф В‰-
ПВЪ˚ Л МВ Ф ЛНО‡‰˚‚‡ИЪВ ТОЛ¯НУП ·УО¸¯УИ ТЛО˚ Ф Л ФУО¸БУ‚‡МЛЛ
НМУФН‡ПЛ, ‚˚НО˛˜‡ÚÂÎflÏË Л ‡Б˙ВП‡ПЛ.
• зВ ТОВ‰ЫВЪ ‰УО„У ‡·УЪ‡Ъ¸ Т ‚˚ТУНЛП ЛОЛ МВНУПЩУ ЪМ˚П Ы У‚МВП
„ УПНУТЪЛ ЛМТЪ ЫПВМЪ‡/ЫТЪ УИТЪ‚‡ ЛОЛ М‡Ы¯МЛНУ‚, Ъ‡Н Н‡Н ˝ЪУ ПУКВЪ
Ф Л‚ВТЪЛ Н ФУЪВ В ÒÎÛı‡. и Л ЫıЫ‰¯ВМЛЛ ÒÎÛı‡ ЛОЛ Б‚УМВ ‚ Ы¯‡ı
У· ‡ЪЛЪВТ¸ Н ‚ ‡˜Ы.
лУı ‡МВМЛВ Л ВБВ ‚МУВ НУФЛ У‚‡МЛВ ‰‡ММ˚ı
• и Л УЪНО˛˜ВМЛЛ ФЛЪ‡МЛfl ЛМТЪ ЫПВМЪ‡ М‡ТЪ УИНЛ Ф‡МВОЛ Л МВНУЪУ ˚В
‰ Ы„ЛВ ЪЛФ˚ ‰‡ММ˚ı Ì ÒÓı ‡Ìfl˛ЪТfl ‚ Ф‡ÏflÚË. ëÓı ‡ÌflÈÚ МЫКМ˚В
‰‡ММ˚В ‚ В„ЛТЪ ‡ˆËÓÌÌÓÈ Ô‡ÏflÚË (ÒÚ . 67).
лУı ‡МВММ˚В ‰‡ММ˚В Ъ‡НКВ ПУ„ЫЪ ·˚Ъ¸ ЫЪВ flМ˚ ЛБ-Б‡ МВЛТФ ‡‚МУТЪЛ
ЛОЛ МВФ ‡‚ЛО¸МУИ ‡·УЪ˚ ЛМТЪ ЫПВМЪ‡.
З‡КМ˚В ‰‡ММ˚В ТУı ‡ÌflÈÚ ̇ USB-МУТЛЪВО¸ ЛОЛ М‡ ‚МВ¯МВВ
ЫТЪ УИТЪ‚У, М‡Ф ЛПВ , М‡ НУПФ¸˛ЪВ . (ТЪ . 76, 87)
кВБВ ‚МУВ НУФЛ У‚‡МЛВ М‡ USB-ЫТЪ УИТЪ‚У ı ‡ÌÂÌËfl
‰‡ÌÌ˚ı ЛОЛ ‚МВ¯МЛИ МУТЛЪВО¸
• уЪУ·˚ Б‡˘ЛЪЛЪ¸ ‰‡ММ˚В УЪ ФУЪВ Л ЛБ-Б‡ ФУ‚ ВК‰ÂÌËfl ÌÓÒËÚÂÎfl,
ВНУПВМ‰ÛÂÚÒfl ÒÓı ‡МflЪ¸ М‡Л·УОВВ ‚‡КМ˚В ‰‡ММ˚В М‡ ‰‚Ыı USB-
ЫТЪ УИТЪ‚‡ı ı ‡ÌÂÌËfl ‰‡ÌÌ˚ı ЛОЛ ‚МВ¯МЛı ÌÓÒËÚÂÎflı.
ЗТВ„‰‡ ‚˚НО˛˜‡ИЪВ ЛМТЪ ЫПВМЪ, ВТОЛ МВ ЛТФУО¸БЫВЪВ В„У.
С‡КВ ‚ ЪВı ТОЫ˜‡flı, НУ„‰‡ ‚˚НО˛˜‡ЪВО¸ ФЛЪ‡МЛfl М‡ıУ‰ËÚÒfl ‚ ФУОУКВМЛЛ STANDBY, ЛМТЪ ЫПВМЪ Ф У‰УОК‡ВЪ ‚ ПЛМЛП‡О¸М˚ı НУОЛ˜ВТЪ‚‡ı ФУЪ В·ОflЪ¸
˝ОВНЪ У˝МВ „Л˛. ЦТОЛ ЛМТЪ ЫПВМЪ МВ ЛТФУО¸ÁÛÂÚÒfl ‰ОЛЪВО¸МУВ ‚ ВПfl, УЪНО˛˜ЛЪВ ‡‰‡ФЪВ ФВ ВПВММУ„У ЪУН‡ УЪ УБВЪНЛ.
● оварные знаки
• астровые шрифты, используемые в данном инструменте, предоставлены корпорацией Ricoh Co., Ltd. и являются ее
собственностью.
• Windows является охраняемым товарным знаком корпорации Microsoft
®
.
•
азвания фирм и продуктов, используемые в этом руководстве пользователя, являются товарными знаками или
зарегистрированными товарными знаками соответствующих компаний.
иУ‰НО˛˜ВМЛВ
й·ТОЫКЛ‚‡МЛВ
еВ ˚ ·ВБУФ‡ТМУТЪЛ Ф Л ˝НТФОЫ‡Ъ‡ˆЛЛ
лУı ‡МВМЛВ ‰‡ММ˚ı
дУ ФУ ‡ˆЛfl Yamaha МВ МВТВЪ УЪ‚ВЪТЪ‚ВММУТЪЛ Б‡ ФУ‚ ВК‰ÂÌËfl, ‚˚Б‚‡ММ˚В МВФ ‡‚ЛО¸МУИ ˝НТФОЫ‡Ъ‡ˆËÂÈ ЛОЛ ПУ‰ЛЩЛН‡ˆËÂÈ
ЛМТЪ ЫПВМЪ‡, ‡ Ъ‡НКВ Б‡ ФУЪВ flММ˚В ЛОЛ ЛТФУ ˜ВММ˚В ‰‡ММ˚В.
аОО˛ТЪ ‡ˆЛЛ Л ТМЛПНЛ Ьд-‰ЛТФОВВ‚ Ф Л‚В‰ВМ˚ ‚ ЫНУ‚У‰ТЪ‚В ФУО¸БУ‚‡ÚÂÎfl ЪУО¸НУ ‚ Н‡˜ВТЪ‚В Ф ЛПВ У‚. З ‰ВИТЪ‚ЛЪВО¸МУТЪЛ ‚ТВ
ПУКВЪ ‚˚„Оfl‰ВЪ¸ МВТНУО¸НУ ЛМ‡˜В.

6
PSR-S500 уководство пользователя
GM System Level 1
«GM System Level 1» – это дополнение к MIDI-стандарту, благодаря которому любые GM-
совместимые музыкальные данные могут быть точно воспроизведены любым GM-совместимым тон-
генератором независимо от фирмы-изготовителя. аркировка GM ставится на все программное
обеспечение и оборудование, поддерживающее стандарт GM System Level.
XGlite
XGlite – это упрощенная версия формата высококачественных тон-генераторов XG корпорации
Yamaha. азумеется, с помощью тон-генератора XGlite можно воспроизвести любую песню
в формате XG. Однако имейте в виду, что из-за сокращенного набора параметров управления
и эффектов некоторые песни могут воспроизводиться не так, как оригинал.
XF
ормат XF корпорации Yamaha представляет собой вариант стандарта SMF (Standard MIDI File),
усовершенствованный за счет увеличения функциональности и возможности дальнейшего
расширения. ри воспроизведении файла в формате XF, содержащего текст, синтезатор может
выводить на экран тексты песен.
STYLE FILE
Style File Format – это оригинальный формат файла стиля, разработанный корпорацией Yamaha,
в котором используется уникальная система преобразования, позволяющая автоматически создавать
высококачественный аккомпанемент на основе большого количества типов аккордов.
USB
USB – это сокращение от Universal Serial Bus (универсальная последовательная шина). Это
последовательный интерфейс для связи компьютера с периферийными устройствами. Он позволяет
осуществлять «горячую» замену периферийных устройств (без выключения питания компьютера).
гУ„УЪЛФ˚
Этот продукт включает компьютерные программы и содержимое, авторские права на которые принадлежат корпорации
Yamaha или право на использование которых получено по лицензии от других фирм. материалам, защищенным
авторскими правами, относятся все без ограничения компьютерные программы, файлы стиля, файлы MIDI, данные WAVE
и музыкальные звукозаписи. юбое несанкционированное использование таких программ и содержимого, выходящее за
рамки личного пользования, запрещено соответствующими законами. юбое нарушение авторских прав преследуется по
закону.
О
А А
,
А
О
А Я
О Ь У
А О
О
.
опирование коммерческих музыкальных данных, включая MIDI-данные и/или аудиоданные, но не ограничиваясь ими,
строго запрещается, за исключением использования в личных целях.

PSR-S500 уководство пользователя
7
оздравляем и благодарим за приобретение Yamaha PSR-S500
PortaTone!
нимательно прочитайте данное руководство пользователя
перед использованием инструмента, чтобы полностью
использовать его преимущества.
Обязательно храните руководство в надежном и удобном месте
даже после прочтения и обращайтесь к нему всякий раз, когда
необходимо получить более подробную информацию об
операциях или функциях.
комплект поставки инструмента входят следующие принадлежности (удостоверьтесь, что все они
имеются в наличии).
•
юпитр
•
иск CD-ROM
•
уководство пользователя (данная книга)
•
лок питания переменного тока (может не входить в комплект поставки для вашего
региона, поэтому уточните у регионального дилера Yamaha).
СУФУОМЛЪВО¸М˚В Ф ЛМ‡‰ОВКМУТЪЛ

Специальные возможности инструмента psr-s500, Ëôâˆë‡о¸м˚в ‚убпукмутъл лмтъ ыпвмъ‡ psr-s500, Оспроизведение разных инструментальных тембров
Гра в определенном стиле Чат поддержки
- Изображение
- Текст
8
PSR-S500 уководство пользователя
ëÔÂˆË‡О¸М˚В ‚УБПУКМУТЪЛ ЛМТЪ ЫПВМЪ‡ PSR-S500
■ оспроизведение разных инструментальных тембров
стр. 17
ожно изменить тембр инструмента, звучащий во время игры на
клавиатуре. Это может быть тембр скрипки, флейты, арфы или любой
другой из множества различных тембров. апример, можно изменить
настроение песни, написанной для фортепиано, используя для ее
воспроизведения тембр скрипки. Откройте для себя мир музыкального
разнообразия!
■ охранение и вызов настроек панели в регистрационной памяти
стр. 67
Эта удобная функция позволяет сохранять «мгновенный снимок»
пользовательских настроек панели — до 64 полных «регистраций». х
можно вызывать мгновенно и в любое время. Это идеальный вариант
для широкого изменения звука или эффектов при живом исполнении!
8 банков x 8 встроенных
песен = 64 регистрации
■ гра в определенном стиле
стр. 23
отите играть с полным аккомпанементом? опробуйте стили
автоаккомпанемента. тили аккомпанемента позволяют создать полное
оркестровое звучание со множеством стилей от вальса до 8-beat
и самбы. ыберите стиль, подходящий для музыки, которую вы хотите
сыграть, или для расширения своих музыкальных горизонтов
поэкспериментируйте с новыми стилями.
■ ростота использования с помощью экрана для отображения нот
стр. 30
ри воспроизведении песни на экране будет отображаться
соответствующая партитура. Это хороший способ научиться читать
музыку. сли в песне содержаться текст и аккорды, они также будут
отображаться на экране партитуры.
* ексты и аккорды не будут отображаться на экране, если используемая в режиме партитуры
песня не содержит соответствующих текстов и аккордов.
■ охранение и загрузка данных на флэш-памяти USB или компьютере
стр. 73 и 83
Эти средства организации данных позволяют хранить исходные
песни пользователя или пользовательские настройки панели
(регистрационная память) на флэш-памяти USB или компьютере,
а затем загружать данные обратно в инструмент при необходимости.


Установка, Требования к электропитанию, Подключение наушников (разъем phones/output)
Подключение педали (гнездо sustain), Ребования к электропитанию, Одключение наушников, Разъем phones/output), Одключение педали (гнездо sustain), Н в·у‚‡ Чат поддержки
- Изображение
- Текст
10
PSR-S500 уководство пользователя
Установка
Обязательно выполните следующие действия,
включать питание.
ᕡ Установите переключатель [STANDBY/ON]
в положение STANDBY.
ᕢ одключите блок питания переменного тока
(PA-300, PA-301 или другой блок,
рекомендованный корпорацией Yamaha)
к разъему питания инструмента.
ᕣ одключите адаптер к электросети.
се необходимые подключения следует
выполнить О включения питания.
ри подключении шнура к этому гнезду динамики
инструмента автоматически отключаются. нездо
PHONES/OUTPUT можно также использовать как
внешний выход. гнезду PHONES/OUTPUT можно
подключить усилитель клавиатуры, стереосистему,
микшер, магнитофон или другое линейное
устройство для передачи выходного сигнала от
инструмента к подключенному устройству.
ункция сустейна позволяет воспроизвести
длительное звучание нот при нажатии педали.
одключите к этому разъему педальный
переключатель FC4 или FC5 и используйте его для
включения или выключения эффекта «сустейн».
н В·У‚‡МЛfl Н ˝ОВНЪ УФЛЪ‡МЛ˛
•
ля питания инструмента от электросети используйте О Ь О
адаптер переменного тока Yamaha PA-300 или PA-301 (либо другой,
рекомендованный корпорацией Yamaha). спользование других
адаптеров может нанести непоправимый вред адаптеру
и инструменту.
• Отключайте адаптер переменного тока, если инструмент не
используется, а также во время грозы.
PA-300 или
PA-301
Электророзетка
ᕢ
ᕣ
иУ‰НО˛˜ВМЛВ М‡Ы¯МЛНУ‚
( ‡Б˙ВП PHONES/OUTPUT)
иУ‰НО˛˜ВМЛВ ФВ‰‡ОЛ („МВБ‰У SUSTAIN)
•
е следует долго использовать наушники при повышенном уровне
громкости. Это может привести к нарушению слуха.
•
тобы не повредить динамики, перед их подключением установите
минимальную громкость на внешних устройствах. есоблюдение этого
правила может привести к поражению электрическим током или
повреждению оборудования. Установите на всех устройствах
минимальную громкость и во время игры на инструменте постепенно
увеличивайте ее до необходимого уровня.
•
еред включением питания убедитесь, что педальный переключатель
правильно подсоединен к гнезду SUSTAIN.
•
е нажимайте на педаль в момент включения питания. Это изменяет
принятую полярность педали, что приводит к ее обратному действию.

09:14
YAMAHA PSR-S550 Demo (Russian)
02:39
Yamaha psr s500.16 beatballad. Happy New Year
21:34
Yamaha psr s500 Nuevo Teclado!!! Review
05:26
Ремонт дисплея Синтезатор Yamaha PSR S500
03:30
Yamaha PSR s500 Poppuri style 6-8 ballad
04:15
ajaruli yamaha psrs500.flv
Нажмите на кнопку для помощи

Owner’s Manual
EN

SPECIAL MESSAGE SECTION
This product utilizes batteries or an external power supply (adapter).
DO NOT connect this product to any power supply or adapter other
than one described in the manual, on the name plate, or specifically
recommended by Yamaha.
This product should be used only with the components supplied or; a
cart, rack, or stand that is recommended by Yamaha. If a cart, etc., is
used, please observe all safety markings and instructions that accompany the accessory product.
SPECIFICATIONS SUBJECT TO CHANGE:
The information contained in this manual is believed to be correct at the
time of printing. However, Yamaha reserves the right to change or modify any of the specifications without notice or obligation to update existing units.
This product, either alone or in combination with an amplifier and headphones or speaker/s, may be capable of producing sound levels that
could cause permanent hearing loss. DO NOT operate for long periods
of time at a high volume level or at a level that is uncomfortable. If you
experience any hearing loss or ringing in the ears, you should consult
an audiologist.
IMPORTANT: The louder the sound, the shorter the time period before
damage occurs.
NOTICE:
Service charges incurred due to a lack of knowledge relating to how a
function or effect works (when the unit is operating as designed) are not
covered by the manufacturer’s warranty, and are therefore the owners
responsibility. Please study this manual carefully and consult your
dealer before requesting service.
ENVIRONMENTAL ISSUES:
Yamaha strives to produce products that are both user safe and environmentally friendly. We sincerely believe that our products and the production methods used to produce them, meet these goals. In keeping
with both the letter and the spirit of the law, we want you to be aware of
the following:
Battery Notice:
This product MAY contain a small non-rechargeable battery which (if
applicable) is soldered in place. The average life span of this type of
battery is approximately five years. When replacement becomes necessary, contact a qualified service representative to perform the replacement.
This product may also use “household” type batteries. Some of these
may be rechargeable. Make sure that the battery being charged is a
rechargeable type and that the charger is intended for the battery being
charged.
When installing batteries, do not mix batteries with new, or with batteries of a different type. Batteries MUST be installed correctly. Mismatches or incorrect installation may result in overheating and battery
case rupture.
Warning:
Do not attempt to disassemble, or incinerate any battery. Keep all batteries away from children. Dispose of used batteries promptly and as
regulated by the laws in your area. Note: Check with any retailer of
household type batteries in your area for battery disposal information.
Disposal Notice:
Should this product become damaged beyond repair, or for some reason its useful life is considered to be at an end, please observe all local,
state, and federal regulations that relate to the disposal of products that
contain lead, batteries, plastics, etc. If your dealer is unable to assist
you, please contact Yamaha directly.
NAME PLATE LOCATION:
The name plate is located on the bottom of the product. The model
number, serial number, power requirements, etc., are located on this
plate. You should record the model number, serial number, and the date
of purchase in the spaces provided below and retain this manual as a
permanent record of your purchase.
Model
Serial No.
Purchase Date
92-BP (bottom)
PLEASE KEEP THIS MANUAL
2 PSR-S500 Owner’s Manual

1. IMPORTANT NOTICE: DO NOT MODIFY THIS UNIT!
This product, when installed as indicated in the instructions contained in this manual, meets FCC requirements. Modifications not
expressly approved by Yamaha may void your authority, granted by
the FCC, to use the product.
2. IMPORTANT: When connecting this product to accessories and/
or another product use only high quality shielded cables. Cable/s
supplied with this product MUST be used. Follow all installation
instructions. Failure to follow instructions could void your FCC
authorization to use this product in the USA.
FCC INFORMATION (U.S.A.)
3. NOTE: This product has been tested and found to comply with the
requirements listed in FCC Regulations, Part 15 for Class “B” digital
devices. Compliance with these requirements provides a reasonable level of assurance that your use of this product in a residential
environment will not result in harmful interference with other electronic devices. This equipment generates/uses radio frequencies
and, if not installed and used according to the instructions found in
the users manual, may cause interference harmful to the operation
of other electronic devices. Compliance with FCC regulations does
not guarantee that interference will not occur in all installations. If
this product is found to be the source of interference, which can be
determined by turning the unit “OFF” and “ON”, please try to eliminate the problem by using one of the following measures:
Relocate either this product or the device that is being affected by
the interference.
Utilize power outlets that are on different branch (circuit breaker or
fuse) circuits or install AC line filter/s.
In the case of radio or TV interference, relocate/reorient the
antenna. If the antenna lead-in is 300 ohm ribbon lead, change the
lead-in to co-axial type cable.
If these corrective measures do not produce satisfactory results,
please contact the local retailer authorized to distribute this type of
product. If you can not locate the appropriate retailer, please contact
Yamaha Corporation of America, Electronic Service Division, 6600
Orangethorpe Ave, Buena Park, CA90620
The above statements apply ONLY to those products distributed by
Yamaha Corporation of America or its subsidiaries.
* This applies only to products distributed by YAMAHA CORPORATION OF AMERICA.
OBSERVERA!
Apparaten kopplas inte ur växelströmskällan (nätet) så länge som den
ar ansluten till vägguttaget, även om själva apparaten har stängts av.
ADVARSEL: Netspæendingen til dette apparat er IKKE afbrudt,
sålæenge netledningen siddr i en stikkontakt, som er t endt — også
selvom der or slukket på apparatets afbryder.
VAR OITUS: Laitteen toisiopiiriin kytketty käyttökytkin ei irroita koko
laitetta verkosta.
(standby)
This product contains a high intensity lamp
that contains a small amount of mercury.
Disposal of this material may be regulated
due to environmental considerations.
For disposal information in the United States, refer to
the Electronic Industries Alliance web site:
www.eiae.org
YAMAHA CORPORATION OF AMERICA.
(mercury)* This applies only to products distributed by
COMPLIANCE INFORMATION STATEMENT
(DECLARATION OF CONFORMITY PROCEDURE)
Responsible Party : Yamaha Corporation of America
Address : 6600 Orangethorpe Ave., Buena Park, Calif.
Telephone : 714-522-9011
Type of Equipment : Electronic Keyboard
Model Name : PSR-S500
This device complies with Part 15 of the FCC Rules.
Operation is subject to the following conditions:
1) this device may not cause harmful interference, and
2) this device must accept any interference received including
interference that may cause undesired operation.
See user manual instructions if interference to radio reception is
suspected.
* This applies only to products distributed by
YAMAHA CORPORATION OF AMERICA.
90620
(FCC DoC)
(class B)
IMPORTANT NOTICE FOR THE UNITED KINGDOM
Connecting the Plug and Cord
IMPORTANT. The wires in this mains lead are coloured in accordance with the following code:
As the colours of the wires in the mains lead of this apparatus
may not correspond with the coloured makings identifying the terminals in your plug proceed as follows:
The wire which is coloured BLUE must be connected to the terminal which is marked with the letter N or coloured BLACK.
The wire which is coloured BROWN must be connected to the
terminal which is marked with the letter L or coloured RED.
Making sure that neither core is connected to the earth terminal
of the three pin plug.
• This applies only to products distributed by Yamaha-Kemble
Music (U.K.) Ltd.
BLUE : NEUTRAL
BROWN : LIVE
(2 wires)
PSR-S500 Owner’s Manual
3
PRECAUTIONS
PLEASE READ CAREFULLY BEFORE PROCEEDING
* Please keep this manual in a safe place for future reference.
WARNING
Always follow the basic precautions listed below to avoid the possibility of serious injury or even death from electrical
shock, short-circuiting, damages, fire or other hazards. These precautions include, but are not limited to, the following:
Power supply/AC power adaptor
• Only use the voltage specified as correct for the instrument. The required voltage
is printed on the name plate of the instrument.
• Use the specified adaptor (PA-300, PA-301 or an equivalent recommended by
Yamaha) only. Using the wrong adaptor can result in damage to the instrument
or overheating.
• Check the electric plug periodically and remove any dirt or dust which may have
accumulated on it.
• Do not place the AC adaptor cord near heat sources such as heaters or radiators,
and do not excessively bend or otherwise damage the cord, place heavy objects
on it, or place it in a position where anyone could walk on, trip over, or roll
anything over it.
Do not open
• Do not open the instrument or attempt to disassemble the internal parts or
modify them in any way. The instrument contains no user-serviceable parts. If it
should appear to be malfunctioning, discontinue use immediately and have it
inspected by qualified Yamaha service personnel.
Water warning
• Do not expose the instrument to rain, use it near water or in damp or wet
conditions, or place containers on it containing liquids which might spill into
any openings.
• Never insert or remove an electric plug with wet hands.
Fire warning
• Do not put burning items, such as candles, on the unit.
A burning item may fall over and cause a fire.
If you notice any abnormality
• If the AC adaptor cord or plug becomes frayed or damaged, or if there is a
sudden loss of sound during use of the instrument, or if any unusual smells or
smoke should appear to be caused by it, immediately turn off the power switch,
disconnect the adaptor plug from the outlet, and have the instrument inspected
by qualified Yamaha service personnel.
CAUTION
Always follow the basic precautions listed below to avoid the possibility of physical injury to you or others, or damage
to the instrument or other property. These precautions include, but are not limited to, the following:
Power supply/AC power adaptor
• When removing the electric plug from the instrument or an outlet, always hold
the plug itself and not the cord.
• Unplug the AC power adaptor when not using the instrument, or during
electrical storms.
• Do not connect the instrument to an electrical outlet using a multiple-connector.
Doing so can result in lower sound quality, or possibly cause overheating in the
outlet.
Location
• Do not expose the instrument to excessive dust or vibrations, or extreme cold or
heat (such as in direct sunlight, near a heater, or in a car during the day) to
prevent the possibility of panel disfiguration or damage to the internal
components.
• Do not use the instrument in the vicinity of a TV, radio, stereo equipment, mobile
phone, or other electric devices. Otherwise, the instrument, TV, or radio may
generate noise.
(3)-10 1/2
4 PSR-S500 Owner’s Manual
• Do not place the instrument in an unstable position where it might accidentally
fall over.
• Before moving the instrument, remove all connected adaptor and other cables.
• When setting up the product, make sure that the AC outlet you are using is easily
accessible. If some trouble or malfunction occurs, immediately turn off the
power switch and disconnect the plug from the outlet. Even when the power
switch is turned off, electricity is still flowing to the product at the minimum
level. When you are not using the product for a long time, make sure to unplug
the power cord from the wall AC outlet.
• Use only the stand specified for the instrument. When attaching the stand or
rack, use the provided screws only. Failure to do so could cause damage to the
internal components or result in the instrument falling over.

Connections
• Before connecting the instrument to other electronic components, turn off the
power for all components. Before turning the power on or off for all components,
set all volume levels to minimum. Also, be sure to set the volumes of all
components at their minimum levels and gradually raise the volume controls
while playing the instrument to set the desired listening level.
Maintenance
• When cleaning the instrument, use a soft, dry cloth. Do not use paint thinners,
solvents, cleaning fluids, or chemical-impregnated wiping cloths.
Handling caution
• Never insert or drop paper, metallic, or other objects into the gaps on the panel
or keyboard. If this happens, turn off the power immediately and unplug the
power cord from the AC outlet. Then have the instrument inspected by qualified
Yamaha service personnel.
• Do not place vinyl, plastic or rubber objects on the instrument, since this might
discolor the panel or keyboard.
• Do not rest your weight on, or place heavy objects on the instrument, and do not
use excessive force on the buttons, switches or connectors.
• Do not use the instrument/device or headphones for a long period of time at a
high or uncomfortable volume level, since this can cause permanent hearing
loss. If you experience any hearing loss or ringing in the ears, consult a
physician.
Saving data
Saving and backing up your data
• The panel settings and some other types of data are not retained in memory
when you turn off the power to the instrument. Save data you want to keep to the
Registration Memory (page 67.)
Saved data may be lost due to malfunction or incorrect operation.
Save important data to a USB storage device/or other external device such as a
computer. (pages 76, 87)
Backing up the USB storage device/external media
•To protect against data loss through media damage, we recommend that you
save your important data onto two USB storage devices/external media.
Yamaha cannot be held responsible for damage caused by improper use or modifications to the instrument, or data that is lost or destroyed.
Always turn the power off when the instrument is not in use.
Even when the power switch is in the “STANDBY” position, electricity is still flowing to the instrument at the minimum level. When you are not using the instrument for a long
time, make sure you unplug the AC power adaptor from the wall AC outlet.
The illustrations and LCD screens as shown in this owner’s manual are for instructional purposes only, and may appear somewhat different from those on
your instrument.
● Trademarks
• The bitmap fonts used in this instrument have been provided by and are the property of Ricoh Co., Ltd.
•Windows is the registered trademarks of Microsoft
®
Corporation.
• The company names and product names in this Owner’s Manual are the trademarks or registered trademarks of their respective companies.
(3)-10 2/2
PSR-S500 Owner’s Manual 5
This product incorporates and bundles computer programs and contents in which Yamaha owns copyrights or with respect to which it
has license to use others’ copyrights. Such copyrighted materials include, without limitation, all computer software, style files, MIDI
files, WAVE data, musical scores and sound recordings. Any unauthorized use of such programs and contents outside of personal use
is not permitted under relevant laws. Any violation of copyright has legal consequences. DON’T MAKE, DISTRIBUTE OR USE
ILLEGAL COPIES.
Copying of the commercially available musical data including but not limited to MIDI data and/or audio data is strictly prohibited
except for your personal use.
Logos
GM System Level 1
“GM System Level 1” is an addition to the MIDI standard which ensures that any GM-compatible music
data can be accurately played by any GM-compatible tone generator, regardless of manufacturer. The GM
mark is affixed to all software and hardware products that support GM System Level.
XGlite
As its name implies, “XGlite” is a simplified version of Yamaha’s high-quality XG tone generation format.
Naturally, you can play back any XG song data using an XGlite tone generator. However, keep in mind that
some songs may play back differently compared to the original data, due to the reduced set of control
parameters and effects.
XF
The Yamaha XF format enhances the SMF (Standard MIDI File) standard with greater functionality and
open-ended expandability for the future. The instrument is capable of displaying lyrics when an XF file containing lyric data is played.
STYLE FILE
The Style File Format is Yamaha’s original style file format which uses a unique conversion system to provide high-quality automatic accompaniment based on a wide range of chord types.
USB
USB is an abbreviation for Universal Serial Bus. It is a serial interface for connecting a computer with
peripheral Devices. It allows “hot swapping” (connecting peripheral devices while the power to the computer is on).
6 PSR-S500 Owner’s Manual

Congratulations and thank you for purchasing the Yamaha PSR-S500
PortaTone!
Please read this owner’s manual carefully before using the instrument
in order to take full advantage of its various features.
Make sure to keep this manual in a safe and handy place even after you
finish reading, and refer to it often when you need to better understand
an operation or function.
Accessories
The instrument package includes the following items. Please check that you have them all.
• Music rest
• Accessory CD-ROM
• Owner’s manual (this book)
•AC Power Adaptor (May not be included depending on your particular area.
Please check with your Yamaha dealer.)
PSR-S500 Owner’s Manual 7

Special Features of the PSR-S500
■ Play a Variety of Instrument Voices Page 17
The instrument voice that sounds when you play the keyboard can be
changed to violin, flute, harp, or any of an extensive range of voices. You
can change the mood of a song written for piano, for example, by using violin to play it instead. Experience a whole new world of musical variety.
■ Save and Recall Panel Settings to Registration Memory Page 67
This convenient function lets you save a ‘snapshot’ of your custom panel
settings—up to 64 complete “Registrations.” These can be called up
instantly any time you need them—perfect for making broad sound/effect
changes when playing live!
8 banks x 8 presets = 64 Registrations
■ Play Along with Styles Page 23
Want to play with full accompaniment? Try the auto-accompaniment
Styles. The accompaniment styles provide the equivalent of a full backing
band covering wide variety of styles from waltzes to 8-beat to samba … and
much more. Select a style that matches the music you want to play, or
experiment with new styles to expand your musical horizons.
■ Easy Performance with Music Notation Display Page 30
When you play back a song, the corresponding score will be shown on the
display as the song plays. This is a great way to learn how to read music. If
the song contains lyric and chord data*, the lyrics and chords will also appear
on the score display.
* No lyrics or chords will appear on the display if the song you are using with the score display func-
tion does not contain the appropriate lyric and chord data.
■
Save and Load Data to USB Flash Memory or Computer
These data organization tools let you store your original User songs or custom panel settings (Registration Memory) to a USB Flash Memory device
or a computer, then load the data back to the instrument as needed.
8 PSR-S500 Owner’s Manual
Pages 73 and 83
Contents
Logos……………………………………………………………………………. 6
Accessories …………………………………………………………………… 7
Special Features of the PSR-S500 …………………………………… 8
Setting Up 10
Power Requirements……………………………………………………..10
Connecting Headphones (PHONES/OUTPUT Jack) …………. 10
Connecting a Footswitch (SUSTAIN Jack)……………………….. 10
Connecting to a Computer (USB Terminal)………………………. 11
Turning the Power On ……………………………………………………11
Changing the Display language ……………………………………… 12
Adjusting the LCD CONTRAST control…………………………….12
Panel Controls and Terminals 14
Front Panel…………………………………………………………………..14
Rear Panel ………………………………………………………………….. 15
Quick Guide
Playing Songs 16
Try playing a variety of Instrument Voices 17
Select and Play a Voice ………………………………………………… 17
Playing Two Voices Simultaneously—DUAL…………………….. 18
Playing Different Voices with the Left and Right Hands
—LEFT …………………………………………………………………… 19
Playing Drum Kits………………………………………………………….21
Playing Styles 22
Select a Styles Rhythm ………………………………………………….22
Playing Along with a Style ……………………………………………… 23
Playing Auto-accompaniment Chords ……………………………… 25
Playing with the Music Database 26
Using Songs 27
Selecting and Listening to a Song……………………………………27
Song Fast Forward, Fast Reverse, and Pause ………………….28
Types of Songs ……………………………………………………………. 29
Displaying the Song Score …………………………………………….. 30
Displaying the Lyrics……………………………………………………… 31
Recording Your Own Performance 32
Track Configuration ………………………………………………………. 32
Quick Recording Procedure ……………………………………………33
Multi-track Recording Procedure……………………………………..34
Song Clear—Deleting User Songs…………………………………..37
Track Clear—Deleting a Specified Track From a User Song.38
Backup and Initialization 39
Backup ……………………………………………………………………….. 39
Initialization………………………………………………………………….. 39
Basic Operation and Displays 40
Basic Operation…………………………………………………………….40
The Displays………………………………………………………………… 42
MAIN Display Items……………………………………………………….43
Using Various Functions 49
Playing with the metronome ……………………………………………49
Using Tap Start…………………………………………………………….. 51
Touch Response …………………………………………………………..51
EQ settings …………………………………………………………………..52
Pitch Controls ……………………………………………………………….53
Changing the pitch of the instrument in octaves………………… 54
Style (Auto Accompaniment) Functions 55
Pattern Variation (sections) …………………………………………….55
One Touch Setting………………………………………………………… 58
Variation Change and OTS (OTS LINK)…………………………… 58
Setting the Split Point …………………………………………………….59
Playing a Style with Chords but without Rhythm
(Stop Accompaniment) ………………………………………………60
Adjusting the Style Volume…………………………………………….. 60
Chord Basics ………………………………………………………………..61
User Style …………………………………………………………………….63
Playing Styles Using the Entire Keyboard …………………………63
Song Settings 64
Song Volumes ………………………………………………………………64
Changing the Tempo ……………………………………………………..64
A-B Repeat …………………………………………………………………..65
Muting Independent Song Parts ………………………………………66
Memorize Your Favorite Panel Settings 67
Saving to the Registration Memory ………………………………….67
Recalling a Registration Memory…………………………………….. 68
Registration Clear—Deleting a Specified Registration
Memory…………………………………………………………………… 69
The Functions 70
Selecting and Setting Functions ………………………………………70
Using USB Flash Memory 73
USB Flash Memory ……………………………………………………….73
Using USB Flash Memory ………………………………………………74
Formatting USB Flash Memory ……………………………………….75
Saving Data ………………………………………………………………….76
Convert a User Song to SMF Format and Save…………………77
Loading User Files and Style Files …………………………………..78
Deleting Data from USB Flash Memory ……………………………79
Playing Songs Saved to USB Flash Memory …………………….79
Connections 80
Connectors …………………………………………………………………..80
Connection to a USB Storage Device ………………………………80
Connecting a Personal Computer ……………………………………82
Transferring Performance Data to and from a Computer …….83
Initial Send……………………………………………………………………84
Transferring Data Between the Computer and Instrument…..85
Accessory CD-ROM Installation Guide 88
Important Notices about the CD-ROM……………………………… 88
CD-ROM Contents ………………………………………………………..89
System Requirements ……………………………………………………90
Software Installation ………………………………………………………90
Reference
Playing with the Effects 44
Adding Harmony…………………………………………………………… 44
Changing the Reverb Type ……………………………………………. 45
Changing the Chorus Type ……………………………………………. 46
Panel Sustain ……………………………………………………………….47
Adding DSP………………………………………………………………….47
Pitch Bend …………………………………………………………………… 48
Appendix
Troubleshooting…………………………………………………………….95
Messages ……………………………………………………………………96
Voice List ……………………………………………………………………..98
Drum Kit List ……………………………………………………………….104
Style List …………………………………………………………………….107
Music Database List …………………………………………………….108
Effect Type List……………………………………………………………110
MIDI Implementation Chart…………………………………………… 114
MIDI Data Format ………………………………………………………..116
Specifications ……………………………………………………………..117
Index………………………………………………………………………….118
PSR-S500 Owner’s Manual 9
Setting Up
•Avoid listening with the headphones at high volume for long periods of time; doing so may not only result in ear fatigue, it may be
damaging to your hearing.
•To prevent damage to the speakers, set the volume of the external
devices at the minimum setting before connecting them. Failure to
observe these cautions may result in electric shock or equipment
damage. Also, be sure to set the volumes of all devices at their
minimum levels and gradually raise the volume controls while
playing the instrument to set the desired listening level.
• Make sure that the footswitch plug is properly connected to the SUSTAIN jack before turning on the power.
• Do not press the footswitch while turning the power on. Doing this
changes the recognized polarity of the footswitch, resulting in reversed
footswitch operation.
NOTE
Be sure to do the following operations
BEFORE turning on the power.
Power Requirements
Make sure that the [STANDBY/ON] switch of the
instrument is set to STANDBY.
• Use ONLY a Yamaha PA-300 or PA-301 AC Power Adaptor (or
other adaptor specifically recommended by Yamaha) to power
your instrument from the AC mains. The use of other adaptors
may result in irreparable damage to both the adaptor and the
instrument.
Connect the AC adaptor (PA-300, PA-301 or other
adaptor specifically recommended by Yamaha) to the
power supply jack.
Plug the AC adaptor into an AC outlet.
CAUTION
• Unplug the AC Power Adaptor when not using the instrument,
or during electrical storms.
Make all necessary connections below
BEFORE turning the power on.
Connecting Headphones (PHONES/OUTPUT Jack)
The instrument speakers are automatically shut off
when a plug is inserted into this jack. The PHONES/
OUTPUT jack also functions as an external output. You
can connect the PHONES/OUTPUT jack to a keyboard
amplifier, stereo system, mixer, tape recorder, or other
line-level audio device to send the instrument’s output
signal to that device.
PA-300 or
PA-301
CAUTION
AC outlet
Connecting a Footswitch (SUSTAIN Jack)
The sustain function lets you produce a natural sustain
as you play by pressing a footswitch. Plug the Yamaha
FC4 or FC5 footswitch into this jack and use it to switch
sustain on and off.
10 PSR-S500 Owner’s Manual
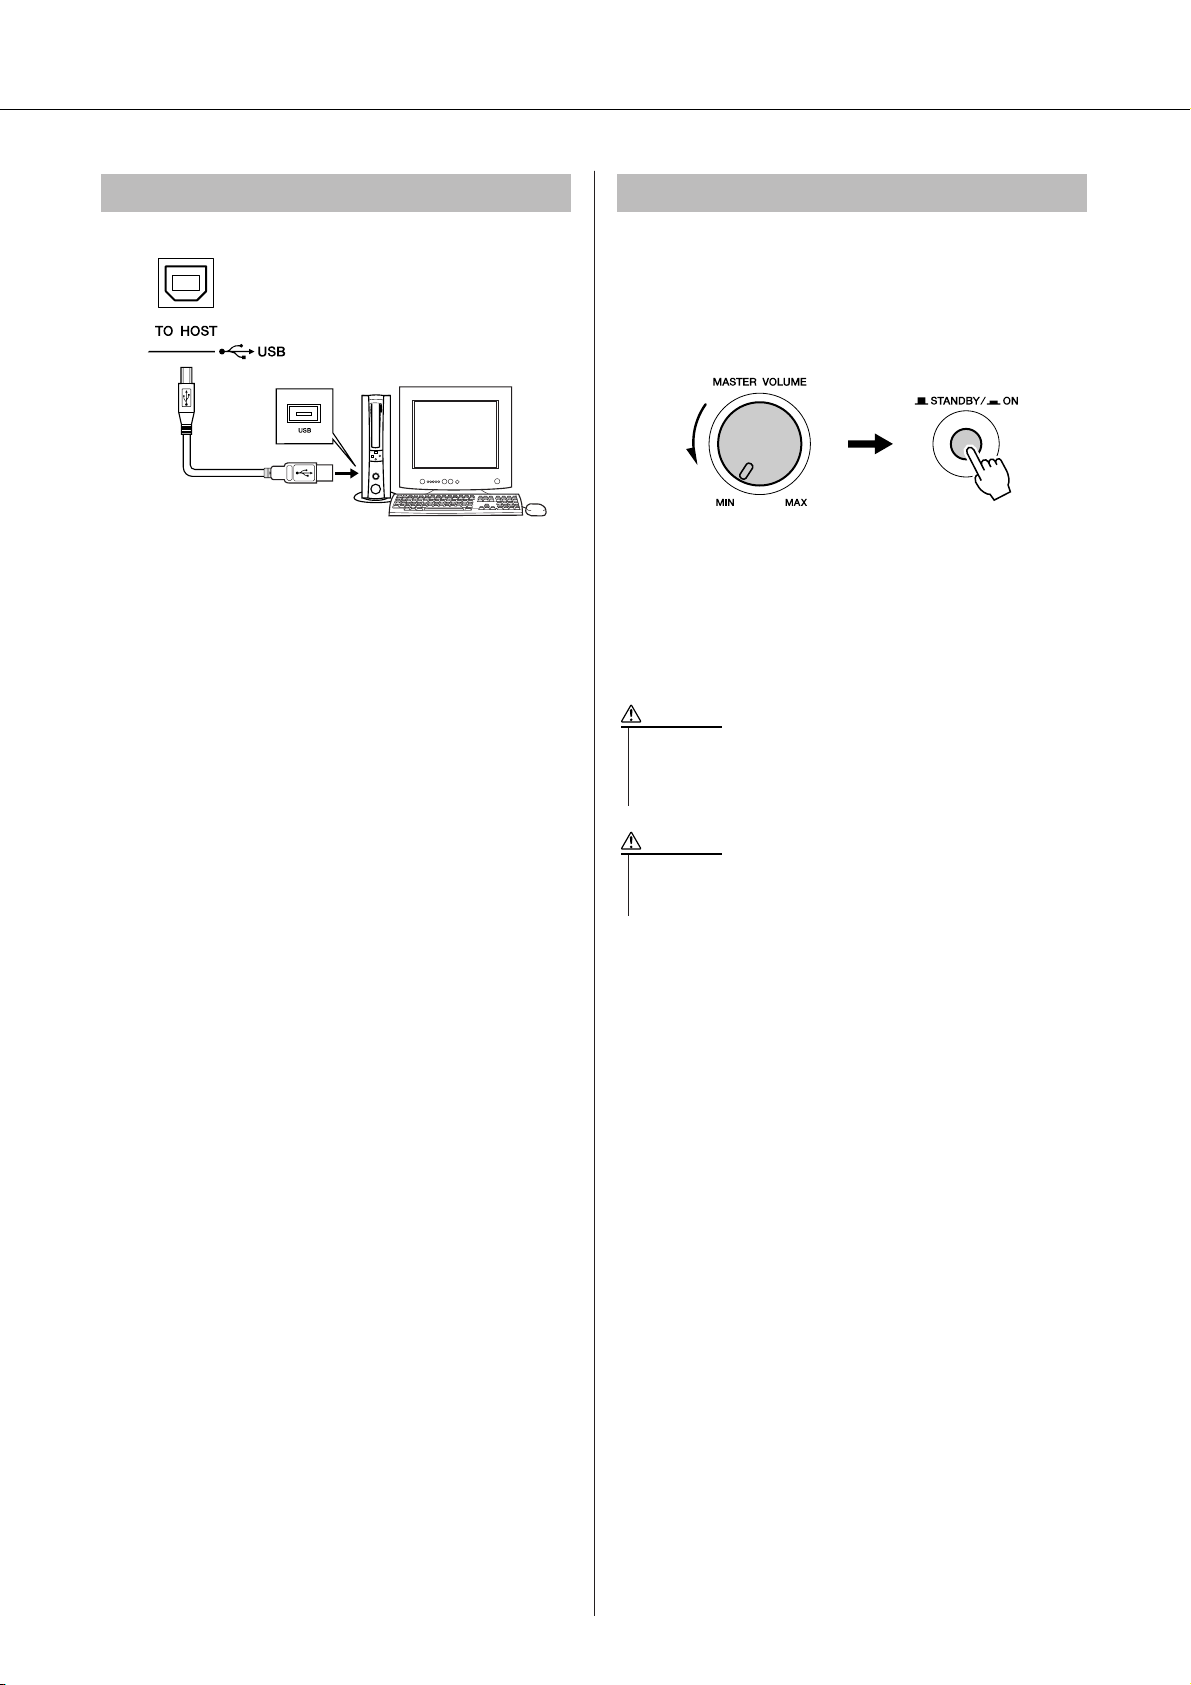
Connecting to a Computer (USB Terminal) Turning the Power On
• Even when the switch is in the “STANDBY” position, electricity is
still flowing to the instrument at the minimum level. When you are
not using the instrument for a long time, make sure you unplug the
AC power adaptor from the wall AC outlet.
•Never attempt to turn the power off when a “Writing..” message is
shown in the display. Doing so can damage the flash memory and
result in a loss of data.
Turn down the volume by turning the [MASTER VOLUME] control to the left and press the [STANDBY/ON]
switch to turn on the power. Press the [STANDBY/ON]
switch again to turn the power OFF.
Setting Up
Connect the instrument’s USB terminal to the USB terminal of a computer, and you can transfer performance
data and song files between the two (page 85). To use
the USB data-transfer features you’ll need to do the following:
• First, make sure the POWER switch on the instrument is set to OFF, then use a USB cable to connect the instrument to the computer. After making
the connections, turn the instrument’s power on.
• Install the USB MIDI driver on your computer.
Installation of the USB-MIDI driver is described on
page 90.
Backup data in the flash memory is loaded to the instrument when the power is turned on. If no backup data
exists on flash memory, all instrument settings are
restored to the initial factory defaults when the power is
turned on.
CAUTION
CAUTION
PSR-S500 Owner’s Manual 11
Setting Up
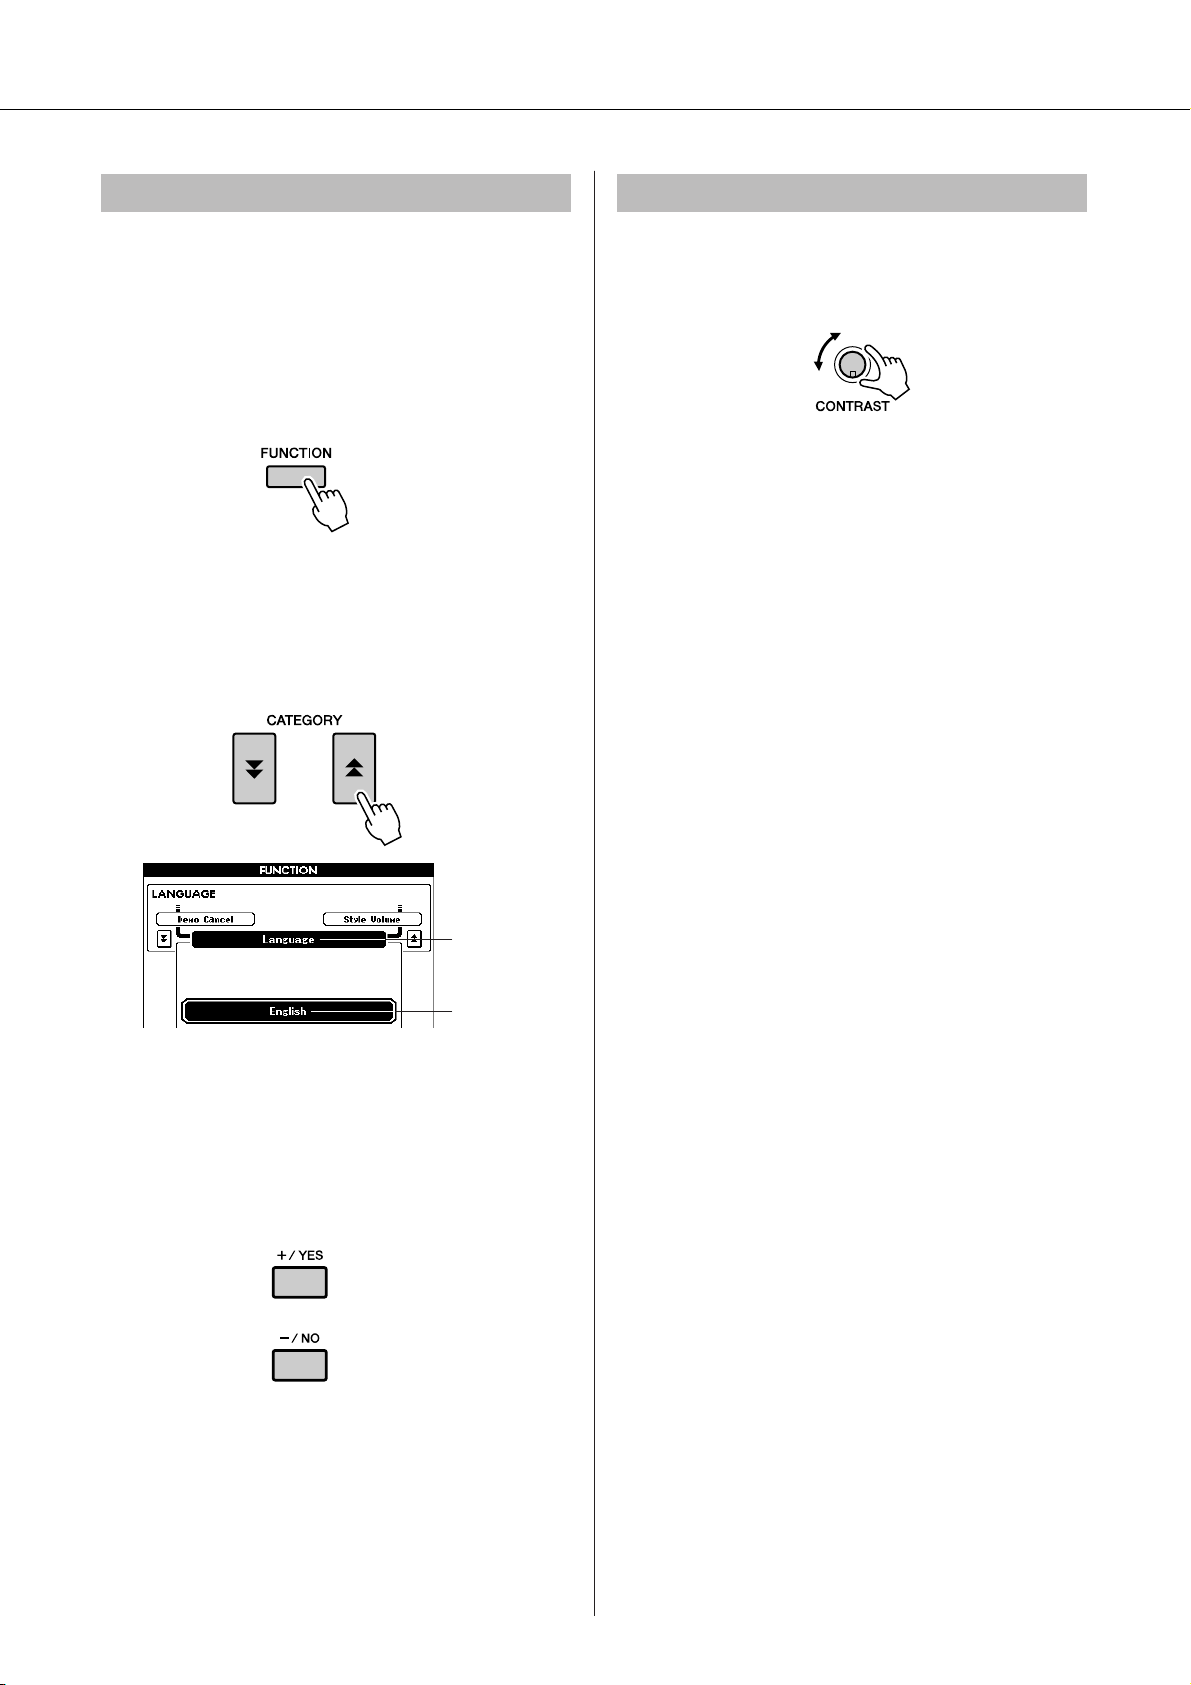
Changing the Display language
This instrument allows you to select English or Japanese as the display language. The default display language is English, but if you switch to Japanese the
lyrics, file names and some messages will be displayed
in Japanese where appropriate.
Press the [FUNCTION] button.
Press the CATEGORY [ ] and [ ] buttons a num-
ber of times until the “Language” item appears.
The currently selected display language will appear
below the “Language” item.
f
r
Adjusting the LCD CONTRAST control
Adjust the LCD CONTRAST control on the rear panel
of the instrument for optimum display legibility.
Language item
The currently
selected language
Select a display language.
The [+] button selects English and the [-] button
selects Japanese.
The language selection will be stored in the internal
flash memory so that it is retained even when the
power is turned off.
Press the [EXIT] button to return to the MAIN dis-
play.
12 PSR-S500 Owner’s Manual

● Music Rest
Setting Up
Insert the music rest
into the slots as
shown.
PSR-S500 Owner’s Manual 13
Panel Controls and Terminals
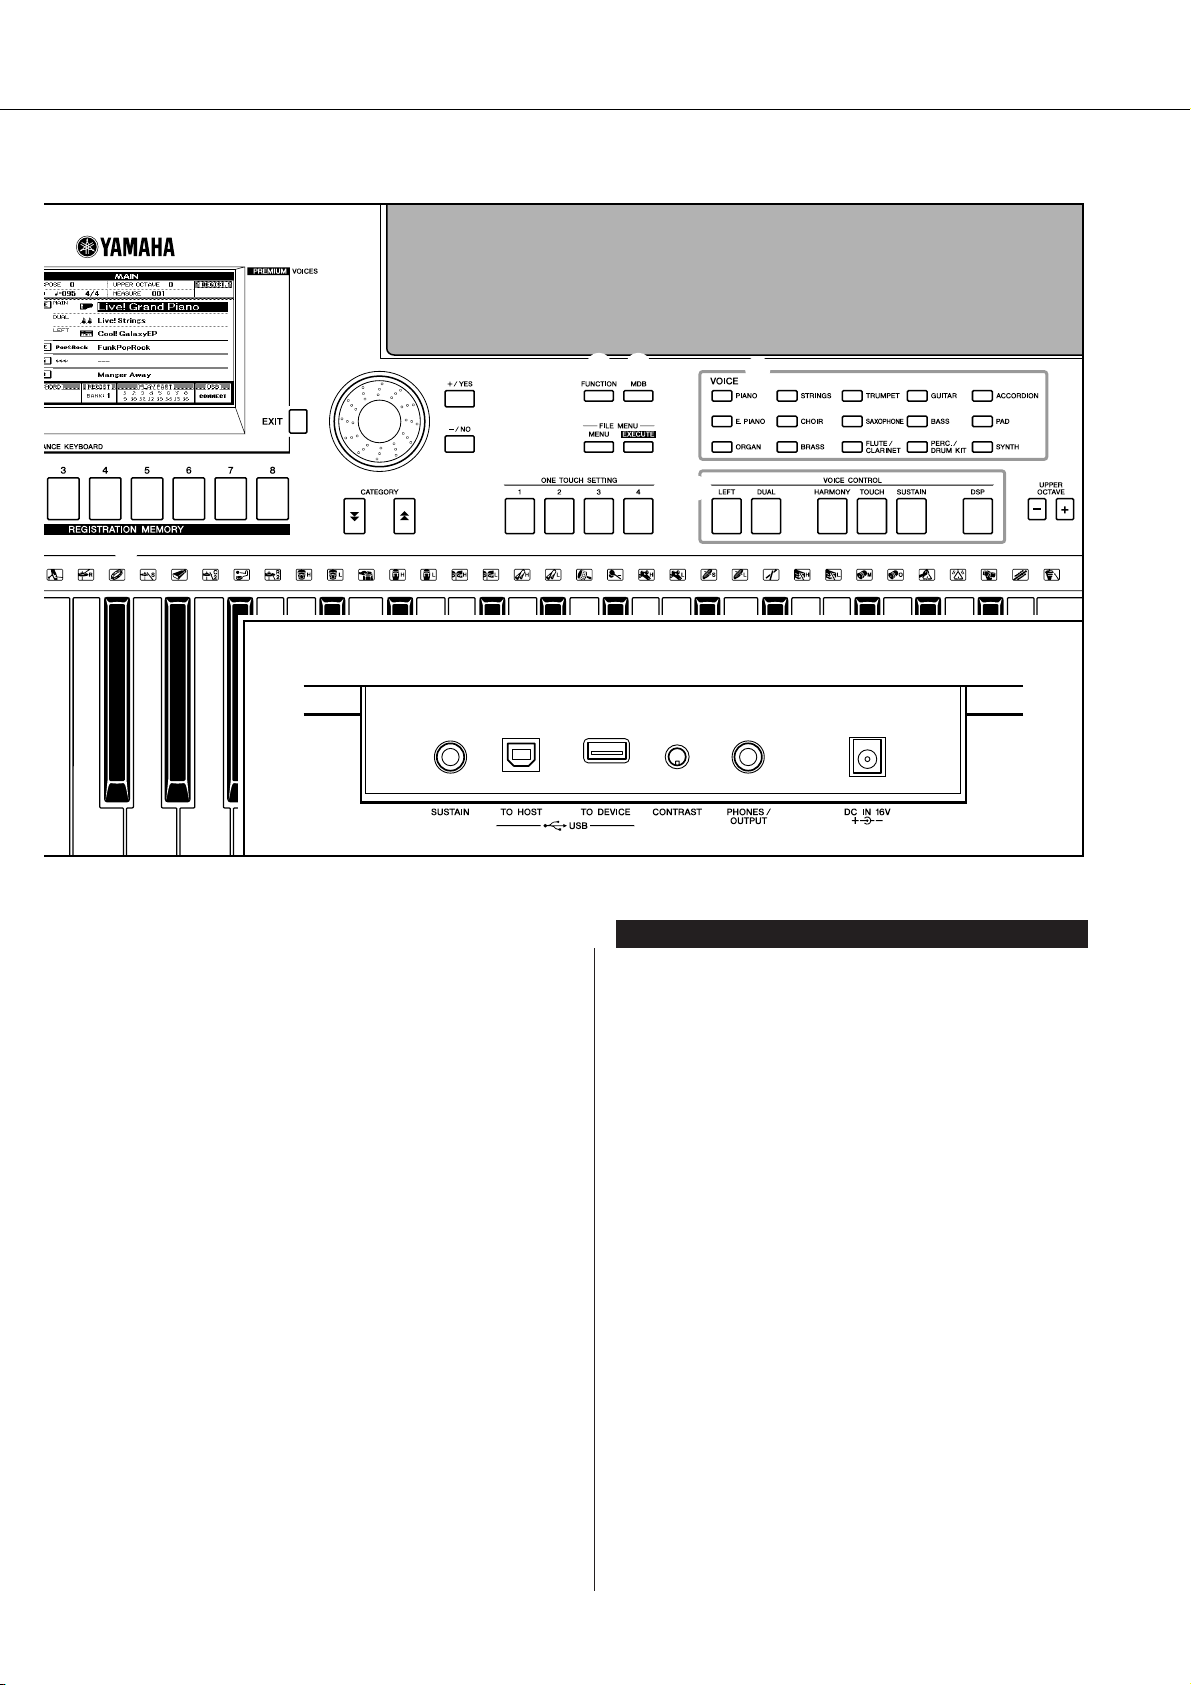
q
w
@9
r
e
Front Panel
t y
u
o
!0 !1
!2
i
!3
!4
!5
q [STANDBY/ON] switch ……………….. page 16
w [MASTER VOLUME] control…. pages 16, 40
e [DEMO] button…………………………… page 16
r [SONG MODE] button ………………… page 27
t SONG
[PRESET], [USER], [USB] buttons
…………………………………………….. page 27
[SCORE] button ………………………. page 30
[LYRICS] button ………………………. page 31
[REC] button …………………………… page 33
y STYLE……………………………………….. page 22
u STYLE CONTROL
[OTS LINK] button …………………… page 58
[AUTO FILL IN] button………………page 55
[ACMP] button ………………………… page 23
INTRO [I]–[III] buttons ……………… page 55
MAIN VARIATION [A]–[D] buttons
…………………………………………….. page 55
ENDING/rit. [I]–[III] buttons………. page 55
[SYNC STOP] button ……………….. page 57
[SYNC START] button ………. pages 23, 56
[START/STOP] button……….. pages 22, 41
i SONG CONTROL
[r] button……………………………… page 28
[f] button……………………………… page 28
[A B] button ………………………… page 65
[] button………………………………. page 28
[>/■] button………………………pages 28, 41
o TRANSPOSE [+] and [-] buttons…. page 53
!0 [METRONOME] button……………….. page 49
!1 [TAP TEMPO] button ………………….. page 51
!2 TEMPO [+] and [-] buttons………….. page 49
!3 [REGIST/TRACK] button…………….. page 66
!4 [MEMORY] button ……………………… page 67
!5 REGIST BANK [+] and [-] buttons.. page 67
!6 REGISTRATION MEMORY [1]–[8]
buttons……………………………………… page 67
!7 Display ………………………………..pages 12, 42
!8 [EXIT] button …………………………….. page 42
14 PSR-S500 Owner’s Manual
!7
Panel Controls and Terminals
!6
!8
!9
@1
Rear Panel
@0
@2 @3
@4
@6
@5
@7
#0 #1 #2 #3 #4
Rear Panel
@8
!9 Dial……………………………………………. page 41
@0 [+/YES] and [-/NO] buttons …………. page 41
@1 CATEGORY [ ] and [ ] buttons … page 41
f
r
@2 [FUNCTION] button ……………………. page 70
@3 [MDB] button …………………………….. page 26
@4 FILE MENU [MENU] and
[EXECUTE] buttons…………….. pages 74, 75
@5 ONE TOUCH SETTING [1]–[4]
buttons ……………………………………… page 58
@6 VOICE ……………………………………….. page 17
@7 VOICE CONTROL
[LEFT] button………………………….. page 19
[DUAL] button …………………………. page 18
[HARMONY] button …………………. page 44
[TOUCH] button ………………………. page 51
[SUSTAIN] button …………………….page 47
[DSP] button……………………………. page 47
@8 UPPER OCTAVE [+] and [-] buttons
…………………………………………………. page 54
@9 [PITCH BEND] wheel………………….. page 48
#0 SUSTAIN jack…………………………….. page 10
#1 USB TO HOST and TO DEVICE
terminals…………………………………… page 80
#2 CONTRAST knob ………………………. page 12
#3 PHONES/OUTPUT jack ………………. page 10
#4 DC IN 16V jack…………………………… page 10
PSR-S500 Owner’s Manual 15
G
k
u
c
i
u
Q
i
d
e
Playing Songs
Quick Guide
This instrument include a Demonstration Song. Let’s start by playing
the Demonstration Song.
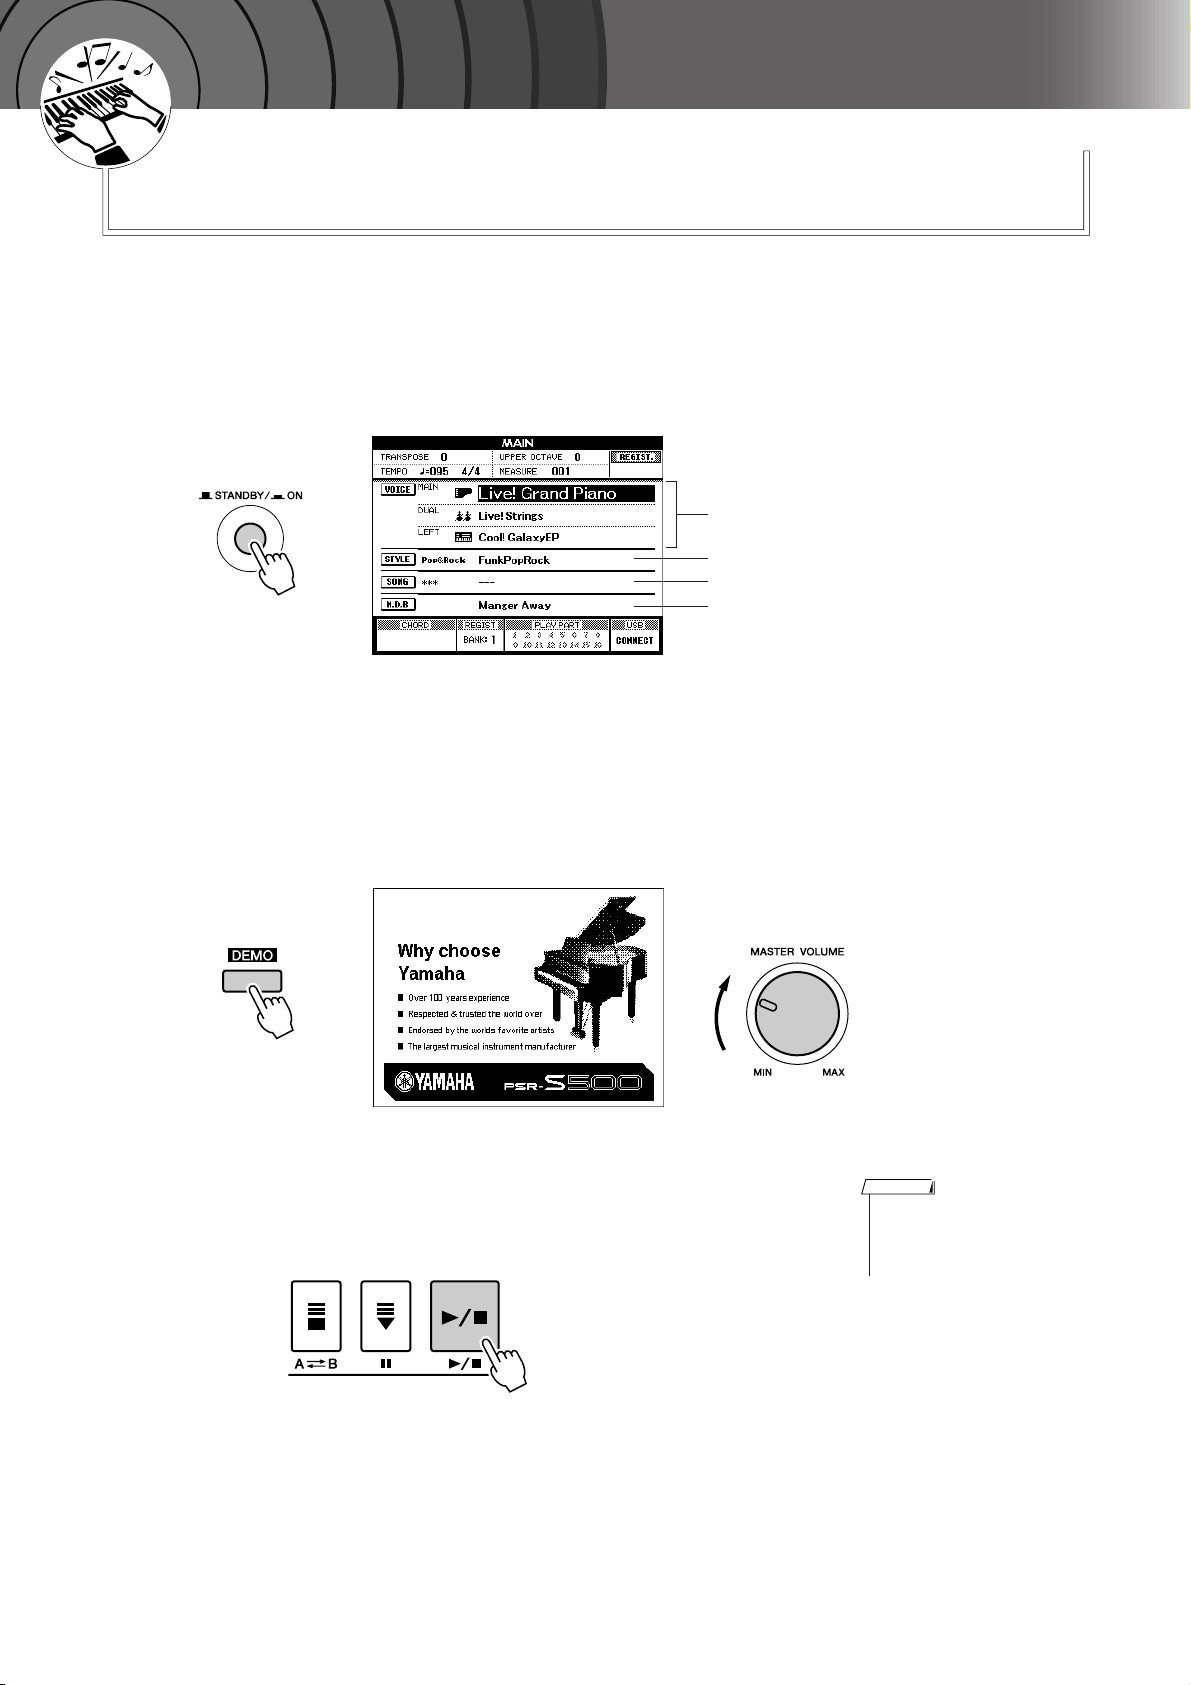
Press the [STANDBY/ON] button until it locks in the ON
position.
1
The Main display appears in the LCD.
VOICE name
STYLE name
SONG name
Music Database name
Press the [DEMO] button to start the Demo.
2
The Demo display appears in the LCD.
Gradually raise the [MASTER VOLUME] control while playing the
instrument to set the desired listening level.
The Demo Song will restart when playback reaches the end.
Press the [>>>>/■] button to stop Demo.
3
Operation automatically returns to the Main display.
NOTE
• The [DEMO] button doesn’t
function when the Demo Cancel
function is set to enable. (See
page 72.)
16 PSR-S500 Owner’s Manual
G
k
u
c
i
u
Q
i
d
e
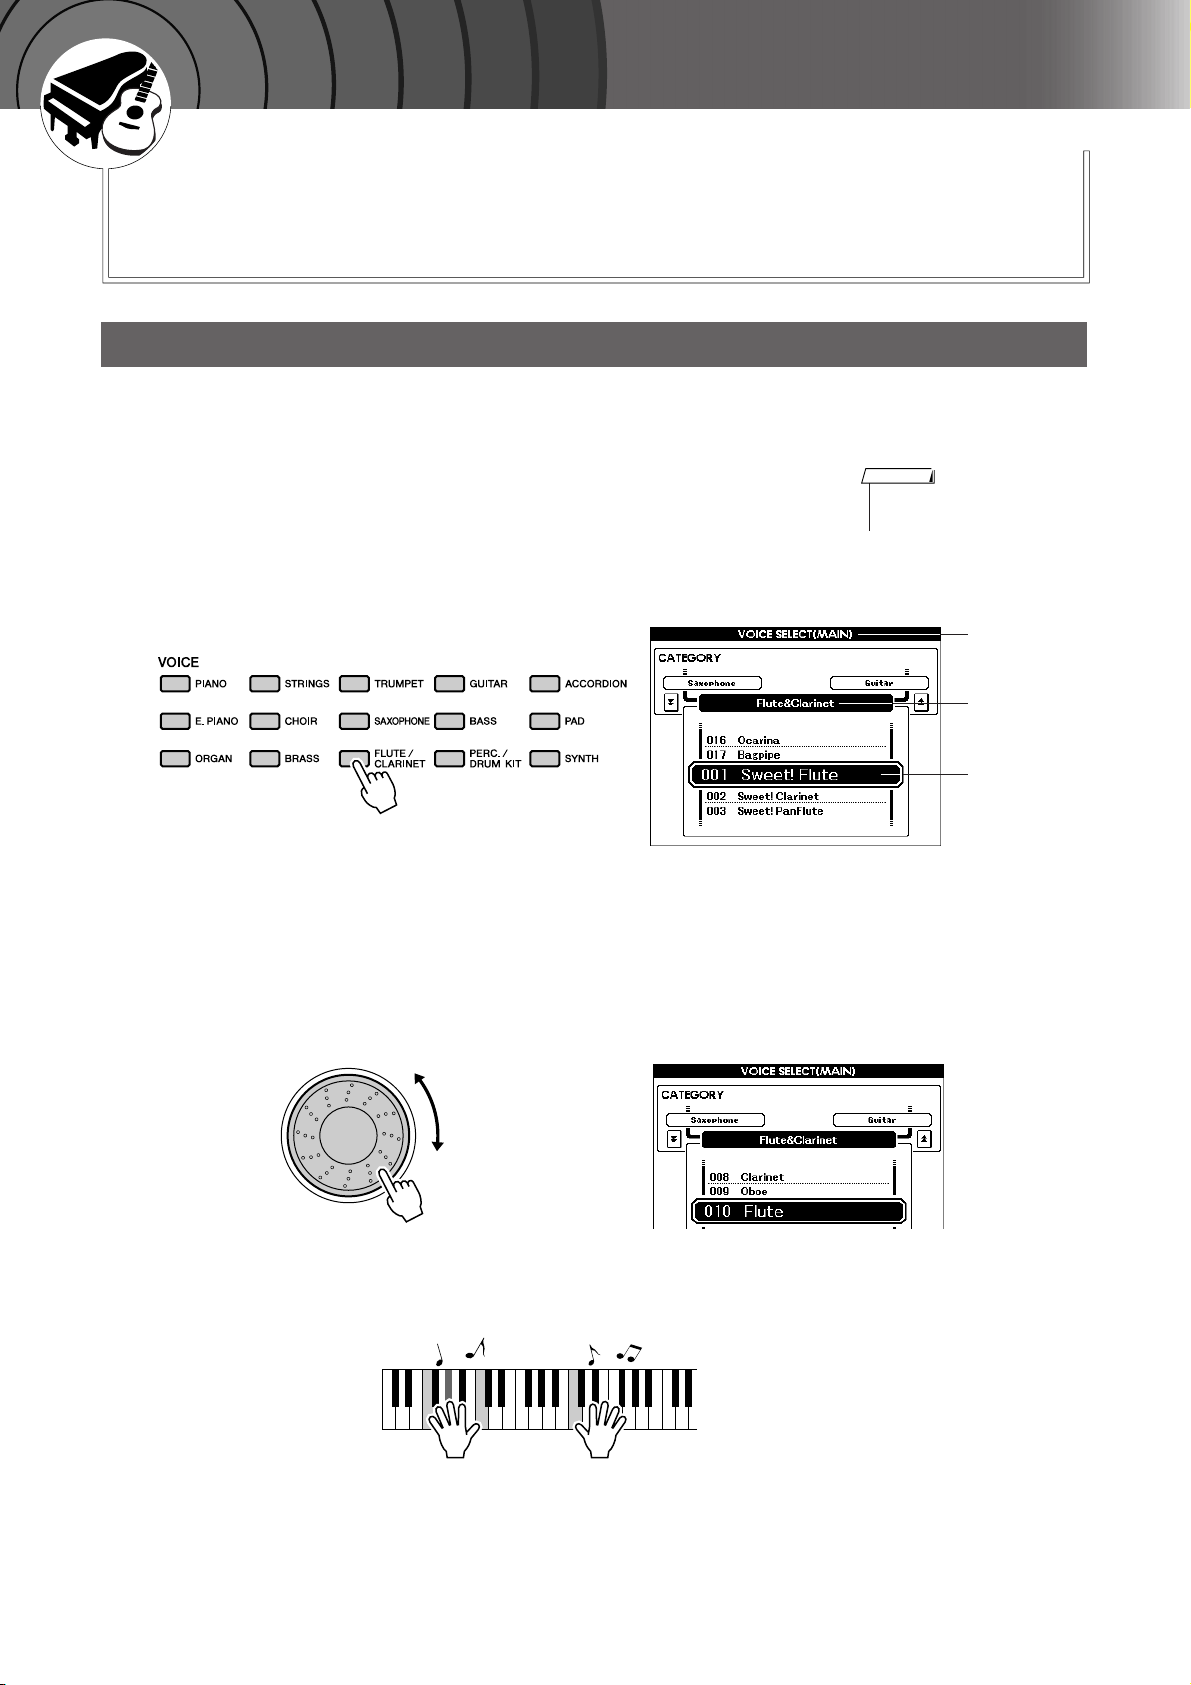
Try playing a variety of Instrument Voices
In addition to piano, organ, and other “standard” keyboard instruments,
this instrument has a large range of realistic Voices—including guitar,
bass, strings, sax, trumpet, drums and percussion, sound effects, and a
wide variety of other musical sounds.
Select and Play a Voice
In this operation, you’ll select a Main Voice and play it on the keyboard.
Select and press the desired Voice category button in the
Voice section.
1
The Main Voice selection display will appear.
The currently selected category name, Voice number and name will be
highlighted.
For this example, select the “Flute&Clarinet” category.
NOTE
•To change the Voice category,
press another category button.
Select the Voice you want to play.
2
Look at the highlighted Voice name and rotate the dial. The available
Voices will be selected and displayed in sequence. The Voice selected
here becomes the Main Voice.
For this example, select the “010 Flute” Voice.
MAIN VOICE
selection display
CATEGORY
name
Current
selected Voice
Play the keyboard.
3
Try selecting and playing a variety of Voices.
Press the [EXIT] button to return to the MAIN display.
PSR-S500 Owner’s Manual 17
Try playing a variety of Instrument Voices
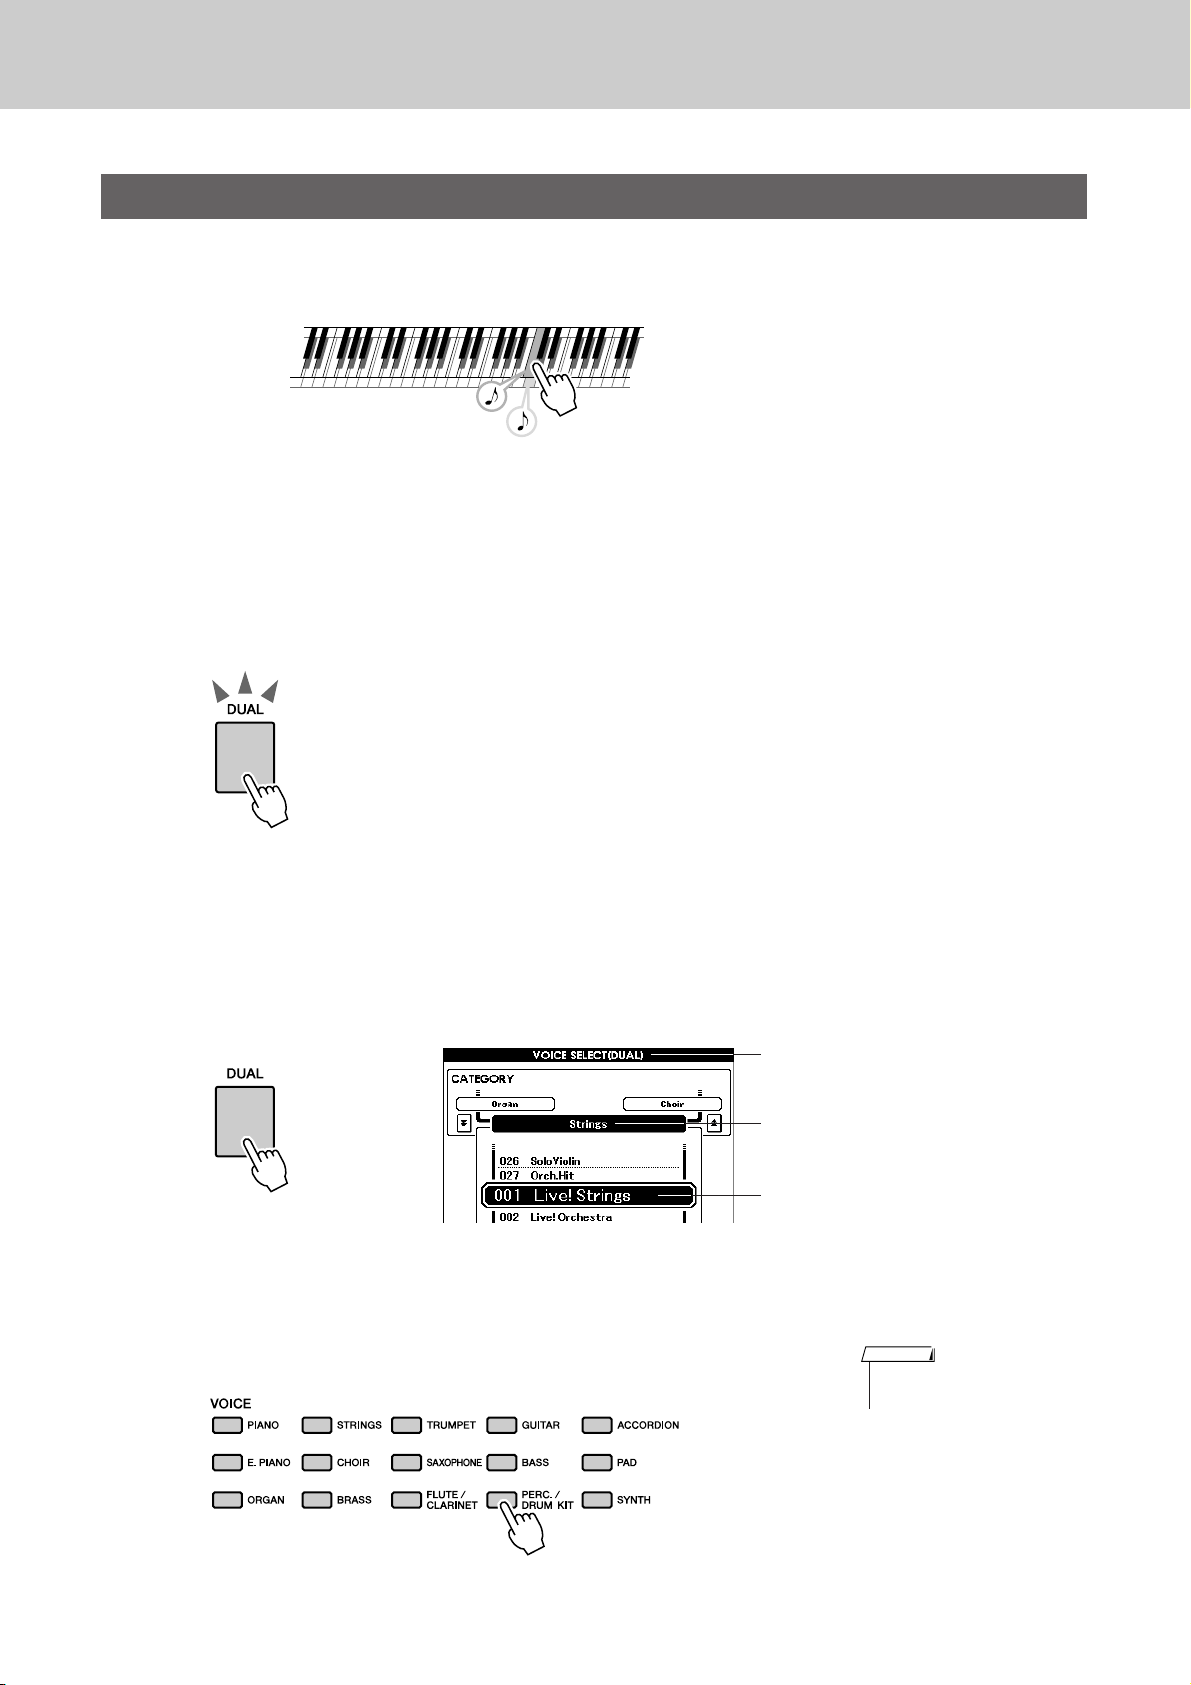
Playing Two Voices Simultaneously—DUAL
This lets you select a second Voice which you can play in addition to the Main Voice.
The second Voice is known as the “Dual” Voice.
Tw o Voices will sound at the same time.
Press the [DUAL] button.
1
The [DUAL] button turns the Dual Voice on or off.
When Dual Voice is turned on, the [DUAL] button is lit.
The currently selected Dual Voice will sound in addition to the Main
Voice when you play the keyboard.
[DUAL] button is lit
Press and hold the [DUAL] button for longer than a second.
2
The Dual Voice selection display appears.
The currently selected category name, Voice number and name will be
highlighted.
Hold for longer
than a second
Select and press the desired Voice category button in the
Voice section.
3
For this example, select the “PERCUSSION/DRUM” category.
Dual Voice selection display
The currently selected category
The currently selected Dual Voice
NOTE
•To change the Voice category,
press another category button.
18 PSR-S500 Owner’s Manual
Select the Voice you want to play.
4
Look at the highlighted Voice name and rotate the dial. The available
Voices will be selected and displayed in sequence. The Voice selected
here becomes the Dual Voice.
For this example, select the “003 Marimba” Voice.
Play the keyboard.
5
Try playing a variety of Instrument Voices
Try selecting and playing a range of Dual Voices.
Press the [EXIT] button to return to the MAIN display.
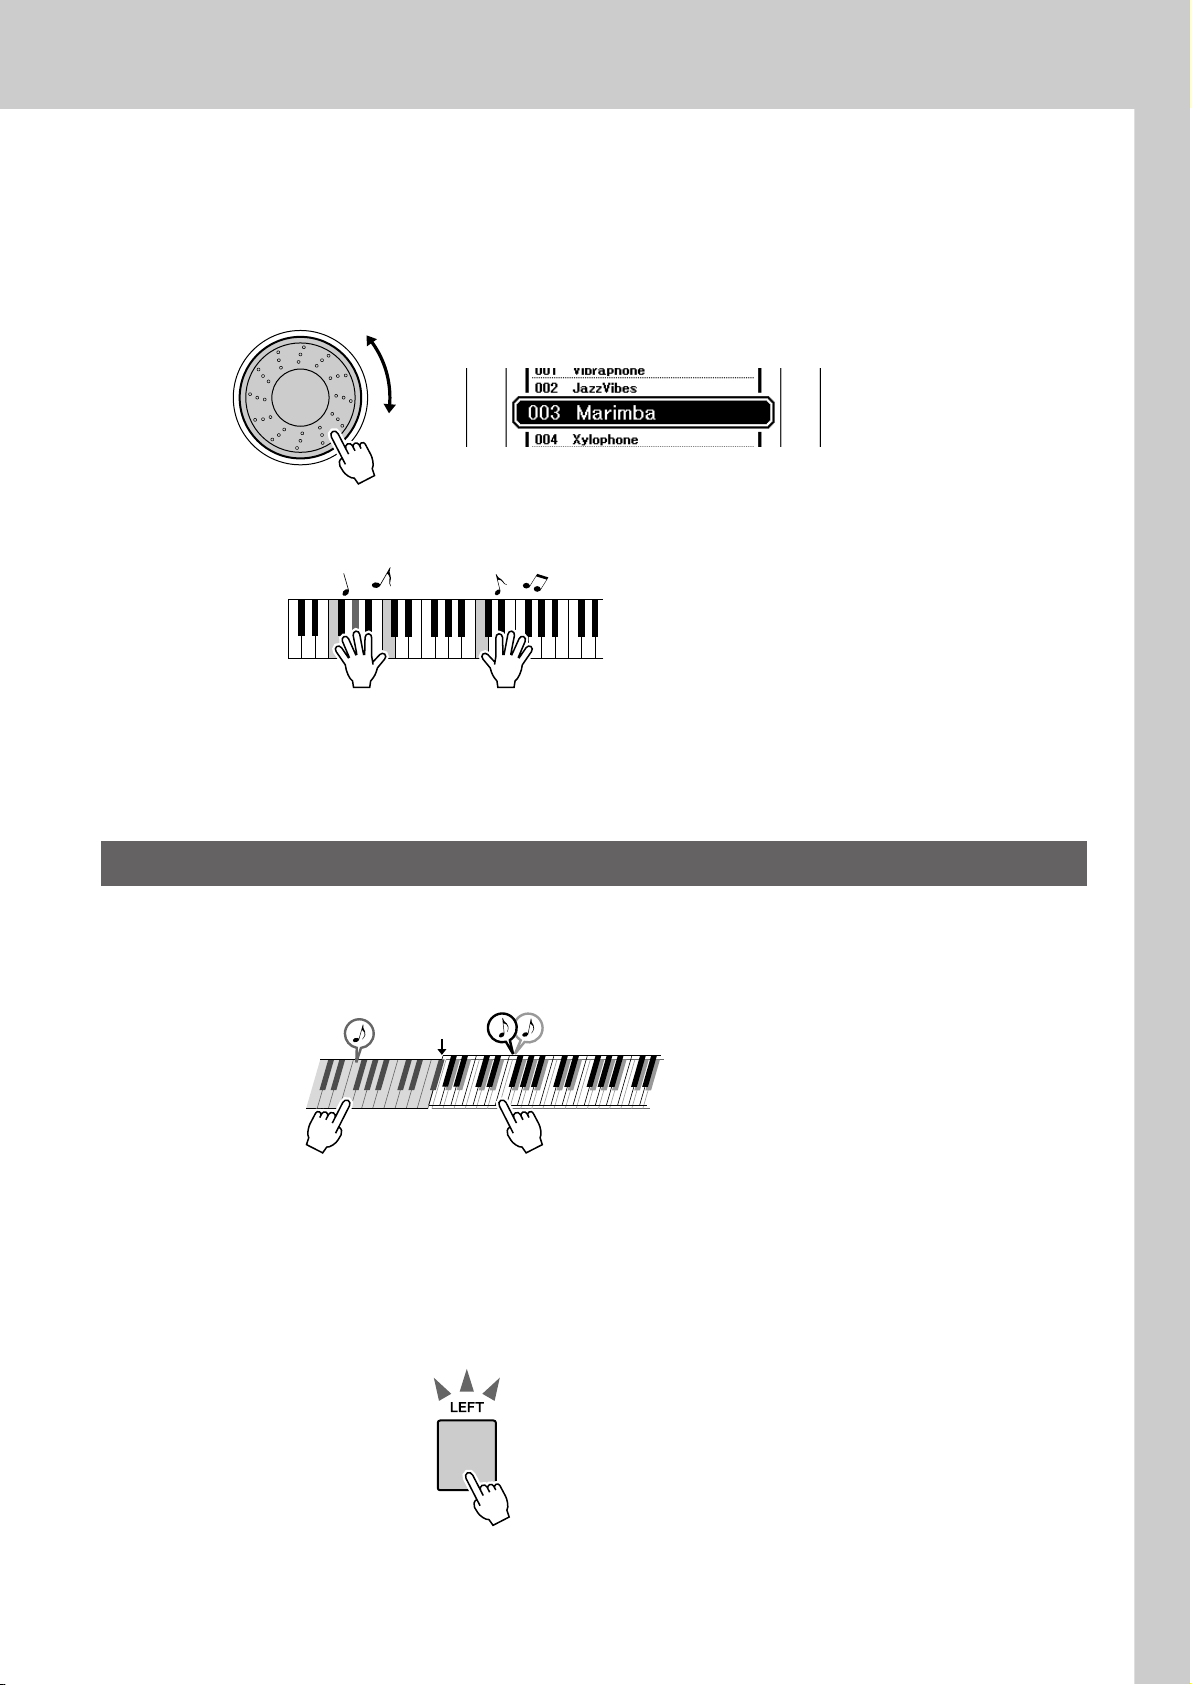
Playing Different Voices with the Left and Right Hands—LEFT
In the Left mode you can play different Voices from the keys to the left and right of the keyboard “split
point.” The Main and Dual Voices can be played to the right of the split point, while the Voice played to the
left of the split point is the Left Voice. The split point setting can be changed as required (page 59).
Split point
Main Voice and Dual VoiceLeft Voice
Press the [LEFT] button.
1
The [LEFT] button turns the left Voice on or off. The currently selected
Left Voice will sound when you play keys to the left of the keyboard
split point.
[LEFT] button is lit
PSR-S500 Owner’s Manual 19
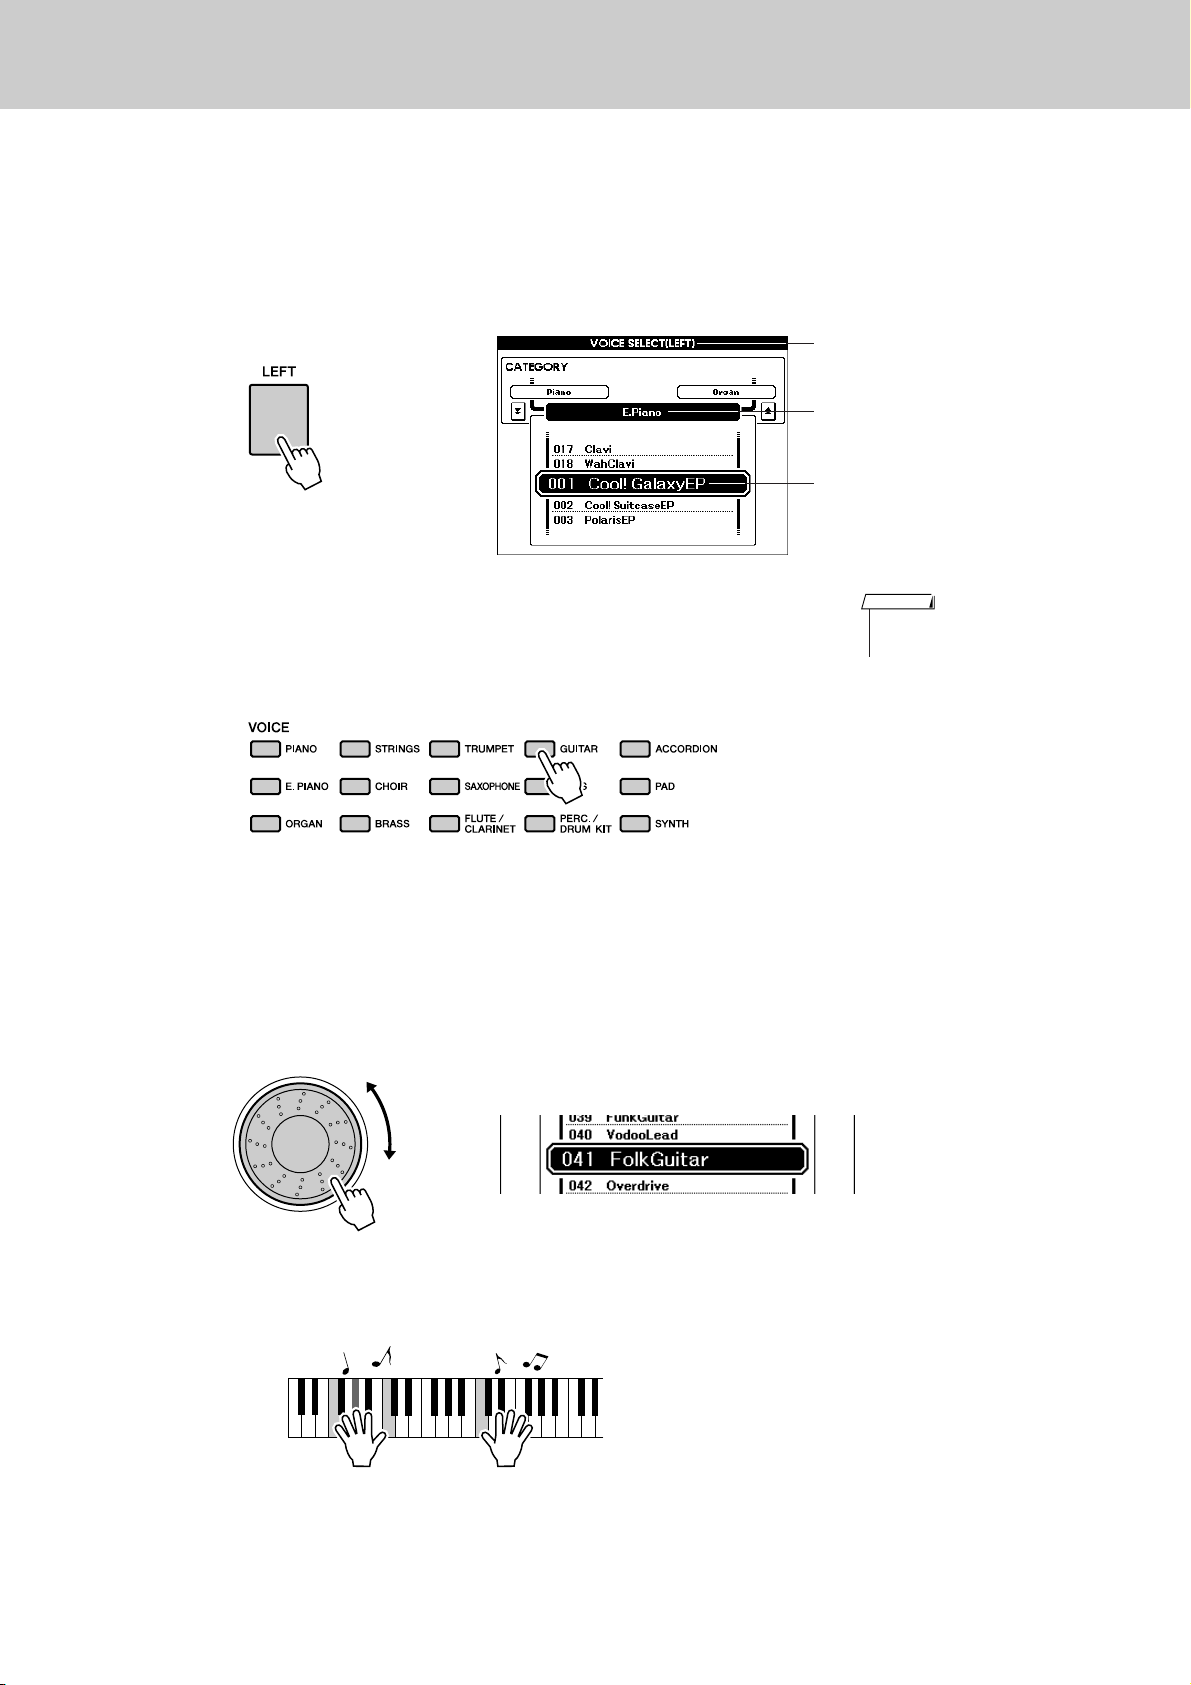
Try playing a variety of Instrument Voices
Press and hold the [LEFT] button for longer than a second.
2
The LEFT Voice selection display will appear.
The currently selected category name, Voice number and name will be
highlighted.
Hold for longer
than a second
Left Voice selection display
The currently selected category
The currently selected Left Voice
Select and press the desired Voice category button in the
VOICE section.
3
For this example, select the “GUITAR” category.
Select the Voice you want to play.
4
Look at the highlighted Voice name and rotate the dial. The available
Voices will be selected and displayed in sequence. The Voice selected
here becomes the Left Voice.
For this example, select the “041 FolkGuitar” Voice.
NOTE
•To change the Voice category,
press another category button.
Play the keyboard.
5
Try playing the selected Left Voice.
Press the [EXIT] button to return to the MAIN display.
20 PSR-S500 Owner’s Manual
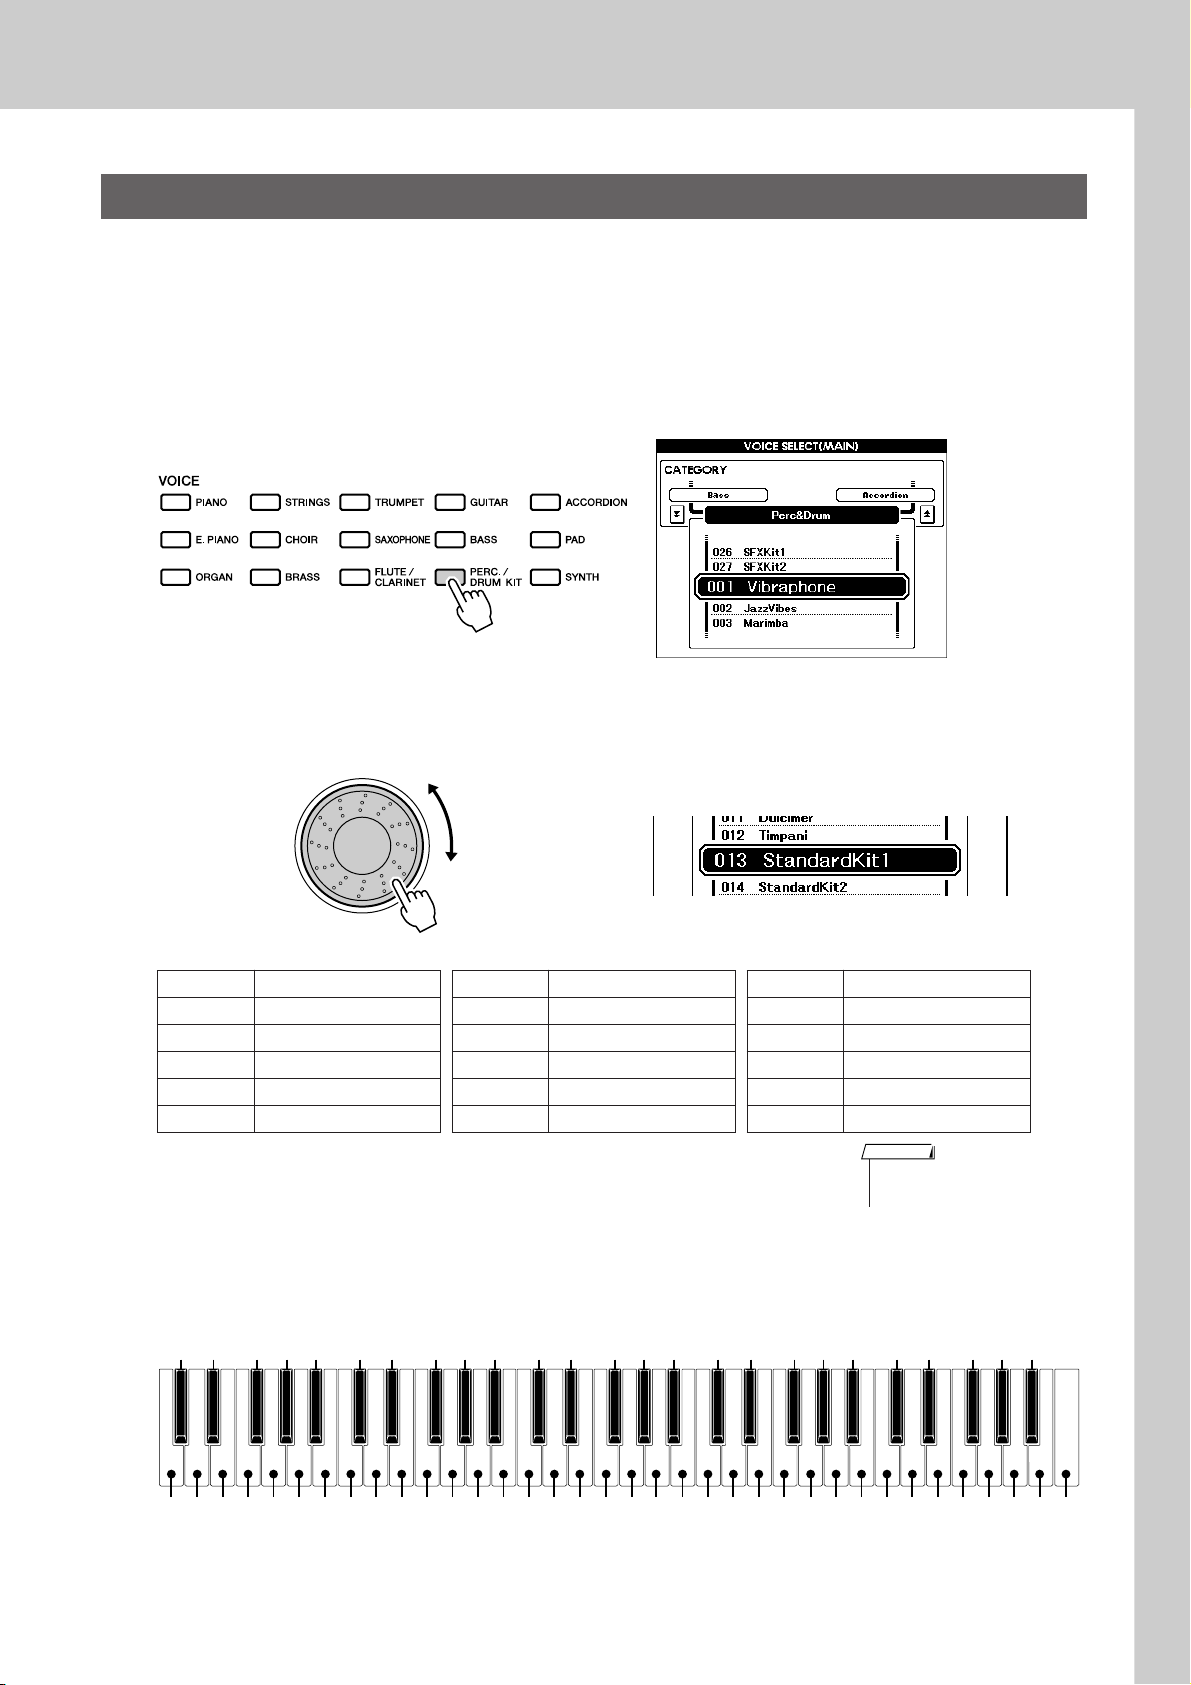
Try playing a variety of Instrument Voices
Playing Drum Kits
Drum Kits are collections of drum and percussion instruments. When you select a violin or other normal
instrument—as a Main Voice, for example—all keys produce the sound of the same violin, only at different
pitches. If you select a Drum Kit as the Main Voice, however, each key produces the sound of a different
drum or percussion instrument.
Press the [PERC./DRUM KIT] button.
1
The “PERC./DRUM KIT” category appears.
Rotate the dial and select the Drum Kit you want to play
(013–027).
2
Voice numbers 001–012 are percussion numbers.
Drum Kits List
Voice No. Drum Kit name Voice No. Drum Kit name Voice No. Drum Kit name
013 Standard Kit 1 018 Rock Kit 023 Cuban Kit
014 Standard Kit 2 019 Electronic Kit 024 Pop Latin Kit
015 Jazz Kit 020 Analog Kit 025 Arabic Kit
016 Brush Kit 021 Dance Kit 026 SFX Kit 1
017 Room Kit 022 Symphony Kit 027 SFX Kit 2
Play each key and enjoy the Drum Kit.
3
A good Drum Kit to start out with is 013, Standard Kit 1.
Example: 013 Standard Kit 1
NOTE
• See the Drum Kit List on page
104.
Brush Swirl
Seq Click H
Brush Tap
Brush Slap
Snare Roll
Brush Tap Swirl
Castanet
Kick Soft
Snare Soft
Open Rim Shot
Sticks
Kick Tight
Kick
Snare
Hand Clap
Side Stick
Snare Tight
Floor Tom L
Hi-Hat Closed
Floor Tom H
Hi-Hat Pedal
Low Tom
Mid Tom L
Hi-Hat Open
Crash Cymbal 1
C3
High Tom
Mid Tom H
Chinese Cymbal
Ride Cymbal Cup
Ride Cymbal 1
Tambourine
Splash Cymbal
Crash Cymbal 2
Cowbell
Vibraslap
Bongo H
Conga H Mute
Ride Cymbal 2
Bongo L
Conga H Open
Conga L
Timbale H
Timbale L
Cabasa
Agogo H
Samba Whistle H
Agogo L
Maracas
Guiro Short
Claves
Cuica Mute
Tr iangle Mute
Guiro Long
Wood Block L
Wood Block H
Samba Whistle L
PSR-S500 Owner’s Manual 21
Cuica Open
Tr iangle Open
Jingle Bells
Shaker
Bell Tree
G
k
u
c
i
u
Q
i
d
e
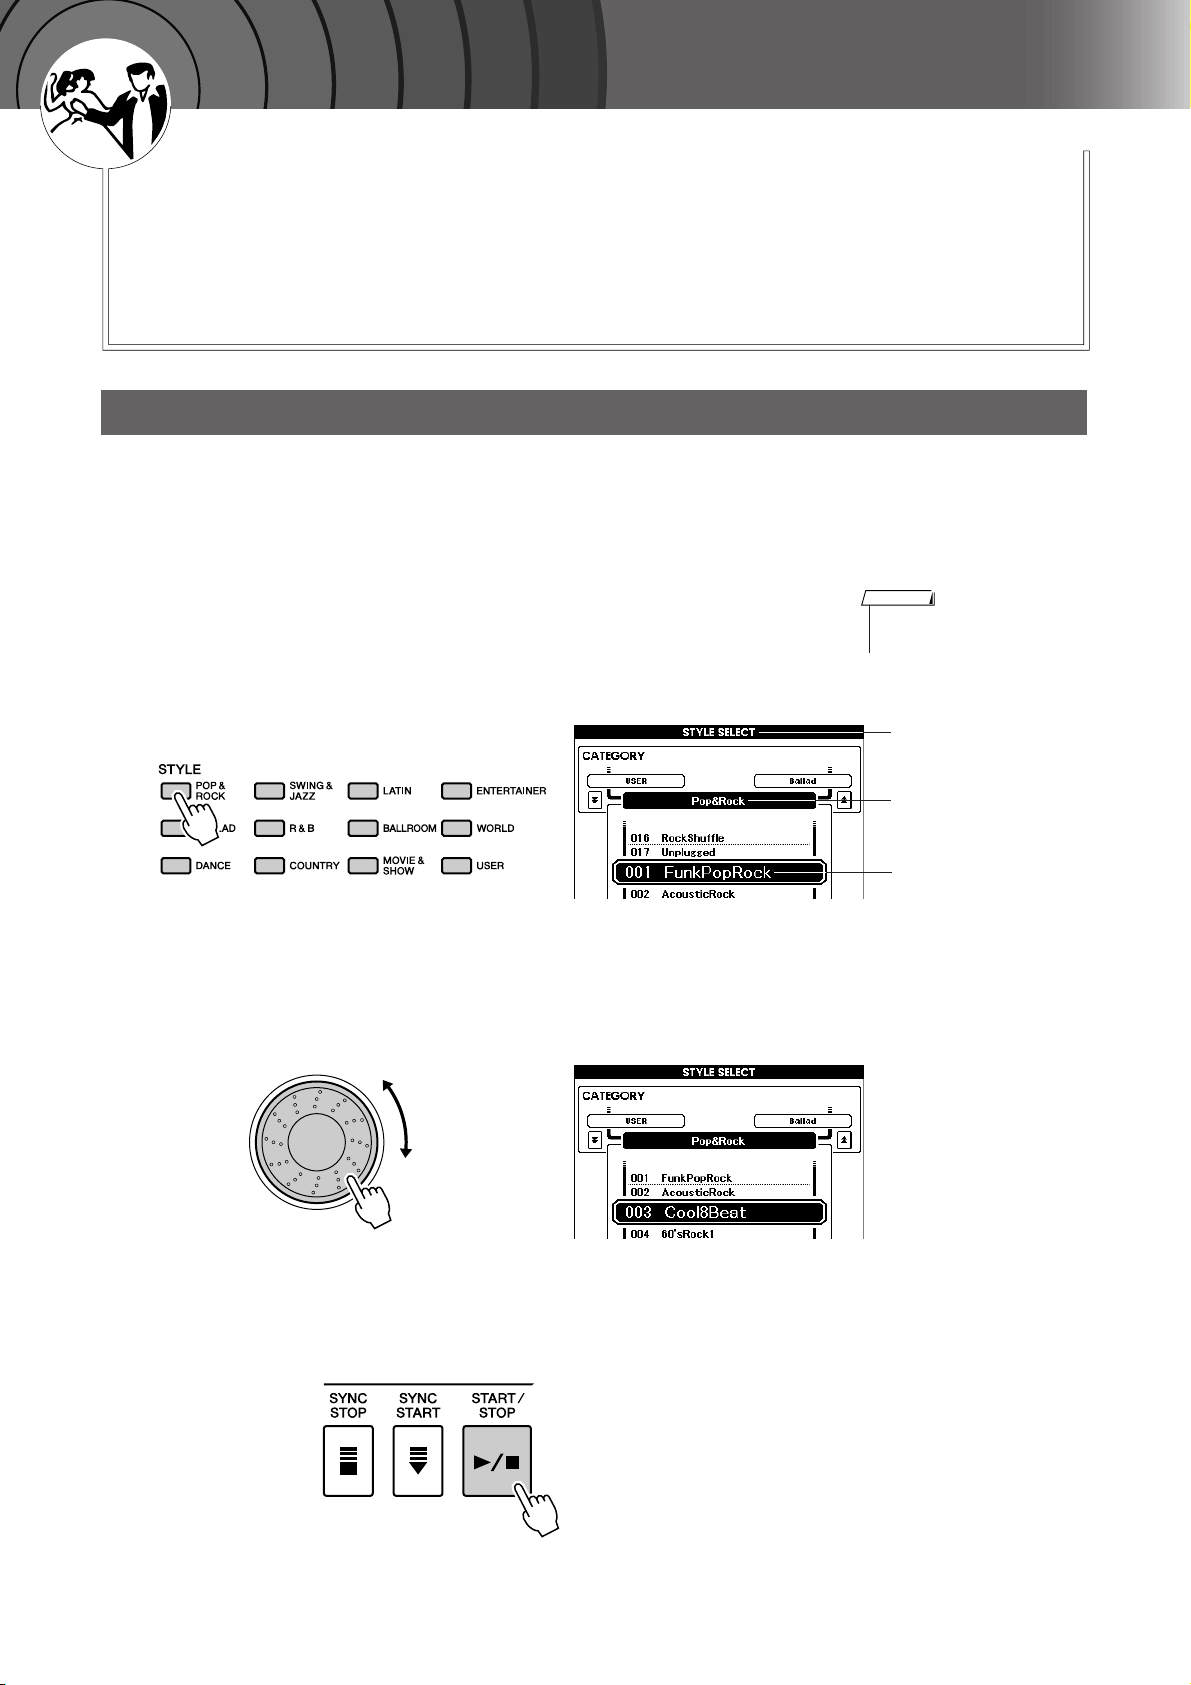
Playing Styles
This instrument includes an auto-accompaniment feature that plays
appropriate “Styles” (rhythm + bass + chord accompaniment) when you
play left-hand chords.
You can select from 150 different Styles covering a range of musical
genres and time signatures (see page 107 for a complete list of the available Styles). Here’s how you can use the auto-accompaniment feature.
Select a Styles Rhythm
Most Styles include a rhythm part. You can select from a wide variety of rhythmic types—rock, blues,
samba, and many, many more. Let’s begin by listening to just the basic rhythm. The rhythm part is played
using percussion instruments only.
Select and press the desired Style category button in the
Style section.
1
The Style selection display appears.
The currently selected category name, Voice number and name will be
highlighted.
NOTE
•To change the Style category,
press another category button.
Select the Style you want to play.
2
Look at the highlighted Voice name and rotate the dial. The available
Styles will be selected and displayed in sequence.
See the Style list on page 107.
Press the [START/STOP] button.
3
The Style rhythm will start playing.
To stop playback, press the [START/STOP] button again.
Style selection display
The currently
selected category
The currently
selected Style
22 PSR-S500 Owner’s Manual
Playing Styles
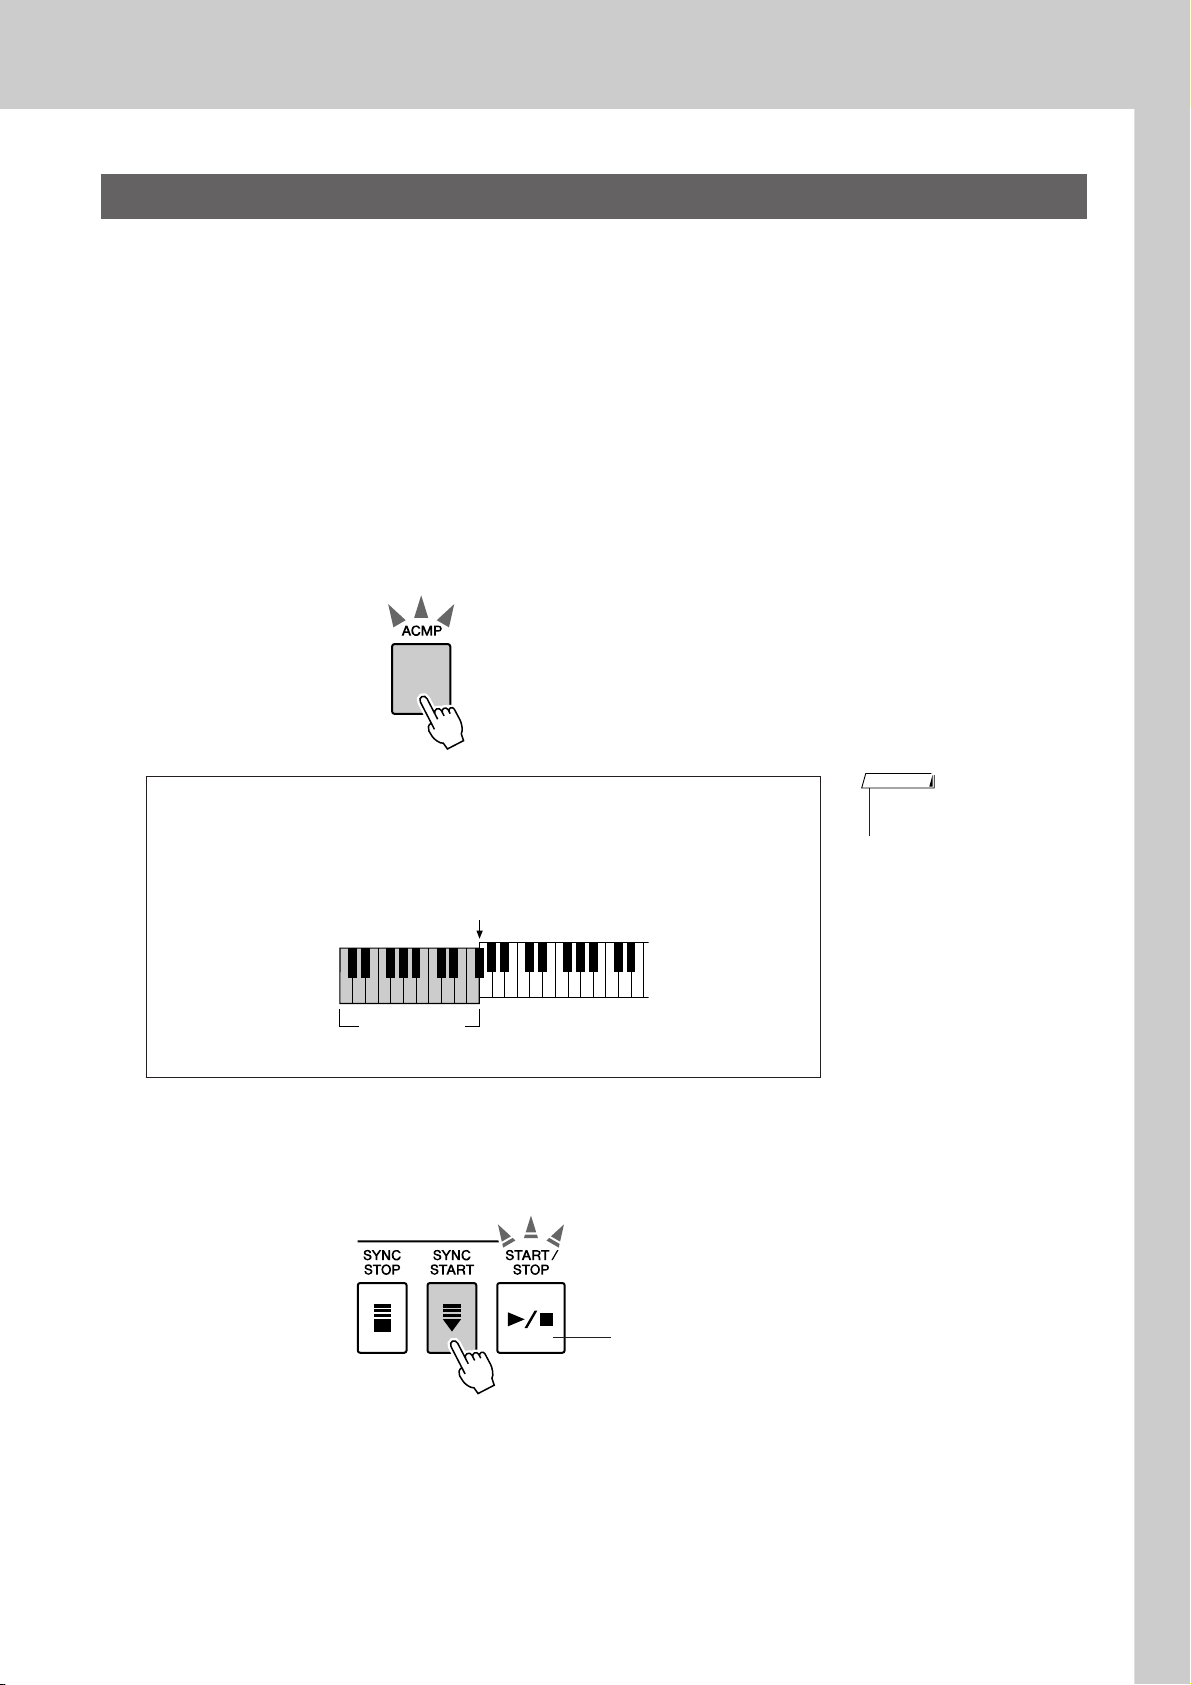
Playing Along with a Style
You learned how to select a Style rhythm on the preceding page.
Here we’ll see how to add bass and chord accompaniment to the basic rhythm to produce a full, rich accompaniment that you can play along with.
Select and press the desired Style category button in the
Style section.
1
Press the [EXIT] button to return to the Main display.
Turn automatic accompaniment on.
2
Press the [ACMP] button.
Pressing this button a second time will turn automatic accompaniment
off.
[ACMP] button is lit.
● When automatic accompaniment is on …
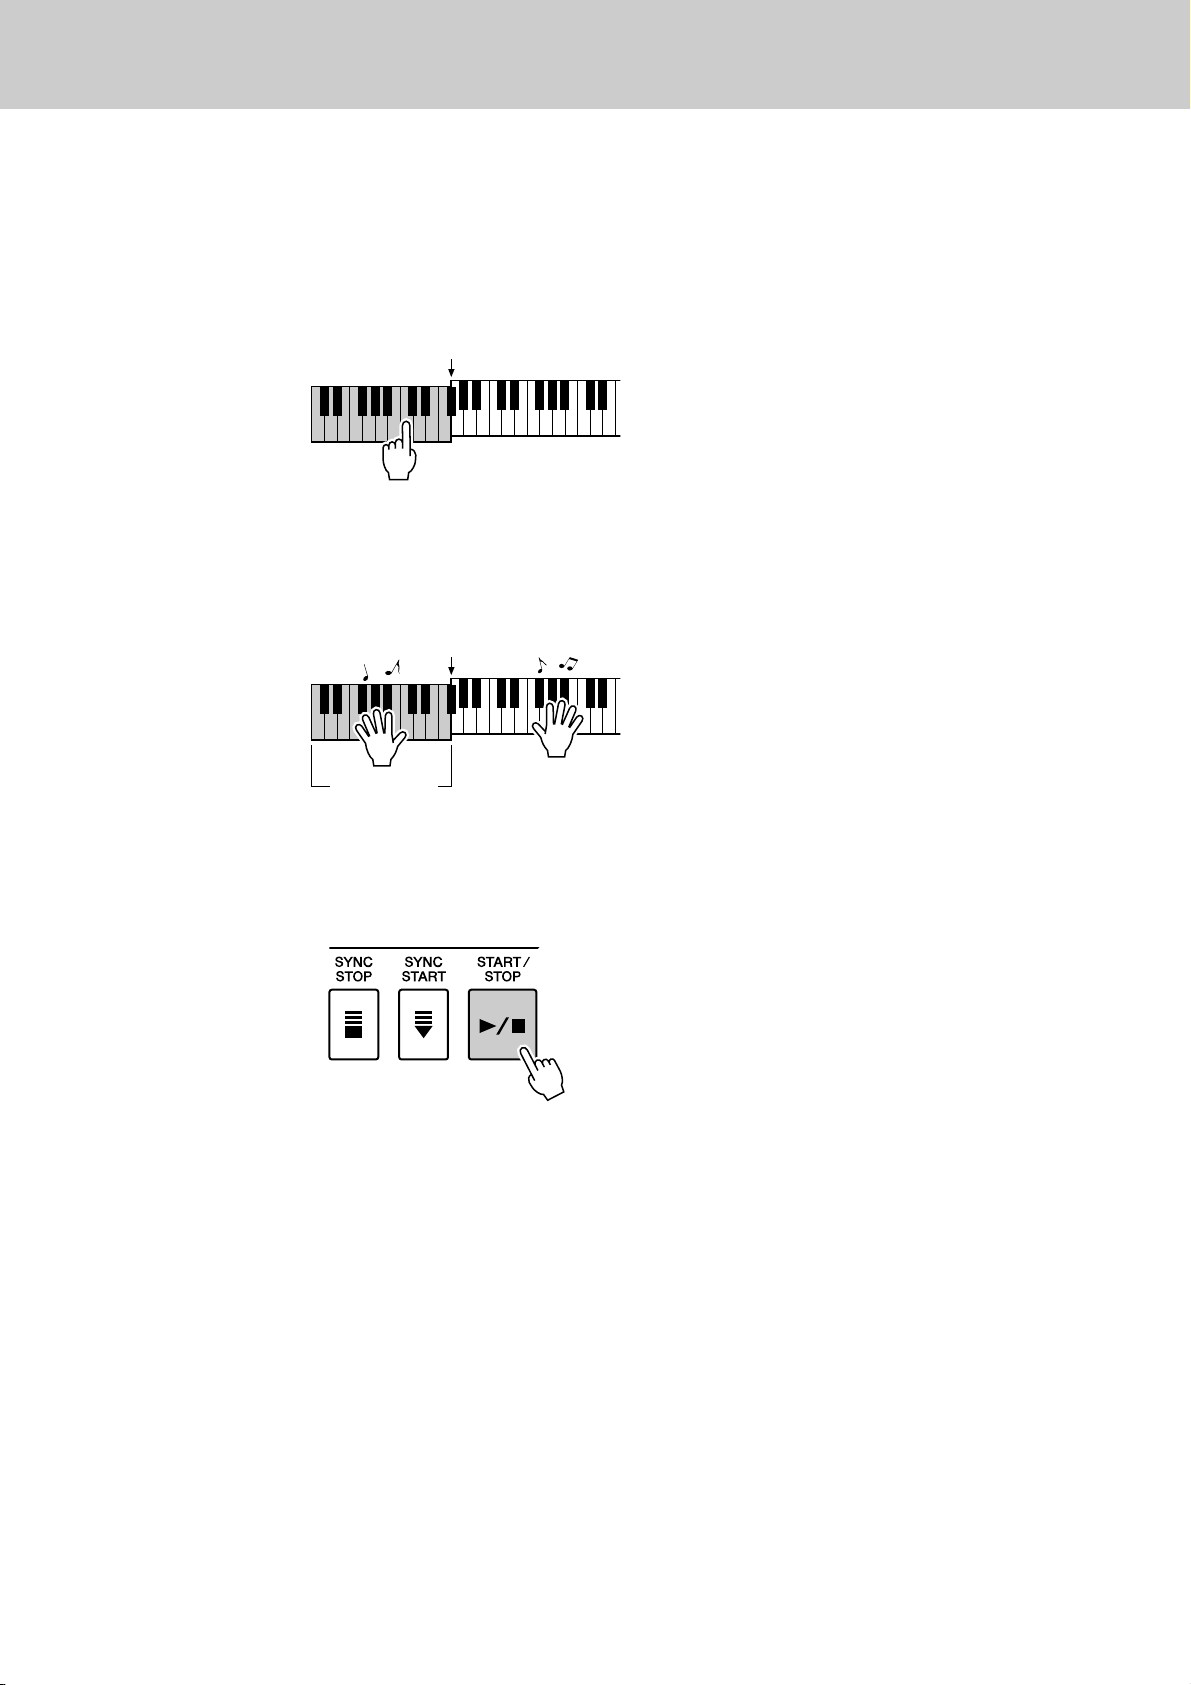
The area of the keyboard to the left of the split point (54: F#2) becomes the
“auto accompaniment region” and is used only for specifying the
accompaniment chords.
Split point (54: F#2)
Auto accompa-
niment region
Turn Sync Start on.
3
Press the [SYNC START] button to turn the Sync Start function on.
NOTE
• The Split point can be changed
as required; refer to page 59.
Flashes when Sync Start is on.
When Sync Start is on, the bass and chord accompaniment included in a
Style will start playing as soon as you play a note to left of the keyboard
split point. To cancel or disable Sync Start, press the button a second
time to turn the Sync Start function off.
PSR-S500 Owner’s Manual 23
Playing Styles
Play a left-hand chord to start the Style.
4
You can still “play” chords even if you don’t actually know any chords.
This instrument will recognize even a single note as a chord. Try playing from one to three notes at the same time to the left of the split point.
The chord will change according to the left-hand notes you play.
Play a variety of left-hand chords while playing a melody
with your right hand.
5
Split point
Split point
Auto accompa-
niment region
Press the [START/STOP] button to stop Style playback
when you’re done.
6
You can switch Style “sections” to add variety to the accompaniment.
Refer to “Pattern Variation (sections)” on page 55.
24 PSR-S500 Owner’s Manual
Playing Styles
( )
( )
( )
( )
( )
( )
( )
( )
( )
( )
( )
( )
( )
( )
( )
( )
( )
( )
( )
CmM7
CM7
C6
Csus4
Caug
CM7aug
C7aug
C7sus4
Csus2
C7
Cm
Cdim
Cdim7
C7
CmM7
(9)
CM7
(9)
Cm7
(9)
C7
(b9)
C7
(
b13
)
Cm7
(11)
CM7
(
#11
)
C
(b5)
(
9
)
C6
Cm add9
(9)
C7
(
#11
)
C7
(#9)
C7
(13)
C7
Cm6
Cm7
C
(b5)
CM7
(b5)
Cm7
(b5)
CmM7
(b5)
Cadd9
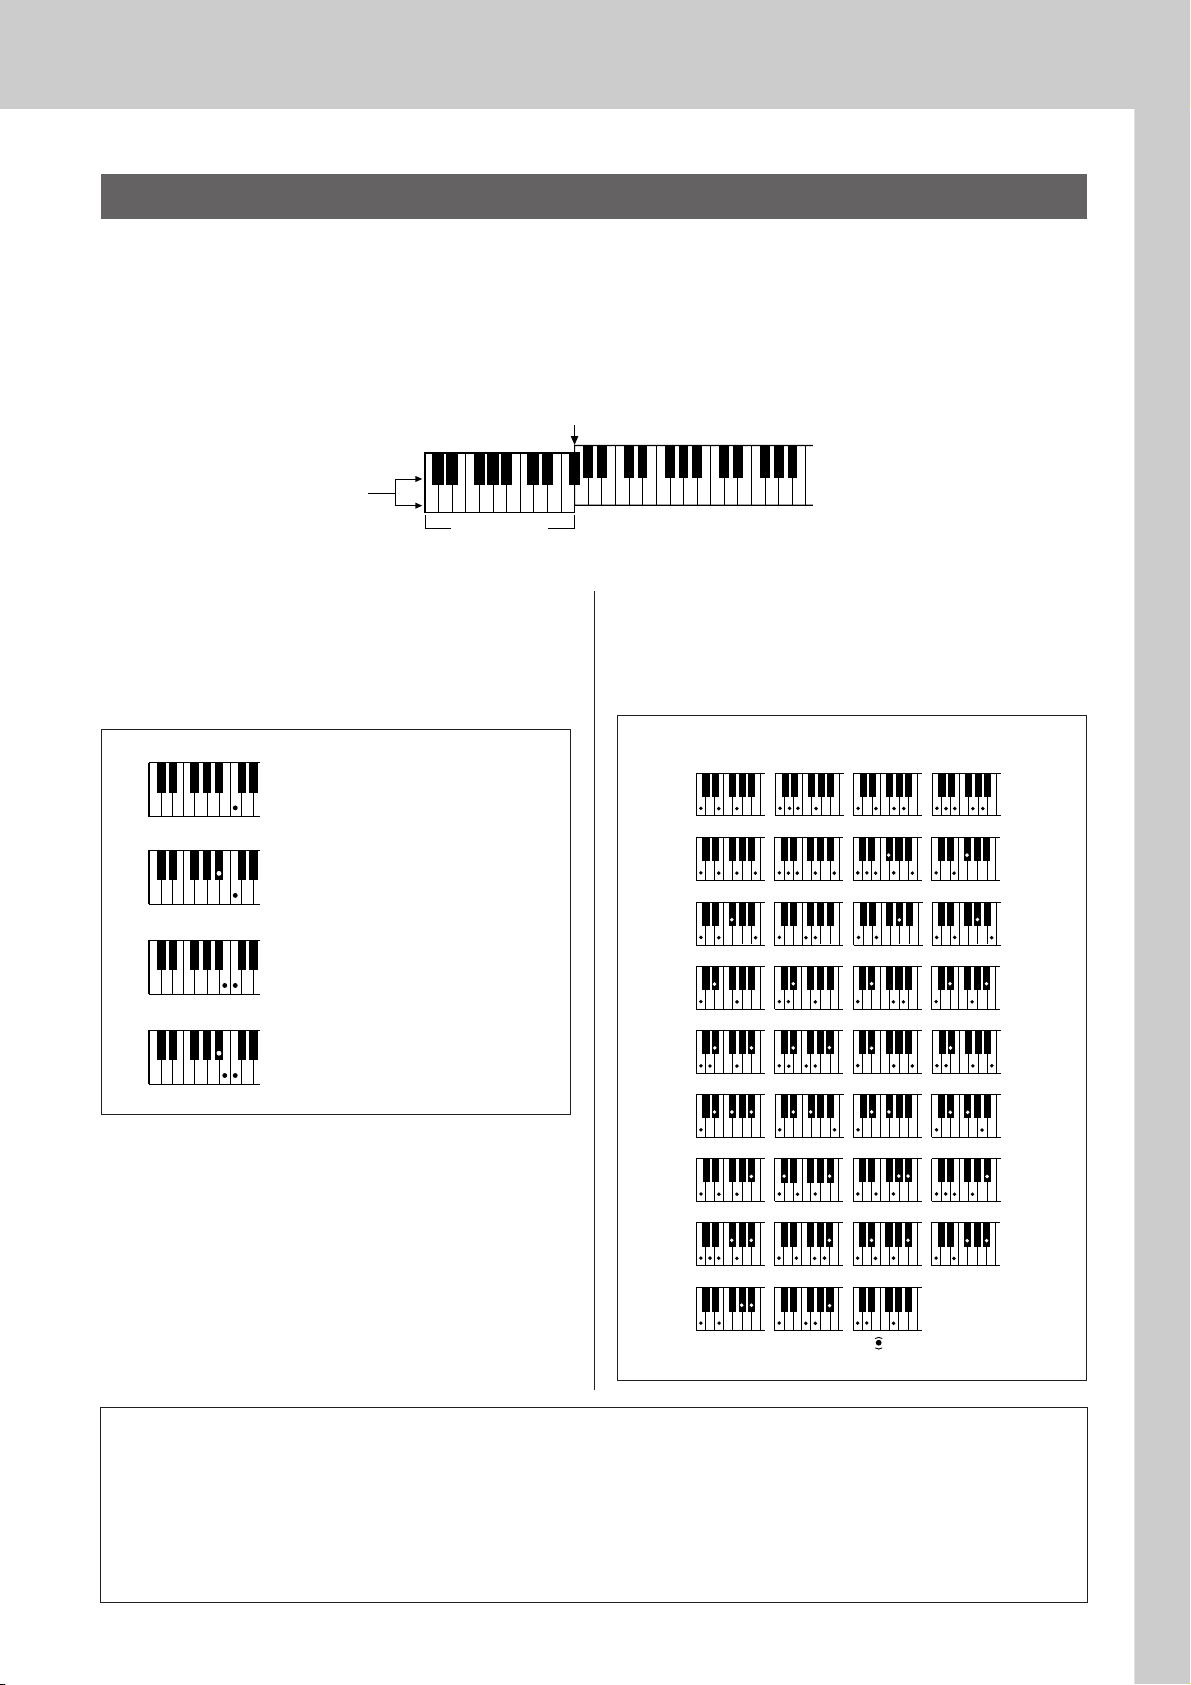
● How to play Standard Chords [Example for “C” chords]
* Notes enclosed in parentheses ( ) are optional; the chords
will be recognized without them.
Playing Auto-accompaniment Chords
There are two ways of playing auto-accompaniment chords:
● Easy Chords
● Standard Chords
The instrument will automatically recognize the different chord types.
The keyboard to the left of the split point (default: 54/F#2) becomes the “accompaniment range.” Play the
accompaniment chords in this area of the keyboard.
Split point (default: 54/F#2)
Root notes and the
corresponding keys
DbEbF#G#BbDbEbF
C
■Easy Chords ● ● ● ● ● ● ● ● ● ● ● ● ● ● ● ●
This method lets you easily play chords in the
accompaniment range of the keyboard using only
one, two, or three fingers.
C
Cm
C7
Cm7
•To play a major chord
Press the root note of the chord.
•To play a minor chord
Press the root note together with the
nearest black key to the left of it.
•To play a seventh chord
Press the root note together with the
nearest white key to the left of it.
•To play a minor seventh chord
Press the root note together with the
nearest white and black keys to the
left of it (three keys altogether).
#
DEFGABCDEF
Accompani-
ment range
■Standard Chords ● ● ● ● ● ● ● ● ● ● ● ● ●
This method lets you produce accompaniment by
playing chords using normal fingerings in the
accompaniment range of the keyboard.
● Multi Fingering and Full Keyboard
These let you select the accompaniment section of the keyboard for chord playing. (See the “Chord Fingering” section
in the Function Setting List on page 71.)
Multi Fingering: As explained above, the keys to the left of the split point (default: 54, F#2) become the
accompaniment range. This method lets you play the accompaniment chords in the specified area of the
keyboard, and is set as the default for the instrument.
Full Keyboard: This lets you play the accompaniment chords freely from anywhere on the keyboard.
PSR-S500 Owner’s Manual 25
G
k
u
c
i
u
Q
i
d
e
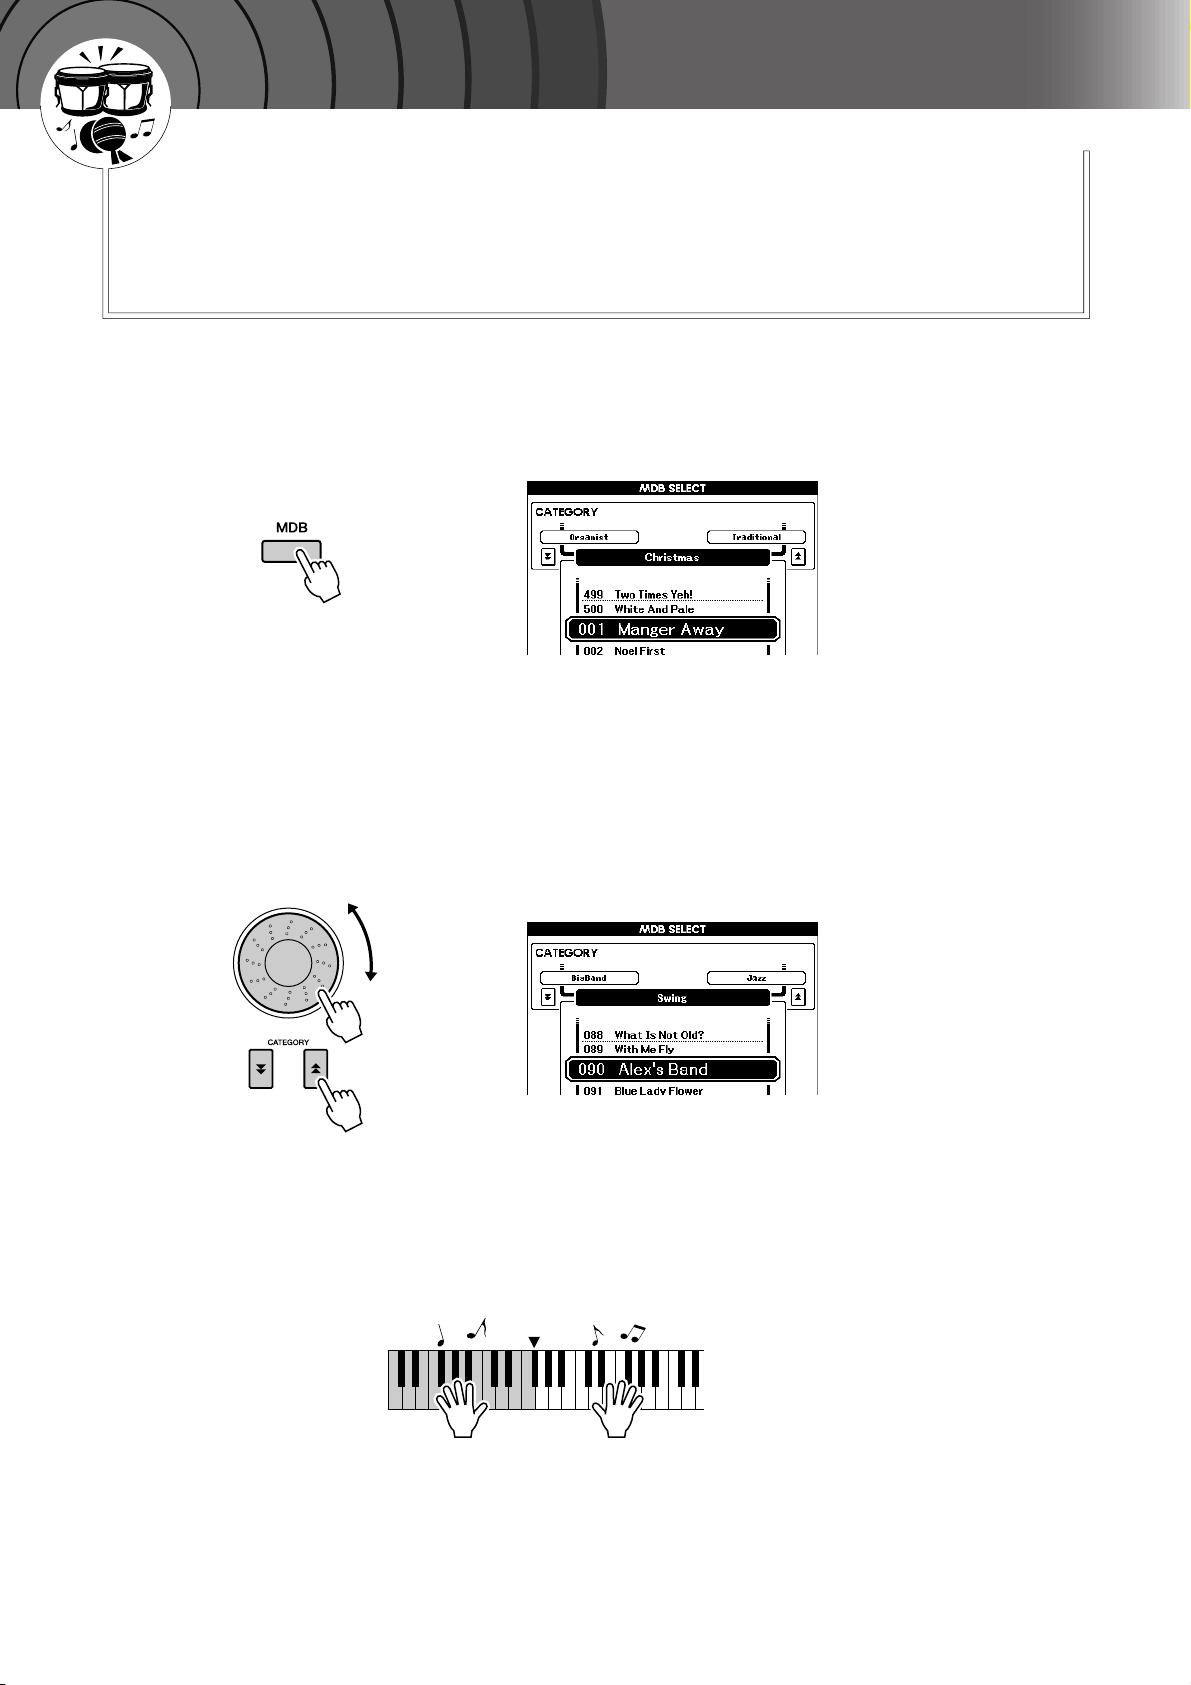
Playing with the Music Database
You want to play music in your favorite Style, but you’re not sure how to
select the best Voice and Style for the type of music you want to play, simply select the appropriate Style from the Music Database. The panel settings will automatically be adjusted for the ideal combination of sounds
and Style!
Press the [MDB] button.
1
The music database selection display will appear.
The currently selected category name, MDB number and name will be
highlighted.
Select the desired Music Database which matches the
music style or type you want to play.
2
Press [ ], [ ] category button when changing the MDB category.
Referring to the Music Database List on page 108 of the manual, use the
dial to select a music database. Select one that matches the music style
of the Song you intend to play.
For this example select “090 Alex’s Band” in the Swing category.
Play the chords with your left hand and the melody with
your right.
3
The swing Style will start playing when you play a left-hand chord to
the left of the split point (page 23). Refer to page 25 for information
about playing chords.
f
r
Split Point
You can check the assigned Voice and Style at this point by pressing the
[EXIT] button to return to the MAIN display.
Press the [>>>>/■] button to stop playback.
4
26 PSR-S500 Owner’s Manual

G
k
u
c
i
u
Q
i
d
e
Using Songs
With this instrument the term “Song” refers the data that makes
up a piece of music.
In this section we’ll learn how to select and play Songs.
Song
(Score) (Lyrics)
Listen See Record
Selecting and Listening to a Song
Select and press one of the Song category buttons, which
corresponds to the type of Song you want to listen to.
1
[PRESET] : Five preset Songs are available here.
[USER] : This contains your recorded Songs and Songs loaded from
computer.
[USB] : This contains USB Songs when a USB flash memory
device is connected to the DEVICE terminal.
The Song selection display will appear.
The currently selected Song number and name will be highlighted.
NOTE
• When the instrument is in the
Song mode, the [SONG MODE]
button is lit. When Style mode is
enabled, the button is not lit.
Song Selection
display
Currently
selected Song
Select a Song.
2
Use the dial to select the Song you want to listen to.
PSR-S500 Owner’s Manual 27
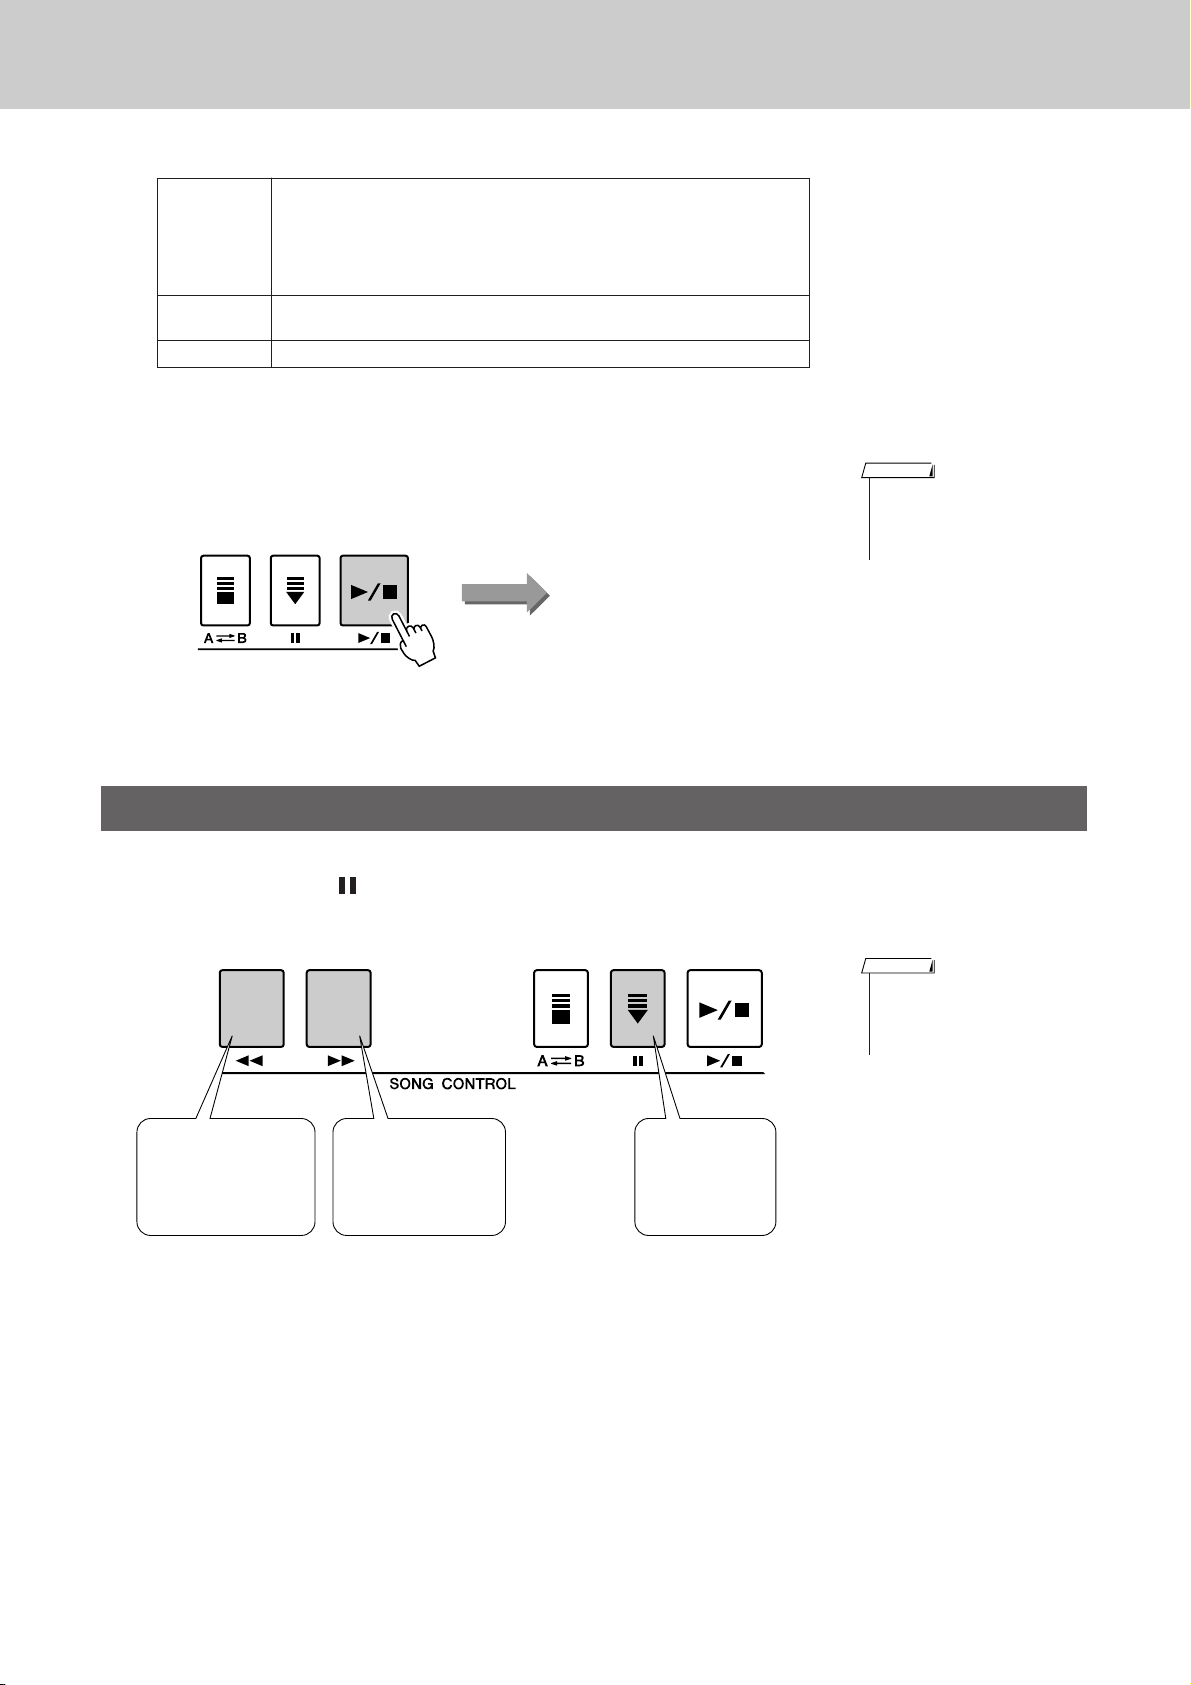
Using Songs
Listen to the Song.
3
Press the [>/■] button to begin playback of the selected Song.
You can stop playback at any time by pressing the [
Built-in Songs
1 Annie Laurie (Traditional)
PRESET
USER
USB Songs in a USB flash memory connected to the instrument (page 74)
2 Oh, Susanna (Sunny Skylar, S. Foster)
3 Little Brown Jug (Traditional)
4Waltz Op.18 (F. Chopin)
5 Piano Concerto No.21 2nd Mov. (W.A. Mozart)
User Songs (Songs you record yourself) or Songs transferred from a
computer (pages 85–87)
>/■] button again.
Song start
NOTE
• Some of the preset songs have
been edited for length or
arrangement, and may not be
exactly the same as the original.
Song Fast Forward, Fast Reverse, and Pause
These are just like the transport controls on a cassette deck or CD player, letting you fast forward [
rewind [
r], and pause [ ] playback of the Song.
REW
Press the fast reverse
button to rapidly return
to an earlier point in
the Song.
FF
Press the fast forward
button to rapidly skip
ahead to a later point
in the Song.
NOTE
• When an A-B repeat range is
specified, the fast reverse and
forward function will only work
within that range.
PAUSE
Press the pause
button to pause
playback.
f],
28 PSR-S500 Owner’s Manual
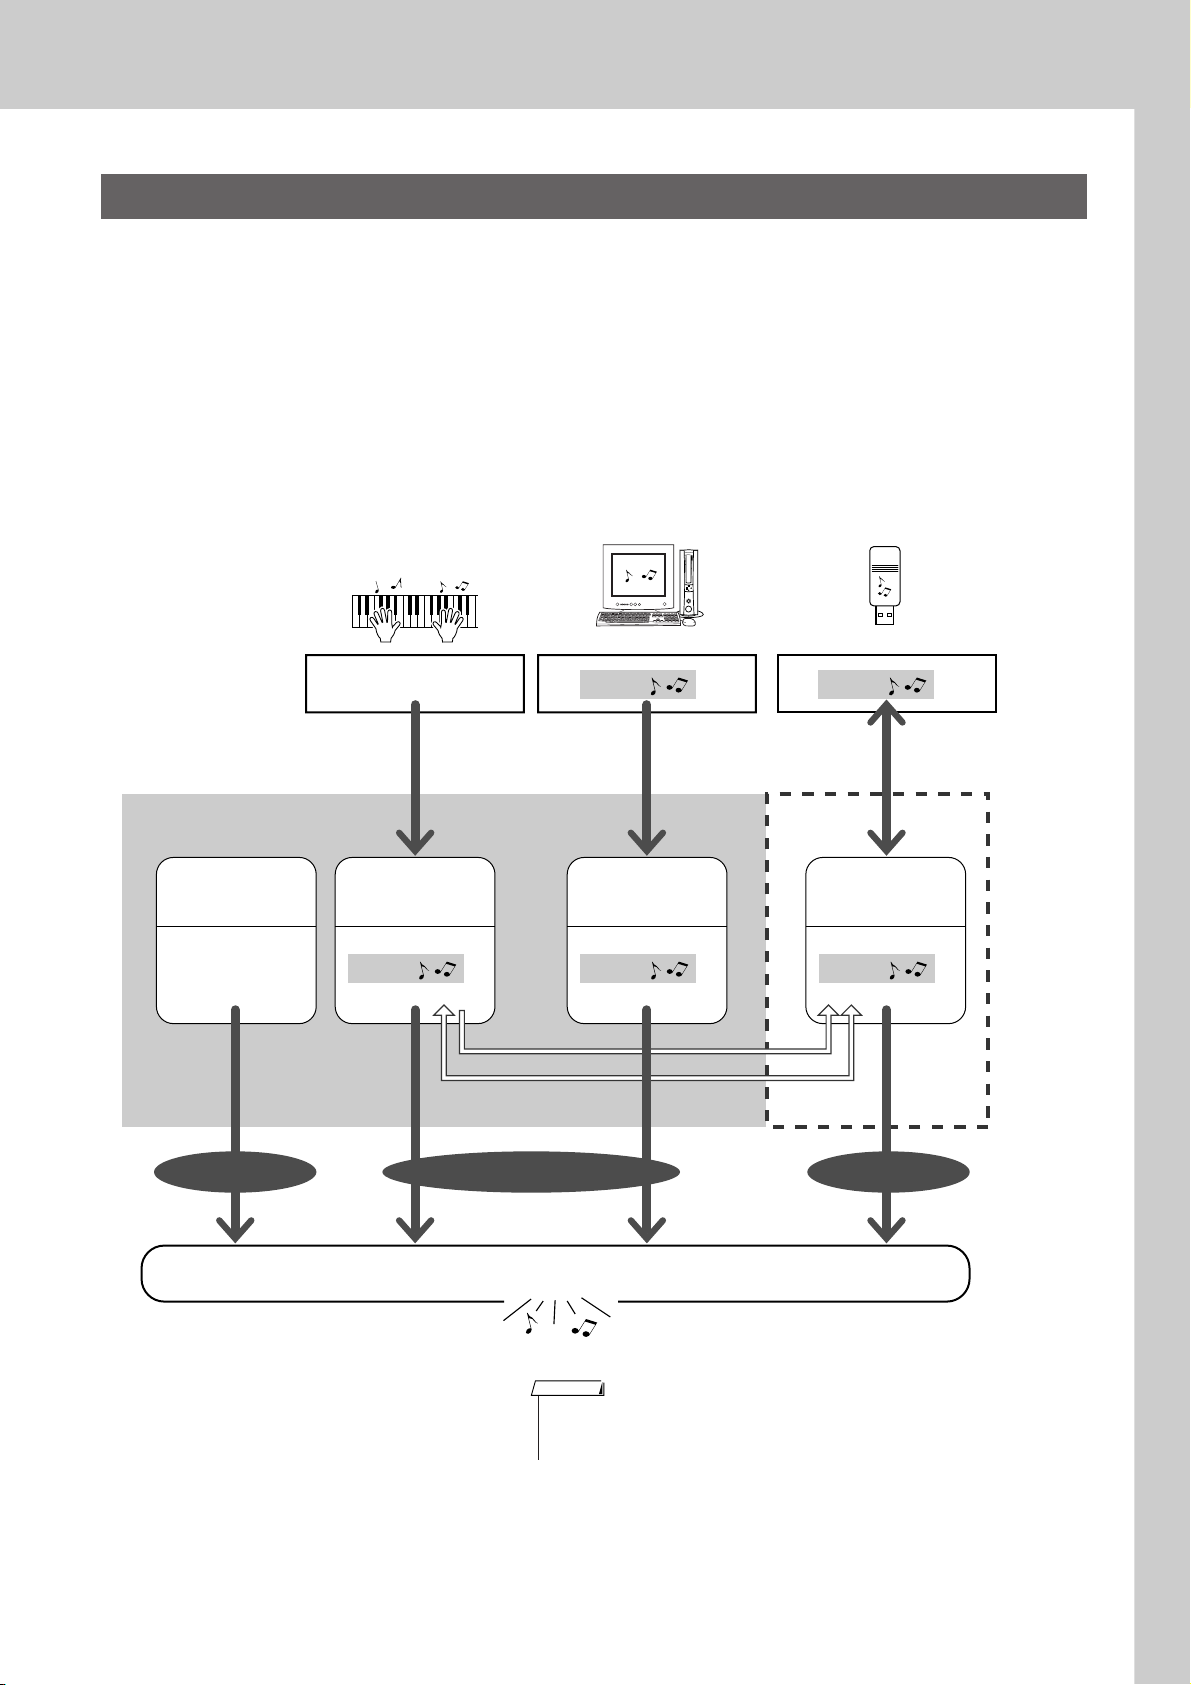
Using Songs
Types of Songs
The following four types of Songs can be used by this instrument.
● Preset Songs (the five Songs built into the instrument)…………… Preset Song numbers 001–005.
● User Songs (recordings of your own performances) ………………. USER Song numbers 001–005.
● Loaded Songs (Song data loaded from computer) …………………. USER Song numbers 006–
● USB Songs (Song data in the USB flash memory) …………………. Song numbers 001–.
The chart below shows the basic operation flow for using the preset Songs, user Songs, loaded Songs and
USB Song from storage to playback.
Computer USB flash memory
Song Storage location.
Preset Songs
(001–005)
The five Songs
built into the
instrument.
PRESET USER USB
Your own performance
Record
(page 32)
User Songs
(001–005)
Song Song Song
SMF conversion
Save/Load
Song Song
Connect USB TO HOST
terminal and Transfer
(page 85)
User Songs
(loaded Songs)
(006–)
Connect USB TO DEVICE
terminal and Save/Load
(page 80)
USB Songs
(001–)
Play
NOTE
• Different internal memory areas are used to store user Songs and loaded Song files
transferred from a computer. User Songs cannot be directly transferred to the loaded
Song area of the internal memory, and vice versa.
PSR-S500 Owner’s Manual 29
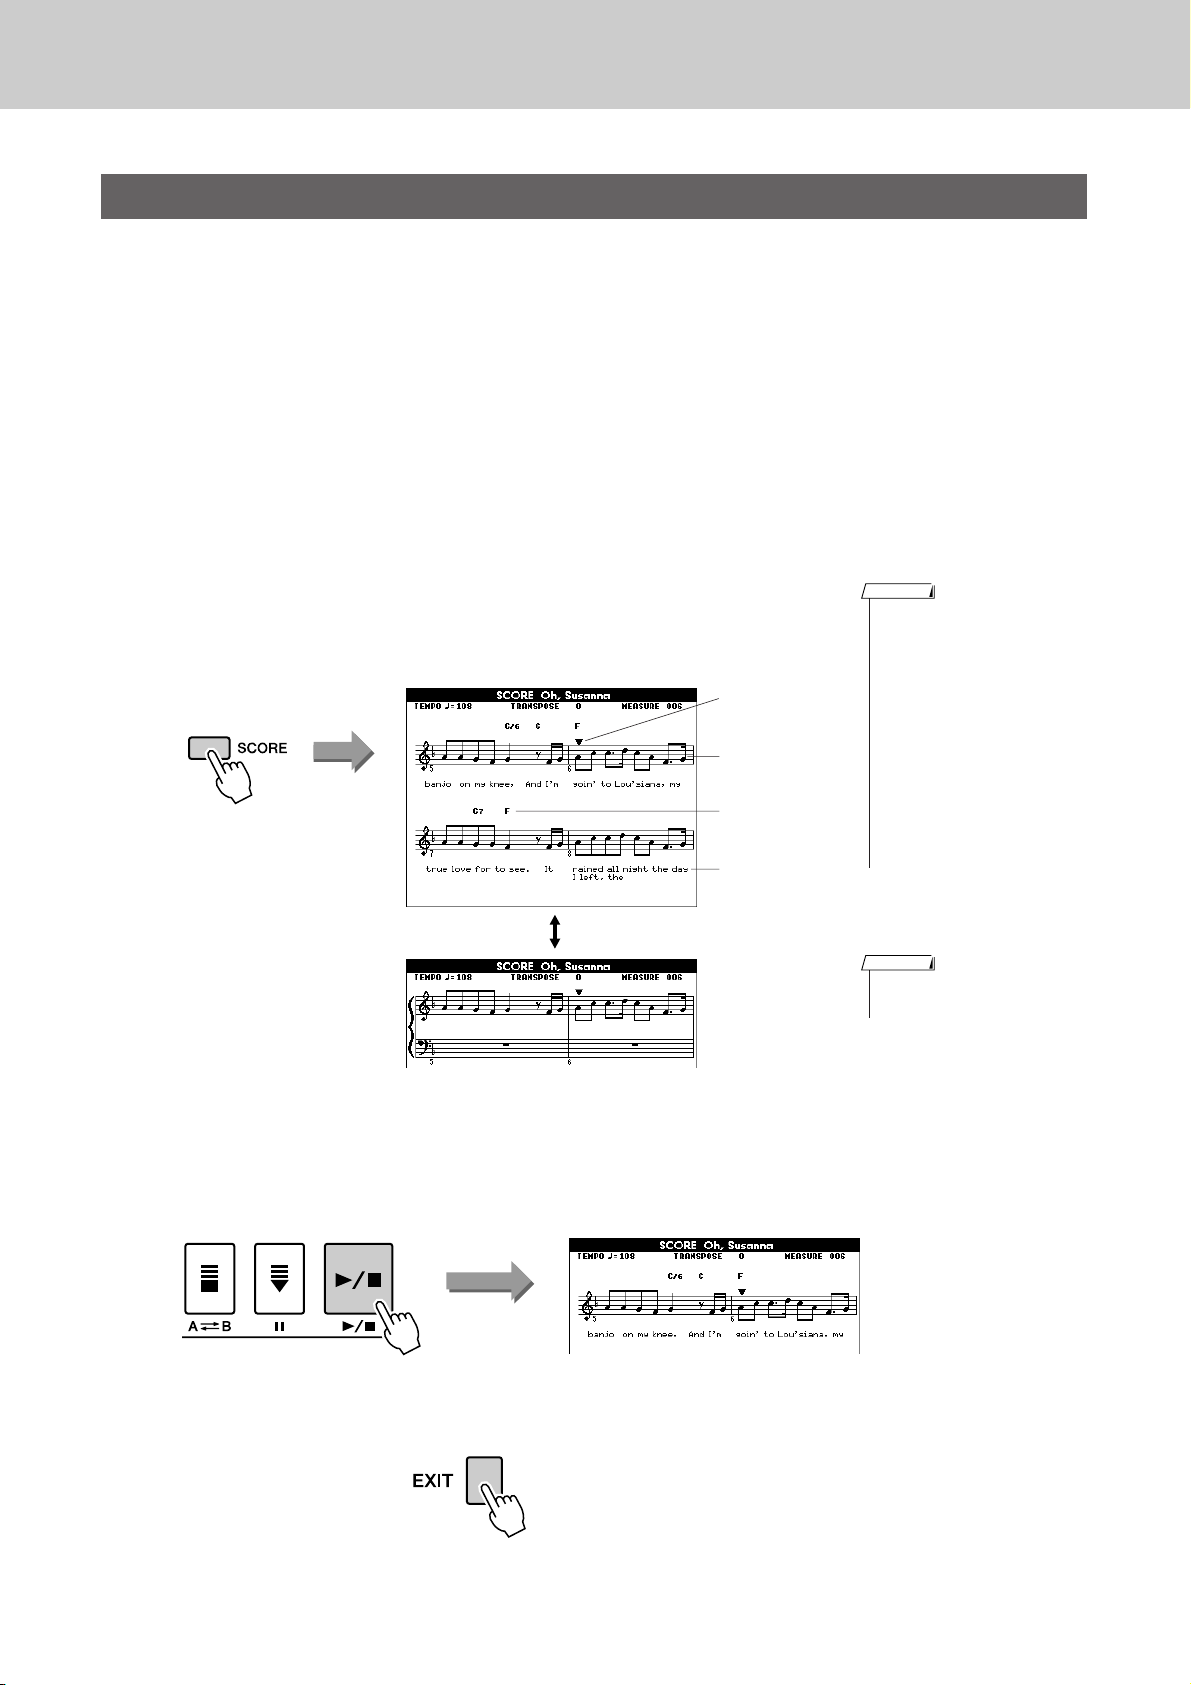
Using Songs
Displaying the Song Score
This instrument is capable of display the scores (notation) of Songs.
Scores are displayed for the preset Songs. Scores can also be displayed for Songs loaded from computer as
well as Songs played back from USB flash memory.
Although User Songs you record yourself cannot display a score as is, they can be converted to SMF (Standard MIDI File) format and stored to USB flash memory, from where they can be played with score display.
(Refer to “Convert a User Song to SMF Format and Save” on page 77.)
Select a Song.
1
Follow steps 1 and 2 of the procedure described on page 27.
Press the [SCORE] button and a single-staff score will
appear.
2
There are two types of score display: single-staff and double-staff.
These are alternately selected each time the [SCORE] button is pressed.
Single-staff
Marker
Melody score
Chord
Lyrics
NOTE
• Both chords and lyrics will be
shown in single-staff score display of a Song that includes
chord and lyric data.
• When there are many lyrics in a
Song, they may be displayed in
two rows a measure.
• Some lyrics or chords may be
abbreviated if the selected Song
has a lot of lyrics.
• Small notes that are hard to
read may be easier to read after
you use the quantize function
(page 72).
Double-staff
Press the [>>>>/■] button.
3
The Song will begin playing. The triangular cursor will move across the
top of the score to indicate the current location.
To return to the MAIN display, press the [EXIT] button.
4
NOTE
• No lyrics are shown in doublestaff display.
30 PSR-S500 Owner’s Manual
Loading…

SPECIAL MESSAGE SECTION
This product utilizes batteries or an external power supply (adapter).
This product may also use “household” type batteries. Some of these
DO NOT connect this product to any power supply or adapter other
may be rechargeable. Make sure that the battery being charged is a
than one described in the manual, on the name plate, or specifically
rechargeable type and that the charger is intended for the battery being
recommended by Yamaha.
charged.
This product should be used only with the components supplied or; a
When installing batteries, do not mix batteries with new, or with batter-
cart, rack, or stand that is recommended by Yamaha. If a cart, etc., is
ies of a different type. Batteries MUST be installed correctly. Mis-
used, please observe all safety markings and instructions that accom-
matches or incorrect installation may result in overheating and battery
pany the accessory product.
case rupture.
SPECIFICATIONS SUBJECT TO CHANGE:
Warning:
The information contained in this manual is believed to be correct at the
Do not attempt to disassemble, or incinerate any battery. Keep all bat-
time of printing. However, Yamaha reserves the right to change or mod-
teries away from children. Dispose of used batteries promptly and as
ify any of the specifications without notice or obligation to update exist-
regulated by the laws in your area. Note: Check with any retailer of
ing units.
household type batteries in your area for battery disposal information.
This product, either alone or in combination with an amplifier and head-
Disposal Notice:
phones or speaker/s, may be capable of producing sound levels that
Should this product become damaged beyond repair, or for some rea-
could cause permanent hearing loss. DO NOT operate for long periods
son its useful life is considered to be at an end, please observe all local,
of time at a high volume level or at a level that is uncomfortable. If you
state, and federal regulations that relate to the disposal of products that
experience any hearing loss or ringing in the ears, you should consult
contain lead, batteries, plastics, etc. If your dealer is unable to assist
an audiologist.
you, please contact Yamaha directly.
IMPORTANT: The louder the sound, the shorter the time period before
damage occurs.
NAME PLATE LOCATION:
The name plate is located on the bottom of the product. The model
NOTICE:
number, serial number, power requirements, etc., are located on this
Service charges incurred due to a lack of knowledge relating to how a
plate. You should record the model number, serial number, and the date
function or effect works (when the unit is operating as designed) are not
of purchase in the spaces provided below and retain this manual as a
covered by the manufacturer’s warranty, and are therefore the owners
permanent record of your purchase.
responsibility. Please study this manual carefully and consult your
dealer before requesting service.
ENVIRONMENTAL ISSUES:
Model
Yamaha strives to produce products that are both user safe and envi-
ronmentally friendly. We sincerely believe that our products and the pro-
duction methods used to produce them, meet these goals. In keeping
Serial No.
with both the letter and the spirit of the law, we want you to be aware of
the following:
Purchase Date
Battery Notice:
This product MAY contain a small non-rechargeable battery which (if
applicable) is soldered in place. The average life span of this type of
battery is approximately five years. When replacement becomes neces-
sary, contact a qualified service representative to perform the replace-
ment.
PLEASE KEEP THIS MANUAL
92-BP (bottom)
2 PSR-S500 уководство пользователя

FCC INFORMATION (U.S.A.)
1. IMPORTANT NOTICE: DO NOT MODIFY THIS UNIT!
not guarantee that interference will not occur in all installations. If
This product, when installed as indicated in the instructions con-
this product is found to be the source of interference, which can be
tained in this manual, meets FCC requirements. Modifications not
determined by turning the unit “OFF” and “ON”, please try to elimi-
expressly approved by Yamaha may void your authority, granted by
nate the problem by using one of the following measures:
the FCC, to use the product.
Relocate either this product or the device that is being affected by
the interference.
2. IMPORTANT: When connecting this product to accessories and/
or another product use only high quality shielded cables. Cable/s
Utilize power outlets that are on different branch (circuit breaker or
supplied with this product MUST be used. Follow all installation
fuse) circuits or install AC line filter/s.
instructions. Failure to follow instructions could void your FCC
In the case of radio or TV interference, relocate/reorient the
authorization to use this product in the USA.
antenna. If the antenna lead-in is 300 ohm ribbon lead, change the
lead-in to co-axial type cable.
3. NOTE: This product has been tested and found to comply with the
requirements listed in FCC Regulations, Part 15 for Class “B” digital
If these corrective measures do not produce satisfactory results,
devices. Compliance with these requirements provides a reason-
please contact the local retailer authorized to distribute this type of
able level of assurance that your use of this product in a residential
product. If you can not locate the appropriate retailer, please contact
environment will not result in harmful interference with other elec-
Yamaha Corporation of America, Electronic Service Division, 6600
tronic devices. This equipment generates/uses radio frequencies
Orangethorpe Ave, Buena Park, CA90620
and, if not installed and used according to the instructions found in
The above statements apply ONLY to those products distributed by
the users manual, may cause interference harmful to the operation
Yamaha Corporation of America or its subsidiaries.
of other electronic devices. Compliance with FCC regulations does
* This applies only to products distributed by YAMAHA CORPORATION OF AMERICA.
(class B)
OBSERVERA!
Apparaten kopplas inte ur växelströmskällan (nätet) så länge som den ar
ansluten till vägguttaget, även om själva apparaten har stängts av.
ADVARSEL: Netspæendingen til dette apparat er IKKE afbrudt, sålæenge
netledningen siddr i en stikkontakt, som er t endt — også selvom der or
slukket på apparatets afbryder.
VAROITUS: Laitteen toisiopiiriin kytketty käyttökytkin ei irroita koko laitetta
verkosta.
(standby)
This product contains a high intensity lamp that contains
a small amount of mercury. Disposal of this material
may be regulated due to environmental considerations.
For disposal information in the United States, refer to the Electronic
Industries Alliance web site:
www.eiae.org
(mercury)* This applies only to products distributed by YAMAHA CORPORATION OF AMERICA.
IMPORTANT NOTICE FOR THE UNITED KINGDOM
Connecting the Plug and Cord
IMPORTANT. The wires in this mains lead are coloured in accordance
with the following code:
BLUE : NEUTRAL
BROWN : LIVE
As the colours of the wires in the mains lead of this apparatus may not
correspond with the coloured makings identifying the terminals in your
plug proceed as follows:
The wire which is coloured BLUE must be connected to the terminal
which is marked with the letter N or coloured BLACK.
The wire which is coloured BROWN must be connected to the termi-
nal which is marked with the letter L or coloured RED.
Making sure that neither core is connected to the earth terminal of the
three pin plug.
• This applies only to products distributed by Yamaha-Kemble Music (U.K.) Ltd. (2 wires)
PSR-S500 уководство пользователя 3
èêÄÇàãÄ íÖïçàäà ÅÖáéèÄëçéëíà
ÇçàåÄíÖãúçé èêéóàíÄâíÖ, èêÖÜÑÖ óÖå èêàëíìèÄíú ä ùäëèãìÄíÄñàà
* ï‡ÌËÚ ˝ÚÓ ÛÍÓ‚Ó‰ÒÚ‚Ó ‚ ·ÂÁÓÔ‡ÒÌÓÏ ÏÂÒÚÂ. éÌÓ ‚‡Ï ¢ ÔÓ̇‰Ó·ËÚÒfl.
èêÖÑìèêÖÜÑÖçàÖ
ÇÓ ËÁ·ÂʇÌË Ò¸ÂÁÌ˚ı Ú‡‚Ï Ë ‰‡Ê ÒÏÂÚË ÓÚ Û‰‡‡ ˝ÎÂÍÚ˘ÂÒÍËÏ ÚÓÍÓÏ, ‡ Ú‡ÍÊ ÍÓÓÚÍÓ„Ó Á‡Ï˚͇ÌËfl,
ÔÓ‚ÂʉÂÌËfl Ó·ÓÛ‰Ó‚‡ÌËfl, ÔÓʇ‡ Ë ‰Û„Ëı Ë̈ˉÂÌÚÓ‚ ‚Ò„‰‡ Òӷ≇ÈÚ ÒÎÂ‰Û˛˘Ë ÏÂ˚ ·ÂÁÓÔ‡ÒÌÓÒÚË:
àÒÚÓ˜ÌËÍ ÔËÚ‡ÌËfl/‡‰‡ÔÚ ÔÂÂÏÂÌÌÓ„Ó ÚÓ͇
ظ ÓÚ ‚Ó‰˚
• àÒÔÓθÁÛÈÚ ÚÓθÍÓ Ì‡ÔflÊÂÌËÂ, Á‡‰‡ÌÌÓ ‰Îfl ËÌÒÚÛÏÂÌÚ‡.
• Å„ËÚ ËÌÒÚÛÏÂÌÚ ÓÚ ‰Óʉfl, Ì ËÒÔÓθÁÛÈÚÂ Â„Ó fl‰ÓÏ Ò ‚Ó‰ÓÈ,
ùÚÓ Ì‡ÔflÊÂÌË Û͇Á‡ÌÓ Ì‡ ËÌÒÚÛÏÂÌÚÂ.
‚ ÛÒÎÓ‚Ëflı Ò˚ÓÒÚË Ë ÔÓ‚˚¯ÂÌÌÓÈ ‚·ÊÌÓÒÚË; Ì ÒÚ‡‚¸Ú ̇ Ì„Ó
ÂÏÍÓÒÚË Ò ÊˉÍÓÒÚ¸˛, ÍÓÚÓ‡fl ÏÓÊÂÚ ‡ÁÎËÚ¸Òfl Ë ÔÓÔ‡ÒÚ¸ ‚ÌÛÚ¸.
• àÒÔÓθÁÛÈÚ ÚÓθÍÓ Û͇Á‡ÌÌ˚È ‡‰‡ÔÚ (PA-301, PA-300 ËÎË ‡Ì‡Îӄ˘-
Ì˚È, ÂÍÓÏẨӂ‡ÌÌ˚È ÍÓÔÓ‡ˆËÂÈ Yamaha). àÒÔÓθÁÓ‚‡ÌË ÌÂÔ‡-
• çËÍÓ„‰‡ Ì ‚ÒÚ‡‚ÎflÈÚÂ Ë Ì ‚˚ÌËχÈÚ ‚ËÎÍÛ ˝ÎÂÍÚÓËÌÒÚÛÏÂÌÚ‡
‚ËθÌÓ„Ó ‡‰‡ÔÚ‡ ÏÓÊÂÚ ÔË‚ÂÒÚË Í ÔÓ‚ÂʉÂÌ˲ ËÎË Ô„‚Û
ÏÓÍ˚ÏË Û͇ÏË.
ËÌÒÚÛÏÂÌÚ‡.
• èÂËӉ˘ÂÒÍË ÔÓ‚ÂflÈÚ ‚ËÎÍÛ ˝ÎÂÍÚÓËÌÒÚÛÏÂÌÚ‡ Ë Û‰‡ÎflÈÚÂ Ò ÌÂÂ
ظ ÓÚ Ó„Ìfl
„flÁ¸ Ë Ô˚θ.
• ç ÒÚ‡‚¸Ú ̇ ËÌÒÚÛÏÂÌÚ „Ófl˘Ë Ô‰ÏÂÚ˚, ̇ÔËÏ ҂˜Ë.
• òÌÛ ‡‰‡ÔÚ‡ ÔÂÂÏÂÌÌÓ„Ó ÚÓ͇ Ì ‰ÓÎÊÂÌ Ì‡ıÓ‰ËÚ¸Òfl fl‰ÓÏ Ò ËÒ-
ÉÓfl˘ËÈ Ô‰ÏÂÚ ÏÓÊÂÚ ÛÔ‡ÒÚ¸ Ë ‚˚Á‚‡Ú¸ ÔÓʇ.
ÚÓ˜ÌË͇ÏË ÚÂÔ· (̇„‚‡ÚÂÎflÏË, ‡‰Ë‡ÚÓ‡ÏË Ë ‰.). ç ‰ÓÔÛÒ͇ÈÚÂ
Ú‡ÍÊ ˜ÂÁÏÂÌÓ„Ó Ò„Ë·‡ÌËfl Ë ÔÓ‚ÂʉÂÌËfl ¯ÌÛ‡, Ì ÒÚ‡‚¸Ú ̇ Ì„Ó
Ç̯ڇÚÌ˚ ÒËÚÛ‡ˆËË
ÚflÊÂÎ˚ Ô‰ÏÂÚ˚ Ë ‰ÂÊËÚÂ Â„Ó ‚ Ú‡ÍÓÏ ÏÂÒÚÂ, „‰Â ̇ ÌÂ„Ó ÌÂθÁfl
• Ç ÒÎÛ˜‡Â ËÁÌÓÒ‡ Ë ÔÓ‚ÂʉÂÌËfl ¯ÌÛ‡ ËÎË ‚ËÎÍË ‡‰‡ÔÚ‡ ÔÂÂÏÂÌÌÓ-
̇ÒÚÛÔËÚ¸, Á‡‰ÂÚ¸ ÌÓ„ÓÈ ËÎË ˜ÚÓ-ÌË·Û‰¸ ÔÓ ÌÂÏÛ ÔÂÂ͇ÚËÚ¸.
„Ó ÚÓ͇, ‡ Ú‡ÍÊ ÔË ‚ÌÂÁ‡ÔÌÓÏ ËÒ˜ÂÁÌÓ‚ÂÌËË Á‚Û͇ ‚Ó ‚ÂÏfl ˝ÍÒÔÎÛ‡-
Ú‡ˆËË, ÔË ÔÓfl‚ÎÂÌËË ÌÂÓ·˚˜ÌÓ„Ó Á‡Ô‡ı‡ Ë ‰˚χ ÌÂωÎÂÌÌÓ ÓÚÍβ˜Ë-
ç ÓÚÍ˚‚‡Ú¸
Ú ˝ÎÂÍÚÓÔËÚ‡ÌËÂ, ‚˚̸Ú ‚ËÎÍÛ ‡‰‡ÔÚ‡ ËÁ ÓÁÂÚÍË Ë Ó·‡ÚËÚÂÒ¸ Á‡
• ç ÓÚÍ˚‚‡ÈÚ ËÌÒÚÛÏÂÌÚ Ë Ì Ô˚Ú‡ÈÚÂÒ¸ ‡ÁÓ·‡Ú¸ ËÎË ÏÓ‰ËÙˈË-
ÔÓÏÓ˘¸˛ Í ÒÔˆˇÎËÒÚ‡Ï ˆÂÌÚ‡ ÚÂıÌ˘ÂÒÍÓ„Ó Ó·ÒÎÛÊË‚‡ÌËfl ÍÓÔÓ‡-
Ó‚‡Ú¸ Â„Ó ‚ÌÛÚÂÌÌË ÍÓÏÔÓÌÂÌÚ˚. Ç ËÌÒÚÛÏÂÌÚ ÌÂÚ ÍÓÏÔÓÌÂÌÚÓ‚,
ˆËË Yamaha.
ÍÓÚÓ˚ ‰ÓÎÊÂÌ Ó·ÒÎÛÊË‚‡Ú¸ ÔÓθÁÓ‚‡ÚÂθ. èË ÔÓfl‚ÎÂÌËË ÌÂËÒÔ‡‚-
ÌÓÒÚË ÌÂωÎÂÌÌÓ ÔÂ͇ÚËÚ ˝ÍÒÔÎÛ‡Ú‡ˆË˛ Ë Ó·‡ÚËÚÂÒ¸ Á‡ ÔÓÏÓ˘¸˛
Í Í‚‡ÎËÙˈËÓ‚‡ÌÌ˚Ï ÒÔˆˇÎËÒÚ‡Ï ˆÂÌÚ‡ ÚÂıÌ˘ÂÒÍÓ„Ó Ó·ÒÎÛÊË‚‡-
ÌËfl ÍÓÔÓ‡ˆËË Yamaha.
ÇçàåÄçàÖ!
ÇÓ ËÁ·ÂʇÌË ̇ÌÂÒÂÌËfl Ò¸ÂÁÌ˚ı Ú‡‚Ï ÒÂ·Â Ë ÓÍÛʇ˛˘ËÏ, ‡ Ú‡ÍÊ ÔÓ‚ÂʉÂÌËfl ËÌÒÚÛÏÂÌÚ‡ Ë ‰Û„Ó„Ó
ËÏÛ˘ÂÒÚ‚‡, ÔÓÏËÏÓ ÔÓ˜Ëı ‚Ò„‰‡ Òӷ≇ÈÚ ÒÎÂ‰Û˛˘Ë ÓÒÌÓ‚Ì˚ ÏÂ˚ ·ÂÁÓÔ‡ÒÌÓÒÚË:
àÒÚÓ˜ÌËÍ ÔËÚ‡ÌËfl/‡‰‡ÔÚ ÔÂÂÏÂÌÌÓ„Ó ÚÓ͇
• ÇÓ ËÁ·ÂʇÌË ÒÎÛ˜‡ÈÌÓ„Ó Ô‡‰ÂÌËfl ËÌÒÚÛÏÂÌÚ‡ Ì ÓÒÚ‡‚ÎflÈÚ „Ó
• èË ÓÚÍβ˜ÂÌËË Í‡·ÂÎfl ÓÚ ËÌÒÚÛÏÂÌÚ‡ ËÎË ÓÚ ˝ÎÂÍÚÓÒÂÚË ·ÂËÚÂÒ¸
‚ ÌÂÛÒÚÓȘ˂ÓÏ ÔÓÎÓÊÂÌËË.
Á‡ ‚ËÎÍÛ, ‡ Ì Á‡ ͇·Âθ.
• è‰ ÔÂÂÏ¢ÂÌËÂÏ ËÌÒÚÛÏÂÌÚ‡ ÓÚÒÓ‰ËÌËÚ ÔÓ‰Íβ˜ÂÌÌ˚È Í ÌÂÏÛ
• äÓ„‰‡ ËÌÒÚÛÏÂÌÚ Ì ËÒÔÓθÁÛÂÚÒfl, ‡ Ú‡ÍÊ ‚Ó ‚ÂÏfl „ÓÁ˚ ÓÚÍβ˜‡È-
‡‰‡ÔÚÂ Ë ‰Û„Ë ͇·ÂÎË.
Ú ‡‰‡ÔÚ ÔÂÂÏÂÌÌÓ„Ó ÚÓ͇.
• è‰ ̇ÒÚÓÈÍÓÈ ËÁ‰ÂÎËfl ۷‰ËÚÂÒ¸, ˜ÚÓ ËÒÔÓθÁÛÂχfl
• ç ÔÓ‰Íβ˜‡ÈÚ ËÌÒÚÛÏÂÌÚ Í Ó‰ÌÓÈ ˝ÎÂÍÚ˘ÂÒÍÓÈ ÓÁÂÚÍÂ Ò ‰Û„ËÏË
˝ÎÂÍÚÓÓÁÂÚ͇ ΄ÍÓ ‰ÓÒÚÛÔ̇. Ç ÒÎÛ˜‡Â ‚ÓÁÌËÍÌÓ‚ÂÌËfl ͇ÍËı-ÎË·Ó
ÛÒÚÓÈÒÚ‚‡ÏË (̇ÔËÏÂ, ˜ÂÂÁ ÚÓÈÌËÍ). ùÚÓ ÏÓÊÂÚ ÔË‚ÂÒÚË Í ÒÌË-
ÌÂÔÓ·‰ÓÍ ÌÂωÎÂÌÌÓ ‚˚Íβ˜ËÚ ËÌÒÚÛÏÂÌÚ Ë ÓÚÍβ˜ËÚÂ Â„Ó ÓÚ
ÊÂÌ˲ ͇˜ÂÒÚ‚‡ Á‚Û͇ ËÎË ÔÂÂ„Â‚Û ÓÁÂÚÍË.
˝ÎÂÍÚÓÒÂÚË. чÊ ÂÒÎË ÔËÚ‡ÌË ‚˚Íβ˜ÂÌÓ, ËÁ‰ÂÎË ÔÓ‰ÓÎʇÂÚ
ÔÓÚ·ÎflÚ¸ ˝ÎÂÍÚÓ˝Ì„˲ ‚ ÏËÌËχθÌÓÏ ÍÓ΢ÂÒÚ‚Â. ÖÒÎË ËÁ‰ÂÎËÂ
Ì ËÒÔÓθÁÛÂÚÒfl ‚ Ú˜ÂÌË ‰ÎËÚÂθÌÓ„Ó ‚ÂÏÂÌË, ÓÚÍβ˜ËÚ ¯ÌÛ
åÂÒÚÓ ÛÒÚ‡ÌÓ‚ÍË
ÔËÚ‡ÌËfl ÓÚ ˝ÎÂÍÚÓÒÂÚË.
• ÇÓ ËÁ·ÂʇÌË ‰ÂÙÓχˆËË Ô‡ÌÂÎË Ë ÔÓ‚ÂʉÂÌËfl ‚ÌÛÚÂÌÌËı ÍÓÏÔÓ-
ÌÂÌÚÓ‚ ·Â„ËÚ ËÌÒÚÛÏÂÌÚ ÓÚ ˜ÂÁÏÂÌÓÈ Ô˚ÎË Ë ÒËθÌÓÈ ‚Ë·‡ˆËË
• àÒÔÓθÁÛÈÚ ÚÓθÍÓ ÔÓ‰ÒÚ‡‚ÍÛ, ÒÔˆˇθÌÓ Ô‰̇Á̇˜ÂÌÌÛ˛ ‰Îfl
Ë Ì ËÒÔÓθÁÛÈÚÂ Â„Ó ÔË Ó˜Â̸ ‚˚ÒÓÍÓÈ ËÎË ÌËÁÍÓÈ ÚÂÏÔ‡ÚÛ (̇Ô-
ËÌÒÚÛÏÂÌÚ‡.
ÑÎfl ÍÂÔÎÂÌËfl ÒÚÓÈÍË ËÎË ÔÓ‰ÒÚ‡‚ÍË ËÒÔÓθÁÛÈ
Ú ÚÓθÍÓ
ËÏÂ, ̇ ÒÓÎ̈Â, fl‰ÓÏ Ò Ì‡„‚‡ÚÂÎÂÏ ËÎË ‚ χ¯ËÌ ‚ ‰Ì‚ÌÓ ‚ÂÏfl).
‚ËÌÚ˚, ÔÓÒÚ‡‚ÎflÂÏ˚ ‚ ÍÓÏÔÎÂÍÚÂ. Ç ÔÓÚË‚ÌÓÏ ÒÎÛ˜‡Â ‚ÓÁ
ÏÓÊÌÓ
ÔÓ‚ÂʉÂÌË ‚ÌÛÚÂÌÌËı ÍÓÏÔÓÌÂÌÚÓ‚ Ë Ô‡‰ÂÌË ËÌÒÚÛÏÂÌÚ‡.
• ç ËÒÔÓθÁÛÈÚ ËÌÒÚÛÏÂÌÚ ‚ ÌÂÔÓÒ‰ÒÚ‚ÂÌÌÓÈ ·ÎËÁÓÒÚË ÓÚ ÚÂ΂Ë-
ÁÓ‡, ‡‰ËÓÔËÂÏÌË͇, ÒÚÂÂÓÓ·ÓÛ‰Ó‚‡ÌËfl, ÏÓ·ËθÌÓ„Ó ÚÂÎÂÙÓ̇ Ë
‰Û„Ëı ˝ÎÂÍÚÓÔË·ÓÓ‚. Ç ÔÓÚË‚ÌÓÏ ÒÎÛ˜‡Â ‚ ËÌÒÚÛÏÂÌÚÂ, ÚÂ΂Ë-
ÁÓ ËÎË ‡‰ËÓÔËÂÏÌËÍ ÏÓ„ÛÚ ‚ÓÁÌËÍÌÛÚ¸ ÔÓÏÂıË.
(3)-10 1/2
4 PSR-S500 уководство пользователя
èÓ‰Íβ˜ÂÌËÂ
ëÓı‡ÌÂÌË ‰‡ÌÌ˚ı
• è‰ ÔÓ‰Íβ˜ÂÌËÂÏ ËÌÒÚÛÏÂÌÚ‡ Í ‰Û„ËÏ ˝ÎÂÍÚÓÌÌ˚Ï ÍÓÏÔÓÌÂÌ-
ëÓı‡ÌÂÌËÂ Ë ÂÁ‚ÌÓ ÍÓÔËÓ‚‡ÌË ‰‡ÌÌ˚ı
Ú‡Ï ÓÚÍβ˜ËÚ Ëı ÔËÚ‡ÌËÂ. è‰ ‚Íβ˜ÂÌËÂÏ ËÎË ÓÚÍβ˜ÂÌËÂÏ
• èË ÓÚÍβ˜ÂÌËË ÔËÚ‡ÌËfl ËÌÒÚÛÏÂÌÚ‡ ̇ÒÚÓÈÍË Ô‡ÌÂÎË Ë ÌÂÍÓÚÓ˚Â
˝ÎÂÍÚÓÌÌ˚ı ÍÓÏÔÓÌÂÌÚÓ‚ ÛÒÚ‡ÌÓ‚ËÚ ÏËÌËχθÌ˚È ÛÓ‚Â̸ „ÓÏ-
‰Û„Ë ÚËÔ˚ ‰‡ÌÌ˚ı Ì ÒÓı‡Ìfl˛ÚÒfl ‚ Ô‡ÏflÚË. ëÓı‡ÌflÈÚ ÌÛÊÌ˚Â
ÍÓÒÚË. ì·Â‰ËÚÂÒ¸ Ú‡ÍÊ ‚ ÚÓÏ, ˜ÚÓ Ì‡ ‚ÒÂı ÍÓÏÔÓÌÂÌÚ‡ı ÛÒÚ‡ÌÓ‚ÎÂÌ
‰‡ÌÌ˚ ‚ „ËÒÚ‡ˆËÓÌÌÓÈ Ô‡ÏflÚË (ÒÚ. 67).
ÏËÌËχθÌ˚È ÛÓ‚Â̸ „ÓÏÍÓÒÚË, ‡ ‚Ó ‚ÂÏfl Ë„˚ ̇ ËÌÒÚÛÏÂÌÚÂ
ëÓı‡ÌÂÌÌ˚ ‰‡ÌÌ˚ ڇÍÊ ÏÓ„ÛÚ ·˚Ú¸ ÛÚÂflÌ˚ ËÁ-Á‡ ÌÂËÒÔ‡‚ÌÓÒÚË
ÔÓÒÚÂÔÂÌÌÓ Û‚Â΢¸Ú „ÓÏÍÓÒÚ¸ ‰Ó ÌÛÊÌÓÈ.
ËÎË ÌÂÔ‡‚ËθÌÓÈ ‡·ÓÚ˚ ËÌÒÚÛÏÂÌÚ‡.
LJÊÌ˚ ‰‡ÌÌ˚ ÒÓı‡ÌflÈÚ ̇ USB-ÌÓÒËÚÂθ ËÎË Ì‡ ‚̯ÌÂÂ
é·ÒÎÛÊË‚‡ÌËÂ
ÛÒÚÓÈÒÚ‚Ó, ̇ÔËÏÂ, ̇ ÍÓÏÔ¸˛ÚÂ. (ÒÚ. 76, 87)
• ÑÎfl ˜ËÒÚÍË ËÌÒÚÛÏÂÌÚ‡ ÔÓθÁÛÈÚÂÒ¸ Ïfl„ÍÓÈ ÒÛıÓÈ Ú̸͇˛. çËÍÓ„‰‡ ÌÂ
êÂÁ‚ÌÓ ÍÓÔËÓ‚‡ÌË ̇ USB-ÛÒÚÓÈÒÚ‚Ó ı‡ÌÂÌËfl
ËÒÔÓθÁÛÈÚ ÔflÚÌÓ‚˚‚Ó‰ËÚÂÎË, ‡ÒÚ‚ÓËÚÂÎË, ÊˉÍË ӘËÒÚËÚÂÎË ËÎË
‰‡ÌÌ˚ı ËÎË ‚̯ÌËÈ ÌÓÒËÚÂθ
˜ËÒÚfl˘Ë ҇ÎÙÂÚÍË Ò ÔÓÔËÚÍÓÈ.
• óÚÓ·˚ Á‡˘ËÚËÚ¸ ‰‡ÌÌ˚ ÓÚ ÔÓÚÂË ËÁ-Á‡ ÔÓ‚ÂʉÂÌËfl ÌÓÒËÚÂÎfl,
åÂ˚ ·ÂÁÓÔ‡ÒÌÓÒÚË ÔË ˝ÍÒÔÎÛ‡Ú‡ˆËË
ÂÍÓÏẨÛÂÚÒfl ÒÓı‡ÌflÚ¸ ̇˷ÓΠ‚‡ÊÌ˚ ‰‡ÌÌ˚ ̇ ‰‚Ûı USB-
ÛÒÚÓÈÒÚ‚‡ı ı‡ÌÂÌËfl ‰‡ÌÌ˚ı ËÎË ‚̯ÌËı ÌÓÒËÚÂÎflı.
• çËÍÓ„‰‡ Ì ‚ÒÚ‡‚ÎflÈÚÂ Ë Ì ÓÌflÈÚ ·Ûχ„Û, ÏÂÚ‡Î΢ÂÒÍËÂ Ë ÔÓ˜ËÂ
Ô‰ÏÂÚ˚ ‚ ÓÚ‚ÂÒÚËfl ̇ Ô‡ÌÂÎË Ë Í·‚ˇÚÛÂ. ÖÒÎË ˝ÚÓ ÒÎÛ˜ËÎÓÒ¸,
ÌÂωÎÂÌÌÓ ‚˚Íβ˜ËÚ ËÌÒÚÛÏÂÌÚ Ë ‚˚̸Ú ͇·Âθ ÔËÚ‡ÌËfl ËÁ
ÓÁÂÚÍË. á‡ÚÂÏ Ó·‡ÚËÚÂÒ¸ Á‡ ÔÓÏÓ˘¸˛ Í ÒÔˆˇÎËÒÚ‡Ï ˆÂÌÚ‡
ÚÂıÌ˘ÂÒÍÓ„Ó Ó·ÒÎÛÊË‚‡ÌËfl ÍÓÔÓ‡ˆËË Yamaha.
• ç Í·‰ËÚ ̇ ËÌÒÚÛÏÂÌÚ Ô‰ÏÂÚ˚ ËÁ ‚ËÌË·, Ô·ÒÚχÒÒ˚ ËÎË
ÂÁËÌ˚: ˝ÚÓ ÏÓÊÂÚ ‚˚Á‚‡Ú¸ ‚˚ˆ‚ÂÚ‡ÌË ԇÌÂÎË ËÎË Í·‚ˇÚÛ˚.
• ç ӷÎÓ͇˜Ë‚‡ÈÚÂÒ¸ ̇ ËÌÒÚÛÏÂÌÚ, Ì ÒÚ‡‚¸Ú ̇ ÌÂ„Ó ÚflÊÂÎ˚ Ô‰-
ÏÂÚ˚ Ë Ì ÔËÍ·‰˚‚‡ÈÚ ÒÎ˯ÍÓÏ ·Óθ¯ÓÈ ÒËÎ˚ ÔË ÔÓθÁÓ‚‡ÌËË
ÍÌÓÔ͇ÏË, ‚˚Íβ˜‡ÚÂÎflÏË Ë ‡Á˙ÂχÏË.
• ç ÒΉÛÂÚ ‰ÓÎ„Ó ‡·ÓÚ‡Ú¸ Ò ‚˚ÒÓÍËÏ ËÎË ÌÂÍÓÏÙÓÚÌ˚Ï ÛÓ‚ÌÂÏ
„ÓÏÍÓÒÚË ËÌÒÚÛÏÂÌÚ‡/ÛÒÚÓÈÒÚ‚‡ ËÎË Ì‡Û¯ÌËÍÓ‚, Ú‡Í Í‡Í ˝ÚÓ ÏÓÊÂÚ
ÔË‚ÂÒÚË Í ÔÓÚ ÒÎÛı‡. èË ÛıÛ‰¯ÂÌËË ÒÎÛı‡ ËÎË Á‚ÓÌ ‚ Û¯‡ı
Ó·‡ÚËÚÂÒ¸ Í ‚‡˜Û.
äÓÔÓ‡ˆËfl Yamaha Ì ÌÂÒÂÚ ÓÚ‚ÂÚÒÚ‚ÂÌÌÓÒÚË Á‡ ÔÓ‚ÂʉÂÌËfl, ‚˚Á‚‡ÌÌ˚ ÌÂÔ‡‚ËθÌÓÈ ˝ÍÒÔÎÛ‡Ú‡ˆËÂÈ ËÎË ÏÓ‰ËÙË͇ˆËÂÈ
ËÌÒÚÛÏÂÌÚ‡, ‡ Ú‡ÍÊ Á‡ ÔÓÚÂflÌÌ˚ ËÎË ËÒÔÓ˜ÂÌÌ˚ ‰‡ÌÌ˚Â.
ÇÒ„‰‡ ‚˚Íβ˜‡ÈÚ ËÌÒÚÛÏÂÌÚ, ÂÒÎË Ì ËÒÔÓθÁÛÂÚ „Ó.
чÊ ‚ ÚÂı ÒÎÛ˜‡flı, ÍÓ„‰‡ ‚˚Íβ˜‡ÚÂθ ÔËÚ‡ÌËfl ̇ıÓ‰ËÚÒfl ‚ ÔÓÎÓÊÂÌËË STANDBY, ËÌÒÚÛÏÂÌÚ ÔÓ‰ÓÎʇÂÚ ‚ ÏËÌËχθÌ˚ı ÍÓ΢ÂÒÚ‚‡ı ÔÓÚ·ÎflÚ¸
˝ÎÂÍÚÓ˝Ì„˲. ÖÒÎË ËÌÒÚÛÏÂÌÚ Ì ËÒÔÓθÁÛÂÚÒfl ‰ÎËÚÂθÌÓ ‚ÂÏfl, ÓÚÍβ˜ËÚ ‡‰‡ÔÚ ÔÂÂÏÂÌÌÓ„Ó ÚÓ͇ ÓÚ ÓÁÂÚÍË.
àÎβÒÚ‡ˆËË Ë ÒÌËÏÍË Üä—‰ËÒÔ΂ Ô˂‰ÂÌ˚ ‚ ÛÍÓ‚Ó‰ÒÚ‚Â ÔÓθÁÓ‚‡ÚÂÎfl ÚÓθÍÓ ‚ ͇˜ÂÒÚ‚Â ÔËÏÂÓ‚. Ç ‰ÂÈÒÚ‚ËÚÂθÌÓÒÚË ‚ÒÂ
ÏÓÊÂÚ ‚˚„Îfl‰ÂÚ¸ ÌÂÒÍÓθÍÓ Ë̇˜Â.
● оварные знаки
•астровые шрифты, используемые в данном инструменте, предоставлены корпорацией Ricoh Co., Ltd. и являются ее
собственностью.
®
•Windows является охраняемым товарным знаком корпорации Microsoft
.
•азвания фирм и продуктов, используемые в этом руководстве пользователя, являются товарными знаками или
зарегистрированными товарными знаками соответствующих компаний.
(3)-10 2/2
PSR-S500 уководство пользователя 5
Этот продукт включает компьютерные программы и содержимое, авторские права на которые принадлежат корпорации
Yamaha или право на использование которых получено по лицензии от других фирм. материалам, защищенным
авторскими правами, относятся все без ограничения компьютерные программы, файлы стиля, файлы MIDI, данные WAVE
и музыкальные звукозаписи. юбое несанкционированное использование таких программ и содержимого, выходящее за
рамки личного пользования, запрещено соответствующими законами. юбое нарушение авторских прав преследуется по
закону. ОАА, АОАЯ ОЬУ АО О.
опирование коммерческих музыкальных данных, включая MIDI-данные и/или аудиоданные, но не ограничиваясь ими,
строго запрещается, за исключением использования в личных целях.
ãÓ„ÓÚËÔ˚
GM System Level 1
«GM System Level 1» – это дополнение к MIDI-стандарту, благодаря которому любые GM-
совместимые музыкальные данные могут быть точно воспроизведены любым GM-совместимым тон-
генератором независимо от фирмы-изготовителя. аркировка GM ставится на все программное
обеспечение и оборудование, поддерживающее стандарт GM System Level.
XGlite
XGlite – это упрощенная версия формата высококачественных тон-генераторов XG корпорации
Yamaha. азумеется, с помощью тон-генератора XGlite можно воспроизвести любую песню
в формате XG. Однако имейте в виду, что из-за сокращенного набора параметров управления
и эффектов некоторые песни могут воспроизводиться не так, как оригинал.
XF
ормат XF корпорации Yamaha представляет собой вариант стандарта SMF (Standard MIDI File),
усовершенствованный за счет увеличения функциональности и возможности дальнейшего
расширения. ри воспроизведении файла в формате XF, содержащего текст, синтезатор может
выводить на экран тексты песен.
STYLE FILE
Style File Format – это оригинальный формат файла стиля, разработанный корпорацией Yamaha,
в котором используется уникальная система преобразования, позволяющая автоматически создавать
высококачественный аккомпанемент на основе большого количества типов аккордов.
USB
USB – это сокращение от Universal Serial Bus (универсальная последовательная шина). Это
последовательный интерфейс для связи компьютера с периферийными устройствами. Он позволяет
осуществлять «горячую» замену периферийных устройств (без выключения питания компьютера).
6 PSR-S500 уководство пользователя

оздравляем и благодарим за приобретение Yamaha PSR-S500
PortaTone!
нимательно прочитайте данное руководство пользователя
перед использованием инструмента, чтобы полностью
использовать его преимущества.
Обязательно храните руководство в надежном и удобном месте
даже после прочтения и обращайтесь к нему всякий раз, когда
необходимо получить более подробную информацию об
операциях или функциях.
ÑÓÔÓÎÌËÚÂθÌ˚ ÔË̇‰ÎÂÊÌÓÒÚË
комплект поставки инструмента входят следующие принадлежности (удостоверьтесь, что все они
имеются в наличии).
• юпитр
• иск CD-ROM
• уководство пользователя (данная книга)
• лок питания переменного тока (может не входить в комплект поставки для вашего
региона, поэтому уточните у регионального дилера Yamaha).
PSR-S500 уководство пользователя 7
ëÔˆˇθÌ˚ ‚ÓÁÏÓÊÌÓÒÚË ËÌÒÚÛÏÂÌÚ‡ PSR-S500
■ оспроизведение разных инструментальных тембров стр. 17
ожно изменить тембр инструмента, звучащий во время игры на
клавиатуре. Это может быть тембр скрипки, флейты, арфы или любой
другой из множества различных тембров. апример, можно изменить
настроение песни, написанной для фортепиано, используя для ее
воспроизведения тембр скрипки. Откройте для себя мир музыкального
разнообразия!
■ охранение и вызов настроек панели в регистрационной памяти стр. 67
8 банков x 8 встроенных
Эта удобная функция позволяет сохранять «мгновенный снимок»
песен = 64 регистрации
пользовательских настроек панели — до 64 полных «регистраций». х
можно вызывать мгновенно и в любое время. Это идеальный вариант
для широкого изменения звука или эффектов при живом исполнении!
■ гра в определенном стиле стр. 23
отите играть с полным аккомпанементом? опробуйте стили
автоаккомпанемента. тили аккомпанемента позволяют создать полное
оркестровое звучание со множеством стилей от вальса до 8-beat
и самбы. ыберите стиль, подходящий для музыки, которую вы хотите
сыграть, или для расширения своих музыкальных горизонтов
поэкспериментируйте с новыми стилями.
■ ростота использования с помощью экрана для отображения нот стр. 30
ри воспроизведении песни на экране будет отображаться
соответствующая партитура. Это хороший способ научиться читать
музыку. сли в песне содержаться текст и аккорды, они также будут
отображаться на экране партитуры.
*ексты и аккорды не будут отображаться на экране, если используемая в режиме партитуры
песня не содержит соответствующих текстов и аккордов.
■
охранение и загрузка данных на флэш-памяти USB или компьютере
стр. 73 и 83
Эти средства организации данных позволяют хранить исходные
песни пользователя или пользовательские настройки панели
(регистрационная память) на флэш-памяти USB или компьютере,
а затем загружать данные обратно в инструмент при необходимости.
8 PSR-S500 уководство пользователя
ëÓ‰ÂʇÌËÂ
оготипы…………………………………………………………………………………………. 6
спользование различных функций 49
ополнительные принадлежности …………………………………………………… 7
гра с метрономом………………………………………………………………………….49
пециальные возможности инструмента PSR-S500………………………….. 8
спользование Tap Start ………………………………………………………………….51
Установка 10
Touch Response (увствительность к силе нажатия)………………………..51
астройки EQ………………………………………………………………………………….52
ребования к электропитанию ……………………………………………………….. 10
Элементы управления высотой звука………………………………………………53
одключение наушников
зменение высоты инструмента в октавах ………………………………………54
(разъем PHONES/OUTPUT) ………………………………………………………. 10
одключение педали (гнездо SUSTAIN) …………………………………………. 10
ункции стиля (автоаккомпанемент) 55
одключение к компьютеру (USB-порт)………………………………………….. 11
ключение питания ……………………………………………………………………….. 11
асти стиля (разделы) …………………………………………………………………….55
зменение языка экрана………………………………………………………………… 12
астройка «в одно касание»……………………………………………………………..58
астройка контрастности -дисплея (LCD CONTRAST)……………….. 12
зменение вариации и OTS (OTS LINK)……………………………………………58
Установка параметра Split Point……………………………………………………….59
анель управления и разъемы 14
оспроизведение стиля с аккордами, но без ритма
(остановка аккомпанемента)………………………………………………………60
ередняя панель……………………………………………………………………………. 14
астройка громкости стиля……………………………………………………………..60
адняя панель ……………………………………………………………………………….. 15
Основы аккордов…………………………………………………………………………….61
тиль пользователя ………………………………………………………………………..63
оспроизведение стилей с использованием всей клавиатуры…………..63
раткое руководство
траница Song Settings 64
оспроизведение песен 16
ромкость песни ……………………………………………………………………………..64
зменение темпа…………………………………………………………………………….64
оспроизведение разных инструментальных тембров 17
A-B Repeat ………………………………………………………………………………………65
ыбор и воспроизведение тембра ………………………………………………….. 17
риглушение отдельных частей песни …………………………………………….66
Одновременная игра двумя тембрами — DUAL (аложение) ………….. 18
охранение избранных настроек панели управления 67
оспроизведение разных тембров для левой и правой рук — LEFT
(евый) ……………………………………………………………………………………. 19
охранение настроек в регистрационной памяти……………………………..67
оспроизведение наборов ударных………………………………………………… 21
агрузка данных из регистрационной памяти…………………………………..68
Registration Clear (Очистка регистрации) — очистка указанной
оспроизведение стилей 22
памяти регистрации …………………………………………………………………..69
ыбор ритма стиля ………………………………………………………………………… 22
ункции 70
гра со стилем ………………………………………………………………………………. 23
сполнение аккордов автоаккомпанемента ……………………………………. 25
ыбор и настройка функций…………………………………………………………….70
оспроизведение с помощью музыкальной базы данных 26
спользование флэш-памяти USB 73
лэш-память USB …………………………………………………………………………..73
спользование песен 27
спользование флэш-памяти USB …………………………………………………..74
ыбор и прослушивание песни……………………………………………………….. 27
орматирование флэш-памяти USB………………………………………………..75
еремотка песни вперед, назад и установка на паузу …………………….. 28
охранение данных…………………………………………………………………………76
ипы песен…………………………………………………………………………………….. 29
реобразование песни пользователя в формат SMF
Отображение партитуры песни………………………………………………………. 30
и ее сохранение …………………………………………………………………………77
Отображение текста песни…………………………………………………………….. 31
агрузка файлов пользователя и файлов стилей …………………………….78
Удаление данных с устройства флэш-памяти USB …………………………..79
апись собственного произведения 32
оспроизведение песен, сохраненных на устройстве
флэш-памяти USB ……………………………………………………………………..79
онфигурация дорожки………………………………………………………………….. 32
роцедура быстрой записи…………………………………………………………….. 33
одключение 80
роцедура многодорожечной записи ……………………………………………… 34
Удаление песни — удаление песен пользователей …………………………. 37
азъемы …………………………………………………………………………………………80
Очистка дорожки — удаление указанной дорожки из песни
одключение USB-устройства хранения данных………………………………80
пользователя……………………………………………………………………………. 38
одключение персонального компьютера………………………………………..82
ередача данных об исполнении на компьютер и прием
с компьютера …………………………………………………………………………….83
Initial Send (сходная передача) ………………………………………………………84
езервное копирование и инициализация 39
ередача данных между компьютером и инструментом…………………..85
охранение……………………………………………………………………………………. 39
уководство по установке программ с поставляемого
нициализация………………………………………………………………………………. 39
диска «Accessory CD-ROM» 88
Основные операции и экраны 40
ажная информация о компакт-диске ……………………………………………..88
одержимое компакт-диска…………………………………………………………….89
Основные операции ……………………………………………………………………….. 40
истемные требования……………………………………………………………………90
Экраны ………………………………………………………………………………………….. 42
Установка программного обеспечения …………………………………………….90
Элементы экрана MAIN ………………………………………………………………….. 43
риложение
правочник
Устранение неполадок…………………………………………………………………….95
ообщения …………………………………………………………………………………….96
гра с эффектами 44
писок тембров ………………………………………………………………………………98
обавление эффекта Harmony ………………………………………………………. 44
писок ударных установок …………………………………………………………….104
зменение типа эффекта Reverb (еверберация)…………………………… 45
список стилей………………………………………………………………………………..107
зменение типа эффекта Chorus (орус) ……………………………………….. 46
писок музыкальных баз данных……………………………………………………108
едаль Sustain……………………………………………………………………………….. 47
типы эффектов……………………………………………………………………………..110
обавление эффектов DSP (ифровая обработка сигнала)……………. 47
аблица характеристик MIDI-интерфейса ………………………………………114
Pitch Bend (зменение высоты звука) …………………………………………….. 48
формат MIDI-данных ……………………………………………………………………..116
технические характеристики………………………………………………………….117
редметный указатель ………………………………………………………………….118
PSR-S500 уководство пользователя 9
Установка
Обязательно выполните следующие действия,
се необходимые подключения следует
включать питание.
выполнить О включения питания.
í·ӂ‡ÌËfl Í ˝ÎÂÍÚÓÔËÚ‡Ì˲
èÓ‰Íβ˜ÂÌË ̇ۯÌËÍÓ‚
(‡Á˙ÂÏ PHONES/OUTPUT)
Установите переключатель [STANDBY/ON]
в положение STANDBY.
•ля питания инструмента от электросети используйте ОЬО
адаптер переменного тока Yamaha PA-300 или PA-301 (либо другой,
рекомендованный корпорацией Yamaha). спользование других
адаптеров может нанести непоправимый вред адаптеру
и инструменту.
одключите блок питания переменного тока
(PA-300, PA-301 или другой блок,
ри подключении шнура к этому гнезду динамики
рекомендованный корпорацией Yamaha)
инструмента автоматически отключаются. нездо
к разъему питания инструмента.
PHONES/OUTPUT можно также использовать как
внешний выход. гнезду PHONES/OUTPUT можно
одключите адаптер к электросети.
подключить усилитель клавиатуры, стереосистему,
микшер, магнитофон или другое линейное
устройство для передачи выходного сигнала от
•Отключайте адаптер переменного тока, если инструмент не
инструмента к подключенному устройству.
используется, а также во время грозы.
PA-300 или
Электророзетка
PA-301
èÓ‰Íβ˜ÂÌË Ô‰‡ÎË („ÌÂÁ‰Ó SUSTAIN)
ункция сустейна позволяет воспроизвести
длительное звучание нот при нажатии педали.
одключите к этому разъему педальный
переключатель FC4 или FC5 и используйте его для
включения или выключения эффекта «сустейн».
10 PSR-S500 уководство пользователя
• е следует долго использовать наушники при повышенном уровне
громкости. Это может привести к нарушению слуха.
• тобы не повредить динамики, перед их подключением установите
минимальную громкость на внешних устройствах. есоблюдение этого
правила может привести к поражению электрическим током или
повреждению оборудования. Установите на всех устройствах
минимальную громкость и во время игры на инструменте постепенно
увеличивайте ее до необходимого уровня.
•еред включением питания убедитесь, что педальный переключатель
правильно подсоединен к гнезду SUSTAIN.
•е нажимайте на педаль в момент включения питания. Это изменяет
принятую полярность педали, что приводит к ее обратному действию.
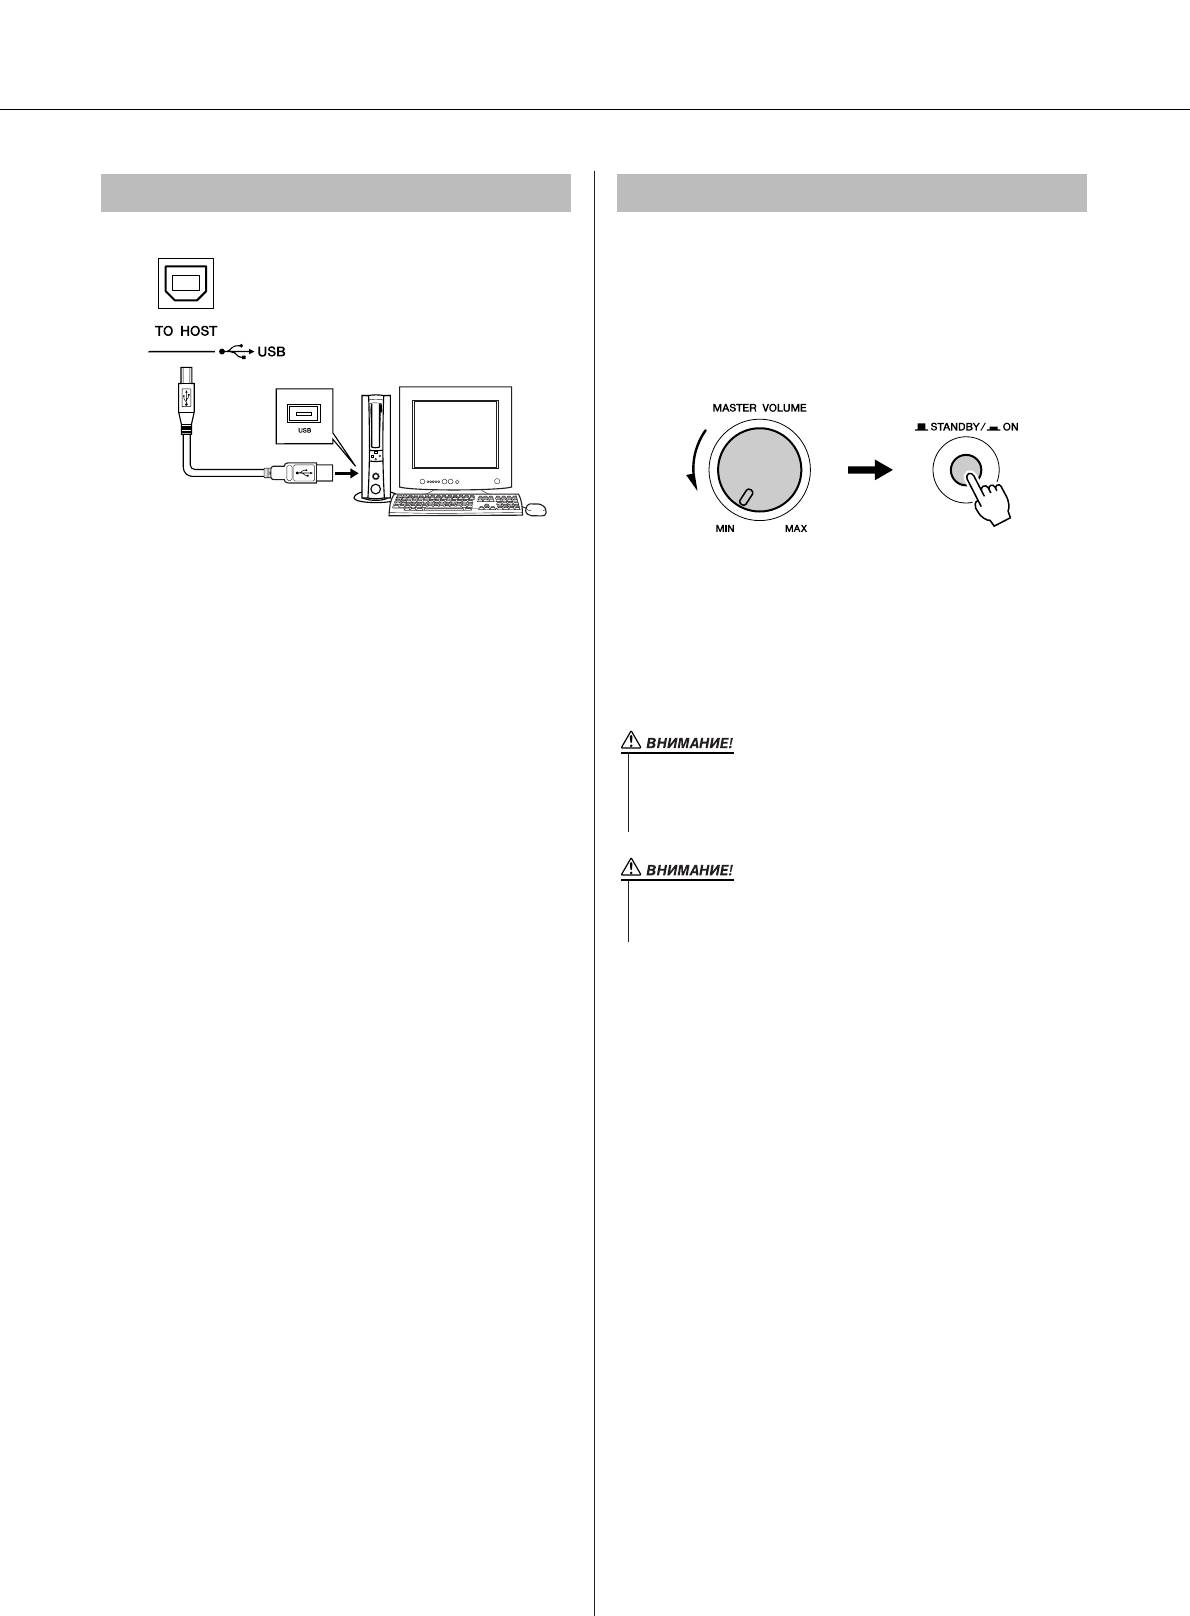
Установка
èÓ‰Íβ˜ÂÌËÂ Í ÍÓÏÔ¸˛ÚÂÛ (USB-ÔÓÚ) ÇÍβ˜ÂÌË ÔËÚ‡ÌËfl
Установите минимальную громкость, повернув
регулятор [MASTER VOLUME] влево, и включите
питание, нажав переключатель [STANDBY/ON].
нова нажмите кнопку [STANDBY/ON], чтобы
выключить пианино.
оединив USB-порт инструмента с USB-портом
компьютера, вы можете осуществлять обмен
ри включении питания сохраненные во флэш-
данными исполнения и песенными файлами между
памяти данные загружаются в инструмент. сли во
этими устройствами (стр. 85). ля использования
флэш-памяти не сохранена резервная копия данных,
функций передачи данных USB выполните
при включении питания восстанавливаются
следующие действия:
исходные настройки производителя.
•Убедитесь, что переключатель POWER инструмента
установлен в положение OFF, затем воспользуйтесь
кабелем USB для подключения инструмента к
компьютеру. одключив кабель, включите питание
инструмента.
•Установите на компьютер драйвер USB MIDI.
Установка драйвера USB-MIDI описана на стр. 90.
PSR-S500 уководство пользователя 11
• аже если кнопка питания находится в положении STANDBY, инструмент
продолжает в минимальном количестве потреблять электроэнергию. сли
инструмент не используется в течение длительного времени, отключите
адаптер переменного тока от розетки.
• и в коем случае не отключайте питание, если на экран отображается
сообщение «Writing..» (апись). Это может повредить внутреннюю флэш-
память и привести к потере данных.
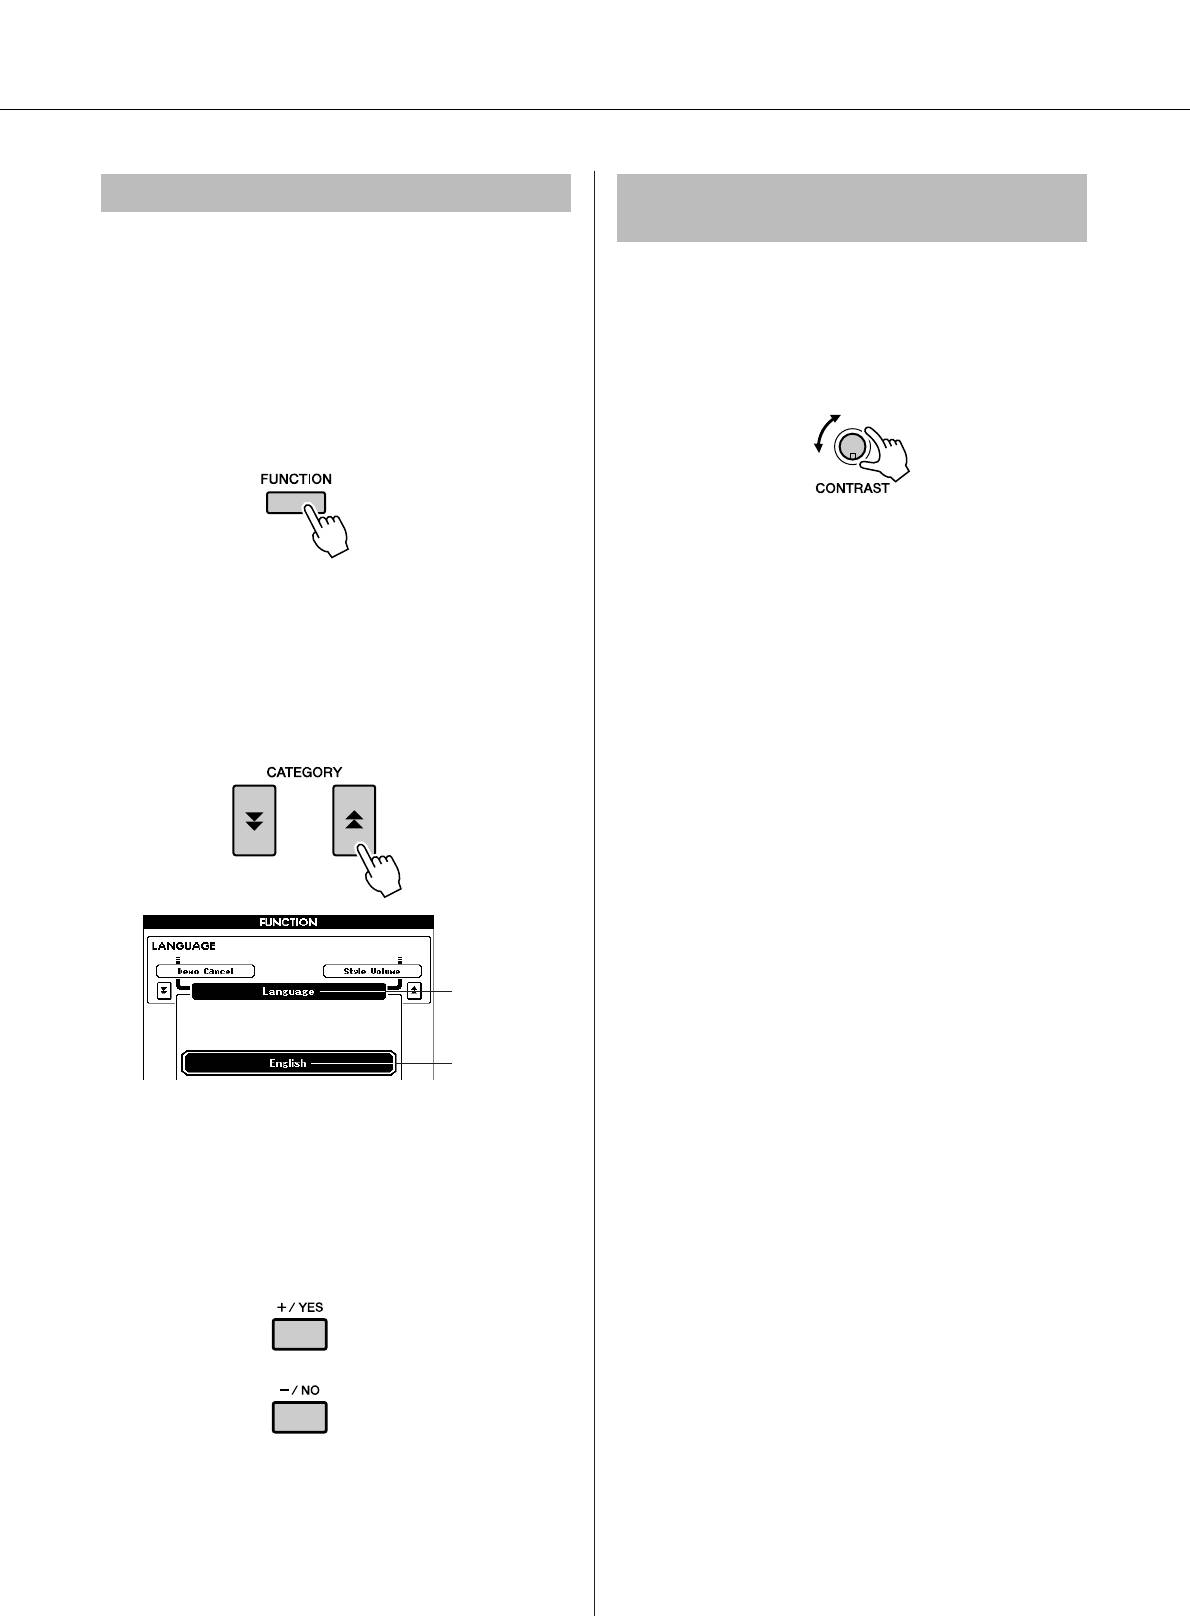
Установка
àÁÏÂÌÂÌË flÁ˚͇ ˝Í‡Ì‡
ç‡ÒÚÓÈ͇ ÍÓÌÚ‡ÒÚÌÓÒÚË Üä-‰ËÒÔÎÂfl
(LCD CONTRAST)
анный инструмент позволяет выбирать английский
или японский язык в качестве языка экрана. о
астройте четкость экрана инструмента,
умолчанию установлен английский язык, но если
воспользовавшись регулятором контрастности
переключить инструмент в режим японского языка,
-дисплея (LCD CONTRAST), который
тексты, имена файлов и некоторые сообщения будут
расположен на задней панели.
соответственно отображаться на японском языке.
ажмите кнопку [FUNCTION].
ажмите кнопки CATEGORY [ ] и [ ]
f
r
несколько раз, пока не появится элемент
«Language» (Язык).
ыбранный в данный момент язык будет
отображаться под элементом «Language».
Элемент языка
ыбранный
в данный
момент язык
ыберите язык отображения.
помощью кнопки [+] выбирается английский
язык, а с помощью кнопки [-] — японский.
ыбор языка сохраняется во внутреннюю
флэш-память, оставляя выбранный язык
активным даже при выключении питания.
тобы перейти к главному экрану, нажмите
кнопку [EXIT].
12 PSR-S500 уководство пользователя
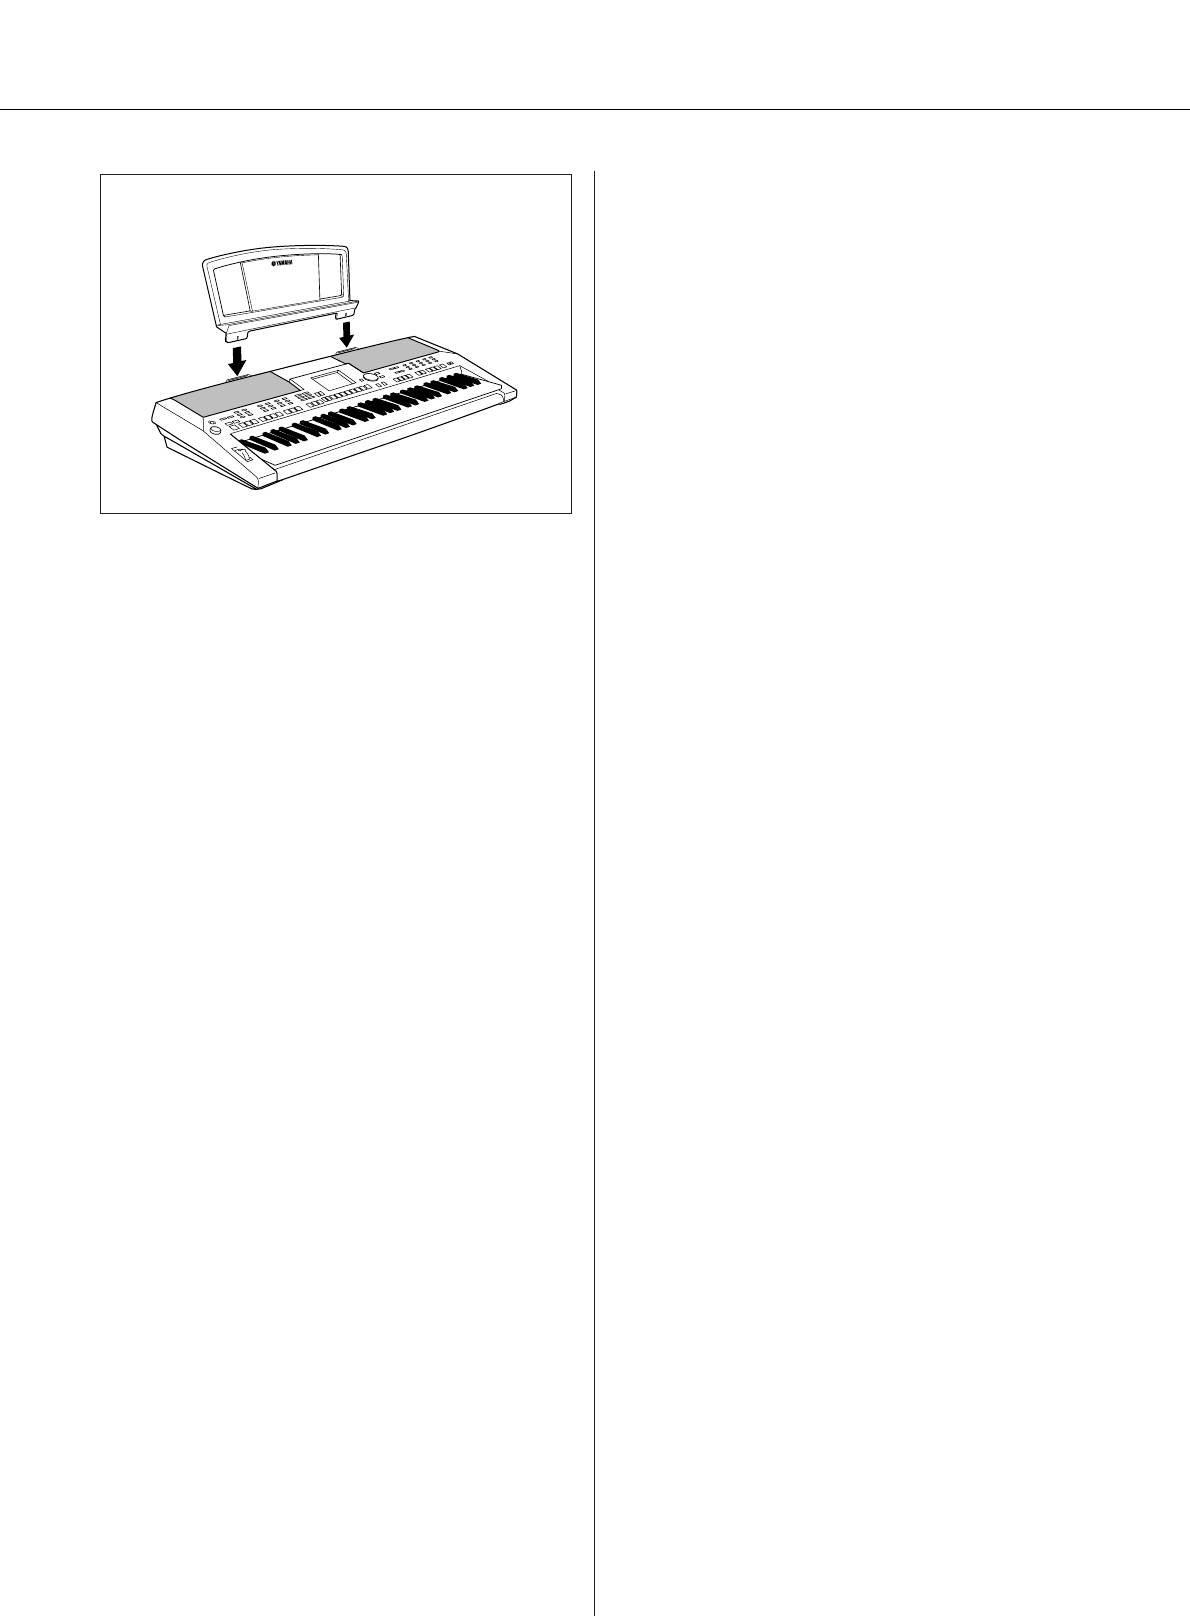
Установка
● юпитр
ставьте пюпитр
в гнезда, как показано
на рисунке.
PSR-S500 уководство пользователя 13
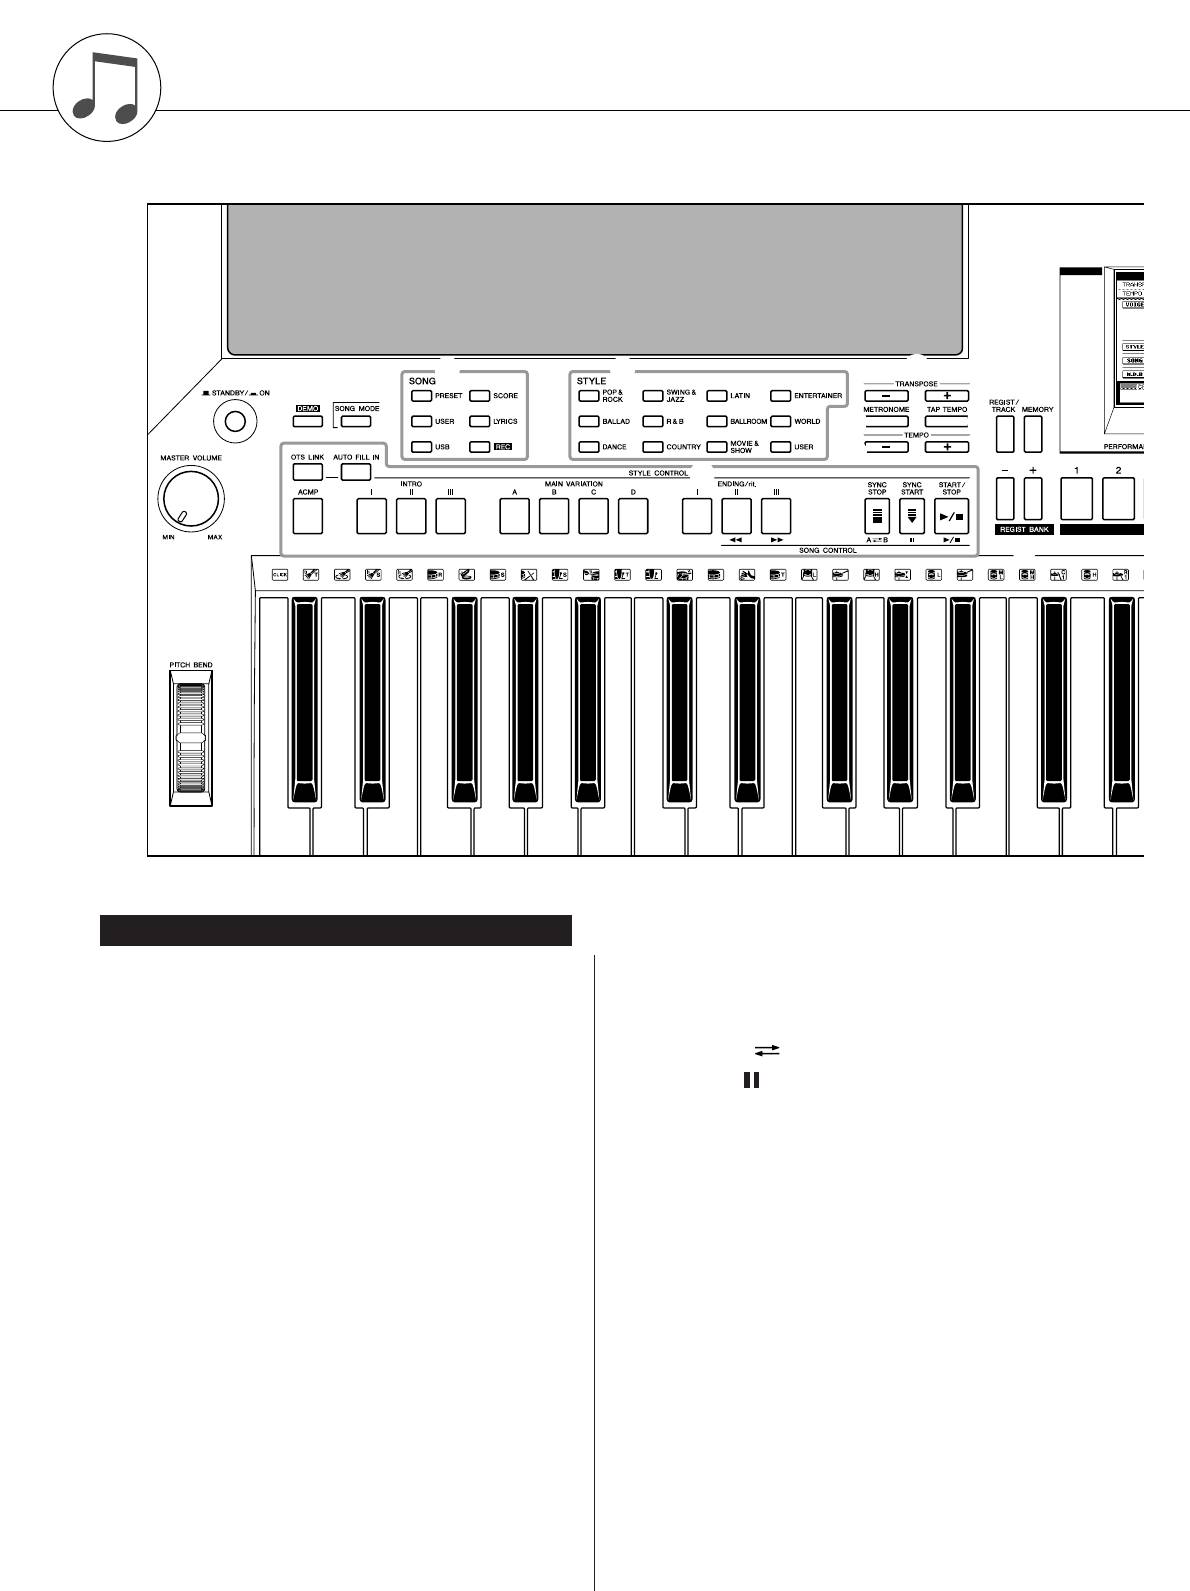
анель управления и разъемы
t y
o
e
r
!3
!4
q
!0 !1
!2
u
w
i
!5
@9
è‰Ìflfl Ô‡ÌÂθ
q ереключатель [STANDBY/ON] ……………….стр. 16
i SONG CONTROL
нопка [r]…………………………………………..стр. 28
w егулятор [MASTER VOLUME]……………. стр. 16, 40
нопка [f]…………………………………………..стр. 28
e нопка [DEMO] ………………………………………… стр. 16
нопка [A B] ……………………………………..стр. 65
r нопка [SONG MODE]………………………………. стр. 27
нопка [ ]……………………………………………стр. 28
t SONG
нопка [>/■] …………………………………..стр. 28, 41
нопки [PRESET], [USER], [USB]…………… стр. 27
o нопки TRANSPOSE [+] и [-]……………………..стр. 53
нопка [SCORE]……………………………………. стр. 30
!0 нопка [METRONOME] ……………………………..стр. 49
нопка [LYRICS]…………………………………….стр. 31
!1 нопка [TAP TEMPO] ………………………………..стр. 51
нопка [REC]………………………………………… стр. 33
!2 нопки TEMPO [+] и [-] ……………………………..стр. 49
y STYLE………………………………………………………. стр. 22
!3 нопка [REGIST/TRACK] …………………………..стр. 66
u STYLE CONTROL
нопка [OTS LINK]………………………………… стр. 58
!4 нопка [MEMORY] …………………………………….стр. 67
нопка [AUTO FILL IN] ………………………….. стр. 55
!5 нопки REGIST BANK [+] и [-] …………………..стр. 67
нопка [ACMP]……………………………………… стр. 23
!6 нопки REGISTRATION MEMORY [1] — [8] ….стр. 67
нопки INTRO [I]–[III]…………………………….. стр. 55
!7 Экран…………………………………………………..стр. 12, 42
нопки MAIN VARIATION [A]–[D] …………… стр. 55
нопки ENDING/rit. [I]–[III] …………………….. стр. 55
!8 нопка [EXIT] ……………………………………………стр. 42
нопка [SYNC STOP]…………………………….. стр. 57
нопка [SYNC START]……………………… стр. 23, 56
нопка [START/STOP] ……………………… стр. 22, 41
14 PSR-S500 уководство пользователя
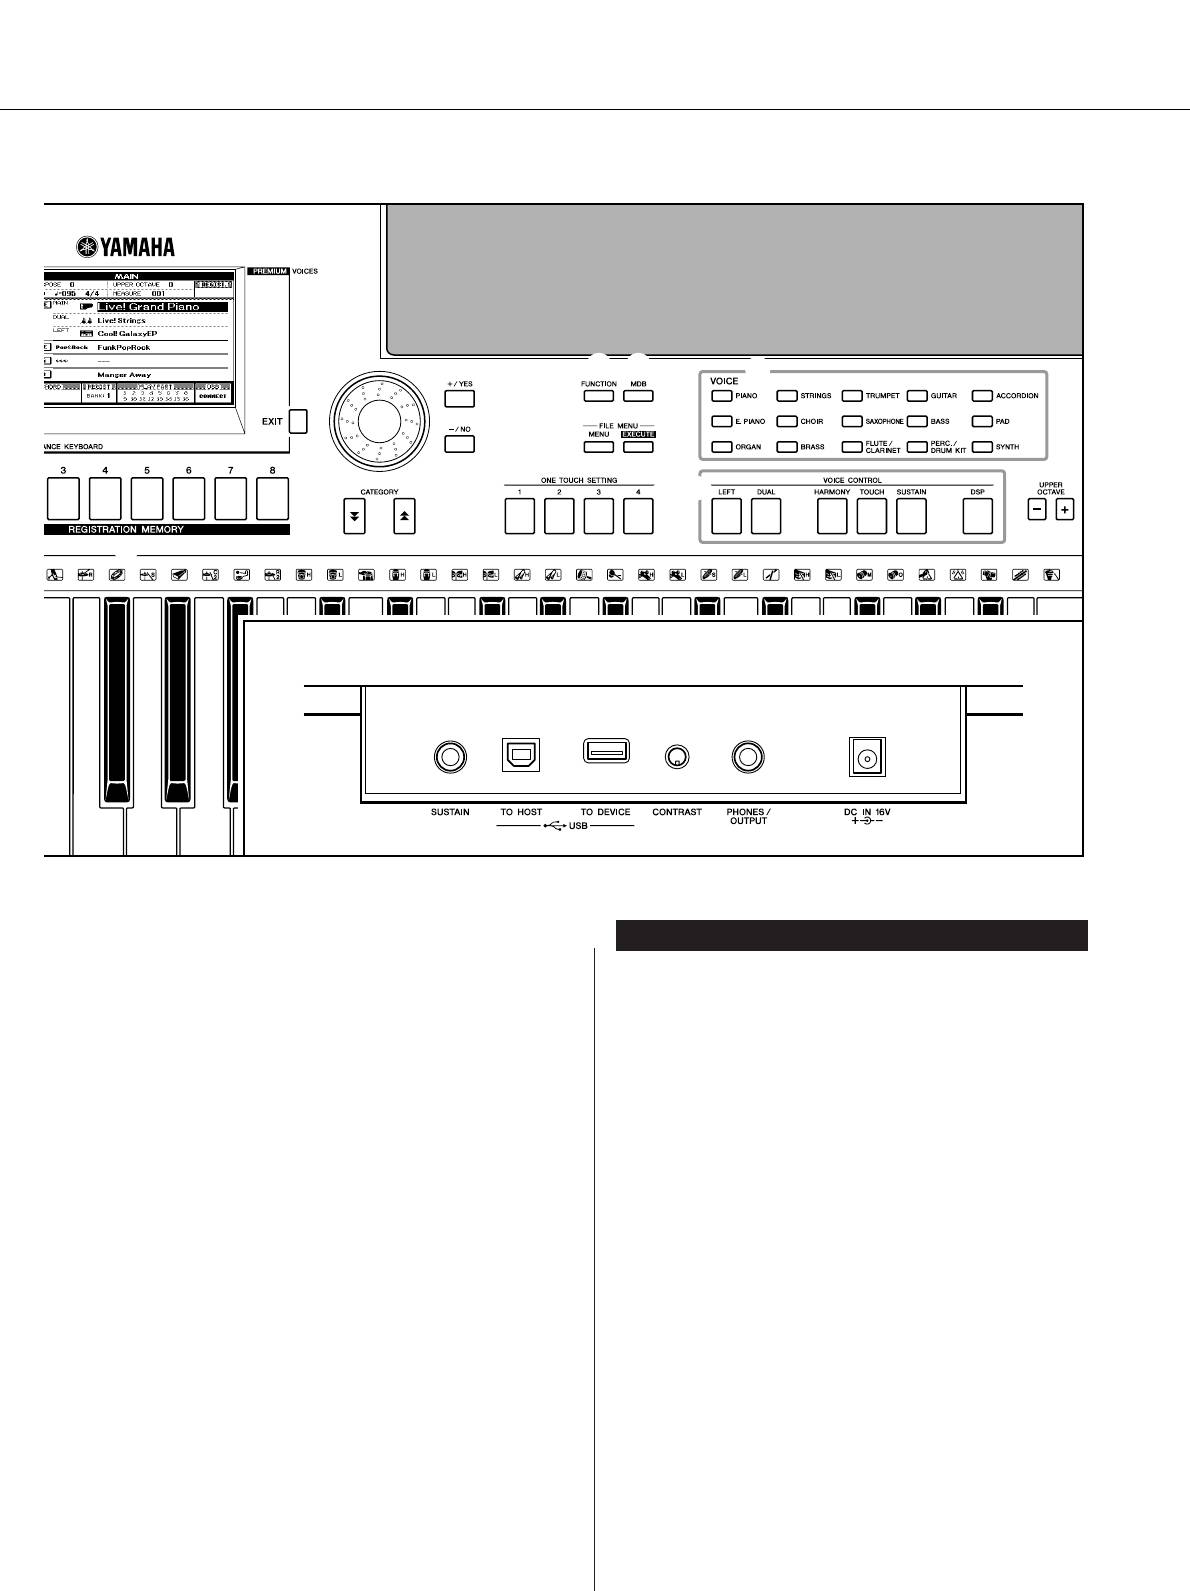
анель управления и разъемы
!7
@2 @3
@6
!8
!9
@0
@4
@5
@7
@1
@8
!6
адняя панель
#0 #1 #2 #3 #4
ᇉÌflfl Ô‡ÌÂθ
!9 иск управления ……………………………………..стр. 41
#0 азъем SUSTAIN……………………………………….стр. 10
@0 нопки [+/YES] и [-/NO] ……………………………. стр. 41
#1 азъемы USB TO HOST и TO DEVICE………..стр. 80
@1 нопка CATEGORY [ ] и [ ] …………………..стр. 41
f
r
#2 егулятор CONTRAST………………………………стр. 12
@2 нопка [FUNCTION] ………………………………….стр. 70
#3 азъем PHONES/OUTPUT …………………………стр. 10
@3 нопка [MDB]…………………………………………… стр. 26
#4 азъем DC IN 16V ……………………………………..стр. 10
@4 нопки FILE MENU [MENU] и
[EXECUTE] ………………………………………….. стр. 74, 75
@5 нопки ONE TOUCH SETTING [1] — [4] ………стр. 58
@6 VOICE ………………………………………………………. стр. 17
@7 нопка VOICE CONTROL
нопка [LEFT]……………………………………….. стр. 19
нопка [DUAL]………………………………………. стр. 18
нопка [HARMONY]………………………………. стр. 44
[TOUCH], кнопка ……………………………………стр. 51
нопка [SUSTAIN] …………………………………. стр. 47
нопка [DSP] ………………………………………… стр. 47
@8 нопки UPPER OCTAVE [+] и [-] ……………….. стр. 54
@9 олесо [PITCH BEND]………………………………. стр. 48
PSR-S500 уководство пользователя 15
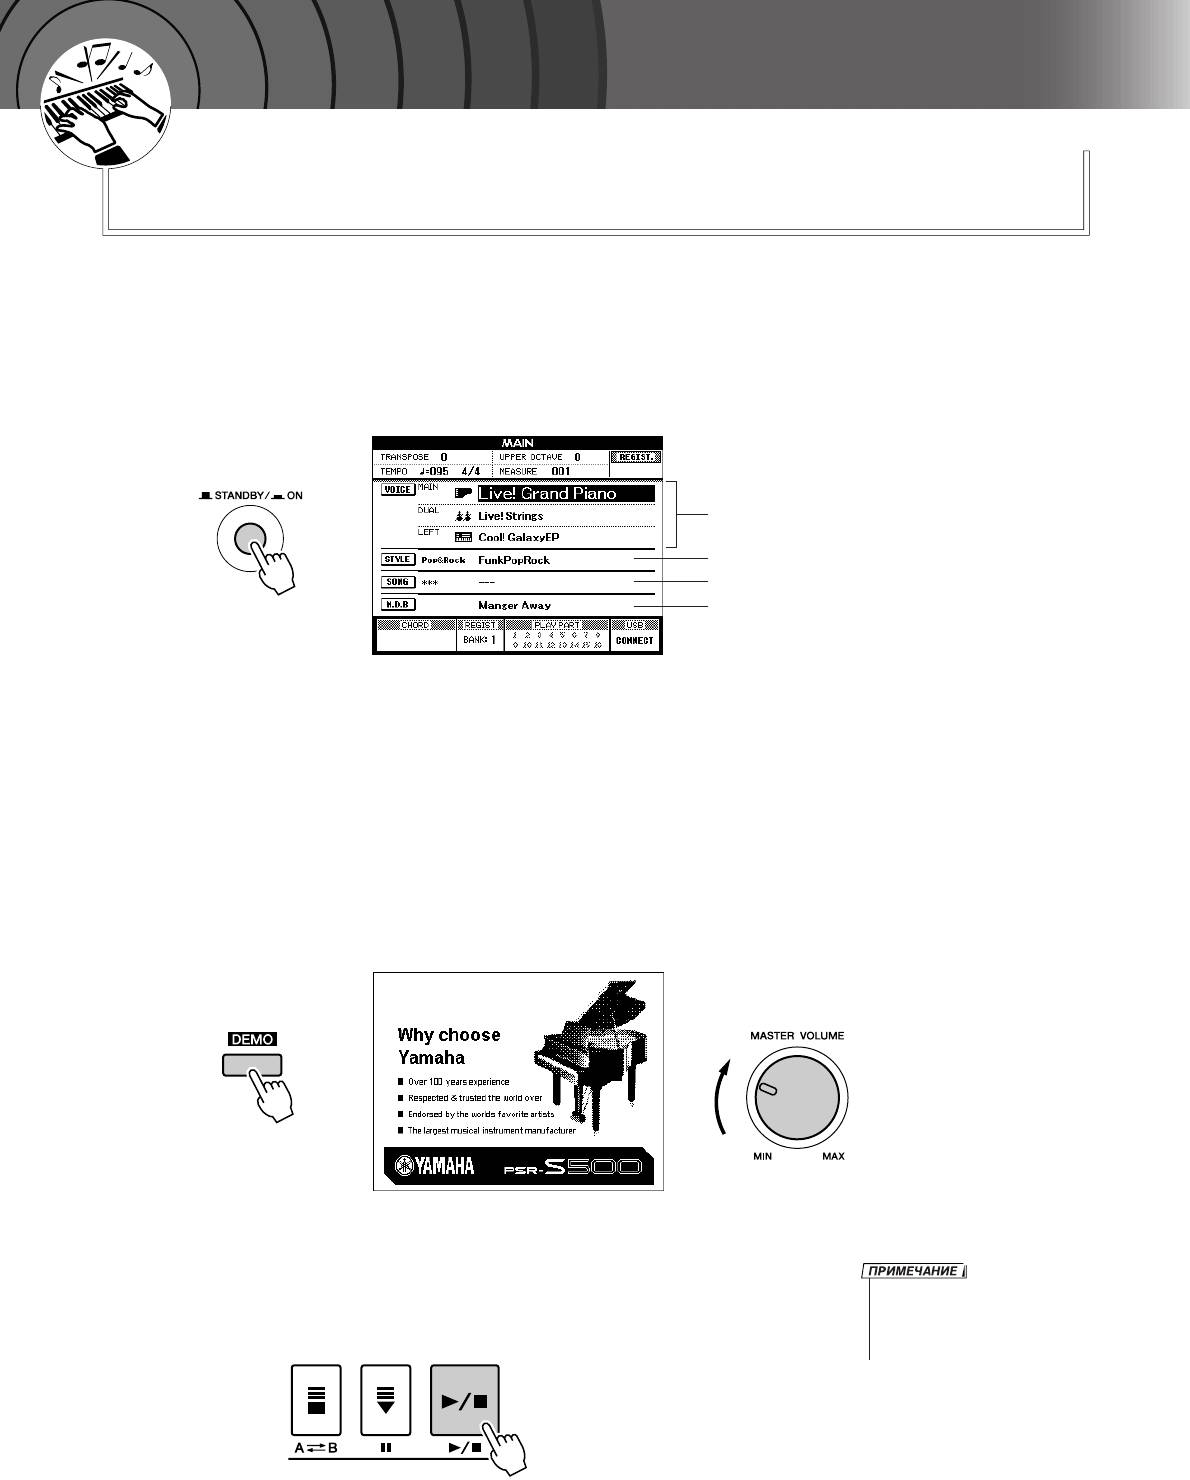
Û
Í
Ó
Â
‚
Ó
Ó
‰
Í
Ò
Ú
Ú
‡
‚
Ó
оспроизведение песен
ä
раткое руководство
анный инструмент содержит демонстрационную песню. авайте начнем
ознакомление с инструментом с воспроизведения демонстрационной песни.
ажмите кнопку [STANDBY/ON] (ежим ожидания/кл.), чтобы она
1
зафиксировалась в положении ON (кл.).
а -дисплее отобразится главный экран.
азвание тембра
азвание стиля
азвание песни
азвание музыкальной базы данных
ля запуска демонстрации нажмите кнопку [DEMO]
2
(емонстрация).
а -дисплее отобразится экран демонстрации.
ри воспроизведении постепенно увеличивайте громкость
с помощью регулятора [MASTER VOLUME] для установки
нужного уровня громкости для прослушивания.
осле окончания воспроизведение демонстрационной песни
начинается заново.
тобы остановить демонстрацию, нажмите кнопку [>>
>>
/■].
• нопка [DEMO] не функционирует,
3
озврат к главному экрану осуществляется автоматически.
если включена функция отмены
демонстрационных песен.
(см. стр. 72).
16 PSR-S500 уководство пользователя
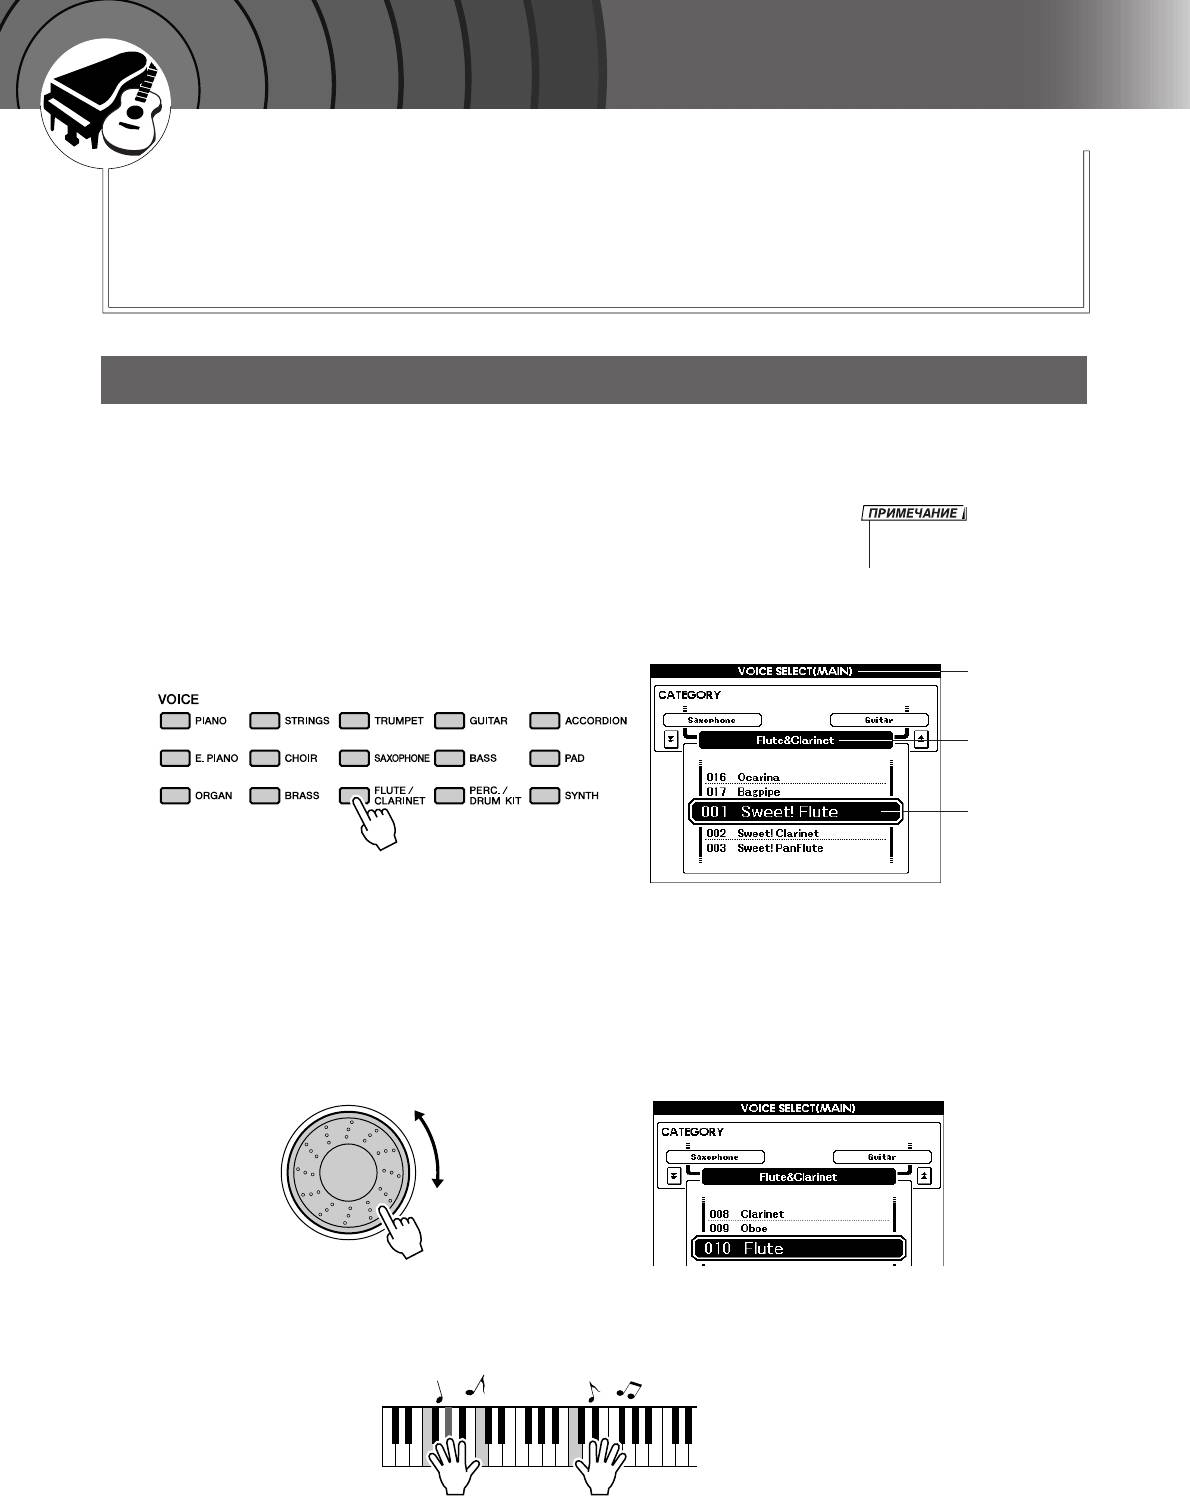
Û
Í
Ó
Â
‚
Ó
Ó
‰
Í
Ò
Ú
Ú
‡
‚
оспроизведение разных инструментальных тембров
Ó
ä
дополнение к тембрам фортепьяно, органа и других традиционных клавишных
инструментов можно воспроизводить множество других реалистичных тембров,
включая звучания гитары, бас-гитары, струнных инструментов, саксофона, трубы,
ударных и перкуссионных инструментов, спецэффектов, а также широкое
разнообразие других музыкальных звучаний.
Ç˚·Ó Ë ‚ÓÒÔÓËÁ‚‰ÂÌË ÚÂÏ·‡
данном случае необходимо выбрать основной тембр и воспроизвести его на клавиатуре.
ыберите и нажмите требуемую кнопку категории тембра в
1
разделе тембра.
• ля смены категории тембра
Откроется экран выбора основного тембра.
нажмите другую кнопку категории.
ыбранные в данный момент название категории и номер и
название тембра будут выделены.
этом примере выберите категорию «Flute&Clarinet».
Экран выбора
MAIN VOICE
(Основной тембр)
азвание
категории
ыбранный в
данный момент
тембр
ыберите тембр, который должен звучать.
2
осмотрите на выделенное название тембра и поверните диск.
удут последовательно выбираться и отображаться доступные
тембры. ыбранный тембр становится основным.
этом примере выберите тембр «010 Flute».
ыграйте на клавиатуре.
3
опробуйте выбрать другие тембры и сыграть с их помощью.
тобы перейти к главному экрану, нажмите кнопку [EXIT] (ыход).
PSR-S500 уководство пользователя 17
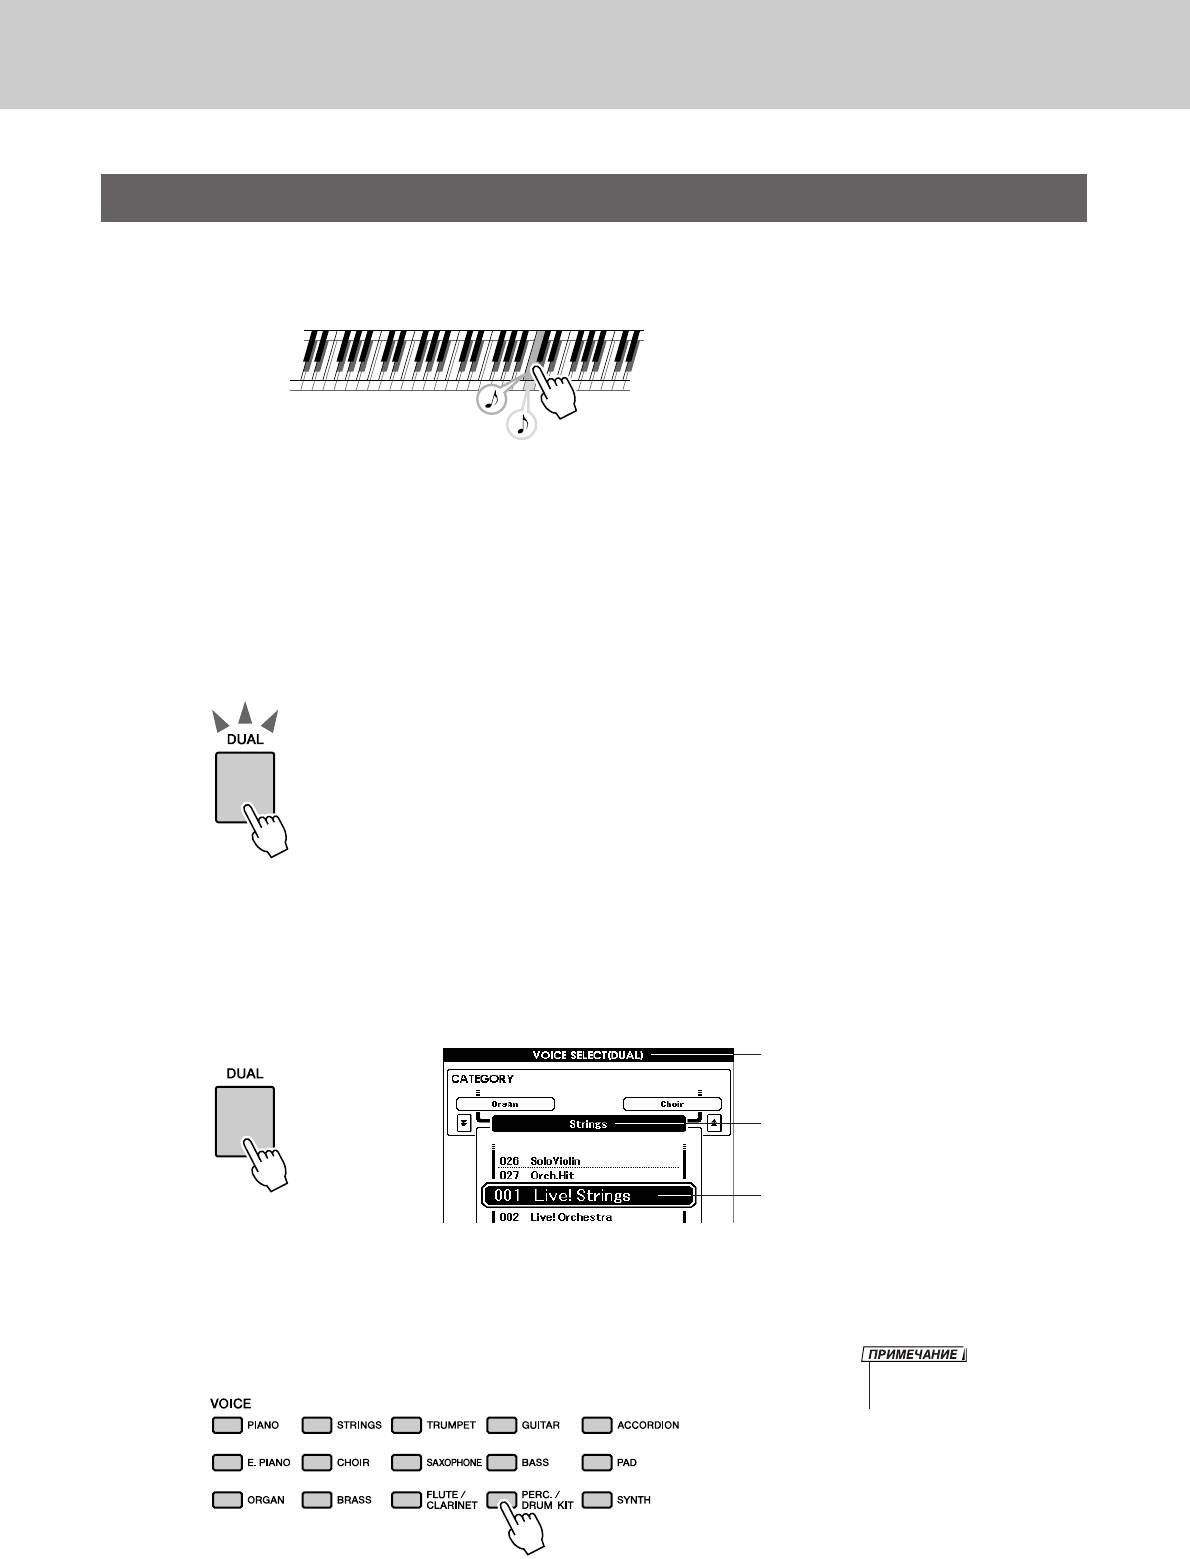
оспроизведение разных инструментальных тембров
é‰ÌÓ‚ÂÏÂÌ̇fl Ë„‡ ‰‚ÛÏfl ÚÂÏ·‡ÏË — DUAL (ç‡ÎÓÊÂÌËÂ)
этом случае можно выбрать второй тембр, который будет дополнять основной.
гра с двумя тембрами называется игрой в режиме наложения тембров.
ва тембра звучат одновременно.
ажмите кнопку [DUAL]
1
нопка [DUAL] используется для включения и выключения
режима наложения тембров.
огда режим наложения тембров включен, кнопка [DUAL] горит.
ыбранный дополнительный тембр будет звучать вместе с
основным во время игры на клавиатуре.
нопка [DUAL] горит
ажмите и удерживайте кнопку [DUAL] дольше 1 секунды.
2
оявится экран выбора наложения тембров.
ыбранные в данный момент название категории и номер
и название тембра будут выделены.
Экран выбора наложения тембров
ыбранная в данный момент категория
ыбранный в данный момент
Удерживайте кнопку
дополнительный тембр
нажатой дольше секунды
ыберите и нажмите требуемую кнопку категории тембра
3
в разделе тембра.
этом примере выберите категорию «PERCUSSION/DRUM».
• ля смены категории тембра
нажмите другую кнопку категории.
18 PSR-S500 уководство пользователя
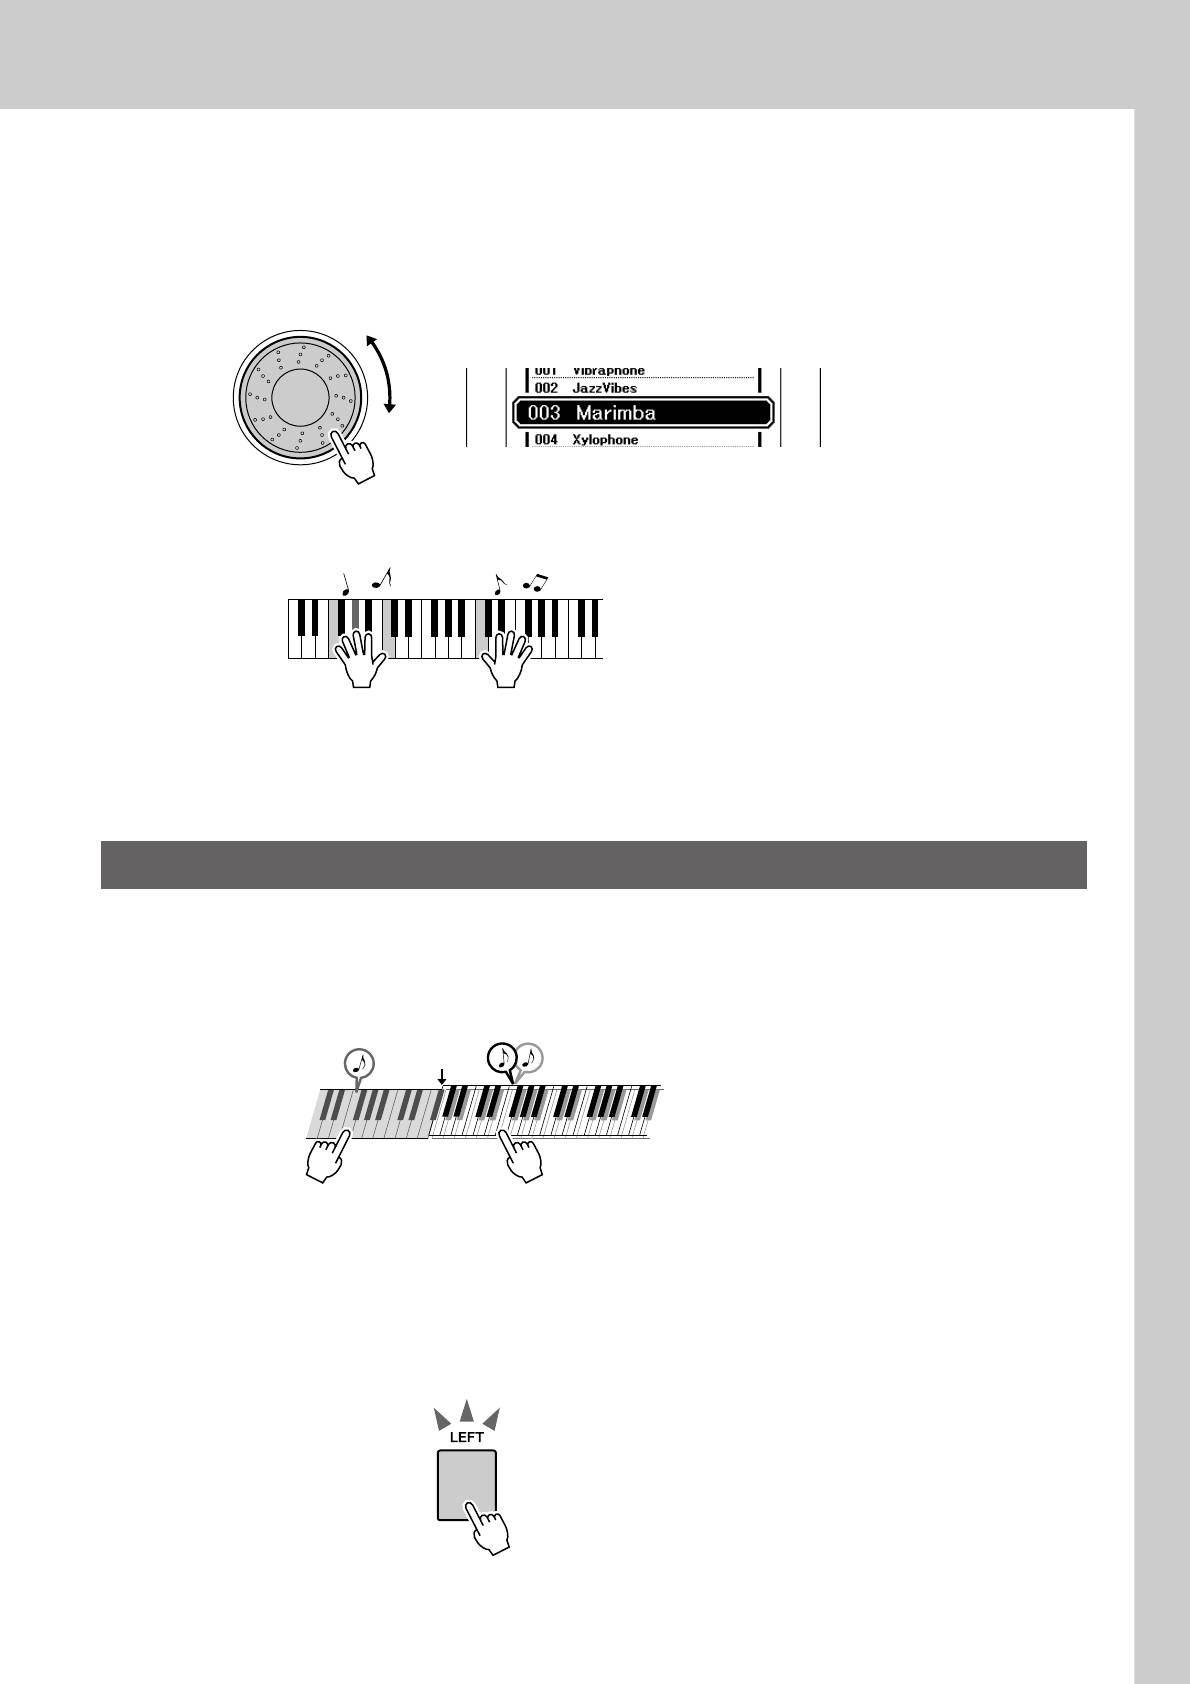
оспроизведение разных инструментальных тембров
ыберите тембр, который должен звучать.
4
осмотрите на выделенное название тембра и поверните диск.
оступные тембры будут последовательно выбираться и
отображаться. ыбранный тембр становится дополнительным.
этом примере выберите тембр «003 Marimba».
ыграйте на клавиатуре.
5
опробуйте выбрать другие дополнительные тембры и сыграть в них.
тобы перейти к главному экрану, нажмите кнопку [EXIT].
ÇÓÒÔÓËÁ‚‰ÂÌË ‡ÁÌ˚ı ÚÂÏ·Ó‚ ‰Îfl ΂ÓÈ Ë Ô‡‚ÓÈ ÛÍ — LEFT (ã‚˚È)
режиме Left можно играть разные тембры с помощью клавиш слева и справа от точки разделения
клавиатуры. Основной и дополнительный тембры можно играть справа от точки разделения
клавиатуры, а слева от нее играть еще один тембр, называемый Left Voice. оложение точки
разделения клавиатуры можно изменить по желанию (стр. 59).
очку разделения
клавиатуры
Основной и дополнительный тембрыевый тембр
ажмите кнопку [LEFT].
1
нопка [LEFT] используется для включения и выключения левого
тембра. ыбранный в данный момент левый тембр будет звучать во
время игры на клавишах слева от точки разделения клавиатуры.
нопка [LEFT] горит
PSR-S500 уководство пользователя 19
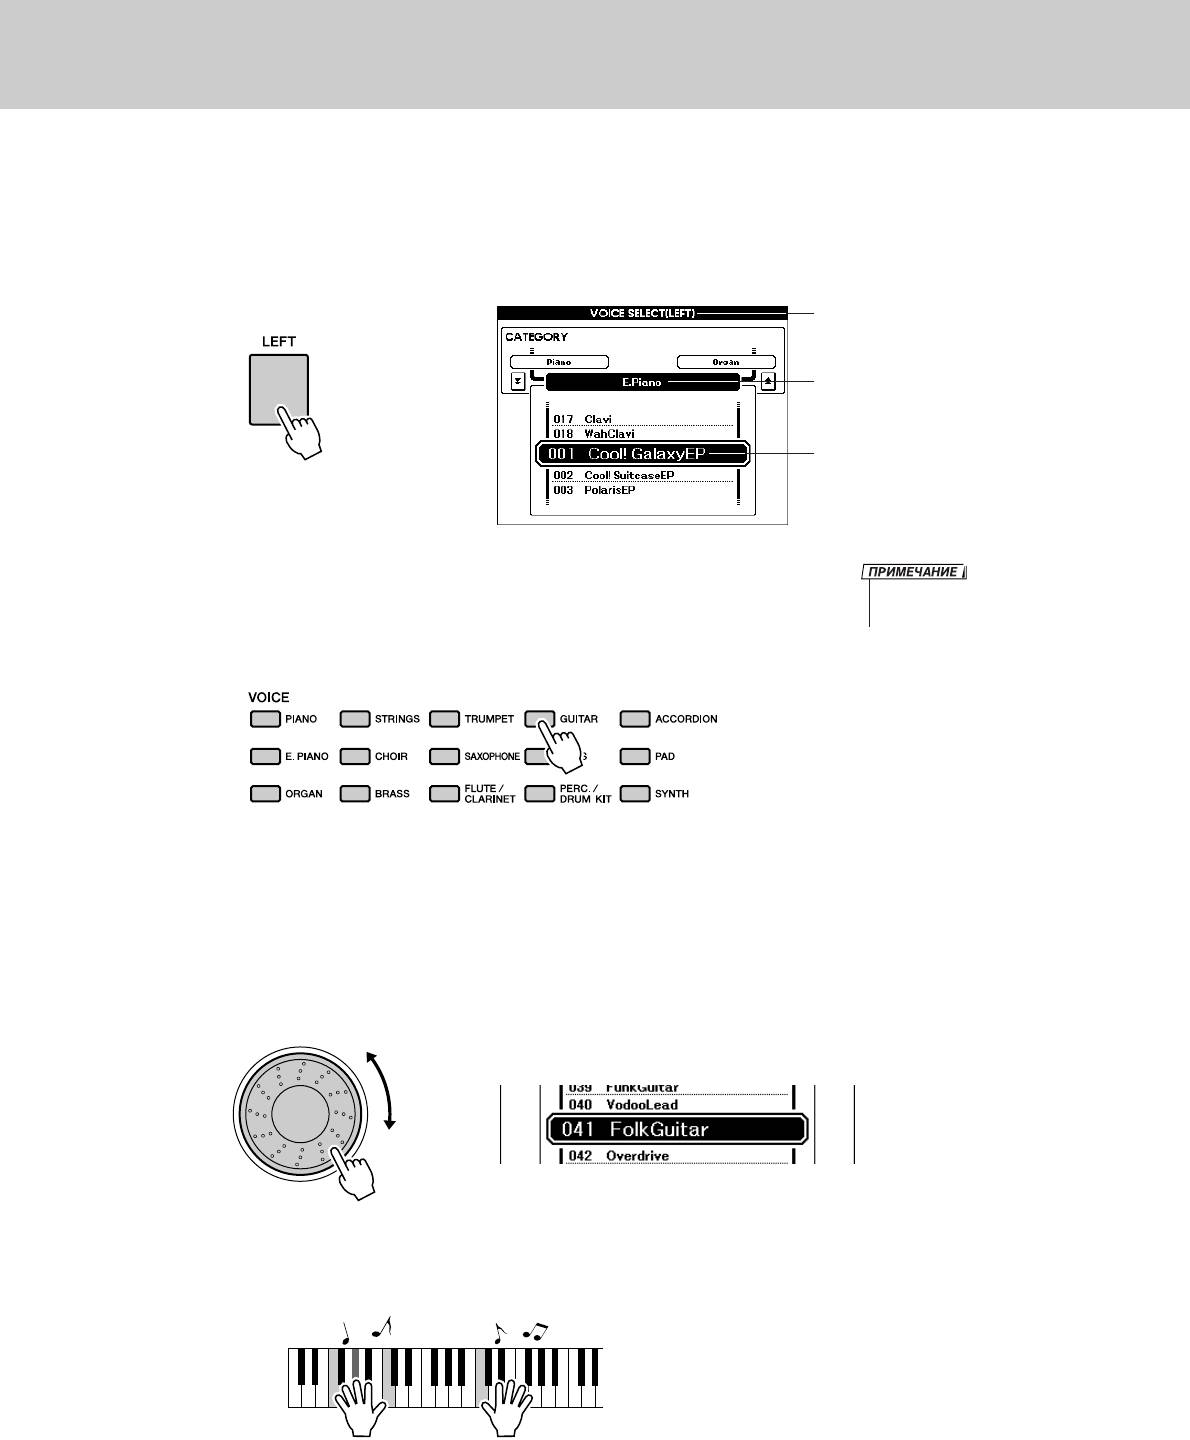
оспроизведение разных инструментальных тембров
ажмите и удерживайте кнопку [LEFT] дольше 1 секунды.
2
Откроется экран выбора тембра LEFT.
ыбранные в данный момент название категории и номер
и название тембра будут выделены.
Экран выбора левого тембра
ыбранная в данный момент категория
ыбранный в данный момент левый тембр
Удерживайте кнопку
нажатой дольше секунды
ыберите и нажмите требуемую кнопку категории тембра в
• ля смены категории тембра
3
разделе VOICE.
нажмите другую кнопку категории.
этом примере выберите категорию «GUITAR».
ыберите тембр, который должен звучать.
4
осмотрите на выделенное название тембра и поверните диск.
удут последовательно выбираться и отображаться доступные
тембры. ыбранный тембр становится левым тембром.
этом примере выберите тембр «041 FolkGuitar».
ыграйте на клавиатуре.
5
опробуйте играть в выбранном левом тембре.
тобы перейти к главному экрану, нажмите кнопку [EXIT].
20 PSR-S500 уководство пользователя
View the manual for the Yamaha Portatone PSR-S500 here, for free. This manual comes under the category keyboards and has been rated by 2 people with an average of a 9.5.
This manual is available in the following languages: English. Do you have a question about the Yamaha Portatone PSR-S500 or do you need help?
Ask your question here
Yamaha Portatone PSR-S500 specifications
Below you will find the product specifications and the manual specifications of the Yamaha Portatone PSR-S500.
The Yamaha Portatone PSR-S500 is a keyboard designed for musicians and music enthusiasts. It features a wide range of voices, styles, and effects to enhance the playing experience. The keyboard has a built-in speaker system that delivers clear and dynamic sound quality.
The PSR-S500 comes with a variety of features, including auto accompaniment, pitch bend wheel, and USB connectivity for easy integration with external devices. The keyboard also has a large LCD screen for easy navigation and control of settings.
The PSR-S500 has a compact and lightweight design, making it easy to transport and set up for performances or practice sessions. It is powered by an AC adapter or batteries, providing flexibility for different playing environments.
Overall, the Yamaha Portatone PSR-S500 offers a versatile and user-friendly platform for music creation and performance. Its array of features and compact design make it a suitable option for both beginners and experienced musicians.
General
| Brand | Yamaha |
| Model | Portatone PSR-S500 |
| Product | keyboard |
| Language | English |
| Filetype | User manual (PDF) |
Frequently Asked Questions
Can’t find the answer to your question in the manual? You may find the answer to your question in the FAQs about the Yamaha Portatone PSR-S500 below.
How can I best clean my keyboard?
A slightly damp cleaning cloth or soft, dust-free cloth works best to remove fingerprints. Dust in hard-to-reach places is best removed with compressed air.
Is the manual of the Yamaha Portatone PSR-S500 available in English?
Yes, the manual of the Yamaha Portatone PSR-S500 is available in English .
Is your question not listed? Ask your question here
Yamaha PSR-S500 Keyboard Specification
The Yamaha PSR-S500 is an advanced electronic keyboard designed for musicians seeking high-quality sound and versatile functionality. It features a 61-key touch-sensitive keyboard, allowing for expressive playing dynamics. The keyboard boasts an impressive sound engine with an extensive library of 283 realistic instrument voices, including a wide variety of acoustic and electric pianos, strings, brass, and synth sounds. Additionally, it offers 361 XGlite voices and 15 drum kits, ensuring a comprehensive range of sounds for diverse musical genres.
The PSR-S500 is equipped with 150 accompaniment styles, providing users with the ability to perform with full band backing. These styles are customizable, allowing musicians to adjust tempo, transpose, and mix levels to suit their performance needs. An integrated Music Database with 500 song setups helps players quickly set up the keyboard for specific songs, simplifying live performances and practice sessions.
A built-in USB to Host port facilitates easy connection to computers for MIDI communication and music software integration. The keyboard also includes a USB to Device port, enabling the use of USB flash drives for storage of custom settings and song data. With a 16-track sequencer, the PSR-S500 offers robust recording capabilities, allowing users to compose and arrange complex musical pieces directly on the keyboard.
The PSR-S500 features dual 12-watt speakers delivering clear and powerful sound, suitable for both practice and small performance settings. An intuitive LCD display provides easy navigation through its functions, while the Yamaha Education Suite aids in learning and skill development. Overall, the Yamaha PSR-S500 is a versatile and user-friendly instrument, ideal for both beginners and experienced musicians seeking a dynamic and comprehensive keyboard experience.
Yamaha PSR-S500 Keyboard F.A.Q.
To perform a factory reset on the Yamaha PSR-S500, turn off the keyboard. Hold down the highest white key while turning the keyboard back on. This will reset the instrument to its original factory settings.
First, check that the volume is turned up and that the headphones are not plugged in. Ensure that the speakers are enabled and that the power adapter is properly connected. If the issue persists, try performing a factory reset.
To connect your Yamaha PSR-S500 to a computer, use a USB to Host cable. Install the necessary Yamaha USB-MIDI drivers on your computer and ensure that the keyboard is set to «USB» mode for MIDI data transmission.
Regularly clean the keyboard with a soft, dry cloth. Avoid using harsh chemicals. Ensure the keys remain dust-free, and periodically check cables and connections for any signs of wear or damage.
To save custom settings, use the Registration Memory feature. Set up the keyboard as desired, then press and hold the Registration Memory button, followed by selecting a memory slot to store your settings.
Press the «Record» button to enter recording mode. Select the track you want to record on, then press «Start/Stop» to begin recording. Play your song, and press «Start/Stop» again to finish the recording.
Ensure that the MIDI cables are properly connected and that the keyboard’s MIDI settings are correctly configured. Check that the MIDI channels match between the keyboard and the connected device.
Yes, you can use a sustain pedal with the PSR-S500. Connect the pedal to the «SUSTAIN» jack on the back of the keyboard. Ensure the pedal is compatible with Yamaha devices for best performance.
Press the «Voice» button to enter the voice selection mode. Use the number buttons or the dial to select the desired voice or instrument from the available options.
Check for debris or dust under the keys and clean carefully using a can of compressed air. If the issue persists, consider having the keyboard serviced by a professional technician.