
Содержание
Введение
Действия в чрезвычайных ситуациях
Ежедневные проверки и определение неисправностей
Эксплуатация автомобиля в зимний период
Поездка на СТО
Инструкция по эксплуатации и техническому обслуживанию
Расходные материалы для проведения технического обслуживания
Предостережения и правила техники безопасности при выполнении работ на автомобиле
Основные инструменты, измерительные приборы и методы работы с ними
Механическая часть двигателя (бензиновые двигатели)
Механическая часть двигателя (дизельные двигатели)
Система охлаждения
Система смазки
Система питания
Система управления двигателем
Система впуска и выпуска
Электрооборудование двигателя
Сцепление
Механическая коробка передач
Автоматическая коробка передач
Раздаточная коробка
Приводные валы и главная передача
Подвеска
Тормозная система
Рулевое управление
Кузов
Система пассивной безопасности (SRS)
Система отопления, вентиляции и кондиционирования воздуха (HVAC)
Электрооборудование и электросистемы автомобиля
Толковый словарь
Действия в чрезвычайных ситуациях
Замена колеса
Расположение запасного колеса
- Нужно быть всегда готовым к проколу шины. Внимательно прочитайте инструкцию по замене колес и всегда помните, где находится соответствующий инструмент.
- Съедьте на обочину и встаньте на как можно более ровном и твёрдом участке, подальше от движущихся автомобилей. Включите аварийную сигнализацию и выставьте знак аварийной остановки, если этого требуют местные правила.
ВНИМАНИЕ
Запасное колесо тяжелое и может привести к травме при неправильном обращении. Особые меры предосторожности соблюдайте при подъеме и перекатывании колес.
Всегда закрепляйте запасное или снятое колесо в нужном положении крепежным болтом. Несоблюдение этого требования может привести к перемещению колеса в случае резкого маневра или столкновения и привести к гибели или тяжелой травме.
Убедитесь, что панель пола расположена таким образом, чтобы не причинить травмы в случае падения при извлечении из автомобиля.
При снятии или установки панели пола на место берегите пальцы и руки. Несоблюдение этих правил может привести к травмам.
- Запасное колесо и домкрат расположены под панелью пола багажного отделения. Для того чтобы вынуть запасное колесо, поднимите панель пола.
- Если автомобиль оснащён временным запасным колесом, для извлечения этого колеса нужно снять багажный лоток. Отверните гайку крепления (1) и выньте запасное колесо. Выньте домкрат и специальный ключ для отворачивания гаек крепления колеса (а также комплект для отворачивания замковых гаек).
- Универсал: На панели пола багажного отделения имеется лямка (2), которой панель пола крепится к крючку в верхней части проёма багажной двери. Это освобождает руки для доступа к запасному колесу. Выньте багажный лоток (3), чтобы получить доступ к запасному колесу.
Временное запасное колесо
- Перед использованием временного запасного колеса ознакомьтесь с некоторыми правилами:
- Прочитайте табличку с предупреждениями по использованию временного запасного колеса. Строго выполняйте инструкции, изложенные на табличке. Несоблюдение инструкций может быть опасным.
- После установки временного запасного колеса поездку следует выполнять с повышенной осторожностью и произвести замену временного колеса на штатное при первой возможности.
- Нельзя использовать одновременно более одного временного запасного колеса и шины в сборе.
- Давление во временном запасном колесе должно соответствовать норме. Табличка с подробными данными по колёсам и шинам находится на торце панели управления, со стороны водителя.
- Максимальная скорость при использовании временного запасного колеса не должна превышать 80 км/ч.
- При использовании временного запасного колеса должна быть включена система DSC.
Примечание
Временное запасное колесо используется в таком же порядке, как и штатные.
Замковые гайки колеса
- Замковые гайки колеса компании Jaguar (по одной на каждое колесо) можно отвернуть только при помощи специального торцевого ключа.
- Замковая гайка состоит из двух частей со шлицами на передней и на задней частях гайки.
- Чтобы отвернуть или привернуть гайку, эти части должны вращаться вместе. Для отворачивания гайки нужно совместить шлицы на передней и на задней частях гайки. Наденьте баллонный ключ на головку торцевого ключа и ослабьте гайку.
- Попытка отвернуть гайку без применения специальной торцевой головки (например, при попытке украсть колесо) или, не полностью надев торцевую головку, приведёт к тому, что вращаться будет только передняя часть гайки (1).
- Если головка надета не полностью, поверните переднюю часть гайки до совпадения шлицевых частей и полностью надвиньте головку на гайку. Если нужно приобрести новую торцевую головку, обратитесь к дилеру компании Jaguar или в ее технический центр. При этом понадобится предъявление документов, подтверждающих право собственности.
Замена колеса
- Перед подъемом автомобиля или заменой колеса прочтите и выполняйте следующие инструкции:
- Всегда подбирайте место для остановки вне дороги и так, чтобы не мешать движению автомобилей. Автомобиль должен стоять на твердой ровной поверхности.
- Отсоедините прицеп/фургон от автомобиля.
- Включите аварийную световую сигнализацию.
- Выведите из автомобиля пассажиров и животных и убедитесь в том, что они находятся на безопасном расстоянии от дороги.
- Установите знак аварийной остановки на подходящем расстоянии позади автомобиля лицевой стороной к встречному движению.
- Убедитесь в том, что передние колеса стоят прямо, и заприте замок рулевой колонки.
- Убедитесь в том, что домкрат находится на твердой ровной поверхности.
- Не размещайте никакие предметы между домкратом и поверхностью земли и между домкратом и автомобилем.
Другие книги по ремонту и обслуживанию автомобилей Jaguar:
- руководство по ремонту Jaguar E-Pace
- книги по ремонту Jaguar F-Pace
- инструкция по эксплуатации Jaguar F-Type
Автомобильная литература
Ваше Имя:*
Ваш отзыв:*
Внимание: HTML не поддерживается! Используйте обычный текст.
Введите код, указанный на картинке:*

X-TYPE
OWNER’S HANDBOOK
Publication Part No. JJM 10 02 20 801

This handbook forms part of the Owner literature supplied with your new vehicle.
Left-hand drive and right-hand drive conditions may be shown in the graphics and where
information is specific to a particular country, it is indicated as such.
The Quick start section is designed to rapidly familiarise the driver with the initial set up
and also explain some of the unique features. Please take the time to study the operating
instructions with your vehicle as soon as you can.
Important
The information contained in this handbook covers all vehicle derivatives and optional
equipment. Some of the options may not be fitted to your vehicle unless they formed part
of the original vehicle specification. Therefore some parts of this handbook may not apply
to your vehicle. Furthermore,due to printing cycles, it may include descriptions of options
before they become generally available.
The options, hardware and software in your vehicle are from the available specifications
for the market in which the vehicle was intended for sale. If your vehicle is to be used in
another geographical area you may have to modify the vehicle specification to suit local
conditions. Jaguar Cars Limited is not responsible for the cost of any modifications.
The information contained in this publication was correct when it went to print. Vehicle
design changes may have been made after this handbook was printed. When this occurs
a handbook supplement is added to the literature pack. Subsequent updates can be
viewed on the Jaguar Internet site at; www.ownerinfo.jaguar.com.
In the interest of development, the right is reserved to change specifications, design or
equipment at any time without notice and without incurring any obligations. This
publication, or part thereof, may not be reproduced nor translated without our approval.
Errors and omissions excepted.
©Jaguar Cars Limited
All rights reserved.
Published by Jaguar Technical Communications.
2

Contents
Quick Overview
Quick Overview . . . . . . . . . . . . . . . . . . . 7
Filling Station Information . . . . . . . . . . 29
Owner Information
General Information. . . . . . . . . . . . . . . 32
Health and Safety . . . . . . . . . . . . . . . . 40
Security and Locks
Starter Switch . . . . . . . . . . . . . . . . . . . 42
Vehicle Security. . . . . . . . . . . . . . . . . . 43
Door Locks . . . . . . . . . . . . . . . . . . . . . 47
Luggage Compartment Locks . . . . . . 52
Alarm Systems . . . . . . . . . . . . . . . . . . 54
Before Driving
Occupant Protection . . . . . . . . . . . . . . 56
Child Safety. . . . . . . . . . . . . . . . . . . . . 66
Seats . . . . . . . . . . . . . . . . . . . . . . . . . . 76
Clock . . . . . . . . . . . . . . . . . . . . . . . . . . 82
Steering Column . . . . . . . . . . . . . . . . . 84
Door Windows. . . . . . . . . . . . . . . . . . . 85
Mirrors . . . . . . . . . . . . . . . . . . . . . . . . . 88
Luggage Compartment . . . . . . . . . . . . 90
On the Road
Instruments . . . . . . . . . . . . . . . . . . . . . 94
Warning Indicators . . . . . . . . . . . . . . . 96
Audible Warnings . . . . . . . . . . . . . . . 101
Message Centre . . . . . . . . . . . . . . . . 102
Trip Computer . . . . . . . . . . . . . . . . . . 105
Cruise (Speed) Control . . . . . . . . . . . 108
Exterior Lighting . . . . . . . . . . . . . . . . 110
Interior Lighting . . . . . . . . . . . . . . . . . 114
Parking Assist . . . . . . . . . . . . . . . . . . 116
Horn. . . . . . . . . . . . . . . . . . . . . . . . . . 119
Sunroof . . . . . . . . . . . . . . . . . . . . . . . 120
Wipers and Washers . . . . . . . . . . . . . 121
Parkbrake . . . . . . . . . . . . . . . . . . . . . 124
Interior Features . . . . . . . . . . . . . . . . 125
Engine Starting . . . . . . . . . . . . . . . . . 129
Transmission . . . . . . . . . . . . . . . . . . . 131
Braking System . . . . . . . . . . . . . . . . . 134
Stability Control. . . . . . . . . . . . . . . . . 136
Driving Information . . . . . . . . . . . . . . 137
Fuel and Refuelling . . . . . . . . . . . . . 142
Climate Control
Climate Control . . . . . . . . . . . . . . . . 149
Automatic Climate Control . . . . . . . 152
Touch-screen Climate Control . . . . 156
Roadside Emergency
Inertia Switch. . . . . . . . . . . . . . . . . . 165
Emergency Starting. . . . . . . . . . . . . 166
Wheel Changing . . . . . . . . . . . . . . . 169
Vehicle Recovery. . . . . . . . . . . . . . . 175
Bulb Renewal. . . . . . . . . . . . . . . . . . 179
Fuses . . . . . . . . . . . . . . . . . . . . . . . . 185
Fire Extinguisher . . . . . . . . . . . . . . . 193
Maintenance
General Maintenance. . . . . . . . . . . . 194
Bonnet Release . . . . . . . . . . . . . . . . 194
Regular Checks . . . . . . . . . . . . . . . . 196
Checking and Top-up . . . . . . . . . . . 198
Battery . . . . . . . . . . . . . . . . . . . . . . . 205
Wiper Blades . . . . . . . . . . . . . . . . . . 209
Tyres . . . . . . . . . . . . . . . . . . . . . . . . 210
Vehicle Care. . . . . . . . . . . . . . . . . . . 215
Electrical Accessories . . . . . . . . . . . 218
Specifications
Engine Data . . . . . . . . . . . . . . . . . . . 219
Weights . . . . . . . . . . . . . . . . . . . . . . 220
Load Weights. . . . . . . . . . . . . . . . . . 223
Dimensions . . . . . . . . . . . . . . . . . . . 224
Wheels and Tyres . . . . . . . . . . . . . . 225
Fuel Consumption . . . . . . . . . . . . . . 226
Touch-screen
Touch-screen. . . . . . . . . . . . . . . . . . 227
Touch-screen Display . . . . . . . . . . . 229
Audio System
Audio System . . . . . . . . . . . . . . . . . 233
Steering Wheel Controls . . . . . . . . . 235
Radio . . . . . . . . . . . . . . . . . . . . . . . . 236
Single CD Player . . . . . . . . . . . . . . . 250
Compact Disc Changer . . . . . . . . . . 253
3

Contents
Telephone
Telephone Introduction . . . . . . . . . . . 257
Telephone System . . . . . . . . . . . . . . 260
Telephone Operation — Standard . . . 264
Telephone Operation — Touch-screen 268
Phone Book. . . . . . . . . . . . . . . . . . . . 273
Declaration of Conformity . . . . . . . . . 275
Voice Control
JaguarVoice . . . . . . . . . . . . . . . . . . . 276
A comprehensive index is located at the
back of this handbook.
4

Quick Overview
Quick Overview
LOCKING AND UNLOCKING . . . . . . . .7
CENTRAL DOOR LOCKING . . . . . . . . .8
LUGGAGE COMPARTMENT . . . . . . . . 8
CLOCK AJUSTMENT . . . . . . . . . . . . . .9
SEATS . . . . . . . . . . . . . . . . . . . . . . . . . 10
WINDOWS/DOOR MIRRORS . . . . . . . 11
AUTO-DIMMING REAR VIEW
MIRROR . . . . . . . . . . . . . . . . . . . . . . . 11
DRIVING POSITION MEMORY . . . . . . 12
STEERING COLUMN LOCK
ADJUSTMENT . . . . . . . . . . . . . . . . . . 12
SEAT BELTS/CHILD RESTRAINTS . . 13
OVERHEAD CONSOLE . . . . . . . . . . . 13
CLIMATE CONTROL . . . . . . . . . . . . . 14
FACIA AND CONTROLS . . . . . . . . . . . 16
EXTERIOR LAMPS/TRIP
COMPUTER . . . . . . . . . . . . . . . . . . . . 19
WIPERS AND WASHERS . . . . . . . . . . 20
WARNING INDICATORS . . . . . . . . . . 21
AUTOMATIC TRANSMISSION . . . . . . 22
CRUISE (SPEED) CONTROL . . . . . . . 23
DYNAMIC STABILITY CONTROL
(DSC) . . . . . . . . . . . . . . . . . . . . . . . . . . 23
AUDIO SYSTEM KEY FEATURES . . . 24
RADIO OPERATION . . . . . . . . . . . . . . 25
CD OPERATION . . . . . . . . . . . . . . . . .25
TELEPHONE — BLUETOOTH
SYSTEM . . . . . . . . . . . . . . . . . . . . . . .27
Filling Station Information
FUEL TYPE . . . . . . . . . . . . . . . . . . . . . 29
FUEL FILLING . . . . . . . . . . . . . . . . . . . 29
BONNET RELEASE . . . . . . . . . . . . . . 30
UNDERBONNET TOP-UP . . . . . . . . . 30
TYRE PRESSURES . . . . . . . . . . . . . . . 31
5

6
Quick Overview
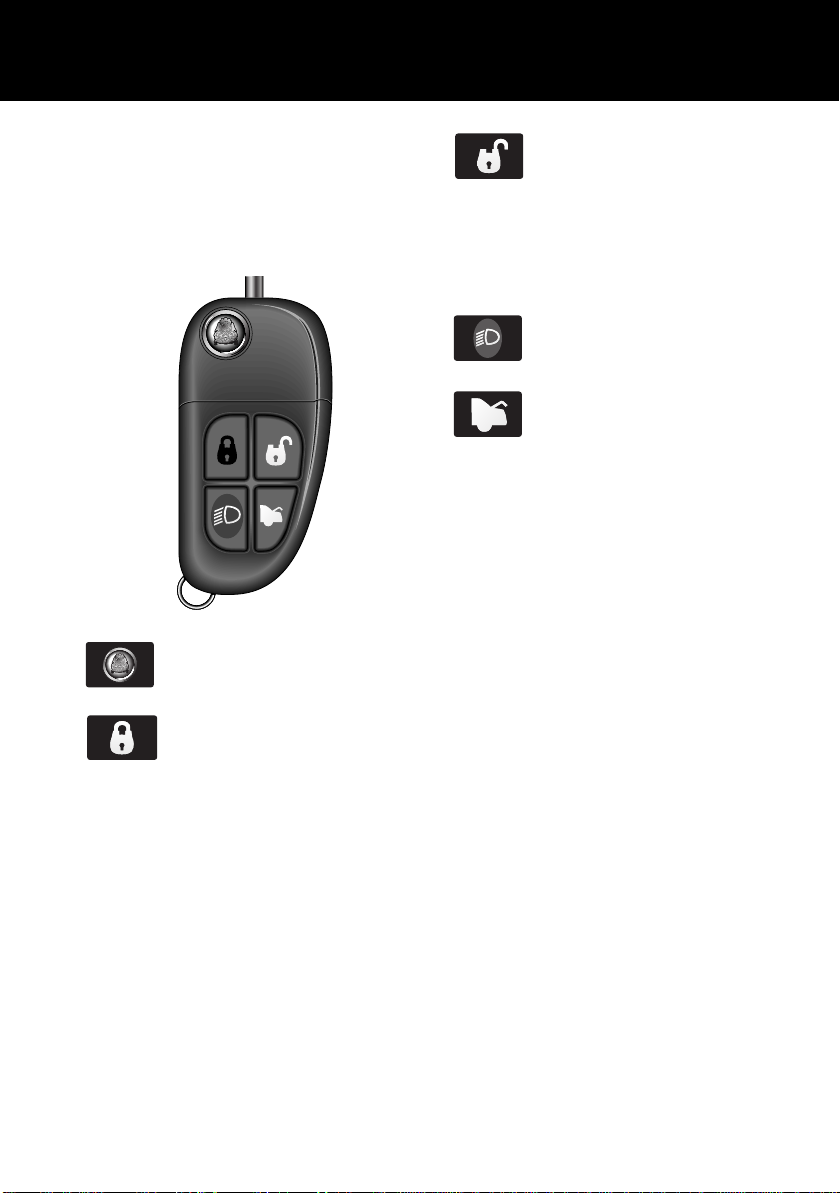
LOCKING AND UNLOCKING
Note: Dependent upon vehicle
configuration, the operation of the remote
handset may differ from the following.
Remote handset
JAG0667
Press to release door key.
Press once to lock the vehicle
and arm the alarm.
Press twice within three
seconds to double-lock the vehicle.
Press and hold to close the sunroof and
any open windows (Global closing).
Press once to disarm the alarm,
unlock the driver’s door and
unlock the luggage
compartment.
Press again to unlock remaining doors.
Press and hold to open the sunroof and
windows (Global opening).
Press once to switch the
headlamps on for 25 seconds.
Press to unlock and open
luggage compartment.
Unlocking mode alternatives
Single stage unlocking will unlock the
vehicle with a single press. Two stage
unlocking will unlock the driver’s door and
luggage compartment with a single press
and all other doors with a second press.
To change between modes, press and
hold the lock and unlock buttons on the
remote handset simultaneously for four
seconds. The direction indicators will
flash twice to confirm the change.
Unlocking with the door key
If the vehicle is unlocked manually via the
door lock, the key must be inserted into
the starter switch within 15 seconds to
prevent the alarm being activated.
7

Quick Overview
CENTRAL DOOR LOCKING
JAG0668
To lock all the doors, press the lock lever
on either of the front doors.
To unlock all doors, pull the lock lever on
either of the front doors.
Drive away door locking
The doors and luggage compartment will
automatically lock when the vehicle’s
forward speed exceeds 7 km/h (5 mph).
This feature can be disabled by your
Jaguar Dealer/Authorised Repairer.
LUGGAGE COMPARTMENT
The luggage compartment is electrically
locked and unlocked in conjunction with
the driver’s door.
To open the luggage
compartment with the vehicle
locked, press the luggage
compartment button on the remote
handset.
1
JAG0669
2
To open the luggage compartment with
the vehicle unlocked, press the release
button 1 on the luggage compartment
lid/tailgate.
Tailgate glass — Estate
To open the tailgate glass, press the
release button 2, located on the reverse of
the tailgate handle and lift the glass.
Care Point
• The release button on the luggage
compartment lid/tailgate is disabled
when the vehicle is alarmed.
8
Quick Overview
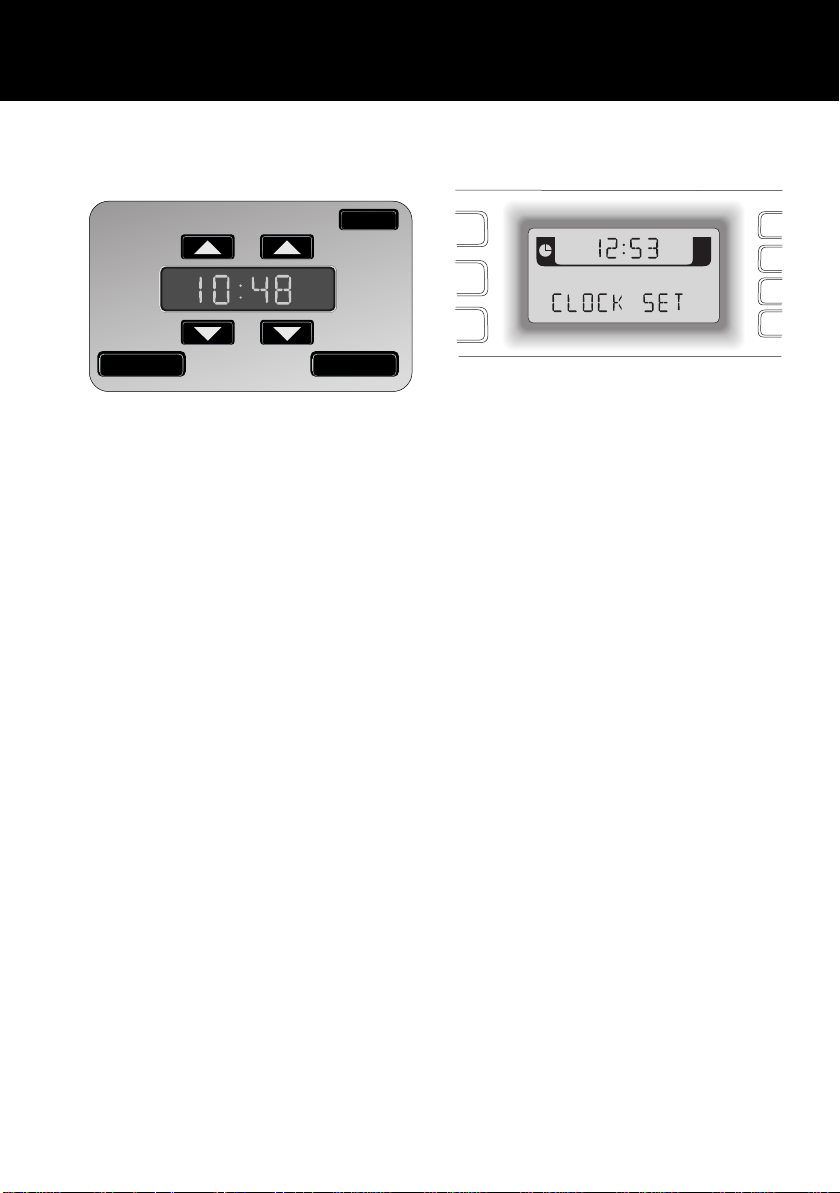
CLOCK AJUSTMENT
Touch-screen
SET CLOCK
12/24 Set
JAG0804
1. Press the MENU button on the
touch-screen surround to access the
MENU screen.
2. Touch System setup to access the
System setup screen.
3. Touch the Set clock icon.
4. Adjust the time by touching the hour
and minute up or down arrow icons.
5. Touch the 12/24 icon to select
between twelve or twenty-four hour
display.
6. Touch Set to confirm.
Cancel
PM
Non-touch-screen
PM
TP ST
JOL4693
1. Repeatedly press and release the
MODE button (on the audio unit) until
until ADV MODE N/Y is displayed.
2. Rotate the volume control to select
ADV MODE YES and then press
MODE.
3. CLOCK SET will be displayed with
the 12/24 hours indicator flashing.
Rotate the volume control clockwise
for 24-hour display; counterclockwise
for 12-hour display.
4. Press MODE to select the hour
setting. Rotate the volume control
clockwise or counterclockwise to
adjust the setting.
5. Press MODE to select the minutes
setting. Rotate the volume control
clockwise or counterclockwise to
adjust the setting.
6. To exit press and hold MODE or wait
approximately five seconds until the
display reverts to audio mode.
9
Quick Overview
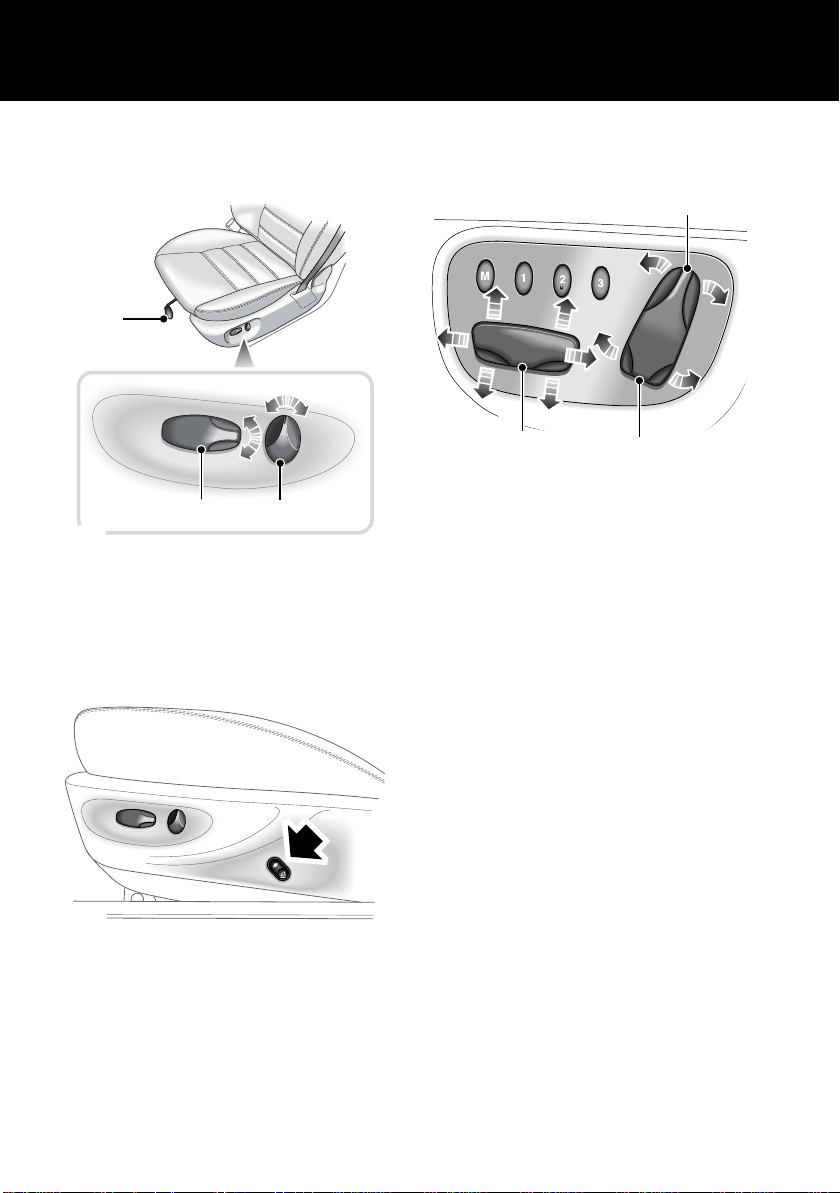
SEATS
4-way electrical seat adjustment
1
JAG0768
2
1. Seat fore/aft lever. Lift and slide into
position.
2. Seat height switch.
3. Seat back angle switch.
6-way electrical seat adjustment
3
10-way electrical seat adjustment memory seats
3
JAG0770
1
1. Seat position switch. Controls fore/aft
position and front and rear cushion
height.
2. Seat back angle switch.
3. Lumbar support switch.
Passenger seat
The 10-way adjustable passenger seat is
not fitted with memory buttons.
2
JAG0769
6-way seat adjustment controls are the
same as the 4-way, but the occupant
benefits from a further switch (arrowed).
To increase lumbar support press the top
of the switch, to decrease press the
bottom.
10
Quick Overview
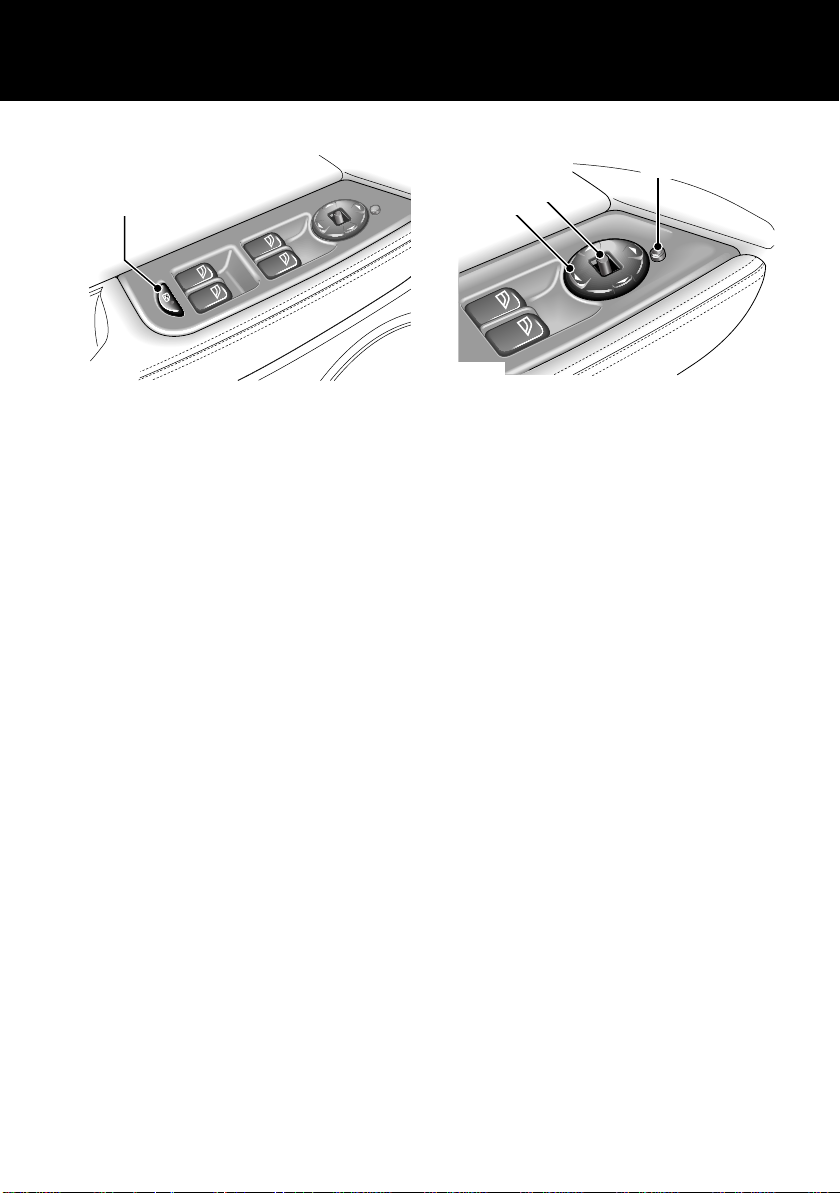
WINDOWS/DOOR MIRRORS
1
JAG0715
Windows
The windows can be fully opened or
closed with a single operation of the
switch.
• To open the window, fully press the
respective switch. Press the switch
again to stop the window from fully
opening.
• To close the window, pull the switch
fully up. Pull the switch again to stop
the window from fully closing.
To partially open a window, lightly press
the appropriate switch and release when
the window reaches the required position.
Press button 1 to inhibit the operation of
the rear window switches.
Global closing
If a window has been left open when
leaving the vehicle, it can be closed by
pressing and holding the lock button on
the remote handset (this will also close
the sunroof).
Door mirrors
3
2
1
JAG0716
Select the appropriate mirror using
selector switch 2. Use the 4-way switch 1
to adjust the position of the mirror glass.
Power fold mirrors
The mirrors can be folded towards the
door for better clearance/protection. With
the starter switch in position I or II, press
button 3 to fold the mirrors. A second
press returns the mirrors to their normal
position.
AUTO-DIMMING REAR-VIEW
MIRROR
With the starter switch on, the rear-view
mirror will automatically darken to
counteract glare from the headlamps of a
following vehicle.
This feature is automatically switched off
when reverse gear is selected.
11
Quick Overview
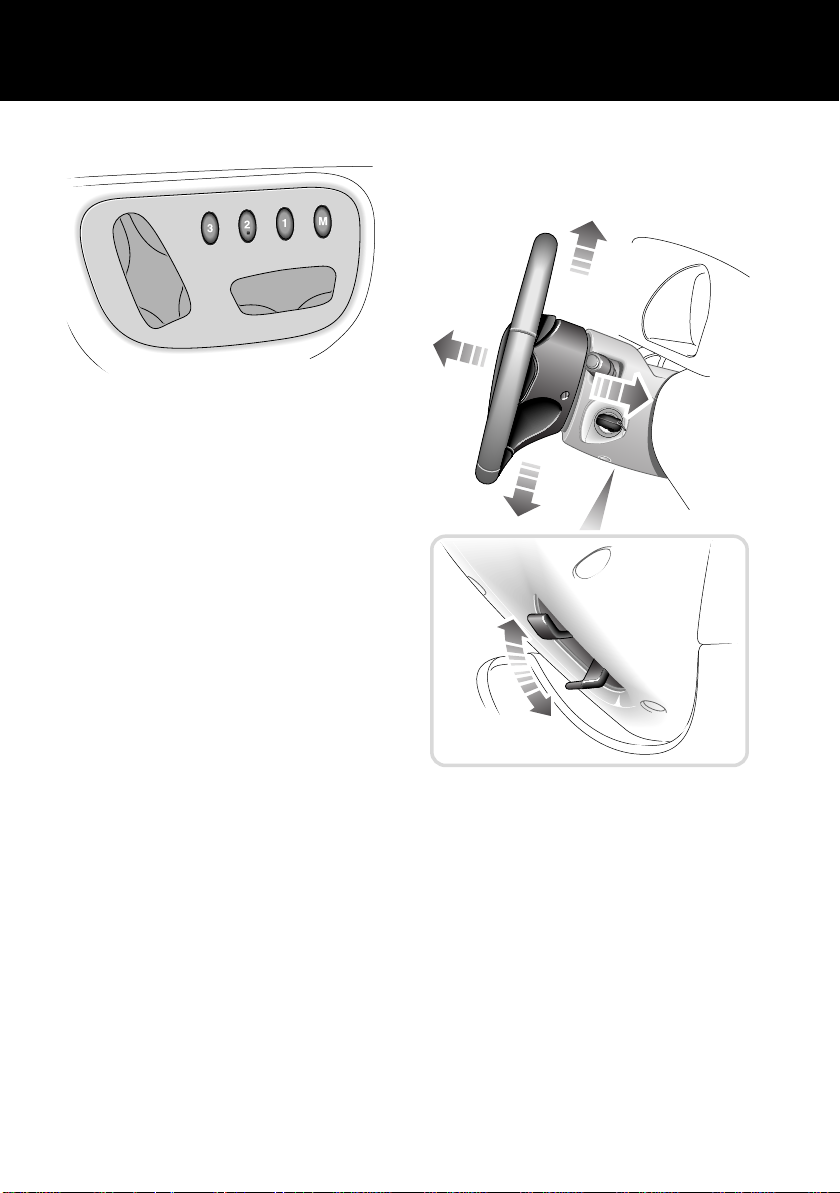
DRIVING POSITION MEMORY
JAG0806
Once you have adjusted the driver’s seat
and exterior mirrors for your ideal driving
position, the vehicle can memorise these
settings for future use.
1. With the starter switch in position I or
II press the M button on the driver’s
seat switch pack. A chime will sound
to indicate that the seat is in memory
mode.
2. Within five seconds, press button 1, 2
or 3 to memorise the current settings.
A double chime will sound to confirm that
the settings are memorised. Any existing
settings will be overwritten.
To recall a memorised driving position
press button 1, 2 or 3. This feature will
only operate if the automatic transmission
is in P (Park) or N (Neutral), or the starter
switch is off in vehicles with manual
transmission.
STEERING COLUMN LOCK
ADJUSTMENT
Steering column
JAG0712
Push the steering column adjustment
lever downwards.
Move the steering wheel to the required
position then fully raise the lever to lock
the steering column in position.
12
Quick Overview
SEAT BELTS/CHILD
RESTRAINTS
A warning indicator on the
instrument pack will illuminate
to alert you that the driver’s
and/or front passenger’s seat belt is
unbuckled. Dependent upon specification
this may be accompanied by an
intermittent chime.
Child Seats
It is important to remember that your
child’s weight, rather than age,
determines the type of seat that is
required.
To determine the correct seat for your
child, see ‘CHILD AND INFANT SAFETY’,
page 66.
Rear centre seat belt interlock — Estate
only
The centre rear seat belt is anchored to
the back of the seat. If the seat backrest
is not correctly latched the seat belt reel
will not extend.
Automatic Locking Reels
Passenger seat belts have ALR fitted for
use with child seats.
• To engage: extend the belt to
maximum length to enable the locking
mechanism.
• To disengage: unbuckle the belt and
allow it to fully retract.
With ALR enabled, as the seat belt
retracts it will automatically lock,
preventing re-extension.
Ensure passengers do not fully extend the
restraints and inadvertently engage this
feature during normal use.
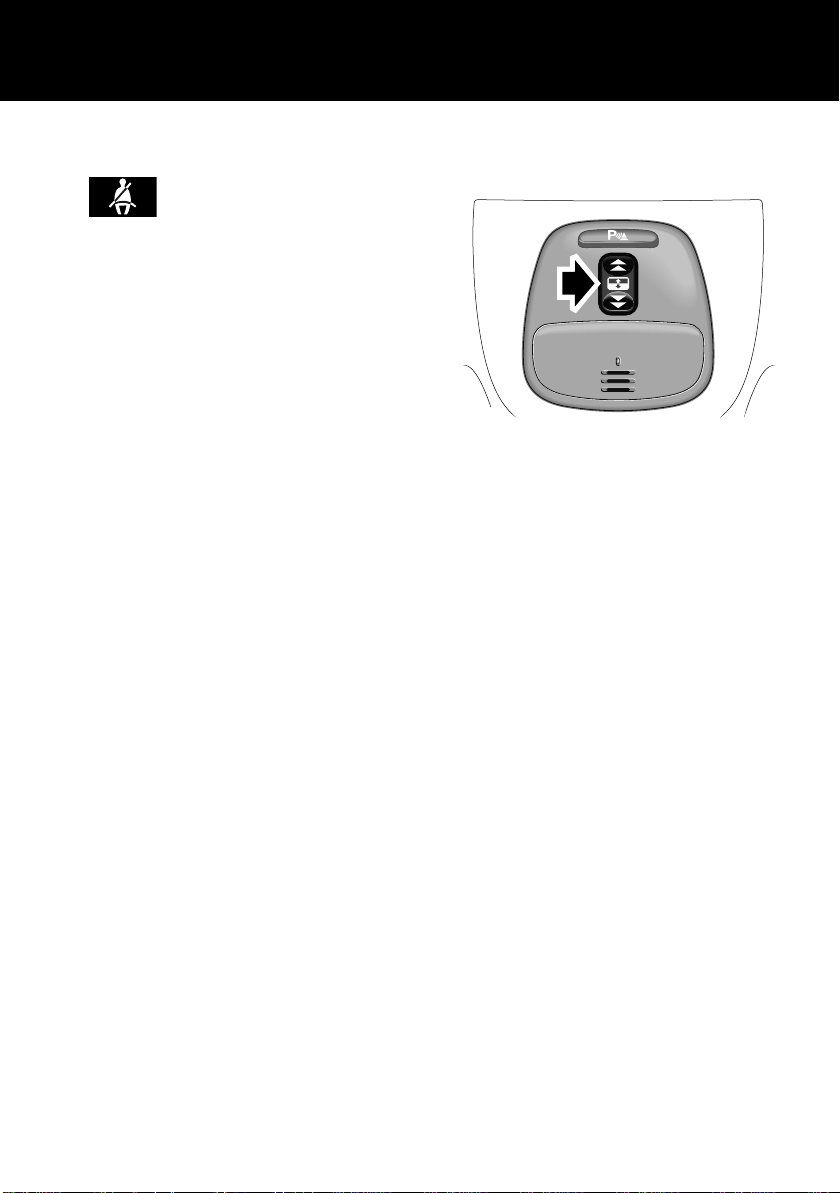
OVERHEAD CONSOLE
Sunroof
JAG0751
The sunroof is fitted with a facility that
allows it to be fully opened or closed with
a single operation of the indicated switch.
Closing remotely
• If the sunroof has been left open when
leaving the vehicle, it can be closed by
pressing and holding the lock button
on the remote handset.
13
Quick Overview
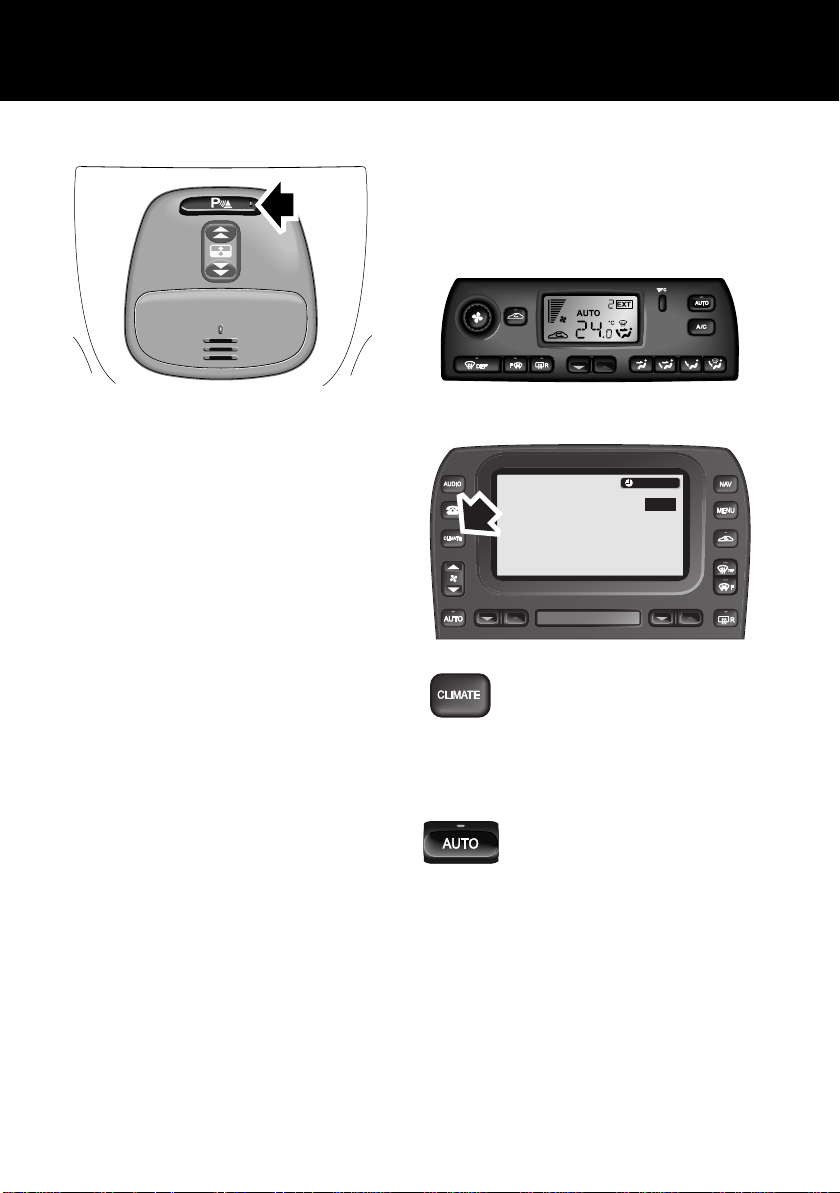
Parking assist
JAG0748
Press the indicated button to turn on and
off the front and rear parking sensors. An
indicator will illuminate in the switch when
the system is turned on.
Note: This button is only fitted to vehicles
with both front and rear parking
assistance.
Care points
• Sensors may activate on detection of
water, snow or ice on their surface.
This is entirely normal and regular
cleaning will aid performance.
• Parking assist may sound if it detects
a signal operating at the same
frequency to that of the sensors (e.g.
motorcycles, airbrakes).
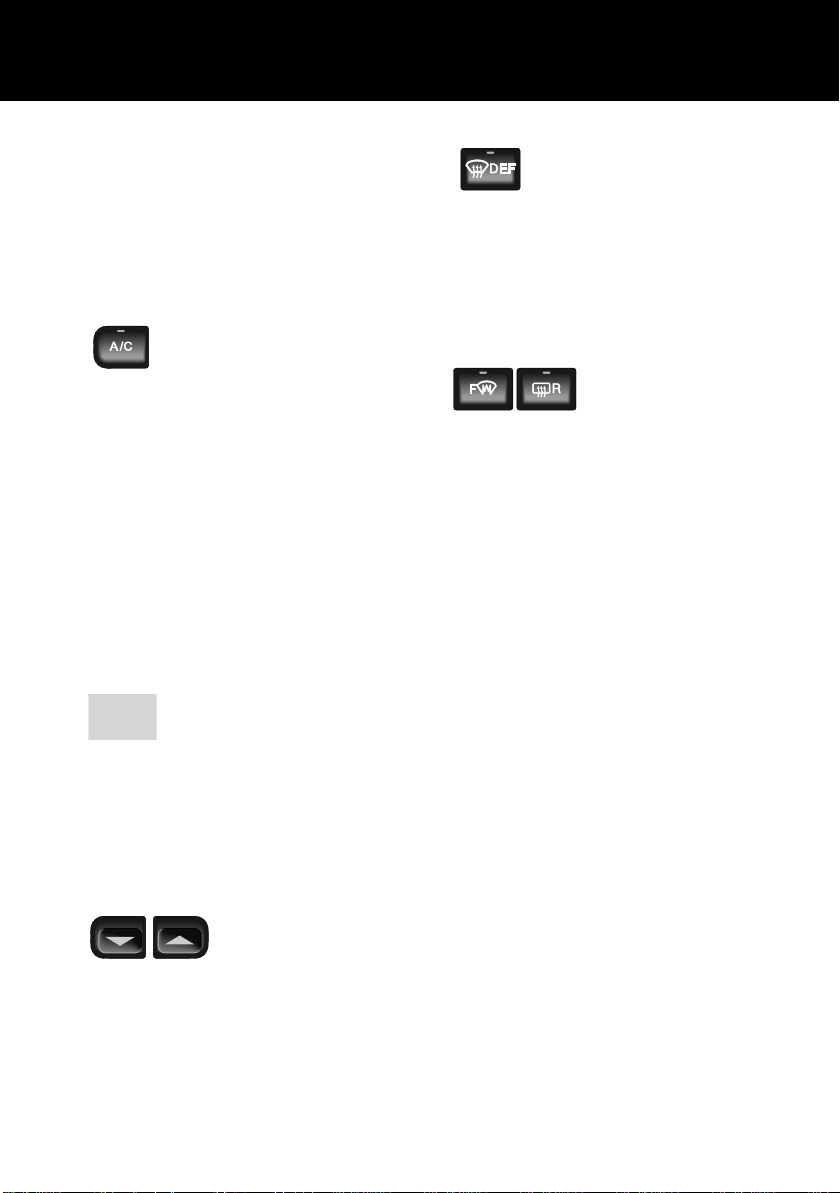
CLIMATE CONTROL
These are the primary functions of the
climate control system. For further
information, see ‘Climate Control’,
page 149.
JOL4740
6 :46
PM
˚C/˚F
JAG0811
For those vehicles fitted with
the touch-screen navigation
system, the advanced climate
control functions can be accessed by
pressing the CLIMATE button.
AUTO (automatic) mode
Press to select automatic
operation of the climate control
system. The system will
automatically adjust the heat output,
blower speed, air intake and airflow
distribution to maintain the selected
temperature(s) and reduce misting
without constant adjustments by the
driver or passengers.
14
Quick Overview
Screen heaters and timed air recirculation
may be selected whilst in AUTO mode.
Selecting any other function will cancel
AUTO operation.
Note: Select AUTO as the normal
operating mode. This will help prevent
window misting.
Air conditioning (A/C)
Air conditioning is an integral
part of the climate control
system, providing cooled and
dehumidified air for occupant comfort;
the dry airflow is also effective in
preventing misting of the windows.
Press the button to switch the air
conditioning system on or off.
External water deposits
• The air conditioning system removes
moisture from the air and deposits the
excess water beneath the vehicle.
Puddles may form, but this is normal
and no cause for concern.
Air recirculation
Air recirculation is used to stop
outside odours from entering
the vehicle or to improve
performance of the air conditioning
system in regions of high ambient
temperatures.
Press the button to switch timed air
recirculation system on or off.
Temperature selection
Press the red buttons to
increase temperature
and the blue buttons to
decrease temperature.
To jump quickly from HI or LO to a midrange temperature setting, press and hold
the AUTO button for a few seconds.
Defrost/demist mode
Press the DEF button to
remove frost or heavy misting
from the windscreen. The rear
screen and windscreen heaters will be
activated.
To de-select defrost mode, press AUTO.
The rear screen and windscreen heaters
will remain on.
Heated screens and door mirrors
The front and rear screen
heaters can be switched
on or off in any mode,
even when the climate control system is
off, but will only operate when the engine
is running.
Operating the DEF button will
automatically activate the front and rear
screen heaters.
The door mirror heaters are controlled by
the rear screen heater button.
15
Quick Overview
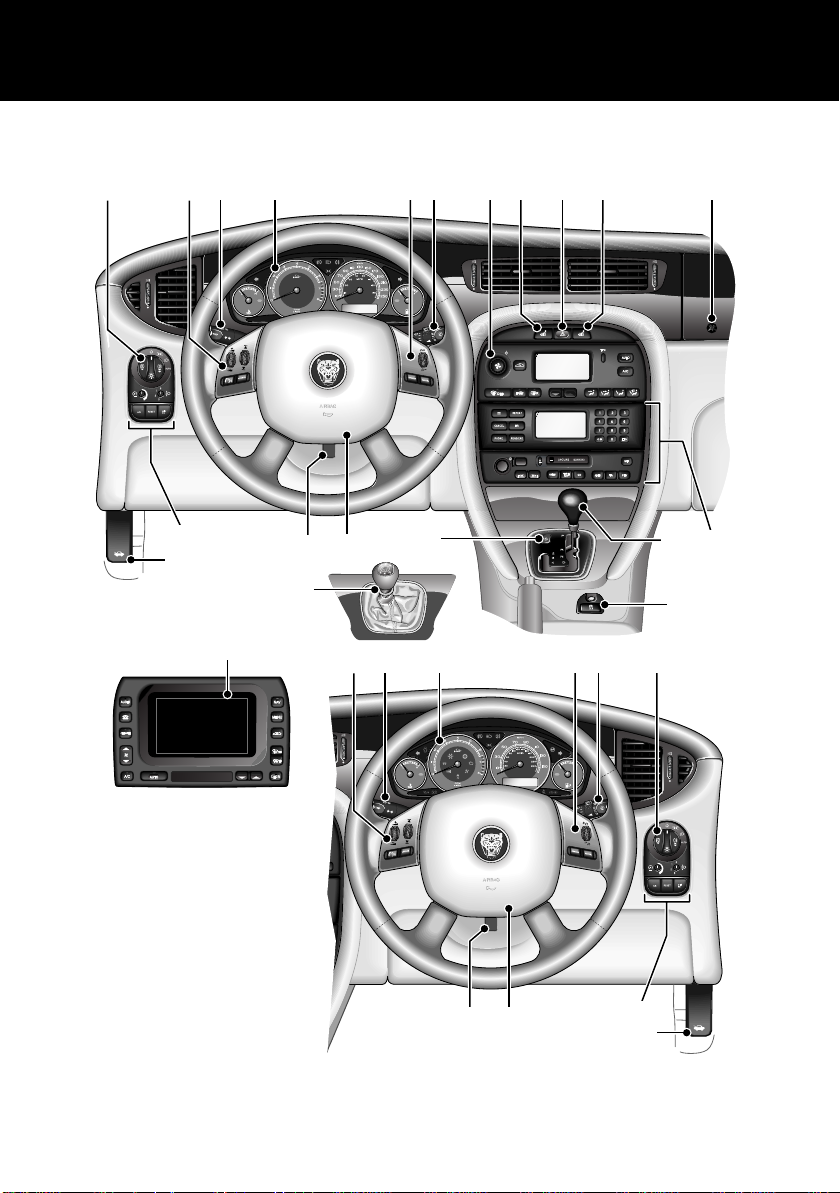
FACIA AND CONTROLS
1 2 3 4 5 6 7 8 9 10 11
JAG0795
20
19
21
16
17
18
2 3 4 6 1
15
18
17
12
13
14
5
19
20
16

Quick Overview
1. Exterior lighting switch (see
‘EXTERIOR LIGHTING SWITCH’,
page 110).
2. Audio switches (see ‘STEERING
WHEEL CONTROLS’, page 235).
3. Direction indicators/trip computer
switch (see ‘DIRECTION
INDICATORS’, page 113).
4. Instrument pack/warning indicators
(see ‘INSTRUMENT PACK’, page 94).
5. Cruise control switches (see ‘CRUISE
CONTROL SWITCHES’, page 108).
6. Wiper/washer switch (see
‘WINDSCREEN WASH/WIPE’,
page 122).
7. Heating and ventilation system (see
‘Climate Control’, page 149).
8. Driver’s seat heater switch (see
‘FRONT SEAT HEATERS’, page 81).
9. Hazard warning switch (see ‘HAZARD
WARNING’, page 113).
10. Passenger’s seat heater switch (see
‘FRONT SEAT HEATERS’, page 81).
11. Passenger airbag deactivation status
indicator (see ‘AIRBAGS’, page 60).
12. Audio system (see ‘Audio System’,
page 233).
13. Automatic gear selector lever (see
‘AUTOMATIC TRANSMISSION’,
page 131).
14. Dynamic Stability Control (DSC)
switch (see ‘DYNAMIC STABILITY
CONTROL (DSC)’, page 136).
15. Sport mode switch (see ‘Sport Mode’,
page 132).
16. Gear selector lever (see
‘Transmission’, page 131).
17. Horn (see ‘HORN LOCATION’,
page 119).
18. Steering column adjustment release
lever (see ‘COLUMN RELEASE
LEVER’, page 84).
19. Trip computer reset switch (see ‘TRIP
COMPUTER SWITCHPACK’,
page 106).
20. Bonnet release lever (see ‘OPENING
THE BONNET’, page 195).
21. Touch-screen control (see ‘GE
INFORMATION’, page 227).
N
ERAL
17
Quick Overview
Passenger airbag deactivation
indicator
The front passenger seat is
fitted with an occupancy sensor
that determines the state of seat
occupancy and sets the airbag status to
suit:
• Seat unoccupied — airbag deactivated
and status indicator off.
• Seat occupied — airbag activated and
status indicator off.
• Seat occupied by a child, child seat or
low weight object — airbag deactivated
and status indicator on.
• Passenger too close to airbags —
airbag deactivated and status
indicator on.
For further information refer to
‘OCCUPANT SENSING’, page 63.
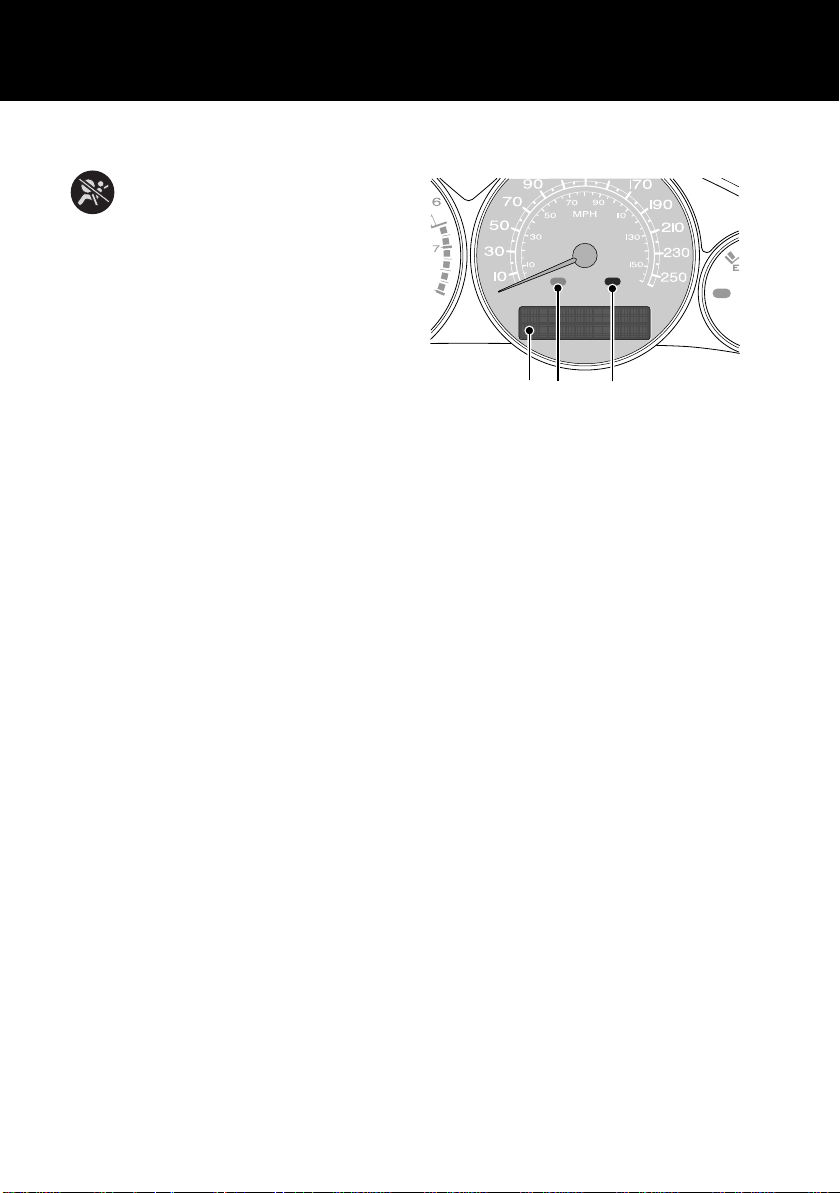
Diesel Particulate Filter (DPF)
indicators
2
JAG0733
If the amber warning indicator 2 is
illuminated, accompanied by the
message DPF FULL SEE HANDBOOK in
the message centre 1, regeneration of the
DPF is required.
If the red warning indicator 3 is
illuminated, accompanied by the same
warning message, seek qualified
assistance as soon as possible.
In either case, refer to ‘DIESEL
PARTICULATE FILTER’, page 146, for
more information.
1
3
18
Quick Overview
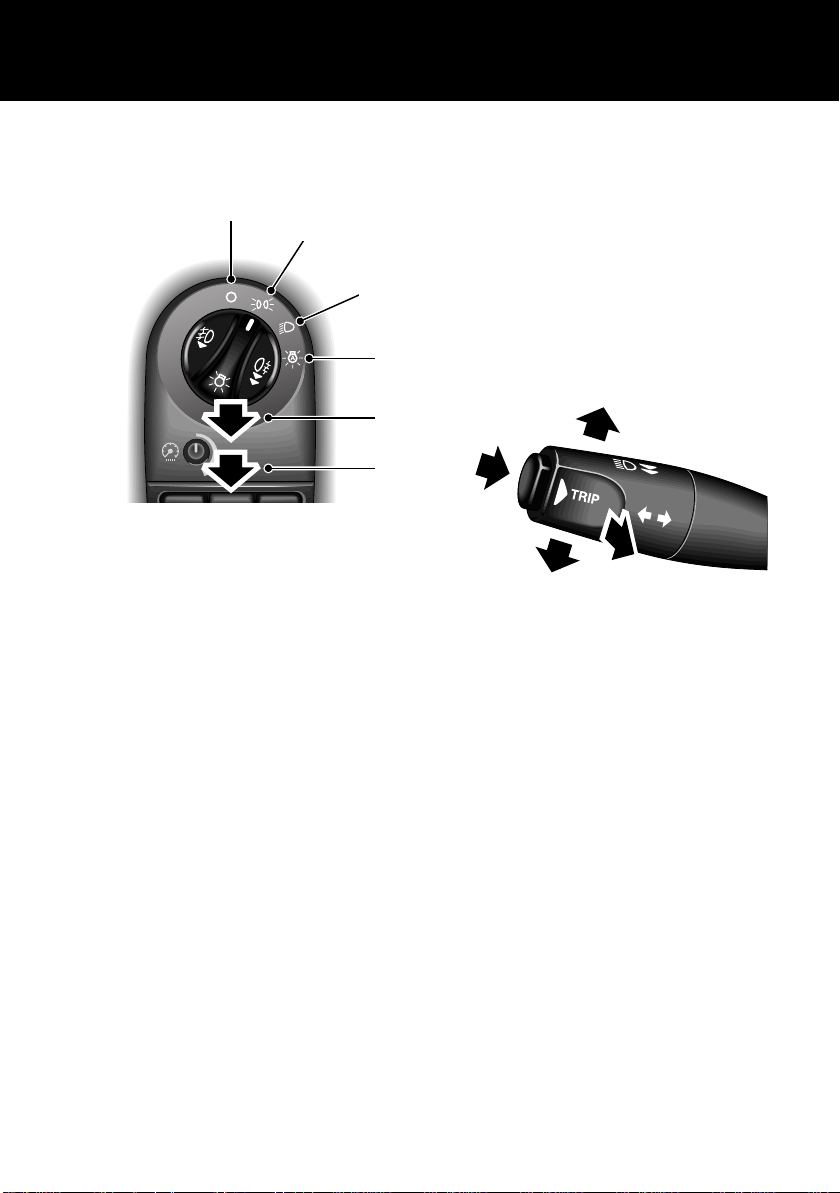
EXTERIOR LAMPS
Lamps master switch
1
2
3
4
A
B
JOL4744
1. Off
2. Side lamps
3. Dipped headlamps
4. Autolamps
A. Front fog lamps
Pull the switch to position A to switch
on the front fog lamps.
B. Rear fog lamps
Pull the switch to position B to switch
on the front and rear fog lamps.
Note: Fog lamps can only be operated
when the master switch is in either
position 2 or 3.
Autolamps
If Autolamps is selected, a sensor
monitors the exterior light levels and will
automatically switch the side lamps and
dipped headlamps on and off. With
Autolamps selected, if the windscreen
wipers are operated continuously for
more than 20 seconds, then the exterior
lamps will be switched on automatically.
Fog lamps cannot be activated when
Autolamps is selected.
JOL4741
Direction indicators
Move the lever up or down to activate the
direction indicators.
Headlamp flash
Pull the lever to the first position and
release to flash the headlamps. Pull the
lever to the second position and release
to switch on the high beam. To switch off
the high beam, again pull the lever to the
second position and release.
19
Quick Overview
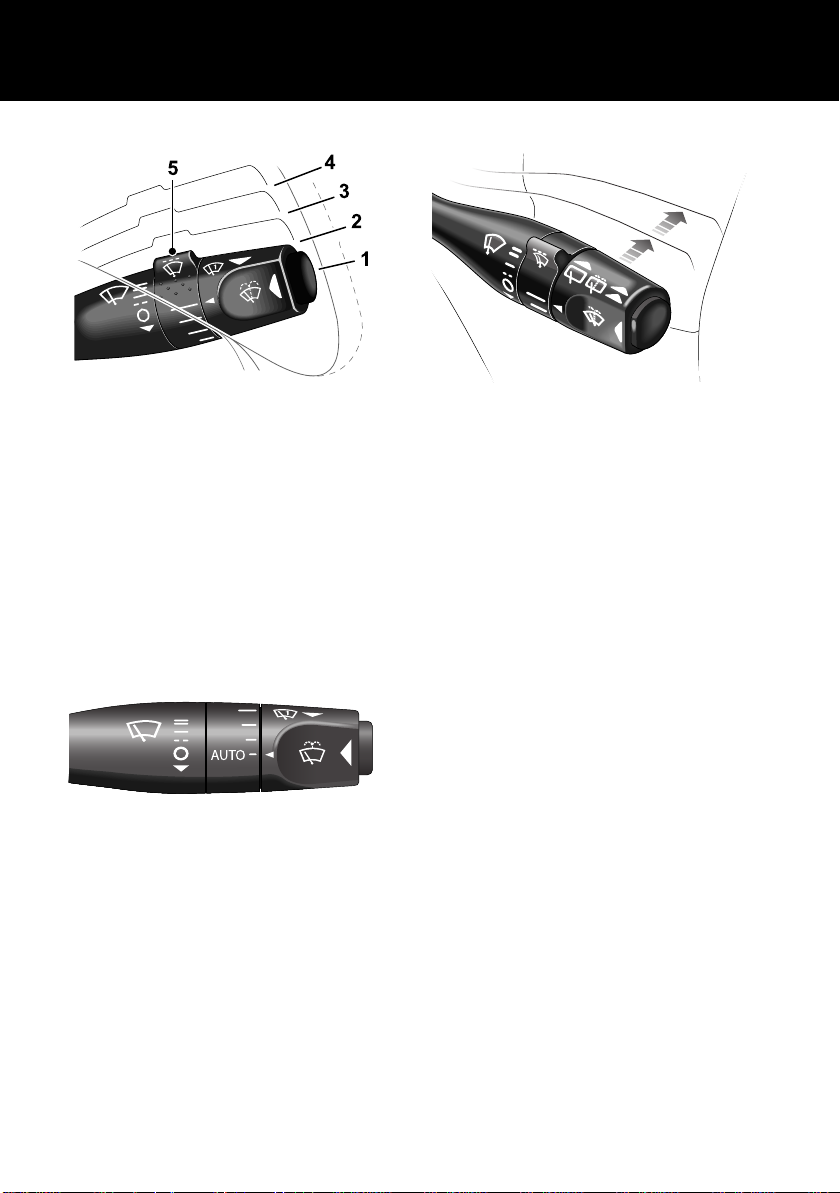
WIPERS AND WASHERS
JAG0687
1. Windscreen wipers off and parked.
2. Intermittent wipe.
3. Slow wiper operation.
4. High speed wiper operation.
5. Intermittent wipe delay.
Press the button for windscreen
wash/wipe.
Rotate the collar to adjust the speed of
the intermittent wipe or to select AUTO
for automatic operation of wipers.
Automatic operation
Rear wiper and washer
2
1
JAG0828
Push the lever to position 1 for
intermittent operation of the rear wiper.
Push and hold the lever in position 2 to
operate the rear washer and wiper.
JAG0807
The wiper lever must be in position 1 and
AUTO selected on the collar to enable
automatic operation of the wipers.
20
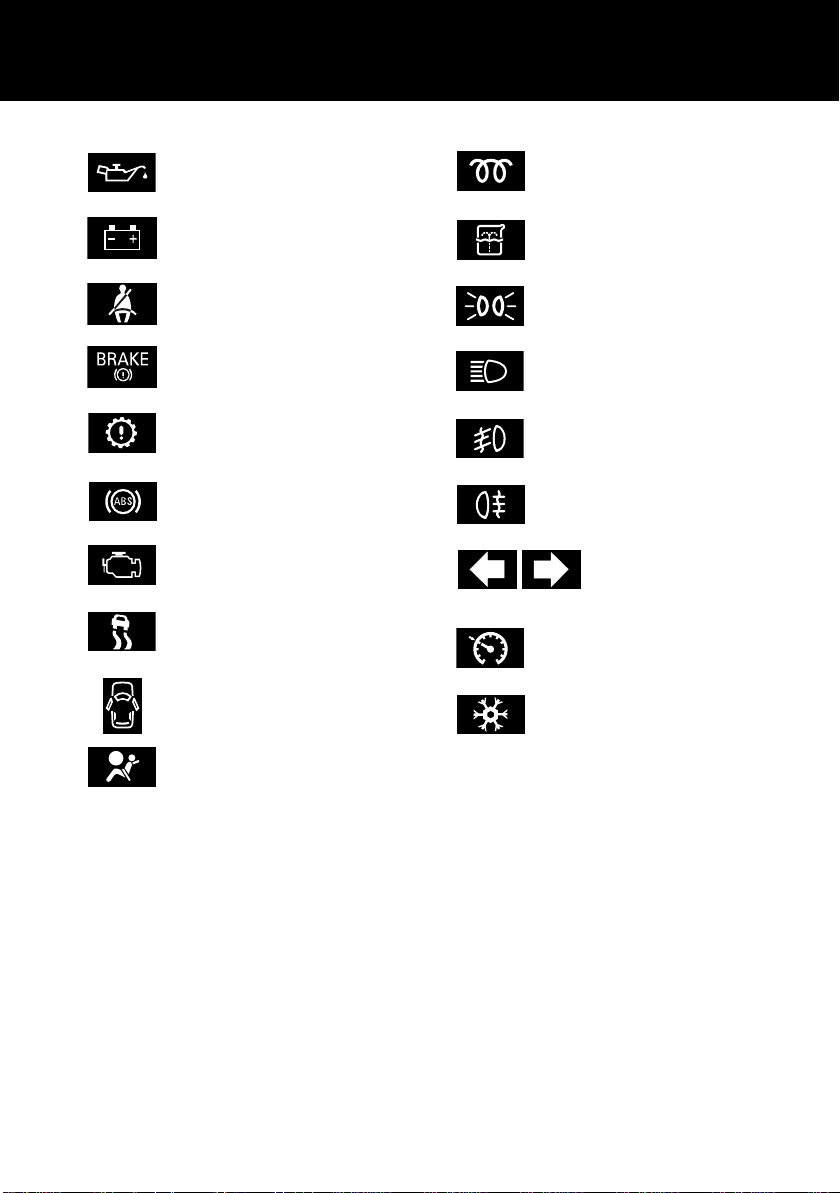
Quick Overview
WARNING INDICATORS
Low oil pressure
Diesel glow plugs
active/malfunction
Battery charge indicator
Seat belt reminder
Park brake on/brake fluid low
Transmission malfunction
detected
Anti-lock Braking System
Engine malfunction detected
Dynamic Stability Control
(DSC) off
Door/luggage compartment
open
Airbag system fault detected
Low washer fluid level
Side lamps on
Headlamp high beam on
Front fog lamps on
Rear fog lamps on
Direction indicators
Cruise control active
Low outside temperature
21
Quick Overview
AUTOMATIC TRANSMISSION
Gearshift interlock
The starter switch must be in position II
and the foot brake applied before the gear
selector can be moved from P (Park) to R
(Reverse).
The lever can be moved into P with the
starter switch off.
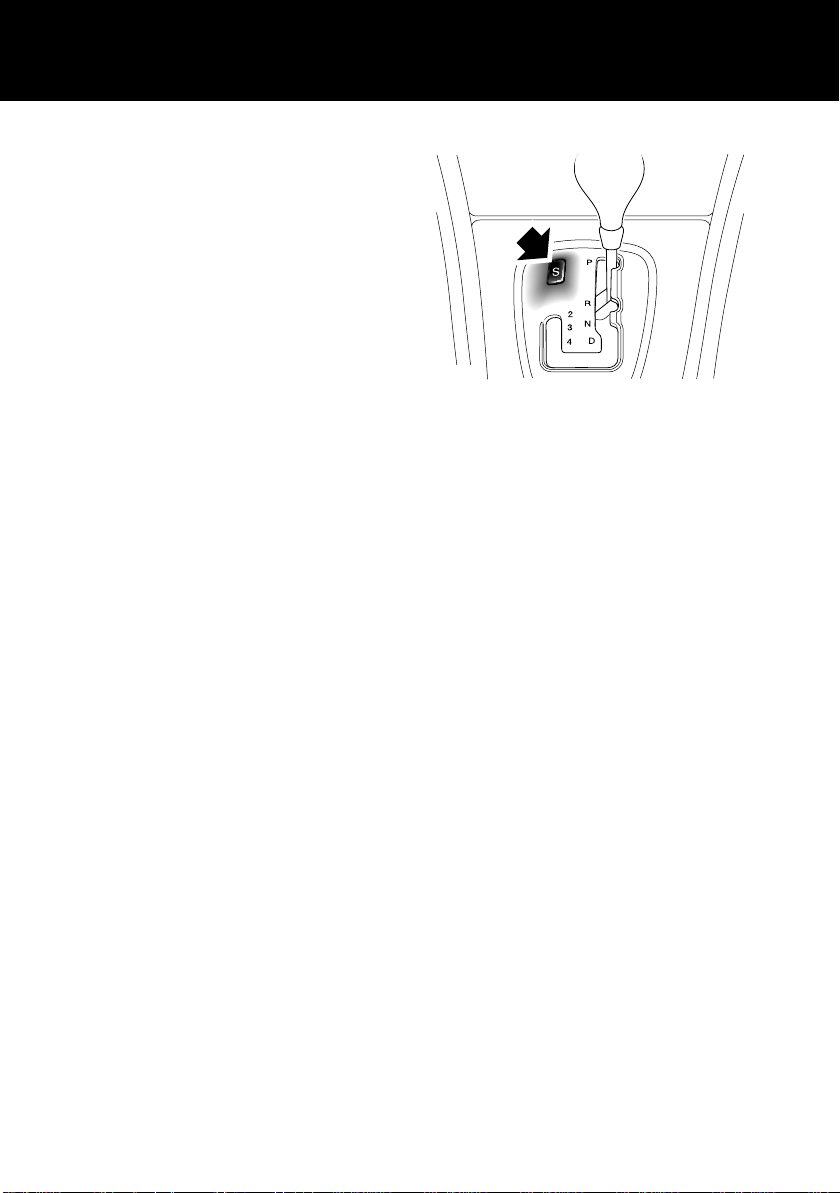
Gear selector
The J-gate gear selector lever is designed
to accommodate two different driving
techniques as follows:
• Automatic selection: the right-hand
side of the selector gate.
• Manual selection: the left-hand side of
the selector gate to individually select
4th, 3rd or 2nd gear.
After selecting R (Reverse) or D (Drive)
from N (Neutral) or P (Park), wait briefly for
the transmission to engage before
accelerating.
Kickdown mode
Kickdown provides maximum engine
performance in circumstances where
rapid acceleration is required, such as
when overtaking. Kickdown is operated
when the accelerator pedal is pressed
fully down, beyond the normal operating
spring pressure. This causes the
transmission to change down to the
lowest gear possible to achieve maximum
acceleration.
Kickdown mode is in effect for as long as
the pedal is fully depressed.
After selecting R (Reverse) or D (Drive)
from N (Neutral) or P (Park), wait briefly for
the transmission to engage before
accelerating.
Sport mode
JAG0762
Press the switch (arrowed) to select Sport
mode. A red indicator in the switch will
illuminate to indicate that Sport mode is
active. When Sport mode is selected, the
gear change points are modified to make
full use of the engine’s power.
Note: With the gear selector in D (Drive)
and Sport mode active, the transmission
will use 5th gear less at higher cruising
speeds.
Fuel consumption will be adversely
affected.
22
Quick Overview
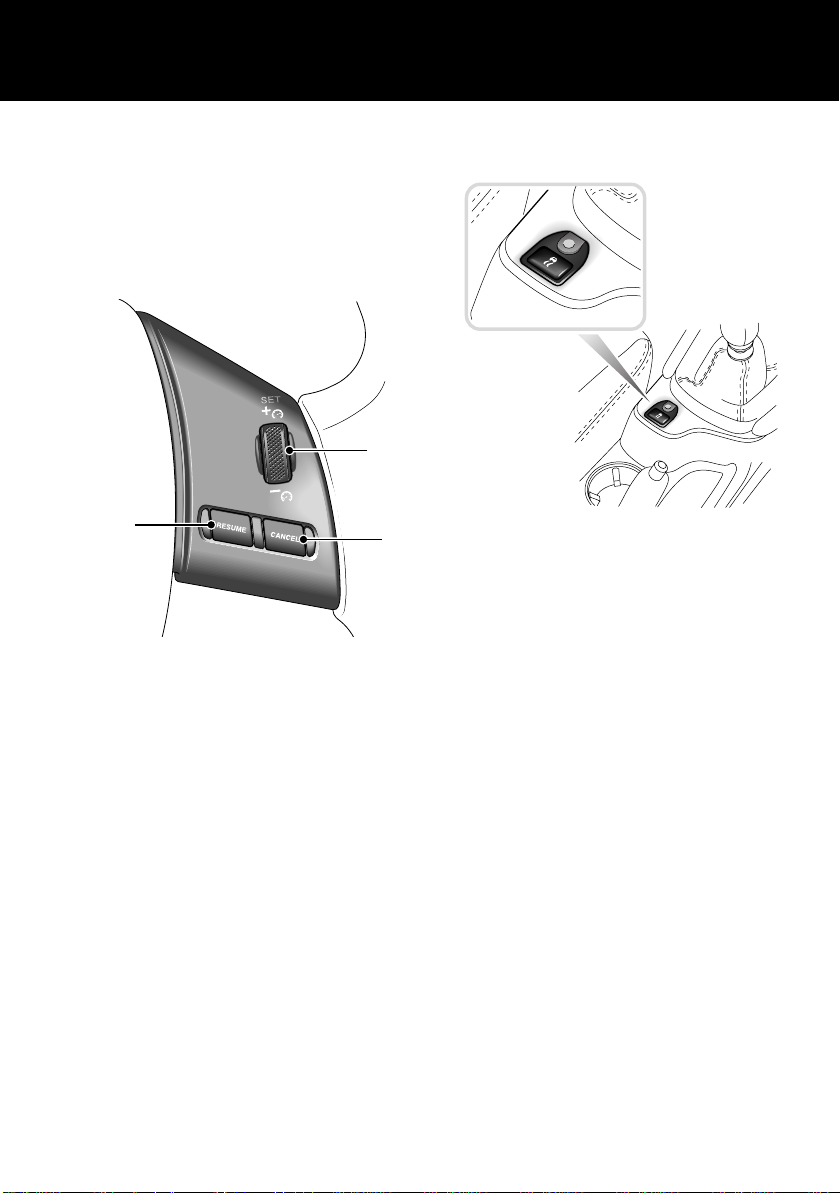
CRUISE (SPEED) CONTROL
The cruise control system will maintain a
set road speed until either cruise control
is cancelled or the brake or clutch pedal is
used.
The system is controlled via switches on
the steering wheel:
1
3
JAG0736
1. SET/Speed adjustment wheel — to
engage cruise control initially. Also
use to increase/decrease the set
speed.
2. CANCEL — cancels cruise control but
retains the set speed in memory.
3. RESUME — to resume a set speed
retained in memory.
Note: Cruise control will automatically
disengage when the vehicle speed falls
below 28 km/h (18 mph).
2
DYNAMIC STABILITY
CONTROL (DSC)
JAG0672
DSC uses traction control and the
Anti-lock Braking System to maximise the
vehicle’s handling performance and help
prevent wheelspin.
DSC is automatically activated when the
starter switch is turned to position II, but
can be turned off by pressing the button
on the centre console. An amber indicator
in the instrument pack will permanently
illuminate whenever DSC is switched off.
In the event of a system fault, the
message DSC SYSTEM FAULT will also
be displayed in the message centre.
23

Quick Overview
AUDIO SYSTEM KEY
FEATURES
General operation
1
JAG0818
Press the control knob 1 to switch on/off
and rotate to adjust the volume.
To adjust the sound settings, press the
MODE button 2 repeatedly, until the
required setting is displayed. Turn the
control knob 1 to adjust the level or rating.
After approximately five seconds, the
system will return to normal control mode.
2
Steering wheel controls
2
1
JAG0673
1. Press to mute audio unit (non-voice
only).
2. Rotate as required to increase or
decrease volume.
3. Press and release to cycle through
Radio, FM, AM, Cassette, CD, MD
and CD multichanger.
4. Rotate and release to cycle through
preset radio stations, the next CD/MD
track or to use cassette AMS
(Automatic Music Search).
Rotate and hold for at least two seconds
to cycle to the next strongest station, next
CD or change cassette side.
4
3
24
Quick Overview
RADIO OPERATION
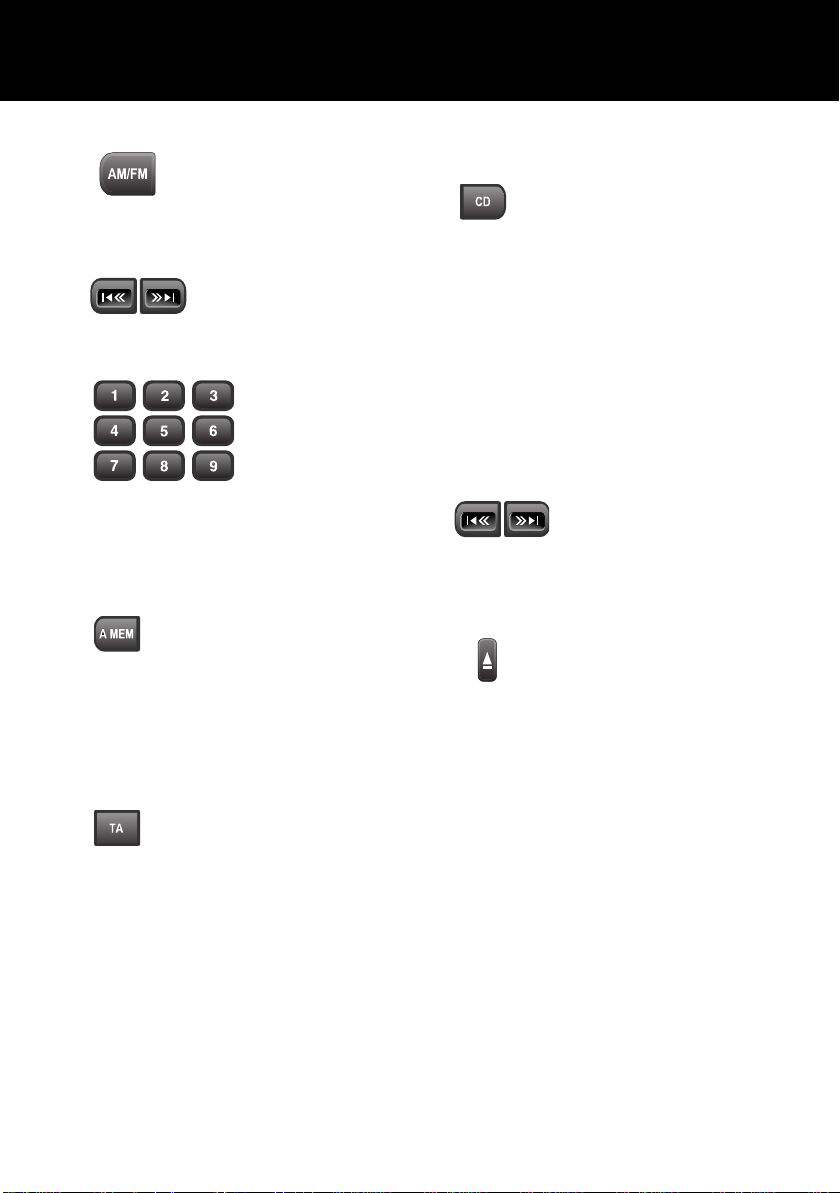
To switch on the radio
function, press the AM/FM
button. Pressing this button
repeatedly scrolls through FM, MW and
LW wavebands.
To search for a radio
station, press the seek
arrow buttons.
Setting the radio presets
Once a radio station
has been tuned,
press and hold the
desired preset
button 1 to 9 (or
touch a station
position on the touch-screen) until a
‘beep’ is heard. The preset is now stored.
A total of nine presets can be stored for
each waveband.
The radio presets can be
automatically set by using the
‘Auto Memory’ function. Press
and hold the A MEM button for two
seconds. The radio will be briefly muted
while it searches the waveband for the
nine strongest stations.
CD OPERATION
Single CD player
If the radio or CD multichanger is
being used, pressing the CD
button will resume playing any
CD installed in the player mechanism.
When a CD is loaded into the aperture, it
will begin to load and play automatically.
Pressing the CD button whilst in CD play
mode will pause the current track. A
subsequent press of the CD button will
resume play mode.
Six discs can be loaded into the
multichanger unit, and a further single
disc in the audio console (when fitted).
To skip tracks, continually
press the seek arrow buttons
to move backwards or
forwards accordingly. Pressing and
holding these buttons will search through
the selected track.
When a disc is inserted, the CD
icon is displayed. Press the eject
button to eject the CD. The
display will show DISC EJECT and the
CD icon will be turned off.
Activating TA (Traffic announcements)
To activate this function, press
and release the TA button. With
TA activated, traffic
announcements will interrupt radio,
cassette or CD/MD play. To deactivate
this feature, press and release the TA
button again.
Press and hold the TA button for two
seconds to display the radio station name
instead of the frequency.
25
Quick Overview
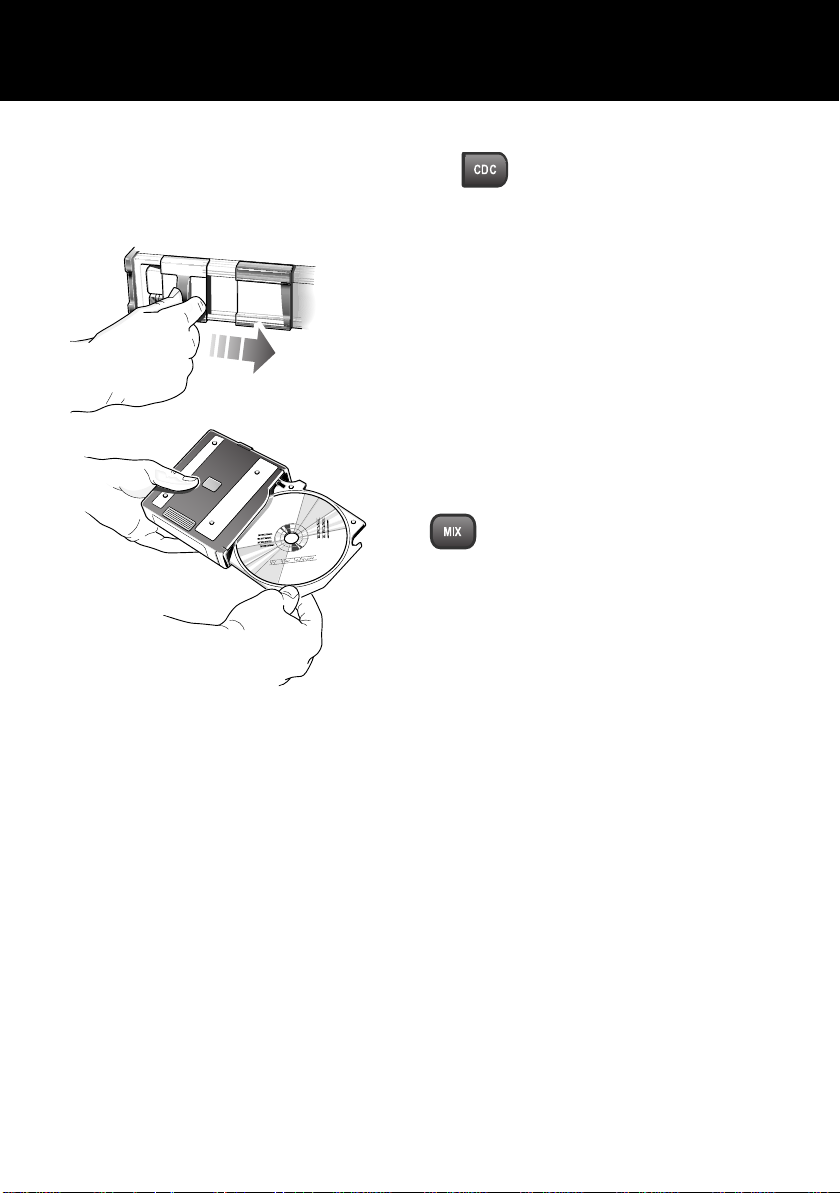
CD Multichanger
Note: Remember to close the
multichanger door; this will prevent dirt
getting into the unit and help reduce
skipping.
JAG0819
The CD multichanger is located in the
luggage compartment. To load a CD into
the multichanger:
1. Slide open the multichanger door,
press the Eject button and remove
the magazine. Close the door.
2. Pull a tray out from the magazine and
insert a CD (label side up). Slide the
tray into the magazine until a ‘click’ is
heard.
3. Slide open the multichanger door and
ensuring correct orientation, replace
the magazine. Ensure the magazine
clicks firmly into position.
CD selection
1. Press the CDC button (CD
button on MiniDisc and
cassette player systems) to
select the CD multichanger mode.
2. Press preset buttons 1to 6 to select
the appropriate CD loaded in the
multichanger.
If a touch-screen is fitted to the
vehicle, disc selection can be made
by touching the relevant numbered
disc icon.
3. When playing a CD, press the CDC
button to pause play. Press again to
continue play.
Playing random tracks
To play random tracks from the
disc, press and release the MIX
button. To cancel, press the MIX
button again.
To play random tracks from all discs
loaded in the multichanger, press the MIX
button for two seconds. To cancel, press
and hold the MIX button.
26

Quick Overview
TELEPHONE — BLUETOOTH
SYSTEM
Mobile phones with Bluetooth capability
can communicate with the vehicle’s
inbuilt telephone system.
The following procedure demonstrates
how to connect the most popular brands
of mobile phone.
Pairing a handset to the vehicle
3. Either using the on-screen or the
audio panel keyboard, press ##3#*#.
4. Touch the on-screen call icon or press
the call button on the audio panel.
5. Prepare the handset for pairing to the
system.
See the telephone manufacturer’s
instructions for further details, or follow
the table below for generic commands.
1. Turn the starter switch to position II.
2. Press the telephone button on the
audio panel. The touch-screen will
display the message No BT phone.
On non touch-screen systems the
message SIG will be displayed.
Nokia Motorola Ericsson
1. Select menu Select menu Select menu
2. Select settings Select settings Select connectivity
3. Select Bluetooth OR
Select Connectivity then
Bluetooth
4. Select On Select Bluetooth link Select My Devices
5. Select Search for Audio
devices
6. After search select Jaguar Select Look for devices After search select Jaguar
7. Enter pass code 1313.
Press OK to confirm
8. No connection? Select
Bluetooth (Menu) then
Paired devices Jaguar
Select Connection Select Bluetooth
Select Hands-free With New Device highlighted,
After search select
Jaguar
Permission to bond?
Select Yes and enter
pass code 1313
select Add. Press OK to
confirm
Select Connect
Enter pass code 1313 after
prompt
When the handset has been successfully
paired to the system, the touch-screen
message changes to REGISTERED or
PHONE CONNECTED. On systems
without a touch-screen the audio system
message changes to SIG*.
Note: For best results when pairing your
handset to the system, ensure the
handset is fully charged.
27

Quick Overview
Mobile phone compatibility
There are a number of mobile phones that
have been tested to function correctly
with the Jaguar system, however not all
mobile phones are compatible. For the
latest list of compatible phones and
software versions, please refer to
www.ownerinfo.jaguar.com.
Alternatively consult your Jaguar
Dealer/Authorised Repairer.
Downloading phone book entries
1. Turn the starter switch to position II,
and ensure the handset is paired to
the vehicle’s system.
2. Press the telephone button on the
audio panel.
3. Either using the on-screen keypad or
the audio panel keyboard, press
##2#*#.
4. Touch the on-screen call icon or
press the call button on the audio
panel.
5. Switch off the starter switch for six
minutes to allow the system to
complete the download process.
Making a call
JOL4746
1. Press and hold the Source switch on
the steering wheel control, or press
the call button on the audio panel.
Phone will be displayed.
2. Key in the phone number required,
using the on-screen or audio panel
keyboard.
3. Press the call button on the steering
wheel control, or on the audio panel.
Calling will be displayed.
4. To end the call, press the call button
on the steering wheel control, or on
the audio panel.
Receiving a call
To answer or end a call, press the call
button on the steering wheel control or on
the audio panel.
28
Filling Station Information
FUEL TYPE
Petrol models
Caution: Jaguar petrol engines are not
fitted with equipment necessary for the
use of fuels containing more than 10
per cent ethanol. Do not use E85 fuels
(85 per cent ethanol content). If E85
fuels are used serious engine and fuel
system damage will occur.
Use an Unleaded fuel with an octane
rating of at least 95 RON.
Diesel models
Caution: Do not use RME (bio-diesel)
except in the case of proprietary diesel
fuels which contain a mix of up to 5%.
Use Diesel fuel meeting specification
EN 590 or equivalent.
Note: Fuel consumption will be higher
than normal when the engine is new and
bedding in. After a period of time, the fuel
consumption will gradually improve to
expected levels.
Incorrect fuelling
Caution: If the fuel tank is accidentally
filled with the wrong type of fuel, it is
essential that the engine is not started
and you seek qualified assistance.
FUEL FILLING
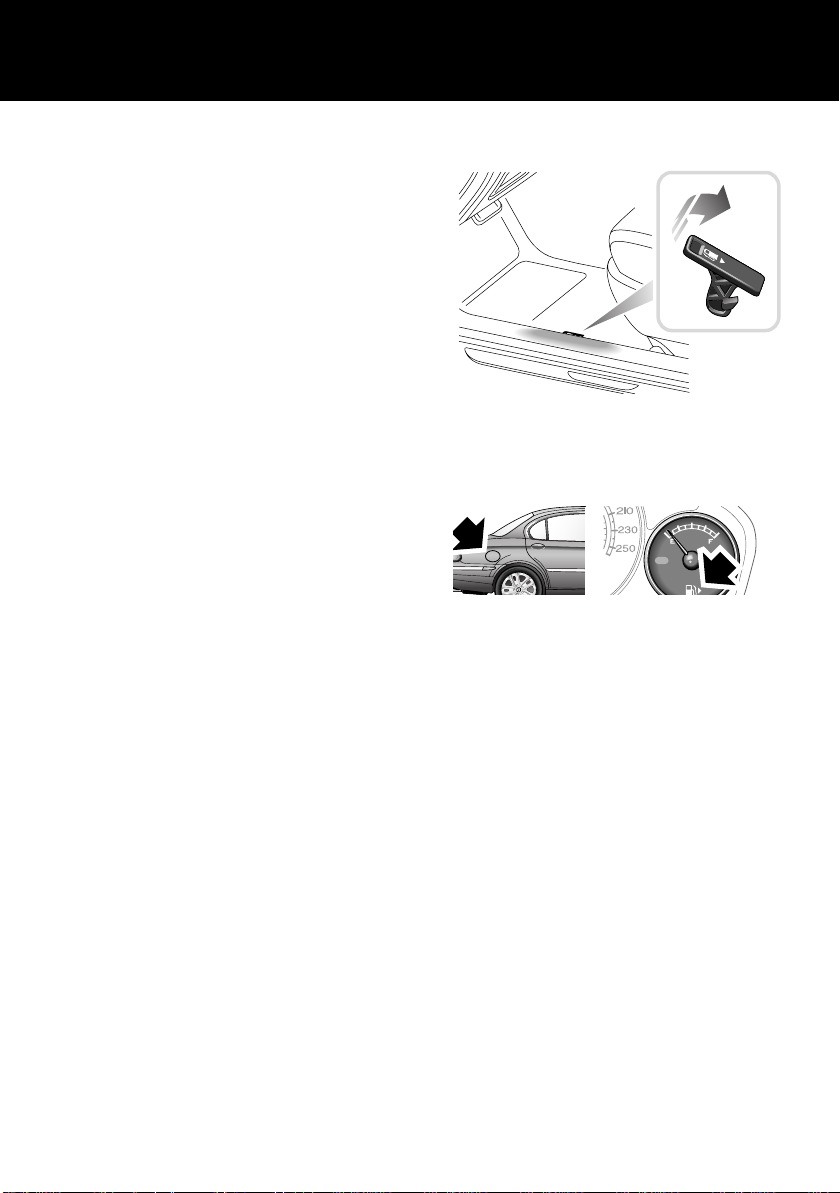
JAG0766
Pull the fuel filler flap release. This is
located on the floor, outboard of the
driver’s seat.
The filler flap is located on the right-hand
side of the vehicle.
Note: Vehicles with a diesel engine have a
yellow filler cap.
For quickness and to completely fill the
tank, ensure that the fuel nozzle rests on
the bottom of the filler neck.
After refuelling, refit the filler cap in the
filler neck and twist the cap clockwise
until it clicks three times. Close the flap,
which automatically locks shut.
29
Filling Station Information
BONNET RELEASE
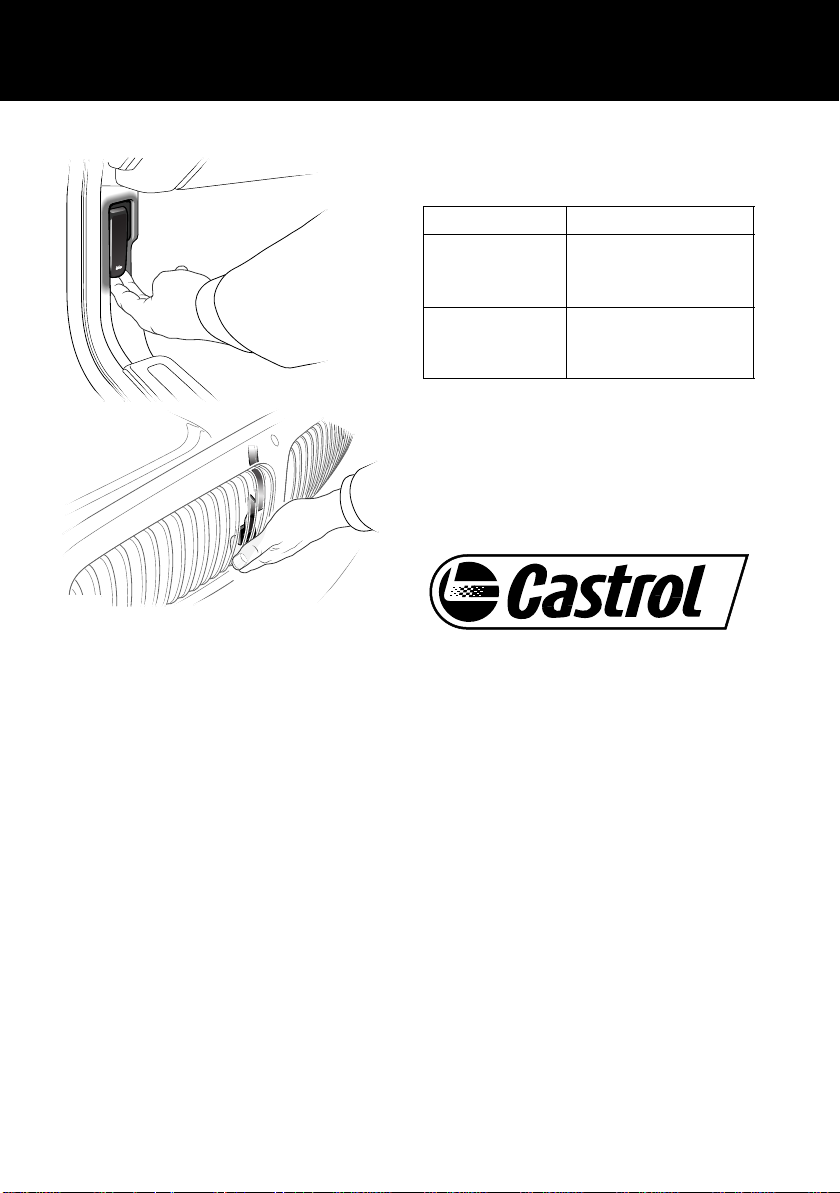
JAG0704
Pull the release lever located below the
facia on the left-hand side of the vehicle,
see ‘OPENING THE BONNET’, page 195.
UNDERBONNET TOP-UP
Engine oil specification
Model Specification
Petrol models SAE 5W-30 to Jaguar
specification WSS
M2C913 — A or B.
Diesel models SAE5W-30 to Jaguar
specification WSS
M2C913 — B ¹
¹ For top-up purposes only, where oil of
specification WSS-M2C-913-B cannot be
found, ACEA B1 or ACEA B3 specification
oils may be used.
JAGUAR RECOMMENDS
Windscreen/headlamp washer
reservoir.
See ‘WINDSCREEN WASHER
RESERVOIR’, page 202.
Cooling system
When the engine is cold, top-up the
coolant until the level is between the MIN
and MAX marks on the side of the header
tank. Use only a 50% mix of water and
antifreeze. See ‘COOLANT LEVEL’,
page 203.
30
Loading…
Jaguar X-Type (2004)
Workshop Manual
X-TYPE
Sedan and Estate (Wagon)
2.0 L
, 2.5 L and 3.0 L Gasoline;
2.0 L and 2.2 L, Diesel
2001 to 2009
www.JagDocs.com
JagDocs.com
View the manual for the Jaguar X-Type (2004) here, for free. This manual comes under the category cars and has been rated by 27 people with an average of a 8.7.
This manual is available in the following languages: English. Do you have a question about the Jaguar X-Type (2004) or do you need help?
Ask your question here
Product Images (1)

Jaguar X-Type (2004) specifications
Below you will find the product specifications and the manual specifications of the Jaguar X-Type (2004).
The Jaguar X-Type (2004) is a midsize luxury car produced by Jaguar Cars from 2001 to 2009. It was the first compact executive car manufactured by Jaguar and was available as a four-door sedan or a five-door estate.
The X-Type (2004) featured a sleek and refined design, with smooth lines and distinctive Jaguar branding. It was equipped with a range of engine options, including a 2.0-liter V6, a 2.5-liter V6, and a 3.0-liter V6. The transmission options included a five-speed manual or an automatic transmission.
In terms of performance, the X-Type (2004) provided a comfortable and smooth driving experience. It had a well-tuned suspension system that offered a good balance between comfort and handling. The steering was precise and responsive, allowing for confident maneuvering on the road.
The interior of the X-Type (2004) was designed with luxury in mind. It featured high-quality materials and finishes, providing an upscale feel. The seats were comfortable and supportive, ensuring a pleasant driving experience for both the driver and the passengers.
In terms of safety, the X-Type (2004) was equipped with standard features such as anti-lock brakes (ABS), traction control, and stability control. It also offered optional features like front and side airbags for enhanced protection.
Overall, the Jaguar X-Type (2004) was a stylish and luxurious car that offered a blend of performance and comfort. It appealed to those seeking a refined and elegant vehicle in the midsize luxury segment.
General
| Brand | Jaguar |
| Model | X-Type (2004) |
| Product | car |
| Language | English |
| Filetype | User manual (PDF) |
Frequently Asked Questions
Can’t find the answer to your question in the manual? You may find the answer to your question in the FAQs about the Jaguar X-Type (2004) below.
Why is the check engine light illuminated on my Jaguar X-Type (2004)?
The check engine light could indicate a wide range of issues, such as a faulty sensor, emissions problem, or even a loose gas cap. It’s essential to diagnose the specific error code using an onboard diagnostic tool or seeking professional assistance to accurately address the underlying cause.
How can I improve the fuel efficiency of my Jaguar X-Type (2004)?
Enhancing fuel efficiency can be done by ensuring regular maintenance, such as keeping tire pressure at the recommended level, using the recommended fuel grade, avoiding unnecessary excess weight, and maintaining smooth acceleration and deceleration habits.
What should I do if my Jaguar X-Type (2004) experiences power steering failure?
If you encounter power steering failure, it is crucial to remain calm and ensure your safety by gradually reducing your speed and pulling over to a safe location. Without referring to the manual, check the power steering fluid level and ensure it is at the proper level. If the fluid level is adequate, it is recommended to seek professional help for diagnosis and repair.
How do I change the headlight bulb on my Jaguar X-Type (2004)?
To replace a headlight bulb, access the bulb compartment by removing the necessary covers or panels. Without referring to the manual, gently detach the electrical connector from the bulb, remove the old bulb, and carefully insert the new one, ensuring not to touch the glass portion. Finally, reconnect the electrical connector and secure any panels or covers that were removed.
Why is my air conditioning system blowing warm air in my Jaguar X-Type (2004)?
If you are experiencing warm air from the air conditioning system, it could be caused by various factors. Without consulting the manual, check if the climate control settings are correct, ensuring the system is set to cool and the AC is activated. If the settings seem accurate, it is advisable to have a technician inspect the refrigerant levels, compressor functionality, or potential leaks within the system for proper resolution.
When does my Jaguar need maintenance?
Regular maintenance is necessary for every car. How often the car needs maintenance and what exactly needs to be done can be found in the maintenance instructions.
For major periodic service, this should generally be done every 2 years or after 30,000 kilometres.
One or more doors won’t open from the inside. Now what?
The lock is most likely set to the child safety lock so it cannot be opened from the inside. How to unset the child safety lock differs per brand and type.
My car radio does not turn on, now what?
If your car radio does not turn on, it will not receive any power. Check that the red wire is connected to the contact power supply and the yellow wire to the constant power supply.
How do I convert miles into kilometres?
1 mile equals 1.609344 kilometers and 1 kilometer equals 0.62137119 miles.
Where can I find the VIN number of my Jaguar?
The location of the VIN number of the car differs per brand and type of car.
The code may be stamped on the frame of the car or mounted on a plate. It is best to consult the manual of the Jaguar X-Type (2004)for the exact location of the VIN number.
When should I change the brake fluid of my Jaguar?
It is recommended to change the brake fluid every two years.
What is the difference between E10 and E5 petrol?
E10 petrol consists of up to ten per cent ethanol while E5 petrol will contain less than five per cent ethanol. As a result, the percentage of E10 petrol is lower than that of E5 petrol, making it less bad for the environment.
What is a VIN number?
The VIN number of a car is an identification number unique to each car. The abbreviation VIN therefore stands for Vehicle Identification Number.
Is the manual of the Jaguar X-Type (2004) available in English?
Yes, the manual of the Jaguar X-Type (2004) is available in English .
Is your question not listed? Ask your question here
Jaguar X-Type (2001)
Workshop Manual
X-TYPE
Sedan and Estate (Wagon)
2.0 L
, 2.5 L and 3.0 L Gasoline;
2.0 L and 2.2 L, Diesel
2001 to 2009
www.JagDocs.com
JagDocs.com
View the manual for the Jaguar X-Type (2001) here, for free. This user manual comes under the category cars and has been rated by 4 people with an average of a 9.1. This manual is available in the following languages: English. Do you have a question about the Jaguar X-Type (2001)?
Ask your question here
Product Images (1)

Jaguar X-Type (2001) specifications
Below you will find the product specifications and the manual specifications of the Jaguar X-Type (2001).
The Jaguar X-Type (2001) is a luxury compact executive car produced by British car manufacturer Jaguar. It is available as a four-door sedan and is equipped with rear-wheel drive or all-wheel drive.
The X-Type features a sleek and sophisticated exterior design, characterized by its Jaguar signature grille and distinctive headlights. It has a length of approximately 4.67 meters, a width of around 1.71 meters, and a height of about 1.39 meters.
Under the hood, the X-Type offers various engine options, including petrol and diesel variants. These engines range from 2.0 to 3.0-litre capacity, providing different levels of performance and fuel efficiency. The transmission options include both manual and automatic transmissions.
Inside the cabin, the X-Type offers a comfortable and spacious interior with seating for up to five occupants. The materials used in the upholstery and trim are of high quality, adding to the overall luxurious feel of the car. The dashboard layout is user-friendly and features various controls and displays for easy access to essential functions.
In terms of safety features, the X-Type incorporates multiple airbags, anti-lock braking system (ABS), traction control, and stability control, among others. These safety systems aim to provide a secure driving experience for the occupants.
Overall, the Jaguar X-Type (2001) is a luxury compact executive car designed with attention to detail and performance. Its elegant exterior, comfortable interior, and advanced safety features make it an appealing choice in its segment.
General
| Brand | Jaguar |
| Model | X-Type (2001) |
| Product | car |
| Language | English |
| Filetype | Manual (PDF) |
Frequently asked questions
Can’t find the answer to your question in the manual? You may find the answer to your question in the FAQs about the Jaguar X-Type (2001) below.
When does my Jaguar need maintenance?
Regular maintenance is necessary for every car. How often the car needs maintenance and what exactly needs to be done can be found in the maintenance instructions.
For major periodic service, this should generally be done every 2 years or after 30,000 kilometres.
One or more doors won’t open from the inside. Now what?
The lock is most likely set to the child safety lock so it cannot be opened from the inside. How to unset the child safety lock differs per brand and type.
My car radio does not turn on, now what?
If your car radio does not turn on, it will not receive any power. Check that the red wire is connected to the contact power supply and the yellow wire to the constant power supply.
How do I convert miles into kilometres?
1 mile equals 1.609344 kilometers and 1 kilometer equals 0.62137119 miles.
Where can I find the VIN number of my Jaguar?
The location of the VIN number of the car differs per brand and type of car.
The code may be stamped on the frame of the car or mounted on a plate. It is best to consult the manual of the Jaguar X-Type (2001)for the exact location of the VIN number.
When should I change the brake fluid of my Jaguar?
It is recommended to change the brake fluid every two years.
What is the difference between E10 and E5 petrol?
E10 petrol consists of up to ten per cent ethanol while E5 petrol will contain less than five per cent ethanol. As a result, the percentage of E10 petrol is lower than that of E5 petrol, making it less bad for the environment.
What is a VIN number?
The VIN number of a car is an identification number unique to each car. The abbreviation VIN therefore stands for Vehicle Identification Number.
Is the manual of the Jaguar X-Type (2001) available in English?
Yes, the manual of the Jaguar X-Type (2001) is available in English .
Is your question not listed? Ask your question here
- Машины
- Jaguar
- X-Type
- Jaguar X-Type
Мануал на русском.
31 мая 2015
podmoskal
Был 3 месяца назад
Я езжу на Jaguar X-Type
Москва, Россия
Подписаться
Сообщение
Подумал, что кому нибудь может пригодиться.
yadi.sk/i/Qgr81sQQgyVWs ссылка на мануал
yadi.sk/i/-NZ6tAE-gyVgp ссылка на quick start guide на русском
Цена вопроса: 0 ₽
Пробег: 64 500 км
31 мая 2015
Метки: аксессуары
Ранее Кошачий характер.
Далее Поездка в сервис.
Разместить рекламу
Реклама
Машины в продаже
Войдите или зарегистрируйтесь, чтобы писать комментарии, задавать вопросы и участвовать в обсуждении.
Войти
Зарегистрироваться