
Как нарисовать таблицу в Фотошопе
Создание таблиц в различных программах, специально предназначенных для этого, дело достаточно простое, но, по каким-то причинам нам понадобилось нарисовать таблицу именно в программе Фотошоп.
Если такая необходимость возникла, то изучите этот урок и больше не будете иметь трудностей в создании таблиц в Фотошопе.
Вариантов создания таблицы немного, всего два. Первый – сделать все «на глаз», потратив при этом кучу времени и нервов (проверено на себе). Второй – немного автоматизировать процесс, тем самым сэкономив и то и другое. Естественно, мы, как профессионалы пойдем по второму пути.
Для построения таблицы нам понадобятся направляющие, которые будут определять размеры самой таблицы и ее элементов.
- Для точной установки направляющей линии необходимо пройти в меню «Просмотр», найти там пункт «Новая направляющая», задать значение отступа и ориентацию…
И так для каждой линии. Это долго, так как направляющих нам может понадобиться очень, очень много.
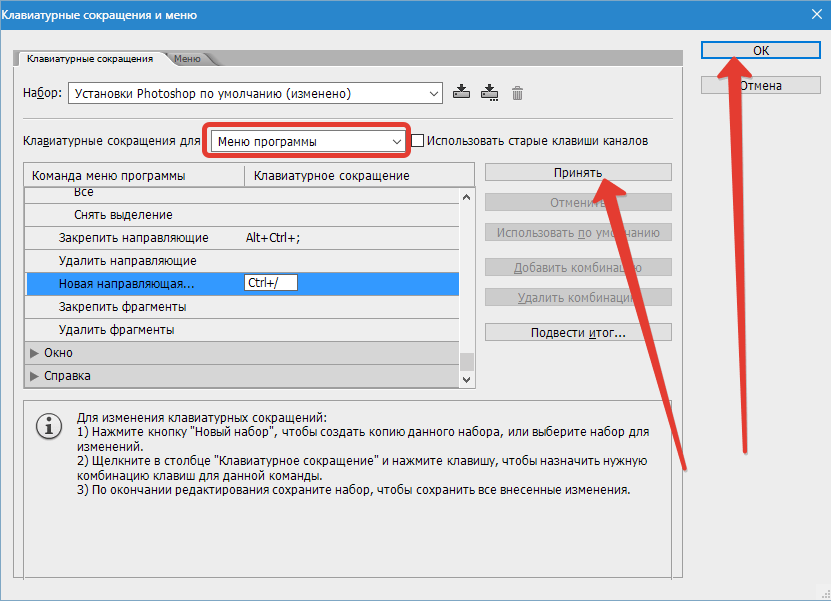
- Нам нужно на данное действие назначить сочетание горячих клавиш. Для этого идем в меню «Редактирование» и ищем внизу пункт «Клавиатурные сокращения».
- В открывшемся окне в выпадающем списке выбираем «Меню программы», ищем пункт «Новая направляющая» в меню «Просмотр», кликаем по полю рядом с ним и зажимаем нужную комбинацию так, как если бы мы ее уже применили. То есть зажимаем, к примеру, CTRL, а затем «/». Именно такую комбинацию я и выбрал.
- По завершению нажимаем «Принять» и ОК.
- Дальше все происходит достаточно просто и быстро.
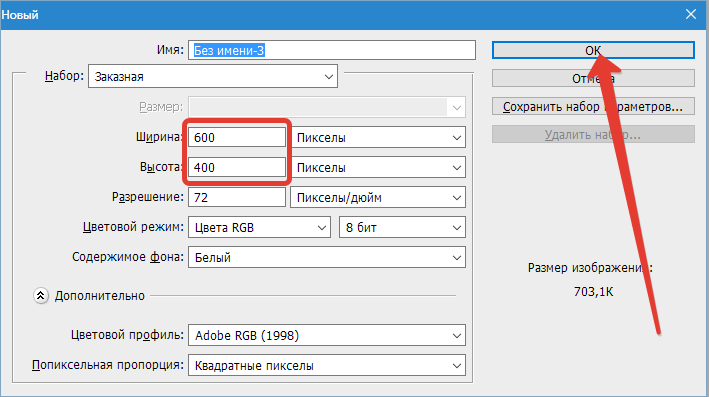
Создаем новый документ нужного размера сочетанием клавиш CTRL+N. - Затем нажимаем CTRL+/, и в открывшемся окне прописываем значение для первой направляющей. Я хочу задать отступ в 10 пикселей от края документа.
- Далее необходимо высчитать точное расстояние между элементами, руководствуясь их количеством и размером контента.
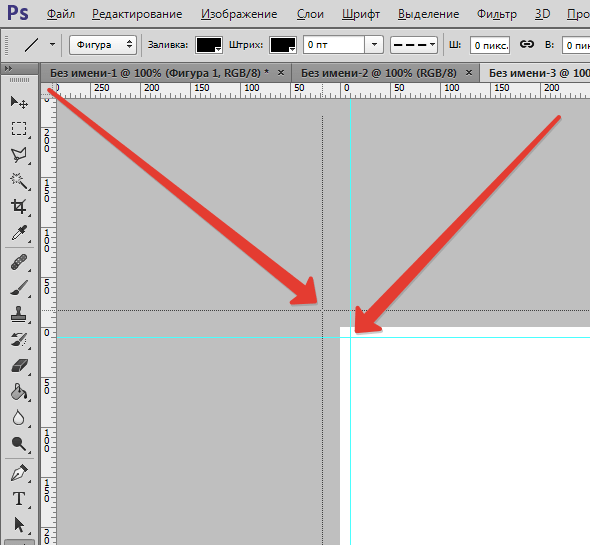
Для удобства расчетов перетащите начало координат из угла, указанного на скрине, на пересечение первых направляющих, определяющих отступ:

Если у вас до сих пор не включены линейки, то активируйте их сочетанием клавиш CTRL+R.
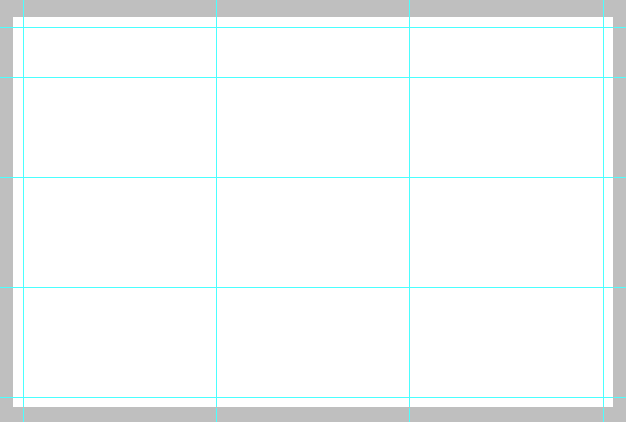
У меня получилась вот такая сетка:
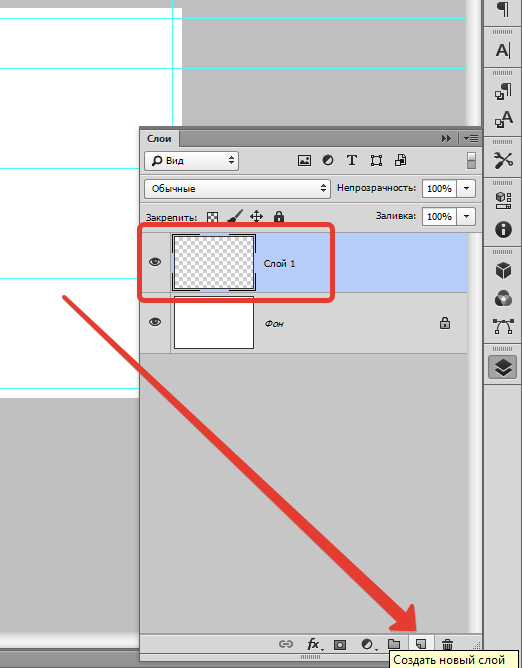
- Теперь нам необходимо создать новый слой, на котором и будет находиться наша таблица. Для этого нажимаем на значок в нижней части палитры слоев:
- Рисовать (ну, ладно, чертить) таблицу мы будем инструментом «Линия», он имеет наиболее гибкие настройки.
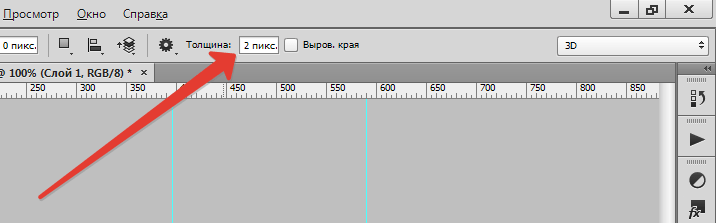
Настраиваем толщину линии.

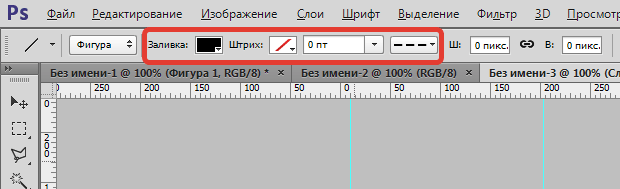
Выбираем цвет заливки и штриха (штрих выключаем).
- И теперь, на только что созданном слое рисуем таблицу.
Делается это так:
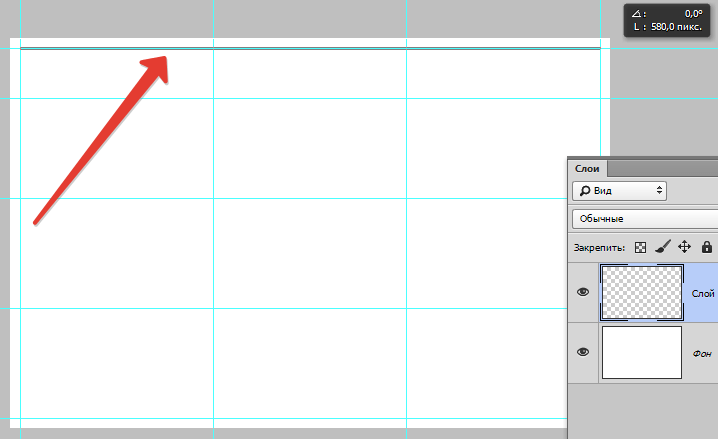
Зажимаем клавишу SHIFT (если не зажать, то каждая линия будет создаваться на новом слое), ставим курсор в нужное место (сами выберите, откуда начать) и проводим линию.
- Таким же образом рисуем остальные линии. По завершению работы направляющие можно отключить сочетанием клавиш CTRL+H, а если они понадобятся, то снова включить этой же комбинацией.
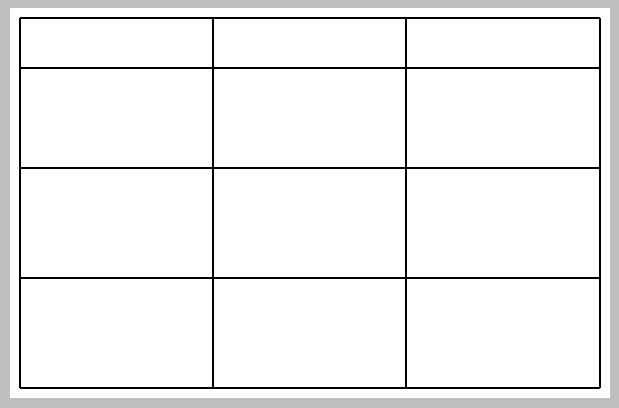
Наша таблица:

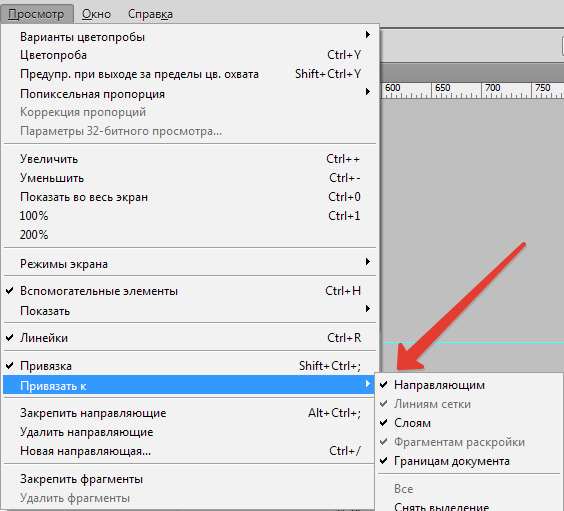
Совет: для удобства работы включите привязку к направляющим. В этом случае не придется дрожащей рукой искать конец линии.

Данный способ создания таблиц в Фотошопе поможет вам значительно сэкономить время.
Наша группа в TelegramПолезные советы и помощь
Whether you’re creating a printable design or needing to create a table for work purposes, it’s relatively quick to make a table in Photoshop. Although they are not very customizable, there are other design options that make Photoshop a worthwhile table-making tool.
So, let’s take a look at how to create a table from scratch and use it to create a printable template design.
Step 1: Go To View > Guides > New Guide Layout
Step 2: Add A Rectangle Frame Using The Rectangle Tool
Step 3: Add Column And Row Lines To The Table Using The Line Tool
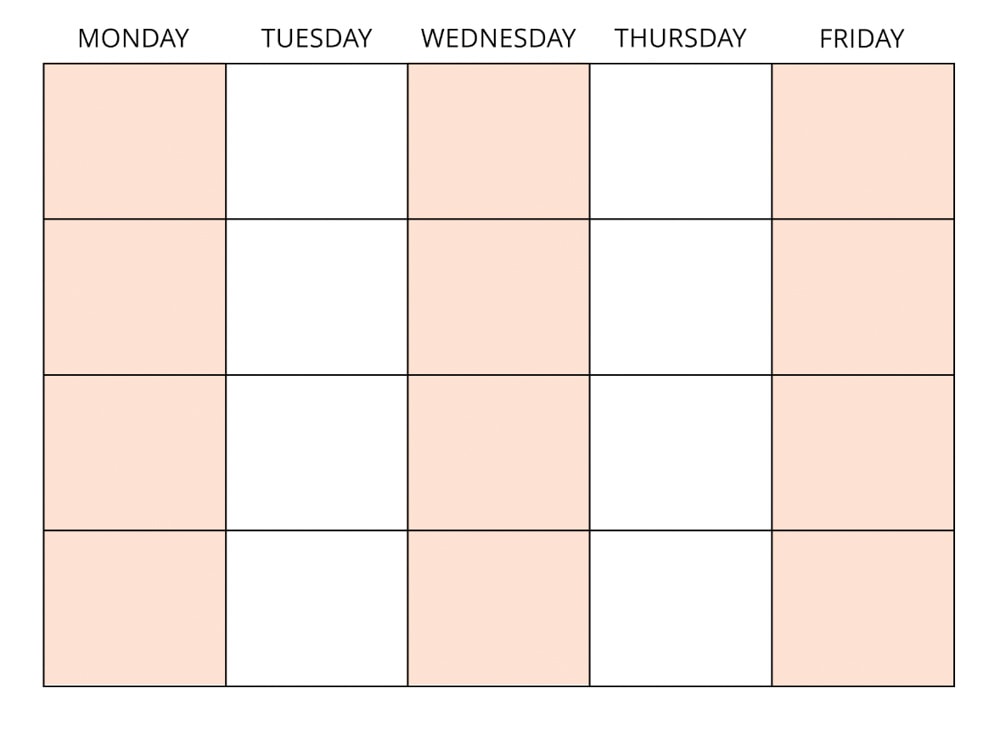
Step 4: Customize The Table By Adding Text And Color To The Cells (Optional)
Step 1: Go To View > Guides > New Guide Layout
Step 2: Add A Rectangle Frame Using The Rectangle Tool
Step 3: Add Column And Row Lines To The Table Using The Line Tool
Step 4: Customize The Table By Adding Text And Color To The Cells (Optional)
How To Make A Table In Photoshop
Step 1: Go To View > Guides > New Guide Layout
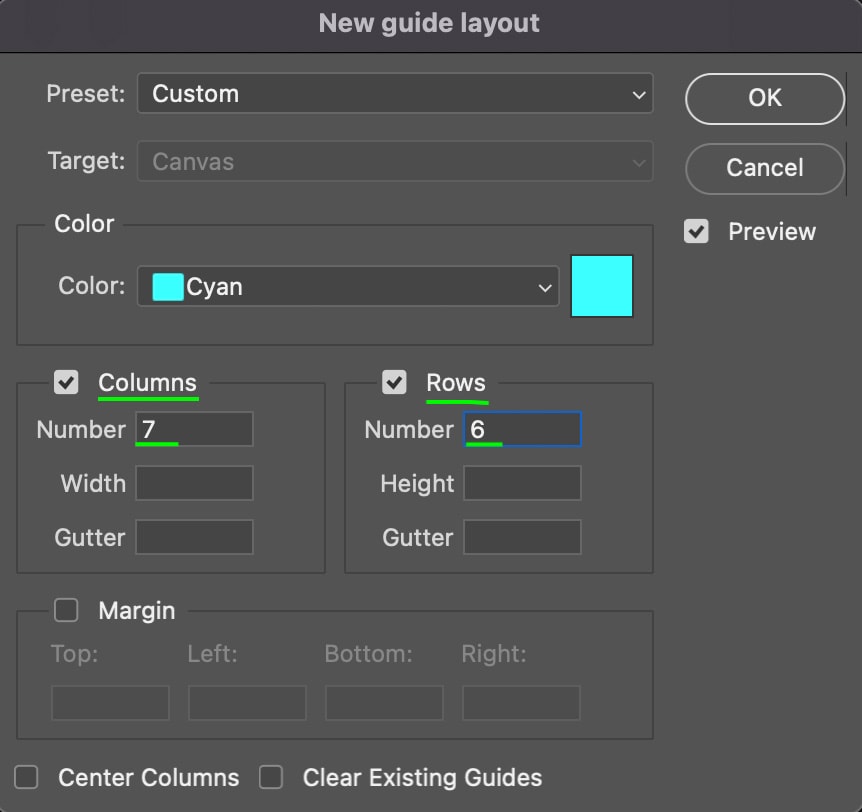
First, add guides to your document, which will form the grid lines of the table. Add guides by heading to View > Guides > New Guide Layout.
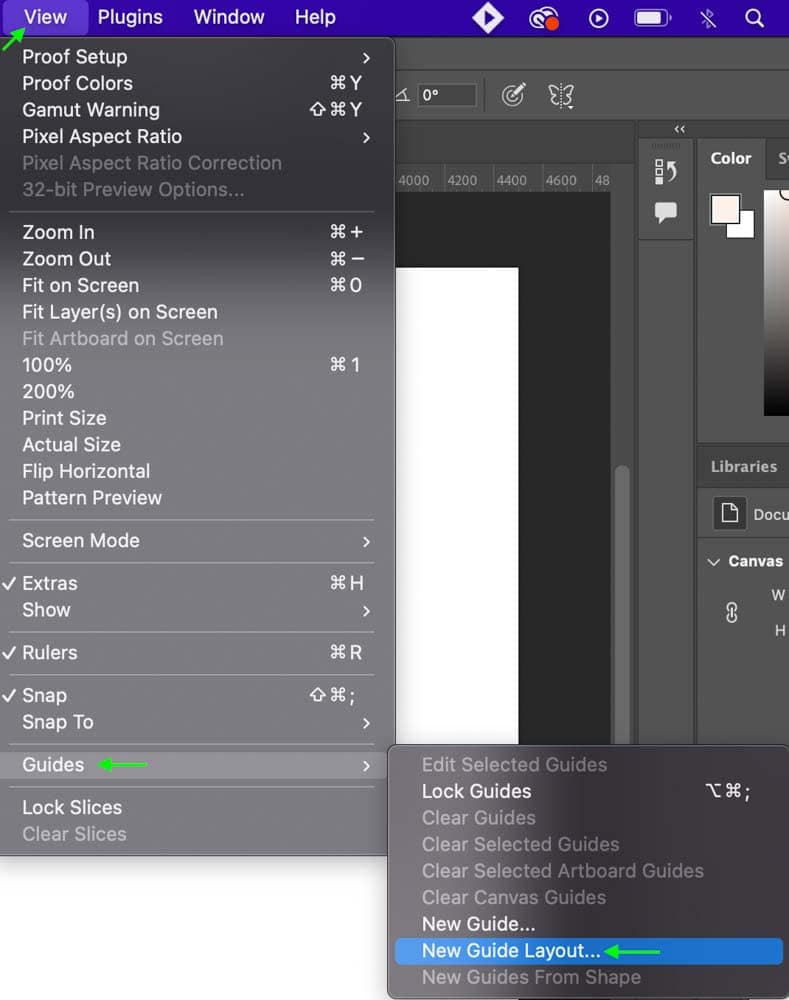
In the Columns and Rows sections, you can set the number of lines to however many columns and rows you need. It helps to add two more guidelines than the amount you need to ensure your table has a section of space around it.
Leave the Gutter empty because you won’t want a gutter for these grids. Click OK once you have added the correct settings.
Step 2: Add A Rectangle Frame Using The Rectangle Tool
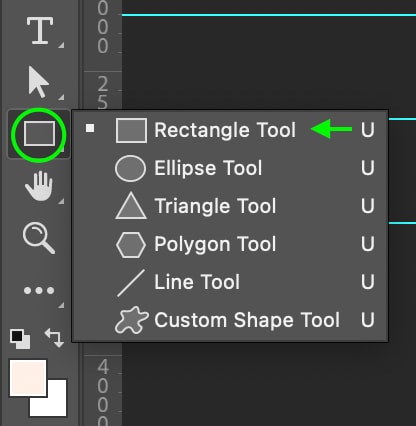
In the Toolbar, head to the Shape Tool (U). If it isn’t already set to the Rectangle, click and hold the tool and select Rectangle Tool.
In the Options Bar, click the Fill box and make sure the fill is set to Transparent.

Now, click and drag the rectangle to cover the area of the cells to create the frame of the table.
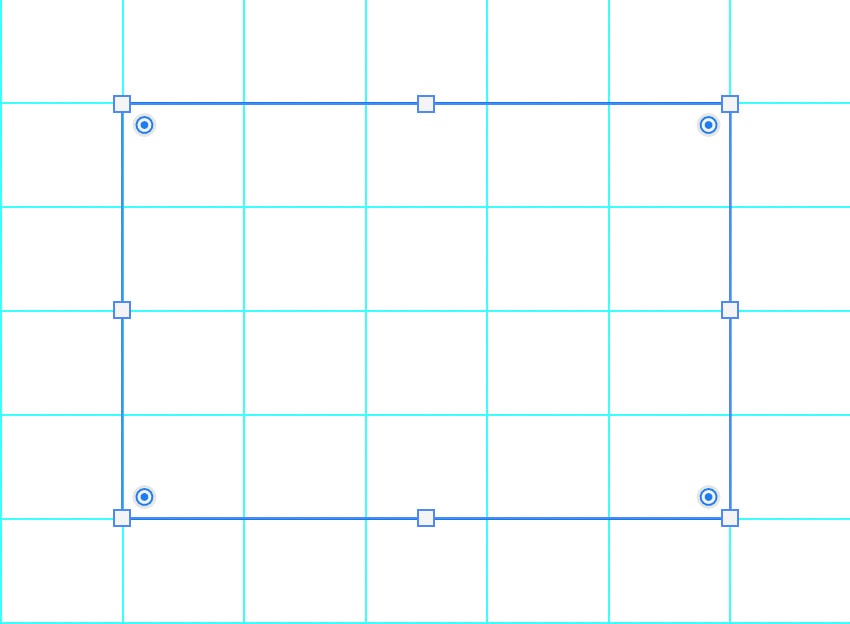
Note: As you drag, the shape should snap to place around the guides, but if it doesn’t, you can head to View > Snap To > Guides. This will ensure that your shape lays perfectly along those guidelines.
Step 3: Add Column And Row Lines To The Table Using The Line Tool
Head back to the Shape Tool (U). Click and hold the icon, and select the Line Tool.
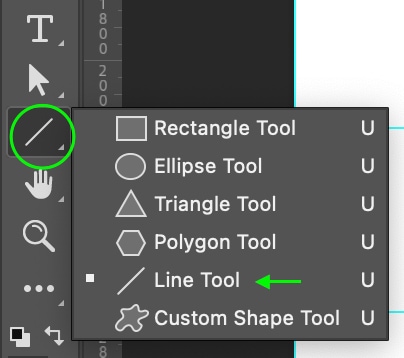
In the Options Bar, ensure the line Weight is set to at least 2 px so you can see the lines around the Grids.

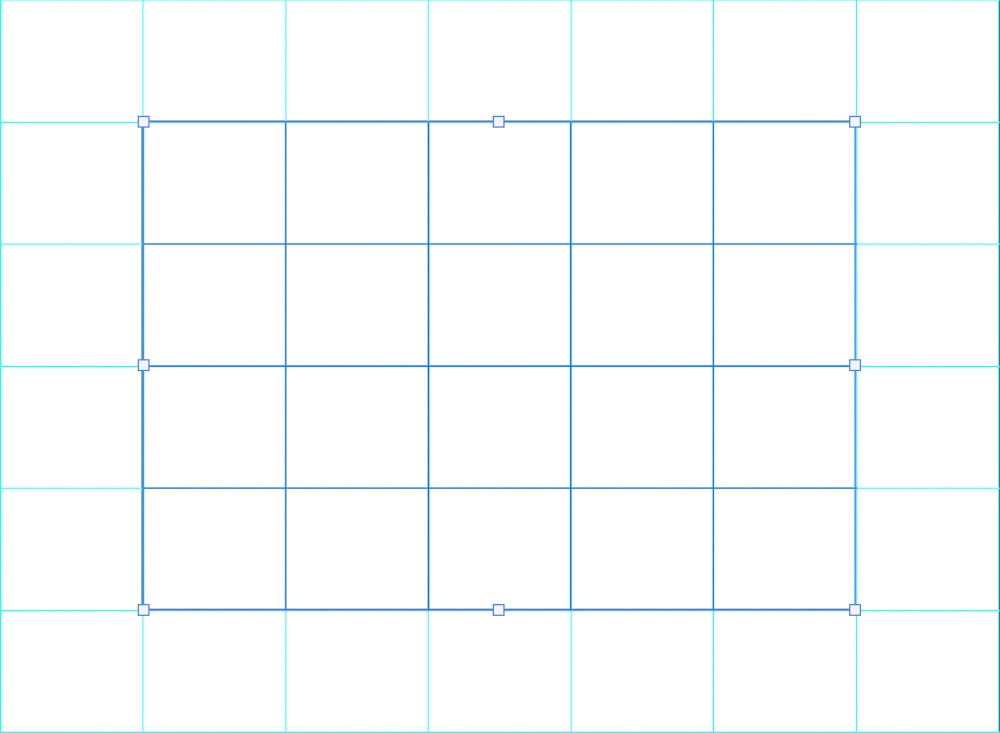
Now, having enabled Snap To Guides (in the previous section), click and drag to create a line along the Guides. Hold Shift while dragging to keep the lines perfectly straight. Repeat until you have lines covering the entire rectangle along the gridlines.
You have now created a basic table in Photoshop. You can read on to customize the table as needed.
How To Customize A Table In Photoshop
Step 1: Add Text Using The Type Tool (T)
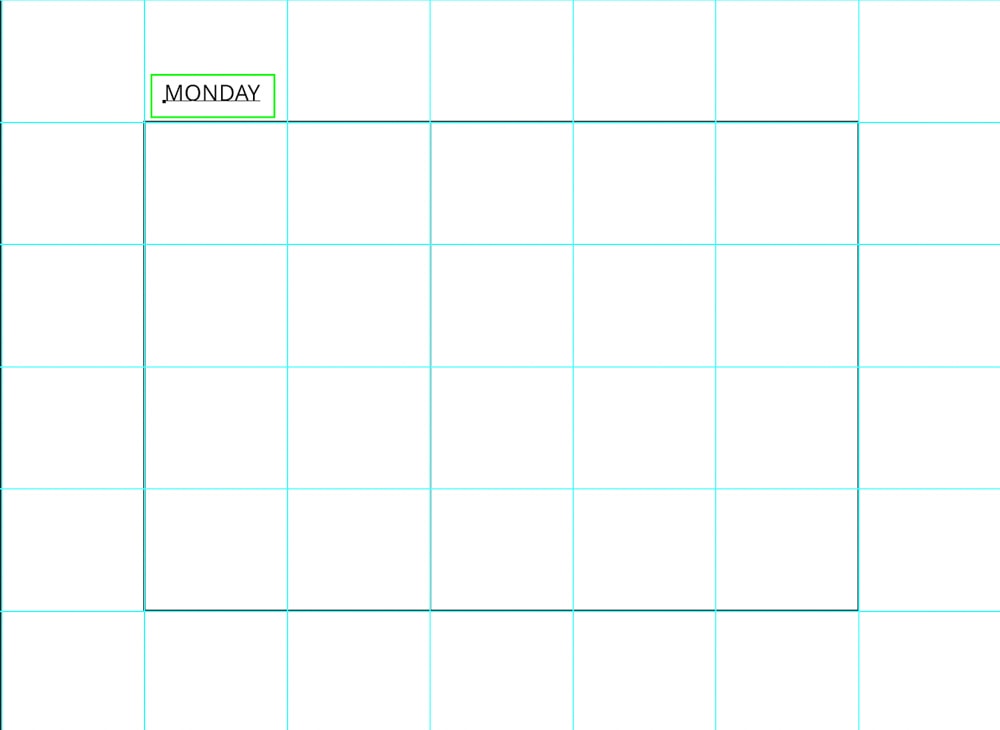
Now, if you’d like, you can add text to your table. To do this, click the Type Tool (T). In the Options Bar, you can set your text’s Font, Style, Size, and Color. You can also go back and edit these options after you’ve added the text.
Click to add a text box in the space you want and type in your text.
Step 2: Center Text And Other Elements
To center the text within the cell, I’ll head to the Marquee Tool (M). Drag a new Marquee around the cell containing the text, turning it into a selection.
In the Layers Panel, make sure the Text Layer is selected. Then, head to the Move Tool (V). In the Options Bar, click the center format icon to center the text within the cell.

Press Control + D (Win) or Command + D (Mac) to deactivate the selection. Repeat this process until you’ve added all the necessary text to your sheet.
Step 3: Add The Table To Another Design
First, select all the layers that make up the table (you can merge the Layers for more organization). Then, press Control + C (Win) or Command + C (Mac) to copy it. Open the design in a new tab, and press Control + V (Win) or Command + V (Mac) to paste the table into the project.
To resize the table, select the Move Tool (V) and then the Transform Tool using Control + T (Win) or Command + T (Mac). Toggles will appear around the table, and you can scale and resize it to fit your project.
Step 4: Use A Rectangle To Fill Table Cells With Color
To fill a cell with color, click and hold the Shape Tool (U) and select the Rectangle Tool. In the Options Bar, set the color of your cell by clicking the Fill box.
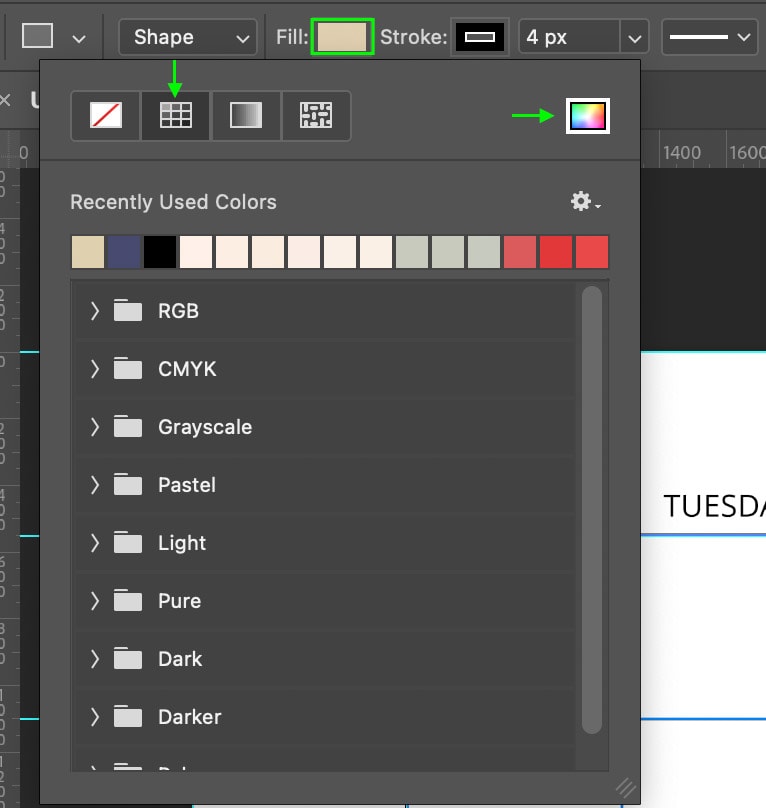
Now, you can set the Stroke of the rectangle to transparent by clicking the Stroke box and selecting the transparent option.

Once you’ve set the color and stroke, click and drag along the guidelines to create a rectangle covering all the cells to which you’d like to add the color.
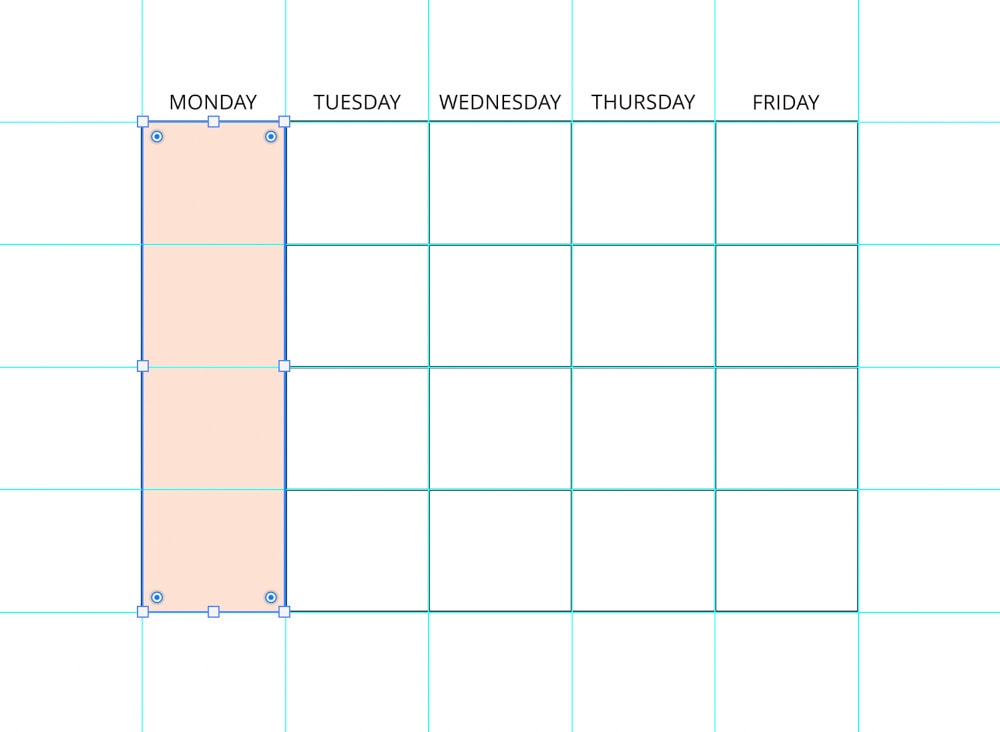
To make sure the color is sitting behind your black lines and not covering them up, head to the Layers Panel. Drag the new rectangle layer below all the other layers except for the Background. This will reorder the layer stack with the colored rectangle behind the other layers so that you can see the colored column with the black lines in front.
You can repeat this process to style your table with whatever colors you’d like. Once you’re happy with how your table looks, you can add elements like text or graphics or export your table.

So, this basic table is pretty easy to make in Photoshop, but anything more complex is better suited for a tool like Canva. To see what I mean, check out my guide to creating tables in Canva here to see how customized they can get.
In today’s tutorial, we’re going to learn how to make tables in Photoshop using a quick, easy method.
If you’re looking to speed up the flow of your design projects, you can always try out some of the plugins, graphic templates, actions, and add-ons that Envato Elements has to offer! There are plenty of assets available for you, with the simple click of a button, to help you enrich your designs.
What You’ll Learn in This Photoshop Insert Table Tutorial
- How to set up a grid to create a table
- How to add columns and rows to the table
- How to make a table in Photoshop for a calendar design
1. How to Set Up a Grid to Create a Table
For the purpose of this tutorial presentation, we will be working on the Wall Calendar 2022 Template file from Envato Elements. Let’s learn how to add a table in Photoshop!
Step 1
In order to create a neat table design, we need to display the grid on the artboard. First, click View > Show > Grid (Command-‘) to bring out the grid to view.
Then we need to configure and edit the grid to fit the canvas. It’s important to keep in mind how many columns and rows you are going to have before drawing the table. Since this is a calendar, I made sure there are seven columns (for the days of the week) centered and two columns on each side of the canvas.
Select Photoshop > Preferences > Guides, Grid & Slices, and set up:
- Gridline Every: 2.82 Centimeters
- Subdivisions: 1


Step 2
Next, we need to activate the special option to snap, that allows our tools to Snap to the Grid (View > Snap to > Grid). This will make it so that anything we draw will fit perfectly with the grid, making the table design process a lot faster and easier.


2. How to Add Columns and Rows to the Table
Step 1
Select the Rectangle Tool from within the Shape Tool icon in the toolbar, and draw a rectangle with seven columns and one row. The seven columns represent the days of the week.


Step 2
Next, we need to add a stroke around the shape. Open the Layers panel (Window > Layers) and the Properties panel (Window > Properties).
With the rectangle shape selected, head over to Properties > Appearance and set:
- Fill to null
- Stroke Black
- Stroke Weight 5px


Step 3
Let’s continue to create the rest of the rows by duplicating the rectangle. With the rectangle shape selected, hold down the Option key and drag the rectangle down to duplicate the shape and create another row.
Repeat the process to create five more rows.


Step 4
Now let’s create our columns.
Hold down the Shape Tool in the toolbar, and select the Line Tool. Split the columns using the Line Tool; it will automatically snap to the grid in a straight line.
When you are done, you can insert numbers into the Photoshop table design, and you will have created a calendar!


Congratulations! You’re Done
Fantastic, you now know how to make a table in Photoshop! You can apply the technique in your future design templates, calendars, pamphlets, and more.
Find some amazing sources of inspiration at Envato Elements to help design your next creation.


Want to Learn More?
I hope you liked this tutorial on how to add a table in Photoshop. Head over to Envato Tuts+, where we have plenty of tutorials that will help you upgrade your skills and speed up your workflow.
Apr 13, 2023
Adobe Photoshop is not merely for posters and graphic design, it can also read PDF documents and even create tables when necessary. These tables include several capabilities that can help you organize and display your data, such as sorting and filtering.
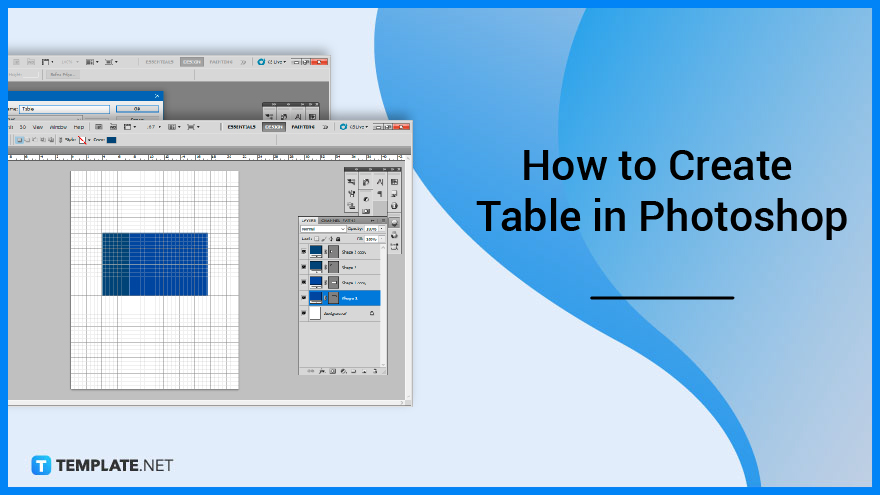
How to Create Table in Photoshop
Creating a table in Photoshop may not be an outright quick process, especially if you are not used to the software or the tools available. It may not be a common output but there are several methods suggested that you can follow, the one below is the most direct.
-
Step 1: Open Adobe Photoshop

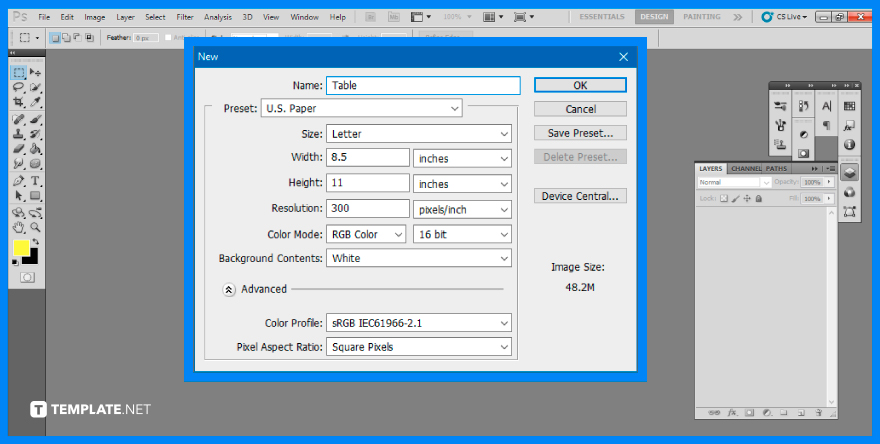
The first step you will need to do is to open your Adobe Photoshop. Once the software is ready to be used, proceed by opening a blank artboard. To do so, go to the top menu bar and select “File,” then click on “New.” Input the necessary specifications you desire then click on “OK.”
-
Step 2: Make Grids Visible
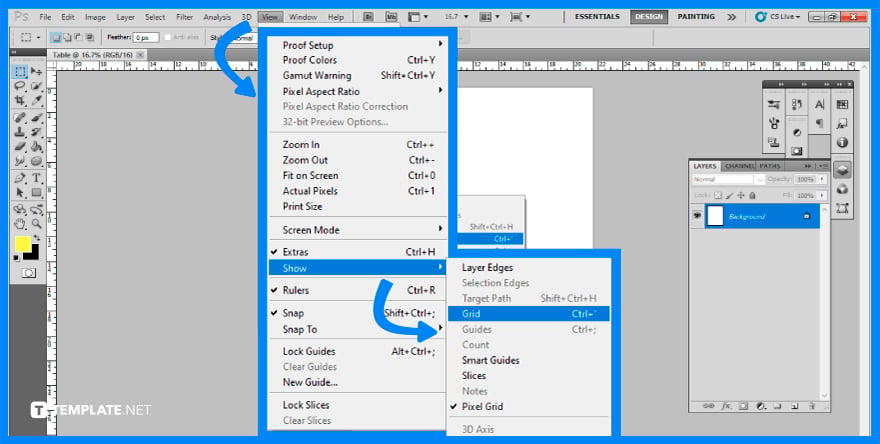
It is best to use a clear background so you can see the gridlines easily. To show the gridlines, go to the top menu bar and click on “View,” then “Show,” and finally select “Grid.”
-
Step 3: Draw a Table

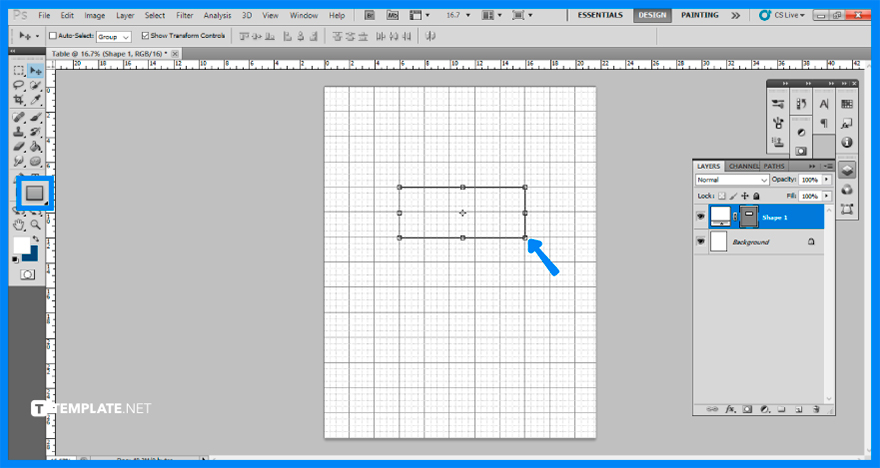
After successfully displaying the grid, you can now design a table using shapes from the rectangle tool. To begin, use the “Rectangle Tool” and then drag it to the desired location on the artboard. Don’t worry about the alignment, as the grids will help you out.
-
Step 4: Configure Table Settings
Your default table settings may not be what you prefer the end look of your table to be, such as having a fill color, or the thickness is not suitable for the table appearance. This is where you can adjust the appearance accordingly.
-
Step 5: Duplicate Shapes
You may duplicate it to make it easy to build another row. The method is to pick the “Layer” menu, then “Replicate Layer,” and proceed to click on the layer you wish to duplicate. Using the “Move Tool,” place it on the appropriate area of the artboard.
-
Step 6: Add Columns

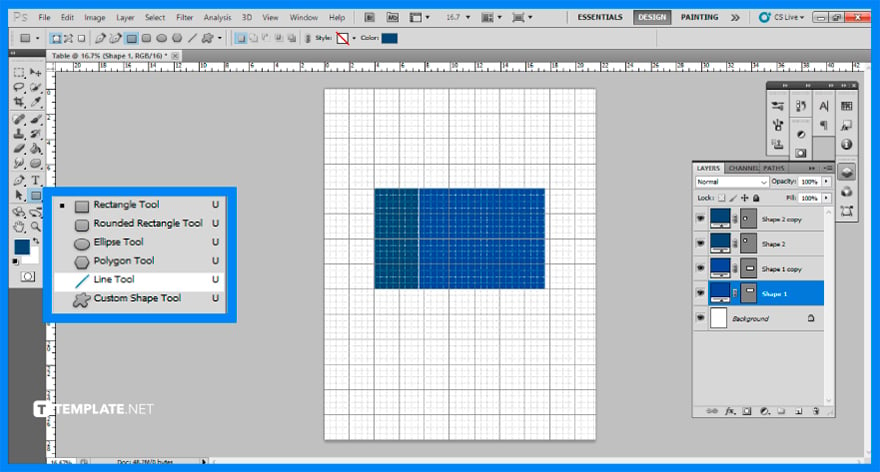
Now that the rows are done, it is time for you to add columns. To do so, The secret is to use the “Line Tool” to draw a straight line. And if you desire to add more columns, repeat this process until you are satisfied with the number of lines.


FAQs
How do I make a row into a column in Photoshop?
Create the additional column and row lines for the table, then launch the “Path Selection” tool by clicking the black arrow in the “Tools” palette.
Can I copy a table from Word to Photoshop?
Instead of copying and pasting, save your table in Word as a PSD and then import a better-resolution image of your table in Photoshop.
What are guides in Photoshop?
Guides are a useful visual tool for helping you coordinate the numerous layers and graphical components used when producing or altering photos in Adobe Photoshop.
How do you resize a table in Photoshop?
By using the Ctrl + T shortcut, you may resize the entire table and you may also choose a specific range of rows and columns and resize it.
Can you insert a table in Photoshop?
Choose “Edit” then “Cut” or “Copy” after selecting the cells or table you want to embed then insert the insertion point in the cell where you want the table to appear, then select “Edit” then “Paste.”