
Инструкция по работе с Краскопультом электрический BOSCH PFS 55.
ПРЕДУПРЕЖДЕНИЕ
Прочтите все указания по технике безопасности и инструкции, включая памятки по безопасности, поставленные для красок и растворителей, и предупредительные таблички на емкостях. Упущения, допущенные при соблюдении предписаний по технике безопасности и инструкций могут вызвать поражение электрическим током, пожар и/или привести к несчастным случаям и тяжелым травмам.
Сохраните эти указания по безопасности и инструкции для будущей пользы. Использованное в предписаниях по технике безопасности определение «электроинструмент» распространяется на электроинструмент с питанием от сетевого напряжения (с шнуром питания от сети) и на электроинструмент с аккумулятрами (без шнура питания от сети).
1) Безопасность рабочего места а) Содержите Ваше рабочее место в чистоте, порядке и хорошо освещенным. Беспорядок или любые неосвещенные участки рабочего места способны привести к травмам или несчастным случаям. б) При работе с электроинструментом не подпускайте близко детей и других лиц. При отвлечении Вы можете утратить контроль над электроинструментом.
2) Электробезопасность
а) Штепсельная вилка вашего электроинструмента должна подходить к штепсельной сетевой розетке. Никоим образом не видоизменяйте штепсельную вилку. Не применяйте какие-либо переходные штекеры для электроинструментов имеющих защитное заземление. Неизмененные штепсельные вилки а также подходящие штепсельные розетки существенно снижают риск поражения персонала электрическим током.
б) Предотвращайте любой телесный контакт с заземленными поверхностями, с трубами, элементами отопления,кухонными плитами, холодильниками и т. д. При заземлении Вашего тела существенно повышается риск поражения электрическим током.
в) Защищайте электроинструмент от сырости и дождя. Присуствие воды в электроинструмент повышает риск поражения человека электрическим током.
г) Не допускается использование шнура не по назначению, к примеру, для транспортировки либо подвески электроинструмента, или для отсоединения вилки из штепсельной розетки. Предохраняйте шнур от воздействия высоких температур, острых кромок, масла либо подвижных частей электроинструмента. Поврежденный либо спутанный шнур повышает риск поражения персонала электротоком.
д) При работе с применением электроинструмента под открытым небом применяйте предназначенные для этого кабели-удлинители. Применение пригодного для эксплуатации под открытым небом кабеля-удлинителя понижает риск поражения электротоком.
е) Если не представляется возможным избежать использования электроинструмента в сыром помещении, то устанавливайте специальный выключатель для защиты от токов повреждения. Использование выключателя защиты от токов повреждения существенно снижает риск электрического поражения пользователя. 3) Безопасность людей
а) Будьте внимательными, внимательно следите за тем, что Вы делаете и начинайте работу с электроинструментом продуманно. Никогда не работайте с электроинструментом в усталом состоянии либо, если Вы находитесь под негативным влиянием наркотиков, спиртных напитков либо лекарств. Любой момент невнимательности при работе с электроинструментом способен привести к серьезным травмам.
б) Пользуйтесь средствами индивидуальной защиты и всегда носите защитные очки.
Применяйте средства индивидуальной защиты, защитную маску и спецобувь. Защитная каска и средства защиты органов слуха, согласно виду конкретной работы, снижают риск травмирования.
в) Предотвращайте непреднамеренное включение. Перед подключением электроинструмента к электрической сети и/или к аккумулятору убедитесь в выключенном состоянии самого электроинструмента. Если Вы при транспортировании электроинструмента держите палец на выключателе либо подключенный электроинструмент включаете в сеть питания, то это способно привести к несчастному случаю.
г) Держите Ваше тело в естественном, удобном положении. Всегда занимайте саксимально устойчивое положение и всегда выдерживайте равновесие. Благодаря этому Вы сможете лучше контролировать электроинструмент в любых неожиданных ситуациях.
д) Носите подходящую одежду. Не надевайте широкую одежду, а также украшения. Держите волосы, перчатки и одежду в стороне от любых движущихся частей.
Широкая одежда, украшения либо длинные волосы могут быть затянуты вращающимися мечанизмами и частями.
4) Применение и обхождение с электроинструментом
а) Не перегружайте электроинструмент. Применяте для Вашей работы предназначенный конкретно для этого электроинструмент. С подходящим электроинструментом Вы будете работаеть лучше и надежнее в указанном диапазоне мощностей.
б) Не эксплуатируйте электроинструмент с неисправным выключателем.
Электроинструмент, который не поддается прямому включению либо выключению, опасен и должен быть срочно отремонтирован. в) До начала непосредственной наладки электроинструмента, замены принадлежностей либо прекращения работы отключайте вилку от розетки сети и/или выньте из него аккумулятор. Эта мера предосторожности предотвращает непреднамеренный запуск электроинструмента.
г) Храните неиспользуемые электроинструменты в месте, недоступном для детей. Не разрешайте пользоваться данным инструментом лицам, которые незнакомы с ним или не читали настоящих предписаний. Электроинструменты особо опасны в руках неопытных людей.
д) Тщательно ухаживайте за вашим электроинструментом. Проверяйте безупречную функцию, а также ход движущихся частей и механизмов электроинструмента, отсутствие каких-либо поломок или повреждений, отрицательно влияющих на функциональность электроинструмента. Поврежденные части необходимо отремонтировать до непосредственного использования электроинструмента. Ненадлжащее обслуживание электроинструментов является причиной большого числа травм и несчастных случаев.
е) Применяйте электроинструмент, принадлежности, рабочие инструменты и прочее в полном соответствии с настоящими инструкциями. Учитывайте при этом любые рабочие условия и выполняемую работу.
Применение электроинструментов для непредусмотренных работ способно привести к опасным ситуациям.
5) Сервис
а) К ремонту Вашего электроинструмента допускайте только квалифицированный персонал и только с применением оригинальных запасных мечанизмов и частей. Этим обеспечивается сохранность безопасности вашего электроинструмента.
Указания по безопасности для систем тонкого распыления
Безопасность рабочего места
► Содержите Ваше рабочее место в чистоте и с хорошим освещением. Убирайте емкости для краски или растворителя, ветошь и все горючие материалы.
Возможная опасность самовоспламенения. Постоянно держите поблизости в готовности работоспособные огнетушители и другие устройства пожаротушения.
► Обеспечивайте приемлимую вентиляцию на участке распыления и хорошую подачу свежего воздуха по всей площади помещения. Испарения горючих растворителей и разбавителей создают взрывоопасную атмосферу.
► Никогда не применяйте для распыления и очистки горючие материалы температура воспламенения которых ниже 21 °C. Применяйте жидкости и материалы на водной основе, на основе труднолетучих углеводородов либо подобные материалы. Легколетучие, испаряющиеся растворители создают в помещениях взрывоопасную атмосферу.
► Не распыляйте непосредственно в пределах источников возгорания, как то, статических открытого пламени, электроискр, инициирующего пламени, горячих предметов, сигарет, двигателей, и искр от сочленения и расчленения электрокабелей или задействования выключателей. Такие источники искр способны привести к воспламенению атмосферы.
► Не распыляйте те материалы, опасность которых вам неизвестна. Незнакомые материалы могут создавать опасные условия.
Безопасность людей
► Применяйте дополнительные, индивидуальные, средства защиты, как то, соответствующие защитные или дыхательные фильтр-маски, защитные перчатки при распылении различных химических веществ и непосредственной работе с ними. Применение индивидуальных защитных средств для соответствующих условий понижает возможность воздействия опасных веществ.
► Не направляйте распыляющую инструментом струю на себя, других людей либо животных. Держитесь вдали от распыляемой струи. Если распыляющая струя пробьет кожные покровы, то немедленно обратитесь к врачу. Струя способна пробить кожу даже сквозь перчатки и впрыснуть Вам распыляемое вещество.
► Ни в коем случае не рассматривайте такое впрыскивание как обычное ранение кожи. Струя высокого давления способна впрыснуть Вам различные ядовитые вещества и привести к серьезным травмам. В случае впрыска через кожу немедленно обратитесь к врачу за мед помощью.
► Учитывайте все возможные опасности, исходящие от распыляемого вами вещества. Учитывайте маркировку на самих емкостях или информации изготовителя распыляемого вами вещества, включая требование к применению индивидуальных защитных средств. Выполняйте указания изготовителя, чтобы понизить риск получения травм, вызванных ядами, пожаром, канцерогенами и т. п.
Применение электроинструмента и обхождение с ним
► Применяйте только специфицированные заводом изготовителем наборы сопел. Никогда не работайте с данным распылителем без оборудованной сопловой защиты.
Использование специального соплового набора с соответствующей сопловой защитой существенно снижает вероятность пробоя кожи струей воздуха высокого давления и впрыскивания ядовитых веществ.
► Осторожно при очистке и смене сопловых наборов. Если при распылении засорится сопловый набор, то перед удалением сопла для очистки выполните указания изготовителя по выключению инструмента и снятию давления. Под высоким давлением жидкости способны пробить кожу и впрыснуть ядовитые вещества в тело, что ведет к тяжелым травмам.
► Содержите вилку шнура сети питания и кнопку выключателя вашего пистолета-распылителя в чистоте от распыляемых красок и любых других жидкостей. Не держите шнур для поддержки на штепсельном соединении. Упущения при соблюдении данных указаний могут повлечь за собой электрическое поражение.
Описание функции
Прочтите все предписания и инструкции по технике безопасности. Упущения, допущенные при
соблюдении данных указаний и инструкций по технике безопасности, способны стать причиной поражения пользователя электрическим током, пожара и даже тяжелых травм.
Применение по назначению
Настоящий электроинструмент предназначен исключительно для распыления (нанесения) эмалевых и лессирующих красок, грунтовок, автомобильных покровных лаков, прозрачных лаков, морилок, средств защиты древесины и растений, дезинфицирующих средств на основе растворителей и воды, масел.
Данный электроинструмент не предназначен для распыления любых дисперсионных и латексных красок, щёлочей, кислотосодержащих субстанций покрытия, материалов с твердыми составляющими компонентами и также материалов с затрудненительным распылением и каплеобразованием.
Изображенные составные части
Нумерация составных частей инструмента выполнена по изображению.
1 Электроузел
2 Кабельный зажим
3 Крышка воздушного фильтра
4 Клавиша SDS для разблокировки
5 Кабель сети
6 Удлинитель опоры (только для стакана 800 миллилитров)
7 Винт от крышки воздушного фильтра
8 Воздушный фильтр
9 Пистолет-распылитель
10 Стояк с уплотнением стакана
11 Стакан для распыляемого материала, 600 мл
Стакан для распыляемого материала, 800 мл*
12 Крышка продувочного отверстия
13 Воздушный колпачок
14 Накидная гайка
15 Установочное колесико количества распыляемой краски
16 Пусковой курок
17 Продувочный шланг
18 Продувочный клапан
19 Мембрана
20 Сопло
21 Уплотнение сопла
22 Мерный стакан
* Изображенные либо описанные принадлежности не входят в стандартный комплект поставки.
Данные по выделению шума и вибрации
Измерения выполнены согласно стандарту ЕН 60745.
Измеренный A-взвешенный уровень звукового излучения электроинструмента составляет, как правило, 74 дБ(А). Недостоверность измерения К=1,5 дБ.
Уровень шума на рабочем месте может пере-вышать 80 дБ(А).
Пользуйтесь средствами защиты для органов слуха!
Взвешенное ускорение, типично, менее 2,5 м/с2.
Технические данные
| Система тонкого распыления | PFS 55 | |
| Предметный № | 3 603 B06 0.. | |
| Потребляемая мощность, номинальная | Вт | 280 |
| Производительност | г/мин | 0 -110 |
| Мощность распыления |
Вт | 55 |
| Время потребляемое для нанесения краски на 5 м2 | мин | 12 |
| Объем стакана для краски | мл | 600 |
| Вес согласно EPTA-Procedure 01/2003 |
кг | 1,3 |
| Степень защиты от электрического поражения |
0/II |
Сборка
► До начала непосредственных работ по обслуживанию и настройке любого электроинструмента отключайте вилку шнура от сетевой розетки.
Сборка пистолета-распылителя с электроузлом
Соединить электроузел с пистолетом-распылителем
Насадить пистолет-распылитель под номером 9 на электроузел 1 до заметного фиксирования.
Снятие электроузла
Нажмите на обе красные кнопки SDS 4, и удерживая их вытяните пистолет-распылитель 9 из электроузла.
Работа с инструментом
Подготовка эксплуатации
► Не допускается производить работы по окраске методом распылением рядом с водными резервуарами либо на соседних площадях непосредственно в водосборном бассейне.
При приобретении лаков, красок и распыляемых средств обязательно обращайте внимание на их экологичность.
Подготовка поверхности для последующего нанесения краски
Указание: Окружение обрабатываемой поверхности материала следует тщательно защитить.
Аэрозольный туман загрязняет окружение.
При работах в закрытых помещениях могут быть загрязнены любые не защищенные поверхности.
Обработываемая поверхность материала должна быть чистой, сухой, а также обезжиренной.
Гладким поверхностям, с помощью наждачной бумаги, придайте шероховатость и затем тщательно очистите их от шлифовальной пыли.
Разжижение распыляемого материала
► При разжижении обращайте особое внимание на сочетание распыляемого материала непосредственно с растворителем. При применении неправильного вида растворителя возможно возникновение комков, которые засоряют пистолет-распылитель.
| Распыляемый материал | Рекомендуемое разбавление |
| Средство защиты древесины, морилка, масла, лессирующие краски | неразбавленные |
| Дезинфицирующее средство, средство защиты растений | неразбавленные |
| Разбавляемые растворителем или водой лаковые краски, грунтовки, покровные автомобильные лаки, лессирующие краски для толстослойного покрытия | разбавлен не менее как на 10% |
Разбавление материала для распыления выполнять следующим образом:
Возьмите мерный стакан 22.
Хорошо перемешайте краску.
Залейте в емкость достаточное для распыления количество материала 11. (см. «Заливка распыляемого материала», стр. 199)
Разбавьте распыляемый материал на 10 % разбавителем. Например:
| Исходное к-во распыляемого материала [мл] | 200 | 300 | 400 | 500 |
| Растворитель [мл] | 20 | 30 | 40 | 50 |
► До начала проведения работ по обслуживанию и настройке любого электроинструмента отключайте вилку шнура сети питания от штепсельной розетки.
Отвинтите стакан 11 от пистолета-распылителя.
Поверните стояк 10 так, чтобы материал можно было распылить практически без остатков: Залейте распыляемый вами материал в стакан и привинтите его к пистолету-распылителю.
Включение
► Учитывайте напряжение сети! Напряжение источника тока должно полностью соответствовать приведенным данным на типовой табличке вашего электроинструмента. Электроинструменты на 230 Вольт могут также работать и при напряжении в 220 Вольт.
► При эксплуатации обязательноисключайте возможность засасывания электроинструментом загрязнений либо паров растворителя.
Включение
Вставьте вилку шнура сети питания в штепсельную розетку.
Возьмите электроинструмент в руку и направьте его на обрабатываемую вами поверхность.
Выключатель управления электроинструмента имеет 2 ступени 16. На первой ступени запускается турбина. На второй ступени подается распыляемый материал.
Нажмите на выключатель управления 16 до выхода распыляемого материала.
Выключение
Отпустите выключатель управления 16. Выньте вилку шнура сети из штепсельной розетки.
Указания по применению
Распыление
Указание: При использовании вами электроинструментим под открытым небом учитывайте направление и силу ветра.
Сначала выполните пробное распыление материала настройте рисунок распыления, а также подачу распыляемого материала. (Значения настройки приведены в следующих разделах.)
Обязательно держите пистолет-распылитель на опредеиленном расстоянии от 5 — 15 сантиметров вертикально к поверхности окрашивания.
Проведение распыления начинайте за пределами обрабатываемой вамиповерхности. Перемещайте ваш пистолет-распылитель в зависимости от рисунка распыления плавно и равномерно поперек или вверх и вниз. Равномерное качество обрабатываемой поверхности возникает при выполнение ходов внахлестку в 4 — 5 сантиметров.
Не прерывайте распыление в пределах обрабатываемой вами площади.
Равномерное ведение пистолета-распылителя обеспечит одинаковое качество обрабатываемой поверхности.
Неравномерное расстояние, а также угол распыления ведут к повышенному образованию тумана и в результате к неравномерно обработанной поверхности.
Процесс распыления заканчивайте только за пределами обрабатываемой поверхности.
Не расходуйте полностью распыляемый вами материал из стакана. Если стояк не погружен в распыляемый материал, то распыляемый туман будет прерываеться и возникнет неравномерная поверхность.
Скопления распыляемого вами материала на сопле и воздушном колпачке удаляйте с помощью использованного разжижителя.
Указание: Ставьте электроинструмент исключительно на ровную и чистую поверхность так, чтобы он не мог опрокинуться.
Техобслуживание и сервис
Техобслуживание и очистка
► До начала проведения работ по обслуживанию и настройке любого электроинструмента отключайте вилку шнура сети от розетки.
► Не погружайте электроузел в растворитель либо в воду. Очищайте корпус исключительно влажной салфеткой.
Правильная очистка является предпосылкой надежной работы пистолета-распылителя. При недостаточной либо неправильной очистке отклоняются любые гарантийные притязания.
Очищайте свой пистолет-распылитель и стакан для краски всегда с соответствующим растворителем (растворитель или вода) для использованного материала.
Не используйте острые металлические предметы для очистки сопел и воздушных отверстий вашего пистолета-распылителя. Разжиженный распыляемый материал нельзя добавлять в подлинный материал для его хранения.
Очень тщательно вычищайте пистолет-распылитель после использования вредного для здоровья распыляемого вещества.
Выньте вилку шнура питания из розетки и задействуйте выключатель управления 16 для слива тспользуемого материала обратно в стакан. Снимите электроузел. Отвинтите стакан 11 и опорожните ее от остатков распыляемого вещества.
Залейте в стакан растворитель (или воду) и привинтите его обратно к пистолету-распылителю.
Встряхните несколько раз пистолет-распылитель.
Соедините пистолет-распылитель вновь с электроузлом.
Вставьте вилку в розетку, нажмите на выключатель управления и выдуйте оставшийся растворитель в пустую емкость из под материала. Повторяйте данный процесс пока из пистолета-распылителя не станет выходить чистый растворитель.
Выньте вилку сетевого шнура из розетки и снимите электроузел.
Полностью опорожните стакан 11. Проверьте стояк и уплотнение емкости 10 на чистоту и отсуствие повреждений. Очистить стакан и пистолет-распылитель снаружи салфеткой, предварительно увлажненной растворителем.
Отвинтите накидную гайку 14, а также воздушный колпачок 13.
Растворителем очистить сопло 20 и иглу сопла.
Периодически следует дополнительно очищать уплотнение сопла 21.
Снимите сопло 20 и уплотнение сопла 21. При надобности используйте острый предмет потому, как уплотнение сопла надежно сидит в пистолете-распылителе. Очистить уплотнение разжижителем. Вставьте уплотнение сопла обратно в пистолет-распылитель. Следите за тем, чтобы паз повернут наружу.
Насадите сопло на ваш пистолет-распылитель и поверните его в правильное положение. Насадите воздушный колпачок 13 на сопло и затяните накидную гайку 14.
Очистка продувочного шланга (см. рис. G)
При загрязнении продувочного шланга 17 распыляемым материалом, его необходимо очистить.
Снимите крышку продувочного отверстия 12.
Отсоедините продувочный шланг 17. Отвинтите продувочный шланг 18.
Выньте мембрану 19.
Очистить продувочный шланг, продувочный клапан и мембрану соответствующим типом растворителя.
После очистки сначала поставте на место мембрану. Длинная оправка должна быть обращена наверх.
Навинтите продувочный шланг.
Затем наденьте продувочный шланг сначала на клапан и потом сверху на пистолет-распылитель.
Установите крышку на место.
Смена воздушного фильтра Указание: Не эксплуатируйте электроинструмент с отсуствующим воздушным фильтром. Без воздушного фильтра могут быть затянуты загрязнения, что ведет к сбою в работе краскопульта.
Загрязненный воздушный фильтр необходимо немедленно заменить.
Отвинтите винт 7.
Снимите крышку воздушного фильтра 3. Замените воздушный фильтр.
Закройте крышку воздушного фильтра и закрутитее винт.
Утилизация материала
Растворитель и остатки распыляемого материала необходимо экологично утилизировать. Учитывайте указания изготовителя, а также местные предписания по утилизации специальных отходов.
Вредные для окружающей среды химикаты не должны попадать в грунтовые воды либо в водоемы. Не выливайте вредные для окружающей среды реактивы в канализацию!
Устранение неисправностей
| 1 Проблема | Причина | Устранение 1 |
| Краска плохо покрывает поверхность | Недостаточное количество краски | Повернуть установочное колесико 15 в направление + |
| Большое расстояние к обрабатываемой площади | Уменьшить расстояние распыления | |
| Мало краски на площади, недостаточное число ходов распыления | Увеличить число ходов распыления | |
| Вязкая краска | Снова разбавить распыляемый материал на 10 % и выполнить пробное распыление | |
| Расплывание краски после нанесения | Слишком много краски нанесено | Повернуть установочное колесико 15 в направление — |
| Маленькое расстояние к обрабатываемой площади | Увеличить расстояние распыления | |
| Жидкая краска | Добавить подлинную краску | |
| Слишком часто покрывали одно и тоже место краской | Снять краску и при второй попытке реже распылять на одном и том же месте |
| Слишком грубое распыление | Большое количество краски | Повернуть установочное колесико 15 в направление — |
| Сопло 20 загрязнено | Прочистить сопло | |
| Недостаточное давление в емкости 11 | Правильно привинтить стакан к пистолету-распылителю | |
| Вязкая краска | Снова разбавить распыляемый материал на 10 % и выполнить пробное распыление | |
| Сильно загрязнен воздушный фильтр | Смена воздушного фильтра | |
| Сильный красочный туман | Слишком много краски нанесено | Повернуть установочное колесико 15 в направление — |
| Большое расстояние к обрабатываемой площади | Уменьшить расстояние распыления | |
| Пульсация струи | Мало краски в стакане | Залить краску |
| распыления | Забито вентиляционное отверстие в стояке 10 | Очистить стояк и отверстие |
| Сильно загрязнен воздушный фильтр | Смена воздушного фильтра | |
| Вязкая краска | Снова разбавить распыляемый материал на 10 % и выполнить пробное распыление | |
| Из сопла капает краска после выключения | Отложения краски на сопле 20 и воздушном колпачке 13 | Очистить сопло и воздушный колпачок |
| Сопло 20 изношено | Замените сопло | |
| Крепление сопла 20 разболталось | Подтянуть накидную гайку 14 | |
| Краска не выходит из | Сопло 20 забито | Прочистить сопло |
| сопла | Стояк 10 засорился | Очистить стояк |
| Забито вентиляционное отверстие в стояке 10 | Очистить стояк и отверстие | |
| Крепление стояка 10 разболталось | Закрепить стояк | |
| Нет давления в стакане 11 | Правильно привинтить стакан к пистолету-распылителю | |
| Вязкая краска | Снова разбавить распыляемый материал на 10 % и выполнить пробное распыление |
Техническое обслуживание
Если электроинструмент, несмотря на тщательные методы изготовления и испытания, выйдет из строя, то ремонт следует производить силами авторизованной сервисной мастерской для электроинструментов фирмы Бош. Пожалуйста, во всех запросах и заказах на запчасти обязательно указывайте 10-разрядный предметный номер по типовой табличке электроинструмента.
Сервисное обслуживание и консультация покупателей
Сервисный отдел ответит на все Ваши вопросы по ремонту и обслуживания Вашего продукта и также по запчастям. Монтажные чертежи и информации по запчастям Вы найдете также по адресу: www.bosch-pt.com
Коллектив консультантов Bosch охотно поможет Вам в вопросах покупки, применения и настройки продуктов и принадлежностей.
Россия
ООО «Роберт Бош»
Сервисный центр по обслуживанию
электроинструмента
ул. Академика Королева 13, строение 5
129515, Москва
Тел.: +7 (0495) 9 35 88 06
Тел.: +7 (0495) 9 35 53 64
Факс: +7 (0495) 9 35 88 07
E-Mail: rbru_pt_asa_mk@ru.bosch.com
ООО «Роберт Бош»
Сервисный центр по обслуживанию
электроинструмента
ул. Зайцева, 41
198188, Санкт-Петербург
Тел.: +7 (0812) 7 84 13 07
Факс: +7 (0812) 7 84 13 61
E-Mail: rbru_pt_asa_spb@ru.bosch.com
ООО «Роберт Бош»
Сервисный центр по обслуживанию
электроинструмента
Горский микрорайон, 53
630032, Новосибирск
Тел.: +7 (0383) 3 59 94 40
Факс: +7 (0383) 3 59 94 65
E-Mail: rbru_pt_asa_nob@ru.bosch.com
ООО «Роберт Бош»
Сервисный центр по обслуживанию
электроинструмента
Ул. Фронтовых бригад, 14,
620017, Екатеринбург Тел.: +7 (0343) 3 65 86 74 Тел.: +7 (0343) 3 78 77 56 Факс: +7 (0343) 3 78 79 28
Беларусь
АСЦ УП-18
220064 Mинск, ул. Курчатова, 7 Тел.: +375 (017) 2 10 29 70 Факс: +375 (017) 2 07 04 00
Утилизация
Отслужившие свой срок пистолет-распылитель, электроузел, принадлежности и упаковку следует сдавать на экологически чистую рециркуляцию отходов.
Для сортировки отходов при утилизации детали из синтетических материалов соответственно обозначены.
Только для стран-членов ЕС:
Не выбрасывайте электроинструменты в коммунальный мусор!
Согласно Европейской Директиве 2002/96^С о старых электрических и электронных инструментах и приборах, а также о претворении этой директивы в национальное право, отслужившие свой срок электроинструменты должны отдельно собираться и сдаваться на экологически чистую утилизацию.
Оставляем за собой право на изменения.
Характеристики
|
Производитель |
|
|
Мощность, Вт |
280 |
|
Производительность, л/мин |
0.11 |
|
Объем бака для распыляемого вещества, л |
0.6 |
|
Диаметр сопла, мм |
3 |
|
Принцип работы |
воздушный |
|
Вес, кг |
1.3 |
|
Расположение бака |
снизу |
Краскопульт Bosch PFS 55 и другие оригинальные товары в категории краскопульты электрические доступны на сайте интернет-магазина Бигам в Москве по специальной цене рублей. Перед покупкой данной модели бренда Bosch рекомендуем посмотреть особенности, технические параметры, документацию и сертификаты на продукцию. Также предлагаем сравнить товар краскопульт Bosch PFS 55 с ассортиментом модификаций и аналогов из категории краскопульты электрические Bosch.
-
-
Инструкция Bosch PFS 55
Инструкция.pdf 10.41 МБ
На странице представлена инструкция по эксплуатации и другие материалы производителя о товаре краскопульт Bosch PFS 55, необходимые пользователю. Из руководства пользователя Bosch (Бош) можно узнать устройство изделия, срок службы и комплект поставки. Краскопульт Bosch PFS 55 и все товары серии требуют соблюдения правил использования, обслуживания, ухода и хранения.
-
Похожие товары

Robert Bosch GmbH
Power Tools Division
70745 Leinfelden-Echterdingen
www.bosch-pt.com
1 609 929 L54 (2008.02) PS / 302
PFS 55
de Originalbetriebsanleitung
en Original instructions
fr Notice originale
es Manual original
pt Manual original
it Istruzioni originali
nl Oorspronkelijke
gebruiksaanwijzing
da Original brugsanvisning
sv Bruksanvisning i original
no Original driftsinstruks
fi Alkuperäiset ohjeet
el Πρωτότυπο οδηγιών χρήσης
tr Orijinal işletme talimat
pl Instrukcją oryginalną
cs Původním návodem k
používání
sk Pôvodný návod na použitie
hu Eredeti használati utasítás
ru Одлинник руководства по
эксплуатации
uk Оригінальна інструкція з
експлуатації
ro Instrucţiuni de folosire
originale
bg Оригинално ръководство
за експлоатация
sr Originalno uputstvo za rad
sl Izvirna navodila
hr Originalne upute za rad
et Algupärane kasutusjuhend
lv Oriģinālā lietošanas
pamācība
lt Originali instrukcija

2 |
Deutsch . . . . . . . . . . . . . . . . . . . . . . . . . . . . Seite 7
English . . . . . . . . . . . . . . . . . . . . . . . . . . . . . Page 18
Français . . . . . . . . . . . . . . . . . . . . . . . . . . . . Page 28
Español. . . . . . . . . . . . . . . . . . . . . . . . . . . . Página 39
Português. . . . . . . . . . . . . . . . . . . . . . . . . . Página 51
Italiano . . . . . . . . . . . . . . . . . . . . . . . . . . . . Pagina 63
Nederlands . . . . . . . . . . . . . . . . . . . . . . . . . Pagina 74
Dansk . . . . . . . . . . . . . . . . . . . . . . . . . . . . . . Side 85
Svenska . . . . . . . . . . . . . . . . . . . . . . . . . . . . Sida 95
Norsk . . . . . . . . . . . . . . . . . . . . . . . . . . . . . . Side 105
Suomi . . . . . . . . . . . . . . . . . . . . . . . . . . . . . . . Sivu 115
Ελληνικά . . . . . . . . . . . . . . . . . . . . . . . . . . . Σελίδα 125
Türkçe . . . . . . . . . . . . . . . . . . . . . . . . . . . . . Sayfa 137
Polski . . . . . . . . . . . . . . . . . . . . . . . . . . . . . Strona 148
Česky . . . . . . . . . . . . . . . . . . . . . . . . . . . . . Strana 160
Slovensky . . . . . . . . . . . . . . . . . . . . . . . . . . Strana 170
Magyar . . . . . . . . . . . . . . . . . . . . . . . . . . . . . Oldal 182
Русский . . . . . . . . . . . . . . . . . . . . . . . . Страница 193
Українська . . . . . . . . . . . . . . . . . . . . . . . Сторінка 205
Română . . . . . . . . . . . . . . . . . . . . . . . . . . . Pagina 217
Български . . . . . . . . . . . . . . . . . . . . . . Страница 228
Srpski . . . . . . . . . . . . . . . . . . . . . . . . . . . . . Strana 240
Slovensko. . . . . . . . . . . . . . . . . . . . . . . . . . . Stran 250
Hrvatski . . . . . . . . . . . . . . . . . . . . . . . . . Stranica 260
Eesti . . . . . . . . . . . . . . . . . . . . . . . . . . . . Lehekülg 270
Latviešu . . . . . . . . . . . . . . . . . . . . . . . . . Lappuse 280
Lietuviškai . . . . . . . . . . . . . . . . . . . . . . . Puslapis 292
1 609 929 L54 | (18.2.08) Bosch Power Tools

3 |
1
2
3
13 14
4
15
16
12
5
11
10
6
22
9
1 609 929 L54 | (18.2.08) Bosch Power Tools

4 |
A1
B1
B
10
A2
4
4
B2
10
10
C1
B
5-15cm
1 609 929 L54 | (18.2.08) Bosch Power Tools
C2
| 5
D
F
E
AB
15
13
C
G
17
12
18
19
Bosch Power Tools 1 609 929 L54 | (18.2.08)

6 |
IH
2120
21
201314
10
11
K
+
8 3
8
7
+
800 ml600 ml
1 609 929 L54 | (18.2.08) Bosch Power Tools

Deutsch | 7
de
Allgemeine Sicherheitshinweise für Elektrowerkzeuge
WARNUNG
schließlich der zu den Farben und Lösemitteln
gelieferten Sicherheitsdatenblätter und Warnschilder auf den Behältern. Versäumnisse bei
der Einhaltung der Sicherheitshinweise und Anweisungen können elektrischen Schlag, Brand
und/oder schwere Verletzungen zur Folge haben.
Bewahren Sie alle Sicherheitshinweise und Anweisungen für die Zukunft auf.
Der in den Sicherheitshinweisen verwendete
Begriff „Elektrowerkzeug“ bezieht sich auf netzbetriebene Elektrowerkzeuge (mit Netzkabel)
und auf akkubetriebene Elektrowerkzeuge (ohne Netzkabel).
1) Arbeitsplatzsicherheit
a) Halten Sie Ihren Arbeitsbereich sauber
und gut beleuchtet. Unordnung oder un-
beleuchtete Arbeitsbereiche können zu
Unfällen führen.
b) Halten Sie Kinder und andere Personen
während der Benutzung des Elektrowerkzeugs fern. Bei Ablenkung können
Sie die Kontrolle über das Gerät verlieren.
2) Elektrische Sicherheit
a) Der Anschlussstecker des Elektrowerk-
zeuges muss in die Steckdose passen.
Der Stecker darf in keiner Weise verändert werden. Verwenden Sie keine Adapterstecker gemeinsam mit schutzgeerdeten Elektrowerkzeugen. Unveränderte
Stecker und passende Steckdosen verringern das Risiko eines elektrischen Schlages.
b) Vermeiden Sie Körperkontakt mit geer-
deten Oberflächen wie von Rohren, Heizungen, Herden und Kühlschränken. Es
besteht ein erhöhtes Risiko durch elektrischen Schlag, wenn Ihr Körper geerdet
ist.
Lesen Sie alle Sicherheitshinweise und Anweisungen, ein-
c) Halten Sie Elektrowerkzeuge von Regen
oder Nässe fern. Das Eindringen von Was-
ser in ein Elektrowerkzeug erhöht das Risiko eines elektrischen Schlages.
d) Zweckentfremden Sie das Kabel nicht,
um das Elektrowerkzeug zu tragen, aufzuhängen oder um den Stecker aus der
Steckdose zu ziehen. Halten Sie das Kabel fern von Hitze, Öl, scharfen Kanten
oder sich bewegenden Geräteteilen. Be-
schädigte oder verwickelte Kabel erhöhen
das Risiko eines elektrischen Schlages.
e) Wenn Sie mit einem Elektrowerkzeug im
Freien arbeiten, verwenden Sie nur Verlängerungskabel, die auch für den Außenbereich geeignet sind. Die Anwen-
dung eines für den Außenbereich
geeigneten Verlängerungskabels verringert das Risiko eines elektrischen Schlages.
f) Wenn der Betrieb des Elektrowerkzeu-
ges in feuchter Umgebung nicht vermeidbar ist, verwenden Sie einen Fehlerstromschutzschalter. Der Einsatz eines
Fehlerstromschutzschalters vermindert
das Risiko eines elektrischen Schlages.
3) Sicherheit von Personen
a) Seien Sie aufmerksam, achten Sie dar-
auf, was Sie tun, und gehen Sie mit Vernunft an die Arbeit mit einem Elektrowerkzeug. Benutzen Sie kein
Elektrowerkzeug, wenn Sie müde sind
oder unter dem Einfluss von Drogen, Alkohol oder Medikamenten stehen. Ein
Moment der Unachtsamkeit beim Gebrauch des Elektrowerkzeuges kann zu
ernsthaften Verletzungen führen.
b) Tragen Sie persönliche Schutzausrüs-
tung und immer eine Schutzbrille. Das
Tragen persönlicher Schutzausrüstung,
wie Staubmaske, rutschfeste Sicherheitsschuhe, Schutzhelm oder Gehörschutz, je
nach Art und Einsatz des Elektrowerkzeuges, verringert das Risiko von Verletzungen.
Bosch Power Tools 1 609 929 L54 | (18.2.08)

8 | Deutsch
c) Vermeiden Sie eine unbeabsichtigte In-
betriebnahme. Vergewissern Sie sich,
dass das Elektrowerkzeug ausgeschaltet
ist, bevor Sie es an die Stromversorgung
und/oder den Akku anschließen, es aufnehmen oder tragen. Wenn Sie beim Tra-
gen des Elektrowerkzeuges den Finger am
Schalter haben oder das Gerät eingeschaltet an die Stromversorgung anschließen, kann dies zu Unfällen führen.
d) Vermeiden Sie eine abnormale Körper-
haltung. Sorgen Sie für einen sicheren
Stand und halten Sie jederzeit das
Gleichgewicht. Dadurch können Sie das
Elektrowerkzeug in unerwarteten Situationen besser kontrollieren.
e) Tragen Sie geeignete Kleidung. Tragen
Sie keine weite Kleidung oder Schmuck.
Halten Sie Haare, Kleidung und Handschuhe fern von sich bewegenden Teilen. Lockere Kleidung, Schmuck oder lan-
ge Haare können von sich bewegenden
Teilen erfasst werden.
4) Verwendung und Behandlung des Elektrowerkzeugs
a) Überlasten Sie das Gerät nicht. Verwen-
den Sie für Ihre Arbeit das dafür bestimmte Elektrowerkzeug. Mit dem pas-
senden Elektrowerkzeug arbeiten Sie
besser und sicherer im angegebenen Leistungsbereich.
b) Benutzen Sie kein Elektrowerkzeug des-
sen Schalter defekt ist. Ein Elektrowerk-
zeug, das sich nicht mehr ein- oder ausschalten lässt, ist gefährlich und muss
repariert werden.
c) Ziehen Sie den Stecker aus der Steckdo-
se und/oder entfernen Sie den Akku, bevor Sie Geräteeinstellungen vornehmen,
Zubehörteile wechseln oder das Gerät
weglegen. Diese Vorsichtsmaßnahme ver-
hindert den unbeabsichtigten Start des
Elektrowerkzeuges.
d) Bewahren Sie unbenutzte Elektrowerk-
zeuge außerhalb der Reichweite von Kindern auf. Lassen Sie Personen das Gerät
nicht benutzen, die mit diesem nicht vertraut sind oder diese Anweisungen nicht
gelesen haben. Elektrowerkzeuge sind
gefährlich, wenn sie von unerfahrenen
Personen benutzt werden.
e) Pflegen Sie Elektrowerkzeuge mit Sorg-
falt. Kontrollieren Sie, ob bewegliche
Teile einwandfrei funktionieren und
nicht klemmen, ob Teile gebrochen oder
so beschädigt sind, dass die Funktion
des Elektrowerkzeuges beeinträchtigt
ist. Lassen Sie beschädigte Teile vor dem
Einsatz des Gerätes reparieren. Viele Un-
fälle haben ihre Ursache in schlecht gewarteten Elektrowerkzeugen.
f) Verwenden Sie Elektrowerkzeug, Zube-
hör, Einsatzwerkzeuge usw. entsprechend diesen Anweisungen. Berücksichtigen Sie dabei die Arbeitsbedingungen
und die auszuführende Tätigkeit. Der
Gebrauch von Elektrowerkzeugen für andere als die vorgesehenen Anwendungen
kann zu gefährlichen Situationen führen.
5) Service
a) Lassen Sie Ihr Elektrowerkzeug nur von
qualifiziertem Fachpersonal und nur mit
Original-Ersatzteilen reparieren. Damit
wird sichergestellt, dass die Sicherheit
des Elektrowerkzeuges erhalten bleibt.
Sicherheitshinweise für
Feinsprühsysteme
Arbeitsplatzsicherheit
f Halten Sie Ihren Arbeitsbereich sauber, gut
beleuchtet und frei von Farb- oder Lösemittelbehältern, Lappen und sonstigen brennbaren Materialien. Mögliche Gefahr der
Selbstentzündung. Halten Sie funktionsfähige Feuerlöscher/Löschgeräte zu jeder Zeit
verfügbar.
1 609 929 L54 | (18.2.08) Bosch Power Tools

Deutsch | 9
f Sorgen Sie für gute Belüftung im Sprühbe-
reich und für ausreichend Frischluft im gesamten Raum. Verdunstende brennbare Lö-
semittel schaffen eine explosive Umgebung.
f Sprühen und reinigen Sie nicht mit Materia-
lien, deren Flammpunkt unterhalb von
21 °C liegt. Verwenden Sie Materialien auf
der Basis von Wasser, schwerflüchtigen
Kohlenwasserstoffen oder ähnlichen Materialien. Leichtflüchtige verdunstende Löse-
mittel schaffen eine explosive Umgebung.
f Sprühen Sie nicht im Bereich von Zündquel-
len wie statischen Elektrizitätsfunken, offenen Flammen, Zündflammen, heißen Gegenständen, Motoren, Zigaretten und Funken
vom Ein- und Ausstecken von Stromkabeln
oder der Bedienung von Schaltern. Derarti-
ge Funkenquellen können zu einer Entzündung der Umgebung führen.
f Versprühen Sie keine Materialien bei denen
nicht bekannt ist, ob sie eine Gefahr darstellen. Unbekannte Materialien können ge-
fährdende Bedingungen schaffen.
Sicherheit von Personen
f Tragen Sie zusätzliche persönliche
Schutzausrüstung wie entsprechende
Schutzhandschuhe und Schutz- oder Atemschutzmaske beim Sprühen oder der Handhabung von Chemikalien. Das Tragen von
Schutzausrüstung für entsprechende Bedingungen verringert die Aussetzung gegenüber
gefährdenden Substanzen.
f Sprühen Sie nicht auf sich selbst, auf ande-
re Personen oder Tiere. Halten Sie Ihre Hände und sonstige Körperteile fern vom
Sprühstrahl. Falls der Sprühstrahl die Haut
durchdringt, nehmen Sie umgehend ärztliche Hilfe in Anspruch. Das Sprühgut kann
selbst durch einen Handschuh hindurch die
Haut durchdringen und in Ihren Körper eingespritzt werden.
f Behandeln Sie eine Einspritzung nicht als
einfachen Schnitt. Ein Hochdruckstrahl kann
Giftstoffe in den Körper einspritzen und zu
ernsthaften Verletzungen führen. Im Falle einer Hauteinspritzung nehmen Sie umgehend
ärztliche Hilfe in Anspruch.
f Geben Sie acht auf etwaige Gefahren des
Sprühguts. Beachten Sie die Markierungen
auf dem Behälter oder die Herstellerinformationen des Sprühguts, einschließlich der
Aufforderung zur Verwendung persönlicher
Schutzausrüstung. Den Herstelleranweisun-
gen ist Folge zu leisten um das Risiko von
Feuer sowie durch Gifte, Karzinogene, etc.
hervorgerufenen Verletzungen zu verringern.
Verwendung und Behandlung des
Elektrowerkzeugs
f Verwenden Sie nur durch den Hersteller
spezifizierte Düseneinsätze. Sprühen Sie
niemals ohne montierten Düsenschutz. Die
Verwendung eines speziellen Düseneinsatzes mit dem passenden Düsenschutz vermindert die Wahrscheinlichkeit, dass ein Hochdruckstrahl die Haut durchdringt und Gifte in
den Körper einspritzt.
f Vorsicht beim Reinigen und Wechseln von
Düseneinsätzen. Falls während des Sprühens der Düseneinsatz verstopft, folgen Sie
vor dem Entfernen der Düse zur Reinigung
den Anweisungen des Herstellers zum Abschalten des Gerätes und Entlasten des
Drucks. Flüssigkeiten unter Hochdruck kön-
nen die Haut durchdringen, Gift in den Körper einspritzen und dadurch zu ernsthaften
Verletzungen führen.
f Halten Sie den Stecker des Netzkabels und
den Schalterdrücker der Sprühpistole frei
von Farbe und anderen Flüssigkeiten. Halten Sie nie das Kabel zur Unterstützung an
den Steckverbindungen. Versäumnisse bei
der Einhaltung können elektrischen Schlag
zur Folge haben.
Bosch Power Tools 1 609 929 L54 | (18.2.08)

10 | Deutsch
Funktionsbeschreibung
Lesen Sie alle Sicherheitshinweise
und Anweisungen. Versäumnisse
bei der Einhaltung der Sicherheitshinweise und Anweisungen können
elektrischen Schlag, Brand
und/oder schwere Verletzungen
verursachen.
Bestimmungsgemäßer Gebrauch
Das Elektrowerkzeug ist nur bestimmt zum Zerstäuben von lösemittelhaltigen und wasserverdünnbaren Lackfarben, Lasuren, Grundierungen, Klarlacken, Kraftfahrzeug-Decklacken,
Beizen, Holzschutzmitteln, Pflanzenschutzmitteln, Ölen und Desinfektionsmitteln.
Das Elektrowerkzeug ist nicht geeignet zum Verarbeiten von Dispersions- und Latexfarben, Laugen, säurehaltigen Beschichtungsstoffen, körnigem und körperhaltigem Sprühmaterial sowie
spritz- und tropfgehemmten Materialien.
Geräusch-/Vibrationsinformation
Messwerte ermittelt entsprechend EN 60745.
Der A-bewertete Schalldruckpegel des Gerätes
beträgt typischerweise 74 dB(A). Unsicherheit
K=1,5 dB.
Der Geräuschpegel beim Arbeiten kann
80 dB(A) überschreiten.
Gehörschutz tragen!
Die Hand-Arm-Vibration ist typischerweise niedriger als 2,5 m/s
2
.
Abgebildete Komponenten
Die Nummerierung der abgebildeten Komponenten bezieht sich auf die Darstellung des Elektrowerkzeuges auf den Grafikseiten.
1 Elektroeinheit
2 Kabelklemme
3 Luftfilterabdeckung
4 SDS-Taste zur Entriegelung
5 Netzkabel
6 Fußverlängerung (nur für 800-ml-Behälter)
7 Schraube für Luftfilterabdeckung
8 Luftfilter
9Sprühpistole
10 Steigrohr mit Behälterdichtung
11 Behälter für Sprühmaterial, 600 ml
Behälter für Sprühmaterial, 800 ml *
12 Abdeckung für Entlüftung
13 Luftkappe
14 Überwurfmutter
15 Stellrad für Sprühmaterialmenge
16 Bedienschalter
17 Entlüftungsschlauch
18 Entlüftungsventil
19 Membran
20 Düse
21 Düsendichtung
22 Messbecher
*Abgebildetes oder beschriebenes Zubehör gehört
nicht zum Standard-Lieferumfang.
1 609 929 L54 | (18.2.08) Bosch Power Tools

Deutsch | 11
Technische Daten
Feinsprühsystem PFS 55
Sachnummer
Nennaufnahmeleis-
tung
Förderleistung
Zerstäubungsleistung
2
Zeitaufwand für 5 m
Farbauftrag
Volumen des Behälters
für Sprühmaterial
Gewicht entsprechend
EPTA-Procedure
01/2003
Schutzklasse
Bitte beachten Sie die Sachnummer auf dem Typenschild Ihres Elektrowerkzeugs. Die Handelsbezeichnungen einzelner Elektrowerkzeuge können variieren.
3 603 B06 0..
W 280
g/min 0– 110
W55
min 12
ml 600
kg 1,3
/II
Konformitätserklärung
Wir erklären in alleiniger Verantwortung, dass
das unter „Technische Daten“ beschriebene
Produkt mit den folgenden Normen oder normativen Dokumenten übereinstimmt: EN 60745 gemäß den Bestimmungen der Richtlinien
2004/108/EG, 98/37/EG (bis 28.12.2009),
2006/42/EG (ab 29.12.2009).
Technische Unterlagen bei:
Robert Bosch GmbH, Dept. PT/ESC,
D-70745 Leinfelden-Echterdingen
Dr. Egbert Schneider
Senior Vice President
Engineering
Dr. Eckerhard Strötgen
Head of Product
Certification
Montage
f
Ziehen Sie vor allen Arbeiten am Elektrowerkzeug den Netzstecker aus der Steckdose.
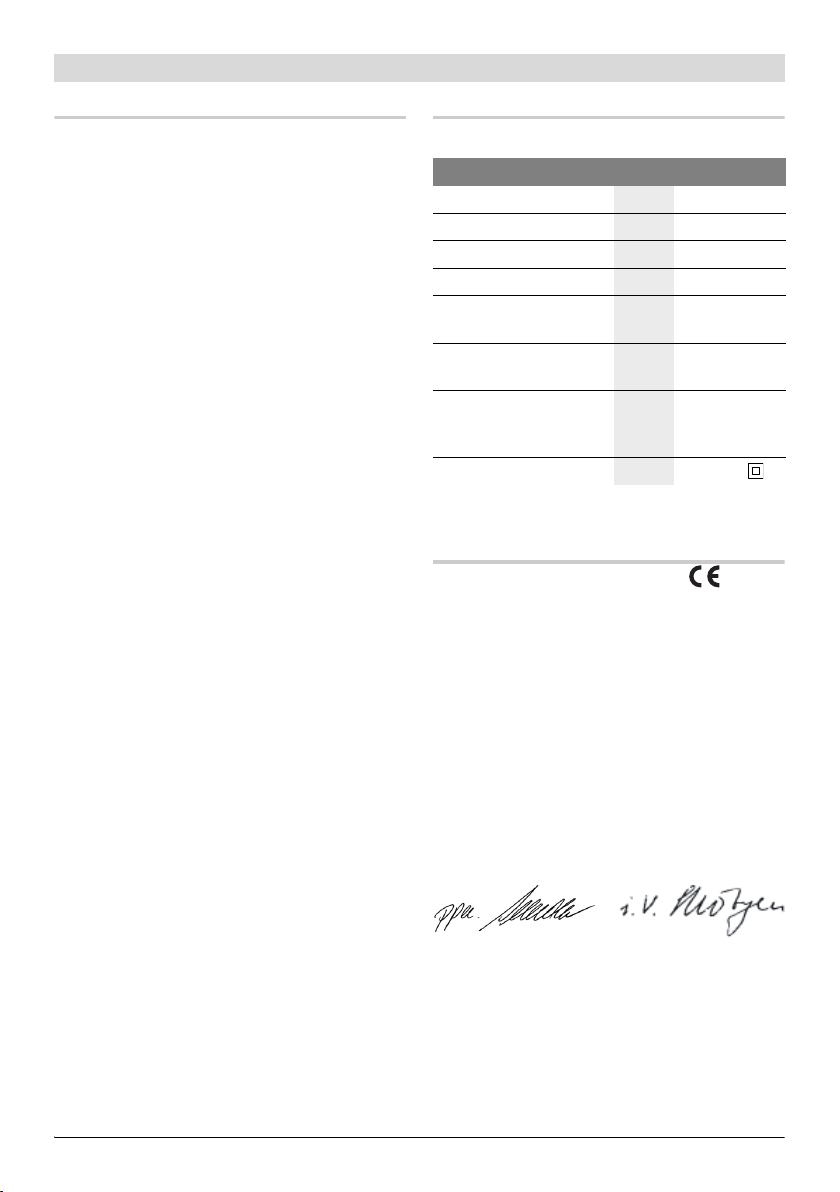
Sprühpistole und Elektroeinheit montieren (siehe Bilder A1–A2)
Elektroeinheit mit Sprühpistole verbinden
– Stecken Sie die Sprühpistole 9 auf die Elek-
troeinheit 1, bis sie hörbar einrastet.
Elektroeinheit abnehmen
– Drücken Sie die beiden roten SDS-Tasten 4,
halten Sie sie gedrückt und ziehen Sie die
Sprühspistole 9 aus der Elektroeinheit.
Betrieb
Arbeitsvorbereitung
f Sprüharbeiten am Rand von Gewässern
oder auf benachbarten Flächen im unmittelbaren Einzugsbereich sind nicht zulässig.
Achten Sie beim Kauf von Farben, Lacken und
Sprühmitteln auf deren Umweltverträglichkeit.
Sprühfläche vorbereiten
Hinweis: Decken Sie die Umgebung der Sprüh-
fläche weiträumig und gründlich ab.
Der Sprühnebel verunreinigt die Umgebung.
Beim Einsatz in Innenräumen können alle nicht
abgedeckten Oberflächen verunreinigt werden.
Die Sprühfläche muss sauber, trocken und fettfrei sein.
– Rauen Sie glatte Flächen auf und entfernen
Sie danach den Schleifstaub.
18.02.2008, Robert Bosch GmbH, Power Tools Division
D-70745 Leinfelden-Echterdingen
Bosch Power Tools 1 609 929 L54 | (18.2.08)

12 | Deutsch
Sprühmaterial verdünnen
f Achten Sie beim Verdünnen darauf, dass
Sprühmaterial und Verdünnung zusammenpassen. Bei Verwendung einer falschen Ver-
dünnung können Klumpen entstehen, die die
Sprühpistole verstopfen.
Sprühmaterial empfohlene
Verdünnung
Holzschutzmittel, Beizen,
Öle, Lasuren
Desinfektionsmittel,
Pflanzenschutzmittel
Lösemittel- oder wasserverdünnbare Lackfarben,
Grundierungen,
Kraftfahrzeug-Decklacke,
Dickschichtlasuren
Bei Sprühmaterial, das verdünnt werden muss,
gehen Sie wie folgt vor:
– Nehmen Sie den Messbecher 22.
– Rühren Sie das Sprühmaterial gut durch.
– Füllen Sie ausreichend Sprühmaterial in den
Behälter für Sprühmaterial 11. (siehe
„Sprühmaterial einfüllen“, Seite 12)
– Verdünnen Sie das Sprühmaterial um 10 %
mit Verdünnungsmittel. Zum Beispiel:
Sprühmaterial
Ausgangsmenge
[ml]
Verdünnungsmittel [ml]
– Rühren Sie das Sprühmaterial gut durch.
Führen Sie eine Probesprühung auf einer
–
Testfläche durch. (siehe „
13
Seite
Wenn Sie ein optimales Sprühbild erhalten, können Sie das Sprühen beginnen.
oder
Wenn das Sprühergebnis nicht zufriedenstellend ist oder keine Farbe austritt, gehen Sie vor
wie bei „Behebung von Störungen“ auf Seite 15
beschrieben.
)
unverdünnt
unverdünnt
mindestens
10 % verdünnt
200 300 400 500
20 30 40 50
Sprühen
“,
Sprühmaterial einfüllen (siehe Bilder B1
f
Ziehen Sie vor allen Arbeiten am Elektrowerkzeug den Netzstecker aus der Steckdose.
– Schrauben Sie den Behälter 11 von der
Sprühpistole ab.
– Drehen Sie das Steigrohr 10 so, dass das
Sprühmaterial fast ohne Rest versprüht werden kann:
für Sprüharbeiten an
liegenden Objekten
für Sprüharbeiten
über Kopf
– Füllen Sie das Sprühmaterial in den Behälter
und schrauben Sie diesen fest an die Sprühpistole.
nach vorne in
Richtung Düse
nach hinten in
Richtung Handgriff
–B2)
Inbetriebnahme
f Beachten Sie die Netzspannung! Die Span-
nung der Stromquelle muss mit den Angaben auf dem Typenschild des Elektrowerkzeuges übereinstimmen. Mit 230 V
gekennzeichnete Elektrowerkzeuge können
auch an 220 V betrieben werden.
f Achten Sie darauf, dass das Elektrogerät
während des Betriebs keine Verschmutzungen oder Lösungsmitteldämpfe ansaugen
kann.
Einschalten
– Stecken Sie den Netzstecker in die Steckdo-
se.
– Nehmen Sie das Elektrowerkzeug in die Hand
und richten Sie es auf die Sprühfläche.
Das Elektrowerkzeug hat einen 2-stufigen Bedienschalter 16. In der ersten Stufe startet die
Turbine. In der 2. Stufe wird Sprühgut gefördert.
– Drücken Sie den Bedienschalter 16, bis das
Sprühgut austritt.
Ausschalten
– Lassen Sie den Bedienschalter 16 los.
– Ziehen Sie den Netzstecker aus der Steckdo-
se.
1 609 929 L54 | (18.2.08) Bosch Power Tools

Deutsch | 13
Arbeitshinweise
Sprühen (siehe Bilder C–D)
Hinweis: Beachten Sie die Windrichtung, wenn
Sie das Elektrowerkzeug im Freien benutzen.
– Führen Sie zuerst eine Probesprühung durch
und stellen Sie das Sprühbild und die
Sprühmaterialmenge entsprechend dem
Sprühmaterial ein. (Einstellungen siehe
nachfolgende Abschnitte)
– Halten Sie die Sprühpistole unbedingt in ei-
nem gleichmäßigen Abstand von 5
senkrecht zum Sprühobjekt.
– Beginnen Sie den Sprühvorgang außerhalb
der Sprühfläche.
– Bewegen Sie die Sprühpistole je nach Sprüh-
bild-Einstellung gleichmäßig quer oder auf
und ab.
Eine gleichmäßige Oberflächenqualität entsteht, wenn sich die Bahnen um 4
überlappen.
– Vermeiden Sie Unterbrechungen innerhalb
der Sprühfläche.
Eine gleichmäßige Führung der Sprühpistole ergibt eine einheitliche Oberflächenqualität.
Ein ungleichmäßiger Abstand und Sprühwinkel
führt zu starker Farbnebelbildung und damit zu
einer ungleichmäßigen Oberfläche.
– Beenden Sie den Sprühvorgang außerhalb
der Sprühfläche.
Sprühen Sie den Behälter für das Sprühmaterial
nie ganz leer. Wenn das Steigrohr nicht mehr in
das Sprühgut taucht, bricht der Sprühnebel ab
und eine uneinheitliche Oberfläche entsteht.
Wenn sich das Sprühmaterial an der Düse und
der Luftkappe ablagert, reinigen Sie beide Teile
mit dem verwendeten Verdünnungsmittel.
Hinweis: Stellen Sie das Elektrowerkzeug nur
auf einer ebenen und sauberen Fläche ab, damit
es nicht umkippen kann.
– 15 cm
– 5cm
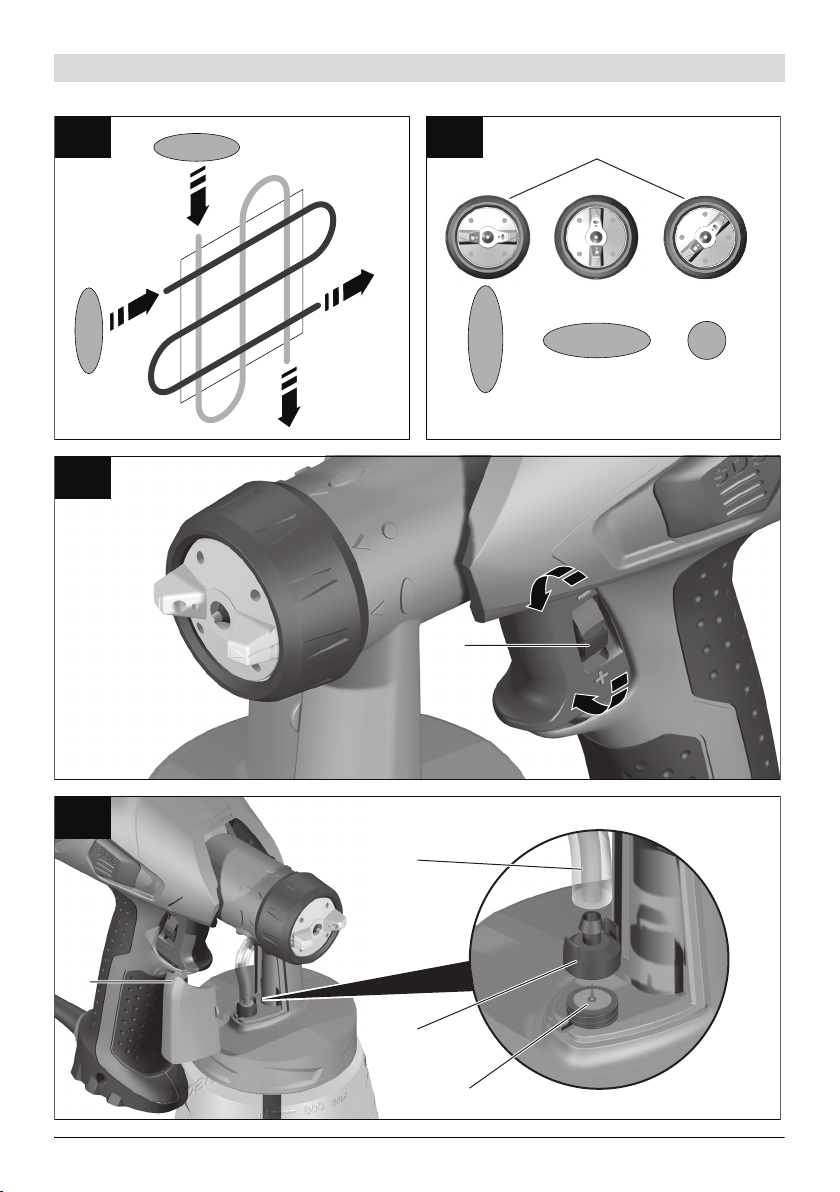
Sprühbild einstellen (siehe Bild E)
f Betätigen Sie nie den Bedienschalter 16
während Sie die Luftkappe 13 verstellen.
– Lockern Sie die Überwurfmutter 14.
– Drehen sie die Luftkappe 13 in die ge-
wünschte Position.
– Ziehen Sie die Überwurfmutter wieder fest
an.
Luftkappe
Sprühmaterialmenge einstellen (siehe Bild F)
– Drehen Sie das Stellrad 15, um die ge-
Sprühmaterialmenge Einstellung
Zu viel Sprühmaterial auf
der Sprühfläche:
Zu wenig Sprühmaterial
auf der Sprühfläche:
Strahl Anwendung
A
senkrechter Flachstrahl
für horizontale Arbeitsrichtung
B
waagrechter Flachstrahl
für vertikale Arbeitsrichtung
C
Rundstrahl für Ecken,
Kanten und schwer zugängliche Stellen
wünschte Sprühmaterialmenge einzustellen:
–: minimale Sprühmaterialmenge,
+: maximale Sprühmaterialmenge.
Die Sprühmaterialmenge muss verringert werden.
– Drehen Sie das
Stellrad 15
Richtung –.
Die Sprühmaterialmenge muss erhöht werden.
– Drehen Sie das
Stellrad 15
Richtung +.
Bosch Power Tools 1 609 929 L54 | (18.2.08)

14 | Deutsch
Wartung und Service
Wartung und Reinigung
f
Ziehen Sie vor allen Arbeiten am Elektrowerkzeug den Netzstecker aus der Steckdo-
.
se
f Tauchen Sie die Elektroeinheit niemals in
Lösungsmittel oder Wasser. Reinigen Sie
das Gehäuse nur mit einem feuchten Tuch.
Reinigung (siehe Bilder H–I)
Eine sachgemäße Reinigung ist Voraussetzung
für den einwandfreien Betrieb der Sprühpistole.
Bei fehlender oder unsachgemäßer Reinigung
werden keine Gewährleistungsansprüche übernommen.
Reinigen Sie die Sprühpistole und den Behälter
für das Sprühmaterial immer mit dem entsprechenden Verdünnungsmittel (Lösemittel oder
Wasser) für das verwendete Sprühmaterial.
Reinigen Sie die Düsen- und Luftbohrungen der
Sprühpistole niemals mit spitzen metallischen
Gegenständen.
Geben Sie verdünntes Sprühmaterial zur Aufbewahrung nicht wieder zum Original-Sprühmaterial zurück.
Reinigen Sie die Sprühpistole sehr gründlich,
wenn Sie gesundheitsschädliche Sprühmittel
verwendet haben.
– Ziehen Sie den Netzstecker und drücken Sie
den Bedienschalter 16, damit das Sprühmaterial in den Behälter zurücklaufen kann.
– Nehmen Sie die Elektroeinheit ab. (siehe
Seite 11)
– Schrauben Sie den Behälter 11 ab und leeren
Sie das restliche Sprühmaterial aus.
– Füllen Sie das Verdünnungsmittel (Lösemit-
tel oder Wasser) in den Behälter und schrauben Sie ihn an der Sprühpistole fest.
– Schütteln Sie die Sprühpistole mehrmals.
– Verbinden Sie die Sprühpistole wieder mit
der Elektroeinheit. (siehe Seite 11)
– Stecken Sie den Netzstecker in die Steckdo-
se, drücken Sie den Bedienschalter und sprühen Sie das Verdünnungsmittel in eine leere
Materialdose.
– Wiederholen Sie den Vorgang so oft, bis aus
der Sprühpistole klares Verdünnungsmittel
austritt.
– Ziehen Sie den Netzstecker und nehmen Sie
die Elektroeinheit ab.
– Entleeren Sie den Behälter 11 vollständig.
– Kontrollieren Sie, ob das Steigrohr mit der
Behälterdichtung 10 frei von Sprühmaterial
und unbeschädigt ist.
– Reinigen Sie den Behälter und die Sprühpis-
tole außen mit einem mit Verdünnungsmittel
befeuchteten Tuch.
– Schrauben Sie die Überwurfmutter 14 und
die Luftkappe 13 ab.
– Reinigen Sie die Düse 20 und die Düsennadel
mit Verdünnungsmittel.
Gelegentlich muss zusätzlich die Düsendichtung
21 gereinigt werden.
– Nehmen Sie die Düse 20 und die Düsendich-
tung 21 ab.
Nehmen Sie eventuell einen spitzen Gegenstand zur Hilfe, da die Düsendichtung fest an
der Sprühpistole sitzt.
– Reinigen Sie die Düsendichtung mit Verdün-
nungsmittel.
– Fügen Sie die Düsendichtung wieder in die
Sprühpistole ein. Achten Sie darauf, dass die
Nut von der Sprühpistole weg zeigt.
– Stecken Sie die Düse auf den Sprühpistolen-
körper und drehen Sie sie in die richtige Position.
– Stecken Sie die Luftkappe 13 auf die Düse
und ziehen Sie sie mit der Überwurfmutter
14 fest.
1 609 929 L54 | (18.2.08) Bosch Power Tools

Deutsch | 15
Entlüftungsschlauch säubern (siehe Bild G)
Wenn der Entlüftungsschlauch 17 mit Sprühmaterial verunreinigt ist, muss er gereinigt werden.
– Nehmen Sie die Abdeckung für die Entlüf-
tung 12 ab.
– Ziehen Sie den Entlüftungsschlauch 17 ab.
– Schrauben Sie das Entlüftungsventil 18 ab.
– Nehmen Sie die Membran 19 heraus.
– Reinigen Sie den Entlüftungsschlauch, das
Entlüftungsventil und die Membran mit dem
entsprechendem Verdünnungsmittel.
– Setzen Sie nach der Reinigung zuerst die
Membran wieder ein. Achten Sie darauf, dass
der längere Dorn nach oben zeigt.
– Schrauben Sie das Entlüftungsventil wieder
auf.
– Stecken Sie danach den Entlüftungsschlauch
zuerst auf das Ventil und dann oben an die
Sprühpistole.
– Setzen Sie die Abdeckung wieder ein.
Luftfilter wechseln (siehe Bild L)
Hinweis: Betreiben Sie das Elektrowerkzeug nie
ohne Luftfilter. Ohne Luftfilter kann Schmutz
angesaugt und der Betrieb des Elektrowerkzeug
beeinflusst werden.
Wenn der Luftfilter verschmutzt ist, muss er gewechselt werden.
– Lösen Sie die Schraube 7.
– Nehmen Sie die Luftfilterabdeckung 3 ab.
– Wechseln Sie die Luftfilter aus.
– Schließen Sie die Luftfilterabdeckung und
schrauben Sie die Schraube wieder fest.
Materialentsorgung
Verdünnungsmittel und Sprühmaterialreste
müssen umweltgerecht entsorgt werden. Beachten Sie die Entsorgungshinweise des Herstellers und die örtlichen Vorschriften zur Sondermüllentsorgung.
Umweltschädliche Chemikalien dürfen nicht ins
Erdreich, ins Grundwasser oder in Gewässer gelangen. Schütten Sie umweltschädliche Chemikalien nie in die Kanalisation!
Behebung von Störungen
Problem Ursache Abhilfe
Sprühmaterial deckt nicht
richtig
Sprühmaterial verläuft
nach Auftragen
Sprühmaterialmenge zu gering Stellrad 15 Richtung + drehen
Abstand zur Sprühfläche zu groß Sprühabstand verringern
Zu wenig Sprühmaterial auf der
Sprühfläche, zu selten über die
Sprühfläche gesprüht
Sprühmaterial zu dickflüssig Sprühmaterial erneut um 10 %
Zu viel Sprühmaterial aufgetragen Stellrad 15 Richtung – drehen
Abstand zur Sprühfläche zu gering Sprühabstand vergrößern
Sprühmaterial zu dünnflüssig Original-Sprühmaterial zugeben
Zu oft über dieselbe Stelle gesprüht
Öfter über die Sprühfläche sprühen
verdünnen und Probesprühung
durchführen
Farbe abtragen und beim zweiten
Sprühversuch nicht so oft über eine Stelle sprühen
Bosch Power Tools 1 609 929 L54 | (18.2.08)

16 | Deutsch
Problem Ursache Abhilfe
Zu grobe Zerstäubung Sprühmaterialmenge zu hoch Stellrad 15 Richtung – drehen
Düse 20 verschmutzt Düse reinigen
Zu geringer Druckaufbau im Behälter 11
Behälter für Sprühmaterial richtig
an der Sprühpistole festschrauben
Sprühmaterial zu dickflüssig Sprühmaterial erneut um 10 %
verdünnen und Probesprühung
durchführen
Luftfilter stark verschmutzt Luftfilter wechseln
Zu starker Farbnebel
Zu viel Sprühmaterial aufgetragen Stellrad 15 Richtung – drehen
Abstand zur Sprühfläche zu groß Sprühabstand verringern
Sprühstrahl pulsiert
Zu wenig Sprühmaterial im Behäl-
Sprühmaterial nachfüllen
ter
Entlüftungsbohrung am Steigrohr
Steigrohr und Bohrung reinigen
10 verstopft
Luftfilter stark verschmutzt Luftfilter wechseln
Sprühmaterial zu dickflüssig Sprühmaterial erneut um 10 %
verdünnen und Probesprühung
durchführen
Sprühmaterial tropft an
der Düse nach
Ablagerung von Sprühmaterial an
Düse 20 und Luftkappe 13
Düse und Luftkappe reinigen
Düse 20 verschlissen Düse auswechseln
Düse 20 lose Überwurfmutter 14 anziehen
Aus der Düse tritt kein
Sprühmaterial aus
Düse 20 verstopft Düse reinigen
Steigrohr 10 verstopft Steigrohr reinigen
Entlüftungsbohrung am Steigrohr
Steigrohr und Bohrung reinigen
10 verstopft
Steigrohr 10 lose Steigrohr feststecken
Kein Druckaufbau im Behälter 11 Behälter für Sprühmaterial richtig
an der Sprühpistole festschrauben
Sprühmaterial zu dickflüssig Sprühmaterial erneut um 10 %
verdünnen und Probesprühung
durchführen
1 609 929 L54 | (18.2.08) Bosch Power Tools

Deutsch | 17
Wartung
Sollte das Elektrowerkzeug trotz sorgfältiger
Herstellungs- und Prüfverfahren einmal ausfallen, ist die Reparatur von einer autorisierten
Kundendienststelle für Bosch-Elektrowerkzeuge
ausführen zu lassen.
Geben Sie bei allen Rückfragen und Ersatzteilbestellungen bitte unbedingt die 10-stellige
Sachnummer laut Typenschild des Elektrowerkzeuges an.
Kundendienst und Kundenberatung
Der Kundendienst beantwortet Ihre Fragen zu
Reparatur und Wartung Ihres Produkts sowie zu
Ersatzteilen. Explosionszeichnungen und Informationen zu Ersatzteilen finden Sie auch unter:
www.bosch-pt.com
Das Bosch-Kundenberater-Team hilft Ihnen gerne bei Fragen zu Kauf, Anwendung und Einstellung von Produkten und Zubehören.
www.bosch-do-it.de, das Internetportal für
Handwerker und Heimwerker.
www.ewbc.de, der Informations-Pool für Handwerk und Ausbildung.
Deutschland
Robert Bosch GmbH
Servicezentrum Elektrowerkzeuge
Zur Luhne 2
37589 Kalefeld – Willershausen
Tel. Kundendienst: +49 (1805) 70 74 10
Fax: +49 (1805) 70 74 11
E-Mail: Servicezentrum.Elektrowerkzeuge@de.
bosch.com
Tel. Kundenberatung: +49 (1803) 33 57 99
Fax: +49 (711) 7 58 19 30
E-Mail: kundenberatung.ew@de.bosch.com
Schweiz
Tel.: +41 (044) 8 47 15 11
Fax: +41 (044) 8 47 15 51
Luxemburg
Tel.: +32 (070) 22 55 65
Fax: +32 (070) 22 55 75
E-Mail: outillage.gereedschap@be.bosch.com
Entsorgung
Sprühpistole, Elektroeinheit, Zubehör und Verpackungen sollen einer umweltgerechten Wiederverwertung zugeführt werden.
Zum sortenreinen Recycling sind Kunststoffteile
gekennzeichnet.
In Deutschland sind nicht mehr gebrauchsfähige
Elektrowerkzeuge zum Recycling beim Handel
abzugeben oder (ausreichend frankiert) direkt
einzuschicken an:
Recyclingzentrum Elektrowerkzeuge
Osteroder Landstr. 3
37589 Kalefeld
Nur für EU-Länder:
Werfen Sie Elektrowerkzeuge
nicht in den Hausmüll!
Gemäß der Europäischen Richtlinie 2002/96/EG über Elektro- und
Elektronik-Altgeräte und ihrer Um-
setzung in nationales Recht müssen nicht mehr gebrauchsfähige Elektrowerkzeuge getrennt gesammelt und einer
umweltgerechten Wiederverwertung zugeführt
werden.
Änderungen vorbehalten.
Österreich
ABE Service GmbH
Jochen-Rindt-Straße 1
1232 Wien
Tel. Service: +43 (01) 61 03 80
Fax: +43 (01) 61 03 84 91
Tel. Kundenberater: +43 (01) 7 97 22 30 66
E-Mail: abe@abe-service.co.at
Bosch Power Tools 1 609 929 L54 | (18.2.08)

18 | English
en
General Power Tool Safety
Warnings
WARNING
Safety Data Sheets (MSDS), and container labels provided with the paints and solvents.
Failure to follow the warnings and instructions
may result in electric shock, fire and/or serious
injury.
Save all warnings and instructions for future
reference.
The term “power tool” in the warnings refers to
your mains-operated (corded) power tool or
battery-operated (cordless) power tool.
1) Workplace safety
a) Keep work area clean and well lit. Clut-
tered and dark areas invite accidents.
b) Keep children and bystanders away
while operating a power tool. Distrac-
tions can cause you to loose control.
2) Electrical safety
a) Power tool plugs must match the outlet.
Never modify the plug in any way. Do not
use any adapter plugs with earthed
(grounded) power tools. Unmodified
plugs and matching outlets will reduce
risk of electric shock.
b) Avoid body contact with earthed or
grounded surfaces, such as pipes, radiators, ranges and refrigerators. There is
an increased risk of electric shock if your
body is earthed or grounded.
c) Do not expose power tools to rain or wet
conditions. Water entering a power tool
will increase the risk of electric shock.
d) Do not abuse the cord. Never use the
cord for carrying, pulling or unplugging
the power tool. Keep cord away from
heat, oil, sharp edges and moving parts.
Damaged or entangled cords increase the
risk of electric shock.
Read all safety warnings, instructions including Material
e) When operating a power tool outdoors,
use an extension cord suitable for outdoor use. Use of a cord suitable for out-
door use reduces the risk of electric
shock.
f) If operating a power tool in a damp loca-
tion is unavoidable, use a residual current device (RCD) protected supply. Use
of an RCD reduces the risk of electric
shock.
3) Personal safety
a) Stay alert, watch what you are doing and
use common sense when operating a
power tool. Do not use a power tool
while you are tired or under the influence of drugs, alcohol or medication. A
moment of inattention while operating
power tools may result in serious personal injury.
b) Use safety equipment. Always wear eye
protection. Safety equipment such as
dusk mask, non-skid safety shoes, hard
hat, or hearing protection used for appropriate conditions will reduce personal injuries.
c) Prevent unintentional starting. Ensure
the switch is in the off-position before
connecting to power source and/or battery pack, picking up or carrying the
tool. Carrying power tools with your fin-
ger on the switch or energising power
tools that have the switch on invites accidents.
d) Do not overreach. Keep proper footing
and balance at all times. This enables
better control of the power tool in unexpected situations.
e) Dress properly. Do not wear loose cloth-
ing or jewellery. Keep your hair, clothing
and gloves away from moving parts.
Loose clothes, jewellery or long hair can
be caught in moving parts.
1 609 929 L54 | (18.2.08) Bosch Power Tools

English | 19
4) Use and care of the power tool
a) Do not force the power tool. Use the cor-
rect power tool for your application. The
correct power tool will do the job better
and safer at the rate for which it was designed.
b) Do not use the power tool if the switch
does not turn it on and off. Any power
tool that cannot be controlled with the
switch is dangerous and must be repaired.
c) Disconnect the plug from the power
source and/or the battery pack from the
power tool before making any adjustments, changing accessories, or storing
power tools. Such preventive safety
measures reduce the risk of starting the
power tool accidentally.
d) Store idle power tools out of the reach of
children and do not allow persons unfamiliar with the power tool or these instructions to operate the power tool.
Power tools are dangerous in the hands of
untrained users.
e) Maintain power tools. Check for mis-
alignment or binding of moving parts,
breakage of parts and any other condition that may affect the power tool’s operation. If damaged, have the power tool
repaired before use. Many accidents are
caused by poorly maintained power tools.
f) Use the power tool, accessories and ap-
plication tools etc. in accordance with
these instructions, taking into account
the working conditions and the work to
be performed. Use of power tools for op-
erations different from those intended
could result in a hazardous situation.
5) Service
a) Have your power tool serviced by a qual-
ified repair person using only identical
replacement parts. This will ensure that
the safety of the power tool is maintained.
Safety Warnings for Fine-spray
Systems
Workplace safety
f Keep area clean well lit and free of paint or
solvent containers, rags, and other flammable materials. Spontaneous combustion
may occur. Fire extinguisher equipment shall
be present and working at all times.
f Provide for good ventilation in the spraying
area and for sufficient fresh air in the complete room. Evaporating inflammable sol-
vents create an explosive environment.
f Do not use materials with a flashpoint be-
low 21 ° C for spraying and cleaning. Use
water-based materials, non-volatile hydrocarbons or similar materials. Fast evaporat-
ing solvents create an explosive environment.
f Do not spray in the vicininty of ignition
sources, such as static electricity sparks,
open flames, pilot lights, hot objects, engines/motors, cigarettes and sparks from
plugging in or unplugging power cords or
operating switches. Such spark sources can
ignite the spraying vicinity/environment.
f Do not spray any liquid of unknown hazard
potential. Unknown materials can create
hazardous conditions.
Personal safety
f Wear additional protective equipment such
as appropriate protective gloves and protective masks or respirators when spraying
or handling chemicals.
equipment for the appropriate conditions reduces the exposure to hazardous substan
Wearing protective
ces.
Bosch Power Tools 1 609 929 L54 | (18.2.08)

20 | English
f Never point the spray jet against yourself,
towards other persons or animals. Keep
your hands and other body parts away from
the spray jet. If the spray jet should penetrate the skin, seek medical attention immediately from a doctor. The material being
sprayed can even penetrate the skin through
a glove and be injected into your body.
f Do not treat injection as a simple cut. High-
pressure spray is able to inject toxins into
the body and cause serious bodily injury. In
the event that injection occurs, seek medical
attention immediately.
f Be aware of possible hazards from the
spray material. Observe the information on
drums/tanks/tins as well as manufacturer
information of the spray material, including
the request to wear personal protective
equipment. The manufacturer’s instructions
are to be observed in order to reduce the risk
of fire as well as injuries caused through toxins, carcinogens, etc.
Use and Handling of the Power Tool
f Use only nozzles/nozzle inserts specified
by the manufacturer. Never spray without
the nozzle protection mounted. Use of a
special nozzle insert with the corresponding
nozzle protection reduces the probability
that a high-pressure jet penetrates the skin
and injects toxins into the body.
f Exercise caution when cleaning and chang-
ing nozzle inserts. If the nozzle insert
should become clogged during spraying,
follow the manufacturer’s instructions for
switching off the system and relieving the
pressure before removing the nozzle. Fluids
under high pressure can penetrate the skin,
inject toxins into the body and lead to serious injury.
f Keep the plug of the mains cord and the
trigger switch of the spray gun clear of
paint and other fluids. Never hold the cord
by its connectors to support it. Failure to
follow the instruction can lead to electric
shock.
Functional Description
Read all safety warnings and all instructions. Failure to follow the
warnings and instructions may result in electric shock, fire and/or serious injury.
Intended Use
The power tool is intended for atomising solvent-based and water-dilutable paints, finishes,
primers, clear finishes, automotive finishes,
staining sealers, wood sealer-preservatives,
plant protectives, oil and disinfection agents.
The power tool is not suitable for spraying dispersions and latex paint, caustic solutions, acidic coating materials, coating materials with
granules or solids as well as spray and drip-impeding materials.
Noise/Vibration Information
Measured values determined according to
EN 60745.
Typically the A-weighted sound pressure level of
the product is 74 dB(A). Uncertainty K=1.5 dB.
The noise level when working can exceed
80 dB(A).
Wear hearing protection!
The hand-arm acceleration is typically below
2
2.5 m/s
.
1 609 929 L54 | (18.2.08) Bosch Power Tools
English | 21
Product Features
The numbering of the components shown refers
to the representation of the power tool on the
graphic pages.
1 Electrical unit
2 Cable clamp
3 Air filter cover
4 SDS release button
5 Mains cable
6 Handle extension
(only for 800 ml container)
7 Screw for air-filter cover
8 Air filter
9 Spray gun
10 Suction tube with container seal
11 Container for spray material, 600 ml
Container for spray material, 800 ml*
12 Vent cover
13 Air cap
14 Union nut
15 Thumbwheel for spraying capacity
16 Trigger switch
17 Venting hose
18 Venting valve
19 Membrane
20 Nozzle
21 Nozzle seal
22 Measuring cup
*The accessories illustrated or described are not included as standard delivery.
Technical Data
Fine-spray System PFS 55
Article number
Rated power input
Spraying capacity
Atomising output
Required time for 5 m
2
3 603 B06 0..
W 280
g/min 0–110
W55
min 12
paint application
Container capacity for
ml 600
spray material
Weight according to
kg 1.3
EPTA-Procedure
01/2003
Protection class
Please observe the article number on the type plate of
your machine. The trade names of the individual machines may vary.
/II
Declaration of Conformity
We declare under our sole responsibility that
the product described under “Technical Data” is
in conformity with the following standards or
standardization documents: EN 60745 according to the provisions of the directives
2004/108/EC, 98/37/EC (until Dec. 28, 2009),
2006/42/EC (from Dec. 29, 2009 on).
Technical file at:
Robert Bosch GmbH, Dept. PT/ESC,
D-70745 Leinfelden-Echterdingen
Dr. Egbert Schneider
Senior Vice President
Engineering
Dr. Eckerhard Strötgen
Head of Product
Certification
18.02.2008, Robert Bosch GmbH, Power Tools Division
D-70745 Leinfelden-Echterdingen
Bosch Power Tools 1 609 929 L54 | (18.2.08)

22 | English
Assembly
f Before any work on the machine itself, pull
the mains plug.
Mounting the Spray Gun and the Electrical Unit (see figures A1
Connecting the Electrical Unit with the Spray
Gun
– Insert the spray gun 9 onto the electrical unit
1 until it can be heard to engage.
Removing the Electrical Unit
– Press and hold the two red SDS release but-
tons 4 and pull the spray gun 9 out of the
electrical unit.
– A2)
Operation
Preparing for Operation
f Spraying on the sides of water bodies
(lakes, rivers, etc.) or neighbouring surfaces in the direct catchment area is not permitted.
When purchasing paint, varnish and spray material, pay attention to their environmental compatibility.
Preparing the Spray Surface
Note: Cover off the vicinity of the spray surface
thoroughly and generously.
The spray mist contaminates the environment.
When spraying in enclosures, surfaces not covered can become contaminated.
The spray surface must be clean, dry and
grease-free.
– Roughen smooth surfaces and then remove
the sanding dust.
Diluting Spray Material
f When diluting, pay attention that the spray
material and the diluting agent correspond.
When using a faulty diluting agent, lumps can
develop that can lead to clogging of the spray
gun.
Spray material Recommended
dilution
Wood preservatives, strippers, oils, finishes
Disinfectants,
plant protectants
Solvent- or water-dilutable
paints, primers,
automobile spray paint,
thick-coat finishes
For spray material that needs to be diluted, proceed as follows:
– Take the measuring cup 22.
– Stir the spray material thoroughly.
– Fill a sufficient quantity of spray material into
the spray-material container 11. (siehe “Filling in Spray Material”, Seite 23)
– Dilute the spray material by 10 % with paint
thinner. Examples:
Amount of spray
material [ml]
Paint thinner [ml] 20 30 40 50
– Stir the spray material thoroughly.
– Carry out a test-spray run on a test surface.
(see “Spraying”, page 23)
When the spraying pattern is perfect, start the
spray job.
or
When the spraying result is not satisfactory or
when no paint comes out, please continue as
described under “Correction of Malfunctions”
on page 25.
undiluted
undiluted
At least 10 %
diluted
200 300 400 500
1 609 929 L54 | (18.2.08) Bosch Power Tools

English | 23
Filling in Spray Material (see figures B1–B2)
f Before any work on the machine itself, pull
the mains plug.
– Unscrew the container 11 from the spray
gun.
– Turn the suction tube 10 so that the spray
material can be sprayed with almost no residue:
For spray jobs on
horizontal surfaces
/objects
For spray jobs
overhead
– Fill the spray material into the container and
screw the container firmly to the spray gun.
toward the front in
nozzle direction
toward the rear in
handle direction
Starting Operation
f Observe correct mains voltage! The voltage
of the power source must agree with the
voltage specified on the nameplate of the
machine. Power tools marked with 230 V
can also be operated with 220 V.
f Pay attention that the power tool cannot
draw in dust or other contamination during
operation.
Switching On
– Plug the mains plug into a socket outlet.
– Grasp the power tool and point it at the
spray surface.
The power tool is equipped with a two-step trigger switch 16. The first step starts the turbine.
The second step transports the spraying material.
– Pull the trigger switch 16 until spraying ma-
terial starts to come out.
Switching Off
– Release the trigger switch 16.
– Pull the mains plug from the socket outlet.
Working Advice
Spraying (see figures C–D)
Note: Observe the wind direction when operat-
ing the power tool outdoors.
– Firstly, carry out a test-spray run and adjust
the spray pattern and the spray material
quantity according to the spray material. (For
adjustments, see the following sections)
– Make sure to hold the spray gun vertical to
the spray object at a uniform clearance between 5
– Begin the spraying procedure outside the tar-
get area.
– Move the spray gun evenly cross-wise or up-
and-down, depending on the spray pattern
setting.
An even surface quality is achieved when the
paths overlap by 4
– Avoid interruptions inside the target area.
An even movement of the spray gun results in an
even surface quality.
Non-uniform clearance and spray angle lead to
heavy formation of paint mist and thus to an uneven surface.
– End the spraying procedure outside the tar-
get area.
Never spray the container completely empty.
When the suction tube no longer immerses in
the spray material, the spray jet will break off,
resulting in a non-uniform surface.
When coating material builds up on the nozzle
and air cap, clean both parts with the corresponding solvent.
Note: Only place down the power tool on a level
and clean surface so that it can not tip over.
– 15 cm.
– 5cm.
Bosch Power Tools 1 609 929 L54 | (18.2.08)
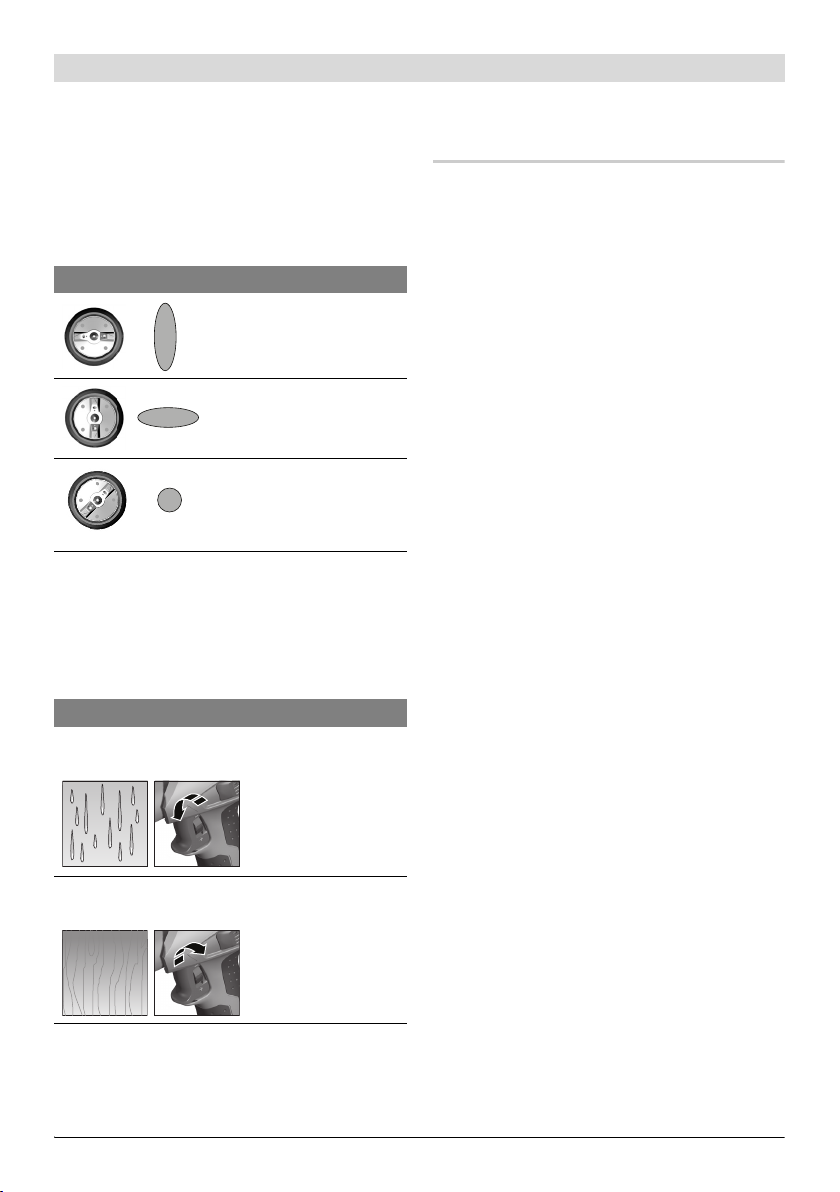
24 | English
Adjusting the Spray Pattern (see figure E)
f Never actuate the trigger switch 16 while
adjusting the air cap 13.
– Loosen the union nut 14.
– Turn the air cap 13 to the requested position.
– Firmly retighten the union nut.
Air cap Jet Application
A
Vertical flat jet for horizontal working direction
B
Horizontal flat jet for vertical working direction
C
Round jet for corners,
edges and hard to reach
locations
Adjusting the Spraying Capacity (see figure F)
– To adjust the requested spraying capacity,
turn the thumbwheel 15:
–: Min. spraying capacity,
+: Max. spraying capacity.
Spraying capacity Adjustment
Too much material on target area:
Not enough material on
target area:
The spraying capacity must be reduced.
– Turn the thum-
bwheel 15 in direction –.
The spraying capacity must be increased.
– Turn the thum-
bwheel 15 in direction +.
Maintenance and Service
Maintenance and Cleaning
f Before any work on the machine itself, pull
the mains plug.
f Never immerse the electrical unit into sol-
vent or water. Clean the housing using only
a moist cloth.
Cleaning (see figures H–I)
Proper cleaning is the requirement for flawless
operation of the spray gun. Improper or lack of
cleaning voids warranty claims.
Always clean the spray gun and the container
with the respective diluting agent (paint thinner
or water) for the spray material being used.
Never clean the nozzle and air holes of the spray
gun with pointed metal objects.
Do not pour diluted spray material back into the
original spray material drum/tin for storage.
Clean the spray gun thoroughly after having
sprayed material hazardous to one’s health.
– Unplug the mains plug and pull the trigger
switch 16 so that the spraying material can
flow back into the container.
– Remove the electrical unit. (see page 22)
– Unscrew the container 11 and empty the re-
maining spray material.
– Fill diluting agent (paint thinner or water) in-
to the container and screw it to the spray
gun.
– Shake the spray gun several times.
– Connect the spray gun to the electrical unit
again. (see page 22)
– Plug the mains plug into a socket outlet, pull
the trigger switch and spray the diluting
agent into an empty material tin.
– Repeat the process until clear diluting agent
emerges from the spray gun.
– Unplug the mains plug and remove the elec-
trical unit.
– Completely empty the container 11.
– Check if the suction tube with the container
seal 10 is free of spray material and undamaged.
1 609 929 L54 | (18.2.08) Bosch Power Tools

English | 25
– Clean the outside of the container and the
spray gun with a cloth moistened in paint
thinner.
– Unscrew the union nut 14 and the air cap 13.
– Clean the nozzle 20 and the nozzle needle
with diluting agent.
From time to time, the nozzle seal 21 must also
be cleaned.
– Remove the nozzle 20 and the nozzle seal 21.
If required, use a pointed object, as the nozzle seal is seated firmly to the spray gun.
– Clean the nozzle seal with diluting agent.
– Reinstall the nozzle seal in the spray gun. Pay
attention that the groove points away from
the spray gun.
– Mount the nozzle onto the spray gun body
and turn it to the correct position.
– Mount the air cap 13 onto the nozzle and
tighten with the union nut 14.
Cleaning the Venting Hose (see figure G)
When the venting hose 17 is contaminated with
spraying material, it must be cleaned.
– Remove the vent cover 12.
– Pull off the venting hose 17.
– Unscrew the venting valve 18.
– Remove the membrane 19.
– Clean the venting hose, the venting valve and
the membrane with an appropriate paint
thinner.
– After cleaning, reinsert the membrane again
first. Pay attention that the longer rod faces
upward.
– Screw the venting valve on again.
– Afterwards, attach the venting hose to the
valve first, then at the top on the spray gun.
– Reattach the vent cover again.
Changing the Air Filter (see figure L)
Note: Never operate the powr tool without the
air filter. Without the air filter, dirt/contamination can be drawn in and can influence the operation of the power tool.
The air filter must be replaced when soiled.
– Loosen screw 7.
– Remove the air filter cover 3.
– Replace the air filter.
– Reattach the air filter cover and screw in the
screw again.
Material Disposal
Diluting agent and remainders of spray material
must be disposed of in an environmentallyfriendly manner. Observe the manufacturer’s
disposal information and the local regulations
for disposal of hazardous waste.
Chemicals harmful to the environment may not
be disposed of into soil, groundwater or bodies
of water. Never pour chemicals harmful to the
environment into the sewerage system!
Correction of Malfunctions
Problem Cause Corrective Measure
Spray material does not
cover properly
Bosch Power Tools 1 609 929 L54 | (18.2.08)
Spraying capacity too low Turning the thumbwheel 15 in
Clearance to target area too large Reduce spray distance
Not enough spray material on target
area, too few spray paths sprayed
over target area
Spray material too viscous Thin down the spray material by
direction +
Apply more spray paths over target area
10% again and carry out a testspray run

26 | English
Problem Cause Corrective Measure
Spray material runs off
after coating
Too much spray material applied Turning the thumbwheel 15 in
direction –
Clearance to target area too close Increase spray distance
Viscosity of spray material too low Add original spray material
Spray material applied too often over
same spot
Remove spray material; reduce
number of spray paths over same
spot
Atomisation too course
Spraying capacity too high Turning the thumbwheel 15 in
direction –
Nozzle 20 soiled Clean nozzle
Too little pressure build-up in con-
tainer 11
Screw container firmly against
spray gun
Spray material too viscous Thin down the spray material by
10% again and carry out a test-
spray run
Air filter heavily soiled Changing the Air Filter
Too much fog of coating
material
Too much spray material applied Turning the thumbwheel 15 in
direction –
Clearance to spray surface too large Reduce spray distance
Spray jet pulsates
Not enough spray material in con-
Refill spray material
tainer
Venting hole on suction tube 10
Clean suction tube and hole
clogged
Air filter heavily soiled Changing the Air Filter
Spray material too viscous Thin down the spray material by
10% again and carry out a test-
spray run
Spray material drips
from the nozzle
Build-up of spray material on nozzle
20 and air cap 13
Clean nozzle and air cap
Nozzle 20 worn Replace nozzle
Nozzle 20 loose Tighten union nut 14
No spray material
emerges from the
nozzle
Nozzle 20 clogged Clean nozzle
Suction tube 10 clogged Clean suction tube
Venting hole on suction tube 10
Clean suction tube and hole
clogged
Suction tube 10 loose Insert suction tube properly
No pressure build-up in container 11 Screw container firmly against
spray gun
Spray material too viscous Thin down the spray material by
10% again and carry out a test-
spray run
1 609 929 L54 | (18.2.08) Bosch Power Tools
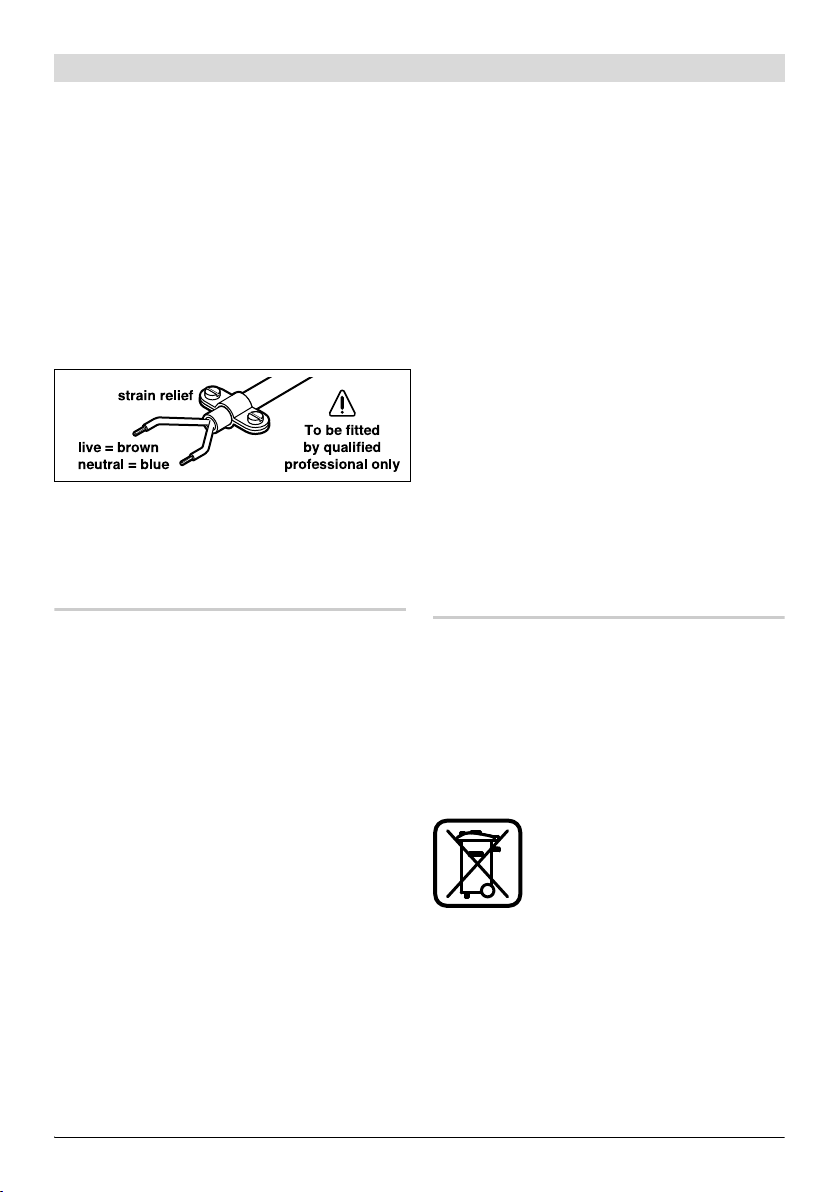
English | 27
Maintenance
If the machine should fail despite the care taken
in manufacturing and testing procedures, repair
should be carried out by an after-sales service
centre for Bosch power tools.
In all correspondence and spare parts order,
please always include the 10-digit article
number given on the type plate of the machine.
WARNING! Important instructions for connecting a new 3-pin plug to the 2-wire cable.
The wires in the cable are coloured according to
the following code:
Do not connect the blue or brown wire to the
earth terminal of the plug.
Important: If for any reason the moulded plug is
removed from the cable of this power tool, it
must be disposed of safely.
After-sales Service and Customer Assistance
Our after-sales service responds to your questions concerning maintenance and repair of your
product as well as spare parts. Exploded views
and information on spare parts can also be
found under:
www.bosch-pt.com
Our customer consultants answer your questions concerning best buy, application and adjustment of products and accessories.
Great Britain
Robert Bosch Ltd. (B.S.C.)
P.O. Box 98
Broadwater Park
North Orbital Road
Denham
Uxbridge
UB 9 5HJ
Tel. Service: +44 (0844) 736 0109
Fax: +44 (0844) 736 0146
E-Mail: SPT-Technical.de@de.bosch.com
Ireland
Origo Ltd.
Unit 23 Magna Drive
Magna Business Park
City West
Dublin 24
Tel. Service: +353 (01) 4 66 67 00
Fax: +353 (01) 4 66 68 88
Australia, New Zealand and Pacific Islands
Robert Bosch Australia Pty. Ltd.
Power Tools
Locked Bag 66
Clayton South VIC 3169
Customer Contact Center
Inside Australia:
Phone: +61 (01300) 307 044
Fax: +61 (01300) 307 045
Inside New Zealand:
Phone: +64 (0800) 543 353
Fax: +64 (0800) 428 570
Outside AU and NZ:
Phone: +61 (03) 9541 5555
www.bosch.com.au
Disposal
Spray gun, electrical unit, accessories and packaging should be sorted for environmental-friendly recycling.
The plastic components are labelled for categorized recycling.
Only for EC countries:
Do not dispose of power tools into household waste!
According the European Guideline
2002/96/EC for Waste Electrical
and Electronic Equipment and its
implementation into national
right, power tools that are no longer usable
must be collected separately and disposed of in
an environmentally correct manner.
Subject to change without notice.
Bosch Power Tools 1 609 929 L54 | (18.2.08)

28 | Français
fr
Avertissements de sécurité généraux pour l’outil
AVERTISSEMENT
tes les instructions, y compris les fiches techniques fournies avec les peintures et solvants
et les plaques d’avertissement se trouvant sur
les récipients. Ne pas suivre les avertissements
et instructions peut donner lieu à un choc électrique, un incendie et/ou blessure sérieuse.
Conserver tous les avertissements et toutes
les instructions pour pouvoir s’y reporter ultérieurement.
Le terme « outil électrique » dans les avertissements fait référence à votre outil électrique alimenté par le secteur (avec cordon d’alimentation) ou votre outil fonctionnant sur batterie
(sans cordon d’alimentation).
1) Sécurité de la zone de travail
a) Conserver la zone de travail propre et
bien éclairée. Les zones en désordre ou
sombres sont propices aux accidents.
b) Maintenir les enfants et les personnes
présentes à l’écart pendant l’utilisation
de l’outil électrique. Les distractions
peuvent vous faire perdre le contrôle de
l’outil.
2) Sécurité électrique
a) ll faut que les fiches de l’outil électrique
soient adaptées au socle. Ne jamais modifier la fiche de quelque façon que ce
soit. Ne pas utiliser d’adaptateurs avec
des outils à branchement de terre. Des fi-
ches non modifiées et des socles adaptés
réduiront le risque de choc électrique.
b) Eviter tout contact du corps avec des
surfaces reliées à la terre telles que les
tuyaux, les radiateurs, les cuisinières et
les réfrigérateurs. Il existe un risque ac-
cru de choc électrique si votre corps est
relié à la terre.
c) Ne pas exposer les outils à la pluie ou à
des conditions humides. La pénétration
d’eau à l’intérieur d’un outil augmentera
le risque de choc électrique.
Lire tous les avertissements de sécurité et tou-
d) Ne pas maltraiter le cordon. Ne jamais
utiliser le cordon pour porter, tirer ou
débrancher l’outil. Maintenir le cordon à
l’écart de la chaleur, du lubrifiant, des
arêtes ou des parties en mouvement. Les
cordons endommagés ou emmêlés augmentent le risque de choc électrique.
e) Lorsqu’on utilise un outil à l’extérieur,
utiliser un prolongateur adapté à l’utilisation extérieure. L’utilisation d’un cor-
don adapté à l’utilisation extérieure réduit
le risque de choc électrique.
f) Si l’usage d’un outil dans un emplace-
ment humide est inévitable, utiliser une
alimentation protégée par un dispositif à
courant différentiel résiduel (RCD).
L’usage d’un RCD réduit le risque de choc
électrique.
3) Sécurité des personnes
a) Rester vigilant, regarder ce que vous est
en train de faire et faire preuve de bon
sens dans votre utilisation de l’outil. Ne
pas utiliser un outil lorsque vous êtes fatigué ou sous l’emprise de drogues, d’alcool ou de médicaments. Un moment
d’inattention en cours d’utilisation d’un
outil peut entraîner des blessures graves
des personnes.
b) Porter des équipements de protection.
Porter toujours des lunettes de protection. Le fait de porter des équipements de
protection personnels tels que masque
anti-poussière, chaussures de sécurité antidérapantes, casque de protection ou
protection acoustique suivant le travail à
effectuer avec l’outil électroportatif, réduit le risque de blessures.
c) Eviter tout démarrage intempestif. S’as-
surer que l’interrupteur est en position
arrêt avant de brancher l’outil au secteur
et/ou au bloc de batteries, de le ramasser ou de le porter. Porter les outils en
ayant le doigt sur l’interrupteur ou brancher des outils dont l’interrupteur est en
position marche est source d’accidents.
1 609 929 L54 | (18.2.08) Bosch Power Tools

Français | 29
d) Eviter les positions anormales. Garder
une position et un équilibre adaptés à
tout moment. Cela permet un meilleur
contrôle de l’outil dans des situations
inattendues.
e) S’habiller de manière adaptée. Ne pas
porter de vêtements amples ou de bijoux. Garder les cheveux, les vêtements
et les gants à distance des parties en
mouvement. Des vêtements amples, des
bijoux ou des cheveux longs peuvent être
pris dans les parties en mouvement.
4) Maintenance et entretien de l’outil
a) Ne pas forcer l’outil. Utiliser l’outil adap-
té à votre application. L’outil adapté réa-
lisera mieux le travail et de manière plus
sûre au régime pour lequel il a été construit.
b) Ne pas utiliser l’outil électrique si l’inter-
rupteur ne permet pas de passer de
l’état de marche à arrêt et vice versa.
Tout outil électrique qui ne peut pas être
commandé par l’interrupteur est dangereux et il faut le réparer.
c) Débrancher la fiche de la source d’ali-
mentation en courant et/ou le bloc de
batteries de l’outil avant tout réglage,
changement d’accessoires ou avant de
ranger l’outil. De telles mesures de sécu-
rité préventives réduisent le risque de démarrage accidentel de l’outil.
d) Conserver les outils électriques à l’arrêt
hors de la portée des enfants. Ne pas
permettre à des personnes ne connaissant pas l’outil ou les présentes instructions de le faire fonctionner. Les outils
électriques sont dangereux entre les
mains d’utilisateurs novices.
e) Observer la maintenance de l’outil. Véri-
fier qu’il n’y a pas de mauvais alignement
ou de blocage des parties mobiles, des
pièces cassées ou toute autre condition
pouvant affecter le fonctionnement de
l’outil. En cas de dommages, faire réparer l’outil avant de l’utiliser. De nom-
breux accidents sont dus à des outils mal
entretenus.
f) Utiliser l’outil électrique, les accessoires
et les outils de travail etc., conformément à ces instructions, en tenant compte des conditions de travail et du travail
à réaliser. Tenir compte des conditions
de travail et du travail à réaliser. L’utili-
sation de l’outil électrique pour des opérations différentes de celles prévues
pourrait donner lieu à des situations dangereuses.
5) Maintenance et entretien
a) Faire entretenir l’outil par un réparateur
qualifié utilisant uniquement des pièces
de rechange identiques. Cela assurera
que la sécurité de l’outil est maintenue.
Consignes de sécurité pour les
systèmes de pulvérisation fine
Sécurité de la zone de travail
f Maintenir la zone de travail propre et bien
éclairée et exempte de pots de peinture ou
de solvants, de torchons et d’autres matériaux inflammables. Danger possible d’auto-
inflammation. Tenir à tout temps à disposition des extincteurs/des équipements et matériels de sapeurs-pompiers prêts à être mis
en service.
f Veiller à garantir une bonne aération dans la
zone de pulvérisation et assez d’air frais
dans le local entier. Les solvants inflamma-
bles qui se volatilisent génèrent une ambiance explosive.
f Ne pas pulvériser et ne pas nettoyer avec
des matériaux dont le point d’inflammation
est inférieur à 21 °C. Utiliser des matériaux
à base d’eau, d’hydrocarbures à faible teneur en matières volatiles ou d’autres matériaux similaires. Les solvants inflammables
volatils génèrent une ambiance explosive.
Bosch Power Tools 1 609 929 L54 | (18.2.08)

30 | Français
f Ne pas pulvériser à proximité de sources
d’allumage telles qu’étincelles d’électricité
statique, feux ouverts, flammes pilotes, objets chauds, moteurs, cigarettes et étincelles générées par la connexion et déconnexion de câbles électriques ou la
commande d’interrupteurs. De tels sources
d’étincelles peuvent causer un incendie dans
les zones avoisinantes.
f Ne pas pulvériser de matériaux dont vous
ne savez pas s’ils présentent un danger. Les
matériaux inconnus peuvent causer des conditions dangereuses.
Sécurité des personnes
f Porter en plus un équipement de protection
individuelle tels que gants et masques antipoussières ou respirateur lors de la pulvérisation ou de la manipulation de produits
chimiques. Les équipements de sécurité
pour certaines conditions réduisent l’exposition des personnes aux substances dangereuses.
f Ne pas pulvériser vers soi-même ou vers
d’autres personnes ou des animaux. Tenir
vos mains et toute autre partie de votre
corps à l’écart du jet. Au cas où le jet pénétrerait dans la peau, consulter immédiatement un médecin. Le produit peut pénétrer
dans la peau même à travers un gant et être
injecté dans votre corps.
f Ne pas traiter une injection comme une sim-
ple blessure. Le jet à haute pression peut in-
jecter des produits toxiques dans votre
corps et causer de graves blessures. Dans le
cas d’une injection dans la peau, consulter
immédiatement un médecin.
f Tenir compte des dangers éventuels du pro-
duit. Tenir compte des repères sur le pot ou
des informations du fabricant du produit, y
compris de la nécessité de porter un équipement de protection personnel. Respecter
impérativement les indications du fabricant
pour réduire le danger d’incendie ou les blessures causées par les toxiques, les carcinogènes etc.
Maintenance et entretien de l’outil
f N’utiliser que des inserts de buse spécifiés
par le fabricant. Ne jamais pulvériser sans
protection de buse. L’utilisation d’un un in-
sert de buse spécial équipé de la protection
de buse appropriée réduit la probabilité
qu’un jet haute pression ne pénètre dans la
peau et injecte des toxiques dans le corps.
f Attention lors du nettoyage ou remplace-
ment des inserts de buse. Au cas où l’insert
de buse se boucherait pendant la pulvérisation, suivre les indications du fabricant
pour arrêter l’appareil ou pour détendre la
pression avant d’enlever la buse pour la
nettoyer. Les liquides sous haute-pression
peuvent passer à travers la peau, injecter des
produits toxiques dans le corps et causer
ainsi des blessures graves.
f Maintenir la fiche du câble de secteur et
l’interrupteur du pistolet-pulvérisateur
exempts de peinture et d’autres liquides.
Ne jamais tenir le câble pour soutenir les
connexions. Ne pas suivre les avertisse-
ments peut donner lieu un choc électrique.
1 609 929 L54 | (18.2.08) Bosch Power Tools
Loading…

Robert Bosch GmbH
Power Tools Division
70745 Leinfelden-Echterdingen
Germany
www.bosch-pt.com
1 609 929 Y12 (2011.08) PS / 192 UNI
PFS 55
de Originalbetriebsanleitung
en Original instructions
fr Notice originale
es Manual original
pt Manual original
it Istruzioni originali
nl Oorspronkelijke
gebruiksaanwijzing
da Original brugsanvisning
sv Bruksanvisning i original
no Original driftsinstruks
fi Alkuperäiset ohjeet
el Рсщфьфхрп пдзгйюн чсЮузт
tr
Orijinal işletme talimat
pl
Instrukcja oryginalna
cs Původní návod k používání
sk Pôvodný návod na použitie
hu Eredeti használati utasítás
ru Оригинальное руководство по
эксплуатации
uk Ориг³нальна ³нструкц³я з
експлуатац³¿
ro Instrucţiuni originale
bg Оригинална инструкция
sr
Originalno uputstvo za rad
sl
Izvirna navodila
hr Originalne upute za rad
et Algupärane kasutusjuhend
lv
Instrukcijas oriģinālvalodā
lt
Originali instrukcija
OBJ_BUCH-670-002.book Page 1 Monday, August 22, 2011 1:10 PM
Хорошее руководство по эксплуатации
Законодательство обязывает продавца передать покупателю, вместе с товаром, руководство по эксплуатации Bosch PFS 55. Отсутствие инструкции либо неправильная информация, переданная потребителю, составляют основание для рекламации в связи с несоответствием устройства с договором. В законодательстве допускается предоставлении руководства в другой, чем бумажная форме, что, в последнее время, часто используется, предоставляя графическую или электронную форму инструкции Bosch PFS 55 или обучающее видео для пользователей. Условием остается четкая и понятная форма.
Что такое руководство?
Слово происходит от латинского «instructio», тоесть привести в порядок. Следовательно в инструкции Bosch PFS 55 можно найти описание этапов поведения. Цель инструкции заключается в облегчении запуска, использования оборудования либо выполнения определенной деятельности. Инструкция является набором информации о предмете/услуге, подсказкой.
К сожалению немного пользователей находит время для чтения инструкций Bosch PFS 55, и хорошая инструкция позволяет не только узнать ряд дополнительных функций приобретенного устройства, но и позволяет избежать возникновения большинства поломок.
Из чего должно состоять идеальное руководство по эксплуатации?
Прежде всего в инструкции Bosch PFS 55 должна находится:
— информация относительно технических данных устройства Bosch PFS 55
— название производителя и год производства оборудования Bosch PFS 55
— правила обслуживания, настройки и ухода за оборудованием Bosch PFS 55
— знаки безопасности и сертификаты, подтверждающие соответствие стандартам
Почему мы не читаем инструкций?
Как правило из-за нехватки времени и уверенности в отдельных функциональностях приобретенных устройств. К сожалению само подсоединение и запуск Bosch PFS 55 это слишком мало. Инструкция заключает ряд отдельных указаний, касающихся функциональности, принципов безопасности, способов ухода (даже то, какие средства стоит использовать), возможных поломок Bosch PFS 55 и способов решения проблем, возникающих во время использования. И наконец то, в инструкции можно найти адресные данные сайта Bosch, в случае отсутствия эффективности предлагаемых решений. Сейчас очень большой популярностью пользуются инструкции в форме интересных анимаций или видео материалов, которое лучше, чем брошюра воспринимаются пользователем. Такой вид инструкции позволяет пользователю просмотреть весь фильм, не пропуская спецификацию и сложные технические описания Bosch PFS 55, как это часто бывает в случае бумажной версии.
Почему стоит читать инструкции?
Прежде всего здесь мы найдем ответы касательно конструкции, возможностей устройства Bosch PFS 55, использования отдельных аксессуаров и ряд информации, позволяющей вполне использовать все функции и упрощения.
После удачной покупки оборудования/устройства стоит посвятить несколько минут для ознакомления с каждой частью инструкции Bosch PFS 55. Сейчас их старательно готовят или переводят, чтобы они были не только понятными для пользователя, но и чтобы выполняли свою основную информационно-поддерживающую функцию.