
CD RECEIVER
RADIO CD
CD PLAYER
English
Español
DEH-7250SD
Português (B)
Operation Manual
Manual de instrucciones
Manual de operação

Contents
Thank you for purchasing this PIONEER product.
To ensure proper use, please read through this manual before using this product. It
is especially important that you read and observe WARNINGs and CAUTIONsin
this manual. Please keep the manual in a safe and accessible place for future refer-
ence.
Before You Start
About this unit 3
In case of trouble 3
Demo mode 3
Reverse mode 3
Resetting the microprocessor 3
About this manual 4
Operating this unit
Head unit 5
Remote control 5
Basic Operations 5
Use and care of the remote control 6
Menu operations identical for function
settings/audio adjustments/initial settings/
lists 7
Tuner 7
– Basic Operations 7
– Storing and recalling stations 7
– Function settings 7
CD/CD-R/CD-RW and external storage
devices (USB, SD) 8
– Basic Operations 8
– Displaying text information 9
– Using lists 9
– Advanced operations using special
buttons 10
– Function settings 10
iPod 11
– Basic Operations 11
– Displaying text information 11
– Browsing for a song 11
– Advanced operations using special
buttons 12
– Function settings 12
Audio Adjustments 13
– Advanced operations using special
buttons 13
– Audio function settings 13
Initial Settings 14
Other Functions 16
– Using the AUX source 16
– Clock display 16
– Switching the display indication and
button illumination 16
– Using different entertainment
displays 16
Additional Information
Troubleshooting 18
Error messages 18
Handling guideline 20
Compressed audio compatibility (disc, USB,
SD) 21
iPod compatibility 23
Sequence of audio files 23
Copyright and trademark 23
Specifications 26
2
En
Before You Start
Section
01
About this unit
CAUTION
! Do not allow this unit to come into contact
with liquids. Electrical shock could result.
Also, damage to this unit, smoke, and overheating could result from contact with liquids.
! “CLASS 1 LASER PRODUCT”
This product contains a laser diode of higher
class than 1. To ensure continued safety, do
not remove any covers or attempt to gain access to the inside of the product. Refer all servicing to qualified personnel.
! Always keep the volume low enough to hear
outside sounds.
! Avoid exposure to moisture.
! If the battery is disconnected or discharged,
any preset memory will be erased.
CAUTION:
USE OF CONTROL OR ADJUSTMENT OR
PERFORMANCE OF PROCEDURES
OTHER THAN THOSE SPECIFIED HEREIN
MAY RESULT IN HAZARDOUS RADIATION
EXPOSURE.
CAUTION:
THE USE OF OPTICAL INSTRUMENTS
WITH THIS PRODUCT WILL INCREASE
EYE HAZARD.
In case of trouble
Should this unit fail to operate properly, please
contact your dealer or nearest authorized
PIONEER Service Station.
! Remember that if the feature demo continues
operating when the car engine is turned off, it
may drain battery power.
The demo automatically starts when the ignition switch is set to ACC or ON while the unit
is turned off. Turning off the unit does not cancel demo mode. To cancel the demo mode,
press DISP/
again to start. Operating the demo while the
ignition switch is set to ACC may drain battery
power.
/SCRL. Press DISP/ /SCRL
Reverse mode
If you do not perform an operation within
about 30 seconds, screen indications start to
reverse, and then continue reversing every 10
seconds. Pressing button BAND/ESC when
power to this unit is turned off while the ignition switch is set to ACC or ON cancels the reverse mode. Press button BAND/ESC again to
start the reverse mode.
Resetting the microprocessor
The microprocessor must be reset under the
following conditions:
! Prior to using this unit for the first time
after installation
! If the unit fails to operate properly
! When strange or incorrect messages ap-
pear on the display
English
Demo mode
Important
! Failure to connect the red lead (ACC) of this
unit to a terminal coupled with ignition switch
on/off operations may lead to battery drain.
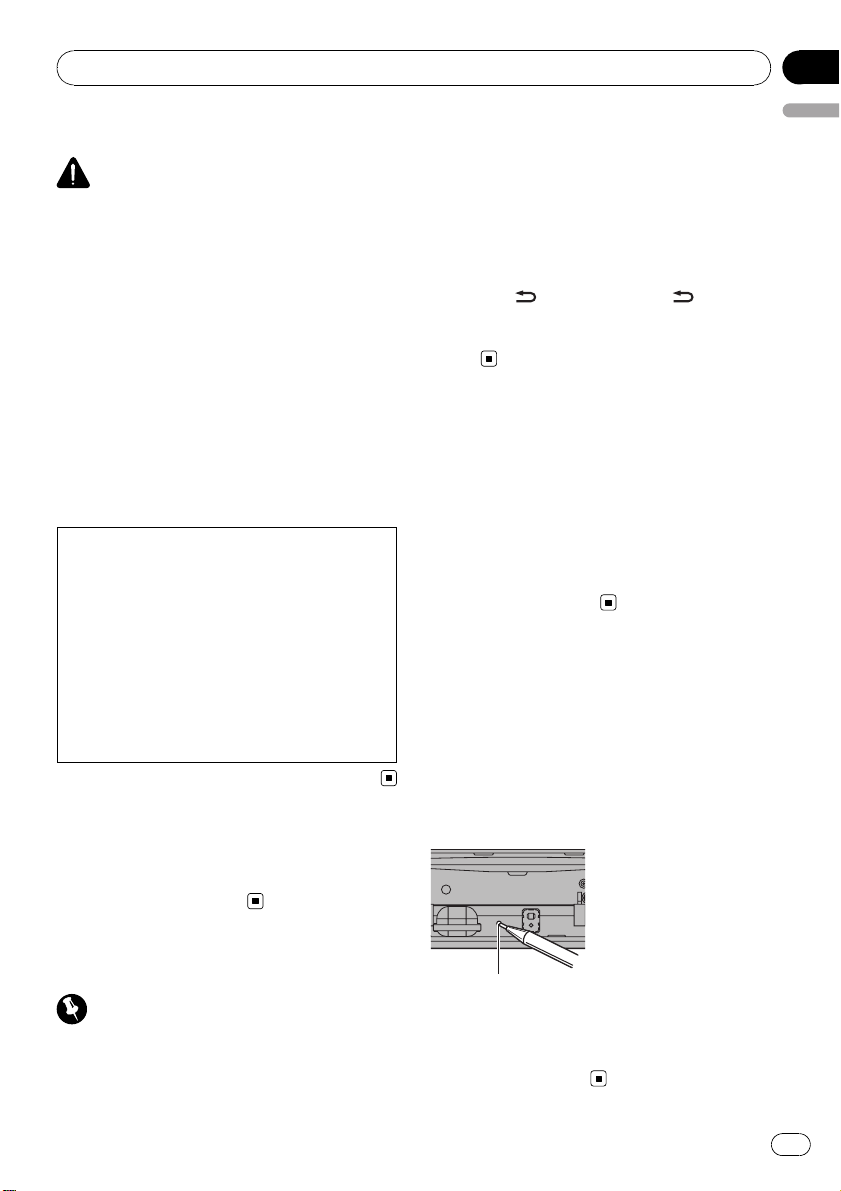
RESET button
1 Remove the front panel.
2 Press RESET with a pen tip or other
pointed instrument.
En
3

Section
01
Before You Start
About this manual
In the following instructions, USB memories,
USB portable audio players, and SD memory
cards are collectively referred to as “external
storage devices (USB, SD).” If only USB memories and USB portable audio players are indicated, they are collectively referred to as “USB
storage devices.”
In this manual, iPod and iPhone will be referred to as iPod.
4
En
Operating this unit
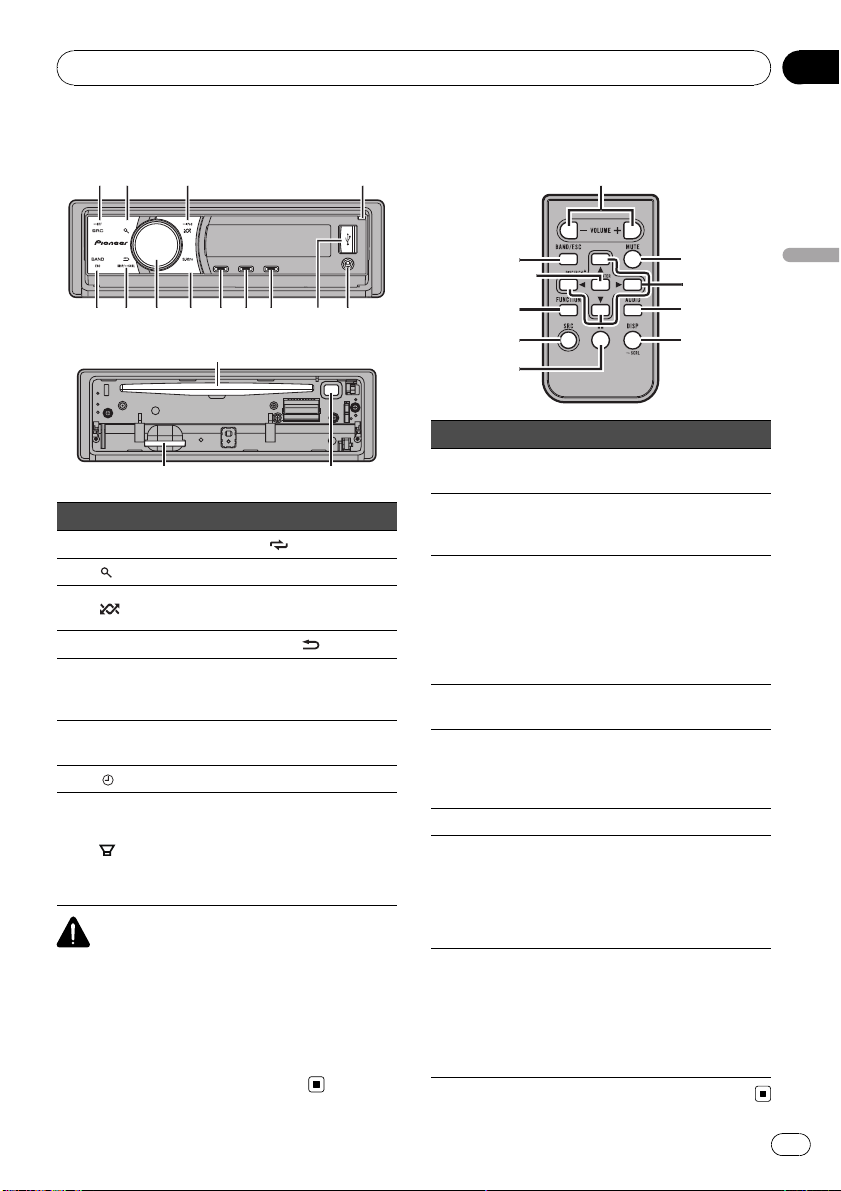
Head unit
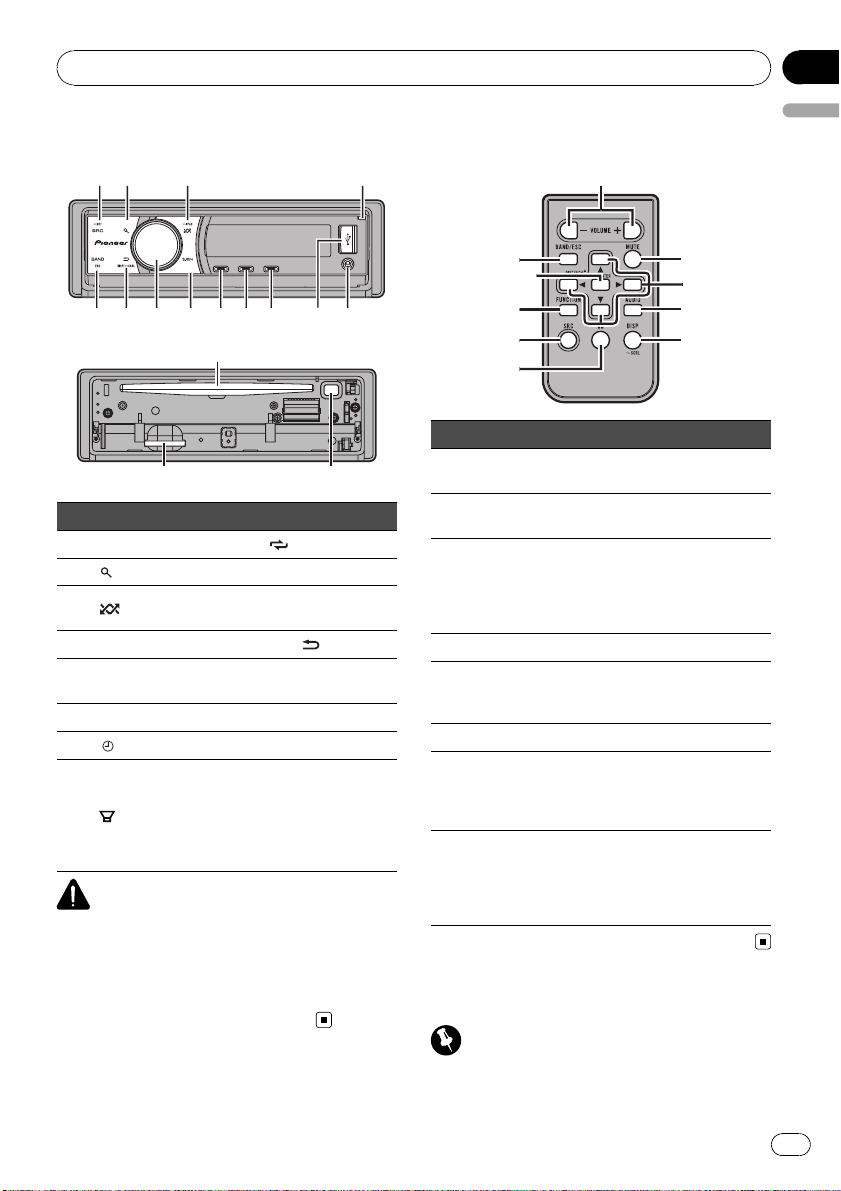
e
Part Part
1 SRC/OFF 9
(list) a S.Rtrv
2
3
/iPod b
4 Open button c DISP/
AUX input jack (3.5
5
mm stereo jack)
6 USB port e Disc loading slot
7
/DISP OFF f h (eject)
8
/BASS g
CAUTION
Use an optional Pioneer USB cable (CD-U50E) to
connect the USB audio player/USB memory to
the USB port. Since the USB audio player/USB
memory is projected forward from the unit, it is
dangerous to connect directly.
Do not use the unauthorized product.
/LOC
MULTI-CONTROL
(M.C.)
/SCRL
d BAND/ESC
SD memory card
slot
You can see the SD
memory card slot if
you remove the
front panel.
Remote control
Part Operation
h VOLUME
i MUTE
j a/b/c/d
k AUDIO Press to select an audio function.
l DISP/SCRL
m e Press to pause or resume.
n FUNCTION
LIST/
o
ENTER
Press to increase or decrease volume.
Press to mute. Press again to unmute.
Press to perform manual seek
tuning, fast forward, reverse and
track search controls.
Also used for controlling functions.
Press to select different displays.
Press and hold to scroll through
the text information.
Press to select functions.
Press and hold to recall the initial
setting menu when the sources
are off.
Press to display the disc title,
track title, folder, or file list depending on the source.
While in the operating menu,
press to control functions.
Basic Operations
Important
! Handle gently when removing or attaching
the front panel.
Section
02
English
En
5

Section
02
Operating this unit
! Avoid subjecting the front panel to excessive
shock.
! Keep the front panel out of direct sunlight and
high temperatures.
! Remove any cables and devices attached to
this unit before detaching the front panel to
avoid damage to the device or vehicle interior.
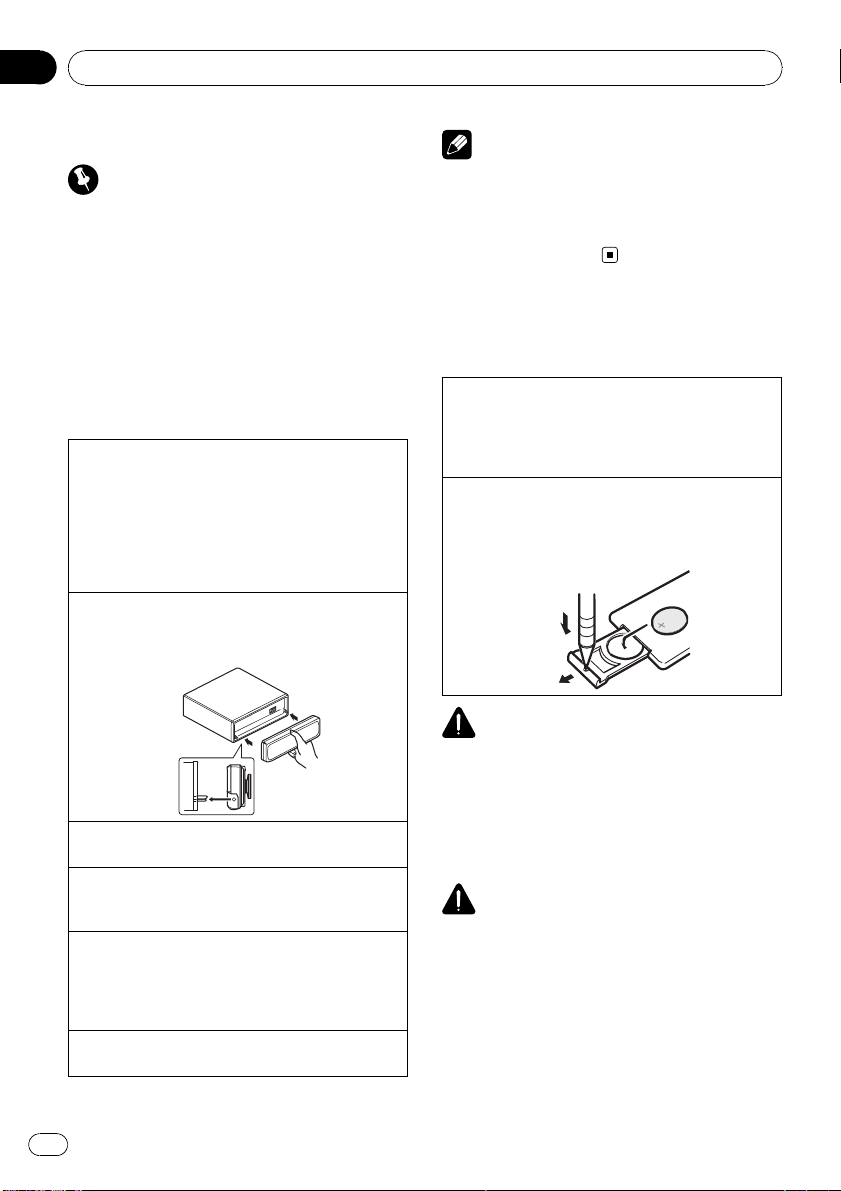
Removing the front panel to protect your unit from
theft
1 Press the open button to open the front panel.
2 Grip the left side of the front panel and pull it
gently outward.
3 Always keep the detached front panel in the pro-
tection device such as protection case.
Re-attaching the front panel
1 Reattach the front panel by holding it upright to
the unit and clipping it securely into the mounting hooks.
Turning the unit on
1 Press SRC/OFF to turn the unit on.
Turning the unit off
1 Press SRC/OFF and hold until the unit turns off.
Selecting a source
1 Press SRC/OFF to cycle between:
TUNER (tuner)—CD (built-in CD player)—USB
(USB)/IPOD (iPod)—SD (SD memory card)—
AUX (AUX)
Adjusting the volume
1 Turn M.C. to adjust volume.
Note
When this unit’s blue/white lead is connected to
the vehicle’s auto-antenna relay control terminal,
the vehicle’s antenna extends when this unit’s
source is turned on. To retract the antenna, turn
the source off.
Use and care of the remote
control
Using the remote control
1 Point the remote control in the direction of the
front panel to operate.
When using for the first time, pull out the film
protruding from the tray.
Replacing the battery
1 Slide the tray out on the back of the remote con-
trol.
2 Insert the battery with the plus (+) and minus (–)
poles aligned properly.
WARNING
! Keep the battery out of the reach of children.
Should the battery be swallowed, consult a
doctor immediately.
! Batteries (battery pack or batteries installed)
must not be exposed to excessive heat such
as sunshine, fire or the like.
CAUTION
! Use one CR2025 (3 V) lithium battery.
! Remove the battery if the remote control is not
used for a month or longer.
! There is a danger of explosion if the battery is
incorrectly replaced. Replace only with the
same or equivalent type.
! Do not handle the battery with metallic tools.
! Do not store the battery with metallic objects.
! If the battery leaks, wipe the remote control
completely clean and install a new battery.
! When disposing of used batteries, comply
with governmental regulations or environmental public institutions’ rules that apply in your
country/area.
Important
! Do not store the remote control in high tem-
peratures or direct sunlight.
6
En
Operating this unit
Section
02
! The remote control may not function properly
in direct sunlight.
! Do not let the remote control fall onto the
floor, where it may become jammed under the
brake or accelerator pedal.
Menu operations identical
for function settings/audio
adjustments/initial
settings/lists
Returning to the previous display
Returning to the previous list/category (the folder/category one level higher)
1 Press DISP/
Returning to the main menu
Returning to the top tier of list/category
1 Press and hold DISP/
Returning to the ordinary display
Canceling the initial setting menu
1 Press BAND/ESC.
Returning to the ordinary display from the list/category
1 Press BAND/ESC.
/SCRL.
/SCRL.
Tuner
Basic Operations
3
1 2 5
4
Selecting a band
1 Press BAND/ESC until the desired band (FM-1,
FM-2, FM-3 for FM or AM) is displayed.
Manual tuning (step by step)
1 Push M.C. left or right.
Seeking
1 Push and hold M.C. left or right.
You can cancel seek tuning by pushing M.C. left
or right.
While pushing and holding M.C. left or right, you
can skip stations. Seek tuning starts as soon as
you release M.C.
Storing and recalling stations
You can easily store up to six stations for each
band as presets.
1 Press
Preset screen is displayed.
2 Use M.C. to store the selected frequency in memory.
Turn to change the preset number. Press and
hold to store.
3 Use M.C. to select the desired station.
Turn to change the station. Press to select.
# All stations stored for FM bands can be recalled from each independent FM band.
# You can also change the station by pushing
M.C. up or down.
# To return to the ordinary display, press BAND/
ESC or
(list).
(list).
English
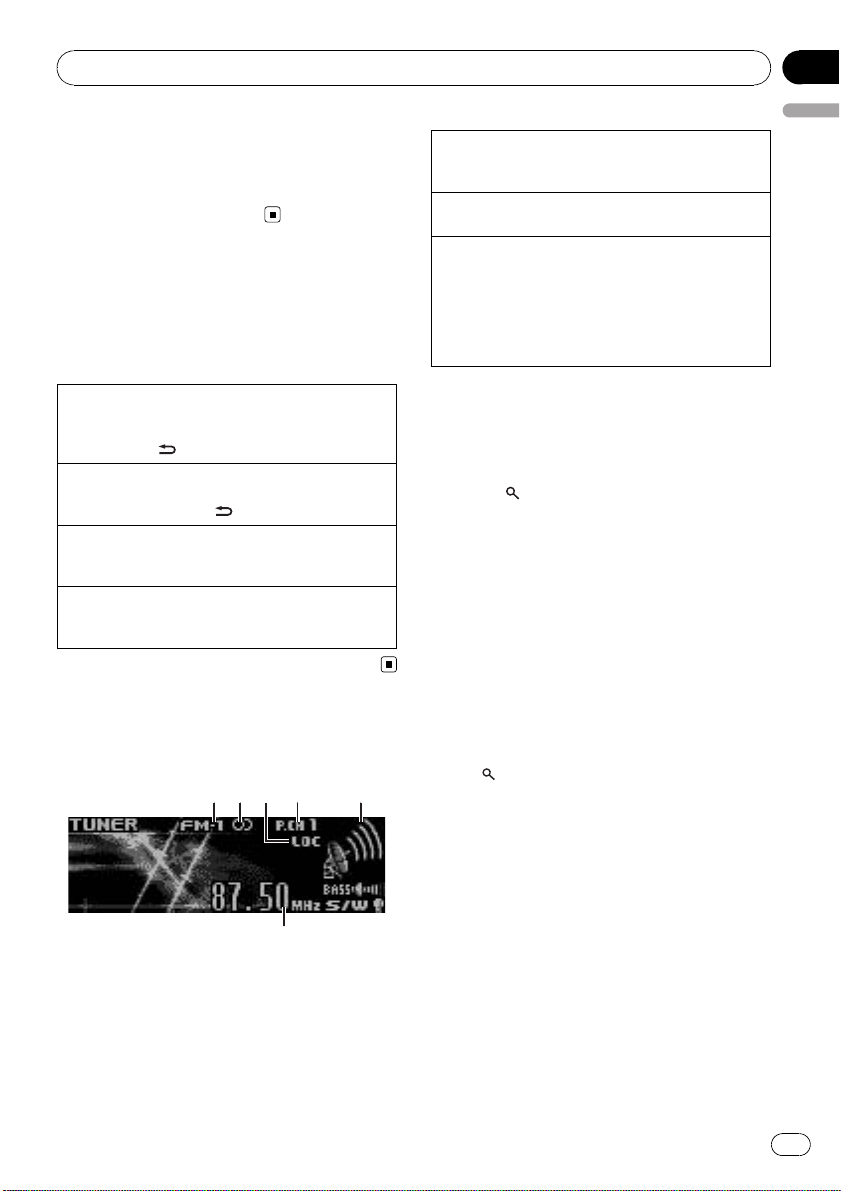
6
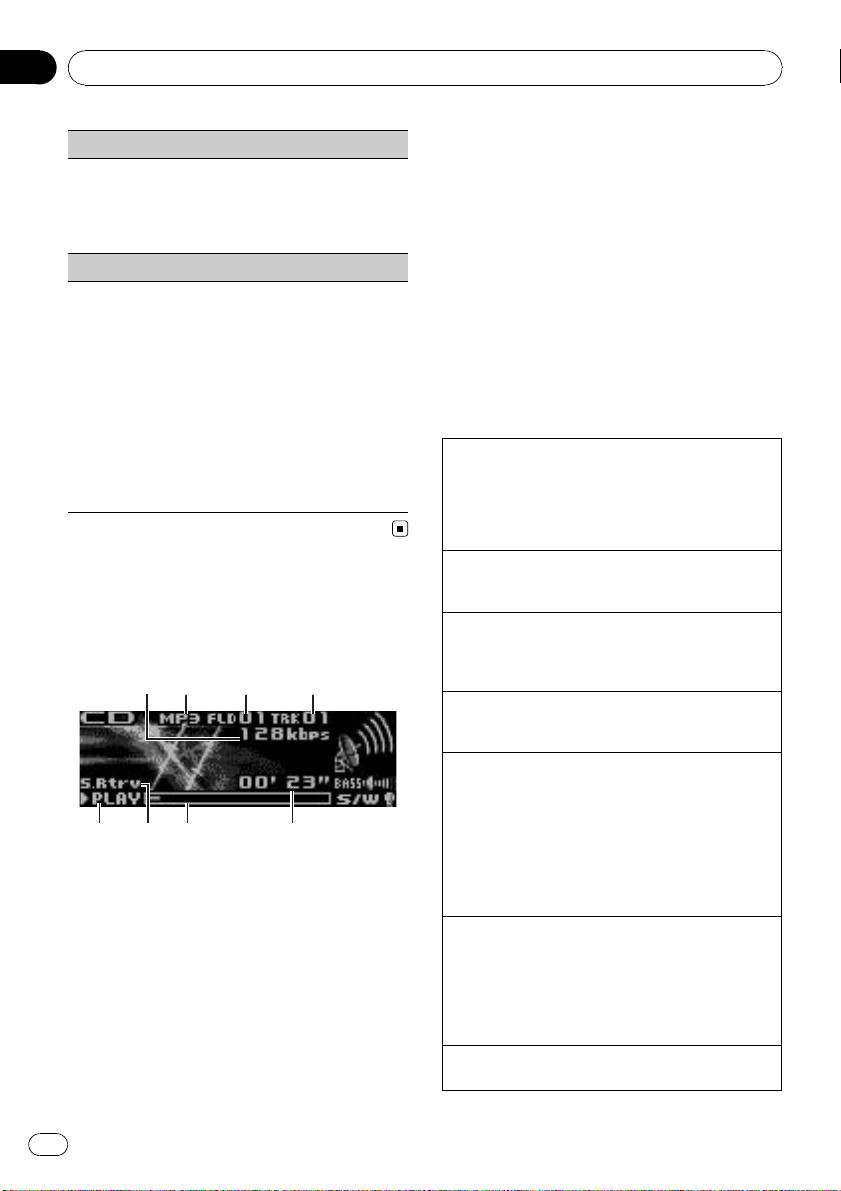
1 Band indicator
2 5 (stereo) indicator
3 LOC indicator
Appears when local seek tuning is on.
4 Preset number indicator
5 Signal level indicator
6 Frequency indicator
Function settings
1 Press M.C. to display the main menu.
2 Turn M.C. to change the menu option
and press to select FUNCTION.
3 Turn M.C. to select the function.
After selecting, perform the following procedures to set the function.
En
7
Section
02
Operating this unit
BSM (best stations memory)
BSM (best stations memory) automatically stores the
six strongest stations in the order of their signal
strength.
1 Press M.C. to turn BSM on.
! To cancel, press M.C. again.
Local (local seek tuning)
Local seek tuning lets you tune in only those radio stations with sufficiently strong signals for good reception.
1 Press M.C. to turn local on.
! To cancel, press M.C. again.
2 Push M.C. left or right to select the desired set-
ting.
FM: Level 1—Level 2—Level 3—Level 4
AM: Level 1—Level 2
Larger setting number is higher level. The highest
level setting allows reception of only the strongest
stations, while lower settings let you receive progressively weaker stations.
CD/CD-R/CD-RW and external
storage devices (USB, SD)
Basic Operations
1 2
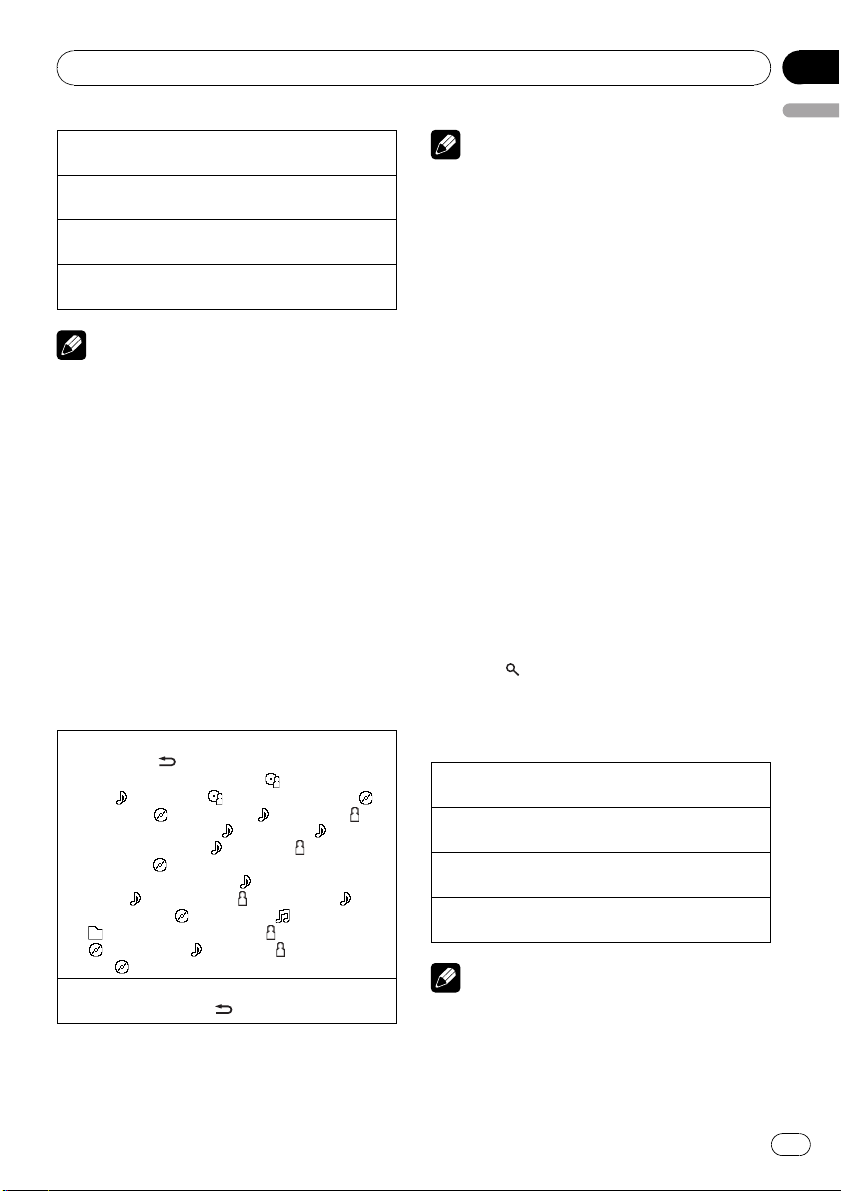
1 Bit rate/sampling frequency indicator
Shows the bit rate or sampling frequency of
the current track (file) when the compressed
audio is playing.
! When playing back VBR (variable bit
rate)-recorded WMA files, the average
bit rate value is displayed.
! When playing back VBR (variable bit
rate)-recorded MP3 files, VBR is displayed instead of bit rate value.
! When playing back VBR (variable bit
rate)-recorded AAC files, the average bit
43
rate value is displayed. However, de-
pending on the software used to decode
AAC files, VBR may be displayed.
2 WMA/MP3/AAC/WAV indicator
Shows the type of audio file currently playing
when the compressed audio is playing.
3 Folder number indicator
Shows the folder number currently playing
when the compressed audio is playing.
4 Track number indicator
5 PLAY/PAUSE indicator
6 S.Rtrv indicator
Appears when Sound Retriever function is on.
7 Song time (progress bar)
8 Play time indicator
Playing a CD/CD-R/CD-RW
1 Press the open button to open the front panel.
2 Insert the disc, label side up, into the disc loading
slot.
1 If a disc has already been inserted, press SRC/
OFF to select the built-in CD player.
Ejecting a CD/CD-R/CD-RW
1 Press the open button to open the front panel.
2 Press h (eject).
Playing songs on a USB storage device
1 Open the USB connector cover.
2 Plug in the USB storage device using a USB
cable.
Stop playing a USB storage device
1 You may disconnect the USB storage device at
anytime.
Playing songs on an SD memory card
1 Press the open button to open the front panel.
2 Remove the front panel.
3 Insert an SD memory card into the SD card slot.
Insert it with the contact surface facing down and
press the card until it clicks and completely locks.
4 Re-attach the front panel.
5 Press SRC/OFF to select SD as the source.
Playback will start.
Stop playing an SD memory card
1 Press the open button to open the front panel.
2 Remove the front panel.
3 Press the SD memory card until it clicks.
The SD memory card is ejected.
4 Pull out the SD memory card.
5 Re-attach the front panel.
Selecting a folder
1 Push M.C. up or down.
8
En
Operating this unit
Selecting a track
1 Push M.C. left or right.
Fast forwarding or reversing
1 Push and hold M.C. left or right.
Returning to root folder
1 Press and hold BAND/ESC.
Switching between compressed audio and CD-DA
1 Press BAND/ESC.
Notes
! When playing compressed audio, there is no
sound during fast forward or reverse.
! USB portable audio players that can be
charged via USB will be recharged when
plugged in and the ignition switch is set to
ACC or ON.
! Disconnect USB storage device from unit
when not in use.
! If plug and play is on and a USB storage de-
vice is present, depending on the type of device, the source may switch to USB
automatically when you turn on the engine.
Please change plug and play setting as necessary. Refer to USB plug&play (plug and play)
on page 15.
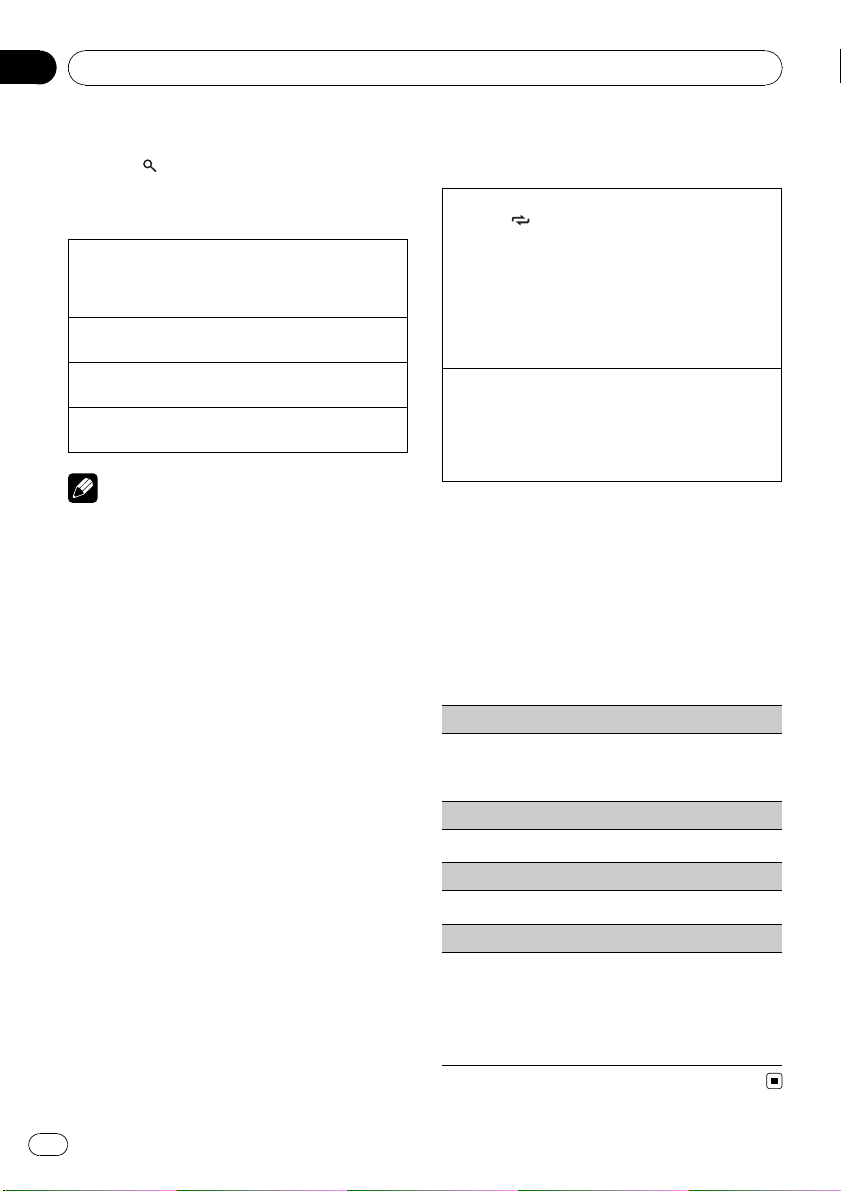
Displaying text information
Selecting the desired text information
1 Press DISP/
CD TEXT discs: Play time—
and
disc title—
track artist name and
title and play time—
name and
WMA/MP3/AAC/WAV:
time—
track title and
: folder name—play time— : artist name and
: album title— : track title, : artist name
and
Scrolling the text information to the left
1 Press and hold DISP/
/SCRL.
: disc artist name
: track title— : disc artist name and :
: disc title and : track title— :
: track title— : track
: track title, : track artist
: disc title
: track title and play
: track title and : artist name— :
: album title— : file name and
: album title
/SCRL.
Section
02
English
Notes
! Incompatible text stored with the audio file
may not be displayed or may be displayed incorrectly.
! Depending on the version of iTunes used to
write MP3 files onto a disc, comment information may be incorrectly displayed.
! When Windows Media Player 11 is used to en-
code the WAV files, text information can be
displayed.
Using lists
When using the external storage devices, you
can select the desired song search method.
One is Selecting and playing files/tracks from
the name list and the other is Browsing for a
song. The searching method can be selected
in the initial settings.
! When using a CD, you can only use Select-
ing and playing files/tracks from the name
list.
Selecting and playing files/tracks
from the name list
1 Press (list) to switch to the file/track
name list mode.
2 Use M.C. to select the desired file name
(or folder name).
Changing file or folder name
1 Turn M.C.
Playing
1 When a file or track is selected, press M.C.
Seeing a list of files (or folders) in the selected folder
1 When a folder is selected, press M.C.
Playing a song in the selected folder
1 When a folder is selected, press and hold M.C.
Note
Track title list will display the list of track titles on
a CD TEXT disc.
En
9
Section
02
Operating this unit
Browsing for a song
1 Press (list) to switch to the top menu
of the list search.
2 Use M.C. to select a category/song.
Changing the name of song or category
1 Turn M.C.
Artists (artists)—Albums (albums)—Songs
(songs)—Genres (genres)
Playing
1 When a song is selected, press M.C.
Seeing a list of songs in the selected category
1 When a category is selected, press M.C.
Playing a song in the selected category
1 When a category is selected, press and hold M.C.
Notes
! Before using this function, you need to oper-
ate the function in the initial setting menu.
Refer to Music browse (list setting) on page
15.
! This unit must create an index in order to facil-
itate Artists, Albums, Songs, and Genres
searches. Typically, it will take approximately
70 seconds to create an index for 1 000 songs,
and we recommend that up to 3 000 songs be
used. Please note that certain types of file
may take longer to index than others.
! Depending on the number of files in the USB
storage device, there may be a delay when displaying a list.
! Keys may not have any effect during the crea-
tion of an index or list.
! Lists are recreated each time the unit is
turned on.
Advanced operations using
special buttons
Selecting a repeat play range
1 Press
Enhancing compressed audio and restoring rich
sound (sound retriever)
1 Press S.Rtrv to cycle between:
/LOC to cycle between the following:
CD/CD-R/CD-RW
! DISC – Repeat all tracks
! TRACK – Repeat the current track
! FOLDER – Repeat the current folder
External storage device (USB, SD)
! TRACK – Repeat the current file
! FOLDER – Repeat the current folder
! ALL – Repeat all files
OFF (off)—1—2
1 is effective for low compression rates, and 2 is
effective for high compression rates.
Function settings
1 Press M.C. to display the main menu.
2 Turn M.C. to change the menu option
and press to select FUNCTION.
3 Turn M.C. to select the function.
After selecting, perform the following procedures to set the function.
Play mode (repeat play)
1 Press M.C. to select a repeat play range.
For details, refer to Sele cting a repeat play range on
this page.
Random mode (random play)
1 Press M.C. to turn random play on or off.
Pause (pause)
1 Press M.C. to pause or resume.
Sound Retriever (sound retriever)
Automatically enhances compressed audio and restores rich sound.
1 Press M.C. to select the desired setting.
For details, refer to Enhancing compressed audio
and restoring rich sound (sound retriever) on this
page.
10
En
Operating this unit
iPod
Basic Operations
2
1
6 7
54
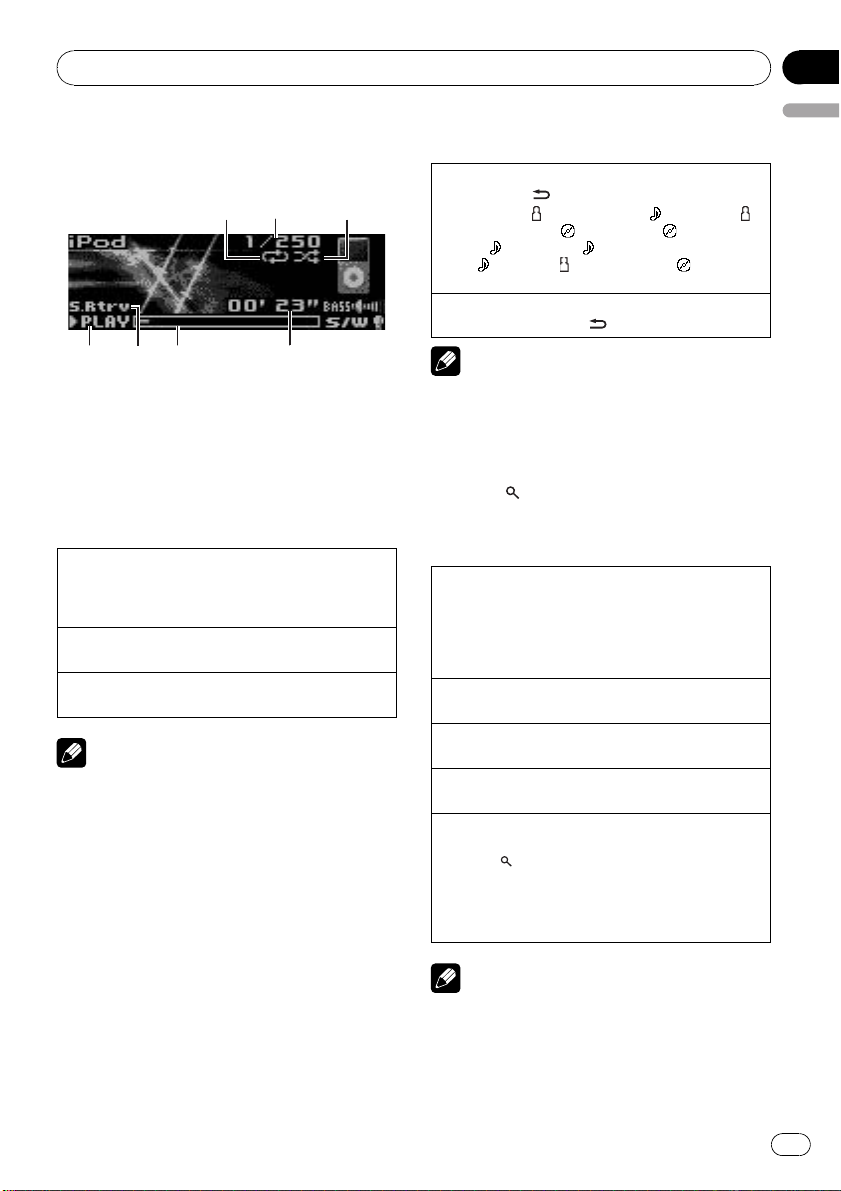
1 Repeat indicator
2 Song number indicator
3 Shuffle indicator
4 PLAY/PAUSE indicator
5 S.Rtrv indicator
Appears when Sound Retriever function is on.
6 Song time (progress bar)
7 Play time indicator
Playing songs on iPod
1 Open the USB connector cover and plug in an
iPod using the iPod Dock Connector to USB
Cable.
Selecting a track (chapter)
1 Push M.C. left or right.
Fast forwarding or reversing
1 Push and hold M.C. left or right.
Notes
! The iPod’s battery will be charged if the igni-
tion switch is set to ACC or ON, while connected.
! While the iPod is connected to this unit, the
iPod cannot be turned on or off unless the
control mode is set to iPod.
! Disconnect headphones from the iPod before
connecting to this unit.
! The iPod will turn off about two minutes after
the ignition switch is set to OFF.
3
Displaying text information
Selecting the desired text information
1 Press DISP/
Play time—
artist name and
and
—
title
Scrolling the text information to the left
1 Press and hold DISP/
/SCRL.
: artist name and : song title— :
: album title— : album title
: song title— : song title and play time
: song title, : artist name and : album
/SCRL.
Note
Incompatible text saved on the iPod will not be
displayed by the unit.
Browsing for a song
1 Press (list) to switch to the top menu
of the list search.
2 Use M.C. to select a category/song.
Changing the name of song or category
1 Turn M.C.
Playlists (playlists)—Artists (artists)—Albums
(albums)—Songs (songs)—Podcasts (podcasts)
—Genres (genres)—Composers (composers)—
Audiobooks (audiobooks)
Playing
1 When a song is selected, press M.C.
Seeing a list of songs in the selected category
1 When a category is selected, press M.C.
Playing a song in the selected category
1 When a category is selected, press and hold M.C.
Searching by alphabet in the list
1 When a list for the selected category is displayed,
press
2 Turn M.C. to select a letter.
3 Press M.C. to display the alphabetical list.
Depending on the number of files in the iPod,
there may be a delay when displaying a list.
/LIST to switch to alphabet search mode.
! If alphabet search is aborted, NOT FOUND is
displayed.
Note
Section
02
English
En
11
Section
02
Operating this unit
Advanced operations using
special buttons
Selecting a repeat play range
1 Press
Playing all songs in a random order (shuffle all)
1 Press
Playing songs related to the currently playing song
You can play songs from the following lists.
— Album list of currently playing artist
— Song list of currently playing album
— Album list of currently playing genre
1 Press and hold M.C. to switch to the link play
2 Turn M.C. to change the mode; press to select.
! The selected song/album may be cancelled if you
! If no related albums/songs are found, Not found
! Dependin g on the song selected to play, the end
Operating this unit’s iPod function from your iPod
This function is not compatible with the following
iPod models.
— iPod nano 1st generation
— iPod 5th generation
This unit’s iPod function allows you to conduct operations from your iPod and listen to it usi ng your car’s
speakers.
! Press
Enhancing compressed audio and restoring rich
sound (sound retriever)
Refer to Enhancing compressed audio and restoring
rich sound (sound retriever) on page 10.
/LOC to cycle between the following:
! ONE – Repeat the current song
! ALL – Repeat all songs in the selected list
/iPod to turn shuffle all on.
mode.
! Artist – Plays an album of currently playing
artist.
! Album – Plays a song of currently playing
album.
! Genre – Plays an album of currently playing
genre.
The selected song/album will be played after the
currently playing song.
operate functions other than link search (e.g. fast
forward and reverse).
is displayed.
of the currently playing song and the beginning
of the selected song/album may be cut off.
/iPod and hold to switch the control
mode.
! iPod – This unit’s iPod function can be oper-
ated from the connected iPod.
! AUDIO – This unit’s iPod function can be op-
erated from this unit.
Function settings
1 Press M.C. to display the main menu.
2 Turn M.C. to change the menu option
and press to select FUNCTION.
3 Turn M.C. to select the function.
After selecting, perform the following procedures to set the function.
Play mode (repeat play)
! Refer to Play mode (repeat play) on page 10.
However the repeat range is different from CD/
USB storage device. Refer to Selecting a repeat
play range on this page.
Shuffle mode (shuffle)
1 Press M.C. to select your favorite setting.
! Shuffle Songs – Play back songs in the se-
lected list in random order.
! Shuffle Albums – Play back songs from a
randomly selected album in order.
! Shuffle OFF – Cancel random play.
Shuffle all (shuffle all)
1 Press M.C. to turn shuffle all on.
To turn off, set Shuffle mode in the FUNCTION
menu to off.
Link play (link play)
1 Turn M.C. to change the mode; press to select.
For details about the settings, refer to Playing
songs related to the currently playing song on this
page.
Control mode (control mode)
1 Press M.C. to select your favorite setting.
For details about the settings, refer to Operating
this unit’s iPod function from your iPod on this
page.
PAUSE (pause)
! Refer to Pause (pause) on page 10.
Audiobooks (audiobook speed)
The playback speed of audiobook can be changed.
1 Press M.C. to select your favorite setting.
! Faster – Playback faster than normal speed
! Normal – Playback in normal speed
! Slower – Playback slower than normal speed
12
En
Operating this unit
Sound Retriever (sound retriever)
! Refer to Sound Retriever (sound retriever) on
page 10.
Notes
! Switching the control mode to iPod pauses
song playback. Operate the iPod to resume
playback.
! The following functions are still accessible
from the unit even if the control mode is set to
iPod.
— Volume
— Fast forward/reverse
— Track up/down
— Pausing
— Switching the text information
! When the control mode is set to iPod, opera-
tions are limited as follows:
— Only Control mode (control mode),
PAUSE (pause) and Sound Retriever
(sound retriever) functions are available.
— Browse function cannot be operated from
this unit.
Audio Adjustments
1
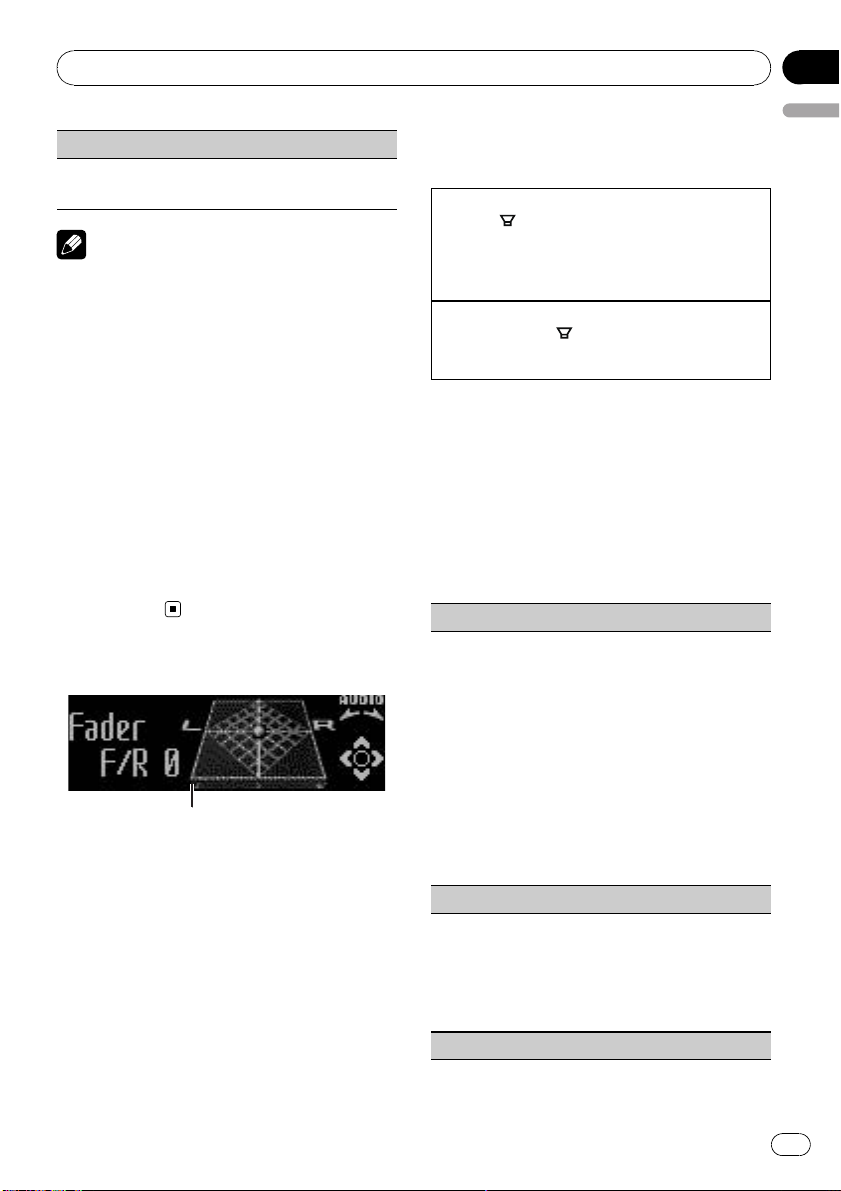
1 Audio display
Shows the audio adjustment status.
Advanced operations using
special buttons
Subwoofer on/off setting
1 Press
2 Press M.C. to turn subwoofer output on or off.
3 Push M.C. left or right to select the phase of sub-
Bass boost
1 Press and hold
2 Push M.C. up or down to select a desired level.
/BASS to select the subwoofer on/off set-
ting menu.
woofer output.
/BASS to select the bass boost
setting menu.
Audio function settings
1 Press M.C. to display the main menu.
2 Turn M.C. to change the menu option
and press to select AUDIO.
3 Turn M.C. to select the audio function.
After selecting, perform the following procedures to set the audio function.
Fader/Balance (fader/balance adjustment)
1 Push M.C. up or down to adjust front/rear speaker
balance.
F15 to R15 is displayed as the front/rear speaker
balance moves from front to rear.
! F/R 0 is the proper setting when only two
speakers are used.
! When the rear output setting is Rear SP :S/W,
you cannot adjust front/rear speaker balance.
Refer to S/W control (rear output and subwoo-
fer setting) on page 16.
2 Push M.C. left or right to adjust left/right speaker
balance.
L15 to R15 is displayed as the left/right speaker
balance moves from left to right.
Powerful (equalizer recall)
1 Push M.C. left or right to select an equalizer
curve.
Powerful—Natural—Vocal—Custom1—Custom2—Flat—Super bass
! When Flat is selected no adjustments are
made to the sound.
100 Hz (equalizer adjustment)
Section
02
English
En
13
Section
02
Operating this unit
You can adjust the currently selected equalizer curve
setting as desired. Adjusted equalizer curve settings
are memorized in Custom1 or Custom2.
! A separate Custom1 curve can be created for
each source. If you make adjustments when a
curve other than Custom2 is selected, the equalizer curve settings will be memorized in Custom1.
! A Custom2 curve can be created common to all
sources. If you make adjustments when the Cus-
tom2 cur ve is selected, the Custom2 curve will
be updated.
1 Recall the equalizer curve you want to adjust.
2 Push M.C. left or right to select the equalizer
band to adjust.
100Hz—315Hz—1.25kHz—3.15kHz—8kHz
3 Push M.C. up or down to adjust the equalizer
curve.
+6 to –6 is displayed as the equalizer curve is in-
creased or decreased.
LOUD (loudness)
Loudness compensates for deficiencies in the lowand high-frequency ranges at low volume.
1 Press M.C. to turn loudness on or off.
2 Push M.C. left or right to select the desired set-
ting.
Low (low)—Mid (mid)—High (high)—OFF (off)
Sub W.1 (subwoofer on/off setting)
This unit is equipped with a subwoofer output which
can be turned on or off.
1 Press M.C. to turn subwoofer output on or off.
2 Push M.C. left or right to select the phase of sub-
woofer output.
Push M.C. left to select reverse phase and Re-
verse appears in the display. Push M.C. right to
select normal phase and Normal appears in the
display.
Sub W.2 (subwoofer adjustment)
When the subwoofer output is on, you can adjust the
cut-off frequency and the output level of the subwoofer.
Only frequencies lower than those in the selected
range are outputted from the subwoofer.
1 Push M.C. left or right to select cut-off frequency.
50Hz—63Hz—80Hz—100Hz—125Hz
2 Push M.C. up or down to adjust the output level
of the subwoofer.
Each time M.C. is pushed up or down, subwoofer
level increases or decreases. +6 to -24 is displayed as the level is increased or decreased.
Bass (bass boost)
1 Push M.C. up or down to select a desired level.
0 to +6 is displayed as the level is increased or de-
creased.
HPF (high pass filter adjustment)
When you do not want low sounds from the subwoofer output frequency range to play from the front or
rear speakers, turn on the HPF (high pass filter). Only
frequencies higher than those in the selected range
are output from the front or rear speakers.
1 Press M.C. to turn high pass filter on or off.
2 Push M.C. left or right to select cut-off frequency.
50Hz—63Hz—80Hz—100Hz—125Hz
SLA (source level adjustment)
SLA (Source level adjustment) lets you adjust the vo-
lume level of each source to prevent radical changes
in volume when switching between sources.
! Settings are based on the FM volume level, which
remains unchanged.
Before adjusting source levels, compare the FM
volume level with the level of the source you wish
to adjust.
! The AM volume level can also be adjusted with
source level adjustments.
1 Push M.C. up or down to adjust the source vo-
lume.
Adjustment range: +4 to –4
Note
When selecting FM as the source, you cannot
switch to SLA.
Initial Settings
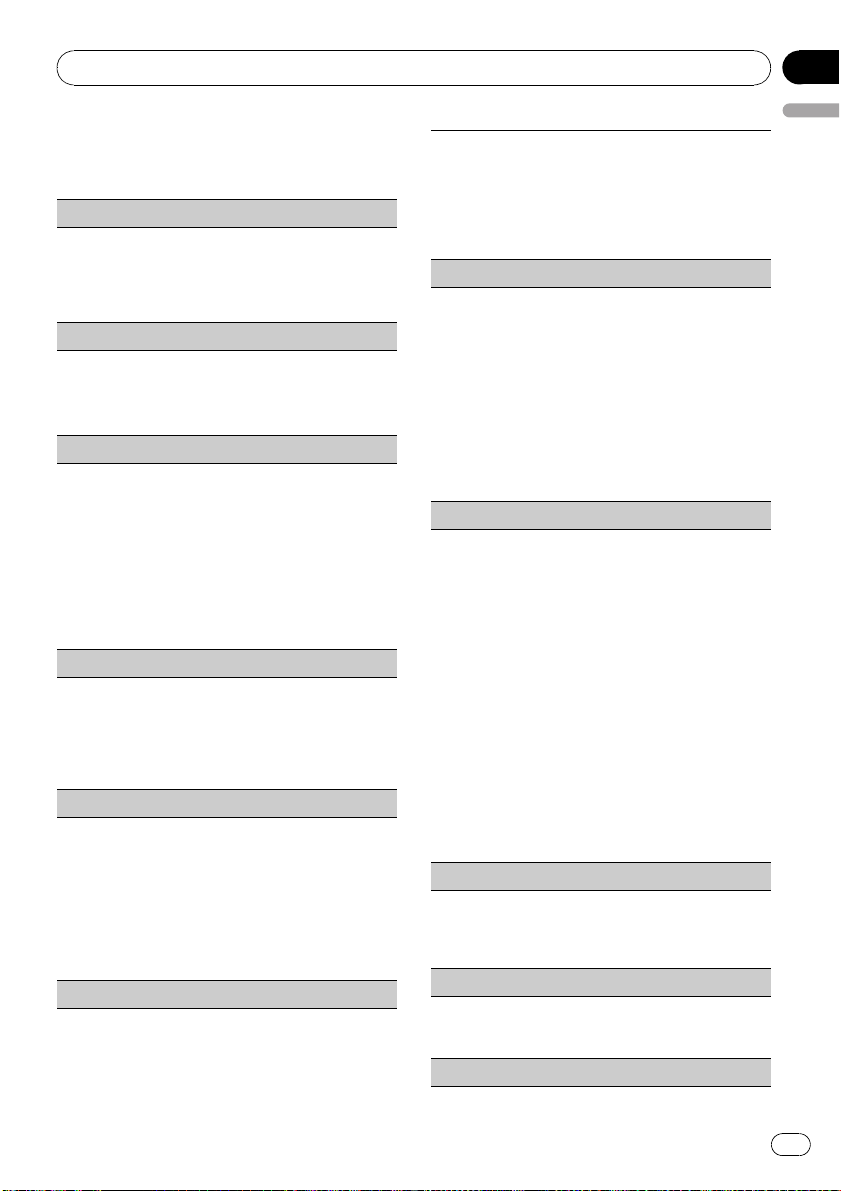
1 Function display
! Shows the function status.
1 Press SRC/OFF and hold until the unit
turns off.
2 Press M.C. and hold until the initial setting menu appears in the display.
14
En
Operating this unit
Section
02
3 Turn M.C. to select the initial setting.
After selecting, perform the following procedures to set the initial setting.
Language select (multi language)
For your convenience, this unit equips multiple language display. You can select the language best suited to your first language.
1 Press M.C. to select the language.
English—Español—Português
Calendar (setting the date)
1 Push M.C. left or right to select the segment of
the calendar display you wish to set.
Day—Month—Year
2 Push M.C. up or down to set the date.
Clock (setting the clock)
1 Push M.C. left or right to select the segment of
the clock display you wish to set.
Hour—Minute
2 Push M.C. up or down to put a clock right.
! You can match the clock to a time signal by press-
ing M.C.
! If 00 to 29, the minutes are rounded down.
(e.g., 10:18 becomes 10:00.)
! If 30 to 59, the minutes are rounded up. (e.g.,
10:36 becomes 11:00.)
EngineTime alert (elapsed time display setting)
This setting allows you to measure the length of time
that elapses from when the machine is turned on and
display the amount of elapsed time per set period.
Also, you will hear alarm.
1 Press M.C. to select your favorite setting.
OFF—15Minutes—30Minutes
FM step (FM tuning step)
The FM tuning step employed by seek tuning can be
switched between 100 kHz, the preset step, and 50
kHz.
If seek tuning is performed in 50 kHz steps, stations
may be tuned in imprecisely. Tune in the stations with
manual tuning or use seek tuning again.
1 Press M.C. to display the setting mode.
2 Turn M.C. to select the FM tuning step.
50kHz (50 kHz)—100kHz (100 kHz)
AM STEP (AM tuning step)
English
The AM tuning step can be switched between 9 kHz,
the preset step, and 10 kHz. When using the tuner in
North, Central or South America, reset the tuning
step from 9 kHz (531 kHz to 1 602 kHz allowable) to 10
kHz (530 kHz to 1 640 kHz allowable).
1 Press M.C. to select the AM tuning step.
10 KHZ (10 kHz)—9 KHZ (9 kHz)
USB plug&play (plug and play)
This setting allows you to switch your source to USB/
IPOD automatically.
1 Press M.C. to turn the plug and play on or off.
! ON – When USB storage device/iPod is con-
nected, the source is automatically switched
to USB/IPOD. If you disconnect your USB storage device/iPod, this unit’s source is turned
off.
! OFF – When USB storage device/iPod is con-
nected, the source is not switched to USB/
IPOD automatically. Please change the source
to USB/IPOD manually.
Music browse (list setting)
When using the external storage devices, you can
search for the desired songs from the file/f older list or
artist/album/song/genre category list.
! This setting can be set to either USB memory or
SD card.
! Music browse can be used with ID3 tag Ver.2.
! It may take time to make the artist/album/song/
genre category list.
! For details concerning operation, please see the
following section. Refer to Browsing for a song on
page 10.
1 Press M.C. to select your favorite setting.
! OFF –file/folder list can be used.
! USB memory –When a USB storage device is
used, a song can be selected from the artist/
album/song/genre list.
! SD card –When an SD card is used, a song
can be selected from the artist/album/song/
genre list.
Warning tone (warning tone setting)
If the front panel is not detached from the head unit
within four seconds of turning off the ignition, a warning tone sounds. You can turn off the warning tone.
1 Press M.C. to turn the warning tone on or off.
AUX (auxiliary input)
Activate this setting when using auxiliary device connected to this unit.
1 Press M.C. to turn auxiliary setting on or off.
Dimmer (dimmer setting)
En
15
Section
02
Operating this unit
To prevent the display from being too bright at night,
the display is automatically dimmed when the car ’s
headlights are turned on. You can turn the dimmer on
or off.
1 Press M.C. to turn dimmer on or off.
Brightness (display brightness setting)
1 Push M.C. left or right to adjust the brightness
level.
0 to 15 is displayed as the level is increased or decreased.
! When dimmer is functioning, the brightness
level can be adjusted 0 to 10.
S/W control (rear output and subwoofer setting)
This unit’s rear output (rear speaker leads output and
RCA rear output) can be used for full-range speaker
(Rear SP :F.Range) or subwoofer (Rear SP :S/W) con-
nection. If you switch the rear output setting to Rear
SP :S/W, you can connect a rear speaker lead directly
to a subwoofer witho ut using an auxiliary amp.
1 Press M.C. to switch the rear output setting.
! When no subwoofer is connected to the rear
output, select Rear SP :F.Range (full-range
speaker).
! When a subwoofer is connected to the rear
output, select Rear SP :S/W (subwoofer).
! Even if you change this setting, there is no output
unless you turn the subwoofer output on (refer to
Sub W.1 (subwoofer on/off setting) on page 14).
! If you change this setting, subwoofer output in
the audio menu will return to the factory settings.
! Both rear speaker lead outputs and RCA rear out-
put are switched simultaneously in this setting.
Demonstration (demo display setting)
1 Press M.C. tp turn the demo display on or off.
! You can also turn on or off feature demo by
pressing DISP while this unit is turned off. For
more details, refer to Demo mode on page 3.
Reverse mode (reverse mode setting)
1 Press M.C. to turn the reverse mode on or off.
! You can also turn on or off reverse mode by
pressing BAND while this unit is turned off.
For more details, refer to Reverse mode on
page 3.
Ever-scroll (scroll mode setting)
When Ever Scroll is set to ON, recorded text information scrolls continuously in the display. Set to OFF if
you prefer the information to scroll just once.
1 Press M.C. to turn the ever scroll on or off.
Other Functions
Using the AUX source
1 Insert the stereo mini plug into the
AUX input jack.
2 Press SRC/OFF to select AUX as the
source.
Note
AUX cannot be selected unless the auxiliar y setting is turned on. For more details, refer to AUX
(auxiliary input) on the previous page.
Clock display
% Press /DISP OFF to select the desired
setting.
Clock off—clock display—elapsed time display
Switching the display indication
and button illumination
Display indication and button illumination can
be switched on or off.
% Press and hold
Pressing and holding
the display indication and button illumination
on or off.
# Even if the display indication is turned off, operation can be conducted. If operation is conducted while the display indication is off, display
will light up for a few seconds and then turn off
again.
Using different entertainment
displays
You can enjoy entertainment displays while listening to each sound source.
1 Press M.C. to display the main menu.
2 Turn M.C. to change the menu option
and press to select ENTERTAINMENT.
/DISP OFF.
/DISP OFF switches
16
En

Operating this unit
Section
02
3 Turn M.C. to change the display.
Background visual—genre—background picture 1—background picture 2—background
picture 3—background picture 4—simple display—movie screen 1—movie screen 2—calendar
# Genre display changes depending on the
genre of music.
# Genre display may not operate correctly depending on the application used to encode audio
files.
English
En
17
Appendix
Additional Information
Troubleshooting
Symptom Cause Action (See)
The display
automatically
returns to the
ordinary display.
The repeat play
range changes
unexpectedly.
A subfolder is
not played
back.
NO XXXX appears when a
display is changed (e.g., NO
TITLE).
The display is
illuminated
when the unit
is turned off.
The unit is malfunctioning.
There is interference.
You did not perform any operation within about
30 seconds.
Depending on
the repeat play
range, the selected range may
change when selecting another
folder or track, or
when fast forwarding/reversing.
Subfolders cannot be played
when FOLDER
(folder repeat) is
selected.
No text information embedded
Demo mode is
on.
You are using a
device, such as a
cell phone, that
transmits electromagnetic waves
near the unit.
Perform operation
again.
Select the repeat
play range again.
Select another repeat play range.
Switch the display
or play another
track/file.
Press DISP/
SCRL to cancel
demo mode.
Move electrical devices that may be
causing the interference away from
the unit.
/
Error messages
When you contact your dealer or your nearest
Pioneer Service Center, be sure to note the
error message.
Built-in CD Player
Message Cause Action
ERROR-11, 12,
17, 30
ERROR-10, 11,
12, 15, 17, 30,
A0
ERROR-15 The inserted disc
ERROR-22, 23 Unsupported CD
FORMAT
READ
NO AUDIO The inserted disc
SKIPPED The inserted disc
PROTECT All the files on
Dirty disc Clean disc.
Scratched disc Replace disc.
Electrical or me-
chanical
is blank
format
There is some-
times a delay between the start of
playback and
when you start to
hear any sound
does not contain
any playable files
contains DRM
protected WMA
files
the inserted disc
are embedded
with DRM
Turn the ignition
switch OFF and
back ON, or switch
to a different
source, then back
to the CD player.
Replace disc.
Replace disc.
Wait until the message disappears
and you hear
sound.
Replace disc.
Replace disc.
Replace disc.
External storage device (USB, SD)
Message Cause Action
NO DEVICE When plug and
FORMAT
READ
play is off, no
USB storage device is connected.
There is sometimes a delay between the start of
playback and
when you start to
hear any sound
! Turn the plug
and play on.
! Connect a compatible USB storage device.
Wait until the message disappears
and you hear
sound.
18
En
Additional Information
NO AUDIO
SKIPPED The connected
PROTECT All the files in the
CHECK USB The USB connec-
CHECK SD Overcurrent to
NOT COMPATIBLE
No songs Transfer the audio
The connected
USB storage device has security
enabled
USB storage device contains
WMA files embedded with
Windows Mediaä DRM 9/10
USB storage device are embedded with
Windows Media
DRM 9/10
tor or USB cable
has shortcircuited.
The connected
USB storage device consumes
more than 500
mA (maximum
allowable current).
the SD memory
card
Communication
failure
Not compatible
USB device
files to the USB
storage device and
connect.
Follow the USB
storage device instructions to disable the security.
Play an audio file
not embedded with
Windows Media
DRM 9/10.
Transfer audio files
not embedded with
Windows Media
DRM 9/10 to the
USB storage device and connect.
Check that the
USB connector or
USB cable is not
caught in something or damaged.
Disconnect the
USB storage device and do not
use it. Turn the
ignition switch to
OFF, then to ACC
or ON and then
connect only compliant USB storage
devices.
Eject the SD memory card and then
insert it again.
Eject the SD memory card and then
insert it again.
Disconnect your
device and replace
it with a compatible USB storage
device.
Communication
ERROR-19
ERROR-23 USB storage de-
CHECKING
8TAGS
failure
vice is not formatted with
FAT12, FAT16 or
FAT32
The unit is creating an index or
list for the music
browse function.
Perform one of the
following operations.
–Turn the ignition
switch OFF and
back ON.
–Disconnect or
eject the external
storage device.
–Change to a different source.
Then, return to the
USB or SD source.
USB storage device should be formatted with FAT12,
FAT16 or FAT32.
Please wait until
this operation has
been completed.
iPod
Message Cause Action
NO DEVICE When plug and
FORMAT
READ
ERROR-19 Communication
play is off, no
USB storage device or iPod is
connected.
There is sometimes a delay between the start of
playback and
when you start to
hear any sound
failure
iPod failure Disconnect the
! Turn the plug
and play on.
! Connect a compatible iPod.
Wait until the message disappears
and you hear
sound.
Disconnect the
cable from iPod.
Once iPod’s main
menu is displayed,
reconnect cable.
Reset the iPod.
cable from iPod.
Once iPod’s main
menu is displayed,
reconnect cable.
Reset the iPod.
Appendix
English
En
19
Appendix
Additional Information
Old iPod firm-
ERROR-16
N/A USB Not compatible
CHECK USB iPod operates
STOP No songs Transfer songs to
ware versions
iPod failure Disconnect the
iPod
correctly but
does not charge
No songs in the
current list
Update the iPod
version.
cable from iPod.
Once iPod’s main
menu is displayed,
reconnect cable.
Reset the iPod.
Disconnect your
device and replace
it with a compatible iPod.
Check if the connection cable for
iPod shorted out
(e.g., not caught in
metal objects).
After checking,
turn the ignition
switch OFF and
back ON or disconnect the iPod and
reconnect.
iPod.
Select a list that
contains songs.
Handling guideline
Discs and player
Use only discs featuring either of following two logos.
Do not insert anything other than a CD into the CD
loading slot.
Do not use cracked, chipped, warped, or otherwise
damaged discs as they may damage the playe r.
Unfinalized CD-R/CD-RW disc playback is not possible.
Do not touch the recorded surface of the discs.
Store discs in their cases when not in use.
Avoid leaving discs in excessively hot environments
including under direct sunlight.
Do not attach labels, write on or apply chemicals to
the surface of the discs.
To clean a CD, wipe the disc with a soft cloth outward
from the center.
Condensation may temporarily impair the player’s
performance. Leave it to adjust to the warmer temperature for about one hour. Also, wipe any damp
discs with a soft cloth.
Playback of discs may not be possible because of
disc characteristics, disc format, recorded application, playback environment, storage conditions, and
so on.
Road shocks may interrupt disc playback.
Read the precautions for discs before using them.
External storage device (USB, SD)
Address any questions you have about your external
storage device (USB, SD) to the manufacturer of the
device.
Do not leave the external storage device (USB, SD) in
any place with high temperatures.
Depending on the external storage device (USB, SD),
the following problems may occur.
! Operations may vary.
! This unit may not recognize the storage device.
! The file may not be played back properly.
Use 12-cm disc. Do not use 8-cm disc or an adapter
for 8-cm disc.
Use only conventional, fully circular discs. Do not use
shaped discs.
20
En
USB storage device
Connections via a USB hub are not supported.
Do not connect anything other than a USB storage
device.

Additional Information
Firmly secure the USB storage device when driving.
Do not let the USB storage device fall onto the floor,
where it may become jammed under the brake or accelerator pedal.
Depending on the USB storage device, the following
problems may occur.
! The device may generate noise in the radio.
SD memory card
This unit supports only the following SD memory
cards.
! SD
! miniSD
! microSD
! SDHC
Keep the SD memory card out of the reach of children. Should the SD memory card be swallowed, consult a doctor immediately.
Do not touch the connectors of the SD memory card
directly with your fingers or with any metal device.
Do not insert anything other than an SD memory card
into the SD card slot. If a metal object (e.g. a coin) is
inserted into the slot, the internal circuits may break
and cause malfunctions.
When inserting a miniSD or microSD, use an adapter.
Do not use an adapter which has metal parts other
than the connectors exposed.
Do not insert a damaged SD memory card (e.g.
warped, label peeled off) as it may not be ejected
from the slot.
Do not try to force an SD memory card into the SD
card slot as the SD memory card or this unit may be
damaged.
When you eject an SD memory card, press it and
hold until it clicks. It is dangerous to press the SD
memory card and release your finger immediately as
the SD card may shoot out of the slot and hit you in
the face, etc. If the SD memory card shoots out of the
slot, it may go missing.
iPod
Do not leave the iPod in direct sunlight for extended
amounts of time. Extended exposure to direct sunlight can result in iPod malfunction due to the resulting high temperature.
Do not leave the iPod in any place with high temperatures.
Appendix
English
To ensure proper operation, connect the dock connector cable from the iPod directly to this unit.
Firmly secure the iPod when driving. Do not let the
iPod fall onto the floor, where it may become jammed
under the brake or accelerator pedal.
For details, refer to the iPod’s manuals.
About iPod settings
! When an iPod is connected, this unit changes the
EQ (equalizer) setting of the iPod to off in order to
optimize the acoustics. When you disconnect the
iPod, the EQ returns to the original setting.
! You cannot set Repeat to off on the iPod when
using this unit. Repeat is automatically changed
to All when connecting the iPod to this unit.
DualDiscs
DualDiscs are two-sided discs that have a recordable
CD for audio on one side and a recordable DVD for
video on the other.
Since the CD side of DualDiscs is not physically compatible with the general CD standard, it may not be
possible to play the CD side with this unit.
Frequent loading and ejecting of a DualDisc may result in scratches on the disc. Serious scratches can
lead to playback problems on this unit. In some
cases, a DualDisc may become stuck in the disc loading slot and will not eject. To prevent this, we recommend you refrain from using DualDisc with this unit.
Please refer to the information from the disc manufacturer for more detailed information about DualDiscs.
Compressed audio
compatibility (disc, USB, SD)
WMA
File extension: .wma
Bit rate: 48 kbps to 320 kbps (CBR), 48 kbps to 384
kbps (VBR)
Sampling frequency: 32 kHz, 44.1 kHz, 48 kHz
Windows Media Audio Professional, Lossless, Voice/
DRM Stream/Stream with video: No
En
21
Appendix
Additional Information
MP3
File extension: .mp3
Bit rate: 8 kbps to 320 kbps
Sampling frequency: 8 kHz to 48 kHz (32 kHz, 44.1
kHz, 48 kHz for emphasis)
Compatible ID3 tag version: 1.0, 1.1, 2.2, 2.3, 2.4 (ID3
tag Version 2.x is given priority over Version 1.x.)
M3u playlist: No
MP3i (MP3 interactive), mp3 PRO: No
WAV
File extension: .wav
Quantization bits: 8 and 16 (LPCM), 4 (MS ADPCM)
Sampling frequency: 16 kHz to 48 kHz (LPCM), 22.05
kHz and 44.1 kHz (MS ADPCM)
AAC
Compatible format: AAC encoded by iTunes
File extension: .m4a
Sampling frequency: 11.025 kHz to 48 kHz
Transmission rate: 16 kbps to 320 kbps, VBR
Apple Lossless: No
AAC file bought on the iTunes Store (.m4p file extension): No
File system: ISO 9660 Level 1 and 2, Romeo, Joliet
Multi-session playback: Yes
Packet write data transfer: No
Regardless of the length of blank section between the
songs of the original recording, compressed audio
discs play with a short pause between songs.
External storage device (USB, SD)
Playable folder hierarchy: up to eight tiers (A practical
hierarchy is less than two tiers.)
Playable folders: up to 1 500
Playable files: up to 15 000
Playback of copyright protected files: No
Partitioned external storage device (USB, SD): Only
the first playable partition can be played.
There may be a slight delay when starting playback of
audio files on an external storage device (USB, SD)
with numerous folder hierarchies.
SD memory card
There is no compatibility for Multi Media Cards
(MMC).
Compatibility with all SD memory cards is not guaranteed.
This unit is not compatible with SD-Audio.
Supplemental information
Only the first 32 characters can be displayed as a file
name (including the file extension) or a folder name.
This unit may not operate correctly depending on the
application used to encode WMA files.
There may be a slight delay when starting playback of
audio files embedded with image data.
Disc
Playable folder hierarchy: up to eight tiers (A practical
hierarchy is less than two tiers.)
Playable folders: up to 99
Playable files: up to 999
22
En
CAUTION
Pioneer accepts no responsibility for data lost on
the USB memory/USB portable audio player/SD
memory card/SDHC memory card even if that
data is lost while using this unit.
Additional Information
Appendix
iPod compatibility
This unit supports only the following iPod models.
Supported iPod software versions are shown below.
Older versions may not be supported.
! iPod nano 4th generation (software version 1.0.3)
! iPod nano 3rd generation (software version 1.1.3)
! iPod nano 2nd generation (software version 1.1.3)
! iPod nano 1st generation (software version 1.3.1)
! iPod touch 2nd generation (software version 3.0)
! iPod touch 1st generation (software version 3.0)
! iPod classic 120GB (software version 2.0.1)
! iPod classic (software version 1.1.2)
! iPod 5th generation (software version 1.3)
! iPhone 3GS (software version 3.0)
! iPhone 3G (software version 3.0)
! iPhone (software version 3.0)
Depending on the generation or version of the iPod,
some functions can not be operated.
Operations may vary depending on the software version of iPod.
When using an iPod, iPod Dock Connector to USB
Cable is required.
Pioneer CD-IU50 interface cable is also available. For
details, consult your dealer.
About the file/format compatibility, refer to iPod manuals.
Audio Book, Podcast: Yes
CAUTION
Pioneer accepts no responsibility for data lost on
the iPod even if that data is lost while using this
unit.
Sequence of audio files
The user cannot assign folder numbers and
specify playback sequences with this unit.
Example of a hierarchy
01
02
03
04
05
Level 1 Level 2 Level 3 Level 4
: Folder
: Compressed
audio file
01 to 05: Folder
number
1 to 6: Playback
sequence
Disc
Folder selection sequence or other operation
may differ depending on the encoding or writing software.
External storage device (USB, SD)
Playback sequence is the same as recorded
sequence in the external storage device (USB,
SD).
! If browsing for a song function is engaged,
playback sequence is changed to alphabe-
tical order in the selected category.
To specify the playback sequence, the following method is recommended.
1 Create the file name including numbers that
specify the playback sequence (e.g.,
001xxx.mp3 and 099yyy.mp3).
2 Put those files into a folder.
3 Save the folder containing files on the external
storage device (USB, SD).
However, depending on the system environment, you cannot specify the playback sequence.
For USB portable audio players, the sequence
is different and depends on the player.
English
Copyright and trademark
iTunes
Apple and iTunes are trademarks of Apple
Inc., registered in the U.S. and other countries.
En
23
Appendix
Additional Information
MP3
Supply of this product only conveys a license
for private, non-commercial use and does not
convey a license nor imply any right to use
this product in any commercial (i.e. revenuegenerating) real time broadcasting (terrestrial,
satellite, cable and/or any other media), broadcasting/streaming via internet, intranets and/
or other networks or in other electronic content distribution systems, such as pay-audio or
audio-on-demand applications. An independent license for such use is required. For details, please visit
http://www.mp3licensing.com.
WMA
Windows Media and the Windows logo are trademarks or registered trademarks of Microsoft
Corporation in the United States and/or other
countries.
This product includes technology owned by
Microsoft Corporation and cannot be used or
distributed without a license from Microsoft
Licensing, Inc.
SD memory card
miniSD Logo is a trademark.
microSD Logo is a trademark.
SDHC Logo is a trademark.
iPod
iPod is a trademark of Apple Inc., registered in
the U.S. and other countries.
“Made for iPod” means that an electronic accessory has been designed to connect specifically to iPod and has been certified by the
developer to meet Apple performance standards.
Apple is not responsible for the operation of
this device or its compliance with safety and
regulatory standards.
SD Logo is a trademark.
24
En
iPhone
iPhone is a trademark of Apple Inc.

Additional Information
Appendix
“Works with iPhone” means that an electronic
accessory has been designed to connect specifically to iPhone and has been certified by
the developer to meet Apple performance
standards.
Apple is not responsible for the operation of
this device or its compliance with safety and
regulatory standards.
English
En
25

Appendix
Additional Information
Specifications
General
Rated power source …………… 14.4 V DC
(allowable voltage range:
12.0 V to 14.4 V DC)
Grounding system ………………. Negative type
Maximum current consumption
…………………………………………….. 10.0 A
Dimensions (W × H × D):
DIN
Chassis ………………… 178 mm × 50 mm × 168
mm
Nose ……………………… 188 mm × 58 mm × 17 mm
D
Chassis ………………… 178 mm × 50 mm × 168
mm
Nose ……………………… 170 mm × 46 mm × 17 mm
Weight …………………………………… 1.6 kg
Audio
Maximum power output ……. 50 W × 4
50 W × 2/4 W + 70 W × 1/2
W (for subwoofer)
Continuous power output … 22 W × 4 (50 Hz to 15 000
Hz, 5 % THD, 4 W load, both
channels driven)
Load impedance …………………. 4 W to 8 W ×4
4 W to 8 W ×2+2W ×1
Preout maximum output level
…………………………………………….. 4.0 V
Equalizer (5-Band Graphic Equalizer):
Freque ncy …………………….. 100/315/1.25k/3.15k/8k Hz
Gain ……………………………….. ±12 dB
HPF:
Freque ncy …………………….. 50/63/80/100/125 Hz
Slope ……………………………… –12 dB/oct
Subwoofer (mono):
Freque ncy …………………….. 50/63/80/100/125 Hz
Slope ……………………………… –18 dB/oct
Gain ……………………………….. +6 dB to –24 dB
Phase ……………………………. Normal/Reverse
Bass boost:
Gain ……………………………….. +12 dB to 0 dB
CD player
System …………………………………… Compact disc audio system
Usable discs ………………………… Compact disc
Signal-to-noise ratio …………… 94 dB (1 kHz) (IEC-A net-
work)
Number of channels ………….. 2 (stereo)
MP3 decoding format ……….. MPEG-1 & 2 Audio Layer 3
WMA decoding format ……… Ver. 7, 7.1, 8, 9, 10, 11 (2ch
audio)
(Windows Media Player)
AAC decoding format ………… MPEG-4 AAC (iTunes en-
coded only) (.m4a)
(Ver. 8.2 and earlier)
WAV signal format ……………… Linear PCM & MS ADPCM
(Non-compressed)
USB
USB standard specification
…………………………………………….. USB 2.0 full speed
Maximum current supply …. 500 mA
File system ……………………………. FAT12, FAT16, FAT32
MP3 decoding format ……….. MPEG-1 & 2 Audio Layer 3
WMA decoding format ……… Ver. 7, 7.1, 8, 9, 10, 11 (2ch
audio)
(Windows Media Player)
AAC decoding format ………… MPEG-4 AAC (iTunes en-
coded only) (.m4a)
(Ver. 8.2 and earlier)
WAV signal format ……………… Linear PCM & MS ADPCM
(Non-compressed)
SD
Compatible physical format
…………………………………………….. Version 2.00
Maximum memory capacity
…………………………………………….. 32 GB (for SD and SDHC)
File system ……………………………. FAT12, FAT16, FAT32
MP3 decoding format ……….. MPEG-1 & 2 Audio Layer 3
WMA decoding format ……… Ver. 7, 7.1, 8, 9, 10, 11 (2ch
audio)
(Windows Media Player)
AAC decoding format ………… MPEG-4 AAC (iTunes en-
coded only) (.m4a)
(Ver. 8.2 and earlier)
WAV signal format ……………… Linear PCM & MS ADPCM
(Non-compressed)
FM tuner
Freque ncy range …………………. 87.5 MHz to 108.0 MHz
Usable sensitivity ………………… 9 dBf (0.8 µV/75 W, mono,
S/N: 30 dB)
Signal-to -noise ratio …………… 72 dB (IEC -A network)
AM tuner
Freque ncy range …………………. 531 kHz to 1 602 kHz (9 kHz)
530 kHz to 1 640 kHz (10
kHz)
Usable sensitivity ………………… 25 µV (S/N: 20 dB)
Signal-to -noise ratio …………… 62 dB (IEC -A network)
Infrared remote control
Wavelength …………………………… 940 nm ±50 nm
Output ……………………………………. typ; 12 mw/sr per Infrared
LED
Note
Specifications and the design are subject to modifications without notice.
26
En

Índice
Gracias por haber adquirido este producto PIONEER.
Lea con detenimiento este manual antes de utilizar el producto por primera vez
para que pueda darle el mejor uso posible. Es muy importante que lea y observe
las ADVERTENCIAS y PRECAUCIONES de este manual. Una vez leído, guarde
el manual en un lugar seguro y a mano para que pueda consultarlo en el futuro.
Español
Antes de comenzar
Acerca de esta unidad 28
En caso de problemas 28
Modo demo 28
Modo inverso 28
Reinicio del microprocesador 28
Acerca de este manual 28
Utilización de esta unidad
Unidad principal 29
Mando a distancia 29
Funciones básicas 30
Uso y cuidado del mando a distancia 30
Las operaciones del menú son idénticas para
los ajustes de función/ajustes de audio/
ajustes iniciales/listas 31
Sintonizador 31
– Funciones básicas 31
– Almacenamiento y recuperación de
emisoras 31
– Ajustes de funciones 32
CD/CD-R/CD-RW y dispositivos de
almacenamiento externos (USB, SD) 32
– Funciones básicas 32
– Visualización de información de
texto 34
– Uso de listas 34
– Operaciones avanzadas mediante el
uso de botones especiales 35
– Ajustes de funciones 35
iPod 36
– Funciones básicas 36
– Visualización de información de
texto 36
– Para buscar una canción 36
– Operaciones avanzadas mediante el
uso de botones especiales 37
– Ajustes de funciones 38
Ajustes de audio 39
– Operaciones avanzadas mediante el
uso de botones especiales 39
– Ajustes de función de audio 39
Ajustes iniciales 40
Otras funciones 43
– Uso de la fuente AUX 43
– Visualización del reloj 43
– Cambio de la indicación del display y la
iluminación de los botones 43
– Uso de diferentes visualizaciones de
entretenimiento 43
Información adicional
Solución de problemas 44
Mensajes de error 44
Pautas para el manejo 46
Compatibilidad con audio comprimido
(disco, USB, SD) 48
Compatibilidad con iPod 50
Secuencia de archivos de audio 50
Copyright y marca registrada 51
Especificaciones 53
27
Es
Sección
01
Antes de comenzar
Acerca de esta unidad
PRECAUCIÓN
! No permita que esta unidad entre en contacto
con líquidos, ya que puede producir una descarga eléctrica. Además, el contacto con líquidos puede causar daños en la unidad, humo y
recalentamiento.
! Mantenga siempre el volumen lo suficiente-
mente bajo como para que pueda escuchar
los sonidos que provienen del exterior.
! Evite la exposición a la humedad.
! Si se desconecta o se descarga la batería,
cualquier memoria preajustada se borrará.
En caso de problemas
En caso de que esta unidad no funcione correctamente, póngase en contacto con su concesionario o con el centro de servicio
PIONEER autorizado más cercano.
Modo demo
Importante
! Si no se conecta el cable rojo (ACC) de esta
unidad a un terminal acoplado con las funciones de activación/desactivación de la llave de
encendido del automóvil, se puede descargar
la batería.
! Recuerde que si este modo de demostración
sigue funcionando cuando el motor del vehículo está apagado, se puede descargar la
batería.
La demostración se inicia automáticamente
cuando la llave de encendido del automóvil
está en ACC o en ON mientras la unidad está
apagada. Aunque la unidad se apague, el
modo de demostración seguirá activado. Para
cancelar el modo de demostración, pulse
DISP/
para iniciarlo. Si utiliza el modo de demostración cuando la llave de encendido está en
ACC, se puede descargar la batería.
/SCRL. Pulse DISP/ /SCRL de nuevo
Modo inverso
Si no se realiza ninguna operación en unos 30
segundos, las indicaciones de la pantalla comienzan a invertirse y siguen haciéndolo cada
10 segundos. Al pulsar el botón BAND/ESC
cuando se apaga la unidad mientras la llave
de encendido está en ACC u ON, se cancelará
el modo inverso. Vuelva a pulsar el botón
BAND/ESC para iniciar el modo inverso.
Reinicio del microprocesador
Se debe reiniciar el microprocesador si se presentan las siguientes condiciones:
! Antes de utilizar esta unidad por primera
vez después de su instalación
! Si la unidad no funciona correctamente
! Cuando aparecen mensajes extraños o in-
correctos en la pantalla
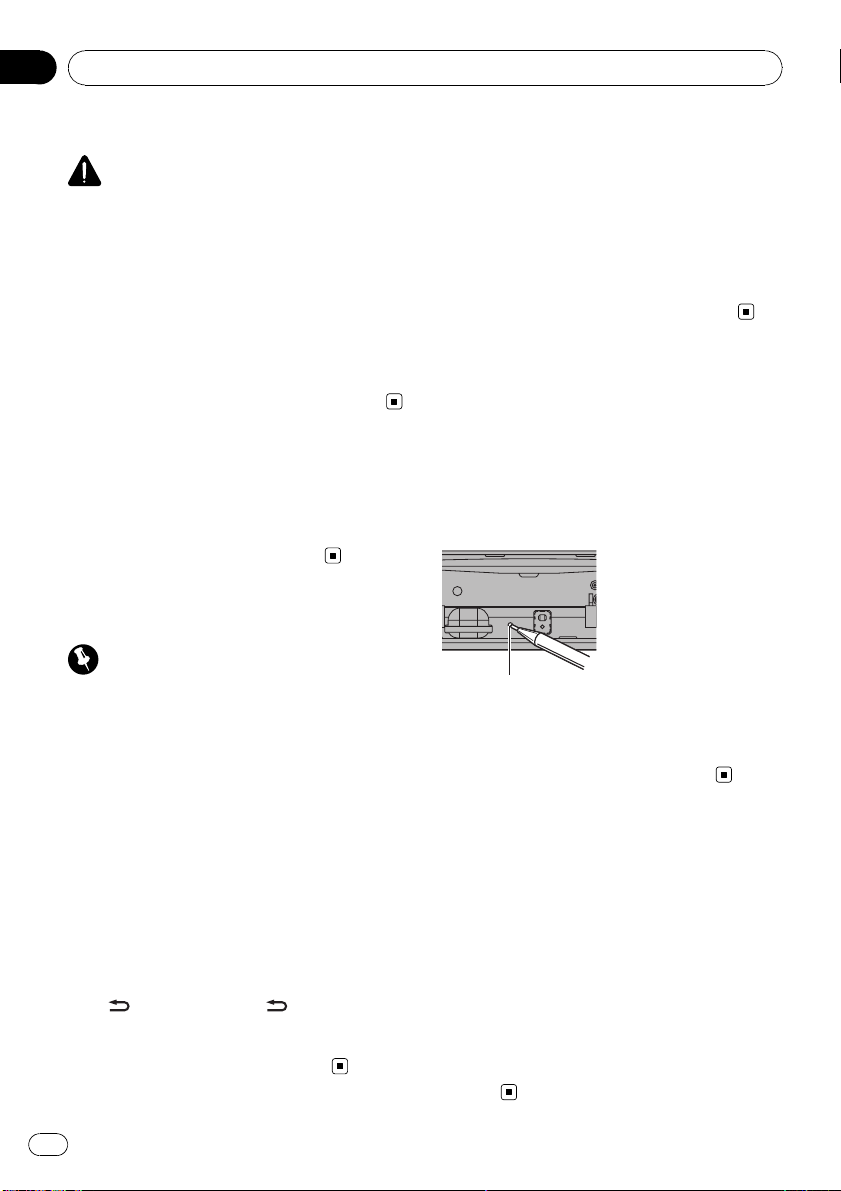
Botón RESET
1 Extraiga el panel delantero.
2 Pulse RESET con la punta de un bolígrafo u otro instrumento puntiagudo.
Acerca de este manual
En las siguientes instrucciones, las memorias
USB, los reproductores de audio USB portátiles y las tarjetas de memoria SD se denominan conjuntamente “dispositivos de
almacenamiento externo (USB, SD)”. Cuando
se habla únicamente de las memorias USB y
de los reproductores de audio USB portátiles,
se denominarán conjuntamente “dispositivos
de almacenamiento USB”.
En este manual, se utiliza el término “iPod”
para denominar tanto a iPod como a
iPhone.
28
Es
Utilización de esta unidad
Sección
02
Unidad principal
e
Parte Parte
1 SRC/OFF 9
(lista) a S.Rtrv
2
3
/iPod b
4 Botón Abrir c DISP/
Conector de entra-
5
da AUX (conector
estéreo de 3,5 mm)
6 Puerto USB e
7
/DISP OFF f h (expulsar)
8
/BASS g
PRECAUCIÓN
Utilice un cable USB Pioneer opcional (CD-U50E)
para conectar el reproductor de audio USB/memoria USB al puerto USB. Puesto que el reproductor de audio USB/memoria USB se proyecta
hacia fuera de la unidad, es peligroso conectarlo
directamente.
No utilice el producto no autorizado.
/LOC
MULTI-CONTROL
(M.C.)
/SCRL
d BAND/ESC
Ranura de carga de
discos
Ranura para la tarjeta de memoria SD
Al extraer la carátula, podrá ver la ranura de la tarjeta
de memoria SD.
Mando a distancia
Parte Operación
h VOLUME
i MUTE
j a/b/c/d
k AUDIO
l DISP/SCRL
m e Pulse para pausar o reanudar.
n FUNCTION
LIST/
o
ENTER
Pulse para aumentar o disminuir
el volumen.
Pulse para silenciar. Pulse de
nuevo para desactivar el silenciamiento.
Presione estos botones para utilizar los controles de sintonización
por búsqueda manual, avance rápido, retroceso y búsqueda de
pista.
También se usan para controlar
las funciones.
Pulse para seleccionar una función de audio.
Pulse este botón para seleccionar
diferentes visualizaciones.
Manténgalo pulsado para desplazarse por la información de texto.
Presione este botón para seleccionar las funciones.
Mantenga pulsado este botón
para acceder al menú de ajustes
iniciales si las fuentes están desactivadas.
Pulse para visualizar la lista de título del disco, la lista de título de
la pista, la lista de carpetas o la
lista de archivos según la fuente.
Cuando esté en el menú de funcionamiento, pulse para controlar
las funciones.
Español
29
Es
Sección
02
Utilización de esta unidad
Funciones básicas
Importante
! Proceda con cuidado al retirar o colocar el
panel frontal.
! Evite someter la carátula a impactos excesi-
vos.
! Mantenga la carátula fuera del alcance de la
luz solar directa y no la exponga a temperaturas elevadas.
! Extraiga cualquier cable o dispositivo conec-
tado a esta unidad antes de extraer el panel
delantero para evitar que el dispositivo o el interior del vehículo sufran daños.
Extracción del panel delantero para proteger la unidad contra robo
1 Pulse el botón Abrir para abrir el panel delantero.
2 Sujete el lado izquierdo del panel delantero y retí-
relo con cuidado.
3 Mantenga siempre el panel delantero que se ha
extraído en su medio de protección, como por
ejemplo su caja protectora.
Colocación del panel frontal
1 Vuelva a colocar el panel delantero; para ello, su-
jételo verticalmente respecto a la unidad y encájelo con firmeza en los ganchos de montaje.
Nota
Si el cable azul/blanco de esta unidad está conectado al terminal de control del relé de la antena
automática del vehículo, la antena se extiende
cuando se enciende el equipo. Para retraer la antena, apague la fuente.
Uso y cuidado del mando a
distancia
Uso del mando a distancia
1 Apunte el mando a distancia hacia la carátula
para que funcione la unidad.
Al utilizar el mando a distancia por primera vez,
extraiga la película que sobresale de la bandeja.
Reemplazo de la batería
1 Deslice y extraiga la bandeja de la parte posterior
del mando a distancia.
2 Inserte la pila con los polos positivo (+) y negati-
vo (–) en la dirección correcta.
Encendido de la unidad
1 Pulse SRC/OFF para encender la unidad.
Apagado de la unidad
1 Mantenga pulsado SRC/OFF hasta que la unidad
se apague.
Selección de una fuente
1 Pulse SRC/OFF para desplazarse entre:
TUNER (sintonizador)—CD (reproductor de CD
incorporado)—USB (USB)/IPOD (iPod)—SD (tarjeta de memoria SD)—AUX (AUX)
Ajuste del volumen
1 Haga girar M.C. para ajustar el volumen.
30
Es
ADVERTENCIA
! Mantenga la pila fuera del alcance de los
niños. En caso de ingestión accidental de
ésta, consulte a un médico de inmediato.
! Las pilas o baterías no deben exponerse a
altas temperaturas ni fuentes de calor como
el sol, fuego, etc.
PRECAUCIÓN
! Utilice una sola batería de litio CR2025 (3 V).
! Extraiga la pila si no piensa utilizar el mando
a distancia durante un mes o más tiempo.
! Si la pila se sustituye de forma incorrecta exis-
te cierto riesgo de explosión. Reemplácela
sólo por una del mismo tipo o equivalente.
! No manipule la pila con herramientas metáli-
cas.
! No guarde la pila junto a objetos metálicos.
Loading…
-
Страница 1
Operation Manual Manual de instrucciones Manual de operação CD RECEIVER RADIO CD CD PLA YER DEH-7250SD English Español Português (B)[…]
-
Страница 2
Thank you for purchasing this PIONEER product. T o ensure proper use, please read through this manual before using this product. It is especially important th at you read and obser ve WARNING s and CAUTION si n this manual. Please keep the manual in a safe and accessible place for future refer- ence. Before Y ou Start About this unit 3 In case of t[…]
-
Страница 3
About this unit CAUTION ! Do not allow this unit to come into contact with liquids. Electrical shock could result. Also, damage to this unit, smoke, and over- heating could result from contact with liquids. ! “ CLASS 1 LASER PRODUCT ” This product contains a laser diode of higher class than 1. T o ensure continued safety , do not remove any cov[…]
-
Страница 4
About this manual In the following instructions, USB memories, USB portable audio players, and SD memor y cards are collectively referred to as “ external storage devices (USB, SD). ” If only USB mem- ories and USB portable audio players are indi- cated, they are collectively referred to as “ USB storage devices. ” In this manual, iPod and […]
-
Страница 5
Head unit 1 1 1 1 4 4 4 4 5 5 5 5 6 6 7 7 7 7 a a a a c c c c d d d d 2 2 2 2 3 3 3 3 8 8 8 8 9 9 9 9 b b b b g e f Part Part 1 SRC / OFF 9 / LOC 2 (list) a S.Rtrv 3 / iPod b MUL TI-CONTROL ( M.C. ) 4 Open button c DISP / / SCRL 5 AUX input jack (3.5 mm stereo jack) d BAND / ESC 6 USB port e Disc loading slot 7 / DISP OFF f h (eject) 8 / BASS g SD […]
-
Страница 6
! Avoid subjecting the front panel to excessive shock. ! Keep the front panel out of direct sunlight and high temperatures. ! Remove any cables and devices attached to this unit before detaching the front panel to avoid damage to the device or vehicle interior . Removing the front panel to protect your unit from theft 1 Press the open button to ope[…]
-
Страница 7
! The remote control may not function properly in direct sunlight. ! Do not let the remote control fall onto the floor , where it may become jammed under the brake or accelerator pedal. Menu operations identical for function settings/audio adjustments/initial settings/lists Returning to the previous display Returning to the previous list/categor y […]
-
Страница 8
BSM (best stations memor y) BSM (best stations memor y) automat ically stores the six strongest stations in the order of their signal strength. 1 Press M.C. to turn BSM on. ! T o cancel, press M.C . again. Local (local seek tuning) Local seek tuning lets you tune in only those radio sta- tions with sufficiently strong signals for good recep- tion. […]
-
Страница 9
Selecting a track 1 Pus h M.C. lef t or right. F ast for warding or reversing 1 Push and hold M.C. left or right. Returning to root folder 1 Press and hold BAND / ESC . Switching between compressed audio and CD-DA 1 Pre s s BAND / ESC . Notes ! When playing compressed audio, there is no sound during fast for ward or reverse. ! USB portable audio pl[…]
-
Страница 10
Browsing for a song 1 Press (list) to switch to the top menu of the list search. 2 Use M.C. to select a category/song. Changing the name of song or categor y 1 Tu r n M.C. Artists (artists) — Albums (albums) — Songs (songs) — Genres (genres) Playing 1 When a song is selecte d, press M.C. Seeing a list of songs in the selected categor y 1 When[…]
-
Страница 11
iPod Basic Operations 6 7 2 1 3 5 4 1 Repeat indicator 2 Song number indicator 3 Shuffle indicator 4 PLA Y / P AUSE indicator 5 S.Rtrv indicator Appears when Sound Retriever function is on. 6 Song time (progress bar) 7 Play time indicator Playing songs on iPod 1 Open the USB connector cover and plug in an iP od using the iPod Dock Connector to USB […]
-
Страница 12
Advanced operations using special buttons Selecting a repeat play ran ge 1 Press / LOC to cycle between the following: ! ONE – Repeat the current song ! ALL – Repeat all songs in the selected list Playing all songs in a random order (shuffle all) 1 Press / iPod to turn shuffle all on. Playing songs related to the curren tly playing song Y ou ca[…]
-
Страница 13
Sound Retriever (sound retriever) ! Refer to Sound Retriever (sound re triever) on page 10. Notes ! Switching the control mode to iPod pauses song playback. Operate the iPod to resume playback. ! The following functions are still accessible from the unit even if the control mode is set to iPod . — V olume — F ast forward/reverse — T rack up/d[…]
-
Страница 14
Y ou can adjust the currently selected equalizer cur ve setting as desired. Adjusted equalizer cur ve settings are memor ized in Custom1 or Custom2 . ! A separate Custom1 cur ve can be created for each source. If you make adjustments when a cur ve other than Custom2 is selected, the equa li- zer cur ve settings will be memorized in Cust om1 . ! A C[…]
-
Страница 15
3 T urn M.C. to select the initial setting. After selecting, per form the following proce- dures to set the initial setting. Language sele ct (multi language) For your convenience, this unit equips multiple lan- guage displ ay . You can select the language best sui- ted to your first language. 1 Press M.C. to select the langua ge. English — Espa?[…]
-
Страница 16
T o prevent the display from being too bright at night, the display is automatically dimmed when the car ’ s headlights are turned on. You can turn the dimmer on or off. 1 Press M.C. to turn dimmer on or off. Brightness (display brightn ess setting) 1 Pus h M.C. left or right to adjust the brightness level. 0 to 15 is displayed as the level is in[…]
-
Страница 17
3 T urn M.C. to change the display . Background visual — genre — background pic- ture 1 — background picture 2 — background picture 3 — background picture 4 — simple dis- play — movie screen 1 — movie screen 2 — ca- lendar # Genre display changes depending on the genre of music. # Genre display may not operate correctly de- pendin[…]
-
Страница 18
T roubleshooting Symptom Cause Action (See) The display automatically returns to the ordinar y dis- play . Y ou did not per- form any opera- tion within about 30 seconds. Perform operation again. The repeat play range chan ges unexpectedly. Depending on the repeat play range, the se- lected range may change when se- lecting another folder or track,[…]
-
Страница 19
NO AUDIO No songs T ransfer the audio files to the USB storage dev ice and connect. The connected USB storage de- vice has security enabled Follow the USB storage dev ice in- structions to dis- able the security. SKIPPED The connected USB storage de- vice contains WMA files em- bedded with Windows Med- ia ä DRM 9/10 Play an audio file not embedded[…]
-
Страница 20
ERROR-16 Old iPod firm- ware versions Update the iPod version. iP od failure Disconnect the cable from iPod. Once iPod ’ s main menu is displayed, reconnect cable. Reset the iP od. N/A USB Not compatible iP od Disconnect your device and replace it with a compati- ble iPod. CHECK USB iP od operates correctly but does not charge Check if the con- n[…]
-
Страница 21
Firmly secure the USB storage device when driving. Do not let the USB storage device fall onto the floor , where it may become jammed un der the brake or ac- celerator pedal. Depending on the USB storage dev ice, the following problems may occur . ! The device may generate noise in the radio. SD memory card This unit supports only the followi ng SD[…]
-
Страница 22
MP3 File extension: .mp3 Bit rate: 8 kbps to 320 kbps Sampling frequenc y : 8 kHz to 48 kHz (32 kHz, 44.1 kHz, 48 kHz for em phasis) Compatible ID3 tag version: 1.0, 1.1, 2.2, 2.3, 2.4 (ID3 tag Version 2.x is given priority over V ersion 1.x.) M3u playlist: No MP3i (MP3 interactive), mp3 PRO: No WA V File extension: .wav Quantization bits: 8 and 16[…]
-
Страница 23
iPod compatibility This unit supports only the followi ng iPod models. Supported iPod software versions are shown below . Older versions may not be supported. ! iP od nano 4th generation (software version 1.0.3) ! iP od nano 3rd generation (software version 1.1.3) ! iP od nano 2nd generation (software version 1.1.3) ! iP od nano 1st generation (sof[…]
-
Страница 24
MP3 Supply of this product only conveys a license for private, non-commercial use and does not convey a license nor imply any right to use this product in any commercial (i.e. revenue- generating) real time broadcasting (terrestrial, satellite, cable and/or any other media), broad- casting/streaming via internet, intranets and/ or other networks or[…]
-
Страница 25
“ Works with iPhone ” means that an electronic accessor y has been designed to connect spe- cifically to iPhone and has been certified by the developer to meet Apple per formance standards. Apple is not responsible for the operation of this device or its compliance with safety and regulator y standards. Additional Information En 25 English Appe[…]
-
Страница 26
Specifications General Rated power source …………… 14.4 V DC (allowable voltage range: 12.0 V to 14.4 V DC) Grounding system ………………. Ne g a tive type Maximum current consumpti on …………………………………………….. 10.0 A Dimensions (W × H × D): DIN Chassis ………………… 1 7 8 m m × 5 0 m m × 1 6 8 m[…]
-
Страница 27
Gracias por haber adquirido este producto PIONEER. Lea con detenimiento este manual antes de utilizar el producto por primera vez para que pueda dar le el m ejor uso posible. Es muy importan te que lea y obser ve las ADVERTENCIAS y PR ECAUCIONES de este manual. Una vez leído, guarde el manual en un lugar seguro y a mano para que pueda consultarlo […]
-
Страница 28
Acerca de esta unidad PRECAUCIÓN ! No permita que esta unidad entre en contacto con líquidos, ya que puede producir una des- carga eléctrica. Además, el contacto con líqui- dos puede causar daños en la unidad, humo y recalentamiento. ! Mantenga siempre el volumen lo suficiente- mente bajo como para que pueda escuchar los sonidos que provienen[…]
-
Страница 29
Unidad principal 1 1 1 1 4 4 4 4 5 5 5 5 6 6 7 7 7 7 a a a a c c c c d d d d 2 2 2 2 3 3 3 3 8 8 8 8 9 9 9 9 b b b b g e f Parte Parte 1 SRC / OFF 9 / LOC 2 (lista) a S.Rt rv 3 / iPod b MUL TI-CONTROL ( M.C. ) 4 Botón Abrir c DISP / / SCRL 5 Conector de entra- da AUX (conector estéreo de 3,5 mm) d BAND / ESC 6 Puerto USB e Ranura de carga de disc[…]
-
Страница 30
Funciones básicas Importante ! P roceda con cuidado al retirar o colocar el panel frontal. ! Evite someter la carátula a impactos excesi- vos. ! Mantenga la carátula fuera del alcance de la luz solar directa y no la exponga a temperatu- ras elevadas. ! Extraiga cualquier cable o dispositivo conec- tado a esta unidad antes de extraer el panel del[…]
-
Страница 31
! En el caso de que se produzcan fugas de la pila, limpie completamente el mando a distan- cia e instale una pila nueva. ! P ara desechar las pilas usadas, cumpla con los reglamentos gubernamentales o las nor- mas ambientales pertinentes de las institucio- nes públicas aplicables en su país/zona. Importante ! No guarde el mando a distancia en lug[…]
-
Страница 32
2 Utilice el M.C. para almacenar la fre- cuencia seleccionada en la memoria. Haga girar el control para cambiar el número de presintonía. Mantenga pulsado para alma- cenarlo. 3 Utilice M.C. para seleccionar la emisora deseada. Haga girar el control para cambiar de emiso — ra. Pulse para seleccionar . # T odas las emisoras almacenadas para las ban[…]
-
Страница 33
! Al reproducir archivos MP3 grabados con VBR (velocidad de grabación varia- ble), aparece VBR en lugar del valor de velocidad de grabación. ! Al reproducir archivos AAC grabados con VBR (velocidad de grabación varia- ble), se visualizará el valor promedio de la velocidad de grabación. Sin embargo, dependiendo del software que se haya empleado[…]
-
Страница 34
! Si “ plug and play ” está activado y hay un dis- positivo de almacenamiento USB conectado, dependiendo del tipo de dispositivo, la fuente puede cambiar a USB de forma automática al encender el motor . Cambie la configuración de “ plug and play ” según sea necesario. Con- sulte USB plug&play (plug and play) en la pá- gina 41. Visu[…]
-
Страница 35
2 Utilice M.C. para seleccionar una cate- goría/canción. Cambio del nombre de la canción o la categoría 1 Haga girar M.C. Artists (artistas ) — Albums (álbumes) — Songs (canciones) — Genres (géner os) Reproducción 1 T ras seleccionar una canción, pulse M.C . Visualización de una lista de canciones de la catego — ría seleccionada 1 T[…]
-
Страница 36
1 Pulse M.C. para pausar o reanudar . Sound Retriever (Sound Retriever) Mejora automáticam ente el audio comprimido y res- taura el sonido óptimo. 1 Pulse M.C. para seleccionar el ajuste desea do. P ara obte ner más información, consulte Mejo ra del audio comprimido y restauración del sonido óp- timo (Sound Retriever) en la página anterior .[…]
-
Страница 37
2 Utilice M.C. para seleccionar una cate- goría/canción. Cambio del nombre de la canción o la categoría 1 Haga girar M.C. Playlists (listas de reproducción) — Artist s (intér- pretes) — Albums (álbumes) — Songs (canciones) — Podcasts (podcas ts) — Genres (géneros) — Composers (composito res) — Audiobooks (au- diolibros) Reprod[…]
-
Страница 38
Ajustes de funciones 1 Pulse M.C. para acceder al menú princi- pal. 2 Haga girar M.C. para cambiar la opción de menú y pulse para seleccionar FUNCTION. 3 Haga girar M.C. para seleccionar la fun- ción. Una vez seleccionada, siga los siguientes pasos para ajustar la función: Play mode (repetición de reproducción) ! Consulte Play mode (repetici[…]
-
Страница 39
Ajustes de audio 1 1 Visualización de audio Muestra el estado de los ajustes de audio. Operaciones avanzadas mediante el uso de botones especiales Ajuste de subgraves activado/desactivado 1 Pulse / BASS para seleccionar el menú de ajus- te de subgraves activado/desactivado. 2 Pulse M.C. para activar o desactivar la salida de subgraves. 3 Presione[…]
-
Страница 40
La sonoridad compensa las deficiencias en las gamas de frecuencias bajas y altas cuando se escu- cha a un volumen ba jo. 1 Pulse M.C. para activar o desactivar la sonoridad. 2 Pulse M.C. izquierda o derecha para sel eccionar el ajuste deseado. Low (bajo) — Mid (medio) — High (alto) — OFF (de- sactivado) Sub W .1 (ajuste de subgraves activado/[…]
-
Страница 41
2 Mantenga presionado M.C. hasta que el menú de ajustes iniciales aparezca en el display . 3 Haga girar M.C. para seleccionar el ajus- te inicial. Una vez seleccionado, siga los siguientes pasos para configurar el ajuste inicial: Language sele ct (idiomas múltiples) P ara una mayor comodidad, esta unidad incl uye un display en varios idiomas. Es […]
-
Страница 42
Si se utilizan dispositivos de almacenamiento externo, se pueden buscar las canciones deseadas a partir de la lista de archivos/carpetas o la lista de catego ría de artista/álbum/canción/género. ! ・ Este ajus te se puede ajustar en memoria USB o en tarjet a SD. ! Music browse puede utilizarse con la ID3 tag V er .2. ! La creación de la lista[…]
-
Страница 43
Ever -scroll (ajuste del modo de desplazamiento) Si la función de desplazamiento cont inuo está activa- da (ON ), la información de texto grabada se desplaza de manera ininterrumpida. Desactive la función (OFF) si desea que la informac ión se desplace una sola vez. 1 Pulse M.C. para activar o desactivar el desplaza- miento contin uo. Otras fun[…]
-
Страница 44
Solución de problemas Síntoma Causa Acción (Consul- te) La pantalla vuelve automá- ticamente a la visualización normal. No ha realizado ninguna opera- ción en aproxi- madamente 30 segundos. Realice la opera- ción de nuevo. La gama de re- petición de re- producción cambia de ma- nera inespe ra- da. Dependiendo de la gama de repe- tición de[…]
-
Страница 45
Dispositivo de almacenamiento externo (USB, SD) Mensaje Causa Acción NO DEVICE Si está desactiva- do “ plug and play ” , no hay nin- gún disposi tivo de almacena- miento USB co- nectado. ! Active “ plug and play ” . ! Conecte un dis- positivo de almace- namiento USB compatible. FORMA T READ A veces se pro- duce un retraso entre el comien[…]
-
Страница 46
ERROR-23 El dispositivo de almacenamiento USB no está for- mateado con FA T12, FA T16 o FA T32 El dispositivo de al- macenamiento USB debe forma- tearse con FA T12, FA T16 o FA T32. CHECKING 8 T AGS La unidad está creando un índi- ce o lista para la función de explo- ración musical. P or favor , espere hasta que se haya completado esta operaci[…]
-
Страница 47
No inserte ningún otro elemento que no sea un CD en la ranura de inserción de CD. No use discos con roturas, picadu ras, deformados o dañados de otro modo, ya que pueden causar daños al reproductor . No es posible reproducir discos CD -R/CD-RW no fina- lizados. No toque la super ficie grabada de los discos. Cuando no utilice los discos guárdel[…]
-
Страница 48
No intente forzar la tarjeta de memor ia SD en la ranu- ra para la tarjeta SD, ya que la tarjeta o la unidad po — drían dañarse . Cuando expu lse una tarjeta de memoria SD, mantén- gala presion ada hasta que esc uche un clic. Es peli- groso presion ar la tarjeta de memoria SD y soltar de inmediato, ya que la tarjeta SD podría dispararse fuera d[…]
-
Страница 49
AAC Formato compatible: AAC codificado con iT unes Extensión de archivo: .m4a F recuencia de mues treo: 11,025 kHz a 48 kHz V elocidad de tran smisión: 16 kbps a 320 kbps, VBR Apple Loss less: no Fichero AAC adquirido en la iT unes Store (extensión del fichero .m4p): no Información complementaria Sólo se pueden visualizar los primeros 32 carac[…]
-
Страница 50
Compatibilidad con iPod Esta unidad sólo es compatible con los siguientes modelos de iPod. Las versiones compatibles del soft- ware iPod se muestran abajo. Es posible que las ver- siones más antiguas no sean compatibles. ! iP od nano 4ª generación (versión del software 1.0.3) ! iP od nano 3ª generación (versión del software 1.1.3) ! iP od n[…]
-
Страница 51
P ara reproductores de audio portátiles USB, la secuencia es diferente y depende del tipo de reproductor . Copyright y marca registrada iT unes Apple e iT unes son marcas comerciales de Apple Inc., registradas en los EE. UU. y otros países. MP3 La venta de este producto sólo otorga una li- cencia para su uso privado, no comercial. No otorga ning[…]
-
Страница 52
iPhone iPhone es una marca comercial de Apple Inc. La etiqueta “ Works with iPhone ” indica que se trata de un accesorio electrónico diseñado para conectarse específicamente a un iPhone y cuyo desarrollador certifica que cumple con los estándares de funcionamiento de Apple. Apple no acepta la responsabilidad por el fun- cionamiento de este […]
-
Страница 53
Especificaciones Generales F uente de alimen tación nominal …………………………………………….. 14,4 V CC (gama de tensión permisi- ble: 12,0 V a 14,4 V CC) Sistema de conexión a tierra …………………………………………….. T i p o n e g ativo Consumo máximo de corriente ………………………………….[…]
-
Страница 54
Sintonizador de FM Gama de frecuencias ………… 87,5 MHz a 108,0 MHz Sensibilidad utilizabl e ……….. 9 d B f (0,8 µV/75 W , mono, Señal/ruido: 30 dB) R e l a c i ó n d e s e ñ a l a r u i d o …. 7 2 d B (red IEC -A) Sintonizador de AM Gama de frecuencias ………… 5 3 1 k H z a 1 6 0 2 k H z ( 9 k H z ) 530 kHz a 1 640 kHz (10 kHz[…]
-
Страница 55
Agradecemos por você ter adquirido este produto PIONEER. Leia este manual antes de utili zar o produto para garantir seu uso adequado. É especialmente importante que você leia e obs er ve as ADV ERTÊNCIAS eo s A VI- SOS nes te manual. Guarde- o em local segur o e ace ssível para referência futura. Antes de utilizar este produto Sobre esta uni[…]
-
Страница 56
Sobre esta unidade CUIDADO ! Não permita que esta unidade entre em con- tato com líquidos. Há risco de choque elétri- co. Além disso, o contato com líquidos pode causar danos, fumaça e superaquecimento desta unidade. ! Sempre deixe o volume baixo para poder ouvir os sons do tráfego. ! Evite a exposição à umidade. ! Se a bateria do carro […]
-
Страница 57
Sobre este manual Nas instruções a seguir , as memórias USB, os áudio players USB e os cartões de memória SD são coletivamente referidos como “ disposi- tivos de armazenamento externos (USB, SD) ” . Se apenas memórias USB e áudio players por- táteis USB forem indicados, eles serão referi- dos coletivamente como “ dispositivos de ar[…]
-
Страница 58
Unidade principal 1 1 1 1 4 4 4 4 5 5 5 5 6 6 7 7 7 7 a a a a c c c c d d d d 2 2 2 2 3 3 3 3 8 8 8 8 9 9 9 9 b b b b g e f Parte Parte 1 SRC / OFF 9 / LOC 2 (Lista) a S.Rtrv 3 / iPod b MUL TI-CONTROL ( M.C. ) 4 Botã o Abrir c DISP / / SCRL 5 Conector de entra- da AUX (conector estéreo de 3,5 mm) d BAND / ESC 6 Porta USB e Slot de carrega- mento […]
-
Страница 59
Operações básicas Importante ! Ao remover ou colocar o painel frontal, manu- seie-o com cuidado. ! Evite expor o painel frontal a impactos exces- sivos. ! Não exponha o painel frontal à luz solar direta e a temperaturas altas. ! P ara evitar que ocorram danos ao dispositivo ou interior do veículo, remova quaisquer cabos e dispositivos acoplad[…]
-
Страница 60
! Não armazene a bateria com objetos metáli- cos. ! Em caso de vazamento da bateria, limpe com- pletamente o controle remoto e instale uma nova bateria. ! Ao descartar baterias usadas, certifique-se de estar em conformidade com as regulamenta- ções governamentais ou com as normas das instituições públicas do meio ambiente que se aplicam ao s[…]
-
Страница 61
2 Utilize M.C. para armazenar a freqüên- cia selecionada na memória. Gire para alterar o número programado. Pres- sione e segure para armazenar . 3 Utilize M.C. para selecionar a emissora desejada. Gire para alterar a emissora. Pressione para selecionar . # T odas as emissoras armazenadas para ban- das FM podem ser chamadas da memória de cada […]
-
Страница 62
! Ao reproduzir arquivos AAC gravados com VBR (T axa de bit variável), o valor da taxa de bit variável será visualizado. No entanto, dependendo do software usado para decodificar os arquivos AAC, pode ser que VBR seja visualizado. 2 Indicador WMA/MP3/AAC/W A V Mostra o tipo de arquivo de áudio atualmente sendo reproduzido, quando o áudio compa[…]
-
Страница 63
! Se a função plug and play estiver ativada e houver um dispositivo de armazenamento USB, dependendo do tipo do dispositivo, pode ser que a fonte alterne automaticamente para USB quando você ligar o motor . Altere os ajus- tes da função plug and play conforme neces- sário. Consulte USB plug&play (Plug and play) na página 70. Visualizaç?[…]
-
Страница 64
2 Utilize M.C. para selecionar uma cate- goria/música. Alteração do nome da música ou categoria 1 Gire M.C. Artists (Artista s) — Albums (Álbuns) — Song s (Músicas) — Genres (Estilos ) Reprodução 1 Quando uma música estiver selecion ada, pressio- ne M.C. Visualização de uma lista de músicas na categoria selecionada 1 Quando uma ca[…]
-
Страница 65
Sound Retriever (Recuperação de som) Aprimora automaticamente o áudio compactado e restaura um som rico. 1 Pressione M.C. p ara selecionar o ajuste desejado. P ara obte r detalhes, consulte Aprimoramento de áudio comp actado e restauração de um som rico (Recuperação de som) na página anterior . iPod Operações básicas 6 7 2 1 3 5 4 1 Ind[…]
-
Страница 66
Visualização de uma lista de músicas na categoria selecionada 1 Quando uma categoria estiver selecionada, pres- sione M.C. Reprodução de uma música na categoria seleciona- da 1 Quando uma categoria estiver selecionada, pres- sione e segure M.C. Busca em ordem alfabética na lista 1 Quando uma lista da categoria seleciona da for vi- sualizada,[…]
-
Страница 67
Ajustes de funções 1 Pressione M.C. para visualizar o menu principal. 2 Gire M.C. para alterar a opção de menu e pressione para selecionar FUNCTION. 3 Gire M.C. para selecionar a função. Após fazer a seleção, execute os seguintes procedimentos para ajustar a função. Play mode (Reprodução com repetição) ! Consulte Play mode (Reproduç[…]
-
Страница 68
Ajustes de áudio 1 1 Display de áudio Mostra o status do ajuste de áudio. Operações avançadas utilizando botões especiais Ajuste para ativar/desativar o alto-falante de graves secundário 1 Pressione / BASS para selecionar o menu de ajuste para ativar/desativar o alto-falante de gra- ves secundári o. 2 Pressione M.C. para ativar ou desativa[…]
-
Страница 69
V ocê pode definir o ajuste da cur va do equalizador atualmente sel ecionada, conforme desejado. Os ajus- tes das cur vas do equalizador ajustadas são memori- zados em Custom1 ou Custom2 . ! Uma cur va Custom1 separada pode ser criada para cada fonte. Se você fizer ajustes quando uma cur va diferente de Custom2 for selecionada, os ajus tes da cu[…]
-
Страница 70
Nota Ao selecionar FM como a fonte, você não pode al- ternar para SLA . Ajustes iniciais 1 1 Display de função ! Mostra o status da função. 1 Pressione e segure SRC/OFF até desligar a unidade. 2 Pressione e segure M.C. até visualizar o menu de ajuste inicial no display . 3 Gire M.C. para selecionar o ajuste ini- cial. Após fazer a seleçã[…]
-
Страница 71
Este ajuste permite alternar sua fonte para USB / IPOD automaticamente. 1 Pressione M.C. p ara ativar ou desativar a função plug and play. ! ON – Quando o disposi tivo de armazenamen- to USB/iPod for conectado, a fonte será auto- maticamente alternada para USB / IPOD .S e você desconectar o dispositivo de armazena- mento USB/iPod, a fonte des[…]
-
Страница 72
1 Pressione M.C. p ara ativar ou desativar o display de demonstração. ! V ocê também pode ativar ou desativar o modo de demonstração de recursos ao pressionar DISP enquanto esta unidade estiver desligada. P ara obte r mais detalhes, consulte Modo de demonstração na página 56. Reverse mode (Ajuste do modo de demonstração de retrocesso) 1 […]
-
Страница 73
Solução de problemas Sintoma Causa Ação (Consulte) O display retor- na automatica- mente ao normal. V ocê ficou sem executar uma operação por aproximadamen- te 30 segundos. Execute a opera- ção novam ente. A série de re- produção com repetição muda inespera- damente. Dependendo da série de reprodu- ção com repeti- ção, a série s[…]
-
Страница 74
NO AUDIO Nenhuma músi- ca T ran sfira os arqui- vos de áudio para o dispositivo de ar- mazenamento USB e conecte- o. O dispositivo de armazenamento USB conectado está com segu- rança ativada Siga as instruções do dispositivo de armazenamento USB para desativar a segurança. SKIPPED O dispositivo de armazenamento USB conectado contém arquivos[…]
-
Страница 75
ERROR-19 F alha de comuni- cação Desconecte o cabo do iPod. Assim que o menu principal do iPod for visuali- zado, reconecte o cabo. Reinicie o iP od. F alha no iPod Descon ecte o cabo do iPod. Assim que o menu principal do iPod for visuali- zado, reconecte o cabo. Reinicie o iP od. ERROR-16 V ersões antigas de firmwar e do iP od Atualize a vers?[…]
-
Страница 76
Impactos nas estrada s ao dirigir podem interromper a reprodução do disco. Leia as precauções sobre discos antes de utilizá-los. Dispositivo de armazenamento externo (USB, SD) Solucione quais quer dúvidas que você possa ter sobre o seu dispositivo de armazename nto externo (USB, SD) com o fabricante . Não deix e o disposi tivo de armazename[…]
-
Страница 77
Discos duais Discos duais são discos com dois lados que pos- suem, de um lado, um CD de áudio gravável e, do outro, um DVD de vídeo gravável. Como o lado do CD dos discos duais não é compatí- vel com o padrão dos CDs comuns, talvez não seja possível reproduz ir o lado do CD nesta unidade. Inserir e ejetar freqüentemente um disco dual po[…]
-
Страница 78
Dispositivo de armazenamento externo (USB, SD) Hierarquia de pastas reproduzíveis: até oito camadas (uma hierarquia prática contém menos de duas ca- madas). P astas reproduzíveis: até 1 500 Arquivos repr oduzíveis: até 15 000 Reprodução de arquivos protegidos por direitos auto- rais: não Dispositivo de armazenamento externo particionado […]
-
Страница 79
Seqüência de arquivos de áudio O usuário não pode atribuir números de pasta e especificar as seqüências de reprodução com esta unidade. Exemplo de uma hierarquia 1 2 3 4 5 6 01 02 03 04 05 Nível 1 Nível 2 Nível 3 Nível 4 : Pasta : Arquivo de áudio compactado 01 a 05: Número de pasta 1 a 6 : Seqüência de reprodução Disco A seqü?[…]
-
Страница 80
O logotipo SD é uma marca comercial. O logotipo miniSD é uma marca comercial. O logotipo microSD é uma marca comercial. O logotipo SDHC é uma marca comercial. iPod iP od é uma marca comercial da Apple Inc., re- gistrada nos EUA e em outros países. “ F eito para iPod ” significa que um acessório eletrônico foi desenvolvido para ser espec[…]
-
Страница 81
Especificações Geral Fonte de alimentação nominal …………………………………………….. 14,4 V CC (faixa de tensão permissível: 12,0 V a 14,4 V CC) Sistema de aterramento …… T i p o n e g ativo Consumo máx. de energia …………………………………………….. 10,0 A Dimensões (L × A × P): DIN C h a s s i ..[…]
-
Страница 82
Sintonizador de FM Fa i x a d e f r e q ü ê n c ia ……………. 87,5 MHz a 108,0 MHz Sensibilidade utilizável ……… 9 d B f (0,8 µV/75 W , mono, Sinal/Ruído: 30 dB) Relação sinal-ruído …………….. 7 2 d B (rede IEC -A) Sintonizador de AM Fa i x a d e f r e q ü ê n c ia ……………. 5 3 1 k H z a 1 6 0 2 k H z ( 9 k H z )[…]
-
Страница 83
感 謝 您 購買 本 先 鋒 產 品 。 為 確 保使 用 方 式 正 確 , 使 用 本 產 品 前 請詳 閱 本 手 冊 。 尤 為 重 要 的 是 要 閱 讀 並 遵 照 本 手 冊 中 的 警 告 與 小 心 。 請 將 本 手 冊 存 放於 安 全 及 將 來 參 考 時 方 便 取 得 的 地 方 。 開 始 使 用 前 關 於 ?[…]
-
Страница 84
關 於 本 機 注 意 ! 請 勿 讓 本 機 接 觸 到 液 體 。 否 則 可 能 造 成 人 員 觸 電 。 此 外 , 接 觸 到 液 體 可 能 導 致 本 機 損 壞 、 冒 煙 和 過 熱 。 ! 「 第 1 類 雷 射 產 品 」 本 產 品 包 含 第 1 類 以上 的 雷 射 二 極 管 。 為 避 免 發 生 危 險 , 切勿 拆 […]
-
Страница 85
主 機 1 1 1 1 4 4 4 4 5 5 5 5 6 6 7 7 7 7 a a a a c c c c d d d d 2 2 2 2 3 3 3 3 8 8 8 8 9 9 9 9 b b b b g e f 部 位 部 位 1 SRC / OFF 9 / LOC 2 ( 清 單 ) a S.Rt rv 3 / iPod b MUL TI-CONTROL ( M.C. ) 4 開 啟 按 鈕 c DISP / / SCRL 5 AUX 輸 入 插 孔 ( 3.5 mm 立 體 聲 插 孔 ) d BAND / ESC 6 USB 埠 e 碟 片 槽 7 / DISP […]
-
Страница 86
拆 下 前 面 板 可 防 止 本 機 遭 竊 1 按 下 開 啟 按 鈕 以 打 開 前 面 板 。 2 抓 住 前 面 板 左 側 , 並 將 其 輕輕 往 外 拉 。 3 務 必 將 卸 下 的 前 面 板 放 置 在 保 護 裝 置 中 , 如 保 護 盒 。 重 新 安 裝 前 面 板 1 重 新 裝 回 前 面 板 時 , 將 其 對 著 主[…]
-
Страница 87
功 能 表 的 操 作 與 功 能 設 定 / 音 訊 調 整 / 初 始 設 定 / 清 單 完 全 相 同 返 回 上一 個 顯 示 畫 面 返 回 上一 個 清 單 / 類 別 ( 上一 層 資 料 夾 / 類 別 ) 1 按 DISP / / SCRL 。 返 回 主 選 單 返 回 清 單 / 類 別 的 最 上 層 1 按 住 DISP / / SCRL 。 ?[…]
-
Страница 88
CD/CD-R/CD-RW 及 外 部 儲 存 裝 置 ( USB 、 SD ) 基 本 操 作 8 4 3 7 6 5 1 2 1 位 元 率 / 取 樣 頻 率 指 示 器 播 放 壓 縮 音 訊 時 顯 示 目 前 曲 目 ( 檔 案 ) 的 位 元 率 或 取 樣 頻 率 。 ! 播 放 以 VBR ( 可 變 位 元 率 ) 錄 製 的 WMA 檔 案 時 , 平 均 位 元 率 值 ?[…]
-
Страница 89
顯 示 文 字 資 訊 選 擇 所 需 的 文 字 資 訊 1 按 DISP / / SCRL 。 CD TEXT 碟 片 : 播 放 時 間 - : 碟 片 作 者 姓 名 和 : 曲 目 標 題 - : 碟 片 作 者 姓 名和 : 碟 片 標 題 - : 碟 片 標 題 和 : 曲 目 標 題 - : 曲 目 作 者 姓 名和 : 曲 目 標 題 - : 曲 目 […]
-
Страница 90
使 用 特 殊 按 鈕 進 行 進 階 操 作 選 擇 重 播 範 圍 1 按 / LOC 可 在 下 列 項 目 間 切 換 : CD/CD-R/CD-RW ! DISC - 重 播 所 有 曲 目 ! TRACK - 重 播 目 前 曲 目 ! FOLDER - 重 播 目 前 資 料 夾 外 部 儲 存 裝 置 ( USB 、 SD ) ! TRACK - 重 播 目 前 檔 案 ! FOLDER - 重 ?[…]
-
Страница 91
顯 示 文 字 資 訊 選 擇 所 需 的 文 字 資 訊 1 按 DISP / / SCRL 。 播 放 時 間 - : 作 者 姓 名和 : 歌 曲 標 題 - : 作 者 姓 名和 : 專 輯 標 題 - : 專 輯 標 題 和 : 歌 曲 標 題 - : 歌 曲 標 題 和 播 放 時 間 - : 歌 曲 標 題 , : 作 者 姓 名和 : 專 輯 ?[…]
-
Страница 92
Play mode ( 重 播 ) ! 請 參 閱 第 90 頁 上 Play mode ( 重 播 ) 。 但 重 播 範 圍 與 CD/USB 儲 存 裝 置 不 同 。 請 參 閱 上一 頁 上 選 擇 重 播 範 圍 。 Shuffle mode ( 隨 機 選 曲 ) 1 按 M.C. 選 擇 常 用 設 定 。 ! Shuffle Songs - 依 隨 機 順 序 播 放 所 選 擇 清 單 中 的[…]
-
Страница 93
Fader/Balance ( 淡 化 器 / 平 衡 調 整 ) 1 向 上 或 向 下 推 M.C. 調 整 前 置 / 後 置 揚 聲 器 平 衡 。 在 前 置 / 後 置 揚 聲 器 平 衡 由 前 移 到 後 的 同 時 , 會 顯 示 F15 至 R15 。 ! F/R 0 為 僅 使 用 兩 個 揚 聲 器 時 的 正 確 設 定 。 ! 當 後 置 輸 出 設 定 為[…]
-
Страница 94
! 顯 示 功 能 狀 態 。 1 按 住 SRC / OFF 直 至 本 機 關閉 。 2 按 住 M.C. , 直 到初 始 設 定 選 單 出 現 在 顯 示 幕 為 止 。 3 轉 動 M.C. 可 選 擇 初 始 設 定 。 選 擇 後 , 執 行 下 列 程 序 以 進 行 初 始 設 定 。 Language sele ct ( 多 種 語言 ) 為 了 您 的 方 便 起 […]
-
Страница 95
本 機 的 後 置 輸 出 ( 後 置 揚 聲 器 喇 叭 線 輸 出 與 RCA 後 置 輸 出 ) 可 用 於 全 音 域 揚 聲 器 ( Rear SP :F .Range ) 或 重 低 音 揚 聲 器 ( Rear SP :S/W ) 的 連 接 。 如 果 您 將 後 置 輸 出 設 定 切 換 至 Rear SP :S/W , 無 須 使 用 輔 助 放 大 器 便 可 將 後 ?[…]
-
Страница 96
故 障 排 除 故 障 情 況 原 因 措 施 ( 請 參 閱 ) 顯 示 畫 面 會 自 動 返 回 一 般 顯 示 畫 面 。 您 無 法 在 30 秒 內 執 行 任 何 操 作 。 再 執 行 操 作 一 次 。 重 播 範 圍 意 外 變 更 。 選 擇 其 他 資 料 夾 或 曲 目 , 或 快 速 前 進 / 快 速 倒 轉 時 , 根 據[…]
-
Страница 97
NOT COMP A T — IBLE 不 相 容 的 USB 裝 置 中 斷 裝 置 連 接 並 更 換 為 相 容 的 USB 儲 存 裝 置 。 ERROR-19 通 訊 失 敗 執 行 下 列 其 中一 項 操 作 。 - 將 點 火 開關 轉 到 OFF , 然 後 再 轉 回 ON 。 - 中 斷 連 接 或 退 出 外 部 儲 存 裝 置 。 - 切 換 至 不 同 的 播 […]
-
Страница 98
凝 結 可 能 會 暫時 影 響 播 放 器 之 效 能 。 請 將 其 放 置 約 一 小 時 , 適 應 較 高 的 溫 度 。 同 時 , 請 用 軟 布 擦 拭 潮 溼 的 碟 片 。 由 於 碟 片特 性 、 碟 片 格 式 、 錄 製 的 應 用 軟 體 、 播 放 環 境 、 存 放 條 件 等 原 因 , 碟 片 可 能 無 法 […]
-
Страница 99
壓 縮 音 訊 相 容 性 ( 碟 片 、 USB 、 SD ) WMA 副 檔 名 : .wma 位 元 率 48 kbps 至 320 kbps ( CBR ), 48 kbps 至 384 kbps ( VBR ) 取 樣 頻 率 : 32 kHz 、 44.1 kHz 、 48 kHz Windows Media Audio Professional 、 Lossless 、 語 音 /DRM 資 料 流 / 視 訊 資 料 流 : 無 MP3 副 檔 名 : .mp3 ?[…]
-
Страница 100
iPod 相 容 性 本 機 僅 支 援 下 列 iPod 機 型 。 支 援 的 iPod 軟 體 版 本 如 下 所 示 。 本 機 可 能 不 支 援 較 舊 的 版 本 。 ! 第 四 代 iPod nano ( 軟 體 版 本 1.0.3 ) ! 第 三代 iPod nano ( 軟 體 版 本 1.1.3 ) ! 第 二代 iPod nano ( 軟 體 版 本 1.1.3 ) ! 第 一代 iPod nano […]
-
Страница 101
「 Windows Media 」 和 「 Windows 」 標 誌 皆 為 Microsoft Corporation 在 美 國 和 / 或 其 他 國 家 的 商 標 或 註 冊 商 標 。 本 產 品 採 用 Microsoft Corporation 開 發 之 技 術 , 未 獲 Microsoft Licensing, Inc 授 權 不 得 使 用 或 散 佈 本 技 術 。 SD 記 憶 卡 SD Logo 是 商 標 。 mini[…]
-
Страница 102
規 格 一 般 額 定 電 源 . . . . . . . . . . . . . . . . . . . . . . . . . . . . . . . . . . . . . . 14.4 V DC ( 容 許 電 壓 範 圍 : 12.0 V 至 14.4 V DC ) 接 地 系 統 . . . . . . . . . . . . . . . . . . . . . . . . . . . . . . . . . . . . . . 負 極 型 最 大 電 流消 耗 . . . . . . . . . . . . . . . . . . . . . . . . […]
-
Страница 103
Zhtw 103 中 文[…]
-
Страница 104
ﺍ ﻟ ﻤ ﻮ ﺍ ﺻ ﻔ ﺎ ﺕ ﻋ ﺎ ﻡ ﻣ ﺼ ﺪ ﺭ ﺍ ﻟ ﻄ ﺎ ﻗ ﺔ ﺍ ﻟ ﻤ ﺤ ﺪ ﺩ ……………………. ١٤٫٤ ﻓ ﻮ ﻟ ﺖ ﺗ ﻴ ﺎ ﺭ ﻣ ﺴ ﺘ ﻤ ﺮ ) ﻣ ﺪ ﻯ ﻧ ﻄ ﺎ ﻕ ﺍ ﻟ ﺠ ﻬ ﺪ ﺍ ﻟ ﻤ ﺴ ﻤ ﻮ ﺡ ﺑ ﻪ : ١٢٫٠ ﻓ ﻮ ﻟ ﺖ ﺇ ﻟ ﻰ ﻓ ﻮ ﻟ ﺖ ١٤٫٤ ?[…]
-
Страница 105
ﺣ ﻘ ﻮ ﻕ ﺍ ﻟ ﻨ ﺸ ﺮ ﻭ ﺍ ﻟ ﻌ ﻼ ﻣ ﺎ ﺕ ﺍ ﻟ ﺘ ﺠ ﺎ ﺭ ﻳ ﺔ iTunes Apple ﻭ iT unes ﻫ ﻤ ﺎ ﻋ ﻼ ﻣ ﺘ ﺎ ﻥ ﺗ ﺠ ﺎ ﺭ ﻳ ﺘ ﺎ ﻥ ﻟ ﺸ ﺮ ﻛ ﺔ Apple Inc . ، ﻣ ﺴ ﺠ ﻠ ﺘ ﺎ ﻥ ﻓ ﻲ ﺍ ﻟ ﻮ ﻻ ﻳ ﺎ ﺕ ﺍ ﻟ ﻤ ﺘ ﺤ ﺪ ﺓ ﻭ ﺩ ﻭ ﻝ ﺃ ﺧ ﺮ ?[…]
-
Страница 106
ﺟ ﻬ ﺎ ﺯ ﺍ ﻟ ﺘ ﺨ ﺰ ﻳ ﻦ ﺍ ﻟ ﺨ ﺎ ﺭ ﺟ ﻲ ) SD ، USB ( ﺍ ﻟ ﺘ ﺴ ﻠ ﺴ ﻞ ﺍ ﻟ ﻬ ﺮ ﻣ ﻲ ﻟ ﻠ ﻤ ﺠ ﻠ ﺪ ﺍ ﻟ ﻘ ﺎ ﺑ ﻞ ﻟ ﻠ ﺘ ﺸ ﻐ ﻴ ﻞ : ﻣ ﺎ ﻳ ﺼ ﻞ ﺇ ﻟ ﻰ ﺛ ﻤ ﺎ ﻥ ﻃ ﺒ ﻘ ﺎ ﺕ ) ﺍ ﻟ ﺘ ﺴ ﻠ ﺴ ﻞ ﺍ ﻟ ﻬ ﺮ ﻣ ﻲ ﺍ ﻟ ﻔ […]
-
Страница 107
ﻟ ﻤ ﻌ ﺮ ﻓ ﺔ ﺍ ﻟ ﺘ ﻔ ﺎ ﺻ ﻴ ﻞ ، ﺭ ﺍ ﺟ ﻊ ﺍ ﻟ ﻜ ﺘ ﻴ ﺒ ﺎ ﺕ ﺍ ﻟ ﺨ ﺎ ﺻ ﺔ ﺑ ﺠ ﻬ ﺎ ﺯ iPod . ﺣ ﻮ ﻝ ﺇ ﻋ ﺪ ﺍ ﺩ ﺍ ﺕ iPod ! ﻋ ﻨ ﺪ ﺗ ﻮ ﺻ ﻴ ﻞ ﺟ ﻬ ﺎ ﺯ iPod ، ﻳ ﻌ ﻤ ﻞ ﺍ ﻟ ﺠ ﻬ ﺎ ﺯ ﻋ ﻠ ﻰ ﺗ ﻐ ﻴ ﻴ ﺮ ﺗ ﻬ ﻴ ﺌ ?[…]
-
Страница 108
ﺍ ﺳ ﺘ ﺨ ﺪ ﻡ ﻓ ﻘ ﻂ ﺍ ﻷ ﻗ ﺮ ﺍ ﺹ ﺍ ﻟ ﺘ ﻘ ﻠ ﻴ ﺪ ﻳ ﺔ ﺍ ﻟ ﻤ ﺴ ﺘ ﺪ ﻳ ﺮ ﺓ ﺑ ﺎ ﻟ ﻜ ﺎ ﻣ ﻞ . ﻻ ﺗ ﺴ ﺘ ﺨ ﺪ ﻡ ﺍ ﻷ ﻗ ﺮ ﺍ ﺹ ﺍ ﻟ ﻤ ﺸ ﻜ ّ ﻠ ﺔ . ﻻ ﺗ ﻘ ﻢ ﺑ ﺈ ﺩ ﺧ ﺎ ﻝ ﺃ ﻱ ﺷ ﻲ ء ﺁ ﺧ ﺮ ﺧ ﻼ ﻑ ﻗ ﺮ ﺹ CD ﺩ ?[…]
-
Страница 109
CHECK USB ﺣ ﺪ ﺙ ﺗ ﻤ ﺎ ﺱ ﻛ ﻬ ﺮ ﺑ ﺎ ﺋ ﻲ ﻣ ﻊ ﻣ ﻮ ﺻ ﻞ USB ﺃ ﻭ ﻛ ﺒ ﻞ USB . ﺗ ﺄ ﻛ ﺪ ﻣ ﻦ ﺃ ﻥ ﻣ ﻮ ﺻ ّ ﻞ USB ﺃ ﻭ ﻛ ﺒ ﻞ USB ﻏ ﻴ ﺮ ﻋ ﺎ ﻟ ﻖ ﺑ ﺸ ﻲ ء ﻣ ﺎ ﺃ ﻭ ﺗ ﺎ ﻟ ﻒ . ﺟ ﻬ ﺎ ﺯ ﺗ ﺨ ﺰ ﻳ ﻦ USB ﺍ ﻟ ﻤ ﻮ ﺻ ﻞ ﻳ ﺴ ?[…]
-
Страница 110
ﺣ ﻞ ﺍ ﻟ ﻤ ﺸ ﺎ ﻛ ﻞ ﺍ ﻷ ﻋ ﺮ ﺍ ﺽ ﺍ ﻟ ﺴ ﺒ ﺐ ﺍ ﻹ ﺟ ﺮ ﺍ ﺀ ) ﺭ ﺍ ﺟ ﻊ ( ﺗ ﻌ ﻮ ﺩ ﺍ ﻟ ﺸ ﺎ ﺷ ﺔ ﺗ ﻠ ﻘ ﺎ ﺋ ﻴ ً ﺎ ﺇ ﻟ ﻰ ﺍ ﻟ ﻮ ﺿ ﻊ ﺍ ﻟ ﻌ ﺎ ﺩ ﻱ . ﻟ ﻢ ﺗ ﻘ ﻢ ﺑ ﺘ ﻨ ﻔ ﻴ ﺬ ﺃ ﻳ ﺔ ﻋ ﻤ ﻠ ﻴ ﺎ ﺕ ﺧ ﻼ ﻝ ﺣ ?[…]
-
Страница 111
Dimmer ) ﺇ ﻋ ﺪ ﺍ ﺩ ﺍ ﻟ ﻤ ﺨ ﻔ ّ ﺖ ( ﻟ ﻠ ﺤ ﻴ ﻠ ﻮ ﻟ ﺔ ﺩ ﻭ ﻥ ﺯ ﻳ ﺎ ﺩ ﺓ ﺳ ﻄ ﻮ ﻉ ﻟ ﻮ ﺣ ﺔ ﺍ ﻟ ﻌ ﺮ ﺽ ﻟ ﻴ ﻼ ً ، ﻳ ﺘ ﻢ ﺧ ﻔ ﺖ ﺇ ﺿ ﺎ ﺀ ﺓ ﻟ ﻮ ﺣ ﺔ ﺍ ﻟ ﻌ ﺮ ﺽ ﺗ ﻠ ﻘ ﺎ ﺋ ﻴ ﺎ ً ﻋ ﻨ ﺪ ﺗ ﺸ ﻐ ﻴ ﻞ ﺍ ﻷ ﺿ ﻮ[…]
-
Страница 112
ﺍ ﻹ ﻋ ﺪ ﺍ ﺩ ﺍ ﺕ ﺍ ﻷ ﻭ ﻟ ﻴ ﺔ 1 1 ﻋ ﺮ ﺽ ﺍ ﻟ ﻮ ﻇ ﻴ ﻔ ﺔ ! ﻳ ﺒ ﻴ ّ ﻦ ﺣ ﺎ ﻟ ﺔ ﺍ ﻟ ﻮ ﻇ ﻴ ﻔ ﺔ . ١ ﺍ ﺿ ﻐ ﻂ ﻣ ﻊ ﺍ ﻻ ﺳ ﺘ ﻤ ﺮ ﺍ ﺭ ﻋ ﻠ ﻰ SRC / OFF ﺇ ﻟ ﻰ ﺃ ﻥ ﻳ ﺘ ﻢ ﺇ ﻳ ﻘ ﺎ ﻑ ﺗ ﺸ ﻐ ﻴ ﻞ ﺍ ﻟ ﺠ ﻬ ﺎ ﺯ . ٢ ?[…]
-
Страница 113
ﺇ ﻋ ﺪ ﺍ ﺩ ﺍ ﺕ ﻭ ﻇ ﺎ ﺋ ﻒ ﺍ ﻟ ﺼ ﻮ ﺕ ١ ﺍ ﺿ ﻐ ﻂ M.C. ﻟ ﻌ ﺮ ﺽ ﺍ ﻟ ﻘ ﺎ ﺋ ﻤ ﺔ ﺍ ﻟ ﺮ ﺋ ﻴ ﺴ ﻴ ﺔ . ٢ ﺃ ﺩ ﺭ M.C. ﻟ ﺘ ﻐ ﻴ ﻴ ﺮ ﺧ ﻴ ﺎ ﺭ ﺍ ﻟ ﻘ ﺎ ﺋ ﻤ ﺔ ﻭ ﺍ ﺿ ﻐ ﻂ ﻻ ﺧ ﺘ ﻴ ﺎ ﺭ AUDIO . ٣ ﺃ ﺩ ﺭ M.C. ﻻ ﺧ ﺘ ﻴ ﺎ […]
-
Страница 114
ﺇ ﻋ ﺪ ﺍ ﺩ ﺍ ﺕ ﺍ ﻟ ﻮ ﻇ ﺎ ﺋ ﻒ ١ ﺍ ﺿ ﻐ ﻂ M.C. ﻟ ﻌ ﺮ ﺽ ﺍ ﻟ ﻘ ﺎ ﺋ ﻤ ﺔ ﺍ ﻟ ﺮ ﺋ ﻴ ﺴ ﻴ ﺔ . ٢ ﺃ ﺩ ﺭ M.C. ﻟ ﺘ ﻐ ﻴ ﻴ ﺮ ﺧ ﻴ ﺎ ﺭ ﺍ ﻟ ﻘ ﺎ ﺋ ﻤ ﺔ ﻭ ﺍ ﺿ ﻐ ﻂ ﻻ ﺧ ﺘ ﻴ ﺎ ﺭ FUNCTION . ٣ ﺃ ﺩ ﺭ M.C. ﻻ ﺧ ﺘ ﻴ ﺎ ﺭ ﺍ ?[…]
-
Страница 115
ﻋ ﺮ ﺽ ﺍ ﻟ ﻤ ﻌ ﻠ ﻮ ﻣ ﺎ ﺕ ﺍ ﻟ ﻨ ﺼ ﻴ ﺔ ﺍ ﺧ ﺘ ﻴ ﺎ ﺭ ﺍ ﻟ ﻤ ﻌ ﻠ ﻮ ﻣ ﺎ ﺕ ﺍ ﻟ ﻨ ﺼ ﻴ ﺔ ﺍ ﻟ ﻤ ﺮ ﻏ ﻮ ﺑ ﺔ 1 ﺍ ﺿ ﻐ ﻂ DISP / / SCRL . ﻣ ﺪ ﺓ ﺍ ﻟ ﻌ ﺮ ﺽ — : ﺍ ﺳ ﻢ ﺍ ﻟ ﻔ ﻨ ﺎ ﻥ ﻭ : ﻋ ﻨ ﻮ ﺍ ﻥ ﺍ ﻷ ﻏ ﻨ ﻴ ﺔ — […]
-
Страница 116
! ﻋ ﻠ ﻰ ﻫ ﺬ ﻩ ﺍ ﻟ ﻮ ﺣ ﺪ ﺓ ﺃ ﻥ ﺗ ﻘ ﻮ ﻡ ﺑ ﻌ ﻤ ﻞ ﻓ ﻬ ﺮ ﺱ ﻟ ﺘ ﺴ ﻬ ﻞ ﻣ ﻦ ﻋ ﻤ ﻠ ﻴ ﺎ ﺕ ﺍ ﻟ ﺒ ﺤ ﺚ ﻋ ﻦ Artists , Albums , Songs , ﻭ Genres . ﻭ ﺳ ﻮ ﻑ ﻳ ﺴ ﺘ ﻐ ﺮ ﻕ ﺍ ﻷ ﻣ ﺮ ٧٠ ﺛ ﺎ ﻧ ﻴ ﺔ ﺗ ﻘ ﺮ ﻳ ﺒ ً ﺎ ﻹ ﻧ ﺸ ﺎ […]
-
Страница 117
! ﺳ ﻴ ﺘ ﻢ ﺇ ﻋ ﺎ ﺩ ﺓ ﺷ ﺤ ﻦ ﻣ ﺸ ﻐ ﻼ ﺕ ﺻ ﻮ ﺕ USB ﺍ ﻟ ﻤ ﺤ ﻤ ﻮ ﻟ ﺔ ﺍ ﻟ ﺘ ﻲ ﻳ ﻤ ﻜ ﻦ ﺷ ﺤ ﻨ ﻬ ﺎ ﻋ ﻨ ﺪ ﺍ ﻟ ﺘ ﻮ ﺻ ﻴ ﻞ ﻭ ﻳ ﺘ ﻢ ﺿ ﺒ ﻂ ﻣ ﻔ ﺘ ﺎ ﺡ ﺗ ﺸ ﻐ ﻴ ﻞ ﺍ ﻟ ﺴ ﻴ ﺎ ﺭ ﺓ ﻋ ﻠ ﻰ ACC ﺃ ﻭ ON . ! ﺍ ﻓ ﺼ ?[…]
-
Страница 118
Local ) ﻣ ﻮ ﺍ ﻟ ﻔ ﺔ ﺍ ﻟ ﺒ ﺤ ﺚ ﺍ ﻟ ﻤ ﺤ ﻠ ﻲ ( ﺗ ﺘ ﻴ ﺢ ﻟ ﻚ ﻭ ﻇ ﻴ ﻔ ﺔ ﻣ ﻮ ﺍ ﻟ ﻔ ﺔ ﺍ ﻟ ﺒ ﺤ ﺚ ﺍ ﻟ ﻤ ﺤ ﻠ ﻲ ﺍ ﻟ ﻤ ﻮ ﺍ ﻟ ﻔ ﺔ ﻋ ﻠ ﻰ ﻣ ﺤ ﻄ ﺎ ﺕ ﺍ ﻟ ﺮ ﺍ ﺩ ﻳ ﻮ ﺍ ﻟ ﺘ ﻲ ﺗ ﺘ ﻤ ﺘ ﻊ ﺑ ﺈ ﺷ ﺎ ﺭ ﺍ ﺕ ﻗ […]
-
Страница 119
ﻋ ﻤ ﻠ ﻴ ﺎ ﺕ ﺍ ﻟ ﻘ ﻮ ﺍ ﺋ ﻢ ﻣ ﺘ ﻄ ﺎ ﺑ ﻘ ﺔ ﻓ ﻲ ﺍ ﻹ ﻋ ﺪ ﺍ ﺩ ﺍ ﺕ / ﺗ ﻌ ﺪ ﻳ ﻼ ﺕ ﺍ ﻟ ﺼ ﻮ ﺕ / ﺍ ﻹ ﻋ ﺪ ﺍ ﺩ ﺍ ﺕ ﺍ ﻷ ﻭ ﻟ ﻴ ﺔ / ﺍ ﻟ ﻘ ﻮ ﺍ ﺋ ﻢ ﺍ ﻟ ﺮ ﺟ ﻮ ﻉ ﺇ ﻟ ﻰ ﺍ ﻟ ﻌ ﺮ ﺽ ﺍ ﻟ ﺴ ﺎ ﺑ ﻖ ﺍ ﻟ ﺮ ﺟ […]
-
Страница 120
! ﻗ ﻢ ﺑ ﻔ ﻚ ﺍ ﻟ ﻜ ﺒ ﻼ ﺕ ﻭ ﺍ ﻷ ﺟ ﻬ ﺰ ﺓ ﺍ ﻟ ﻤ ﻮ ﺻ ﻠ ﺔ ﺑ ﻬ ﺬ ﻩ ﺍ ﻟ ﻮ ﺣ ﺪ ﺓ ﻗ ﺒ ﻞ ﻓ ﺼ ﻞ ﺍ ﻟ ﻠ ﻮ ﺣ ﺔ ﺍ ﻷ ﻣ ﺎ ﻣ ﻴ ﺔ ﻟ ﺘ ﺠ ﻨ ﺐ ﺗ ﻠ ﻒ ﺍ ﻟ ﺠ ﻬ ﺎ ﺯ ﺃ ﻭ ﺍ ﻷ ﺟ ﺰ ﺍ ﺀ ﺍ ﻟ ﺪ ﺍ ﺧ ﻠ ﻴ ﺔ ﻟ ﻠ ﺴ […]
-
Страница 121
ﺍ ﻟ ﻮ ﺣ ﺪ ﺓ ﺍ ﻟ ﺮ ﺋ ﻴ ﺴ ﻴ ﺔ 1 1 1 1 4 4 4 4 5 5 5 5 6 6 7 7 7 7 a a a a c c c c d d d d 2 2 2 2 3 3 3 3 8 8 8 8 9 9 9 9 b b b b g e f ﺍ ﻟ ﺠ ﺰ ﺀ ﺍ ﻟ ﺠ ﺰ ﺀ 1 SRC / OFF 9 / LOC 2 ) ﺍ ﻟ ﻘ ﺎ ﺋ ﻤ ﺔ ( a S.Rtrv 3 / iPod b MUL TI-CONTROL ) M.C. ( 4 ﺯ ﺭ ﺍ ﻟ ﻔ ﺘ ﺢ c DISP / / SCRL 5 ?[…]
-
Страница 122
ﺣ ﻮ ﻝ ﻫ ﺬ ﺍ ﺍ ﻟ ﺠ ﻬ ﺎ ﺯ ﺗ ﻨ ﺒ ﻴ ﻪ ! ﻻ ﺗ ﺪ ﻉ ﻫ ﺬ ﺍ ﺍ ﻟ ﺠ ﻬ ﺎ ﺯ ﻳ ﻼ ﻣ ﺲ ﺍ ﻟ ﺴ ﻮ ﺍ ﺋ ﻞ . ﺇ ﺫ ﻳ ﻤ ﻜ ﻦ ﺃ ﻥ ﻳ ﺆ ﺩ ﻱ ﺫ ﻟ ﻚ ﺇ ﻟ ﻰ ﺻ ﺪ ﻣ ﺎ ﺕ ﻛ ﻬ ﺮ ﺑ ﺎ ﺋ ﻴ ﺔ . ﻛ ﻤ ﺎ ﻳ ﻤ ﻜ ﻦ ﺗ ﺆ ﺩ ﻱ ﻣ ﻼ ﻣ […]
-
Страница 123
ﺷ ﻜ ﺮ ً ﺍ ﻟ ﺸ ﺮ ﺍ ﺀ ﻫ ﺬ ﺍ ﺍ ﻟ ﻤ ﻨ ﺘ ﺞ ﻣ ﻦ PIONEER . ﻟ ﻠ ﺘ ﺄ ﻛ ﺪ ﻣ ﻦ ﺍ ﻻ ﺳ ﺘ ﺨ ﺪ ﺍ ﻡ ﺍ ﻟ ﺼ ﺤ ﻴ ﺢ ، ﻳ ﺮ ﺟ ﻰ ﻗ ﺮ ﺍ ﺀ ﺓ ﻫ ﺬ ﺍ ﺍ ﻟ ﺪ ﻟ ﻴ ﻞ ﺟ ﻴ ﺪ ﺍ ﻗ ﺒ ﻞ ﺍ ﺳ ﺘ ﺨ ﺪ ﺍ ﻡ ﻫ ﺬ ﺍ ﺍ ﻟ ﻤ ﻨ ﺘ ﺞ . […]
-
Страница 124
<QRD3050-A/N> 124[…]
-
Страница 125
<QRD3050-A/N> 125[…]
-
Страница 126
<QRD3050-A/N> 126[…]
-
Страница 127
<QRD3050-A/N> 127[…]
-
Страница 128
PIONEER CORPORA TION 4-1, MEGURO 1-CHOME, MEGURO-KU T OKY O 153-8654, JAP AN PIONEER ELECTRONICS (USA) INC. P .O. Box 1540, Long Beach, California 90801-1540, U.S.A. TEL: (800) 421-1404 PIONEER EUROPE NV Haven 1087, Keetberglaan 1, B-9120 Melsele, Belgium/Belgique TEL: (0) 3/570.05.11 PIONEER ELECTRONICS ASIACENTRE PTE. L TD . 253 Alexandra Road, #[…]
Инструкция и руководство для
Pioneer DEH-7200SD
36 страниц подробных инструкций и пользовательских руководств по эксплуатации на русском


Если вы желаете утилизировать данное
изделие, не выбрасывайте его вместе с
обычным бытовым мусором. Существует
отдельная система сбора использованных
электронных изделий в соответствии с за-
конодательством, которая предполагает со-
ответствующее обращение, возврат и
переработку.
Частные лица в странах Евросоюза, Швей-
царии и Норвегии могут бесплатно возвра-
щать использованные электронные
изделия в специализированные пункты
приема или в магазин (при покупке анало-
гичного нового устройства).
Если Ваша страна не указана в приведен-
ном выше перечне, обращайтесь в органы
местного управления за инструкциями по
правильной утилизации продукта.
Тем самым Вы обеспечите утилизацию
Вашего изделия с соблюдением обязатель-
ных процедур по обработке, утилизации и
вторичной переработке и, таким образом,
предотвратите потенциальное негативное
воздействие на окружающую среду и здо-
ровье людей.
Сведения об этом устройстве
Частоты тюнера в этом устройстве рас-
пределены для использования в Западной
Европе, Азии, на Ближнем Востоке, в
Африке и Океании. При использовании в
других регионах качество приема может
быть плохим. Функция RDS (радиове-
щательная система передачи информа-
ции) доступна только в регионах, в которых
имеются FM-станции, передающие сигна-
лы RDS.
ВНИМАНИЕ
! Не допускайте попадания жидкости на
данное устройство. Это может повлечь по-
ражение электрическим током. Кроме того,
попадание жидкости в устройство может
стать причиной его выхода из строя,
перегрева и появления дыма.
! “ЛАЗЕРНЫЙ ПРОДУКТ КЛАССА 1”
Это изделие оснащено лазерным диодом
класса выше 1. В целях обеспечения пол-
ной безопасности не снимайте какие-либо
крышки и не пытайтесь проникнуть внутрь
изделия. Ремонт должен выполняться ква-
лифицированным специалистом.
! Pioneer CarStereo-Pass предназначен для
использования только в Германии.
! Всегда сохраняйте уровень громкости до-
статочно низким, чтобы были слышны
звуки извне.
! Не допускайте воздействия влажности на
изделие.
! При отключении или разряде аккумулятор-
ной батареи память предварительных на-
строек будет стерта.
В случае возникновения
неполадок
При неполадках в работе этого изделия
свяжитесь с торговым представителем
компании-производителя или с ближайшим
сервисным пунктом Pioneer.
Перед началом эксплуатации
Ru
3
Раздел
01
Перед
началом
эксплуатации

Демонстрационный режим
Важно
! Если красный провод (ACC) этого устрой-
ства не подсоединен к контакту, обеспечи-
вающему включение/выключение
зажигания, аккумуляторная батарея авто-
мобиля может разрядиться.
! Следует помнить, что работа режима дем-
онстрации функциональных возможностей
при выключенном двигателе может приве-
сти к излишнему расходу заряда аккумуля-
торной батареи.
Демонстрационный режим включается ав-
томатически при повороте ключа зажига-
ния в положение ACC или ON при
отключенном питании устройства. При вы-
ключении устройства этот режим не отклю-
чается. Чтобы отключить
демонстрационный режим, нажмите кнопку
DISP/
/
SCRL.
Для включения режима на-
жмите кнопку DISP/ /SCRL еще раз.
Следует помнить, что использование дем-
онстрационного режима, когда ключ зажи-
гания находится в положении ACC, может
привести к излишнему расходу заряда ак-
кумуляторной батареи.
Режим реверса
Если в течение 30 секунд не выполнить ни-
каких действий, то экранные индикаторы
начнут реверсировать и будут продолжать
реверсировать каждые 10 секунд. Если на-
жать кнопку BAND/ESC при отключенном
питании устройства, а ключ зажигания при
этом находится в положении ACC или ON,
то реверсивный режим будет отключен.
Нажмите кнопку BAND/ESC, чтобы вклю-
чить реверсивный режим снова.
Перезагрузка
микропроцессора
Микропроцессор следует перезагружать в
следующих случаях:
! Перед первым использованием этого
устройства после установки
! Если устройство работает неправильно
! Если на дисплее появляются странные
или неверные сообщения
Кнопка RESET
1
Снимите переднюю панель.
2
Нажмите RESET кончиком карандаша
или другим заостренным предметом.
Приглушение звука
Звук приглушается автоматически:
! при получении входящего вызова или
наборе номера на сотовом телефоне,
подключенном к этому устройству;
! при произнесении голосовых инструк-
ций подключенной навигационной
системы Pioneer.
Звук выключается, отображается надпись
MUTE,
и регулировка всех аудиопарамет-
ров, кроме громкости, становится нед-
оступна. Устройство вернется в обычный
режим работы после того как телефонное
соединение или голосовые подсказки
будут завершены.
Перед началом эксплуатации
Ru
4
Раздел
01

Сведения об этом
руководстве
Далее в описании запоминающие устрой-
ства USB, USB аудиоплееры и карты памя-
ти SD собирательно называются “внешние
запоминающие устройства (USB, SD)”.
Если указываются только запоминающие
устройства USB и USB аудиоплееры, то
они собирательно называются “запоми-
нающее устройство USB”.
Перед началом эксплуатации
Ru
5
Раздел
01
Перед
началом
эксплуатации

Основное устройство
1
1
1
1
4
4
4
4
5
5
5
5
6
6
7
7
7
7
a
a
a
a
c
c
c
c
d
d
d
d
2
2
2
2
3
3
3
3
8
8
8
8
9
9
9
9
b
b
b
b
g
e
f
Элемент
Элемент
1
SRC/OFF
9
/
LOC
2
(
список)
a
S.Rtrv
3
/
IPOD
b
MULTI-CONTROL
(
M.C.)
4
Кнопка открытия
панели
c
DISP/
/
SCRL
5
Вход AUX (стерео-
разъем 3,5 мм)
d
BAND/ESC
6
USB
порт
e
Щель для загрузки
диска
7
TA/NEWS
f
h (извлечение)
8
MUTE/CLOCK
g
Слот для карты
памяти SD
Для доступа к
слоту для карты
памяти SD необ-
ходимо снять
переднюю панель.
ВНИМАНИЕ
Для подключения портативного USB-
аудиоплеера/запоминающего устройства USB
к USB порту используйте USB-кабель Pioneer
(CD-U50E,
приобретается отдельно). Посколь-
ку USB-аудиоплеер/запоминающее устрой-
ство USB в подключенном состоянии
выступают из устройства, подключать их
непосредственно к разъему опасно.
Не используйте изделия, не разрешенные
производителем к использованию.
Дополнительный пульт
дистанционного управления
Пульт дистанционного управления CD-
R320
продаётся отдельно.
h
h
h
o
o
o
m
m
2
2
2
f
o
f
f
i
l
k
n
n
n
j
j
Элемент
Назначение
h
VOLUME
Нажмите, чтобы увеличить или
уменьшить громкость.
i
MUTE
Нажмите, чтобы приглушить
звук. Чтобы отменить при-
глушение звука, нажмите еще
раз.
j
a/b/c/d
Нажмите, чтобы произвести
ручную настройку с поиском,
ускоренную перемотку вперед,
перемотку назад, или исполь-
зовать функции поиска дорож-
ки.
Также используется для
управления функциями.
k
AUDIO
Используется для выбора
аудиофункций.
l
DISP/SCRL
Нажмите, чтобы выбрать раз-
личные режимы дисплея.
Чтобы прокрутить текстовую
информацию, нажмите и удер-
живайте кнопку.
Управление данным устройством
Ru
6
Раздел
02

m
e
Нажмите, чтобы включить
паузу или возобновить вос-
произведение.
n
FUNCTION
Нажмите для выбора функций.
Нажмите и удерживайте для
вызова меню начальных на-
строек при выключенных источ-
никах сигнала.
o
LIST/
ENTER
Нажатием производится вывод
на дисплей (в зависимости от
источника сигнала) списка на-
званий дисков, названий до-
рожек, папок или файлов.
Нажмите данную кнопку, наход-
ясь в рабочем меню, для
управления функциями.
Основные операции
Важно
! Соблюдайте осторожность при снятии и
установке передней панели.
! Оберегайте переднюю панель от сильных
ударов.
! Предохраняйте переднюю панель от воз-
действия прямого солнечного света и вы-
соких температур.
! Прежде чем снять переднюю панель, обя-
зательно отсоедините все кабели и устрой-
ства, чтобы избежать повреждения
устройства или внутренней отделки сало-
на.
Снятие передней панели в целях защиты от
кражи
1 Чтобы открыть переднюю панель, нажмите на
кнопку открытия панели.
2 Возьмитесь за левую сторону передней
панели и осторожно потяните ее наружу.
3 Всегда храните отсоединенную переднюю
панель в защитном футляре.
Установка передней панели
1 Для повторной установки передней панели
приложите ее к основному устройству и про-
чно защелкните в фиксаторах держателя.
Включение устройства
1 Нажмите кнопку SRC/OFF, чтобы включить ус-
тройство.
Выключение устройства
1 Нажмите кнопку SRC/OFF и удерживайте ее в
нажатом положении до тех пор, пока не вы-
ключится устройство.
Выбор источника сигнала
1 Нажимайте кнопку SRC/OFF для выбора из
следующих функций:
TUNER (
тюнер)—CD (встроенный проигры-
ватель компакт-дисков)—USB (USB)/IPOD
(iPod)
—SD (карта памяти SD)—AUX (вспомо-
гательное устройство (AUX))
Регулировка громкости
1 Поворачивайте M.C., чтобы отрегулировать
громкость.
Примечания
! Когда голубой/белый провод этого устрой-
ства подключен к реле панели управления
автомобильной антенной, антенна на авто-
мобиле выдвигается при включении источ-
ника сигнала этого устройства. Чтобы
втянуть антенну, выключите источник сиг-
нала.
! В данном руководстве iPod и iPhone упо-
минаются под общим названием iPod.
Управление данным устройством
Ru
7
Раздел
02
Управление
данным
устройством

Элементы меню, общие для настройки, Тюнер 8, Основные операции 8
Использование функции поиск pi, По идентификатору программы) 8, Тюнер, Управление данным устройством, Основные операции, 1 2 5 3 b Чат поддержки
- Изображение
- Текст
Элементы меню, общие для
настройки функций/
аудиопараметров/начальных
настроек/списков
Возвращение к предыдущему дисплею
Возврат к предыдущему списку/категории (к
папке/категории на один уровень выше)
1 Нажмите кнопку DISP/ /SCRL.
Возврат в главное меню
Возврат в верхний уровень списка/категории
1 Нажмите и удерживайте DISP/ /SCRL.
Возврат в исходный режим
Отмена вывода меню начальных настроек
1 Нажмите кнопку BAND/ESC.
Возврат в исходный режим из списка/категории
1 Нажмите кнопку BAND/ESC.
Тюнер
Основные операции
7
a
9
8
6
1
2
4
5
3
RDS
1 2
5
3
b
Диапазоны, не поддерживающие RDS
или MW/LW
1
Индикатор диапазона
2
Индикатор 5 (стерео)
3
Индикатор LOC
Появляется при включении местного поис-
ка.
4
Индикатор номера предварительной на-
стройки
5
Индикатор уровня сигнала
6
Индикатор TEXT
Показывает, что принимается радиотекст.
7
Индикатор значка станции PTY
8
Название программы
9
Индикатор новостей (
)
Загорается, если принимается заданная
программа новостей.
a
Индикатор TP – программы дорожных
сводок (
)
Появляется, когда радиоприемник на-
строен на TP-станцию.
b
Индикатор частоты
Выбор диапазона
1 Нажимайте кнопку BAND/ESC, пока на
дисплее не отобразится нужный диапазон
(
FM-1, FM-2, FM-3
для FM или MW/LW).
Ручная настройка (пошаговая)
1 Нажмите M.C. влево или вправо.
Поиск
1 Нажмите M.C. влево или вправо и удержи-
вайте.
Вы можете отменить настройку с поиском,
нажав M.C. вправо или влево.
Каналы можно пропускать, нажимая вправо
или влево и удерживая M.C. Настройка с по-
иском начнется, как только Вы отпустите M.C.
Использование функции Поиск PI
(по идентификатору программы)
Если подходящую станцию найти не удает-
ся или качество приема ухудшается, ус-
тройство автоматически выполнит поиск
другой станции со сходной программой. Во
время поиска отображается PI seek и при-
глушается звук.
Управление данным устройством
Ru
8
Раздел
02

Использование автоматического, Запоминание и повторный вызов, Радиостанций 9
Использование функции, Радиотекста 9, Управление данным устройством, Запоминание и повторный вызов радиостанций, Использование функции ра Чат поддержки
- Изображение
- Текст
Использование автоматического
поиска PI (по идентификатору
программы) для предварительно
настроенных станций
Если не удается вызывать предварительно
настроенные станции, устройство можно
настроить на выполнение поиска PI (по
идентификатору программы) во время вы-
зова предварительной настройки.
! По умолчанию функция автоматическо-
го поиска PI (по идентификатору про-
граммы) выключена. См. раздел Auto PI
(
автоматический поиск по идентифика-
тору программы) на стр. 20.
Запоминание и повторный
вызов радиостанций
В памяти устройства можно сохранить до
шести радиостанций в каждом диапазоне
для последующего быстрого вызова.
1
Нажмите
(
список)
Отображается экран предварительной на-
стройки.
2
С помощью M.C. сохраните выбран-
ную частоту в памяти устройства.
Поворачивайте для выбора другого
номера предварительной настройки.
Чтобы сохранить, нажмите и удерживайте.
3
С помощью M.C. выберите нужный
телеканал.
Поворачивайте для перехода к другому
телеканалу. Нажмите, чтобы выбрать.
# Все сохраненные радиостанции FM диапа-
зонов можно вызывать из отдельных FM диа-
пазонов.
# Вы также можете выбрать другой телека-
нал, нажимая M.C. вверх или вниз.
# Чтобы вернуть дисплей в исходный режим,
нажмите BAND/ESC или
(
список).
Использование функции
радиотекста
Отображение радиотекста
Вы можете вывести на дисплей принимаемый
радиотекст, а также радиотекст трех последних
сообщений.
1 Нажмите и удерживайте кнопку DISP/SCRL для
вывода на дисплей радиотекста.
! Вы можете отменить показ радиотекста
нажатием кнопки DISP/SCRL, TA/NEWS,
SRC/OFF, EQ
или BAND.
! Если радиотекст не принимается, то на
дисплее будет показано сообщение NO
TEXT.
2 Нажмите M.C. влево или вправо, чтобы вы-
звать из памяти три последних радиотекста.
3 Для прокрутки нажмите M.C. вверх или вниз.
Запись и вызов из памяти радиотекста
Вы можете сохранить данные шести сообщений
радиотекста под кнопками от RT Memo 1 до RT
Memo 6.
1 Выведите на дисплей радиотекст, который
нужно сохранить.
2 Нажмите
(
список)
Отображается экран предварительной на-
стройки.
3 Используйте M.C., чтобы сохранить выбран-
ный радиотекст.
Поворачивайте для выбора другого номера
предварительной настройки. Чтобы сохра-
нить, нажмите и удерживайте.
4 Используйте M.C. для выбора нужного
радиотекста.
Поворачивайте для перехода к другому
радиотексту. Нажмите, чтобы выбрать.
! Чтобы вернуть дисплей в исходный
режим, нажмите BAND/ESC или
(
спи-
сок).
! Тюнер автоматически запоминает три
последних принимаемых станции и за-
меняет текст первой из них на новый,
если такой текст принимается.
Управление данным устройством
Ru
9
Раздел
02
Управление
данным
устройством

Расширенные функции с, Использованием специальных кнопок 10, Настройка функций 10
Управление данным устройством, Настройка функций Чат поддержки
- Изображение
- Текст
Расширенные функции с
использованием специальных
кнопок
Прием дорожных сводок
Функция TA (ожидание дорожных сводок) позво-
ляет автоматически получать дорожные сводки,
независимо от прослушиваемого источника сиг-
нала.
1 Настройте тюнер на TP-станцию или станцию
расширенной сети вещания, передающую до-
рожные сводки TP.
2 Нажмите TA/NEWS, чтобы включить или вы-
ключить режим ожидания дорожных сводок.
3 В начале приема дорожной сводки отрегули-
руйте громкость TA (дорожных сводок) с по-
мощью регулятора M.C.
Новая установленная громкость сохраняется
в памяти и будет вызываться для последую-
щих дорожных сводок.
4 Для отмены прослушивания сводки нажмите
кнопку TA/NEWS во время приема сводки.
Тюнер вернется к исходному источнику сигна-
ла, но останется в режиме ожидания до по-
вторного нажатия кнопки TA/NEWS.
Использование прерывания для передачи ново-
стей
Устройство может переключаться с других стан-
ций на станцию новостей с кодом PTY, когда эта
станция начинает передавать программу ново-
стей. После окончания программы новостей воз-
обновляется прием прежней программы.
1 Для включения и выключения режима преры-
вания для передачи новостей нажмите и
удерживайте TA/NEWS.
Прослушивание программы новостей можно
отменить, нажав TA/NEWS.
Настройка функций
1
Нажмите M.C., чтобы вывести на
экран основное меню.
2
Поворачивайте M.C. для прокрутки
пунктов меню; нажмите FUNCTION,
чтобы выбрать.
3
Для выбора функции поворачивайте
M.C.
Затем выполните следующие действия,
чтобы подтвердить настройку.
BSM (
запоминание лучших станций)
Функция BSM (запоминание лучших станций) по-
зволяет автоматически сохранять в памяти ус-
тройства шесть станций с самым мощным
сигналом в порядке мощности сигнала.
1 Нажмите M.C., чтобы включить функцию BSM.
Для отмены режима нажмите M.C. еще раз.
Regional (
региональный)
При использовании функции AF функция регио-
нальных программ ограничивает выбор станция-
ми, транслирующими региональные программы.
1 Нажмите M.C., чтобы включить или выключить
функцию региональных программ.
Local (
настройка с местным поиском)
Настройка с местным поиском позволяет Вам на-
страиваться только на радиостанции с достаточ-
но мощными сигналами для качественного
приема.
1 Нажмите M.C., чтобы включить настройку с
местным поиском.
! Для отмены режима нажмите M.C. еще
раз.
2 Нажмите M.C. влево или вправо, чтобы вы-
брать нужную настройку.
FM:
Level 1
—Level 2—Level 3—Level 4
MW/LW:
Level 1
—Level 2
Чем больше число, тем выше уровень на-
стройки. Настройка самого высокого уровня
позволяет осуществлять прием только стан-
ций с самым сильным сигналом, а уменьше-
ние уровня настройки позволяет принимать
другие станции по степени убывания интен-
сивности сигнала.
PTY search (
выбор типа программы)
Управление данным устройством
Ru
10
Раздел
02

04:11
Секрет Пионера 88 про который мало кто знает!
07:56
настройка CD/MP3-ресивер с USB Pioneer DEH-P7150UB
04:40
Pioneer DEH-7200SD + Lanzar MAX 12 Blaupunkt velocity va 2100
04:41
Pioneer DEH-7200SD + Lanzar MAX 12 Blaupunkt velocity va 2100
Нажмите на кнопку для помощи
-
Page 1: Pioneer DEH-7250SD
Operation Manual Manual de instrucciones Manual de operação CD RECEIVER RADIO CD CD PLA YER DEH-7250SD English Español Português (B)[…]
-
Page 2: Pioneer DEH-7250SD
Thank you for purchasing this PIONEER product. T o ensure proper use, please read through this manual before using this product. It is especially important th at you read and obser ve WARNING s and CAUTION si n this manual. Please keep the manual in a safe and accessible place for future refer- ence. Before Y ou Start About this unit 3 In case of t[…]
-
Page 3: Pioneer DEH-7250SD
About this unit CAUTION ! Do not allow this unit to come into contact with liquids. Electrical shock could result. Also, damage to this unit, smoke, and over- heating could result from contact with liquids. ! “ CLASS 1 LASER PRODUCT ” This product contains a laser diode of higher class than 1. T o ensure continued safety , do not remove any cov[…]
-
Page 4: Pioneer DEH-7250SD
About this manual In the following instructions, USB memories, USB portable audio players, and SD memor y cards are collectively referred to as “ external storage devices (USB, SD). ” If only USB mem- ories and USB portable audio players are indi- cated, they are collectively referred to as “ USB storage devices. ” In this manual, iPod and […]
-
Page 5: Pioneer DEH-7250SD
Head unit 1 1 1 1 4 4 4 4 5 5 5 5 6 6 7 7 7 7 a a a a c c c c d d d d 2 2 2 2 3 3 3 3 8 8 8 8 9 9 9 9 b b b b g e f Part Part 1 SRC / OFF 9 / LOC 2 (list) a S.Rtrv 3 / iPod b MUL TI-CONTROL ( M.C. ) 4 Open button c DISP / / SCRL 5 AUX input jack (3.5 mm stereo jack) d BAND / ESC 6 USB port e Disc loading slot 7 / DISP OFF f h (eject) 8 / BASS g SD […]
-
Page 6: Pioneer DEH-7250SD
! Avoid subjecting the front panel to excessive shock. ! Keep the front panel out of direct sunlight and high temperatures. ! Remove any cables and devices attached to this unit before detaching the front panel to avoid damage to the device or vehicle interior . Removing the front panel to protect your unit from theft 1 Press the open button to ope[…]
-
Page 7: Pioneer DEH-7250SD
! The remote control may not function properly in direct sunlight. ! Do not let the remote control fall onto the floor , where it may become jammed under the brake or accelerator pedal. Menu operations identical for function settings/audio adjustments/initial settings/lists Returning to the previous display Returning to the previous list/categor y […]
-
Page 8: Pioneer DEH-7250SD
BSM (best stations memor y) BSM (best stations memor y) automat ically stores the six strongest stations in the order of their signal strength. 1 Press M.C. to turn BSM on. ! T o cancel, press M.C . again. Local (local seek tuning) Local seek tuning lets you tune in only those radio sta- tions with sufficiently strong signals for good recep- tion. […]
-
Page 9: Pioneer DEH-7250SD
Selecting a track 1 Pus h M.C. lef t or right. F ast for warding or reversing 1 Push and hold M.C. left or right. Returning to root folder 1 Press and hold BAND / ESC . Switching between compressed audio and CD-DA 1 Pre s s BAND / ESC . Notes ! When playing compressed audio, there is no sound during fast for ward or reverse. ! USB portable audio pl[…]
-
Page 10: Pioneer DEH-7250SD
Browsing for a song 1 Press (list) to switch to the top menu of the list search. 2 Use M.C. to select a category/song. Changing the name of song or categor y 1 Tu r n M.C. Artists (artists) — Albums (albums) — Songs (songs) — Genres (genres) Playing 1 When a song is selecte d, press M.C. Seeing a list of songs in the selected categor y 1 When[…]
-
Page 11: Pioneer DEH-7250SD
iPod Basic Operations 6 7 2 1 3 5 4 1 Repeat indicator 2 Song number indicator 3 Shuffle indicator 4 PLA Y / P AUSE indicator 5 S.Rtrv indicator Appears when Sound Retriever function is on. 6 Song time (progress bar) 7 Play time indicator Playing songs on iPod 1 Open the USB connector cover and plug in an iP od using the iPod Dock Connector to USB […]
-
Page 12: Pioneer DEH-7250SD
Advanced operations using special buttons Selecting a repeat play ran ge 1 Press / LOC to cycle between the following: ! ONE – Repeat the current song ! ALL – Repeat all songs in the selected list Playing all songs in a random order (shuffle all) 1 Press / iPod to turn shuffle all on. Playing songs related to the curren tly playing song Y ou ca[…]
-
Page 13: Pioneer DEH-7250SD
Sound Retriever (sound retriever) ! Refer to Sound Retriever (sound re triever) on page 10. Notes ! Switching the control mode to iPod pauses song playback. Operate the iPod to resume playback. ! The following functions are still accessible from the unit even if the control mode is set to iPod . — V olume — F ast forward/reverse — T rack up/d[…]
-
Page 14: Pioneer DEH-7250SD
Y ou can adjust the currently selected equalizer cur ve setting as desired. Adjusted equalizer cur ve settings are memor ized in Custom1 or Custom2 . ! A separate Custom1 cur ve can be created for each source. If you make adjustments when a cur ve other than Custom2 is selected, the equa li- zer cur ve settings will be memorized in Cust om1 . ! A C[…]
-
Page 15: Pioneer DEH-7250SD
3 T urn M.C. to select the initial setting. After selecting, per form the following proce- dures to set the initial setting. Language sele ct (multi language) For your convenience, this unit equips multiple lan- guage displ ay . You can select the language best sui- ted to your first language. 1 Press M.C. to select the langua ge. English — Espa?[…]
-
Page 16: Pioneer DEH-7250SD
T o prevent the display from being too bright at night, the display is automatically dimmed when the car ’ s headlights are turned on. You can turn the dimmer on or off. 1 Press M.C. to turn dimmer on or off. Brightness (display brightn ess setting) 1 Pus h M.C. left or right to adjust the brightness level. 0 to 15 is displayed as the level is in[…]
-
Page 17: Pioneer DEH-7250SD
3 T urn M.C. to change the display . Background visual — genre — background pic- ture 1 — background picture 2 — background picture 3 — background picture 4 — simple dis- play — movie screen 1 — movie screen 2 — ca- lendar # Genre display changes depending on the genre of music. # Genre display may not operate correctly de- pendin[…]
-
Page 18: Pioneer DEH-7250SD
T roubleshooting Symptom Cause Action (See) The display automatically returns to the ordinar y dis- play . Y ou did not per- form any opera- tion within about 30 seconds. Perform operation again. The repeat play range chan ges unexpectedly. Depending on the repeat play range, the se- lected range may change when se- lecting another folder or track,[…]
-
Page 19: Pioneer DEH-7250SD
NO AUDIO No songs T ransfer the audio files to the USB storage dev ice and connect. The connected USB storage de- vice has security enabled Follow the USB storage dev ice in- structions to dis- able the security. SKIPPED The connected USB storage de- vice contains WMA files em- bedded with Windows Med- ia ä DRM 9/10 Play an audio file not embedded[…]
-
Page 20: Pioneer DEH-7250SD
ERROR-16 Old iPod firm- ware versions Update the iPod version. iP od failure Disconnect the cable from iPod. Once iPod ’ s main menu is displayed, reconnect cable. Reset the iP od. N/A USB Not compatible iP od Disconnect your device and replace it with a compati- ble iPod. CHECK USB iP od operates correctly but does not charge Check if the con- n[…]
-
Page 21: Pioneer DEH-7250SD
Firmly secure the USB storage device when driving. Do not let the USB storage device fall onto the floor , where it may become jammed un der the brake or ac- celerator pedal. Depending on the USB storage dev ice, the following problems may occur . ! The device may generate noise in the radio. SD memory card This unit supports only the followi ng SD[…]
-
Page 22: Pioneer DEH-7250SD
MP3 File extension: .mp3 Bit rate: 8 kbps to 320 kbps Sampling frequenc y : 8 kHz to 48 kHz (32 kHz, 44.1 kHz, 48 kHz for em phasis) Compatible ID3 tag version: 1.0, 1.1, 2.2, 2.3, 2.4 (ID3 tag Version 2.x is given priority over V ersion 1.x.) M3u playlist: No MP3i (MP3 interactive), mp3 PRO: No WA V File extension: .wav Quantization bits: 8 and 16[…]
-
Page 23: Pioneer DEH-7250SD
iPod compatibility This unit supports only the followi ng iPod models. Supported iPod software versions are shown below . Older versions may not be supported. ! iP od nano 4th generation (software version 1.0.3) ! iP od nano 3rd generation (software version 1.1.3) ! iP od nano 2nd generation (software version 1.1.3) ! iP od nano 1st generation (sof[…]
-
Page 24: Pioneer DEH-7250SD
MP3 Supply of this product only conveys a license for private, non-commercial use and does not convey a license nor imply any right to use this product in any commercial (i.e. revenue- generating) real time broadcasting (terrestrial, satellite, cable and/or any other media), broad- casting/streaming via internet, intranets and/ or other networks or[…]
-
Page 25: Pioneer DEH-7250SD
“ Works with iPhone ” means that an electronic accessor y has been designed to connect spe- cifically to iPhone and has been certified by the developer to meet Apple per formance standards. Apple is not responsible for the operation of this device or its compliance with safety and regulator y standards. Additional Information En 25 English Appe[…]
-
Page 26: Pioneer DEH-7250SD
Specifications General Rated power source …………… 14.4 V DC (allowable voltage range: 12.0 V to 14.4 V DC) Grounding system ………………. Ne g a tive type Maximum current consumpti on …………………………………………….. 10.0 A Dimensions (W × H × D): DIN Chassis ………………… 1 7 8 m m × 5 0 m m × 1 6 8 m[…]
-
Page 27: Pioneer DEH-7250SD
Gracias por haber adquirido este producto PIONEER. Lea con detenimiento este manual antes de utilizar el producto por primera vez para que pueda dar le el m ejor uso posible. Es muy importan te que lea y obser ve las ADVERTENCIAS y PR ECAUCIONES de este manual. Una vez leído, guarde el manual en un lugar seguro y a mano para que pueda consultarlo […]
-
Page 28: Pioneer DEH-7250SD
Acerca de esta unidad PRECAUCIÓN ! No permita que esta unidad entre en contacto con líquidos, ya que puede producir una des- carga eléctrica. Además, el contacto con líqui- dos puede causar daños en la unidad, humo y recalentamiento. ! Mantenga siempre el volumen lo suficiente- mente bajo como para que pueda escuchar los sonidos que provienen[…]
-
Page 29: Pioneer DEH-7250SD
Unidad principal 1 1 1 1 4 4 4 4 5 5 5 5 6 6 7 7 7 7 a a a a c c c c d d d d 2 2 2 2 3 3 3 3 8 8 8 8 9 9 9 9 b b b b g e f Parte Parte 1 SRC / OFF 9 / LOC 2 (lista) a S.Rt rv 3 / iPod b MUL TI-CONTROL ( M.C. ) 4 Botón Abrir c DISP / / SCRL 5 Conector de entra- da AUX (conector estéreo de 3,5 mm) d BAND / ESC 6 Puerto USB e Ranura de carga de disc[…]
-
Page 30: Pioneer DEH-7250SD
Funciones básicas Importante ! P roceda con cuidado al retirar o colocar el panel frontal. ! Evite someter la carátula a impactos excesi- vos. ! Mantenga la carátula fuera del alcance de la luz solar directa y no la exponga a temperatu- ras elevadas. ! Extraiga cualquier cable o dispositivo conec- tado a esta unidad antes de extraer el panel del[…]
-
Page 31: Pioneer DEH-7250SD
! En el caso de que se produzcan fugas de la pila, limpie completamente el mando a distan- cia e instale una pila nueva. ! P ara desechar las pilas usadas, cumpla con los reglamentos gubernamentales o las nor- mas ambientales pertinentes de las institucio- nes públicas aplicables en su país/zona. Importante ! No guarde el mando a distancia en lug[…]
-
Page 32: Pioneer DEH-7250SD
2 Utilice el M.C. para almacenar la fre- cuencia seleccionada en la memoria. Haga girar el control para cambiar el número de presintonía. Mantenga pulsado para alma- cenarlo. 3 Utilice M.C. para seleccionar la emisora deseada. Haga girar el control para cambiar de emiso — ra. Pulse para seleccionar . # T odas las emisoras almacenadas para las ban[…]
-
Page 33: Pioneer DEH-7250SD
! Al reproducir archivos MP3 grabados con VBR (velocidad de grabación varia- ble), aparece VBR en lugar del valor de velocidad de grabación. ! Al reproducir archivos AAC grabados con VBR (velocidad de grabación varia- ble), se visualizará el valor promedio de la velocidad de grabación. Sin embargo, dependiendo del software que se haya empleado[…]
-
Page 34: Pioneer DEH-7250SD
! Si “ plug and play ” está activado y hay un dis- positivo de almacenamiento USB conectado, dependiendo del tipo de dispositivo, la fuente puede cambiar a USB de forma automática al encender el motor . Cambie la configuración de “ plug and play ” según sea necesario. Con- sulte USB plug&play (plug and play) en la pá- gina 41. Visu[…]
-
Page 35: Pioneer DEH-7250SD
2 Utilice M.C. para seleccionar una cate- goría/canción. Cambio del nombre de la canción o la categoría 1 Haga girar M.C. Artists (artistas ) — Albums (álbumes) — Songs (canciones) — Genres (géner os) Reproducción 1 T ras seleccionar una canción, pulse M.C . Visualización de una lista de canciones de la catego — ría seleccionada 1 T[…]
-
Page 36: Pioneer DEH-7250SD
1 Pulse M.C. para pausar o reanudar . Sound Retriever (Sound Retriever) Mejora automáticam ente el audio comprimido y res- taura el sonido óptimo. 1 Pulse M.C. para seleccionar el ajuste desea do. P ara obte ner más información, consulte Mejo ra del audio comprimido y restauración del sonido óp- timo (Sound Retriever) en la página anterior .[…]
-
Page 37: Pioneer DEH-7250SD
2 Utilice M.C. para seleccionar una cate- goría/canción. Cambio del nombre de la canción o la categoría 1 Haga girar M.C. Playlists (listas de reproducción) — Artist s (intér- pretes) — Albums (álbumes) — Songs (canciones) — Podcasts (podcas ts) — Genres (géneros) — Composers (composito res) — Audiobooks (au- diolibros) Reprod[…]
-
Page 38: Pioneer DEH-7250SD
Ajustes de funciones 1 Pulse M.C. para acceder al menú princi- pal. 2 Haga girar M.C. para cambiar la opción de menú y pulse para seleccionar FUNCTION. 3 Haga girar M.C. para seleccionar la fun- ción. Una vez seleccionada, siga los siguientes pasos para ajustar la función: Play mode (repetición de reproducción) ! Consulte Play mode (repetici[…]
-
Page 39: Pioneer DEH-7250SD
Ajustes de audio 1 1 Visualización de audio Muestra el estado de los ajustes de audio. Operaciones avanzadas mediante el uso de botones especiales Ajuste de subgraves activado/desactivado 1 Pulse / BASS para seleccionar el menú de ajus- te de subgraves activado/desactivado. 2 Pulse M.C. para activar o desactivar la salida de subgraves. 3 Presione[…]
-
Page 40: Pioneer DEH-7250SD
La sonoridad compensa las deficiencias en las gamas de frecuencias bajas y altas cuando se escu- cha a un volumen ba jo. 1 Pulse M.C. para activar o desactivar la sonoridad. 2 Pulse M.C. izquierda o derecha para sel eccionar el ajuste deseado. Low (bajo) — Mid (medio) — High (alto) — OFF (de- sactivado) Sub W .1 (ajuste de subgraves activado/[…]
-
Page 41: Pioneer DEH-7250SD
2 Mantenga presionado M.C. hasta que el menú de ajustes iniciales aparezca en el display . 3 Haga girar M.C. para seleccionar el ajus- te inicial. Una vez seleccionado, siga los siguientes pasos para configurar el ajuste inicial: Language sele ct (idiomas múltiples) P ara una mayor comodidad, esta unidad incl uye un display en varios idiomas. Es […]
-
Page 42: Pioneer DEH-7250SD
Si se utilizan dispositivos de almacenamiento externo, se pueden buscar las canciones deseadas a partir de la lista de archivos/carpetas o la lista de catego ría de artista/álbum/canción/género. ! ・ Este ajus te se puede ajustar en memoria USB o en tarjet a SD. ! Music browse puede utilizarse con la ID3 tag V er .2. ! La creación de la lista[…]
-
Page 43: Pioneer DEH-7250SD
Ever -scroll (ajuste del modo de desplazamiento) Si la función de desplazamiento cont inuo está activa- da (ON ), la información de texto grabada se desplaza de manera ininterrumpida. Desactive la función (OFF) si desea que la informac ión se desplace una sola vez. 1 Pulse M.C. para activar o desactivar el desplaza- miento contin uo. Otras fun[…]
-
Page 44: Pioneer DEH-7250SD
Solución de problemas Síntoma Causa Acción (Consul- te) La pantalla vuelve automá- ticamente a la visualización normal. No ha realizado ninguna opera- ción en aproxi- madamente 30 segundos. Realice la opera- ción de nuevo. La gama de re- petición de re- producción cambia de ma- nera inespe ra- da. Dependiendo de la gama de repe- tición de[…]
-
Page 45: Pioneer DEH-7250SD
Dispositivo de almacenamiento externo (USB, SD) Mensaje Causa Acción NO DEVICE Si está desactiva- do “ plug and play ” , no hay nin- gún disposi tivo de almacena- miento USB co- nectado. ! Active “ plug and play ” . ! Conecte un dis- positivo de almace- namiento USB compatible. FORMA T READ A veces se pro- duce un retraso entre el comien[…]
-
Page 46: Pioneer DEH-7250SD
ERROR-23 El dispositivo de almacenamiento USB no está for- mateado con FA T12, FA T16 o FA T32 El dispositivo de al- macenamiento USB debe forma- tearse con FA T12, FA T16 o FA T32. CHECKING 8 T AGS La unidad está creando un índi- ce o lista para la función de explo- ración musical. P or favor , espere hasta que se haya completado esta operaci[…]
-
Page 47: Pioneer DEH-7250SD
No inserte ningún otro elemento que no sea un CD en la ranura de inserción de CD. No use discos con roturas, picadu ras, deformados o dañados de otro modo, ya que pueden causar daños al reproductor . No es posible reproducir discos CD -R/CD-RW no fina- lizados. No toque la super ficie grabada de los discos. Cuando no utilice los discos guárdel[…]
-
Page 48: Pioneer DEH-7250SD
No intente forzar la tarjeta de memor ia SD en la ranu- ra para la tarjeta SD, ya que la tarjeta o la unidad po — drían dañarse . Cuando expu lse una tarjeta de memoria SD, mantén- gala presion ada hasta que esc uche un clic. Es peli- groso presion ar la tarjeta de memoria SD y soltar de inmediato, ya que la tarjeta SD podría dispararse fuera d[…]
-
Page 49: Pioneer DEH-7250SD
AAC Formato compatible: AAC codificado con iT unes Extensión de archivo: .m4a F recuencia de mues treo: 11,025 kHz a 48 kHz V elocidad de tran smisión: 16 kbps a 320 kbps, VBR Apple Loss less: no Fichero AAC adquirido en la iT unes Store (extensión del fichero .m4p): no Información complementaria Sólo se pueden visualizar los primeros 32 carac[…]
-
Page 50: Pioneer DEH-7250SD
Compatibilidad con iPod Esta unidad sólo es compatible con los siguientes modelos de iPod. Las versiones compatibles del soft- ware iPod se muestran abajo. Es posible que las ver- siones más antiguas no sean compatibles. ! iP od nano 4ª generación (versión del software 1.0.3) ! iP od nano 3ª generación (versión del software 1.1.3) ! iP od n[…]
-
Page 51: Pioneer DEH-7250SD
P ara reproductores de audio portátiles USB, la secuencia es diferente y depende del tipo de reproductor . Copyright y marca registrada iT unes Apple e iT unes son marcas comerciales de Apple Inc., registradas en los EE. UU. y otros países. MP3 La venta de este producto sólo otorga una li- cencia para su uso privado, no comercial. No otorga ning[…]
-
Page 52: Pioneer DEH-7250SD
iPhone iPhone es una marca comercial de Apple Inc. La etiqueta “ Works with iPhone ” indica que se trata de un accesorio electrónico diseñado para conectarse específicamente a un iPhone y cuyo desarrollador certifica que cumple con los estándares de funcionamiento de Apple. Apple no acepta la responsabilidad por el fun- cionamiento de este […]
-
Page 53: Pioneer DEH-7250SD
Especificaciones Generales F uente de alimen tación nominal …………………………………………….. 14,4 V CC (gama de tensión permisi- ble: 12,0 V a 14,4 V CC) Sistema de conexión a tierra …………………………………………….. T i p o n e g ativo Consumo máximo de corriente ………………………………….[…]
-
Page 54: Pioneer DEH-7250SD
Sintonizador de FM Gama de frecuencias ………… 87,5 MHz a 108,0 MHz Sensibilidad utilizabl e ……….. 9 d B f (0,8 µV/75 W , mono, Señal/ruido: 30 dB) R e l a c i ó n d e s e ñ a l a r u i d o …. 7 2 d B (red IEC -A) Sintonizador de AM Gama de frecuencias ………… 5 3 1 k H z a 1 6 0 2 k H z ( 9 k H z ) 530 kHz a 1 640 kHz (10 kHz[…]
-
Page 55: Pioneer DEH-7250SD
Agradecemos por você ter adquirido este produto PIONEER. Leia este manual antes de utili zar o produto para garantir seu uso adequado. É especialmente importante que você leia e obs er ve as ADV ERTÊNCIAS eo s A VI- SOS nes te manual. Guarde- o em local segur o e ace ssível para referência futura. Antes de utilizar este produto Sobre esta uni[…]
-
Page 56: Pioneer DEH-7250SD
Sobre esta unidade CUIDADO ! Não permita que esta unidade entre em con- tato com líquidos. Há risco de choque elétri- co. Além disso, o contato com líquidos pode causar danos, fumaça e superaquecimento desta unidade. ! Sempre deixe o volume baixo para poder ouvir os sons do tráfego. ! Evite a exposição à umidade. ! Se a bateria do carro […]
-
Page 57: Pioneer DEH-7250SD
Sobre este manual Nas instruções a seguir , as memórias USB, os áudio players USB e os cartões de memória SD são coletivamente referidos como “ disposi- tivos de armazenamento externos (USB, SD) ” . Se apenas memórias USB e áudio players por- táteis USB forem indicados, eles serão referi- dos coletivamente como “ dispositivos de ar[…]
-
Page 58: Pioneer DEH-7250SD
Unidade principal 1 1 1 1 4 4 4 4 5 5 5 5 6 6 7 7 7 7 a a a a c c c c d d d d 2 2 2 2 3 3 3 3 8 8 8 8 9 9 9 9 b b b b g e f Parte Parte 1 SRC / OFF 9 / LOC 2 (Lista) a S.Rtrv 3 / iPod b MUL TI-CONTROL ( M.C. ) 4 Botã o Abrir c DISP / / SCRL 5 Conector de entra- da AUX (conector estéreo de 3,5 mm) d BAND / ESC 6 Porta USB e Slot de carrega- mento […]
-
Page 59: Pioneer DEH-7250SD
Operações básicas Importante ! Ao remover ou colocar o painel frontal, manu- seie-o com cuidado. ! Evite expor o painel frontal a impactos exces- sivos. ! Não exponha o painel frontal à luz solar direta e a temperaturas altas. ! P ara evitar que ocorram danos ao dispositivo ou interior do veículo, remova quaisquer cabos e dispositivos acoplad[…]
-
Page 60: Pioneer DEH-7250SD
! Não armazene a bateria com objetos metáli- cos. ! Em caso de vazamento da bateria, limpe com- pletamente o controle remoto e instale uma nova bateria. ! Ao descartar baterias usadas, certifique-se de estar em conformidade com as regulamenta- ções governamentais ou com as normas das instituições públicas do meio ambiente que se aplicam ao s[…]
-
Page 61: Pioneer DEH-7250SD
2 Utilize M.C. para armazenar a freqüên- cia selecionada na memória. Gire para alterar o número programado. Pres- sione e segure para armazenar . 3 Utilize M.C. para selecionar a emissora desejada. Gire para alterar a emissora. Pressione para selecionar . # T odas as emissoras armazenadas para ban- das FM podem ser chamadas da memória de cada […]
-
Page 62: Pioneer DEH-7250SD
! Ao reproduzir arquivos AAC gravados com VBR (T axa de bit variável), o valor da taxa de bit variável será visualizado. No entanto, dependendo do software usado para decodificar os arquivos AAC, pode ser que VBR seja visualizado. 2 Indicador WMA/MP3/AAC/W A V Mostra o tipo de arquivo de áudio atualmente sendo reproduzido, quando o áudio compa[…]
-
Page 63: Pioneer DEH-7250SD
! Se a função plug and play estiver ativada e houver um dispositivo de armazenamento USB, dependendo do tipo do dispositivo, pode ser que a fonte alterne automaticamente para USB quando você ligar o motor . Altere os ajus- tes da função plug and play conforme neces- sário. Consulte USB plug&play (Plug and play) na página 70. Visualizaç?[…]
-
Page 64: Pioneer DEH-7250SD
2 Utilize M.C. para selecionar uma cate- goria/música. Alteração do nome da música ou categoria 1 Gire M.C. Artists (Artista s) — Albums (Álbuns) — Song s (Músicas) — Genres (Estilos ) Reprodução 1 Quando uma música estiver selecion ada, pressio- ne M.C. Visualização de uma lista de músicas na categoria selecionada 1 Quando uma ca[…]
-
Page 65: Pioneer DEH-7250SD
Sound Retriever (Recuperação de som) Aprimora automaticamente o áudio compactado e restaura um som rico. 1 Pressione M.C. p ara selecionar o ajuste desejado. P ara obte r detalhes, consulte Aprimoramento de áudio comp actado e restauração de um som rico (Recuperação de som) na página anterior . iPod Operações básicas 6 7 2 1 3 5 4 1 Ind[…]
-
Page 66: Pioneer DEH-7250SD
Visualização de uma lista de músicas na categoria selecionada 1 Quando uma categoria estiver selecionada, pres- sione M.C. Reprodução de uma música na categoria seleciona- da 1 Quando uma categoria estiver selecionada, pres- sione e segure M.C. Busca em ordem alfabética na lista 1 Quando uma lista da categoria seleciona da for vi- sualizada,[…]
-
Page 67: Pioneer DEH-7250SD
Ajustes de funções 1 Pressione M.C. para visualizar o menu principal. 2 Gire M.C. para alterar a opção de menu e pressione para selecionar FUNCTION. 3 Gire M.C. para selecionar a função. Após fazer a seleção, execute os seguintes procedimentos para ajustar a função. Play mode (Reprodução com repetição) ! Consulte Play mode (Reproduç[…]
-
Page 68: Pioneer DEH-7250SD
Ajustes de áudio 1 1 Display de áudio Mostra o status do ajuste de áudio. Operações avançadas utilizando botões especiais Ajuste para ativar/desativar o alto-falante de graves secundário 1 Pressione / BASS para selecionar o menu de ajuste para ativar/desativar o alto-falante de gra- ves secundári o. 2 Pressione M.C. para ativar ou desativa[…]
-
Page 69: Pioneer DEH-7250SD
V ocê pode definir o ajuste da cur va do equalizador atualmente sel ecionada, conforme desejado. Os ajus- tes das cur vas do equalizador ajustadas são memori- zados em Custom1 ou Custom2 . ! Uma cur va Custom1 separada pode ser criada para cada fonte. Se você fizer ajustes quando uma cur va diferente de Custom2 for selecionada, os ajus tes da cu[…]
-
Page 70: Pioneer DEH-7250SD
Nota Ao selecionar FM como a fonte, você não pode al- ternar para SLA . Ajustes iniciais 1 1 Display de função ! Mostra o status da função. 1 Pressione e segure SRC/OFF até desligar a unidade. 2 Pressione e segure M.C. até visualizar o menu de ajuste inicial no display . 3 Gire M.C. para selecionar o ajuste ini- cial. Após fazer a seleçã[…]
-
Page 71: Pioneer DEH-7250SD
Este ajuste permite alternar sua fonte para USB / IPOD automaticamente. 1 Pressione M.C. p ara ativar ou desativar a função plug and play. ! ON – Quando o disposi tivo de armazenamen- to USB/iPod for conectado, a fonte será auto- maticamente alternada para USB / IPOD .S e você desconectar o dispositivo de armazena- mento USB/iPod, a fonte des[…]
-
Page 72: Pioneer DEH-7250SD
1 Pressione M.C. p ara ativar ou desativar o display de demonstração. ! V ocê também pode ativar ou desativar o modo de demonstração de recursos ao pressionar DISP enquanto esta unidade estiver desligada. P ara obte r mais detalhes, consulte Modo de demonstração na página 56. Reverse mode (Ajuste do modo de demonstração de retrocesso) 1 […]
-
Page 73: Pioneer DEH-7250SD
Solução de problemas Sintoma Causa Ação (Consulte) O display retor- na automatica- mente ao normal. V ocê ficou sem executar uma operação por aproximadamen- te 30 segundos. Execute a opera- ção novam ente. A série de re- produção com repetição muda inespera- damente. Dependendo da série de reprodu- ção com repeti- ção, a série s[…]
-
Page 74: Pioneer DEH-7250SD
NO AUDIO Nenhuma músi- ca T ran sfira os arqui- vos de áudio para o dispositivo de ar- mazenamento USB e conecte- o. O dispositivo de armazenamento USB conectado está com segu- rança ativada Siga as instruções do dispositivo de armazenamento USB para desativar a segurança. SKIPPED O dispositivo de armazenamento USB conectado contém arquivos[…]
-
Page 75: Pioneer DEH-7250SD
ERROR-19 F alha de comuni- cação Desconecte o cabo do iPod. Assim que o menu principal do iPod for visuali- zado, reconecte o cabo. Reinicie o iP od. F alha no iPod Descon ecte o cabo do iPod. Assim que o menu principal do iPod for visuali- zado, reconecte o cabo. Reinicie o iP od. ERROR-16 V ersões antigas de firmwar e do iP od Atualize a vers?[…]
-
Page 76: Pioneer DEH-7250SD
Impactos nas estrada s ao dirigir podem interromper a reprodução do disco. Leia as precauções sobre discos antes de utilizá-los. Dispositivo de armazenamento externo (USB, SD) Solucione quais quer dúvidas que você possa ter sobre o seu dispositivo de armazename nto externo (USB, SD) com o fabricante . Não deix e o disposi tivo de armazename[…]
-
Page 77: Pioneer DEH-7250SD
Discos duais Discos duais são discos com dois lados que pos- suem, de um lado, um CD de áudio gravável e, do outro, um DVD de vídeo gravável. Como o lado do CD dos discos duais não é compatí- vel com o padrão dos CDs comuns, talvez não seja possível reproduz ir o lado do CD nesta unidade. Inserir e ejetar freqüentemente um disco dual po[…]
-
Page 78: Pioneer DEH-7250SD
Dispositivo de armazenamento externo (USB, SD) Hierarquia de pastas reproduzíveis: até oito camadas (uma hierarquia prática contém menos de duas ca- madas). P astas reproduzíveis: até 1 500 Arquivos repr oduzíveis: até 15 000 Reprodução de arquivos protegidos por direitos auto- rais: não Dispositivo de armazenamento externo particionado […]
-
Page 79: Pioneer DEH-7250SD
Seqüência de arquivos de áudio O usuário não pode atribuir números de pasta e especificar as seqüências de reprodução com esta unidade. Exemplo de uma hierarquia 1 2 3 4 5 6 01 02 03 04 05 Nível 1 Nível 2 Nível 3 Nível 4 : Pasta : Arquivo de áudio compactado 01 a 05: Número de pasta 1 a 6 : Seqüência de reprodução Disco A seqü?[…]
-
Page 80: Pioneer DEH-7250SD
O logotipo SD é uma marca comercial. O logotipo miniSD é uma marca comercial. O logotipo microSD é uma marca comercial. O logotipo SDHC é uma marca comercial. iPod iP od é uma marca comercial da Apple Inc., re- gistrada nos EUA e em outros países. “ F eito para iPod ” significa que um acessório eletrônico foi desenvolvido para ser espec[…]
-
Page 81: Pioneer DEH-7250SD
Especificações Geral Fonte de alimentação nominal …………………………………………….. 14,4 V CC (faixa de tensão permissível: 12,0 V a 14,4 V CC) Sistema de aterramento …… T i p o n e g ativo Consumo máx. de energia …………………………………………….. 10,0 A Dimensões (L × A × P): DIN C h a s s i ..[…]
-
Page 82: Pioneer DEH-7250SD
Sintonizador de FM Fa i x a d e f r e q ü ê n c ia ……………. 87,5 MHz a 108,0 MHz Sensibilidade utilizável ……… 9 d B f (0,8 µV/75 W , mono, Sinal/Ruído: 30 dB) Relação sinal-ruído …………….. 7 2 d B (rede IEC -A) Sintonizador de AM Fa i x a d e f r e q ü ê n c ia ……………. 5 3 1 k H z a 1 6 0 2 k H z ( 9 k H z )[…]
-
Page 83: Pioneer DEH-7250SD
感 謝 您 購買 本 先 鋒 產 品 。 為 確 保使 用 方 式 正 確 , 使 用 本 產 品 前 請詳 閱 本 手 冊 。 尤 為 重 要 的 是 要 閱 讀 並 遵 照 本 手 冊 中 的 警 告 與 小 心 。 請 將 本 手 冊 存 放於 安 全 及 將 來 參 考 時 方 便 取 得 的 地 方 。 開 始 使 用 前 關 於 ?[…]
-
Page 84: Pioneer DEH-7250SD
關 於 本 機 注 意 ! 請 勿 讓 本 機 接 觸 到 液 體 。 否 則 可 能 造 成 人 員 觸 電 。 此 外 , 接 觸 到 液 體 可 能 導 致 本 機 損 壞 、 冒 煙 和 過 熱 。 ! 「 第 1 類 雷 射 產 品 」 本 產 品 包 含 第 1 類 以上 的 雷 射 二 極 管 。 為 避 免 發 生 危 險 , 切勿 拆 […]
-
Page 85: Pioneer DEH-7250SD
主 機 1 1 1 1 4 4 4 4 5 5 5 5 6 6 7 7 7 7 a a a a c c c c d d d d 2 2 2 2 3 3 3 3 8 8 8 8 9 9 9 9 b b b b g e f 部 位 部 位 1 SRC / OFF 9 / LOC 2 ( 清 單 ) a S.Rt rv 3 / iPod b MUL TI-CONTROL ( M.C. ) 4 開 啟 按 鈕 c DISP / / SCRL 5 AUX 輸 入 插 孔 ( 3.5 mm 立 體 聲 插 孔 ) d BAND / ESC 6 USB 埠 e 碟 片 槽 7 / DISP […]
-
Page 86: Pioneer DEH-7250SD
拆 下 前 面 板 可 防 止 本 機 遭 竊 1 按 下 開 啟 按 鈕 以 打 開 前 面 板 。 2 抓 住 前 面 板 左 側 , 並 將 其 輕輕 往 外 拉 。 3 務 必 將 卸 下 的 前 面 板 放 置 在 保 護 裝 置 中 , 如 保 護 盒 。 重 新 安 裝 前 面 板 1 重 新 裝 回 前 面 板 時 , 將 其 對 著 主[…]
-
Page 87: Pioneer DEH-7250SD
功 能 表 的 操 作 與 功 能 設 定 / 音 訊 調 整 / 初 始 設 定 / 清 單 完 全 相 同 返 回 上一 個 顯 示 畫 面 返 回 上一 個 清 單 / 類 別 ( 上一 層 資 料 夾 / 類 別 ) 1 按 DISP / / SCRL 。 返 回 主 選 單 返 回 清 單 / 類 別 的 最 上 層 1 按 住 DISP / / SCRL 。 ?[…]
-
Page 88: Pioneer DEH-7250SD
CD/CD-R/CD-RW 及 外 部 儲 存 裝 置 ( USB 、 SD ) 基 本 操 作 8 4 3 7 6 5 1 2 1 位 元 率 / 取 樣 頻 率 指 示 器 播 放 壓 縮 音 訊 時 顯 示 目 前 曲 目 ( 檔 案 ) 的 位 元 率 或 取 樣 頻 率 。 ! 播 放 以 VBR ( 可 變 位 元 率 ) 錄 製 的 WMA 檔 案 時 , 平 均 位 元 率 值 ?[…]
-
Page 89: Pioneer DEH-7250SD
顯 示 文 字 資 訊 選 擇 所 需 的 文 字 資 訊 1 按 DISP / / SCRL 。 CD TEXT 碟 片 : 播 放 時 間 - : 碟 片 作 者 姓 名 和 : 曲 目 標 題 - : 碟 片 作 者 姓 名和 : 碟 片 標 題 - : 碟 片 標 題 和 : 曲 目 標 題 - : 曲 目 作 者 姓 名和 : 曲 目 標 題 - : 曲 目 […]
-
Page 90: Pioneer DEH-7250SD
使 用 特 殊 按 鈕 進 行 進 階 操 作 選 擇 重 播 範 圍 1 按 / LOC 可 在 下 列 項 目 間 切 換 : CD/CD-R/CD-RW ! DISC - 重 播 所 有 曲 目 ! TRACK - 重 播 目 前 曲 目 ! FOLDER - 重 播 目 前 資 料 夾 外 部 儲 存 裝 置 ( USB 、 SD ) ! TRACK - 重 播 目 前 檔 案 ! FOLDER - 重 ?[…]
-
Page 91: Pioneer DEH-7250SD
顯 示 文 字 資 訊 選 擇 所 需 的 文 字 資 訊 1 按 DISP / / SCRL 。 播 放 時 間 - : 作 者 姓 名和 : 歌 曲 標 題 - : 作 者 姓 名和 : 專 輯 標 題 - : 專 輯 標 題 和 : 歌 曲 標 題 - : 歌 曲 標 題 和 播 放 時 間 - : 歌 曲 標 題 , : 作 者 姓 名和 : 專 輯 ?[…]
-
Page 92: Pioneer DEH-7250SD
Play mode ( 重 播 ) ! 請 參 閱 第 90 頁 上 Play mode ( 重 播 ) 。 但 重 播 範 圍 與 CD/USB 儲 存 裝 置 不 同 。 請 參 閱 上一 頁 上 選 擇 重 播 範 圍 。 Shuffle mode ( 隨 機 選 曲 ) 1 按 M.C. 選 擇 常 用 設 定 。 ! Shuffle Songs - 依 隨 機 順 序 播 放 所 選 擇 清 單 中 的[…]
-
Page 93: Pioneer DEH-7250SD
Fader/Balance ( 淡 化 器 / 平 衡 調 整 ) 1 向 上 或 向 下 推 M.C. 調 整 前 置 / 後 置 揚 聲 器 平 衡 。 在 前 置 / 後 置 揚 聲 器 平 衡 由 前 移 到 後 的 同 時 , 會 顯 示 F15 至 R15 。 ! F/R 0 為 僅 使 用 兩 個 揚 聲 器 時 的 正 確 設 定 。 ! 當 後 置 輸 出 設 定 為[…]
-
Page 94: Pioneer DEH-7250SD
! 顯 示 功 能 狀 態 。 1 按 住 SRC / OFF 直 至 本 機 關閉 。 2 按 住 M.C. , 直 到初 始 設 定 選 單 出 現 在 顯 示 幕 為 止 。 3 轉 動 M.C. 可 選 擇 初 始 設 定 。 選 擇 後 , 執 行 下 列 程 序 以 進 行 初 始 設 定 。 Language sele ct ( 多 種 語言 ) 為 了 您 的 方 便 起 […]
-
Page 95: Pioneer DEH-7250SD
本 機 的 後 置 輸 出 ( 後 置 揚 聲 器 喇 叭 線 輸 出 與 RCA 後 置 輸 出 ) 可 用 於 全 音 域 揚 聲 器 ( Rear SP :F .Range ) 或 重 低 音 揚 聲 器 ( Rear SP :S/W ) 的 連 接 。 如 果 您 將 後 置 輸 出 設 定 切 換 至 Rear SP :S/W , 無 須 使 用 輔 助 放 大 器 便 可 將 後 ?[…]
-
Page 96: Pioneer DEH-7250SD
故 障 排 除 故 障 情 況 原 因 措 施 ( 請 參 閱 ) 顯 示 畫 面 會 自 動 返 回 一 般 顯 示 畫 面 。 您 無 法 在 30 秒 內 執 行 任 何 操 作 。 再 執 行 操 作 一 次 。 重 播 範 圍 意 外 變 更 。 選 擇 其 他 資 料 夾 或 曲 目 , 或 快 速 前 進 / 快 速 倒 轉 時 , 根 據[…]
-
Page 97: Pioneer DEH-7250SD
NOT COMP A T — IBLE 不 相 容 的 USB 裝 置 中 斷 裝 置 連 接 並 更 換 為 相 容 的 USB 儲 存 裝 置 。 ERROR-19 通 訊 失 敗 執 行 下 列 其 中一 項 操 作 。 - 將 點 火 開關 轉 到 OFF , 然 後 再 轉 回 ON 。 - 中 斷 連 接 或 退 出 外 部 儲 存 裝 置 。 - 切 換 至 不 同 的 播 […]
-
Page 98: Pioneer DEH-7250SD
凝 結 可 能 會 暫時 影 響 播 放 器 之 效 能 。 請 將 其 放 置 約 一 小 時 , 適 應 較 高 的 溫 度 。 同 時 , 請 用 軟 布 擦 拭 潮 溼 的 碟 片 。 由 於 碟 片特 性 、 碟 片 格 式 、 錄 製 的 應 用 軟 體 、 播 放 環 境 、 存 放 條 件 等 原 因 , 碟 片 可 能 無 法 […]
-
Page 99: Pioneer DEH-7250SD
壓 縮 音 訊 相 容 性 ( 碟 片 、 USB 、 SD ) WMA 副 檔 名 : .wma 位 元 率 48 kbps 至 320 kbps ( CBR ), 48 kbps 至 384 kbps ( VBR ) 取 樣 頻 率 : 32 kHz 、 44.1 kHz 、 48 kHz Windows Media Audio Professional 、 Lossless 、 語 音 /DRM 資 料 流 / 視 訊 資 料 流 : 無 MP3 副 檔 名 : .mp3 ?[…]
-
Page 100: Pioneer DEH-7250SD
iPod 相 容 性 本 機 僅 支 援 下 列 iPod 機 型 。 支 援 的 iPod 軟 體 版 本 如 下 所 示 。 本 機 可 能 不 支 援 較 舊 的 版 本 。 ! 第 四 代 iPod nano ( 軟 體 版 本 1.0.3 ) ! 第 三代 iPod nano ( 軟 體 版 本 1.1.3 ) ! 第 二代 iPod nano ( 軟 體 版 本 1.1.3 ) ! 第 一代 iPod nano […]
-
Page 101: Pioneer DEH-7250SD
「 Windows Media 」 和 「 Windows 」 標 誌 皆 為 Microsoft Corporation 在 美 國 和 / 或 其 他 國 家 的 商 標 或 註 冊 商 標 。 本 產 品 採 用 Microsoft Corporation 開 發 之 技 術 , 未 獲 Microsoft Licensing, Inc 授 權 不 得 使 用 或 散 佈 本 技 術 。 SD 記 憶 卡 SD Logo 是 商 標 。 mini[…]
-
Page 102: Pioneer DEH-7250SD
規 格 一 般 額 定 電 源 . . . . . . . . . . . . . . . . . . . . . . . . . . . . . . . . . . . . . . 14.4 V DC ( 容 許 電 壓 範 圍 : 12.0 V 至 14.4 V DC ) 接 地 系 統 . . . . . . . . . . . . . . . . . . . . . . . . . . . . . . . . . . . . . . 負 極 型 最 大 電 流消 耗 . . . . . . . . . . . . . . . . . . . . . . . . […]
-
Page 103: Pioneer DEH-7250SD
Zhtw 103 中 文[…]
-
Page 104: Pioneer DEH-7250SD
ﺍ ﻟ ﻤ ﻮ ﺍ ﺻ ﻔ ﺎ ﺕ ﻋ ﺎ ﻡ ﻣ ﺼ ﺪ ﺭ ﺍ ﻟ ﻄ ﺎ ﻗ ﺔ ﺍ ﻟ ﻤ ﺤ ﺪ ﺩ ……………………. ١٤٫٤ ﻓ ﻮ ﻟ ﺖ ﺗ ﻴ ﺎ ﺭ ﻣ ﺴ ﺘ ﻤ ﺮ ) ﻣ ﺪ ﻯ ﻧ ﻄ ﺎ ﻕ ﺍ ﻟ ﺠ ﻬ ﺪ ﺍ ﻟ ﻤ ﺴ ﻤ ﻮ ﺡ ﺑ ﻪ : ١٢٫٠ ﻓ ﻮ ﻟ ﺖ ﺇ ﻟ ﻰ ﻓ ﻮ ﻟ ﺖ ١٤٫٤ ?[…]
-
Page 105: Pioneer DEH-7250SD
ﺣ ﻘ ﻮ ﻕ ﺍ ﻟ ﻨ ﺸ ﺮ ﻭ ﺍ ﻟ ﻌ ﻼ ﻣ ﺎ ﺕ ﺍ ﻟ ﺘ ﺠ ﺎ ﺭ ﻳ ﺔ iTunes Apple ﻭ iT unes ﻫ ﻤ ﺎ ﻋ ﻼ ﻣ ﺘ ﺎ ﻥ ﺗ ﺠ ﺎ ﺭ ﻳ ﺘ ﺎ ﻥ ﻟ ﺸ ﺮ ﻛ ﺔ Apple Inc . ، ﻣ ﺴ ﺠ ﻠ ﺘ ﺎ ﻥ ﻓ ﻲ ﺍ ﻟ ﻮ ﻻ ﻳ ﺎ ﺕ ﺍ ﻟ ﻤ ﺘ ﺤ ﺪ ﺓ ﻭ ﺩ ﻭ ﻝ ﺃ ﺧ ﺮ ?[…]
-
Page 106: Pioneer DEH-7250SD
ﺟ ﻬ ﺎ ﺯ ﺍ ﻟ ﺘ ﺨ ﺰ ﻳ ﻦ ﺍ ﻟ ﺨ ﺎ ﺭ ﺟ ﻲ ) SD ، USB ( ﺍ ﻟ ﺘ ﺴ ﻠ ﺴ ﻞ ﺍ ﻟ ﻬ ﺮ ﻣ ﻲ ﻟ ﻠ ﻤ ﺠ ﻠ ﺪ ﺍ ﻟ ﻘ ﺎ ﺑ ﻞ ﻟ ﻠ ﺘ ﺸ ﻐ ﻴ ﻞ : ﻣ ﺎ ﻳ ﺼ ﻞ ﺇ ﻟ ﻰ ﺛ ﻤ ﺎ ﻥ ﻃ ﺒ ﻘ ﺎ ﺕ ) ﺍ ﻟ ﺘ ﺴ ﻠ ﺴ ﻞ ﺍ ﻟ ﻬ ﺮ ﻣ ﻲ ﺍ ﻟ ﻔ […]
-
Page 107: Pioneer DEH-7250SD
ﻟ ﻤ ﻌ ﺮ ﻓ ﺔ ﺍ ﻟ ﺘ ﻔ ﺎ ﺻ ﻴ ﻞ ، ﺭ ﺍ ﺟ ﻊ ﺍ ﻟ ﻜ ﺘ ﻴ ﺒ ﺎ ﺕ ﺍ ﻟ ﺨ ﺎ ﺻ ﺔ ﺑ ﺠ ﻬ ﺎ ﺯ iPod . ﺣ ﻮ ﻝ ﺇ ﻋ ﺪ ﺍ ﺩ ﺍ ﺕ iPod ! ﻋ ﻨ ﺪ ﺗ ﻮ ﺻ ﻴ ﻞ ﺟ ﻬ ﺎ ﺯ iPod ، ﻳ ﻌ ﻤ ﻞ ﺍ ﻟ ﺠ ﻬ ﺎ ﺯ ﻋ ﻠ ﻰ ﺗ ﻐ ﻴ ﻴ ﺮ ﺗ ﻬ ﻴ ﺌ ?[…]
-
Page 108: Pioneer DEH-7250SD
ﺍ ﺳ ﺘ ﺨ ﺪ ﻡ ﻓ ﻘ ﻂ ﺍ ﻷ ﻗ ﺮ ﺍ ﺹ ﺍ ﻟ ﺘ ﻘ ﻠ ﻴ ﺪ ﻳ ﺔ ﺍ ﻟ ﻤ ﺴ ﺘ ﺪ ﻳ ﺮ ﺓ ﺑ ﺎ ﻟ ﻜ ﺎ ﻣ ﻞ . ﻻ ﺗ ﺴ ﺘ ﺨ ﺪ ﻡ ﺍ ﻷ ﻗ ﺮ ﺍ ﺹ ﺍ ﻟ ﻤ ﺸ ﻜ ّ ﻠ ﺔ . ﻻ ﺗ ﻘ ﻢ ﺑ ﺈ ﺩ ﺧ ﺎ ﻝ ﺃ ﻱ ﺷ ﻲ ء ﺁ ﺧ ﺮ ﺧ ﻼ ﻑ ﻗ ﺮ ﺹ CD ﺩ ?[…]
-
Page 109: Pioneer DEH-7250SD
CHECK USB ﺣ ﺪ ﺙ ﺗ ﻤ ﺎ ﺱ ﻛ ﻬ ﺮ ﺑ ﺎ ﺋ ﻲ ﻣ ﻊ ﻣ ﻮ ﺻ ﻞ USB ﺃ ﻭ ﻛ ﺒ ﻞ USB . ﺗ ﺄ ﻛ ﺪ ﻣ ﻦ ﺃ ﻥ ﻣ ﻮ ﺻ ّ ﻞ USB ﺃ ﻭ ﻛ ﺒ ﻞ USB ﻏ ﻴ ﺮ ﻋ ﺎ ﻟ ﻖ ﺑ ﺸ ﻲ ء ﻣ ﺎ ﺃ ﻭ ﺗ ﺎ ﻟ ﻒ . ﺟ ﻬ ﺎ ﺯ ﺗ ﺨ ﺰ ﻳ ﻦ USB ﺍ ﻟ ﻤ ﻮ ﺻ ﻞ ﻳ ﺴ ?[…]
-
Page 110: Pioneer DEH-7250SD
ﺣ ﻞ ﺍ ﻟ ﻤ ﺸ ﺎ ﻛ ﻞ ﺍ ﻷ ﻋ ﺮ ﺍ ﺽ ﺍ ﻟ ﺴ ﺒ ﺐ ﺍ ﻹ ﺟ ﺮ ﺍ ﺀ ) ﺭ ﺍ ﺟ ﻊ ( ﺗ ﻌ ﻮ ﺩ ﺍ ﻟ ﺸ ﺎ ﺷ ﺔ ﺗ ﻠ ﻘ ﺎ ﺋ ﻴ ً ﺎ ﺇ ﻟ ﻰ ﺍ ﻟ ﻮ ﺿ ﻊ ﺍ ﻟ ﻌ ﺎ ﺩ ﻱ . ﻟ ﻢ ﺗ ﻘ ﻢ ﺑ ﺘ ﻨ ﻔ ﻴ ﺬ ﺃ ﻳ ﺔ ﻋ ﻤ ﻠ ﻴ ﺎ ﺕ ﺧ ﻼ ﻝ ﺣ ?[…]
-
Page 111: Pioneer DEH-7250SD
Dimmer ) ﺇ ﻋ ﺪ ﺍ ﺩ ﺍ ﻟ ﻤ ﺨ ﻔ ّ ﺖ ( ﻟ ﻠ ﺤ ﻴ ﻠ ﻮ ﻟ ﺔ ﺩ ﻭ ﻥ ﺯ ﻳ ﺎ ﺩ ﺓ ﺳ ﻄ ﻮ ﻉ ﻟ ﻮ ﺣ ﺔ ﺍ ﻟ ﻌ ﺮ ﺽ ﻟ ﻴ ﻼ ً ، ﻳ ﺘ ﻢ ﺧ ﻔ ﺖ ﺇ ﺿ ﺎ ﺀ ﺓ ﻟ ﻮ ﺣ ﺔ ﺍ ﻟ ﻌ ﺮ ﺽ ﺗ ﻠ ﻘ ﺎ ﺋ ﻴ ﺎ ً ﻋ ﻨ ﺪ ﺗ ﺸ ﻐ ﻴ ﻞ ﺍ ﻷ ﺿ ﻮ[…]
-
Page 112: Pioneer DEH-7250SD
ﺍ ﻹ ﻋ ﺪ ﺍ ﺩ ﺍ ﺕ ﺍ ﻷ ﻭ ﻟ ﻴ ﺔ 1 1 ﻋ ﺮ ﺽ ﺍ ﻟ ﻮ ﻇ ﻴ ﻔ ﺔ ! ﻳ ﺒ ﻴ ّ ﻦ ﺣ ﺎ ﻟ ﺔ ﺍ ﻟ ﻮ ﻇ ﻴ ﻔ ﺔ . ١ ﺍ ﺿ ﻐ ﻂ ﻣ ﻊ ﺍ ﻻ ﺳ ﺘ ﻤ ﺮ ﺍ ﺭ ﻋ ﻠ ﻰ SRC / OFF ﺇ ﻟ ﻰ ﺃ ﻥ ﻳ ﺘ ﻢ ﺇ ﻳ ﻘ ﺎ ﻑ ﺗ ﺸ ﻐ ﻴ ﻞ ﺍ ﻟ ﺠ ﻬ ﺎ ﺯ . ٢ ?[…]
-
Page 113: Pioneer DEH-7250SD
ﺇ ﻋ ﺪ ﺍ ﺩ ﺍ ﺕ ﻭ ﻇ ﺎ ﺋ ﻒ ﺍ ﻟ ﺼ ﻮ ﺕ ١ ﺍ ﺿ ﻐ ﻂ M.C. ﻟ ﻌ ﺮ ﺽ ﺍ ﻟ ﻘ ﺎ ﺋ ﻤ ﺔ ﺍ ﻟ ﺮ ﺋ ﻴ ﺴ ﻴ ﺔ . ٢ ﺃ ﺩ ﺭ M.C. ﻟ ﺘ ﻐ ﻴ ﻴ ﺮ ﺧ ﻴ ﺎ ﺭ ﺍ ﻟ ﻘ ﺎ ﺋ ﻤ ﺔ ﻭ ﺍ ﺿ ﻐ ﻂ ﻻ ﺧ ﺘ ﻴ ﺎ ﺭ AUDIO . ٣ ﺃ ﺩ ﺭ M.C. ﻻ ﺧ ﺘ ﻴ ﺎ […]
-
Page 114: Pioneer DEH-7250SD
ﺇ ﻋ ﺪ ﺍ ﺩ ﺍ ﺕ ﺍ ﻟ ﻮ ﻇ ﺎ ﺋ ﻒ ١ ﺍ ﺿ ﻐ ﻂ M.C. ﻟ ﻌ ﺮ ﺽ ﺍ ﻟ ﻘ ﺎ ﺋ ﻤ ﺔ ﺍ ﻟ ﺮ ﺋ ﻴ ﺴ ﻴ ﺔ . ٢ ﺃ ﺩ ﺭ M.C. ﻟ ﺘ ﻐ ﻴ ﻴ ﺮ ﺧ ﻴ ﺎ ﺭ ﺍ ﻟ ﻘ ﺎ ﺋ ﻤ ﺔ ﻭ ﺍ ﺿ ﻐ ﻂ ﻻ ﺧ ﺘ ﻴ ﺎ ﺭ FUNCTION . ٣ ﺃ ﺩ ﺭ M.C. ﻻ ﺧ ﺘ ﻴ ﺎ ﺭ ﺍ ?[…]
-
Page 115: Pioneer DEH-7250SD
ﻋ ﺮ ﺽ ﺍ ﻟ ﻤ ﻌ ﻠ ﻮ ﻣ ﺎ ﺕ ﺍ ﻟ ﻨ ﺼ ﻴ ﺔ ﺍ ﺧ ﺘ ﻴ ﺎ ﺭ ﺍ ﻟ ﻤ ﻌ ﻠ ﻮ ﻣ ﺎ ﺕ ﺍ ﻟ ﻨ ﺼ ﻴ ﺔ ﺍ ﻟ ﻤ ﺮ ﻏ ﻮ ﺑ ﺔ 1 ﺍ ﺿ ﻐ ﻂ DISP / / SCRL . ﻣ ﺪ ﺓ ﺍ ﻟ ﻌ ﺮ ﺽ — : ﺍ ﺳ ﻢ ﺍ ﻟ ﻔ ﻨ ﺎ ﻥ ﻭ : ﻋ ﻨ ﻮ ﺍ ﻥ ﺍ ﻷ ﻏ ﻨ ﻴ ﺔ — […]
-
Page 116: Pioneer DEH-7250SD
! ﻋ ﻠ ﻰ ﻫ ﺬ ﻩ ﺍ ﻟ ﻮ ﺣ ﺪ ﺓ ﺃ ﻥ ﺗ ﻘ ﻮ ﻡ ﺑ ﻌ ﻤ ﻞ ﻓ ﻬ ﺮ ﺱ ﻟ ﺘ ﺴ ﻬ ﻞ ﻣ ﻦ ﻋ ﻤ ﻠ ﻴ ﺎ ﺕ ﺍ ﻟ ﺒ ﺤ ﺚ ﻋ ﻦ Artists , Albums , Songs , ﻭ Genres . ﻭ ﺳ ﻮ ﻑ ﻳ ﺴ ﺘ ﻐ ﺮ ﻕ ﺍ ﻷ ﻣ ﺮ ٧٠ ﺛ ﺎ ﻧ ﻴ ﺔ ﺗ ﻘ ﺮ ﻳ ﺒ ً ﺎ ﻹ ﻧ ﺸ ﺎ […]
-
Page 117: Pioneer DEH-7250SD
! ﺳ ﻴ ﺘ ﻢ ﺇ ﻋ ﺎ ﺩ ﺓ ﺷ ﺤ ﻦ ﻣ ﺸ ﻐ ﻼ ﺕ ﺻ ﻮ ﺕ USB ﺍ ﻟ ﻤ ﺤ ﻤ ﻮ ﻟ ﺔ ﺍ ﻟ ﺘ ﻲ ﻳ ﻤ ﻜ ﻦ ﺷ ﺤ ﻨ ﻬ ﺎ ﻋ ﻨ ﺪ ﺍ ﻟ ﺘ ﻮ ﺻ ﻴ ﻞ ﻭ ﻳ ﺘ ﻢ ﺿ ﺒ ﻂ ﻣ ﻔ ﺘ ﺎ ﺡ ﺗ ﺸ ﻐ ﻴ ﻞ ﺍ ﻟ ﺴ ﻴ ﺎ ﺭ ﺓ ﻋ ﻠ ﻰ ACC ﺃ ﻭ ON . ! ﺍ ﻓ ﺼ ?[…]
-
Page 118: Pioneer DEH-7250SD
Local ) ﻣ ﻮ ﺍ ﻟ ﻔ ﺔ ﺍ ﻟ ﺒ ﺤ ﺚ ﺍ ﻟ ﻤ ﺤ ﻠ ﻲ ( ﺗ ﺘ ﻴ ﺢ ﻟ ﻚ ﻭ ﻇ ﻴ ﻔ ﺔ ﻣ ﻮ ﺍ ﻟ ﻔ ﺔ ﺍ ﻟ ﺒ ﺤ ﺚ ﺍ ﻟ ﻤ ﺤ ﻠ ﻲ ﺍ ﻟ ﻤ ﻮ ﺍ ﻟ ﻔ ﺔ ﻋ ﻠ ﻰ ﻣ ﺤ ﻄ ﺎ ﺕ ﺍ ﻟ ﺮ ﺍ ﺩ ﻳ ﻮ ﺍ ﻟ ﺘ ﻲ ﺗ ﺘ ﻤ ﺘ ﻊ ﺑ ﺈ ﺷ ﺎ ﺭ ﺍ ﺕ ﻗ […]
-
Page 119: Pioneer DEH-7250SD
ﻋ ﻤ ﻠ ﻴ ﺎ ﺕ ﺍ ﻟ ﻘ ﻮ ﺍ ﺋ ﻢ ﻣ ﺘ ﻄ ﺎ ﺑ ﻘ ﺔ ﻓ ﻲ ﺍ ﻹ ﻋ ﺪ ﺍ ﺩ ﺍ ﺕ / ﺗ ﻌ ﺪ ﻳ ﻼ ﺕ ﺍ ﻟ ﺼ ﻮ ﺕ / ﺍ ﻹ ﻋ ﺪ ﺍ ﺩ ﺍ ﺕ ﺍ ﻷ ﻭ ﻟ ﻴ ﺔ / ﺍ ﻟ ﻘ ﻮ ﺍ ﺋ ﻢ ﺍ ﻟ ﺮ ﺟ ﻮ ﻉ ﺇ ﻟ ﻰ ﺍ ﻟ ﻌ ﺮ ﺽ ﺍ ﻟ ﺴ ﺎ ﺑ ﻖ ﺍ ﻟ ﺮ ﺟ […]
-
Page 120: Pioneer DEH-7250SD
! ﻗ ﻢ ﺑ ﻔ ﻚ ﺍ ﻟ ﻜ ﺒ ﻼ ﺕ ﻭ ﺍ ﻷ ﺟ ﻬ ﺰ ﺓ ﺍ ﻟ ﻤ ﻮ ﺻ ﻠ ﺔ ﺑ ﻬ ﺬ ﻩ ﺍ ﻟ ﻮ ﺣ ﺪ ﺓ ﻗ ﺒ ﻞ ﻓ ﺼ ﻞ ﺍ ﻟ ﻠ ﻮ ﺣ ﺔ ﺍ ﻷ ﻣ ﺎ ﻣ ﻴ ﺔ ﻟ ﺘ ﺠ ﻨ ﺐ ﺗ ﻠ ﻒ ﺍ ﻟ ﺠ ﻬ ﺎ ﺯ ﺃ ﻭ ﺍ ﻷ ﺟ ﺰ ﺍ ﺀ ﺍ ﻟ ﺪ ﺍ ﺧ ﻠ ﻴ ﺔ ﻟ ﻠ ﺴ […]
-
Page 121: Pioneer DEH-7250SD
ﺍ ﻟ ﻮ ﺣ ﺪ ﺓ ﺍ ﻟ ﺮ ﺋ ﻴ ﺴ ﻴ ﺔ 1 1 1 1 4 4 4 4 5 5 5 5 6 6 7 7 7 7 a a a a c c c c d d d d 2 2 2 2 3 3 3 3 8 8 8 8 9 9 9 9 b b b b g e f ﺍ ﻟ ﺠ ﺰ ﺀ ﺍ ﻟ ﺠ ﺰ ﺀ 1 SRC / OFF 9 / LOC 2 ) ﺍ ﻟ ﻘ ﺎ ﺋ ﻤ ﺔ ( a S.Rtrv 3 / iPod b MUL TI-CONTROL ) M.C. ( 4 ﺯ ﺭ ﺍ ﻟ ﻔ ﺘ ﺢ c DISP / / SCRL 5 ?[…]
-
Page 122: Pioneer DEH-7250SD
ﺣ ﻮ ﻝ ﻫ ﺬ ﺍ ﺍ ﻟ ﺠ ﻬ ﺎ ﺯ ﺗ ﻨ ﺒ ﻴ ﻪ ! ﻻ ﺗ ﺪ ﻉ ﻫ ﺬ ﺍ ﺍ ﻟ ﺠ ﻬ ﺎ ﺯ ﻳ ﻼ ﻣ ﺲ ﺍ ﻟ ﺴ ﻮ ﺍ ﺋ ﻞ . ﺇ ﺫ ﻳ ﻤ ﻜ ﻦ ﺃ ﻥ ﻳ ﺆ ﺩ ﻱ ﺫ ﻟ ﻚ ﺇ ﻟ ﻰ ﺻ ﺪ ﻣ ﺎ ﺕ ﻛ ﻬ ﺮ ﺑ ﺎ ﺋ ﻴ ﺔ . ﻛ ﻤ ﺎ ﻳ ﻤ ﻜ ﻦ ﺗ ﺆ ﺩ ﻱ ﻣ ﻼ ﻣ […]
-
Page 123: Pioneer DEH-7250SD
ﺷ ﻜ ﺮ ً ﺍ ﻟ ﺸ ﺮ ﺍ ﺀ ﻫ ﺬ ﺍ ﺍ ﻟ ﻤ ﻨ ﺘ ﺞ ﻣ ﻦ PIONEER . ﻟ ﻠ ﺘ ﺄ ﻛ ﺪ ﻣ ﻦ ﺍ ﻻ ﺳ ﺘ ﺨ ﺪ ﺍ ﻡ ﺍ ﻟ ﺼ ﺤ ﻴ ﺢ ، ﻳ ﺮ ﺟ ﻰ ﻗ ﺮ ﺍ ﺀ ﺓ ﻫ ﺬ ﺍ ﺍ ﻟ ﺪ ﻟ ﻴ ﻞ ﺟ ﻴ ﺪ ﺍ ﻗ ﺒ ﻞ ﺍ ﺳ ﺘ ﺨ ﺪ ﺍ ﻡ ﻫ ﺬ ﺍ ﺍ ﻟ ﻤ ﻨ ﺘ ﺞ . […]
-
Page 124: Pioneer DEH-7250SD
<QRD3050-A/N> 124[…]
-
Page 125: Pioneer DEH-7250SD
<QRD3050-A/N> 125[…]
-
Page 126: Pioneer DEH-7250SD
<QRD3050-A/N> 126[…]
-
Page 127: Pioneer DEH-7250SD
<QRD3050-A/N> 127[…]
-
Page 128: Pioneer DEH-7250SD
PIONEER CORPORA TION 4-1, MEGURO 1-CHOME, MEGURO-KU T OKY O 153-8654, JAP AN PIONEER ELECTRONICS (USA) INC. P .O. Box 1540, Long Beach, California 90801-1540, U.S.A. TEL: (800) 421-1404 PIONEER EUROPE NV Haven 1087, Keetberglaan 1, B-9120 Melsele, Belgium/Belgique TEL: (0) 3/570.05.11 PIONEER ELECTRONICS ASIACENTRE PTE. L TD . 253 Alexandra Road, #[…]
Руководстве по эксплуатации Pioneer DEH-7250SD — вам приходилось его терять? Поскольку вы попали сюда, наверняка с вами это случилось. Но вы не единственный человек, сталкивающийся с проблемами с хранением руководства по эксплуатации всех домашних устройств. Ниже несколько советов, касающихся того, зачем собирать руководства по эксплуатации.
Руководстве по эксплуатации Pioneer DEH-7250SD это определенный вид технической документации, являющейся неразлучным элементом каждого устройства, которое мы приобретаем. Они отличаются между собой количеством информации, которую можно найти на тему данного устройства: напр. Pioneer DEH-7250SD. Конечно же, если производитель считает что необходимо передать нам большее количество информации, касающейся устройства Pioneer DEH-7250SD, то стоит ее хоть раз прочитать — в начале, сразу же после покупки данной вещи. Однако мы считаем, что инструкции должны заключать самую важную, наиболее необходимую информацию о Pioneer DEH-7250SD, так, чтобы не отнимать желания пользователя прочесть ее уже в самом начале. Несомненно, если устройство Pioneer DEH-7250SD имеет много продвинутых функций, неизбежно большое количество информации в содержании этого документа.
Które из информации в инструкции Pioneer DEH-7250SD необходимо обязательно прочитать?
- Информацию, касающуюся правильного использования и ухода за устройством Pioneer DEH-7250SD — нам необходимо ознакомиться с основными правилами, чтобы в случае проблем с устройством сервисный центр не отказал нам в гарантийном обслуживании, из-за неправильного использования
- Информация, касающаяся самых частых проблем с Pioneer DEH-7250SD и способы их решения
- Информация, касающаяся гарантии устройства Pioneer DEH-7250SD и ближайших сервисных центров, способных починить устройство в соответствии с рекомендациям производителя Pioneer
Как хранить инструкции дома?
Хорошей идеей является предназначение одного ящика, в котором бы хранилась инструкция Pioneer DEH-7250SD а также всех других домашних устройств которыми мы пользуемся. Тогда значительно легче вам будет ее найти, чем искать в родных коробках, которые наверняка уже выбросили вы, или другие домочадцы. Раз в год достаточно просмотреть ящик и выбросить инструкции, которые касаются устройств, которыми вы уже не пользуетесь. Таким образом вы избежите хранения ненужных документов, а останутся только актуальные. Вы можете также скачать и распечатать инструкцию Pioneer DEH-7250SD чтобы разместить ее в своем ящике.