
Инструкция и руководство для
Pioneer MVH-150UBG
22 страницы подробных инструкций и пользовательских руководств по эксплуатации на русском на английском

Black plate (2,1)
Thank you for purchasing this PIONEER
product
To ensure proper use, please read through this
manual before using this product. It is especially
important that you read and observe WARN-
INGs and CAUTIONs in this manual. Please
keep the manual in a safe and accessible place for
future reference.
If you want to dispose this product, do not
mix it with general household waste. There is
a separate collection system for used elec-
tronic products in accordance with legislation
that requires proper treatment, recovery and
recycling.
Private households in the member states of the
EU, in Switzerland and Norway may return their
used electronic products free of charge to desig-
nated collection facilities or to a retailer (if you
purchase a similar new one).
For countries not mentioned above, please con-
tact your local authorities for the correct method
of disposal.
By doing so you will ensure that your disposed
product undergoes the necessary treatment, re-
covery and recycling and thus prevent potential
negative effects on the environment and human
health.
About this unit
The tuner frequencies on this unit are allocated
for use in Western Europe, Asia, the Middle
East, Africa and Oceania. Use in other areas
may result in poor reception. The RDS (radio
data system) function only operates in areas
with broadcasting RDS signals for FM stations.
CAUTION
! Do not allow this unit to come into contact
with liquids. Electrical shock could result.
Also, damage to this unit, smoke, and over-
heating could result from contact with
liquids.
! The Pioneer CarStereo-Pass is for use only in
Germany.
! Always keep the volume low enough to hear
outside sounds.
! Avoid exposure to moisture.
! If the battery is disconnected or discharged,
any preset memory will be erased.
Note
Function setting operations are completed even
if the menu is canceled before the operations
are confirmed.
About this manual
! In the following instructions, USB memories
and USB audio players are collectively re-
ferred to as
“USB storage device”.
In case of trouble
Should this unit fail to operate properly, please
contact your dealer or nearest authorized
PIONEER Service Station.
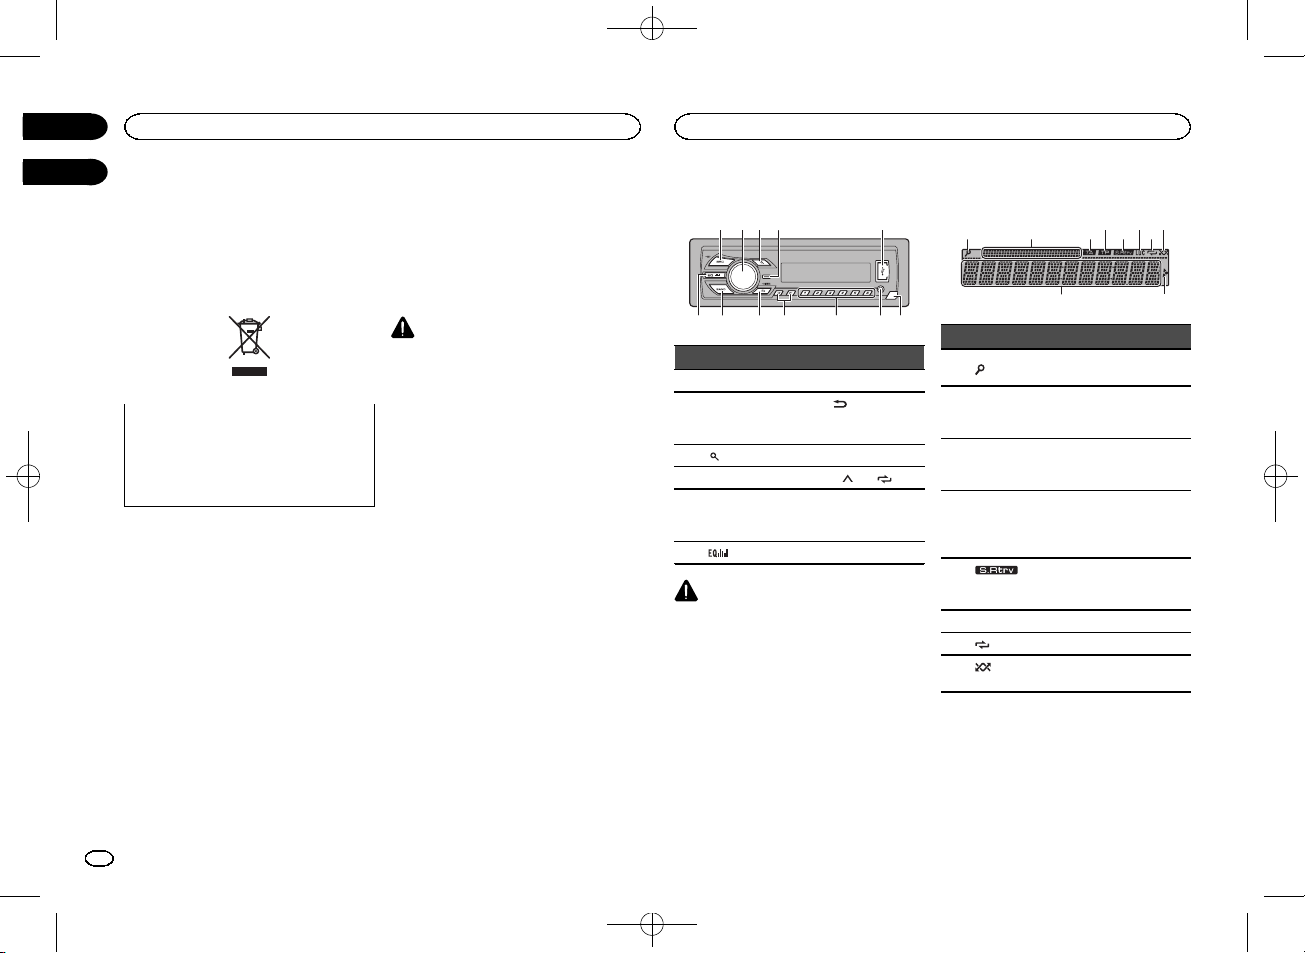
Head unit
a
b
4
7
1 2 3
5
9
8
c
6
Part
Part
1
SRC/OFF
7
BAND
2
MULTI-CONTROL
(
M.C.)
8
(back)/
DIMMER
(dimmer)
3
(list)
9
c/d
4
DISP
a
1/
to
6/
5
USB port
b
AUX input jack
(3.5 mm stereo
jack)
6
(equalizer)
c
Detach button
CAUTION
! Use an optional Pioneer USB cable (CD-
U50E) to connect the USB storage device as
any device connected directly to the unit will
protrude out from the unit, which could be
dangerous.
! Do not use unauthorized products.
Display indication
2
1
3
7
5
9
4
6 8
a
Indicator
State
1
(list)
The list function is being oper-
ated.
2
Sub infor-
mation sec-
tion
Sub information is displayed.
3
TA (traffic
announce-
ments)
TA function is on.
4
TP (traffic
program
identifica-
tion)
A TP station is tuned in.
5
(sound re-
triever)
The sound retriever function
is on.
6
LOC
Local seek tuning is on.
7
(repeat)
Track or folder repeat is on.
8
(ran-
dom)
Random play is on.
Before you start
2
Section
Operating this unit
En
01
02
<QRB3391-A>2

Black plate (3,1)
Indicator
State
9
Main infor-
mation sec-
tion
! Tuner: band and fre-
quency
! RDS: program service
name, PTY information
and other literal informa-
tion
! USB storage device:
elapsed playback time
and text information
a
Appears when a lower tier of
folder or menu exists.
Set up menu
When you turn the ignition switch to ON after in-
stallation, set up menu appears on the display.
You can set up the menu options below.
1
After installation of this unit, turn the
ignition switch to ON.
SET UP appears.
2
Turn M.C. to switch to YES.
# If you do not operate for 30 seconds, the set up
menu will not be displayed.
# If you prefer not to set up at this time, turn M.C.
to switch to
NO. Press to select.
If you select
NO, you cannot set up in the set up
menu.
3
Press M.C. to select.
4
Perform the following procedures to set
the menu.
To proceed to the next menu option, you need to
confirm your selection.
LANGUAGE (multi-language)
This unit can display the text information from a
compressed audio file even for information em-
bedded in English or Russian.
! If the embedded language and the selected
language setting are not the same, text infor-
mation may not display properly.
! Some characters may not be displayed prop-
erly.
1 Turn M.C. to select the desired setting.
ENG (English)
—РУС (Russian)
2 Press M.C. to confirm the selection.
CLOCK SET (setting the clock)
1 Turn M.C. to adjust hour.
2 Press M.C. to select minute.
3 Turn M.C. to adjust minute.
4 Press M.C. to confirm the selection.
FM STEP (FM tuning step)
Normally, the FM tuning step employed by seek
tuning is 50 kHz. When AF or TA is on, the tuning
step automatically changes to 100 kHz. It may be
preferable to set the tuning step to 50 kHz when
AF is on.
! The tuning step remains at 50 kHz during man-
ual tuning.
1 Turn M.C. to select the FM tuning step.
50 (50 kHz)
—100 (100 kHz)
2 Press M.C. to confirm the selection.
QUIT appears.
5
To finish your settings, turn M.C. to select
YES.
# If you prefer to change your setting again, turn
M.C. to switch to NO. Press to select.
6
Press M.C. to select.
Notes
! You can set up the menu options from the
system menu. For details about the settings,
refer to System menu on page 7.
! You can cancel set up menu by pressing
SRC/OFF.
Basic operations
Important
! Handle gently when removing or attaching
the front panel.
! Avoid subjecting the front panel to excessive
shock.
! Keep the front panel out of direct sunlight
and high temperatures.
! To avoid damaging the device or vehicle inte-
rior, remove any cables and devices attached
to the front panel before detaching it.
Removing the front panel to protect your unit from
theft
1 Press the detach button to release the front
panel.
2 Push the front panel upward (M) and then pull
it toward (
N) you.
3 Always keep the detached front panel in a pro-
tection device such as a protection case.
Re-attaching the front panel
1 Slide the front panel to the left.
Make sure to insert the tabs on the left side of
the head unit into the slots on the front panel.
2 Press the right side of the front panel until it is
firmly seated.
If you cannot attach the front panel to the
head unit successfully, make sure that you are
placing the front panel onto the head unit cor-
rectly. Forcing the front panel into place may
result in damage to the front panel or head
unit.
Turning the unit on
1 Press SRC/OFF to turn the unit on.
Turning the unit off
1 Press and hold SRC/OFF until the unit turns
off.
English
Operating this unit
3
Section
Operating this unit
En
02
<QRB3391-A>3

Black plate (4,1)
Selecting a source
1 Press SRC/OFF to cycle between:
TUNER (tuner)
—USB (USB)—AUX (AUX)
Adjusting the volume
1 Turn M.C. to adjust the volume.
CAUTION
For safety reasons, park your vehicle when re-
moving the front panel.
Note
When this unit
’s blue/white lead is connected to
the vehicle
’s auto-antenna relay control termi-
nal, the vehicle
’s antenna extends when this
unit
’s source is turned on. To retract the anten-
na, turn the source off.
Frequently used menu
operations
Returning to the previous display
Returning to the previous list (the folder one level
higher)
1 Press
/
DIMMER.
Returning to the ordinary display
Canceling the main menu
1 Press BAND.
Returning to the ordinary display from the list
1 Press BAND.
Tuner
Basic operations
Selecting a band
1 Press BAND until the desired band (FM1,
FM2, FM3 for FM or MW/LW) is displayed.
Switching preset stations
1 Press c or d.
! Select PCH (preset channel) under SEEK to
use this function. For details about the set-
tings, refer to
SEEK (left/right key setting) on
page 5.
Manual tuning (step by step)
1 Press c or d.
! Select MAN (manual tuning) under SEEK to
use this function. For details about the set-
tings, refer to
SEEK (left/right key setting) on
page 5.
Seeking
1 Press and hold c or d, and then release.
You can cancel seek tuning by briefly pressing
c or d.
While pressing and holding c or d, you can
skip stations. Seek tuning starts as soon as
you release c or d.
Note
This unit
’s AF (alternative frequencies search)
function can be turned on and off. AF should be
off for normal tuning operation (refer to
AF (al-
ternative frequencies search) on page 5).
Storing and recalling stations
for each band
Using preset tuning buttons
1
When you find a station that you want
to store in memory, press one of the preset
tuning buttons (1/
to 6/
) and hold until
the preset number stops flashing.
2
Press one of the preset tuning buttons
(1/
to 6/
) to select the desired station.
Switching the display
Selecting the desired text information
1 Press DISP to cycle between the following:
! FREQUENCY (program service name or
frequency)
! BRDCST INFO (program service name/PTY
information)
! CLOCK (source name and clock)
Notes
! If the program service name cannot be ac-
quired in
FREQUENCY, the broadcast fre-
quency is displayed instead. If the program
service name is detected, the program serv-
ice name will be displayed.
! BRDCST INFO text information will change
automatically.
! Depending on the band, text information can
be changed.
! Text information items that can be changed
depend on the area.
Using PTY functions
You can tune in to a station using PTY (program
type) information.
Searching for an RDS station by PTY information
You can search for general types of broadcasting
programs, such as those listed in the following
section. Refer to page 4.
1 Press
(list).
2 Turn M.C. to select a program type.
NEWS/INFO
—POPULAR—CLASSICS—
OTHERS
3 Press M.C. to begin the search.
The unit searches for a station broadcasting
that type of program. When a station is found,
its program service name is displayed.
! To cancel the search, press M.C. again.
! The program of some stations may differ
from that indicated by the transmitted PTY.
! If no station is broadcasting the type of
program you searched for,
NOT FOUND is
displayed for about two seconds and then
the tuner returns to the original station.
PTY list
NEWS/INFO (news and information)
NEWS (News), AFFAIRS (Current affairs), INFO
(Information),
SPORT (Sports), WEATHER (Weath-
er),
FINANCE (Finance)
POPULAR (popular)
POP MUS (Popular music), ROCK MUS (Rock
music),
EASY MUS (Easy listening), OTH MUS
(Other music),
JAZZ (Jazz), COUNTRY (Country
music),
NAT MUS (National music), OLDIES
(Oldies music),
FOLK MUS (Folk music)
CLASSICS (classics)
L. CLASS (Light classical), CLASSIC (Classical)
Operating this unit
4
Section
Operating this unit
En
02
<QRB3391-A>4

Black plate (5,1)
OTHERS (others)
EDUCATE (Education), DRAMA (Drama), CUL-
TURE (Culture), SCIENCE (Science), VARIED (Var-
ied),
CHILDREN (Children
’s), SOCIAL (Social
affairs),
RELIGION (Religion), PHONE IN (Phone
in),
TOURING (Travel), LEISURE (Leisure), DOCU-
MENT (Documentaries)
Function settings
1
Press M.C. to display the main menu.
2
Turn M.C. to change the menu option
and press to select FUNCTION.
3
Turn M.C. to select the function.
Once selected, the following functions can be
adjusted.
# If MW/LW band is selected, only BSM, LOCAL
and
SEEK are available.
BSM (best stations memory)
BSM (best stations memory) automatically stores
the six strongest stations in the order of their sig-
nal strength.
1 Press M.C. to turn BSM on.
To cancel, press
M.C. again.
REGION (regional)
When AF is used, the regional function limits the
selection of stations to those broadcasting region-
al programs.
1 Press M.C. to turn the regional function on or
off.
LOCAL (local seek tuning)
Local seek tuning lets you tune in to only those
radio stations with sufficiently strong signals for
good reception.
1 Press M.C. to select the desired setting.
FM:
OFF
—LV1—LV2—LV3—LV4
MW/LW:
OFF
—LV1—LV2
The highest level setting allows reception of
only the strongest stations, while lower levels
allow the reception of weaker stations.
TA (traffic announcement standby)
1 Press M.C. to turn traffic announcement
standby on or off.
AF (alternative frequencies search)
1 Press M.C. to turn AF on or off.
NEWS (news program interruption)
1 Press M.C. to turn the NEWS function on or
off.
SEEK (left/right key setting)
You can assign a function to the left and right keys
of the unit.
Select
MAN (manual tuning) to tune up or down
manually or select
PCH (preset channel) to switch
between preset channels.
1 Press M.C. to select MAN or PCH.
USB storage device
Basic operations
Playing songs on a USB storage device
1 Open the USB port cover.
2 Plug in the USB storage device using a USB
cable.
Playback is performed automatically.
Stopping playback of files on a USB storage de-
vice
1 You may disconnect the USB storage device at
any time.
The unit stops playback.
Selecting a folder
1 Press 1/ or 2/ .
Selecting a track
1 Press c or d.
Fast forwarding or reversing
1 Press and hold c or d.
! When playing compressed audio, there is no
sound during fast forward or reverse.
Returning to root folder
1 Press and hold BAND.
Switching between playback memory devices
You can switch between playback memory devices
on USB storage devices with more than one Mass
Storage Device-compatible memory device.
1 Press BAND.
! You can switch between up to 32 different
memory devices.
Note
Disconnect USB storage devices from the unit
when not in use.
Switching the display
Selecting the desired text information
1 Press DISP to cycle between the following:
MP3/WMA/WAV
! TRACK INFO (track title/artist name/album
title)
! FILE INFO (file name/folder name)
! ELAPSED TIME (track number and play-
back time)
! CLOCK (source name and clock)
! SPEANA (spectrum analyzer)
Notes
! TRACK INFO and FILE INFO text information
will change automatically.
! Depending on the version of iTunes used to
write MP3 files to media file types, incompati-
ble text stored within an audio file may be
displayed incorrectly.
! Text information items that can be changed
depend on the media.
Selecting and playing files/
tracks from the name list
1
Press
to switch to the file/track name
list mode.
2
Use M.C. to select the desired file name
(or folder name).
Selecting a file or folder
1 Turn M.C.
Playing
1 When a file or track is selected, press M.C.
Viewing a list of the files (or folders) in the se-
lected folder
1 When a folder is selected, press M.C.
Playing a song in the selected folder
1 When a folder is selected, press and hold M.C.
English
Operating this unit
5
Section
Operating this unit
En
02
<QRB3391-A>5

Black plate (6,1)
Operations using special buttons
Selecting a repeat play range
1 Press 6/
to cycle between the following:
! ALL – Repeat all files
! ONE – Repeat the current file
! FLD – Repeat the current folder
Playing tracks in random order
1 Press 5/
to turn random play on or off.
Tracks in a selected repeat range are played in
random order.
! To change songs during random play, press d
to switch to the next track. Pressing c restarts
playback of the current track from the begin-
ning of the song.
Pausing playback
1 Press 4/PAUSE to pause or resume.
Enhancing compressed audio and restoring rich
sound (sound retriever)
1 Press 3/S.Rtrv to cycle between:
1
—2—OFF (off)
1 is effective for low compression rates, and 2
is effective for high compression rates.
Function settings
1
Press M.C. to display the main menu.
2
Turn M.C. to change the menu option
and press to select FUNCTION.
Once selected, the function below can be ad-
justed.
S.RTRV (sound retriever)
Automatically enhances compressed audio and
restores rich sound.
1 Press M.C. to select the desired setting.
For details, refer to Enhancing compressed
audio and restoring rich sound (sound retriever)
on page 6.
Audio adjustments
1
Press M.C. to display the main menu.
2
Turn M.C. to change the menu option
and press to select AUDIO.
3
Turn M.C. to select the audio function.
Once selected, the following audio functions
can be adjusted.
! FADER is not available when SUB.W/SUB.W
is selected in
SP-P/O MODE. For details, refer
to
SP-P/O MODE (rear output and preout set-
ting) on page 7.
! SUB.W, SUB.W CTRL and HPF SETTING are
not available when
REAR/REAR is selected in
SP-P/O MODE. For details, refer to
SP-P/O MODE (rear output and preout set-
ting) on page 7.
! SUB.W CTRL and HPF SETTING are not avail-
able when
SUB.W is selected in OFF. For de-
tails, refer to
SUB.W (subwoofer on/off
setting) on page 6.
FADER (fader adjustment)
1 Press M.C. to display the setting mode.
2 Turn M.C. to adjust the front/rear speaker bal-
ance.
BALANCE (balance adjustment)
1 Press M.C. to display the setting mode.
2 Turn M.C. to adjust the left/right speaker bal-
ance.
EQ SETTING (equalizer recall)
1 Press M.C. to display the setting mode.
2 Turn M.C. to select the equalizer.
POWERFUL
—NATURAL—VOCAL—CUS-
TOM1
—CUSTOM2—FLAT—SUPER BASS
The equalizer band and equalizer level can be
customized when
CUSTOM1 or CUSTOM2 is
selected.
If selecting
CUSTOM1 or CUSTOM2, complete
the procedures outlined below. If selecting
other options, press
M.C. to return to the pre-
vious display.
! CUSTOM1 can be set separately for each
source.
! CUSTOM2 is a shared setting used in com-
mon for all sources.
3 Press M.C. to display the setting mode.
4 Press M.C. to cycle between the following:
Equalizer band
—Equalizer level
5 Turn M.C. to select the desired setting.
Equalizer band:
80HZ
—250HZ—800HZ—
2.5KHZ
—8KHZ
Equalizer level:
+6 to
–6
! You can also switch the equalizer by pressing
repeatedly.
LOUDNESS (loudness)
Loudness compensates for deficiencies in the low-
frequency and high-frequency ranges at low vol-
ume.
1 Press M.C. to select the desired setting.
OFF (off)
—LOW (low)—MID (mid)—HI (high)
SUB.W (subwoofer on/off setting)
This unit is equipped with a subwoofer output
which can be turned on or off.
1 Press M.C. to select the desired setting.
NOR (normal phase)
—REV (reverse phase)—
OFF (subwoofer off)
SUB.W CTRL (subwoofer adjustment)
Only frequencies lower than those in the selected
range are outputted from the subwoofer.
1 Press M.C. to display the setting mode.
2 Press M.C. to cycle between the following:
Cut-off frequency
—Output level—Slope level
Rates that can be adjusted will flash.
3 Turn M.C. to select the desired setting.
Cut-off frequency:
50HZ
—63HZ—80HZ—
100HZ
—125HZ—160HZ—200HZ
Output level:
–24 to +6
Slope level:
–6— –12
BASS BOOST (bass boost)
1 Press M.C. to display the setting mode.
2 Turn M.C. to select a desired level.
0 to +6 is displayed as the level is increased or
decreased.
HPF SETTING (high pass filter adjustment)
When you do not want low sounds from the sub-
woofer output frequency range to play from the
front or rear speakers, turn on the HPF (high pass
filter). Only frequencies higher than those in the
selected range are output from the front or rear
speakers.
1 Press M.C. to display the setting mode.
2 Press M.C. to cycle between the following:
Cut-off frequency
—Slope level
3 Turn M.C. to select the desired setting.
Cut-off frequency:
OFF
—50HZ—63HZ—80HZ
—100HZ—125HZ—160HZ—200HZ
Slope level:
–6— –12
Operating this unit
6
Section
Operating this unit
En
02
<QRB3391-A>6

Sp-p/o mode (rear output and preout set, System menu, Switching the dimmer setting
Initial menu, Operating this unit Чат поддержки
- Изображение
- Текст
Black plate (7,1)
SLA (source level adjustment)
SLA (Source level adjustment) lets you adjust the
volume level of each source to prevent radical
changes in volume when switching between sour-
ces.
! Settings are based on the FM volume level,
which remains unchanged.
! The MW/LW volume level can also be adjusted
with this function.
! When selecting FM as the source, you cannot
switch to
SLA.
1 Press M.C. to display the setting mode.
2 Turn M.C. to adjust the source volume.
Adjustment range:
+4 to
–4
System menu
Important
PW SAVE (power saving) is canceled if the ve-
hicle battery is disconnected and will need to be
turned back on once the battery is reconnected.
When
PW SAVE (power saving) is off, depend-
ing on connection methods, the unit may con-
tinue to draw power from the battery if your
vehicle
’s ignition doesn’t have an ACC (acces-
sory) position.
1
Press M.C. to display the main menu.
2
Turn M.C. to change the menu option
and press to select SYSTEM.
3
Turn M.C. to select the system menu
function.
Once selected, the following system menu func-
tions can be adjusted.
LANGUAGE (multi-language)
This unit can display the text information from a
compressed audio file even for information em-
bedded in English or Russian.
! If the embedded language and the selected
language setting are not the same, text infor-
mation may not display properly.
! Some characters may not be displayed prop-
erly.
1 Turn M.C. to select the desired setting.
ENG (English)
—РУС (Russian)
CLOCK SET (setting the clock)
1 Press M.C. to display the setting mode.
2 Press M.C. to select the segment of the clock
display you wish to set.
Hour
—Minute
3 Turn M.C. to adjust the clock.
12H/24H (time notation)
1 Press M.C. to select the desired setting.
12H (12-hour clock)
—24H (24-hour clock)
AUTO PI (auto PI seek)
The unit can automatically search for a different
station with the same programming, even during
preset recall.
1 Press M.C. to turn Auto PI seek on or off.
AUX (auxiliary input)
Activate this setting when using an auxiliary de-
vice connected to this unit.
1 Press M.C. to turn AUX on or off.
PW SAVE (power saving)
Switching this function on enables you to reduce
the consumption of battery power.
! Turning on the source is the only operation al-
lowed when this function is on.
1 Press M.C. to turn the power save on or off.
Switching the dimmer setting
You can adjust the brightness of illumination.
1
Press M.C. to display the main menu.
2
Turn M.C. to display ILLUMI and press to
select.
3
Press M.C. to select the desired setting.
OFF (off)
—ON (on)
! You can also change the dimmer setting by
pressing and holding
/
DIMMER.
Initial menu
1
Press and hold SRC/OFF until the unit
turns off.
2
Press and hold SRC/OFF until the main
menu appears in the display.
3
Turn M.C. to change the menu option
and press to select INITIAL.
4
Turn M.C. to select the initial menu func-
tion.
Once selected, the following initial menu func-
tions can be adjusted.
FM STEP (FM tuning step)
Normally, the FM tuning step employed by seek
tuning is 50 kHz. When AF or TA is on, the tuning
step automatically changes to 100 kHz. It may be
preferable to set the tuning step to 50 kHz when
AF is on.
! The tuning step remains at 50 kHz during man-
ual tuning.
1 Press M.C. to select the FM tuning step.
50 (50 kHz)
—100 (100 kHz)
SP-P/O MODE (rear output and preout setting)
The rear speaker leads output and the RCA output
of this unit can be used to connect a full-range
speaker or subwoofer. Select a suitable option for
your connection.
1 Press M.C. to display the setting mode.
2 Turn M.C. to select the desired setting.
You can select any one of the options in the fol-
lowing list:
! REAR/SUB.W – Select when there is a full-
range speaker connected to the rear speak-
er leads output and there is a subwoofer
connected to the RCA output.
! SUB.W/SUB.W – Select when there is a
subwoofer connected directly to the rear
speaker leads output without any auxiliary
amp and there is a subwoofer connected
to the RCA output.
! REAR/REAR – Select when there is a full-
range speaker connected to the rear speak-
er leads output and the RCA output.
If there is a full-range speaker connected to
the rear speaker leads output and the RCA
output is not used, you may select either
REAR/SUB.W or REAR/REAR.
System menu
1
Press and hold SRC/OFF until the unit
turns off.
2
Press and hold SRC/OFF until the main
menu appears in the display.
3
Turn M.C. to change the menu option
and press to select SYSTEM.
4
Turn M.C. to select the system menu
function.
Once selected, the following system menu func-
tions can be adjusted.
For details, refer to System menu on page 7.
English
Operating this unit
7
Section
Operating this unit
En
02
<QRB3391-A>7

Black plate (8,1)
Using an AUX source
1
Insert the stereo mini plug into the AUX
input jack.
2
Press SRC/OFF to select AUX as the
source.
Note
AUX cannot be selected unless the auxiliary set-
ting is turned on. For more details, refer to
AUX
(auxiliary input) on page 7.
Switching the display
Selecting the desired text information
1 Press DISP to cycle between the following:
! Source name
! Source name and clock
If an unwanted display appears
Turn off the unwanted display using the proce-
dures listed below.
1
Press M.C. to display the main menu.
2
Turn M.C. to change the menu option
and press to select SYSTEM.
3
Turn M.C. to display DEMO OFF and press
to select.
4
Turn M.C. to switch to YES.
5
Press M.C. to select.
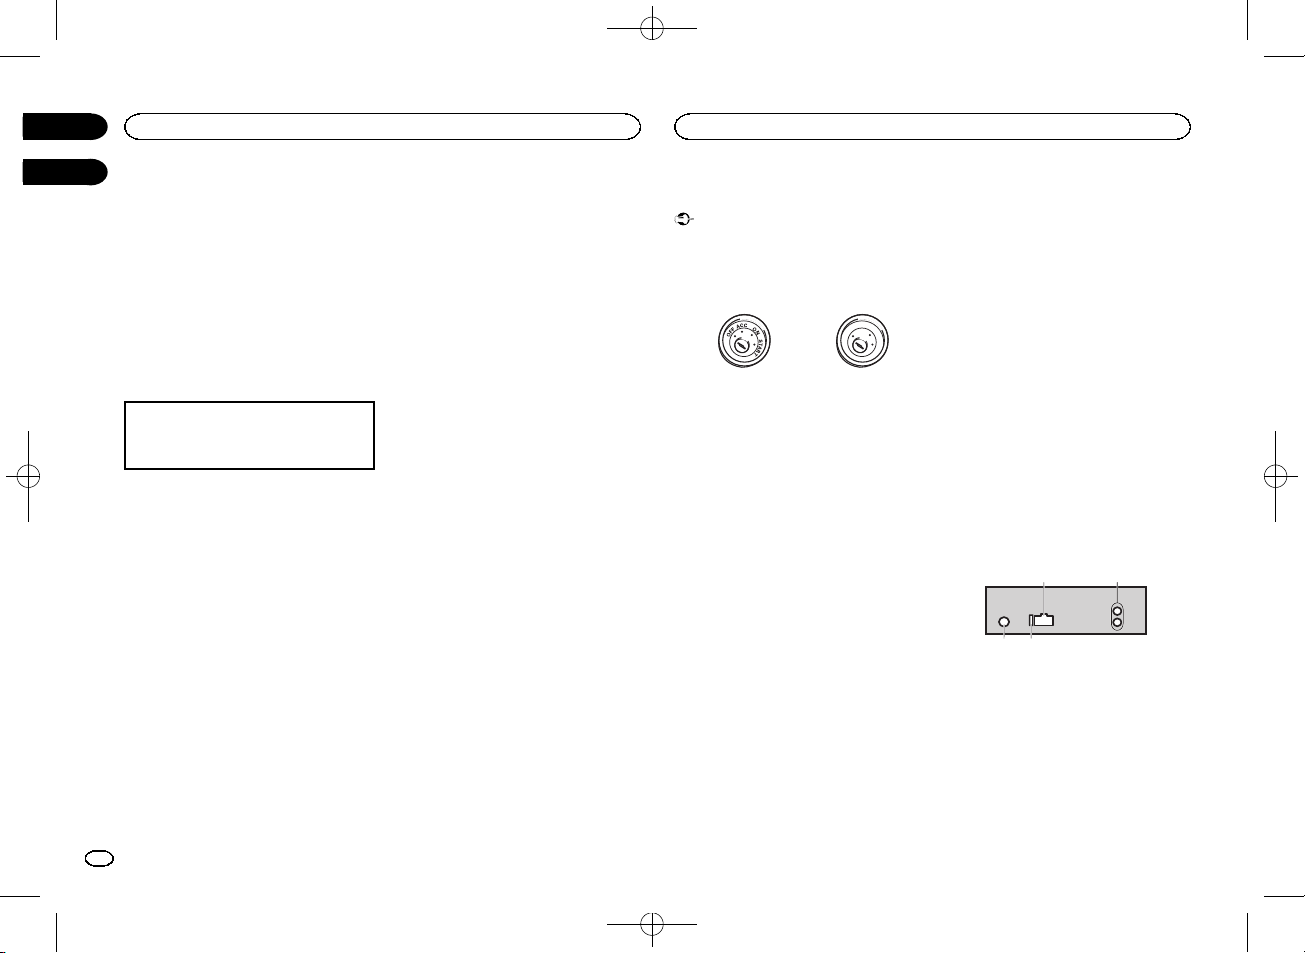
Connections
Important
! When installing this unit in a vehicle without
an ACC (accessory) position on the ignition
switch, failure to connect the red cable to the
terminal that detects operation of the ignition
key may result in battery drain.
ON
S
T
A
R
T
O
FF
ACC position
No ACC position
! Use of this unit in conditions other than the
following could result in fire or malfunction.
— Vehicles with a 12-volt battery and negative
grounding.
— Speakers with 50 W (output value) and 4 W to
8
W (impedance value).
! To prevent a short-circuit, overheating or mal-
function, be sure to follow the directions
below.
— Disconnect the negative terminal of the bat-
tery before installation.
— Secure the wiring with cable clamps or adhe-
sive tape. Wrap adhesive tape around wiring
that comes into contact with metal parts to
protect the wiring.
— Place all cables away from moving parts,
such as the shift lever and seat rails.
— Place all cables away from hot places, such
as near the heater outlet.
— Do not connect the yellow cable to the battery
by passing it through the hole to the engine
compartment.
— Cover any disconnected cable connectors
with insulating tape.
— Do not shorten any cables.
— Never cut the insulation of the power cable of
this unit in order to share the power with
other devices. The current capacity of the
cable is limited.
— Use a fuse of the rating prescribed.
— Never wire the negative speaker cable directly
to ground.
— Never band together negative cables of multi-
ple speakers.
! When this unit is on, control signals are sent
through the blue/white cable. Connect this
cable to the system remote control of an ex-
ternal power amp or the vehicle
’s auto-anten-
na relay control terminal (max. 300 mA
12 V DC). If the vehicle is equipped with a
glass antenna, connect it to the antenna
booster power supply terminal.
! Never connect the blue/white cable to the
power terminal of an external power amp.
Also, never connect it to the power terminal
of the auto antenna. Doing so may result in
battery drain or a malfunction.
! The black cable is ground. Ground cables for
this unit and other equipment (especially,
high-current products such as power amps)
must be wired separately. If they are not, an
accidental detachment may result in a fire or
malfunction.
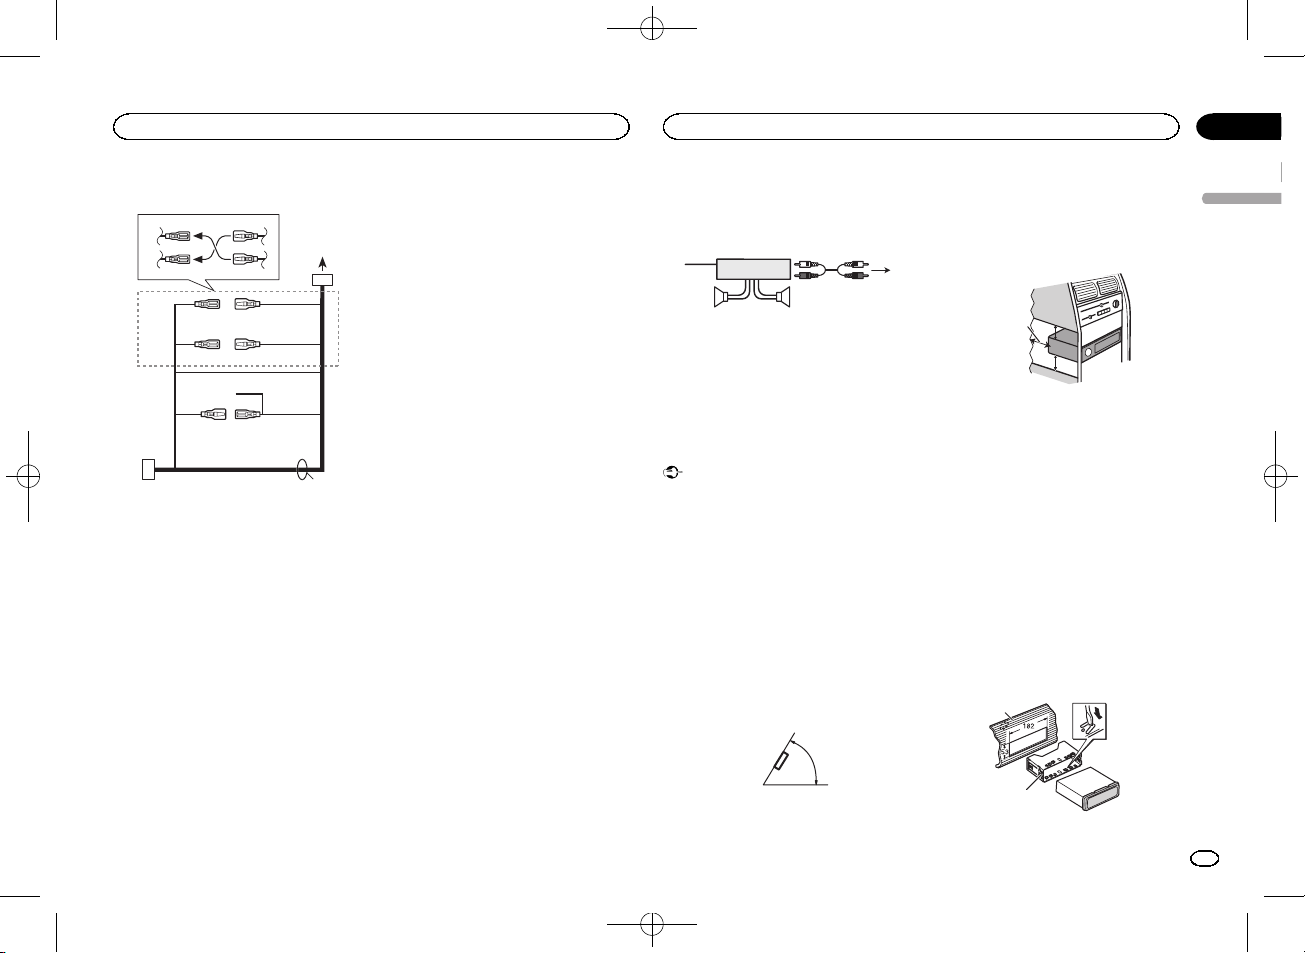
This unit
3
4
2
1
1 Power cord input
2 Rear output or subwoofer output
3 Antenna input
4 Fuse (10 A)
Operating this unit
8
Section
Installation
En
02
03
<QRB3391-A>8

Black plate (9,1)
Power cord
1
3
3
2
4
4
5
5
6
6
b
8
9
7
a
d
c
1 To power cord input
2 Depending on the kind of vehicle, the func-
tion of
3 and 5 may be different. In this
case, be sure to connect
4 to 5 and 6 to
3.
3 Yellow
Back-up (or accessory)
4 Yellow
Connect to the constant 12 V supply termi-
nal.
5 Red
Accessory (or back-up)
6 Red
Connect to terminal controlled by ignition
switch (12 V DC).
7 Connect leads of the same color to each
other.
8 Black (chassis ground)
9 Blue/white
The pin position of the ISO connector will dif-
fer depending on the type of vehicle. Connect
9 and b when Pin 5 is an antenna control
type. In another type of vehicle, never con-
nect
9 and b.
a Blue/white
Connect to system control terminal of the
power amp (max. 300 mA 12 V DC).
b Blue/white
Connect to auto-antenna relay control termi-
nal (max. 300 mA 12 V DC).
c Speaker leads
White: Front left +
White/black: Front left *
Gray: Front right +
Gray/black: Front right *
Green: Rear left + or subwoofer +
Green/black: Rear left * or subwoofer *
Violet: Rear right + or subwoofer +
Violet/black: Rear right * or subwoofer *
d ISO connector
In some vehicles, the ISO connector may be
divided into two. In this case, be sure to con-
nect to both connectors.
Notes
! Change the initial menu of this unit. Refer to
SP-P/O MODE (rear output and preout set-
ting) on page 7.
The subwoofer output of this unit is monau-
ral.
! When using a subwoofer of 70 W (2 W), be
sure to connect the subwoofer to the violet
and violet/black leads of this unit. Do not
connect anything to the green and green/
black leads.
Power amp (sold separately)
Perform these connections when using the op-
tional amplifier.
1
3
2
4
5
5
1 System remote control
Connect to Blue/white cable.
2 Power amp (sold separately)
3 Connect with RCA cables (sold separately)
4 To Rear output or subwoofer output
5 Rear speaker or subwoofer
Installation
Important
! Check all connections and systems before
final installation.
! Do not use unauthorized parts as this may
cause malfunctions.
! Consult your dealer if installation requires
drilling of holes or other modifications to the
vehicle.
! Do not install this unit where:
— it may interfere with operation of the vehicle.
— it may cause injury to a passenger as a result
of a sudden stop.
! The semiconductor laser will be damaged if
it overheats. Install this unit away from hot
places such as near the heater outlet.
! Optimum performance is obtained when the
unit is installed at an angle of less than 60°.
60°
! When installing, to ensure proper heat dis-
persal when using this unit, make sure you
leave ample space behind the rear panel and
wrap any loose cables so they are not block-
ing the vents.
5cm
cm
Leave ample
space
5 cm
5 cm
DIN front/rear mount
This unit can be properly installed using either
front-mount or rear-mount installation.
Use commercially available parts when instal-
ling.
DIN Front-mount
1
Insert the mounting sleeve into the dash-
board.
For installation in shallow spaces, use the sup-
plied mounting sleeve. If there is enough space,
use the mounting sleeve that came with the ve-
hicle.
2
Secure the mounting sleeve by using a
screwdriver to bend the metal tabs (90°) into
place.
1
2
1 Dashboard
English
Installation
9
Section
Installation
En
03
<QRB3391-A>9

Black plate (10,1)
2 Mounting sleeve
# Make sure that the unit is installed securely in
place. An unstable installation may cause skipping
or other malfunctions.
DIN Rear-mount
1
Determine the appropriate position
where the holes on the bracket and the side
of the unit match.
2
Tighten two screws on each side.
1
2
3
1 Tapping screw (5 mm × 8 mm)
2 Mounting bracket
3 Dashboard or console
Removing the unit
1
Remove the trim ring.
1 Trim ring
2 Notched tab
! Releasing the front panel allows easier ac-
cess to the trim ring.
! When reattaching the trim ring, point the
side with the notched tab down.
2
Insert the supplied extraction keys into
both sides of the unit until they click into
place.
3
Pull the unit out of the dashboard.
Removing and re-attaching the front
panel
You can remove the front panel to protect your
unit from theft.
Press the detach button and push the front
panel upward and pull it toward you.
For details, refer to Removing the front panel to
protect your unit from theft and Re-attaching the
front panel on page 3.
Troubleshooting
Symptom
Cause
Action
The display
automatically
returns to the
ordinary dis-
play.
You did not per-
form any opera-
tion within
about 30 sec-
onds.
Perform operation
again.
The repeat
play range
changes un-
expectedly.
Depending on
the repeat play
range, the se-
lected range
may change
when another
folder or track is
being selected
or during fast
forwarding/re-
versing.
Select the repeat
play range again.
A subfolder is
not played
back.
Subfolders can-
not be played
when
FLD (fold-
er repeat) is se-
lected.
Select another re-
peat play range.
NO XXXX ap-
pears when a
display is
changed (
NO
TITLE, for ex-
ample).
There is no em-
bedded text in-
formation.
Switch the display
or play another
track/file.
The unit is
malfunction-
ing.
There is inter-
ference.
You are using a
device, such as
a cellular
phone, that
transmits elec-
tric waves near
the unit.
Move electrical
devices that may
be causing the in-
terference away
from the unit.
Error messages
When you contact your dealer or your nearest
Pioneer Service Center, be sure to note the error
message.
Common
Message
Cause
Action
AMP ERROR
Unit fails to op-
erate or speaker
connection is
incorrect; pro-
tective circuit is
activated.
Check the speak-
er connection. If
the message fails
to disappear even
after the engine is
switched off/on,
contact your deal-
er or an author-
ized Pioneer
Service Station
for assistance.
USB storage device
Message
Cause
Action
FORMAT
READ
Sometimes
there is a delay
between the
start of playback
and when you
start to hear any
sound.
Wait until the
message disap-
pears and you
hear sound.
NO AUDIO
There are no
songs.
Transfer the audio
files to the USB
storage device
and connect.
The connected
USB storage de-
vice has secur-
ity enabled.
Follow the USB
storage device in-
structions to dis-
able the security.
Installation
10
Section
Additional information
En
03
<QRB3391-A>10

09:46
Видеообзор автомагнитолы Pioneer DEH-1500UBG
10:02
Настройка магнитолы Pioneer. На примере Pioneer MVH-150UB
05:01
Pioneer MVH-150UBG распаковка и небольшой обзор настроек
05:35
Bluetooth 4.2(aptX) в магнитолу Pioneer MVH-150
06:00
Pioneer MVH-X580BT.Ошибка 19. УСТРАНЕНИЕ
Нажмите на кнопку для помощи

RDS MEDIA CENTER RECEIVER
ЦИФРОВОЙ МЕДИА-РЕСИВЕР
MVH-150UBG
Black plate (1,1)
English Русский
Owner’s Manual
Руководство пользователя
<QRB3391-A>1
Section
Before you start
01
02
Thank you for purchasing this PIONEER
product
To ensure proper use, please read through this
manual before using this product. It is especially
important that you read and obser ve WARN-
INGs and CAUTIONs in this manual. Please
keep the manual in a safe and accessible place for
future reference.
If you want to dispose this product, do not
mix it with general household waste. There is
a separate collection system for used electronic products in accordance with legislation
that requires proper treatment, recover y and
recycling.
Private households in the member states of the
EU, in Switzerland and Norway may return their
used electronic products free of charge to designated collection facilities or to a retailer (if you
purchase a similar new one).
For countries not mentioned above, please contact your local authorities for the correct method
of disposal.
By doing so you will ensure that your disposed
product undergoes the necessar y treatment, recovery and recycling and thus prevent potential
negative effects on the environment and human
health.
About this unit
The tuner frequencies on this unit are allocated
for use in Western Europe, Asia, the Middle
East, Africa and Oceania. Use in other areas
may result in poor reception. The RDS (radio
data system) function only operates in areas
with broadcasting RDS signals for FM stations.
CAUTION
! Do not allow this unit to come into contact
with liquids. Electrical shock could result.
Also, damage to this unit, smoke, and overheating could result from contact with
liquids.
! The Pioneer CarStereo-Pass is for use only in
Germany.
! Always keep the volume low enough to hear
outside sounds.
! Avoid exposure to moisture.
! If the battery is disconnected or discharged,
any preset memor y will be erased.
Note
Function setting operations are completed even
if the menu is canceled before the operations
are confirmed.
About this manual
! In the following instructions, USB memories
and USB audio players are collectively referred to as “USB storage device”.
In case of trouble
Should this unit fail to operate properly, please
contact your dealer or nearest authorized
PIONEER Service Station.
Operating this unit
Head unit
4
1 2 3 5
Part Part
1 SRC/OFF 7 BAND
MULTI-CONTROL
2
(M.C.)
3
(list) 9 c/d
4 DISP a 1/
5 USB port b
(equalizer) c Detach button
6
CAUTION
! Use an optional Pioneer USB cable (CD-
U50E) to connect the USB storage device as
any device connected directly to the unit will
protrude out from the unit, which could be
dangerous.
! Do not use unauthorized products.
8
(back)/
DIMMER
(dimmer)
to 6/
AUX input jack
(3.5 mm stereo
jack)
Black plate (2,1)
Display indication
21 3 75
Indicator State
The list function is being oper-
(list)
1
Sub infor-
2
mation section
TA (traffic
3
announcements)
TP (traffic
program
4
identification)
(sound re-
5
triever)
6 LOC Local seek tuning is on.
7
8
dom)
ated.
Sub information is displayed.
TA function is on.
A TP station is tuned in.
The sound retriever function
is on.
(repeat) Track or folder repeat is on.
(ran-
Random play is on.
4 6 8
a
2
En
<QRB3391-A>2

Operating this unit
Operating this unit
Black plate (3,1)
Section
02
Indicator State
! Tuner: band and fre-
quency
! RDS: program service
name, PTY information
and other literal information
! USB storage device:
elapsed playback time
and text information
Appears when a lower tier of
folder or menu exists.
9
a
Main information section
Set up menu
When you turn the ignition switch to ON after installation, set up menu appears on the display.
You can set up the menu options below.
1 After installation of this unit, turn the
ignition switch to ON.
SET UP appears.
2 Turn M.C. to switch to YES.
# If you do not operate for 30 seconds, the set up
menu will not be displayed.
# If you prefer not to set up at this time, turn M.C.
to switch to NO. Press to select.
If you select NO, you cannot set up in the set up
menu.
3 Press M.C. to select.
4 Perform the following procedures to set
the menu.
To proceed to the next menu option, you need to
confirm your selection.
LANGUAGE (multi-language)
This unit can display the text information from a
compressed audio file even for information embedded in English or Russian.
! If the embedded language and the selected
language setting are not the same, text information may not display properly.
! Some characters may not be displayed prop-
erly.
1 Turn M.C. to select the desired setting.
ENG (English)—РУС (Russian)
2 Press M.C. to confirm the selection.
CLOCK SET (setting the clock)
1 Turn M.C. to adjust hour.
2 Press M.C. to select minute.
3 Turn M.C. to adjust minute.
4 Press M.C. to confirm the selection.
FM STEP (FM tuning step)
Normally, the FM tuning step employed by seek
tuning is 50 kHz. When AF or TA is on, the tuning
step automatically changes to 100 kHz. It may be
preferable to set the tuning step to 50 kHz when
AF is on.
! The tuning step remains at 50 kHz during man-
ual tuning.
1 Turn M.C. to select the FM tuning step.
50 (50 kHz)—100 (100 kHz)
2 Press M.C. to confirm the selection.
QUIT appears.
5 To finish your settings, turn M.C. to select
YES.
# If you prefer to change your setting again, turn
M.C. to switch to NO. Press to select.
6 Press M.C. to select.
Notes
! You can set up the menu options from the
system menu. For details about the settings,
refer to System menu on page 7.
! You can cancel set up menu by pressing
SRC/OFF.
Basic operations
Important
! Handle gently when removing or attaching
the front panel.
! Avoid subjecting the front panel to excessive
shock.
! Keep the front panel out of direct sunlight
and high temperatures.
! To avoid damaging the device or vehicle inte-
rior, remove any cables and devices attached
to the front panel before detaching it.
Removing the front panel to protect your unit from
theft
1 Press the detach button to release the front
panel.
2 Push the front panel upward (M) and then pull
it toward (N) you.
3 Always keep the detached front panel in a pro-
tection device such as a protection case.
Re-attaching the front panel
1 Slide the front panel to the left.
Make sure to insert the tabs on the left side of
the head unit into the slots on the front panel.
2 Press the right side of the front panel until it is
firmly seated.
If you cannot attach the front panel to the
head unit successfully, make sure that you are
placing the front panel onto the head unit correctly. Forcing the front panel into place may
result in damage to the front panel or head
unit.
Turning the unit on
1 Press SRC/OFF to turn the unit on.
Turning the unit off
1 Press and hold SRC/OFF until the unit turns
off.
English
<QRB3391-A>3
3
En

Section
Operating this unit
02
Black plate (4,1)
Operating this unit
Selecting a source
1 Press SRC/OFF to cycle between:
TUNER (tuner)—USB (USB)—AUX (AUX)
Adjusting the volume
1 Turn M.C. to adjust the volume.
CAUTION
For safety reasons, park your vehicle when removing the front panel.
Note
When this unit’s blue/white lead is connected to
the vehicle’s auto-antenna relay control terminal, the vehicle’s antenna extends when this
unit’s source is turned on. To retract the antenna, turn the source off.
Frequently used menu
operations
Returning to the previous display
Returning to the previous list (the folder one level
higher)
/DIMMER.
1 Press
Returning to the ordinary display
Canceling the main menu
1 Press BAND.
Returning to the ordinary display from the list
1 Press BAND.
Tuner
Basic operations
Selecting a band
1 Press BAND until the desired band (FM1,
FM2, FM3 for FM or MW/LW) is displayed.
Switching preset stations
1 Press c or d.
! Select PCH (preset channel) under SEEK to
use this function. For details about the settings, refer to SEEK (left/right k ey setting) on
page 5.
Manual tuning (step by step)
1 Press c or d.
! Select MAN (manual tuning) under SEEK to
use this function. For details about the settings, refer to SEEK (left/right k ey setting) on
page 5.
Seeking
1 Press and hold c or d, and then release.
You can cancel seek tuning by briefly pressing
c or d.
While pressing and holding c or d, you can
skip stations. Seek tuning starts as soon as
you release c or d.
Note
This unit’s AF (alternative frequencies search)
function can be turned on and off. AF should be
off for normal tuning operation (refer to AF (al-
ternative fre quencies search) on page 5).
Storing and recalling stations
for each band
Using preset tuning buttons
1 When you find a station that you want
to store in memory, press one of the preset
tuning buttons (1/
the preset number stops flashing.
to 6/ ) and hold until
2 Press one of the preset tuning buttons
(1/
to 6/ ) to select the desired station.
Switching the display
Selecting the desired text information
1 Press DISP to cycle between the following:
! FREQUENCY (program ser vice name or
frequency)
! BRDCST INFO (program service name/PTY
information)
! CLOCK (source name and clock)
Notes
! If the program ser vice name cannot be ac-
quired in FREQUENCY, the broadcast frequency is displayed instead. If the program
service name is detected, the program ser vice name will be displayed.
! BRDCST INFO text information will change
automatically.
! Depending on the band, text information can
be changed.
! Text information items that can be changed
depend on the area.
Using PTY functions
You can tune in to a station using PTY (program
type) information.
Searching for an RDS station by PTY information
You can search for general types of broadcasting
programs, such as those listed in the following
section. Refer to page 4.
1 Press
2 Turn M.C. to select a program type.
3 Press M.C. to begin the search.
(list).
NEWS/INFO—POPULAR—CLASSICS—
OTHERS
The unit searches for a station broadcasting
that type of program. When a station is found,
its program service name is displayed.
! To cancel the search, press M.C. again.
! The program of some stations may differ
from that indicated by the transmitted PTY.
! If no station is broadcasting the type of
program you searched for, NOT FOUND is
displayed for about two seconds and then
the tuner returns to the original station.
PTY list
NEWS/INFO (news and information)
NEWS (News), AFFAIRS (Current affairs), INFO
(Information), SPORT (Sports), WEATHER (Weather), FINANCE (Finance)
POPULAR (popular)
POP MUS (Popular music), ROCK MUS (Rock
music), EASY MUS (Easy listening), OTH MUS
(Other music), JAZZ (Jazz), COUNTRY (Country
music), NAT MUS (National music), OLDIES
(Oldies music), FOLK MUS (Folk music)
CLASSICS (classics)
L. CLASS (Light classical), CLASSIC (Classical)
4
En
<QRB3391-A>4

Operating this unit
Operating this unit
Black plate (5,1)
Section
02
OTHERS (others)
EDUCATE (Education), DRAMA (Drama), CULTURE (Culture), SCIENCE (Science), VARIED (Var-
ied), CHILDREN (Children’s), SOCIAL (Social
affairs), RELIGION (Religion), PHONE IN (Phone
in), TOURING (Travel), LEISURE (Leisure), DOCU-
MENT (Documentaries)
Function settings
1 Press M.C. to display the main menu.
2 Turn M.C. to change the menu option
and press to select FUNCTION.
3 Turn M.C. to select the function.
Once selected, the following functions can be
adjusted.
# If MW/LW band is selected, only BSM, LOCAL
and SEEK are available.
BSM (best stations memory)
BSM (best stations memory) automatically stores
the six strongest stations in the order of their signal strength.
1 Press M.C. to turn BSM on.
To cancel, press M.C. again.
REGION (regional)
When AF is used, the regional function limits the
selection of stations to those broadcasting regional programs.
1 Press M.C. to turn the regional function on or
off.
LOCAL (local seek tuning)
Local seek tuning lets you tune in to only those
radio stations with sufficiently strong signals for
good reception.
1 Press M.C. to select the desired setting.
FM: OFF—LV 1 —LV2 —LV3 —LV4
MW/LW: OFF—LV1 —LV 2
The highest level setting allows reception of
only the strongest stations, while lower levels
allow the reception of weaker stations.
TA (traffic announcement standby)
1 Press M.C. to turn traffic announcement
standby on or off.
AF (alternative frequencies search)
1 Press M.C. to turn AF on or off.
NEWS (news program interruption)
1 Press M.C. to turn the NEWS function on or
off.
SEEK (left/right key setting)
You can assign a function to the left and right keys
of the unit.
Select MAN (manual tuning) to tune up or down
manually or select PCH (preset channel) to switch
between preset channels.
1 Press M.C. to select MAN or PCH.
USB storage device
Basic operations
Playing songs on a USB storage device
1 Open the USB port cover.
2 Plug in the USB storage device using a USB
cable.
Playback is performed automatically.
Stopping playback of files on a USB storage device
1 You may disconnect the USB storage device at
any time.
The unit stops playback.
Selecting a folder
1 Press 1/
Selecting a track
1 Press c or d.
Fast forwarding or reversing
1 Press and hold c or d.
! When playing compressed audio, there is no
Returning to root folder
1 Press and hold BAND.
Switching between playback memory devices
You can switch between playback memory devices
on USB storage devices with more than one Mass
Storage Device-compatible memory device.
1 Press BAND.
! You can switch between up to 32 different
Note
Disconnect USB storage devices from the unit
when not in use.
or 2/ .
sound during fast forward or reverse.
memory devices.
Switching the display
Selecting the desired text information
1 Press DISP to cycle between the following:
MP3/WMA/WAV
! TRACK INFO (track title/artist name/album
title)
! FILE INFO (file name/folder name)
! ELAPSED TIME (track number and play-
back time)
! CLOCK (source name and clock)
! SPEANA (spectrum analyzer)
Notes
! TRACK INFO and FILE INFO text information
will change automatically.
! Depending on the version of iTunes used to
write MP3 files to media file types, incompatible text stored within an audio file may be
displayed incorrectly.
! Text information items that can be changed
depend on the media.
Selecting and playing files/
tracks from the name list
1 Press to switch to the file/track name
list mode.
2 Use M.C. to select the desired file name
(or folder name).
Selecting a file or folder
1 Turn M.C.
Playing
1 When a file or track is selected, press M.C.
Viewing a list of the files (or folders) in the selected folder
1 When a folder is selected, press M.C.
Playing a song in the selected folder
1 When a folder is selected, press and hold M.C.
English
<QRB3391-A>5
5
En
Section
Operating this unit
02
Black plate (6,1)
Operating this unit
Operations using special buttons
Selecting a repeat play range
1 Press 6/
Playing tracks in random order
1 Press 5/
! To change songs during random play, press d
Pausing playback
1 Press 4/PAUSE to pause or resume.
Enhancing compressed audio and restoring rich
sound (sound retriever)
1 Press 3/S.Rtrv to cycle between:
to cycle between the following:
! ALL – Repeat all files
! ONE – Repeat the current file
! FLD – Repeat the current folder
to turn random play on or off.
Tracks in a selected repeat range are played in
random order.
to switch to the next track. Pressing c restarts
playback of the current track from the beginning of the song.
1—2—OFF (off)
1 is effective for low compression rates, and 2
is effective for high compression rates.
Function settings
1 Press M.C. to display the main menu.
2 Turn M.C. to change the menu option
and press to select FUNCTION.
Once selected, the function below can be adjusted.
S.RTRV (sound retriever)
Automatically enhances compressed audio and
restores rich sound.
1 Press M.C. to select the desired setting.
For details, refer to Enhancing compressed
audio and restoring rich sound (sound retriever)
on page 6.
Audio adjustments
1 Press M.C. to display the main menu.
2 Turn M.C. to change the menu option
and press to select AUDIO.
3 Turn M.C. to select the audio function.
Once selected, the following audio functions
can be adjusted.
! FADER is not available when SUB.W/SUB.W
is selected in SP-P/O MODE. For details, refer
to SP-P/O MODE (rear output and pre out set-
ting) on page 7.
! SUB.W, SUB.W CTRL and HPF SETTING are
not available when REAR/REAR is selected in
SP-P/O MODE. For details, refer to
SP-P/O MODE (rear output and preout set-
ting) on page 7.
! SUB.W CTRL and HPF SETTING are not avail-
able when SUB.W is selected in OFF. For details, refer to SUB.W (subwoofer on/off
setting) on page 6.
FADER (fader adjustment)
1 Press M.C. to display the setting mode.
2 Turn M.C. to adjust the front/rear speaker bal-
ance.
BALANCE (balance adjustment)
1 Press M.C. to display the setting mode.
2 Turn M.C. to adjust the left/right speaker bal-
ance.
EQ SETTING (equalizer recall)
1 Press M.C. to display the setting mode.
2 Turn M.C. to select the equalizer.
POWERFUL—NATURAL—VOCAL—CUSTOM1—CUSTOM2—FLAT—SUPER BASS
The equalizer band and equalizer level can be
customized when CUSTOM1 or CUSTOM2 is
selected.
If selecting CUSTOM1 or CUSTOM2, complete
the procedures outlined below. If selecting
other options, press M.C. to return to the previous display.
! CUSTOM1 can be set separately for each
source.
! CUSTOM2 is a shared setting used in com-
mon for all sources.
3 Press M.C. to display the setting mode.
4 Press M.C. to cycle between the following:
Equalizer band—Equalizer level
5 Turn M.C. to select the desired setting.
Equalizer band: 80HZ—250HZ—800HZ—
2.5KHZ—8KHZ
Equalizer level: +6 to –6
! You can also switch the equalizer by pressing
repeatedly.
LOUDNESS (loudness)
Loudness compensates for deficiencies in the lowfrequency and high-frequency ranges at low volume.
1 Press M.C. to select the desired setting.
OFF (off)—LOW (low)—MID (mid)—HI (high)
SUB.W (subwoofer on/off setting)
This unit is equipped with a subwoofer output
which can be turned on or off.
1 Press M.C. to select the desired setting.
NOR (normal phase)—REV (reverse phase)—
OFF (subwoofer off)
SUB.W CTRL (subwoofer adjustment)
Only frequencies lower than those in the selected
range are outputted from the subwoofer.
1 Press M.C. to display the setting mode.
2 Press M.C. to cycle between the following:
Cut-off frequency—Output level—Slope level
Rates that can be adjusted will flash.
3 Turn M.C. to select the desired setting.
Cut-off frequency: 50HZ—63HZ—80HZ—
100HZ—125HZ—160HZ—200HZ
Output level: –24 to +6
Slope level: –6— –12
BASS BOOST (bass boost)
1 Press M.C. to display the setting mode.
2 Turn M.C. to select a desired level.
0 to +6 is displayed as the level is increased or
decreased.
HPF SETTING (high pass filter adjustment)
When you do not want low sounds from the subwoofer output frequency range to play from the
front or rear speakers, turn on the HPF (high pass
filter). Only frequencies higher than those in the
selected range are output from the front or rear
speakers.
1 Press M.C. to display the setting mode.
2 Press M.C. to cycle between the following:
Cut-off frequency—Slope level
3 Turn M.C. to select the desired setting.
Cut-off frequency: OFF—50HZ—63HZ—80HZ
—100HZ—125HZ—160HZ—200HZ
Slope level: –6— –12
6
En
<QRB3391-A>6
Operating this unit
Operating this unit
Black plate (7,1)
Section
02
SLA (source level adjustment)
SLA (Source level adjustment) lets you adjust the
volume level of each source to prevent radical
changes in volume when switching between sources.
! Settings are based on the FM volume level,
which remains unchanged.
! The MW/LW volume level can also be adjusted
with this function.
! When selecting FM as the source, you cannot
switch to SLA.
1 Press M.C. to display the setting mode.
2 Turn M.C. to adjust the source volume.
Adjustment range: +4 to –4
System menu
Important
PW SAVE (power saving) is canceled if the vehicle battery is disconnected and will need to be
turned back on once the battery is reconnected.
When PW SAVE (power saving) is off, depending on connection methods, the unit may continue to draw power from the battery if your
vehicle’s ignition doesn’t have an ACC (accessory) position.
1 Press M.C. to display the main menu.
2 Turn M.C. to change the menu option
and press to select SYSTEM.
3 Turn M.C. to select the system menu
function.
Once selected, the following system menu functions can be adjusted.
LANGUAGE (multi-language)
This unit can display the text information from a
compressed audio file even for information embedded in English or Russian.
! If the embedded language and the selected
language setting are not the same, text information may not display properly.
! Some characters may not be displayed prop-
erly.
1 Turn M.C. to select the desired setting.
ENG (English)—РУС (Russian)
CLOCK SET (setting the clock)
1 Press M.C. to display the setting mode.
2 Press M.C. to select the segment of the clock
display you wish to set.
Hour—Minute
3 Turn M.C. to adjust the clock.
12H/24H (time notation)
1 Press M.C. to select the desired setting.
12H (12-hour clock)—24H (24-hour clock)
AUTO PI (auto PI seek)
The unit can automatically search for a different
station with the same programming, even during
preset recall.
1 Press M.C. to turn Auto PI seek on or off.
AUX (auxiliar y input)
Activate this setting when using an auxiliary device connected to this unit.
1 Press M.C. to turn AUX on or off.
PW SAVE (power saving)
Switching this function on enables you to reduce
the consumption of battery power.
! Turning on the source is the only operation al-
lowed when this function is on.
1 Press M.C. to turn the power save on or off.
Switching the dimmer setting
You can adjust the brightness of illumination.
1 Press M.C. to display the main menu.
2 Turn M.C. to display ILLUMI and press to
select.
3 Press M.C. to select the desired setting.
OFF (off)—ON (on)
! You can also change the dimmer setting by
pressing and holding
/DIMMER.
Initial menu
1 Press and hold SRC/OFF until the unit
turns off.
2 Press and hold SRC/OFF until the main
menu appears in the display.
3 Turn M.C. to change the menu option
and press to select INITIAL.
4 Turn M.C. to select the initial menu function.
Once selected, the following initial menu functions can be adjusted.
FM STEP (FM tuning step)
Normally, the FM tuning step employed by seek
tuning is 50 kHz. When AF or TA is on, the tuning
step automatically changes to 100 kHz. It may be
preferable to set the tuning step to 50 kHz when
AF is on.
! The tuning step remains at 50 kHz during man-
ual tuning.
1 Press M.C. to select the FM tuning step.
50 (50 kHz)—100 (100 kHz)
SP-P/O MODE (rear output and preout setting)
The rear speaker leads output and the RCA output
of this unit can be used to connect a full-range
speaker or subwoofer. Select a suitable option for
your connection.
1 Press M.C. to display the setting mode.
2 Turn M.C. to select the desired setting.
You can select any one of the options in the following list:
! REAR/SUB.W – Select when there is a full-
range speaker connected to the rear speaker leads output and there is a subwoofer
connected to the RCA output.
! SUB.W/SUB.W – Select when there is a
subwoofer connected directly to the rear
speaker leads output without any auxiliar y
amp and there is a subwoofer connected
to the RCA output.
! REAR/REAR – Select when there is a full-
range speaker connected to the rear speaker leads output and the RCA output.
If there is a full-range speaker connected to
the rear speaker leads output and the RCA
output is not used, you may select either
REAR/SUB.W or REAR/REAR.
System menu
1 Press and hold SRC/OFF until the unit
turns off.
2 Press and hold SRC/OFF until the main
menu appears in the display.
3 Turn M.C. to change the menu option
and press to select SYSTEM.
4 Turn M.C. to select the system menu
function.
Once selected, the following system menu functions can be adjusted.
For details, refer to System menu on page 7.
English
7
En
<QRB3391-A>7
Section
Operating this unit
02
Black plate (8,1)
Installation
03
Using an AUX source
1 Insert the stereo mini plug into the AUX
input jack.
2 Press SRC/OFF to select AUX as the
source.
Note
AUX cannot be selected unless the auxiliary setting is turned on. For more details, refer to AUX
(auxiliary input) on page 7.
Switching the display
Selecting the desired text information
1 Press DISP to cycle between the following:
! Source name
! Source name and clock
If an unwanted display appears
Turn off the unwanted display using the procedures listed below.
1 Press M.C. to display the main menu.
2 Turn M.C. to change the menu option
and press to select SYSTEM.
3 Turn M.C. to display DEMO OFF and press
to select.
4 Turn M.C. to switch to YES.
5 Press M.C. to select.
8
En
Connections
Important
! When installing this unit in a vehicle without
an ACC (accessor y) position on the ignition
switch, failure to connect the red cable to the
terminal that detects operation of the ignition
key may result in batter y drain.
O
F
N
F
O
S
T
A
R
T
ACC position No ACC position
! Use of this unit in conditions other than the
following could result in fire or malfunction.
— Vehicles with a 12-volt battery and negative
grounding.
— Speakers with 50 W (output value) and 4 W to
8 W (impedance value).
! To prevent a short-circuit, overheating or mal-
function, be sure to follow the directions
below.
— Disconnect the negative terminal of the bat-
tery before installation.
— Secure the wiring with cable clamps or adhe-
sive tape. Wrap adhesive tape around wiring
that comes into contact with metal parts to
protect the wiring.
— Place all cables away from moving parts,
such as the shift lever and seat rails.
— Place all cables away from hot places, such
as near the heater outlet.
— Do not connect the yellow cable to the battery
by passing it through the hole to the engine
compartment.
— Cover any disconnected cable connectors
with insulating tape.
— Do not shorten any cables.
— Never cut the insulation of the power cable of
this unit in order to share the power with
other devices. The current capacity of the
cable is limited.
— Use a fuse of the rating prescribed.
— Never wire the negative speaker cable directly
to ground.
— Never band together negative cables of multi-
ple speakers.
! When this unit is on, control signals are sent
through the blue/white cable. Connect this
cable to the system remote control of an external power amp or the vehicle’s auto-antenna relay control terminal (max. 300 mA
12 V DC). If the vehicle is equipped with a
glass antenna, connect it to the antenna
booster power supply terminal.
! Never connect the blue/white cable to the
power terminal of an external power amp.
Also, never connect it to the power terminal
of the auto antenna. Doing so may result in
battery drain or a malfunction.
! The black cable is ground. Ground cables for
this unit and other equipment (especially,
high-current products such as power amps)
must be wired separately. If they are not, an
accidental detachment may result in a fire or
malfunction.
This unit
21
1 Power cord input
2 Rear output or subwoofer output
3 Antenna input
4 Fuse (10 A)
<QRB3391-A>8
Installation
Installation
Black plate (9,1)
Section
03
Power cord
3
4
1
3
556
8
9
6
4
a
b
2
7
d
1 To power cord input
2 Depending on the kind of vehicle, the func-
tion of 3 and 5 may be different. In this
case, be sure to connect 4 to 5 and 6 to
3.
3 Yellow
Back-up (or accessor y)
4 Yellow
Connect to the constant 12 V supply terminal.
5 Red
Accessory (or back-up)
6 Red
Connect to terminal controlled by ignition
switch (12 V DC).
7 Connect leads of the same color to each
other.
8 Black (chassis ground)
9 Blue/white
The pin position of the ISO connector will differ depending on the type of vehicle. Connect
9 and b when Pin 5 is an antenna control
type. In another type of vehicle, never connect 9 and b.
a Blue/white
Connect to system control terminal of the
power amp (max. 300 mA 12 V DC).
b Blue/white
Connect to auto-antenna relay control terminal (max. 300 mA 12 V DC).
c Speaker leads
White: Front left +
White/black: Front left *
Gray: Front right +
Gray/black: Front right *
Green: Rear left + or subwoofer +
Green/black: Rear left * or subwoofer *
Violet: Rear right + or subwoofer +
Violet/black: Rear right * or subwoofer *
d ISO connector
In some vehicles, the ISO connector may be
divided into two. In this case, be sure to connect to both connectors.
Notes
! Change the initial menu of this unit. Refer to
SP-P/O MODE (rear output and preout setting) on page 7.
The subwoofer output of this unit is monaural.
! When using a subwoofer of 70 W (2 W), be
sure to connect the subwoofer to the violet
and violet/black leads of this unit. Do not
connect anything to the green and green/
black leads.
Power amp (sold separately)
Perform these connections when using the optional amplifier.
1
1 System remote control
Connect to Blue/white cable.
2 Power amp (sold separately)
3 Connect with RCA cables (sold separately)
4 To Rear output or subwoofer output
5 Rear speaker or subwoofer
3
2
55
4
Installation
Important
! Check all connections and systems before
final installation.
! Do not use unauthorized parts as this may
cause malfunctions.
! Consult your dealer if installation requires
drilling of holes or other modifications to the
vehicle.
! Do not install this unit where:
— it may interfere with operation of the vehicle.
— it may cause injur y to a passenger as a result
of a sudden stop.
! The semiconductor laser will be damaged if
it overheats. Install this unit away from hot
places such as near the heater outlet.
! Optimum performance is obtained when the
unit is installed at an angle of less than 60°.
60°
! When installing, to ensure proper heat dis-
persal when using this unit, make sure you
leave ample space behind the rear panel and
wrap any loose cables so they are not blocking the vents.
Leave ample
5 cm
space
5 cm
DIN front/rear mount
This unit can be properly installed using either
front-mount or rear-mount installation.
Use commercially available parts when installing.
DIN Front-mount
1 Insert the mounting sleeve into the dashboard.
For installation in shallow spaces, use the supplied mounting sleeve. If there is enough space,
use the mounting sleeve that came with the vehicle.
2 Secure the mounting sleeve by using a
screwdriver to bend the metal tabs (90°) into
place.
1
2
English
1 Dashboard
9
En
<QRB3391-A>9

Section
03
Installation
Black plate (10,1)
Additional information
2 Mounting sleeve
# Make sure that the unit is installed securely in
place. An unstable installation may cause skipping
or other malfunctions.
DIN Rear-mount
1 Determine the appropriate position
where the holes on the bracket and the side
of the unit match.
2 Tighten two screws on each side.
1
2
1 Tapping screw (5 mm × 8 mm)
2 Mounting bracket
3 Dashboard or console
3
Removing the unit
1 Remove the trim ring.
1 Trim ring
2 Notched tab
! Releasing the front panel allows easier ac-
cess to the trim ring.
! When reattaching the trim ring, point the
side with the notched tab down.
2 Insert the supplied extraction keys into
both sides of the unit until they click into
place.
3 Pull the unit out of the dashboard.
Removing and re-attaching the front
panel
You can remove the front panel to protect your
unit from theft.
Press the detach button and push the front
panel upward and pull it toward you.
For details, refer to Removing the front panel to
protect your unit from theft and Re-attaching the
front panel on page 3.
Troubleshooting
Symptom Cause Action
The display
automatically
returns to the
ordinary display.
The repeat
play range
changes unexpectedly.
A subfolder is
not played
back.
NO XXXX appears when a
display is
changed (NO
TITLE, for example).
The unit is
malfunctioning.
There is interference.
You did not perform any operation within
about 30 seconds.
Depending on
the repeat play
range, the selected range
may change
when another
folder or track is
being selected
or during fast
forwarding/reversing.
Subfolders cannot be played
when FLD (folder repeat) is selected.
There is no embedded text information.
You are using a
device, such as
a cellular
phone, that
transmits electric waves near
the unit.
Perform operation
again.
Select the repeat
play range again.
Select another repeat play range.
Switch the display
or play another
track/file.
Move electrical
devices that may
be causing the interference away
from the unit.
Error messages
When you contact your dealer or your nearest
Pioneer Service Center, be sure to note the error
message.
Common
Message Cause Action
AMP ERROR Unit fails to op-
USB storage device
Message Cause Action
FORMAT
READ
NO AUDIO There are no
erate or speaker
connection is
incorrect; protective circuit is
activated.
Sometimes
there is a delay
between the
start of playback
and when you
start to hear any
sound.
songs.
The connected
USB storage device has security enabled.
Check the speaker connection. If
the message fails
to disappear even
after the engine is
switched off/on,
contact your dealer or an authorized Pioneer
Service Station
for assistance.
Wait until the
message disappears and you
hear sound.
Transfer the audio
files to the USB
storage device
and connect.
Follow the USB
storage device instructions to disable the security.
10
En
<QRB3391-A>10
Loading…
Перейти к контенту
Русские электронные инструкции по эксплуатации
Постоянно обновляемый большой каталог документации по эксплуатации и использованию современных устройств и оборудования на русском языке. Бесплатное скачивание файлов.
Поиск:
Главная
♥ В закладки
Просмотр инструкции в pdf
Инструкция по эксплуатации автомагнитолы Pioneer MVH-150UBG.
Скачать инструкцию к автомагнитоле Pioneer MVH-150UBG (1,19 МБ)
Автомагнитолы
« Инструкция к автомагнитоле Pioneer DEH-2800UI
» Инструкция к автомагнитоле VARTA V-DV810BT
Вам также может быть интересно

Инструкция к автомагнитоле Pioneer FH-S720BT

Инструкция к видеорегистратору Pioneer VREC-DZ600

Инструкция к наушникам Pioneer SE-MJ751

Инструкция к автомагнитоле Pioneer MVH-G111

Инструкция к автомагнитоле Pioneer DMH-G121
Инструкция к наушникам Pioneer SE-MX8-K

Инструкция к автомагнитоле Pioneer DEH-X3600UI

Инструкция к автомагнитоле Pioneer MVH-S120UI
Добавить комментарий
Имя *
Email *
Сайт
Комментарий
Сохранить моё имя, email и адрес сайта в этом браузере для последующих моих комментариев.
- Добавить инструкцию
- Заказать инструкцию
- Политика конфиденциальности
Перейти к контенту
Автомагнитолы Pioneer
- Размер инструкции: 740.41 kB
- Формат файла: pdf
Если вы потеряли инструкцию от автомагнитолы Pioneer MVH-150UBG, можете скачать файл для просмотра на компьютере или печати.
Инструкция для автомагнитолы Pioneer MVH-150UBG на русском языке. В руководстве описаны возможности и полезные функции, а также правила эксплуатации. Перед использованием внимательно ознакомьтесь с инструкцией.
Чтобы не читать всю инструкцию вы можете выполнить поиск по содержимому внутри инструкции и быстро найти необходимую информацию. Рекомендации по использованию помогут увеличить срок службы автомагнитолы Pioneer MVH-150UBG. Если у вас появилась проблема, то найдите раздел с описанием неисправностей и способами их решения. В нем указаны типичные поломки и способы их решения.
Раздел: Авто, мото оборудование и транспорт
Тип: Автомагнитола
Характеристики, спецификации
Радиоприемник:
есть, цифровой тюнер
Blu-ray проигрыватель:
нет
Номинальная и пиковая мощность:
4×22 Вт/4×50 Вт
Формат дисплея:
монохромный
Инфракрасный пульт дистанционного управления:
нет
USB на передней панели:
есть
Вход аудио на передней панели:
есть
Выходы:
PreAmp фронт, PreAmp тыл, PreAmp сабвуфер
Поддержка технологии «Bluetooth»:
нет
Поддержка диапазонов:
FM, СВ, ДВ
Поддержка технологии «RDS»:
RDS, RDS/EON, RDS/PTY
Тюнер с дальним приёмом:
есть
Количество полос эквалайзера:
5
Размеры (ШхВхГ):
178x50x165 мм
Инструкция к Автомагнитоле Pioneer MVH-150UBG

Black plate (1,1)
RDS MEDIA CENTER RECEIVER
ЦИФРОВОЙ МЕДИА—РЕСИВЕР
English Русский
MVH-150UBG
Owner’s Manual
Руководство пользователя
<QRB3391-A>1
Black plate (2,1)
Thank you for purchasing this PIONEER
About this unit
Head unit
product
To ensure proper use, please read through this
The tuner frequencies on this unit are allocated
manual before using this product. It is especially
for use in Western Europe, Asia, the Middle
important that you read and observe WARN-
East, Africa and Oceania. Use in other areas
INGs and CAUTIONs in this manual. Please
may result in poor reception. The RDS (radio
keep the manual in a safe and accessible place for
data system) function only operates in areas
future reference.
with broadcasting RDS signals for FM stations.
CAUTION
! Do not allow this unit to come into contact
with liquids. Electrical shock could result.
Also, damage to this unit, smoke, and over-
heating could result from contact with
liquids.
If you want to dispose this product, do not
! The Pioneer CarStereo-Pass is for use only in
mix it with general household waste. There is
Germany.
a separate collection system for used elec-
! Always keep the volume low enough to hear
tronic products in accordance with legislation
outside sounds.
that requires proper treatment, recovery and
! Avoid exposure to moisture.
recycling.
! If the battery is disconnected or discharged,
any preset memory will be erased.
Private households in the member states of the
Note
EU, in Switzerland and Norway may return their
Function setting operations are completed even
used electronic products free of charge to desig-
if the menu is canceled before the operations
nated collection facilities or to a retailer (if you
are confirmed.
purchase a similar new one).
For countries not mentioned above, please con-
tact your local authorities for the correct method
About this manual
of disposal.
! In the following instructions, USB memories
By doing so you will ensure that your disposed
and USB audio players are collectively re-
product undergoes the necessary treatment, re-
ferred to as “USB storage device”.
covery and recycling and thus prevent potential
negative effects on the environment and human
health.
In case of trouble
Should this unit fail to operate properly, please
contact your dealer or nearest authorized
PIONEER Service Station.
a b
4
7
1 2 3 5
98c6
Display indication
21 3 75
Part Part
1 SRC/OFF 7 BAND
(back)/
MULTI-CONTROL
2
8
DIMMER
(M.C.)
(dimmer)
3
(list) 9 c/d
4 DISP a 1/
to 6/
AUX input jack
5 USB port b
(3.5 mm stereo
jack)
6
(equalizer) c Detach button
CAUTION
! Use an optional Pioneer USB cable (CD-
U50E) to connect the USB storage device as
any device connected directly to the unit will
protrude out from the unit, which could be
dangerous.
! Do not use unauthorized products.
9
Section
01
Before you start
Operating this unit
02
4 6 8
a
Indicator State
The list function is being oper-
1
(list)
ated.
Sub infor-
2
mation sec-
Sub information is displayed.
tion
TA (traffic
3
announce-
TA function is on.
ments)
TP (traffic
program
4
A TP station is tuned in.
identifica-
tion)
The sound retriever function
5
(sound re-
is on.
triever)
6 LOC Local seek tuning is on.
7
(repeat) Track or folder repeat is on.
(ran-
8
Random play is on.
dom)
2
En
<QRB3391-A>2
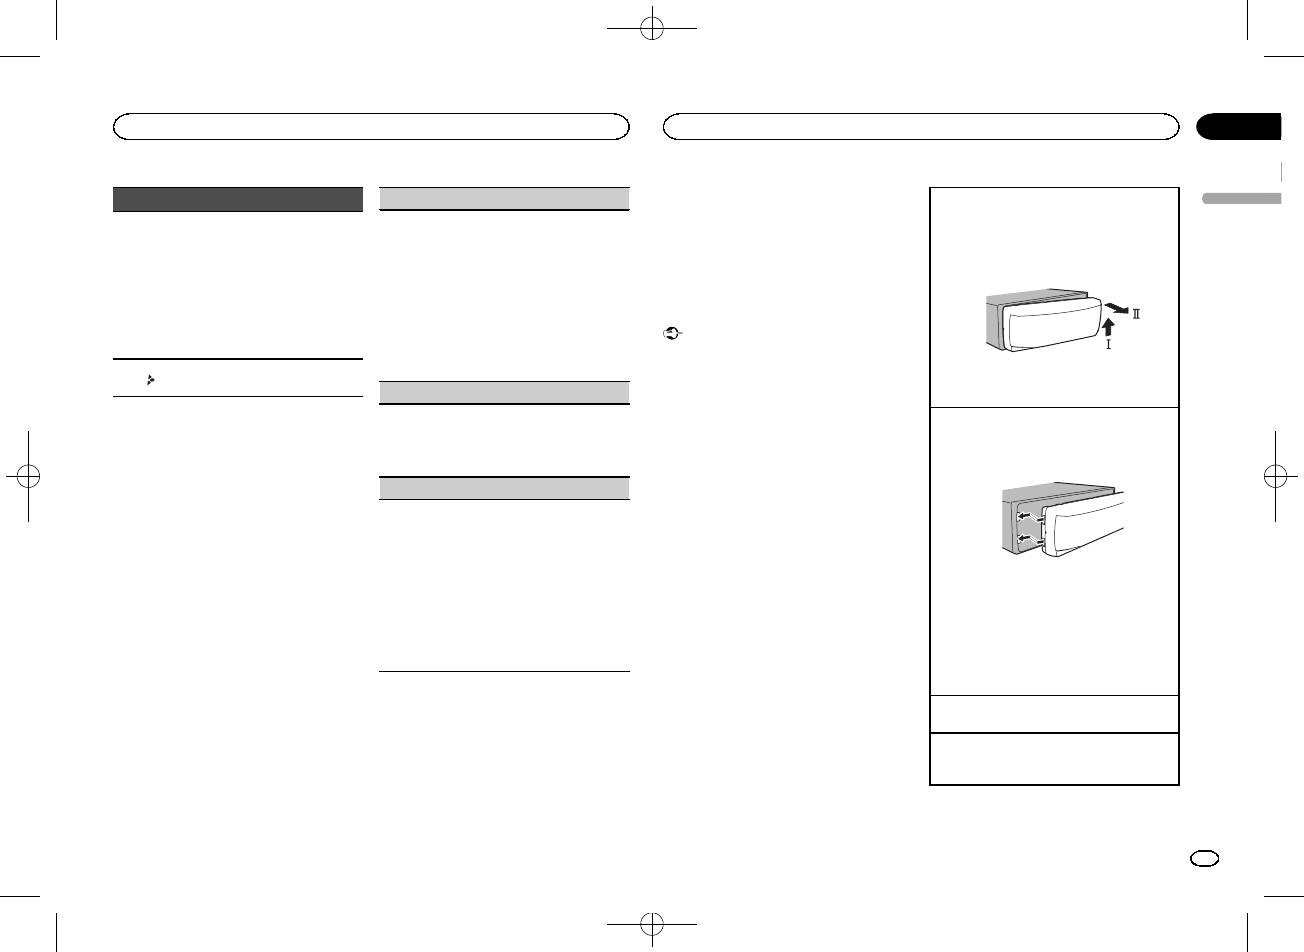
Black plate (3,1)
Section
Operating this unit
Operating this unit
02
Notes
Indicator State
LANGUAGE (multi-language)
Removing the front panel to protect your unit from
! You can set up the menu options from the
English
theft
This unit can display the text information from a
! Tuner: band and fre-
system menu. For details about the settings,
1 Press the detach button to release the front
compressed audio file even for information em-
quency
refer to System menu on page 7.
panel.
bedded in English or Russian.
! RDS: program service
! You can cancel set up menu by pressing
2 Push the front panel upward (M) and then pull
Main infor-
! If the embedded language and the selected
name, PTY information
SRC/OFF.
it toward (N) you.
9
mation sec-
language setting are not the same, text infor-
and other literal informa-
tion
mation may not display properly.
tion
! Some characters may not be displayed prop-
Basic operations
! USB storage device:
erly.
elapsed playback time
Important
1 Turn M.C. to select the desired setting.
and text information
! Handle gently when removing or attaching
ENG (English)—РУС (Russian)
the front panel.
Appears when a lower tier of
2 Press M.C. to confirm the selection.
a
! Avoid subjecting the front panel to excessive
folder or menu exists.
3 Always keep the detached front panel in a pro-
CLOCK SET (setting the clock)
shock.
tection device such as a protection case.
! Keep the front panel out of direct sunlight
1 Turn M.C. to adjust hour.
and high temperatures.
Re-attaching the front panel
Set up menu
2 Press M.C. to select minute.
! To avoid damaging the device or vehicle inte-
1 Slide the front panel to the left .
3 Turn M.C. to adjust minute.
rior, remove any cables and devices attached
Make sure to insert the tabs on the left side of
When you turn the ignition switch to ON after in-
4 Press M.C. to confirm the selection.
the head unit into the slots on the front panel.
stallation, set up menu appears on the display.
to the front panel before detaching it.
You can set up the menu options below.
FM STEP (FM tuning step)
Normally, the FM tuning step employed by seek
1 After installation of this unit, turn the
tuning is 50 kHz. When AF or TA is on, the tuning
ignition switch to ON.
step automatically changes to 100 kHz. It may be
SET UP appears.
preferable to set the tuning step to 50 kHz when
AF is on.
2 Turn M.C. to switch to YES.
! The tuning step remains at 50 kHz during man-
2 Press the right side of the front panel until it is
# If you do not operate for 30 seconds, the set up
ual tuning.
firmly seated.
menu will not be displayed.
1 Turn M.C. to select the FM tuning step.
If you cannot attach the front panel to the
# If you prefer not to set up at this time, turn M.C.
50 (50 kHz)—100 (100 kHz)
head unit successfully, make sure that you are
to switch to NO. Press to select.
2 Press M.C. to confirm the selection.
placing the front panel onto the head unit cor-
If you select NO, you cannot set up in the set up
QUIT appears.
rectly. Forcing the front panel into place may
menu.
result in damage to the front panel or head
unit.
3 Press M.C. to select.
5 To finish your settings, turn M.C. to select
Turning the unit on
YES.
4 Perform the following procedures to set
1 Press SRC/OFF to turn the unit on.
# If you prefer to change your setting again, turn
the menu.
M.C. to switch to NO. Press to select.
Turning the unit off
To proceed to the next menu option, you need to
1 Press and hold SRC/OFF until the unit turns
confirm your selection.
6 Press M.C. to select.
off.
En
3
<QRB3391-A>3
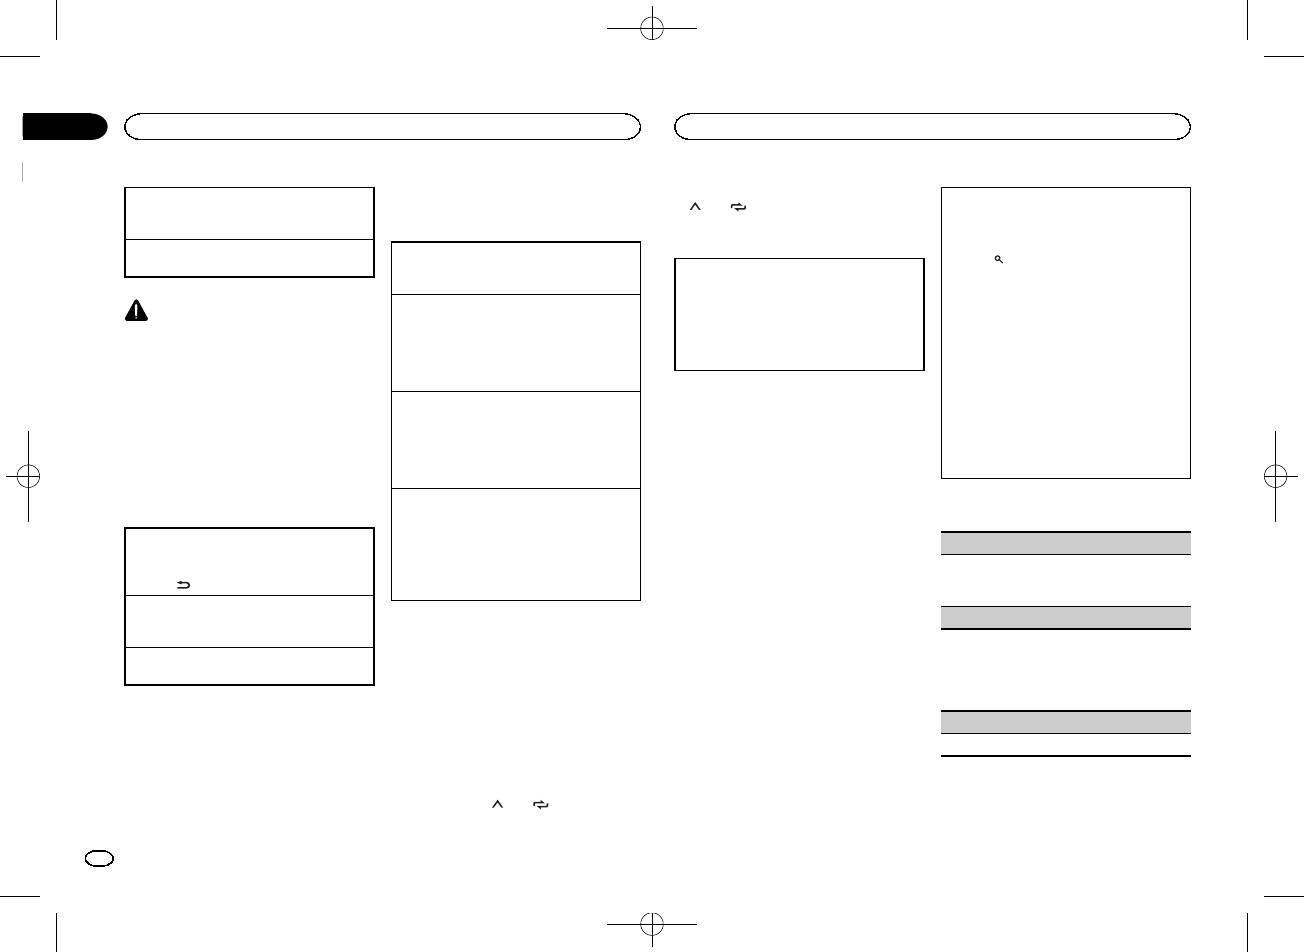
Black plate (4,1)
Section
02
Operating this unit
Operating this unit
2 Press one of the preset tuning buttons
Selecting a source
Tuner
Searching for an RDS station by PTY information
(1/
to 6/ ) to select the desired station.
1 Press SRC/OFF to cycle between:
You can search for general types of broadcasting
Basic operations
TUNER (tuner)—USB (USB)—AUX (AUX)
programs, such as those listed in the following
Switching the display
section. Refer to page 4.
Adjusting the volume
Selecting a band
1 Press
(list).
1 Turn M.C. to adjust the volume.
1 Press BAND until the desired band (FM1,
Selecting the desired text information
2 Turn M.C. to select a program type.
FM2, FM3 for FM or MW/LW) is displayed.
1 Press DISP to cycle between the following:
NEWS/INFO—POPULAR—CLASSICS—
! FREQUENCY (program service name or
Switching preset stations
OTHERS
CAUTION
frequency)
1 Press c or d.
3 Press M.C. to begin the search.
For safety reasons, park your vehicle when re-
! BRDCST INFO (program service name/PTY
! Select PCH (preset channel) under SEEK to
The unit searches for a station broadcasting
moving the front panel.
information)
use this function. For details about the set-
that type of program. When a station is found,
! CLOCK (source name and clock)
Note
tings, refer to SEEK (left/right key setting) on
its program service name is displayed.
! To cancel the search, press M.C. again.
When this unit’s blue/white lead is connected to
page 5.
Notes
! The program of some stations may differ
the vehicle’s auto-antenna relay control termi-
Manual tuning (step by step)
! If the program service name cannot be ac-
from that indicated by the transmitted PTY.
nal, the vehicle’s antenna extends when this
1 Press c or d.
quired in FREQUENCY, the broadcast fre-
! If no station is broadcasting the type of
unit’s source is turned on. To retract the anten-
! Select MAN (manual tuning) under SEEK to
quency is displayed instead. If the program
program you searched for, NOT FOUND is
na, turn the source off.
use this function. For details about the set-
service name is detected, the program serv-
displayed for about two seconds and then
tings, refer to SEEK (left/right key setting) on
ice name will be displayed.
the tuner returns to the original station.
page 5.
! BRDCST INFO text information will change
Frequently used menu
automatically.
Seeking
operations
! Depending on the band, text information can
1 Press and hold c or d, and then release.
PTY list
be changed.
You can cancel seek tuning by briefly pressing
Returning to the previous display
! Text information items that can be changed
c or d.
NEWS/INFO (news and information)
Returning to the previous list (the folder one level
depend on the area.
While pressing and holding c or d, you can
higher)
NEWS (News), AFFAIRS (Current affairs), INFO
skip stations. Seek tuning starts as soon as
1 Press
/DIMMER.
(Information), SPORT (Sports), WEATHER (Weath-
you release c or d.
Using PTY functions
er), FINANCE (Finance)
Returning to the ordinary display
You can tune in to a station using PTY (program
Note
Canceling the main menu
type) information.
POPULAR (popular)
1 Press BAND.
This unit’s AF (alternative frequencies search)
POP MUS (Popular music), ROCK MUS (Rock
function can be turned on and off. AF should be
Returning to the ordinary display from the list
music), EASY MUS (Easy listening), OTH MUS
off for normal tuning operation (refer to AF (al-
1 Press BAND.
(Other music), JAZZ (Jazz), COUNTRY (Country
ternative frequencies search) on page 5).
music), NAT MUS (National music), OLDIES
(Oldies music), FOLK MUS (Folk music)
Storing and recalling stations
for each band
CLASSICS (classics)
L. CLASS (Light classical), CLASSIC (Classical)
Using preset tuning buttons
1 When you find a station that you want
to store in memory, press one of the preset
tuning buttons (1/
to 6/ ) and hold until
the preset number stops flashing.
4
En
<QRB3391-A>4
Black plate (5,1)
Section
Operating this unit
Operating this unit
02
OTHERS (others)
Local seek tuning lets you tune in to only those
USB storage device
Switching the display
English
radio stations with sufficiently strong signals for
EDUCATE (Education), DRAMA (Drama), CUL-
Basic operations
good reception.
Selecting the desired text information
TURE (Culture), SCIENCE (Science), VARIED (Var-
1 Press M.C. to select the desired setting.
1 Press DISP to cycle between the following:
ied), CHILDREN (Children’s), SOCIAL (Social
FM: OFF—LV1—LV2—LV3—LV4
Playing songs on a USB storage device
MP3/WMA/WAV
affairs), RELIGION (Religion), PHONE IN (Phone
MW/LW: OFF—LV1 —LV2
1 Open the USB port cover.
! TRACK INFO (track title/artist name/album
in), TOURING (Travel), LEISURE (Leisure), DOCU-
The highest level setting allows reception of
2 Plug in the USB storage device using a USB
title)
MENT (Documentaries)
only the strongest stations, while lower levels
cable.
! FILE INFO (file name/folder name)
allow the reception of weaker stations.
Playback is performed automatically.
! ELAPSED TIME (track number and play-
Function settings
back time)
TA (traffic announcement standby)
Stopping playback of files on a USB storage de-
vice
! CLOCK (source name and clock)
1 Press M.C. to display the main menu.
! SPEANA (spectrum analyzer)
1 Press M.C. to turn traffic announcement
1 You may disconnect the USB storage device at
2 Turn M.C. to change the menu option
standby on or off.
any time.
Notes
The unit stops playback.
and press to select FUNCTION.
AF (alternative frequencies search)
! TRACK INFO and FILE INFO text information
Selecting a folder
will change automatically.
3 Turn M.C. to select the function.
1 Press M.C. to turn AF on or off.
1 Press 1/
or 2/ .
! Depending on the version of iTunes used to
Once selected, the following functions can be
write MP3 files to media file types, incompati-
NEWS (news program interruption)
Selecting a track
adjusted.
ble text stored within an audio file may be
1 Press c or d.
# If MW/LW band is selected, only BSM, LOCAL
displayed incorrectly.
1 Press M.C. to turn the NEWS function on or
and SEEK are available.
Fast forwarding or reversing
! Text information items that can be changed
off.
1 Press and hold c or d.
depend on the media.
BSM (best stations memory)
SEEK (left/right key setting)
! When playing compressed audio, there is no
sound during fast forward or reverse.
Selecting and playing files/
BSM (best stations memory) automatically stores
You can assign a function to the left and right keys
the six strongest stations in the order of their sig-
of the unit.
Returning to root folder
tracks from the name list
nal strength.
Select MAN (manual tuning) to tune up or down
1 Press and hold BAND.
1 Press
to switch to the file/track name
1 Press M.C. to turn BSM on.
manually or select PCH (preset channel) to switch
Switching between playback memory devices
list mode.
To cancel, press M.C. again.
between preset channels.
You can switch between playback memory devices
1 Press M.C. to select MAN or PCH.
REGION (regional)
on USB storage devices with more than one Mass
2 Use M.C. to select the desired file name
Storage Device-compatible memory device.
(or folder name).
When AF is used, the regional function limits the
1 Press BAND.
selection of stations to those broadcasting region-
! You can switch between up to 32 different
Selecting a file or folder
al programs.
memory devices.
1 Turn M.C.
1 Press M.C. to turn the regional function on or
off.
Note
Playing
Disconnect USB storage devices from the unit
1 When a file or track is selected, press M.C.
LOCAL (local seek tuning)
when not in use.
Viewing a list of the files (or folders) in the se-
lected folder
1 When a folder is selected, press M.C.
Playing a song in the selected folder
1 When a folder is selected, press and hold M.C.
En
5
<QRB3391-A>5
Black plate (6,1)
Section
02
Operating this unit
Operating this unit
Operations using special buttons
Audio adjustments
Only frequencies lower than those in the selected
1 Press M.C. to display the setting mode.
1 Press M.C. to display the main menu.
range are outputted from the subwoofer.
2 Turn M.C. to select the equalizer.
Selecting a repeat play range
1 Press M.C. to display the setting mode.
POWERFUL—NATURAL—VOCAL—CUS-
1 Press 6/
to cycle between the following:
2 Turn M.C. to change the menu option
2 Press M.C. to cycle between the following:
TOM1—CUSTOM2—FLAT—SUPER BASS
! ALL – Repeat all files
and press to select AUDIO.
Cut-off frequency—Output level—Slope level
The equalizer band and equalizer level can be
! ONE – Repeat the current file
Rates that can be adjusted will flash.
customized when CUSTOM1 or CUSTOM2 is
! FLD – Repeat the current folder
3 Turn M.C. to select the audio function.
3 Turn M.C. to select the desired setting.
selected.
Playing tracks in random order
Once selected, the following audio functions
Cut-off frequency: 50HZ—63HZ—80HZ—
If selecting CUSTOM1 or CUSTOM2, complete
1 Press 5/
to turn random play on or off.
can be adjusted.
100HZ—125HZ—160HZ—200HZ
the procedures outlined below. If selecting
Tracks in a selected repeat range are played in
! FADER is not available when SUB.W/SUB.W
Output level: –24 to +6
other options, press M.C. to return to the pre-
random order.
is selected in SP-P/O MODE. For details, refer
Slope level: –6— –12
vious display.
! To change songs during random play, press d
to SP-P/O MODE (rear output and preout set-
! CUSTOM1 can be set separately for each
BASS BOOST (bass boost)
to switch to the next track. Pressing c restarts
ting) on page 7.
source.
playback of the current track from the begin-
! SUB.W, SUB.W CTRL and HPF SETTING are
! CUSTOM2 is a shared setting used in com-
1 Press M.C. to display the setting mode.
ning of the song.
not available when REAR/REAR is selected in
mon for all sources.
2 Turn M.C. to select a desired level.
SP-P/O MODE. For details, refer to
3 Press M.C. to display the setting mode.
0 to +6 is displayed as the level is increased or
Pausing playback
SP-P/O MODE (rear output and preout set-
4 Press M.C. to cycle between the following:
decreased.
1 Press 4/PAUSE to pause or resume.
ting) on page 7.
Equalizer band—Equalizer level
HPF SETTING (high pass filter adjustment)
Enhancing compressed audio and restoring rich
! SUB.W CTRL and HPF SETTING are not avail-
5 Turn M.C. to select the desired setting.
sound (sound retriever)
able when SUB.W is selected in OFF. For de-
Equalizer band: 80HZ—250HZ—800HZ—
When you do not want low sounds from the sub-
1 Press 3/S.Rtrv to cycle between:
tails, refer to SUB.W (subwoofer on/off
2.5KHZ—8KHZ
woofer output frequency range to play from the
1—2—OFF (off)
setting) on page 6.
Equalizer level: +6 to –6
front or rear speakers, turn on the HPF (high pass
1 is effective for low compression rates, and 2
! You can also switch the equalizer by pressing
filter). Only frequencies higher than those in the
is effective for high compression rates.
FADER (fader adjustment)
repeatedly.
selected range are output from the front or rear
speakers.
LOUDNESS (loudness)
1 Press M.C. to display the setting mode.
1 Press M.C. to display the setting mode.
Function settings
2 Turn M.C. to adjust the front/rear speaker bal-
Loudness compensates for deficiencies in the low-
2 Press M.C. to cycle between the following:
1 Press M.C. to display the main menu.
ance.
frequency and high-frequency ranges at low vol-
Cut-off frequency—Slope level
ume.
3 Turn M.C. to select the desired setting.
BALANCE (balance adjustment)
2 Turn M.C. to change the menu option
1 Press M.C. to select the desired setting.
Cut-off frequency: OFF—50HZ—63HZ—80HZ
and press to select FUNCTION.
1 Press M.C. to display the setting mode.
OFF (off)—LOW (low)—MID (mid)—HI (high)
—100HZ—125HZ—160HZ—200HZ
Once selected, the function below can be ad-
2 Turn M.C. to adjust the left/right speaker bal-
Slope level: –6— –12
SUB.W (subwoofer on/off setting)
justed.
ance.
This unit is equipped with a subwoofer output
EQ SETTING (equalizer recall)
S.RTRV (sound retriever)
which can be turned on or off.
1 Press M.C. to select the desired setting.
Automatically enhances compressed audio and
NOR (normal phase)—REV (reverse phase)—
restores rich sound.
OFF (subwoofer off)
1 Press M.C. to select the desired setting.
For details, refer to Enhancing compressed
SUB.W CTRL (subwoofer adjustment)
audio and restoring rich sound (sound retriever)
on page 6.
6
En
<QRB3391-A>6

Black plate (7,1)
Section
Operating this unit
Operating this unit
02
SLA (source level adjustment)
LANGUAGE (multi-language)
Switching the dimmer setting
SP-P/O MODE (rear output and preout setting)
English
SLA (Source level adjustment) lets you adjust the
This unit can display the text information from a
You can adjust the brightness of illumination.
The rear speaker leads output and the RCA output
volume level of each source to prevent radical
compressed audio file even for information em-
of this unit can be used to connect a full-range
changes in volume when switching between sour-
bedded in English or Russian.
1 Press M.C. to display the main menu.
speaker or subwoofer. Select a suitable option for
ces.
! If the embedded language and the selected
your connection.
! Settings are based on the FM volume level,
language setting are not the same, text infor-
2 Turn M.C. to display ILLUMI and press to
1 Press M.C. to display the setting mode.
which remains unchanged.
mation may not display properly.
select.
2 Turn M.C. to select the desired setting.
! The MW/LW volume level can also be adjusted
! Some characters may not be displayed prop-
You can select any one of the options in the fol-
with this function.
erly.
3 Press M.C. to select the desired setting.
lowing list:
! When selecting FM as the source, you cannot
1 Turn M.C. to select the desired setting.
OFF (off)—ON (on)
! REAR/SUB.W – Select when there is a full-
switch to SLA.
ENG (English)—РУС (Russian)
! You can also change the dimmer setting by
range speaker connected to the rear speak-
1 Press M.C. to display the setting mode.
pressing and holding
/DIMMER.
er leads output and there is a subwoofer
CLOCK SET (setting the clock)
2 Turn M.C. to adjust the source volume.
connected to the RCA output.
Adjustment range: +4 to –4
! SUB.W/SUB.W – Select when there is a
1 Press M.C. to display the setting mode.
Initial menu
subwoofer connected directly to the rear
2 Press M.C. to select the segment of the clock
1 Press and hold SRC/OFF until the unit
speaker leads output without any auxiliary
display you wish to set.
System menu
amp and there is a subwoofer connected
Hour—Minute
turns off.
to the RCA output.
3 Turn M.C. to adjust the clock.
Important
2 Press and hold SRC/OFF until the main
! REAR/REAR – Select when there is a full-
PW SAVE (power saving) is canceled if the ve-
12H/24H (time notation)
menu appears in the display.
range speaker connected to the rear speak-
hicle battery is disconnected and will need to be
er leads output and the RCA output.
turned back on once the battery is reconnected.
1 Press M.C. to select the desired setting.
3 Turn M.C. to change the menu option
If there is a full-range speaker connected to
When PW SAVE (power saving) is off, depend-
12H (12-hour clock)—24H (24-hour clock)
and press to select INITIAL.
the rear speaker leads output and the RCA
ing on connection methods, the unit may con-
AUTO PI (auto PI seek)
output is not used, you may select either
tinue to draw power from the battery if your
4 Turn M.C. to select the initial menu func-
REAR/SUB.W or REAR/REAR.
vehicle’s ignition doesn’t have an ACC (acces-
The unit can automatically search for a different
tion.
sory) position.
station with the same programming, even during
Once selected, the following initial menu func-
preset recall.
tions can be adjusted.
System menu
1 Press M.C. to display the main menu.
1 Press M.C. to turn Auto PI seek on or off.
AUX (auxiliary input)
FM STEP (FM tuning step)
1 Press and hold SRC/OFF until the unit
2 Turn M.C. to change the menu option
turns off.
and press to select SYSTEM.
Activate this setting when using an auxiliary de-
Normally, the FM tuning step employed by seek
vice connected to this unit.
tuning is 50 kHz. When AF or TA is on, the tuning
2 Press and hold SRC/OFF until the main
3 Turn M.C. to select the system menu
1 Press M.C. to turn AUX on or off.
step automatically changes to 100 kHz. It may be
menu appears in the display.
function.
preferable to set the tuning step to 50 kHz when
PW SAVE (power saving)
Once selected, the following system menu func-
AF is on.
3 Turn M.C. to change the menu option
tions can be adjusted.
Switching this function on enables you to reduce
! The tuning step remains at 50 kHz during man-
and press to select SYSTEM.
the consumption of battery power.
ual tuning.
! Turning on the source is the only operation al-
1 Press M.C. to select the FM tuning step.
4 Turn M.C. to select the system menu
lowed when this function is on.
50 (50 kHz)—100 (100 kHz)
function.
1 Press M.C. to turn the power save on or off.
Once selected, the following system menu func-
tions can be adjusted.
For details, refer to System menu on page 7.
En
7
<QRB3391-A>7
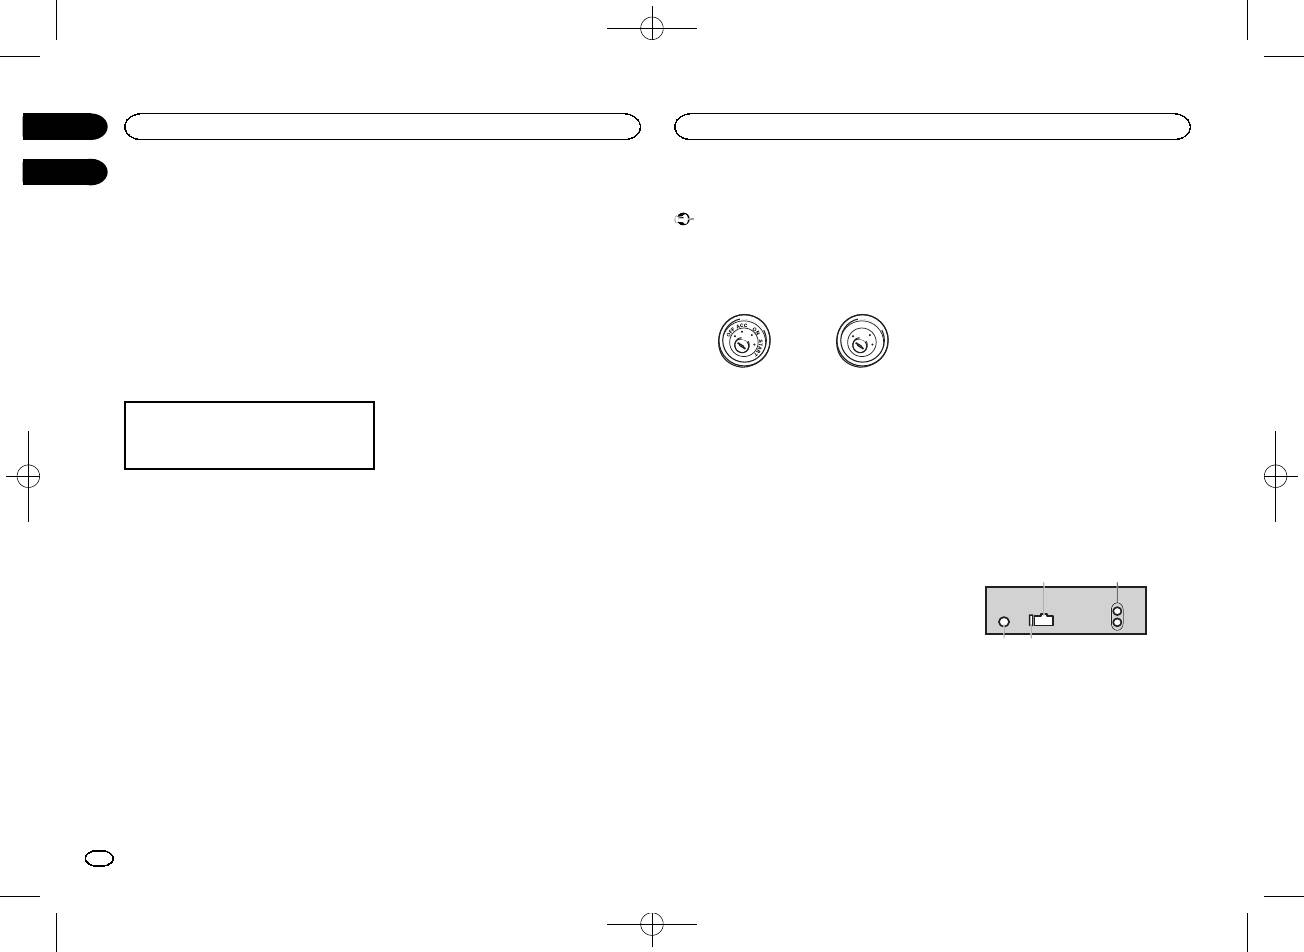
Black plate (8,1)
Using an AUX source
Connections
— Never wire the negative speaker cable directly
to ground.
1 Insert the stereo mini plug into the AUX
Important
— Never band together negative cables of multi-
input jack.
! When installing this unit in a vehicle without
ple speakers.
an ACC (accessory) position on the ignition
! When this unit is on, control signals are sent
2 Press SRC/OFF to select AUX as the
switch, failure to connect the red cable to the
through the blue/white cable. Connect this
source.
terminal that detects operation of the ignition
cable to the system remote control of an ex-
key may result in battery drain.
ternal power amp or the vehicle’s auto-anten-
Note
na relay control terminal (max. 300 mA
AUX cannot be selected unless the auxiliary set-
O
F
F
O
N
12 V DC). If the vehicle is equipped with a
ting is turned on. For more details, refer to AUX
T
S
(auxiliary input) on page 7.
T
R
A
glass antenna, connect it to the antenna
booster power supply terminal.
Switching the display
ACC position No ACC position
! Never connect the blue/white cable to the
power terminal of an external power amp.
! Use of this unit in conditions other than the
Also, never connect it to the power terminal
Selecting the desired text information
following could result in fire or malfunction.
of the auto antenna. Doing so may result in
1 Press DISP to cycle between the following:
— Vehicles with a 12-volt battery and negative
battery drain or a malfunction.
! Source name
grounding.
! The black cable is ground. Ground cables for
! Source name and clock
— Speakers with 50 W (output value) and 4 W to
this unit and other equipment (especially,
8 W (impedance value).
high-current products such as power amps)
! To prevent a short-circuit, overheating or mal-
must be wired separately. If they are not, an
If an unwanted display appears
function, be sure to follow the directions
accidental detachment may result in a fire or
below.
malfunction.
Turn off the unwanted display using the proce-
— Disconnect the negative terminal of the bat-
dures listed below.
tery before installation.
This unit
— Secure the wiring with cable clamps or adhe-
1 Press M.C. to display the main menu.
sive tape. Wrap adhesive tape around wiring
that comes into contact with metal parts to
2 Turn M.C. to change the menu option
protect the wiring.
and press to select SYSTEM.
— Place all cables away from moving parts,
such as the shift lever and seat rails.
3 Turn M.C. to display DEMO OFF and press
— Place all cables away from hot places, such
to select.
as near the heater outlet.
— Do not connect the yellow cable to the battery
4 Turn M.C. to switch to YES.
by passing it through the hole to the engine
compartment.
5 Press M.C. to select.
— Cover any disconnected cable connectors
with insulating tape.
— Do not shorten any cables.
— Never cut the insulation of the power cable of
this unit in order to share the power with
other devices. The current capacity of the
cable is limited.
— Use a fuse of the rating prescribed.
3 4
Section
02
Operating this unit
Installation
03
21
1 Power cord input
2 Rear output or subwoofer output
3 Antenna input
4 Fuse (10 A)
8
En
<QRB3391-A>8

Black plate (9,1)
Power cord
3
4
2
5
6
1
3
4
7
5
6
8
a
9
b
d
c
9 Blue/white
Power amp (sold separately)
! When installing, to ensure proper heat dis-
The pin position of the ISO connector will dif-
Perform these connections when using the op-
persal when using this unit, make sure you
fer depending on the type of vehicle. Connect
leave ample space behind the rear panel and
tional amplifier.
9 and b when Pin 5 is an antenna control
wrap any loose cables so they are not block-
type. In another type of vehicle, never con-
1
3
ing the vents.
nect 9 and b.
2
a Blue/white
4
Connect to system control terminal of the
55
power amp (max. 300 mA 12 V DC).
b Blue/white
1 System remote control
Connect to auto-antenna relay control termi-
Connect to Blue/white cable.
nal (max. 300 mA 12 V DC).
2 Power amp (sold separately)
c Speaker leads
3 Connect with RCA cables (sold separately)
White: Front left +
4 To Rear output or subwoofer output
White/black: Front left *
5 Rear speaker or subwoofer
Gray: Front right +
Gray/black: Front right *
Green: Rear left + or subwoofer +
Installation
Green/black: Rear left * or subwoofer *
Violet: Rear right + or subwoofer +
Important
Violet/black: Rear right * or subwoofer *
! Check all connections and systems before
1 To power cord input
d ISO connector
final installation.
2 Depending on the kind of vehicle, the func-
In some vehicles, the ISO connector may be
! Do not use unauthorized parts as this may
tion of 3 and 5 may be different. In this
divided into two. In this case, be sure to con-
cause malfunctions.
case, be sure to connect 4 to 5 and 6 to
nect to both connectors.
! Consult your dealer if installation requires
3.
drilling of holes or other modifications to the
Notes
3 Yellow
vehicle.
Back-up (or accessory)
! Change the initial menu of this unit. Refer to
! Do not install this unit where:
4 Yellow
SP-P/O MODE (rear output and preout set-
— it may interfere with operation of the vehicle.
Connect to the constant 12 V supply termi-
ting) on page 7.
— it may cause injury to a passenger as a result
nal.
The subwoofer output of this unit is monau-
of a sudden stop.
5 Red
ral.
! The semiconductor laser will be damaged if
Accessory (or back-up)
! When using a subwoofer of 70 W (2 W), be
it overheats. Install this unit away from hot
6 Red
sure to connect the subwoofer to the violet
places such as near the heater outlet.
Connect to terminal controlled by ignition
and violet/black leads of this unit. Do not
! Optimum performance is obtained when the
switch (12 V DC).
connect anything to the green and green/
unit is installed at an angle of less than 60°.
7 Connect leads of the same color to each
black leads.
other.
60°
8 Black (chassis ground)
5cmcm
Section
Installation
Installation
03
English
Leave ample
space
5 cm
5 cm
DIN front/rear mount
This unit can be properly installed using either
front-mount or rear-mount installation.
Use commercially available parts when instal-
ling.
DIN Front-mount
1 Insert the mounting sleeve into the dash-
board.
For installation in shallow spaces, use the sup-
plied mounting sleeve. If there is enough space,
use the mounting sleeve that came with the ve-
hicle.
2 Secure the mounting sleeve by using a
screwdriver to bend the metal tabs (90°) into
place.
1
2
1 Dashboard
En
9
<QRB3391-A>9
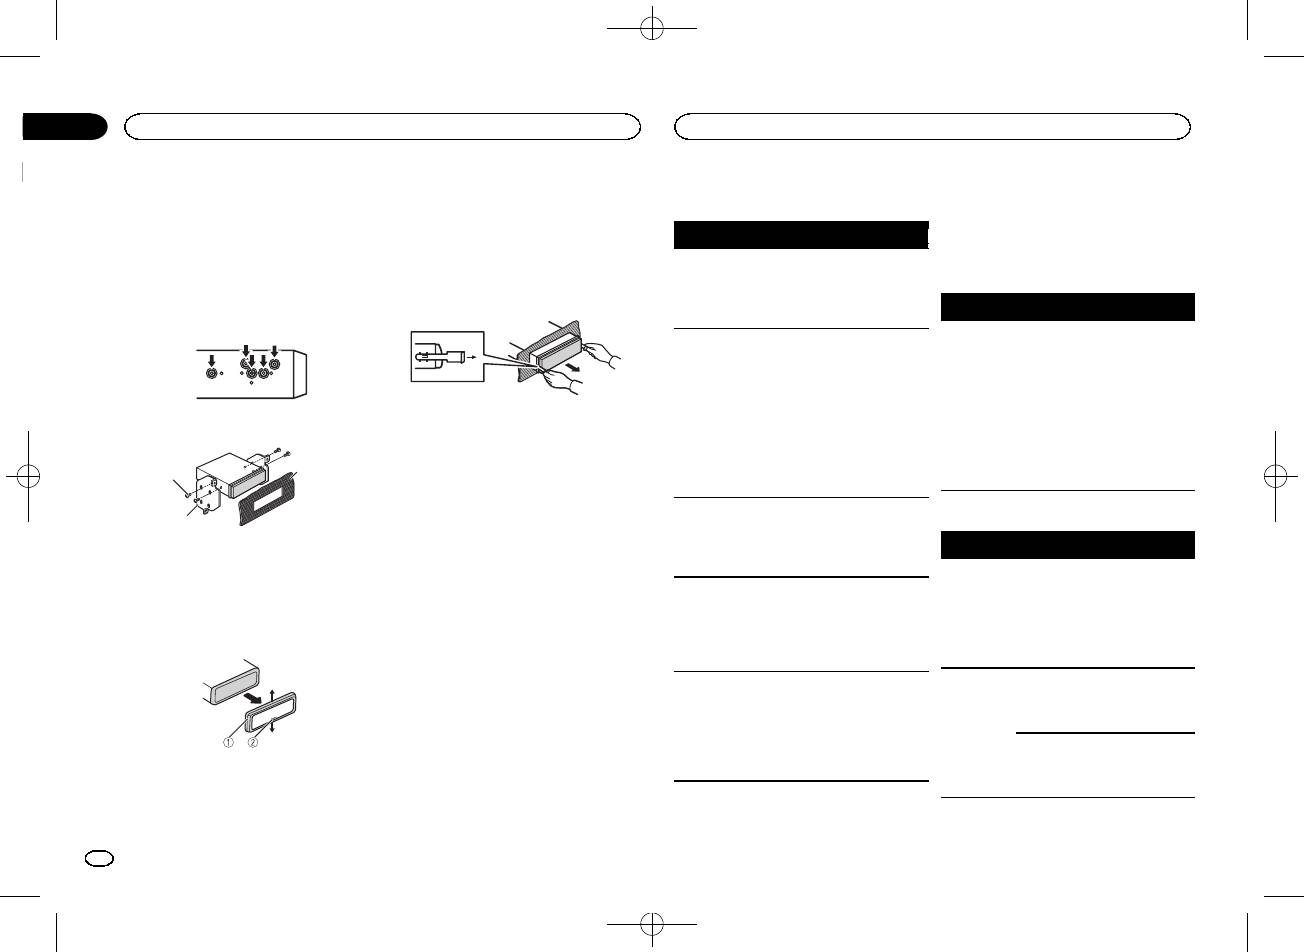
Black plate (10,1)
Section
03
Installation
Additional information
2 Mounting sleeve
! When reattaching the trim ring, point the
Troubleshooting
Error messages
# Make sure that the unit is installed securely in
side with the notched tab down.
place. An unstable installation may cause skipping
When you contact your dealer or your nearest
or other malfunctions.
2 Insert the supplied extraction keys into
Symptom Cause Action
Pioneer Service Center, be sure to note the error
both sides of the unit until they click into
message.
The display
You did not per-
Perform operation
DIN Rear-mount
place.
automatically
form any opera-
again.
returns to the
tion within
Common
1 Determine the appropriate position
3 Pull the unit out of the dashboard.
ordinary dis-
about 30 sec-
where the holes on the bracket and the side
Message Cause Action
play.
onds.
of the unit match.
AMP ERROR Unit fails to op-
Check the speak-
The repeat
Depending on
Select the repeat
erate or speaker
er connection. If
play range
the repeat play
play range again.
connection is
the message fails
changes un-
range, the se-
incorrect; pro-
to disappear even
expectedly.
lected range
tective circuit is
after the engine is
may change
activated.
switched off/on,
when another
contact your deal-
2 Tighten two screws on each side.
Removing and re-attaching the front
folder or track is
er or an author-
panel
being selected
ized Pioneer
You can remove the front panel to protect your
or during fast
3
Service Station
1
unit from theft.
forwarding/re-
for assistance.
Press the detach button and push the front
versing.
panel upward and pull it toward you.
A subfolder is
Subfolders can-
Select another re-
2
For details, refer to Removing the front panel to
not played
not be played
peat play range.
USB storage device
protect your unit from theft and Re-attaching the
back.
when FLD (fold-
1 Tapping screw (5 mm × 8 mm)
Message Cause Action
front panel on page 3.
er repeat) is se-
2 Mounting bracket
lected.
FORMAT
Sometimes
Wait until the
3 Dashboard or console
NO XXXX ap-
There is no em-
Switch the display
READ
there is a delay
message disap-
pears when a
bedded text in-
or play another
between the
pears and you
Removing the unit
display is
formation.
track/file.
start of playback
hear sound.
changed (NO
and when you
1 Remove the trim ring.
TITLE, for ex-
start to hear any
ample).
sound.
The unit is
You are using a
Move electrical
NO AUDIO There are no
Transfer the audio
malfunction-
device, such as
devices that may
songs.
files to the USB
ing.
a cellular
be causing the in-
storage device
There is inter-
phone, that
terference away
and connect.
ference.
transmits elec-
from the unit.
The connected
Follow the USB
tric waves near
USB storage de-
storage device in-
1 Trim ring
the unit.
vice has secur-
structions to dis-
2 Notched tab
ity enabled.
able the security.
! Releasing the front panel allows easier ac-
cess to the trim ring.
10
En
<QRB3391-A>10
Black plate (11,1)
Appendix
Additional information
Additional information
Firmly secure the USB storage device when driv-
WAV
Message Cause Action
Message Cause Action
English
ing. Do not let the USB storage device fall onto the
SKIPPED The connected
Play an audio file
ERROR-19 Communication
Perform one of
floor, where it may become jammed under the
File extension: .wav
USB storage de-
not embedded
failed.
the following op-
brake or accelerator pedal.
Quantization bits: 8 and 16 (LPCM), 4 (MS
vice contains
with Windows
erations.
files embedded
Depending on the USB storage device, the follow-
ADPCM)
Media DRM 9/10.
–Turn the ignition
with Windows
switch OFF and
ing problems may occur.
Sampling frequency: 16 kHz to 48 kHz (LPCM),
Mediaä DRM 9/
back ON.
! Operations may vary.
22.05 kHz and 44.1 kHz (MS ADPCM)
10.
–Disconnect the
! The storage device may not be recognized.
PROTECT All the files in
Transfer audio
USB storage de-
! Files may not be played back properly.
vice.
! The device may generate noise in the radio.
Supplemental information
the USB storage
files not em-
device are em-
bedded with
–Change to a dif-
ferent source.
Only the first 32 characters can be displayed as a
bedded with
Windows Media
Windows Media
Then, return to
file name (including the file extension) or a folder
DRM 9/10 to the
Compressed audio
USB storage de-
the USB source.
name.
DRM 9/10.
compatibility (USB)
vice and connect.
ERROR-23 USB storage de-
USB storage de-
Russian text to be displayed on this unit should be
WMA
N/A USB The USB device
! Connect a USB
vice was not for-
vice should be for-
encoded in one of the following character sets:
connected to is
Mass Storage
matted with
matted with
! Unicode (UTF-8, UTF-16)
not supported
Class compliant
FAT12, FAT16 or
FAT12, FAT16 or
File extension: .wma
! A character set other than Unicode that is
by this unit.
device.
FAT32.
FAT32.
used in a Windows environment and is set to
Bit rate: 48 kbps to 320 kbps (CBR), 48 kbps to
! Disconnect
STOP There are no
Select a list that
Russian in the multi-language setting
384 kbps (VBR)
your device and
songs in the
contains songs.
This unit may not operate correctly depending on
Sampling frequency: 32 kHz, 44.1 kHz, 48 kHz
replace it with a
current list.
the application used to encode WMA files.
compatible USB
Windows Media Audio Professional, Lossless,
storage device.
There may be a slight delay at the start of playback
Voice/DRM Stream/Stream with video: Not com-
of audio files embedded with image data or audio
CHECK USB The USB con-
Check that the
Handling guidelines
patible
files stored on a USB storage device that has nu-
nector or USB
USB connector or
USB storage device
merous folder hierarchies.
cable has short-
USB cable is not
MP3
circuited.
caught in some-
Address any questions you have about your USB
thing or dam-
USB storage device
storage device to the manufacturer of the device.
File extension: .mp3
aged.
The connected
Disconnect the
Connections via USB hub are not supported.
Bit rate: 8 kbps to 320 kbps (CBR), VBR
Playable folder hierarchy: up to eight tiers (A prac-
USB storage de-
USB storage de-
tical hierarchy is less than two tiers.)
Do not connect anything other than a USB stor-
Sampling frequency: 8 kHz to 48 kHz (32 kHz,
vice consumes
vice and do not
age device.
44.1 kHz, 48 kHz for emphasis)
Playable folders: up to 500
more than maxi-
use it. Turn the
mum allowable
ignition switch to
Compatible ID3 tag version: 1.0, 1.1, 2.2, 2.3, 2.4
Playable files: up to 15 000
current.
OFF, then to ACC
(ID3 tag Version 2.x is given priority over Version
Playback of copyright-protected files: Not compati-
or ON and then
1.x.)
ble
connect only
M3u playlist: Not compatible
compliant USB
storage devices.
MP3i (MP3 interactive), mp3 PRO: Not compatible
En
11
<QRB3391-A>11
Black plate (12,1)
Appendix
Additional information
Additional information
Partitioned USB storage device: Only the first par-
3 Save the folder containing files on the USB
streaming via internet, intranets and/or other
tition can be played.
storage device.
networks or in other electronic content distribu-
However, depending on the system environment,
tion systems, such as pay-audio or audio-on-de-
There may be a slight delay when starting play-
you may not be able to specify the playback se-
mand applications. An independent license for
back of audio files on a USB storage device with
quence.
such use is required. For details, please visit
numerous folder hierarchies.
For USB portable audio players, the sequence is
http://www.mp3licensing.com.
different and depends on the player.
WMA
CAUTION
Windows Media is either a registered trademark
Russian character chart
! Pioneer cannot guarantee compatibility with
or trademark of Microsoft Corporation in the
all USB mass storage devices and assumes
United States and/or other countries.
no responsibility for any loss of data on
D: C D: C D: C D: C D: C
This product includes technology owned by
media players, smart phones, or other devi-
: А : Б : В : Г : Д
Microsoft Corporation and cannot be used or
ces while using this product.
distributed without a license from Microsoft
! Do not leave a USB storage device in any
: Е, Ё : Ж : З : И, Й : К
Licensing, Inc.
place that is subject to high temperatures.
: Л : М : Н : О : П
: Р : С : Т : У : Ф
Sequence of audio files
: Ш,
: Х : Ц : Ч
: Ъ
The user cannot assign folder numbers and
Щ
specify playback sequences with this unit.
: Ы : Ь : Э : Ю : Я
Example of a hierarchy
D: Display C: Character
01
02
Copyright and trademark
: Folder
03
: Compressed
iTunes
04
audio file
Apple and iTunes are trademarks of Apple Inc.,
01 to 05: Folder
registered in the U.S. and other countries.
number
05
1 to 6: Playback
MP3
Level 1 Level 2 Level 3 Level 4
sequence
Supply of this product only conveys a license for
private, non-commercial use and does not con-
USB storage device
vey a license nor imply any right to use this prod-
Playback sequence is the same as recorded se-
uct in any commercial (i.e. revenue-generating)
quence in the USB storage device.
real time broadcasting (terrestrial, satellite,
To specify the playback sequence, the following
cable and/or any other media), broadcasting/
method is recommended.
1 Create a file name that includes numbers
that specify the playback sequence (e.g.,
001xxx.mp3 and 099yyy.mp3).
2 Put those files into a folder.
12
En
<QRB3391-A>12
Black plate (13,1)
Appendix
Additional information
Specifications
Maximum current supply
…………………………….. 1 A
English
General
USB Class ………………….. MSC (Mass Storage Class)
Power source ………………. 14.4 V DC (10.8 V to 15.1 V al-
File system ………………….. FAT12, FAT16, FAT32
lowable)
MP3 decoding format …… MPEG-1 & 2 Audio Layer 3
Grounding system ………… Negative type
WMA decoding format ….. Ver. 7, 7.1, 8, 9, 10, 11, 12 (2 ch
Maximum current consumption
audio)
…………………………….. 10.0 A
(Windows Media Player)
Dimensions (W × H × D):
WAV signal format ……….. Linear PCM & MS ADPCM
DIN
(Non-compressed)
Chassis ………….. 178mm × 50 mm ×
165 mm
FM tuner
Nose ……………… 188 mm × 58 mm ×
Frequency range ………….. 87.5 MHz to 108.0 MHz
15 mm
Usable sensitivity …………. 9 dBf (0.8 µV/75 W, mono, S/N:
D
30 dB)
Chassis ………….. 178mm × 50 mm ×
Signal-to-noise ratio ……… 72dB (IEC-A network)
165 mm
Nose ……………… 170 mm × 46 mm ×
15 mm
MW tuner
Weight ……………………….. 0.7 kg
Frequency range ………….. 531 kHz to 1 602 kHz
Usable sensitivity …………. 25 µV (S/N: 20 dB)
Signal-to-noise ratio ……… 62dB (IEC-A network)
Audio
Maximum power output ... 50 W × 4
70 W × 1/2 W (for subwoofer)
LW tuner
Continuous power output
Frequency range ………….. 153 kHz to 281 kHz
…………………………….. 22 W × 4 (50 Hz to 15 000Hz,
Usable sensitivity …………. 28 µV (S/N: 20 dB)
5 % THD, 4 W load, both chan-
Signal-to-noise ratio ……… 62dB (IEC-A network)
nels driven)
Load impedance ………….. 4 W (4 W to 8 W allowable)
Note
Preout maximum output level
Specifications and the design are subject to
…………………………….. 2.0V
modifications without notice.
Loudness contou r ………… +10 dB (100 Hz), +6.5 dB
(10 kHz) (volume: –30 dB)
Equalizer (5-Band Graphic Equalizer):
Frequency …………….. 80 Hz/250 Hz/800 Hz/
2.5 kHz/8 kHz
Equalization range …. ±12 dB (2 dB step)
Subwoofer (mono):
Frequency …………….. 50 Hz/63 Hz/80 Hz/100 Hz/
125 Hz/160 Hz/200 Hz
Slope …………………… –6 dB/oct, –12 dB/oct
Gain ……………………. +6dB to –24 dB
Phase ………………….. Normal/Reverse
USB
USB standard specification
…………………………….. USB 2.0 full speed
En
13
<QRB3391-A>13
Black plate (14,1)
Раздел
01
Перед началом эксплуатации
Перед началом эксплуатации
Благодарим Вас
за покупку этого изделия
шего изделия с соблюдением обязательных
! Не допускайте воздействия влажности на
компании PIONEER.
процедур по обработке, утилизации и вто—
изделие.
Для обеспечения правильности эксплуата—
ричной переработке и, таким образом, пред—
! При отключении или разряде аккумуля—
ции внимательно прочитайте данное руко—
отвратите потенциальное негативное
торной батареи память предварительных
водство перед началом использования
воздействие на окружающую среду и здоро—
настроек будет стерта.
изделия. Особенно важно, чтобы Вы прочли
вье людей.
Примечание
и соблюдали инструкции, помеченные в дан—
ном руководстве заголовками ПРЕДУПРЕ—
Выполненные настройки вступают в силу,
ЖДЕНИЕ и ВНИМАНИЕ.
Держите данное
даже если выйти из меню без подтвержде—
руководство под рукой для обращения к
ния настройки.
нему в будущем.
Сведения об этом руководстве
Дату изготовления оборудования можно
! В следующих инструкциях для USB-нако—
определить по серийному номеру, который
пителей и USB-аудиоплееров использует—
содержит информацию о месяце и годе про—
ся собирательное название
изводства.
“запоминающее устройство USB”.
Если вы желаете утилизировать данное
Сведения об этом устройстве
изделие, не выбрасывайте его вместе с
В случае возникновения
Частоты тюнера в этом устройстве распре—
обычным бытовым мусором. Существует
неполадок
делены для использования в Западной
отдельная система сбора использованных
Европе, Азии, на Ближнем Востоке, в Афри—
При неполадках в работе этого изделия свя—
электронных изделий в соответствии с за—
ке и Океании. При использовании в других
житесь с торговым представителем компа—
конодательством, которая предполагает
регионах качество приема может быть пло—
нии—производителя или с ближайшим
соответствующее обращение, возврат и
хим. Функция RDS (радиовещательная си—
сервисным пунктом Pioneer.
переработку.
стема передачи информации) доступна
только в регионах, где транслируются сигна—
Частные лица в странах Евросоюза, Швей—
лы RDS для FM-станций.
царии и Норвегии могут бесплатно возвра—
щать использованные электронные изделия
ВНИМАНИЕ
в специализированные пункты приема или в
! Не допускайте попадания жидкости на ус—
магазин (при покупке аналогичного нового
тройство. Это может повлечь поражение
устройства).
электрическим током. Кроме того, попада—
Если Ваша страна не указана в приведенном
ние жидкости в устройство может стать
выше перечне, обращайтесь в органы мест—
причиной его выхода из строя, перегрева
ного управления за инструкциями по пра—
и появления дыма.
вильной утилизации продукта.
! Pioneer CarStereo-Pass предназначен для
Тем самым Вы обеспечите утилизацию Ва—
использования только в Германии.
! Всегда сохраняйте уровень громкости до—
статочно низким, чтобы были слышны
звуки извне.
14
Ru
<QRB3391-A>14
Black plate (15,1)
Основное устройство
a b
4
7
1 2 3 5
98c6
Индикация на дисплее
21 3 75
Элемент Элемент
1 SRC/OFF 7 BAND
(назад)/DIM-
MULTI-CONTROL
2
8
MER (регулятор
(M.C.)
освещенности)
3
(список) 9 c/d
4 DISP a С 1/
по 6/
Вход AUX (сте—
5 USB порт b
реоразъем
3,5 мм)
(эквалай—
Кнопка снятия
6
c
зер)
панели
ВНИМАНИЕ
! Для подключения запоминающих ус—
тройств USB используйте USB-кабель
Pioneer (CD-U50E, приобретается отдель—
но), поскольку любое устройство при под—
ключении напрямую выступает из
устройства, что создает потенциальную
опасность.
! Не используйте изделия, не разрешенные
производителем к использованию.
9
Раздел
Управление данным устройством
Управление данным устройством
02
4 Для настройки выполните следующие
Индика—
Состояние
процедуры.
тор
4 6 8
Для перехода к следующему пункту меню
! Тюнер: диапазон и ча—
необходимо подтвердить выбор.
стота
! RDS: название програм—
LANGUAGE (выбор языка)
мы, PTY—информация и
Данное устройство может отображать тексто—
a
Сектор ос—
Русский
прочая текстовая ин—
вую информацию из сжатых аудиофайлов, в
9
новной ин—
формация
том числе информацию на английском и рус—
формации
Индика—
! Запоминающее устрой—
ском языках.
Состояние
тор
ство USB: время, про—
! При несовместимости настроек встроенно—
шедшее с начала
го и выбранного языка возможны искаже—
1 (список) Работает функция списка.
воспроизведения, и тек—
ния при выводе текстовых сообщений.
Сектор до—
стовая информация
! Некоторые символы могут отображаться
полнитель—
Отображается дополни—
неправильно.
2
Отображается при наличии
ной ин—
тельная информация.
a
нижнего уровня папки или
1 Поворачивайте M.C. для выбора настрой—
формации
меню.
ки.
ENG (английский)—РУС (русский)
TA (дорож—
Включена функция приема
2 Нажмите M.C., чтобы подтвердить выбор.
3
ные свод—
дорожных сводок.
ки)
Установочное меню
CLOCK SET (установка часов)
TP (иден—
При повороте ключа зажигания в положение
1 Поворачивайте M.C., чтобы установить
тификатор
Тюнер настроен на TP-
ON после установки устройства на дисплее
4
часы.
дорожных
станцию.
появляется установочное меню.
2 Нажимайте M.C., чтобы выбрать установку
программ)
Оно позволяет выполнить следующие на—
минут.
стройки.
3 Поворачивайте M.C., чтобы установить ми—
(sound ret-
нуты.
1 После установки устройства поверни—
riever, тех—
Включен режим Sound Ret-
4 Нажмите M.C., чтобы подтвердить выбор.
те ключ зажигания в положение ON.
5
нология
riever (технология преоб—
Появится надпись SET UP.
FM STEP (шаг настройки в FM-диапазоне)
преобраз—
разования звука).
ования
Обычно шаг настройки в FM-диапазоне, ис—
2 Поверните M.C. для выбора YES.
звука)
пользуемый при настройке с поиском, соста—
# Если в течение 30 секунд не выполняется ни—
вляет 50 кГц. При включении функции AF или
Включена настройка с
каких операций, установочное меню не будет вы—
6 LOC
TA шаг настройки автоматически меняется на
местным поиском.
водиться.
100 кГц. При включенной функции AF предпо—
# Если вы хотите выполнить настройку позже,
Включён режим повторного
чтительно установить шаг настройки 50 кГц.
(по—
поверните M.C., чтобы выбрать NO. Нажмите
7
воспроизведения дорожки
! Во время ручной настройки шаг настройки
втор)
для выбора.
или папки.
составляет 50 кГц.
В случае выбора NO настройка в установочном
1 Поверните M.C., чтобы выбрать шаг на—
(в про—
меню невозможна.
Включён режим воспроиз—
стройки в FM-диапазоне.
извольной
8
ведения в произвольной по—
50 (50 кГц)—100 (100 кГц)
последова—
3 Нажмите M.C. для выбора.
следовательности.
2 Нажмите M.C., чтобы подтвердить выбор.
тельности)
Появится надпись QUIT.
Ru
15
<QRB3391-A>15
Black plate (16,1)
Раздел
02
Управление данным устройством
Управление данным устройством
5 Чтобы закончить настройку, поверни—
Снятие передней панели в целях защиты от
Выбор источника сигнала
Тюнер
те M.C. и выберите YES.
кражи
1 Нажимайте кнопку SRC/OFF для выбора из
# Если понадобится вновь изменить настройку,
Основные операции
1 Чтобы отсоединить переднюю панель, на—
следующих функций:
поверните M.C. и выберите NO. Нажмите для вы—
жмите на кнопку отсоединения панели.
TUNER (тюнер)—USB (USB)—AUX (вспомо—
бора.
2 Нажмите на панель по направлению вверх
гательное устройство (AUX))
Выбор диапазона
(M) и потяните на себя (N).
1 Нажимайте кнопку BAND, пока на дисплее
6 Нажмите M.C. для выбора.
Регулировка громкости
не появится нужный диапазон (FM1, FM2,
1 Для регулировки громкости поворачивайте
FM3 для FM или MW/LW).
Примечания
M.C.
! Настроить параметры меню можно в
Переключение станций предварительной на—
меню системы. Более подробную инфор—
стройки
мацию см. в разделе
Меню системы
на
1 Нажмите кнопку c или d.
ВНИМАНИЕ
стр. 20.
! Выберите PCH (станции предварительной
В целях безопасности остановите автомо—
! Вы можете отменить настройку парамет—
3 Всегда храните снятую переднюю панель в
настройки) в меню SEEK, чтобы воспользо—
биль, прежде чем снять переднюю панель.
ра, нажав кнопку SRC/OFF.
защитном футляре.
ваться этой функцией. Подробнее о на—
Примечание
стройках см. в разделе
SEEK (настройка
Установка передней панели
Когда голубой/белый провод этого устрой—
левой и правой кнопок)
на стр. 18.
Основные операции
1 Зафиксируйте левый край панели на ус—
тройстве.
ства подключен к реле панели управления
Ручная настройка (пошаговая)
Важно
Убедитесь, что язычки с левой стороны ос—
автомобильной антенной, антенна на авто—
1 Нажмите кнопку c или d.
! Соблюдайте осторожность при снятии и
новного устройства вошли в пазы на пере—
мобиле выдвигается при включении источни—
! Выберите MAN (ручная настройка) в меню
установке передней панели.
дней панели.
ка сигнала этого устройства. Чтобы втянуть
SEEK, чтобы воспользоваться этой функ—
! Оберегайте переднюю панель от сильных
антенну, выключите источник сигнала.
цией. Подробнее о настройках см. в разде—
ударов.
ле
SEEK (настройка левой и правой кнопок)
! Предохраняйте переднюю панель от воз—
на стр. 18.
действия прямого солнечного света и вы—
Часто используемые
Поиск
соких температур.
элементы меню
1 Нажмите и удерживайте кнопку c или d, а
! Прежде чем снять переднюю панель, обя—
затем отпустите.
зательно отключите от нее все кабели и
Возврат к предыдущему дисплею
2 Нажмите на правый край передней панели
Вы можете отменить настройку с поиском
устройства, чтобы не повредить устрой—
Возврат к предыдущему списку (к папке на
кратким нажатием c или d.
ство и внутреннюю отделку салона.
и зафиксируйте ее.
один уровень выше)
Если прикрепить переднюю панель к ос—
При нажатии и удерживании кнопки c или
1 Нажмите кнопку
/DIMMER.
новному устройству не удается, убедитесь,
d можно пропускать радиостанции. На—
что действия производятся в правильном
Возврат в исходный режим
стройка с поиском начнется сразу после от—
порядке. В случае приложения излишнего
Выход из главного меню
пускания кнопки c или d.
усилия передняя панель или основное ус—
1 Нажмите BAND.
Примечание
тройство могут быть повреждены.
Возврат в исходный режим из списка
Можно включить или выключить функцию AF
Включение устройства
1 Нажмите BAND.
(поиск альтернативных частот) данного ус—
1 Нажмите кнопку SRC/OFF, чтобы включить
тройства. Для обычной настройки функция
устройство.
AF должна быть выключена (смотрите в
AF
(поиск альтернативных частот)
на стр. 17).
Выключение устройства
1 Нажмите и удерживайте кнопку SRC/OFF,
пока устройство не выключится.
16
Ru
<QRB3391-A>16
Black plate (17,1)
Раздел
Управление данным устройством
Управление данным устройством
02
Сохранение и вызов из памяти
Использование функций PTY
POP MUS (поп—музыка), ROCK MUS (рок—музы—
BSM (запоминание лучших станций)
радиостанций для каждого
Можно настроиться на радиостанцию с по—
ка), EASY MUS (легкая музыка), OTH MUS
Функция BSM (запоминание лучших станций)
диапазона
мощью информации PTY (типа программы).
(прочие музыкальные жанры), JAZZ (джаз),
позволяет автоматически сохранять в памяти
COUNTRY (кантри), NAT MUS (национальная
Использование кнопок
Поиск станции RDS с помощью информации
устройства шесть станций с самым мощным
музыка), OLDIES (золотая коллекция), FOLK
предварительной настройки
PTY
сигналом в порядке убывания его мощности.
MUS (народная музыка)
Можно выполнять поиск общих радиовеща—
1 Нажмите M.C., чтобы включить функцию
1 Чтобы сохранить в памяти нужную ра—
тельных программ, например, тех, что перечи—
CLASSICS (классика)
BSM.
Русский
диостанцию, нажмите одну из кнопок
слены в следующем разделе. См. стр. 17.
Для отмены режима нажмите M.C. еще раз.
предварительной настройки (с 1/
по 6/
L. CLASS (легкая классическая музыка), CLAS-
1 Нажмите
(список).
) и удерживайте ее, пока номер предва—
SIC (классическая музыка)
REGION (региональный)
2 Кнопкой M.C. выберите тип программы.
рительной настройки не прекратит ми—
NEWS/INFO—POPULAR—CLASSICS—OT—
OTHERS (прочее)
При использовании функции AF функция ре—
гать.
HERS
гиональных программ ограничивает выбор
EDUCATE (образовательные программы),
3 Нажмите M.C., чтобы начать поиск.
станциями, транслирующими региональные
2 Для выбора нужной радиостанции на—
DRAMA (постановки), CULTURE (культура),
Устройство начинает поиск радиостанций,
программы.
жмите одну из кнопок предварительной
SCIENCE (наука), VARIED (разное), CHILDREN
передающих данный тип программ. При
1 Нажмите M.C., чтобы включить или выклю—
настройки ( с 1/
по 6/ ).
(детские программы), SOCIAL (социальные во—
обнаружении радиостанции на дисплее
чить функцию региональных программ.
просы), RELIGION (религиозные программы),
будет показано название данной програм—
PHONE IN (ток—шоу), TOURING (путешествия),
LOCAL (настройка с местным поиском)
Переключение дисплея
мы.
LEISURE (отдых), DOCUMENT (документаль—
! Для отмены поиска нажмите M.C. еще
Настройка с местным поиском позволяет Вам
ные программы)
Выбор текстовой информации
раз.
настраиваться только на радиостанции с до—
1 Нажимайте DISP для выбора из следующих
! Программы некоторых радиостанций
статочно мощными сигналами для качествен—
функций:
могут отличаться от программ, указан—
Настройка функций
ного приема.
! FREQUENCY (служебное название про—
ных в передаваемом коде PTY.
1 Нажмите M.C. для выбора нужной настрой—
граммы или частота)
1 Нажмите M.C., чтобы открыть главное
! Если ни одна из станций не передает
ки.
! BRDCST INFO (служебное название про—
меню.
программы нужного типа, то на дисплее
FM: OFF—LV1—LV2—LV3—LV4
граммы/информация PTY)
в течение примерно двух секунд будет
MW/LW: OFF—LV1—LV2
! CLOCK (название источника сигнала и
2 Поворачивайте M.C. для прокрутки
показано NOT FOUND, и затем тюнер
Настройка самого высокого уровня позво—
часы)
пунктов меню; нажмите, чтобы выбрать
перейдет в режим приема станции, ско—
ляет осуществлять прием только станций с
FUNCTION.
торой был начат поиск.
самым сильным сигналом, а уменьшение
Примечания
уровня настройки позволяет принимать
! Если служебное название программы в
3 Для выбора функции поворачивайте
станции с более слабым сигналом.
поле FREQUENCY отсутствует, вместо
M.C.
Список PTY
TA (режим ожидания дорожных сводок)
него отображается канал. Если служеб—
Следующие выбранные функции можно на—
ное название программы обнаружено,
страивать.
NEWS/INFO (новости и информация)
# В диапазонах MW/LW можно выбрать только
1 Нажмите M.C., чтобы включить или выклю—
оно будет отображаться.
! Текстовая информация BRDCST INFO
NEWS (новости), AFFAIRS (текущая информа—
BSM, LOCAL и SEEK.
чить режим ожидания дорожных сводок.
будет изменяться автоматически.
ция), INFO (информация), SPORT (спорт),
AF (поиск альтернативных частот)
! Текстовая информация может меняться в
WEATHER (погода), FINANCE (финансы)
зависимости от диапазона.
1 Нажмите M.C., чтобы включить или выклю—
POPULAR (поп—музыка)
! Возможность внесения изменений в тек—
чить функцию AF.
стовую информацию зависит от региона.
NEWS (прерывание для передачи новостей)
Ru
17
<QRB3391-A>17
Black plate (18,1)
Раздел
02
Управление данным устройством
Управление данным устройством
! В зависимости от версии iTunes, исполь—
Ускоренная перемотка вперед или назад
Функции с использованием
1 Нажмите M.C., чтобы включить или выклю—
зуемой для записи файлов МР3, или от
1 Нажмите и удерживайте кнопку c или d.
специальных кнопок
чить функцию НОВОСТИ.
типа медиафайла текстовая информация
! При воспроизведении сжатых аудиофай—
несовместимого формата, записанная в
SEEK (настройка левой и правой кнопок)
лов звук не воспроизводится, если включе—
Выбор диапазона повторного воспроизведе—
аудиофайле, может отображаться некор—
на ускоренная перемотка вперед или
ния
Правой и левой кнопкам на устройстве можно
ректно.
назад.
1 Нажимайте кнопку 6/
для выбора из сле—
назначить определенную функцию.
! Возможность внесения изменений в тек—
Выберите MAN (ручная настройка) для ручной
дующих функций:
Возврат к корневой папке
стовую информацию зависит от типа но—
! ALL – Повтор всех файлов
настройки или PCH (предустановленный
1 Нажмите и удерживайте BAND.
сителя.
канал) для переключения между заранее на—
! ONE – Повтор текущего файла
Переключение между запоминающими ус—
строенными каналами.
! FLD – Повтор текущей папки
Выбор и воспроизведение
тройствами
1 Нажмите кнопку M.C., чтобы выбрать MAN
Воспроизведение дорожек в произвольной по—
При наличии нескольких запоминающих ус—
фалов/дорожек из списка
или PCH.
следовательности
тройств USB Mass Storage воспроизведение
1 Нажмите кнопку
, чтобы отобразить
1 Нажмите кнопку 5/
, чтобы включить или
можно переключать между ними.
список названий файлов/дорожек.
выключить функцию воспроизведения в
1 Нажмите BAND.
Запоминающее устройство
произвольной последовательности.
! Возможно переключение между 32 различ—
2 С помощью M.C. выберите нужное
Данная функция позволяет воспроизводить
USB
ными запоминающими устройствами.
имя файла (или папки).
дорожки в произвольной последовательно—
Основные операции
Примечание
сти в пределах выбранного диапазона по—
Если запоминающее устройство USB не ис—
Выбор файла или папки
вторного воспроизведения.
пользуется, отключите его.
1 Поворачивайте M.C.
! Для переключения на следующую дорожку
Воспроизведение композиций на запоминаю—
во время воспроизведения в произвольной
щем устройстве USB
Воспроизведение
последовательности нажмите кнопку d.
1 Откройте крышку порта USB.
Переключение дисплея
1 Выберите файл или дорожку и нажмите M.
При нажатии на кнопку c воспроизведение
2 Подключите запоминающее устройство
C.
текущей дорожки начинается с начала.
USB с помощью кабеля USB.
Выбор текстовой информации
Просмотр списка названий файлов (папок) в
Воспроизведение начинается автоматиче—
1 Нажимайте DISP для выбора из следующих
Приостановка воспроизведения
выбранной папке
ски.
функций:
1 Нажмите кнопку 4/PAUSE, чтобы включить
1 Выберите папку и нажмите M.C.
Остановка воспроизведения файлов на запо—
MP3/WMA/WAV
паузу или возобновить воспроизведение.
минающем устройстве USB
! TRACK INFO (название дорожки/имя ис—
Воспроизведение композиции из выбранной
Улучшение качества звука сжатых аудиофай—
полнителя/название альбома)
папки
1 Запоминающее устройство USB можно от—
лов и восстановление полноты звучания (тех—
1 Выберите папку, затем нажмите и удержи—
ключить в любой момент.
! FILE INFO (название папки/название
нология преобразования звука)
Устройство закончит воспроизведение.
файла)
вайте M.C.
1 Нажимайте кнопку 3/S.Rtrv для выбора из
! ELAPSED TIME (номер дорожки и время
следующих функций:
Выбор папки
воспроизведения)
1—2—OFF (выкл)
1 Нажмите кнопку 1/
или 2/ .
! CLOCK (название источника сигнала и
Настройка 1 эффективна для файлов с
Выбор дорожки
часы)
низкой степенью сжатия, а настройка 2 –
1 Нажмите кнопку c или d.
! SPEANA (анализатор спектра)
для файлов с высокой степенью сжатия.
Примечания
! Текстовая информация TRACK INFO и
Настройка функций
FILE INFO будет изменяться автоматиче—
ски.
1 Нажмите M.C., чтобы открыть главное
меню.
18
Ru
<QRB3391-A>18
Black plate (19,1)
Раздел
Управление данным устройством
Управление данным устройством
02
2 Поворачивайте M.C. для прокрутки
! Функции SUB.W CTRL и HPF SETTING недо—
Это устройство имеет выход канала сабвуфе—
пунктов меню; нажмите, чтобы выбрать
ступны, если в режиме OFF выбрано
1 Для отображения установочного меню на—
ра, который можно включать и выключать.
FUNCTION.
SUB.W. Подробнее см. в разделе
SUB.W
жмите M.C.
1 Нажмите M.C. для выбора нужной настрой—
Выбранные функции, которые можно на—
(включение/выключение сабвуфера)
на
2 Нажмите кнопку M.C., чтобы выбрать эква—
ки.
страивать, перечислены ниже.
стр. 19.
лайзер.
NOR (нормальная фаза)—REV (обратная
POWERFUL—NATURAL—VOCAL—CU-
фаза)—OFF (сабвуфер выключен)
S.RTRV (sound retriever, технология преобраз—
FADER (регулировка баланса)
STOM1—CUSTOM2—FLAT—SUPER BASS
ования звука)
Полосу и уровень эквалайзера можно отре—
SUB.W CTRL (настройка сабвуфер)
Русский
1 Для отображения установочного меню на—
гулировать, если выбрано CUSTOM1 или
Автоматически улучшает качество звука сжа—
На выходе сабвуфера будут воспроизводиться
жмите M.C.
CUSTOM2.
тых аудиофайлов и восстанавливает полноту
только те частоты, которые ниже указанных ча—
2 Нажмите M.C., чтобы отрегулировать ба—
При выборе CUSTOM1 или CUSTOM2 вы—
звучания.
стот среза.
ланс передних и задних громкоговорите—
полните действия, описанные ниже. При
1 Нажмите M.C. для выбора нужной настрой—
1 Для отображения установочного меню на—
лей.
выборе других настроек нажмите M.C.,
ки.
жмите M.C.
чтобы вернуться к предыдущему дисплею.
Подробную информацию см. в
Улучшение
BALANCE (регулировка баланса)
2 Нажимайте M.C. для выбора из следующих
! CUSTOM1 можно настраивать отдельно
качества звука сжатых аудиофайлов и вос—
функций:
для каждого источника сигнала.
становление полноты звучания (технология
1 Для отображения установочного меню на—
Частота среза—Уровень выходного сигна—
! CUSTOM2 — это общая настройка, ис—
преобразования звука)
на стр. 18.
жмите M.C.
ла—Крутизна характеристики
пользуемая для всех источников сигна—
2 Поворачивайте M.C., чтобы отрегулировать
Изменяемые значения будут мигать.
ла.
баланс левого/правого громкоговорителей.
3 Поворачивайте M.C. для выбора настрой—
3 Для отображения установочного меню на—
ки.
Регулировки параметров звука
EQ SETTING (вызов настроек эквалайзера)
жмите M.C.
Частота среза: 50HZ—63HZ—80HZ—100HZ
4 Нажимайте M.C. для выбора из следующих
1 Нажмите M.C., чтобы открыть главное
—125HZ—160HZ—200HZ
функций:
меню.
Уровень выходного сигнала: от –24 до +6
Полоса эквалайзера—Уровень эквалайзе—
Крутизна характеристики: –6— –12
ра
2 Поворачивайте M.C. для прокрутки
5 Поворачивайте M.C. для выбора настрой—
BASS BOOST (усиление нижних звуковых ча—
пунктов меню; нажмите, чтобы выбрать
ки.
стот)
AUDIO.
Полоса эквалайзера: 80HZ—250HZ—
800HZ—2.5KHZ—8KHZ
1 Для отображения установочного меню на—
3 Для выбора аудиофункции поворачи—
Уровень эквалайзера: от +6 до –6
жмите M.C.
вайте M.C.
! Кроме того, можно выбрать эквалайзер, на—
2 Поворачивайте M.C. для выбора нужного
Следующие выбранные аудиофункции
жимая кнопку
.
уровня.
можно настраивать.
При увеличении или уменьшении уровня
! Функция FADER недоступна, если в режи—
LOUDNESS (тонкомпенсация)
отображаются надписи с 0 до +6.
ме SP-P/O MODE выбрано SUB.W/SUB.W.
Тонкомпенсация компенсирует недостаточное
Подробнее см. в разделе
SP-P/O MODE
HPF SETTING (настройка фильтра верхних ча—
звуковое давление в нижнем и верхнем диапа—
(настройка выхода заднего канала и пред—
стот)
зонах частот на низкой громкости.
варительного усилителя)
на стр. 21.
1 Нажмите M.C. для выбора нужной настрой—
! Функции SUB.W, SUB.W CTRL и
ки.
HPF SETTING недоступны, если в режиме
OFF (выкл)—LOW (низкий)—MID (средний)
SP-P/O MODE выбрано REAR/REAR. Под—
—HI (высокий)
робнее см. в разделе
SP-P/O MODE (на—
стройка выхода заднего канала и
SUB.W (включение/выключение сабвуфера)
предварительного усилителя)
на стр. 21.
Ru
19
<QRB3391-A>19
Black plate (20,1)
Раздел
02
Управление данным устройством
Управление данным устройством
Если Вы не хотите, чтобы низкочастотные
Меню системы
Настройка регулятора
1 Для отображения установочного меню на—
звуки из диапазона частот выхода канала саб—
Важно
жмите M.C.
освещенности
вуфера воспроизводились из передних или за—
PW SAVE (режим энергосбережения) отклю—
2 Нажимайте M.C., чтобы выбрать сегмент
Можно настроить яркость и подсветку.
дних громкоговорителей, включите HPF
чается при отсоединении аккумуляторной
дисплея часов, который нужно установить.
(фильтр верхних частот). В этом случае из пе—
батареи автомобиля; при подсоединении ба—
Часы—Минуты
1 Нажмите M.C., чтобы открыть главное
редних или задних громкоговорителей будут
тареи его потребуется включить снова. При
3 Поворачивайте M.C., чтобы отрегулировать
меню.
воспроизводиться только звуки с частотой
выключенном режиме PW SAVE (режим
время.
выше заданной.
энергосбережения) возможно, что, в зависи—
2 Поверните M.C., чтобы отобразить
1 Для отображения установочного меню на—
12H/24H (формат отображения времени)
мости от метода подключения, устройство
ILLUMI, затем нажмите.
жмите M.C.
будет потреблять энергию аккумулятора,
2 Нажимайте M.C. для выбора из следующих
1 Нажмите M.C. для выбора нужной настрой—
если зажигание автомобиля не имеет поло—
3 Нажмите M.C. для выбора нужной на—
функций:
ки.
жения АСС.
стройки.
Частота среза—Крутизна характеристики
12H (12-часовой)—24H (24-часовой)
OFF (выкл)—ON (вкл)
3 Поворачивайте M.C. для выбора настрой—
1 Нажмите M.C., чтобы открыть главное
AUTO PI (автоматический поиск по идентифи—
! Вы также можете выбрать другую на—
ки.
меню.
катору программы)
стройку регулятора освещенности, удер—
Частота среза: OFF—50HZ—63HZ—80HZ—
Устройство может автоматически искать дру—
живая нажатой кнопку
/DIMMER.
100HZ—125HZ—160HZ—200HZ
2 Поворачивайте M.C. для прокрутки
Крутизна характеристики: –6— –12
гую станцию с такой же программой даже во
пунктов меню; нажмите, чтобы выбрать
время вызова предварительной настройки.
SLA (регулировка уровня входного сигнала)
SYSTEM.
Стартовое меню
1 Нажмите M.C., чтобы включить или выклю—
SLA (функция настройки уровня входного сиг—
чить автоматический поиск по идентифика—
1 Нажмите и удерживайте кнопку SRC/
3 Для выбора функции меню системы
нала) позволяет регулировать уровень громко—
тору программы.
OFF, пока устройство не выключится.
поворачивайте M.C.
сти каждого источника сигнала, чтобы
Следующие выбранные функции меню си—
AUX (вспомогательный вход)
предотвратить резкие изменения громкости
2 Нажмите кнопку SRC/OFF и удерживай—
стемы можно настраивать.
при переключении источников сигнала.
Активируйте эту настройку при подключении к
те ее, пока не откроется стартовое меню.
! Настройки основываются на уровне гром—
данному устройству вспомогательного устрой—
LANGUAGE (выбор языка)
кости FM-тюнера, который остается неиз—
ства.
3 Поворачивайте M.C. для прокрутки
менным.
Данное устройство может отображать тексто—
1 Нажмите M.C., чтобы включить или выклю—
пунктов меню; нажмите, чтобы выбрать
! Регулировку уровня громкости в диапазоне
вую информацию из сжатых аудиофайлов, в
чить функцию AUX.
INITIAL.
MW/LW также можно производить с по—
том числе информацию на английском и рус—
PW SAVE (энергосбережение)
мощью данной функции.
ском языках.
4 Для выбора функции меню системы
! При выборе FM-тюнера в качестве источ—
! При несовместимости настроек встроенно—
Включение этой функции позволяет снизить
поворачивайте M.C.
ника сигнала функция SLA недоступна.
го и выбранного языка возможны искаже—
потребляемую мощность аккумуляторной ба—
Следующие выбранные функции стартового
1 Для отображения установочного меню на—
ния при выводе текстовых сообщений.
тареи.
меню можно настраивать.
жмите M.C.
! Некоторые символы могут отображаться
! При включении этой функции единствен—
2 Поворачивая M.C., отрегулируйте уровень
неправильно.
ной возможной операцией является вклю—
громкости источника сигнала.
1 Поворачивайте M.C. для выбора настрой—
чение источника сигнала.
Диапазон настройки: от +4 до –4
ки.
1 Нажмите M.C., чтобы включить или выклю—
ENG (английский)—РУС (русский)
чить функцию энергосбережения.
CLOCK SET (установка часов)
20
Ru
<QRB3391-A>20
Оглавление
- 1
- 2
Аннотации для Автомагнитолы Pioneer MVH-150UBG в формате PDF
Топ 10 инструкций
Другие инструкции