
LaserJet Pro M101-M104,
LaserJet Ultra M105-M106
Руководство пользователя
M101-M106
www.hp.com/support/ljM101


HP LaserJet Pro M101-M104, HP LaserJet
Ultra M105-M106
Руководство пользователя

Авторские права и лицензия
© Copyright 2016 HP Development Company,
L.P.
Копирование, адаптация или перевод без
предварительного письменного разрешения
запрещены, за исключением случаев,
разрешенных законом об авторских правах.
Информация, содержащаяся в этом
документе, может быть изменена без
предварительного уведомления.
Гарантии на изделия и услуги HP
устанавливаются в специальных
гарантийных положениях, прилагаемых к
таким изделиям и услугам. Ничто из
сказанного в настоящем документе не
л
жно истолковываться как
до
дополнительная гарантия. HP не несет
ответственности за технические или
редакторские ошибки или упущения,
содержащиеся в настоящем документе.
Edition 2, 01/2019
Информация о товарных знаках
®
, Adobe Photoshop®, Acrobat® и
Adobe
PostScript
®
являются зарегистрированными
товарными знаками Adobe Systems
Incorporated.
Название Apple и логотип Apple являются
товарными знаками компании Apple Inc.,
зарегистрированными в США и других
странах.
OS X является зарегистрированным
товарным знаком Apple Inc. в США и в других
странах/регионах.
AirPrint является зарегистрированным
товарным знаком Apple Inc. в США и в других
странах/регионах.
Microsoft®, Windows®, Windows XP® и
Windows Vista® являются
зарегистрированными в США товарными
знаками Microsoft Corporation.

Содержание
1 Общие сведения о принтере …………………………………………………………………………………………………………. 1
Изображения принтера ……………………………………………………………………………………………………………………… 2
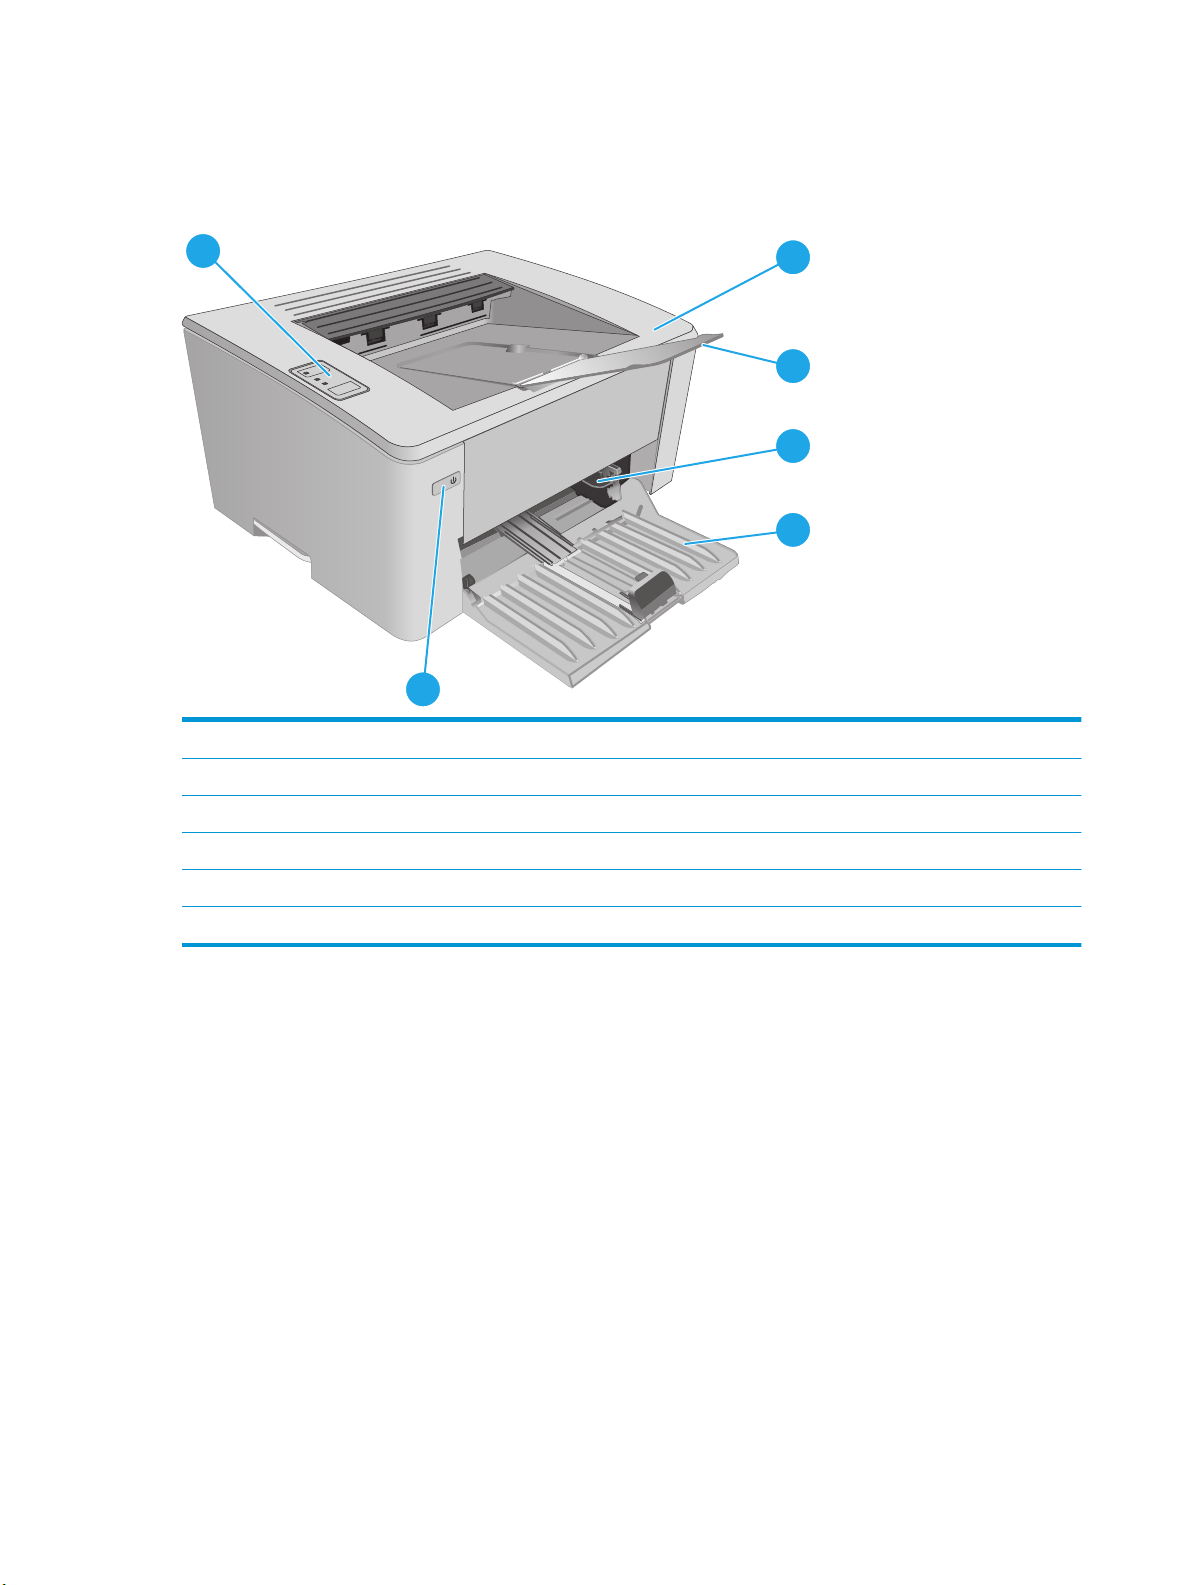
Вид принтера спереди ………………………………………………………………………………………………………. 2
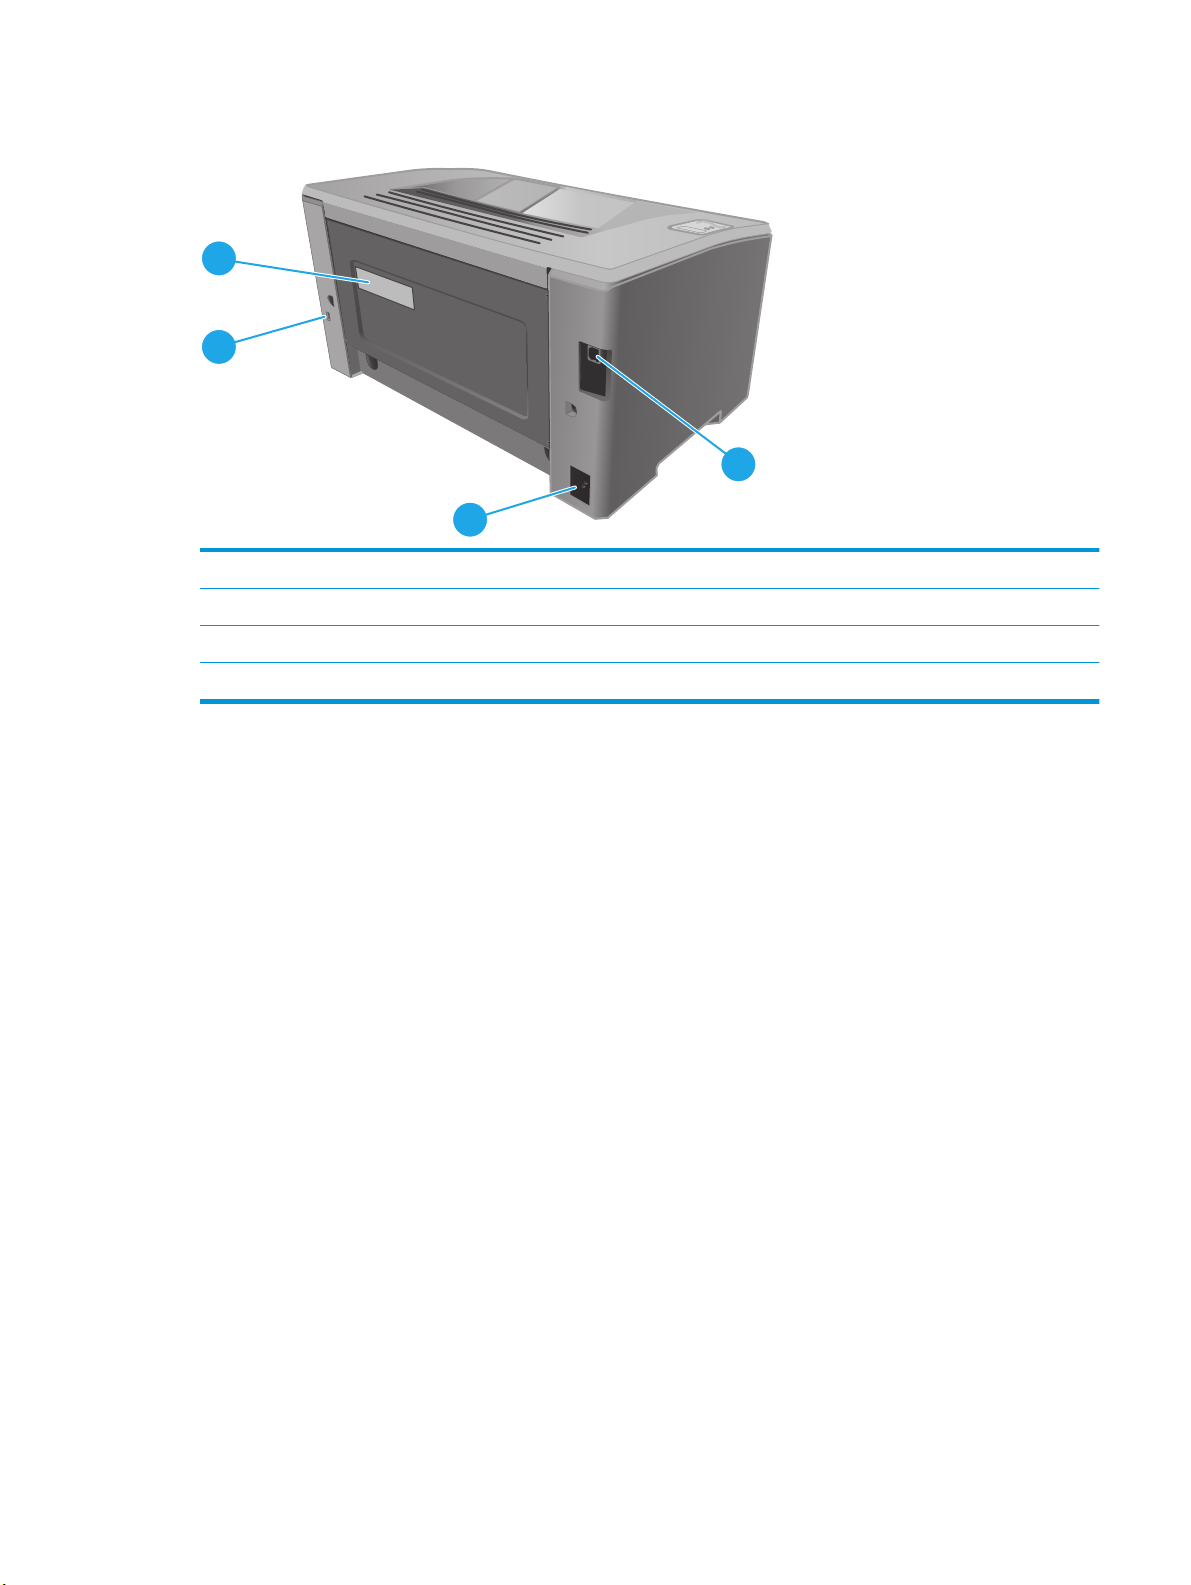
Вид принтера сзади …………………………………………………………………………………………………………… 3
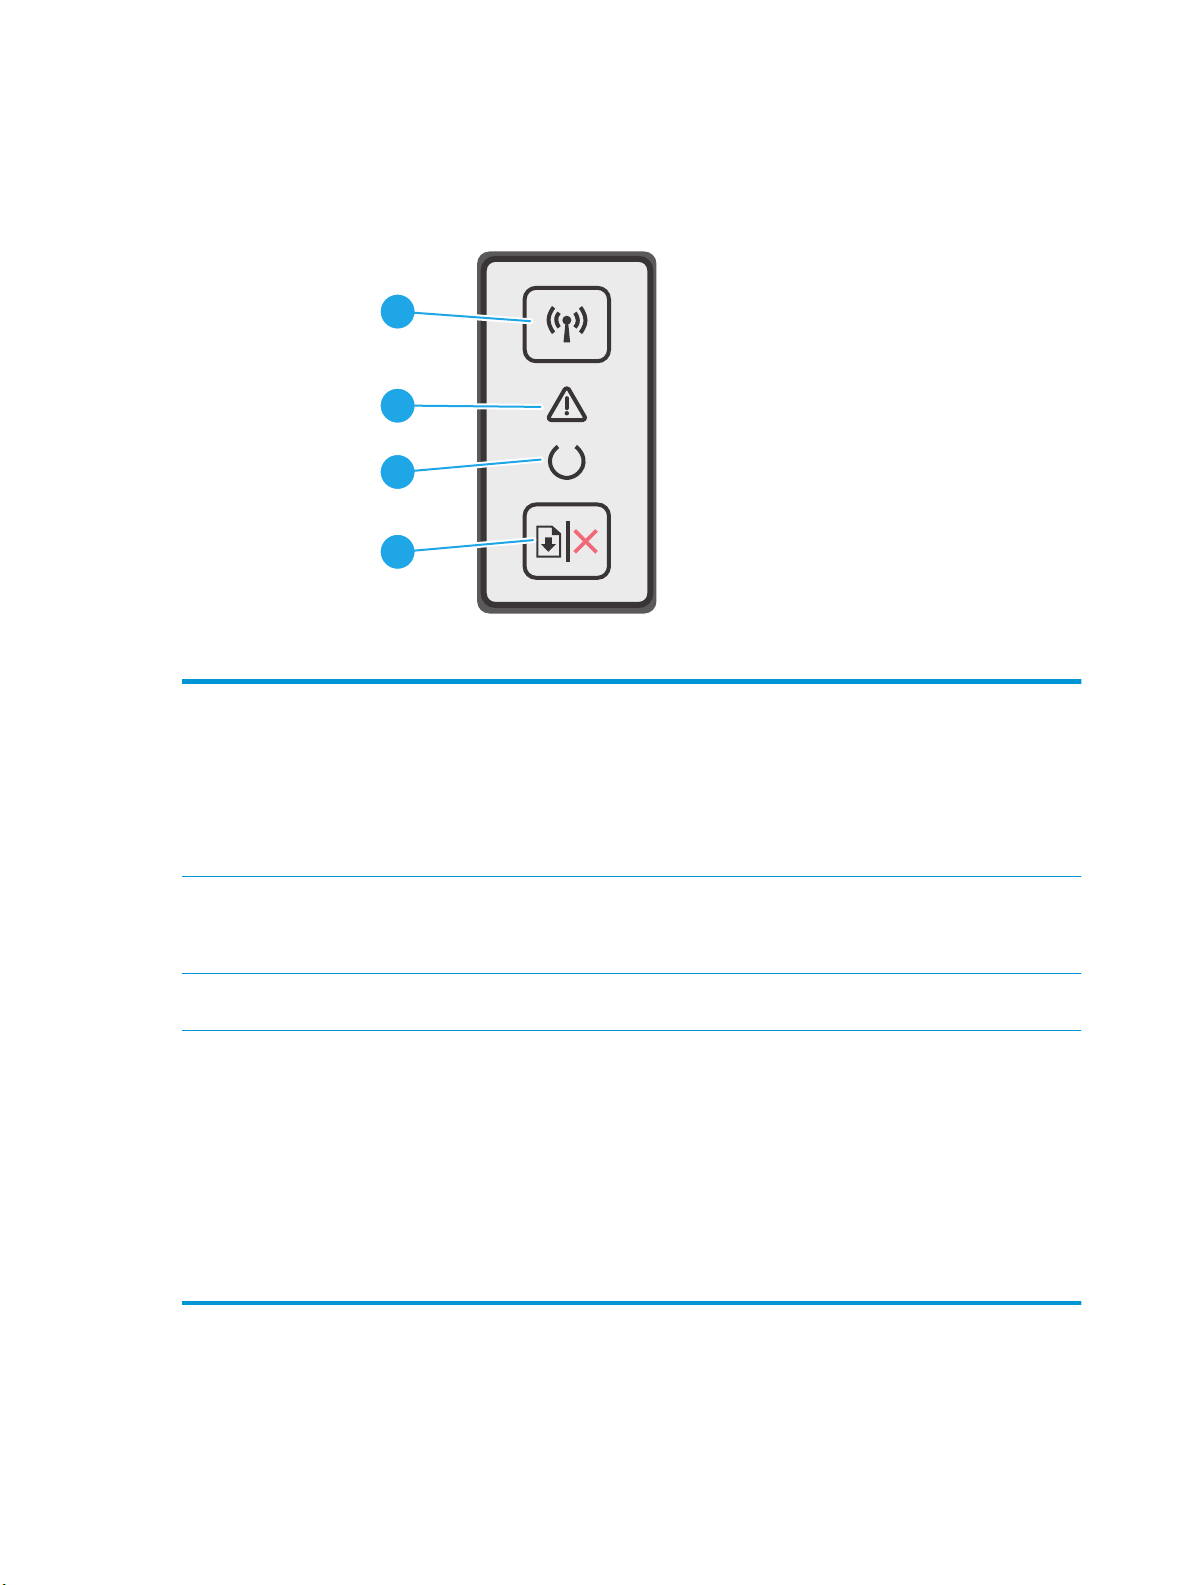
Вид панели управления …………………………………………………………………………………………………….. 4
Технические характеристики принтера ……………………………………………………………………………………………… 5
Технические характеристики …………………………………………………………………………………………….. 5
Поддерживаемые ОС ………………………………………………………………………………………………………… 5
Решения для мобильной печати ………………………………………………………………………………………… 7
Размеры принтера …………………………………………………………………………………………………………….. 7
Потребляемая мощность, электрические характеристики и акустическая эмиссия …………….. 8
Допустимые условия эксплуатации …………………………………………………………………………………… 8
Аппаратная настройка принтера и установка ПО ………………………………………………………………………………… 9
2 Лотки для бумаги ……………………………………………………………………………………………………………………… 11
Загрузка подающего ло
Введение ………………………………………………………………………………………………………………………… 12
Загрузка бумаги во входной лоток …………………………………………………………………………………… 12
Загрузка лотка приоритетной подачи (только беспроводные модели) …………………………………………….. 15
Введение ………………………………………………………………………………………………………………………… 15
Загрузка бумаги в лоток приоритетной подачи ………………………………………………………………… 15
Загрузка бумаги и печать конвертов ………………………………………………………………………………………………… 18
Введение ………………………………………………………………………………………………………………………… 18
Печать конвертов ……………………………………………………………………………………………………………. 18
Ориентация конверта ………………………………………………………………………………………………………. 18
3 Расходные материалы, дополнительные принадлежности и запасные части ……………………………………. 19
Заказ расходных материалов, дополнительных принадлежностей и запасных частей …………………….. 20
Заказ ………………………………………………………………………………………………………………..
Расходные материалы и дополнительные принадлежности ……………………………………………. 20
Детали для самостоятельного ремонта ……………………………………………………………………………. 20
ка ……………………………………………………………………………………………………………… 12
т
……….. 20
…….
RUWW iii

Настройка параметров расходных материалов HP для защиты картриджей с тонером …………………….. 22
Введение ………………………………………………………………………………………………………………………… 22
Включение и отключение функции «Политика по картриджам» ……………………………………….. 22
Использование встроенного веб-сервера HP (EWS) для включения функции
«Политика по картриджам» ……………………………………………………………………………… 22
Использование встроенного веб-сервера HP (EWS) для отключения функции
«Политика по картриджам» ……………………………………………………………………………… 23
Сообщения об ошибках в HP EWS – Устранение неполадок: политика по
картриджам ……………………………………………………………………………………………………. 24
Включение и отключение функции «Защита к
спользование встроенного веб-сервера HP (EWS) для включения функции
И
«Защита картриджей» ……………………………………………………………………………………… 25
Использование встроенного веб-сервера HP (EWS) для отключения функции
«Защита картриджей» ……………………………………………………………………………………… 26
Сообщения об ошибках в HP EWS – Устранение неполадок: защита
картриджей ……………………………………………………………………………………………………. 27
Сменный картридж с тонером ………………………………………………………………………………………………………….. 28
Введение ………………………………………………………………………………………………………………………… 28
Сведения о картридже с тонером и фотобарабане …………………………………………………………… 28
Замена картриджа с тонером (модели M101–M104) …………………………………………………………. 29
Замена картриджа с тонером (модели M105–M106) …………………………………………………………. 31
Замена барабана пер
Замена барабана передачи изображения (модели M105–M106) ………………………………………. 37
е
дачи изображения (модели M101–M104) ………………………………………. 34
артриджей» ……………………………………………….. 25
4 Печать ……………………………………………………………………………………………………………………………………. 41
Задания печати (Windows) ……………………………………………………………………………………………………………….. 42
Как выполнять печать (Windows) …………………………………………………………………………………….. 42
Двусторонняя печать в ручном режиме (Windows) …………………………………………………………… 42
Печатать несколько страниц на листе (Windows) ……………………………………………………………… 44
Выбор типа бумаги (Windows) ………………………………………………………………………………………….. 44
Дополнительные задания на печать ……………………………………………………………………………….. 44
Задания печати (OS X) ………………………………………………………………………………………………………………………. 46
Как выполнять печать (OS X) ……………………………………………………………………………………………. 46
Двусторонняя печать в ручном режиме (OS X) ………………………………………………………………….. 46
Печать нескольких страниц на листе (OS X) ……………………………………………………………………… 46
Выбор типа бум
Дополнительные задания на печать ……………………………………………………………………………….. 47
Мобильная печать …………………………………………………………………………………………………………………………… 48
Введение ………………………………………………………………………………………………………………………… 48
Wi-Fi Direct (только беспроводные модели) …………………………………………………………………….. 48
аги (OS X
Включение или отключение функции Wi-Fi Direct ……………………………………………. 49
) ………………………………………………………………………………………………… 47
iv RUWW

Изменение имени Wi-Fi Direct принтера ……………………………………………………………. 50
HP ePrint по электронной почте ……………………………………………………………………………………….. 50
ПО HP ePrint …………………………………………………………………………………………………………………….. 51
AirPrint …………………………………………………………………………………………………………………………….. 52
Встроенное решение для печати в Android ………………………………………………………………………. 52
5 Управление принтером ……………………………………………………………………………………………………………… 53
Изменение типа подключения принтера (Windows) ………………………………………………………………………….. 54
Дополнительная настройка со встроенным веб-сервером HP (EWS) и HP Device Toolbox (Windows) …… 55
Дополнительные настройки с HP Utility для OS X ……………………………………………………………………………… 58
Откройте утилиту HP Utility ……………………………………………………………………………………………… 58
Функции HP Utility ……………………………………………………………………………………………………………. 58
Настройка параметров IP-сети …………………………………………………………………………………………………………. 60
Введение ………………………………………………………………………………………………………………………… 60
Отказ от обязательств в связи с совместным использованием принтера …………………………… 60
Просмотр и из
Изменение сетевого имени принтера ……………………………………………………………………………….. 60
Ручная настройка параметров IPv4 TCP/IP ……………………………………………………………………….. 61
Параметр скорости линии ………………………………………………………………………………………………… 62
Функции безопасности принтера ……………………………………………………………………………………………………… 63
Введение ………………………………………………………………………………………………………………………… 63
Задайте или измените пароль системы с помощью встроенного веб-сервера HP ……………… 63
Блокировка форматтера …………………………………………………………………………………………………. 64
Параметры энергосбережение …………………………………………………………………………………………………………. 65
Введение ………………………………………………………………………………………………………………………… 65
Печать в экономичном режиме (EconoMode) …………………………………………………………………….. 65
Настройка режима ожидания/функции автоматического выключения ……………………………. 65
Настройка задержки выключения и параметров принтера для потребление не бо
Настройка задержки выключения …………………………………………………………………………………… 67
Обновление микропрограммы …………………………………………………………………………………………………………. 69
Обновление микропрограммы с помощью утилиты обновления микропрограммы …………… 69
менение се
тевых параметров …………………………………………………………………….. 60
ее 1 Вт 66
л
6 Решение проблем ……………………………………………………………………………………………………………………… 71
Поддержка клиентов ………………………………………………………………………………………………………………………. 72
Пояснение состояний световых индикаторов на панели управления ………………………………………………… 73
Восстановление заводских настроек по умолчанию …………………………………………………………………………. 76
В HP EWS отображается сообщение об ошибке «Низкий уровень тонера в картридже» или «Очень
низкий уровень тонера в картридже» ………………………………………………………………………………………………. 77
Изменение нас
Заказ расходных материалов ………………………………………………………………………………………….. 78
Устранение замятий и неполадок при подаче бумаги ……………………………………………………………………….. 79
RUWW v
троек «Очен
ь низкий уровень» …………………………………………………………………… 77

Принтер не захватывает бумагу ………………………………………………………………………………………. 79
Принтером захватывается несколько листов бумаги ……………………………………………………….. 79
Часто заминается бумага в устройстве ……………………………………………………………………………… 79
Предотвращение замятий бумаги ……………………………………………………………………………………. 80
Устранение замятий бумаги ……………………………………………………………………………………………………………… 82
Введение ………………………………………………………………………………………………………………………… 82
Места замятия бумаги ……………………………………………………………………………………………………… 82
Замятие бумаги случается часто или периодически? ……………………………………………………….. 82
Устранение замятий бумаги в подающем лотке ……………………………………………………………….. 84
Устранение замятий в области картриджей с тонером ……………………………………………………… 86
Устранение замятий бумаги в выходном лотке ………………………………………………………………… 88
Улучшение ка
Решение проблем проводной сети …………………………………………………………………………………………………… 96
Решение проблем беспроводной сети ……………………………………………………………………………………………… 98
чества печ
Введение ………………………………………………………………………………………………………………………… 91
Печать из другой программы …………………………………………………………………………………………… 91
Проверка параметра типа бумаги для задания печати ……………………………………………………… 91
Проверка статуса картриджа с тонером …………………………………………………………………………… 91
Очистка принтера ……………………………………………………………………………………………………………. 92
Визуальный осмотр картриджа с тонером ……………………………………………………………………….. 92
Проверка бумаги и условий печати ………………………………………………………………………………….. 92
Проверка параметров режима EconoMode ……………………………………………………………………….. 93
Регулировка плотности печати ………………………………………………………………………………………… 94
Введение ………………………………………………………………………………………………………………………… 96
Некачественное подключение на физическом уровне ……………………………………………………… 96
В компьютере используется неверный IP-адрес принтера ……………………………………………….. 96
Компьютер не может связаться с принтером ……………………………………………………………………. 96
В принтере используется неверный параметр скорости связи для сети ……………………………. 97
Новое программное обеспечение может вызывать неполадки с совместимостью. …………… 97
Неправильные настройки к
Принтер отключен или настройки сети неверны ……………………………………………………………… 97
Введение ………………………………………………………………………………………………………………………… 98
Контрольный список для проверки беспроводного соединения ………………………………………. 98
Принтер перестает печатать после завершения настройки беспроводного соединения …… 99
Принтер не печатает, а на компьютере установлен брандмауэр стороннего
разработчика ………………………………………………………………………………………………………………….. 99
ати …………………………………………………………………………………………………………….. 91
Проверка параметра типа бумаги (Windows) ……………………………………………………. 91
Проверка параметра типа бумаги (OS X) …………………………………………………………… 91
Печать страницы очистки ……………………………………………………………………………….. 92
Этап 1. Используйте бумагу, которая соответствует требованиям HP ………………. 92
Этап 2. Пр
оверьте услов
омпьютера ил
ия эксплуатации ………………………………………………………… 93
и рабочей станции …………………………………………… 97
vi RUWW

Беспроводное соединение не работает после перемещения беспроводного
маршрутизатора или принтера ………………………………………………………………………………………… 99
Невозможно подсоединить дополнительные компьютеры к принтеру с функциями
беспроводной связи ………………………………………………………………………………………………………. 100
Принтер с беспроводным соединением теряет связь при подсоединении к виртуальной
частной сети (VPN) …………………………………………………………………………………………………………. 100
Сеть не представлена в списке беспроводных сетей ………………………………………………………. 100
Беспроводная сеть не функционирует …………………………………………………………………………… 100
Выполнение диагностического теста беспроводной сети ………………………………………………. 101
Уменьшение помех в беспроводной се
……………………………………………………………………. 101
ти ….
Указатель …………………………………………………………………………………………………………………………………. 103
RUWW vii

viii RUWW

1 Общие сведения о принтере
●
Изображения принтера
●
Технические характеристики принтера
●
Аппаратная настройка принтера и установка ПО
Для получения дополнительной информации см.:
Следующая информация является верной на момент публикации. Дополнительные сведения см. в
разделе
В полной справке от HP для этого принтера представлена следующая информация:
●
●
www.hp.com/support/ljM101.
Установка и настройка
Обучение и использование
●
Решение проблем
●
Загрузка обновлений ПО и микропрограммы
●
Участие в форумах технической поддержки
●
Поиск информации по гарантии и нормативной информации
RUWW 1
Изображения принтера
Вид принтера спереди
6
5
1 Верхняя крышка (доступ к картриджу с тонером) и выходной лоток
2 Удлинитель выходного лотка
3 Лоток приоритетной подачи (только модели M102w, M104w, M106w)
1
2
3
4
4 Входной лоток
5 Кнопка питания
6 Панель управления
2 Глава 1 Общие сведения о принтере RUWW
Вид принтера сзади
4
3
1 Интерфейсный порт USB
2 Разъем питания
3 Разъем для защиты блокировкой кабельного типа
4 Этикетка с серийным номером и номером принтера
1
2
RUWW Изображения принтера 3
Вид панели управления
1
2
3
4
1 Кнопка беспроводного соединения
и индикатор (только
беспроводные модели)
2 Светодиодный индикатор
«Внимание«
3 Светодиодный индикатор «Готов« Индикатор готовности горит, когда принтер готов к печати. Он мигает, когда
4 Кнопка возобновления/отмены Эта кнопка используется для следующих действий:
Нажмите эту кнопку, чтобы включить или отключить функцию беспроводного
соединения или настроить подключение Wi-Fi Direct.
Нажмите и удерживайте эту кнопку, чтобы настроить соединение WPS.
Если индикатор беспроводного соединения светится, есть устойчивое
беспроводное соединение. Если этот индикатор мигает, выполняется процедура
настройки WPS или Wi-Fi Direct. Если этот индикатор быстро мигает, возникли
проблемы с беспроводным с
Индикатор «Внимание» мигает для привлечения внимания пользователя,
например, когда в принтере закончилась бумага или картридж с тонером
необходимо заменить. Если индикатор горит не мигая, в принтере произошла
ошибка.
принтер получает данные печати или отм
●
Если принтер в настоящее время обрабатывает задание, а светодиодный
индикатор «Внимание» выключен, и мигает светодиодный индикатор «Готов»,
нажмите кнопку, чтобы отменить задание печати.
●
Если принтер находится в состоянии ошибки или запроса с выключенным
светодиодным индикатором «Готов» и мигающим св
индикатором «Внимание», нажмите кнопку, чтобы устранить ошибку и
продолжить печать.
●
В режиме двусторонней печати вручную нажмите эту кнопку для печати на
второй стороне страницы.
оединением.
еняет задание печати.
етодиодным
4 Глава 1 Общие сведения о принтере RUWW

Технические характеристики принтера
ВАЖНО! Следующие характеристики верны на момент публикации, но могут измениться.
Дополнительные сведения см. в разделе
●
Технические характеристики
●
Поддерживаемые ОС
●
Решения для мобильной печати
●
Размеры принтера
●
Потребляемая мощность, электрические характеристики и акустическая эмиссия
●
Допустимые условия эксплуатации
Технические характеристики
Для получения актуальной информации см. www.hp.com/support/ljM101.
Поддерживаемые ОС
Следующая информация относится к драйверам печати Windows PCLmS и OS X для конкретных
принтеров.
www.hp.com/support/ljM101.
Windows. Установщик программного обеспечения устанавливает драйвер PCLm.S, PCLmS или PCLm-S в
зависимости от операционной системы Windows, а также дополнительное программное обеспечение,
при использовании полной версии установщика программного обеспечения. Дополнительные
сведения см. в примечаниях по установке ПО.
OS X. Данный принтер поддерживает компьютеры Mac. Загрузите HP Easy Start с установочного
компакт-диска или с
123.hp.com, а затем с помощью HP Easy Start установите драйвер и утилиты
печати HP. Дополнительные сведения см. в примечаниях по установке ПО.
1. Перейдите на страницу
123.hp.com.
2. Выполните указанные действия для загрузки программного обеспечения принтера.
Linux: Для получения информации и загрузки драйверов печати для Linux перейдите по адресу
hplipopensource.com/hplip-web/index.html.
Операционная система Установленный драйвер печати Примечания
Windows® XP SP3 или более
поздней версии, 32-разрядная
Windows Vista®, 32-разрядная Драйвер печати HP PCLm.S для
Драйвер печати HP PCLm.S для
конкретного принтера
устанавливается для данной ОС в
процессе базовой установки ПО.
Базовый установщик
устанавливает только драйвер.
конкретного принтера
устанавливается для данной ОС в
процессе базовой установки ПО.
овый установщик
Баз
устанавливает только драйвер.
Microsoft прекратила предоставление базовой
поддержки для Windows XP в апреле 2009 г. Компания
HP продолжит предоставление негарантированной
поддержки ОС XP.
RUWW Технические характеристики принтера 5

Операционная система Установленный драйвер печати Примечания
Windows Server 2003 SP2 или
более поздней версии, 32разрядная
Windows Server 2003 R2, 32разрядная версия
Windows 7 (32- и 64разрядные версии).
Windows 8, 32- и 64разрядные версии
Windows 8.1, 32- и 64разрядные версии
Windows 10 (32- и 64-
разрядные версии).
Драйвер печати HP PCLm.S для
конкретного принтера
устанавливается для данной ОС в
процессе базовой установки ПО.
Базовый установщик
устанавливает только драйвер.
Драйвер печати HP PCLm.S для
конкретного принтера
устанавливается для данной ОС в
процессе базовой уста
Базовый установщик
устанавливает только драйвер.
Драйвер печати HP PCLmS для
конкретного принтера
устанавливается для данной ОС в
процессе полной установки ПО.
Драйвер печати HP PCLmS для
конкретного принтера
устанавливается для данной ОС в
процессе базовой уста
Драйвер печати HP PCLm-S для
конкретного принтера
устанавливается для данной ОС в
процессе базовой установки ПО.
Драйвер печати HP PCLm-S для
конкретного принтера
устанавливается для данной ОС в
процессе базовой установки ПО.
новки ПО.
новки ПО.
Компания Microsoft прекратила предоставление
базовой поддержки для Windows Server 2003 в июле
2010 г. Компания HP продолжит предоставление
негарантированной поддержки ОС Server 2003.
Компания Microsoft прекратила предоставление
базовой поддержки для Windows Server 2003 в июле
2010 г. Компания HP продолжит предоставление
негарантированной поддержки ОС Server 2003.
Поддержка Windows 8 RT осуществляется через
Microsoft в версии ОС 4, 32-разрядный драйвер.
Поддержка Windows 8.1 RT осуществляется через
Microsoft в версии ОС 4, 32-разрядный драйвер.
ows Server 2008, 32- и 64-
Wind
разрядные версии
Windows Server 2008 R2, 64разрядная версия
Windows Server 2012, 64разрядная версия
Windows Server 2012 R2, 64разрядная версия
OS X 10.9 Mavericks, OS X 10.10
Yosemite и OS X 10.11 El
Capitan
Драйвер печати HP PCLm.S для
конкретного принтера
устанавливается для данной ОС в
процессе базовой установки ПО.
Драйвер печати HP PCLmS для
конкретного принтера
устанавливается для данной ОС в
процессе базовой установки ПО.
Драйвер печати HP PCLmS для
конкретного принтера
устанавливается для данной ОС в
процессе базовой установки ПО.
Драйвер печати HP PCLm-S для
т
ного принтера
конкре
устанавливается для данной ОС в
процессе базовой установки ПО.
Драйвер печати и утилиты для
печати для OS X можно скачать
либо с установочного компактдиска, либо с веб-сайта
123.hp.com.
Загрузите HP Easy Start с установочного компакт-диска
или с
123.hp.com, а затем с помощью HP Easy Start
установите драйвер и утилиты печати HP.
1. Перейдите на страницу
2. Выполните указанные действия для загрузки
программного обеспечения принтера.
123.hp.com.
6 Глава 1 Общие сведения о принтере RUWW
ПРИМЕЧАНИЕ. Для поддерживаемых в настоящее время ОС на сайте www.hp.com/support/ljM101
можно получить исчерпывающие сведения по принтеру.
Решения для мобильной печати
У компании HP есть несколько решений мобильной печати и печати через службу ePrint для удобной
печати на любом принтере HP с ноутбука, планшетного ПК, смартфона или другого мобильного
устройства. Ознакомиться с полным списком и определиться с выбором можно на сайте
go/LaserJetMobilePrinting.
ПРИМЕЧАНИЕ. Обновите микропрограмму принтера, чтобы обеспечить поддержку всех
возможностей мобильной печати и ePrint.
●
Wi-Fi Direct (только беспроводные модели)
●
HP ePrint по электронной почте (требуется подключение к веб-службам HP и регистрация
принтера в HP Connected)
●
ПО HP ePrint
●
Android Printing
●
AirPrint
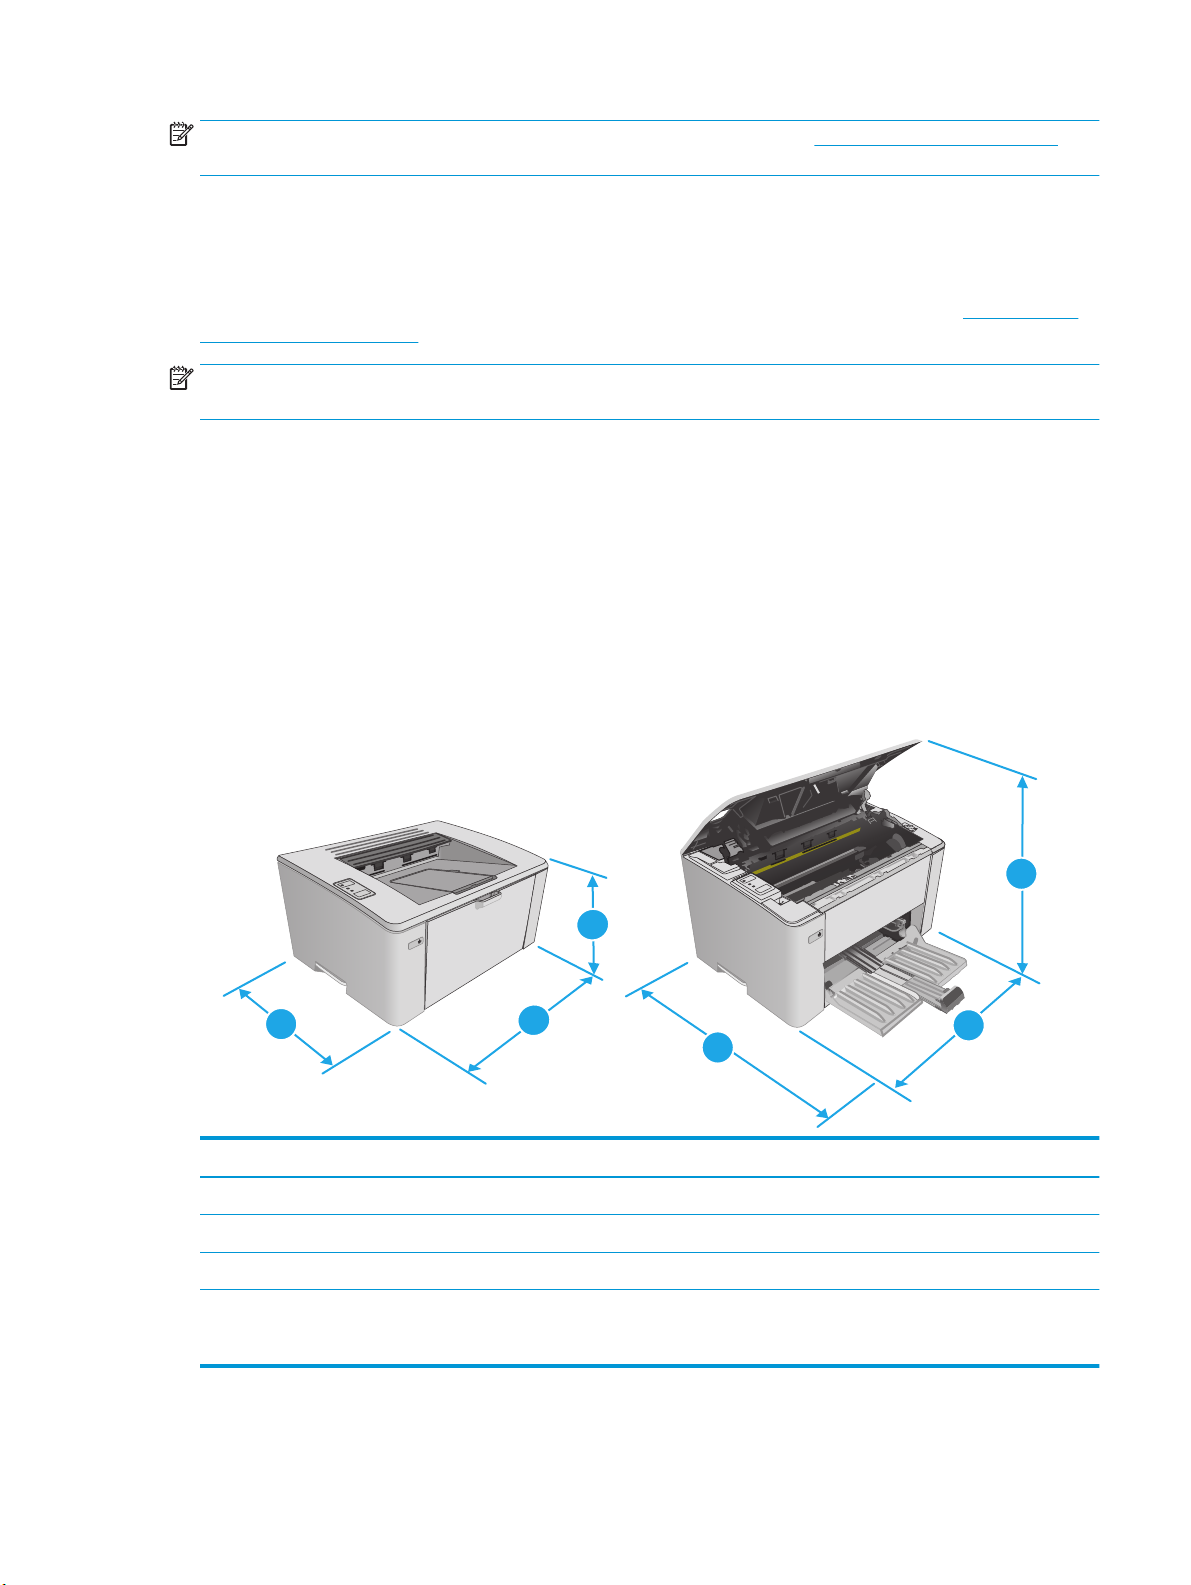
Размеры принтера
www.hp.com/
1
3
2
2
3
Принтер полностью закрыт Принтер в открытом состоянии
1. Высота 190,7 мм 332,4 мм
2. Ширина 364,7 мм 364,7 мм
3. Глубина 247,8 мм 467 мм
Вес (с картриджами) С картриджем CF217A/CF218A: 5,1 кг
С картриджем CF233A: 5,26 кг
1
RUWW Технические характеристики принтера 7

Потребляемая мощность, электрические характеристики и акустическая
эмиссия
Последние сведения см. по адресу www.hp.com/support/ljM101.
ПРЕДУПРЕЖДЕНИЕ. Требования к электропитанию зависят от страны/региона, где продается
данный принтер. Не изменяйте рабочее напряжение. Это может вывести принтер из строя и послужить
причиной аннулирования гарантийных обязательств.
Допустимые условия эксплуатации
Среда Рекомендуемая Допустимая
Температура 15° – 27°C 15 – 30 °C
Относительная влажность 20% – 70% относительной
влажности (RH), без конденсата
10 %-80 % относительной влажности,
RH, без конденсации
8 Глава 1 Общие сведения о принтере RUWW

Аппаратная настройка принтера и установка ПО
Основные инструкции по настройке см. на плакате по установке и в руководстве по началу работы из
комплекта поставки принтера. Дополнительные инструкции см. на веб-сайте поддержки HP.
См.
www.hp.com/support/ljM101 для получения полной справки от HP для этого принтера: Выполните
поиск следующей записи:
●
Установка и настройка
●
Обучение и использование
●
Решение проблем
●
Загрузка обновлений ПО и микропрограммы
●
Участие в форумах технической поддержки
●
Поиск информации по гарантии и нормативной информации
RUWW Аппаратная настройка принтера и установка ПО 9

10 Глава 1 Общие сведения о принтере RUWW

2 Лотки для бумаги
●
Загрузка подающего лотка
●
Загрузка лотка приоритетной подачи (только беспроводные модели)
●
Загрузка бумаги и печать конвертов
Для получения дополнительной информации см.:
Следующая информация является верной на момент публикации. Дополнительные сведения см. в
разделе
В полной справке от HP для этого принтера представлена следующая информация:
●
●
www.hp.com/support/ljM101.
Установка и настройка
Обучение и использование
●
Решение проблем
●
Загрузка обновлений ПО и микропрограммы
●
Участие в форумах технической поддержки
●
Поиск информации по гарантии и нормативной информации
RUWW 11
Загрузка подающего лотка
Введение
Далее приводится описание загрузки бумаги в подающий лоток. Этот лоток вмещает до 150 листов
бумаги плотностью 75 г/м
2
.
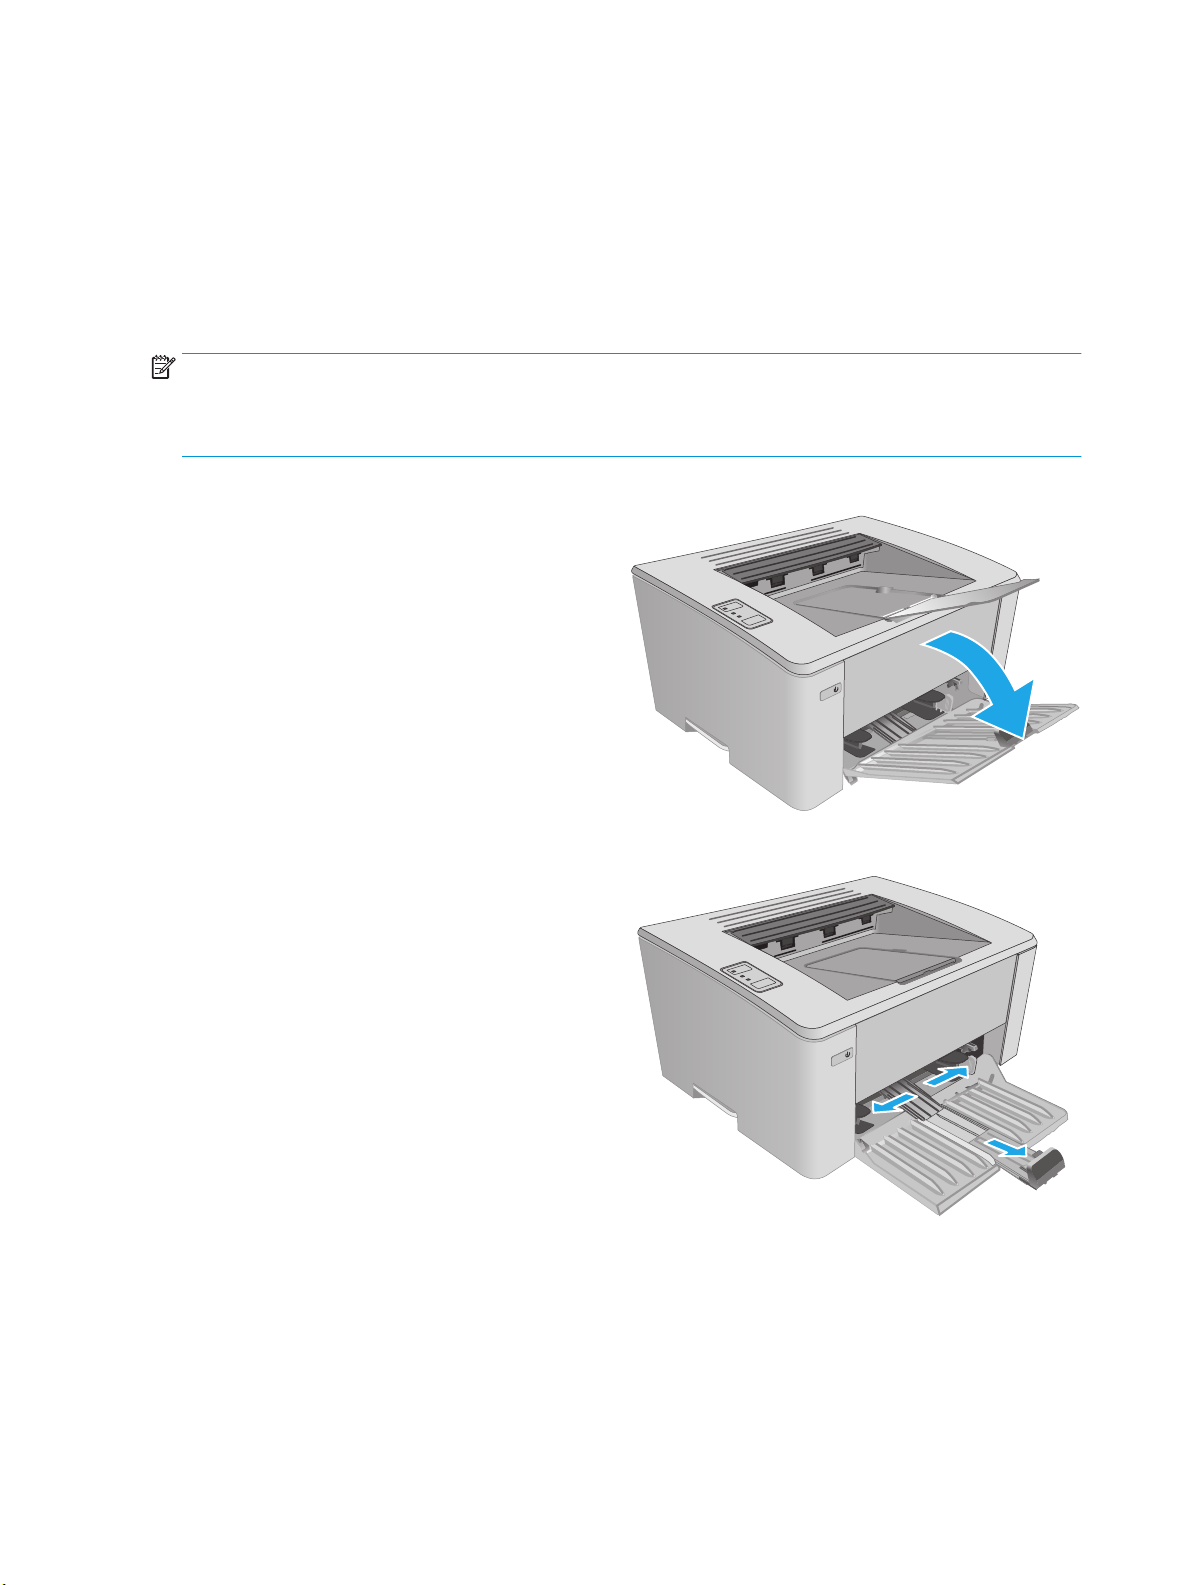
Загрузка бумаги во входной лоток
ПРИМЕЧАНИЕ. При загрузке новой бумаги убедитесь, что в подающем лотке нет старой бумаги, и
выровняйте стопку новой бумаги. Не пролистывайте пачку бумаги. Соблюдение этого правила
предупреждает захват устройством нескольких листов одновременно и снижает вероятность
возникновения замятий.
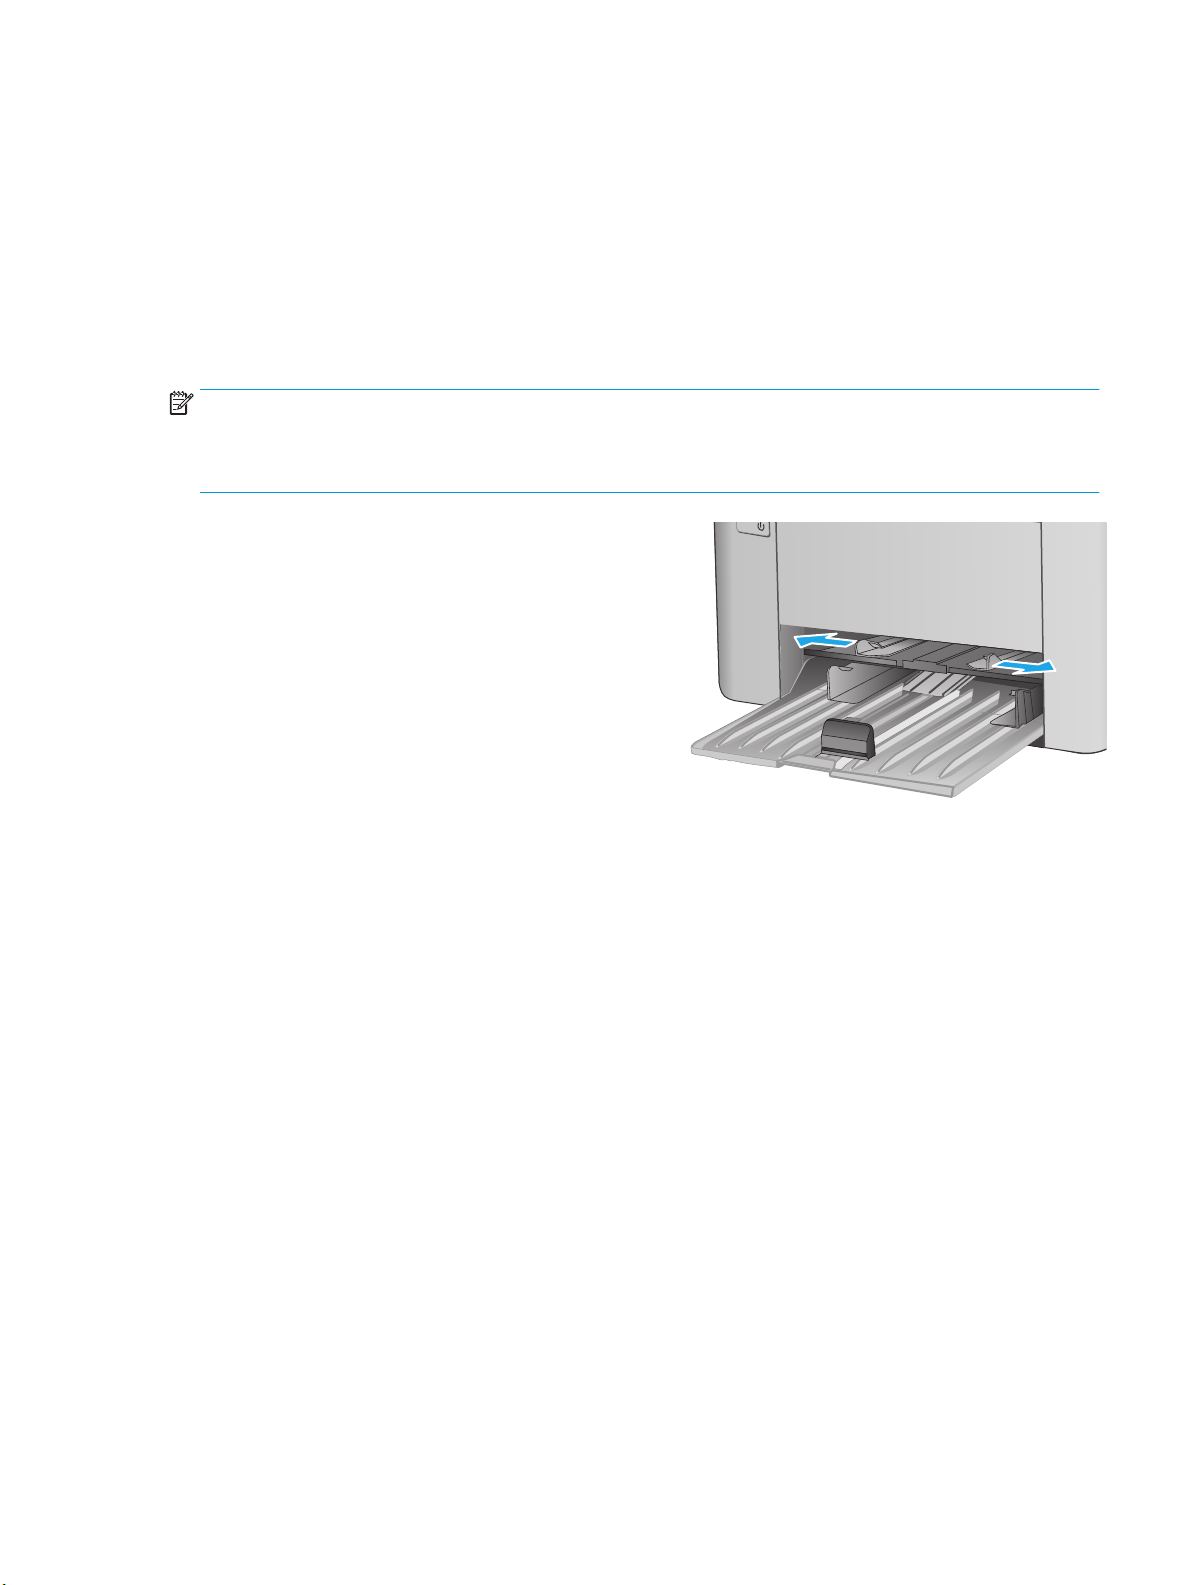
1. Откройте входной лоток, если еще не открыт.
2. Раздвиньте направляющие ширины и длины
бумаги.
12 Глава 2 Лотки для бумаги RUWW
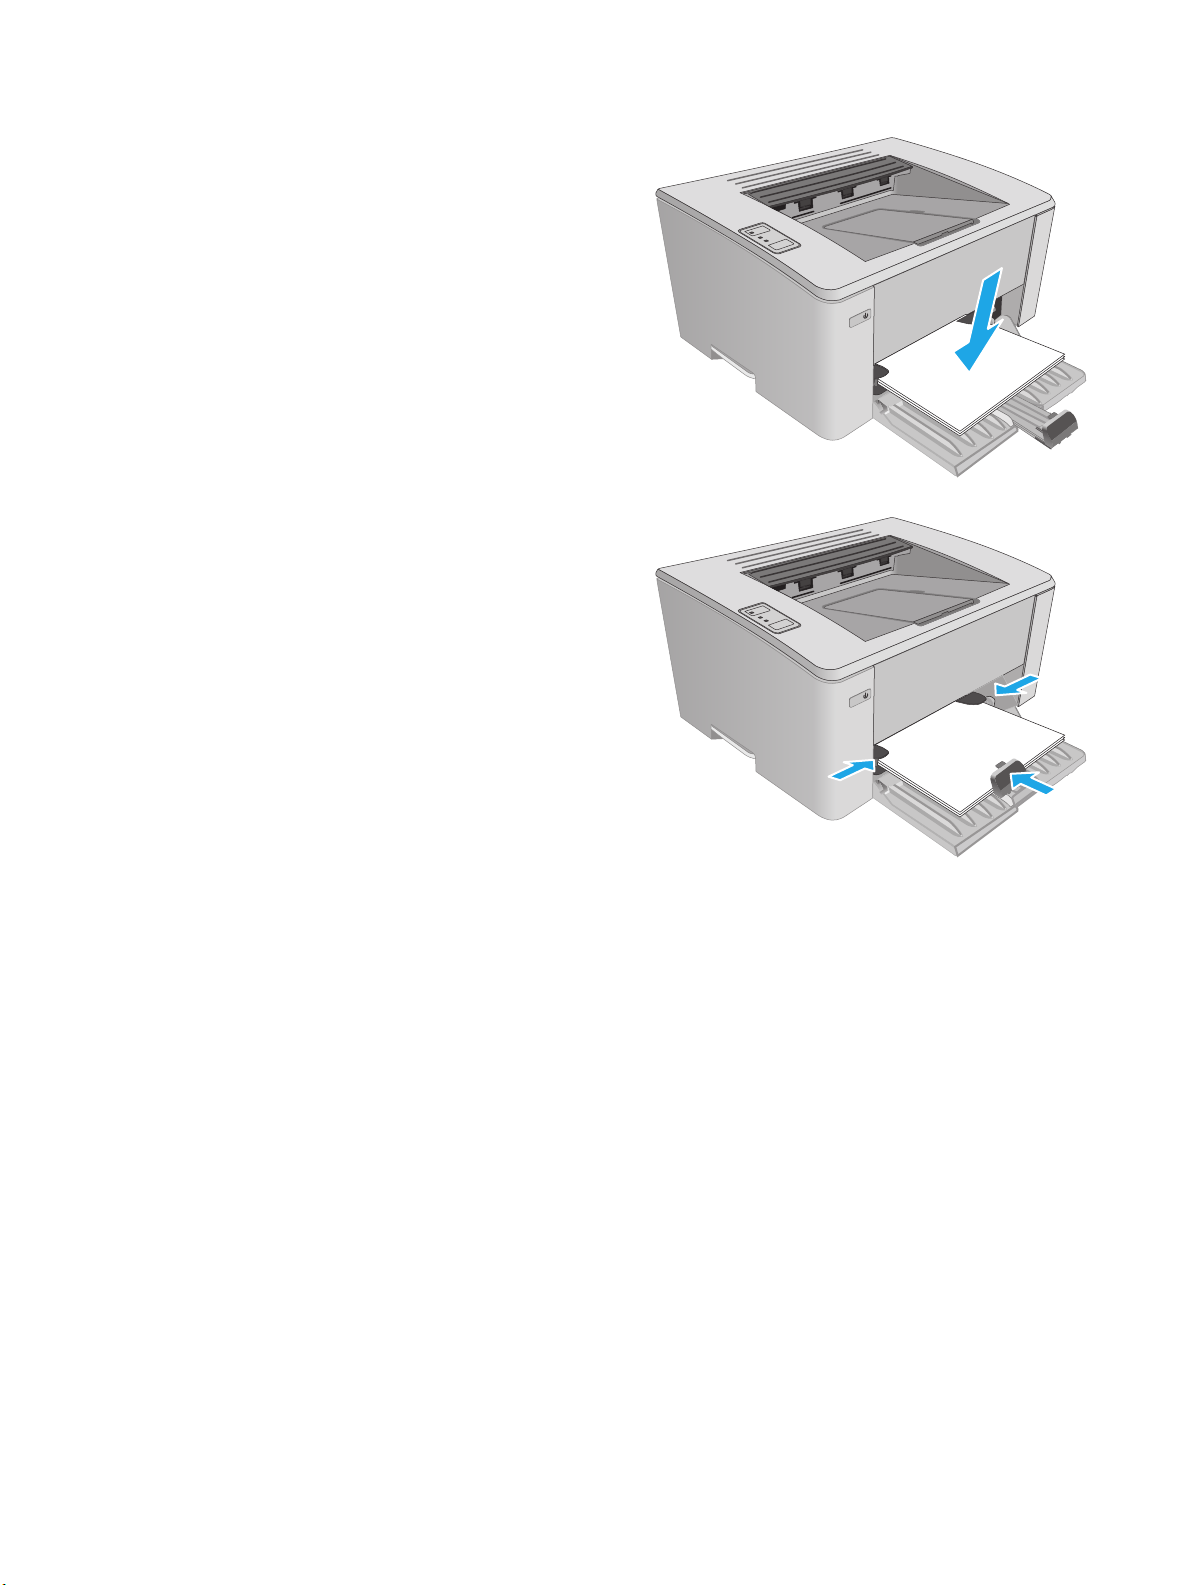
3. Загрузите бумагу в подающий лоток лицевой
стороной вверх.
Ориентация бумаги в лотке меняется в
зависимости от типа задания печати.
Подробнее см. в приведенной ниже таблице.
4. Прижмите направляющие, чтобы они
прилегали к бумаге.
RUWW Загрузка подающего лотка 13
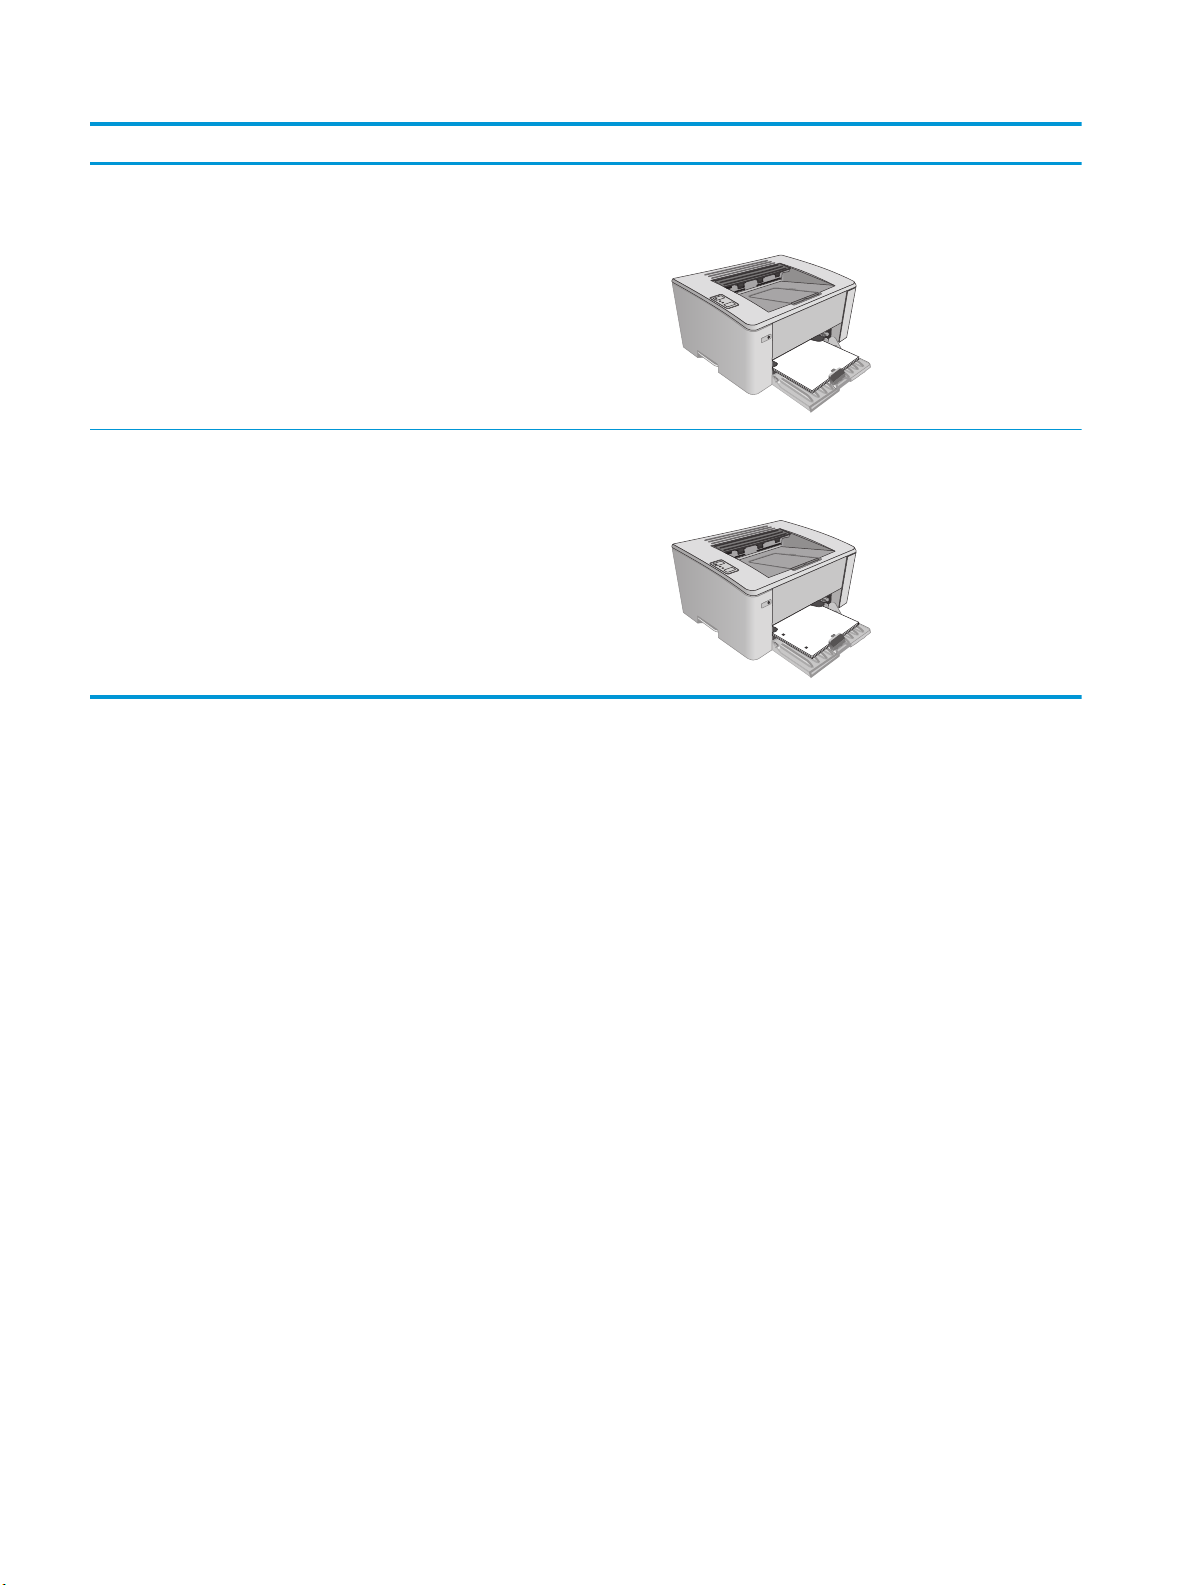
Тип бумаги Режим двусторонней печати Загрузка бумаги
Бланковая бумага или фирменные
бланки
Перфорированная 1-сторонняя или 2-сторонняя печать Лицевой стороной вверх
1-сторонняя или 2-сторонняя печать Лицевой стороной вверх
Верхним краем внутрь устройства
Отверстия должны располагаться слева
14 Глава 2 Лотки для бумаги RUWW
Загрузка лотка приоритетной подачи (только беспроводные
модели)
Введение
Далее приводится описание загрузки бумаги в лоток приоритетной подачи. Этот лоток вмещает до 10
листов бумаги плотностью 75 г/м
2
.
Загрузка бумаги в лоток приоритетной подачи
ПРИМЕЧАНИЕ. При загрузке новой бумаги убедитесь, что в подающем лотке нет старой бумаги, и
выровняйте стопку новой бумаги. Не пролистывайте пачку бумаги. Соблюдение этого правила
предупреждает захват устройством нескольких листов одновременно и снижает вероятность
возникновения замятий.
1. Раздвиньте направляющую ширины бумаги.
RUWW Загрузка лотка приоритетной подачи (только беспроводные модели)15
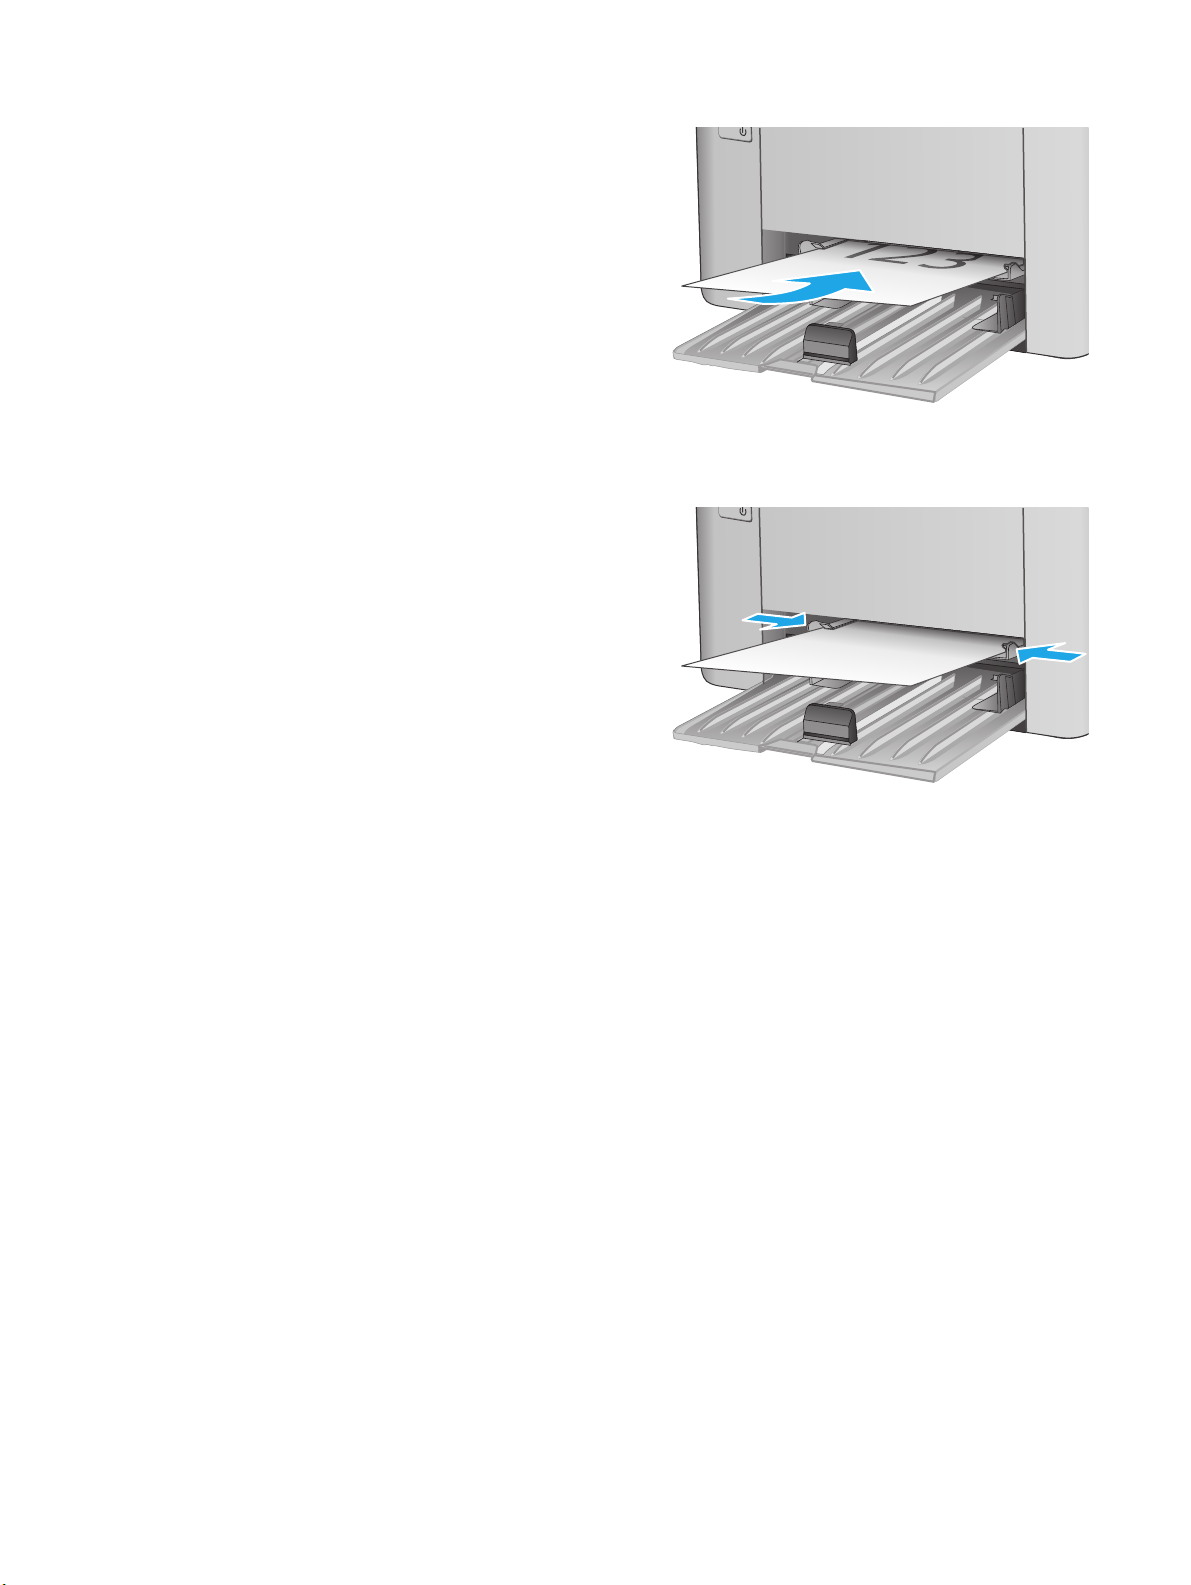
2. Загрузите бумагу в подающий лоток лицевой
стороной вверх.
Ориентация бумаги в лотке меняется в
зависимости от типа задания печати.
Подробнее см. в приведенной ниже таблице.
3. Скорректируйте положение направляющих
так, чтобы они прилегали к бумаге.
16 Глава 2 Лотки для бумаги RUWW

Тип бумаги Режим двусторонней печати Загрузка бумаги
Бланковая бумага или фирменные
бланки
Перфорированная 1-сторонняя или 2-сторонняя печать Лицевой стороной вверх
1-сторонняя или 2-сторонняя печать Лицевой стороной вверх
Верхним краем внутрь устройства
Отверстия должны располагаться слева
RUWW Загрузка лотка приоритетной подачи (только беспроводные модели)17
Загрузка бумаги и печать конвертов
Введение
В следующем разделе приводится описание печати и загрузки конвертов. Для достижения наилучшего
результата в лоток приоритетной подачи следует загружать стопку конвертов не более 5 мм (4 — 6
конвертов), и только 10 конвертов во входной лоток.
Для печати на конвертах, выполните следующие действия, чтобы выбрать правильные настройки в
драйвере печати.
Печать конвертов
1. Из окна программы выберите параметр Печать.
2. Выберите принтер из списка принтеров, а затем нажмите или коснитесь пункта Свойства или
Параметры, чтобы открыть драйвер печати.
ПРИМЕЧАНИЕ. Название кнопки различается в зависимости от программного обеспечения.
ПРИМЕЧАНИЕ. Чтобы получить доступ к данным функциям с начального экрана Windows 8 или
8.1, выберите Устройства, Печать, затем выберите принтер.
3. Нажмите или коснитесь вкладки Бумага/качество.
4. В раскрывающемся списке Формат бумаги выберите соответствующий формат для конвертов.
5. В раскрывающемся списке Материал для печати выберите Конверты.
6. Нажмите кнопку ОК, чтобы закрыть диалоговое окно Свойства документа.
7. В диалоговом окне Печать нажмите кнопку ОК, чтобы отправить задание на печать.
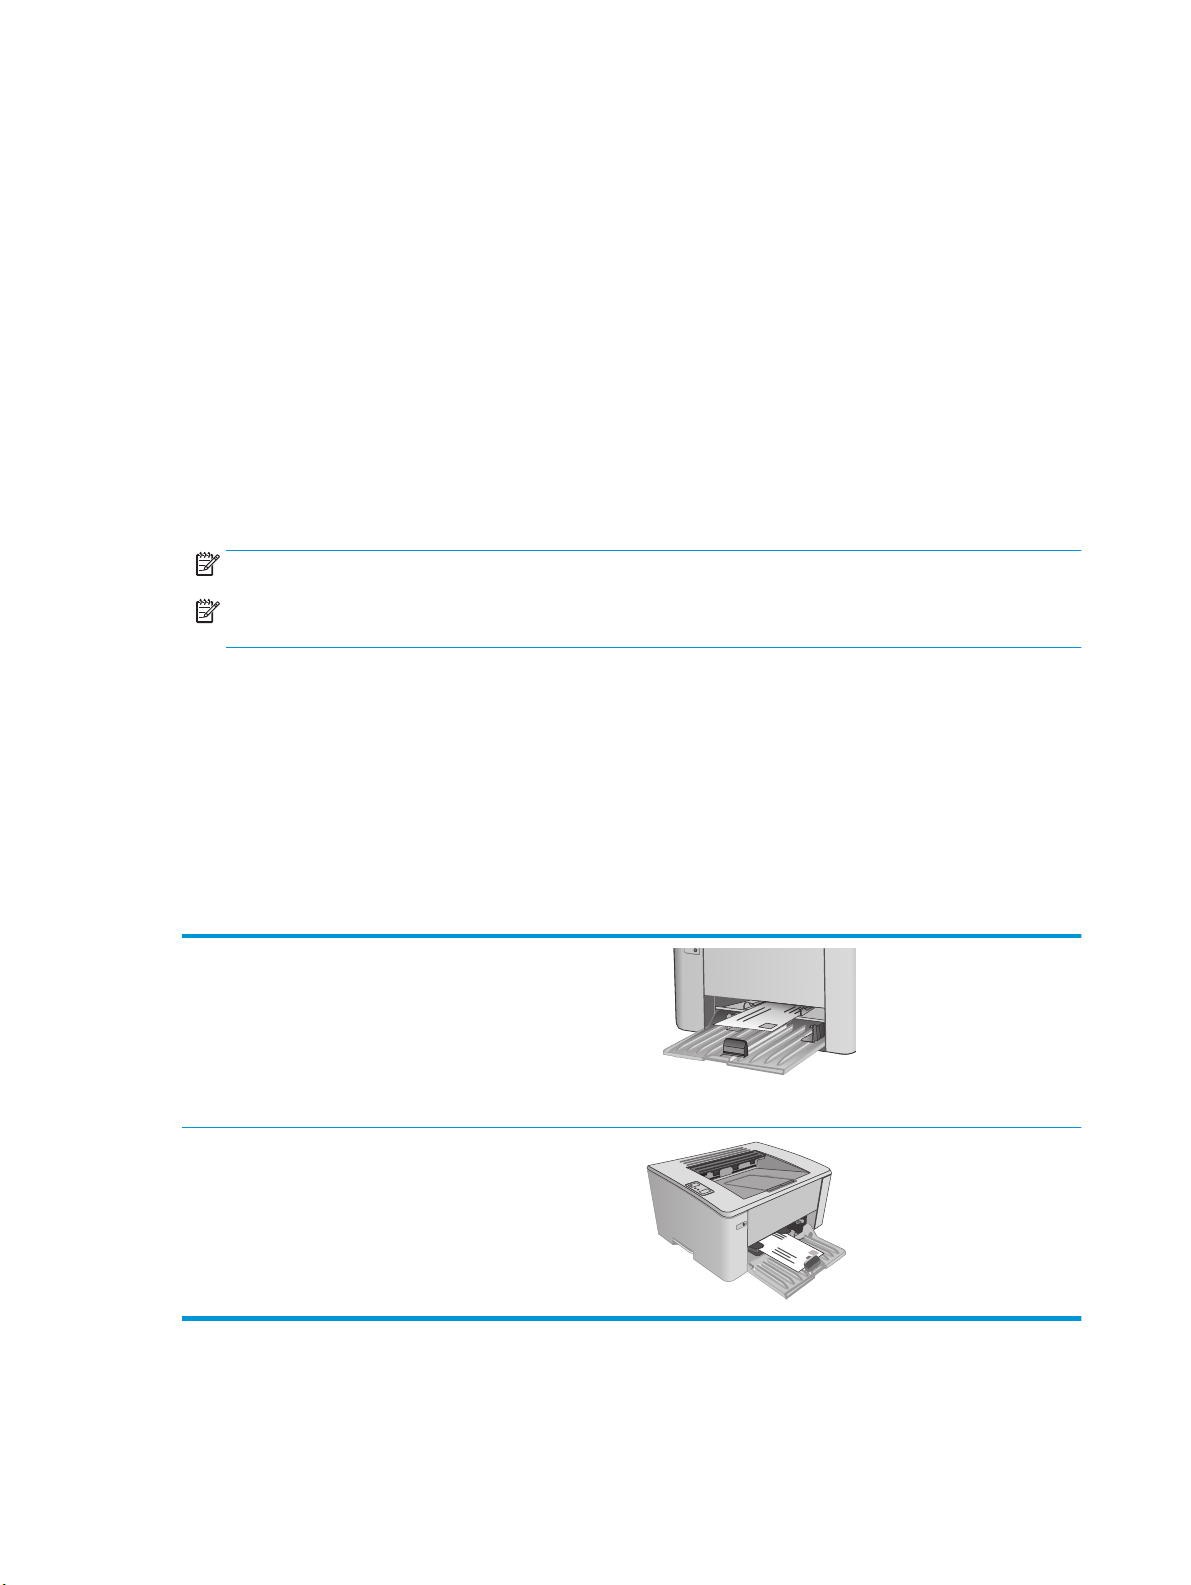
Ориентация конверта
Загрузите конверты в лоток приоритетной подачи лицевой
стороной вверх, короткой стороной с обратным адресом к
принтеру.
Загрузите конверты в подающий лоток лицевой стороной
вверх, короткой стороной с обратным адресом к принтеру.
18 Глава 2 Лотки для бумаги RUWW

3 Расходные материалы, дополнительные
принадлежности и запасные части
●
Заказ расходных материалов, дополнительных принадлежностей и запасных частей
●
Настройка параметров расходных материалов HP для защиты картриджей с тонером
●
Сменный картридж с тонером
Для получения дополнительной информации см.:
Следующая информация является верной на момент публикации. Дополнительные сведения см. в
разделе
В полной справке от HP для этого принтера представлена следующая информация:
www.hp.com/support/ljM101.
●
Установка и настройка
●
Обучение и использование
●
Решение проблем
●
Загрузка обновлений ПО и микропрограммы
●
Участие в форумах технической поддержки
●
Поиск информации по гарантии и нормативной информации
RUWW 19

Заказ расходных материалов, дополнительных
принадлежностей и запасных частей
Заказ
Заказ расходных материалов и бумаги www.hp.com/go/suresupply
Заказ оригинальных комплектующих и дополнительных
принадлежностей HP
Заказ через сервисный центр или службу поддержки Обратитесь в уполномоченный сервисный центр или службу
Заказ при помощи встроенного веб-сервера HP (EWS) Для доступа в адресной строке поддерживаемого веб-
www.hp.com/buy/parts
поддержки HP.
браузера, установленного на используемом компьютере,
введите IP-адрес устройства или имя хоста. Встроенный вебсервер (EWS) содержит ссылку на сайт HP SureSupply, который
представляет возможности приобретения оригинальных
расходных материалов HP .
Расходные материалы и дополнительные принадлежности
Элемент Описание Номер картриджа Номер детали
Расходные материалы
Черный оригинальный картридж с
тонером HP 17A LaserJet
Черный оригинальный картридж с
тонером HP 18A LaserJet
HP 19A, подлинный фотобарабан
LaserJet
Сменный черный картридж с тонером для
моделей M101-M102
Сменный черный картридж с тонером для
моделей M103-M104
Сменный фотобарабан для моделей M101-
M104
17A CF217A
18A CF218A
19A CF219A
Черный оригинальный картридж с
тонером HP 33A LaserJet
HP 34A, подлинный фотобарабан
LaserJet
Сменный черный картридж с тонером для
моделей M105-M106
Сменный фотобарабан для модел
M106
ей M10
33A CF233A
5-
34A CF234A
Детали для самостоятельного ремонта
Детали для самостоятельного ремонта (CSR) доступны для многих принтеров HP LaserJet для
сокращения времени ремонта. Более подробные сведения о программе CSR, а также преимущества
можно найти по адресу
Оригинальные сменные детали HP можно заказать по адресу
авторизованным сервисом или поставщиком услуг HP. При заказе вам понадобится одно из следующих
сведений: номер детали, серийный номер (на задней стороне принтера), код продукта или имя
принтера.
●
Детали, для которых требуется самостоятельная замена, должны устанавливаться
пользователем (персонал сервисной службы HP выполняет такую замену только за
20 Глава 3 Расходные материалы, дополнительные принадлежности и з
www.hp.com/go/csr-support и www.hp.com/go/csr-faq.
www.hp.com/buy/parts или связавшись с
апасные части RU
WW
Loading…
1
Portugus ……… 10
……………… 13
Espaol …………… 7
Franais …………… 4
English…………….. 1
USB connection directly between the printer and the computer Use an A-to-B type USB cable.
Windows 1. Do not connect the USB cable before installing the software. The
installation process prompts to connect the cable at the appropriate time. If the cable is already connected, restart the printer when installation prompts to connect the cable.
2. Continue to 6. Download and install the software.
OS X 1. Connect the USB cable between the computer and the printer before
installing the software. 2. Continue to 6. Download and install the software.
Perform a wireless installation (wireless models only)
Before starting the installation, verify that the wireless access point is working correctly. Make sure that the printer, router, and computer are all turned on and that the computer is connected to the same wireless network that the printer will be connected to.
1. Place the CD in the CD-ROM drive, navigate to setup.exe and double click. When the Printer connections dialog appears, choose Make a wireless connection to the device.
2. Follow the on-screen instructions.
3. Select the printer detected by the software. If the printer cannot be detected by the installer, manually input the printers IP address to continue the installation.
NOTE: Print a configuration page to find the printers IP address. At the printer control panel, press and hold the Resume/Cancel button for 5 seconds, and then release the Resume/Cancel button to print the configuration page. The IP address is listed on the configuration page in the Network Information section.
Manually configure the IP address See the printer user guide for information on how to manually configure the IP address www.hp.com/support/ljM101.
Wired (Ethernet) network connection (optional) Use a standard network cable.
1. Connect the network cable to the printer and to the network. Wait a few minutes for the printer to acquire a network address.
2. Continue to 6. Download and install the software.
IMPORTANT: First, follow Steps 1 — 3 on the printer hardware setup poster, then continue with Step 4.
www.hp.com/support/ljM101 www.register.hp.com
4. Set up the control panel At the printer control panel, check the LED status before beginning software installation.
5. Select a connection method
LaserJet Pro M101-M104, LaserJet Ultra M105-M106 Getting Started Guide
2
6. Download and install the software
Method 1: Download HP Easy Start (Windows and OS X) 1. Go to 123.hp.com/laserjet, and click Download. 2. Follow the on-screen instructions and prompts to save the file to the computer. 3. Launch the software file from the folder where the file was saved.
Method 2: Download from the printer support website (Windows and OS X)
1. Go to www.hp.com/support/ljM101. 2. Select Software and drivers. 3. Download the software for your printer model and operating system. 4. Launch the software file from the folder where the file was saved.
Method 3: Install from the printer CD (Windows only) 1. Insert the printer CD into the computer. 2. Follow the on-screen instructions to install the software. For more information
see the Install Notes on the printer CD.
Learn more about mobile printing For further information on these and other operating systems (Chrome/Google Cloud Print) go to www.hp.com/go/LaserJetMobilePrinting or scan the QR code below.
Connect the device to the wireless network To print from a phone or tablet, connect the device to the same wireless network as the printer.
Apple iOS devices (AirPrint) Open the item to print, and select the Action icon. Select Print, select the printer, and then select Print. Android devices (4.4 or newer) Open the item to print, and select the Menu button. Select Print, select the printer, and select Print. Some devices require downloading the HP Print Service plugin app from the Google Play store.
Windows Phone Download the HP AiO Remote app from the Windows Store.
7. Mobile printing (optional) Wi-Fi Direct (wireless models only) Wi-Fi Direct allows Wi-Fi capable devices, such as smart phones, tablets, or computers, to make wireless network connection directly to the printer without using a wireless router or access point. Connect to the printers Wi-Fi Direct signal the same way Wi-Fi capable devices are connected to a new wireless network or hotspot.
Enable Wi-Fi Direct Enable HP Web Services in the HP Embedded Web Server (EWS) by following these steps:
1. Connect the printer to a network, and print a configuration page to get the printer IP address.
NOTE: To set the IP address manually or configure it automatically, see Configure the network product in the user guide.
2. Open a web browser, enter the printer IP address into the address line, and then press Enter. Example IP address: 192.168.0.1
3. In the HP EWS, select the Networking tab.
4. Select the Wi-Fi Direct Setup page, select On, and then click Apply.
To use HP ePrint via email, the printer must meet these requirements: The printer must be connected to wireless network and have Internet access. HP Web Services must be enabled on the printer, and the printer must be
registered with HP Connected.
Enable HP Web Services (wireless models only) 1. After the printer is connected to the HP Embedded Web Server (EWS), print a
configuration page and identify the printer IP address. 2. At the computer, open a web browser and enter the printer IP address into the
address line. The HP EWS opens. 3. Click the HP Web Services tab. If the network uses a proxy server do the
following: Select the Proxy Settings tab. Select the Check this box if your network uses a proxy server to access the
Internet check box. In the Proxy Server field, enter the proxy server address and port number, and
then click the Apply button.
4. Select the HP Web Services tab, and click the Enable button. The printer configures the connection to the Internet, and then a message appears indicating an information sheet will print
5. Click the OK button. An ePrint page prints out. On the ePrint page, look for the e-mail address that is automatically assigned to the printer.
8. Set up HP ePrint via email (optional)
Use HP ePrint via email to print documents by sending them as an email attachment to the printers email address from any email enabled device, even from devices that are not on the same network.
7.1
7.2
3
Wireless network connection (wireless models only) Verify that the printer and wireless router are turned on and have power. Also make sure the wireless switch is turned on. Verify that the printer is within the range of the wireless network. For most networks, the printer must be within 30 m (100 ft) of the wireless access point
(wireless router). Verify that the print driver is installed on the computer. Verify that the computer and printer connect to the same wireless network. For Mac, verify that the wireless router supports Bonjour. Restart the wireless router.
Troubleshooting
User guide The user guide includes printer usage and troubleshooting information. It is available on the printer CD and on the Web:
1. Go to www.hp.com/support/ljM101. 2. Select a printer or category from the list, and then click User Guides.
Check for firmware updates 1. Go to www.hp.com/support/ljM101. 2. Select a printer or category from the list, and then click Drivers. 3. Select the operating system, and then click the Next button. 4. Select Firmware, and then click the Download button.
Resolve error code messages (First Use) Error code Action Attention light is blinking Load the paper into the tray
Additional support resources For HPs all-inclusive help for the printer, go to www.hp.com/support/ljM101:
Solve problems Find advanced configuration instructions Download software updates Join support forums Find warranty and regulatory information Access mobile printing resources
4
Portugus …. 10
………… 13
Espaol ………. 7
Franais ……… 4
English ……….. 1
www.hp.com/support/ljM101 www.register.hp.com
4. Configurer le panneau de commande Sur le panneau de commande de l’imprimante, vrifiez l’tat des voyants avant de commencer l’installation du logiciel.
Guide de dmarrage LaserJet Pro M101-M104, LaserJet Ultra M105-M106
IMPORTANT :
Suivez tout d’abord les tapes 1 3 indiques sur le poster d’installation matrielle de l’imprimante, puis passez l’tape 4.
Connexion USB directement entre l’imprimante et l’ordinateur Utilisez un cble USB de type A—B.
Windows 1. Ne connectez pas le cble USB avant d’installer le logiciel. Le processus
d’installation vous invite connecter le cble au moment opportun. Si le cble est dj connect, redmarrez l’imprimante lorsque le processus d’installation vous invite connecter le cble.
2. Passez la section 6. Tlcharger et installer le logiciel.
OS X 1. Pour Mac, branchez le cble USB entre l’ordinateur et l’imprimante avant
d’installer le logiciel. 2. Passez la section 6. Tlcharger et installer le logiciel.
Effectuer une installation sans fil (modles sans fil uniquement)
Avant de commencer l’installation, vrifiez que le point d’accs sans fil fonctionne correctement. Assurez-vous que l’imprimante, le routeur et l’ordinateur sont tous sous tension et que l’ordinateur est connect au rseau sans fil auquel vous souhaitez connecter l’imprimante.
1. Placez le CD dans le lecteur de CD-ROM, rendez-vous au fichier setup.exe et double-cliquez. Lorsque la bote de dialogue relative aux connexions d’imprimante s’affiche, choisissez tablir une connexion sans fil vers le dispositif.
2. Suivez les instructions affiches l’cran.
3. Slectionnez l’imprimante dtecte par le logiciel. Si l’installateur ne peut pas dtecter l’imprimante, saisissez manuellement l’adresse IP de l’imprimante pour continuer l’installation.
REMARQUE : Imprimez une page de configuration pour dterminer l’adresse IP de l’imprimante. Sur le panneau de commande de l’imprimante, appuyez sur le bouton Reprendre/Annuler pendant 5 secondes, puis relchez-le pour imprimer la page de configuration. L’adresse IP est mentionne sur la page de configuration dans la section Information rseau.
Configurer manuellement l’adresse IP Consultez le manuel de l’utilisateur de l’imprimante pour obtenir des informations sur la configuration manuelle de l’adresse IP www.hp.com/support/ljM101.
Connexion un rseau filaire (Ethernet) (facultatif) Utilisez un cble rseau standard.
1. Branchez le cble rseau l’imprimante et au rseau. Attendez quelques minutes que l’imprimante acquire une adresse rseau.
2. Passez la section 6. Tlcharger et installer le logiciel.
5. Slectionner une mthode de connexion
5
6. Tlcharger et installer le logiciel Mthode 1 : Tlchargement de HP Easy Start (Windows et OS X)
1. Visitez la page 123.hp.com/laserjet et cliquez sur Tlcharger. 2. Suivez les instructions et les invites l’cran pour enregistrer le fichier sur
l’ordinateur. 3. Lancez le fichier du logiciel partir du dossier dans lequel il a t enregistr.
Mthode 2 : Tlchargement depuis le site Web d’assistance de l’imprimante (Windows et OS X)
1. Accdez www.hp.com/support/ljM101. 2. Slectionnez Pilotes et logiciels. 3. Tlchargez le logiciel adapt votre modle d’imprimante et votre systme
d’exploitation. 4. Lancez le fichier du logiciel partir du dossier dans lequel il a t enregistr.
Mthode 3 : Installation avec le CD de l’imprimante (Windows uniquement)
1. Insrez le CD de l’imprimante dans votre ordinateur. 2. Suivez les instructions l’cran pour installer le logiciel. Pour plus d’informations,
consultez les notes d’installation sur le CD de l’imprimante.
Connexion du produit un rseau sans fil Pour imprimer depuis un tlphone ou une tablette, connectez le priphrique au mme rseau sans fil que l’imprimante.
Priphriques Apple iOS (AirPrint) Ouvrez le document imprimer, puis slectionnez l’icne Action. Slectionnez Imprimer, puis l’imprimante et appuyez sur Imprimer.
Priphriques Android (4.4 ou ultrieurs) Ouvrez l’lment imprimer puis slectionnez le bouton Menu. Slectionnez Imprimer, puis l’imprimante et appuyez sur Imprimer.
Pour certains priphriques, il est ncessaire de tlcharger l’application du module d’extension du service d’impression HP sur Google Play.
Tlphones Windows Tlchargez l’appli HP AiO Remote disponible dans le Windows Store.
7. Impression mobile (facultatif) Wi-Fi Direct (modles sans fil uniquement) Wi-Fi Direct permet aux priphriques Wi-Fi (smartphones, tablettes ou ordinateurs) d’effectuer une connexion rseau sans fil directement vers l’imprimante sans utiliser de routeur sans fil ou de point d’accs. Les utilisateurs se connectent au signal d’impression directe Wi-Fi de l’imprimante de la mme manire qu’ils connectent un priphrique Wi-Fi un nouveau rseau sans fil ou une borne d’accs.
Activer Wi-Fi Direct Activez les services Web HP dans le serveur Web intgr (EWS) HP en procdant comme suit :
1. Connectez l’imprimante un rseau et imprimez une page de configuration pour dterminer l’adresse IP de l’imprimante.
REMARQUE : Pour configurer manuellement ou automatiquement l’adresse IP, consultez Configurer le produit en rseau dans le manuel de l’utilisateur.
2. Lancez un navigateur Internet, saisissez l’adresse IP de limprimante dans le champ d’adresse, puis appuyez sur Entre. Exemple d’adresse IP : 192.168.0.1
3. Dans le serveur Web intgr (EWS) HP, cliquez sur l’onglet Rseaux.
4. Slectionnez la page Configuration Wi-Fi Direct, slectionnez Activ, puis cliquez sur Appliquer.
Pour utiliser HP ePrint via messagerie lectronique, l’imprimante doit rpondre aux exigences suivantes :
L’imprimante doit tre connecte un rseau cbl ou sans fil et avoir accs Internet.
Les services Web HP doivent tre activs sur l’imprimante et celle-ci doit tre enregistre auprs de HP Connected.
Activer les Services Web HP (modles sans fil uniquement) 1. Une fois l’imprimante connecte au serveur Web intgr (EWS) HP, imprimez une
page de configuration et dterminez l’adresse IP de l’imprimante.
2. Sur votre ordinateur, ouvrez un navigateur Web et saisissez l’adresse IP de l’imprimante dans le champ d’adresse. L’EWS de HP s’ouvre.
3. Cliquez sur l’onglet Services Web HP. Si le rseau utilise un serveur proxy, effectuez ce qui suit :
Slectionnez l’onglet Paramtres de proxy.
Slectionnez l’option Cochez cette case si votre rseau utilise un serveur proxy pour accder Internet.
Dans le champ Serveur proxy, entrez l’adresse et le numro de port du serveur proxy, puis cliquez sur le bouton Appliquer.
4. Slectionnez l’onglet Services Web HP, puis cliquez sur le bouton Activer. L’imprimante configure la connexion Internet, puis un message s’affiche vous indiquant qu’une page d’informations va tre imprime.
5. Cliquez sur le bouton OK. Une page ePrint est imprime. Sur la page ePrint, recherchez l’adresse lectronique automatiquement attribue l’imprimante.
8. Configurer HP ePrint via messagerie lectronique (facultatif) Utilisez HP ePrint via messagerie lectronique pour imprimer des documents en les envoyant en pice jointe l’adresse lectronique de l’imprimante depuis n’importe quel priphrique activ, mme ceux qui ne sont pas sur le mme rseau.
7.1
7.2
En savoir plus sur l’impression mobile Pour plus d’informations sur ces systmes d’exploitation et d’autres (Chrome/Google Cloud Print), accdez www.hp.com/go/LaserJetMobilePrinting ou scannez le code QR ci-dessous.
6
Connexion du rseau sans fil (modles sans fil uniquement) Vrifiez que l’imprimante et le routeur sans fil sont sous tension et aliments. Vrifiez galement que l’interrupteur sans fil est activ. Vrifiez que l’imprimante se trouve dans la plage du rseau sans fil. Pour la plupart des rseaux, l’imprimante doit se trouver dans une plage de 30 m (100 pi)
du point d’accs sans fil (routeur sans fil). Vrifiez que le pilote dimpression est bien install sur l’ordinateur. Vrifiez que l’ordinateur et l’imprimante se connectent au mme rseau sans fil. Pour Mac, vrifiez que le routeur sans fil prend en charge Bonjour. Redmarrez le routeur sans fil.
Dpannage
Manuel de l’utilisateur Le manuel de l’utilisateur comprend des informations relatives l’utilisation de l’imprimante et au dpannage. Il est disponible sur le CD de l’imprimante et sur le Web :
1. Accdez www.hp.com/support/ljM101. 2. Slectionnez une imprimante ou une catgorie dans la liste, puis cliquez
sur Manuels de l’utilisateur.
Recherche des mises jour de micrologiciels 1. Accdez www.hp.com/support/ljM101. 2. Slectionnez une imprimante ou une catgorie dans la liste, puis cliquez
sur Pilotes. 3. Slectionnez le systme d’exploitation et cliquez sur le bouton Suivant. 4. Slectionnez Micrologiciel et cliquez sur le bouton Tlcharger.
Rsolution des messages code d’erreur (premire utilisation) Code d’erreur Action Le voyant Attention clignote Chargez le papier dans le bac
Ressources d’assistance supplmentaires Pour l’aide globale de HP relative l’imprimante, accdez www.hp.com/support/ljM101 :
Rsolution des problmes Recherche d’instructions de configuration avances Tlchargement des mises jour du logiciel Inscription au forum d’assistance Recherche d’informations rglementaires et de garantie Accs aux ressources d’impression mobile
7
Portugus ……… 10
……………… 13
Espaol …………… 7
Franais …………… 4
English…………….. 1
Conexin USB directamente entre la impresora y el equipo Utilice un cable USB de tipo A a B.
Windows 1. No conecte el cable USB antes de instalar el software. El proceso de
instalacin del software muestra un aviso para conectar el cable en el momento adecuado. Si el cable ya est conectado, reinicie la impresora cuando el proceso de instalacin muestre el aviso para conectar el cable.
2. Contine con 6. Descarga e instalacin del software.
OS X 1. Conecte el cable USB entre el equipo y la impresora antes de instalar
el software. 2. Contine con 6. Descarga e instalacin del software.
Realice una instalacin inalmbrica (solo para los modelos inalmbricos)
Antes de comenzar la instalacin, verifique que el punto de acceso inalmbrico funcione correctamente. Asegrese de que la impresora, el direccionador y el equipo estn encendidos y que el equipo est conectado a la misma red inalmbrica a la que desea conectar la impresora.
1. Coloque el CD en la unidad de CD-ROM, navegue hasta setup.exe y haga doble clic. Cuando aparezca el dilogo de conexiones de la impresora, seleccione Establecer una conexin inalmbrica con el dispositivo.
2. Siga las instrucciones que aparecen en pantalla.
3. Seleccione la impresora que el software ha detectado. Si el programa de instalacin no puede detectar la impresora, introduzca manualmente la direccin IP de la impresora para proseguir con la instalacin.
NOTA: Para obtener la direccin IP de la impresora, imprima una pgina de configuracin. En el panel de control de la impresora, mantenga pulsado el botn Reanudar/Cancelar durante 5 segundos y, despus, sultelo para imprimir la pgina de configuracin. La direccin IP consta en la seccin Informacin de la red de la pgina de configuracin.
Configuracin manual de la direccin IP Consulte la Gua del usuario de la impresora para obtener informacin sobre cmo configurar manualmente la direccin IP www.hp.com/support/ljM101.
Conexin a una red por cable (Ethernet) (opcional) Utilice un cable de red estndar.
1. Conecte el cable de red a la impresora y a la red. Espere unos minutos a que la impresora obtenga la direccin de red.
2. Contine con 6. Descarga e instalacin del software.
IMPORTANTE:
En primer lugar, siga los pasos 1 — 3 del folleto de configuracin del hardware de la impresora y, despus, contine con el paso 4.
www.hp.com/support/ljM101 www.register.hp.com
4. Configuracin del panel de control En el panel de control de la impresora, compruebe el estado del LED antes de comenzar a instalar el software.
5. Seleccin del mtodo de conexin
LaserJet Pro M101-M104, Gua de inicio de LaserJet Ultra M105-M106
8
6. Descarga e instalacin del software
Mtodo 1: Descarga desde HP Easy Start (Windows y OS X) 1. Vaya a 123.hp.com/laserjet y haga clic en Descargar. 2. Siga las instrucciones e indicaciones en pantalla para guardar el archivo
en el equipo. 3. Inicie el archivo de software de la carpeta en la que se guard el archivo.
Mtodo 2: Descarga desde el sitio web de asistencia de la impresora (Windows y OS X)
1. Vaya a www.hp.com/support/ljM101. 2. Seleccione Software y controladores. 3. Descargue el software para su modelo de impresora y sistema operativo. 4. Inicie el archivo de software de la carpeta en la que se guard el archivo.
Mtodo 3: Instalacin desde el CD de la impresora (solo Windows)
1. Inserte el CD de la impresora en el equipo. 2. Siga las instrucciones en pantalla para instalar el software. Para obtener ms
informacin, consulte las Notas sobre la instalacin del CD de la impresora.
Obtener ms informacin sobre la impresin mvil Para obtener ms informacin acerca de este y otros sistemas operativos (Chrome/Google Cloud Print) vaya a www.hp.com/go/LaserJetMobilePrinting o escanee el cdigo QR a continuacin.
Conexin del dispositivo a la red inalmbrica Para imprimir desde un telfono o una tableta, conecte el dispositivo a la misma red inalmbrica que la impresora.
Dispositivos iOS de Apple (AirPrint) Abra el elemento que desee imprimir y seleccione el icono Accin. Seleccione primero Imprimir, despus la impresora y por ltimo, de nuevo, Imprimir.
Dispositivos Android (4.4 o versiones posteriores) Abra el elemento que desee imprimir y seleccione el botn Men. Seleccione primero Imprimir, despus la impresora y por ltimo, de nuevo, Imprimir.
Algunos dispositivos requieren que se descargue el complemento HP Print Service de Play Store de Google.
Windows Phone Descargue la aplicacin HP AiO Remote de Windows Store.
7. Impresin mvil (opcional) Wi-Fi Direct (solo modelos inalmbricos) Wi-Fi Direct permite que los dispositivos con capacidad Wi-Fi, como por ejemplo, los telfonos inteligentes, las tabletas o los equipos, realicen conexiones de red inalmbricas directamente a la impresora sin utilizar un direccionador ni un punto de acceso inalmbricos. Conctese a la seal directa de Wi-Fi Direct de la impresora del mismo modo que conecta un dispositivo con capacidad Wi-Fi a una red inalmbrica nueva o a un punto de acceso inalmbrico.
Activar Wi-Fi Direct Active los Servicios Web de HP en el servidor Web incorporado de HP (EWS) siguiendo estos pasos:
1. Conecte la impresora a una red e imprima una pgina de configuracin para obtener la direccin IP de la impresora.
NOTA: Para establecer manualmente la direccin IP o configurarla de manera automtica, consulte la seccin Configuracin del producto de red de la Gua del usuario.
2. Abra un navegador web, escriba la direccin IP de la impresora en la barra de direcciones y, a continuacin, pulse Intro. Direccin IP de ejemplo: 192.168.0.1
3. En el EWS de HP, haga clic en la ficha Redes.
4. Seleccione la pgina Configuracin de Wi-Fi Direct, seleccione la opcin Activado y, a continuacin, haga clic en Aplicar.
Para utilizar HP ePrint a travs del correo electrnico, la impresora debe cumplir los requisitos siguientes: La impresora debe estar conectada a una red inalmbrica y disponer de acceso
a Internet. Los servicios web de HP deben estar activados en la impresora, la cual debe
estar registrada en HP Connected.
Activacin de los servicios Web de HP (solo para los modelos inalmbricos) 1. Una vez que la impresora ya se haya conectado al servidor Web incorporado
de HP (EWS), imprima una pgina de configuracin e identifique la direccin IP de la impresora.
2. En el equipo, abra un navegador Web e introduzca la direccin IP de la impresora en la lnea de la direccin. Se abre el EWS de HP.
3. Haga clic en la ficha Servicios web de HP. Si en la red se utiliza un servidor proxy, haga lo siguiente:
Seleccione la ficha Configuracin del servidor proxy. Seleccione la casilla de verificacin Marque esta casilla si en su red se utiliza
un servidor proxy para acceder a Internet. En el campo Servidor proxy, introduzca la direccin y el nmero de puerto del
servidor proxy y, a continuacin, haga clic en el botn Aplicar.
4. Seleccione la ficha Servicios Web de HP y haga clic en el botn Activar. La impresora configura la conexin a Internet y, a continuacin, se muestra un mensaje en que se indica que se imprimir una hoja de informacin.
5. Haga clic en el botn Aceptar. Se imprime una pgina de ePrint. En la pgina de ePrint, busque la direccin de correo electrnico que se asigna automticamente a la impresora.
8. Configuracin de HP ePrint a travs del correo electrnico (opcional)
Utilice HP ePrint a travs del correo electrnico para imprimir documentos envindolos como adjunto de un mensaje de correo electrnico a la direccin de correo de la impresora desde cualquier dispositivo que tenga acceso al correo electrnico, incluso desde dispositivos que no estn en la misma red.
7.1
7.2
9
Conexin de la red inalmbrica (solo modelos inalmbricos) Compruebe que la impresora y el direccionador inalmbrico estn encendidos y tengan alimentacin. Asegrese tambin de que el interruptor inalmbrico est
encendido. Compruebe que la impresora se encuentre dentro del alcance de la red inalmbrica. Para la mayora de las redes, la impresora debe encontrarse dentro de un
alcance de 30 m (100 pies) del punto de acceso inalmbrico (direccionador inalmbrico). Compruebe que el controlador de impresin est instalado en el equipo. Compruebe que el equipo y la impresora estn conectados a la misma red inalmbrica. En Mac, verifique que el direccionador inalmbrico sea compatible con Bonjour. Reinicie el direccionador inalmbrico.
Solucin de problemas Gua del usuario En la Gua del usuario se incluye informacin sobre el uso de la impresora y solucin de problemas. Est disponible en el CD de la impresora y en la Web:
1. Vaya a www.hp.com/support/ljM101. 2. Seleccione una impresora o una categora en la lista y luego haga clic
en Guas del usuario.
Comprobar las actualizaciones del firmware 1. Vaya a www.hp.com/support/ljM101. 2. Seleccione una impresora o una categora en la lista y, a continuacin, haga
clic en Controladores. 3. Seleccione el sistema operativo y haga clic en el botn Siguiente. 4. Seleccione Firmware y haga clic en el botn Descargar.
Resolver mensajes de cdigo de error (primer uso) Cdigo de error Accin La luz Atencin parpadea Cargue el papel en la bandeja
Recursos de asistencia adicional Para obtener ayuda total de HP para la impresora, vaya a www.hp.com/support/ljM101:
Solucionar problemas Buscar instrucciones de configuracin avanzada Descargar las actualizaciones de software Participar en foros de asistencia Buscar informacin legal y sobre la garanta Acceder a recursos de impresin mvil
10
Portugus …. 10
………… 13
Espaol ………. 7
Franais ……… 4
English ……….. 1
IMPORTANTE:
Primeiro, siga as Etapas 1 a 3 no pster de configurao do hardware da impressora, ento prossiga para a Etapa 4.
www.hp.com/support/ljM101 www.register.hp.com
4. Configurar o painel de controle No painel de controle da impressora, verifique o status do LED antes de iniciar a instalao do software.
Guia de primeiros passos da LaserJet Pro M101-M104, LaserJet Ultra M105-M106
Conexo USB direta entre a impressora e o computador necessrio utilizar um cabo USB do tipo A a B.
Windows 1. No conecte o cabo USB antes de instalar o software. O processo
de instalao solicitar a conexo do cabo no momento apropriado. Se o cabo j estiver conectado, reinicie a impressora quando a instalao solicitar a conexo do cabo.
2. Continue at 6. Baixe e instale o software.
OS X 1. Conecte o cabo USB entre o computador e a impressora antes de instalar
o software. 2. Continue at 6. Baixe e instale o software.
Execute uma instalao sem fio (somente nos modelos sem fio)
Antes de iniciar a instalao, verifique se o ponto de acesso sem fio est funcionando corretamente. Certifique-se de que a impressora, o roteador e o computador estejam ligados e que o computador esteja conectado mesma rede sem fio qual voc conectar a impressora.
1. Coloque o CD na unidade de CD-ROM, navegue at setup.exe e clique duas vezes. Quando a caixa de dilogo Conexes da impressora aparecer, escolha Fazer uma conexo sem fio com o dispositivo.
2. Siga as instrues na tela.
3. Selecione a impressora detectada pelo software. Se o instalador no conseguir detectar a impressora, insira manualmente o endereo IP da impressora para prosseguir a instalao.
NOTA: Imprima uma pgina de Configurao para localizar o endereo IP da impressora. No painel de controle da impressora, pressione e mantenha pressionado o boto Retomar/Cancelar por 5 segundos e libere o boto Retomar/Cancelar para imprimir a pgina de configurao. O endereo IP listado na pgina de Configurao na seo Informaes da rede.
Configurar manualmente o endereo IP Consulte o guia do usurio da impressora para obter informaes sobre como configurar o endereo IP manualmente www.hp.com/support/ljM101.
Conexo de rede cabeada (Ethernet) (opcional) Use um cabo de rede padro.
1. Conecte o cabo de rede impressora e rede. Aguarde alguns minutos at a impressora adquirir um endereo de rede.
2. Continue at 6. Baixe e instale o software.
5. Selecionar o mtodo de conexo
11
6. Baixe e instale o software
Mtodo 1: Faa download do HP Easy Start (Windows e OS X)
1. Acesse 123.hp.com/laserjet e clique em Fazer download. 2. Siga as instrues na tela e os comandos para salvar o arquivo no computador. 3. Inicie o arquivo de software da pasta onde ele foi salvo.
Mtodo 2: Faa download do site de suporte da impressora (Windows e OS X)
1. Acesse www.hp.com/support/ljM101. 2. Selecione Software e drivers. 3. Faa o download do software para seu modelo de impressora e sistema operacional. 4. Inicie o arquivo de software da pasta onde ele foi salvo.
Mtodo 3: Instale do CD da impressora (somente Windows) 1. Insira o CD da impressora no computador. 2. Siga as instrues exibidas na tela para instalar o software. Para obter mais
informaes, consulte as notas sobre a instalao no CD da impressora.
Conectar o dispositivo rede sem fio Para imprimir usando um telefone ou tablet, conecte o dispositivo mesma rede sem fio em que a impressora est.
Dispositivos Apple iOS (AirPrint) Abra o item a ser impresso e selecione o cone Ao. Selecione Imprimir, selecione a impressora e ento selecione Imprimir.
Dispositivos Android (4.4 ou mais recentes) Abra o item a ser impresso e selecione o boto Menu. Selecione Imprimir, selecione a impressora e depois Imprimir.
Alguns dispositivos exigem que o plug-in HP Print Service seja baixado da Google Play Store.
Windows Phone Baixe o aplicativo HP AiO Remote da Windows Store.
7. Impresso mvel (opcional) Wi-Fi Direct (somente modelo sem fio) O Wi-Fi Direct permite que dispositivos compatveis com Wi-Fi, como smartphones, tablets ou computadores, faam uma conexo de rede sem fio diretamente com a impressora sem o uso de um ponto de acesso ou roteador sem fio. Conecte-se ao sinal Wi-Fi Direct da impressora da mesma maneira que dispositivos compatveis com Wi-Fi se conectam a uma nova rede sem fio ou hotspot.
Ativar o Wi-Fi Direct Ative os HP Web Services no Servidor da Web incorporado (EWS) da HP seguindo estas etapas:
1. Conecte a impressora a uma rede e imprima uma pgina de configurao para obter o endereo IP da impressora.
NOTA: Para definir manualmente o endereo IP ou para configur-lo automaticamente, consulte «Configurar o produto de rede» no Guia do Usurio.
2. Abra um navegador da Web e insira o endereo IP da impressora na linha de endereo e pressione Enter. Exemplo de endereo IP: 192.168.0.1
3. No EWS da HP, selecione a guia Rede.
4. Selecione a pgina Configurao do Wi-Fi Direct, a opo Habilitar e, em seguida,clique em Aplicar.
Para usar o HP ePrint via e-mail, a impressora dever atender a estes requisitos: A impressora deve estar conectada a uma rede sem fio e ter acesso Internet. Os Servios da Web HP devem estar habilitados na impressora, e ela dever
estar registrada no HP Connected.
Ativar o HP Web Services (somente nos modelos sem fio) 1. Depois que a impressora estiver conectada ao HP Embedded Web Server (EWS),
imprima uma pgina de configurao e identifique o endereo IP da impressora. 2. No computador, abra um navegador da Web e insira o endereo IP da impressora
na linha de endereo. O HP EWS aberto. 3. Clique na guia HP Web Services. Se a rede usar um servidor proxy, faa o seguinte:
Selecione a guia Configuraes de proxy. Marque a caixa de seleo Marque esta caixa se a sua rede usar um servidor
proxy para acessar a Internet. No campo Servidor proxy, insira o endereo e o nmero da porta do servidor
proxy e ento clique no boto Aplicar.
4. Selecione a guia HP Web Services e clique no boto Ativar. A impressora configura a conexo com a Internet e ento uma mensagem exibida, indicando que uma folha de informaes ser impressa
5. Clique em OK. Uma pgina do ePrint impressa. Na pgina do ePrint, procure o endereo de e-mail atribudo automaticamente impressora.
8. Configurar o HP ePrint por e-mail (opcional)
Use o HP ePrint via e-mail para imprimir documentos enviando-os como um anexo de e-mail para o endereo de e-mail da impressora de qualquer dispositivo compatvel com e-mail, mesmo de dispositivos que no estejam na mesma rede.
7.1
7.2
Saiba mais sobre a impresso mvel Para obter mais informaes sobre esses e outros sistemas operacionais (Chrome/Google Cloud Print), acesse www.hp.com/go/LaserJetMobilePrinting ou digitalize o cdigo QR abaixo.
12
Conexo da rede sem fio (somente nos modelos sem fio) Verifique se a impressora e o roteador sem fio esto ligados e esto recebendo energia. Verifique tambm se o switch sem fio est ligado. Verifique se a impressora est dentro do alcance da rede sem fio. Na maioria das redes, a impressora deve estar a 30 m (100 ps) do ponto de acesso sem
fio (roteador sem fio). Verifique se o driver de impresso est instalado no computador. Verifique se o computador e a impressora esto conectados mesma rede sem fio. Para Mac, verifique se o roteador sem fio suporta Bonjour. Reinicie o roteador sem fio.
Soluo de problemas Guia do usurio O guia do usurio inclui o uso da impressora e informaes sobre soluo de problemas. Ele est disponvel no CD da impressora e na Web:
1. Acesse www.hp.com/support/ljM101. 2. Selecione uma impressora ou uma categoria na lista e clique em
Guias do usurio.
Verificar atualizaes de firmware 1. Acesse www.hp.com/support/ljM101. 2. Selecione uma impressora ou uma categoria na lista e ento clique em Drivers. 3. Selecione o sistema operacional e clique no boto Avanar. 4. Selecione Firmware e clique no boto Download.
Resolver mensagens de cdigo do erro (primeira utilizao) Cdigo do erro Ao A luz Ateno est piscando Carregue o papel na bandeja
Recursos de suporte adicionais Para obter ajuda completa da HP para a impressora, acesse www.hp.com/support/ljM101:
Solucionar problemas Localizar instrues de configurao avanada Download de atualizaes de software Participar de fruns de suporte Localizar informaes de garantia e reguladoras Acessar recursos de impresso mvel
13
Portugus ……… 10
……………… 13
Espaol …………… 7
Franais …………… 4
English…………….. 1
.5
.4
www.hp.com/support/ljM101 www.register.hp.com
14
.6
.8
: ,» HP ePrint- .
, HP Web Services .HP Connected
( ) HP , HP (EWS) .1
. IP- . IP- .2
. HP (EWS) , proxy .HP Web Services .3
: . Proxy
Proxy .
, Proxy- , Proxy .
. HP Web Services .4 . ,
,ePrint .ePrint . .5 .
. ,» , » » — » HP ePrint-
.7 7.2
7.1
Copyright 2017 HP Development Company, L.P.
Reproduction, adaptation or translation without prior written permission is prohibited, except as allowed under the copyright laws.
The information contained herein is subject to change without notice.
The only warranties for HP products and services are set forth in the express warranty statements accompanying such products and services. Nothing herein should be construed as constituting an additional warranty. HP shall not be liable for technical or editorial errors or omissions contained herein.
Trademark Credits Windows is a U.S. registered trademark of Microsoft Corporation.
Apple and the Apple logo are trademarks of Apple Inc., registered in the U.S. and other countries.
OS X is a trademark of Apple Inc., registered in the U.S. and other countries.
AirPrint is a trademark of Apple Inc., registered in the U.S. and other countries.
FCC Regulations This equipment has been tested and found to comply with the limits for a Class B digital device, pursuant to Part 15 of the FCC rules. These limits are designed to provide reasonable protection against harmful interference in a residential installation. This equipment generates, uses, and can radiate radio-frequency energy. If this equipment is not installed and used in accordance with the instructions, it may cause harmful interference to radio communications. However, there is no guarantee that interference will not occur in a particular installation. If this equipment does cause harmful interference to radio or television reception, which can be determined by turning the equipment off and on, correct the interference by one or more of the following measures:
Reorient or relocate the receiving antenna.
Increase separation between equipment and receiver.
Connect equipment to an outlet on a circuit different from that to which the receiver is located.
Consult your dealer or an experienced radio/TV technician.
Any changes or modifications to the product that are not expressly approved by HP could void the users authority to operate this equipment. Use of a shielded interface cable is required to comply with the Class B limits of Part 15 of FCC rules. For more regulatory information, see the electronic user guide. HP shall not be liable for any direct, indirect, incidental, consequential, or other damage alleged in connection with the furnishing or use of this information.
www.hp.com
Copyright 2017 HP Development Company, L.P.
La reproduction, l’adaptation ou la traduction sans autorisation crite pralable est interdite, sauf dans le cadre des lois sur le droit d’auteur.
Les informations contenues dans ce document peuvent tre modifies sans pravis.
Les seules garanties pour les produits et services HP sont dcrites dans les dclarations de garantie expresses accompagnant ces mmes produits et services. Les informations contenues dans ce document ne constituent en aucun cas une garantie supplmentaire. HP ne pourra tre tenu responsable des erreurs ou omissions de nature technique ou rdactionnelle qui pourraient subsister dans le prsent document.
Crdits concernant les marques Windows est une marque dpose de Microsoft Corporation aux Etats-Unis.
Apple et le logo Apple sont des marques commerciales dApple, Inc. aux Etats-Unis et dans dautres pays/rgions.
OS X est une marque commerciale dApple Inc. aux tats-Unis et dans dautres pays/ rgions.
AirPrint est une marque commerciale dApple Inc. aux tats-Unis et dans dautres pays/rgions.
Rglementations de la FCC Les tests effectus sur cet quipement ont dtermin quil est conforme aux prescriptions des units numriques de classe B, telles que spcifies larticle 15 des normes de la FCC (Commission fdrale des communications). Ces limites sont destines assurer une protection suffisante contre les interfrences produites dans une installation rsidentielle. Cet quipement gnre, utilise et peut mettre de lnergie sous forme de frquences radio. Si ce matriel nest pas install et utilis conformment aux instructions, il peut causer des interfrences nuisibles aux communications radio. Aucune garantie nest nanmoins fournie quant lapparition dinterfrences dans une installation particulire. Si cet appareil provoque des interfrences nuisibles (qui peuvent tre dtermines en teignant et rallumant lappareil) des communications radio ou tlvision, corrigez ce problme en appliquant une ou plusieurs des mesures suivantes :
Rorientez ou dplacez lantenne de rception.
Augmentez la distance sparant lquipement du rcepteur.
Connectez lquipement une prise situe sur un circuit diffrent de celui sur lequel se trouve le rcepteur.
Consultez votre revendeur ou un technicien radio/tlvision expriment.
Toute modification apporte au produit sans le consentement de HP peut se traduire par la rvocation du droit dexploitation de lquipement dont jouit lutilisateur. Un cble dinterface blind est requis afin de satisfaire aux stipulations de larticle 15 des rglementations de la FCC sur les appareils de classe B. Pour de plus amples informations sur les rglementations, reportez-vous au Guide de lutilisateur au format lectronique. HP ne sera en aucun cas tenu responsable des dommages directs, indirects, accessoires, conscutifs ou autres pouvant rsulter de la mise disposition de ces informations ou de leur utili
1
Dansk ……………. 14
Català ……………. 12
Español …………. 10
Italiano ……………. 8
Deutsch …………… 5
Français …………… 3
English…………….. 1
Norsk …………….. 26
Lietuvių …………. 24
Latviešu …………. 22
Suomi ……………. 20
Eesti………………. 18
Nederlands …….. 16
Svenska …………. 30
Português ……… 28
USB connection directly between the
printer and the computer
Use an A-to-B type USB cable.
Windows
1. Do not connect the USB cable before installing the software. The
installation process prompts to connect the cable at the appropriate
time. If the cable is already connected, restart the printer when
installation prompts to connect the cable.
2. Continue to “6. Download and install the software.”
OS X
1. Connect the USB cable between the computer and the printer before
installing the software.
2. Continue to “6. Download and install the software.”
Perform a wireless installation
(wireless models only)
Before starting the installation, verify that the wireless access point is working
correctly. Make sure that the printer, router, and computer are all turned on
and that the computer is connected to the same wireless network that the
printer will be connected to.
1. Place the CD in the CD-ROM drive, navigate to setup.exe and double click.
When the Printer connections dialog appears, choose Make awireless
connection to the device.
2. Follow the on-screen instructions.
3. Select the printer detected by the software. If the printer cannot be
detected by the installer, manually input the printer’s IP address to
continue the installation.
NOTE: Print a conguration page to nd the printer’s IP address. At the
printer control panel, press and hold the Resume/Cancel button for
5 seconds, and then release the Resume/Cancel button to print the
conguration page. The IP address is listed on the conguration page
inthe Network Information section.
Manually congure the IP address
See the printer user guide for information on how to manually congure the IP
address www.hp.com/support/ljM101.
Wired (Ethernet) network connection
(optional)
Use a standard network cable.
1. Connect the network cable to the printer and to the network. Wait a few
minutes for the printer to acquire a network address.
2. Continue to “6. Download and install the software.”
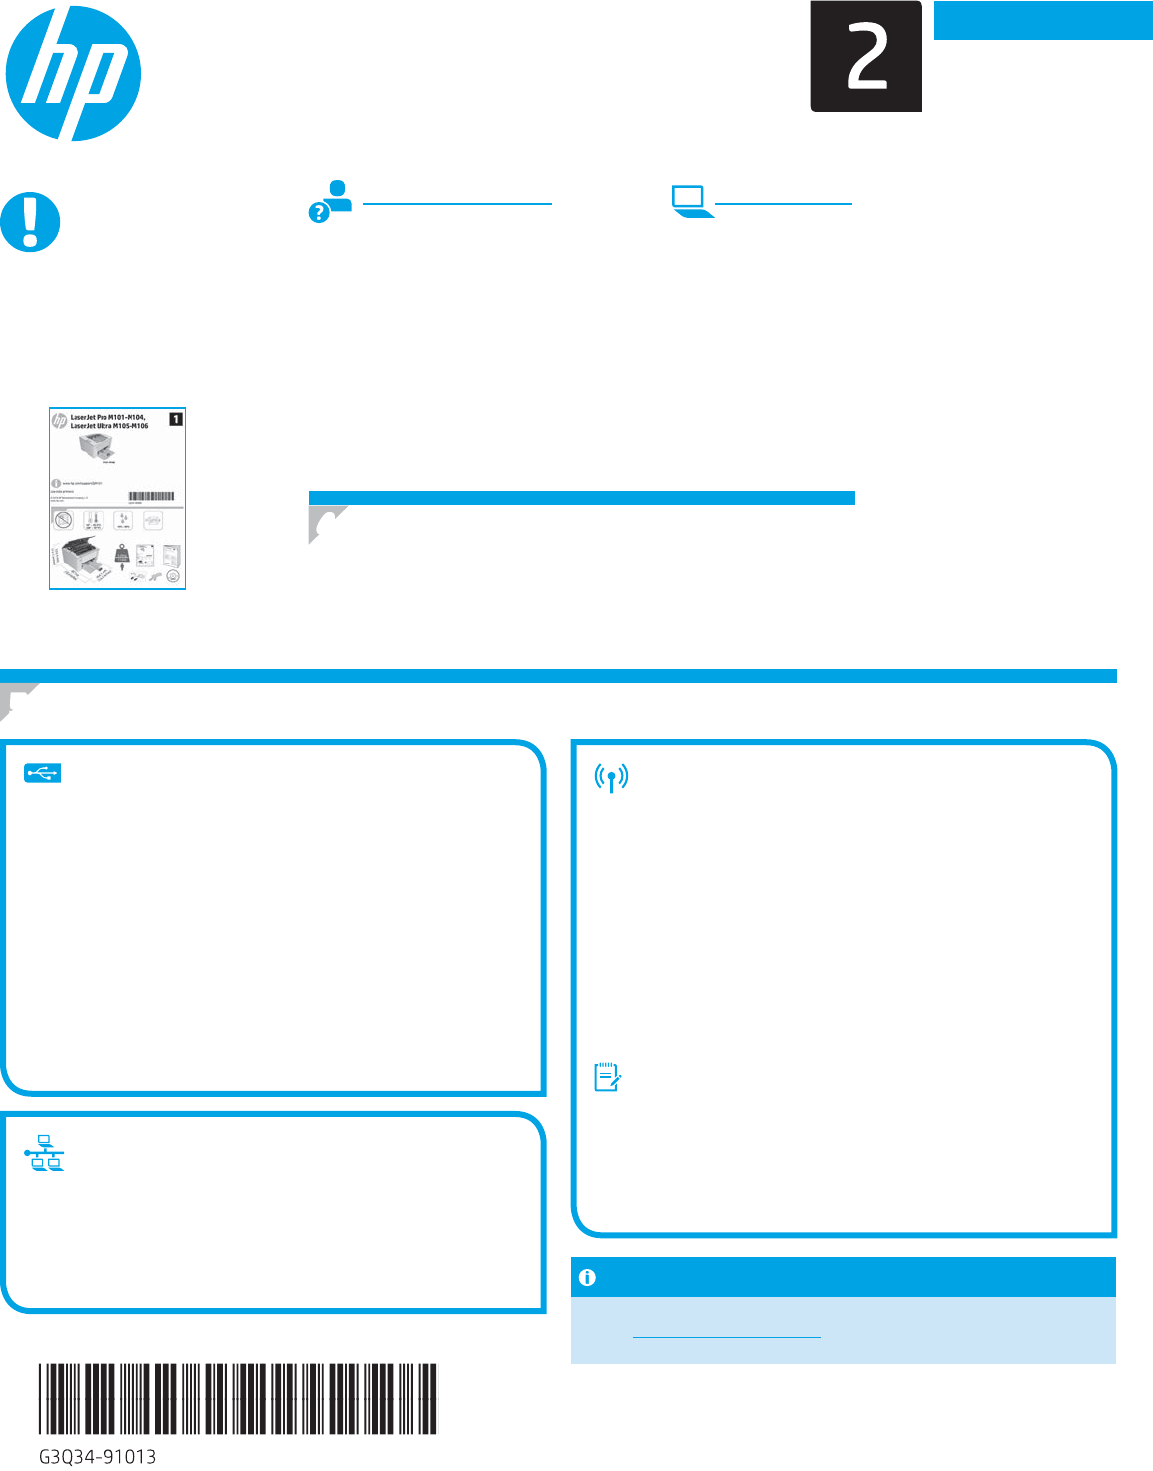
IMPORTANT:
First, follow
Steps 1 — 3
on the printer hardware
setup poster, then continue
with Step 4.
www.hp.com/support/ljM101 www.register.hp.com
4.
Set up the control panel
At the printer control panel, check the LED status before beginning software installation.
5. Select a connection method
LaserJet Pro M101-M104,
LaserJet Ultra M105-M106
Getting Started Guide
HP LaserJet Pro M101 All in One Printer PDF User Guides and Manuals for Free Download: Found (2) Manuals for HP LaserJet Pro M101 Device Model (Troubleshooting Manual, Repair Manual)
The HP LaserJet Pro M101 is a compact and efficient monochrome laser printer designed for small office and home use. It offers reliable printing performance and a range of features that cater to everyday printing needs. This review will delve into the device’s specifications, performance, and overall value for users looking for a dependable printing solution.
One of the standout features of the HP LaserJet Pro M101 is its compact design. Measuring just 13.6 x 7.5 x 7.5 inches, it easily fits on a desk or in a small office space. This makes it an ideal option for users who may be limited on space but still require a high-quality printing solution. Its sleek and minimal aesthetic also means it can blend seamlessly into most environments.
Print speed is another strong point for the HP LaserJet Pro M101, with the ability to produce up to 22 pages per minute. Whether you are printing documents for work or school assignments, you can expect prompt and efficient output. The first page is printed in as little as 6.5 seconds, which is impressive for a printer of its size and price range.
Here are some key specifications of the HP LaserJet Pro M101:
- Print technology: Laser
- Print resolution: Up to 1200 x 1200 dpi
- Monthly duty cycle: Up to 8,000 pages
- Connectivity: USB 2.0
- Operating systems supported: Windows, Mac, Linux
The quality of text documents printed by the LaserJet Pro M101 is exceptional. The laser printing technology ensures crisp, clear text with sharp edges, making it suitable for professional documents. Additionally, graphics and images are rendered well, although this printer is primarily designed for text printing.
One of the concerns when choosing a printer is the cost of toner cartridges, but the HP LaserJet Pro M101 offers competitive running costs. The printer utilizes a standard cartridge that provides a yield of approximately 1,600 pages. This allows users to handle smaller workloads without frequently replacing cartridges, making it a cost-effective choice for budget-conscious individuals or businesses.
Setup and installation of the HP LaserJet Pro M101 are straightforward. Users can easily connect the printer to their computers via the USB port and install the necessary drivers. The user-friendly control panel and LED indicators further simplify the printing process, ensuring that even those not technologically inclined can operate it with ease.
However, it’s worth noting that the HP LaserJet Pro M101 lacks wireless connectivity, which may be a drawback for users who desire convenience in printing from multiple devices without the hassle of cables. Additionally, it does not have duplex printing capabilities, limiting the printer’s ability to print on both sides of the paper automatically. While these functionalities are often found in more advanced models, they may influence the decision of some potential buyers.
In conclusion, the HP LaserJet Pro M101 is an excellent choice for users who prioritize efficiency and quality in monochrome printing. Its compact design, fast print speeds, and solid text quality make it an attractive option for home and small office use. Despite its limitations in wireless connectivity and duplex printing, it remains a reliable workhorse that effectively meets everyday printing needs.
For anyone seeking a straightforward, dependable monochrome laser printer, the HP LaserJet Pro M101 proves to be a competent option that delivers on its promises without overwhelming the user with unnecessary features.